![Hololive Dreams Tier List [Best Cards]](/wp-content/uploads/2026/07/hololive-dreams-tier-list.jpg "Hololive Dreams Tier List [Best Cards]")
Hololive Dreams Tier List [Best Cards]
The best cards for the best performances.


![Iron Soul Dungeon Weapon Tier List [Best Weapons]](/wp-content/uploads/2026/07/iron-soul-dungeon-weapon-tier-list.jpg "Iron Soul Dungeon Weapon Tier List [Best Weapons]")

Welcome to the Paige Harper and the Tome of Mystery walkthrough on Gamezebo. Paige Harper and the Tome of Mystery is an Interactive Adventure/Hidden Object game played on PC, created by Thunderstorm Games and available at GameHouse Games. This walkthrough includes tips and tricks, helpful hints, and a strategy guide for how to complete Paige Harper and the Tome of Mystery.
Welcome to the Paige Harper and the Tome of Mystery walkthrough on Gamezebo. Paige Harper and the Tome of Mystery is an Interactive Adventure/Hidden Object game played on PC, created by Thunderstorm Games and available at GameHouse Games. This walkthrough includes tips and tricks, helpful hints, and a strategy guide for how to complete Paige Harper and the Tome of Mystery.
General Information
Game Tips
I can’t stress this enough: Remember to use the preset views, or the trackball, to move the scenes to different angles. Some items marked on the walkthrough, are located behind, on top, in back or underneath objects. Also, make sure to open everything; there may be items hidden inside.
“Per aspera ad astra” (trans. Through adversities we can reach the stars)
Paige Harper gets a telephone request to find a rare book for a customer, Mr. Anderson. She begins to pull the book from the shelf, when…watch the opening movie to find out what happens next!
“Sir,” replied the commander, “I am nothing to you but Captain Nemo; and you and your companions are nothing to me but the passengers of the Nautilus.”
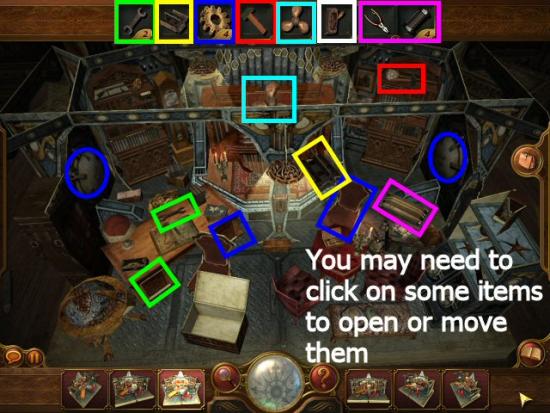
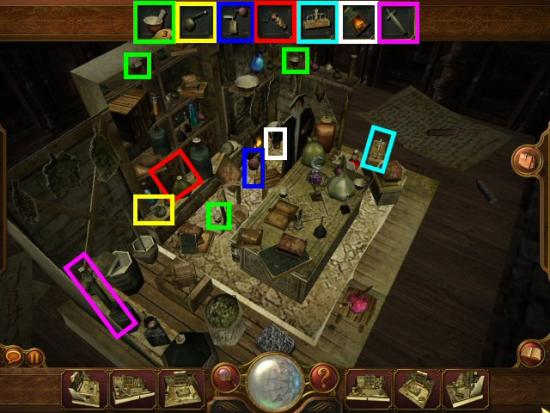
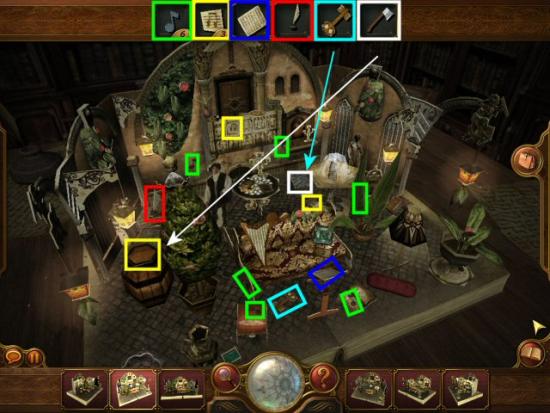
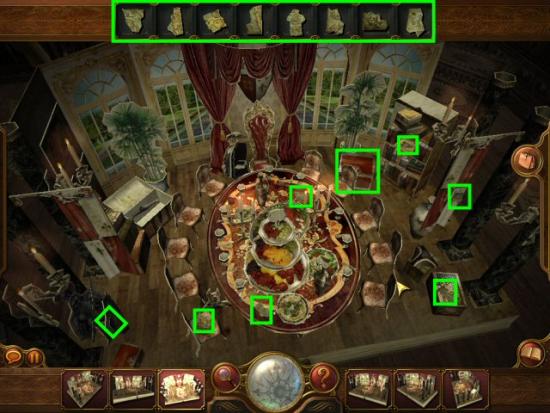
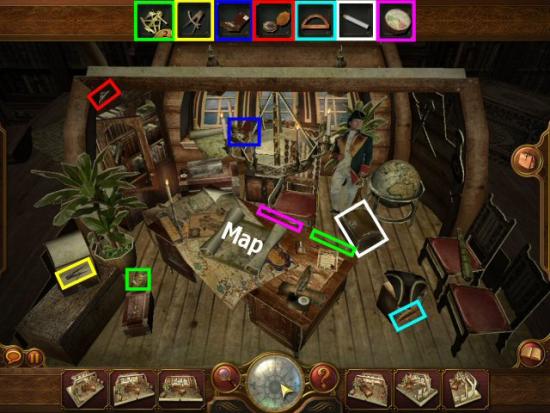
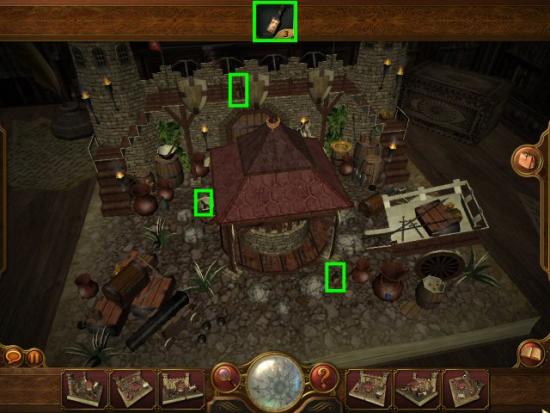
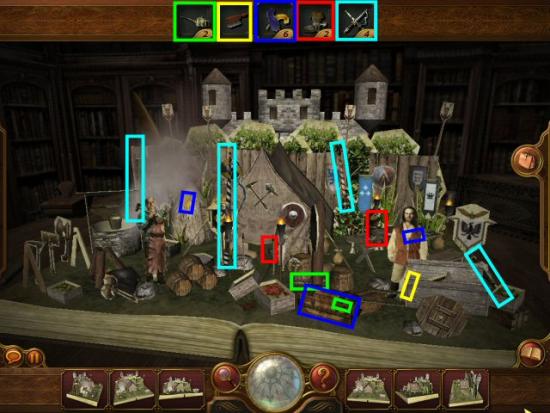
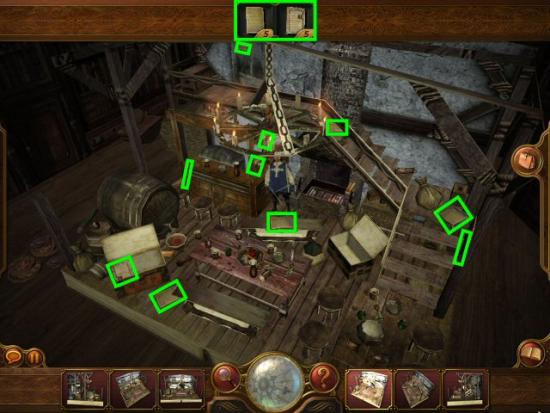
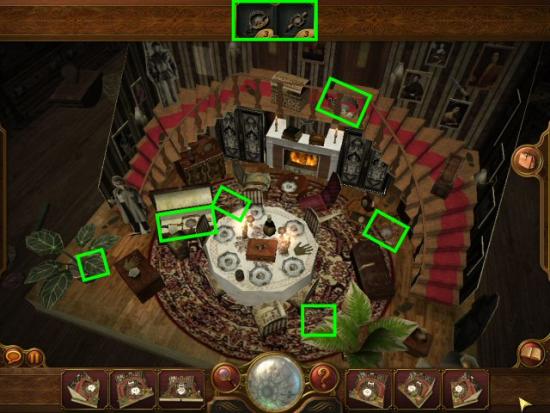
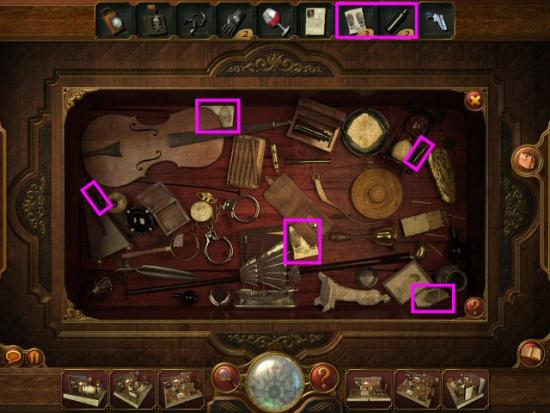
The Captain’s Bridge
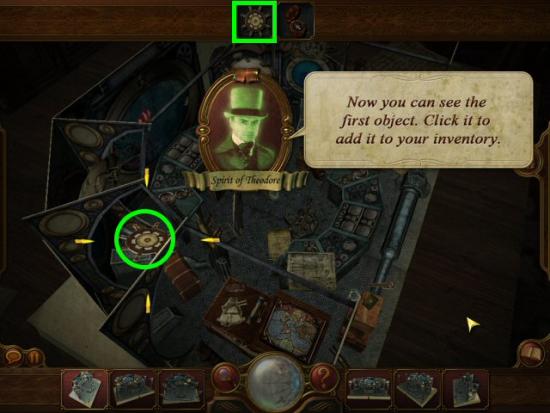
Follow the instructions in the tutorial to familiarize yourself with where everything is located, what it does and how to navigate in the game. The tutorial will help you find your first 2 items.

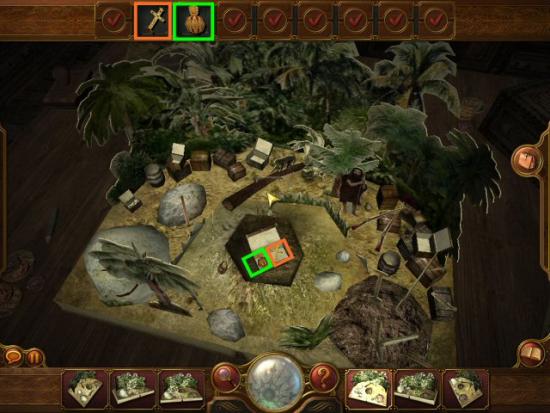
After you’ve found the first 2 items, the Compass and Ship’s Wheel, you can begin to search on your own. Find the 6 pieces of Nautilus’ diagram. Use the camera angle indicated (yellow) and collect the pieces (green).
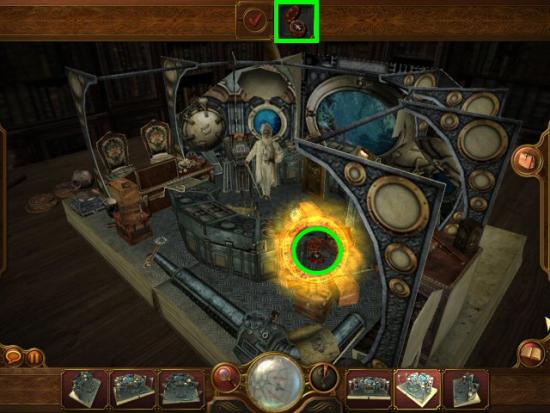
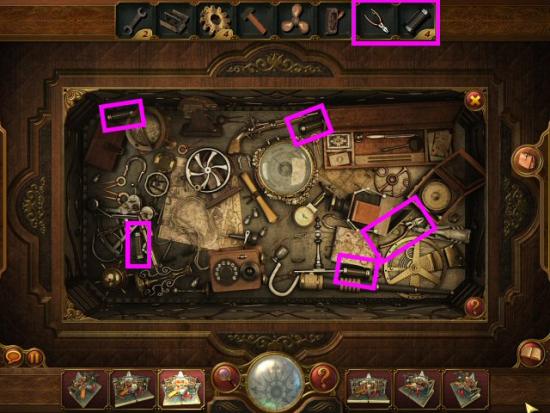
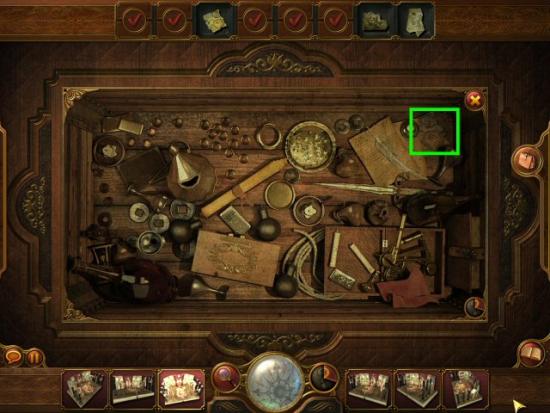
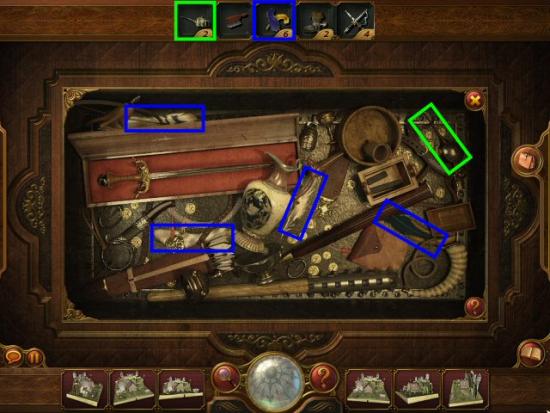
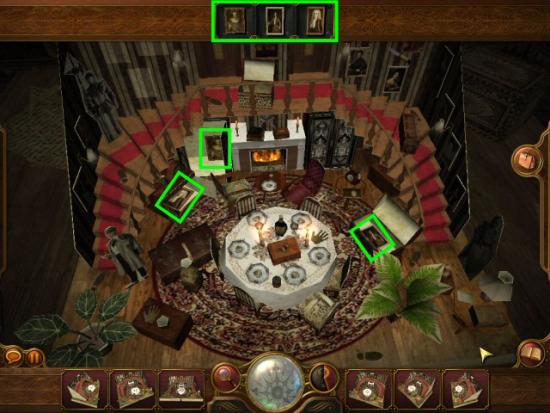
Captain Nemo’s Cabinet
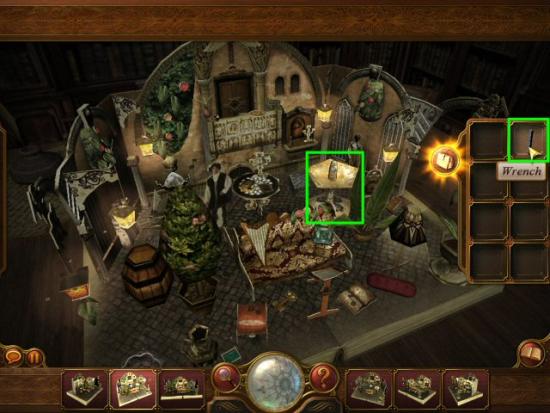
The tutorial continues with collecting the first Wrench.
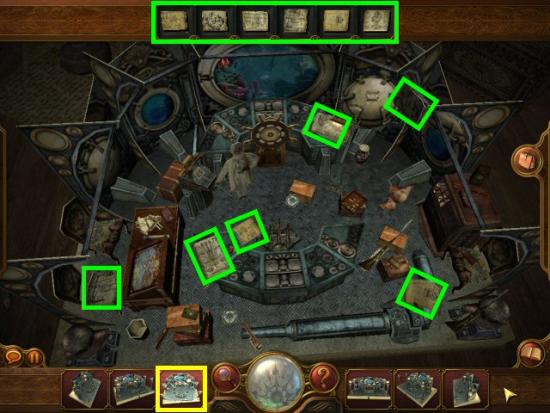
Continue collecting the rest of the items to repair the submarine.
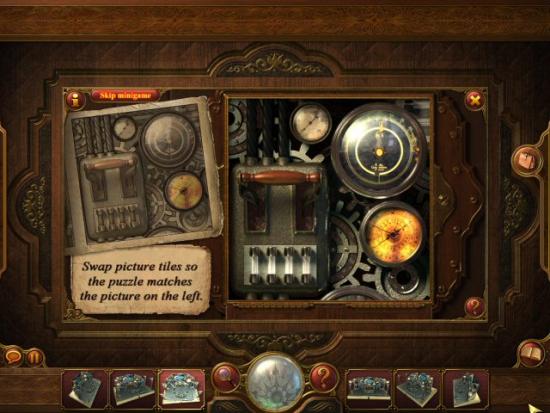
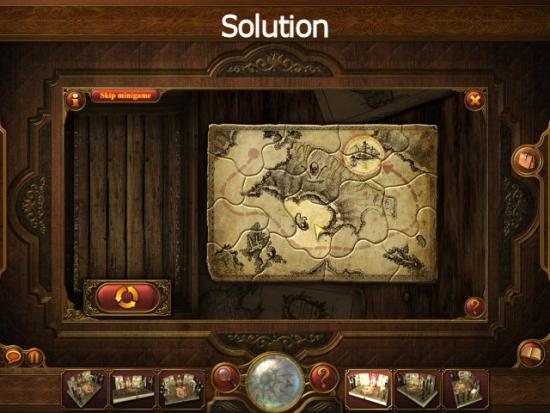
The Captain’s Bridge
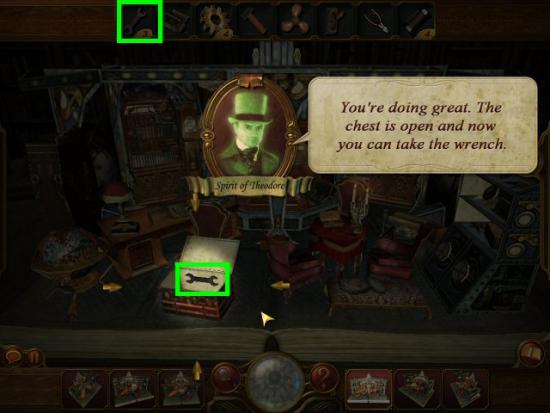
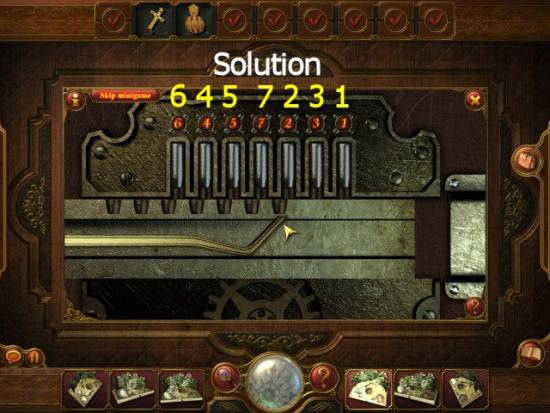
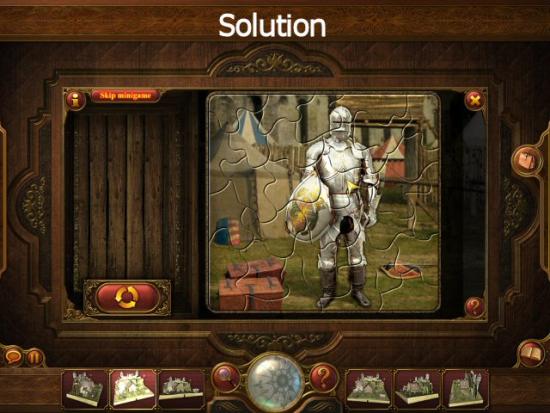
Give the spare parts to Captain Nemo, then complete the puzzle to repair the Nautilus. Swap one tile with another until you match the picture shown on the left. Click on one tile then click on another; those 2 tiles will switch places. Repeat until all tiles are placed correctly.
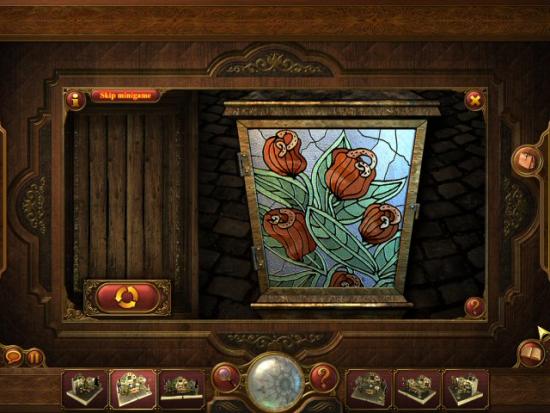
Repairing the Nautilus seems to have lit one of the symbols on an ancient mechanism. Perhaps lighting them all will release Paige and the rest of the souls trapped in the Tome of Mystery.
“But soft! What light through yonder window breaks? It is the East, and Juliet is the sun!”
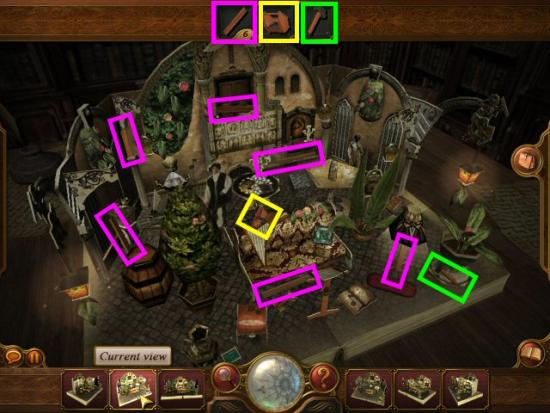
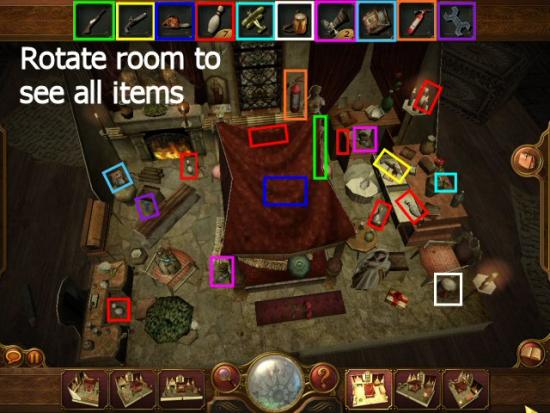
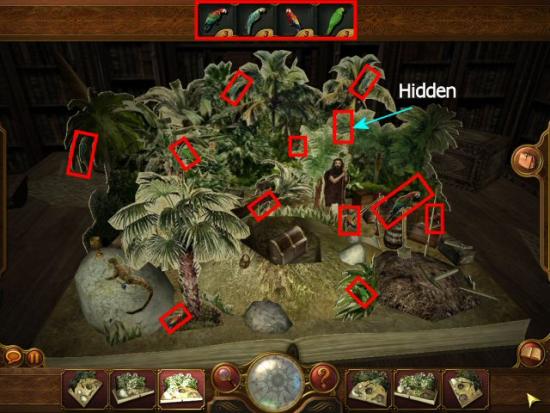
Capulet’s Garden
Romeo needs to light the Garden so his beloved, Juliet, will come out onto the balcony. Find the items needed to build a Ladder for Romeo to light the Lamps in the Garden. You’ll need to find Lamp Oil somewhere else.
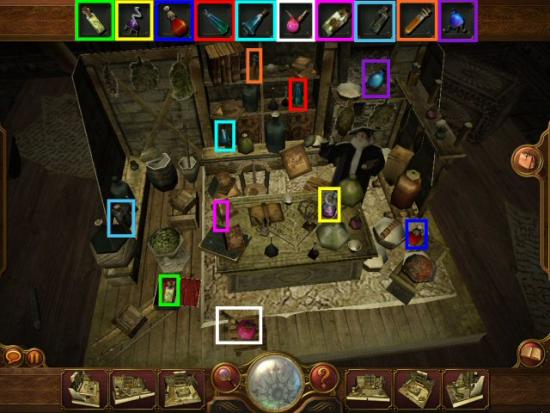
Chemist’s Lab
Find the items the Chemist needs to make a Sleeping Potion for a client (Juliet, perhaps?). After you find everything, he’ll give you the Lamp Oil, but you’ll need to find the Formula for the Sleeping Potion in another chapter.
Juliet’s Boudoir
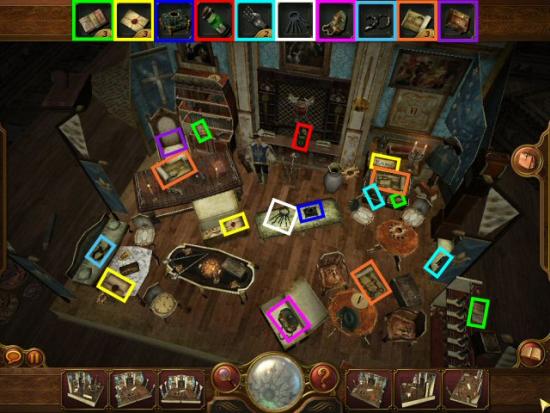
Juliet’s Nurse is terrified of all the strange objects that have appeared. Find all the modern items that don’t belong in this book. Don’t forget to open things and rotate the scene to find everything.
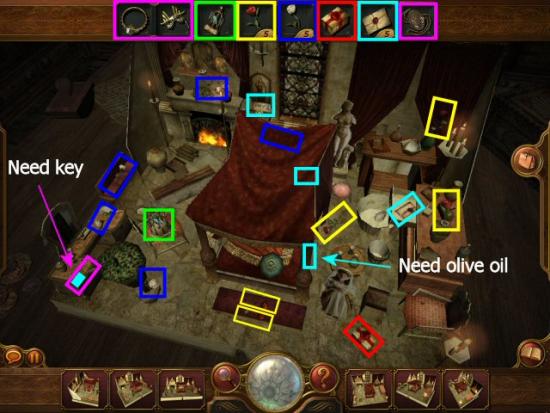
Juliet’s Nurse fears that Lord Capulet will search Juliet’s Boudoir. Help her find all the gifts that Romeo has given her. You’ll have to come back with a Key to unlock the drawers that hold the remaining items. Open things and rotate the scene to find everything. Let’s head back to the Garden.
Capulet’s Garden
Use the Ladder and Lamp Oil on the 4 lamps (green). One of the Lamps is broken; repair it by completing the next puzzle.
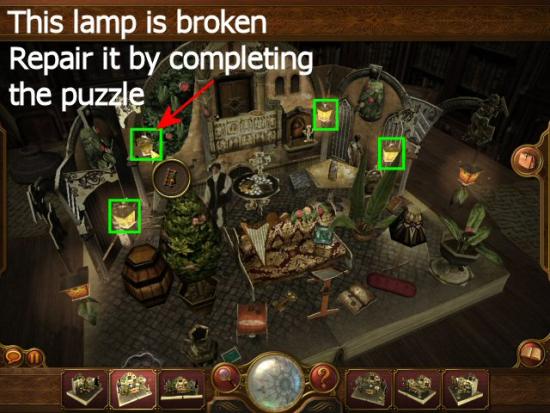
Place the pieces to repair the Lamp. Click on them to pick them up, right click to rotate and click again to place them.
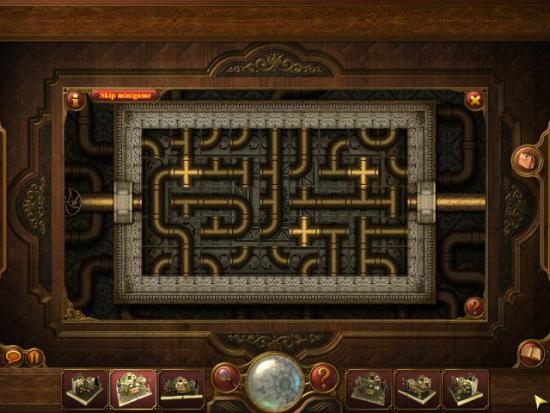
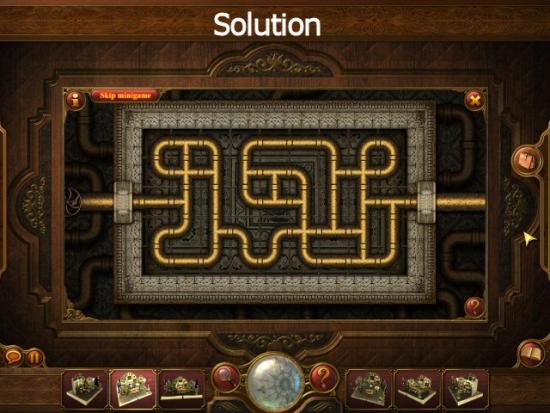
Use the Wrench on the Fountain to repair it and start the next puzzle.
Rotate the pieces of pipe to get the water flowing again. Each time you get a piece in the correct position, that piece will change color and lock into place. Here’s one solution.
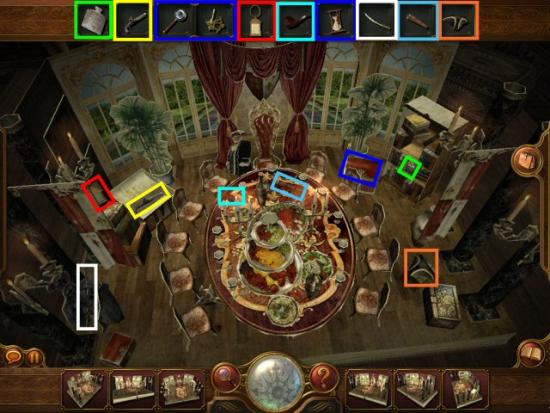
After you repair the Fountain, you find a Formula that was stuck in the pipes. I wonder who’s looking for that? The Chemist, perhaps? Romeo would like to play some beautiful music but needs you to find the Sheet Music, Notes, Chords and Pen and Ink. Some objects need to be opened with other items, and a Key and an Axe are added to the list. Open things and rotate the scene to find everything.
After you’ve found everything, get the Music from your inventory and give it to Romeo. Ta Da! All’s right with the Capulet/Montague world and Juliet comes out onto the balcony. As your reward, Romeo gives you a Key. Aha! Just what you need to unlock the drawer in Juliet’s Boudoir. But first, let’s take the Formula to the absent-minded Chemist.
Chemist’s Lab
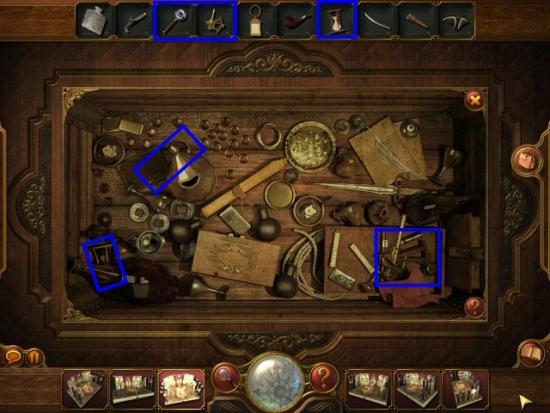
Give the Formula to the Chemist. Now you need to find the ingredients for the Sleeping Potion. Open things and rotate the scene to find everything. Give the ingredients to the Chemist to start your next puzzle.
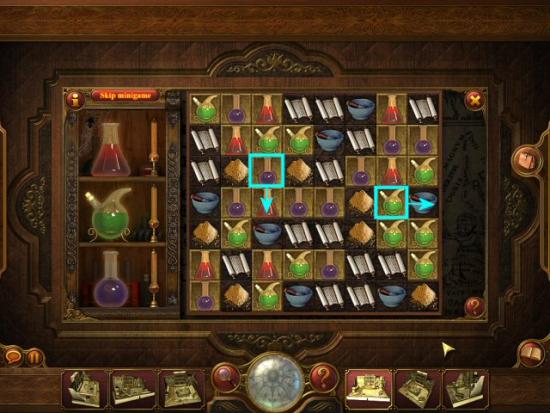
This puzzle is a traditional match 3, but you need to “collect” red, green and purple potions to complete the Formula. I’ve marked a couple suggestions (cyan) for first moves. Your puzzle will probably be different. Continue playing until the meters, to the right of the potion bottles on the left, are filled. Your reward is a bottle of Olive Oil. Time to head back to Juliet’s Boudoir.
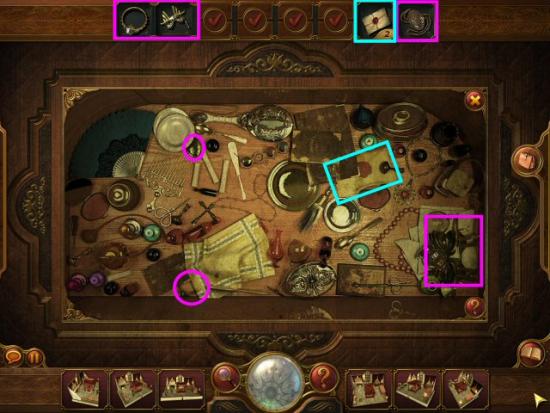
Juliet’s Boudoir
Use the Key on the drawers, at the left, to get 4 more items, then use the Olive Oil on the bed to get the final item (Letter).
Another symbol is lit but the Tome of Mystery has disappeared. A grandfather clock holds the key to solving the next mystery.
“You’re either my ship’s cook – and then you were treated handsome – or Cap’n Silver, a common mutineer and pirate, and then you can go hang!”
Trelawney’s Room
Squire Trelawney’s dog has torn the Map to Treasure Island to pieces. Yikes! Better find them all.
Give the pieces to Squire Trelawney to start your next puzzle. Place the pieces to put the Map back together. Click on them to pick them up, right click to rotate them and click again to place them. Here’s the solution.
Squire Trelawney asks you to hold on to the Map and says he needs to pack for his sea voyage. The problem is, he has no clue what to bring and needs you to find him a List. Can the man do nothing for himself? Off you go to the next chapter.
The Spyglass Tavern
Long John Silver needs to spiffy up the place for some bigshots that will be there soon. Get rid of anything “piratey.”
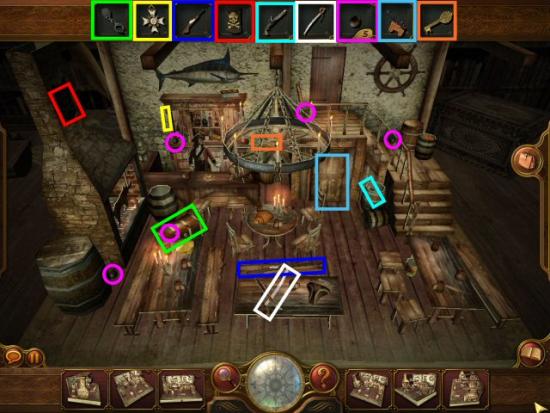
You slip the fancy Medal you found into your pocket; nothing “piratey” about that one. Next, Long John Silver needs you to find his big, red Parrot…but it’s in another chapter. Let’s go explore the next chapter.
Captain’s Cabin
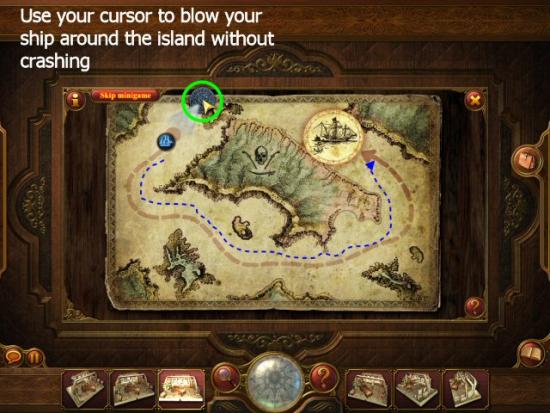
It seems Captain Smollett is needing that map to Treasure Island. Give it to him; now he needs you to find his navigation tools. What am I? Honeydew? “Honey do this, honey do that.”

Use the Navigation tools on the Smollet’s map to start your next mini game. Using your cursor (green), gently blow your ship around the island, following the dotted line, to the dock on the other side. The closer you have your cursor to the ship, the harder the “wind” blows and the easier it is to crash into the rocks. Shiver me timbers!
Remember that Medal you found at Long John Silver’s tavern? Seems it belongs to Captain Smollett (some lowlife gave himself a “five finger discount”). Give it to him and he asks you to find more things to prepare for the voyage.
Give them to Captain Smollett and you’re ready to sail.
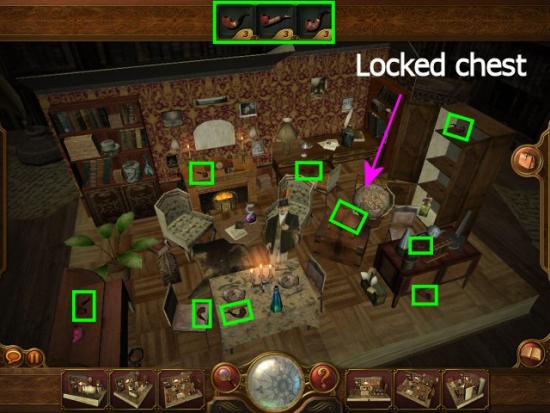
Treasure Island
Ben Gunn hasn’t been able to hide the treasure yet. Seems Long John Silver’s parrot, and a flock of other parrots, keep attacking him. Capture all the beasties so Ben can bury the treasure before Long John Silver arrives.
Now you need to help Ben collect all of Captain Flint’s treasure. There are a couple things you can’t get, yet, because they’re in a locked chest. Head back to The Spyglass Tavern and return Long John Silver’s parrot to him.
The Spyglass Tavern
Give Long John Silver his beloved parrot, then find all the grub (food, that is) for his voyage to Treasure Island.
Give the food to Long John Silver. Now it’s time to pack all that food away in the next puzzle. Click on each piece to pick it up, then click again to place it so everything fits. Here is one solution.
As a reward, Long John Silver gives you a spiffy set of lock picks. Time to head back to Treasure Island and get into that chest.
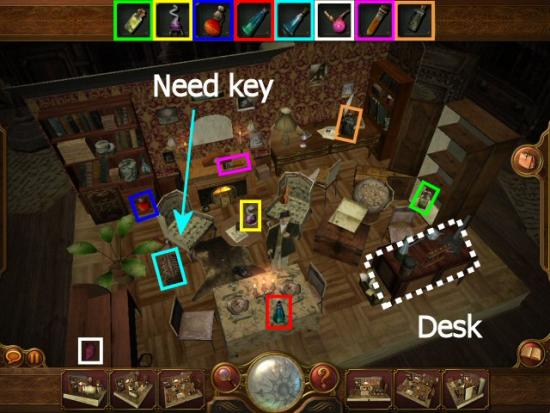
Treasure Island
Use the lock picks on the Chest and to start your next puzzle and get the remaining items of treasure. Pick the lock by moving your cursor left or right to position the pick under one of the pins. Click on that pin. If it’s correct, it will stay up and a number will appear in a circle above the pin. You must click on the pins in a certain order. If you click on an incorrect pin, the lock will reset and you’ll have to begin again. The numbers stay visible, so you won’t need to remember which ones you need to click. Here is one solution.
Pick up the last two items. Time to head back to Trelawney’s Room.
Trelawney’s Room
Give Squire Trelawney the list he wanted, then find the items he needs. He’s off on his voyage and you’ve solved this chapter. Remember to open things and rotate the scene to find everything.
No symbol, this time; just a parchment with text in Latin. What could it mean?
“Alas, poor Yorick! I knew him, Horatio: a fellow of infinite jest, of most excellent fancy.”
Elsinore Castle
Hamlet’s going to need to get inside the Castle, but the guard’s not cooperating. Maybe a little vino? Find 3 empty wine bottles.
Well, empty bottles of wine don’t sound very tempting to me…they won’t tempt the guard, either. Let’s go see what else we can find.
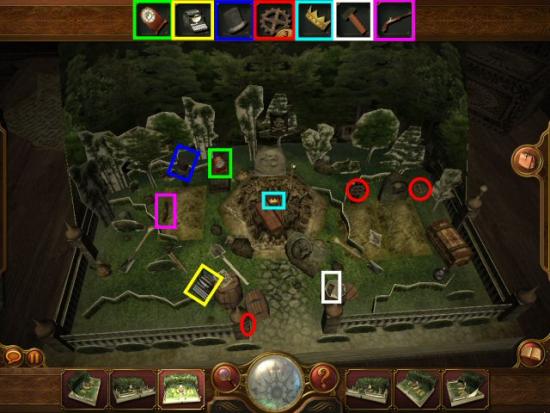
Cemetery
Time to “clean house” and get rid of all those things that don’t belong in this book.
Now, to find poor Yorick’s skull, for Hamlet.
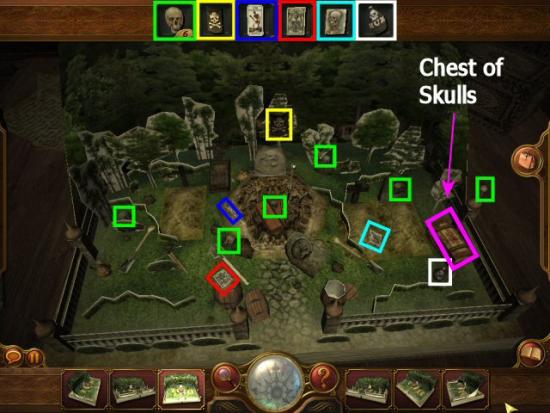
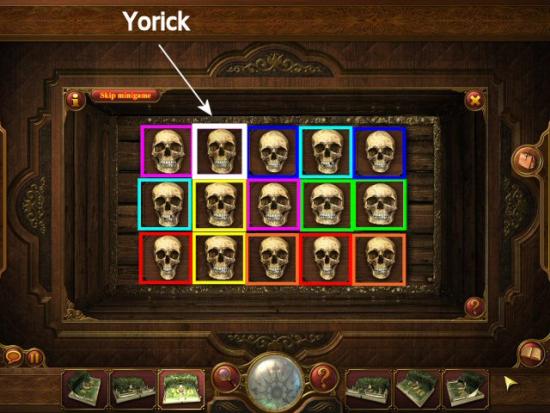
Use the skulls on the Chest of Skulls to start a mini game. Match pairs of skulls to eliminate them; the last one is Yorick. Your solution may be different.
You need to figure out where Yorick’s skull belongs. There are headstones, but they’re covered with moss and you can’t read the names. Don’t any of these people have “people” to do this stuff? (sigh) You’ll need something to clean them off, but you’ll have to look for it in another chapter.
Throne Room
Herold won’t let you in unless you can show him your Servant’s Crest, which you’ll have to get in another chapter. However, there’s a cask of wine so you can fill up those empty bottles. Partay!
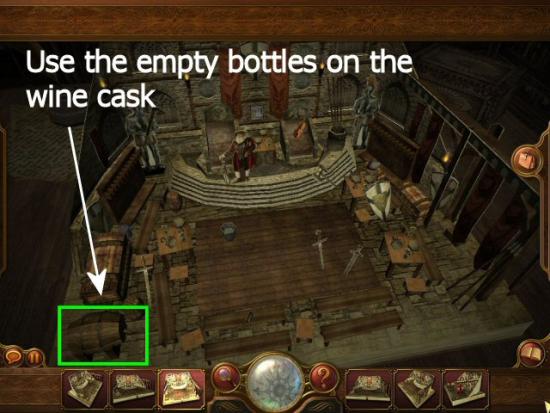
Once you fill up the bottles, it’s time to head back to Elsinore Castle. I swear, if I haven’t lost 15 pounds, after all this schlepping, I’m asking for a re-write!
Elsinore Castle
Use the wine bottle on the guard. Hmmm, no dice. He wants a date…ewww! Looks like I’m going to have to “grease his palm.” Find all the gold items.
Use the gold on the guard. Amazing! He went “blind” from staring at those bright, shiny things. Open the gate so Hamlet can enter the Castle.
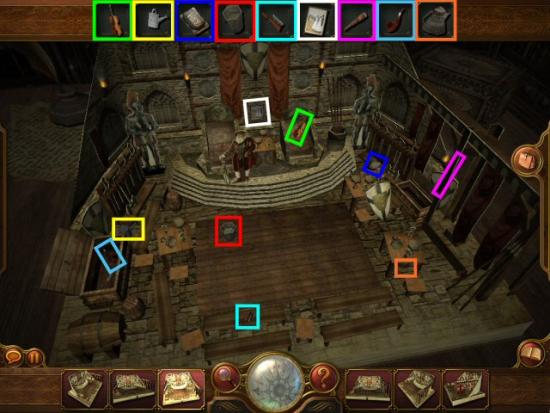
Throne Room
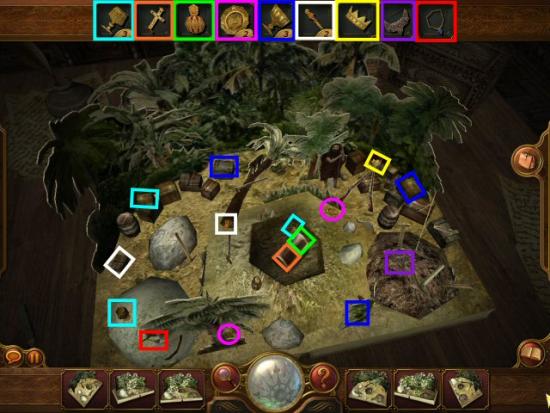
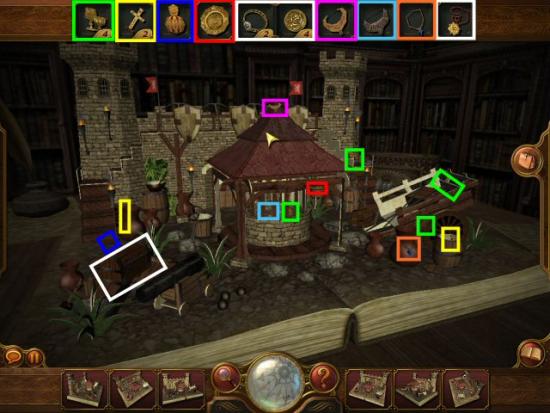
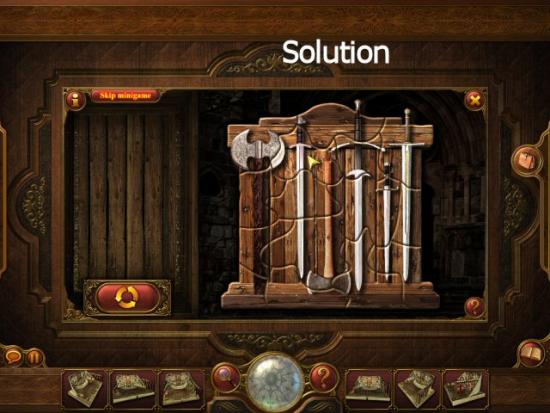
Use the Servant’s Crest on Herold; like a good, little serving wench, you’re going to pick up all the weapons those slobs, the knights, left lying around. Open things and rotate the scene to find everything.
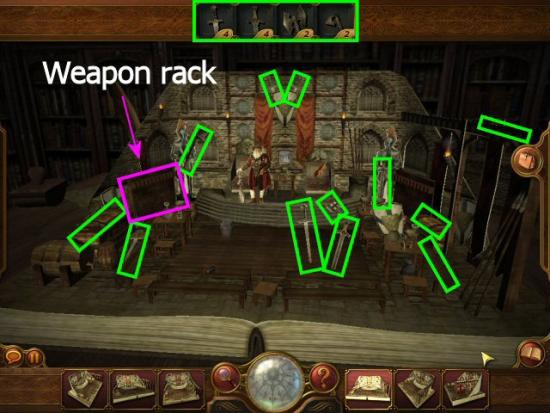
Use the weapons on the Weapon Rack for your next puzzle. Place the pieces to put the weapons back in the rack. Click on them to pick them up, right click to rotate them and click again to place them. Here’s the solution.
Now Herold needs you to pick up all the “trash” (stuff SOMEBODY didn’t put away). Be sure and open things and rotate the scene to find everything.
Herold ‘barely’ says thank you, then remarks that the King’s crown is missing. I’ll bet it looks exactly like the one you found in the Cemetery. Give it to Herold. Now that you have a Bucket and Brush, you can head back to the Cemetery and clean up those headstones.
Cemetery
Use the Bucket and Brush on either headstone.
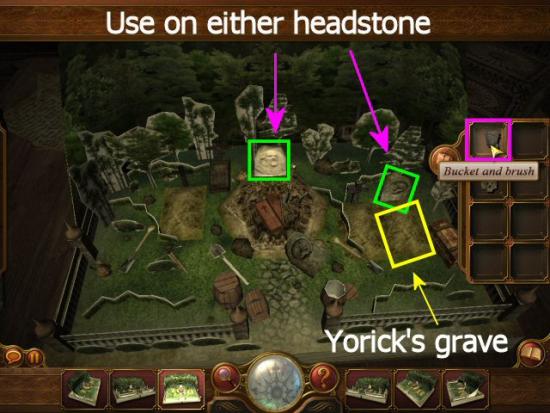
Hold down the left mouse button and “scrub” back and forth over each headstone, until the meter fills completely. I’m getting tired of picking up, and cleaning up, after everyone! Maybe I’ll just pretend I’m Samantha, from Bewitched, and…click the Skip button (nose twitch doesn’t seem to be working).

Place Yorick’s skull on his grave…the one on the far right…and you’ve solved this Chapter.
Another symbol is glowing on the Mechanism! We’re making progress toward beating “this cursed book.”
“Alas! fair Rowena,” returned De Bracy, “you are in presence of your captive, not your jailor; and it is from your fair eyes that De Bracy must receive that doom which you fondly expect from him.”
Tournament
Ivanhoe’s broke after spending all his money on the Crusades. He needs a new suit of armor, but can’t afford it. Let’s see if I can make a deal with the Blacksmith. Great! He says he’ll do it if I gather all the old pieces of armor for him to use. N.B. the number of items in the list (20) may not be correct; I found 21.

The Blacksmith says he’ll need to paint a crest on the shield, but needs you to find a Painter’s Palette…elsewhere, of course.
Robin Hood’s Camp
To prove your worthiness (and trustworthiness), Robin wants you to clear out all the “trash” that doesn’t belong. Great! You found the Painter’s Palette.
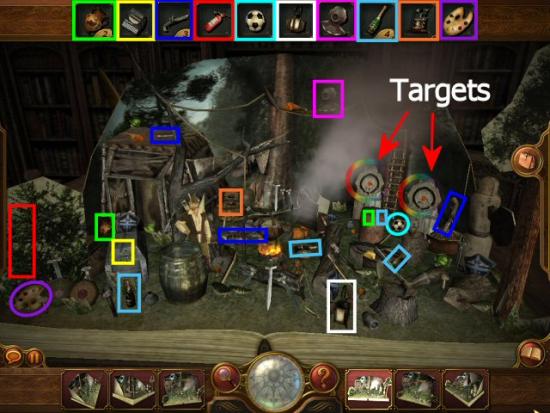
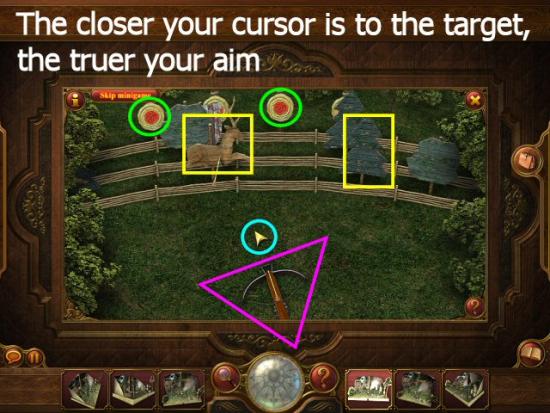
Next, Robin wants you to prove that you can “shoot with the best of ’em.” Click on either Target to start your next mini game. The object is to hit all the red targets (green), without hitting any obstacles (yellow). Point and shoot with your mouse (cyan) so the crossbow arrows (magenta) hit the targets. The closer your cursor is to the target, the better chance you have of hitting it. Congratulations!
Now that you’ve proven yourself, Robin needs you to steal a guard’s uniform. Off, to Front-de-Boeuf’s place.
Front-de-Boeuf’s Castle
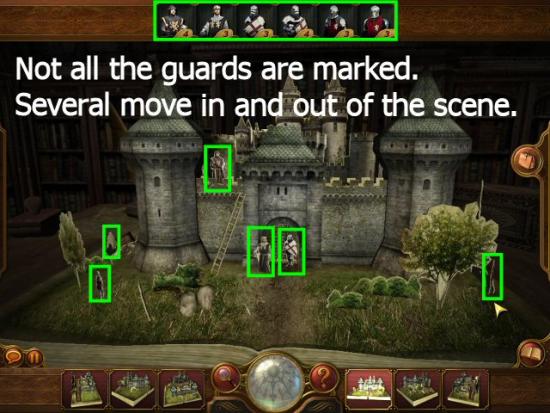
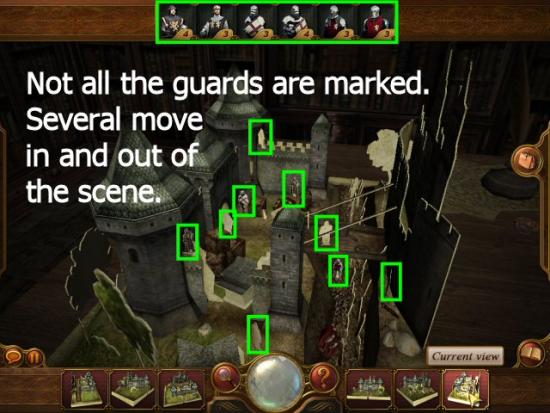
Your first task is to capture all the guards. Refer to the next 2 screenshots for the location of some of them. You will have to change your viewing angle several times to find all of them (If you use the 6 preset viewing angles, you’ll be able to find them all. In this scene, it works better than using the trackball button). In addition, several of the guards move in and out of the scene, so showing the location of all of them isn’t possible. Don’t worry. It’s like shooting fish in a barrel. They move slow, and they don’t know you’re there.
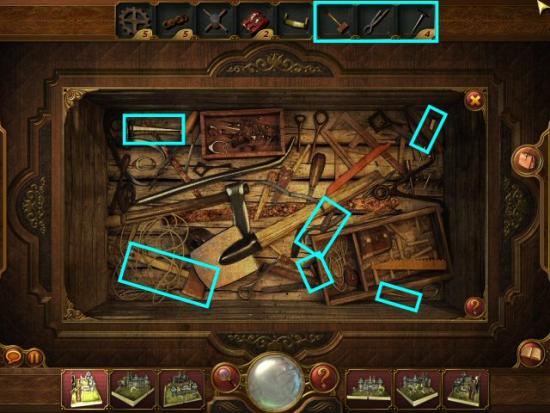
You’ve captured all the guards and got that uniform Robin was wanting. Let’s see if we can get into the Castle…Rats! It’s broken and we’re going to have to find the parts to repair it. N.B. The number of gears in the list (5) is not correct; there are 6 of them.
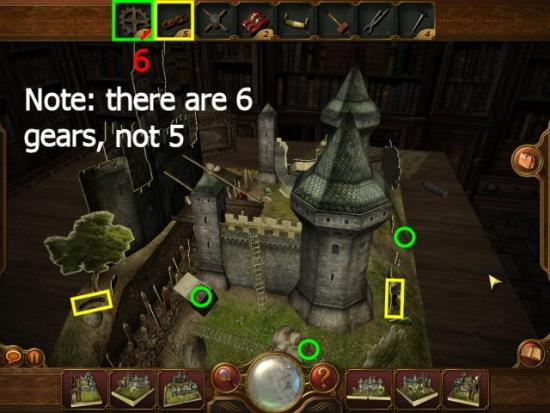
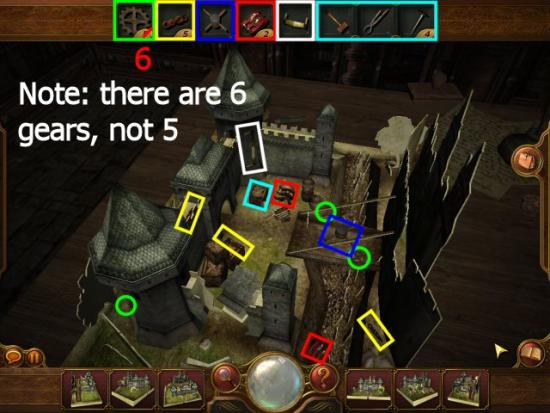
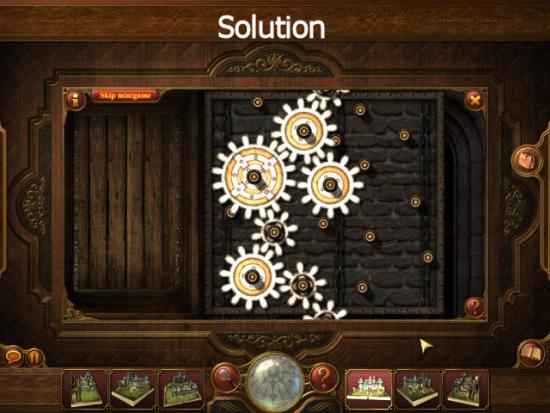
Use the spare parts on the Gate and click on it to start your next puzzle. Place 1 large, 3 medium and 2 small gears so that they all move. Here is one solution.
Click on the Gate to open it. Darn! It’s too rusty and nothing will move. Looks like I need to go find an oil can. But first, let’s see how the Blacksmith is coming with Ivanhoe’s armor.
Tournament
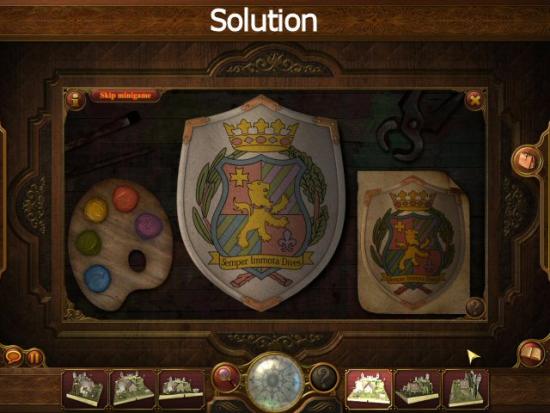
Give the Painter’s Palette to the Blacksmith to start your next puzzle. You need to paint Ivanhoe’s crest. Click on one of the colors, on the left, then click in the appropriate place on the crest to paint it. N.B. If you’ve painted everything correctly, and the screen won’t change, click the Help button (?) to get it to finish. This may be a random bug.
It seems the Blacksmith also needs an oil can to lubricate the joints on the armor, plus a few other items.
You give one of the 2 oilcans to the Blacksmith…and now he wants money!? What a ripoff! Guess we’ll have to go see if Robin can spare some loot.
Robin Hood’s Camp
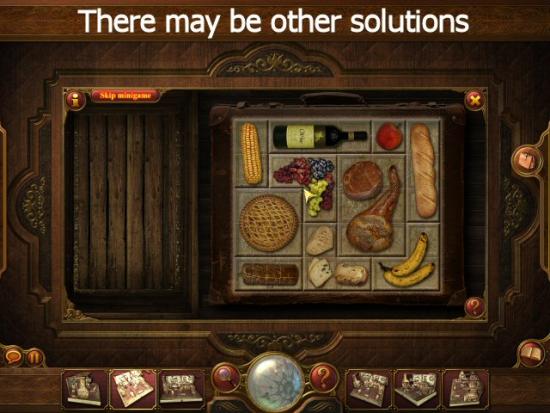
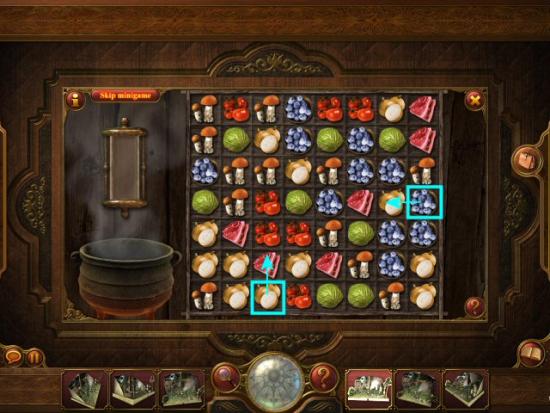
Give the guard’s uniform to Robin, then he asks you to gather all his merry men. He suggests making a nice soup; the aroma’s sure to have them running back to camp for a good meal.
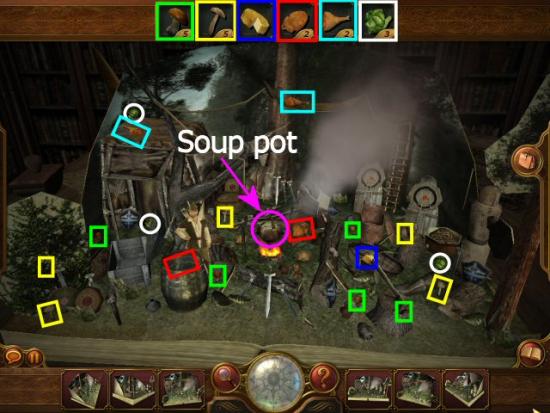
Use the soup ingredients on the Soup Pot to start your next mini game. This puzzle is a traditional match 3, but you need to “fill” the soup pot with the ingredients. I’ve marked a couple suggestions (cyan) for first moves. Your puzzle will probably be different. Continue playing until the meter, above the soup pot, on the left, is filled.
As your reward, Robin gives you some gold coins and agrees to help Ivanhoe rescue his lady-love, Rowena, from the evil De Bracy. Perfect! First things first. We’ve got to go pay off that cheating Blacksmith, so Ivanhoe can get his armor.
Tournament
Give the Gold Coins to that scurvy Blacksmith, then give the armor to Ivanhoe to start your next puzzle. You need to dress Ivanhoe in his new armor. Place the pieces to complete the puzzle and put the armor on Ivanhoe. Click on them to pick them up, right click to rotate them and click again to place them. Here’s the solution.
Front-de-Boeuf’s Castle
Now to rescue fair Rowena. Use the oilcan on the Gate to open it for Ivanhoe, Robin Hood and all their happy campers…I mean, merry men. This chapter is solved and we’re on to the next.
Another symbol is lit on the mysterious Mechanism, but The Tome of Mystery is now trying to hide in a locked box. Paige’s spirit-friend, Theodore, manages to peer inside and got the code to unlock it.
“To die among friends. Can a man ask more? Can the world offer less? Who wants to live ’till the last bottle is empty? It’s all for one, d’Artagnan, and one for all.”
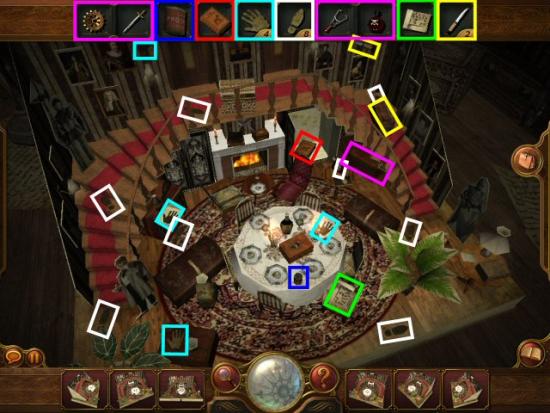
De Treville’s Waiting Room
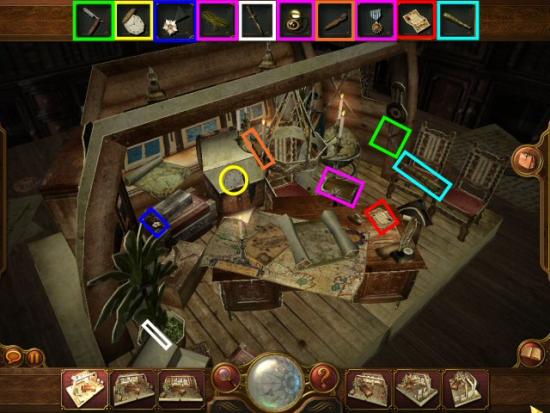
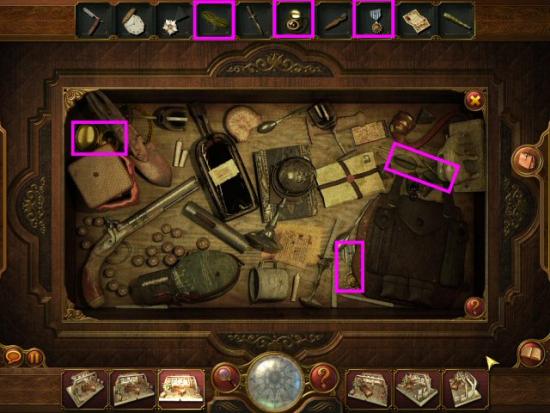
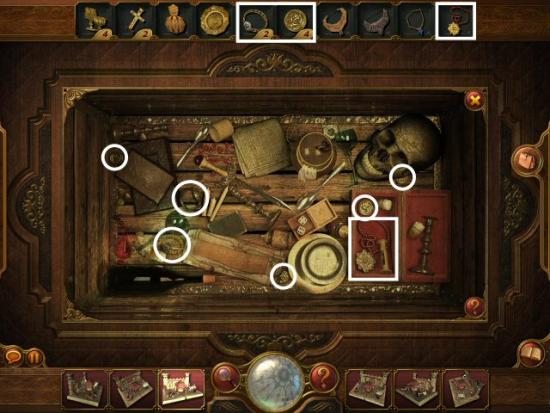
Milady de Winter has just left and Monsieur De Treville is fearful that she’s hidden incriminating items that will surely lead him straight to Madame La Guillotine. Help him find everything. Make sure to open things and rotate the scene to find everything.
When you’re finished, he asks you to try an locate the saddle d’Artagnan’s father gave him. He wants to give it to d’Artangnan and would hate to have to tell him he’d lost it. Time to explore another chapter.
“Red Dovecot” Inn
The minute you walk in the door, Athos tells you to collect all the weapons scattered in a recent fight. Exsqueeze me!? Athos explains he’s…er…guarding (trying to eavesdrop, more like) the room where Cardinal Richelieu is having a secret meeting. Remember to open things and rotate the scene to find everything.

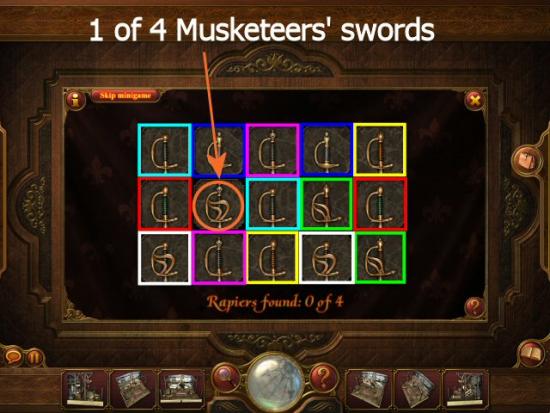
Give the swords to Athos, so he can sort out the 4 swords of The Musketeers from their enemies’ swords. This starts your next puzzle. Match pairs of enemy swords to eliminate them; the last one is a Musketeers’ sword. You’ll play this 4 times to collect all 4 Musketeers’ swords. Your solutions may be different. I have only shown my first solution.
After retrieving the Musketeers’ swords, Athos mentions that he wants to hear what’s going on in that secret meeting. He’ll need a bucket of water to douse the flames in the fireplace so he can listen through the wall. Alas, no water here. We’re off to Bastion Saint-Gervais to see what we can find.
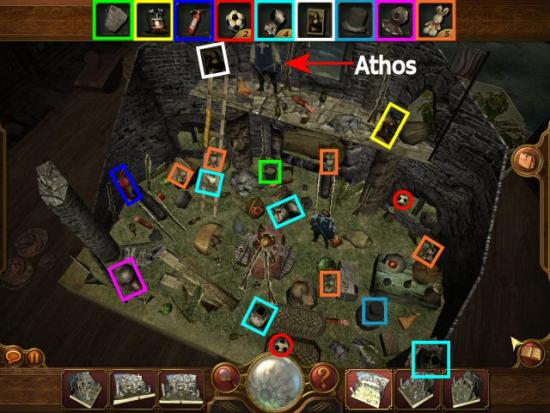
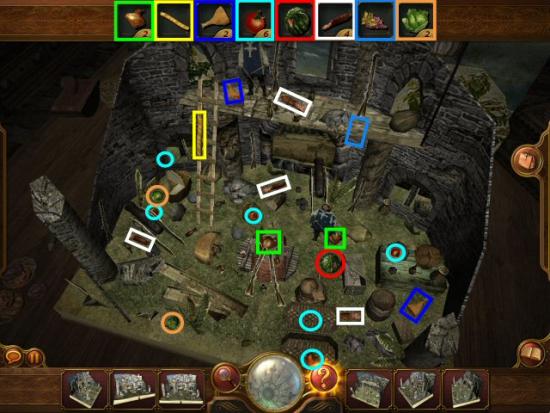
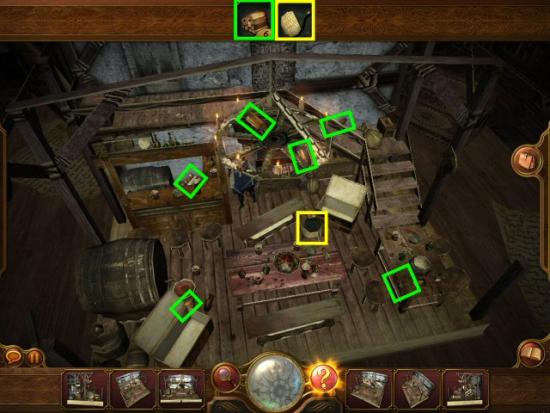
Bastion Saint-Gervais
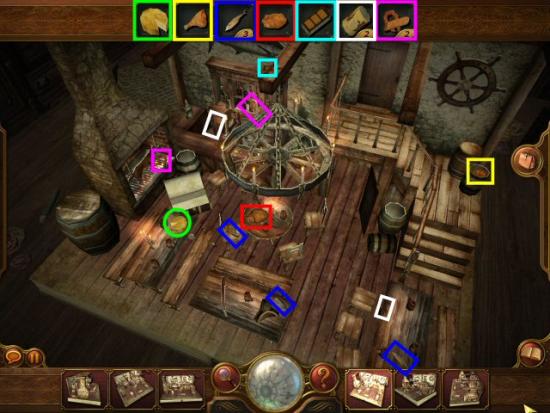
You arrive at Bastion Saint-Gervais and are greeted by Athos and d’Artagnan (where the heck are Porthos and Aramis?). Athos boastfully exclaims that they are there to “enjoy breakfast, defeat our enemies and write letters warning of assassin’s plots.” Golly gee! All at the same time? Well, apparently there’s too much garbage strewn around and it’s put them off their feed. Help the poor guys out and pick it all up. Oh, look! Bunnies! How cute! Now, if they only had guns, they’d be cute AND armed.
Next, they need to write warning letters to Lord De Winter and the Queen, but the ink bottle broke. Luckily, you just happen to have a spare in your pocket. Give the ink bottle to Athos; he’s on the top, left. This starts your next puzzle, which is a word search. Click and hold your mouse button and drag to the end of the word. Here is one solution; yours may be different.
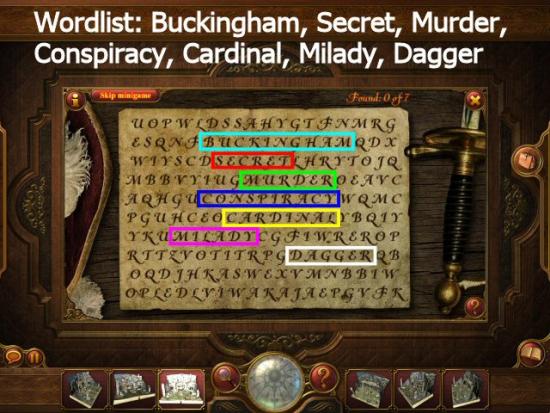
Now that the letters are written, it’s time for breakfast. But, hark! There are ruffians about. Let’s gather the food while A. and d’. fend off the bad guys.
All’s well with the world, for now. Let’s see what other mischief we can get into.
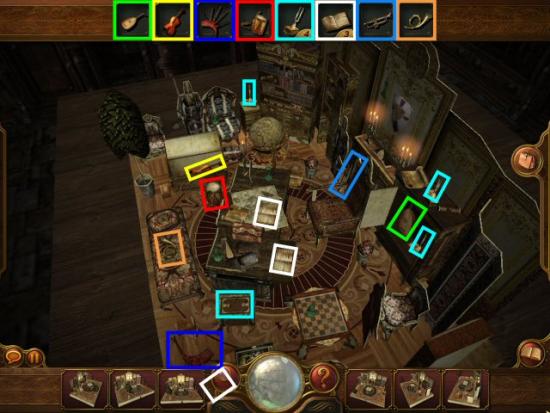
Richelieu’s Office
It appears Cardinal Richelieu has been rockin’ out while waiting for d’Artagnan, and asks you to gather his musical instruments and such.
d’Artagnan arrives only to have Cardinal Richelieu confront him and sentence him to the Bastille. d’Artagnan asks you to find a pardon for him, in another chapter. Now that we have that Bucket of Water, let’s head back to the Inn.
“Red Dovecot” Inn
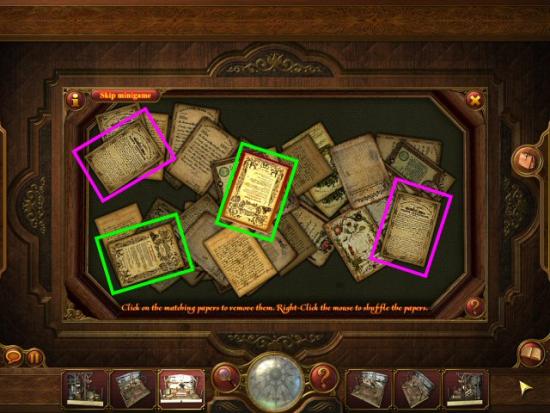
Use the Bucket of Water on the fireplace. Athos knows there’s a pardon somewhere around here. Gather all the papers you can find.
Give the papers to Athos to start your next puzzle. Click on pairs of matching papers; right click to shuffle them. You can only click on papers that aren’t covered by other papers. When you’ve exhausted your choices, shuffle them to free more up. The first two pairs, in my puzzle are marked. I’ll need to shuffle them to have more pairs available. Your puzzle will probably not start like mine did. When you’re finished, you’ll have the pardon d’Artagnan needs.
Before you head out, Athos asks you to find Wood and Oil to relight the fireplace, so the Cardinal won’t get suspicious.
Use the Wood and Oil on the fireplace. Time to head out, but, before going back to Cardinal Richelieu’s Office, let’s return that saddle to Monsieur De Treville.
de Treville’s Waiting Room
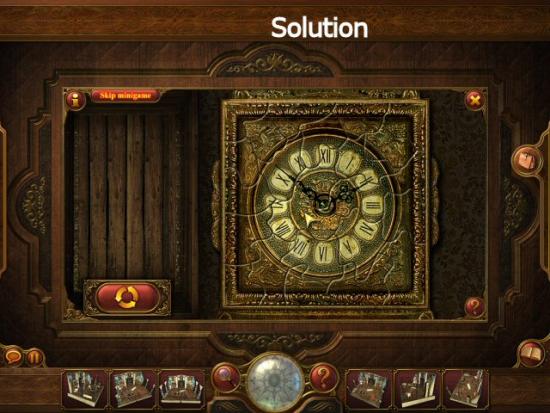
After you give de Treville’s saddle to him, he asks you to help him repair his clock. Find all the missing pieces.
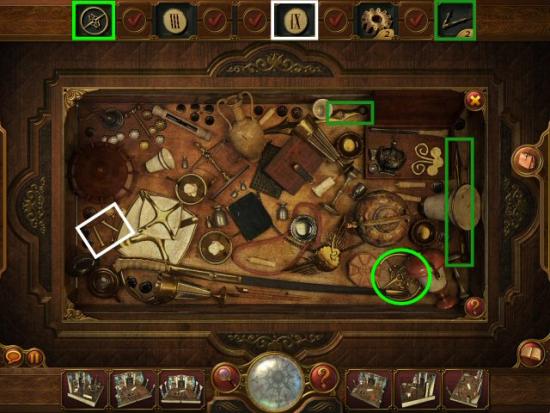
Use the Clock Parts on the Clock to start your next puzzle. Repair de Treville’s clock by completing the puzzle. Place the pieces for the clock. Click on them to pick them up, right click to rotate them and click again to place them. Here’s the solution.
As a reward, de Treville presents you with a Lieutenant’s Commission. You just nod politely and say thanks. Don’t we know someone else who could actually use it? Let’s head back to Cardinal Richelieu’s Office with that pardon for d’Artagnan.
Richelieu’s Office
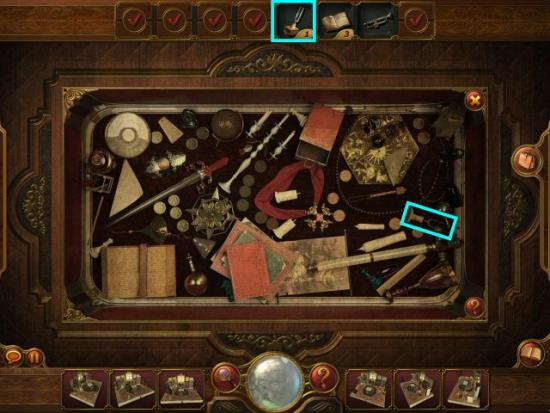
Give the pardon to d’Artagnan. d’Artagnan shows the pardon to Cardinal Richelieu who promptly gives him a Lieutenancy in the Musketeers…however, he seems to have misplaced it. Oddly enough, you just happen to have one of those in your strangely voluminous pocket. Give the Commission to Cardinal Richelieu. He needs to stamp it with his seal, which is hidden somewhere in his office. In order to find it, you need to collect all the Chess Pieces and place them on the chessboard.
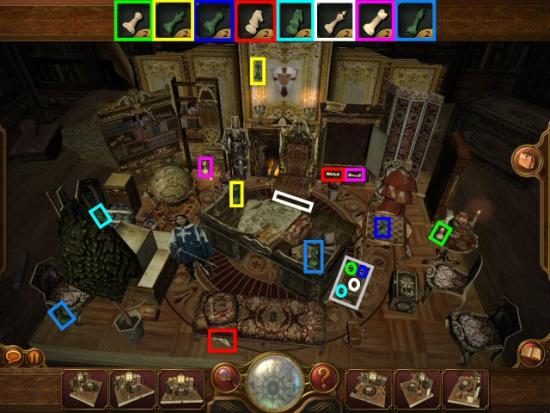

Use the Chess Pieces on the chessboard to start a mini game. The object is to move your knight to the opposite corner of the board. In Chess, the knight can move either 2 horizontal spaces, then 1 vertical space, or 2 vertical spaces, then 1 horizontal space. Here is one solution; yours may be different.
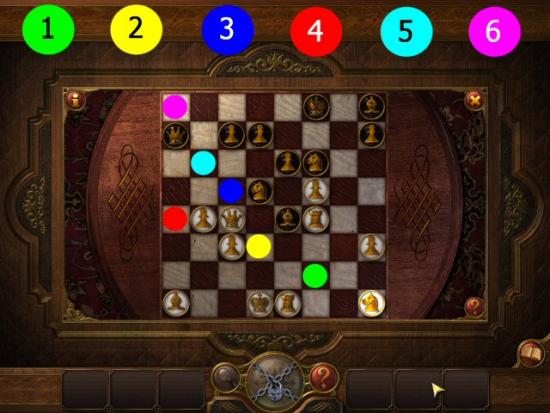
Completing the Chess Puzzle gets you the Cardinal’s Seal. Give it to the Cardinal so he can make d’Artangan’s Lieutenancy official and his dreams come true. (loud cheers erupt) All for one and one for all! Huzzah!!
There’s only one more symbol left to light on the mysterious mechanism.
“You will not apply my precept,” he said, shaking his head. “How often have I said to you that when you have eliminated the impossible, whatever remains, however improbable, must be the truth?”
Baker Street 221B
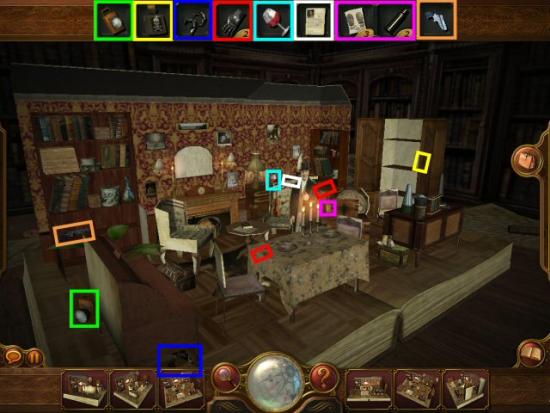
You arrive at Holmes’ and Watson’s lodgings and are greeted by Dr. Watson’s request for you to find all of Holmes’ Pipes. He and Mrs. Hudson want Holmes to quit smoking, but he realized this and hid them. You find 8, but the remaining Pipe is inside a locked chest.
Click on the chest to start your next puzzle. Swap one tile with another until you match the picture shown on the left. Click on one tile then click on another; those 2 tiles will switch places. Repeat until all tiles are placed correctly.

Holmes requested Dr. Watson create a Formula for him, and now we need to gather the Chemicals. Well, we could only find 7 of the 8 Chemicals, so we’ll have to look elsewhere for the last one.
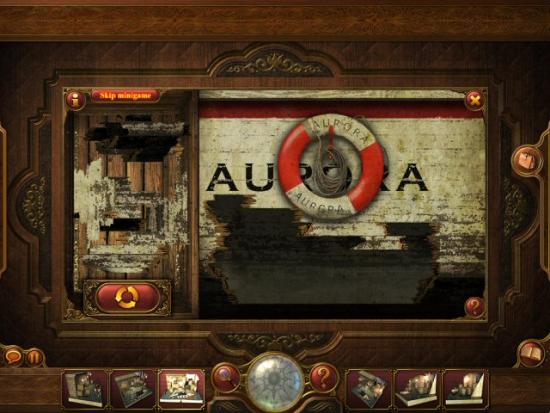
Aurora’s Berth
At the docks, it appears that the Aurora has been sunk. The policeman, guarding the area, asks you to locate clues for Inspector Lestrade and Holmes. Perhaps those will help them to identify the vandals.
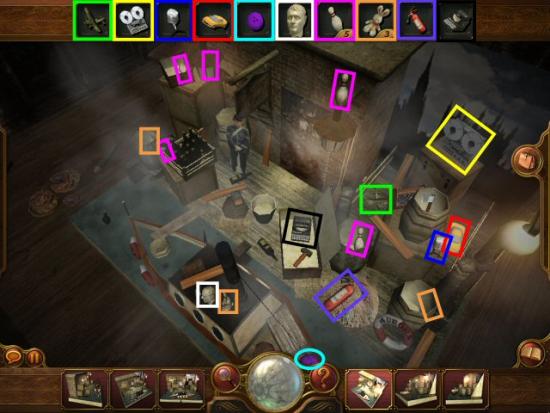
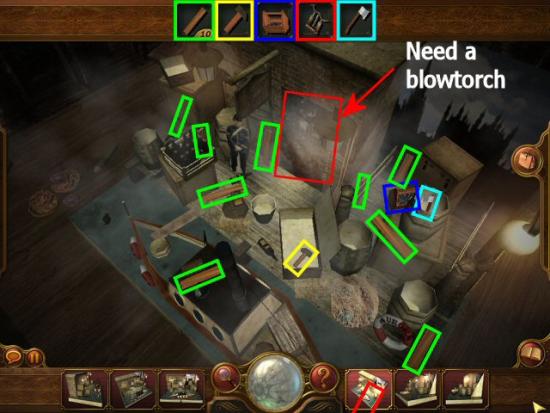
Next, we need to repair the boat. Locate Wood Planks and the Tools. Well, we found everything except the Pump, which may just be hiding behind that door that’s welded shut. We’ll need a Blowtorch but we’ll have to try another chapter to find it.
Baskerville Hall
Well, hello there, Mr. Sherlock Holmes. Wondered where you’d gotten yourself to. Apparently, Sir Hugh Baskerville set a bunch of traps around, making it too dangerous to search for clues. Let’s remove them all.
Now that it’s safe to walk around, we need to find out more about the Baskerville family. There are some paintings of Baskerville ancestors missing from the walls. Let’s see if we can find them.
Well we found them, but one appears to be damaged. Holmes needs that Formula he asked Dr. Watson to prepare. Sherlock gives you a Key to a locked chest in his study; let’s head back there, now, and see if that Formula is ready.
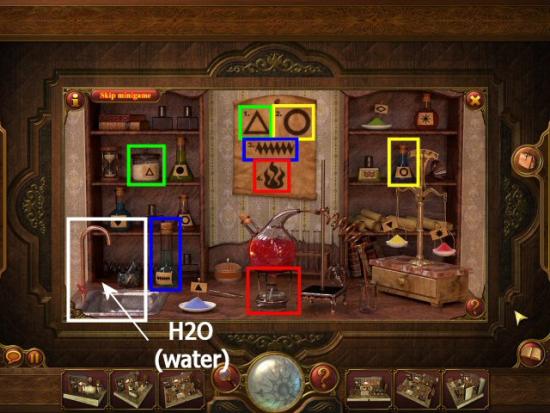
Baker Street 221B
Use the Key on that chest and retrieve the final Chemical. Click on Holmes’ desk to start your next puzzle. You need to click on the proper chemicals, in the correct order in order to begin creating the formula Holmes needs. The following screenshot shows what you need to do. Repeat this procedure 4 more times to complete the formula. If you make a mistake, you’ll have to start over, from the very beginning. Note: when the instructions call for H2O, click on the sink (white).
You now have the Formula that Holmes needs, but, before you go, Dr. Watson asks for your help collecting Evidence that Inspector Lestrade will be arriving to collect. More housekeeping (I want a vacation!), so let’s get to work.
Dr. Watson remarks on your uncanny Holmsian abilities and you’re off to get that Formula to him, to restore the painting.
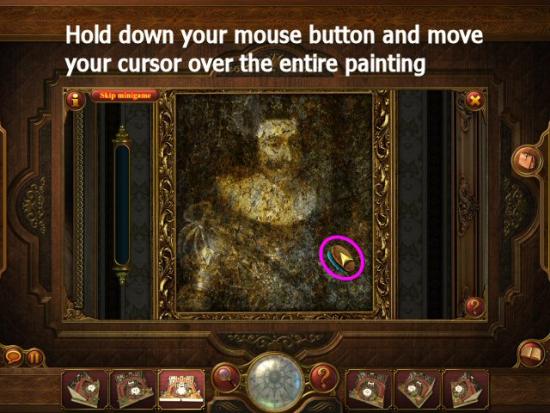
Baskerville Hall
Use the Formula on the Painting, which starts your next mini-game. Hold down your mouse button (magenta) and apply the Formula to the entire painting. When it’s entirely coated with the Restoration Formula, you’ll repeat this again, to remove it.
We’ve identified the suspect, X. Now we need to find the Evidence that proves he committed the crime.
We’ve gotten everything except for a Knife, which appears to be locked in a chest. Click on the chest to start the next puzzle. You need to rotate the 4 wheels to get the correct colors and symbols to line up in each quadrant. The best way to start is to complete one color, then work on the rest. Begin working on the other 3 (you also need to match the center). You may have to move one of the circles, temporarily, so they line up except for a final click or two. This puzzle is different each time you play, so there isn’t one solution. It between 10 and 15 clicks to get them all into position. If you like, you can just skip it.
Now that we have that last piece of Evidence, the mystery of the Baskerville’s is solved. Now, we still need to repair the Aurora, and need to find a Blowtorch. Off to the next chapter.
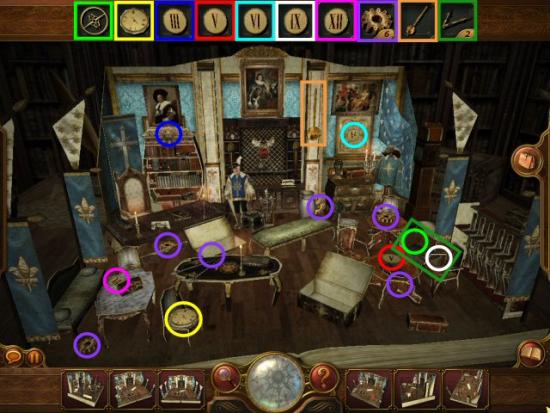
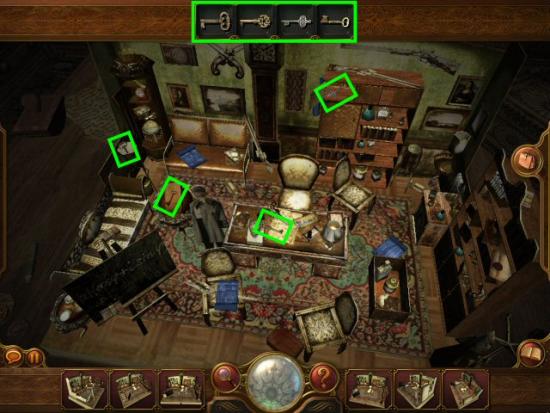
Professor Moriarty’s Office
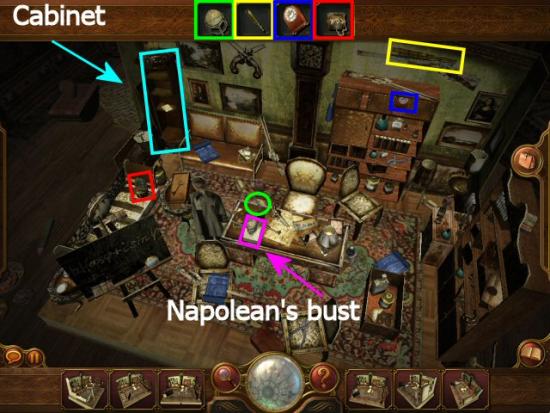
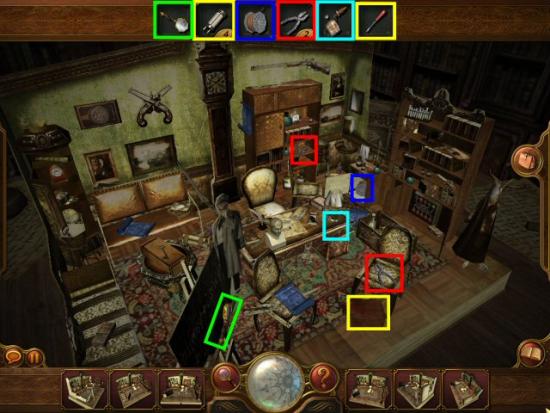
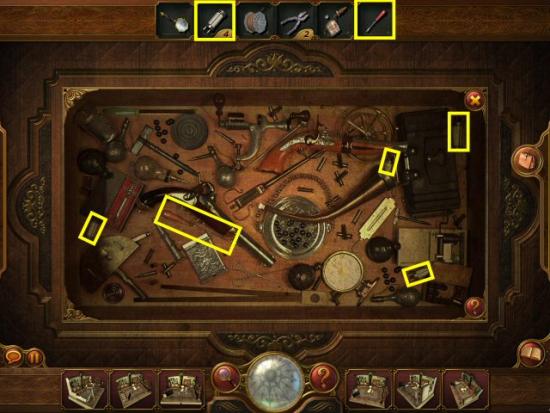
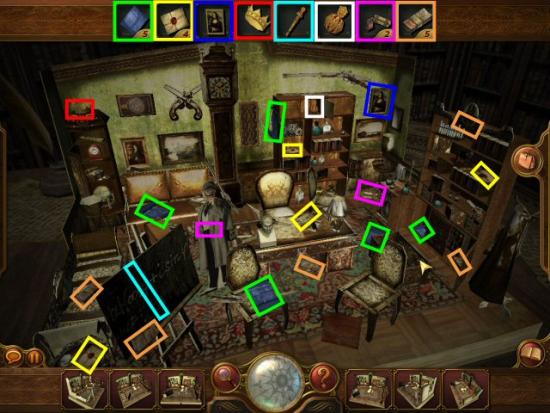
Holmes needs to find Professor Moriarty’s diary, which is sure to contain a complete history of his crimes. But first, he seems to thing the missing head, to Napolean’s bust, is the key to locating all of Moriarty’s hiding places. Use the head on the base of the bust, sitting on the left side of the desk (magenta). This opens a cabinet, at the back of the room (cyan) which contains a list of objects. Holmes seems to feel that replacing them will reveal the rest of the hiding places.
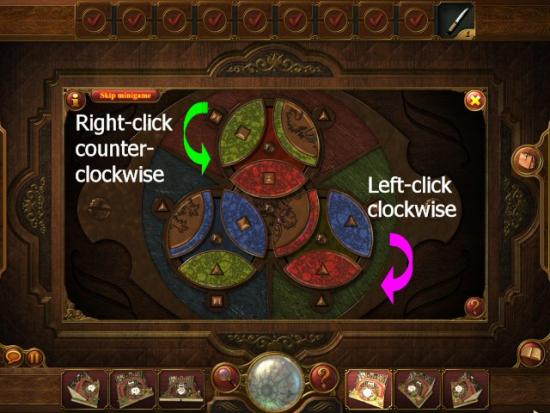
Use the items on the cabinet, which knocks a painting off the wall, revealing a puzzle. Click on it to start the next puzzle. Click and drag each ring around and into the correct position. Here’s one solution. Your puzzle will probably be different. Once all are in place, Professor Moriarty’s hiding place is revealed.

There’s an electrical device beneath the cabinet on the right side of the room, but we’ll need some equipment to be able to work on it, safely. Great! Here’s that blowtorch we need.
Before we try that electrical device, let’s head back to the Aurora and finish repairing her.
Aurora’s Berth
Use the Blowtorch on the door that’s welded shut. Pick up the Pump then use the supplies and tools on the Boat. This starts your next puzzle. Place the pieces to X. Click on them to pick them up, right click to rotate them and click again to place them. All righty, now! She’s shipshape and watertight. Let’s head back to Moriarty’s.
Professor Moriarty’s Office
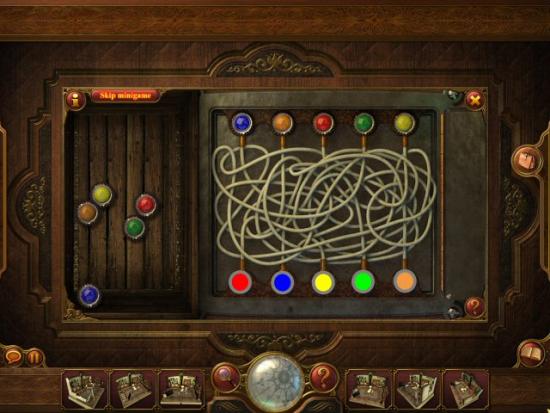
Use the electrical parts and click on the device to start your next puzzle. You need to trace each wire and place the fuses, on the left, into the correct sockets. Here’s one solution; yours may be different. N.B. To prevent your eyes from crossing, permanently, I’d recommend just placing the fuses and switching them (sort of like the Mastermind game) until they’re correct.
Solving that puzzle moved the grandfather clock and revealed something on the wall, with 4 Locks. Find the Keys.
Use the Keys on the Locks. That opened another door revealing another mechanism; looks like it’s missing a gear. Good thing we already found one. Use the gear on the mechanism and a secret drawer opens…Ta Da! Moriarty’s Diary.
Give the Diary to Holmes…seems the Diary mentions that Moriarty kept some of his plans and ill-gotten gains in his office. Let’s find it so Holmes can finally bring this evil man to justice.
At last! The final symbol is lit on the mechanism, and you, along with Theodore and all the souls that have been trapped for so long, are released. But wait. What’s this!? Oh, no!
Watch the ending. Congratulations, you’ve successfully solved the Tome of Mystery…at least, for now.
