![Hololive Dreams Tier List [Best Cards]](/wp-content/uploads/2026/07/hololive-dreams-tier-list.jpg "Hololive Dreams Tier List [Best Cards]")
Hololive Dreams Tier List [Best Cards]
The best cards for the best performances.


![Iron Soul Dungeon Weapon Tier List [Best Weapons]](/wp-content/uploads/2026/07/iron-soul-dungeon-weapon-tier-list.jpg "Iron Soul Dungeon Weapon Tier List [Best Weapons]")

Check out our strategy guide for Pahelika: Secret Legends. GENERAL TIPS Starting a new game Before starting a new adventure, you can configure options or change players in the study. Select the toolbox to configure options, the painting to add or change to a different player, the chair to play a game with the currently selected player or the door to exit the game. Controls Move the mouse to control the cursor. Green sparks will appear when the cursor hovers over an object that can be …
a:1:i:0;a:2:s:13:”section_title”;s:29:”Pahelika: Secret Legends Tips”;s:12:”section_body”;s:41149:”
Check out our strategy guide for Pahelika: Secret Legends.
GENERAL TIPS
Starting a new game

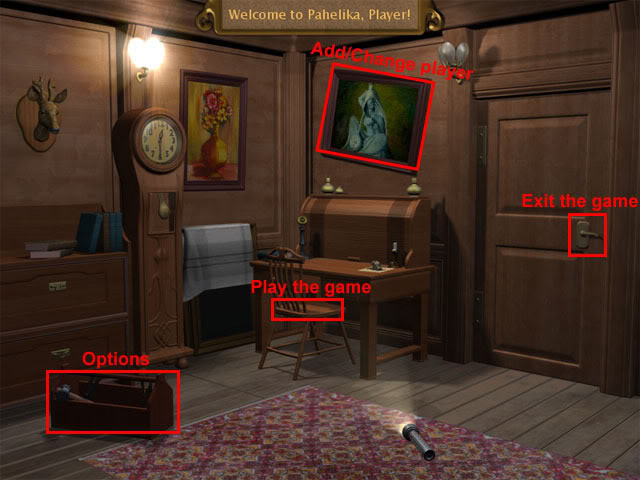
Before starting a new adventure, you can configure options or change players in the study. Select the toolbox to configure options, the painting to add or change to a different player, the chair to play a game with the currently selected player or the door to exit the game.
Controls
Move the mouse to control the cursor. Green sparks will appear when the cursor hovers over an object that can be interacted with. Left click when the sparks appear to examine or take an object. Objects that can be taken will be added to the inventory at the bottom of the screen. There is a button at each side of the inventory window: Menu and Info. Select the menu button for options or the info button for a description of the current location.
Inventory
Any item that can be taken in the game will be added to the inventory. Select an item from the inventory and it will be attached onto the cursor: The item can now be used on an object in the playing area. Occasionally you will need to combine two different inventory items to make a new inventory item.
Puzzles
There are six types of puzzles in the game:
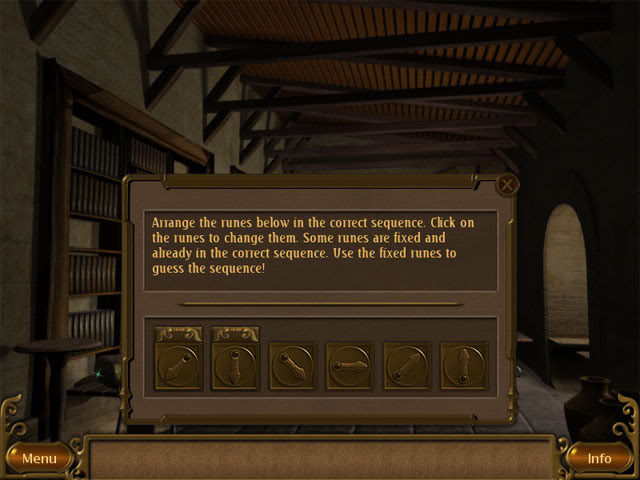
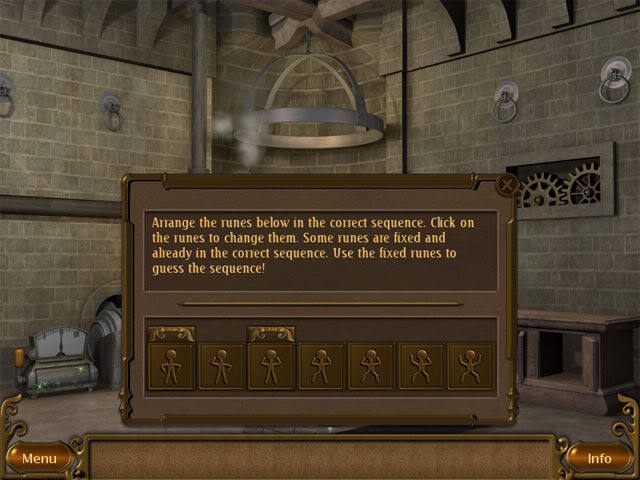
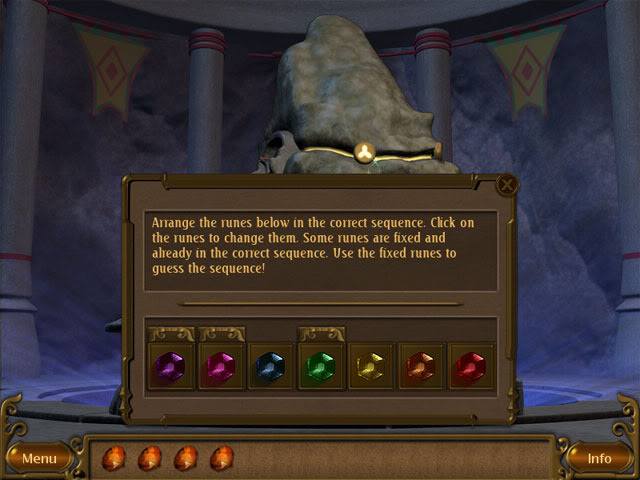
Sequence – A series of pictures are shown and some have already been put in the correct position. The aim is to put the moveable pictures in to the correct order.
Jigsaw – Left click a puzzle piece to select it and right click to rotate the piece. A good tip is to get as many edges fixed in place as possible first before starting on the other pieces.
Memory – It is not possible to give an exact walkthrough for each memory game as it is random each time. Flip over the first panel and then flip over the other panels until you have found the same picture. When you have found the same picture, flip over both panels to match the pictures. Panels will stay when both pictures have been found. Match all of the different panels to complete the memory game.
Number – These puzzles require you to observe the surroundings in the current area to find a code. The code is then used to complete the number puzzle.
Quiz – These puzzles require you to answer a simple question. If you get it wrong, just restart the quiz to try again.
Sliding block – The aim here is to move all of the other bricks out of the way so that the red brick can slide from the left side of the panel to the gap at the right side of the panel.
WALKTHROUGH
Store Room Tutorial
Store room
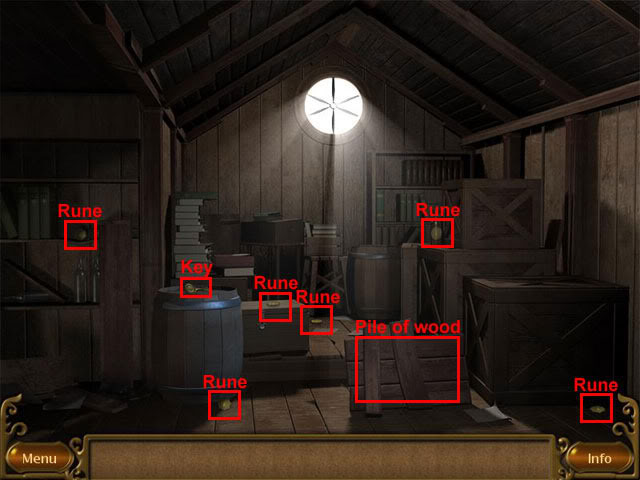
The game starts with a tutorial in the store room. Move the cursor to the pile of wood and left click three times to reveal a chest. Try to open the chest: It is locked. Take the key on top of the barrel and it will be added to the inventory at the bottom of the screen. Left click the key to select it and then use the key on the chest to open it. Take the strange contraption from the chest.
Click the contraption in the inventory to see that it has six empty slots where runes should fit. Click the X button at the right side of the window to close it. The aim now is to find six of the runes in the store room. The runes are in the following locations:
1: On the shelf at the left side of the room.
2: At the bottom of the barrel.
3: On top of the box at the right side of the barrel.
4: At the right side of the box.
5: On the bottle on top of a crate at the right side of the room.
6: On the floor at the right side of the room.
When the six runes have been found, open the contraption. Put the six runes in the correct slots on the contraption. A message will tell you if you have tried to put a rune in an incorrect slot. When all of the runes have been used, click anywhere to take the contraption to the study.
Study
Select the Play button to travel to the wizard tower.
The First Challenge
Outside the tower of the wizard

Examine the bush at the right side of the chest to reveal a close-up. In the close-up view, select the leaves and then select the water bottle to take it. Use the water bottle on the fire to extinguish it. Examine the smoking wood and take the key. Use the key on the chest and take the blank scroll from inside. Examine the loose brick near the bottom of the tower. Pull the brick and take the quill. Combine the quill with the blank scroll in the inventory. Select the scroll and a stairway will appear on the tower. Examine the pile of stones, select them in the close-up and take the key. Use the key on the door at the top of the staircase to open it. Enter the tower.
Wizard’s study
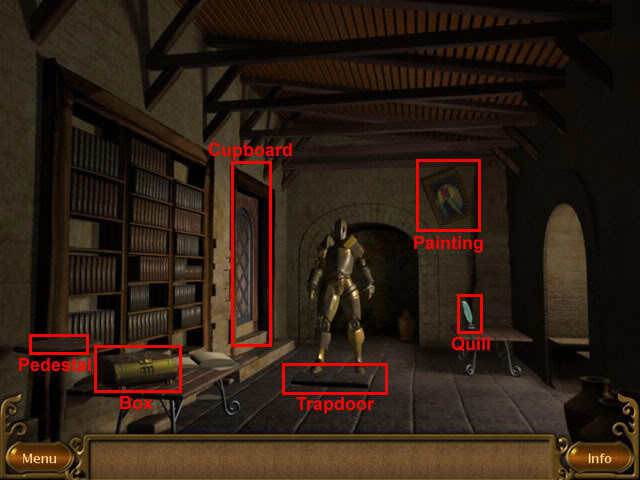
Examine the box on the table at the left side of the room to see a sequence puzzle.
Solve the sequence puzzle to open the chest:
Take the blank scroll. Take the quill on the table at the right side of the golem. Combine the quill with the blank scroll. Use the scroll to make the golem move its foot from the trapdoor. Move the tilted painting on the wall to open the trapdoor. Go down the trapdoor to enter the wizard’s lab.
Wizard’s lab
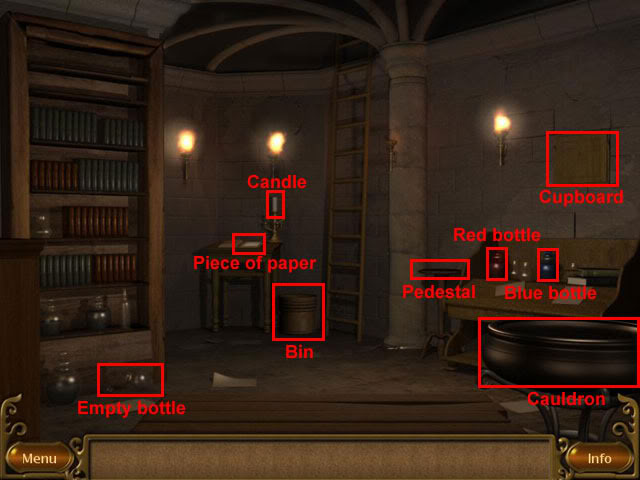
Take the piece of paper on the table near the candle. Read the paper for information on how to dispel illusions. Take the red and blue bottles on the desk at the right side of the room. Use the red and blue bottles on the cauldron. Examine the bin at the right side of the table with the candle and take the scroll. Read the scroll to cast the spell. Take an empty bottle near the bottom of the book rack. Use the empty bottle on the cauldron to fill it with the potion. Examine the cupboard on the wall to see a sliding block puzzle.
Solve the sliding block puzzle:
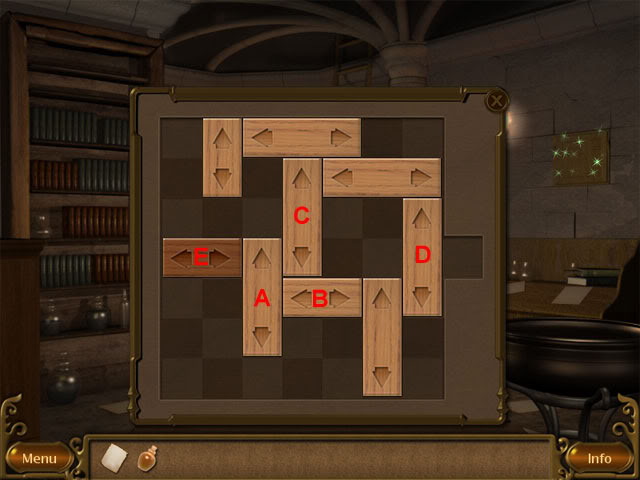
A – Up 2
B – Left 3
A – Down 3
C – Down 3
D – Down 2
E – Right 6
The cupboard will open when the sliding block puzzle has been solved. Take the lantern from the cupboard. Combine the bottle of magic oil with the lantern. Take the candle. Combine the candle with the lantern to light it. Use the lantern on the pedestal to dispel all of the illusions. Take the magic lantern. Go up the ladder.
Wizard’s study
Use the magic lantern on the pedestal at the left side of the room to reveal a secret cupboard. Take the magic dust from the cupboard. Go back downstairs to the lab.
Wizard’s lab
Use the magic dust on the runes on the floor to activate the portal. Use the portal to travel to the roof of the wizard’s tower.
Roof of wizard’s tower
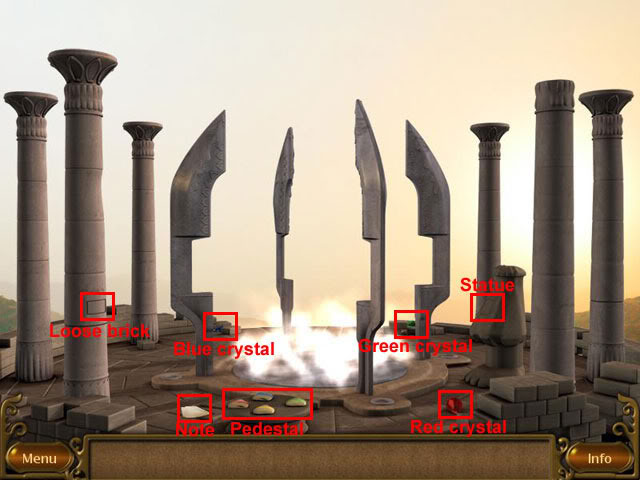
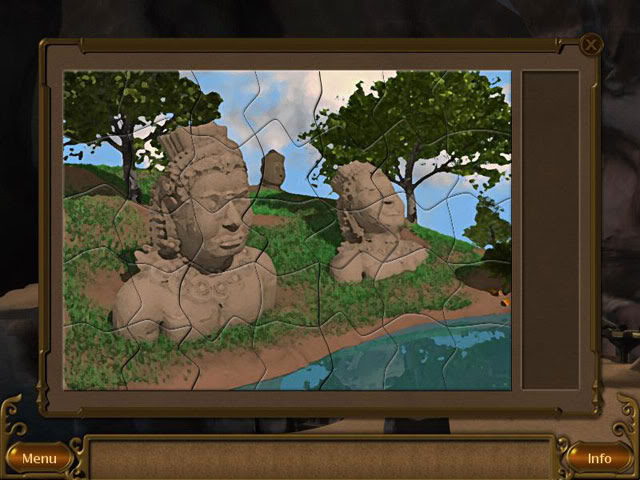
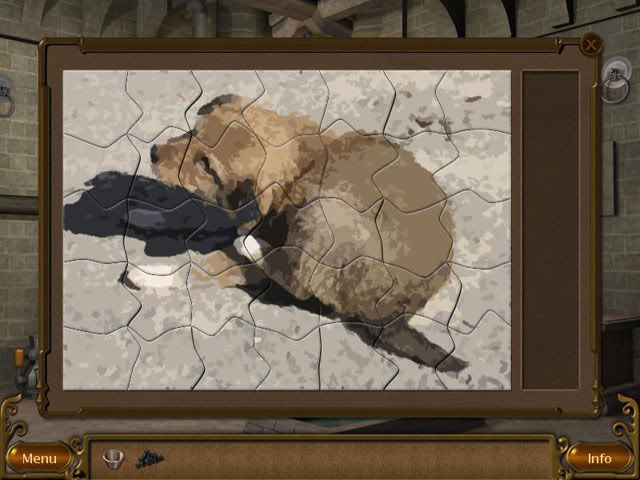
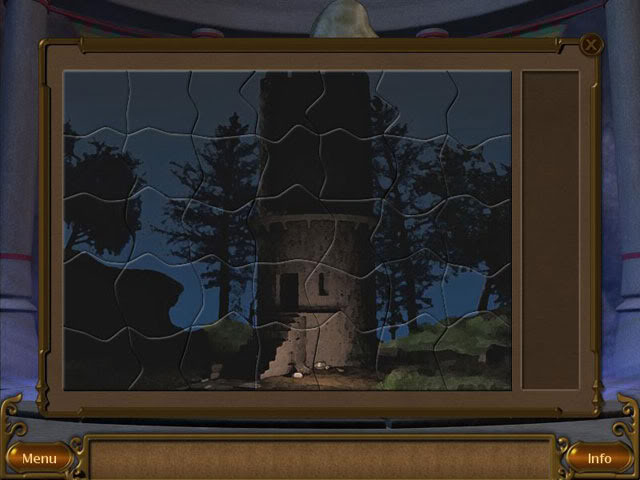
Take the note at the left side of the pedestal and read it to learn how to extinguish the hellfire using the sands of Zeruniya. Take the four bags on the small platform. In the following order, use the red bag, green bag, blue bag and yellow bag on the teleporter to extinguish the hellfire. Take the blue, red and green crystals. Examine the loose brick on the second pillar from the left, move the brick and take the yellow crystal. There are four slots around the sides of the teleporter. Use the yellow crystal in the left slot, the blue crystal in the top slot, the green crystal in the right slot and the red crystal in the bottom slot. Examine the slot in the strange statue at the right side of the teleporter to start a jigsaw puzzle.
Solve the jigsaw puzzle:
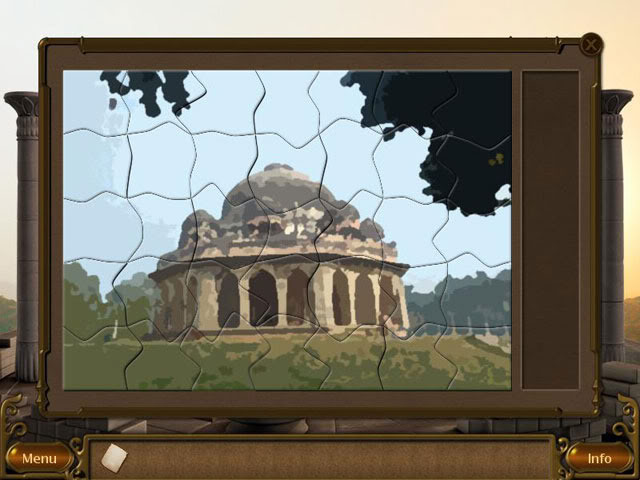
Once the puzzle has been solved, the slot in the statue will open. Take the scroll and then read it to activate the teleporter. Use the teleporter to return to the study.
Study
Select the Play button to travel to the puzzle house.
The Second Challenge
The Puzzle House
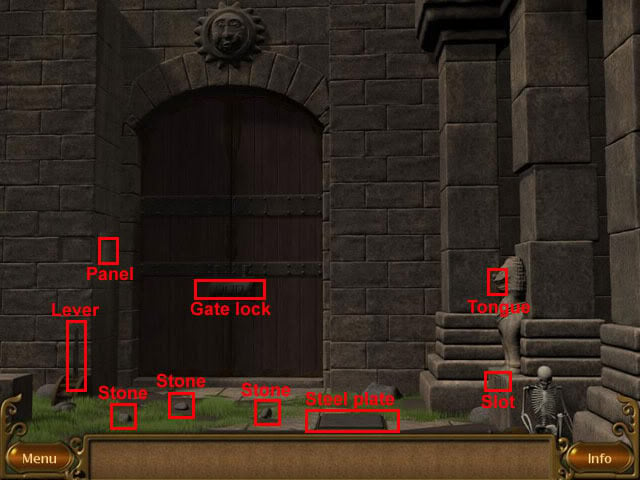
Take the three stones on the floor and use the on the steel plate. Examine the panel at the left side of the gate and take the bottle. Use the bottle on the lever and on the gate lock. Pull the tongue on the lion statue and take the letter from the slot below the statue. Read the letter for the clue to the gate lock. Examine the lock on the gate and set the combination to 542. Use the lever to open the door. Walk through the doorway.
The Great Hall
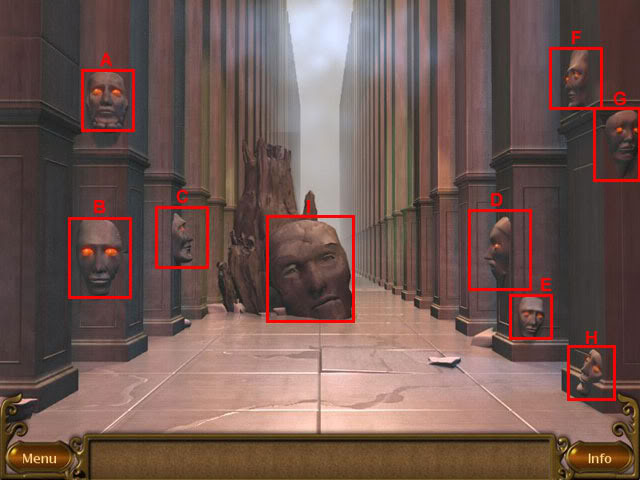
Talk to the statue heads and answer their questions correctly. The answers are shown below:
Statue A: 2.
Statue B: 2.
Statue C: 4.
Statue D: 3.
Statue E: 1.
Statue F: 4.
Statue G: 2.
Statue H: 2.
Statue I: Any answer.
Once all questions have been answered, move north to the underground cavern.
Underground Cavern
Move the left forward to make a green triangle appear. Move the left lever back and the other two levers forward to make a red triangle appear. Move the left and right levers forward and the middle lever back to make a blue triangle appear. Take the four triangles. In the following order, use the white triangle, green triangle, red triangle and the blue triangle on the rune on the floor. Examine the target at the left side of the room to see a slider puzzle.
Solve the sliding block puzzle:
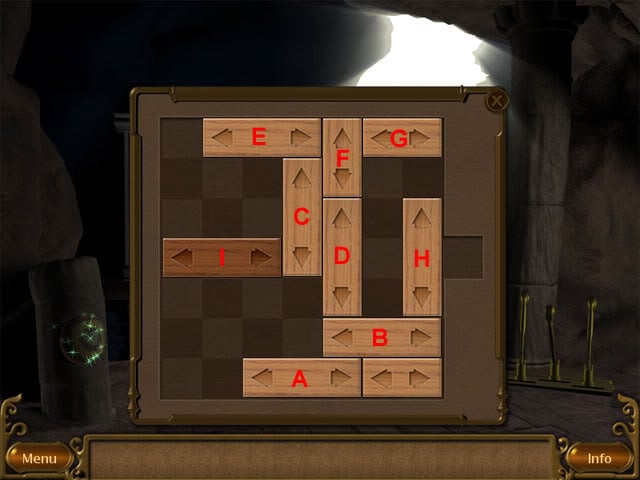
A – Left 2
B – Left 4
C – Down 3
D – Down 2
E – Left 1
F – Down 1
G – Left 1
H – Up 2
I – Right 5
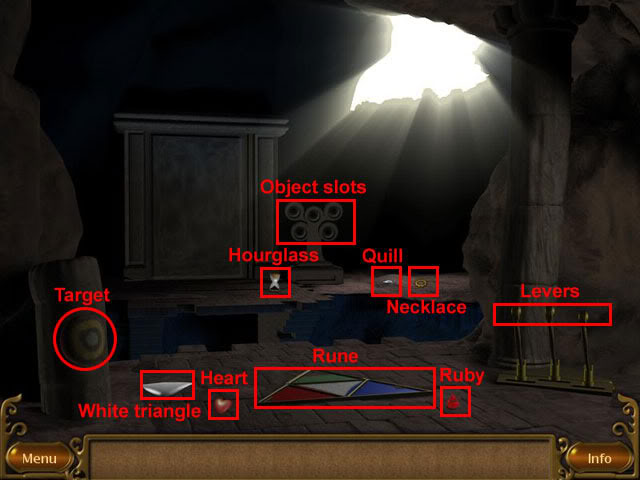
Take the scroll from the hole and then read the scroll to create a bridge. Take the heart, ruby, hourglass, quill and necklace. Examine the slots on the statue at the other side of the bridge to see clues. Put the quill in the top-left slot, the ruby in the bottom-left slot, the necklace in the middle slot, the hourglass in the bottom-right slot and the heart in the top-right slot to open the door. Go through the doorway.
Compass Room
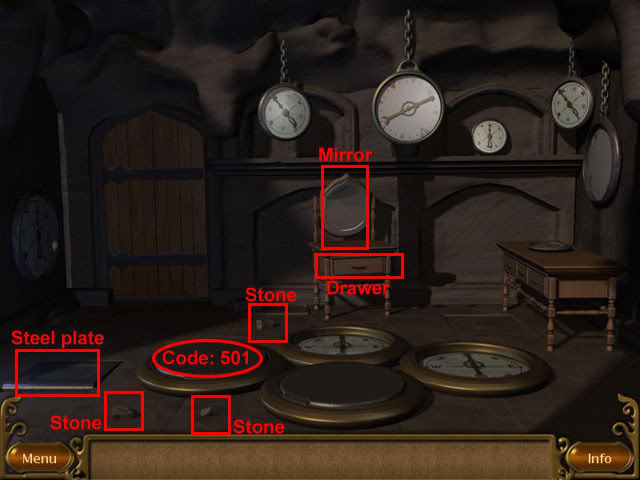
Take the three stones on the floor and put them on the steel plate at the left side of the room to reveal another compass. Examine the mirror to see the combination 501. Examine the shutter covering the west compass and enter the combination 501 to reveal the west compass. Examine the drawer below the mirror, open it and take the note. Read the note for a clue for the compass puzzle. Change the west compass to face south, the south compass to face north, the north compass to face east and the east compass to face west to open the door. Go through the doorway.
Underground Teleporter Cavern
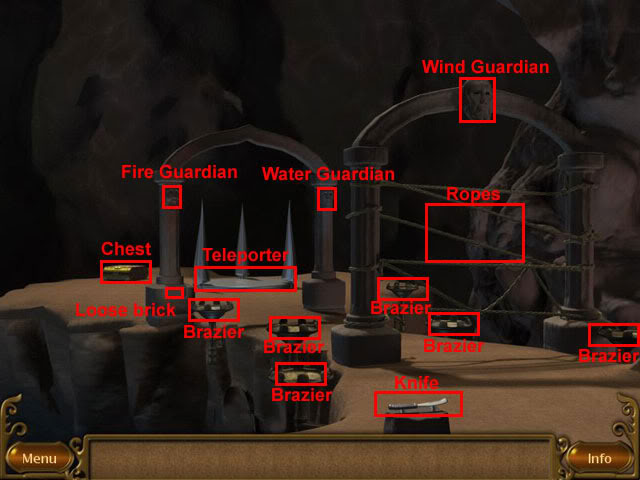
Take the knife on the pedestal and use it to cut the ropes below the arch. Examine the chest at the left side of the teleporter to see a jigsaw puzzle.
Solve the jigsaw puzzle:
Take the bag from the chest and use it on all six of the braziers. Examine the guardian at the top of the left pillar. Talk to the fire guardian three times and answer fire, sunlight and tiger. Talk to the water guardian three times and answer water, water and whale. Talk to the wind guardian three times and answer wind, air and eagle. Examine the loose brick on the far left pillar, remove the brick and take the scroll. Read the scroll to activate the teleporter. Use the teleporter to return to the study.
Study
Select the Play button to travel to the puzzle house.
The Third Challenge
Outside the Fairy Garden
Examine the trapdoor to see a sequence puzzle.
Solve the sequence puzzle.
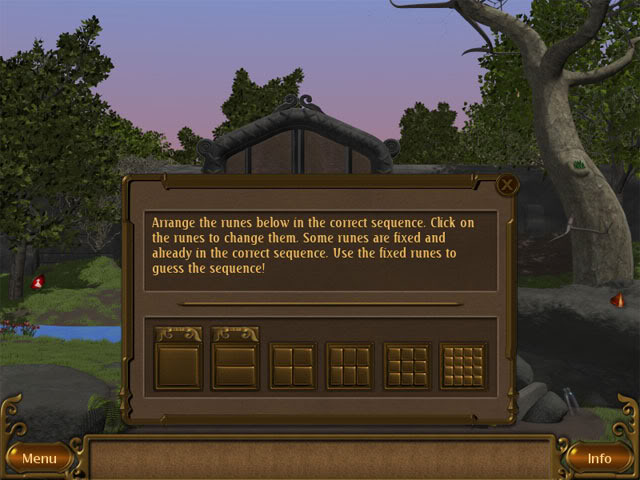
The trapdoor will open after the sequence puzzle has been solved. Go down the trapdoor to the underground store room.
Underground Store Room
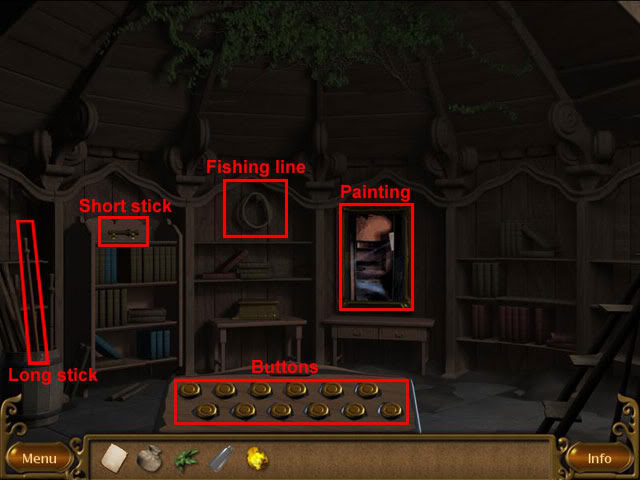
Set all of the buttons to a pressed state to open a secret compartment at the top of the machine. Take the magnet from the compartment. Take the long stick from the barrel, short stick from the bookshelf and fishing line from the wall. Examine the painting and complete the memory game. Examine the panel, take the note and read it for a clue, which when read backwards reads: The word is fire. Examine the chest on the table and select F on the top row, I on the second row, R on the third row and E on the bottom row to open the chest. Take the key. Go upstairs.
Outside the Fairy Garden
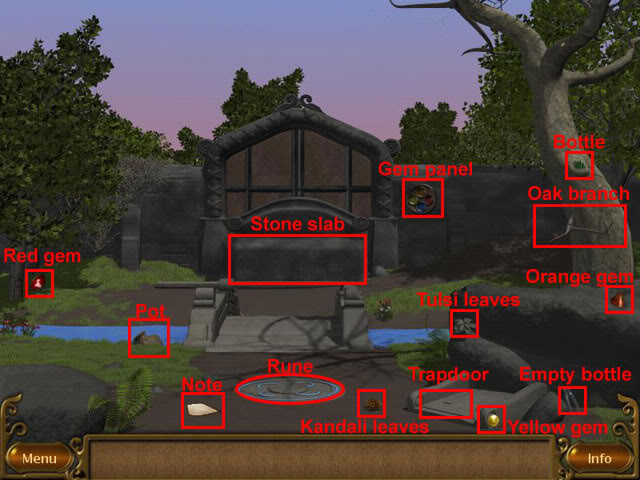
Take the note on the ground and read it: The note mentions ingredients for a strength potion. Take the pot in the grass and use it on the rune in the middle of the area. Take the Tulsi leaves on the rock above the trapdoor. Combine the fishing line with the long stick in the inventory. Combine the fishing line and stick with the magnet.
Use the magnetised fishing rod on the left side of the stream to find a knife. Use the magnetised fishing rod on the right side of the stream to find an iron box. Use the knife on the tree at the right side of the screen to take an oak branch. Examine the hole on the right tree and take the bottle. Use the knife on the thorns at the left side of the trapdoor to take the Kandali leaves. Use the Tulsi leaves, Kandali leaves and oak plant on the pot. Use the bottle on the pot.
Combine the knife with the short stick and take the scroll from it. Read the scroll. Take the empty bottle at the right side of the trapdoor and use it on the pot to fill it. Use the bottle to drink the potion. Move the stone slab in front of the door. Use the key on the box that was fished out of the river and take the blue crystal. Take the other three crystals as well.
Examine the panel at the right side of the gate. In the following order, put the orange crystal in the top slot, the red crystal in the right slot, the blue crystal in the bottom slot and the yellow crystal in the left slot to open the door. Go through the doorway to the fairy garden.
Fairy Garden
Take the empty bottle on the grass. Select the icon at the top-right corner of the playing area to return to the previous area.
Outside the Fairy Garden
Use the empty bottle on the pot to fill it with strength potion. Go through the doorway to return to the fairy garden.
Fairy Garden
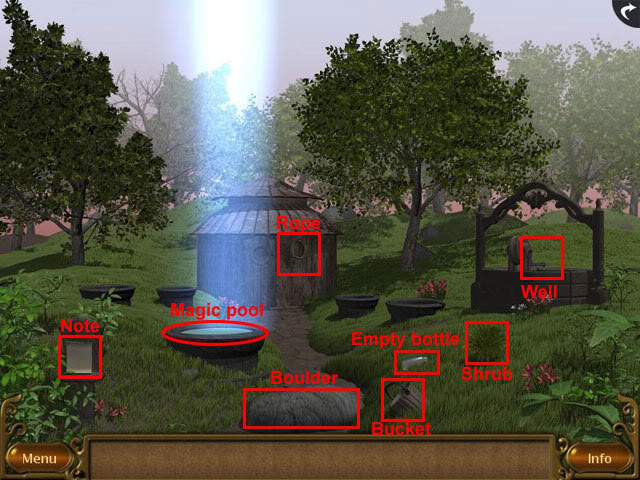
Drink the strength potion and move the boulder on the path. Take the scroll on the path. Take the bucket in the grass and use it on the well. Take the rope from the front of the hut. Use the rope on the well. Use the well to lower the bucket. Use the well again to pull out a skeleton. Read the scroll and the skeleton will fall over. Take the sword from the skeleton. Use the sword on the shrub and take the empty bottle.
Take the note on the pedestal and read it for instructions on how to remove the ward. Wait until the pool of water glows red and then use the empty bottle on the pool. Use the red water on the left empty pool. Use the empty bottle on the pool again when it glows blue, and empty the blue water into the second empty pool. Using the same method, empty yellow water into the third empty pool from the left and green water into the right empty pool to open the door. Go through the doorway.
Brazier Room
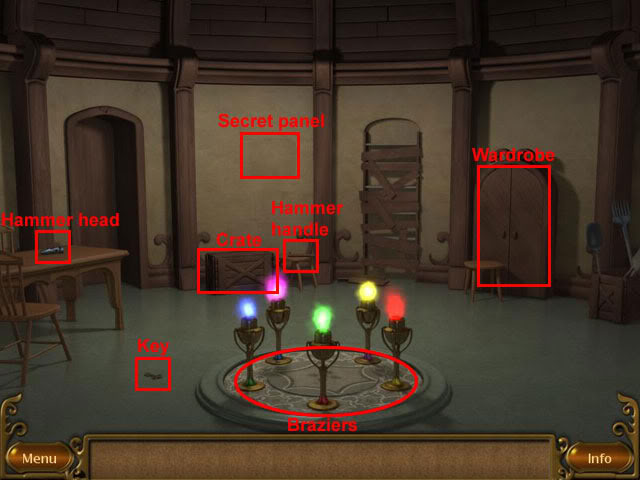
Take the hammer head on the table, key on the floor and hammer handle on the stool. Combine the hammer head with the handle in the inventory. Use the hammer on the crate and take the silver star from inside. Use the key on the wardrobe and take the wand. Examine the secret panel on the wall to see another jigsaw puzzle.
Solve the jigsaw puzzle:
Take the gold star from the compartment. Combine the gold and silver stars with the wand. Examine the base of the five braziers to see that each one has a different colour. The aim now is to use the wand on the each brazier to change the flame to the same colour as the one on its base. Start by selecting the left brazier once, then select the top-left brazier, top-right brazier, bottom-right brazier and bottom-left brazier to open the door. Go through the door to enter the study.
Fairy Study
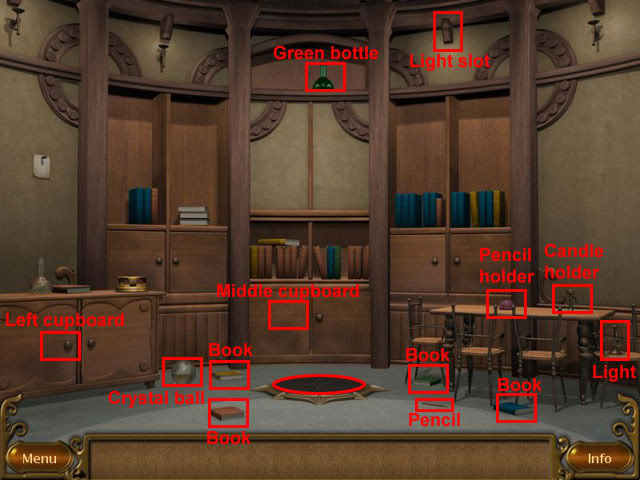
Take the four books on the floor. Put the yellow book in the second book shelf from the right, the brown book in the far left book shelf, the first blue book in the far right book shelf and the second blue book in the third book shelf from the left. Take the pen and use it on the holder on the right desk. Take the crystal ball and put it on the holder on top of the left cupboard. Open the left cupboard and take the door knob and the blue vase. Use the door knob on the middle-left cupboard. Put the blue vase on the right table.
Open the middle cupboard and take the candle. Put the candle on the candle stand on the right table. Get the green bottle on the shelf at the top of the room. Put the bottle in the cupboard in the middle of the room. Close the left cupboard and the middle cupboard. Take the light on the right chair and use it on the blank light near the ceiling to hear something being unlocked. The room should look like this when it has been tidied:
Open the second cupboard from left and take the bag. Open the right cupboard and take the scroll. Use the bag on the teleporter and then read the scroll. Use the teleporter.
Study
Select the Play button to travel to the wood cabin.
The Fourth Challenge
Wood Cabin
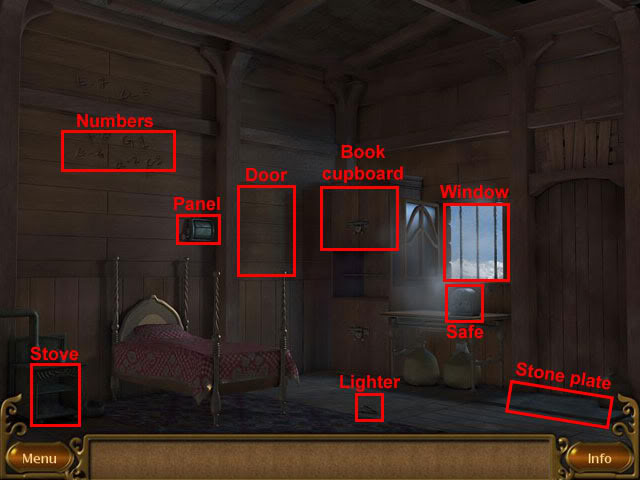
Take the lighter on the floor. Close the window and take the green bottle on the shelf. Use the green bottle on the stove and then use the lighter on the stove to start a fire. Examine the metal device on the wall to see a slider puzzle.
Solve the slider puzzle to open the door:
A: Up 3
B: Left 1
C: Down 1
D: Right 1
E: Down 2
F: Left 1
G: Down 1
H: Left 1
I: Up 1
J: Right 1
Notice that the words on the wall behind the door spell EGG. There are other words on the wall above the bed. On the numbers, the letter E is given the value 7 and G is the value 1. Examine the safe on the table and enter the number 711. Take the key. Use the key on the top cupboard at the left side of the table. Take the three books from inside. In the following order, use the yellow, brown and blue book on the stone plate in front of the door at the right side of the room to open the left door. Go through the left doorway.
Room of Ice
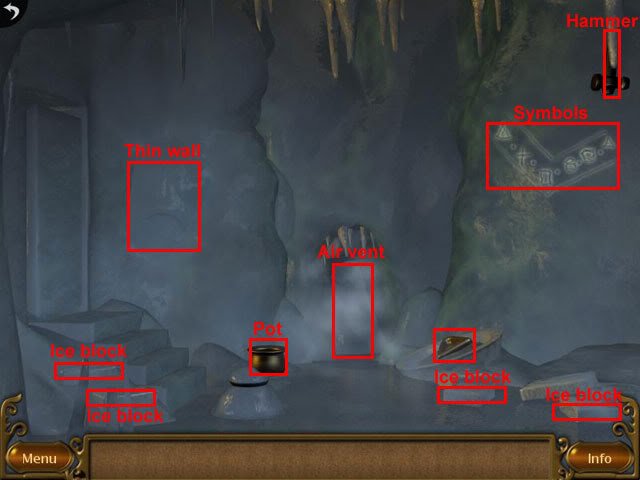
Take the pot. Take four ice blocks and stack them up under the hammer. Take the icicle and the hammer. Return to the wood cabin.
Wood Cabin
Combine the hammer with the icicle to break it into pieces. Combine the broken pieces of ice with the pot. Use the pot of ice on the fire and the ice will melt. Return to the room of ice.
Room of Ice
Take the triangle mould. Combine the pot of water with the triangle mould. Use the triangle mould on the air vent and the water will freeze. Use the mould to get a triangle piece. Use the hammer on the thin part of the wall to see triangular slots. Use the triangle piece on the triangle slot. Combine the pot of water with the mould again, use the mould on the air vent, use the mould to get another triangle piece and then use the triangle piece on the triangle slot. Do this one more time, add a third triangle piece to the slot and an ice pillar will rise from the ground.
Note the symbols on the wall at the right side of the room of ice. Examine the ice pillar and select it to make the shape at the front change. Rotate the pillar until the shape on the front of the pillar is the same as the first symbol on the wall, then press the O button. Now make the pillar show the second symbol on the wall and again press the O button. Do the same thing for the other four symbols on the wall to hear an unlocking sound. Move west to enter the massive hall.
Massive Hall
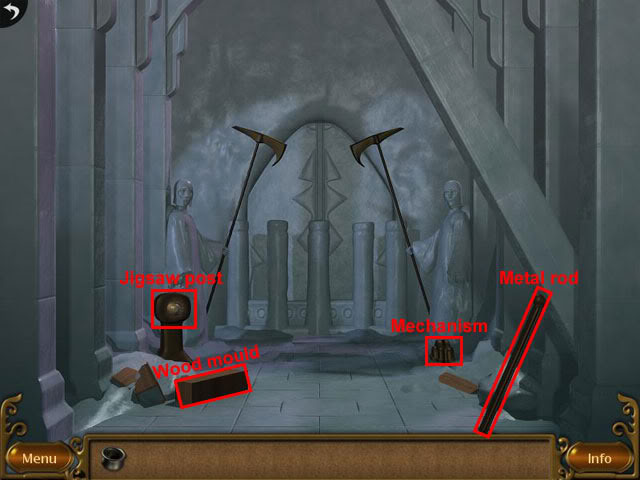
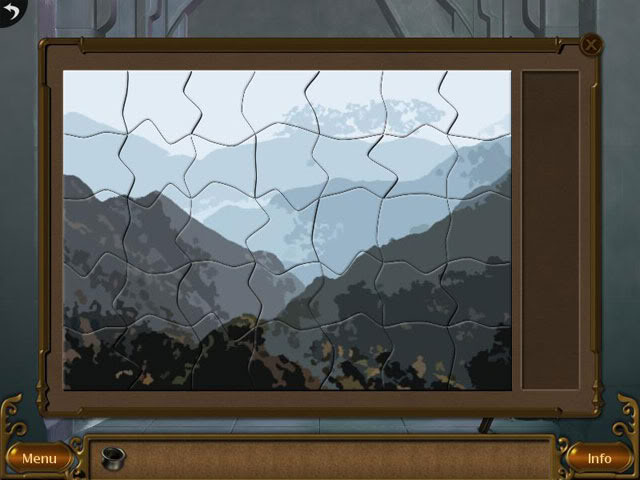
Examine the post at the left side of the room.
Solve the jigsaw.
Take two shards of ice on the floor. Take the wood mould and use it on the metal rod at the right side of the room to support the pillar. Backtrack twice to return to the wood cabin.
Wood Cabin
Combine the ice with the pot in the inventory. Use the pot of ice on the fire to melt the ice. Return to the massive hall.
Massive Hall
Use the pot of water on the wooden mould against the pillar. Return to the wood cabin again.
Wood Cabin
Combine the ice with the pot in the inventory. Use the pot of ice on the fire to melt the ice. Return to the massive hall.
Massive Hall
Use the pot of water on the wooden mould against the pillar. This time, the water will solidify in the mould. Take the metal rod and use it in the mechanism at the right side of the room. Notice that above the keypad the letter O is repeated a number of times. Use the keypad and select the letter O on all five rows to lower the slab. Use the pole to open the door. Go through the doorway to enter the underground ice room.
Underground Ice Room
Select the hole on the floor four times to take four snowballs. Use all four of the snowballs on the scales to level the scales. Take the knife that drops down. Backtrack three times to return to the wood cabin.
Wood Cabin
Use the knife on the fire to get the red hot knife. Return to the underground ice room.
Underground Ice Room
Use the red hot knife on the ice pillar at the left side of the room. Take the block of ice with the hammer inside. Backtrack three times to return once again to the wood cabin.
Wood Cabin
Use the block of ice with the hammer inside on the fire to get the hammer. Return to the underground ice room.
Underground Ice Room
Use the hammer on the ice pillar twice and then use the hammer on the block of ice that contains the chest. Examine the chest to see a sequence puzzle.
Solve the sequence puzzle:
Take the tuning fork and use it on the pillar. Use the hammer on the tuning fork and four ice shards will fall down. Use the hammer on the ice shards to break them. Open the door and go through the doorway.
Snowman
Examine the stones at the right side of the screen and then move the stones to reveal a hammer. Take the hammer and use it on the large stone at the right side of the snowman. Take a fragment of the stone from the rock. Use the fragment of stone on the air vent to block it. Take the two sticks, the two snowballs and the snowman nose that are scattered around the area and use them on the snowman to uncover the chest.
Examine the chest to see a number lock. Notice the groups of pillars in the area. There is a group of two pillars, a group of three pillars and a group of five pillars. Enter the number 235 to open the chest. Take the scroll. Read the scroll to activate the teleporter. Use the teleporter to return to the study.
Study
Select the Play button to travel to the machine island.
The Fifth Challenge
Machine Island Beach
Take the bow, peg, hammer, pole, plank bellows and curved wood. Combine the curved wood with the peg to join them. Combine the joined pieces of wood with the bow to create the fire starter. Combine the fire starter with the plank. Use the plank on the coal in the furnace to light the coal. Use the bellows on the fire. Use the iron rod in the furnace to get the red hot rod. Combine the hammer with the red hot rod to make a sharp point at one end. Use the red hot rod with sharp point on the wooden board on the tree. Take the cog from the hole in the tree and use it on the machine. Set the levers to the following positions:
1: Back
2: Back
3: Forward
4: Forward
5: Back
The lift will start working. Walk onto the lift.
Gallery of Many Deaths
Examine the panel to see a sliding block puzzle.
Solve the sliding block puzzle to cover the spikes:
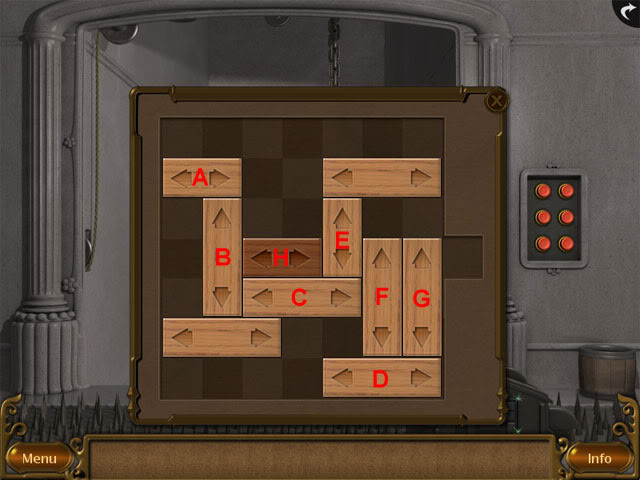
A – Right 2
B – Up 2
C – Left 2
D – Left 4
E – Down 3
F – Down 1
G – Down 1
H – Right 4
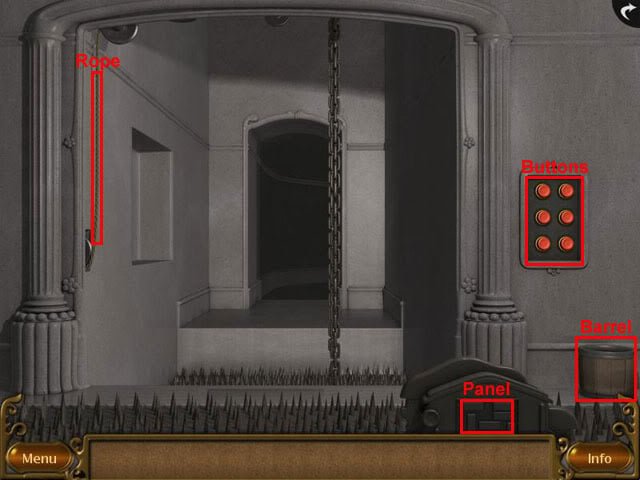
Examine the barrel at the right side of the screen and take the shard from inside. Use the shard on the rope at the left side of the screen to trigger the flame trap. On the panel with the buttons, press the left-middle button and then the three right buttons to stop the flames. Walk through the doorway to the ancient machinery room.
Ancient Machinery Room
Take the plank. Backtrack twice to the beach.
Machine Island Beach
Use the plank on the fire. Return to the ancient machinery room.
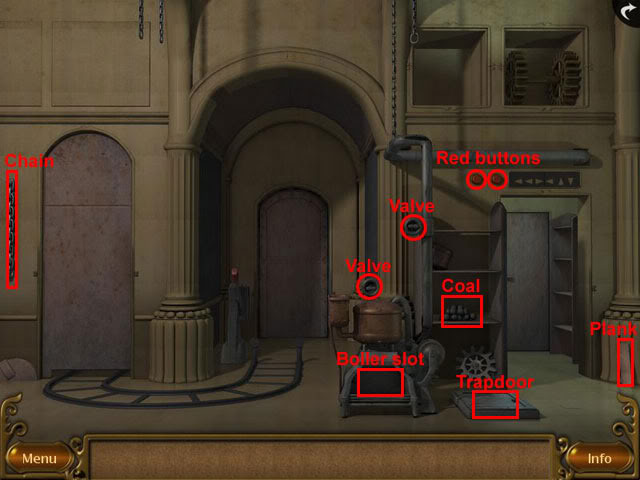
Ancient Machinery Room
Take the coal from the shelf and use it in the slot on the boiler. Use the burning plank on the coal. Use the valve on the pipe to restore the water supply. Take the chain at the left side of the screen. Use the chain on the trapdoor to tie it to the machine. Use the valve on top of the boiler to open the trapdoor. Press the button below the trapdoor. Go through the doorway to the workshop.
Workshop

Take the two pipes on the floor and use them on the machine at the left side of the room. Operate the small switch at the base of the machine. Take the three tools that are scattered about the room. Take the spring. Take the key. Use the key on the cabinet at the right side of the robot. Press the button in the cabinet. Use the three tools in the stand at the right side of the room to open a secret compartment.
Press the button in the compartment. Examine the panel and use the spring on the slot. The correct order for the buttons can be found above the right door in the ancient machinery room. The order is: Left, left, right, left, up and down. Enter the buttons in this order to wind the spring. Take the spring. Go through the doorway to the ancient machinery room.
Ancient Machinery Room
Use the wound spring on the robot and then press the left red button above the right doorway to move the robot. Press the right red button and the door will open. Go through the middle doorway.
Huge Machine Room
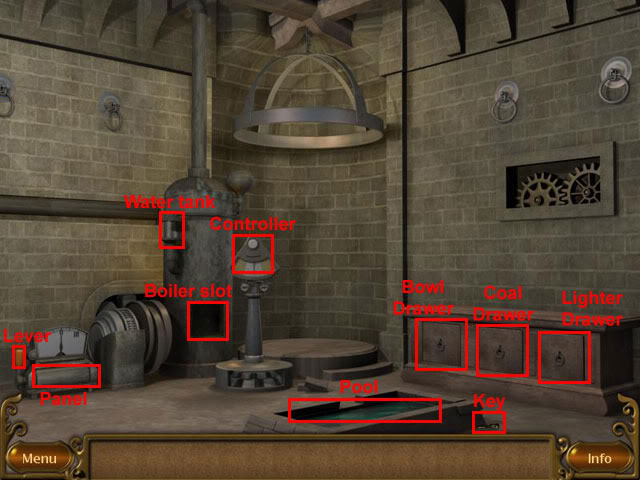
Take the key on the ground at the right side of the pool and use the key to unlock the left drawer. Examine the left drawer and take a bowl. Open the middle drawer and take the coal. Examine the right drawer to see a jigsaw puzzle.
Solve the jigsaw puzzle:
Take the lighter. Use the coal on the slot in the furnace and then use the lighter on the boiler to start the fire. Use the bowl on the pool of water. Use the bowl on the water tank at the left side of the boiler. Fill the bowl with water again and use it on the water tank. Examine the panel on the far left machine to start the sequence puzzle.
Solve the sequence puzzle:
Turn the dial on the machine to I and then move the lever to power the controller. Start machine II and III in the same way. Examine the controller and press the left or right buttons to keep the needle near to the green zone. Keep waiting until the steam pressure has been equalised. Use the transporter.
Study
Select the Play button to travel to the machine island.
The Sixth Challenge
Ropeway
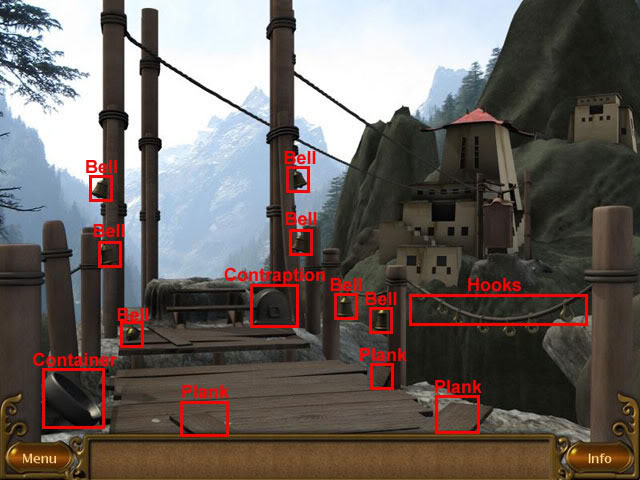
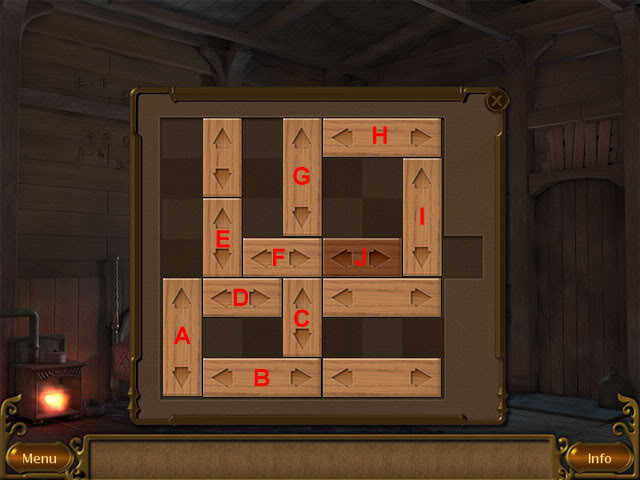
Take the three planks and use them on the gap in the bridge. Take the seven bells. Use the bells on the hooks on the right rope. Ring the bells in the following order: seventh, fourth, first, sixth, second, third and fifth to recall the trolley. Examine the door to see a sliding block puzzle.
Solve the sliding block puzzle:
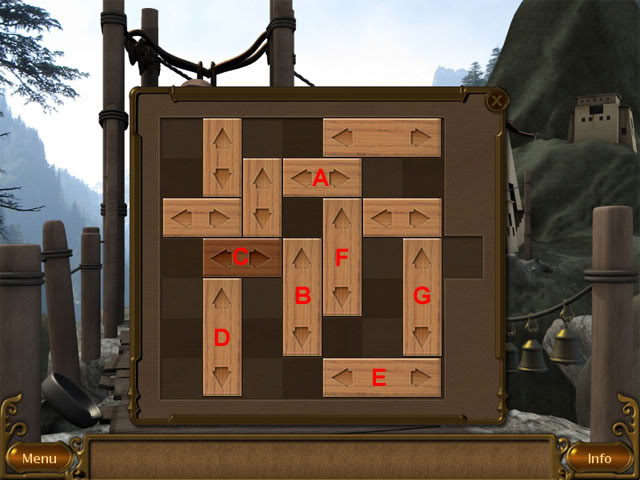
A – Right 2
B – Up 3
C – Right 1
D – Up 1
E – Left 3
F – Down 2
G – Down 1
C – Right 4
Examine the metal container at the left side of the ropeway and take the handle. Use the handle on the contraption and then rewind the spring three times. Enter the trolley.
Floating Rock

Push the button on the right pedestal to rotate the rock. Examine the button on the rock to see a jigsaw.
Solve the jigsaw puzzle:
Take the first gem in the slot below the pedestal. Push the button on the right pedestal to rotate the rock. Examine the button on the rock to see a sliding block puzzle.
Solve the sliding block puzzle:
A – Left 1
B – Right 1
C – Down 2
D – Left 1
E – Down 2
F – Left 3
E – Up 2
G – Up 4
H – Up 2
D – Right 3
C – Up 2
B – Left 1
I – Left 2
H – Down 2
D – Right 3
Take the second gem, push the button on the right pedestal again and examine the button on the rock. Solve the memory puzzle. Take the third gem, push the button on the right pedestal again and examine the button on the rock. Solve the quiz with the answer 2. Take the fourth gem, push the button on the right pedestal again and examine the button on the rock to see a sequence puzzle.
Solve the sequence puzzle:
Put all of the gems in the left pedestal to create stairs leading to the rock. Take Pahelika to complete the game.
“;
