Pahelika: Revelations Walkthrough

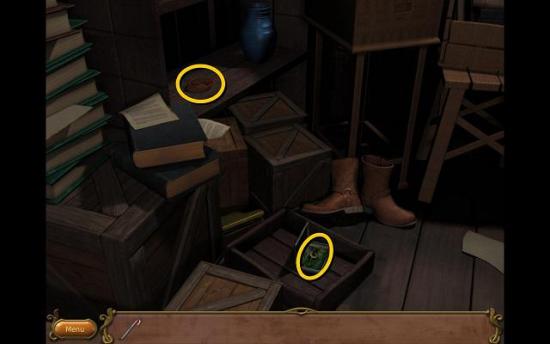
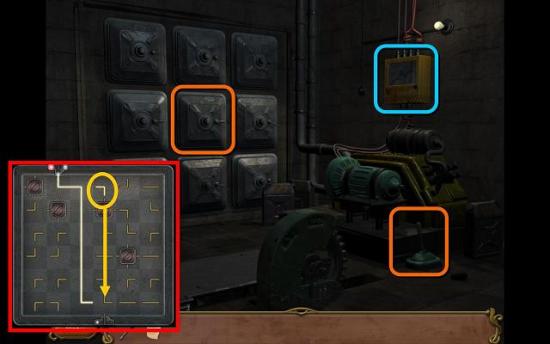
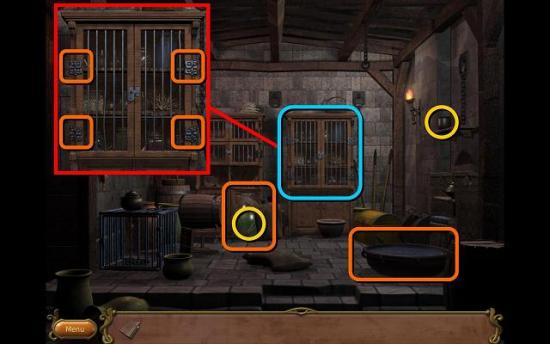
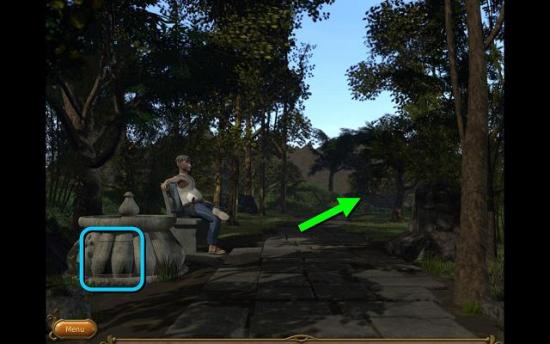
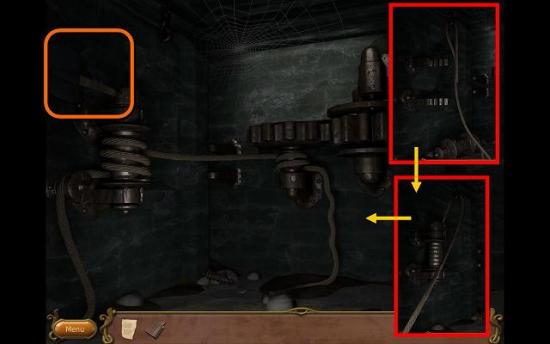
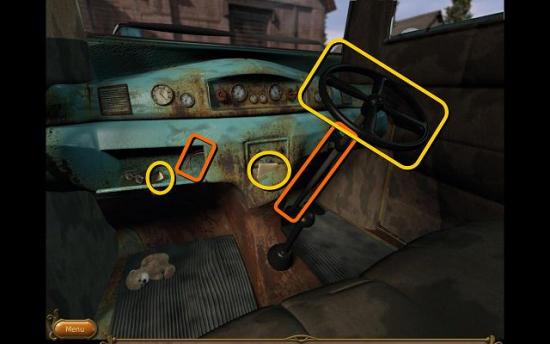
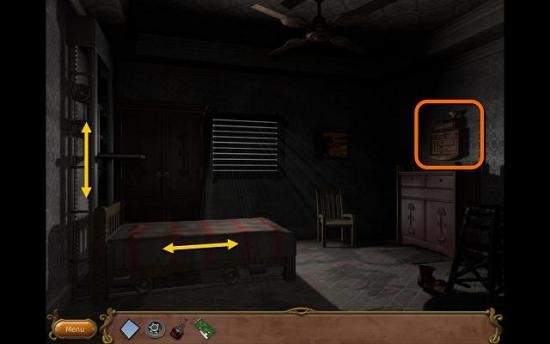
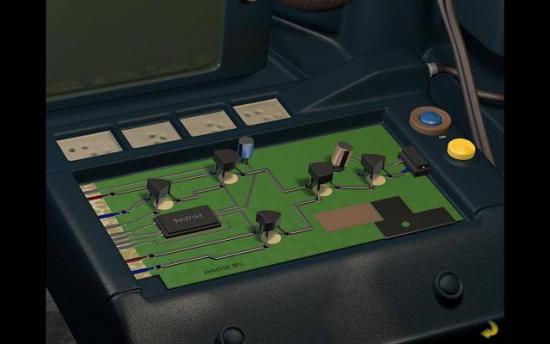
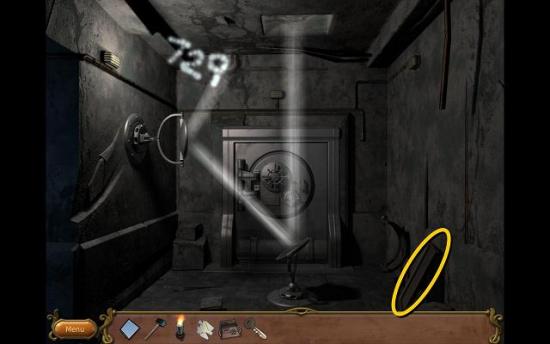
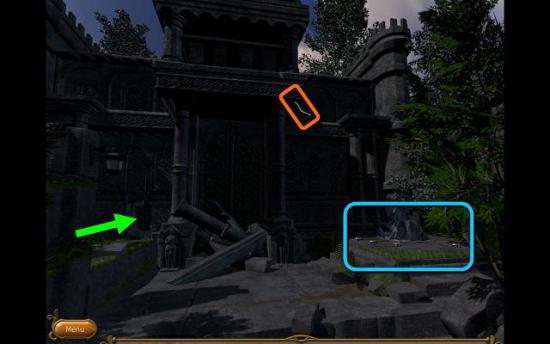
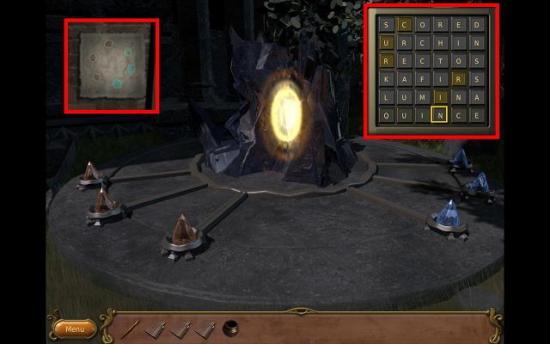
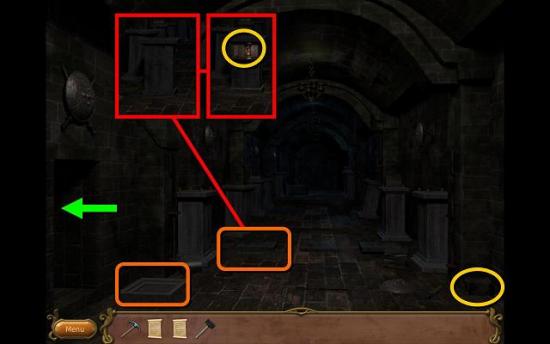
Welcome to the Pahelika: Revelations walkthrough on Gamezebo. Pahelika: Revelations is an adventure game played on PC created by Ironcode Gaming. This walkthrough includes tips and tricks, helpful hints, and a strategy guide on how to complete Pahelika: Revelations.

By
Share this
  • Share this on Facebook
  • Share this on Twitter

Pahelika: Revelations – Game Introduction

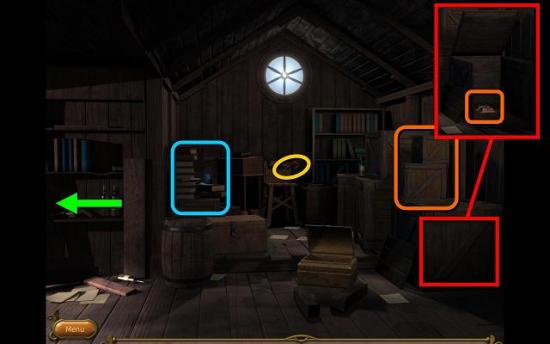
Welcome to thePahelika: Revelationswalkthrough on Gamezebo.Pahelika: Revelationsis an adventure game played on PC created by Ironcode Gaming. This walkthrough includes tips and tricks, helpful hints, and a strategy guide on how to completePahelika: Revelations.

General Information

  • General gameplay is pretty straightforward and similar to most hidden object/adventure games. You have to find items for your inventory and objects to interact with, solving puzzles along the way.
  • All interactive areas are indicated with sparkles when you move your cursor over them. When you can zoom in on an object for closer inspection, the cursor changes into a magnifying glass. When you can put an object into your inventory, the cursor changes into a hand. Arrows will indicate places where you can move on to the next scene.
  • The game has two difficulty modes. The default setting is casual, but you can choose to switch off casual mode in the options menu if you’re up for a real challenge. Although in the ‘non-casual’ mode all interactive areas are still indicated with sparkles, clues you will get along the way are more cryptic and less detailed.
  • However, for most players casual mode will be difficult enough as this game does not have any kind of hint system or strategy guide, and does not even have a journal that keeps track of your progress. Also, puzzles cannot be skipped. This is definitely a brain teaser and not for people who like to rush through games. You need to take your time and put those little grey cells to work! However, every move is ultimately logical, however obscure it may initially seem.
  • In this walkthrough I will describe the game as played in casual mode. Some clues, puzzles and codes may be different in expert mode.

Walkthrough

 Revelations

  • Click on the two smallest crates to move them to the floor
  • Click on the largest crate and it will tell you that you need something to open it
  • Pick up the IRON CROWBAR and use it on the crate
  • The crate opens, revealing a trapdoor with a lock. Click on the lock to be told that you need to find something to open it
  • Click on the stack of books in the back to zoom in

 Revelations

  • Open the small metal case to find a BRASS KEY
  • Also pick up the WIRE PIECE
  • Go back to the room, use the BRASS KEY on the lock of the trapdoor and go down the hatch to the basement
  • Switch on the light with the switch by the door

 Revelations

  • On the top bookshelf is a BOOK WITH METAL COVER that’s bolted shut
  • Zoom in on the oval box in the middle

 Revelations

  • The chest has a set of dials. Although the image above shows the right setting for the dials, you can’t unlock the chest until you find the code later on
  • On the shelf behind the chest is a piece of paper. Take it and then click on it in your inventory to read it. It says that the code to open the door consists of three digits from an important date in your life, minus all the 0s and 2s. Remember this
  • Go back to the first room and then go left into the office

 Revelations

  • On the desk is a picture with the date 22/2/1970 – take out all the 0s and 2s and you get 197
  • In the tool box is a SCREWDRIVER
  • Use the screwdriver to open the BOOK WITH METAL COVER. Click on the metal case again and get another note, which is someone’s to do list. This is a nonessential step; if you miss it, it won’t affect your game and you can still move on to the next chapter
  • Zoom in on the door on the left, enter 197, and go into the sitting room

 Revelations

  • In the next room, move the curtain to find an ELECTRIC CORD
  • On the side table by the record player is a KNOB
  • Put the ELECTRIC CORD and the KNOB on the TV – it needs power
  • Zoom in on the sideboard and open the locked drawer with the CROWBAR
  • Inside the drawer is an IRON HANDLE
  • Go back to the basement and put the IRON HANDLE on the mechanism by the door
  • Use the SCREWDRIVER on the switch above the mechanism and put the WIRE PIECE in it
  • Click on the switch to close it and again to activate it. The large cog should start turning
  • Now pull the handle to go down the lift to the sub-basement

 Revelations

  • Click on the yellow box on the wall and make a connecting line between the two lights at the top and bottom, without going through any of the circuit breaker. Rather than turning the tiles, as in most circuit puzzles, you need to find the correct tile and move it. The solution is different in each game, but the image above shows a sample solution
  • Open the middle vault to get a note with a poem explaining you how to open the oval chest in the basement
  • Pull the lever again to go back to the basement
  • Zoom in on the oval chest and set the dials as shown in the image above. This is also a nonessential step; you can continue the game without it
  • Go back to the sitting room and click on the TV, which now has power, to go to the next chapter

The Tower

 Revelations

  • Pick up the STONE, the IRON ROD and the PAINTING
  • Put the STONE next to the golem and use the IRON ROD as a lever
  • Click on the lever to move the golem
  • Put the PAINTING on the mechanism on the wall to open the trapdoor
  • Pick up the IRON ROD again and use it to poke at the chest that’s perched on a beam in the ceiling. You need a key to open the chest
  • Go down the trapdoor

 Revelations

  • Push on the brick sticking out of the wall to turn the desk. Behind it is a key. Unfortunately, it is protected by a magical barrier
  • Zoom in on the cupboard on the left and open the top compartment

 Revelations

  • Take out the MAGICAL RED POWDER, the KEY and the PORTAL METER
  • Also pick up the MAGICAL BLUE POWDER from underneath the cupboard
  • Go through the portal to the tower roof

 Revelations

  • Pick up the MAGICAL WHITE POWDER
  • Move the two stones on the left to reveal a journal that contains a recipe for an intelligence potion
  • Click where the journal was lying to open a hatch
  • You find yourself back with the golem
  • Open the chest with the KEY and find a scroll saying that the portal needs 40% fire power and 60% water power to be reversed
  • Go down the trapdoor
  • Put the PORTAL METER on the portal and hit the red button. It should say 50/50; the red meter should be adjusted to 40 and the blue to 60, according to the scroll. The MAGICAL WHITE POWDER takes 5% off both blue and red, and the MAGICAL RED POWDER and MAGICAL BLUE POWDER add 5% each. So first, put 2x white powder on the portal to reduce both blue and red to 40%. Then add 4x blue powder to adjust blue to 60%. If you are lost or made a mistake, you can put the portal meter on the portal again and hit the red button to see where you are. When it’s set to 40/60, the color of the portal will change
  • Go through the portal to a room with two doors
  • Go through the left door and on to the next room (there is nothing in the corridor)

 Revelations

  • Pick up the MUG from the shelf and use it to transfer water out of the bowl on the right and into the jar of acid in the center. Keep doing this until you can pick up the BOLT CUTTERS from the acid
  • Zoom in on the cupboard on the right and remove all four hinges with the bolt cutters

 Revelations

  • Inside the cupboard are magical ingredients. Take several of each – 4 or 5 to be safe
  • Back out to the room with the two doors and go through the door on the right and on to the room in the back

 Revelations

  • On the shelves on the right is a note explaining how to ‘prepare’ paper. This note goes into the journal. Note that you have to view the note in the journal before you can use it
  • On the shelves on the left is another note explaining how to make a scroll that dispels energy fields. Useful!
  • Take a SHEET OF PAPER from the book by the fire and place it in the tray on the table
  • Refer to your journal and find out you need to put ether on the paper, followed by Irwak Root and Kawra Leaf – you took all these ingredients from the other room
  • When the paper is ‘prepared’, it will turn red. Pick up the PREPARED PAPER from the tray
  • Now take the PEN from the table, dip it in the ink well and use it on your PREPARED PAPER
  • Select the spell to make the scroll to dispel magic fields: SAPK ALAD OSG LUP HARI
  • Go back to the room with the doors and take the portal back to the tower
  • Click on the dispel scroll you just made
  • You can now take the KEY!
  • Go back through the portal and to the lab on the right
  • Use the KEY on the locked cupboard to find another spell that goes into your book
  • Prepare another paper with ether, Kawra Leaf and Irwak Root, and this time write the spell for the mirror portal on it: ELAD TI TUS IR
  • Use the scroll immediately and go through the portal that opens in the mirror

 Revelations

  • Pick up the EMPTY BOTTLE from the shelves on the right, and another spell from the book stand on the left
  • You can almost read the new spell, but… you’re not quite smart enough!
  • Go back through the portal, back to the room with the two doors and through the portal to the tower
  • Check your spell book for the recipe for the intelligence potion: add devil’s root and deadwood to the bowl on the right, followed by ether
  • Put the potion in the EMPTY BOTTLE and click on it to drink it
  • You can now read the last spell, which is an unlocking spell
  • Go back to the lab, prepare another paper and write the spell for the unlock scroll: TER GO GIA EY OURE YT ORU NMIS
  • Go through the mirror portal and use the unlock scroll
  • Open the chest on the table and take out the wizard’s journal. Read it and go through the dialog to the next chapter
  • NOTE: occasionally it can happen that the dialog with the wizard isn’t triggered when you open the book. If this happens, just shut down the game and restart. As soon as you restart, the dialog with the wizard will start

The Sage

  • Talk to the monk outside the door
  • Go in
  • Talk to the six heads and answer their questions. It doesn’t seem to matter which answers you give, as you will always be allowed through the door. When you’ve answered all six, talk to the head in the middle
  • In the next room you find eight doors and you have to pick the right one. Apparently, the middle head gave you a clue as to which door to choose. I personally couldn’t work out the clue. I only ever got two different answers from the head, one saying I’m not the first nor the second, and the other saying “it is not completion but perfection you must seek”. In the end I just tried all doors and found it’s the bottom left one
  • Talk to the sage about whatever you want to talk about and then exit the room to…

The Library and the Rune of Fire

 Revelations

  • Talk to the guy on the bench
  • Go to the next screen

 Revelations

  • There is nothing to do here right now, but note the dry leaves, the sunlight and the low hanging branch
  • Cross the bridge to the library, and walk closer to the door

 Revelations

  • Pick up the SHOVEL and the PETAL, which is on the shoulder of the statue
  • Try the SHOVEL on the rocks blocking the door on the right and it will break
  • Back out to the guy on the bench, talk to him and give him the PETAL. He will give you his KNIFE
  • Go back to the bridge and cut the low hanging branch with the KNIFE. You have to cut several times
  • Put the BRANCH together with the SHOVEL BLADE to get a new SHOVEL
  • Go back to the library doors and cut the ropes on the main door with the knife. Pick up the ROPE when you’re done
  • Use the new SHOVEL on the rubble by the small door, open the door and go in

 Revelations

  • There is another PETAL on the wall, and above it is a slot with four petal shaped recesses. Interesting…
  • On the floor is a note with a story about fingers pointing at something in the center
  • Go back to the man on the bench, zoom in on the fountain and the fountain mechanism. Turn the dials so that they all point to the center
  • In the compartment is a VERY OLD JOURNAL and a STRANGE STAMP
  • Talk to the man again and keep talking until he agrees to give you all his petals in exchange for the knife. So give him the KNIFE
  • Put all the PETALS on the STRANGE STAMP
  • Go back to the door mechanism and put the STRANGE STAMP in the interestingly shaped slot. This releases the big cogs

 Revelations

  • Put the rope on the hook in the ceiling and put the other end on the pulley on the floor
  • Pull the rope to hoist the pulley into place and click on the pulley to secure it
  • Take the rope out again and put it on the left cog
  • Click on the pulley to put the rope around it
  • Now put the SHOVEL in the hole above the pulley and click on it to activate the mechanism
  • Back out and go through the giant doors into the library

 Revelations

  • Take the TORCH from the holder in the wall
  • Go into the two rooms behind this one and take the TORCHES from there as well. There are pieces of paper around in these rooms, but you can’t do anything until the torches are lit
  • Back out to the first room and go through the door to the left

 Revelations

  • Open the middle cabinet from the three highlighted ones and take out the MAGNIFYING GLASS and three lots of COAL
  • Put a lot of COAL in each of the three TORCHES
  • You can use the MAGNIFYING GLASS on the left cabinet to read a message, but this is not essential
  • Back out to the bridge and use the MAGNIFYING GLASS to set fire to the leaves in the sunlight
  • Light all TORCHES in the fire and go back to the library
  • Put a lit TORCH back in the holder in the first room and pick up a page for your very old journal
  • Move to the second room and light it with another torch

 Revelations

  • In this room you can find three more pages for the journal, a note with a poem and the visier’s journal
  • Go into the last room and light it

 Revelations

  • Find six more pages and a WOODEN KEY
  • When you back out to the first room, a ghost appears, but he has no interest in you right now
  • Go back into the room on the left and open the wooden cupboard with the WOODEN KEY
  • Inside is a picture story that you need to reassemble according to the story in the old journal. Check the dates at the top of each entry, find the earliest one (15 Marga 1298), read the entry and find the image or images related to it. Then find the next one (16 Marga 1298), read the entry and find the images related to that, etc. until you have reassembled the story. Quite frankly, I don’t know how you would ever figure this out in expert mode!

 Revelations

  • In the cupboard that opens are a POUCH and a pile of sand
  • Open the POUCH for an image clue
  • Then fill the POUCH with the sand
  • Exit the room and talk to the ghost. He’s not very forthcoming with information, other than telling you you’re looking for the heart of darkness
  • Go back to the room at the end. You can now move the two bookcases in the back to reveal black and white scales. Note that this is only possible after you’ve looked at the image clue from the pouch
  • Talk to the ghost again. He will talk to you about light and dark, but still doesn’t reveal where you can find the heart of darkness
  • Extinguish your three torches in the three rooms with the sand from the pouch, go back to the ghost and close the door to the side room to make it pitch dark
  • You have found the heart of darkness!
  • Move on to the next room where you will now find a mechanism with the heart of light on it. Use the strange poem you found to decide on the order of lights: the first line is white, the color of heart is red, hope is yellow, freshness is green and nothingness is black

 Revelations

  • Take the heart of light
  • Go to the scales in the back room and place the two hearts in the white and black pans
  • Take the rune of fire

Uncle Rajat’s House and the Rune of Water

  • Go to the house on the left

 Revelations

  • There is an OLD PAPER by the car
  • Zoom in on the car

 Revelations

  • Pick up another OLD PAPER
  • Open the glove compartment for a third OLD PAPER
  • Click on the shaft of the steering wheel and then on the steering wheel (or ‘car handle’ as the game calls it) itself to put the CAR HANDLE in your inventory
  • Back out of the car and zoom in on the fuse box by the door

 Revelations

  • Pick up the COVER, open the fuse box and take another OLD PAPER out of it, as well as a FUSE
  • Put the CAR HANDLE on the hole with the gears
  • Go left to the front door, take the last OLD PAPER from the wall and zoom in on the lock
  • To open the lock, you need to enter six different symbols as shown on the OLD PAPERS. You only have five papers, so you have to deduce the last symbol

 Revelations

  • Once they’re all in place, the metal bars of the lock will retract
  • Back out to the street and go to the house on the right
  • Use the knocker to knock on the door and talk to the little girl, whose name is Rinki
  • Make sure to ask her for a rod – if you ask for a lever she gets very confused! You might want to do this just for fun. But in the end, she will give you a THIN ROD (not a lever)
  • Go back to the other house and to the screen where the fuse box is
  • Now you need to turn the handle and place the THIN ROD in the holes that open. You can try to turn the handle five times and then instantly put the rod in the top hole, but I never quite managed that. What worked for me was to turn once, place the rod. Then take the rod out, turn the handle as fast as you can and then put the rod in the next hole as fast as you can. You actually only need to open the door halfway to be able to get through
  • Go left to the opened door and go through it

 Revelations

  • In the sitting room, find the IRON WHEEL, SCISSORS and OIL CAN, and open the compartment on the side of what looks like a sort of pinball machine to take out the MOTHERBOARD
  • Read the notebook on the table, as it contains important clues about three puzzles you’ll encounter later
  • Go back outside and to the car. Use the SCISSORS on the wires sticking out of the glove compartment to get a WIRE
  • In your inventory, put the WIRE together with the FUSE (thanks, Liesbeth!)
  • Go back to the fuse box and put the fixed FUSE in the bottom right socket. The bottom green light should go on
  • Go back inside and through the door on the left to the bedroom. The ceiling fan in the bedroom should be working. If it isn’t, check if you haven’t missed a step

 Revelations

  • On the right wall is a funny looking contraption with valves. At the top is a funnel. Put the OIL CAN on the funnel to fill the contraption with oil, then zoom in on the thing itself
  • Now, the idea is that you somehow move the bed off the trapdoor underneath it. To slide the bed, direct the oil to the bottom arrow, to move the arrow from left to right. To move the rising platform behind the bed, direct the oil to the top arrow. So, first slide the bed to the right, then move the platform down. Then slide the bed to the left (bottom arrow to the left) on top of the platform and raise the platform again (top arrow to the left). The image below shows how the valves should be set for each step

 Revelations

  • Go down the trapdoor

 Revelations

  • Pick up the HAMMER, GLUE, a RAW ROD and a couple of RAW KEYS. You can take as many rods and keys if you like, if you want to figure some things out for yourself. Ignore the items on the right side of the room for now
  • Go into the room on the right

 Revelations

  • Pick up the ODD COIN from the floor
  • First place the MOTHERBOARD from the pinball machine on the electronic equipment in the back
  • Put the little pins on the motherboard as in the image below and hit the blue ‘on’ button. If you make a mistake, a little electric sparkle will show you which pin is wrong. If you’re right, the repaired motherboard will return to your inventory

 Revelations

  • Back out to the room with the pinball machine and place the repaired MOTHERBOARD back in the slot on the side and put the ODD COIN in the coin slot

 Revelations

  • You need to move the little ball from the top left to the hole in the bottom right by hitting the arrow keys. The ball will keep rolling in the same direction until it hits a barrier, but you can make it change direction by hitting another arrow in mid-roll. When the ball falls down the hole, a red light will come on
  • Exit the machine and hit it with your HAMMER (I had such a giggle at this! I thought I was stuck, and got frustrated and started hitting things with the hammer in frustration… et voila!), and a BALL BEARING will fall out of the coin slot
  • Note that you can also make the ball roll to the hole on the right, after which a green light will come on. If you then hit the machine with your hammer, the odd coin will come out again and you can play again
  • Combine the BALL BEARING with the IRON WHEEL and put the wheel on the large metal cabinet in the sitting room
  • Click on the cabinet to reveal the door behind it. Click again to open a safe behind the landscape painting
  • First zoom in on the door lock. The instructions on how to solve the lock code are in the notebook on the coffee table. Basically, you have to guess a number, and if a number is in the code, but not in the right place, it will tell you you have a cow. If a number is in the code and you entered it in the correct place, too, it will tell you you have a bull. From the number of cows and bulls you need to deduce what the code is. You have as many tries as you like. If you don’t want to play, the code is 851.
  • Go into the kitchen

 Revelations

  • Pick up the GLASS SHARDS, the CANDLE and the LIGHTER
  • Light the CANDLE with the LIGHTER
  • Time to do some more smashing with the HAMMER: hit the broken cabinet on the right a few times until you can take out the SOLAR COOKER
  • Also hit the sun hatch in the ceiling with your hammer and click it to open it
  • Go back to the basement
  • Zoom in on the key cutter on the right
  • Put your RAW KEY in the indentation on the right
  • Push the lever on the left down and flick the switch below the green light to activate the machine
  • Take out the PROCESSED KEY and use the lit CANDLE from the kitchen on it to pour wax on it and get a WAXED KEY (thanks, Liesbeth!)
  • Put the WAXED KEY in the lock on the door, try to turn it, and take it out again to get a USED WAX KEY. This key shows the indentations you need to make
  • Go back to the key cutter, place another RAW KEY on it and set the machine according to the indentations in the USED WAX KEY, as shown in the picture below

 Revelations

  • Back out to the room, put the key in the door on the right and turn it. If you made a mistake, you can throw away our old keys in the trash can by the door, or in the container by the key cutter itself
  • Go through the door on the right
  • Pick up the MIRROR FRAME
  • If you opened the ceiling hatch in the kitchen, light should fall on the center mirror from the ceiling. Turn both mirrors until you get the code 729 (thanks, thalassemia!)

 Revelations

  • Zoom in on the machine on the left, across from the key cutter

 Revelations

  • First turn the handle on the far right, then the one in the middle
  • You can now place a RAW ROD on the machine
  • Turn the dial (yellow) to II and hit the switch on the left
  • Take out the PROCESSED ROD and combine it with the MIRROR FRAME in your inventory. If you set the dial to any other setting, the rod will either be too thick or too thin. You can discard any faulty rods in the trash can
  • Go back one room, where you found the rods and keys, and pick up two SIMPLE BOWLS from the top shelf
  • Fill one SIMPLE BOWL with rochelle salts and the other with silver nitrate from the jars on the shelf below the bowls
  • Now go back outside to the front of the house

 Revelations

  • Place the SOLAR COOKER from the kitchen in the sunny spot on the path, and put the bowls with chemicals in the cooker
  • Take the COVER you found under the fuse box and put it on the cooker
  • Wait until the chemicals are warmed up and take them out of the cooker again
  • While you’re there, go into the sitting room and enter the code 729 in the safe behind the painting, which opened after you rolled the cabinet away from the kitchen door. Inside is a piece of paper with lines and dots… intriguing!
  • Go back to the bedroom and down the trapdoor
  • Pick up a sheet of PLAIN GLASS and put it in the flat tray that’s on the floor
  • Pour your warmed chemicals on the glass
  • When the solution has settled, take the MIRROR out of the tray and combine it with the MIRROR FRAME
  • Go back to the room with the key cutter and first put the GLUE and then the GLASS SHARDS on the wooden tray in the back
  • Zoom in on the wooden tray and do the jigsaw. You can rotate pieces by right clicking. You get POLARIZED GLASS when you’re done

 Revelations

  • Go back to the kitchen to put the POLARIZED GLASS in the hatch on the floor and close the hatch
  • Go back to the vault room and place your MIRROR on the wall mount on the right
  • Turn all three mirrors until the polarized light falls on the lock, as in the image

 Revelations

  • Zoom in on the lock and move the slides as in the code you found in the safe. It takes a little tweaking, but when you have it right, the door to the vault will open
  • Take the rune of water

The Magic Academy and the Rune of Air

 Revelations

  • Note the metal rod hanging from the roof that you can’t get to yet, and the strange platform on the right. First go through the hole in the wall on the left

 Revelations

  • Zoom in on the safe on the left wall and click the buttons until all handles point up. When they’re all down, click 21342
  • Inside the safe are a KEY and the KEEPER’S JOURNAL
  • Also read the journal on the desk
  • Right now you can’t touch the strongboxes that are on the shelf
  • Go through the hole in the wall, open the door on the left with your KEY and go into the bedroom

 Revelations

  • Take the QUILL and the spell book from the table on the right and browse through the book
  • Take a sheet of PREPARED PAPER from the bed and use the QUILL and the ink well to make a SEE INVISIBLE SCROLL
  • Also make a LOWER SCROLL
  • Go back to the first room and use the SEE INVISIBLE SCROLL
  • Check the KEEPER’S JOURNAL for clues on how to open the strongboxes
  • First try the box on the right and enter JALAAL from top to bottom
  • Inside is JALAAL’S JOURNAL

 Revelations

  • Read JALAAL’S JOURNAL for a better clue on how to open Rulade’s strongbox
  • Click on the box on the left and enter SMELLY
  • Inside is RULADE’S JOURNAL
  • Go outside to the front of the academy and use the LOWER SCROLL to knock down the IRON ROD
  • Zoom in on the platform on the right and use the IRON ROD on the magnetic stone in the center to get a MAGNETIZED ROD
  • Go back to the bedroom
  • Use the MAGNETIZED ROD on the hole in the wall on the left
  • Then click on the rod again to get a WRENCH
  • Use the WRENCH on the hinges of the back door (thanks again, Liesbeth!) – note that you have to use it on the part of the hinge that’s on the door frame, not on the door itself! It only has a very small active area
  • Zoom in on the safe on the left wall. The code from this safe can be deduced from the riddle in Rulade’s journal. It’s a bit confusing, as the riddle suggests there are four numbers instead of three, but if you read the first line as “the second is half of four”, it makes sense, and the code should be 124
  • Inside the safe is another paper with spells that goes into the spell book
  • Make two LEVITATION SCROLLS, a LOWER SCROLL and at least six TRANSFER ELEMENTS SCROLLS
  • The last thing you need to do before you go through the door is take note of the diagram to the right of the door with the six dots. It’s a bit tricky to see, but there are three blue dots and three brown dots – not red!
  • Go through the door and use the LEVITATION SCROLL
  • Go through the door in the left that is unblocked by the scroll. Don’t worry, the rocks are not going to fall on your head!

 Revelations

  • Use a LEVITATION SCROLL to raise the large cupboard, and a LOWER SCROLL to drop and smash it
  • Take six crystals of PLAIN QUARTZ from the cupboard
  • Take the METAL BOWL from the shelf on the right and use it to transfer water from the large ancient pot to the ‘strange receptacle’ in the center
  • Place a piece of PLAIN QUARTZ in the receptacle and then add one of the powders from the table on the right.
  • When all ingredients are combined, use one of the TRANSFER ELEMENT SCROLLS to transfer the powder to the quartz. You need to make three crystals of WATER QUARTZ and three crystals of EARTH QUARTZ
  • Go back to the bedroom and make an OPEN PLANAR POCKET SCROLL
  • Go all the way back to the outside of the academy and zoom in on the platform on the right

 Revelations

  • Put the three EART QUARTZES on the left and the three WATER QUARTZES on the right, as per the image in the bedroom, and use the OPEN PLANAR POCKET SCROLL
  • Check RULADE’S JOURNAL for the code to unlock the portal
  • Zoom in on the portal and enter CURRIN from top to bottom
  • Take the Rune of Air

The Monastery and the Sands of Infinity

 Revelations

  • Pick up the OLD PICKAXE and use it twice on the wall of the structure on the right
  • Behind it is a STRONG ROPE
  • Also use the OLD PICKAXE on the old flag outside the structure, and then click on the flag to get a FLAGPOLE
  • Combine the STRONG ROPE with the FLAGPOLE and throw it through the opened window on the first floor
  • Climb through the window

 Revelations

  • Pick up the DECAYING PAPER, the STRANGE KNOB and the CRUMPLED PAPER
  • Open the drawer on the left and take out the COTTON
  • If you put the strange knob directly on the safe in the wall, it will fall out again, so you need something to wedge it in place
  • Combine the CRUMPLED PAPER with the STRANGE KNOB and then place it on the safe on the wall
  • Zoom in on the safe for a puzzle. By rotating the two discs, you need to move the numbers in the right order, matching the numbers on the outside. I have no real strategy for this. I first focused on one circle, and then somehow, carefully swapped the numbers of the other disc around
  • Inside the safe is another DECAYING PAPER with three riddles
  • Go through the door

 Revelations

  • Pick up the ROD, the ROCK, the HAMMER and the SWORD
  • Go back to the bedroom and out through the window and use the HAMMER on the white rocks until you get a FLINTSTONE
  • Use the SWORD on the broken rope trolley to get DRY WOOD
  • Go back to the back room and put the DRY WOOD and COTTON under the boiler, then light it with the FLINTSTONE
  • A door to a hidden bookcase opens. Zoom in on it
  • To open the bookcase, refer to the DECAYING PAPER with the three riddles on it. You need to select one book on each row, according to the answers to the riddles. They are: 2, 7 and 4

 Revelations

  • Go down the hole in the ground and put the ROCK on the pressure plate on the right
  • Go to the back of the corridor

 Revelations

  • Move the large stone on the lower step to uncover a lever
  • Hit that lever a few times with the HAMMER to bend it back into shape
  • Put the ROD on the lever on the top step
  • Push all three levers back to unblock the passageway
  • Use the HAMMER on the large stone to get another ROCK – put it on the pressure plate
  • Move to the next room

 Revelations

  • There’s a third ROCK in the right hand corner – put it on the pressure plate
  • In the middle of the room are three sunken pedestals that have hidden compartments. You can raise the pedestals one by one by taking one of the rocks of the pressure plates and leaving the other two on. You can check all three pedestals, but to find the item you need you need to raise the pedestal on the left by removing the rock from the first room
  • Click on the raised pedestal to get a slide puzzle in which you have to move the numbers 1-8 to their correct places, as on a regular key pad
  • Inside the hidden compartment are the Sands of Infinity

Krur Jalaal

  • Go through the doors and talk to Krur Jalaal
  • Select the Sands of Infinity from your inventory
  • You now have to fight Krur Jalaal by throwing the elements from your runes at him. He will throw an element at the same time. Air beats Water, Water beats Fire, Fire beats Air. I think I found the key to predicting Krur Jalaal’s next move: he tends to throw the same element again if he was successful with it. So if he beat your fire with water, he will throw water again, so your next move should be air. In the first half of the battle, if you beat his previous move, he will usually throw the spell that would have beaten your previous move. So if you beat his fire with water, he will throw air at you next time to beat your water, so you should throw fire. In the second half of the battle, after he got out of his chair, he will generally throw your last move back at you if you beat him with it. So if you beat his fire with water, he will throw water and you should therefore throw air