
Best Horror Games On Itch.io – July 2026
Across a bounty of subgenres.
Grow A Garden 2 Base Price List
What's the most valuable crop?![Evomon Best Starter [Leafbun, Blazpup, or Bubble?]](/wp-content/uploads/2026/06/evomon-best-starter.jpg "Evomon Best Starter [Leafbun, Blazpup, or Bubble?]")
Evomon Best Starter [Leafbun, Blazpup, or Bubble?]
Grass-type, Fire-type, or Water-type?
![[Roblox] Evomon Shiny Hunting Guide – Including Prismatic and Pris Shinies!](/wp-content/uploads/2026/06/evomon-shiny-hunting-guide.jpg "[Roblox] Evomon Shiny Hunting Guide – Including Prismatic and Pris Shinies!")
Otherworld: Spring of Shadows Walkthrough
Welcome to the Otherworld: Spring of Shadows walkthrough on Gamezebo. Otherworld: Spring of Shadows is a hidden object/adventure game played on the PC created by BoomZap. This walkthrough includes tips and tricks, helpful hints, and a strategy guide on how to complete Otherworld: Spring of Shadows.


- Prefer Gamezebo on Google


Game Introduction – Otherworld: Spring of Shadows
Welcome to the Otherworld: Spring of Shadows walkthrough on Gamezebo. Otherworld: Spring of Shadows is a hidden object/adventure game played on the PC created by BoomZap. This walkthrough includes tips and tricks, helpful hints, and a strategy guide on how to complete Otherworld: Spring of Shadows.
How to Use this Walkthrough (Please read)
- This walkthrough is meant to be used as a guide to assist in solving mini-puzzles and acquiring all items in order to complete the game. You may explore locations in the order you wish, this walkthrough is written to take the most direct route to the game’s finish.
- Inventory objects will be written in bold. The walkthrough will state, “Use the inventory item on the blah blah,” because it assumes you have the item. If you don’t have the item, on your keyboard, press CTRL+F (at the same time). In the text box, type the name of the item you are looking for and press ENTER. This will scan this page for the appearance of that word.
Gameplay and Tips
- This is a hidden object adventure game. You will move from location to location solving hidden object hunts, mini-puzzles and picking up items to use in order to proceed in the game.
- Help on the main screen explains gameplay.
- There are three difficulty settings.
- Casual mode has more hints and guided help. Click on the checkmark above the journal to get guidance on what to do next.
- Expert mode has fewer hints and guided help.
- Hardcore mode has no hints nor guided help and you cannot skip puzzles.
- Move your cursor over every aspect of a scene, it’s the only way to find everything.
- Achievements – This game has achievements. From the main screen, click Achievements. Hover your mouse over the ovals to see how to earn them.
- If getting all the achievements is important to you, some notable ones are to finish the game in Hardcore mode, do not use Hint or Skip, find all the faeries, to finish the game in under six hours and to finish the game in one sitting (i.e., do not exit the game).
- Collectibles – There are 60 fairies to find. Fairies can be found in either the full scene or in close-ups. A list of their locations appears at the bottom of this walkthrough. Fairies will be highlighted by a white circle.
- The Menu button at the bottom left of the screen will bring you back to the main screen.
- Items collected throughout the game go into your inventory, located at the bottom of your screen.
- Closing a window – To close the zoom-in windows, click anywhere outside of the window. Tip: If you can zoom in on the area again, you likely haven’t found everything you needed to find.
- Journal – Your journal is located at the bottom left of the screen. It records the story’s progress and can contain clues to solve puzzles.
- Mini-puzzles can be skipped once the Skip button fills. If you are playing Expert mode, you cannot skip puzzles.
- Click on the eye icon at the bottom right of the scene to get instructions on how to solve the puzzle.
- Hints are available in the bottom right of the screen.
- Hints are only available if you are playing in Casual or Expert mode.
- Hints used in the hidden object scenes will point out an object to be found.
- Hints used during the adventure mode will point out something to do in that scene or give you an indication as to what to do next.
- Hidden object hunts provide a list of items to find.
Naming Convention
- All scenes, active areas and interactive objects are labelled (see top of the scene). This walkthrough will use that naming convention.
- There is no map but all the scenes are named. This walkthrough will use the names of the scenes and will include directions.
Chapter One: The Missing Girl
- From the main screen, press Play. Enter your name and then select a difficulty setting (explained above).
- Watch the cutscene.
- If you are offered the tutorial, click Yes.

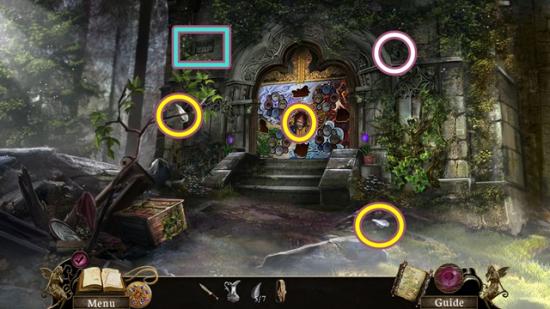
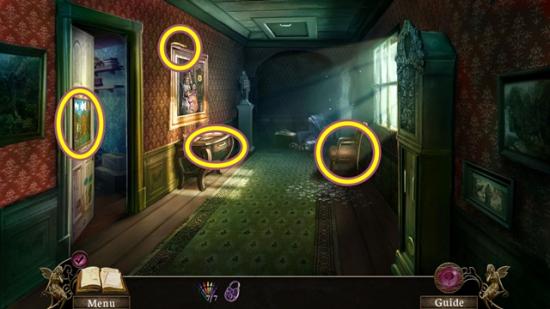
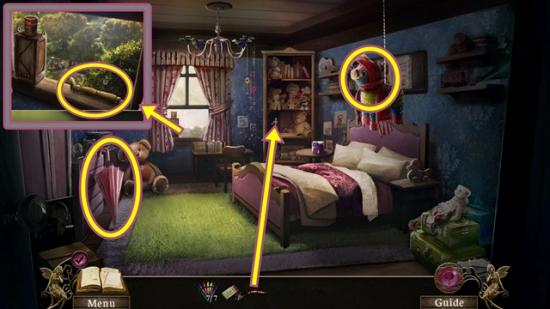
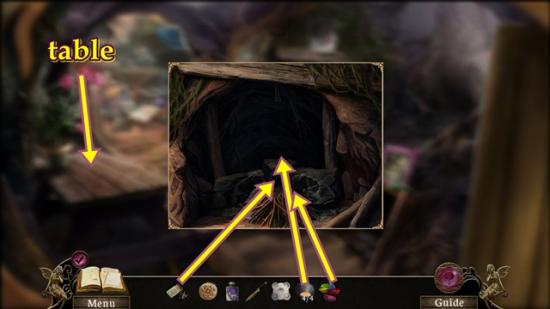
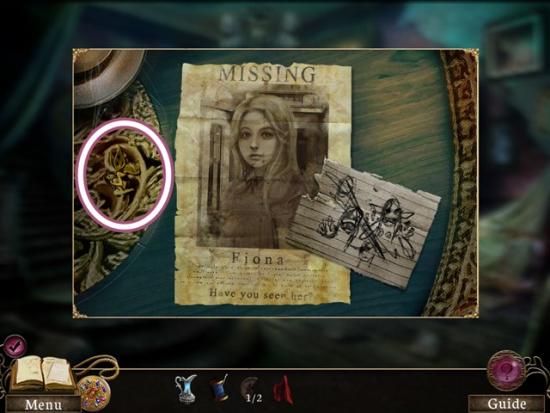
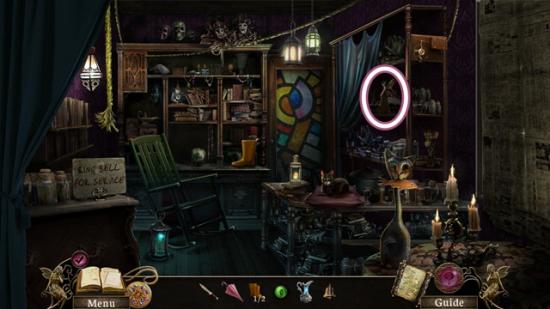
- Click on the table. Take the handle. Look at the poster and the drawing. Click anywhere outside the window to close it.
- Click on the mirror. After the dialogue, take the iron key.
- Click on the journal. Note the tabs on the left. Click anywhere outside the journal to close it.
- Click on the back porch door. Add the handle, then turn it.
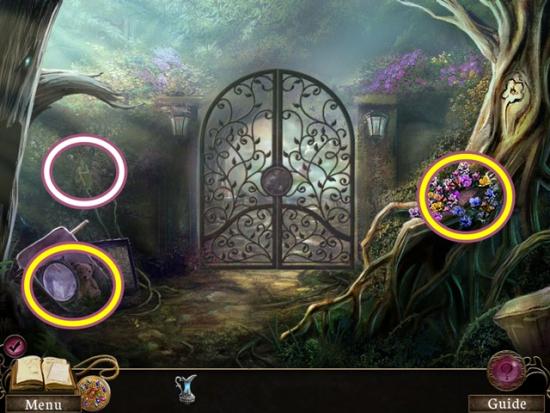
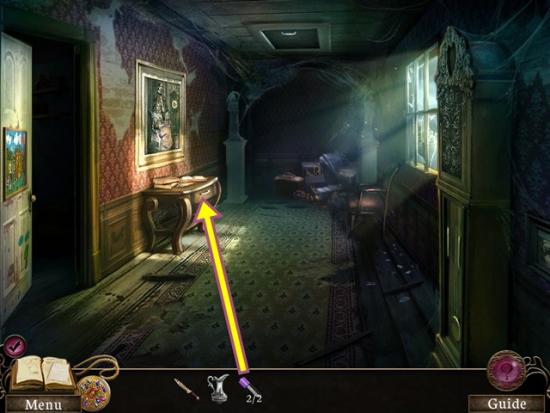
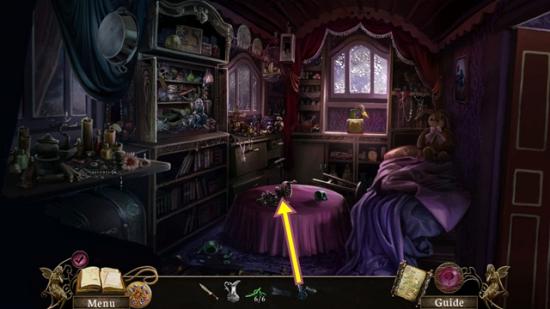
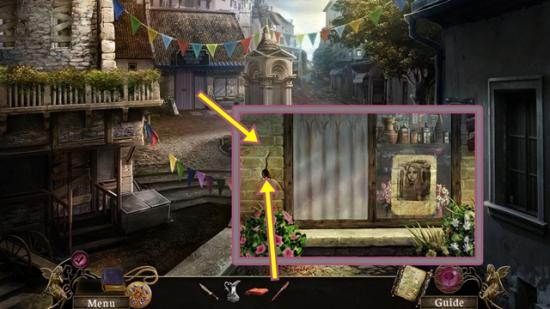
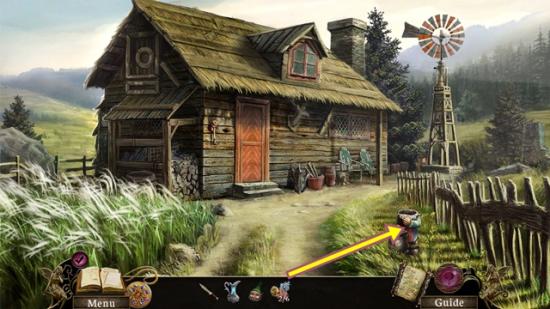
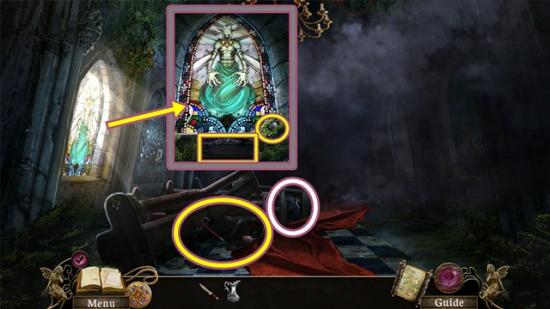
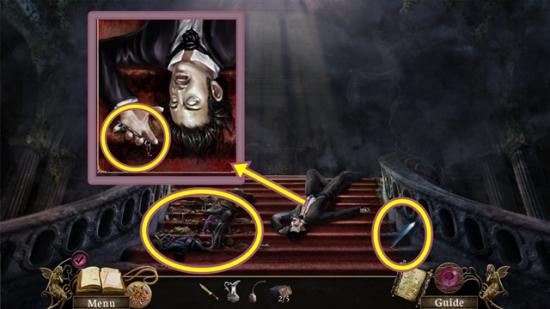
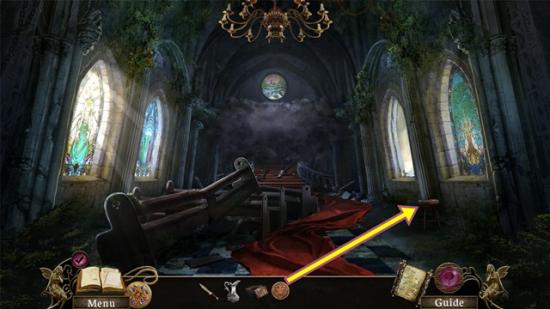
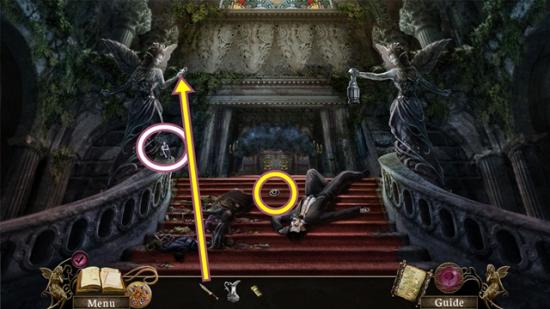
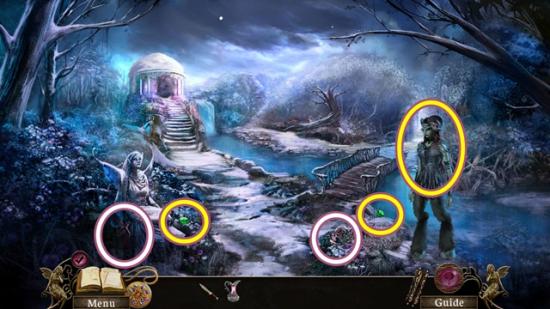
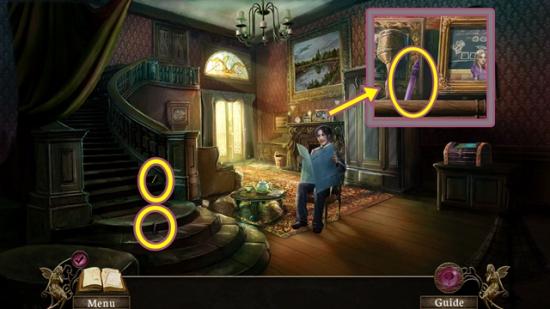
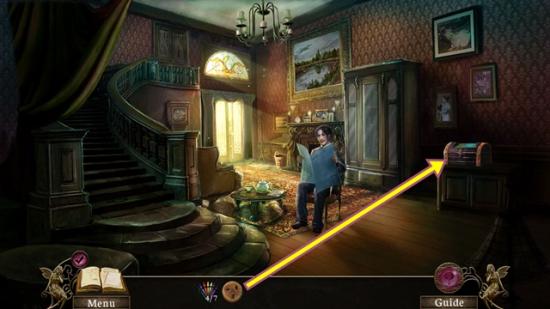
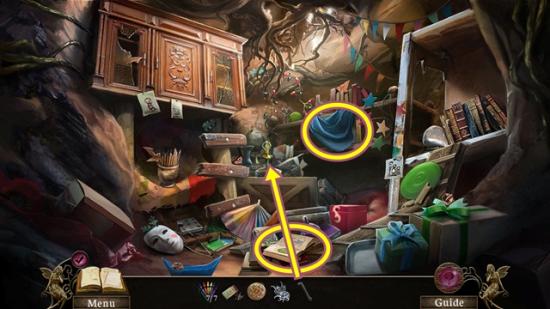
- Before you leave, click on the painting. Take the stone fragment (1/3). Click down.
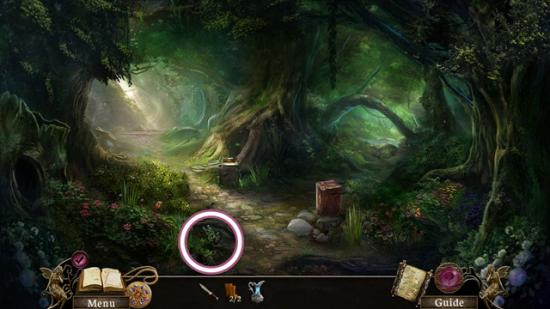
- Go out onto the back porch.
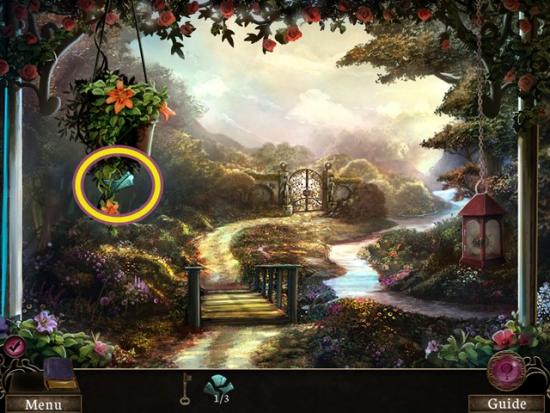
- Take the stone fragment (2/3) from the flower pot.
- Walk forward to the garden.
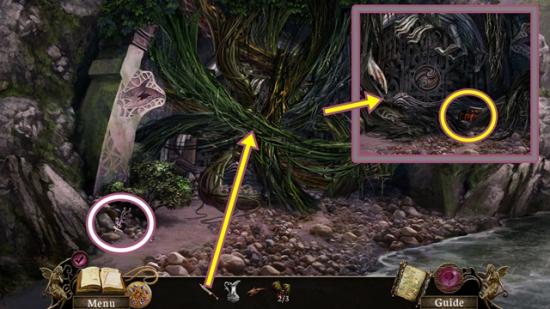
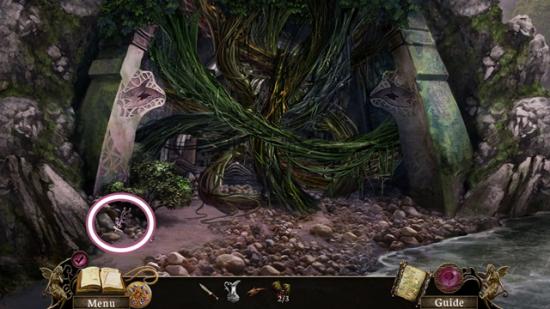
- Click on the bush on the right. Move the weeds and take the stone fragment (3/3).
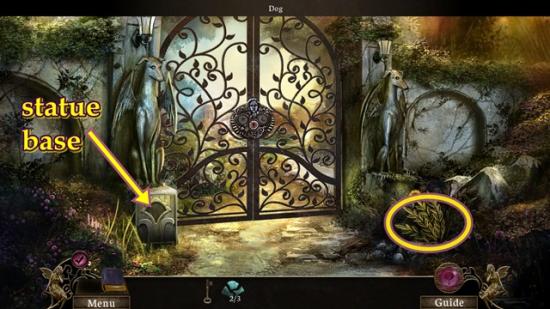
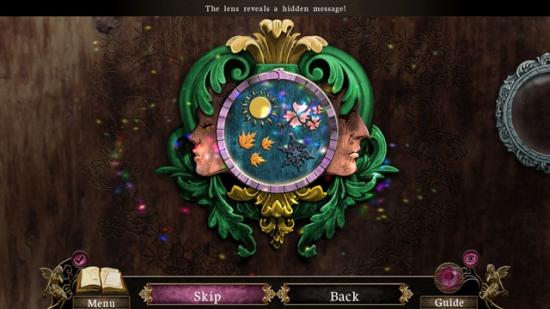
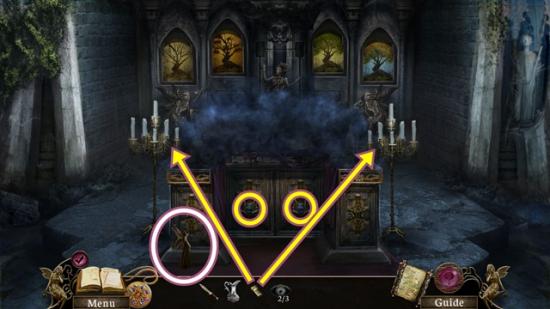
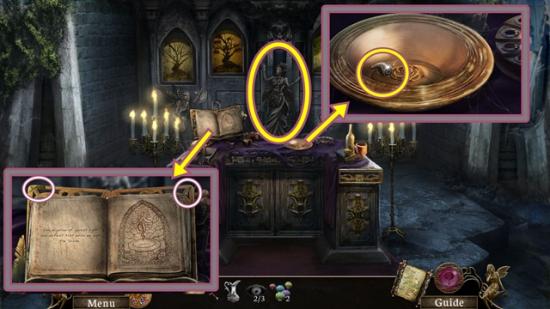
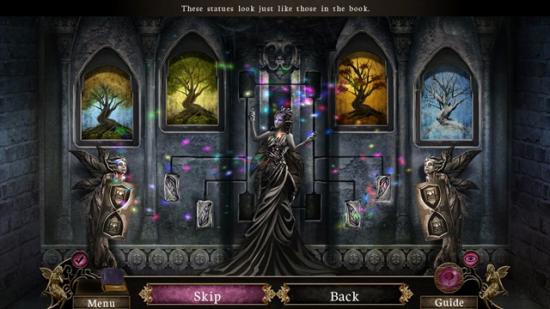
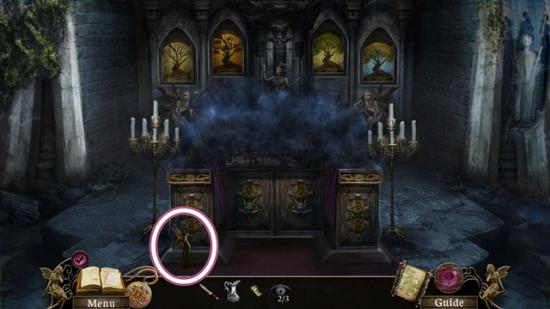
- Click on the statue base. Add the three stone fragments. Take the star dial and the metal pin.
- Move down.
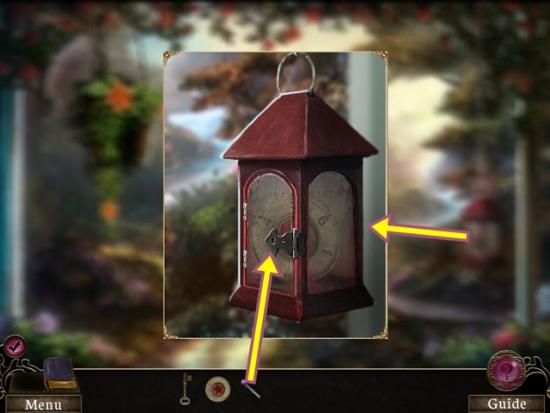
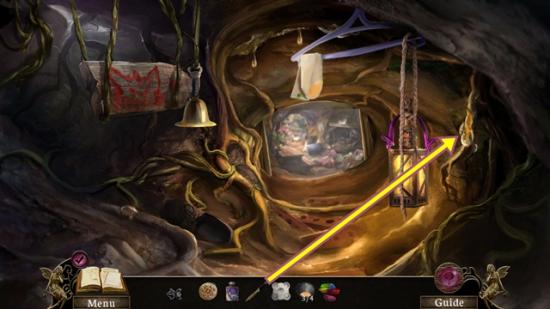
- Click on the hanging lamp. Unlock it with the metal pin. Take the moon dial.
- Walk forward to the garden.
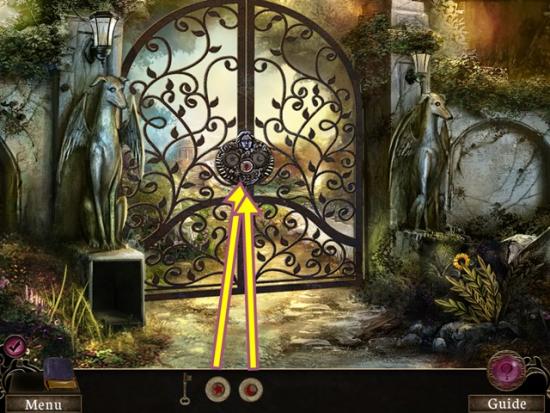
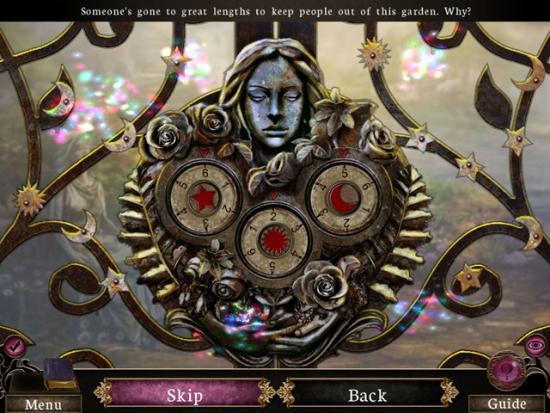
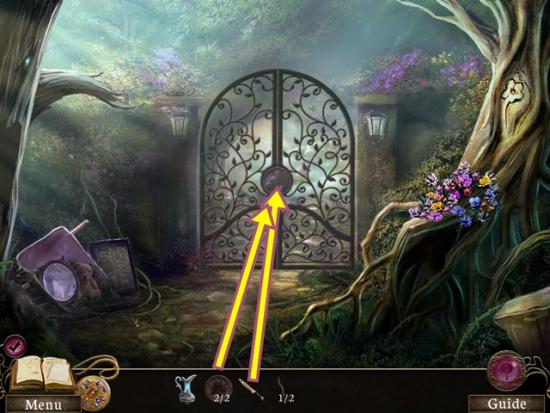
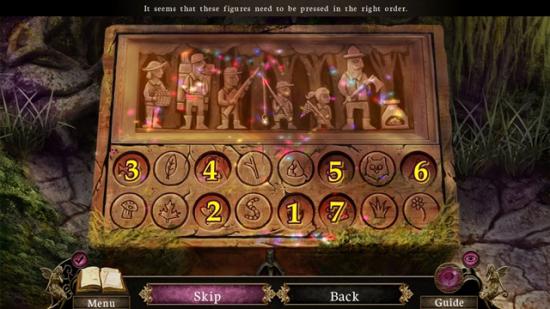
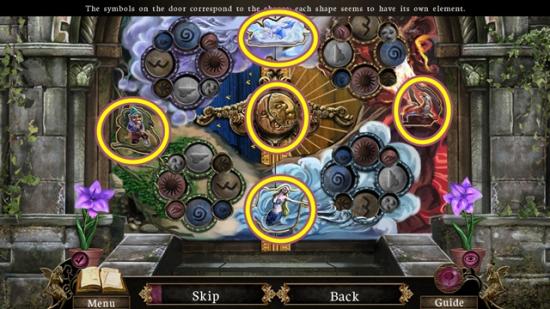
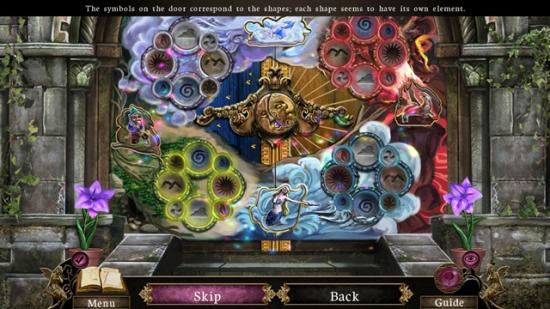
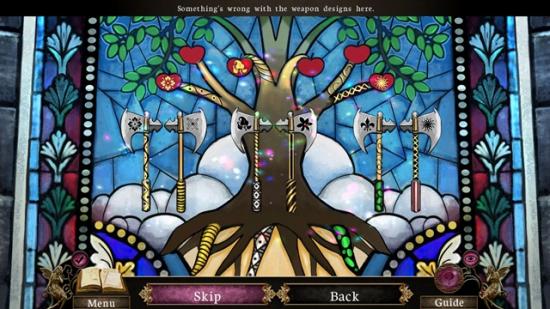
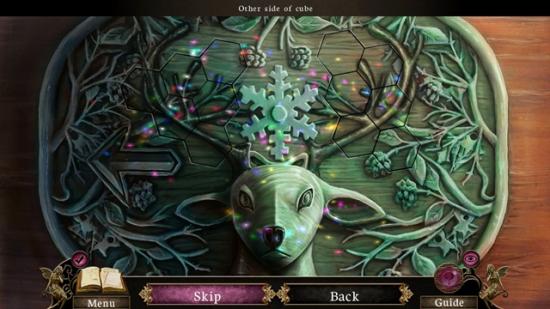
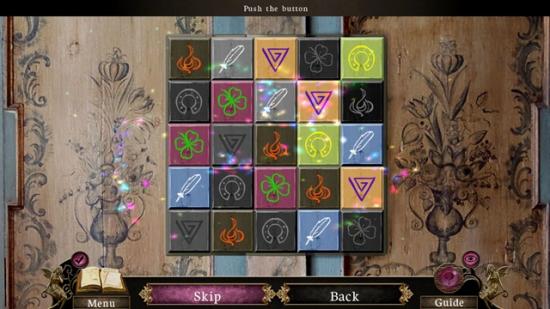
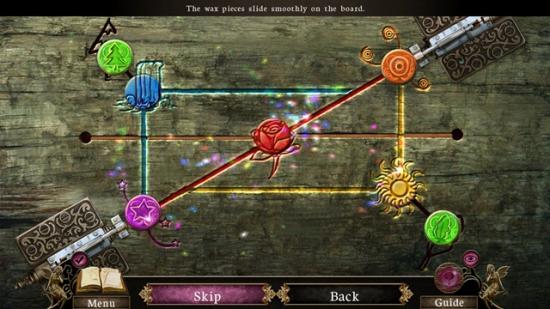
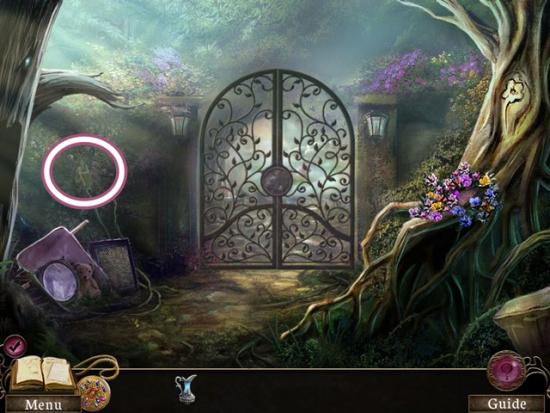
- Click on the gate. Add the star dial and the moon dial. A mini-puzzle starts. Rotate the three dials so the pointer is pointing to the correct number.
- To determine the correct numbers, count the metal stars, suns and moons attached to the gate.
- Solution:
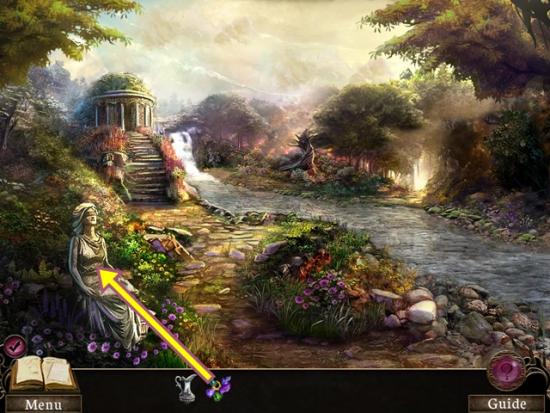
- Open the lock with the iron key. Enter the garden.
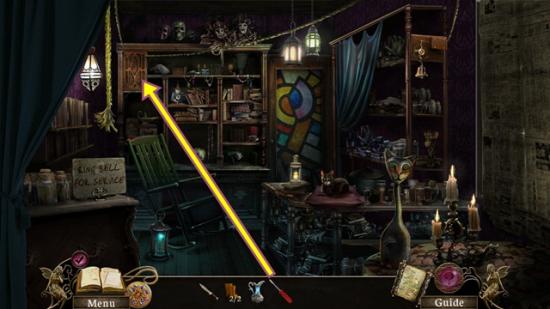
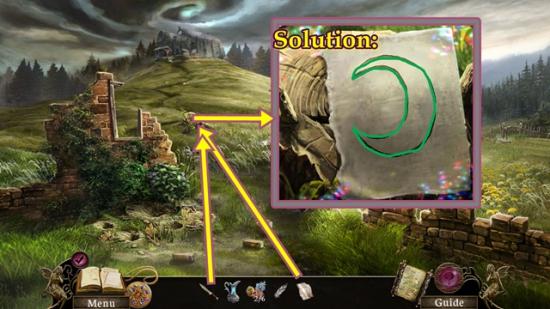
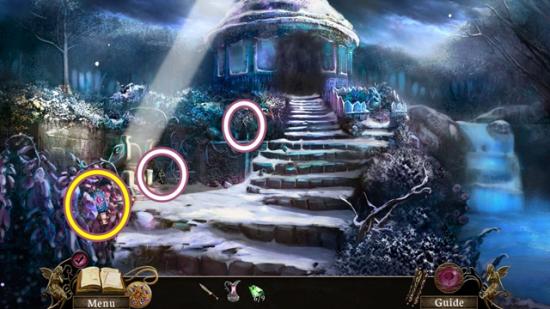
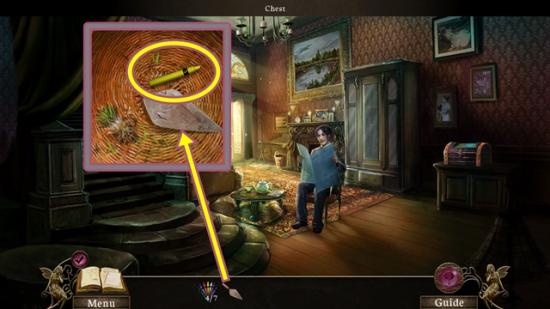
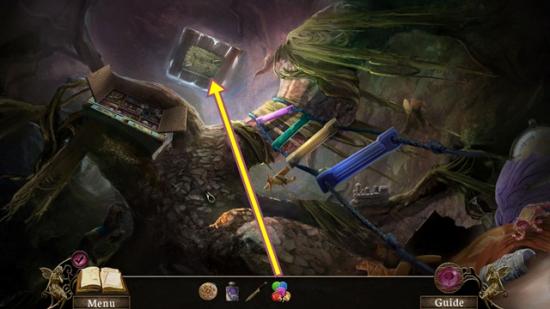
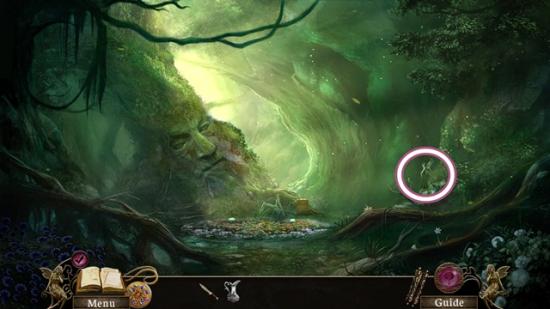
- Click on the locket statue. Take the wire brush. Click down.
- Move forward towards the gazebo, then click on the gazebo gate.
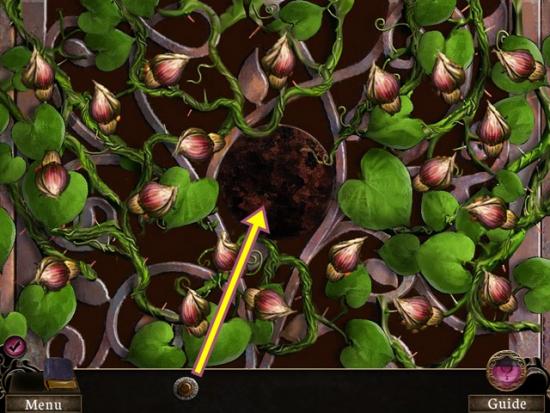
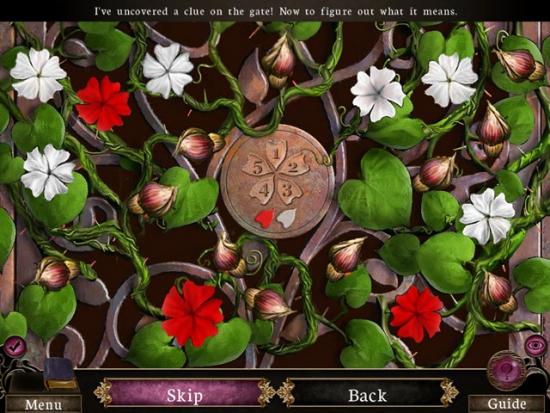
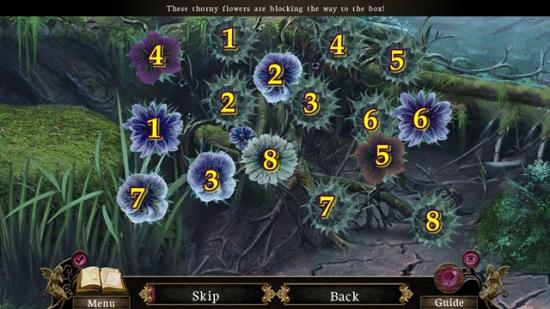
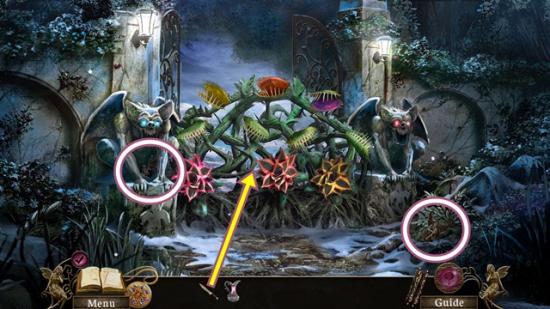
- Use the wire brush to clean the rusty gate. A mini-puzzle starts. Click on each bud to open it. If it has five petals and is white or red, leave it open. If it doesn’t match that criteria, click on it to close it.
- Solution:
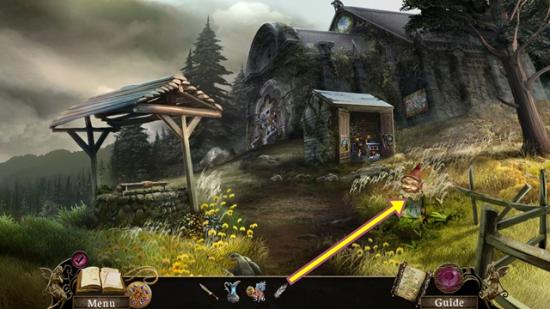
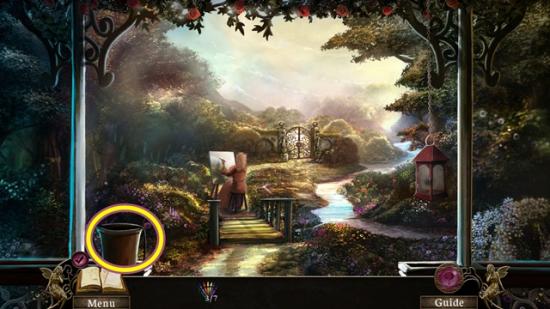
- Enter the gazebo.
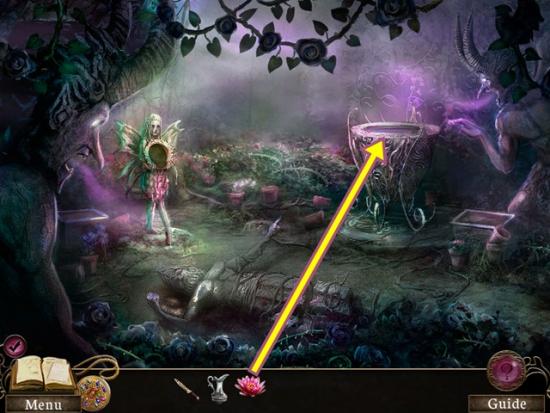
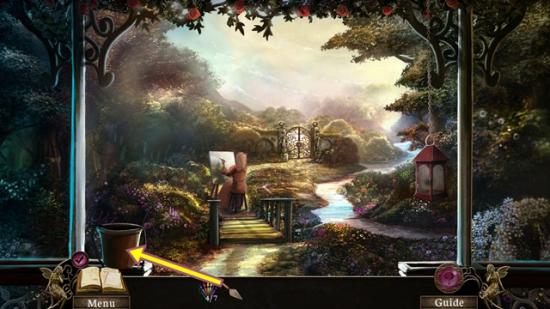
- Take the pitcher.
- Leave the gazebo and go back to the main garden.
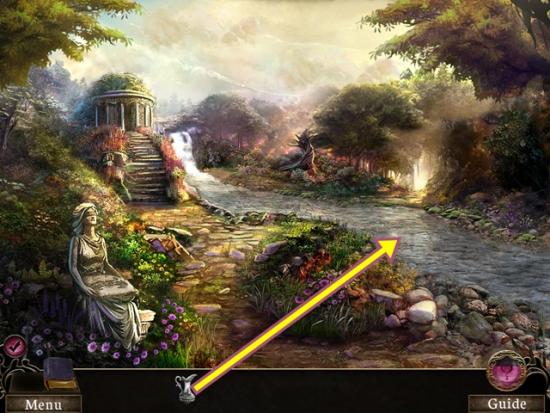
- Fill the pitcher from the brook to get the filled pitcher.
- Return into the gazebo.
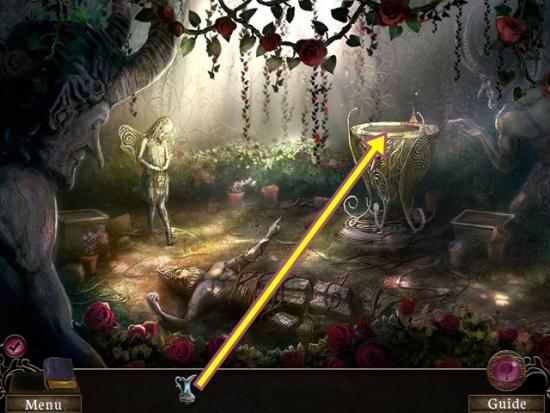
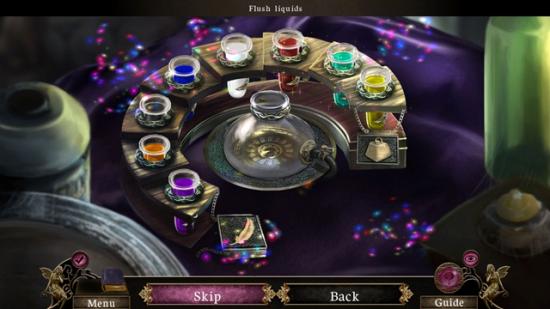
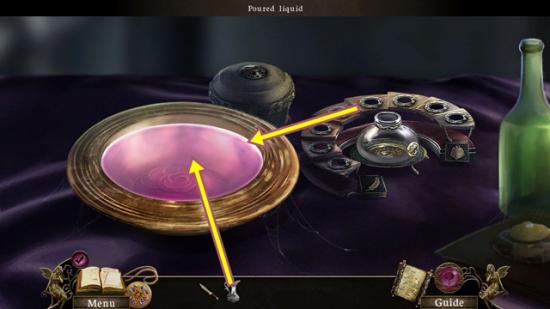
- Click on the basin. Pour the filled pitcher into the basin. When it fills, take the butterfly wing.
- Click through the dialogue.
- Leave the basin and leave the gazebo.

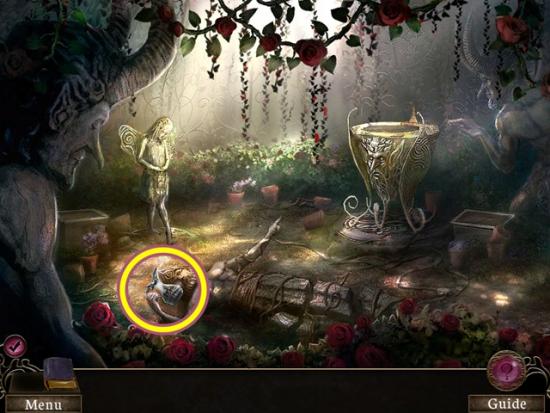
- Click on the flowerbed.
- Add the butterfly wing to the jewelled butterfly. A mini-puzzle starts.
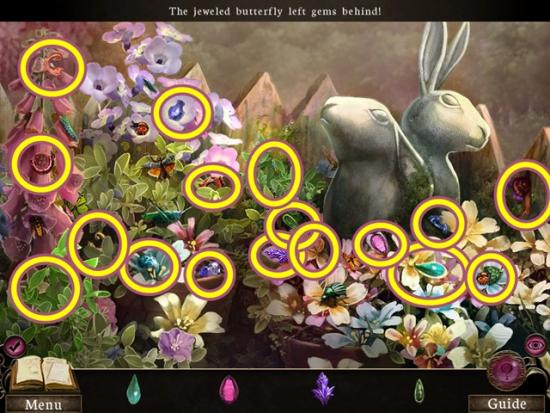
- Find all the gems. You may have to move snails or leaves, move your cursor around and when it changes into a hand, click.
- The locket gems are added to your inventory.
- Go back to the main garden.
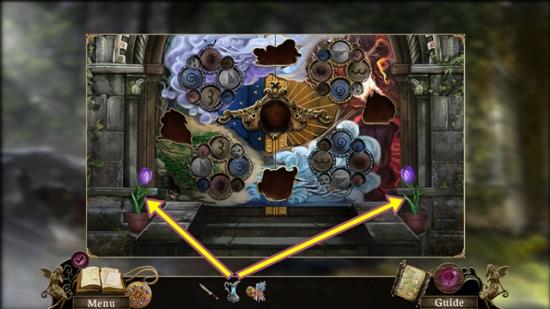
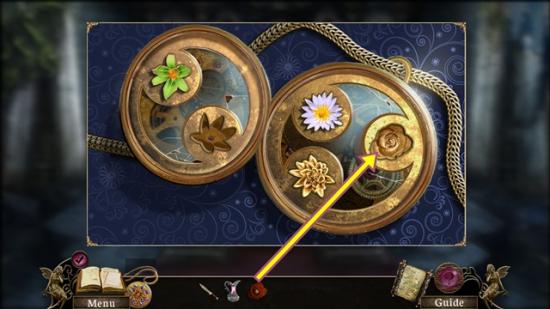
- Click on the locket statue. Add the locket gems. A mini-puzzle starts. Place the gems in their appropriate slots. Hover your cursor over a gem, then click to rotate it (if necessary). Click and drag the gem to move it.
- Solution:
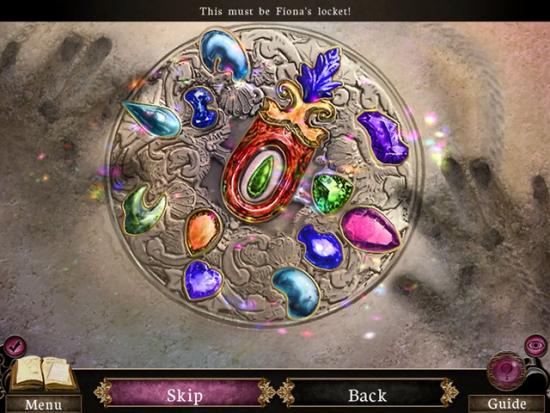
- Take the locket.
- Watch the cutscene.
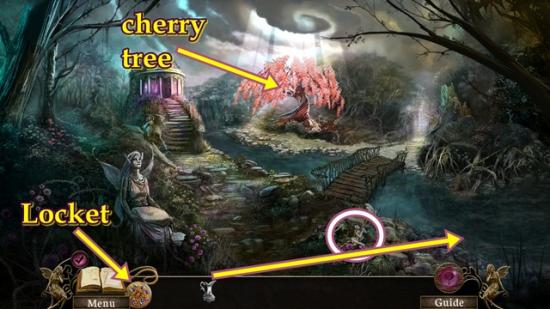
- Click on the locket. Take note of the missing charms. Click anywhere outside the window to close it.
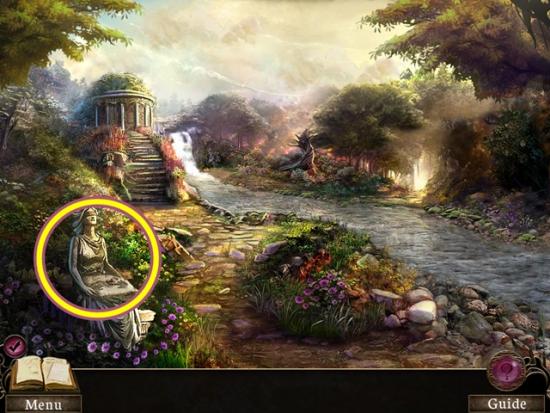
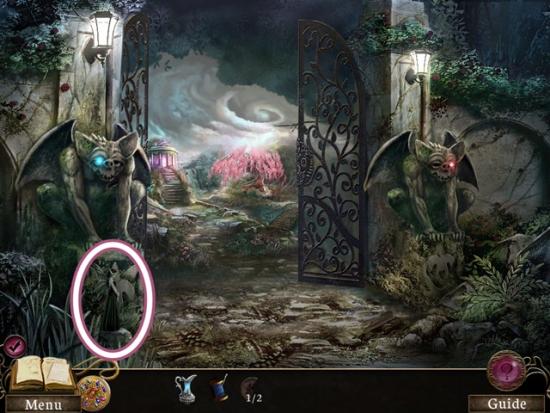
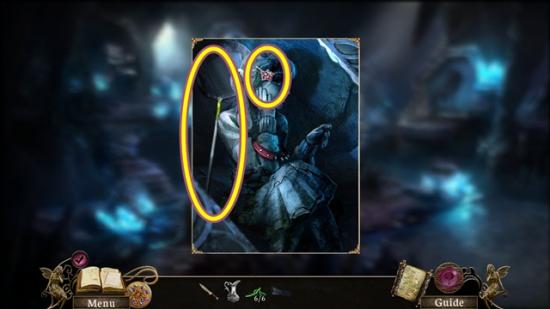
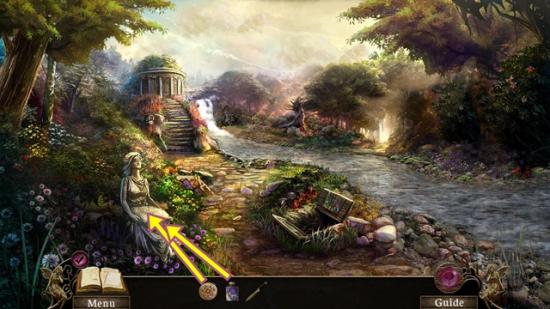
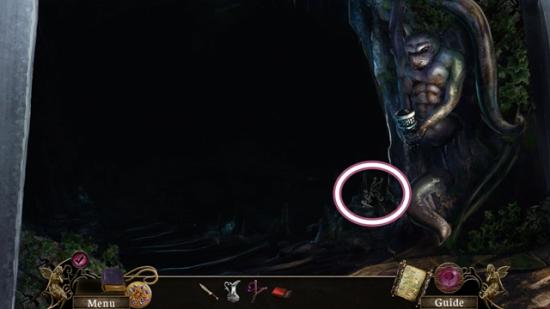
- Take the fairy (1/60).
- Fill the pitcher from the brook to get the filled pitcher.
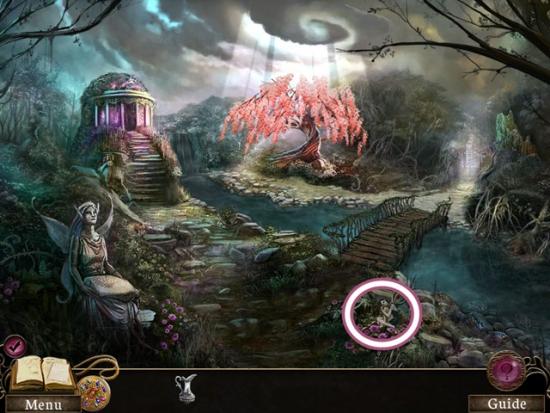
- Go to the cherry tree.
- Take the fairy (2/60).
- Click on the Dryad. Talk to her. Click through the dialogue. Click anywhere outside the window to close it.
- Walk down and go to the lily pond.
- Take the fairy (3/60).
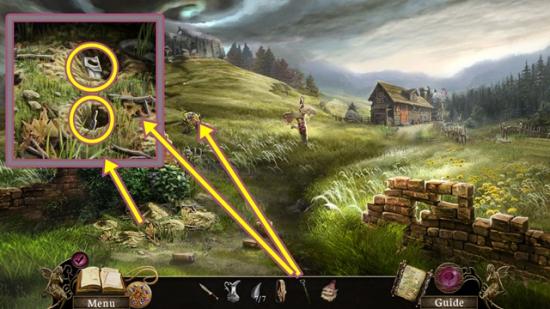
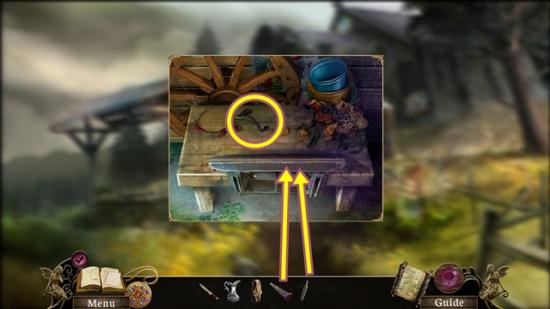
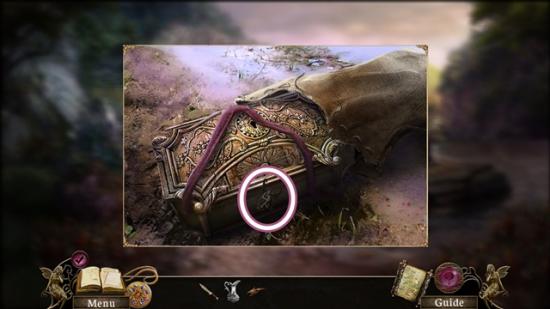
- Click on the wheelbarrow. Take the needle and thread. Click anywhere outside the window to close it.
- Click on the flowers. Take the disc (1/2).
- Move down two scenes to return to the gate.
- Take the fairy (4/60).
- Move down to the back porch.

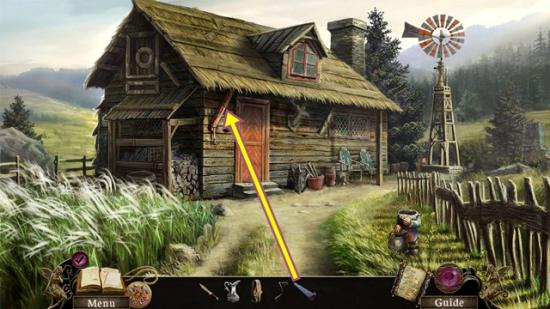
- Shoo the bird away. Click on the flower pot. Take the torn cloth. Click anywhere outside the window to close it.
- Go down to enter the house.
- Click on the table. Take the fairy (5/60).
- Click on the chair. Put the torn cloth on the gardening glove, then use the needle and thread. Take the gardening glove. Read the notice. Click anywhere outside the window to close it.
- Go back out to the back porch.
- Click on the flower pot. Remove the thorns with the gardening glove and take the handle.
- Go back into the house.
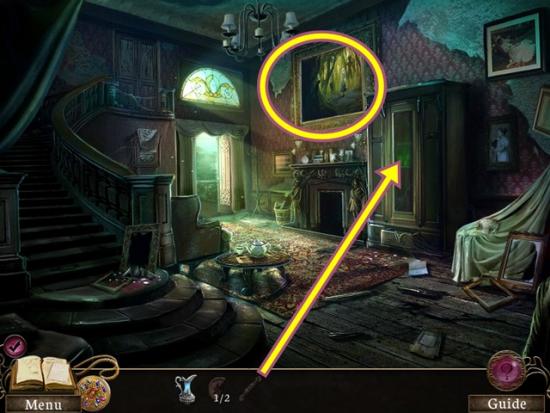
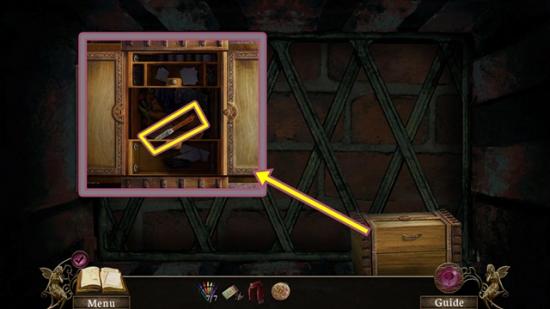
- Click on the cupboard. Add the handle. Take the paint remover. Look at the drawing. Click anywhere outside the window to close it.
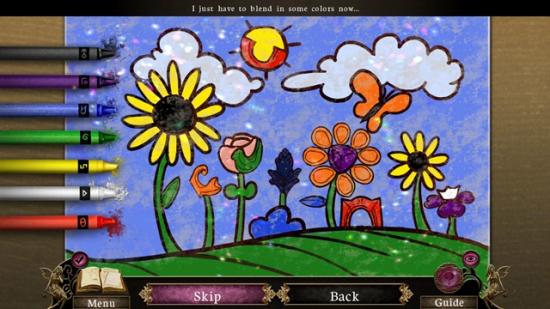
- Click on the painting. Add the paint remover. A mini-puzzle starts. The paint remover is in your hand. Click around the painting until you remove the paint.
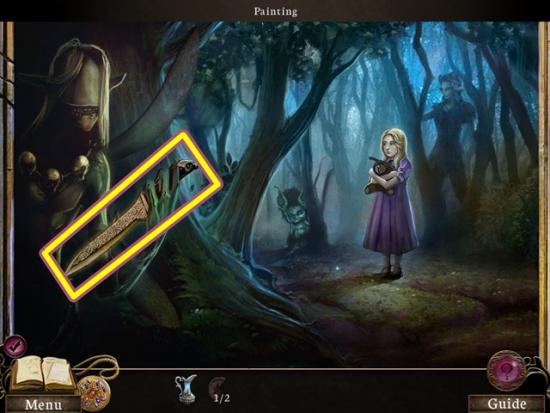
- Take the ancient knife. Look at the painting. Click anywhere outside the window to close it.
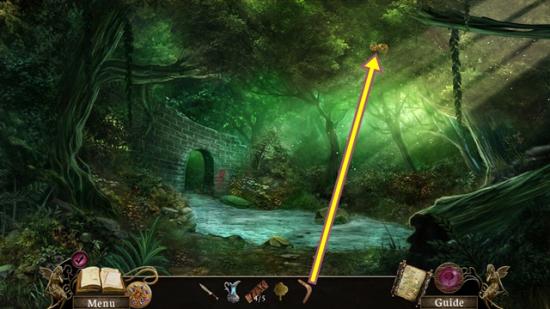
- Return to outside the gazebo (forward four scenes).

- Take the fairy (6/60).
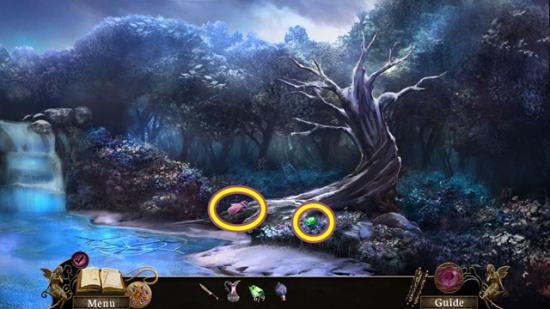
- Click on the flowerbed. Take the wire cutter (1/2).
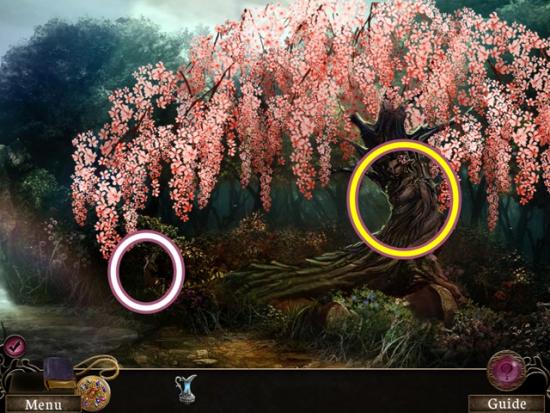
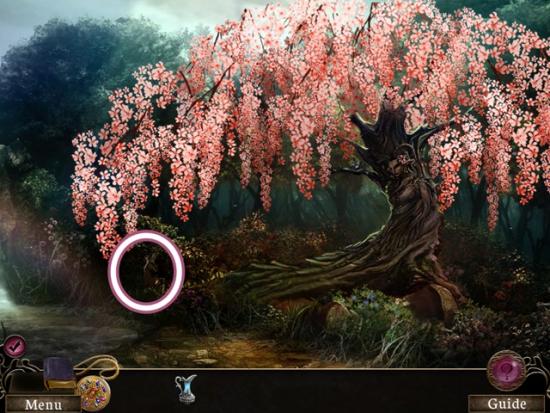
- Move down to scenes to the main garden, then go to the cherry tree.

- Click on the cherry tree. Cut a flower with the ancient knife.
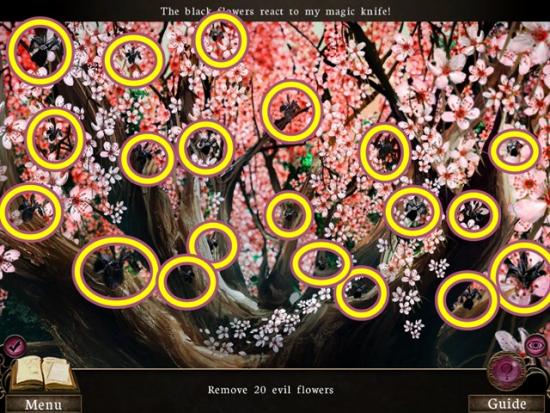
- Cut off the 20 flowers.
- When you are finished, use the ancient knife on the Dryad to get the Provocation achievement.
- Talk to the Dryad. Click through the dialogue.
- The disc (2/2) is added to your inventory.
- Walk down and then go to the lily pond.
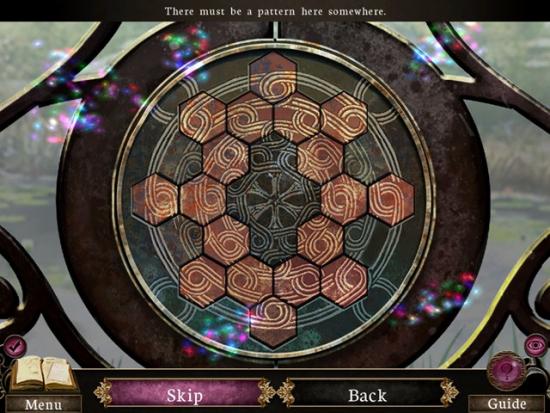
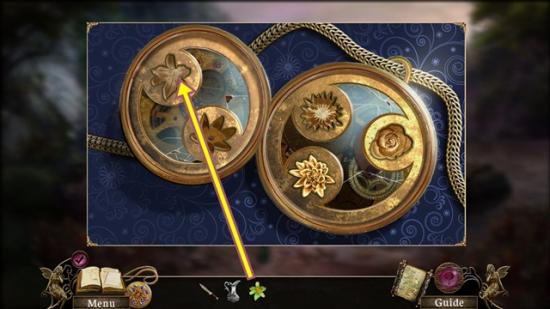
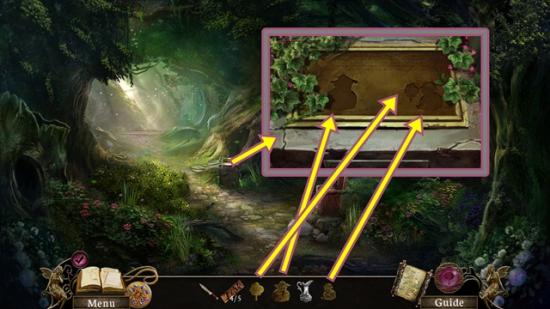
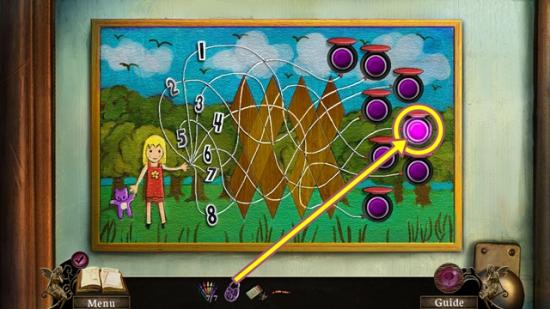
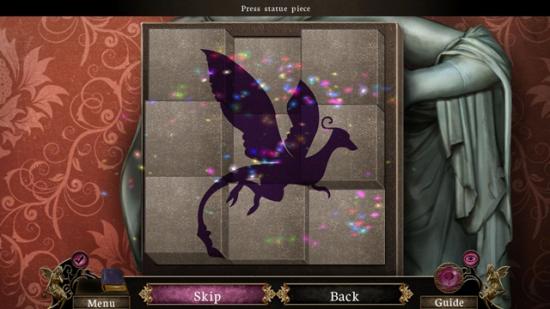
- Click on the lily pond gate. Clean it off with the ancient knife. Add the two discs. A mini-puzzle starts. Complete the pattern. Click on the hexagons to rotate them.
- Solution:
- When you are finished, enter the lily pond.
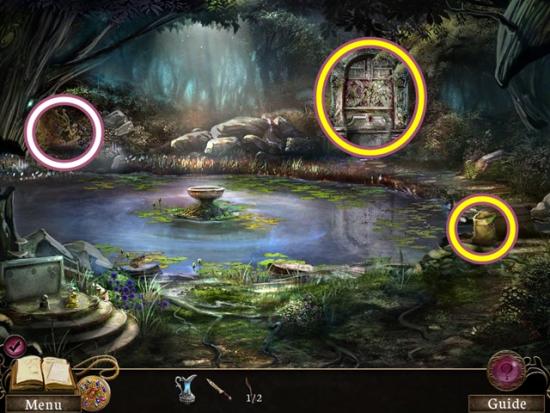
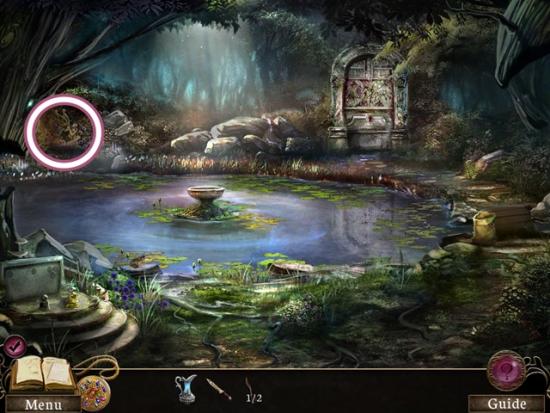
- Take the fairy (7/60).
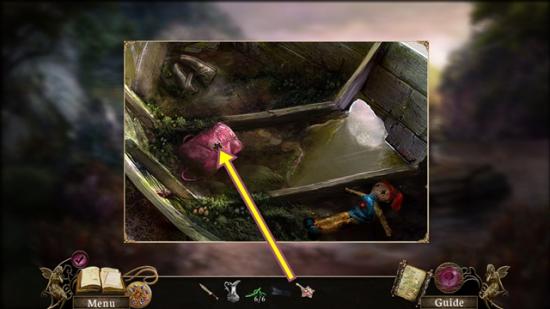
- Take the empty bag.
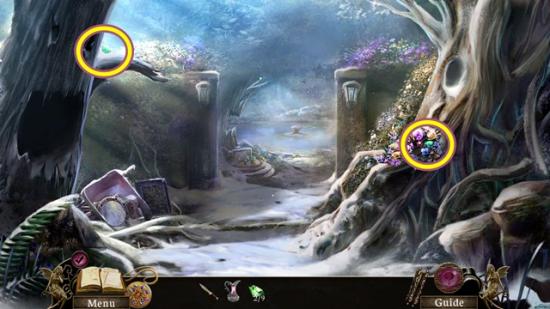
- Click on the alcove.
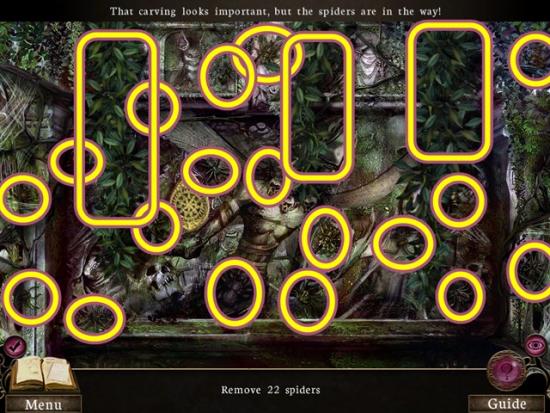
- Remove the 22 spiders. Move (click and drag) the three vines to uncover more spiders.
- Take the tear-shaped carving.
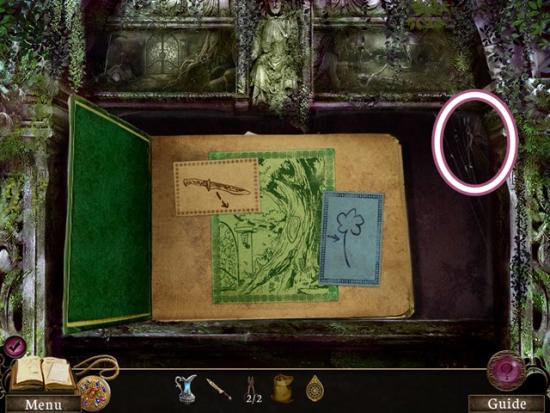
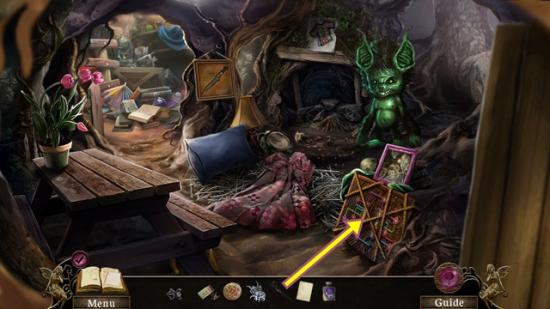
- Take the wire cutters (2/2). Open the sketchbook. A mini-puzzle starts. Jigsaw puzzle. Hover your cursor over a piece and click to rotate. Click and drag to place a piece. When a piece is properly positioned, it locks and can’t be moved.
- Start with the green pieces, then do the blue and beige.
- Solution:
- Take the fairy (8/60).
- Move down.
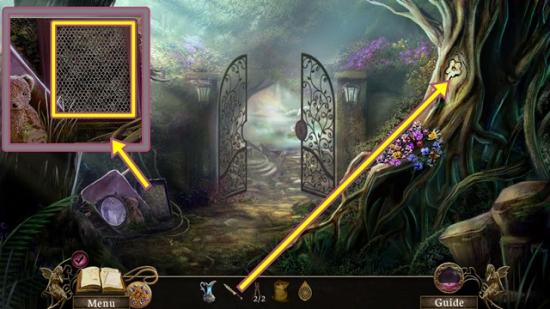
- Click on the wheelbarrow. Use the wire cutters on the window screen to get the window mesh.
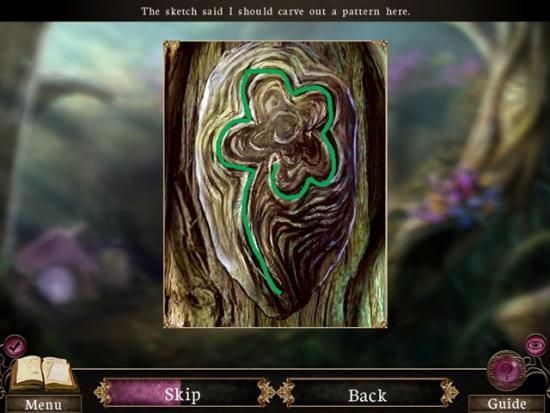
- Use the ancient knife on the carving on the tree. A mini-puzzle starts. Carve (click and drag) the design.
- Solution:
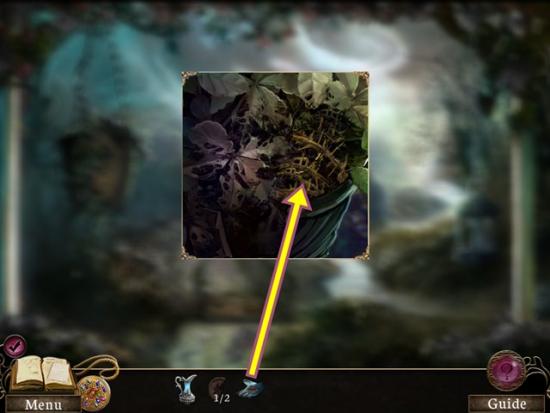
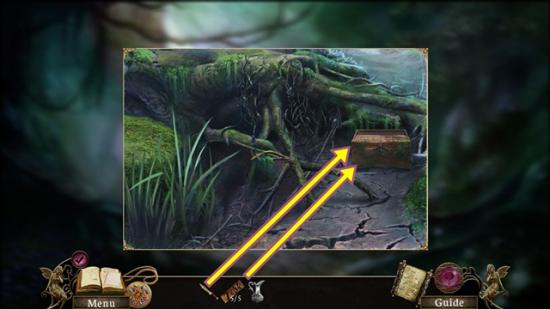
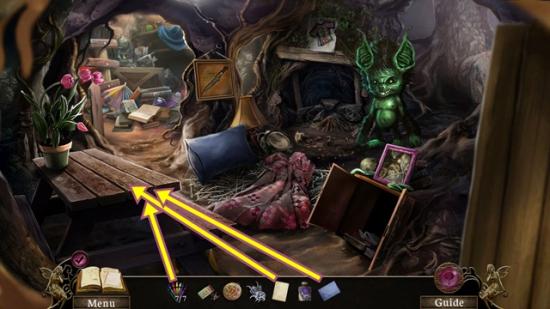
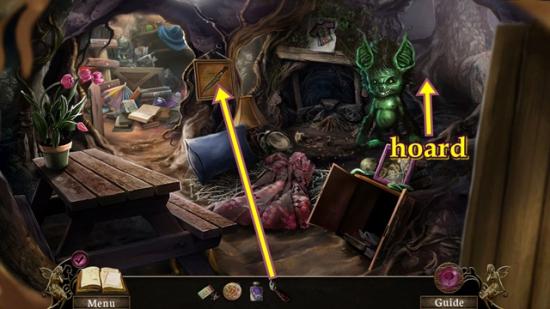
- When you are finished, take the figurine (1/3). Use the empty bag to gather the magic soil.
- Move down and move forward to the front of the gazebo.
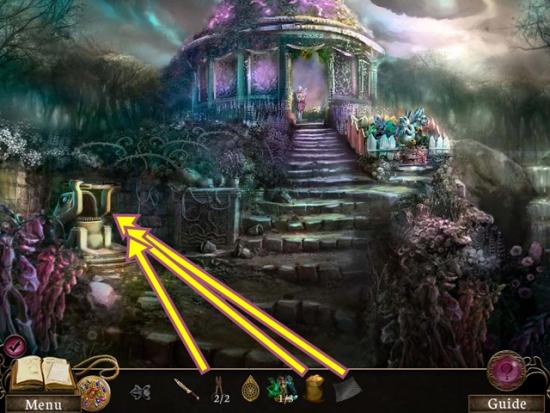
- Click on the soil sifter.
- Add the wire mesh. Use the wire cutters to cut the four corners. Add the magic soil.
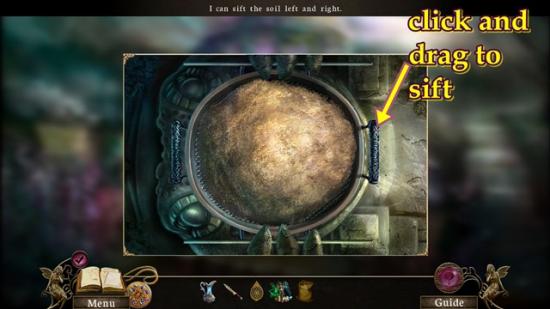
- Grab the handle on the right and click to sift the soil. Take the sapphire.
- Use the empty bag on the soil to get the sifted soil.
- Enter the gazebo.

- Take the fairy (9/60).
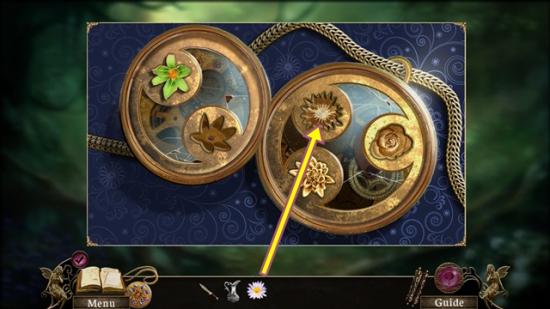
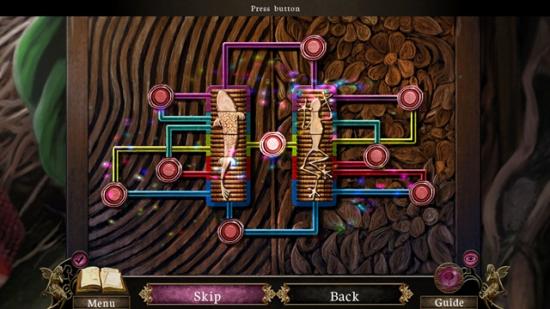
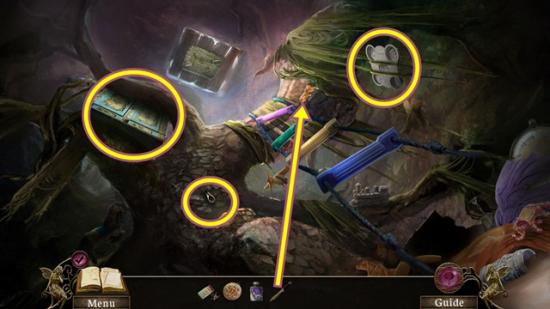
- Click on the statue. Add the tear-shaped carving. A mini-puzzle starts. Jigsaw puzzle. Place a piece into the empty slots. Hover your mouse over a piece and click to rotate it. Click and drag to place the piece. Only four pieces go into the first puzzle.
- Solution:
- For the second puzzle, in the centre area, recreate the design in the tear-shaped carving. Click on the arrows to rotate the rings.
- Solution:
- Take the ruby.
- Move down four scenes to the gate.
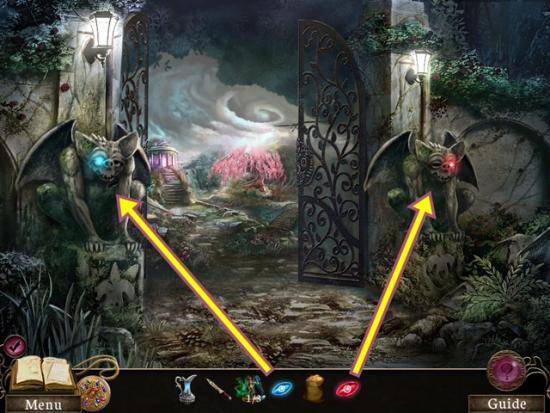
- Click on the gargoyle on the left. Add the sapphire. Take the figurine (2/3).
- Click on the gargoyle on the right. Add the right. Take the figurine (3/3).
- Move forward, walk to the lily pond, then enter the lily pond.
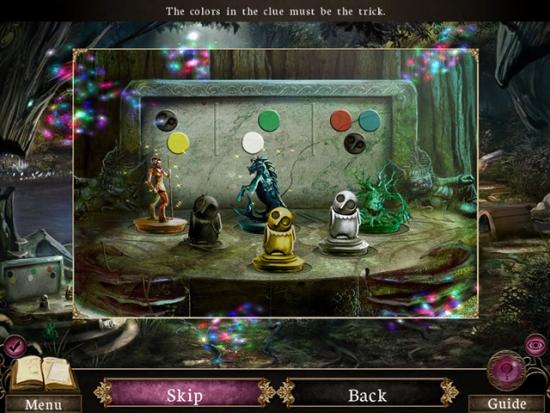
- Click on the pedestal. Add the figurines. A mini-puzzle starts. Rearrange the figurines according to the coloured dots. Click on two figurines to swap their positions. Notice the rows. There’s a row of one, row of two and row of three. Looking at the dots, the yellow is before black and the black is before red and blue. Therefore yellow is before black is before red and blue. Yellow must be in the front row. Continue.
- Solution:
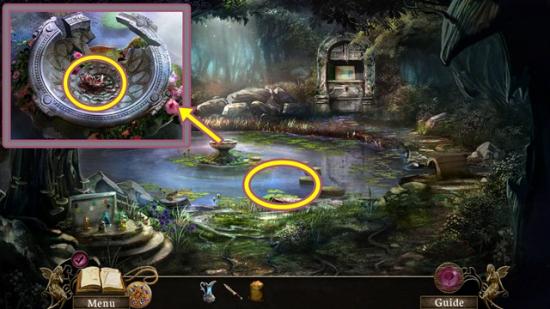
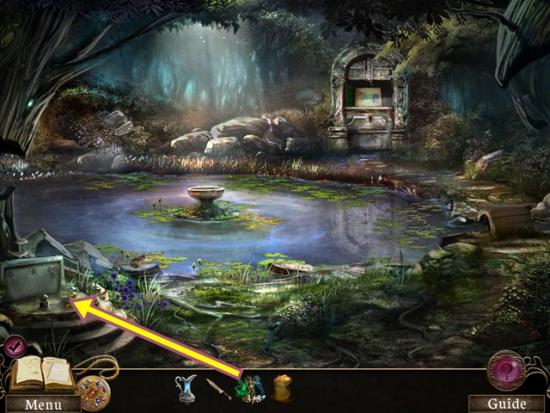
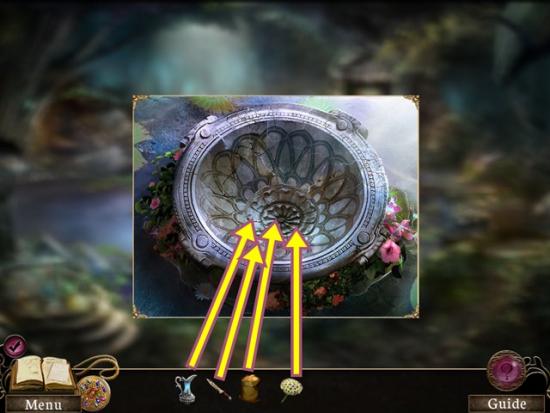
- Click on the broken planter. Take the dead eternal flower. Click anywhere outside the window to close it.
- Click on the pond.
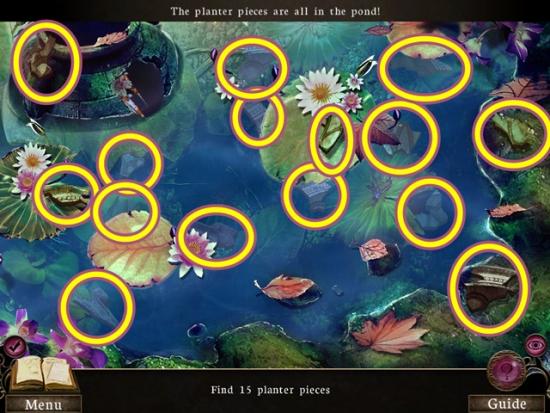
- Find the 15 planter pieces. When you are finished, the planter pieces are added to your inventory.
- Click on the broken. Add the planter pieces. A mini-puzzle starts. Fix the planter. Hover your cursor over a piece and click to rotate. Click and drag to move a piece.
- Solution:
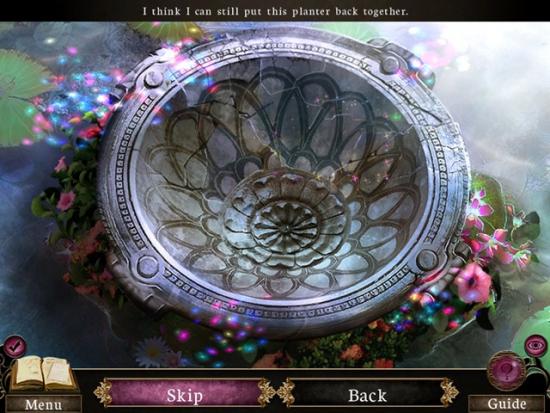
- Click anywhere outside the window to close it.
- Return to the Dryad.
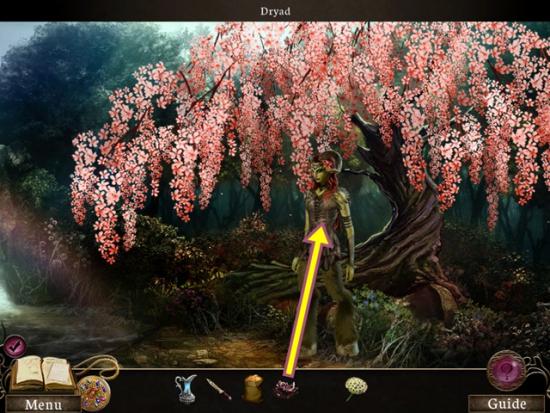
- Talk to the Dryad. Click through the dialogue. Give her the dead eternal flower. Click through the dialogue. The seed pod is added to your inventory.
- Return to the lily pond.
- Click on the planter. Add the sifted soil, then the seed pod, then the filled pitcher. Use the ancient knife to cut and take the eternal flower.
- Return to the Dryad.
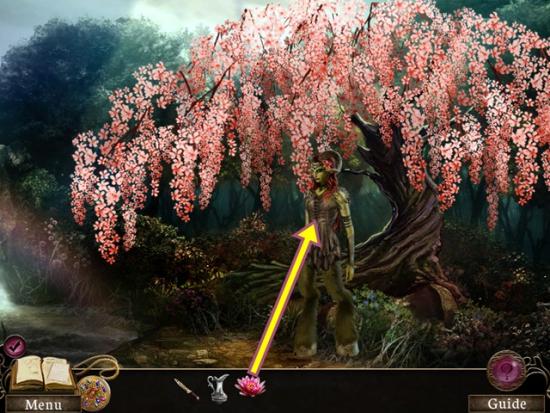
- Give the eternal flower to the Dryad. Click through the dialogue.
- Return to the gazebo (move down, then forward two scenes).
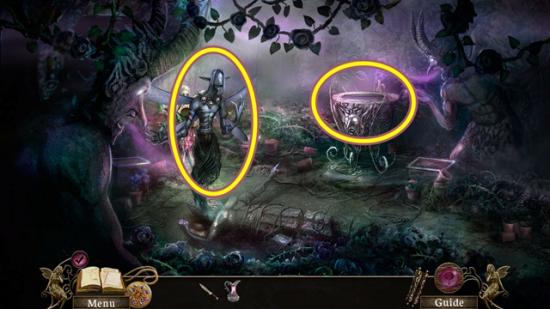
- Click on the basin. Add the eternal flower. Click through the dialogue. When Fiona disappears, take the lily charm.
- Click on the locket. Add the lily charm.
- Watch the cutscene. Click through the dialogue.
Chapter Two: The Intruder
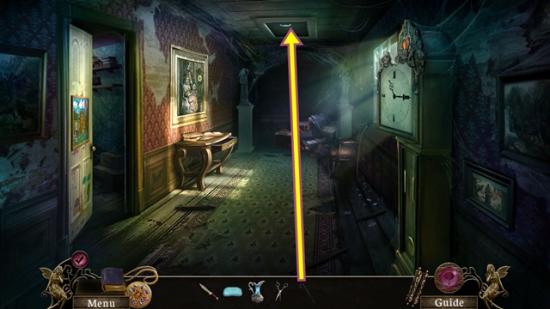
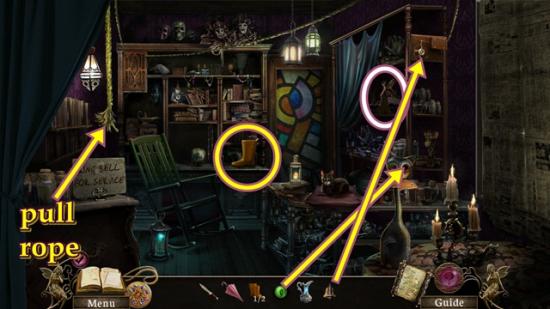
- Click on the second floor door. Pull (click and drag) the rug down and take the door key. Put the door key in the lock, then turn the key. Enter the second floor.
- Take the fairy(10/60).
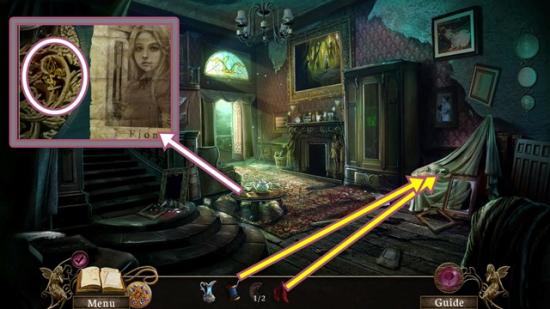
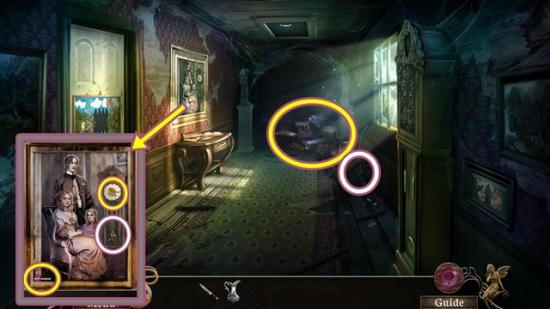
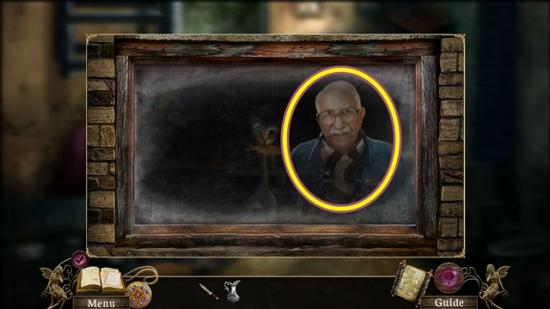
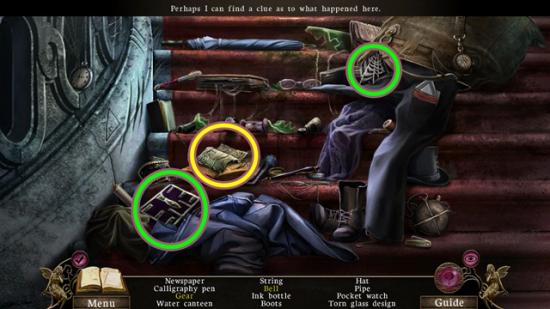
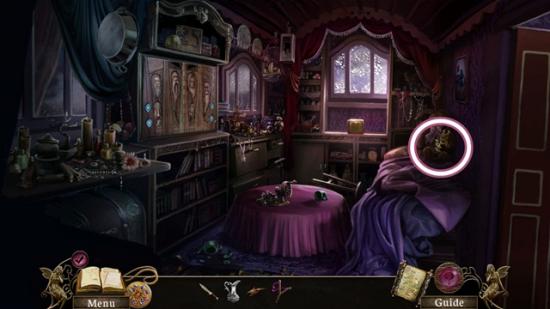
- Click on the family portrait. Take the fairy (11/60). Take the battery (1/2). Note the time on the grandfather clock. Click anywhere outside the window to close it.
- Click on the boxes.
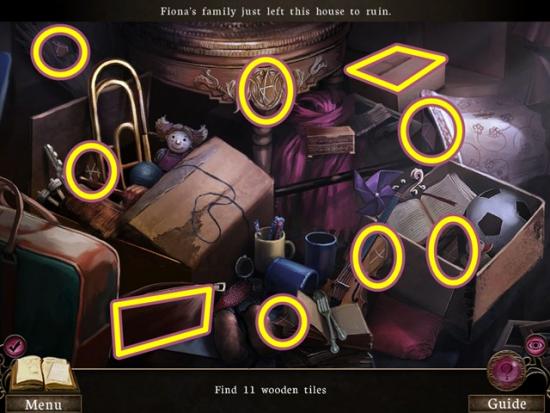
- Find the 11 tiles. Open the box and shaving kit to find more tiles. The wooden tiles are added to your inventory.
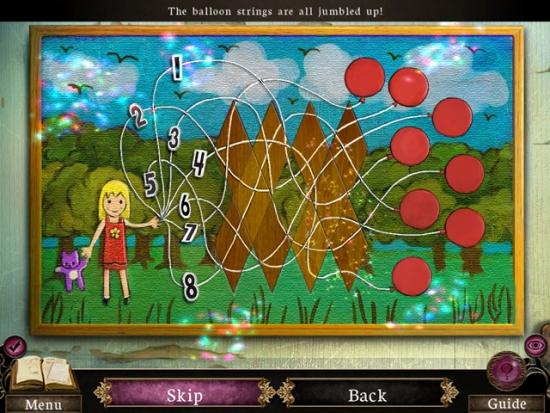
- Click on the bedroom door. Add the wooden tiles. A mini-puzzle starts. Rearrange the tiles so all the balloon lines connect. Click on two tiles to swap their positions.
- Solution:
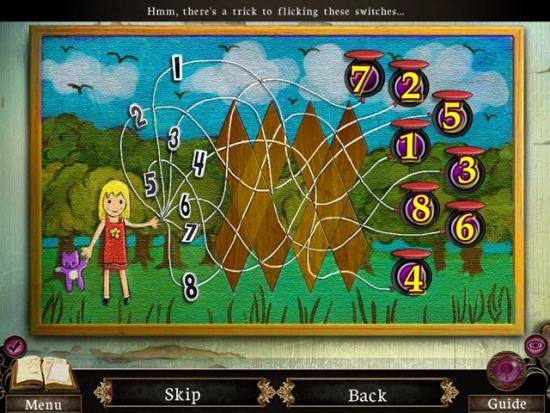
- Once you are finished, click on the switches in a particular order. Find the #1 balloon line and follow its line to its switch, then click on it. Then do the same for #2, then #3, etc.
- Once you are finished, enter the bedroom.
- Take the battery (2/2). Return to the hallway.
- Click on the table. Pull the drawer out. Add the two batteries. Take the flashlight.
- Return to the bedroom.
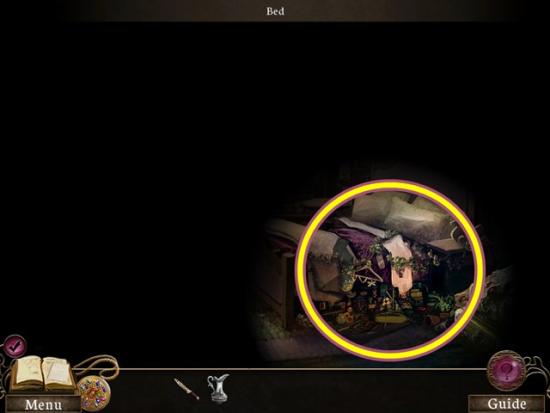
- Use the flashlight. Click on the bed.
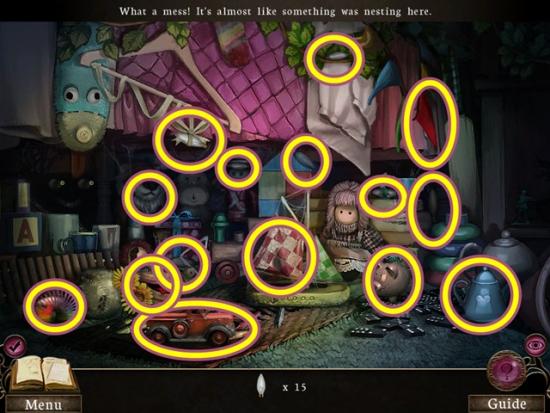
- Find the 15 bulbs. The bulbs are added to your inventory.
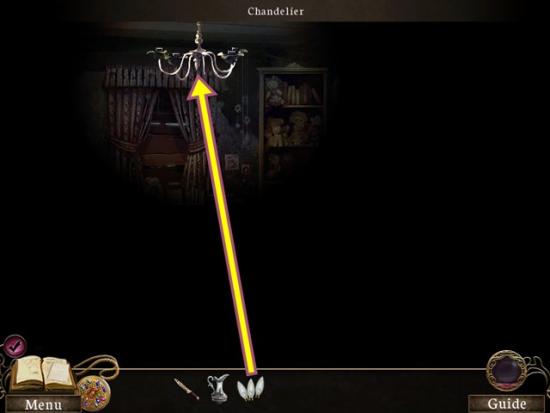
- Add the bulbs to the chandelier.
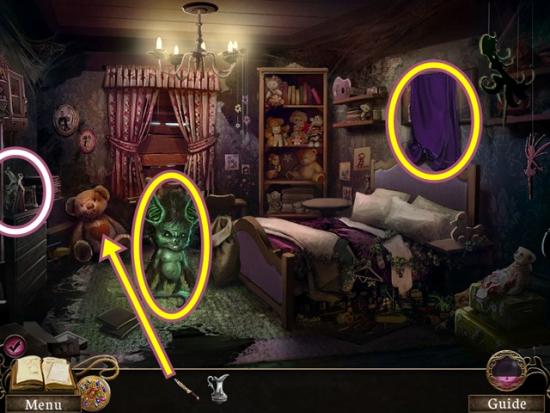
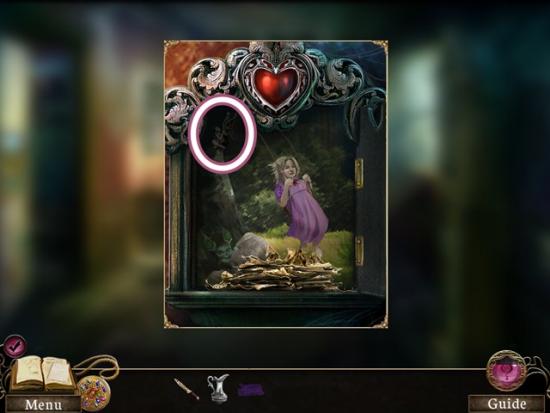
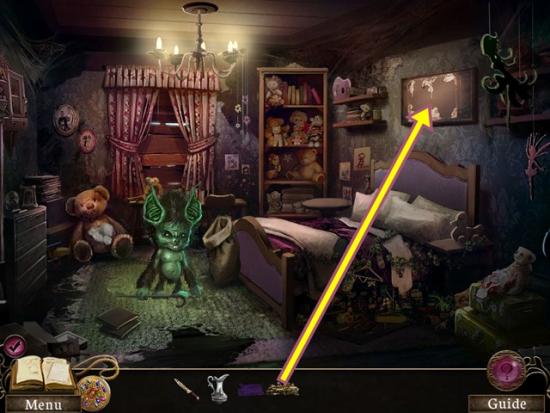
- Take the fairy (12/60).
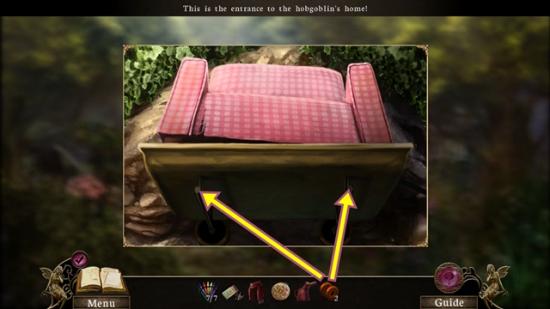
- Take the blanket. Click on the hobgoblin. Click through the dialogue.
- Click on the teddy bear. Use the ancient knife to cut the bear. A mini-puzzle starts. Use the ancient knife to cut out the heart. Click and drag the knife to outline the heart.
- Solution:
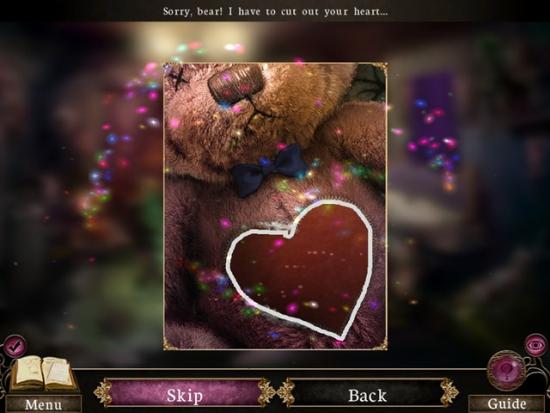
- Remove the stuffing and take the heart.
- Return to the hallway.
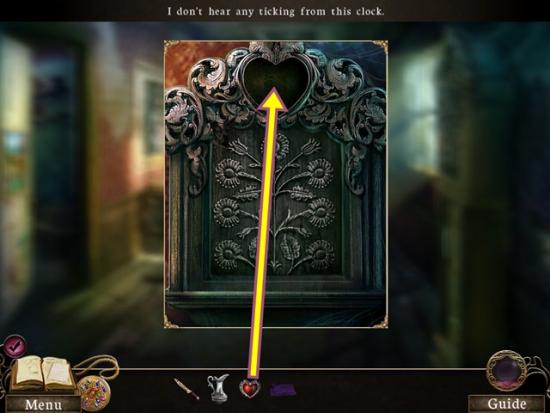
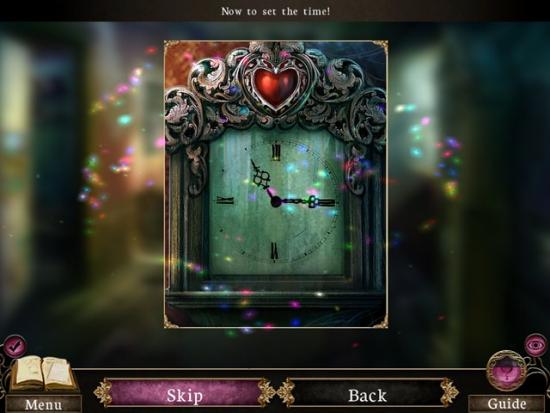
- Click on the grandfather clock. Add the heart. A mini-puzzle starts. Set the clock to the proper time. The proper time was seen in the family portrait. Start with the hour hand. Click and drag it to its proper location. To move the minute hand, click on the very bottom of the hand to take control of it. When you have control of it, move it to its proper location.
- Solution:
- Take the fairy (13/60).
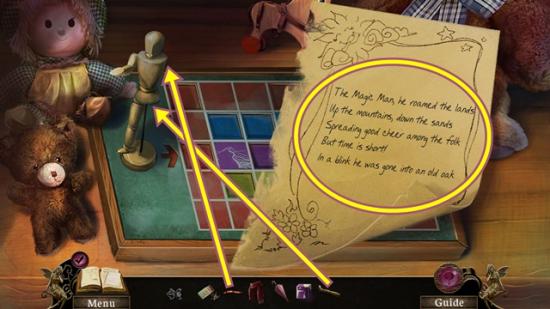
- Take the torn sketch. Click anywhere outside the window to close it.
- Return to the bedroom.
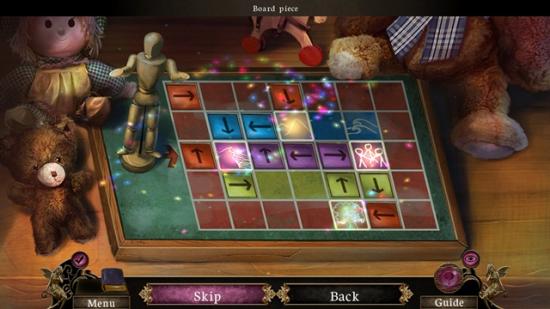
- Click on the board. Add the torn sketch. A mini-puzzle starts. Rearrange the pieces to complete the image.
- Solution:
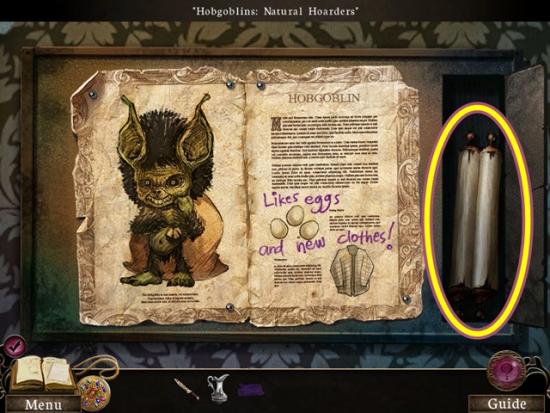
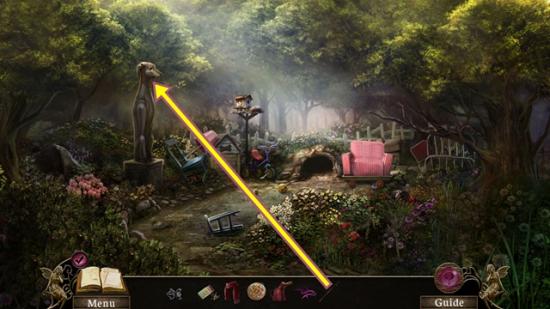
- Click on the article to learn about the hobgoblin. Take the map.
- Click on the Go to map.
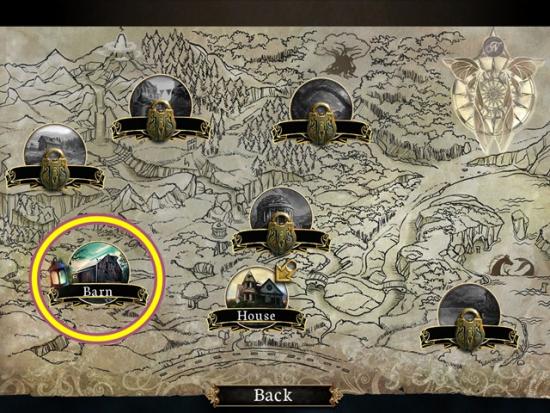
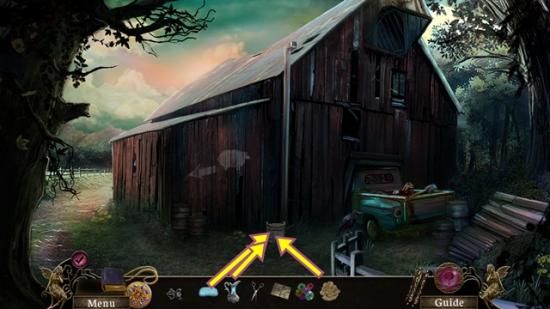
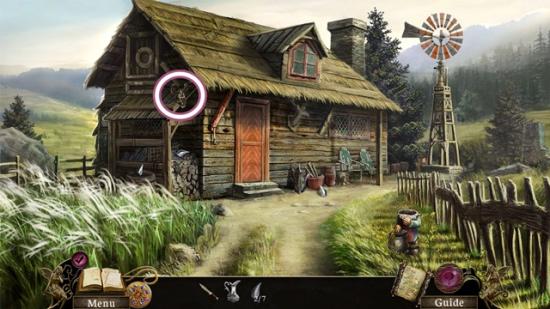
- Click on the barn.
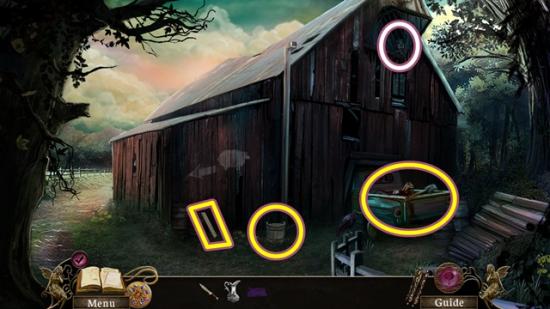
- Take the fairy (14/60).
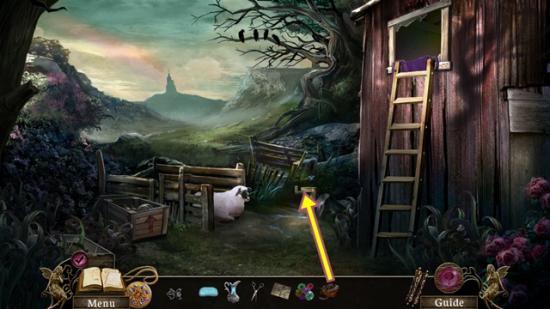
- Take the step (1/4). Click on the empty bucket. Take the step (2/4). Click down.
- Click on the pick-up truck.
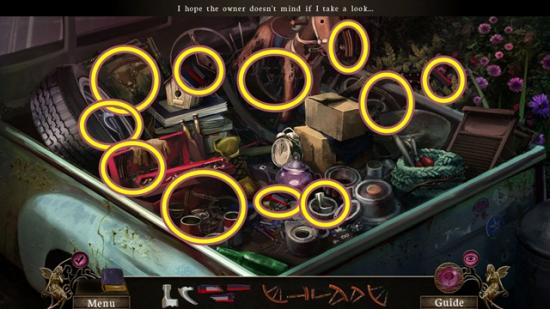
- Find all the pieces shown at the bottom of the scene.
- Go to the back of the barn.
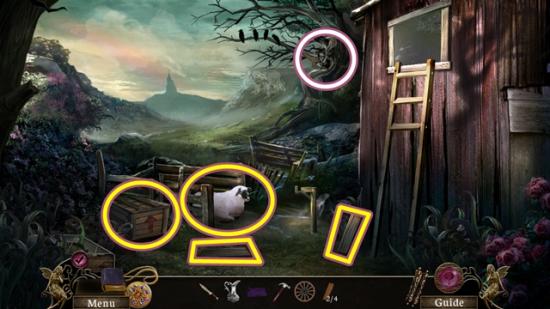
- Take the fairy (15/60).
- Take the two steps (4/4).
- Click on the sheep. Click on the sheep five times (in the close-up) to get the “Sheepish Grin” achievement. Use the ancient knife or hammer on the sheep to get the “Meanie” achievement.
- Click anywhere outside the window to close it.
- Click on the crate.
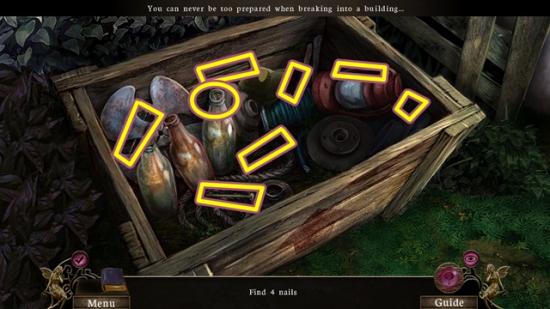
- Find the nails. Nails are added to your inventory.
- Click on the ladder. Add the four steps, then the nails, then use the hammer (four clicks).
- Click on the window. Smash the glass with the hammer. Use the hammer on the cracks in the window. Click on one crack about four times; when no more cracks appear, use the hammer on the other crack.
- Put the blanket over the shards of glass, then enter the loft.
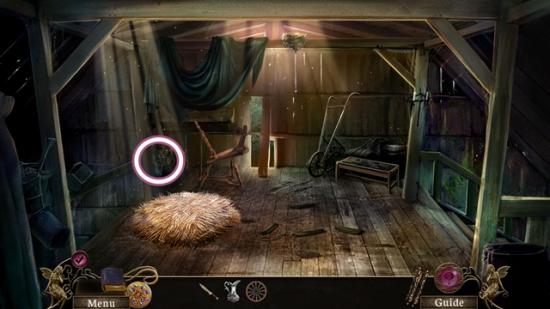
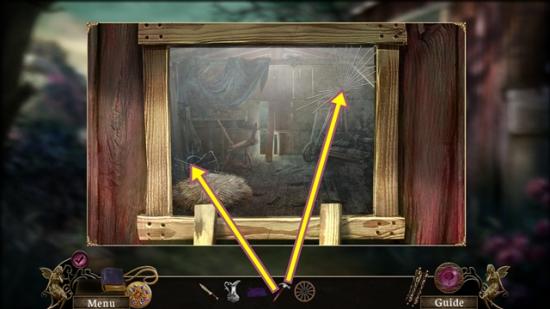
- Take the fairy (16/60).
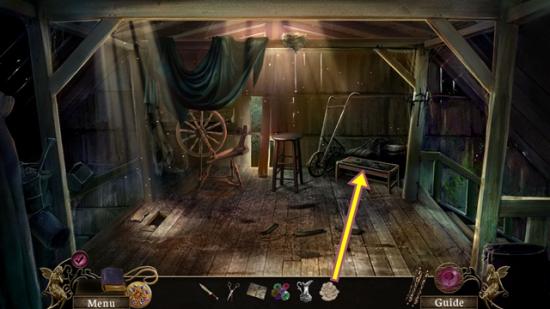
- Go down the stairs to the workshop.
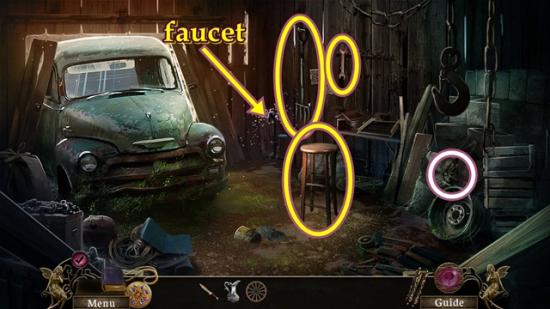
- Take the fairy (17/60).
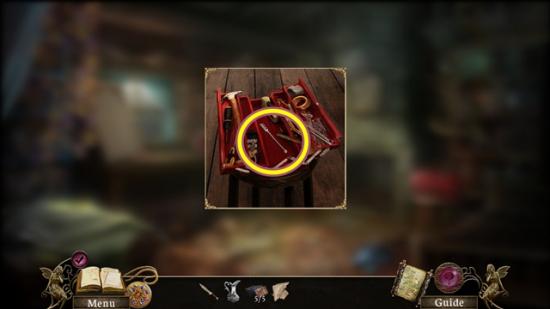
- Take the stool, pitchfork and wrench.
- Click on the faucet.
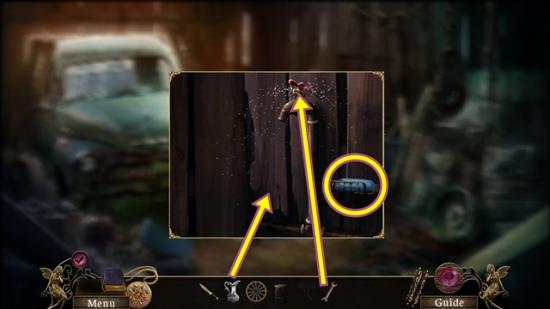
- Take the soap. Use the wrench to tighten the valve.
- Place the pitcher under the tap, then turn the tap and take the filled pitcher.
- Return to the loft.
- Use the pitchfork on the hay. Click on the floorboard you uncovered.
- Lift the loose board out using the ancient knife. Take the car key.
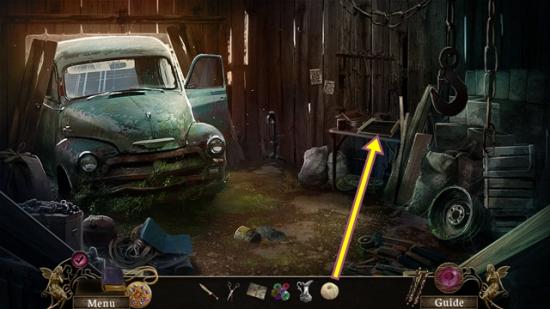
- Return to the workshop.
- Click on the truck.
- Put the car key in the lock and turn it. Take the scissors and basket.
- Return to the loft.
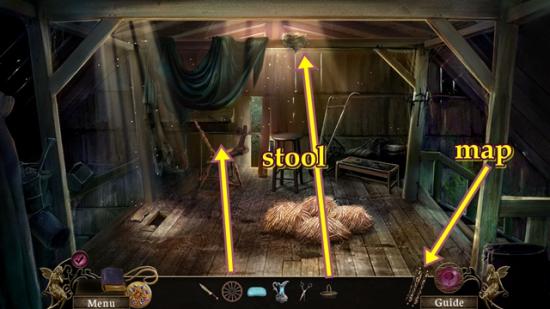
- Put the stool on the floor. Click on the nest. Add the basket to get the rotten eggs.
- Click on the loom. Put wheel on loom. Click anywhere outside the window to close it.
- Return to the bedroom (click on the map at the bottom right of the scene and return to the house, go up stairs and into the room on the left).

- Give the rotten eggs to the hobgoblin. Click through the dialogue. Take the cane it dropped (be careful not to leave the room).
- Leave the bedroom.
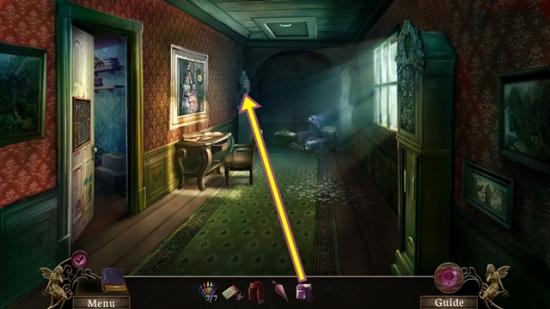
- Click on the attic hatch. Hook the cane into the latch and pull, then pull down the hatch. Enter the attic.
- Take the fairy (18/60).
- Take the empty feed bag.
- Click on the sewing box. A mini-puzzle starts. Swap the crosses to complete the pattern.
- Solution:
- Open the box.
- Take the fairy (19/60).
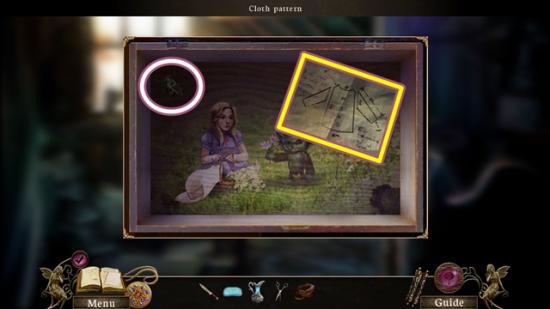
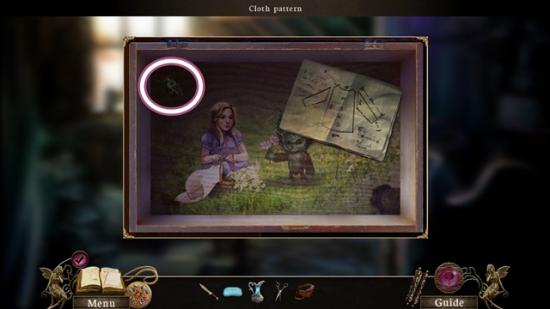
- Take the cloth pattern.
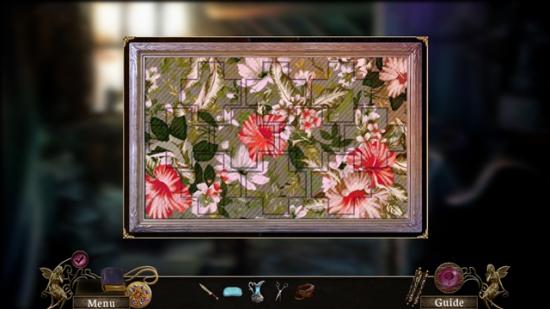
- Look at the picture. Click anywhere outside the window to close it.
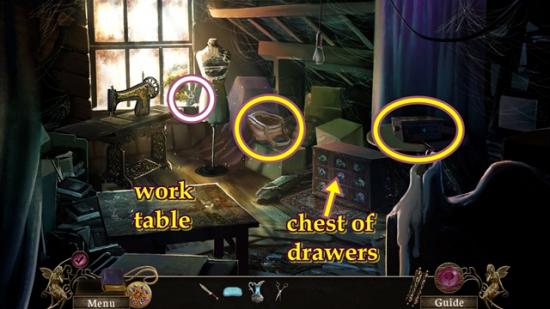
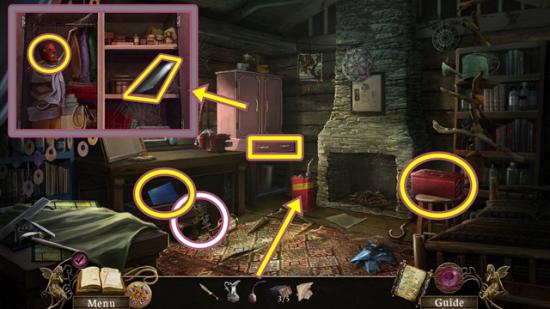
- Click on the chest of drawers.
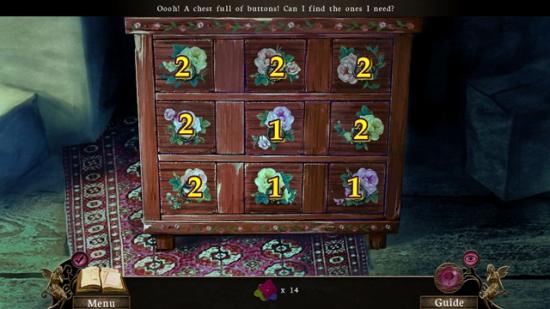
- Open the drawers to find the 15 buttons. The screenshot above shows how many buttons are in each drawer. Once you’ve found all the buttons in a drawer, it will close automatically. Buttons are added to your inventory.
- Return to the loft (click on the map, click on the barn, go to the back of the barn and climb the ladder into the loft).
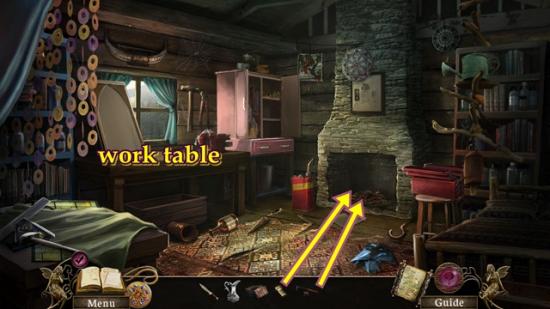
- Click on the work table.
- Take the fairy (20/60).
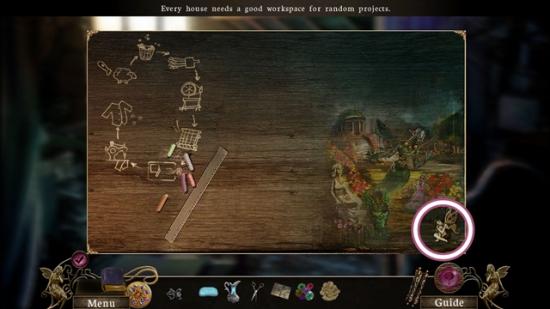
- Click on the table to add instructions to your journal. Click anywhere outside the window to close it.

- Use the empty feed bag on the haystack to get the bag of hay.
- Go back outside.
- Hang the bag of hay on the hook. When the sheep gets up, click on the pen (where it was). Take the shears. Use the shears on the sheep. A mini-puzzle starts. Shear the sheep. Start from the bottom of the sheep and click and drag the shears upward. Continue to shear the sheep until the game stops you. Dirty wool is added to your inventory.
- Click on the journal. If you clicked on the work table in the attic, the instructions for making clothes will be here. Click anywhere outside the window to close it.
- Return to the front of the barn.
- Click on the empty bucket. Add the filled pitcher, then the soap, then the dirty wool. Click on the dirty wool and move it around until you get the clean wool.
- Return to the loft.
- Click on the carding bench. Add the clean wool (uncarded wool). Click and drag the card back and forth through the wool until you get the fine wool.
- Click on the spinning wheel.
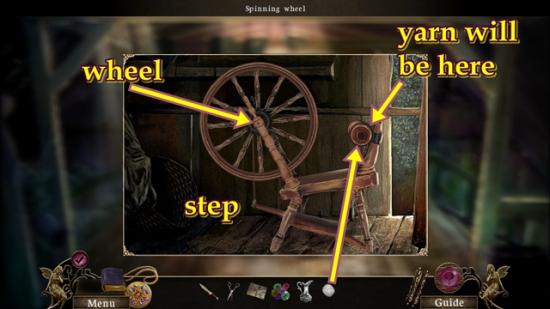
- If you haven’t already, add the wheel, then add the fine wool. Click on the step to spin the wheel. Do this three times, then take the yarn.
- Return to the workshop.
- Put the yarn on the loom. A mini-puzzle starts. Complete the pattern. Click on a colour on the left and click on a white spot on the cloth to colour it.
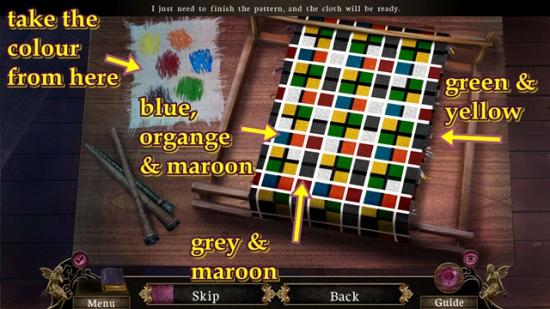
- Solution:
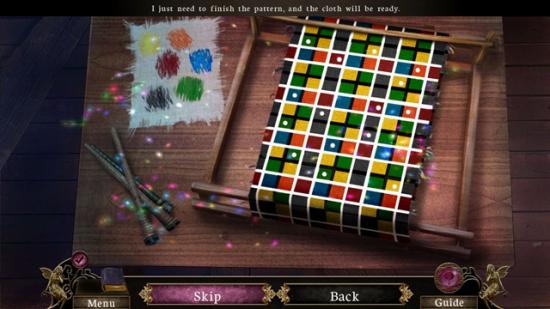
- Note all the squares that have a little white dot in them are the ones that have been painting to solve the puzzle.
- The uncut cloth is added to your inventory.
- Return to the attic (click on the map and return to the house and make your way up to the attic).
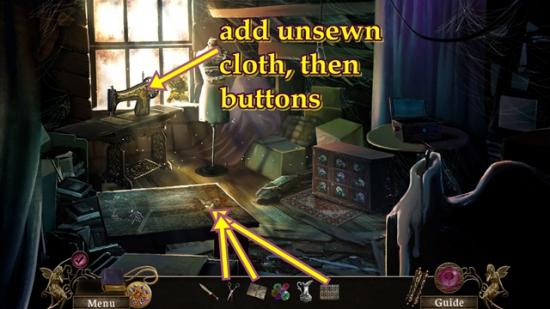
- Click on the work table. If you haven’t already taken it, take the fairy. Add the uncut cloth, then add the cloth pattern, then add the scissors. A mini-puzzle starts. Cut the cloth. The scissors are added to your cursor, click and drag the scissors around the pattern to cut the cloth. Notice the pieces are numbered, cut the sleeve on the left first, then the other sleeve, then the body.
- When you are finished, take the unsewn cloth.
- Click on the sewing machine. Add the unsewn cloth and click on the pedal (three times) to sew the coat. When you are done sewing, add the buttons and take the coat.
- Return to the bedroom.
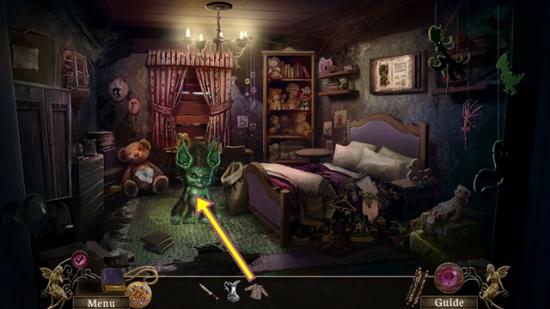
- Give the coat to the hobgoblin. Click through the dialogue.
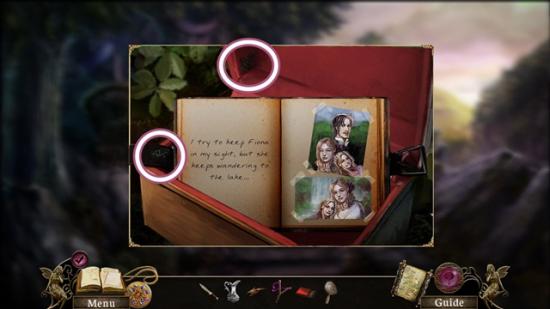
- Click on the sack. Turn the right pages of the book and take the photo of Fiona.
- Watch the cutscene.
Chapter Three: The Monster
- Talk to the hobgoblin. Note the words in yellow.
- Take the fairy (21/60).
- Click on the pedestal and add the photo of Fiona.
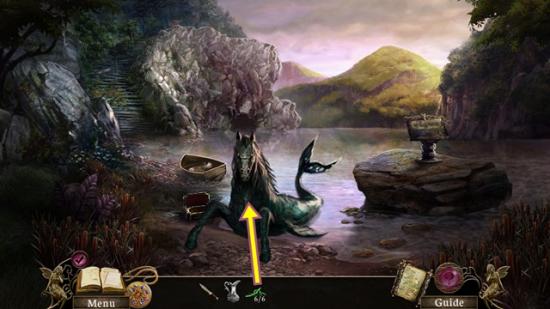
- The Kelpie appears. Click on the Kelpie.
- Watch the cutscene.
- Talk to the hobgoblin. Note the words in yellow.
- When the hobgoblin disappears, the sack appears but it is out of reach.
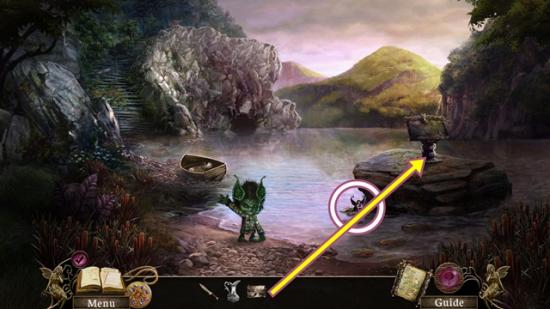
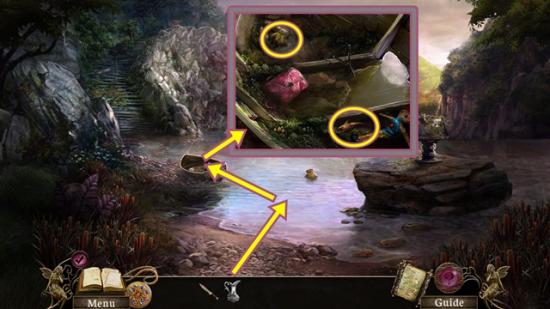
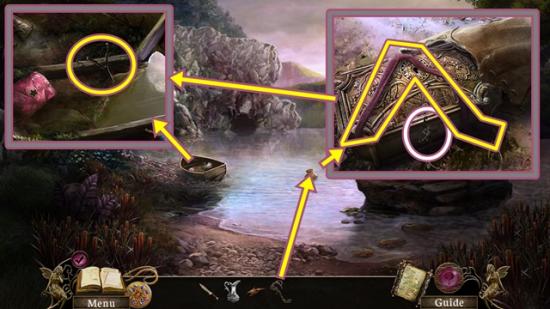
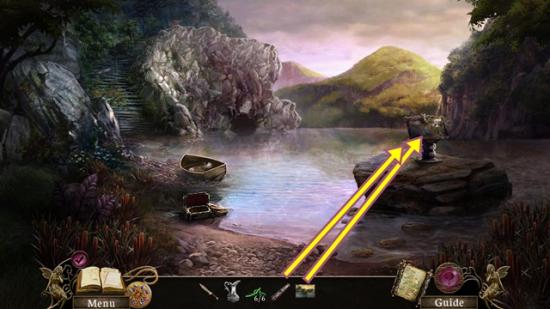
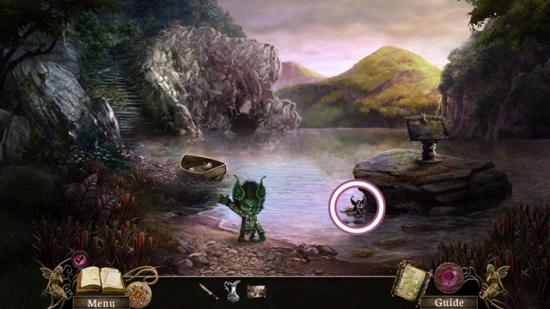
- Fill the pitcher in the lake to get the filled pitcher.
- Click on the boat. Add the filled pitcher.
- Take the dragon carving and the fruit peeling (1/3). Click anywhere outside the window to close it.
- Go up the stairs to the shaded path.
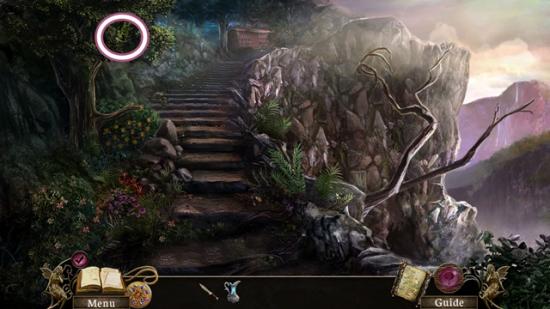
- Take the fairy (22/60).
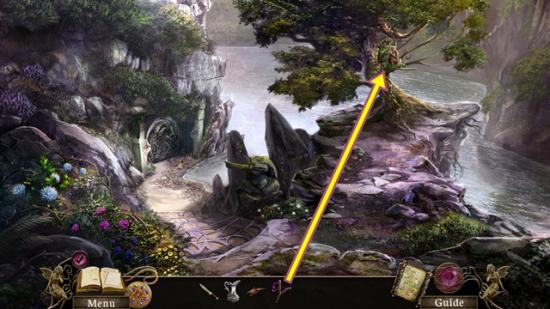
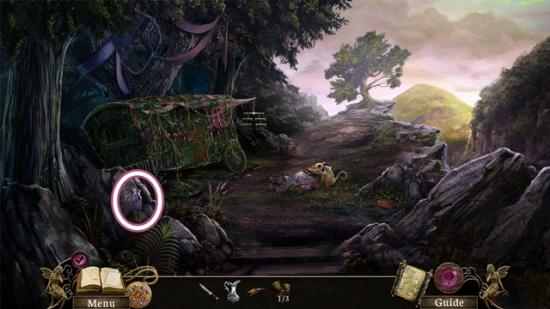
- Continue up the stairs to the wagon.
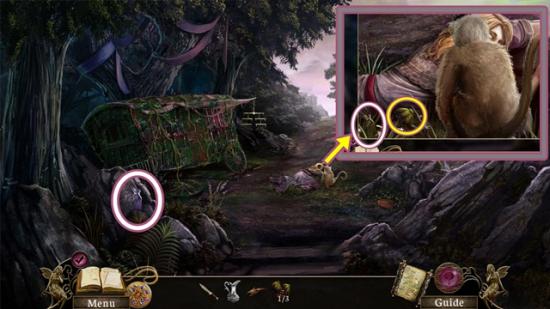
- Take the fairy (23/60).
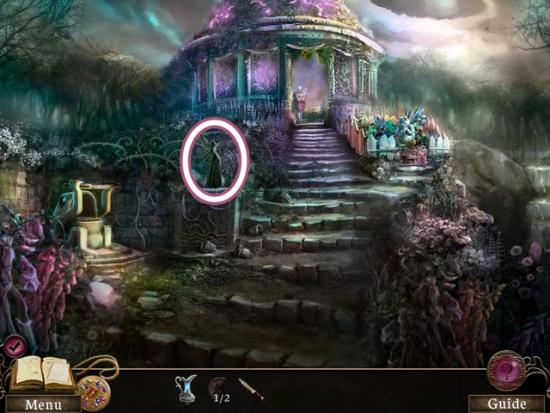
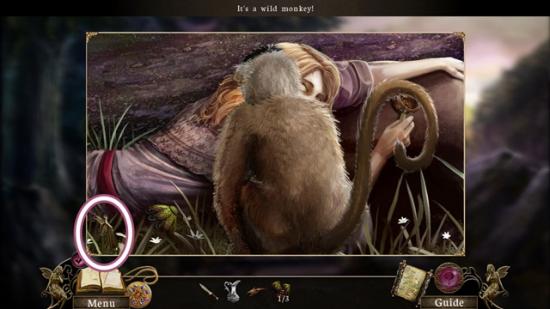
- Click on the dead woman.
- Take the fairy (24/60).
- Take the fruit peeling (2/3). Click anywhere outside the window to close it.
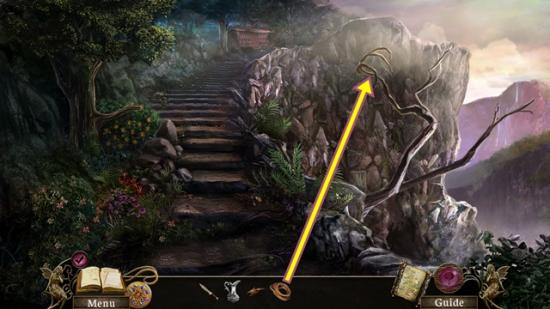
- Walk forward to the cliff.

- Take the fairy (25/60). Continue down the path to the mural.
- Take the fairy (26/60).
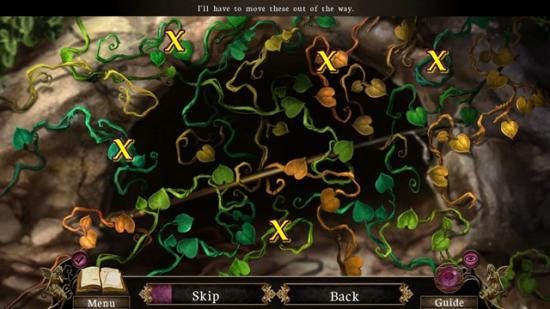
- Use the ancient knife to cut the vines. First cut the front most vine, then continue in that fashion. If you click on the wrong vine, the ancient knife will return to your inventory.
- When you are finished, take the fruit peeling (3/3).
- Return to the shaded path (move down three scenes).
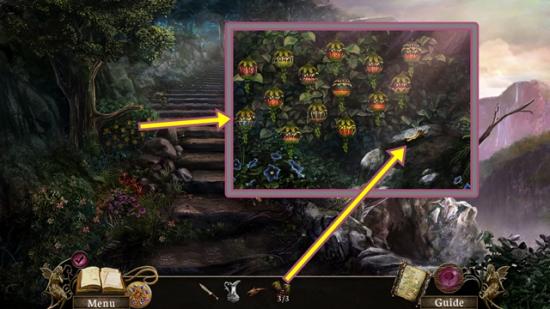
- Click on the fruit. Add the three pieces of fruit peeling to the core. A mini-puzzle starts. Determine the fruit the monkey will want by looking at the peelings. Click on the fruit to eliminate them. The last piece of fruit is the one the monkey will eat.
- Solution:
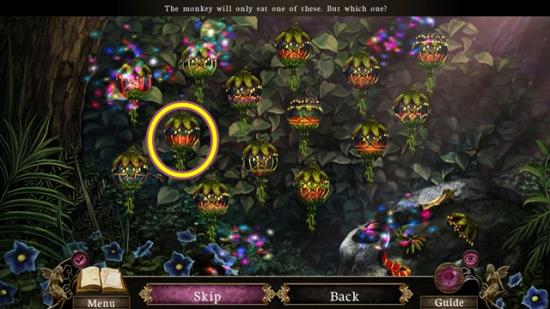
- The fruit circled in the screenshot above is the one you do not click.
- The fruit is added to your inventory.
- Return to the wagon and click on the dead woman.
- Give the fruit to the monkey and it will run away.
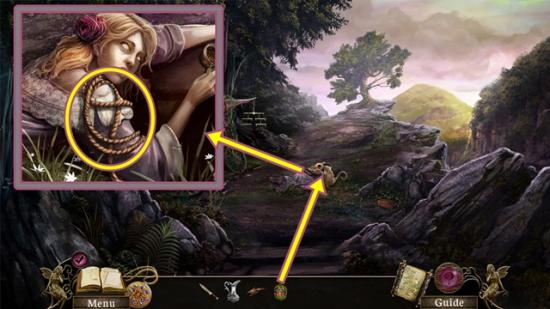
- Click on the dead woman again.
- Take the rope. Click anywhere outside the window to close it.
- Return to the shaded path.
- Put the rope on the branch. Pull the rope two times to break the branch. Take the branch.
- Return to the lake.
- Use the branch to get the hobgoblin’s sack (put your cursor directly on the sack, then click; do this twice).
- Click on the sack.
- Take the fairy (27/60) and the rubber strip. Click anywhere outside the window to close it.
- Click on the boar. Add the rubber strip to the slingshot handle to get the slingshot. Click anywhere outside the window to close it.
- Return to the cliff (move forward three scenes).
- Click on the three. Use the slingshot on the monkey thief. A mini-puzzle starts. Get the weights from the monkey using the slingshot.
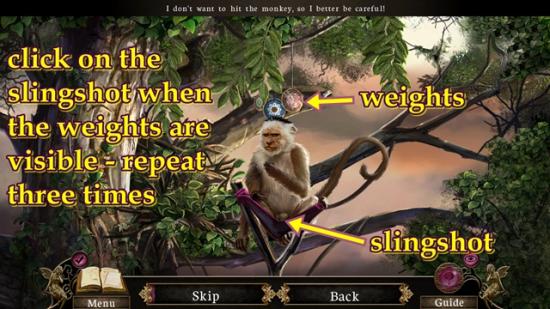
- When the monkey moves out of the way, click on the slingshot. Do this three times.
- When you are finished, weights are added to your inventory.
- Return to the wagon.
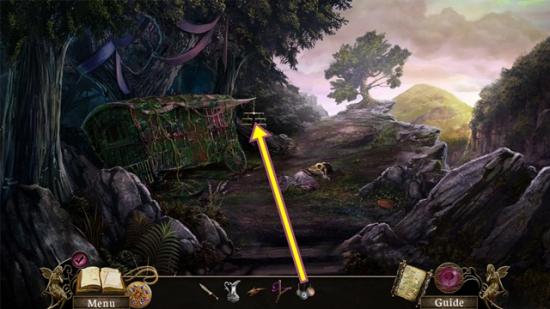
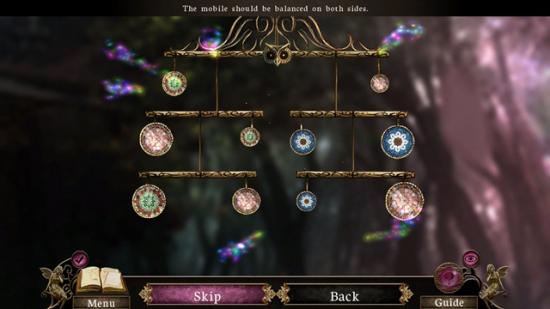
- Add the weights to the mobile (when your cursor is directly over the mobile, click). A mini-puzzle starts. Rearrange the weights so both sides are even. You can only swap weights from one side to the other.
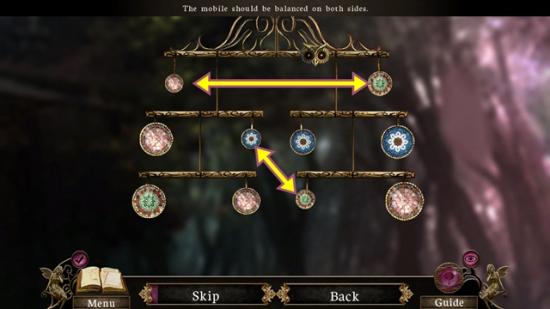
- Solution:
- Enter the wagon.
- Take the fairy (28/60).
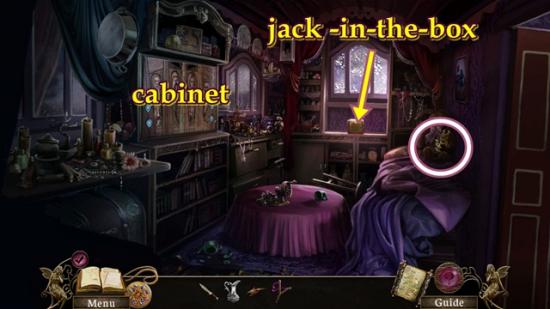
- Click on the cabinet. A mini-puzzle starts. Align the centre knobs by rotating the blue discs on the side.
- Click on the discs to determine what turns what.
- When you are finished, a hidden object scene starts.
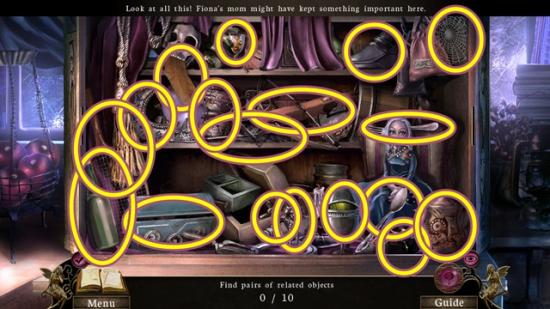
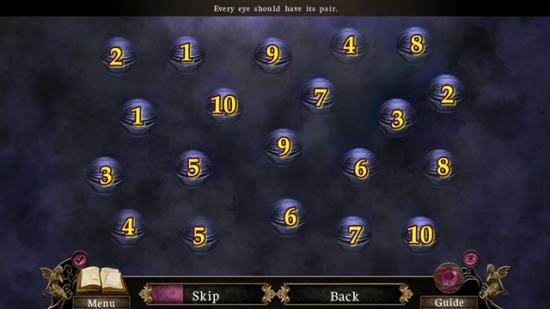
- Find the related pairs of objects. Pair the sock and shoe; shield and suit of armour; move the curtain and pair the star and moon; open the chest and pair the spider and web; arrow and crossbow; pair the spoon and fork; corkscrew and bottle; quill and inkwell; teapot and cups; lift the silver tray and pair the tennis ball to the tennis racket.
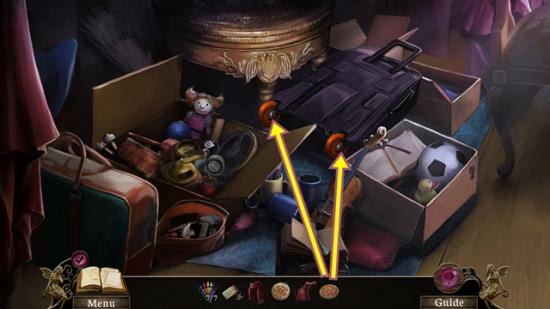
- When you are finished, open the suitcase and take the winder.
- Click on the jack-in-the-box.
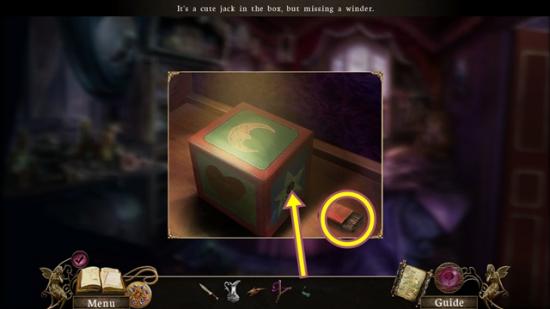
- Take the matches. Add the winder, then turn it. When the duck pops out, take the lens from its eye.
- Leave the wagon and click on the dead woman.
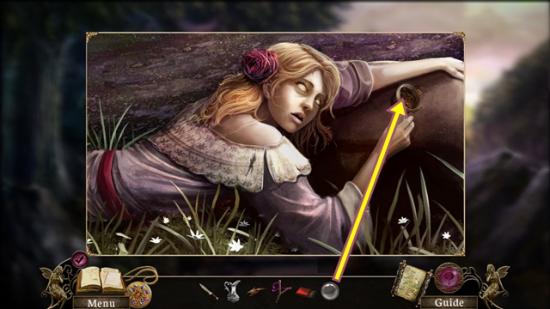
- Put the lens on the magnifying glass. Take the magnifying glass. Click on the carving it uncovered. Pry it out with the ancient knife. A mini-puzzle starts. Use the knife to cut out the carving.
- Solution:
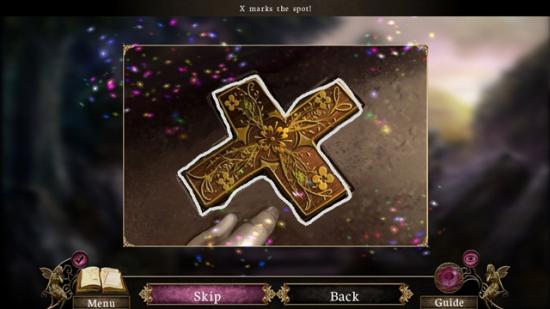
- The carved X is added to your inventory.
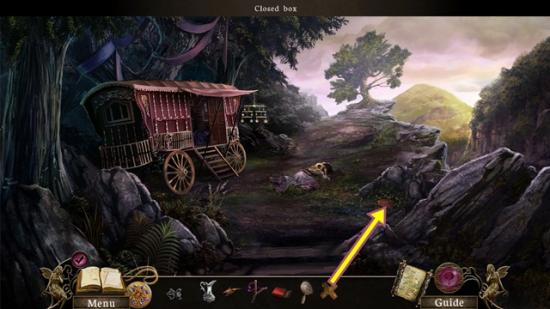
- Click on the closed box. Add the carved X. Press the X.
- Take the two fairies (29 and 30/60).
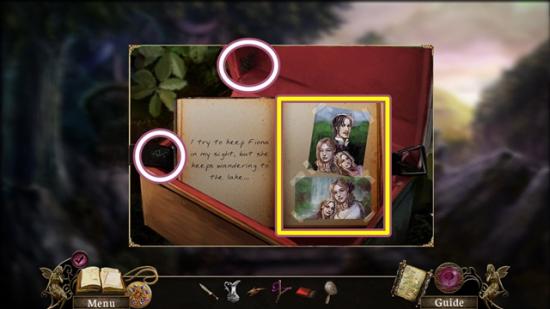
- Read the journal and turn the pages on the right. Take the dragon carving. Click anywhere outside the window to close it.
- Return to the mural (move forward two scenes).
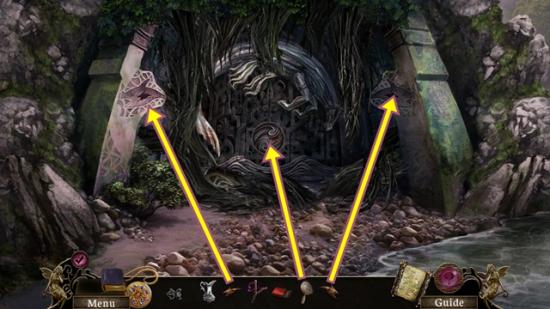
- Add the two dragon carvings to the left and right recesses. Use the magnifying glass on the small symbols in the centre of the door. A mini-puzzle starts. Click on the pairs of symbols.
- Solution:

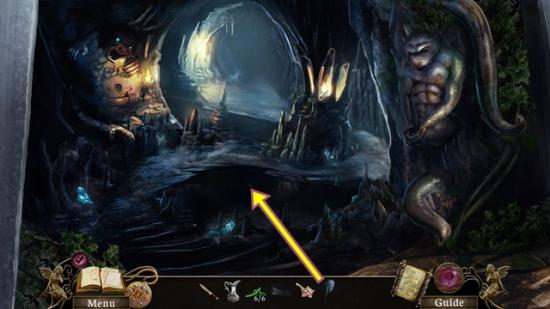
- Enter the cave.
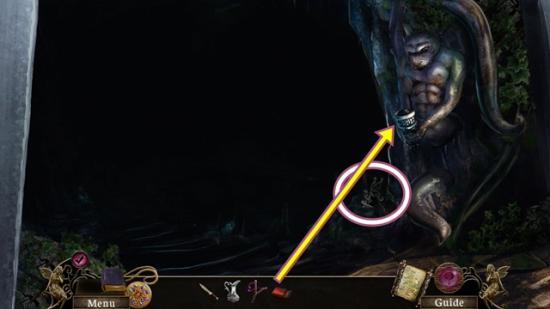
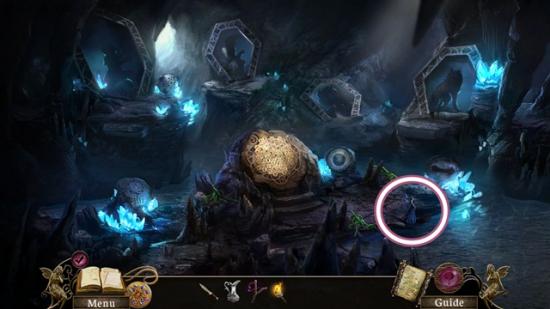
- Take the fairy (31/60).
- Use the matches to light the torch. Take the torch. Use the torch to light the series of torches so you can enter the cave.
- Use the torch on the three areas of kelpweed, then cut it with the ancient knife. Take the kelpweed (3/6).
- Go further into the cave.
- Take the fairy (32/60).
- Use the torch on the three areas of kelpweed, then cut it with the ancient knife. Take the kelpweed (6/6).
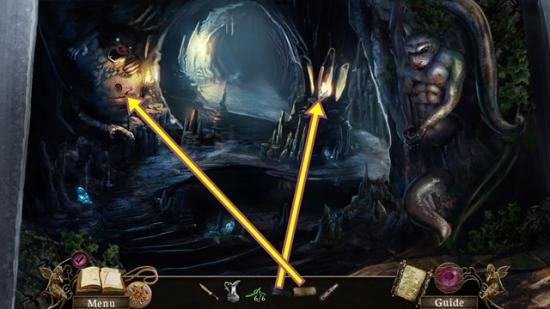
- Click on the stone code on the left. Note the water symbol and the number 4.
- Click on the control panel. A mini-puzzle starts. Click on four symbols that represent water.
- Solution:

- Click on the statue of the boy.
- Put the slingshot in the boy’s hands. When the satchel opens, take the gear.
- Return to the passageway.
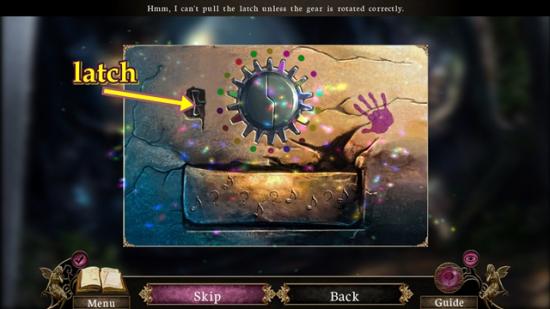
- Click on the markings. Add the gear to the inset. A mini-puzzle starts. Rotate the gear so the colours on its spokes match the colour on the stone. When you are done, pull the latch.
- Solution:
- When the panel opens, take the stone disc. Click anywhere outside the window to close it.
- Return to the cave.
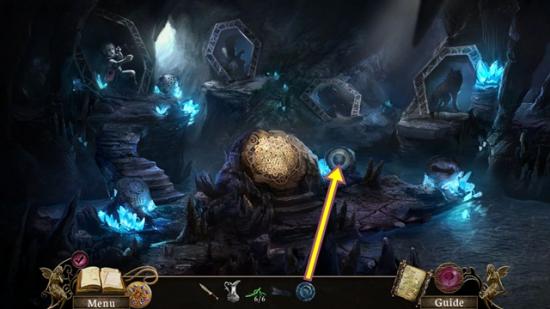
- Click on the stone code on the right. Add the stone disc. A mini-puzzle starts. Rotate the rings to recreate the image. Click and drag the rings to turn them.
- Solution:
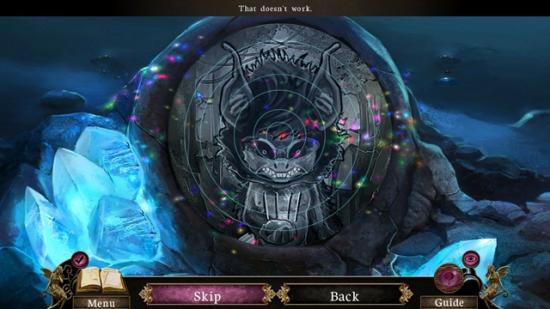
- Note the hobgoblin and the number 4. Click down, then click on the control panel. A mini-puzzle starts. Click on the four symbols that represent the hobgoblin. Think back to what you had to do for and get from the hobgoblin.
- Solution:
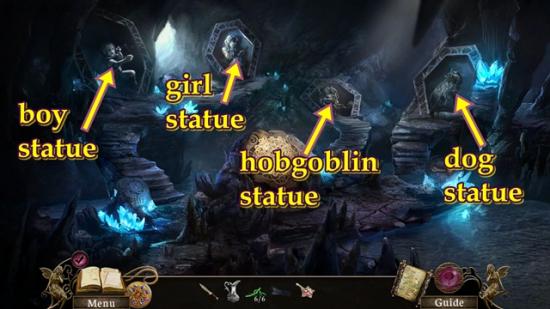
- Click on the hobgoblin statue. Take the three marbles from its eyes and mouth. Click anywhere outside the window to close it.
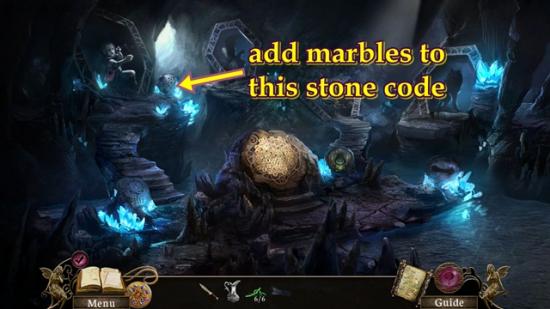
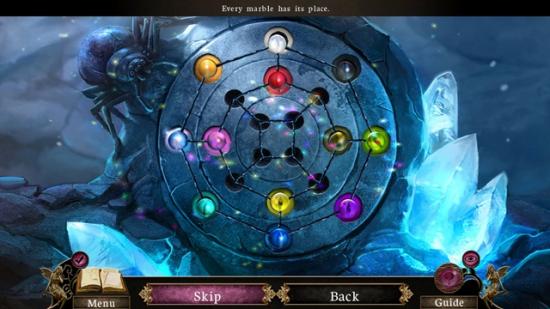
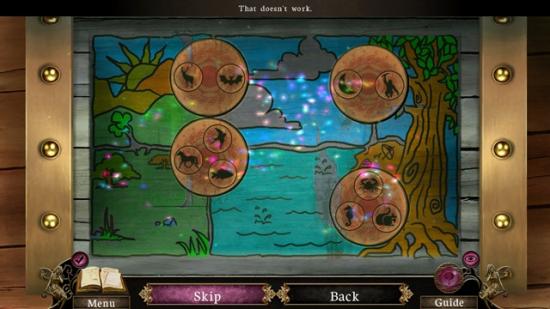
- Click on the stone disc beside the boy statue. Add the three marbles. A mini-puzzle starts. Place all the marbles on they’re matching coloured slot. Click and drag the marbles along the web.
- Solution:
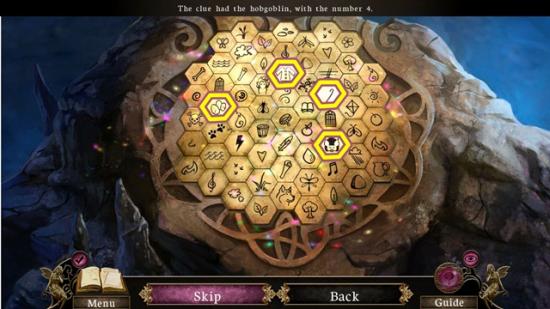
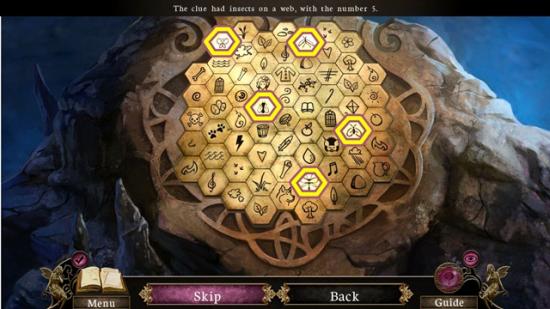
- Take note of the insects and the number 5.
- Click on the control panel. A mini-puzzle starts. Click on the five symbols that represent insects.
- Solution:
- Click on the girl statue once the path appears.
- Take the jewel and the butterfly net. Click anywhere outside the window to close it.
- Return to the lake (down seven scenes).
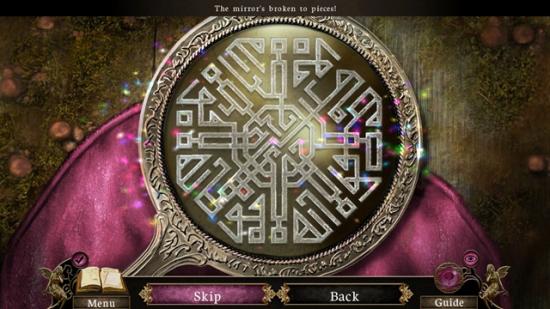
- Click on the boat. Add the jewel to the purse. Open the purse, then click on the broken mirror. A mini-puzzle starts. Repair the broken mirror by placing the pieces in the right place. Hover your cursor over a piece and click to rotate, click and drag to put the piece in the mirror. When a piece is correctly placed, the piece locks into place. Start with the largest pieces first.
- Solution:
- Return to the cave’s passageway.
- Click on the murky water.
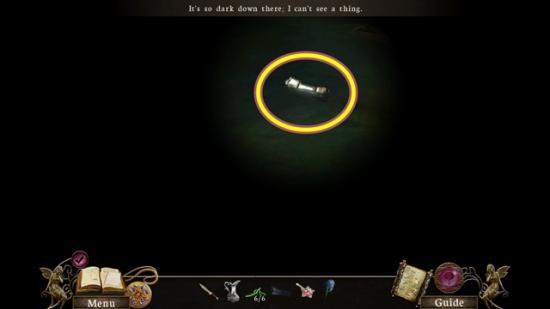
- Use the torch to find the bone, then use the butterfly net to get the bone.
- Return to the cave.
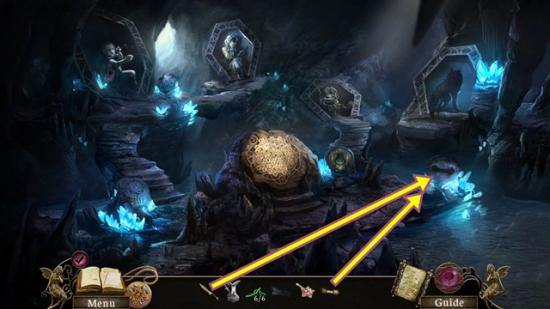
- Click on the stone code on the far right. Remove the wood with the ancient knife. Add the bone. Note the dog symbol and the number 4.
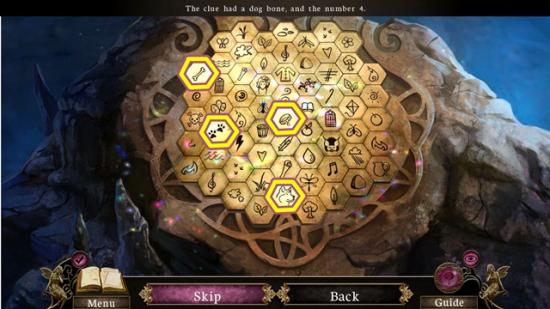
- Click on the control panel. A mini-puzzle starts. Click on the four symbols that represent a dog.
- Solution:
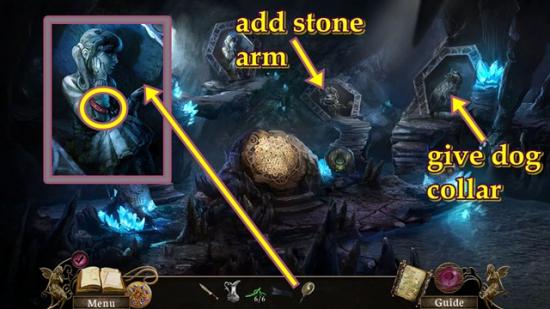
- Click on the girl statue. Put the mirror in the girl’s hand, click through the dialogue, then take the dog collar. Click anywhere outside the window to close it.
- Click on the dog statue. Give the dog collar to the dog statue. Take the stone arm.
- Click on the hobgoblin statue. Add the stone arm. Take note of the text in yellow.

- Take the stone key from its hand.
- Return to the wagon, then go inside.
- Put the stone key on the key machine. A mini-puzzle starts. Swap the pins to match the stone key’s grooves.
- Solution:
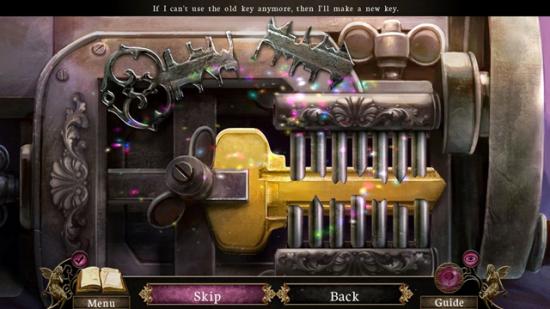
- The new key is added to your inventory.
- Return to the lake.
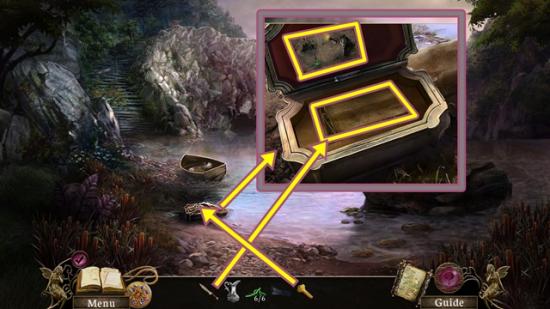
- Click on the sack. Unlock the chest with the new key.
- Click on the sheet of paper, then take the blank music sheet. Use the ancient knife in the slot to lift the bottom out and take the flute. Look at the sketch. Click anywhere outside the window to close it.
- Return to the passageway.
- Put the wood on any torch to get the burnt wood. Click on the markings.
- Add the blank sheet music, then rub the burnt wood on it to transfer the notes. Take the music sheet.
- Return to the lake.
- Click on the pedestal. Add the music sheet and the flute. A mini-puzzle starts. Arrange the notes according to the sheet music. To arrange the notes, click and drag them up or down to make it match its position in the sheet music. Not all notes are indicated on the sheet music (the question marks). First position the notes you know to be correct. Press the green play button to play the melody. Green notes mean they are properly positioned, red notes mean they are in the wrong position and yellow notes mean they are close to their proper position.
- Solution:

- Give the six pieces of kelpweed to the Kelpie. Click through the dialogue. Take the kelpweed charm.
- Click on the locket. Add the kelpweed charm. Click anywhere outside the window to close it.
Talk to the Kelpie. Click through the dialogue.
Chapter Four: The Curio Shoppe
- Take the fairy (33/60).
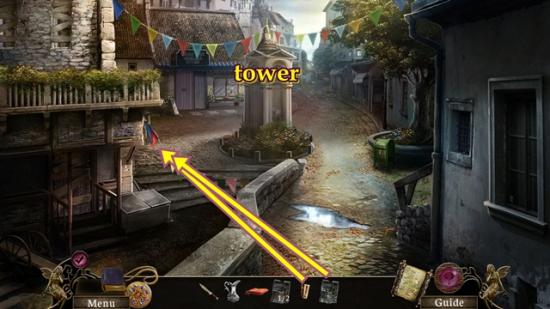
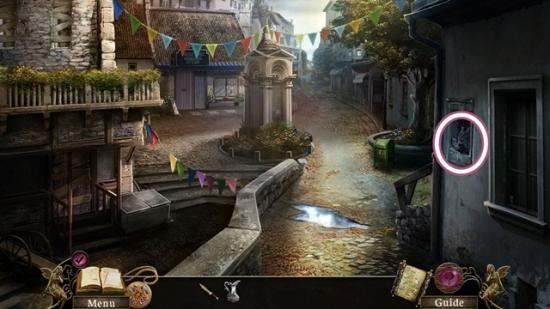
- Click on the tower to take note of it in your journal. Click anywhere outside the window to close it.
- Click on the general store. Take the rag. Click anywhere outside the window to close it.
- Move forward to Main Street.
- Take the fairy (34/60).
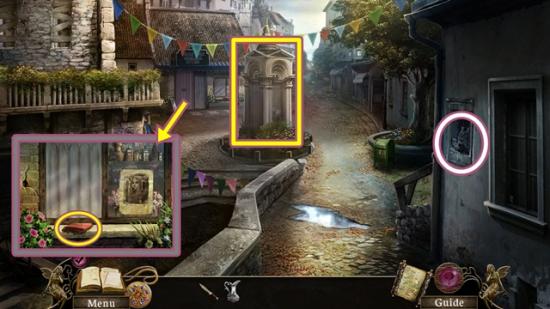
- Click on the bulletin board to start a hidden object hunt.
- Find all the objects. Move your cursor around the scene. When it turns into a hand, click. This will reveal an item. A poster piece (1/2) is added to your inventory.
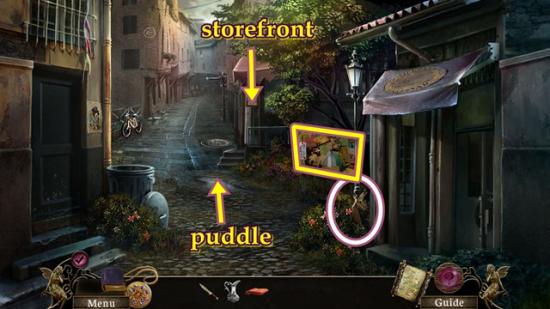
- Click on the storefront. Undo the clip to make the papers fall.
- Click on the puddle. Move the pieces of paper out of the way and take the wet poster piece.
- Return to the town square.
- Click on the banners. Add the clip, then the wet poster piece. Wait a few seconds, then take the poster piece (2/2).
- Click on the tower. Add the two poster pieces. Take the photo of Main Street.
- Return to Main Street.
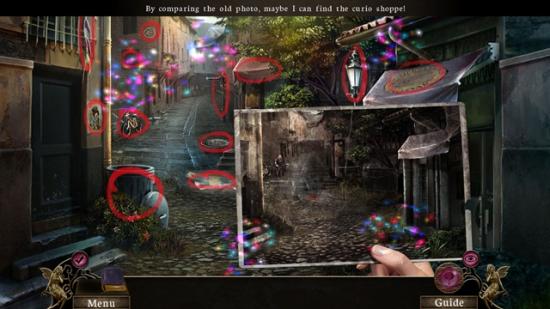
- A mini-puzzle starts. Find 12 differences.
- When you are finished, go back to Main Street.
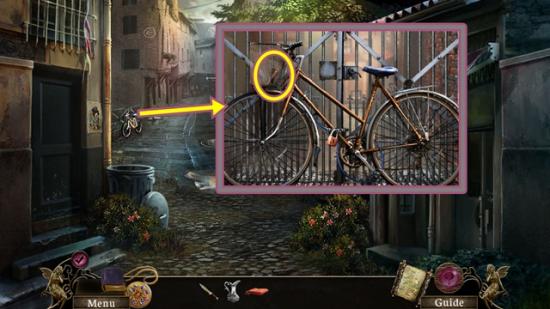
- Click on the bike. Take the pen from the basket. Click anywhere outside the window to close it.
- Return to the town square.
- Click on the general store. Put the pen in the crack and take the small key.
- Return to Main Street.
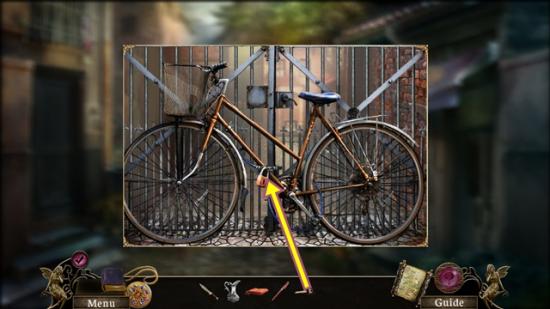
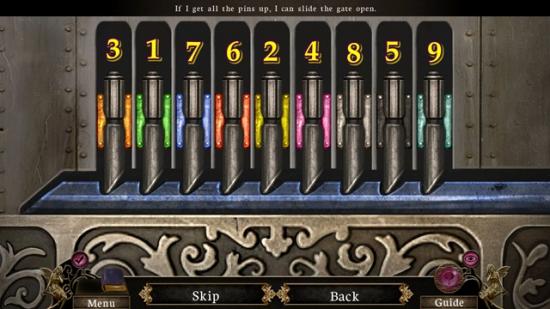
- Click on the bike. Unlock the padlock with the small key. Open the padlock. When the bike rolls away, use the pen on the latch. A mini-puzzle starts. Pick the lock by lifting all the pins. Start by clicking all the pins. When one remains “up,” that is pin #1. With pin #1 up, click another pin. If pin #1 falls down, click it again and click on another pin. Continue until a second pin stays up. This pin becomes pin #2. With pin #1 and pin #2 up, discover pin #3 and so forth.
- Solution:
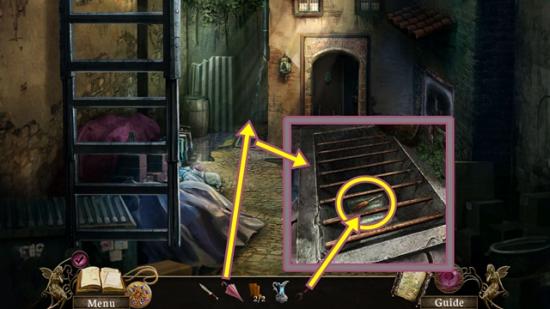
- Go into the back alley.
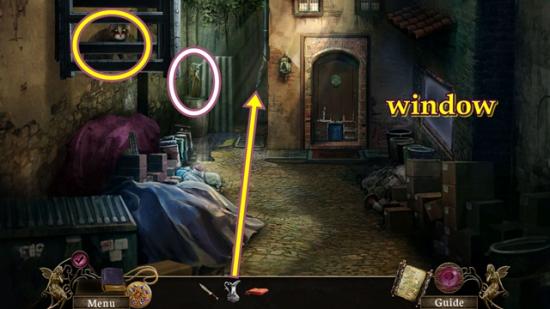
- Take the fairy (35/60).
- Put the pitcher under the burst pipe to get the filled pitcher. Click on the black cat.
- Click on the window. Add the filled pitcher (three clicks) to the window, then add the rag. Click on the rag and wipe it quickly back and forth.
- When you are done, click on the man in the reflection. Click through the dialogue.
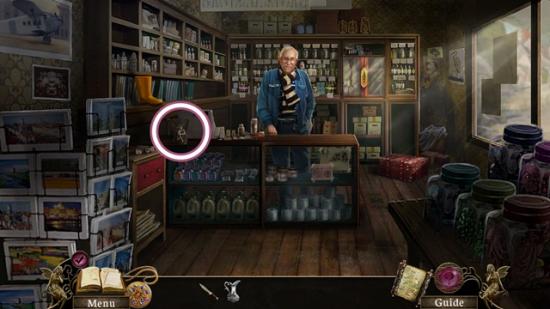
- When you are finished talking, return to the town square and enter the general store.

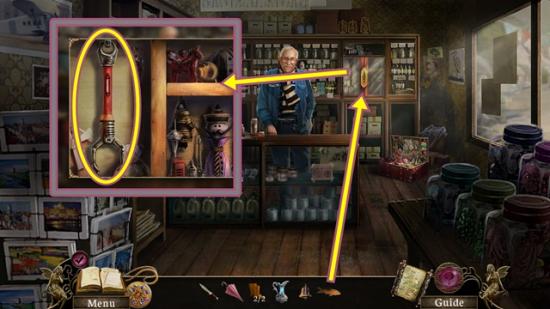
- Take the fairy (36/60).
- Take the store owner. Click through the dialogue.
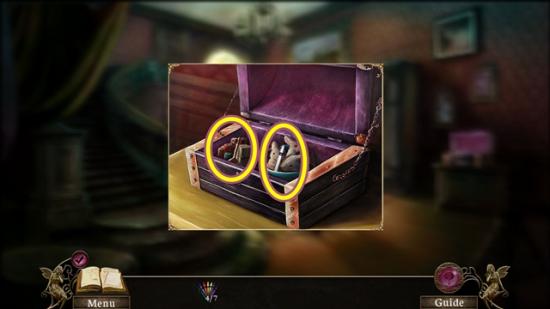
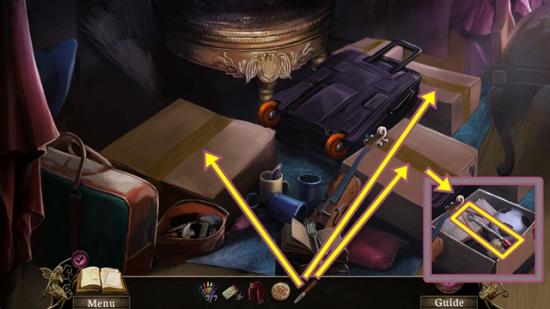
- Take the galoshes (1/2).
- Click on the footlocker. A mini-puzzle starts. Find the items according to the clue given at the bottom. In order, open the bag and take the shoe; take the spyglass, take the compass, take the lunchbox; open the square bag and take the teddy bear; take the umbrella; take the Kelpie; take the brush; open the pouch and take the crayons.
- An umbrella is added to your inventory.
- Click on the side table.

- Take the can opener and the eye.
- Return to the back alley.
- Put the pitcher under the burst pipe to get the filled pitcher.
- Use the umbrella to pull the fire escape ladder down.

- Take the fairy (37/60).
- Take the food bowl. Use the can opener on the can of tuna, then take the can of tuna.
- Climb back down to the alley.

- Click on the door mat. Add the food bowl and put the can of tuna in it. The cat will come and eat the food. When the cat is done eating and sits nicely, take the charm from around its neck.
- Return to the town square.
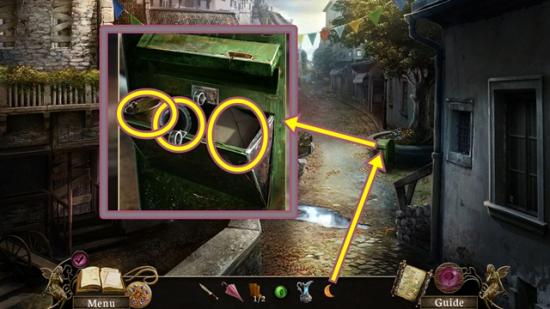
- Click on the mailbox. Add the charm. Open the mailbox and take the carved glass and the bell. Take the sealed letter and open it with the ancient knife. Read the note. Click anywhere outside the window to close it.
- Return to the back alley.
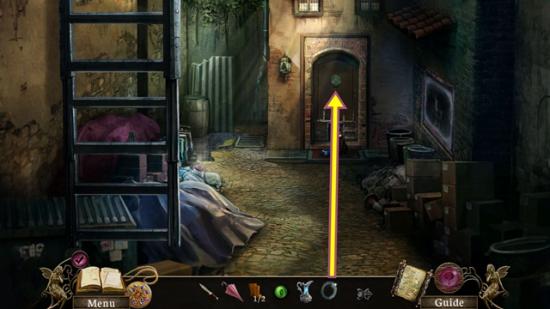
- Click on the shoppe door. Add the carved glass. A mini-puzzle starts. Add the proper symbols to the crest. To determine the proper symbols, drag the lens around the carved symbols around the crest.
- Solution:
- Enter the curio shoppe.
- Take the fairy (38/60).
- Take the galoshes (2/2). Put the eye on the cat statue to get the fish.
- Put the bell on the bell pull and pull the rope.
- Return to the general store.
- Click on the toy display. Add the fish. Take the robot arm.
- Return to the back alley.
- Put the umbrella below the burst pipe. Click on the grate. Use the robot arm to get the screwdriver.
- Go into the curio shoppe.
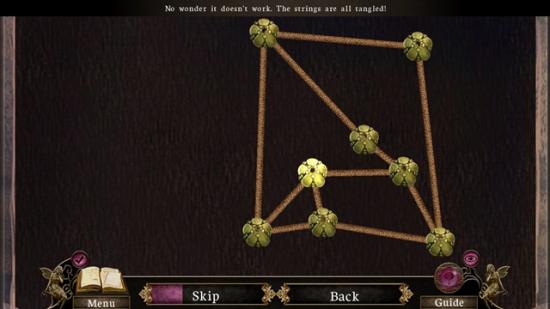
- Click on the control box. Unscrew the screws with the screwdriver. A mini-puzzle starts. Untangle the strings. Click and drag the metal knobs so the strings do not overlap each other.
- Solution (there are many possible solutions):
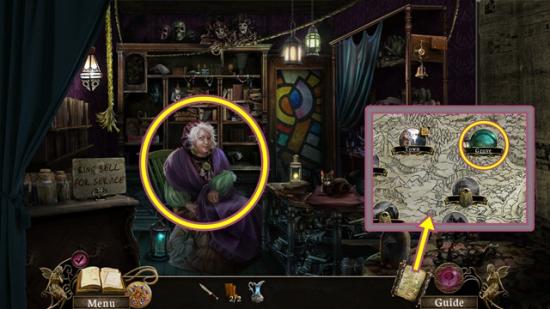
- Talk to Mathilde. Click through the dialogue.
- Click on the map and go to the grove.
- Take the fairy (39/60).
- Take the two rectangular code (2/5) pieces.
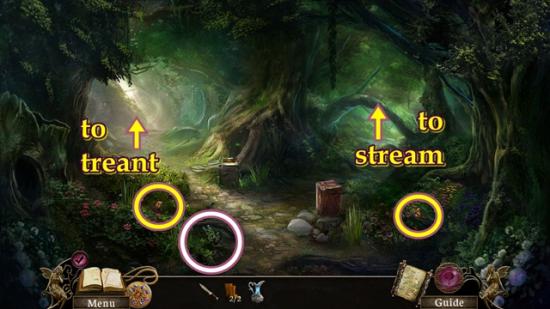
- Take the right path to the stream.
- Take the fairy (40/60).
- Take the two rectangular code (4/5) pieces. If you need to, fill the picther in the stream to get the filled pitcher.
- Put the two galoshes in the stream. When the graffiti is presented to you, add the ancient knife. A mini-puzzle starts. Carve the tree using the knife.
- Solution:

- The tree cutout is added to your inventory.
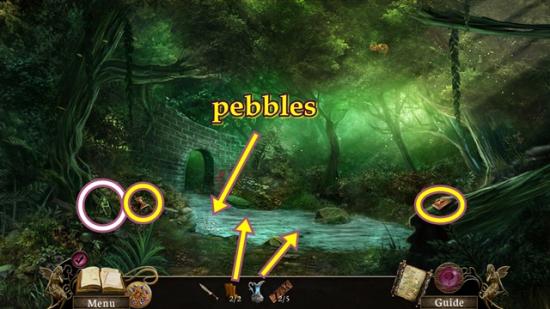
- Click on the pebbles. A mini-puzzle starts. Find the matching pebbles.
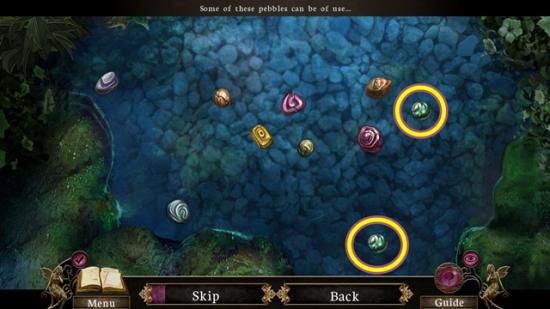
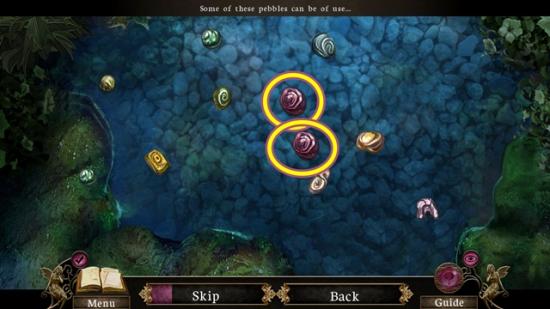
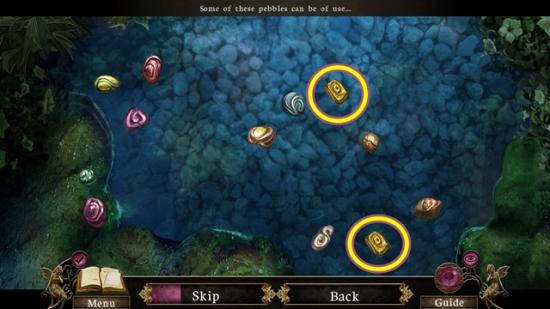
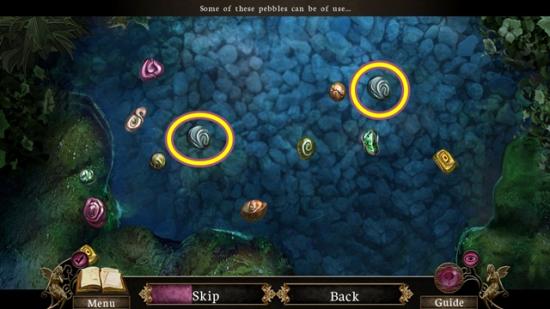
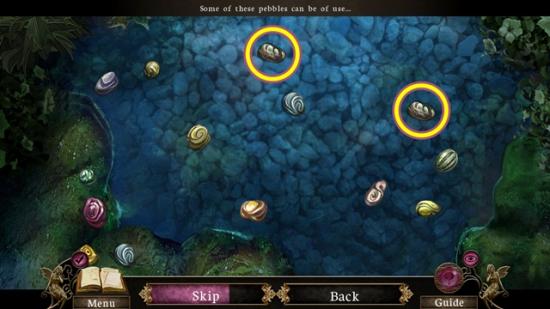
- Pebbles are added to your inventory.
- Return to the grove.
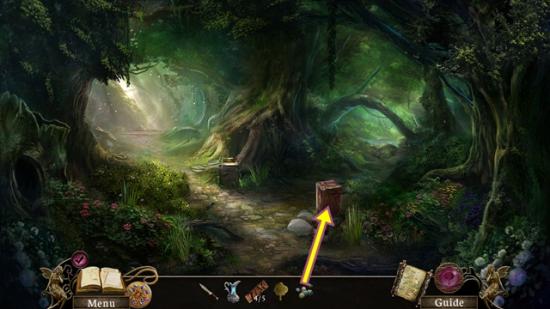
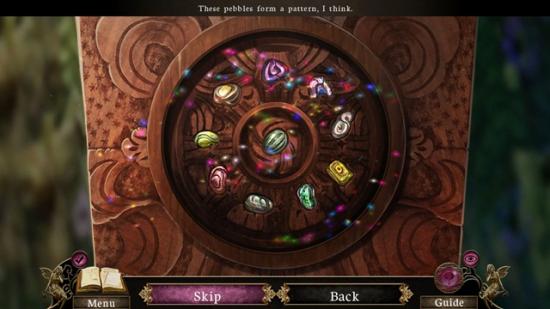
- Click on the map box. Add the pebbles. A mini-puzzle starts. Rearrange the pebbles so each is in its proper slot. Match the shape of the pebbles to its proper groove.
- Solution:
- When the map box opens, take the boomerang.
- Return to the stream.
- Use the boomerang on the willow. Take the boy scout cutout from where it drops.
- Return to the grove and go to the treant.

- Click on the roots. Take the park ranger cutout. Pour the filled pitcher on the dry ground. A mini-puzzle starts. Click on a closed flower to open it, then click on its match.
- Solution:
- Click anywhere outside the window to close it.
- Return to the grove.
- Click on the plaque. Add the tree cutout, the boy scout cutout and the park ranger cutout. Take the rectangular code (5/5).
- Return to the treant.
- Click on the roots. Use the ancient knife to clear the dirt off the box. Add the five rectangular code pieces. A mini-puzzle starts. Press the symbols in a certain order. Match the symbols to the figures at the top of the box. Press the symbols in the order of the shortest to the tallest figures
- Solution:
- When the box opens, take the encoded treant guide. Open the map, return to the town and go to the curio shoppe to talk to Mathilde.
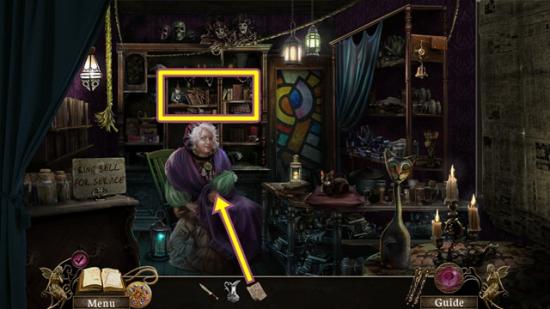
- Give the encoded treant guide to Mathilde. Click through the dialogue. Click on the bookcase behind her.
- A hidden object hunt starts. Find the objects shown at the bottom of the scene.
- Solution:
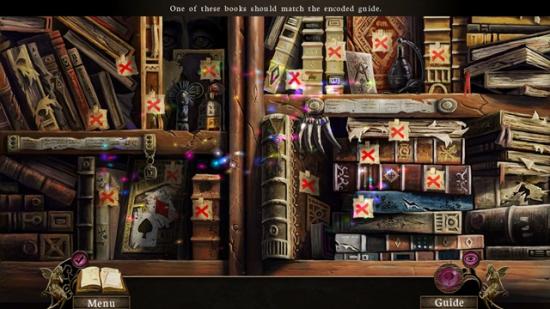
- The red x’s show where items were.
- The fay recipe book is added to your inventory.
- Give the fay recipe book to Mathilde. Click through the dialogue.
- Return to the general store.
- Talk to the store owner. Click through the dialogue. Click on the box on the counter. Move the items out of the way to get four funnels.
- Return to the curio shoppe and click on the back door.
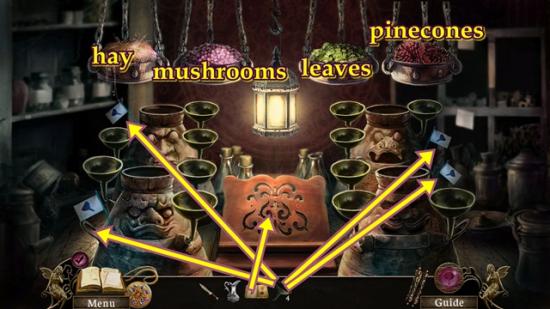
- Add the four funnels to the empty stands. Put the fay recipe book on the stand. A mini-puzzle starts. Put the proper ingredients into the funnels. Look at the recipe book for help. The ingredients are (to me), hay, mushrooms, leaves and pinecones.
- Using the recipe book as a guide, note the location of the blue funnel. Use that to determine which ingredients go in which funnel.
- Solution:
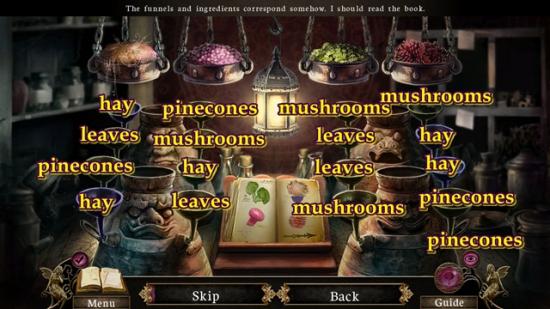
- When you are finished, treant powders are added to your inventory.
- Talk to Mathilde. Click through the dialogue.
- Click on the map and return to the grove and go to the treant.
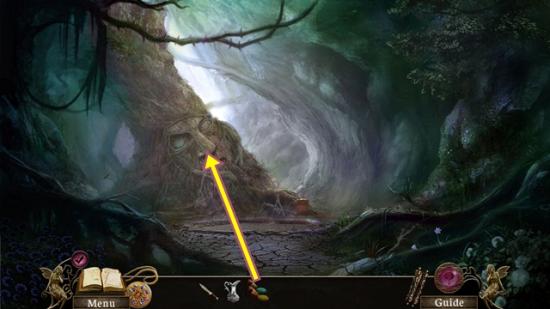
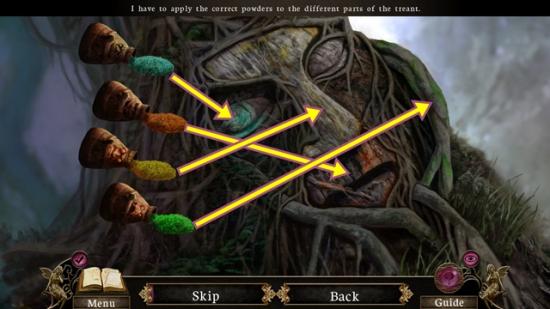
- Use the treant powders on the treant. A mini-puzzle starts. Colour the treant using the powders. Notice some areas of the treant already have bits of colour. Click on a coloured powder and then click on the correct area of the treant. Repeatedly click around the area to colour it.
- Solution:
- Take the fairy (41/60).
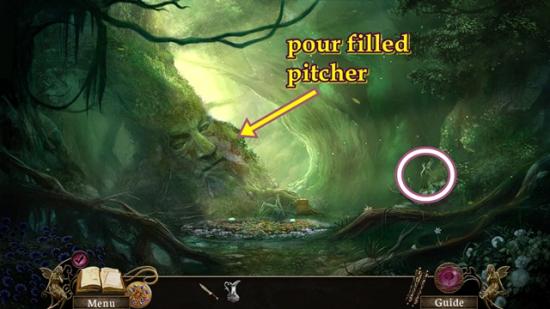
- Talk to the treant. He wants water.
- If you don’t have the filled pitcher, return to the stream and fill the pitcher in the stream to get the filled pitcher. Return to the treant.
- Pour the filled pitcher on the treant.
- Click through the dialogue. The locket charm is added to your inventory.
- Click on the locket. Add the locket charm.
- Watch the cutscene.
Chapter Five: Sanctuary
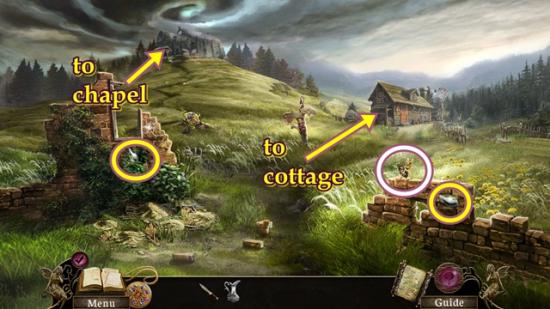
- Take the fairy (42/60).
- Take the two metal pieces (2/7).
- Walk to towards the cottage.
- Take the fairy (43/60).
- Take the three metal pieces (5/7).
- Click on the windmill. Cut the rope with the ancient knife. Take the rope with a hook.
- Return to the path and walk forward to the chapel.
- Take the fairy (44/60).
- Move forward to the chapel entrance.
- Take the fairy (45/60).
- Click on the BoomZap logo for the Aww, Thanks achievement.
- Take the two metal pieces (7/7).
- Click on the overgrowth of vines. Cut away the vines with the ancient knife (five clicks). Take the shovel handle.
- Click on the chapel door. Take the gnome’s head.
- Walk back to the path.
- Click on the tree stump. Add the shovel handle to the shovel blade to get the shovel. Click anywhere outside the window to close it.
- Click on the ruined garden patch. Use the shovel to dig up the five mounds (click on each between three and five times) to reveal the blunt saw and the triangular file.
- Move toward the chapel (one scene).

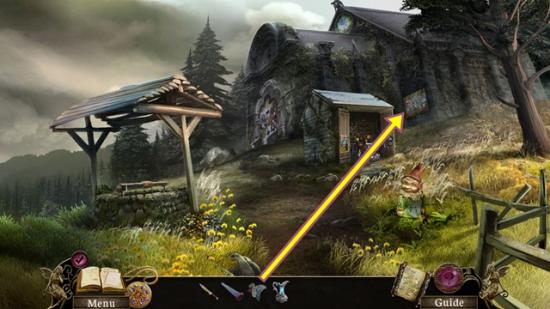
- Click on the headless gnome. Add the gnome’s head. Click through the dialogue. Click anywhere outside the window to close it.
- Click on the toolshed. Add the seven metal pieces. Wait for the chains to melt. Open the door and play the hidden object hunt.

- Find all the related pairs. Open the cupboard to reveal the top hat. Open the basket to reveal the baseball. Knock over the can to reveal the chess pieces. Break the wooden board to reveal the bulb (for the lantern).
- Take the pulley handle. Add the blunt saw to the vice, then use the triangular file to sharpen it. Pull the file back and forth quickly. When you are finished, take the saw.
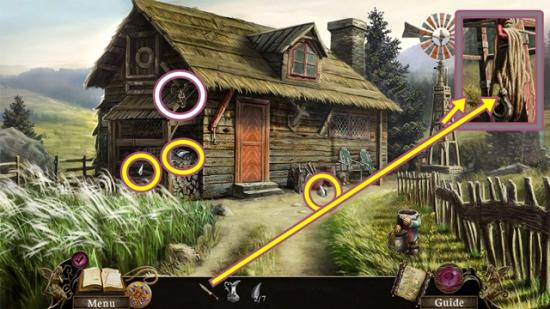
- Return to the cottage.
- Click on the awning. Use the saw (two clicks) and take the stick of wood.
- Return to outside the chapel (seen with the well).
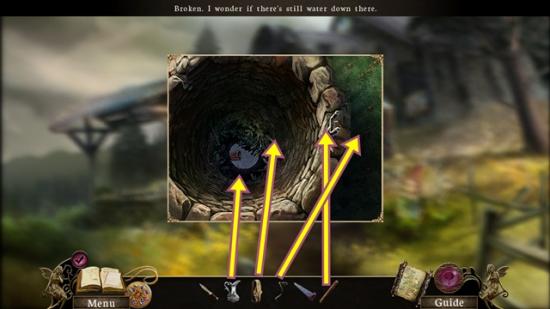
- Click on the well. Add the stick of wood, then add the rope with a hook, then add the pulley handle. Click on the pulley handle to draw the water up.
- When the bucket comes up, take the mosaic slab. Fill the pitcher from the bucket to get the filled pitcher.
- Click on the mosaic. Add the mosaic slab. A mini-puzzle starts. Rearrange the mosaic pieces to complete the image.
- Solution:
- Take the gnome’s head. Take note of the image.
- Return to the path.
- Click on the sign. Use the saw to remove two door shapes (2/6).
- Go to the cottage.
- Click on the headless gnome. Add the gnome’s head. Click through the dialogue. Take the feather and door shape pattern from his pot. Click anywhere outside the window to close it.
- Return to the path.
- Click on the tree stump. Add the door shape pattern, then add the ancient knife. A mini-puzzle starts. Cut out the shape using the knife.
- When you are finished, the door shape (3/6) is added to your inventory.
- Return to outside the chapel.
- Click on the gnome. Give the feather to the gnome. Click through the dialogue. Take the door shape (4/6). Click anywhere outside the window to close it.
- Move forward to the chapel entrance.
- Click on the chapel door. Use the filled pitcher on the two flowers and take the door shapes (6/6).
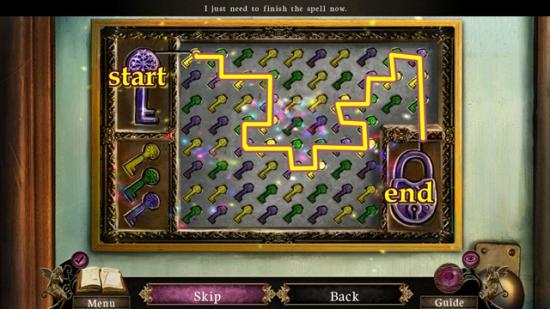
- Add the six door shapes to the door. A mini-puzzle starts. Arrange the elements so they match their door shape.
- Click on the shapes (circled in screenshot above) to properly arrange the symbols. As there is no reset button, a step-by-step solution would be unusable as you have likely already moved the symbols before consulting this walkthrough.
- Solution:
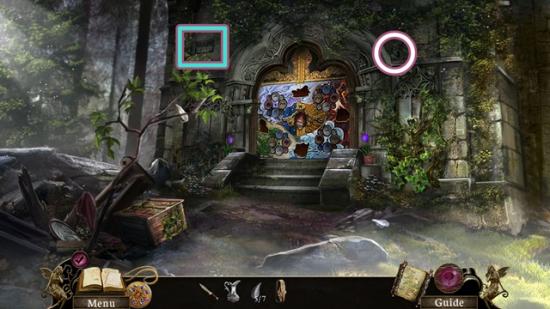
- Enter the chapel.
- Take the fairy (46/60).
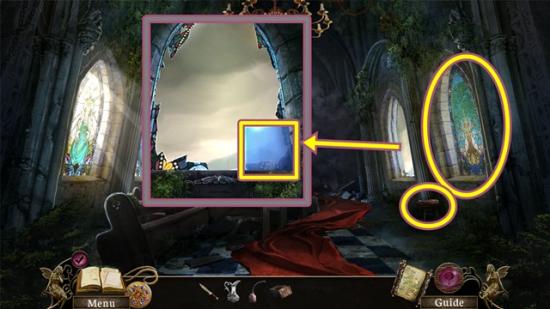
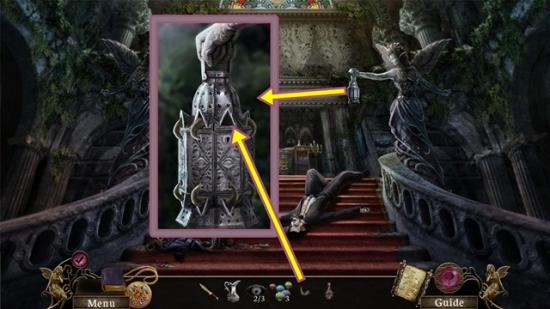
- Click on the broken pew. Take the crowbar and the empty oil can.
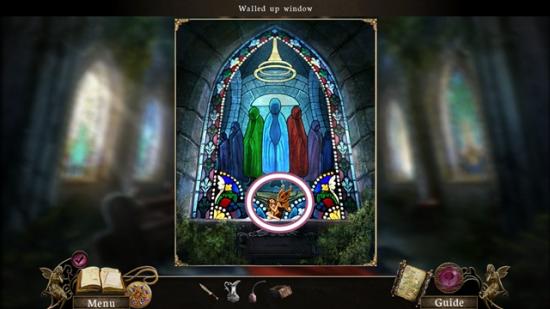
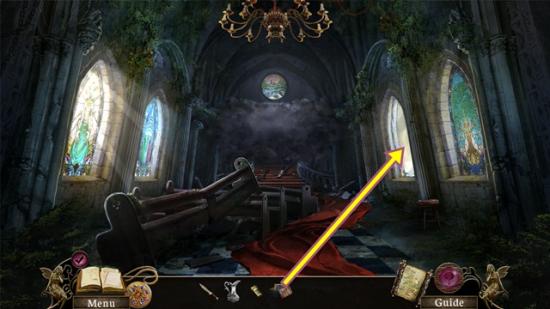
- Click on the stained glass window. Read the inscription. Take the rune stone (1/2). Click anywhere outside the window to close it.
- Leave the chapel.
- Use the crowbar to open the crate. Look inside. Take the rune stone (2/2), then take the crate.
- Go back inside the chapel.
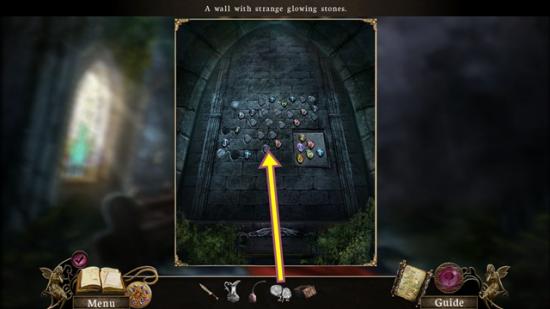
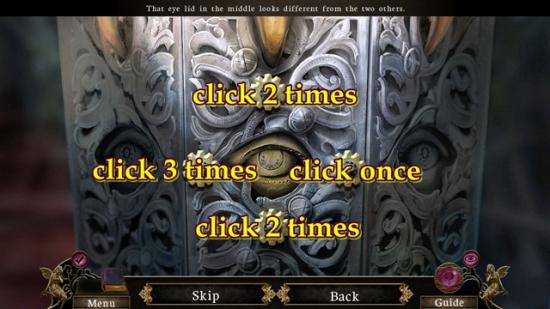
- Click on the walled up window. Add the two rune stones. A mini-puzzle starts. Make the patterns match the pattern in the lower right panel. Click on one of the rune stones in the lower right panel (brass background) and click on a rune stone to etch that symbol into it.
- Solution:
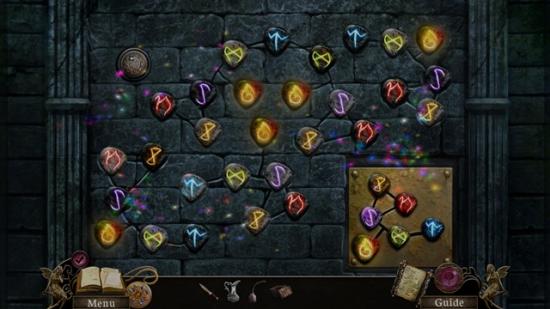
- If it closes, click on the walled up window again.
- Take the fairy (47/60).
- Read the inscription below the wall. Click anywhere outside the window to close it.
- Click on the stained glass window that is the second from the right. Take the stained glass sheet (1/5). Click anywhere outside the window to close it.
- Click on the candle-vending box on the stool. Take the stained glass sheet (2/5). Click anywhere outside the window to close it.
- Click on the stained glass window on the far right. A mini-puzzle starts. Rearrange the axes to match the symbols above and below them.
- The axe blades, body and the handle grips are separate and all need to be rearranged.
- Match the axe blade to the symbols on the apples. Match the axe body to the symbols on the branches. Match the handle grip to the symbols on the roots.
- When a piece is in the right position, it is locked and can’t be moved. First arrange the pieces according to the clues on the apples, branches and roots, then rearrange the other pieces.
- Solution:
- When you are finished, read the inscription below the window. Click anywhere outside the window to close it.
- Move towards the altar. If you cannot, click on the four stained glass windows and read the inscriptions below the window. This will clear the shadows.
- Take the stained glass sheet (3/5). Click on the body. Take the door key.
- Click on the scattered items.
- Find all the items. Move the cobweb to get the gear. Open the chest to get the bell. Blueprints are added to your inventory.
- Return to the cottage (go down all the way and then go right to the cottage).
- Click on the cottage door and unlock it with the door key. Enter the cottage.
- Take the fairy (48/60).
- Take the stained glass sheet (4/5). Add the empty oil can to the full oil container to get the filled oil container.
- Click on the cabinet. Oil the hinges with the filled oil container.
- Open the cabinet. Take the toolbox piece and the stained glass sheet (5/5).
- Click on the drawer. Pull it open. Move the papers around and take the soldering iron and solder.
- Click on the toolbox. Add the toolbox piece. A mini-puzzle starts. Click and drag the buttons to make them match the symbols carved into the wood.
- Solution:

- Take the glass cutter.
- Click on the work table.
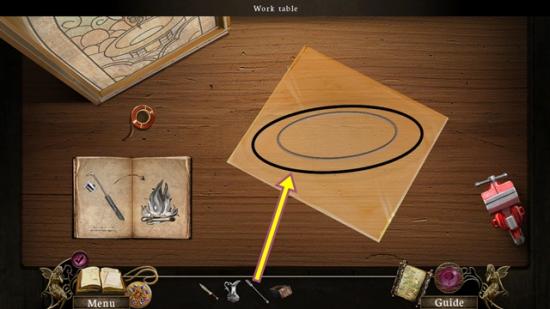
- Add the blueprints, then click on the blueprints. Add the stained glass sheets. Turn the pages of the book. Take the glass cutter and click on the black lines on the stained glass. This will cycle through all the sheets. If the glass cutter returns to your inventory, pick it up again and click on the black lines.
- Drag the copper foil to the stained glass pieces, then click on the stained glass pieces to add them to the jig.
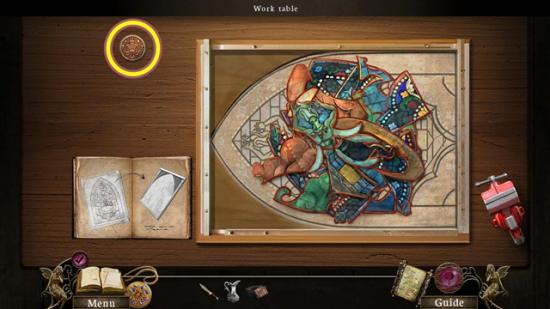
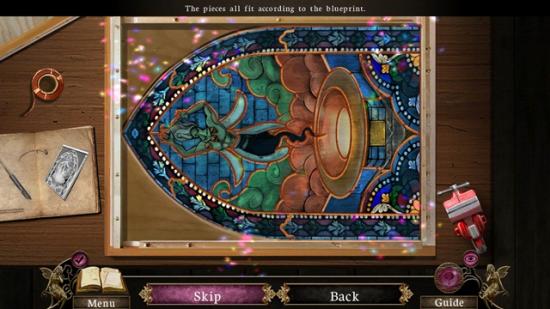
- Take the coin. Click on the stained glass pieces. A mini-puzzle starts. Put the stained glass pieces back together.
- Solution:
- Move down.
- Return to the chapel.
- Click on the candle-vending box. Add the coin. Take the lighter.
- Return to the cottage.
- Use the lighter on the fireplace. Add the soldering iron and solder to the fire to get the hot soldering iron and solder. Click on the work table.
- Use the hot soldering iron and solder on the stained glass. Take the completed stained glass.
- Return to the chapel.
- Click on the stained glass window that is second from the right. Add the completed stained glass. Read the inscription. Click anywhere outside the window to close it.
- Move forward to the altar.
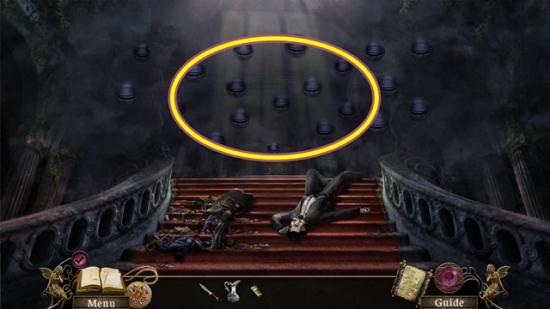
- Click on the blinking eyes. A mini-puzzle starts. Find the matching pairs of eyes.
- Solution:
- Take the fairy (49/60).
- Take the eyeball (1/3).
- Click on the statue on the left. Use the ancient knife to remove the eyeball (2/3).
- Continue towards the altar.
- Take the fairy (50/60).
- Click on the altar front. Take the two gem stones.
- Use the lighter to light the candles on both sides of the altar.
- Click on the basin. Take the claw. Click down.
- Click on the journal.
- Take the two fairies (51 and 52/60).
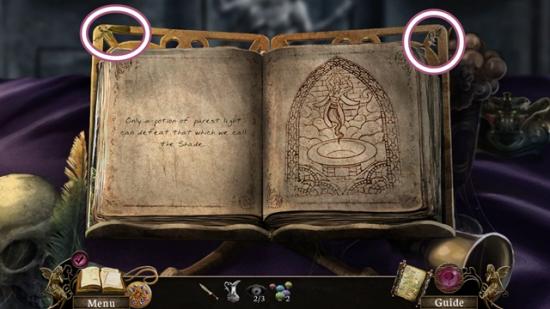
- Read the book. Turn the pages and at the end, take the potion amulet. Click down.
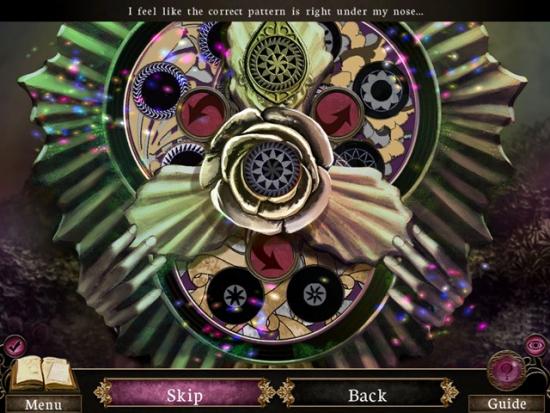
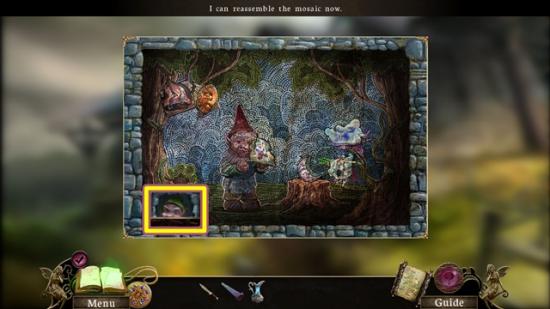
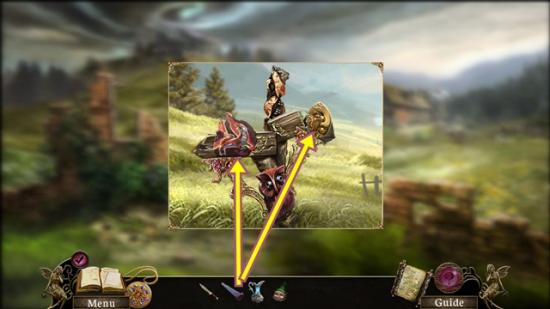
- Click on the wall relief. A mini-puzzle starts. Arrange the tree symbols and the items in the statues’ hands to match the image in your journal.
- Solution:
- For the second part of the puzzle, click on the gold symbols on the shields to get the leaf tablets into the four corners around the centre statue. As there is no reset button, step-by-step solution would be unusable as you have likely already moved the symbols before consulting this walkthrough.
- Solution:

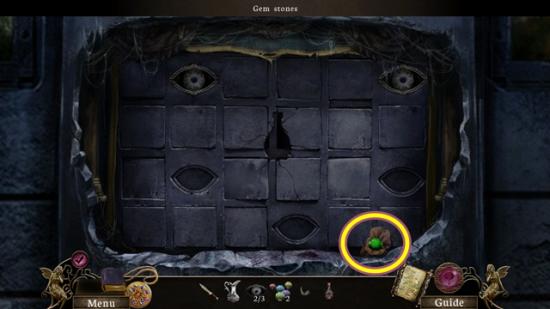
- Once the statue moves, click on the vault cover and take the gem stones.
- Move down two scenes.
- Click on the statue on the right. Add the claw. A mini-puzzle starts. Click on the stars to adjust the eye to make it match the other two.
- Solution:
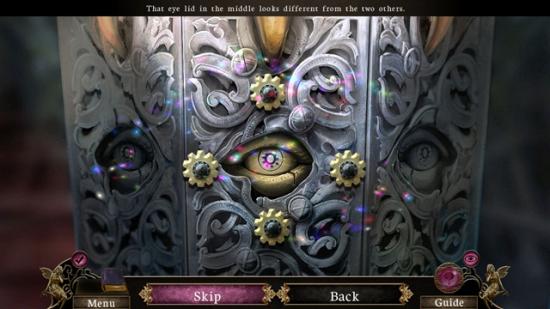
- When you are finished, the eyeball (3/3) is added to your inventory.
- Take the gems from the lantern.
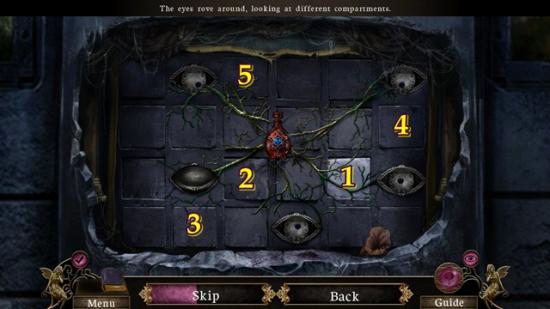
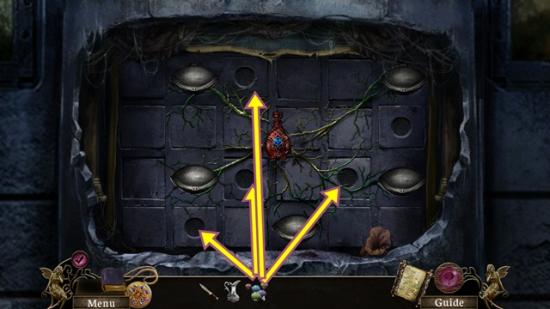
- Return to the altar and click on the opened vault.
- Add the three eyeballs and the potion amulet. A mini-puzzle starts. Click on the compartments (squares) in a certain order. Hover your mouse over the compartments and wait for the eyes to stop moving. Click on that compartment. Continue until all the eyes are closed.
- Solution:
- Use the gem stones to open the compartments. Take the enchanted liquids. One compartment will have the empty potion flask and a fourth gem stone. Use that gem stone to open the last compartment and take the last empty potion flask.
- Click on the basin.
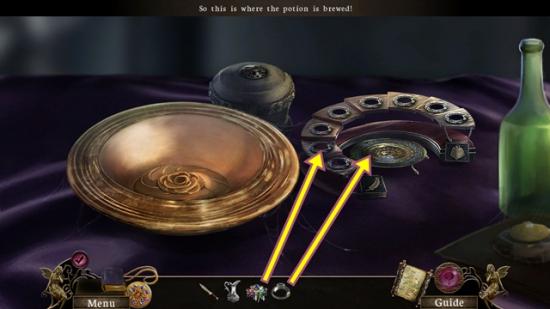
- Add the four enchanted liquids to the rack for vials. Put the empty potion flask in the centre of the rack for vials. A mini-puzzle starts. Arrange the flasks so the heaviest potion is on the far right and the lightest potion is at the far left. To determine the weights of the potions, click on one and then click on the flask. Add another potion. If the second potion stays on top, it’s lighter, if it falls to the bottom, it’s heavier. To empty the flask, click on the small valve on the tube attached to it.
- To rearrange the flasks, click and drag the flask to where you want to put it.
- Solution:
- Pour the arranged flasks into the golden bowl. Wait for the flasks to pour into the bowl.
- When the bowl is full, use the pitcher on the bowl to get the potion.
- Take the locket charm.
- Click on the locket. Add the locket charm.
- Watch the cutscene.
Chapter Six: The Final Battle
- Talk to The Shade. Click through the dialogue.
- Take the two fairies (53 and 54/60).
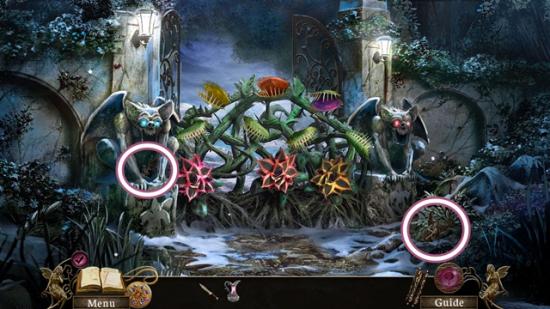
- Use the ancient knife on the biting vines. A mini-puzzle starts. Cut the flowers. Watch the biting vines to notice the colour of the inside of their mouths. The first set of biting vines have purple mouths. Wait for all their mouths to be closed, then cut the purple flower. Cut the other flowers following this pattern.
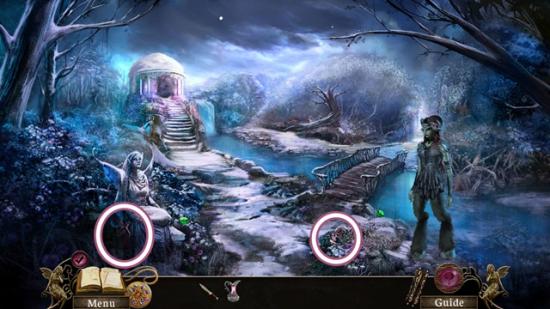
- Enter the garden.
- Talk to The Shade. Click through the dialogue. A mini-puzzle starts. Click on the pairs of insects according to the Dryad’s clues. When you click, make sure you hear the squishing noise to know you have an insect selected. First click on the green insects; then the black and white insects; then the blue insects; then the gold insects; then the black and red insects; small purple butterflies; then the grey butterflies; finally the grey insects.
- Take the two fairies (55 and 56/60).
- Take the two gems (2/9).
- Talk to the Dryad. Click through the dialogue.
- Move forward to the gazebo.
- Take the two fairies (57 and 58/60).
- Take the sceptre head.
- Move down and toward the cherry tree.
- Take the gem (3/9) and the mitten.
- Move down and go toward the lily pond.
- Take the two gems (5/9).
- Continue toward the lily pond.

- Take the two fairies (59 and 60/60).
- Take the two gems (7/9).
- Click on the rocks. Add the mitten. Move the mittens around in a circle until the snow is cleared. When you are finished, take the gem (8/9), the mirror and put the sceptre head on the sceptre handle, then take the heavy sceptre.
- Return to the cherry tree.
- Click on the frozen brook. Smash the ice with the heavy sceptre (three clicks). Take the buried mirror and gem (9/9).
- Return to the entrance of the lily pond.
- Click on the mirror. Add the nine gems. Take the mirror.
- Return to the gazebo.
- Put a mirror on the soil sifter, branch and flowerbed.
- Click on the mirrors so the light is reflected toward the gazebo door.
- Enter the gazebo.
- Talk to The Shade. Click through the dialogue.
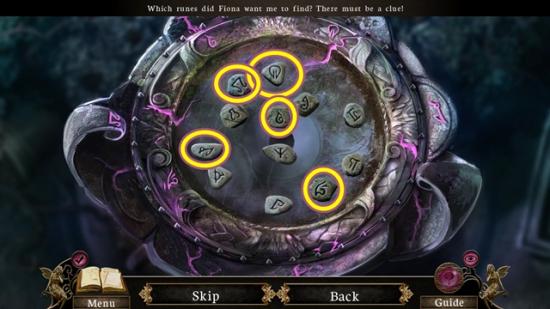
- Click on the basin. Talk to Fiona. Click through the dialogue. A mini-puzzle starts. Click on the runes that are on the rim of the basin.
- Solution:
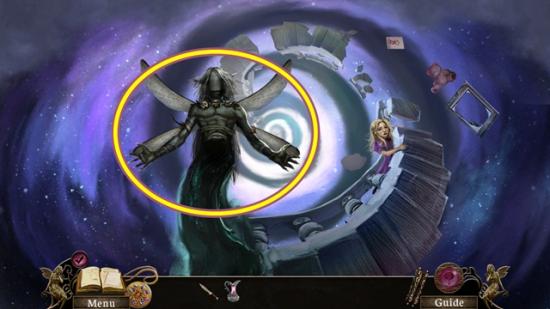
- Talk to The Shade. Click through the dialogue.
- Click on the runes in the reverse order of how they appear before the timer runs out. When you have pressed the right runes, use the potion on The Shade. Do this four times.
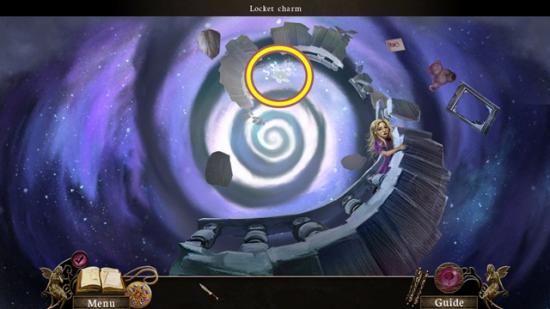
- Take the locket charm. Click on the locket and add the locket charm.
- The locket is added to your inventory.
- Talk to Fiona. Give her the locket. Click through the dialogue.
- Watch the cutscene.
- The end!
Epilogue: That Fateful Day
If you are playing the Collector’s Edition, you can now play the Bonus Chapter. From the main screen, click Epilogue.
Watch the cutscene.
- Talk to the father.
- Take the two crayons (2/7).
- Click on the mantle piece. Take the crayon (3/7). Click anywhere outside the window to close it.
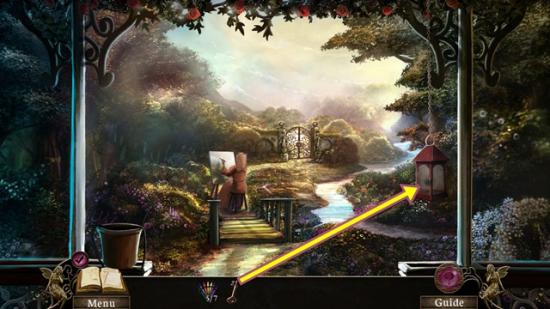
- Go out to the balcony.
- Click on the pot. Take the trowel handle. Click anywhere outside the window to close it.
- Go back into the house.
- Click on the basket. Take the crayon (4/7). Add the trowel handle to the trowel blade and take the trowel.
- Go back onto the balcony.
- Click on the pot. Use the trowel and take the disc.
- Go back into the house.
- Click on the chest. Add the disc. A mini-puzzle starts. Rotate the discs to solve the puzzle. Rotate the larger disc so the right symbol is over its proper environment (i.e., moon is in the sky, fish is in the water, etc.). Once the large disc is in its proper position, rotate the small disc so the symbol is facing upright. Also notice the designs on the discs. Use this to help align them.
- Solution:
- Take the crayon (5/7) and the key.
- Go back onto the balcony.
- Click on the hanging lantern. Unlock it with the key. Take the two crayons (7/7).
- Go back into the house.
- Click on the table. Add the seven crayons. A mini-puzzle starts. Colour the drawing. Match the symbols on the crayons to the symbols on the drawing. Colour in all the areas that have symbols. For the areas with ?s, look at the other areas of the drawing to determine what colour to paint.
- Solution:
- When you are finished, wait for The Shade to appear on the drawing, then take the drawing.
- Give the drawing to the father. Click through the dialogue. Talk to the mother. Click through the dialogue. When The Shade appears, click through the dialogue. Talk to the father.
- Go up to the second floor.
- Click on the drawer. Pull it open and take the matches.
- Move the chair towards the family portrait (click twice). Click on the family portrait. Take the wooden arm.
- Click on the board on the door.
- Press the lit button, then add the toy padlock.
- Wait for the animation to end. A mini-puzzle starts. Create a line from the large blue key to the padlock. Click on the keys in this order, yellow – green – blue. There is no reset button, if you cannot move further, deselect the most recently selected key and move backwards in that fashion.
- Solution:
- Enter the bedroom.
- Take the umbrella. Take the scarf off the piñata. Click on the window. Take the wooden leg. Click anywhere outside the window to close it.
- Click on the mannequin.
- Add the wooden leg and wooden arm. Read the poem, then click on the paper. A mini-puzzle starts. Use the poem as a guide to how to arrange the arrows (the poem is in your journal). Also the colour of the arrow tiles must be the same as the row.
- Solution:
- Go back into the hallway.
- Click on the statue. Add the statue part. A mini-puzzle starts. Click on the tiles to adjust the heights of the tiles to properly complete the image.
- Solution:
- When the statue crumbles, take the old photos.
- Go back into the bedroom.
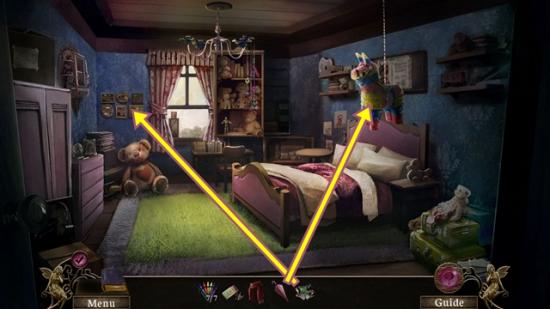
- Use the umbrella to break the piñata (three clicks). After it breaks, click on the candies on the floor.
- Move the candies out of the way and take the 17 locket gems.
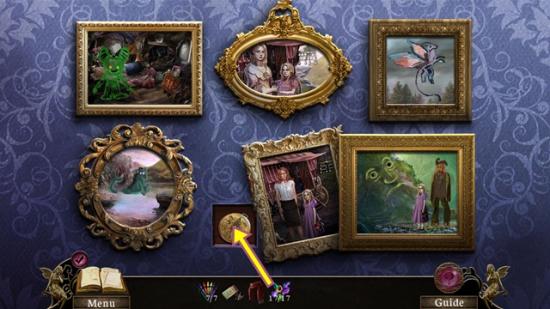
- Click on the picture frames. Add the old photos. A mini-puzzle starts. Put the pieces of the pictures back in the frames.
- Solution:
- Put the 17 locket gems on the locket. The locket is added to your inventory.
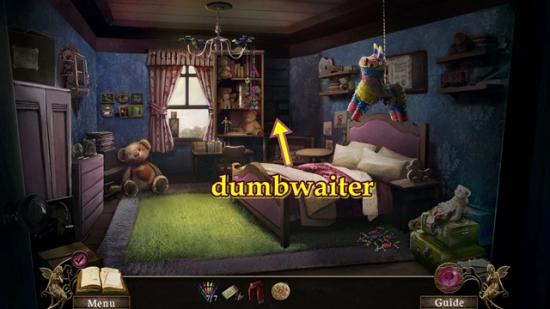
- Enter the dumbwaiter.
- Click on the box. Pull open the lids and take the palette knife.
- Return to the hallway and click on the boxes at the back of the hallway.
- Take the lever.
- Return to the dumbwaiter.
- Add the lever to the controls. Pull the lever to activate the dumbwaiter.
- Leave the dumbwaiter and enter the yard.
- Click on the statue. Take the oilcan.
- Click on the burrow. Take the coin.
- Return to the boxes (walk down into the dumbwaiter, activate the dumbwaiter to ride back up, move down and go back to the hallway).
- Use the coin on the stroller (suitcase with wheels) to take the two casters.
- Return to the yard.
- Click on the burrow. Add the casters. Move the sofa. Click on the vines. A mini-puzzle starts. Select five vines that don’t overlap with any other vine.
- Solution:
- Take the shoe laces and poker.
- Move down.
- Click on the statue. Use the poker to get the rope.
- Return to the bedroom.
- Click on the window. Add the shoe laces to the lantern, then open it. Use the scarf to clean it. Pour oil in using the oilcan, then light the lantern with the matches. Lower the cover, then take the lantern.
- Return to the yard and click on the hobgoblin burrow.
- When you get to the hobgoblin burrow, use the lantern.
- Find the hanger. Put the rope on the hanger, then hang the lantern on it.
- Take the two windstones (2/5). Use the poker on the bell.
- Enter the hobgoblin’s burrow.
- Talk to the hobgoblin. Click through the dialogue.
- Take the windstone (3/5).
- Click on the fireplace. Take the winder. Click anywhere outside the window to close it.
- Enter the study.
- Click on the stack of books. Flip the pages of the books until you get a piece of paper.
- Click on the musical box. Add the winder. Turn the winder, then take the scissors.
- Move the tarpaulin. Click on the cube. Click on the cube again.
- A hidden object scene starts. Find all the pieces of the cube. Open the boxes and the cabinet door to find more pieces.
- Blocks are added to your inventory.
- Put the blocks on the cube. A mini-puzzle starts. Rotate the hexagons to complete the pattern.
- Solution:

- Click on the arrow to turn the cube. Solve the puzzle again.
- When you are finished, take the windstone (4/5) and the vial of invisibility.
- Walk down.
- Click on the cabinet. Use the scissors to cut the rope. A mini-puzzle starts. Recreate the two animals. Use the buttons to swap the tiles.
- Solution:
- When the cabinet opens, take the windstone (5/5). Move the newspapers and take the envelope.
- Click on the table. Add the paper, then use the crayons on the paper. Add the envelope to get the letter. Click anywhere outside the window to close it. Click through the dialogue.
- Return to the yard.
- Click on the nest. Add the five windstones to summon the fay dragon. Give it the letter. After it flies away, take the hilt.
- Return to the burrow.
- Click on the frame. Add the hilt and take the knife.
- Go into the hobgoblin’s hoard.
- Take the mold. Click on the sap collector. Take the pot (1/4). Use the knife to take the piece of sap at the top of the inset to get the pot (2/4).
- Use the knife to take the sap to get the pot (3/4).
- Click on the cabinet. A mini-puzzle starts. Click on the tiles so each symbol appears only once in each row and column (diagonal doesn’t count).
- Solution:
- When you are finished, complete the hidden object hunt. Open the cupboard and slide the panels back and forth to reveal all the items.
- Use the rag to clean the mirror to take the reflection. Drag the dye to the chunks to wax to colour them (match the dye to the wax). Use the knife on the painting to get the torn canvas.
- When you are finished, wax chunks are added to your inventory.
- Move down two scenes.
- Use the knife to get the sap to get the pot (4/4).
- Move forward into the burrow.
- Click on the fireplace. Add the pot, then add the wax chunks. Light it with the matches, then take the melted wax.
- Click on the table. Add the mold, then pour in the melted wax. Take the five wax pieces.
- Return to the hobgoblin’s hoard.
- Click on the trap door. Add the five wax pieces. A mini-puzzle starts. Slide the symbols along the rails and drop them on their matching slot. A piece can only move into an empty slot.
- Solution:
- Use the knife on the evil flowers. A mini-puzzle starts. Click on the flowers in a certain order. If the top row of flowers were labelled A-C and the bottom row was labelled D-F, double click on D-A-B-C-F-E.
- Go up to the garden.
- Click on the statue. Add the locket to the surface, then add the vial of invisibility. A mini-puzzle starts. Look at the rune and gem shown above the surface (on the statue’s chest). Click on that gem and rune when you see it floating by. Matching a rune and gem will eliminate it. Once you’ve matched up a rune and gem, click on the rune and gem on the statue to change it. Continue until all the runes and gems are gone.
- Watch the cutscene.
Congratulations! You have finished Gamezebo’s walkthrough forOtherworld: Spring of Shadows. Be sure to keep reading Gamezebo for new, reviews, and walkthroughs for all of your favorite games!
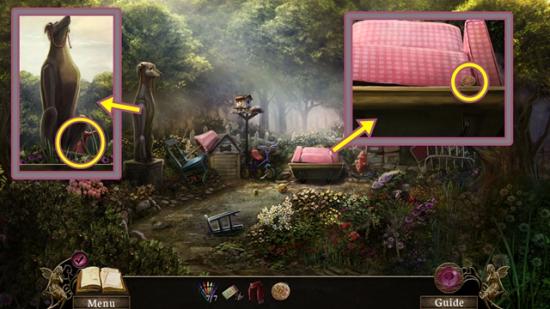
Fairy Locations
- Main garden
- Cherry tree
- Outside lily pond

- Gate
- House, on the table
- Outside the gazebo
- Lily pond

- Inside alcove
- Inside the gazebo
- Second floor hallway
- Second floor hallway, in the family portrait
- Bedroom

- Inside grandfather clock
- Outside the barn
- Back of barn

- In the loft
- Workshop
- Attic
- Attic, in the sewing box
- Attic, on work table
- Lake
- Shaded path
- Wagon
- Wagon, dead woman
- Cliff
- Mural
- Lake, hobgoblin’s sack
- Inside the wagon
- Outside the wagon, inside the closed box (there are two)
- Passageway
- Cave
- Town square

- Main Street

- Back alley
- General store

- Fire escape
- Curio shoppe
- Grove

- Stream
- Treant (after powder puzzle)

- Path (before chapel)
- Outside of cottage
- Outside the chapel
- Chapel entrance
- Aww, Thanks achievement highlighted
- Chapel, inside
- Walled up window
- Cottage
- Stairs to the altar
- Altar
- Journal on altar
- Gate
- Garden
- Gazebo
- Lily pond

More articles...
-
Best Horror Games On Itch.io – July 2026
Across a bounty of subgenres. -
Grow A Garden 2 Base Price List
What's the most valuable crop? -
Evomon Best Starter [Leafbun, Blazpup, or Bubble?]
Grass-type, Fire-type, or Water-type?