- Wondering how to get Monopoly GO! free rolls? Well, you’ve come to the right place. In this guide, we provide you with a bunch of tips and tricks to get some free rolls for the hit new mobile game. We’ll …
Best Roblox Horror Games to Play Right Now – Updated Weekly
By Adele Wilson
Our Best Roblox Horror Games guide features the scariest and most creative experiences to play right now on the platform!The BEST Roblox Games of The Week – Games You Need To Play!
By Sho Roberts
Our feature shares our pick for the Best Roblox Games of the week! With our feature, we guarantee you'll find something new to play!All Grades in Type Soul – Each Race Explained
By Adele Wilson
Our All Grades in Type Soul guide lists every grade in the game for all races, including how to increase your grade quickly!
Nostradamus: The Last Prophecy Tips Walkthrough
Check out our strategy guide for Nostradamus: The Last Prophecy. WALKTHROUGH NOTES When the walkthrough tells you to inspect an item, go to your inventory and inspect this item with the magnifying glass. When the walkthrough tells you to ground an item, put the item in the mortar on the workbench, and use the pestle on it. Use the spoon to take the powder and put it in the cooking pot. Wednesday, March 27, 1566 Getting dressed As you wake, you're still in your underwear, so let'…
a:1:i:0;a:2:s:13:”section_title”;s:35:”Nostradamus: The Last Prophecy Tips”;s:12:”section_body”;s:47996:”Check out our strategy guide for Nostradamus: The Last Prophecy.
WALKTHROUGH NOTES
- When the walkthrough tells you to inspect an item, go to your inventory and inspect this item with the magnifying glass.
- When the walkthrough tells you to ground an item, put the item in the mortar on the workbench, and use the pestle on it. Use the spoon to take the powder and put it in the cooking pot.
Wednesday, March 27, 1566
Getting dressed
- As you wake, you’re still in your underwear, so let’s first get dressed.
- At the foot of the bed, get the lady’s shoes.
- Left of the door, open the cabinet and take the dress.
- Exit your room and walk to the end of the hallway, and turn right.
- Go down the stairs and go to the room at the left to meet Nostradamus.
- Talk to him, and he will give you a set of tools in your inventory screen.
- Before you go and look for your new wardrobe, look at the wall next to the door, where the zodiac chart is hanging. On the table in front of it, you will find a lighter, which you will need for later.
César wardrobe
To pose as your brother César, you will first need to find 7 items of clothes and accessories.
Go back up the stairs and enter the first room on your left, César’s room.
1. César’s clothes are found on the bed in his room.
2. César’s boots are fount at the food of the bed in his room.
Go back down to Nostradamus’ room, and enter the next room.
3. On the dressing table, grab the long wig.
4. In the top drawer of the bedside table, find a strip of cloth.
5. In the top drawer of the bedside table, find a set of shoulder pads.
Before you leave, also pick up the recipe for coloring cream from the drawer in the dressing table by the window.
Go down the stairs in the back of Nostradamus’ room, into the entrance hall.
6. On the hat rack, get the hat.
7. On the desk, get a pair of glasses.
Now go into your inventory and examine the wig with the magnifying glass. Use the scissors to cut it, and get a short wig and a moustache.
Take off Madeleine’s dress, and put the shoulder pads and the strip of cloth on her.
Now dress her with César’s clothes, boots, hat and glasses.
Finish the transformation with the short wig and mustache.
Colouring cream
- Now take the recipe for coloring cream from the inventory and put it in your journal by clicking on the pages.
- You will need 4 ingredients: clay, water, oil and beeswax.
- First go out the door, and into the next room, the kitchen.
- On the table near the oven, pick up the recipients of all sorts.
- Turn around, go outside and turn left into the barn.
- To your right, you will notice a basket full of apples. Take the apples, and the pail from the ground, and as you look up, grab the squashes.
- Now turn around, and next to the entrance to the backstairs, grab the long rope.
- Continue to the gate in the back of the yard, and as you look to your left, you will find some clay. Pick it up.
- To the right of the gate, you will see a well. Go there.
- Click and hold the handle and pull it down twice to lower the bucket.
- Now pull it up to raise the bucket, but the rope will snap and the bucket will fall down into the well.
- Take the broken rope, and attach the rope you found to the beam of the well. Use the pail on the new rope, and lower it into the well. Now bring it back up, and use the recipients of all sorts to get the water you need.
Go back up into the house, and go into the workshop, across from Nostradamus’ bedroom, to prepare the coloring cream:
1. Take the water from your inventory, and put it in the cooking pot on the stove in the corner.
2. Use the pipette from the worktable on the bottle of oil on the shelf, and put it in the cooking pot.
3. Use the spoon on the bottle of beeswax and put it in the cooking pot.
4. Now put the clay in the mortar on the worktable, and use the pestle. Then use the spoon on the powdered clay and put it in the cooking pot.
5. Open the bottom drawer of the stove. Take some kindling wood from the basket on the wall and place it in the drawer.
6. Use the lighter from your inventory on the wood and close the drawer.
7. Move the lever on the stove to open its vents.
The cream is done. Use the recipients of all sorts to get the coloring cream.
Squash and apple jam
- Go down into the kitchen, and read the recipe for jam above the fire pit.
- Place the squash and the apples from your inventory in the cooking pot.
- Now turn around and take a spoon and put sugar in the cooking pot, 3 times.
- Finally also use the spoon to add cinnamon and ginger to the cooking pot.
- Turn to your left, take a log, and put it under the cooking pot.
When the jam is finished, use recipients of all sorts to get 2 jars of jam.
Queen Catherine’s birth chart – astrological test
- Go back to Nostradamus and talk to him.
- He will advice you to get some jam for the Queen, and gives you the Queen’s birth chart, along with an astrological test sheet. Place the sheet in your journal, and take the test.
The goal of the test column on the right is to match the right symbols with the name of the different zodiacs.
The symbol column is in correct order. The order of the names from top to bottom is:
- Aries, Taurus, Gemini, Cancer, Leo, Virgo, Libra, Scorpio, Sagittarius, Capricorn, Aquarius and Pisces.
- At the bottom of the column you see two icons: a sun, and two moons.
- The sun icon moves down the entire column, while the moon icon moves the bottom name up one position.
- The trick is to move the names in the correct order one by one, so start with getting Taurus under Aries.
- Move the zodiac name up one, and then move the column down, and repeat this until your zodiac is in the correct position.

- Next is the test on the left side of the page. Your goal here is to match the symbols on the left column, with the names of the planets on the right column. The order of the names from top to bottom is: Sun, Moon, Mercury, Venus, Mars, Jupiter and Saturn
- The arrow at the top scrolls the left column up, and the right column down.
- The arrows at the bottom switch the positions of the two signs in the middle.
- The same basic principle applies here as it did in the other test: arrange the pieces one by one.
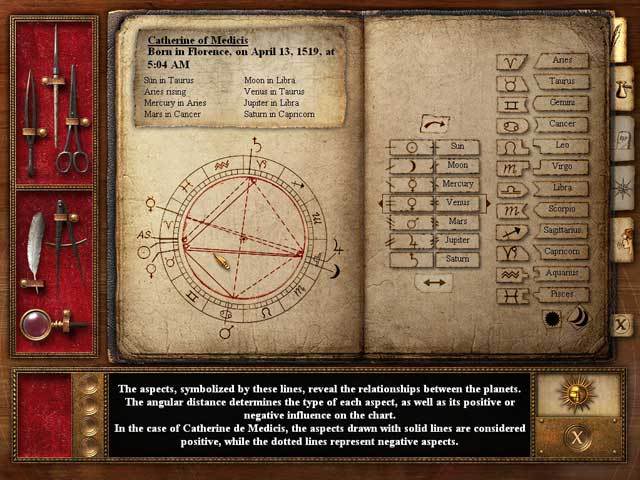
Now focus on the queen’s birth chart. Take the compass from the tool case and click it on the center of the left page. By moving the outside arm of the compass, make an outer circle and an inner circle. Now take the quill and click it inside the circles to make connecting lines. Place the cursor over these lines to read their meaning.
Voice test
Nostradamus will now test how well you can mimic César’s voice and way of speaking. The objective here is to adjust the tone-circles on the right so they are always in the correct position before answering the question. The left circle should be at the bottom, while the right circle should always be at the top.
Questions – Correct answers:
- Say something… anything… to see how you place your voice ? Anything!
- What’s the first sign of the zodiac? ? Aries
- Which zodiac sign rules the heart? ? Leo
- What common product is often used to avoid contagion? ? Vinegar
- What is used to determine someone’s sign? ? The sun in natal sky
- What very rare animal matter crosses the seas before finishing in the hands of apothecaries? ? Ambergris
After correctly finishing all the tests, Nostradamus applies the coloring cream on Madeleine.
Thursday, March 28, 1566
Talk to Queen Catherine
- Go down to the barn, and exit the gate there, and go left up the hill. An earthquake occurs.
- Continue up the hill and enter the chateau, then enter the courtyard through the right gate.
- In the far right corner in the back, go up the stairs, enter the salon on your left and go right to the guard at the end of the salon. After talking to the guard, he will let you see the queen in the next room.
- To her question, you answer “You are mistaken, Your Majesty.”
- She will then give you a quatrain; put it down in your journal.
- Exit the room and walk to the other side of the salon, and talk to the scribe monk, and get his notes.
- Place the notes in your journal and use the quill on the lines next to the names.
- The zodiac signs of the victims are in the same order of their deaths.
Scriptorium
- Go down the stairs, take a left and then another left to enter the scriptorium.
- As you enter the scriptorium, you see the scene of an accident. First, go to the next set of bookcases on your right, and check the locked cabinet on the left set of these bookcases. You can’t do anything with it now, so go back to the accident.
- Take the long pole on your right and use to get the lantern from the ceiling.
- Grab the rope from your inventory, put it on the pole and then place it on the hook the lantern was hanging from. Click one end of the rope on the fallen bookcase, and click-hold-move the other end down to lift the bookcase. Click on the table to tie the rope to it, and keep the bookcase upright.
Investigate the scene of the accident
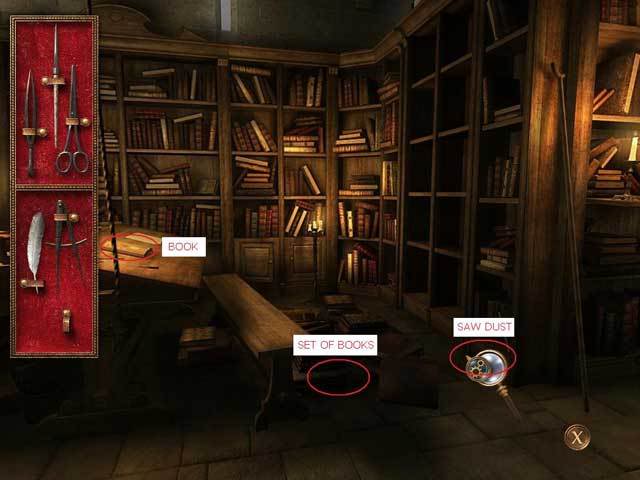
- Click on the table where the book case was on before, and use the magnifying glass.
- Examine the book about the Celts and take the crumbled paper.
- In your inventory, inspect the crumbled paper to see it is a map. Place it in your journal.
- Back to the scene, use the magnifying glass to inspect the floor in front of the bookcase, and find sawdust.
- Now inspect the set of books in the front, on the floor, and also find some blood next to them.
- When Jean Aimé, Nostradamus’ secretary, comes in, talk to him.
- When the chappel opens, go in there and take the sheet of the body.
- Take Philibert’s key, which is found lying next to the body.
- Use the magnifying glass to closer inspect the body.
- Use the tongs on the splinter in his head, and open his mouth to check his tongue.
- Return to the scriptorium to see if the key fits on the locked cabinet.
- When you arrive though, it is forced open and emptied.
- One item is still there, on the top shelf: a rag.
- Take the rag and a small package will fall on the floor.
- Grab it, and expect it in your inventory. Now use the scalpel to open it.
- Inside you find Philibert’s note and Philibert’s engraved stone.
- Now inspect the engraved stone. Click on it to turn it over, and find the word TOMBE written on it.
Talk to Jean Aimé Chavigny
- Go out, and back up the stairs, and then turn right into the hallway.
- Enter the second door on your right, and talk to Jean Aimé dressed as César.
- After talking to him, go back down the stairs and enter the chappel on your right.
- Change into Madeleine’s clothes, and go back up to talk to Jean Aimé as Madeleine.
- After you’re done, exit his room and turn right, and talk to the guard at the end of the hallway.
Nostradamus’ memory
- Return to your home, and go up to find Nostradamus in his office, across from his bedroom.
- Talk to him, and you will hear he does not remember if he wrote the quatrain you got from the queen.
- Tell him about the murder, and how the zodiac of the victims was in the order of their deaths.
- To be certain the quatrain was his, Nostradamus wants to induce his memory, and asks your help in preparing a medicine.
- (click the image below to enlarge it)

- At night, you will need to find the following ingredients:
- Garlic – at the stand just out the backyard gate left.
- Mandrake – go up the hill to the gallows outside the chateau. Take away the wedge under the cart’s wheel, and move the cart. You will see mandrake growing under the gallows.
- Cypress wood – in front of the evergreen tree, next to the gallows.
- Swallowwort – from the cypress wood, look left for a bush across the road.
- Fenugreek – at the bottom of the hill, from the bushes in the middle of the road.
- Return home, and find the recipe for hypnotic incense powder and sage wine on the worktable in his office.
- Place them in your journal. If during the preparation of either medicine you make a mistake, you can empty the pot by picking it up and tilting it over the fireplace.
To prepare hypnotic incense powder, first close the stove vent so it’s not heating. Now:
- Grind swallowwort with the mortar and pestle. Put it in the cooking pot with a spoon.
- Grind fenugreek with the mortar and pestle. Put it in the cooking pot with a spoon.
- Using the spoon, add absinth -found on the second shelf- to the cooking pot.
- Use recipients of all sorts to get hypnotic incense powder.
To prepare sage wine:
- Use the pipette to put whine from the top shelf in the cooking pot.
- Use the spoon to put pepper, sage, cinnamon, ginger and honey in the cooking pot.
- Inspect the Mandrake in the inventory, and use the scalpel to get mandrake root and mandrake berries.
- Grind mandrake root with the mortar and pestle. Put it in the cooking pot with a spoon.
- Open the stove vent to heat it.
- Use recipients of all sorts to get sage wine.
- Return to Nostradamus bedroom, where he’s on his bed
- Use the hypnotice incense powder on the brazier in front of him, and light it with the lighter.
- Talk to Nostradamus and then give him the sage wine. As Nostradamus’ get bits of his memory back, he remembers an engraved stone he found, which is in the observatory.
Find the engraved stone in the observatory
- Take the medallion he gives you, and go up the stairs, and then right to the closed door.
- Use the medallion on the door lock, and solve the puzzle.
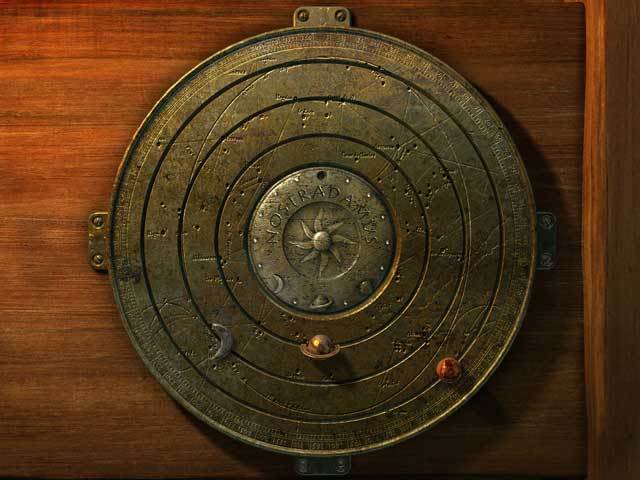
The goal is to move the planets in the extended line under their own pictures on the medallion:
- The sun moves itself and the moon.
- First move the sun to its correct position.
- The moon moves itself and Saturn.
- Second move the moon to its correct position.
- Saturn only moves itself.
- Lastly move Saturn to its correct position.
- After solving the puzzle correctly, music plays and the door opens.
- Enter the observatory, and turn right and look on the shelf to find a small engraved stone, similar to Philibert’s stone.
Friday, March 29, 1566
- As you wake up in the morning, get dressed and go down to talk to Nostradamus in his bedroom.
- You can choose to dress as Madeleine, or right away as César, since you will need to later on.
- He would like to have some bread.
Repair the breadmaking machine
- Go down into the kitchen, and look to your left to see a kneader left of the exit.
- The kneader is broken though, so click on it to get the broken part.
- Exit through the backyard gate, and go forward to the blacksmith’s house.
- Knock on the door to find he won’t repair the broken part, but will allow you to use his equipment.
- In exchange, he would like some bread as well.
- Look on the ground by the pile of wood, and take a piece of metal.
- Turn around and place it on the forge.
- Use the handle on the right of the forge to use the fan and heat it up.
- Take the tongs and use it to grab the glowing piece of metal and place it on the anvil on the right.
- On the ledge there’s a set of wire cutters. Take it and use it on the metal.
- Right-click to put down the cutters and use the tongs to place the metal in the bucket of water on your left.
- Put the tongs back on the forge, and take the cut piece of metal from the bucket of water.
- Return to the kitchen and put the piece of metal on the hinge of the kneader.
Make some bread
- Turn to the table, and read the recipe right of the window.
- Use the right handle on the kneader to raise the beaters, so you can put in the ingredients.
Now put the following ingredients in the beater:
- From under the table, 2 scoops of flour.
- From the table, a spoon of salt and yeast.
- From your inventory, water.
- Use the handle to lower the kneader’s beater, and use the handle on the left to turn the beats.
- Once the dough has risen, take it, put it on the breadboard and put it in the oven behind you.
- Light the wood in the oven with the lighter, and wait for the bread to bake nice and brown. When it’s done, use the bread bord to take it out and put it on the table. Now take the baked bread.
- Talk to Nostradamus and give him the bread.
- Now go to the smith, knock on his door and leave him his bread.
Get the key to Jean Aimé’s office
- Go up the chateau, and before you go into the courtyard, look on your left to see a bin filled with clay and take some. If you’re not dressed like César yet, go into the chapel in the back and change. Otherwise, go up the stairs and knock on Jean Aimé’s door. Finding him to be out of his room, go down to the scriptorium and talk to Jean Aimé.
- Go to the chapel and change back into Madeleine’s clothes, and go talk to Jean Aimé as Madeleine.
- While his back is turned to you as he looks at the books, take the clay from your inventory and use it on the key behind Jean Aimé to make an impression of the key.
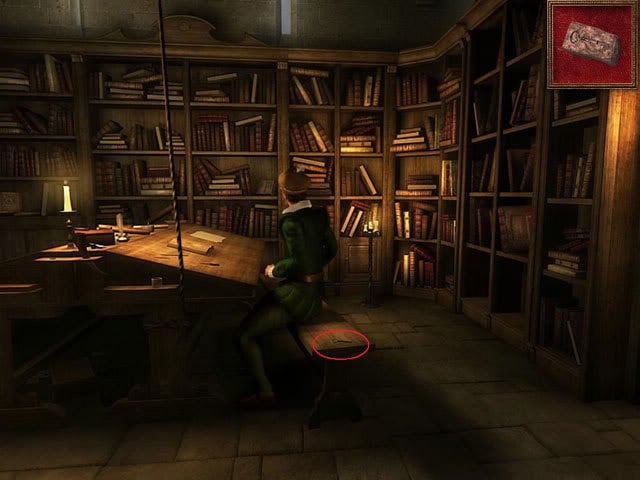
Make a medicine against the plague
- Go back down to the blacksmith’s house and knock on his door to ask him to make a copy of the key.
- He will help you, but only if you get him your father’s medicine against the plague.
- Go back home and ask Nostradamus in his bedroom about this medicine.
To prepaire the Vinegar of the Four Thieves, go to the office and put the following ingredients in the cooking pot:
- A pipette of vinegar, found on one of the shelves,
- A spoon of garlic powder; garlic grounded with the mortar and pestle.
- You got this before, but if you don’t have it, get it just out the backyard on the stand on your left.
- Use recipients of all sorts to get the Vinegar of the Four Thieves.
- Now turn to your right and go to the desks.
- Read the 2 quatrains on the book stand.
- Take the phial which if on top of the books by the window, and inspect it.
- Use tongs to get the parchment from the phial, the recipe for incense powder against plague.
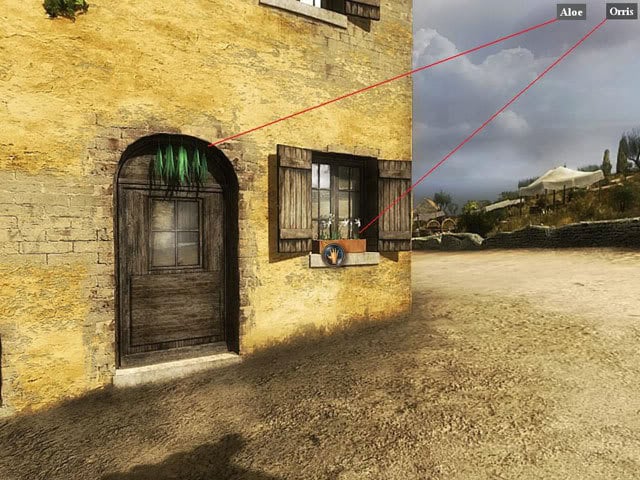
- You need two more ingredients, so go out the barn gate, take a left and look at the last house on your left, just at the bottom of the hill. On the windowsill, you will find orris, while hanging over the door, you can get 2 aloe plants.
To prepaire the incense powder against plague, put the following ingredients in the cooking pot:
- Cypress wood, orris and allow; one of each, all grounded and put in the cooking pot with a spoon.
- Use the pipette to add rose petal juice and musk from the shelves.
- From your inventory, add the ambergris.
- Open the vent to heat it up, and use the recipients of all sorts to get the incense powder against plague.
- Go to the blacksmith’s house and knock on his door.
- Leave him the impression of Chavigny’s key, and walk around a bit, waiting for him to finish a copy. Walking up and down to the chateau’s court yard should be plenty time. When you come back, knock on his door and take Chavigny’s key from the shelf.
Inspect Jean Aimé’s office
- Change into César’s clothes and return to the chappel.
- Go up the stairs, to your right and to Jean Aimé’s office, the second door on the right.
- Use Chavigny’s key on the door to enter.
- Check the green book on the table, to find it is the Astronomia Magna of Paracelsus (AMP). Take Philibert’s notes from inside the book.
- Click on the desk and look closer with the magnifying glass.
- Open the drawer inside the desk and take the star chart.
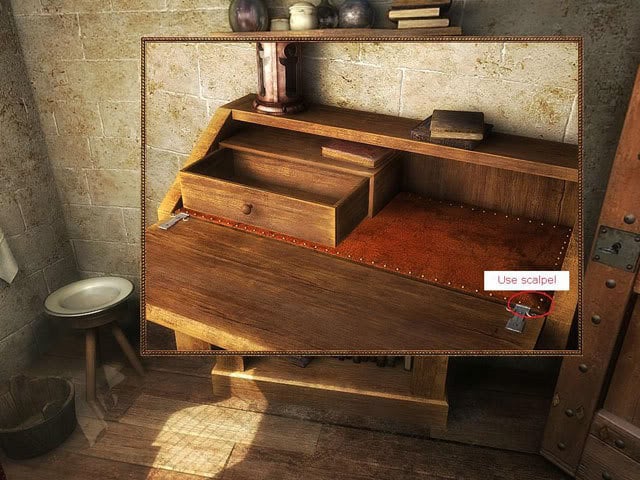
- Now use your scalpel on the right bottom corner of the desk, near it’s hinge. Use the tongs to get the parchment hidden inside.
- When Jean Aimé catches you, and asks you what you are doing, answer “My job, Jean Aimé, my job.”
The dead guard
- Exit Jean Aimé’s office and notice the dead guard in the hallway.
- Closer inspect the guard with the magnifying glass.
- Take the letter with a woman’s scent from under his belt.
- Use the magnifying glass on the wound on his stomach, to find it was made by a dagger.
- Use the compass on the footprint in the puddle of blood to find that it measures a little less than a royal foot.
- In your inventory put the parchment from Jean Aimé’s room desk in your journal and read the 2 original quatrains. Then place the star chart in the journal, and finally Philibert’s notes. Look at Philibert’s notes and notice a circle and some inscriptions similar to those on the engraved stones. Read the description.
- In your inventory, inspect the soldier’s letter. Use the scalpel on the letter to get a red rose and an empty envelope.
- Go forward through the hallway to the last door and enter the room on the right.
- On your left, there is a jail cell. Between the cell and the door, there’s a bed. Notice the knive missing from the knive holder, and remove the bed sheet to find an empty bottle of brandy.
- Go back and talk to the guard in front of the queen’s room and tell him about the death of the other soldier.
- He will tell you that the dead guard was seeing the queen’s companion, Constance.
- Turn around and knock on the door on your right.
- Enter the room and talk to Constance to find out what she knows about the prophecy.
- When you leave the room, Constance will stop you and asks you a favor: to make her a love potion with the ambergris she gives you.
Check the star chart
- You are returned home as another earthquake occurs.
- Talk to Nostradamus about your latest findings. He will give you the drawer key so you can check the star chart from Jean Aimé’s desk. Also talk to him to ask about the love potion, and find out César keeps the recipe.
- Go to the office and use the drawer key on the drawer of the desk next to the window.
- Take the paper inside to find the birth chart of Henry of Navarra.
- Go upstairs to the observatory to read the young prince’s future.
- Turn to your right, and read the instructions for using the solar return machine, found on the wall left of the door.
- Click on the rim of the machine to pull out the tray, and place the birth chart on the tray. Now click on it again to slide it in.
- Near the top of the machine, you will find your cursor to respond, click there to zoom in on it. Click on the question mark in the top-right corner to see the planets and coordinates related to prince Henry.
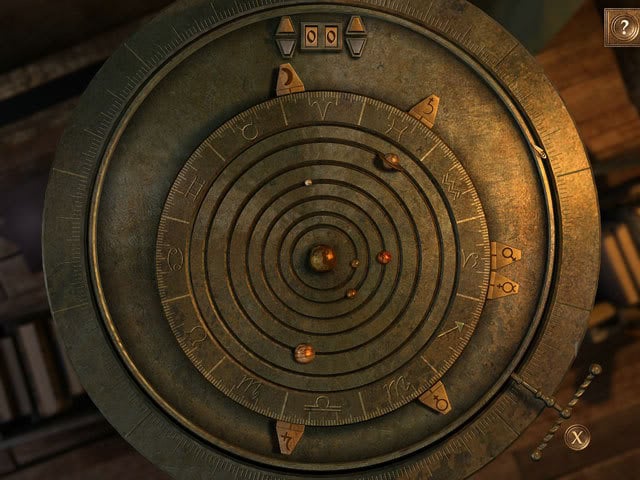
- Your goal is to move the planets in position, as found on the birth chart.
- For instance, for the moon at 26 degrees Aries, you look up the sign of Aries, and count 26 degrees (lines), starting to count from 1 degrees on the right side to 30 degrees on the left side of the zodiac.
Move the planets into the following positions:
- Moon at 26 degrees Aries
- Mercury at 6 degrees Capricorn
- Venus at 24 degrees Scorpio
- Mars at 16 degrees Capricorn
- Jupiter at 4 degrees Libra
- Saturn at 10 degrees Pisces.
- Once the planets are placed correctly, the board will not move anymore and you will hear a music.
- At the top of the page, set the counter to the person’s age, in this case 12.
- The machine will make it’s reading, and when it’s done, turn the crank on the right side.
- Remove the birth chart of Henry of Navarre with solar return from the tray and read it in your journal.
Prepare the love potion
- Go to César’s room and remove the cover of the chest by the window.
- Use the magnifying glass on the lock of the chest, to find the flap is blocked.
- Use the scalpel on the very small pin sticking out of the bottom hinge, and then use the tongs to pull it out.
- When you open the lid, you will see 3 wheels with zodiac signs on them.
- Move the weels to line up: Libra, Aquarius and Gemini (the constellations in César’s picture’s background).
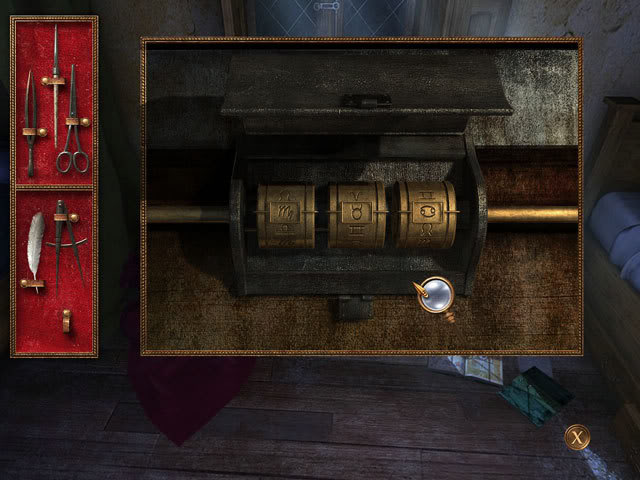
- Now take the long metal bar from the chest and open it.
- Take the sheet on top of the clothes and put it in your journal: it’s the recipe of the love potion.
Go down to the office and prepare the love potion with the following ingredients:
- Grounded aloe.
- A spoon of iron fillings, sugar, clove, cinnamon, grated nutmeg and iris illyrica root.
- A pipette of sparrow blood, musk and mulled win.
- Finally put the mandrake berry and ambergris in the cooking pot.
- Open the vent to heat it and use the recipients of all sorts to get Aphrodisiac potion.
Saturday, March 30, 1566
- As you get dressed, choose César’s outfit and go down to talk to Nostradamus in his office.
- In total, there are 4 parts of the Astronomia Magna of Paracelsus.
Secret room in the scriptorium
- Go up to the chateau and report to the queen.
- After talking to her, go to Jean Aimé’s office to find a fragment of Philibert’s map in front of his closed door.
- Enter his office and talk to Jean Aimé.
- Add the fragment of Philibert’s map to your journal to find there is a hidden room in the scriptorium.
- Go down to the scriptorium, and to the alcove on the right.
- Look at the bookcase across the forced cabinet, and move the books on the middle shelf to find a keyhole.
- Try to use Philibert’s key to find it won’t turn.
- Inspect it in your inventory, and use the scalpel to move the teeth of the key apart.
- Now use the modified key on the keyhole and enter the hidden room.
- Look at the book on the book stand by the door to find the second Astronomia Magna of Paracelsus, although it does not have a paper hidden inside.
- Use the lighter to light the candles on the chandelier.
- Go to the back of the secret room, and look on your left to see another AMP-book.
- This is the second book. Take it and turn around to put it on the book stand.
- Look through the book to find another one of Philibert’s notes.
- As you hear Jean Aimé come to the scriptorium, it’s best to avoid him, so leave through the exit on your left. Outside, place Philibert’s note in your journal and read it.
Giving Constance her love potion
- Go visit Constance, either as Madeleine or César, and give her the love potion.
- If you go as César, there is an alternate scenario possible, if you take the love potion with her.
Constance’s dice game
- To be able to ask her some questions for your research, she will challenge you to a game.
- The goal is to guess what set of 5 dice she threw to get score x.
- For instance, if she threw 17 with 5 dice, one of the possible answers is 1+2+3+5+6.
- You will have 5 chances to guess one series. If you lose then, you will need to give her something.
- Alas there is no real strategy to this game, it’s a bit of guessing. Just make sure you don’t waste any chances by miscalculating.
Some sets I have come across are:
- 14: 1 + 2 + 3 + 4 + 6
- 15: 2 + 3 + 3 + 3 + 4
- 19: 1 + 3 + 4 + 5 + 6
- 22: 2 + 4 + 5 + 5 + 6
- When you win, she will give you Philibert’s medallion, which he asked her to hide for him.
- Ask her any other questions you want, and then exit the room.
The secret room floor puzzle
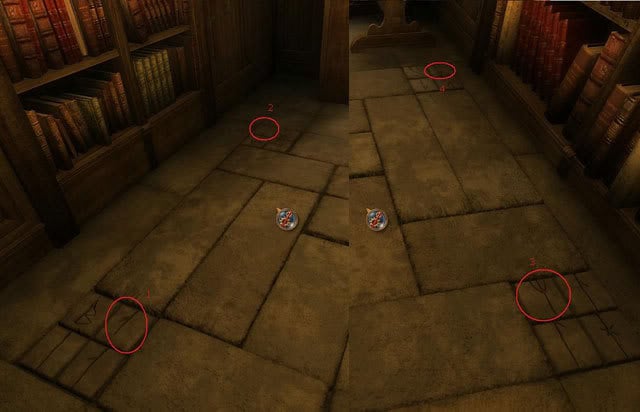
- Inspect Philibert’s medallion and turn it around an engraving,
- Go back down to the secret room in the scriptorium, and press the tiles as seen in the image below.
- If you like to puzzle, the floor tiles you need to press are the ones with the markings from the medallion.
- When all 4 tiles are pressed correctly, the corners will stay down.
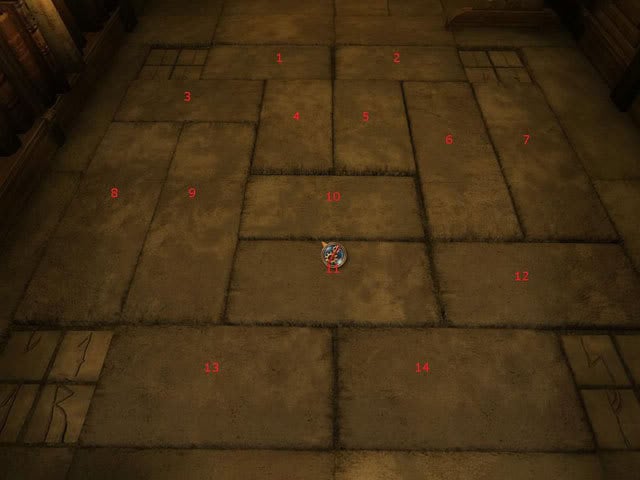
- The next puzzle, you will need to slide the big floor tiles so that a hole in the middle is opened.
Using the image below for reference, slide:
- 1 and 2 left
- 6 and 7 up
- 10 right twice
- 4 and 5 down
- 3 right twice
- 8 and 9 up
- 11 left twice
- 13 left
- 14 right
- 4 and 5 down twice
Enter the secret tunnel
- Now that you’ve spotted a hole in the ground, we need to find a way down.
- Go back to the blacksmith and take the rope from the hook left of the forge.
- Go back to the secret room and tie the rope to the chandelier and climb down.
- You will now be in the tunnel that Madeleine has seen in her dreams.
- Look down to the ground and pick up the fourth book of the Astronomia Magna of Paracelsus.
- Inspect the green book, open it and take the note that’s inside. Place the note in your journal and read it.
Move forward to the end of the tunnel.
- Pick up the sword and the shield from the ground, and make sure that at least the shield is easy to grab in your inventory.
- Now before you continue, save the game, since you could die in the next part.
- Have a look at the large stone wall and see that is has the same engravings as Nostradamus’ and Philibert’s stones. The wall also two holes in them, that match the stones. Put them together and you will automatically take not of the wall.
- Then another earthquake occurs, and the tunnel roof starts to collapse.
- Immediately take out the shield from your inventory -it will automatically be held over your head- and run out of the tunnel.
- Climb back up to the secret room.
The scribe’s death
Go up to the second floor of the chateau, turn right and enter the first door on your right to find the scribe is dead. Use the magnifying glass to examine the scribe.
- Look at his hand, and get the scribe’s notebook.
- Look at the ink on his finger.
- Use the compass to measure his foot.
- Use the magnifying glass on his lips.
Inspect the notebook, and use the scalpel to get a key and a sheet of paper.
There is a chest near the bed, but Madeleine does not want to use the key to check it.
Translate the Celtic alphabet
- You are automatically taken home.
- Open the journal and read Philibert’s notes.
- Notice the inscription of Philibert’s stone, and compare it to the engravings from the wall.
- Use the quill on Philibert’s stone to find that the writing on the left, means TOMBE, giving you 5 letters to the Celtic alphabet.
- Use the compass to complete the inside wheel on the journal page, and a column of letters will appear on the right.
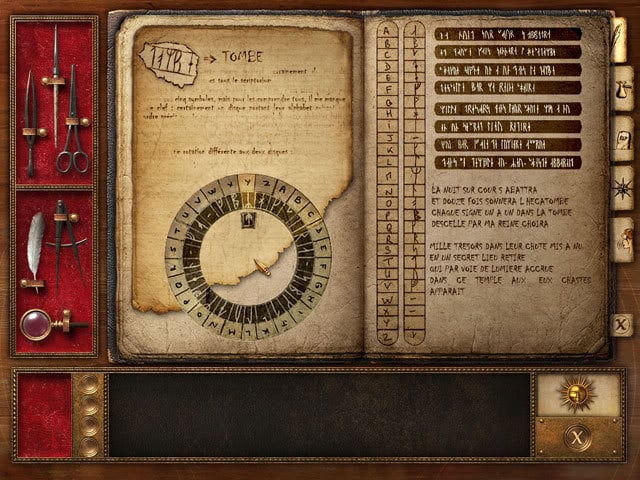
- Your goal is to line up the western letter with it’s Celtic equivalent on the top middle position of the wheel, and enter it with the arrow-button. Other then TOMBE, you will also find the word SIDH translated in one of the notes. And if you have not yet touched the wheel, the letter A is already aligned correctly.
- The trick is this: starting from a correct letter (for instance A), count clockwise to the third Celtic letter, and that will be the next letter on the Western alphabet. So for instance, starting at A and the Celtic letter A, count to the third Celtic letter clockwise, and you will find the Celtic letter B.
- Complete the entire alphabet this way, and Madeleine finds that the notes are actually Nostradamus’ 2 quatrains.
Arranging the observatory
- Go and talk to Nostradamus in his bedroom, about your findings.
- Select whoever you suspect of the murders.
- Nostradamus asks you to arrange his observatory, so climb up there and look to your left to see a solar system mobile, lopsided and missing items. The goal of the puzzle is to place the correct items from the bottom left list on the mobile, so it’s completed and balanced.

- Saturn – add 2 large weights on the left, and a small weight on the right.
- Now put the rings on Saturn.
- Jupiter – add 1 large weight and 2 medium weights on the right.
- Mars – add 1 large weight on the left and a medium weight on the right.
- Add a moon to Mars.
- Earth – Add 1 small weight on the left and a large weight on the right.
- Add a moon to Earth.
- Venus – add 1 medium weight on the left, and attach Venus to the loop on the right.
- Mercury – add 1 small weight on the right.
Drink some tea before bed
- Nostradamus talks to Adalyn and discusses the quatrains.
- Over the night, he will examine Madeleine’s destiny, but for now, he wants her to drink some eucalyptus tea.
- Go down to the table in the office and put water and a spoon of eucalyptus tea in the cooking pot. Open the vent on the stove to heat it, and us recipients of all sorts to get the tea, In your inventory, click the tea on Madeleine. Go upstairs and click on the bed to have a nice peacefull night’s sleep.
Sunday, March 31, 1566
- When you wake up, get dressed as César and go down to Nostradamus in his office.
- Talk to him, and then go to the blacksmith.
Straighten the sword
- Put the sword you found in the underground tunnel on the forge and use the handle on the right to heat up the embers. Use the tongs to take the hot sword and place it on the anvil. Use the sledgehammer to straighten the sword, and then put it in the bucket of water left of the forge.
- Put the tongs back on the forge and take the straightened sword from the water.
Investigate the scribe’s room
- Go up to the chateau and then go to the first room on the second floor on your right, to the scribe’s room.
- Use the key you found on him yesterday to open the chest, and take the monk’s cowl and Philibert’s note. Place the note in the journal to read it.
- Use the magnifying glass on the chest to find sawdust next to the saw.
Return to Constance
- Go to the salon, and enter Constance’s room, to find her dead.
- Use the magnifying glass to read the letter she is holding in her hand, to find it is a suicide note that implies that Nostradamus, Jean Aimé and César are plotting againt the royal family.
- Before you have time to leave the room, the guard arrives. As you can just hide, the guard finds Contsance and reads the note, and gets Nostradamus and Jean Aimé arrested.
Talk to Jean Aimé
- Use the monk’s cowl to disguise yourself and go through the second floor hallway to the guard’s room and talk to Jean Aimé’s in the prison cell. Jean Aimé gives you the key to his room so that you can check the pentagram.
- Go to his office (the second room coming from the stairs) and use the key to enter it.
- Look at the desk and use the magnifying glass to open the green book and take the pentagram engraving. Read the page of the book, and then use the scalpel on the Last Prophecy-page.
- Place both the pentagram and the Last Prophecy in your journal.
Talk to the queen
- Go down to the chapel where the scribe’s body was, to find it missing and replaced by sacks of sand.
- Go outside to find the drawbridge raised, and yourself trapped.
- Go upstairs, ignore the guard and talk to the queen.
Use the following replies:
- I have not come to defend my own head.
- I know that no explanation will satisfy you completely. So the only way to convince you is to catch the really guilty party.
- You’ve nothing to lose by letting me try. If I’m mistaken, or don’t manage to
- convince you, we both know that I have little chance of escaping.
- My father is in the custody of your guards, and as odious as he may be, Chavigny
- is my friend. Anyhow, there’s no way out that isn’t in clear sight of your guards.
- Someone so clever that today he seems above suspicion…
Looking for clues
- Go down to the chapel, and stand by the altar.
- Out of your sight, the scribe arrives and knocks you unconscious.
- When you wake up, you found he poisoned you and you have only limited time to help him before the poision kills you. Save here, and don’t forget to save after each following puzzle.
First timed puzzle – the glass pentagram
- On the front of the altar, you see a glass medallion with lines inside.
- The goal of the puzzle is to move the parts of the medallion around so that the lines form a pentagram.
- You can use the image below as a reference point for the 5 turning circles.
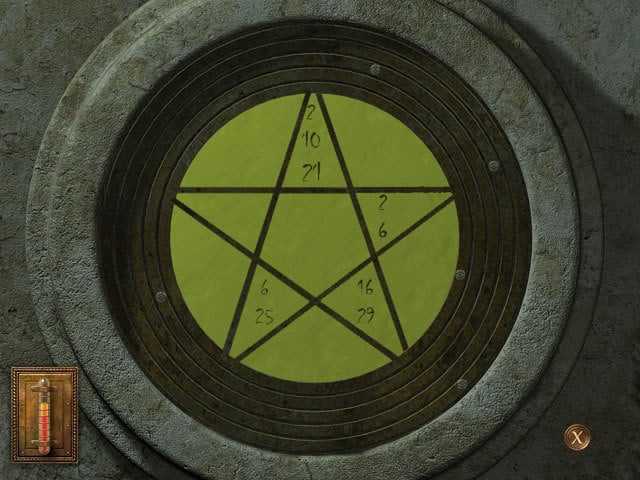
- Take the glass pentagram out and grab the pole with a star at the end from the hole.
Second timed puzzle – decode the last prophecy
- The numbers from the pentagram are transferred to the Last Prophecy-page in your journal.
- The goal of the puzzle is to find the letters that correspond to the numbers.
- Take the quill and click the corresponding letters – count the letters, including the dashes, on all 4 lines.
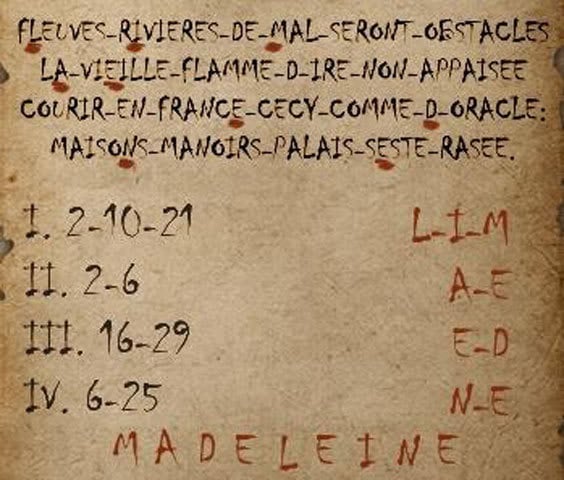
- If selected correctly, dashes will appear at the bottom of the page.
- Click on a red letter to move it to the bottom of the page.
- The word you are looking for is your name: M – A – D – E – L – E – I – N – E
Third timed puzzle – letters on columns
- Talk to the scribe twice, and when you need to select a response, choose “Did you notice any strange inscriptions in a script quite different from ours”.
- The twelfth earthquake occurs.
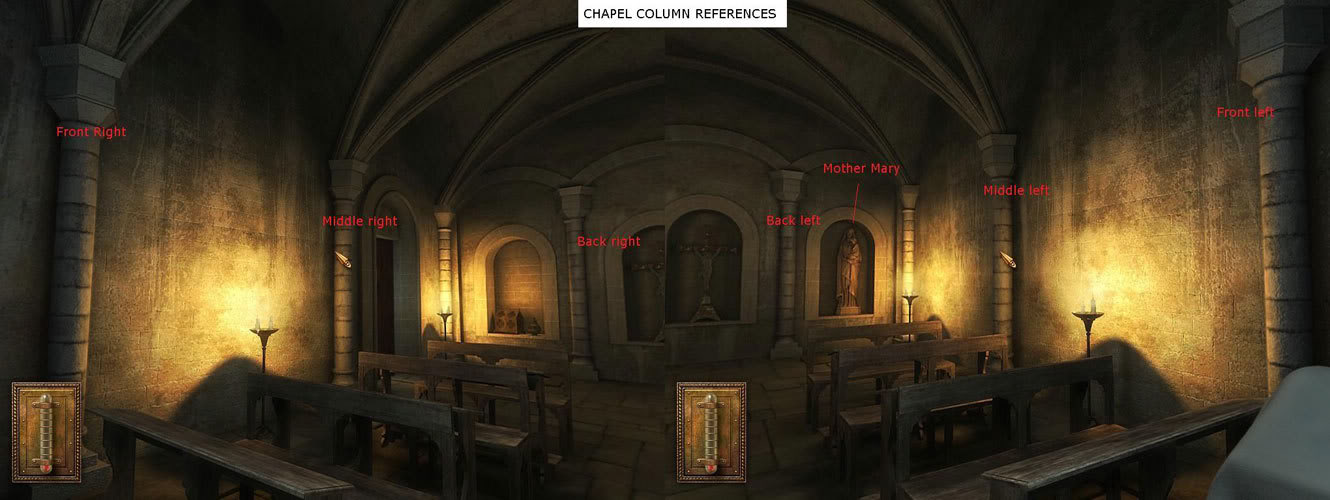
- The goal of this last puzzle is to move the tops of the columns so that the Celtic letters on top of them, spell MADELEINE. Click the question mark in the top right corner to see both alphabets. Some columns can form either one or two letters, so there are several possible sollutions.
One sollution is shown in the image below (click it to enlarge):
![]()
When done correctly the columns open up and show a set of movable mirrors.
Fourth timed puzzle – open the sanctuary
- Go to the statue of mother Mary on the back wall, and listen to a prophecy of how her eyes will illuminate.
- The goal of this puzzle is to get a light source and have the light bounce via the mirrors to the statue.
- Go to your inventory and check the rod you’ve gotten from behind the glass pentagram, and extend it.
- Place the rod in the hole on top of the altar and put the glass medallion on the top of it.
- A beam of light is sent to the first column.
Now swivel the mirrors in the following way:
- Front right column – 3 times
- Front left column – 5 times
- Middle right column – 3 times
- Back right column – 3 times
- Middle left column – 4 times
- The light beam from the statues hits a set of tiles on the floor.
- Use the long metal rod from your inventory to break the tiles on the floor.
Enter the sanctuary
- Go down to the sanctuary of the Sidhe.
- Pick up the head from the floor, and place it on the statue missing it.
- Place the straightened sword on his hands.
- After the statue smashes through the wall, enter the treasure chamber.
CONGRATULATIONS! YOU HAVE FINISHED THE GAME. ENJOY THE ENDING.“;
More articles...
Monopoly GO! Free Rolls – Links For Free Dice
By Glen Fox
Wondering how to get Monopoly GO! free rolls? Well, you’ve come to the right place. In this guide, we provide you with a bunch of tips and tricks to get some free rolls for the hit new mobile game. We’ll …Best Roblox Horror Games to Play Right Now – Updated Weekly
By Adele Wilson
Our Best Roblox Horror Games guide features the scariest and most creative experiences to play right now on the platform!The BEST Roblox Games of The Week – Games You Need To Play!
By Sho Roberts
Our feature shares our pick for the Best Roblox Games of the week! With our feature, we guarantee you'll find something new to play!All Grades in Type Soul – Each Race Explained
By Adele Wilson
Our All Grades in Type Soul guide lists every grade in the game for all races, including how to increase your grade quickly!


