
Best Horror Games On Itch.io – July 2026
Across a bounty of subgenres.![Haze Seas Accessories Tier List [Best Accessories to Equip]](/wp-content/uploads/2026/07/haze-seas-accessories-tier-list.jpg "Haze Seas Accessories Tier List [Best Accessories to Equip]")
Haze Seas Accessories Tier List [Best Accessories to Equip]
The accessories with the best stat buffs in Haze Seas.
![[Roblox] Evomon Shiny Hunting Guide – Including Prismatic and Pris Shinies!](/wp-content/uploads/2026/06/evomon-shiny-hunting-guide.jpg "[Roblox] Evomon Shiny Hunting Guide – Including Prismatic and Pris Shinies!")

Nightmares from the Deep: The Siren’s Call Walkthrough
Welcome to the Nightmares from the Deep: The Siren’s Call walkthrough on Gamezebo. Nightmares from the Deep: The Siren’s Call is an Adventure Game with puzzles and hidden object scenes created by Artifex Mundi. This walkthrough includes tips and helpful hints, and can be used as a strategy guide for completing Nightmares from the Deep: The Siren’s Call.


- Prefer Gamezebo on Google

Game Introduction – Nightmares from the Deep: The Siren’s Call
Welcome to the Nightmares from the Deep: The Siren’s Call walkthrough on Gamezebo. Nightmares from the Deep: The Siren’s Call is an Adventure Game with puzzles and hidden object scenes created by Artifex Mundi. This walkthrough includes tips and helpful hints, and can be used as a strategy guide for completing Nightmares from the Deep: The Siren’s Call.
General Tips
- Play is mostly linear with a few options for the order in which to explore locations and find inventory items.
- This guide completes tasks in the most efficient way possible. Not all inventory items are picked up when first encountered; tasks are completed when all required items have been assembled.
- To make it easier to find where this guide may differ from your own play, inventory items are CAPITALIZED and highlighted in white with a blue border in the screenshots.
- If you don’t have an item referenced in this guide, press and hold the “Ctrl” key while pressing the “F” key. This opens a Find area in your web browser. Type in the name of the object as it appears in this guide. Press the “Enter” key to find references to the item.
- Consult the game diary for story information, playing hints, and tips to solve puzzles.
Options
- Adjust the music and sound volumes.
- Change the difficulty mode of play for the current profile.
- Toggle voice-overs, custom cursor, or full screen support on or off.
Difficulty Modes
- There are three playing modes: Casual, Advanced, or Expert.
- Casual mode offers the most assistance during play. Active and hidden object locations are highlighted with sparkles; hint and skip buttons recharge quickly; no mis-click penalty in hidden object scenes is assessed; and locations with an available action are indicated on the Map.
- Advanced mode increases the challenge. Hidden object puzzle areas are indicated but active areas are not; hint and skip button recharge at a moderate speed; a mild mis-click penalty is assessed in hidden object scenes; and locations with available actions are not indicated on the Map.
- Expert mode is the most challenging way to play. Interactive areas and hidden object scenes are not indicated; hint and skip buttons recharge slowly; a mis-click penalty is assessed in hidden object scenes; and locations with available actions are not indicated on the Map.
- The playing mode may be changed at any time from the Options menu.
- This guide was written using the casual mode of the Collector’s Edition.
Cursors
- The default custom cursor is an arrow. It can change into the following icons:
- A magnifying glass represents an interactive area requiring closer inspection.
- A magnifying glass with a question mark denotes an interesting but non-interactive object.
- A hand signifies that an item may be moved or picked up.
- Lips indicate a character has something to say.

Hidden Object Scenes or Mahjong Games
- There are three types of hidden object scenes: List, Find and Use, or Fragmented Item.
- Blue-listed objects require interacting with the scene to reveal or create them.
- Place the cursor over an item to see its silhouette in the Sonar globe.
- An optional mahjong game may be played to remove items in a listed-object scene.
- Cursor icons in these scenes are the same as in the rest of the game.
- Only interactive and inventory items are highlighted in the screenshots for list-object scenes in this guide.
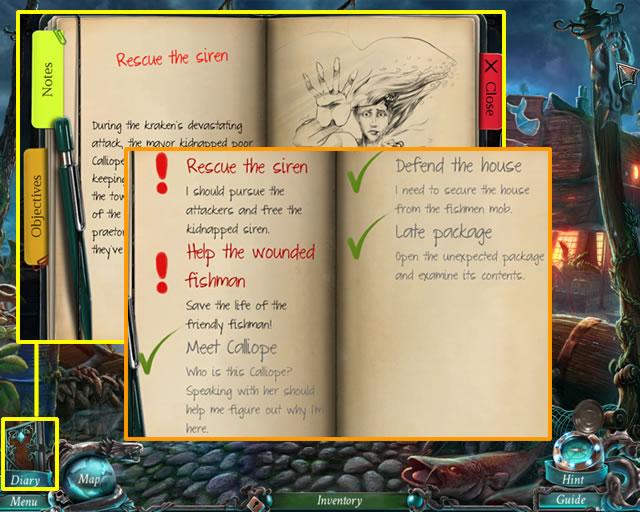
Diary
- The diary icon is in the lower left of the screen and is updated regularly with story information and hints for solving puzzles.
- The Objectives tab helps keep track of tasks. An exclamation mark beside an entry signifies an open item; a check means the task is complete.
Hint and Skip Buttons
- The hint icon is the compass in the lower right corner of the screen.
- How much assistance the hint provides depends on the play mode selected.
- The hint button can also be used in a hidden object scene to locate an item.
- Puzzles may be skipped once the skip button has charged.
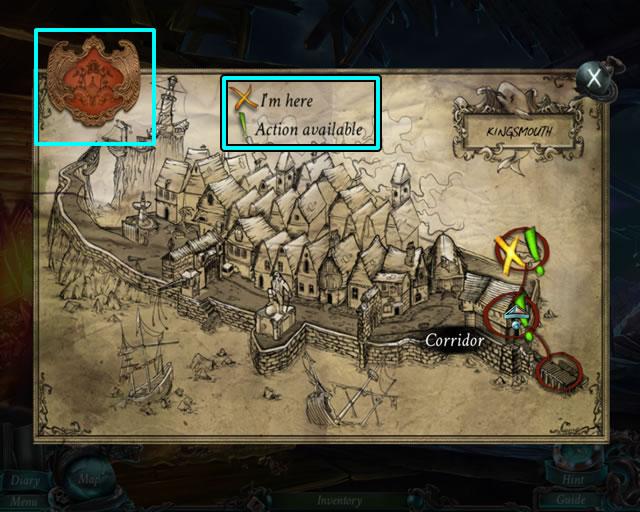
Map
- The interactive map is collected early in the game.
- A yellow “X” shows your current location. Exclamation marks indicate a location with actions that can be completed.
- Move the cursor over a location to reveal its name. The cursor changes to a navigational arrow; click to move to that location.
- Locations and an additional map are added as they are discovered. Click the insignia in the upper left corner to switch maps.
Chapter 1: The Package
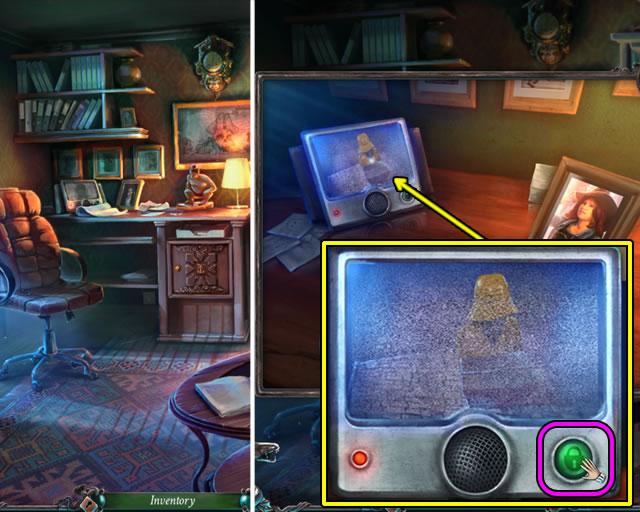
- Zoom in on the desk.
- Click the intercom to hear the delivery person; press the green lock button to open the door.
- Go forward to the hallway.
- Speak to the delivery person.
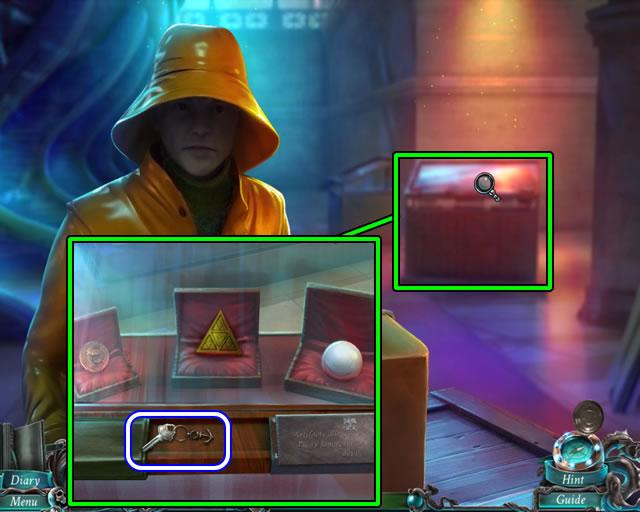
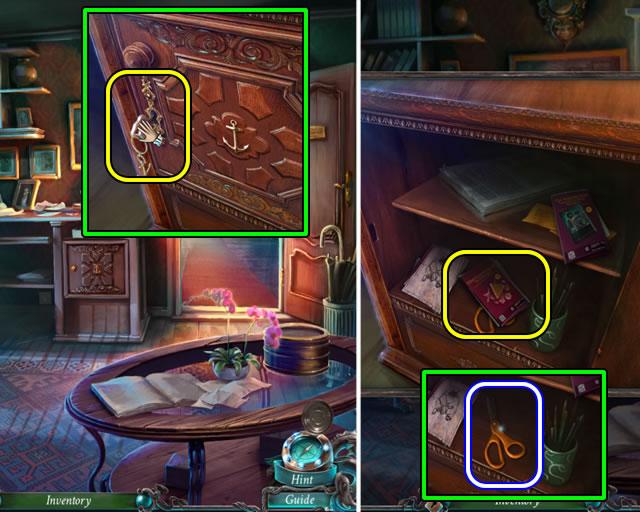
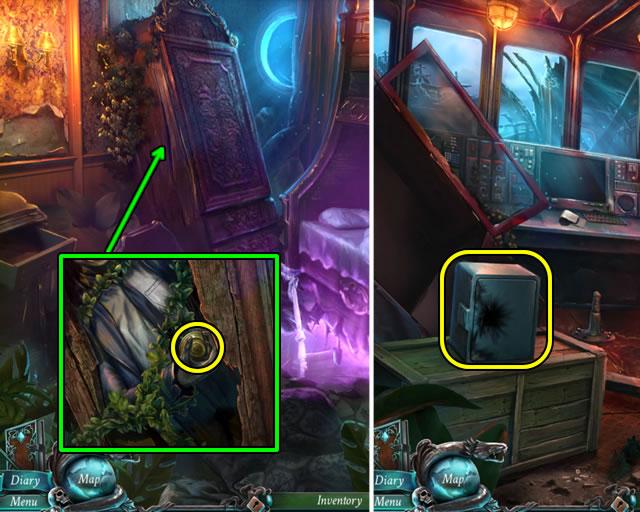
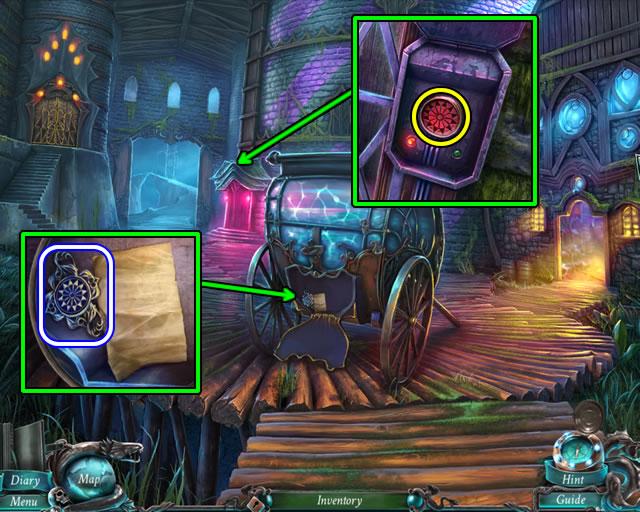
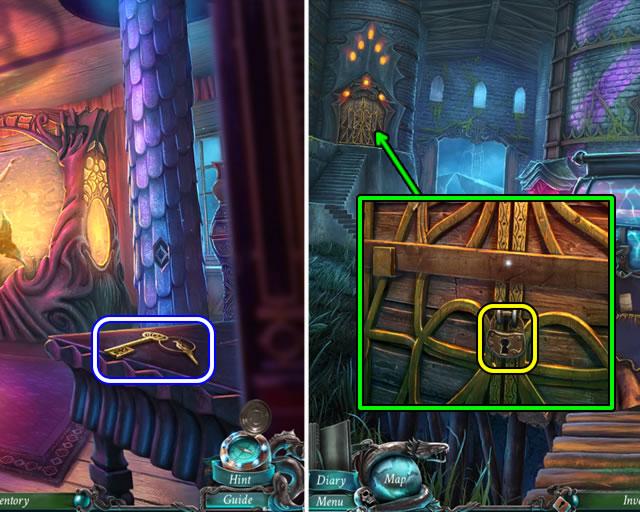
- Examine the blurred case behind him; pick up the OFFICE KEY.
- Exit the close-up scene. Go down to return to the office.
- Look closer at the desk cabinet.
- Insert the OFFICE KEY in the lock and open the cabinet door.
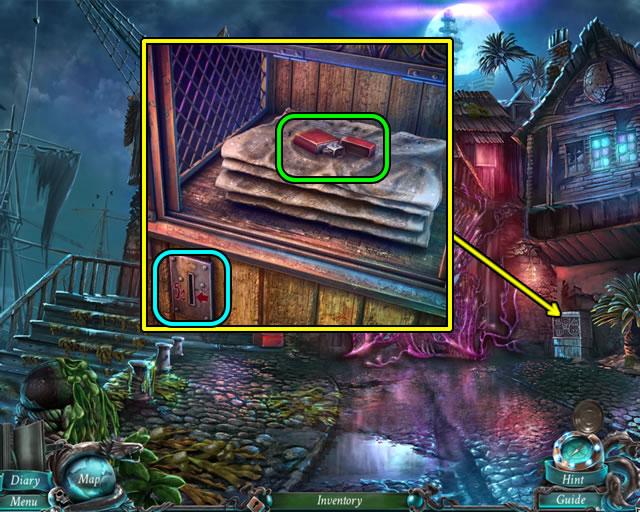
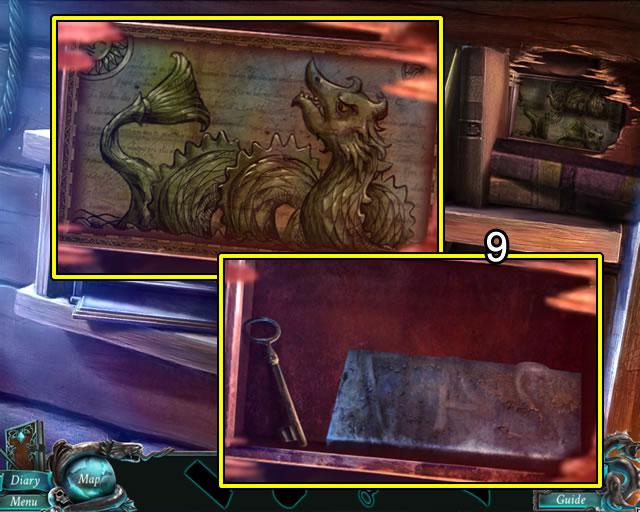
- Read the pink brochure on the bottom shelf; pick up the SCISSORS.
- Return to the hall and the delivery person.
- Use the SCISSORS to cut the string on the package; remove the paper.
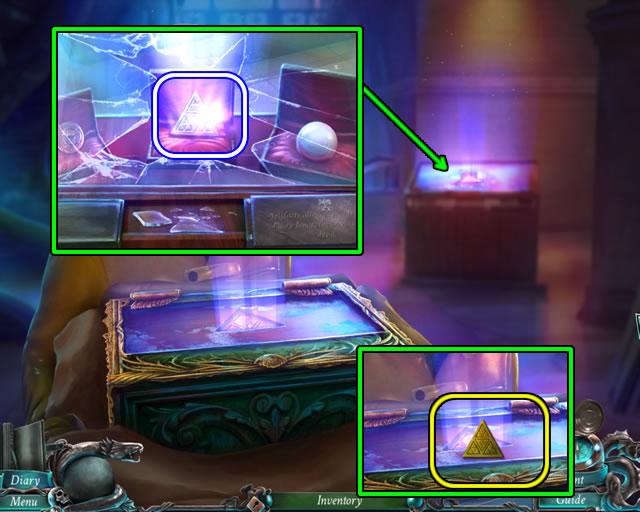
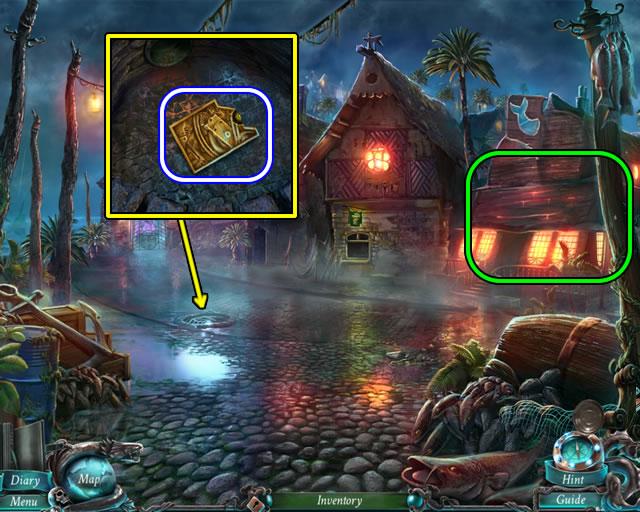
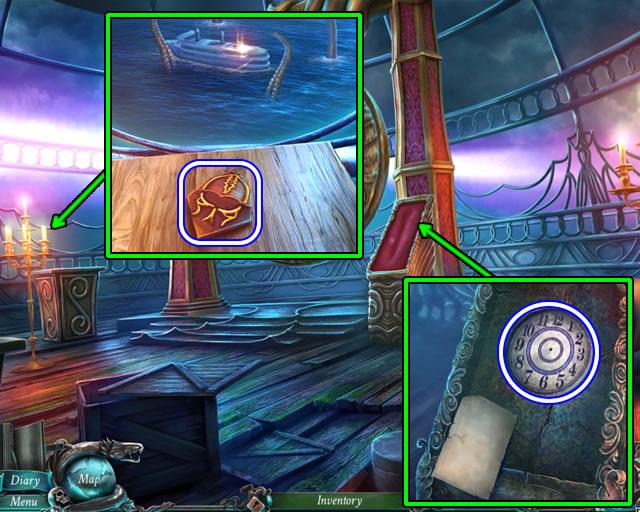
- Examine the broken display case; take the TRIANGULAR PENDANT.
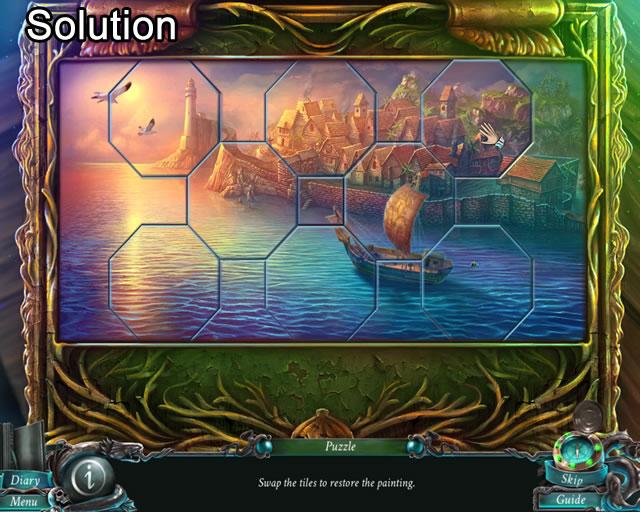
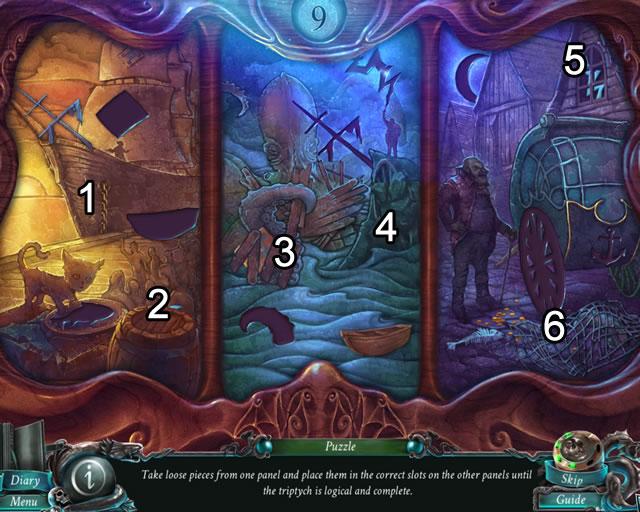
- Insert the TRIANGULAR PENDANT in the inset on the top of the package to open a puzzle.
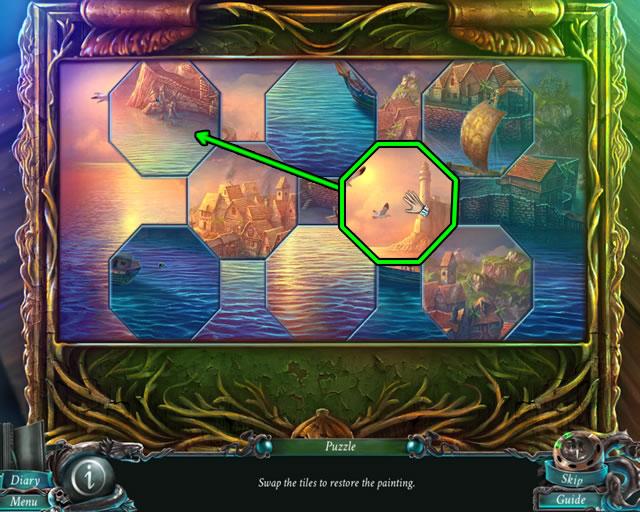
- Click a tile to select it and move it to a spot that matches the background.
- Click to place the tile. The existing tile is automatically selected for placement.
- Continue swapping tiles to complete the picture.
- The next screenshot shows the solution.
- Solving this puzzle opens a slide-the-disk puzzle.
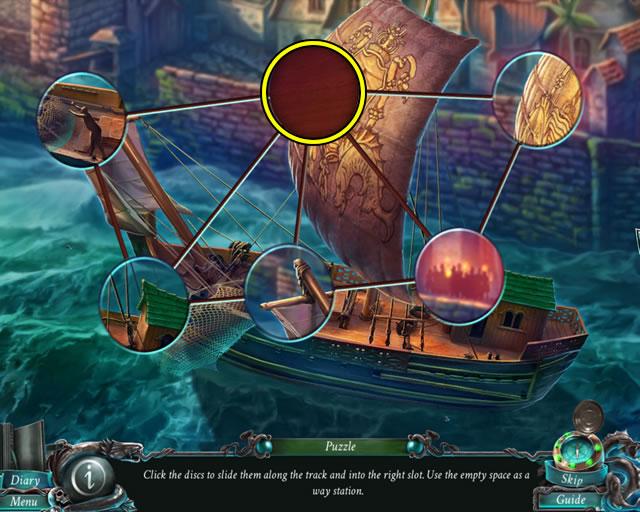
- Slide the disks along the tracks until the disks match the background.
- A disk can only slide into an empty circle.
- The next screenshot shows the solution.
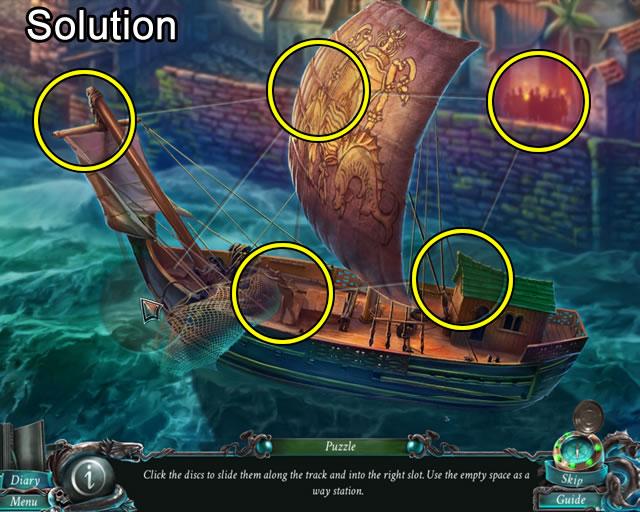
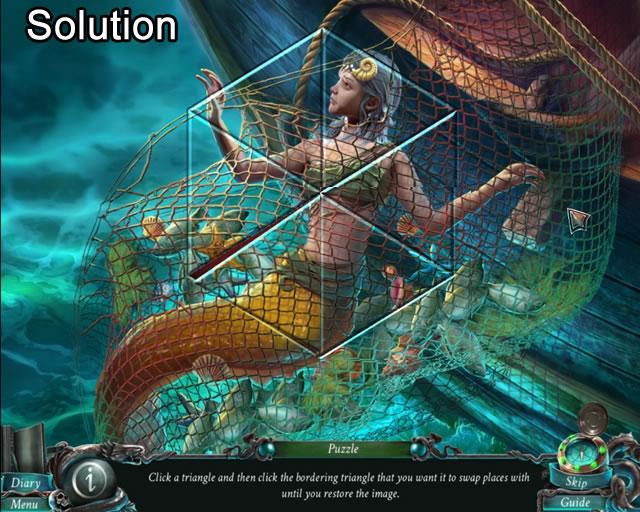
- Solving this puzzle opens a swap-the-triangles puzzle.
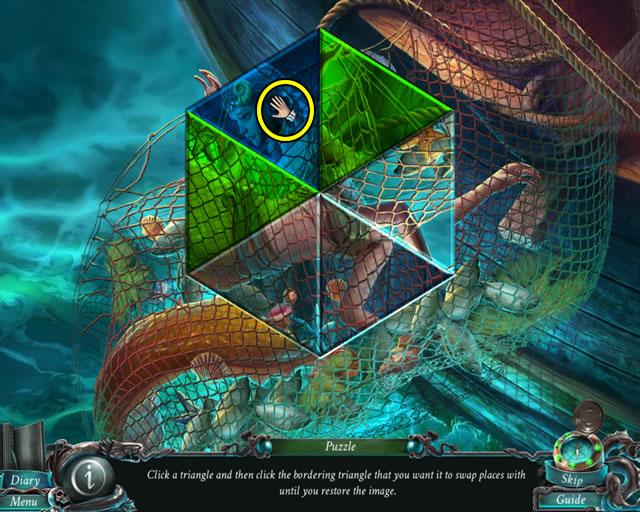
- Select a puzzle section to swap. The selected section turns blue and possible swap locations turn green. Select a destination section; click to complete the swap.
- Continue swapping sections to complete the picture.
- The next screenshot shows the completed image.
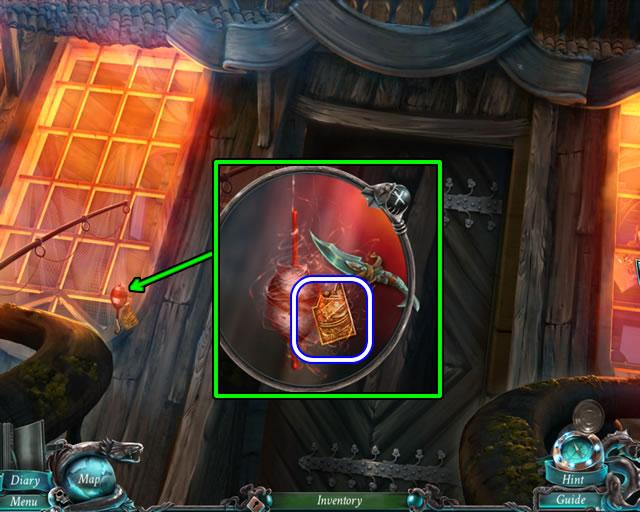
- Solving the puzzle reveals a drawer.
- Open the drawer and take the golden octopus.
- View the cutscenes and begin the quest.
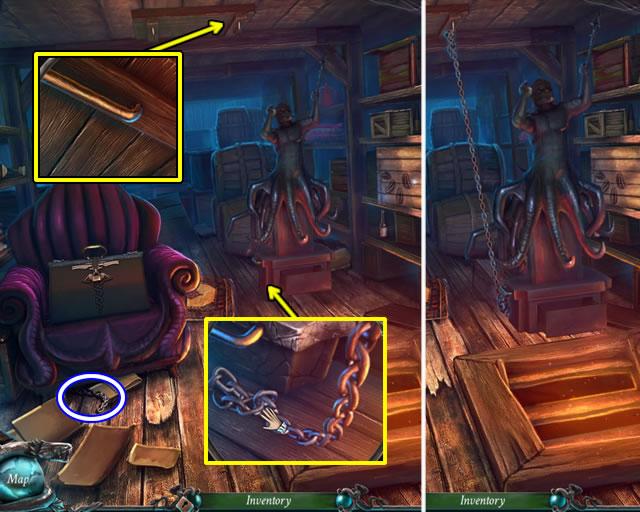
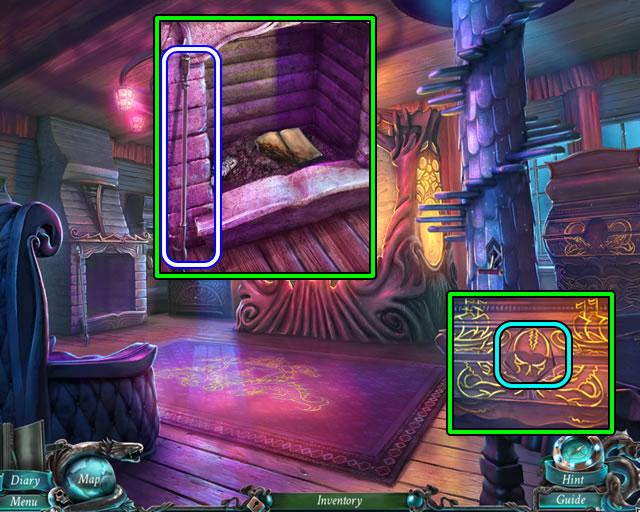
Chapter 2: Giving Assistance
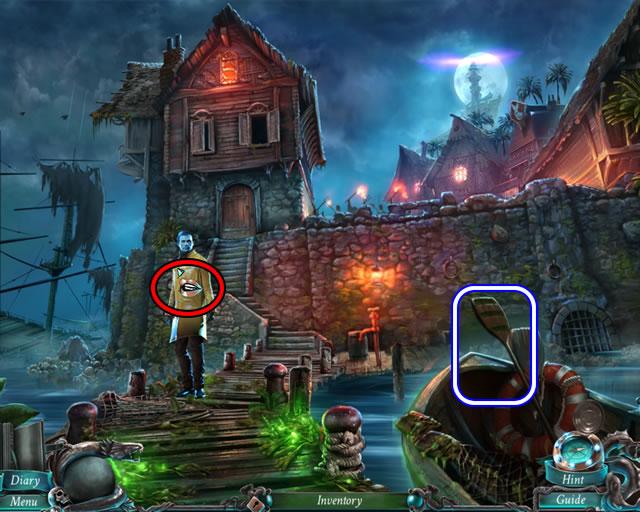
- Speak to the character to activate the scene.
- Grab the OAR and follow the man up the steps and into the house.
- Speak to the character to activate the scene.
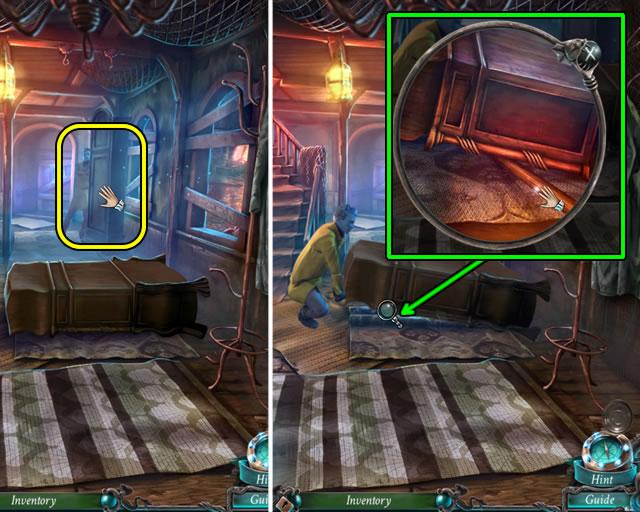
- Help him move the first armoire across the window.
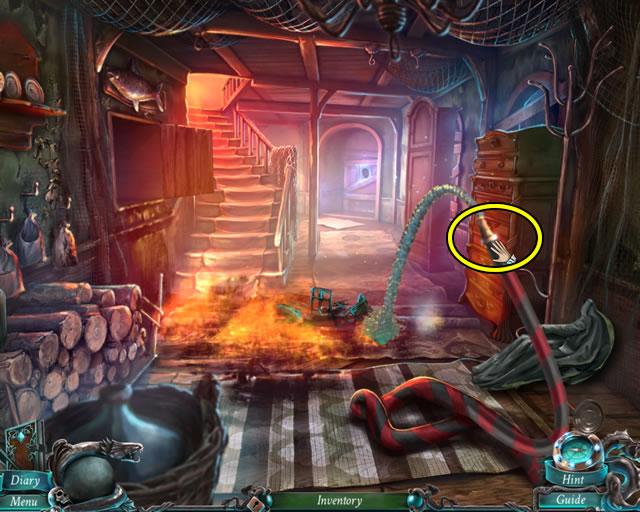
- Zoom in on the top of the second armoire. Insert the OAR under the armoire; click to help lift the cabinet into position. The OAR returns to inventory.
- Attempt to follow the man up the stairs.
- Open the cabinet door.
- Use the OAR to retrieve the HOSE.
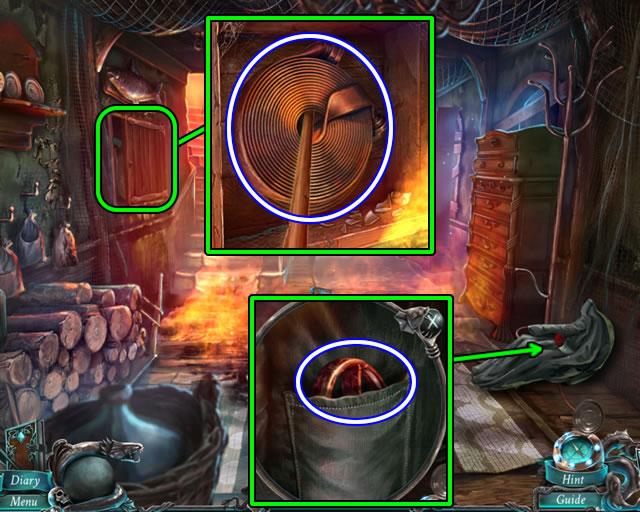
- Examine the coat; take the VALVE from the pocket.
- Go down to the pier.
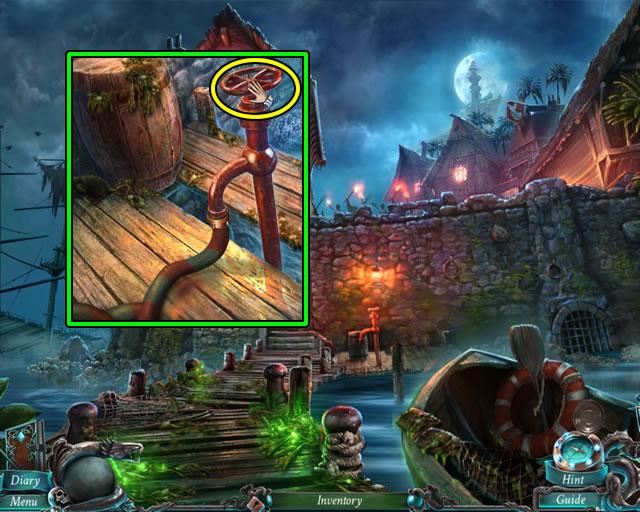
- Zoom in on the pump at the end of the pier.
- Attach the HOSE and VALVE to the pump. Click the valve to start pumping water.
- Return to the house.
- Direct the water and extinguish all the flames.
- Go up the stairs to the bedroom. Move the screen.
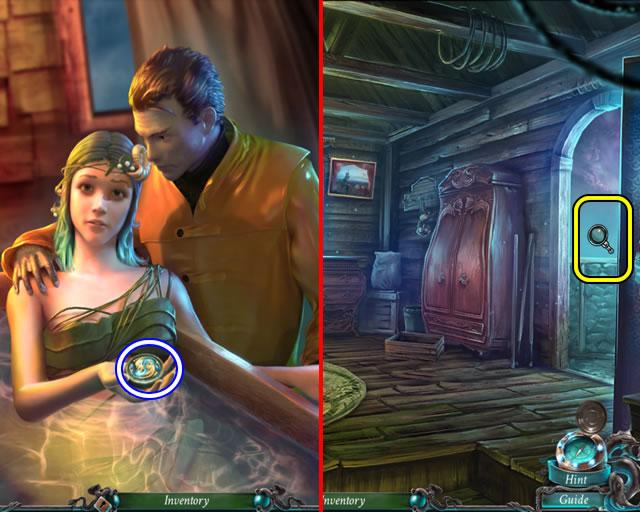
- Speak to Calliope; take the proffered GOLDEN FISH.
- Follow the fisherman to the balcony.
- View the cutscenes for additional story information.
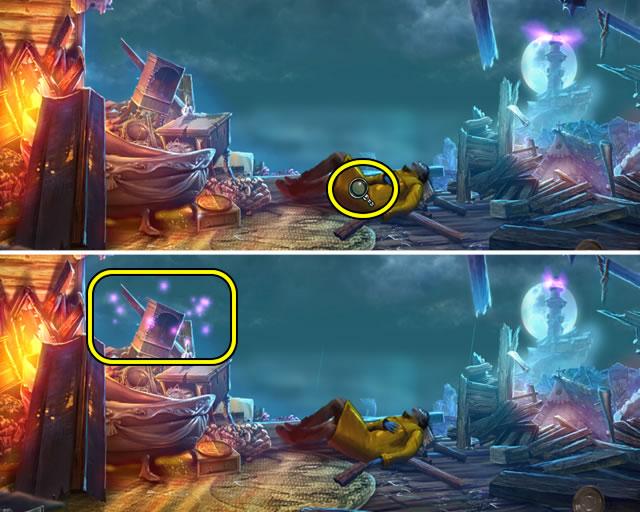
- Look closer at the fisherman.
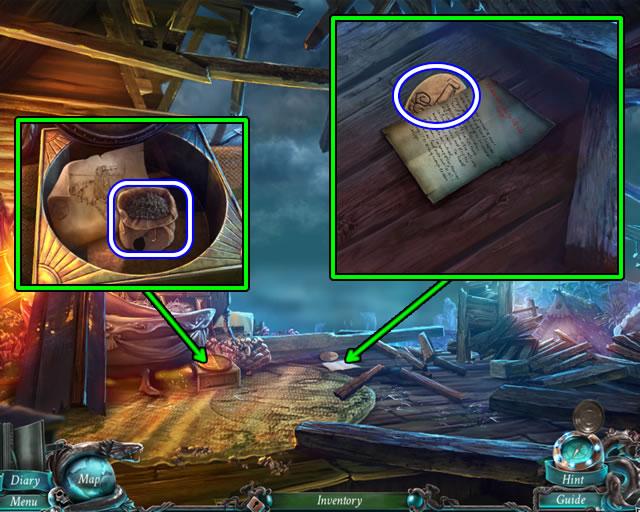
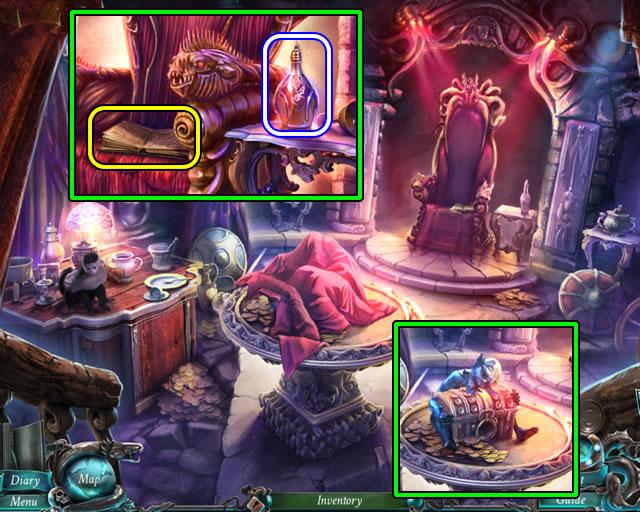
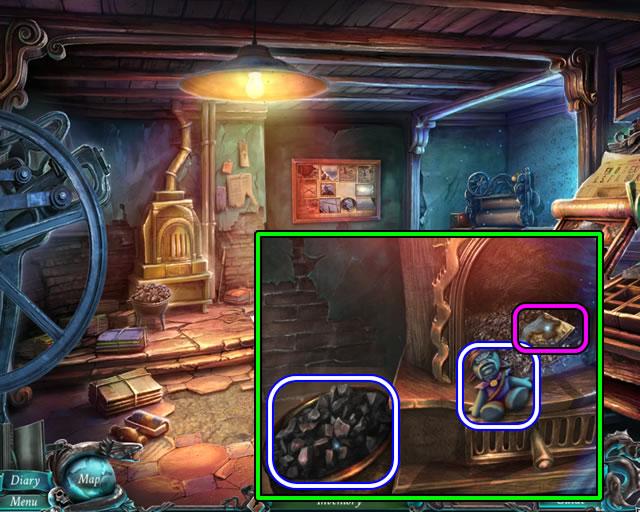
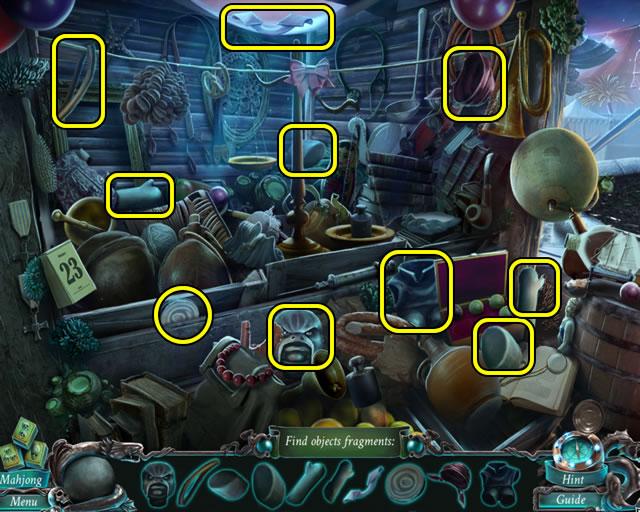
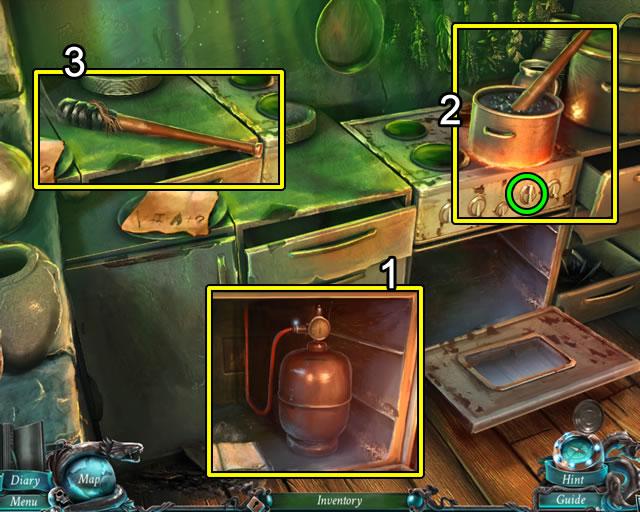
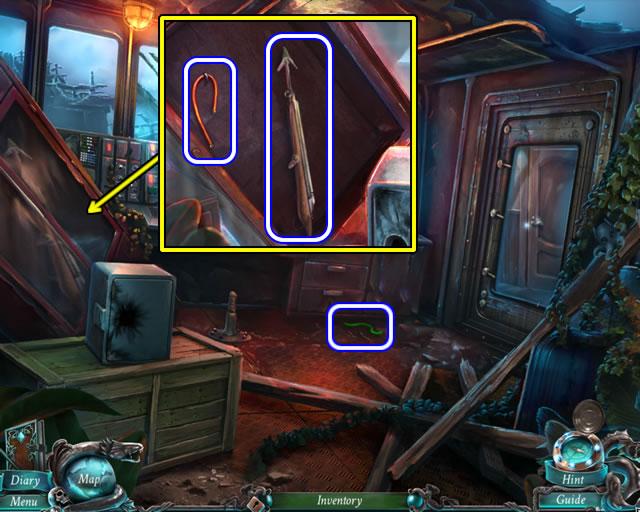
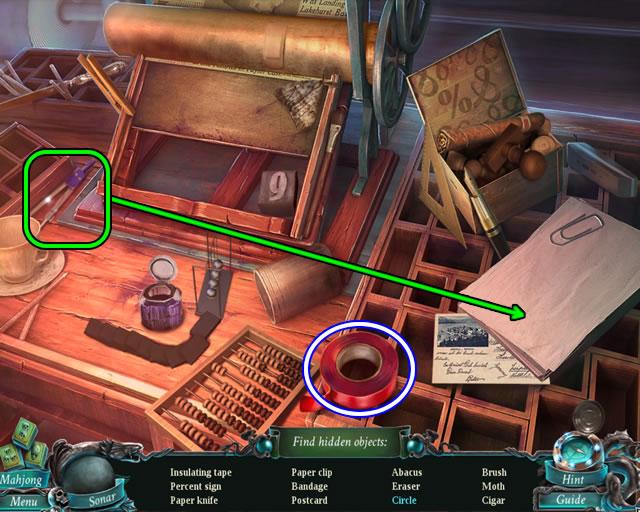
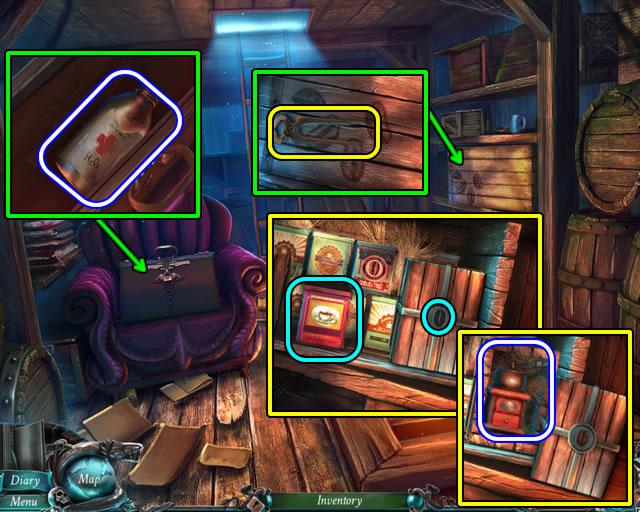
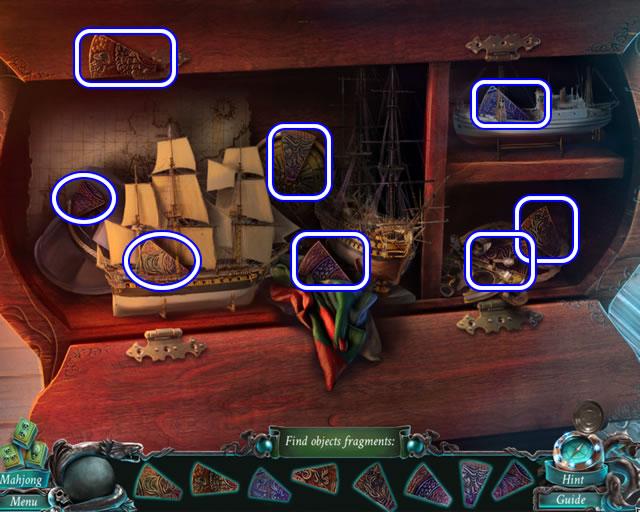
- Exiting the close-up area activates a Find and Use object scene in the rubble.
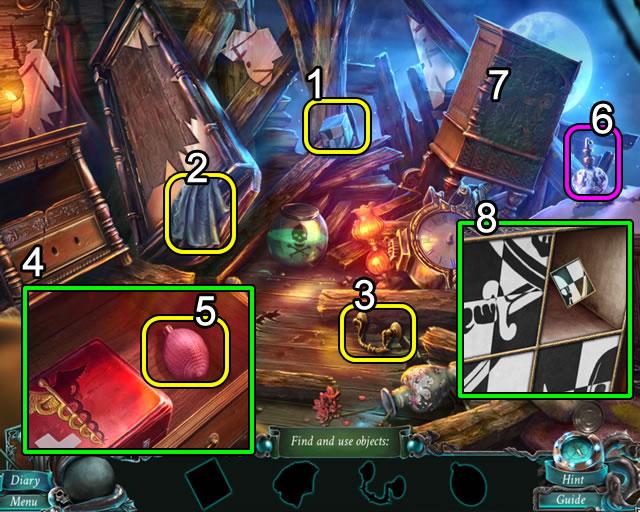
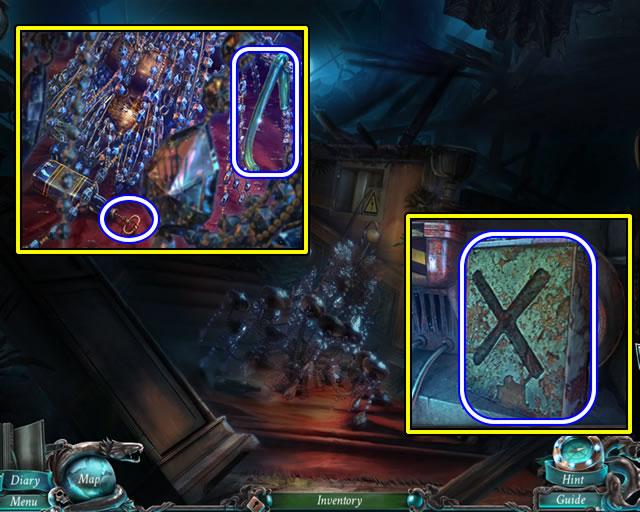
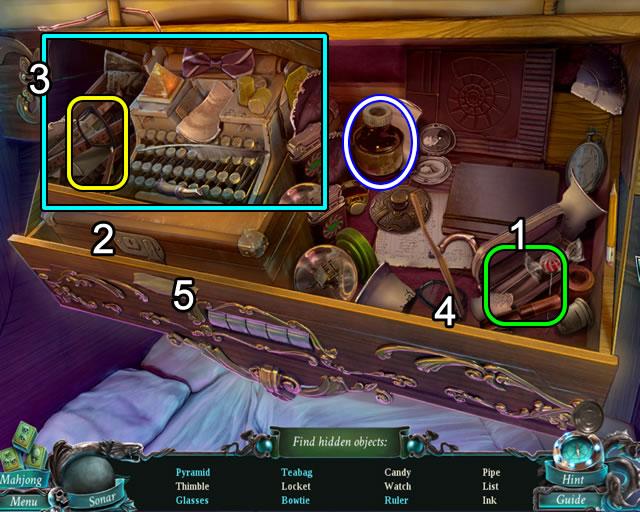
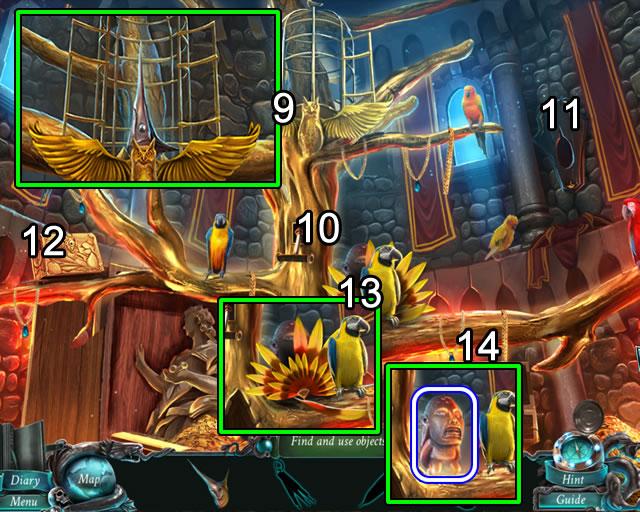
- Pick up the checkerboard piece (1), cloth (2), and drawer handle (3).
- Affix the drawer handle to the cabinet (4). Open the drawer and take the pump (5).
- Attach the pump to the bottle (6); click to spray the cabinet (7). Use the cloth to clean the cabinet doors. Zoom in and open the doors.
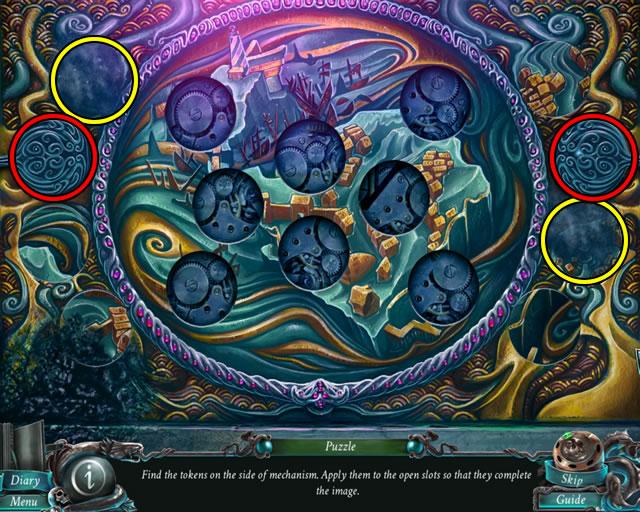
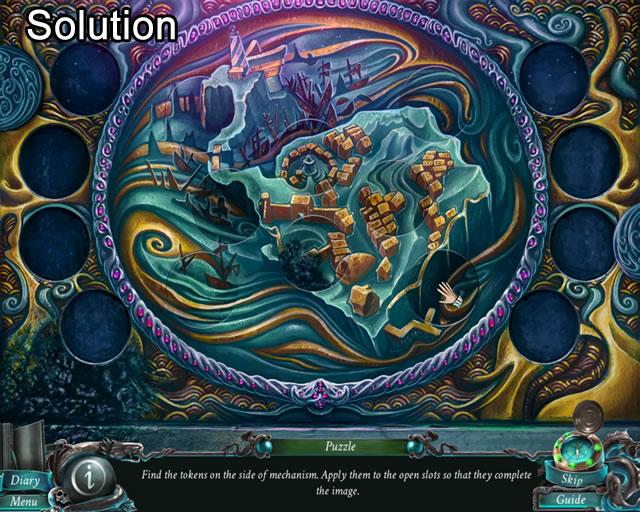
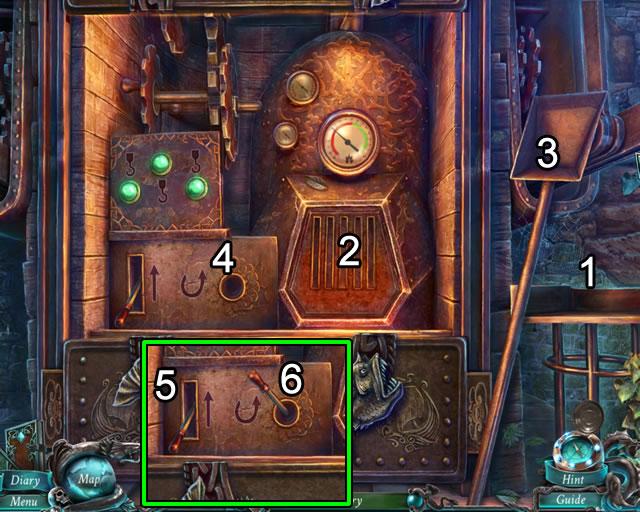
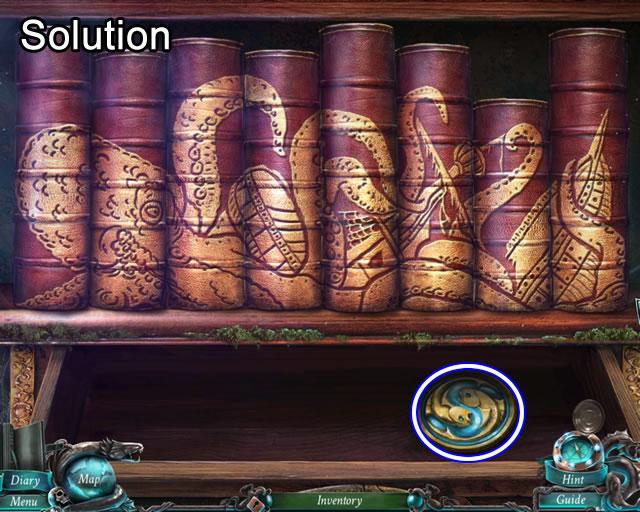
- Insert the checkerboard piece in the empty slot (8) in the cabinet inset to start a puzzle.
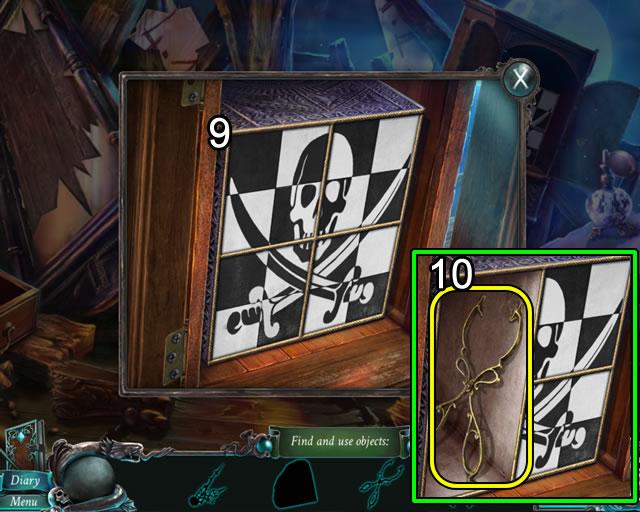
- Click the sections to form a checkerboard pirate image (9).
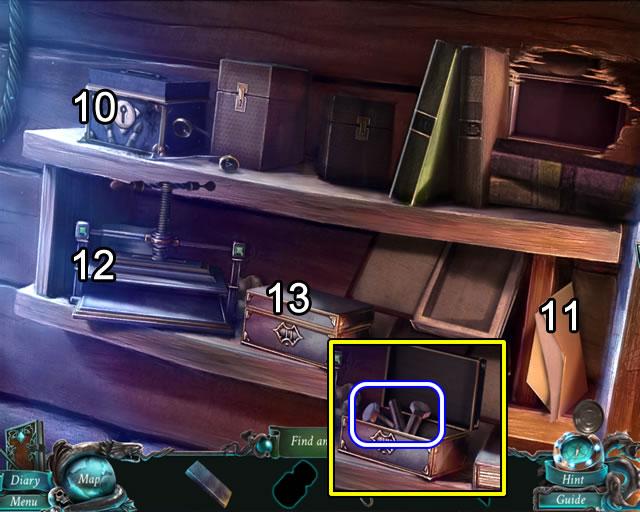
- Take the tongs (10) from the compartment.
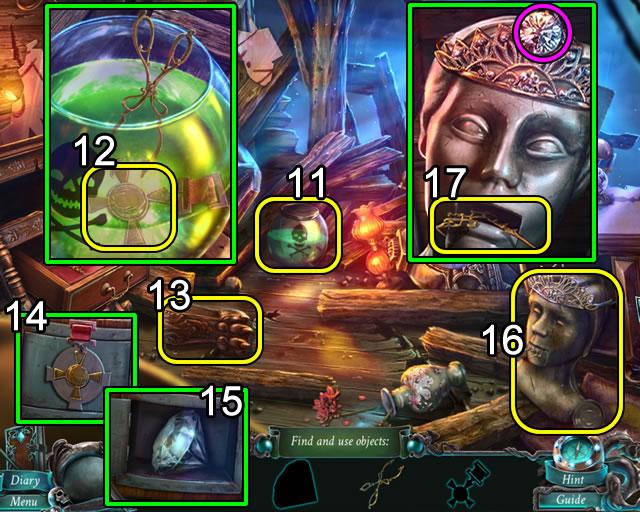
- Look closer at the jar (11). Remove the lid; use the tongs to extract a cross (12).
- Turn over the furniture leg (13). Insert the cross in the slot on the leg (14); take the tiara’s jewel (15) from the compartment.
- Examine the mannequin head (16). Insert the jewel in the top of the tiara; take the clock hands (17) from the open mouth.
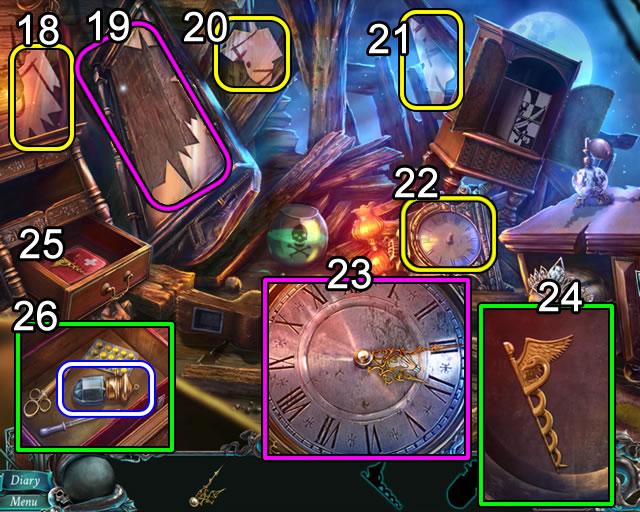
- Pick up a mirror shard (18) and add it to the mirror frame (19). Do the same with shards (20) and (21) to form an image.
- Zoom in on the clock (22). Attach the clock hands and set them (23) to the time shown on the mirror. Take the caduceus half (24) from the compartment.
- Look again in the drawer (25). Insert the caduceus half in the first-aid box lid. Take the SMELLING SALTS from the box (26).
- Look again at the fisherman.
- Use the SMELLING SALTS to revive him and have a conversation; receive the map from the man.
- An interactive location map is now available by clicking the Map icon. Use it to change locations. New locations are added as they are activated during play.
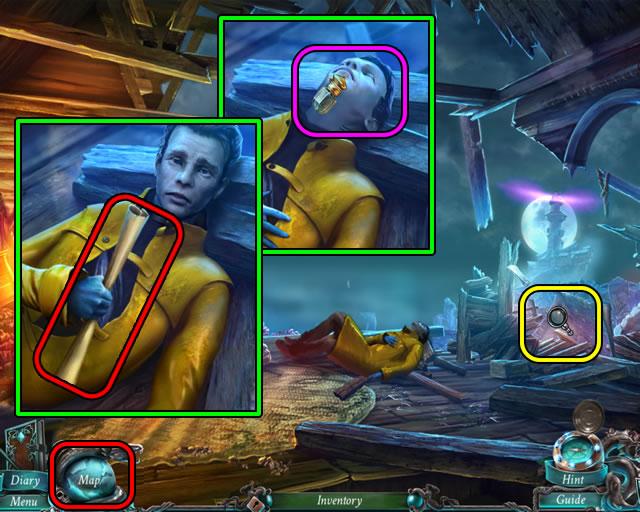
- Inspect the debris pile that used to be the balcony.
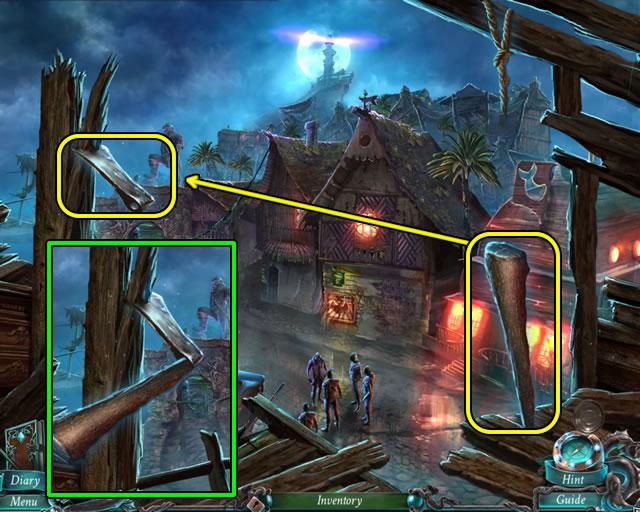
- Drag the handle to the hatched head; take the HATCHET.
- Go down the stairs.
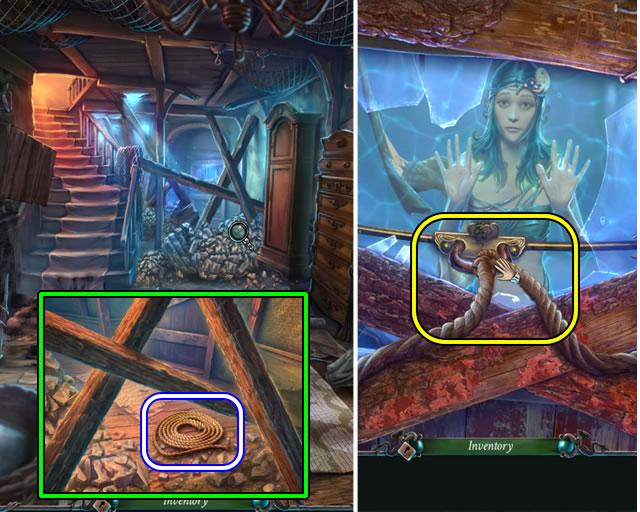
- Examine the rubble pile.
- Move the rocks to uncover a ROPE.
- Use the HATCHET to remove the three beams.
- Go forward.
- Attach the ROPE to the back of the carriage and the timbers blocking the door. Click to secure the rope and start a cutscene.
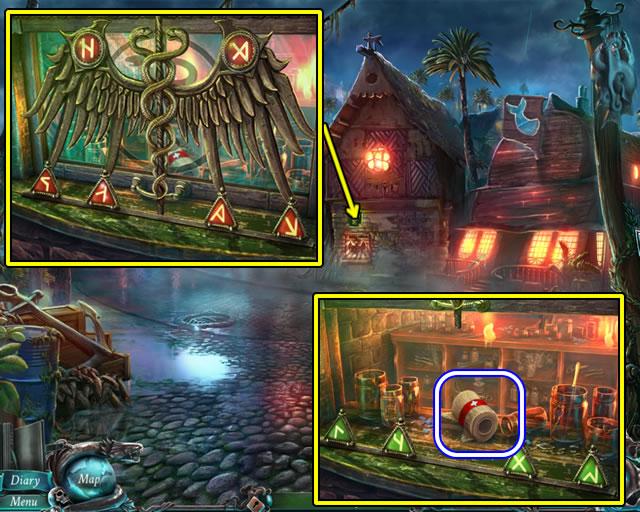
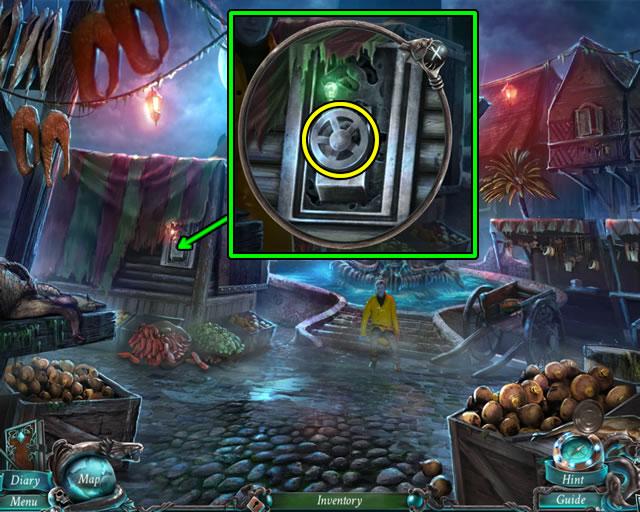
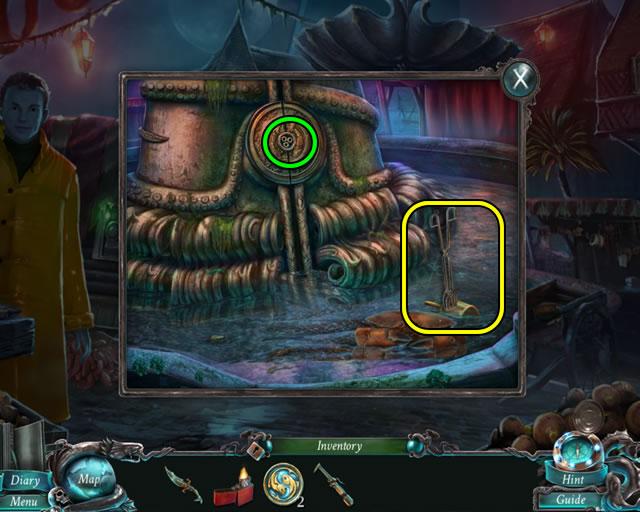
- Look in the pharmacy window.
- Scroll through the tabs on the bottom part of the window until their combined pattern matches the symbol on top. The three tabs turn green when the correct combination is formed. Repeat the process with the second set of tabs.
- Raise the window; reach in and take the GAUZE.
- Go down once and up the stairs to the bedroom.
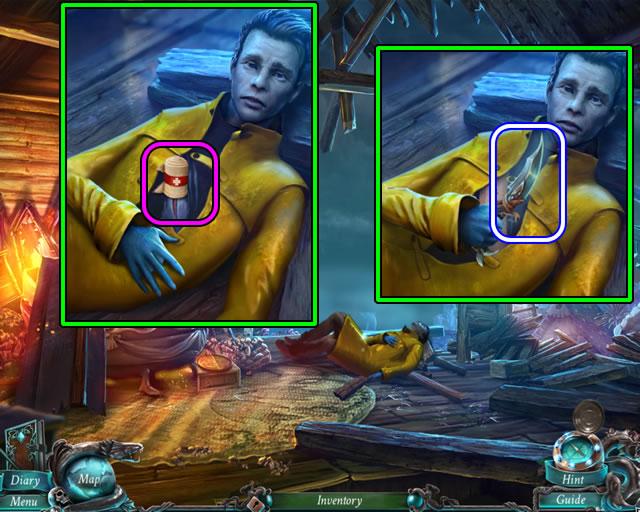
- Use the GAUZE to bind the wound; take the DAGGER.
Exit the house and go forward.
Chapter 3: Finding the Secret Chamber
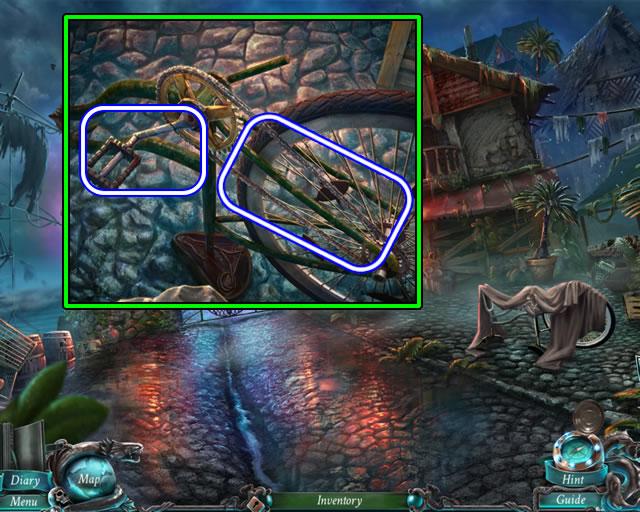
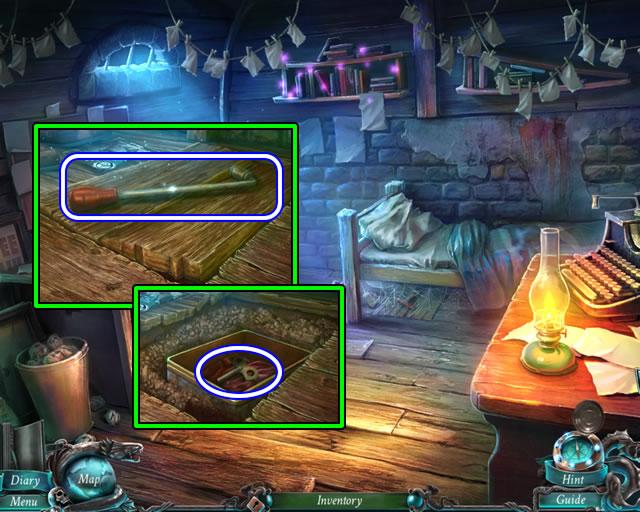
- Remove the cloth covering the bicycle.
- Unbolt the PEDAL and take the CHAIN.
- Look closer at the archway gate.
- Examine the gate mechanism.
- Attach the PEDAL and CHAIN. Click the pedal to open the gearbox.
- Look closer at the gears; take the OILCAN.
- Take the loose ROD from the gate.
- Exit the scene and look again at the bicycle.
- Use the OILCAN to remove the rust from the GEAR.
- Exit the scene and go down once.
- Inspect the drain cover.
- Brush off the leaves; use the ROD to pry off the cover.
- Take the MECHANISM PLATE (1/2).
- Zoom in on the tavern.
- Look closer at the fishing rod.
- Use the DAGGER to cut off the MECHANISM PLATE (2/2).
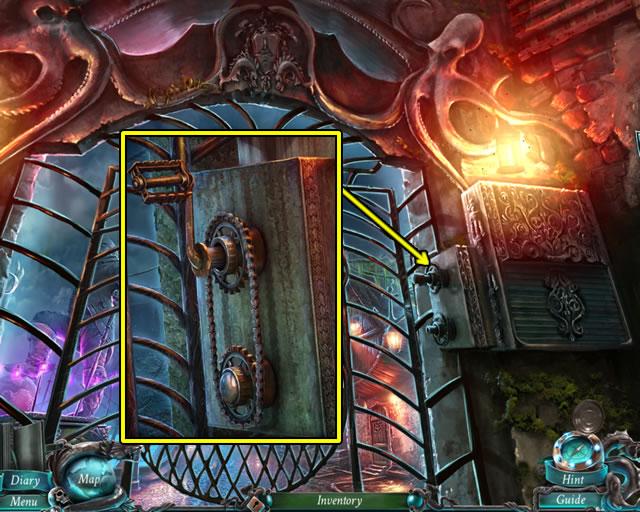
- Exit the scene. Go forward once and zoom in on the archway gate.
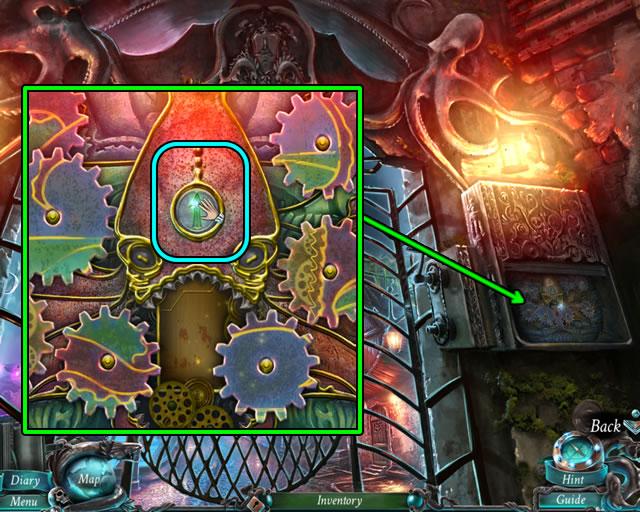
- Inspect the gearbox.
- Click the center arrow to raise the cover.
- Add the two MECHANISM PLATES and the GEAR to open a puzzle.
- The goal is to place the gears so they mesh smoothly.
- Swap the gears on the pegs based on the background pattern. The first swap is shown above.
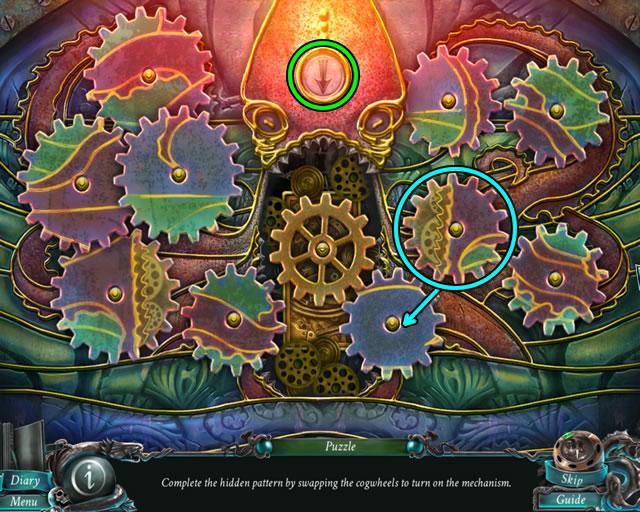
- Test gear placement by pressing the down arrow to force the gears to turn. Sparks indicate which gears overlap.
- The gears turn automatically when all are correctly positioned.
- The next screenshot shows the solution.

- Complete this puzzle to open the archway gate.
- Go forward.
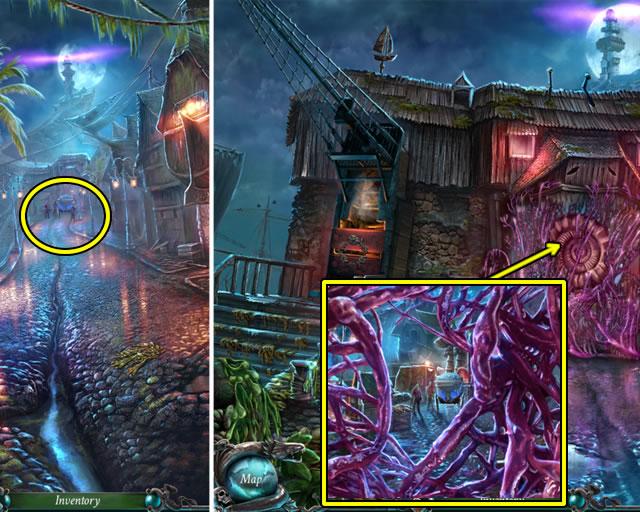
- Look at the figures at the end of the promenade to activate a cutscene.
- Go forward and peek through tangles covering the gate.
- Go left down the steps to the dilapidated harbor.
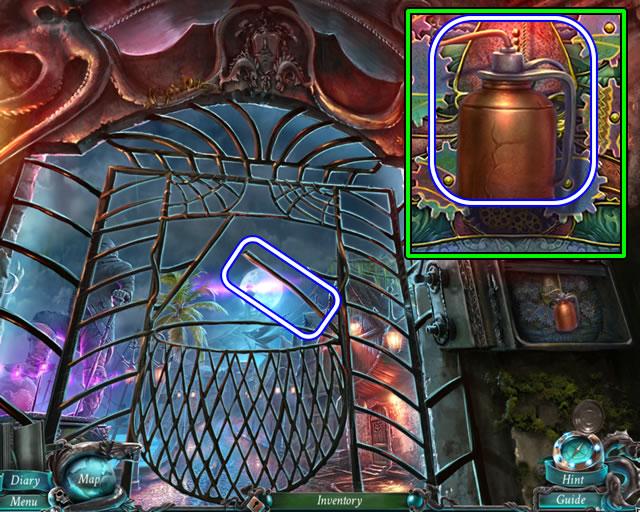
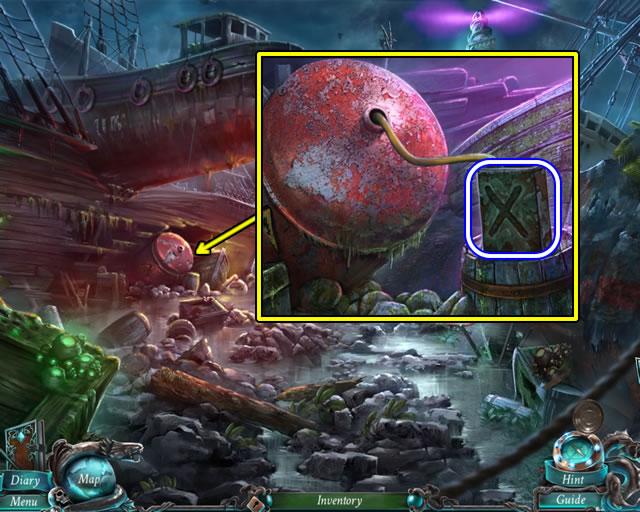
- Remove the cover from the boat.
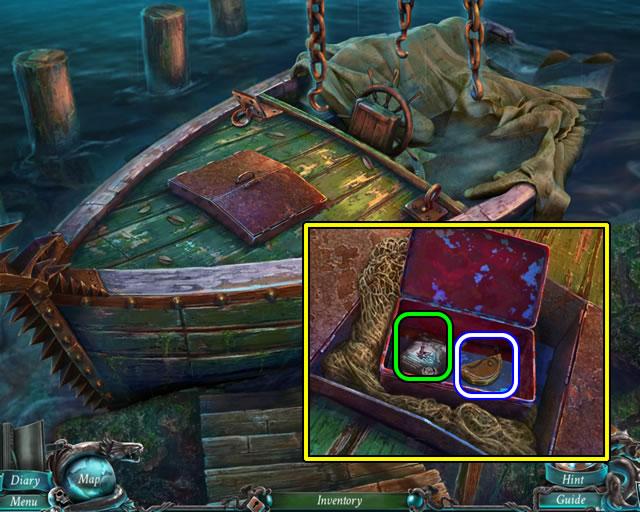
- Open the hatch, uncover and open the red box.
- Read the flyer and take the HALF CIRCLE.
- Go down three times.
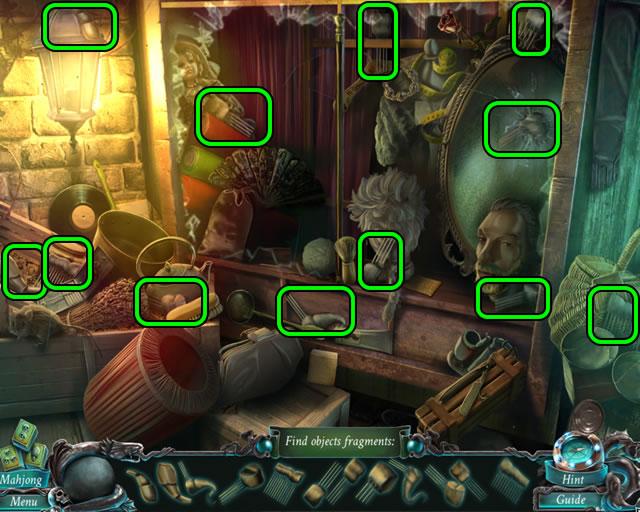
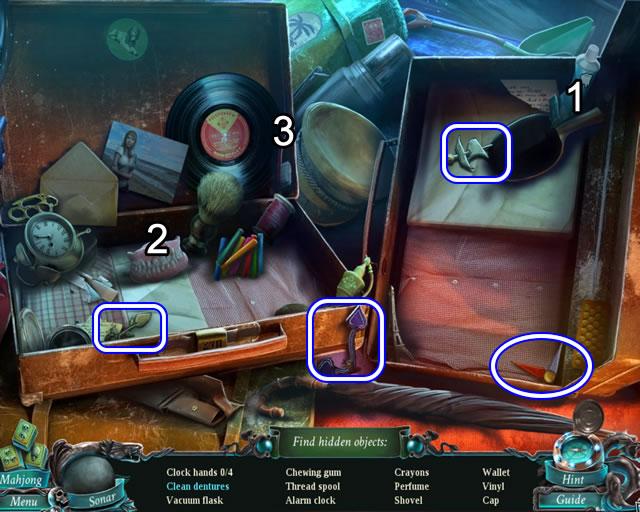
- Play the hidden object scene to the right of the archway.
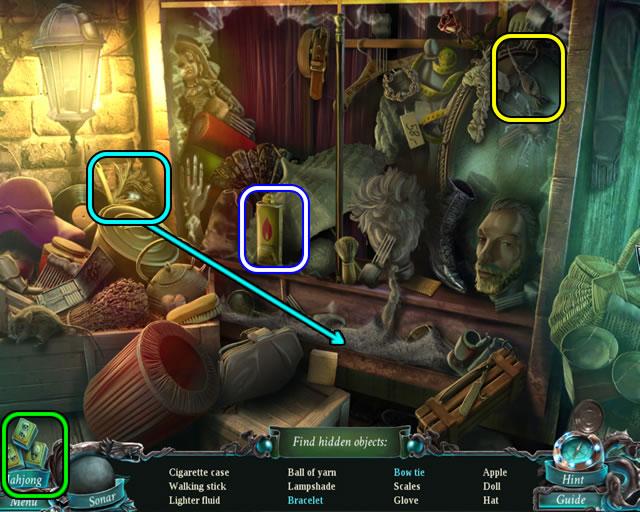
- The list items are randomly generated. Your list may not agree with the above screenshot.
- Find the listed objects. Placing the cursor over an item shows its silhouette in the Sonar globe.
- Alternately, click the Mahjong icon to switch to a Mahjong game. Pairing gold tiles eliminates list items.
- Use the duster to remove the dust from the ledge and uncover a Bracelet.
- Click the tie to turn it into a Bow tie.
- Find the rest of the listed objects. LIGHTER FUEL goes to inventory.
- Go forward to the Promenade.
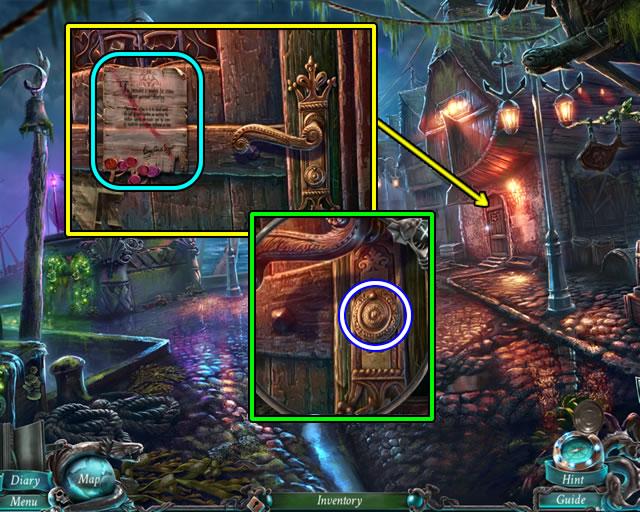
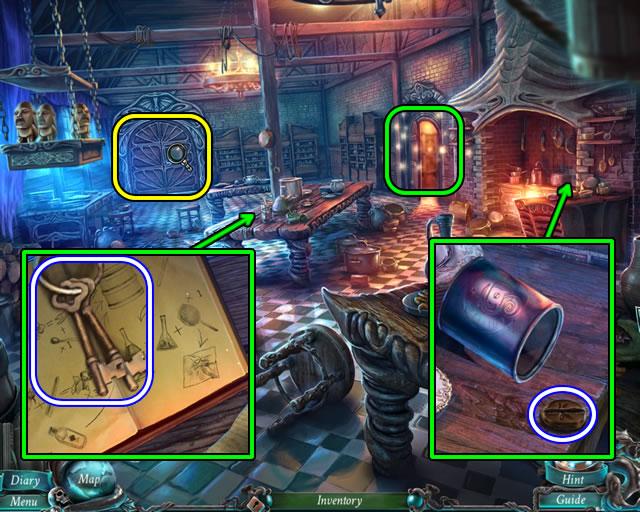
- Look at the door to the newspaper office.
- Read the notice; examine the door handle.
- Move the keyhole cover; it turns into a COIN.
- Exit the scene and go forward to the Gate.
- Zoom in on the newspaper vending stand.
- Insert the COIN in the slot; open the cover.
- Pour the LIGHTER FUEL into the empty lighter case. The LIGHTER automatically goes to inventory.
- Go down four times and up the stairs to the Bedroom.
- Zoom in on the paper on the floor.
- Read the paper and take the REBEL SYMBOL.
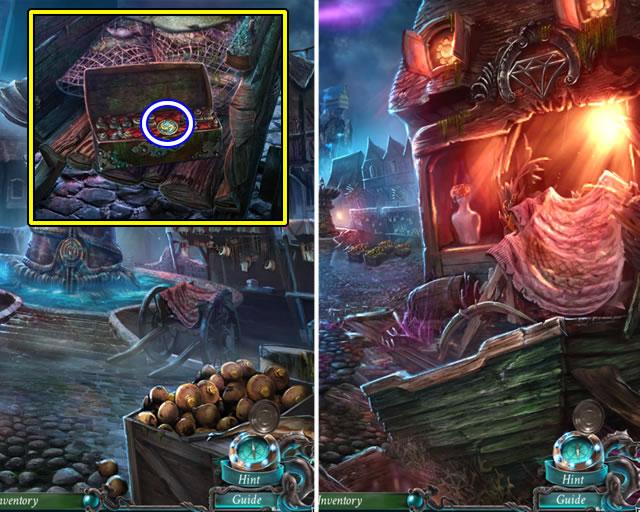
- Examine the box.
- Insert the CIRCLE HALF in the top to open the box.
- Look at the diagram; take the GUNPOWDER.
- Exit the house; go forward twice to the Promenade. Go left to the Statue.

- Examine the statue base.
- Pull the red rag; use the DAGGER to remove the barnacles.
- Pour the GUNPOWDER around the entrance. Use the LIGHTER to ignite the powder.
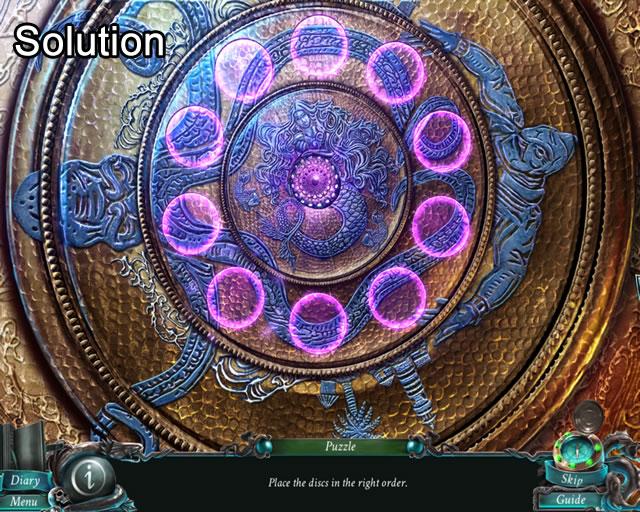
- Zoom in on the blasted area to play a puzzle.
- Clear the gunk off the two dirty disks (yellow) and remove the covers (red) from two others.
- Match the pattern on the disks to the background and insert them in the correct slots.
- The next screenshot shows the solution.
- Correctly placing the disks opens the door to the secret chamber.
- Zoom in on the chair.
- Read the journal; take the BOTTLE OF RUM.
- Remove the cloth covering the creature.
- Speak to the creature and give it the GOLDEN FISH token for story information.
- Exit the chamber. Go forward to the Promenade and down twice to the Square.
Chapter 4: Breaching the Gate
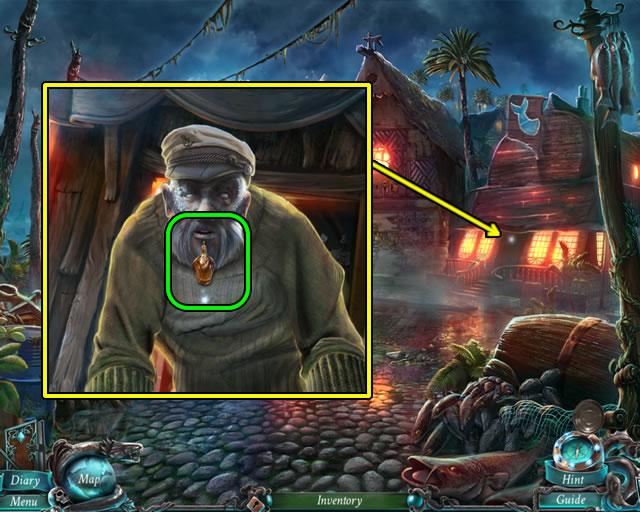
- Knock on the tavern door.
- Give the BOTTLE OF RUM to the fisherman.
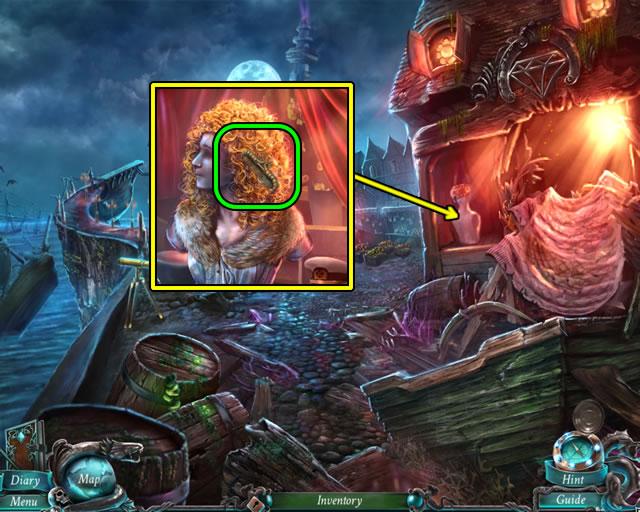
- Go forward.
- Speak to the fisherman; receive a PHOTO.
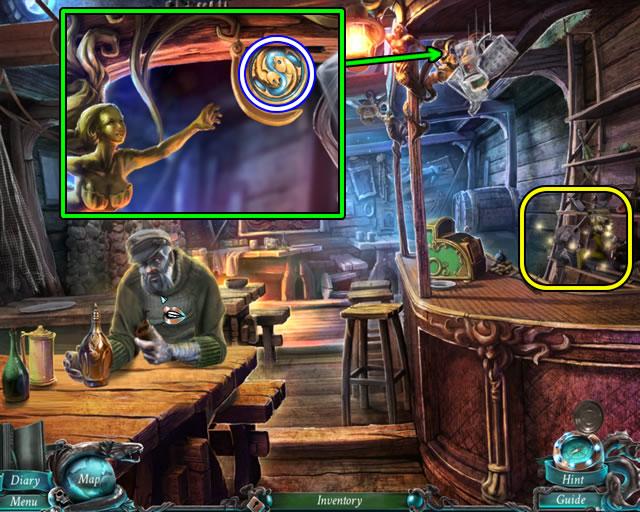
- Examine the mugs hanging above the bar.
- Move the mugs and find a mermaid. Click the mermaid to get a GOLDEN FISH.
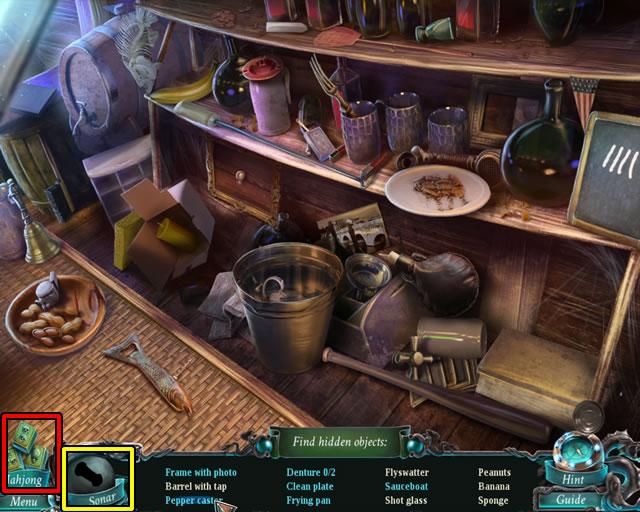
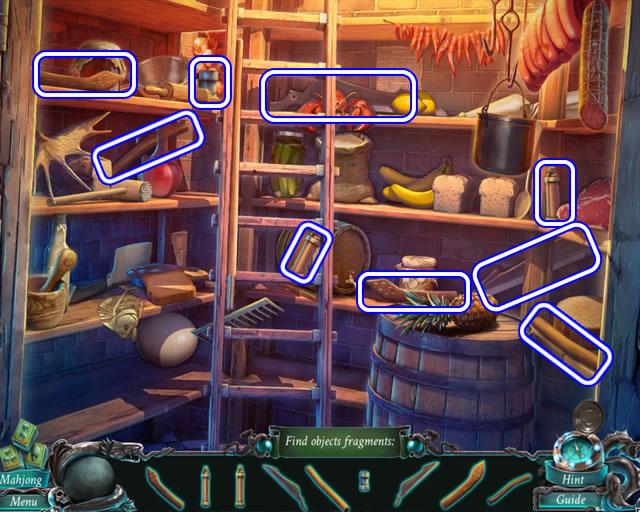
- Play the hidden object scene on the bar.
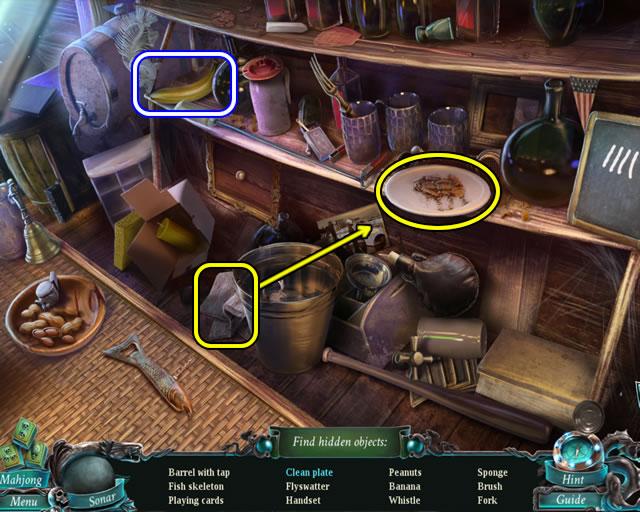
- The list items are randomly generated. Your list may not agree with the above screenshot.
- Find the listed objects. Click the Mahjong icon at any time to switch to a Mahjong game. Pairing gold tiles eliminates list items.
- Placing the cursor over an item shows its silhouette in the Sonar globe.
- Drag the cloth to the dirty plate and create a clean plate.
- Eliminate all times to receive a BANANA for inventory.
- Zoom in on the back wall to open a puzzle.
- The goal is to find and place items in their correct slot.
- First reveal all the items: raise the chain (1), remove the barrel top (2), move the boards (3), remove the rocks (4), open the window (5) and lift the net (6). All items may now be placed.
- The solution is shown in the next screenshot.
- Correctly restoring the images opens a secret compartment.
- Read the open book for story information; take the NEWSPAPER KEY.
- Exit the Tavern. Go forward twice and left to the Statue. Enter the Secret Chamber.
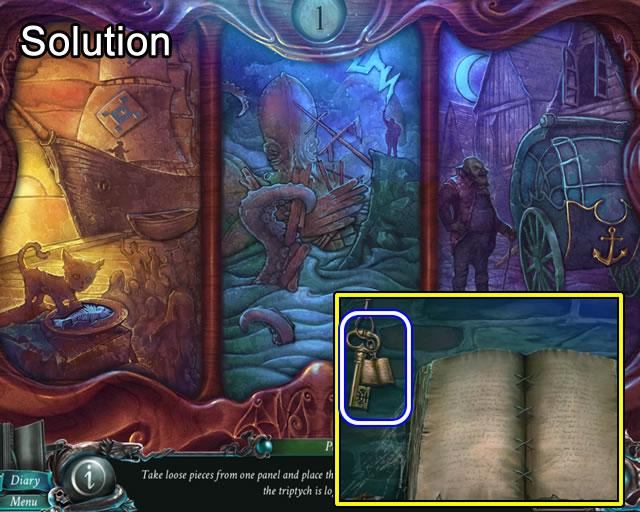
- Give the BANANA to the monkey; take the FIREPROOF GLOVE.
- Zoom in on the chest creature.
- Give the creature the second GOLDEN FISH for additional story information.
- Note: All slots on the chest must be filled to complete the game. Use the Map at any time to zip back and add collected tokens. This walkthrough does not specifically mention doing this task.
- Exit the statue and go forward to the Promenade.
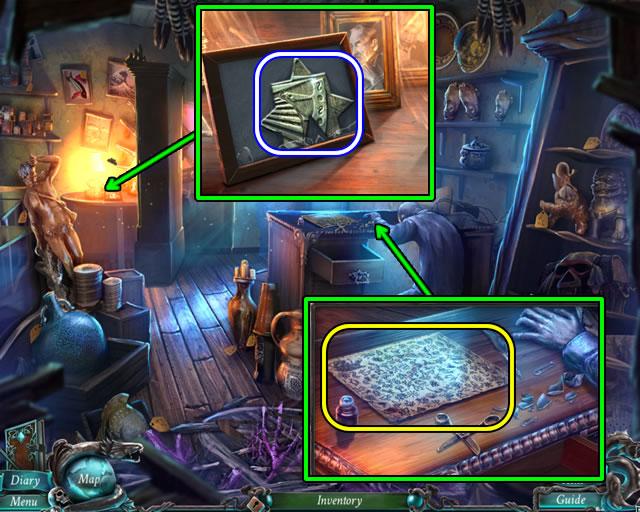
- Zoom in on the newspaper office door. Insert the NEWSPAPER KEY in the lock and enter the office.
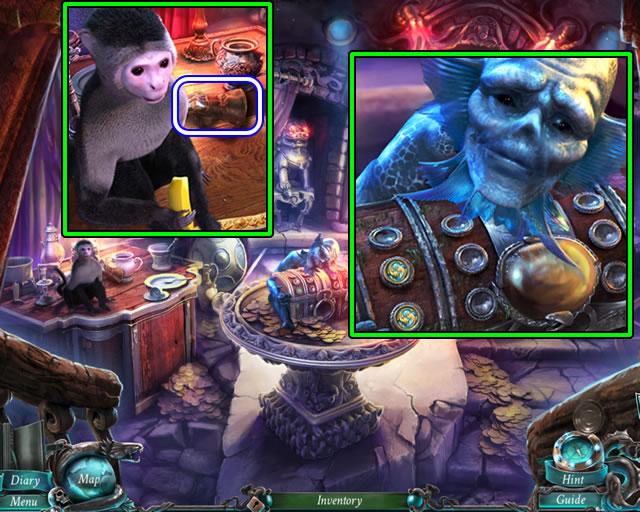
- Click the LIGHTER over the darkened desk on the right to illuminate a hidden object scene.
- Use the LIGHTER to help find the objects.
- The list items are randomly generated. Your list may not agree with the above screenshot.
- Add the domino (1) to the line of dominoes (2). Click a domino to knock them over; take the Damaged Gate.
- Turn the camera (3) over. Open the back and take the Negative.
- Pick up the picture fragment (4) and add it to the torn picture (5). Drag the other scrap (6) over to form a complete Picture.
- Find the rest of the objects; receive a LIGHT BULB for inventory.
- Use the LIGHTER to zoom in on the ceiling lamp.
- Replace the broken bulb with the LIGHT BULB.
- Read the scattered papers for additional story information.
- Look at the heat stove.
- Take the bucket of COAL.
- Open the stove and move the ashes to uncover a TOY SOLDIER (1/3). Examine the singed diagram.
- Zoom in on the photos on the back wall. Add the PHOTO to start a puzzle.
- Swap the photos to form a picture. Use the photo background images to help place them.
- The next screenshot shows the solution.

- Correctly positioning the photos tears the photo with an “X”.
- Put the REBEL SYMBOL in the inset.
- Enter the Hideout.
- Use the LIGHTER to light the lantern.
- Move the covers and look at the floor under the bed.
- Remove the cobwebs; read the brochure; take the CRANE LEVER.
- Remove the loose boards; uncover and open the box; take the WIND-UP KEY.
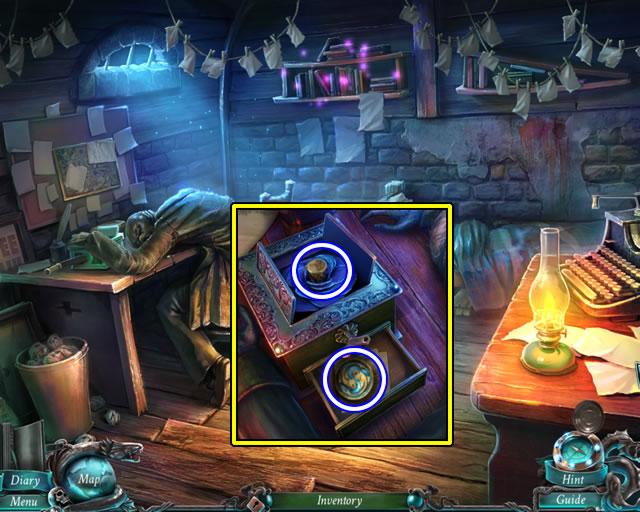
- Look at the desk; move the arm to uncover a box.
- Insert the WIND-UP KEY. Open the box and take the SIGNET RING. Pick up the GOLDEN FISH token and read the notes.
- Examine the bulletin board over the desk to add an objective.
- Play the find-and-use object scene on the bookshelves.
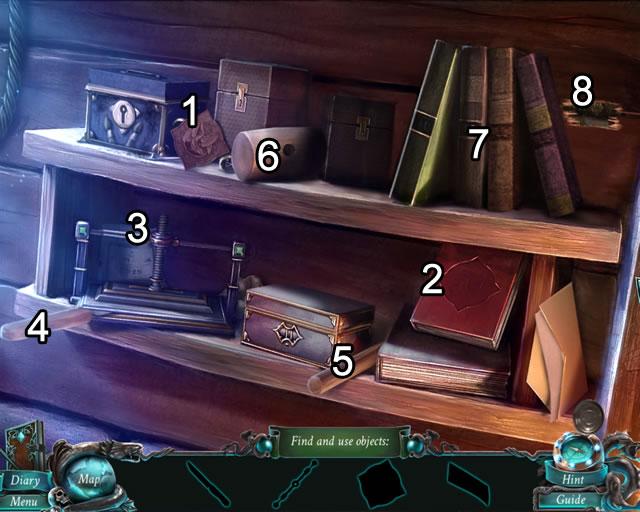
- Pick up the book symbol (1) and insert it in the slot on the book (2). Take the handle that was hidden in the book.
- Affix the handle to the top of the letterpress (3); turn to free the knife (4).
- Use the knife to whittle the stick (5) into a hammer handle. Insert the handle into the hammerhead (6).
- Move the books (7) and use the hammer to widen the hole in the wall (8).
- Zoom in to open a puzzle. Click the sections to form a pattern.
- The next screenshot shows the solution.
- Solving the puzzle opens a compartment (9).
- Take the paint box key and fonts from the compartment.
- Open the box (10) with the paint box key and take the bottle of printing ink.
- Remove the blank paper from the envelope (11).
- Zoom in on the letterpress (12) and insert the fonts. Spread the printing ink and insert the blank paper. Turn the press handle to print a code.
- Use the printed combination code to open the box (13) and find the BOLTS.
- Exit the Newspaper office. Go forward to the Gate.
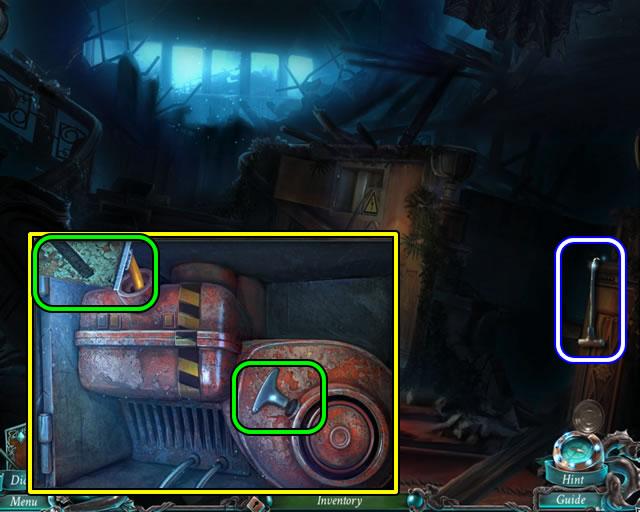
- Open the toolbox and take the WRENCH.
- Go left to the boat.
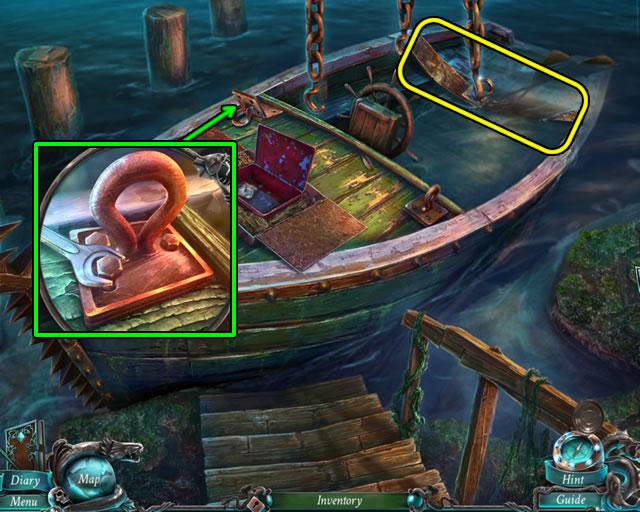
- Zoom in on the loose fastener.
- Position the fastener, insert the BOLTS and tighten them with the WRENCH.
- Raise the supporting bar on the back.
- Click each dangling chain to attach the hooks.
- Exit the harbor.
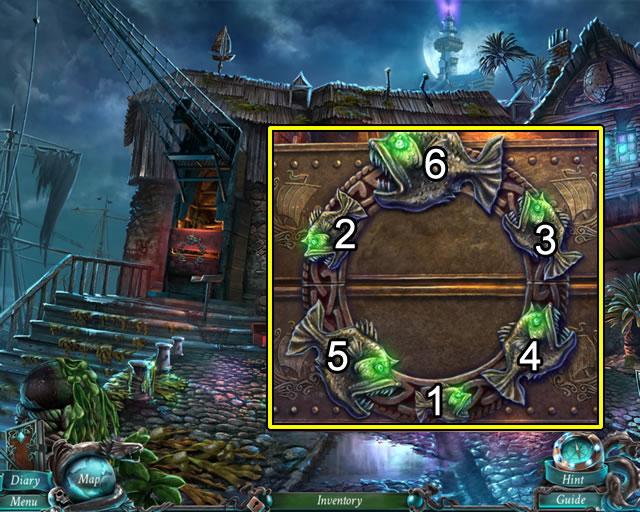
- Zoom in on the crane control cover.
- Click the fish in the order shown to open the cover.
- Put the COAL on the shelf (1).
- Open the furnace door (2) with the FIREPROOF GLOVE. Shovel (3) coal into the furnace until the temperature gage rises to the green level.
- Insert the CRANE LEVER in the slot (4).
- Pull the first lever (5) to raise the boat and the second lever (6) to swing the boat around and crash it through the gate.
Chapter 5: An Alternate Route
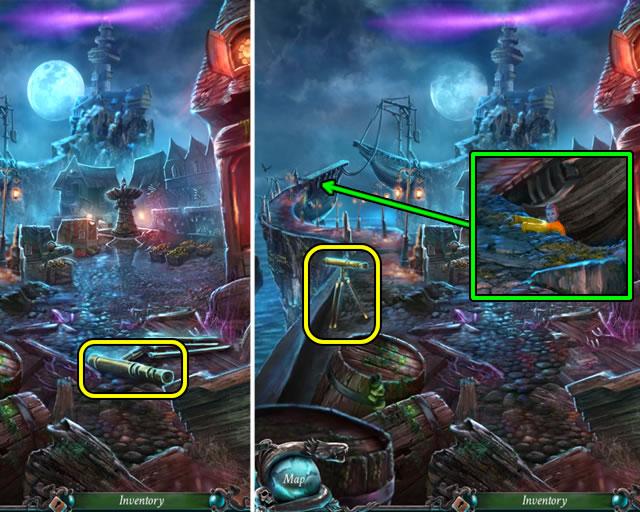
- Click the telescope in the rubble to set it up.
- Peer through the telescope and view a cutscene.
- Zoom in on the end of the broken bridge; rescue the fisherman.
- Take the TOY SOLDER (2/3) from the character and exit the scene.
- Go forward toward the fountain.
- Remove the THICK CLOTH covering the cart on the right.
- Move the fish to uncover a box; use the DAGGER to pry open the lid; take the GOLDEN FISH token.
- Go down.
- Put the THICK CLOTH on the rubble to enter the pawnshop.
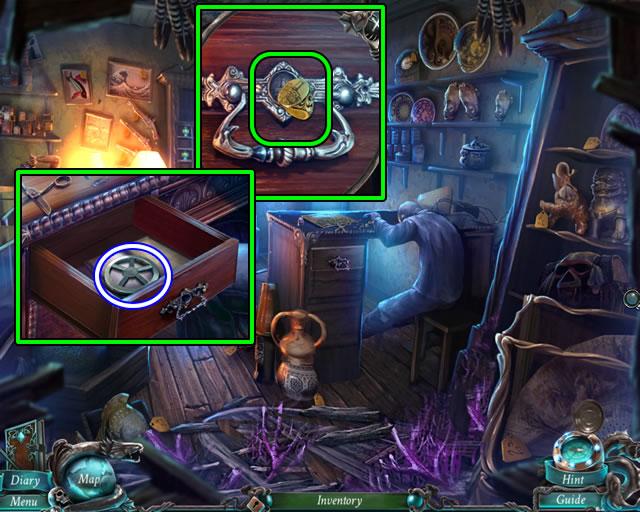
- Look closer at the top desk drawer.
- Insert the SIGNET RING in the inset to open the drawer.
- Take the STEEL WHEEL and read the journal.
- Exit the shop. Go forward toward the fountain.
- Speak to the fisherman.
- Zoom in on the side of the stall.
- Attach the STEEL WHEEL to the mechanism; turn to open the stall and open a fragmented object scene.
- Collect the pieces of the TOY SOLDIER (3/3).
- Go down and enter the pawnshop.
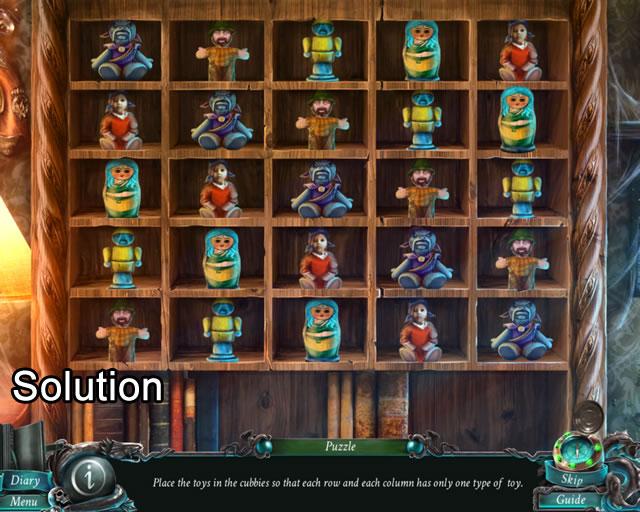
- Zoom in on the back wall; remove the TONGS from the cubbyhole; place the three TOY SOLDIERS on the scene to open a puzzle.
- Arrange the toys so there are no duplicates in any row or column.
- One solution is shown in the next screenshot.
- Solving the puzzle opens a find-and-use object scene.
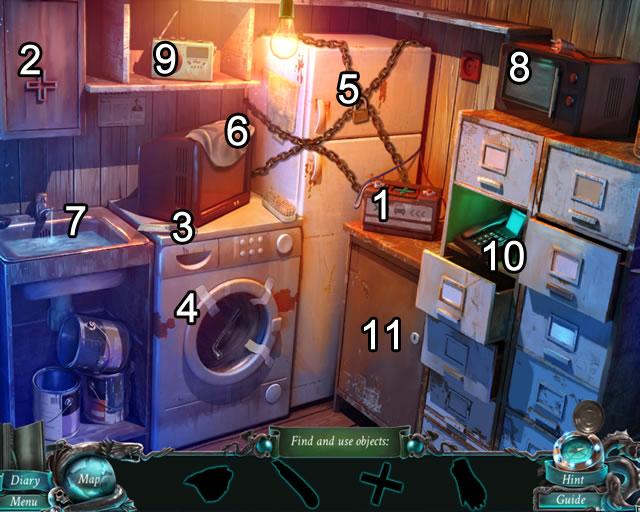
- Take the green cross from the battery (1) and insert it in the cabinet door (2); take the rubber gloves and syringe from the cabinet.
- Pick up the cutter (3) and use it to slit the tape on the washer door; retrieve the wrench.
- Look again at the battery. Use the wrench to remove the bolt. Remove the cover and insert the syringe in the acid. Take the syringe with acid.
- Use the syringe with acid to dissolve the lock on the refrigerator door (5). Reach in the freezer with the rubber gloves and retrieve the ice block.
- Pick up the rag (6) and look at the sink (7). Turn off the water and dry the extension cord with the rag.
- Go to the microwave (8). Plug in the extension cord, open the door, put in the ice block and close the door to activate the oven. Take the crank.
- Insert the crank in the top of the radio (9); turn the crank to reveal three numbers.
- Look at the telephone (10) and key in the three numbers to open a compartment. Take the key.
- Insert the key in the cabinet door lock (11); open the cabinet and take the BLOWTORCH.
- Exit the shop. Go forward to the fountain.
- Remove the debris in the water; use the TONGS to retrieve the FOUNTAIN KEY.
- Zoom in on the three-pronged cover, insert and turn the FOUNTAIN KEY to open the panel and activate the fountain.
- Zoom in again on the center of the fountain.
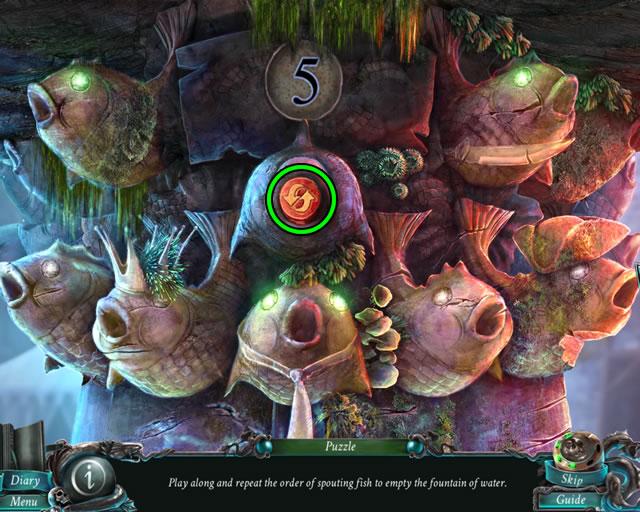
- Play the five rounds of a repeat-the-sequence puzzle.
- Touch the fish in the same order they light up on the screen. Correct touches turn the eyes green. Incorrect touches turn the eyes red and the round must be repeated.
- Press the double arrow button to reshow the sequence.
- Completing the puzzle opens the fountain and reveals a hatch.
- Clean the hatch and use the BLOWTORCH to cut the bars.
- Enter the underground chamber.
Chapter 6: Solving the Labyrinth

- Look at the counter in the kitchen alcove.
- Remove the top of the pot and look inside.
- Uncover five cash register buttons. Uncovered buttons go into the pouch.
- Take the pouch of CASH REGISTER BUTTONS.
- Use the Map to return to the tavern.

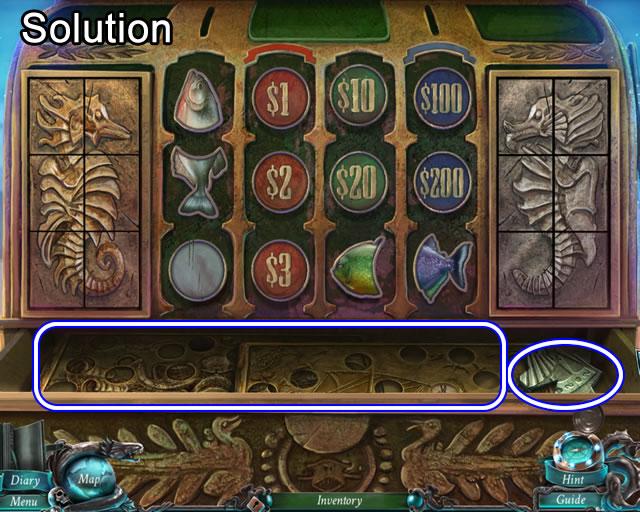
- Add the CASH REGISTER BUTTONS to the front of the cash register to open a puzzle.
- Switch the buttons to flip the side image panels. Find the correct button positions to create seahorse images on both sides.
- The solution is shown in the next screenshot.
- Solving the puzzle opens the drawer.
- Take the DECODER PLATES and PRINTING MATRIX PIECES (1/3).
- Play the hidden object scene behind the bar.
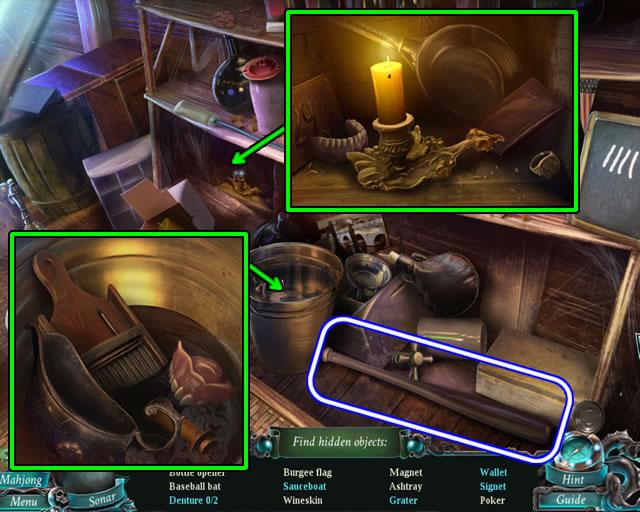
- Remove the panel in the lower left to reveal a hidden compartment.
- Look in the compartment to find a denture, wallet, and signet.
- Look in the bucket to find a denture, sauceboat, and grater.
- The list items are randomly generated. Your list may not agree with the above screenshot.
- Finding all the objects adds a BASEBALL BAT to inventory.
- Exit the tavern. Go forward once to the archway.
- Play the fragmented object scene to the right of the arch.
- Collect the fragments of the COMB.
- Go forward three times.
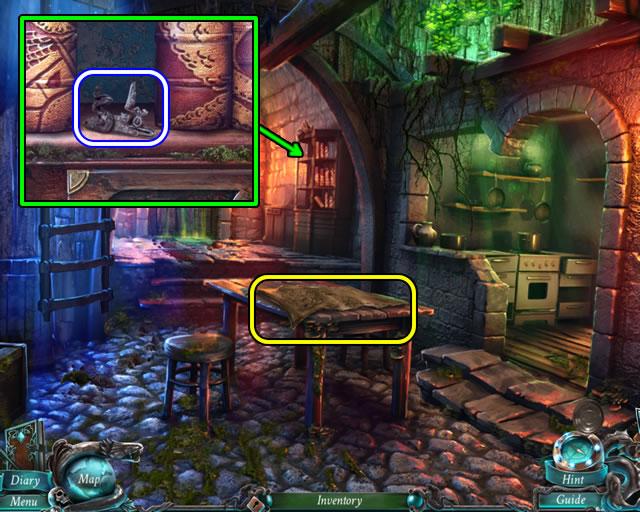
- Zoom in on the window beside the pawnshop entrance.
- Use the COMB to get a HAIR BRISTLE from the wig on the mannequin.
- Enter the pawnshop.
- Examine the framed photos on the table.
- Remove the glass and photo from the front left frame; take PRINTING MATRIX PIECES (2/3).
- Look at the desktop.
- Look closer at the paper with the symbols.
- Put the DECODER PLATES on the symbols to open a puzzle.
- Play two rounds of an eliminate-the-matching-symbols game.
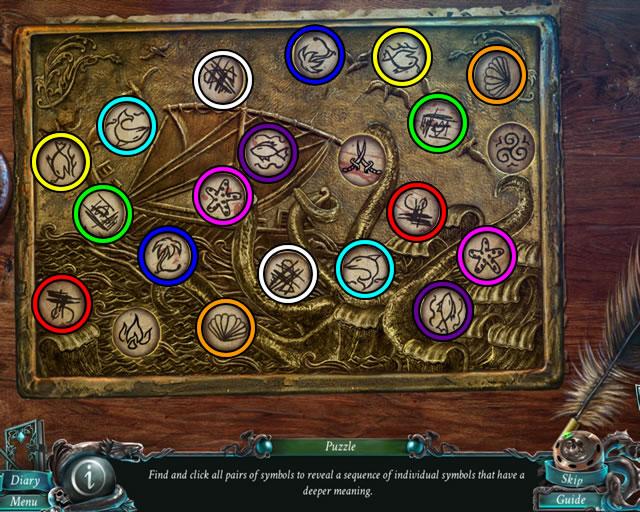
- Click matching pairs until only the three symbols without a match remain.
- Each pair is color coded in the above screenshot.
- Eliminating all of the pairs adds three symbols to a piece of paper and starts round two.
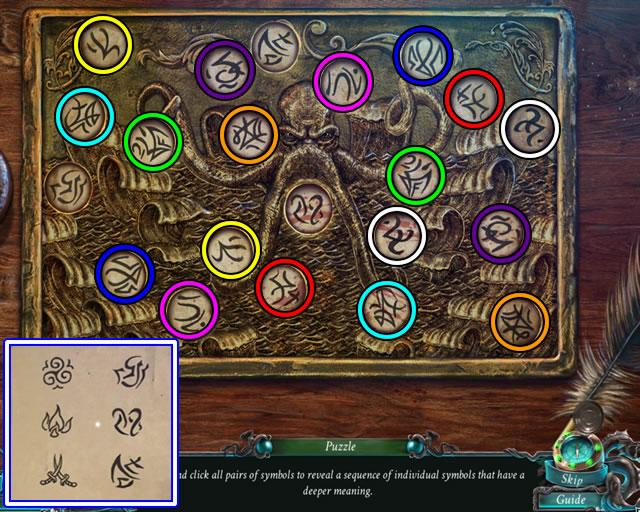
- Eliminating the matching pairs in this round adds the three remaining symbols to the paper.
- Pick up the paper with the STRANGE CODE.
- Exit the pawnshop, go forward to the fountain and enter the underground chamber.
- Look at the bookcase; pick up the BLUNDERBUSS LOCK.
- Take the new Map from the table and add the BLUNDERBUSS LOCK to the pistol parts.
- Assemble the pistol according to the directions.
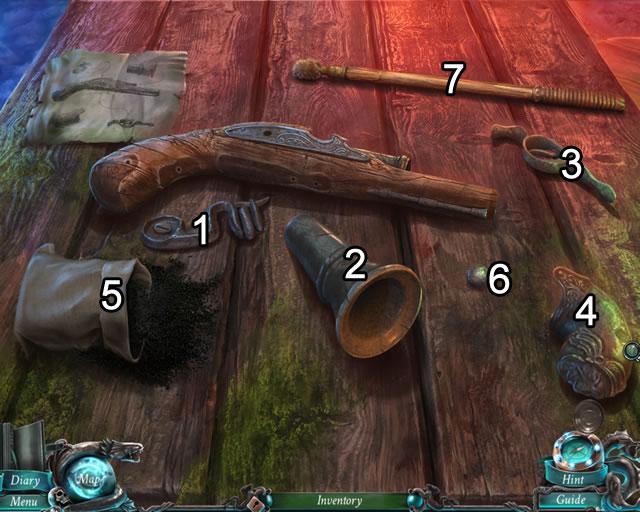
- Add the lock (1), barrel (2), trigger (3) and handle (4) to the pistol body.
- Pour the power (2) into the barrel, insert the ball (6) and tamp it with the rod (7).
- Take the assembled BLUNDERBUSS PISTOL and use it to shoot the lock off the back door.
- Enter the catacombs.
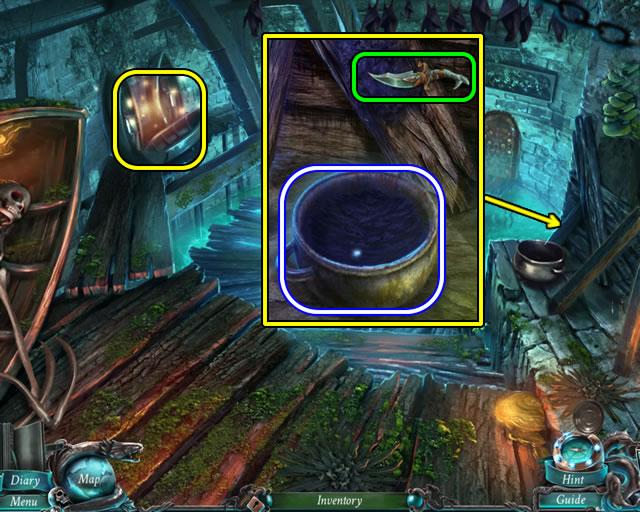
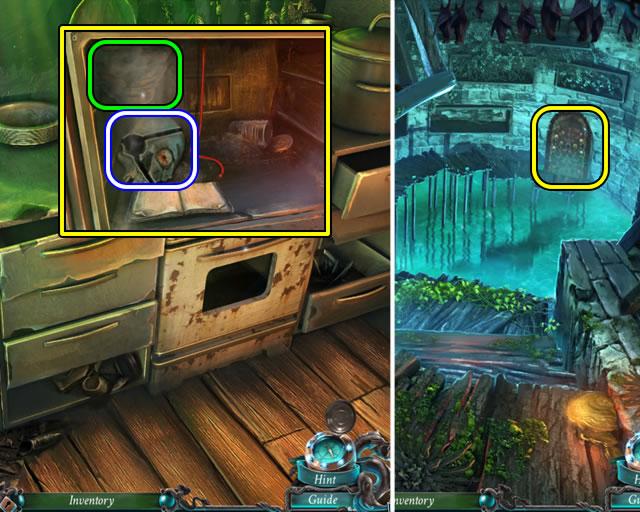
- Inspect the ledge on the right.
- Use the DAGGER to scrape the tar from the board into the pot; take the PORT OF HARD TAR.
- Play the fragmented object scene by the boats on the left.
- Collect the pieces of the BELLOWS.
- Go down once and zoom in on the kitchen area.
- Open the oven door and attempt to remove the hornet’s nest.
- Use the BELLOWS to blow away the hornets; take the ONE-EYED SKULL and read the diary.
- Exit the scene. Go forward to the catacombs and zoom in on the door.
- Add the ONE-EYED SKULL to open a puzzle.
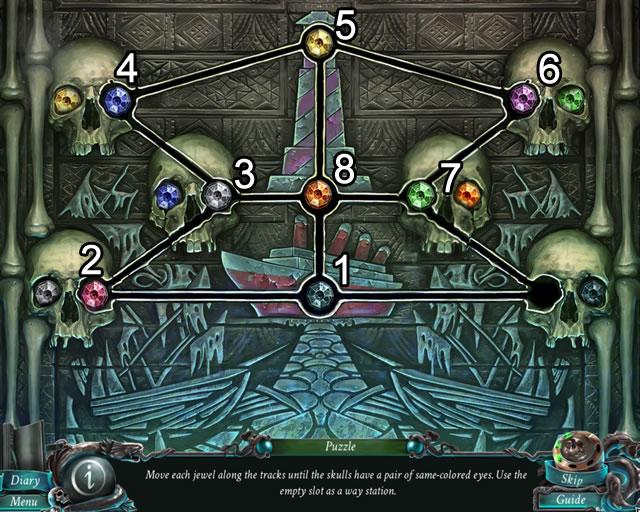
- The goal is to slide the gems along the tracks into a skull with the same colored skull eye.
- Gems can only be moved to an open slot.
- The above screenshot shows the order in which to move the gems based on their starting positions. Unfortunately, there is no reset button for this puzzle and exiting the scene does not reset it.
- The next screenshot shows the ending positions.
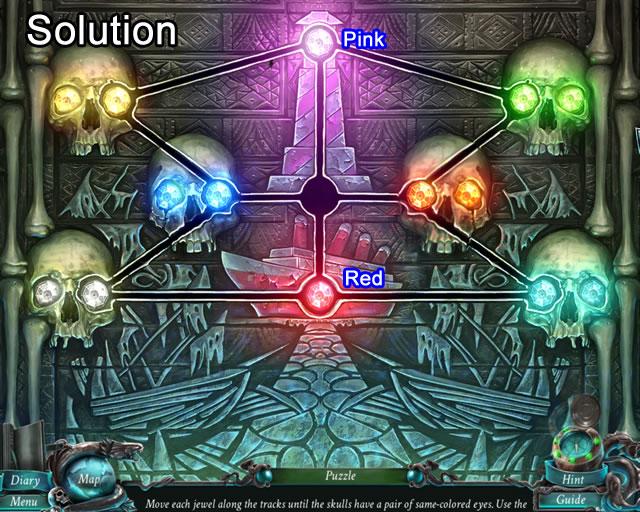
- Note that the pink gem is in the lighthouse and the red gem is on the boat.
- Solving the puzzle opens the door.
- Look inside. Remove the boards on the left and grab the GAS CYLINDER.
- Go back to the underground entrance and zoom in on the kitchen area.
- Put the GAS CYLINDER in the oven (1) and attach the gas line.
- Turn the second knob on the right (2) and light the burner with the LIGHTER.
- Put the POT OF HARD TAR on the burner; dip the BASEBALL BAT in the melted tar.
- Add the HAIR BRISTLE to the tar on the bat (3) and use the LIGHTER to create a TORCH.
- Go forward to the labyrinth entrance.
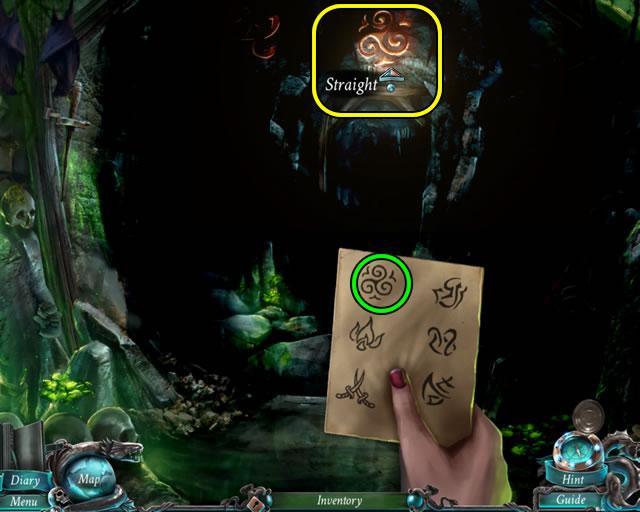
- Place the TORCH and STRANGE CODE on the darkened labyrinth.
- Move the torch around to find a symbol that matches one on the paper. Click to follow that direction.
- Repeat the process for each symbol.
- Solution: Straight, Right, Straight, Left, Right and Straight.
Chapter 7: Warning the Ship
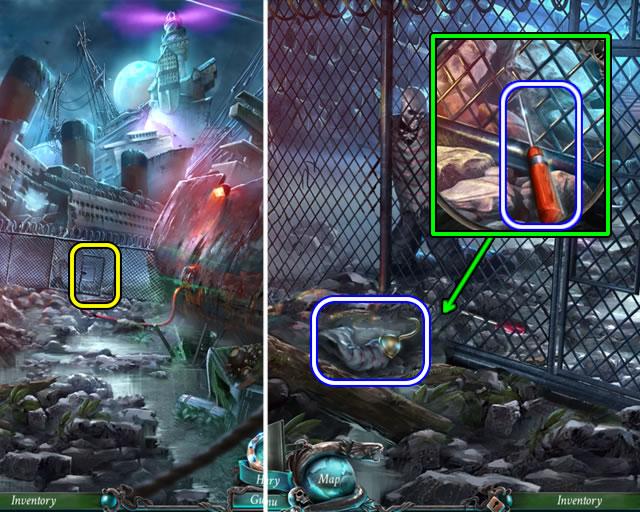
- Go toward the gate in the fence and attempt to open it.
- Pick up the HOOK that falls through the fence.
- Zoom in on the hole in the bottom of the fence; use the HOOK to retrieve the SCREWDRIVER.
- Exit the scene.
- Look at the side of the ship.
- Use the SCREWDRIVER to remove the electrical panel and open a puzzle.
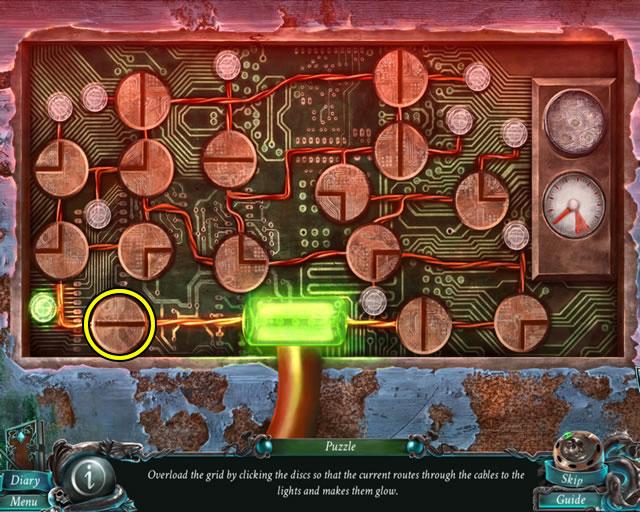
- Illuminate all the lights by rotating the disks to form a complete circuit.
- The solution is shown in the next screenshot.

- Completing the puzzle deactivates the electrified fence.
- Return to the gate; speak to the fisherman; open the gate and go forward.
- Speak to the ghost in the foyer to activate the scene.
- Look at the chandelier.
- Pick up the TUBE and remove the CORKSCREW from the bottle.
- Look in the generator cabinet; take the EMPTY FUEL CAN.
- Go back.
- Zoom in on the fuel tank.
- Put the EMPTY FUEL CAN on the barrel; remove the tank cork with the CORKSCREW; insert the TUBE in the tank to siphon off some fuel.
- Take the FULL FUEL CAN.
- Go forward to the foyer.
- Grab the STARTER CORD on the right.
- Zoom in on the generator cabinet.
- Remove the generator cap; pour the contents of the FULL FUEL CAN into the generator.
- Pull the starter cord; replace the broken cord with the newly acquired STARTER CORD.
- Pull the cord three times to start the generator.
- Click the scene to activate it.
- Play the fragmented object scene on the stairs.
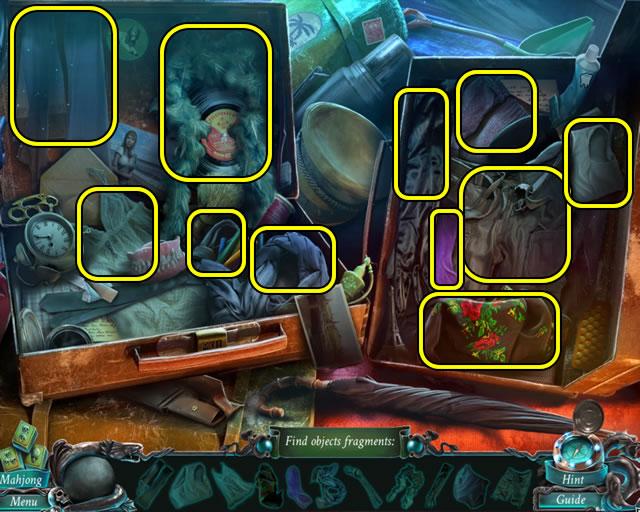
- Open the two cases.
- Collect the items to form an IMPROVISED ROPE.
- Zoom in on the window above the stairs.
- Attach the IMPROVISED ROPE; climb up to the bridge.
- Speak to the ghost.
- Inspect the fallen cabinet.
- Open the doors; take the CABLES (1/3) and HARPOON GUN.
- Pick up CABLES (2/3) from the floor.
- Look at the control desk.
- Pick up CABLES (3/3); open the panel door between the two screens.
- Add the three CABLES to open a puzzle.
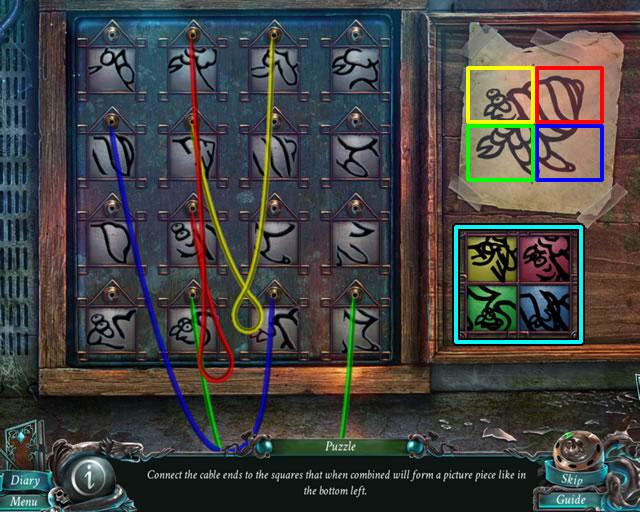
- Use the image taped to the board as a guide for connecting the cables.
- Each cable represents a quadrant of the image. Connect the cable ends to partial image squares on the board so they form the complete image.
- Correctly connected cables light up and illuminate an image square on the right.
- The solution is shown in the next screenshot.
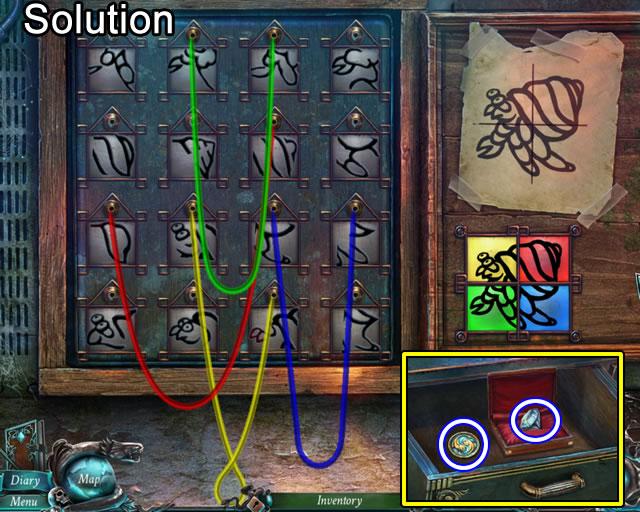
- The starting image positions on the board are random so your puzzle may not match the screenshot. The solution images are the same.
- Completing the puzzle establishes connection with the endangered ship.
- Take the GOLDEN FISH token; open the box and take the DIAMOND from the open drawer after the transmission.
- Use the DIAMOND to cut the reinforced glass on the door to the right.
- Enter the passenger’s cabin.
Chapter 8: Opening the Lighthouse
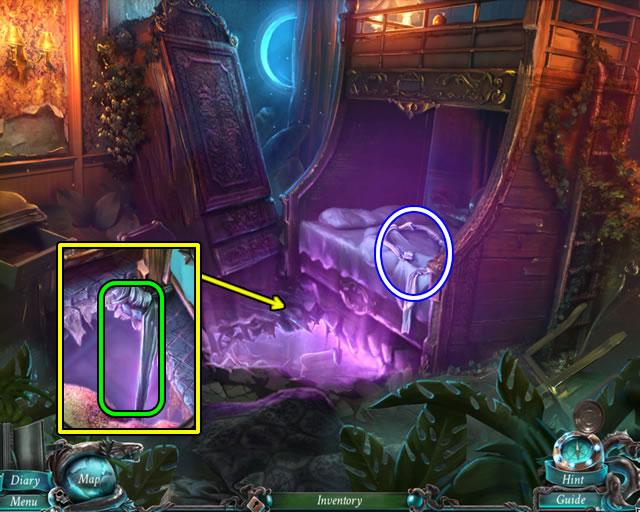
- Speak to the ghost.
- Click the bed sheets to form a SHEET ROPE.
- Move the carpet; attach the SHEET ROPE to the bed.
- Go down to enter the captain’s cabin.
- Zoom in on the large table.
- Take the STONE PICTURE and examine the diagram.
- Look closer at the desk on the right.
- Pick up the KNOB.
- Open the diary; take the PRINTING MATRIX PIECE (3/3).
- Read the diary for story information.
- Climb the rope to the passenger’s cabin; go down twice to the foyer.
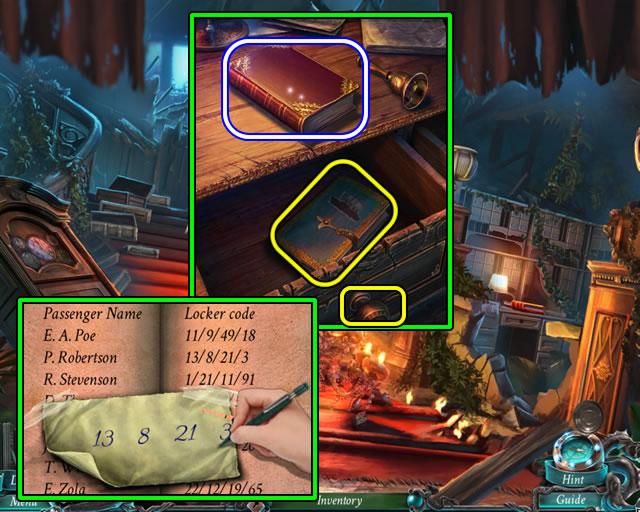
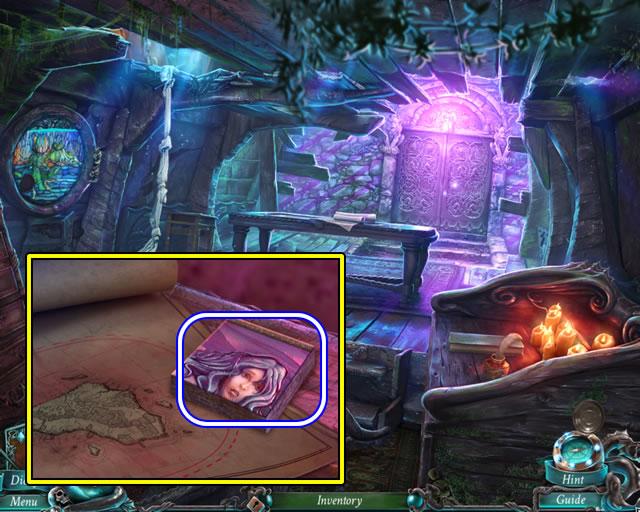
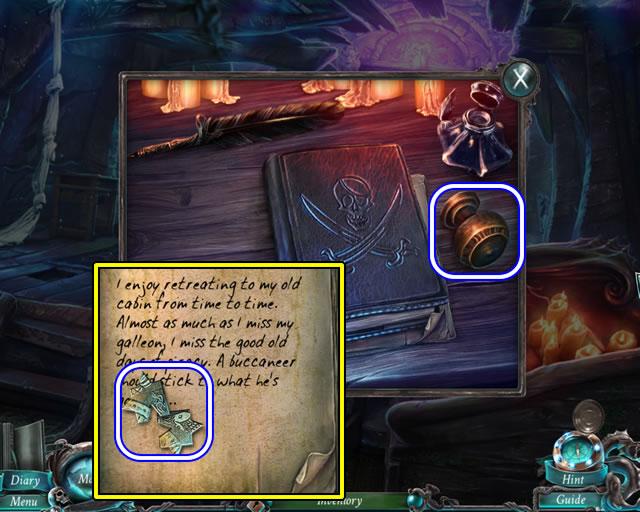
- Zoom in on the desk; take the RED BOOK.
- Use the KNOB to open the desk drawer.
- Open the passenger logbook.
- The locker code for passenger Robinson is automatically copied to the Diary.
- Go forward twice to return to the passenger’s cabin.
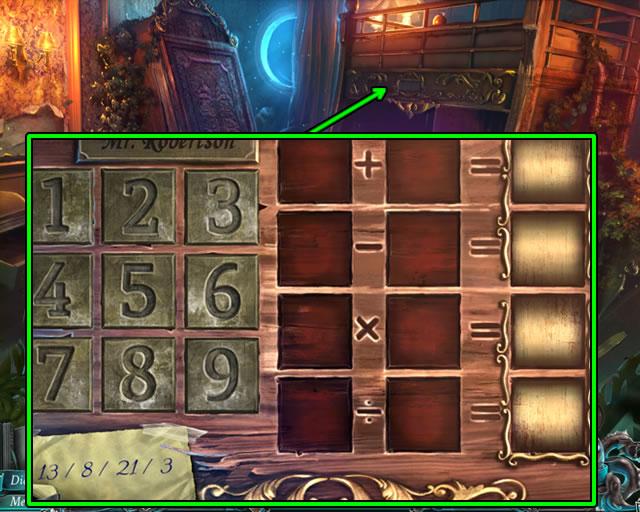
- Zoom in on the top of the bed to open a puzzle.
- Drag the numbers to the empty slots so the calculations equal the numbers 13-8-21-3 from top to bottom.
- Solution: 8 plus 5; 9 minus 1; 7 times 3; 6 divided by 2.
- Solving the puzzle opens a hidden object scene in the locker.
- Use the pin (1) to pick the lock (2). Open the case to reveal more items.
- Drag the glasses piece (3) from the case to the second glasses piece (4). Mend the glasses with the tape (5).
- Find the items on your list. Receive a bottle of PRINTING INK for inventory.
- Go down five times or use the Map to return to the underground chamber.
- Zoom in on the bookshelves.
- Clean the books and add the RED BOOK to open a puzzle.
- Swap the books to form an image.
- Solving the puzzle opens a drawer.
- Take the GOLDEN FISH token.
- Go up to the fountain.
- Play the hidden object scene by the stall.
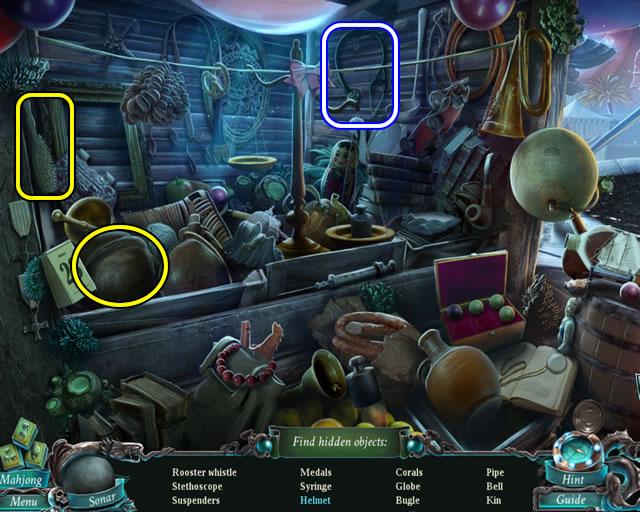
- Use the brush to clean the helmet.
- Find the rest of the items on your list. Receive the STETHOSCOPE for inventory.
- Go down three times and enter the newspaper office. Go forward to the hideout.
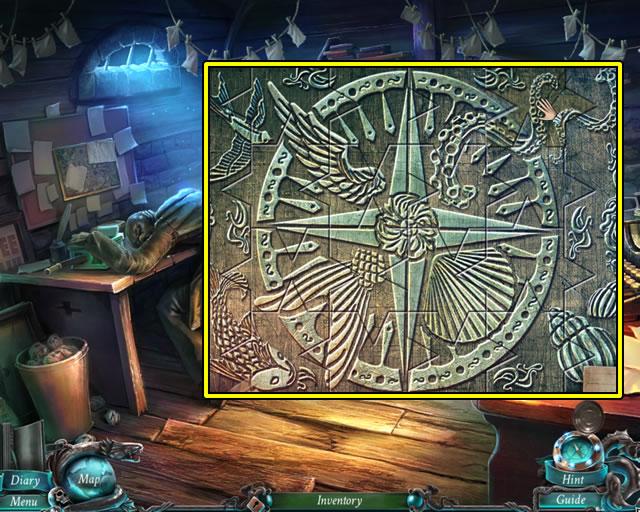
- Zoom in on the bulletin board; move the papers and add the three PRINTING MATRIX PIECES to open a jigsaw puzzle.
- Match the background with puzzle piece patterns and shapes. Correctly positioned pieces lock into place.
- The solution is shown above.
- Click the completed puzzle to take the MATRIX.
- Go upstairs and play the hidden object scene on the worktable.
- Use the compass to draw a circle on the paper.
- Find the rest of the listed objects. Receive INSULATING TAPE for inventory.
- Zoom in on the printing press.
- Mend the frayed wires (1) with the INSULATING TAPE.
- Pour the PRINTING INK in the funnel (2) and insert the MATRIX in the press (3).
- Turn the crank (4) and take the printed RINGS’ PATTERN.
- Exit the office, go left to the statue and play the hidden object scene.
- Find the listed objects.
- Receive the SLEDGEHAMMER for inventory.
- Enter the secret chamber.
- Click the statue on the back wall to reveal an alcove.
- Zoom in and place the STONE PICTURE on the scene to open a puzzle.
- Swap the tiles to form an image.
- The completed image is shown above.
- Completing the puzzle opens a compartment.
- Read the book entry and take the STONE RING.
- Now is an excellent time to open the Map for the Lighthouse and switch to the passenger’s cabin location.
- Use the SLEDGEHAMMER to smash the side of the cabinet.
- Pry the SAFE DIAL from the fingers of the corpse.
- Go back once to the bridge.
- Zoom in on the safe. Insert the SAFE DIAL and attach the STETHOSCOPE to open a puzzle.
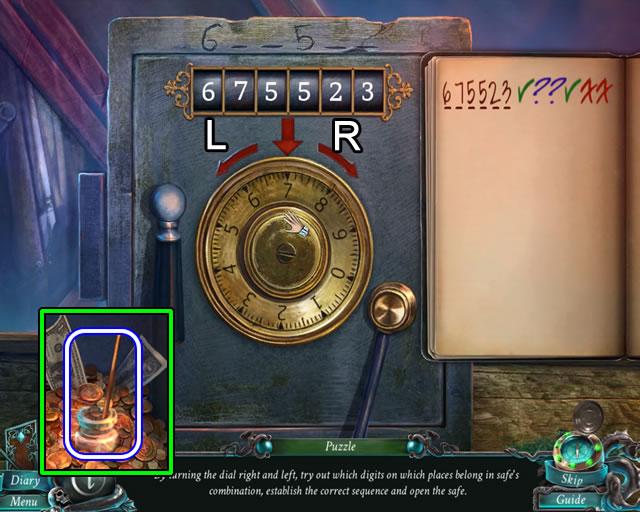
- The goal is to figure out four of the six combination numbers and their positions. Two numbers and their order are etched above the safe tumblers.
- Turn the dial to the right and then the left and test numbers. Correctly positioned numbers are designated by a check. A question mark means the number is part of the combination but is in the wrong position. An “X” means the number is not part of the combination.
- Solving the puzzle opens the safe. Take the STICKY RESIN.
- Solution: 6-4-8-5-0-7.
- Go right and down to the captain’s cabin.
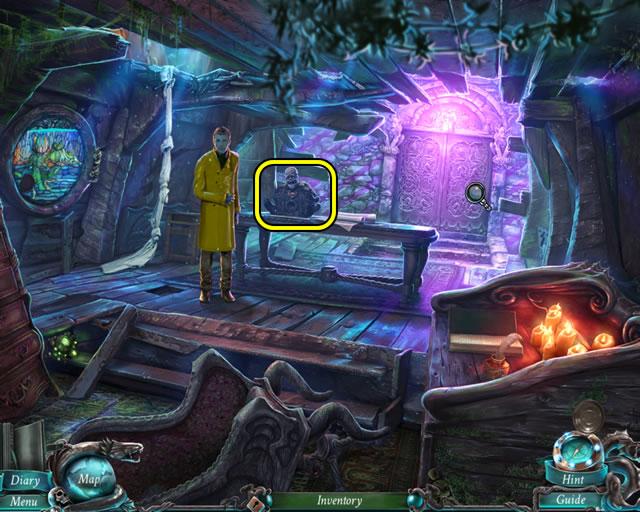
- Speak to the fisherman; add any collected GOLDEN FISH tokens to the chest.
- Examine the back door.
- Insert the STONE RING and attach the RINGS’ PATTERN to open a puzzle.
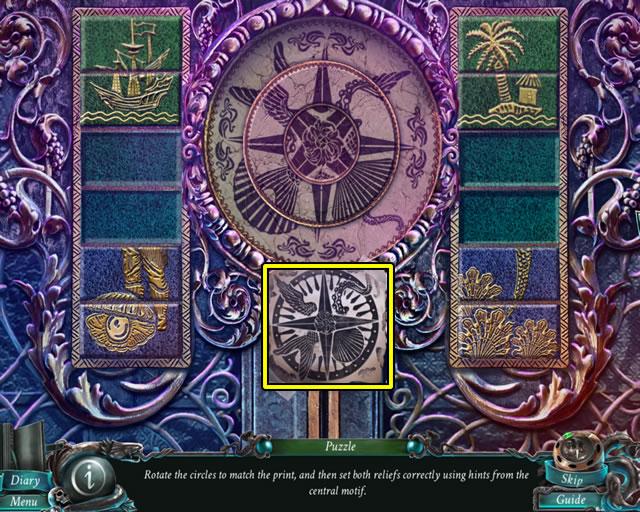
- This is a two-part puzzle.
- First rotate the rings until they match the printed pattern.
- Correctly positioning the rings adds bas-relief panels on the side.
- Use the pattern on the rings to flip through the panels and assemble the correct images.
- The solution is shown in the next screenshot.
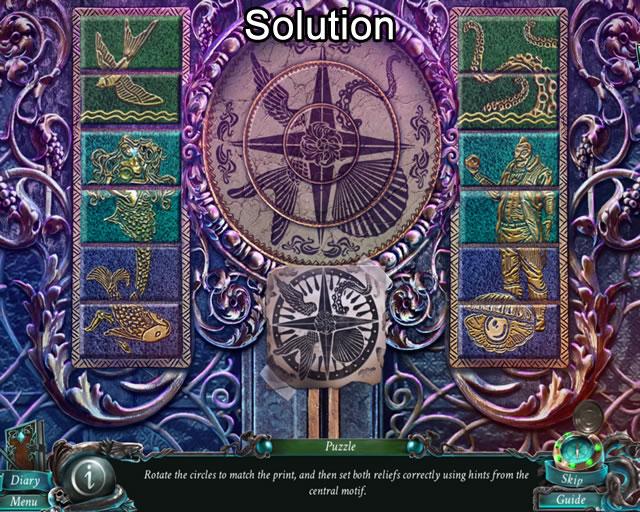
- Solving the puzzle opens the access to the lighthouse.
- View a cutscene and speak to the fisherman.
- Play the hidden object scene by the skeleton.
Chapter 9: Finding Calliope

- Use the straight razor (1) to create fingerless gloves (2).
- Pick up the key (3) to open the shackles (4) and release the chain.
- Open the lantern (5) cover. Pick up the matches (6) and light the lantern to attract a moth.
- Use the soap (7) to clean the dirty cloth (8).
- Find the rest of the items on your list. Receive a CHAIN for inventory.
- Climb the upper ladder to the storeroom.
- Remove the three dust covers.
- Zoom in on the chair; pick up the OLD CHAIN on the floor.
- Look at the top right of the trapdoor; attach the OLD CHAIN to the rung.
- Examine the statue base; add the CHAIN. The two chains combine. Click the chain again to attach it to the statue.
- Click the statue twice to send it down the stairs and open the trapdoor.
- Go up to the kitchen
- Zoom in on the rear door; slide the small door open and speak to the guard.
- Take the bunch of KEYS from the cookbook on the table.
- Look at the counter by the stove.
- Use the DAGGER to pry the lid off the coffee can; pick up the COFFEE SYMBOL.
- Open the door on the right to play a fragmented object puzzle.
- Collect the pieces of the GARDEN SHEARS.
- Open the Map and return to the catacombs.
- Use the GARDEN SHEARS to cut the ivy holding the FLOWER STALK.
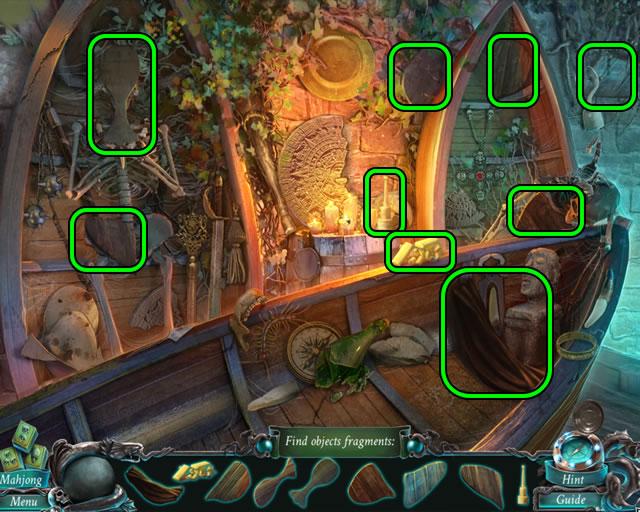
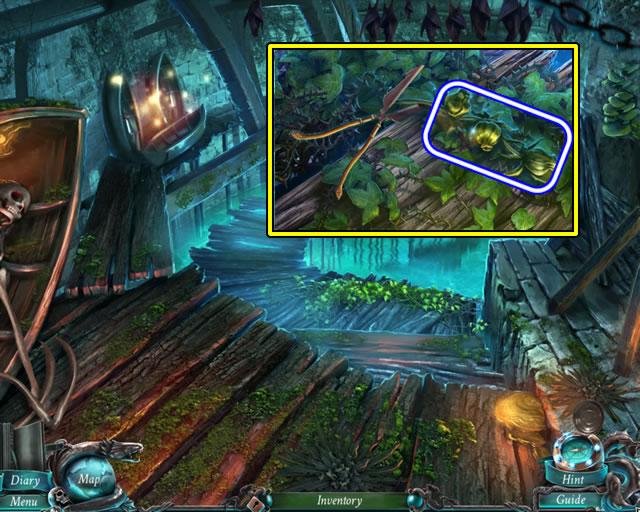
- Play the hidden object scene by the boats.
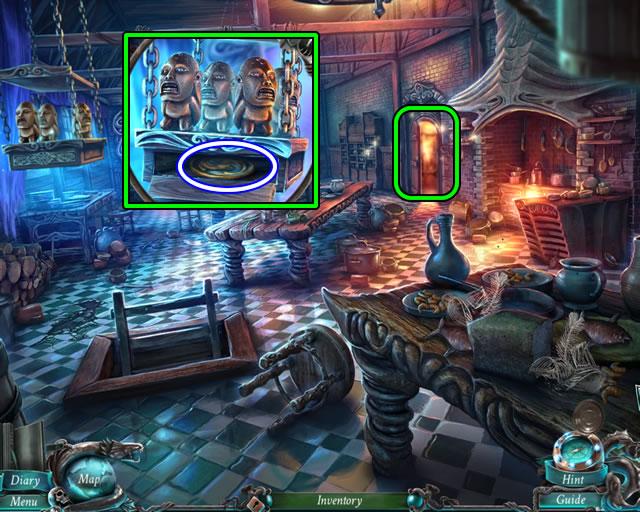
- Add fragment (1) and (2) to the broken stone (3) to restore the ancient calendar.
- Remove the helmet (4) to uncover a bomb.
- Use the flint (5) to ignite the bomb and reveal a compartment containing a bracelet and scroll.
- Find the rest of the listed objects on your list. Receive PLIERS for inventory.
- Go forward to the passenger’s cabin.
- Play the fragmented object scene in the locker above the bed.
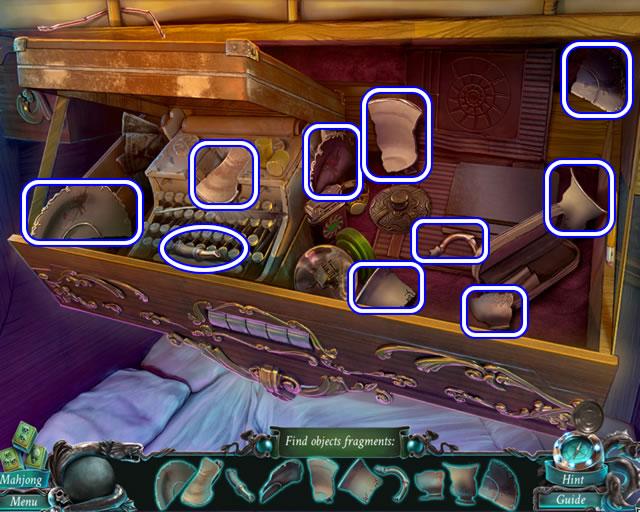
- Collect the fragments to create a CHINA CUP.
- Go forward to the prison.
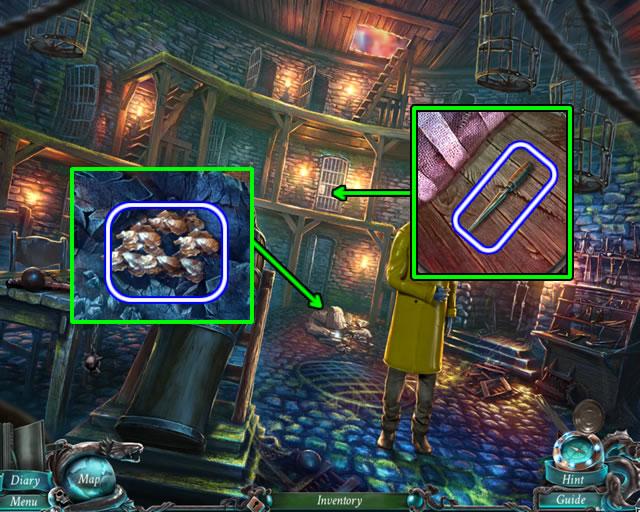
- Go through the rubble from the fallen statue; pick up the three GOLDEN FLECKS.
- Use the KEYS to open the cell door. The KEYS return to inventory.
- Move the pillow on the cot; take the ICE PICK.
- Go up to the storeroom.
- Examine the briefcase on the chair.
- Use the KEYS to open the padlock; snap the latches; take the HYDROGEN PEROXIDE from the case.
- Use the PLIERS to remove the crate lid.
- Pry the lid off the coffee can with the DAGGER; dip some COFFEE BEANS from the can.
- Insert the COFFEE SYMBOL in the box lid inset; take the COFFEE GRINDER.
- Go up to the kitchen and zoom in on the table.
- Place the HYDROGEN PEROXIDE, FLOWER STALK and GOLDEN FLECKS (3/3) on the work surface to open a puzzle.
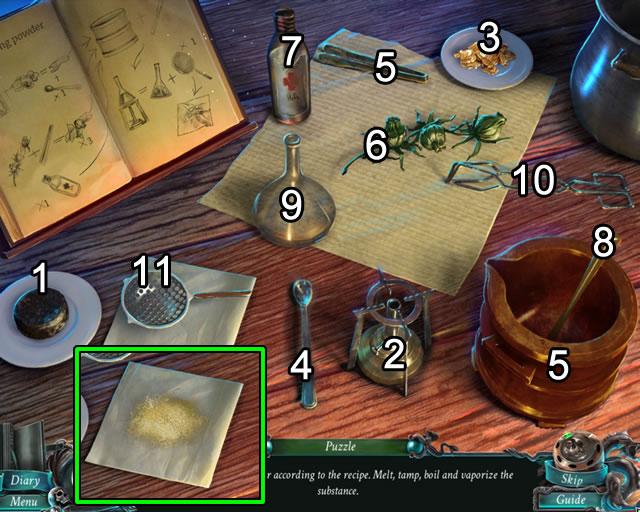
- Follow the directions in the book to make sleeping powder.
- Put the disk (1) on the burner (2) and add the gold flecks (3) to melt them.
- Use the spoon (4) to add a spoonful of liquid gold to the mortar (5).
- Use the tweezers (5) to remove the three buds from the stalk (6); add each of them to the mortar.
- Pour some of the hydrogen peroxide (7) into the mortar.
- Mix the ingredients with the pestle (8); pour the contents of the mortar into the beaker (9).
- Use the tongs (10) to remove the disk of melted gold from the burner.
- Put the beaker on the burner. Pour the heated contents in the sieve (11) to extract the powder.
- Click the paper to wrap up the SLEEPING POWDER.
- Zoom in on the stove area.
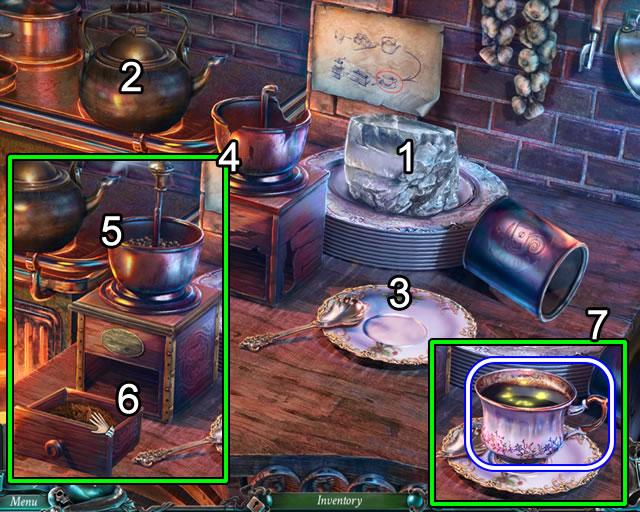
- Follow the directions taped to the wall to make coffee.
- Use the ICE PICK to break up the block of ice (1).
- Remove the lid from the kettle (2), add the ice chips and bring to a boil.
- Put the CHINA CUP on the saucer (3); replace the broken grinder with the COFFEE GRINDER from inventory.
- Add the COFFEE BEANS to the grinder and turn the handle, take the ground coffee (6) that pops out and put it in the cup. Pour the boiling water in the cup and add the SLEEPING POWDER; take the SPIKED COFFEE (7).
- Zoom in on the back door and give the SPIKED COFFEE to the guard.
- Go forward and right to the quarters.
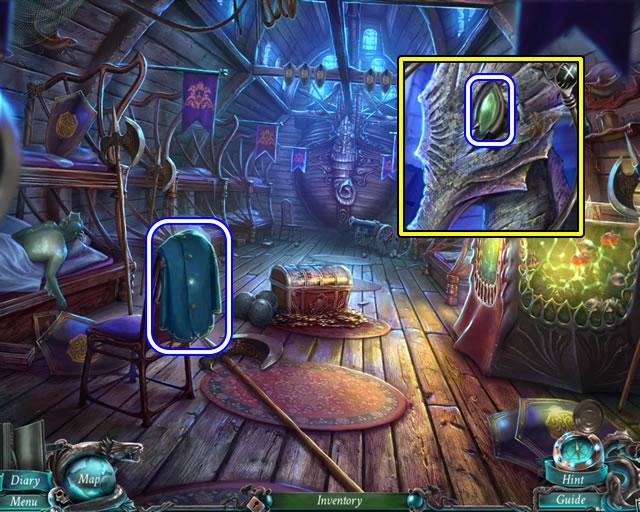
- Grab the UNIFORM from the chair.
- Examine the seahorse figure on the back wall; use the DAGGER to pry out the GREEN EYE.
- Go down four times to the prison.
- Give the UNIFORM to the fisherman.
- Insert the GREEN EYE in the empty slot on the torture device; pluck the GOLDEN FISH token from the open iron maiden.
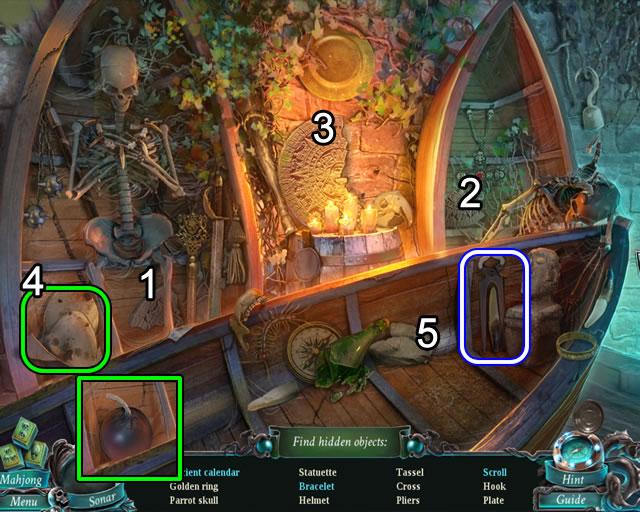
- Play the hidden object scene by the skeleton.
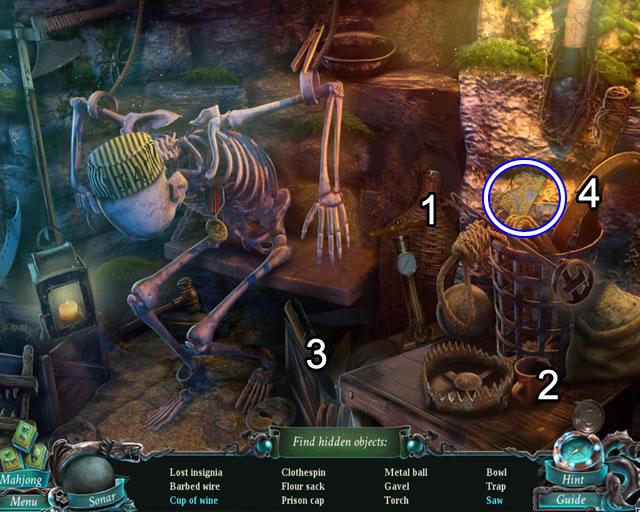
- Use the jug (1) on the cup (2) to pour a cup of wine.
- Take the brush (3) to the rusty saw (4) to get a saw.
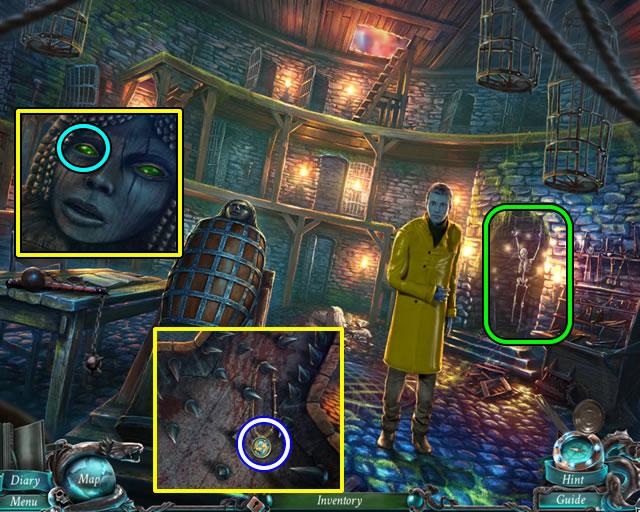
- Find the rest of the items on your list. Receive a GOLD INSIGNIA for inventory.
- Go forward three times to the yard; speak to the fisherman.
- Speak to the fisherman a second time.
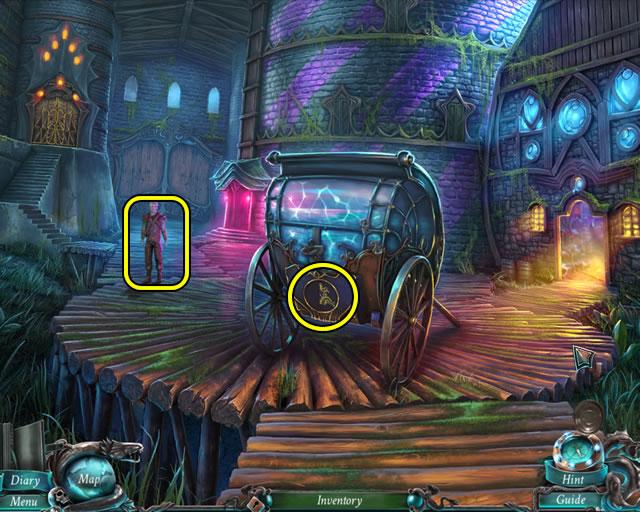
- Examine the back of the carriage.
- Add the GOLD INSIGNIA to open a puzzle.
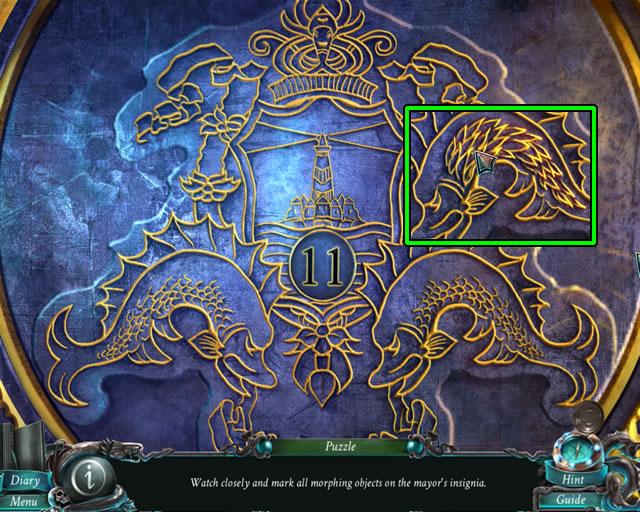
- The goal is to spot the eleven morphing portions of the puzzle.
- Click an area when it changes to stop that area from changing. Areas morph at different rates.
- The next screenshot shows all the changed areas.
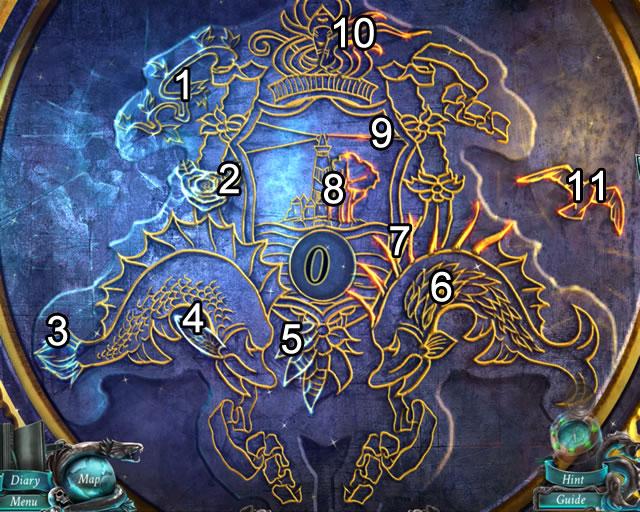
- The numbers do not indicate the order in which the areas morph, only their location.
- Zoom in again on the open area of the carriage.
- Take the ELEVATOR EMBLEM and read the note.
- Look at the glowing pink door.
- Open the cover, insert the ELEVATOR EMBLEM in the mechanism and press to activate the elevator.
- Grab the TREASURY KEY from the table in the apartment.
- Return to the yard.
- Zoom in on the door on the left.
- Remove the bar; use the TREASURY KEY on the padlock.
- Open the door to activate a find-and-use object scene.
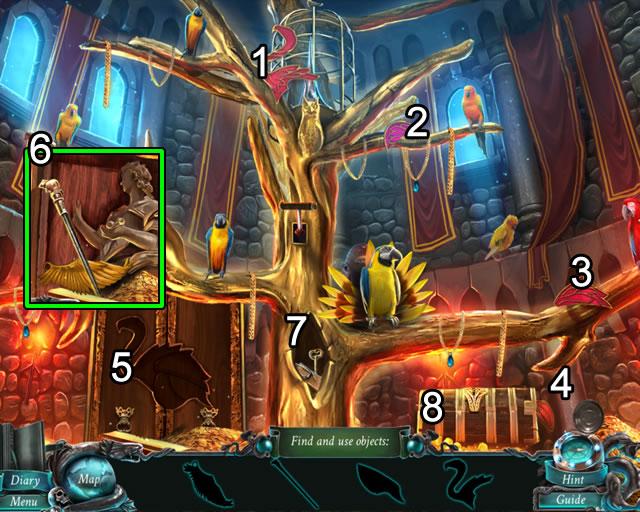
- Zoom in and pick up flamingo piece (1) from the cage, collect pieces (2) and (3) from the tree limbs and piece (4) from behind the chest.
- Fit the pieces in the chest inset (5) to open the doors. Take the cane and wing from the chest (6).
- Look in the tree hollow (7). Use the cane to spring the trap to get the key. Use the key to open the trunk (8). Remove a second wing from the bag in the trunk.
- Attach the two wings to the owl (9) to open the cage. Take the trophy from the cage.
- Flip the switch (10) to drop the banner and reveal a trophy mount (11); attach the trophy. Swing the mounted trophy aside and take the lock picks from the hidden compartment.
- Open the small chest (12) with the lock picks; take the cracker.
- Give the cracker to the parrot (13) and pick up the feather it drops. Insert the feather in the empty space in the headdress.
- Move the headdress aside (14) to reveal a BRASS IDOL.
- View the cutscene and help the fisherman bar the treasury door.
- Go forward to the embankment overlook; take the CHEST PANEL from the tree branches.
- Go down to the kitchen.
- Look at the hanging platform.
- Add the BRASS IDOL to the collection; take the GOLDEN FISH from the compartment.
- Play the hidden object scene by the door on the right.
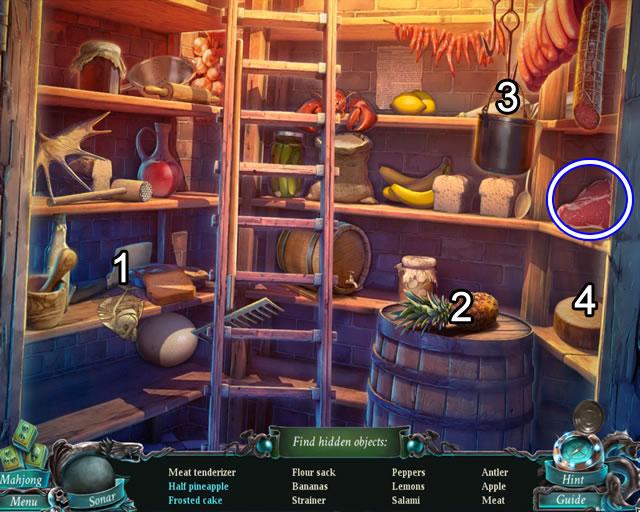
- Pick up the cleaver (1) and halve the pineapple (2).
- Use frosting (3) to decorate the cake (4).
- Find the objects on your list. Receive MEAT for inventory.
- Go forward to the yard and enter the apartment.
Chapter 10: Opening the Chest
- Speak to Calliope.
- Zoom in on the window; pick up the LEVER.
- Insert the LEVER in the slot on the column; pull to open the column stairs.
- Climb the stairs to the gong.
- Look at the action in the harbor; pick up the WOODEN SEAL from the stand.
- Remove the cover on the gong support.
- Read the note. The time mentioned in the note is added to the diary. Take the CLOCK FACE.
- Go down the stairs to the apartment.
- Zoom in on the fireplace.
- Take the FIRE POKER; move the ashes and read the partially burned book.
- Inspect the chest.
- Insert the WOODEN SEAL in the slot; open the chest to play a fragmented object scene.
- Collect the GONG PIECES.
- Return to the gong; insert the pieces to open a swap-the-slices puzzle.
- Swap adjacent pieces until the slices form the pattern shown above.
- Solving this puzzle opens a place-the-disk puzzle.
- Insert the disks in the slots to match the background pattern.
- The solution is shown above.
- Solving this puzzle opens a rotate-the-disk puzzle.
- Rotate the disks to match the background pattern as shown above.
- Click the center of the gong to take the CHEST SEAL.
- Exit the apartment and view a cutscene.
- Use the HARPOON GUN to shoot the pouch off the ledge.
- Zoom in on the fallen sack, remove the harpoon and take the GOLDEN FISH.
- Enter the quarters.

- Zoom in on the chest.
- Use the CHEST PANEL to complete the image on the lid and open the chest.
- Put the STICKY RESIN on the chest contents. Click to spread the resin and reassemble the broken glass pieces. Take the STAINED GLASS DISK.
- Look at the fish tank.
- Toss in the MEAT to distract the fish. Use the FIRE POKER to retrieve the collar with the GOLDEN FISH disk.
- Open the Map and switch to the foyer location.
- Play the hidden object scene on the stairs.
- Click the toothpaste tube (1) twice to remove the cap and squeeze out some paste. Drag the tube to the dentures (2) to apply the paste. Use the toothbrush (3) to clean the dentures.
- Find the items on your list. The four CLOCK HANDS go to inventory.
- Zoom in on the clock.
- Add the CLOCK FACE and CLOCK HANDS. The time from the note on the gong support is automatically added to start a puzzle.
- Use the smaller clocks to set the hour, minute, and second hands on the center clock to the time shown on the yellow note.
- The next screenshot shows the solution.
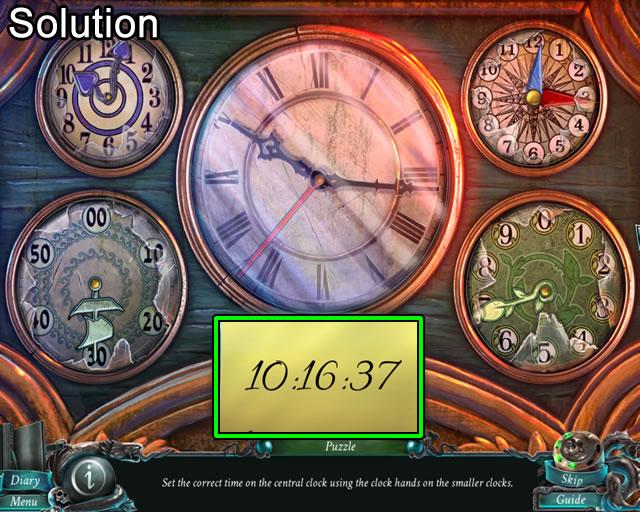
- Setting the correct time opens a compartment behind the center clock.
- Take the GOLDEN FISH token.
- Go forward to the captain’s cabin.
- Examine the stained-glass window.
- Insert the STAINED-GLASS DISK in the slot to open a puzzle.
- Click the disks to rotate them so they match the background image.
- The solution is shown above.

- Zoom in on the spot on the floor that the beam from the window illuminates.
- Use the DAGGER to pry up the boards; open the can; take the GOLDEN FISH token.
- Give the remaining GOLDEN FISH tokens to the creature to place in the chest.
- Insert the CHEST SEAL in the slot; take the CONCH.
- Go forward to the yard for a cutscene; enter the apartment and then up to the gong.
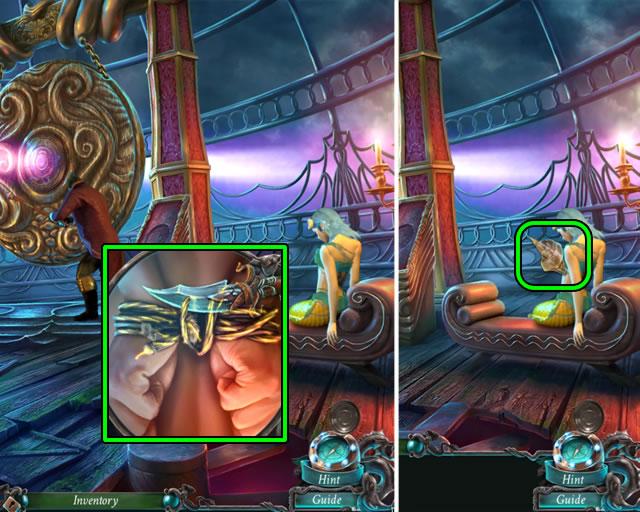
- Examine Calliope.
- Use the DAGGER to cut the ropes and give her the CONCH to view the final cutscene.
Congratulations!
You have completed playing Nightmares from the Deep: The Siren’s Call. Be sure to check back often for game updates, staff and user reviews, user tips, forums comments and much more here at Gamezebo.

More articles...
-
Best Horror Games On Itch.io – July 2026
Across a bounty of subgenres. -
Haze Seas Accessories Tier List [Best Accessories to Equip]
The accessories with the best stat buffs in Haze Seas.