![All VV Ultimatum Titles [How to Get]](/wp-content/uploads/2026/06/vv-ultimatum-titles.jpg "All VV Ultimatum Titles [How to Get]")
All VV Ultimatum Titles [How to Get]
Do titles provide buffs?


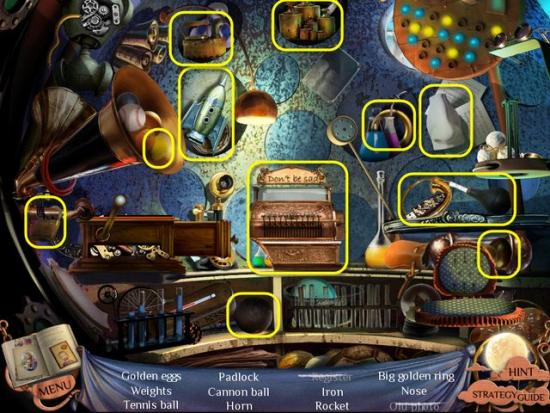
Welcome to the Nightmare Realm walkthrough on Gamezebo. Nightmare Realm is a Hidden Object game played on the PC and Mac created by Lesta Games & Films. This walkthrough includes tips and tricks, helpful hints, and a strategy guide on how to complete the Nightmare Realm.

Welcome to the Nightmare Realm walkthrough on Gamezebo. Nightmare Realm is a Hidden Object game played on the PC and Mac created by Lesta Games & Films. This walkthrough includes tips and tricks, helpful hints, and a strategy guide on how to complete the Nightmare Realm.
• You have unlimited Hints.
• Hint Meter takes approximately 40 seconds to refill.
• Skip Timer takes approximately 2 minutes and 45 seconds to fill.
• The Hidden Objects stay the same every time you play.
• There is two different Game Modes, Relaxed and Expert, to choose from.
• Relaxed Mode features faster filling Hint Meter and Skip Button; Active Areas will sparkle.
• Expert Mode features slower filling Hint Meter and Skip Button. No sparkle Areas and no Tutorial.
• Hidden Objects are highlighted in Yellow.
• Items are highlighted in Red.
• Origami are highlighted in Orange.
• Interactive Areas are highlighted in Green.
• Locations are highlighted in Blue.

• Inventory – Located and bottom of screen. In the middle of the Inventory Strip is a Padlock. This Padlock can be Locked or Unlocked. Locked will keep Inventory visible at all times. Unlocked will hide Inventory until you mouse over the Bottom of the Screen.
• Hint – Use your Hints when stuck. When Hint is available the Moon will be fully risen. After using a Hint the Moon will set and slowly rise again. Once the moon is fully risen the Hint feature is ready again.
• Diary – Check the Diary for story points and clues. Diary also contains the Help section and Map.
• Map Key – If you get stuck the Map can be a useful Hint. The different rectangular Images represent the rooms you have visited. Those featuring an Exclamation Point ( ! ) are Areas that still contain something you need to complete.
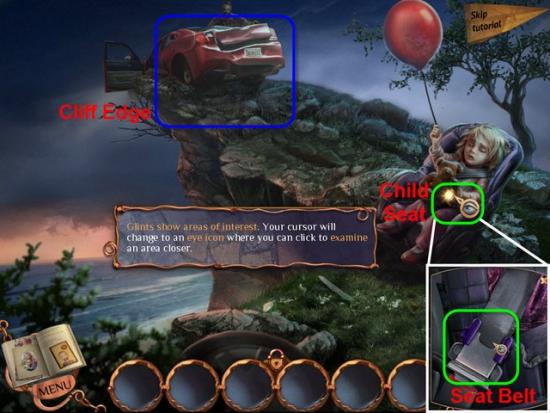
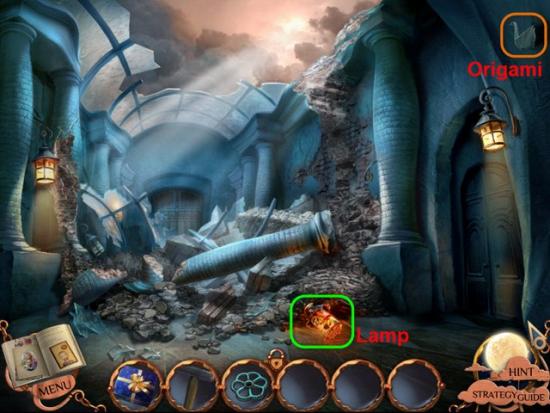
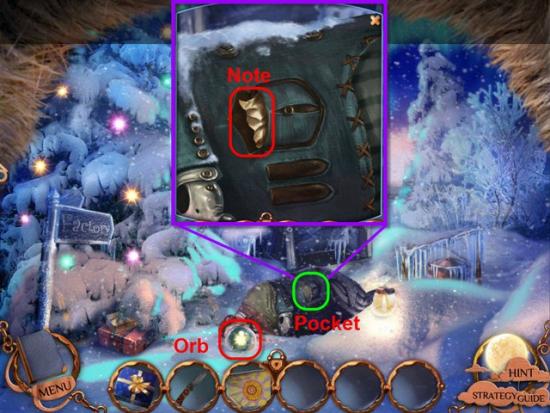
Click on the Right side of the screen to head to the Cliff.
Examine the Child Seat highlighted in Green.
Examine the Seat Belt.
Head to the Cliff Edge highlighted in Blue.
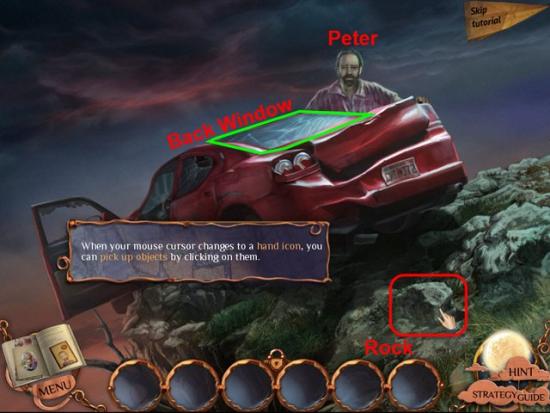
Gather the Rock highlighted in Red.
Talk to Peter.
Examine the Back Window if the Car.
Use the Rock, twice, to break the Back Window.
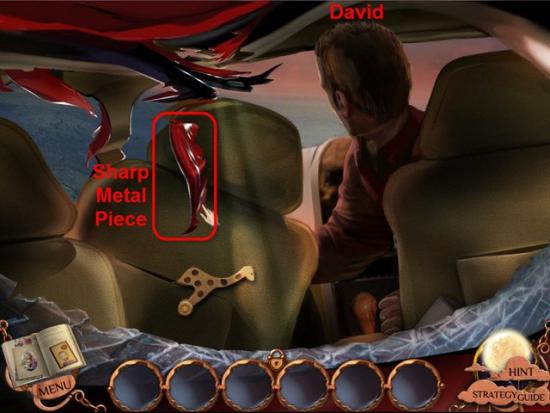
Talk to David.
Gather the Sharp Metal Piece highlighted in Red.
Head Back two screen.
Examine the Child Seat again.
Examine the Seat Belt.
Use the Sharp Metal Piece on the Seat Belt.
Receive the Safety Belt.
Return to the Cliff Side and the Car.
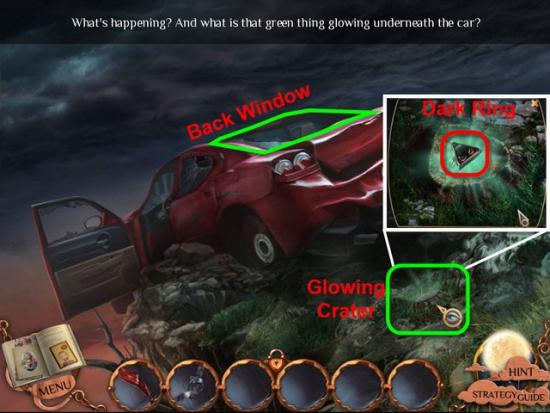
Examine the Glowing Crater highlighted in Green.
Gather the Dark Ring highlighted in Red.
Examine the Back Window again.
Use the Safety Belt on David.
Talk to Peter.
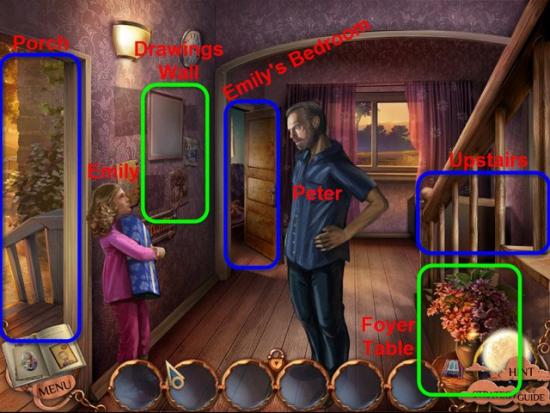
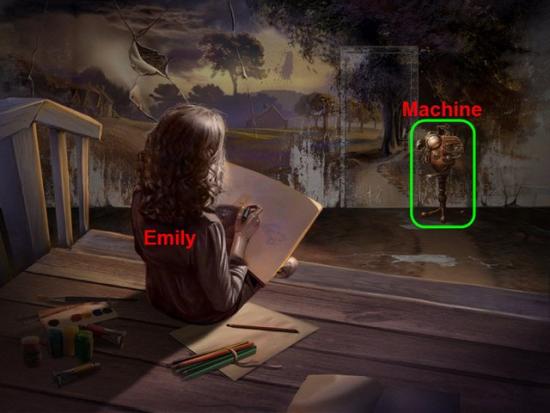
Talk to Emily.
Head to the Porch.
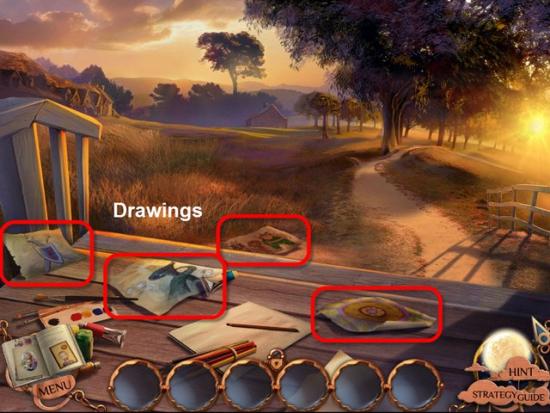
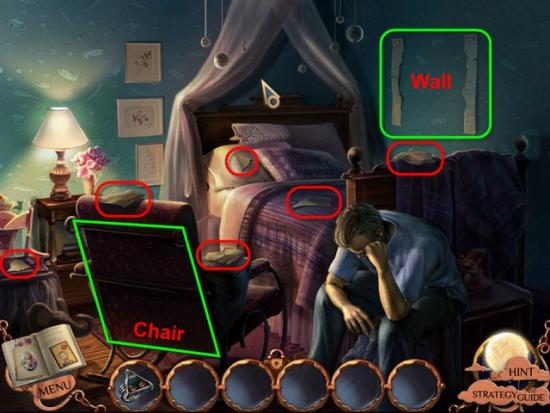
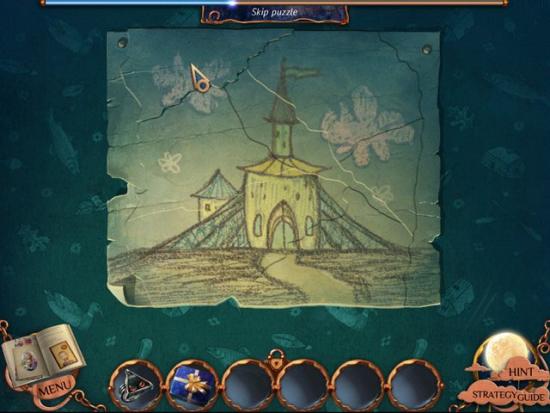
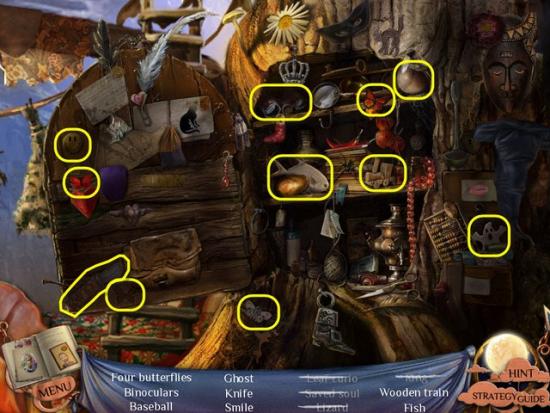
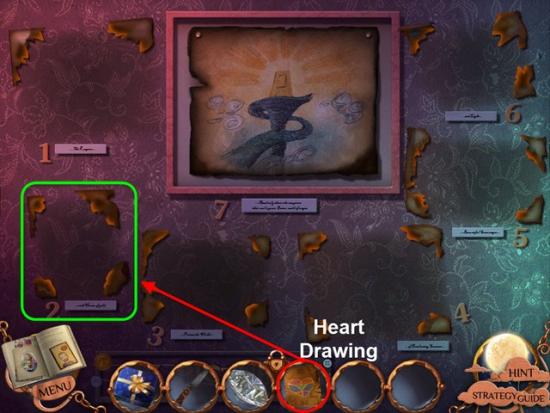
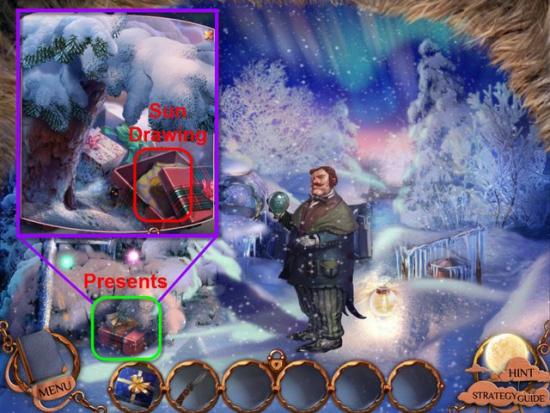
Gather the four Drawings highlighted in Red.
Head Back into the House.
Talk to Emily.
Examine the Drawing Wall.
Place a Drawing on an empty Spot.
Head Back one screen.
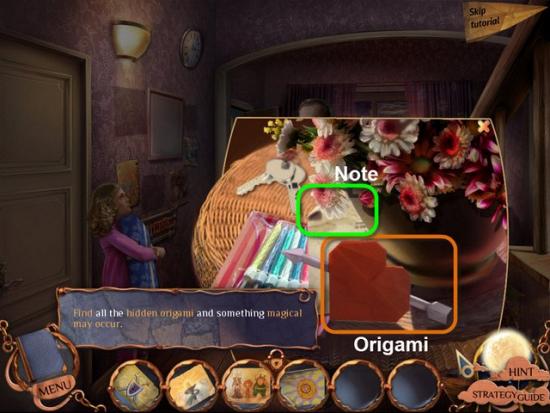
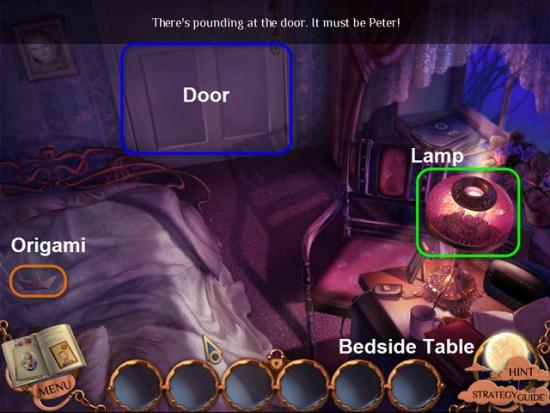
Examine the Foyer Table.
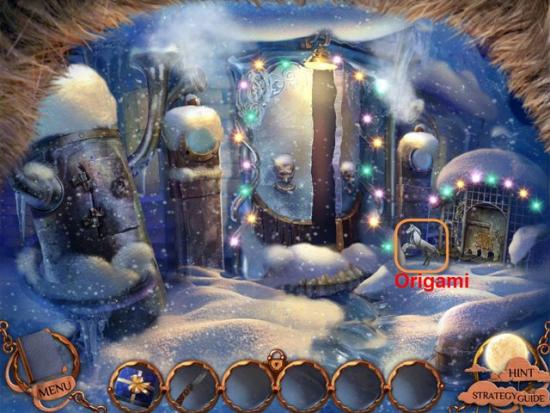
Gather the first Origami highlighted in Orange. Collect all 33 Origami to unlock a special extra.
Examine the Note highlighted in Green.
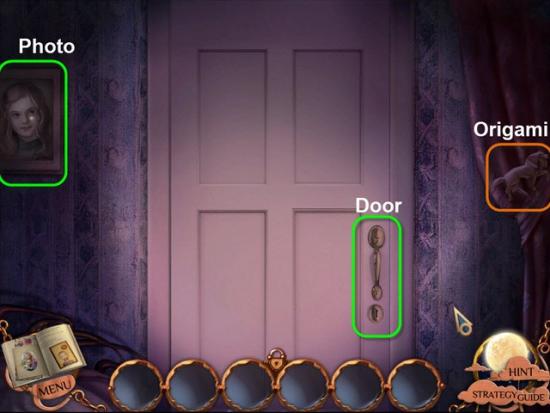
Enter Emily’s Bedroom.
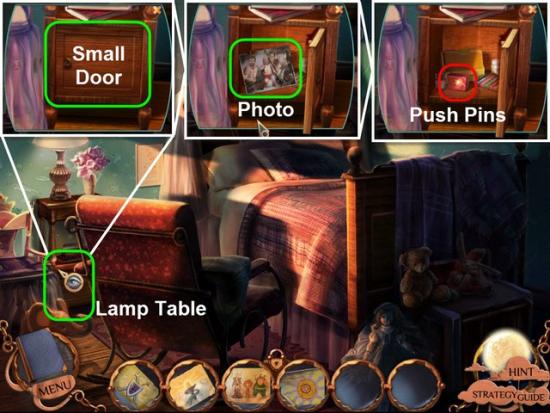
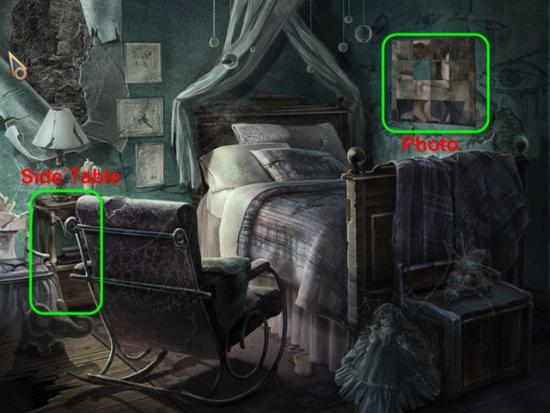
Examine the Lamp Table highlighted in Green.
Open the Small Door.
Examine the Photo.
Gather the Push Pins highlighted in Red.
Return to the Foyer.
Examine the Drawing Wall once again.
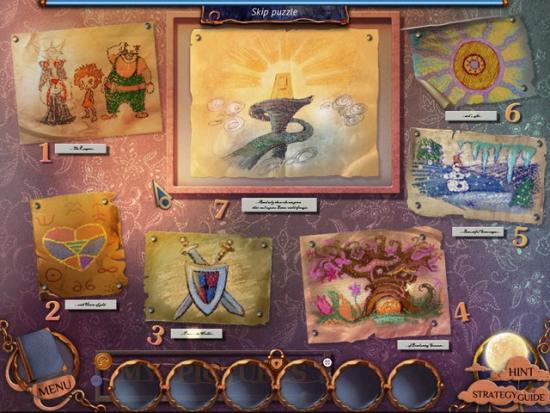
Place the four Drawings into the corresponding empty spots.
Read the Plaques under each empty spot for a clue on which Drawing goes where.
Return to Emily’s Bedroom.
Talk to Emily.
Examine Emily.
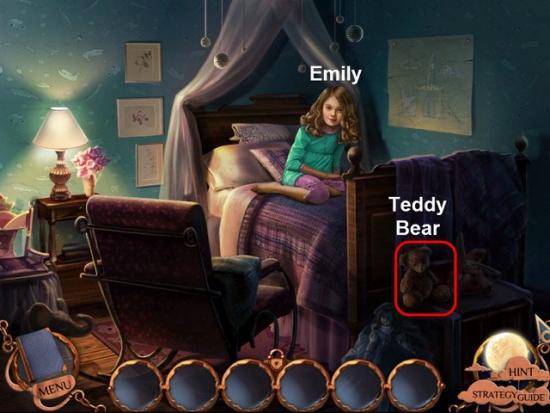
Gather the Teddy Bear highlighted in Red.
Give the Teddy Bear to Emily.
Return to the Foray.
Climb the Stairs on the Right.
Turn on the Lamp highlighted in Green.
Gather the Origami highlighted in Orange.
Head to the Bedroom Door highlighted in Blue.
Gather the Origami highlighted in Orange.
Open the Door highlighted in Green.
Talk to Peter.
Head Right.
Examine Emily’s Bedroom Door.
Examine the Keyhole.
Try to turn the Door Handle.
Head Back one screen.
Examine the Drawing Wall.
Head Left to the Mom’s Bedroom.
Examine the Photo next to the Bedroom Door.
Head Back two screens.
Examine the Bedside Table.
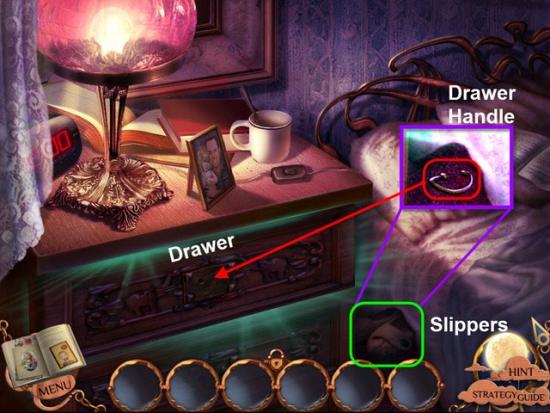
Move the Slippers highlighted in Green.
Gather the Drawer Handle highlighted in Red.
Use the Drawer Handle on the Drawer.
Open the Drawer.
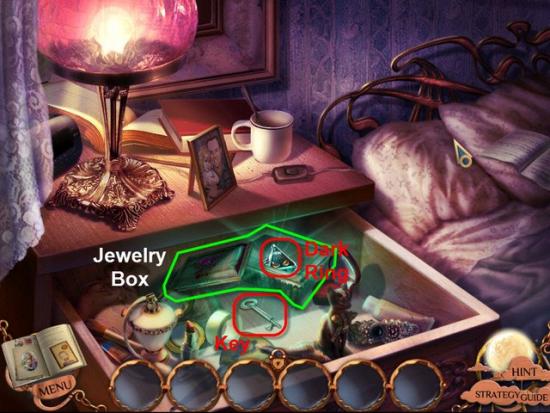
Gather the Key highlighted in Red.
Open the Jewelery Box highlighted in Green.
Gather the Dark Ring.
Return to Emily’s Bedroom Door.
Use the Key to unlock Emily’s Bedroom Door.
Enter Emily’s Room.
Gather the six Drawing Pieces highlighted in Red.
Examine the Chair highlighted in Green.
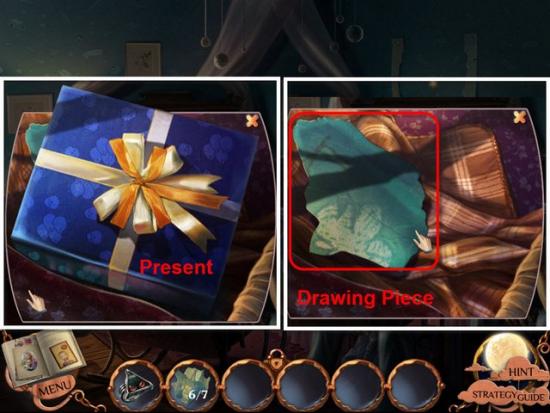
Gather the Present.
Gather the seventh Drawing Piece highlighted in Red.
Examine the Wall where the Drawing used to be.
Place the seven Drawing Pieces onto the Wall.
Rearrange the Drawing Pieces to assemble the Drawing.
Left Click to gather and move a Piece.
Right Click to rotate the Drawing Pieces.
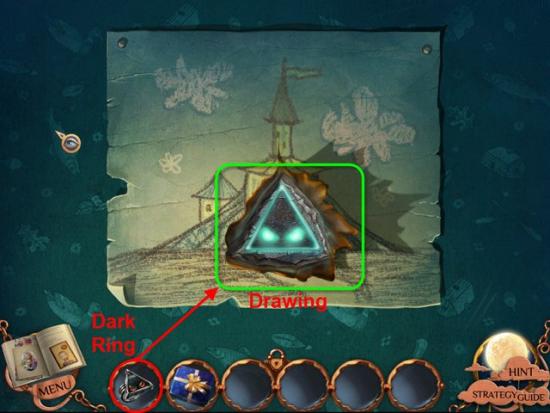
Place the Dark Ring, highlighted in Red, into the Drawing, highlighted in Green.
Talk to Peter.
Enter the Drawing on the Wall.

Talk to Peter.
Examine the Pillar Door highlighted in Green.
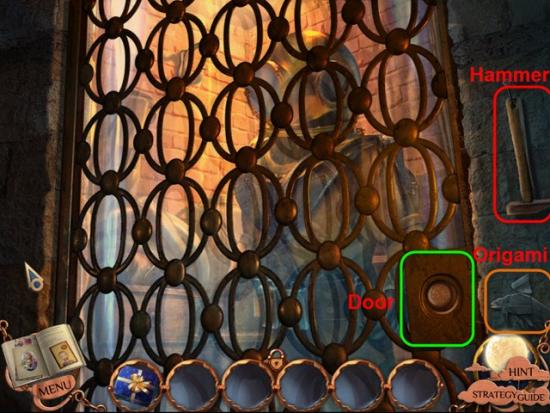
Gather the Hammer highlighted in Red.
Gather the Origami highlighted in Orange.
Examine the Door highlighted in Green.
Head Back one screen.
Head to the Right to the Staircase.
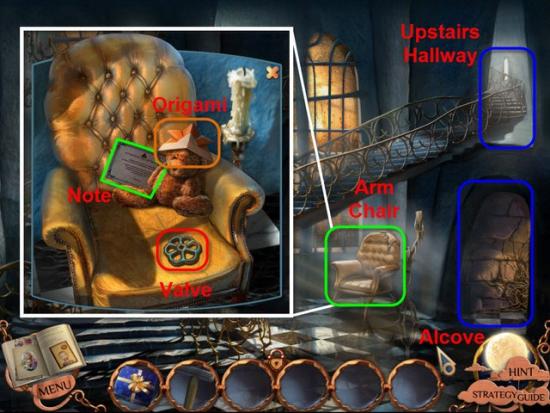
Examine the Arm Chair highlighted in Green.
Gather the Valve highlighted in Red.
Gather the Origami highlighted in Orange.
Examine the Note highlighted in Green.
Head to Upstairs Hallway.
Head forward through the Upstairs Hallway to the Far Door.
Talk to Emily.
Examine the Origami Crane.
Speak with the Extractor.
After the cut scene you will be back in the Upstairs Hallway.
Gather the Origami highlighted in Orange.
Examine the Lamp highlighted in Green.
Try to pick up the Lamp.
Head Back Downstairs.
Head to the Alcove on the Right.
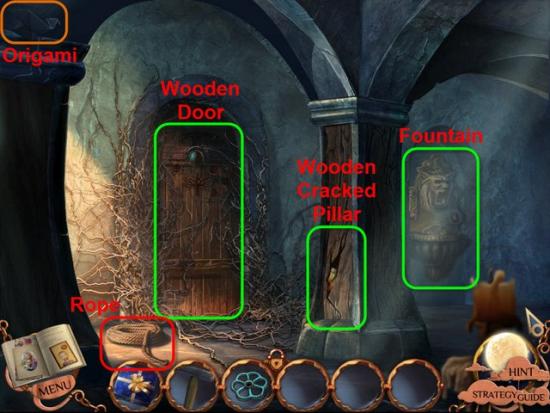
Gather the Origami highlighted in Orange.
Gather the Rope highlighted in Red.
Examine the Wooden Door.
Examine the Fountain. Make not of the Numbers written on the Fountain.
Examine the Cracked Wooden Pillar.
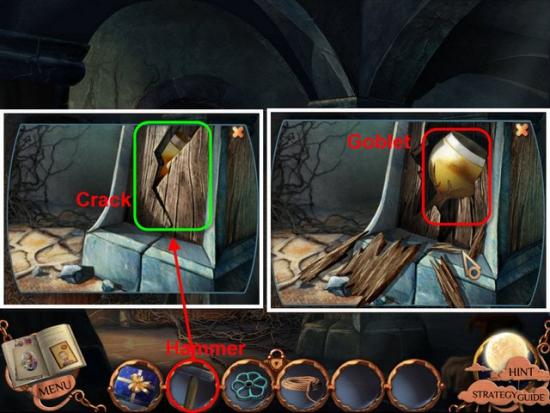
Use the Hammer, highlighted in Red, three times, on the Cracked Wooden Pillar.
Gather the Goblet highlighted in Red.
Head Back Left two times back to where you entered.
Examine the Hole in the Floor where Peter used to be standing.
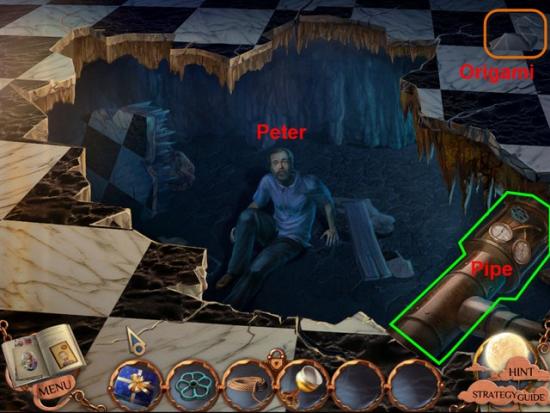
Talk to Peter.
Gather the Origami highlighted in Orange.
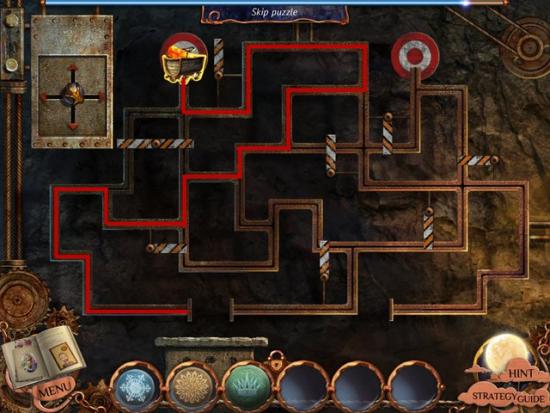
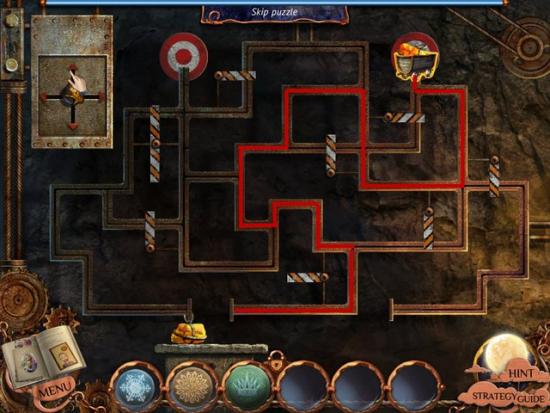
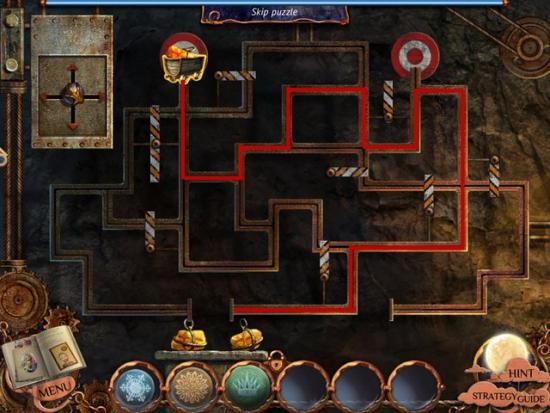
Examine the Pipe highlighted in Green.
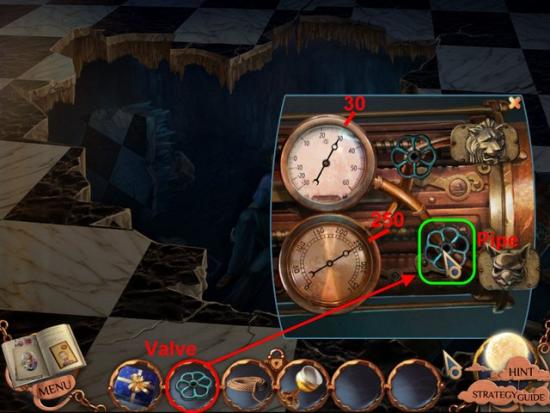
Place the Valve, highlighted in Red, onto the Pipe, highlighted in Green.
Remember the Numbers written on the Fountain earlier.
Click to Turn the Valves.
Solution: Turn the Top Valve five times until it reaches 30. Turn the Bottom Valve six times until it reaches 250.
Return to the Alcove.
Examine the Fountain once again.
Now there is Water flowing through the Fountain
Use the Goblet in the Fountain Water.
Gather the Water Filed Goblet.

Return to the Upstairs Hallway.
Examine the Lamp once again.
Use the Water Filled Goblet, highlighted in Red, to Extinguish the Lamp, highlighted in Green.
Gather the Ornament Half highlighted in Red.
Return Downstairs to the Alcove.
Examine the Wooden Door.
Place the Ornament Half, highlighted in Red, into the Wooden Door, highlighted in Green.
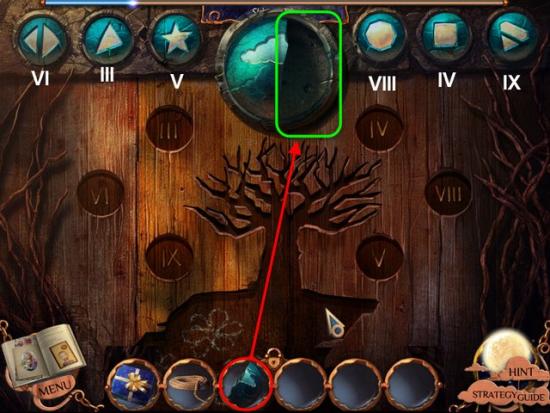
This will start the next Puzzle.
For this Puzzle you need to place each of the six Geometric Shapes into the corresponding Roman Numeral Numbered Spots.
The key is to count the number of Corners that are in each Geometric Shape and place it in the corresponding Roman Numeral on the Wooden Door.
Once you complete the Puzzle the Door will open.
Enter through the Door to the Arid Land.
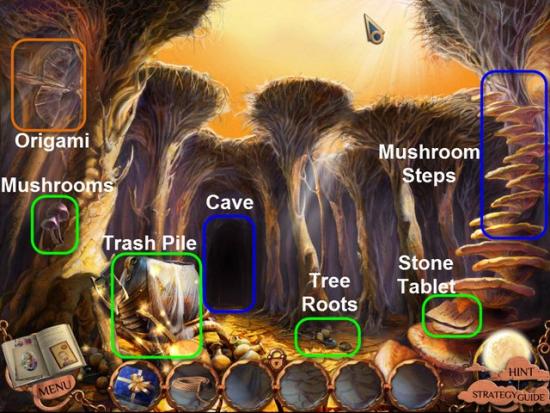
Gather the Origami highlighted in Orange.
Examine the Stone Tablet.
Gather the Stone Tablet.
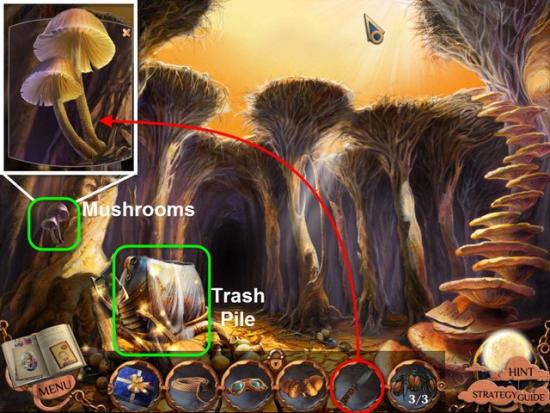
Examine the Mushrooms.
Examine the Tree Roots.
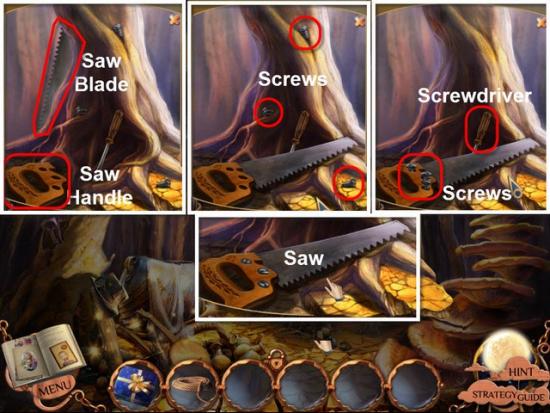
Gather the Saw Blade and place it with the Handle.
Next place the three Screws into the Holes on the Saw Handle.
Pick up the Screwdriver.
Click each of the three Screws to tighten them.
Finally gather the completed Saw.
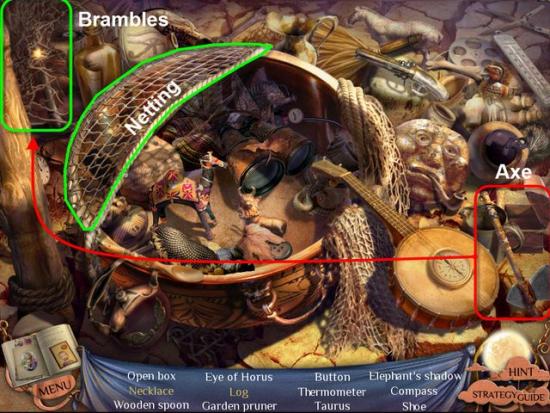
Examine the Trash Pile.
Move the Netting.
Gather the Axe, highlighted in Red, use the Axe on the Brambles, highlighted in Green.
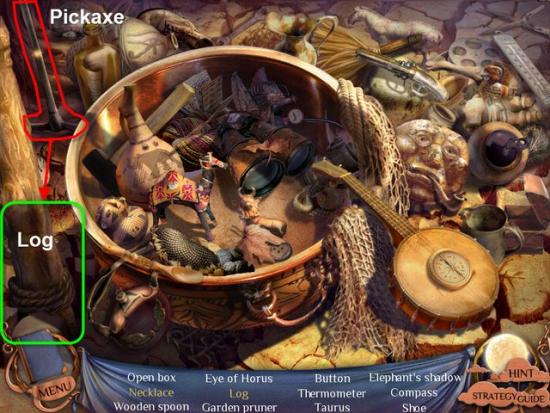
Gather the Pick Axe, highlighted in Red, and use it on the Log, highlighted in Green.
Gather the Log.
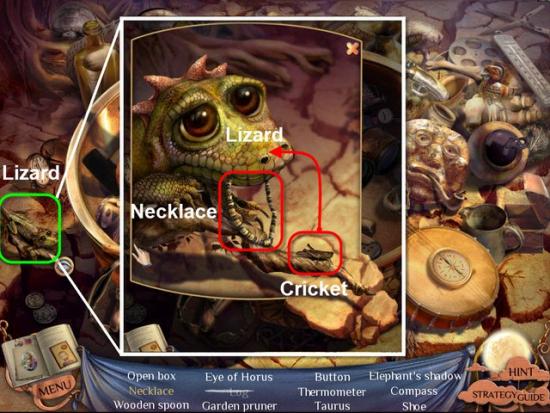
Examine the Lizard highlighted in Green.
Gather the Cricket, highlighted in Red, and feed it to the Lizard.
Gather the Necklace from the mouth of the Lizard.
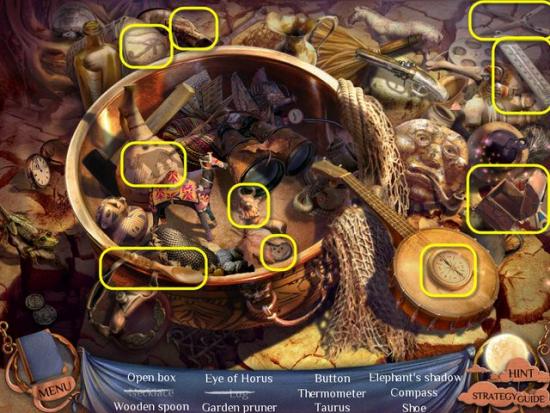
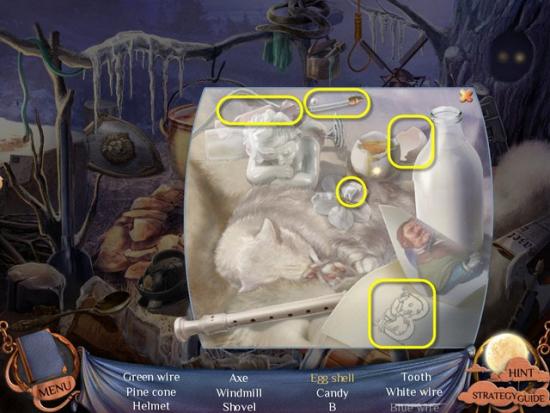
Gather the remaining Hidden Objects highlighted in Yellow.
Receive the Log.
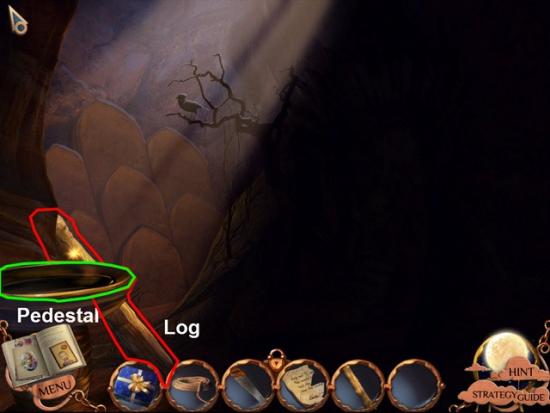
Enter the Cave highlighted in Blue.
Gather the Log highlighted in Red.
Examine the Pedestal highlighted in Green.
Head Back one screen.
Climb the Mushroom Steps to the Arid Land.

Gather the Origami highlighted in Orange.
Place the two Logs across the first two Gaps.
Examine the Post on the first Chasm Pillar.
Use the Saw to cut down the Post.
Gather the third Log.
Place the final Log across the third Gap.
Cross the Chasm.
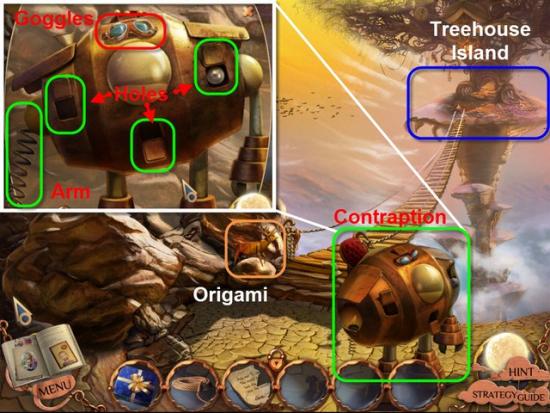
Gather the Origami highlighted in Orange.
Examine the Contraption.
Gather the Goggles highlighted in Red.
Examine the four Holes on the Contraption and the missing Arm highlighted in Green.
Cross the Bridge to the Tree-house Island.
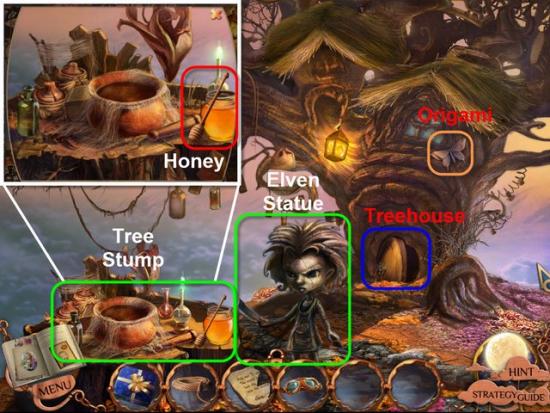
Gather the Origami highlighted in Orange.
Examine the Tree Stump.
Gather the Honey highlighted in Red.
Examine the Elven Statue.
Examine the Hand of the Elven Statue.
Place the Stone Tablet Piece, highlighted in Red, with the Stone Tablet Piece in the Elven Statue’s Hand.
Note the Recipe engraved on the Stone Tablet.
Gather the Acorns highlighted in Red.
Enter the Tree-house.
Gather the Origami highlighted in Orange.
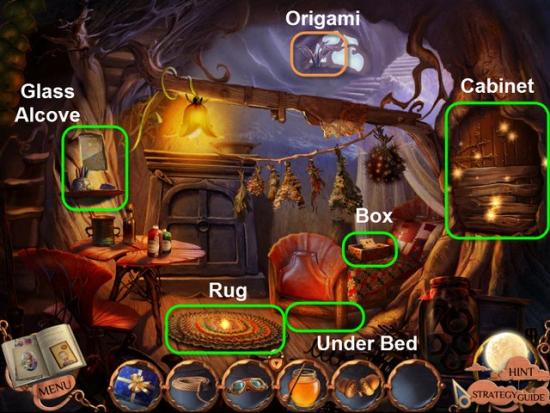
Examine the Cabinet highlighted in Green.
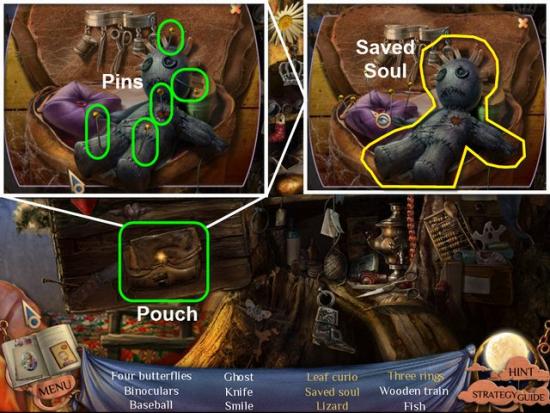
Examine the Pouch highlighted in Green.
Remove each of the Pins, highlighted in Green, from the Doll.
Now collect the Saved Soul.
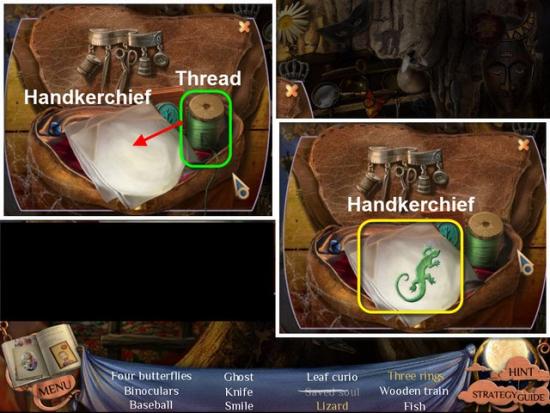
Gather the Thread & Needle, highlighted in Green, and use them on the Handkerchief.
Now gather the Lizard, on the Handkerchief, highlighted in Yellow.
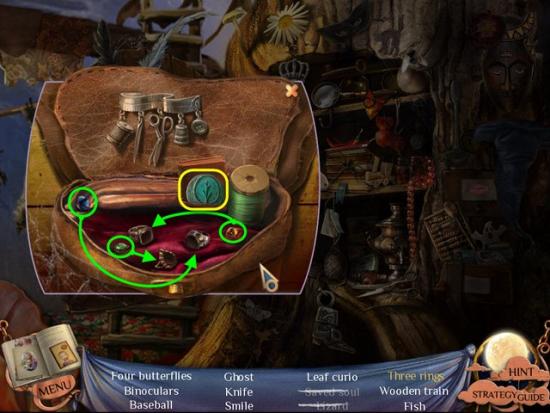
Gather the Leaf Curio highlighted in Yellow.
Gather the three Gems, highlighted in Green, and place them in their corresponding Rings.
Now gather the Three Rings.
Gather the remaining Hidden Objects highlighted in Yellow.
Receive the Knife.
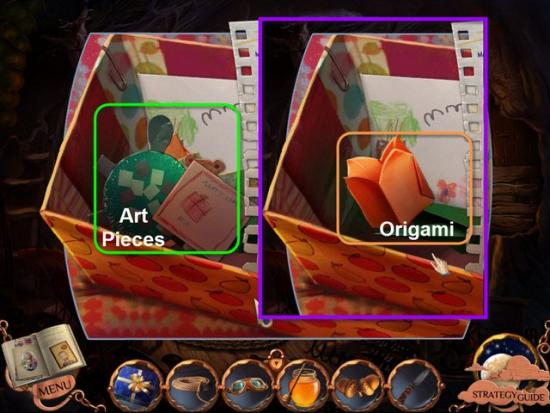
Examine the Box on the Bed.
Move all the Art Pieces, highlighted in Green, and Examine the Tulip Origami.
After the Cut Scene, gather the Tulip Origami, highlighted in Orange.
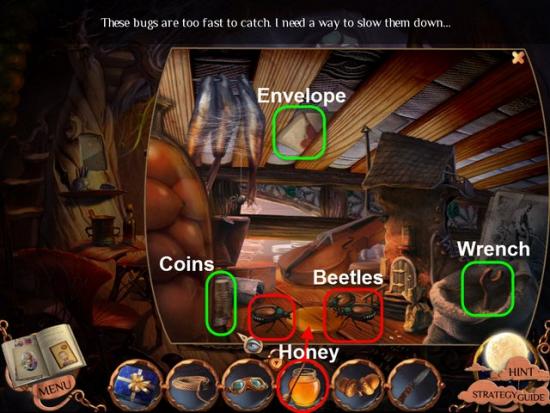
Examine under the Bed.
Place the Honey, highlighted in Red, onto the Floor.
Next, move the Envelope, Wrench, and Coins to scare out the Beetles.
Finally, gather the three Beetles.

Move the Rug highlighted in Green, revealing a Trap Door.
Gather the Root highlighted in Red.
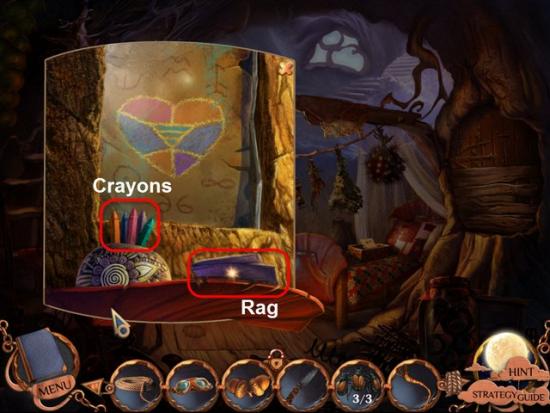
Examine the Glass Alcove.
Gather the Rag and Crayons highlighted in Red.
Examine the Drawing.
Return Back four screens to where you first entered through the Wooden Door. Near the Mushroom Steps and the Cave.
Examine the Mushrooms on the Tree Trunk.
Use the Knife to cut the Mushrooms free.
Gather the Mushrooms.
Examine the Trash Pile once again.
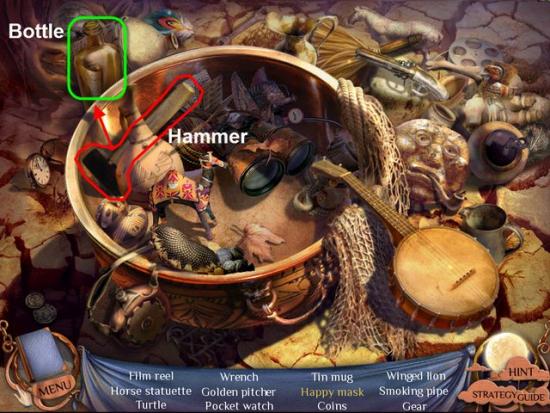
Gather the Hammer, highlighted in Red, and use it on the Bottle, highlighted in Green.
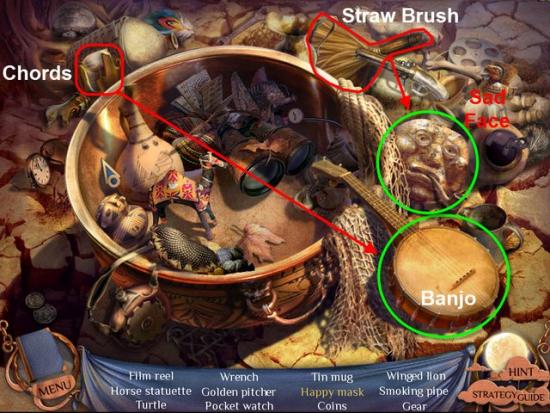
Gather the Chords and place them on the Banjo.
A colorful Bird will alight on the Cauldron dropping a Razor.
Next, gather the Straw Brush and use it to clean the Sad Face.
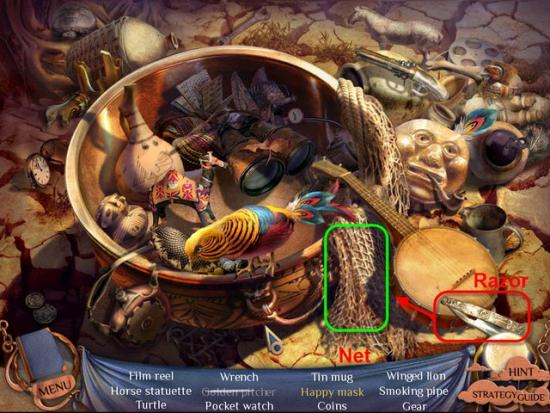
Use the Razor, highlighted in Red, to cut the Net, highlighted in Green.
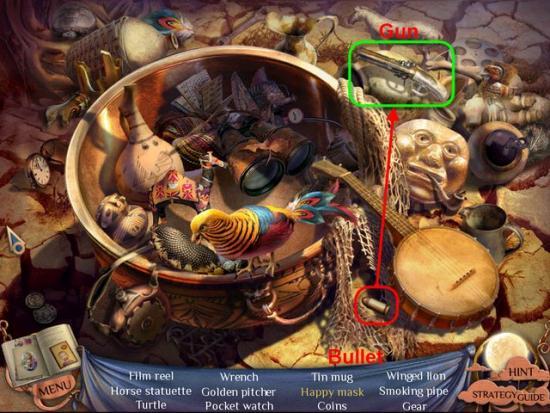
Gather the Bullet, highlighted in Red, and put it in the Gun, highlighted in Green.
The Bird will fly off leaving behind two Feathers.
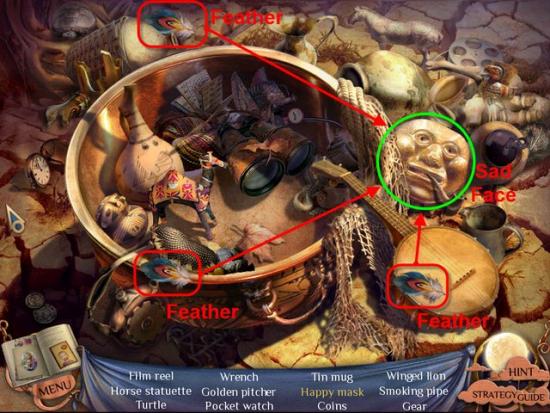
Gather the three Feathers, highlighted in Red, and place them on the Sad Face, highlighted in Green.
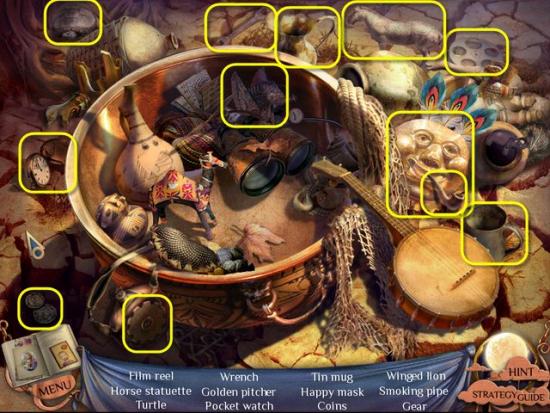
Gather the Hidden Objects highlighted in Yellow.
Receive the Gear.
Return to the Tree-house Island.
Examine the Tree Stump.
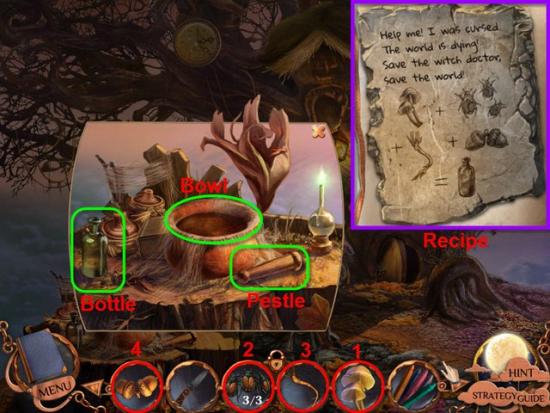
Use the Recipe from the Stone Tablet found on Page 11 of the Diary.
Place the Mushrooms in the Bowl.
Next add the Beetles, then the Root, and finally add the Acorns.
Now, use the Pestle on the Bowl to mix all the ingredients.
Next, use the Bottle on the Liquid in the Bowl.
Finally gather the Magic Potion filled Bottle.
Use the Magic Potion filled Bottle on the Elven Statue.
Talk to the Witchdoctor Elf.
The Witchdoctor will hand you a Flint.
Head Back two screens to the Chasm.
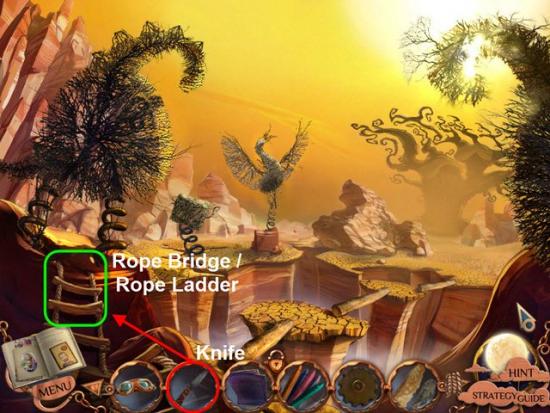
Use your Knife to cut down the Rope Bridge.
Gather the Rope Ladder.
Head Back one screen.
Enter the Cave.
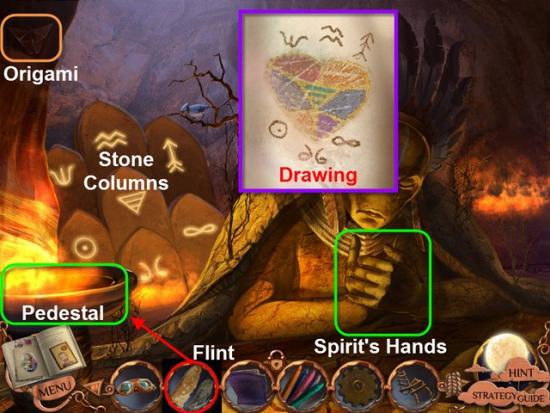
Use the Flint, highlighted in Red, on the Pedestal, highlighted in Green.
Next, gather the Origami highlighted in Orange.
Using the Drawing, from Page 13 of the Diary, rearrange the Stone Columns into the correct order.
Click on any two Stone Columns to switch positions.
Once the Stone Columns are aligned correctly the Spirits Hands will open.
Examine the Spirits Hands.
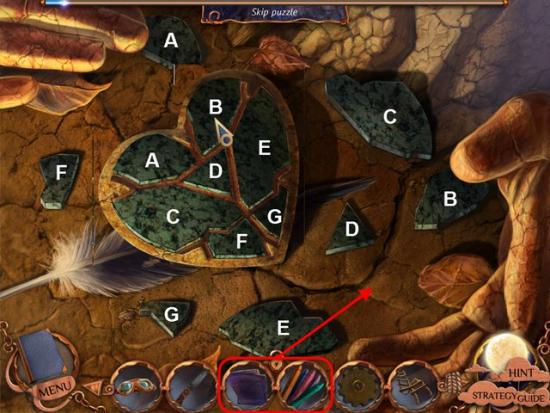
Now you need to fix the Broken Heart.
Left to Click to pickup each Piece and once again to set the Piece.
Right Click to rotate a Piece you have in hand.
Once all the Pieces are inserted, place the Crayons and Rag on the ground next to the Heart.
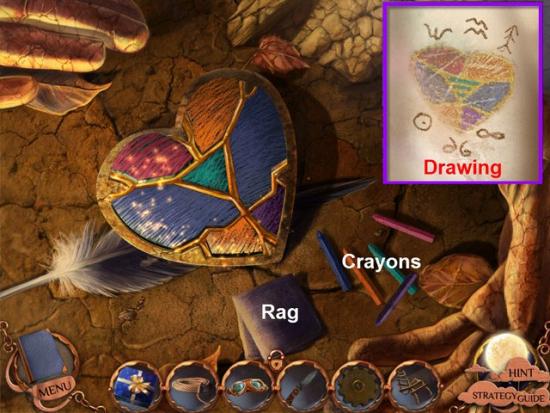
Using the Drawing from Page 13 of the Diary as a guide, color the Heart.
Click on each Crayons, to pick it up, and again to color each Section of the Heart.
If you miss color an area, pick up the Rag and click on a Section, to clean it; then recolor the Section.
Receive the Spirit Heart.
Give the Spirit Heart to the Spirit.
Talk to the Spirit. After the Cut Scene, talk to the Spirit, once again.
Return to the Chasm.
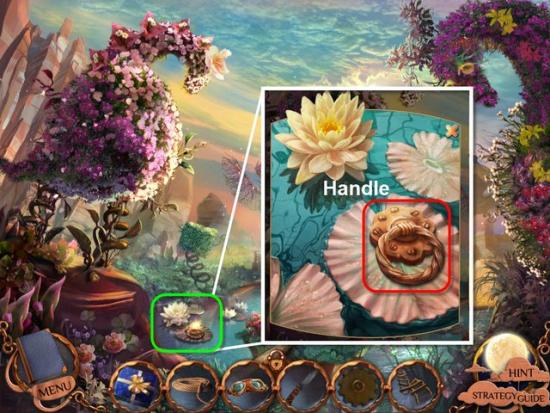
Examine the Lily Pad highlighted in Green.
Gather the Handle highlighted in Red.
Return to the Witchdoctor on the Tree-house Island.
Talk to the Witchdoctor.
Enter the Tree-house.

Place the Handle on the Trap Door.
Open the Trap Door.
Place the Rope Ladder into the Open Trap Door.
Enter the Cellar.
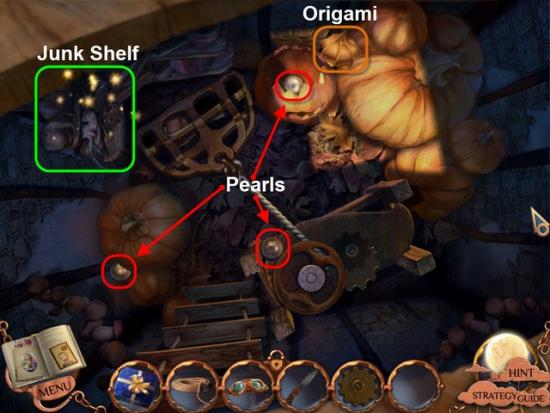
Gather the Origami highlighted in Orange.
Gather the three Pearls highlighted in Red.
Examine the Junk Shelf highlighted in Green.
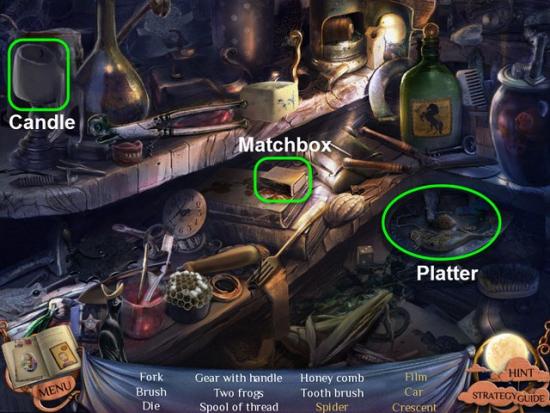
Open the Box of Matches highlighted in Green.
Gather a Match and Strike it on the side of the Matchbox.
Use the Lit Match to light the Candle.
Next, examine the Platter.
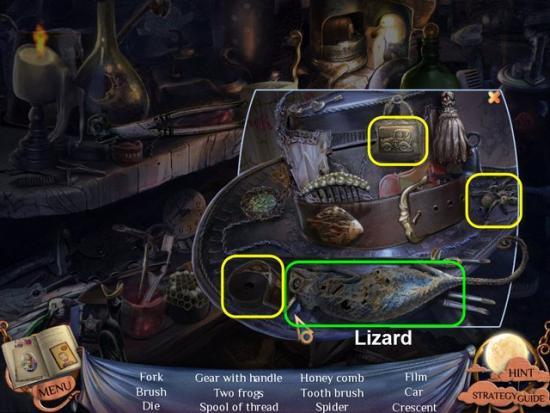
Move the Lizard highlighted in Green.
Gather the Film, Car, and Spider highlighted in Yellow.
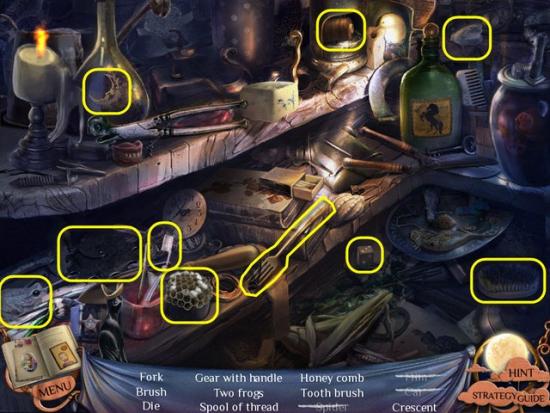
Gather the remaining Hidden Objects highlighted in Yellow.
Receive a Gear with Handle.
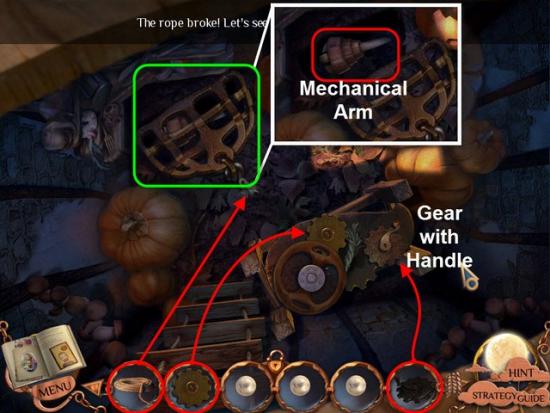
Place the two Gears onto the Mechanism.
Turn the Gear with Handle.
The Rope will break.
Place the Rope, from your inventory, on the Mechanism to repair it.
Turn the Gear with the Handle once more to reveal a shallow Pit.
Gather the Mechanical Arm highlighted in Red.
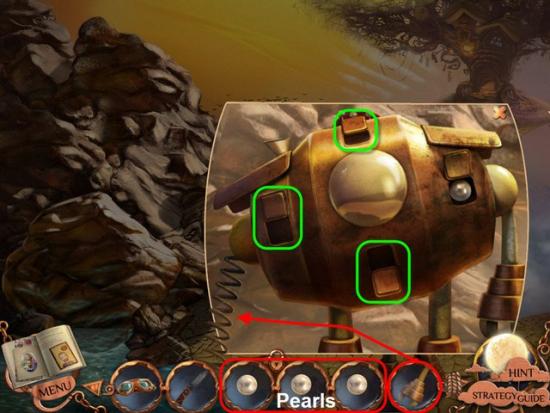
Return across the Bridge to the Contraption.
Examine the Contraption.
Place the three Pearls into the three empty Slots on the Contraption.
Replace the Spring with the Mechanical Arm.
Next, click each of the four Slots to close the Small Doors.
Give the Goggles to the Witchdoctor.
After Cut-scene, talk to the Witchdoctor and receive a Diamond.
Return to the Tree-house.
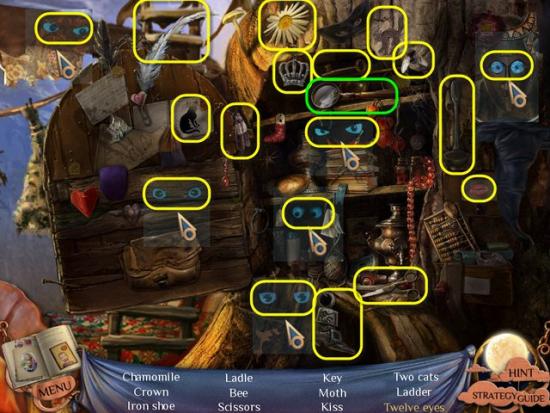
Examine the Cabinet on the Right.
Gather the Magnifying Glass, highlighted in Green, and use it to find the Twelve Eyes.
Gather the Hidden Objects highlighted in Yellow.
Receive the Wooden Ladder

Use the Diamond, highlighted in Red, to cut the Glass, highlighted in Green.
Gather the Heart Drawing behind the Glass.
Head Back five screens and to the Left two screens, to where you left Peter.
Examine the Hole in the Floor.
Place the Wooden Ladder into the Hole.
Climb down the Ladder and talk to Peter.
Climb back up the Ladder and go Back one screen.
Examine the Mirror, on the Left, that heads back to Emily’s Room.
Enter the Mirror.
Exit Emily’s Room into the Foyer.
Examine the Drawing Wall.
Place the Heart Drawing, highlighted in Red, onto the Drawing Wall, highlighted in Green.
Head Back one screen.
Head Left one screen back to the Mother’s Room.
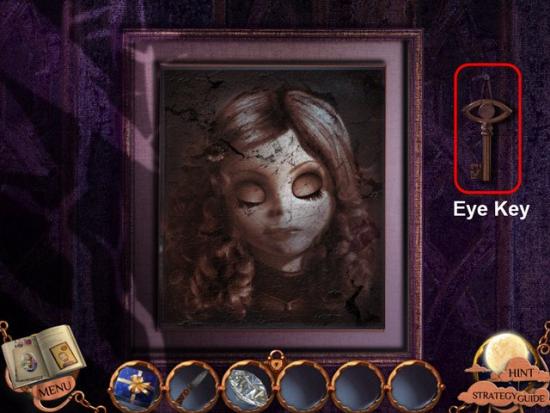
Examine the Portrait.
Gather the Eye Key highlighted in Red.
Step Back two screens to the Bedside.
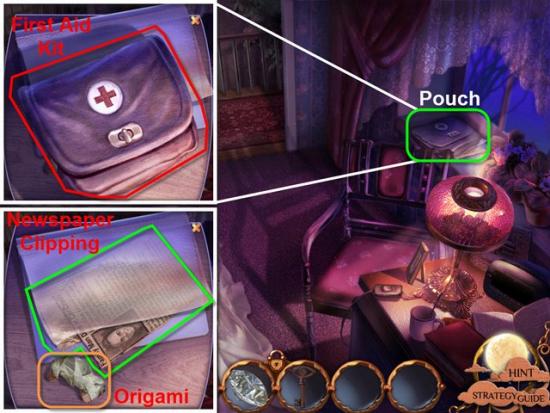
Examine the Pouch on the Window Seal.
Gather the First Aid Kit highlighted in Red.
After retrieving the First Aid Kit, gather the Origami highlighted in Orange.
Examine the Newspaper Clipping and Photo highlighted in Green.
Return to Emily’s Room and enter the Drawing once more.
Examine the Hole in the Floor.
Climb down the Ladder.
Talk to Peter.
Use the First Aid Kit on Peter.
Talk to Peter.
Try to gather the Drawing Peter is holding.
After the Cut-scene, climb the Ladder.
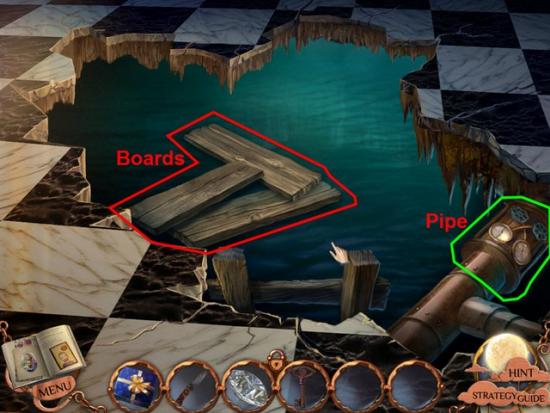
After the second Cut-scene, gather th Boards highlighted in Red.
Examine the Pipes highlighted in Green.
Step Back one screen.
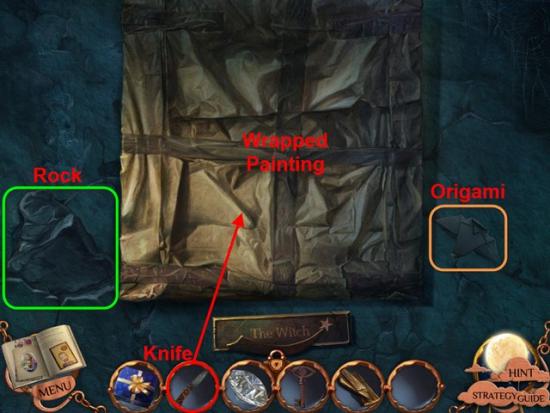
Examine the Wrapper Painting on the Wall.
Gather the Origami highlighted in Orange
Click the Rock, three times, to reveal a Button.
Use the Knife, highlighted in Red, to cut off the Wrapping around the Painting.
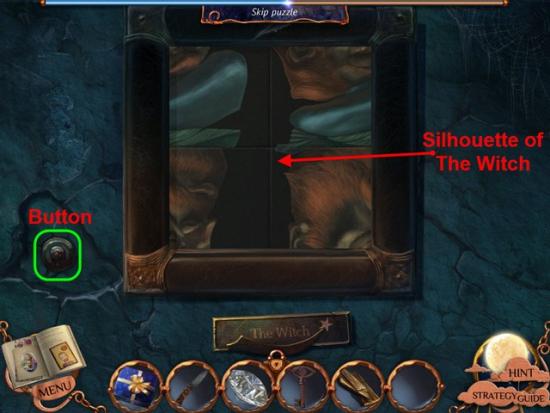
The key to this Puzzle is to rotate the Sections of the Painting to form the Silhouette of a Witch.
Solution: Click each Section of the Painting twice, to rotate the Image. Once all four Sections have been rotated twice, you should have the Silhouette of a Witch as seen in the Image above.
Click on the Button, highlighted in Green.
The Painting will roll away revealing a shelf with a Fur Coat lying on it..
Gather the Fur Coat.
Head Left one screen, then Upstairs to the Hallway.
Examine the Door on the Right,
Use the Eye Key you got earlier, on the Keyhole, to unlock the door.
After the Door opens, enter the Attic.
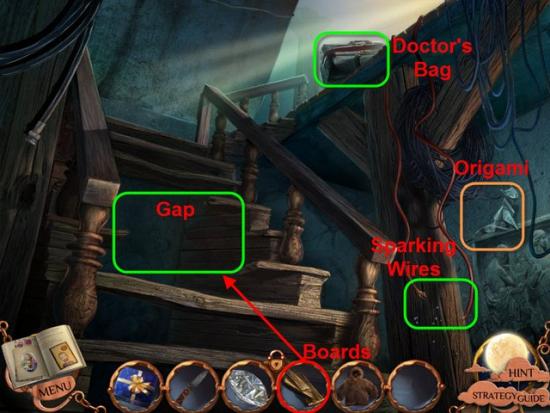
Gather the Origami highlighted in Orange.
Examine the Sparking Wires.
Place the Boards, highlighted in Red, on the Gap in the Stairs, highlighted in Green.
Examine the Doctors Bag.
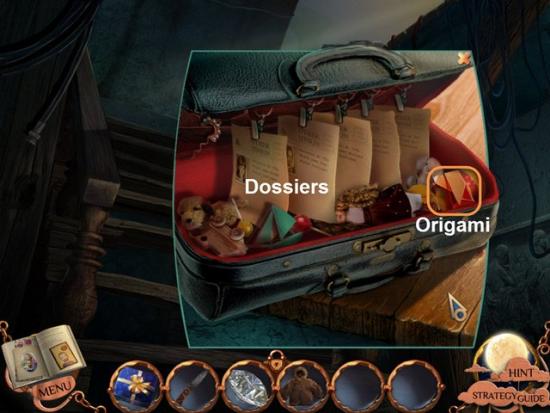
Gather the Origami highlighted in Orange.
Examine each of the Dossiers hanging in the Bag.
Exit Back one screen.
Climb the Stairs to the Attic, proper.
Gather the Origami highlighted in Orange.
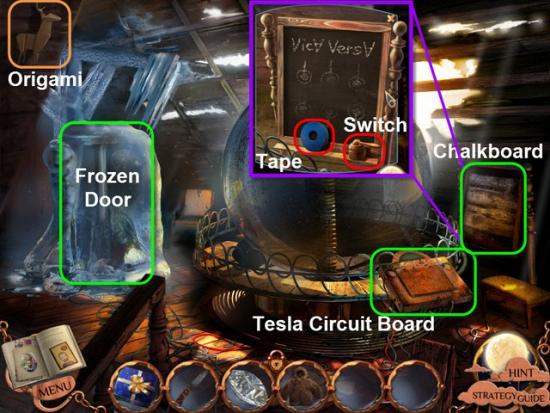
Examine the Chalkboard highlighted in Green.
Make a note of the Drawing on the Chalkboard.
Gather the Tape and Switch highlighted in Red.
Head back down the Stairs.
Use the Tape on the Sparking Wires.
Head back Up the Stairs to the Attic.
Examine the Tesla Circuit Board.
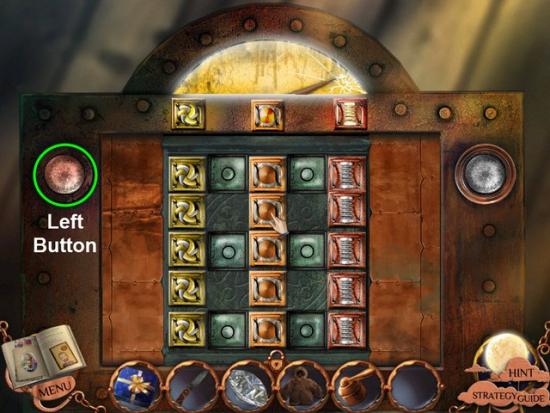
Click the Left Button.
This will start the first Puzzle.
For this Puzzle you need to move the Squares around until all the Squares are in their corresponding Row.
Remember if you get stuck you can use the Skip option.
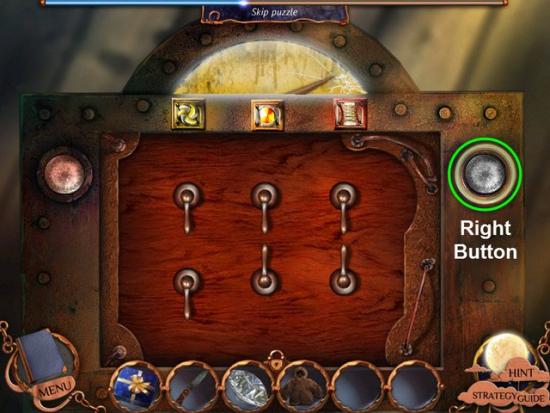
This is the second Puzzle.
Place the Switch in the empty spot on the Board.
Flip each of the Switches to match the Layout you saw on the Chalkboard earlier; but in reverse order.
See Image above for correct order.
Click the Right Button to activate the Tesla.
Examine the Frozen Door.
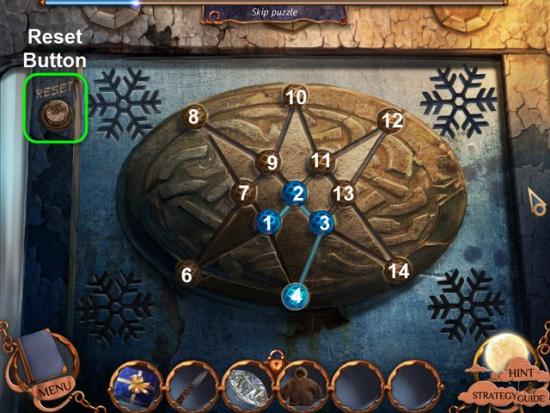
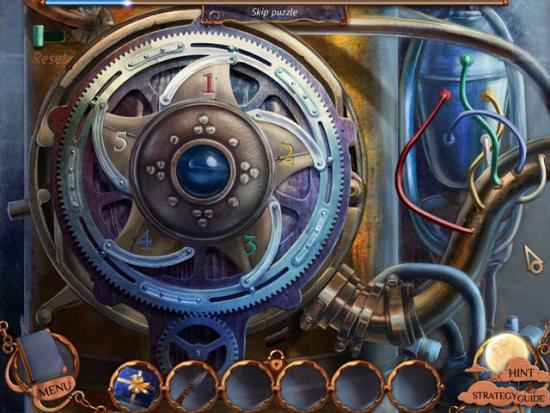
For this Puzzle your goal is to light up all the Lines of the Star by clicking Point to Point without crossing any Lines.
If you make a mistake, use the Reset Button to reset the Puzzle.
Solution: Starting with Point 1. 1 to 2, 2 to 3, 3 to 4, 4 to 1, 1 to 6, 6 to 7, 7 to 8, 8 to 9, 9 to 10, 10 to 11, 11 to 12, 12 to 13, 13 to 14, 14 to 3, 3 to 13, 13 to 11, 11 to 2, 2 to 9, 9 to 7, 7 to 1.
Now enter the Door into the Frozen Land.
Gather the Origami highlighted in Orange
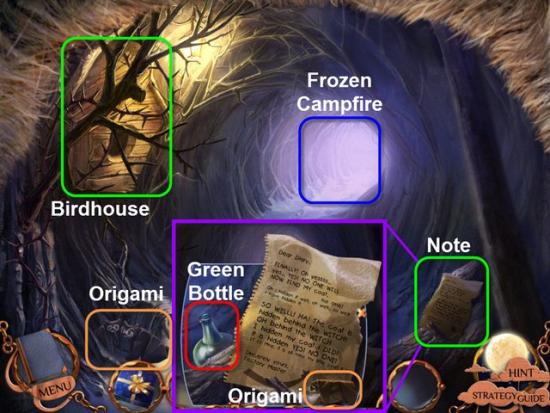
Examine the Birdhouse.
Examine the Note highlighted in Green.
Gather the Origami highlighted in Orange.
Gather the Green Bottle highlighted in Red.
Read the Note.
Head Forward to the Frozen Campfire.
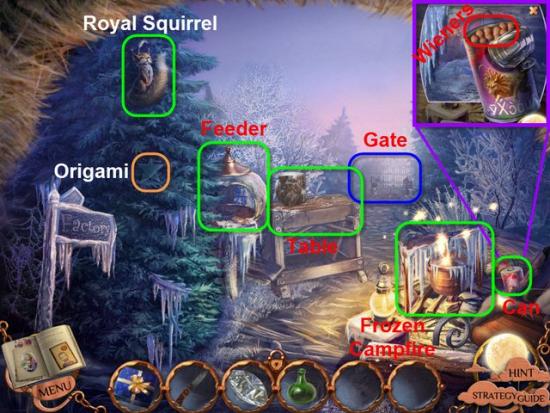
Gather the Origami highlighted in Orange.
Examine the Royal Squirrel, the Feeder, and Table.
Examine the Can.
Open the Can.
Gather the Wieners highlighted in Red.
Examine the Frozen Campfire.
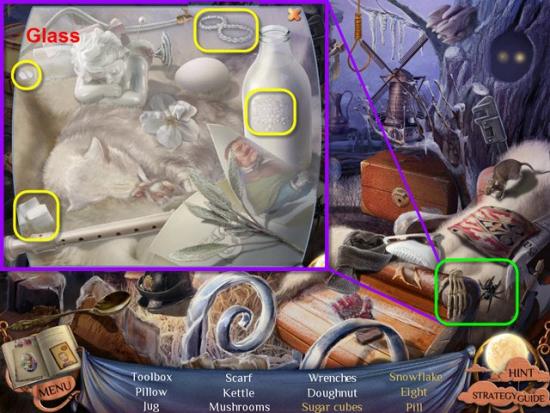
Examine the Area highlighted in Green.
Click the Glass, a couple times, to reveal the Pill.
Click to move the Pocket Watch to reveal the Eight.
Gather the Hidden Objects highlighted in Yellow.
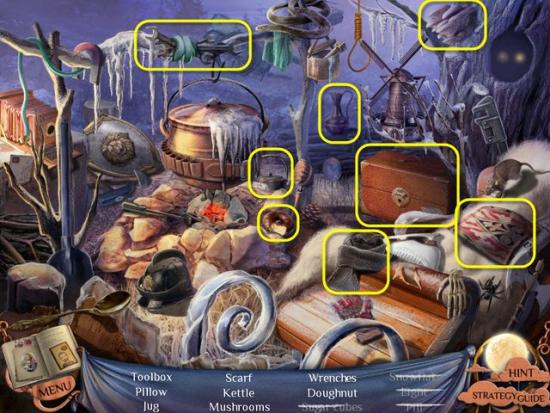
Gather the remaining Hidden Objects highlighted in Yellow.
Receive the Toolbox.
Head to the Gate.
Gather the Origami highlighted in Orange.
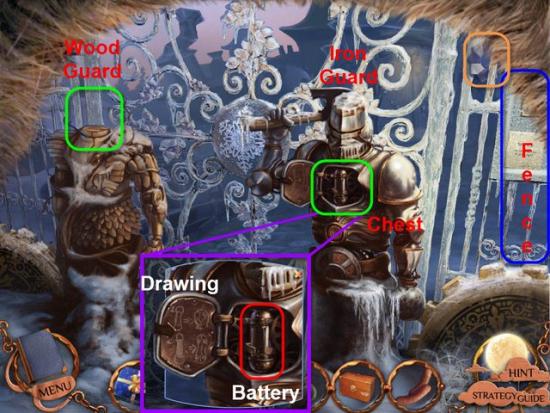
Examine the Chest of the Iron Guard.
Note the Drawing on the Chest Plate.
Gather the Battery highlighted in Red.
Head to the Right to the Fence.
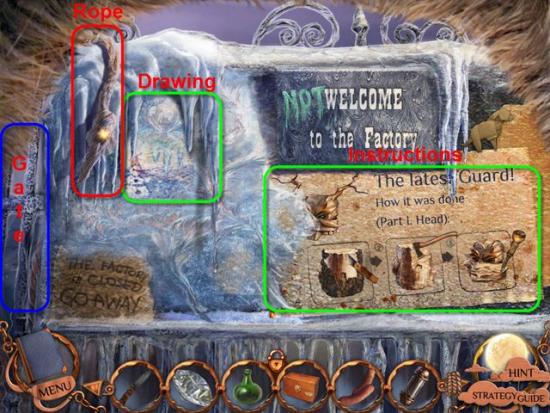
Gather the Rope highlighted in Red.
Examine the Drawing and the Instructions highlighted in Green.
Head Left to the Gate.
Return to the Attic and the Tesla.
Use the Battery on the Tesla.
Gather the Charged Battery

Return to the Gate.
Place the Charge Battery into the Chest of the Iron Guard.
Gather the Axe the Iron Guard drops.
Return to the Birdhouse.
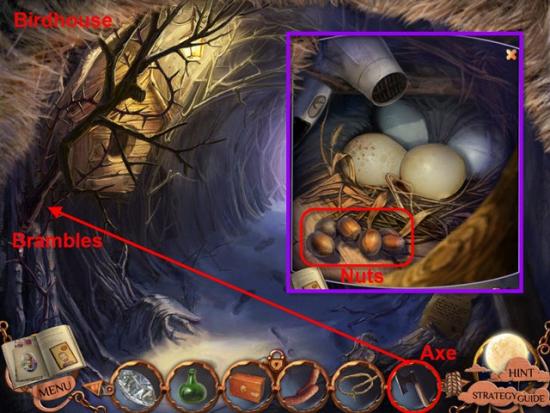
Use the Axe, highlighted in Red, to chop down the Brambles.
Examine the Birdhouse.
Gather the Nuts highlighted in Red.
Head Forward one screen.
Examine the Bird-feeder and place the Nuts in the Feeder.
Examine the Bird-feeder, once again, and gather the Key.
Examine the Table.
Place the Toolbox onto the Table.
Use the Key to unlock the Toolbox.
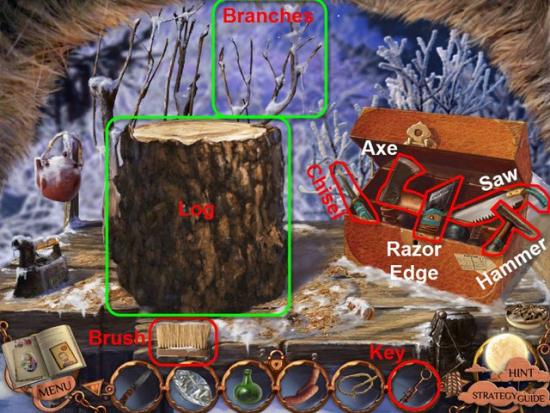
Gather the Brush and clean off the Log.
Gather the Saw and cut down the Branches.
Next, use the Razor Edge to remove the bark from the Log.
Now, gather the Axe and use it on the Log.
Next, use the Chisel on the Log.
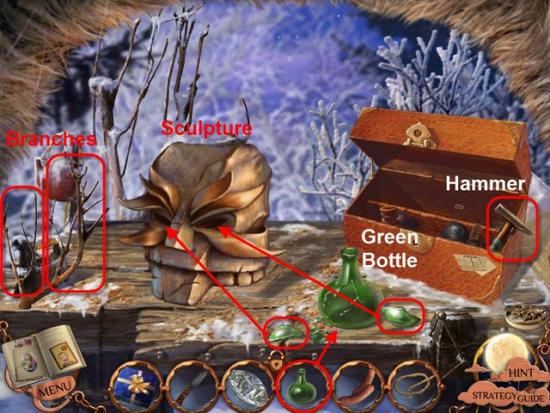
Gather the Branches and attach them to the Head of the Sculpture.
Place the Green Bottle on the Table.
Use the Hammer to break the Green Bottle.
Pick up the two Green Shards and place them in the Eye Sockets of the Sculpture.
Gather the Wooden Head.
Return to the Gate.
Place the Wooden Head upon the Wooden Guard on the Left.
Talk to the Wooden Guard.
The Guards will open the Gate.
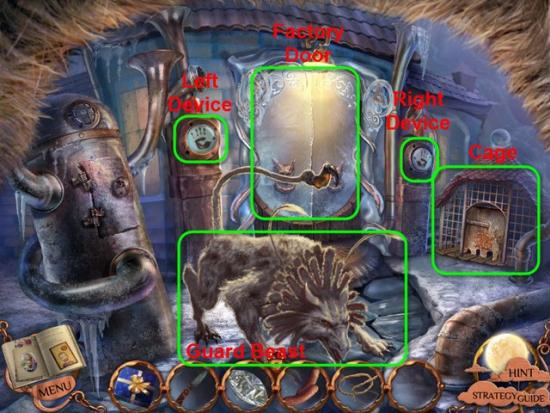
Enter the Factory Grounds.
Examine the Factory Doors.
A Guard Beast will block your path.
Head Back two screens and examine the Frozen Campsite once again.
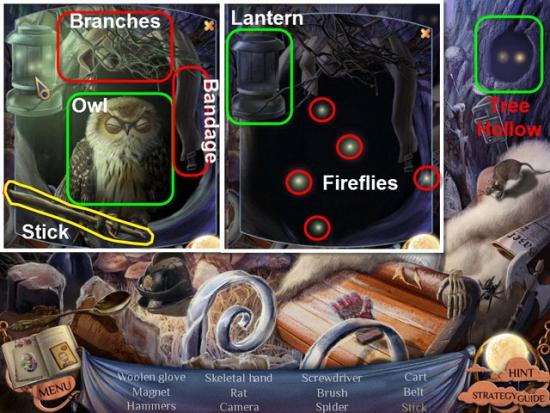
Examine the Tree Hollow highlighted in Green.
Gather the five Fireflies and place them in the Lantern.
Next remove the Branches above the Hollow.
Gather the Bandage and wrap it around the Owl.
Finally, gather the Stick, highlighted in Yellow, from the Owl’s Claws.
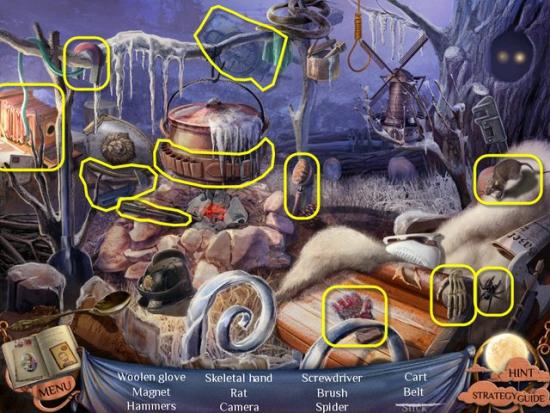
Gather the remaining Hidden Objects highlighted in Yellow.
Receive the Stick.
Return to the Factory Grounds.
Give one of the Wieners to the Guard Beast.
As soon as the Guard Beast, starts eating the Wiener, examine the Dog House.
Gather the Origami highlighted in Orange.
Open the Door highlighted in Green.

Place the Stick into the Doorway of the Dog House.
Place the second Wiener inside the Dog House.
Next, attach the Rope to the Stick.
Head Back one screen,
Note: If you make a mistake or move to slow and need extra Wieners, just head back to the Frozen Campfire. Examine the Can beside the Frozen Campfire and gather some extra Wieners. Can only gather more if used up all the Wieners you had, so feed the extra Wiener you have to the Guard Beast before getting two more.
As soon as the Guard Beast enters the Dog House, pull the Rope.
Now the Guard Beast is out of the way, examine the two Devices, on either side of the Door.
Head Back one screen to the Gate.
Talk to the Wooden Guard, he will give you his Left Hand.
Return to the Factory Grounds.
Place the Wooden Guards Left Hand on the Left Device.
Then, click the Right Device.
Examine the Factory Door and fall through the Sidewalk.
After the Cut-scene you will wake up in a Small Room.
Gather the Origami highlighted in Orange.
Gather the Rope highlighted in Red.
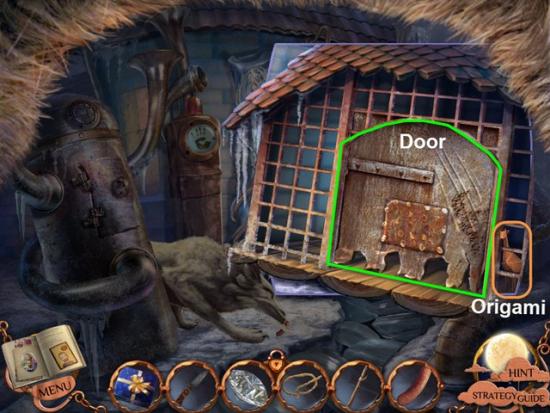
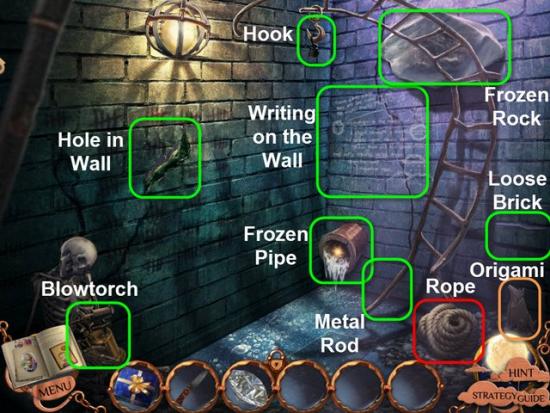
Examine the Blowtorch in the Skeletons Hands.
After the Blowtorch drops out of the Skeletons Hands, gather the Blowtorch and the Bone.
Examine each of the highlighted Areas.
The Hole in the Wall, Hook, Frozen Rock, Loose Brick, Metal Rod, Frozen Pipe, and the Writing on the Wall.
Make note of the Writing on the Wall.
Attach the Rope to the Hook.
Gather the Hanging Rope and tie it around the Frozen Rock.
Use the Bone, on the Frozen Rock, to pry the Frozen Rock free.
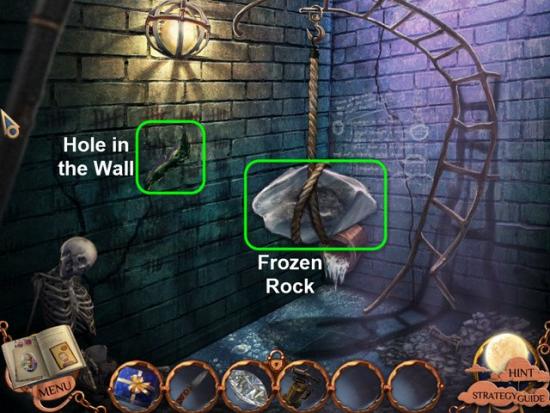
Now click to swing the Frozen Rock into the Hole in the Wall.
Swing the Frozen Rock three times to knock down the Wall.
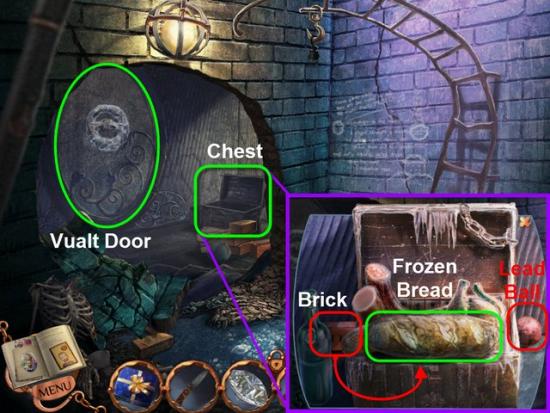
Examine the Chest.
Gather the Lead Ball highlighted in Red.
Pick up the Brick and use it to to break the Frozen Bread open, three times.
Gather the Hacksaw that was inside the Frozen Bread.
Back one screen.

Use the Hacksaw, highlighted in Red, to cut off the Metal Rod.
Gather the Metal Rod.
Examine the Loose Brick.
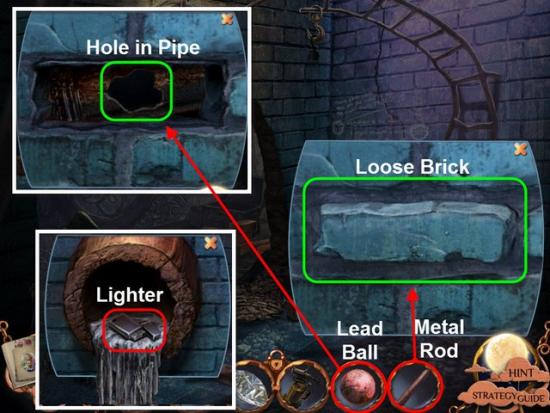
Use the Metal Rod on the Loose Brick.
Place the Lead Ball into the Hole in the Pipe.
Examine the Frozen Pipe.
Gather the Lighter highlighted in Red.
Examine the Vault Door.
Hang the Blowtorch on the Hook on the Vault Door.
Next, use the Lighter to Ignite the Blowtorch.
Finally, gather the Blowtorch and melt all the Ice on the Vault Door.
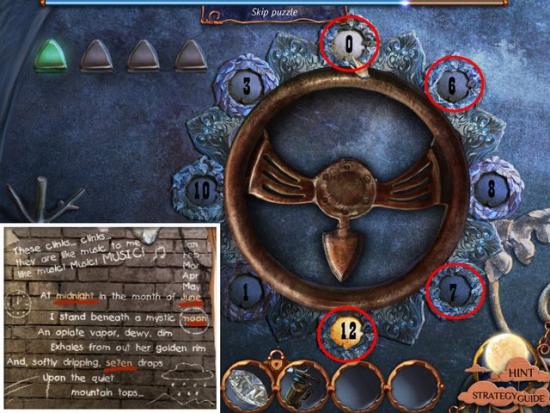
To solve the Vault Door Puzzle you need to enter the correct four number sequence.
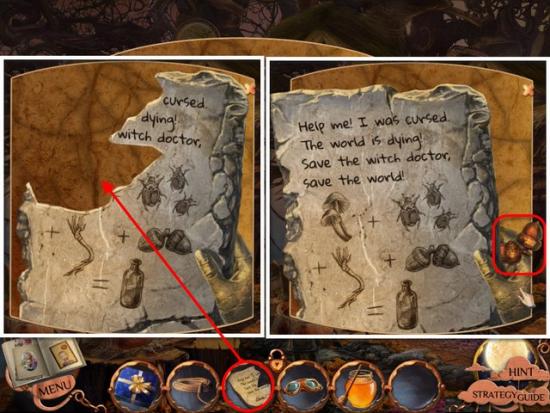
Check page 20 of the Diary or the Writing on the Wall for the key to the Vault Door.
Solution: Note the four underlined Words in the Poem. Enter the numbers in the order they appear in the poem.
Midnight = 12, June = 6, Moon = 0, = Se7ven = 7.
Click on each Numbers on the Door in order to open the Door.
Enter the Vault Door into an Elevator.
Press the Up Button in the Lower Left Corner.
The Elevator will open up into the Factory.
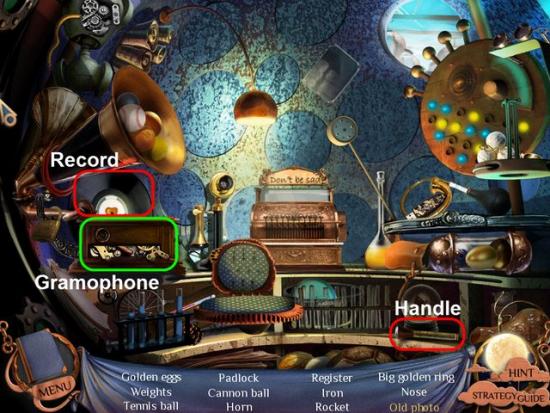
Examine the Metal Sphere directly in front of you.
Gather the Handle and attach it to the Gramophone.
Gather the Record and place it on the Gramophone.
Turn the Handle on the Gramophone.
A Drawer will open on the side of the Gramophone.
Examine the Drawer.
Place the pieces of the Paper to repair the Torn Page.
Next, open the Matchbook.
Gather a Match and strike it on the Matchbook to light it.
Use the Lit Match on the Candle, to light the Candle.
Gather the Repaired Page and use on the Lit Candle, to reveal the message.
Examine the Note.
Click once again to gather the Note.
Look at the Gramophone Drawer again and examine the Pink Envelope.
Open the Pink Envelope and withdraw the Photo.
Gather the Old Photo.
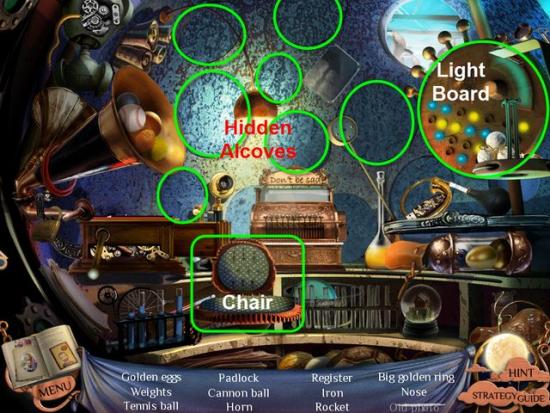
Move the Chair and Light Board.
Click on each of the Circles on the Wall to reveal Hidden Alcoves.
Can have only one Alcove open at a time.
Several Hidden Objects are in these Hidden Alcoves.
Gather the Hidden Objects highlighted in Yellow.
After the Cut-scene, you will find yourself back outside the Factory.
Head Back to the Gate and Right one to the Fence.
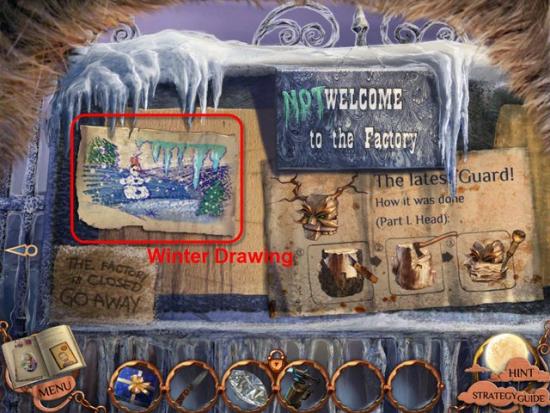
Use the Blowtorch on the Frozen Drawing.
Gather the Winter Drawing.
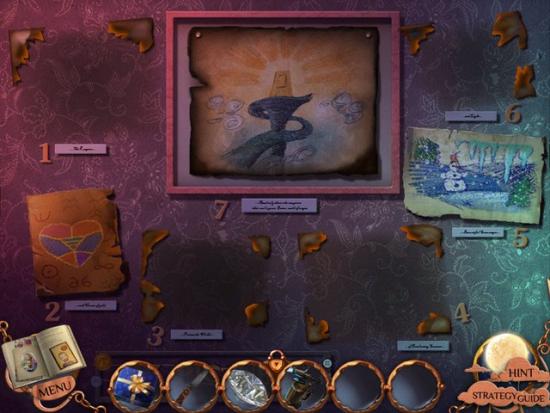
Return to Emily’s Bedroom.
Exit Emily’s Bedroom to the Foyer.
Examine the Drawing Wall.
Place the Winter Drawing on the Wall in the corresponding position.
Back one screen and Left one screen.
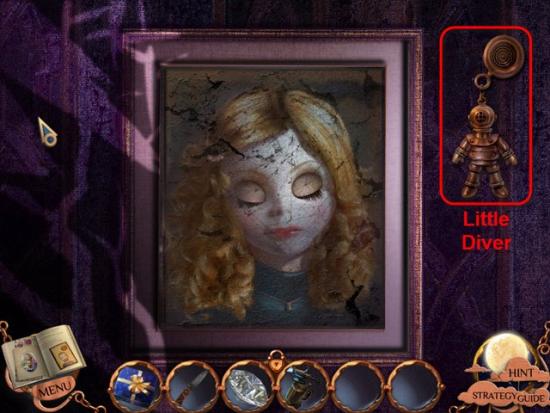
Examine the Photo.
Gather the Little Diver.
Head back to Emily’s Bedroom.
Enter through the Drawing once again.
Head Forward to the Cage Door in the Column.

Use the Little Diver, highlighted in Red, on the Door Lock, highlighted in Green.
Next, use the Diamond on the Glass to break it.
Finally, gather the Diving Suit.
Head Back one screen.
Examine the Hole in the Floor.
Use the Diving Suit on the Water.
Gather the Origami highlighted in Orange.
Examine the Holes in the Pipe.
Use the Blowtorch, highlighted in Red, and seal the Hole in the Pipe.
Notice the Empty Blowtorch.
Climb Up the Ladder.
Head back to the Alcove where got the Diving Suit.
Use the Blowtorch on the Gas Can.
Receive filled Blowtorch.
Return to the Hole in the Floor.
Climb down the Ladder.
Examine the remaining two Holes in the Pipe.
Use the Blowtorch to repair the Holes.
Next, head forward through the Tunnel.
Place the Diamond, highlighted in Red, into the Eye Socket of the Cat Statue.
The Grate will reveal a set of Numbers.
Make note of the numbers 360 and -10.
Head Back one screen.
Climb Up the Ladder.
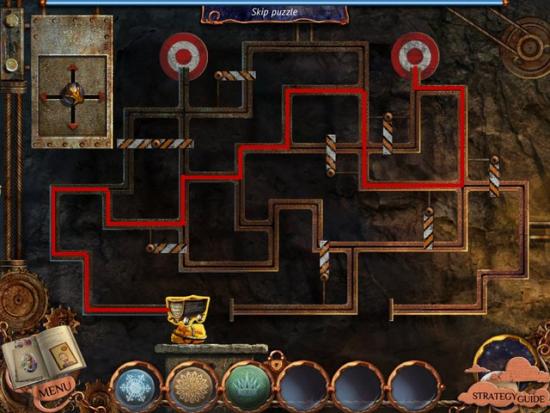
Examine the Pipe on the Right of the Hole.
Turn the Valves to set them to the new settings.
Top Dial = -10, Bottom Dial = 360.
The Water will drain from the Hole in the Floor.
Climb Down the Ladder.
Head Forward through the Tunnel.
Gather the Origami highlighted in Orange.
Examine the Bottle highlighted in Green.
Use the Knife on the Cork, to remove the Cork from the Bottle.
Remove the Note from the Bottle.
Open the Paper, revealing the Shield Drawing.
Gather the Drawing.
Return to Emily’s Bedroom.
Exit to the Foyer and examine the Drawing Wall.
Place the Shield Drawing onto the Drawing Wall.
Head Back one screen and Left one screen.
Examine the Photo.
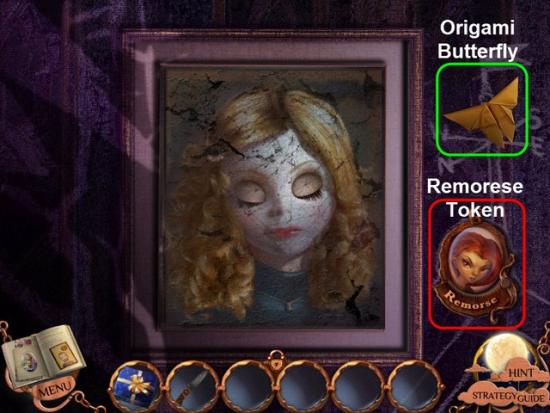
Examine the Origami Butterfly.
Open the Origami revealing a Note.
Gather the Note.
Next, gather the Remorse Token.
Head back to the Arid Land.
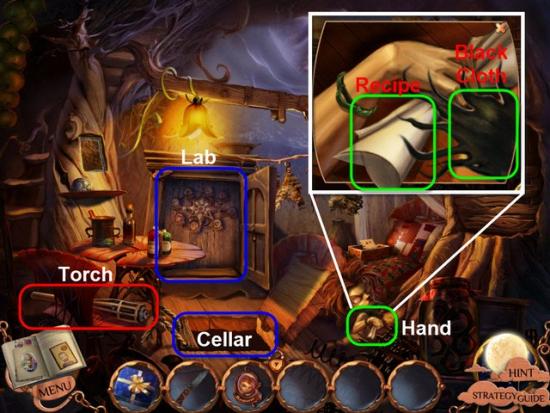
Return to the Witchdoctor’s Tree-house.
Examine the Witch-doctor’s Hand.
Attempt to gather the Black Cloth.
Gather the Recipe from the Witchdoctor’s Hand.
Enter the Cellar.
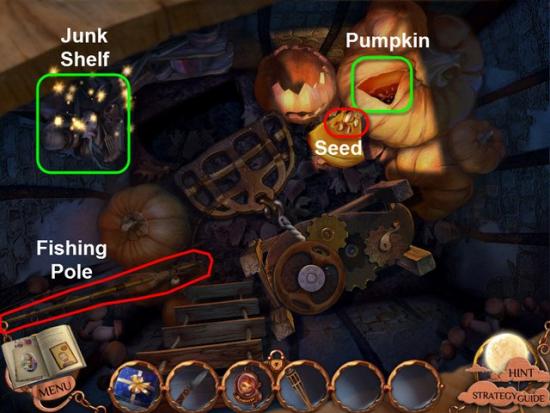
Gather the Fishing Rod.
Use the Knife to cut open the Pumpkin.
Gather a Pumpkin Seed.
Examine the Junk Shelf.
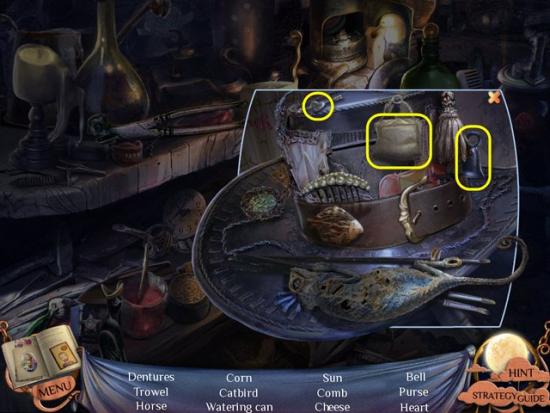
Examine the Platter on the Right Side under the Shelf.
Gather the Bell, Purse, and Heart highlighted in Yellow.
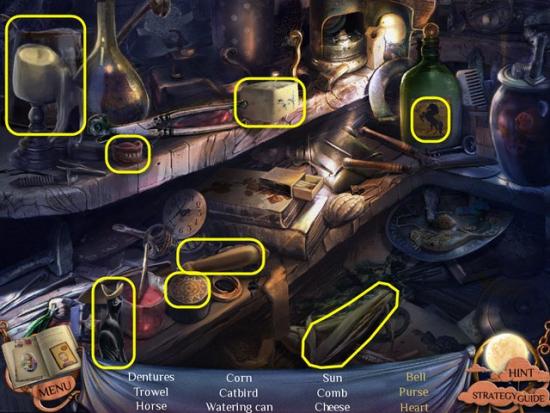
Gather the remaining Hidden Objects highlighted in Yellow.
Receive the Trowel.
Head Back two screens, to outside the Tree-house.
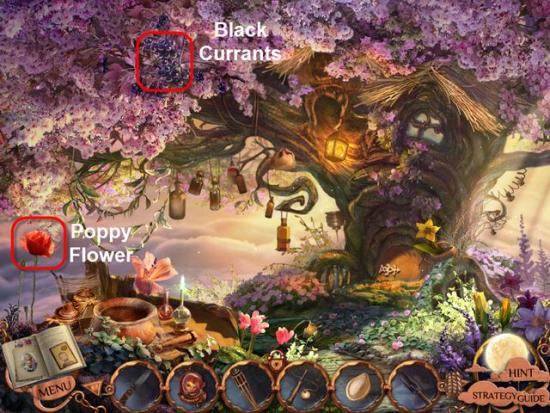
Gather the Poppy Flower and Black Currant highlighted in Red.
Head Back one screen.
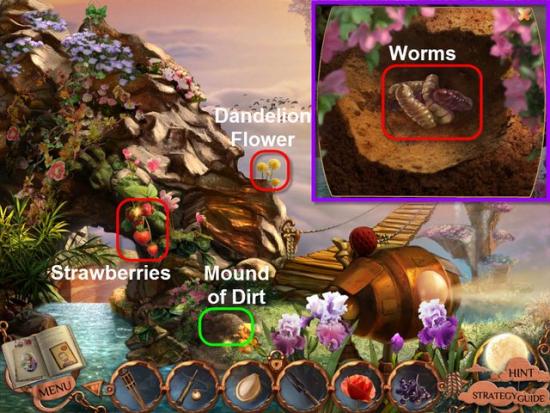
Gather the Dandelion Flower and the Strawberries high in Red.
Use the Trowel on the Mound of Dirt highlighted in Green,
Dig up the Dirt, twice.
Gather the Worms.
Head Back one screen.
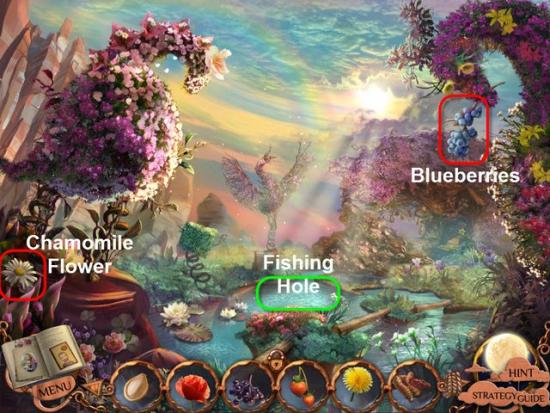
Gather the Chamomile Flower and Blueberries highlighted in Red.
Examine the Water highlighted in Green.
Place the Fishing Rod into the Water.
As soon as a Fish swims up, tug on the Fishing Line to catch the Fish.
Receive the Fish.
Head Back one screen.
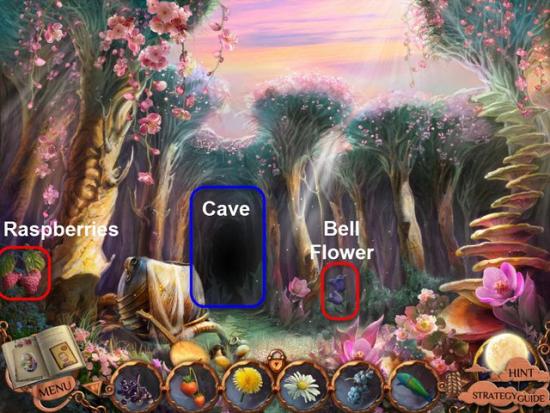
Gather the Raspberries and Bell Flower highlighted in Red.
Enter the Cave.
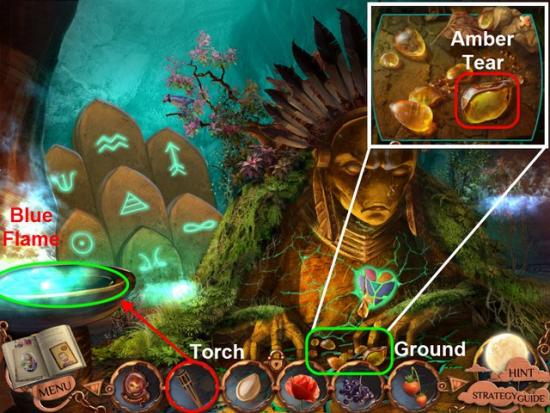
Use the Torch on the Blue Flame highlighted in Green.
Receive the Lit Torch.
Examine the Ground in front of the Spirit.
Gather the Amber Tear highlighted in Red.
Return to the Witch-doctor’s Tree-house.
Examine the Door to the Lab.
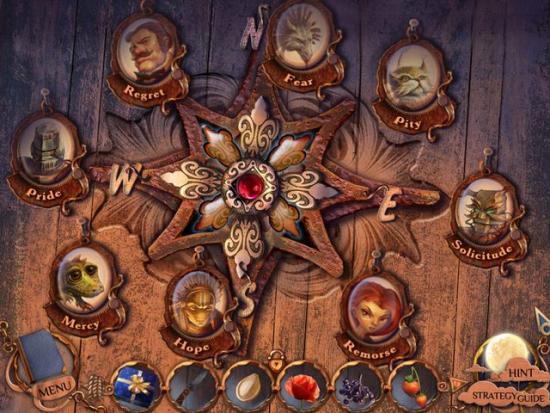
Place the Remorse Token into the Empty Slot.
For this Puzzle refer to the Poem you received earlier.
You can find the Poem on Page 23 of the Diary.
Click on any two Tokens to switch positions.
Solution: Reading the Poem you obtain the location of the Tokens as shown in Image.
• Fear – North
• Hope – South
• Solicitude – E
• Pride – W
• Mercy – SW
• Pity – NE
• Remorse – SE
• Regret – NW
Once the Puzzle is solved the Door the the Lab will open.
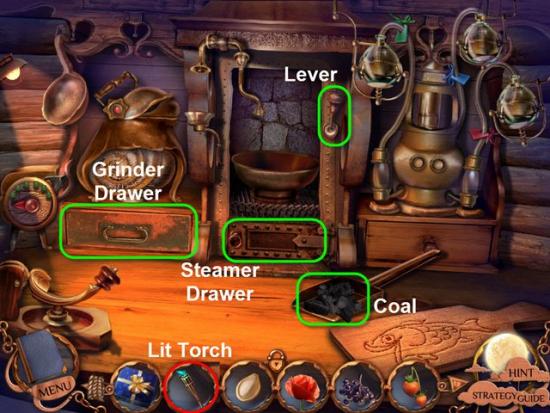
Pick up the Shovel of Coal.
Place the Coal into the Steamer Drawer.
Use the Lit Torch to light the Coal.
Next, pull the Lever to lower the Steamer Lid.
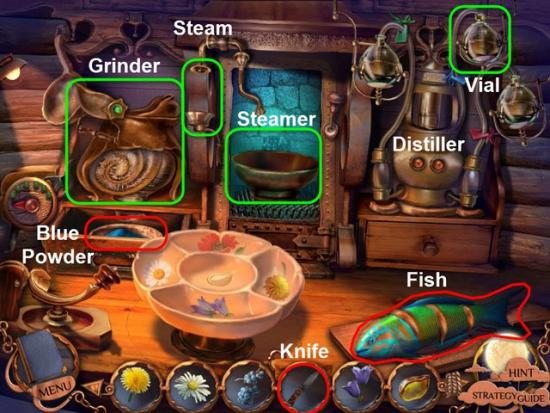
Place the Fish on the Cutting Board.
Use the Knife to cut the Fish, three times.
Take the Cut Fish and Place in the Grinder.
After a couple seconds the Grinder Door will open.
Gather the Blue Powder and pour the Blue Powder into the Steamer.
Gather the Vial, highlighted in Green, and place it into the Steam.
Take the Vial of Blue Liquid and replace on the Distiller.

Place the Pumpkin Seed, Dandelion Flower, Bell Flower, Chamomile Flower, and Poppy Flower into the Bowl in the marked Sections.
The Bowl will drop into the Floor.
When the Bowl comes back up, use the Scoop to gather up the chopped Ingredients.
Place the Chopped Ingredients into the Grinder.
Gather the Red Powder from the Grinder Drawer and place in the Steamer.
Take the Vial, highlighted in Green, and place into the Steam.
Gather the Red Vial and replace in the Distiller.
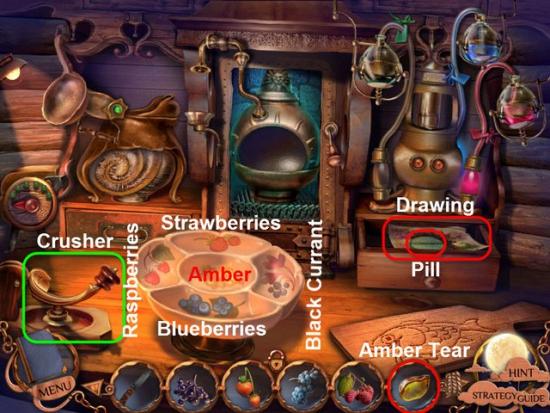
Now place the Raspberries, Strawberries, Blueberries, and Black Currant into the corresponding Sections of the Bowl.
Take the Amber Tear, highlighted in Red, and place it on the Crusher.
Gather the Crushed Amber and place into the Bowl.
After the Bowl comes back Up, use the Ladle to Scoop up the chopped Ingredients.
Place the Ingredients into the Grinder.
Gather the Green Powder and place into the Steamer.
Gather the last Vial and place into the Steam.
Gather the Green Vial and replace it on the Distiller.
After a moment the Distiller Drawer will open.
Gather the Pill and Drawing in the Drawer.
Return to Emily’s Bedroom.
Exit to the Foyer and examine the Drawing Wall.
Place the Tree-house Drawing onto the Drawing Wall.
Head Back one and Left one.
Examine the Photo.
Gather the Factory Key
Examine the Photo once again.
Return to Emily’s Bedroom.
Enter the Drawing.
Climb the Stairs and into the Frozen Land.
Return to the Frozen Campfire.
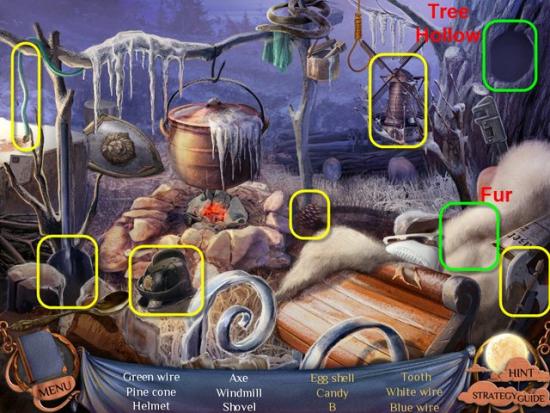
Gather the Hidden Objects highlighted in Yellow.
Examine the Tree Hollow.
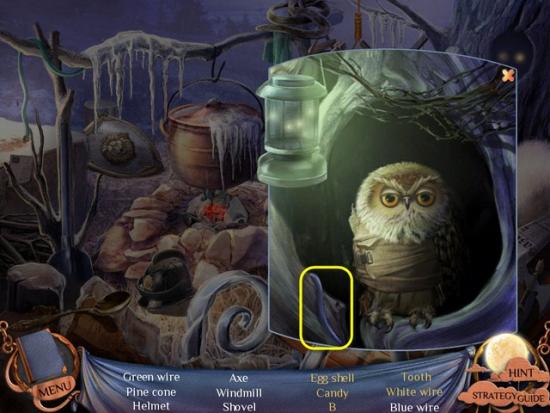
Gather the Blue Wire highlighted in Yellow.
Examine the Fur.
Click the Egg, twice, to crack the Egg.
Gather the remaining Hidden Objects highlighted in Yellow.
Receive a Bundle of Colored Wires.
Head Forward to the Factory Grounds.
Examine the Factory Doors.
Use the Factory Key on the Lock to open the Factory Door.
Enter the Factory.
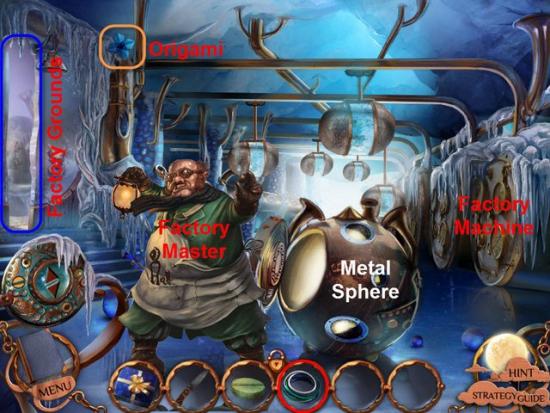
Get the Origami highlighted in Orange.
Give the Pill to the Factory Master.
After the Factory Master takes the Pill; talk to him.
Examine the Metal Sphere.

Gather the Hidden Objects highlighted in Yellow.
Receive the red and Yellow Wires.
Examine the Factory Machine.
Place the Bundle of Wires, Red Wire and the Yellow Wire onto the Device.
Now click to attach each Wire in the order shown on the Gear.
Solution: Red, Yellow, Green, Blue, and White.
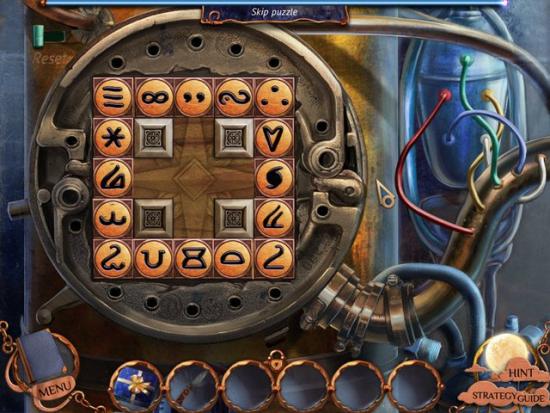
For this Puzzle you need to rearrange the Tiles onto the matching Symbols printed on the Board.
Click and Drag to move the Tiles.
Hint: Start with a corner and work your way around the Board.
Once you solve the Puzzle, the Factory will start working once more.
Talk to the factory Master
Exit the Factory.
Gather the Origami highlighted in Orange.
Head Back two screens to the Frozen Campfire.
Talk to the factory Master once again.
Examine the Presents under the Tree highlighted in Green.
Move the Branch covering the Presents.
Move the Top Present.
Click, twice, to Open the Red Present.
Gather the Sun Drawing in the Red Present.
Gather the Orb highlighted in Red.
Examine the Coat Pocket on the Factory Master.
Click to open the Pocket.
Retrieve the Note in the Pocket.
Gather the Note.
Return to Emily’s Bedroom.
Exit to the Foyer, examine the Drawing Wall.
Place the Sun Drawing.
Head Back one screen and Left one screen.
Examine the Photo.
Return to Emily’s Bedroom.
Enter the Drawing.
Head Right one screen, Up one scree, and Forward 1 Screen through the Atrium.
Examine the Rocks on the Path.
Head to the Golden Door.
Talk to Peter.
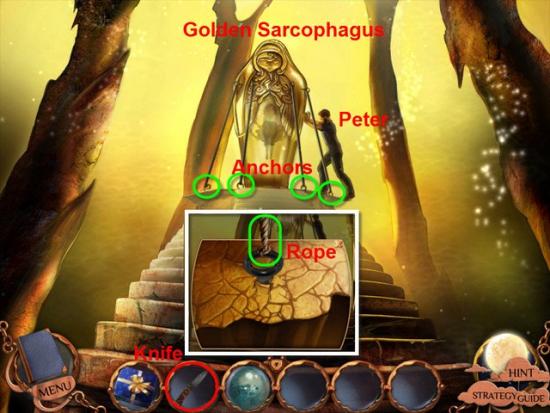
Examine the Golden Sarcophagus.
Examine each of the four Anchors.
Use the Knife, highlighted in Red, to cut each Rope, highlighted in Green.
After the Sarcophagus Lid has moved aside, Examine Emily.
After the Cut-scene, Place the Orb into the Indentation.
After Emily wakes up, talk to her.
Leave the World and return to Emily’s Bedroom.
After the Cut-scene, open the Envelope.
Takle out the Note.
Receive the final Drawing.
Return to the Foyer and examine the Drawing Wall.
Place the final Drawing onto the Wall.
After the Cut-scene, give the Present to Emily.
Talk to Emily.
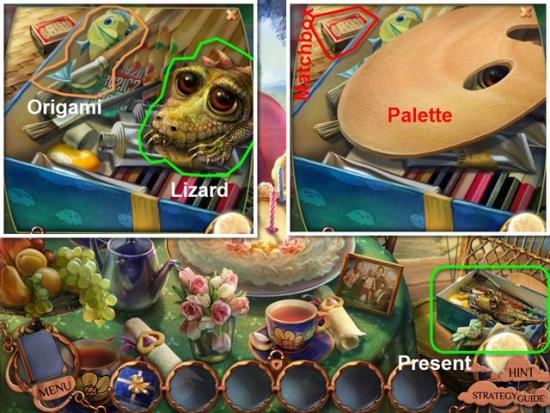
Examine the Present.
Move the Palette.
Gather the Matchbox highlighted in Red.
Examine the Lizard.
Gather the final Origami high in Orange.
Place the Matchbox on the Table.
Take a Match and Light it.
Use the Lit match on the Birthday Candles on the Cake.
Examine the Birthday Cake.
Congratulations you have completed the Nightmare Realm Game, or have you. If you have the Collector’s Edition and have collected all 33 Origami you now have access to all the Extra’s. Which includes another three Areas to explore.
From the Main Menu choose Extras.
Here you will find several extras.
Click the large Play at top of the screen.
These extra level will follow Peter’s adventures after he drowns.
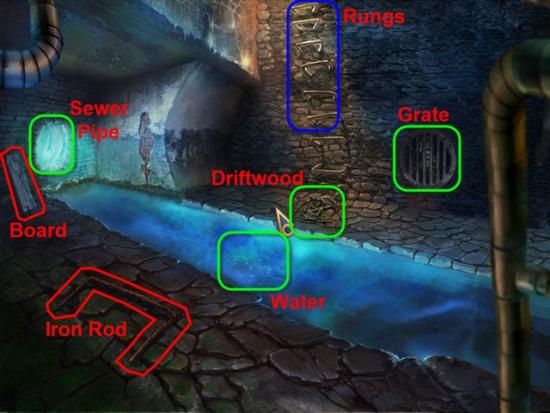
Gather the Iron Step and Board highlighted in Red.
Examine the Water.
Examine the Sewer Pipe.
Gather the second Iron Rung highlighted in Red.
Examine the Backpack highlighted in Green.
Place the Board across the Water.
Examine the Driftwood.
Gather the third Iron Step.
Move the Branches.
Gather the Wrench.
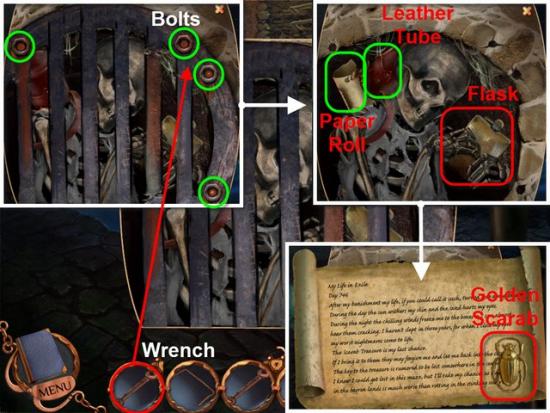
Examine the Grate.
Use the Wrench, highlighted in Red, to remove the four Bolts, highlighted in Green.
Gather the Flask.
Click to open the Leather Tube.
Examine the Paper inside.
Click the Paper Roll to untie the Paper.
Read the Note.
Gather the Golden Scarab highlighted in Red.
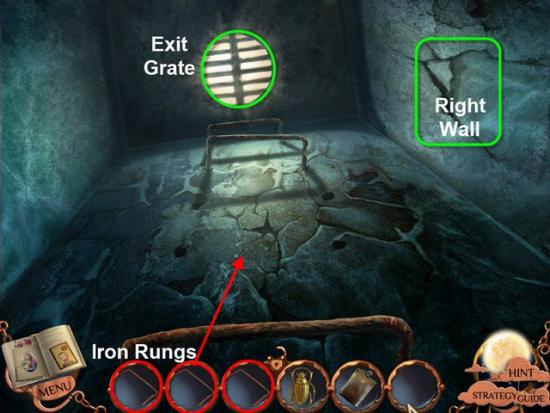
Climb the Rungs up the Wall.
Place the three Iron Rungs, highlighted in Red, into the empty spots on the Wall.
Examine the Right Wall highlighted in Green.
Click the Exit Grate above you.

Gather the Rock highlighted in Red.
Examine the Grate on the Floor.
Use the Rock on the Loose Bar in the Grate.
Gather the Loose Bar.
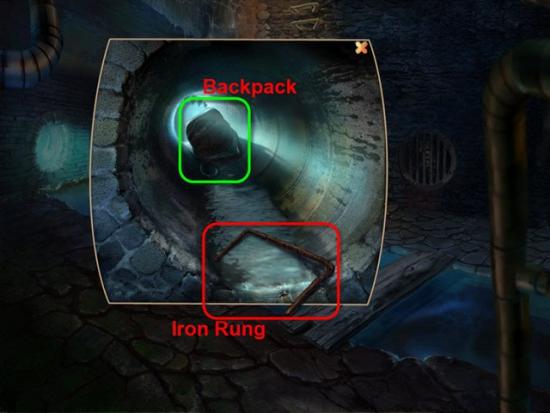
Examine the Sewer Pipe.
Use the Loose Bar to retrieve the Backpack.
Gather the Matches from the Backpack.
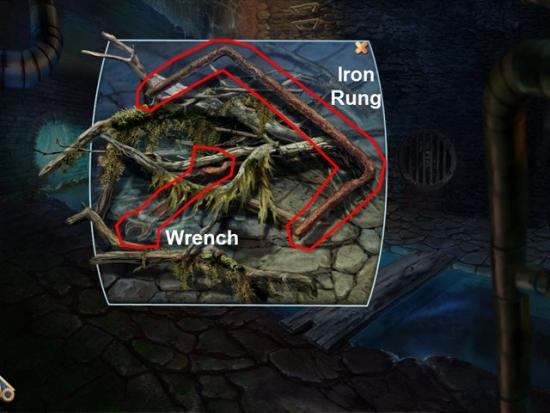
Examine the Driftwood at the base of the Rungs, once more.
Use the Flask on the Branches.
Then, use the Matches on the Driftwood.
Finally, climb the Rungs, again, and click to open the Exit Grate.
Exit through the Exit Grate.
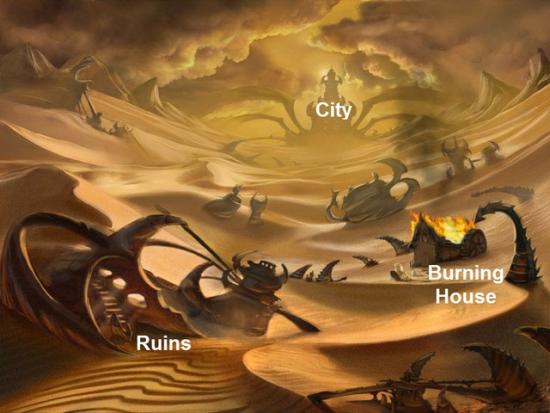
Head toward the Burning House.
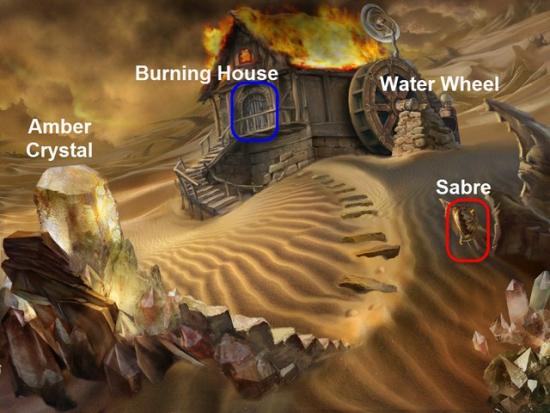
Gather the Sabre highlighted in Red.
Examine the Amber Crystal.
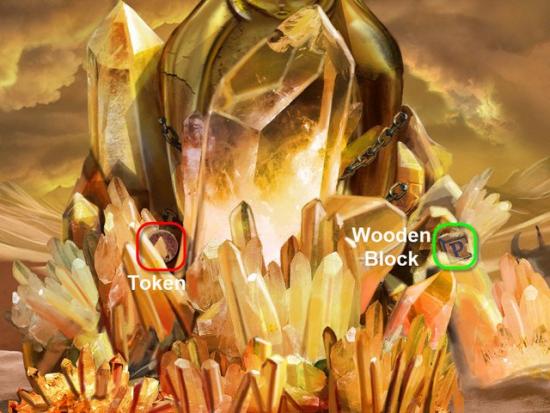
Gather the Token highlighted in Red.
Examine the Wooden Block highlighted in Green.
Head Back one screen.
Next, enter the Burning House.
After talking with the Witch, head Back one screen.
Move Forward to the Water Wheel.
Use the Sabre to cut the Brambles.
Gather the Shovel.
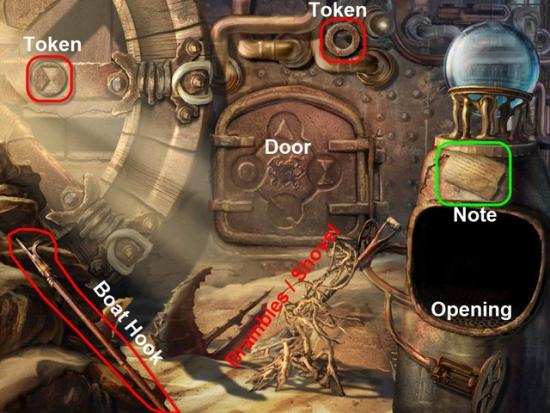
Gather the Boat Hook and the two Tokens highlighted in Red.
Examine the Note highlighted in Green.
Return to the Sewer.
Examine the Water.
Use the Boat Hook to retrieve the Wooden Box.
Use the Sabre to pry open the Wooden Box.
Gather the Switch from inside the Wooden Box.
Climb back out of the Sewer and head to the Ruins.
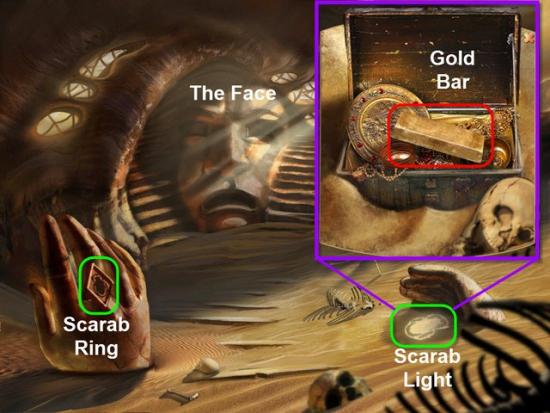
Place the Golden Scarab into the Ring highlighted in Green.
Next, use the Shovel, twice, on the Scarab Light.
Open the Chest and Examine the contents.
Gather the Gold Bar.
Head Back one screen and return to the Water Wheel.
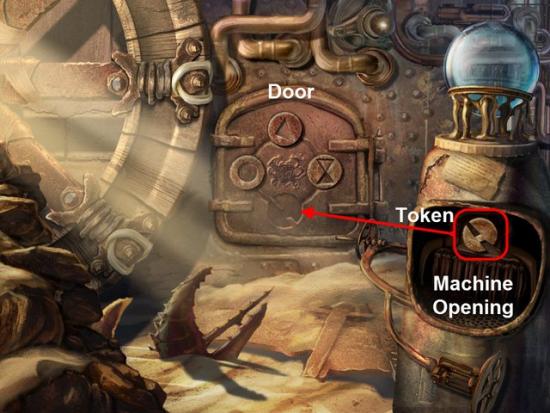
Place the Gold Bar into the Opening of the Machine.
Gather the fourth Token.
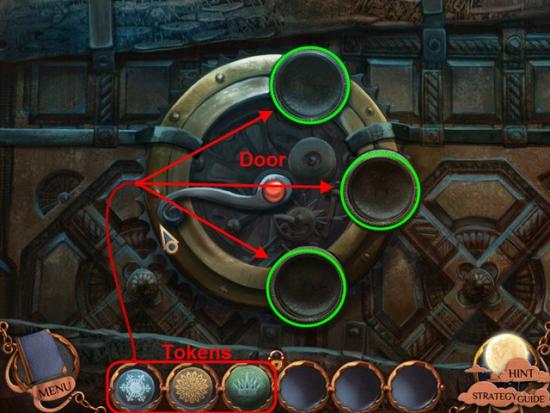
Place all four Tokens into the Door as shown.
After the Door opens, examine the Panel behind the Door.
Attach the Handle to the Panel, on the Right.
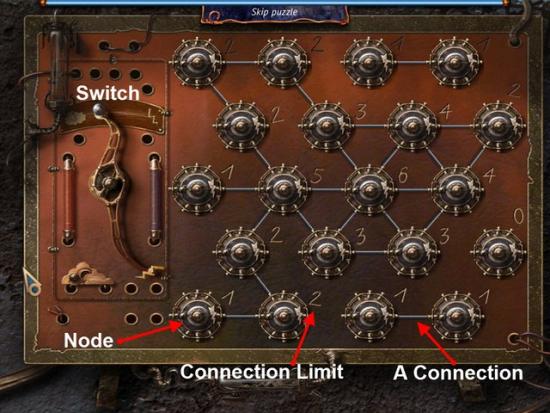
For this Puzzle you need to connect the Nodes, so each Node has only the number of Connections noted next to each Node.
Nodes have eight potential Connections each.
Click between a pair of Nodes to set a Connections between two Node.
Once all the Nodes have the correct number of Connections, click to turn the Handle.
See Image above for Solution to the Puzzle.
Head Back one screen.
Examine the Golden Puddle in the middle of the screen.
Return to the Burning House, no longer Burning. Will refer to it as the Witch’s House from here on in.
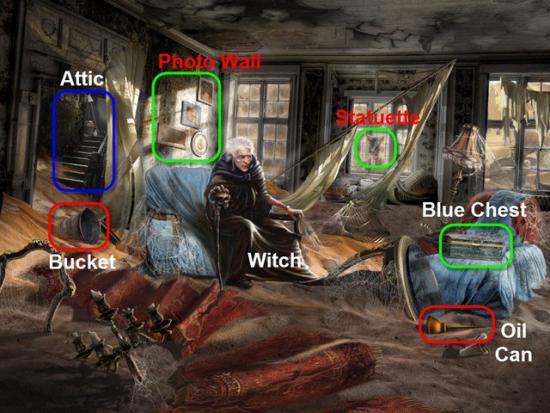
Gather the Bucket and Oil Can highlighted in Red.
Examine the Blue Chest.
Read the Note laying in front of the Blue Chest.
Examine the Statuette.
Examine the Photo Wall.
Examine the Note tucked behind the Lower Left Painting, around the top of the Frame..
Climb the Stairs to the Attic.
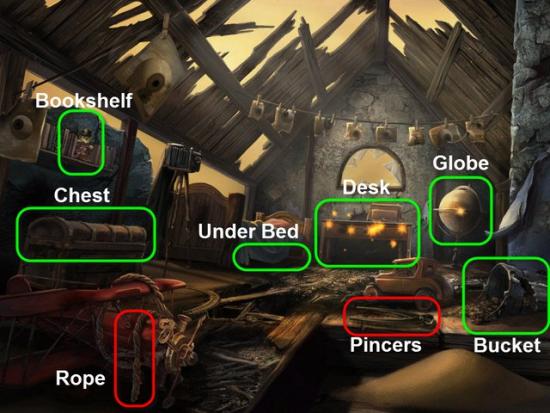
Gather the Rope and Pincers highlighted in Red.
Head Back two Screens.
Examine the Amber Crystal.
Use the Pincers to gather the Wooden Block.
Return to the Attic.
Examine the Bucket.
Gather the Wooden Block.
Examine the Note.
Examine Under the Bed.
Gather the Wooden Block.
Examine the Loose Plank.
Examine the Desk.
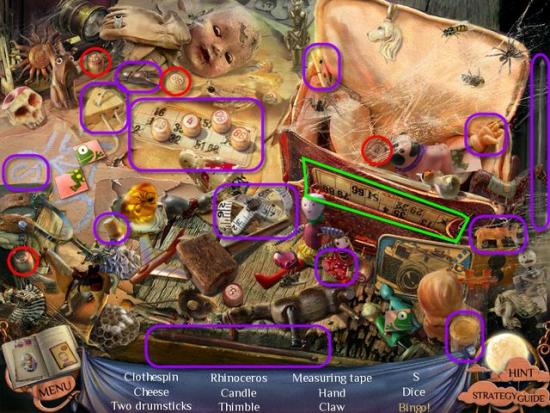
Click on the Bingo Card, highlighted in Green, to bring it out.
Next, gather the four Bingo Blocks, highlighted in Red, and place them on the Bingo Card.
Gather the Bingo and remaining Hidden Objects highlighted in Purple.
Receive the Drumsticks.
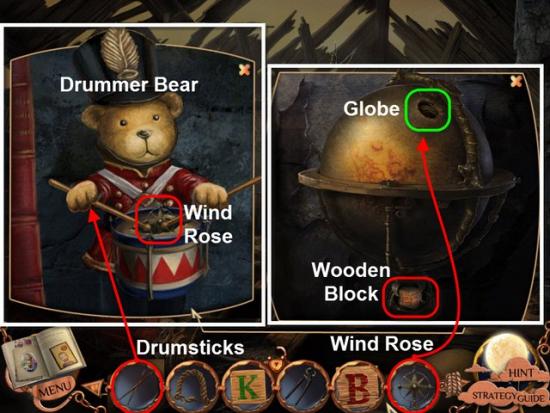
Examine the Bookshelf.
Give the Drumsticks to the Drummer Bear.
Gather the Wind Rose.
Examine the Globe.
Place the Wind Rose into the depression in the Globe.
Gather the Wooden Block.
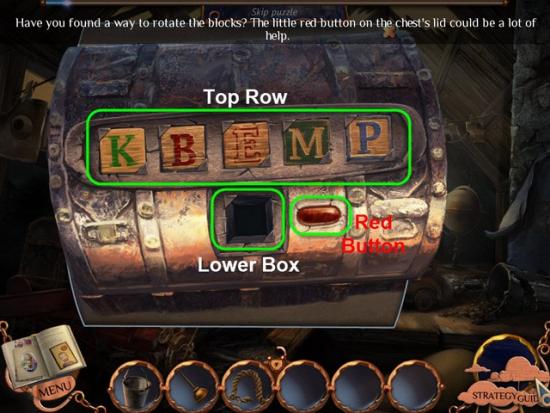
Examine the Chest.
Place the four Blocks into the Top Row of Holes in the Chest.
For this Puzzle you need to solve the Word Scramble to open the Chest.
You have five Blocks.
The fourth Block, the “M”, can not be moved.
Click on a Block from the Top Row to move it to the Lower Box.
Here you can click on the Red Button to rotate the Block and show possible Letter combinations.
While you have a Block in the Lower Box, you can click on a Block and move it to an Empty Spot.
When you remove the Lower Block it will fill whichever slots is empty.
This will allow you to move the Blocks into the correct order.
Solution: The Word is “TOMMY”.
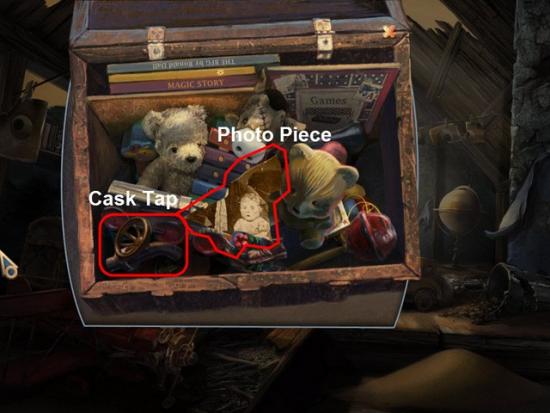
After the Chest opens, gather the Photo Piece and Cask Tap highlighted in Red.
Return Downstairs and Examine the Photo Wall.
Place the Photo Piece into the Top Left Photo.
Examine the Photo.
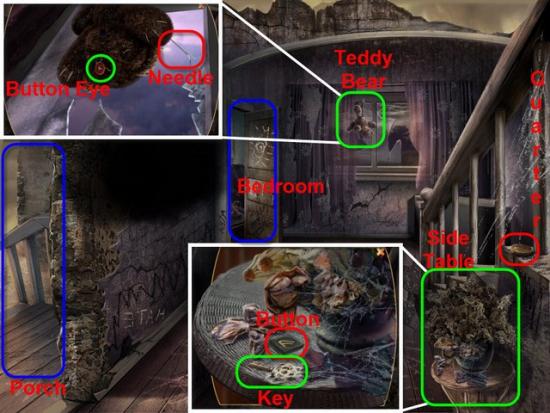
Gather the Quarter, highlighted in Red, off the Staircase.
Examine the Side Table highlighted in Green.
Gather the Button.
Examine the Key.
Examine the Teddy Bear.
Gather the Needle and Thread.
Sew the Loose Button Eye on.
Head to the Porch.
Talk to Emily.
Examine the Machine.
Head Back one screen.
Enter the Bedroom.
Examine the Bed Side Table.
Open the Door.
Examine the Tablet inside.
Place the Button into the Lower Right Corner.
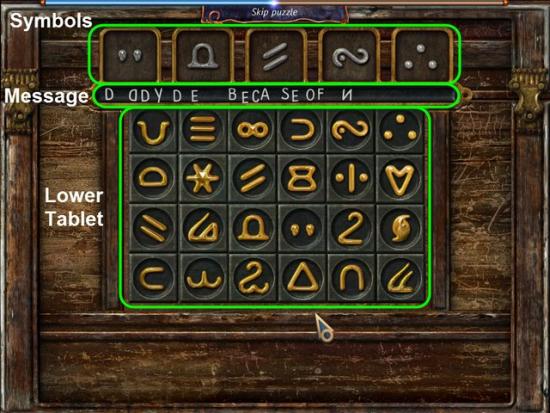
This Puzzle is pretty simple one.
Five Symbols will appear at the Top of the Tablet.
Just click on the five symbols on the Lower Section of the Tablet.
You will be presented with four sets of Symbols.
They will spell out a Message.
After you complete the Message, three Crayons will come up.
Gather one of the Crayons and return to the Porch.
Give the Crayon to Emily.
Examine the Photo Wall.
Examine the Upper Left Photo, it is now complete.
Head Back two screens.
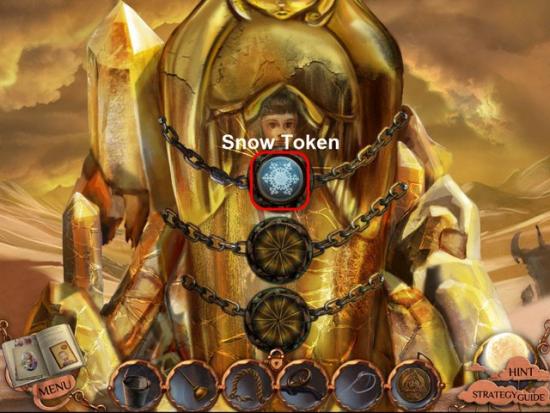
Examine the Amber Crystal.
Gather the Snow Token highlighted in Red.
Return to the Attic.
Examine the Desk, once again.
Gather the two Puzzle Pieces highlighted in Red and place on the Puzzle highlighted in Green.
Gather the Frog Puzzle highlighted in Green.
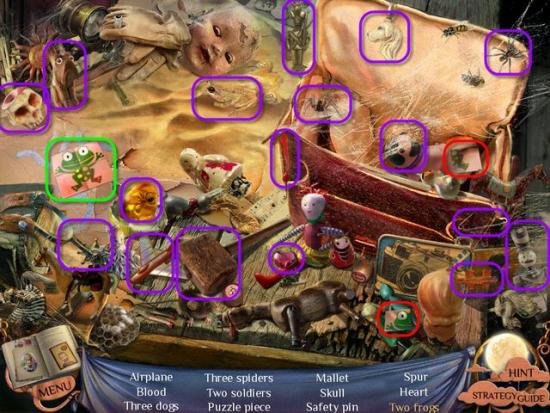
Gather the remaining Hidden Objects highlighted in Purple.
Receive the Mallet.
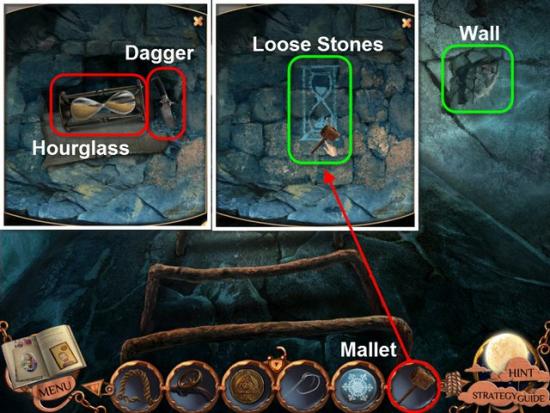
Return to the Sewer Rungs.
Examine the Wall on he Right.
Use the Mallet, highlighted in Red, on the Loose Stones marked with an Hourglass.
Gather the Dagger.
Unwrap the Cloth Package.
Gather the Hourglass
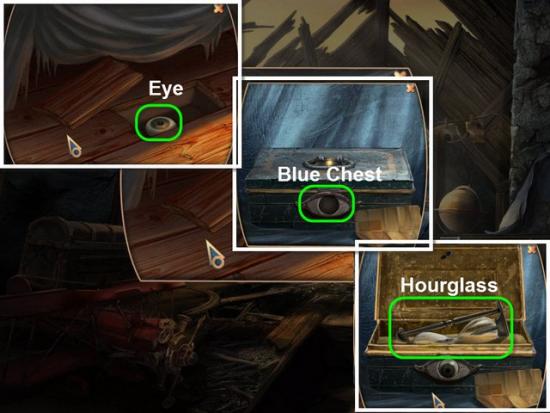
Return to the Attic.
Examine under the Bed.
Use the Dagger to pull up the Loose Plank.
Gather the Eye.
Head Back Downstairs.
Examine the Blue Chest.
Place the Eye in the Lock.
Gather the Hourglass inside.
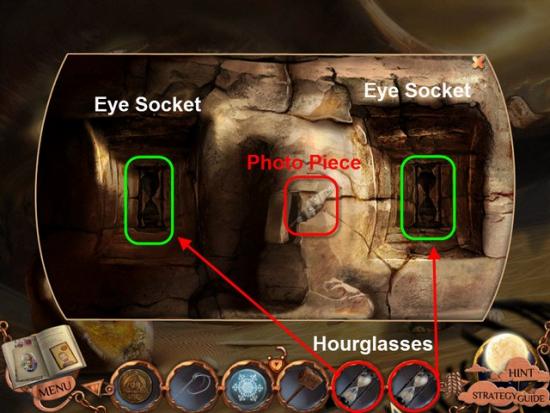
Return to the Ruins.
Examine The Face.
Place the two Hourglasses into the Eye Sockets of The Face.
Return to the Witch’s House.
Examine the Photo Wall.
Place the Photo Piece into the Lower Left Photo.
Head to the Porch.
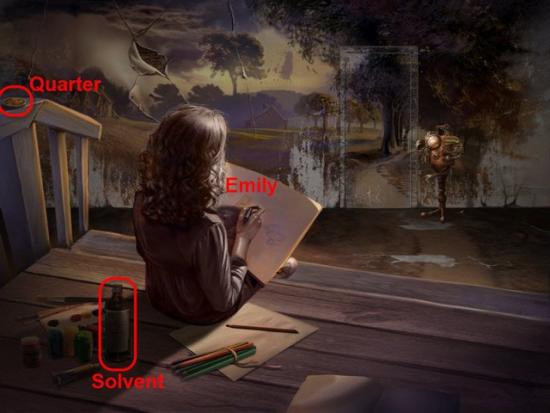
Gather the Quarter and Solvent highlighted in Red.
Talk to Emily.
Head Back one screen.
Examine the Table.
Use the Solvent on the Key.
Gather the Key.
Enter Bedroom.
Examine the Bedside Table.
Examine the Tablet, once again.

Insert the Key into the Keyhole on the Tablet.
Symbols will start crossing the Screen on either side of the Board and across the Top.
As the Symbols appear press the corresponding Symbol on the Board.
Once you have correctly entered 10 Symbols, before they roll out of view, you will complete the Puzzle.
Tip: Take your time, The Symbols can be pressed at any time as long as they are still visible. Clicking a wrong Symbol has no adverse affect. Nor will missing a Symbol reset the Lights.
Once you solve the Puzzle, a Chalkboard will be shown. Gather the Crayon Color it asks for.
Return to the Porch and give the Crayon to Emily.
You will receive a Picture Square.
Return to the Bedroom and examine the Wall.
Place the Picture Square into the empty spot.
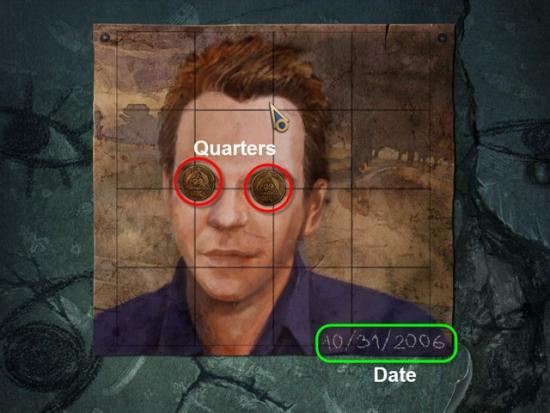
Rotate the Picture Pieces to form the completed Picture.
Click on a Picture Piece to rotate it clock-wise.
Once the Picture is complete, gather the two Quarters over the Eyes.
Examine the Date highlighted in Green.
Head Back two screens and return to the Porch.
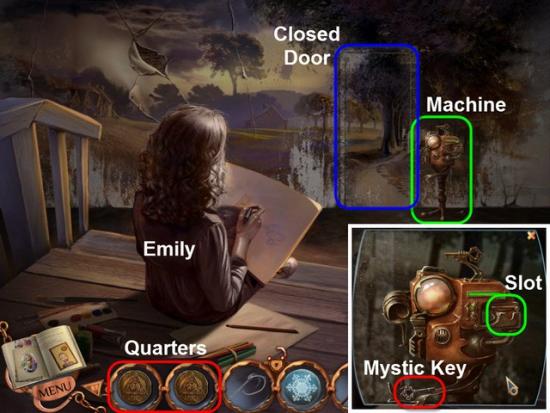
Examine the Machine near the Closed Door.
Insert the four Quarters into the Slot.
Gather the Mystic Key.
Use the Mystic Key to unlock the Closed Door.
Enter through the Door.
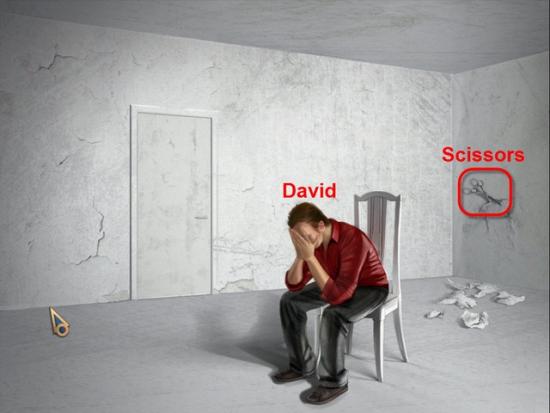
Gather the Scissors highlighted in Red.
Talk to David.
Examine the Photo Wall.
Examine the Left Lower Photo.
Head Back two screens.
Examine the Melted Sand.
Gather the Reflector.
Examine the Amber Crystal.
Gather the Flower Token.
Head Back two screens.
Head to the Ruins.
Head to The Face.
Enter the Mouth.
Examine the Statue Head on the Left highlighted in Green.
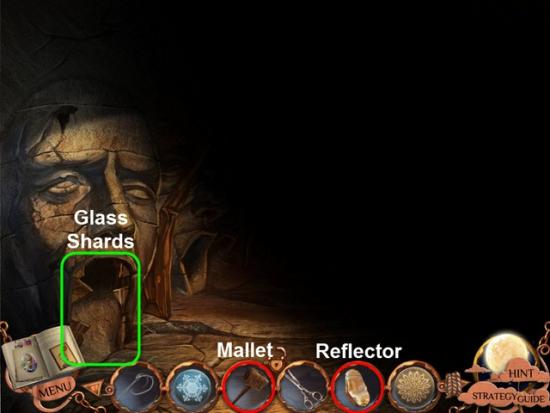
Use the Mallet to knock out the Glass Shards.
Place the Reflector in the Mouth of the Statue.
Examine the Statue Head on the Right.
Head Forward down the Tunnel, to the Back Room.
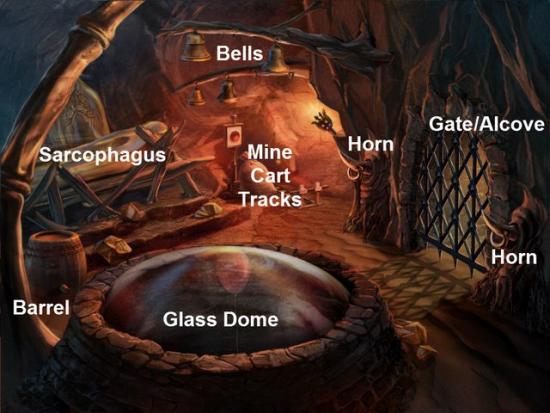
Examine the Sarcophagus.

Examine the Wooden Barrel.
Use the Cask Tap on the Cork.
Now use the Bucket on the Cask Tap.
Receive the Filled Bucket.
Examine the Min Cart Tracks.
Gather the Sack highlighted in Red.
Use the Oik Can on the Lever.
Pull the Lever.
When the Cart arrives, gather the Bell.
Attach the Rope to one of the Horns.
Attach the Sack to the Rope.
Place the Full Bucket on the other Horn.
Examine the Alcove.
Gather the two Fish, highlighted in Red, on the Hooks, highlighted in Green
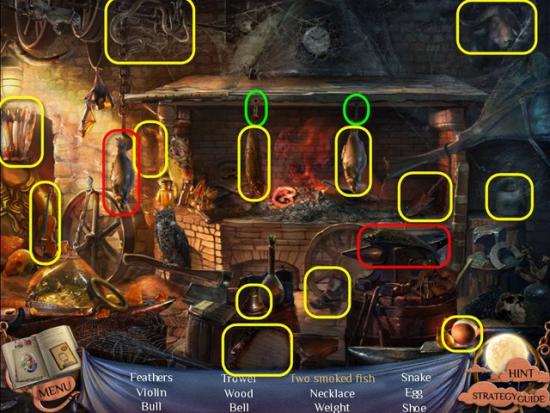
Gather the Hidden Objects highlighted in Yellow.
Receive the Bell.
Move the Barrel and place under the Branch of Bells.
Examine the Bells.
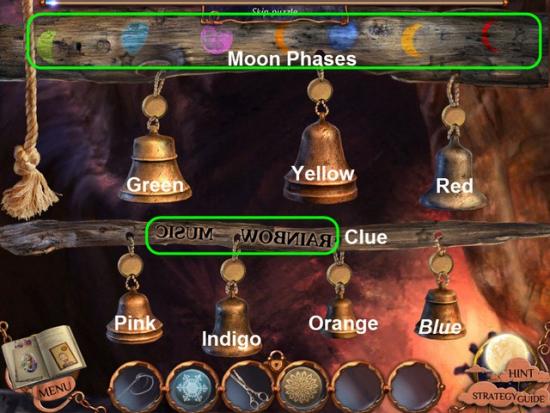
Place the three Bells into the Empty Spots on the Branches.
To solve this Puzzle you need to play the Bells in the correct order.
Note the Phases of the Moon on the Top Branch.
Click on each Phase of the Moon for information on the Phase and its Color.
Note the Clue on the Lower Branch.
Click on each Bell to see the Color of the Bell.
The Key to solving this Puzzle is to play the Phases of the Moon backward.
Note: The Bell colors from Left to Right and from Top to Bottom are:
• Green, Yellow, Red
• Pink, Indigo, Orange, Blue
Solution: Play the Bells in the following order: Pink, Blue, Indigo, Green, Yellow, Orange, Red.
Gather the Photo Piece,
Return to the Witch’s House.
Examine the Photo Wall.
Place the Photo Piece into the Upper Right Photo.
Examine the Eye Photo.
Read the Note.
Head to the Bedroom.
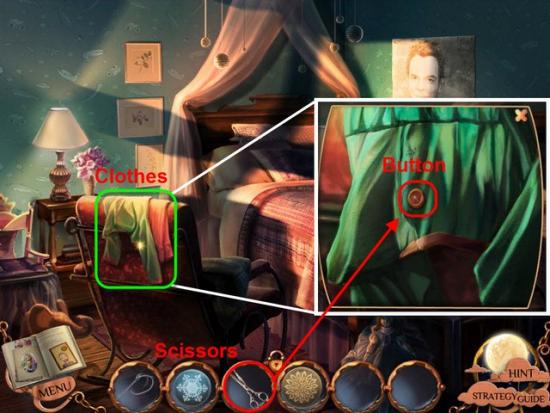
Examine the Clothes highlighted in Green.
Use the Scissors to cut off the Button.
Receive the Button
Head Back to the Foyer.
Examine the Teddy Bear.
Sew the Button onto the Missing Eye.
Examine the Wall where the Black Smoke used to be.
Remove the Wallpaper Pieces from the Wall.
Using the Arrows, change the Date to match the date on the Photo you fixed earlier, from the Bedroom.
Solution: October, 31, 2006
Grab the Teddy Bear off the Window Sill.
Head to the Porch.
Talk to Emily.
Give the Teddy Bear to Emily.
Gather the Letter that Emily hands you.
Head Forward.
Give the Letter to David.
Examine the Photo Wall.
Examine the Upper Right Photo.
Head Back two screens.
Examine the Amber Crystal.
Gather the Crown Token.
Examine the Sarcophagus.
Return to the House.
Talk to Mary, the former Witch.
Receive the Handle.
Head back to the Ruins.
Enter the Mouth of The Face.
Head Forward to the Back Room.
Examine the Back Wall behind where the Sarcophagus used to sit.
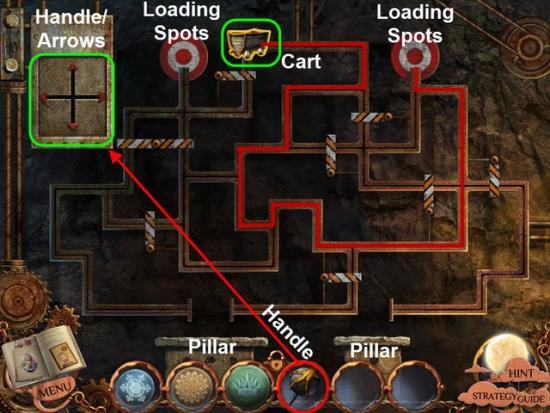
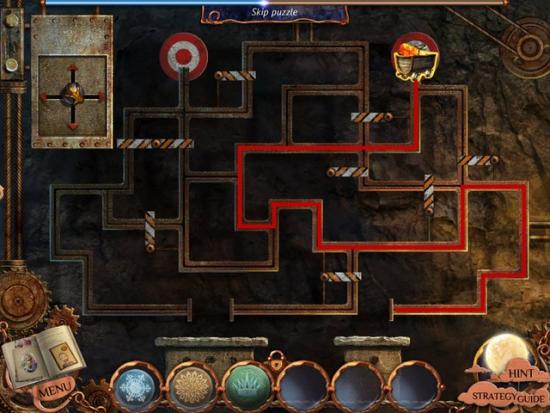
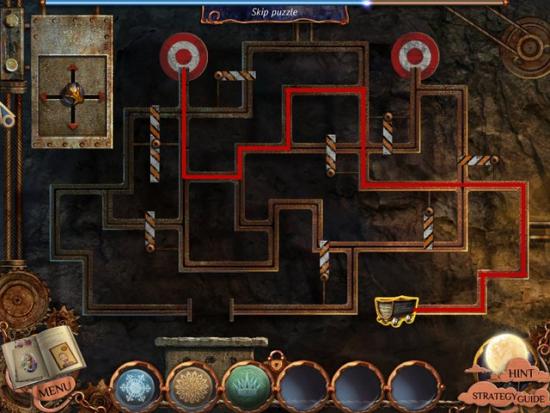
Place the Handle into the Mechanism.
To solve this Puzzle, use the Handle and Arrows to move the Ore Cart around the Tracks, gathering the Gold, and place on the Stone Pillars at the bottom of the Tracks.
Solution: For each Trip the Path you need to follow, is highlighted in Red.

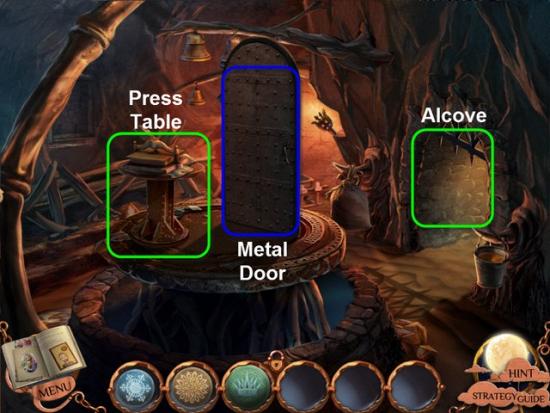
Examine the Press Table.
Examine the two Notes highlighted in Red.
Head Back one screen.
Examine the Alcove.
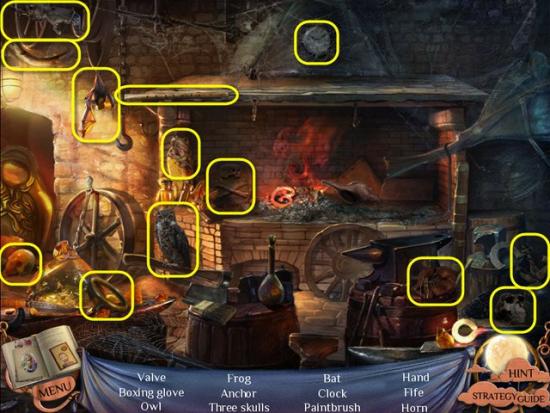
Gather the Hidden Objects highlighted in Yellow.
Receive the Valve.
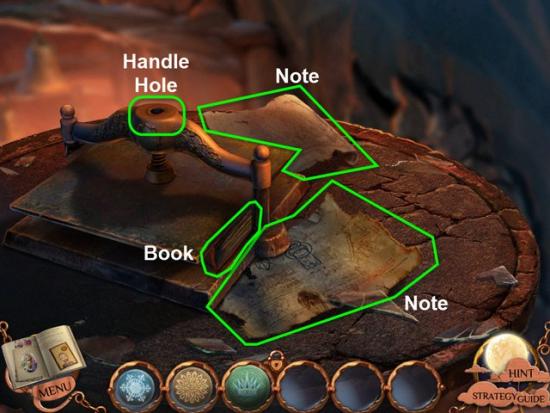
Examine the Press Table.
Place the Valve into the Handle Hole.
Remove the Book from the Press.
Open the Book.
Gather the Statuette Base inside the Book.
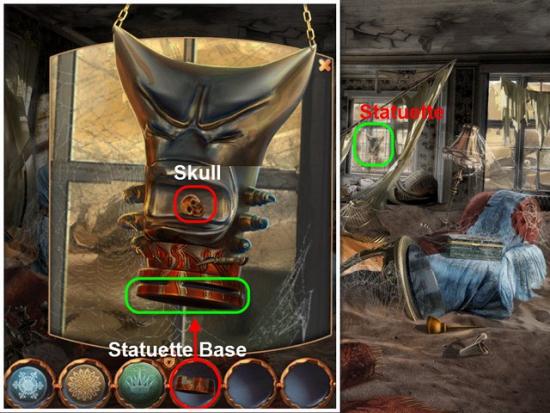
Return to the House.
Examine the Statuette.
Place the Base onto the Statuette.
Gather the Skull from the Open Mouth of the Statuette.
Return to the Ruins.
Enter The Face,
Examine the Skull on the Right.
Place the Brown Skull into the small Depression in the center of the Lower Board.
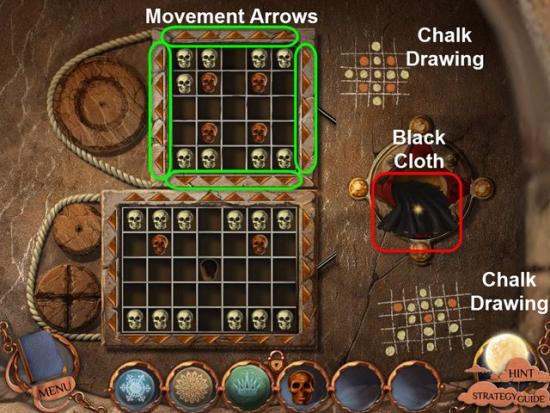
To solve this Puzzle you need to arrange the Skulls to match the Chalk Drawings beside each Board.
The Brown Skulls do not move and are already in the correct Position.
Use the Arrows around each Board to move the Rows and Columns of Skull.
Once you have solved the Puzzle, a Black Cloth will appear on the Right side of the Board.
Gather the Black Cloth.
Return to the Back Room.
Use the Black Cloth on the Metal Door.
Head forward to the Door at the end of the Hallway.
Place the three Tokens, highlighted in Red, into the Door, highlighted in Green.
Open the Gold Door.
Enter through the Gold Door.
Examine the Sarcophagus.
Click on the Sarcophagus.
Congratulations you have completed all the Levels in the Nightmare Realm.
