- Wondering how to get Monopoly GO! free rolls? Well, you’ve come to the right place. In this guide, we provide you with a bunch of tips and tricks to get some free rolls for the hit new mobile game. We’ll …
Best Roblox Horror Games to Play Right Now – Updated Weekly
By Adele Wilson
Our Best Roblox Horror Games guide features the scariest and most creative experiences to play right now on the platform!The BEST Roblox Games of The Week – Games You Need To Play!
By Sho Roberts
Our feature shares our pick for the Best Roblox Games of the week! With our feature, we guarantee you'll find something new to play!All Grades in Type Soul – Each Race Explained
By Adele Wilson
Our All Grades in Type Soul guide lists every grade in the game for all races, including how to increase your grade quickly!
Nightmare on the Pacific Walkthrough
Welcome to the Nightmare on the Pacific walkthrough on Gamezebo. Nightmare on the Pacific is a hidden object adventure game played on the PC created by Gogii Games. This walkthrough includes tips and tricks, helpful hints, and a strategy guide for how to complete Nightmare on the Pacific.
Nightmare on the Pacific – Game Introduction
Welcome to the Nightmare on the Pacific walkthrough on Gamezebo. Nightmare on the Pacific is a hidden object adventure game played on the PC created by Gogii Games. This walkthrough includes tips and tricks, helpful hints, and a strategy guide for how to complete Nightmare on the Pacific.
General Tips
- Available from the main menu is premium content: The Prequel. This will allow you to play through the events prior to the main gameplay. The guide section for The Prequel can be found after the main guide portion of the game below.
- Premium content Alternate Ending can be unlocked from the main menu.
- Throughout the game, various “Collector’s Rank” objects will be hidden. Collect these to boost your Collector’s Rank. These objects are circled in blue in the guide below.
- Tasks or objects in the game are circled in red below: locations you should move to, or things you should take note of, are squared in red.
- Inventory items are always visible at the bottom of the screen during the main gameplay. Once an item is finished being used, it will disappear from the inventory items. Inventory items are capitalized in the guide below.
- An in-game diary can be accessed at the upper right-hand corner of the screen. From here you can keep track of in-game events, as well as keep track of your location: a map can be accessed from here, showing you where you’ve been, where you are, and where you should probably go next.
- Hints are only available during hidden object scenes. After using a hint, it will take a short while to recharge.
- Hidden objects aren’t randomized: they’re all circled in the guide below.
- The guide below is divided into chapters according to in-game goals. Locations use the same names as the map in the game.
- If you find yourself stuck at any point in time, look for objects or locations that are sparkling: these are things you should take note of, and will need to interact with in some way to continue.
- Game options can be accessed from the main menu.
Chapter 1: Jimmy
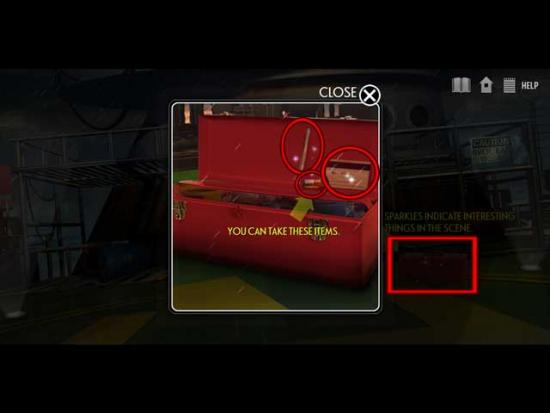
- You’ll begin the game on the deck of the ship. There’s a blue door in front of you, and a red toolbox to the right. Click on the red toolbox for a closer view.
- Click on the toolbox to open it, then collect the Control Light, Card, and Tweezers from within to add them to your inventory.

- Enter the ship through the blue door straight ahead.
Stairs
- Immediately notice the yellow control box on the stair railing, as well as the red locker in the background.
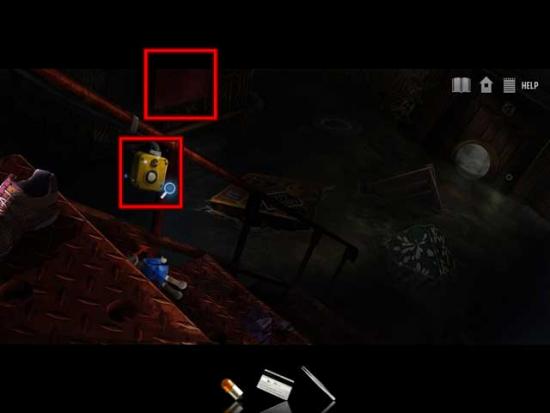
- Click on the yellow control box for a closer view. Use the Control Light from your inventory on the broken one to replace it, then click on the switch to restore light to the room.
- Now, take a closer look at that red locker: use the Card on the left edge to open it, then collect the Pipe and the Door Handle to add them to your inventory.
- Now look at the door on the right through which the light is coming for a closer view.
- Use the Door Handle on the hole in the door to restore it to working order.
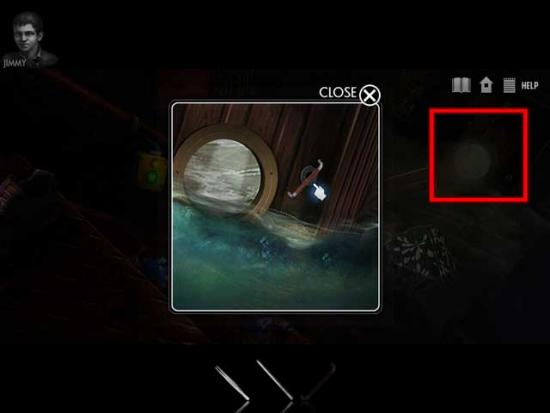
- Click on the door to open it and proceed into the next room.
Corridor
- Take a closer look at the barred doorway on the far side of the room.
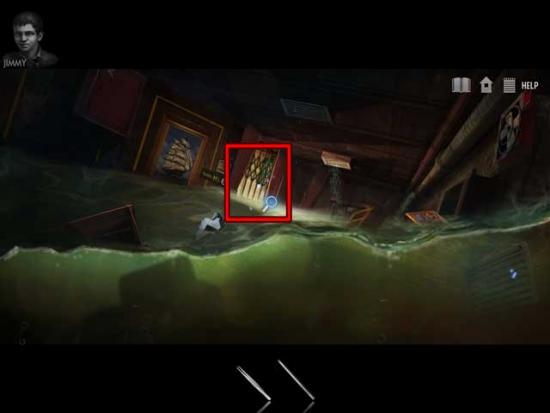
- Use the Pipe on the bars to bend them apart and gain access into the next part of the Corridor.
- Take a closer look at the far doorway with the green edges: you’ll enter a close-up revealing the location of Jimmy.
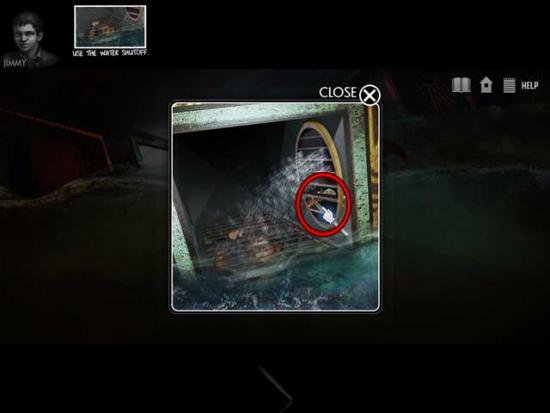
- Use the Tweezers on the grate to recover the Keys and add them to your inventory.
- Return to the Stairs.
Stairs
- Take a closer look at the suitcase floating in the water. Use the Keys on the locks to open them and gain access inside the suitcase. You will then enter a hidden object scene.
- Find all the items listed at the top of the screen; their locations are shown below:
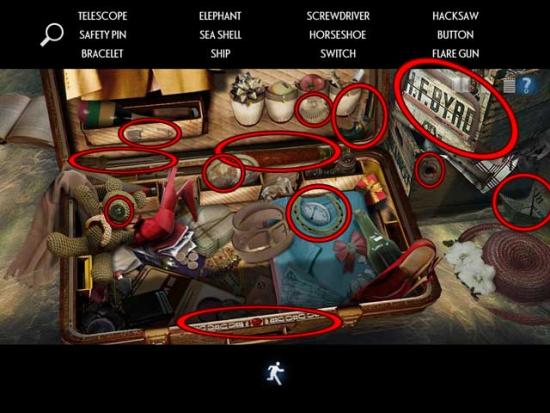
- Upon completing the hidden object scene, the Screwdriver, Hacksaw, Switch, and Flare Gun will be added to your inventory.
- Return to the Corridor.
Corridor
- Back in the first portion of the Corridor, take a closer look at the grate floating underwater on the right.
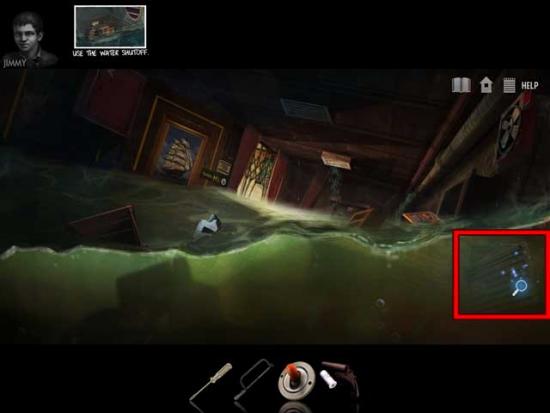
- Use the Screwdriver on the red screw in the upper right-hand corner, then reassemble the broken control wheel. The solution is shown below:
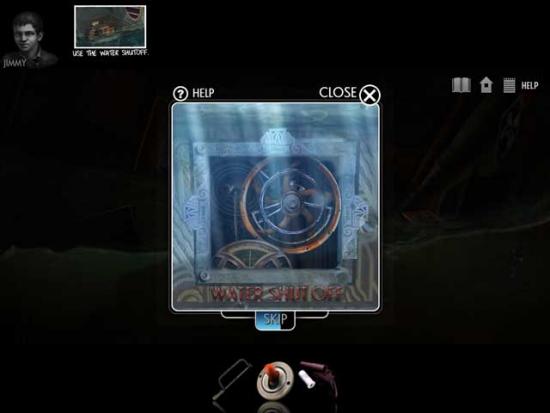
- Proceed to the second part of the Corridor, and take a closer look at Jimmy’s previous location: fixing the control wheel seemed to have fixed the water flow, but dropped Jimmy down the Ventilation Shaft. Click on the Shaft to follow him.
Chapter 2: The Pool
Pool
- Jimmy has survived the fall in one piece, however his leg is now stuck in the Pool. You’ll need to track down someone who can help you free him.
- Before you do anything in this area, pick up the Book on the left: this is the first of several family possessions you can collect throughout the course of the game for increased Collector’s Rank.
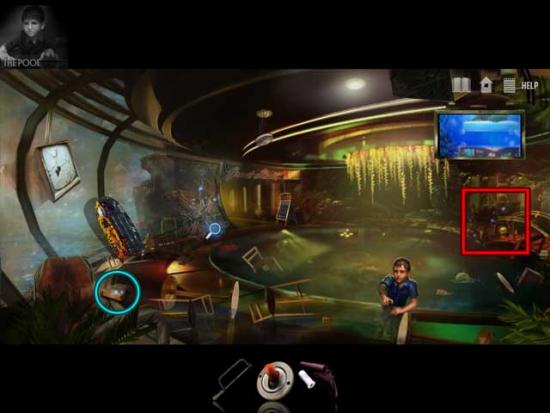
- Click on the sparkling area on the right to enter a hidden object scene.
- Find all the items listed at the top of the screen; their locations are shown below:
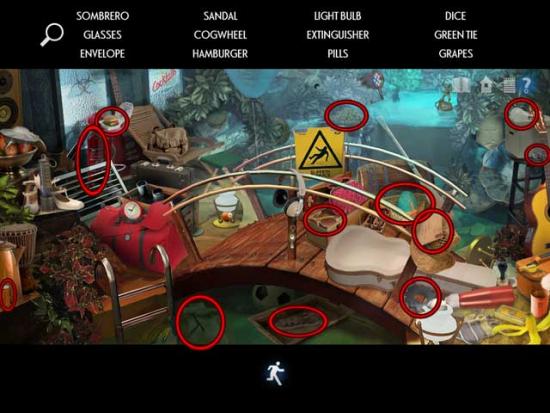
- Upon completing the hidden object scene, the Cogwheel and the Extinguisher will be added to your inventory.
- Proceed towards the back end of the room, beneath the sign reading “Great Hall”.
Hallway
- Use the Fire Extinguisher on the flames in front of your cabin until they’re all put out. While you’re here, don’t forget to also pick up the Stuffed Panda to acquire Collector’s Rank 2.
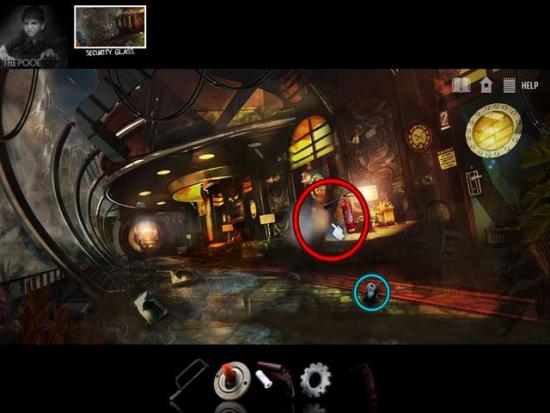
- Continue to the far end of the Hallway and into the Dining Hall.
Dining Hall
- A Steward of the ship is trapped beneath a chandelier, and begs you to help. Click on the switch on the left to activate the sprinkler system and douse the flames, then the switch on the right to activate the fans and clear the smoke.
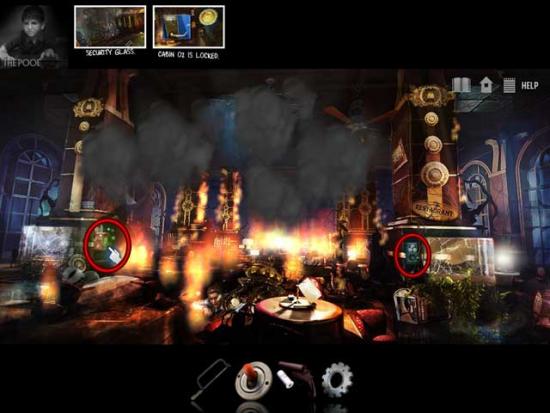
- There’s nothing more you can do for the Steward at the moment, so exit back to the Hallway.
Hallway
- Upon entering the Hallway, a portion of the ceiling will collapse, blocking entry back into the Dining Hall. However, a hidden object scene will also appear over the rubble. Click on it.
- Find all the items listed at the top of the screen; their locations are shown below:
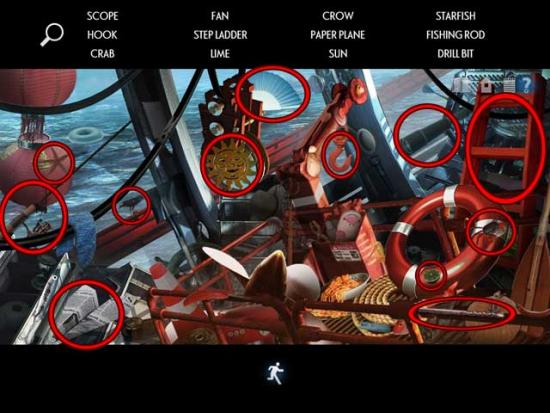
- Upon completing the hidden object scene, the Step Ladder will be added to your inventory.
- Use the Step Ladder in front of your cabin door to gain access to the grate above.
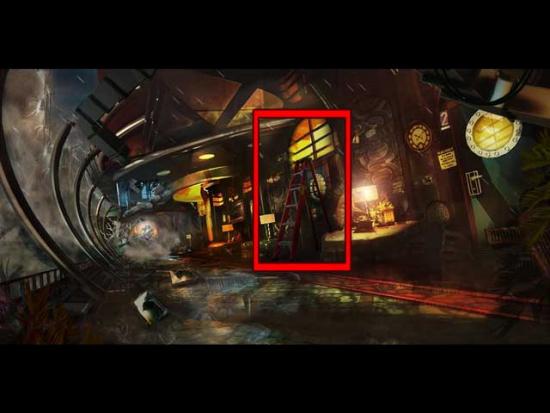
- Use the Hacksaw on the grate bars to remove them all and gain access into the cabin.
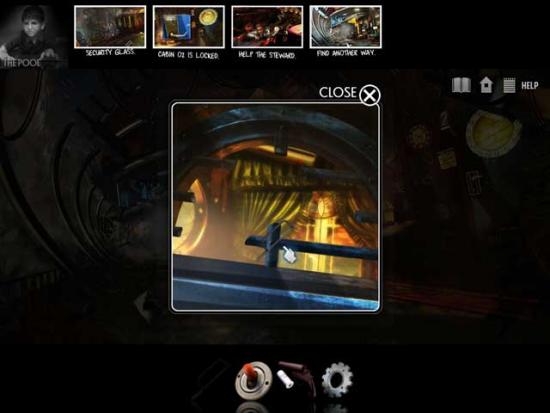
Our Cabin
- Immediately notice the glass doors at the far end of the room: they can’t be opened just yet. Pick up the Toy Truck to obtain Collector’s Rank 3, then proceed through the door on the right.
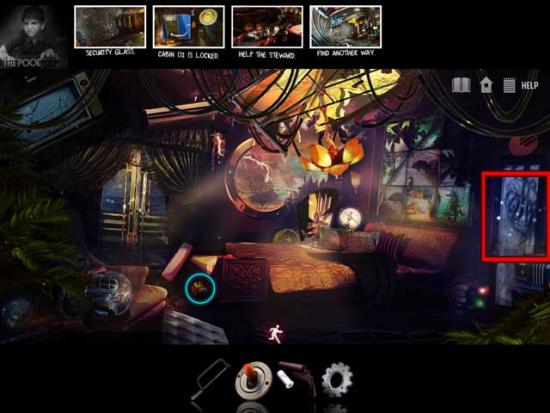
Bathroom
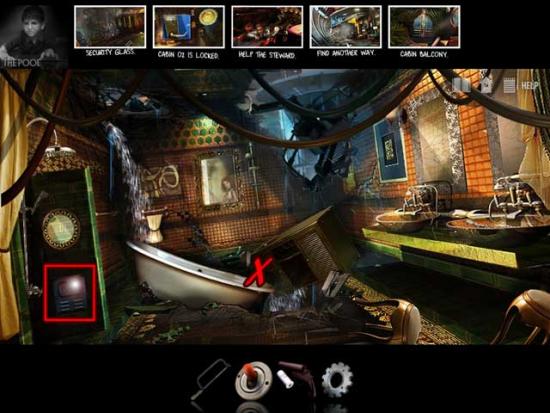
- There’s a hole in the middle of the floor here, but there’s debris blocking the way. Click on the debris several times until it falls through and clears the hole. The water’s running too fast however, so click the control panel on the left to address the problem.
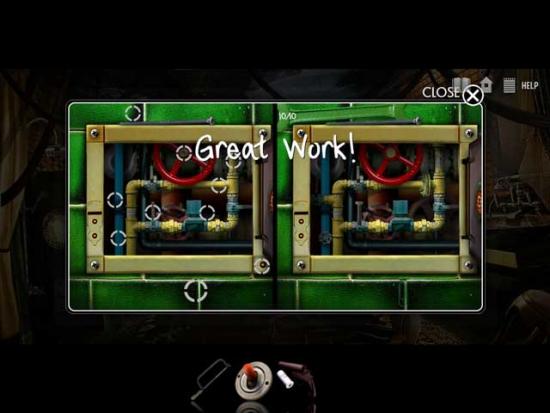
- Find the 10 differences between the two pictures: the solution is shown below:
- Now before you go down through the hole, use the Hacksaw on the jagged edges of debris to remove them, and don’t forget to collect the Bathroom Kit to obtain Collector’s Rank 4.
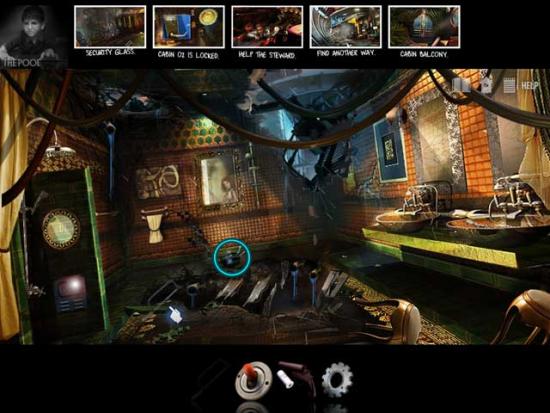
- Go down through the hole in the floor to reach the next area.
Corridor (w/Hole)
- There’s a Charger on the left wall, however there’s nothing you can use with it just yet. Instead, click on the sparkling area on the right to enter a hidden object scene.
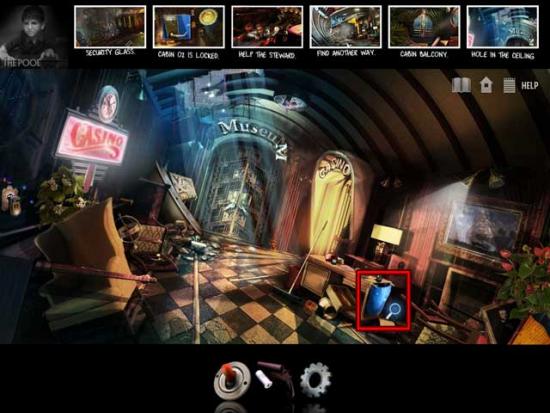
- Find all the items listed at the top of the screen; their locations are shown below:
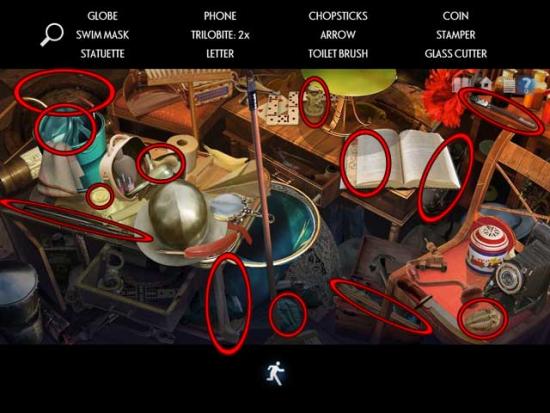
- Upon completing the hidden object scene, the Glass Cutter will be added to your inventory.
- The door to the Museum is locked and there’s nothing we can do about it at the moment, so proceed through the door on the right to gain access to the Casino.
Casino
- Once inside, go ahead and pick up the camera on the right: it’ll allow you to obtain Collector’s Rank 5. Then take a closer look at the roulette table to enter a hidden object scene, also on the right.
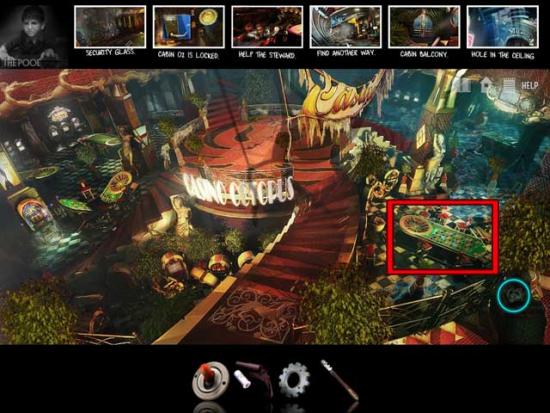
- Find all the items listed at the top of the screen; their locations are shown below:
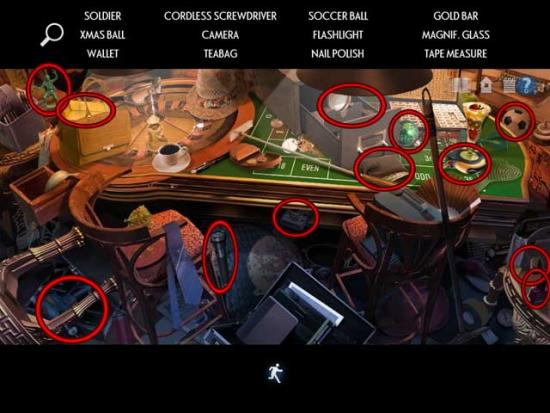
- Upon completing the hidden object scene, the Cordless Screwdriver will be added to your inventory.
- You can choose to look at the Slot Machine on the left before you leave, but we’ll be revisiting here later anyway, so return to the Corridor.
Corridor (w/Hole)
- Remember that charger I mentioned when we first entered this area? Now’s the time to use it.
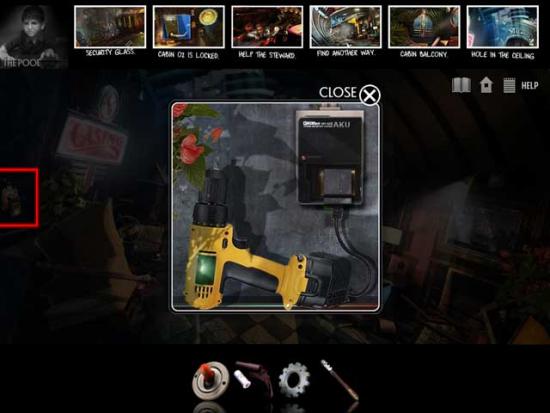
- Click on the charger on the wall for a closer view, then use the Cordless Screwdriver on the socket. Wait until the button indicator on the side of the Cordless Screwdriver turns green before removing it from the wall and back into your inventory.
- Take a closer look at the Museum doors. Use the Cordless Screwdriver to remove each of the screws to unlock the doors and gain access into the next room.
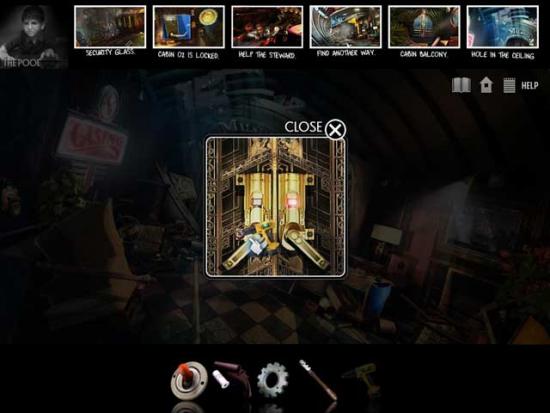
Museum
- There are two locations worth noting upon entering the room, both of them on the right. Leftmost of the two is a hidden object scene, and beside that, a mini-game. Enter the hidden object scene first.
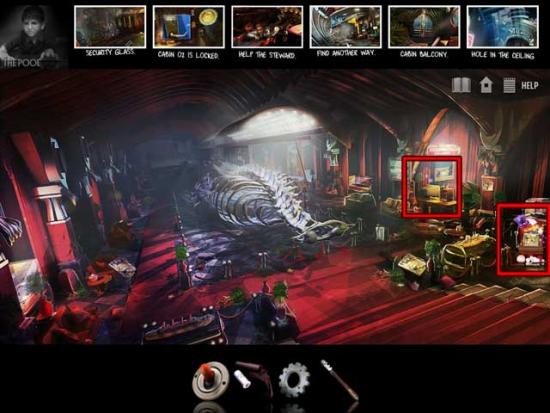
- Find all the items listed at the top of the screen; their locations are shown below:
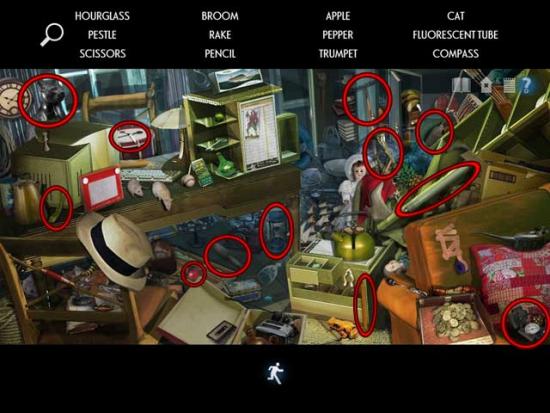
- Upon completing the hidden object scene, the Fluorescent Tube will be added to your inventory.
- Now, click on the sparkling area left on the right to enter a mini-game.
- Arrange the animal names on the board according to their size: the solution is shown below. Upon completing the puzzle, the Chip will appear. Pick it up and add it to your inventory.
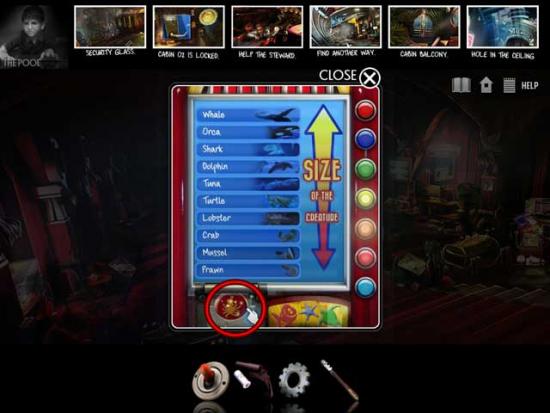
- Our tasks in the Museum are complete for now. Return to the Casino.
Casino
- Click on the Slot Machine on the left for a closer view.
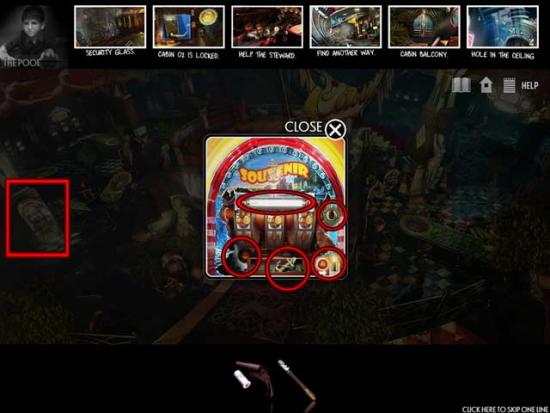
- Repair the Slot Machine by placing the Cogwheel, Fluorescent Tube, and the Switch in their correct locations. Next, use the Chip to activate the machine. You’ll win the Golden Anchor souvenir and it will be added to your inventory.
- Exit the Casino back to the Corridor.
Corridor (w/Hole)
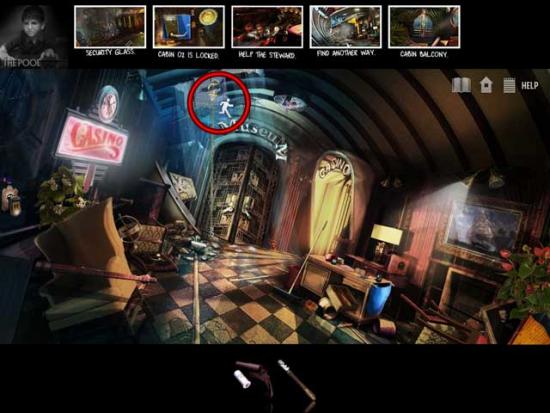
- Use the Golden Anchor on the hole in the upper left portion of the ceiling. This will allow you to gain access back to the upper floor.
- Return to the upper floor, then go back to the Pool.
Pool
- Take a closer look at the cracked section of glass on the left, near the Hallway entrance.
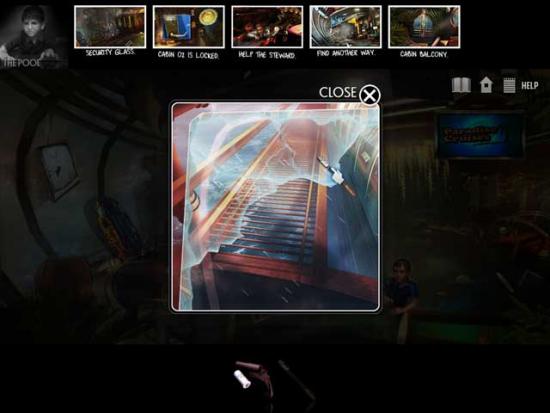
- Use the Glass Cutter on the glass to remove all the cracked and broken shards and gain access to the outside of the ship.
Maintenance Side-Walk
- Out here, you’ll notice a key card and a lifeboat. There’s nothing you can do about them right now, so continue forward to the far side of the Walk.
Ladder
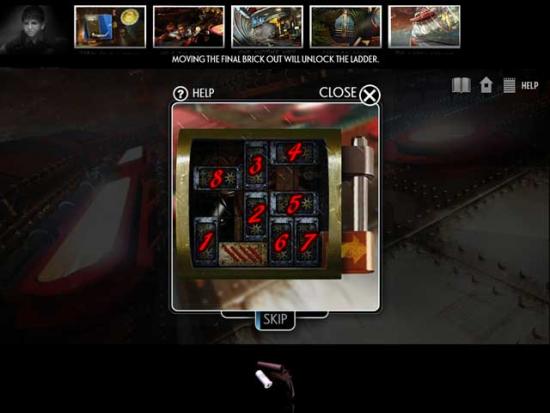
- The ladder is just out of reach. Click on the yellow tube-like control panel to enter a mini-game.
- Move the following blocks into the following positions to complete the puzzle: 1= up, key block= left, 2= down, 3= down, 4= left, 3= up, 5= left, 6= up, 7= up, 5= right, 2= up, and the key block into the locking mechanism.
- The ladder will now be lowered so you can reach it. Climb up the ladder to the next area.
Heliport
- Collect the Sweater on the left to obtain Collector’s Rank 6, then click on the hidden object scene over the green shed at the far end of the scene.
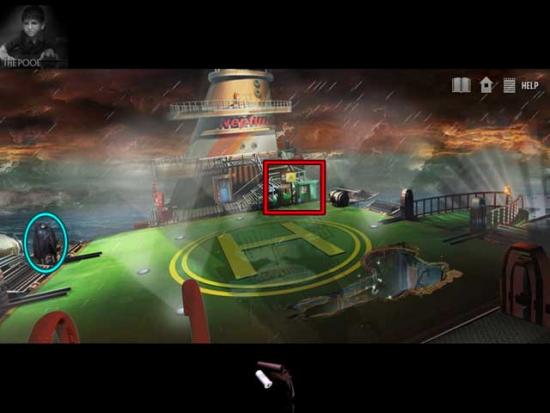
- Find all the items listed at the top of the screen; their locations are shown below:
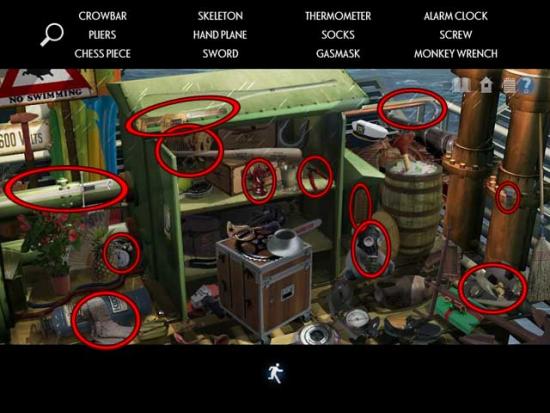
- Upon completing the hidden object scene, the Crowbar and the Wire Cutting Pliers will be added to your inventory.
- Backtrack to Our Cabin.
Our Cabin
- Use the Crowbar on the jammed door at the back of the room to open it. This will give you access to a new hidden object scene.
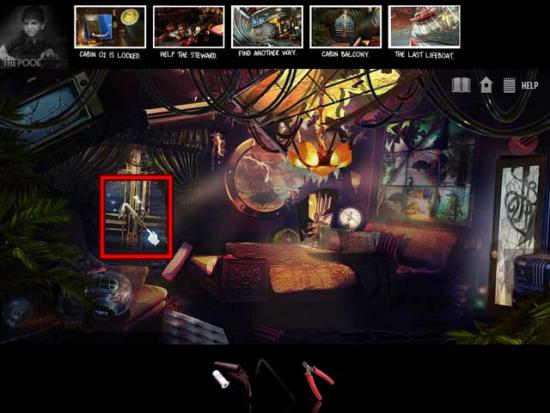
- Find all the items listed at the top of the screen; their locations are shown below:
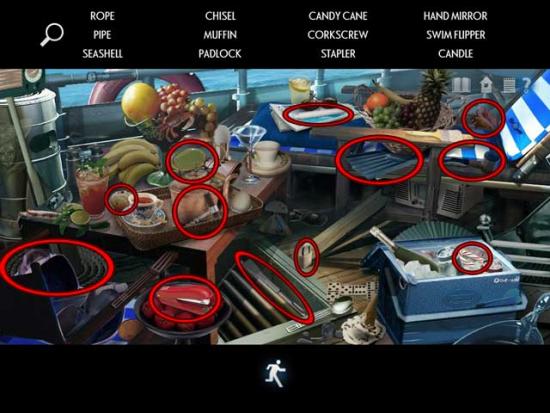
- Upon completing the hidden object scene, the Rope will be added to your inventory.
- Return to the Heliport.
Heliport
- Use the Rope on the hook on the inside edge of the hole to gain access to the Dining Hall.
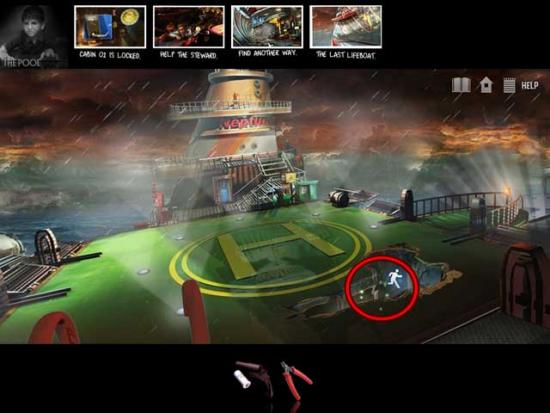
Dining Hall
- Click on the sparkling Rope and use it to lift the chandelier off the Steward, thus freeing him.
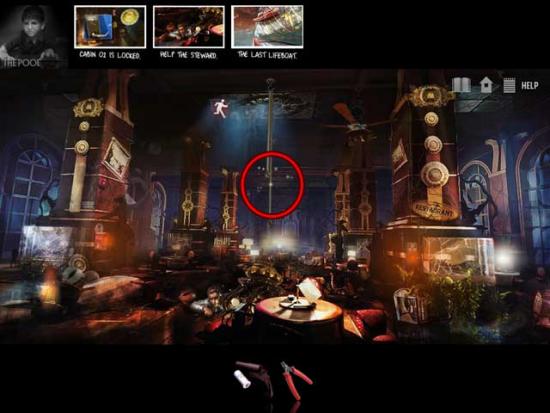
- The Steward agrees to help you with Jimmy. Return to the Pool via the Heliport.
Pool
- Click on Jimmy to help him out of the Pool. The Steward agrees to take Jimmy to the Heliport and wait with him for rescue there.
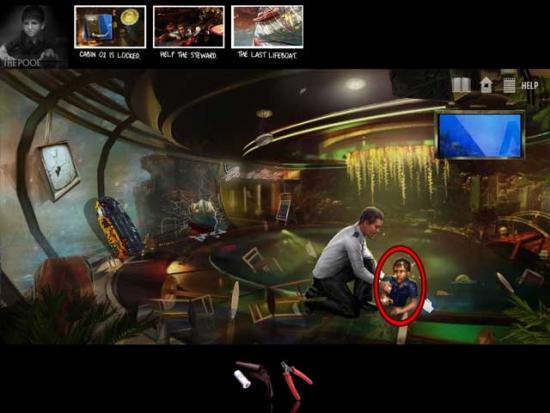
- Shortly after, you’ll receive a call from Thomas.
Chapter 3: The Lifeboat
Pool
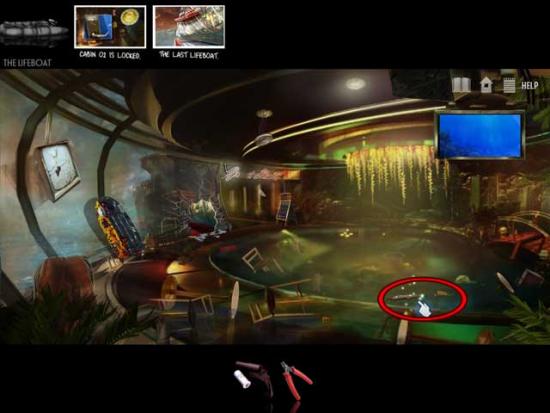
- Pick up the Harpoon floating in the Pool to add it to your inventory, then exit through the glass and make your way to the Heliport.
Heliport
- Once here, continue to the far right.
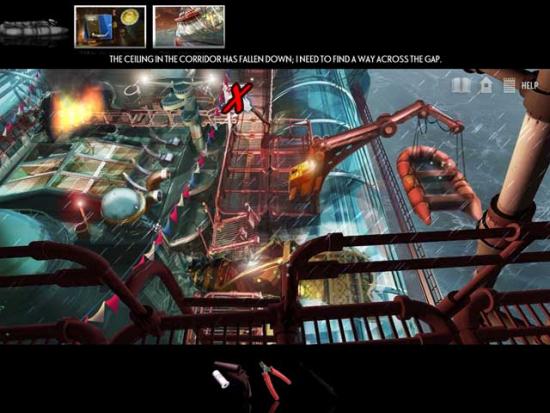
Heliport Edge
- Use the Harpoon on the area marked with an “X” in the screenshot below to secure it, then move along the rope to gain access to the lower levels.
Safe-Boat Crane
- The crane seems to be missing its control stick, so there’s nothing we can do with that for now. However, click on the lifeboat to enter a hidden object scene.
- Find all the items listed at the top of the screen; their locations are shown below:
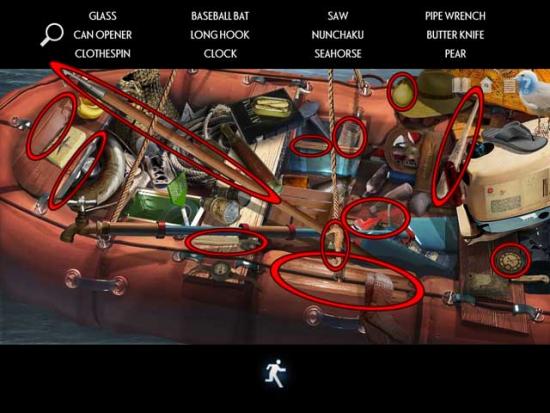
- Upon completing the hidden object scene, the Long Hook will be added to your inventory.
- Return to the Maintenance Side-Walk.
Maintenance Side-Walk
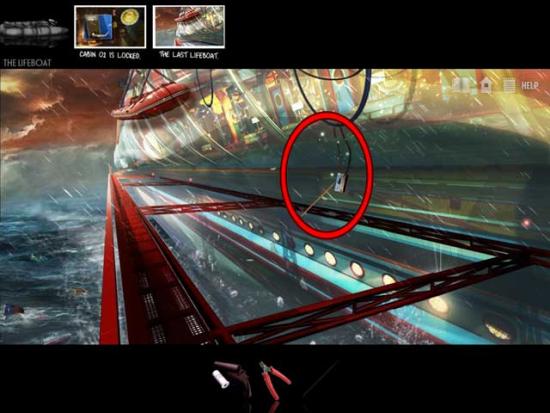
- Use the Long Hook to obtain the Key Card and add it to your inventory.
- Backtrack to the Hallway.
Hallway
- You may have noticed this before, but there’s a doorway next to your own that requires a Key Card in order to be opened. Use the Key Card from your inventory on the door to open it and gain access to the rooms beyond.
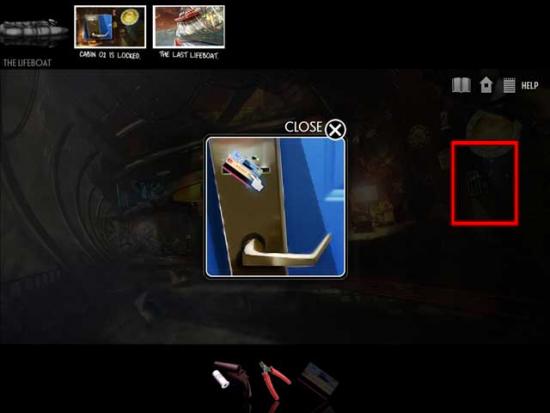
- Or wow, lack of rooms for that matter! Pick up the Pills for a Collector’s Rank increase, and the Control Lever, then return to the Safe-Boat Crane.
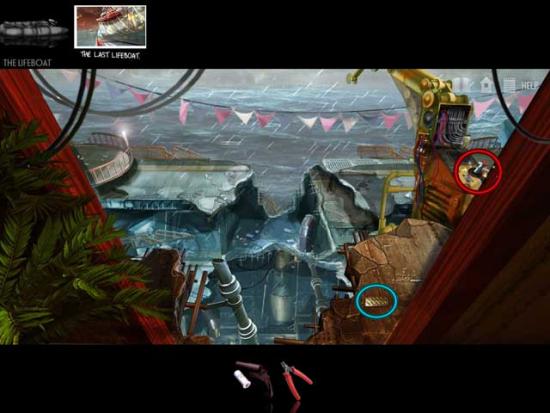
Safe-Boat Crane
- Use the Control Lever on the crane to restore it to working order, then click on it to lower the Lifeboat to the walkway below.
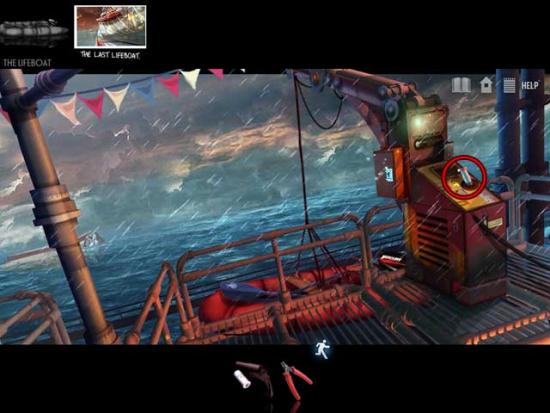
- Return to the Maintenance Side-Walk.
Maintenance Side-Walk
- Click on the Lifeboat to enter it, and ensue cutscene.
Chapter 4: Thomas
Ship’s Keel
- Notice the Life Buoy in the water in the distance: there’s nothing you can do with this now, but keep it in mind for later. For now, focus on the bolted hatch near your feet. Click on it to enter a puzzle.
- Click the rivets into the up position to open the hatch. The solution is as follows:
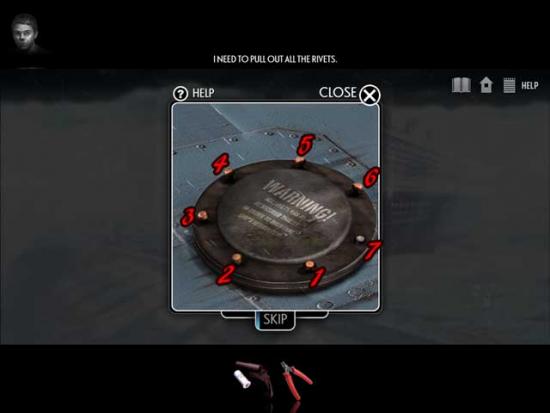
Click Rivet 1, Rivet 4, Rivet 7, Rivet 3, then Rivet 6 to open the hatch successfully.
- Crawl down inside the hatch.
Elevator I
- Pick up the Watch to increase your Collector’s Rank, then click on the open hatch to enter a hidden object scene.
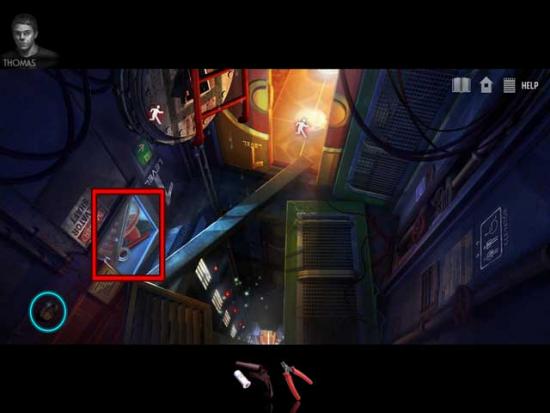
- Find all the items listed at the top of the screen; their locations are shown below:
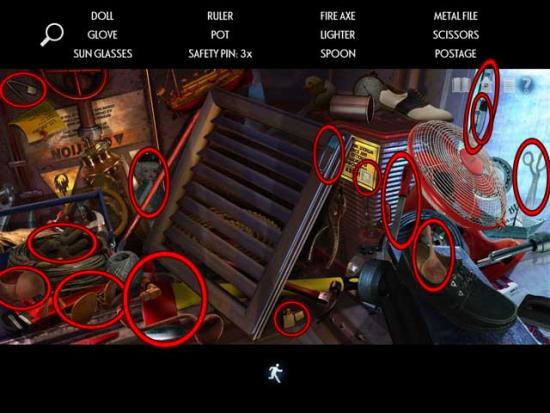
- Upon completing the hidden object scene, the Fire Axe and the Scissors will be added to your inventory.
- Proceed through the open elevator doors into the next room.
Corridor
- Click on the suitcase on the left to open it. Collect the Keys inside to obtain a boost in your Collector’s Rank, then use the Fire Axe on the door on the far end of the room.
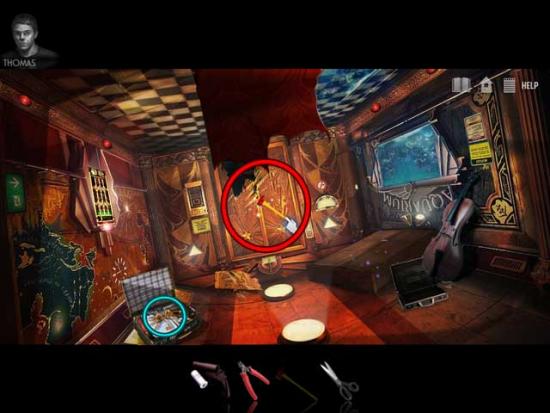
- Once the door is busted open enough to can proceed into the next room, do so. You may notice the sparkling cabinet on the right, however there’s nothing you can do here at the moment.
Aquarium
- Click the light switch on the right side of the room: it’s big, it’s yellow, it glows; you can’t miss it.
- Now, there are a couple objects of interest in this room, however the only thing you can work with right now is the sparkling object outside. You may have noticed the curious fish outside the glass already: well, it’s quite important!
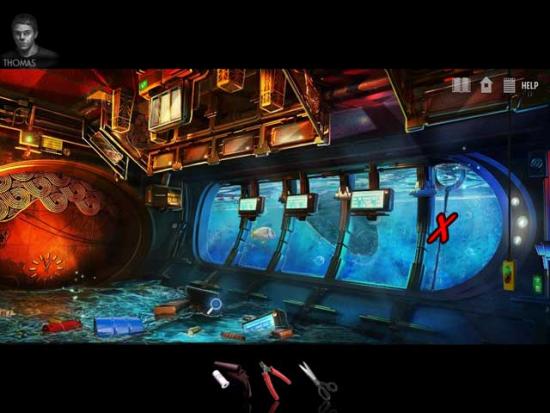
- Tap on the glass near the fish by clicking, gradually luring it closer and closer to the rope outside. When the fish runs into the rope, it will release. Return up to the Ship’s Keel.
Ship’s Keel
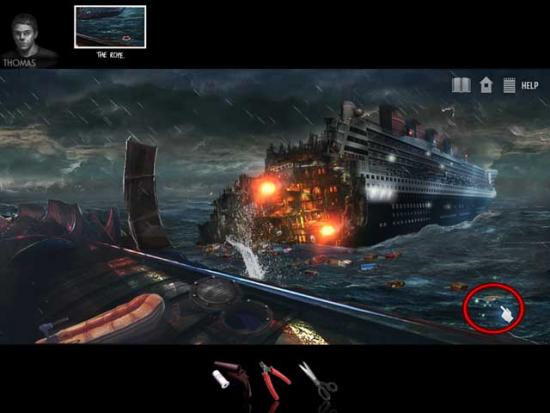
- Pluck the sparkling Rope from the water to add it to your inventory, then return down to the Elevator shaft.
Elevator I
- Use the Rope on the metal beam covering the gap expanse to fasten it: this will give you access to the lower (or should I say upper?) levels. The ladder leading back to the outside has fallen, so for now, the only way forward is down.
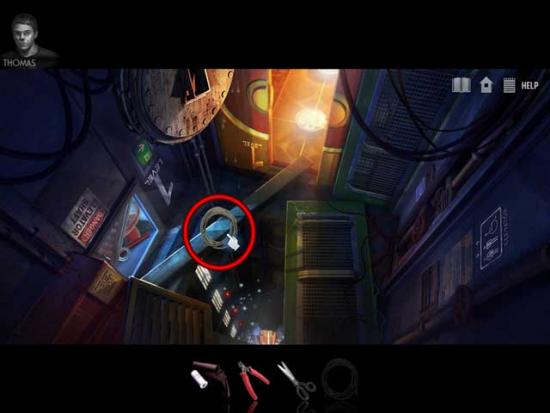
Elevator II
- There’s a very hot lever and a broken elevator door here, however we can’t work with either of them right now. Continue down the rope.
Elevator III
- It’s impossible to continue climbing down the rope until the power has been dealt with. Click on the red power box on the left to enter a puzzle.
- Open the box, then click on the correct lights to cut the power. Click on the middle and four corner lights to cut the power.
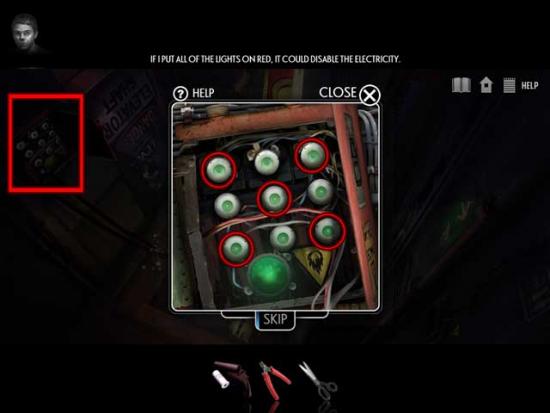
- Use the Scissors on the powerless cables to cut them, then continue climbing down the rope.
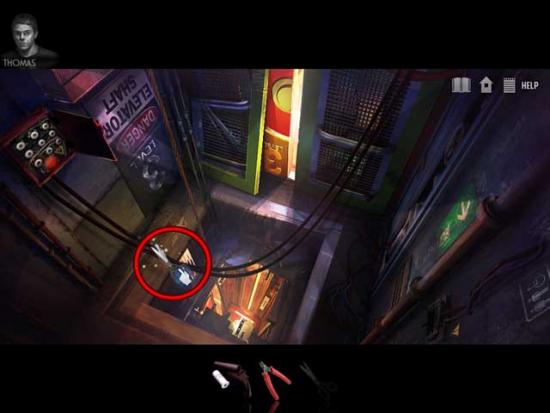
Elevator IV
- Thomas is okay! Well, mostly anyway. Collect the Swiss Knife to boost your Collector’s Rank, then continue through the elevator doors straight past him.
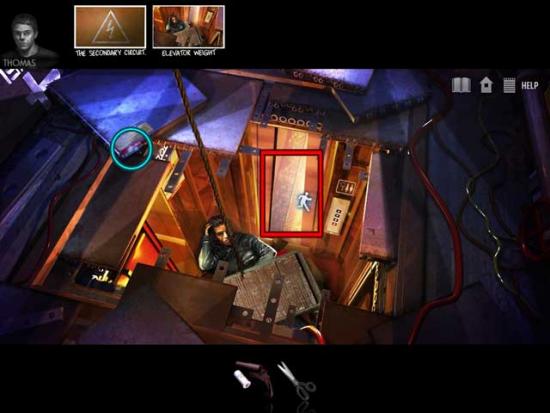
Corridor (Bottom)
- From here, you can choose to either go left through the green door, or right through the red door. For now, take the green door on the left.
Kitchen
- Pick up the Wallet to increase your Collector’s Rank, then click on the sparkling area on the right to enter a hidden object scene.
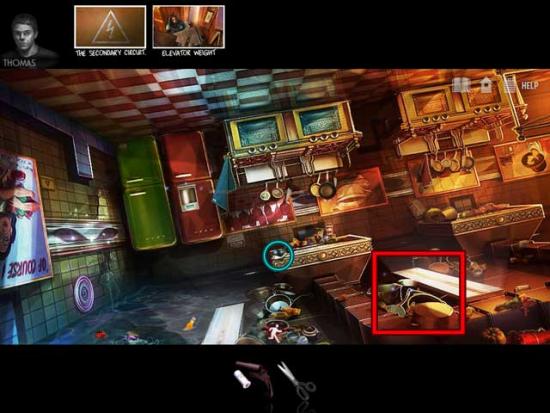
- Find all the items listed at the top of the screen; their locations are shown below:
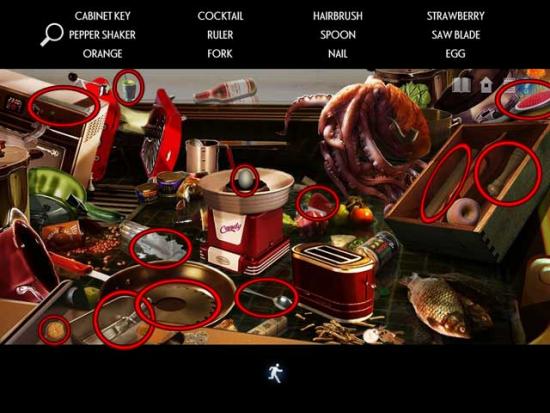
- Upon completing the hidden object scene, the Cabinet Key will be added to your inventory.
- There’s nothing left to do here for now, so return to the Corridor via Elevator I.
Corridor
- Use the Cabinet Key on the cabinet lying on the floor to unlock it. A hidden object scene will be revealed: click on it to enter.
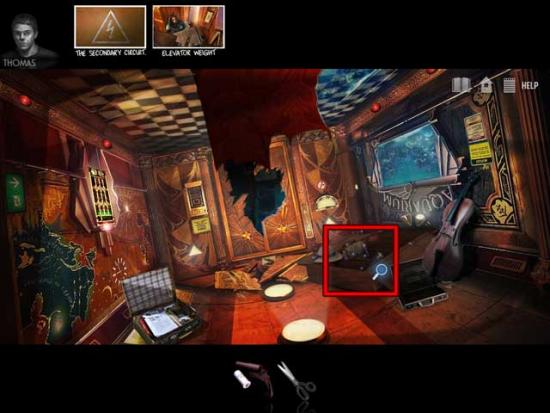
- Find all the items listed at the top of the screen; their locations are shown below:
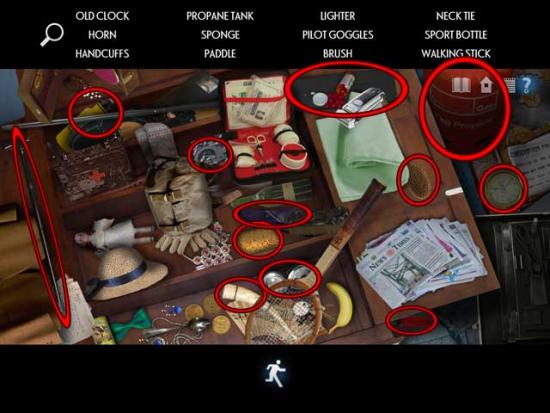
- Upon completing the hidden object scene, the Propane Tank and Paddle will be added to your inventory.
- We’re finished here now. Return back down to the Kitchen.
Kitchen
- Lean the Propane Tank up against the left wall, then use the Flare Gun to blow it up!
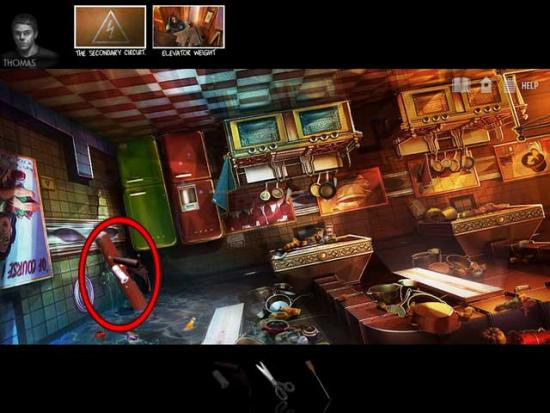
- Once the smoke is clear, proceed through the hole in the wall to the next room.
Restaurant
- If you try to approach the instruments in the center of the room here, you’ll notice the presence of a large and seemingly hungry shark, so it’s best to avoid it until you can address the problem properly. For now, use the Paddle to knock the furniture off the ceiling by the door on the right in order to gain access into the next room.
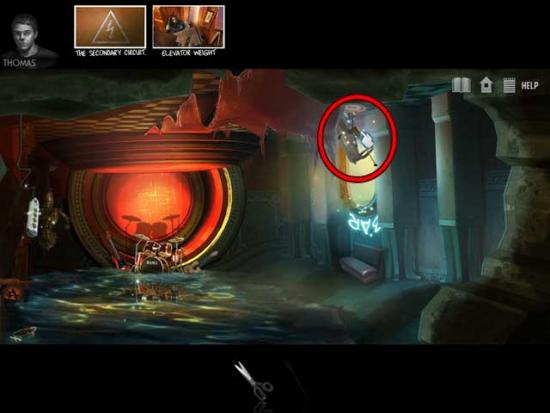
Bar
- Pick up the Passports to increase your Collector’s Rank, then click on the rubble near the broken aquarium to enter a hidden object scene.
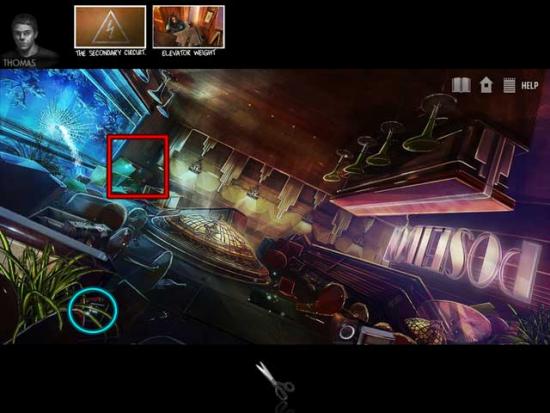
- Find all the items listed at the top of the screen; their locations are shown below:
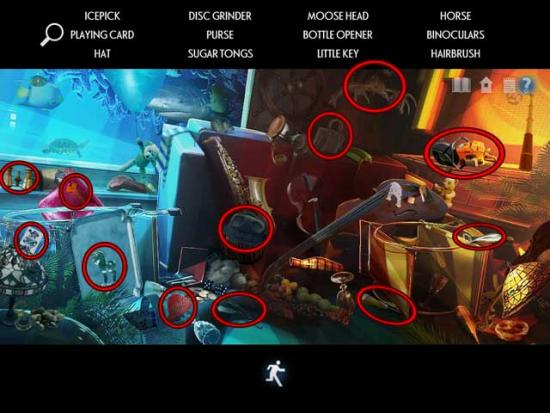
- Upon completing the hidden object scene, the Disc Grinder and the Little Key will be added to your inventory.
- You now have the tool needed to free Thomas! Return to him in the Elevator IV shaft.
Elevator IV
- Use the Disc Grinder on the panel pinning Thomas: you will enter a puzzle.
- Use the Disc Grinder to carefully cut through the panel without going outside the white lines. An example is shown below:
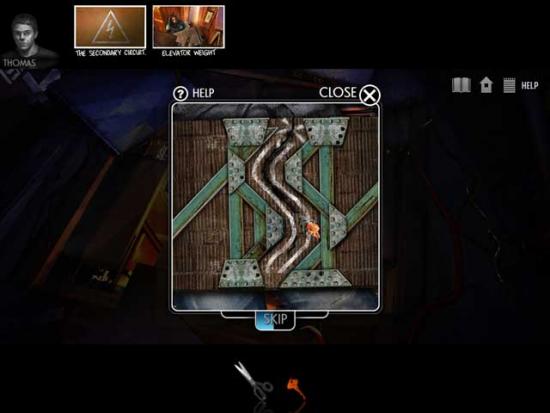
- A hidden object scene will appear upon successful completion of the puzzle. However, Thomas is still talking, so we should listen. At the end of the conversation, Thomas will give you the Service Key to add to your inventory (it’s not actually a key, but a sort of wrench).
Chapter 5: Way Out
Elevator IV
- Click on the hidden object scene that appears next to Thomas to enter.
- Find all the items listed at the top of the screen; their locations are shown below:
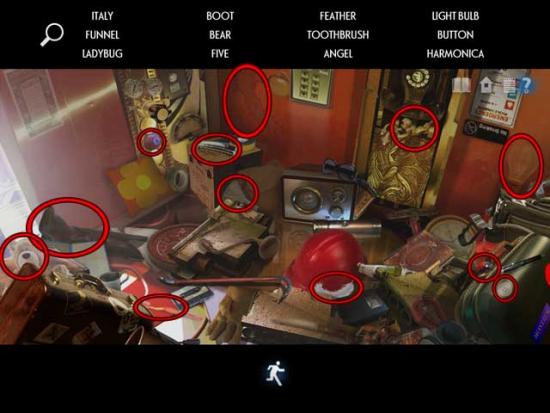
- Upon completing the hidden object scene successfully, the Light Bulb will be added to your inventory.
- Return to the Bar.
Bar
- Use the Light Bulb on the hatch in the middle of the floor to replace the lighting, then proceed down inside.
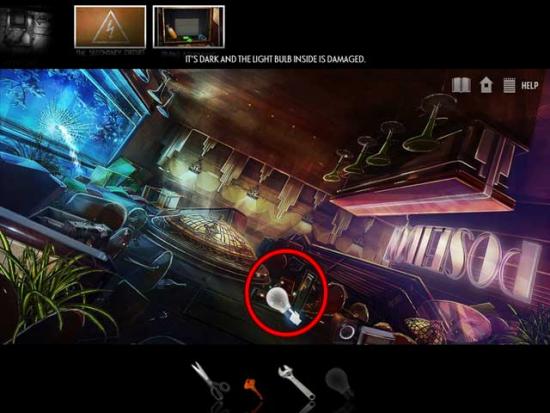
Shaft
- Continue down to the bottom of the Shaft.
Ship’s Stacks
- Take a look at the sparkling pile of odds and ends in the middle of the room to enter a hidden object scene.
- Find all the items listed at the top of the screen; their locations are shown below:
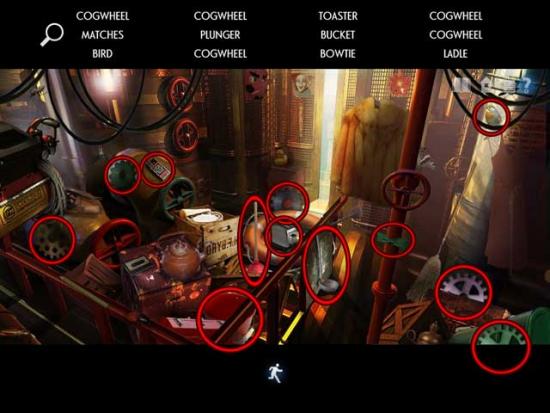
- Upon completing the hidden object scene, the five Missing Cogwheels and the Toaster will be added to your inventory.
- Now, there’s a red and white-striped hatch on the middle ship stack in this room that’s sparkling. Click on it to take a closer look.
- Use the Service Key on the fasteners to twist them and remove the hatch.
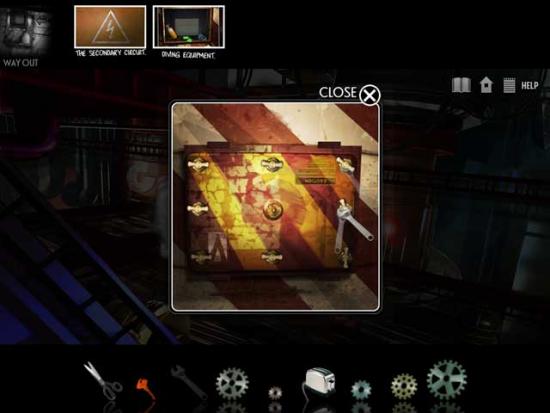
- This is the escape route you’ll be using, but first you’ll need to collect diving equipment. Exit the area and return to the Corridor (Bottom).
Corridor (Bottom)
- Remember that red door on the right? Now’s the time to enter. Click on the red door to open it, then proceed inside.
Engine Room
- Pick up the Glasses lying on the floor to increase your Collector’s Rank, then click on the sparkling yellow power box at the far end of the room. Take a closer look inside.
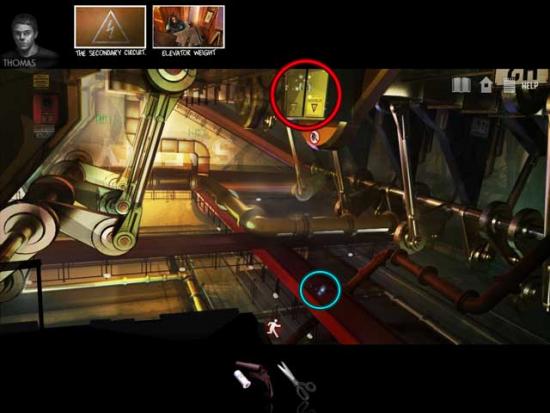
- Place the Missing Cogwheels in their correct locations to restore power to the generator, the solution is shown below:
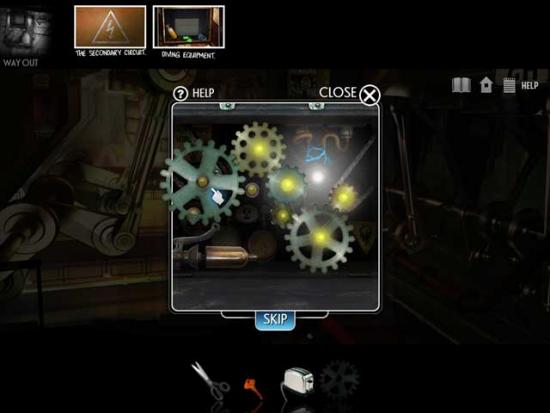
- Now that the power’s back on, return to the Kitchen.
Kitchen
- Take a closer look at the refrigerator on the back corner of the wall. Press the green button to make the Ice Cubes appear. Click on them to add them to your inventory.
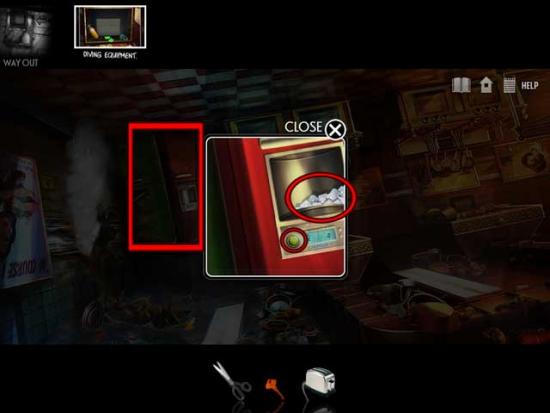
- Now that’s done, proceed next door to the Restaurant.
Restaurant
- Looks like that shark’s still here. Use the Toaster on the power outlet hanging on the left side of the room to cause an electric shock that will kill the shark, then take a closer look at the now-deceased creature.
- Pick up the Swim Mask inside the dead shark’s mouth to add it to your inventory.
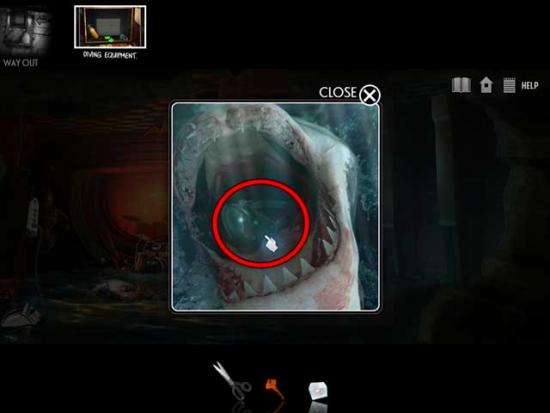
- Now, backtrack up to Elevator II.
Elevator II
- Use the Ice Cubes on the hot lever on the right to cool it, then click the lever to fix the elevator door, thus revealing a new hidden object scene.
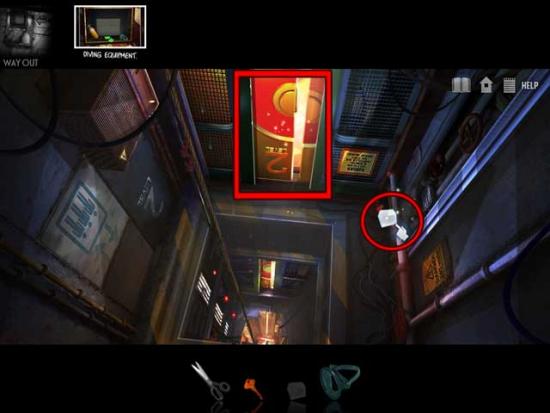
- Find all the items listed at the top of the screen; their locations are shown below:
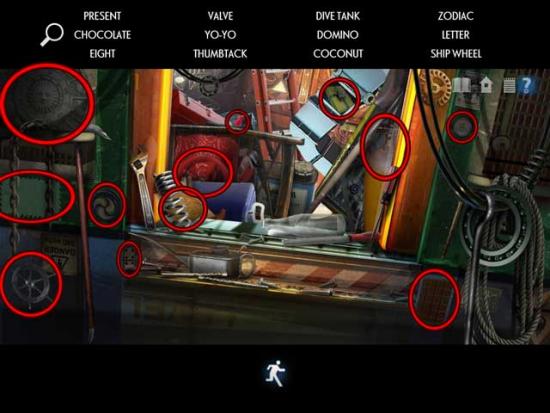
- Upon completing the hidden object scene, the Valve and the Dive Tank will be added to your inventory.
- Time to backtrack to the Aquarium.
Aquarium
- Take a closer look at the sparkling valve hatch near the center of the room’s floor. Use the Valve on the mechanism to return it to working order and drain the water from the room.
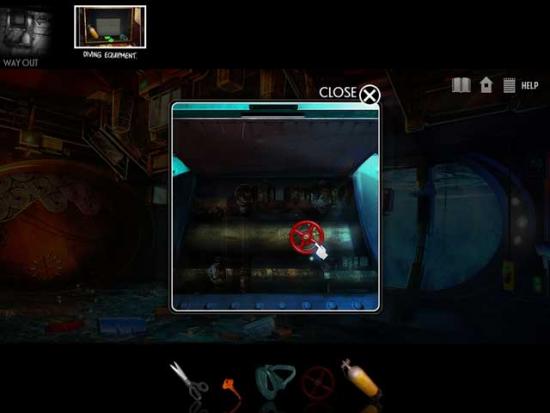
- Click on the Flippers that appear once the water drains to add them to your inventory.
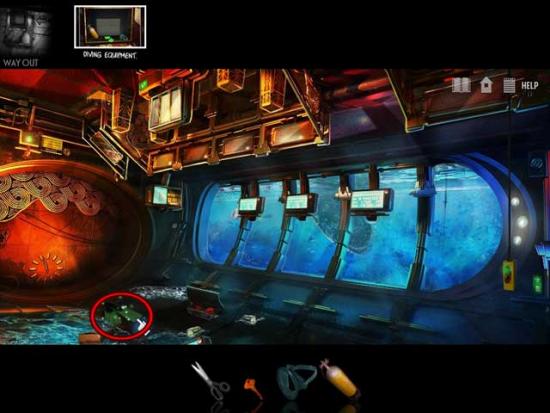
- Now we can make our escape! Return to the Ship’s Stacks.
Ship’s Stacks
- The moment you arrive here, you’ll receive a call from Dennise. She’s okay and tells you her location.
- Take a closer look at the middle stack where you opened the hatch earlier. From here, jump down inside and make your escape.
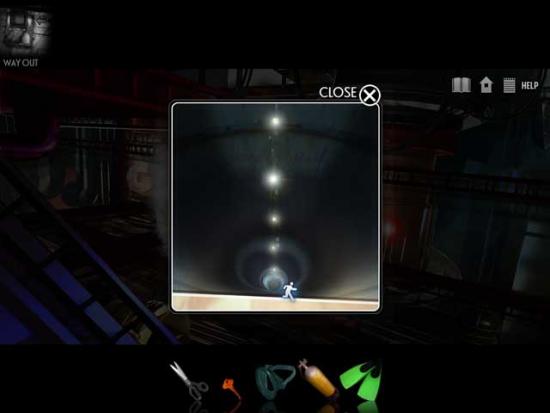
Chapter 6: Dennise
Ocean
- Climb up the red chain hanging from the side of the ship and into the hole. You’ll find yourself back in the main portion of the ship, specifically the Corridor w/Hole in front of the Museum and Casino.
Corridor (w/Hole)
- Enter the Casino.
Casino
- Use the Scissors on the Banner to cut it down and add it to your inventory.
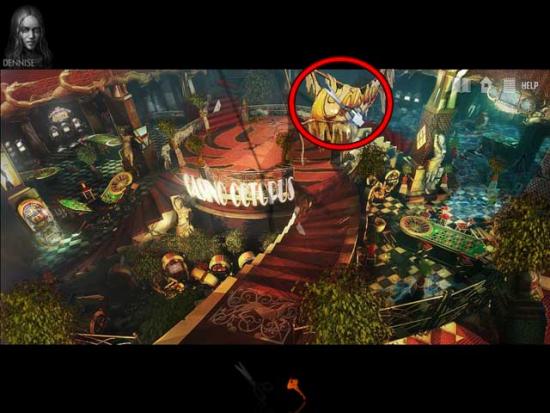
- Now go back, and this time enter the Museum.
Museum
- Take a closer look at the opening that’s appeared in the floor on the left side of the room.
- Dennise is inside. Use the Banner to free her.
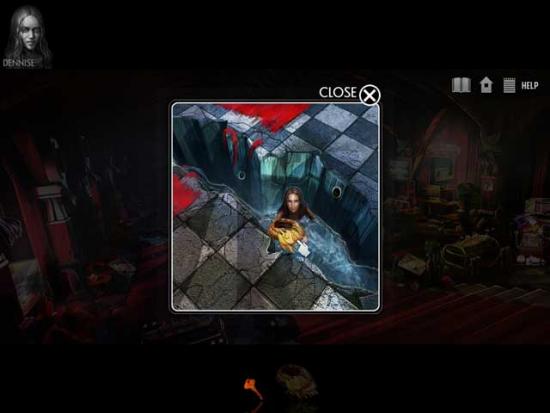
- Well now, that might have been the shortest chapter and easiest task yet!
Chapter 7: S.O.S.
Museum
- It’s time to get back in contact with the rescuers and call for help. Return to the Heliport via the hole in the ceiling of the Corridor w/Hole.
Heliport
- From here, proceed to the Heliport Edge, and then the Safe-Boat Crane.
Safe-Boat Crane
- Use the Little Key you’ve been saving on the box on the side of the crane. Pull out the blue Weather Balloon to add it to your inventory.
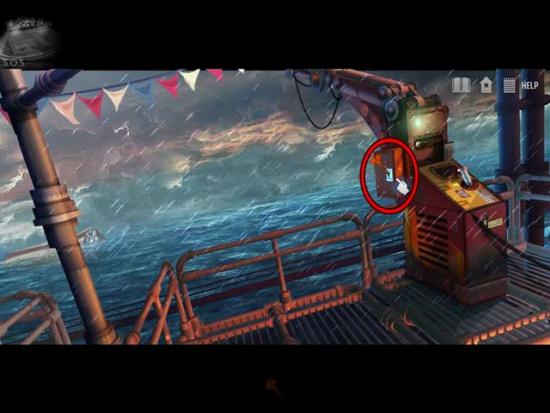
- Return to the Heliport.
Heliport
- Use the Weather Balloon on the emergency call box to restore electricity. You will be receiving a life-saving call soon after.
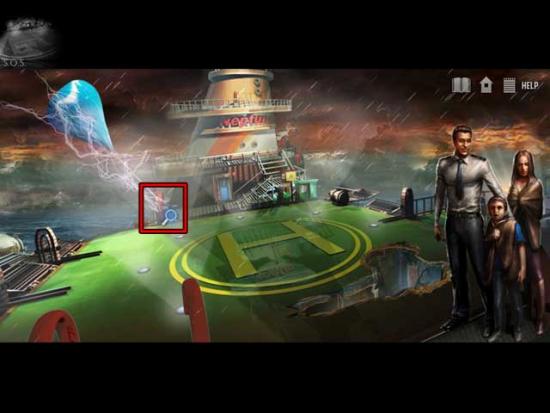
Congratulations! You’ve completed Nightmare on the Pacific! Now try The Prequel (accessible from the main menu).
Prequel Part 1: The Silence before the Storm
Pool
- A nap sounds really good right about now, doesn’t it? That’s certainly what our heroic mother thinks! Exit the Pool and proceed to the Dining Hall.
Dining Hall
- Click on the aquarium to enter a hidden object scene.
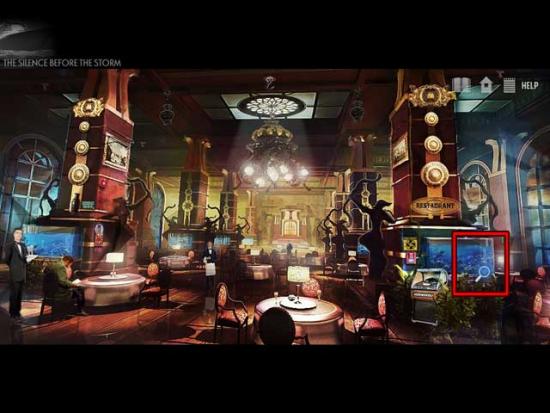
- Find all the items listed at the top of the screen; their locations are shown below:
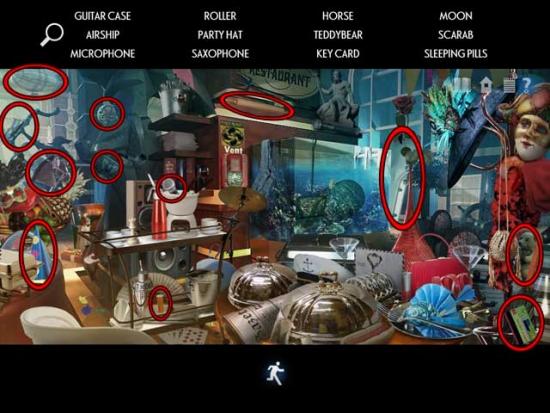
- Upon completing the hidden object scene, the Key Card and the Sleeping Pills will be added to your inventory.
- Return to the Hallway.
Hallway
- Use the Key Card on the Our Cabin door to unlock it and enter.
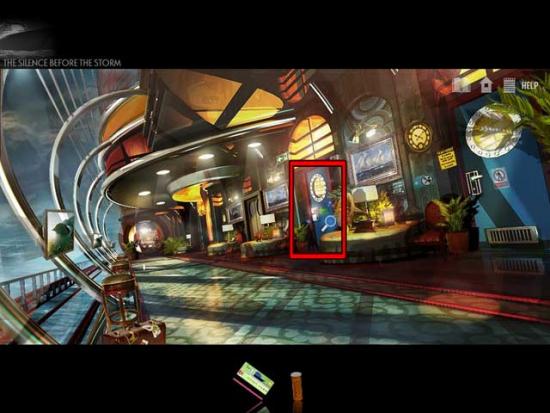
Our Cabin
- Click on the bed to crawl inside, then use the Sleeping Pills to fall asleep.
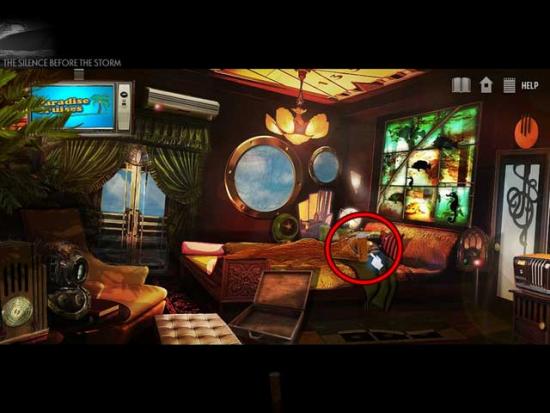
Prequel Part 2: Abandon Ship!
Our Cabin
- Exit the cabin and return to the Dining Hall.
Dining Hall
- Click on the sparkling area near the middle of the screen and slightly to the right to enter a hidden object scene.
- Find all the items listed at the top of the screen; their locations are shown below:
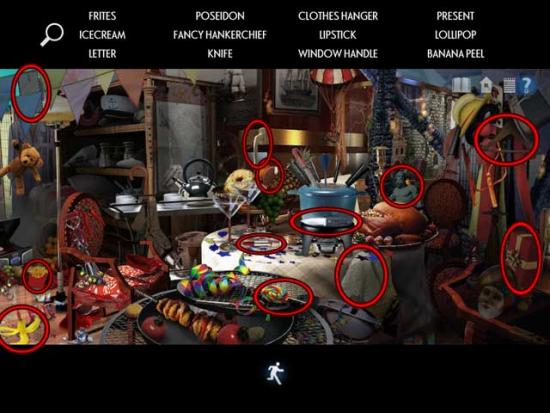
- Upon completing the hidden object scene, the Knife and the Window Handle will be added to your inventory.
- Exit the Dining Hall and return to the Hallway.
Hallway
- Click on the sparking elevator door for a closer look. Use the Knife on the sparkling cover to remove it, then click to enter a mini-game.
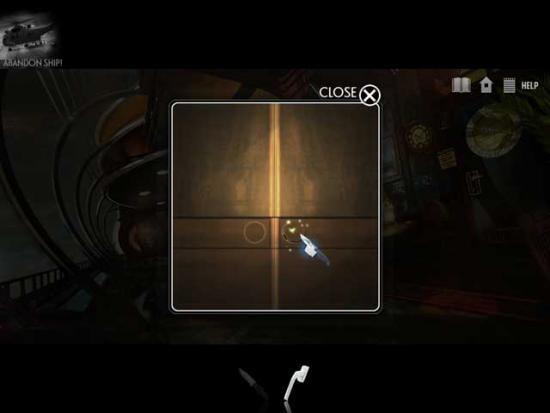
- Click on the green button to shoot the ball. Click on the various tube joints to rotate them so that the ball lands in the destination marked with the blinking light: these locations will be randomly selected. An example solution is shown below:
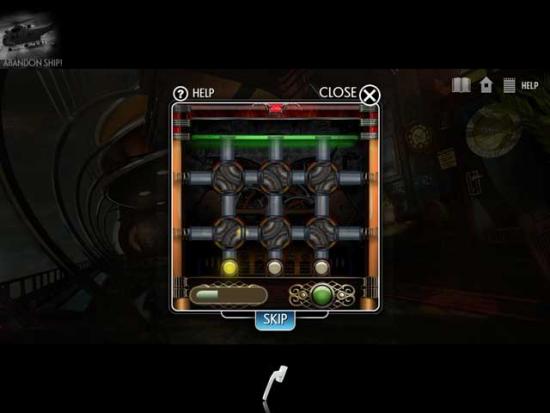
- Once the bar at the bottom of the screen is filled, you’ll be able to gain access to the elevator.
Elevator Floor 1
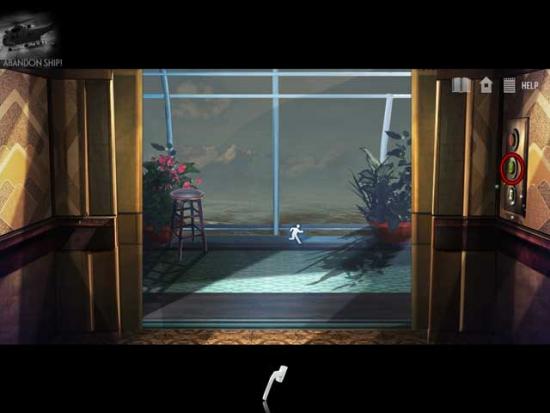
- Once inside the elevator, click the middle “0” button on the right to go down one level.
Elevator Floor 0
- Click on the cart slightly to the right when the door opens to enter a puzzle.
- Find the matching pair for each of the keys until they’re all gone. It’s best to look for distinguishing features, i.e. a clover keychain, in order to find the pairs. An example is shown below:
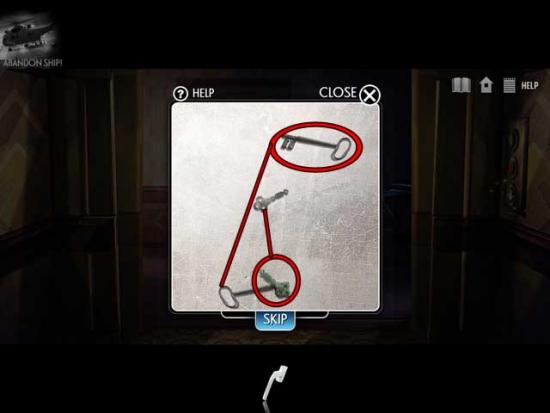
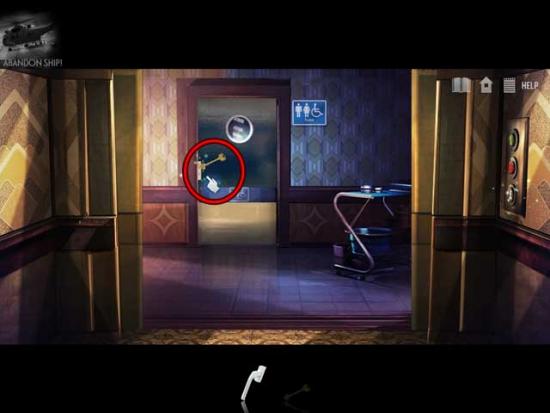
- Once you’ve finishing the puzzle, you will acquire a Key. Use the Key on the door straight ahead and enter.
Bathroom
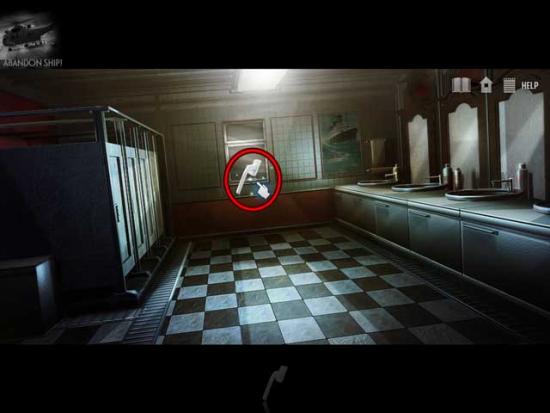
- Use the Window Handle on the window at the far end of the room to gain access outside.
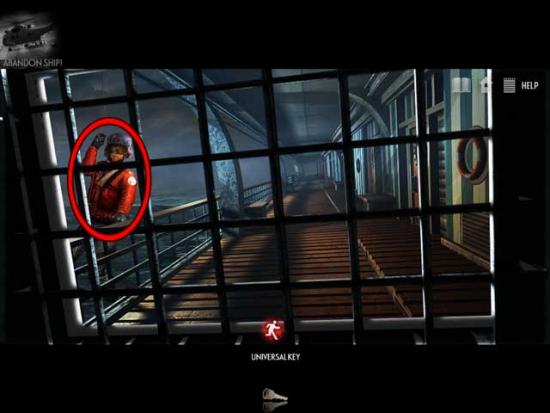
Escape Grate
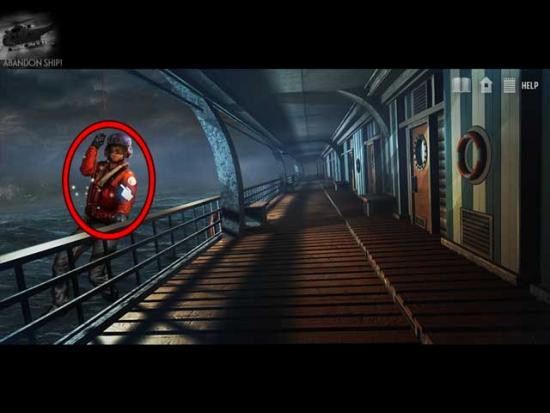
- Talk to the rescuer with the orange coat. He’ll give you the Universal Key to add to your inventory.
- Return to the Elevator.
Elevator Floor 0
- Use the Universal Key on the bottom button to gain access to the Maintenance Floor.
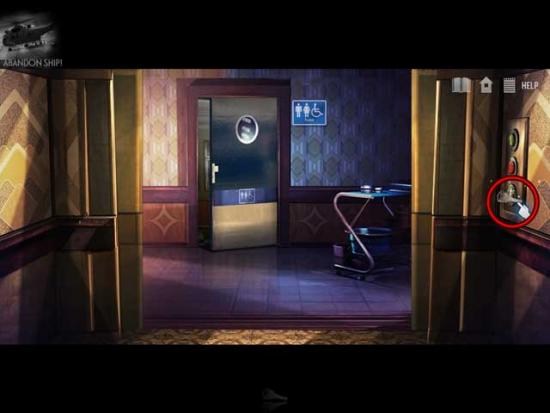
Maintenance Floor
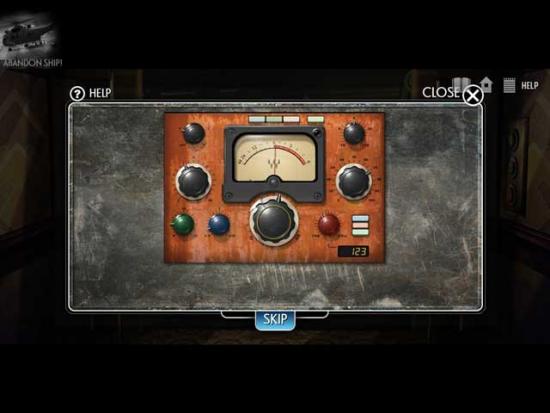
- Take a closer look at the generator sparkling just outside the door. You will enter a puzzle.
- Reassemble the generator panel: click on a piece to rotate it, then click and drag it into its proper location. The solution is shown below:
- Now, take the Elevator back up to Floor 0.
Elevator Floor 0
- Enter the Bathroom, then crawl through the window.
Escape Grate
- The grate blocking your escape is gone! Click on the rescuer to witness a cutscene…
Congratulations! You’ve completed Nightmare on the Pacific!
More articles...
Monopoly GO! Free Rolls – Links For Free Dice
By Glen Fox
Wondering how to get Monopoly GO! free rolls? Well, you’ve come to the right place. In this guide, we provide you with a bunch of tips and tricks to get some free rolls for the hit new mobile game. We’ll …Best Roblox Horror Games to Play Right Now – Updated Weekly
By Adele Wilson
Our Best Roblox Horror Games guide features the scariest and most creative experiences to play right now on the platform!The BEST Roblox Games of The Week – Games You Need To Play!
By Sho Roberts
Our feature shares our pick for the Best Roblox Games of the week! With our feature, we guarantee you'll find something new to play!All Grades in Type Soul – Each Race Explained
By Adele Wilson
Our All Grades in Type Soul guide lists every grade in the game for all races, including how to increase your grade quickly!


