
Best Horror Games On Itch.io – July 2026
Across a bounty of subgenres.![Haze Seas Accessories Tier List [Best Accessories to Equip]](/wp-content/uploads/2026/07/haze-seas-accessories-tier-list.jpg "Haze Seas Accessories Tier List [Best Accessories to Equip]")
Haze Seas Accessories Tier List [Best Accessories to Equip]
The accessories with the best stat buffs in Haze Seas.
![[Roblox] Evomon Shiny Hunting Guide – Including Prismatic and Pris Shinies!](/wp-content/uploads/2026/06/evomon-shiny-hunting-guide.jpg "[Roblox] Evomon Shiny Hunting Guide – Including Prismatic and Pris Shinies!")

Nightmare Adventures: The Witch’s Prison Walkthrough
Welcome to the Nightmare Adventures: The Witch’s Prison walkthrough on Gamezebo.com. Nightmare Adventures: The Witch’s Prison is a Hidden Object game for the PC created by Ghost Ship Studios. This walkthrough includes tips and tricks, helpful hints, and a strategy guide on how to complete Nightmare Adventures: The Witch’s Prison.


- Prefer Gamezebo on Google

Nightmare Adventures: The Witch’s Prison – Game Introduction
Welcome to the Nightmare Adventures: The Witch’s Prison walkthrough on Gamezebo.com. Nightmare Adventures: The Witch’s Prison is a Hidden Object game for the PC created by Ghost Ship Studios. This walkthrough includes tips and tricks, helpful hints, and a strategy guide on how to complete Nightmare Adventures: The Witch’s Prison.
General Information
- On the main menu, there are options to adjust the music volume, sound effects volume, and options for Full Screen or Windowed display.
- There’s also an option to adjust the Brightness Level of the game’s graphics. This is especially helpful for very dark scenes.
- You may turn off the Custom Cursors and use a simpler set of monochrome cursors. You’ll still be able to see cursor icons like the hand, eye, footprints, and go back.
- These Options are accessible anytime from within the game by clicking on the Menu button.
- Your cursor will change to various cursor icons as you move your mouse around the screen.
o The Footprints icon shows where you can move to another location. Sometimes, the cursor shows a U-turn or Go Back sign, allowing you to return to your previous location.
o The Eye icon indicates that you can take a closer look at an area. When you click on it, a smaller window may pop up. To close a window, just click anywhere outside of it.
o The Hand icon means that you can interact with an object. In most instances, the objects can be picked up and will automatically go into your inventory.
- Pick up an object from your Inventory to use it in a scene. To release an object from your hand, click on the right-mouse button. The object will return to your inventory.
- The inventory can only display 7 objects at a time, but can contain much more. Use the left and right arrows alongside the inventory to scroll through all its contents.
- Whenever you discover a detail about the investigation, it will be added to your PDA. Click the Story button to read your comments and review what you’ve learned.
- When you encounter a useful clue, the camera will automatically take a picture of it and store it in your Photos. You can refer to these when solving puzzles. Click on Photos while inside a puzzle and the appropriate clue will be shown to you.
- If you need a nudge in the right direction, click the Hint button. You’ll need to wait for the Hint bar to refill and turn red before using it again.
- Puzzles may be skipped. However, you’ll need to wait for Skip bar to fill and turn red before you can use it.
- There are no penalties for clicking on the wrong areas. Click on anything and everything!
Walkthrough – Gate
A Tutorial is available at the start of the game. You may skip it, but when playing the game for the first time, we recommend that you take the tutorial.
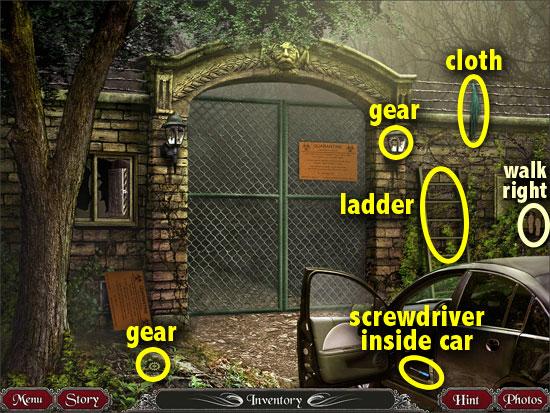
LEFT GATE

- Read the Quarantine sign on the gate.
- Open up the car’s front door and take the screwdriver from inside.
- Take the scrap of green cloth on the electric fence. Then, take the ladder so you can use it somewhere else.
- Take the gear (1 of 5) from the lamp. Pick up the gear (2 of 5) from the ground under the tree.
- Click on the right side of the screen to walk to the right.
RIGHT GATE

- Take the scrap of cloth from your inventory and soak it with water streaming from the pipe.
- Take the ladder from your inventory and lean it against the tree.
- Zoom in on the bird’s nest in the tree branches. Move the eggs aside to find a gear (3 of 5). Click outside the pop-up window to close it.
- Take the gear (4 of 5) above the “T” on the “Blackwater Asylum” sign. Pick up the gear (5 of 5) from the weeds on the ground.
- Click on the left side of the screen to walk to the left.
LEFT GATE
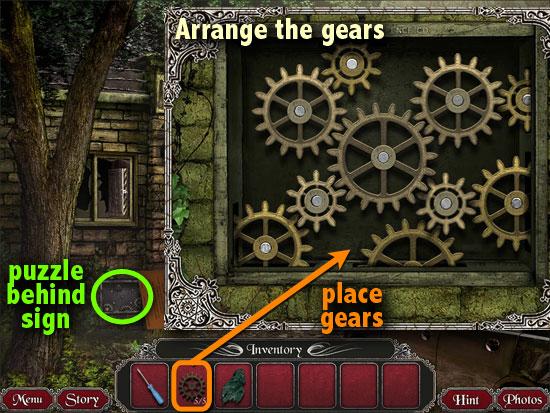
- Move the bottom Quarantine sign out of the way and zoom into the gearbox.
- Take the 5 gears from your inventory and place them on the gearbox.
- Arrange the 5 gears in their proper positions on the pegs. A gear will lock into place if it’s in the right spot. Click outside the window to close it.
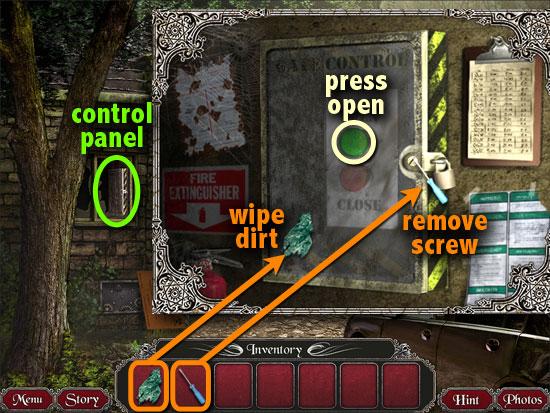
- Zoom in on the broken glass panel on the wall. Take the wet cloth from your inventory and use to clean the dirt off the control panel.
- Use the screwdriver from your inventory to remove the screw holding the lock.
- Then, press the green button to open the gate.
Chapter 1: Quinn’s House
PORCH
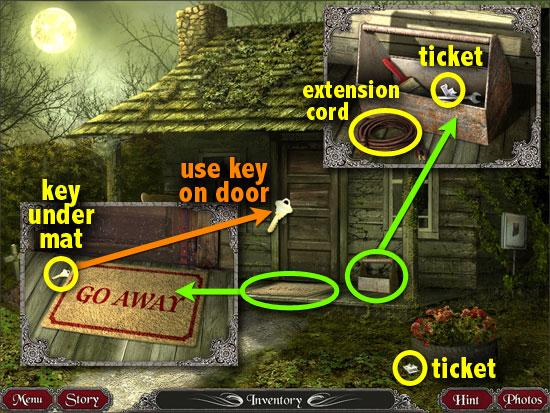
- Pick up the scrap of a lottery ticket (1 of 10) from beside the tire with flowers.
- Zoom into the toolbox on the porch. Take the scrap of lottery ticket (2 of 10) and the extension cord.
- Zoom into the door mat and click on it to reveal a key.
- Pick up the key and use it on the locked door. Enter the house.
LIVING ROOM
- Pick up the fuse from the floor. Go back outside.
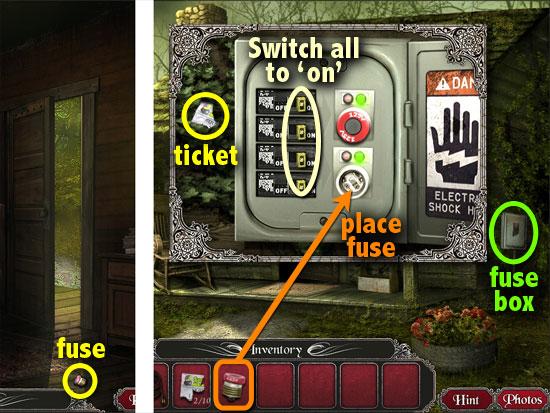
PORCH
- Zoom in on the fuse box on the right side of the house.
- Put the fuse into the empty socket. Flip all the breaker switches to the “on” position.
- Take the scrap of lottery ticket (3 of 10) from the left of the fuse box.
- Go back inside the house.
LIVING ROOM
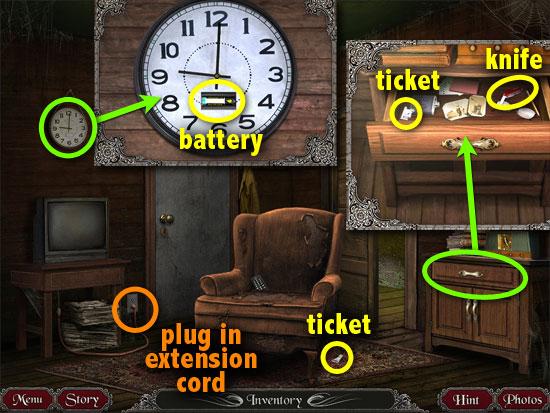
- Pick up the scrap of lottery ticket (4 of 10) from the floor rug.
- Open the drawer of the side table. Take the scrap of lottery ticket (5 of 10) and the pocket knife.
- Zoom in on the wall clock. Open the battery panel and take the battery.
- Take your extension cord and plug it into the wall socket.
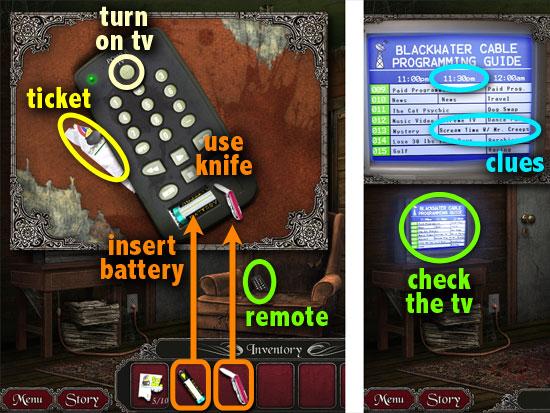
- Zoom in on the TV remote control on the armchair. Use the pocket knife to pry off the cover. Plug the clock battery into the slot. Click the power button to turn the TV on. Take the scrap of lottery ticket (6 of 10).
- Get a closer look at the TV. Note that Scream Time W/ Mr. Creeps begins at 11:30.
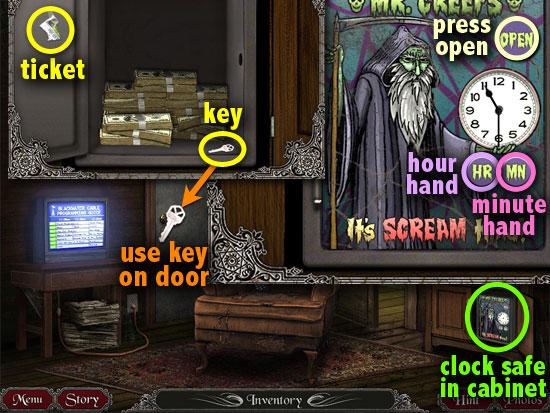
- Open the cabinet door of the side table. Zoom in on the Mr. Creeps safe with a clock.
- To open the safe, set the clock to 11:30. Click the HR button to move the hour hand to 11, and the MN button to move the minute hand to 6.
- Press the Open button. Take the key from inside the safe, and the scrap of lottery ticket (7 of 10).
- Use the room key to open the locked door. Enter the room.
BEDROOM
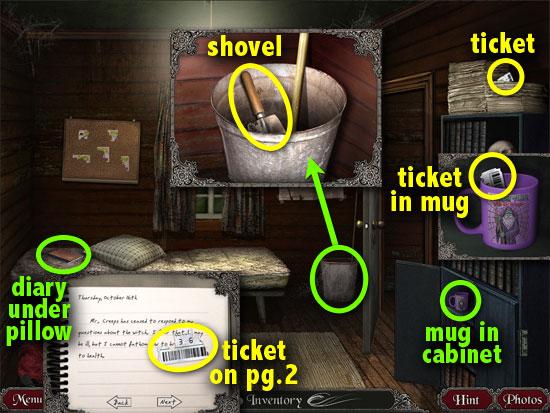
- Take the scrap of lottery ticket (8 of 10) from the top of the bookshelf.
- Open the cabinet door and zoom in on the purple mug. Take the scrap of lottery ticket (9 of 10) from inside the mug.
- Zoom in on the bucket in the corner. Take the shovel.
- Move aside the pillow on the bed to reveal Quinn’s diary. Read through its pages.
- From the second page, take the scrap of lottery ticket (10 of 10). Learn that you need to exhume Mr. Creeps to retrieve the keycard.
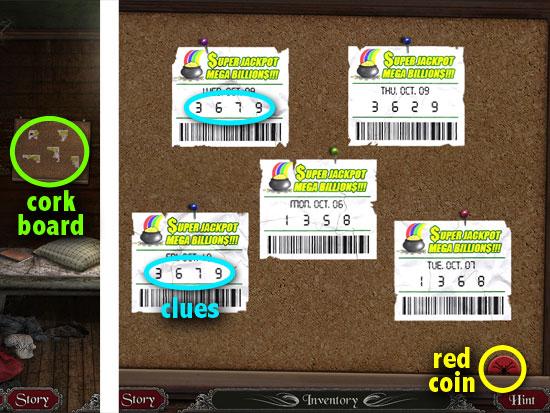
- Zoom in on the corkboard.
- Pick up the red spider coin.
- Place the 10 lottery ticket scraps on the corkboard.
- Assemble the pieces to complete 5 separate lottery tickets.
- Note that Quinn’s favorite combination is 3679.
- Go outside to exhume Mr. Creeps.
PORCH
- Use the shovel in your inventory to dig up the small grave on the left. Zoom in on the coffin playset to solve a puzzle.
- Align the spider coins with their matching color. When you click a coin, it will slide into the empty slot, and an adjacent coin will take its place.
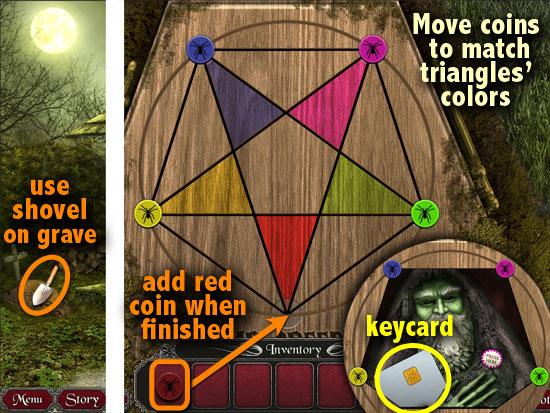
- Here is one of many solutions. Click on the coins in the following order:
o 1. Blue
o 2. Green
o 3. Yellow
o 4. Pink
o 5. Green
o 6. Green
o 7. Blue
- When all the coins are in the right spots, place the red spider coin in the empty slot.
- Take the keycard from Mr. Creeps. Return to the bedroom.
BEDROOM
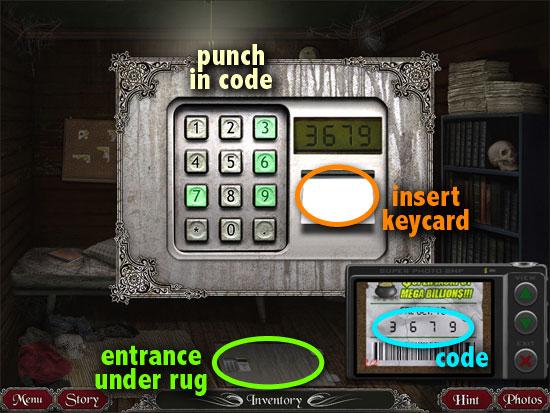
- Move the floor rug to reveal the entrance to the basement.
- Zoom in on the basement door.
- Slide the keycard into the slot and punch in Quinn’s favorite lottery combination. If you’ve forgotten the code, it’s in your Photos.
- Climb down the ladder into the basement.
BASEMENT
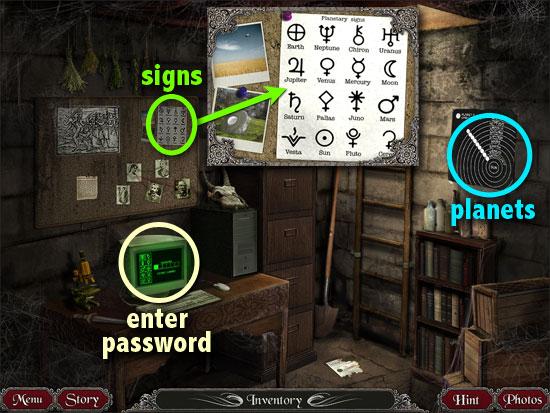
- Examine the news clippings on the floor and bulletin board to learn more details about what’s going on.
- Take photos of the planetary signs on the bulletin board and the solar system map on the wall. These clues will help you crack the computer password.
- Zoom in on the computer monitor.
- Using the photo clues, note that the first symbol is the Sun, and the last is Jupiter.
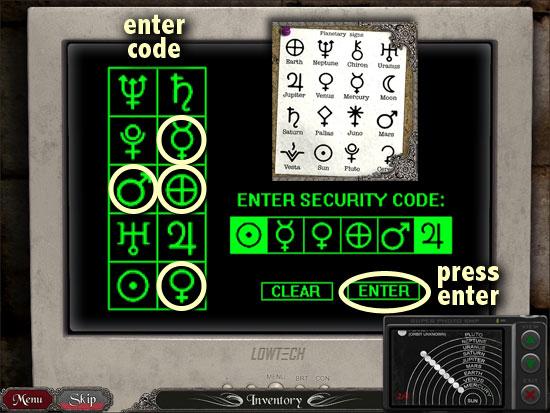
- Fill in the four blanks with the missing planetary symbols according to their order in the solar system (Sun – Mercury – Venus – Earth – Mars – Jupiter). Then click Enter.
- Play the hidden object game by finding the items on the list. Once you find 10 out of 12 items, you’ll be taken to the desktop.

- Click on Vale.txt and asylum notes.txt to find out more, then click outside the computer monitor.
Chapter 2: Graveyard
CENTER GRAVEYARD
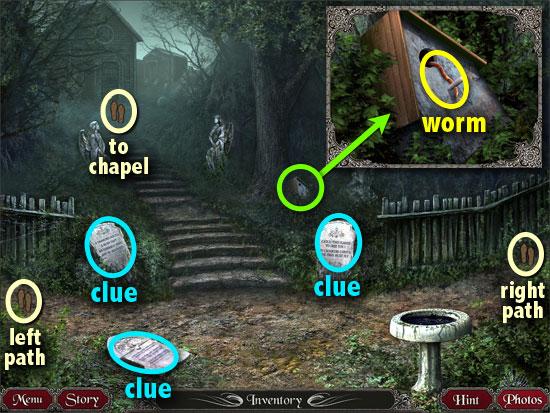
- Read the inscriptions on the 3 gravestones. They contain clues to puzzles around the graveyard.
- Zoom in on the fallen bird house and gather up the worm.
- Go up the steps towards the back.
CHAPEL FRONT
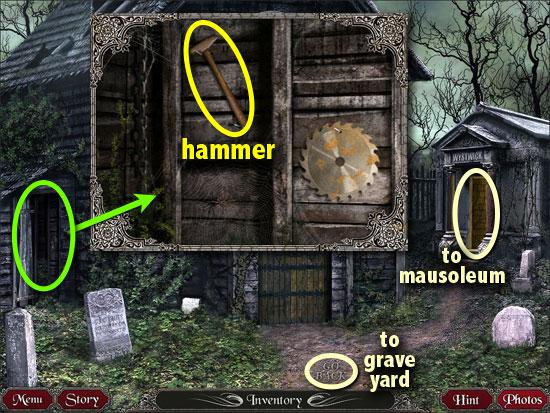
- Read the note on the ground.
- Zoom in on the door of the shed on the left.
- Take the hammer from the wall.
MAUSOLEUM
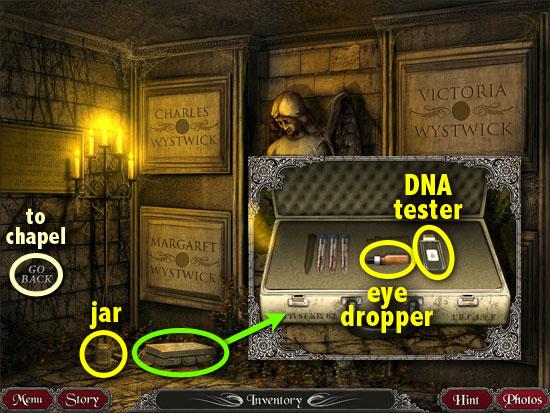
- Go to the Wystwick mausoleum on the right.
- Take the empty jar from the floor.
- Open the DNA test kit and take the empty eye-dropper and the DNA tester slide.
- Exit the mausoleum and go back down the steps.
- Walk to the left side of the graveyard.
LEFT GRAVEYARD
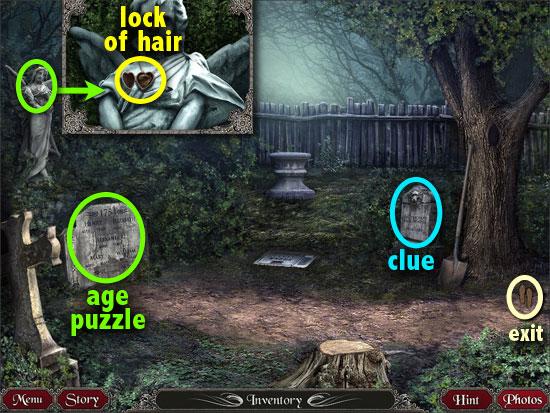
- Zoom in on the stone angel on the left. Open her locket and take the lock of hair from inside it.
- Read the inscription on the rightmost gravestone beside the tree. It’s another clue.
- Examine the stone plaque on the ground. It’s a DNA-based lock, but don’t worry about it for now, as the solution is found only at the end of the chapter. Take the puzzle tile from the panel.
- Zoom in on the gravestone on the left.
- You’ll need to enter the correct ages of the children, using the clue in your Photos.
- After analyzing the poem, we can deduce that the birth order from eldest to youngest is: Henry, Mary, Alexander, Elizabeth, and William. Henry and Mary were double the ages of their youngest siblings, so their ages need to be an even number.
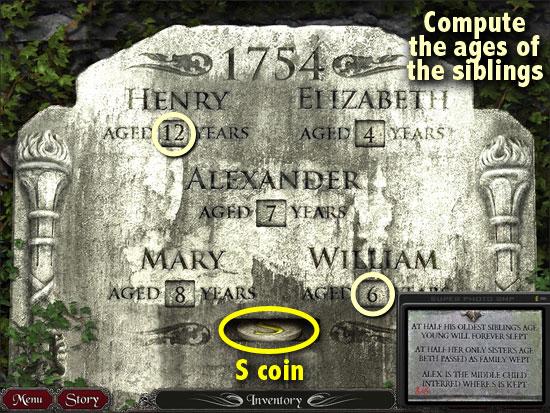
- Click on the age of Henry, the eldest, until it displays the maximum age (12 years). Click on the age of William until it shows 6 years, half Henry’s age. The other ages will automatically adjust (in case they don’t, Elizabeth was 4, Alex was 7 and Mary was 8).
- Take the “S” coin from the slot that opens up.
- Zoom in on the stone table near the fence. Take the hexagonal lion tile. Move the colored stones to their proper locations on the compass using the clue in your Photos:
o a diamond (white) on S
o a ruby (red) on E
o an emerald (green) on W
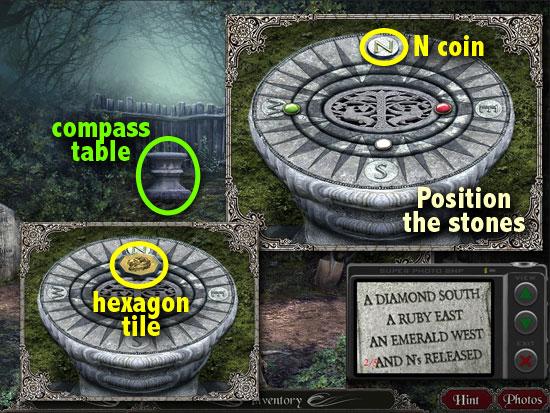
- Take the “N” coin from the top of the compass.
- Go right to return to the center graveyard. Then take the path to the right side.
RIGHT GRAVEYARD
- Pick up the book from the ARCANE box.
- Read the large memorial marker to learn about the asylum’s history.
- Move aside the 3 rocks and the plywood board to reveal a skeleton. Zoom in on it and take a few small bones from the upper left of the grave.

- Zoom in on the leftmost gravestone with the frogs. Take the empty jar from the frog on the left. The clue in your Photos tells you to catch two flames which means two fireflies (or lightning bugs).
- Click on the bottom left to return to the center graveyard.
CENTER GRAVEYARD
- Take an empty jar from your inventory. While holding the jar, place it over a moving yellow circle, and click to catch a firefly / lightning bug.
- Do the same with the other empty jar. You’ll need to scroll through your inventory items to find it.
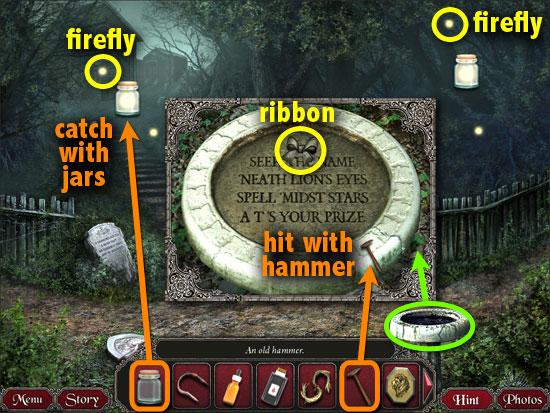
- Zoom in on the birdbath.
- Use the hammer to knock out the loose piece on the bottom right.
- Once the birdbath is drained, a clue is revealed.
- Take the ribbon from above the inscription.
- Go back to the graveyard on the right.
RIGHT GRAVEYARD
- Place the two jars with lightning bugs in the holes of the frog’s bellies.
- Take the “I” coin from the mouth of the frog in the center.

- Click on the rightmost gravestone to solve a puzzle.
- Refer to the two clues in your Photos: one tells you to find the name under the lion and spell it amidst the stars; the other clue shows the name under the lion.
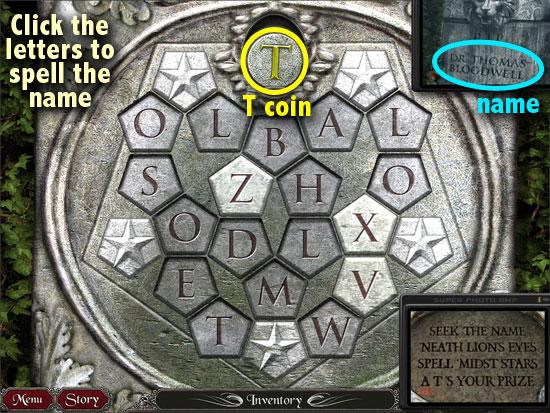
- Click on the letters one by one to spell out Thomas Bloodwell. Not all letters will be used.
- Take the “T” coin from the slot that opens up. You should now have 4 coins.
- Go left, up the steps, and right to the mausoleum.
MAUSOLEUM
- Examine the torn memo on the bottom right of angel statue. It shows the names of 3 Wystwicks, where you can see their middle initials:
o Charles N
o Victoria I
o Abraham T

- Place the coins in the correct slots on the plaques to complete the 3 names. The last coin (S) must belong to Margaret, so place it on her name.
- When all the names are complete, the box held by the angel opens up. Zoom into it and take the sun disc from inside.
- Exit the mausoleum.
CHAPEL FRONT
- Click on the door of the chapel to solve a puzzle.
- Place the sun-shaped disc in the center of the puzzle.
- Rotate the rings to align specific colors so that, when mixed, the resulting colors match the angels’ clothes.
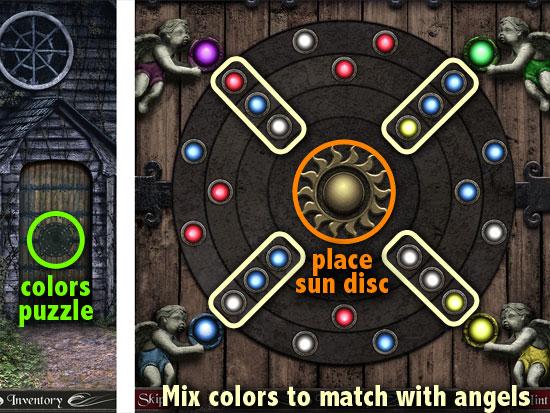
- Start with yellow, because there are only 2 yellow circles. One belongs with the yellow angel, and one with the green angel.
- Rotate the inner ring so that the yellow circle aligns with the green angel. Rotate the middle ring so that the white circle aligns with the yellow angel. Rotate the outer ring so that the yellow circle aligns with the yellow angel.
- When the door opens, enter the chapel.
CHAPEL INSIDE
- Take photos of the drawings around the chapel: the left wall, the front of the altar, the right wall, the book on the left pew, the note on the right pew.
- Read the journal pages on the floor to learn what happened in the chapel.
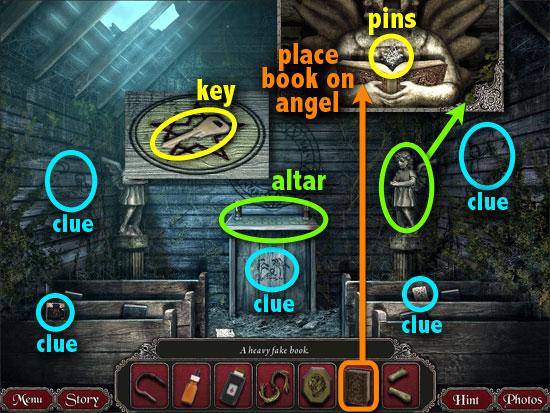
- Note that the statue on the left is holding a book.
- Zoom in on the statue on the right. Place the book from your inventory into the statue’s hands. Pick up the pins that fall out of its mouth.
- Zoom in on the top of the altar. Take the bronze key resting on the altar.
- On the five symbols, place the corresponding items from your inventory, according to the 5 drawings you photographed around the chapel.

o ribbon = cloud and lightning symbol
o lock of hair = sun symbol
o small bones = star symbol
o worm = moon symbol
o pins = tree and leaf symbol
- Once the items are in the right places, the wall etching glows and the word THORN will bleed from the wall.
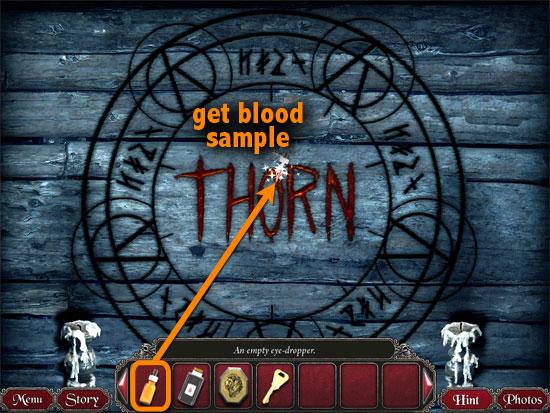
- Take the empty eye-dropper and get a sample of blood from the letters.
- Exit the chapel. Go downwards and take the path to the left.
LEFT GRAVEYARD
- Zoom in on the stone plaque on the ground. Pick up the square puzzle tile if you haven’t done so yet.
- Place the DNA tester on the slot on the right.
- Take the eye-dropper with the DNA sample and apply it on the tester.
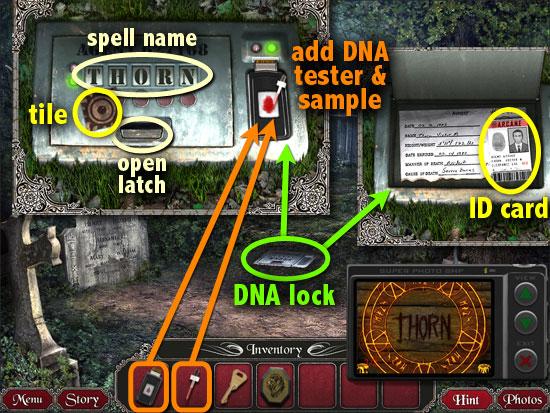
- Click on the buttons below the letters to spell out the name THORN.
- Press the panel latch below the letters. Take Agent Thorn’s ID card from inside the panel.
Chapter 3: Bunker
SECURITY FENCE
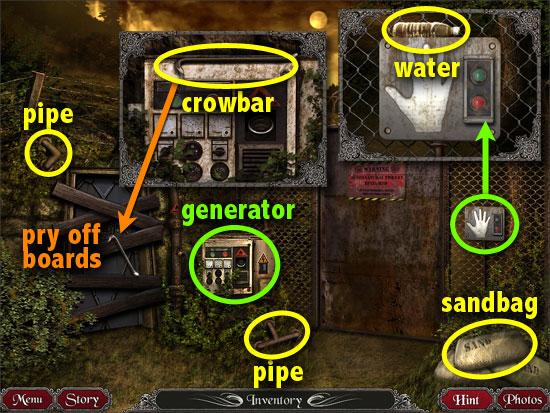
- Pick up a sandbag from pile on the right.
- Pick up a T-shaped pipe from the ground, and an elbow pipe from the wall on the left.
- Zoom in on the old generator. Take the crowbar resting atop the generator.
- Zoom in on the hand scanner on the fence. Take the water bottle perched on top of it.
- Use the crowbar to pry off the boards from the door.
- Click on the door to bring up a lock mechanism puzzle.
- Take the hexagonal “XI” tile.
- Slide the pieces around to form a circular symbol. The center piece will be empty.
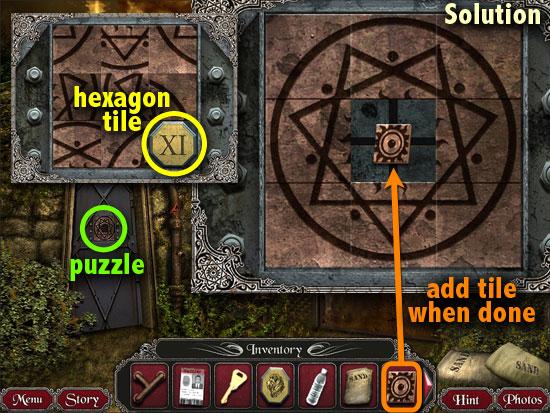
- Once the pieces are in the proper place, take the square tile from your inventory and place it in the center of the puzzle.
- Enter the bunker.
HALLWAY
- Pick up the pipe section near the trash bag.
- Check the door on the left, but it’s not safe to enter yet due to the green poisonous gas.
- There’s a panel at the hallway rear, but it’s bolted.
- Click on the puzzle on the floor. It’s a bar slider puzzle, but the mechanics are different from the usual slider puzzles.
- There is no exit path; instead you need to move the bars to the areas marked in red.
- Below is one of many possible solutions:
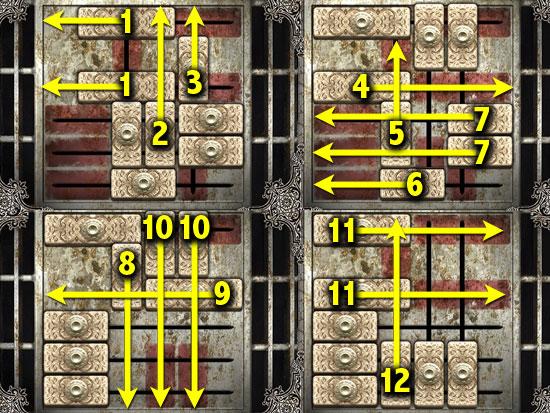
- When the puzzle is solved, the grate opens. Take the black rubber hose from beneath it.
- Go through the doorway on the right into the control room.
CONTROL ROOM
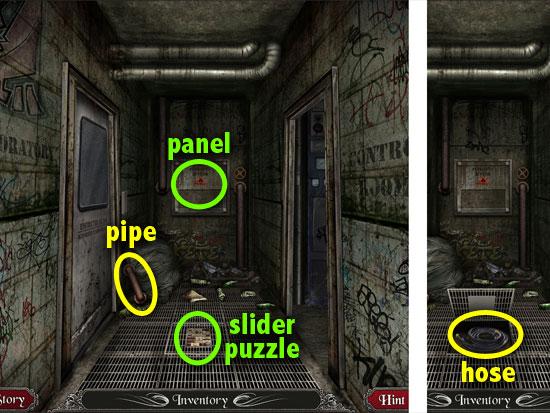
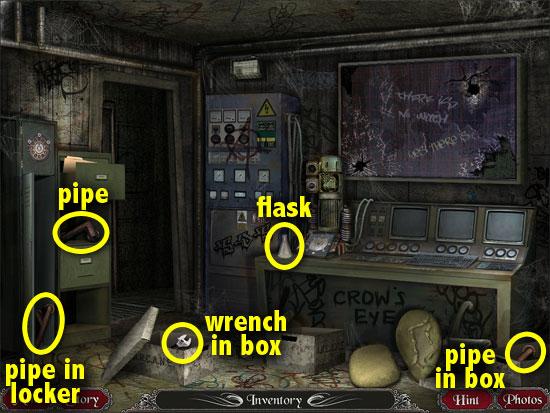
- Open up all the boxes on the floor. Pick up a wrench and a short pipe.
- Take the L-shaped pipe from the shelf. Open the locker door and take the Y-shaped pipe inside.
- Take the Erlenmeyer flask from the left side of the computer table.
- Click on the top drawer of the filing cabinet to read an internal memo.
- There are several puzzles in the room, but you won’t be able to solve them until the generator has been powered up.
- Exit to the hallway.
HALLWAY
- Zoom in on the bolted panel on the rear wall of the hallway.
- Use the wrench to remove the 4 bolts on all corners.
- Place the 6 pipe pieces on the panel, so that all the holes are covered. Pipes may not intersect.
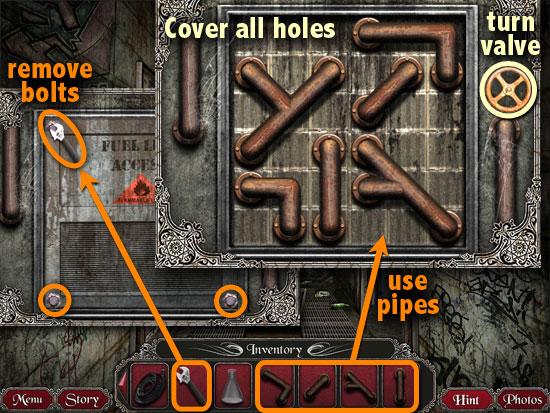
- When all the holes are covered, turn on the fuel valve on the right side of the pipes.
- Go outside to the electric fence.
SECURITY FENCE
- Zoom in on the generator.
- Take the rubber hose from your inventory and attach it to the hole below the flammable sign.
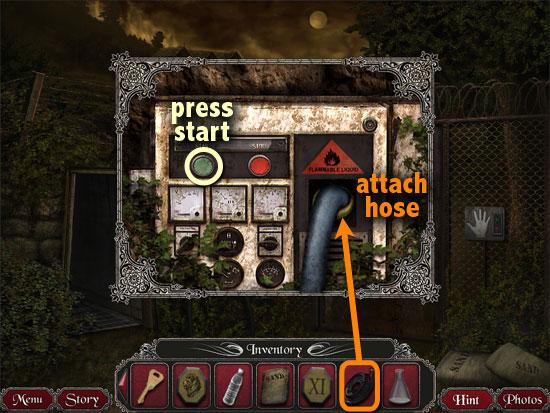
- Press the green button to power up the generator.
- Go back inside to the control room.
CONTROL ROOM
- Click on the puzzle at the left end of the table.
- The objective is to move the 4 rune stones in the inner ring, to their matching symbols on the outer ring.
- Move a stone by pressing the symbols on the outer ring. First, click on a symbol that has a stone next to it – the symbol will turn green – then click on the symbol where you want the stone to move to. You may not move a stone to a symbol that is red.
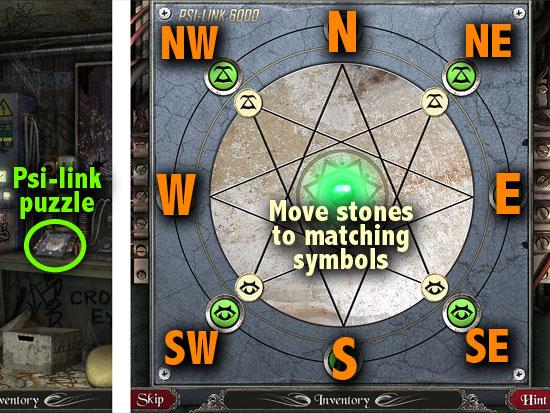
- Here is a suggested solution:
o NW -> S
o SW -> E then E -> NW
o SE -> N
o NE -> W then W -> SE
o N -> SW then SW -> E
o S -> NE then NE -> W
o SE -> N then N -> SW
o W -> SE
o NW -> S then S -> NE
o E -> NW
- When puzzle is solved, the star in the center glows green. Exit the Psi-Link 6000 panel.
- Zoom in on the green computer monitor.
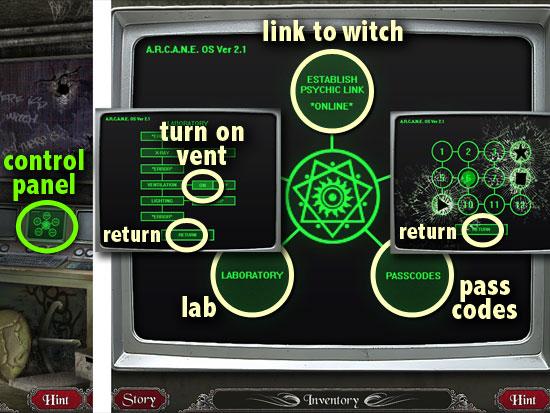
- Select Laboratory and beside Ventilation, click the On button. The laboratory is now safe to enter. Click Return at the bottom to go back to the menu.
- Click Establish Psychic Link. The witch will send you a message, which shatters the monitor.
- Select Passcodes. Here you’ll find the clue to open the safe above the locker. If you’ve received the message from the witch, the passcode should have 4 symbols (star, square, triangle, and a faint circle). Click “Return” at the bottom.
- Read the Files folder if you want to learn more about Quinn’s back story.
- Back out from the computer.
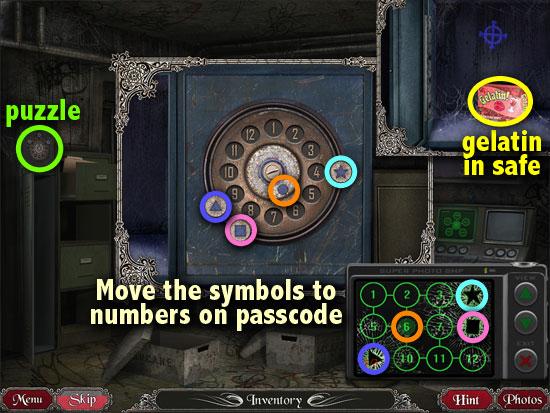
- Zoom in on the puzzle on the safe above the locker. Check the password clue in your Photos. Notice that:
o star = 4
o circle = 6
o square = 8
o triangle = 9
- In the puzzle, click on the symbols to move them beside those numbers on the dial.
- When the safe opens, take the box of strawberry gelatin from inside.
HALLWAY
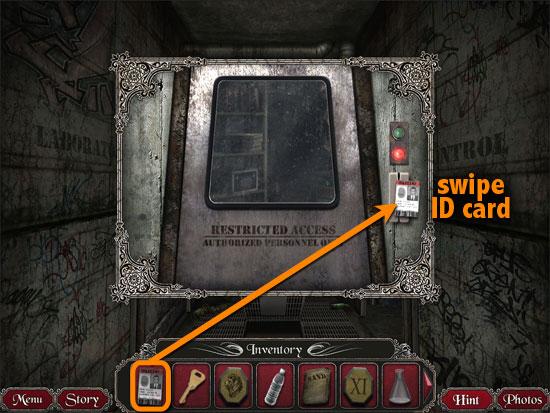
- Go to the hallway, and click on the door on the left.
- Swipe Agent Thorn’s ID card on the ID badge reader.
- Enter the laboratory.
LABORATORY
- Examine the memo on the floor and the photos on the stool.
- Use the sandbag to cover the green poison on the floor.
- Check the note on the lightbox on the wall. Take the match peeking out from the right side of the note.
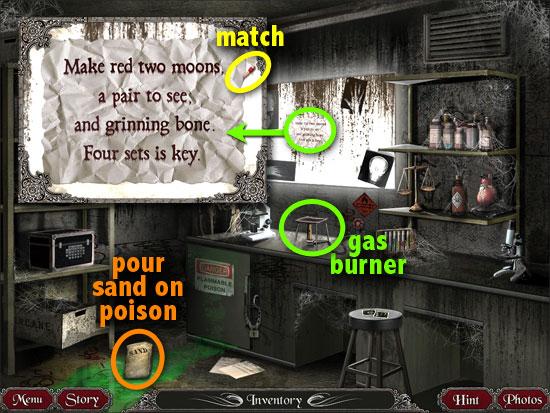
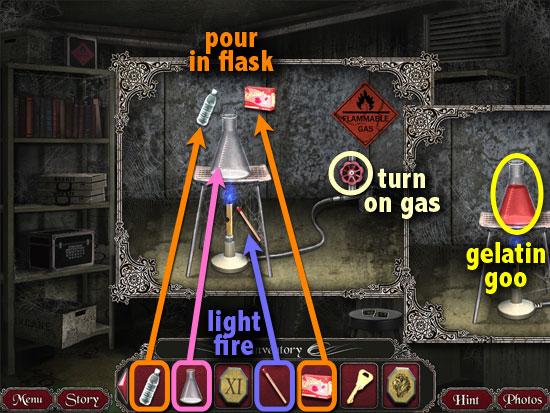
- Zoom in on the gas burner on the table.
- Turn on the gas valve. Light the burner with the match you found.
- Place the Erlenmeyer flask on top of the burner. On the flask, add the water bottle, and the box of gelatin.
- Take the flask of strawberry gelatin goo.
- Click on the black box on the shelf to solve a puzzle.
- The objective is to press down all the buttons in a specific order.
- You should end with the green ball in the center — however, you’ll need to figure out where to start.
- The number of triangles indicates how many steps to take next, and the direction of the arrows shows which way to go (e.g. a button with 4 left arrows means the next button is 4 steps to the left).
- To find the exact starting point, backtrack from the center by pinpointing which button leads where.
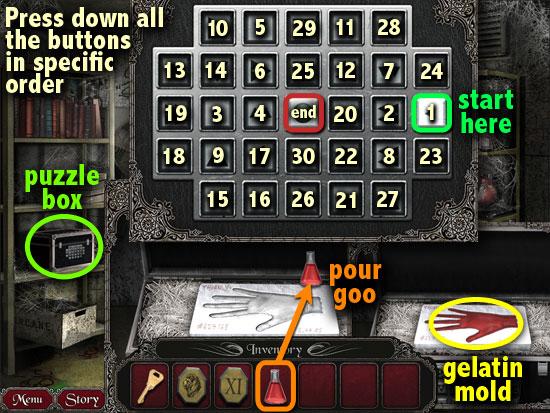
- When the puzzle is solved, the box opens to reveal a casting mold of a hand.
- Pour the gelatin goo into the mold.
- Pick up the goo-filled mold.
- Take the bronze key you found in the chapel and use it on the padlocked refrigerator.
- Look inside the refrigerator.
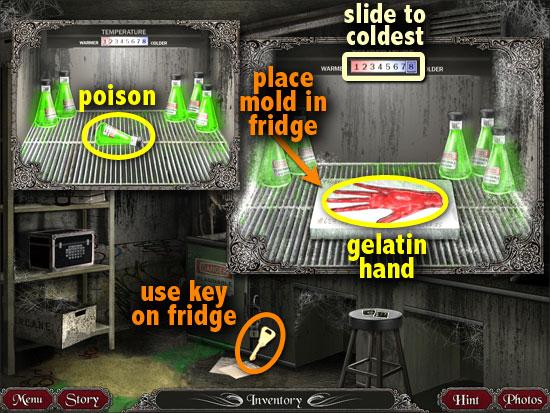
- Pick up the bottle of poison.
- Place the gelatin mold inside. Slide the refrigerator’s temperature to 8, the coldest setting. Take the frozen gelatin hand.
- Exit the laboratory and go outside to the security fence.
SECURITY FENCE
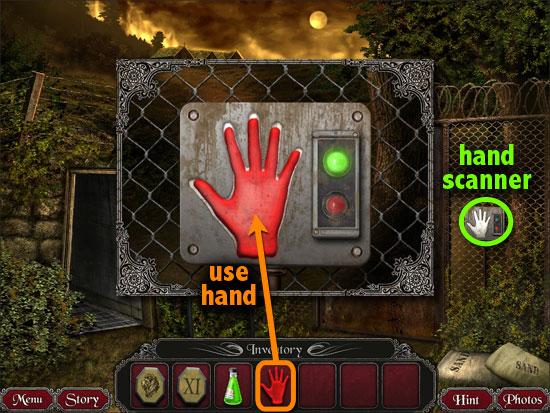
- Zoom in on the hand scanner.
- Place the gelatin hand on the slot.
Chapter 4: Asylum
FOUNTAIN
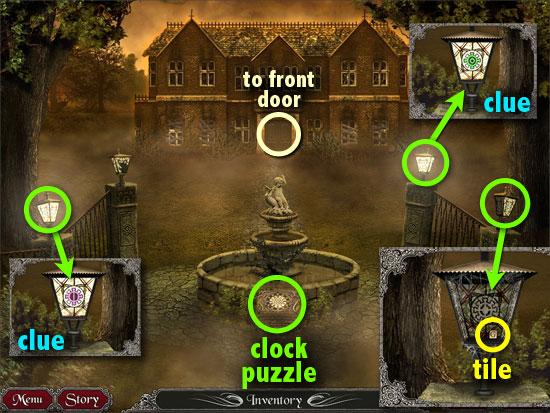
- Examine each of the lamp posts. The first and third lamps contain clues.
- Take the “G” tile from the lamp on the far right.
- Zoom in on the puzzle in front of the fountain.
- Refer to your Photos for the clue Even moons, odd stars, a sun at 6.
- Slide the symbols around so that the moons are on 2, 4, 8, 10 and 12; the stars on 1, 3, 5, 7, 9, 11, and the sun on 6.
- Use the three empty slots on sides of the clock to help you switch around the positions of the symbols.
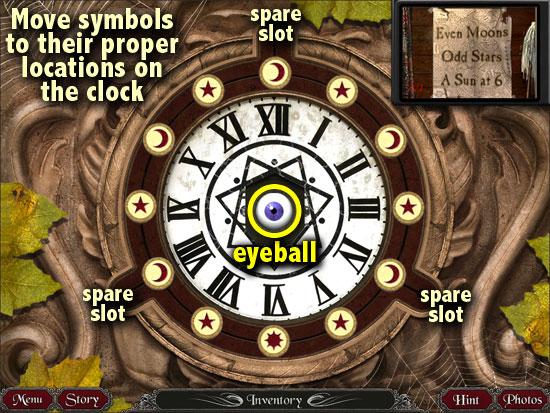
- It’s easier when you end with 3 moons in the outer slots, so that you just slide them back into the 4, 8, and 12 positions where they belong. Keep in mind that the sun needs to be in between 2 stars.
- Take the eyeball from the slot that opens up. Exit the clock.
- Walk forward to the asylum’s front door.
FRONT DOOR
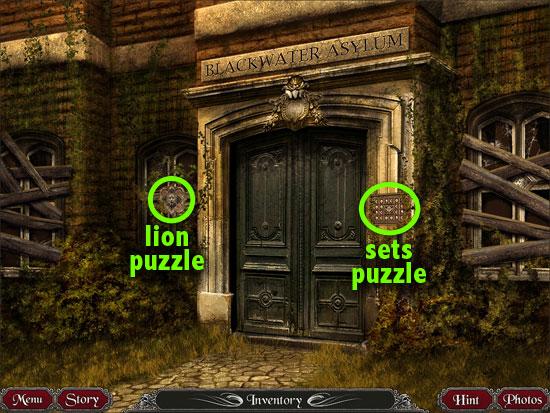
- There’s a lion puzzle on the left, but you don’t have all the clues to solve it yet.
- Zoom in on the puzzle on the right.
- The photo clue for this is Make red two moons, a pair to see, and grinning bone. Four sets is key.
- You’ll need to make 4 sets of symbols, where each set contains 2 moons, 2 eyeballs, and a skull.
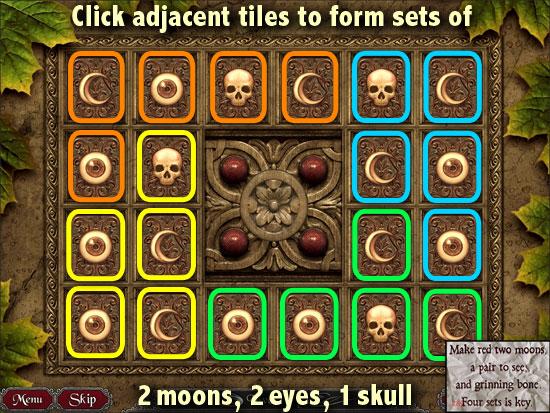
- Click on 5 adjacent tiles to complete a set. When a set is complete it will glow red.
- Clicking on a wrong tile will reset the whole board.
- The front door opens. Enter the asylum.
ENTRANCE HALL

- Read the book in the left corner. Note the year when the witch was unsuccessfully burned at the stake – 1563.
- Pick up the “H” tile beside the book.
- Examine the painting on the right corner. Take the gold key.
- Enter the parlor on the left.
LEFT PARLOR
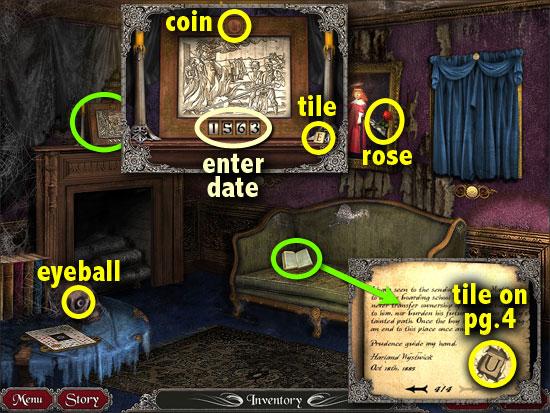
- Take the eyeball from the skull on the table. There’s a card game on the table, but the pieces are missing.
- Zoom into the wooden frame on the mantelpiece. It’s a drawing of a witch being burned.
- Click the numbers until it displays the year of the burning (1563), according to the book in the entrance hall.
- Take the wooden coin from the slot that opens up. Pick up the “E” tile beside the frame.
- Read the book on the couch. Scroll to the last page. Take the “U” tile embedded in the page.
- Take the red rose from the painting of the little girl.
- Go right to the entrance hall. Enter the parlor on the right.
RIGHT PARLOR
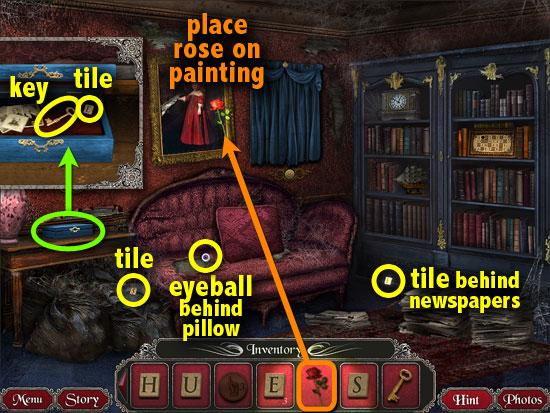
- Take the “S” tile from the trash bags.
- Open up the blue jewelry box on the table. Take the other gold key and an “E” tile.
- Move aside the pillow on the couch and take the eyeball from behind it.
- Move aside the rightmost stack of newspapers, then the middle stack. Take the “E” tile.
- Place the red rose from the other room, on the painting of the little girl. Zoom in on the panel that opens up.
- The objective is to turn all the fuses to the vertical position. Clicking on a fuse will also turn its adjacent fuses, so you’ll need to find the right order in which to click them.
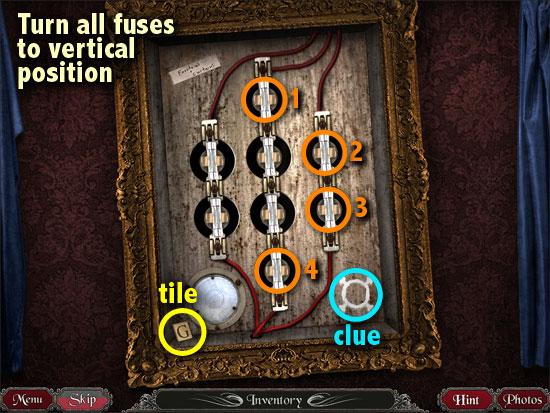
- If you get stuck, back away from the fusebox, then click on it again to reset it.
- Click on the fuses in this order:
o 1. top
o 2. upper right
o 3. lower right
o 4. bottom
- Take the “G” tile from the lower left corner. Notice that the fusebox contains the last clue for the lion puzzle on the asylum’s front door.
- Go back to the entrance hall and downwards to the front door.
FRONT DOOR
- Zoom in on the lion puzzle on the left.
- The clues in your Photos show 4 symbols in 4 colors: white, purple, green and blue.
- Recreate those symbols on the puzzle.
- Use the C button to change a color, and the symbol button to change a shape.
- By process of elimination, the white goes on the bottom left, the blue on the top right, the green on top left, and the purple on bottom right. Then, find the correct symbol for the respective colors.
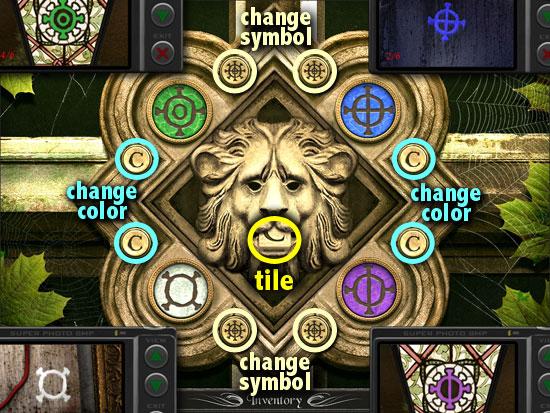
- Take the “C” tile that slides out of the statue’s mouth.
- Go inside and to the left parlor.
LEFT PARLOR
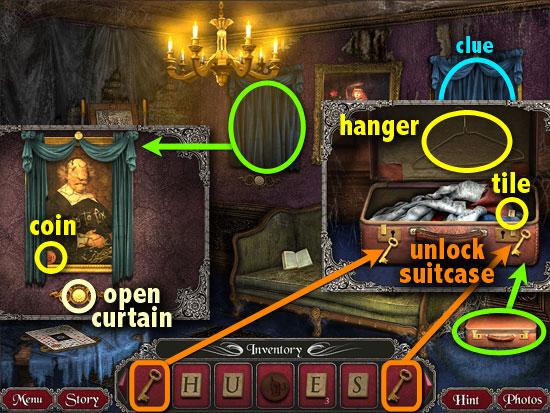
- Zoom in on the brown suitcase. Use the two gold keys on the two suitcase locks.
- Click to open the suitcase. Take the hanger and the “E” tile inside.
- The curtains can be opened now that the power is on. Zoom in and click on the floral button below each set of curtains to open it.
- Take note of the phrase written on the paintings: The way to fix a broken chime’s…
- Behind the curtain on the left, pick up a wooden coin.
- Go to the right parlor.
RIGHT PARLOR
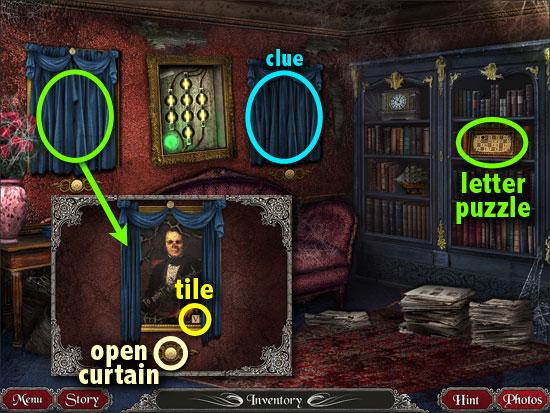
- Zoom into both sets of curtains. Open them by pressing the floral buttons below them. Take note of the phrase written on the paintings: to point each hand to numbers rhyme.
- Behind the curtain on the left, pick up a “V” tile.
- Zoom in on the word puzzle on the shelf.
- Take the “K” tile on the top right. You should now have all 12 letter tiles.
- Place the tiles on the puzzle to form possible words, using trial and error.
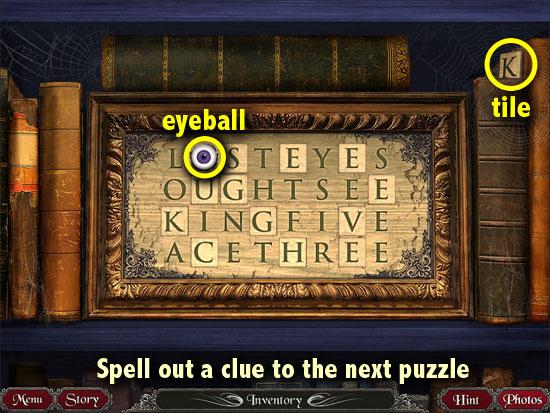
- The solution for this puzzle is a clue for the next puzzle: Lost eyes ought see King Five Ace Three. Take the eyeball that pops out.
- Go to the left parlor.
LEFT PARLOR
- Zoom in on the card game on the table.
- Place the 4 eyeballs into the 4 bowls around the board. All the eyeballs must be complete before you can move the cards.
- According to the clue from the word puzzle, the eyeballs need to see King, 5, Ace, and 3. Slide the cards around until those 4 cards are in the 4 corners (in any order).
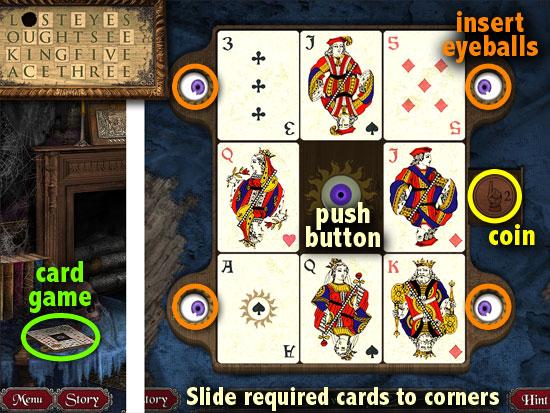
- Push the button in the center.
- Take the wooden coin that slides out from the side.
- Go to the entrance hall.
ENTRANCE HALL
- Notice that the lion fountain on the right is now working, after turning on the fuses.
- Use the clothes hanger to unclog the lion fountain on the left.
- Pick up the wooden coin from the water basin.
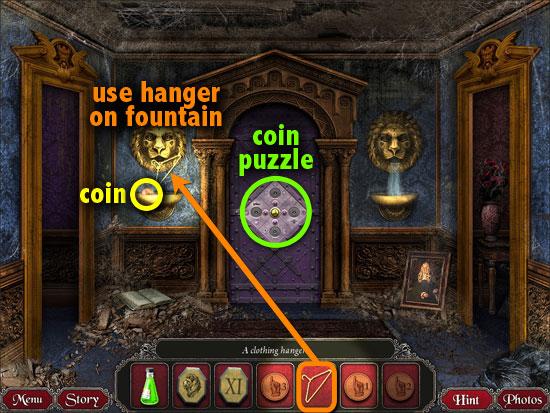
- Zoom in on the puzzle on the purple door.
- Recall the phrase written on the paintings: The way to fix a broken chime’s to point each hand to numbers rhyme.
- Place the wooden coins on the 4 slots.
- Figure out which coin belongs where by finding words that rhyme with the numbers one, two, three and four.
- Then, click the purple buttons to make the finger point to that word.
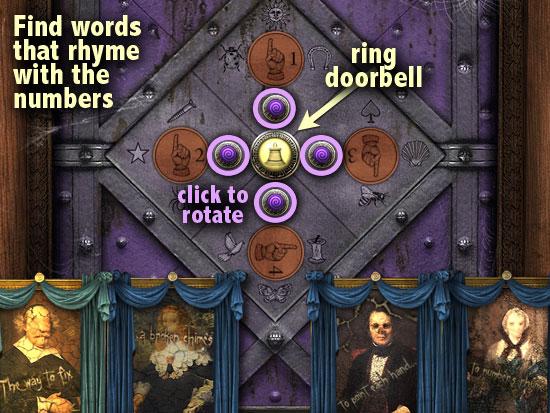
o one = sun
o two = screw
o three = bee
o four = core
- When done, ring the doorbell at the center.
Chapter 5: Upstairs
PRISON CELL
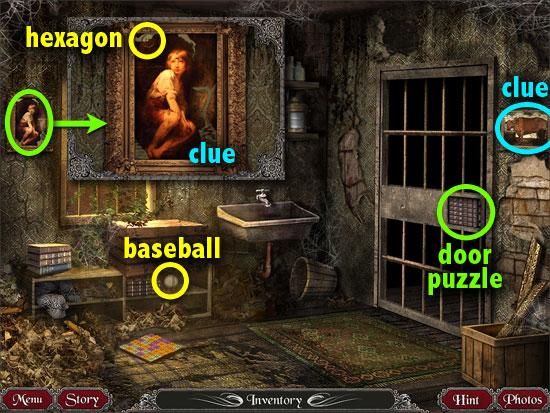
- Examine the painting on the left wall. Take the hexagonal “III” tile from its top left corner.
- Also, check the painting on the right wall.
- Take the baseball from the bottom shelf. There’s a puzzle on the floor but the solution for this is in another room.
- Click on the puzzle on the cell door. The objective is to group the tiles in rows and columns, according to color and symbol.
- The red smudge on top indicates that red tiles belong in the 4th column. The symbol on the left means tiles with that symbol belong in the 3rd row.
- Click on two tiles to swap their positions.
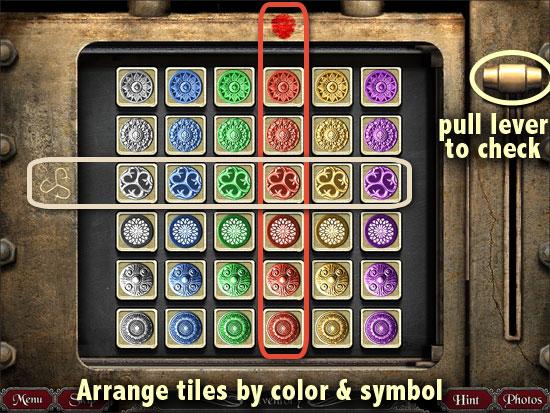
- Pull the lever on the right – if the tiles are in the correct place, they will stay down a bit longer. Use the lever to figure out which tiles belong in what row or column.
- When all the tiles are in order, pull the lever to slide open the door lock.
- Exit the prison cell.
HALL
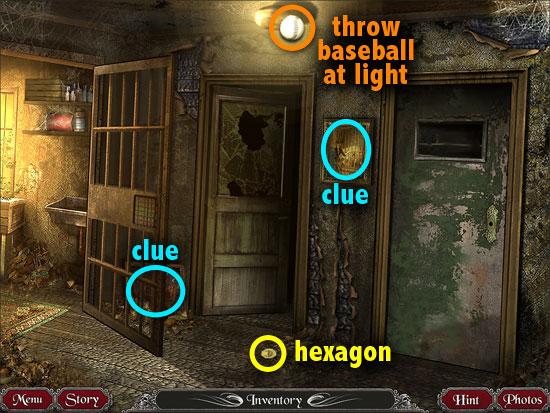
- Examine the two paintings: one on the corner behind the cell door, and the other on the wall.
- Throw the baseball at the ceiling light.
- Pick up the hexagonal moon tile that falls out.
- Enter the room with the open door.
BIRD ROOM
- Look outside the window to see some ARCANE agents.
- Examine the painting of the crow on the wall. Recall the clue in your Photos which says Crow’s Eye.
- Click on the crow’s eye. Take the hexagonal “V” tile from the slot that opens up.
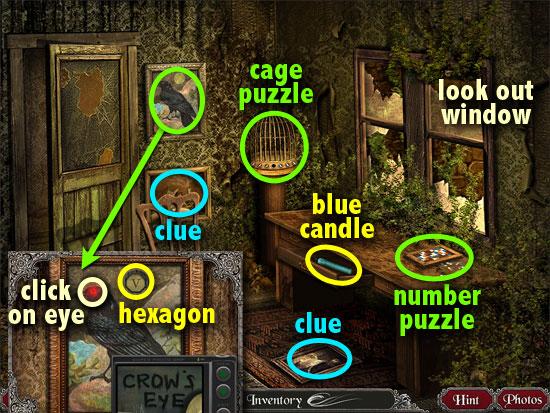
- Check the 2nd painting on the wall, below the crow. Also, look at the painting on the floor.
- Open the middle drawer on the desk. Take the blue candle from inside.
- Zoom into the bird cage.
- The objective is to move all the blue birds to the left, and all the red birds to the right.
- The birds can only move forward, not backward, by taking one step or jumping over another bird.
- If there are no more possible moves, the puzzle will reset.
- As you move the birds forward, make it a point to always alternate the colors. Never have two colors adjacent to each other (except when they reach the end), or you’ll run out of moves.
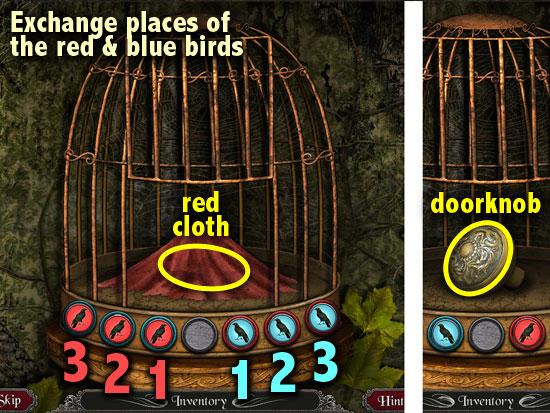
- Here’s a suggested solution:
o blue 1
o red 1
o red 2
o blue 1-2-3
o red 1-2-3
o blue 1-2-3
o red 2-3
o blue 3
- When the cage door slides up, take the red piece of cloth and the doorknob from inside the cage.
- Click on the puzzle on the desk.
- Arrange the pieces to fit into the frame. The numbers on the sides of the frame means that the rows and columns must add up to those.
- Here’s a tip: the numbers on the bottom half are a mirror image of the numbers on the top half. Likewise, the numbers on the left side are a mirror image of those on the right.
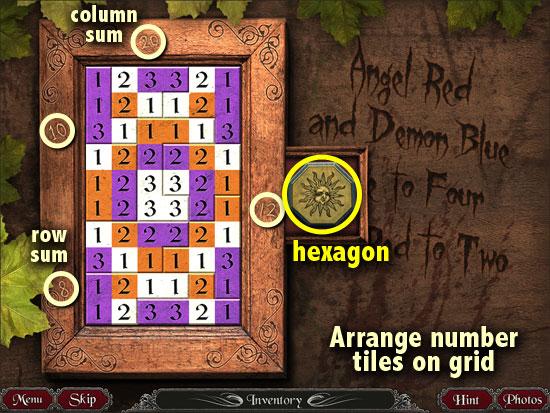
- The center of the completed puzzle is a clue to solving the puzzle in the prison cell.
- Take the hexagonal sun tile that slides out from the side.
- Exit the bird room.
HALLWAY

- Zoom in on the door on the right. Place the doorknob on the hole. Enter the room.
BEDROOM
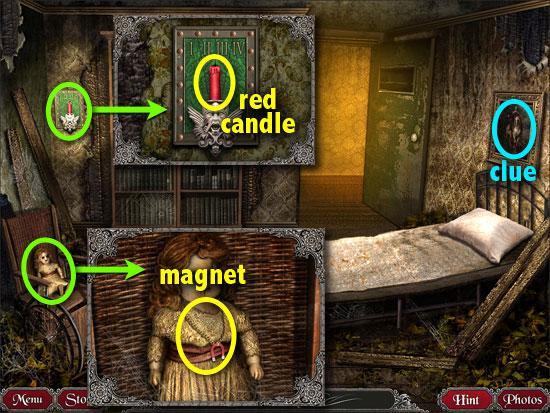
- Check the doll on the wheelchair. Take the necklace with a magnet from around the doll’s neck.
- Zoom in on the wall candle sconce on the left. Take the red candle.
- Examine the painting on the right wall. You should have 8 painting clues in your Photos by now.
- There’s something inside the pillow, but you need a tool to get it out.
- Exit the bedroom and go back to the prison cell.
PRISON CELL
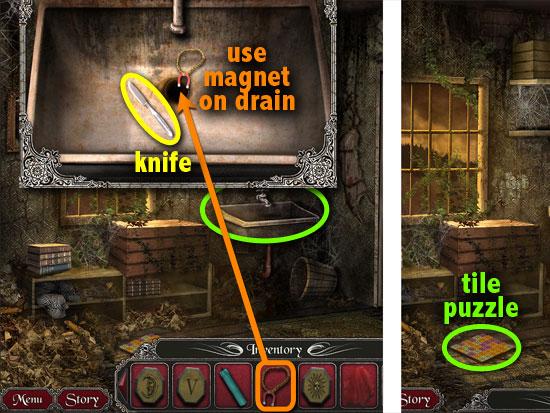
- Check the sink. Use the necklace with the magnet to pull out whatever’s stuck in the drain. Take the butter knife.
- Zoom in on the puzzle on the floor. The clue in your Photos tells you the color and number of tiles that should go in each square.
- If the diagram shows a purple 3, that means you need 3 purple tiles in that position.
- For the orientation of the puzzle, imagine that your head is tilted left. Therefore, the top left square in the Photos corresponds to the leftmost square on the puzzle.
- Click on a tile you want to move, then click on where you want to put it.
- Stacks can only go as high as 3 tiles.
- Some stacks may have the right color on top, but you’ll need to check if the tiles beneath are also the right color.
- To help speed up tile building: note that the bottom 3 rows are a mirror image of the top 3 rows. Also, the left side is a mirror image of the right.
- Take the hexagonal spider tile that slides out from the side.
- Exit the prison cell and go to the bedroom (the door on the right).
BEDROOM
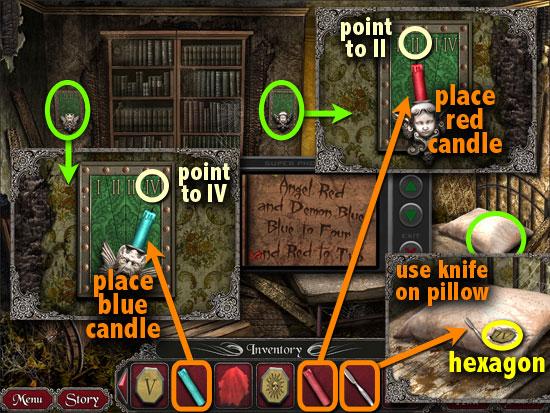
- Zoom in on the pillow. Use the butter knife to slice across the pillow. Take the hexagonal “IV” tile. You should now have 8 tiles.
- Click on the left candle sconce. Check your Photos for the clue: Angel Red and Demon Blue. Blue to Four and Red to Two. Place the blue candle on the demon candleholder. Click the demon until the candle points to “IV”.
- Click on the right candle sconce. Place the red candle on the angel candleholder. Click the angel until the candle points to “II”.
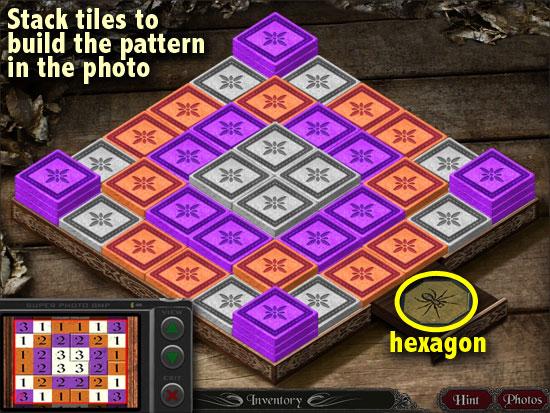
- When the bookshelves slide apart, zoom in on the puzzle.
- Place the 8 hexagonal tiles in the slots, using the 8 painting clues in your Photos as a reference.
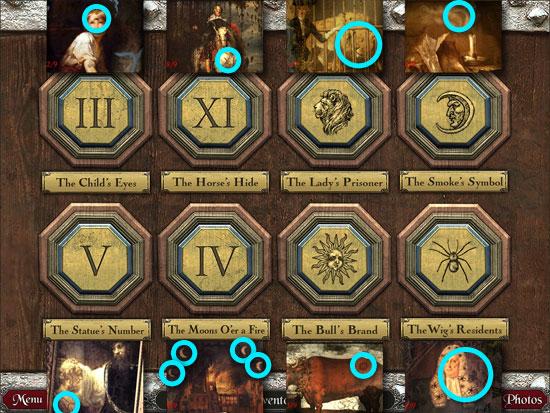
o The Child’s Eyes – III
o The Horse’s Hide – XI
o The Lady’s Prisoner – lion
o The Smoke’s Symbol – moon
o The Statue’s Number – V
o The Moons O’er a Fire – IV
o The Bull’s Brand – sun
o The Wig’s Residents – spider
- Enter to descend the dark staircase.
Chapter 6: Underground
ANGELS
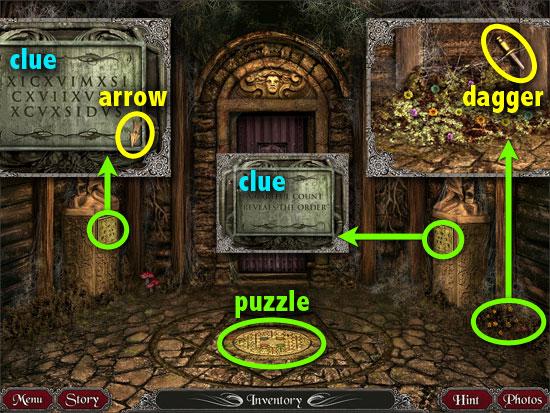
- Examine the plaque under the angel on the left. Take the wooden arrow from the corner of the plaque.
- Read the plaque under the angel on the right. Note the dead flies stuck in the spider web on the plaque.
- Zoom in on the flowers on the right. Take the dagger out of the post.
- Click on the puzzle on the floor.
- The objective is to rotate the discs so that the colored lines connect the circles of that same color.
- If you’re familiar with pipe mini-games, this should be a breeze. It’s easiest to start with the red lines.
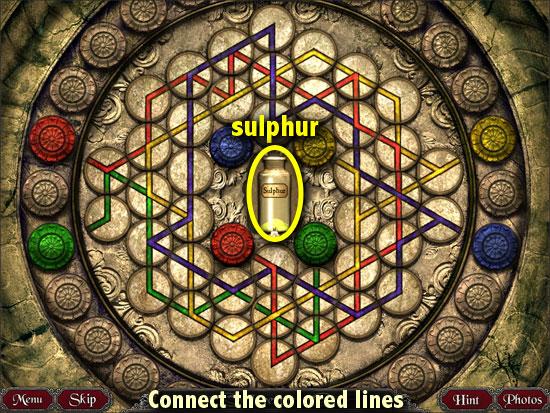
- Take the bottle of sulphur from the panel that opens up in the center.
- Zoom in on the puzzle on the door. Open up your Photos to check the plaque with the Roman numerals. The other plaque says: A careful count reveals the order. Count how many times each letter appears on the plaque:
o X – 7 times
o I – 6 times
o C – 3 times
o V – 5 times
o M – 1 times
o S – 4 times
o D – 2 times
- Each letter corresponds to a number from 1 to 7. Thus we have the order in which the letters on the door should be pressed.
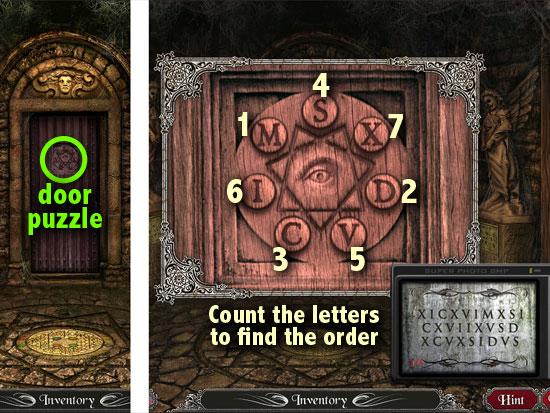
- Click on the letters in that order: M D C S V I X.
- Go through the open doorway.
BOOKS
- Examine the skull above the left doorway. Note the moss covering the stone. Take the wooden arrow on the right of the skull.
- There’s a puzzle with books on the wall, but we don’t have enough clues for that yet. The same goes for the puzzle on the floor.
- Zoom in on the door puzzle on the right. Click on the columns to move the letters downwards, until the words begin to make sense.
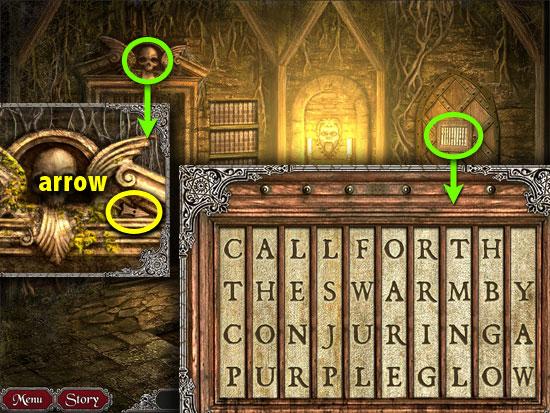
- There are only 4 letters per column, so all letters are visible at once. It’s just a matter of finding the right letter combinations.
- The solution is: Call forth the swarm by conjuring a purple glow.
- Enter through the doorway on the right.
CRYPT
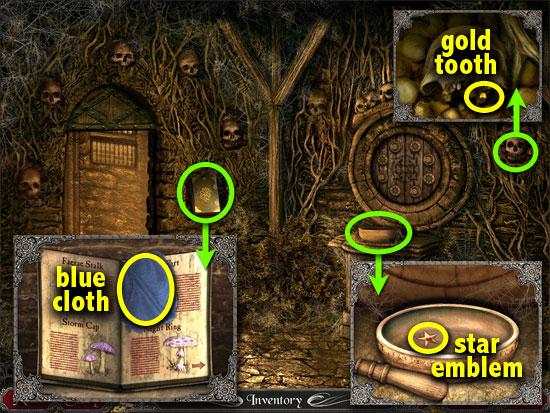
- Examine the gold book in the niche. Take the blue cloth inside it. The book identifies various mushrooms and flowers.
- Zoom in on the skull on the far right. Take its gold tooth.
- Check the mortar and pestle on the platform. Take the star emblem.
BOOKS
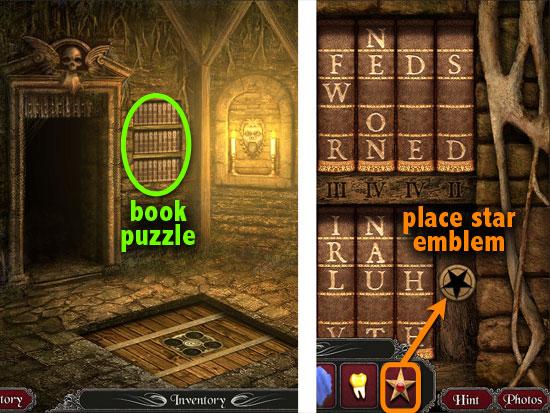
- Exit the crypt and zoom in on the books on the wall.
- Place the little star emblem on the slot on the right.
- Move the books to their proper spots to form a phrase.
- You may only move a book to an empty space.
- First, click on the book you want to move, then click on the space.
- Notice the Roman numerals on the wooden shelves. The number of letters on a book’s spine should match the number under the book.
- Since there is only one book with 5 letters on its spine, move that book to the V spot. There are 2 books with 2 letters. Figure out where they go, and do the same for the books with 3 and 4 letters.
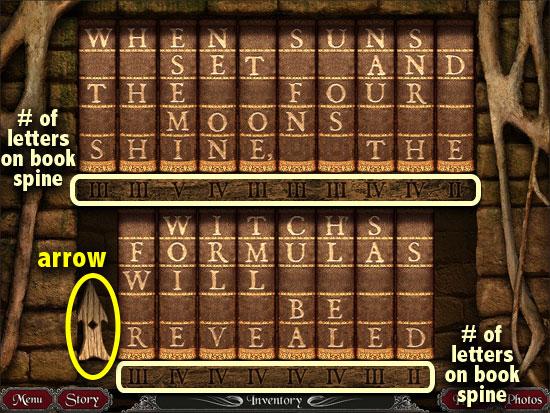
- The solution is: When suns set and the four moons shine, the witch’s formulas will be revealed.
- Take the wooden arrow from the left side of the books.
- Go right to the crypt.
CRYPT
- Zoom in on the round puzzle on the wall.
- Refer to the clue in your Photos: when suns set and the four moons shine.
- This means the suns should be pressed down and the moons should remain in the up position.
- Clicking a button will affect its adjacent buttons.

- The solution for this puzzle is to click all four suns once, in any order.
- Read the book of recipes inside the hidden compartment. The clue in your Photos tells you to conjure a purple glow.
- Therefore, to create purple, you’ll need the recipe for a red flame (page 1) and recipe for a blue flame (page 3).
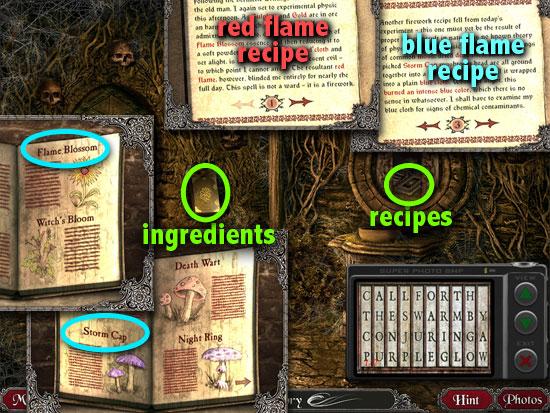
- Take note of the ingredients for both recipes and check their illustrations in the gold book.
- If you don’t read the recipes or view all the illustrations, you won’t be able to pick up the ingredients.
- Exit the crypt and go left to the chamber with the angel statues.
ANGELS & BOOKS
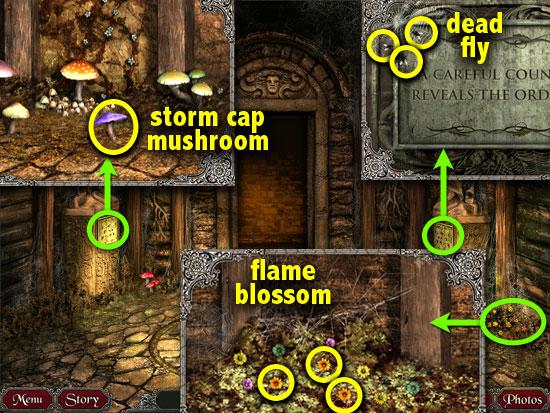
- The recipe for red flame calls for Flame Blossom. Zoom in on the flowers on the right. Take one of the orange flowers.
- The recipe for blue flame calls for dead flies, moss and a Storm Cap mushroom. Zoom in on the mushrooms on the left. Take the purple mushroom.
- Check the plaque under the angel on the right. Take one of the dead flies.
- For the moss, go to the room with books.
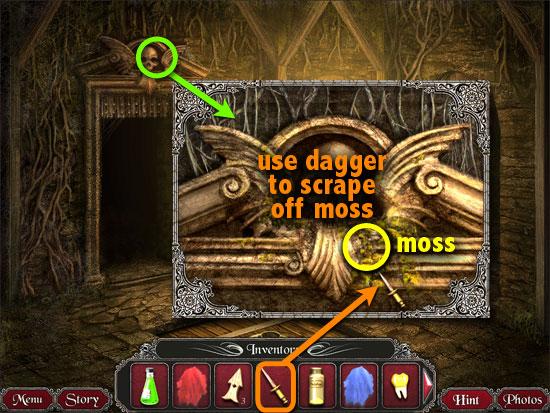
- Zoom in on the skull above the left doorway. Use your dagger to scrape off some moss.
- Take the wooden arrow on the right of the skull, if you haven’t done so yet.
- Go right to the crypt.
CRYPT
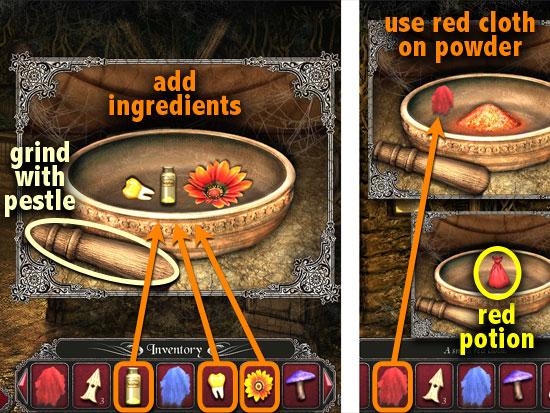
- Consult the recipe for red flame. Zoom in on the mortar and pestle on the platform.
- Add the sulphur, the gold tooth, and the Flame Blossom flower to the mortar. Pick up the pestle and click on the ingredients to grind them. Place the red cloth on the powder.
- Take the pouch of red-burning potion.
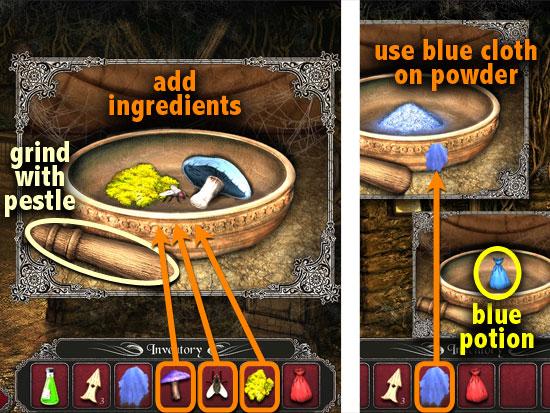
- Consult the recipe for blue flame. Zoom in on the mortar and pestle on the platform.
- Add the moss, the dead fly, and the Storm Cap mushroom to the mortar. Pick up the pestle and click on the ingredients to grind them. Place the blue cloth on the powder.
- Take the pouch of blue-burning potion.
- Exit the crypt to the room with books.
BOOKS
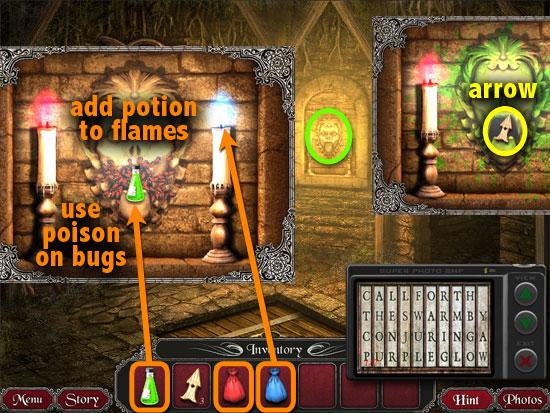
- Zoom in on the wall niche with two candles.
- Place the red potion on either flame, and the blue potion on the other flame.
- A swarm of bugs pour out from the statue’s mouth. Use the green bottle of poison on the mouth to kill the bugs. Reach into the open mouth to pick up a wooden arrow.
- Zoom in on the puzzle lock on the floor.
- Place the four arrows on the four slots.

- Clicking an arrow rotates it counter-clockwise.
- Refer to the clue in your Photos to see what direction the arrows should face.
- Descend the stairs to the coffin chamber.
COFFIN CHAMBER
- Read the journal pages on the floor.
- On the 4th page is a clue for a puzzle.
- Click on the puzzle in the left niche.
- This is similar to Sudoku, but not only does each row or column need one of each animal. Each chain (or string of circles) also needs to have one of each animal.
- Click on a disc to choose an animal.
- Some discs are locked and cannot be changed – these will help to solve the puzzle.
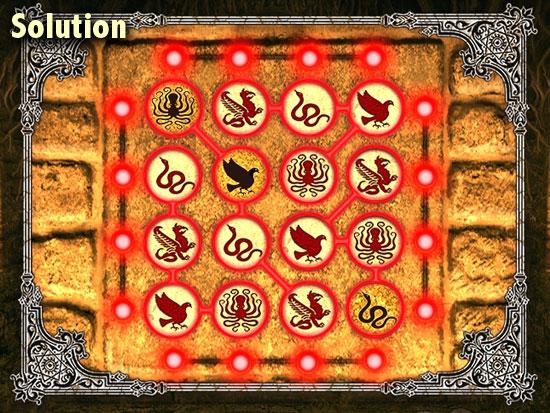
- When a row or column is correct, the side indicators light up. When a chain is correct, its borders will glow red. Once solved, a bar on the door slides open.
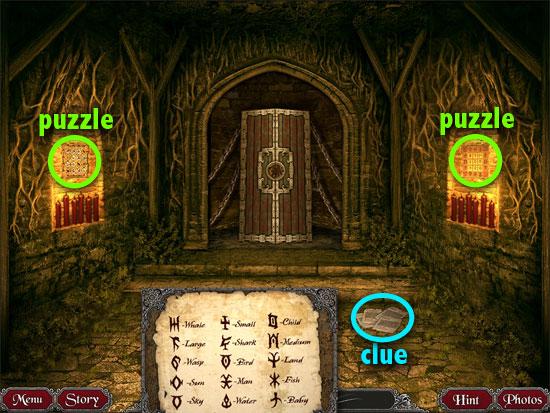
- Click on the puzzle on the right niche.
- Use the clue in your Photos to decipher the symbols on the column and row headers.
o The columns, from left to right, are: Water, Land, and Sky.
o The rows, from top to bottom, are: Small, Medium, and Large.
- Figure out where each symbol should go, e.g. Fish, a small water creature, goes in the intersection of Small and Water.
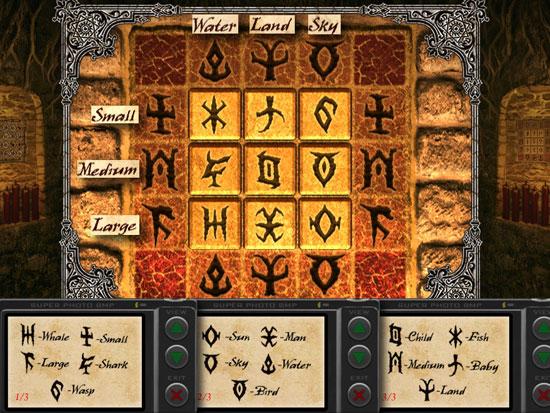
- Click on two symbols to swap their positions.
- Once solved, the coffin chamber opens.
WITCH’S COFFIN
- Zoom in on the coffin.
- Rotate the rings to complete the image of a red hand, with fingers facing upwards.
- Clicking on a ring will affect the others, so you’ll need to find the right combination of moves.
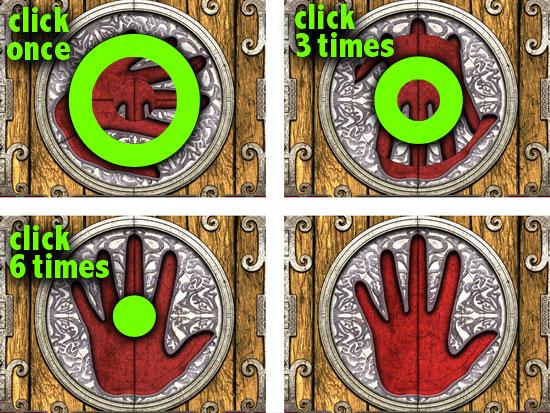
- Here’s a suggested solution. Start from the outermost ring, going inwards.
o Don’t touch the outermost ring.
o Click the next largest ring once.
o Click the smaller ring 3 times.
o Click the innermost ring 6 times.
FINAL PUZZLE
- The last puzzle requires you to move the stones to their proper locations, so that the color of the stones matches the color of the painted areas.
- For the yellow and purple stones, you’ll also need to match the Roman numberals above and below.
- Click on the circular arrows to rotate the positions of the stones clockwise.
- Start by getting all the numbered stones (yellow and purple) in place.
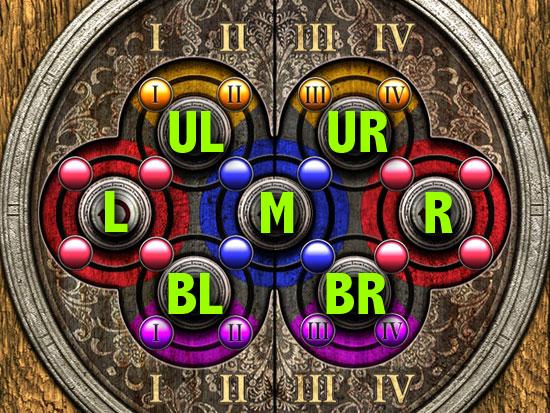
- Here is a suggestion solution:
o M – BR – BR – BR – M – UL – M – UL – UL
o BL – M – M – UR – M – UR
o BL – BL – M – BL – BL
o BR – BR – M – M – M – BR – BR
o L – L – BL – UL – UL – UL
o M – M – UL – BL – BL – BL – M – M
o UR – UR – UR – R – R – UR
o R – BR – R – R – R – BR – BR – BR
- Watch the ending scene.
Congratulations! You’ve completed Nightmare Adventures: The Witch’s Prison.
Be sure to click on “set an alert” on the top of this page to be notified of any updates, reviews, posts and tips for Nightmare Adventures: The Witch’s Prison. Have tips of your own? Post your user tips in the User Tips + Cheats section.

More articles...
-
Best Horror Games On Itch.io – July 2026
Across a bounty of subgenres. -
Haze Seas Accessories Tier List [Best Accessories to Equip]
The accessories with the best stat buffs in Haze Seas.