![Digimon UP Tier List [Supports, Buddies, and Partners]](/wp-content/uploads/2026/07/digimon-up-tier-list.jpg "Digimon UP Tier List [Supports, Buddies, and Partners]")
Digimon UP Tier List [Supports, Buddies, and Partners]
These Digimon will get you UP the leaderboard.


![Haze Seas Boss Drops [Chances, Locations, and How to Spawn]](/wp-content/uploads/2026/07/haze-seas-boss-drops.jpg "Haze Seas Boss Drops [Chances, Locations, and How to Spawn]")

Welcome to Gamezebo's walkthrough for Nightfall Mysteries: Curse of the Opera. General Information Main Menu The Change Player button at the bottom-right corner of the main menu displays the profile window. Select the New button to create a new profile, the Delete button to delete the selected profile from the list or the Done button to to exit the profile window with the selected profile. The Start button starts the game with the currently selected profile. The Options button display…
Welcome to Gamezebo’s walkthrough for Nightfall Mysteries: Curse of the Opera.
General Information
Main Menu

Normal Locations
Hidden Object Locations
Mini-Games
Walkthrough
Prologue – Find a way to get to the village
The game starts on the road leading to the Black Horse Inn:
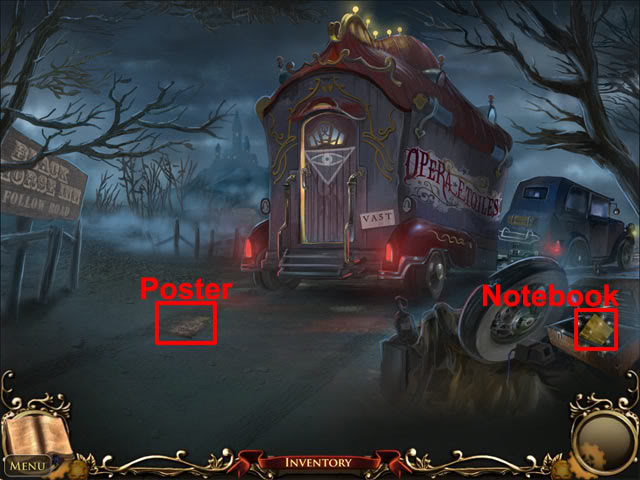
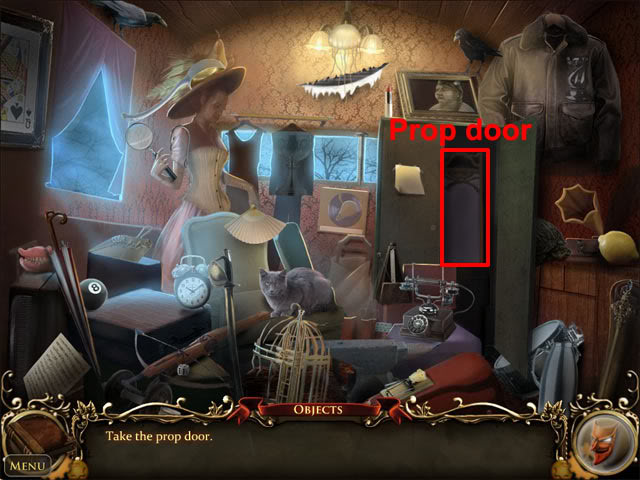
Take the notebook from the chest. The notebook can now be selected to view the current task and a map of the area. Select the X button at the bottom of the notebook to put it away. Take the poster on the ground to view an advertisement for the theatre. Enter the carriage and find all of the hidden objects on the list. Open the closet and take the prop door:
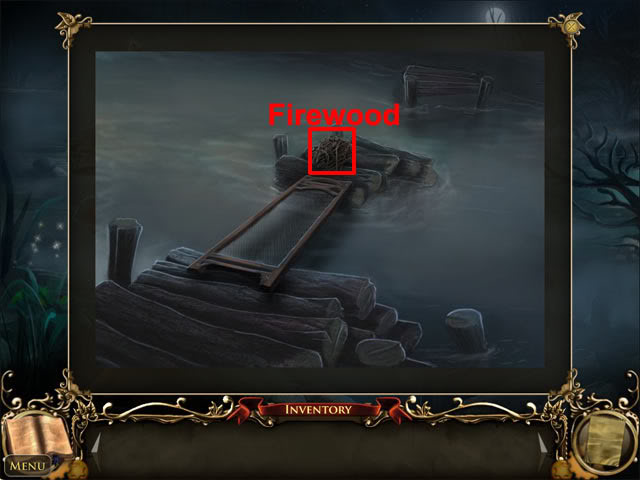
Back out of the carriage and then move forward to the river. Select the broken bridge in the river. Select the prop door from the inventory and use it on the gap. Take the firewood:
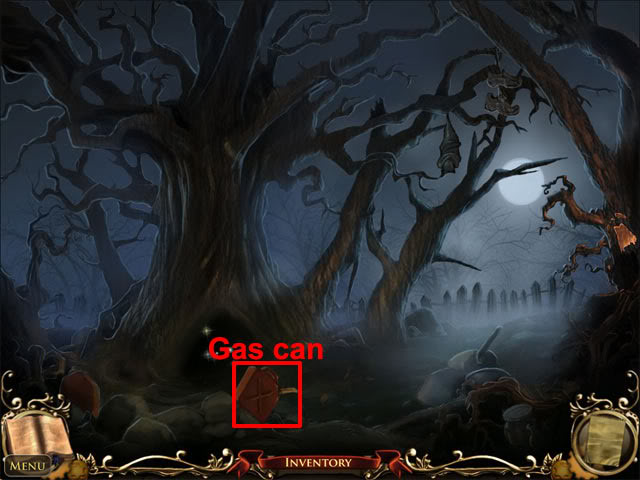
Select the X at the top-right corner of the close-up window to close it. Move left to the forest. Take the gas can:
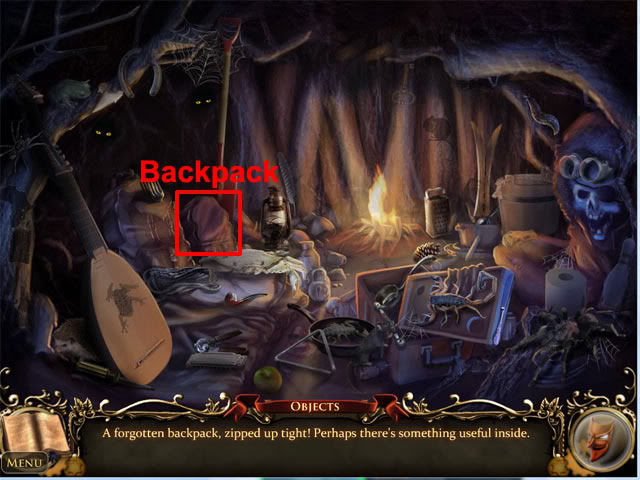
Enter the cave. Use the firewood and gas can on the campfire to illuminate the cave. Find all of the hidden objects on the list. Open the backpack:
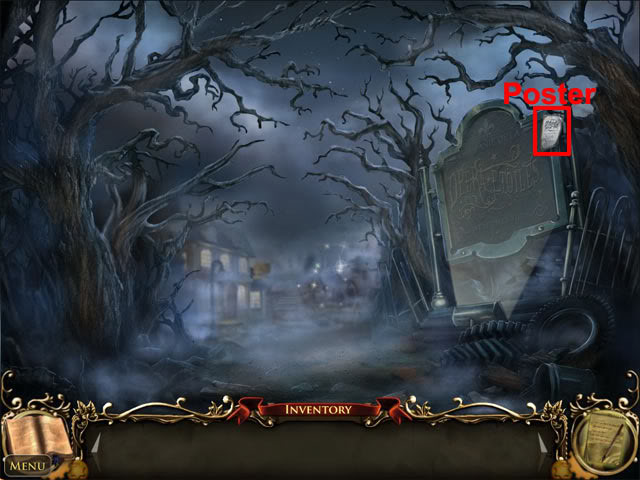
Take the axe from the backpack. Exit the cave. Select the branch:
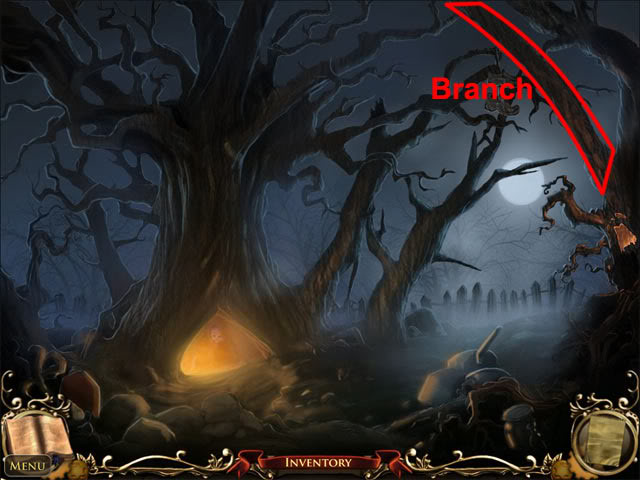
Use the axe on the branch to take it. Move back to the river. Examine the broken bridge. Use the branch on the gap:
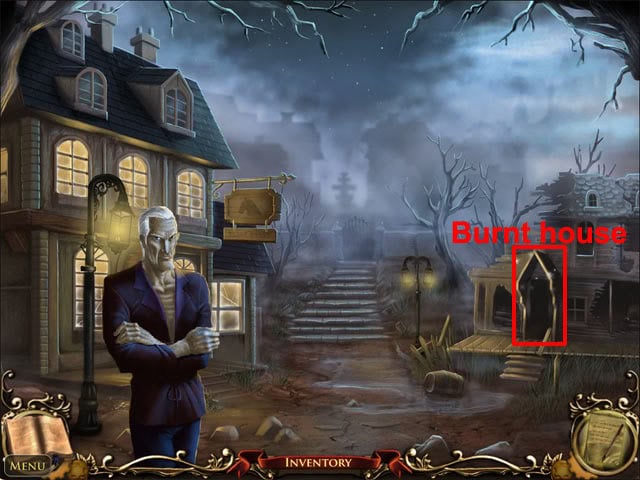
Exit the view of the bridge to see that a new exit has appeared on the other side of the river. Select the other side of the river to arrive at the town entrance. Select the poster:
Move forward to the town.
Chapter 1 – A Grim Discovery
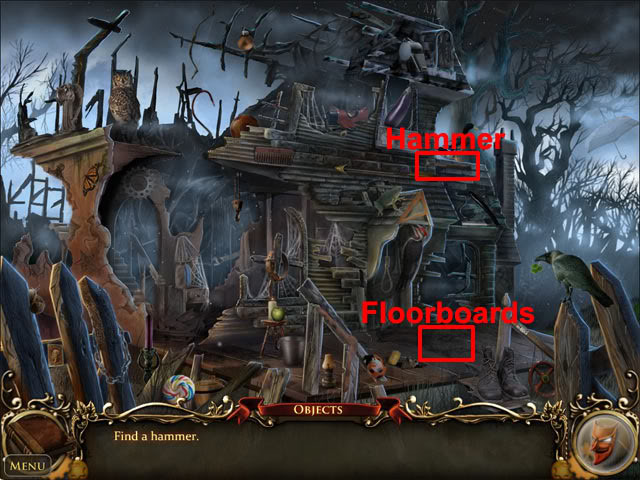
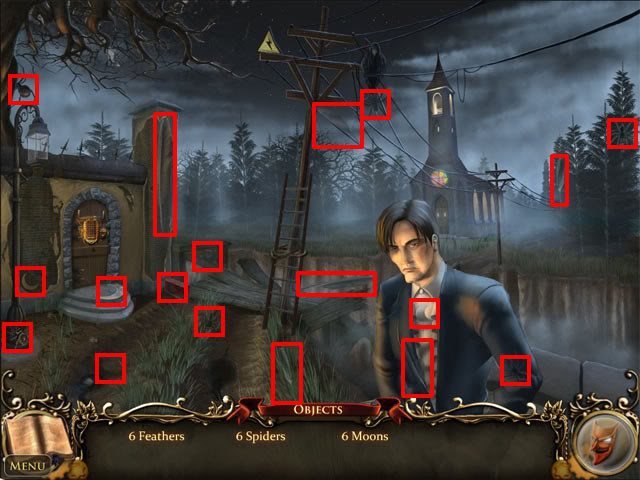
The chapter starts in the town. Vladd Vansig III says that he has lost his watch. Move to the burnt house:
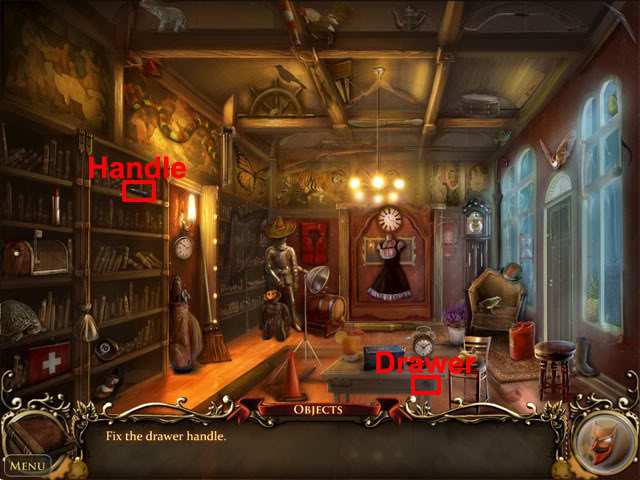
Find all of the hidden objects on the list. Take the hammer and use it on the floorboards:
Take the pocket watch from the hole. Select the left door to enter the inn. Give the pocket watch to Vladd to receive the key to the gate. Hilda wants to know where Abigail is. Exit the inn and examine the gate at the top of the stairs. Use the inn gate key on the lock:
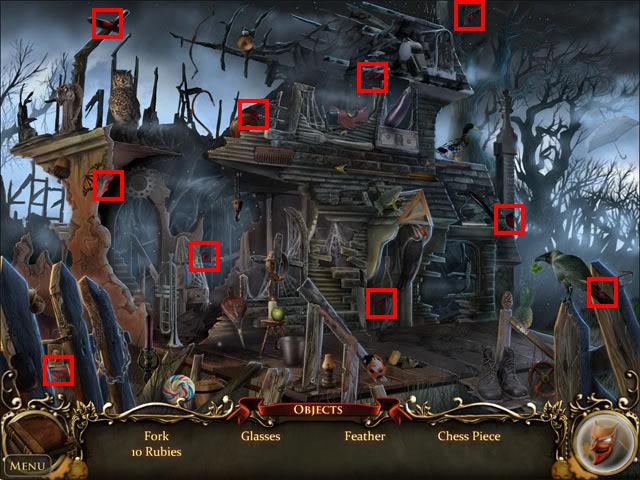
Find the hidden objects:

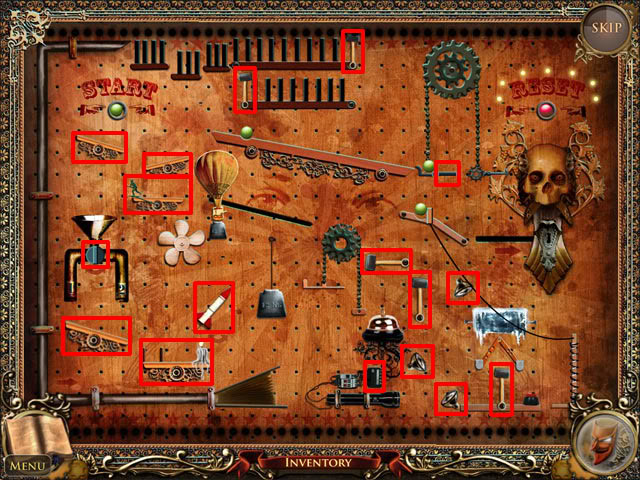
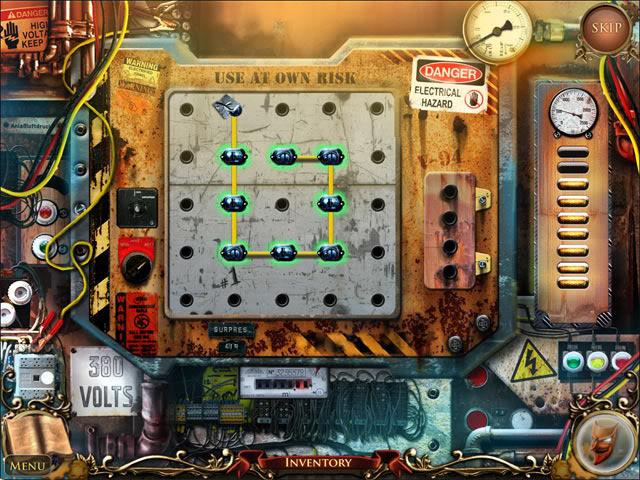
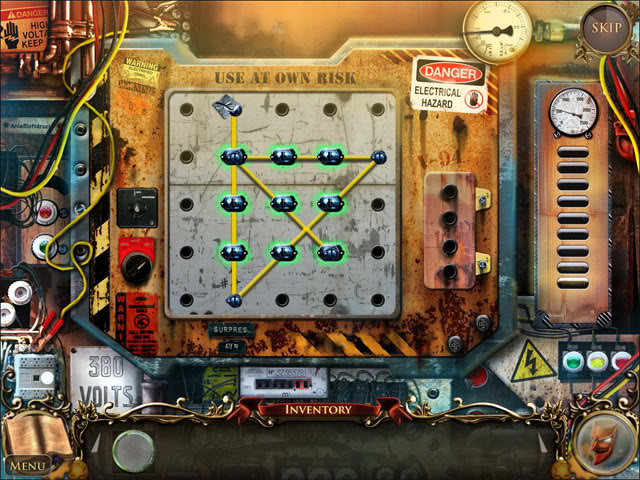
Move forward to the outside of the opera house. Select the fuse box at the bottom-left corner of the screen to view the fuse box mini-game. Move the fuses to the correct holes:
Enter the opera house and find the hidden objects. Take the mace and use it on the vase:
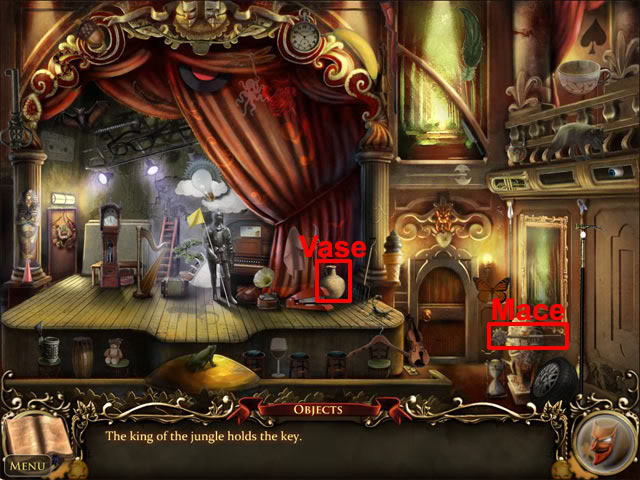
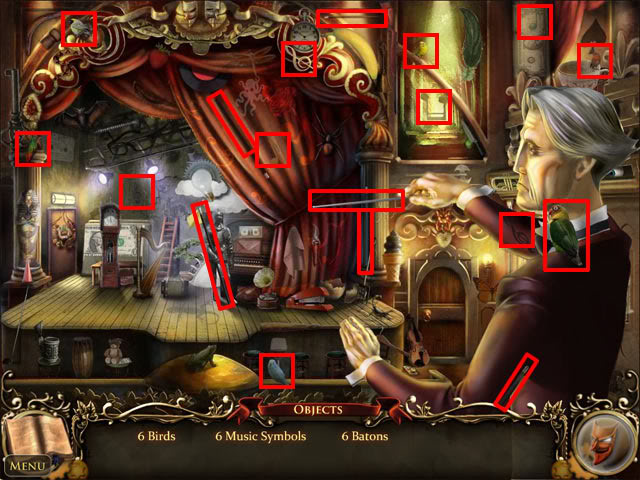
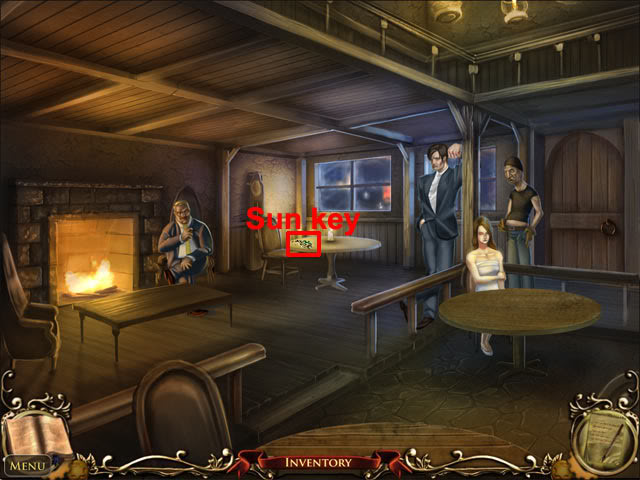
Take the blue sun key from the broken vase. Examine the door to the makeup room and then select the knocker to knock on the door. Abigail answers and says that she wants Hilda to leave her alone. Move back twice to the village square. Talk to Hilda: She wants you to find Tiberius. Move forward and enter the opera house. Find the hidden objects:
Move back three times and open the left door to enter the inn. Take the sun key on the middle table:
Talk to Carolina to receive the makeup room key. Exit the inn. Move forward twice and enter the opera house. Examine the makeup room door and use the key on the lock. Find all of the hidden objects on the list. Take the scissors and use them on the dress:
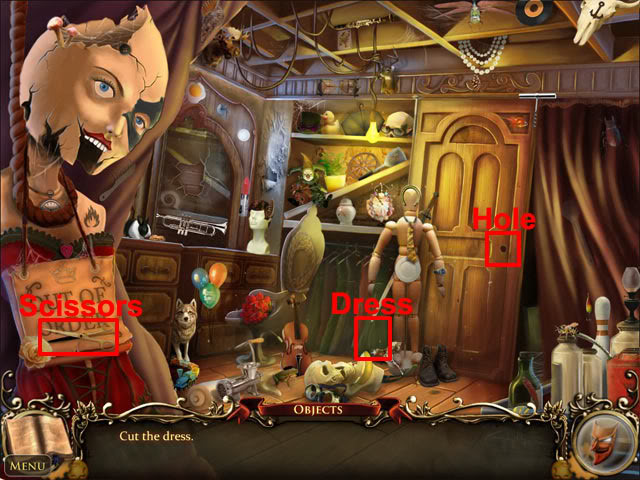
Take the doorknob below the dress. Examine the hole on the door and use the doorknob on the hole to complete the chapter.
Chapter 2 – A Cry for Help
Talk to Tiberius and he will ask you to call the police. Exit the inn and select the burnt house. Select the doorway to enter the burnt house. Find all of the hidden objects on the list. Take the knife and use it on the stack of books:
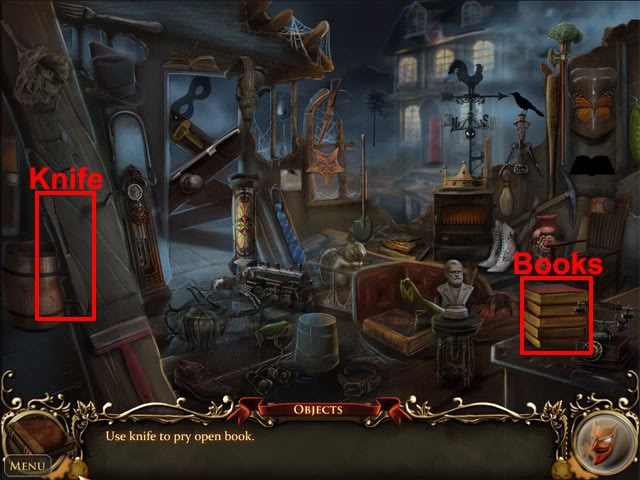
Take the screwdriver from the top book. Move forward to the village square. Examine the fountain in the middle of the square. Find all of the hidden objects on the list. Take the sword and use it on the ribs at the right side of the demon:
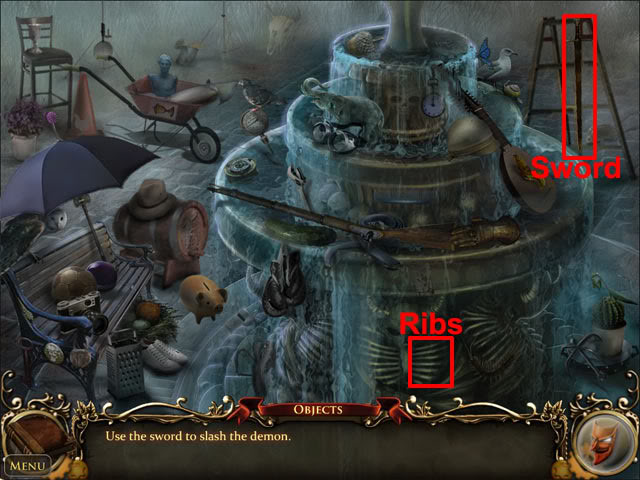
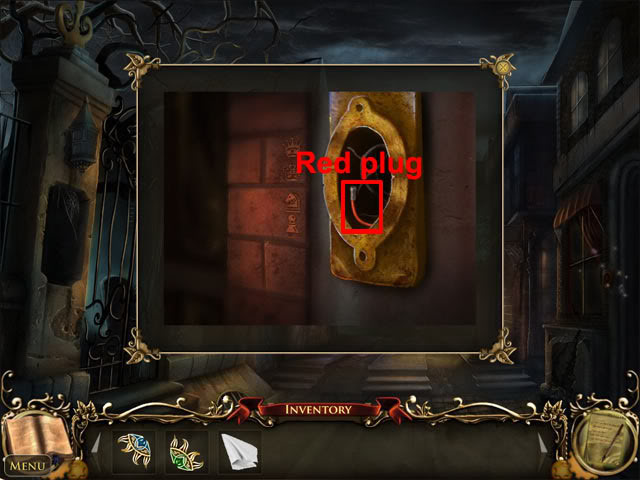
Take the cloth from the hole. Move right to the residential street. Examine the door at the right side of the street and use the screwdriver on the doorknob. Take the red electrical plug:
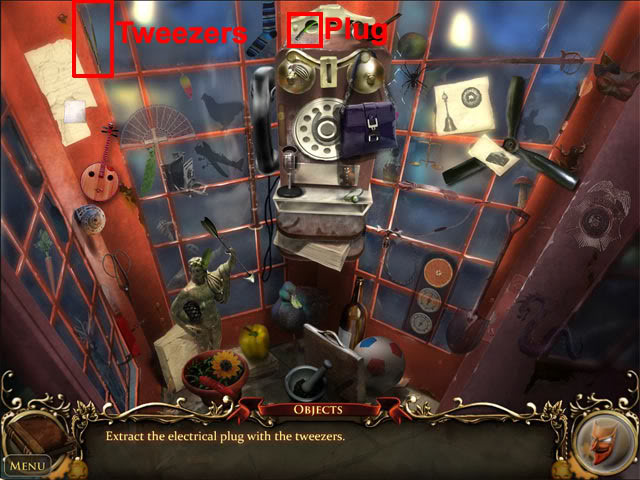
Examine the plaque at the right side of the gate. Use the cloth on the plaque to make a note of the symbols. Move back and left to Shop Street. Examine the telephone box and find all of the hidden objects on the list. Take the tweezers and use it on the green wire to take the green electrical plug:
Move back twice and enter the inn. Talk to Tiberius: He tells you to look for Giles in the opera house. Exit the inn, move forward twice and enter the opera house. Enter the backstage area. Find all of the hidden objects on the list. Take the bamboo and use it on the saw:
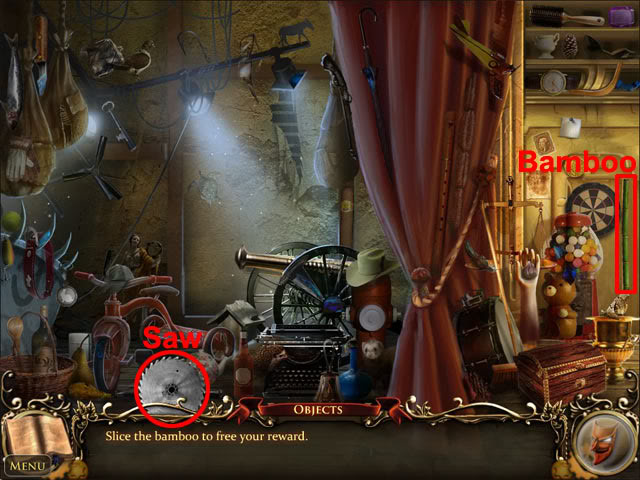
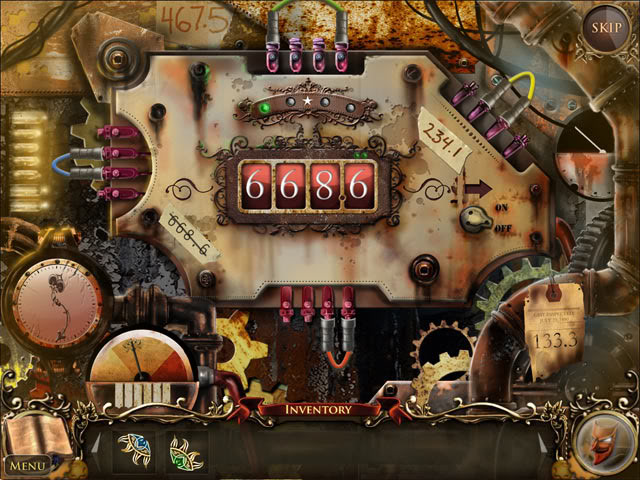
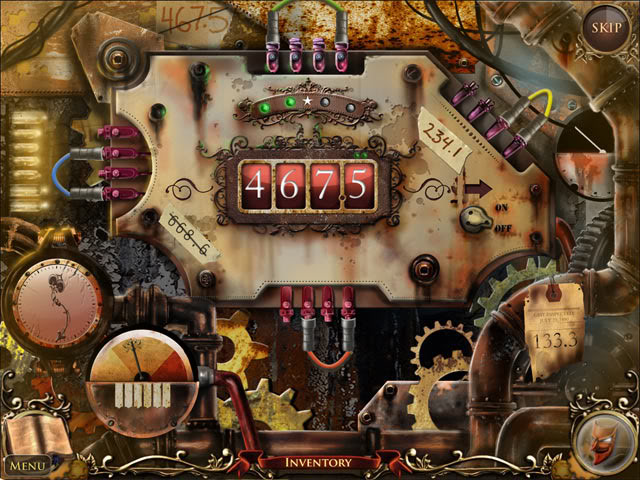
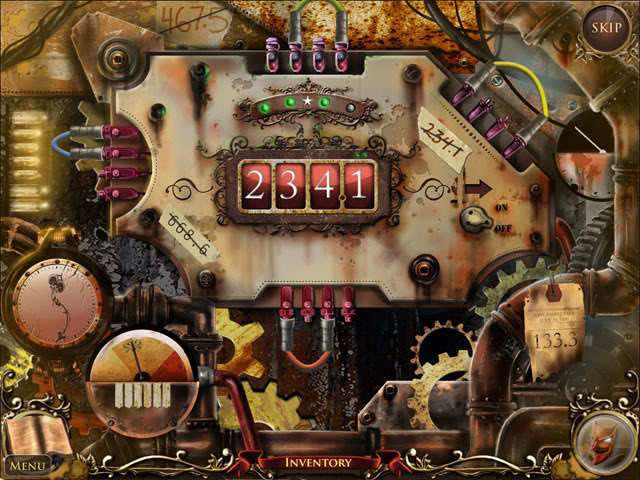
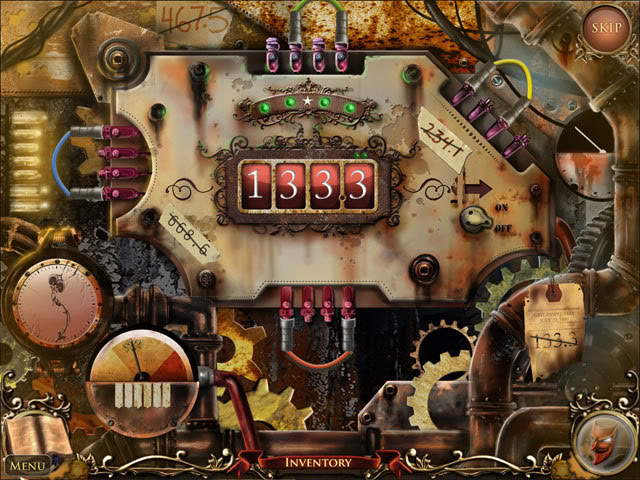
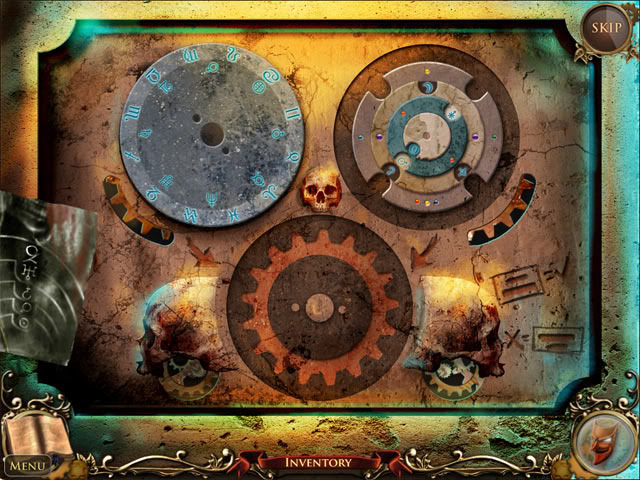
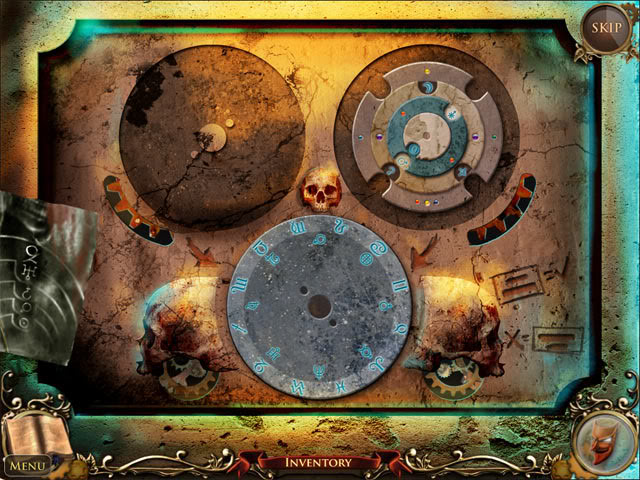
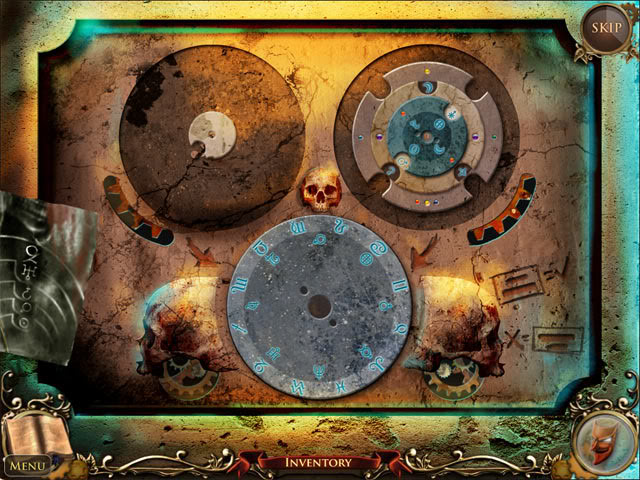
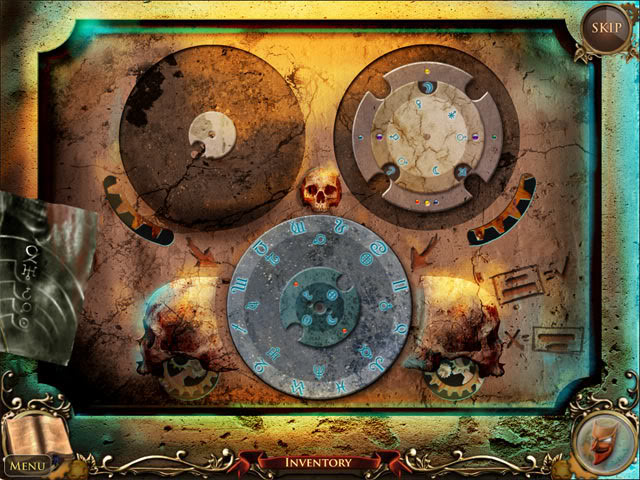
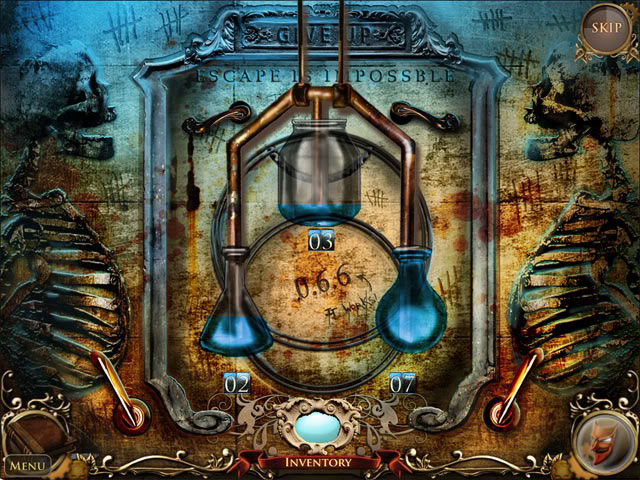
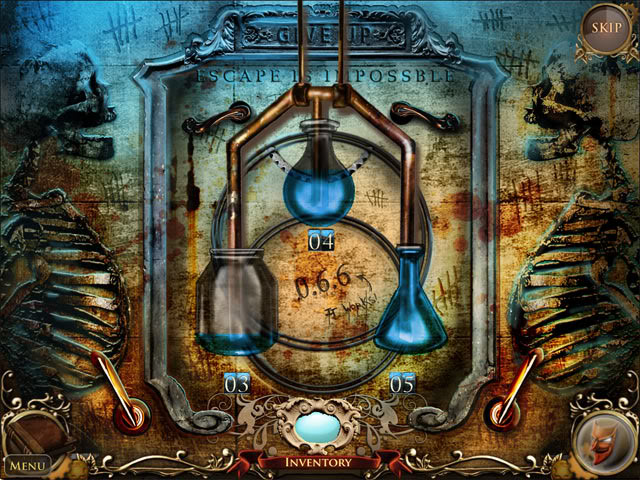
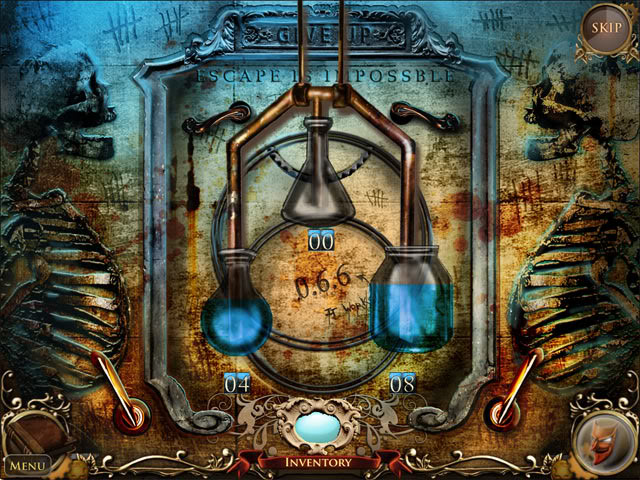
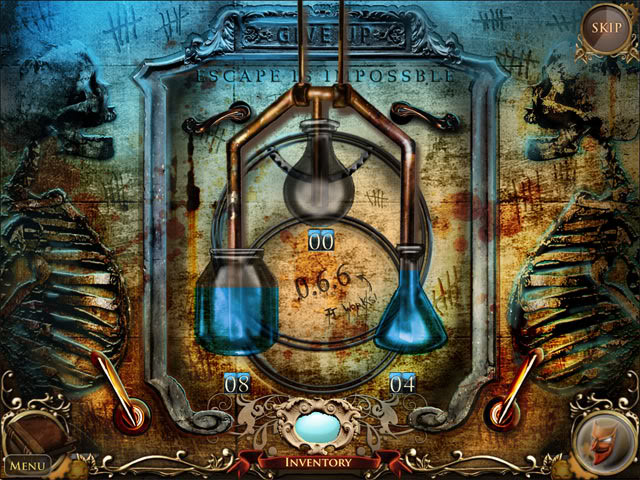
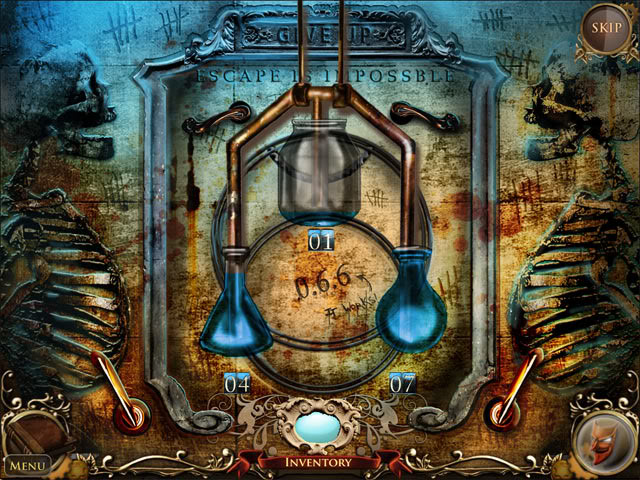
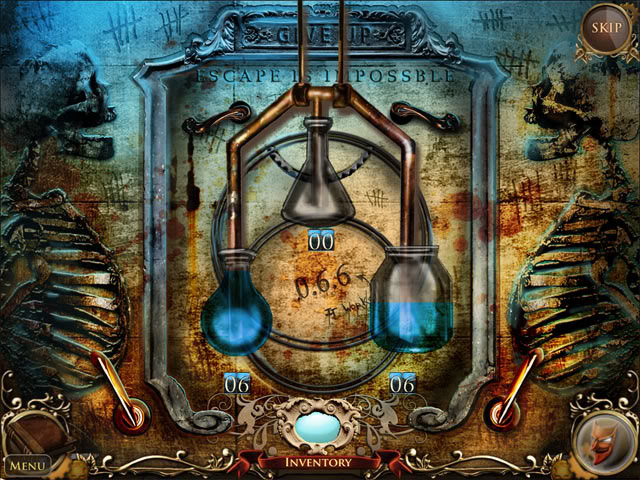
The blue electrical plug is found in the bamboo. Select the electrical room door at the left side of the stage. Use the three electrical plugs on the device. The aim now is to move the wires to change the numbers on the display to the four sets of numbers shown on the device. The blue wire changes the first number, the green wire changes the second number, the red wire changes the third number and the yellow wire changes both the third and fourth number. The sets of numbers are 6686, 4675, 2341 and 1333. Move the wires to make the numbers 6686:
Move the wires to make the numbers 4675:
Move the wires to make the numbers 2341:
Move the wires to make the numbers 1333:
Go through the doorway to enter the electrical room. Find all of the hidden objects on the list:
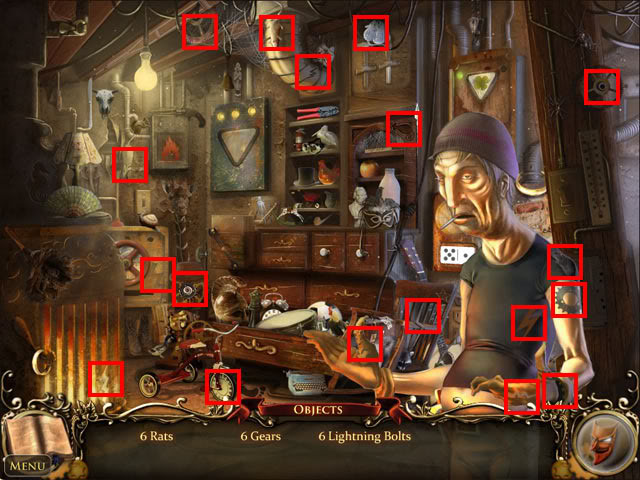
Move back four times and enter the inn. Talk to Vincent and he will mention that Giles was in Shop Street earlier today. Exit the inn and select the burnt house. Find all of the hidden objects on the list:
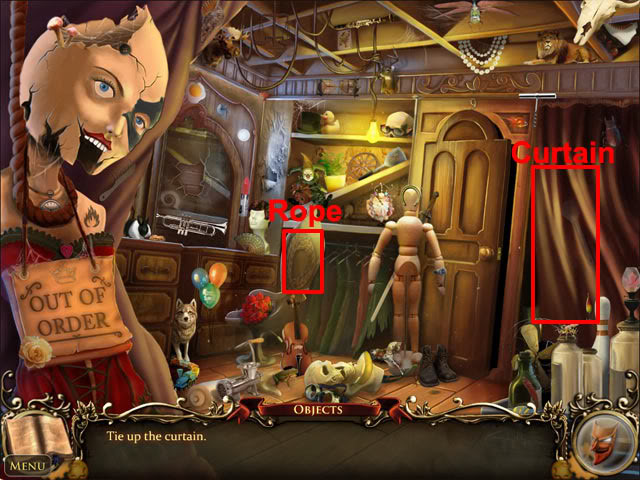
Move back, forward twice and left into the opera house. Enter the makeup room and find all of the hidden objects on the list. Take the rope and use it on the curtain:
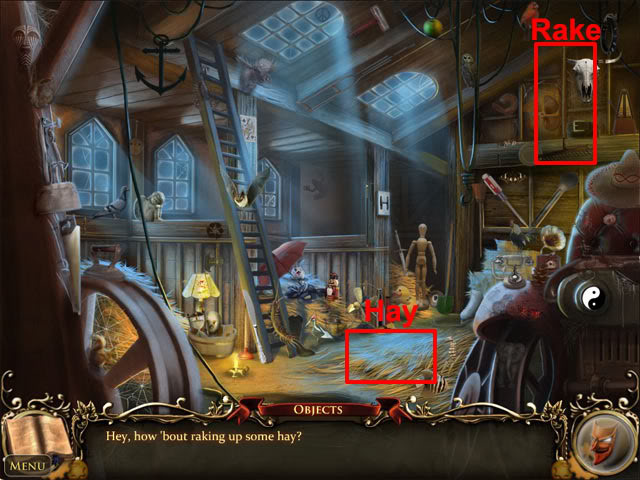
Take the crowbar behind the curtain. Move back three times and left to Shop Street. Examine the boarded door of the coach house. Use the crowbar on the door to remove the boards. Enter the coach house and find all of the hidden objects on the list. Take the rake and use it on the hay:
Take the pliers. Move back twice, forward and left into the opera house. Enter the electrical room to complete the second chapter.
Chapter 3 – The Only Way Out
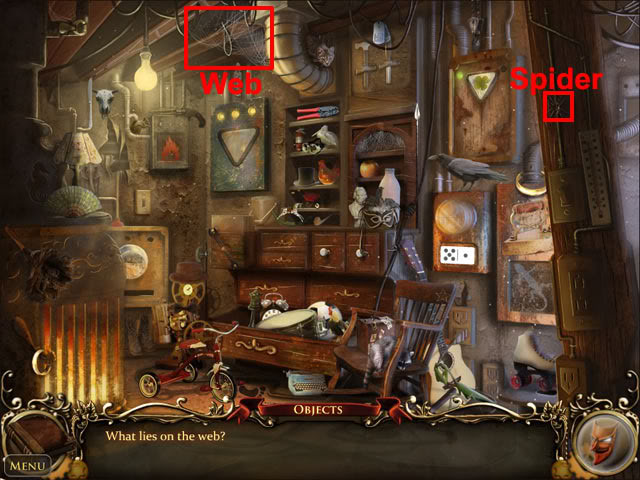
Talk to Tiberius: He tells you to see if the phone lines are intact at the bridge. Exit the inn. Move forward twice and left into the opera house. Enter the electrical room. Find all of the hidden objects on the list. Take the spider and use it on the web:
Take the matchbox from the web. Move back three times and right to the residential street. Find all of the hidden objects on the list:

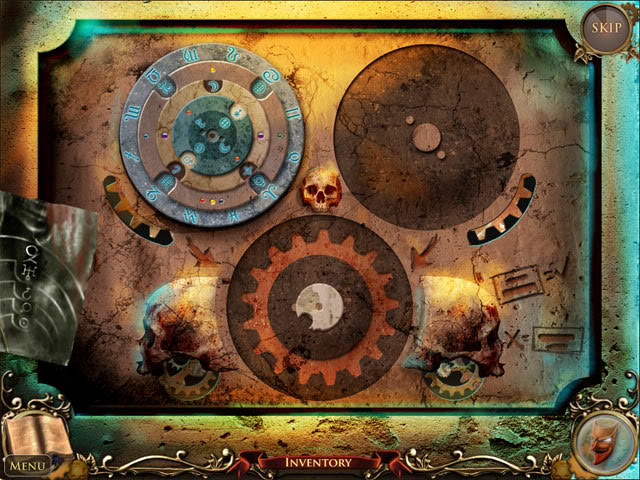
Examine the lantern and use the matchbox on the candle:
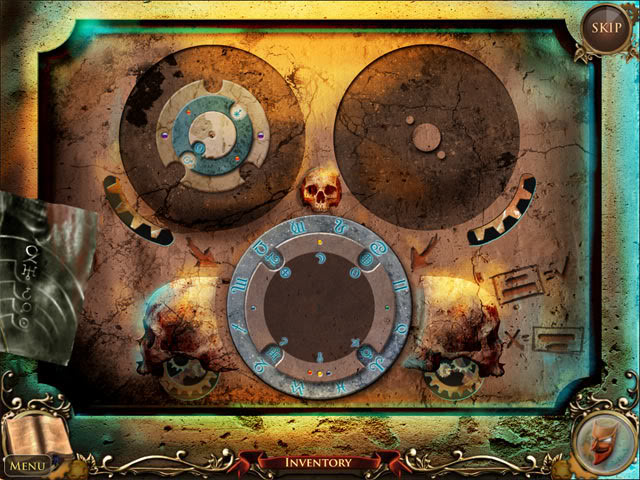
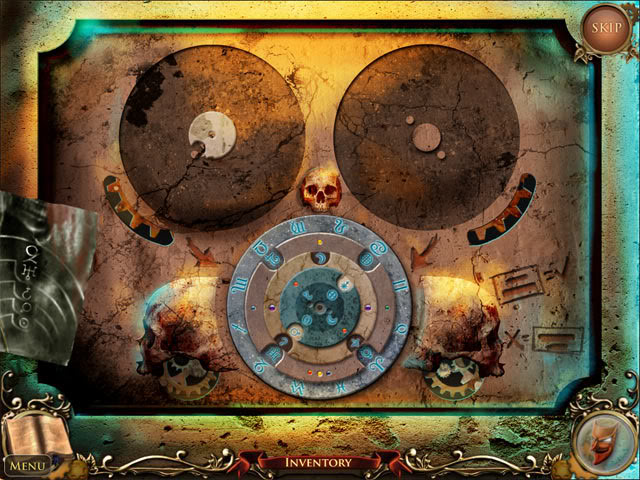
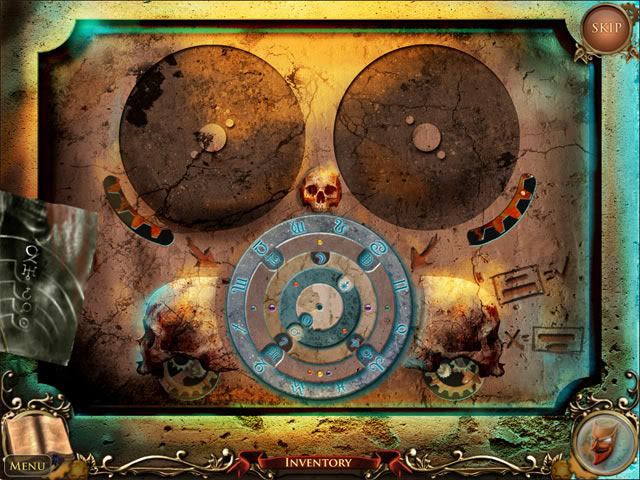
Exit the view of the lantern. If you haven’t done so already, use the cloth on the plaque at the right side of the gate to make a note of the symbols. Examine the puzzle at the left side of the gate to see a disc mini-game. The aim is to move all of the discs to the middle circle, with the rule that only smaller discs can be placed on top of larger discs. To make following the instructions below easier, the discs will be named 1 to 5 in order of smallest to largest. Start by moving 1 to the middle circle:
Move 2 to the right circle:

Move 1 to the right circle:
Move 3 to the middle circle:
Move 1 to the left circle:
Move 2 to the middle circle:
Move 1 to the middle circle:
Move 4 to the right circle:
Move 1 to the right circle:
Move 2 to the left circle:

Move 1 to the left circle:
Move 3 to the right circle:
Move 1 to the middle circle:

Move 2 to the right circle:
Move 1 to the right circle:
Move 5 to the middle circle:
Move 1 to the left circle:
Move 2 to the middle circle:
Move 1 to the middle circle:
Move 3 to the left circle:

Move 1 to the right circle:
Move 2 to the left circle:
Move 1 to the left circle:
Move 4 to the middle circle:
Move 1 to the middle circle:
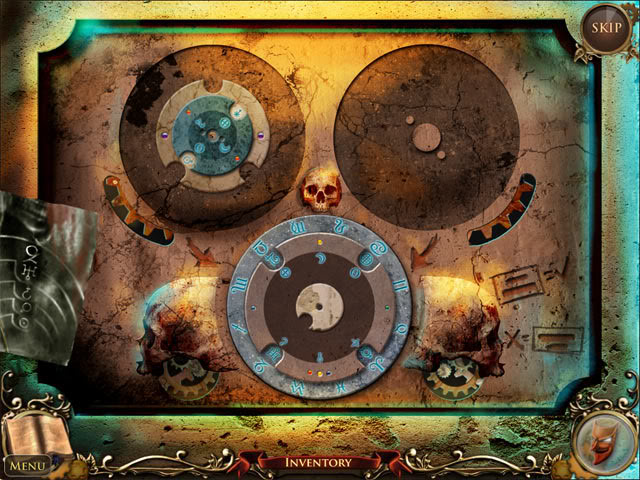
Move 2 to the right circle:

Move 1 to the right circle:

Move 3 to the middle circle:
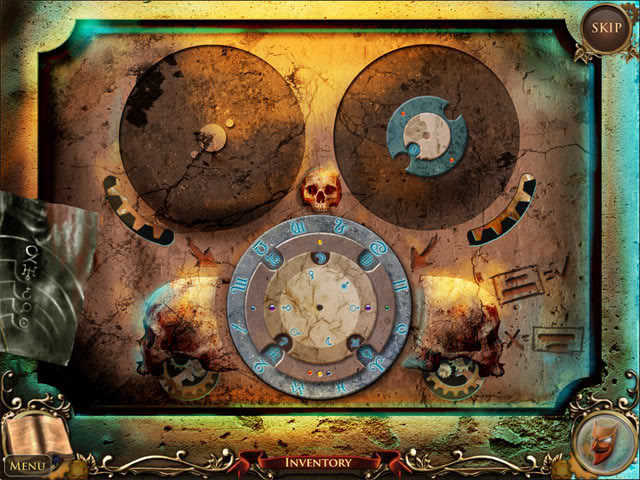
Move 1 to the left circle:
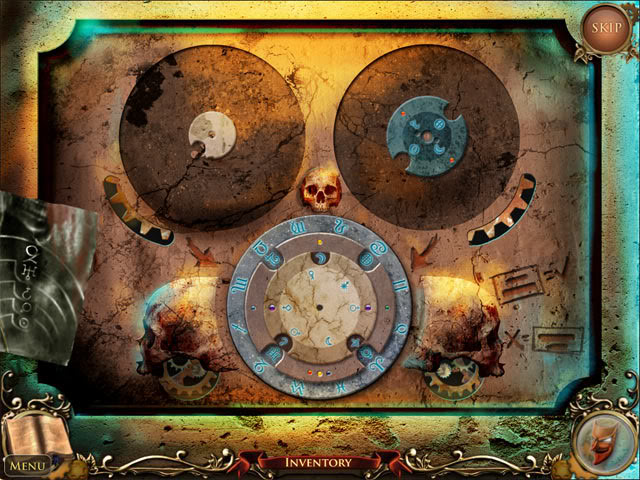
Move 2 to the middle circle:
Move 1 to the middle circle to complete the puzzle:
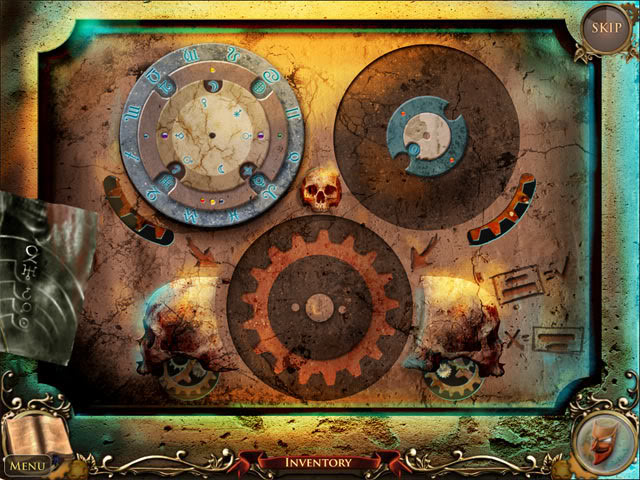
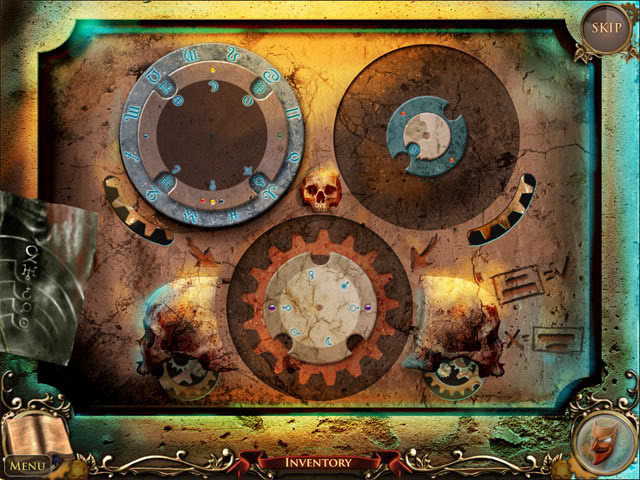
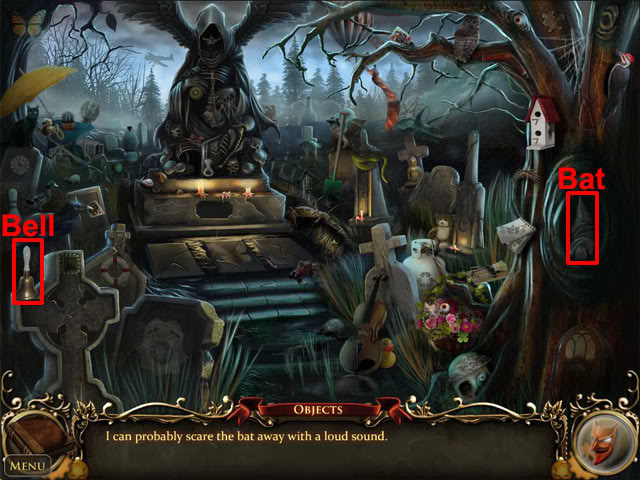
Click the discs to rotate them to the symbols shown on the piece of paper at the left side of the screen. Enter the graveyard and find all of the hidden objects on the list. Take the bell and use it on the bat:
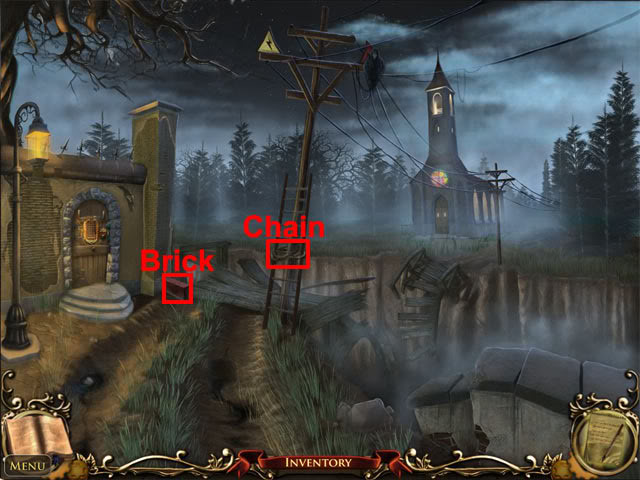
Take the lantern. Move back twice and left to Shop Street. Examine the bridge and find all of the hidden objects on the list:
Take the brick. Use the pliers on the chain to take the ladder:
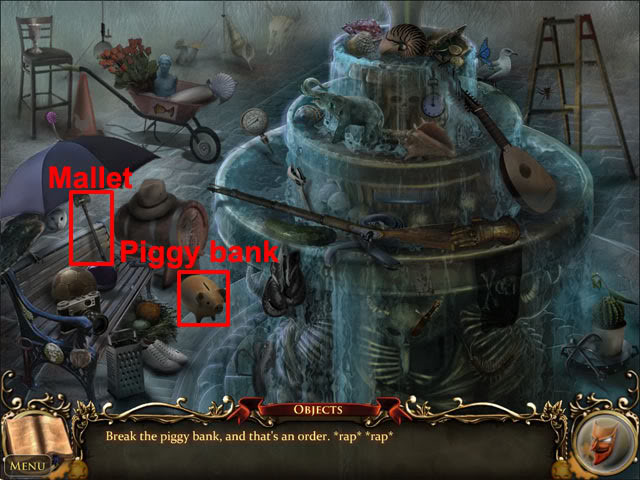
Move back twice to the village square. Examine the fountain and find all of the hidden objects on the list. Take the mallet and use it on the piggy bank:
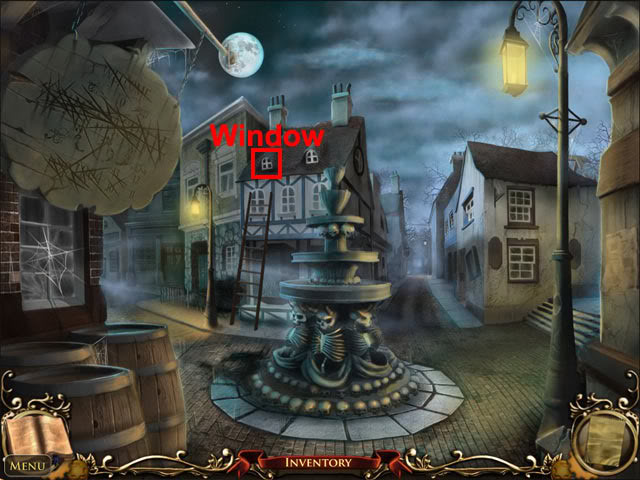
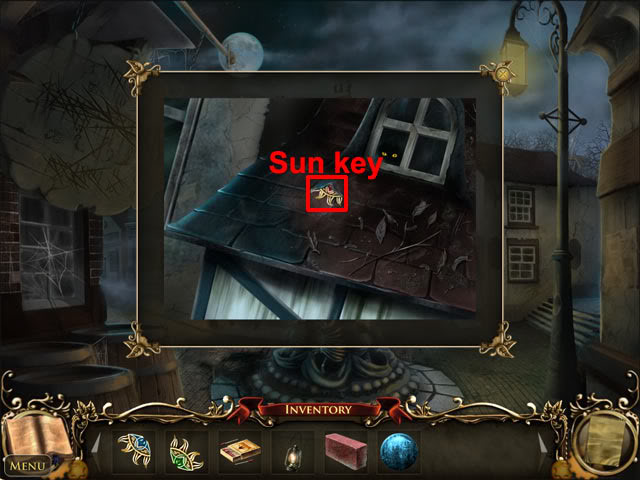
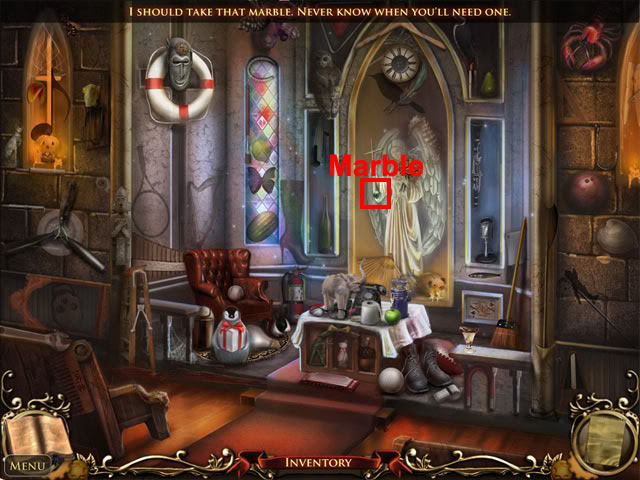
Take the blue marble from the piggy bank. Use the ladder on the left house with the sloped roof and examine the top-left window:
Take the purple sun key:
Select the window to enter Hilda’s room. Find all of the hidden objects on the list. Find four picture pieces and use them on the frame:
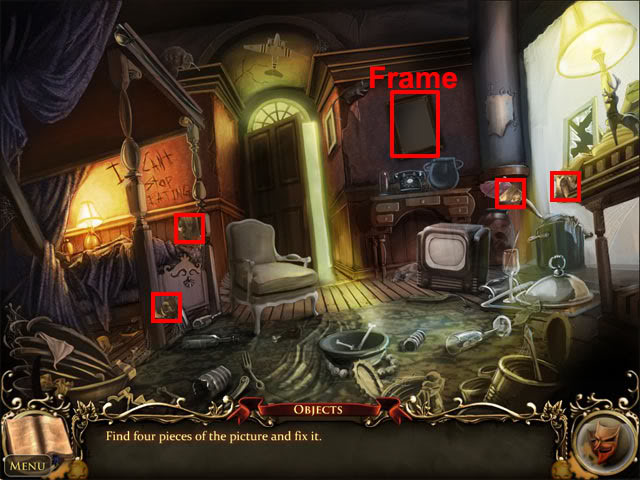
The picture is of Hilda when she was younger. Exit the view of the picture. Move back and right to the residential street. Examine the church window. Use the brick on the glass to break it. Select the window to enter the church. Find all of the hidden objects on the list. Take the spoon and use it on the ice cream:
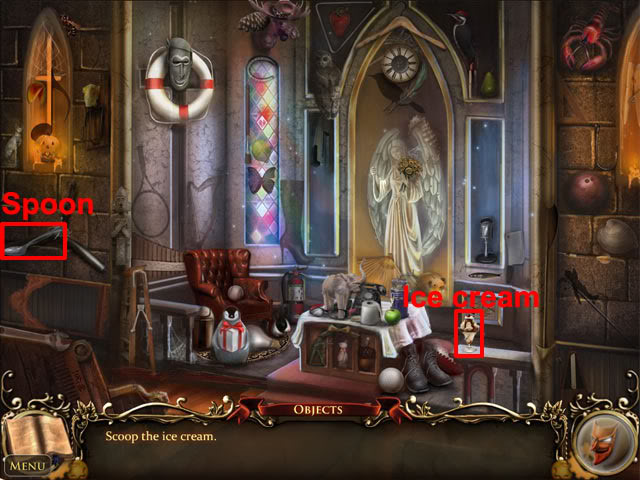
Take the red marble from the ice cream to complete the chapter.
Chapter 4 – A Gloom of Darkness
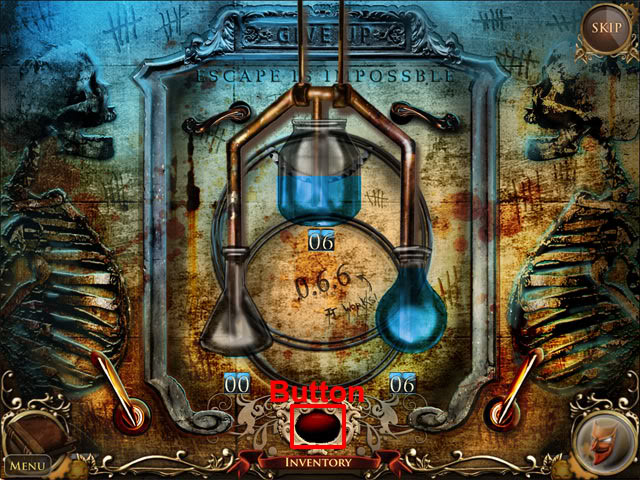
Talk to all of the characters in the inn. After talking to the final character, the lights will go out and Carolina will scream. Talk to Vladd and he will tell you to go to the electrical room to get some candles. Exit the inn. Move forward twice and left into the opera house. Enter the electrical room and press the red button:
Find all of the hidden objects on the list. Take the feather duster and use it on the spider web:
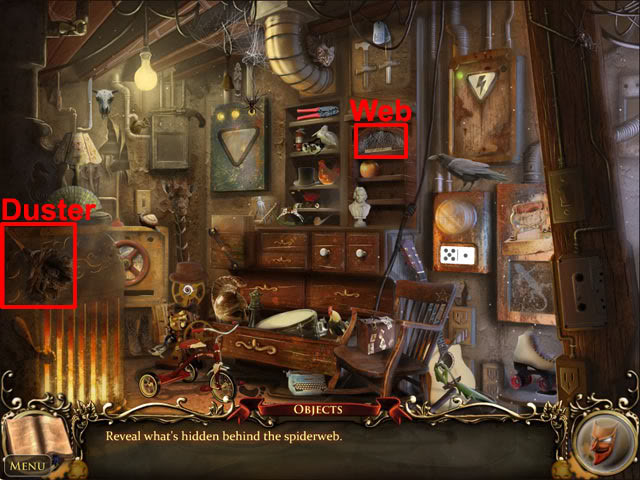
Take the candlebox from the shelf. Move back and then select the backstage area. Find the 10 sapphires:
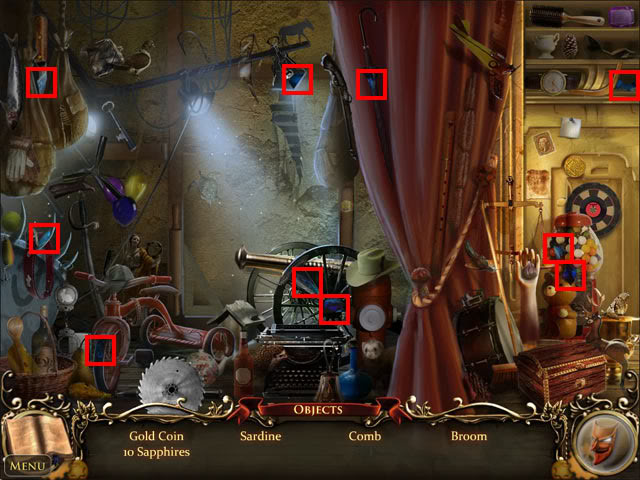
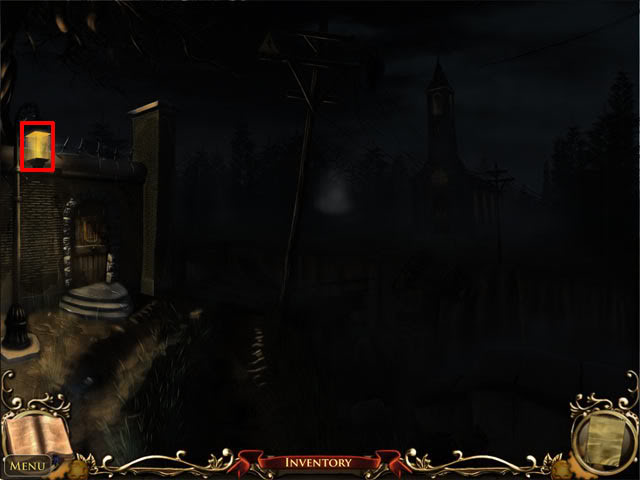
Find the remaining hidden objects on the list to take the sapphire eye. Move back to exit the opera house. The aim now is to light all of the lamps in the town. To do this, examine the lamp, use the candlebox on the lamp and then use the matchbox on the candle. Light the lamp outside the opera house:

Move back to the village square. Light the lamps:
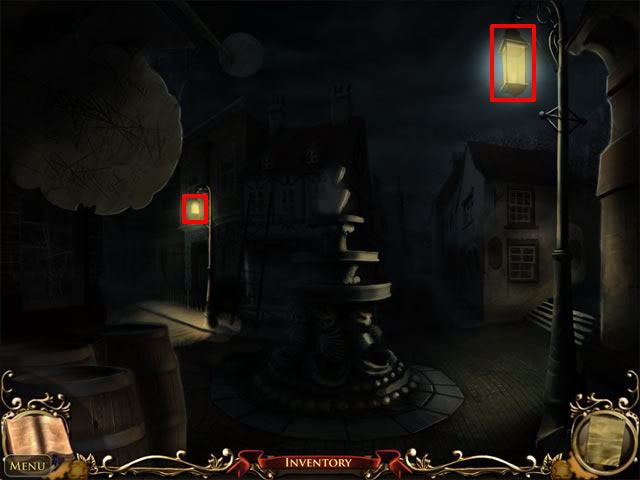
Move left to Shop Street. Light the lamp:

Move forward to the broken bridge. Light the lamp:
Move back twice and right to the residential street. Light the lamps:
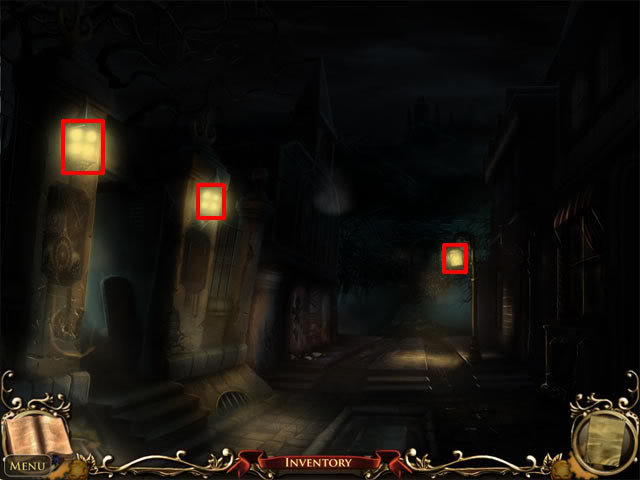
Move back twice to the inn entrance. Light the lamps:
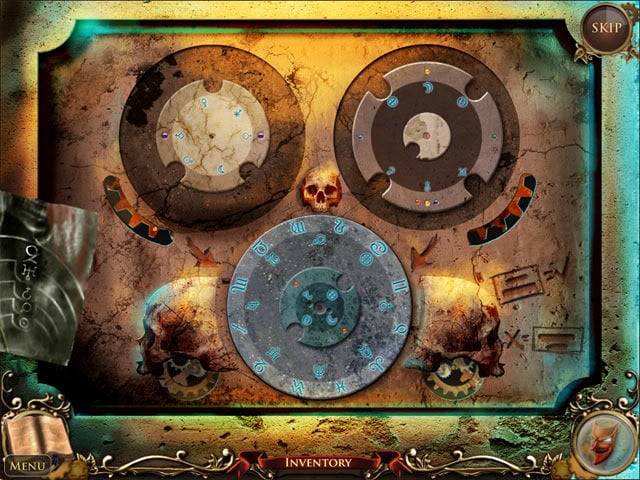
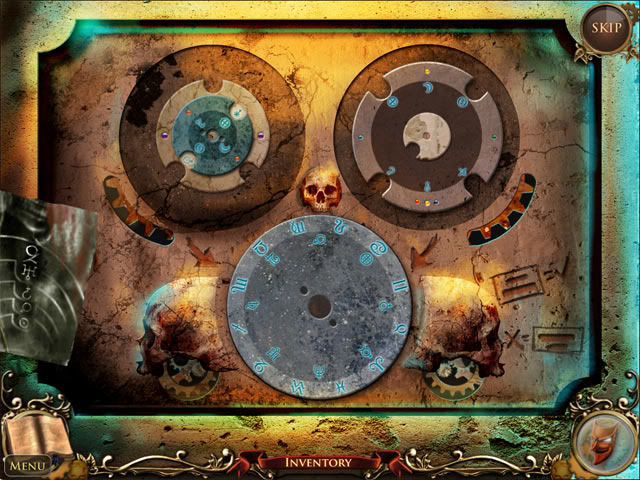
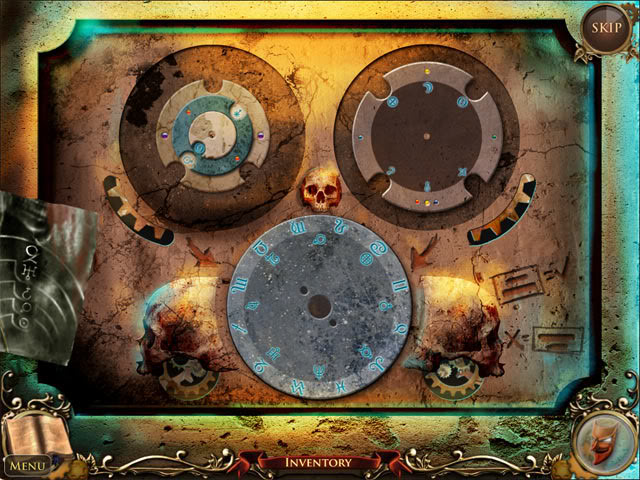
Move forward and left to Shop Street. Examine the door to see a mini-game. The symbols that were revealed from lighting the lamps are shown on the piece of paper at the left side of the screen. The first aim is to work out the equation on the paper. 160 / 8 = 20. 27 + 3 = 30. 90 / 45 = 2. 20 x 30 x 2 = 1200. The next aim is to change the symbols so that they represent the numbers 1200. Select the arrows to change the symbols to the ones shown below:
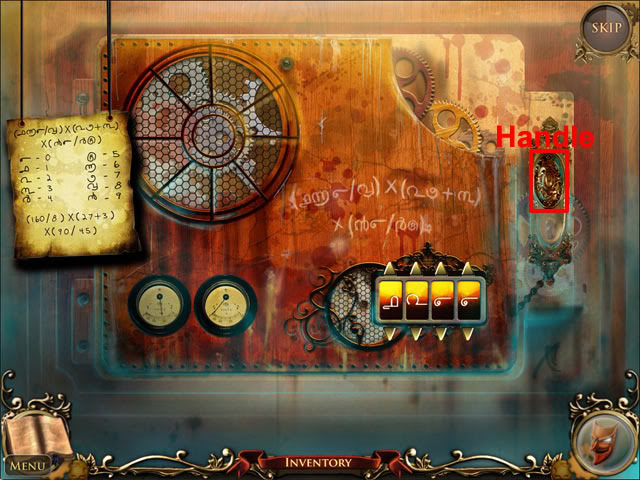
After entering the correct symbols, select the door handle to unlock the door. Enter the butcher shop and find all of the hidden objects on the list. Take the pointer and use it on the scale:
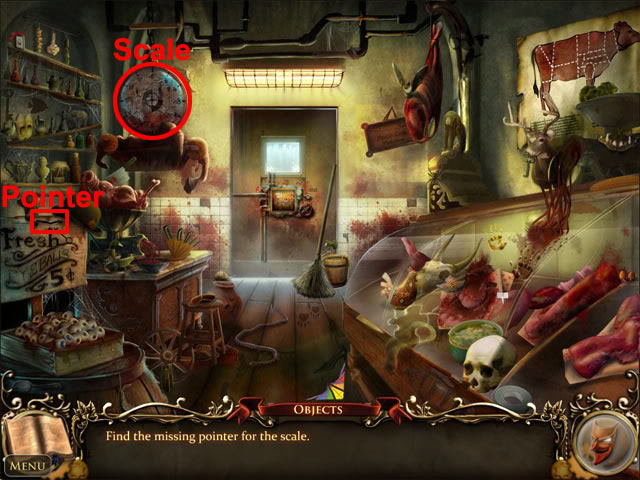
Take the cross from the scale. Exit the butcher shop to see Hilda. Find all of the hidden objects on the list:
Move back and right to the residential street. Enter the church. Use the cross on the angel statue and take the green marble:
Move back twice, left and forward to the bridge. Examine the door to see the marble mini-game. Use the three marbles on the door. The aim now to find the correct combination of marbles to open the door. To do this, start by inserting a marble into all four slots by selecting one marble, changing the slot by selecting a number, selecting another marble and so on.
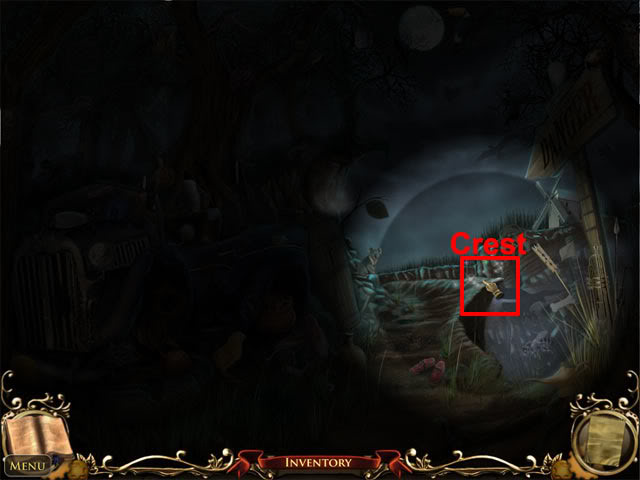
When all four slots have been filled, lights will appear at the sides of the slot. The red light means that the marble does not have to be used, the yellow light means that the marble has to be used but is currently in the wrong position, and the green light means that the marble is in the correct position. The order of the lights are not related to the order of the marbles, so you will need to experiment in order to find the correct order. After completing the puzzle, select the door to see Carolina jump off the ledge. Examine the sparkling area of the ground and take the family crest:
Take the caretaker room key to complete the chapter.
Chapter 5 – An Echo from the Past
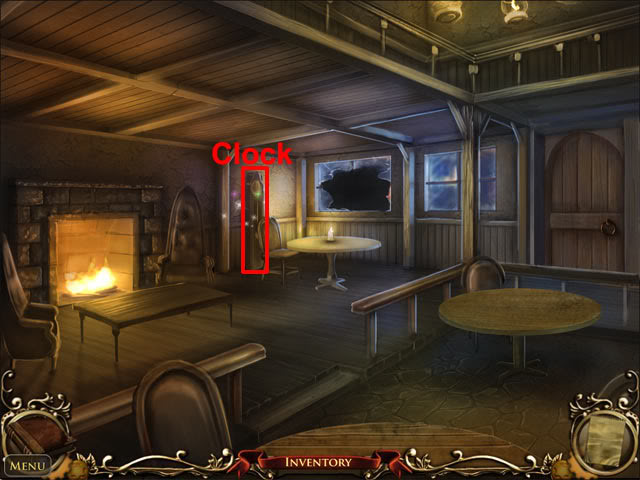
Examine the clock in the inn:
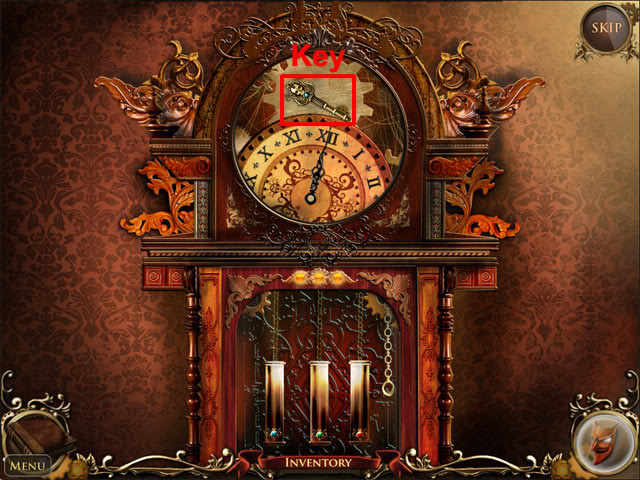
The aim in this mini-game is to move the clock hands to the times that Hilda mentioned (2:45, 7:45 and 10:30). Lower the weights and then select the chain to change the time on the clock. The left weight advances the time by 105 minutes, the middle weight advances the time by 15 minutes and the right weight advances the time by 45 minutes.
More than one weight can be lowered at the same time before the chain is pulled to combine the minutes that are advanced. Lower all three weights and pull the chain to advance the time to 2:45. Raise the middle weight and then pull the chain twice to advance the time to 7:45. Lower the middle weight and pull the chain to advance the time to 10:30. Take the skull key:
Exit the inn and move to the burnt house. Find the 10 rubies:
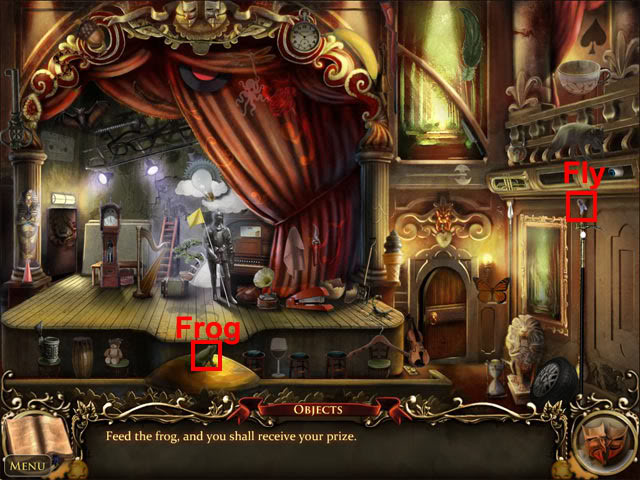
Find the remaining hidden objects on the list to take the ruby eye. Move back and forward twice to the opera house entrance. Examine the ice house door and then examine the lock to hear Hilda. Enter the opera house and find all of the hidden objects on the list. Take the fly and use it on the frog:
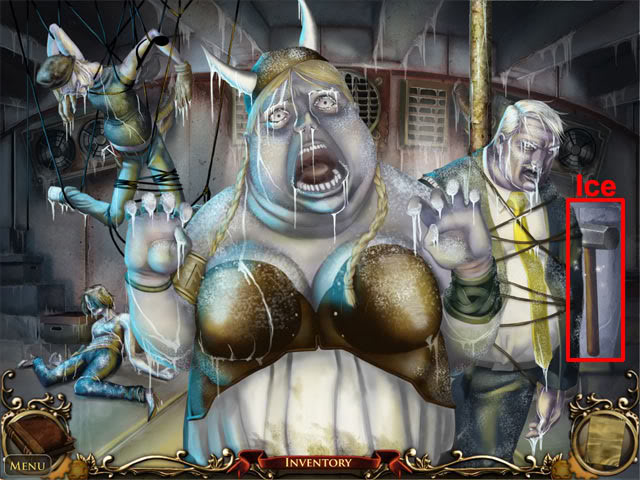
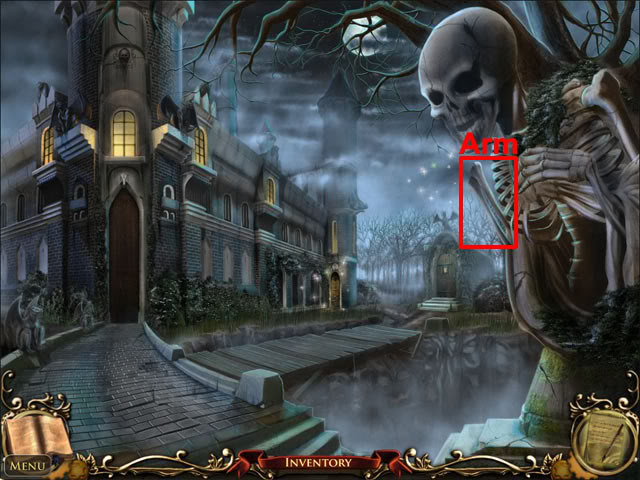
Take the antifreeze. Exit the opera house and examine the ice house door. Use the antifreeze on the lock to remove the ice. Use the skull key on the lock to enter the ice house. Take the frozen arm:
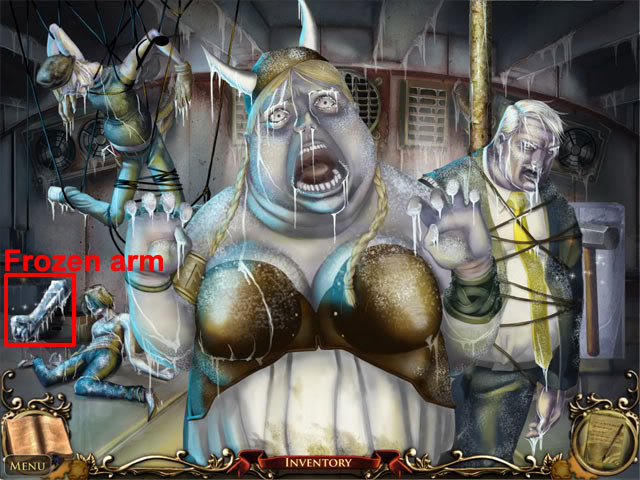
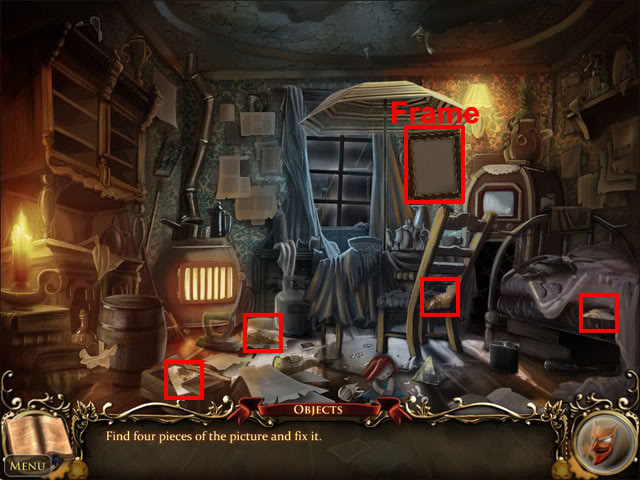
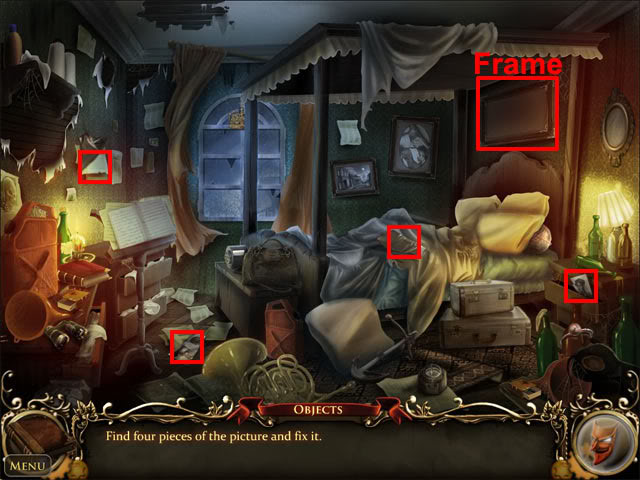
Move back and enter the opera house. Enter the electrical room. Use the frozen arm on the furnace to take the statue arm. Move back three times to the village square. Examine the window at the top of the ladder and select the window to enter Hilda’s room. Move forward to the hallway. Examine the blue door and use the caretaker room key on the lock to enter Charles’ room. Find all of the hidden objects on the list. Find four picture pieces and use them on the frame:
Move back three times and left to Shop Street. Examine the telephone box and find all of the hidden objects on the list. Take the coin and use it on the slot:
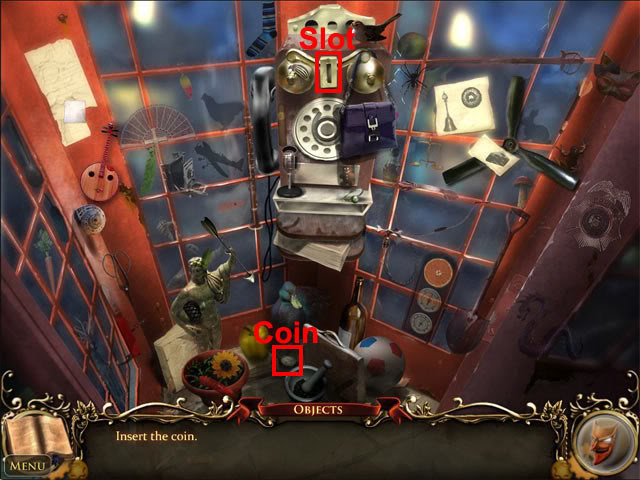
Take the blue star gear. Enter the coach house and find all of the hidden objects on the list. Take the handle and use it on the switch:
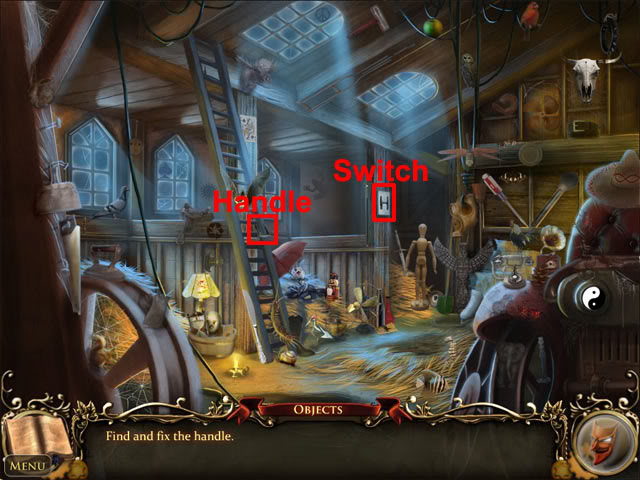
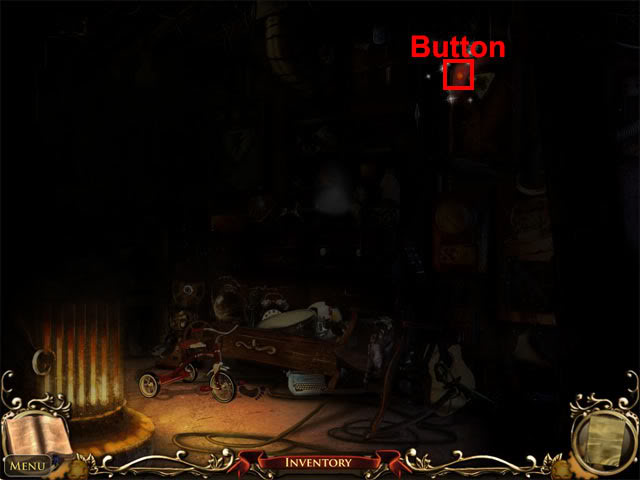
Take the ice chisel. Examine the sparkling area near the bottom-right corner of the room and find all of the hidden objects on the list. Take the button and use it on the button holder:
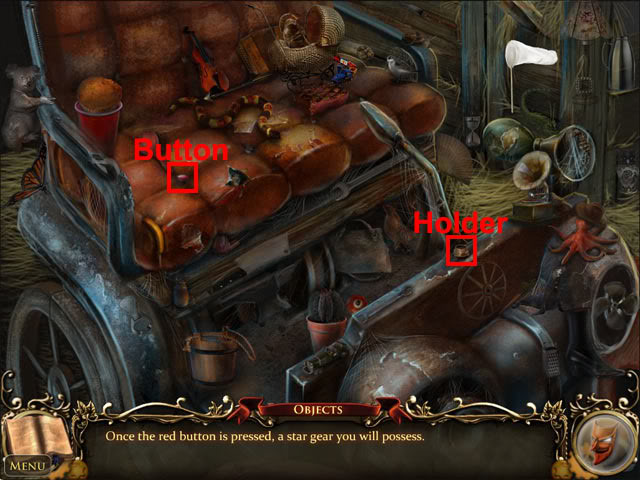
Take the green star gear. Move back twice and then move forward to the bridge. Select the door and find all of the hidden objects on the list. Take the shovel and use it on the ground:
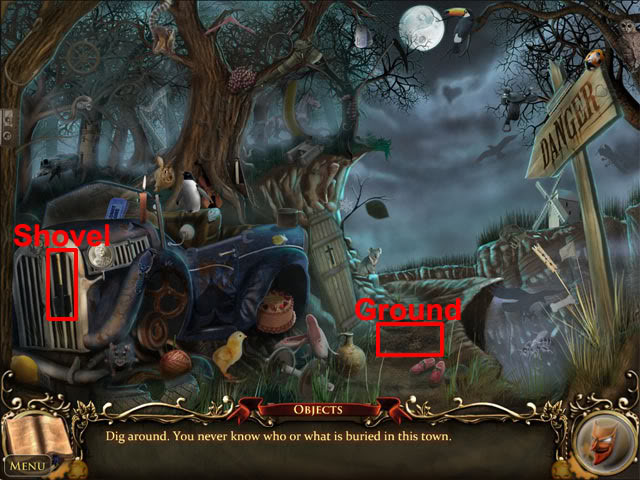
Take the red sun key. Examine the car and find all of the hidden objects. Take the hammer and use it on the lion:
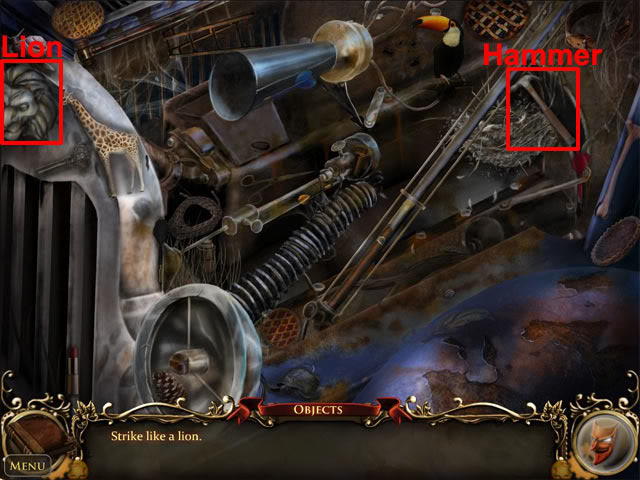
Take the red star gear. Move back three times and forward to the opera house entrance. Enter the ice house. Use the ice chisel on the block of ice:
The sledge hammer is added to the inventory. Move back twice, right and left to the graveyard. Find all of the hidden objects on the list. Take the angel statue and use it on the headstone:
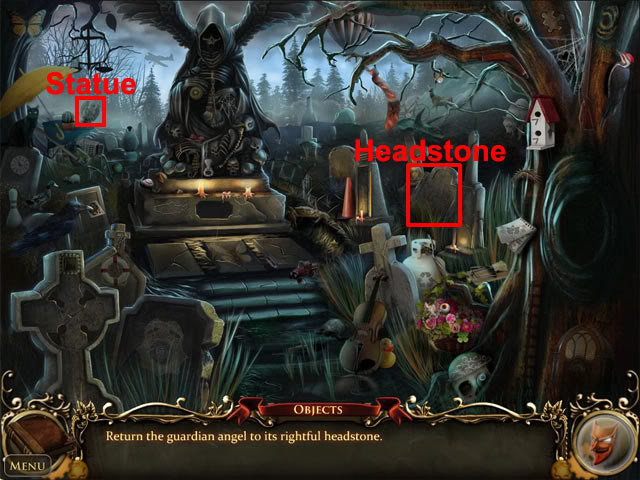
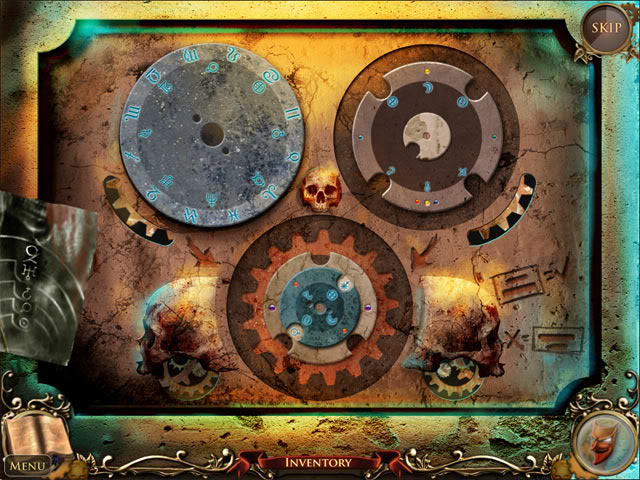
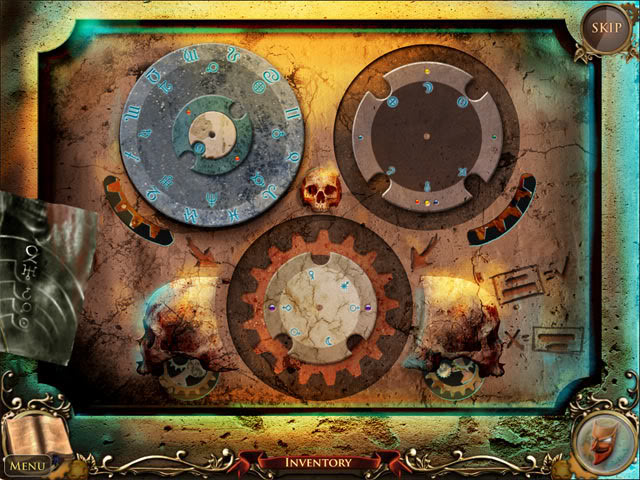
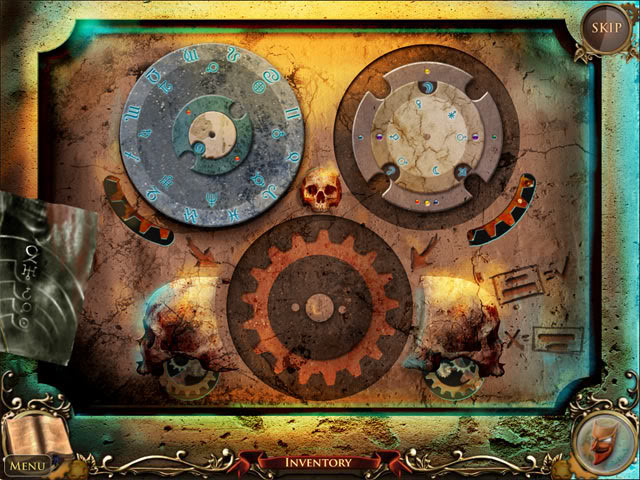
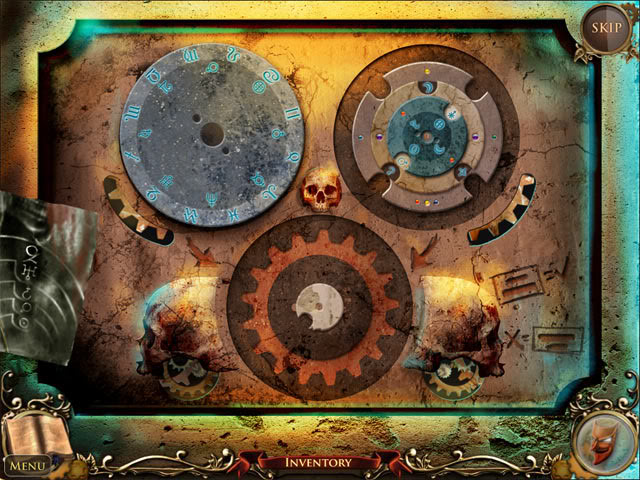
Take the yellow star gear from the headstone. Examine the sparkling area at the top of the steps. Use the sledge hammer on the gravestone to reveal a box. Examine the box to see a button mini-game. Press the buttons in the following order to make all of the lights turn on at once:

Use the family crest on the disc and it will slide out of the way. Take the center sun key. Move back to the residential street. Move forward to the castle door. Use the five sun keys and the four star gears on the door. The aim now is to select the four corner sun keys so that they are the same colour as the nearest star gear:

Chapter 6 – The Plot Thickens
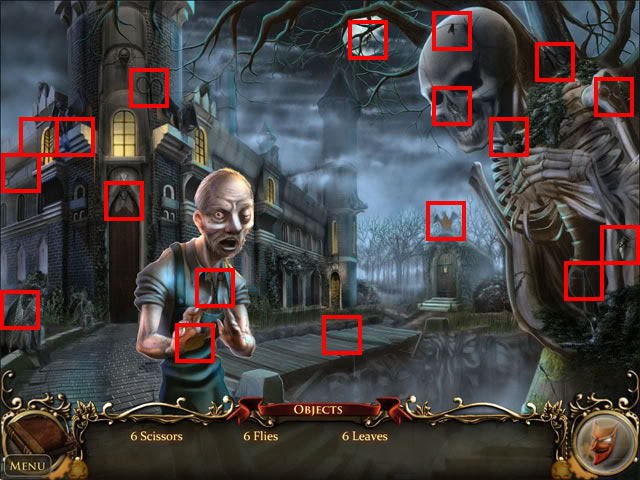
Find all of the hidden objects on the list:
Move forward to the castle. Examine the note on the pillar and the statue:
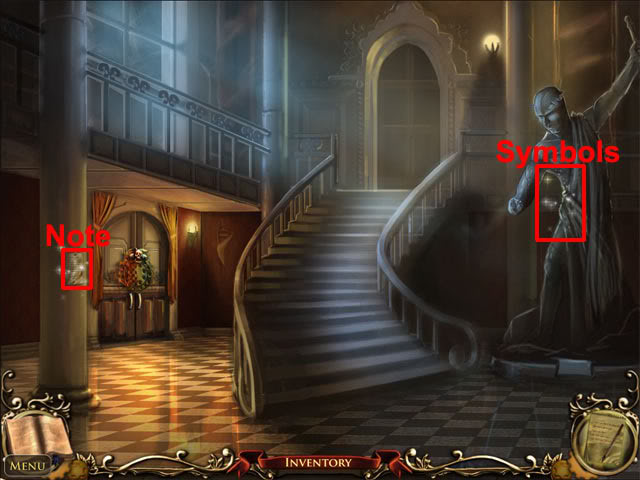
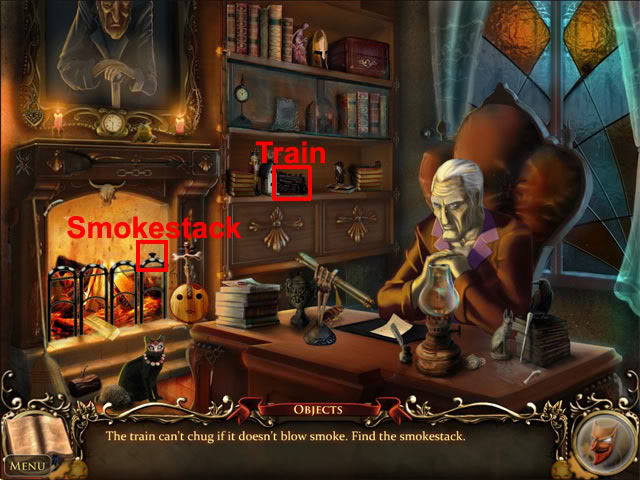
Use the statue arm, sapphire eye and ruby eye on the statue. Take the heart key. Examine the library door to see that tokens are needed. Move forward to the Count’s office and find all of the hidden objects on the list. Take the smokestack and use it on the train:
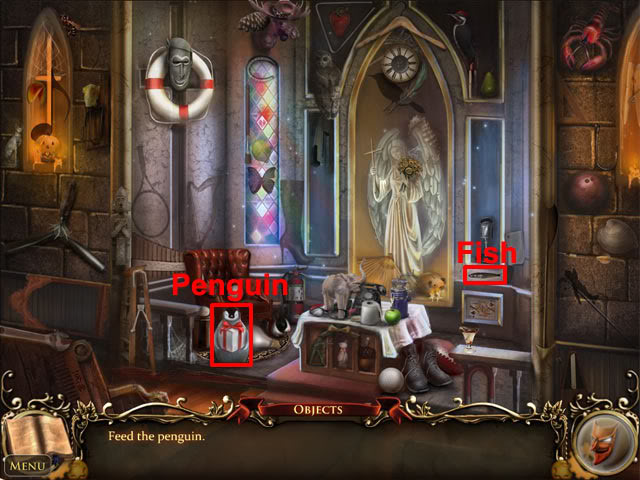
Take the half mask from the shelf. The count asks you to find a special notebook. Move back three times and enter the church. Find all of the hidden objects on the list. Take the fish and use it on the penguin:
Take the notebook from the box. Exit the church and move forward twice to return to the castle. Find all of the hidden objects on the list:
Move forward to the Count’s office and find all of the hidden objects on the list. Take the three skeleton fingers and use them on the hand:
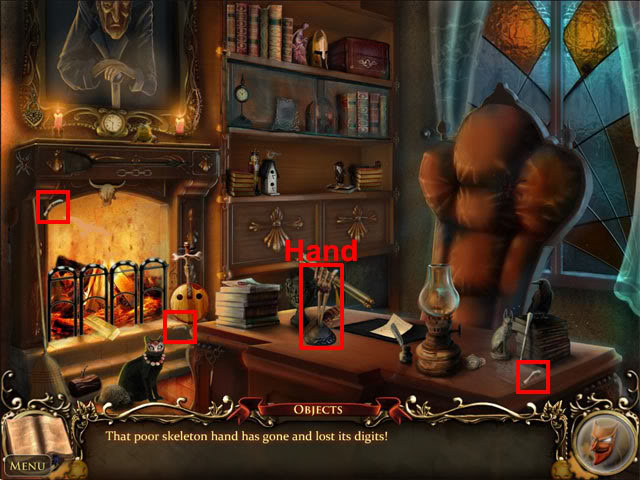
Move back twice to exit the castle. Use the hand on the skeleton arm at the right side of the screen:
Take the poker token set from the slot below the skeleton. Move back twice, forward and left into the opera house. Enter the makeup room and use the half mask on the mannequin. Take the chess token set above the eyeball. Move back four times and select the burnt house. Enter the burnt house. If there are no items to find here, you need to first examine the library room door in the castle. Find all of the hidden objects on the list. Take the shovel and use it on the bucket:
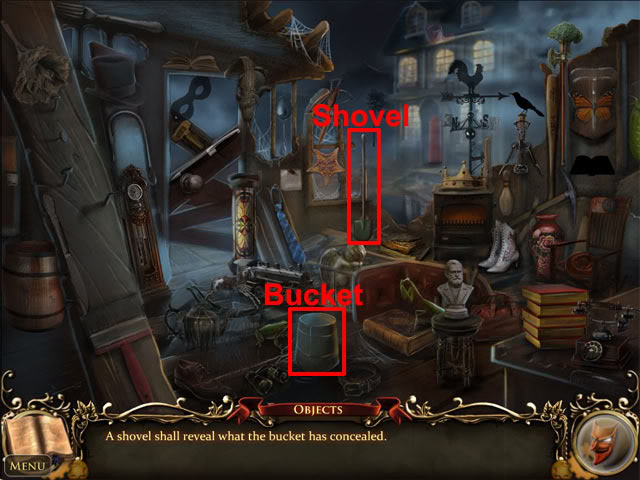
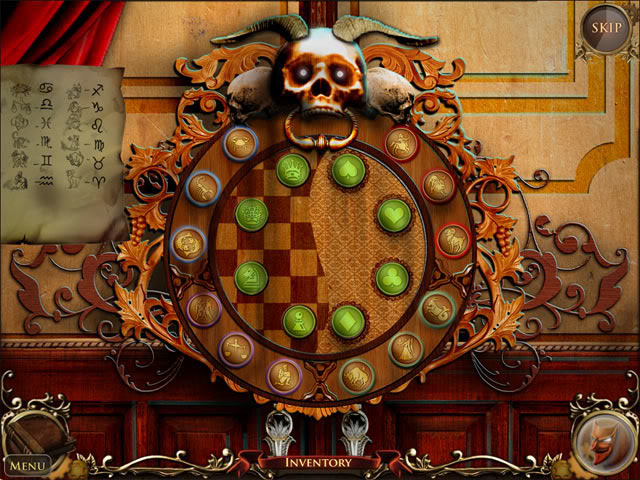
Take the scroll at the left side of the bucket. Move back twice, forward, right and forward twice to enter the castle. Examine the library door. Use the poker token set and the chess token set on the door. Put the tokens in the following order:
Enter the library and find all of the hidden objects on the list:

Take the pistol offered by the Count. Move back four times, left and forward to the bridge. Use the Count’s pistol on the top of the church and the raven will fly away. Select the door and find all of the hidden objects on the list. Take the cross and use it on the coffin:
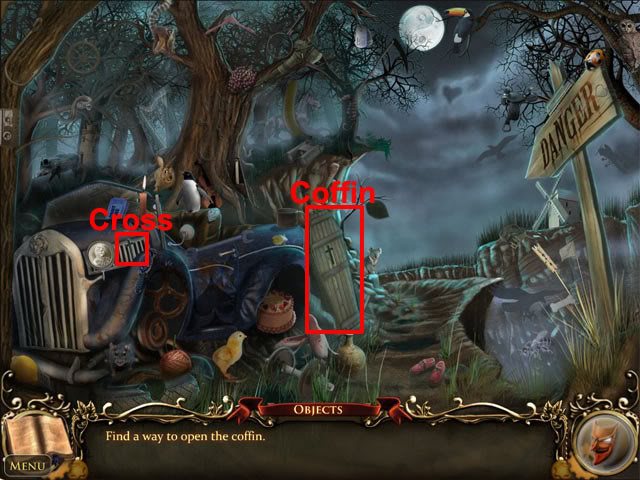
Take the shepherd’s crook from the coffin. Move back to the bridge and use the shepherd’s crook on the freezer key:

Move back to Shop Street and enter the butcher shop. Examine the door. Use the freezer key on the door to see a tile mini-game. The aim is to flip the tiles so that they are all blue. Flip the tiles in the following order:
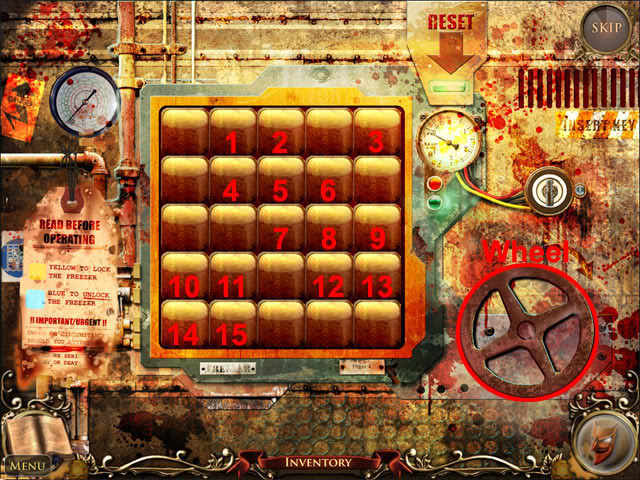
When all of the tiles are blue, select the wheel to complete the chapter.
Chapter 7 – Closing the Curtains
Find all of the hidden objects on the list. Take the jugs and use them on the shield:

Examine the shield to see a puzzle:
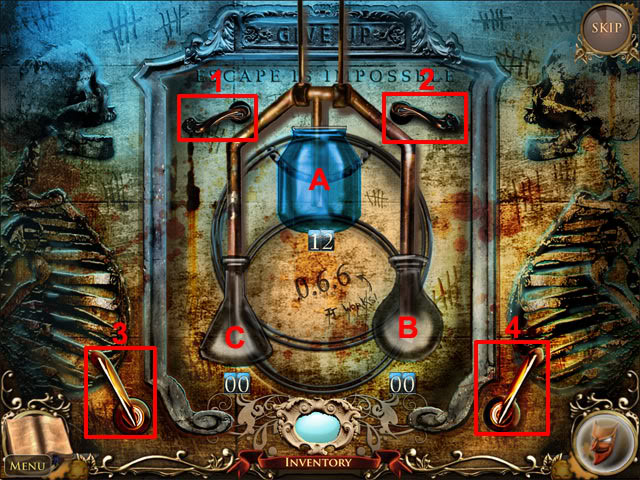
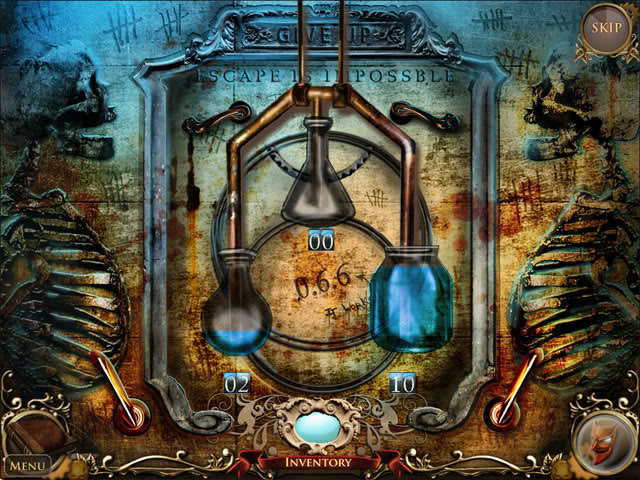
There are three jugs: Jug A can hold 12 litres of liquid, jug B can hold 7 litres of liquid and jug C can hold 5 litres of liquid. There are four switches: Switch 1 swaps the liquid from the top jug into the bottom-left jug. Switch 2 swaps the liquid from the top jug into the bottom-right jug. Switch 3 swaps the bottom two jugs. Switch 4 moves all three jugs one position to the left. The aim is to have 6 litres of liquid in jugs A and B. Follow the directions below to complete the puzzle.
Press switch 2:

Press switch 4 and switch 2:

Press switch 4 and switch 2:
Press switch 4 twice and switch 2:
Press switch 4 twice and switch 2:
Press switch 4 and switch 2:
Press switch 4 and switch 2:
Press switch 4 twice and switch 2:
Press switch 4 twice and switch 2:
Press switch 4 and switch 2:

Press switch 4 and switch 2:
Press switch 4 to complete the puzzle. Press the red button:
Enter the sewer and find all of the hidden objects. Take the dart and use it on the balloons:

Take music box key 1. Select the ladder to climb up to the residential street. Move forward three times to enter the Count’s office. Examine the safe:
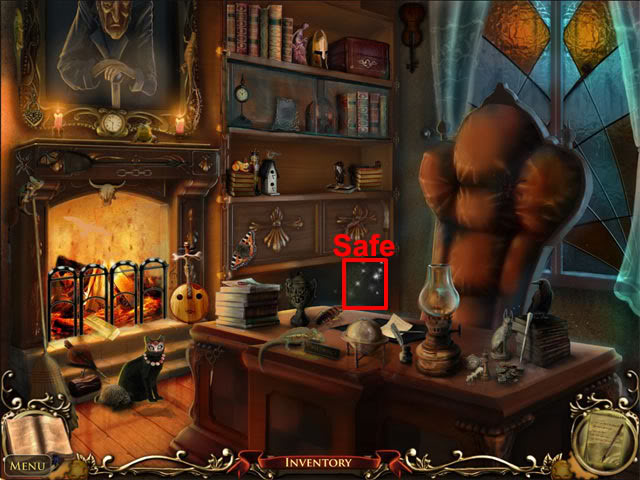
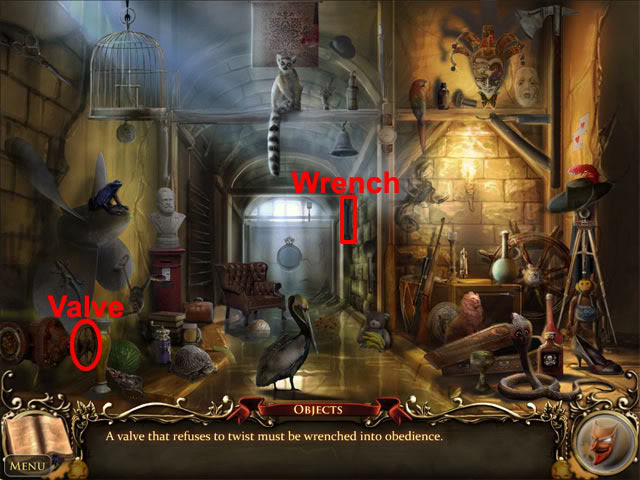
The missing demon emblems need to be found before the safe can be opened. Exit the view of the safe. Move back four times, forward and left into the opera house. Enter the backstage area and find all of the hidden objects on the list. Take the key and use it on the chest:
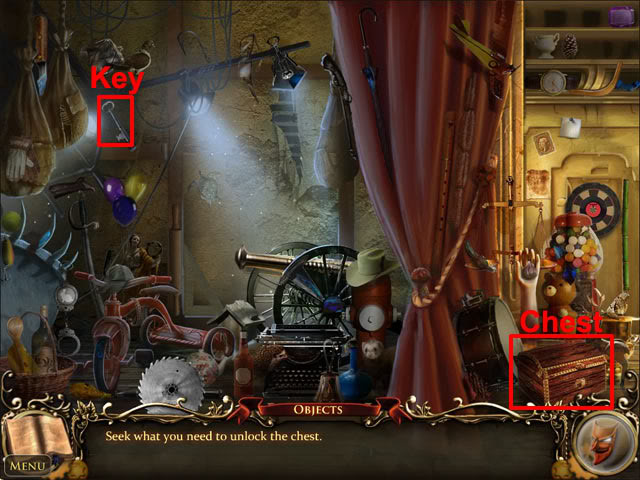
Take the wrench from the chest. Move back and enter the ice house. Use the wrench on the vent:
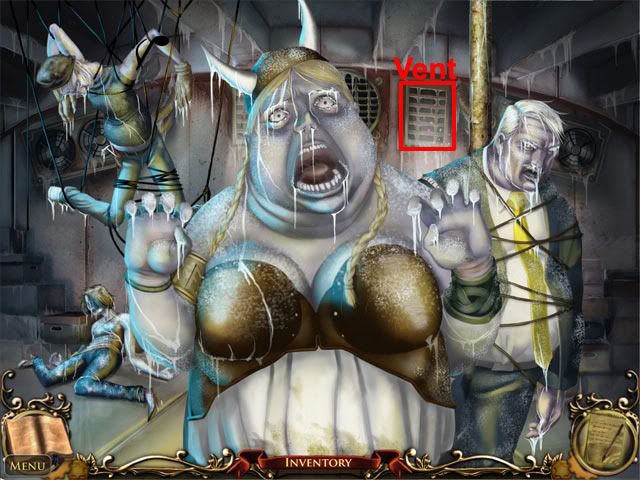
Take the ice demon from the vent. Move back twice and left Shop Street. Enter the coach house and examine the sparkling area. Find all of the hidden objects on the list. Take the net and use it on the butterfly:
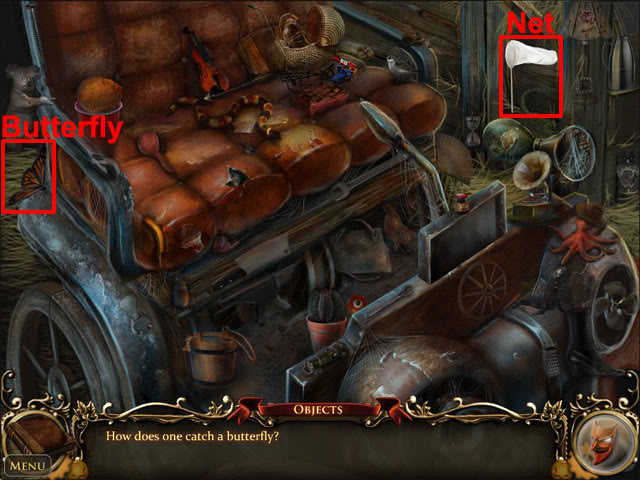
Take music box key 2. Move back twice to Shop Street. Enter the butcher shop and move forward to see Tiberius. Take the monocle and the door key:

Move back and find all of the hidden objects on the list. Take the knife and use it on the sign:
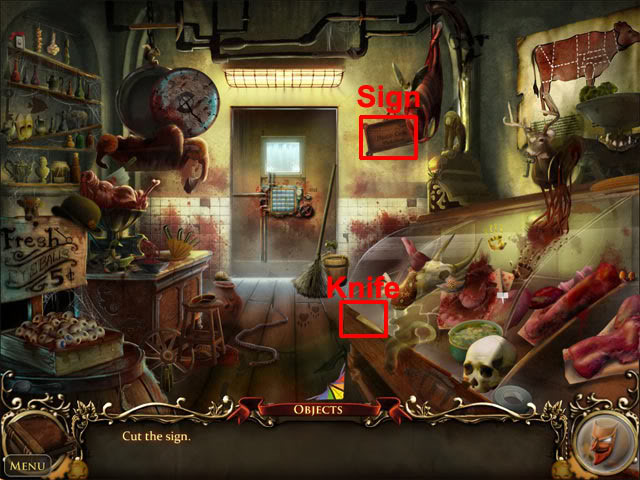
Take the blood demon. Move back twice to the village square. Examine the window at the top of the ladder and then select the window to enter the house. Move forward to the hallway. Examine the left door and then use the maestro door key on the lock to enter Tiberius’ room. Find all of the hidden objects on the list. Find four picture pieces and use them on the frame:
Move back three times, right, down and back to the dungeon. Find all of the hidden objects on the list. Take the letter and use it on the mailbox:
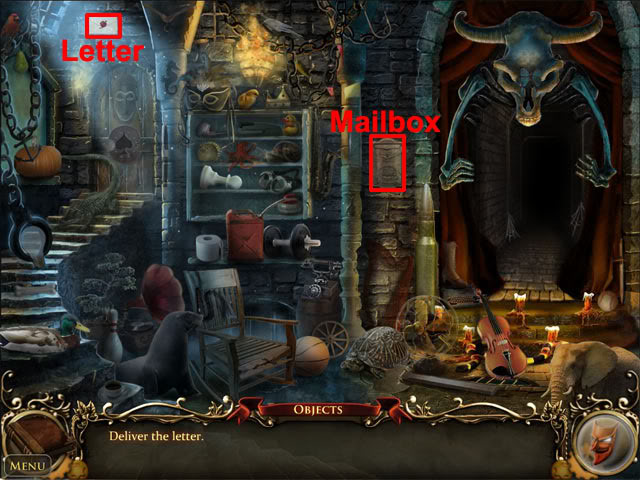
Take the abyss demon from the mailbox. Move forward, up and forward three times to the Count’s office. Examine the safe. Use the blood demon, ice demon and abyss demon on the safe. Enter the following codes:
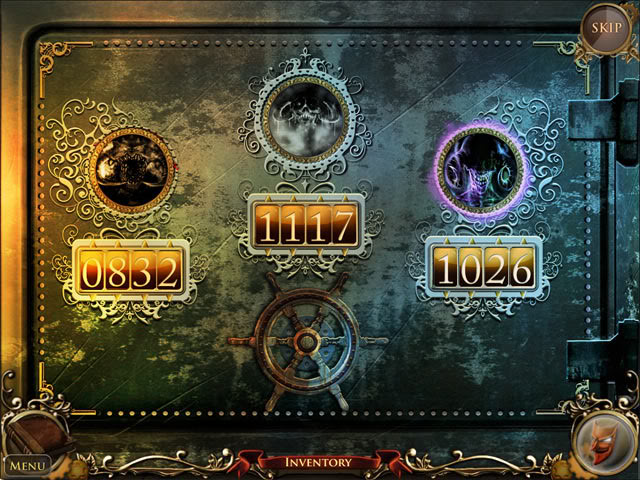
When all three numbers have been entered, select the wheel to open the safe. Examine the safe. Examine the photograph and then examine the letter. Exit the view of the letter. Move back twice and left into the library. Find all of the hidden objects on the list. Take the handle and use it on the drawer:
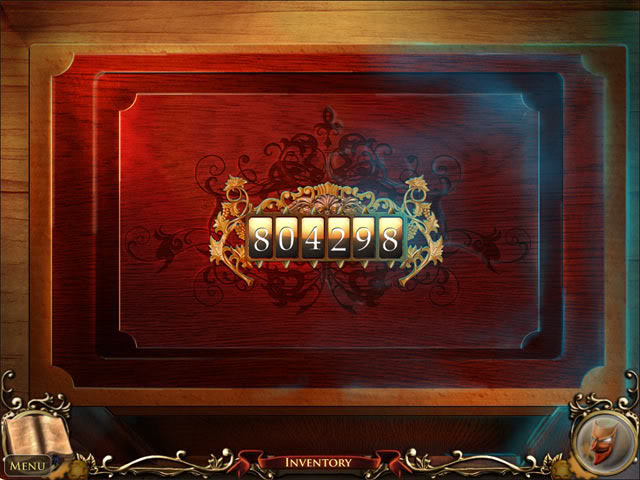
Examine the letter in the drawer. Examine the music box and enter the following code:
Examine the music box. Use the two music box keys on the music box. Select the slider button at the bottom of the music box and watch the sequence of four notes that is played. Play back the sequence of four notes and then press the slider button again. Play back the sequence of six notes and press the slider button again. Play back the sequence of eight notes to complete the puzzle. Take the garden key. Select the right door and use the garden key on the lock. Examine the fuse box:
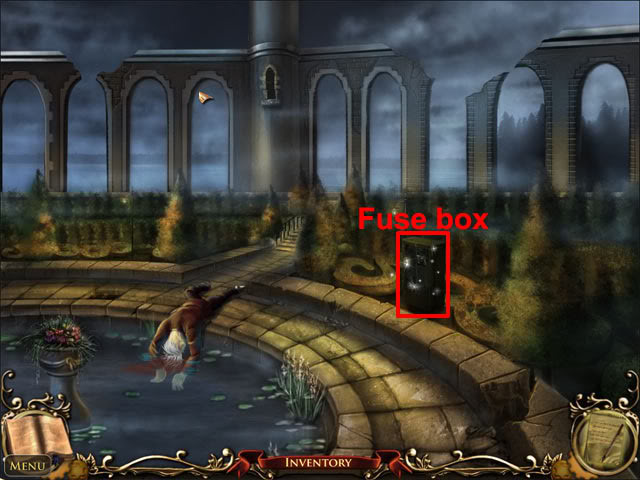
An object is needed to turn the lock. Exit the view of the fuse box. Move back four times and down to the sewer. Find all of the hidden objects on the list. Take the wrench and use it on the valve:
Move up, forward twice, left and right to the garden. Examine the fuse box. Use the rusty valve on the lock: It needs to be cleaned before it can be used. Move back five times, left, forward and left to the car. Examine the car and find all of the hidden objects on the list. Take the button and use it on the panel:
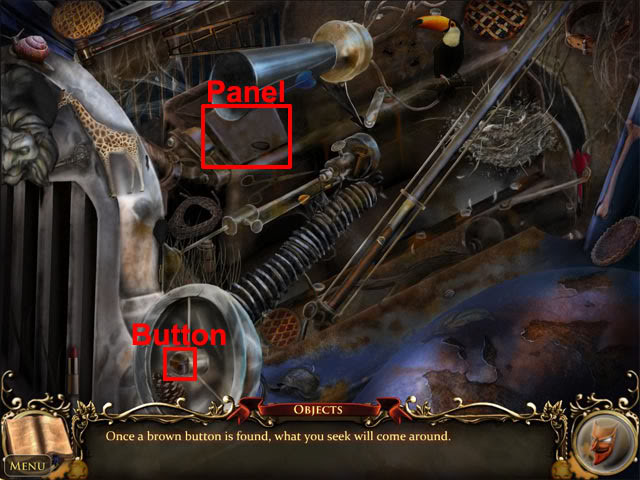
Take the rust remover. Move back three times, right, forward twice, left and right to the garden. Examine the fuse box and use the rust remover on the valve. Turn the valve to open the fuse box. Move the fuses to the correct holes:
Move back three times and select the tower door. Use the heart key on the lock to enter the tower. Select the door at the top of the stairs to see a puzzle. Move the pieces to the following positions to complete the game: