
Best Horror Games On Itch.io – July 2026
Across a bounty of subgenres.![Haze Seas Accessories Tier List [Best Accessories to Equip]](/wp-content/uploads/2026/07/haze-seas-accessories-tier-list.jpg "Haze Seas Accessories Tier List [Best Accessories to Equip]")
Haze Seas Accessories Tier List [Best Accessories to Equip]
The accessories with the best stat buffs in Haze Seas.
![[Roblox] Evomon Shiny Hunting Guide – Including Prismatic and Pris Shinies!](/wp-content/uploads/2026/06/evomon-shiny-hunting-guide.jpg "[Roblox] Evomon Shiny Hunting Guide – Including Prismatic and Pris Shinies!")

Nightfall Mysteries: Black Heart Walkthrough
Welcome to the Nightfall Mysteries: Black Heart walkthrough on Gamezebo. Nightfall Mysteries: Black Heart is a Hidden Object/Adventure Game played on the PC created by Vast Studios. This walkthrough includes tips and tricks, helpful hints and a strategy guide on how to complete Nightfall Mysteries: Black Heart.


- Prefer Gamezebo on Google

Game Introduction – Nightfall Mysteries: Black Heart
Welcome to the Nightfall Mysteries: Black Heart walkthrough on Gamezebo. Nightfall Mysteries: Black Heart is a Hidden Object/Adventure Game played on the PC created by Vast Studios. This walkthrough includes tips and tricks, helpful hints and a strategy guide on how to complete Nightfall Mysteries: Black Heart.
General Tips
This hidden object game requires visiting several locations and using inventory items to advance play.
- Play is mostly linear although there are some options for the order in which to explore locations.
- Begin play by selecting one of three a modes.
- Casual – Hint and Skip button recharge quickly (approximately 15 seconds). Sparkles indicate active zones.
- Advanced – Hint and Skip buttons recharge three times slower than casual mode. Extreme – No help is available. Puzzles cannot be skipped.
- Change the play mode during the game by selecting Menu and Options from the current scene.
- Hidden object scenes contain items listed in green and yellow lettering. Yellow lettered items require interacting with the scene to reveal the item. Green lettered items require combining one or more items in the scene to create the listed object.
- Always move the cursor around a scene. Watch the cursor to see if it changes into a hand or magnifying glass.
- The Journal eventually contains four sections.
- Clues – Contains information that adds to the storyline and helps solve puzzles. The journal glows as an entry is added.
- Collectables – Find 15 opera masks scattered among the scenes to unlock extra material. Refer to this section for the current number collected.
- Audio Tapes – Cassette tapes also contribute to solving the game. Find all 15 for a bonus. This section is not immediately available when the game starts.
- Map – Provides a good overview of the locations. Visited areas with outstanding objectives are indicated as well as the current location. It can’t be used to switch locations. This section is not immediately available when the game starts.
Walkthrough Tips
- CAPITALIZED inventory items are meant to make it easier to find where this guide may differ from your own play. Inventory items are highlighted in blue with a white border in the screenshots.
- The opera masks are highlighted in a scene and mentioned in bold print in the scene objectives.
- If you don’t have an item referenced in this guide, click and hold the “Ctrl” key and then press the “F” key. This opens a Find area in your web browser. Type in the name of the object as it appears in this guide to find where else it is referenced.
- To minimize back and forth moves, most available inventory items in a scene are picked up when first encountered.
- Location references correspond to the location names on the map in the journal.
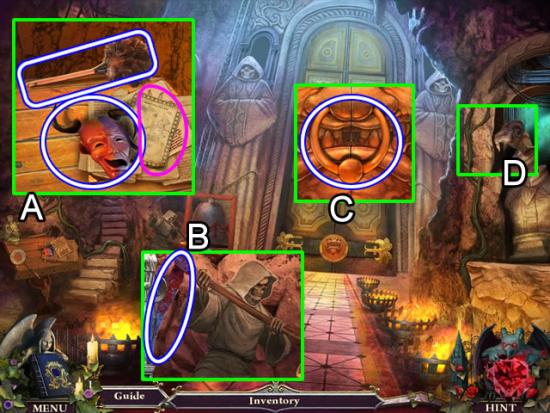
Chapter 1: Getting onto the Grounds

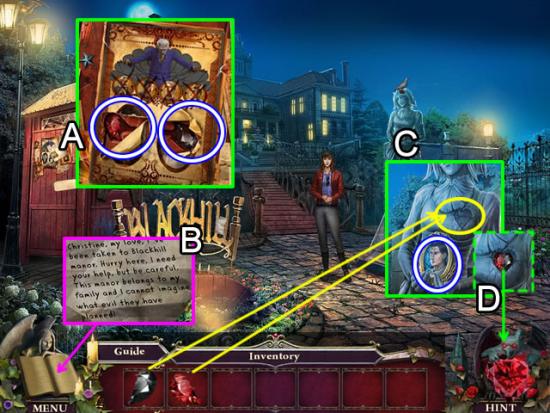
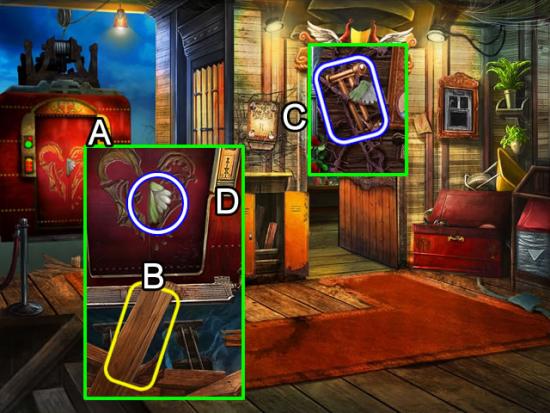
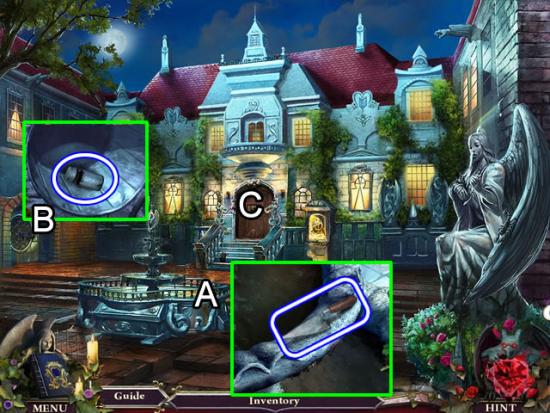
- Examine the posters on the side of the shack (A). Tear away the two pictures to reveal a BLACK HEART HALF and a RED HEART HALF. They are added to inventory.
- Look closer at the “Blackhill” entrance sign (B). Read the piece of paper. It is added to the Clues section of the journal.
- Zoom in on the statue (C). Place the BLACK and RED HEART HALVES in the heart outline. Take the PORTRAIT OF VIGGO.
- Click the glowing heart (D) to create the Hint button (not available in Extreme playing mode).
- Attempt to cross the bridge.
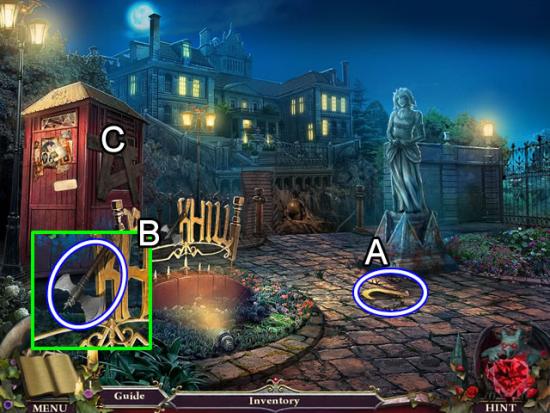
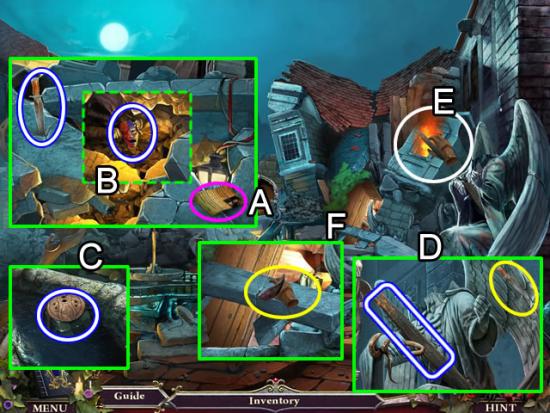
- Pick up the METAL BAR (A).
- Look at the broken sign (B). Take the AXE.
- Use the AXE to smash the boards on the shack.
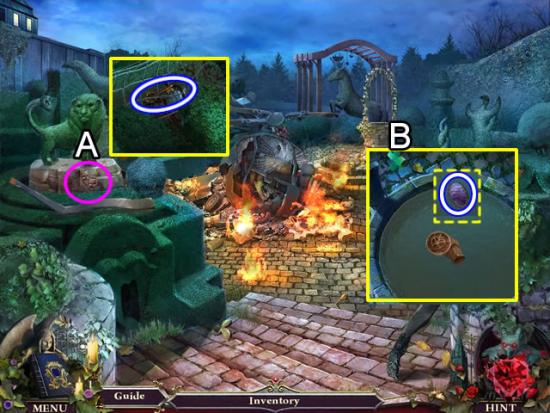
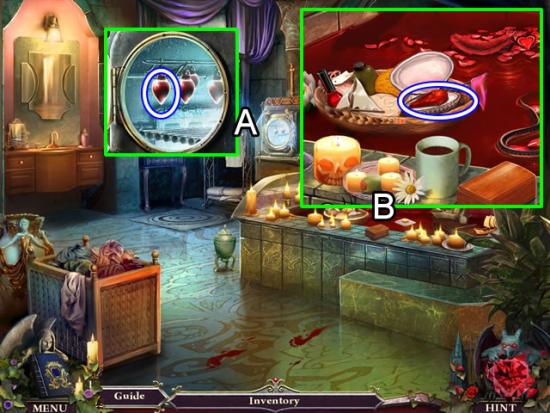
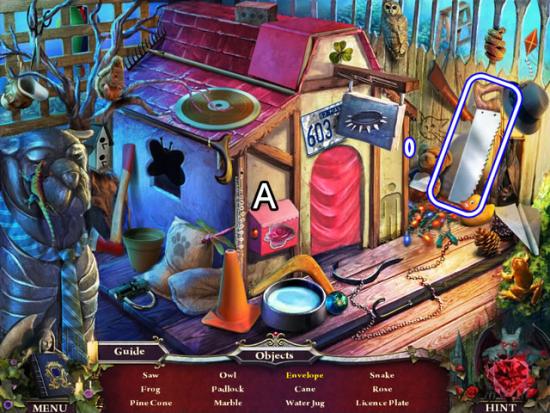
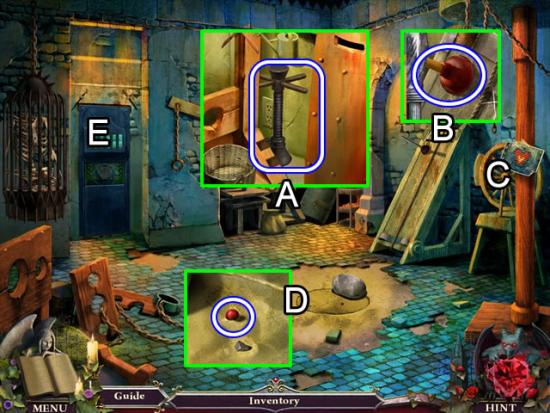
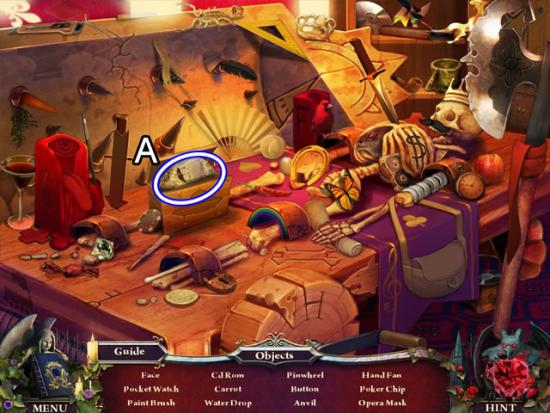
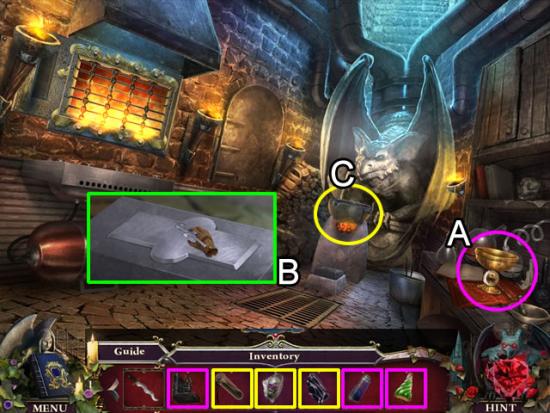
- Play the hidden object scene.

- Open the take-out container (A) to find the Shrimp. Pick up the fish and place the Fish in Bowl (B). Drag the dart to the center of the target for the Bulls eye (C). Guide the golf ball into the cup (D) for a Hole in One.
- Find the rest of the listed objects. The BUG SPRAY goes to inventory.
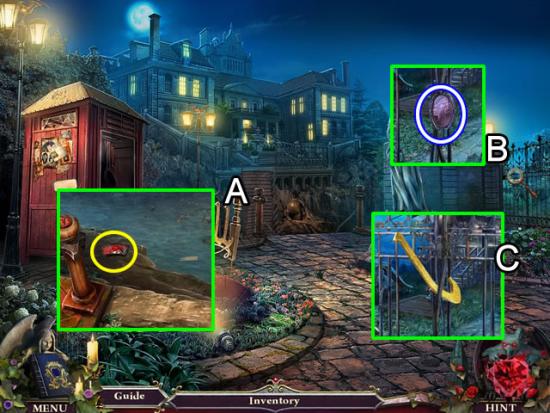
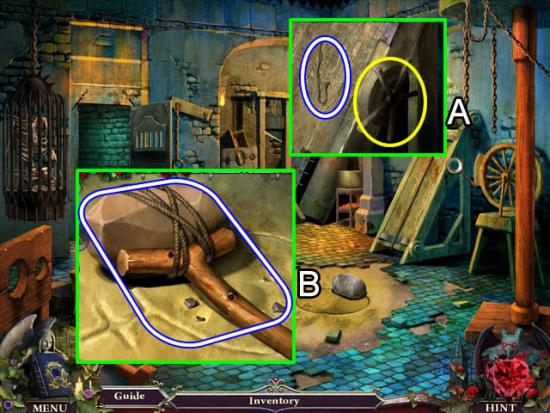
- Peer into the chasm the bridge once spanned (A). Note the object just beyond reach.
- Zoom in on the gates (B). Remove the COUNTESS INSIGNIA. Use the METAL BAR to pry apart the bars on the gate (C).
- Go forward.
Abandoned Playground
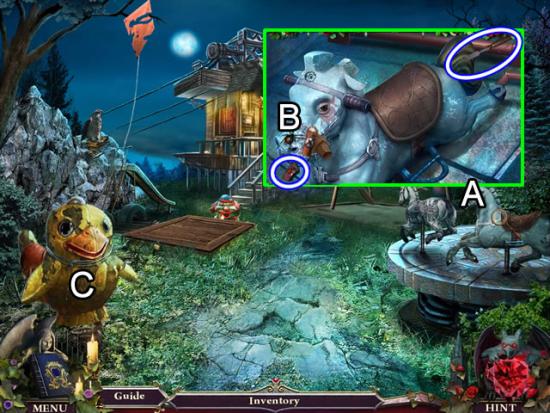
- Look closer at the horse (A). Take the CHISEL. (Spider Alert!) Attempt to take the wooden piece from its mouth (B). Use the BUG SPRAY on the spider. Take the WOOD CARVING (1/3)
- Click the chicken (C).
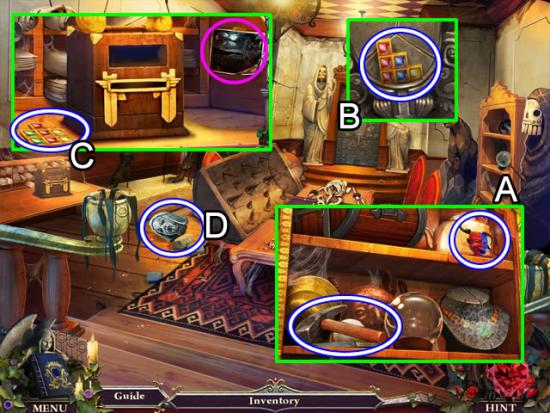
- Play the hidden object scene in the nest.
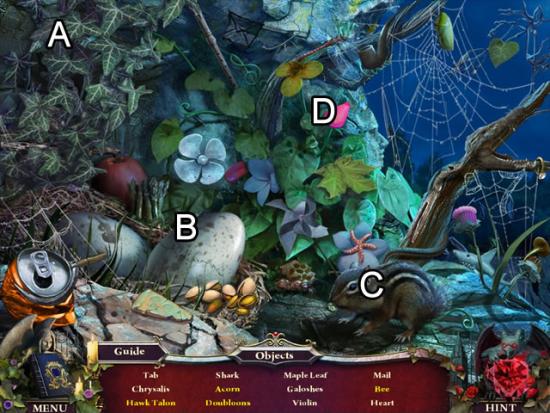
- Move the vines (A) to find the Doubloons. Crack the egg (B) to find the HAWK TALON. Pet the chipmunk (C) to take its Acorn. Open the flower (D) to find the Bee.
- Find the rest of the listed objects.
Workshop Porch
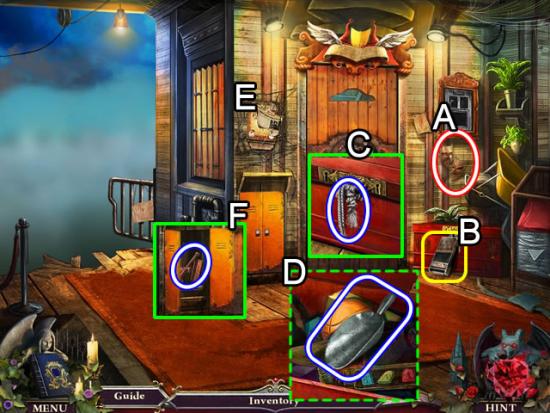
- Collect the Opera Masks (A).
- Pick up the tape recorder (B) to add the audio chapter to the journal.
- Look closer at the chest (C). Use the HAWK TALON to remove the ROPE.
- Open the chest (D) and take the SCOOP.
- Take the paper from the board (E).
- Open the cabinet (F). Take the HANDLE.
Blackhill Bridge
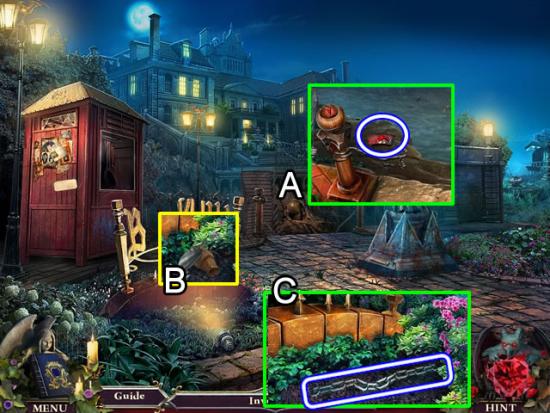
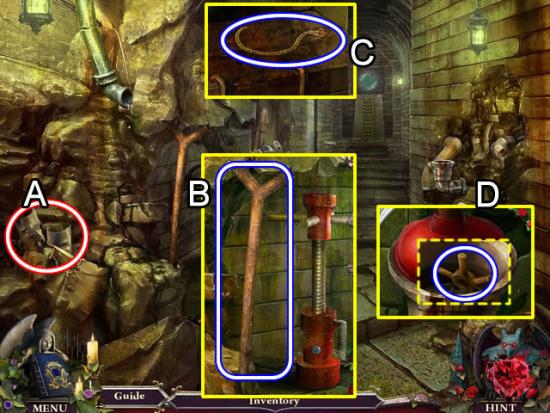
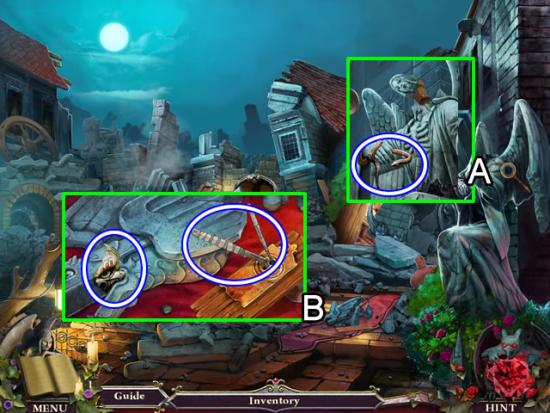
- Attach the ROPE to the support for the broken bridge (A). Climb down and pick up the WOOD CARVING (2/3).
- Use the SCOOP (B) to uncover the CHAIN (C) in the soil in front of the broken sign.
Abandoned Playground
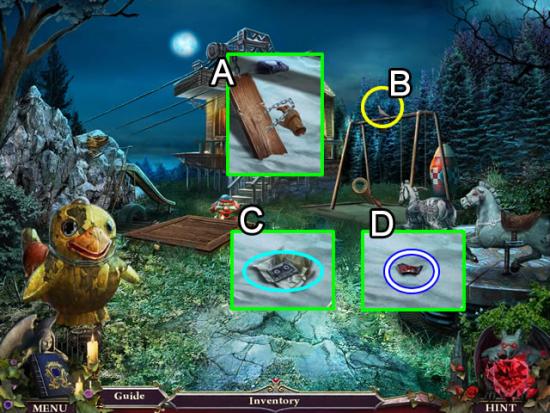
- Use the CHAIN to repair the broken swing (A).
- Push the swing to scare away the pigeon (B).
- Look at the pigeon droppings by the swing. Unwrap the first audio cassette (C) and listen to the clue.
- Notice the Map section is now in the journal. The map is a good reference but cannot be used to jump to locations. All location notations in this walkthrough now correspond to the locations on the map.
- Look again at the sand (D). Pick up the WOOD CARVING (3/3).
Workshop Porch
- Zoom in on the door.
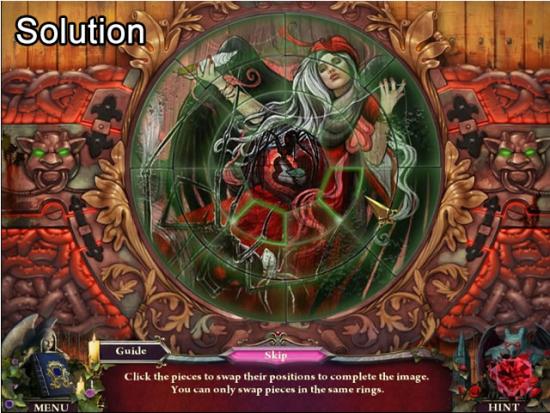
- Place the WOOD CARVINGS (3/3) on the door to open a puzzle.
- The goal is to swap the pieces within the same ring to form a picture.
- The center ring doesn’t change. A correctly placed piece will glow green.
- Exiting the puzzle and re-entering will reset the puzzle.
- See the next screenshot for the solution.
- Enter the workshop.
Workshop
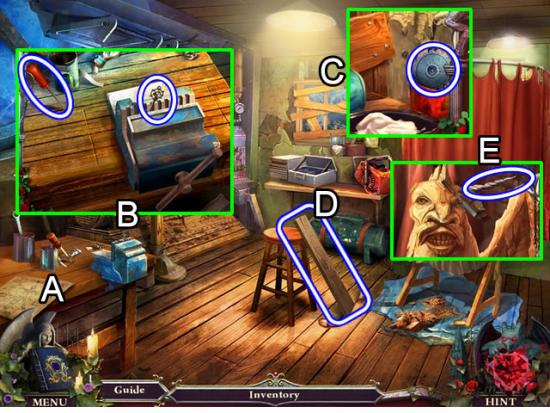
- Pick up the drawing (A)
- Look at the workbench (B). Place the HANDLE on the vice to get the SANDBOX KEY. Take the SCREWDRIVER.
- Examine the boarded-up window (C). Take the GEAR (1/3)
- Take the WOOD PLANK leaning against the stool (D).
- Open the curtains to see the carving (E). Use the CHISEL to pry off the BONE HORN.
Workshop Porch
- Look in the toy box. Use the SCREWDRIVER to remove the front panel on the robot. Take the GEAR (2/3).
Abandoned Playground
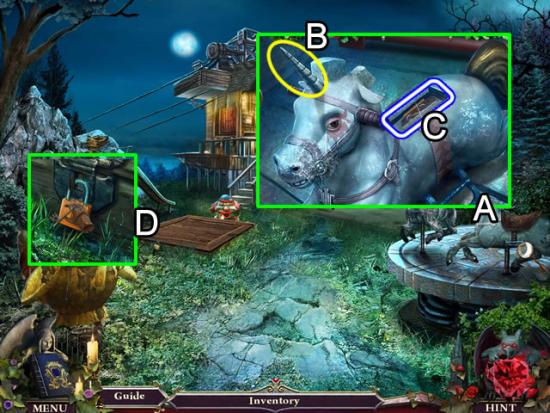
- Examine the horse on the carrousel (A). Transform the horse into a unicorn with the BONE HORN (B). Remove its saddle and take the CONTROL CHIP in its back (C).
- Use the SANDBOX KEY on the padlock (D).
- Play the hidden object scene.
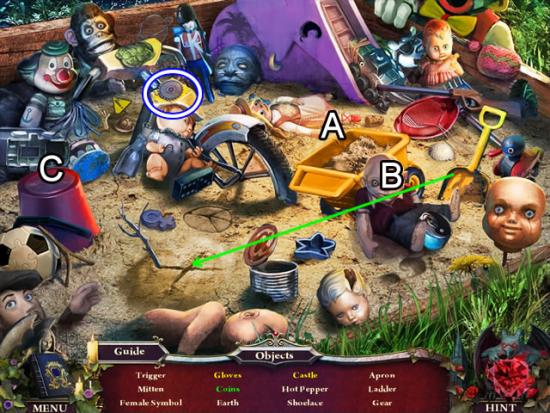
- Dump the sand out of the dump truck to find the Gloves (A). Use the shovel to dig up the sand where “X” marks the spot (B). Take the Coins. Tip over the bucket and find the Castle (C).
- Find the rest of the listed objects. The GEAR (3/3) goes to inventory.
Workshop
- Zoom in on the control box to the right of the workbench.
- Put the GEARS (3/3) on the panel to open a puzzle.
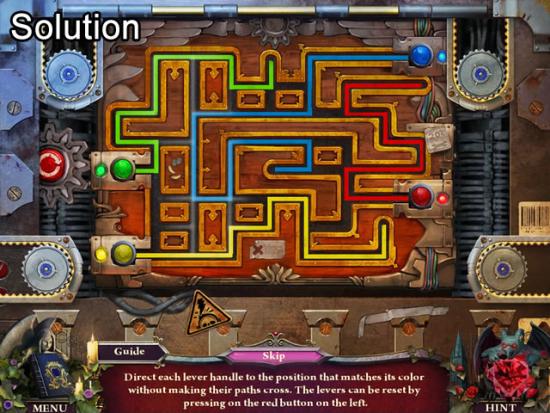
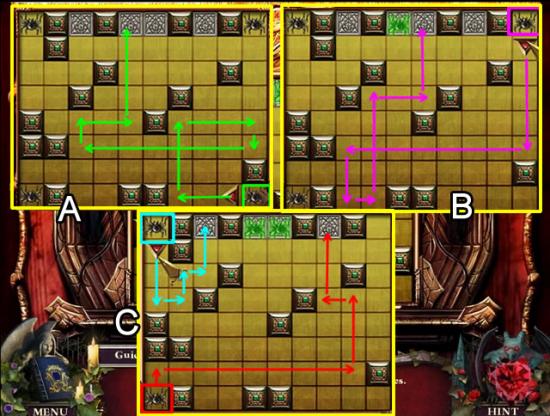
- The goal is to place the colored balls in their correspondingly colored square without crossing path of another ball.
- Click a ball to activate it. Arrows indicate available directions. The balls stop at each intersection. This puzzle has a reset button on the left.
- See the next screenshot for the solution.
- Return to the workshop porch and watch the cable car approach.
Workshop Porch
- Examine the front of the cable car (A).
- Lay the WOOD PLANK across the gap (B). Take the WORK GLOVES.
- Look at the poster board (C). Use the WORK GLOVES to extract the DOOR RELEASE HANDLE.
- Insert the DOOR RELEASE HANDLE in the slot (D) to open the doors.
Cable Car
- Pick up the can of PAINT THINNER from the padded seat.
Workshop
- Inspect the boarded-up window.
- Pour the PAINT THINNER on the dried paint. Take the CORKSCREW.
- Zoom in on the carving. Use the CORKSCREW to remove the cork panel in side of the carving. Take the KEY.
Cable Car
- Pick up the newspaper (A).
- Examine the control panel (B). Take the NIGHTLIGHT.
- Slide the CONTROL CHIP in the slot and insert the KEY to start the cable car.
- Flip the lever (D).
Chapter 2: Exploring the Grounds
Courtyard
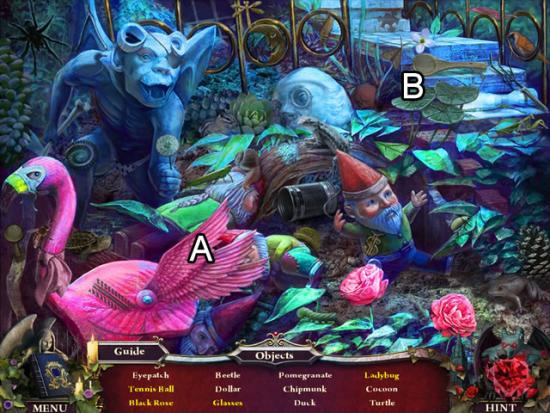
- Play the hidden object scene.
- Spread the wings (A) to uncover the Tennis Ball, Glasses and Ladybug. Move the leaves (B) to find the BLACK ROSE.
- Find the rest of the listed objects.
- Inspect the bench. Pick up the newspaper. Take the LOCK PICK that was under the paper.
- Click the left side of the scene.
Fountains
- Inspect the fountain (A). Pick up the MASONRY TROWEL.
- Use the LOCK PICK to open the bolt on the sewer grate (B). Take the CLEAN WATER TABLET.
- Approach the front door (C).
Front Door
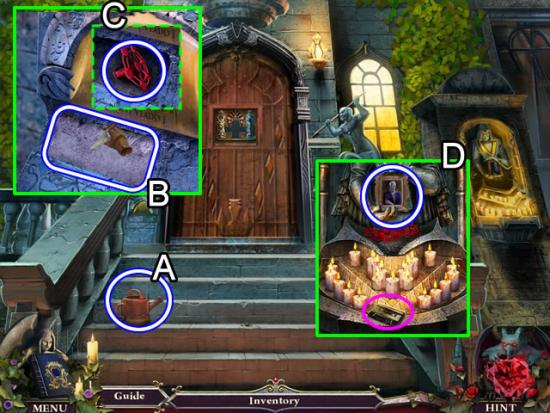
- Pick up the WATERING CAN (A).
- Examine the plaque (B). Use the MASONRY TROWEL to loosen the BRICK. Take the VALVE WHEEL from the nook (C).
- Look at the memorial on the right (D). Take the PORTRAIT OF VLADD and the audio tape.
Fountains
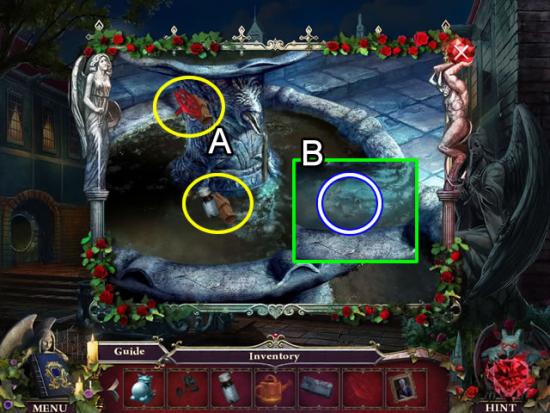
- Zoom in on the fountain.
- Put the VALVE WHEEL on the spigot to turn off the water (A). Put the CLEAN WATER TABLET in the dirty water.
- Take the ICE GARGOYLE HEAD floating in the clean water (B).
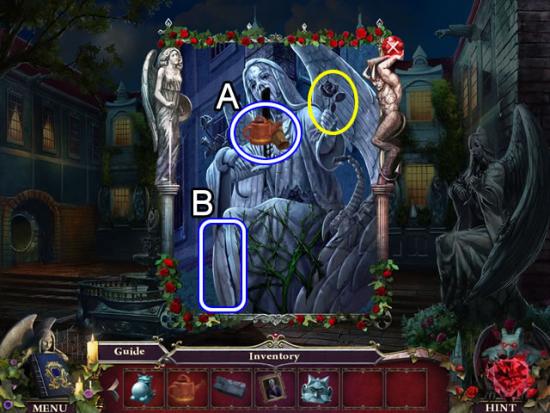
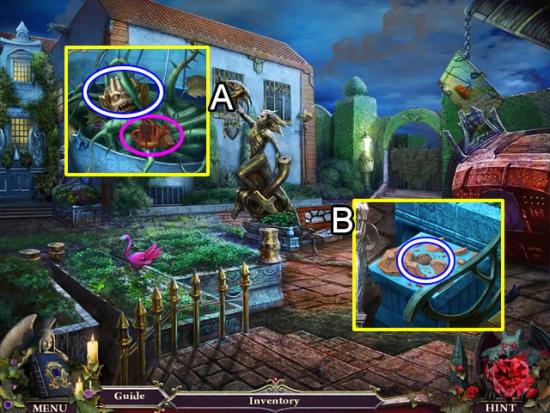
- Inspect the statue.
- Place the BLACK ROSE in the statue’s hand (yellow).
- Use the WATERING CAN to collect the POISONOUS SUBSTANCE (A).
- Pluck the QUILL off the leg (B).
Courtyard
- Pour the POISONOUS SUBSTANCE (pink) over the vines in the planter (A). Take the FIRE GARGOYLE HEAD.
- Look at the bench (B). Smash the clay jar with the BRICK. Take the COPPER COIN.
Front Door
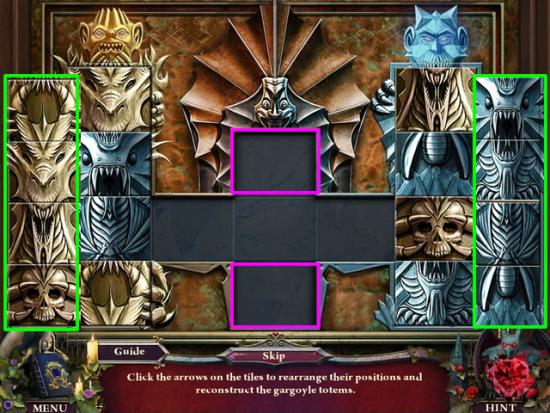
- Insert the FIRE and ICE GARGOYLE HEADS in the door to start a puzzle.
- The goal is to slide the tiles to form two totems.
- The best strategy is to work on one totem at a time. Use the top and bottom slots (pink) for holding tiles.
- The completed totems are shown above (green). Watch the video to see the moves.
Grand Stairs
- Zoom in on the double doors at the top of the staircase.
- Take the note and the HEDGE CLIPPERS.
Courtyard
- Talk to Viggo.
- Look at the overgrown gates on the right.
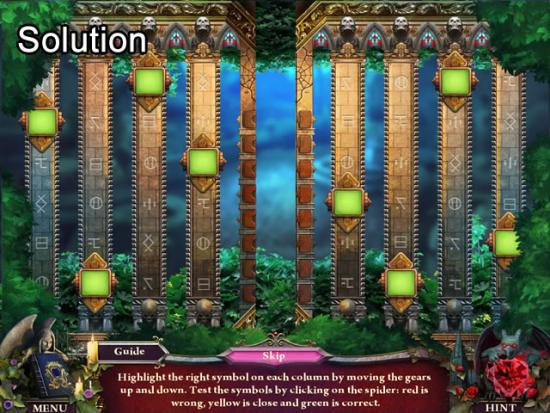
- Use the HEDGE CLIPPERS to remove the bushes and open a puzzle.
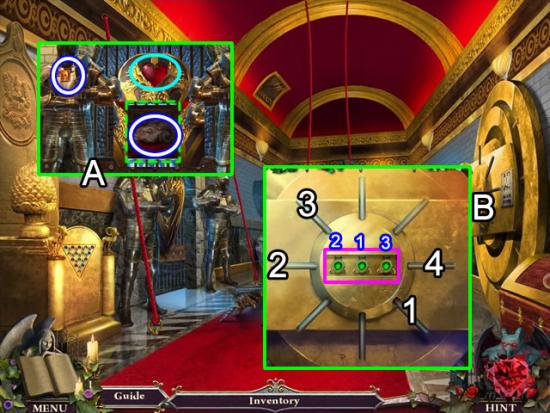
- The goal is to find the right symbol on each column to open the gates.
- The best strategy is to move all the symbols in the same direction. Pull the spider to test the new positions. Red is incorrect, yellow is close, green is correct. Continue until all are green.
- The next screenshot shows the solution.
- Enter the hedge maze.
Hedge Maze
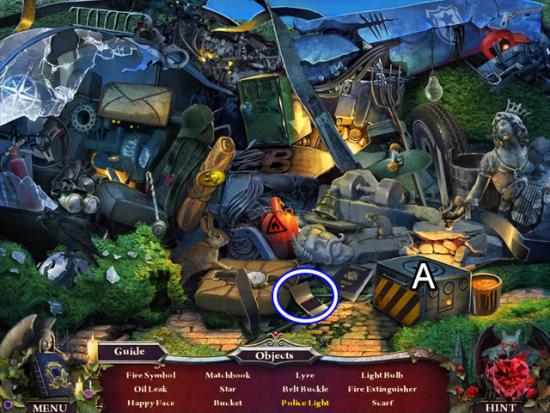
- Play the hidden object scene.
- Open the box (A) to find the Police Light.
- Find the rest of the listed objects. The MATCHBOOK goes to inventory.
- Take the Opera Masks from the base of the statue (A).
- Look closer at the lion topiary. Remove the foliage from its body to find the SANGUINE KEY.
- Go to the wishing well (B). Toss the COPPER COIN in the water. Retrieve the COUNT INSIGNIA.
Chapter 3: The Black Widow’s Lair
Grand Stairs
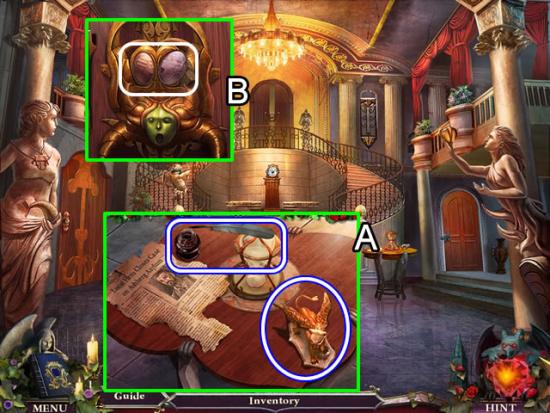
- Look at the side table (A). Take the newspaper clipping. Dip the QUILL in the bottle of ink. Return the INKED QUILL to inventory. Pick up the GRIFFIN FIGURINE.
- Examine the lock at the top of the stairs (B).
- Insert the COUNTESS and COUNT INSIGNIAS in the ovals to unlock the doors.
Great Hallway
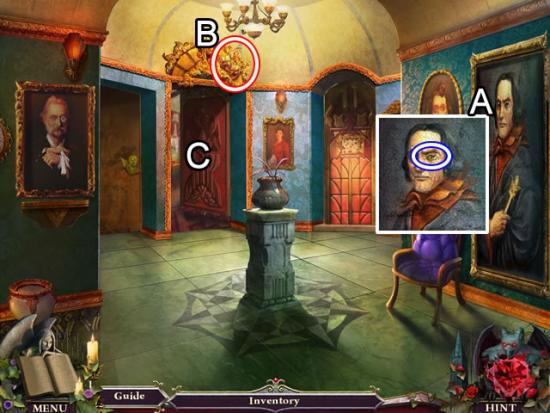
- Examine the painting (A). Pluck the SNAKE EYE from the portrait.
- Take the opera masks (B) above the door.
- Enter the Countess’ Bedroom.
Countess’ Bedroom
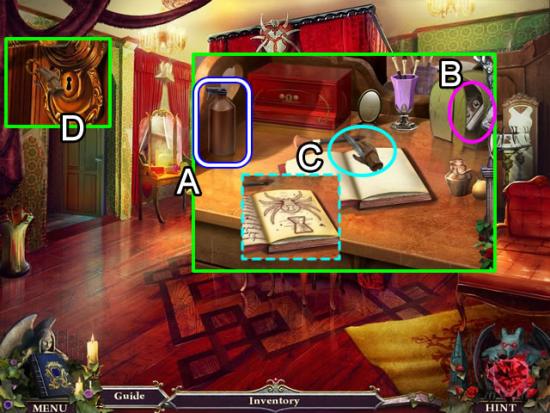
- Inspect the contents on the dressing table (A). Open the case (B) and take the audio tape. Use the INKED QUILL on the book to reveal a drawing (C). Take the CLEANING SPRAY.
- Insert the SANGUINE KEY in the door lock (D).
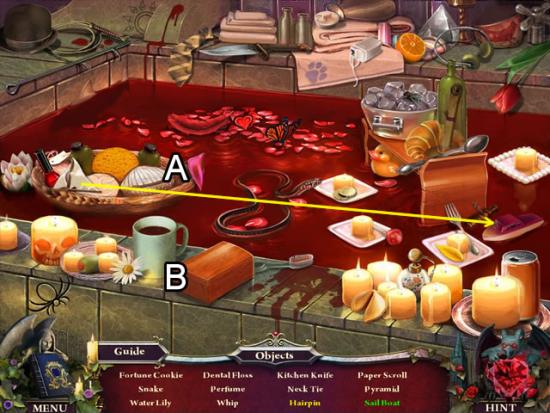
Countess’ Bathroom
- Place the sail on the boat (A). Take the Sail Boat. Open the box (B) to find the HAIRPIN.
- Find the rest of the listed objects.

- Look closer at the sink (A). Pick up the HARPY FIGURINE.
- Take the MANNEQUIN ARM from atop the machine (B).
Countess’ Bedroom
- Look again at the dressing table.
- Use the HAIRPIN to open the small box.
- Take the NURSERY KEY and the SPIDER PIN (1/4).
Great Hall
- Zoom in on the door on the left.
- Put the NURSERY KEY in the angel’s mouth to unlock the door.
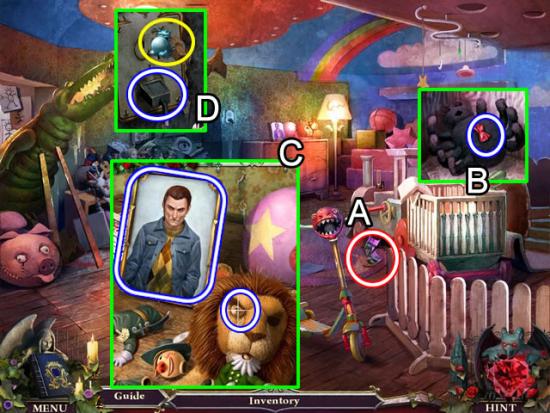
Nursery
- Pick up the opera masks on the floor (A).
- Peer into the crib (B). Take the HOURGLASS GEM.
- Inspect the contents on top of the dresser (C). Pull the LION EYE from the stuffed lion. Pick up the PORTRAIT OF VICTOR.
- Look at the electrical outlet (D). Remove the BROKEN POWER CORD. Insert the NIGHTLIGHT.
- Play the hidden object scene.

- Open the shark’s mouth to find the Fishing Hook and Submarine. Open the eyeball (B) to see the Pink Eye.
- Find the rest of the hidden objects. The DRAWER HANDLE goes to inventory.
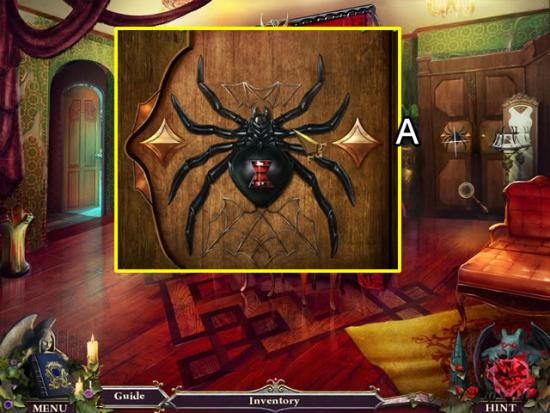
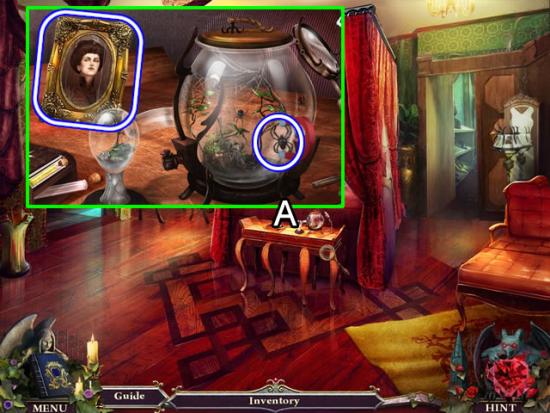
Countess’ Bedroom
- Look at the closet door (A).
- Insert the HOURGLASS GEM in the body of the spider.
- Arrange the legs by moving the cursor closely around the body. Click when the cursor turns into a hand.

Walk-in Closet
- Pick up the opera masks on the ceiling (A).
- Inspect the dresser (B). Insert the DRAWER HANDLE in the heart-shaped inset. Take the SPIDER PIN (2/4) and HEART TIP. Open the bird’s beak to find the next audio tape (pink).
- Look closer at the mannequin (C). Attach the MANNEQUIN ARM. Take the MEDICAL GLOVE from the opposite arm. Continue to unlace the bodice (D) until a SEAM RIPPER is available.
Countess’ Bathroom
- Use the MEDICAL GLOVE to unplug the sink.
- Take the MAGNET.
Countess’ Bedroom
- Examine the contents on the tabletop (A).
- Use the MAGNET to retrieve the SPIDER PIN (3/4). Pick up the PORTRAIT OF VIOLETTA.
Nursery
- Peer into the crib.
- Use the SEAM RIPPER to open the stuffed toy. Pull out the stuffing. Take the GOLDEN APPLE PIN.
Walk-in Closet
- Insert the GOLDEN APPLE PIN in the lock on the steamer trunk.
- Play the hidden object scene.
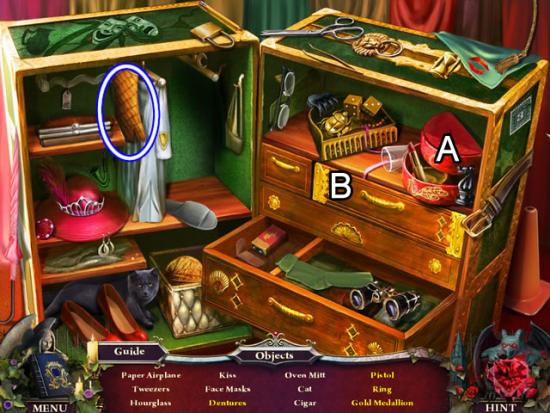
- Life the top on the jewelry box (A) to find the Ring. Open the drawer (B) to reveal the Dentures, Pistol and Gold Medallion.
- Find the rest of the objects. The OVEN MITT goes to inventory. The faces above the oven mitt don’t count as opera masks.
Hedge Maze
- Insert the LION and SNAKE EYES in the lion’s eye sockets.
- Take the SPIDER PIN (4/4) from its mouth.
Grand Staircase
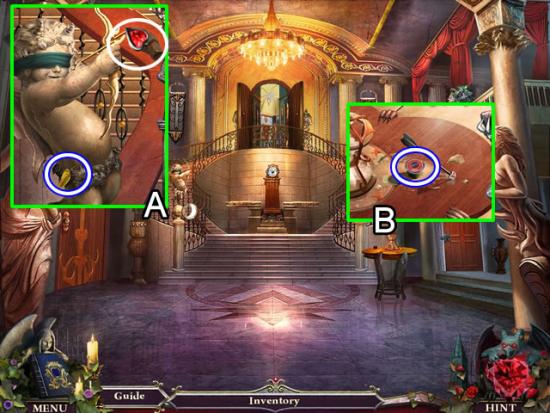
- Inspect the cupid statue (A). Take the GOLD LEAF.
- Put the HEART TIP on the end of the arrow. The arrow is shot across the room to the table.
- Look at the table (B). Pick up the FUSE.
Great Hallway
- Zoom in on the door on the right.
- Place the SPIDER PINS (4/4) on the lock to open a puzzle.
- The goal is to place the four spiders in the top silver squares.
- Use the solid squares to position the spiders.
- The next screenshot shows the solution.
Chapter 4: Discovering Victor’s Secret
Family Parlor
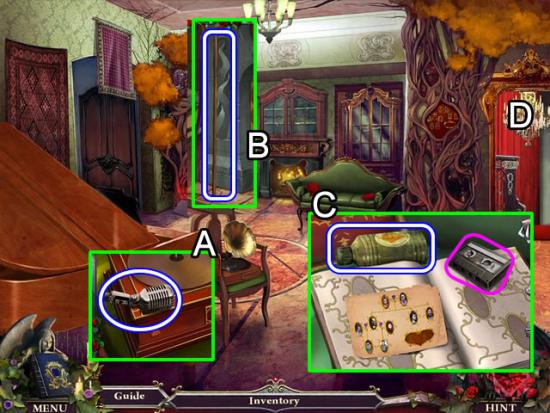
- Take the MICROPHONE from the gramophone (A).
- Get the SHEPHERD’S CROOK leaning against the fireplace (B).
- Inspect the couch (C). Open the book. Take the drawing and the audio tape. Pick up the SOLVENT.
- Go through the curtains on the right (D).
- Play the hidden object scene.
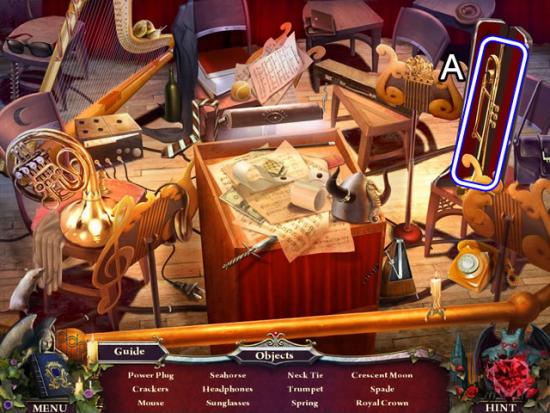
Conservatory
- Open the instrument case (A) to find the TRUMPET and spade.
- Find the rest of the listed objects.
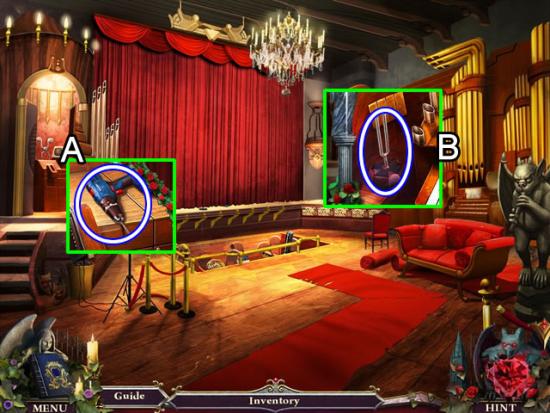
- Take the DRILL from the lever control table (A).
- Look at the organ (B). Pick up the TUNING FORK.
Great Hallway
- Examine the large portrait on the right wall.
- Use the DRILL to remove the bolts.
- Go down the stairs behind the portrait.
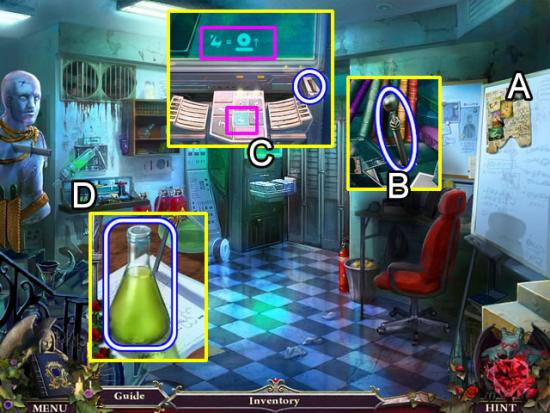
Victor’s Secret Room
- Take the animal collage from the board (A).
- Pick up the CONTROL LEVER on the desk (B).
- Zoom in on the machine in the back (C). Use the CLEANING SPRAY to uncover the directions on the screen. Push the blue button to eject the DATA DISK.
- Look at the worktable (D). Take the ACID.
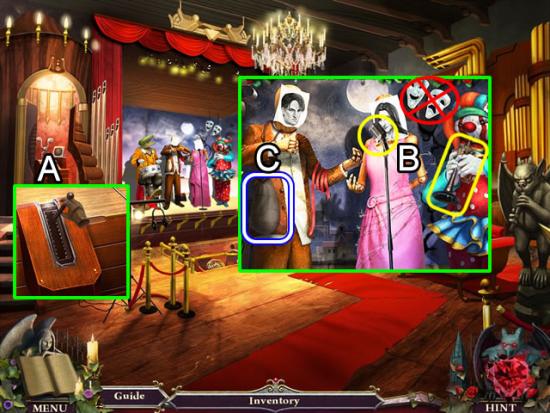
Conservatory
- Insert the CONTROL LEVER in the slot (A) to open the curtains.
- Look closer at the musicians. Give the TRUMPET to the clown. Place the MICROPHONE on the stand (B). Take the SANDBAG (C). Don’t bother to try to pick up the masks; they aren’t part of the collectibles.
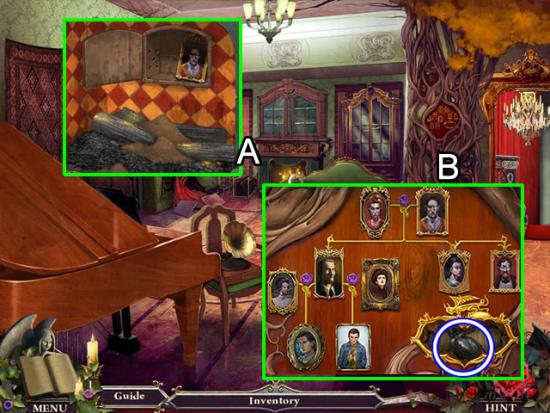
Family Parlor
- Use the SANDBAG to put out the flames in the fireplace (A). Open the compartment. Take the PORTRAIT OF VILHELM.
- Zoom in on the family tree (B). Place the PORTRAITS OF VIGGO, VLADD, VICTOR, VIOLETTA and VILHELM on the tree to start a puzzle.
- Refer to the page in the journal for the correct placement of the pictures. The solution is also shown above. Take the BLACK HEART KEY.
Grand Staircase
- Use the BLACK HEART KEY to open the door on the right.
Basement Hallway
- Listen to Victor
- Enter the door on the right.
Breaker Room
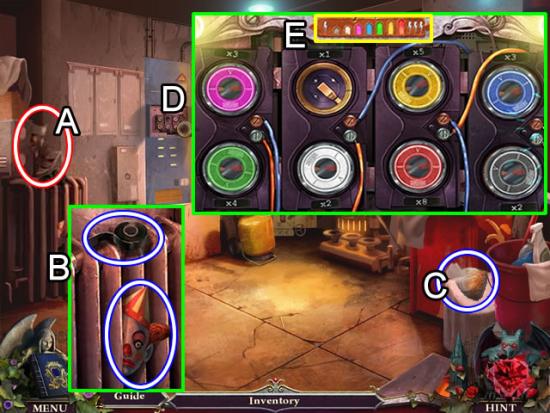
- Pick up the opera masks above the radiator (A).
- Look at the radiator (B). Take the ELECTRICAL TAPE. Use the OVEN MITT to extract the CLOWN HEAD.
- Take the BIRD SEEDS (C).
- Zoom in on the fuse box (D). Insert the FUSE to open a puzzle.
- The goal is to put the fuses in the correct order to cause a circuit overload and turn off the power.
- Use the color key at the top (E) as a guide for placing the colored fuses. Note the number along the bottom of each fuse. Put the fuses in ascending colored order and number. The x1 slot isn’t used. One solution is shown above.
Chapter 5: Searching the Lower Rooms
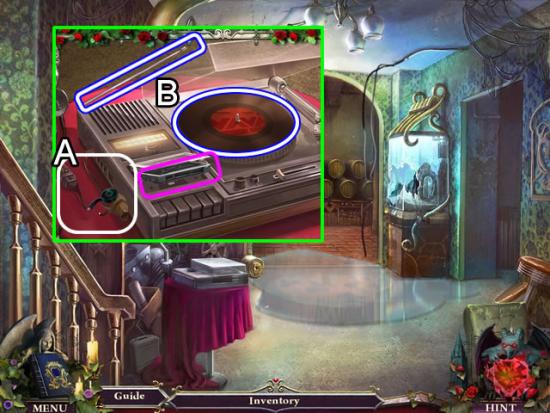
Basement Hallway
- Inspect the record player.
- Attach the BROKEN POWER CORD to the existing plug. Repair the wiring with the ELECTRICAL TAPE.
- Take the ANTENNA, RECORD and audio tape.
- Enter the wine cellar and play the hidden object scene.
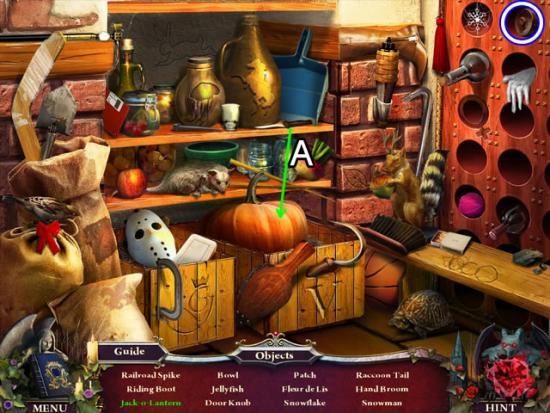
Wine Cellar
- Use the knife to carve the Jack-o-Lantern (A).
- Find the rest of the listed objects. The DOOR KNOB goes to inventory.
Grand Staircase
- Use the DOOR KNOB to open the door on the left.
- Enter the dining room.
- Play the hidden object scene.
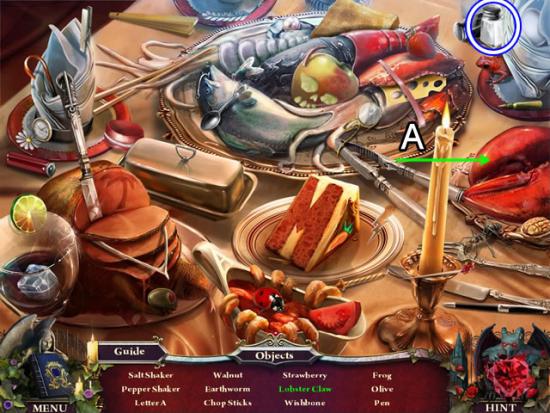
Dining Room
- Use the crackers to open the Lobster Claw (A).
- Find the rest of the hidden objects. The SALT SHAKER is added to inventory.
- Take the opera masks (A).
- Look at the side table (B).
- Use the SOLVENT to dissolve the rust on the box. Take the WINE BOTTLE.
- Ping the TUNING FORK against the crystal glass. Pick up the PURE CRYSTAL.
- Grab the MINOTAUR FIGURINE.
- Enter the kitchen.
- Play the hidden object scene.

Kitchen
- Drain the sink (A) to find the Rolling Pin, Sink Plug, Star and Hand Print.
- Find the rest of the objects. The FORCEPS go to inventory.
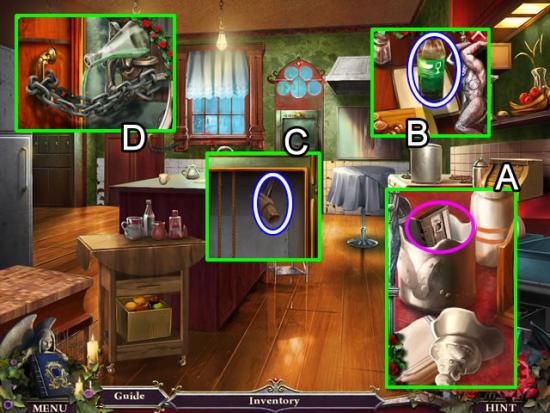
- Remove the top of the cookie jar by the breadbox (A). Take the audio tape.
- Look at the stove (B). Take the bottle of DISH SOAP.
- Open the door of the dumb waiter (C). Grab the RUBBER HOSE.
- Pour the ACID on the chain barring the back door (D).

Back Patio
- Use the SHEPHERD’S CROOK to retrieve the GREEN BOOK from the tree limbs (A).
- Pour the DISH SOAP on the sap on the tree roots (B). Take the BARBEQUE LIGHTER.
- Pick up the STOOL (C).
- Put the BIRD SEEDS in the empty feeder (D). Take the CLOCK SPRING the pigeon drops.
- Pick up the opera masks (E).
Chapter 6: Freeing Viggo
Wine Cellar
- Place the WINE BOTTLE in the empty slot in the wine rack on the gold woman.
- Go through the secret passage.
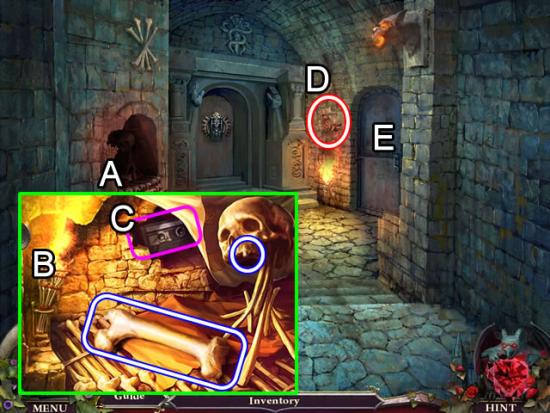
Catacomb Halls
- Look in the nook (A).
- Use the BARBEQUE LIGHTER to light the torch (B). Pick up the BONE. Use the FORCEPS to remove the TOOTH (1/3) from the skull.
- Move the cloth (C). Take the audio tape.
- Get the opera masks from the wall (D).
- Examine the metal door (E) to speak to Viggo. Receive a VIOLIN.
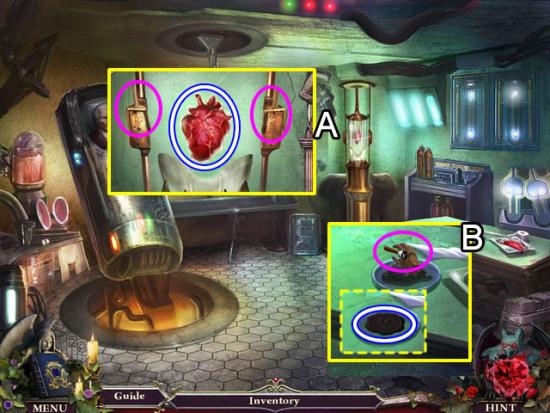
Countess’ Bathroom
- Sprinkle the SALT SHAKER on the iced door of the machine (A). Take the BLOOD CRYSTAL.
- Play the hidden object scene in the bathtub (B).
- Open the clamshell to find the BLOOD VIAL. Find the rest of the listed objects.
Walk-in Closet
- Place the STOOL at the base of the stacked boxes.
- Open the top box. Take the ORGAN KEY (1/3) and YELLOW BOOK (2/4).
Nursery
- Zoom in on the dresser.
- Place the CLOWN HEAD on the headless clown.
- Take the DRUM STICKS.
- Play the hidden object scene.
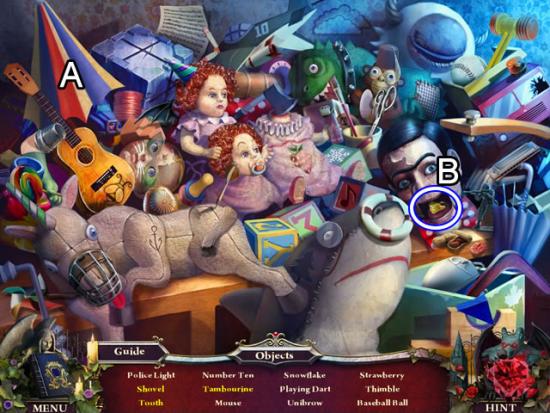
- Open the umbrella (A) to find the Shovel and Tambourine. Open the mouth (B) and take the TOOTH (2/3).
- Find the rest of the listed objects.
Family Parlor
- Put the RECORD on the gramophone turntable. Drop the needle on the record to open a compartment. Take the ORGAN KEY (2/3)
Conservatory
- Give the musicians the DRUM STICKS and VIOLIN (A).
- Inspect the debris (B). Pick up the ORGAN KEY (3/3) and MANNEQUIN HEAD. Open the box to collect the audio tape.
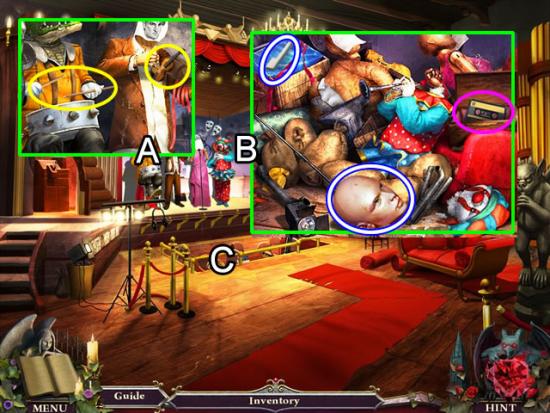
- Play the hidden object scene in the orchestra pit.
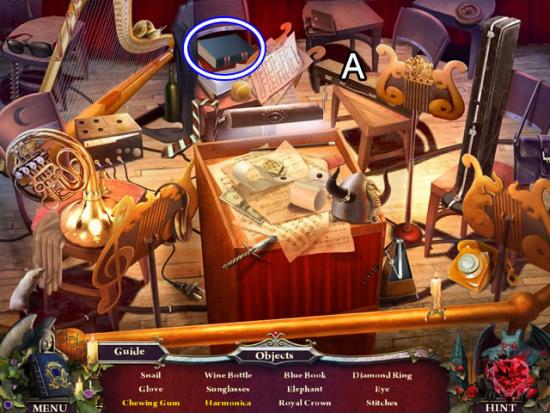
- Open the instrument case (A) to find the Chewing Gum and Harmonica.
- Find the rest of the listed objects. The BLUE BOOK (3/4) goes to inventory.
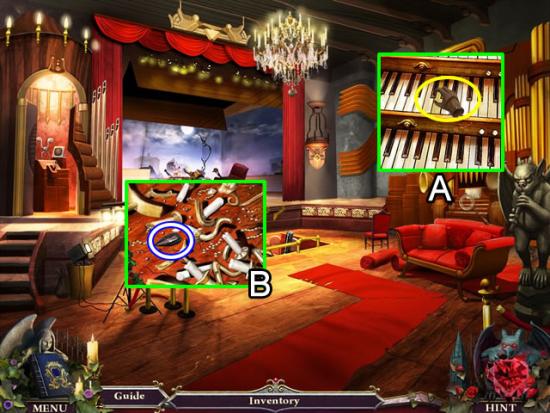
- Place the ORGAN KEYS (3/3) on the keyboard (A). Strike any key.
- Take the NIGHT CRYSTAL from the chandelier remnants (B).
Family Parlor
- Zoom in on the black door on the left.
- Place the PURE, BLOOD and NIGHT CRYSTALS in the lizard circle.
Great Library
- Play the hidden object scene
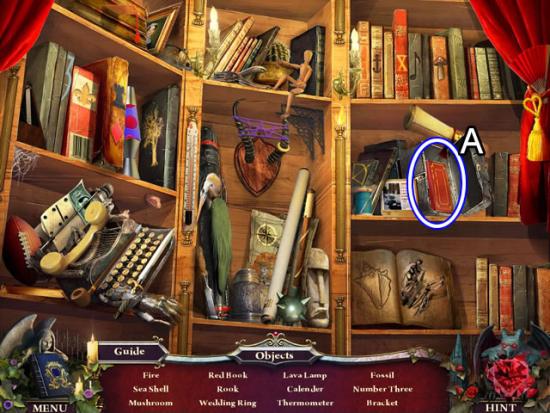
- Open the box (A) to find the RED BOOK (4/4).
- Find the rest of the listed objects.
- Examine the contents on the lit desk (A). Pick up the SUN HALF and the audio tape.
- Zoom in on the back shelves (B).
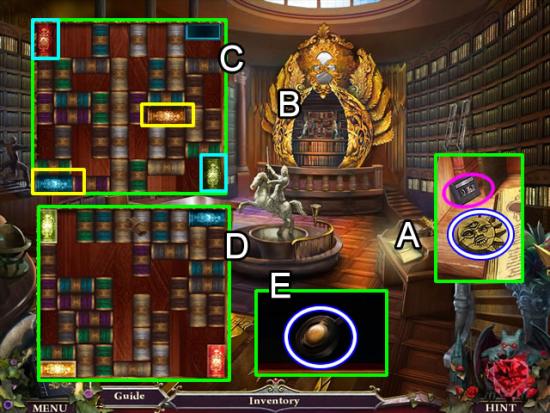
- Place the BOOKS (4/4) on the shelves to open a puzzle (C).
- The goal is to slide the colored books into their corresponding colored slot.
- The best strategy is to work with two books at a time. The blue and gold books can be solved together. The red and green books can be solved together. The solution is shown in screenshot (D). View the video for all the moves.
- Click the books to open a compartment (E). Take the CLOCK SPRING (2/2).
Walk-in Closet
- Put the MANNEQUIN HEAD on the mannequin. Pluck the LENS (1/5) from its eye.
- Play the hidden object scene.
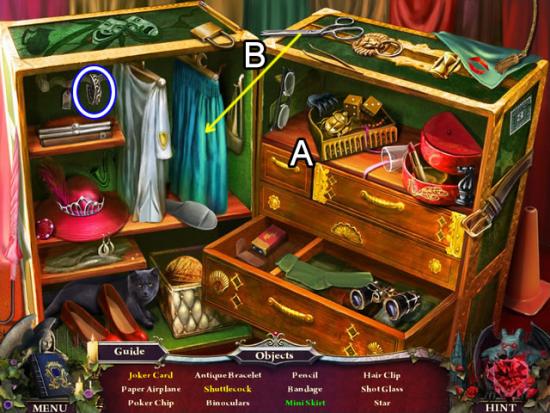
- Open the drawer (A) to find the Joker Card and Shuttlecock. Use the scissors to turn the skirt (B) into a Mini Skirt.
- Find the rest of the objects. The ANTIQUE BRACELET goes to inventory.
Back Patio
- Give the BONE to the dog.
- Play the hidden object scene.
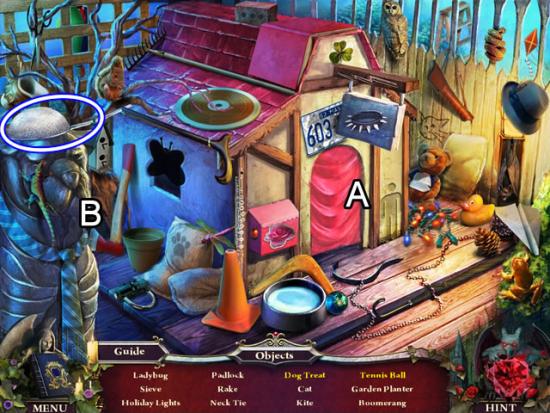
- Open the curtain (A) to find the Dog Treat. Open the dog mouth (B) for the Tennis ball.
- Find the rest of the listed objects. The SIEVE goes to inventory.
- Go through the back gate.
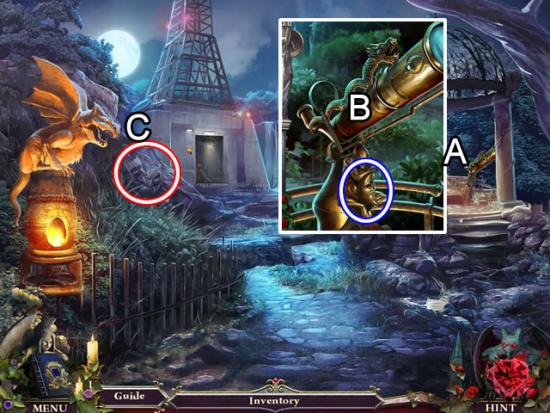
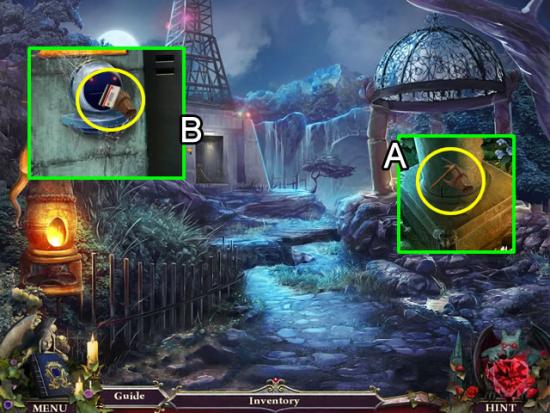
Cliffside Path
- Inspect the gazebo (A). Click the telescope (B) to rotate it. Take the MOON HALF.
- Pick up the opera masks on the side of the hill (C).
Kitchen
- Dip the SIEVE in the simmering pot on the stove.
- Take the TOOTH (3/3).
Dining Room
- Put the SUN and MOON HALVES on the door on the left.
Study
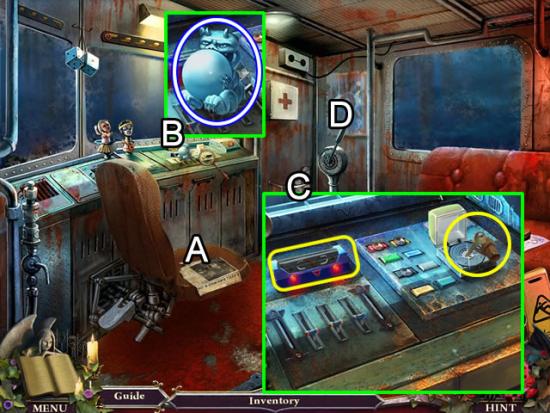
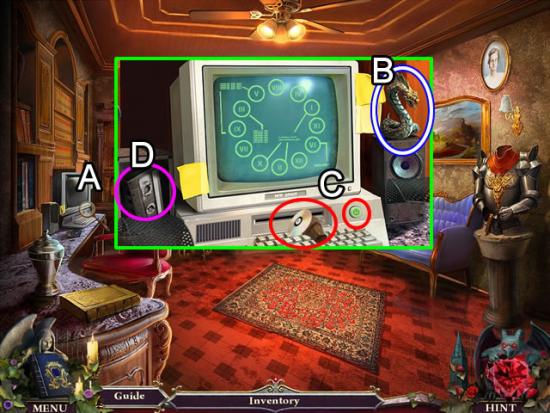
- Examine the computer (A).
- Pick up the BASILISK FIGURINE (B)
- Push the button (red) to turn on the computer and insert the DATA DISK (C). The pattern on the screen is added to the journal.
- Remove the cover on the speaker to retrieve the audio cassette (D).
Grand Staircase
- Zoom in on the standing clock.
- Place the CLOCK SPRINGS (2/2) on the face to open a puzzle.
- The goal is to replicate the pattern saved in the journal by rotating and swapping numerals on the clock.
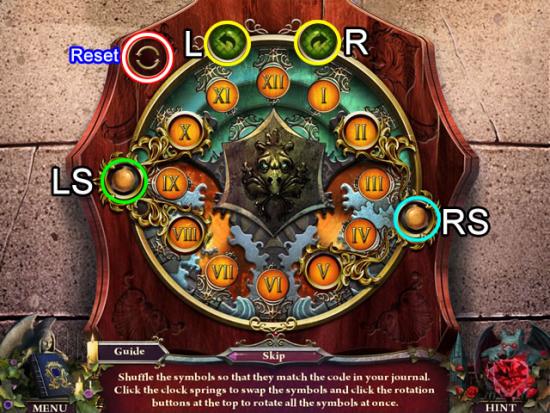
- An unfortunately timed brain freeze caused me to forget to turn on my video capture software while solving this puzzle. Without that review film as an analytical tool and due to the time constraints for delivering this guide, Plan B was implemented for directions on how to solve this puzzle. The following the solution is from the collector’s edition strategy guide.
- Use the (L) left and (R) right arrows to rotate the numbers. Click the (LS) left swap or (RS) right swap buttons as indicated. Use the Reset button as needed.
- R, R, LS.
- Rx4 RS, LS.
- Lx5, RS.
- L, LS. The numbers (11, 6, 12 and 2) are now in sequential order with the 12 at the top center.
- Lx3, RS.
- Rx3, RS.
- Rx3, LS.
- Rx2, LS.
- Rx3, RS.
- Lx4, LS. The numbers (11, 6, 12, 2, 10, 7, 9 and 3) are in order with the 5 at the top center position.
- Lx3, LS.
- Lx5, RS.
- Rx6, LS.
- R3.
- Receive the SHADOW DIAL.
Catacombs Hallway
- Inspect the door at the end.
- Place the TEETH (3/3) in the head to start a puzzle.
- The goal is to press the circles so all teeth are retracted.
- See the following screenshot for the solution
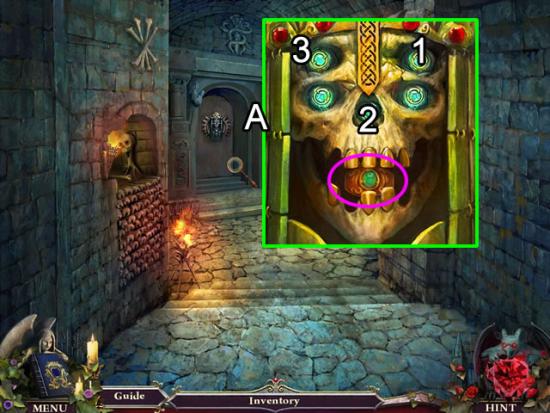
- Push the circles in the order shown.
- Pull the ring to open the door.
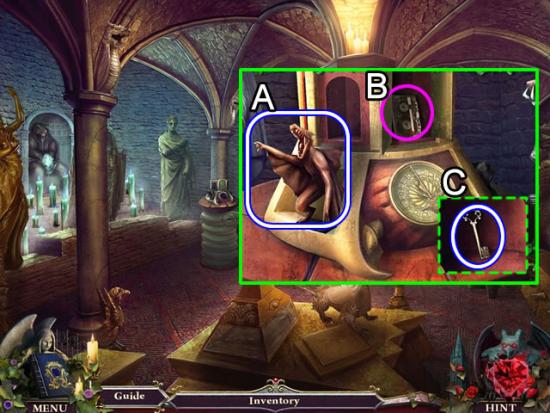
Demon Reliquary
- Examine the column base.
- Take the DRAGON FIGURINE (A). Open the box door (B) to find an audio tape.
- Insert the SHADOW DIAL in the inset (C). Take the CELL KEY from the compartment.
Catacombs Hallway
- Use the CELL KEY to open the door to Viggo’s cell.
Chapter 7: Repairing the Radio Tower
Viggo’s Cell
- Open the floor grate. Take the WOODEN KNOB.
- Remove the top of the toilet tank. Retrieve the WRENCH.
- Play the hidden object scene
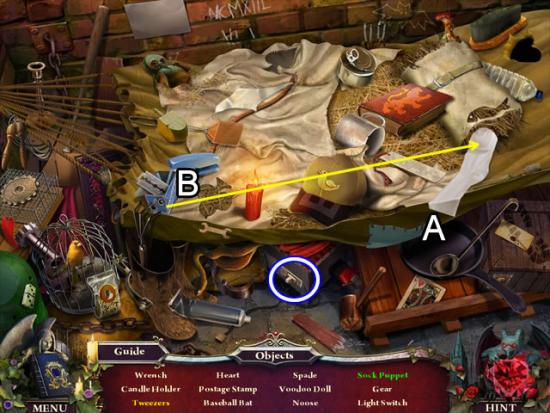
- Undo the patch (A) to find the Tweezers. Drag the eyes (B) to the sock to form a Sock Puppet.
- Find the rest of the listed objects. The LIGHT SWITCH goes to inventory.
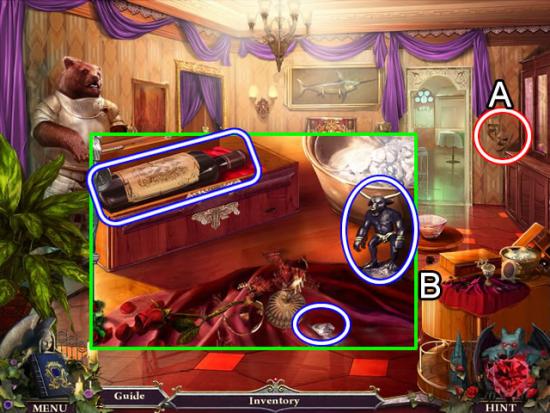
Wine Cellar
- Play the hidden object scene.
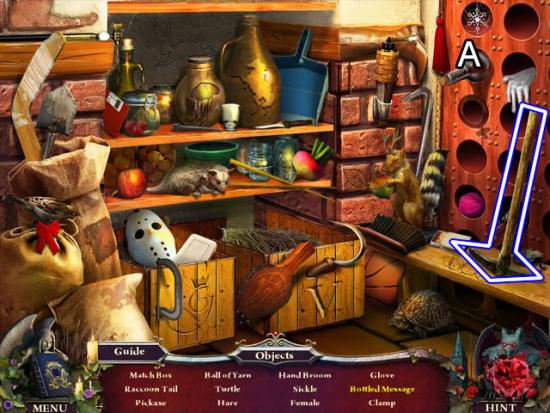
- Remove the cork in the bottle (A). Take the Bottled Message.
- Find the rest of the listed objects. The PICKAXE goes to inventory.
Dining Room
- Zoom in on the back table.
- Place the DRAGON, BASILISK, MINOTAUR, HARPY and GRIFFIN FIGURINES anywhere on the mechanism to activate a stamp. Pick up the black VANSIG SEAL (1/4).
Kitchen
- Insert the WOODEN KNOB in the slot on the breadbox.
- Take the GLASS CUTTER from the breadbox.
Study
- Examine the glass doors on the cupboard.
- Use the GLASS CUTTER to cut a LENS (2/5) from the glass.
- Reach in and take the KEYCARD wedged between the bottles.
Back Patio
- Play the hidden object scene.
- Open the mailbox (A) to find the Envelope.
- Find the rest of the listed objects. The SAW goes to inventory.
Cliffside Path
- Use the PICKAXE on the weakened column (A) to create a bridge across the gap.
- Insert the KEYCARD in the access mechanism on the radio tower door (B).
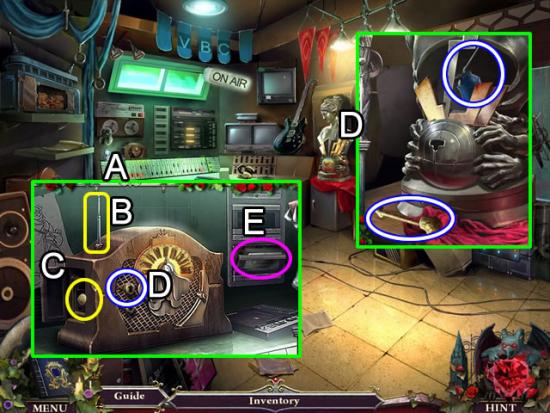
Radio Tower
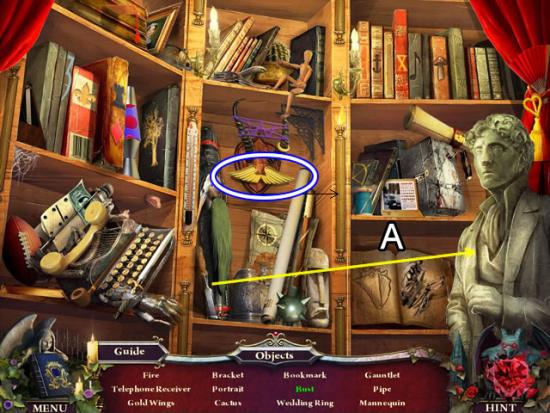
- Zoom in on the old radio above the control panel (A).
- Attach the ANTENNA (B).Open the side panel (C). Turn the white knob to turn on the radio. Remove the UP BUTTON (D). Eject the audio tape (E).
- Look at the bust (D). Click the lightning bolts. Retrieve the CANDLE SNUFFER and OIL CAN.
Cliffside Path
- Use the OIL CAN to loosen the LENS (3/5) on the telescope.
Kitchen
- Play the hidden object scene.
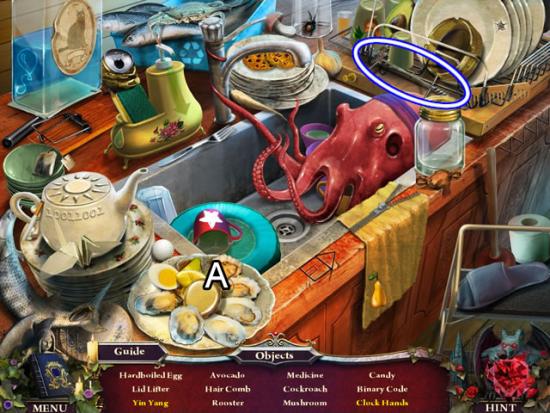
- Open the watchcase (A) to find the Yin Yang symbols and the Clock Hands.
- Find the rest of the listed objects. The LID LIFTER goes to inventory.
- Insert the UP BUTTON in the dumb waiter. Press the button and take the FAN BLADE.
Grand Library
- Play the hidden object scene.
- Use the chisel to create a Bust of the statue (A).
- Find the rest of the listed objects. The GOLDEN WINGS go to inventory.
- Look at the lit desk. Insert the LIGHT SWITCH on the desk to turn off the light. Take the LIGHT BULB.
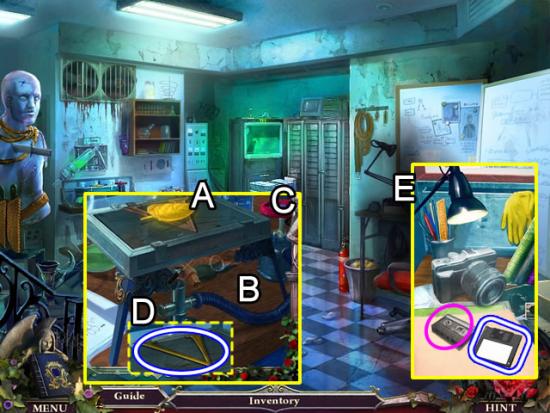
Victor’s Secret Room
- Zoom in on the workbench.
- Place the GOLD LEAF on the top of the mold (A). Attach the RUBBER HOSE (B). Turn on the gas (C). Light the flame with the BARBEQUE LIGHTER (D). Take the GOLDEN V.
- Insert the LIGHT BULB in the lamp (E) on the desk. Open the folder. Take the audio tape and BOOT DISK.
Front Door
- Inspect the memorial on the right.
- Insert the GOLDEN V on the statue. Take the VANSIG SEAL (2/4) from the secret compartment.
Basement Hallway
- Use the WRENCH to remove the bolts on the vent.
- Add the FAN BLADE to blow the radio tower blueprints within reach.
Wine Cellar
- SAW the top center barrel apart.
- Take the EMPTY JUG.
Viggo’s Cell
- Pry up the drain with the LID LIFTER.
- Pick up the BLACK LIGHT.
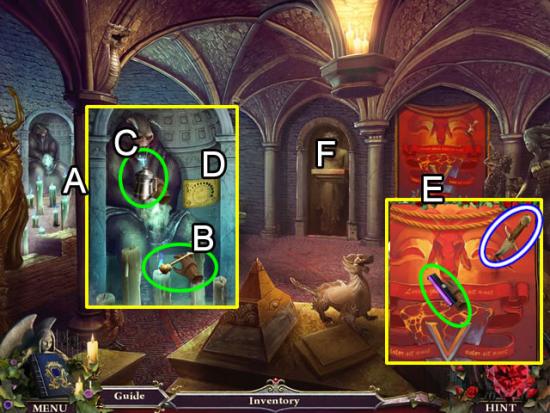
Demon Reliquary
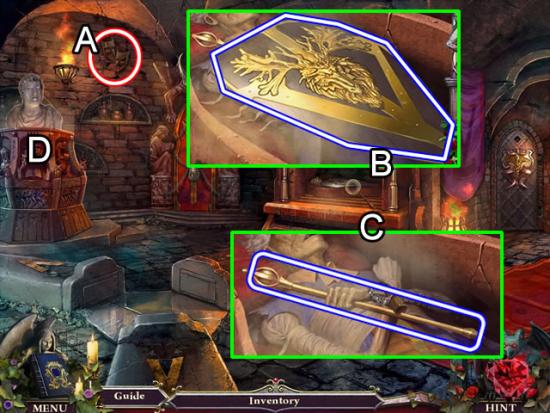
- Move to the alcove on the left (A).
- Use the CANDLE SNUFFER to put out the candles (B). Fill the EMPTY JUG with a JUG OF LIQUID NITROGEN from the statue’s mouth (C). Take the drawing (D).
- Examine the tapestry (E). Take the DAGGER. Drag the BLACK LIGHT over the tapestry to reveal a design.
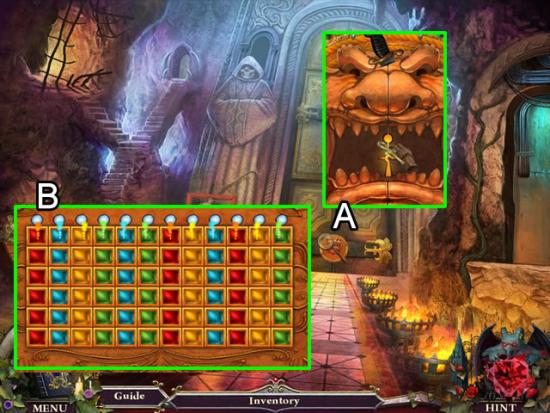
- Place the BLOOD VIAL on the door (F) to start a puzzle.
- This is a tough puzzle to solve. The following screenshots show the step-by-step solution adopted from the collector’s edition strategy guide.
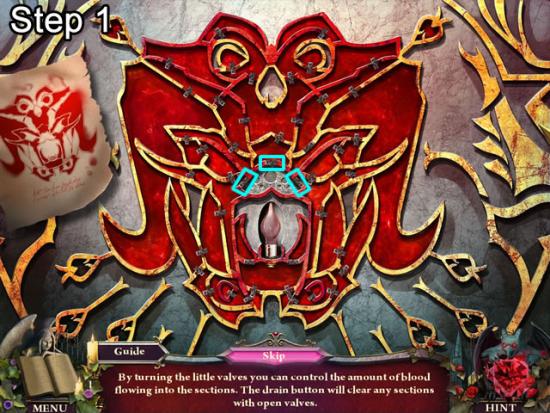
- Strategy Tip: Reset the puzzle by exiting and reentering the scene.
- Flood the entire puzzle.
- Open every valve except the three drain valves (aqua).
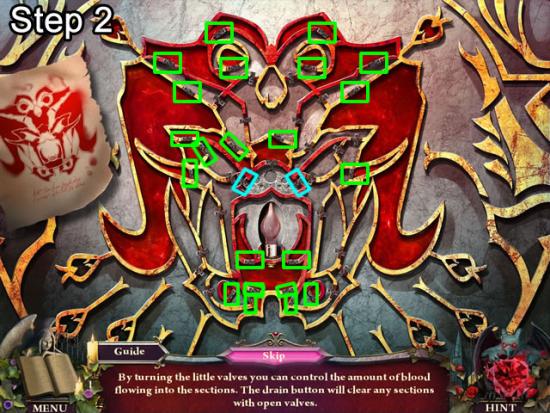
- Close the 22 valves shown in green.
- Open and then close the two aqua drain valves.
- The above screenshot shows the result of these actions.
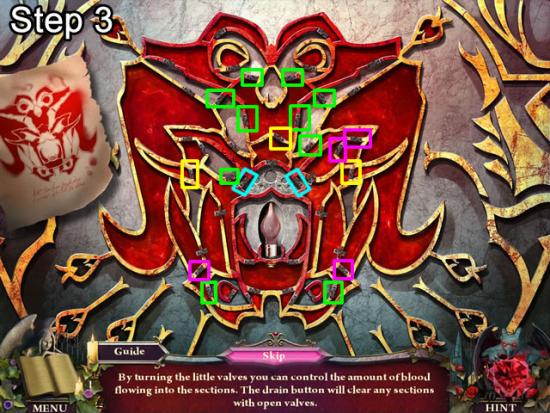
- Close the 10 green valves.
- Open and then close the 3 yellow valves.
- Close the 4 pink valves.
- Open and then close the 2 aqua drain valves.
- The above screenshot shows the result of these actions.
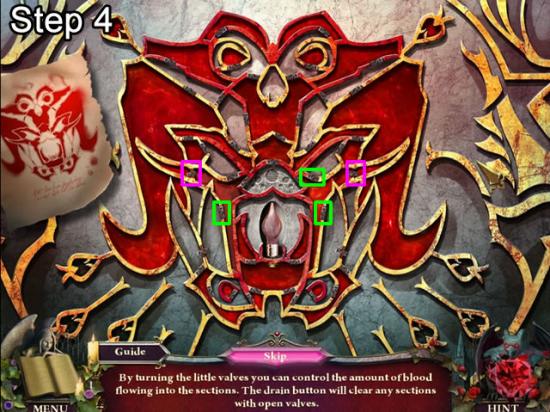
- Close the 3 green valves.
- Open the 2 pink valves.
- The door should now open.
Catacomb Crypt
- Pick up the opera masks from the back wall (A).
- Examine the coffin (B). Take the VANSIG SHIELD.
- Put the ANTIQUE BRACELET on the mummy’s wrist (C). Take the GOLD STAFF.
- Play the hidden object scene (D).
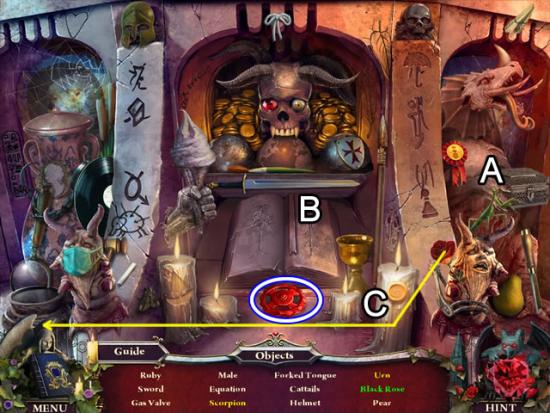
- Open the box (A) to find the Scorpion. Turn the page in the book (B) to uncover the Urn. Drag the rose to the black paint (C) for a Black Rose.
- Find the rest of the listed objects. The GAS VALVE goes to inventory.
Breaker Room
- Place the GAS VALVE on the stem next to the furnace to turn off the fire.
- Open the furnace and take the GAUNTLET.
Dining Room
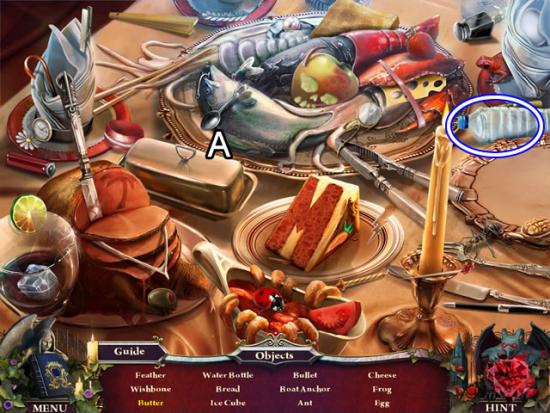
- Play the hidden object scene.
- Open the butter dish and take the Butter (A).
- Find the rest of the objects. The WATER BOTTLE goes to inventory.
Study
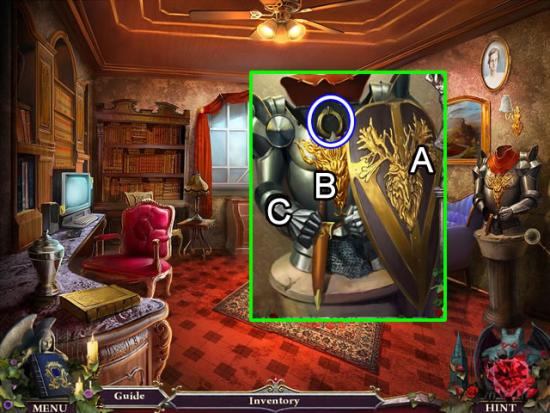
- Zoom in on the armor on the pedestal.
- Add the VANSIG SHIELD (A), DAGGER (B) and GAUNTLET (C). Take the GOLD WIRE.
Radio Tower
- Pick up the diagram on top of the circuit board (A).
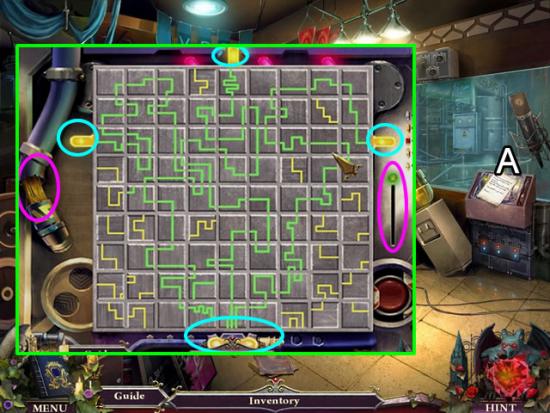
- Look at the circuit board. Place the GOLD WIRE and BOOT DISK (pink) on the board to start a puzzle.
- The goal is to create a path from the power supply at the bottom of the board to the three lights.
- Rotate the tiles to create the circuits. Not all tiles need to be used. Refer to the diagram in the journal for extra help. The above inset also shows the solution.
Chapter 8: Uncovering the Plot
Dungeon
- Play the hidden object scene in the corner (A).
- Find the listed objects. The HOUSE JACK goes to inventory.
- Take the PLUNGER from the board (B).
- Pick up the pattern on the post for the journal (C).
- Pick up the RED MARBLE on the sand (D).
- Zoom in on the door (E). Place the RED MARBLE on the board to start a puzzle.
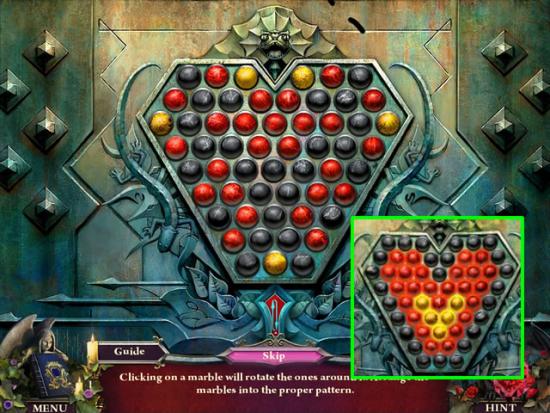
- The goal is to rotate the marbles to match the pattern saved in the journal (inset).
- Unfortunately this is yet another puzzle without a reset button. Exit and reenter the puzzle to restart the puzzle.
- The best strategy is to align the black marbles around the outside first. Doing this allows positioning the yellow marbles easier. Try to align two or three black marbles to rotate them to the outside simultaneously.
Old Sewer
- Pick up the opera masks on the left (A).
- Use the HOUSE JACK to support the rocks (B). Take the STICK.
- Inspect the stairs at the top (C). Pick up the FLUSH CHAIN.
- Look at the exposed pipe (D). Use the PLUNGER to free the clog. Take the WOOD CRANK.
Dungeon
- Attach the WOOD CRANK to the side of the mechanism (A). Snap the rope. Take the TWINE.
- Look closer at the rock (B). Put the STICK on the rock. Secure the rock and stick with the TWINE. Take the SLEDGE HAMMER.
Old Sewer
- Use the SLEDGE HAMMER to bash out the window at the top and escape.
Courtyard
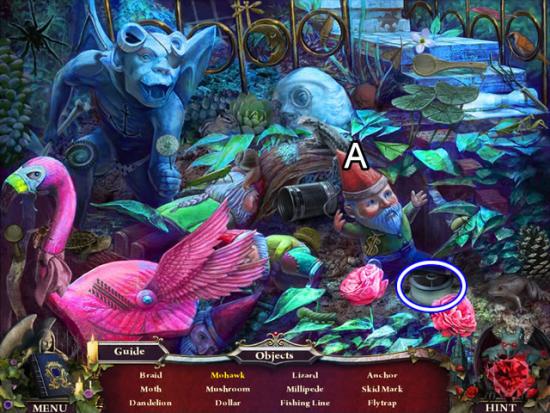
- Play the hidden object scene.
- Remove the hat on the gnome (A) to find the Mohawk.
- Find the rest of the listed objects. The FISHING LINE goes to inventory.
Hedge Maze
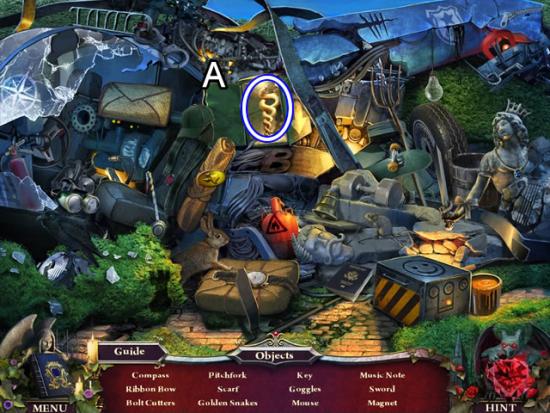
- Play the hidden object scene.
- Open the safe door (A) to find the GOLDEN SNAKES.
- Find the rest of the listed objects.
- Peer into the well. Use the FISHING LINE to retrieve the CATACOMB KEY.
Viggo’s Cell
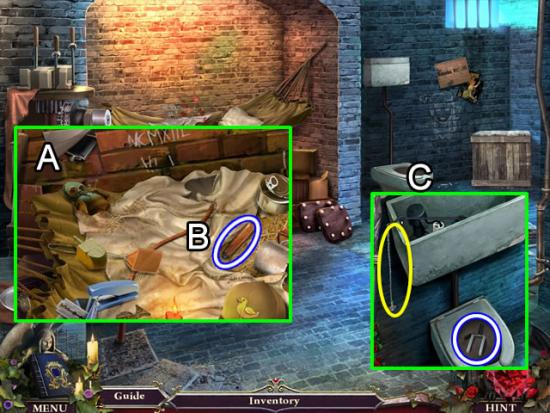
- Play the hidden object scene on the hammock.
- Lift the metal plate (A) to find the Flask. Move the cover (B) to get the ICE PICK.
- Find the rest of the listed objects.
- Look at the toilet (C). Attach the FLUSH CHAIN (yellow). Pull the chain to drain the toilet bowl. Retrieve the THROW SWITCH (1/2).
Catacomb Crypt
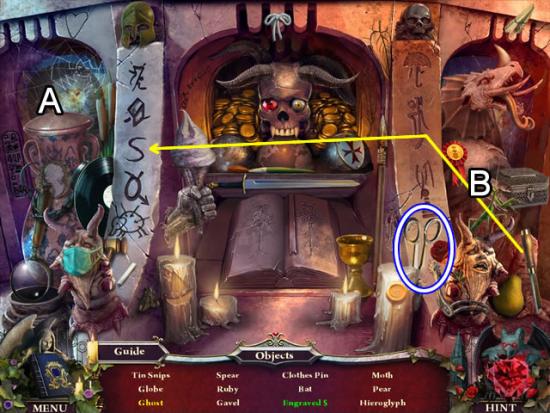
- Play the hidden object scene.
- Open the lid on the jar (A) to free the Ghost. Use the chisel to Engrave $ on the S (B).
- Find the rest of the listed objects. The Tin Snips go to inventory as SNIPS.
- Inspect the door on the right.
- Place the GOLD WINGS, GOLD STAFF and GOLD SNAKES on the door to open it.
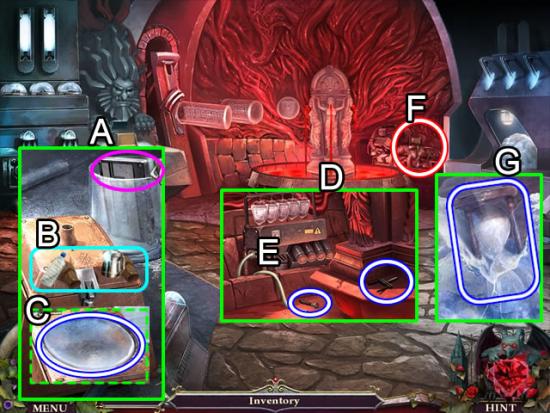
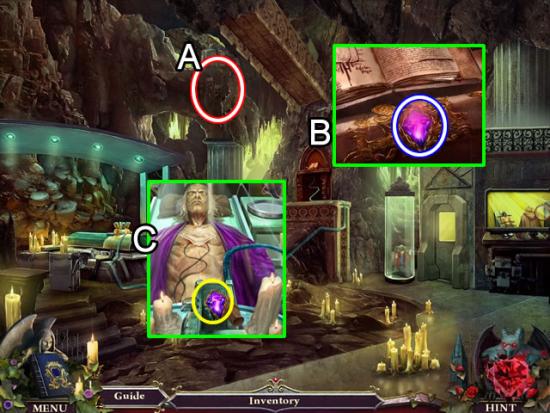
Medical Room
- Click the cryogenic storage chamber (A) to raise it. Open the glass door (B). Use the SNIPS to cut the chain holding the RED CRYSTAL HEART (C).
- Take the MEDICAL TUBING from the table (D).
Catacomb Crypt
- Use the CATACOMB KEY to unlock the chains securing the rear door.
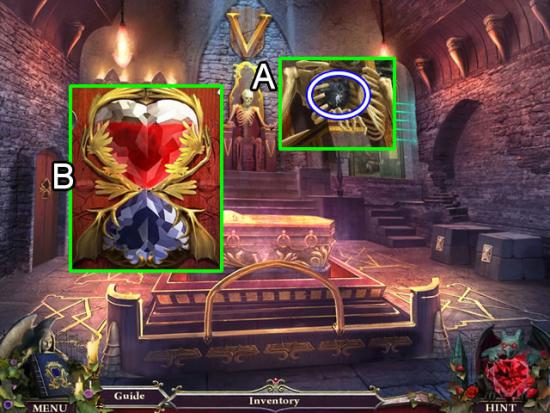
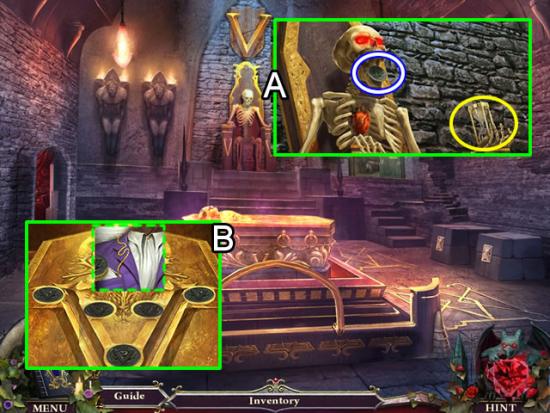
Vladd’s Tomb
- Take the BLACK CRYSTAL HEART from the chest cavity of the skeleton (A).
- Insert both the RED and BLACK CRYSTAL HEARTS in the door (B).
Blood Chamber
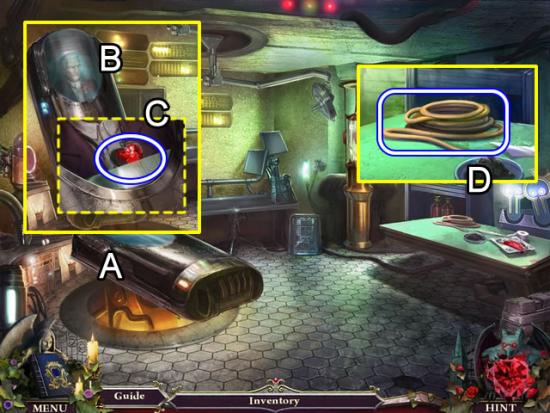
- Zoom in on the work surface (A).
- Close the lid on the gold box (B). Pick up the audio tape in the glass. Pour the WATER BOTTLE and JUG OF LIQUID NITROGEN into the top of the box (aqua).
- Lift the lid and get LENS (4/5) from the mold (C).
- Look at the fountain (D).
- Insert the MEDICAL TUBING into the side of the machine (E) to suck the blood out of the pool and into the bags. Pick up the SEAL STAMPER from the bottom of the fountain. Take the THROW SWITCH (2/2) from the ledge.
- Get the opera masks (F).
- Use the ICE PICK to free the HOURGLASS (G).
Medical Room
- Inspect the tube (A). Insert the THROW SWITCHES (2/2) on the sides of the stand (pink). Throw the switches. Take the DEMONIC HEART.
- Look at the table (B). Put the SEAL STAMP in the wax (pink). Take the VANSIG SEAL (3/4).
Vladd’s Tomb
- Insert the DEMONIC HEART in the skeleton’s chest and place the HOURGLASS in its hand. (A). Take the VANSIG SEAL (4/4) from its mouth.
- Zoom in on the casket (B). Put the VANSIG SEALS (4/4) in the slots to open the coffin. Click the chain to retrieve the LENS (5/5).
- Examine the door on the right.
- Place the LENS (5/5) on the lock to open a puzzle.
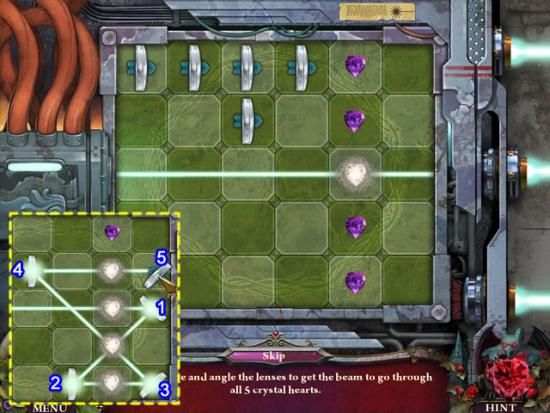
- The goal is to use the lenses to direct the beam through all of the hearts.
- The left side of each lens accepts the beam. The right, or pointed side, directs the beam. Click each lens to change the position and direct the beam as needed.
- The dashed inset shows the order and direction for each lens.
Inner Sanctum
- Take the opera masks from the back wall (A).
- Look closer at the book (B). Take the ENERGY GEM.
- Place the ENERGY GEM on cryogenic chamber (C).
- Watch the final cutscenes.
Congratulations! You have completed playing Nightfall Mysteries: Black Heart.
If you are playing the Collector’s Edition, click the Bonus tab from the main menu for additional play including the bonus chapter.
Collector’s Edition Bonus Play
Fountain
- Dig through the rubble (A). Pick up the piece of paper (pink). Taking the SLENDER DAGGER loosens the rocks. Dig out the DEMON HEAD (1/4) (B).
- Take the SURGICAL MASK from the fountain (C).
- Use the SLENDER DAGGER to pry off a BROKEN WING (yellow) from the statue (D). Take the STICK.
- Turn the STICK into a TORCH by inserting it into the flames coming out of the window (E).
- Use the BROKEN WING to clear a path through the debris (F).
Storage Room
- Remove all the dust cloths.
- Play the hidden object scene.
- Open the box lid (A) to find the OPERA MASK.
- Find the rest of the listed objects.
- Look at the shelf (A). Pick up the DEMON HEAD (2/4) and the MINER’S HAMMER.
- Examine the back door (B). Get the ORNATE TILE (1/3).
- Zoom in on the table (C). Get the ORNATE TILE (2/3) and the photograph.
- Pick up the ANGEL STATUE HEAD off the floor (D).
Fountain
- Place the ANGEL STATUE HEAD atop the angel (A). Take the BRONZE SNAKE.
- Look at the fallen gargoyle (B). Take the LOCK PICK. Use the MINER’S HAMMER to free the DEMON MASK wedged in the mouth.
Storage Room
- Take the DIAMOND HEART from the skeleton next to the back door.
- Look closer at the door. Put the DEMON MASK, OPERA MASK and SURGICAL MASK in the lock.
Treasury
- Zoom in on the guards (A). Take the PIRATE MEDALLION from the left guard. Insert the DIAMOND HEART in the inset on the shield. Take the SATYR HEAD.
- Examine the safe (B). Remove the sign. Insert the BRONZE SNAKE in the outline to start a puzzle.
- The goal is to retract all the spokes to open a lock. The above screenshot shows the order for the spokes and inner lock (pink). Exit the scene to reset the puzzle.
- Play the hidden object scene.
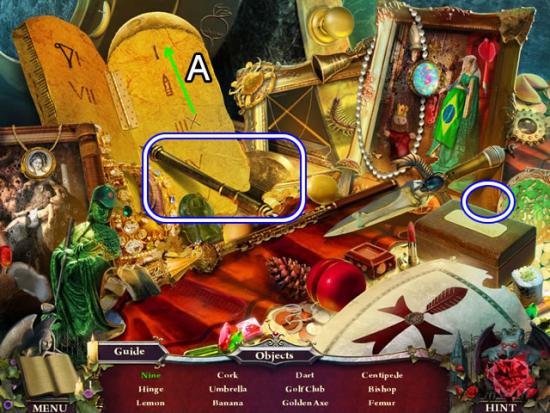
- Drag the “X” to the “I” to make Nine.
- Find the rest of the listed objects. The GOLDEN AXE goes to inventory.
Storage Room
- Zoom in on the shelf.
- Place the PIRATE MEDALLION on the chest lock. Take the SWORD HANDLE.
Fountain
- Place the SWORD HANDLE on the blade stuck in the fountain. Take the GOLDEN SWORD.
Treasury
- Place the GOLDEN SWORD and GOLDEN AXE in the guard’s hands.
- Go forward to the cave.
Cave
- Light the braziers along both sides of the isle with the TORCH.
- Inspect the contents on the table (A). Pick up the FEATHER DUSTER, DEMON HEAD (3/4) and diagram (pink).
- Look at the bell striker (B). Take its SICKLE.
- Take the NOSE RING off the far door (C).
- Place the SATYR HEAD on the bust (D).
- Play the hidden object scene.
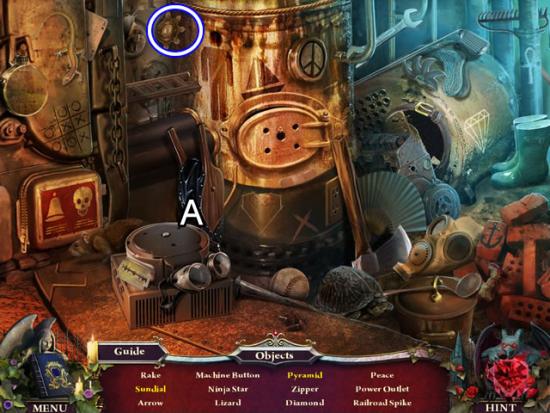
- Lift the lid (A) to find the Pyramid and Sundial.
- Find the rest of the listed objects. The MACHINE BUTTON goes to inventory.
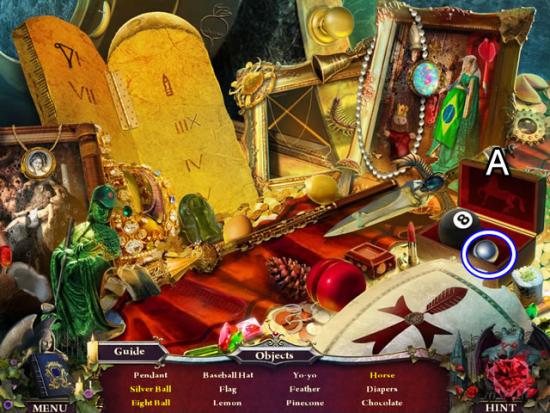
Treasury
- Play the hidden object scene.
- Open the box lid (A) to find the Eight Ball, Horse and SILVER BALL.
- Find the rest of the listed objects.
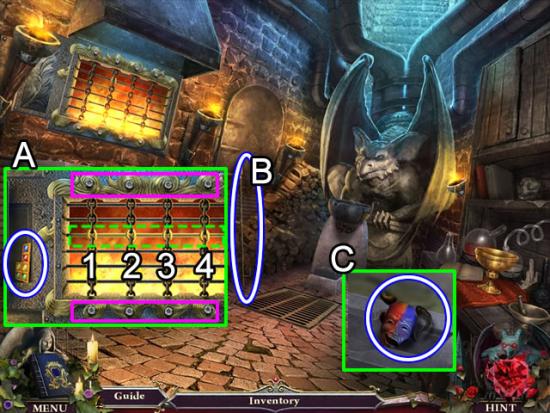
Forge
- Zoom in on the furnace to play a puzzle (A).
- The goal is to use the up and down buttons (pink) to align the four gold links on the gold bar (dashed green).
- Chain 1 only affects chain 1. Chain 2 affects 2 and 4. Chain 3 affects 1 and 3. Chain 4 affects 3 and 4.
- Solution. Click chain 2 down once. Click chain 4 up twice. Click chain 1 up once. Click chain 3 up once.
- Take the ORNATE TILE (3/3).
- Pick up the HOOKED POLE (B).
- Get the DEMON HEAD (4/4) from the mold (C).
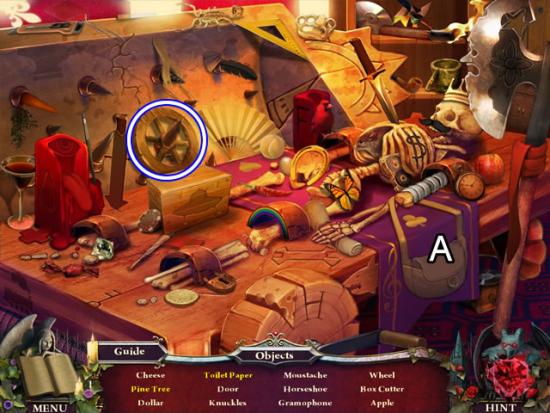
Storage Room
- Play the hidden object scene.
- Open the purse to find the Toilet Paper and Pine Tree.
- Find the rest of the listed objects. The WHEEL goes to inventory.
- Insert the MACHINE BUTTON in the box to open a puzzle.
- The goal is to use the arrows on each button to create the number of connections indicated by the number on the button.
- See the next screenshot for the solution.

- The last move is to connect 4 to 1.
- Take the DEMON EAR from the hidden compartment (A).
- Zoom in on the shelf. Use the FEATHER DUSTER to reveal the necklace. Take the EMERALD.
- Give the SICKLE to the skeleton by the door. Take the CONSTELLATION TOKEN from its mouth.
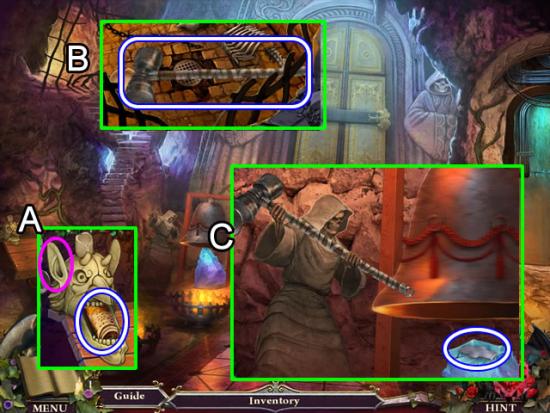
Cave
- Attach the DEMON EAR to the demon (A). Take the MUSIC ROLL.
- Peer into the chamber (B). Use the HOOKED POLE to retrieve the BELL HAMMER.
- Give the BELL HAMMER to the bell ringer (C). Take the KEY MOULD.
- Go up the stairs on the right.
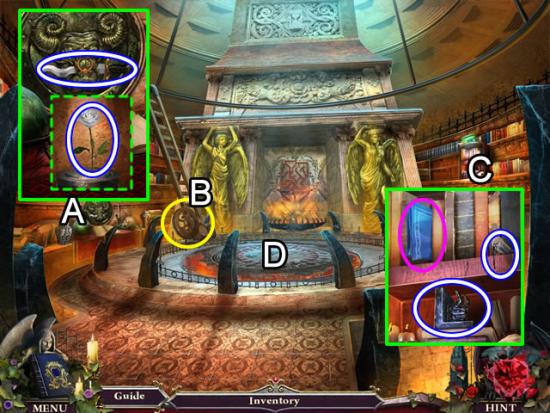
Ritual Chamber
- Look at the emblem on the left (A). Insert the NOSE RING. Take the SACRIFICIAL DAGGER. Remove the glass case covering the WHITE ROSE.
- Put the WHEEL on the ladder (B).
- Examine the upper shelf (C). Take the blueprint (pink), VILE PREPARATION and LEAD BOOKEND.
- Zoom into the center circle. Place the CONSTELLATION TOKEN to start a puzzle.
- The goal is to place all the constellation tokens in the slots along the outside of the circle so no lines cross. A correctly placed token lights up. See the next screenshot for the solution.
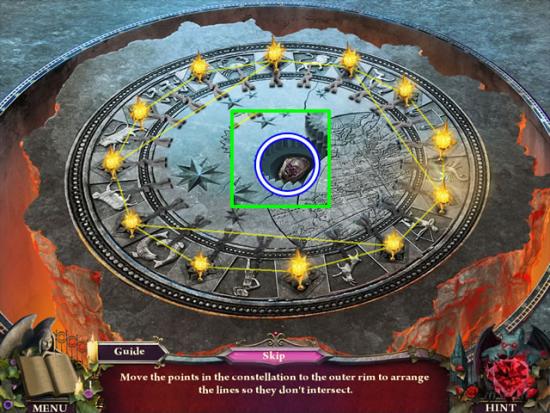
- Take the CURSED METAL INGOT from the nook that opens.
- Solving the puzzle puts the fire out. Look at the back of the fireplace.
- Place the DEMON HEADS (4/4) and the SILVER BALL to open a puzzle.
- The goal is to move the silver ball through the maze to the exit hole at the top.
- The red or blue sides of each demon can push or pull the ball.
- See the next screenshot for the solution.
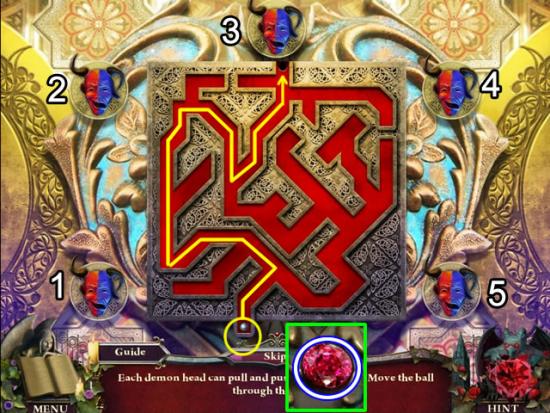
- Here is the solution for following the above yellow path. The number indicates which demon to click. The R is for the Red side, B is for the Blue side.
- 3B, 4B, 2B, 5R
- 4R, 1B, 3B, 4B
- 3B, 5B, 2R, 3R
- 4B, 3B, 4B, 3B.
- Take the RUBY from the opening.
Cave
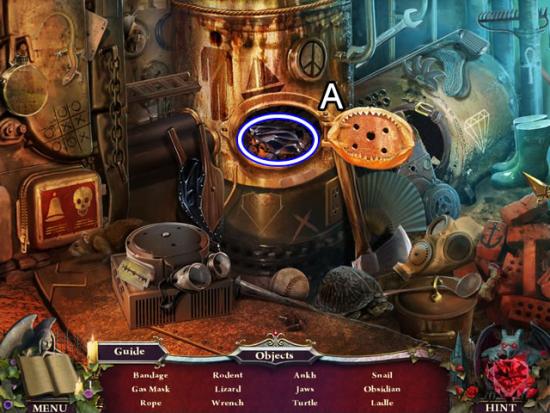
- Play the hidden object scene.
- Open the furnace door (A) to find the OBSIDIAN and Jaws.
- Find the rest of the listed objects.
Treasury
- Use the LOCK PICKS to get the SAPPHIRE from the case on the back right.
- Zoom in on the board on the left wall. Place the SAPPHIRE, EMERALD and RUBY on the board to start the puzzle.
- The goal is to rotate the gems to the areas on the board that relate to their colors.
- See the next screenshot for the solution.
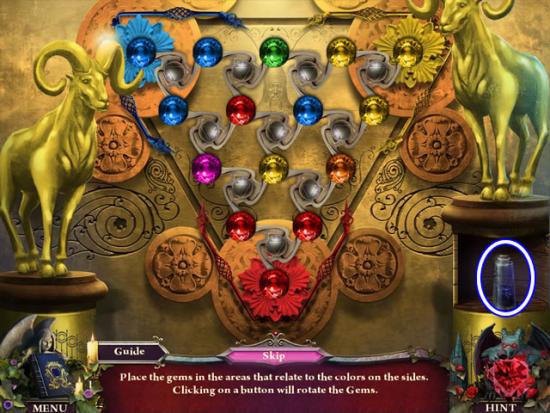
- The logic for this solution escapes me. The three yellow, blue and red gems around the same colored flowers make sense. The placement of the rest I can’t explain. But it works. Take the DEMONIC ETHER.
Storage Room
- Put the MUSIC ROLL in the music box on the left. Take the mixing procedure.
Fountain
- Place the WHITE ROSE in the statue hand. Retrieve the TWISTED ICHOR from the chest cavity.
Forge
- Zoom in on the work surface (B). Refer to the journal for the order for mixing the ingredients in the chalice. Add the TWISTED ICHOR, DEMONIC ETHER and LEAD BOOKEND. Receive the KEY FORM. Take the page for mixing the ingredients in the pot from the book.
- Place the KEY MOULD and KEY FORM on the stand (A).
- Put the OBSIDIAN, CURSED METAL INGOT and VILE PREPARATION in the pot. Tip the contents into the key form.
- Take the DREAD KEY.
Cave
- Zoom in on the doors (A). Insert the SACRED DAGGER in the slit at the top of the head. Use the DREAD KEY in the lock.
- Open the door to a puzzle. Place the ORNATE TILES (3/3) on the board to begin the puzzle.
- The goal is to arrange the tiles by color and pattern. The solution is shown above.
Congratulations! You have completed the bonus play for Nightfall Mysteries: Black Heart Collector’s Edition.

More articles...
-
Best Horror Games On Itch.io – July 2026
Across a bounty of subgenres. -
Haze Seas Accessories Tier List [Best Accessories to Equip]
The accessories with the best stat buffs in Haze Seas.