![Digimon UP Tier List [Supports, Buddies, and Partners]](/wp-content/uploads/2026/07/digimon-up-tier-list.jpg "Digimon UP Tier List [Supports, Buddies, and Partners]")
Digimon UP Tier List [Supports, Buddies, and Partners]
These Digimon will get you UP the leaderboard.


![Haze Seas Boss Drops [Chances, Locations, and How to Spawn]](/wp-content/uploads/2026/07/haze-seas-boss-drops.jpg "Haze Seas Boss Drops [Chances, Locations, and How to Spawn]")

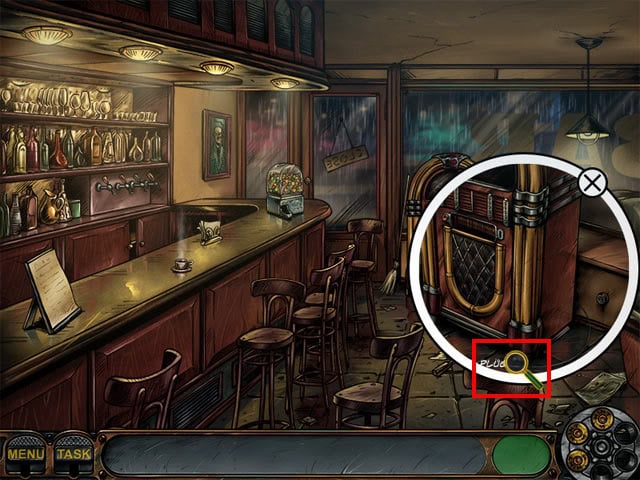
Welcome to Gamezebo's strategy guide for Nick Chase and the Deadly Diamond. General Information Main Menu The profile selection allows you to add new players and delete current players. Select the Add button to create a new profile or click the bin icon to delete a player from the list. Up to six player profiles can be created. Select OK to select a new profile or Cancel to exit the window with the previously chosen profile. The Play button starts the game with the currently selected …
a:1:i:0;a:2:s:13:”section_title”;s:45:”Nick Chase and the Deadly Diamond Walkthrough”;s:12:”section_body”;s:75800:”
Welcome to Gamezebo’s strategy guide for Nick Chase and the Deadly Diamond.
General Information
Main Menu

Normal Locations
Hidden Object Locations
Mini-Game Locations
Walkthrough
Joe’s Bar
A tutorial can be followed at the start of the game or skipped by selecting the Skip Tutorial option. Examine the jukebox:
Examine the plug:
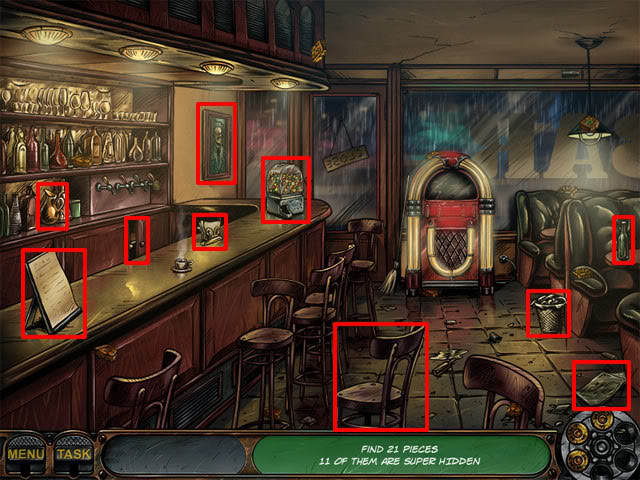
Examine the jukebox and select the coin:

Find the remaining hidden objects on the list. Also look out for bullets which will increase the amount of hints that are currently available. Use the coin on the jukebox. The barman will try to hand a clay tablet over to Nick, but it drops on the floor and shatters. The aim now is to find the pieces of the tablet. Some pieces are visible while others require objects to be moved before they can be seen. Start by selecting the following objects:
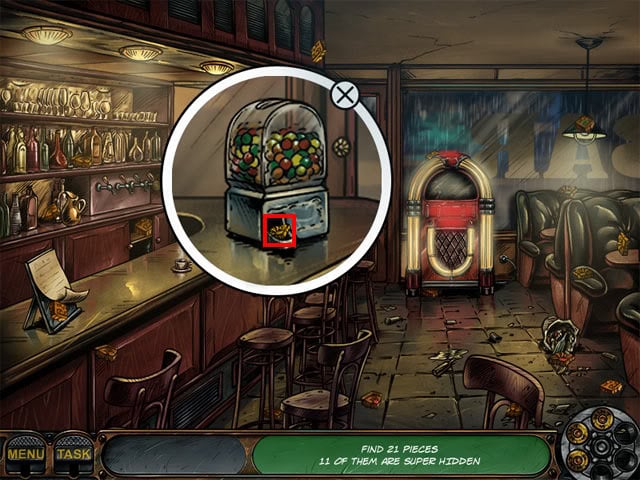
Examine the gumball machine to see a close-up. Examine the gumball machine again to reveal a tablet piece. Take the piece:
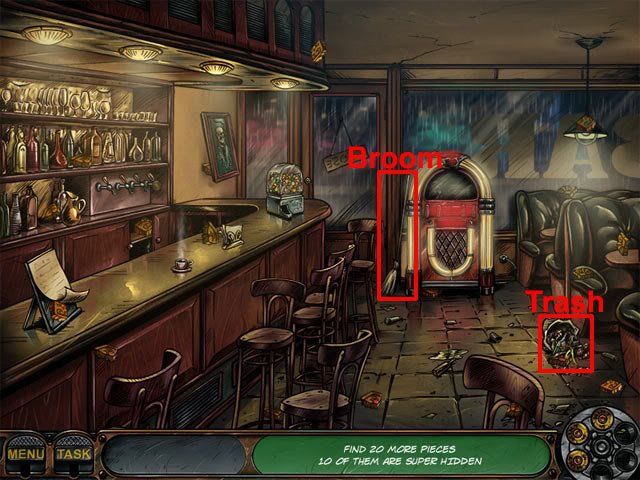
Select the broom at the left side of the jukebox and use it on the trash:
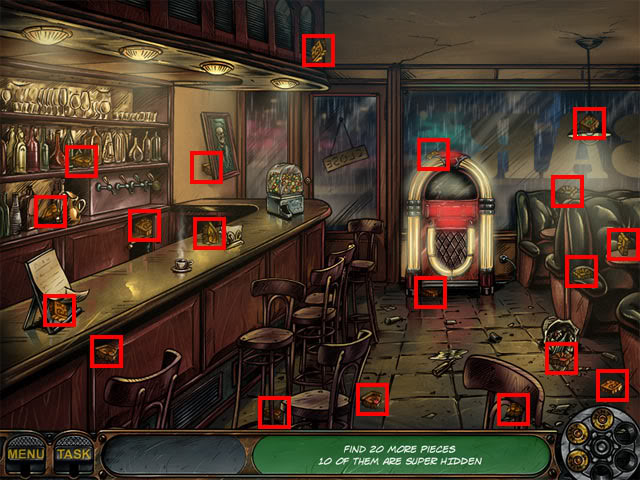
Find 19 tablet pieces:
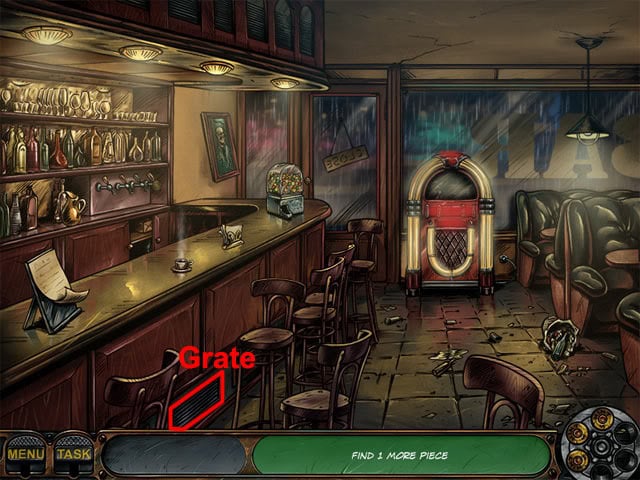
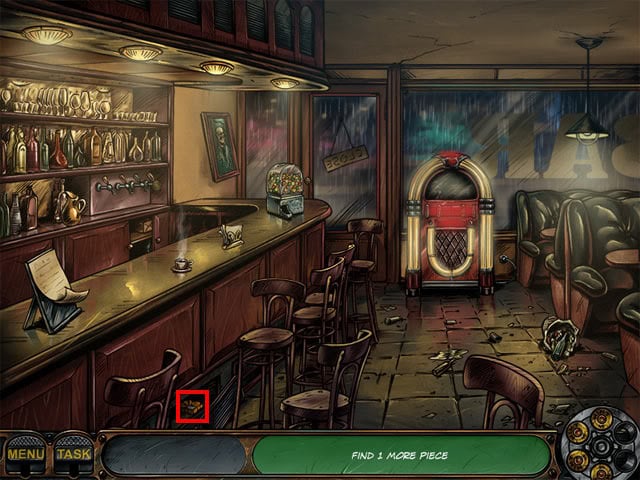
A new hotspot will become available when there is only one tablet piece left to find. Examine the grate at the bottom of the bar:
Nick will say that he needs a tool. Examine the jukebox and select the tool:
Find the remaining hidden objects on the list. Examine the grate and use the screwdriver on the four screws. Find the final tablet piece:
Put the tablet pieces back in the correct positions. Hold the left mouse button to select a tile and press the right mouse button to rotate a tile. The finished tablet is shown below:

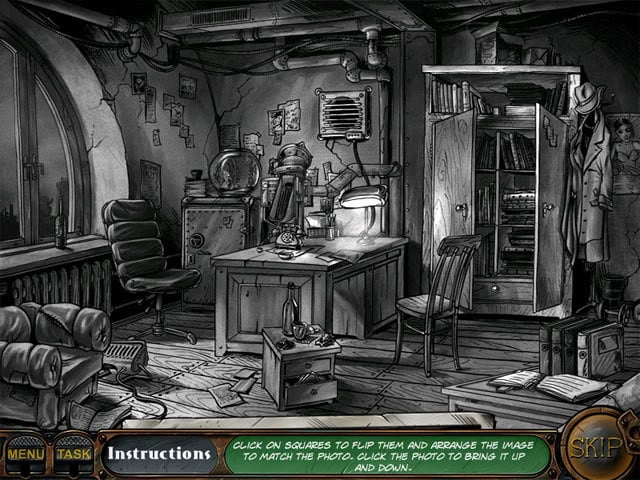
Flashback – Nick’s Office
Click the images to flip them into the correct order shown below:
Take the key and use it on the safe:
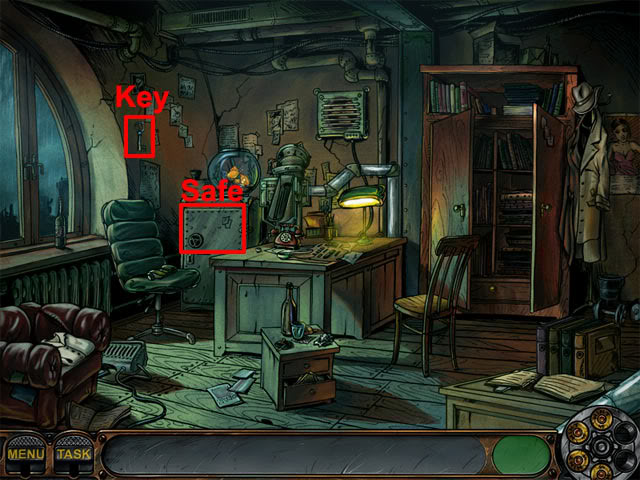
Select the newspaper:
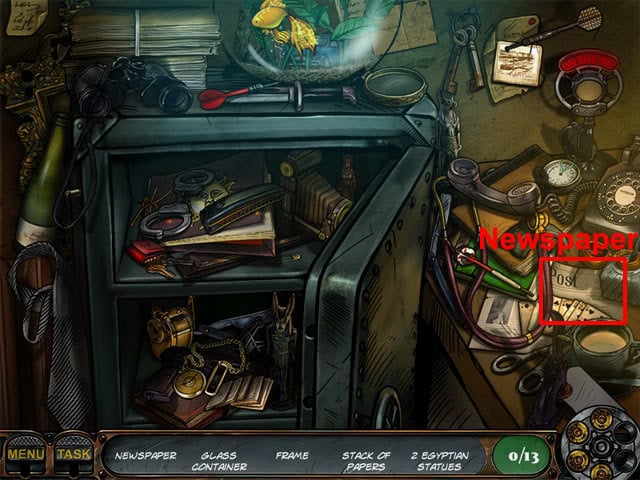
Find the remaining hidden objects on the list.
Rose Street
The following hotspots are available:
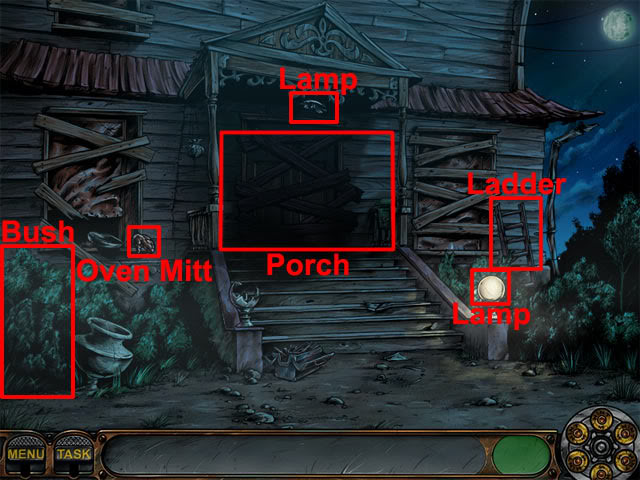
Select the bulb at the right side of the porch to reveal the bulb. Take the oven mitt and use it on the bulb to take it. Take the ladder and use it on the porch. Use the bulb on the lamp at the top of the ladder. Take the garden shears:
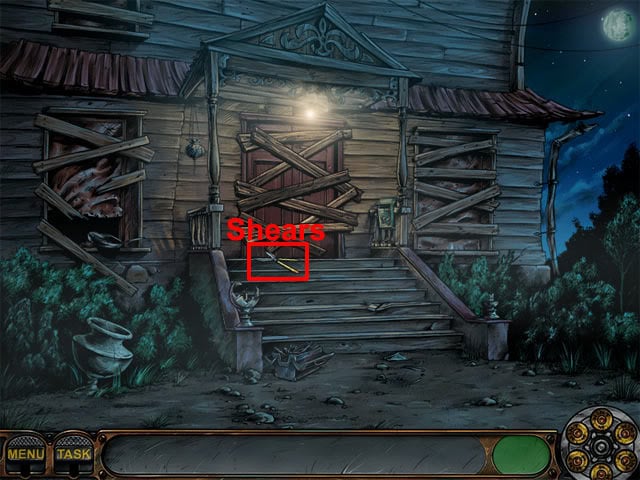
Use the garden shears on the bush to reveal a crowbar. Take the crowbar:

Use the crowbar on the planks in the following order:
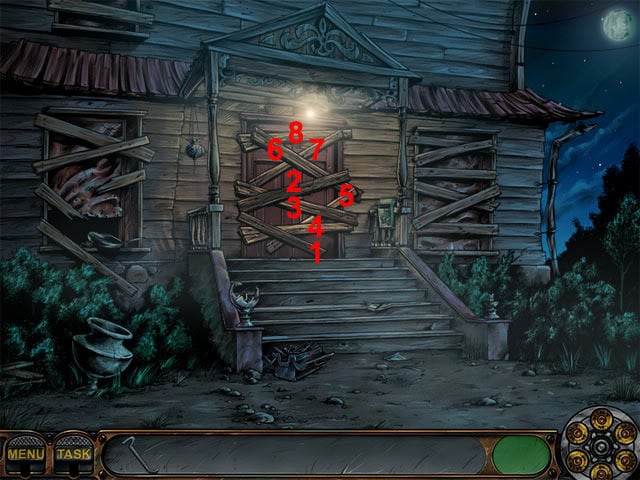
Examine the device on the door. Examine the fuse place at the bottom-right corner of the device to see that a fuse is needed. Examine the toolbox:

Find 19 fuses:
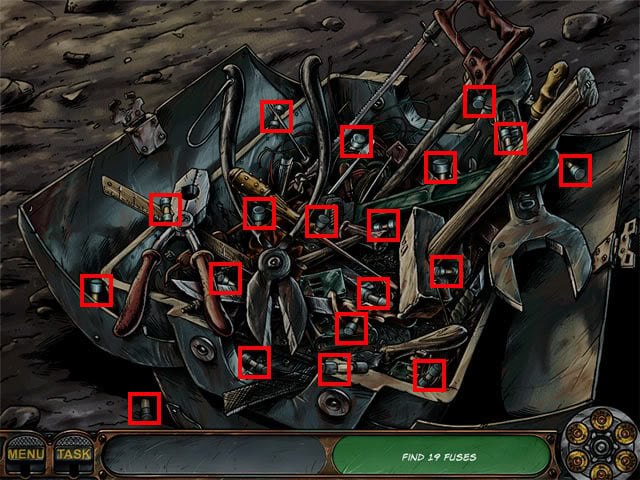
Examine the device on the door and use the fuse on the fuse space. The keypad is shown:

Press the buttons in the following order to solve the puzzle: 1, 2, 3, 4, 6, 7, 9, 10, 11, 12. Nick enters the house and is tied to a chair.
Locked Room
Drag the knots to the correct positions so that they become green. The two red knots next to Nick’s hands cannot be moved. One way of solving the puzzle is shown below:

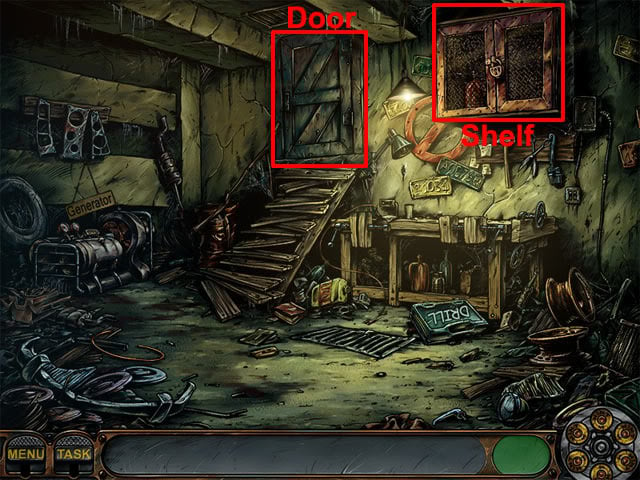
Look at the door and then look at the shelf:
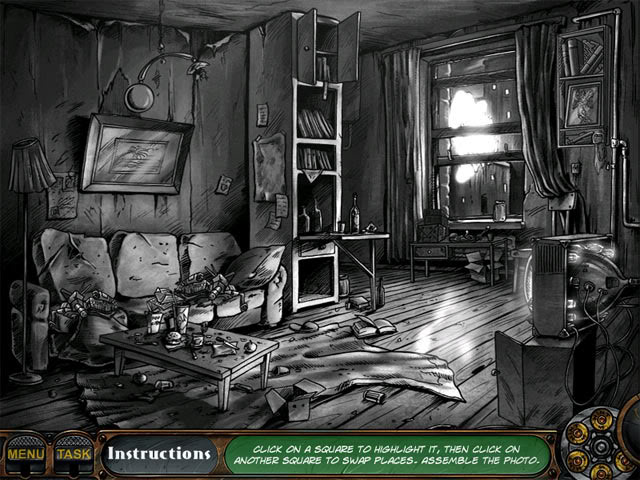
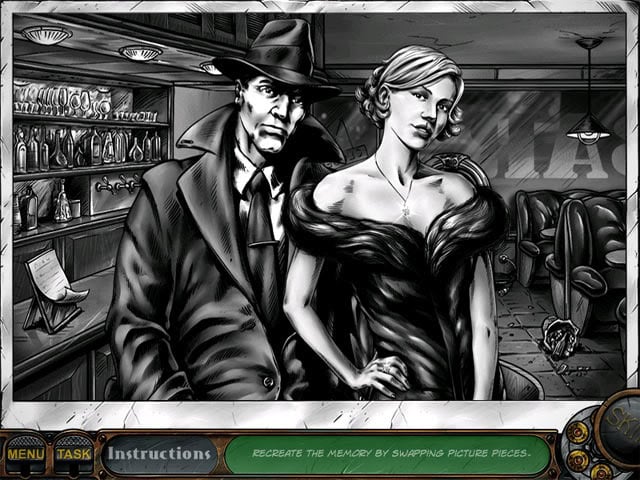
Flashback – Joe the Scribbler’s Room
Swap the tiles to make the picture below:
Examine the sofa and select the comic book:
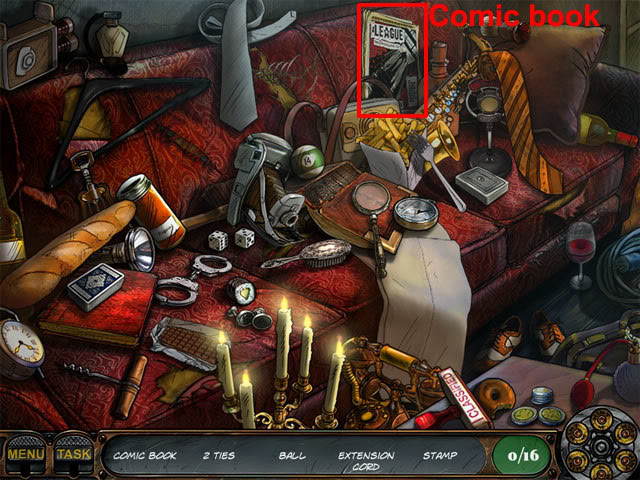
Find the remaining hidden objects on the list.
Locked Room
Open the right toolbox to reveal a drill. Examine the drill: There are no drill bits or power cable. The following hotspots are now available:
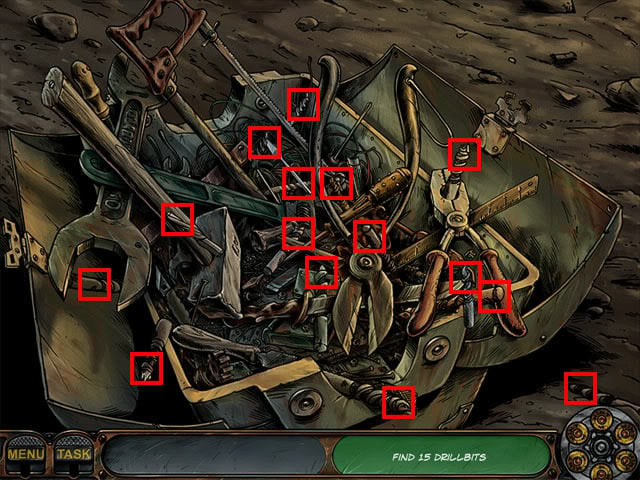
Take the scissors and use them on the cable. Examine the toolbox and find the 15 drillbits:
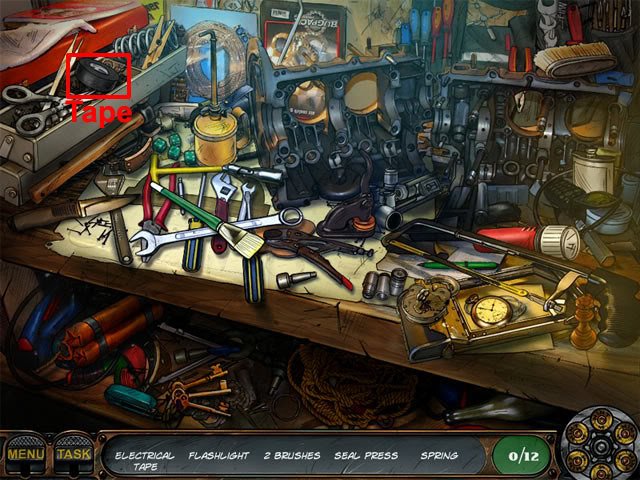
Use the cable and the drill bit on the drill. Examine the drill: Electrical tape now needs to be found. Examine the table below the shelf and find the electric tape:
Find the remaining hidden objects on the list. Use the electrical tape on the drill. Take the drill and use it on the lock on the shelf. Take the blowtorch and the hose:
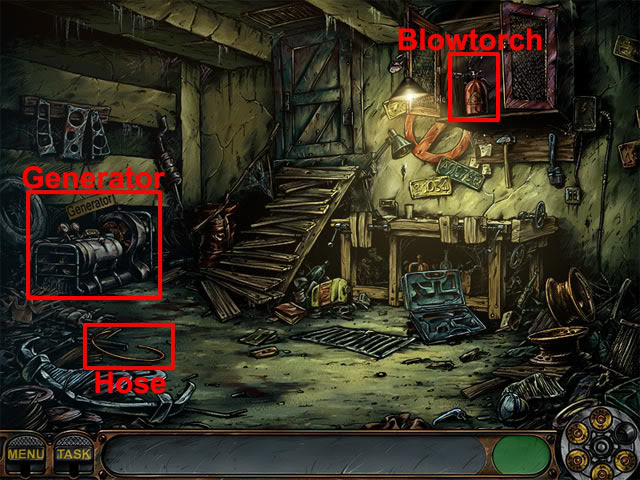
Use the hose and the blowtorch on the generator to fill the blowtorch with fuel. Use the blowtorch on the door to start the mini-game:
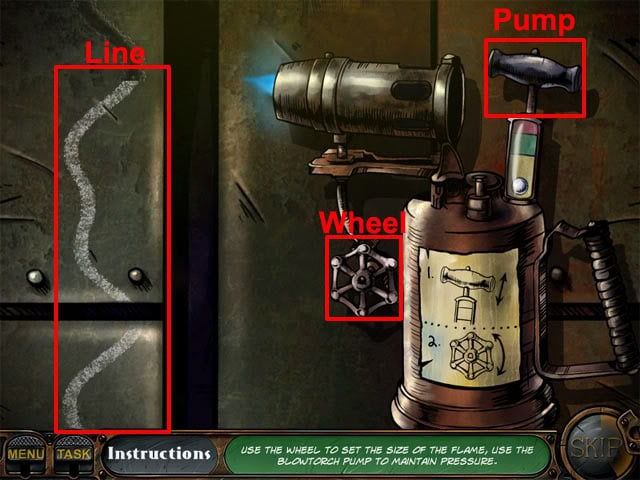
Move the mouse cursor over the pump, hold the left mouse button and then move the cursor up and down a few times to operate the pump. The small ball below the pump should move into the red area. When this has been done, move the mouse cursor over the wheel, hold the left mouse button and then move the cursor in a circular motion around the wheel to operate the flame. The aim is to make the flame cut through the line to reach the door handle. Nick steps into a new room.
New Room
Take the flashlight and then select the switch:
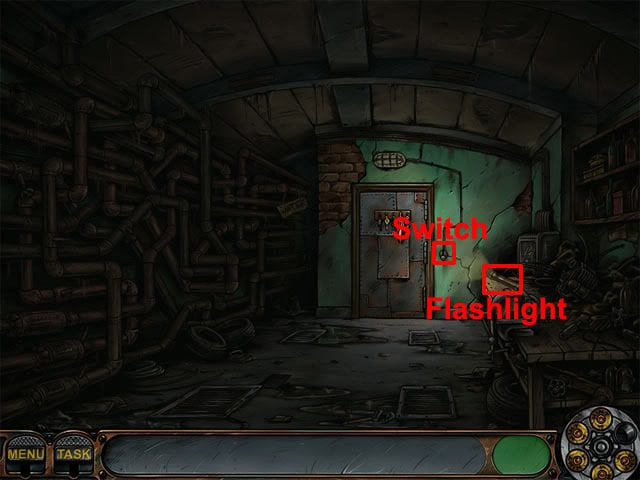
The following hotspots are now available:
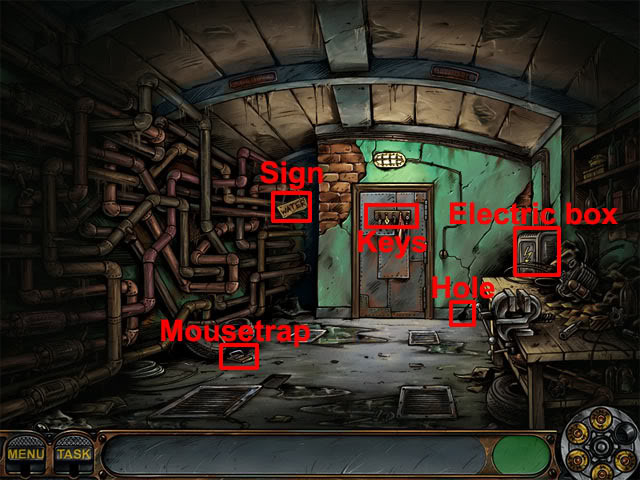
Examine the keys on the door: A key will drop to the floor and a mouse will then steal it. Take the mousetrap and use it on the hole. Examine the hole: Bait is needed for the mousetrap. Nick automatically returns to the table. Select the cheese:
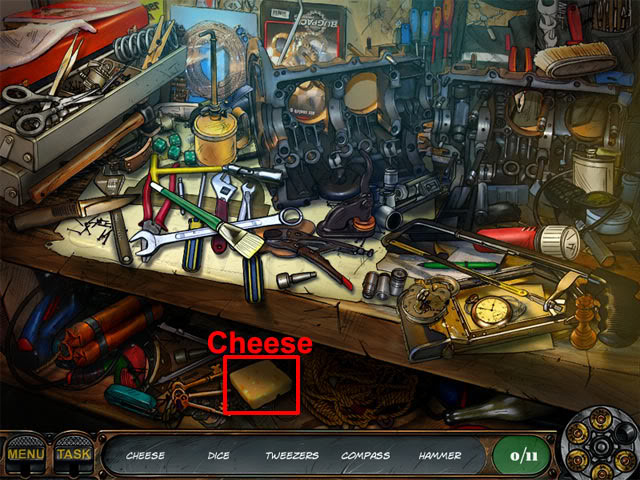
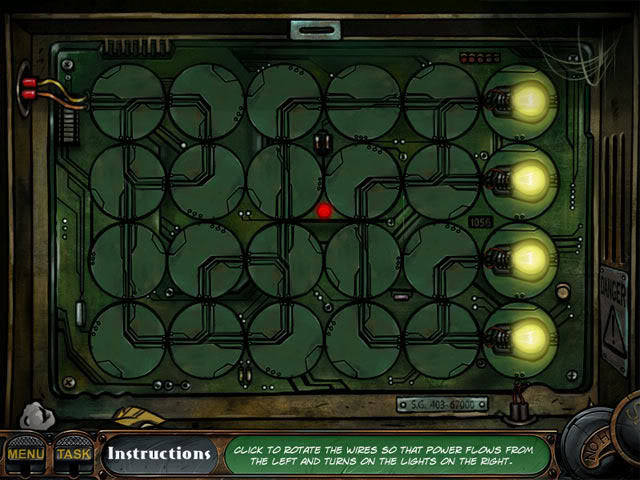
Find the remaining hidden objects on the list. Use the cheese on the hole to get the key. Use the key on the electric box. Rotate the wires so that electricity flows from the left to the bulbs on the right:
The following hotspots are now available:

Take the wrench and use it on the valve. Take the valve and use it on the pipes.
Gas Station
The game switches to Big D. The following hotspots are available:
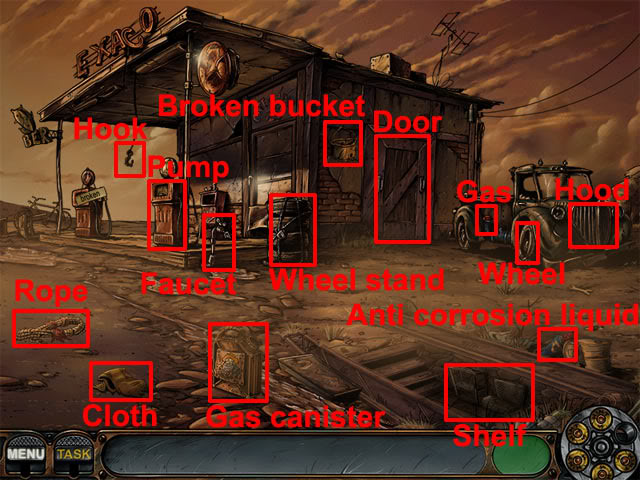
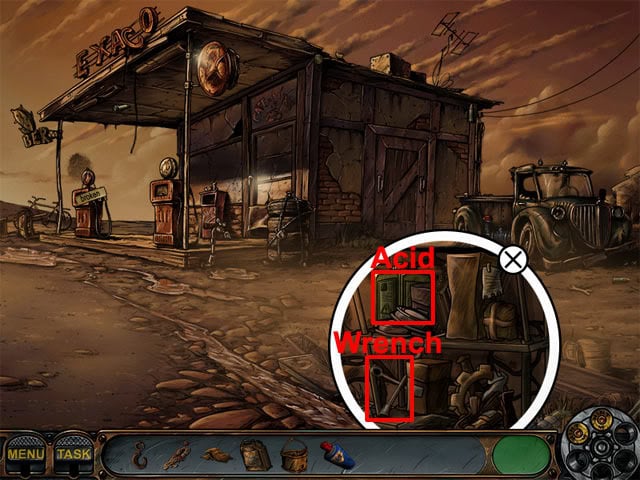
Take the hook, rope, cloth, gas canister, broken bucket and anti corrosion liquid. Examine the shelf. Take the acid and the wrench:
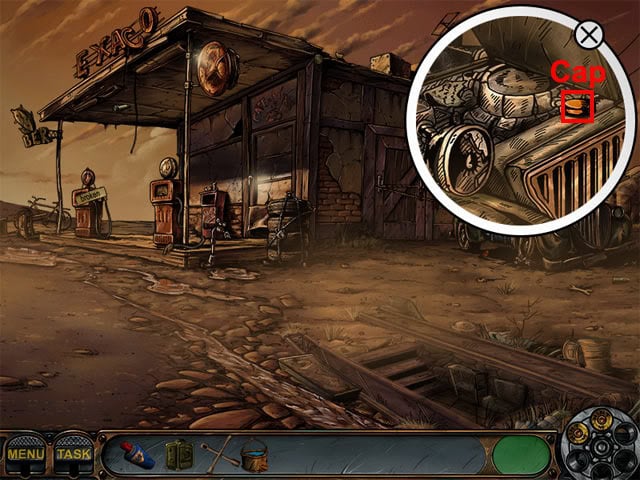
Combine the rope and the hook in the inventory. Use the rope and hook on the door. Use the empty gas canister on the pump. Select the gas cap on the car. Use the full gas canister on the gas hotspot. Combine the broken bucket and the cloth in the inventory. Use the empty bucket on the faucet and then select the faucet to fill the bucket. Examine the hood of the car twice to see a close-up. Select the cap to remove it:
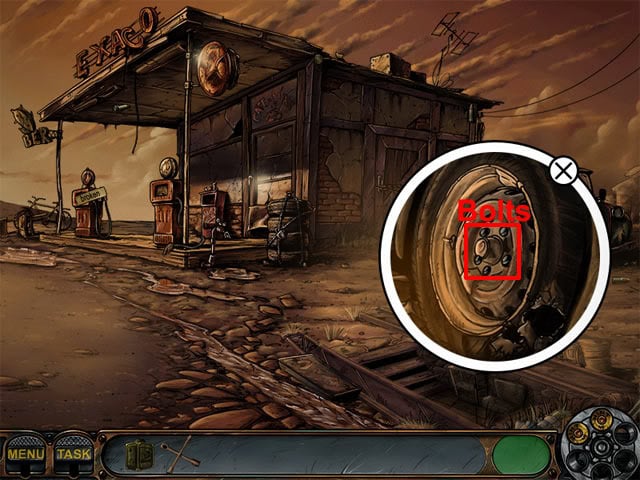
Use the bucket with water on the radiator. Examine the wheel. Use the anti corrosion liquid on the five sections of rust. Use the wrench on the five bolts:
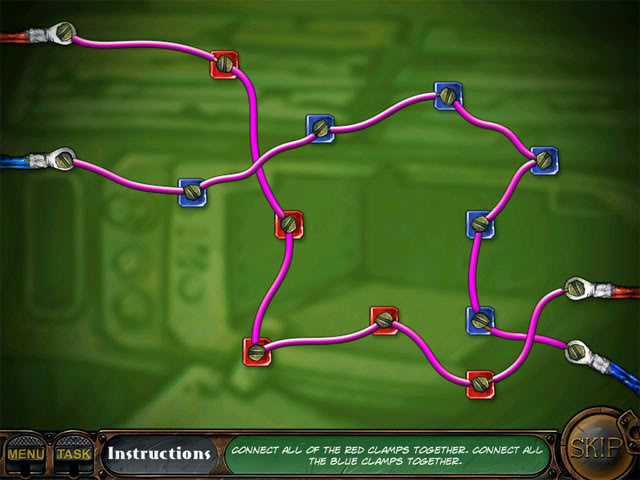
Use the acid on the wheel stand. Examine the wheel stand to take a wheel. Use the wheel on the car wheel hotspot. Drag the wires to the following positions:
Dr Morrison’s Lab
The game switches to Dr. Morrison. Take the fire extinguisher and use it on three of the flames:

The fire extinguisher will be empty after three flames have been extinguished. Take the shovel and use it on the sandbox, then use sand on the remaining flames in the room. When all flames have been put out, open the door to let Nick into the room. Open the cupboard below Nick and take the syringe:
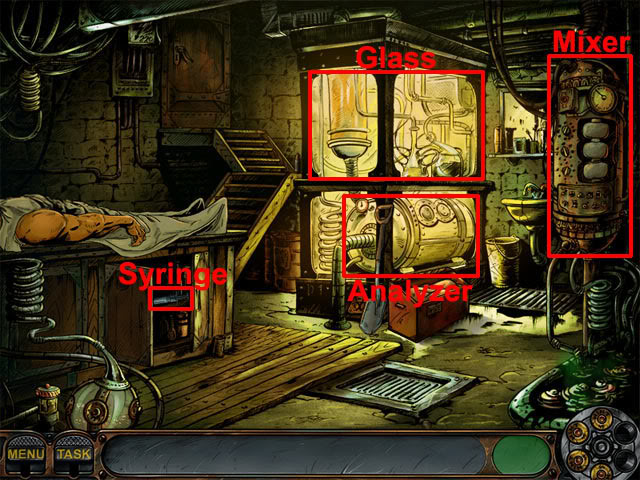
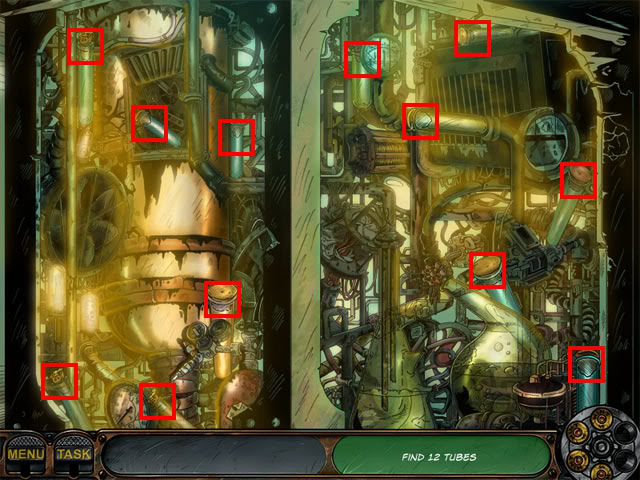
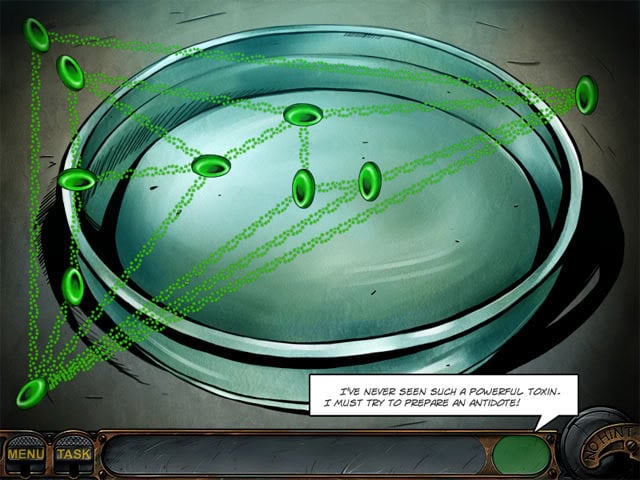
Use the syringe on Nick. Examine the glass hotspot and find 12 tubes:
Combine Chase’s blood with the test tube in the inventory. Use the test tube on the analyzer. Move the red blood cells so that none of the strands overlap. One possible way of doing this is shown below:
Examine the antidote mixer at the right side of the room and enter the following numbers:
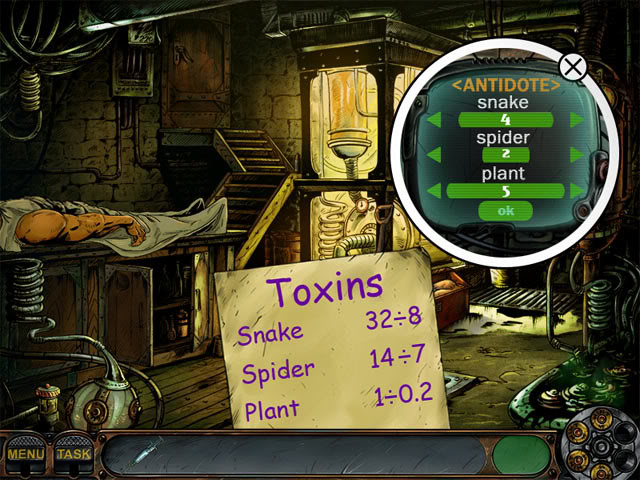
Press OK to receive the antidote. Combine the syringe with the antidote. Use the antidote syringe on Nick.
Flashback – Mary
Swap the tiles to make the picture below:
Nick’s Office
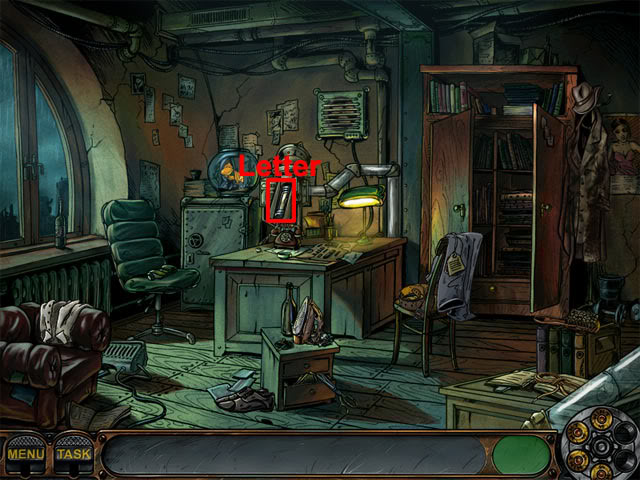
Select the telephone to answer Mister X, who tells Nick to get the diamond if he wants the antidote. Take the letter from the tube:
Put the pieces of the letter together:
The following hotspots are now available:
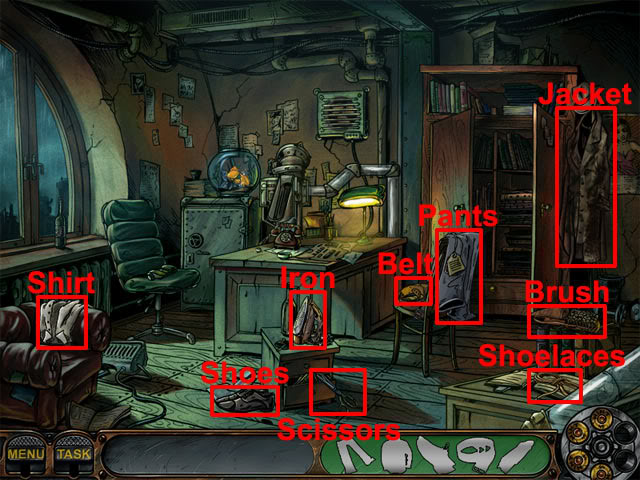
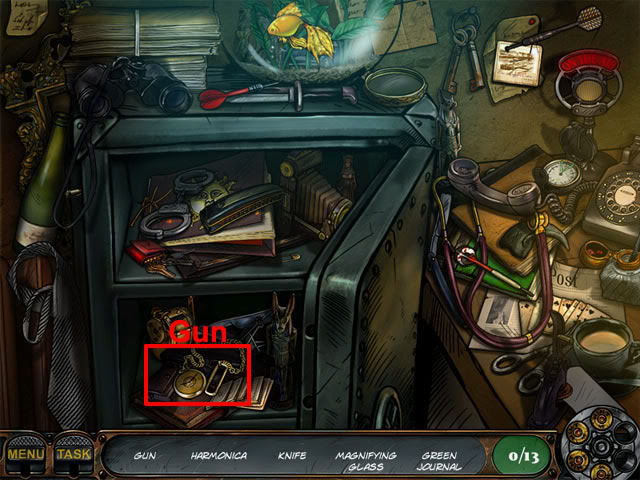
Take the scissors and use them on the pants. Take the iron and use it on the shirt. Take the shoelaces and use them on the shoes. Take the brush and use it on the jacket. Take the pants, shirt, shoes, belt and jacket. Examine the safe below the goldfish bowl. Select the gun:
Gallery
The following hotspots are available:
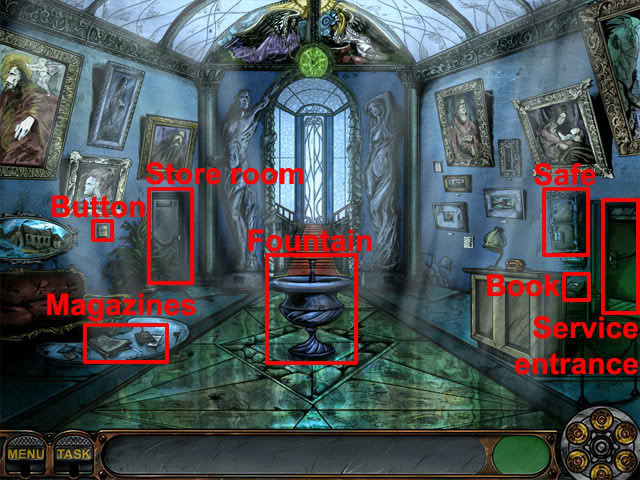
Examine the magazines to see that one of the magazines is missing its cover. Examine the fountain to see a paper ship. Examine the book behind the desk to see that the safe code must be entered in reverse order. Select the button on the left wall to turn on the fountain. Take the magazine cover scrap from the fountain and use it on the magazine to see the safe code. Examine the safe and enter the following code:
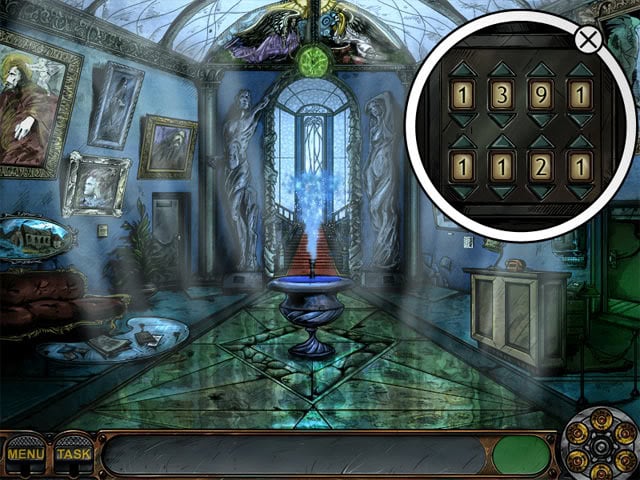
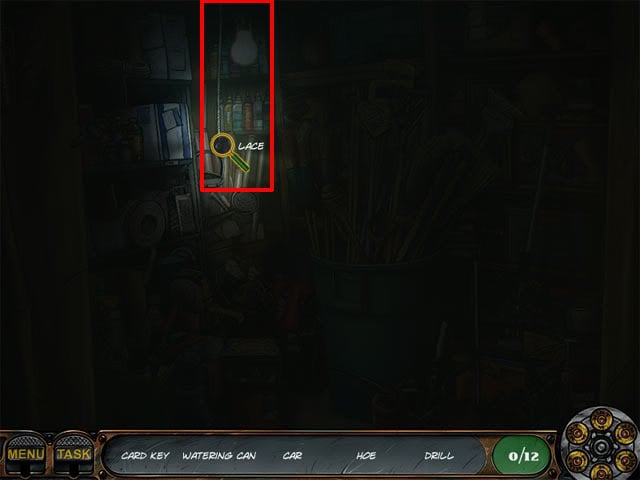
Use the key on the store room door. Select the lace to turn the light on for eight seconds:
Select the card key:
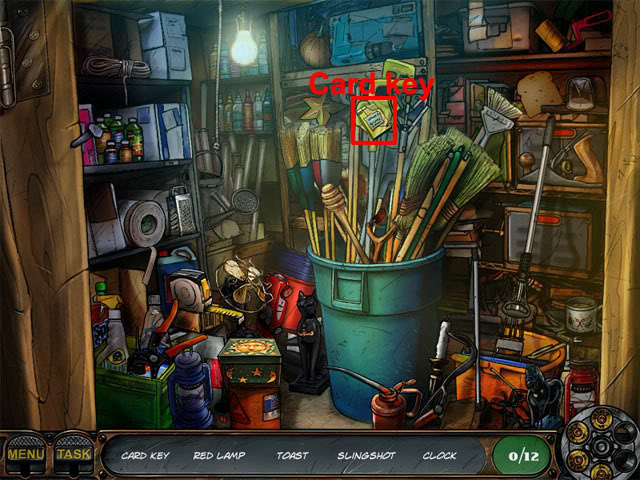
Find the remaining hidden objects on the list. Use the key card on the service entrance. The aim in the next three locations is to move the crates in order to create a clear path across the room for Nick. In the following directions, U is up, R is right, D is down and L is left. The number refers to how far the crate should be pushed. So R3 means to move the crate three squares to the right. Use the following directions to complete the crate puzzles:
Level 1:
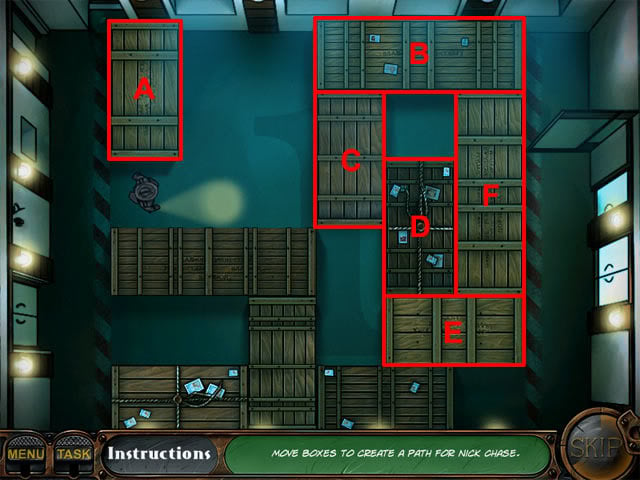
Nick: Right 1
A: Down 1
B: Left 3
C: Up 1
D: Up 2
E: Left 1
F: Down 2
Nick: Right 4
Level 2:
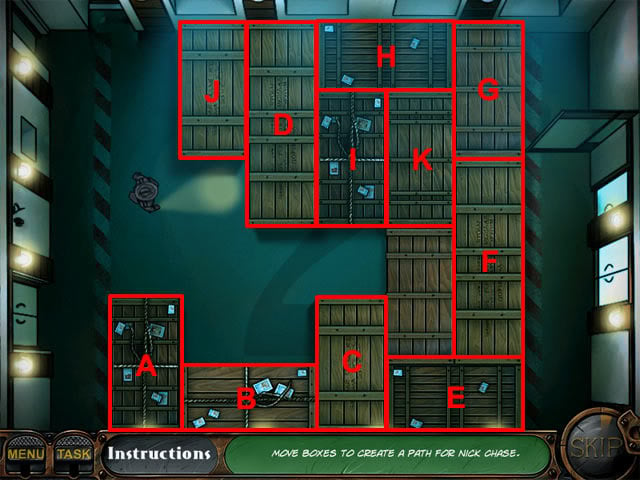
A: Up 1
B: Left 1
C: Up 1
D: Down 3
E: Left 1
F: Down 1
G: Down 1
H: Right 1
I: Up 1
Nick: Right 2
J: Down 3
Nick: Left 2
I: Down 1
H: Left 4
I: Up 1
K: Up 1
G: Up 1
Nick: Right 5
Level 3:
A: Down 1
B: Left 1
C: Up 1
D: Up 2
E: Right 1
F: Right 3
G: Down 2
H: Right 1
Nick: Right 1
I: Down 4
Nick: Left 1
H: Left 1
J: Down 2
B: Left 3
A: Up 1
J: Up 2
Nick: Right 3
G: Up 2
E: Left 2
F: Left 2
D: Down 2
Nick: Right 2
Flashback – Police Station
Swap the tiles to make the picture below:
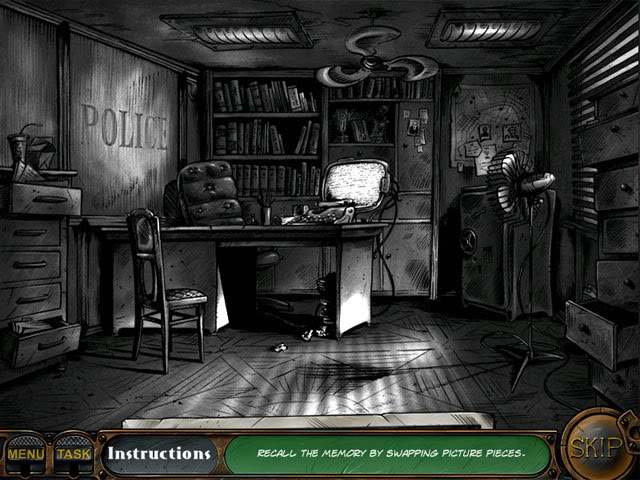
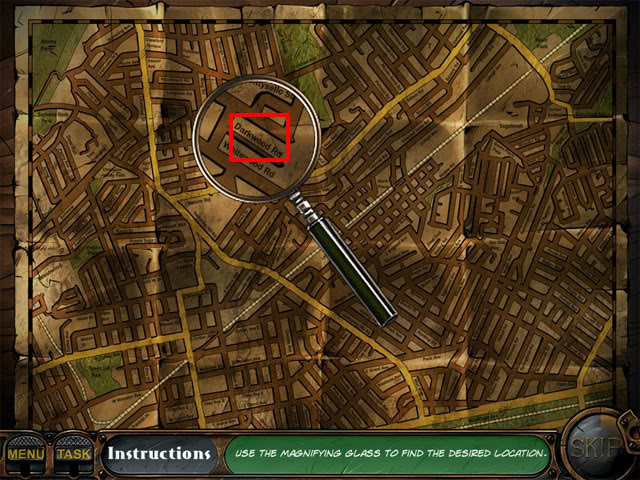
Take the case from the drawer. Examine the map on the wall:

Move the magnifying glass over the map and select Darkwood Road:
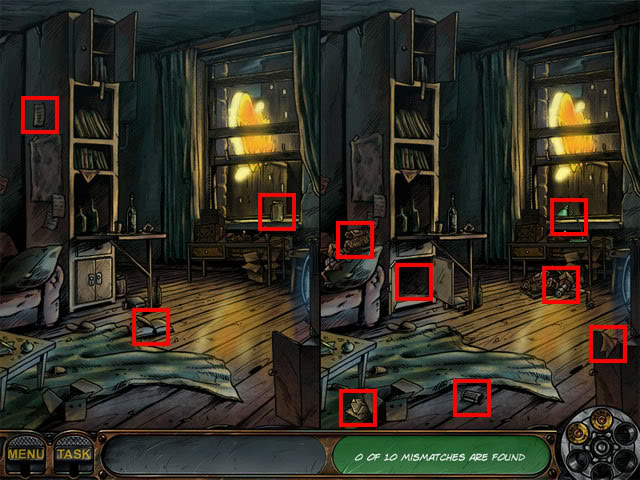
Joe Scribbler’s Room
Find the ten differences in the room:
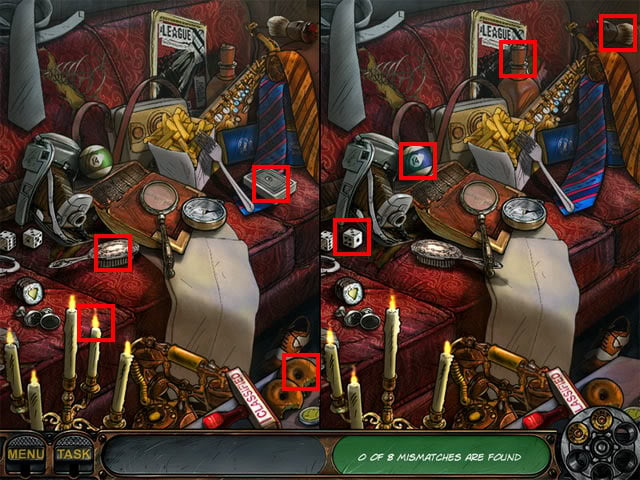
Find the eight differences in the scene:
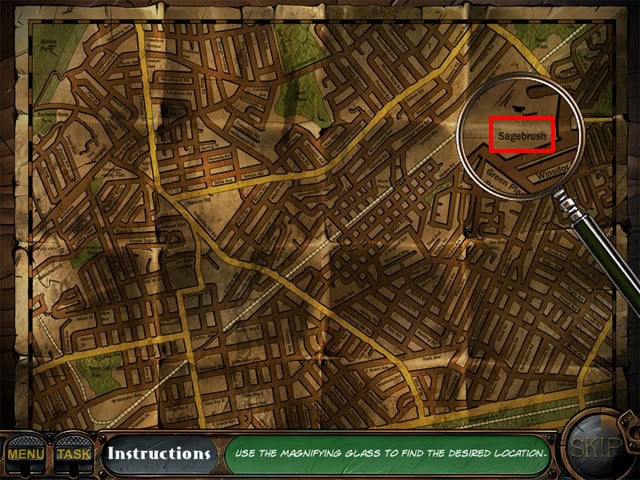
Move the magnifying glass over the map and select Sagebrush:
Junkyard
The vehicles must be placed with the largest at the bottom at the smallest at the top. Move the cars in the following order:
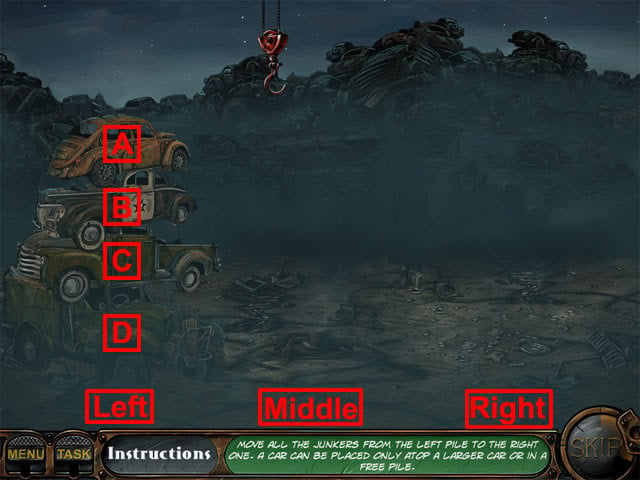
A: Middle
B: Right
A: Right
C: Middle
A: Left
B: Middle
A: Middle
D: Right
A: Right
B: Left
A: Left
C: Right
A: Middle
B: Right
A: Right
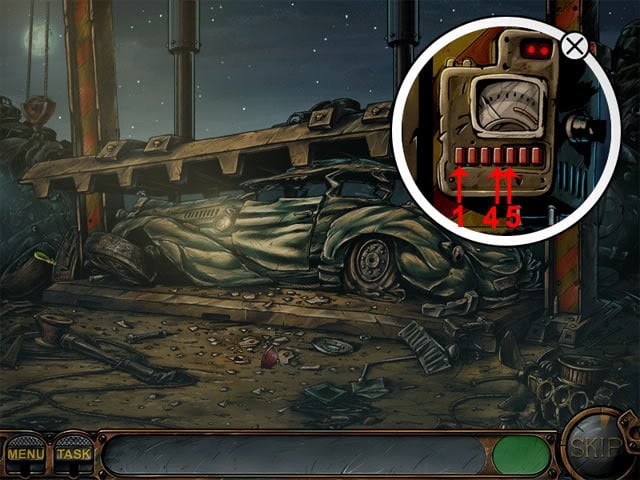
Examine the panel:
Press the first, fourth and fifth buttons:
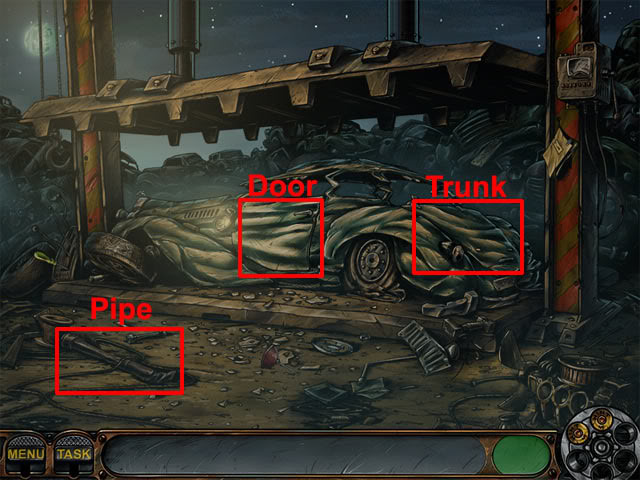
Examine the door and the handle will fall off. Take the pipe and use it on the door:
Examine the instruction book on the post and take the clip:
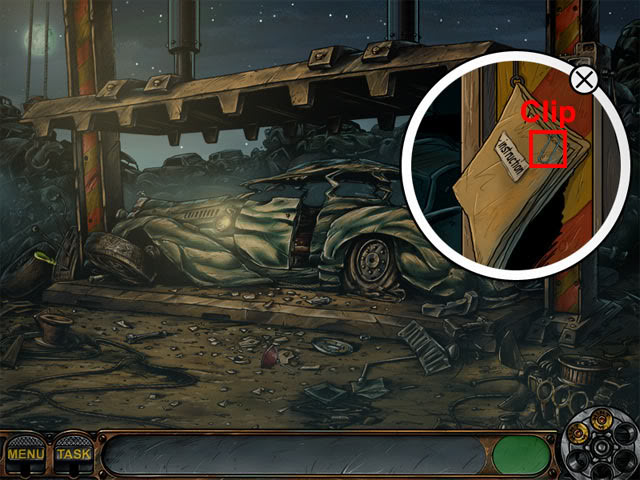
Use the clip on the car trunk. Examine the trunk and take the car jack:
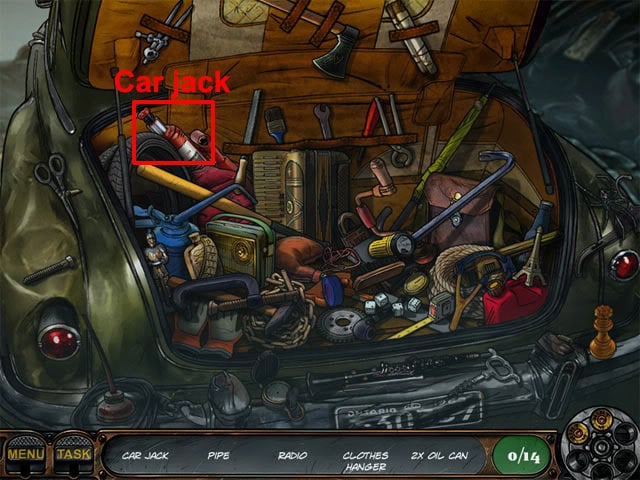
Find the remaining hidden objects on the list. Use the jack on the door. Take the screwdriver and the oiler:
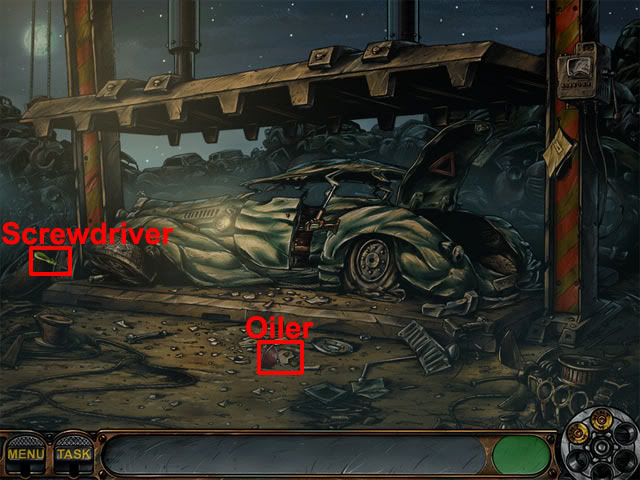
Examine the jack to see a close-up of the panel. Use the screwdriver on the four screws to open the panel. Select the five stones:
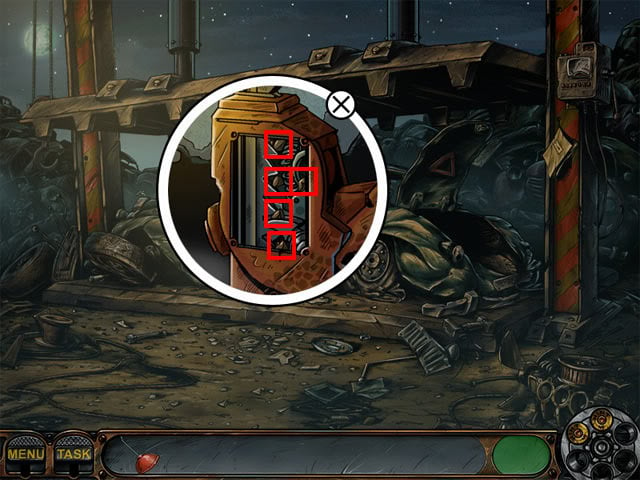
Use the oiler on the gear. Select the door to rescue Joe.
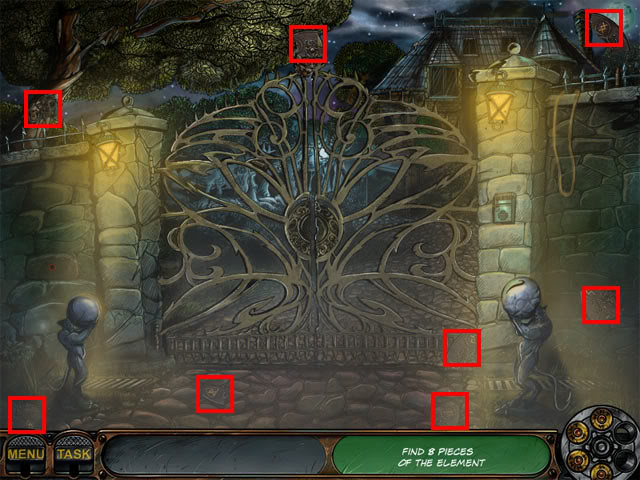
Bernard’s Gate
Examine the intercom at the right side of the gate. Press the button on the intercom and Bernard will tell Nick to find his own way in. The following hotspots are now available:
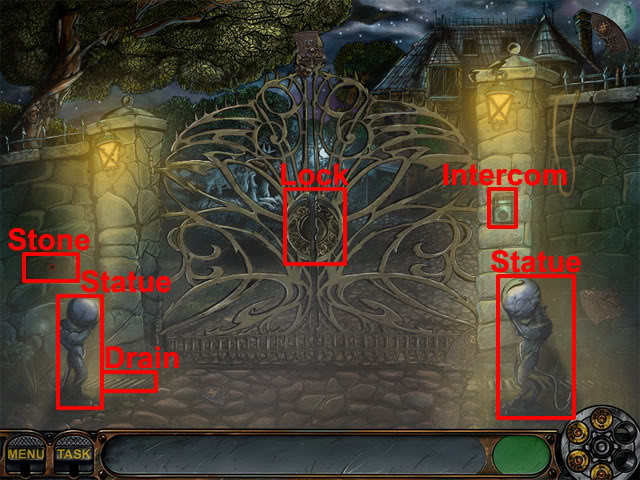
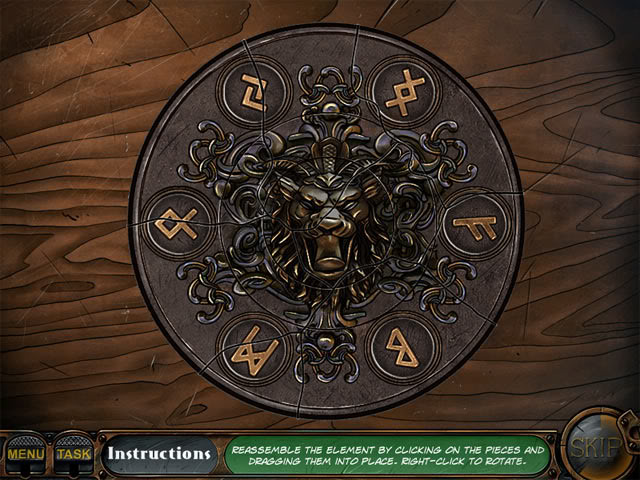
Examine the lock on the middle of the gate to see an empty slot. Examine the empty slot: A round element is missing. Find 8 pieces of the element:
Hold the left mouse button to select a piece and press the right mouse button to rotate a piece. The completed element is shown below:
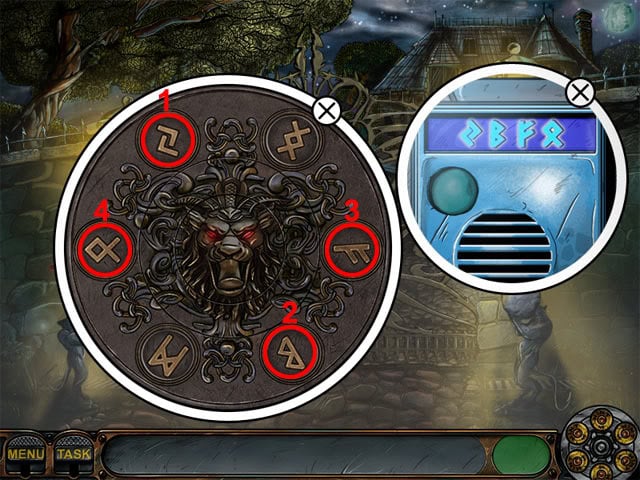
Use the restored element on the lock in the middle of the gate. Rotate the three discs to the following position:

The element will spin around when it has been placed in the correct position. Examine the intercom to see the symbols that need to be pressed. Press the buttons on the restored element in the following order:
Examine both statues to see two levers. Move the left lever until a blue beam appears, then do the same thing with the right lever. Examine the stone:
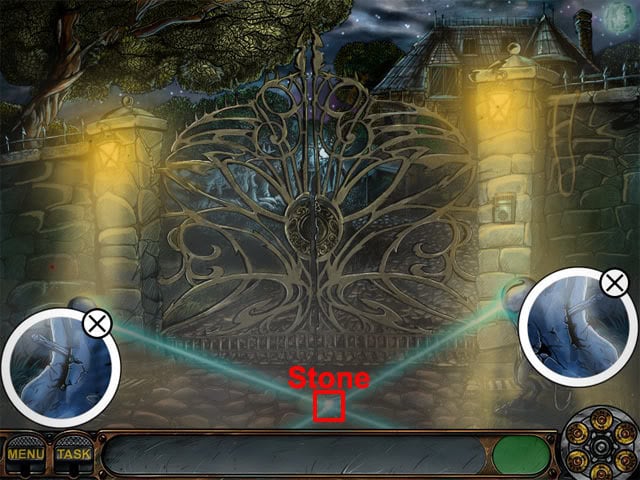
Take the hexagonal key that was hidden below the stone and use it on the stone above the left statue. Take the key and Nick will drop it down the grate. Take the rope and the hook:
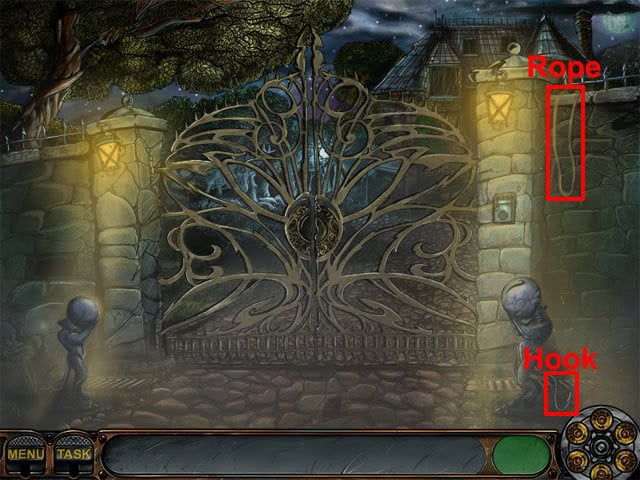
Combine the rope with the hook in the inventory. Use the rope with hook on the drain to retrieve the key. Use the key on the lock.
Archive Outside
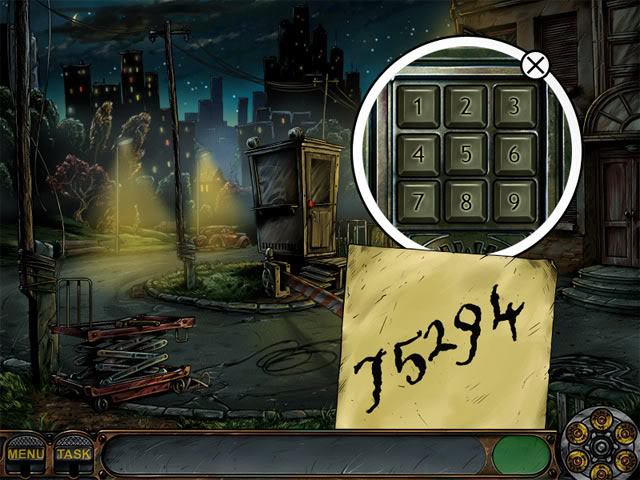
Examine the paper on the pole to reveal a code:
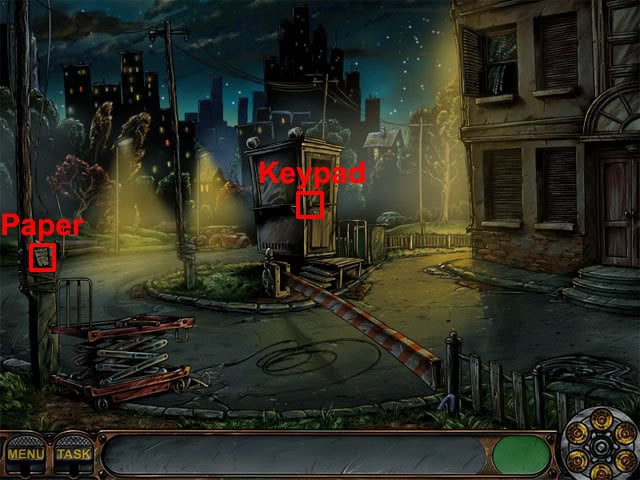
Examine the keypad and enter the code 75294:
Examine the booth and select the keys:
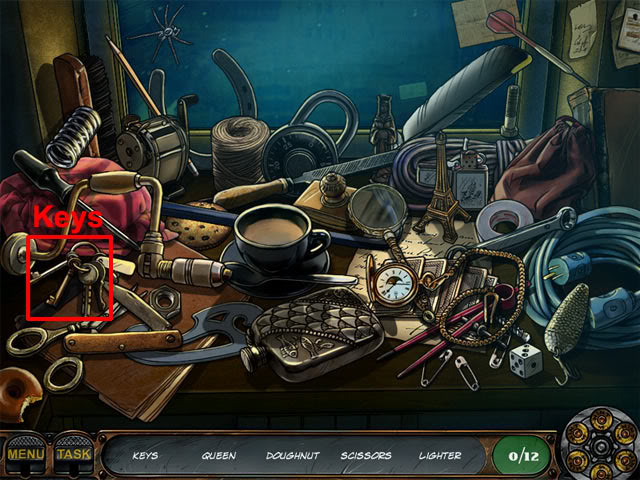
Find the remaining hidden objects on the list. Examine the barrier panel and use the key on the key slot:
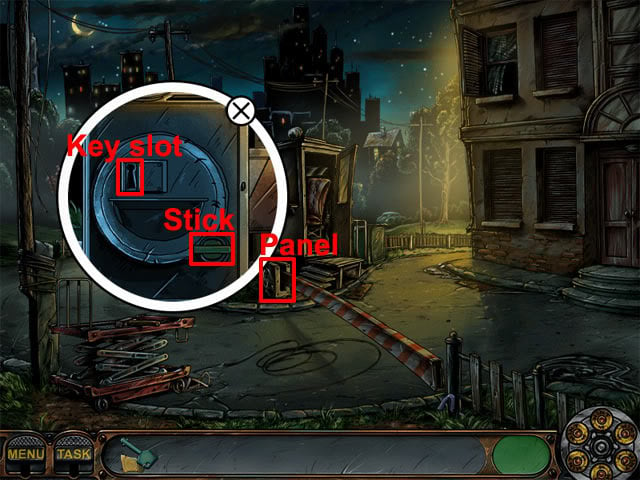
Select the stick to open the barrier. The following hotspots are now available:
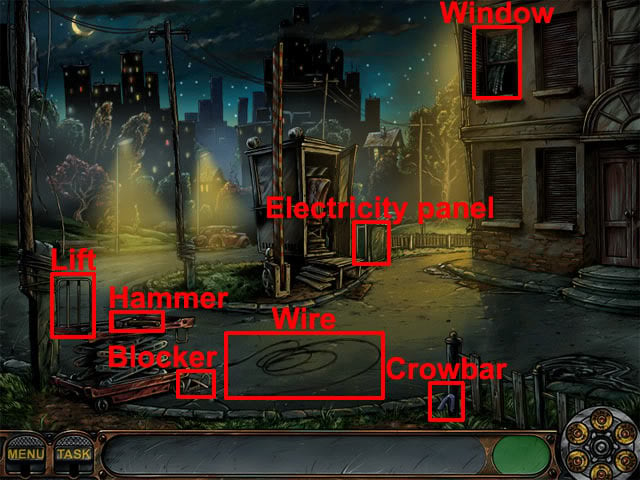
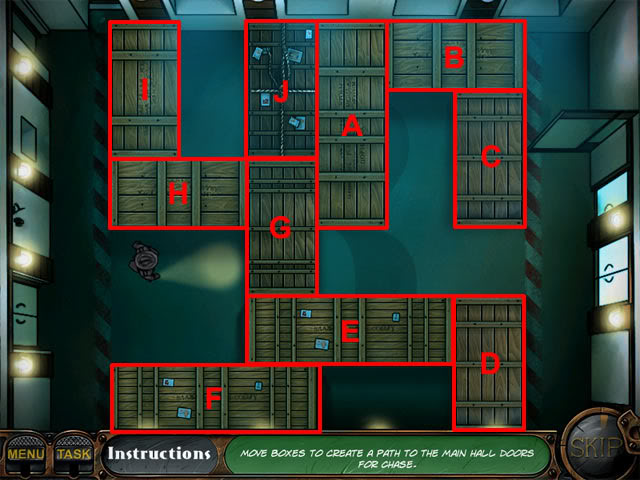
Take the hammer, wire and crowbar. Use the hammer on the blocker and then take the blocker. Keep clicking the scissor lift to move it across to the building. When Nick says that the lift is not stable, quickly use the blocker on the lift before it rolls back to the left. Use the crowbar on the electricity panel. Use the wire on the electricity panel to activate the lift. Select the lift. Examine the window to see a crate puzzle. The aim is to move the packages onto the Xs. Use the following movements to solve the puzzles:
Level 1:
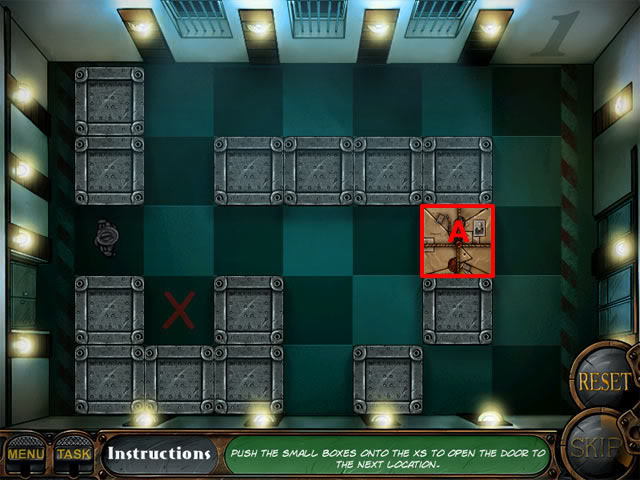
A: 4 Left, 1 Down
Level 2:
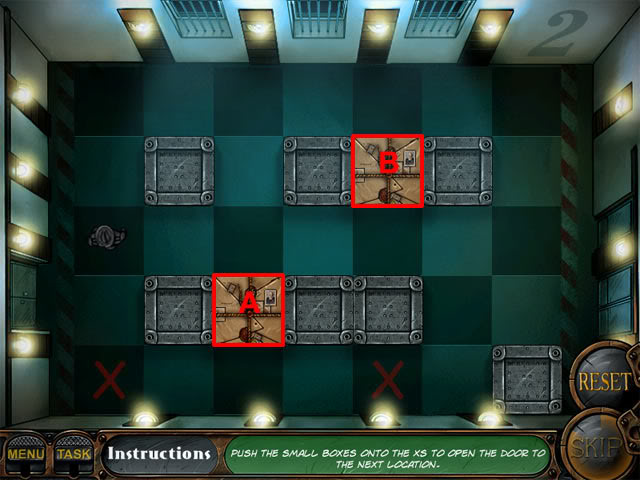
A: Down 1, Right 2
B: Down 1, Left 4, Down 2
Level 3:
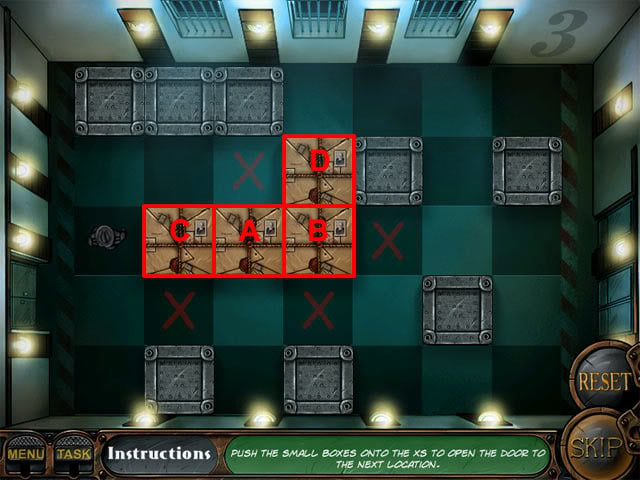
A: Up 1
B: Right 1
C: Down 1
D: Down 2
Archive
Examine the info stand to see that the reels have gone missing. Find the 6 reels:
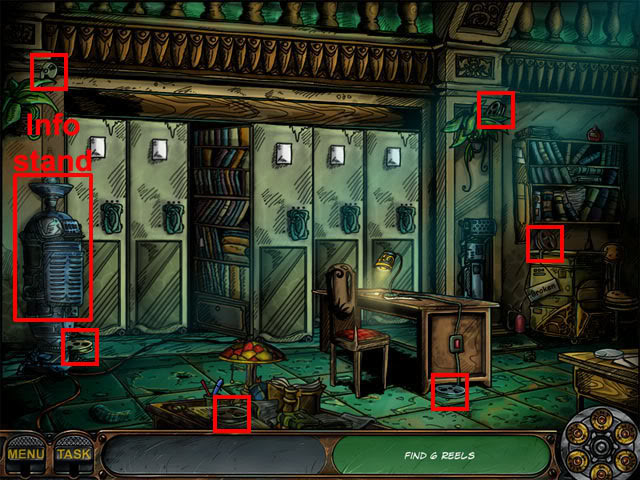
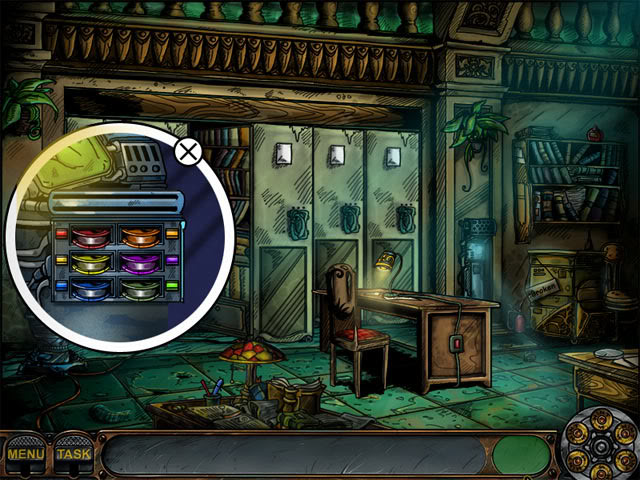
Use the reels on the info stand. Put the reels in the correct slots:
Examine the control panel and press the top-right button: The shelf is stuck. Take the oilcan and use it on the bookshelf:
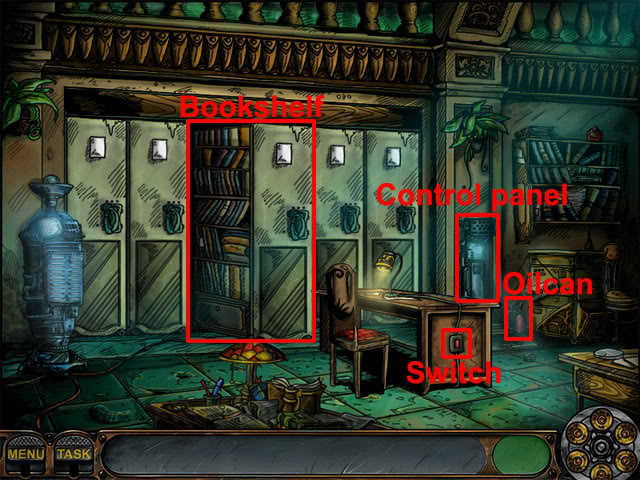
Examine the control panel and press the top-right button again to move the bookshelf. Examine the control panel and select the bottom-left button to move the fourth bookshelf. Take the blueprints:
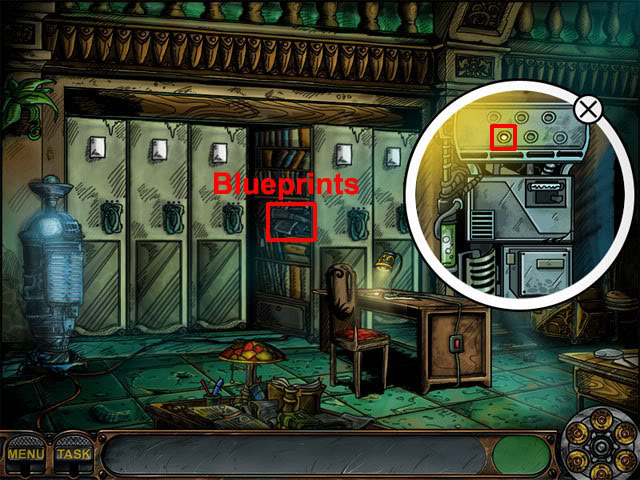
Nick now needs to make a copy of the blueprints. Examine the copier: The bulb, lens and purple ink is missing. The following hotspots are now available:
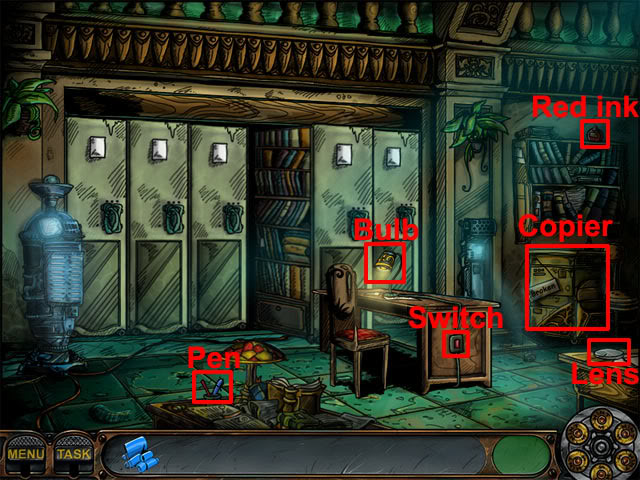
Take the pen, lens and red ink. Select the switch on the desk and take the bulb. Combine the pen with the red ink in the inventory to make purple ink. Use the lens, bulb and purple ink on the photocopier to fix it. Use the blueprints on the photocopier.
Joe Scribbler’s Room
Examine the curtains to see the dirty window. The following hotspots are now available:
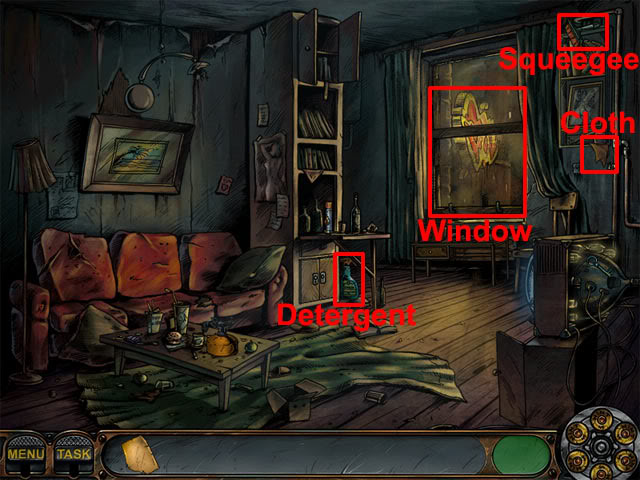
Take the detergent, squeegee and cloth. Use the detergent, squeegee and cloth on the dirty window to clean it. Use the blank page on the clean window: Joe thinks that burning the paper might reveal the message. The following hotspots are now available:
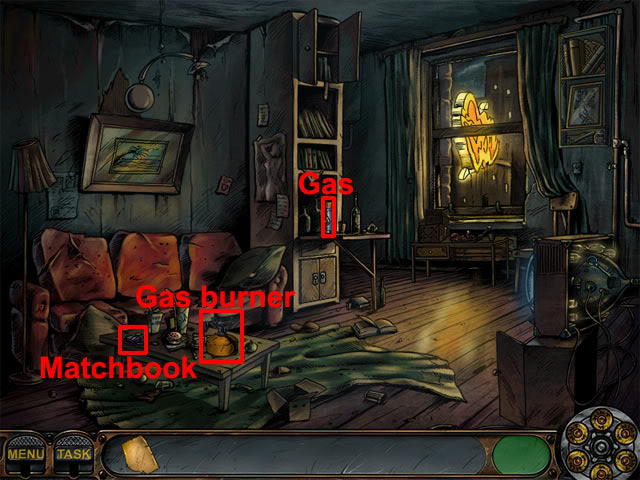
Take the matchbook and the gas. Use the gas and the matchbook on the gas burner to light it. Use the blank page on the working gas burner: Joe thinks that invisible ink may have been used on the paper. The following hotspots are now available:
Take the key and use it on the locker. Take the ultraviolet lamp from the locker and Nick will automatically put it on the desk below the window. Select the wire below the lamp to plug it in. Select the curtains next to the window to close them. Select the five holes in the curtains:
Select the lamp to turn it on. Use the blank page on the lamp to reveal the word Ci-tre-um.
Mary’s Room
Select the telephone at the left side of the bed to talk to Joe. The following hotspots are now available:

Take the three magazines and use them on the magazine table at the bottom-right corner of the screen. Take the pillow and use it on the pillows on the bed. Take the painting and use it on the place for painting on the wall. Take the gift wrap and use it on the chair. Take the hairbrush and use it on the boudoir. Open the drawer below the mirror. Take the nighty and use it on the drawer. Close the drawer below the mirror. Open the closet. Take the gown and use it on the closet. Take the manto and use it on the closet: A key will now drop down to the floor. Take the key and use it on the dresser drawer:
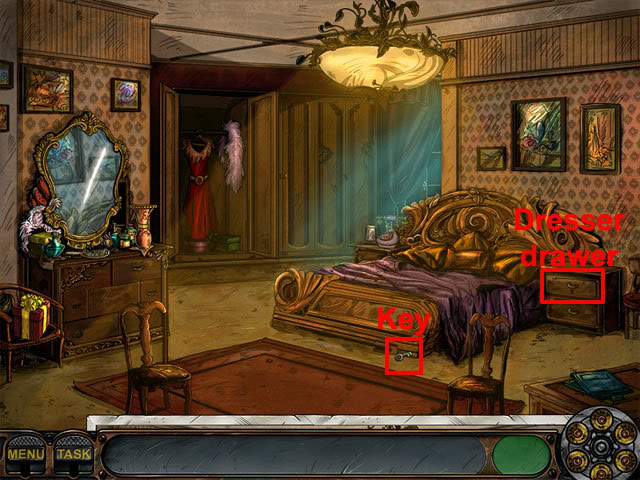
Take the dictionary from the dresser drawer. Select the phone to call Joe: Ci-tre-um is Latin for lemon.
Joe Scribbler’s Room
Find the juicer parts:
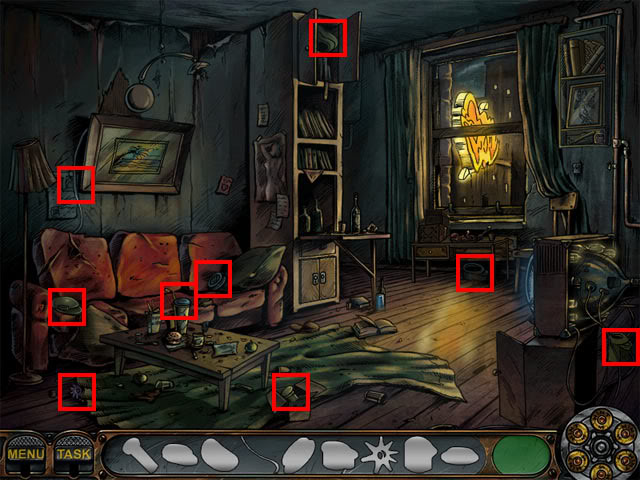
Examine the cushion at the right side of the sofa and select the lemon:
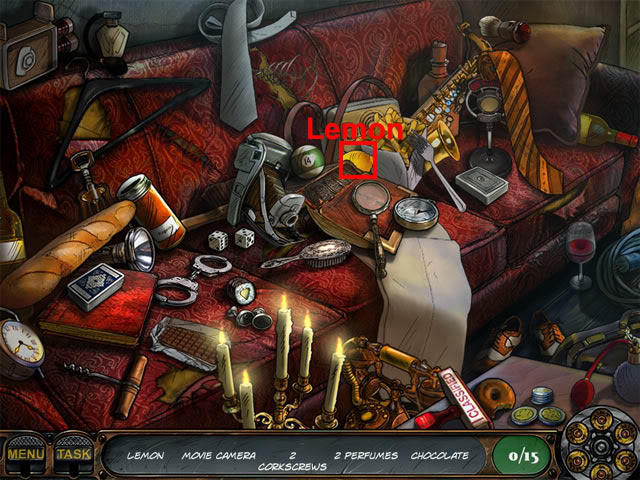
Find the remaining hidden objects on the list. The following hotspots are now available:
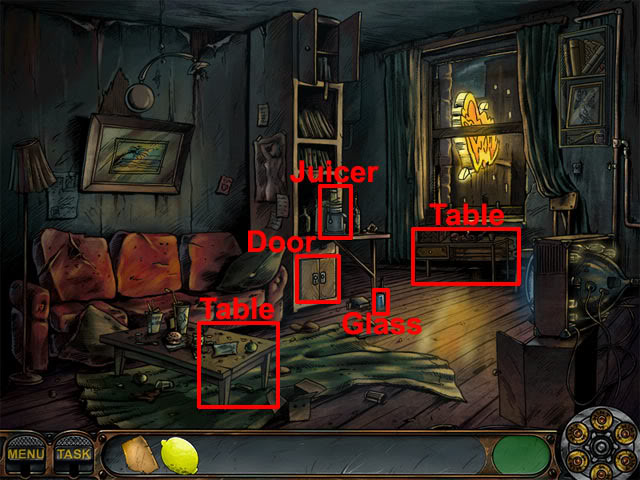
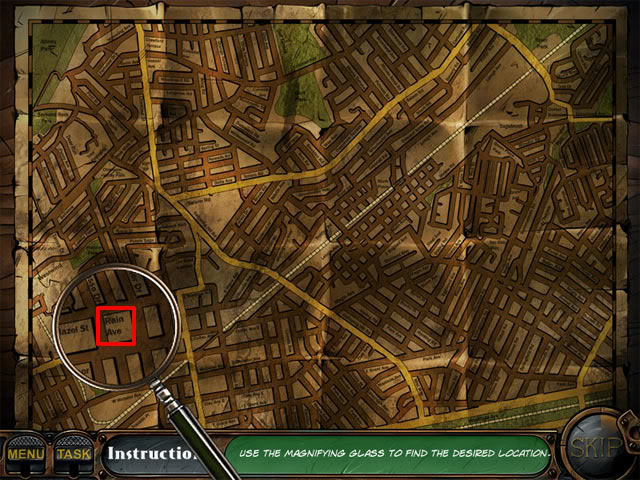
Open the door and take the plate. Take the glass. Select the right table to move it. Take the knife behind the right table. Use the plate on the left table. Use the lemon on the plate. Use the knife on the lemon. Take the sliced lemon. Use the glass on the juicer. Use the sliced lemon on the juicer to make lemon juice. Take the glass of lemon juice. Combine the lemon juice with the strange paper in the inventory to reveal a diagram of a device. Move the magnifying glass over the map and select Rain Avenue:
Factory
Take the fan:

With the fan now replacing the mouse cursor, move the fan around to blow away 100% of the gas clouds. Examine the ladder at the left side of the room. Find 10 parts of the ladder:
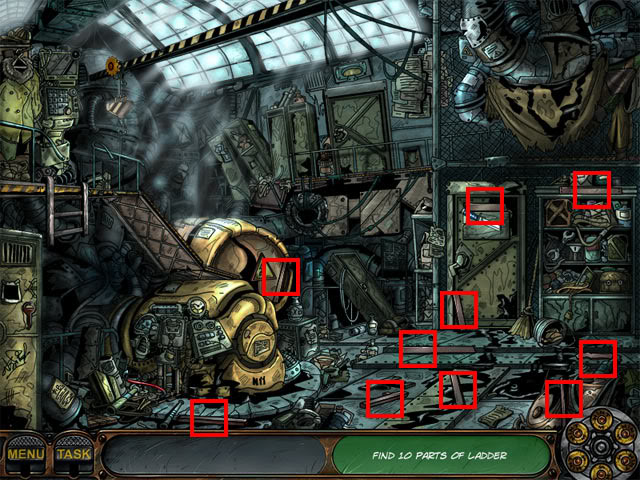
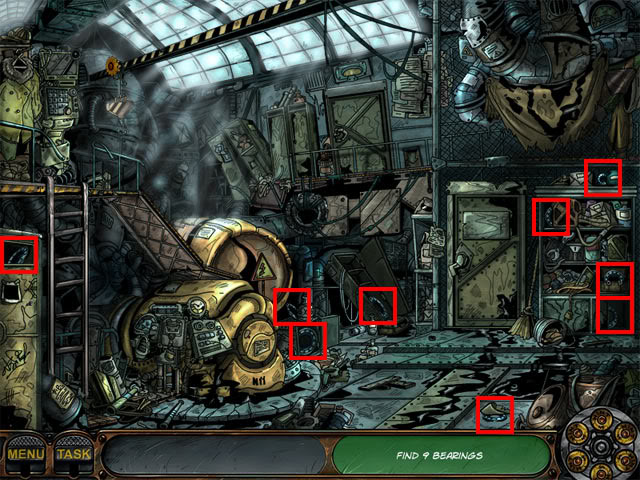
Use the ladder on the broken ladder. Examine the yellow generator to see the engine cover. Open the engine cover and examine the engine: Many of the bearings are missing. The following hotspots are now available:
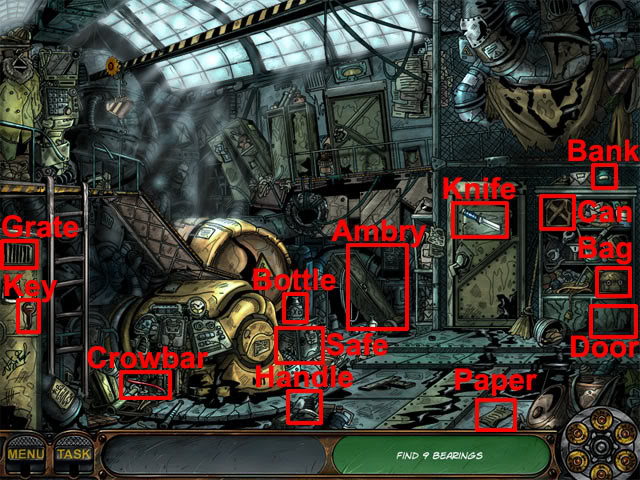
Select the bottle, bank, can, door and paper. Take the key, crowbar, handle, and knife. Use the key on the ambry. Use the crowbar on the grate. Use the handle on the safe and then select the safe handle to open it. Use the knife on the bag. Find the 9 bearings:
Examine the generator and use the bearings on the engine to activate the crane. Examine the control panel at the top-left corner of the room. Examine the card slot: The key is missing. Examine the case:

A triangle tile puzzle is shown:
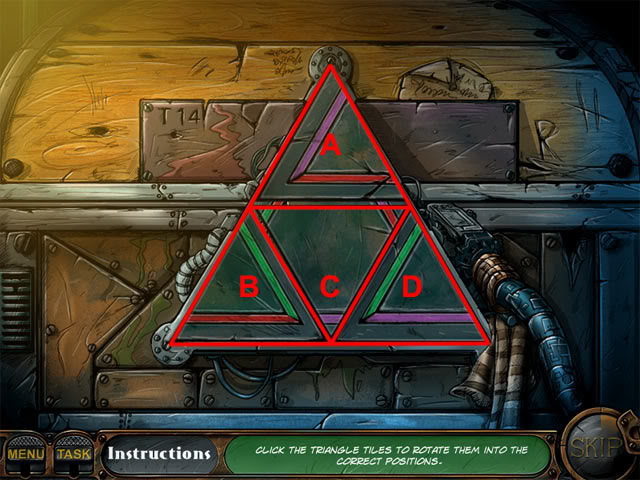
The solution to the puzzle is different each time the game is played. Pressing the tiles rotates other tiles:
A: Rotates A and C
B: Rotates A, B and D
C: Rotates A, B and C
D: Rotates B and D
Rotate the tiles to the following position:
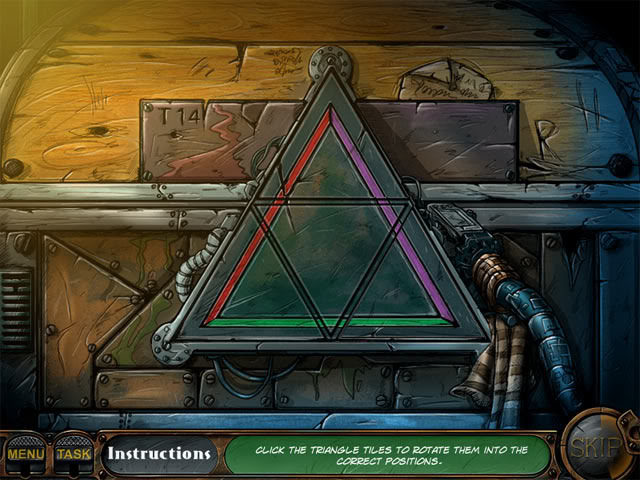
Use the card-key on the control panel. Select the top door.
Gas Station
Flip the tiles to make the picture below:
The following hotspots are available:
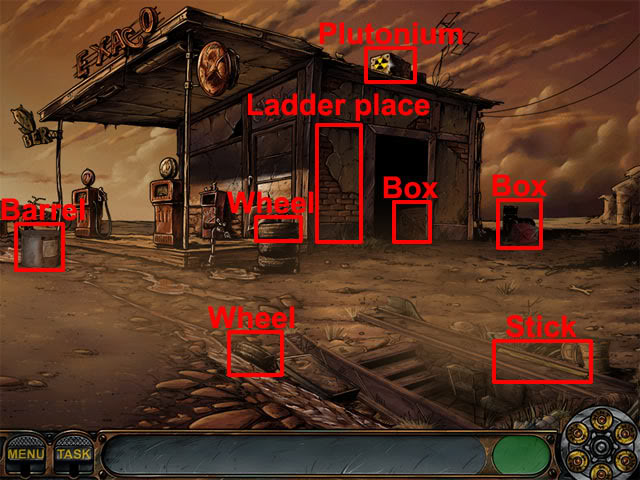
Take the barrel and the two wheels. Take another wheel from the wheel stand and then take the wheel stand. Take the two boxes and the plutonium. Use the barrel on the ladder place. Use the wheel stand on the barrel. Use the three wheels on the wheel stand. Use the two boxes and the stick on the ladder place. Take the plutonium.
Junkyard
Examine the trunk and find the hidden objects. All of the objects are randomly placed in this hidden object scene.
Factory
Drag the items to make rows or columns consisting of three or more of the same type of item. An example is shown below:
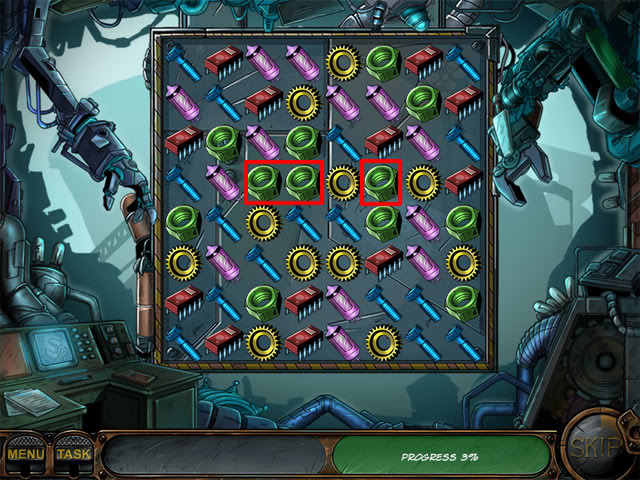
Dragging the single green bolt left will match three items of the same type. Keep matching items until the progress counter reaches 100%. The next puzzle involves pressing a certain number of keys on a piano:
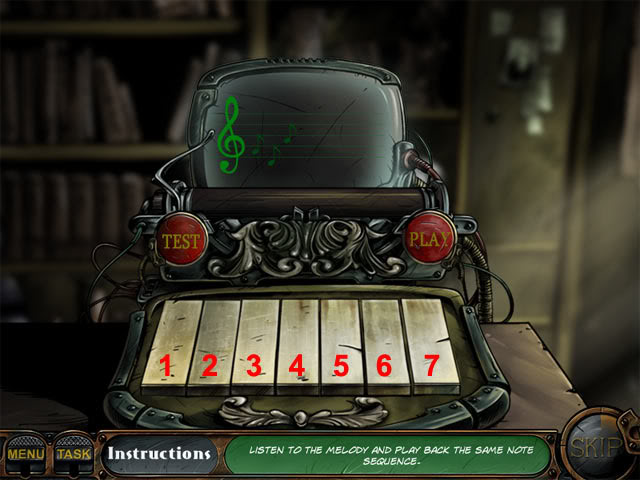
The keys that need to be pressed are random each time the game is played. Start by pressing the Play button and watch the keys that are pressed. Next, press the keys in the order that they were played. If you were successful, you will move onto the next round where more keys have to be played. There are five rounds to complete.
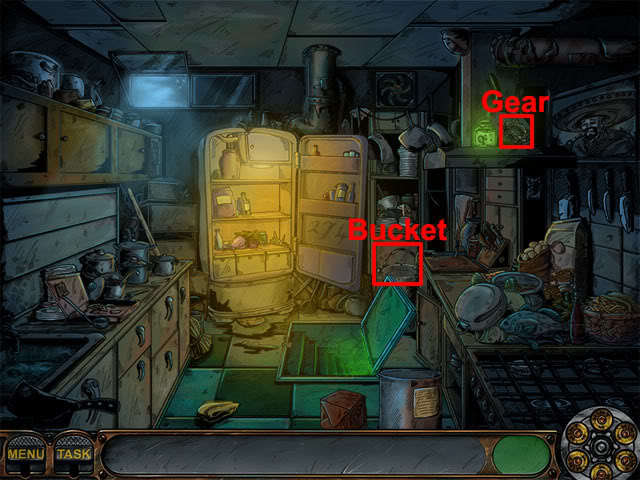
Kitchen
The following hotspots are available:
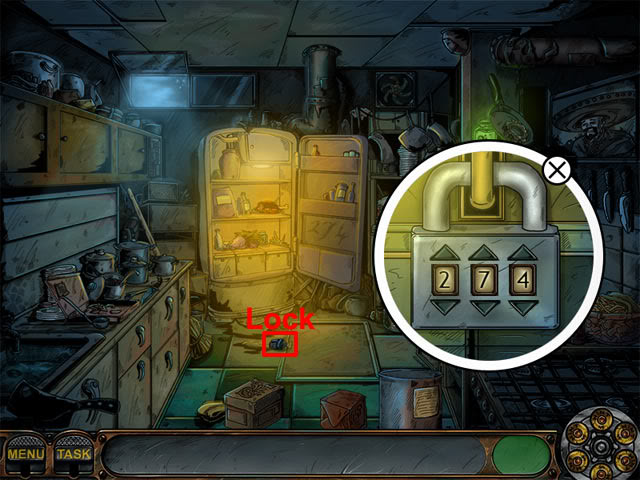
Open the refrigerator to see the number 274. Take the hose and use it on the barrel. Move the two boxes and the barrel to reveal a hatch door. Examine the lock at the left side of the hatch and enter the number 274:
Open the hatch. Select the hatch to see rats in the basement. Select the hatch to return to the kitchen. Examine the refrigerator and select the meat:
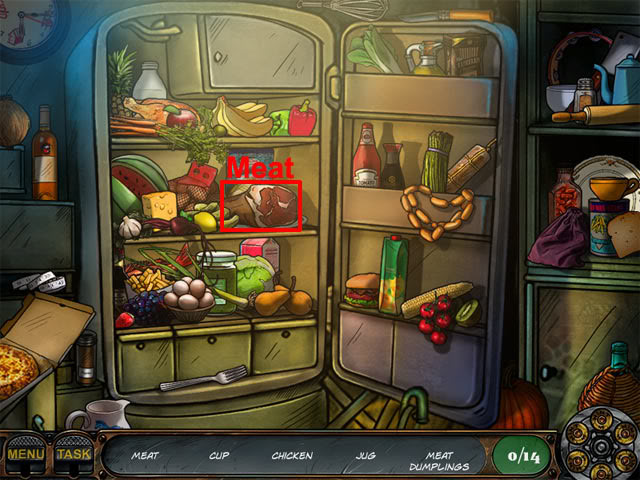
Find the remaining hidden objects on the list. The following hotspots are now available:
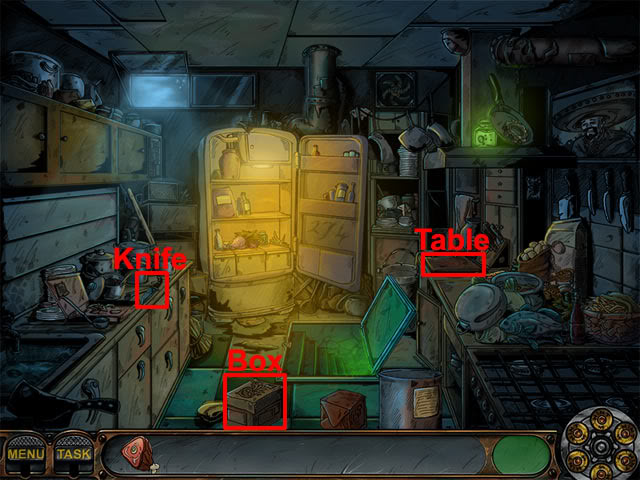
Take the knife and the box. Use the meat on the table. Use the knife on the meat. Select the hatch to return to the basement.
Basement
The following hotspots are available:
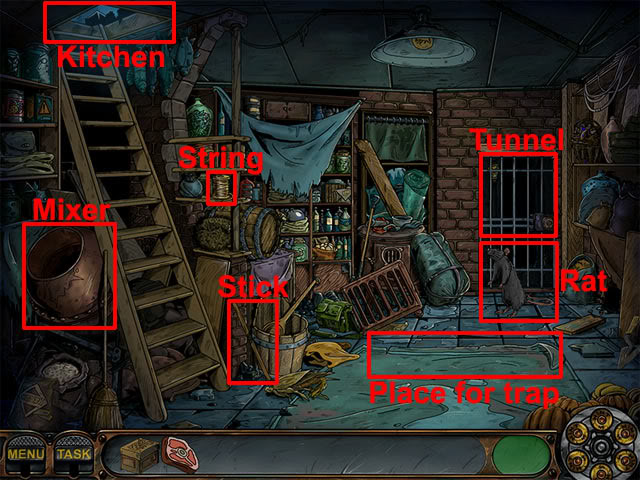
Take the string and the stick. Use the box on the place for trap. Use the stick, string and bait on the box: The rat will escape. Select the hatch to enter the kitchen.
Kitchen
Take the empty bucket and the gear:
Select the hatch to return to the basement.
Basement
The following hotspots are now available:
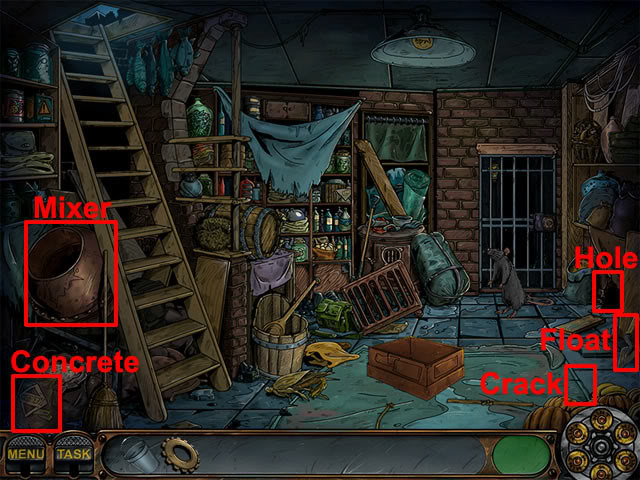
Use the gear on the concrete mixer. Take the concrete and use it on the concrete mixer. Use the bucket on the crack and then take the bucket with water. Use the bucket with water on the concrete mixer. Use the trowel on the mixed concrete. Use the trowel with wet concrete on the hole. Take the box, bait, string and stick. Use the box on the place for trap. Use the stick, string and bait on the box to trap the rat. Examine the tunnel. Click and hold the dial to rotate it:
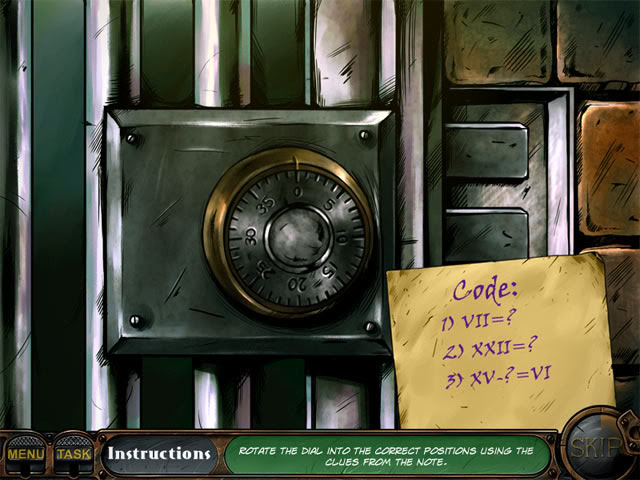
Rotate the dial to 7, 22 and 9: Nick enters the dark tunnel.
Tunnel
Take the matches from the bucket. Move the cursor right and select the helmet with headlamp:
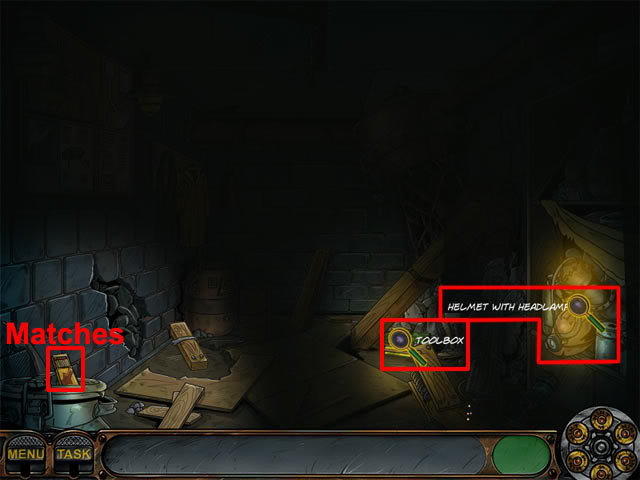
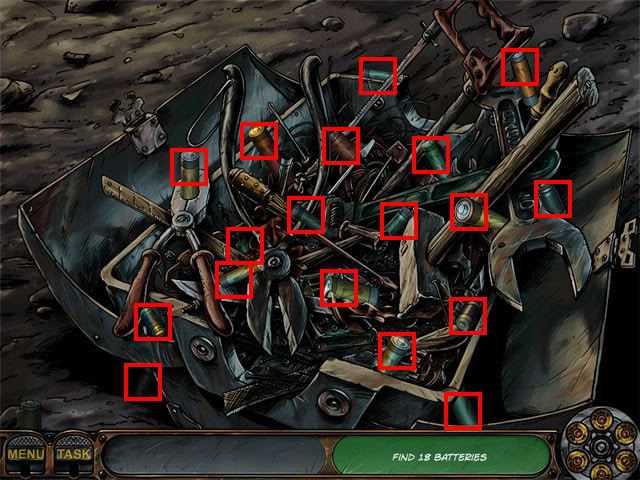
The headlamp has no batteries. Examine the toolbox and find 18 batteries:
Select the matches. Use the battery on the helmet with headlamp. Select the matches again and then take the electrical tape:
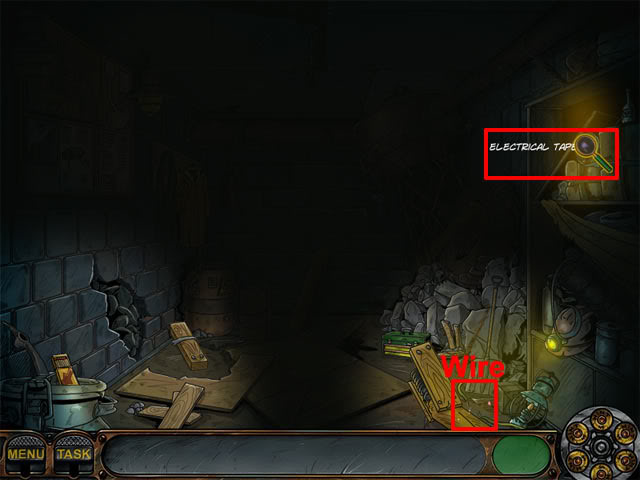
Use the electrical tape on the gnawed through wire to light the room. The following hotspots are now available:
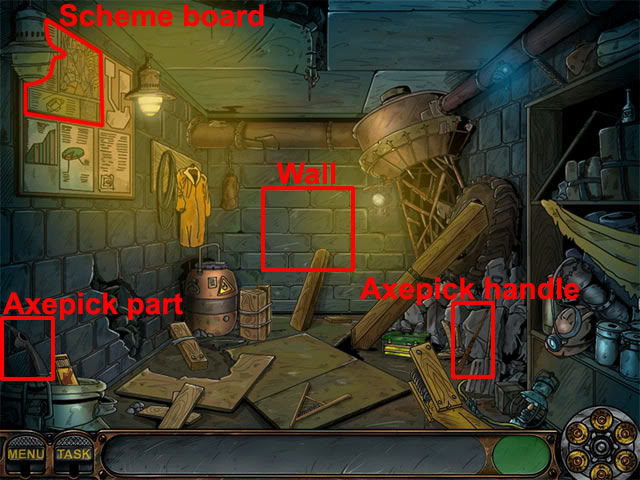
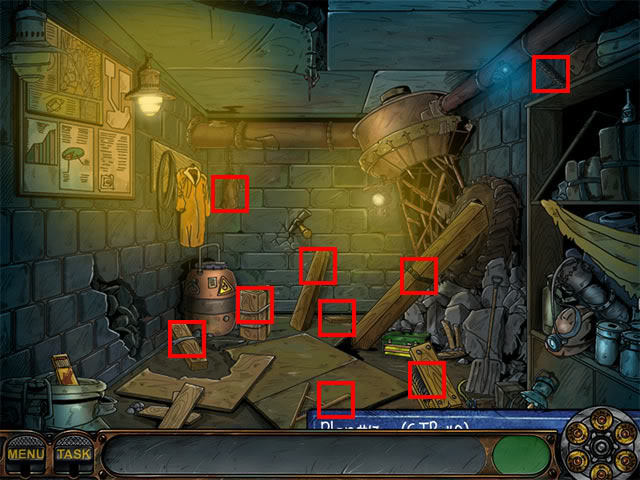
Take the axepick part and the axepick handle. Combine the two axepick parts in the inventory to make the axepick. Use the axepick on the wall: The support beam now needs to be restored. Examine the damaged scheme board. Put the scheme pieces back in the correct positions. Hold the left mouse button to select a piece and press the right mouse button to rotate a piece. The finished scheme is shown below:
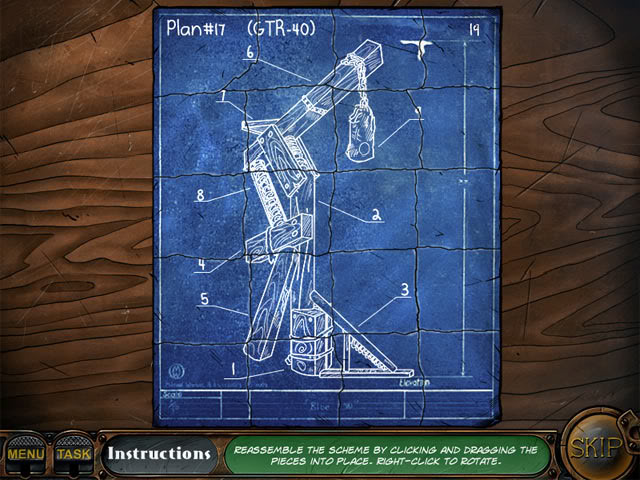
Find the parts for the scheme:
Place the items on the support beam in the following order:
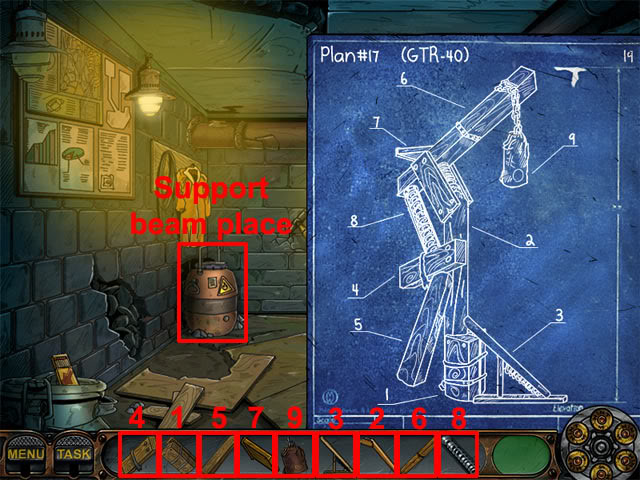
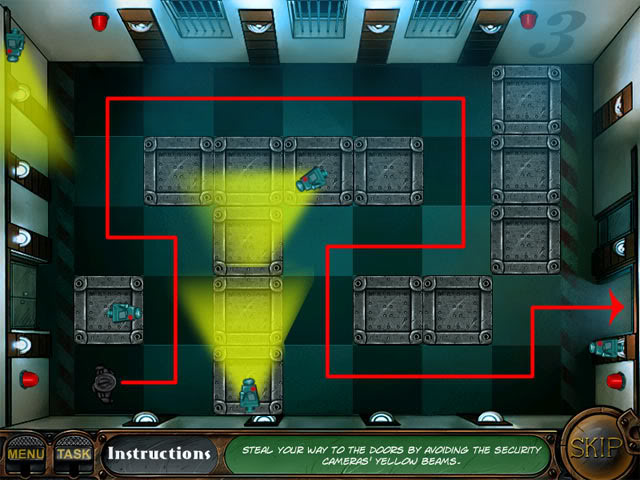
Note that the order of the items in your inventory may be different from the image shown above, as the order varies depending on which items were picked up first. Select the wall twice to play the security camera mini-game. The aim is to move Nick to the door at the right side of the room without being caught by any of the security cameras.
Level 1:

Level 2:
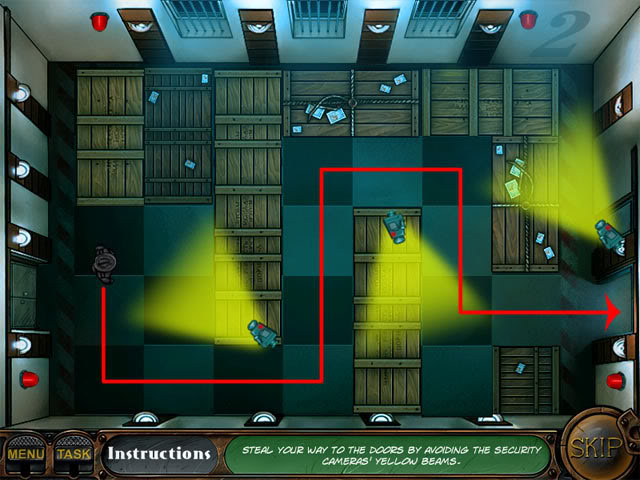
Level 3:
Gallery
The following hotspots are available:
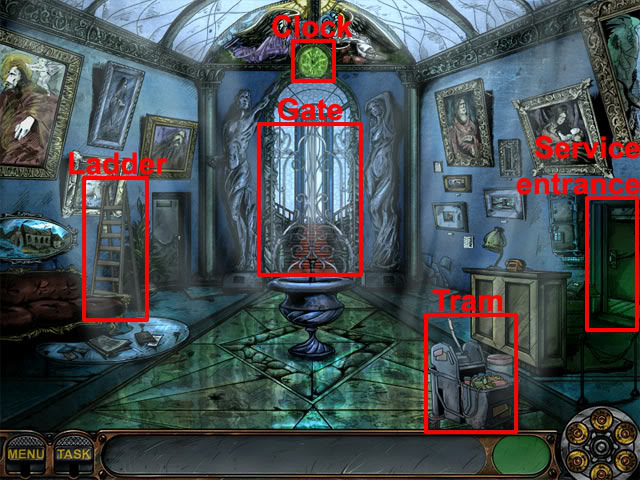
Take the ladder and use it on the clock. Examine the tram and the clock:
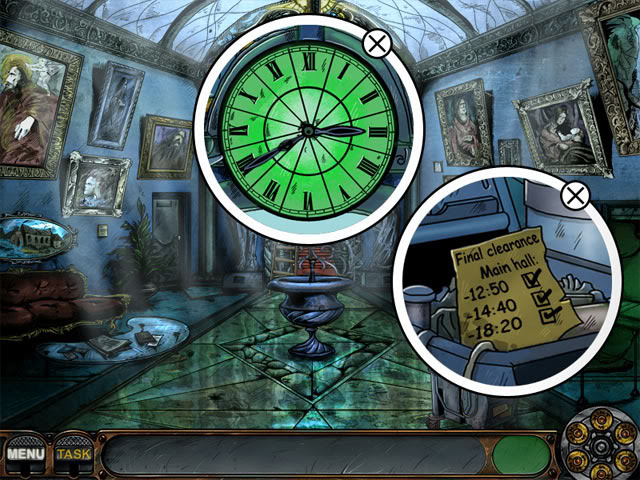
Select the clock hands to move them. Set the clock to 12:50, 2:40 and 6:20. Select the gate to view a light sequence on the floor. Examine the plates at the bottom of the statues:
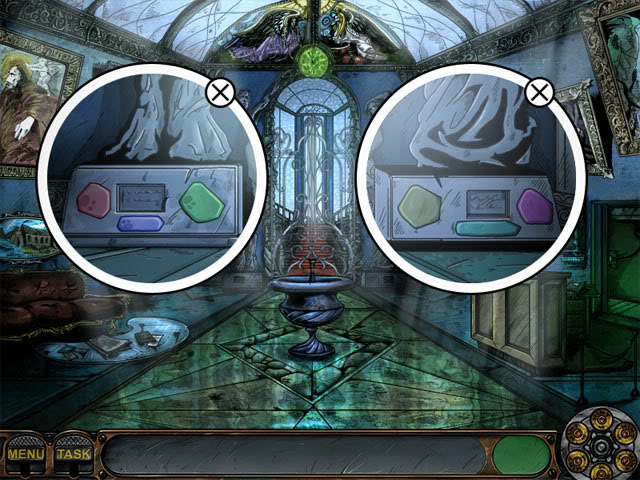
Press the buttons to copy the four sequences of lights on the floor. Select the door to enter the main hall.
Main Hall
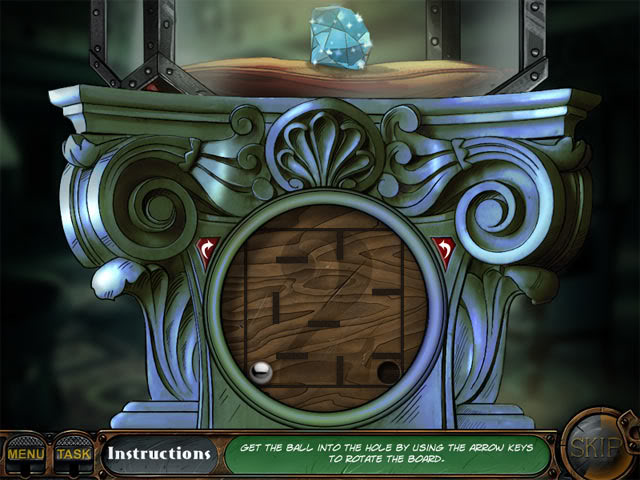
The aim is to use the arrow buttons to rotate the board so that the ball falls into the hole. Follow the directions below:
Level 1:

Left
Right 6
Left 2
Right 4
Level 2:
Right 7
Left 4
Level 3:
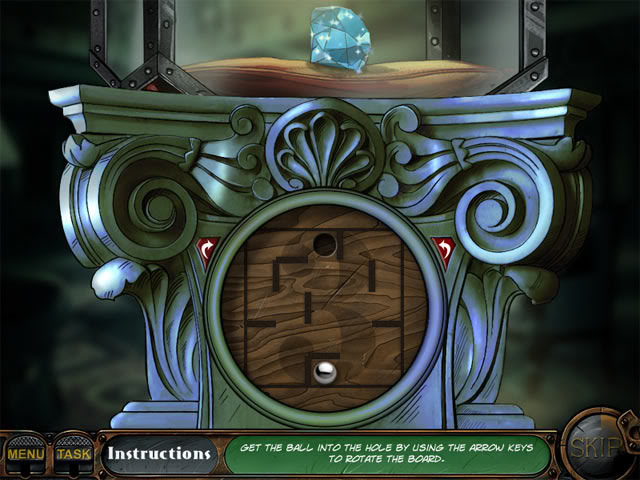
Left 6
Right
Left
Right 4 to complete the game.
“;
