
Best Horror Games On Itch.io – July 2026
Across a bounty of subgenres.![Haze Seas Accessories Tier List [Best Accessories to Equip]](/wp-content/uploads/2026/07/haze-seas-accessories-tier-list.jpg "Haze Seas Accessories Tier List [Best Accessories to Equip]")
Haze Seas Accessories Tier List [Best Accessories to Equip]
The accessories with the best stat buffs in Haze Seas.
![[Roblox] Evomon Shiny Hunting Guide – Including Prismatic and Pris Shinies!](/wp-content/uploads/2026/06/evomon-shiny-hunting-guide.jpg "[Roblox] Evomon Shiny Hunting Guide – Including Prismatic and Pris Shinies!")

Nemo’s Secret: The Nautilus Walkthrough
Welcome to the Nemo’s Secret: The Nautilus walkthrough on Gamezebo. Nemo’s Secret: The Nautilus is a Hidden Object game played on PC, created by Odian Games and available at BigFish Games. This walkthrough includes tips and tricks, helpful hints, and a strategy guide for how to complete Nemo’s Secret: The Nautilus.


- Prefer Gamezebo on Google


Nemo’s Secret: The Nautilus – Game Introduction
Welcome to the Nemo’s Secret: The Nautilus walkthrough on Gamezebo. Nemo’s Secret: The Nautilus is a Hidden Object game played on PC, created by Odian Games and available at BigFish Games. This walkthrough includes tips and tricks, helpful hints, and a strategy guide for how to complete Nemo’s Secret: The Nautilus.
General Information
- From the Start Screen, click on Options to adjust the Sound and Music volumes, Turn Full Screen and Custom Cursor on and off and to view the Credits.
- Click on Help to view descriptions of the various elements used in gameplay.
- Click on Profile, then Create, to add up to 6 different profiles. Click on the specific profile name to play the game with that profile. You may also Delete profiles.
- Progress is saved only after you complete a search scene or minigame. If you quit the game, in the middle of a section, you will start at the beginning of that section. All other parts of the game will be saved automatically.
- When you start your first game, you’ll be given an opportunity to use a Tutorial. Click Yes to continue with a tutorial or No to continue without it.
- You may skip movies and cutscenes. The Skip Button is located at the far right, at the bottom of the screen.
- Click Play to begin a new game or continue a previous one.
- The Logbook is located at the far left, on the bottom. This will contain the story progress and various clues to minigames and tasks.
- During object searches, the Hint button is fully charged when you begin a search scene. It’s located at the bottom left and takes 60 seconds to recharge between uses.
- When you find an item in the list, click on it and it will move to a fixed position, elsewhere in the scene. Some items will go into the Box (inventory) for use in a later task or minigame.
- The Box (inventory) won’t be available except during Minigames that require those items.
- As you find items, they will be crossed out and more will be added to the Item List. Continue locating items until the list is exhausted. Note: Item Lists are always the same but the order listed may be different.
- During searches, some objects become interactive and may have items inside them. Those items will be in green text, in the Item List.
- During minigames, the Skip button takes 00 seconds to charge for use.
Game Tips
- Use the Tutorial, the first time you play the game, to familiarize yourself with the location of game tools and how to interact with various items. Be sure to read any on screen tips that pop up for additional information.
- This guide assumes you’ve read the General Information section of this guide, used the Tutorial and/or are familiar with the all the mechanics of playing this game. Additional images and instructions will not be provided.
- Complete each individual section (search scene, task or minigame) before quitting. If you quit in the middle of a search or minigame, your progress won’t be saved and you’ll have to replay that section. Your progress will be saved as you complete tasks.
Walkthrough
Watch the opening movie.
Part 1 – Boston
Front Yard
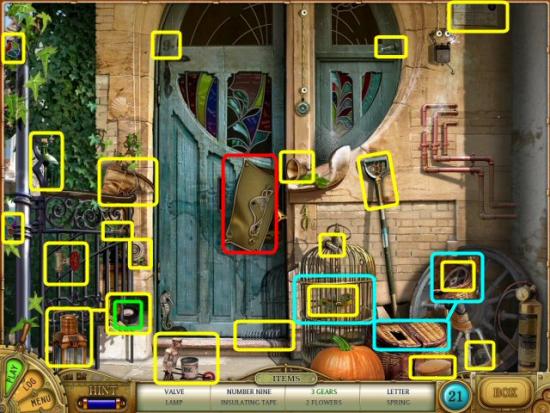
Find the items in the list (yellow). Some items will not appear until you collect other items or open objects. Click on the Mailbox (green) to open it and collect the Handle (cyan). Click on the Front Door (red) to continue.

Front Door
Find the items in the list (yellow). Some items will not appear until you collect other items or open objects. Collect the Lamp to reveal the Insulating Tape (green). Click on the Birdcage and Creel (cyan) to collect the Bird and Gear. Click on the Door Mechanism (red) for a minigame.
Front Door Lock Minigame
- Use the Wrench on the remaining bolt
- Use the Gears and Spring where indicated
- Use the Oil Can in 5 or 6 spots (red – the ones shown aren’t exact)
- Use the Cover on the Mechanism
- Use the 4 Bolts (blue), Handle (red) and Key (green) where indicated
Click on the following for a video solution
Click on the Handle to open the Door
Study
Find all the items in the list (yellow). Some items will not appear until you collect other items or open objects. Click on the Telegraph Machine (red) for a minigame
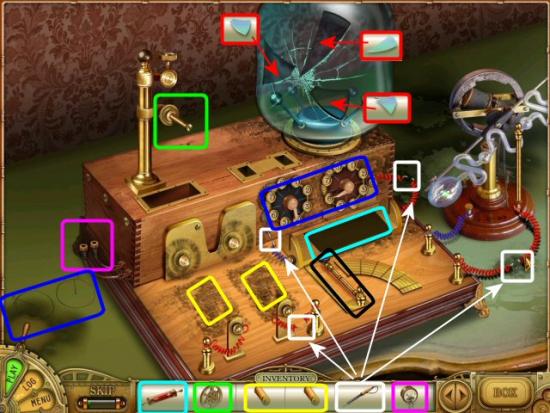
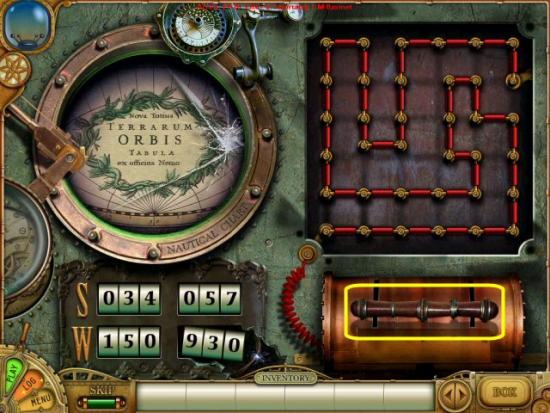
Telegraph Machine Minigame
Use the Battery (cyan), Telegraph Tape (green), 2 Spools (yellow), Voltmeter (magenta), 3 Glass Shards (red) and the Soldering Iron (white) where indicated. Note: you may use them in any order you like. Click on the Dials (blue) so the indicators match the number shown at the left, then click on the Telegraph Key (black). Note: the right dial must be set at 1 (not 2, as indicated in the drawing at the left side of the machine).
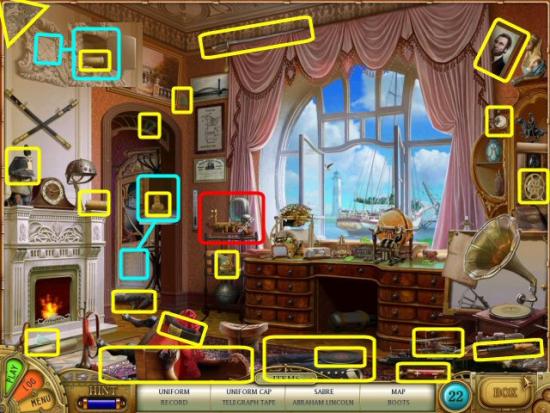
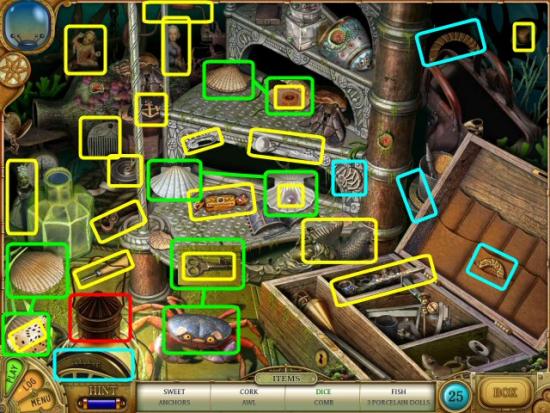
Desk
Click on the Desk to start a search. Find all the items in the list (yellow). Some items will not appear until you open objects. Click on the drawers (green) to open and collect other items. Click on the Map (red) for a minigame.
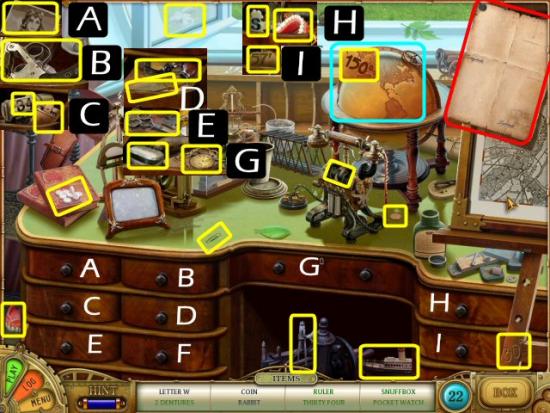
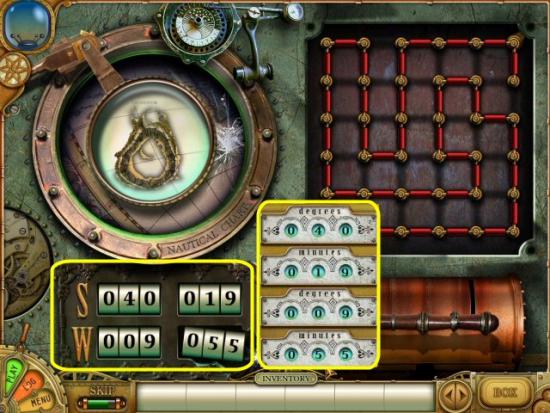
Map Minigame
Place the Degrees, Minutes and compass Directions on the Map. As you move a part of the Longitude or Latitude near the correct position on the Map, parts of the Map will appear. See the following screenshot for the solution.
- Latitude: South 34 degrees 57 minutes
- Longitude: West 150 degrees 30 minutes
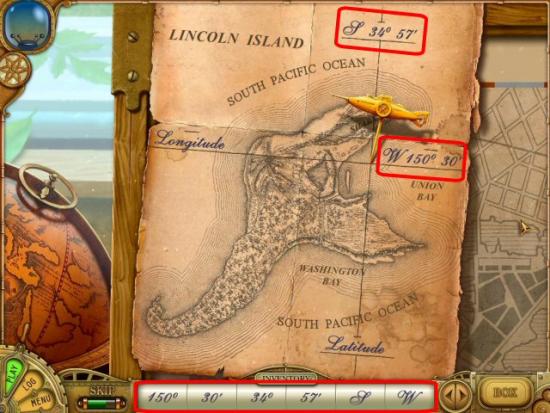
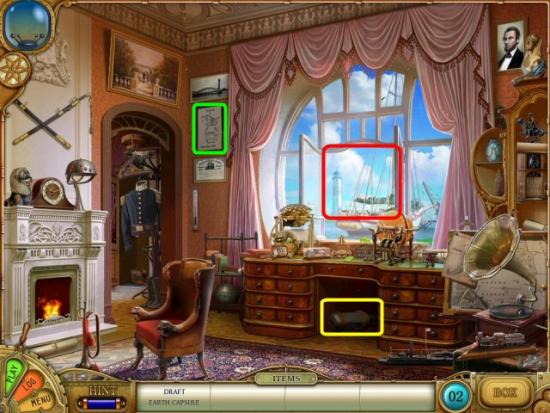
Collect the Draft (green) and Earth Capsule (yellow), and then click on the Window (red) to go to the Bonaventure.
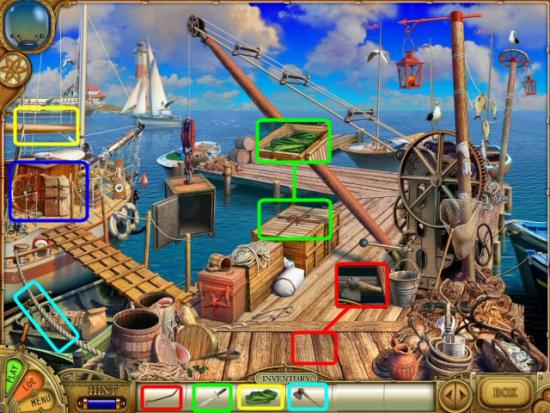
Dock
Find all the items in the list (yellow). Some items will not appear until you open objects. Click on the Barrels (green) and the Lever (cyan) to open and collect other items.
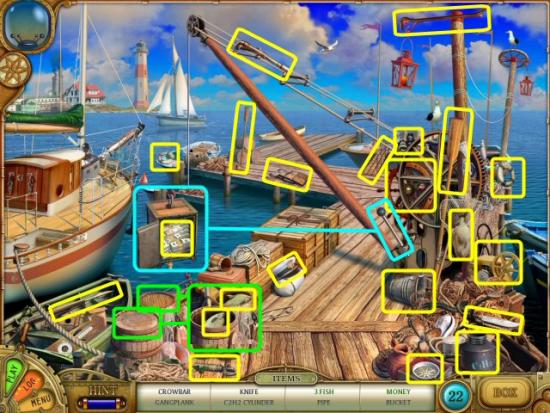
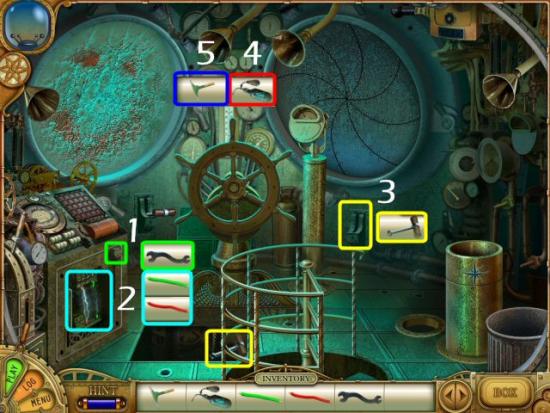
Use the Knife (green) on the Crate and collect the Sail. Use the Sail (yellow) on the Rigging. Use the Crowbar (red) on the Planks and collect the Axe. Use the Axe (cyan) on the Mooring Rope and click on the Bonaventure (blue).
Part 2 – The Island
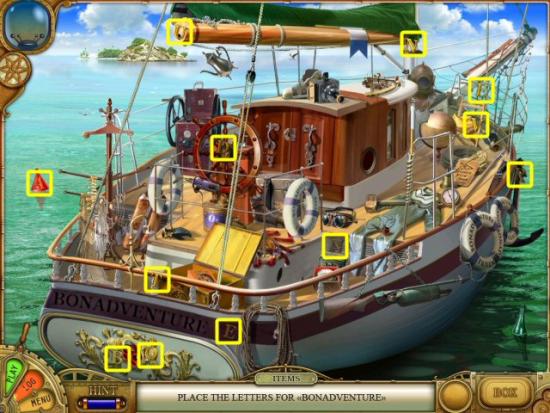
The Bonaventure
Find each Letter (yellow) and use it on the missing part of the Ship’s Name (red).
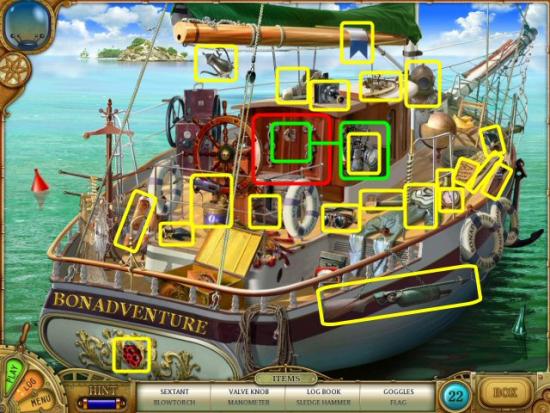
Find all the items in the list (yellow). Some items will not appear until you open objects. Click on the Doors (green) and collect the Lantern. Click on the open Cabin (red) doors to start a minigame.
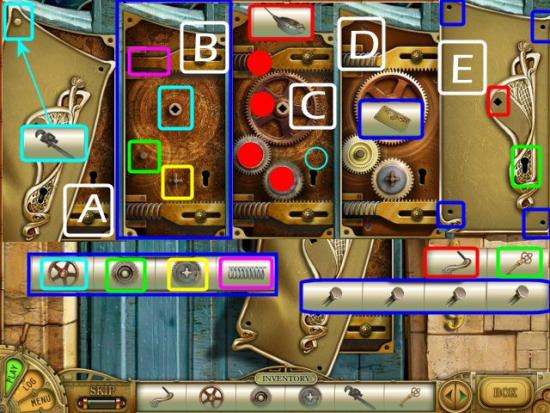
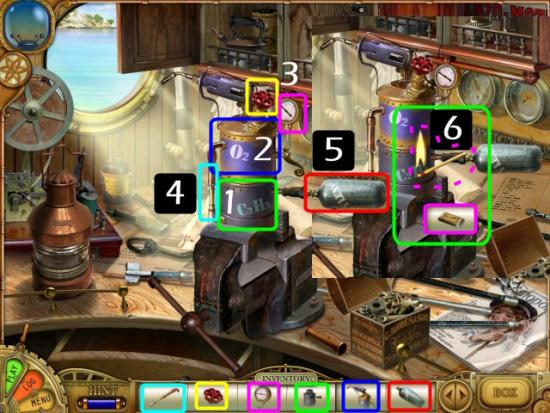
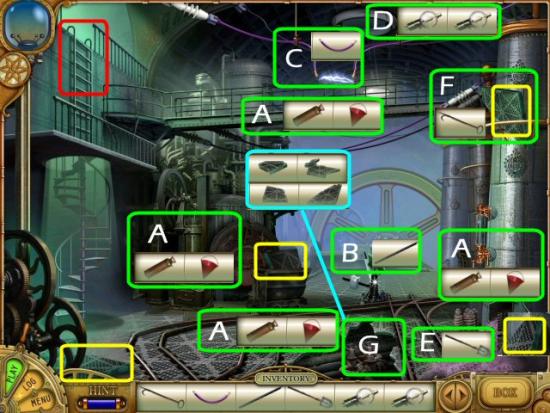
Torch Minigame
Click on the Cloth (A), collect the Scissors (red), use them on the Poster (B) and collect the Key (green). Use the Key on the Drawer (C), collect the Vise Handle (yellow) and use it on the Vise (D). Click on the Box (E), collect the Cabinet Knob (cyan) and use it on the Right Cabinet (F). Open the Left (G) and Right Cabinet Doors and collect the Matches (white) and Acetylene (magenta).

Use the C2H2 Canister (green) on the Vise (1), use the O2 Blowtorch (blue) on the C2H2 (2), use the Valve (yellow) and Manometer (magenta) on the O2 (3), use the Pipe (cyan) to connect the O2 and C2H2 (4), use the Acetylene (red) on the C2H2 (5) and use the Match (7) on the whole shootin’ match.
Warning: These instructions DO NOT represent the construction of any kind of OxyAce torch. If you actually did this, with a leaking Acetylene bottle, an extra tank of C2H2 (Acetylene), no separate hoses, one shutoff valve, then put an open flame anywhere near it, you would blow yourself to Kingdom Come. Don’t do this, EVER! This is for entertainment purposes, only.
Part 3 – Underwater
The Sea Floor
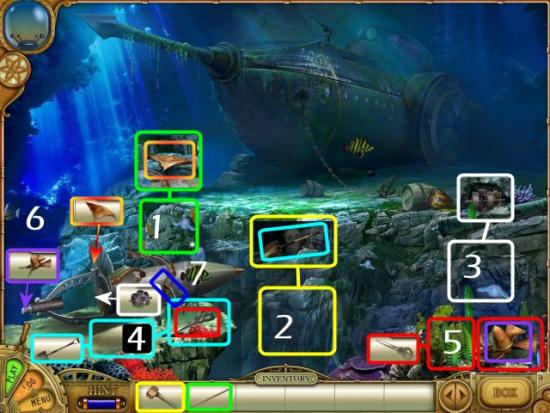
Use the Pike Pole (green) on the Lion’s Head (1) and collect the Stabilizer (orange). Use the Hammer (yellow) on the Wall (2) and collect the Shovel (cyan). Click on the Statue of Neptune (3) and collect the Gear Mechanism (white). Use the Shovel in the Sand (4) and collect the Scissors (red). Use the Scissors on the Kelp (5) and collect the Propeller (purple). Use the Stabilizer, Gear Mechanism and Propeller on Underwater Vehicle (6) and then click the Lever (blue) to start it.
The Nautilus Hull
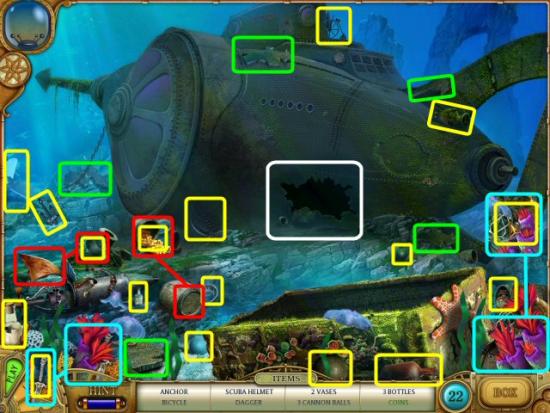
Find all the items (yellow) and 5 Hull Pieces (green) in the list. Click on the Barrel Lid and the Stabilizer Fin (red) to collect the Coins and the Cauldron, mouse over the 2 Purple Coral (cyan) to collect the Dagger and the Scuba Helmet and then click on the Hull (white).
Bomb Puzzle
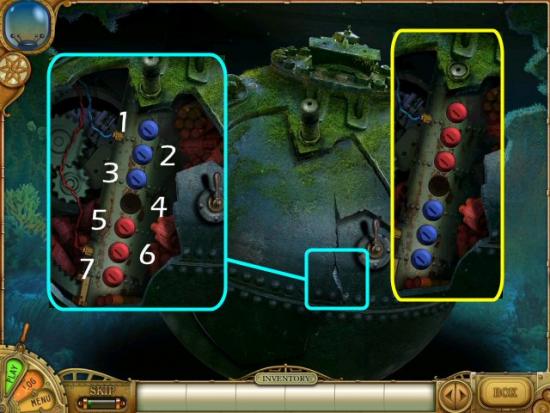
Switch the places of all the Blue buttons with all the Red buttons. You can either move a button to an adjacent space, or jump over 1 button to the next empty space. You can’t jump more than 1 button. Click on the buttons in this order: 3, 5, 6, 4, 2, 3, 1, 2, 3, 5, 7, 6, 4, 3, 5, 4 See the following screenshot for the solution (yellow).
Click on the following for a video solution.
The Hull Breach
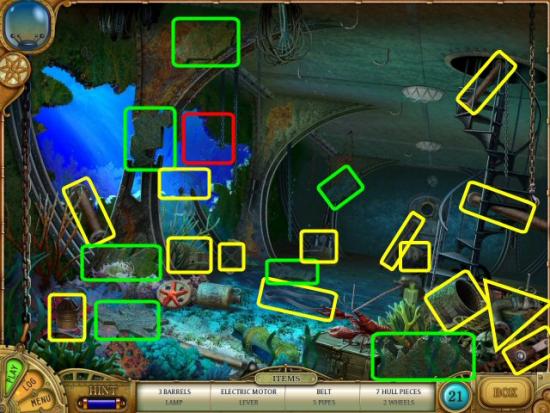
Find all the items (yellow), the 7 Hull Pieces (green) and then click (red) to go back outside.
Hull Repair Minigame
Click on each piece, move it into position and then click to place it. Use the OxyAce Torch (cyan) and click on each piece to weld the seams.
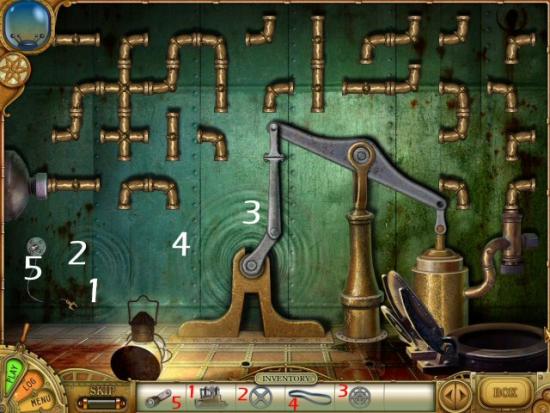
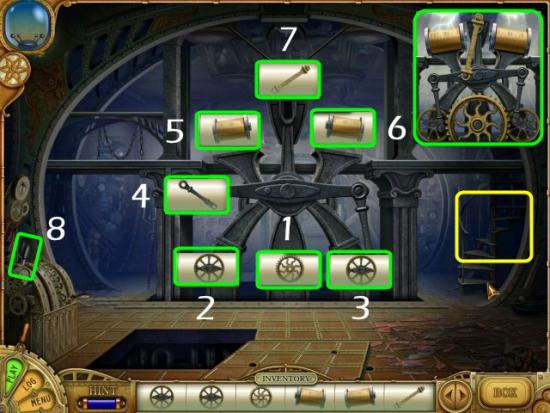
The Pump Motor
Assemble the motor: Place the Electric Motor (1) on the left, place the Small Flywheel (2) into the Electric Motor, place the Piston Wheel (3) in the center, place the Drive Belt (4) between the Electric Motor and the Piston Wheel and place the Cranking Lever (5) on the Electric Motor. See the following screenshot for the solution.
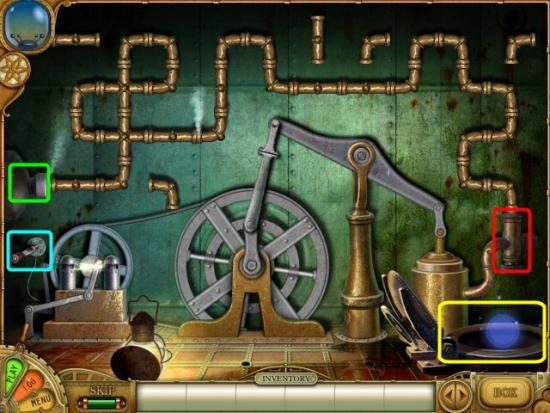
Bilge Pump Minigame
Click on each pipe connection to rotate it, connect the pipes from the Intake (green), on the right, to the Outlet (red), on the left, and click on the Cranking Lever (cyan) to start the Pump. Exit through the Hatch (yellow). Note: you will not use all the connections. See the following screenshot for the solution.
Click on the following for a video solution.
Part 4 – Exploring the Nautilus
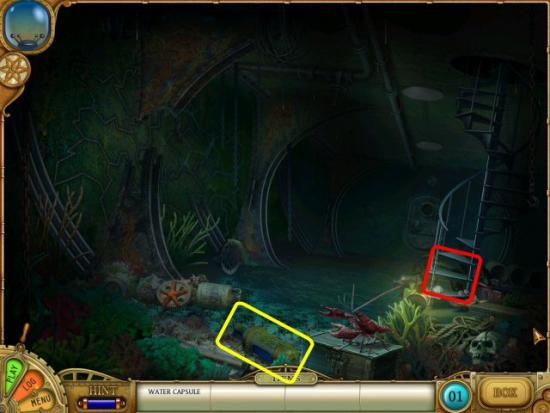
The Hold
Collect the Water Capsule (yellow) and click on the Stairs (red).
Find all the items in the list (yellow). Some items will not appear until you collect other items or open objects (green). Click on the Lantern (red) to continue.
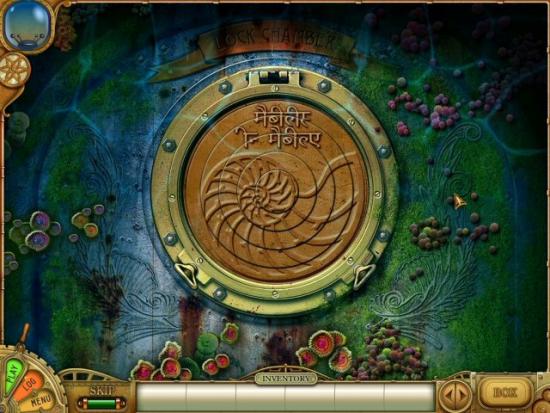
Door Lock
Click on the Door. Place the rings, from largest to smallest in the lock. Click and hold each ring until it locks into the proper position. See the following screenshot for the solution.
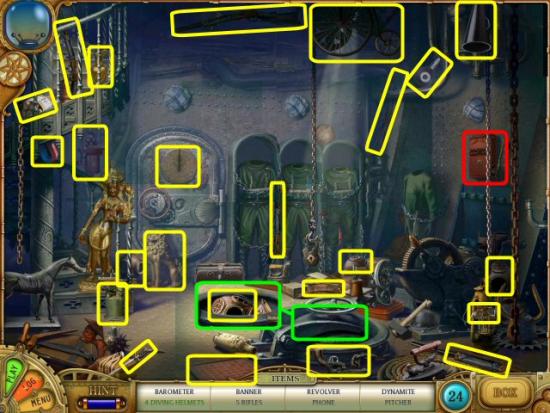
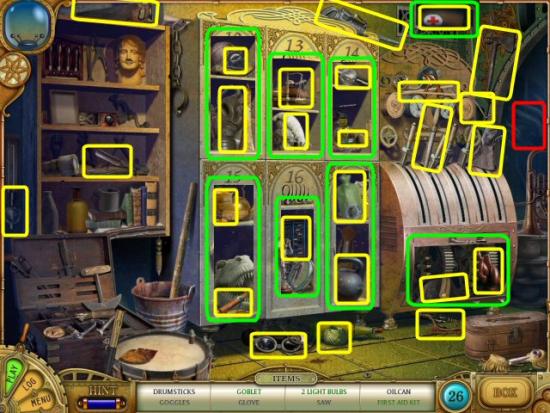
Equipment Locker
Find all the items in the list (yellow). Some items will not appear until you collect other items or open objects (green). Click on the Fuse Box (red) to continue.
Fuse Box Puzzle
Click on 2 adjacent fuses to unscrew them and then click on the center “Move” button (green) to move them to the next empty spaces. The object is to arrange the fuses so color is grouped together.
Solution 1 (shorter):
- 3, 4,Move
- 5, 6, Move
- 2, 3, Move
- 6, 7, Move
- 4, 5, Move
- 9, 10, Move
Solution 2 (longer):
- 3, 4, Move
- 5, 6, Move
- 7, 8, Move
- 9, 10 Move
- 7, 8, Move
- 5, 6, Move
- 8, 9, Move
- 4, 5, Move
- 6, 7, Move
- 1, 2, Move
See the following screenshot for 2 solutions (cyan/yellow) – there may be other solutions.

Click on the following video solutions
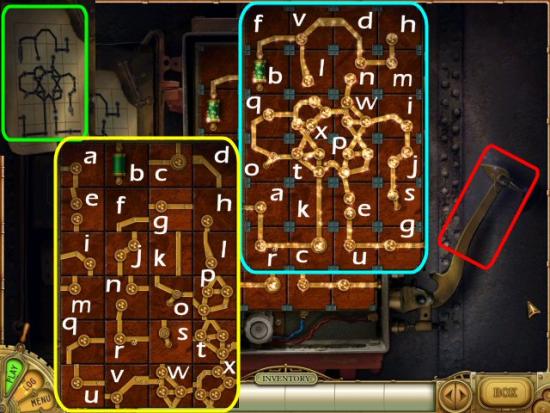
Wiring Puzzle
Switch any 2 tiles and move them so they match the Drawing (green). Click on the Lever (red) to continue. See the following screenshot for a solution (cyan).
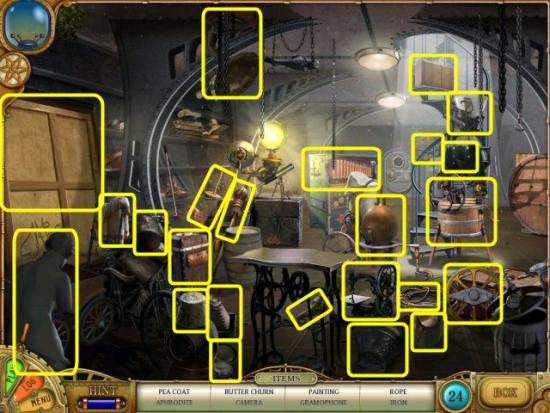
Storeroom
Click on the Door to exit the Equipment Locker. Find all the items in the list (yellow). Click on the Suitcase for a minigame.
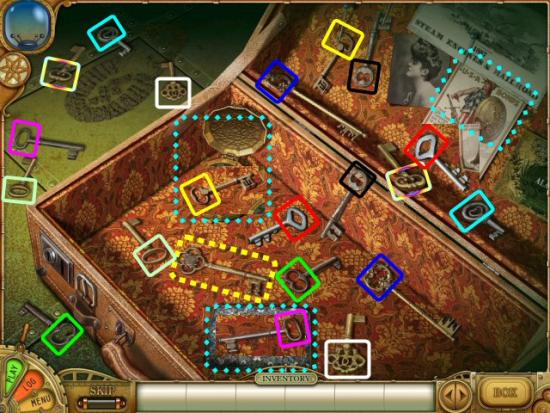
Key Minigame
Match pairs of keys until only one remains. Click on the Card, Pocket Watch and Cigarette Case (cyan dotted) to reveal 3 more keys. Collect the final Key (yellow dotted). See the following screenshot for a solution.
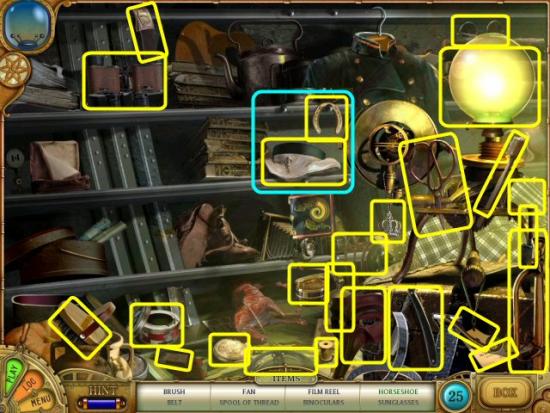
Shelves
Click on the Shelves. Find all the items in the list (yellow). Click on the Pea Coat twice (cyan) to reveal 2 items.
Power Station
Click on the Stairs to go to the Power Station. Use the Lamp on the Shelf (1) and collect the Piston Arm. Use the Magnet on the Floor (2) and collect the Gear. Use the Key on the Door (3) and collect the Coil. Use the Dynamite and Matches on the Box (4) and collect the Coil. Click the Right Lever (5) and collect the Piston Arm.
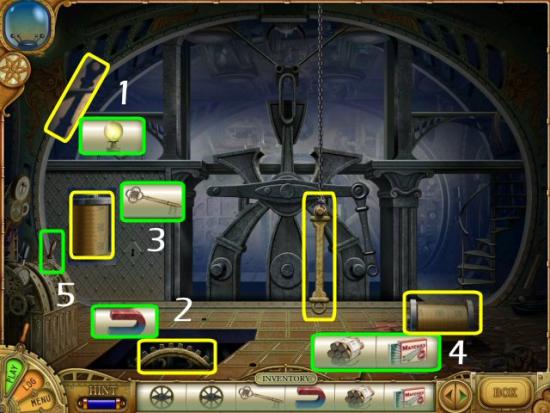
Assemble the Engine (1-7) and Click the Left Lever (8) to start it. Click on the Stairs (yellow) to continue and then click on the Door to enter the Galley.
Galley Storage
Find all the items in the list (yellow). Open each Locker, the Vent and the Machine Cover (green) to reveal more items. Click on the Exit (red) and then click on the Control Panel.
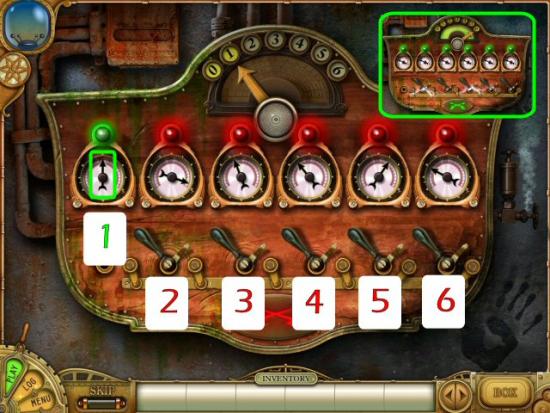
Control Panel Minigame
Click on the levers (yellow) below gauges 2-6 when the arrow in the first gauge (cyan) is pointing straight up (green). As you complete each gauge, it locks. You won’t have to start over if you miss it. See the following screenshot for a solution.
Engine Room
Find all the items in the list (yellow). Click to continue (red).
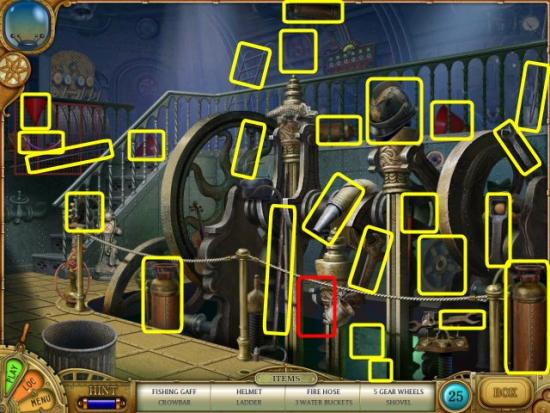
Extinguish the Fire
Use the Fire Extinguisher and then the Bucket on the Fires (A). Use the Crowbar on the Switch (B), use the Electrical Wire on the Arcing Cable (C), use the Light Bulbs in the Fixture (D) and use the Shovel on the Soil (E). Use the Fishing Gaff on the Flooring (F), collect the rest of the Flooring (yellow) and then use them on the Floor (G). Click on the Ladder (red) to continue.
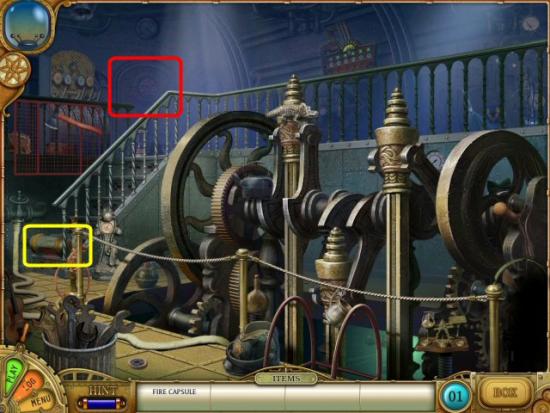
Collect the Fire Capsule (yellow) and then click on the Door (red) to continue.
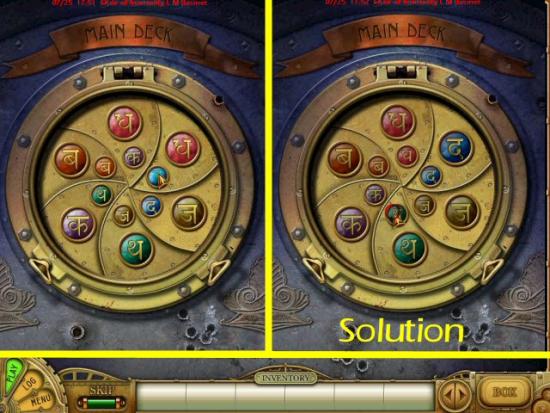
Symbol Puzzle
You need to switch the symbols so each section has a matching large and small symbol. You may only switch a small symbol with a large symbol that is directly above it, or diagonally adjacent. See the following screenshot for a solution. Note: your puzzle may be different.
Click on the following for a video solution.
Main Deck
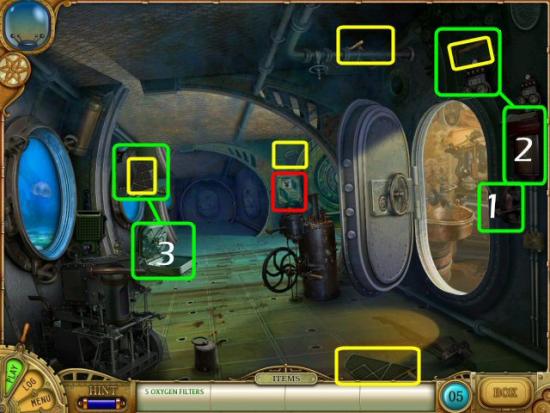
Click on the Light Switch (1), the Electrical Box (2) and the Hatch (3). Find all the items in the list (yellow) and click on the Air Filter System (red).
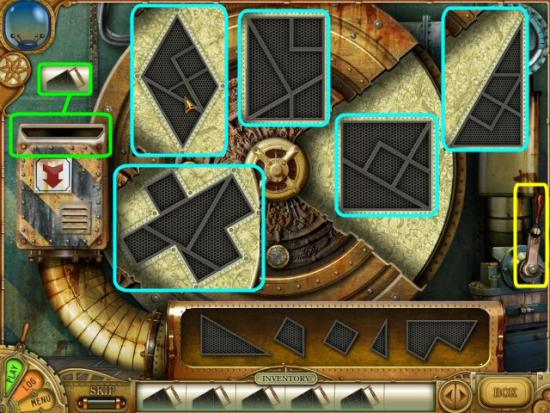
Air Filter Minigame
Pick up an Air Filter and click on the Slot (green). Use the pieces that appear below the Filter Holder to complete the simple jigsaw puzzle. Repeat with the remaining Air Filters and click the Lever (yellow) when you’re finished. See the following screenshot for the solutions.
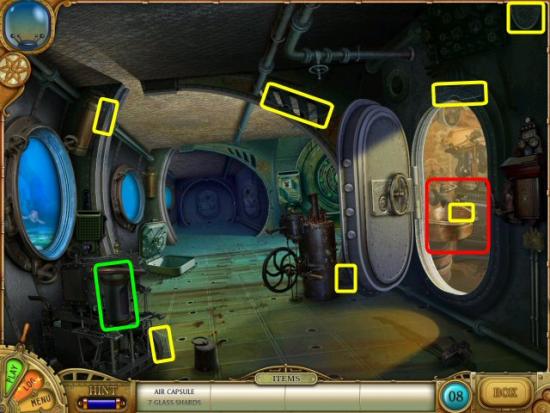
Find the Air Capsule (green) and 7 Glass Shards (yellow). Click on the Sink (red) to continue.
Galley
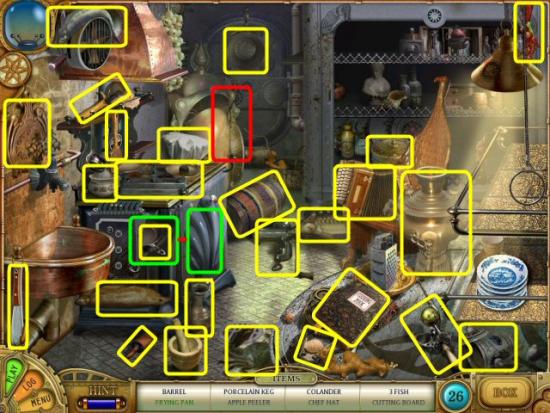
Find all the items in the list (yellow). Click on the Stove (green) to reveal the Frying Pan. Click on Refrigerator (red) to continue.
Refrigerator
Find all the items on the list (yellow), on the Shelf and inside the Refrigerator. Click the Handle of the Refrigerator to open it. Note: some items in the Refrigerator won’t appear until you collect other items on the list.

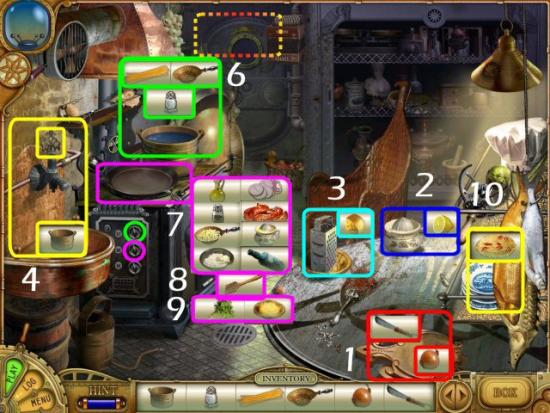
Prepare the Shrimp Pie
- Use the Onion on the Cutting Board, use the Knife on the Onion and click on the Sliced Onion
- Use the Lemon on the Juicer and click on the Lemon Juice
- Use the Cheese on the Grater and click on the Shredded Cheese
- Use the Pot on the Sink, click on the Faucet and click on the Pot
- Turn on the Right Burner (green), use the Pot on the Stove, use the Salt, Spaghetti and Colander on the Pot
- Turn on the Left Burner (magenta), use the Frying Pan on the Stove and use the Oil on the Frying Pan
- Use the Onion, Pepper, Shrimp, Spaghetti, Lemon Juice, Sour Cream and Wine on the Frying Pan
- Use the Spatula on the Frying Pan
- Use the Parsley and the Shredded Cheese on the Frying Pan
- Click on the Shrimp Pizza and use it on the Table.
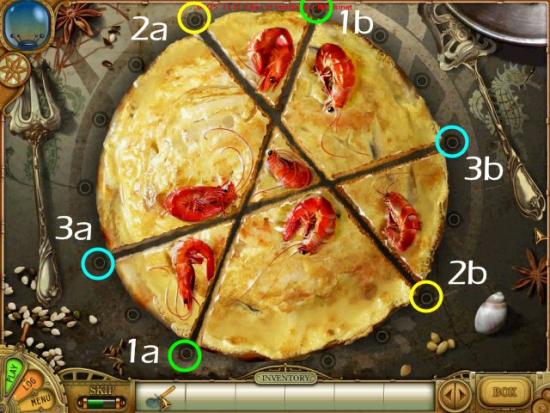
Shrimp Pizza Puzzle
Click on the Shrimp Pizza. You need to cut the Pizza into 7 pieces, each containing 1 whole shrimp, and you can only make 3 cuts. Click on the Pizza Cutter. Click on the dot (green) at 1a then move across and click on the dot at 1b. Repeat for 2 (yellow) and 3 (cyan). See the following screenshot for a solution.
Click on the following for a video solution.
Hidden Compartment
Click on the center of the table (yellow) to open the Hidden Compartment.
Collect the 7 Lock Pieces. Note: you need to collect the pieces around the outside (yellow) before you can collect the center piece (green).
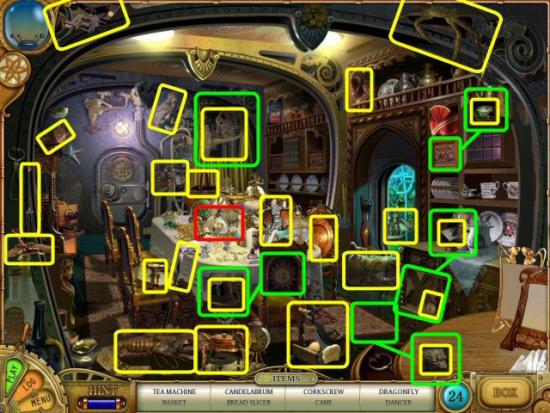
Dining Room
Click on the Door (orange dotted) at the back of the Galley to continue. Find all the items in the list (yellow). Some items will not appear until you collect other items or open objects. Click on the Center of the Table (red) to continue.
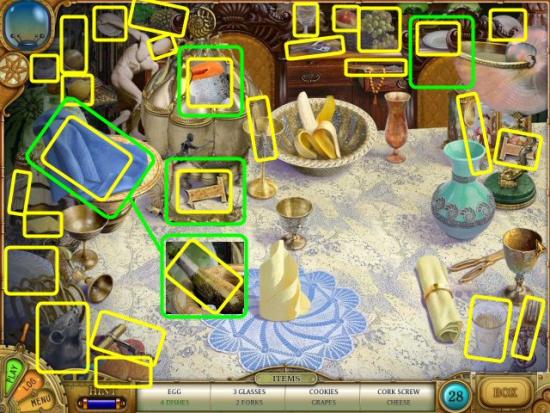
Dining Table
Find all the items in the list (yellow). Some items will not appear until you collect other items or open objects. When complete, click on the Door at the back of the Dining Room.
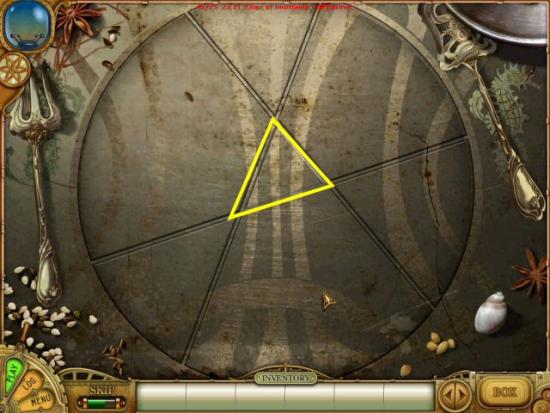
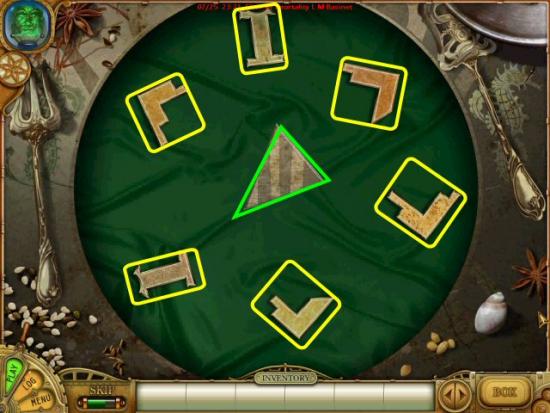
Library Lock Puzzle
Place the pieces of Key into the Lock, in any order you choose. See the following screenshot for a solution.
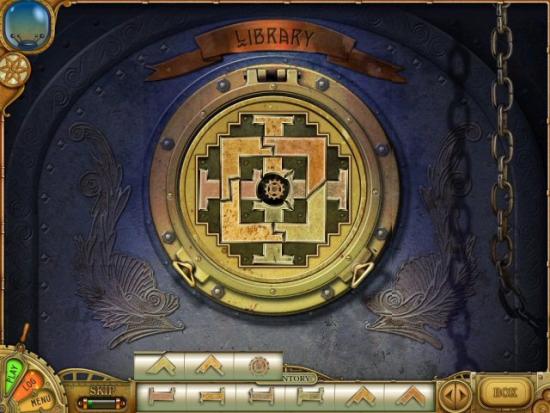
Click on the following for a video solution
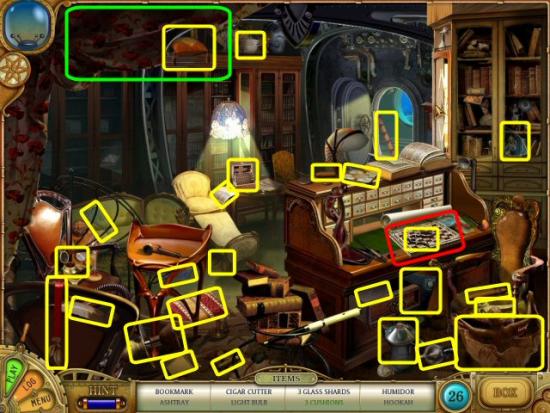
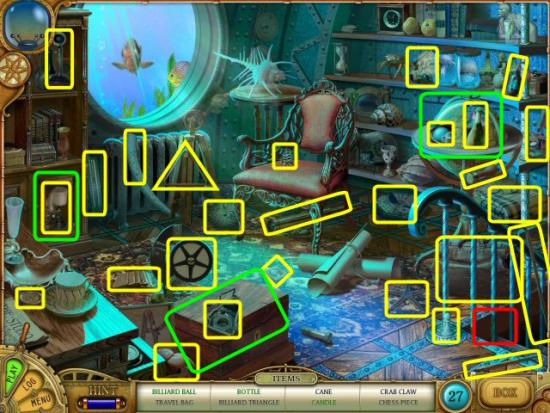
Library
Find all the items in the list (yellow). Click on the Drapes (green) to reveal an item. Click on the Chessboard (red) to continue.
Chessboard Puzzle
Use the Copper Plate in the drawer. You need to move the Yellow Shells so there are only 2 shells in each horizontal, vertical and diagonal row. The Blue Shells can’t be moved. See the following screenshot for a solution. Note: this was the only solution that would solve the puzzle. There should be at least 3 other solutions, but they didn’t work. Once complete, collect the Copper Key (cyan) and then exit the Library to continue.

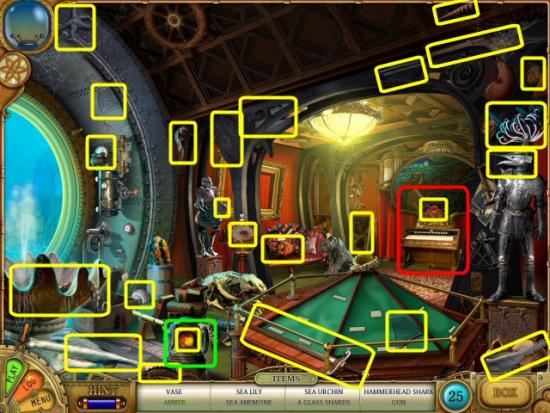
Trophy Room
Click on the Lever (1) to activate the Door Lock. Use the Copper Key on the Door Lock (2) and then click on the Door (red) to continue.
Find all the items in the list (yellow). Some items will not appear until you collect other items or open objects. Click on the Organ (red) to continue.
Stained Glass Minigame
Use the Glass Shards to fill in the missing spaces in the Stained Glass picture. See the following screenshot for the solution.
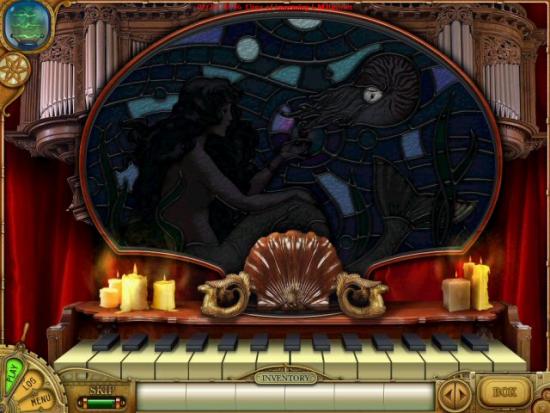
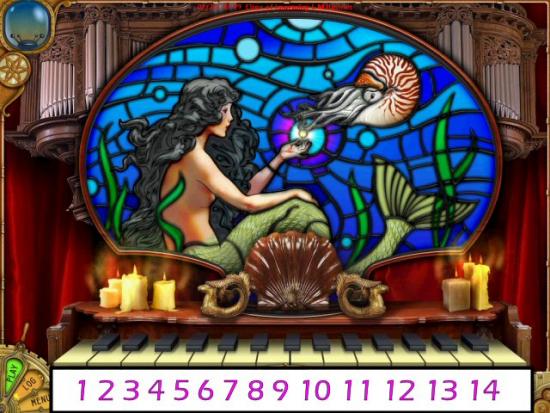
Organ Minigame
The Organ will play 3 tunes. You must repeat the notes that the Organ plays by clicking on the correct keys. The first tune is 3 notes, the second is 4 notes and the third is 5 notes. When complete, click on the Doorway to continue. Look at the following screenshot and press the numbered keys as follows:
- Tune 1: 3, 8, 6
- Tune 2: 10, 4, 5, 5
- Tune 3: 7, 11, 2, 13, 2
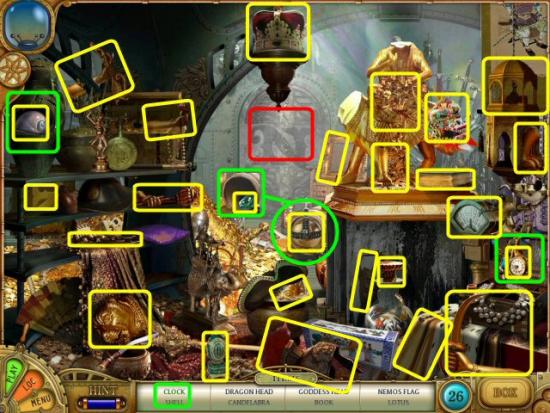
Treasure Room
Find all the items in the list (yellow). Some items will not appear until you collect other items or open objects. Click on the Door (red) to continue.
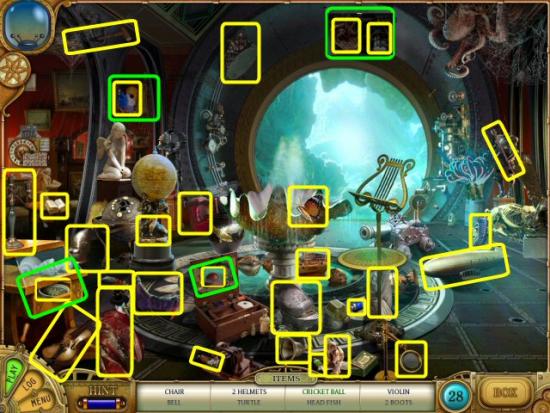
Study
Find all the items in the list (yellow). Some items will not appear until you collect other items or open objects. Click on the Stairs (red) to continue.
Salon
Find all the items in the list (yellow). Some items will not appear until you collect other items or open objects. Click on the Stairs (red) to continue.
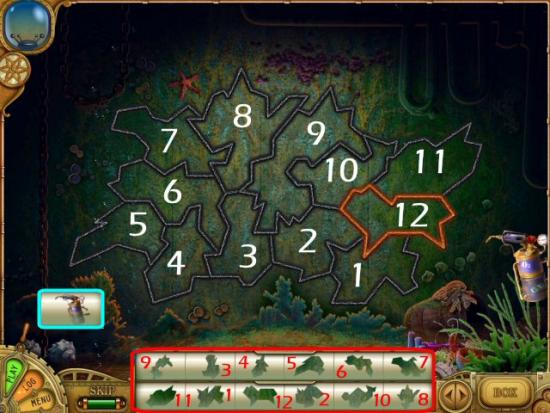
Shell Matching Minigame
Pull the lever (cyan) on the Wheel. Match the green highlighted picture (blue) with one of the cards in the boxes. You will make a total of 12 matches. As you progress, the Wheel spins faster. Make all 12 matches before time runs out. Collect the Punch Card (magenta) and remember the Compass Directions (yellow) revealed when you completed the game: South 40 degrees 19 minutes and West 9 degrees 55 minutes. See the following screenshot for the solution. When complete, exit on the Left of the Salon.

Click on the following for a video solution
Laboratory Hallway
Collect the Bolt Cutters (cyan) and use them on the Chains (green) twice. Click on the Dorr Handle (yellow) and click to enter the Lab.

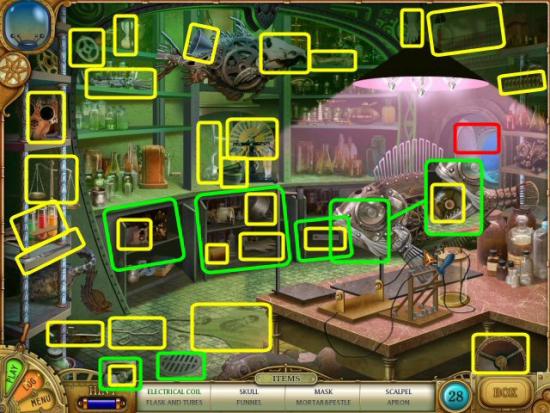
Laboratory
Find all the items in the list (yellow). Some items will not appear until you collect other items or open objects. Exit through the Door (red) to continue.
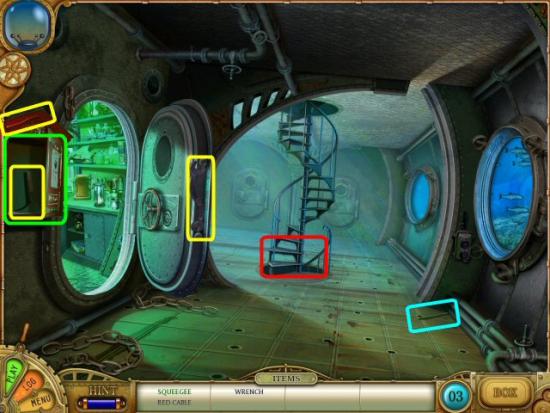
Laboratory Hallway
Collect the Red Cable and Wrench. Open the Fire Alarm (green) to collect the Squeegee. Note the Green Cable (cyan); you’ll come back here to collect it after the next area. Click on the Stairs (red) to continue.
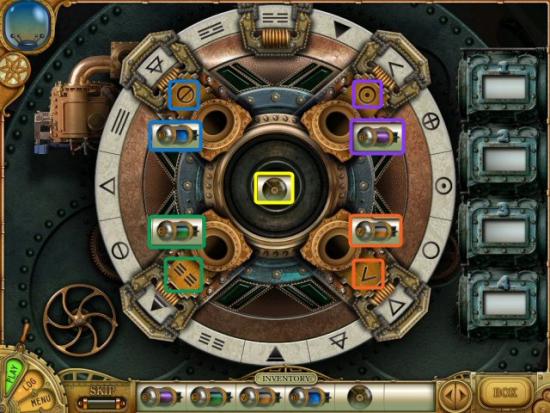
Power Station
Use the Ether Flask (yellow) in the center and then use one of the Capsules in whichever slot matches the symbol shown on the Capsule. You can choose any Capsule you like, to start the minigame. See the following for an example
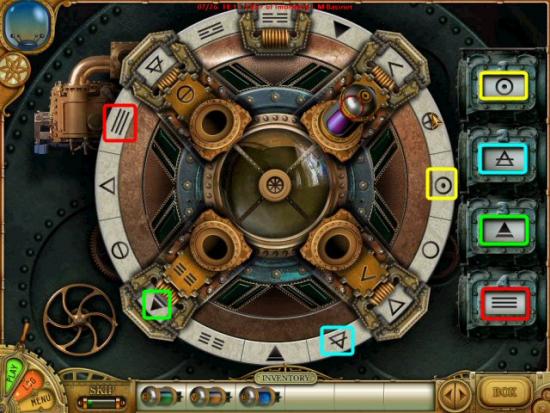
Turbine Minigame
Once you’ve used the Ether Flask and one of the Capsules, the minigame will start. The object is to click on the symbols, on the wheel, in the same order as the matching symbols shown at the right. Each time you click on a symbol, the wheel will spin. Click on the succeeding symbols after the wheel has stopped. You will complete 4 sets of 4 symbols; once for each of the Capsules. See the following for an example of the first set of symbols.
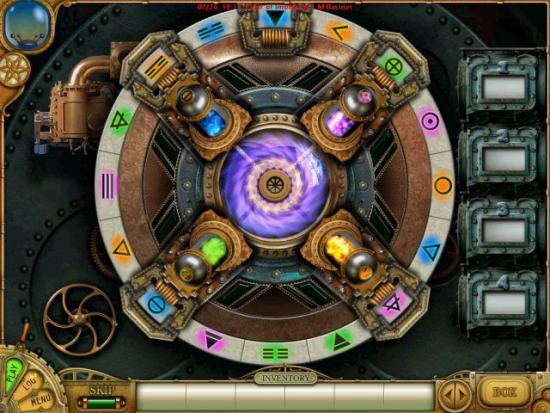
When complete, click on the Stairs to continue. See the following screenshot for the completed Turbine Minigame.
Click the following for a video example
Laboratory Hallway
Collect the Green Cable and click on the Stairs to continue.
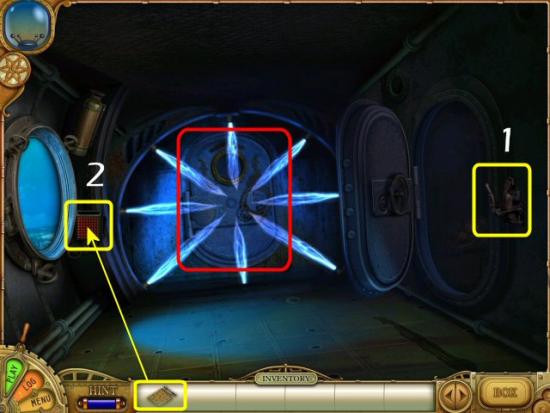
The Nautilus’ Bridge
- Use the Wrench on the Control Panel (1) and use the Red and Green Wires (2) to repair it.
- Collect the Handle, use it below the Right Porthole and click on it to open the Porthole Cover (3)
- Use the Glass Cleaner (4) and then the Squeegee (5) on the Portholes
Electric Shock Puzzle
Click on the Control Panel. This puzzle is like a large “matchstick” puzzle, except you aren’t limited to how many moves you make. You pick up wires and place them in new spots to create one, continuous connection. Once complete, click on the Handle (yellow). See the following screenshot for the solution.
Click on the following for a video solution
Set Course Minigame
Using the information from the Shell Matching Minigame, enter the correct coordinates by clicking on each number until you have the correct one. Note: the numbers do not cycle through in numerical order, but it doesn’t take many clicks to complete each one. See the following screenshot for the solution.
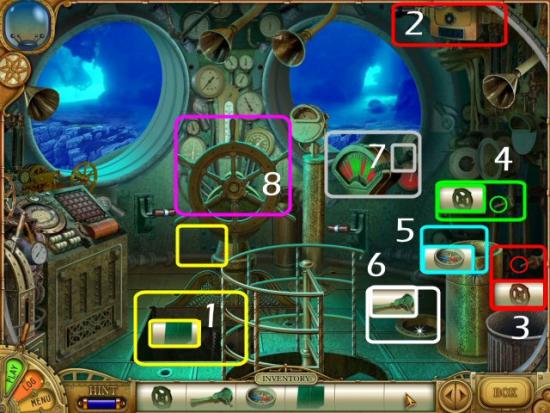
The Nautilus’ Bridge
- Collect the Floor Panel and use it on the Floor (1)
- Click on the Periscope (2), collect the Red Handle and use it on the Red Pin (3)
- Use the Green Handle on the Green Pin (4)
- Use the Compass on the Stand (5)
- Use the Throttle Control in the Hole (6)
- Click on the Throttle Handle (7 – inset)
Once on the surface, click on the Ship’s Wheel (8) to change course, then click on the Throttle Handle again.
Congratulations, you’ve completed Nemo’s Secret: The Nautilus! Watch the ending movie.

More articles...
-
Best Horror Games On Itch.io – July 2026
Across a bounty of subgenres. -
Haze Seas Accessories Tier List [Best Accessories to Equip]
The accessories with the best stat buffs in Haze Seas.