![Hololive Dreams Tier List [Best Cards]](/wp-content/uploads/2026/07/hololive-dreams-tier-list.jpg "Hololive Dreams Tier List [Best Cards]")
Hololive Dreams Tier List [Best Cards]
The best cards for the best performances.


![Iron Soul Dungeon Weapon Tier List [Best Weapons]](/wp-content/uploads/2026/07/iron-soul-dungeon-weapon-tier-list.jpg "Iron Soul Dungeon Weapon Tier List [Best Weapons]")

Welcome to the Natural Threat: Ominous Shores walkthrough on Gamezebo. Natural Threat is a hidden object adventure game created by Alawar Entertainment. This walkthrough includes tips and tricks, helpful hints, and a strategy guide for how to complete Natural Threat: Ominous Shores.
Welcome to theNatural Threat: Ominous Shoreswalkthrough on Gamezebo. Natural Threatis a hidden object adventure game created by Alawar Entertainment. This walkthrough includes tips and tricks, helpful hints, and a strategy guide for how to completeNatural Threat: Ominous Shores.
When starting the game for the first time, you can choose between one of two difficulties: Casual or Expert. Casual difficulty features the Hint button recharging quickly, interactive zones being highlighted, and you will not be penalized for bad clicks. Expert difficulty features the Hint button recharging slowly, interactive zones not being highlighted, and penalties for too many bad clicks.
The Menu can be accessed anytime during gameplay via the button in the lower left corner.
Also located in the lower left corner is the Journal: this keeps track of important events, characters, and clues you uncover during your journey.
The Hint button is located in the lower right corner of the screen. Click on it to reveal an item, or just to point you in the right direction. Once the bottle of perfume is filled, you can use another Hint. Hints are unlimited but require time to charge. The Hint button will become the Skip button during puzzles, but will require a certain amount of time to pass before you can use it.
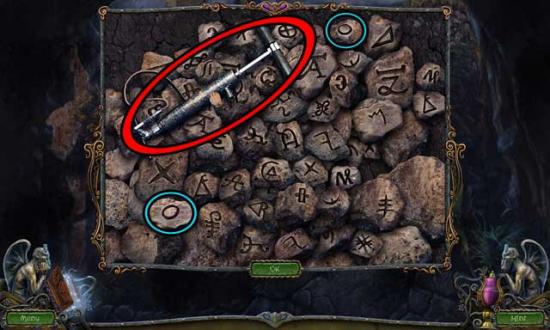
Items listed in orange in hidden object areas require an additional action before you can collect them. These items are circled in orange in the guide below and linked to the other item necessary to complete said listed item.
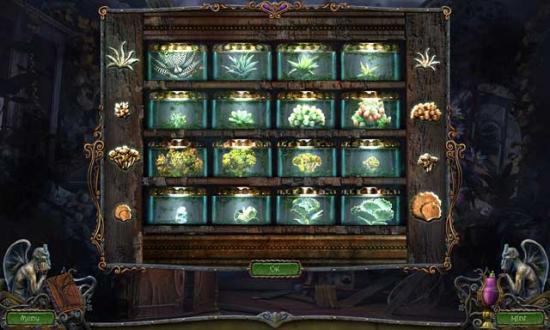
Items in hidden object areas are not randomized, and as such, all are shown in the guide below. However, INVENTORY ITEMS (written in CAPS in the guide below) do not always appear in a hidden object area, therefore they will not be circled in a separate color within hidden object areas.
The guide below does not need to be followed step-by-step persé, however it outlines one of the most efficient routes to progress in the game.
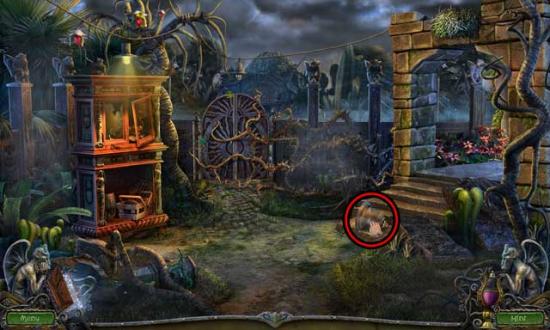
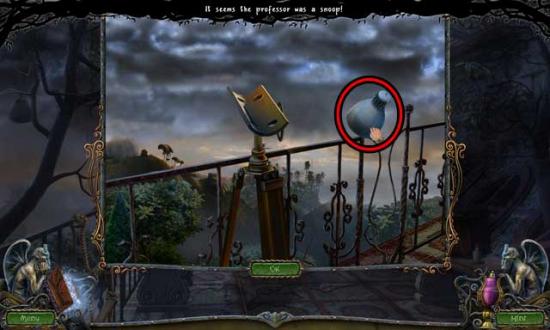
Garden
Click on the professor to speak with him, then click on the Journal to read up on recent events.
Click on the PRUNING SHEARS on the right to add them to your inventory.

Take a closer look at the fountain statue on the left. Use the PRUNING SHEARS on the vines, then click on the KEY to add it to your inventory.
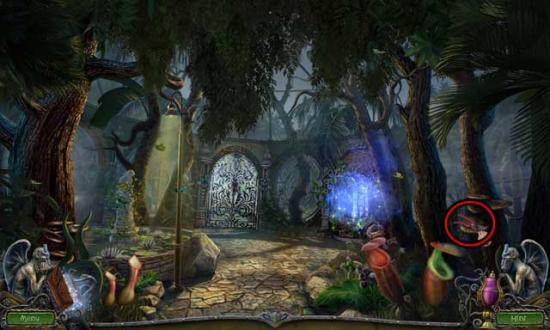
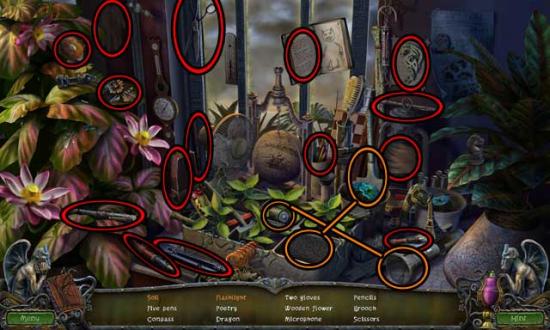
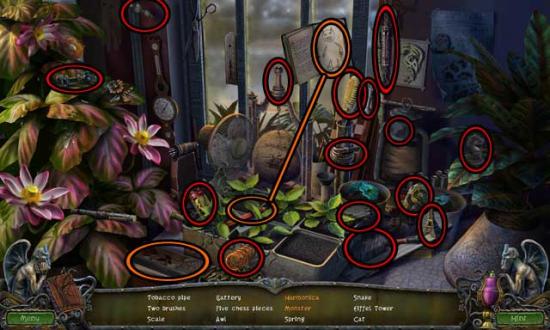
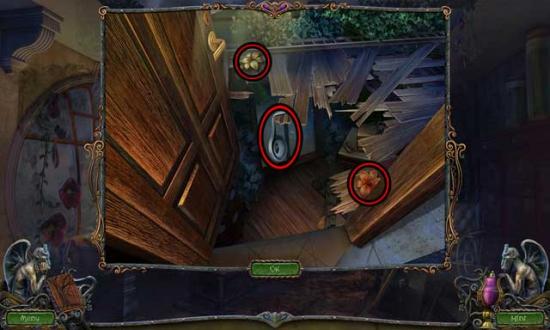
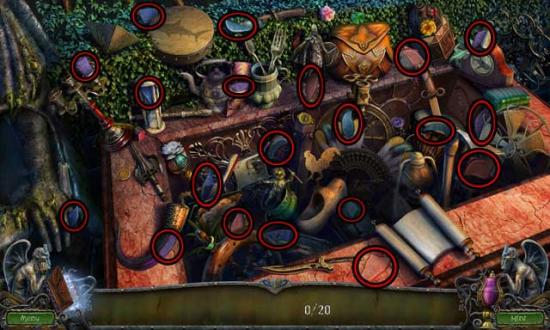
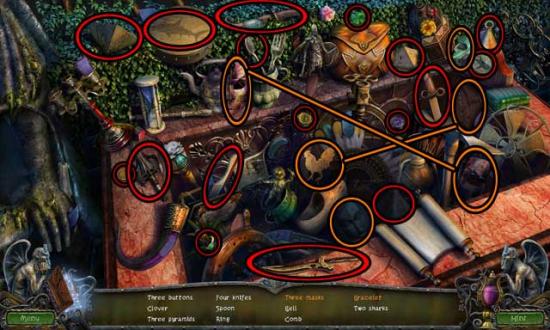
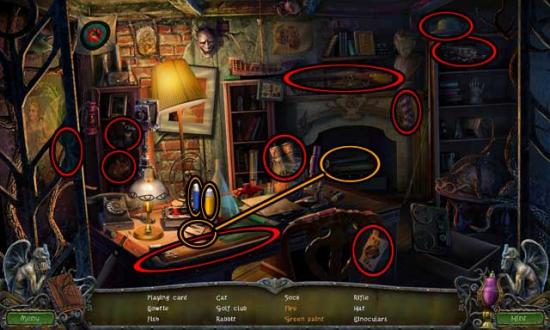
Click on the hidden object area just to the left of the trees on the right.
Find the objects listed at the bottom of the screen: their locations are shown below. Items listed in orange require an additional item or action to strike them from the list.
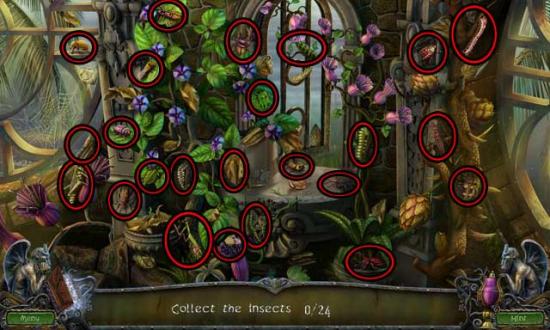
Upon completing the area, the INSECTS will be added to your inventory.
Take a closer look at the closed gate at the far end of the Garden. Give the INSECTS to the spider, then use the KEY on the gate to open it and proceed through to the next area.
Entrance
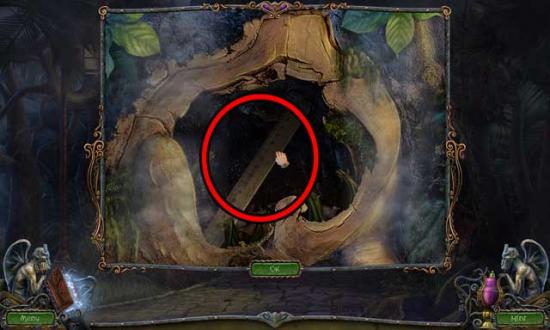
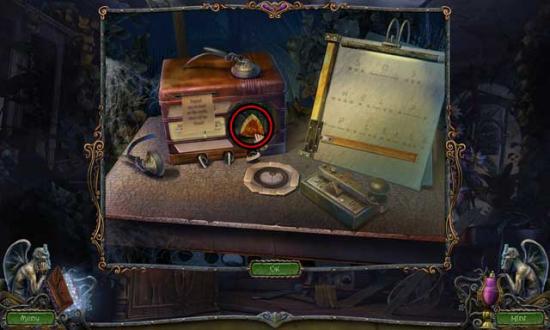
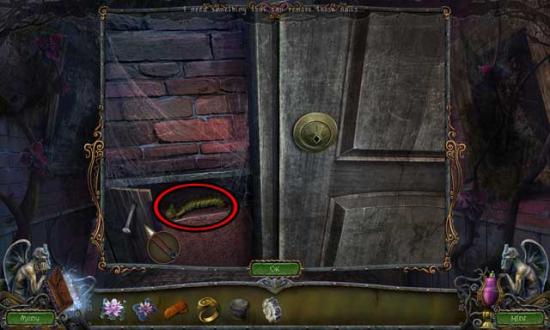
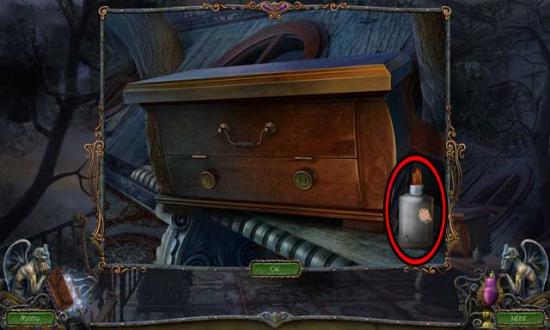
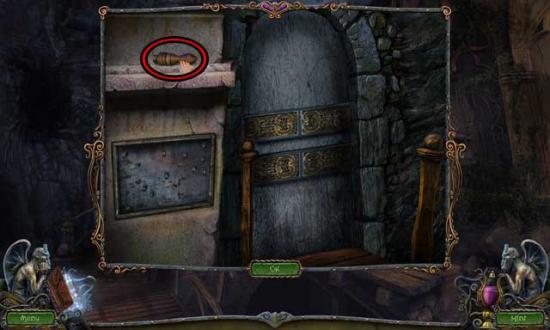
Examine the tree with the hole in it on the left. Use the PRUNING SHEARS on the vines to clear them away, then click on the RULER inside to add it to your inventory.
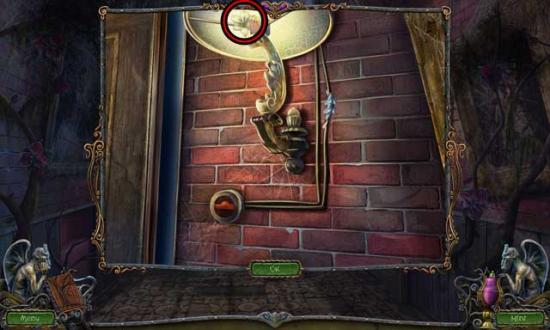
Examine the window to the left of the doors. Use the RULER on the window latch to open it, then click on the SMALL WHEEL and the SUGAR to add them to your inventory. Don’t forget to also examine the letter at the base of the sugar bowl.
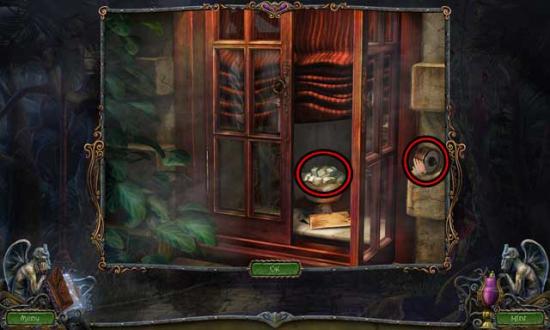
Back in the main area, take a closer look at the ant hill at the base of the tree with the hole in it. Use the SUGAR on the ant hill, then click on the DOOR KNOB to add it to your inventory.
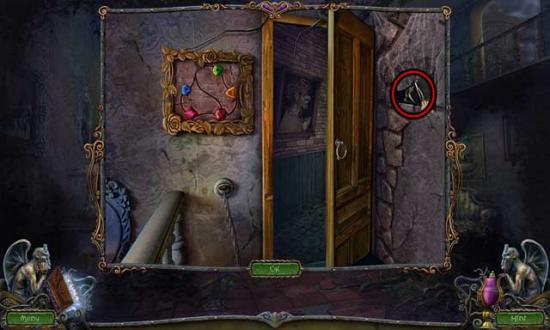
Examine the front door. Use the DOOR KNOB in its proper location, then enter the mansion.
Foyer
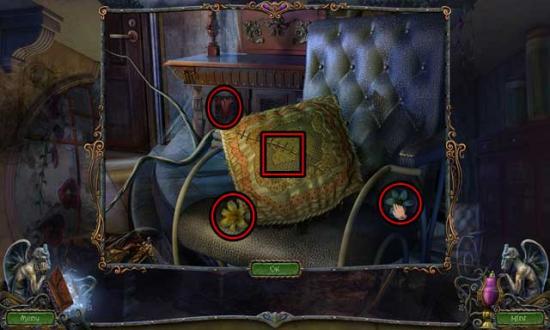
Click on the hidden object area over the small table to the left of the staircase.
Find the objects listed at the bottom of the screen: their locations are shown below. Items listed in orange require an additional item or action to strike them from the list.
Upon completing the area, the BROOM & DUSTPAN will be added to your inventory.
Take a closer look at the couch on the right. Use the SMALL WHEEL on the foot of the couch to repair it, then click on the couch to move it out of the way.
Examine the floor where the plant has fallen over. Use the BROOM & DUSTPAN on the dirt to clean it up, then click on the ACCESS CARD that’s revealed to add it to your inventory.
Examine the doors on the right. Use the ACCESS CARD on the slot to open the doors and proceed through to the next area.
Lab Entrance
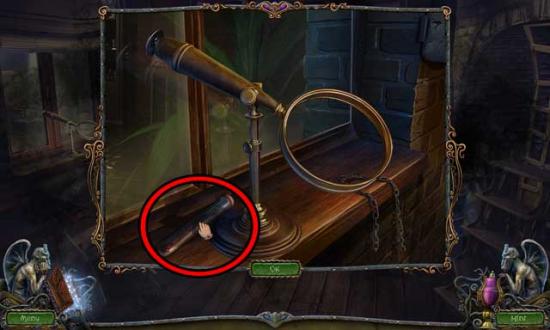
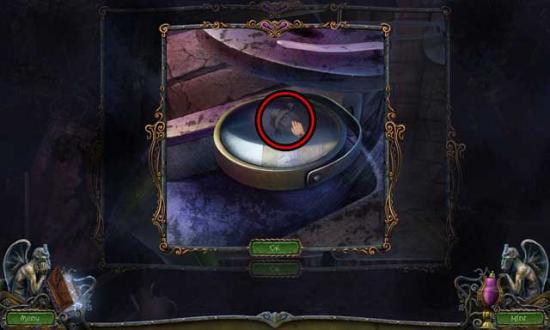
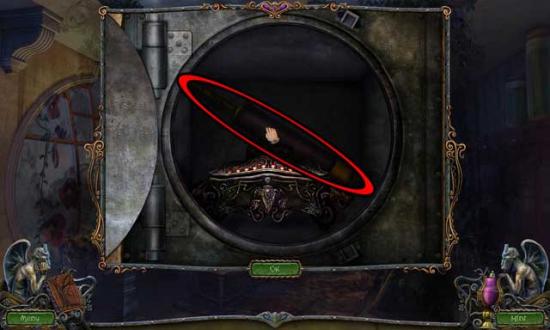
Take a closer look at the round glass mechanism on the left. Click on the VALVE HANDLE to add it to your inventory.
Proceed forward through the door to the next area.
Laboratory
Click on the professor to speak with him. You will acquire the GENETIC MATERIAL 1/3.
Examine the blackboard on the left. Click on the PESTLE to add it to your inventory, then use the VALVE HANDLE on the sink to restore it.
Back in the main area, take a closer look at the small window straight ahead. Click on the KNIFE to add it to your inventory.
Proceed forward through the door at the back of the room.
Storage Area
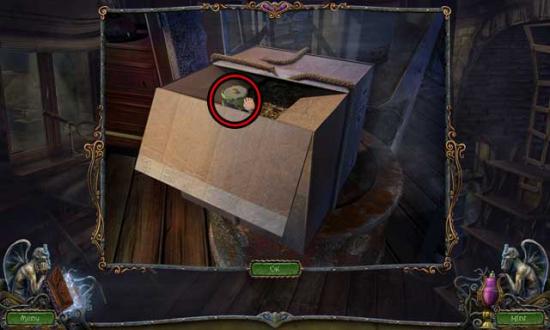
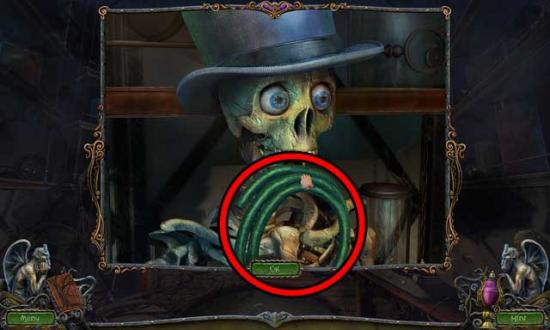
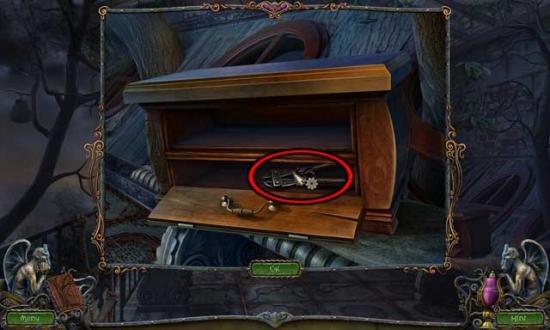
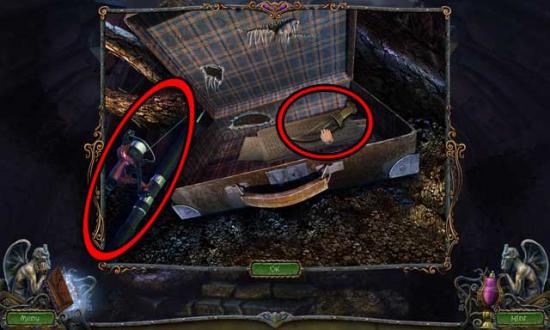
Take a closer look at the box sitting on top of the steel drum on the right. Use the KNIFE to cut the rope, then click on the BATTERY inside to add it to your inventory.
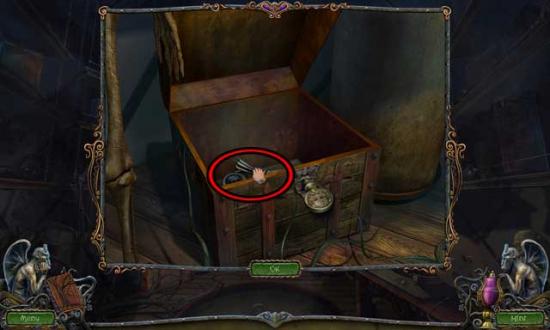
Examine the base of the left cupboard where the mouse disappeared. Click on the SAFETY PIN to add it to your inventory.
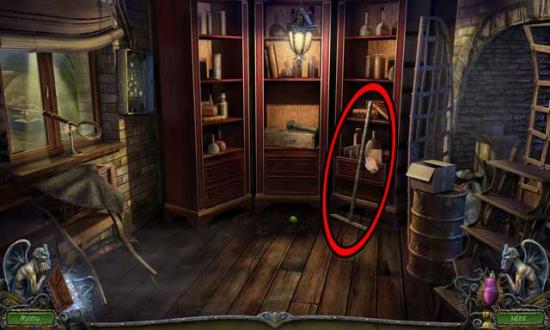
Click on the BROOM HANDLE propped up against the cabinet on the right to add it to your inventory.
Examine the box sitting on the shelf in the middle cabinet. Click on the GENETIC MATERIAL 2/3, then use the BATTERY on the FLASHLIGHT to complete it, then click on it to add it to your inventory.
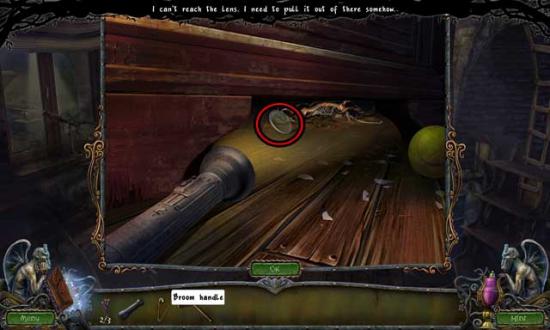
Examine the base of the left cabinet again. Use the FLASHLIGHT on the dark to light it up, then use the BROOM HANDLE to retrieve the MAGNIFYING LENS and add it to your inventory.
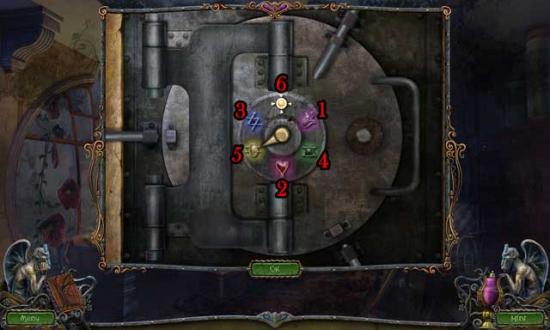
Examine the open power box hanging on the wall on the left. To light up all of the bulbs, direct the electricity from the negative terminal to the positive terminal. The current can run through each bulb only once. The solution is shown below.
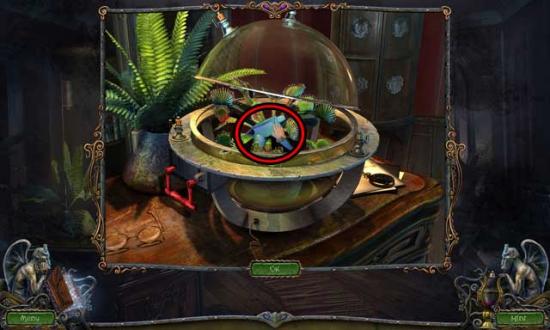
Take a closer look at the lens stand sitting on the sill on the left. Click on the GENETIC MATERIAL 3/3 to add it to your inventory, then use the MAGNIFYING LENS on the frame to restore it.
For now, return to the Laboratory.
Laboratory
Take a closer look at the table on the right. Place the GENETIC MATERIAL into the tri-slotted stand on the right, then exit for now.
Return to the Lab Entrance.
Lab Entrance
Take a closer look at the glass sphere mechanism on the left again. Use the SAFETY PIN to pick the lock on the mechanism, then click on the red lever to shut the electricity off. Click on the SPRAY BOTTLE NOZZLE inside to add it to your inventory.
Return to the Foyer.
Foyer
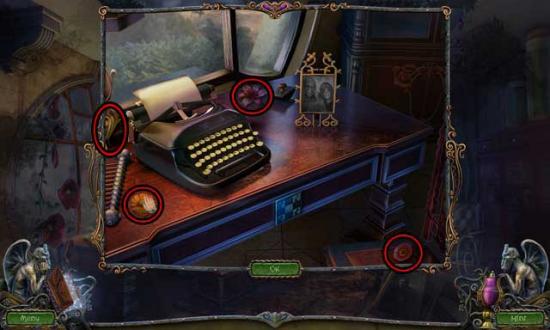
Click on the hidden object area over the table to the left of the staircase.
Find the objects listed at the bottom of the screen: their locations are shown below. Items listed in orange require an additional item or action to strike them from the list.
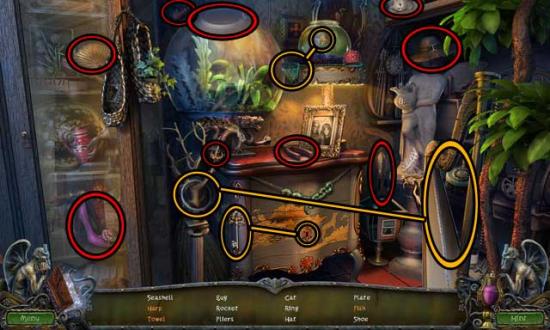
Upon completing the area, the PLIERS will be added to your inventory.
Return to the Garden.
Garden
Click on the hidden object area to the left of the trees on the right.
Find the objects listed at the bottom of the screen: their locations are shown below. Items listed in orange require an additional item or action to strike them from the list.
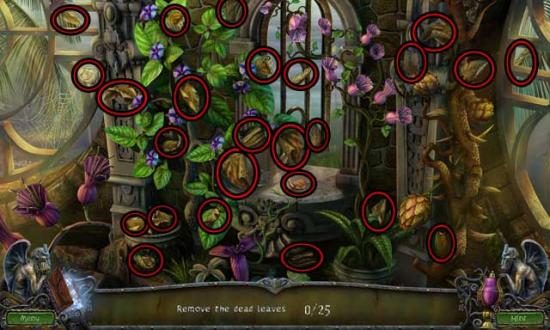
Upon completing the area, click on the watering can and use it on the sprout in the pot on the left to cause it to grow. Click on the DRAGONIUM MUTANA to add it to your inventory.
Return to the Storage Area.
Storage Area
Take a closer look at the lens on the sill on the left. Use the PLIERS on the broken chain link to restore it, then click on the CHAIN to add it to your inventory.
Return to the Laboratory.
Laboratory
Take a closer look at the blackboard on the left. Use the DRAGONIUM MUTANA on the bowl, then exit for now and take a closer look at the table on the right, back in the main area.
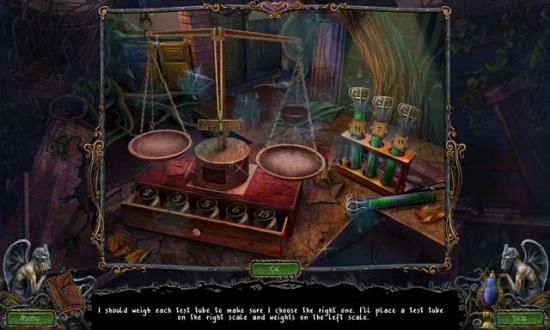
Use the CHAIN on the scale to restore it, triggering a puzzle.
Weigh each test tube to make sure you choose the right one. Place a test tube on the right scale and weights on the left scale. The solution is shown and outlined below.
1)Left test tube= 11 (weights 5, 4, 2 or 5, 4, 1, 1)
2)Middle test tube= 3 (weights 2, 1)
3)Right test tube= 10 (weights 5, 4, 1)
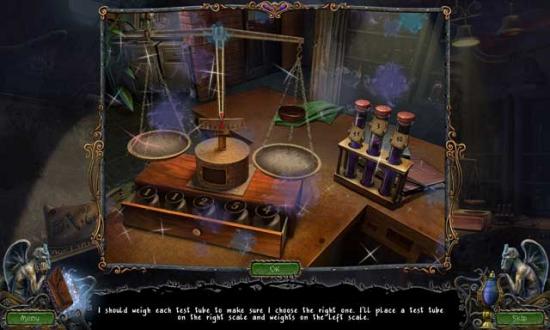
Upon completing the puzzle, 10 GRAMS OF GENETIC MATERIAL will be added to your inventory.
Examine the blackboard on the left again. Add the 10 GRAMS OF GENETIC MATERIAL to the bowl, then click on the red valve to add water. Use the PESTLE to mash all the ingredients together and acquire the EXPERIMENTAL SOLUTION.
Return to the Lab Entrance.
Lab Entrance
Take a closer look at the table to the right of the door. Use the EXPERIMENTAL SOLUTION on the bottle, then use the SPRAY BOTTLE NOZZLE on the top. Click on the SPRAY BOTTLE WITH SOLUTION to add it to your inventory.
Return to the Laboratory.
Laboratory
Take a closer look at the small window straight ahead. Use the SPRAY BOTTLE WITH SOLUTION on the plant, then click on the microscope for a closer view.
Talk with the professor, he will give you the MICROSCOPE CASE KEY.
Enter the Storage Area.
Storage Area
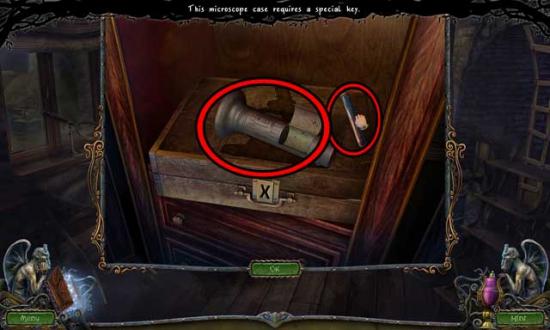
Click on the case on the shelf in the middle cabinet for a closer view. Use the MICROSCOPE CASE KEY on the lock to open it, then click on the LENS inside and watch the cutscene that follows.
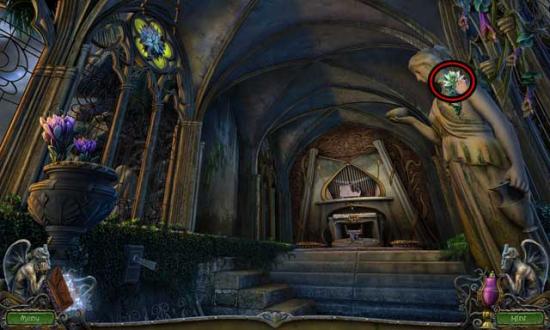
Shore
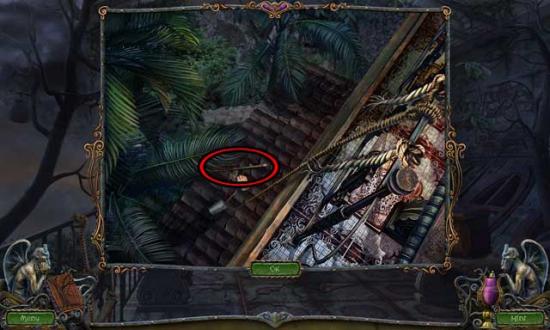
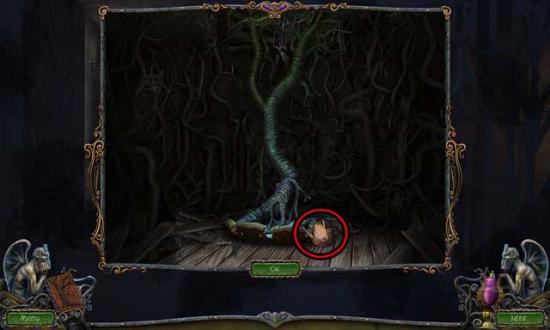
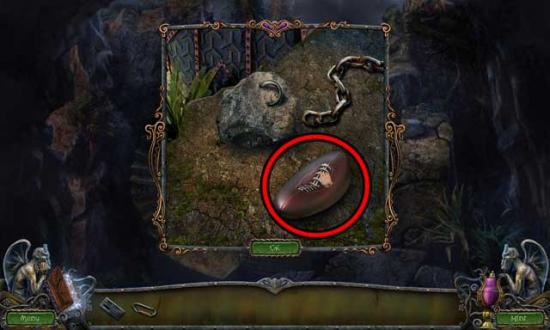
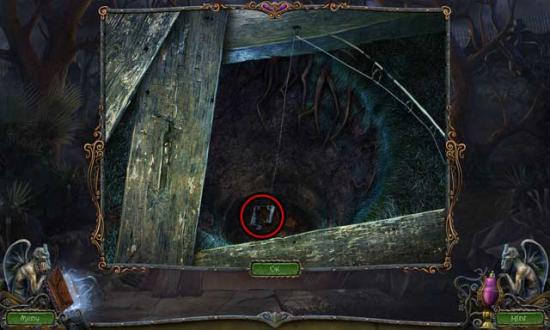
Click on the photo to add it to your Journal, then take a closer look at the foot of the makeshift walkway. Click on the ROCK and the HARPOON TIP to add them to your inventory.
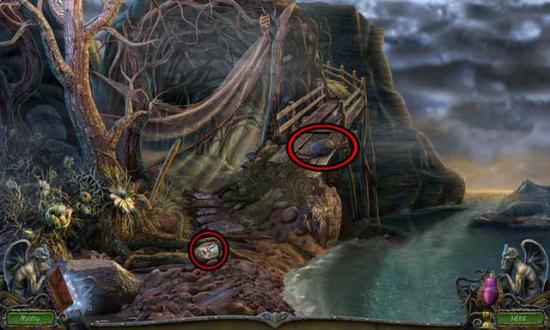
Take a closer look at the wooden stake sticking out of the ground near the tree on the left. Use the ROCK to knock the NAIL out of the stake, then place the HARPOON TIP at the top of the stake, followed by the NAIL, and use the ROCK to complete it. Click on the HARPOON to add it to your inventory.
Examine the hook holding up the net that’s blocking your way inland. Use the HARPOON to unhook the net and continue inland.
Cabin
Take a closer look at the base of the cabin door, where a board has been broken off. Use the HARPOON to retrieve the CABIN KEY and add it to your inventory,.
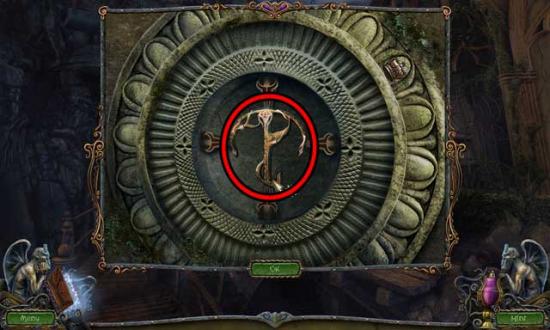
Examine the shut gate ahead to trigger a puzzle.
The blossoms feed the vines. Close all the blossoms on a vine to cause the vine to fall away. It doesn’t matter in which order you click on the blossoms, so long as they’re blossoms of the same vine. Blossoms are circled and shown below to show you which to click on in a sequence to cause a vine to fall away.
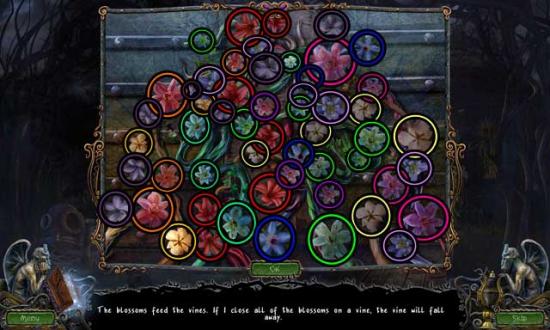
Upon completing the puzzle, the gate will open. Proceed forward into the next area.
Stone Staircase
Click on the figure of the man in the distance, then return to the Cabin.
Cabin
Take a closer look at the cabin door. Use the CABIN KEY on the lock to open it, then proceed inside.
Cabin (Inside)
Click on the hidden object area over the cabinet on the left.
Find the objects listed at the bottom of the screen: their locations are shown below. Items listed in orange require an additional item or action to strike them from the list.
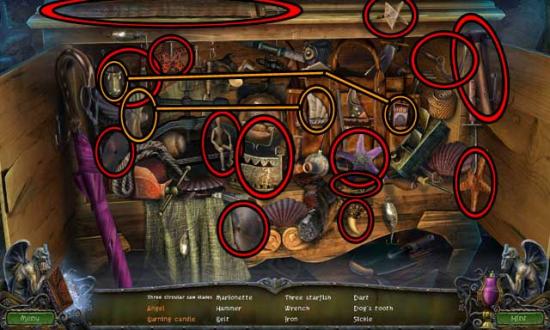
Upon completing the area, the MATCHES will be added to your inventory.
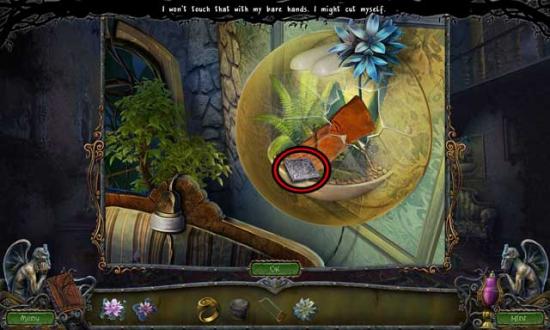
Take a closer look at the upper portion of the cabinet. Click on the PIECES OF THE PICTURE 12/13, then exit for now.
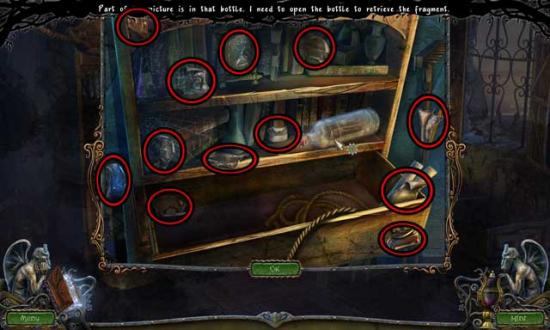
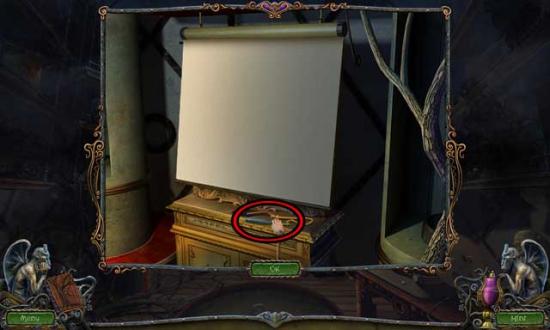
Take a closer look at the table. Click on the TWEEZERS and the CORKSCREW to add them to your inventory.
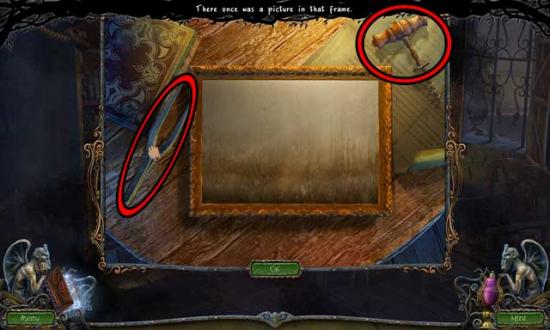
Return to the close-up of the upper portion of the cabinet. Use the CORKSCREW to uncork the glass bottle, then use the TWEEZERS to collect the final PIECE OF THE PICTURE and add it to your inventory.
Take a closer look at the top of the table again. Use the PIECES OF THE PICTURE on the frame to trigger a puzzle.
Assemble the picture like you would a puzzle. Place each piece where it belongs. The solution is shown below.
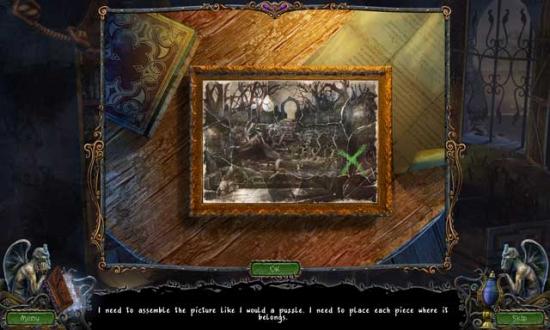
Upon completing the puzzle, exit the inside of the cabin.
Cabin
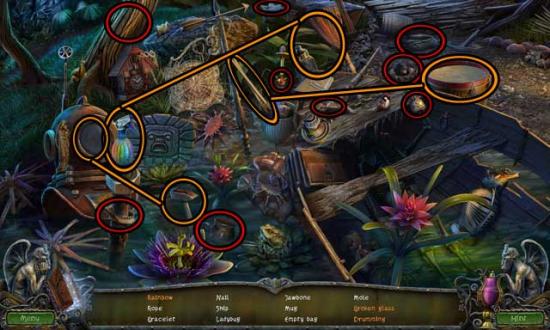
Click on the hidden object area over the sunken boat.
Find the objects listed at the bottom of the screen: their locations are shown below. Items listed in orange require an additional item or action to strike them from the list.

Upon completing the area, the PLANKS will be added to your inventory.
Proceed forward to the Stone Staircase.
Stone Staircase
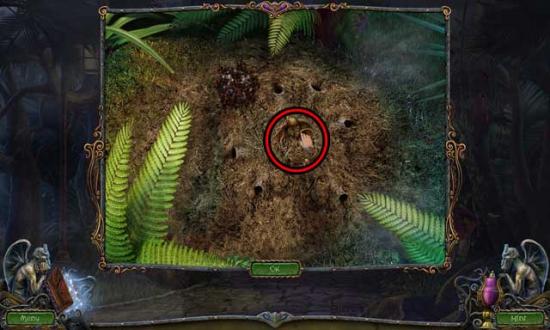
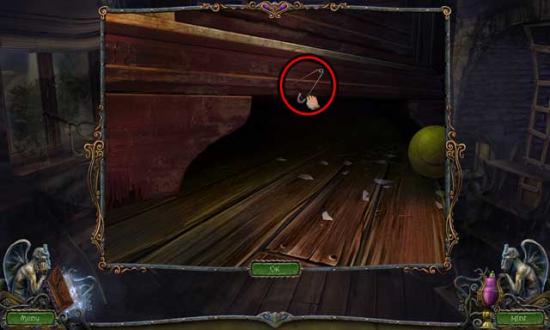
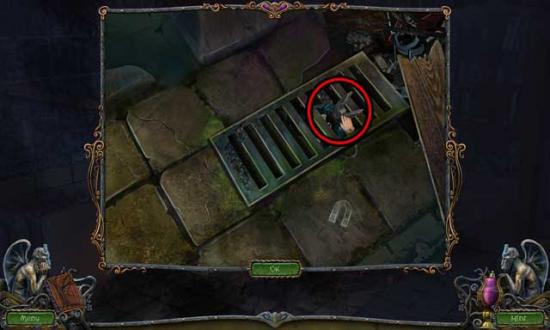
Take a closer look at the grassy area on the right. Click on the HAY to add it to your inventory.
Back in the main area, use the HAY on the firewood towards the left, then use the MATCHES to light it. A portion of the stairs will collapse. Look in the gap and take note of the chisel, but for now (back in the main area again) use the PLANKS on the gap to create a bridge.
Proceed forward to the next area.
Crossroads
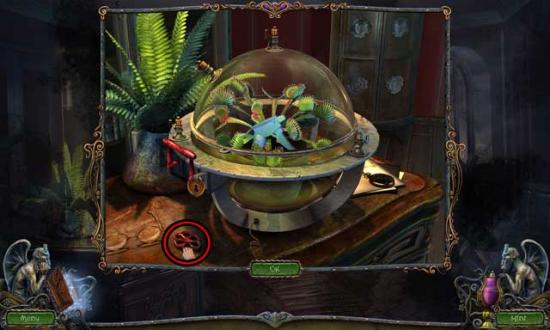
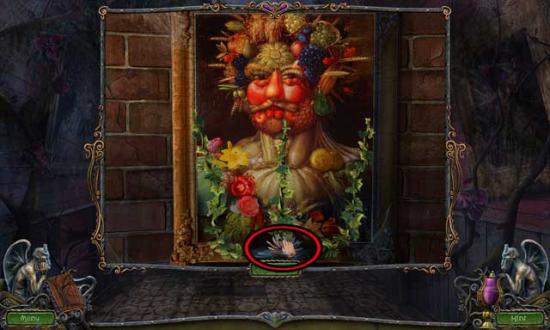
Click on the GLASS BELL DOME lying on the ground to add it to your inventory.
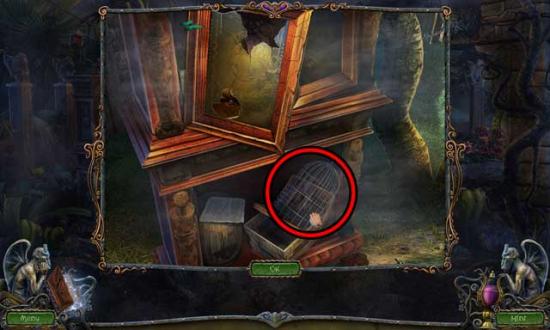
Take a closer look at the bottom portion of the cabinet on the left. Click on the Note, then the BIRDCAGE to add it to your inventory. Click on the painting above to knock it down, revealing a gas mask. We’ll come back to this later, though.
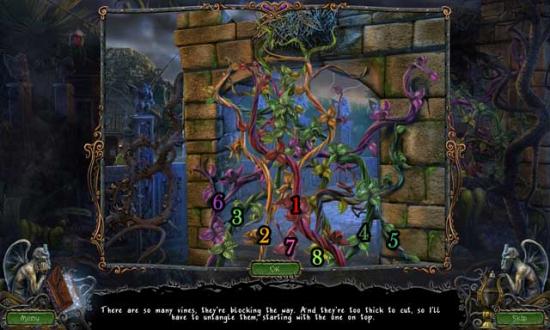
Back in the main area, attempt to proceed through the archway on the right, only to have vines block your path. Click for a closer view of the vines to trigger a puzzle.
There are so many vines, they’re blocking the way. They’re too thick to cut, so untangle them, starting with the one on top. The vines are numbered in the screenshot below to show you the solution in which you should click on them.
Upon completing the puzzle, a baby owl will fall out of its nest onto the ground. Use the BIRDCAGE on the baby owl to obtain the CAGED BABY OWL.
Proceed through the archway to the next area.
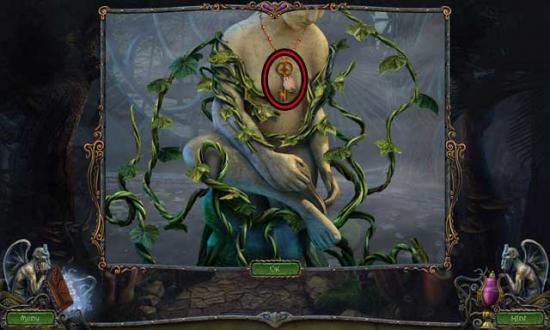
Sculpture Garden
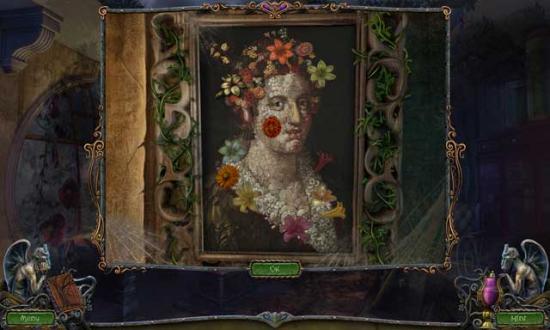
Take a closer look at the girl lying on the ground and take note of her condition. Upon doing this, a hidden object area will appear at the foot of the sculpture on the right.
Find the objects listed at the bottom of the screen: their locations are shown below. Items listed in orange require an additional item or action to strike them from the list.
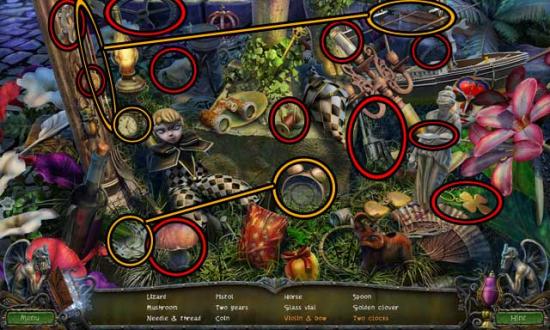
Upon completing the area, the SMELLING SALTS will be added to your inventory.
Take a closer look at the girl lying on the ground again. Use the SMELLING SALTS on her to wake her up.
Examine the sculpture/fountain on the left. Click on the EMPTY GLASS to collect it, then click on the faucet to turn on the flow of water. Use the EMPTY GLASS on the water to obtain the GLASS OF WATER.
Use the GLASS OF WATER on Carrie. You will obtain the GLASS EYE.
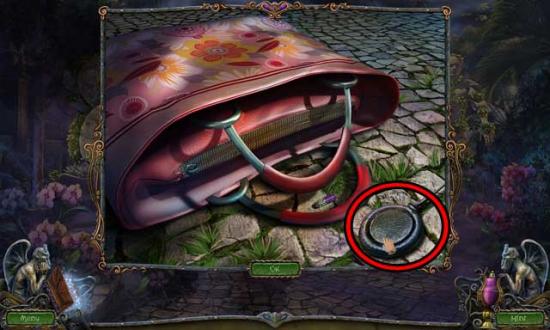
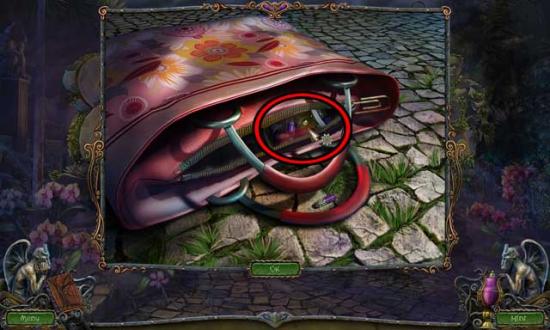
Return to the Crossroads, then promptly return to the Sculpture Garden to find Carrie has disappeared. Examine the purse she left behind on the ground. Click on the OILER to add it to your inventory.
Backtrack to the Cabin.
Cabin
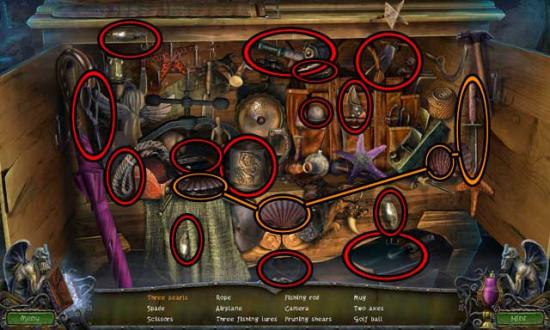
Click on the hidden object area over the sunken boat.
Find the objects listed at the bottom of the screen: their locations are shown below. Items listed in orange require an additional item or action to strike them from the list.
Upon completing the area, the EMPTY BAG will be added to your inventory.
Enter the Cabin.
Cabin (Inside)
Click on the hidden object area over the cabinet on the left.
Find the objects listed at the bottom of the screen: their locations are shown below. Items listed in orange require an additional item or action to strike them from the list.
Upon completing the area, the SLEDGE HAMMER will be added to your inventory.
Take a closer look at the box of sand beneath the table. Use the EMPTY BAG on the sand to obtain the BAG OF SAND.
Return to the Stone Staircase.
Stone Staircase
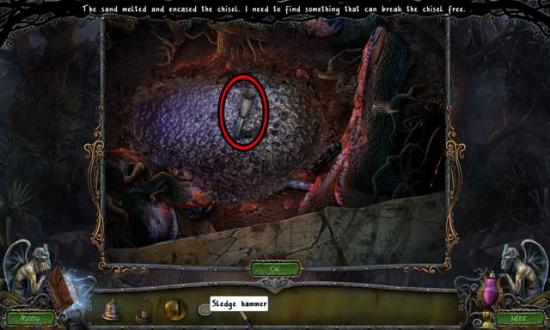
Take a closer look at the gap beneath the planks where the steps collapsed. Use the BAG OF SAND on the embers, then use the SLEDGE HAMMER to break the CHISEL free and add it to your inventory.
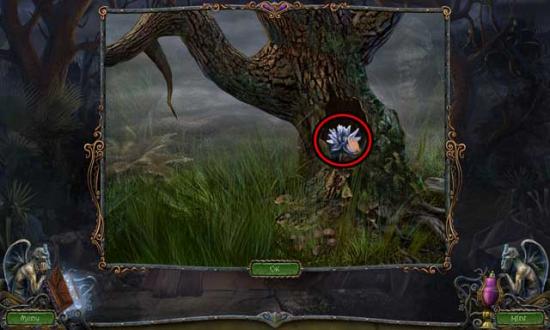
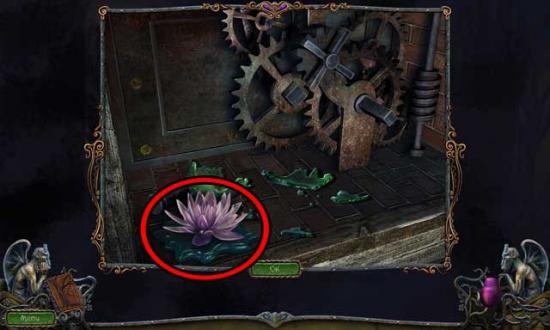
Take a closer look at the grassy area on the right (back in the main view). Use the CHISEL on the blue-colored item in the tree to break apart the bark around it, then click on the CRYSTAL FLOWER inside to add it to your inventory.
Backtrack all the way back to the Shore.
Shore
Proceed up the makeshift wooden walkway to the next area.
Ravine
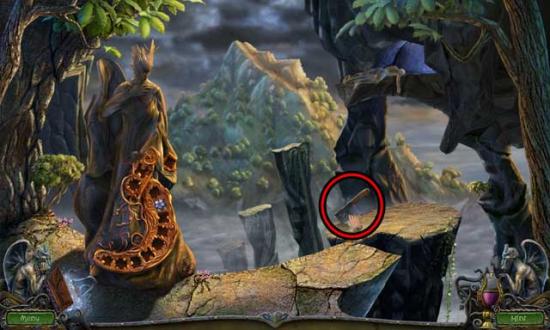
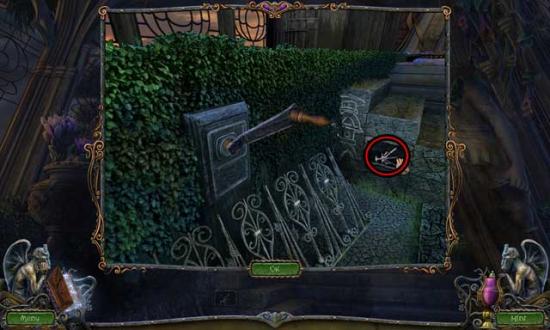
Try to continue forward, only the stone platforms will vanish. Take a closer look at the slots in the statue on the left. Use the CRYSTAL FLOWER on the slots to restore it, causing one of the stone platforms to reappear. Click on the AXE to add it to your inventory.
Return to the Crossroads.
Crossroads
Take a closer look at the shut gate straight ahead. Use the AXE to chop away the vines, then use the OILER on the rusty hinges to open the gate. Proceed through to the next area.
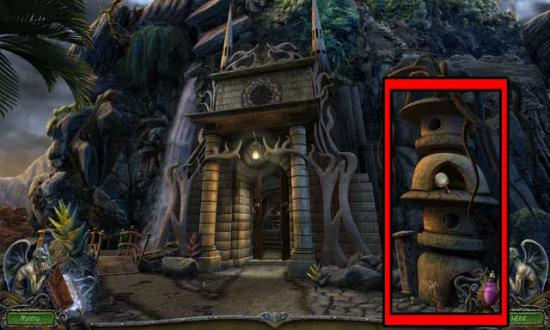
Cactus Garden
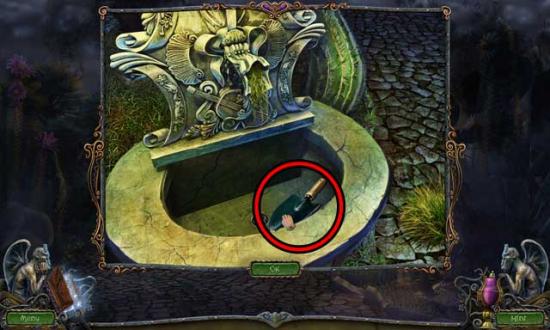
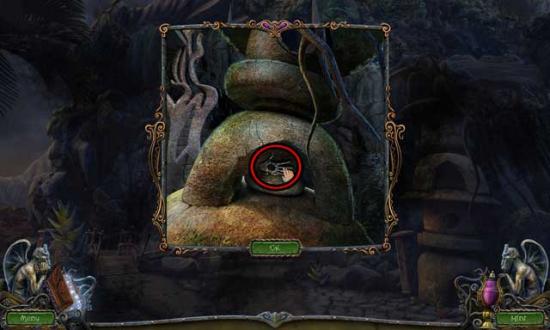
Take a closer look at the fountain straight ahead. Click on the SPADE inside to add it to your inventory.
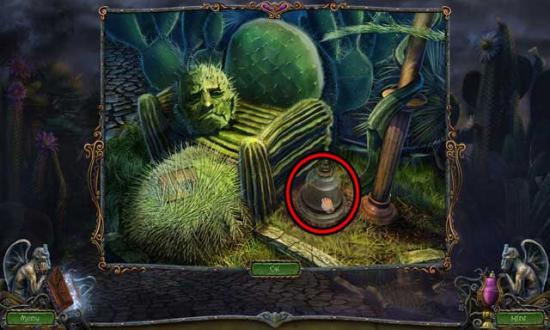
Examine the cacti beneath the lamp on the right. Use the SPADE to dig out the semi-buried GLASS BELL DOME and add it to your inventory.
Proceed down the path to the left.
Cave
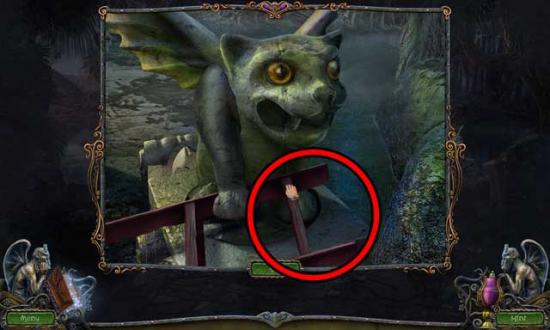
Examine the gargoyle holding the ladder on the right for a closer view. Use the GLASS EYE on the empty socket to restore it, then click on the LADDER to add it to your inventory.
Return to the Cactus Garden.
Cactus Garden
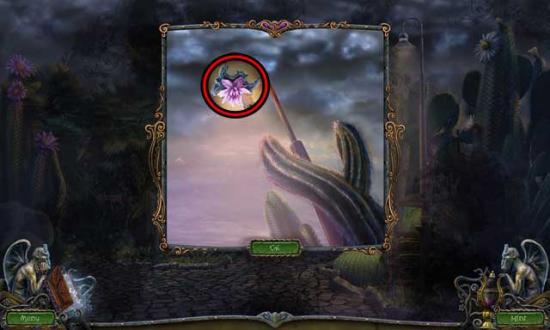
Use the LADDER on the lamppost on the right, then examine the light for a closer view. Click on the CRYSTAL FLOWER to add it to your inventory.
Click on the LADDER to add it to your inventory again, then proceed back to the Crossroads.
Crossroads
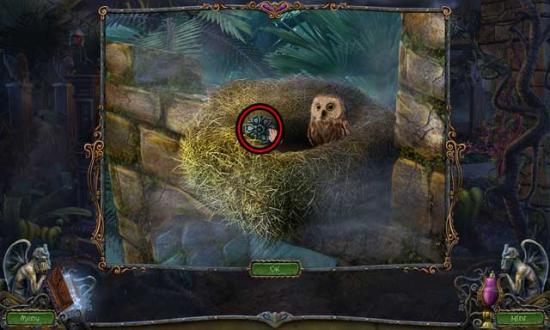
Use the LADDER to reach the nest above the archway on the right, then click for a closer view. Use the CAGED BABY OWL on the nest to release it, then click on the STONE BLOSSOM that appears to add it to your inventory.
Return to the Cactus Garden.
Cactus Garden
Examine the front door of the mansion in the distance, then examine the lock on the door. Use the STONE BLOSSOM on one of the two empty slots, then return to the Sculpture Garden.
Sculpture Garden
Click on the hidden object area at the foot of the statue on the right.
Find the objects listed at the bottom of the screen: their locations are shown below. Items listed in orange require an additional item or action to strike them from the list.
Upon completing the area, the GAS MASK FILTER will be added to your inventory.
Return to the Crossroads.
Crossroads
Take a closer look at the cabinet on the left. Use the GAS MASK FILTER on the GAS MASK, then click on it to add it to your inventory.
Return to the Sculpture Garden.
Sculpture Garden
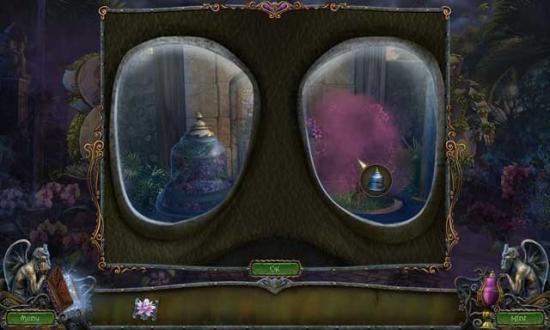
Use the GAS MASK on the pink cloud over the path to the left of the gazebo. Then in the close-up, use the GLASS BELL DOME (x2) on each of the two plants emitting the gas to stop them.
Now that the gas has stopped, you can remove the mask. Take a closer look at the painting ahead to trigger a puzzle.
Perhaps something will happen if you put each brick where it belongs. The solution is shown below.
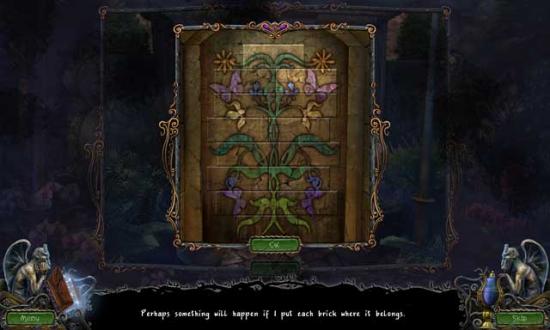
Upon completing the puzzle, click on the STONEPHALANX to add it to your inventory.
Take a closer look at the gazebo. Use the STONEPHALANX on the gap with the others to complete the stone hand. Click on the SCISSORS that appear to add them to your inventory.

Return to the Cactus Garden.
Cactus Garden
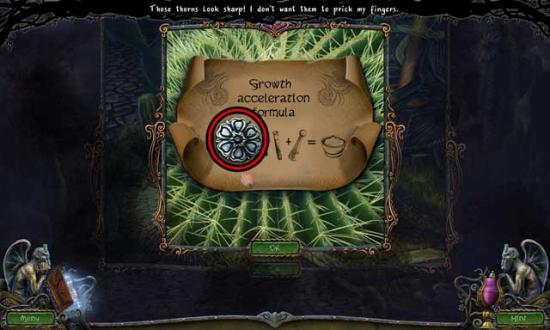
Take a closer look at the cacti beneath the lamp on the right. Use the SCISSORS on the needles of the cactus in front of the cactus chair to cut them, then click on the note for a closer view. Note the Formula, which will be added to your Journal, and click on the STONE BLOSSOM to add it to your inventory.
Take a closer look at the front door of the mansion in the distance, then examine the lock over the door. Use the STONE BLOSSOM on the remaining hole to restore it and trigger a puzzle.
A hidden mechanism controls the stone blossoms, and each blossom rotates the four tiles around it. Restore the picture by clicking on the blossoms: tile starting positions may vary. The final solution is shown below.
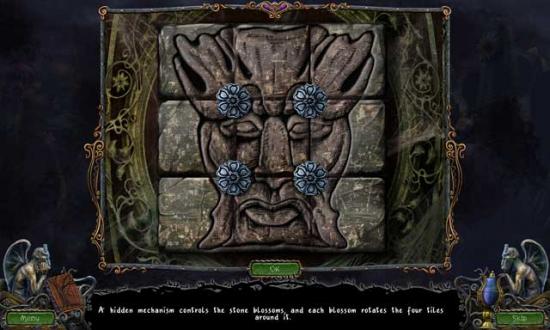
Upon completing the puzzle, click on the doors to open them and proceed inside.
Foyer
Take a closer look at the “no entry” sign lying on the stairs. Click on it to reveal a code on the back, which will be noted in your Journal.
Proceed to the next area via the doorway in the upper right corner.
Deck
Attempt to proceed forward. You will fall through the deck into the Lab Entrance.
Lab Entrance
Examine the basin on top of the cupboard on the left. Click on the WEIGHTS 1/5 to add it to your inventory.
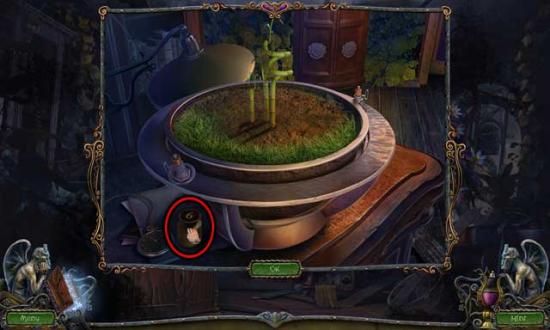
Take a closer look at the radio on the table on the right. Click on the WEIGHTS 2/5 to add it to your inventory.
Proceed forward through the door to the Laboratory.
Laboratory
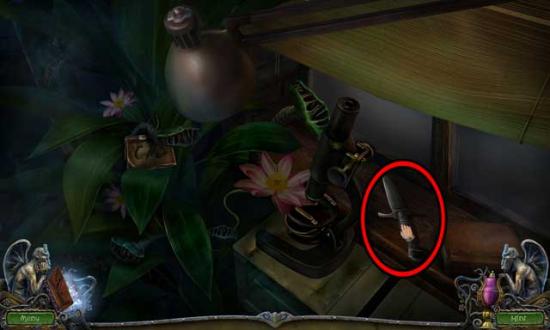
Take a closer look at the microscope straight ahead. Click on the WEIGHTS 3/5 to add it to your inventory, and click on the RAG as well.
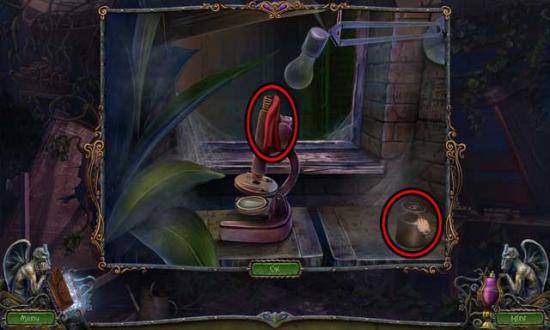
Take a closer look at the lens of the microscope. Use the RAG to clean the lens. Click on the LIGHT BULB that’s revealed to add it to your inventory.
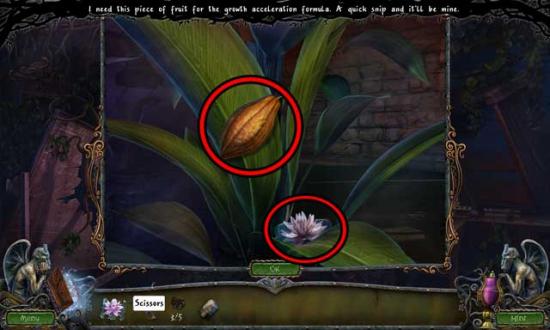
Back in the main area, take a closer look at the yellow plant pod above the broken blackboard. Use the SCISSORS on the pod to cut it off the plant and acquire the EXOTIC FRUIT, then click on the CRYSTAL FLOWER (2) to add it to your inventory.
Examine the basin in front of the blackboard. Note the formula, then click on the WEIGHTS 4/5 to add it to your inventory.
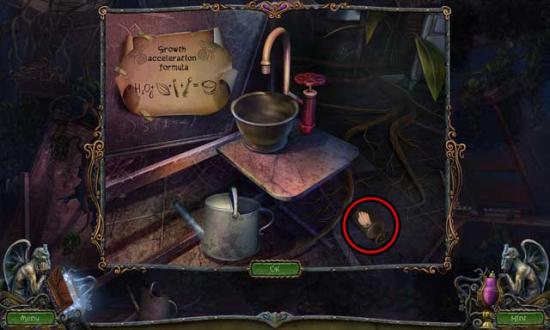
Next, click on the red valve to fill the basin with water. Then, add the EXOTIC FRUIT. Exit the close-up for now.
Back in the main area, examine the table on the right for a closer view. Click on the GARDENING GLOVES to add them to your inventory.
Proceed forward through the door at the back of the room.
Storage Area
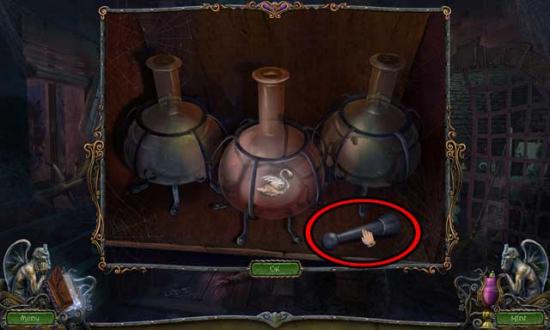
Take a closer look at the cabinet straight ahead. Click on the PESTLE to add it to your inventory and note the swan within the flask.
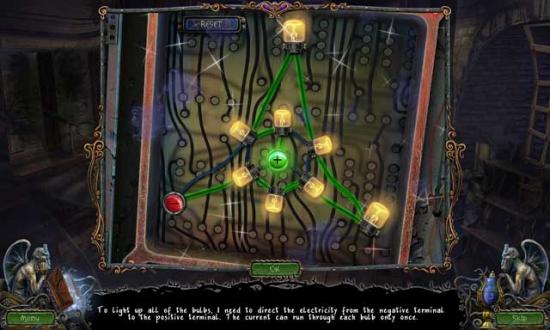
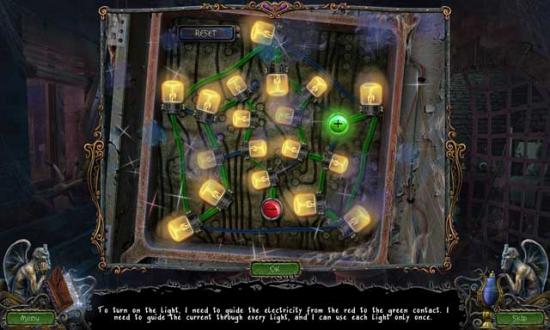
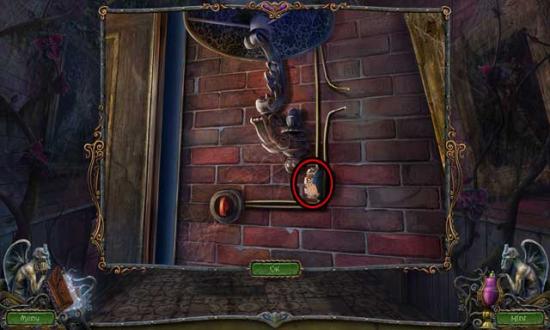
Examine the power box on the left. Use the LIGHT BULB on the empty socket to trigger a puzzle.
To turn on the light, guide the electricity from the red to the green contact. Guide the current through every light, using each light only once. The solution is shown below.
Upon completing the puzzle, examine the red steel drum at the bottom of the screen for a closer view. Click on the final one of the WEIGHTS to add it to your inventory, and note for later that there appears to be something at the bottom of the barrel.
Take a closer look at the corpse on the floor. Click on the RING and the MICROSCOPE LENS to add them to your inventory. We’ll return for the watch later.
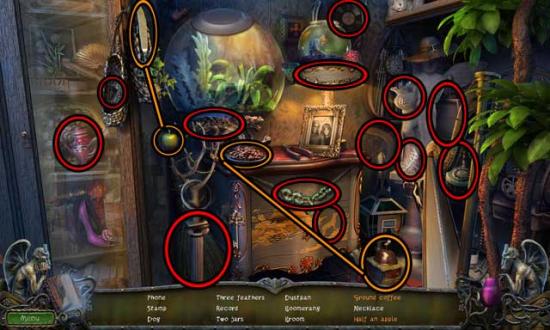
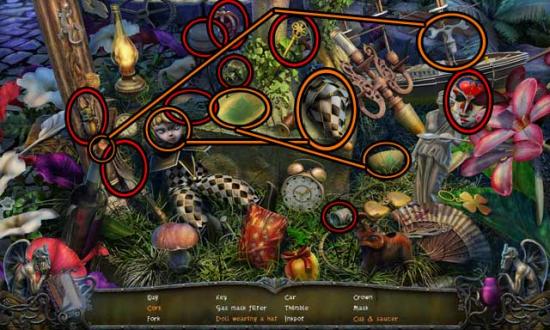
Back in the main area, click on the hidden object area that has appeared over the alcove to the right.
Find the objects listed at the bottom of the screen: their locations are shown below. Items listed in orange require an additional item or action to strike them from the list.
Upon completing the area, the FOUR TEST TUBES OF GROWTH POWDER will be added to your inventory.
Return to the Laboratory.
Laboratory
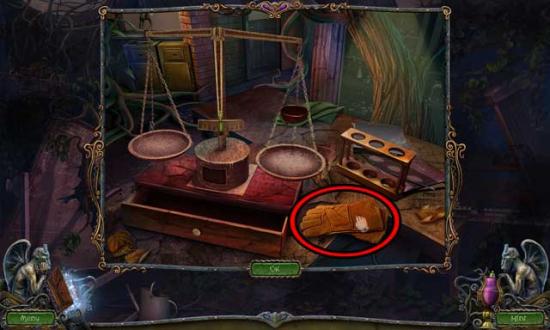
Examine the table on the right. Use the FOUR TEST TUBES OF GROWTH POWDER on the stand on the right, and the WEIGHTS on the drawer at the bottom of the scale to trigger a puzzle.
Weigh each test tube to make sure you choose the right one. Place a test tube on the right scale and weights on the left scale. The solutions are shown below and are as follows:
1)Left test tube= 13 (weights 6, 5, 2)
2)Middle test tube= 7 (weights 2, 5)
3)Right test tube= 11 (weights 6, 5)
Upon completing the puzzle, 11 GRAMS OF GROWTH POWDER will be added to your inventory.
Examine the basin on the left in front of the blackboard again. Use the 11 GRAMS OF GROWTH POWDER on the bowl, then use the PESTLE to mix it all. Click on the GROWTH ELIXIR poured into the watering can to add it to your inventory.
Return to the Lab Entrance.
Lab Entrance
Take a closer look at the basin container on the left. Use the GROWTH ELIXIR on the bamboo plant inside to cause it to grow into a ladder.
Proceed up and out of the room.
Deck
Examine the red plant on the right. Use the GARDENING GLOVES on the plant to remove it, then examine the door. A necessary number wheel is missing.
Return to the Foyer.
Foyer
After a cutscene, you will receive the SCREWDRIVER.
Return to the Lab Entrance.
Lab Entrance
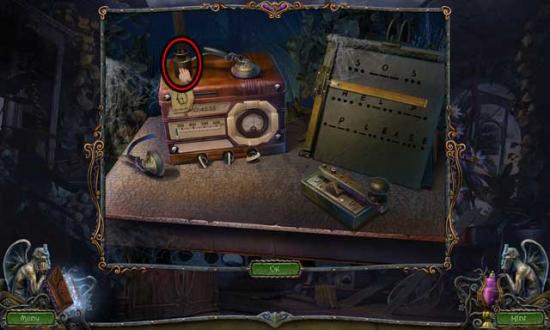
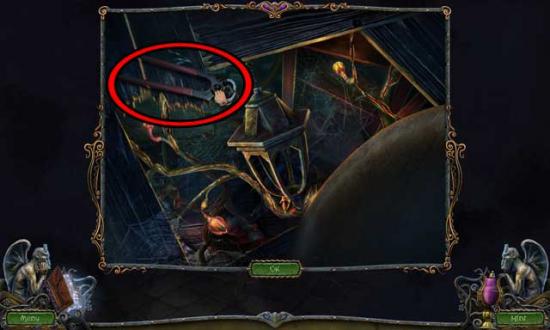
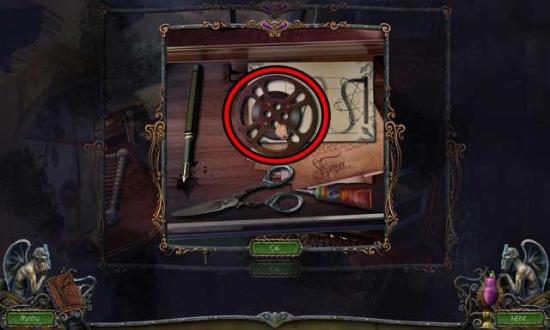
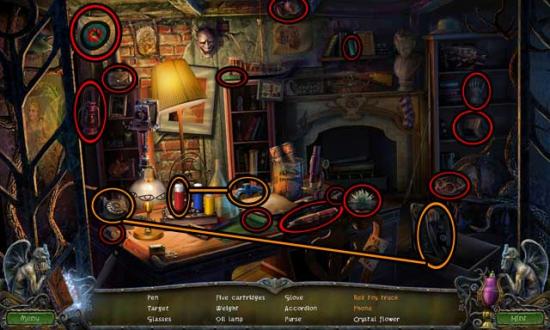
Examine the radio on the table on the right. Use the SCREWDRIVER to remove the front panel of the radio, then click for a closer view: several pieces are missing.
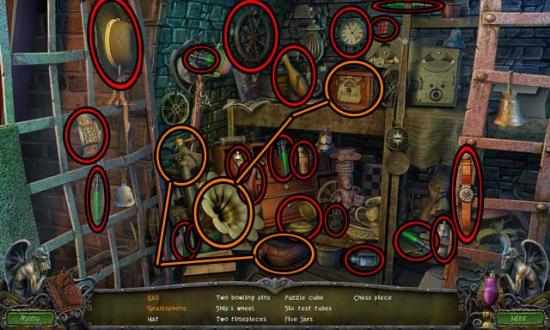
Click on the hidden object area that appears over the plant to the right.
Find the objects listed at the bottom of the screen: their locations are shown below. Items listed in orange require an additional item or action to strike them from the list.
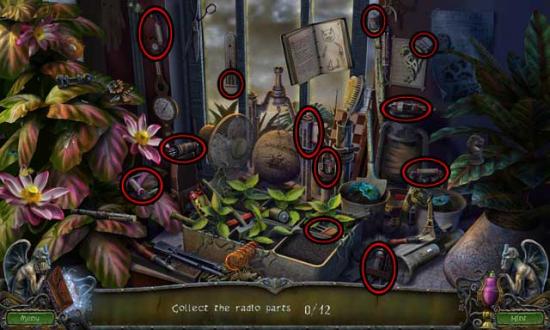
Upon completing the area, the RADIO PARTS will be added to your inventory.
Exit the hidden object area and return to the close-up of the radio.
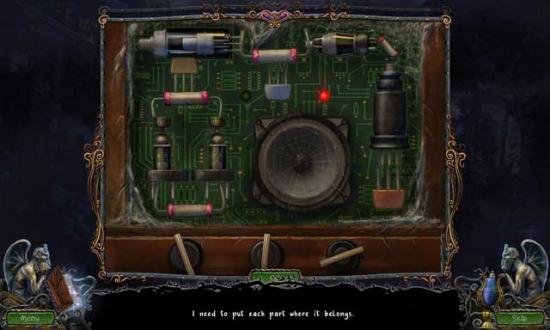
Take a closer look at the front of the radio again. Use the RADIO PARTS on the radio to trigger a puzzle.
Put each part where it belongs. The solution is shown below.
Click on the radio faceplate to put it back where it belongs, then examine the front of the radio. While you don’t know what frequency to tune it to yet, note the time hint shown in the upper corner.
Proceed forward back to the Storage Area.
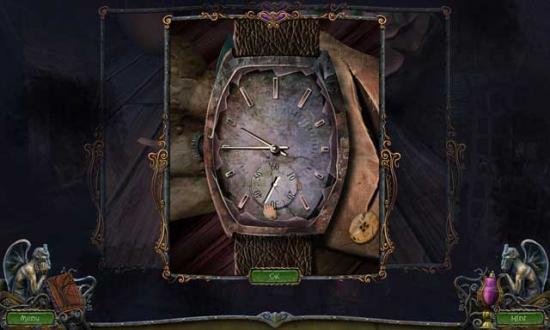
Storage Area
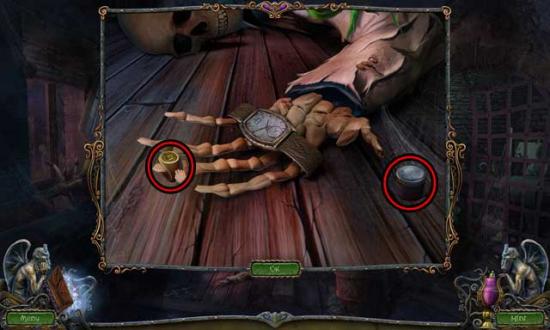
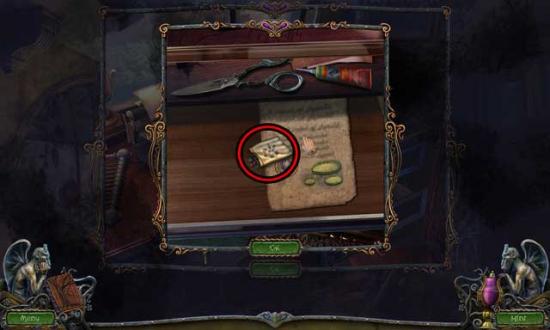
Examine the corpse on the floor, then take a closer look at the watch. Input the correct time (10:45:35) as shown below to open a secret compartment. Click on the note inside, which tells you what frequency to tune the radio to.
Return to the Lab Entrance.
Lab Entrance
Take a closer look at the radio again until you have a close-up of the front panel. Now you know you need to tune it to 500kHz.
Three knobs below control the length of the radio wave. Set it to 500kHz to send the SOS signal. The solution is as follows (press the following buttons in the order as described): -100, +150, -100.
Next, use Morse code to send an SOS. Use a short click where there’s a dot and a long click where there’s a dash. Do not enter anything for the spaces between the words.
Once you’ve completed the puzzle, you’ll receive a message that the SOS was received, and a panel will fall off the front of the radio. Click on the CRYSTAL revealed to add it to your inventory.
Backtrack to the Foyer.
Foyer
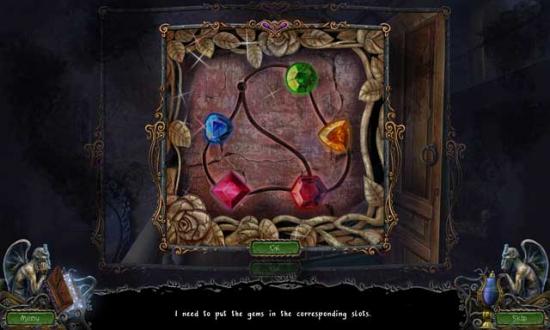
Take a closer look at the doorway on the upper left. Examine the frame on the wall, then place the CRYSTAL in the empty slot to trigger a puzzle.
Put the gems in their corresponding slots by clicking on them to move them to the neighboring empty slot. The final solution is shown below.
Enter through the doorway to the next area.
Hallway
Take a closer look at the lamp hanging on the wall on the right. Click on the NUMBER WHEEL to add it to your inventory.
Enter the door on the right.
Bathroom
Examine the edge of the broken floor for a closer view. Click on the TONGS to add them to your inventory.
Return to the Hallway.
Hallway
Examine the door on the left. Use the TONGS on the nails in the lower left corner, then click on the DOOR HANDLE to add it to your inventory. Use the DOOR HANDLE on the hole in the door to open it, then click on the SAW inside to add it to your inventory.
Return to the Deck.
Deck
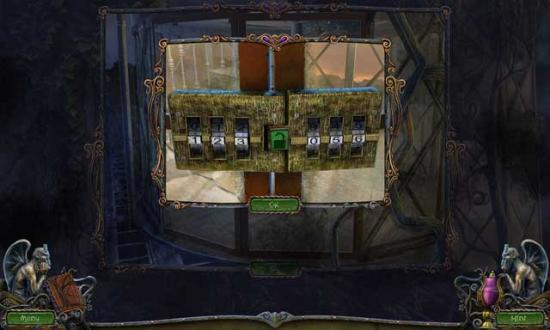
Take a closer look at the door on the right, then specifically at the lock. Use the NUMBER WHEEL on the empty slot to restore the lock to working order, then input the code “1-2-3-0-5-6” to gain entry.
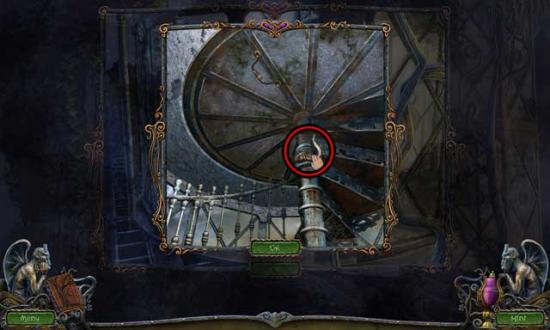
Take a closer look at the winding staircase. Click on the STONE HORN to add it to your inventory.
Backtrack to the Cactus Garden.
Cactus Garden
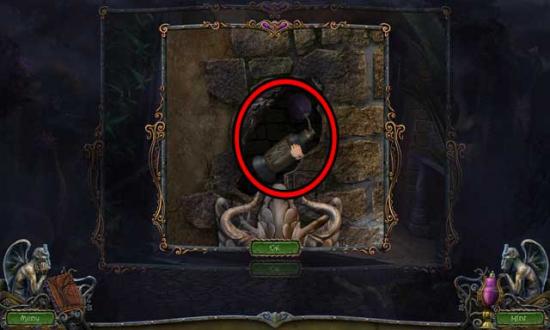
Take a closer look at the doorway of the mansion, then take a closer look at the stone face decor to the left of the doors. Use the STONE HORN on the empty slot on the right to reveal a hidden compartment containing the GLASS CLEANER. Click on it to add it to your inventory.
Return to the Deck.
Deck
Take a closer look at the stairs on the right, then yet another closer look. Use the GLASS CLEANER on the shutter at the top of the stairs to clean it, opening the way into the next area. Proceed up the stairs.
Records Room
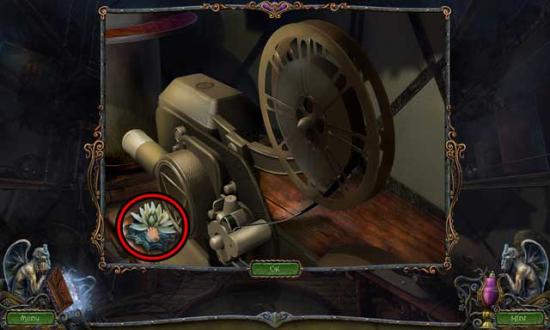
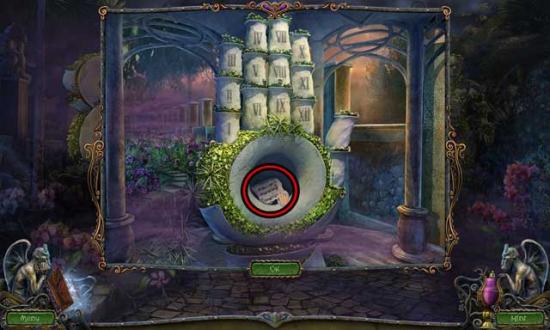
Take a closer look at the projector on the right. Click on the CRYSTAL FLOWER (3) to add it to your inventory.
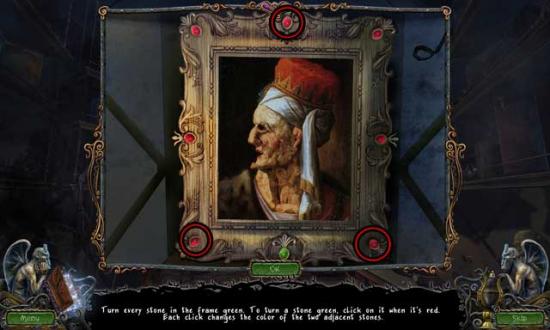
Examine the painting at the back of the room to trigger a puzzle.
Turn every stone in the frame green. To turn a stone green, click on it when it’s red. Each click changes the color of the two adjacent stones. Click on the stones circled below to solve the puzzle.
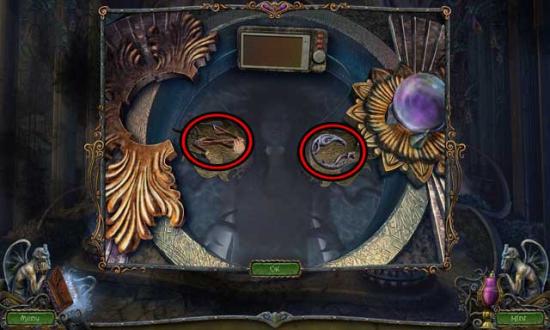
Examine the shelf with the green jars on the right. The jars with the toads in them need to be placed in a certain order. The solution is shown below.
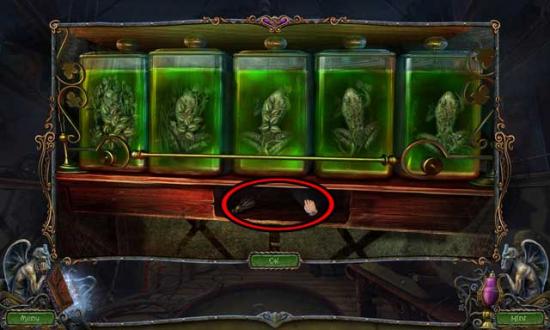
Upon completing the puzzle, click on the PIPE CLEANER to add it to your inventory.
Click on the note on the left pillar for a clue as of what to do with the skeleton.
Return to the Cactus Garden.
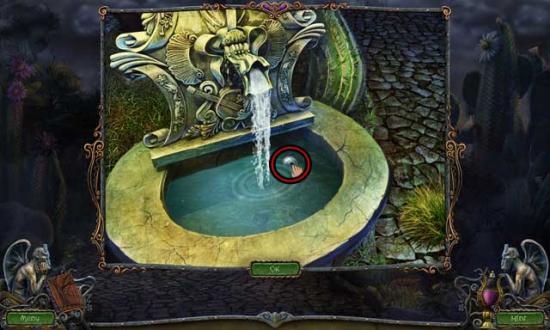
Cactus Garden
Take a closer look at the fountain. Use the PIPE CLEANER on the clogged mouth of the fountain to unclog it and restore the flow of water. Click on the EYE that appears to add it to your inventory.
Return to the Records Room.
Records Room
Take a closer look at the skeleton on the left. Use the EYE on the empty socket to restore it, then click on the HOSE to add it to your inventory.
Return to the Laboratory.
Laboratory
Take a closer look at the basin on the left. Use the HOSE on the sink, then proceed to the Storage Area.
Storage Area
Take a closer look at the red steel drum at the bottom of the screen. Use the HOSE on the barrel to fill it, then click on the ANTIQUE KEY that appears to add it to your inventory.

Return to the Records Room.
Records Room
Examine the chest on the left. Use the ANTIQUE KEY on the chest to open it, then click on the EXTENSION CORD inside to add it to your inventory.
Return to the Foyer.
Foyer
Take a closer look at the door on the upper left. Use the EXTENSION CORD on the plug. You will acquire the SOCKET.
Back in the main area again, take a closer look at the couch on the right. Use the SOCKET on the plug hanging over the couch to restore light, then use the GARDENING GLOVES on the broken sphere to retrieve the DIAMOND-SHAPED KEY and add it to your inventory.
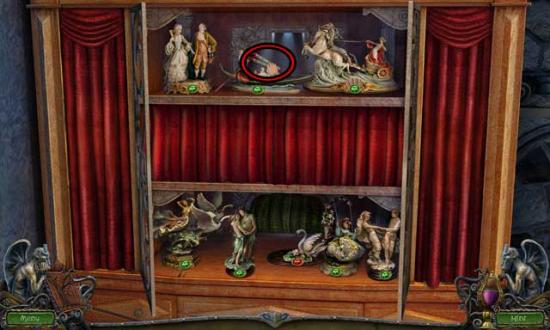
Examine the cabinet on the left for a closer view. Use the DIAMOND-SHAPED KEY on the cabinet to open it. Place the loose figures onto their correct stands: the solution is shown below.
Upon placing those figures in their correct locations, a hidden alcove will reveal itself on the top shelf. Place the lady figure in the alcove on the second display on the bottom shelf, then click on the CHOPSTICKS to add them to your inventory.
Return to the Storage Area.
Storage Area
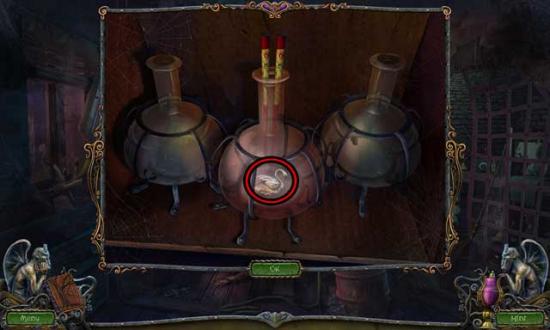
Take a closer look at the shelf in the middle cabinet. Use the CHOPSTICKS on the middle flask to retrieve the PROCELAIN SWAN and add it to your inventory.
Click on the hidden object area that appears over the alcove on the right.
Find the objects listed at the bottom of the screen: their locations are shown below. Items listed in orange require an additional item or action to strike them from the list.
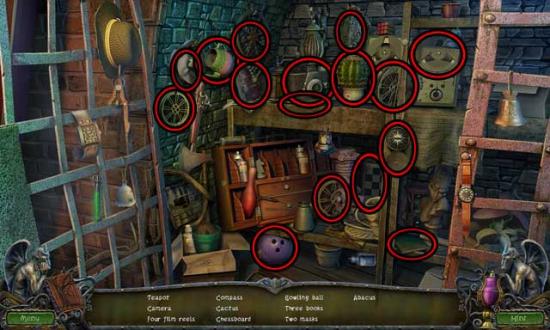
Upon completing the area, the LIGHT BULB will be added to your inventory.
Return to the Foyer.
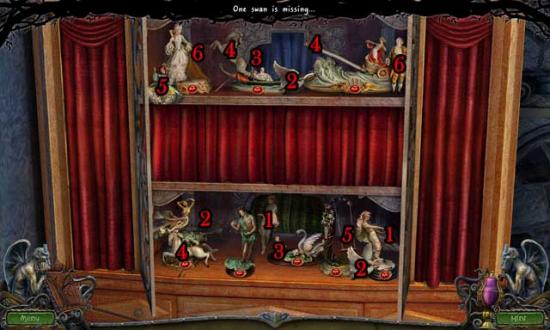
Foyer
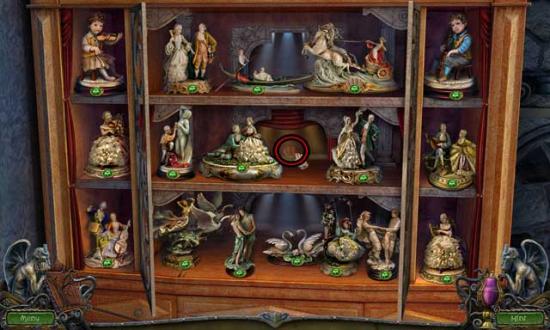
Take a closer look at the cabinet on the left again. Use the PORCELAIN SWAN on the remaining stand to trigger more stands being revealed.
Place all the small missing pieces and figures into their correct locations, which are shown below. Upon completing all successfully, click on the RED BUTTON WITH A LETTER that appears to add it to your inventory.
Go to the Bathroom.
Bathroom
Take a closer look at the gap in the floor. Use the LIGHT BULB on the empty light to restore it, then watch the cutscene that follows.
Examine the mirror above the sink on the left. Click on the RAZOR to add it to your inventory.
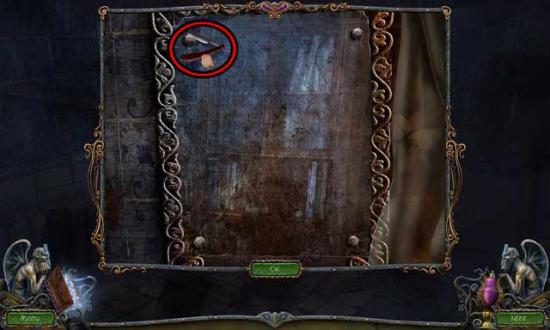
Click on the two planks under the sink and place them over the gap in the floor, then take a closer look at the ventilator fan on the back wall. Use the SAW on the bars to saw them off, then click on the WRENCH to add it to your inventory.
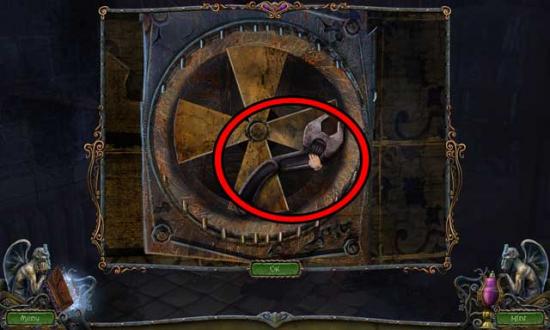
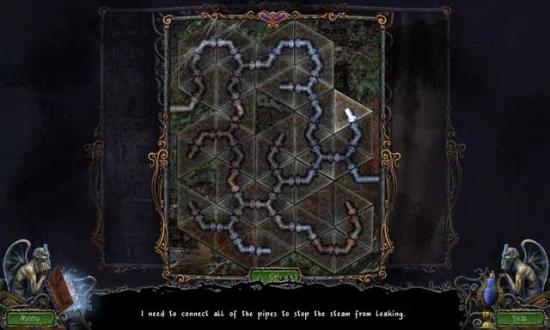
Take a closer look at the mirror above the sink again. Use the WRENCH on the bolts to remove them, then take a closer look at the pipes inside.
Connect all of the pipes to stop the steam from leaking. The solution is shown below.
Return to the Hallway.
Hallway
Take a closer look at the door at the far end of the hallway. Click on the THIN ROPE hanging over the handle to add it to your inventory, then click on the bat on the right and use it on the glass to break it. Click on the handle on the other side to open the door and proceed through to the next area.
Balcony
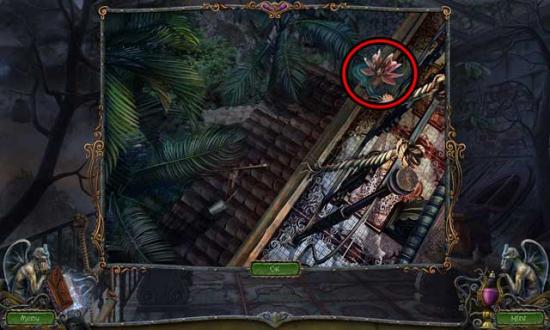
Take a closer look at the rope ladder attached to the railing on the left. Click on the CRYSTAL FLOWER (4) to add it to your inventory.
Examine the telescope stand also along the railing on the left. Click on the LAMPSHADE to add it to your inventory.
Back in the main area again, take a closer look at the small cabinet on the right. Click on the GLUE to add it to your inventory, then use the RING on the gold button on the right.
Examine the broken chair lying under the tree. Use the GLUE on the broken leg, then use the THIN ROPE to secure it.
Take a closer look at the door straight ahead. Place the RED BUTTON WITH A LETTER in the empty slot.
Exit for now and return to the Lab Entrance.
Lab Entrance
Click on the hidden object area over the plant on the right.
Find the objects listed at the bottom of the screen: their locations are shown below. Items listed in orange require an additional item or action to strike them from the list.
Upon completing the area, the WOODEN FLOWER will be added to your inventory.
Take a closer look at the cabinet on the left. Use the WOODEN FLOWER on the left groove to open the cabinet, then take a closer look inside.
Put the flasks in a certain order – the order is shown on the sides of the shelves. The solution is shown below.
Upon completing the puzzle, the shelves will lower, revealing the PALETTE. Click on it to add it to your inventory.
Click on the hidden object area over the plant on the right.
Find the objects listed at the bottom of the screen: their locations are shown below. Items listed in orange require an additional item or action to strike them from the list.
Upon completing the area, the BATTERY will be added to your inventory.
Proceed forward to the Laboratory.
Laboratory
Take a closer look at the blinding light straight ahead. Use the LAMPSHADE on the light, then use the MICROSCOPE LENS on the microscope.
Return to the Balcony.
Balcony
Take a closer look at the monkey holding the rope up in the tree. Use the BATTERY on the monkey, then once it’s gone, click on the THICK ROPE to add it to your inventory.
Examine the rope ladder on the railing on the left for a closer view. Use the THICK ROPE on the ladder, then click on the PAINT BRUSH below to add it to your inventory.
Return to the Hallway.
Hallway
Take a closer look at the painting at the far end of the hall. Use the PALETTE and the PAINT BRUSH on the painting to trigger a puzzle.
You only need five colors of paint to restore the painting – use them to restore the painting. The solution is shown below. Upon completing the puzzle, click on the CRYSTAL FLOWER (5) to add it to your inventory. Don’t forget to also collect the Note hidden inside the same compartment.
Return to the Balcony.
Balcony
Take a closer look at the door at the far end of the balcony to trigger a puzzle.
Select two letters and the device will move them to the right. Spell the word “ARCHIMBOLBO” — the professor’s favorite artist. Click on a letter to move that letter and the one next to it– it’s easiest to move them so they’ll slide into place in even intervals. If it’s odd, select the other side of that letter so it’s grabbed and put back on the right again. It should now be even. The solution is shown below.
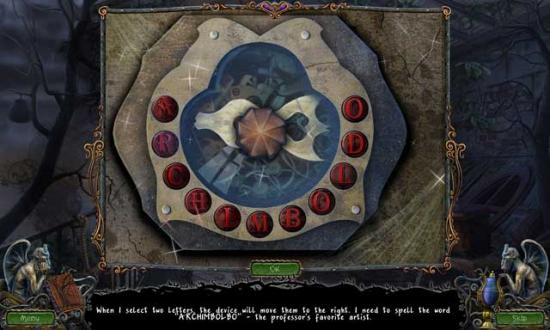
Upon completing the puzzle, proceed through the door to the next area.
Office
Click on the CRYSTAL FLOWER (6) lying on the floor to add it to your inventory.
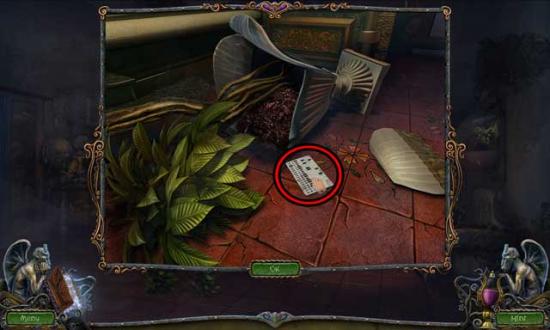
Examine the chair on the right for a closer view. Click on the CANVAS FRAGMENTS 3/10 to add them to your inventory, then use the RAZOR on the pillow to cut it open and collect the RING inside.
Take a closer look at the desk on the left. Click on the CANVAS FRAGMENTS 7/10 to add them to your inventory.
Examine the painting on the back wall. Click on the Journal page to the left of the painting to collect it.
Return to the Balcony.
Balcony
Take a closer look at the small cabinet on the right. Use the RING on the first (and only remaining) gold button to open the cabinet. Click on the WIRE CUTTERS inside to add them to your inventory.
Return to the Office.
Office
Examine the door at the far end of the room. Use the WIRE CUTTERS on the chain holding the door shut to cut it, opening the door. Click on the CANVAS FRAGMENTS 9/10 and the INSULATING TAPE to add them to your inventory.
Return to the Hallway.
Hallway
Take a closer look at the lamp on the wall on the right. Use the INSULATING TAPE on the severed wire to repair it, then click on the red switch to turn the light on. Click on the last CANVAS FRAGMENT to add it to your inventory.
Return to the Office.
Office
Examine the painting at the far end of the room. Use the CANVAS FRAGMENTS on the painting, then place each of the blossoms into their correct locations: the solution is shown below.
Upon completing the painting, examine the safe that appears in its place. Click on the scrap of paper to add it to your Journal.
Take a closer look at the desk on the left, then examine the typewriter to trigger a puzzle.
The typewriter will decode the symbols on the piece of paper you found. Type the symbols on the typewriter to see the letters in English. Remember to hit the space bar when needed. Once you’ve completed this successfully, a valuable clue will be revealed.
Return to the Bathroom.
Bathroom
Take a closer look at the grate beneath the sink. Click on the PLIERS to add them to your inventory.
Return to the Records Room.
Records Room
Take a closer look at the drop-down screen in front of the painting at the far end of the room, then click again for a close-up view. Use the PLIERS on the nail to bend it, triggering a cutscene.
Once the cutscene is finished, take a closer look at the screen again. Click on the MAGNET to add it to your inventory.
Return to the Bathroom.
Bathroom
Take a closer look at the grate beneath the sink again. Use the MAGNET on the grate to retrieve the KNIGHT and add it to your inventory.
Return to the Office.
Office
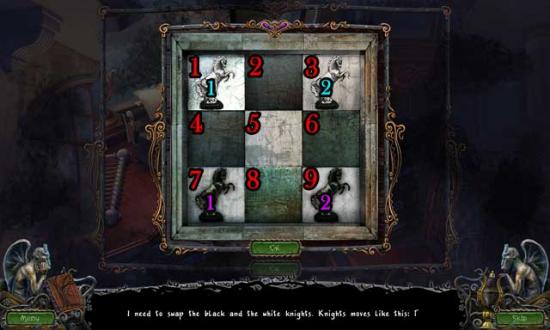
Examine the desk on the left. Click on the chessboard lock at the front of the desk for a closer view, then use the KNIGHT on the board to trigger a puzzle.
Swap the black and white knights. Knights move like this: L. Refer to the screenshot below for the solution, which is as follows:
1)Move Black Knight #2 to position 2.
2)Move White Knight #2 to position 4, followed by 9.
3)Move White Knight #1 to position 8.
4)Move Black Knight #1 to position 6, followed by 1.
5)Move White Knight #1 to position 3, followed by 4.
6)Move Black Knight #1 to position 8, followed by 3.
7)Move Black Knight #2 to position 7, followed by 6, followed by 1.
8)Move White Knight #2 to position 2, followed by 7.
9)Move White Knight #1 to position 9.
Upon completing the puzzle, take a closer look inside the drawer. Click on the FILM REEL to add it to your inventory.
Return to the Records Room.
Records Room
Take a closer look at the film projector on the right. Use the FILM REEL on the projector to trigger a cutscene.
Return to the Office.
Office
Examine the desk on the left again, then take a closer look inside the open drawer. Click the bottom of the drawer to reveal a secret compartment, then click on the Journal Page and the VARIOUS SEEDS to collect them.
Backtrack to the Laboratory.
Laboratory
Take a closer look at the microscope at the other end of the room. Use the VARIOUS SEEDS on the microscope to trigger a puzzle.
Collect two types of seeds – lilies and luminous plants. Do this until all the symbols on the left are crossed off. An example of which seeds you should be trying to find is shown below.
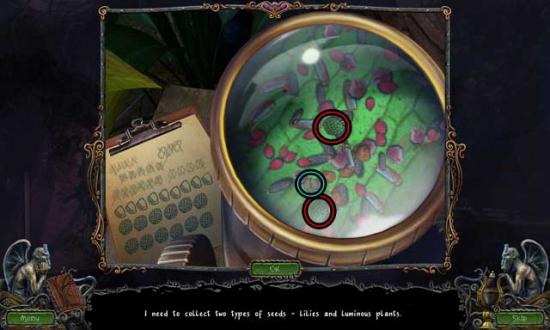
Upon completing the puzzle, you will acquire the PLANTA LUMINOSUS SEEDS and the LILIUM AQUA REGIA SEEDS to be added to your inventory.
Backtrack to the Cave.
Cave
Use the LILIUM AQUA REGIA SEEDS on the water to create a path over to the other side of the Cave, then proceed forward.
Chapel Entrance
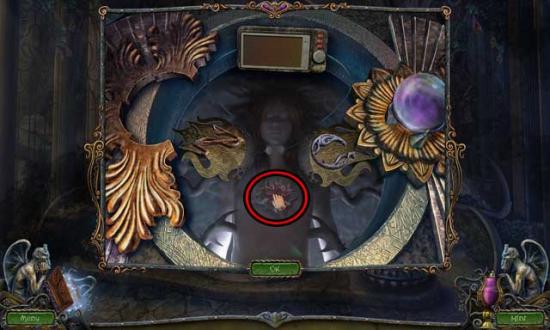
Examine the window above the chapel doorway to trigger a puzzle.
Arrange the blossoms according to the colors in the middle of the puzzle. Click on a blossom to move it to the center, then click on the blossoms around the outside to move them over until the slot for the center blossom is empty. Then, click on the center blossom, which will have rotated into the correct position, to move it into its slot. Repeat this process for all of the blossoms until the puzzle is complete. The solution is shown below.
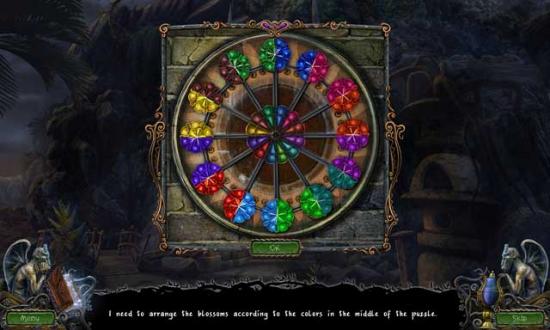
Upon completing the puzzle, click on the DRAGONFLY FIGURINE that’s revealed to add it to your inventory.
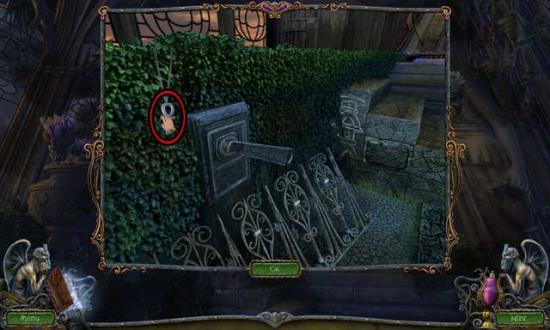
Examine the chapel door. Click on the paper scrap on the left to add it to your Journal.
Proceed forward via the bridge on the left.
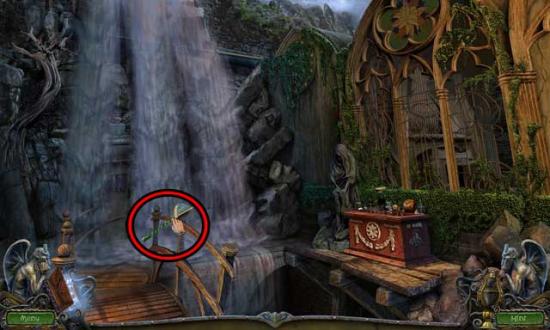
Waterfall
Click on the BUTTERFLY NET to add it to your inventory.
Return to the Cave.
Cave
Take a closer look at the large flowers on the far shore straight ahead. Use the DRAGONFLY FIGURINE on the empty slot to trigger a puzzle.
This is a food chain. When an arrow moves down the food chain, from the predator to its prey, it lights up. Illuminate all of the arrows by putting the creatures into their correct positions. The solution is shown below.
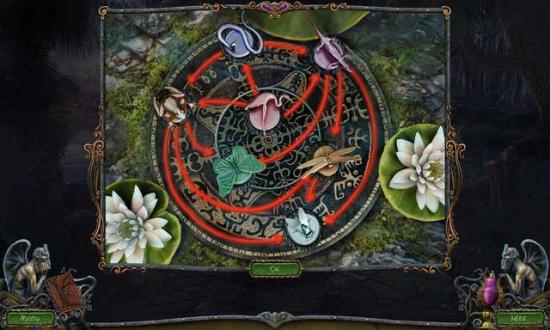
Upon completing the puzzle, click on the PIECE OF THE MOSAIC that’s revealed to add it to your inventory.
Back in the main area, take a closer look at the purple circular pattern on the floor. Use the PIECE OF THE MOSAIC on the empty slot to trigger another puzzle.
Find the correct colors for the mosaic – there’s a clue in your journal. Click on the flowers around the mosaic: each controls the color switch for a specific part of the mosaic. Change the colors so that they match the solution shown below.
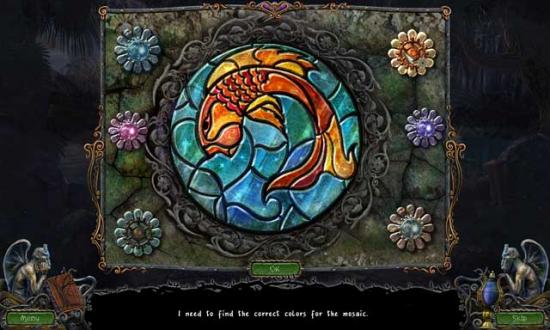
Upon completing the puzzle, a pedestal will appear. Click on it for a closer view.
Click on the DRIED FROG and the CRYSTAL FLOWER (7) to add them to your inventory.
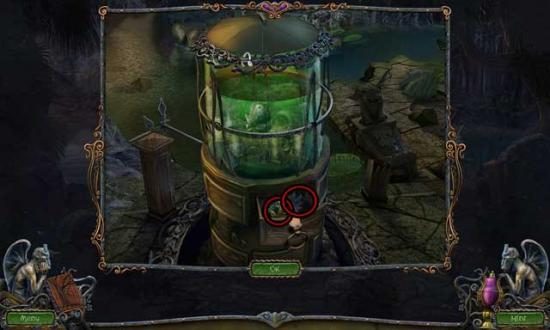
Next, remove the top of the tank and take a closer look inside. Use the DRIED FROG on the fish, then use the BUTTERFLY NET to remove it. Once you’ve removed the fish, take a closer look at the tank again to trigger a puzzle.
Move the tower onto the foundation in the middle. You can only place a small section of tower on top of a larger section. Use the screenshot below as reference, move the following sections to the following foundations: 1-B, 2-C, 1-C, 3-B, 1-A, 2-B, 1-B, 4-C, 1-C, 2-A, 1-A, 3-C, 1-B, 2-C, 1-C, 5-B, 1-B, 2-A, 1-C, 2-B, 1-B, 3-A, 1-C, 2-A, 1-A, 4-B, 1-B, 2-C, 1-C, 3-B, 1-A, 2-B, 1-B.
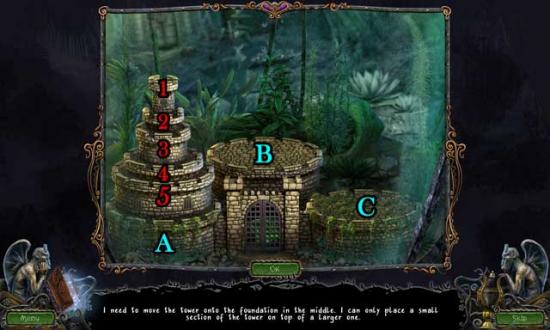
Upon completing the puzzle, click on the GREEN CRYSTAL to add it to your inventory.
Return to the Chapel Entrance.
Chapel Entrance
Take a closer look at the chapel doors. Use the GREEN CRYSTAL on the lock slot to open the doors, then proceed inside.
Chapel
Take a closer look at the lever on the left. Click on DANIEL’S ANKH to add it to your inventory.
Before leaving the close-up, note the positions of the sections on the white sketch on the steps.
Back in the main area, click on the CRYSTAL FLOWER (8) to add it to your inventory.
Proceed forward, deeper into the Chapel.
Altar
Click on the SNAKE CLAMP to add it to your inventory.

Return to the Chapel Entrance.
Chapel Entrance
Click on the sections of the pagoda on the right until they match the white sketch in the Chapel. Refer to the screenshot below for the correct positions.
When the cobra appears, use the SNAKE CLAMP to remove it.
Take a closer look at the middle section again and click on the STONE PALM to add it to your inventory.
Backtrack to the Sculpture Garden.
Sculpture Garden
Zoom in on the gazebo. Use the STONE PALM on the slot in the hand sculpture to complete it, then click on the PART OF STONE MUSIC TABLET that appears to add it to your inventory.
Return to the Altar.
Altar
Take a closer look at the organ. Use the PART OF STONE MUSIC TABLET on the broken section to restore it, triggering a puzzle.
The stone plate contains three melodies: play them correctly. To play a melody, click on the notes that illuminate on the keys. Follow the patterns until all the music lines are glowing on the tablet, completing the puzzle.
Upon completing the puzzle, return to the Waterfall.
Waterfall
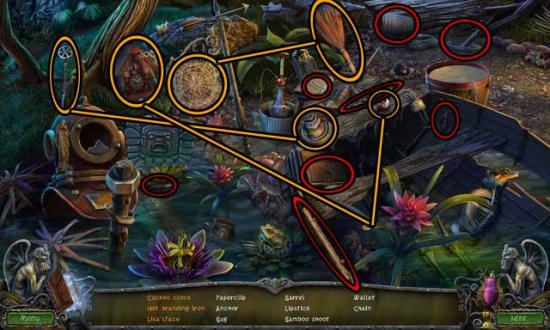
Click on the hidden object area over the sarcophagus on the right.
Find the objects listed at the bottom of the screen: their locations are shown below. Items listed in orange require an additional item or action to strike them from the list.
Upon completing the area, the STAINED-GLASS WINDOW FRAGMENTS will be added to your inventory.
Take a closer look at the stone door ahead. Click on the HANDLE to add it to your inventory.
Return to the Chapel.
Chapel
Take a closer look at the lever on the left. Use the HANDLE on the lever, then click on it to lower a ladder.
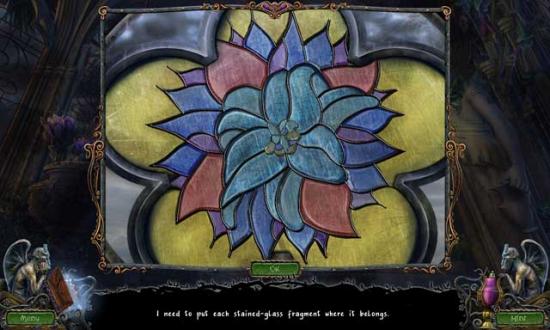
Climb the ladder and take a closer look at the stained-glass window. Use the STAINED-GLASS WINDOW FRAGMENTS on the window to trigger a puzzle.
Put each stained-glass fragment where it belongs. The solution is shown below.
Upon completing the puzzle, you will acquire the ROUND GEM.
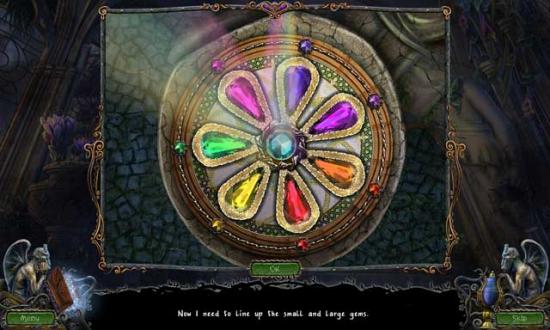
Take a closer look at the bowl in the statue’s hand on the right. Use the ROUND GEM on the slot in the middle to trigger a puzzle.
Line up the small and large gems. Click on a large colored gem to switch the gems on either side of it. Repeat this process, moving the large gems around until they’re all in their correct locations. The solution is shown below.
Return to the Waterfall.
Waterfall
Click on the hidden object area over the sarcophagus on the right.
Find the objects listed at the bottom of the screen: their locations are shown below. Items listed in orange require an additional item or action to strike them from the list.
Upon completing the area, the PUTTY KNIFE will be added to your inventory.
Return to the Chapel.
Chapel
Take a closer look at the section of wall on the left on which the beam of light from the right is shining. Use the PUTTY KNIFE to clear away the moss, then use DANIEL’S ANKH on the slot. Click on the GEARS to add them to your inventory.
Return to the Waterfall.
Waterfall
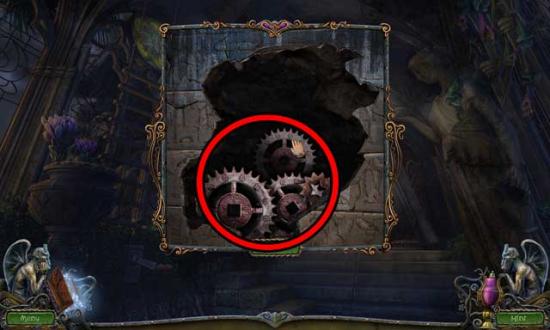
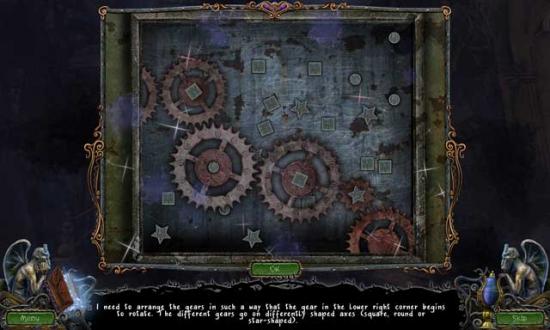
Take a closer look at the stone door, then take a closer look at the panel to the left of the door. Use the GEARS on the panel to trigger a puzzle.
Arrange the gears in such a way that the gear in the lower right corner begins to rotate. The different gears go on differently shaped axis’ (square, round, or star-shaped). The solution is shown below.
Upon completing the puzzle, proceed forward through the open stone doorway.
Elevator (1F)
Click on the hidden object area over the desk at the far end of the elevator.
Find the objects listed at the bottom of the screen: their locations are shown below. Items listed in orange require an additional item or action to strike them from the list.
Upon completing the area, the CRYSTAL FLOWER (9) will be added to your inventory.
Click on the Note hanging on the red box on the right to add it to your Journal.
Take a closer look at the floor of the elevator. Click on each of the boards to remove them, revealing hungry plants below. Click on the Note in the upper left corner to add it to your Journal.
Back in the main area, take a closer look at the control panel ahead on the left. Click on the old access card until it’s removed, where it will be added to your Journal.
Backtrack to the Office.
Office
Take a closer look at the safe at the back of the room. Click on the buttons in the order shown below to open the safe.
Once the safe is open, click on the SPYGLASS at the back of the safe to add it to your inventory.
Leave the box for now and return to the Balcony.
Balcony
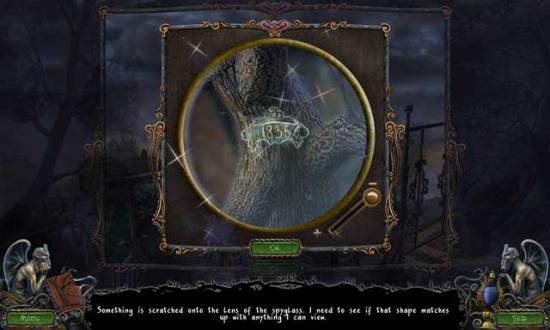
Take a closer look at the telescope stand on the left. Use the SPYGLASS on the stand, then click for a closer view.
Something is scratched onto the lens of the spyglass. See if the shape matches up with anything you can view. The solution is on the tree to the left while zoomed back, and is also shown below.
Upon completing the puzzle, you will now have the code for the box in the safe. Return to the Office.
Office
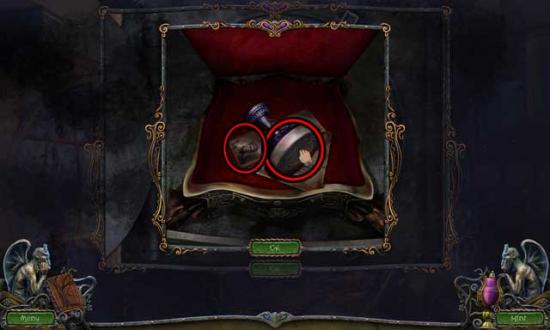
Examine the safe again and click on the box inside for a closer view. Input the code “1835” to open the box, then click on the PROFESSOR’S PHOTO and the PROFESSOR’S STAMP inside to add them to your inventory. You will also acquire a new Journal page.
Examine the desk on the left again, then take a closer look at the inside of the open drawer. Follow these steps:
1) Place the PROFESSOR’S PHOTO in the drawer.
2) Use the scissors to cut the Professor’s Photo.
3) Use the glue on photo square of the card in the upper corner.
4) Place the Professor’s Photo on the card.
5) Place the PROFESSOR’S STAMP in the drawer.
6) Use the Professor’s Stamp on the card.
7) Use the pen to sign the NEW ACCESS CARD, then click on it to add it to your inventory.
Return to the Elevator (1F).
Elevator (1F)
Take a closer look at the control panel again. Use the NEW ACCESS CARD on the slot – you can now control the elevator.
For now, remain on the first floor and click on the hidden object area that appears over the desk.
Find the objects listed at the bottom of the screen: their locations are shown below. Items listed in orange require an additional item or action to strike them from the list.
Upon completing the area, the PAPERCLIP will be added to your inventory.
Go to the control panel and select the 2nd floor as your destination.
Elevator (2F)
Take a closer look at the opening on the other end of the elevator. There appears to be a plant stem here.
Click on the WATERING CAN to add it to your inventory.
Go to the control panel again and select the 3rd floor as your destination.
Elevator (3F)
Examine the new area and take note of the hungry-looking plants.
Go to the control panel and select the 4th floor as your destination.
Elevator (4F)
Take a closer look at the new area, then take a closer look at the planter hanging from the ceiling. Use the PLANTA LUMINOSUS SEEDS on the pot to restore light to the area.
Take a closer look at the dark area above the door/wall on the left. Click on the CRYSTAL FLOWER (10) to add it to your inventory.
Exit and backtrack to the Cactus Garden.
Cactus Garden
Take a closer look at the fountain. Use the WATERING CAN on the fountain to fill it with water.
For now, exit back to the Sculpture Garden.
Sculpture Garden
Examine the purse lying on the ground. Use the PAPERCLIP on the zipper to fix it and open the purse. Click on the SLEEPING PILLS inside to add them to your inventory.
Return to the Cactus Garden.
Cactus Garden
Take a closer look at the fountain again. Use the SLEEPING PILLS on the watering can, then click on it to obtain the WATERING CAN WITH SLEEPING PILLS.
Return to Elevator (2F).
Elevator (2F)
Take a closer look at the stem of the plant. Use the WATERING CAN WITH SLEEPING PILLS on the plant, then take the elevator to the 3rd floor.
Elevator (3F)
Now that the plant is asleep, click on the HARPOON to add it to your inventory.
Take the elevator back down to the 1st floor.
Elevator (1F)
Examine the hole in the floor for a closer view. Use the HARPOON to retrieve the file that’s down amongst the plants, then click on the folder to open it, revealing a Cassette. Use the Cassette on the Tape Recorder on the left, then click on it to obtain the TAPE WITH STEINER’S VOICE.
Exit to the Waterfall.
Waterfall
Click on the hidden object area over the sarcophagus on the right.
Find the objects listed at the bottom of the screen: their locations are shown below. Items listed in orange require an additional item or action to strike them from the list.
Upon completing the area, the SOLID PICKAXE will be added to your inventory.
Take a closer look at the pile of rocks to the right of the stone archway leading to the elevator. Use the SOLID PICKAXE on the rocks, then click on the GEAR to add it to your inventory.
A rock slide will follow. For now, return to Elevator (4F).
Elevator (4F)
Take a closer look at the dark area above the wall on the left again. Use the GEAR on the mechanism to open a secret alcove. Click on the CROWN to add it to your inventory.
Return to the Waterfall.
Waterfall
Take a closer look at the sculpture of the lion’s head that was revealed up high after the rock slide Place the CROWN on the lion’s head, then click on the GLASS SPHERE to add it to your inventory.
Return to the Altar of the Chapel.
Altar
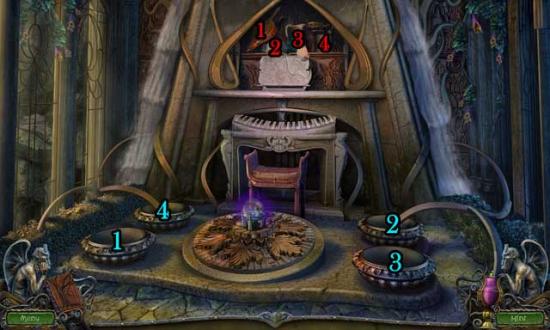
Use the GLASS SPHERE on the stand in the middle to reveal a secret compartment above the organ containing four items. Use each of these four items on the corresponding elemental bowl. The solution is shown below.
Upon completing the puzzle, take a closer look at the compartment that opens up in the floor.
After the cutscene, take a closer look at the compartment again. Talk with the girl inside. Once you’re done talking with her, click on the CRYSTAL FLOWER (11) to add it to your inventory.
Backtrack to the Cabin.
Cabin
Click on the hidden object area over the sunken boat.
Find the objects listed at the bottom of the screen: their locations are shown below. Items listed in orange require an additional item or action to strike them from the list.
Upon completing the area, the CARABINER will be added to your inventory.
Backtrack to the Ravine.
Ravine
Take a closer look at the statue with the slots on the left. One by one, place the 11 CRYSTAL FLOWERS into the slots to cause all of the platforms to rise up again. You can now access the far area. Continue forward.
Chasm
Take a closer look at the rock near the edge of where the walkway drops off. Click on KEVIN’S DEFLATED FOOTBALL to add it to your inventory, then use the CARABINER on the rock and chain.
A rock slide will occur, revealing a puzzle to be viewed in the upper right corner.
Click on the PUMP to add it to your inventory, then click on matching pairs of stones (an example is shown below) until they’re all cleared away.
Once all the stones have been cleared away and the crate hidden beneath has been opened, click on the GILDED AXE and the GUILDED SHIELD to add them to your inventory.
Back in the main area again, take a closer look at the small rock near where the walkway drops off for a second time. Use KEVIN’S DEFLATED BALL on the rock, then use the PUMP to fill it with air. Click on the lever to operate it and restore the missing steps.
Examine the door to the Dome. Place the GUILDED AXE in the hands of the left gargoyle and the GUILDED SHIELD in the hands of the right gargoyle to unlock the door.
Finally, examine the door of the Dome. Use the TAPE WITH STEINER’S VOICE on the voice recognition lock to open it, then proceed inside the Dome.
Dome
Click on the large tree inside for a closer view, then take a closer look at the young man on the right. Click on the page within his hands to collect it.
Exit the close-up back to the main view of the room, then take a closer look at the sprout with the eye that appears: it will give you a valuable clue as to where you should go next.
Backtrack to the Foyer.
Foyer
Take a closer look at the door on the upper left. Click on the door to close it slightly, then click on the cobwebs on the right until all of them are removed. Click on the MUTATION NEUTRALIZER to add it to your inventory.
Return to the Dome.
Dome
Take a closer look at the tree again, specifically the victims highest up. Use the MUTATION NEUTRAILIZER on the largest of the two victims.
Back in the main area, the sprout with the eye will appear again. Click on it to find out where you should go next.
Before you leave the area, examine the suitcase on the left near the roots. Click to open the suitcase, then click on the SHARP KNIFE and the FISHING ROD to add them to your inventory.
Backtrack to the Chapel.
Chapel
Examine the lever on the left. In that close-up, notice the loose stone to the right of the white chalk sketch on the steps. Use the SHARP KNIFE to remove the stone, then click on the MUTATION NEUTRALIZER to add it to your inventory.
Return to the Dome.
Dome
Take a closer look at the tree, specifically the victims highest up. Use the MUTATION NEUTRALIZER on the slot above the larger victim.
Back in the main area, the sprout with the eye will appear again. Click on it to see where to go next.
Return to the Altar in the Chapel.
Altar
Take a closer look at the opening in the floor. Speak with the girl inside, then click on the MUTATION NEUTRALIZERS (x2) to add them to your inventory.
Return to the Dome.
Dome
Examine the tree for a closer view, then take a closer look at the victims on the right. Place both the MUTATION NEUTRALIZERS in the slots for this area. You will have to do it one-by-one.
Once you’ve placed both and you’re back in the main area, the sprout with the eye will appear. Click on it to see where you should go next.
Backtrack to the Waterfall.
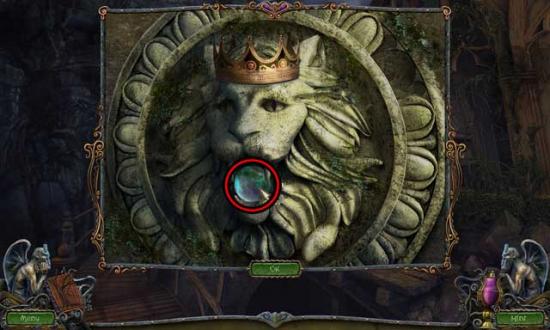
Waterfall
Examine the lion carving high above the rocks. Click on the STONE ELEMENT on the lower left of the close-up to add it to your inventory, then use it on the empty slot in the upper right of the close-up. Click on the MUTATION NEUTRALIZER that appears to add it to your inventory.
Return to the Dome.
Dome
Take a closer look at the tree, then take a closer look at the victims on the left. Use the MUTATION NEUTRALIZER on the lower left slot.
Back in the main area, click on the sprout with the eye when it appears again to discover the final location.
Backtrack to the Stone Staircase.
Stone Staircase
Take a closer look at the gap in the steps further up. Use the FISHING ROD to retrieve the final MUTATION NEUTRALIZER and add it to your inventory.
Return to the Dome.
Dome
Take a closer look at the tree, then specifically the victims on the left. Use the MUTATION NEUTRALIZER on the final empty slot, then watch the cutscene that ensues.
Congratulations! You’ve completed Natural Threat: Ominous Shores!
