
Grow A Garden 2 Base Price List
What's the most valuable crop?![Evomon Best Starter [Leafbun, Blazpup, or Bubble?]](/wp-content/uploads/2026/06/evomon-best-starter.jpg "Evomon Best Starter [Leafbun, Blazpup, or Bubble?]")
Evomon Best Starter [Leafbun, Blazpup, or Bubble?]
Grass-type, Fire-type, or Water-type?![Evomon Tier List [META and BEST Evomon]](/wp-content/uploads/2026/06/evomon-tier-list.jpg "Evomon Tier List [META and BEST Evomon]")
Evomon Tier List [META and BEST Evomon]
The Evomon dream team.
![[Roblox] Evomon Shiny Hunting Guide – Including Prismatic and Pris Shinies!](/wp-content/uploads/2026/06/evomon-shiny-hunting-guide.jpg "[Roblox] Evomon Shiny Hunting Guide – Including Prismatic and Pris Shinies!")
Nat Geo Games: Mystery of Cleopatra Walkthrough
Welcome to Gamezebo's walkthrough for Nat Geo Games: Mystery of Cleopatra. Cleopatra has been one of history's most celebrated and controversial rulers. The fascination continues in this latest game in the National Geographic series. You will play the part of the Queen's Advisor to help solve the mystery surrounding a murder of one of Octavian's informants who have infiltrated the City of Alexandria and perhaps even the Queen's Palace. We hope you find the information pr…


- Prefer Gamezebo on Google

a:1:i:0;a:2:s:13:”section_title”;s:47:”Nat Geo Games: Mystery of Cleopatra Walkthrough”;s:12:”section_body”;s:53173:”
Welcome to Gamezebo’s walkthrough for Nat Geo Games: Mystery of Cleopatra.
Cleopatra has been one of history’s most celebrated and controversial rulers. The fascination continues in this latest game in the National Geographic series.
You will play the part of the Queen’s Advisor to help solve the mystery surrounding a murder of one of Octavian’s informants who have infiltrated the City of Alexandria and perhaps even the Queen’s Palace.
We hope you find the information provided useful whether you use it for general tips or more detailed help when needed as you play the game.
GENERAL TIPS AND HINTS
- This game gives you a choice of two modes of play, neither of which has a timer.
- In Casual Mode the objects you find will automatically go into their proper places at the bottom of the screen or if combined, they will go into your Inventory and placed where they belong when they are chosen from the Inventory. In Casual Mode the Hint button recharges faster.
- In Advanced Mode, you will need to put the objects in their places and the Hint button will recharge slower.
- Other options include Sound and Music volume as well as Full-Screen versa Window Mode and whether you want the Tutorial to be shown during play.
- At the bottom right of the screen below the Hint Button there is a Task Button to help you discover what you need to do next or to remind you what you currently doing.
- You also have an Inventory of objects that can be used within a scene or to give to characters or to combine with other items to form new objects. It is located to the left of the Hint button but is not labeled. When there is more than one item in the Inventory, arrows will appear for you to use to scroll in order to see what is available.
- In the bottom far left corner there is a Journal which will give you interesting information about the characters and locations so is worthy of checking out for it’s historical value.
- Sparkles are an indication that you need to investigate something so click on the object to find out why. Sometimes it will only be informative but if you skip it, you may have missed something important that you were suppose to do or learn for future reference.
- Not all objects to find will be in silhouette at the bottom of the screen. Many times the silhouette will combine to form a complete object which will go into your Inventory. Once used, they may not go away because you may be called upon to use them again in another scene.
- Some sparkles will produce what I’ve called a circlet which is an object pop-up contained within an Egyptian necklace showing items to find.
- Sometime you may need to complete another object at the bottom of the screen to go into your Inventory and used for the circlet.
- When you need to do something, your cursor will get an attachment such as an eye, a hand or a foot.
§ The eye is to investigate or for extra information. Sometimes you will get an eye to investigate and a hand to take the item.
§ The hand wants you to take something or can be used to indicate more information is coming in a dialog.
§ The foot tells you to exit to another location and shows you the way when you get close to the sparkles.
- When there is an important discovery, there will be clues that you will need to check out from a previous scene. These remembrance scenes will have a red glow around them and you will visit the past location with several items to place into that scene.
- If you hold your cursor over an object, it will tell you what the object is which may help you to better identify it.
- There are mini games along the way which you can play or Skip at your option. If you choose to play, help is available below.
- This is the end of general tips…….what comes next is the play by play to help you get from the beginning to the end of the game and to find out who the informer is.
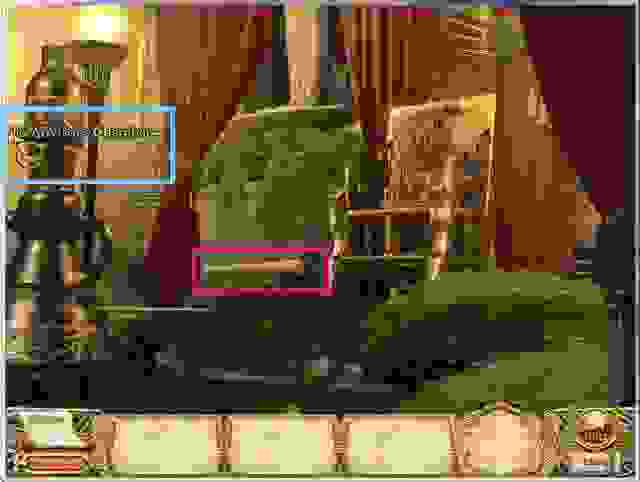
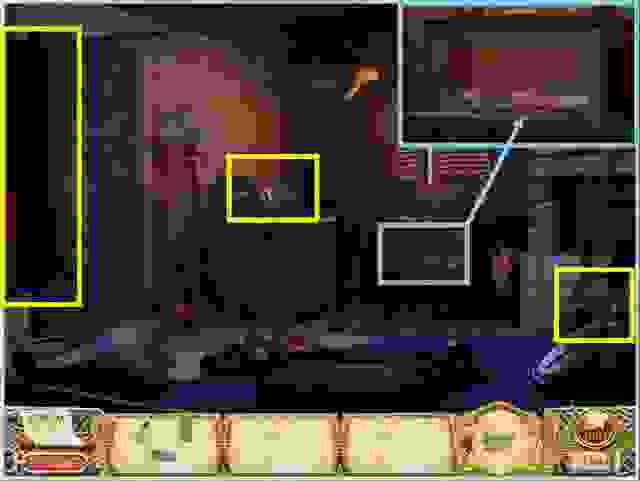
ADVISOR’S CHAMBERS AT THE PALACE

- Click on the sparkling scroll to find you’ve been summoned to the Throne Room to see the Queen.
- Click on the sparkling curtain to the far right for a reminder that you need to get suitably dressed for your meeting with the Queen.
- Pick up the articles of clothing shown in silhouette at the bottom of the screen.
- Exit to the Courtyard through the curtain to the right.
COURTYARD AT THE PALACE
- As you travel through the Courtyard on your way to the Throne Room, you need to pick up the sparkling scroll that will then go into your Inventory.
- Exit through the sparkling doors to get to the Throne Room.
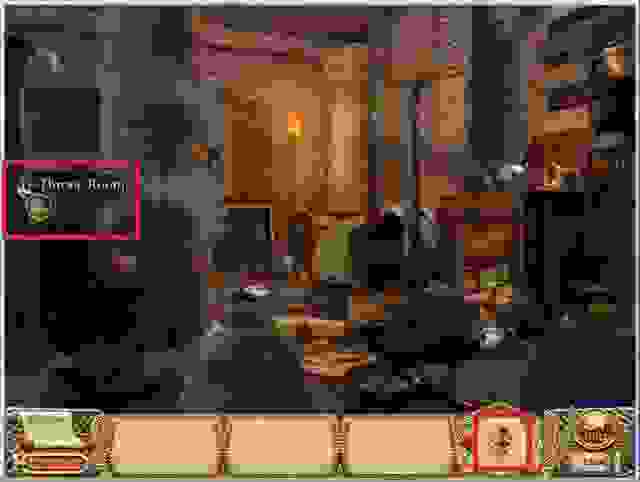
THRONE ROOM IN THE PALACE
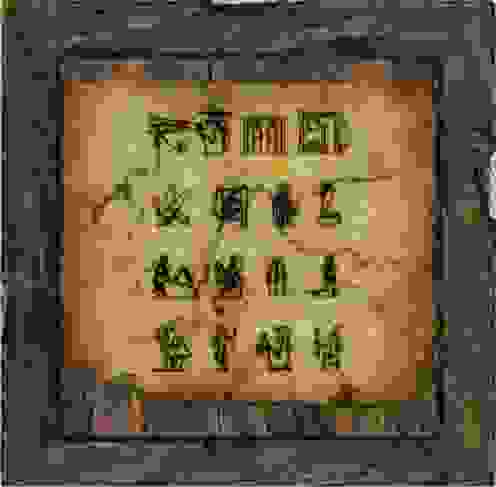
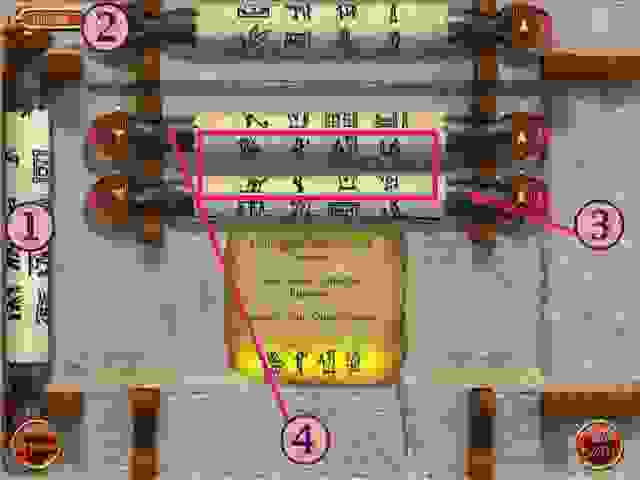
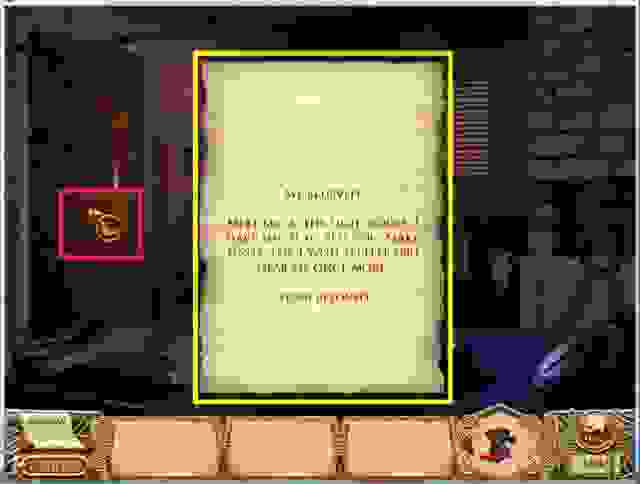
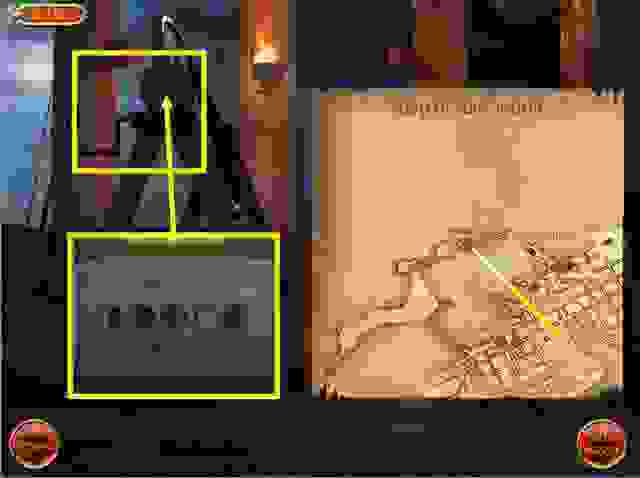
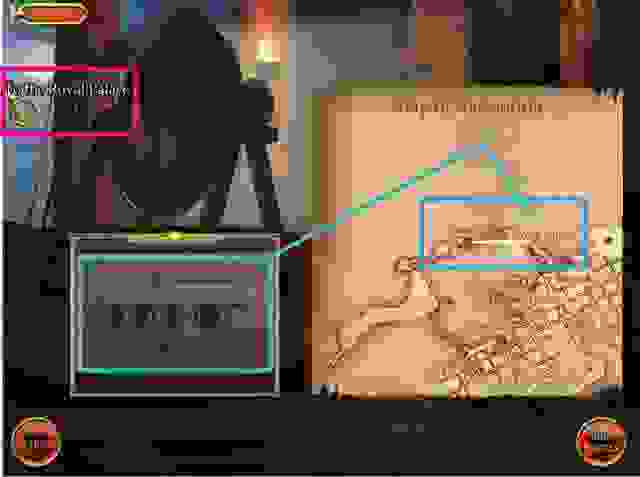
- After speaking with Cleopatra you learn that she also received a scroll. Compare the two scrolls to find out what is the same in both of them.
- Click on an item on the left scroll and then the matching item on the right scroll.
- Click on the scroll marked in magenta.
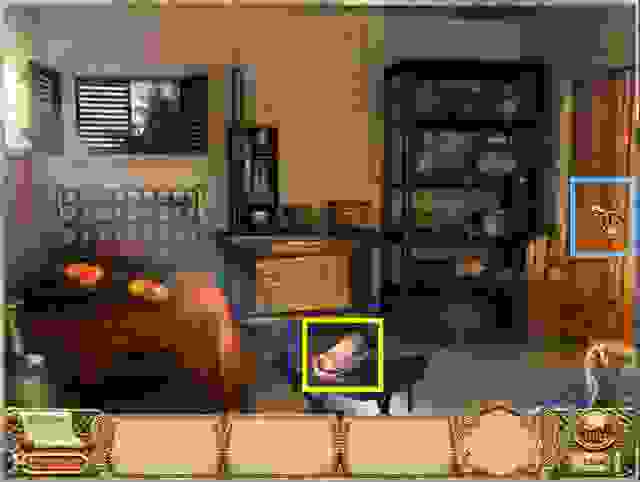
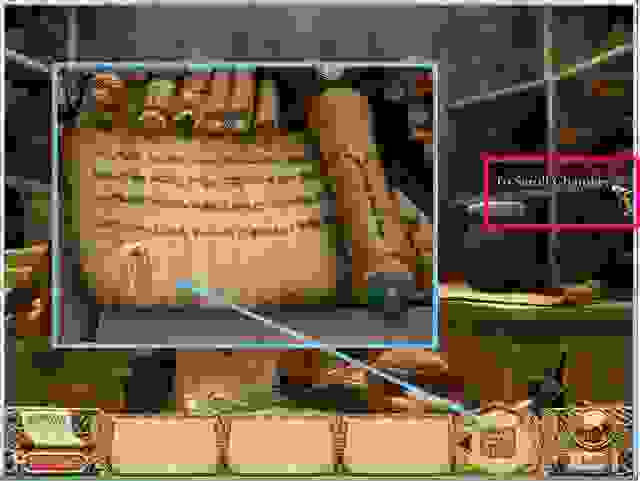
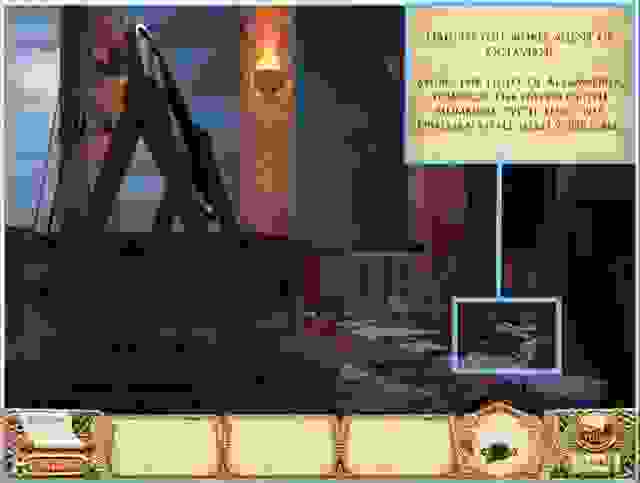
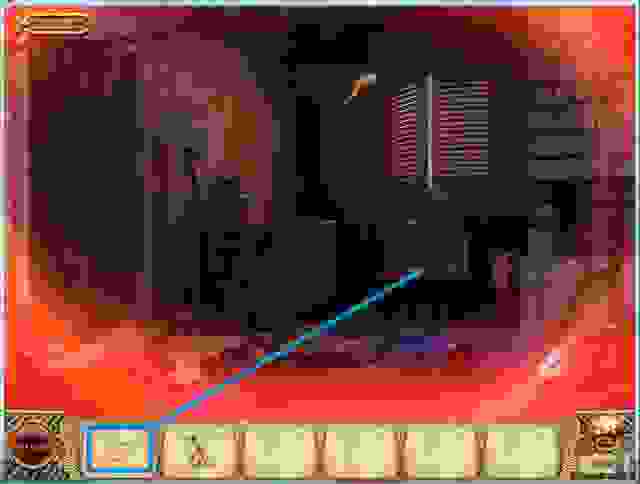
- Cleopatra wants you to investigate the incident that happened at the docks so you need to stop at to your chambers to pick up a few things…..exit to the left where it is marked.
- Per the Queen’s request, Kathya, her handmaiden, will be accompanying you to assist.
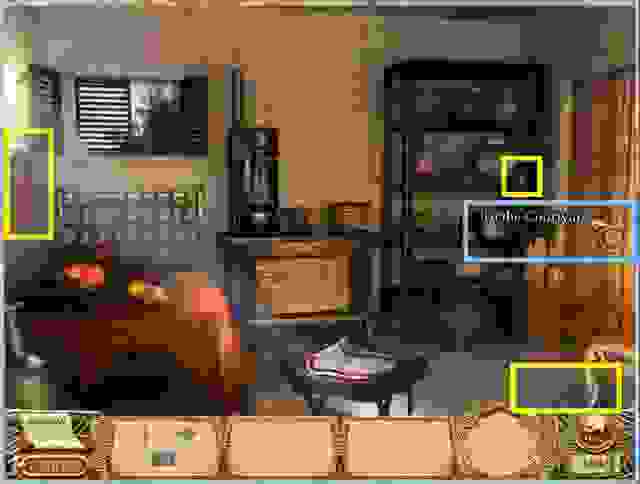
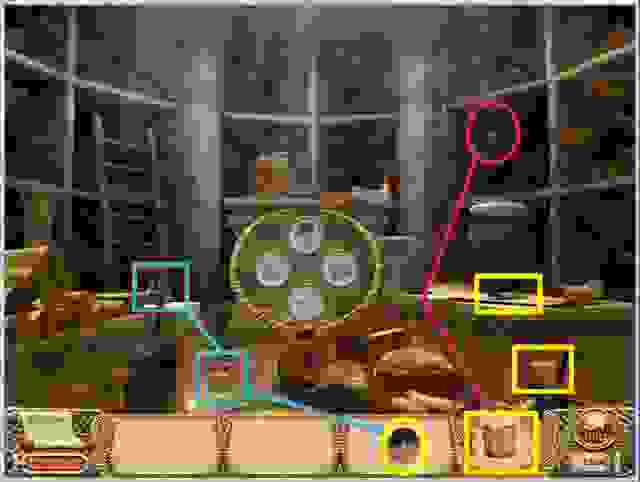
ADVISOR’S CHAMBERS AT THE PALACE
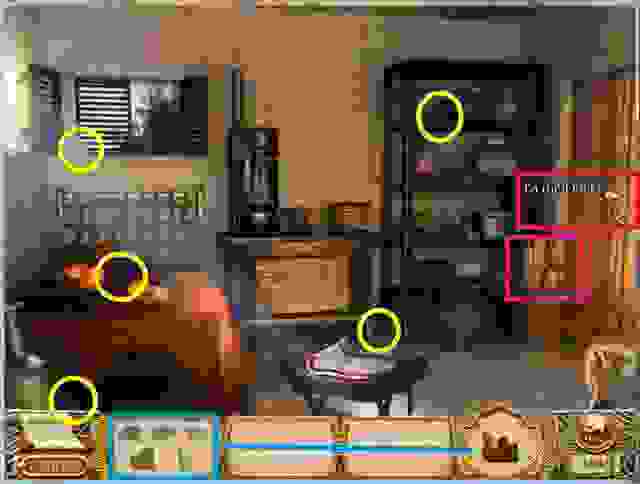
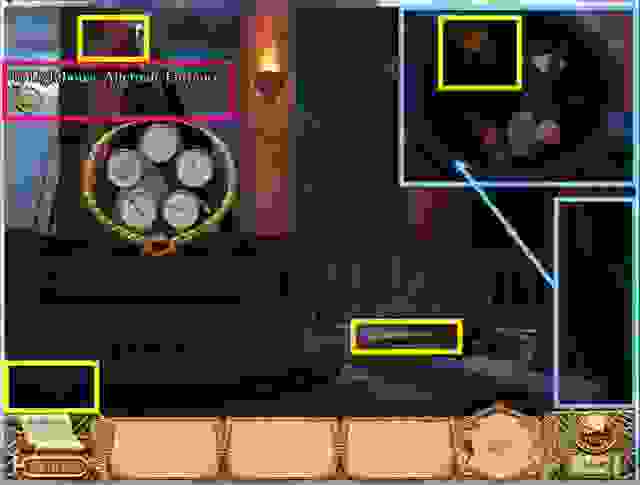
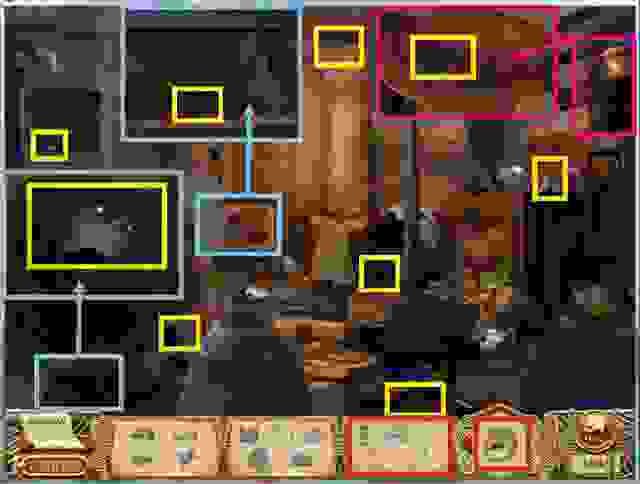
- Investigate the sparkling scrolls in the basket on the right for information and then exit out of the scroll.
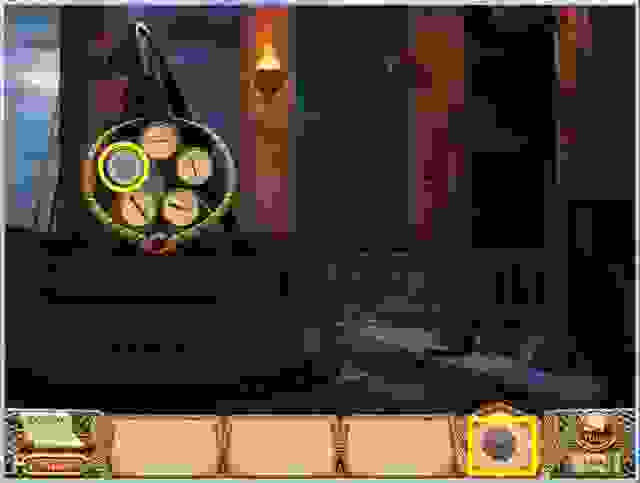
- Pick up the circled items. The coins and bag will go into your Inventory and bring up a mini game.
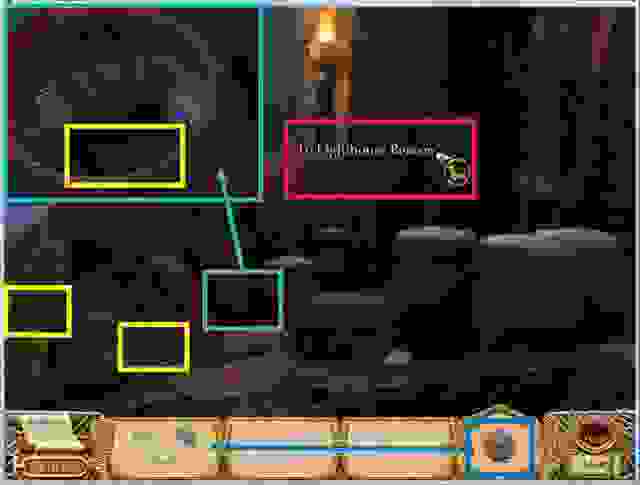
- After the mini game, you will return to the chambers to exit to the Docks through the curtain on the right where you see the marking.
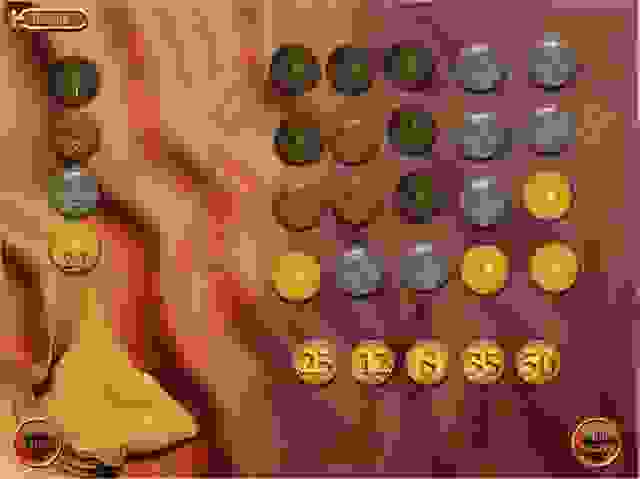
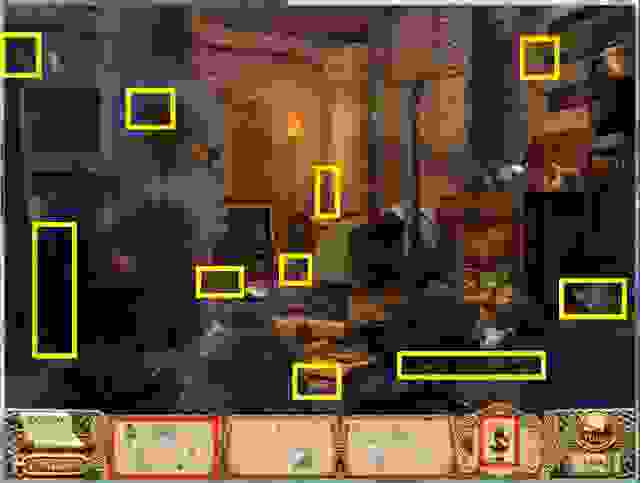
- The goal is to collectively pick up 4 of the scattered coins to total each of the numbered coins in the bottom row and place them on that coin.
- I’ve lined up one possible solution of the 4 coins you can choose for each total……I found there are variations so go for whatever you like.
- 25 = 20 + 3 + 1 + 1
- 12 = 5 + 3 + 3 + 1
- 8 = 5 + 1 + 1 + 1
- 35 = 20 + 5 + 5 + 5
- 50 = 20 + 20 + 5 + 5
- When solved the coins will go into the pouch in the lower left corner and then into your Inventory.
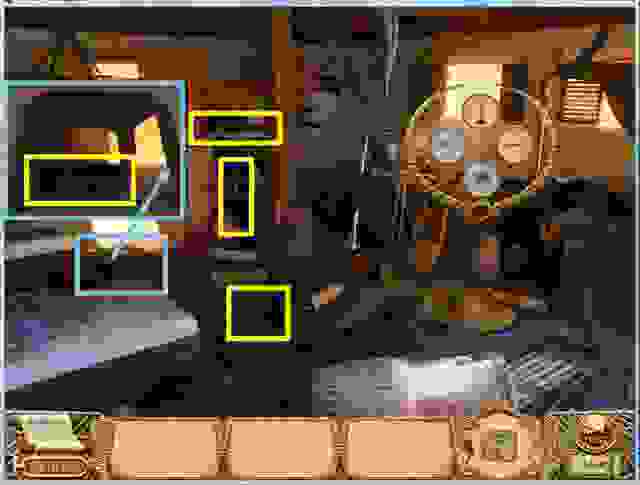
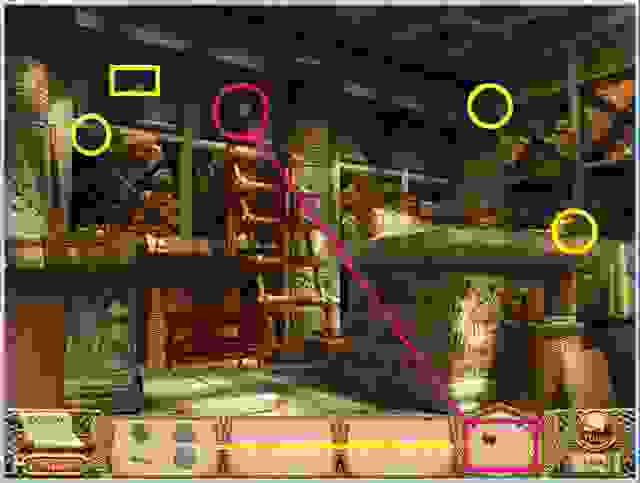
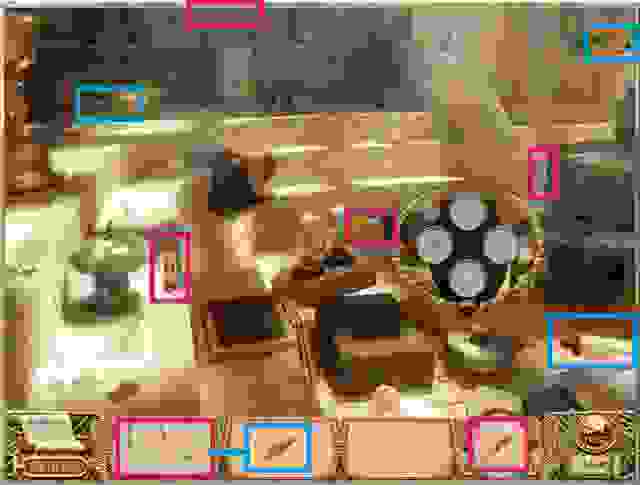
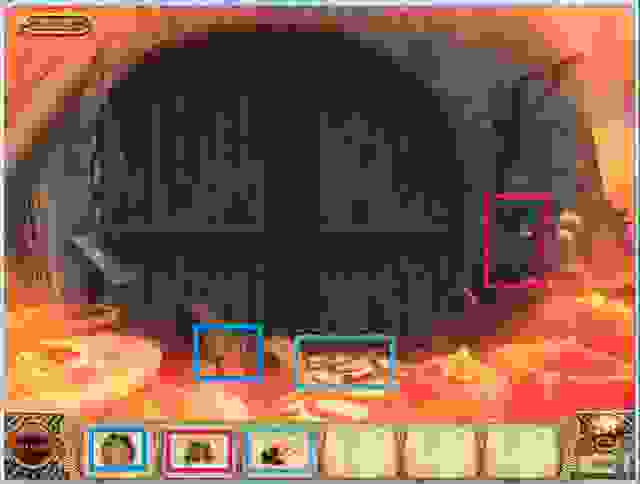
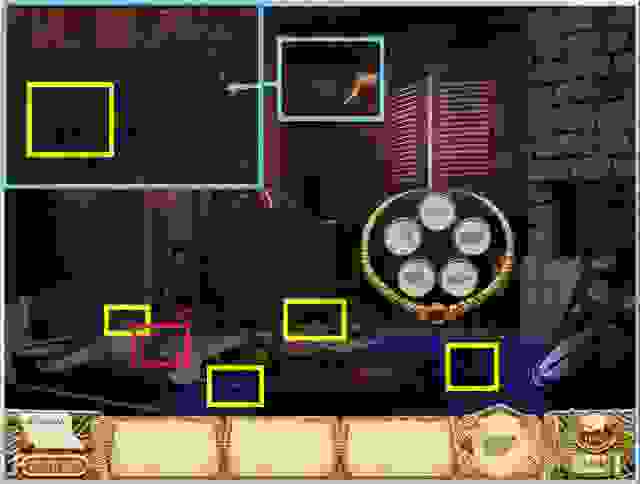
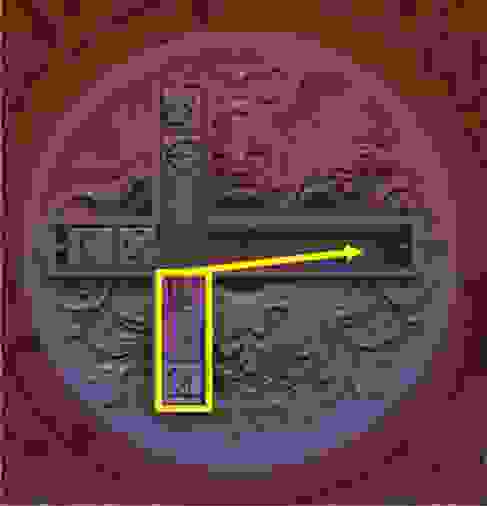
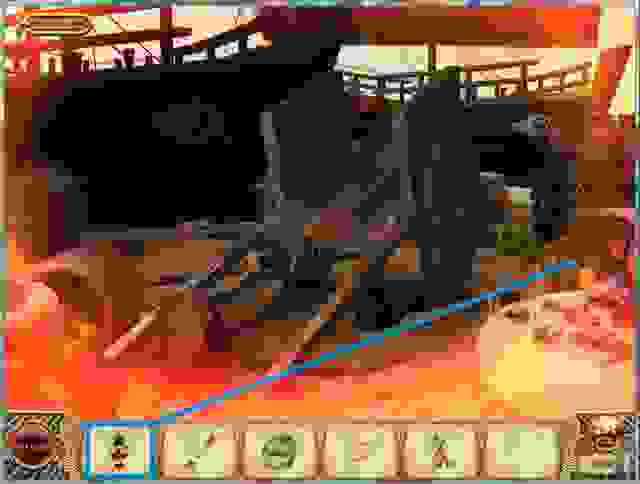
GATE AT THE DOCKS
- A map of Alexandria will occasionally appear for you to choose a destination. Follow the sparkles and choose the Docks.
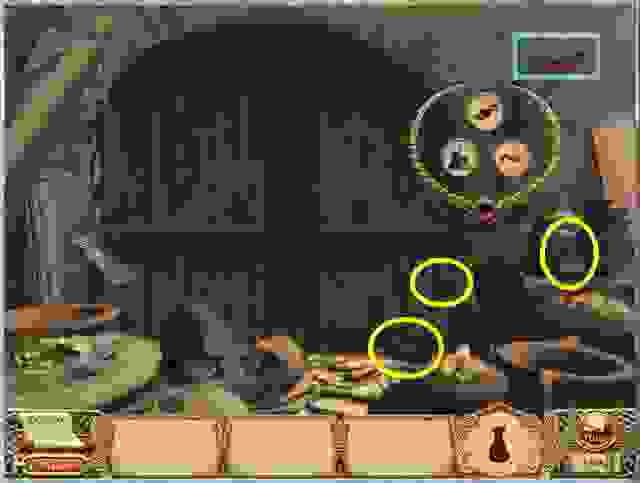
- Click on the blue square to find out that the bell is missing. It will bring up a circlet with the items you need to find to restore the bell.
- The silhouette of the next item will appear after you find the one requested and rotates clockwise.
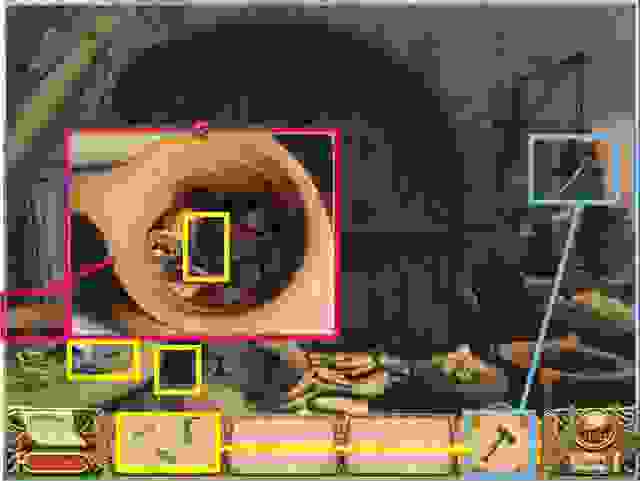
- You need something to strike the bell so collect the 3 pieces that will turn into a hammer.
- Click on the terra cotta container on the left and it will open to give you one of the pieces of the hammer as shown in the insert.
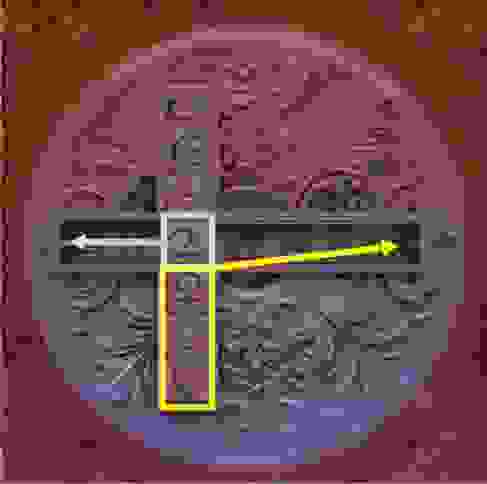
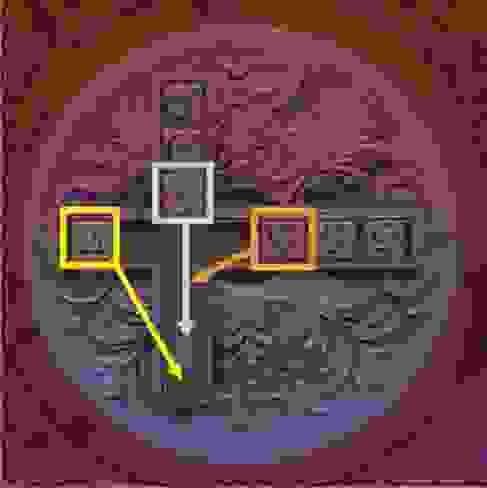
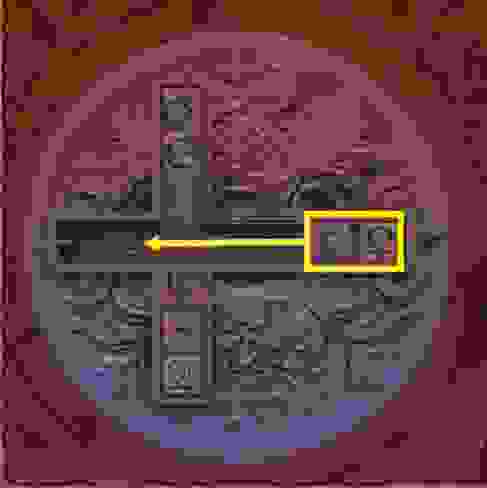
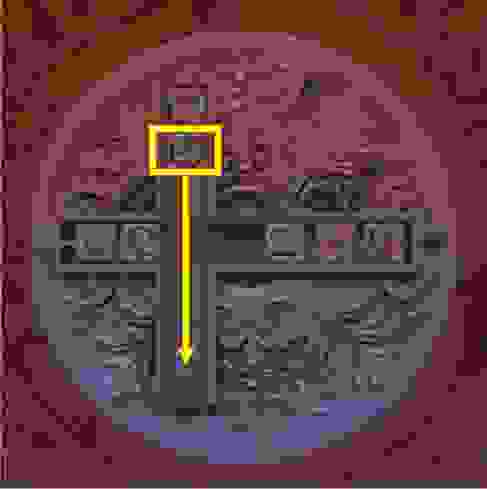
- Once the hammer is assembled, strike the bell and a mini game will appear.
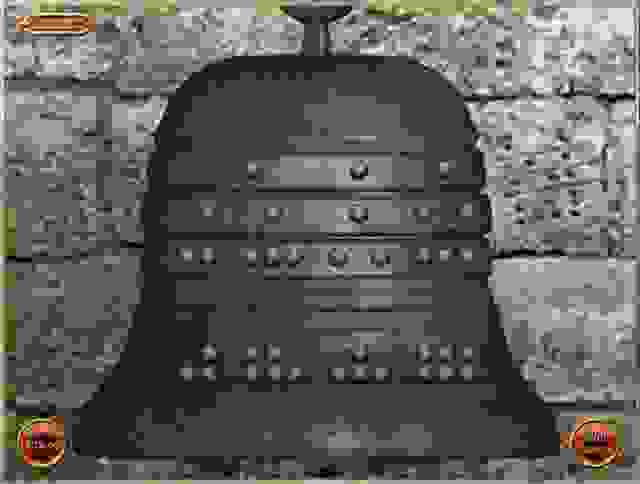
- Rotate the 3 top rings so that the number of dots in the rings matches the pattern shown on the bottom of the bell.
- It doesn’t matter which row the dots are in as long as the pattern is correct.
- Hit the bottom of the bell with the hammer that shows up to help you check if the dots are in the right place. The dots will turn green if you did a good job.
- There may be more than one solution but the above is the solution that worked for me.
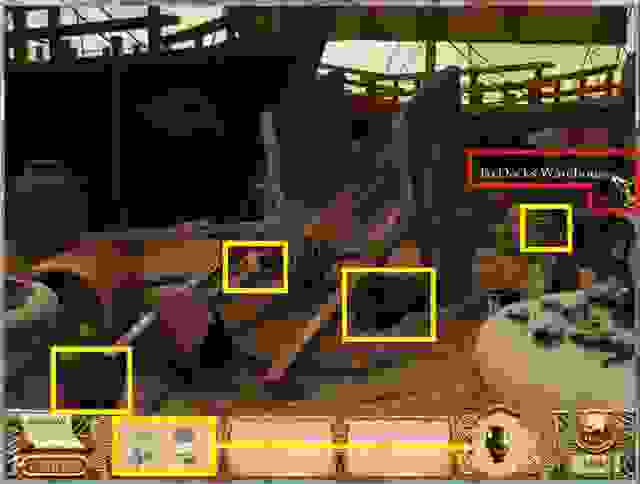
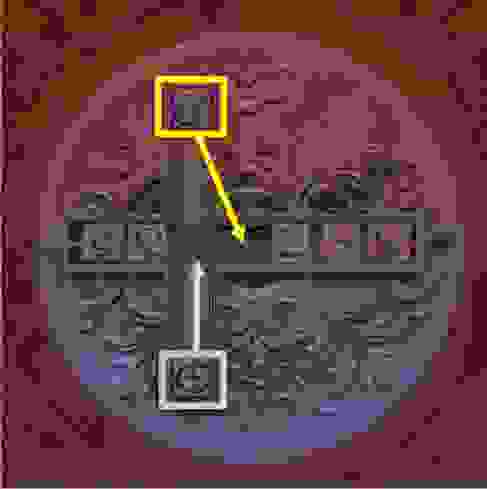
WHARF AT THE DOCKS
- During your conversation with the Dock Master you will figure out you need to give him the sack of coins in your Inventory so you can enter the wharf.
- Go through the sparkling doors to the Wharf.
- Click on the magenta square to investigate.
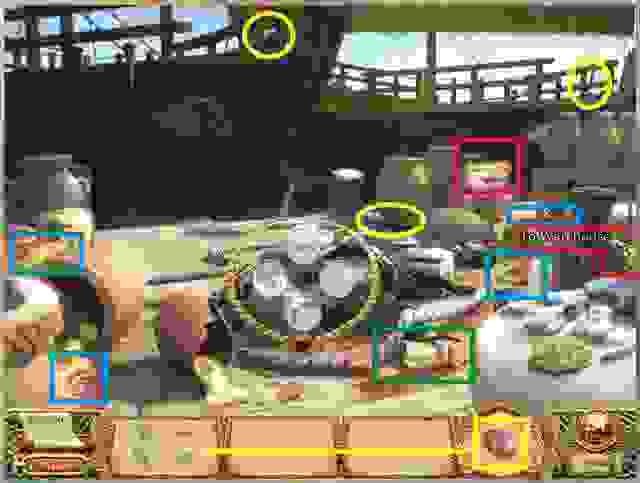
- There is a dead man in the middle of the wharf………click on his sparkling shoulder to bring up a circlet of items to find which are circled in yellow.
- The shield fragments are the blue squares. When you collect them they will to go into your Inventory to be used in the circlet.
- Click on the scroll in the man’s hand. It will shatter and fly all over the wharf.
- Exit far right by the red arrow to go to the Warehouse in search of the scroll fragments.
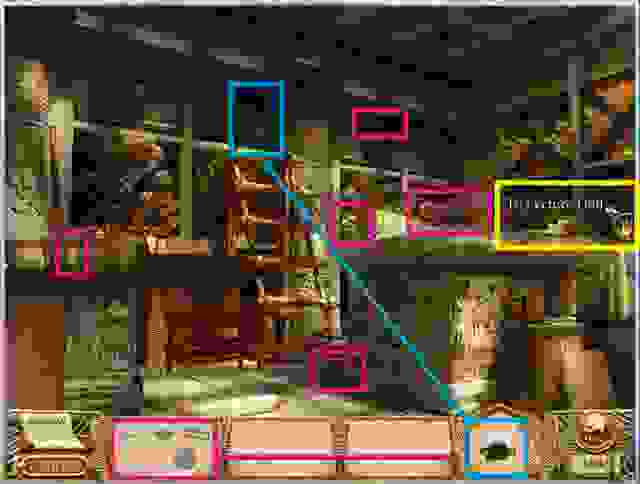
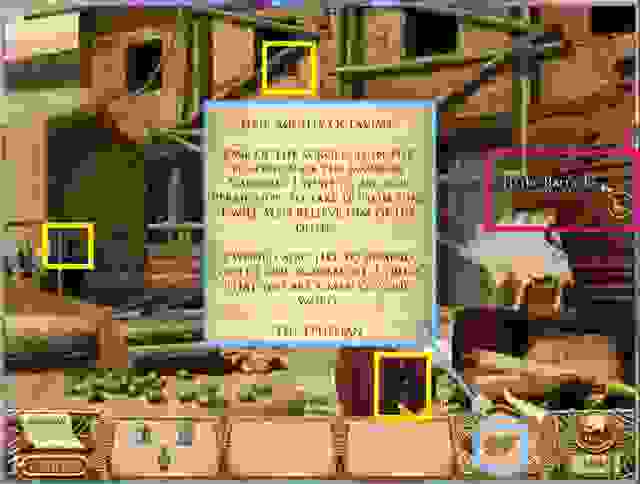
WAREHOUSE AT THE DOCKS
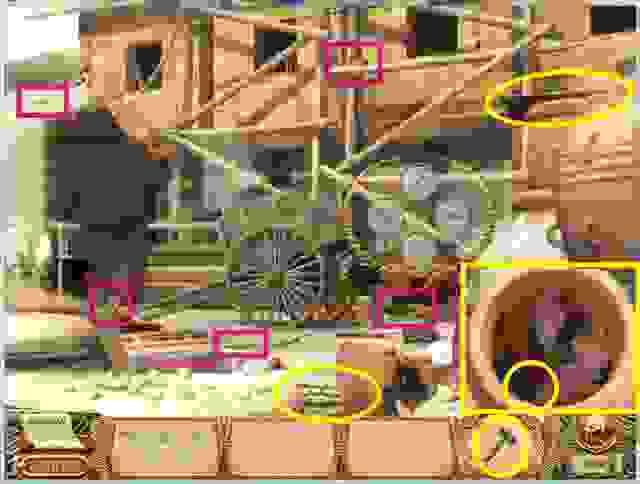
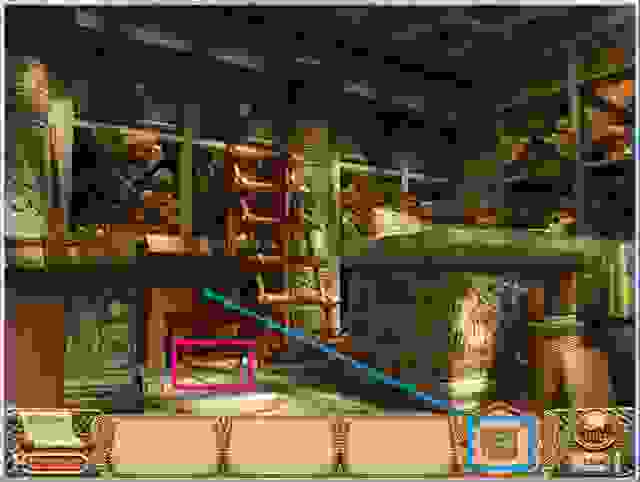
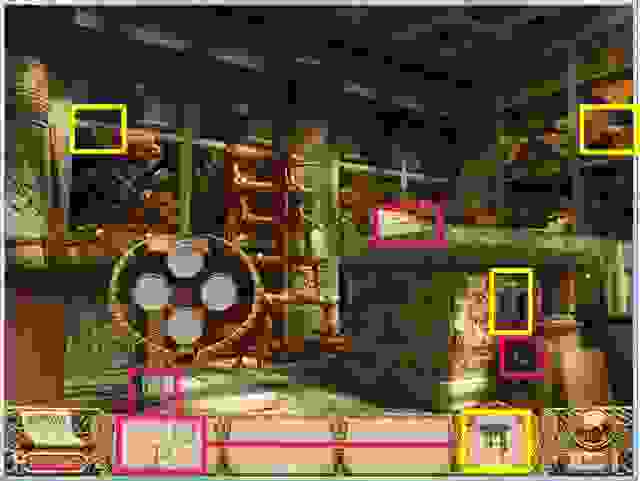
- There are 5 scroll fragments marked in magenta. The 5th one is stuck under the pile of logs.
- Click on the logs to bring up a circlet of items. Use the hammer from your Inventory. The board and rope are circled in yellow.
- Click on the terra cotta pot on the lower right side of the screen and it will open up for you to find the nails.
- When you have found everything, you will get the log mini game so you can get the last piece of the scroll.

- The mini game is a pick up sticks sort of game with helpers. A green highlight shows you picked the right log; yellow says that there is one log before it and red says you are off by two or more logs.
- You will need to select all of the logs in the correct order before you can pick them up. The solution order is marked.
- Once you have succeeded, the last piece of scroll will go into your Inventory. Click on it to add it to the collection.
- The scroll needs to be put back together so you will get a puzzle mini game to do so. This is the solution.
- You have now come up with some important evidence so you are remembering what you saw at the palace courtyard.

- Match each piece of evidence with its corresponding place.

- Back at the Docks, the Dock Master finally tells us what happened the night before. The evidence indicates that there should be further investigation at the Theater and Library so exit where it is marked at the right of the scene.
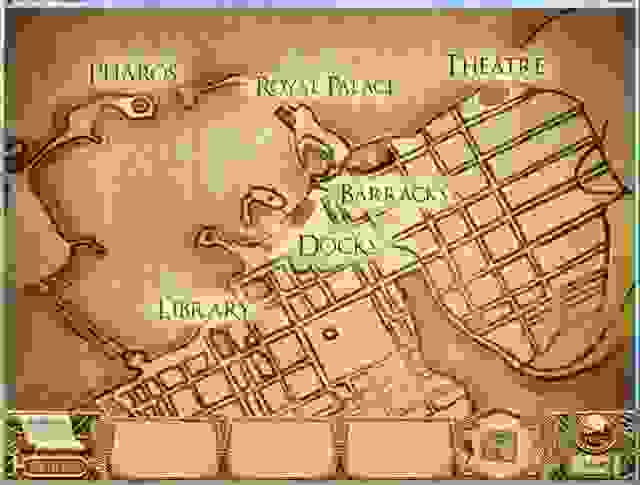
- The map of Alexandria gives you the choice of which location you wish to choose first. I chose the Theater.
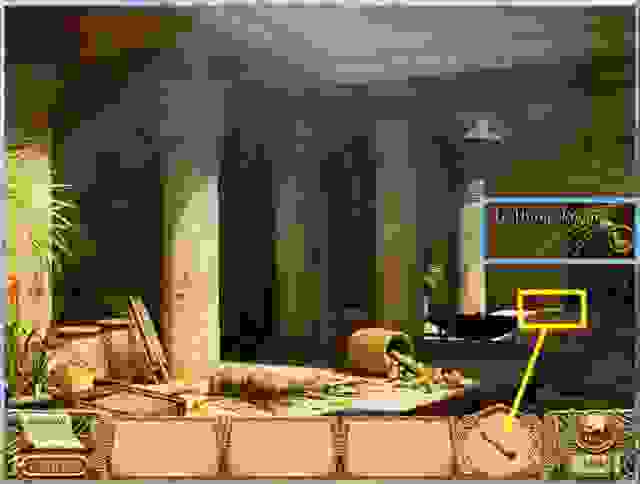
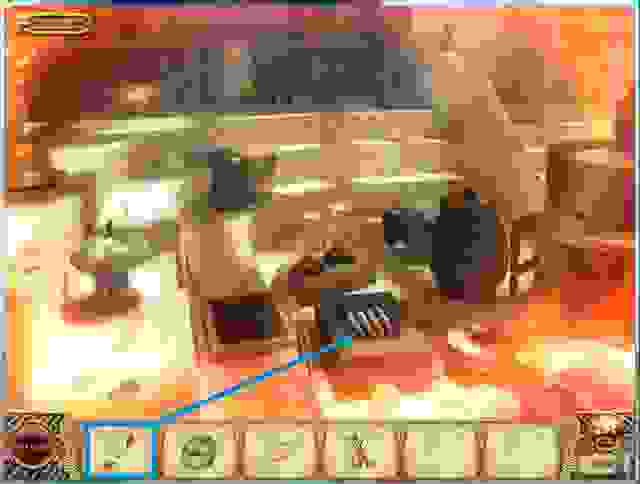
ACTORS’ HALL THEATRE
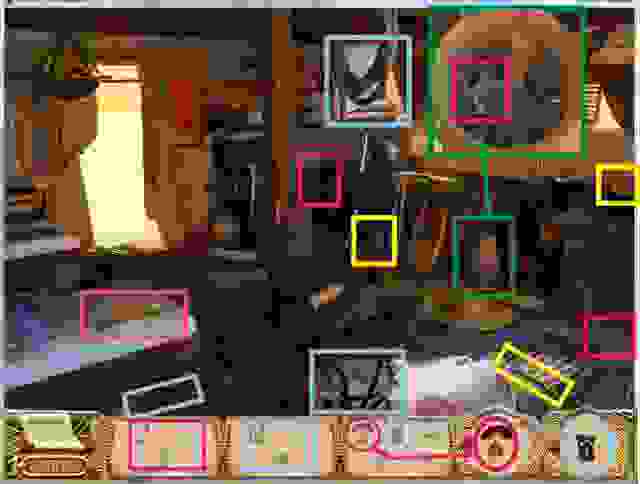
- Click on the scroll at the left to investigate it.
- Click on the terra cotta vessel marked in green to pick up a piece of the helmet.
- When you find all the parts of the Helmet and Body Armor they will go into your Inventory.
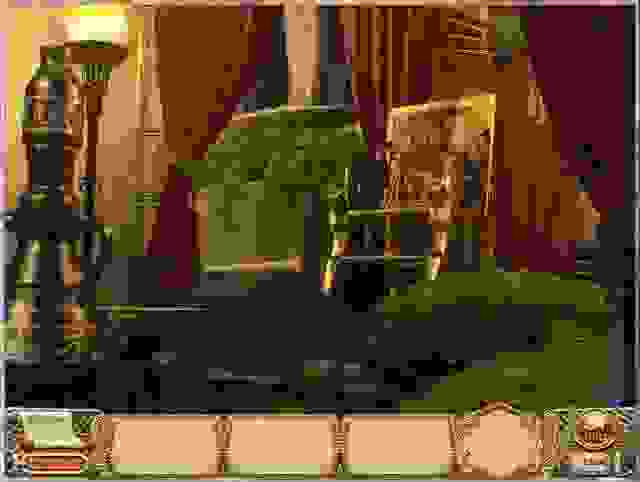
- I gave you an extra Inventory shot so you can see how the pieces are to be used. The rest of the costume is marked in yellow.
- Give the assembled costume to Crysanthos, the Greek playwright, as proof that the murdered actor worked for him.
- Click on the sparkles on the back wall to bring up a circlet of masks.
- You need to weigh the masks to see which one is the heaviest but the scale needs to be assembled.
- Click on the sparkles on the back wall once again to bring up a circlet of parts for the scale. The parts will start to appear as you find the first one.
- Click on the stool at the left to bring up an insert with one of the parts.
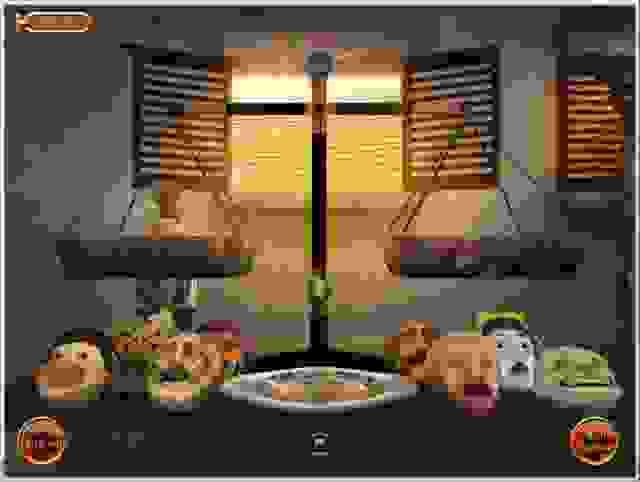
- Once the scale is ready, you will get a mini game in which you will need to weigh the masks to find the heaviest one.
- The solution is below but if you want to try it on your own, put a mask in each side of the scale and push the green egg button above the plate.
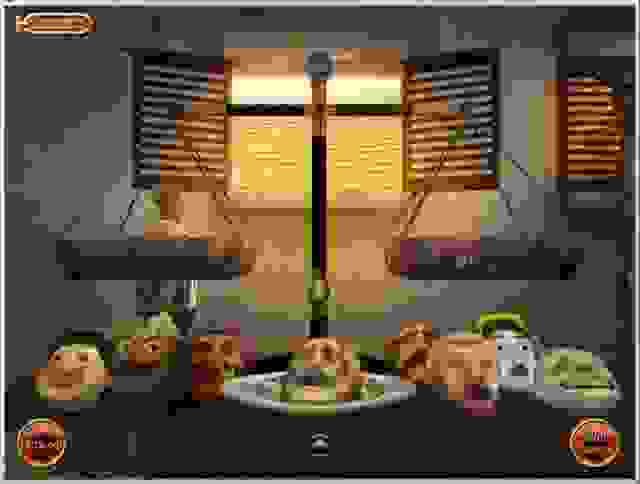
- If you get too eager and just put the proper mask on the plate without weighing any of them, Crysanthos will ask you if you are sure since you didn’t weigh anything.
- He might also remind you that the masks are very expensive so I suggest weighing a couple different sets to keep him happy.
- Put the heaviest one on the plate and press the submit button just under the plate.
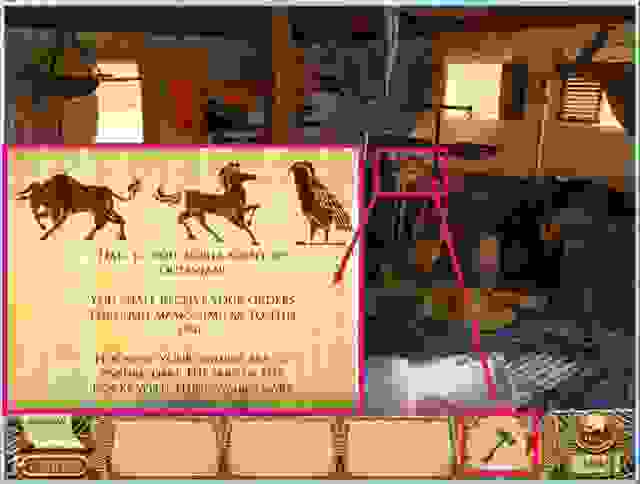
- Click on the mask. You must break it to find out what is inside so take the hammer from your Inventory and hit the mask.
- Inside the mask is a scroll which is shown in the insert.
- All messages bound for Rome are stored at the Wharf. You remember seeing jars at the Wharf with the Bull, Horse, and Falcon symbols on them.

- Place each design from the scroll on the proper jar.
- Meanwhile, back at the theater, Crysanthos is told that his actor was a Roman spy so you want to know how the actor came to be in his troupe.
- He tells his story and so you exit through the curtains on the left to go to the Great Library of Alexandria in order to get the scroll decoded.
- Choose the Library on the map of Alexandria.
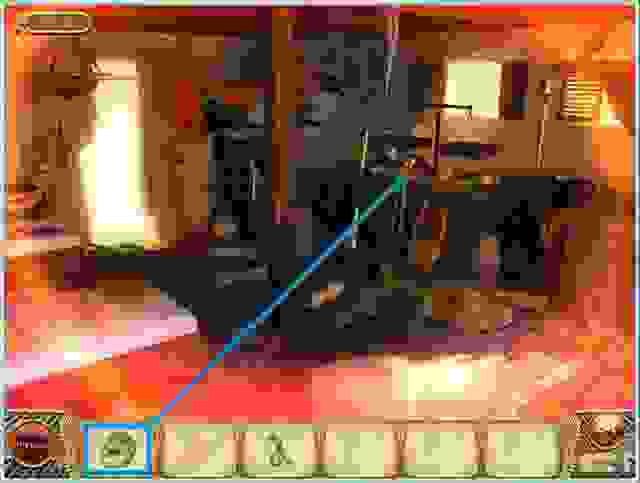
OVERSEER’S OFFICE AT THE LIBRARY
Gregorios, the Overseer says he is busy taking care of a matter for the Roman Marshal and that he doesn’t see the Queen’s seal on the scroll so you are going to make sure the scroll is validated.
- Click on the sparkling pedestal in the center of the screen to bring up a circlet.
- Pick up the jar on the floor and combine it with the ink marked in blue too. I’ve placed the filled ink jar at the bottom of the screen but it will go into your Inventory to be used in the circlet.
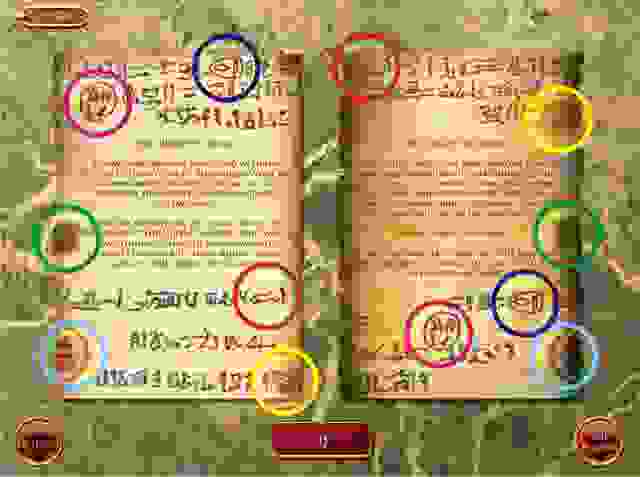
- In order to get Cleopatra’s scroll for the circlet, you will need to play the scroll mini game. Click on the sparkling scroll area on the right to learn that a scroll from the Queen came in yesterday and to bring up the mini game.

- In the Scroll mini game you will need to put 5 of the scrolls in their correct place. Scrolls with close numbers can’t be side by side nor can two odd or two even numbers be placed across from each other.
- If the placement is wrong, the circle around the scroll will turn red. If it is ok to be placed there, it will turn green.
- There may be more than one solution but I’ve shown the one above that I used to get Cleopatra’s scroll which is my #5 marked as VIII.
- By completing the circlet, you have forged a copy of the Dock scroll with the Queen’s seal.
- Give the forged seal to the Library Overseer and follow him to the Scroll Chamber……….the exit is marked at the right side of the screen.
LIBRARY SCROLL CHAMBER
- The Overseer tells you to put the scroll on the table and find a magnifying glass and 3 books on Cryptology.
- Investigate the magenta marked scroll.
- Place your scroll on the sparkles on the study table to bring up a circlet.
- Pick up the blue, green and red scrolls.
- Combine the magenta marked parts to produce the magnifying glass which will go into your Inventory to be used in the circlet.
- You are going to need some advanced documents so you are directed to find them in the Armaria Chest.
- Click on the sparkles up on the wall to find out that you need a key to open the chest. Collect the red, blue and green runes and the rune holder which will combine in your Inventory as the key.
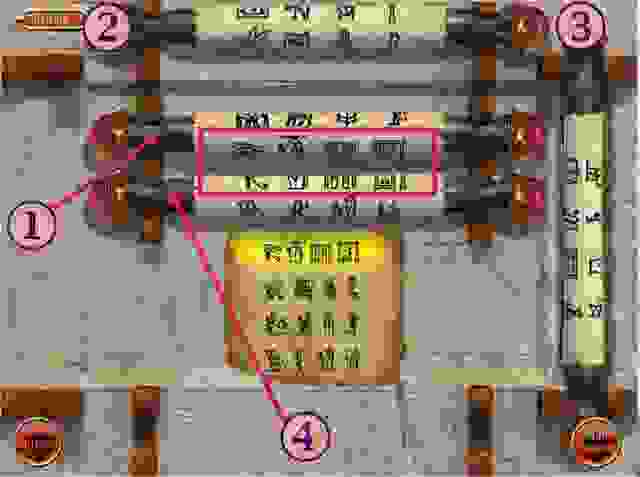
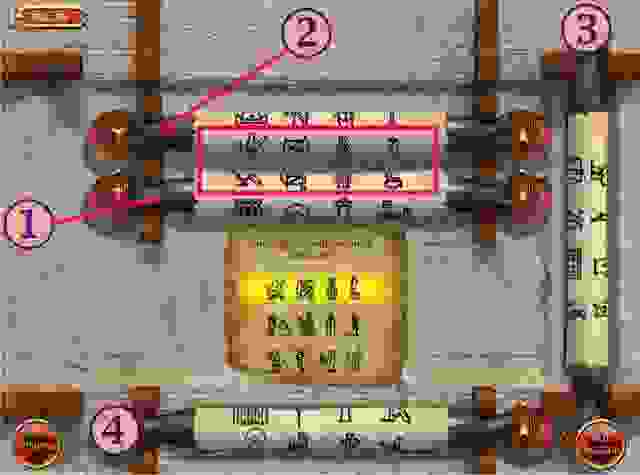
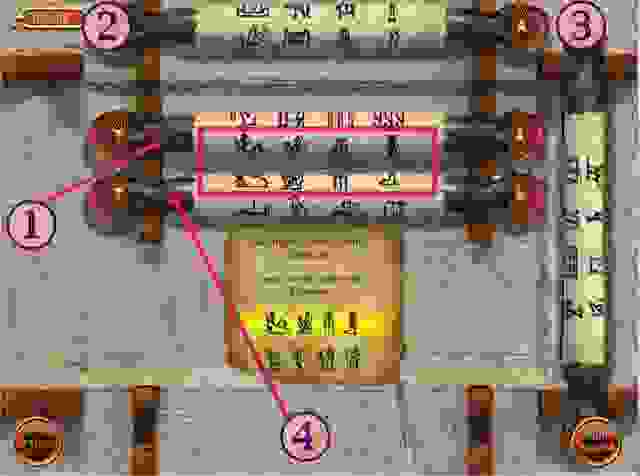
- Use the key on the chest. It won’t open because you need a code.
- A mini game with runes appears for you to find the correct combination of stones.
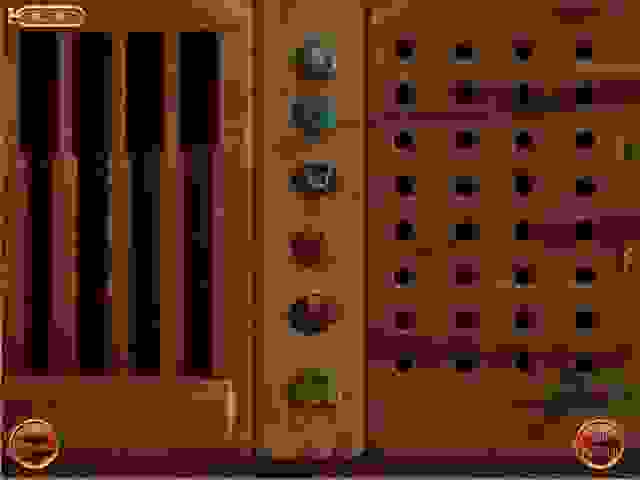
- This game is like the color sequence games where you put a sequence of four colors on a paper until you have the colors in the right order.
- In this case you put four stones on the bottom row of holes to the right. If there is a color and in the right place, a black peg appears on the left side of the screen. The white pegs indicate there are correct colors but in the wrong position.
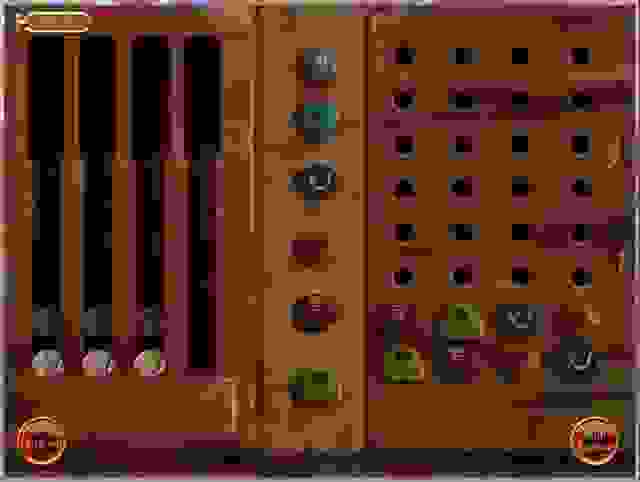
- The order of the pegs has nothing to do with the position of the stones and the solutions are random. The above shot is one I tried.
- The bottom row shows that 3 of the colors are correct but not in the right place.
- The next row shows that 3 of the colors are correct and in the right place.
- In the next row I kept the first 3 stones and replaced the orange with the turquoise and got a match so keep trying until it works for you.
- The inside of the chest is dark so gather the pieces to make a lamp to light the chest.
- There are no scrolls inside. The overseer says some scholars used them the day before and to grab the pair of rollers which automatically end up in your Inventory after the conversation.
- Exit to the Lecture Hall at the right side of the screen.
LIBRARY LECTURE HALL
- Click on the large urn to bring up a circlet…….those items are marked in blue.
- The magenta items will make up the cipher to be used in the circlet.
- A mini game will appear in which you are to select two scrolls and place them in the middle of the board. Rotate them to match the highlighted portion of the code.
- The top scroll has to match the top portion of the highlighted code and the bottom scroll must match the bottom portion of the highlight.
- When it is correct, click on the highlighted area. The solutions for each line are below.
- Choose scrolls 1 and 4 and rotate them to match the shot and then click the highlight.
- Rotate scrolls 1 and 2 to match the shot and then click the highlight.
- Rotate scrolls 1 and 4 to match the shot and then click the highlight.
- Rotate scrolls 3 and 4 to match the shot and then click the highlight.
- The Library Overseer denies having been at the docks but the evidence gathered says otherwise.
- You are remembering the ink and wine spills and the scrolls that didn’t seem like they should be at the docks.
- Match the objects to their proper places.
- Back at the Library Gregorios admits he was making a delivery to the docks the day before and that the Dock Master pushed him so he lost all his scrolls and was covered with what you found as the evidence.
WHARF AT THE DOCKS
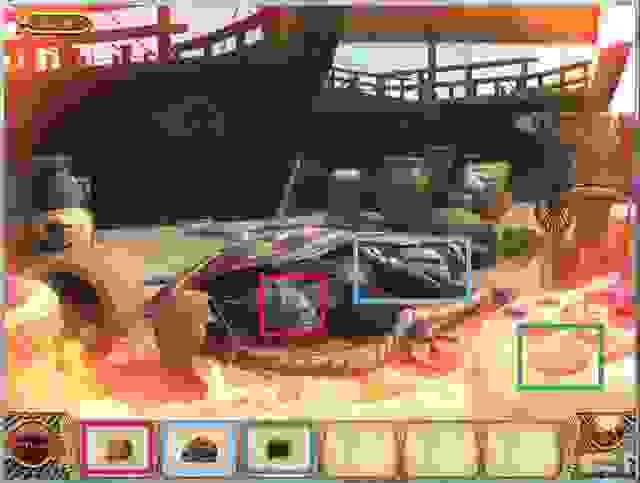
The map wants you to choose to go to the Docks so you will be taken to the Wharf after your selection.
- The City Guard already moved the body but since Greek jars were used to send the scrolls to Rome, you need to find the pieces to put a particular one back together.
- That jar contains another report to Octavian from Ephesian.
- Thinking there must be other jars around you exit to the Warehouse to talk to the Dock Master.
WAREHOUSE AT THE DOCKS
- Converse with the Dock Master and give him the black jar to examine. He will tell you he was paid to store more jars.
- Find 3 more jars. One of them has an interesting scroll in it so exit to the Barracks to investigate the Marshal.
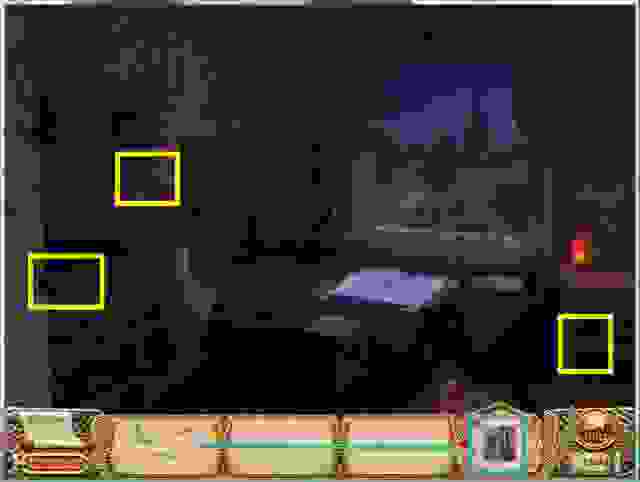
MARSHAL’S QUARTERS AT THE BARRACKS
The map of Alexandria will appear……..choose the Barracks.
- Investigate the magenta square.
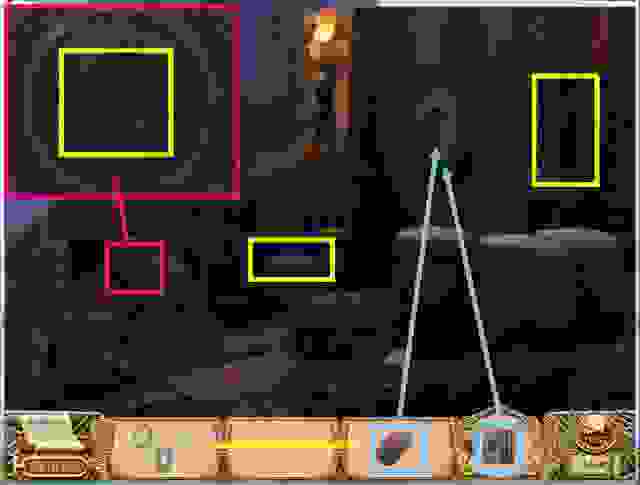
- Click on the chest to bring up a circlet of tiles to find they are part of the locking mechanism needed to open the chest.
- Click on the hanging pot to bring up an insert to find one of the tiles.
- After you have located all the tiles, you will get a tile mini game to solve.
- Choosing to move the tiles in the positions shown below is one of the ways to get to the solution but it is not the only way.
- Move them in this order: yellow – blue – orange.
- Move the yellow tile and then the blue one.
- This is the solution you need to find to make each of the tiles match the carvings underneath its ultimate position.
- Once you have opened the chest you will find a bloody rag and a piece of paper.
- You are now looking for the Marshal’s clothing to see if it is blood splattered which would prove he was the other man at the docks.
- Click on the letter you find in the chest and read it.
- There is a knock at the door and all you have to disguise yourself is the Marshal’s bloody uniform. The soldier enters and wants to know if your meeting at the lighthouse got over early.
- You tell him to go back to his post and after he exits, you do it too and leave through that same door. When the map appears, choose Pharos.
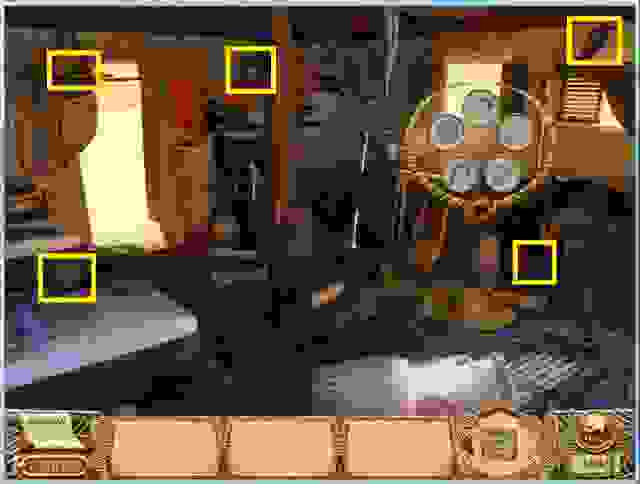
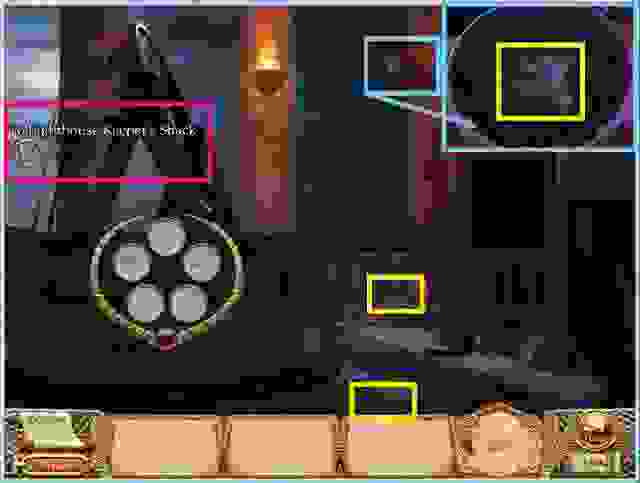
KEEPER’S SHACK AT PHAROS LIGHTHOUSE
The Lighthouse keeper tells you the Marshal has gone mad and locked himself in the beacon tower. If you are going to be able to speak to him, you will need to find some square tiles that are part of the lock.
- After you find the 3 lock components, the Lighthouse keeper says to follow him so
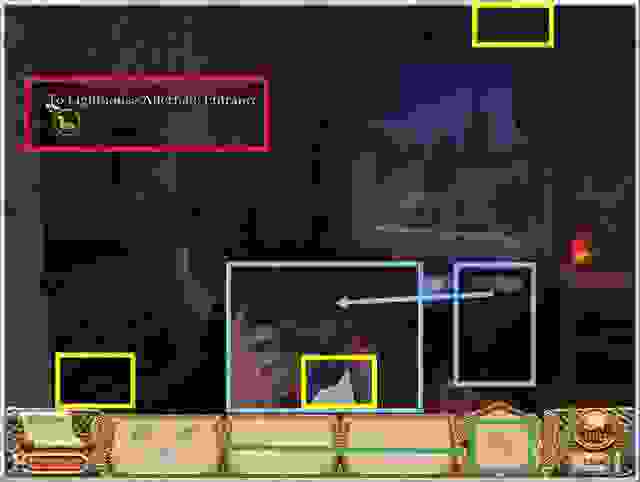
ALTERNATE ENTRANCE TO PHAROS LIGHTHOUSE
Nobody has used the alternate entrance in weeks so the Lighthouse keeper is pretty sure you will find more piece of the lock there.
- Find 3 round lock pieces………one piece is in the pot shown in the insert.
- Both components will be in your Inventory but I’ve shown them separately so you can see what they look like.
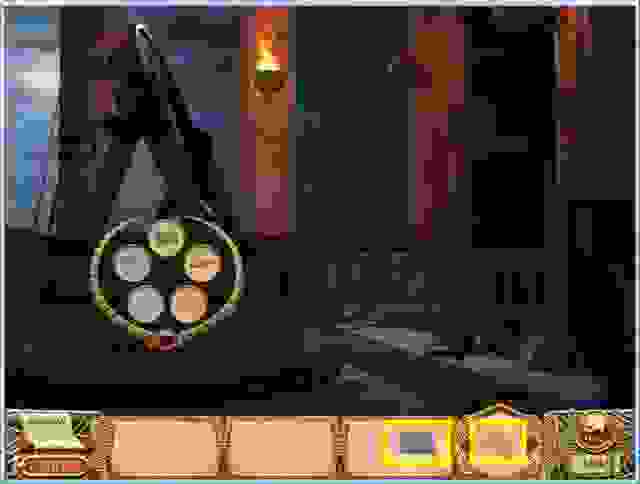
- First place the round component and then the square one will go in the middle of it. A mini game will appear.
- This is what the puzzle should look like when you are done.
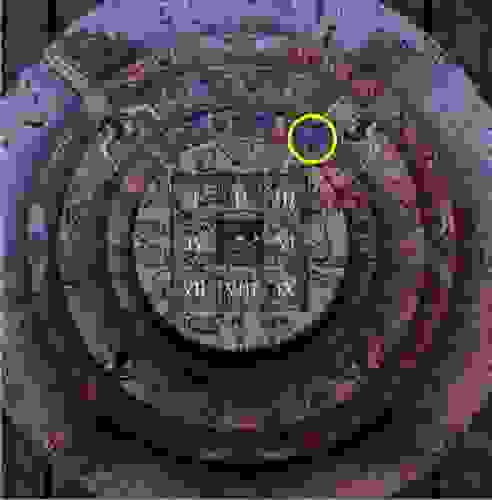
- The square part is a slider mini game where you need to rearrange the square tiles from I – IX around the edge without the V for the middle.
- Arrange the 3 circles to match up with the outside plate……click on them one at a time to move them.
- When there in the correct configuration, you will get a brown poof to tell you so
- Start with the outer circle and match the above the waist colors to the legs. Then match the shoulder straps to the color scheme so that all the figures are the same color.
- The easiest way to match the inner circle is to line up the half round to the other half round where I have circled them.
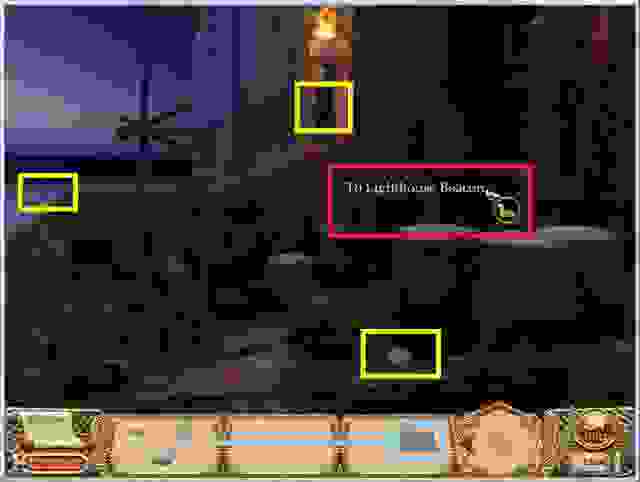
- Light the lamp from your Inventory and go to the Lighthouse Beacon to talk to the Marshal.
BEACON AT PHAROS LIGHTHOUSE
- You now have an opportunity to converse with the Marshal at the Lighthouse Beacon room.
- You ask him to explain his bandaged hand, the bloody cloth you found in his quarters and the missing part from his breastplate. You show him the evidence and remember what you saw at the Docks.
- You remember seeing the missing clasp from his breastplate at the wharf as well as seeing the bruises on the actor’s face which would explain the bandaged hand and the blood on the cloth would have been caused by the wooden sword which the actor used in an effort to defend himself. Place the evidence where it belongs.
- Valerius the Marshal admits to having killed the actor and tells you everything that happened.
- Even though he saw his beloved with the actor, Valerius he doesn’t want to believe she is a spy and betrayed him by being an informant to Octavian.
- Suddenly Valerius is shot with an arrow and it is a deadly blow so he directs you to take the scroll the actor gave his beloved but he dies before he can tell you her name.
- The scroll has instructions as to how to signal Ephesian with the beacon.
- The Lighthouse Keeper tells you where to find the parts for the beacon so you can repair it. The large gear is at the alternate entrance and the others are at his shack.
- Click on the Beacon to bring up a circlet and pick up the first 4 parts.
- Exit to the Alternate Entrance.
- Find the large gear and take it back to the beacon.
- Click on the beacon to bring up the circlet again and then click on the large gear to insert it.
- The light in the beacon doesn’t go on and the Keeper mentions there were zodiac signs on the scroll.
- He remembers there were some plates with zodiac signs and when he dismantled the beacon that two of them broke. One is at the entrance and the other at his shack.
- Click on the side of the beacon above the signs to bring up a circlet with the plates. The Scorpio and Pisces that are in the room.
- Click on the pot that isn’t lit to find the Taurus plate shown in the insert.
- Go to the Keeper’s Shack to find one of the missing plates.
- Click on the basket to find the piece shown in the insert.
- Once you have the complete Gemini plate, exit to the Alternate Entrance to pick up the other missing plate.
- When you have all the pieces of the Libra plate, exit to the Beacon to see how it works.
- Click on the side of the beacon again and insert the Gemini and Libra plates to see what happens……….a mini game will appear.
- Arrange the moon pegs so that the light from the beacon will shine on the theater.
- All of the moons other that the full moon will point the beacon toward the direction of the moon.
- The half moons rotate the beam a half circle in either direction.
- The quarter moons rotate the beam a quarter of a circle in either direction.
- The full moon peg with do whatever the moon before it did.
- When you are finished, click on the gear above to see if you are correct.
- The solution appears to be random. The screen shot above is one of the solutions that worked for me.
- When you find the solution, watch the beam move until it points to the servants’ quarters at the Palace then exit to go there and select it on the map.
INFORMANT’S CHAMBER AT THE ROYAL PALACE
- Start gathering the evidence which is shown in the red square. It will explain the informant’s activities.
- You will need to put other items such as the Mask together to use in the evidence. They will go into your Inventory once they are assembled.
- Several items will need to be gathered from inside other objects and are shown in the inserts.
- The evidence that has to be found is not all available at the same time so I decided to separated the screen shots and hopefully remembered which went where…….at any rate between the two shots, everything you need to find is marked.
- The captured bow smells of poison and has been recently used so may be the one that killed the Marshal.
- There is a scroll inside the Amphora and another in the Mask.
- You confirm by the reply to the letter you found in the Barracks that Ephesian was indeed Valerius’ beloved.
- You have now gathered enough information to report back to Cleopatra with what you have found so exit to the Throne Room.
THE FINAL CONFRONTATION
Kathya accuses you of being the informant and says she can prove it. The Queen asks Kathya to explain.
There are now a series of remembrance scenes……….you will automatically be transported to each place so you can place the evidence.
- Where did the Amphora’s originate.
- You need to remember where you found the cipher.
- You know where the mask came from but need to remember where to place it.
- You are sure that the love letter had a reply.
- You also need to remember what was used with the weapon.
- Kathya says that she saw how you bribed the Dock Master to keep quiet about how the agent died.
- Place the Amphora at the docks and explain that you bribed the Dock Master to gain access to the docks as you were ordered to so you could begin your investigation.
- Kathya says she saw how you forged the Queen’s signature to fool the Library Overseer and then stole manuscripts.
- Place the Ciphers as shown and explain that you forged the signature to get the Overseer to help decipher the scroll found on the dead man and discovered he was an agent working with the informant Ephesian.
- Kathya says you went to the Theatre to get Masks with messages from Octavian.
- Place the Mask on the plate and agree that instructions are sent via the masks and that the same masks are all over Ephesian’s room.
- Kathya says you learned that a certain Roman Marshal found you out so went sneaking around his quarters even though she advised against it.
- Place the Love Letter in the chest at the Barracks and explain that you broke into Valerius’ quarters where you found out Ephesian was his lover and that the letter was a reply to her message to meet at the lighthouse where he was murdered.
- Kathya says she followed you to the Lighthouse and saw you kill the Marshal in cold blood.
- Place the bow and arrows with the deadly arrow and explain how the poisoned weapon proves that Ephesian killed Valerius but that the arrow was actually meant for you, the Advisor.
THRONE ROOM AT THE PALACE
- The Queen wishes to know who killed the man at the Docks so you explain the whole scenario.
- Kathya is taken away and when you ask what should be done with the scrolls, Cleopatra says to burn them.
CONGRATULATIONS!
YOU HAVE SOLVED THE MYSTERY OF CLEOPATRA
“;

More articles...
-
Grow A Garden 2 Base Price List
What's the most valuable crop? -
Evomon Best Starter [Leafbun, Blazpup, or Bubble?]
Grass-type, Fire-type, or Water-type? -
Evomon Tier List [META and BEST Evomon]
The Evomon dream team.