
Best Horror Games On Itch.io – July 2026
Across a bounty of subgenres.![Haze Seas Accessories Tier List [Best Accessories to Equip]](/wp-content/uploads/2026/07/haze-seas-accessories-tier-list.jpg "Haze Seas Accessories Tier List [Best Accessories to Equip]")
Haze Seas Accessories Tier List [Best Accessories to Equip]
The accessories with the best stat buffs in Haze Seas.
![[Roblox] Evomon Shiny Hunting Guide – Including Prismatic and Pris Shinies!](/wp-content/uploads/2026/06/evomon-shiny-hunting-guide.jpg "[Roblox] Evomon Shiny Hunting Guide – Including Prismatic and Pris Shinies!")

Nancy Drew: Warnings at Waverly Academy Walkthrough
Welcome to Gamezebo’s strategy guide for Warnings at Waverly Academy.


- Prefer Gamezebo on Google


a:1:i:0;a:2:s:13:”section_title”;s:51:”Nancy Drew: Warnings at Waverly Academy Walkthrough”;s:12:”section_body”;s:67779:”
Welcome to Gamezebo’s strategy guide for Warnings at Waverly Academy.
How to Play
Controls
- The cursor will change into different icons when it moves over interactive areas on the playing area.
- Left click the mouse to perform an action when an icon is shown.
- The default cursor is the magnifying glass, which will glow red when it is moved over an area that can be examined more closely.
- The directional arrows forward, back, up, down, quarter turn left, quarter turn right and half turn will move Nancy in those directions.
- In some areas, a double arrow is seen when the cursor is moved to one side of the screen; this means that Nancy will slowly rotate in that direction.
- The hand icon is used to take and interact with different objects.
- The question mark icon allows Nancy to talk to talk to different characters in the game. The conversation window shows the character’s lines in yellow and Nancy’s lines in blue.
Taskbar Icons

A: Inventory. Items that are collected in the game are added to the inventory window. Items that have an eye icon can be examined more closely. Items that don’t have an eye icon can be used on other objects outside of the inventory.
B: Journal. Shows Nancy’s observations, phone numbers, clues and suspects that she writes down during the course of the game. If you get stuck and the task list doesn’t help, it is well worth checking the journal to see if something might be useful.
C: Task list. Only available when playing on Junior Detective difficulty. The task list shows the current tasks that Nancy needs to complete. A check can be put in the box next to the task description if the task has been completed.
D: Phone. The phone is used to make calls, take photographs using the camera, set the alarm clock, read messages and change settings.
E: Options. Change voice volume, effects volume, music volume, matte colours, display options, closed-captioning and text size.
F: Load game. Restore a previously saved game. A thumbnail image along with the date and time that the game was saved is shown.
G: Save game. Enter a name for the game and click the Save button to save the game.
H: Quit. Closes the game.
Setting the Alarm
You may occasionally reach a point where there are no more current tasks to complete and there seems to be nothing else to do. When this happens, it is likely that you need to advance time forward. To do this, return to Nancy’s room and select the clock from the phone menu. Set the time to 11pm to wake up at night or 6am to wake up the next day.
Difficulty
There are two difficulties to choose from when you select the plane tickets from the case file at the start of the game: Junior Detective and Senior Detective. Junior Detective allows you to view the task list throughout the game. Senior Detective does not allow you to view the task list, and one puzzle involving the squirrel climbing the tree is more difficult in this mode.
Walkthrough
Examine the case file on the desk and then open it to read about the current assignment: Nancy is going to enter Waverly Academy under the name of Becca Sawyer to try and discover who has been leaving mysterious notes for students. Select the plane ticket at the bottom of the file and then select either Junior Detective or Senior Detective to begin the game.
Task complete: Read the case file.
The game starts in Nancy’s room, where her roommate Corine introduces herself. Select either topic twice and she will mention her previous roommate, Danielle. Say "What happened to her?": She had a bad experience when she got locked in a dark closet for the night. Select the bottom topic to end the conversation with Corine.
Task complete: Meet the person I’ll be rooming with at Waverly.
Half turn, move forward and open the door. Quarter turn left in the hall to meet Izzy Romero, who sets Nancy up on the local network so that she can receive text messages. Move forward and go downstairs. Open the first door on the right to enter the library. Quarter turn left, move forward and examine the computer. Select the Waverly Website icon to be prompted for a password. Select the Forgot Password button: A message appears mentioning that the student body president should be seen for password assistance. Back away from the computer, half turn and move forward twice to see Izzy.
Talk to Izzy and say "You don’t like Corine?": She says that nobody likes Corine. Say "Why not?": She thinks she isn’t cool. Say "Do you like your roommate?": Her roommate is Leela Yadav. Say "Apparently I need to get a password from you before I can use the school’s computer: She needs a DNA model to be finished before she can give Nancy the password.
Task complete: Ask Izzy for my password so I can use the computer in the library.
Say "Want me to help you?" to see the DNA model. Izzy explains the rules that should be used to solve the DNA model:
- Adenine should be paired with Thymine.
- Cytosine should be paired with Guanine.
- Each pair should be connected to a sugar on the alternating sugar-phosphate side.
Task complete: See if I can help Izzy with her homework so she’ll give me my computer password.
Select the DNA model on the desk and then take the model to add it to the inventory. When Izzy asks what else is going on, select the bottom topic to end the conversation with Izzy. Open the inventory and select the DNA model. Solve the DNA puzzle using the rules that Izzy explained earlier:
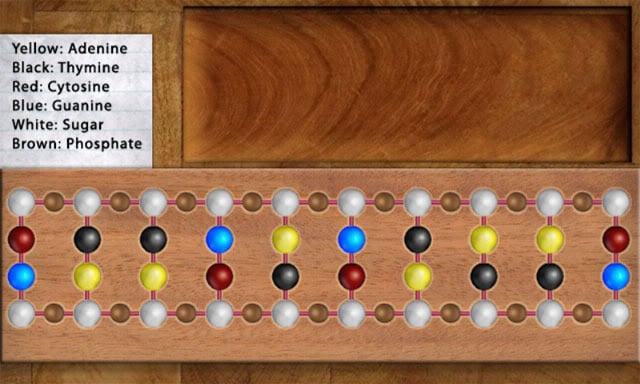
Task complete: Complete that DNA assignment for Izzy.
Talk to Izzy to present her with the DNA model: She will tell you the password for the computer in the library: WAC35NE136.
If Izzy says that the DNA model is not correct, remove the three pieces shown below:
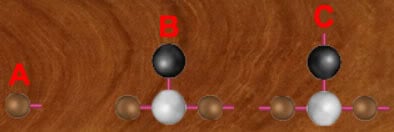
First of all, check to see that all of the lines are joined up. Piece A should be rotated so that the lines are joined. Secondly, pieces B and C are very similar. If Izzy says that the DNA model is not correct, switch these two pieces and then present the DNA model to her again until she says that it is it is correct.
Task complete: Give that completed DNA assignment to Izzy.
When she asks what else is going on, select the bottom topic to end the conversation with Izzy. Half turn and move north-east twice to return to the computer. Examine the computer and then use it. Select the Waverly Website, enter the password WAC35NE136 and then press the OK button.
Task complete: See if the password Izzy gave me gets me onto the computer in the library.
The Home page is already selected, which gives a brief description of Waverly Academy along with current announcements. Nancy has been assigned the role of the snack shop boss. Select the About Us page to read a more detailed description of Waverly Academy. Select the Academics page to read about Waverly’s academic program. Select the Library page to read about the library. Select the Student Life page to read the word on the campus and security announcements. Select page 2 on the Campus Word to see that the blog has been written by the current student body president, Izzy Romero.
Task complete: Read everything on Waverly’s school web site so I don’t get into trouble and accidentally blow my cover!
Select the Student Life page of the website and then select the Student Handbook on the Quick Links menu to read about the major school rules. The lights out time for Seniors is 11:00pm. Select the next button to read about the demerit system, along with the points that are given for each demerit.
Task complete: Check out the student guide that’s on the computer in the library.
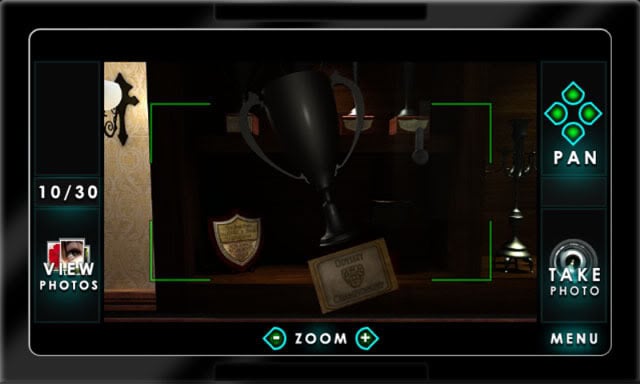
Back away from the computer and exit the library. Turn right in the hall. Examine the display case on the left and try to open it to see that a key is needed. Back away from the display case and move forward. Examine the piano to see a star on one of the keys. Back away from the piano, quarter turn right, move forward, quarter turn right and examine the lamps.
Select the lamp to reveal the names of piano keys on the other side. Back away from the lamp. Examine the other lamp and select it to see that more piano notes are displayed. Back away from the lamp. Quarter turn right twice and move forward through the doorway. Try to open the classroom door to see that it is locked. Quarter turn right and examine the display case on the left. Open the display case by selecting the keyhole:
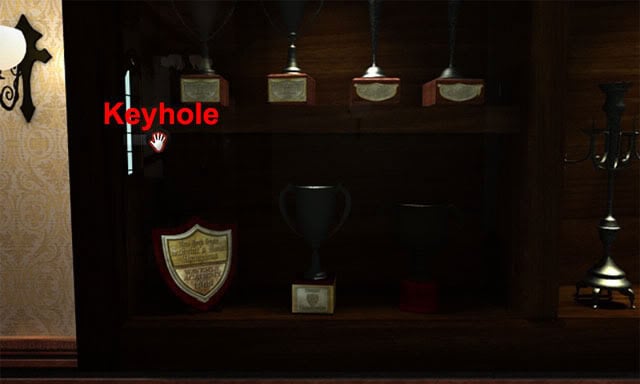
Examine the trophy in the display case to see that it was awarded for winning the Odyssey Championship.
Task complete: See everything there is to see in the downstairs foyer.
Back away from the display case and move forward through the doorway to enter the rec room. Quarter turn right to see the snack shop. Examine the snack shop boss orientation guide on the counter to read the rules. Take the guide to start taking orders.
Task complete: Go to the snack shop and try my hand at making snacks so I don’t get any demerits.
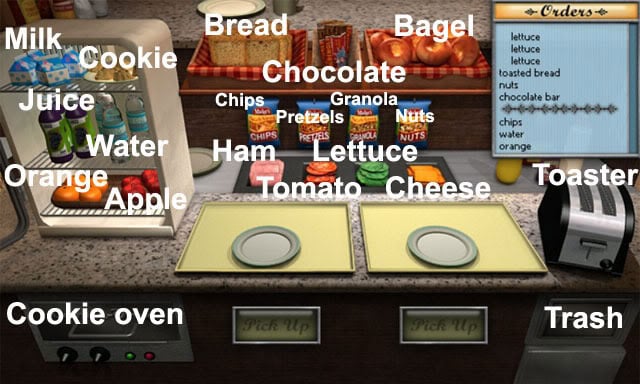
Orders will appear in the blue window at the top-right corner of the screen. Add all of the items for one person on a tray, and then select the Pick Up button to send the order away. Complete all of the orders in the blue window and a key will drop down. Examine the key and then take it. Turn slightly right and move forward. Quarter turn left twice and move forward twice to the front door. Open the door and move forward to go outside the school. Quarter turn right and move forward on the left path to see a large oak tree with a squirrel in it. After the squirrel has climbed up the tree, Nancy will look down to the base of the tree. Half turn from the tree, quarter turn left twice and then move forward on the right path. Examine the cornerstone of the building:
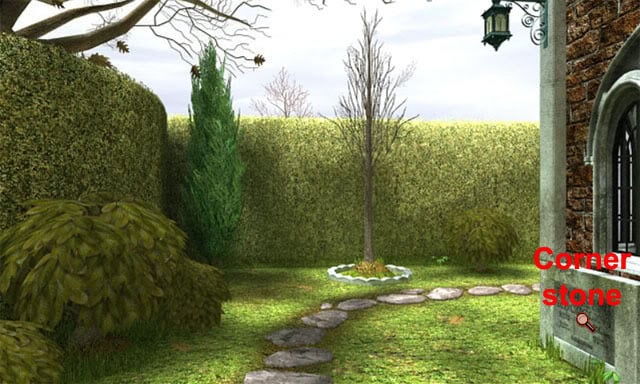
Back away from the cornerstone and continue along the path at the side of the building to see the hatch.
Task complete: Explore the grounds around Ramsey Hall.
Select the inventory icon on the taskbar to see all of the items that have been collected so far. Select the key that dropped down in the snack shop and then select the padlock to unlock it.
Task complete: Figure out what the key I found in the snack shop is for.
Open the hatch and move forward to the top of the stairs. Use the light switch at the left side of the stairs to turn the lights on. Move forward to enter the cellar. Move forward twice to the shelves in the arch on the wall. Examine the cardboard box three times and select the first three books that appear to put them away. Examine the box for a fourth time and a book on America will appear. Select the book to read about the location of the different states in America. Put the book away, back away from the box and half turn. Move forward and examine the star-shaped slots on the wall.
Task complete: Check out the cellar (no matter how creepy it is!).
Exit the cellar and go back along the path to the front door of the school. Open the door and move forward to the foyer. Move forward, quarter turn right, move forward through the doorway, quarter turn right and move forward to the rec room, then quarter turn left and go upstairs. Quarter turn right and move to the door on the right to see a plaque with the name Rachel Hubbard. Knock on the door and enter the room. Talk to Rachel and she will ask Nancy to help with her web design project. Say "But I don’t know anything about web design.":
She just needs Nancy to take pictures and upload them to the Waverly school web site. Say "You sure that’s not cheating?": She assures Nancy that it’s a design class, not a photography class. Nancy agrees to help, and Rachel shows her a list with all of the candidates that she wants photographs taken of. Take the list and Rachel will say that the pictures should be uploaded on the computer in the library. Open the inventory and examine the list.
Task complete: See who’s on the list of kids whose pictures I’m supposed to take for Rachel.
Move forward, quarter turn left and go downstairs. Quarter turn left and move forward to see Leela Yadav. Talk to Leela and say "What happened to your wrist?": She fell over and sprained it. Say "Do you think the Black Cat had anything to do with your wrist?": She says her fall was weird, but thinks it was just bad luck. She then says that Nancy has also had bad luck by seeing Rachel on her first day.
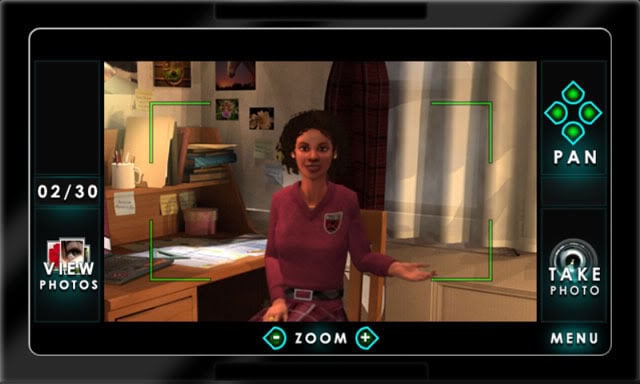
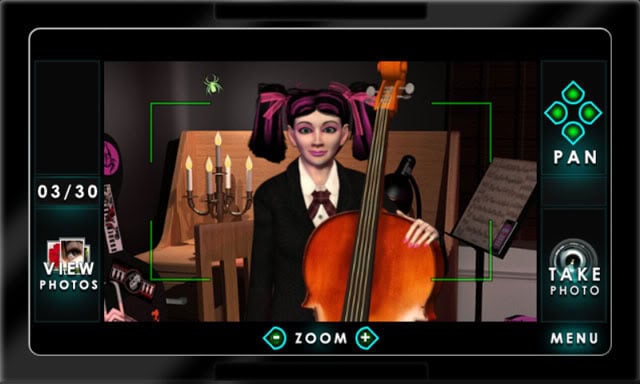
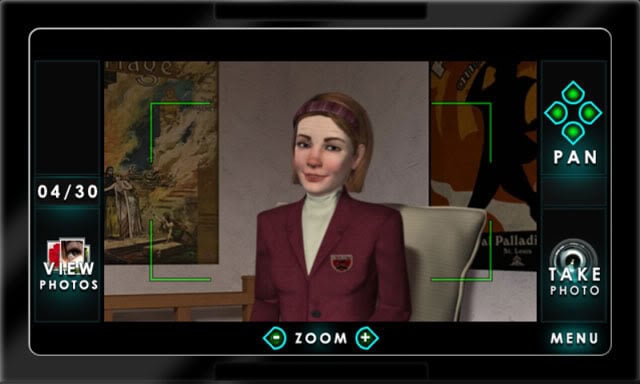
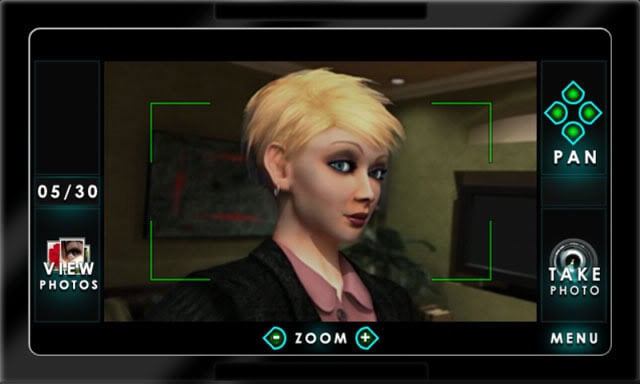
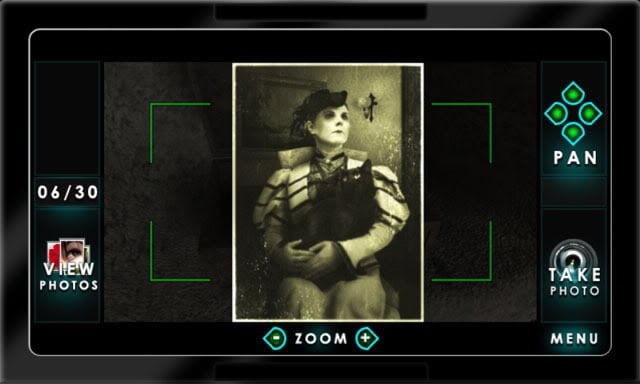
Say "Why do you say that?": She seems to change her personality from day to day, and Leela thinks that she may even be the Black Cat. Say "Because you’re in the running for valedictorian, I need to get a close-up of you for the school web site, if that’s okay.". Zoom in by selecting the + button and then select the pan arrows until Leela is centered in the frame. Select the Take Photo button to save the photo to the phone:
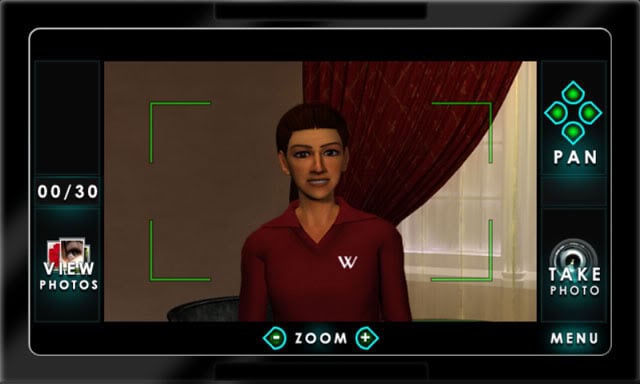
The game is quite strict on how the photos should be taken when they are uploaded to the library computer, so it’s worth changing the zoom and pan slightly and then taking at least three photos of each candidate so that you don’t have to return to them if the photos are wrong. Back away from the phone view and then select the bottom topic to end the conversation with Leela. Back away from Leela, half turn and go back down the hall. Enter the library. Move forward, quarter turn right and move forward to see Izzy. Talk to Izzy and say "Okay if I take a close-up of you? Rachel needs it for the school web site.". Take a photo of Izzy:
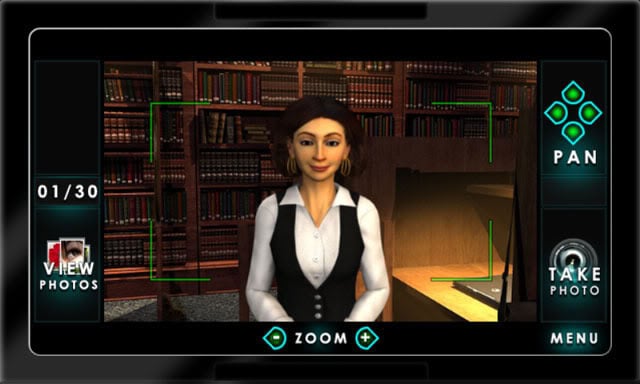
Back away from the phone view and then select the bottom topic to end the conversation with Izzy. Exit the library. Quarter turn left in the hall and go up the stairs. Open the first door on the right and enter Nancy’s room. Talk to Corine and she will ask why she couldn’t find any information about Becca Sawyer online. Say "You looked me up online?": She is curious why Nancy doesn’t have a YR page. Say "Rachel enlisted me to help her get her web project done.". Say "In fact, I need to take your picture for it.". Take a photo of Corine:
Back away from the phone view and then select the bottom topic to end the conversation with Corine. Exit Nancy’s room and turn right in the hall. Knock on the next door on the right and move forward into Mel’s room. Talk to Mel and say "I just moved into the room next door.". Select either topic when Mel asks if Nancy got kicked out of a school in France. Say "What’s the rumor mill been saying about the ‘Black Cat?’":
She thinks it’s just someone playing a prank, but says that her roommate Megan had to go home with an allergic reaction. Say "Oh my gosh! What exactly happened to her?" to receive Megan’s cellphone number. Say "I need to take a close-up of you for a page on the school web site I’m helping put up.". Take a photo of Mel:
Back away from the phone view and then select the bottom topic to end the conversation with Mel.
Task complete: Meet all the kids in Ramsey Hall.
Move forward and examine the sampler on Mel’s wall: Searching for something is what life is for; to find what is hidden read much followed by Moore. Nancy wonders why Moore was spelled with two Os instead of one. Mel said that her great-great-great grandmother made the sampler, and that she was in the first class of students to graduate from Waverly academy.
Task complete: Take as good a look around Mel’s room as I can without seeming suspicious.
Exit Mel’s room and quarter turn right in the hall. Examine the blue list of candidates in the inventory if you haven’t already done so. Use the phone, select the menu button, phone button and then press the right arrow button three times to scroll through to Megan’s number. Press the green call button to call Megan Vargas. Say "What exactly happened to you anyway?": She had an allergic reaction when she was eating dinner, and says that she misses Waverly, for the most part. Say "What do you mean? Is there something about it you don’t miss?":
The Black Cat slipped a note under her door about ten days ago, and then a week later she got another note. The night after the second note was when she had the allergic reaction at dinner. Say "Who at Waverly knew about your allergies?": The school policy was that everybody knew. Say "Could you e-mail me your picture? I need it for the school’s web site.": She thinks that Leela Yadav has a decent picture of her. Select the bottom topic to end the conversation with Megan.
Task complete: Call Mel’s roommate, Megan Vargas, and see what, if anything, the allergic reaction that got her sent home has to do with the Black Cat.
Move forward four times in the hall, quarter turn left and approach the door on the right. Knock on Rachel’s door and move forward into the room. Talk to Rachel and Nancy will say that she needs to take a photograph of her. Take a photo of Rachel:
Back away from the phone view and then select the bottom topic to end the conversation with Rachel. Exit Rachel’s room. Quarter turn left in the hall, move forward, quarter turn left and go downstairs to the rec room. Talk to Leela and say "I was told I could maybe get a picture of Megan Vargas from you?". She says she will get the picture if she is beaten at a game of Air Hockey.
Task complete: Ask Leela if she has a picture of Megan Vargas.
Say "Bring it on." and Leela will explain the rules of the game. Select a mallet to start playing Air Hockey. You can only use the mallet on your half of the table. The aim is to hit the red puck into the goal on Leela’s side. Score seven goals before Leela to win the game.
Task complete: Beat Leela at a game of Air Hockey so she’ll give me a picture of Megan Vargas.
Leela agrees to get Megan’s picture the next time she goes upstairs. Say "No thanks." when she asks if you want to play again. Select the bottom topic to end the conversation with Leela. Back away from Leela, quarter turn left and go upstairs. Quarter turn right and knock on the door to Rachel’s room. Enter Rachel’s room. By doing this, Leela will have had time to go and get the picture of Megan Vargas from her room. Exit Rachel’s room and go downstairs to the rec room. Talk to Leela and say "Did you get that picture of Megan for me?".
Task complete: See if Leela has retrieved Megan’s picture for me yet.
Leela says that she will hand over the picture of Megan if Nancy beats her at a game of Scram. Say "Same as before. Bring it on." and Leela will explain the rules of the game. The aim in the first round is to throw darts at the highest numbers that have not been crossed off the panel at the right side of the dartboard. So if 50 has not been crossed off, aim for the bullseye in all three darts. When it is Leela’s turn to throw darts, she will likely throw darts at the highest numbers, and these will then be crossed off the panel. Keep throwing darts at the highest numbers that remain, aiming for the treble to score maximum points.
In the second round, Nancy plays as blocker. This time, aim for the highest numbers to remove them from the panel. So try and start by hitting 50, then 25, then 20, 19, 18 and so on. Prevent Leela from scoring a higher total than Nancy to win the game of Scram.
Task complete: Beat Leela at a game of Scram so she’ll hand over that picture of Megan.
Zoom into the picture of Megan and take a photo:
Back away from the phone view and say "No thanks." to Leela when she asks if you want to play again. Select the bottom topic to end the conversation with Leela. Go to the library and examine the computer. Select the black external hard drive at the left side of the monitor to connect the phone. Use the computer and select the Library Catalog icon. Press the Search the Catalog button. Search for the word Moore and then press the green Go button to see that the book is called The Story of Four, written by Madeline Moore on the Special Collections shelf.
Task complete: Investigate the reference to ‘Moore’ that was in that sampler in Mel’s room (refers to a book, maybe?).
Select the Academics page of the website and then click the Valedictorian Race button. As the phone has been connect to the computer, you can download photos into the folders. Select one of the folders, scroll to a photo of one of the valedictorian candidates from the phone and then select the download button to download it to the folder. Back away from the phone view, click the next folder and download the photo of a different candidate. Do this for all six of the candidates. Back away from the computer, exit the library and go upstairs. This gives enough time for Rachel to check the photos on the library website.
Go back downstairs and enter the library. Use the computer and return to the Valedictorian Race page on the website. If any of the photos are wrong, delete them from the folder and upload a different picture of the candidate, then go upstairs and return to the library until the website under development page is shown when you select the Valedictorian Race page. This means that all the photos are correct.
TASKS COMPLETE: Take pictures of everyone on the list I got from Rachel and upload them to the web site she’s working on + Take all the pictures for Rachel correctly.
Back away from the computer, half turn and then quarter turn left. Move forward to the locked book cabinet and try to open it.
Task complete: Find the book called ‘The Story of Four’ by Madeline Moore; the catalog says it’s in Special Collections.
Exit the library, quarter turn left in the hall and go upstairs. Go to the other end of the hall and knock on the door to Rachel’s room. Move forward into the room. Talk to Rachel and she will ask Nancy to lay out the web page on the Meet the Candidates link. Say "No problem." to agree to update the page.
Task complete: Report back to Rachel and see if she needs help with anything else.
Exit Rachel’s room. Go downstairs and return to the library. Use the computer and select the Waverly website, Academics page and then the Valedictorian Race button. The aim now is to place the pictures, names, locations and classes in the correct places on the website by following the clues given in the middle of the page:
Task complete: Lay out the ‘Meet the Candidates’ web page according to Rachel’s directions.
Back away from the computer. Exit the library, quarter turn left and go upstairs. Go to the other end of the hall and knock on the door to Rachel’s room. Move forward into the room. Talk to Rachel and she will ask Nancy to take a few more pictures of objects around the school grounds. Take the list and Rachel will tell Nancy to upload them on the library computer like before.
Task complete: Report back to Rachel and see what else she wants me to do.
Select the remaining topic to end the conversation with Rachel. Exit Rachel’s room. Use the phone and select the Messages option. Press the More button to keep reading the text messages until one mentions that Mel has been caught plagiarizing her history paper. Enter Mel’s room and talk to her. She says that the rumours are not true. Say "So you didn’t plagiarize that paper?": She assures Nancy that she has never cheated on a test. Say "Can you prove that you didn’t?": The teachers have locked her computer account to make sure that she doesn’t change anything on Paper Trail, the web site the teachers use to compare papers.
Say "You think someone’s trying to frame you?": She got a glimpse of the IP address of the person that posted the paper and remembered that none of the digits in it repeated. She shows Nancy the paper that Mrs. Arlington found. Select the paper and then take it. Select the bottom option to end the conversation with Mel.
Task complete: Ask Mel what the deal is with that text about her being busted for plagiarism.
Exit Mel’s room. Go downstairs and enter the library. Use the computer. Select the Waverly website icon, then select the Academics page and click Resources on the Quick Links menu to access Paper Trail. Examine Mel’s paper in the inventory to see different database source numbers. The first number is 3043.624.1, so enter this as the datatbase source number on Paper Trail. Select the View button to read the poster IP. The last five combination sequences will be shown, so you will need to enter one of the sequences in each box to make an IP address with no repeating numbers. Enter the number 69, 57, 284 and 103, then select the Submit IP button:
The poster is shown as Jacob Pryce and the paper was posted on the date November 18th, which was a date after Mel posted her paper.
Task complete: Jump on the computer in the library, go to PaperTrail.edu under Resources and try to track down the person who posted the paper Mel supposedly plagiarized.
Exit the library and quarter turn left in the hall. Go upstairs and knock on the door to Mel’s room. Move forward into the room and talk to Mel. Say "Was the date on your term paper the date that you turned it in?": Nancy tells Mel that the plagiarized paper wasn’t online until the next day. As a reward for finding the information, Mel shows Nancy a newspaper article with some information about Waverly. Take the newspaper article. Select the bottom topic to end the conversation with Mel.
Task complete: Tell Mel that the paper she supposedly plagiarized was posted online after she turned in her paper, which proves she’s innocent.
Open the inventory and examine the article: It mentions that the Waverly Ravens won the all-school Oddyssey Championship trophy.
Task complete: Read that article Mel gave me.
Exit Mel’s room and go downstairs to the library. Quarter turn left and move forward to the main desk to see that the on call library assistant is Corine Myers.
Task complete: Look around for a way to get into that locked book cabinet in the library.
Exit the library. Go upstairs and enter Nancy’s room. Talk to Corine and say "Do you know where I can get the key that opens the Special Collections cabinet in the library?": She will give Nancy the key to the cabinet if she can finish the orthographic views.
Task complete: Ask Corine (since she’s the on-call library assistant) if she has a key to the Special Collections cabinet.
Examine the Drafting folder on the table and then take it. Select the bottom topic to end the conversation with Corine. Open the inventory and select Corine’s folder. Select the first page to turn to the views. Put the views in the correct places for the four shapes:
Exit the view of the folder and then talk to Corine to see the key to the cabinet. Examine the key and then take it. Select the bottom topic to end the conversation with Corine.
Task complete: Finish those orthographic views for Corine so she’ll give me the key to the cabinet.
Exit Nancy’s room. Go downstairs and enter the library. Move forward four times to the Special Collections cabinet. Use the key to unlock the cabinet. Take the Story of Four book and examine it to read about Rita Hallowell. Turn the page to see a photograph of the board of directors of Waverly Academy in 1866.
Task complete: Unlock the Special Collections cabinet and take a look at that Moore book.
Back away from the Special Collections cabinet and exit the library. Quarter turn right in the hall, move forward, quarter turn right and open the front door. Move forward to go outside, quarter turn right and move forward along the right path. Examine the cornerstone twice to see a close-up of the tiles. The aim here is to rotate the tiles so that there is no gap in the middle. Left click to select a tile, right click and move left or right to rotate a tile, and left click again to replace the tile. Put all of the tiles in the correct positions:
After putting the tiles in the correct positions, the cornerstone will open and a token will be revealed. Before Nancy can take the token, a squirrel appears and runs off with it.
Task complete: Figure out how to close up that square inset in the cornerstone so it looks like the old picture I saw in that book by Madeline Moore.
Examine the cornerstone to see a journal by Hallowell.
Task complete: See what’s stashed in that cornerstone I managed to open.
Read Hallowell’s journal. The second page mentions a specific piano rendition that was used to calm her cat, Usher. A note at the bottom of the page says "1st low bass, then coloratura". Turn the page to see a diagram of a raven. Turn to the final page of the journal to read about a celebratory dinner.
TASKS COMPLETE: Read the journal I found in that cornerstone + Find something that says what a ‘Celebratory Dinner’ consisted of back when people ate nine course meals.
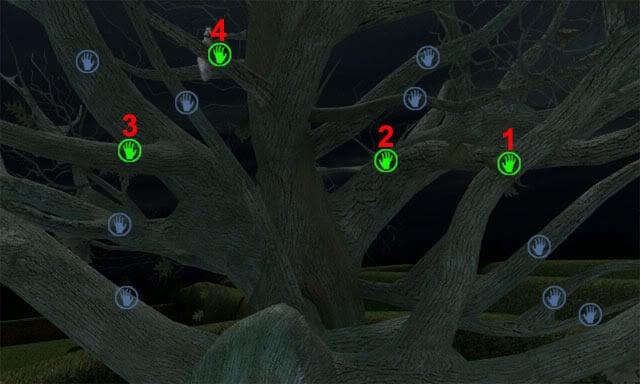
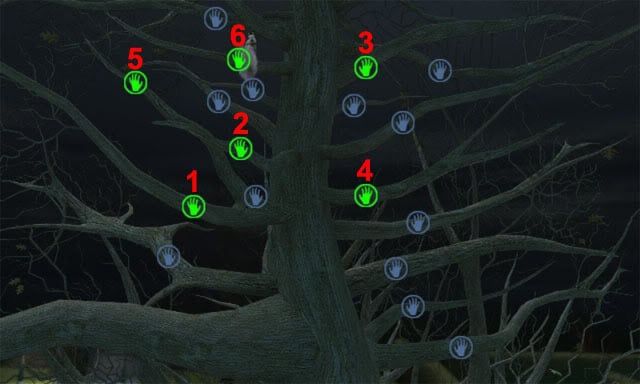
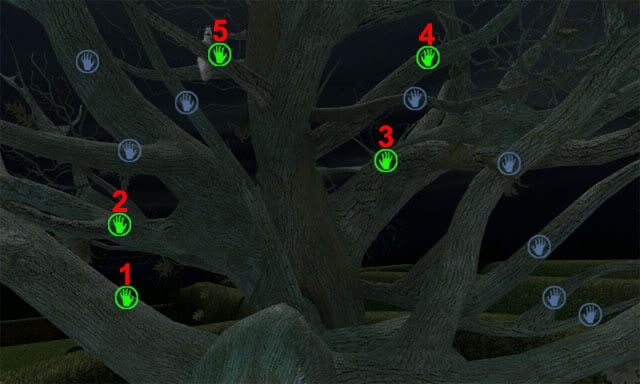
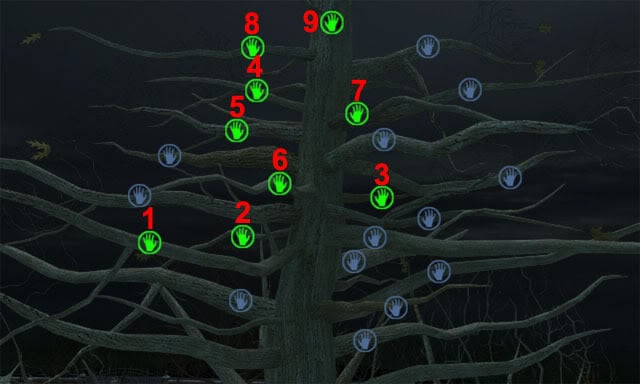
Back away from the cornerstone and Nancy’s phone will ring. Select the phone to talk to Ned. Select any topic when he asks how the case is going. After he tells Nancy to be very careful, select the bottom topic to end the conversation with Ned. Enter the school and go upstairs to Nancy’s room. Set the phone alarm to 11pm and Nancy will be woken up in the night by a tapping at the window. Open the window and move forward to go outside to the tree. The aim now is to click on the branches that the squirrel jumps onto in order to climb up to the top of the tree. This puzzle varies depending on the difficulty you chose at the start of the game. Select the following branches on the three sections of the tree if you are playing on Junior Difficulty mode.
Junior Difficulty – Lower Branches:
Junior Difficulty – Middle Branches:
Junior Difficulty – Upper Branches:

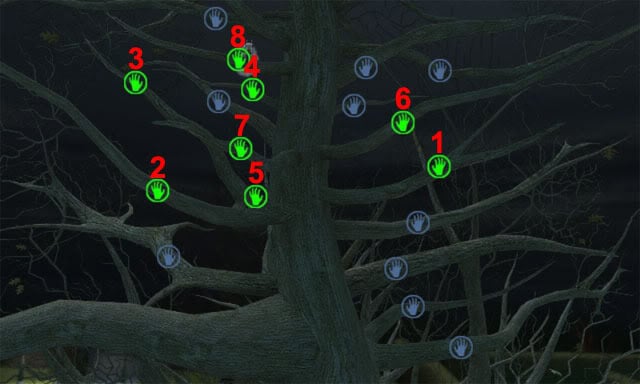
Select the following branches on the three sections of the tree if you are playing on Senior Difficulty mode.
Senior Difficulty – Lower Branches:
Senior Difficulty – Middle Branches:
Senior Difficulty – Upper Branches:
After reaching the top of the tree, select the hole and take the gold bug token:
TASKS COMPLETE: Retrieve the gold token that was in that cornerstone from that sticky-pawed little white squirrel! + Follow that pesky little squirrel (at night, so Paige doesn’t see me!) so I can retrieve the gold token he swiped from that cornerstone.
Nancy hears the sound of chanting and looks down to see a group of hooded figures below. After they leave, climb down from the tree to return to Nancy’s room. Set the phone alarm for 6am and a new day will start. When Nancy wakes up, her phone falls off her desk and lands on the floor. Quarter turn right and look under the desk to see the phone and a note from the Black Cat. Take the phone and examine the note. Back away from the view of the note. Examine the piece of wood and take it:
Task complete: Make sure there’s nothing else of interest under the desk where I found that Black Cat note to Danielle.
Back away from the desk and take the note that has been slipped under the door. Exit Nancy’s room. Go downstairs and return to the foyer. Open the front door and go outside. Quarter turn right and move forward on the left path to the oak tree. Examine the barrette at the base of the oak tree:
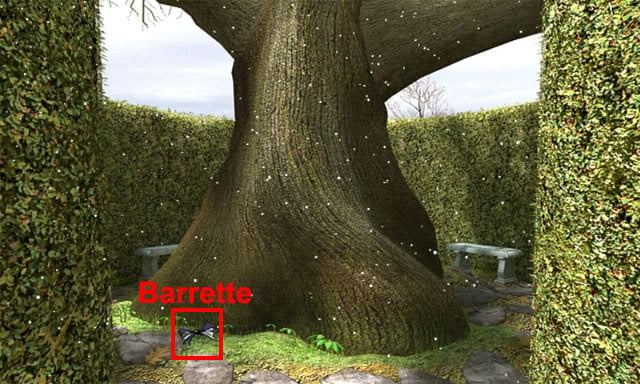
Examine the barrette again for a close-up and then take the barrette.
Task complete: Look around for clues below the oak tree where I saw that group of chanters.
Enter the school and return to the library. Use the computer and select the Library Catalog icon. Press the Search Catalog button. Search for "piano" and press the green Go button to see that the musical notation book was taken out by Mel.
Task complete: See if there’s a book or something around here that ways what the letters and numbers on those lamp shades mean — they could be the key (as it were) to playing the piano ‘rendition’ Hallowell mentioned in her journal.
Search the catalog for "Victorian dining" to see that the book on formal Victorian dining was taken out by Rachel.
Task complete: Look for a way to learn more about what people back in Rita Hallowell’s time (the Victorian era) considered to be ‘perfect etiquette.’.
Exit the library. Go upstairs and knock on the door to Rachel’s room. Enter the room and talk to Rachel to ask her for the book on Victorian dining: She wants her math notebook from Mel.
Task complete: Ask Rachel if I can borrow the book on Victorian dining she checked out of the library.
Select the remaining topic to end the conversation with Rachel. Exit Rachel’s room and knock on the door to Mel’s room. Enter the room. Talk to Mel and say "I found your barrette.": She tells Nancy to forget about what she saw: Select either topic and she will mention the Blackwood Society, a secret club that was formed shortly after the school was founded. Say "Who does the choosing?": Everything is anonymous. Say "Who’s the leader?": She has no idea but suspects it may be a senior.
Task complete: Find out who owns the barrette I found by the oak tree; I’m pretty sure it belongs to one of those ‘chanters.’.
Say "That book on music theory you checked out — could I take a look at it?": She wants Nancy to get her some milk and a cookie from the snack shop.
Task complete: Ask Mel for the music theory book she borrowed from the library.
Exit Mel’s room. Go downstairs and approach the snack shop in the rec room. Open the refrigerator, take a carton of milk and put it on the left tray. Take a cookie and put it in the cookie oven, then close the oven. Wait a few seconds for the bell to go off, then open the oven, take out the cookie and put it on the left tray. Select the Pick Up button below the left tray to take the food. Make the remaining five food orders for the rest of the students to avoid getting a demerit for the day. Go upstairs and return to Mel’s room. Give her the snack to see the musical notation book. Take the book.
Task complete: Get Mel some milk and a cookie so she’ll give me that music book.
Say "I need to get Rachel’s math notebook from you.": She left it in the library.
Task complete: Ask Mel for Rachel’s notebook so she’ll give me that book on Victorian dining.
Say "Did you do something to make her mad at you?": She doesn’t treat Rachel any differently than anyone else. Select the bottom topic to end the conversation with Mel. Exit Mel’s room. Go downstairs and enter the library. Quarter turn left, turn slightly left and then move forward to the drawers.
Task complete: Go to the library and look for Rachel’s math notebook.
The number MMDXCLI is carved into the top drawer. Examine the top drawer and turn the combination lock digits to the number 2641 to unlock the drawer. Examine the math notebook and then take it.
Task complete: Figure out how to open the lost and found drawer in the library (check out those Roman numerals?) and see if Rachel’s notebook is in there.
Exit the library. Go upstairs and enter Rachel’s room. Talk to Rachel and say "What do you have against Mel?": Mel is one of the few girls in the school she actually likes. Take the formal dining book.
Task complete: Take Rachel’s notebook back to her and trade it for the Victorian book.
Exit Rachel’s room. Go downstairs to the rec room and talk to Leela. Say "Do you think I could borrow the old menu that you borrowed from the display case in the foyer?": Leela says that Nancy has to beat her at a game before she hands over the menu.
Task complete: Ask Leela for the old menu she borrowed from the display case in the foyer.
Select either air hockey or scram, and then win the game to see the menu. Examine the menu and then take it. Select the bottom topic to end the conversation with Leela.
Task complete: Beat Leela at a game so she’ll give me that menu.
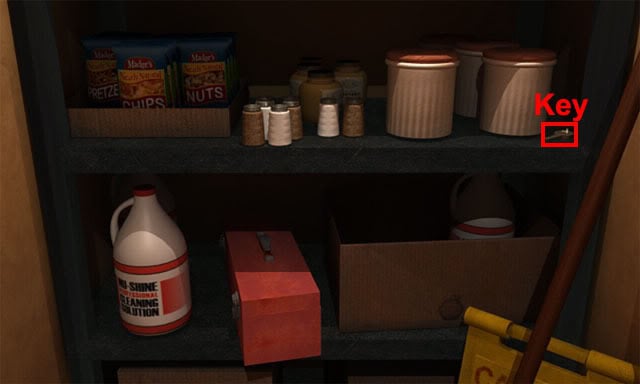
Back away from Leela. Quarter turn left and move forward to the door at the left side of the dartboard. Open the door to the closet. Turn on the light switch at the right side of the door. Examine the closet and take the key at the right side of the pots on the top shelf:
Close the closet. Move to the foyer and examine the display case near the piano to see nine knives, nine spoons and nine forks. Examine the menu in the inventory to see the courses that were served in the celebratory dinner.
Task complete: See in what order the foods on that menu were served.
Examine the formal Victorian dining book in the inventory to see which utensils were used in the celebratory dinner.
Task complete: See what foods were to be eaten with which utensil according to Victorian etiquette.
Flip through to page 41 of the Victorian dining book and take the ID card. Exit the view of the book. Use the key from the closet to unlock the display case. Examine the utensils and then select them in the correct order that they would have been used in to eat the celebratory dinner:
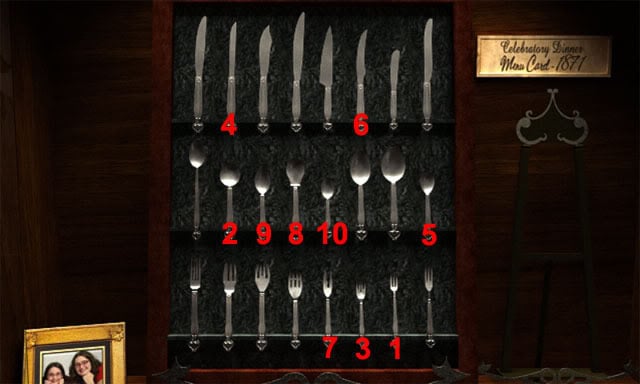
Task complete: See if pulling on those utensils in the order polite Victorians would’ve used them to eat a Celebratory Dinner does anything.
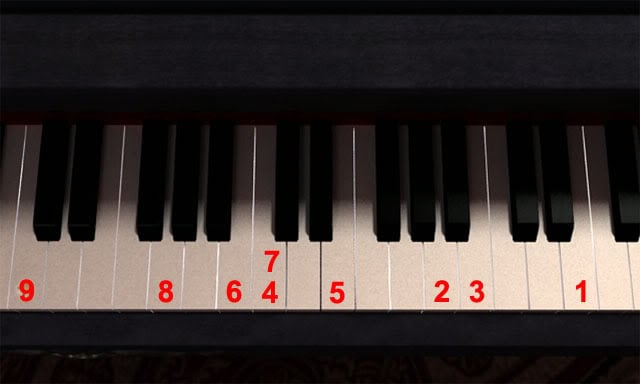
After the utensils have been selected in the correct order, take the ape token that appears. Back away from the display case, half turn and move forward to the piano. Examine the musical notation book in the inventory to see an explanation of key notation. It mentions that the coloratura range is from C4 to F6 and the low bass range is from C2 to F4.
The clue to what keys can be played is found on the lamps in the foyer. The left lamp in the foyer has the following notes: E6, A5, B5, C5, E5, B4, C5, G4, C4. The right lamp in the foyer has the following notes: D2, A2, B2, D3, F3, A2, C2. The right lamp is in the low bass range, so these notes should be played first. The left lamp is in the coloratura range, so these notes should be played last. Examine the left side of the piano and play the following notes: D2, A2, B2, D3, F3, A2, C2:
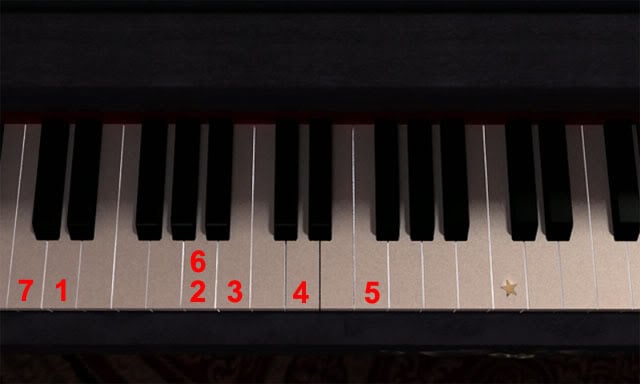
Examine the right side of the piano and play the following notes: E6, A5, B5, C5, E5, B4, C5, G4, C4:
A compartment will open after the correct notes have been played.
Task complete: See if the music book I got from Mel can help me turn whatever those piano key lamps signify into a tune for the piano.
Take the gold cat token from the compartment. Go upstairs and face the door opposite Rachel’s room to see the door to Izzy and Leela’s room. Use the ID card on the door to see the lock. Use the ID card on the lock to open the door. Move forward into the room. Examine the equipment at the bottom of the left bed. Move the dumbbells to reveal a book below it. Examine the book and then select the book to open it. Examine the list inside the book:
Task complete: Take a look at the book of Poe stories I found by Leela’s bed.
Back away from the equipment. Move forward and examine the desk. Examine Izzy’s picture and then select it to turn it around. Take the key from the back of the picture:
Task complete: Take a really really good look around Izzy and Leela’s room.
Examine the chest at the bottom of the right bed and then use the key on it. Remove some of the items from the chest to see a blue cloak below. Take the blue cloak to see that it was the same cloak the leader of the Blackwood Society was wearing.
Task complete: Look around Izzy’s stuff and see if the key that was behind her picture opens anything.
Close the chest and exit Izzy and Leela’s room. Go downstairs to the library and talk to Izzy. Say "Seeing as you’re the leader of the Blackwood Society, I need you to tell me something.". Select either topic when she asks what is in it for her: She says that the chant means ‘Three is fine but five is more. Even nineteen defeats four. Should just seven become lore, At least two will find the door.’. Say "What does the chant mean?": She has no idea, but it has been passed down since the school and the society was founded. Select the bottom topic to end the conversation with Izzy.
TASKS COMPLETE: Tell Izzy I know she’s the leader of the Blackwood Society and get her to repeat the chant for me + That chanting I heard may have something to do with Rita Hallowell’s ‘hidden treasure’, so find out what those people were saying!
Exit the library. Go upstairs and enter Nancy’s room. Set the phone alarm to 11pm to wake up at night. Exit Nancy’s room. Go downstairs and move forward five times to the locked classroom door. Examine the door and then use the ID card on the crack in the door to open it.
TASKS COMPLETE: Keep my eyes peeled for a way to put the ID I found in the Victorian book to use + Find a way into the locked classroom that has the old U.S. map in it.
Move forward into the classroom. Quarter turn right to see the raven panel. The fourth page of the Hallowell journal mentioned the tail, bill, breast and primary feathers of the raven.
Task complete: Be on the lookout for something that might tell me in what order to press the raven that’s in that empty classroom.
Press the tail, bill, breast and primary feathers on the raven panel:
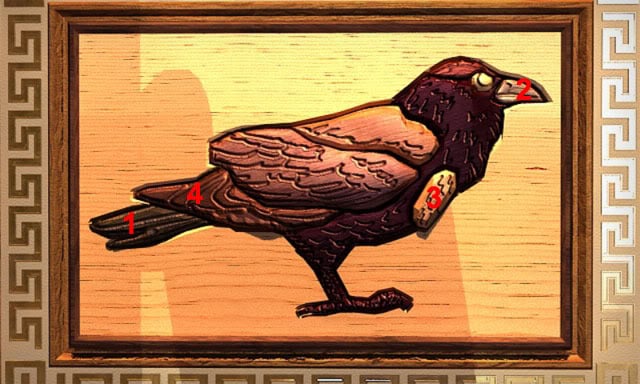
Pressing the parts of the raven in the correct order causes the states to drop off the map of the United States.
Task complete: Press the raven in the classroom in the order suggested in Rita Hallowell’s journal and see if anything happens.
Examine the map of the United States to see that all but one of the states has fallen off.
Task complete: See if that piece of wood I found under the bed is shaped like the state of Oklahoma for a reason.
Place all of the states in the correct order on the map:

Task complete: Yikes! Put that map of the U.S. back together before I really get in trouble!
Half turn from the map. Move forward to the door and examine the left post. Take the raven token. Nancy sees Rachel walking past the classroom door and follows her back to her room. Use the ID card on Rachel’s door to open it. Enter the room to see a sliding door close. Approach the sliding door and examine it to see a star shape.
Task complete: Use that ID again to carefully and quietly break into Rachel’s room so I can see what she’s up to.
Select the star at the left side of the button to move the slider. From here, move the slider between all of the stars without crossing the same star twice:
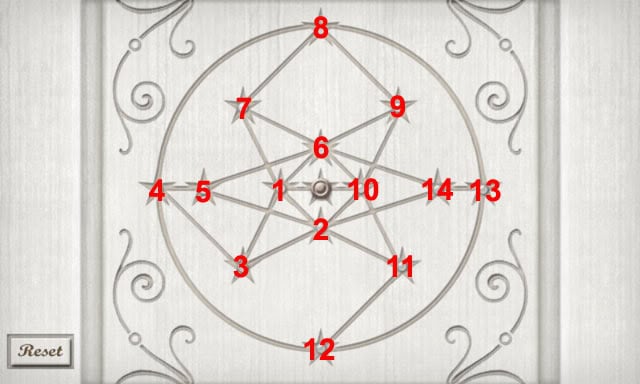
Task complete: Fiddle with the starburst pattern on the wood paneling and see if I can make that secret door that Rachel disappeared through open up again.
Move forward into the secret room to see Rachel and her twin Kim: They explain they were blackmailed into leaving the Black Cat notes for other people, but that they are not the Black Cat. Nancy agrees to help the twins out. The next morning, go downstairs to the foyer and open the front door. Go outside, quarter turn right and move forward on the right path to reach the cellar hatch. Clear the snow away from the hatch and then open the hatch. Move forward to the top of the stairs. Turn the light switch on at the left side of the stairs.
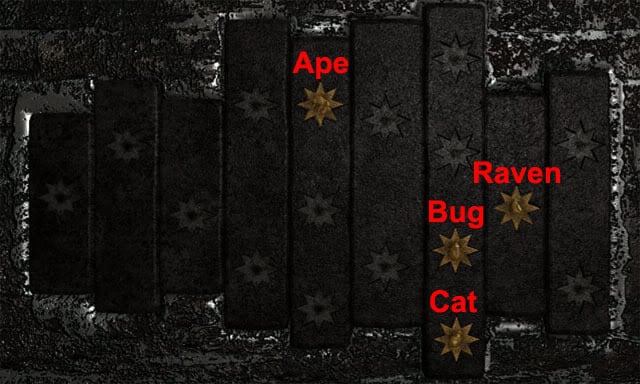
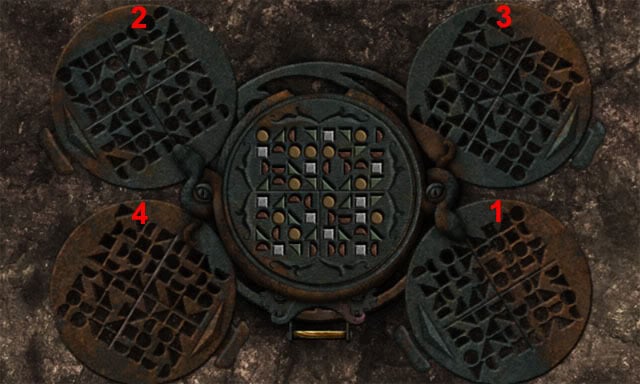
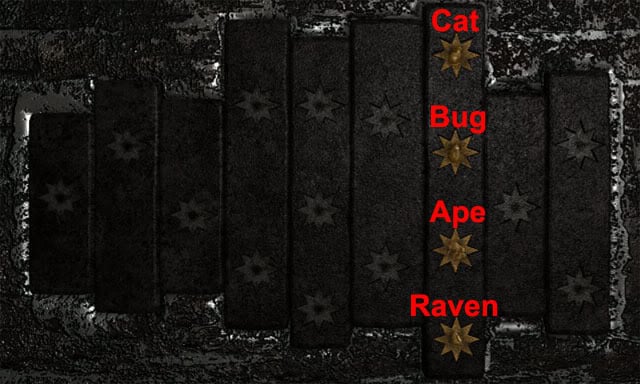
Continue forward into the cellar. Move forward, half turn and then move forward to the wall with the star slots. Nancy automatically puts the four gold tokens into the slots on the wall. Examine the Black Cat book in the inventory to see a list of stories with dates next to them. When the dates are arranged from earliest to latest, the ape appears 6th, the bug 13th, the cat 14th and the raven 15th. Put the ape token in the 6th slot, the bug token in the 13th slot, the cat token in the 14th slot and the raven token in the 15th slot:
TASKS COMPLETE: Figure out why there are four star-shapes at the top of the list that was in the ‘Black Cat’ book (represent the four tokens I’ve found maybe?) + Figure out what the animal tokens I’ve found are good for + It looks like something goes into those little niches in the dripping wall down in the cellar — figure out what!
Examine the box in the hole and open the box. Examine the blueprint of the storage cellar and take it. Examine the photograph of Rita Hallowell and her cat. Use the phone to take a picture of the photograph:
Task complete: Take a picture of that photo I found of Hallowell and her cat.
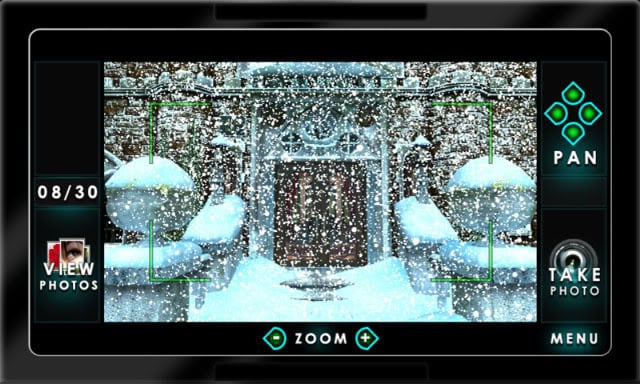
The next aim is to take a photograph of the remaining five school items for Rachel. Exit the cellar and go back down the path toward the front door. Half turn and move forward on the left path to the oak tree. Use the phone to take a picture of the oak tree:

Half turn and move forward on the path to see the front door. Use the phone to take a picture of the entrance arch:
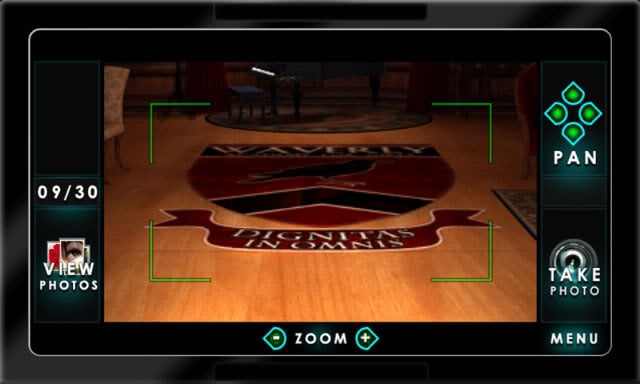
Open the front door and move forward to the school foyer. Use the phone to take a picture of the emblem on the floor:
Move forward twice, quarter turn right and move forward twice through the doorway. Quarter turn right and examine the display case on the left. Open the display case and examine the trophy. Use the phone to take a picture of the trophy:
Back away from the trophy, half turn and examine the door on the right. Use the ID card on the door to unlock it. Open the door and move forward to enter the classroom. Move forward twice and use the phone to take a picture of the map of the United States:

Exit the classroom. Enter the library and examine the computer. Select the black external hard drive to connect the phone to it. Use the computer and select the Waverly Website icon. Select the About Us page and then select Why Waverly in the quick links menu. Download the six pictures of the icons from the phone.
Exit the library and go upstairs, then go back downstairs and return to the library. Use the computer and check the Why Waverly quick link on the About Us page. Check to see if there are comments below any of the photographs. If there are, you will need to take that photograph again. Once all the photographs have been downloaded correctly, exit the library and go upstairs.
Task complete: Take pictures of the Waverly Academy ‘icons’ that are on Rachel’s list (be on the lookout for the photo of Rita Hallowell and her cat!).
Knock on the door to Rachel’s room and the door will open. Move forward into her room. Talk to Rachel and she will ask Nancy to get a copy of the essay that Corine wrote.
Task complete: See if there’s anything else Rachel needs me to do.
Select the bottom topic to end the conversation with Rachel. Exit Rachel’s room. Go to the other end of the hall and open the door to enter Nancy’s room. Talk to Corine and say "For the web page I’m helping Rachel put up, I need to get the essay you wrote that won the ‘Pen to Paper Award.’: She will copy it onto a flash drive if Nancy gets her a toasted bagel with cheese, an apple, some juice and a candy bar.
Task complete: Ask Corine for that award-winning essay she wrote.
Half turn and move to the door to see that Nancy has received a second note from the Black Cat. Examine the note and then take it. Exit Nancy’s room and go downstairs to the snack shop in the rec room. Put a bagel in the toaster and press the lever to start toasting it. After the bagel has popped up, put one half of the bagel on the plate on the left tray. Put cheese on the one half of the bagel on the plate. Put the half of the bagel from the toaster on top of the half of the bagel on the plate. Open the refrigerator and put an apple and a bottle of juice on the left tray. Put a candy bar on the tray. Press the pick up button to take the snack.
Task complete: Make the snack Corine asked for.
Back away from the snack bar. Go upstairs and open the door to enter Nancy’s room. Talk to Corine to give her the snack and she will give the flash drive to Nancy. Examine the flash drive and then take it.
Task complete: Take Corine her snack so I can get that essay from her.
When Corine asks if there is anything else, select the bottom topic to end the conversation. Exit Nancy’s room. Go downstairs and enter the library. Examine the computer and use the flash drive in the black external hard drive. Use the computer and select the Waverly Website. Select the Academics page and then click the English Department button to see a drive detected message. Select the download button to download the essay. Preview the essay.
Task complete: Upload the essay that’s on the flashdrive Corine gave me to Rachel’s web site.
Select page 2 of the essay and Nancy will realise that Corine is an expert on Poe and Hallowell.
Task complete: Read Corine’s award-winning essay (and see if I go ‘gaga’ over it, too).
Exit the library. Go upstairs and enter Nancy’s room to see that Corine has gone.
Task complete: Talk to Corine and find what else she knows about Rita Hallowell.
Move forward and examine the computer desk. Move the blueprint below the triangle ruler and examine the piece of paper to read the steps to reformatting Izzy’s computer. Back away from the view of the paper. Examine the blueprint below the straight ruler and take the sticky note to see the word cellar. Back away from the view of the sticky note.
Task complete: Snoop around Corine’s desk (I may never get another chance!).
Exit Nancy’s room and go downstairs to the foyer. Open the front door and move forward to go outside. Follow the path around to the side of the academy and open the hatch. Move forward to the top of the stairs. Turn on the light switch. Move forward to enter the cellar. Move forward to the furnace and Nancy will hear a noise coming from the other side of the wall. Examine the plan and Nancy will notice that the old set of blueprints shows a tiny room behind the furnace. A diagram of the furnace is shown with numbered valves.
TASKS COMPLETE: From what I saw on Corine’s desk, it looks like Corine may be in the cellar, so head down there and see what she’s up to + Compare the blueprints I found on the floor in the cellar with the old ones I found behind the wall and look for differences.
The aim now is to remember the verse of the Blackwood Society and the numbers on the blueprint so that you know what valves to pull. Pull the valves in the correct order and the furnace door will open:
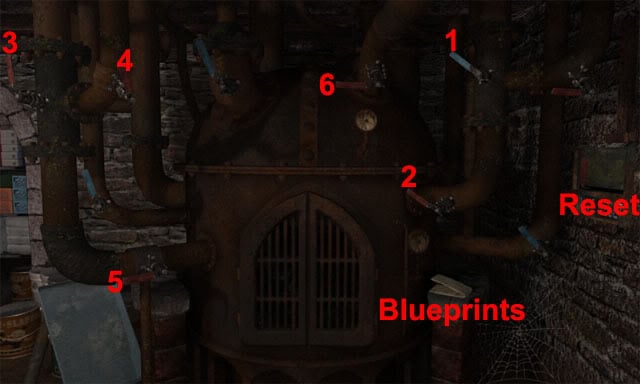
Task complete: Find the little room that’s on the old blueprints; looks like it’s behind the furnace with all the numbered valves.
Move forward twice into the secret room to see Corine. After Nancy accuses her of being the Black Cat, Corine grabs the book and runs out of the room. Examine the block in the middle of the room and a swinging pendulum will start to slowly descend from the ceiling. Nancy faces a group of shapes surrounded by four panels. Select one of the panels and pull the lever to make the shapes disappear, then do the same thing with the remaining three panels. The panels should be selected in the following order:
Task complete: Figure out how to get out of that room with the pendulum so Corine doesn’t get away (and I don’t end up looking like a sliced ham!).
After solving the puzzle, the pendulum is raised and the door opens. Move forward twice through the door to complete the game.
Task complete: Nab Corine!
The following awards are shown after the ending sequence:
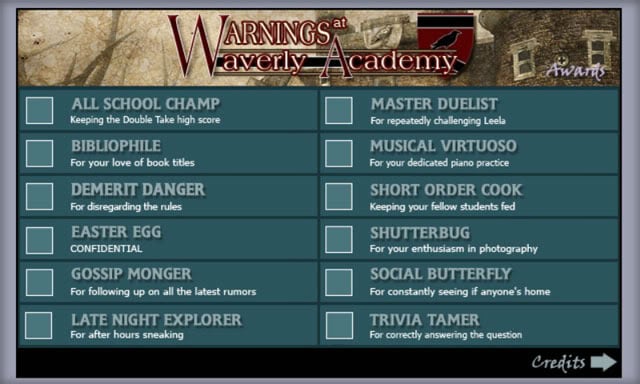
All of the awards are given descriptions explaining what needs to be done to get them, apart from the easter egg which is given the description "confidential". To get the easter egg award, when you are placing the four gold tokens on the wall in the cellar, place them in the following order:
The boards will fall away from the wall to reveal the easter egg.
“;

More articles...
-
Best Horror Games On Itch.io – July 2026
Across a bounty of subgenres. -
Haze Seas Accessories Tier List [Best Accessories to Equip]
The accessories with the best stat buffs in Haze Seas.