
Best Horror Games On Itch.io – July 2026
Across a bounty of subgenres.
Grow A Garden 2 Base Price List
What's the most valuable crop?![Evomon Best Starter [Leafbun, Blazpup, or Bubble?]](/wp-content/uploads/2026/06/evomon-best-starter.jpg "Evomon Best Starter [Leafbun, Blazpup, or Bubble?]")
Evomon Best Starter [Leafbun, Blazpup, or Bubble?]
Grass-type, Fire-type, or Water-type?
![[Roblox] Evomon Shiny Hunting Guide – Including Prismatic and Pris Shinies!](/wp-content/uploads/2026/06/evomon-shiny-hunting-guide.jpg "[Roblox] Evomon Shiny Hunting Guide – Including Prismatic and Pris Shinies!")
Nancy Drew: Ransom of the Seven Ships Walkthrough
Welcome to the walkthrough for Nancy Drew: Ransom of the Seven Ships, courtesy of Her Interactive.


- Prefer Gamezebo on Google

a:1:i:0;a:2:s:13:”section_title”;s:49:”Nancy Drew: Ransom of the Seven Ships Walkthrough”;s:12:”section_body”;s:27503:”
Welcome to the walkthrough for Nancy Drew: Ransom of the Seven Ships, courtesy of Her Interactive.
1. Flight to Bahamas. Island Arrival and Nancy learns that Bess Marvin has been kidnapped.
2. George Fayne shows Nancy the note from the Gibsons and gives Nancy the kidnapper’s note.
3. You can now explore the resort’s Lounge. George is available at the front desk.
4. Explore the lounge’s exhibits: Flying Friends, Nautical Flags, Monkey Mania, Island Map.
5. Take games pamphlet from Monkey Mania.
6. Find parrot hanging out in the lounge. Talk to Coucou.
7. See locked equipment closet.
8. Disarm the Light Panel lock – door opens. Press in following order:
Junior
Senior
_
_
___
_
_
5
6
6
5
3
4
4
2
1
1
2
3
9. Pick up walkie-talkies
10. Notice Air Refill station in closet.
11. Get Scuba gear.
12. Exit Lounge. Find Golf Cart parked by the entrance with sign that battery needs to be filled.
13. See Shed locked with a key padlock. Nancy VO that Gibsons may have the key at the front desk.
14. Return to Lounge and get shed key from George.
15. Open shed with key.
16. Find Shovel inside. Notice locked Sail Bin.
17. Take the Water Filler from a shelf and read instructions of use.
18. Place Water Filler on batteries and try to fill correctly.
19. Return to Lounge and see a Fruit Bowl has appeared.
20. Pick up a Guava from the bowl.
21. Give a Guava and receive Coucou Hints.
22. Battery Fill – open valves to individual batteries according to following (initial battery levels are shown at top):
Junior
Senior
Turn
100
100
45
15
25
15
___
15
40
60
55
55
75
1
X
X
X
X
X
X
X
X
X
X
2
X
X
X
X
X
X
X
3
X
X
X
X
4
X
X
X
X
X
5
X
X
X
23. Drive golf cart out to the road and into Map Driving – loop on the island. Sites marked that P can stop at: Sangre Beach, Monkey Center, Shark Cove, Blue Hole, Resort, Bat Caves.
24. Stop at Sangre Beach. Walk into tree line off beach, see one of Bess’ shoes. Trigger the Snare Capture.
25. Enter and meet Johnny Rolle.
26. See a metal detector behind Johnny.
27. Drive to Shark Cove.
28. Follow kidnapper’s note’s instructions and use correct pacing in Buried Treasure. Dig with shovel to obtain El Toro’s coded journal. Walk according to direction (N, S, E or W) and number of paces: S3 from palm tree W, W3, N9, W9, N2, W3, S15, W4, S6, E12, N5, E6, S4, E8, N2 and dig while still facing north.
29. Decode book’s Cryptograms. Solutions:
1. In the black of night, with hurricane winds wailing and giant waves pounding, I ordered my fleet to change course and make for land. But with this island in sight, the Caridad foundered and disappeared into the sea, while the Castidad was set ablaze when lightning ignited her sails and sank amid the smoke and flames. The remaining five ships managed to reach the island, where we dropped anchor, and waited out the tempest.
2. The light of dawn revealed catastrophic damage. Only a third of my men survived. Worse, not one of my ships is salvageable. None shall ever sail again. We are shipwrecked. The only hope we have of ever leaving this accursed place is to be seen by a passing ship. Lest it be a pirate ship, I have undertaken to hide our cargo. As a loyal servant of the King, it is my duty.
3. Seven ships set sail, and so seven pieces shall open the seal. I have tasked each surviving ships’ crew with hiding a single item, its location known only to them and to me. Securing the treasure itself shall be my task alone. I write this in English so that no one here with me will know how to find it. In this manner, any attempt to force the location of the treasure from my men will be fruitless.
30. Random sentences and passages still appear as gibberish in the symbol version of El Toro’s journal. Read initial passage describing site of shipwreck and an iron chest buried there. See last page has extra toed monkey pawprint on it.
31. Read Shipwrecks for info on underwater search. Note requirement of a Metal Detector, Shovel and Scuba gear.
32. Return to Johnny and ask for metal detector. He will let Nancy borrow it if she can obtain his Compass that was stolen by a monkey with a notched ear.
33. Drive to Monkey Center. Read games pamphlet for rules and see notched eared monkey referenced. Play Coconut Toss. Win and receive Compass.
34. Play Color Squares. Win and receive Dial.
35. Play additional games with monkeys. Win Coucou Guava or random Prize.
36. Return Compass to Johnny, get Metal Detector.
37. Need to sail to shipwreck site. Go to Pier and try to board boat.
38. Sails are missing. Return to Sail Bin in shed. See flag markings on top of box.
39. Check flags against Nautical Flags poster in Lounge. Get corresponding numbers.
40. Enter numbers into bin’s lock in shed – 7 9 2 0 4. Sail Bin opens and you retrieve Sails.
41. Place Sails on boat to enter Sailing.
42. Read Sailing Manual for sailing instructions.
43. Sail to Boat Salvage site – lower right corner of map.
44. Dive down to wreck’s location.
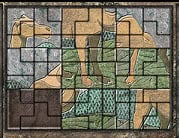
45. Metal Detection to find and dig to uncover iron chest located near center of shipwreck.
46. Complete Mosaic Tiles to open lock. Success state – Junior Detective:
1
2
3
9
4
7
6
8
5
4
5
6
8
2
1
7
9
3
7
8
9
5
3
6
4
1
2
.
.
.
9
6
2
4
7
5
8
3
1
8
1
4
3
9
2
5
6
7
3
7
5
1
6
8
9
2
4
.
.
.
2
9
1
6
5
4
3
7
8
6
4
8
7
1
3
2
5
9
5
3
7
2
8
9
1
4
6
47. Mosaic tiles success state – Senior Detective:
4
7
9
6
5
3
8
1
2
1
3
6
8
7
2
5
4
9
5
8
2
4
1
9
6
7
3
.
.
.
6
5
8
2
4
1
3
9
7
7
9
4
3
6
8
2
5
1
2
1
3
7
9
5
4
6
8
.
.
.
9
2
7
5
8
4
1
3
6
3
4
1
9
2
6
7
8
5
8
6
5
1
3
7
9
2
4
48. Chest opens and you retrieve Dial and a brass Astrolabe.
49. Return to surface, Sailing back to the Pier.
50. Find Threat1 posted to Resort porch.
51. See symbols on back of Astrolabe that match those in the symbol version of El Toro’s journal. Astrolabe Decode and repeat Cryptograms to obtain fully decoded journal. Solutions:
1. Befriended one of the families of bats that call this island home. Their gargantuan ears and winged antics provide much needed laughter for my men as the creatures devour the insects attracted to our lantern. The cave which they call home has become a safe haven to us.
2. Explored the interior of the isle searching for supplies. From its highest point, found a view most worthy. Half a fathom tall, the astrolabe guides the way to a flying dove and a watery grave.
3. Discovered a bounty of seafood at Halfmoon reef. Divers swim down to the secret entombed behind death. Two form a perfect square times three, three create four, four makes five. Then they return to the surface, prize in hand.
4. A challenge issued today by Generosidad’s cabin boy, Manuel, to helmsman, Andres, for ownership of a hammock which washed ashore. Pointing to two three hundred kg rocks, Manuel proposed that whoever lifted one of them first would win. Andres, the stronger by far, quickly accepted. He had not yet budged his rock when Manuel, having used six loops of a fifty foot rope over pulleys, raised his with ease and walked off with the hammock.
5. More losses at the Blue Hole when a group of men dove in and lost their bearings. Danger! Heed this warning: Death awaits all who enter these caves unprepared. Poisonous guardians of the deep strike with no warning. Stay away! Only those who follow the signs will find their way.
52. Discover locations of other sites: start at Bat Caves with the specific bat and Astrolabe Sightings.
53. Need sighting Rod for Astrolabe Sightings. See Coucou’s metal perch and ask to have it. Coucou demands fruit.
54. Give Coucou a Guava and get new perch requirements from Coucou for a Perch Trade.
55. Find new driftwood for perch at Shark Cove (3 possible), Sangre Beach (2 possible) or Blue Hole (1 possible).
56. Give perch to Coucou, but it’s the wrong one. Continue bringing in perches until Coucou agrees to trade – get Rod in return.
57. Make Detector from Flying Friends exhibit. Get a Bat Detector. Notice it’s missing a battery. 
58. Find audio frequency of bat described in El Toro’s journal is 16 kmhz at Flying Friends.
59. You need battery for Bat Detector. Ask Johnny if he has one.
60. Go Sailing to retrieve Johnny’s Beacon. Get Battery in return.
61. Place [Battery in Bat Detector.
62. Driving to Bat Caves and start Climbing. Avoid obstacles being hurled down by monkeys.
63. Use Bat Detector for Echolocation at each cave until correct frequency 16 is found.
64. Enter further into Cave.
65. Find Jade Glyph in wall. Press glyph which triggers a Cave In.
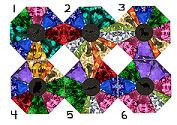
66. See a mirror that can rotate, now lit from hole in the rock blocking the entrance. Turn Mirror Light mirrors until light beam illuminates hidden nook where P gets Dial6 and the Symbol Guide. 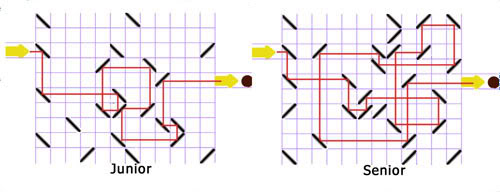
67. Last light beam is cut off after solving mirrors. Hear static sfx on walkies. Call George on Walkies for help.
68. Become George. Run out to caves, Climbing to reach Nancy.
69. Find closed cave door. Talk to Nancy, inspect door and complete Cave Reset.
70. Complete Cave Slider. Slide order (numbered 1 upper left across and down to 9 in lower right): 8 9 6 3 2 1 4 5 6 3 2 5 8 7 4 5 6 9 8 7 4 5 6 9 8 5 4 7 8 9.
71. As rocks reset in George Rescue, Player switches back to Nancy.
72. Player exits cave and finds the fake ID.
73. Drive to Sangre Beach and confront Johnny in Aussie Reveal.
74. Climbing to top of Bat Caves. Blocked from boulder for Astrolabe Sightings by the Monkeys.
75. Ask monkeys to move. Hear what Monkey Bribe would entice them to leave the rock face.
76. Use Monkey Mania display to determine the meaning of monkey’s vocalization – urchin.
77. While in Lounge, refill air tanks from Air Refill in closet.
78. Return to Boat Salvage and find the Urchin by the brain coral.
79. Hand Urchin over to monkeys in Monkey Bribe.
80. Find hole to place sighting Rod and Astrolabe_.
81. Astrolabe Sightings – See Bad Men moving around in the trees.
82. Find bearings of Reef (SW 40) and Dove Isle (NE 70).
83. Sailing to Dove Isle.
84. Land on the isle – find Sundials.
85. Wind dies and cannot leave isle.
86. Call George to retrieve Reale coin from Shed. See Prowler Flash of light by Resort while talking. Tell George to check it out. Become George.
87. Take another copy of the games pamphlet to view as George.
88. Explore resort exterior and find another Threat posted out front.
89. See that the shed has been Trashed.
90. Look for Reale from the Nuestra de Atocha placard – now missing.
91. See multiple monkey track trails leading from Shed into trees.
92. Drive to Monkey Center and play Alleyway with Monkeys.
93. Win back Reale.
94. Play additional games with monkeys. Win Coucou Guava or random Prize.
95. Call Nancy with date from the coin.
96. Become ND.
97. Spin Sundials to read 6 – 9 – 1 – 6 – 2 – 2. Turn clockwise in following order (A1 is first dial, A2 is last):
1. Johnny: O C C C H H H A1 A1 A2 A2
2. Sr: C C H H O O O A1 A2 T T
98. Obtain Dial Guide and Medallion.
99. With wind now blowing, Sailing to Reef.
100. Reef Dive.
101. Navigate through the Jellyfish Swarm.
102. Follow symbols down reef wall using the Symbol Guide to locate active hole as described in El Toro’s journal.
103. Reach in and get surprised by an Octopus Warning. See distinct shell remnants around entrance.
104. Continue Scuba dive down to seabed floor to Mollusk Find. Pick up the Mollusk.
105. Bait Octopus to leave den – put shell on shelf farthest from den hole.
106. Get Octopus Box. Follow El Toro’s journal to move dividers’ placements (multiple solutions). 
107. Unlock box and receive Dial2.
108. Return to surface from Reef Dive. Watch dive meter for decompression danger, pausing to let pressure stabilize.
109. Board boat, Sailing back to Pier.
110. Drive to Blue Hole.
111. Find Pulley Line – note missing pulley and extra toed monkey tracks.
112. Play Color Squares with Monkeys to obtain Pulley.
113. Return Pulley to Pulley Line and string rope through pulleys (as listed in riddle book where A is upper left pulley, B is lower right, C is lower left and D is upper right): B A D B C D.
114. Obtain Dial5 from underneath.
115. Look at Medallion to find see location of next item. Drive to Shark Cove.
116. Use Metal Detector to find correct areas in Beach Detection.
117. Find Bess Bracelet.
118. Detect missing metal plates – Donkey, Rabbit and Dove.
119. Locate Owl Silhouette base, replace missing plates and create owl silhouette with plates. Solution: Donkey rotated 0, Dove rotated 270, Camel rotated 90. Receive Dial4.
120. With all dials, head to Blue Hole for final location.
121. Need light for Cave Dive. Talk to Johnny.
122. Help with GPS Programming using the Chart and GPS to obtain Glowsticks. Coordinates are:
1. Half Moon Bay | N23°57´ W74°30´
2. USS Cyclops | N24°09´ W73°42´
3. Gull Rock | N23°51´ W73°48´
4. Shipwreck Shoals | N24°06´ W74°00´
5. Kraken Whirlpool | N23°54´ W74°12´
6. Danger Reef | N24°09´ W74°18´
7. Bermuda Triangle | N24°18´ W73°27´
8. Dread Isle | N24°00´ W73°24´
123. Drive to Blue Hole and dive into blue hole.
124. Navigate through Cave Dive to dial door using El Toro’s journal and Symbol Guide. Follow the purple route: 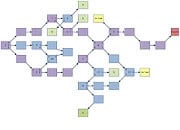
125. Find one of two spare Air Tank in underwater caves.
126. Follow Dial Guide to determine Order of all six dials on the door lock. Top row L-R: bee, ant, donkey; bottom row L-R: owl, panther, camel.
127. Spin Dials to match all sides.
128. Enter into cave Treasure Room.
1. See Hourglasses. Find Well Key lying over one of them.
2. Turn Hourglasses in correct timing so all run out at same moment. Duration and order: Humilidad 27 sec, Generosidad 25, Castidad 20, Paciencia 15, Templanza 11, Caridad 6, Diligencia 2.
3. Take Silver_Map.
4. Find spare Air_Tank.
5. Cave Dive back out.
6. Return to Lounge where George hands over the Treasure Dropoff instructions.
7. Read instructions and drive to Sangre Beach.
8. Treasure handoff to Johnny.
9. With treasure in hand, Johnny’s secret comes out with the Dwayne Reveal.
10. Dwayne pushes Nancy into the Well Trap.
11. Find Bess in Well Trap.
12. Open entrance into El Toro Room with the Well Key.
13. See El Toro’s skeleton and remove El Toro Key still in his hand.
14. Use Well Key in Skeleton Key (8 pointed iron plate) to reveal Symbol Press.
15. ”Symbol Press in correct order to reveal special compartment: ![]()
16. Place both Well Key and El Toro key into the chest keyholes, turn keys and press buttons to open the Secret Cache – I, II, IV, V.
17. Obtain El Toro’s Treasure.
18. Find doorway covered in keyholes. Locate correct keyhole in Skeleton Key, using El Toro key.
1. If heart plate in 4th column, 3rd row: lower left corner of board.
2. If heart plate in last column, 3rd row: plate in 4th column, 2nd row.
3. If heart plate in 3rd column, 3rd row: rose plate upper right corner.
4. If heart plate in 2nd column, 2nd row: plate in 4th column, 1st row.
5. If heart plate in 4th column, 1st row: plate in 5th column, 2nd row.
19. Leave El Toro’s room with Bess and return to the resort.
20. Reunion with George at the Resort.
21. Fade to Closing dossier. If Nancy found the Secret Cache, you’ll see an extra treasure scene.
“;

More articles...
-
Best Horror Games On Itch.io – July 2026
Across a bounty of subgenres. -
Grow A Garden 2 Base Price List
What's the most valuable crop? -
Evomon Best Starter [Leafbun, Blazpup, or Bubble?]
Grass-type, Fire-type, or Water-type?