- Wondering how to get Monopoly GO! free rolls? Well, you’ve come to the right place. In this guide, we provide you with a bunch of tips and tricks to get some free rolls for the hit new mobile game. We’ll …
Best Roblox Horror Games to Play Right Now – Updated Weekly
By Adele Wilson
Our Best Roblox Horror Games guide features the scariest and most creative experiences to play right now on the platform!The BEST Roblox Games of The Week – Games You Need To Play!
By Sho Roberts
Our feature shares our pick for the Best Roblox Games of the week! With our feature, we guarantee you'll find something new to play!Type Soul Clan Rarity Guide – All Legendary And Common Clans Listed!
By Nathan Ball
Wondering what your odds of rolling a particular Clan are? Wonder no more, with my handy Type Soul Clan Rarity guide.
Mystery Trackers: The Void Walkthrough
Welcome to the Mystery Trackers: The Void walkthrough on Gamezebo. Mystery Trackers: The Void is a hidden object adventure game played on PC. This walkthrough includes tips and tricks, helpful hints, and a strategy guide for how to complete Mystery Trackers: The Void.
Mystery Trackers: The Void – Game Introduction
Welcome to the Mystery Trackers: The Void walkthrough on Gamezebo. Mystery Trackers: The Void is a hidden object adventure game played on PC. This walkthrough includes tips and tricks, helpful hints, and a strategy guide for how to complete Mystery Trackers: The Void.
General Information
- Enter your player name. Click on “Change Player” (lower left) to add or delete a profile. Your profile name can consist of 7 characters (letters and numbers, only) and you may create up to 5 profiles.
- Click on Options to adjust Music and FX/Env (Effects/Environment) Sounds volume levels. Click on Full Screen or System Mouse Cursor to turn them on or off. Note that you can’t switch to Windowed Mode if your screen resolution is set below 1152×864. Click on Credits to view this information.
- Click on Achievements (lower right) to view trophies you’ve collected. When you begin, only 3 of these have descriptions. There are 12 Achievements you can collect.
- Bonus Content is locked until you complete the game.
- The Strategy Guide contains the in-game walkthrough, including the Bonus Gameplay (locked until you complete the game). You can access it from the Main Menu or at the lower right in any game screen.
- Click on Play Game to begin and click on Yes or No at the Tutorial prompt.
- Click on the Diary (lower left) to view story information and clues for puzzles.
- Once activated, the Hint button takes 25 seconds to recharge and the Skip button takes 60 seconds to charge. When you begin puzzles and minigames, a brief description of the instructions (upper part of the screen) will be shown. Click on the Info button (right side of the screen) to see them again.
- Mouseover the items in your Inventory for a popup description.
- Gameplay and Guide Tips
- This guide assumes you’ve used the in-game Tutorial, read the General Information, read the Gameplay and Guide Tips or otherwise familiarized yourself with using the features in this game.
- Item lists in object searches are always the same and all objects will be highlighted. The Inventory Items will be highlighted in Green and multiple items will be highlighted in separate colors.
Walkthrough
Watch the introduction, create your Player Name, change Options (if you like) and then click on Play Game to begin.
Chapter 1 – Void Mansion
Front Door
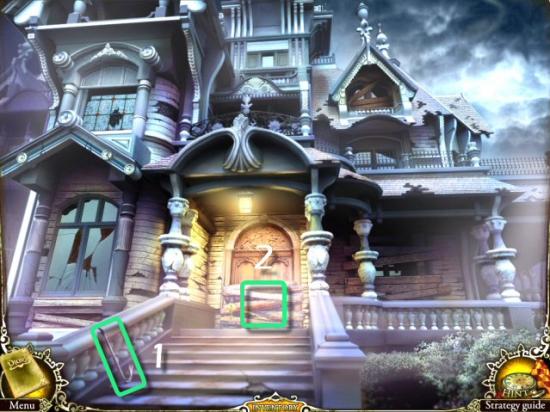
Collect the Crowbar (1) and then click on the boarded over Front Door (2). Use the Crowbar (click 3 times) on the Boards and click forward to enter Void Mansion.

Foyer
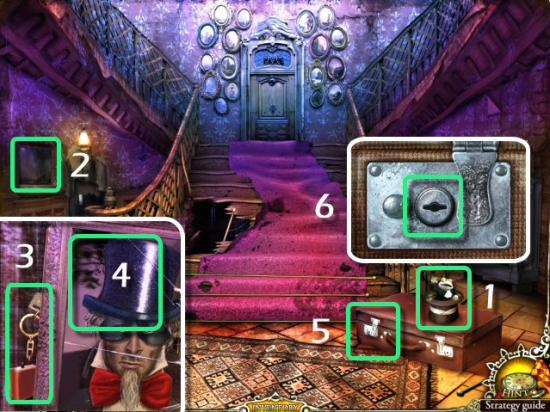
Collect the Toad (1) to enable the Hint function, click on the Painting (2), collect the Key (3) and the Painting (4), click on the Suitcase (5), use the Key on the Lock (6) and then click on the open Suitcase.
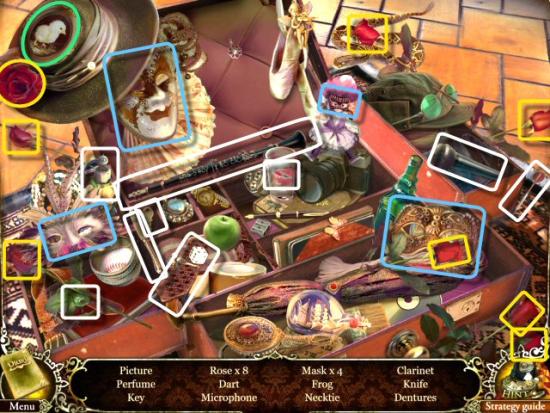
Find all the objects in the list. Inventory Item: Picture (green) Multiple Items: 8 Roses (yellow); 4 Masks (blue)
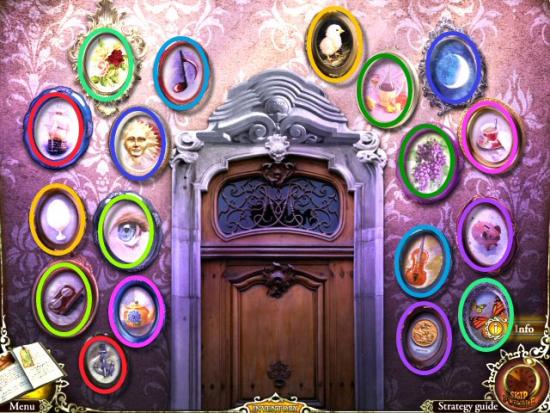
Click on the Door and use the Painting on the Empty Space. Eliminate the pictures by clicking on related pairs. When complete, enter the Bedroom.
Bedroom
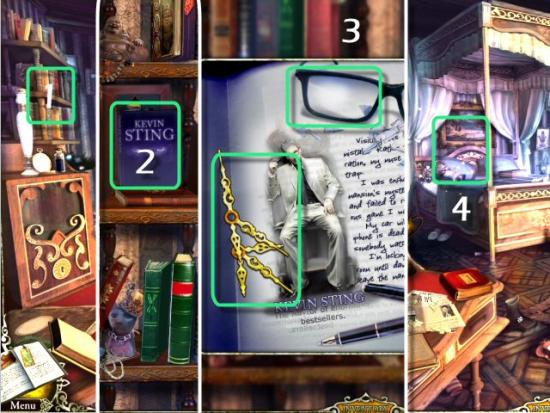
Click on the Bookshelves (1), click on the Kevin Sting novel (2), collect the Clock Hands and Glasses (3) and then click on the Bed (4).
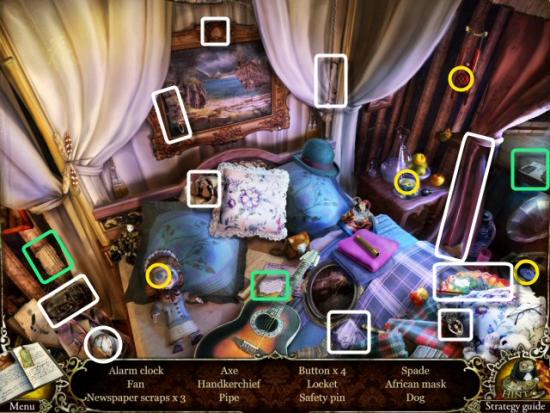
Find all the objects in the list. Inventory Item: Newspaper scraps (green) Multiple Items: 4 Buttons (yellow).
Click on the Desk (1), use the Newspaper Scraps on the Desk and reassemble the page. Click on a piece to rotate it clockwise; right click to rotate it counter-clockwise. Click and drag a piece to move it into position and then release your mouse button to place it. Once placed correctly, the piece will lock into place. Collect the Screwdriver and Diary Entry (2) and then return to the Foyer (3).
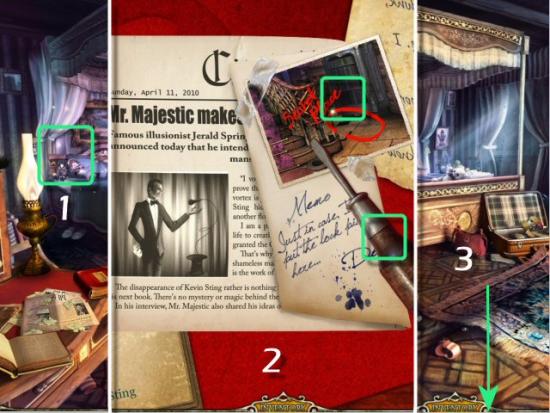
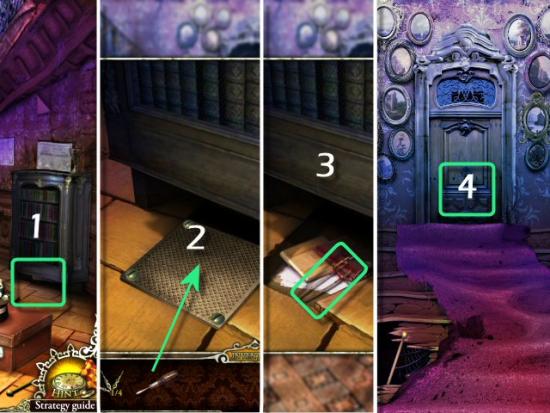
Click on the floor, underneath the Bookcase (1), use the Screwdriver on the Panel (2), collect the Lock Pick (2) and then return to the Bedroom (4).
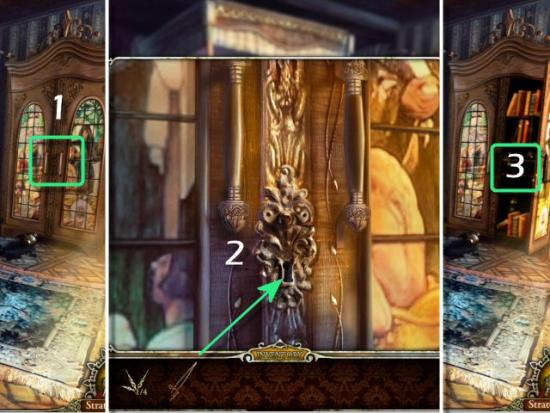
Click on the Wardrobe (1), use the Lock Pick in the Key Hole (2) and then click on the open Door (3).
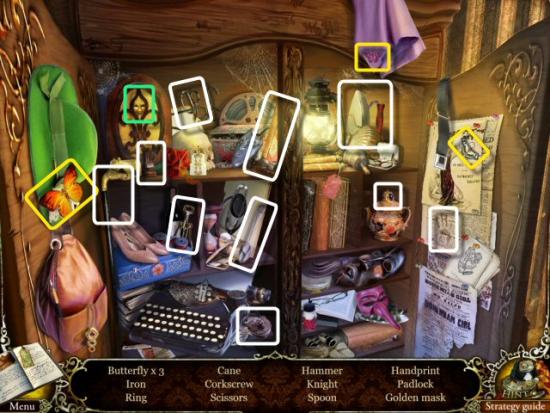
Find all the objects in the list. Inventory Item: Golden Mask (green) Multiple Items: 3 Butterflies (yellow).
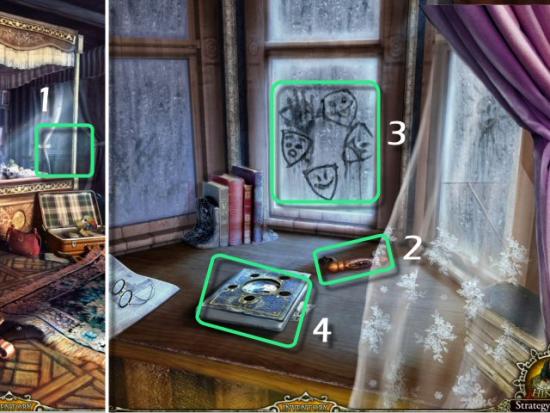
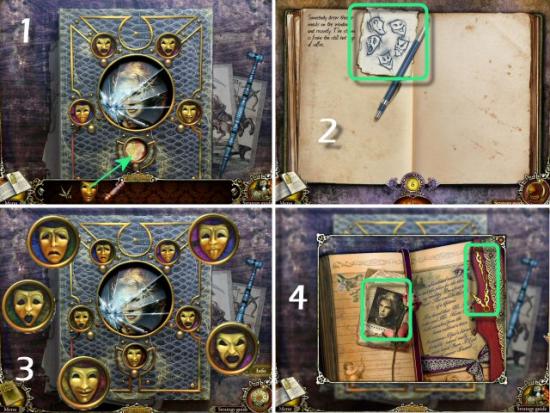
Click on the Window (1), collect the Drawer Handle (2), Diary Entry (3) and then click on the Book (4).
Use the Golden Mask in the Empty Space (1), refer to your game Diary for the clue (2) and then click on each Mask to change it to the correct Expression (3). Clicking on a Mask will rotate it clockwise; right clicking will rotate it counter-clockwise. When complete, collect the Diary Entry and the Clock Hands (4).
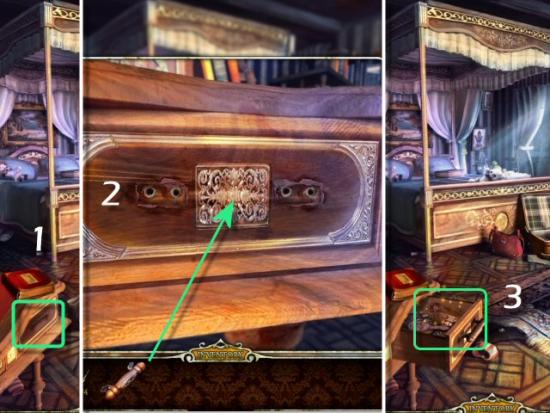
Click on the Desk Drawer (1), use the Drawer Handle on the front (2) and then click on the open Drawer (3).
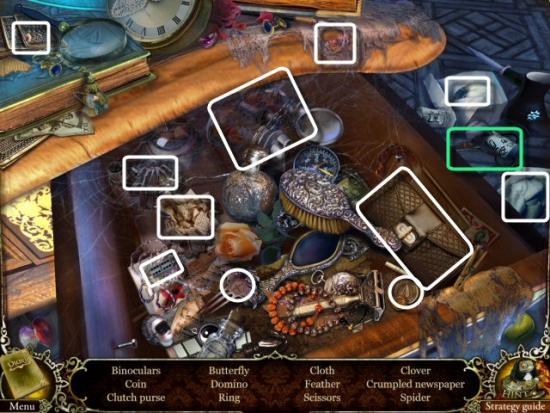
Find all the objects in the list. Inventory Item: Scissors (green).
Sitting Room
Enter the Sitting Room (1), collect the Clock Hands and the Diary Entry (2) and then click on the Mantel (3).
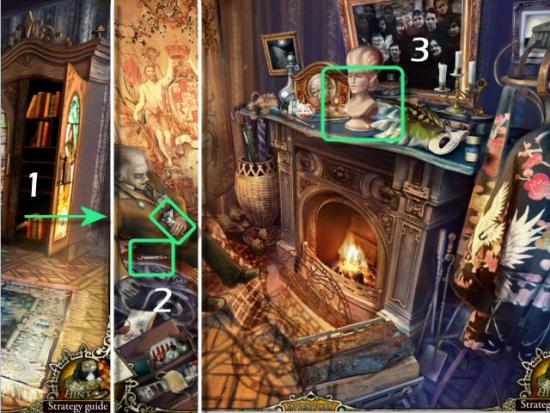
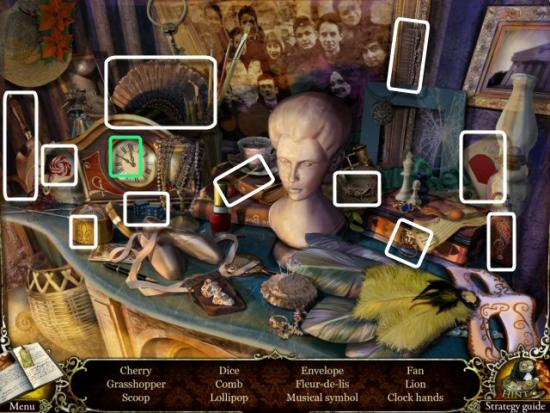
Find all the objects in the list. Inventory Item: Clock Hands (green).
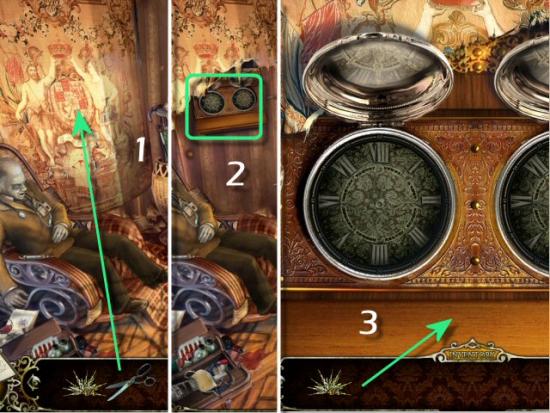
Use the Scissors on the Tapestry (1), click on the Clocks (2) and then use the Clock Hands on the Shelf (3).
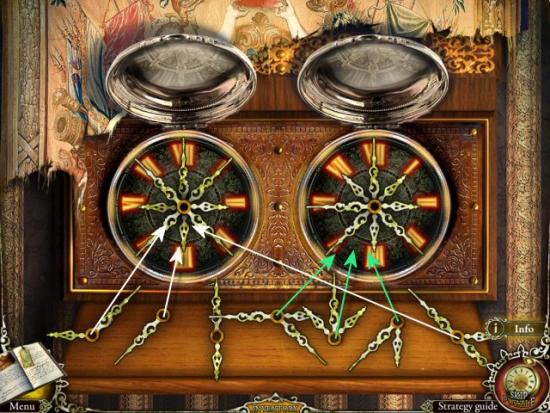
The object is to place all the Clock Hands on the two Clock Faces so that all the numerals are highlighted. Click and drag one of the Clock Hands to a Clock Face and then rotate it into position. Click to rotate them clockwise; right click to rotate them counter-clockwise. Click near the point of the Clock Hand to make sure you select the one you want, or rotate them before you place them on the Clock Faces. The following screenshot shows the Clock Hands rotated into the correct positions, before being placed. When complete, enter the Hallway.
Chapter 2 – Secret Area
Right Hallway
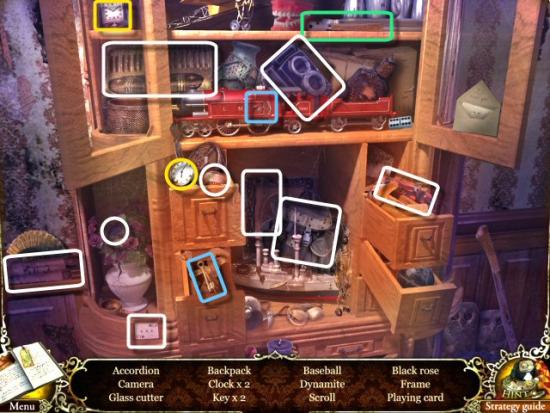
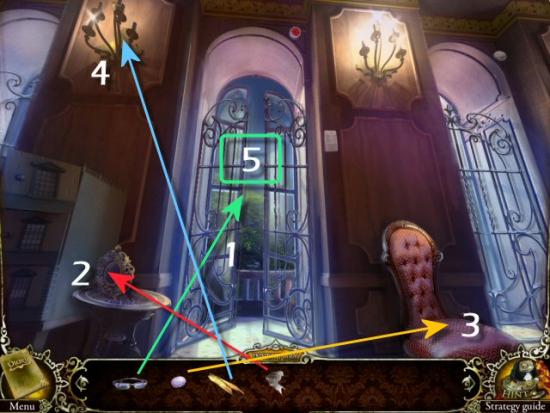
Click on the Door (1), collect the Caduceus Ring (2), click on the Book (3), collect the Diary Entry (4) and then click on the Cabinet (5).
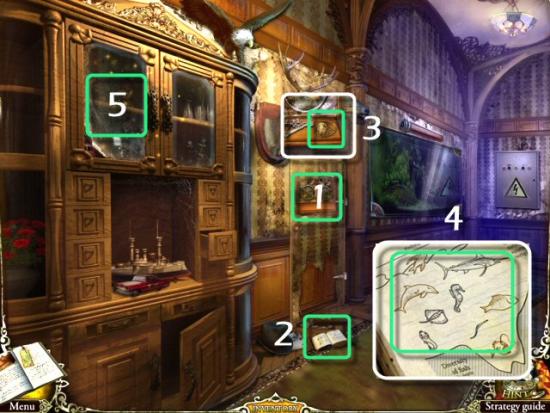
Find all the objects in the list. Inventory Item: Glass Cutter (green) Multiple Items: 2 Clocks (yellow), 2 Keys (blue).
Left Hallway
Enter the Left Hallway (1), click on the Safe (2), refer to the Diary Entry for the clue (3), move all the Fish to their correct depths (44 – click and drag each Fish, up or down). When complete, collect the Bulb and Diary Entry (5).
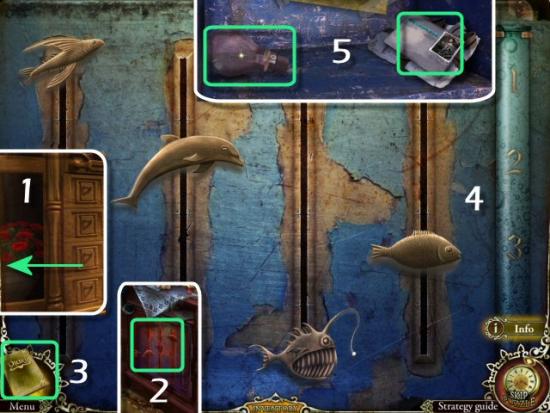
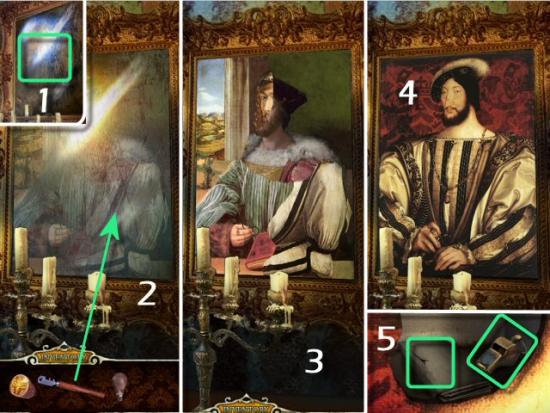
Click on the Painting (1), use the Glass Cutter on the Glass (2), click on each section of the Painting (3) until you form a complete picture (4). When complete, collect the Whistle and Diary Entry (5). The Painting solution is:
- A – Upper Left – click twice
- B – Upper Right – click twice
- C – Lower Left – click once
- D – Lower Right – click twice
Right Hallway
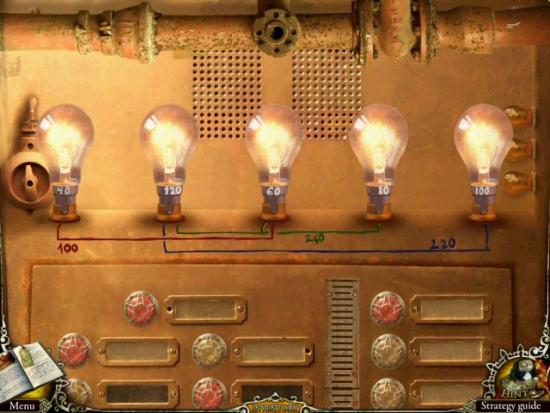
Return to the Right Hallway (1), click on the Control Box (2), use the Light Bulb in the Empty Socket (3) and then switch the Bulbs until they match the correct wattage combinations for the wiring diagram.
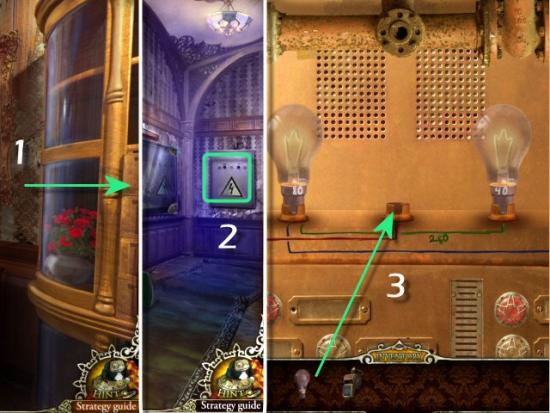
Click on one Light Bulb and then click on another to switch their locations. Refer to the wattage labels on each Light Bulb and the wiring diagram [100 – 260 – 220], below the sockets, for the correct placements. The solution is 40 – 120 – 60 – 80 – 100
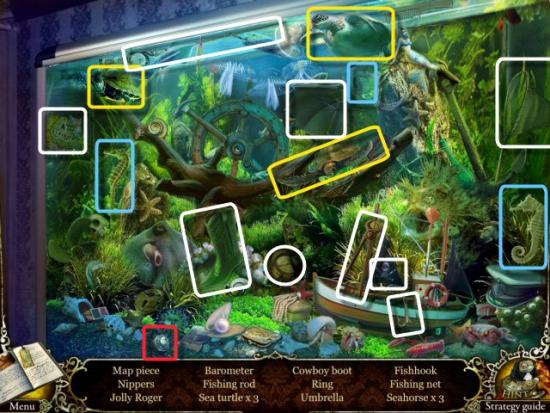
Click on the Aquarium. Find all the objects in the list. Inventory Item: Emerald Ring (red) Multiple Items: 3 Sea Turtles (yellow), 3 Seahorses (blue).
Left Hallway
Return to the Left Hallway, use the Whistle on the Troll (1), enter the Illusionist’s Room (2) and then click on the Dressing Table (3).
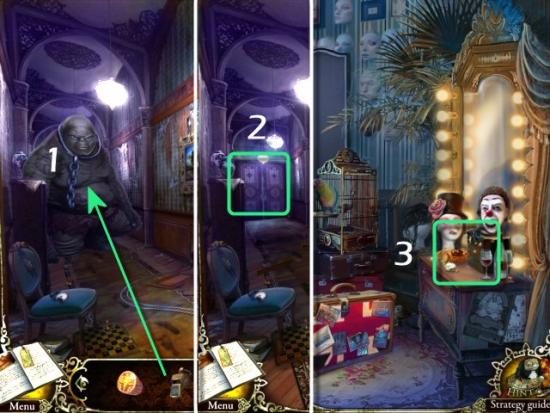
Illusionist’s Room
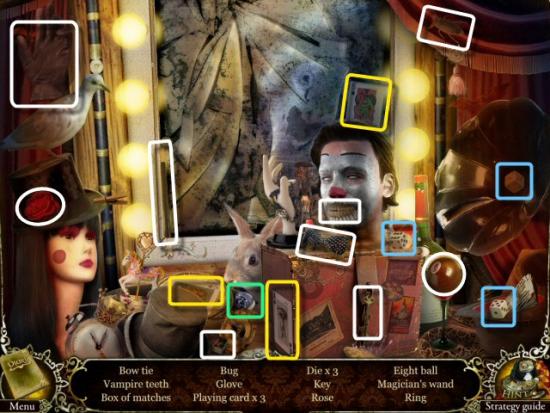
Find all the objects in the list. Inventory Item: Salamander Ring (green) Multiple Items: 3 Playing Cards (yellow), 3 Dice (blue).
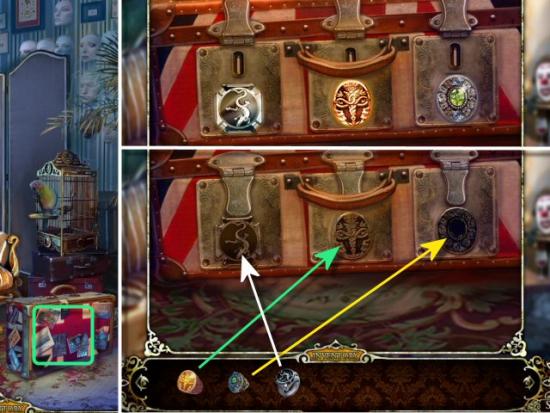
Click on the Suitcase (1) and use the Rings in the slots (2).
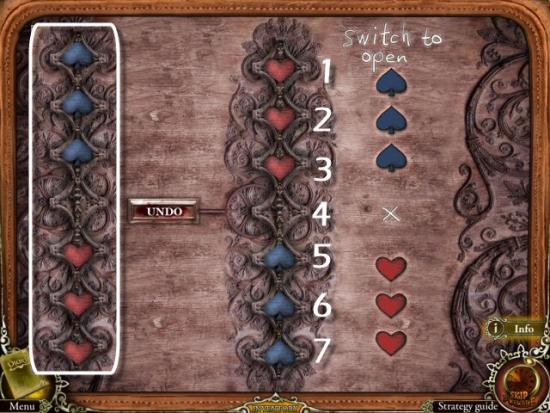
Switch the places of the Blue Spades and the Red Hearts, as shown in the diagram on the right. The key to this puzzle is to make sure you never have 2 of the same symbols next to one another, until you’re ready to make your final moves. You can either move a symbol to an adjacent space, or jump over 1 other symbol to the next empty space. You can’t jump more than 1 symbol. Here are 2 solutions:
- Solution 1: click on 3, 5, 6, 4, 2, 1, 3, 5, 7, 6, 4, 2, 3, 5, 4
- Solution 2: click on 5, 3, 2, 4, 6, 7, 5, 3, 1, 2, 4, 6, 5, 3, 4
Click on the following for a video solution. Solution 2 is used.
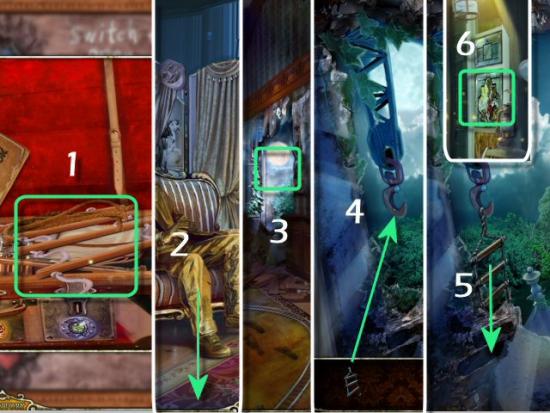
Collect the Rope Ladder (1), return to the Left Hallway (2), exit through the Hole (3), use the Rope Ladder on the Hook (4), descend to the Porch (5) and then click on the Window (6).
Porch
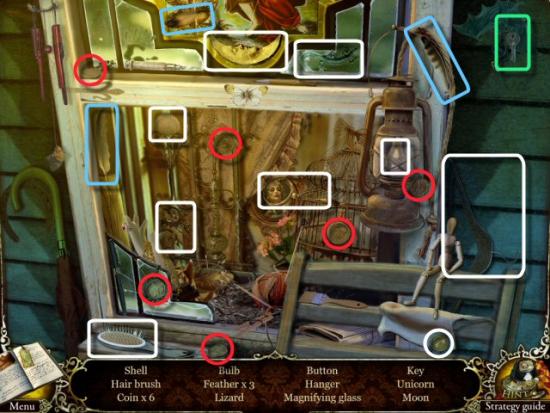
Find all the objects in the list. Inventory Item: Mailbox Key (green) Multiple Items: 6 Coins (red), 3 Feathers (blue).
Amusement Park Gate
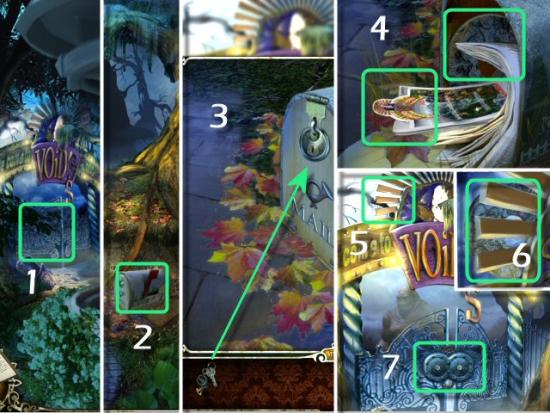
Continue to the Amusement Park (1), click on the Mailbox (2), use the Key in the Lock (3), collect the Starry Sky Circle and Diary Entry (4), click on the Sign (5), collect the second Starry Sky Circle and then click on the Gate Lock (6), twice.
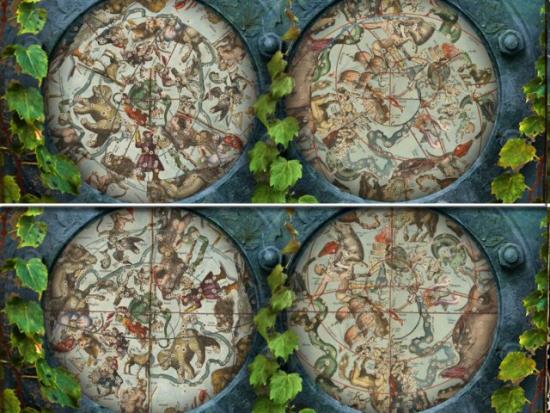
Use the Starry Sky Circles on the Gate. Click and drag the 2 outer circles, on each side of the lock, until the images line up.
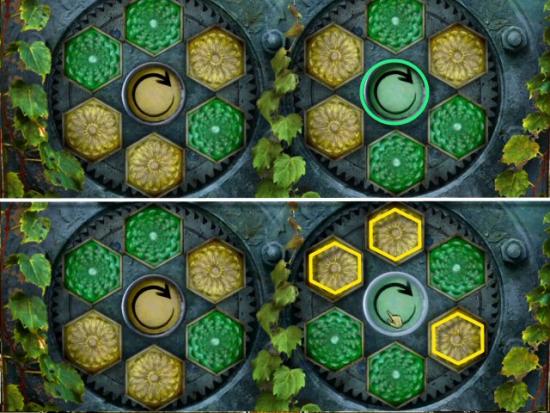
Move the Hexagons so that the left and right sides match the color of the Center Circle. Click on the Center Circles to rotate the positions and then click on a Hexagon to switch places with one in the same position on the opposite circle. To solve, all you need to do is click the Green circle once (1) and then click on each of the Yellow Hexagons (2). When complete, enter the Gate.
Drawbridge
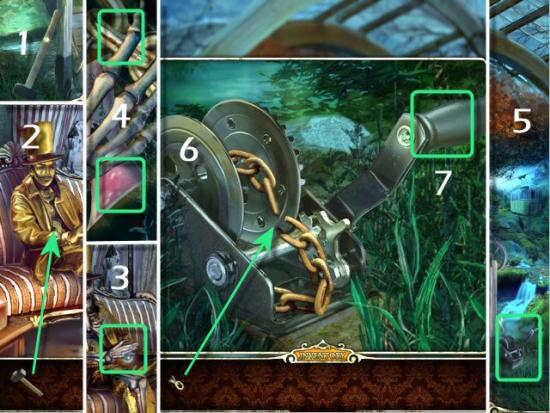
Collect the Sledge Hammer (1), return to the Illusionist’s Room and then use the Sledge Hammer on the Golden Statue (2 – click 4 times). Click on the Skeleton’s Hand (3), collect the Chain Link and Diary Entry (4) and then return to the Drawbridge. Click on the Drawbridge Controls (5), use the Chain Link on the Broken Chain (6), click on the Handle (7) and then click on the Drawbridge, to cross over.
Chapter 3 – Fairy Garden
Fairy Garden
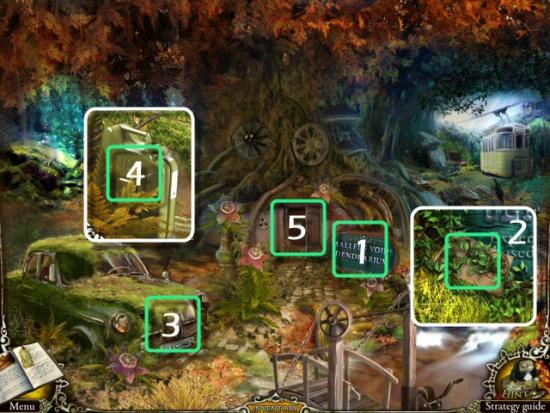
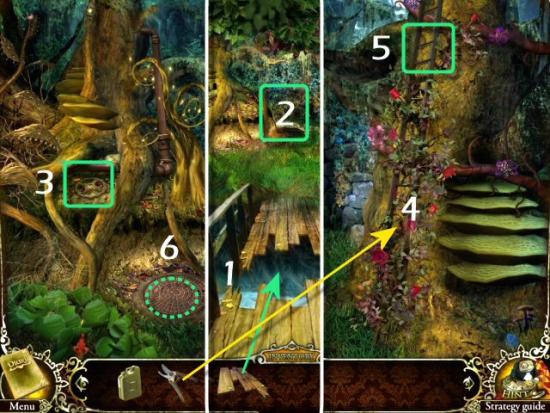
Click on the Sign (1), collect the Diary Entry (2), click on the Car Hood (3), collect the Gas Can (4) and then enter the Dendrarium (5).
Dendrarium
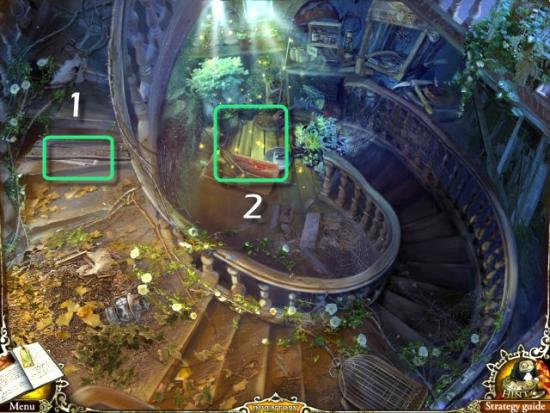
Collect the Diary Entry (1) and then click on the Gardening Tools (2)
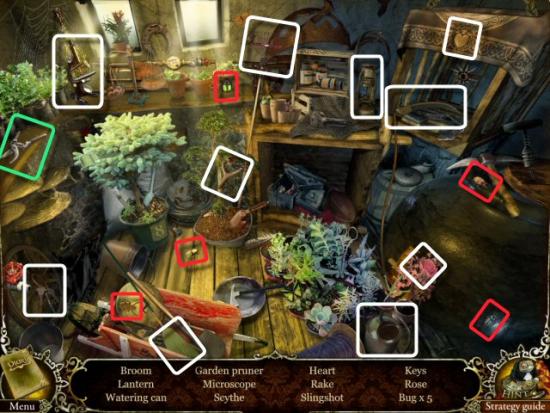
Find all the objects in the list. Inventory Item: Garden Pruner (green) Multiple Items: 5 Bugs (red).
Path
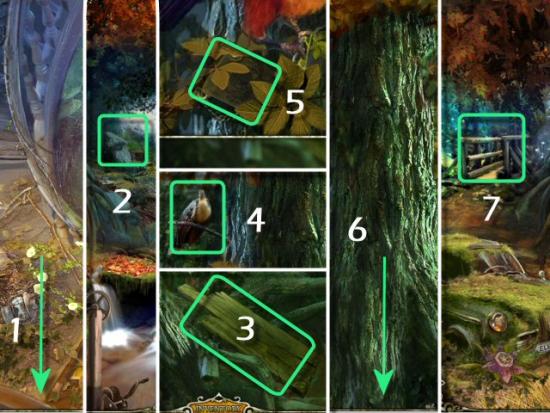
Return to the Fairy Garden (1), continue to the Path (2), collect the Plank (3), click on the Bird (4), collect the Diary Entry (5), return to the Fairy Garden (6) and then enter the Bridge (7).
Bridge
Use the Plank on the Hole (1), enter the Glade (2), collect the Valve (3), use the Garden Pruner on the Rose Vine (4) and then enter the Tree House (5).
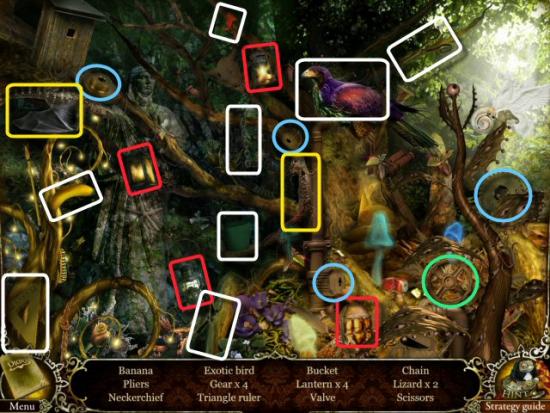
Glade
Find all the objects in the list. Inventory Item: Valve (green) Multiple Items: 4 Gears (blue), 4 Lanterns (red), 2 Lizards (yellow).
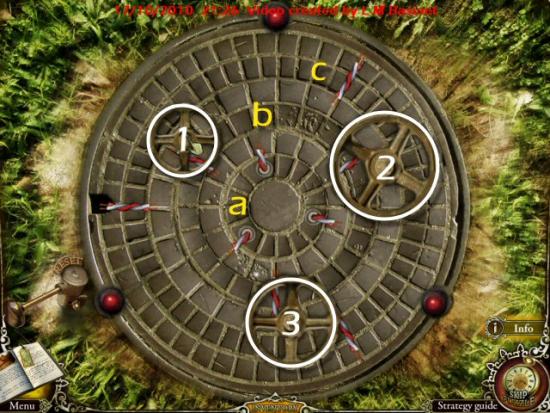
Click on the Manhole Cover (6 – see previous screenshot) and use the Valves. Click on the Valves to rotate the rings, so the wires line up and illuminate the Red Lights. Valve 1 rotates rings “a” and “c” clockwise, Valve 2 rotates rings “b” and “c” clockwise and Valve 3 rotates rings “a” and “c” counter-clockwise. It takes 16 clicks for each ring to make a complete rotation and return to its starting position. Based on the positions of the wires after each step, the quickest solution is to click on each Valve 3 times. When complete, click on the opening to enter the Generator Room
Click on the following for the video solution.
Generator Room
Click on the Funnel (1) and use the Gas Tank (2).
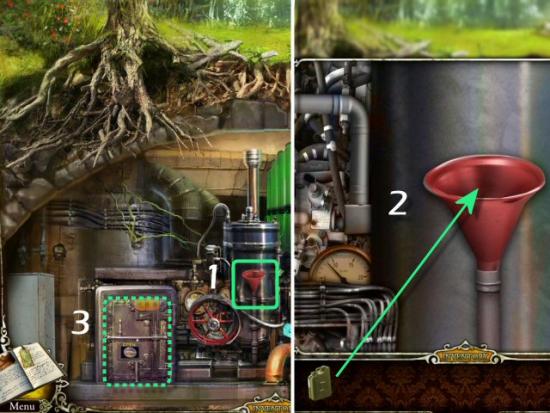
You need to fill the Fuel Tank with only 4 units of Fuel, using the Fill, Transfer and Empty Valves, and the Buffer Tank. Fill the Fuel Tank (click a-1), transfer fuel into the Buffer Tank (click b-1), empty the Buffer Tank (click c-2), transfer fuel into the Buffer Tank (click b-1), fill the Fuel Tank (click a-1) and then transfer fuel into the Buffer tank (b-1).
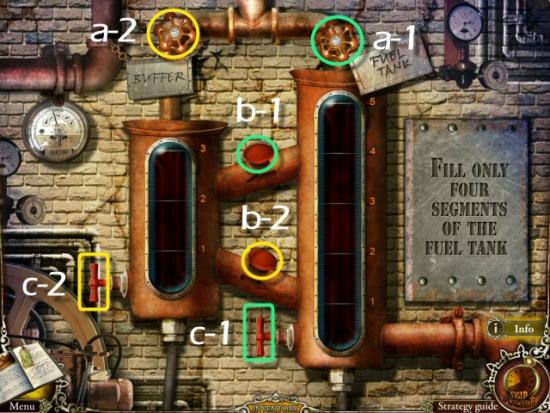
Click on the following for the video solution.
Click on the Safe (3 – see previous screenshot), click on the Open knob (1), collect the Car Key and Diary Entry (2), exit the Generator Room (3) and then return to the Fairy Garden.
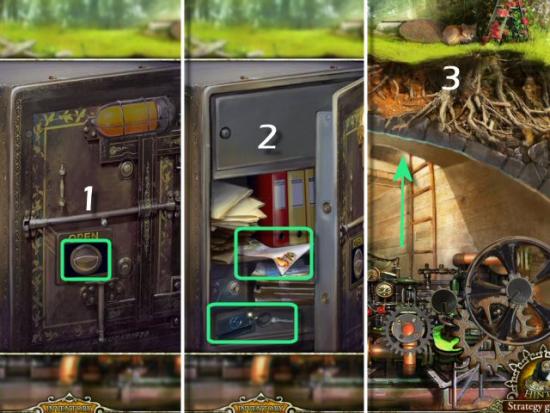
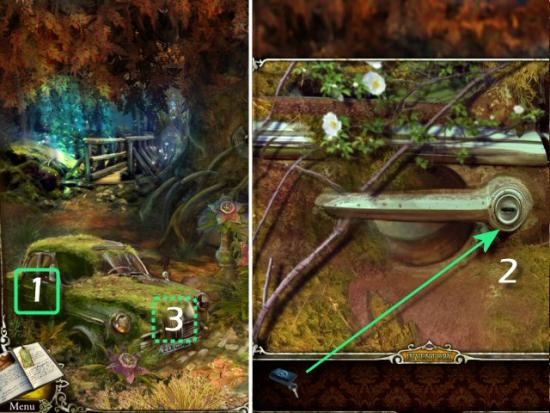
Fairy Garden
Click on the Car Door (1), use the Key (2) and then click on the open Car Door.
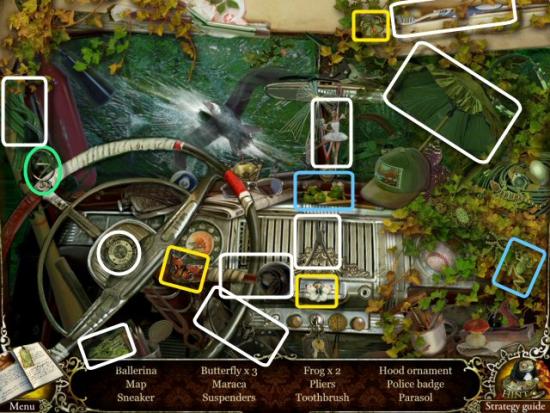
Find all the objects in the list. Inventory Item: Hood Ornament (green) Multiple Items: 3 Butterflies (yellow), 2 Frogs (blue).
Click on the Car Hood (3 – see previous screenshot), use the Hood Ornament on the Empty Space (1), collect the Lever (2), continue to the Path (3) and then on to the Tram (4).
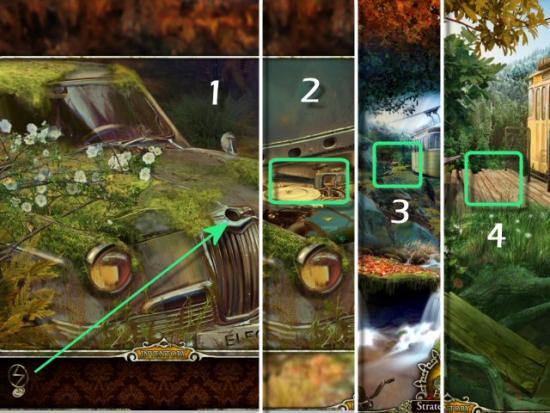
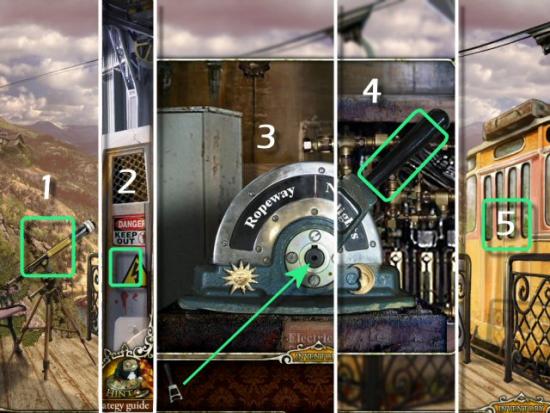
Tram
Click on the Telescope (1), click on the Control Box (2), use the Lever on the Controls (3), click on the Lever (4) and then enter the Tram (5).
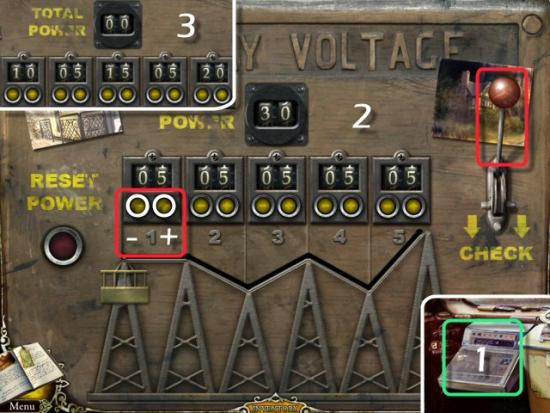
Inside the Tram
Click on the Tram Controls (1). There are a total of 30 extra watts of power to use for the Tram to make the trip to the Hotel. Use the “-” or “+” buttons (2 – white) to subtract or add power. If you look at the route, you’ll see a Straightaway, a Downhill Run, an Incline, another Downhill Run and a steeper Incline. Logic would dictate that it will take “some” power for the Straightaway, little for the Downhill Runs, more for the first Incline and even more for the final, steeper Incline. You can test it, with the original configuration to see how far it will go. 5 Watts isn’t enough for the Straightaway, so 10 makes sense. The Downhill Runs take little power so those don’t need to change and the Inclines should take incrementally more power. The additional watts needed are 5 for the Straightaway, 10 for the first Incline, 15 for the final Incline to make a total of 30 watts. The settings are 10 – 05 – 15 – 05 – 20 (3). Click on the Handle (red) to Check. Once complete, the Tram will start moving.
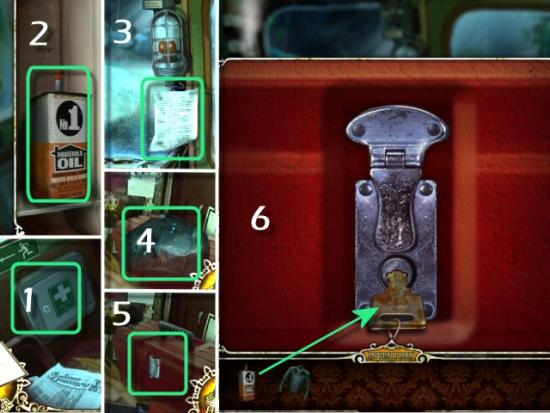
Chapter 4 – Mountain Hotel
Inside the Tram
Click on the First Aid Kit (1), collect the Oil (2), collect the Diary Entry (3), collect the Leather Jacket (4), click on the Toolbox (5), use the Oil on the Key (6) and then click on the Key.
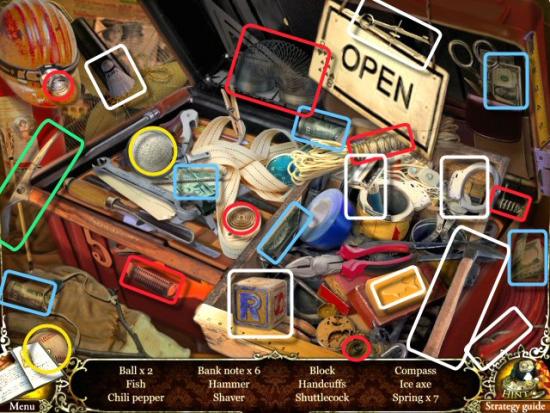
Find all the objects in the list. Inventory Item: Ice Axe (green) Multiple Items: 2 Balls (yellow), 6 Bank Notes (blue), 7 Springs (red).
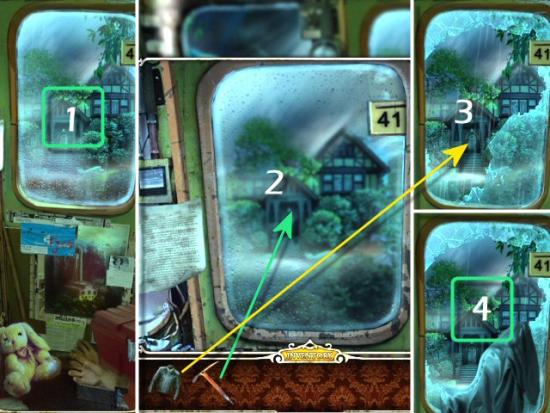
Click on the Window (1), use the Ice Axe (2 – click 3 times], use the Leather Jacket on the Hole (3) and then exit through the Hole (4).
Path
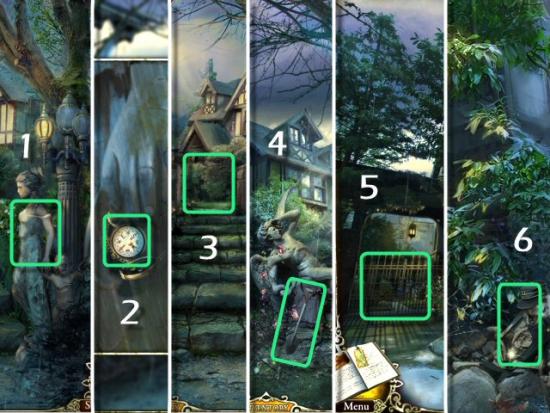
Click on the Statue (1), collect the Compass (2), continue to the Hotel (3), collect the Shovel (4), continue to the Side Gate (5) and then click on the Skeleton (6).
Side Gate
Click on the Camera and Pocket (1), collect the Diary Entries (2) and then click on the Bushes (3).
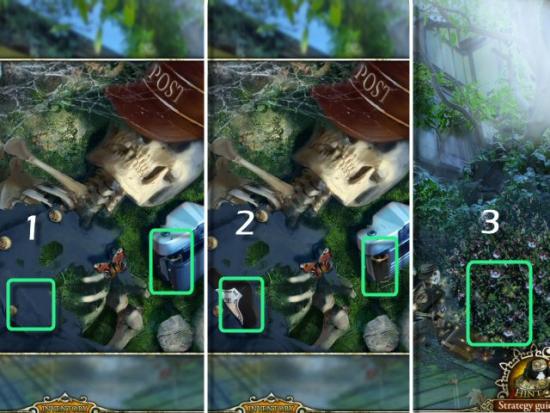
Find all the objects in the list. Inventory Item: Solvent (green) Multiple Items: 5 Bullets (blue), 2 Skulls (yellow), 4 Postage Stamps (red).
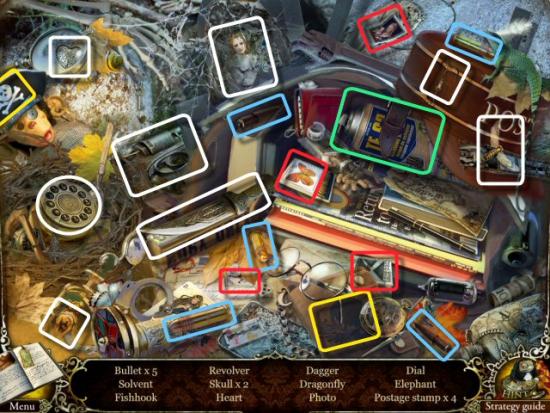
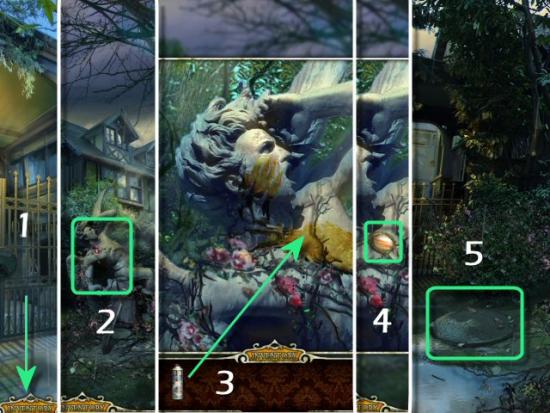
Hotel Grounds
Return to the Hotel Grounds (1), click on the Statue (2), use the Solvent on the Paint (3 – click 3 times], collect the Planet Emblem (4) and then click on the Manhole Cover (5).
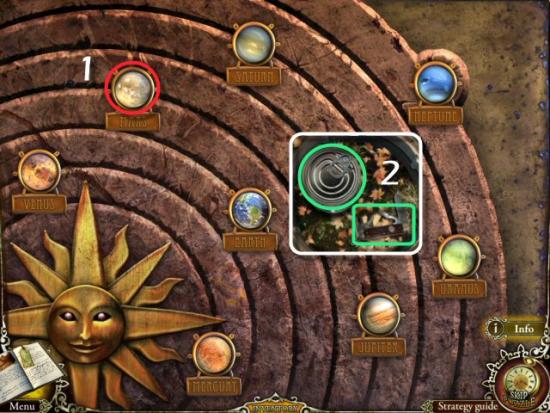
Use the Planet Emblem in the Empty Space (1). Change the Planets shown so that they are arranged in correct orbit around the Sun. The order of Planets, from the Sun, is Mercury, Venus, Earth, Mars, Jupiter, Saturn, Uranus and Neptune. Click on each Symbol to change it. When complete, collect the Can of Dog Food and the Pocket Knife (2).
Front Path
Continue to the Hotel (1), click on the Dirt (2), use the Shovel (3 – click once) and then click on the Hole.
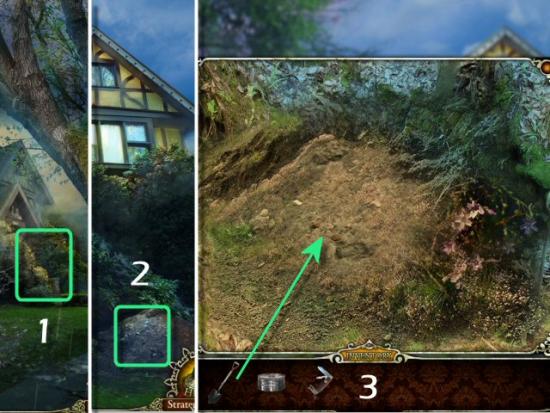
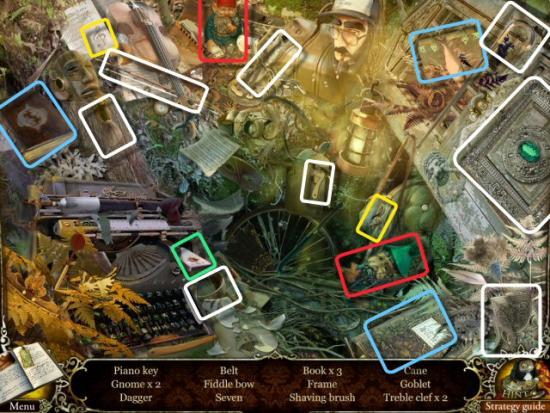
Find all the objects in the list. Inventory Item: Piano Key (green) Multiple Items: 2 Gnomes (red), 3 Books (blue), 2 Treble Clefs (yellow).
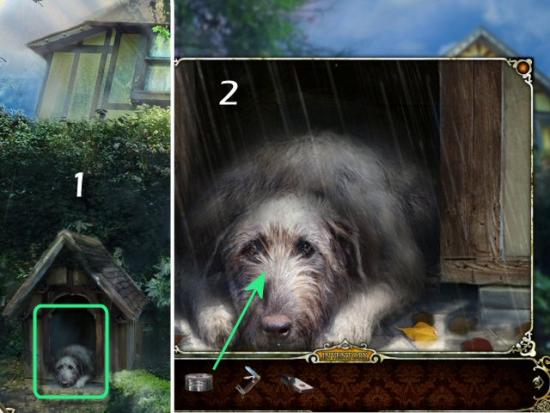
Click on the Dog (1) and use the Can of Dog Food (2).
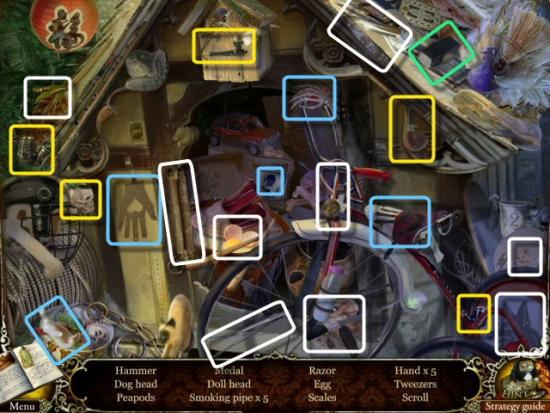
Find all the objects in the list. Inventory Item: Hammer (green) Multiple Items: 5 Smoking Pipes [], 5 Hands []
Front Door
Continue to the Front Door (1), click on the Mail Box (2), collect the Key (3), click on the Knob (4), collect the Diary Entry and click on the Bear (5) and then click on the Front Door (6).
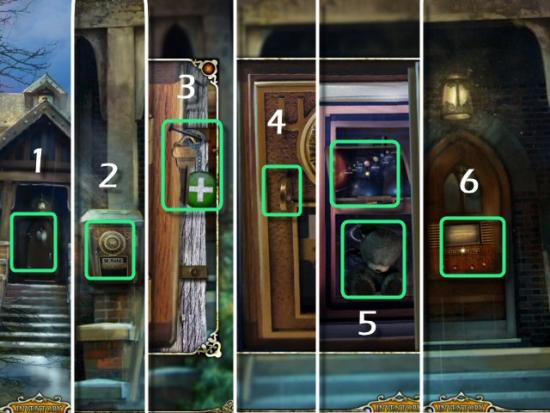
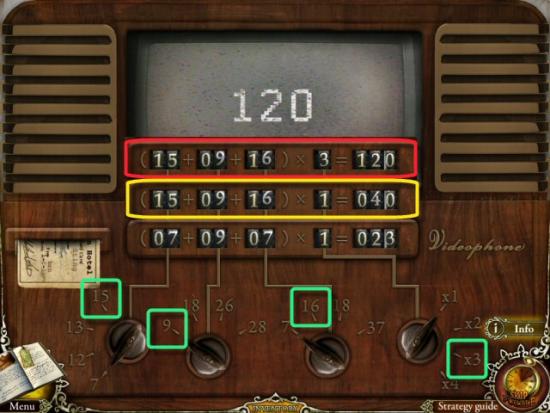
Complete the mathematical equation: (a + b + c) x d = Result. Click on the dials to change each number so you can release the Access Card.
- First off, the Result must be 120, as shown on the video screen.
- I recommend looking at the Multiplier, d, next. Out of the choices given, only 2, 3 or 4 could possibly work [no combination of numbers (for a, b and c) will add up to 120, so 1 cannot be the multiplier].
- Working backwards, and dividing 120 by each of the remaining multipliers, the 3 numbers (a, b and c) must add up to 60, 40 or 30. So, a + b + c must have a total ending in 0.
- The total for a + b must end with 2, 3 or 4 and c must end with 8, 7 or 6.
- The total for b + c must end with 3 or 5 and a must end with 7 or 5.
- The total for a + c must end with 2 or 4 and b must end with 8 or 6.
- The only numbers that meet all these criteria, and will result in a correct equation, are (15 + 9 + 16) x 3 = 120, or 40 x 3 = 120.
Tram
Return to the Tram, enter through the Window (1), click on the First Aid Kit (2), use the Key on the Lock (3), collect the Injector (4), exit the Tram and then click on the Lamp (5).
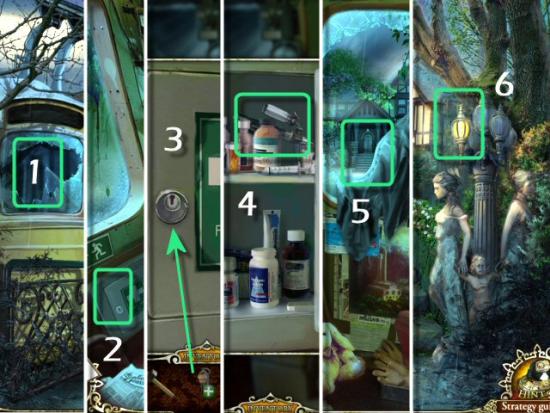
Use the Pocket Knife on the Seal (1), click on the Glass (2), collect the Light Bulb (3), return to the Side Gate and then click on the Gate.
Side Gate
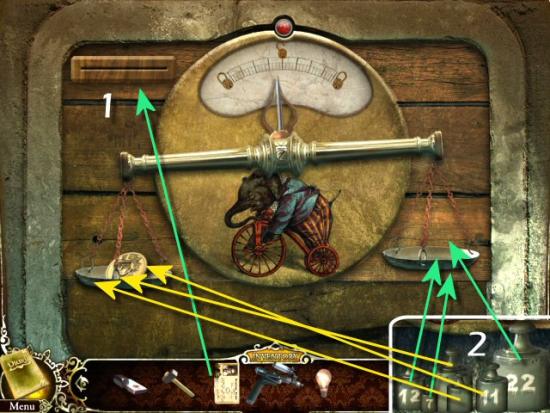
Use the Access Card in the Slot (1). You’re given 6 weights: (in order of size) 7, unknown x, 11, 12, unknown y and 22. In addition, there’s a coin in the left pan of unknown z weight. You must use all the weights to balance the scales.
- The total weight, of all elements, must divide evenly by 2
- Unknown x equals somewhere between 7 and 11 so it must weigh 8, 9 or 10.
- Unknown y equals somewhere between 12 and 22 so the range is between 13 and 21
- If you put 7 in the right pan, it slightly outweighs the Coin, so the unknown z weight is most likely between 4 and 6.
- So, we have [4-6], 7, [8-10], 11, 12, [13-21] and 22.
- The final result is simply a case of trial and error because no combination, without using all the weights, will give you the weights of the unknown elements.
Use 7, 12 and 22 in the right pan, and unknown x, unknown y and 11 in the left pan (2). When complete, click on the opening.
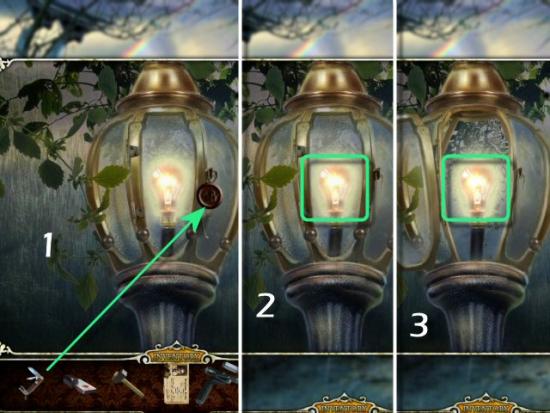
Use the Light Bulb in the Lamp and click forward to the Tunnel
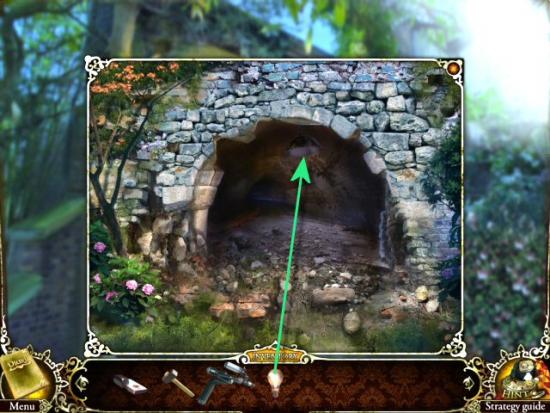
Cellar
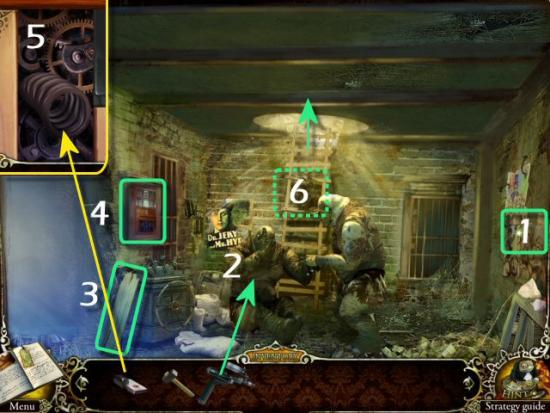
Collect the Diary Entry (1), use the Injector on the Sitting Troll (2), collect the Board (3), click on the Cabinet (4) and then use the Piano Key in the Empty Space (5).
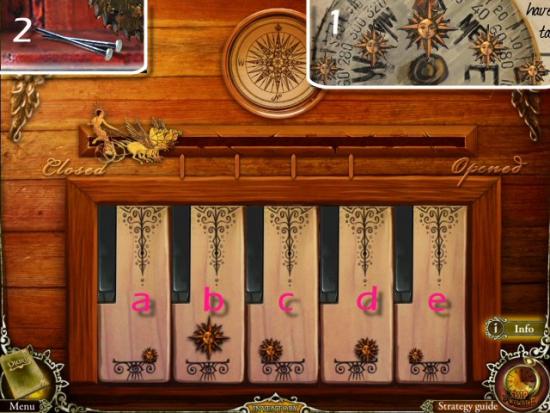
Press the Keys in the correct order to move Helios from the left to the right. Use the clue in your Diary (1) for the correct order. The clue shows the arc of the Sun moving from West to East, so those are the order in which you need to press the Keys, beginning with 1 or 5. Pressing 5 doesn’t move Helios at all, so it must be East and 1 is West. Pressing 1 moves Helios, but pressing 3, next, moves him back, so 3 must be Northeast and 4 must be Northwest. The correct order is a, d, b, c and e. When complete, collect the Nails (2).
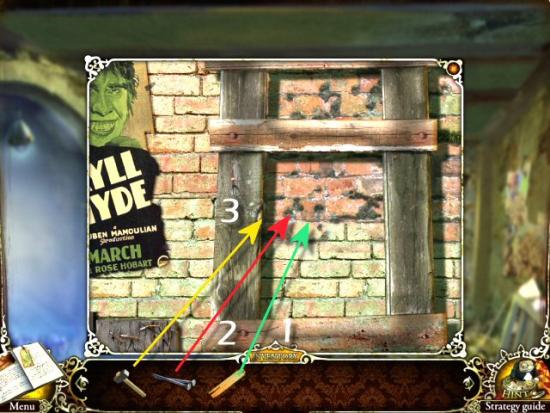
Click on the Ladder (6 – see previous screenshot), use the Board, Nails and Hammer, in that order, on the Ladder and then enter the Hotel Hallway.
Chapter 5 – Inside the Hotel
Broom Closet
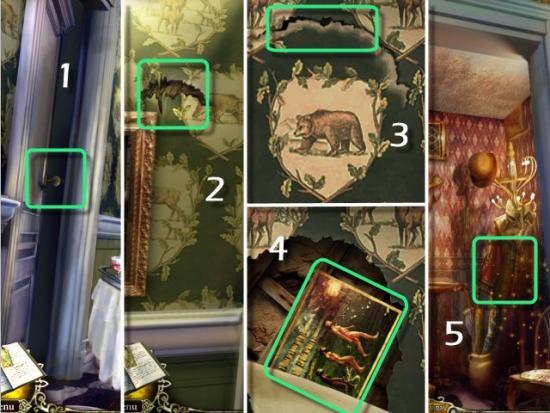
Enter the Door to the Broom Closet (1), click on the Ripped Wallpaper (2), click on the Tear (3 – click 3 times), collect the Diary Entry (4) and then click on the Closet (5).
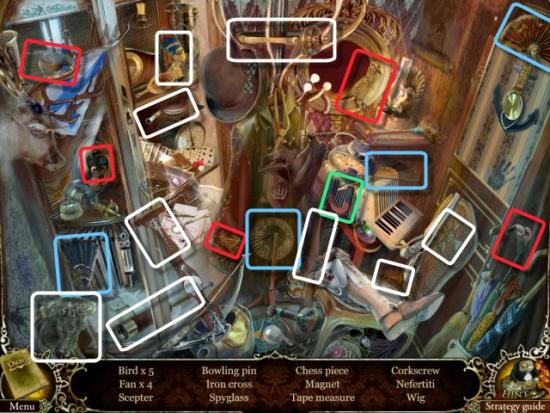
Find all the objects in the list. Inventory Item: Magnet (green) Multiple Items: 5 Birds (red), 4 Fans (blue).
Back Hall
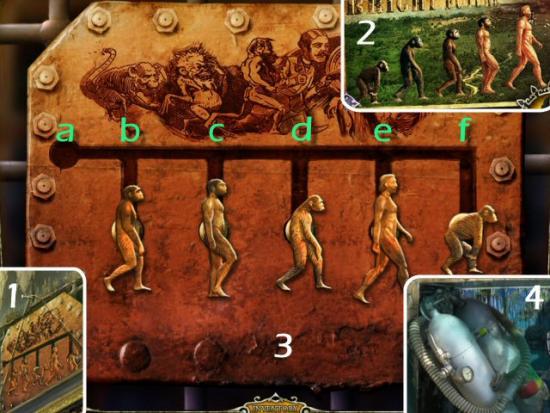
Return to the Back Hall and click on the Evolution Puzzle (1). Refer to the Diary for the clue (2 and move the figures so they’re in the correct positions. Click and drag them to the next open space. the quickest solution is as follows: move f to a, e to f, c to e, d to c, b to d and a to b. When complete, collect the Oxygen Tank (3).
Click on the following for the video solution.
Upstairs Hall
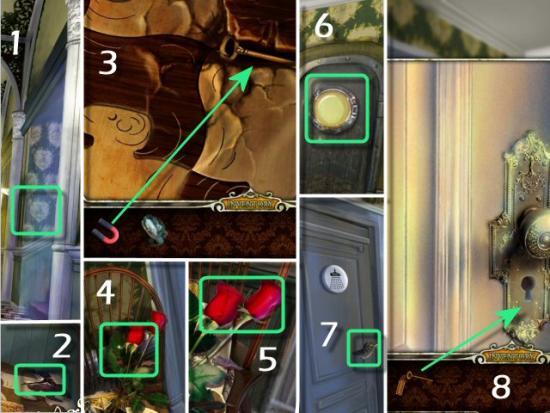
Click on the Loose Tile (1), use the Magnet on the Bathroom Key (2), click on the Chair (3), collect the Diary Entry (4), click on the Viewport (5), click on the Door to the Bathroom (6), use the Bathroom Key in the Lock (7) and then enter the Bathroom.
Bathroom
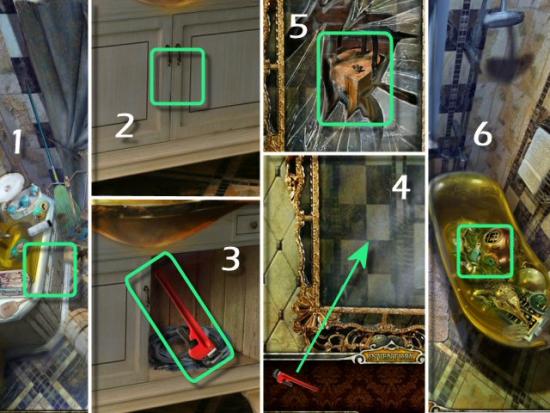
Click on the Cabinet (1), click on the Door (2), collect the Wrench (3), click on the Mirror, use the Wrench (4), collect the Detonator (5) and then click on the Bath Tub (6).
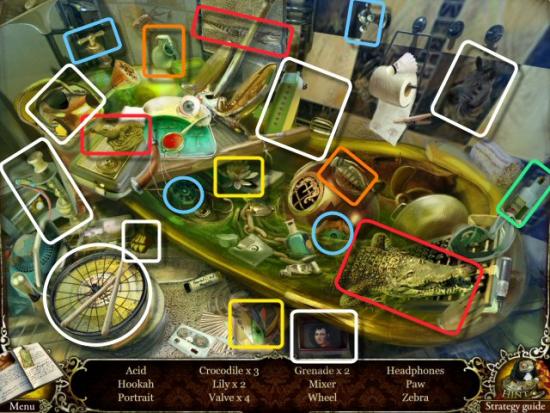
Find all the objects in the list. Inventory Item: Acid (green) Multiple Items: 3 Crocodiles (red), 2 Lilies (yellow), 4 Valves (blue), 2 Grenades
Elevator Door
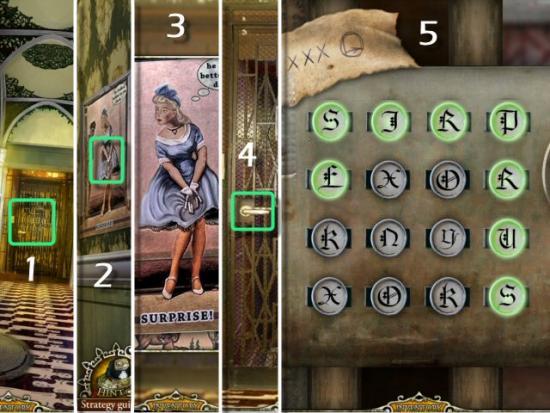
Return to the Back Hall, continue to the Elevator (1), click on the Painting (2), collect the Diary Entry (3), click on the Elevator Door (4), refer to the Diary for the clue, and enter the code: S U R P R I S E (5). Enter the Elevator.
Elevator
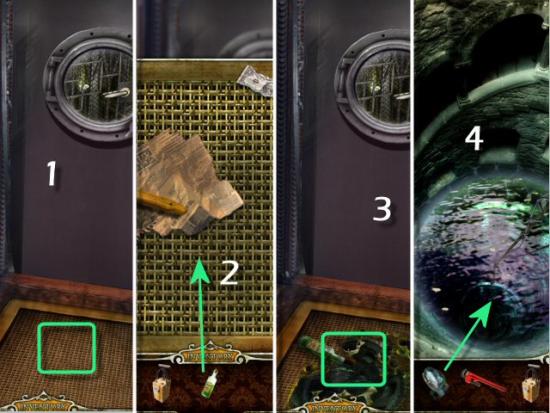
Click on the Floor Grating (1), use the Acid (2), click on the Hole (3) and then use the Oxygen Tank (4).
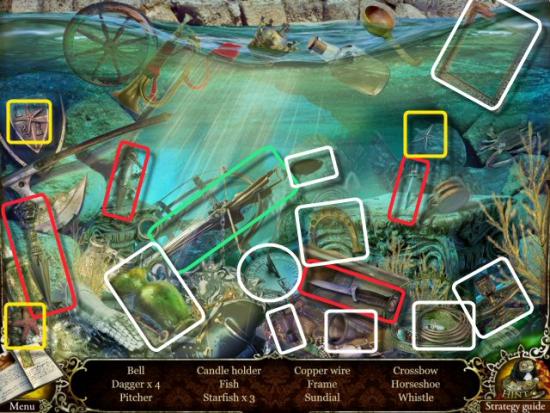
Find all the objects in the list. Inventory Item: Crossbow (green) Multiple Items: 4 Daggers (red), 3 Starfish (yellow).
Bathroom
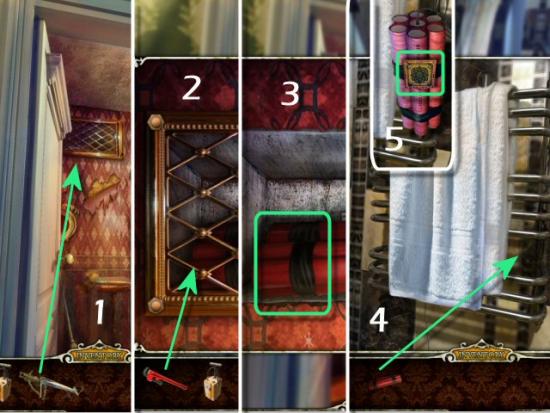
Return to the Broom Closet, use the Crossbow on the Vent (1), click on the Vent, use the Wrench on the Vent (2), collect the Dynamite (3), return to the Bathroom, click on the Towel Rack, use the Dynamite on the Towel Holder (4) and then click on the Safety Mechanism (5).
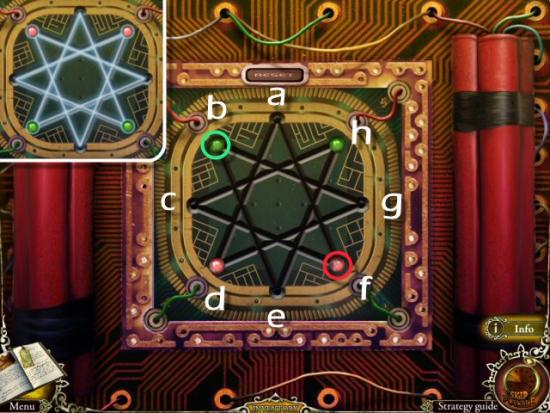
Switch the positions of the Green and Red Balls so that they end up next to the same colored Wire. Click and drag Balls to any available positions until they’re placed correctly. One solution is: move b to e, h to c, d to g, f to a, c to f, e to h, h to c, a to d, g to b, b to e, d to g, g to b, e to h, f to a, a to d and c to f
Click on the following for a video solution
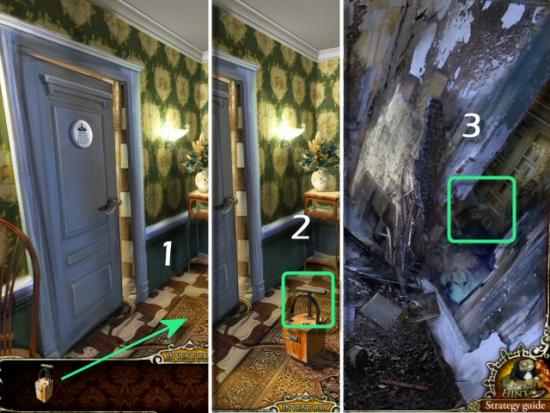
Exit the Bathroom, use the Detonator on the Wire (1), click on the Detonator (2), return to the Bathroom and then enter the Study (3).
Study
Click on the Desk (1), collect the Money (2), click on the Slot Machine (3) and then use the Money (4).
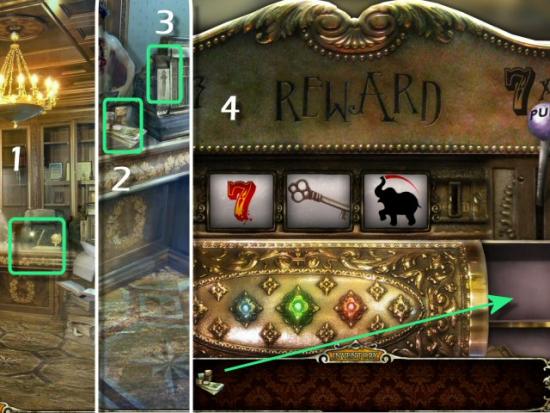
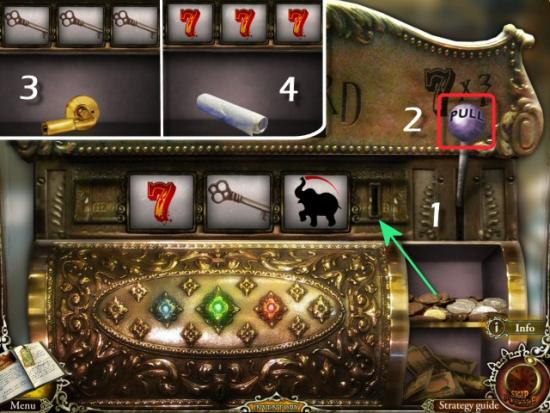
Click on the Coins, click on the Money Slot (1) and then click on the Handle (2). You must get 3 Keys to receive the Safe Handle (3) and 3 “7s” to receive the Diary Entry (4). There are unlimited Coins, so you play until you “win” twice. Note that if you get any other “3 of a kind,” before you get 3 Keys, nothing will happen.
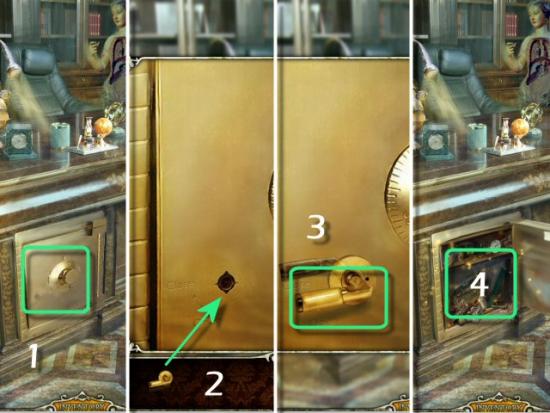
Click on the Safe (1), use the Safe Key (2), click on the Handle (3) and then click on the open Safe (4).
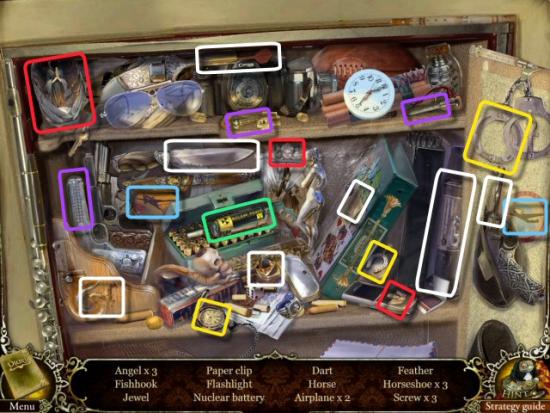
Find all the objects in the list. Inventory Items: Nuclear Battery (green) Multiple Items: 3 Angels (red), 2 Airplanes (blue), 3 Horseshoes (yellow), 3 Screws (purple).
Exit the Desk (1), click on the Power Source (2) and then use the Nuclear Battery in the Empty Space (3). The object is to move the Nuclear Battery into the Battery Slot (4). In order to do this, you must slide the batteries around so you can slide the Nuclear Battery into place.
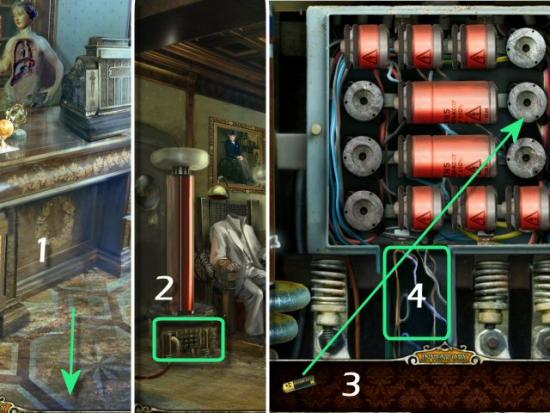
Click on the following for a video solution
Collect the Elevator Button (1), click on the Painting (2), collect the Diary Entry (3), return to the Elevator, click on the Elevator Panel (4), use the Elevator Button (5) and then push the Button (6).
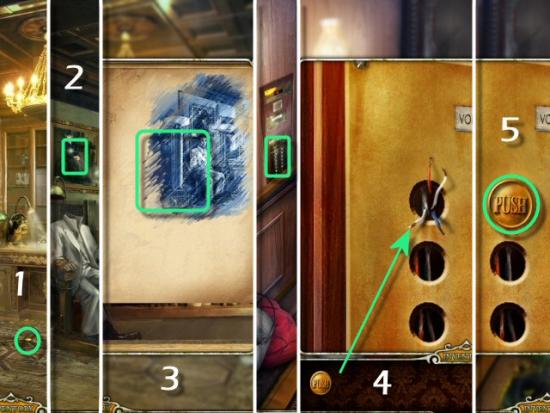
Chapter 6 – Subway
Elevator
Collect the Boots (1) and then click on the pile of Junk (2).
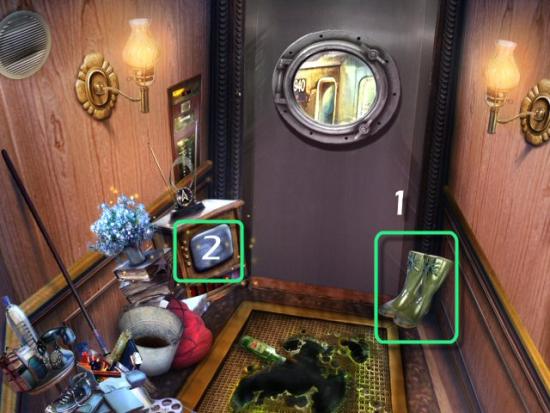
Find all the objects in the list. Inventory Item: Glass Eye (green) Multiple Items: 4 Cassettes (red), 3 Umbrellas (blue).
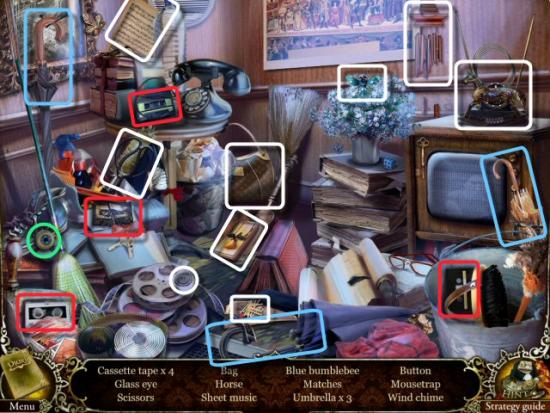
Newsstand
Click on the Door, use the Boots (1), exit the Elevator, continue to the Newsstand (2), click on the Trash Bin (3), collect the Rivet (4), click on the Newsstand (5), collect the Keys (6) continue to the End of the Tunnel (7).
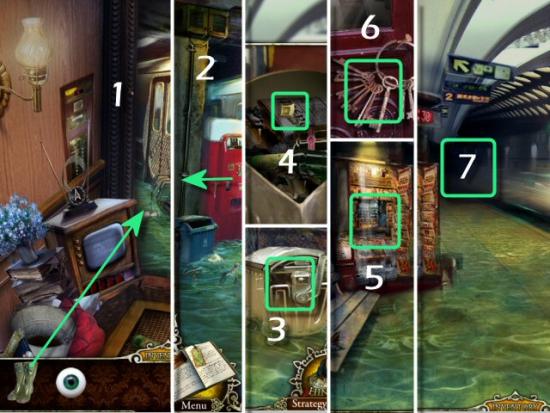
End of the Tunnel
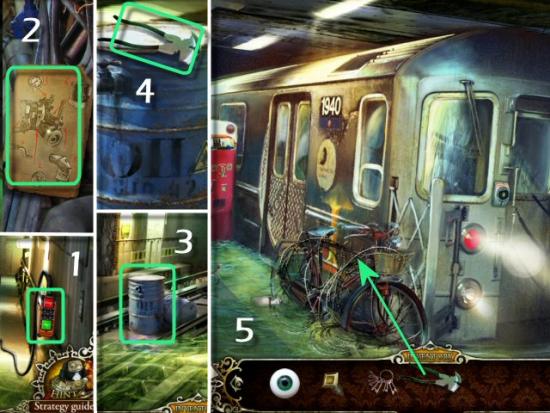
Click on the Control Box (1), collect the Diary Entry (2), click on the Oil Barrel (3), collect the Wire Cutters (4) and then return to the Front of the Subway.
Front of the Subway
Use the Wire Cutters (5), and then click on the Bicycle.
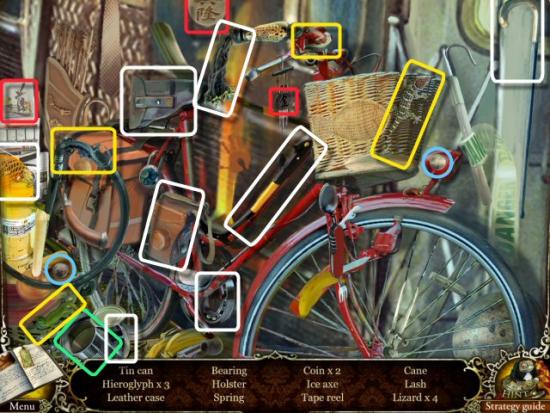
Find all the objects in the list. Inventory Item: Tin Can (green) Multiple Items: 3 Hieroglyphs (red), 2 Coins (blue), 4 Lizards (yellow).
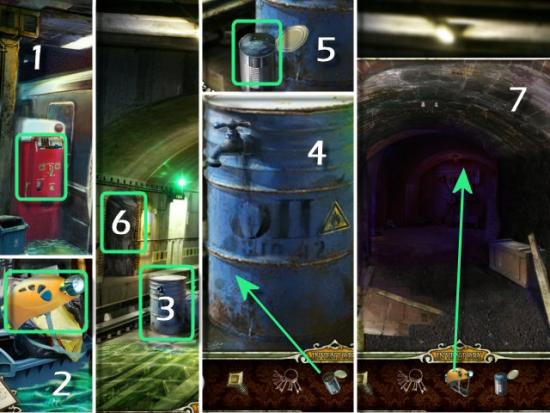
Cola Machine
Continue to the Cola Machine (1), collect the Headlamp (2) and then return to the End of the Tunnel.
End of the Tunnel
Click on the Oil Barrel (3), use the Tin Can (4), collect the Tin Can with Fuel (5), click on the Passageway (6), use the Headlamp (7) and then enter the Bank Vault.
The Bank Vault
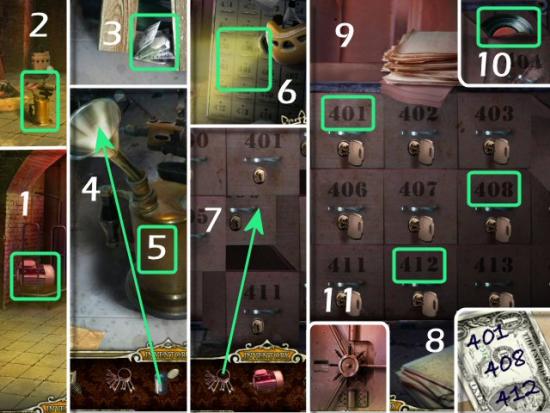
Collect the Engine (1), click on the Torch (2), collect the Diary Entry (3), use the Can of Fuel on the Torch (4), collect the Torch (5) and then click on the Safety Deposit Drawers (6). Use the Keys on the Drawers (7), refer to the Diary for the clue (8), click on the correct Keys (9), collect the Record (10) and then click on the Vault Safe (11).
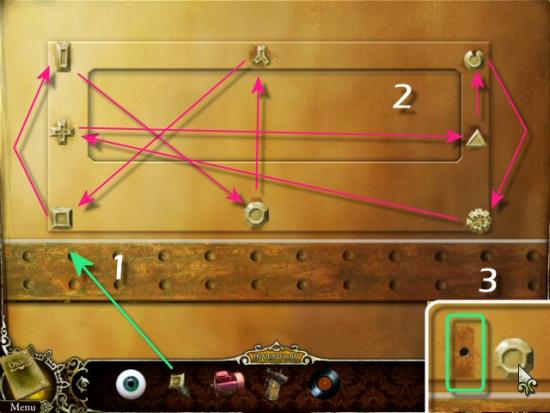
Use the Rivet in the Empty Hole (1) and rearrange the Rivets so they’re in the correct holes (2). Click and drag a Rivet to another position to switch their places. Note the discolorations around the Rivets for clues to correct placement; you may also drag the Rivet away from its current position, to reveal the shapes of all the discolorations (3).
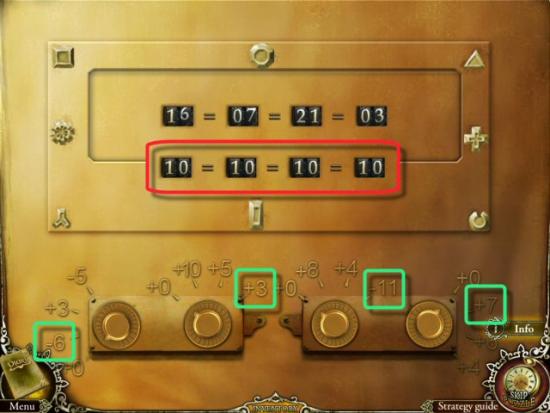
Click on the Dials, below the Display, to change the Display Numbers so that the equation is true. When complete, click on the open Vault Safe.
- The numbers on the Dials have mathematical operators (addition “+” or subtraction “-“).
- These will add or subtract the associated numbers to/from the numbers on the Display.
- If you use +0, +3 or – 5, on the first Dial, the first number in the Display will be 16, 19 or 21.
- The second Dial has no operation that can change the second number in the Display, 7, to any of those numbers.
- The only possible solution is – 6, which will change the first number in the Display to 10
- From there, it’s a simple matter to figure out the rest of the numbers.
- The solution is:
- 16 – 6 = 10
- 7 + 3 = 10
- 21 – 11 = 10
- 3 + 7 = 10
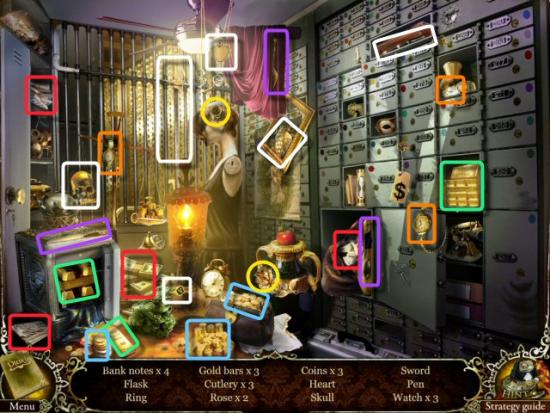
Find all the objects in the list. Inventory Item: Gold Bar (green) Multiple Items: 4 Bank Notes (red), 3 Gold Bars (green), 3 Cutlery (purple), 2 Roses (yellow), 3 Coins (blue), 3 Watches (orange).
End of the Tunnel
Return to the End of the Tunnel, click on the Pump (1), use the Engine (2), refer to the Diary for the instructions (3) and then click and drag each component to its proper location (4). When complete, click on the Control Box and click the Start Button (5).
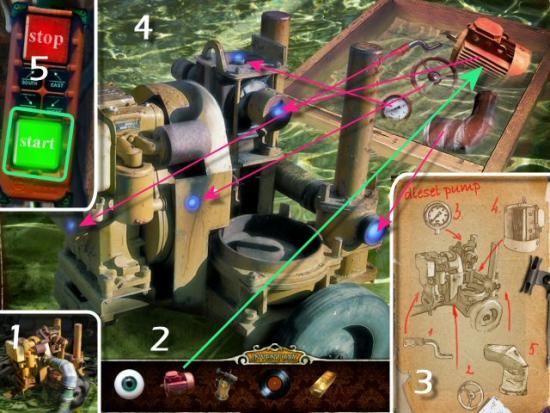
Cola Machine
Return to the Cola Machine, click on the Front Doors, use the Torch and then enter the Subway Car.
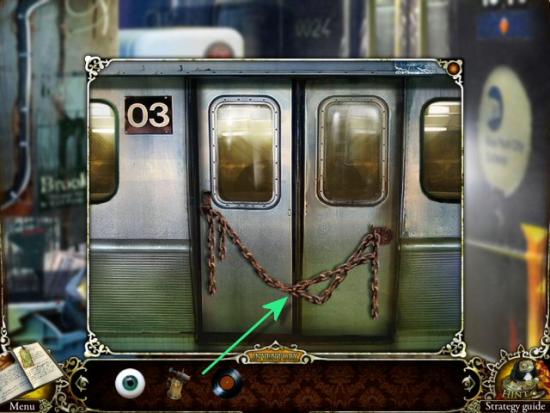
Inside the Subway Car
Collect the Climbing Boots (1), click on the Guitar Case (2) and then use the Record (3).
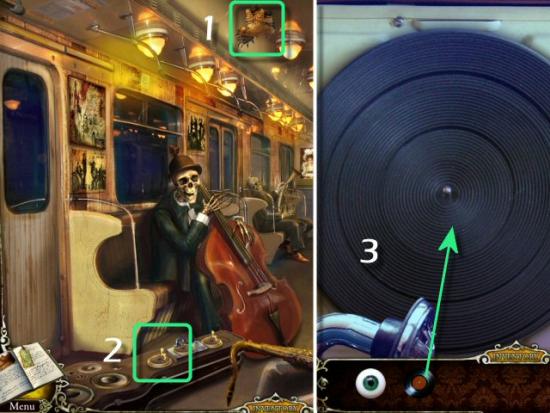
Click on the 5 program buttons (1) so that the needle avoids the holes in the record and then click on the Start button (2) to play. If you hit one of the holes, the program will reset and the needle will move back to the beginning. When complete, click on the Guitar Case, again.
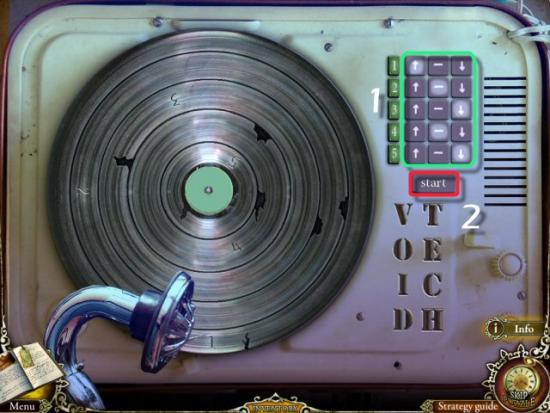
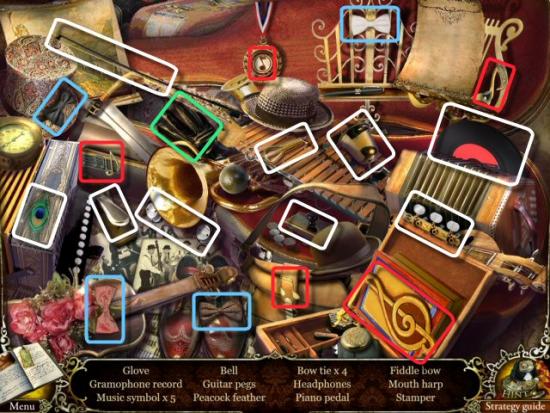
Find all the objects in the list. Inventory Item: Glove (green) Multiple Items: 5 Music Symbols (red), 4 Bow Ties (blue). When complete, exit the Subway Car through the Back Doors to the Newsstand and then click on the Newsstand.
Newsstand
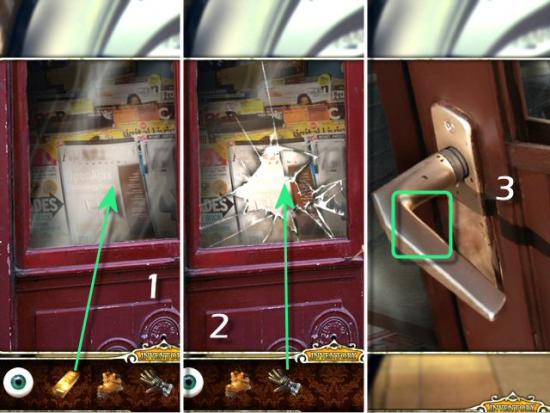
Use the Gold Bar on the Glass (1), use the Glove on the Hole (2), click on the Handle (3) and then click on the Newsstand, again.
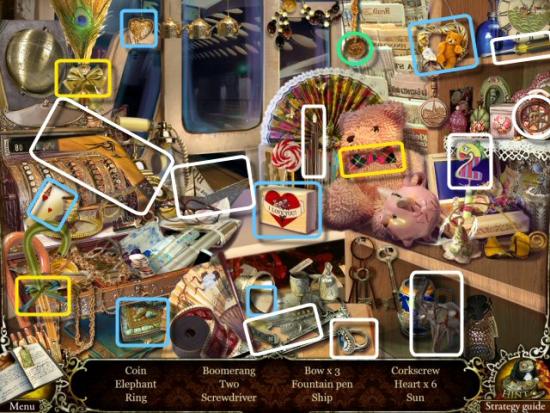
Find all the objects in the list. Inventory Item: Coin (green) Multiple Items: 3 Bows (yellow), 6 Hearts (blue).
Return to Inside the Subway Car, exit through the Front Doors to the Cola Machine, return to the Front of the Subway Car and then continue left, to the Tunnel.
Tunnel
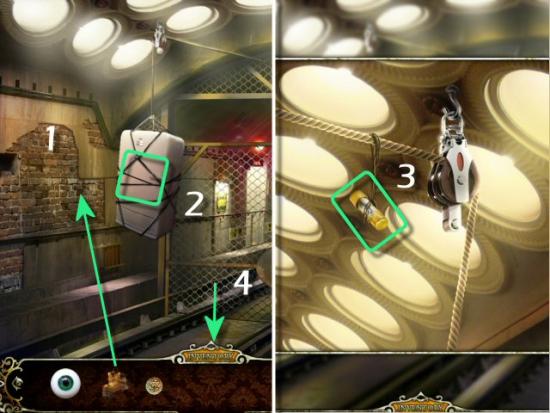
Use the Climbing Boots (1), lick on the Refrigerator (2), collect the Fuse (3) and then return to the Cola Machine (4).
Cola Machine
Click on the Fuse Box (1) and then use the Fuse (2 -click anywhere).
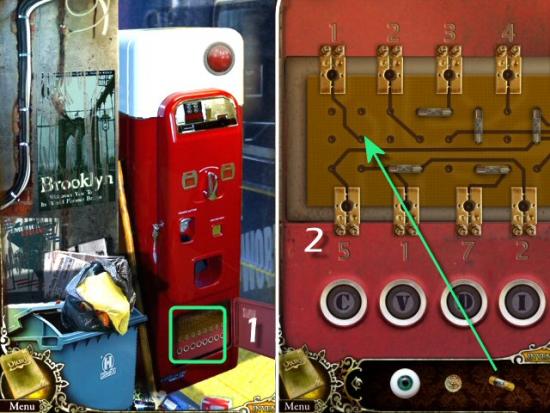
Move the Fuses so that they make connections between the matching numbers, on the top and bottom rows, and all the lights are green (on). Click on a fuse, move it to another location and click to place it. You may need to relocate some fuses, temporarily, in order to place others in the correct locations. When all the lights are lit, click on the Lettered Buttons, in the correct sequence, to turn the Cola Machine on. Click on the upper part of the Cola Machine for a clue to the sequence.
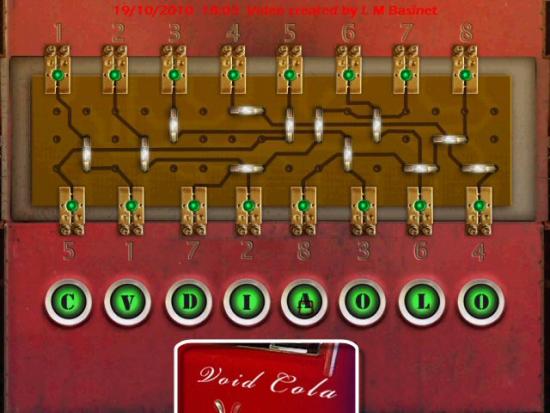
Click on the following for the video solution
Click on the Cola Machine, use the Coin in the Slot (1), click on the Handle (2), collect the Broken Bottle (3) and then return to the Tunnel.
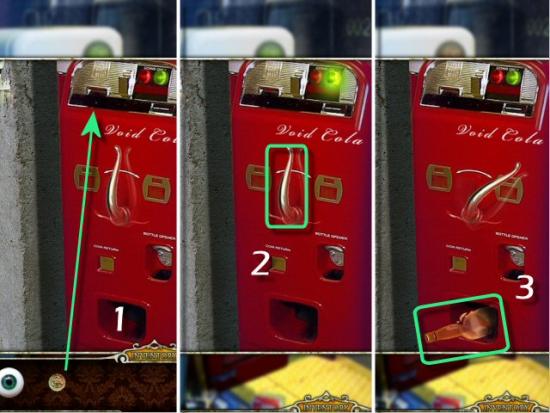
Tunnel
Click on the Refrigerator, use the Broken Bottle (1) and then click on the fallen Refrigerator (2).
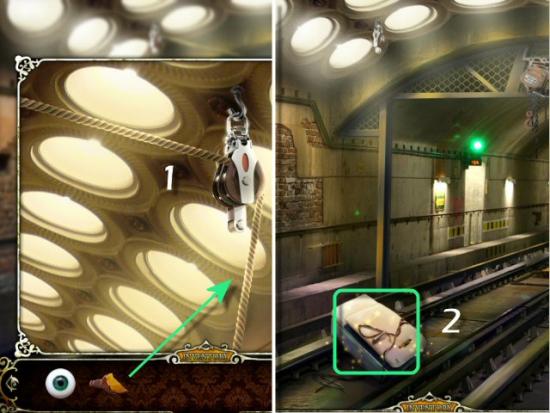
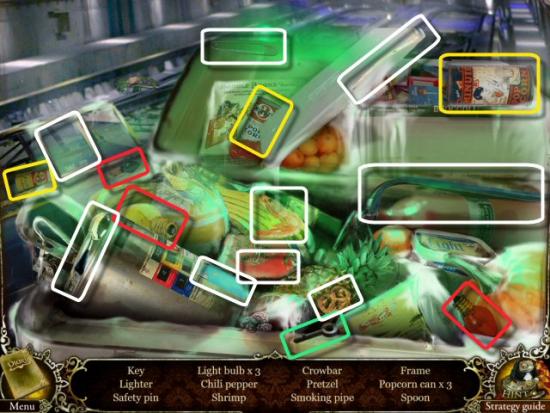
Find all the objects in the list. Inventory Item: Key (green) Multiple Items: 3 Light Bulbs (red), 3 Pop Corn Cans (yellow). Return to the Front of the Subway Car.
Front of the Subway Car
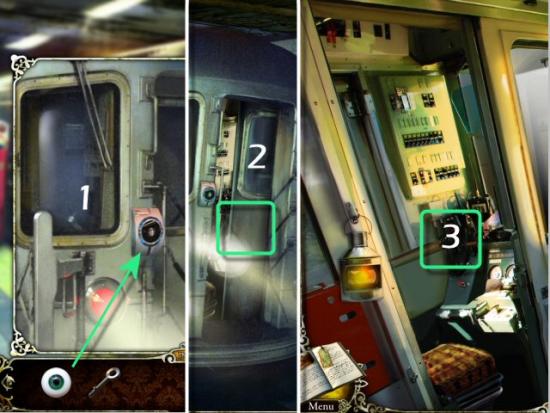
Click on the Conductor’s Entrance, use the Glass Eye in the Retinal Scanner (1), enter the Door (2) and then click on the Conductor’s Cabin (3).
Conductor’s Cabin
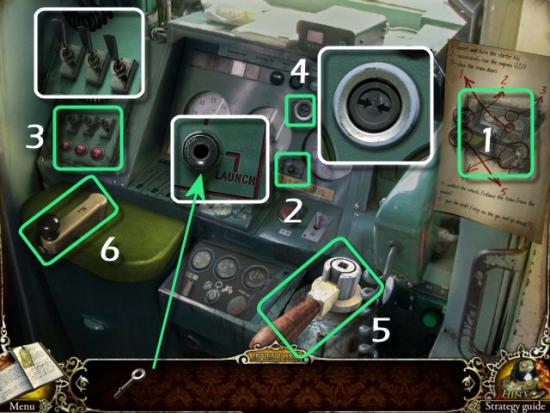
- Collect the Subway Operating Instructions
- Click on the Starter, use the Key in the Ignition and click on it to move it to Launch position
- Click on the Power Controls and click on each Switch to turn on the engines
- Click on the Door Controls and click on the button to close the Doors
- Click on the Brake Controls and click on the Brake Lever to unlock the wheels
- Click on the Throttle Controls and click on the Throttle Lever to move the Subway Car
Chapter 7 – Return to Void Mansion
Main Hall
Enter Void Mansion (1), click on the Bookcase (2), click on the Door (3), collect the Figurine (4) and then click on the Cube (5).
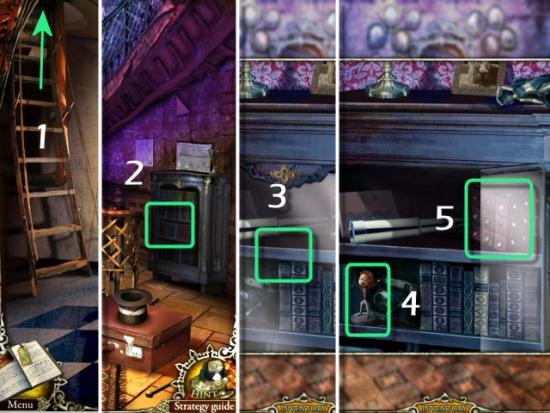
This puzzle is similar to a Rubik’s Cube, except you begin with the colors aligned and you move the colored balls rather than rotating the smaller cubes. Note the image on the wall, to the right of the Cube. Move the colored balls so that the cube matches the image. Click on a Ball to move it to the adjoining empty space; you can’t move any ball over another. The best strategy is to begin moving the Green to the top, the Blue to the left and the Red to the front, working back and forth and shifting the colors to open the space for the next color. When complete, collect the Fireman’s Badge (2).
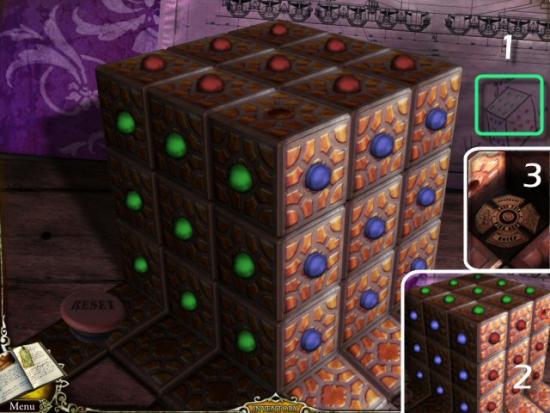
Click on the following for a video solution.
Click on Brick Wall (1), collect the Iron Ring (2), click on the Iron Chest (3), use the Ring (4) and then collect the Key Fob (5).
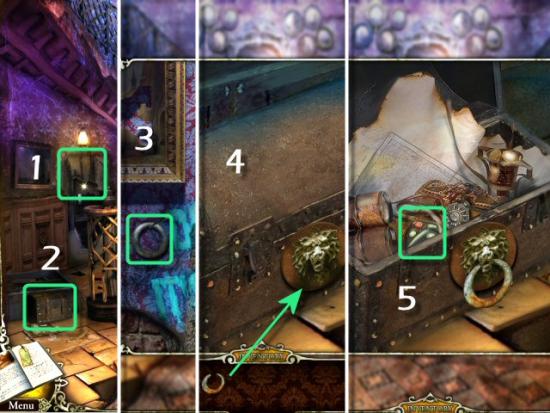
Subway Terminal
Return to the Subway Terminal (1), click on the Fire Hose Cabinet (2), use the Fireman’s Badge (3) and then click on the open Cabinet.
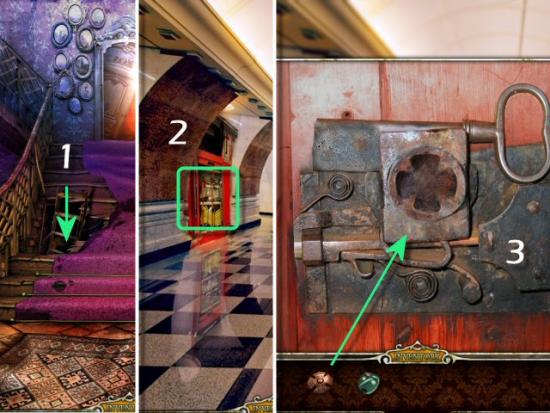
Find all the objects in the list. Inventory Item: Fire Extinguisher (green) Multiple Items: 3 Boots (yellow), 5 Fireman’s Helmets (blue).
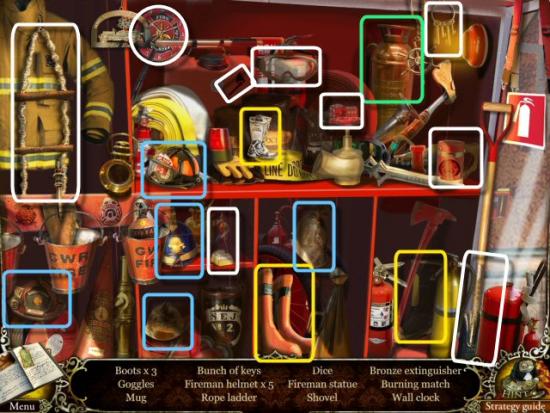
Car
Return to the Mansion, exit to the Front Door (1), use the Key Fob (2), click on the open Car Door, collect the Gas Mask (3) and then click on the 3 Figurines (4).
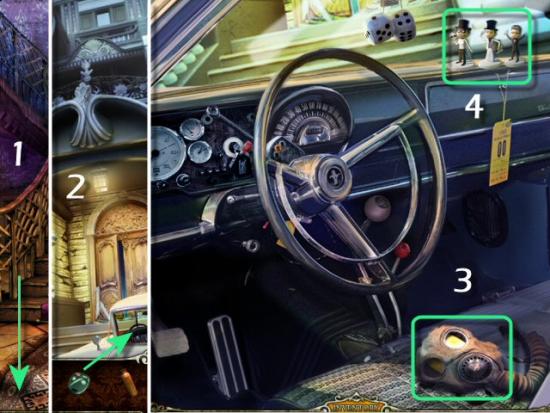
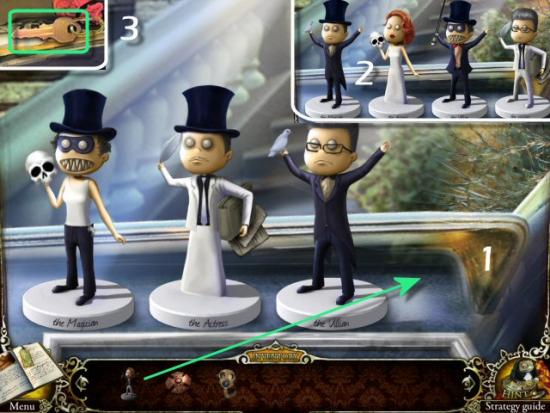
Use the Figurine (1), switch the body segments (heads, torsos) so that the figurines are complete (2) and then collect the Key from the Glove Compartment (3). Use the name on the base of each figurine to determine which goes where.
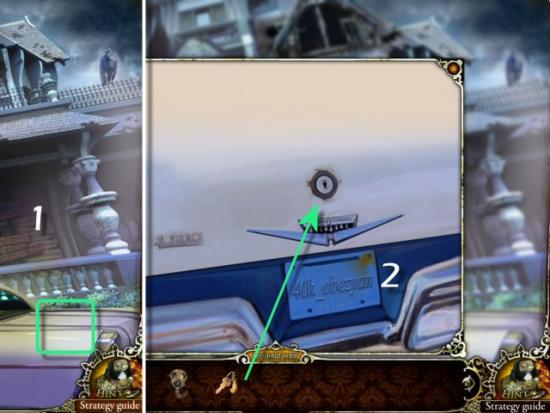
Click on the Car Trunk (1), use the Key (2) and the click on the open trunk.
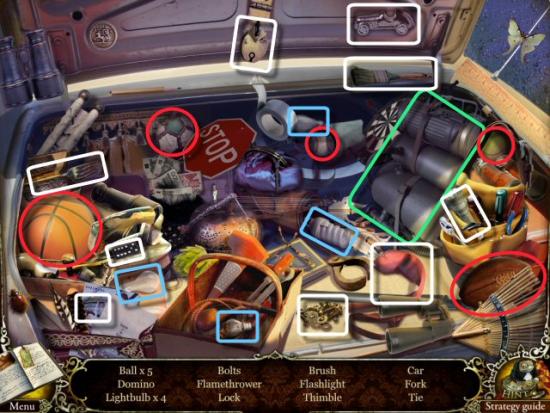
Find all the objects in the list. Inventory Item: Flamethrower [(green) Multiple Items: 5 Balls (red), 4 Light Bulbs (blue).
Attic
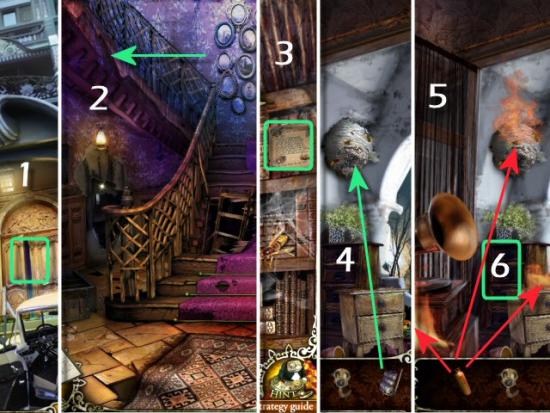
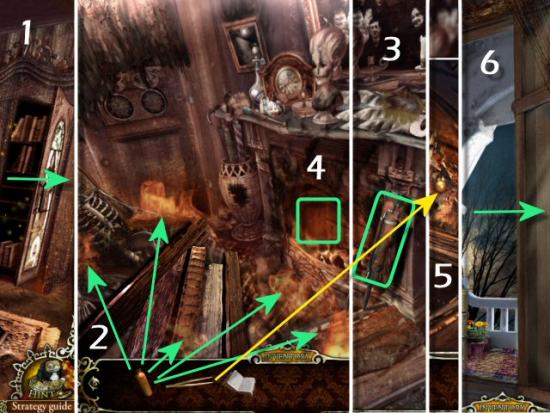
Return to the Mansion (1), continue to the Attic (2), collect the Diary Entry (3), use the Flamethrower (4), use the Fire Extinguisher on the Flames (5) and then click on the Dresser (6).
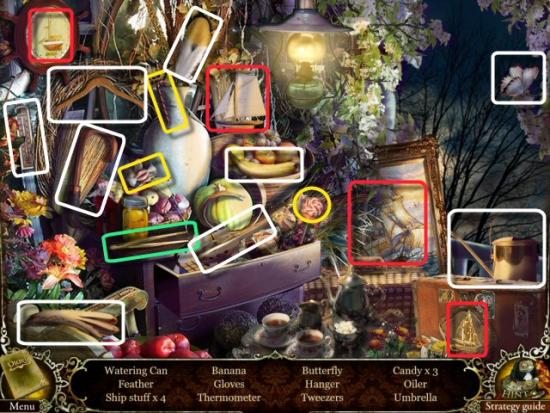
Find all the objects in the list. Inventory Item: Tweezers (green) Multiple Items: 4 Ships (red), 3 Candies (yellow).
Bedroom
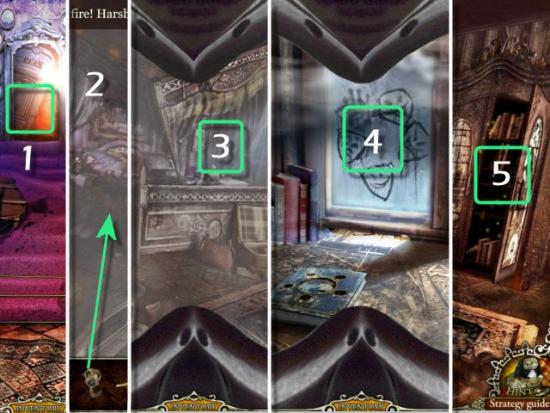
Return to the Main Hall, enter the Bedroom (1), use the Gas Mask (2 – click anywhere), click on the Window Seat (3), click on the Window (4) and then click on the Wardrobe (5).
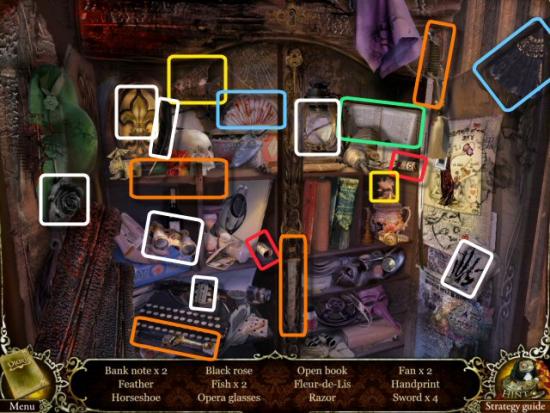
Find all the objects in the list. Inventory Item: Book (green) Multiple Items: 2 Bank Notes (red), 2 Fishes (yellow), 2 Fans (blue), 4 Swords (orange).
Sitting Room
Continue to the Sitting Room (1), use the Fire Extinguisher on the Flames (2), collect the Jack Hammer (3), click on the Fireplace (4), use the Tweezers (5), return to the Attic and then continue to the Balcony.
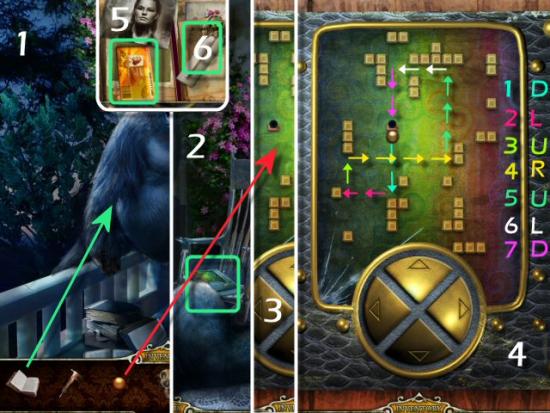
Balcony
Use the Book (1), click on the Book (2) and then use the Ball (3). Using the control pad, move the ball into the hole (4). You can use one of two strategies…either start at the end, and work your way back, or start at the beginning and work your way to the end. Be careful to pay attention to where you’ll end up, after you move the ball. If your only choices will send you off the board, undo your last move and choose another direction. Collect the ID Card (5) and Diary Entry (6).
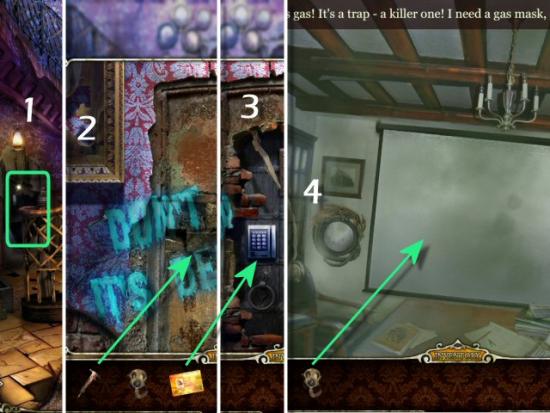
Return downstairs, click on the Brick Wall (1), use the Jack Hammer (2), use the ID Card (3), enter Void’s Private Quarters and then use the Gas Mask (4).
Chapter 8 – Void’s Private Quarters
Conference Room
Click on the Projector (1), collect the Lever (2), click on the Handbag (3), collect the Hairpin (4), click on the Door (5) and then click on the Upper Panel (6).
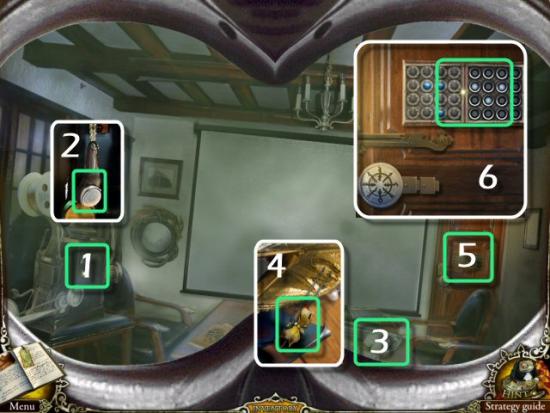
use the Lever (green) and then press the Start button (yellow).
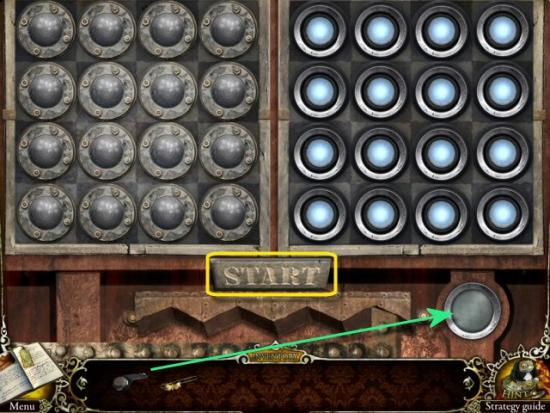
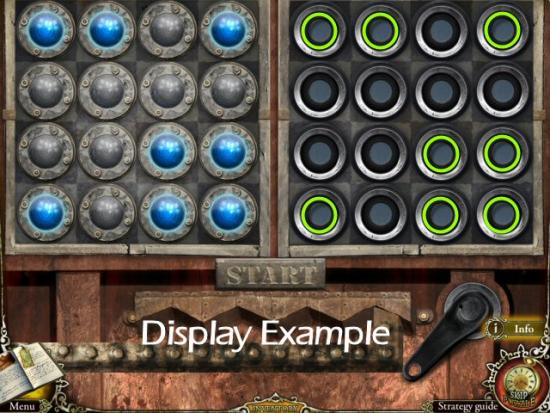
After the lights stop flashing, you have a few seconds to memorize their positions and then press the corresponding buttons on the right panel. Each display will contain 8 lights out of the 16 possible. The best strategy is to number the columns and write down which lights are illuminated, in each row. The display only lasts a short time, so be sure and write them down, quickly. Subsequent panels display for even shorter lengths of time, until the 4th panel, which is only displayed for a second.
You can click on the buttons in any order you like, but you can’t undo any incorrect clicks. If you make an incorrect click, the puzzle will reset after you’ve clicked on 8 buttons and you’ll be given a new display. Once you complete a panel correctly, the lock mechanism, at the bottom, will move one notch to the left. If you make a mistake on the next panel, the lock mechanism will move back, one notch, to the right. Complete 4 complete panels, in a row, to release the lock mechanism.
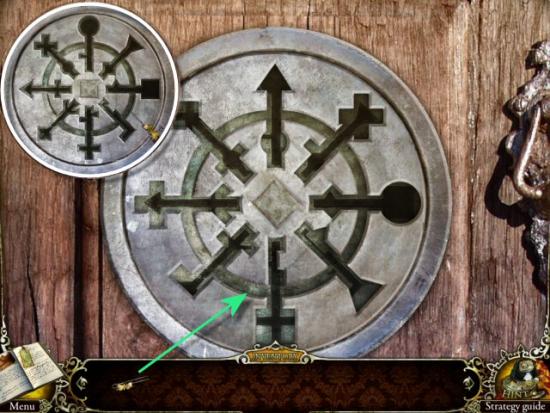
Click on the Lower Lock and use the Hairpin. Click and drag each ring to match the shapes of the outlines. Click on the Door and enter the Music Room.
Sunroom
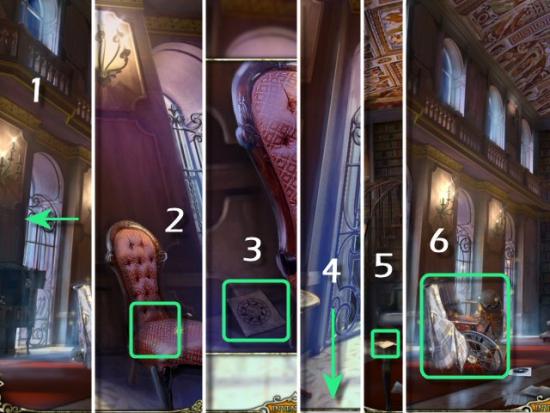
Enter the Sunroom (1), click on the Chair (2), collect the Diagram (3), return to the Music Room (4), collect the Diary Entry (5) and then click on the Wheelchair (6).
Music Room
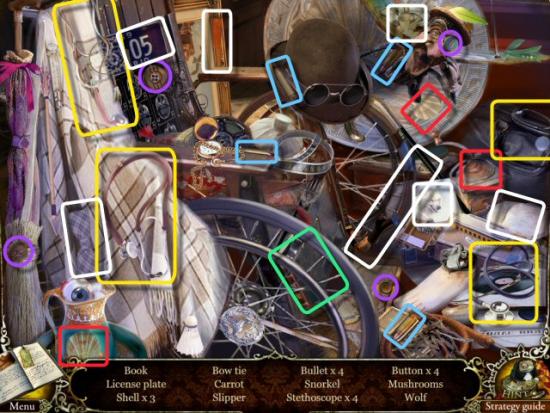
Find all the objects in the list. Inventory Item: Book (green) Multiple Items: 3 Shells (red), 4 Bullets (blue), 4 Stethoscopes (yellow), 4 Buttons (purple).
Library Loft
Go up to the Library Loft (1), click on the Medical Bag (2), collect the Sunglasses and Diary Entry (3), click on the Door (4) and then use the Diagram (5).
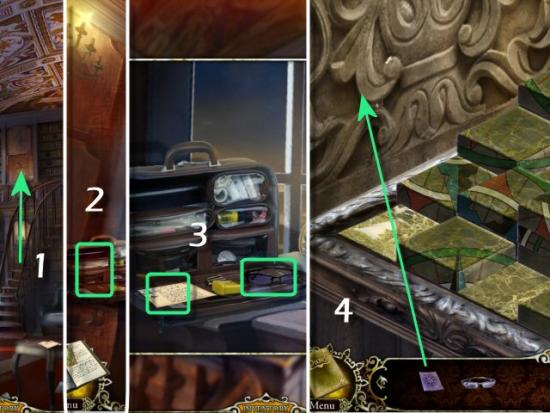
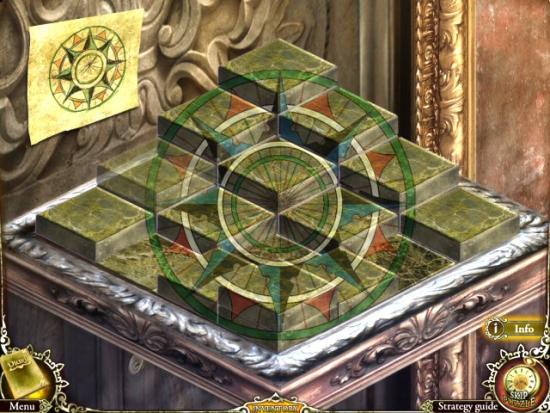
Arrange the 3-dimensional tiles to match the image on the diagram. Click on a tile, move your cursor to any space and click to place the tile. Parts of the image appear on the board, parts on the top of the tiles and parts on the sides of the tiles. Use the blank tiles to raise others so the image displays properly. A good starting strategy would be to move all the tiles so you can tell which parts of the board and tiles show which parts of the image. To begin, you’ll need to stack blank tiles at the back of the board. When complete, enter the Film Studio.
Film Studio
collect the Diary Entry (1) and then click on the Monitor (2).
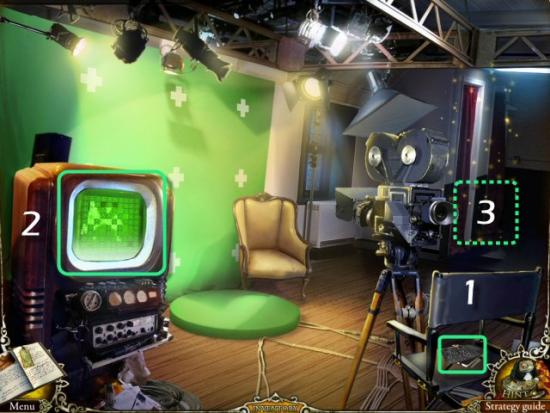
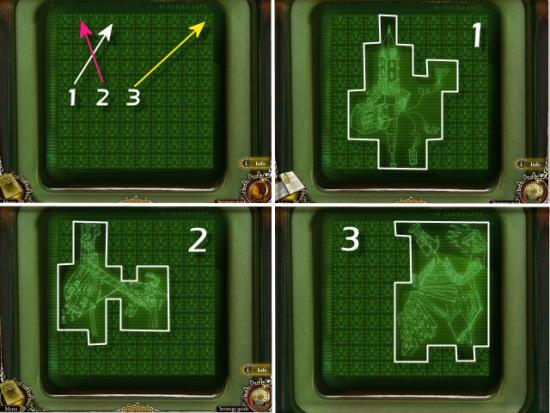
Complete the video game by clicking on the blocks, in the 10×10 grid (100 squares) to uncover the image. The maximum number of clicks you can use is shown at the upper right of the screen. Use all the clicks to complete the game. If you use too many clicks, you’ll be given another image. There are only 3 different images and they will repeat if you need to try again.
You have 41 clicks for the first image, 49 clicks for the second image and 39 clicks for the third image.
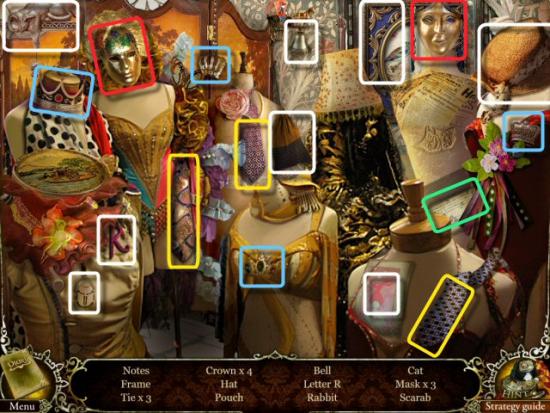
click on the Dressing Area (3 – see previous screenshot). Find all the objects in the list. Inventory Item: Notes (green) Multiple Items: 3 Ties (yellow), 4 Crowns (blue), 3 Masks (red).
Click on the Monitor (1), collect the Mirror (2), return to the Library Loft (3), click on the Bookshelves (4) and then use the Book (5).
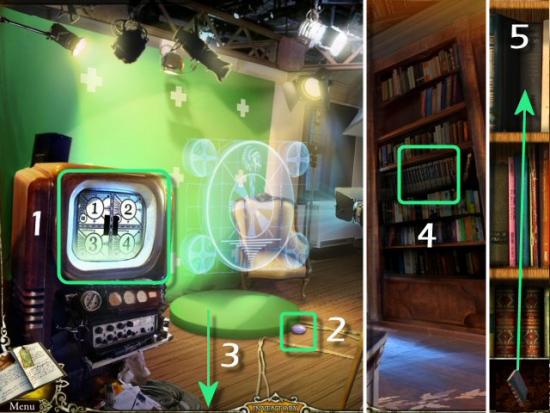
Library Loft
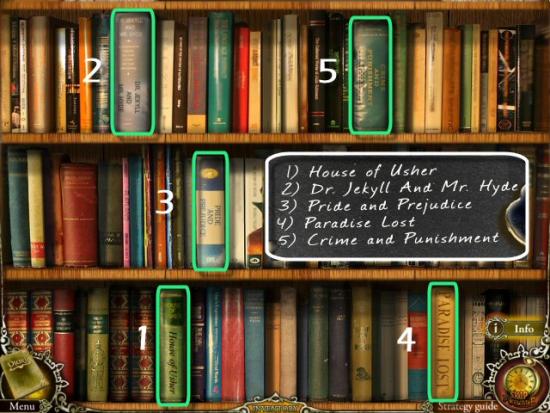
Click on the Books, in the correct order, to open the Secret Compartment. Refer to the Diary for the clue.
Click on the Secret Compartment. Find all the objects in the list. Inventory Item: Mirror Splinter (Green) Multiple Items: 5 Keys (red), 3 Butterflies (yellow).
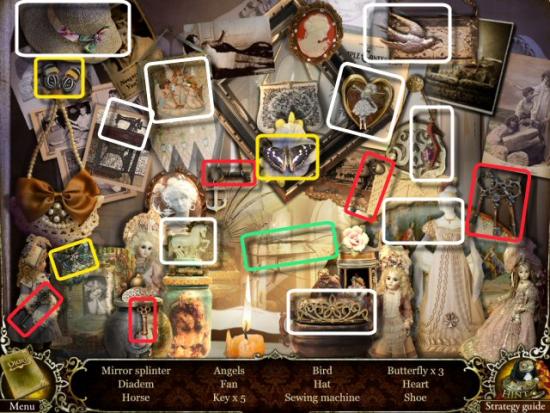
Music Room
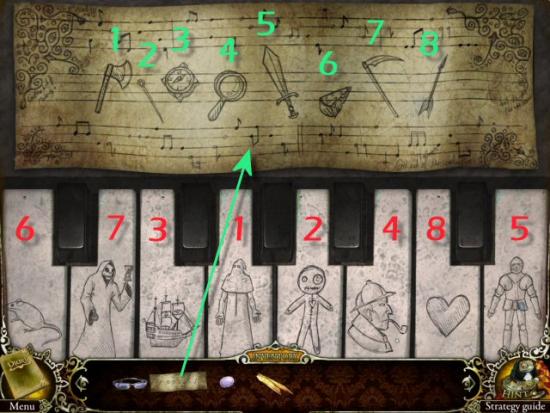
Return to the Music Room and click on the Piano. Use the Notes on the music stand and click on the keys in the order the matching object occurs in the music score. When complete, click on the Piano, again.
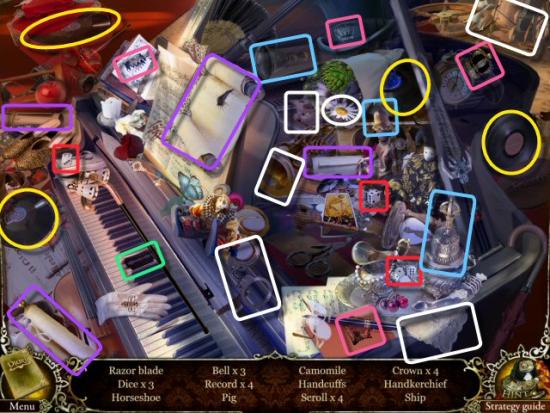
Find all the objects in the list. Inventory Item: Razor (green) Multiple Items: 3 Dice (red), 3 Bells (blue), 4 Records (yellow), 4 Scrolls (purple), 4 Crowns (pink).
Conference Room
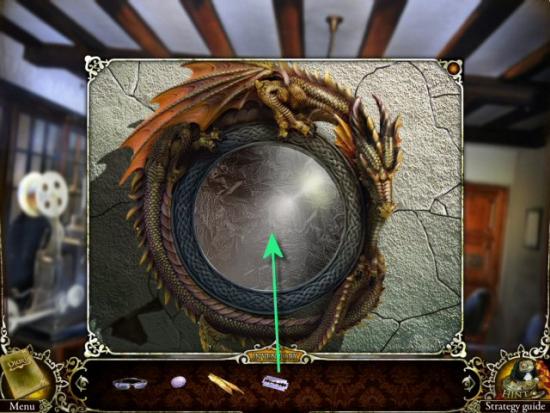
Return to the Conference Room, click on the Mirror, use the Razor Blade (green), return to the Music Room and then continue to the Sunroom.
Sunroom
Use the Sunglasses on the Veranda Doors (1), click on the Frame and use the Foil (2), click on the Chair and use the Mirror Compact (3), click on the Wall Sconce and use the Mirror Sliver (4) and then exit through the Doors (5).
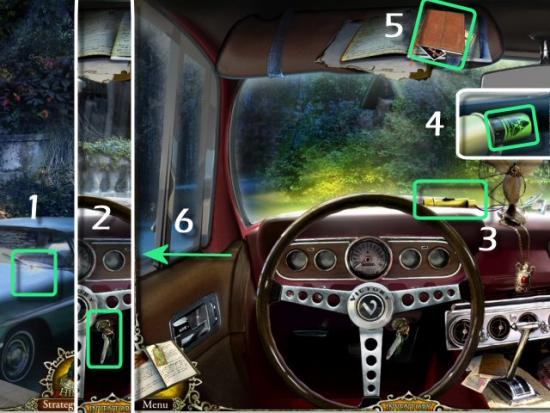
Patio
Click on the Car (1) and then click on the Keys (2). When you arrive at the Hotel, click on the Dashboard (3), collect the Battery (4), collect the Diary Entry (5) and then exit the Car (5).
Chapter 9 – Return to the Hotel
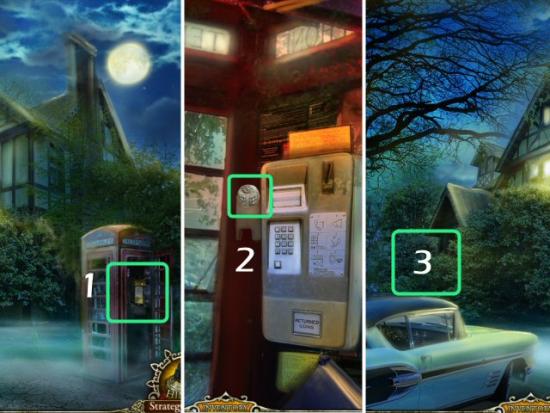
Telephone Booth
Click on the Telephone Booth (1), collect the Face Cube (2), return outside and continue to the Front Entrance (3).
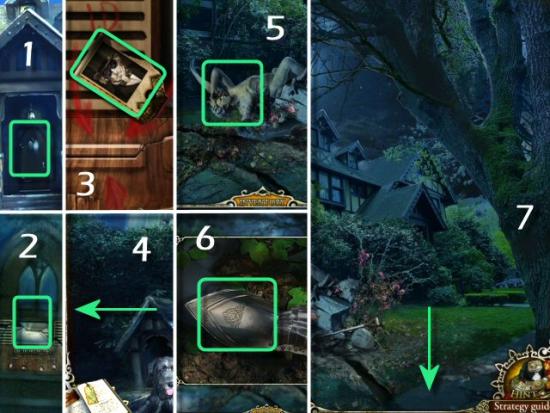
Front Entrance
Continue to Entrance (1), click on the Front Door (2), collect Access Card (3), return to Front Entrance and continue to the Hotel Grounds (4), click on the Statue (5), collect Gauntlet (6) and then continue to Tram (7).
Tram
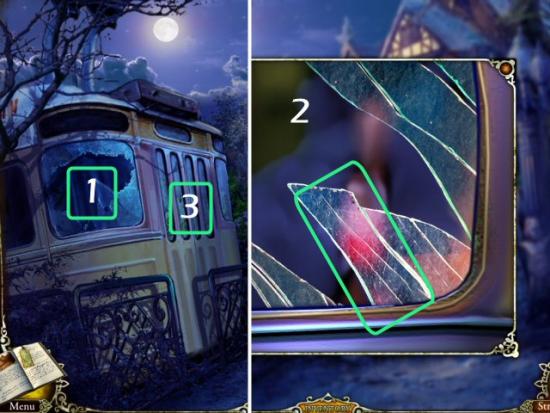
Click on the Broken Window (1), collect the Broken Glass (2) and then click on the Tram Doors (3).
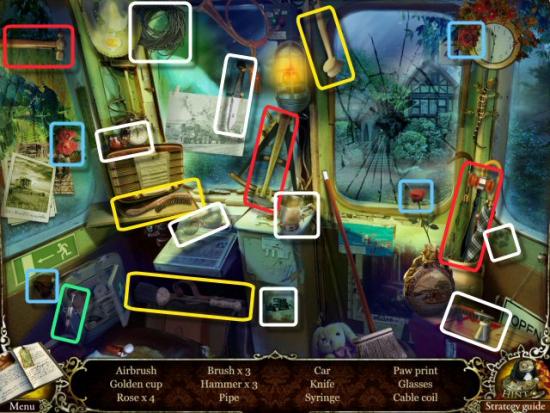
Find all the objects in the list. Inventory Item: Syringe (green) Multiple Items: 4 Roses (blue), 3 Brushes (yellow), 3 Hammers (red).
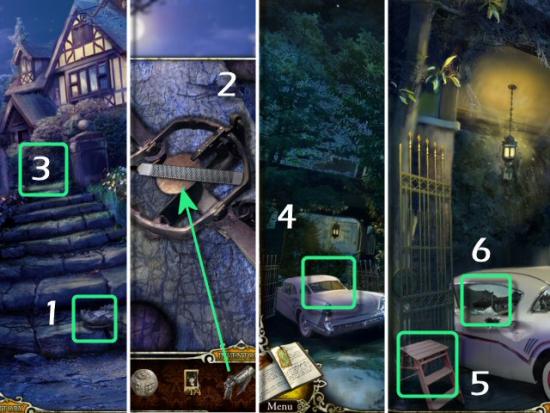
Click on the Trap (1), use the Gauntlet to collect the File (2), return to the Hotel Grounds (3) continue to the Side Gate (4), collect Step Ladder (5) and then click on the Car Window (6).
Side Gate
Use the Battery (1) on the Electrical Panel and arrange the Fuses so there’s a continuous connection between the Battery and the Light. Click on a Fuse to pick it up, move it and then click to place it.
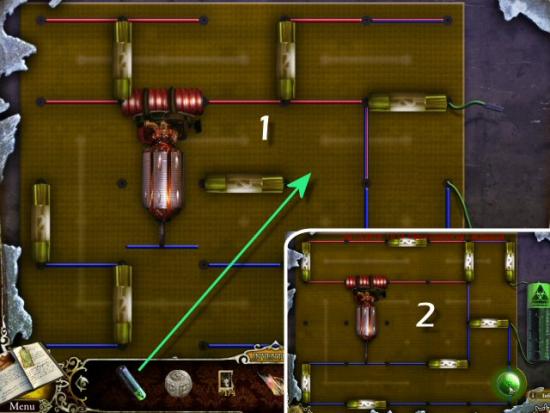
Click on the following for the video solution.
Sirius’ Car
Collect the Crowbar (1), click on the Rip (2), use the Broken Glass (3), collect the Access Card, exit the Car and return to the Front Entrance
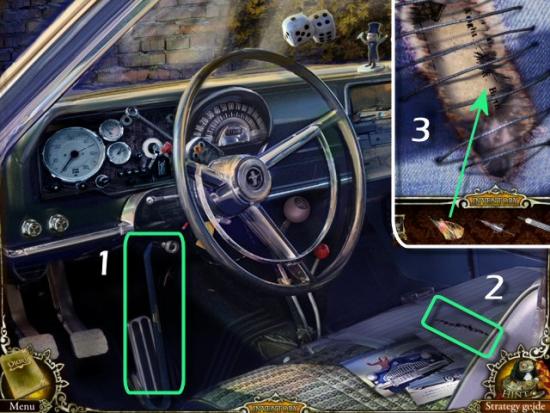
Front Entrance
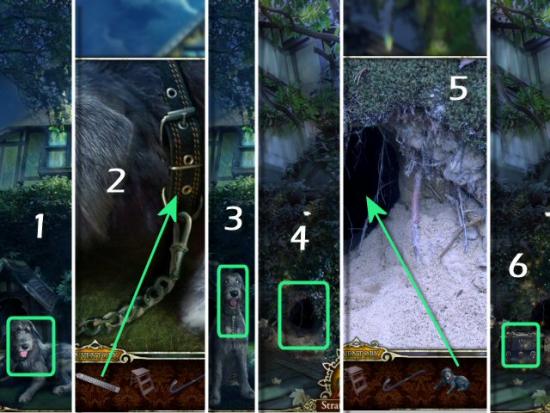
Click on the Dog (1), use File (2), collect the Dog (3), return to the Side Gate, click on the Hole (4), use the Dog (5) and then click on the Suitcase (6).
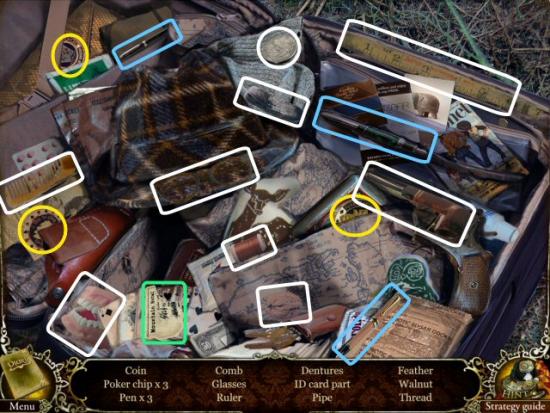
Find all the objects in the list. Inventory Item: Access Card (green) Multiple Items: 3 Poker Chips [], 3 Pens []
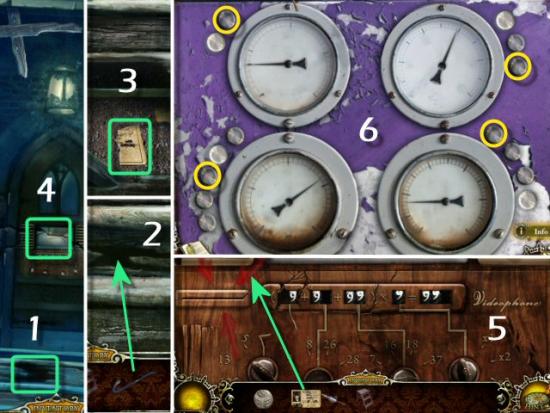
Front Porch
Return to the Front Porch, click on the Steps (1), use the Crowbar (2), collect Access Card (3), click on the Door (4) and then use the Access Card (5). Each button rotates the dials at a different speed. The bottom buttons rotate the dials faster than the top buttons. Click on the correct buttons so all the dials rotate at the same speed (6) and then enter the Hotel.
Front Hall
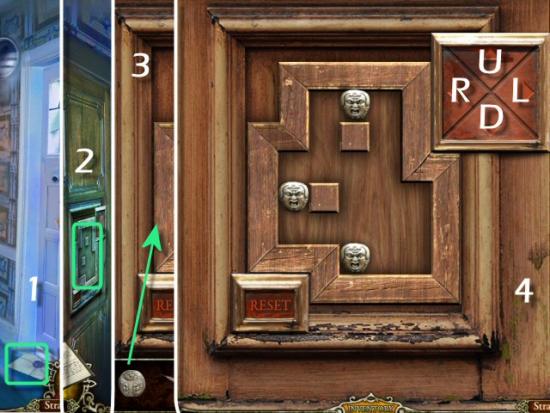
Collect the Diary Entry (1), click on the Bedroom Door (2) and then use the Face Cube (3). Eliminate the face cubes to unlock the door. Use the directional pad to move the face cubes so they come in contact with each other at the same time. All 3 face cubes move in the direction of the button clicked. If you make a move, then change your mind, click the reset button to restart the puzzle. If only 2 face cubes come into contact, the puzzle will reset itself. Click right, up, right, down. When complete, click on the open Bedroom Door.
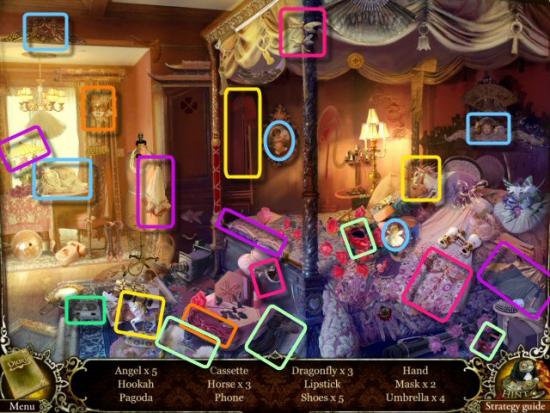
Find all the objects in the list. Inventory Item: Cassette (green) Multiple Items: 5 Angels (blue), 3 Horses (yellow), 3 Dragonflies (pink), 3 Shoes (light green), 2 Masks (orange), 4 Umbrellas (purple).
Car
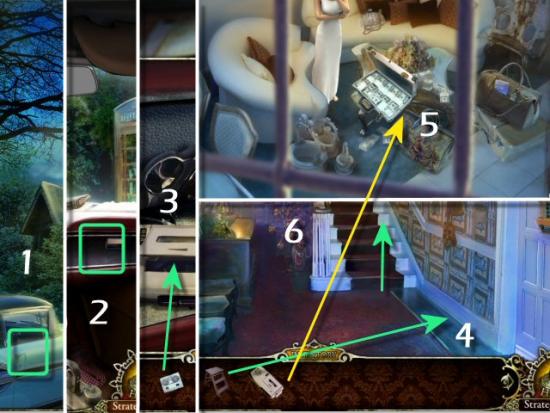
Return to the Telephone Booth, enter the Car (1), click on the Glove Compartment (2), use the Cassette in the Player (3), collect the Cassette Player, return to the Front Hall. use the Step Ladder (4), click on the Step Ladder, use the Cassette Player (5) and then continue Upstairs (6).
Upstairs hall
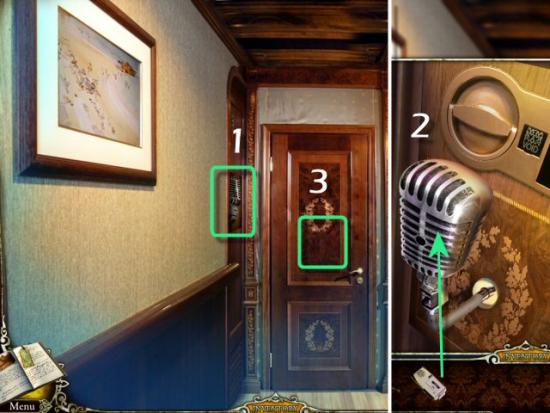
Click on the Intercom (1), use the Cassette Player (2) and then enter the Study.
Study
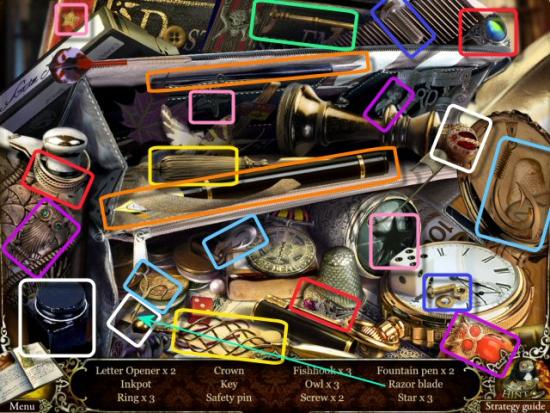
Click on the medical bag. Find all the objects in the list. Inventory Item: Key (green) Multiple Items: 2 Letter Openers (yellow), 3 Rings (red), 3 Fishhooks (blue), 3 Owls (purple), 2 Screws (dark blue), 2 Fountain Pens (orange), 3 Stars (pink).
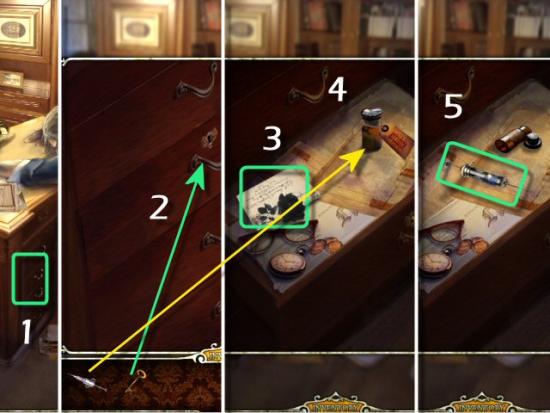
Click on the Desk Drawer (1), use the Key (2), collect the Diary Entry (3), use the Syringe (4) and then collect the Syringe (5).
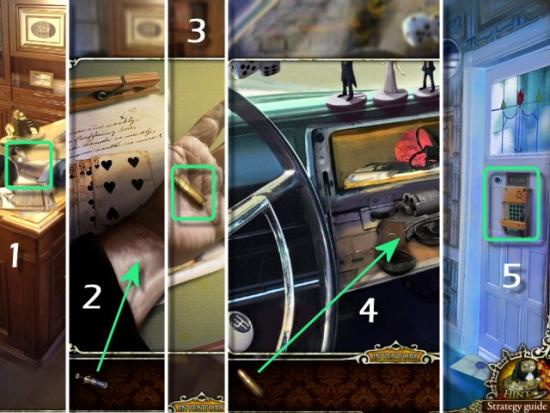
Click on Sirius’ Arm (1), use the Syringe (2), collect the Bullet (3), return to the Side Gate, enter Sirius’ Car, click on the Glove Compartment, use the Bullet (4), collect the Revolver, return to the Front Hall and then click on the Right Door (6).
Front Hall
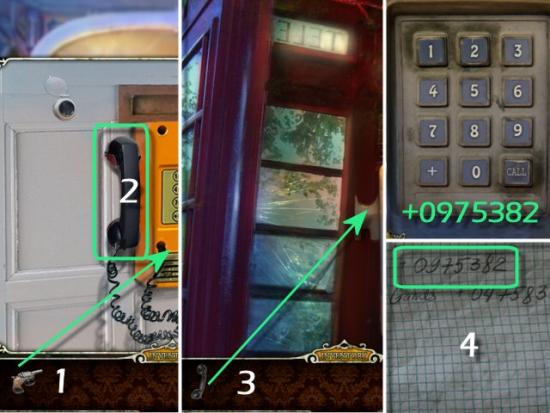
Use the Revolver (1), collect the Handset (2) and then return to the Telephone Booth.
Telephone Booth
Use the Handset (3), click on the Telephone and dial the Police (4) – +0975382.
Watch the ending movie. Congratulations! You’ve completed Mystery Trackers: The Void.
Achievements
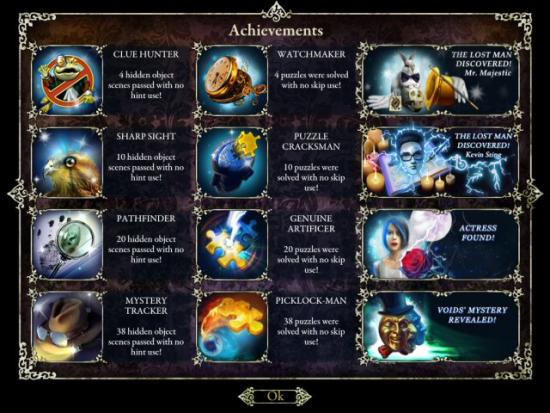
You now have access to the Bonus Content: Wallpapers, Soundtracks, Bonus Gameplay, Concept Art, Papercraft and Screensaver.
More articles...
Monopoly GO! Free Rolls – Links For Free Dice
By Glen Fox
Wondering how to get Monopoly GO! free rolls? Well, you’ve come to the right place. In this guide, we provide you with a bunch of tips and tricks to get some free rolls for the hit new mobile game. We’ll …Best Roblox Horror Games to Play Right Now – Updated Weekly
By Adele Wilson
Our Best Roblox Horror Games guide features the scariest and most creative experiences to play right now on the platform!The BEST Roblox Games of The Week – Games You Need To Play!
By Sho Roberts
Our feature shares our pick for the Best Roblox Games of the week! With our feature, we guarantee you'll find something new to play!Type Soul Clan Rarity Guide – All Legendary And Common Clans Listed!
By Nathan Ball
Wondering what your odds of rolling a particular Clan are? Wonder no more, with my handy Type Soul Clan Rarity guide.


