- Wondering how to get Monopoly GO! free rolls? Well, you’ve come to the right place. In this guide, we provide you with a bunch of tips and tricks to get some free rolls for the hit new mobile game. We’ll …
Best Roblox Horror Games to Play Right Now – Updated Weekly
By Adele Wilson
Our Best Roblox Horror Games guide features the scariest and most creative experiences to play right now on the platform!The BEST Roblox Games of The Week – Games You Need To Play!
By Sho Roberts
Our feature shares our pick for the Best Roblox Games of the week! With our feature, we guarantee you'll find something new to play!Type Soul Clan Rarity Guide – All Legendary And Common Clans Listed!
By Nathan Ball
Wondering what your odds of rolling a particular Clan are? Wonder no more, with my handy Type Soul Clan Rarity guide.
Mystery Trackers: Black Isle Walkthrough
Welcome to the Mystery Trackers: Black Isle walkthrough on Gamezebo. Mystery Trackers: Black Isle is a hidden object adventure game played created by Elephant Games. This walkthrough includes tips and tricks, helpful hints, and a strategy guide on how to complete Mystery Trackers: Black Isle.
Game Introduction – Mystery Trackers: Black Isle
Welcome to the Mystery Trackers: Black Isle walkthrough on Gamezebo. Mystery Trackers: Black Isle is a hidden object adventure game played created by Elephant Games. This walkthrough includes tips and tricks, helpful hints, and a strategy guide on how to complete Mystery Trackers: Black Isle.
General Tips
- You can choose to play this game in Casual, Advanced or Hardcore Mode
– Casual Mode: all areas of interest are indicated with sparkles and hint and skip buttons recharge relatively fast
– Advanced Mode: you get no extra hints and hint and skip buttons recharge much slower
– Hardcore mode really is for hardcore players as it gives you no help whatsoever and games cannot be skipped - The Options Menu allows you to change sound volumes, screen size and your cursor. You can also switch between game modes during the game
- To go back to the main menu and exit the game you need to click the menu button twice
- At the start of the game you can choose to play a tutorial, which shows you the various interactions:
– A magnifying glass cursor means you can zoom in on an object
– Gears mean you need to use an inventory item on an object
– A hand cursor means you can grab an object for your inventory
– A pointed finger means you can interact with something
– The cursor becomes an ornate arrow in places where you can move on to another scene - This game features an interactive map that can be accessed at the bottom left of the window. This map allows you to quickly travel from one location to another simply by clicking where you want to go. The general map shows you the areas unlocked in each chapter. Click on an area to get a full map of the chapter. All areas remain accessible throughout the game
- The hint button is very useful when you’re completely stuck, as it gives you a very direct description of the next step
- Hidden object scenes (HOS) are a little different once you’ve reached a certain part of the game: in the list of items there will be some items listed in blue, which are items that can only be found if you use an item from your inventory on an object in the scene. This may mean that the first time you encounter a certain HOS you won’t have the correct item yet, meaning you will have to come back to it later
- In Casual and Advanced modes puzzles can be skipped once the skip button has charged. All puzzles can be reset with the reset button
Features only available in the Collector’s Edition
- The Collector’s edition allows you to gain several achievements throughout the game, which can be accessed from the main menu
- An in-game strategy guide can be accessed at the bottom right of the screen. You can quickly skip between chapters from the table of contents, but it also remembers where you were at your last visit. Click on the images to zoom in
- There are 50 “lady owl ghosts” hidden in throughout the game. Finding these flowers will gain you an achievement at the end of the game. Note that owls can also be found in hidden object scenes, meaning you won’t be able to find these owls once you’ve completed the scene
- A bonus chapter of normal gameplay can be accessed from the main menu after the main game has been completed
- Other bonus content consists of wallpaper and concept art, the soundtrack and some cute little videos
Chapter 1: East Wing
Chapter 1: East Wing
- Note to Standard Edition players: Collectors Edition bonus owls will be shown in the screenshots and mentioned in this walkthrough. They are not available in your game
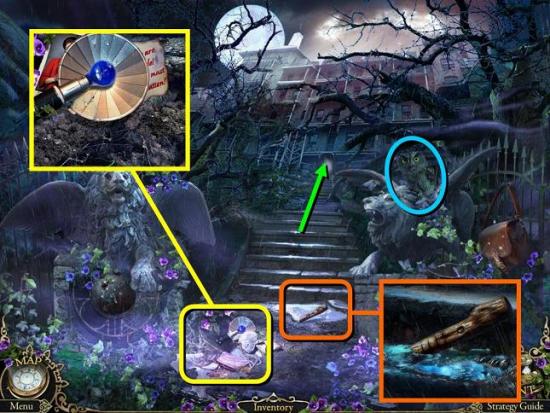
- Click on Thomas

- Click on the puddle and take the BOARD
- Click on the rubble in front of the puddle and take the CAMERA FLASH
- CE players, find the first owl (1/50)
- Go on to the hotel gates
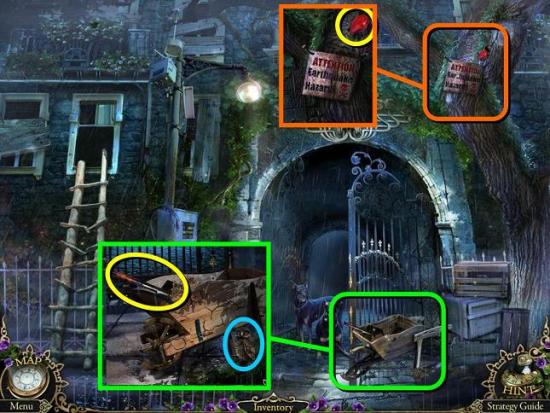
- Click on the wheelbarrow and take the SPADE (and owl 2/50)
- Zoom in on the sign on the tree and take the BULB
- Go back one screen and zoom in on the rubble again
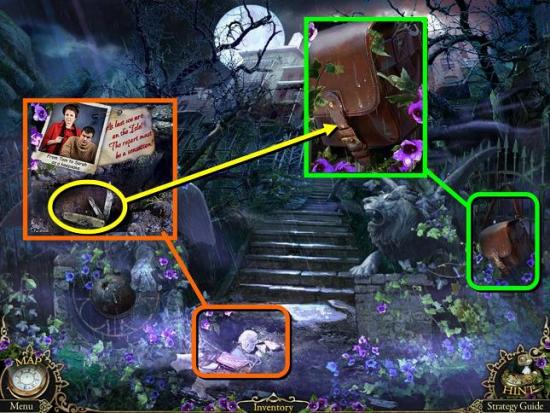
- Use the SPADE to dig up a KNIFE
- Zoom in on the bag hanging from the fence and cut the strap with the KNIFE
- Click on the bag again for your first HOS
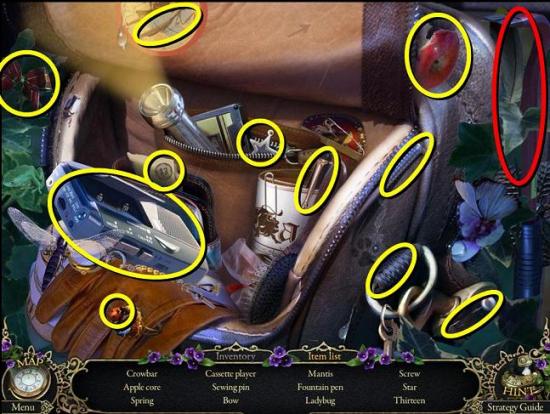
- Get a CROWBAR
- Go back to the hotel gates and zoom in on the crates
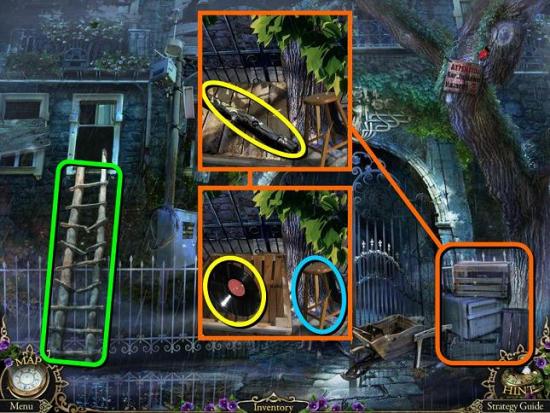
- Use the CROWBAR to get another BOARD
- Inside the crate is a RECORD
- Zoom in on the ladder and place your two BOARDS
- You need to repair the ladder by swapping the half rungs on the left around to match the ones on the right. There’s no trick to this, and posting a screen shot of the solution isn’t particularly interesting. Just keep swapping until they’re all in place
- Go up the ladder to the hotel room
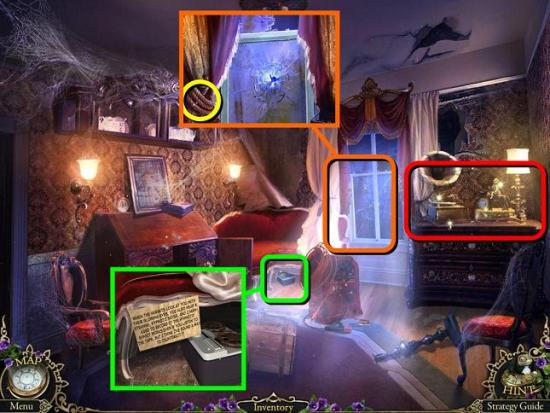
- Zoom in on the window and take the ROPE
- Zoom in under the couch and play the tape, although I’m not sure what that does
- Zoom in on the dresser for another HOS
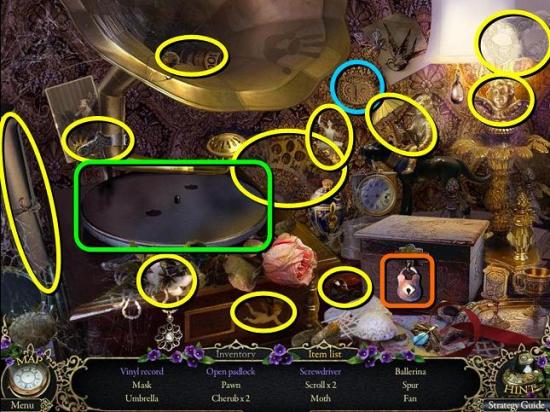
- In this HOS you need to use inventory items to find other items. Put the RECORD on the record player (green) to find the vinyl record. Use the CROWBAR to open the padlock on the small chest (orange). Take the open padlock and the SCREWDRIVER inside the chest. Also find owl 3/50 before you complete the scene (blue) – if you miss this owl, you won’t be able to go back for it later
- Back out to the hotel gates
- Zoom in on the crate and fix the stool with the ROPE (shown blue in image of gates above). Take the STOOL
- Go back to the hotel room and zoom in on the wall on the left
- Place the STOOL on its shadow
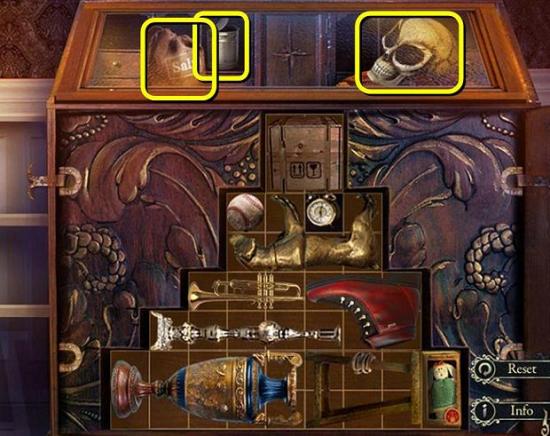
- You now need to place all the items on the left in the grid so that they all fit in without overlapping or leaving empty spaces
- When you’re done you can take the SKULL, SALT and DOG FOOD from the top of the cupboard
- Back out to the hotel gates and zoom in on the dogs
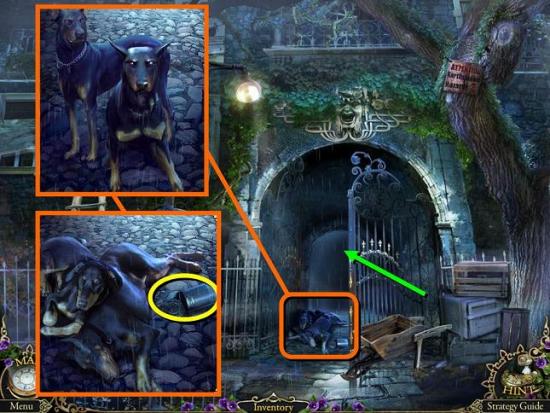
- Give the dogs the DOG FOOD
- When the dogs are asleep, pick up the TIN CAN
- Back out to the stone stairs
- Use the SALT to melt the ice
- Zoom in on the puddle and use the TIN CAN to scoop up some water
- Go through the gates to the gates corridor
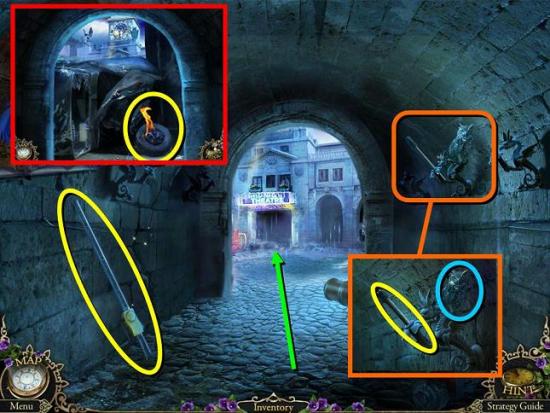
- Take the HOISTING JACK
- Zoom in on the torch on the wall and take the TORCH and owl 4/50
- Go on to the courtyard and watch what happens
- Extinguish the burning tyre with the CAN WITH WATER
- Pick up the WHEEL
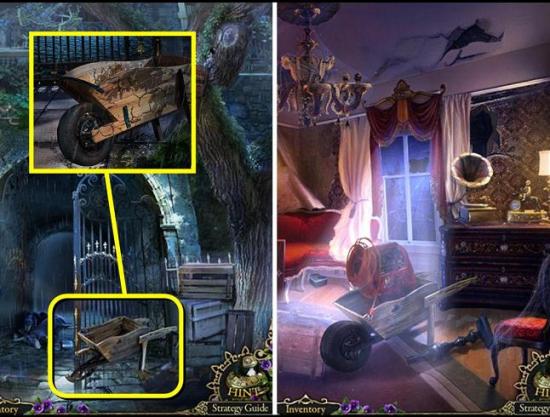
- Go back to the gates and zoom in on the wheelbarrow
- Click to remover the broken wheel, and place the WHEEL from your inventory
- Take the WHEELBARROW
- Go up the ladder
- Use the WHEELBARROW on the WELDER and then pick it up
- Go back to the gates, into the corridor and on to the archway
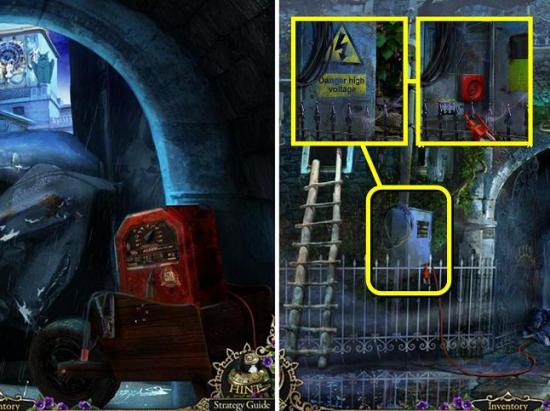
- Put the WELDER by the pile of cars and back out to the gates, where you’ll now see a red cable running to the power box next to the ladder
- Zoom in on the power box and open it with your SCREWDRIVER
- Plug in the welder’s red cable
- Go back to the archway and use the welder to cut through the cars
- Use the HOISTING JACK to push the pieces aside
- Go through to the courtyard
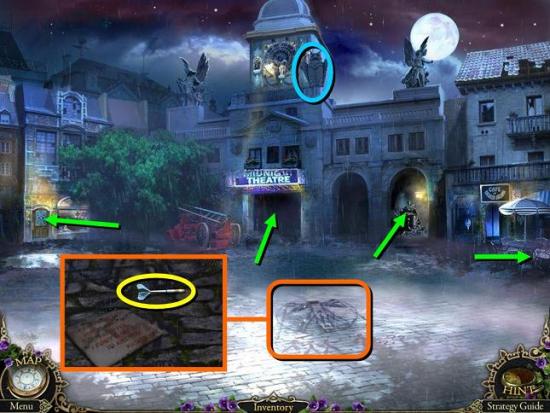
- Take owl 5/50
- Click on the drawing of Michelangelo’s David on the ground and pick up the DART. Wow, creepy
- Go left to the curiosity shop entrance
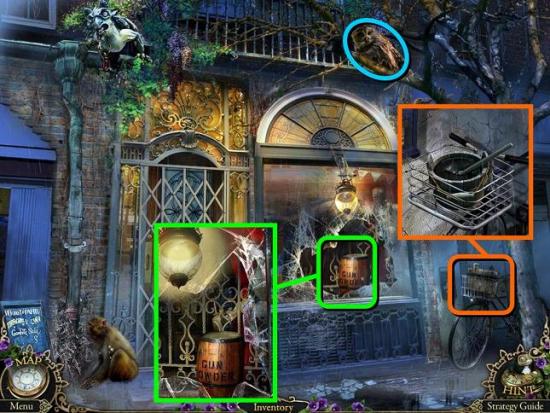
- Take owl 6/50
- Zoom in on the bike and dip your TORCH in the bucket of tar. Take the TORCH WITH TAR
- Zoom in on the window and take the GUNPOWDER
- Go back to the courtyard and on to the theater entrance
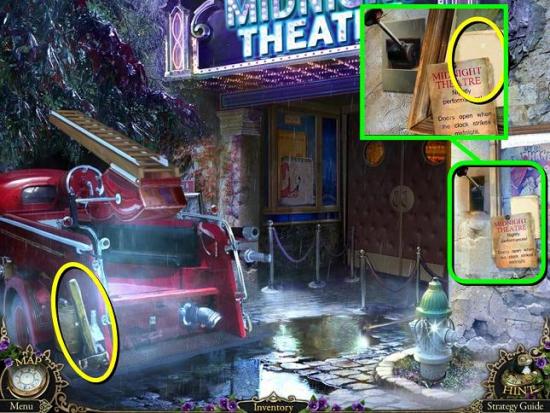
- Take the SLEDGEHAMMER
- Zoom in on the lever on the wall and take the SHEET OF PAPER
- Go back to the courtyard and go to the statue corridor
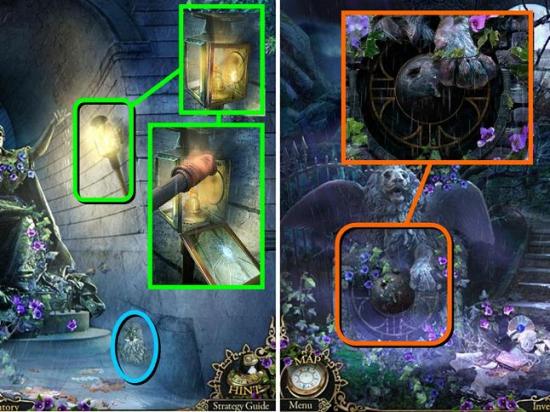
- Take owl 7/50
- Zoom in on the lantern, open it and use it to light your TORCH WITH TAR and get a BURNING TORCH
- Back out to the stone steps at the start of the game
- Zoom in on the lion statue and use the SLEDGEHAMMER to take the CANNON BALL. You need to hit it three times
- Go to the arch corridor and zoom in on the cannon
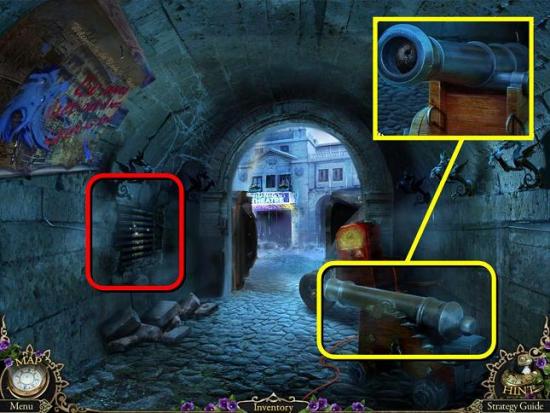
- Put your GUNPOWDER in it, followed by the CANNON BALL
- Then fire it with your BURNING TORCH
- Zoom in on the new puzzle in the wall
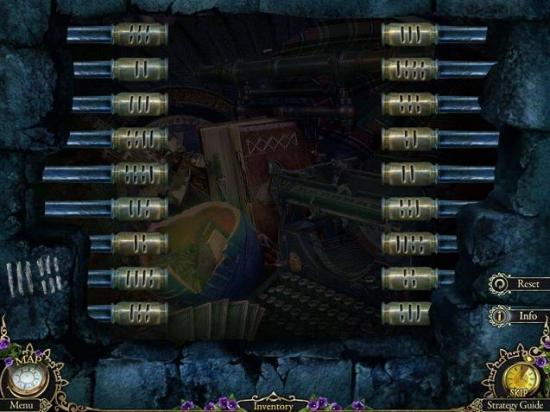
- You need to move the metal rods around, matching them with the one opposite so that each pair of torches has three dashed gashes and three long gashes. Just look at a rod on one side and figure out what it needs to complete the pattern, then find the matching one on the other side
- Behind the puzzle is a new HOS
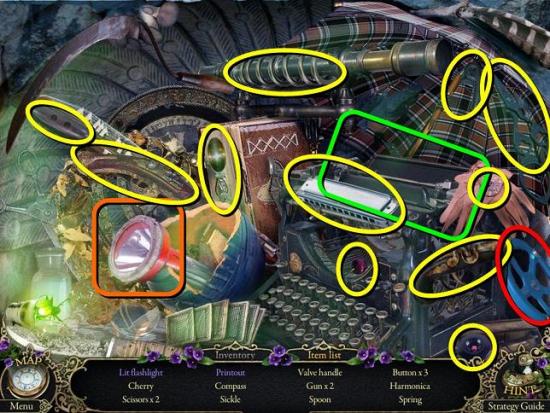
- Put the SHEET OF PAPER in the typewriter to get the printout (green), and use the BULB on the flashlight to get the lit flashlight (orange). When you’re done you get the VALVE HANDLE (red)
- Go back to the courtyard and to the theater entrance
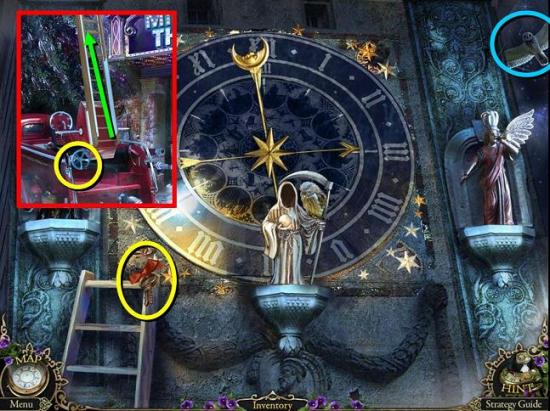
- Zoom in on the fire engine and place the VALVE HANDLE (inset)
- Click on the handle again to raise the ladder
- Go up to the theater balcony
- Take the BRONZE KEY and owl 8/50
- Back out to the courtyard and go left to the curiosity shop entrance
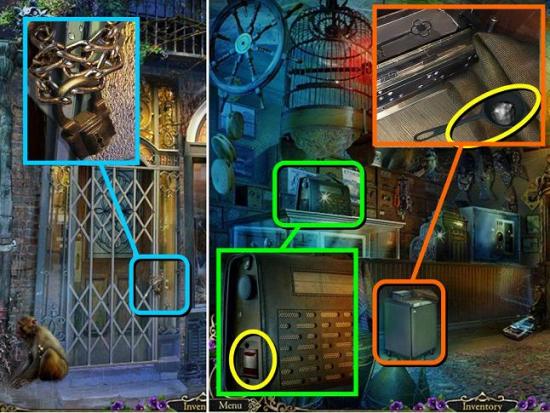
- Zoom in on the padlock on the door and open it with your BRONZE KEY
- Go into the curiosity shop
- Zoom in on the strange box on the floor and take the LADLE WITH TIN
- Zoom in on the old radio on the counter and unscrew the side panel with your SCREWDRIVER
- Take out the BATTERY
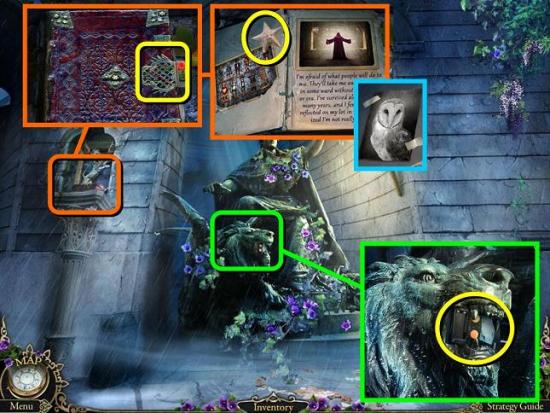
- Go to the statue corridor and zoom in on the lion’s head
- Place the BATTERY in the device and take the ELECTRONIC MASTER KEY
- Zoom in on the book in the alcove on the left and use the ELECTRONIC MASTER KEY on the lock
- Click on the lock again to open the book
- Take the STARFISH
- Turn the page and take owl 9/50
- Go back to the courtyard and go right to the café entrance
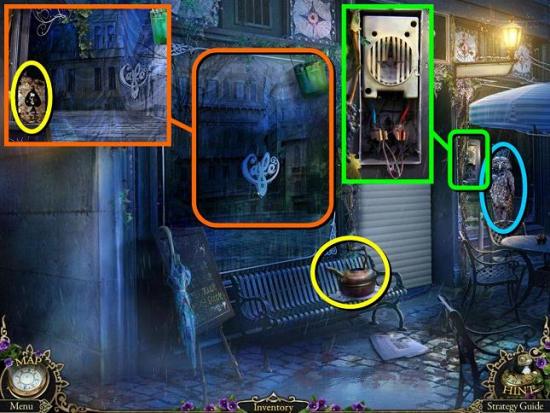
- Take owl 10/50
- Take the KETTLE
- Zoom in on the main window and take the ACE OF SPADES
- Zoom in on the electronic lock to the right of the window and use the ELECTRONIC MASTER KEY to open the roller blind
- Enter the Café of Broken Dreams
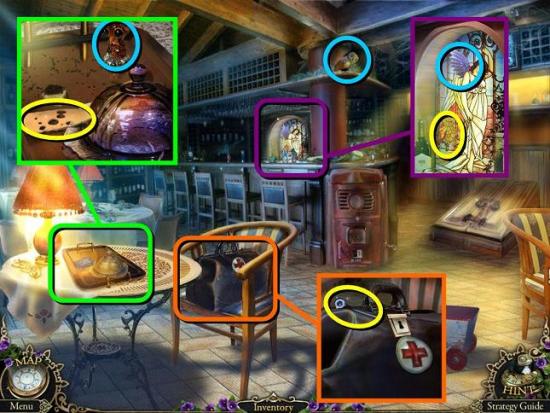
- Take owl 11/50 from above the bar
- Zoom in on the tray on the table and take the CHEESE and owl 12/50
- Zoom in on the doctor’s bag and take the KEY LEVER
- Zoom in on the stained glass window and take the WING and owl 13/50
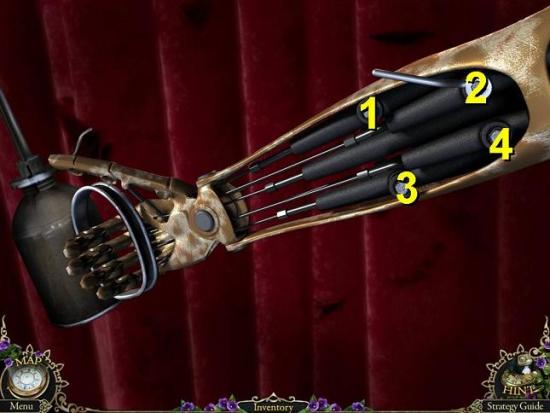
- Go back to the curiosity shop and click on the hand of the suit of armor
- Click on it again to zoom in and place the KEY LEVER
- Click the bolts in the order 4, 2, 3, 1, 2 to open the hand and take the OILCAN
- Go back to the café and zoom in on the hatch on the right
- Use the OILCAN to open the rusty latch
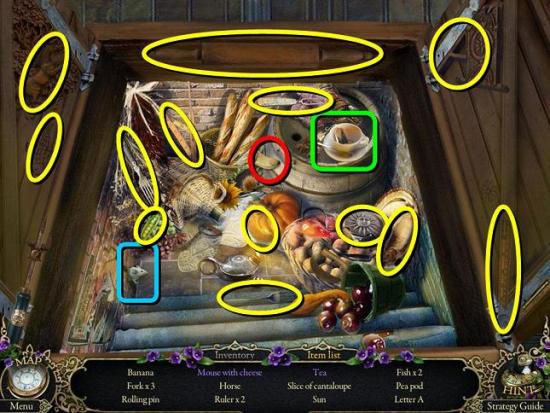
- Click on the hatch again for a HOS. Give the mouse the CHEESE (blue) and use your KETTLE to make the tea (green). You will get a banana (red)
- Go back to the entrance of the curiosity shop and zoom in on the monkey
- Give him the banana and he will get you the BEADS
- Go to the theater entrance and up to the balcony
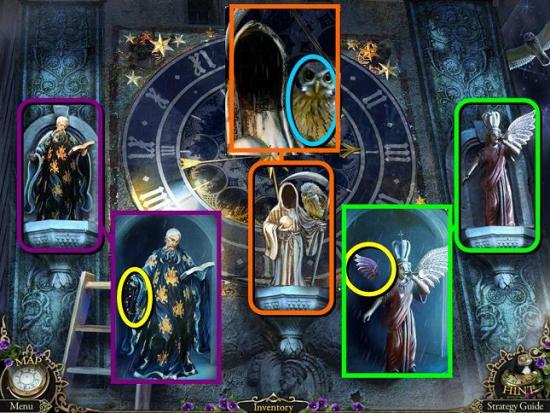
- Zoom in on the statue of the reaper in the center and take owl 14/50
- Give the reaper his SKULL back
- Give the BEADS to the statue on the left and the WING to the statue on the right
- Click on the clock mechanism for a puzzle
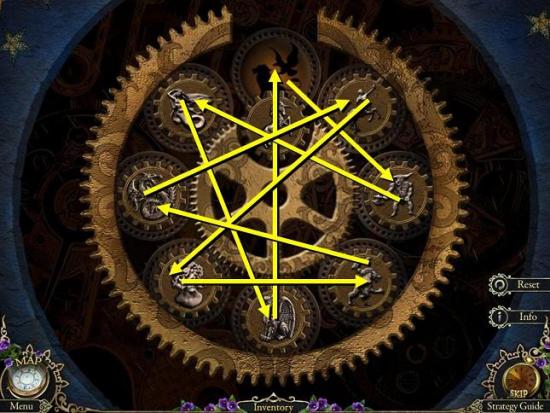
- The discs need to be moved around to their right places. Click on the disc by the opening to move it down and see the image underneath. Then click on the disc that matches the image to move it into place. Do this until all discs are in place
- Go back down the ladder and into the theater hall
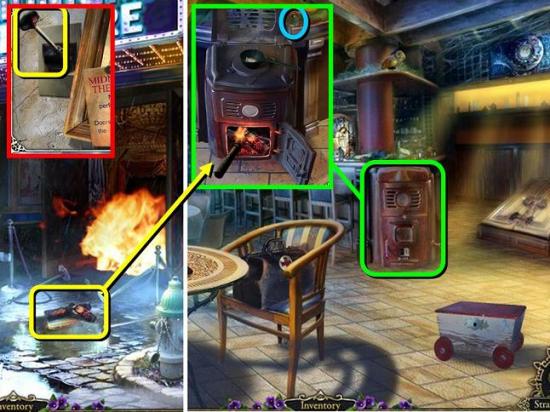
- Back outside, zoom in on the puddle and take the SMOULDERING BOARDS
- Go into the café and zoom in on the stove
- Take owl 15/50
- Put the SMOULDERING BOARDS in the lower compartment of the stove and then fire them up with your BURNING TORCH
- Put the LADLE WITH TIN on top of the stove and then pick up the LADLE WITH MOLTEN TIN
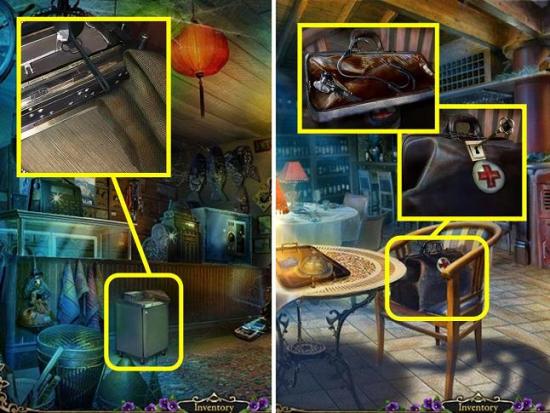
- Go to the curiosity shop and zoom back in on the box, which is a mould for a key
- Use the LADLE WITH MOLTEN TIN to make a TIN KEY
- Go back to the café, zoom in on the doctor’s bag and open it with the TIN KEY
- Take out the STETHESCOPE
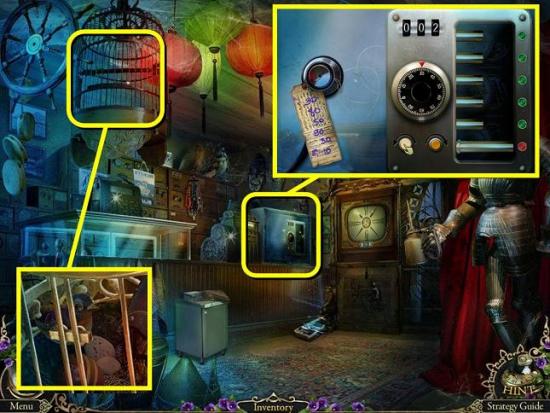
- Go back to the curiosity shop and zoom in on the safe on the counter
- Place the STETHESCOPE to activate the puzzle
- You need to hit the numbers shown on the note by clicking the two yellow buttons to rotate the dial. However, you only have 21 clicks to do this. Click the buttons in the following order:
30: 3xL
80: 5xR
50: 3xR
90: 4xL
30: 4xL
10: 2xR - Take out the STRING. Hang on, we cracked a safe to get a violin string??!
- Zoom in on the cage hanging from the ceiling and use the STRING to cut the bars. This seems to be a favorite of this developer
- Click on the cage again for a HOS
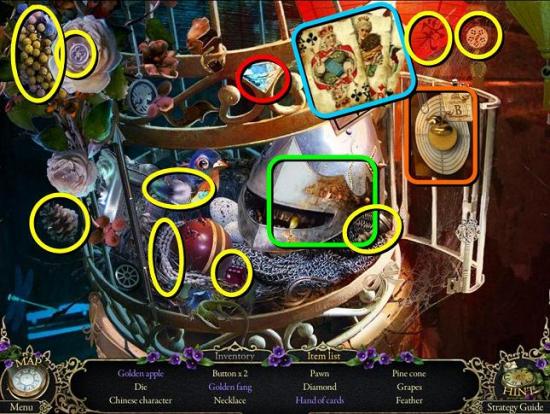
- Use the ACE OF SPADES to get the hand of cards (blue), hit the target (orange) with your DART to get the golden apple and use the OILCAN to open the helmet’s visor (green) to get the golden fang. Get the DIAMOND (red)when you’re done
- Go to the entrance to the café and zoom in on the window

- Cut the window with the DIAMOND
- Take the MICROPHONE
- Go back to the shop (all the while the theater is burning away nicely) and zoom in on the old TV set
- Take owl 16/50
- Plug in the MICROPHONE
- Watch footage on both channels and take note of the figures at the top of the screen
- Go back to the courtyard and click on the crate that has arrived
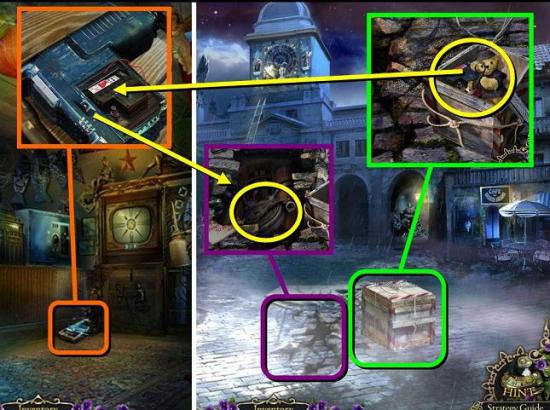
- Undo the ropes and open the crate
- Take out the BEAR DETECTIVE and STORAGE BATTERY
- Go back into the shop and place the STORAGE BATTERY in the JACKHAMMER on the floor by the TV
- Go back to the crate in the courtyard and use the JACKHAMMER to uproot the cobblestones
- Take the FIRE HOSE
- Go back to the theater, zoom in on the fire hydrant, take off the cap and place the FIRE HOSE
- Go into the theater hall
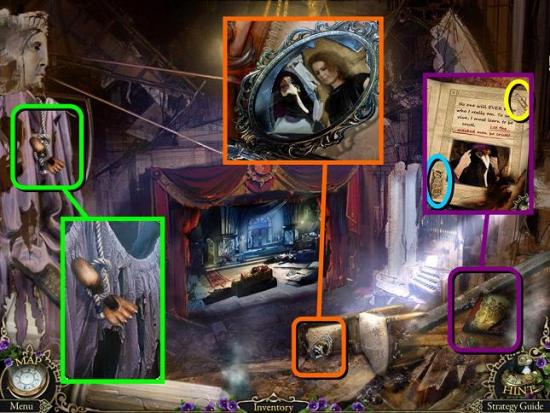
- Zoom in on the photo album and turn the pages until you find a CLIP and owl 17/50
- Zoom in on the framed portrait and take the PORTRAIT
- Zoom in on the rope on the left and take the WOODEN LEG
- Back out to the courtyard and go into the café
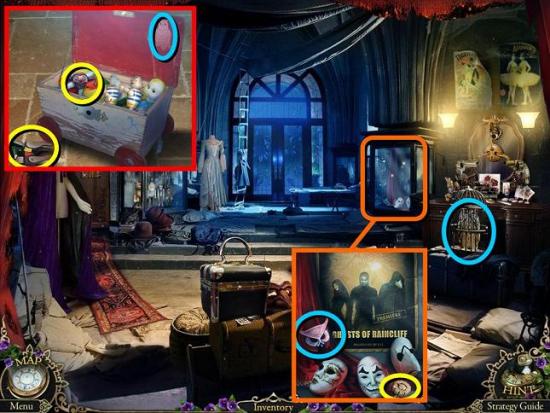
- Zoom in on the toy box and unlock it with the CLIP (inset)
- Take the TOY HORSE if you didn’t do so earlier
- Inside the box are a JESTER HEAD and owl 18/50
- Go back to the theater hall and move on to the theater stage
- Take owl 19/50
- Zoom in on the display case on the right and take the COMBINATION LOCK and owl 20/50
- Go on to the balcony doors
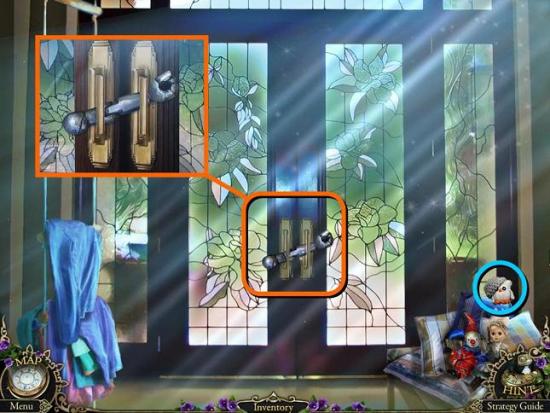
- Take owl 21/50
- Zoom in on the doors and take the WOODEN HAND
- Go through the doors to the bridge and watch the scene
- Go back to the theater stage and zoom in on the display case on the left
- Place the WOODEN HAND, WOODEN LEG and JESTER HEAD to activate the puzzle
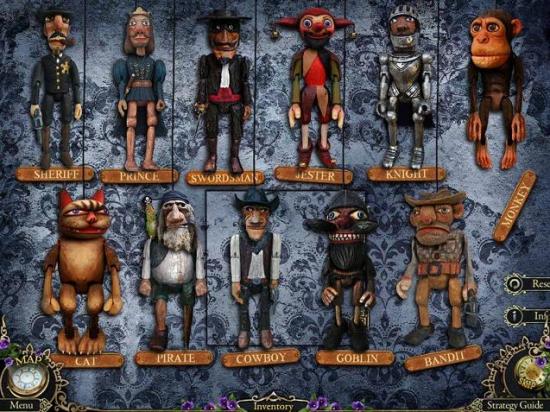
- Restore the puppets by dragging limbs and heads from one puppet to another
- Open the compartment that’s revealed and take the METAL CYLINDER
- Back out one screen to the theater hall and zoom in on the organ
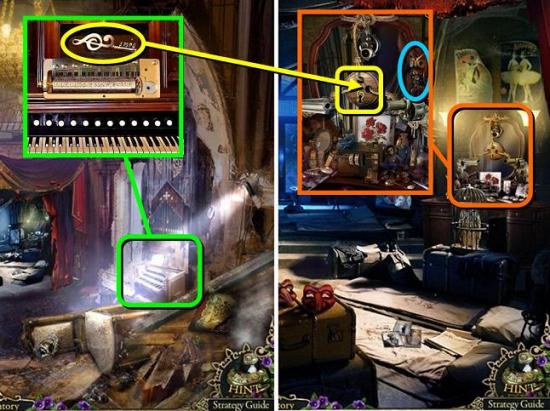
- Place the METAL CYLINDER and take the MUSIC KEY once the organ stops playing
- Go back to the stage and zoom in on the dressing table
- Take the owl (22/50). If you miss this owl, you won’t be able to go back for it later
- Use the MUSIC KEY on the lock
- Click on the dressing table again for a HOS
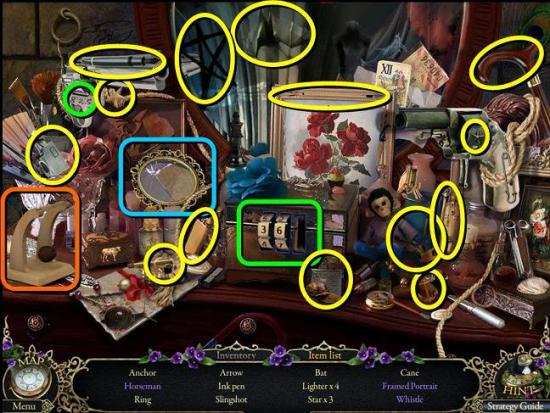
- Put your PORTRAIT in the broken frame (blue). Put the COMBINATION LOCK on the lock (green) and turn the wheels to 825 (which is scratched on one of the guns). Put the TOY HORSE on the broken toy on the left (orange). When you’re done you get a WHISTLE
- Go back to the balcony doors and use the WHISTLE on the doors
- Go through the doors to the bridge
Chapter 2: West Wing
- Ignore everything on your way right now and first cross the bridge, go down the narrow alley, past the poor wee puppy and the ice cream van and down to the dock
- Zoom in on the sea plane and get the BINOCULARS
- Now back out to the bridge
- Take owl 23/50 (shown in a later image)
- Go right to the stony shore
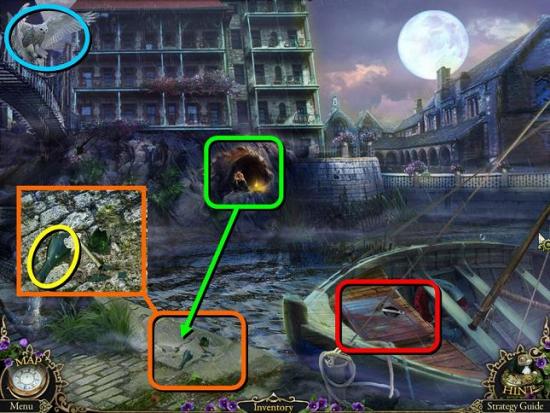
- Take owl 24/50
- Use your BINOCULARS to look at the man across the water. It’s Thomas!
- Zoom in on the broken bottle, read the note and pick up the SHARP SPLINTER
- Open the hatch on the deck of the sailboat and play the HOS
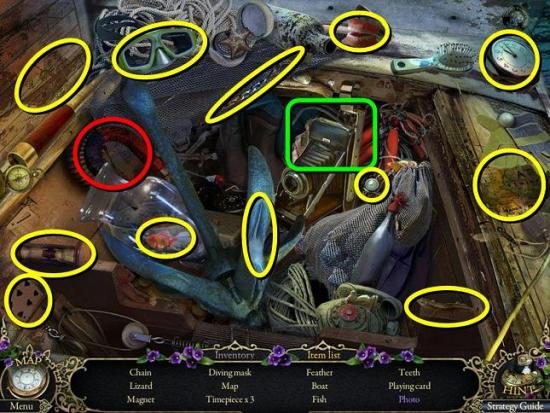
- Put the CAMERA FLASH on the camera to get the photo. When you’re done you get a MAGNET
- Back out through the theater to the hotel courtyard
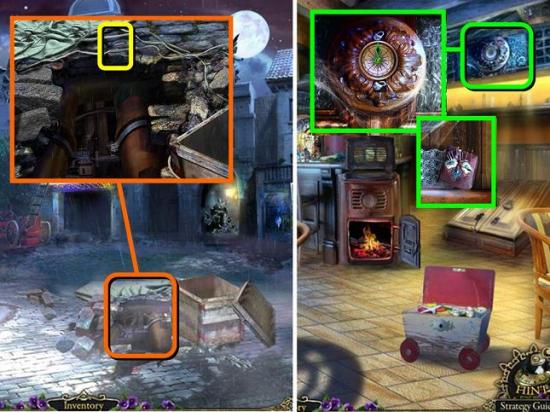
- Zoom in on the crate that was dropped for you and use the SHARP SPLINTER to cut the cords of the parachute and take the PARACHUTE
- Go into the café and zoom in on the weird looking safe on the wall
- Use the MAGNET to open it and take out the NEEDLE AND THREAD
- Go back to the rocky shore
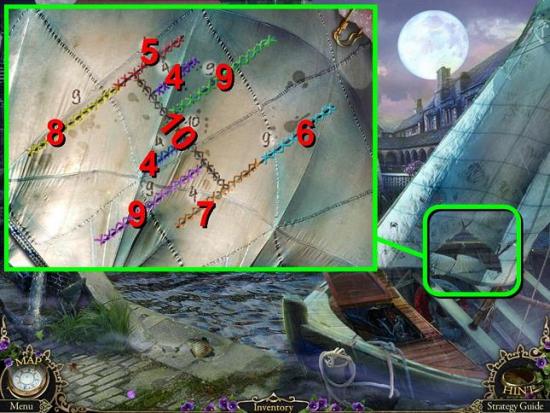
- Put the PARACHUTE on the mast of the boat
- Zoom in on the hole and place the NEEDLE AND THREAD
- You need to mend all the tears with the colored threads on the right. The lengths of the threads and tears are all indicated. Use combinations of 8+5 and 7+6 on the long tears at the top and bottom as they’re both 9+4=13 long. Use the 10 length thread on the 10 length tear. Then fill up the remaining 9’s and 4’s with the threads of corresponding length
- Click on the sail to sail to Thomas in the grotto
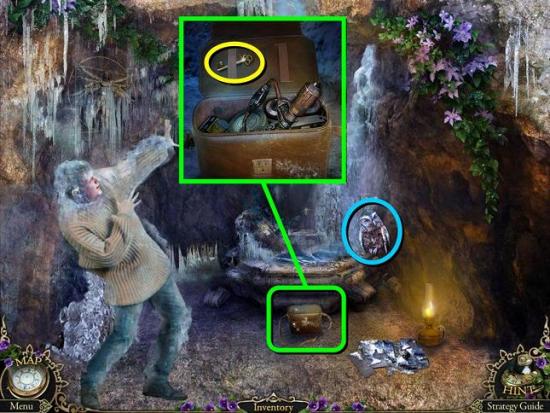
- Take owl 25/50
- Click on his case, open it and take out the VAN KEY
- Go back to the narrow alley with the puppy and the ice cream van, and zoom in on the lock
- Open it with the VAN KEY
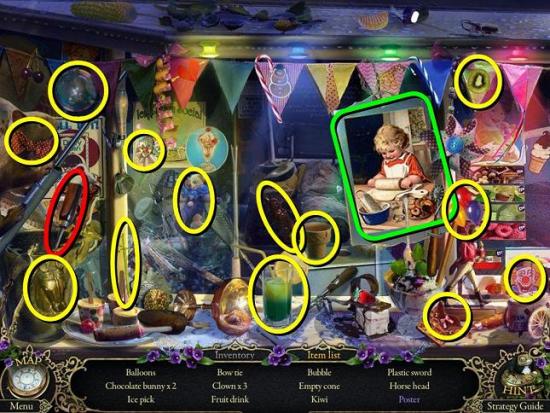
- Play the HOS inside the van. To get the poster (green), swap the bits of the scrambled poster to recreate the image. You will get an ICE PICK (red)
- Go back to Thomas
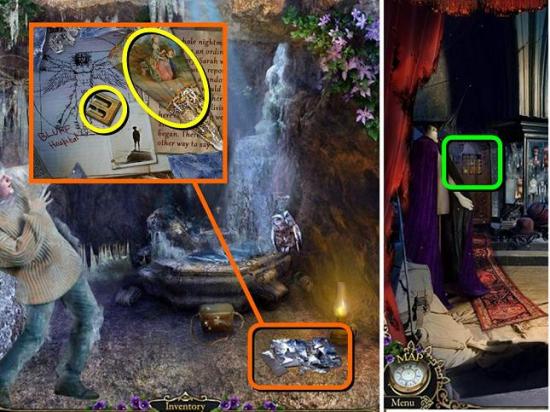
- Zoom in on his diary and use the ICE PICK to break the ice
- Take the PLATE and FEATHER FAN
- Go back to the theater stage and zoom in on the puzzle in the left wall
- Put the PLATE on the puzzle to unlock it
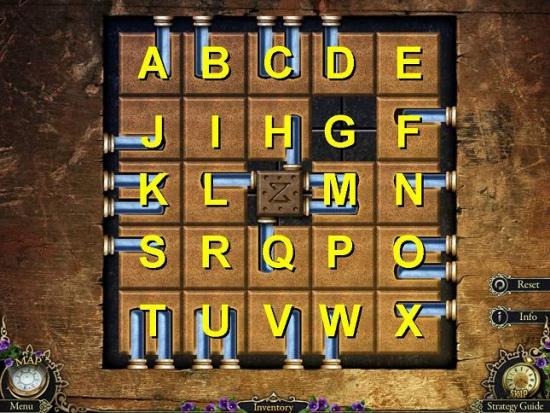
- You need to slide the tiles around so that all the bolts around the outside and center can slide into the slots on the tiles. I honestly have no strategy for slide puzzles like this. The the Collector’s Edition Strategy Guide has a step-by-step walkthrough that’s not entirely accurate. The adapted version of it is: U, V, W, X, O, P, M, G, D, E, F, N, M, G, F, N, M, G, F, N, O, P, Q, V, W, P, Q, R, L, K, J, I, L, K, J, A, B, C,H, I, L, K, S, T, U, R, Q, P, M, N, F, G, M, N, F, G
- Play the HOS behind the door
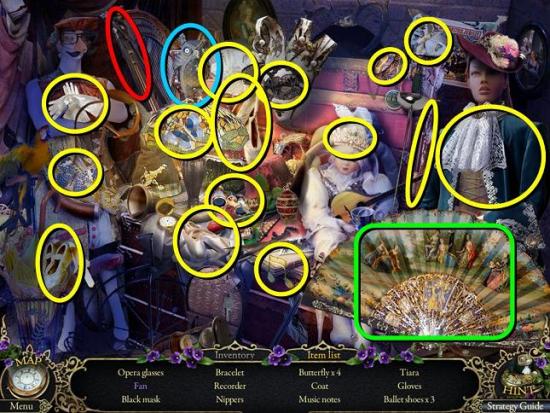
- Put the FEATHER FAN on the fan in the HOS (green) and swap the pieces around to restore the image. Note there is also an owl (26/50) in the scene (blue). When you’re done, you get the NIPPERS (red)
- Go through the balcony doors and across the bridge to the crossroads
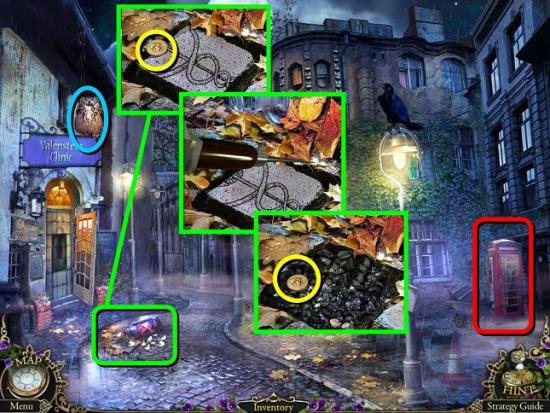
- Take the owl (27/50)
- Zoom in on the stone by the lantern on the ground. If you try to take the coin, it falls in the crack
- Use the ICE PICK to loosen the stone, then take the DOOR STONE (1/2) and the COIN
- Zoom in on the phone booth
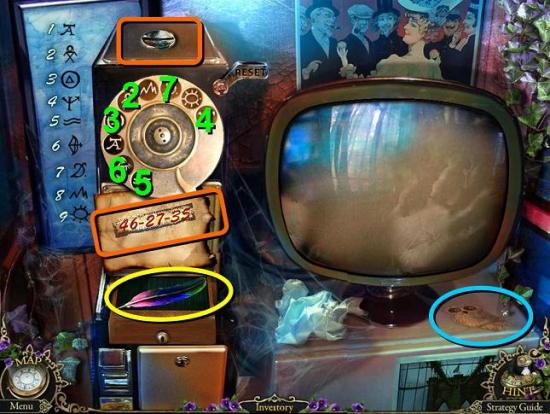
- Take owl 28/50
- Use the COIN to scratch the gray panel below the phone and reveal the number: 46-27-35
- Put the COIN in the slot
- Dial the number on the panel. However, the number holes are scrambled, so you need to use the legend on the wall to figure out which is which
- After the video call, take the RAVEN FEATHER (1/2) from the drawer
- Go back to the crossroads and into the narrow alley
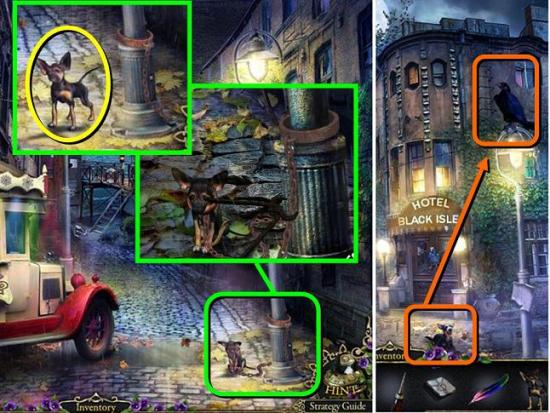
- Zoom in on the puppy and cut his chain with the NIPPERS
- Take the puppy, whose name is ELF
- Back out to the crossroads and release ELF on the raven on the lamp post
- You will automatically get another RAVEN FEATHER (2/2)
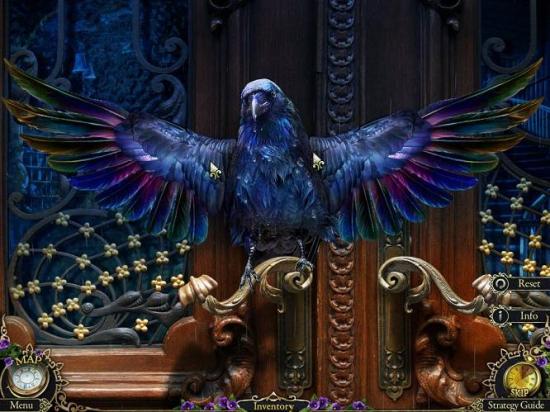
- Zoom in on the hotel door and give the two RAVEN FEATHERS to the raven
- You now need to move the feathers on both wings around until they’re all in the right place. Unfortunately, there are virtually no clues on how to do this, other than some size and shape clues. Also, feathers don’t stay in place when they’re in the right spot, so good luck with that! You can refer to the screenshot above for visual help. Another tip is that the wings are exact mirror images of each other
- Click on the door handle and go into the hotel hall
- Go up the stairs to the hotel corridor
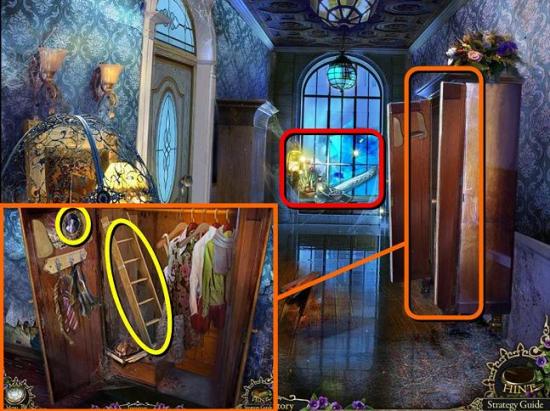
- Zoom in on the cupboard and take the LADDER and the TWIN PORTRAIT
- Zoom in on the window for a HOS
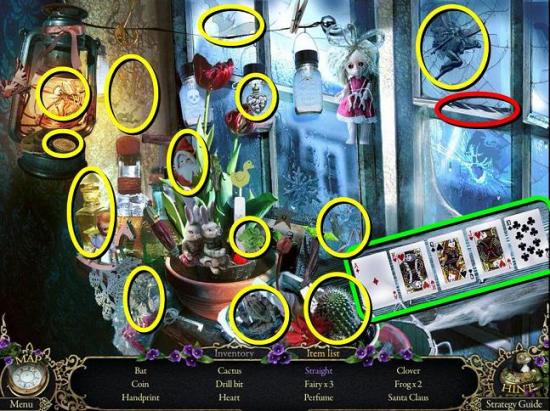
- Click on the card halves to get A, K, Q, J, 10 from left to right (green). Get a DRILL BIT (red)
- Return to Thomas across the water
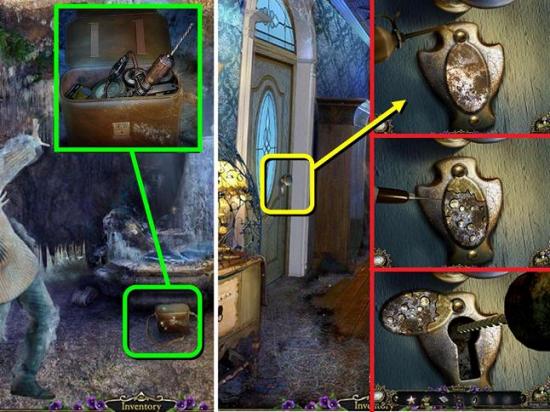
- Zoom in on his bag and put the DRILL BIT on the DRILL
- Go back to the hotel and go upstairs to the corridor
- Zoom in on the door on the left and oil the lock with your OILCAN
- Use the ICE PICK on the lock and then take off the cover
- Drill through the lock with your DRILL, which sounds oddly electrical for a hand drill
- Go through the opened door
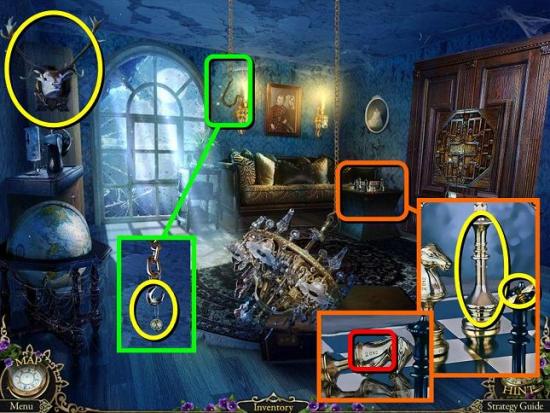
- Take the DEER HEAD from the wall
- Zoom in on the chess board on the table and take the BEE and the CHESS FIGURE
- Take note of the code carved into the knight (2012)
- Zoom in on the hook hanging from the ceiling and take the CASH REGISTER BUTTON
- Back out to the hotel hall
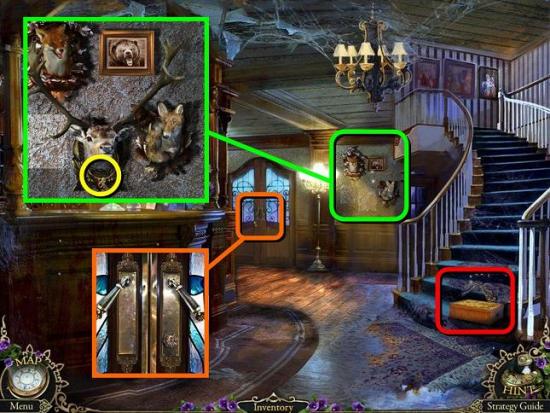
- Zoom in on the mounted animal heads
- Put the DEER HEAD on the wall and take the DIARY KEY
- Zoom in on the puzzle box on the stairs and put the BEE on it
- The goal of this puzzle is to have the bee carry the golden ball across the board to the target box on the right. Use the arrows to move the bee across the board. The bee will keep moving until it hits one of the solid blocks, but will move off the board when it hits the edge of the board, meaning you will have to start over.
The bee can carry one item at a time – a key or the golden ball. Pick up the keys to open the doors and then carry the golden ball to the target. Make sure to pick up the golden ball instantly after you opened the first door as you can’t go back through the first door without moving off the board. You get the GOLDEN BALL (1/2) as a reward.
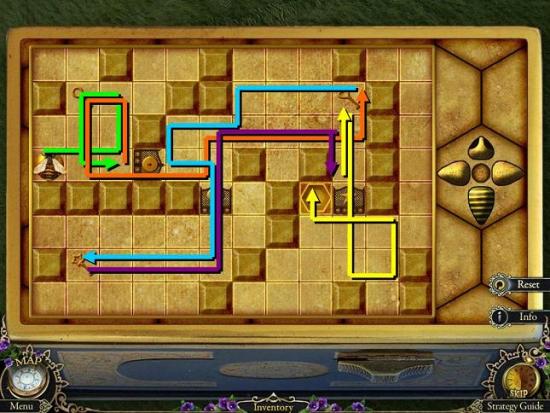
Either follow the solution in the screenshots, or click the arrows in this order:
1. R, U, L, D, R (green)
2. U, L, D, R, U, R, U (orange)
3. L, D, L, D, R, D, L (blue)
4. R, U, R, D (purple)
5. U, D, R, U, L, U (yellow)
- Zoom in on the door in the back of the hall and use the DRILL to break the lock
- Pull the door handle to open the door
- Go into the hotel lobby
- Zoom in on the small side table and take the GARDENING GLOVE
- Zoom in on the counter top and take the POT WITH WATER
- Back out to the bridge and zoom in on the diary
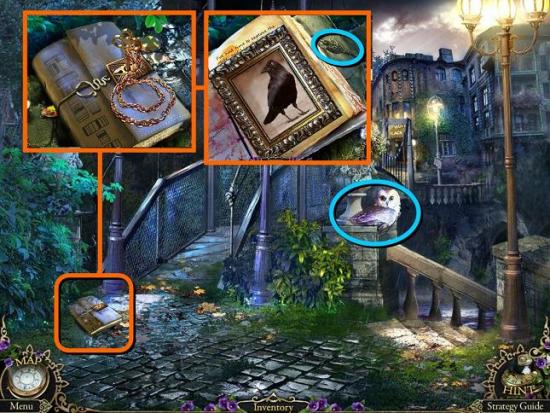
- Open the diary with the DIARY KEY
- Take owl 29/50 and the RAVEN PICTURE
- While we’re at it, we should also go back to the curiosity shop (use the interactive map if you prefer)
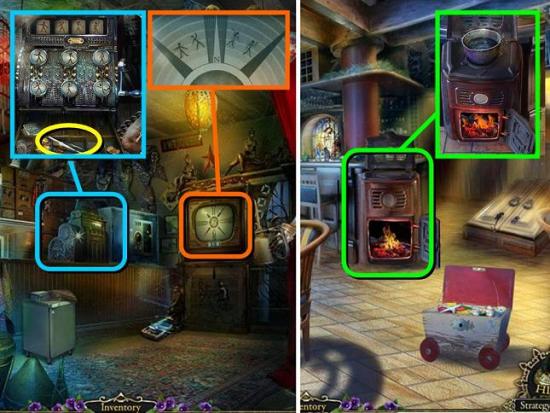
- Check the TV screen again to remember the sequence of figures shown at the top
- Zoom in on the cash register and take owl 30/50. You have to take it now because once you have the tweezers you can’t go back to the register
- Put the CASH REGISTER BUTTON in the empty spot and then enter the sequence as shown on the TV screen
- Pull the lever and take the TWEEZERS
- Now go to the Café of Broken Dreams
- Zoom in on the stove and put the POT WITH WATER on the stovetop
- Take the POT WITH BOILING WATER
- Go back to the stony shore and cross the water to where Thomas is
- Zoom in on the fountain and use the POT WITH BOILING WATER to thaw it
- Click on the fountain again for a HOS
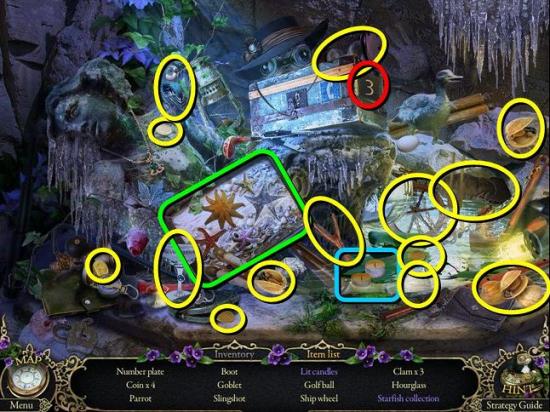
- Put your STARFISH with the starfish collection (green) and use the BURNING TORCH to light the candles (blue). When you’re done you get a PLATE WITH NUMBER (1/2; red)
- Go back to the hotel hall and zoom back in on the mounted animal heads
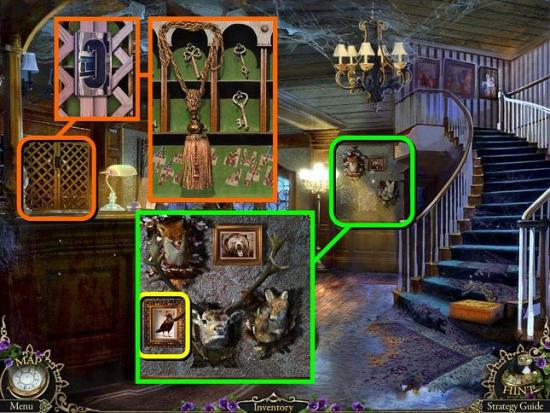
- Place the RAVEN PICTURE, then click on it to turn it and open the wall panel
- Behind the panel is a HOS
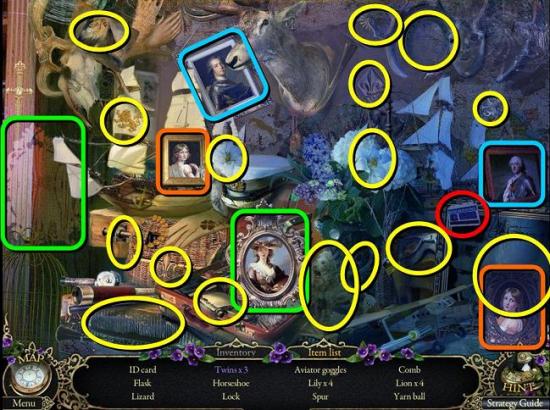
- Put the TWIN PORTRAIT on its shadow on the left (green) and then select the three pairs of twin images (green, blue and orange). The ball of yarn is behind one of the portraits. Get the ID CARD when you’re done (red)
- Zoom in on the cabinet behind the counter and open it with the ID CARD
- Take the CORD BRUSH
- Go upstairs and zoom in on the loose floorboard
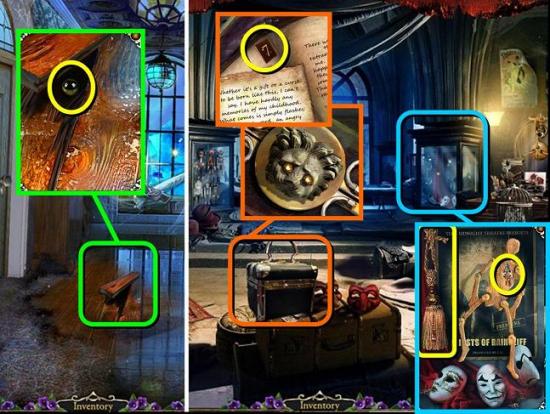
- Use the TWEEZERS to take the second GOLDEN BALL (2/2)
- Back out all the way to the theater stage
- Zoom in on the display case on the right and repair the rope with your CORD BRUSH
- Turn over the skeleton and take the TAG
- Zoom in on the locked case at the front of the stage and put the two GOLDEN BALLS in the eye sockets
- Open the diary and take the second PLATE WITH NUMBER (2/2)
- Go back to the hotel hall and zoom back in on the key case behind the counter
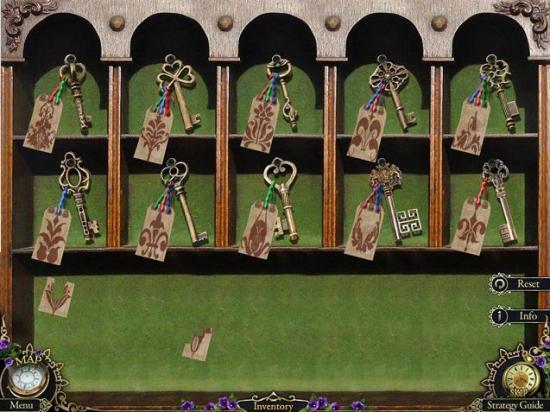
- Place the TAG to unlock the puzzle
- Match all the tags to the keys. Look at the colored strings on the tags and keys to find the correct top halves of the tags. Then match the bottom halves of the tags according to shape and image
- Take the SECRET ROOM KEY
- Go upstairs and zoom in on the cupboard
- You can now move all the clothes aside to reveal a secret door
- Zoom in on the lock, remove the cover and open the door with the SECRET ROOM KEY
- Open the door and go into the secret room
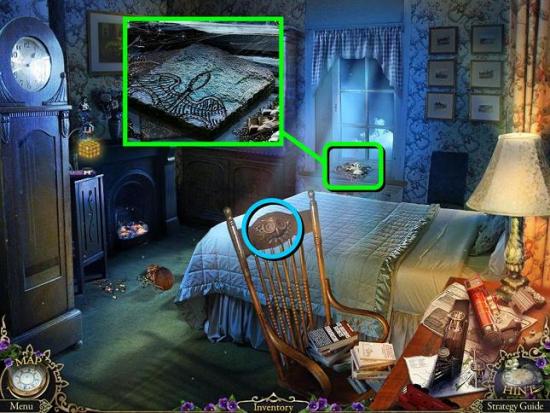
- Take owl 31/50
- Zoom in on the windowsill and remove the dirt
- Take the second DOOR STONE (2/2)
- Back out to the crossroads and go left to the clinic entrance
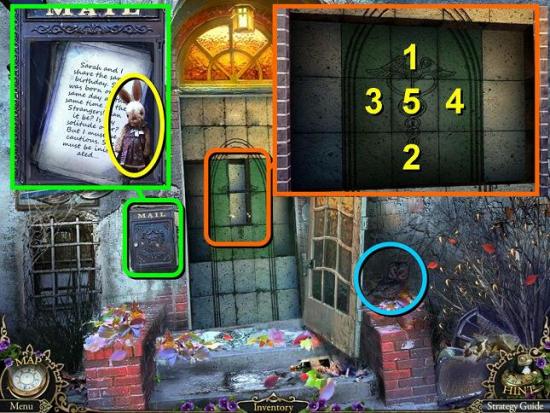
- Take owl 32/50
- Zoom in on the mailbox, open it and take the BUNNY
- Zoom in on the door and place the two DOOR STONES
- You need to click on the stones so that all the dark green stones in the middle come up. Clicking a stone will also affect the stones at its corners. However, it doesn’t seem to matter how many of the gray stones come up, as long as all the green ones are. The screenshot shows one of many possible solutions
- Go into the clinic
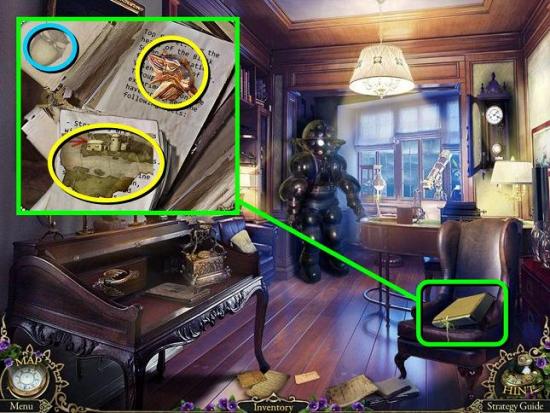
- Zoom in on the box on the chair and undo the ties
- Take the MAP FRAGMENT (1/4), MEDALLION and owl 33/50
- Go back to the hotel, upstairs and into the guest room on the left
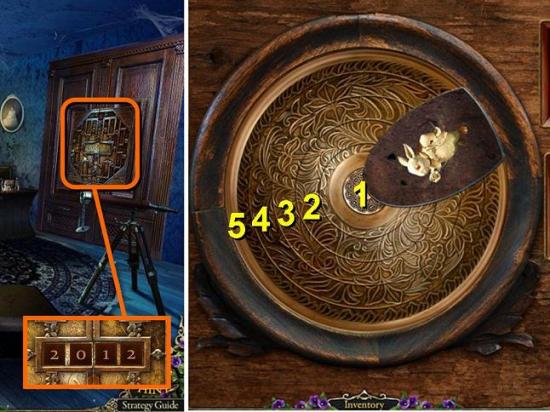
- Zoom in on the locked cupboard and place the two PLATES WITH NUMBER
- Click on the numbers until you get the code 2012, as seen on the chess set
- You need to do this puzzle four times, to find all four statues to go into the alcoves. To solve the puzzle, you need to rotate the discs until a whole statue is revealed. Clicking on a disc will rotate it, as well as the two discs on either side. Start with disc 2 until the disc 1 is in place, then move disc 3 until disc 2 is in place. Continue moving outward until you get the whole image
- Play the HOS behind the puzzle
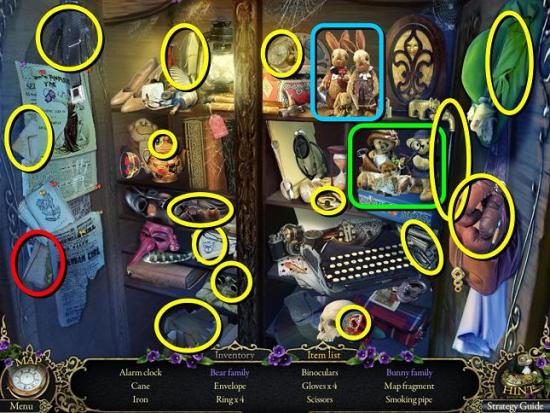
- Put the BEAR DETECTIVE with the bear family (green) and the BUNNY with the bunny family (blue). When you’re done you get a MAP FRAGMENT (2/4; red)
- Back out to the corridor and go into the secret room in the cupboard
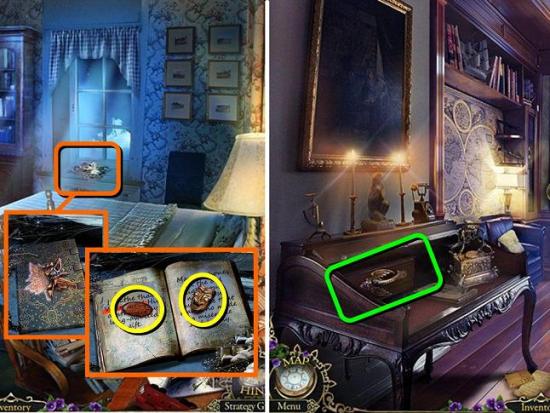
- Zoom in on the windowsill and place the MEDALLION on the diary
- Open the diary and take the BUTTON and the BUTTON MASK
- Go back to the clinic, left of the crossroads
- Open the drawer on the desk and zoom in on it
- Place the BUTTON to activate the puzzle
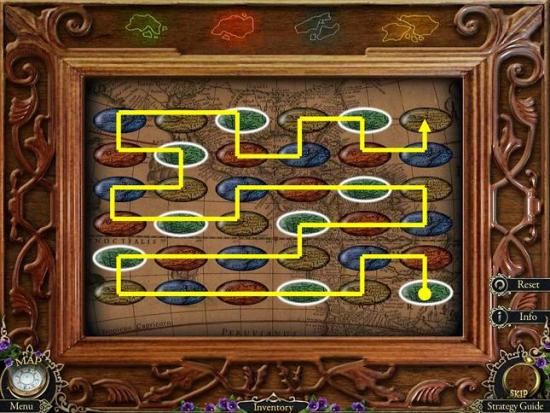
- You need to click all the buttons in one consecutive chain, in the order shown at the top: green, red, blue, yellow
- Behind the puzzle is another puzzle you can’t do yet, but do take the MAP FRAGMENT (3/4)
- Go back to the dock where the sea plane is
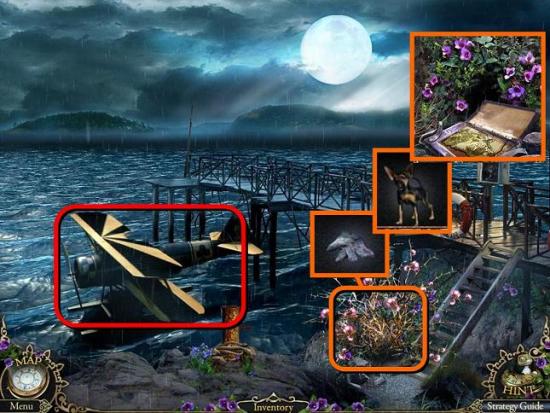
- Use the GARDENING GLOVE to clear away the thorny shrub
- Release ELF on the area you cleared so he can dig
- Zoom in on the diary, open it and take the last MAP FRAGMENT (4/4)
- Board the sea plane and click on the fuel gauges on the right wall
- Place the four MAP FRAGMENTS to trigger the puzzle
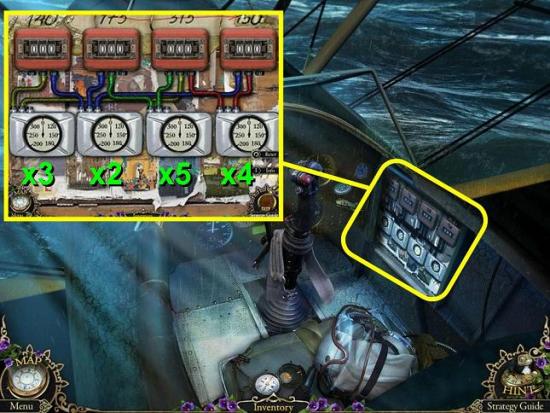
- You need to click on the four dials until the counters show the numbers shown above. Each dial affects several counters
1. Click dial 1 x 3
2. Click dial 2 x 2
3. Click dial 3 x 5
4. Click dial 4 x 4 - Click on the plane controls to fly to the hospital
Chapter 3: Bluff Hospital
Go right down the mountain trail
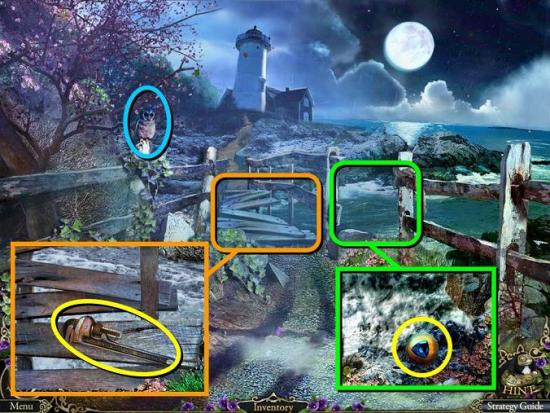
Take owl 34/50
Inspect the broken fence on the right and take the GOLDEN GLOBE WITH AZURE STONE
Zoom in on the broken bridge and take the WRENCH
Go back to the seaside and up the hill to the hospital yard
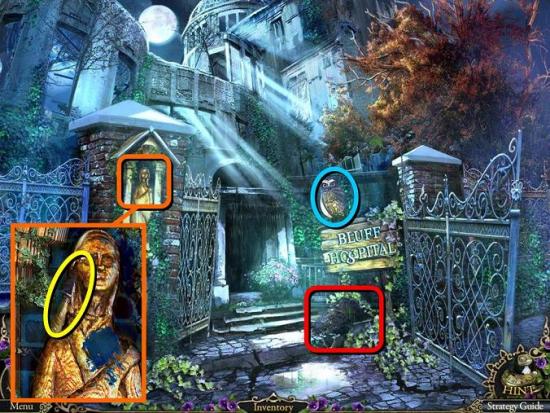
Take owl 35/50
Inspect the statue and take the DULL KNIFE
Release ELF on the dirt below the sign
Under the dirt is a find the differences puzzle
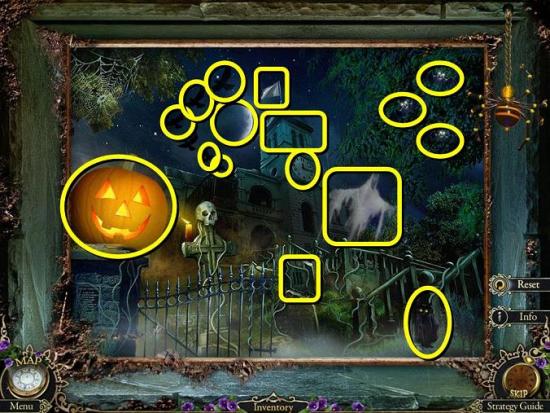
You can change between two pictures by pulling on the spider on the right. Click on the places in the first picture that are different from the second picture
When you’ve completed the puzzle you’ll unlock a HOS
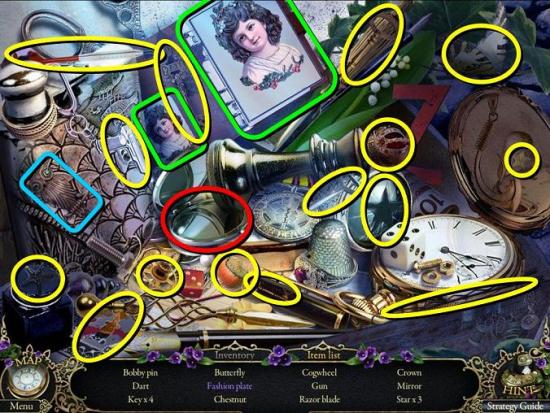
For the fashion plate you need to unscramble the image until it resembles the small image to the left of it (green). This scene contains another owl (blue; 36/50). When you’re done you’ll get a MIRROR (red)
Move on to the hospital gates
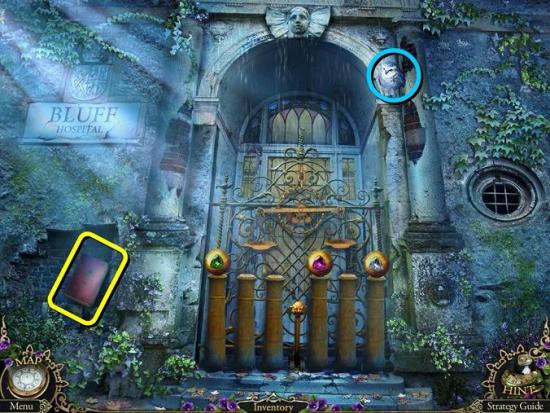
Take owl 37/50 and the BOOK
Use your map to go back to the clinic office in the West Wing
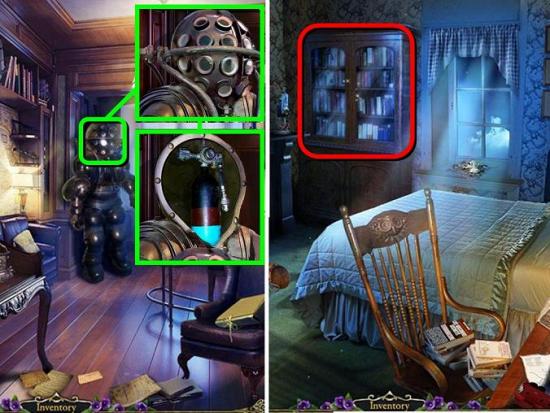
Zoom in on the diving suit and undo the bolts with the WRENCH
Click to release the helmet and take the HELIUM TANK
Go to the secret room in the hotel
Zoom in on the bookcase and place the BOOK on the shelves to trigger a puzzle
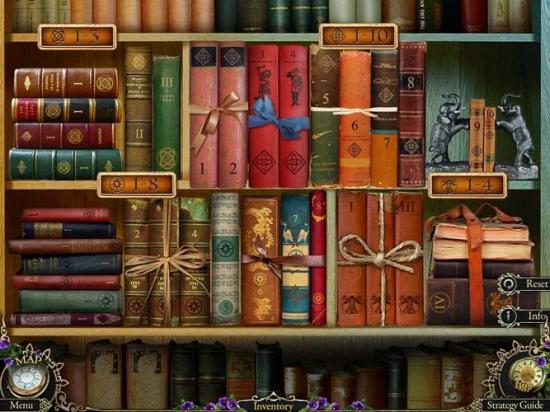
You need to move the books around until they are in numerical order under the sign with the symbol that matches the one on the spine. Some books come in groups, and you can only move them to a new place if it is big enough. When you’re done, open the compartment and take the BALLOON
Go back to the seaside on Bluff Hospital island
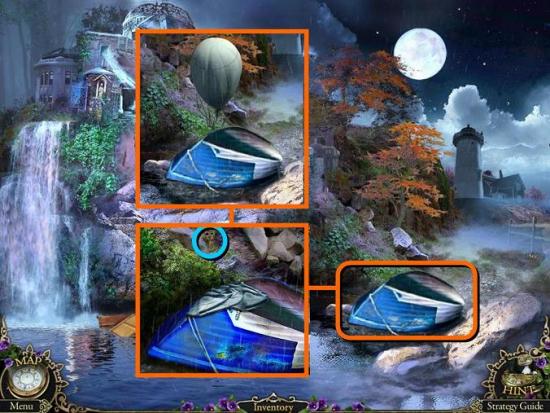
Zoom in on the rowboat and take owl 38/50
Place the BALLOON on it and inflate the balloon with the HELIUM TANK
You can now play the HOS under the boat
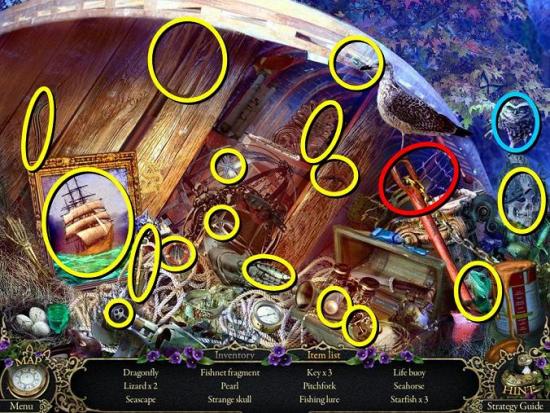
This is a straightforward one! No funny business. Do remember to take owl 39/50, though (blue). Find the FISHNET FRAGMENT (red)
Use the map to go back to the hotel lounge in the West Wing
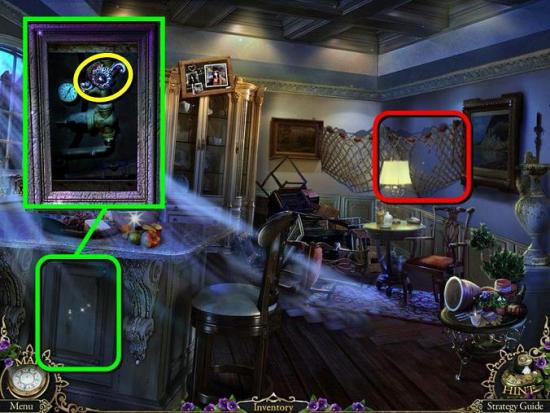
Zoom in on the front panel of the counter on the left and undo the bolts with the WRENCH
Take out the LEVER VALVE
Zoom in on the broken fishnet in the back right corner and use the FISHNET FRAGMENT to trigger another puzzle
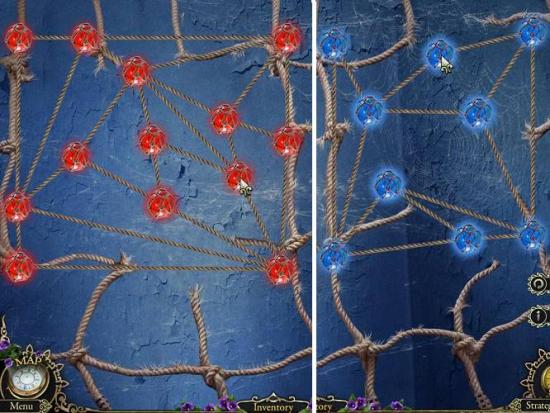
This is a double untangle the lines puzzle: you need to move the pins around until none of the lines in the net cross
Grab the FISHNET when you’re done
Go to the corridor upstairs and inspect the cabinet on the left
Place the LEVER VALVE in the lock and turn it
Play the HOS in the cabinet
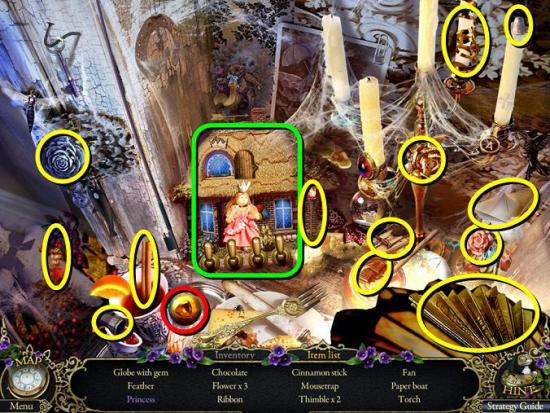
For the princess you need to flick the switches at the bottom until all the doors and windows are open. The princess will come out. When you finish you get a GOLDEN GLOBE WITH AMBER
Go back to the seaside by the hospital
Zoom in on the crates in the water and grab them with your FISHNET
Play the HOS
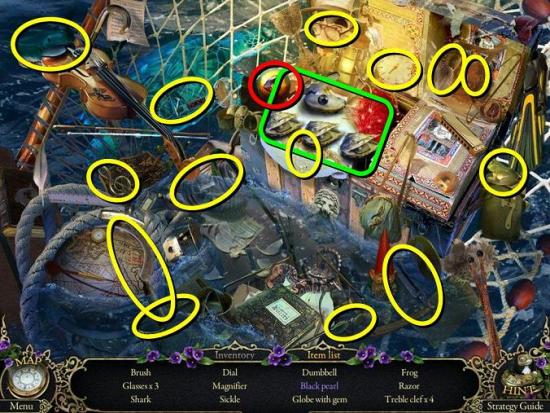
Click the three oysters (left, right, middle) to open the large oyster and get the black pearl (green). When you’re done you get a GOLDEN GLOBE WITH RUBY (red)
Go on to the hospital yard and through to the gates
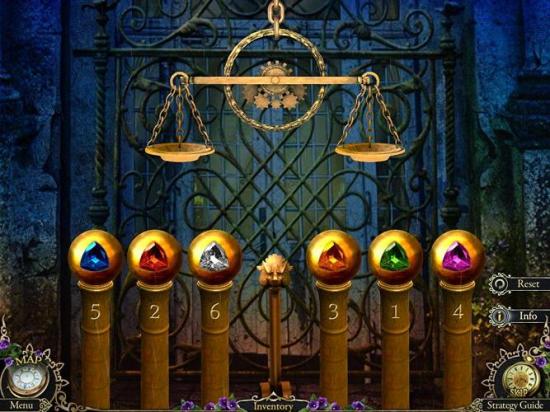
Zoom in on the golden pillars and place the three golden globes. You need to reorganize the globes until they’re on the correct pillars, according to weight. Use the scales to figure out which of the globes is heaviest etc. Pull the lever when you’re done.
Open the doors and enter the hospital hall
Take owl 40/50
Go left into the gallery
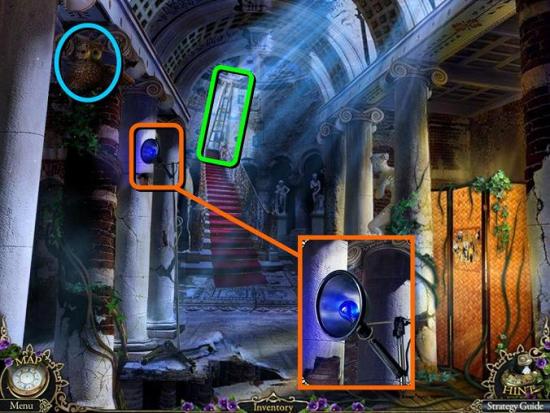
Take owl 41/50 and the HEAT LAMP
Place your LADDER at the top of the stairs
Go on to the dome and play the HOS
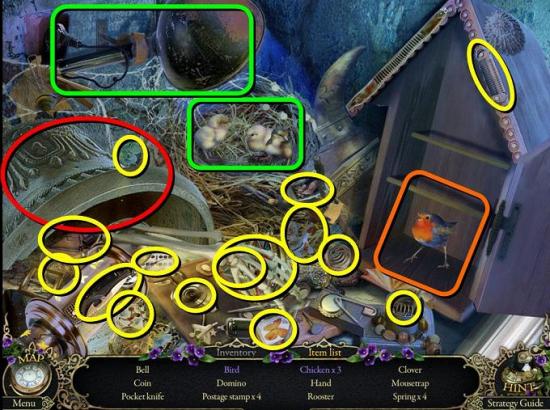
Open the birdhouse to find the bird (orange). Put the HEAT LAMP above the nest to hatch three chickens (green). The fourth postage stamp is under the skeleton hand. When you’re done you get a giant BELL (red)
Go back to the guest room in the West Wing
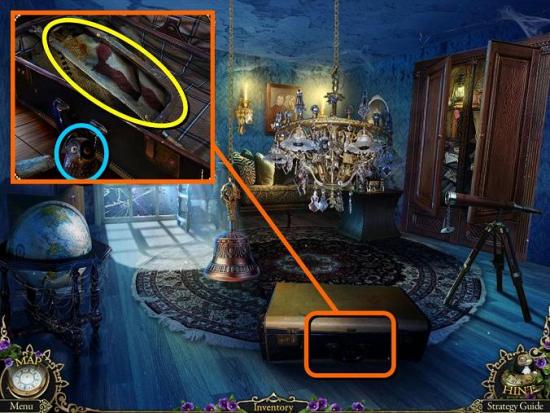
Zoom in on the hook on the ceiling and hang the BELL from it to lift the chandelier
Zoom in on the suitcase and take owl 42/50
Flip the locks to open the case and take the HACKSAW
Use your map to go to the hospital gates
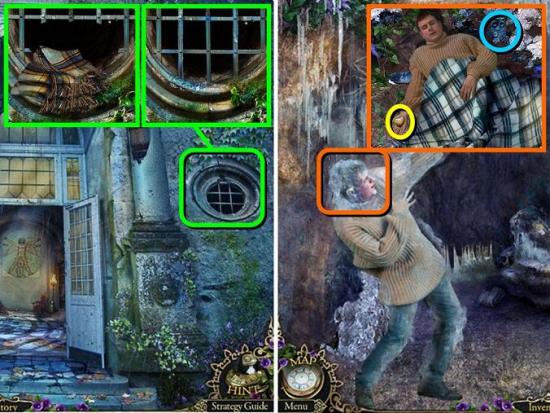
Zoom in on the circular opening on the right and use the HACKSAW to take out the bars
Release ELF down the hole so he can retrieve a PLAID BLANKET for you
Make your way back to Thomas in the grotto in the West Wing
Zoom in on his head and thaw him out with the HEAT LAMP
Zoom in on him again, take owl 43/50 and cover him with the PLAID BLANKET
Take the MEDALLION from his hand
Go to the hotel lobby
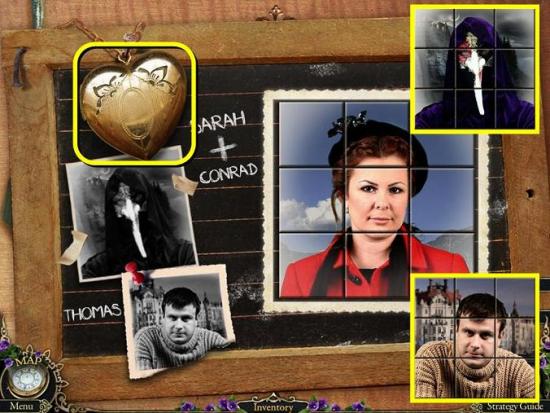
Zoom in on the cupboard in the back and put the MEDALLION on the collage
You need to unscramble the image on the right three times to create pictures of Sarah, Conrad and Thomas
This puzzle is instantly followed by another puzzle
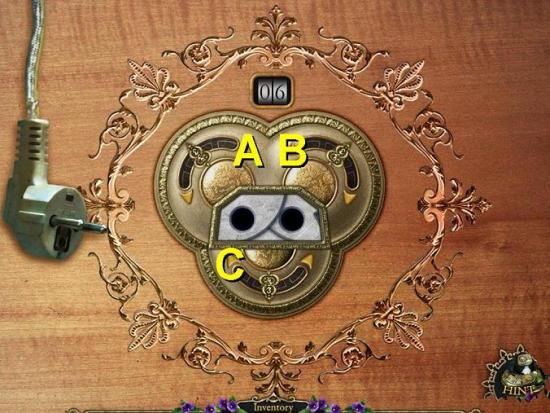
You need to turn the three discs to create a socket for the plug on the left. However, you only get fifteen clicks to do this. Click arrow A x 1, B x 3 and C x 5. Then click on the plug
Play the HOS in the cupboard
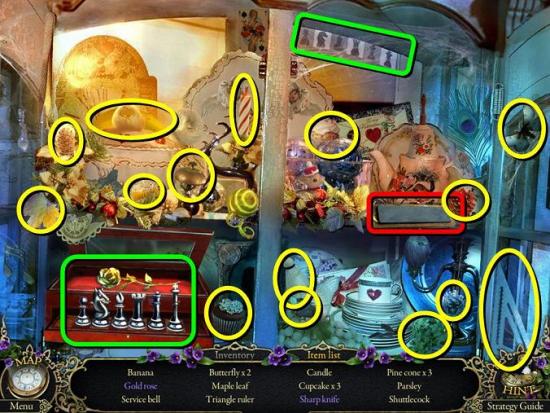
Use your DULL KNIFE on the whetstone (red) to get the sharp knife. Place your CHESS FIGURE with the others and then move them around according to the clue in the top right to get the gold rose (green). You will get the SHARP KNIFE as a reward
Go to the dock with the sea plane
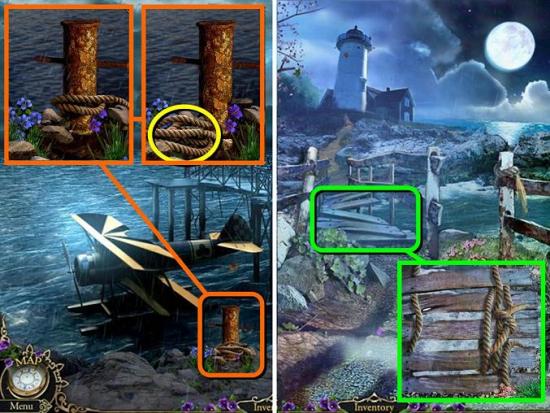
Zoom in on the iron post and cut the ROPE with your SHARP KNIFE
Go to the mountain path by the hospital
Zoom in on the broken bridge and repair it with the ROPE
Cross the bridge to the lighthouse entrance
Click anywhere to get a scene
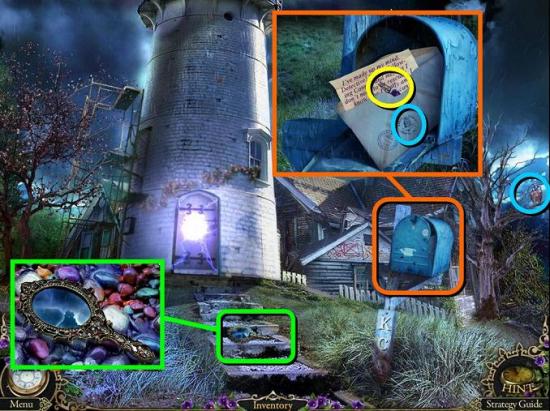
Take owl 44/50 and pick up the SMALL MIRROR
Zoom in on the mailbox and open it with the SHARP KNIFE
Open the envelope, find owl 45/50 and take out the MINI LIGHT BULB
Go back to the hospital hall
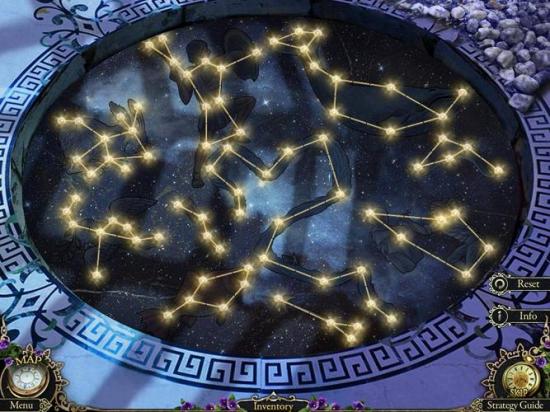
Zoom in on the floor below the mural and place your MINI LIGHT BULB
You need to draw the constellations by drawing lines between the lights. Fortunately, it won’t let you draw incorrect lines
Play the new HOS
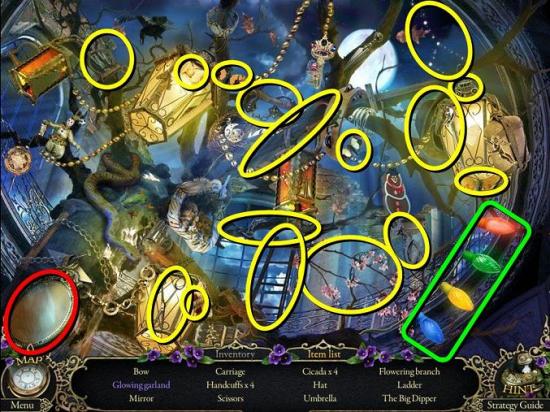
To get the garland you need to match the lights with their fittings (green). You will get another MIRROR (red)
Go to the hospital hall, left into the gallery and up to the dome
Zoom in on the painting on the right and cut down the GOLDEN MEDAL with your SHARP KNIFE
Zoom in on the door to the right and place your two MIRRORS and the SMALL MIRROR
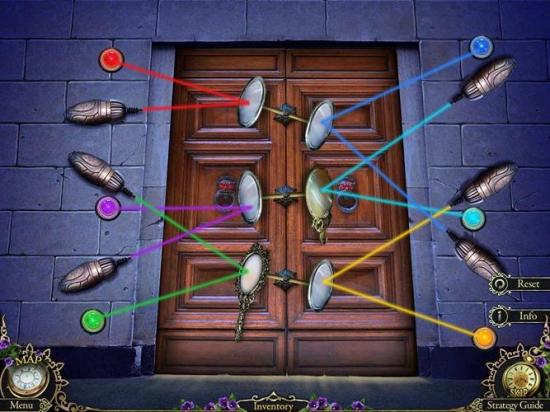
Move the lasers around until the beams hit the lights with matching color
Go through the door into the director’s office
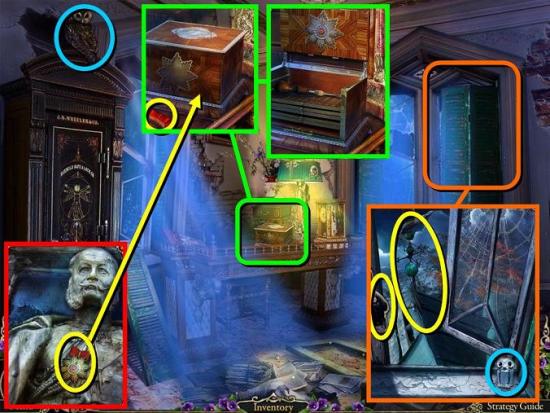
Take owl 46/50
Move the shutter and zoom in on the window
Take owl 47/50, the LIGHTNING ROD and the CARDBOARD MONKEY
Zoom in on the wooden box on the desk and take the RED BUTTON
Put the GOLDEN MEDAL on the side of the box and click to open
Take the CLOCK SCREWDRIVER
Go back to the hall and into the gallery
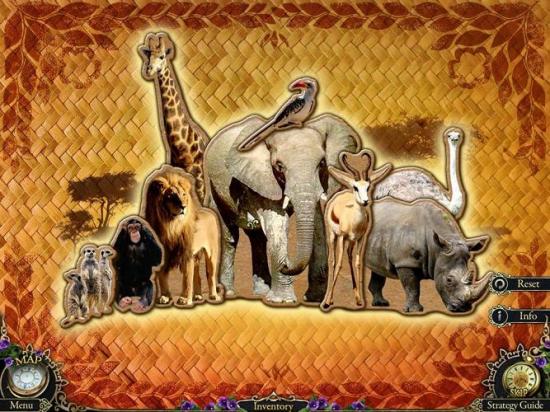
Zoom in on the right wall
Place the CARDBOARD MONKEY on the board to trigger the puzzle
When you click on the elephant you will briefly see the outline of a group of animals. Move cardboard animals to the correct spot on the outline. Some animals need to be flipped over
Play the new HOS
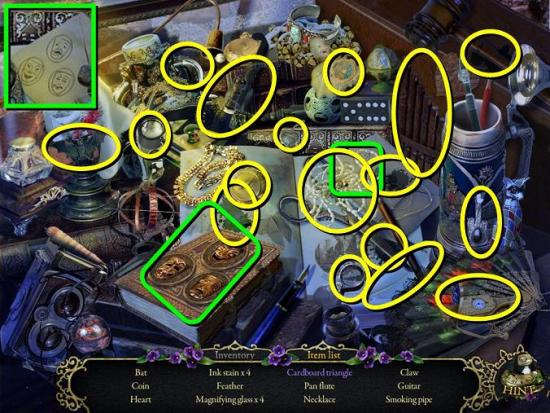
To get the cardboard triangle, you need to place your MASK KEY on the book and then swap the three masks around according to the visual clue on the paper (green). Pick up the necklace to get a better look at it (inset). You will get a CARDBOARD FRAGMENT (1/4)
Go to the seaside and go right to the lighthouse
Zoom in on the door and use the LIGHTNING ROD to remove the electricity
Go through the door into the lighthouse tower
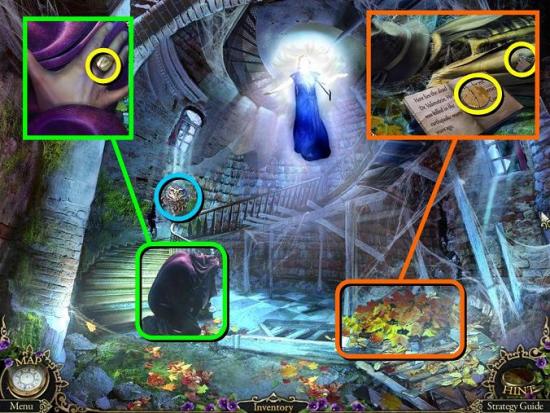
Take owl 48/50
Zoom in on Conrad and take his SIGNET RING
Have ELF dig up the leaves on the right
Zoom in on the skeleton, open the diary and take the CARDBOARD FRAGMENT (2/4) and the KEY CODE
Go to the secret room in West Wing of the hotel
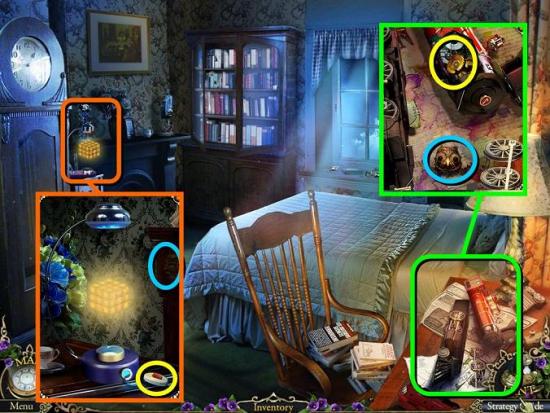
Zoom in on the bedside table and take owl 49/50
Use the CLOCK SCREWDRIVER on the toy train to get a COGWHEEL
Zoom in on the hovering cube and put your RED BUTTON on the switch
Take the owl (50/50) and then flick the switch and pick the cube up off the floor
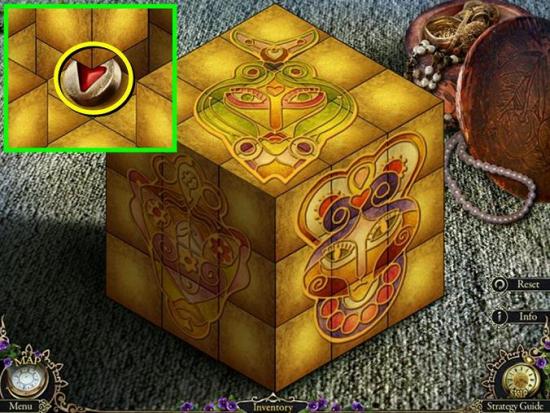
Move the cube blocks around to recreate the three images on the visible sides
Take the BALL ARROW
Go to the dock and zoom in on the red flag
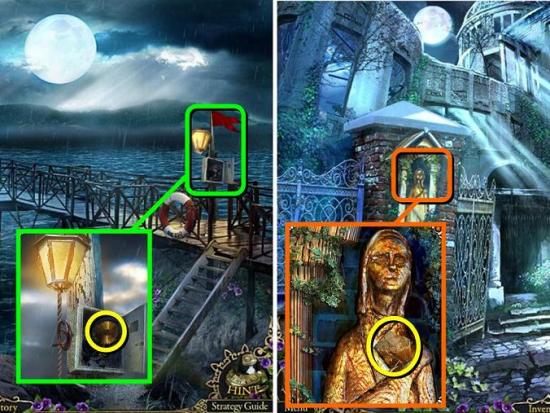
Place the COGWHEEL in the box and turn the handle to pull down the flag
You will get a RED RAG
Cross the water to the hospital and go up to the hospital yard
Zoom in on the statue and clean it with the RED RAG
Take the CARDBOARD FRAGMENT (3/4)
Go back to the director’s office to the right of the hospital hall
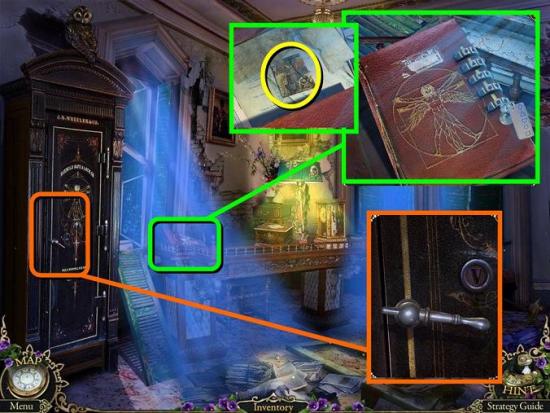
There is a locked folder on the left side of the desk. Place the KEY CODE on it, then turn the wheels according to the code
Open the folder, move the papers and take the CARDBOARD FRAGMENT (4/4)
Zoom in on the safe and unlock it with the SIGNET RING
Pull the handle to open and play the HOS
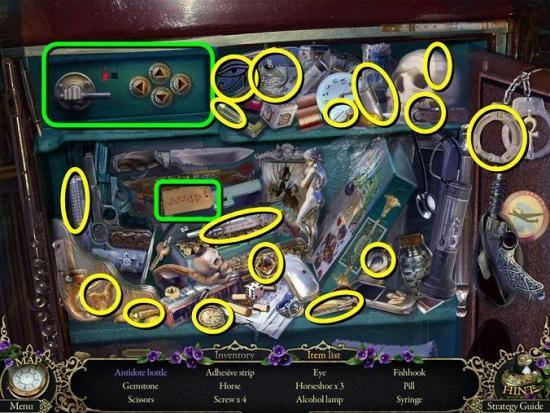
Put the BALL ARROW on the safe and click the arrows in the order shown on the paper tag (green) to open the safe and get the ANTIDOTE BOTTLE
Go to the clinic office in the West Wing
Zoom in on the desk drawer for a puzzle
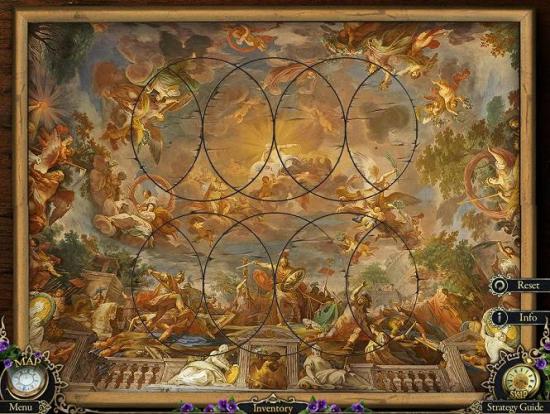
Put your four CARDBOARD FRAGMENTS on the board to trigger the puzzle. You need to turn the discs so you can place the fragments in the holes. When the four fragments are in place, rotate the discs again to unscramble the image
Pick up the syringe and you will get the ANTIDOTE
Go back to the lighthouse tower
Zoom in on Sarah and give her the ANTIDOTE
Click on Sarah again to finish the puzzle
Bonus Chapter – Collector’s Edition Only
The bonus chapter can be accessed by clicking on ‘bonus content’ on the main menu and then selecting ‘play game’
Click on the exit to the hotel gates for a little scene
Follow Elf up the hill to the hotel gates, into the gates corridor and straight through to the courtyard
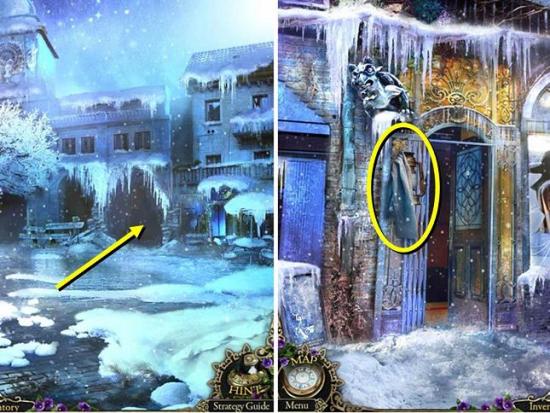
Click on the ice hall – you need fire!
Go left to the curiosity shop entrance
Take the RAG and the burning lantern will fall in the snow
Back out to the stone steps
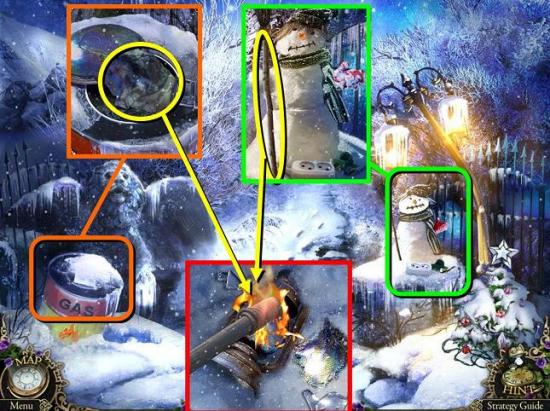
Zoom in on the snowman and take his STICK
Zoom in on the barrel on the left
Click to open the barrel and use the RAG to soak up some of the fuel
Pick up the rag and it will combine with the STICK to make a TORCH
Go back to the curiosity shop entrance
Zoom in on the broken lantern and light your TORCH to get a BURNING TORCH
Back out to the courtyard and use your BURNING TORCH on the ice hall
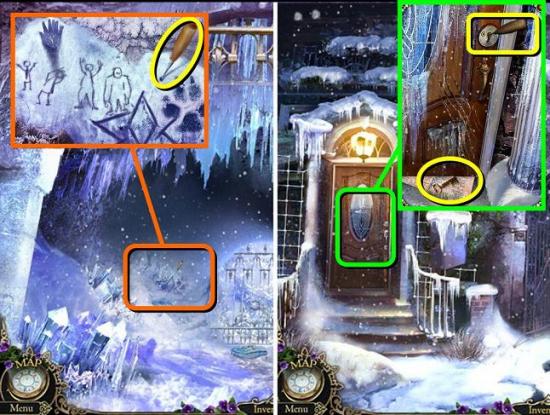
Inspect the carvings on the left in the back and take the AWL
Back out to the hotel gates
Zoom in on the door on the left
Use the AWL to knock the key out of the lock, then pull the newspaper that’s under the door to get the ROOM KEY from the other side
Use the ROOM KEY to open the door
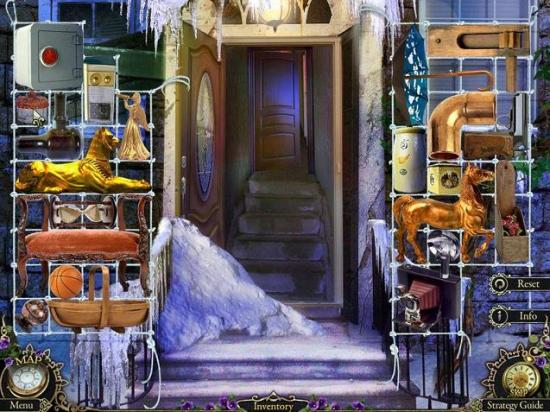
Click on the door again for a puzzle. You need to place the items from the middle to the grids on either side of the door so all squares are filled and no items overlap. There are three layers of items you need to work through. However, once an item is on a grid, it can’t be moved back to the middle. You’ll only be able to move it around on the two grids
Go through the door to the first floor
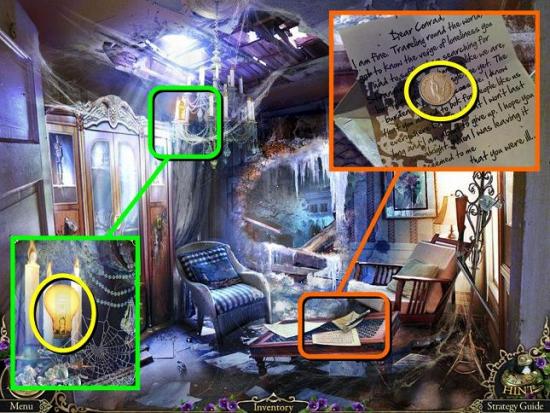
Zoom in on the coffee table, open the envelope and take the COIN (1/5), which curiously is an old-fashioned New Zealand sixpence
Inspect the chandelier and take the BULB (1/3)
Go back to the courtyard
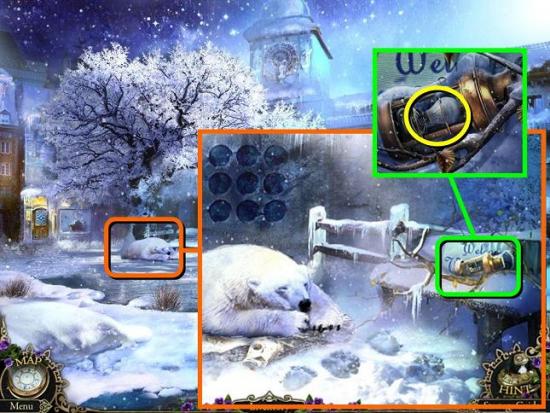
Zoom in on the snoring polar bear
Inspect the bench to the right and take the BULB (2/3)
Go to the curiosity shop entrance and into the shop
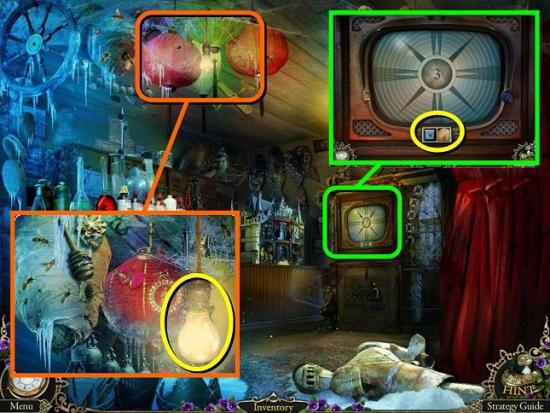
Zoom in on the TV and hit the button to play the video
You will receive another COIN (2/5)
Zoom in on the lights on the ceiling, ignore the bees and take the light bulb (3/3)
Go back to the ice hall
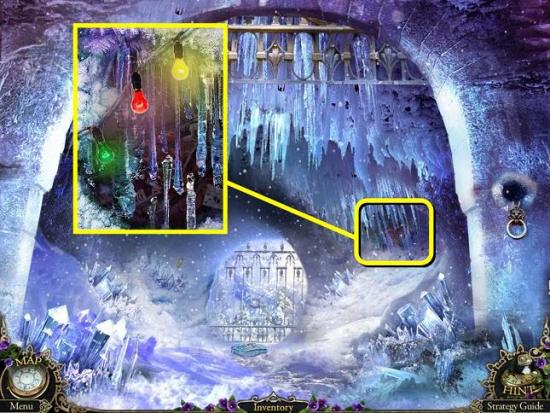
Zoom in on the string of lights in the back right
Put your three BULBS on the string and click to remove the icicles
Play the HOS
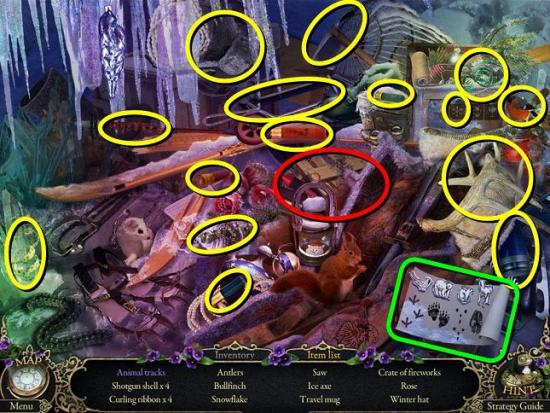
To get the animal tracks you need to put the animals above the tracks they would make (green). Get a CRATE OF FIREWORKS (red)
Go to the curiosity shop entrance
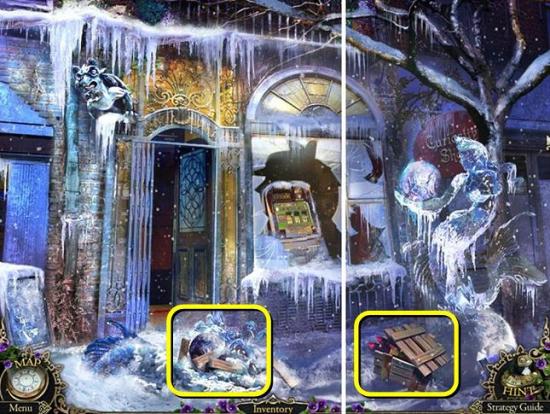
Put the CRATE OF FIREWORKS down at the base of the ice sculpture
Light the fireworks with your BURNING TORCH
Release Elf on the pile of ice and snow so he can dig it up
Pick up the CANNONBALL
Go back to the ice hall
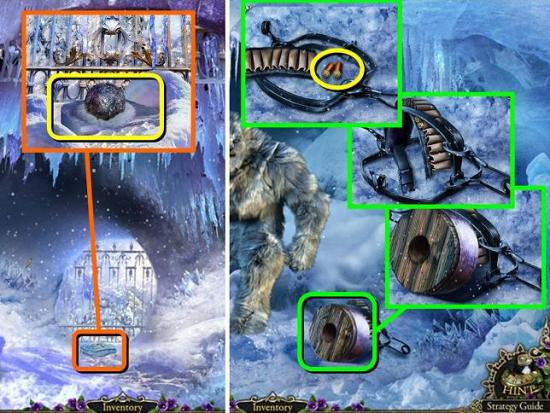
Zoom in on the stone in the middle of the hall
Put the CANNONBALL on it
Go on to the stony shore and into the grotto
Zoom in on the bear trap and take the WOODEN WHEEL
Use the AWL to open the trap and take the CARTRIDGES
Go to the gates corridor and zoom in on the cannon
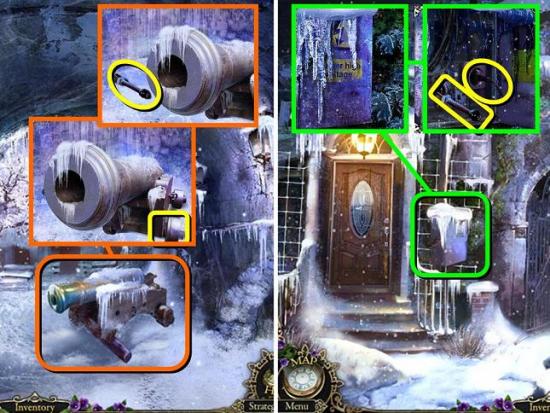
Put the WOODEN WHEEL on the cannon to move it aside
Pick up the SWITCH
Back out to the hotel gates
Zoom in on the electricity box and click a few times to open it
Put the SWITCH in the box and pull it down to switch off the power
Take the CABLE
Go to the room on the first floor
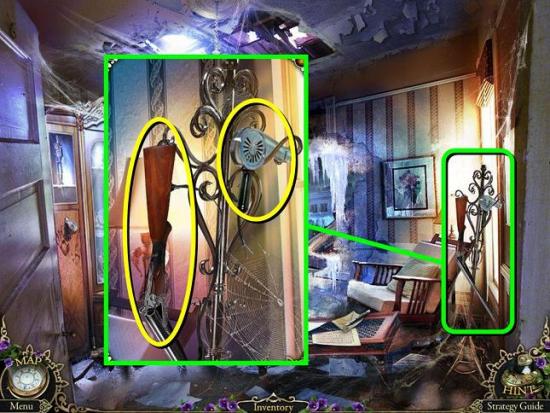
Zoom in on the hat stand and put the CARTRIDGES into the GUN
Zoom in on the hat stand again, put the CABLE on the HAIR DRYER and pick it up
Back out to the stone stairs at the start
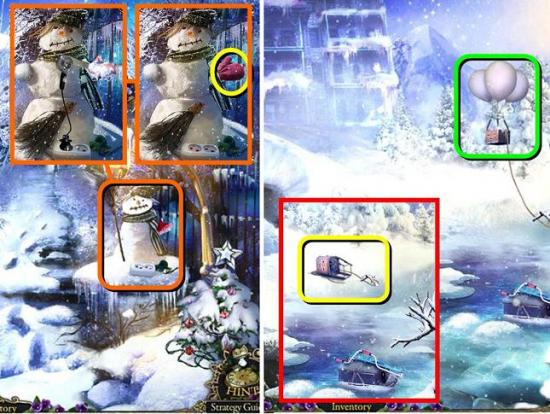
Zoom in on the snowman again and plug in the HAIR DRYER
Take his MITTEN (1/2)
Go to the stony shore and shoot the balloons with your GUN
Play the HOS in the basket
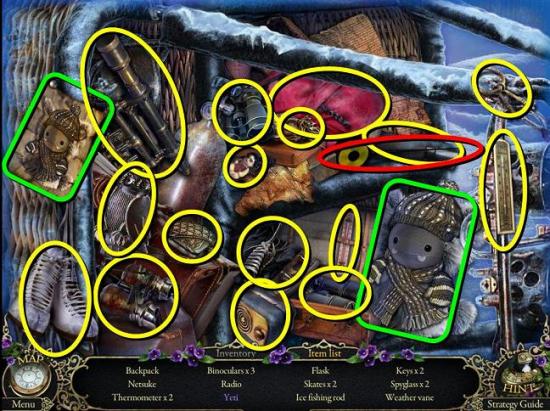
Change the toy yeti’s hat, scarf and mittens to resemble the picture on the left (green). Get an ice fishing ROD (red)
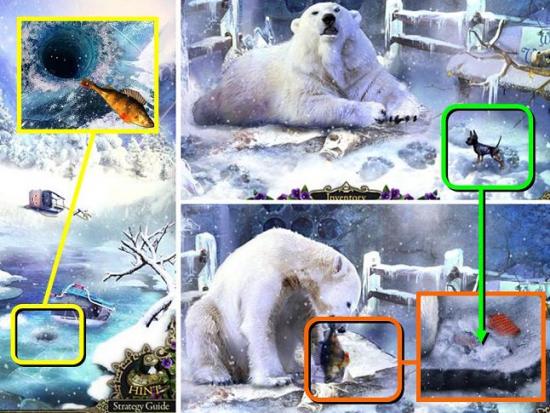
Have Elf dig up the snow by the toolbox on the ice
Zoom in on the hole in the ice and use the ROD to get a FISH
Go to the courtyard and go back to the polar bear
Release Elf on the bear to wake him up and give him the FISH
Zoom in on the fish and use Elf again to dig up the MITTEN (2/2)
Go into the grotto and zoom in on the snowballs on the left
Put your two MITTENS on the puzzle to activate it
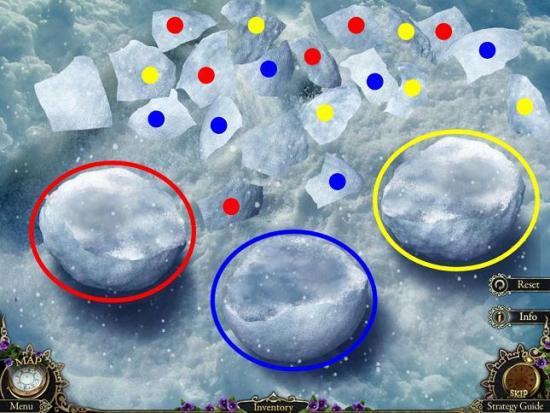
Complete the three snowballs by moving the pieces into the right places. Pieces will stay in place when they’re correct. In the screenshot, pieces with red dots go on the ball circled red etc.
You get three SNOWBALLS
Throw a SNOWBALL at the yeti
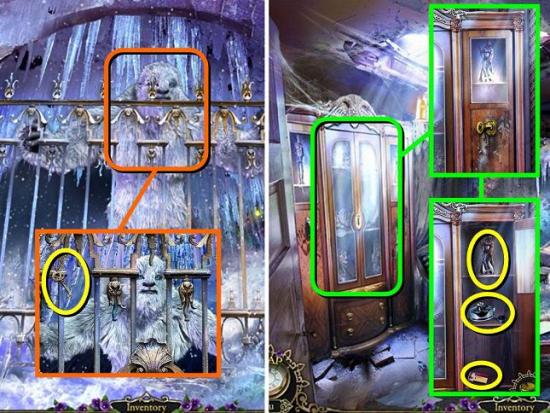
Zoom in on the yeti when he’s behind bars and take his BRONZE KEY
Go back to the room on the first floor
Zoom in on the cupboard and use the BRONZE KEY to open the lock on the right
Take the ALCOHOL LAMP, the MATCHES and the EXECUTIONER FIGURINE
Go to the curiosity shop entrance
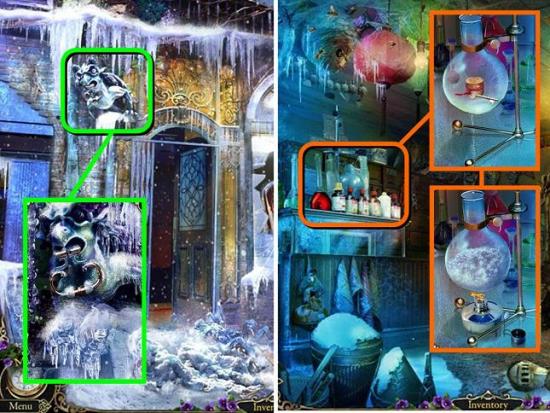
Zoom in on the gargoyle and throw a SNOWBALL at it
You get an IRON RING
Go to the curiosity shop
Zoom in on the bottles on the counter
Put a SNOWBALL in the flask, put the ALCOHOL LAMP under it and light it with the MATCHES
You will get the SILVER KEY
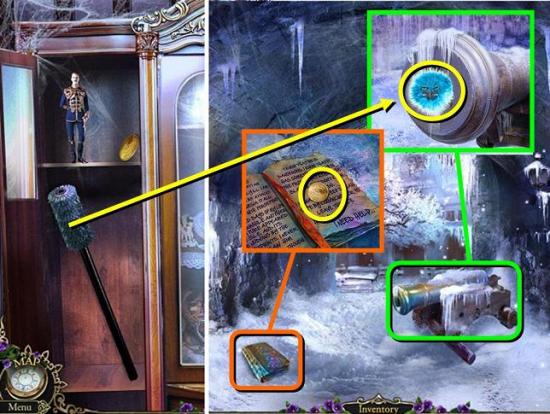
Return to the first floor once more and use the SILVER KEY to open the left door of the cupboard
Take the PRINCE FIGURINE, the RAMROD and another COIN (3/5)
Go to the cannon in the gates corridor
Use the RAMROD on it to get the WHITE FLUFFY
While you’re there, prise open the diary with the AWL and take your next COIN (4/5)
Go to the curiosity shop entrance and zoom in on the window
Take the last COIN (5/5)
Put all five COINS in the slot to activate the game
You need to remove all colored balls by clicking on groups of three or more of the same color. You can reset each level if you make a mistake. After completing a level, pull the lever on the right for the next puzzle. Click the colored balls in the following order:
Level 1
Red x2
Orange x2
Green
Blue
Purple
Level 2
Green
Purple
Aqua
Blue
Red
Level 3
Top orange
Middle purple x2
Middle yellow vertical
Aqua
Yellow
Red
Blue
Orange
Purple
Level 4
Purple
Orange x2
Green x2
Yellow
Bottom aqua
Blue x2
Red
Aqua
Level 5
Purple
Green
Aqua x5
Orange
Red
You receive the GOLD KEY
Go to the room on the first floor
Open the middle door of the cupboard with the GOLD KEY
Play the HOS
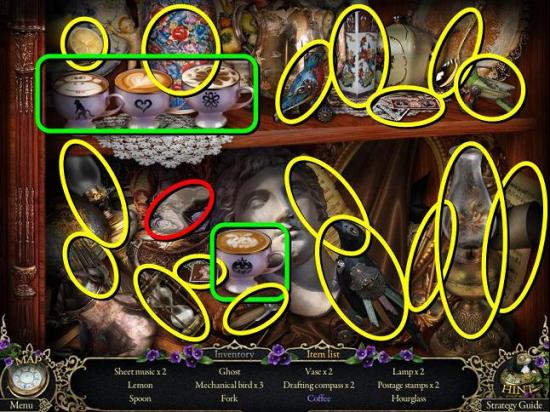
For the coffee you need to make the foam patterns of the four coffee cups match the image on the cup (green). Get the GHOST FIGURINE (red)
Go to the curiosity shop and zoom in on the dollhouse on the counter
Place your GHOST FIGURINE, PRINCE FIGURINE and EXECUTIONER FIGURINE
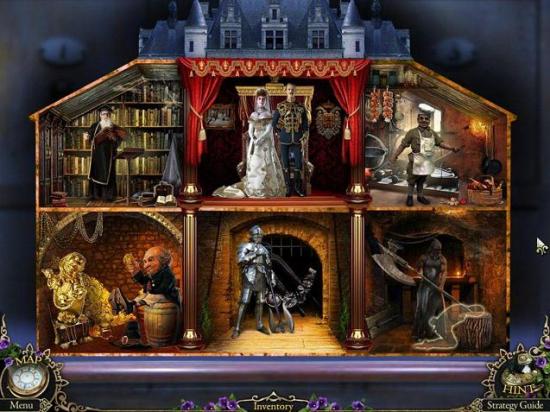
Move all the loose items to their correct places. Some empty spots that need an item are indicated with a pale outline to help you out. Note that there are some pretty small items that are easy to overlook, such as a string of garlic in the top right and a chain in the bottom left
When you’ve placed everything correctly, the gate will open so you can take a NAIL DRAWER and a CURVED RING
Go back to the hotel gates
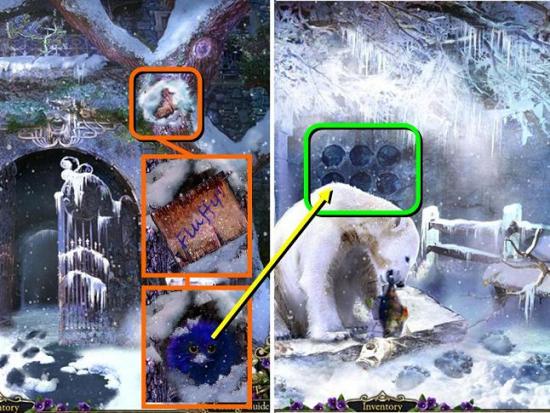
Zoom in on the sign on the tree
Use the NAIL DRAWER to take the board down
Have Elf bark down the hole so you can take the BLUE FLUFFY
Go to the polar bear and zoom in on the panel behind him
Put the WHITE and BLUE FLUFFY with their siblings
You need to feed all the fluffies matching the food on the right with the symbol on their tags using the legend on the left. Scroll up and down to get to all fluffies
Get a FORGED RING when you’re done
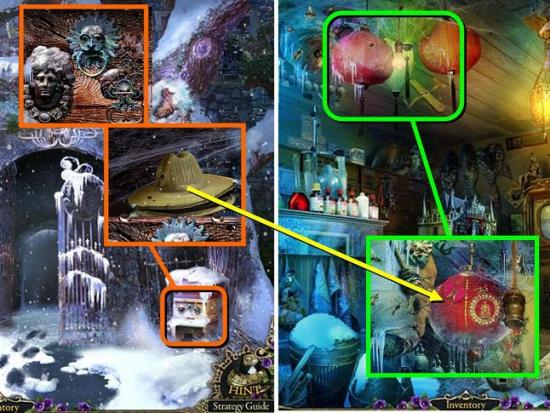
Go to the hotel gates and zoom in on the chest on the right
Place the FORGED RING, IRON RING and CURVED RING on it to open
Take the BEEKEEPER’S HAT
Go to the curiosity shop
Zoom in on the lanterns on the ceiling and use the BEEKEEPER’S HAT on them
Play the HOS
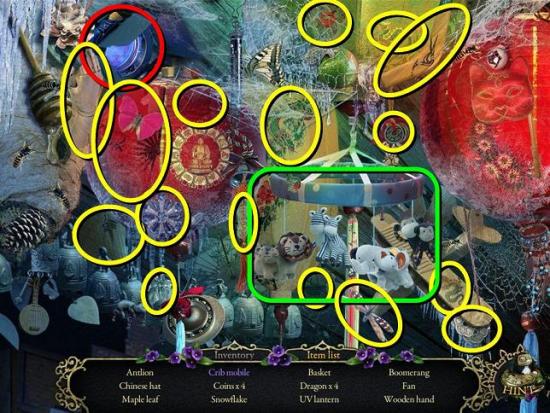
Match the animals with their babies to get the crib mobile (green). Get the UV LANTERN (red)
Go to the ice hall, zoom in on the yeti and put the UV LANTERN on him to finish the game
More articles...
Monopoly GO! Free Rolls – Links For Free Dice
By Glen Fox
Wondering how to get Monopoly GO! free rolls? Well, you’ve come to the right place. In this guide, we provide you with a bunch of tips and tricks to get some free rolls for the hit new mobile game. We’ll …Best Roblox Horror Games to Play Right Now – Updated Weekly
By Adele Wilson
Our Best Roblox Horror Games guide features the scariest and most creative experiences to play right now on the platform!The BEST Roblox Games of The Week – Games You Need To Play!
By Sho Roberts
Our feature shares our pick for the Best Roblox Games of the week! With our feature, we guarantee you'll find something new to play!Type Soul Clan Rarity Guide – All Legendary And Common Clans Listed!
By Nathan Ball
Wondering what your odds of rolling a particular Clan are? Wonder no more, with my handy Type Soul Clan Rarity guide.


