- Wondering how to get Monopoly GO! free rolls? Well, you’ve come to the right place. In this guide, we provide you with a bunch of tips and tricks to get some free rolls for the hit new mobile game. We’ll …
Best Roblox Horror Games to Play Right Now – Updated Weekly
By Adele Wilson
Our Best Roblox Horror Games guide features the scariest and most creative experiences to play right now on the platform!The BEST Roblox Games of The Week – Games You Need To Play!
By Sho Roberts
Our feature shares our pick for the Best Roblox Games of the week! With our feature, we guarantee you'll find something new to play!Type Soul Clan Rarity Guide – All Legendary And Common Clans Listed!
By Nathan Ball
Wondering what your odds of rolling a particular Clan are? Wonder no more, with my handy Type Soul Clan Rarity guide.
Mystery Stories: Mountains of Madness Walkthrough
Welcome to the Mystery Stories: Mountains of Madness walkthrough on Gamezebo. Mystery Stories: Mountains of Madness is a Hidden Object/Adventure game played on PC created by Cerasus Media. This walkthrough includes tips and tricks, helpful hints, and a strategy guide on how to complete Mystery Stories: Mountains of Madness.
Mystery Stories: Mountains of Madness – Game Introduction
Welcome to the Mystery Stories: Mountains of Madness walkthrough on Gamezebo. Mystery Stories: Mountains of Madness is a Hidden Object/Adventure game played on PC created by Cerasus Media. This walkthrough includes tips and tricks, helpful hints, and a strategy guide on how to complete Mystery Stories: Mountains of Madness.
General Information
- You can play this game on two difficulty levels:
- Casual – with visible clues (look for purple sparkles)
- Expert – without visible clues
- Gameplay is pretty straightforward for experienced hidden object game players. The cursor is normally shaped like an arrow, but changes to the following symbols when over an interactive area:
- Hand – grab an object for your inventory
- Speech bubble – talk to someone
- Magnifying glass – have a closer look at something
- Gears – interact with something by using an inventory item on it
- The cursor will also change into a different shaped arrow when you can move to the next scene.
- In the bottom left is your journal, which keeps track of the storyline for you. But there is never any need to refer to the journal for clues or codes as everything you need will be on the screen.
- There is also no need to get lost or stuck at any point during this game as the hint and advice system is really good. To the right of the inventory is the advice panel, which normally just shows the next objective (for example: find a way to listen to the sound reel). When you click the advice panel once, you get a little bit more information (for example: listen to the sound reel on the plane). If you really don’t know where to go next, click the panel a second time for a detailed tip (for example: find the headphones in the sleeping tent).
- If that wasn’t enough to keep you going, there is also a hint button, which will indicate the item you need to find or the direction you need to go with a white swirly light. The hint button is inexhaustible – it can be used as often as you want, at any time you want. There is no need for it to recharge.
- There are two different types of hidden object scene in this game. The first is a standard HOS where you get a list of items you need to find at the bottom of the screen and you have to find them on the description only. At the top of the list it will tell you how many items you need to find, and how many you have found. New items will appear on the list until you found the required number. Note that you can only find the items once they appear on the list. So even if you know you’re looking for a certain item, and you have found it on the screen, you can’t take it until it is on the list.
- For the second type of HOS you get a list of black and white images that you need to find on the screen. This makes it quite easy to find things. The only little thing with this system is that sometimes the images are rotated, so they will not appear in the scene exactly as shown on the list.
Walkthrough – Chapter 1
Find the Expedition Team

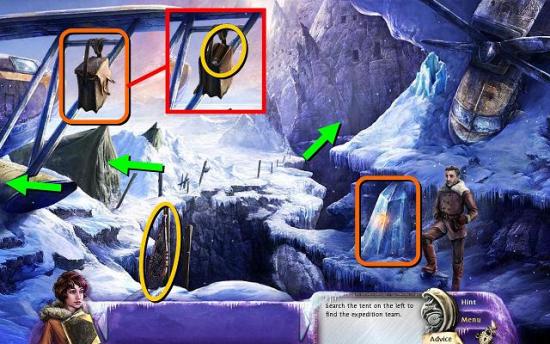
- Pick up the SNOW SHOE
- Click on the bag to find a KNIFE
- Use the KNIFE on the tent and enter the tent
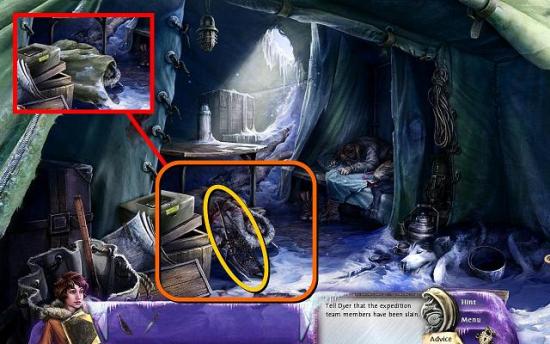
- Move the tarp from the dead man on the floor
- Pick up the second SNOW SHOE
- Back out of the tent and talk to Dyer. You need to inspect the second tent, but you need to dig it out first
- Move to the back, to the excavation site. Looks like we used the snow shoes for that, as they’re gone
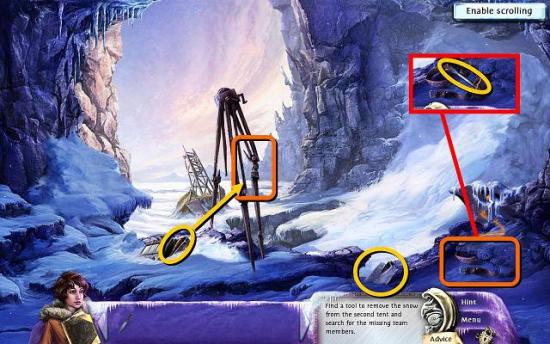
- Pick up the SHOVEL BLADE
- Open the crate and take out a SCREWDRIVER
- Use the SCREWDRIVER on the tripod structure and pick up the WOODEN HANDLE
- Combine the WOODEN HANDLE with the SHOVEL BLADE to get a SHOVEL
- Move the tool belt on the right and pick up the CHISEL
- Go back to the camp and use the SHOVEL to dig up the second tent
- Enter the laboratory tent for your first HIDDEN OBJECT SCENE
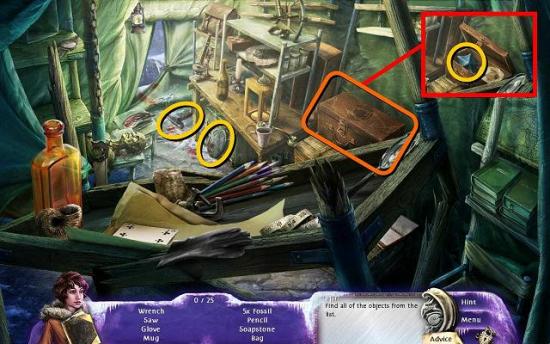
- You will find a SOUND REEL, HAMMER and SOAPSTONE
- Leave through the back of the tent and talk to Dyer again. Give him the shovel
Find a Way to Listen to the Sound Reel
- When Dyer has gone, zoom in on the block of ice, put the CHISEL in the ice and hit it with the HAMMER
- Find a JEWEL HALF
- Go back into the sleeping tent and find the HEADPHONES where one member of the expedition used to lie
- Back out to the camp and go left to the plane
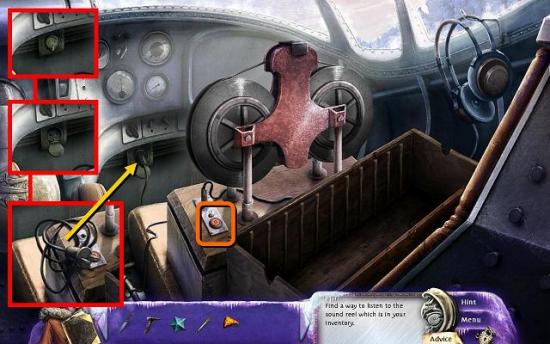
- Open the electrical socket, pick up the wire and plug and plug it into the socket
- Put the SOUND REEL on the player and plug in the HEADPHONES
- Hit the red button and listen to the recording
Look for Clues Pointing to Gedney
- Go back to the excavation site
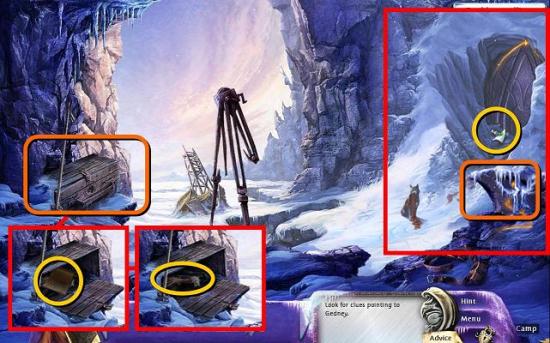
- Use the SHOVEL to dig beside the ski pole on the left
- Put the CHISEL in the locked box and hit it with the HAMMER
- Read what’s in the notebook and pick up GEDNEY’S GLOVE
- Back out to the camp and give GEDNEY’S GLOVE to the tracking dog, then follow him back to the excavation site
- Dig in the snow where the dog is sitting and find a note with a KEY
- Go back to the sleeping tent and open the locked box with the KEY
- Find another note and the second JEWEL HALF
- Go back to the excavation site and click on the orange glowing device on the right
- Put the two JEWEL HALVES in the device
Chapter 2: The Frozen City
Attend to Danforth
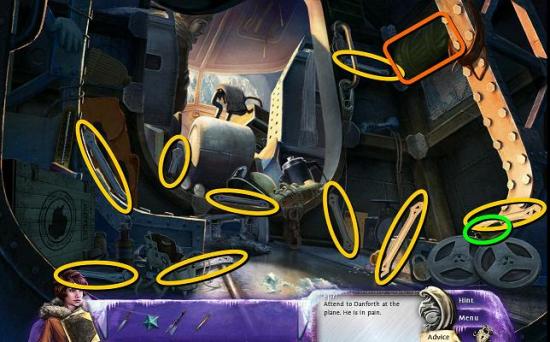
- Pick up 9 RUNGS and a bottle of MORPHINE (green)
- Pull down the tarp on the right to find 3 more RUNGS
- Talk to Danforth, but he won’t take the morphine just like that
- Back out to the landing site
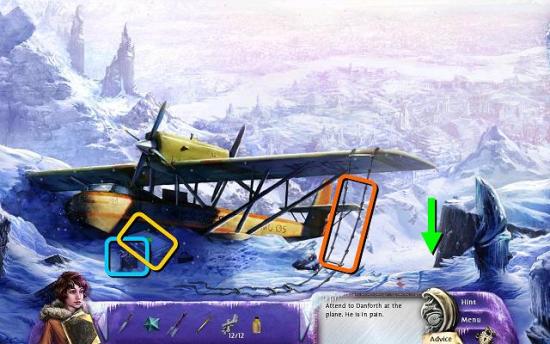
- Open the first aid box to get a SYRINGE
- Combine the SYRINGE with the MORPHINE to get the ANESTHETIC
- Go back into the plane and give the ANESTHETIC to Danford
Find Your Way into the City
- Back out again and put the 12 RUNGS on the rope ladder hanging from the plane, and pick up the ROPE LADDER
- Hang the ROPE LADDER over the edge of the cliff and move down to the city boundary
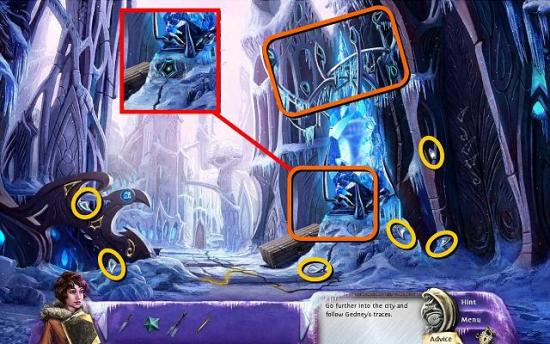
- Pick up 6 pieces of a LENS and put them at the top of the statue
- Click the symbols on the device on the left as shown on the door on the right, and a blue light will shine on a tower in the distance and a star shape will appear at the base of the statue
- Put the SOAPSTONE in the star shape at the base of the statue
- Click on the star again for a puzzle. You need to rotate the pieces to connect all 5 corners with the energy source in the middle. Note that you don’t need to use all blocks, just enough to connect all corners. There are many solutions possible, below is one of them
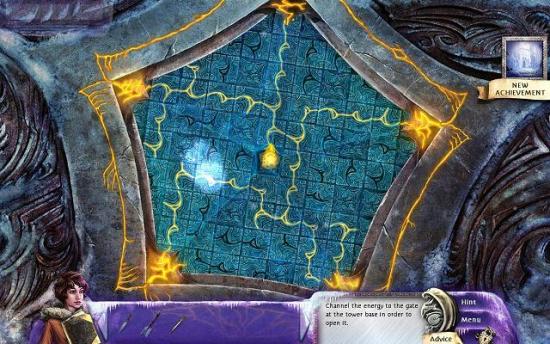
- Walk to the tower base in the back
Climb the Tower to Find Traces of Gedney
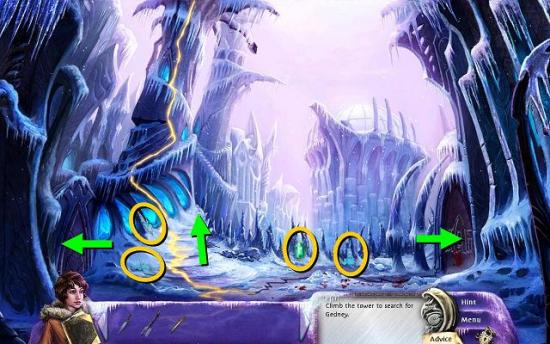
- Pick up the GREEN PRISM and the three GLASS FRAGMENTS
- Click on the ice ramp up to the tower (you have to do this to unlock the next hidden object scene)
- Go back to the plane for a hidden object scene
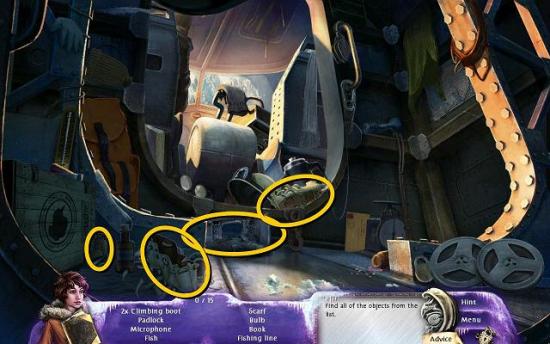
- The CLIMBING BOOTS, LIGHTER and EMPTY OIL LAMP will be added to your inventory
- Go to the outside of the plane and put the EMPTY OIL LAMP on the petroleum can to get an UNLIT OIL LAMP
- Obviously, you need to light the UNLIP OIL LAMP with the LIGHTER to get a LIT OIL LAMP
- Go back to the tower base and climb the ice ramp to the tower (this will use the CLIMBING BOOTS)
Find a Way to open the Tunnel at the Tower Base
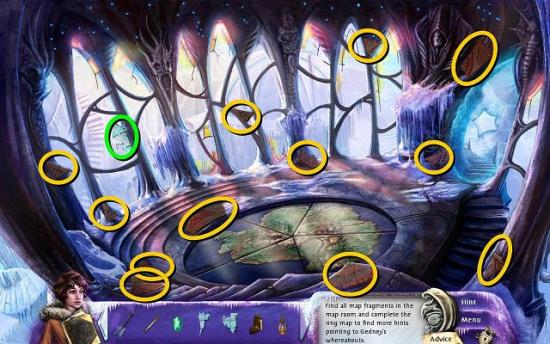
- In the map room, find all 12 map FRAGMENTS and another GLASS FRAGMENT (green)
- Click on the map in the center of the floor
- To solve the puzzle, place the 12 map FRAGMENTS on the puzzle, then put the fragments in the correct places to complete the image as in the picture below. You can rotate fragments by clicking on the red dot in the center
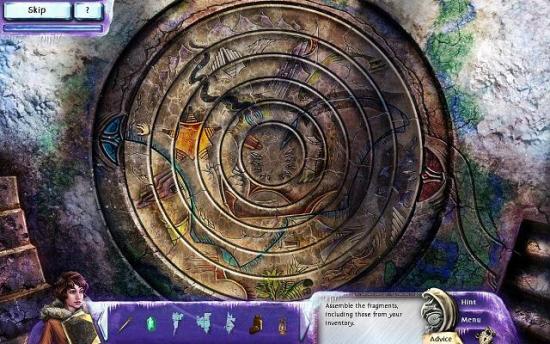
- Notice that there’s a continuous blue line from the blue shape on the left to the center of the map
- Go back to the tower base, and follow the energy line through the door on the left to the bridge tower
Find Gedney’s Book
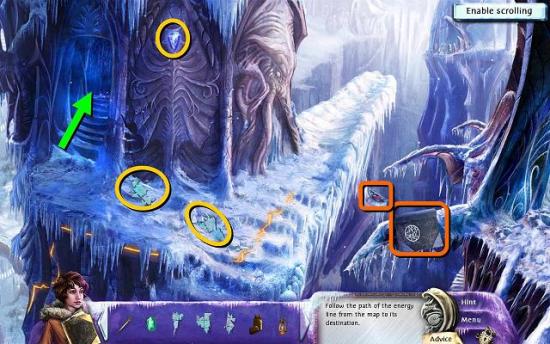
- Pick up 2 more GLASS FRAGMENTS and a BLUE PRISM
- Enter the door on the left to the camp in the tower for another hidden object scene
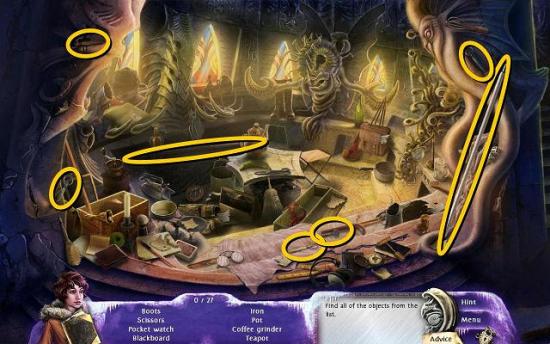
- Items that will be added to your inventory are: 2 TENT POLES, 4 CLIMBING HOOKS and a KEY
- Back out to the bridge tower, put the 2 TENT POLES together to get a STAFF and poke the book with it
- Go back to the tower base and pick up the book
Solve the Mystery of the Ring Map
- Also pick up a RED GEM (which was under the book) and another note
- Back out to the city entrance and unlock the crate with the KEY
- Inside are a ROPE and a RED PRISM
- Go back to the bridge tower and put the CLIMBING HOOKS in the ice
- Put the ROPE on the climbing hooks
- Grab the RED GEM from the ledge
- Go back to the map room at the top of the tower, zoom in on the city map on the floor and place the two RED GEMS in the slot on the right
- Turn the rings to connect the orange lines with the gems
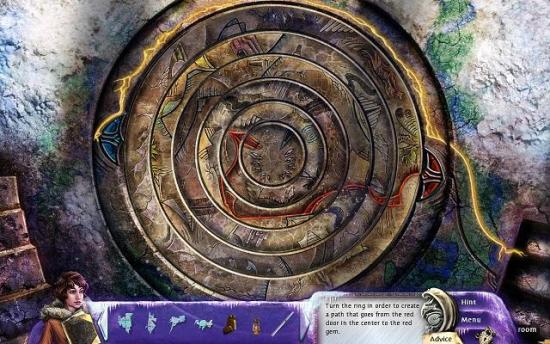
- Click in the center of the map to remove the stone disc, and again to receive the GATE SYMBOL
Find a Way to Enter the Tunnel
- Go back to the tower base, place the GATE SYMBOL on the gate to the right and enter the tunnel
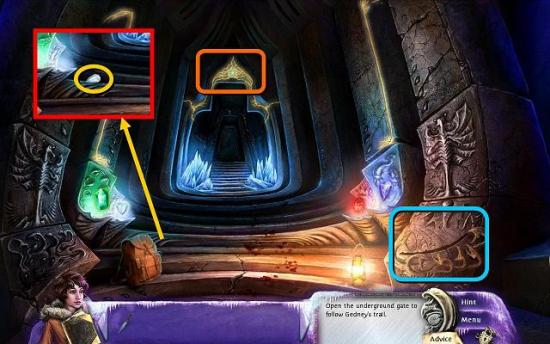
- Pick up the WHITE PRISM
- Put the RED PRISM, BLUE PRISM, GREEN PRISM and WHITE PRISM in the lamps of the same color
- Dyer will take the backpack and Lynn will go on by herself, carrying nothing but the knife
- Touch the glowing star above the tunnel and enter
Chapter 3: Descent
Call Dyer on the Radio Apparatus
- Zoom in on the dog sled on the right for a hidden object scene in which you get shape clues rather than descriptive ones. Note that the shapes may be rotated
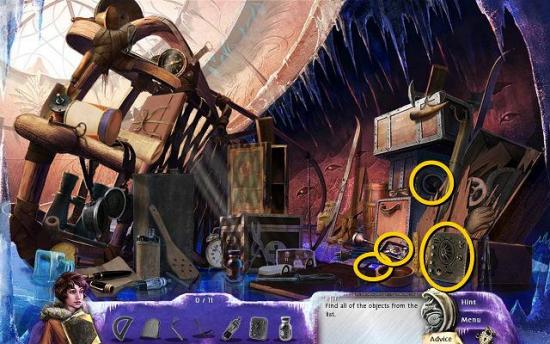
- A SPEAKER, CONTOL PANEL, MICROPHONE and ENERGY CRYSTAL are added to your inventory
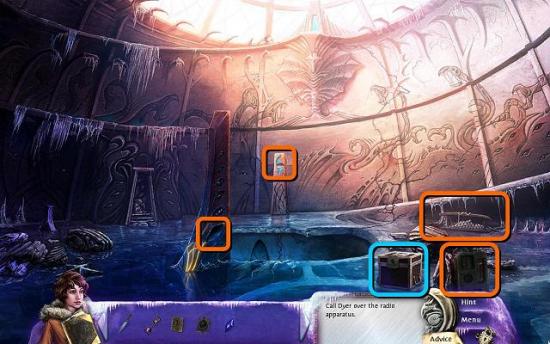
- In the main cave, repair the RADIO on the right with the MICROPHONE, CONTROL PANEL and SPEAKER
Activate the Ramp in the Dome
- Place the ENERGY CRYSTAL in the socket at the base of the pillar at the front to charge and then put the charged crystal in the socket on the opposite wall
- You’re taken back to Dyer in the tunnel
- Click the ramp mechanism on the right
- To solve the puzzle, click on ramp pieces to move them into place (up). Some pieces affect others, so you need to find out the right order. The order appears to be different in each game
Get to the Door in the Dome
- Zoom back in on the dog sled for another hidden object scene
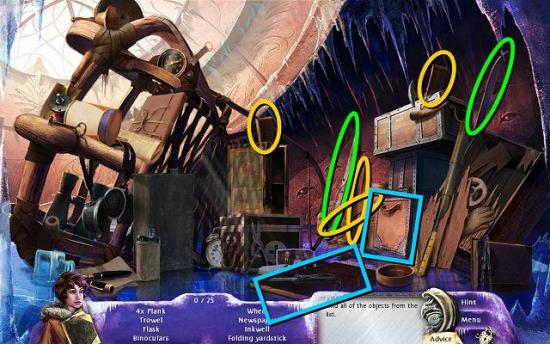
- You will get 4 BOARDS (yellow), 2 SKIS (green) and 2 BOX LIDS (blue)
- In the main cave, place the 4 BOARDS in the gap in the middle and the 2 SKIS in the gap on the right. Then place the 2 BOX LIDS on the skis
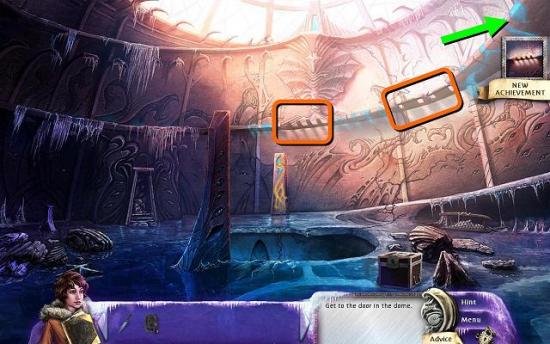
- You can now go to the dome in the top right
- Inspect the door mechanism on the left, you need to find some missing pieces
- Pull the lever – the mechanism has no energy
Open the Gates to the Underground Labyrinth
- Now we’re taken back to Dyer in the tunnel, where the WARM SOAPSTONE will have fallen from the star shape above the arch. Pick it up
- Also pick up the backpack Lynn left
- Go back to the map room and place the WARM SOAPSTONE in the hole in the ice on the right
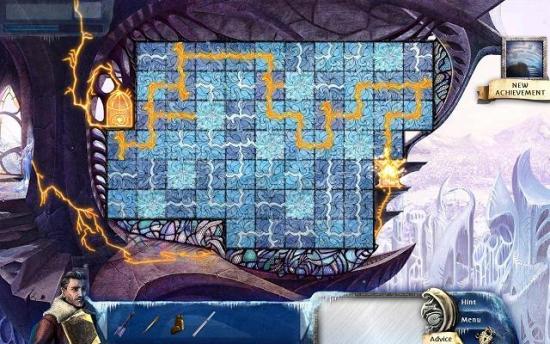
- Go on to the labyrinth map and place the 6 GLASS FRAGMENTS in the empty spaces
- Turn the squares to make the energy flow from the top left to bottom right. One of the many possible solutions is shown below
Cross the Labyrinth
- You’re now back with Lynn, who can activate the stairs to the labyrinth by pulling the handle on the left, which is now glowing orange
- Go back down to the dome hall and down to the labyrinth
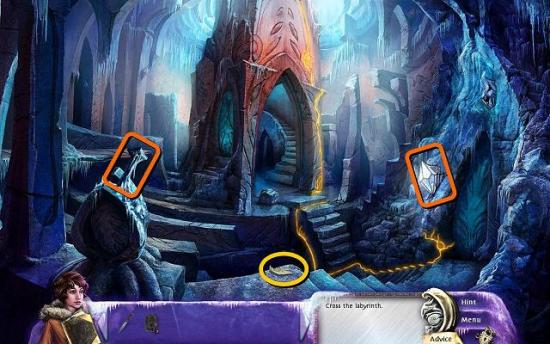
- Pick up the SCRAP OF PAPER and go back to the dome hall
- Go back to the dog sled for another hidden object scene and get PLIERS, which are leaning against the sled behind the jerry can
- Back to the dome hall, zoom in on the locked case and put the SCRAP OF PAPER on the torn note to get a code
- Pull the wire on the right out with the PLIERS
- Enter the number of dots on the paper to open the case (23745)
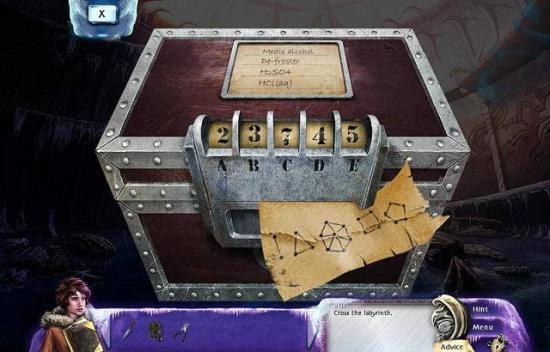
- You get a bottle of DEFROSTER
- Go back down to the labyrinth, put the DEFROSTER on the handle on the left and pull the handle
- Go through the newly opened door to the geyser on the right
Light the Dark Corner
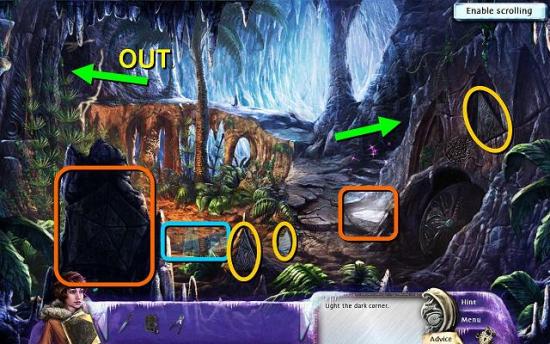
- Pick up another note from Gedney and two PLATFORM PIECES
- Move to the ruins in the back for a hidden object scene and get a METAL SAW
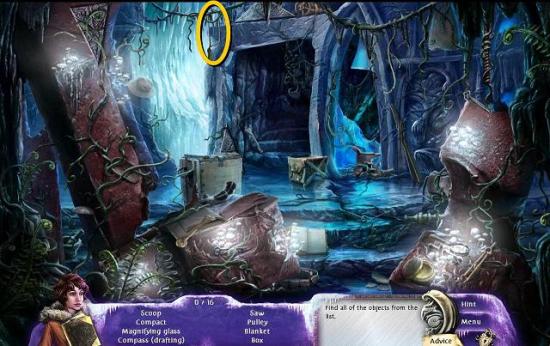
- Back out to the geyser and go to the left to the labyrinth, and use the SAW to take the LAMP off the wall
- Go back to the geyser and use the LAMP on the puddle of glowing organisms to the left of the circular door to get a SHINING LAMP
- Put the SHINING LAMP on the dark stone on the left and click on the stone
- You’re taken back to Dyer
Translate Glyphs and Dot Signs
- Take Dyer back to the plane to talk to Danford the pilot
- Go back to the bridge tower and into the camp
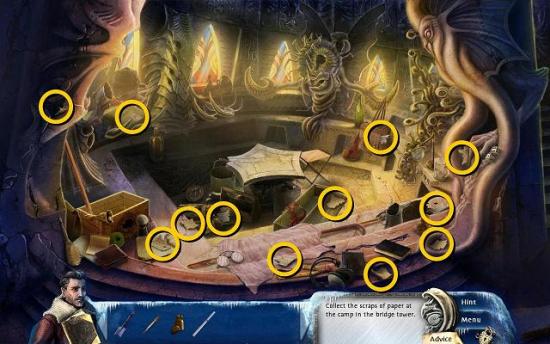
- Find the 12 SCRAPS OF BOOK PAGE
- Place the 12 SCRAPS OF BOOK PAGE on the opened book and complete the jigsaw to get the NECRONOMICON PAGE
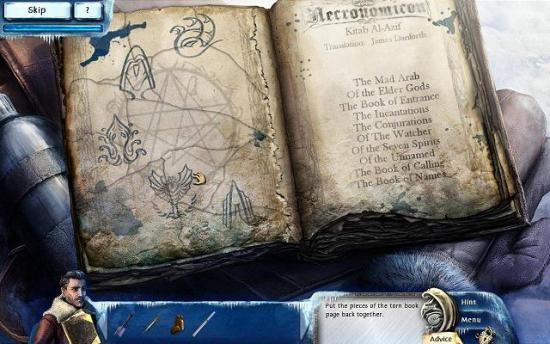
- Back all the way out to the plane and give the NECRONOMICON PAGE to Danford
- Go to the bridge tower and click on the two wall carvings of elder things
- Go to the map room and click on the elder thing on the wall
- Zoom in on the floor map and click on the center of the circle
- Back out to the tunnel and click on the carving in the bottom left of the screen for the last dot code
Open the Round Door
- You’re taken back to Lynn in the labyrinth
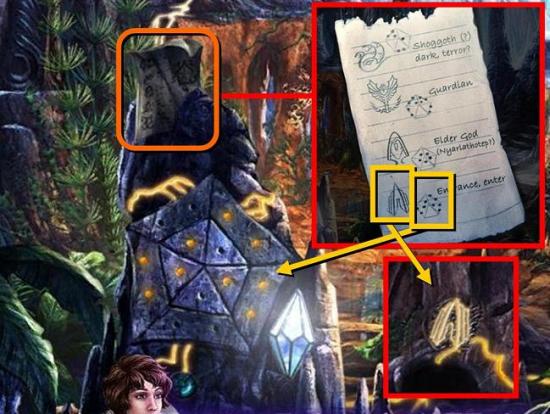
- Zoom in on the piece of paper stuck in the rock, which now has all the dot codes on it. Find the one for entrance or enter
- Enter the dot code for entrance/enter into the stone, then click on the glowing glyph above the door until it shows the glyph for entrance/enter
Chapter 4: Beneath the Mountains
Cross the Sulphurous Pond
- Pick up the first PART OF DOOR MECHANISM and back out to the geyser
- Use your PLIERS to get another PLATFORM PIECE from the hot water
- Go back to the ruins in the back and pick up 3 more PLATFORM PIECES
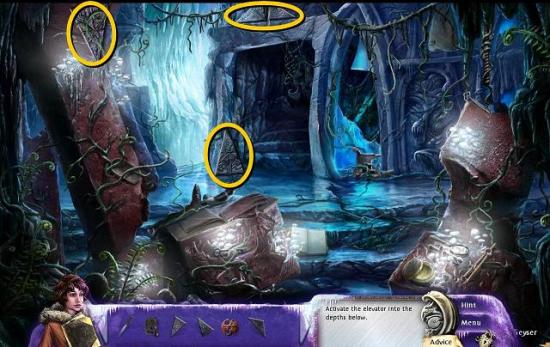
- Go back to the geyser and right to the ice shaft. Place the 6 PLATFORM PIECES on the platform to complete the pentagon. You can rotate the pieces by clicking on the red dot in the center
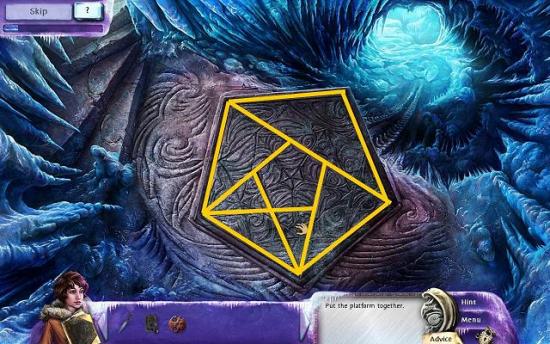
- Click on the platform again to go down the elevator to the ice cave
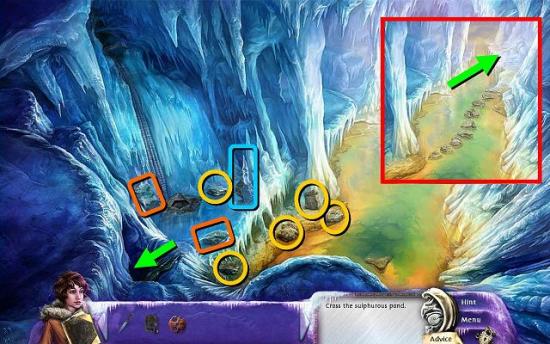
- There are 5 large STONES you can just pick up (yellow)
- Click on the stone behind the icicle (blue) to activate the next hidden object scene
- Go into the hole on the left to the dead elder thing
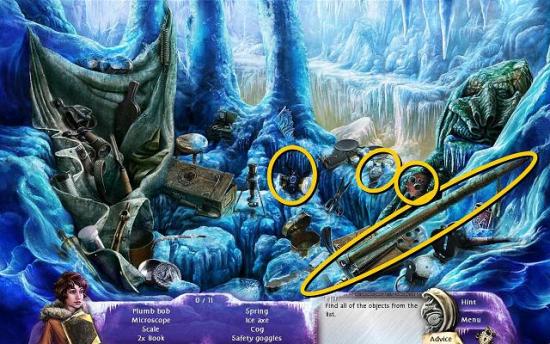
- Play the hidden object scene to get an ICE AXE, OXYGEN MASK, GOGGLES and another PART OF DOOR MEHCANISM
- Go back to the ice cave and use the ICE AXE to get 3 more STONES (blue and orange)
- Also pick up the ICICLE after you’ve chopped it down
- Place the 8 STONES in the sulphurous pond
- Combine the OXYGEN MASK with the GOGGLES to get a MASK
- You can now cross the pond to the underground oasis
Free Gedney
- When you’re at the oasis, first go right into the alcove
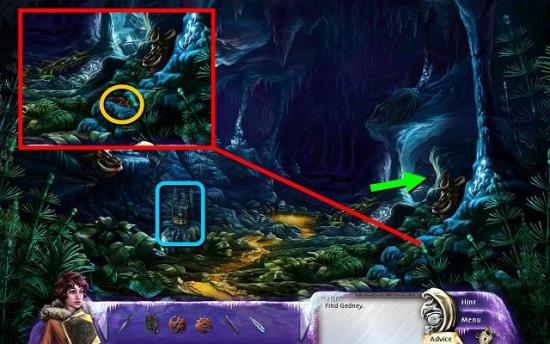
- Use the KNIFE to cut through Gedney’s ropes (any of the ropes on his body will do)
- Play the hidden object scene to get BATTERIES and a SPOTLIGHT CASE
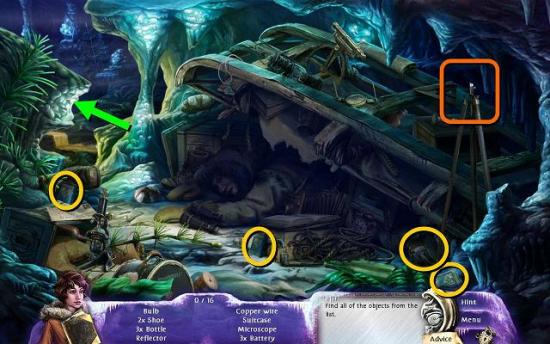
- Put the SPOTLIGHT CASE on the tripod on the right and put the BATTERIES in it
- Go back to the underground oasis (left) and back to the ice cave
- Go back to the dead elder thing to find a CROWBAR (which is in the crate – you need to lift the lid), POT and MATCHES
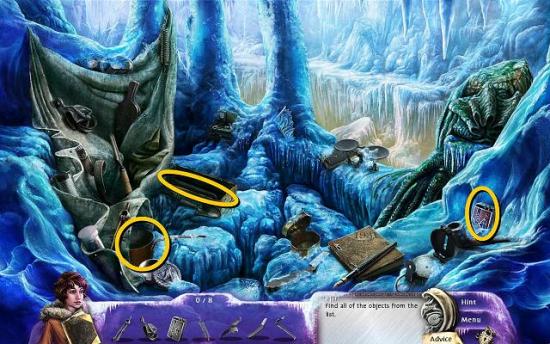
- Go back to the underground oasis and put the POT on the spirit burner on the left
- Put the ICICLE in the pot and light the burner with the MATCHES
- Pick up the POT WITH WATER and go back to Gedney in the alcove
- Pour the POT WITH WATER over his arm to get the acid off
- In the next hidden object scene, find the third PART OF DOOR MECHANISM, which is behind the rope
- Back out to the underground oasis and use the CROWBAR to find the last PART OF DOOR MECHANISM and another note (see image of oasis above, inset)
- Go back to Gedney
Chapter 5: Up to the Light of Day
Escape from the Ice Cave
- Pick up the KEYSTONE FRAGMENT that has just fallen down
- Back out to the ice cave
- Go back to the dead elder thing one last time to find the other KEYSTONE FRAGMENT and put the two KEYSTONE FRAGMENTS together to get a KEYSTONE
- Back out to the ice cave, put the KEYSTONE at the base of the elevator and click on the elevator to get out
- Go back to the geyser
Cross the Broken Bridge
- You’re taken back to Dyer, who is in the plane
- Take him to the bridge tower and take the ROPE you left there earlier
- Go into the camp and find the GRAPPLING HOOK
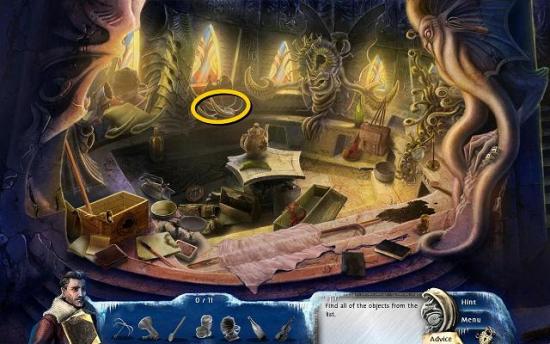
- Combine the GRAPPLING HOOK with the ROPE to get a ROPE WITH HOOK
- Back out to the bridge and use the ROPE WITH HOOK on the back of the broken bridge
- Back all the way out to the plane to get the CLIMBING BELT
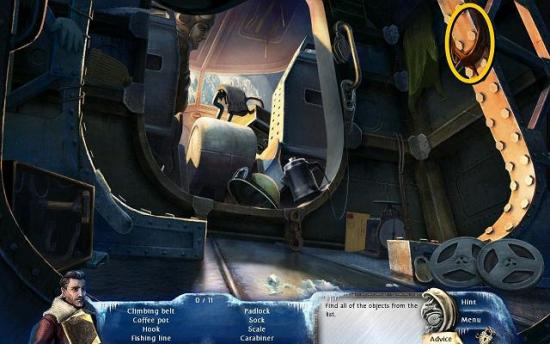
- Go back to the bridge tower and use the CLIMBING BELT on the rope to cross the gap
Clear the Escape Route for Lynn and Gedney
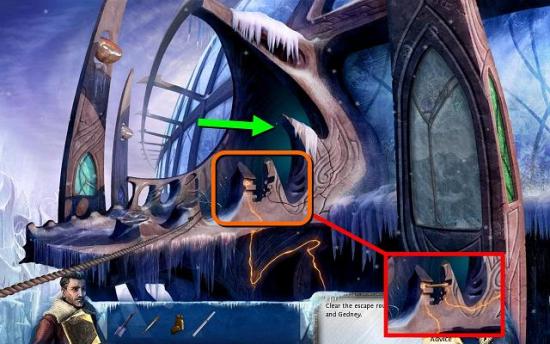
- Put the CHISEL in the slot to connect the energy line
- Go to the dome gate
- Play the exploding blocks game until there are no blocks left, and click on the orange button. One way of clearing all the blocks is by clicking on them in the following order:
All the yellows
The two blocks of two purples on either side
Green at the top, green on the sides, green at the bottom
Purples at the top
All the blues
All the purples
All the blacks
Open the Door to the Dome Room
- You’re taken back to Lynn
- Take her to the labyrinth and pull the lever, which breaks
- Put the CROWBAR under the door (click on the rock by the door to get it in the right place) and click on the door
- Go back to the geyser and to the ruins to find the THREADS, PARTS OF A BENCH VICE and a HAND CRANK
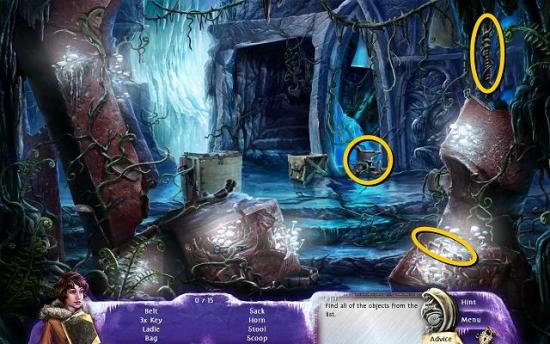
- Combine the THREADS with the PARTS OF A BENCH VICE and then combine that with the HAND CRANK to get a BENCH VICE
- Go back to the labyrinth, click on the door again and put the BENCH VISE under it before it drops back down
- Click on the vice again to crank open the door even more and exit to the dome hall
Fix the Door Mechanism
- Go up to the dome and click on the large spotlight until it shines on the smoke
- You’re taken back to Dyer
- Back out to the dome roof
- You need to click on the mechanism on the right until both lights are on. I honestly have no idea how this worked, but I just kept selecting the colored blocks at the top and then pulling the ropes until they were both on
- Back with Lynn zoom in on the gate mechanism on the left
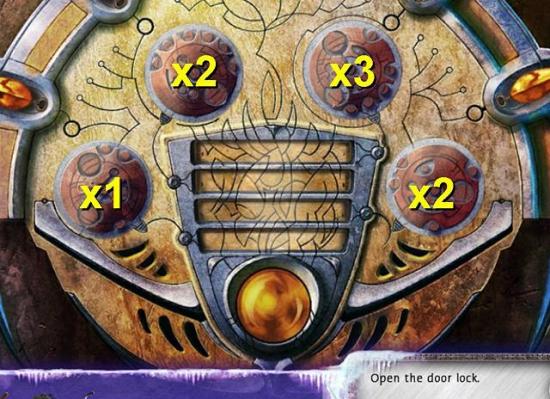
- Place all 4 PARTS OF DOOR MECHANISM in the right places, then hit the orange button
- Turn the mechanism parts until the energy lines are connected: left x2, right x2, top left x3, top right x3. Then hit the orange button again
More articles...
Monopoly GO! Free Rolls – Links For Free Dice
By Glen Fox
Wondering how to get Monopoly GO! free rolls? Well, you’ve come to the right place. In this guide, we provide you with a bunch of tips and tricks to get some free rolls for the hit new mobile game. We’ll …Best Roblox Horror Games to Play Right Now – Updated Weekly
By Adele Wilson
Our Best Roblox Horror Games guide features the scariest and most creative experiences to play right now on the platform!The BEST Roblox Games of The Week – Games You Need To Play!
By Sho Roberts
Our feature shares our pick for the Best Roblox Games of the week! With our feature, we guarantee you'll find something new to play!Type Soul Clan Rarity Guide – All Legendary And Common Clans Listed!
By Nathan Ball
Wondering what your odds of rolling a particular Clan are? Wonder no more, with my handy Type Soul Clan Rarity guide.


