- Wondering how to get Monopoly GO! free rolls? Well, you’ve come to the right place. In this guide, we provide you with a bunch of tips and tricks to get some free rolls for the hit new mobile game. We’ll …
Best Roblox Horror Games to Play Right Now – Updated Weekly
By Adele Wilson
Our Best Roblox Horror Games guide features the scariest and most creative experiences to play right now on the platform!The BEST Roblox Games of The Week – Games You Need To Play!
By Sho Roberts
Our feature shares our pick for the Best Roblox Games of the week! With our feature, we guarantee you'll find something new to play!All Grades in Type Soul – Each Race Explained
By Adele Wilson
Our All Grades in Type Soul guide lists every grade in the game for all races, including how to increase your grade quickly!
Mystery of the Missing Brigantine Walkthrough
Welcome to the Mystery of the Missing Brigantine walkthrough on Gamezebo. Mystery of the Missing Brigantine is a Hidden Object Game played on the PC created for Big Fish Games. This walkthrough includes tips and tricks, helpful hints and a strategy guide on how to complete Mystery of the Missing Brigantine.
Mystery of the Missing Brigantine – Game Introduction
Welcome to the Mystery of the Missing Brigantine walkthrough on Gamezebo. Mystery of the Missing Brigantine is a Hidden Object Game played on the PC created for Big Fish Games. This walkthrough includes tips and tricks, helpful hints and a strategy guide on how to complete Mystery of the Missing Brigantine.
General Tips
This hidden object game requires visiting several locations and using inventory items to advance play.
- Play is linear although some scenes allow collecting items for multiple tasks.
- CAPITALIZED inventory items are meant to make it easier to find where this guide may deviate from your own play.
- There are no penalties for multiple clicks in a scene.
- Always move the cursor around a scene. Watch the cursor to see if it changes into a hand.
Main Menu:
- Profiles – Click the arrow link to create, delete or switch player profiles
- Play – Begin or resume a game
- Options – Change music and sound effects volume. You may select or deselect full.
- Help – Describes how to interact with the game.
- Exit – Quit the game.
Screen Navigation:
- Menu – Change your options, resume the game or return to the main menu.
- Hint/Skip Bar – Clicking will show a random item from an itemized list. Hints are not limited and the bar refills quickly. The bar turns into a Skip bar for puzzles.
- Documents – View character profiles or document clues.
- Inventory – A pop-up list of icons showing available items.
- Item Search Panel – light blue icons represent the hidden items to be collected.
Symbol Meanings:
- Magnifying Glass – Zoom in on interactive area.
- Hand – Interact with an object: pick up an item, open a door or move an object.
- Gear – Place an inventory item or play a mini-game.
Walkthrough
A short clip explains the background and introduces the story line for play.
If you are not familiar with hidden object games, click “Yes” when asked if you would like a tutorial. This will show you how to interact with objects and characters.
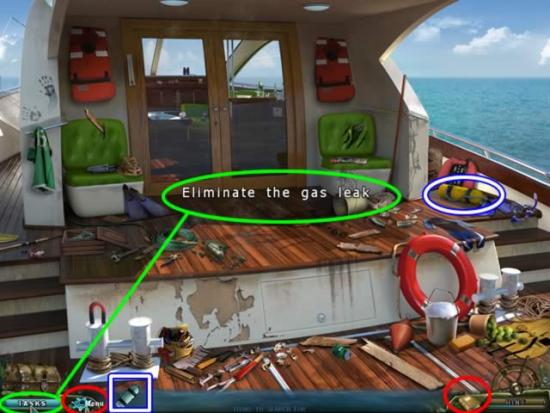
Inventory items are highlighted in white with a blue border in screenshots.
Chapter 1: The Yacht

- Click the Tasks tab to show the current objective.
- Access the Menu by clicking the gear icon.
- Check the Documents book at any time to view character profiles or collected documents.
- Pick up the air tank for the SCUBA SET on the deck. Items used immediately do not appear in the inventory list.
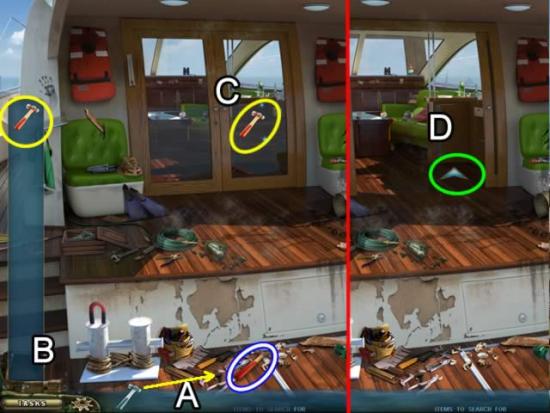
- Pick up the HAMMER that appears in the item panel (A). It goes to inventory.
- Click the treasure chest to view the current inventory items (B).
- Click the Hammer to select it. Place it on the glass door with the sparkles (C) to shatter the glass.
- Enter the cabin (D).
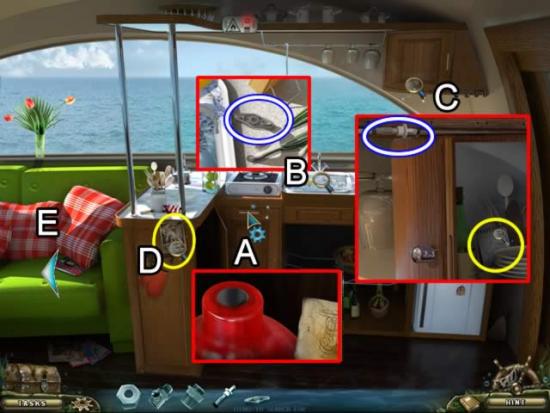
- Move the cursor over the cabinet door (A). The gear icon indicates an inventory area or mini-game. Open the door to receive the items needed to seal the gas tank.
- Zoom in on the sink (B). Pick up the FLAPPER VALVE.
- Open the overhead cabinet (C). Take the tank STOP. Inspect the piece of paper.
- Inspect the card attached to the cabinet (D).
- Head left toward the helm (E).
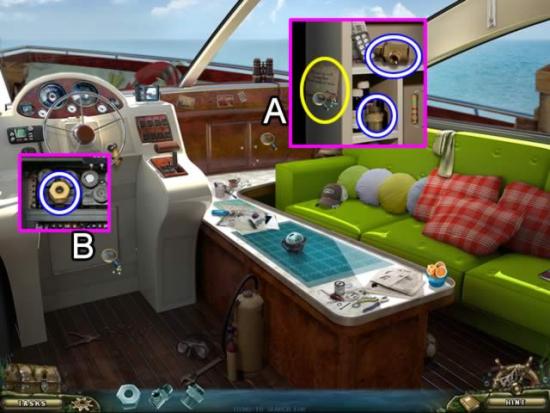
- Open the cabinet door (A). Take the BUSHING and GATE VALVE. Read the note on the side of the shelves.
- Open the compartment (B). Retrieve the SCREW.
- Return to the cabin.
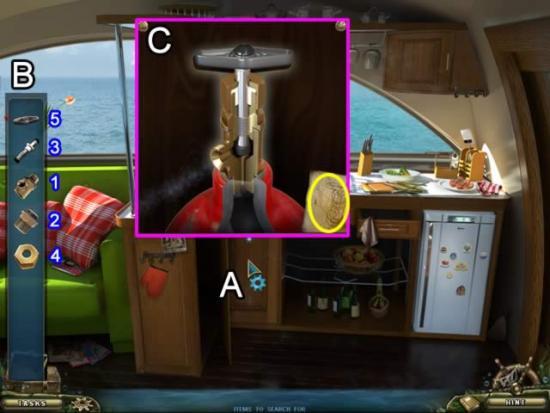
- Open the cabinet door (A) to start the puzzle.
- Use the FLAPPER VALVE, STOP, BUSHING, GATE VALVE and SCREW from inventory (B) to stop the leak. Note the assembly directions (yellow) next to the gas canister. The numbers to the right of the inventory items indicate the order they are placed.
- Return to the deck and go to the left to find Elizabeth. Receive a list of items necessary to revive her.
- Return to the cabin.
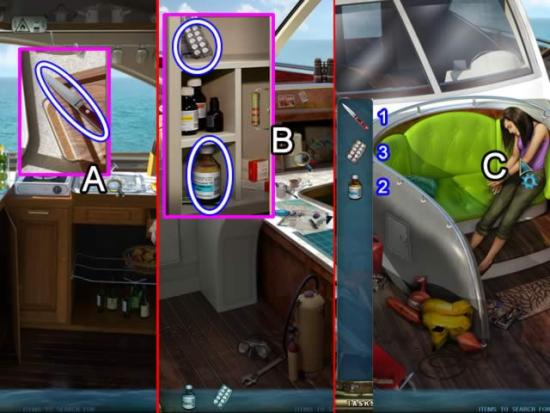
- Zoom in on the sink (A). Pick up the KNIFE.
- Go to the helm.
- Access the first-aid cabinet (B). Get the PILLS and SMELLING SALTS.
- Return to Elizabeth (C). Use the KNIFE (1) to cut the ropes. Apply the SMELLING SALTS (3) to revive her and the PILLS (2) to stabilize her.
- Return to the helm.
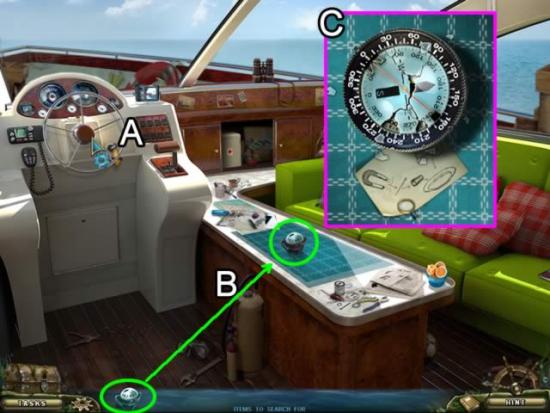
- Click the control panel (A). Find that the compass is missing. Pick up the missing compass from the table (B). Discover it is broken, but that you can make a compass from common parts (C).
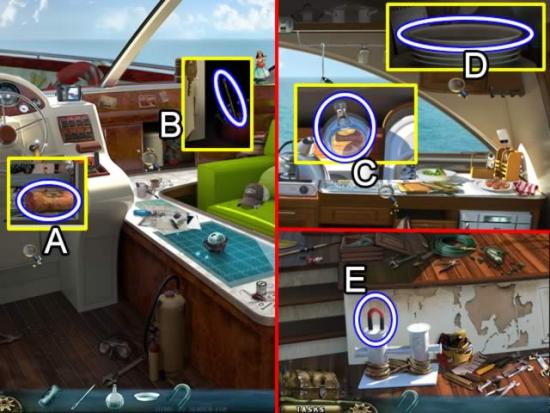
- Open the compartment below the wheel (A). Get the CORK.
- Zoom in on the first-aid kit (B). Pick up the NEEDLE from the pin cushion.
- Go to the cabin.
- Get the LAB FLASK from the sink (C) and the PLATE from the upper cabinet (D).
- Go to the deck. Pick up the MAGNET (E).
- Return to the broken compass on the table in the helm.
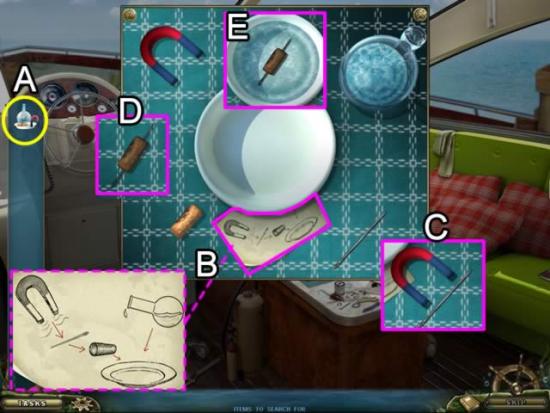
- Place the compass parts from inventory (A) on the broken compass. They spread out.
- Examine the instructions (B).
- Drag the MAGNET to the NEEDLE (C) to magnetize it.
- Drag the magnetized needle to the CORK (D) to combine them.
- Place the needle and cork in the DISH and add the water from the LAB FLASK (E).
Chapter 2: The Diving Shop
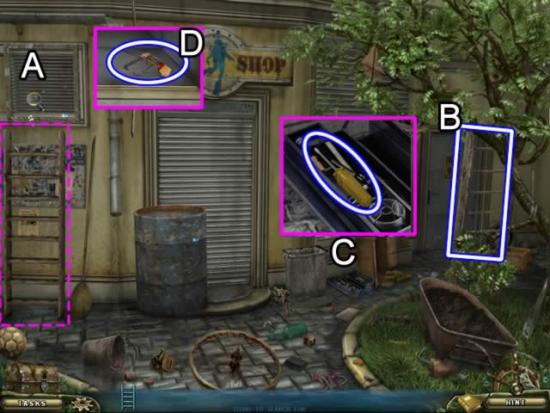
- After the character dialogue, notice the two sparkling areas: the vent and the door. There are two things to do here. They can be completed in any order.
- Click the vent (A). A LADDER appears in the item search panel.
- Get the LADDER (B). Place it under the vent (dotted pink). Examine the vent. A SCREWDRIVER appears in the search panel.
- Zoom in on the toolbox (C). Take the SCREWDRIVER. Use it to remove the four screws.
- Take the LOCK PICK hidden inside the vent duct (D).
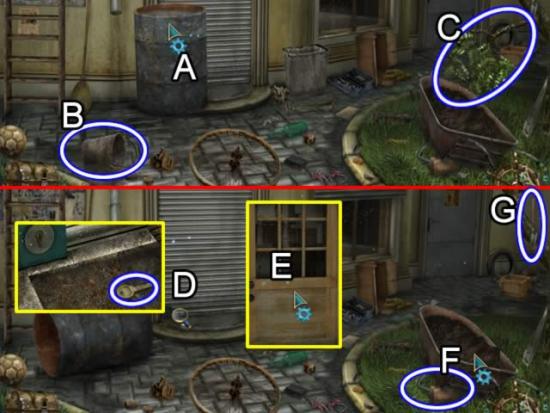
- The barrel of water blocks the way into the shop. Click the barrel (A). A BUCKET appears in the search panel. Place the BUCKET (B) on the barrel. Click three times to drain the water.
- Click the barrel again and a BRANCH appears in the search panel. Use the BRANCH (C) as a lever to tip over the barrel.
- Click the metal shutter covering the door (D). Zoom in on the door mat to get the KEY. Use it on the shutter lock. The shutter retracts revealing the door (E).
- Click the door. The HOOK AND BRICK are under the wheelbarrow (F). Click the wheelbarrow and a SHOVEL (G) is added to the search panel. Use the SHOVEL to remove the dirt from the wheelbarrow (click three times).
- Use the HOOK AND BRICK to smash the glass on the door.
- Enter the shop.
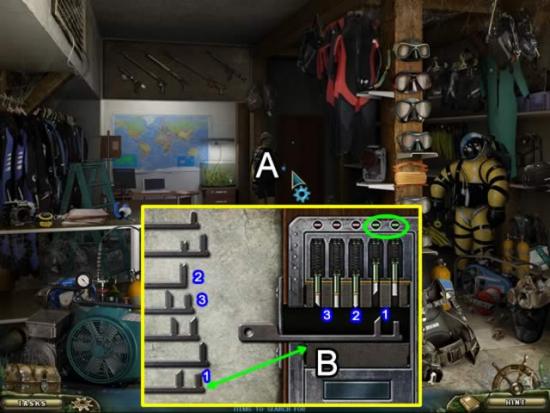
- Zoom in on the office lock (A).
- Place the LOCK PICK on the case on the bottom of the screen to start the puzzle.
- The goal is to match the picks with the lock springs. Correctly matching a pick to a spring causes the tumblers to retract and turn the light(s) above it green. The three picks needed and their seqence is shown above.
- Enter the office.
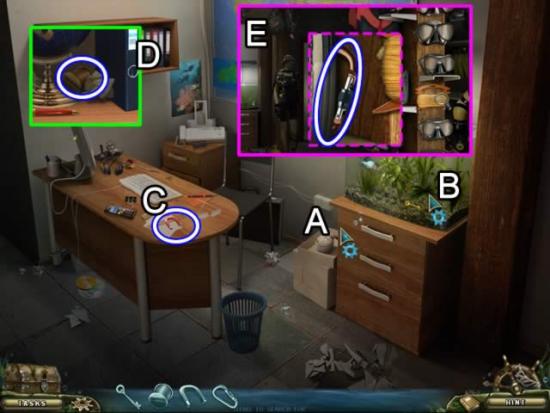
- Click the cabinet drawer (A) to add a KEY to the search panel.
- Click the aquarium (B) to add FISHING LINE, MAGNET and CARABINER.
- Pick up the MAGNET on the desk (C).
- Zoom in on the binders in the shelf (D) to get the FISHING LINE.
- Return to the shop (E). Take a closer look at the dive masks to find the CARABINER.
- Return to the office.
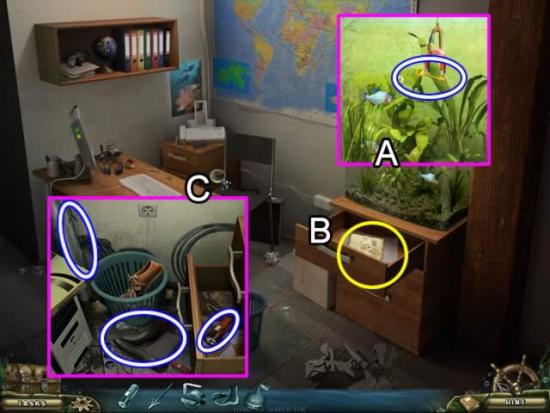
- Place the items from inventory on the aquarium to open a puzzle (A).
- The goal is to retrieve the key from the bottom of the aquarium without having a fish knock it off. Position the magnet over the key. Click the left button to grab the key and begin lifting it.
- Use the KEY to open the drawer (B). Inspect the list of missing items.
- Zoom in on the area behind the desk (C). Get the Harpoon (ARROW), BOOTS and FLASHLIGHT.
- Return to the shop.
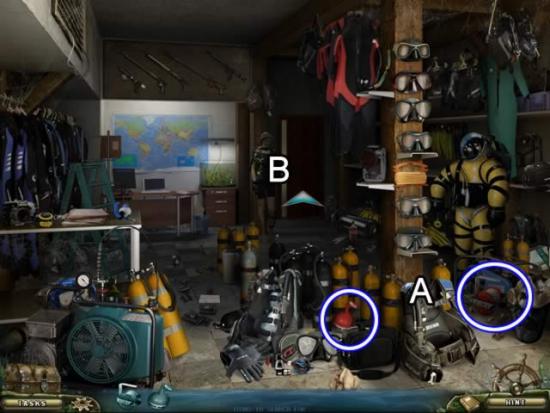
- Pick up the BUOY and BOBBIN (Reel).
- Enter the door on the right (B).
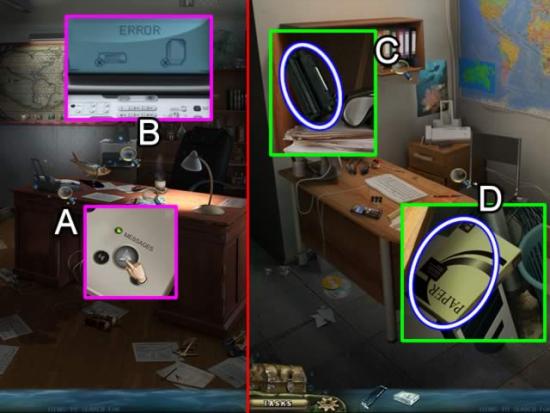
- Listen to the message on the answering/fax machine (A).
- Click the printer (B) to receive the two search items.
- Return to the office.
- Get the TONER from the shelf (C) and the PAPER from behind the desk (D).
- Return to the other office.
- Click the printer. Add the TONER and PAPER. A photocopy goes directly to inventory.
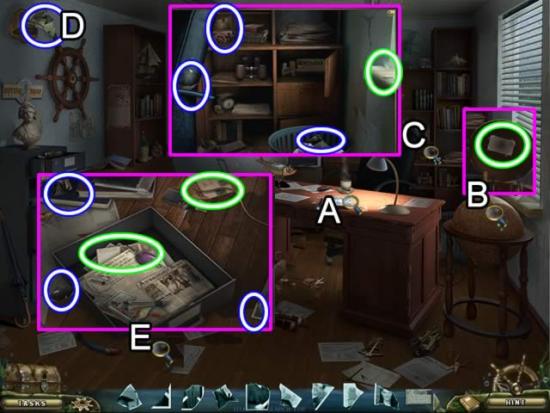
- Check out the broken picture frame on the desk (A). RIPPED PHOTO pieces are added to the search items.
- Click the globe next to the desk (B). The top pops open. Take the LETTER from inside the top of the globe. LETTERs are also added to the search items.
- Inspect the book shelves behind the desk (C). Get the three RIPPED PHOTO pieces (blue and white) and the LETTER (green and white).
- Take the RIPPED PHOTO from the mouth of the fish (D).
- Look at the contents of the drawer on the floor (E). Get three more RIPPED PHOTO pieces and two more LETTERS.
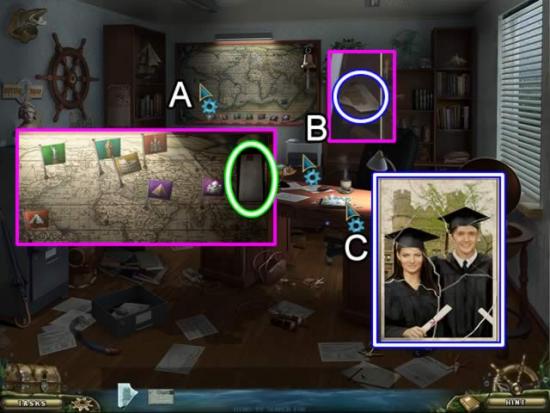
- Inspect the map (A). Place the flags with their landmark symbols in the correct country. Take the last LETTER.
- Get the last RIPPED PHOTO piece from beside the copier (B).
- Access the broken picture frame (C). Place the photo SCRAPS on the frame to begin the puzzle.
- Place each piece to reconstruct the photo. When correctly placed, a piece locks into place.
Chapter 3: The Professor’s Lab
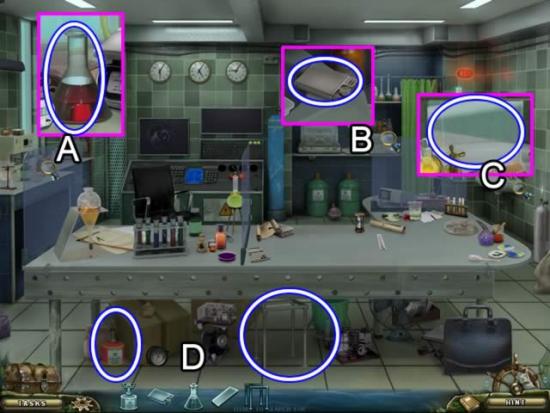
- Pick up the LAB FLASK from the close up of the counter on the left (A).
- Zoom in on the shelves at the back of the lab to get the LIGHTER (B).
- Inspect the sink (C) to get the GLASS.
- Pick up the BURNER and the BASE from the floor (D).
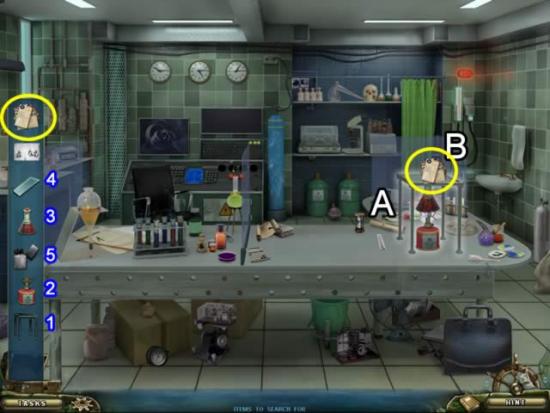
- Follow the silhouette of the stamp remover device to assemble it (A). Place the items in the order indicated on the inventory tab.
- Place the LETTERS on top to extract the STAMPS.
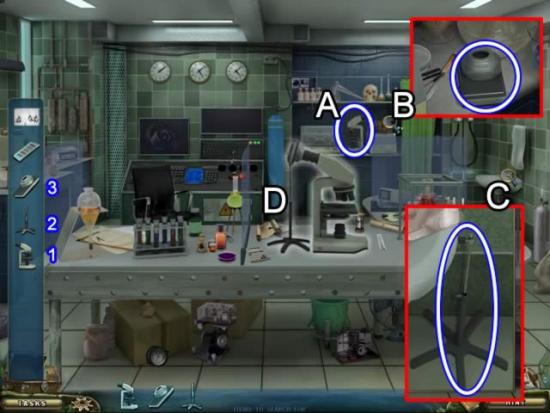
- Collect the MICROSCOPE (A), CAMERA (B) and TRIPOD (C) from the indicated places.
- Assemble the fluoroscope (D) using the items from inventory. The positioning order is indicated next to each inventory item.
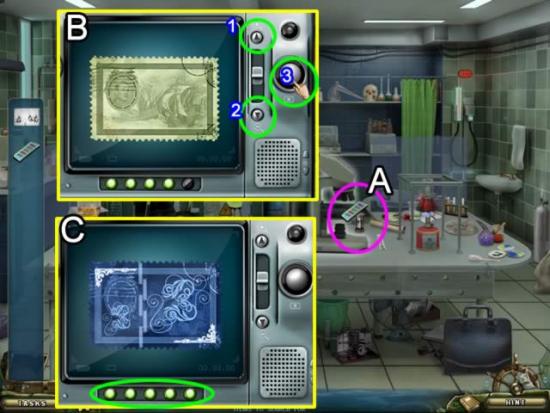
- Place the STAMPS under the microscope (A).
- Each stamp appears in the viewing screen of the camera (B). Use the up (1) and down (2) arrows to focus each stamp. Click the button (3) to get an x-ray of the stamp (C). If the stamp was correctly focused, a green light appears at the bottom of the camera view screen.
- Do this for each of the five stamps.
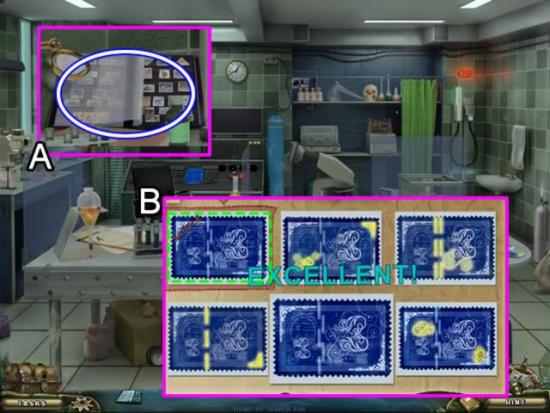
- Retrieve the ALBUM (A).
- Place the album in the empty slot next to the stamp x-rays (dashed-green) to start a puzzle (B).
- The goal is to spot the eight differences between the album specimen (dashed-green line) and the x-rays to find the authentic stamp.
- The solution is shown above.
- Another mini-game automatically pops up.
- The goal is to match the PHOTOCOPY with various pictures of three monkeys. Click an image and then the “Compare” button. Finding the correct picture shows the location of the “Three Monkeys” coral reef.
Chapter 4: Jack’s Mansion
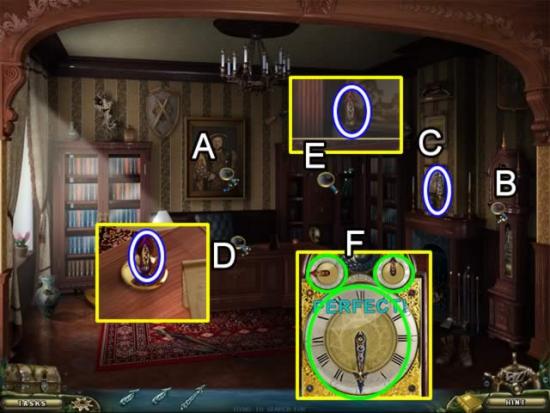
- Inspect the portrait of Henry VIII (A). Receive a CLOCK in the search panel.
- Check out the CLOCK (B). Three CLOCK HANDS replace the clock in the panel.
- Pick up the first CLOCK HAND on the fireplace mantel (C). Another CLOCK HAND is on the lamp on the desk (D) and the third in the cabinet on the back wall (E).
- Look at the portrait again. This time the rubies on the medallions are glowing. Note the position of each ruby in relation to a clock face.
- Access the clock again. Place the hands on the face to open a puzzle. Place the hands in the same position as the rubies on the portrait medallions (F). Click each dial to move the hands to the correct position.
- The portrait swings open revealing a wall safe.
- Examine the safe to get a new search list.
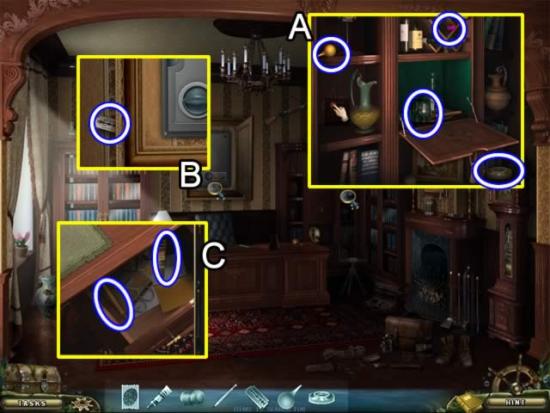
- Examine the cabinet on the back wall (A). Move the vase and press the red button to open the drinks cabinet. Take the GLASS to add to the search list. Take the BULB SYRINGE, CORK and DUCT TAPE.
- Go back to the safe (B) and get the RAZOR BLADE.
- Open the top drawer on the desk (C). Get the GLUE and PENCIL.
- A puzzle automatically opens.
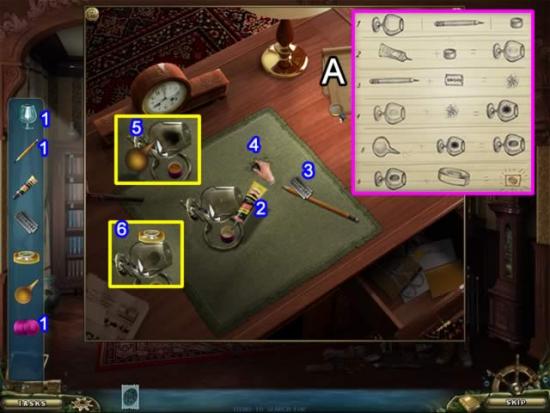
- Zoom in on the directions on the corner of the desk (A). Follow the steps to get the finger print:
- Place the GLASS on the stand. Put the CORK under it. Place the the PENCIL on the blotter.
- Pour the GLUE on the CORK.
- Use the RAZOR BLADE to get some shavings.
- Place the shavings on the GLASS.
- Use the BULB SYRINGE to blow off the excess shavings.
- Place the DUCT TAPE over the print on the GLASS to extract the print.
- Return to the safe.
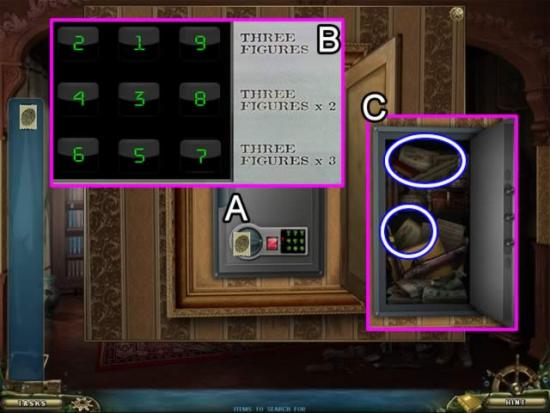
- Place the FINGER PRINT on the safe lock (A) to open a puzzle.
- Click to swap numbers so the three numbers in the second row sum to twice that of the first row. The third row should sum to three times that of the first row. The solution is shown above (B).
- Take the two NEWSPAPERS (C).
Chapter 5: Pelican Island
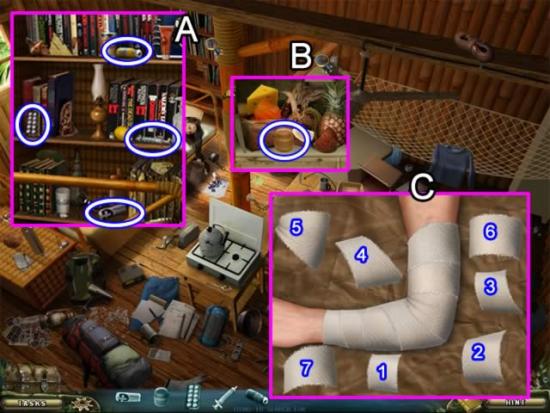
- Zoom in on the bookshelf (A) to collect the BANDAGE, PILLS, SYRINGE and AMPOULE.
- Access the food shelf (B) to get the OINTMENT.
- Place the collected drugs on Elizabeth to open a puzzle (C). Place the bandage parts on her arm working from the wrist up. The numbers on the pieces indicate their position on her arm.
- A new list of items appears in the search panel.
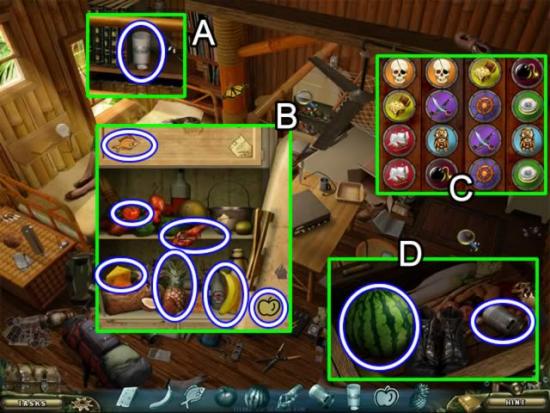
- Get the WATER from the bookshelf (A).
- Open the food shelf (B) and collect the indicated items.
- Click the cellar door (C) to open a puzzle. Match the symbols to open the door (your solution may be different than mine). Get the MELLON and CAN.
- A new list of items appears in the search panel
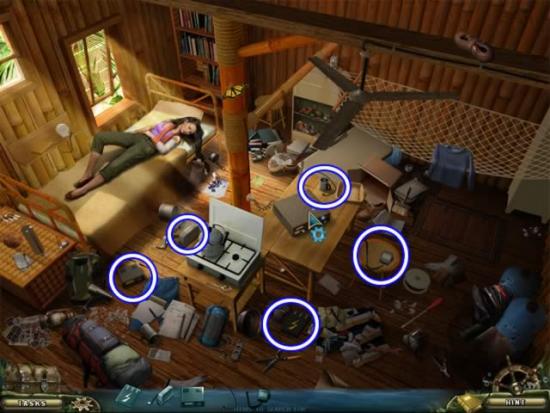
- Collect the items shown above to reassemble the radio.
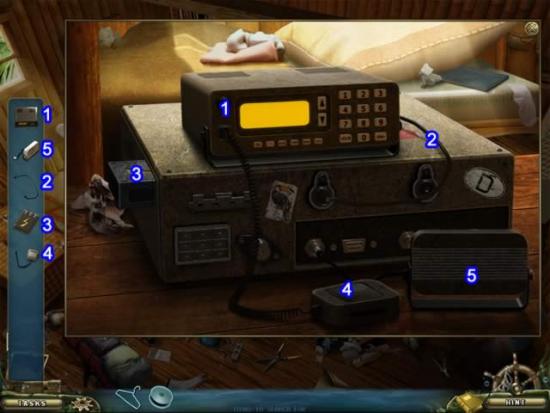
- Match the items to their silhouette. The numbers on the inventory panel correspond with their location.
- Two new items appear in the search panel.
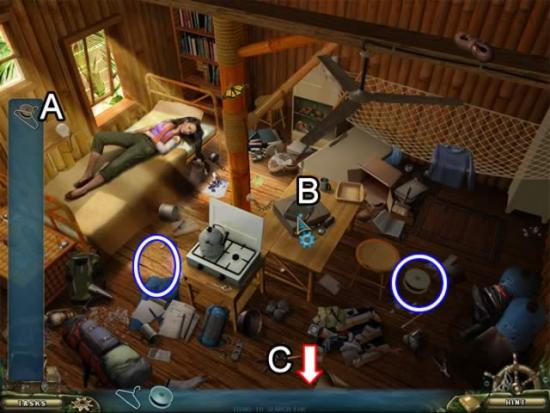
- Pick up the HANGER and WIRE for inventory (A).
- Place them on the radio (B).
- Exit the cabin (C).
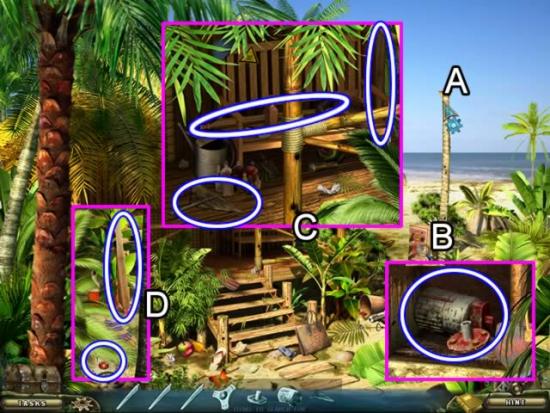
- Click the pole (A) to add items to the search panel.
- Zoom in on the box at the base of the pole (B). Play three rounds of a repeat-the-sequence puzzle to open the lock. Take the GENERATOR and SLEEVE.
- Access the porch area (C). Pick up two BLADES and the STABILIZER TAIL.
- Open the area next to the steps (D). Get a BLADE and the T-PLATE.
- Click the pole again to open the assembly puzzle.
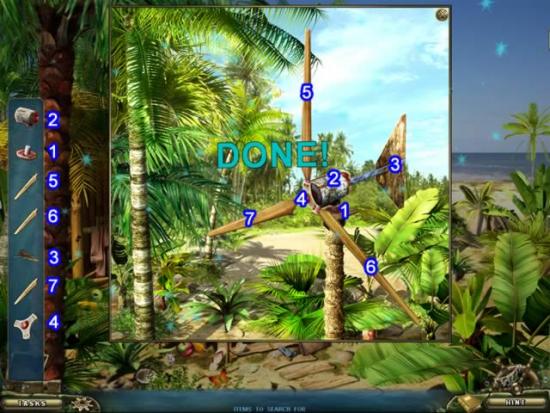
- Match the items to their silhouette. The numbers on the inventory panel correspond with their location.
- Return to the cabin.
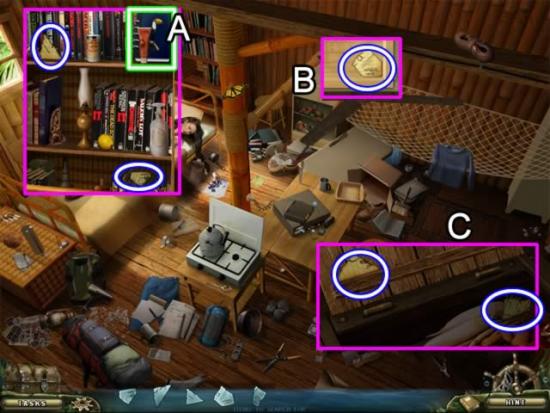
- Zoom in on the book case (A) to retrieve Elizabeth’s NOTEBOOK (green and white).
- The search panel is refreshed with NOTEBOOK PIECES. Get two from the book case.
- Pick up a third from the food shelf (B).
- The last two are in the cellar (C).
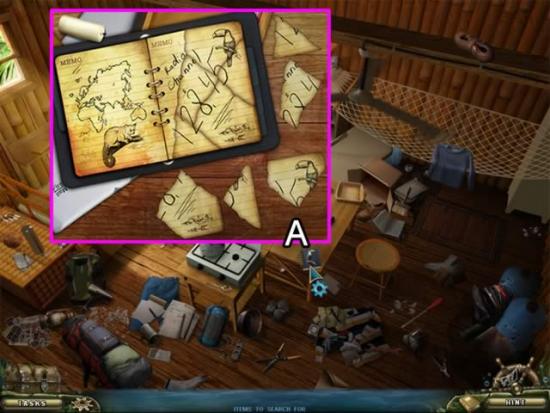
- Click the notebook to open a puzzle (A).
- Solve the jig-saw puzzle by fitting the pieces on the page. Start from the outside and work in. Correctly placed pieces will lock into place. The solution is shown above.
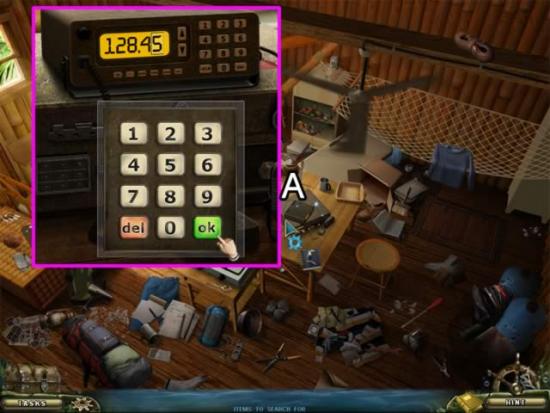
- Zoom in on the radio (A). Enter the frequency code from the notebook: 1-2-8-4-5. Press each number and the click the “ok” button to enter the digit.
Chapter 6: Preparing for the Dive
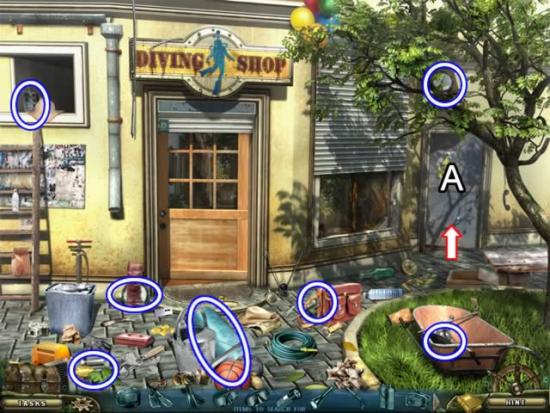
- Enter the door on the right (A) to add more items to the search panel. It is a puzzle, but you cannot play it yet. Exit the door.
- Pick up the seven objects shown above: Two MANOMETERS, ENGINE, REMOTE CONTROL, GAS CYLINDER, VALVE and LEVER.
- Enter the shop.
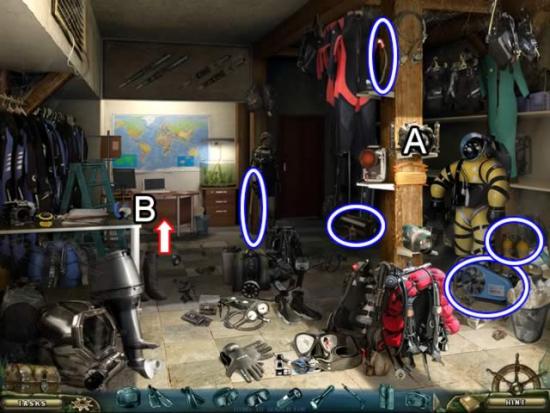
- Pick up the items in the shop (A): SPEAR GUN, DIVING CYLINDER, COMPRESSOR, DIVE PROPULSION VEHICLE and PIPE.
- Enter the office (B).
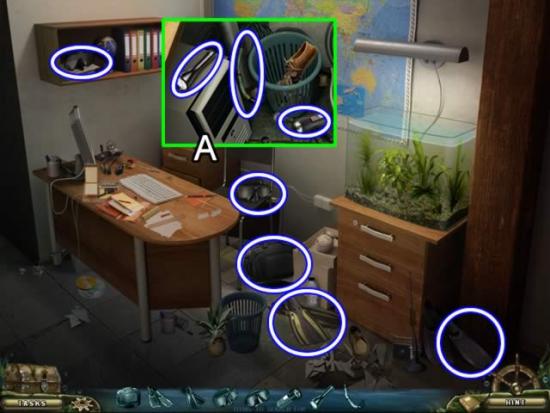
- Pick up the two FLIPPERS and MASKS and the BAG.
- Look behind the desk (A) to get the two LANTERNS and the PIPE.
- Exit the shop.
- Return to the door on the right.
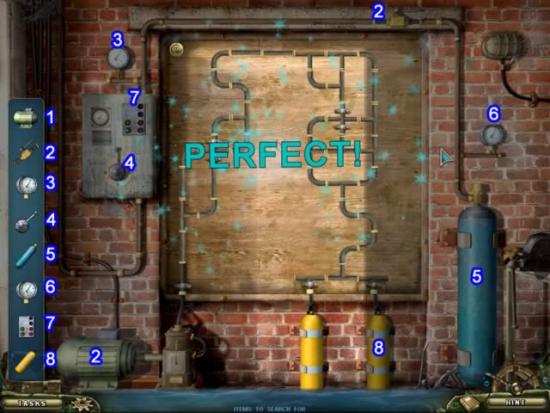
- Match the items to their silhouette. The numbers on the inventory panel correspond with their location.
- The goal of the puzzle is to complete a circuit from the engine to the air tanks. Click the pipes to rotate them. There can be no open pipes.
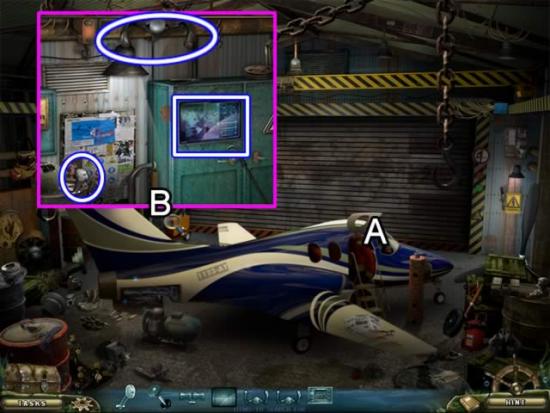
- Enter the airplane cockpit to get the search panel items.
- Zoom in on the ladder in the left corner (B). Pick up the MONITOR, LEVER and STEERING WHEEL.
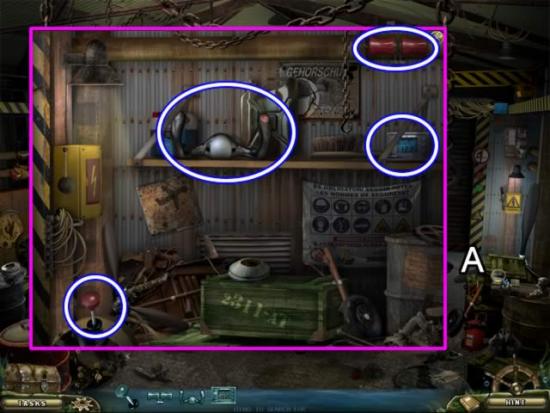
- Zoom in on the barrels on the right (A).
- Get the LEVER, STEERING WHEEL, DOUBLE LEVER and MONITOR.
- Return to the cockpit.
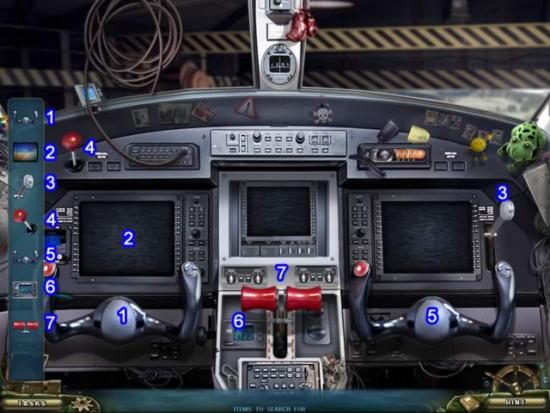
- Match the items to their silhouette. The numbers on the inventory panel correspond with their location. The order they are positioned is not important.
- Exit the cockpit.
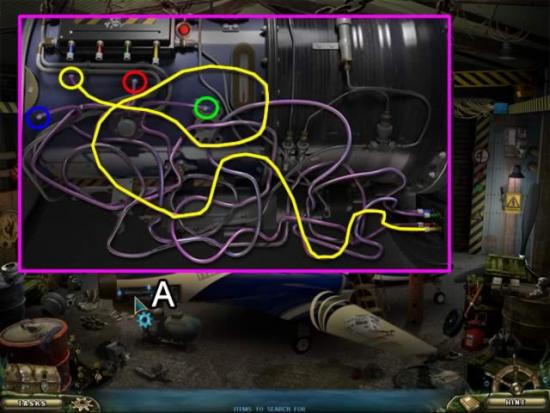
- Access the electrical system at the rear of the plane (A) to open a puzzle.
- The goal is to match the end color with the attached lead in the lower right corner. Trace the wires through the maze. Click on the end of the lead and then attach it to a colored end.
- The easiest way is to trace two wires (yellow and blue are the easiest to follow). Attach those then alternate with the last two to get the right combination. The solution is shown above.
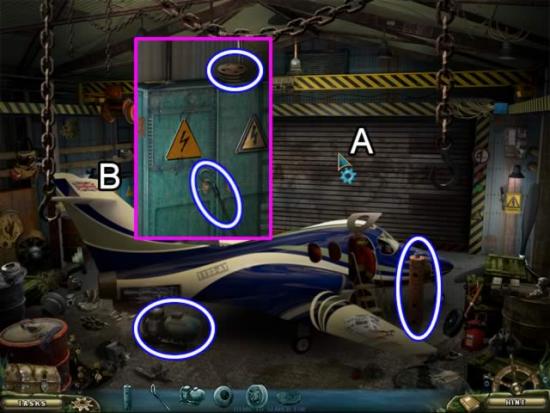
- Click the hangar door to get the search item list (A).
- Pick up the STONE BALANCE and ENGINE.
- Zoom in on the lockers (B). Get the HOOK and BLOCK.
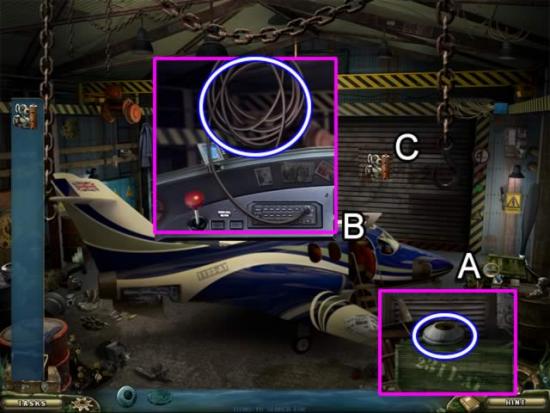
- Access the parts area on the right (A). Get the BLOCK.
- Enter the cockpit (B). Get the HAWSER.
- Place the parts on the hangar door (C).
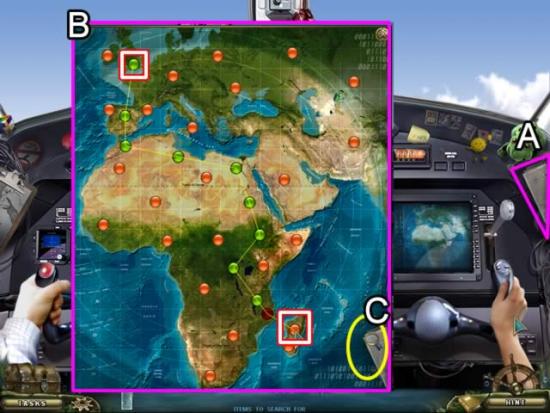
- Take the diagram on the left (A) to open a puzzle.
- The goal is to replicate the diagram by clicking the dots and drawing a line from point to point. Note that the diagram is now in the lower right corner of the puzzle (C). Click it as a reference if needed.
- Solving this puzzle causes another puzzle to pop up.
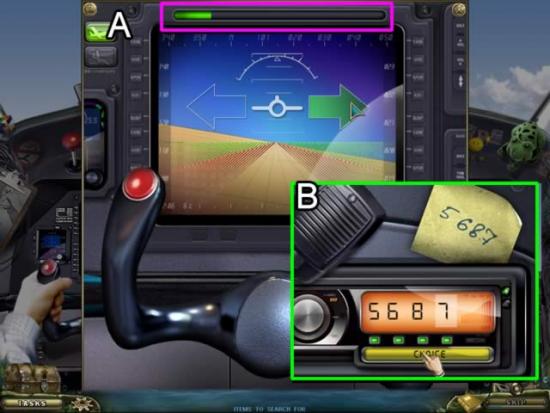
- Continue clicking the whichever arrow is flashing until the green bar at the top if full.
- As soon as that puzzle is complete another one pops up (B).
- The goal is to capture the correct number as it rolls by on the screen by pressing the “Choice” button in time. Capture the same numbers as listed on the yellow note.
Chapter 7: The Missing Brigantine
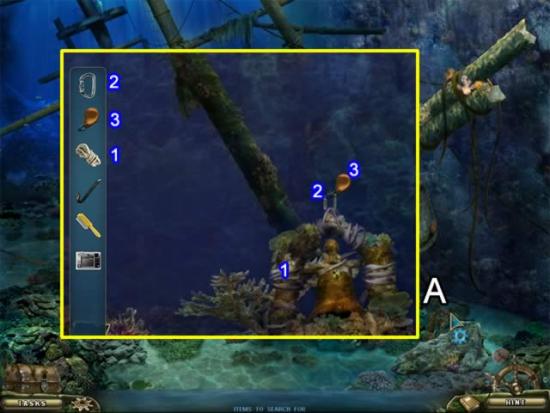
- Click the bell on the right (A). Place the ROPE, CARABINER and SURFACE MARKER from inventory in the order shown to raise the bell to the surface.
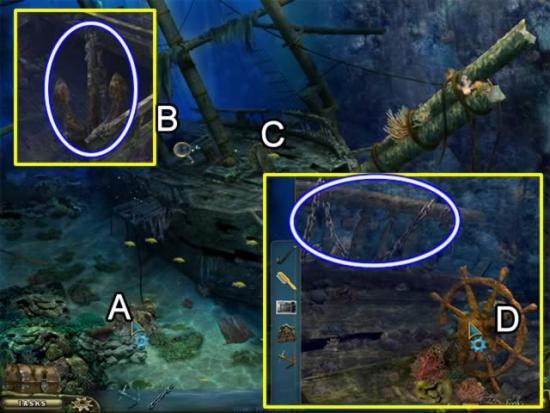
- Click the cannon (A) to get the list of items to collect.
- Zoom in on the hatch (B) to get the ANCHOR.
- Inspect the wheel (C). Get the CHAIN.
- Use the brush from inventory on the wheel (D) to remove the rust. Use the crowbar to pry out the COAT OF ARMS.
- Return to the cannon.
- Place the CHAIN and then the ANCHOR on the cannon.
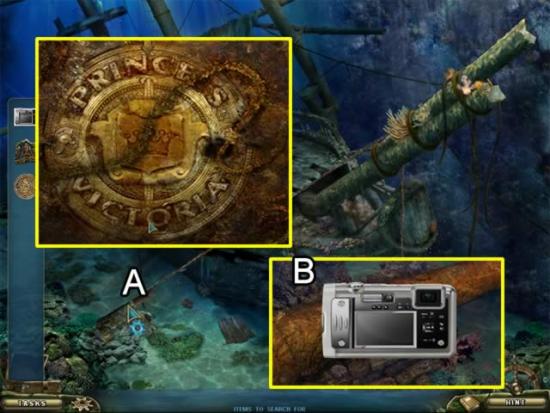
- Click the cannon to start a puzzle (A).
- Form the emblem by rotating the rings. It is easiest to start with the outside rings and work inward. Match the letters and patterns.
- Use the camera from inventory to take a picture of the cannon.
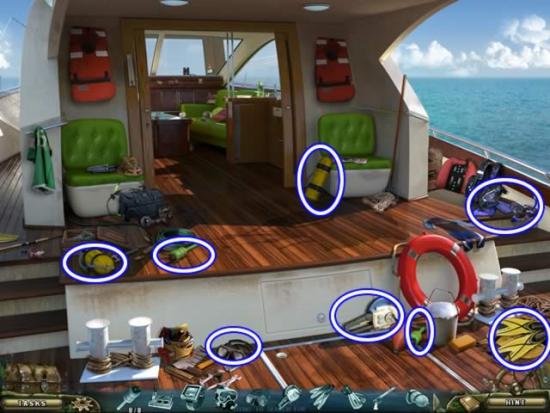
- Collect the eight pieces of diving equipment on the deck.
- Enter the cabin.
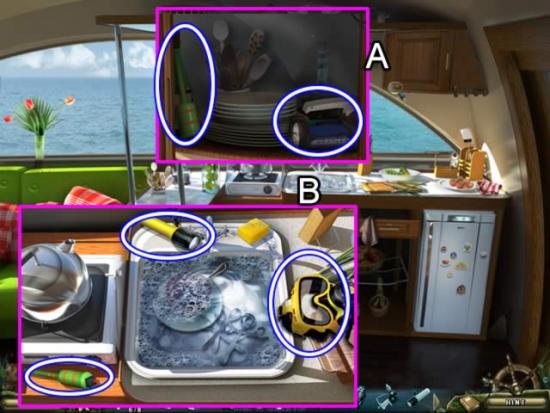
- Take the two pieces of equipment from the cupboard on the right (A).
- Zoom in on the sink area (B) and pick up three more pieces.
- Head left to the helm.
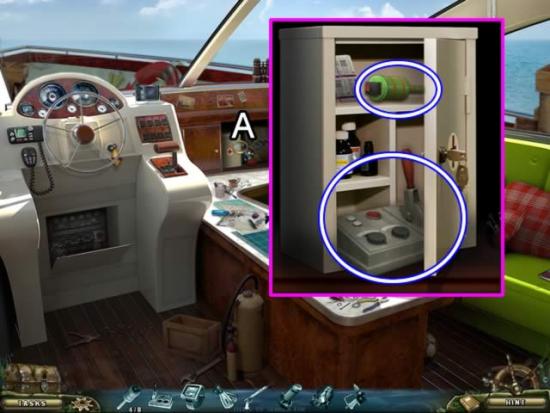
- Get the two pieces of equipment from the first-aid kit (A).
- Exit the cabin. Head left to the front of the boat.
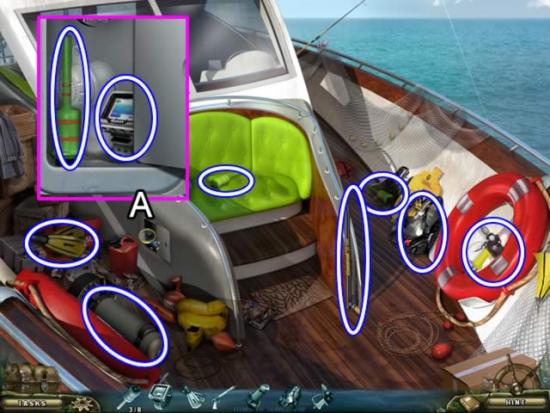
- Zoom in on the side panel (A) and get two pieces of equipment.
- Pick up the last seven pieces from the deck.
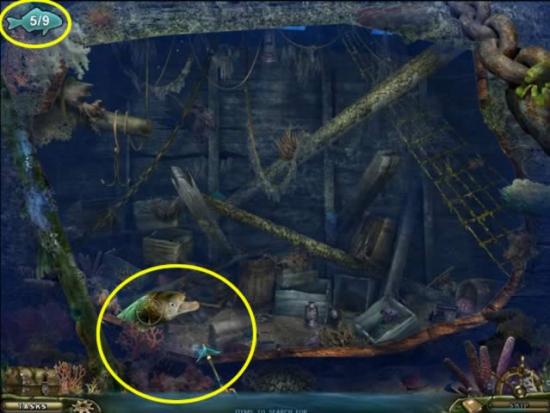
- Place the saw on the silhouette on the side of the ship to cut away the side panel.
- Play the mini-game. Use the spear gun to site on the fish. Click to pull the trigger. Kill nine fish to gain entrance.
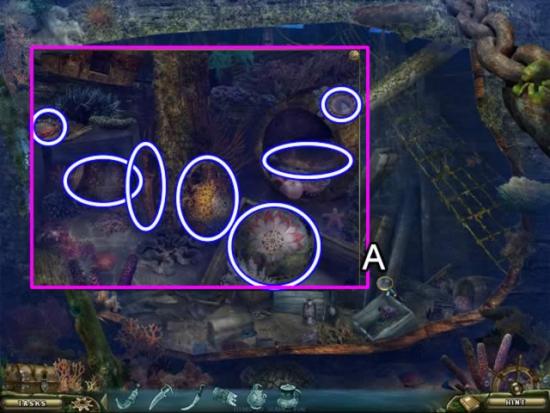
- Access the box on the right (A). Pick up seven pieces of treasure.
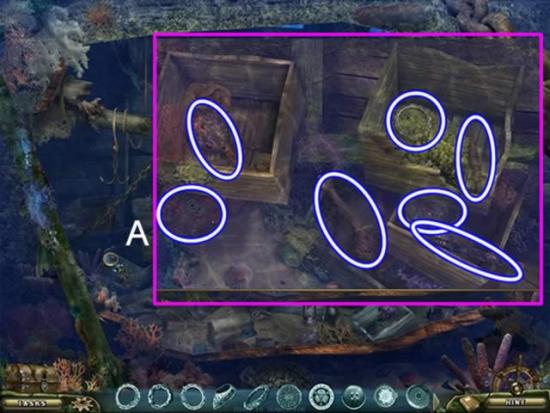
- Access the box on the left (A). Pick up another seven pieces of treasure.
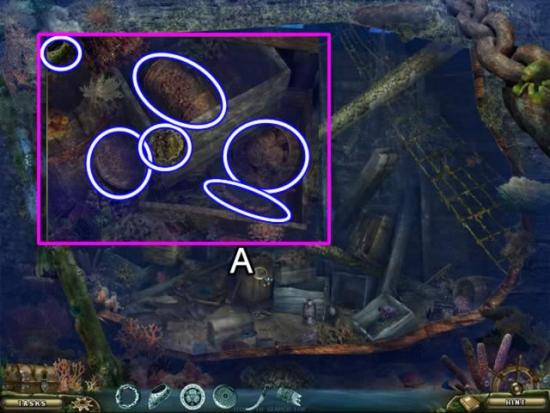
- Access the barrel in the middle (A). Pick up the last six pieces of treasure.
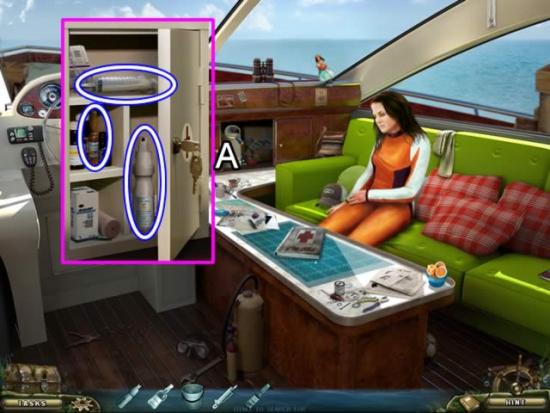
- Open the first-aid kit. Pick up the SYRINGE, SPRAY and AMPOULE.
- Go into the cabin.
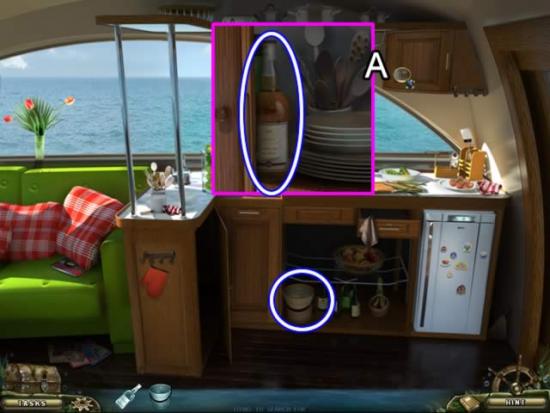
- Open the cupboard door (A). Get the WHISKEY.
- Take the pail of SALT WATER from under the sink.
- Return to the helm.
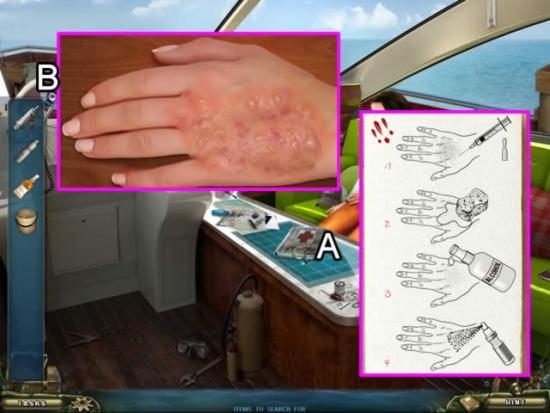
- Open the first-aid book on the table (A).
- Click Elizabeth to fix her hand.
- Take the items from inventory and apply them to the hand in the order indicated in the book.
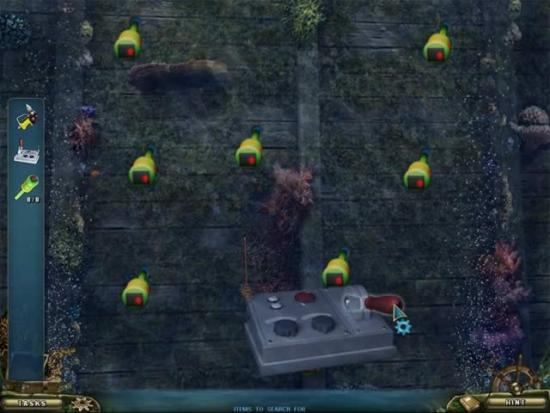
- Use the drill to drill eight holes around the area.
- Insert the explosives.
- Use the remote control to open the hold.
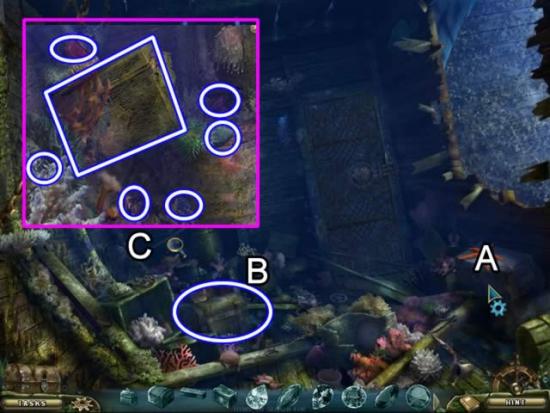
- Click the box on the right (A) to add more items to the search panel.
- Pick up the CHEST (B).
- Inspect the area on the left (C). Get the seven pieces of treasure.
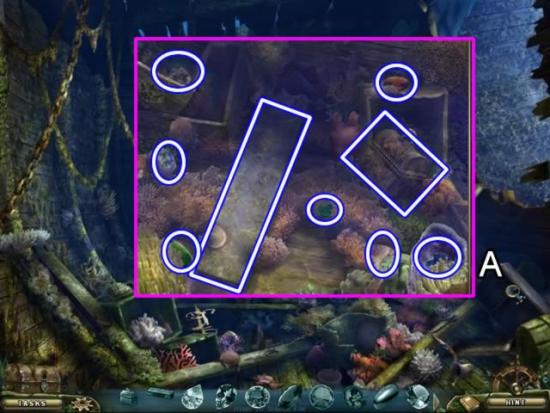
- Inspect the area on the right (A). Get the two CHESTS and seven JEWELS.
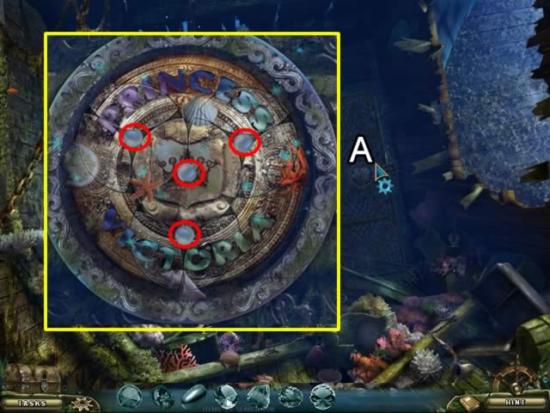
- Click the door to start a puzzle (A).
- Use the four pearls to rotate and exchange parts of the disks to form the above image.
- It is easiest to get either the top or bottom words formed first. Rotate and exchange to get the inner crown.
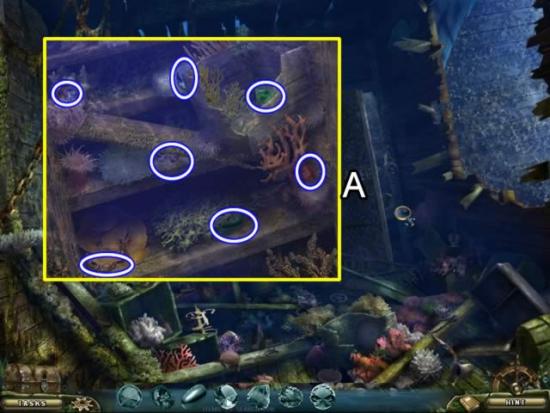
- Enter the door and collect the remaining seven JEWELS.
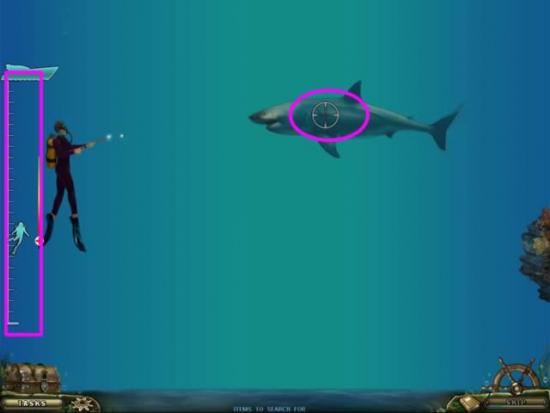
- Play the mini-game to get to the surface.
- Move the cursor over the shark. Click to shoot the spear gun. Continue shooting sharks until the diver reaches the surface.
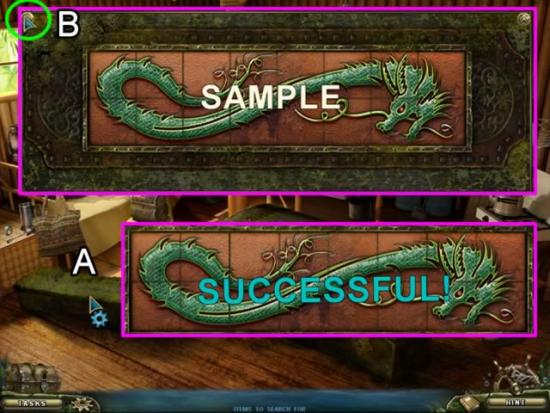
- Click the first chest (A) to open a slider puzzle. Click the “?” to see a sample of the completed puzzle. Tiles cannot be swapped directly. Start at one end and work toward the other.
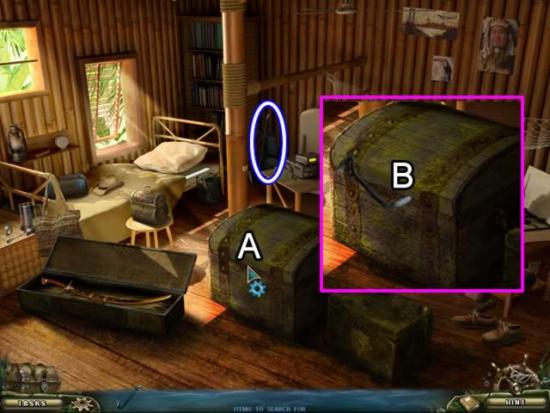
- Click the second chest (A) to get an item for the search panel.
- Pick up the crowbar in the corner. Use it to pry off the hinges (B).
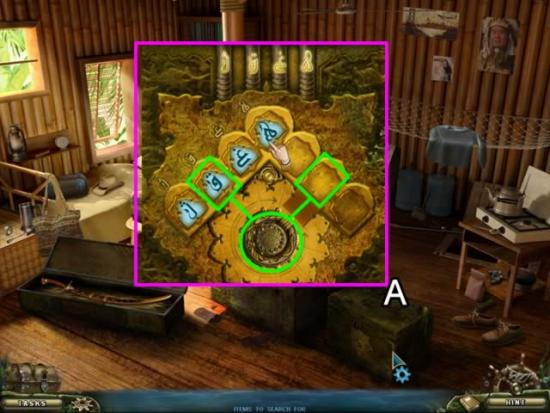
- Click the third chest (A) to open another puzzle.
- The goal is to align the symbols in the correct order and rotate them into the correct pattern. Use the circle and the two opposing squares to rotate a tile 45 degrees. Move the tiles between these two squares to keep rotating them. Use the two end slots to hold correctly aligned pieces. There is no re-set button so this puzzle can be time consuming.
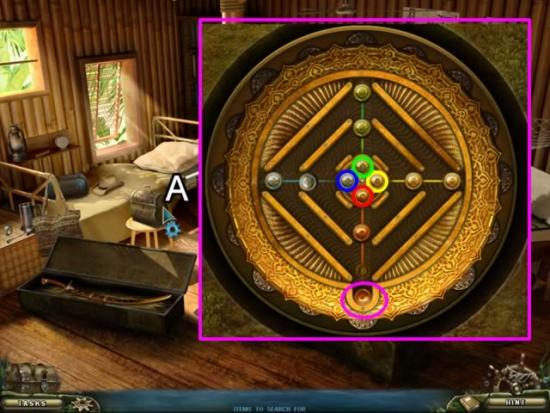
- Click the small chest on the stool to open a puzzle (A).
- Slide the balls around until the colors match those in the fixed center circle. Slide a ball into the outside circle. Balls inside can move to open slots. Rotate the outside ring to place the ball in the open hole. See the above inset for the solution.
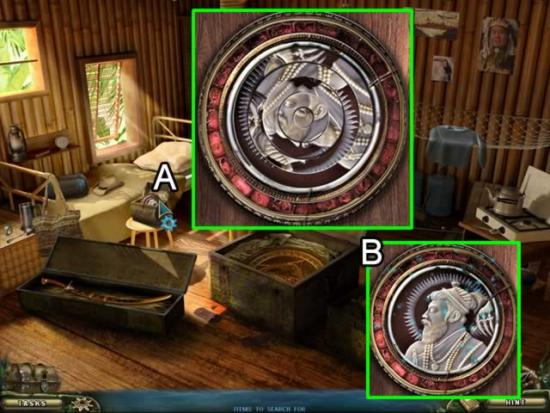
- Click the object inside the box to start a puzzle (A).
- Rotate the rings to form the cameo (B). Start with the inner most ring and work outwards.
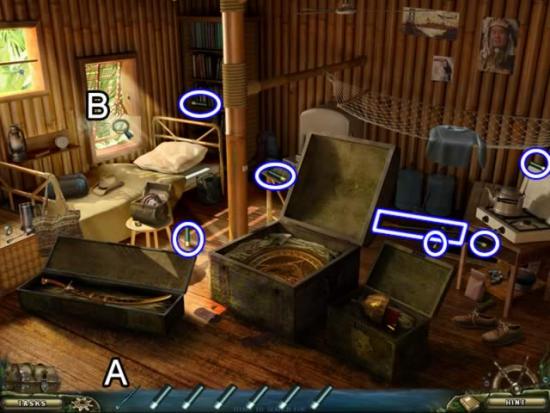
- Collect the SHOTGUN and six ROUNDS (A).
- Zoom in on the window (B) to start a game.
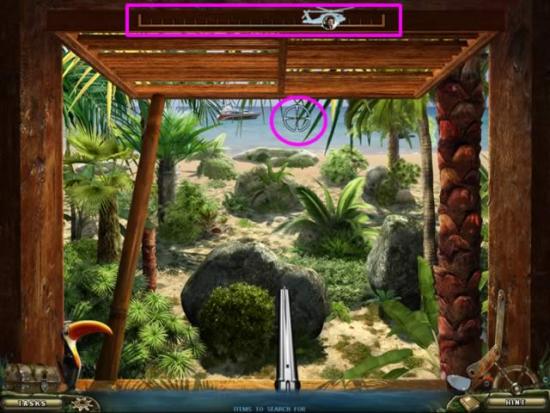
- Move the bulls-eye cursor and click to shoot the gun until the helicopter arrives.
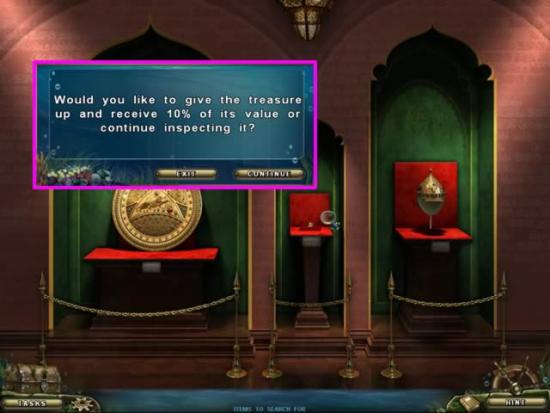
- To finish the game, inspect the treasure until the exit box appears.
Congratulations! You have finished playing Mystery of the Missing Brigantine.
More articles...
Monopoly GO! Free Rolls – Links For Free Dice
By Glen Fox
Wondering how to get Monopoly GO! free rolls? Well, you’ve come to the right place. In this guide, we provide you with a bunch of tips and tricks to get some free rolls for the hit new mobile game. We’ll …Best Roblox Horror Games to Play Right Now – Updated Weekly
By Adele Wilson
Our Best Roblox Horror Games guide features the scariest and most creative experiences to play right now on the platform!The BEST Roblox Games of The Week – Games You Need To Play!
By Sho Roberts
Our feature shares our pick for the Best Roblox Games of the week! With our feature, we guarantee you'll find something new to play!All Grades in Type Soul – Each Race Explained
By Adele Wilson
Our All Grades in Type Soul guide lists every grade in the game for all races, including how to increase your grade quickly!


