![All VV Ultimatum Titles [How to Get]](/wp-content/uploads/2026/06/vv-ultimatum-titles.jpg "All VV Ultimatum Titles [How to Get]")
All VV Ultimatum Titles [How to Get]
Do titles provide buffs?


Welcome to the Mystery of Mortlake Mansion walkthrough on Gamezebo. Mystery of Mortlake Mansion is an Interactive Hidden Object Adventure game played on the PC, created by Stella Games, and originally published by Playrix Entertainment. This walkthrough includes tips and tricks, helpful hints, and a strategy guide for completing Mystery of Mortlake Mansion.
Welcome to the Mystery of Mortlake Mansion walkthrough on Gamezebo. Mystery of Mortlake Mansion is an Interactive Hidden Object Adventure game played on the PC, created by Stella Games, and originally published by Playrix Entertainment. This walkthrough includes tips and tricks, helpful hints, and a strategy guide for completing Mystery of Mortlake Mansion.
Profiles: If you have played previous games from related game studios, the game might already know your name. Click on “If this is not you” to create a new player profile. Profile names can contain up to nine characters.
For each Profile, you must choose to be a male or female character, which will affect the voice acting when your Hero character speaks.
Options/Settings: Set your preferred volume level for Music and Sound Effects. The voice acting is actually quite good, so do not turn your sound off completely, or you will miss lots of the fun. During game play if you do not want to listen to the entire dialog, click on the screen to skip to the next line of dialog.
Select a Difficulty Level. High Difficulty will NOT allow you to use the interactive Map to transport yourself to other rooms. In addition, the Hint Amulet will normally recharge in 10 seconds, but in High Difficulty, it will recharge in 30 seconds. You can change the Difficulty Level at any time during the game by returning to the Options.
Full Screen is the default setting, but you can choose to play in Window mode by unchecking that option.
This walkthrough is designed to help you complete the game in an efficient way, which means that it might not always mention things in the current location that you cannot use at the current time. You are free to explore the game and pick up anything that is available, but you might not need to use some items until much later in the game.
Screenshots of Search (Hidden Object) scenes will not always highlight every object you can find. Some of Search scenes are randomized in the order in which items are presented to you. Key Inventory Objects or specific tasks that you must complete in order to move forward in the Game will always be explained. Key Inventory Objects will appear in the text as bold allcaps.
There are some minor errors in the Game’s clues for Hidden Object scenes. When possible, these will be pointed out.
Many of the Minigames/puzzles will be described, but might not be given detailed solutions. Some of them are so easy that describing an exact solution would take more time than it would probably take the average player to complete the puzzle. Some of them are much more difficult, but it is almost impossible to write systematic instructions for them. Others have very detailed solutions. Almost all of them may be Skipped if you are really stuck.
The interactive Map is a very useful tool. You will find a detailed discussion of it at the beginning of Chapter 2.
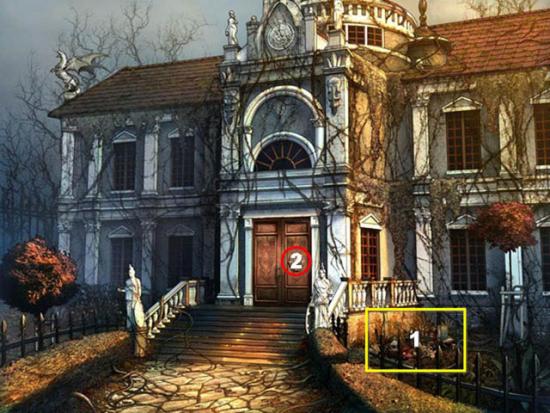
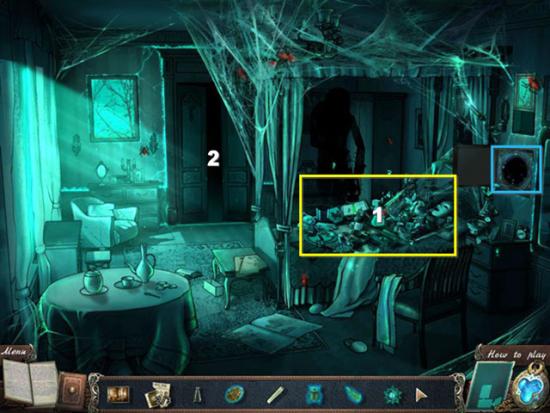
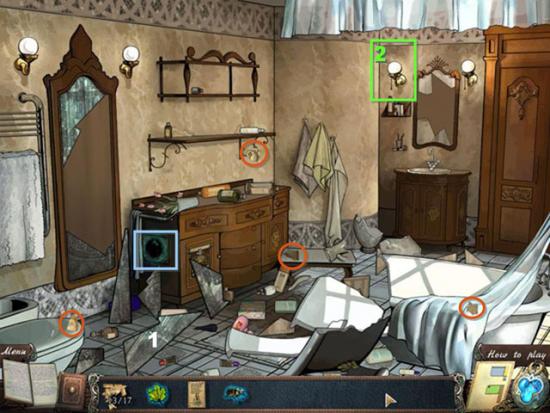
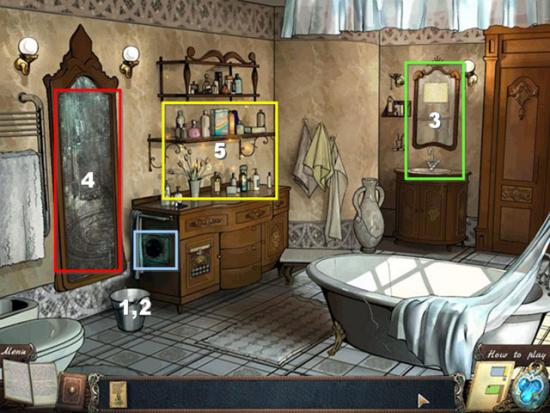
Outside the Mansion

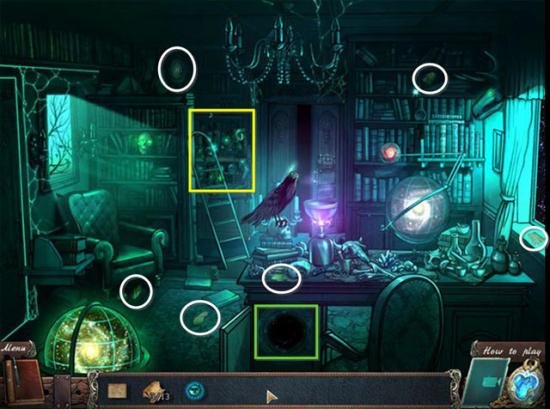
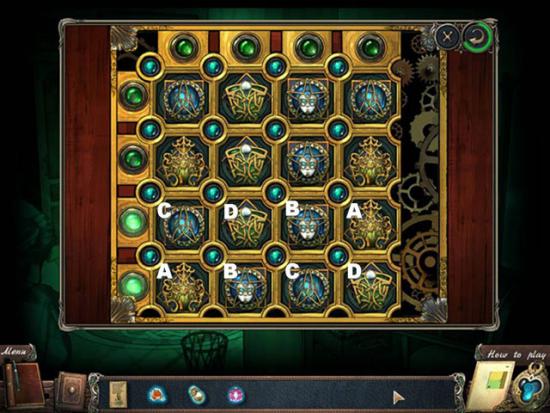
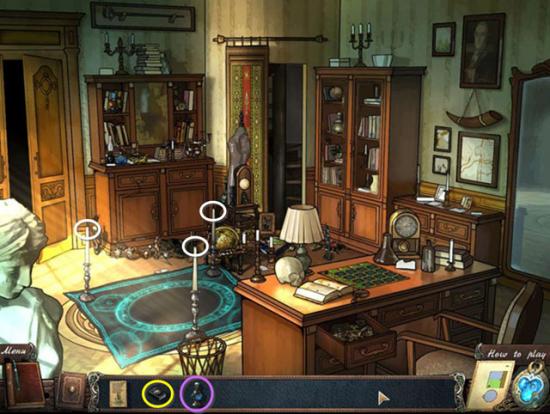
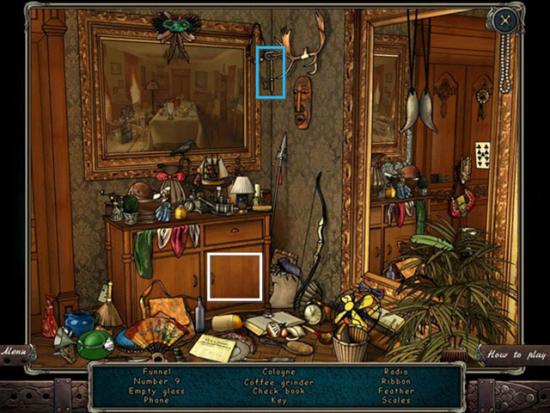
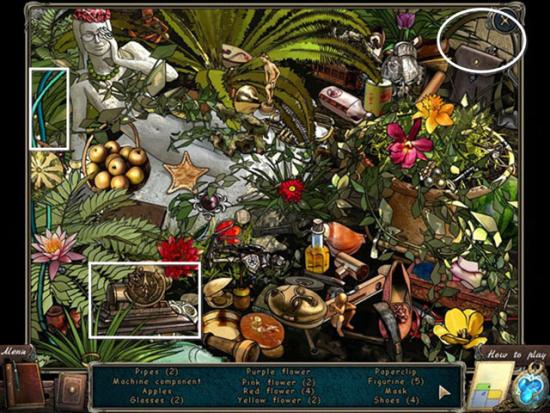
(1) Search the area next to the front steps (yellow), then (2) use the Key Items you find there on the Door Lock (red).
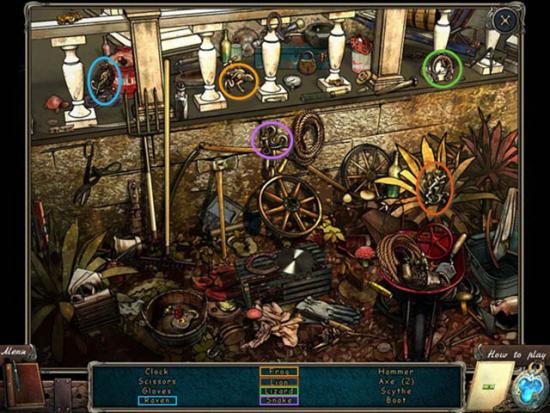
Only the Key Items you need are highlighted: raven (blue), frog (gold), lion (orange), lizard (green), and snake (purple). Find the rest of the items on the list using the Hint Amulet, if you need it.
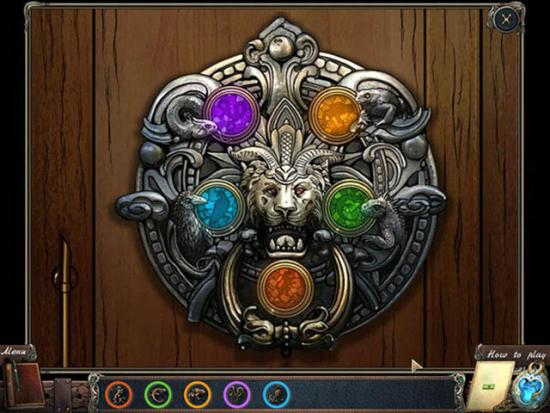
In the above screenshot, the highlights are color-coded to the places on the lock where each item needs to go.
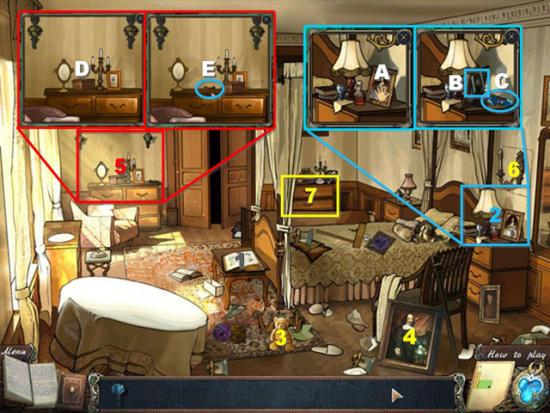
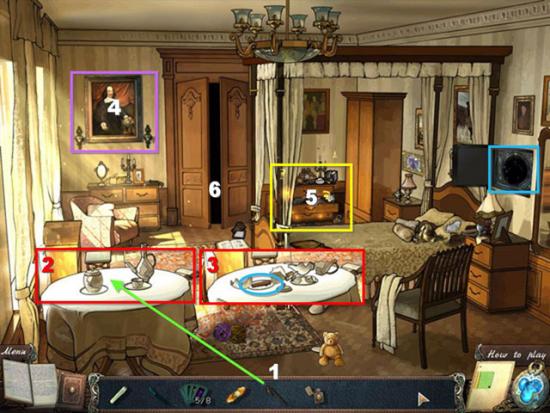
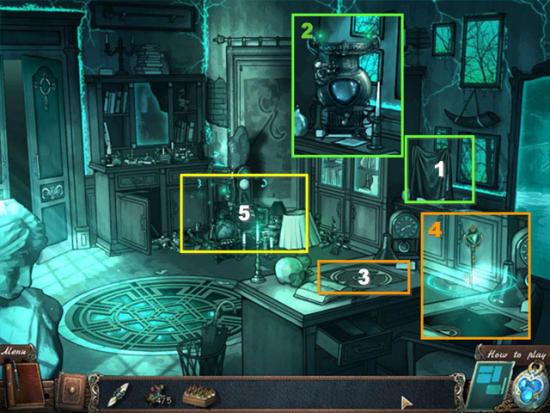
The Hall
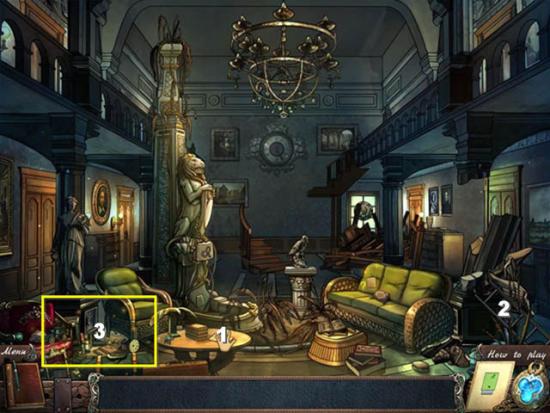
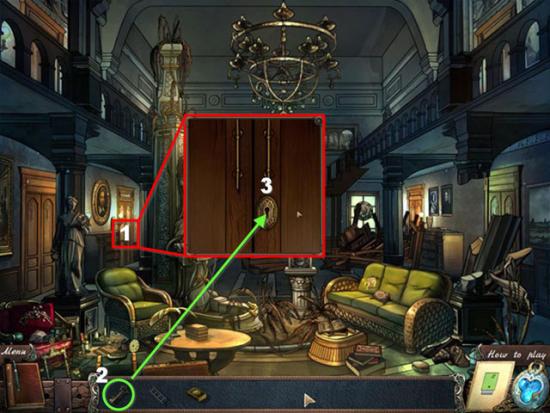
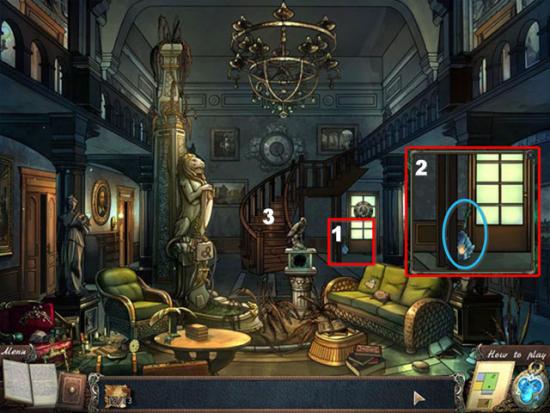
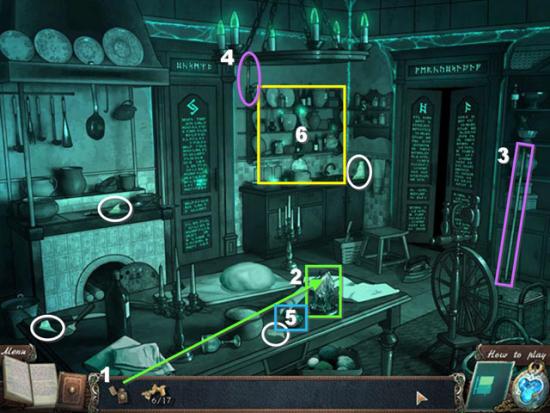
Pick up the Note from “R” (1), which provides you with the Library Key. Pick up the LADDER (2) and complete the Search scene (3).
The Matches item is highlighted in blue and all other items are highlighted in yellow.
Click on the Library Door (1), and then use the Library Key (2) in the Library Door Lock (3).
Note: You will encounter many locked Doors that require a particular KEY. The procedure will be the same for all such doors, so detailed screenshots may not be provided for each Door.
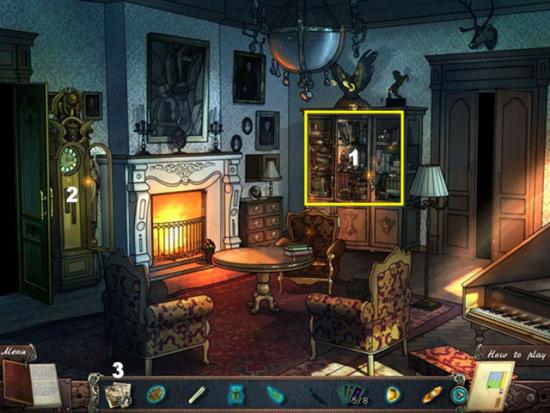
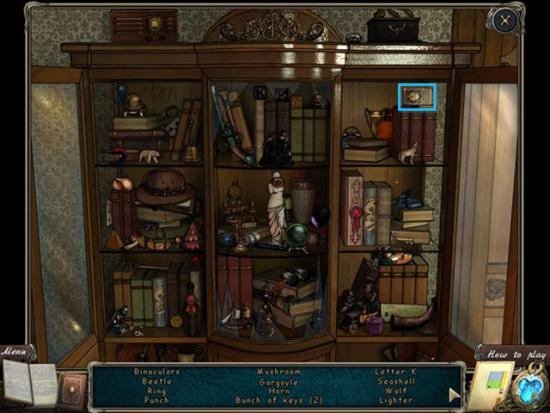
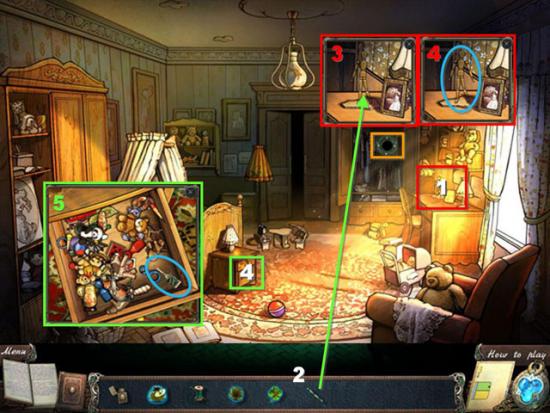
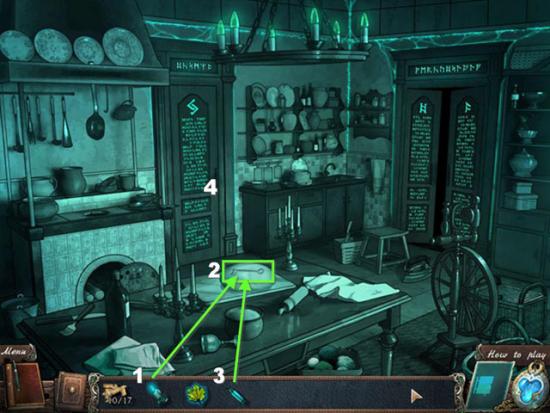
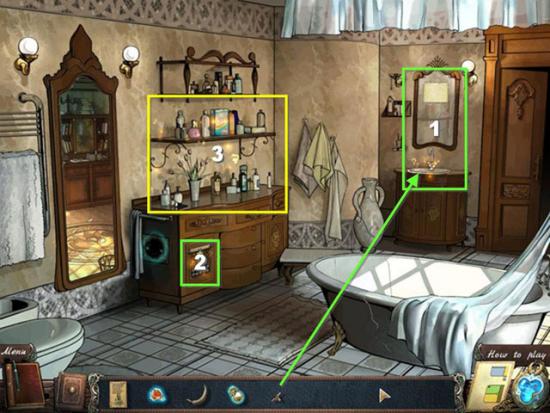
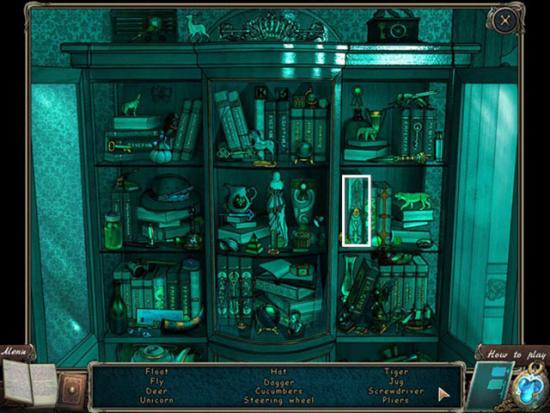
The Library
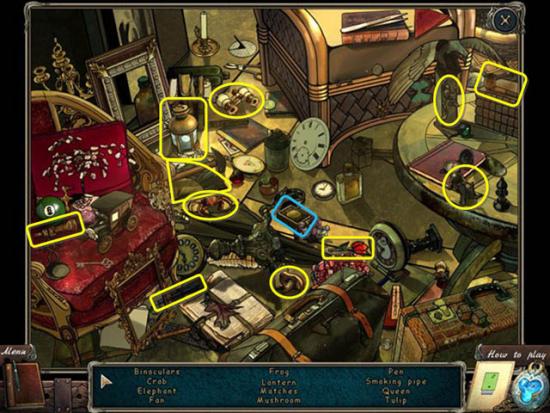
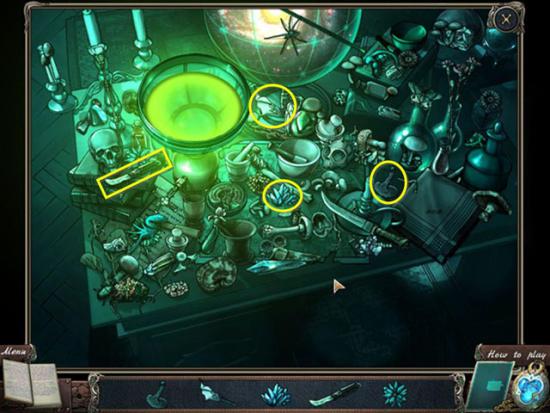
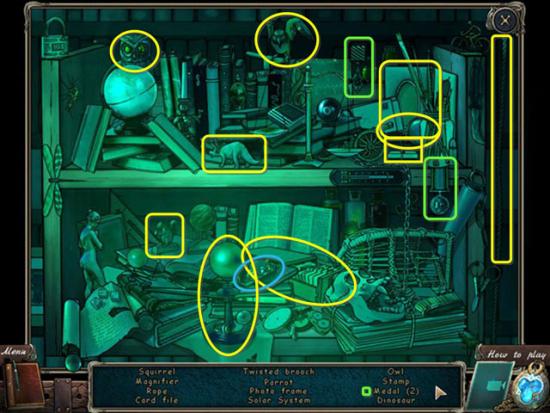
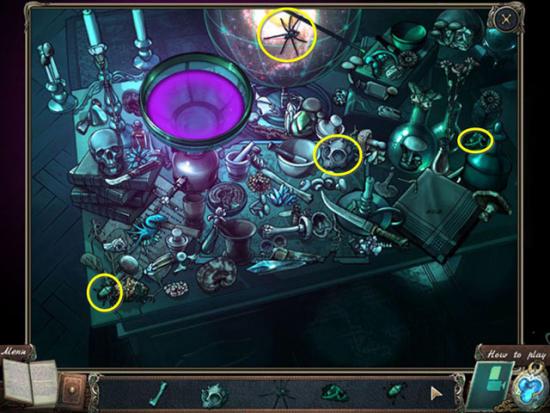
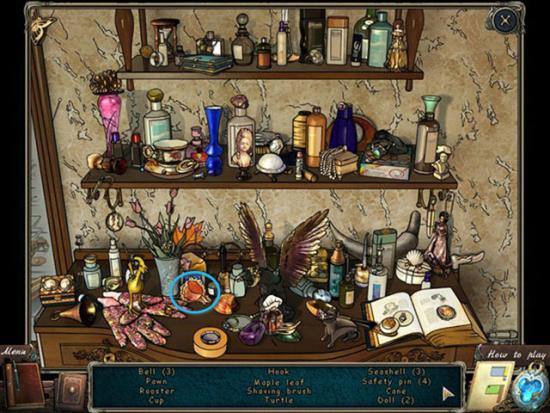
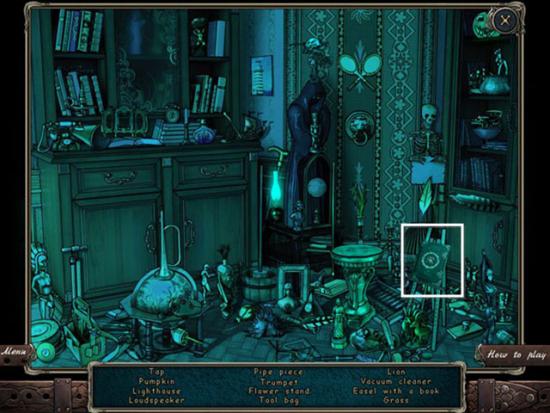
(1) Pick up the NOTE (1) revealing the Green Portal. (2) Place the Ladder near the bookshelves so you can reach the TAP (3). Complete the Search scene (4).
The Glass Bowl is highlighted in blue. Items that have multiple occurrences are highlighted in their own color. In this case 2 Balls (purple), 2 Dice (gold) and 3 Nuts (green). All other items are highlighted in yellow.
Note: Sometimes the Item descriptions appear in plural form (such as “Dominoes”) but only one item is actually present in the Search scene. When there really are separate multiple items to find, the number of items will appear after the Item description.
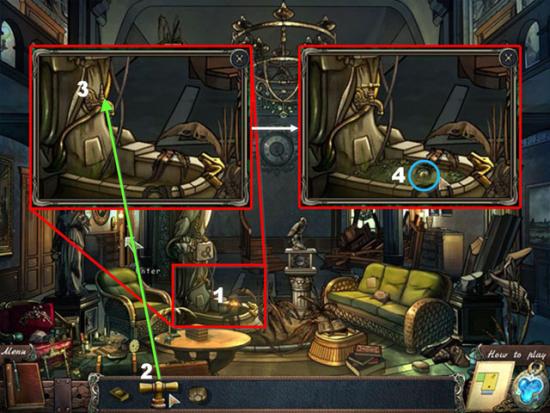
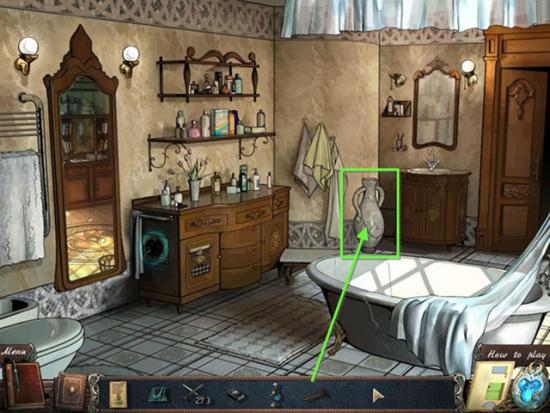
Return to the Hall. Click on the Dry Fountain beneath the Lion (1) (red). Place the Tap (2) on the handle (3) to fill the basin with water. Take the Eye (4).
Enter the Library again.
The Library
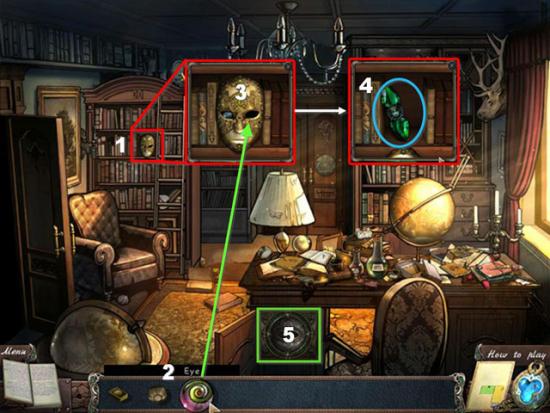
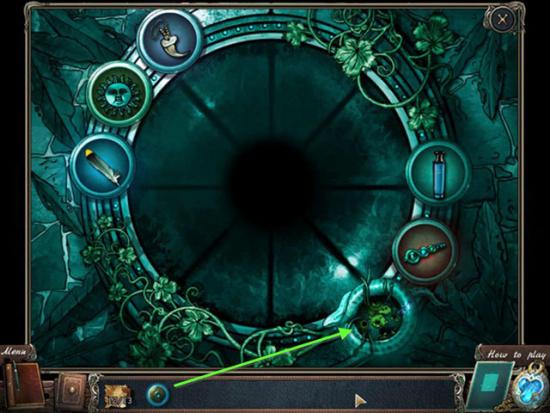
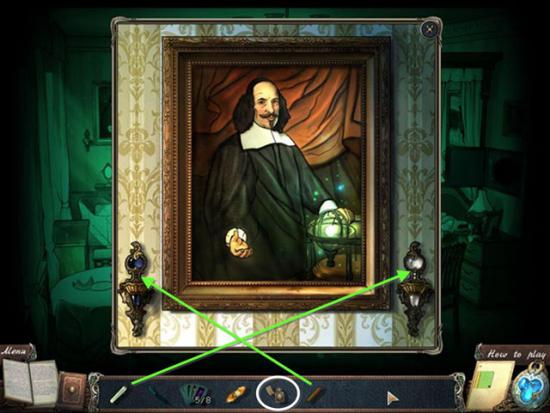
Click on the Mask on the bookshelves (1). Place the EYE (2) in the Mask (3), revealing the GREEN CRYSTAL (4). Click on the Green Portal (5) and place the Green Crystal in the Green Portal.
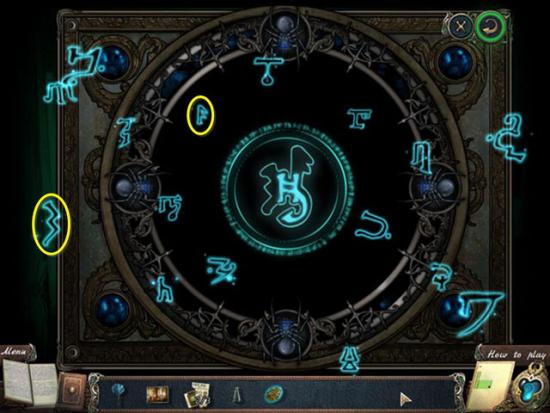
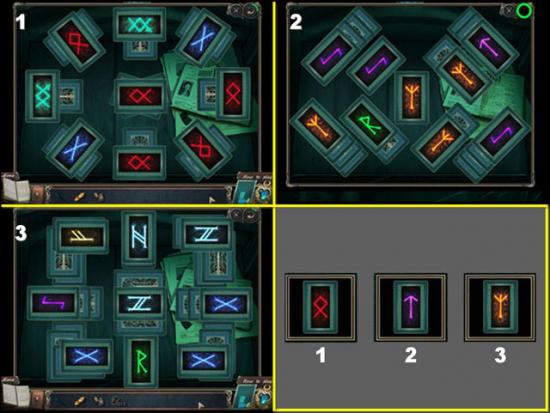
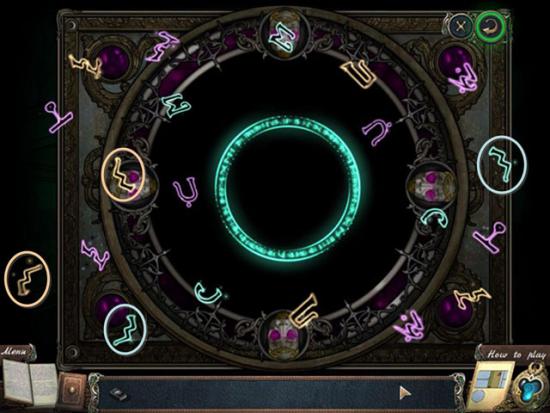
Green Portal Minigame
This is the first of several Portal Minigames. They all involve Mystic Runes of some sort, but the rules differ with each Minigame.
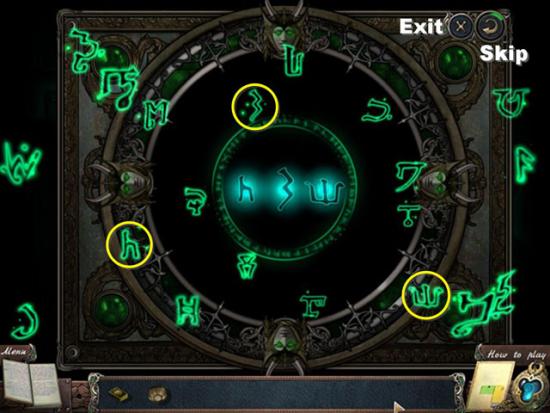
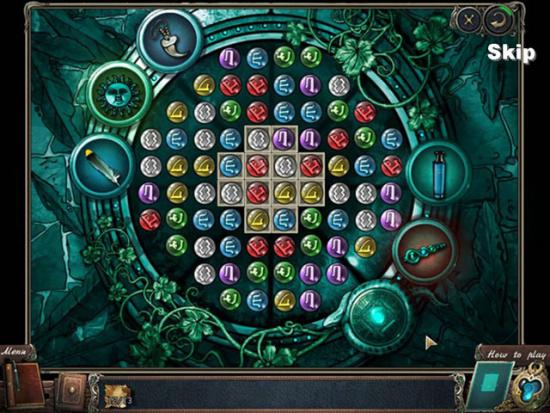
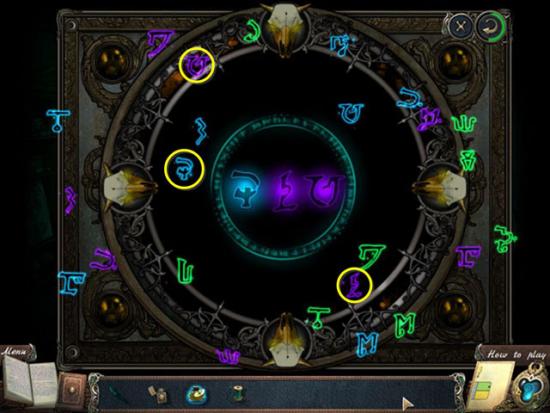
In the Green Portal Minigame, you must click on any of the floating Runes that are displayed in the central circle. The Screenshot shows you the first three Runes for this game (and it can be randomized). As you select correct Runes, they will be displayed along the border of the central circle and new Runes will appear for you to match.
When you have matched all the required Runes, (the central circle border is completed), the Minigame is finished (there will be unmatched Runes left over).
During the Portal Minigames, you may also:
The Shadowy Library
After the Green Portal is opened, you will be transported to the Shadowy Library. On your Map is a new page called “The shady side” which will contain “Shadowy” versions of Rooms from the main Map “Mortlake Estate”.
Note: You can travel back and forth between the Maps by clicking on the open Portals in any Room. For example, now that the Green Portal is open, you can travel from the Library to the Shadowy Library (or back) by clicking in the Green Portal in either room.

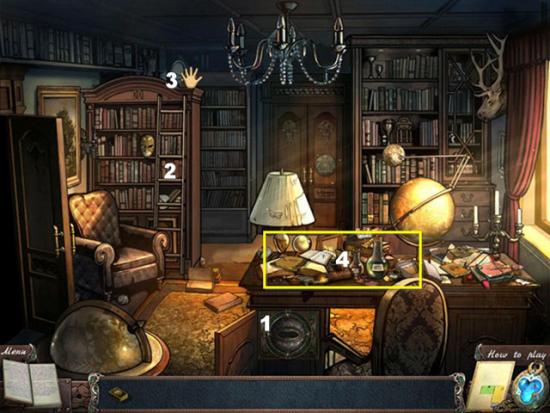
Click on the Books on the left side of the Shadowy Library (1). The Raven (2) will fly in through the window and you receive the RECIPE BOOK (3) in your inventory.
Click on the Raven (2) to talk to him. You find out that it only can say “Caw! Caw!” (for now).
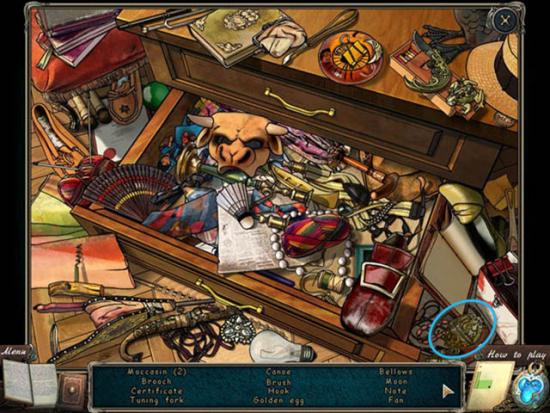
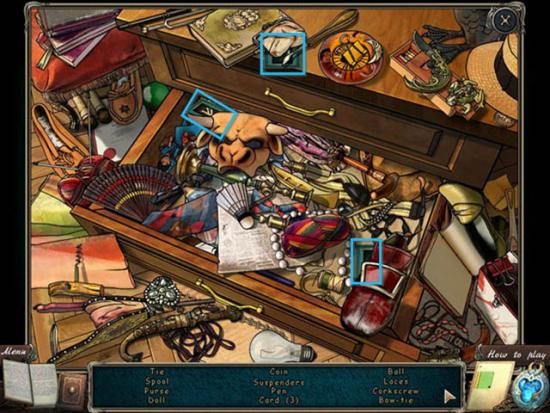
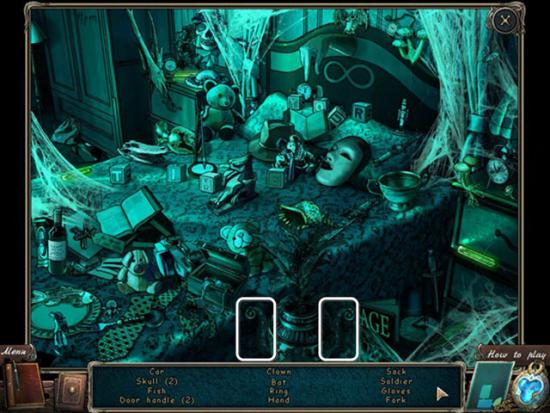
Open up the Recipe Book (3) to discover that its title is “Secrets of Potions and Elixirs” and it contains a recipe for a Voice Potion. You already have many of the necessary items, but pick up the Basil Potion (4) on the windowsill at the right.
Now you are ready to prepare your Voice Potion, so click on the Search scene (5) (yellow) on the desk.
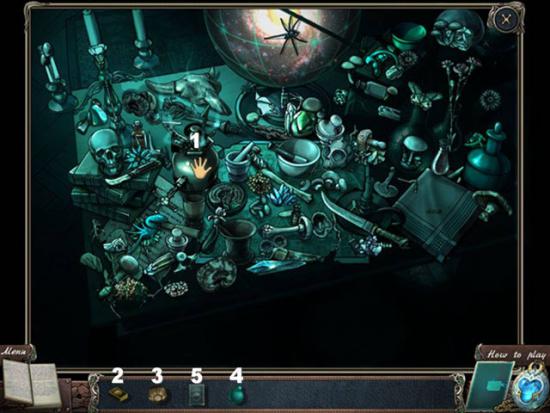
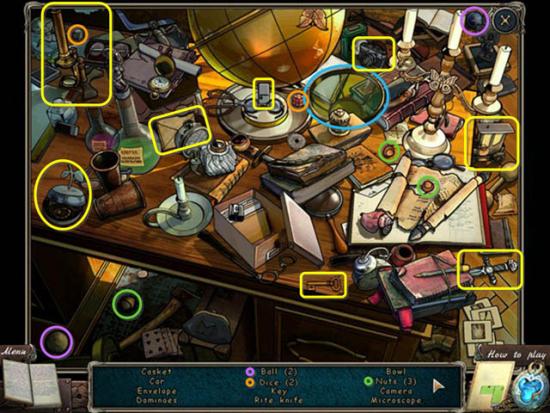
Click on the Burner (1) to turn on the gas. Light the Burner with the matches (2). Place the Glass Bowl (3) on the Burner. Add the Basil Potion (4) to the Glass Bowl. Finally, place the Recipe Book (5) in the Bowl.
Now you need to gather 15 ingredients for your Voice Potion. The first 4 ingredients are highlighted above. The order of the ingredients can vary, and each time you select a correct ingredient, it will be replaced by another in the search list. Some ingredients may obscure others. This Puzzle may not be Skipped.
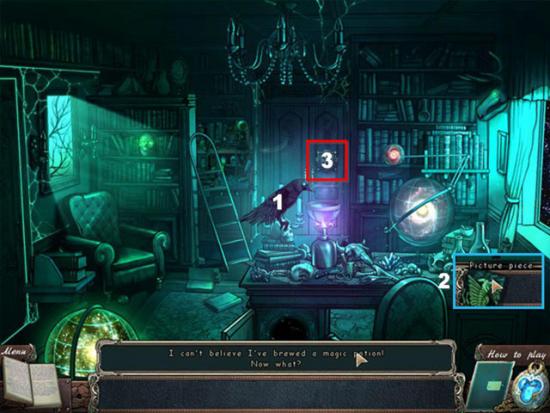
After the Voice Potion is completed, the Raven (1) will drink it and can now talk with you! He explains that you must look for the Book of Shadows, and then departs.
Pick up the Picture Piece (2), and then click on the Door Puzzle (3). Place the Picture Piece in the blank space in the Door Puzzle.
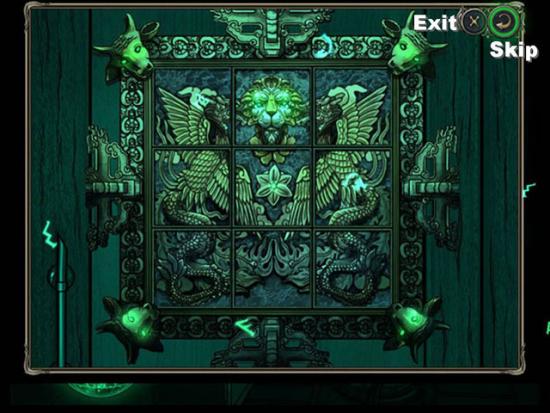
This Puzzle is extremely simple. You just need to click on any two pieces to swap their positions. The solution is shown above.
You may now enter:
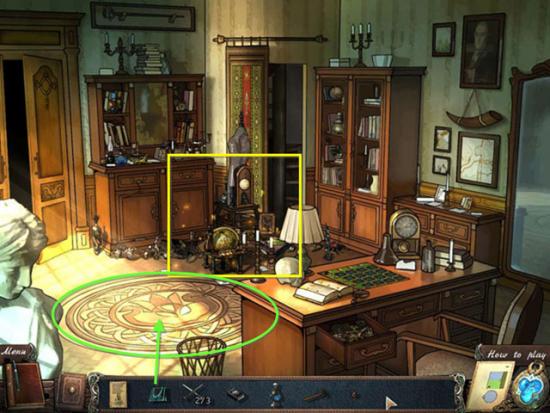
The Shadowy Observatory
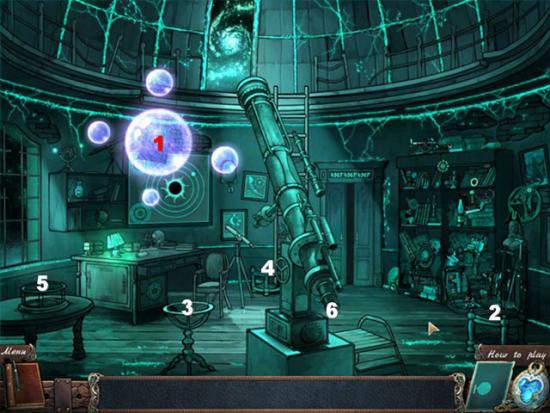
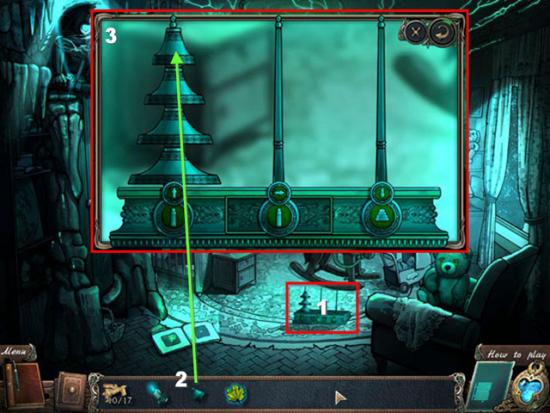
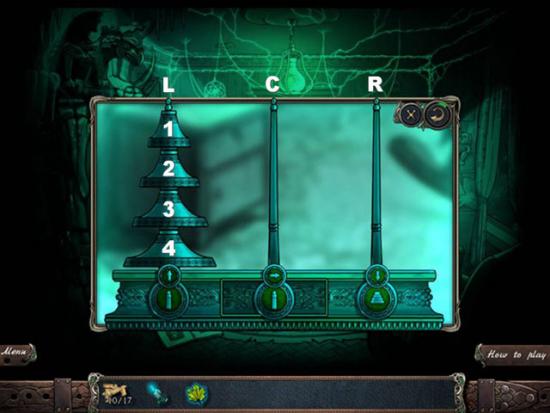
Notice the Book (1) floating in a protective shield. In order to free it, you will need to locate Globes (2-5) for each of the Globe Holders. Start by looking in the Telescope (6).
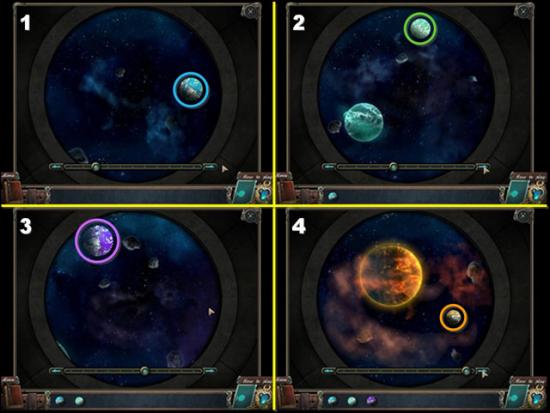
Use the Zoom button at the right of the screen to increase the Telescope magnification. You are looking for “still” planets (not spinning). Set the Zoom Control on the right side at:
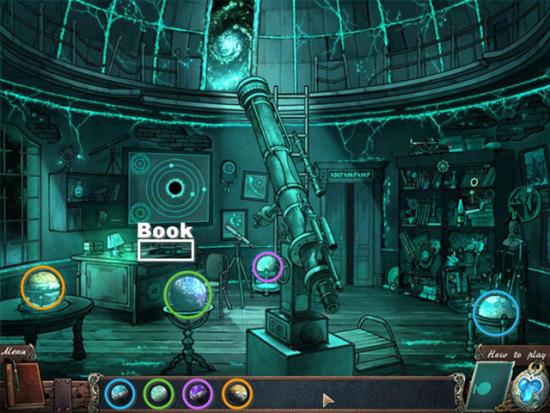
Place the Globes in their stands according to the colors in the screenshot. As you place each Globe, one of the protective shields will disappear, revealing the Book of Shadows (white).
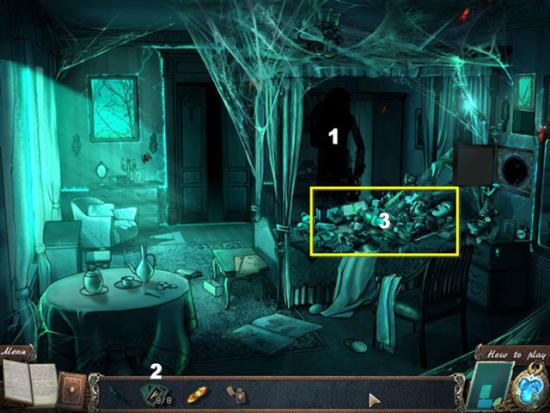
Fasten your seatbelt, and then pick up the BOOK OF SHADOWS on the desk. An Evil Magus appears and attempts to destroy the Book, scattering most of its pages.
The Raven urges you to find all the scattered pieces of the Book of Shadows.
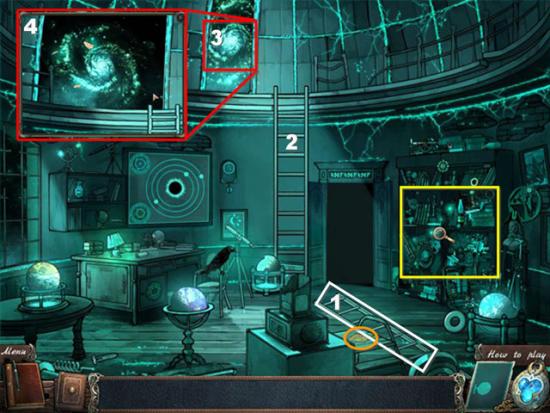
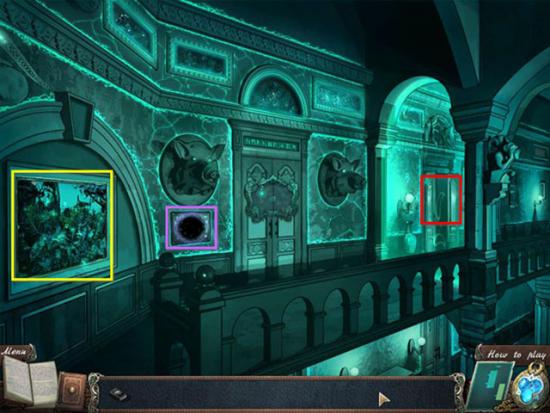
Pick up the Ladder (1) and place it against the railing (2). Open up the Observatory window (3) to reveal three Paper Scraps floating in space (4) for you to collect. There will be 13 Paper Scraps to collect, but they are not all in this location.
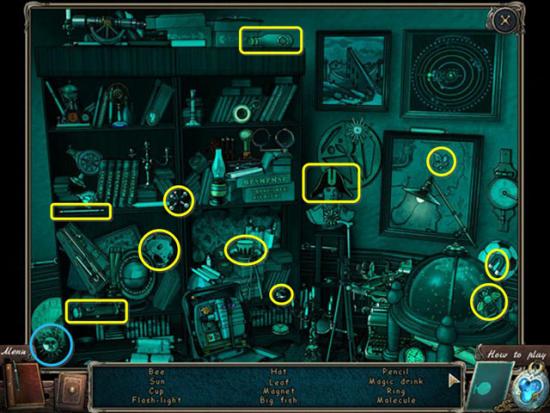
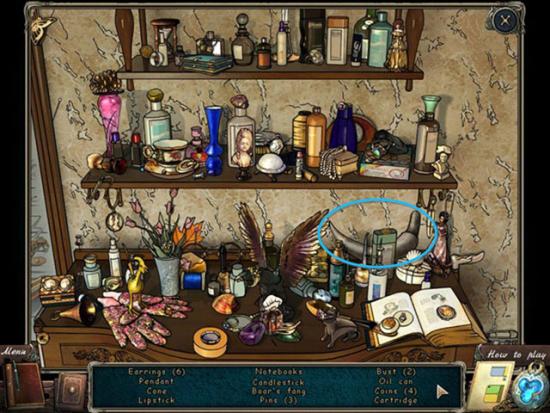
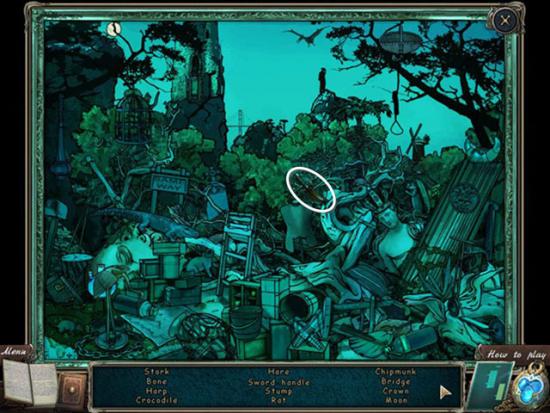
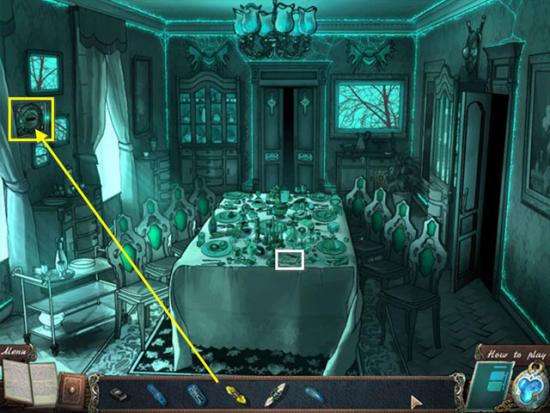
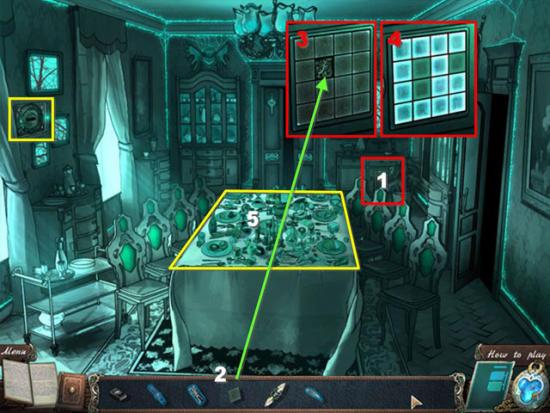
The Raven congratulates you, and urges you to look for more scraps in the Library, but before you do, pick up the Runic Note (gold) and complete the Search scene (yellow) on the bookshelves.
You collect the Sun Ingredient (blue) for the magic Book of Shadows. You will not need it until much later.
Click on the door to return to the Shadowy Library.
The Shadowy Library
Collect six more Book Scraps (white) then complete the Search scene (yellow).
You collect the Twisted Brooch Ingredient (blue) for the Book of Shadows.
Enter the Green Portal to return to the Library.
The Library

The Green Portal takes you back to the “normal” Library. Complete the Search scene (1) (yellow), and then solve the Library Door Puzzle (2) (red).
You collect the Lion’s Claw Ingredient (blue) for the Book of Shadows.
Click on the Library Door Puzzle (2).
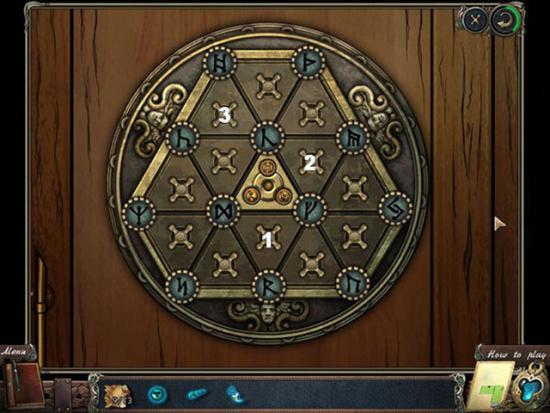
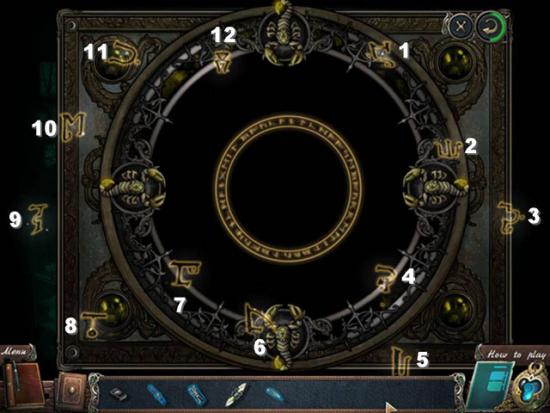
Place the Runic Code on the center of the puzzle. You must rotate the triangles (clockwise) to make the Runes match the code in the center. The solution shown above works for this particular puzzle, but THE STARTING POSITION OF THE RUNES IS COMPLETELY RANDOMIZED. If you Exit this puzzle and return, the Runes will be in different positions. You may Skip this puzzle, if you wish.
Completing this puzzle opens the door to:
The Living Room
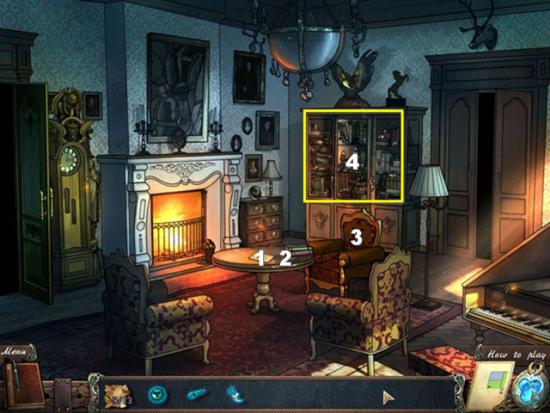
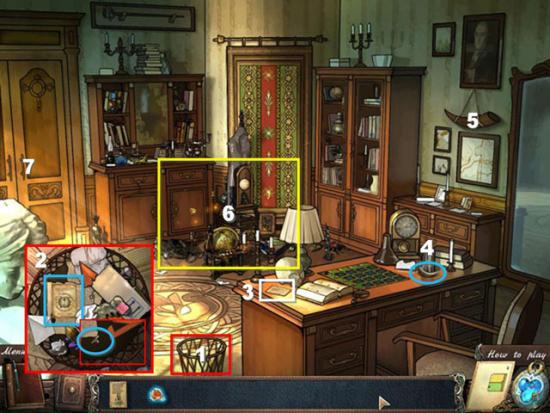
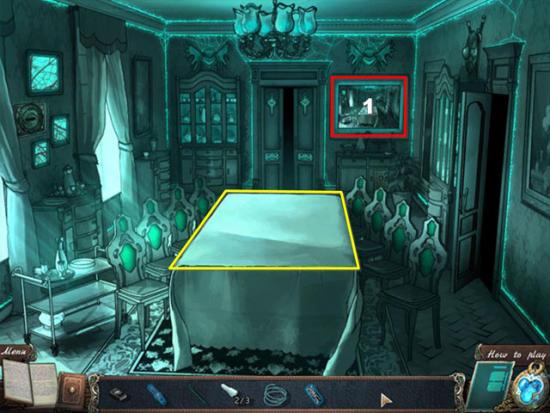
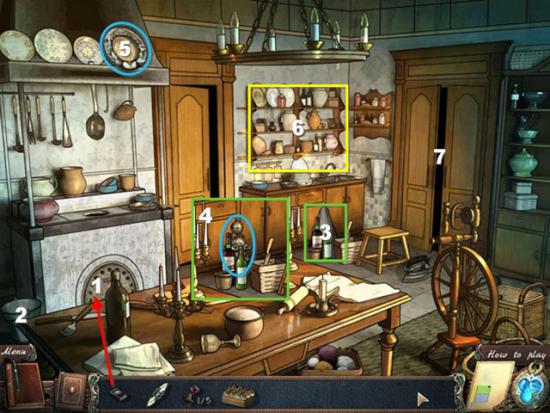
Pick up and read the Diary Day 3 (1), and the Scissors (2). Move the Armchair (3) to get access to the Hutch (4) for a Search Scene.

You collect the Bottle Ingredient (blue) for the Book of Shadows.
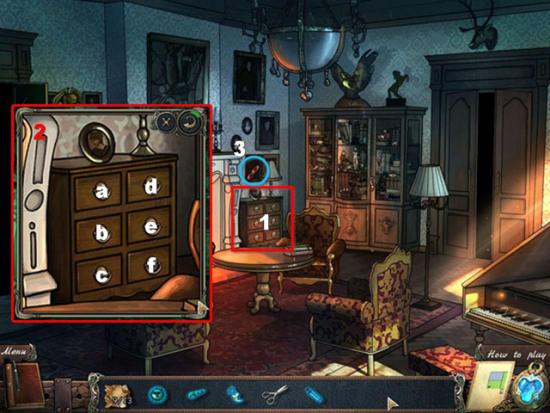
Click on the Chest of Drawers (1) to open up a new puzzle (2). You need to open all the drawers. As you open drawers, other drawers will close. This puzzle is randomized, but one sequence that worked is a-b-c-e-b-d-f-e-d-a. Your results might be different. You may Skip this puzzle, if you wish.
After all the drawers have been opened, they will all close again, and a panel opens in the wall, revealing the Red Crystal (3).
Go through the door to the right, into the Hall.
The Hall
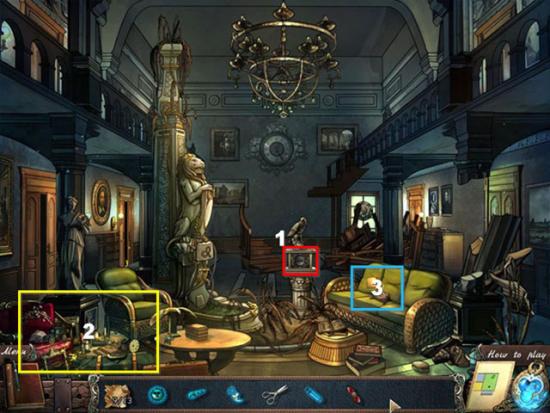
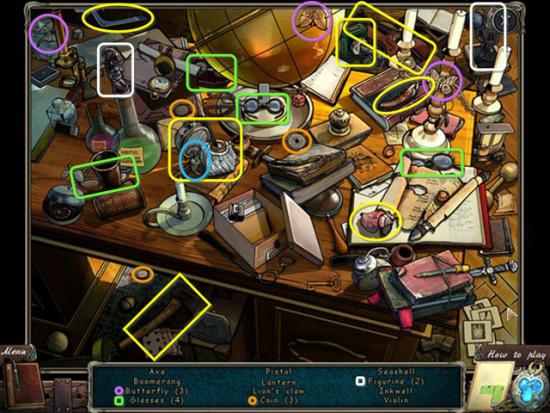
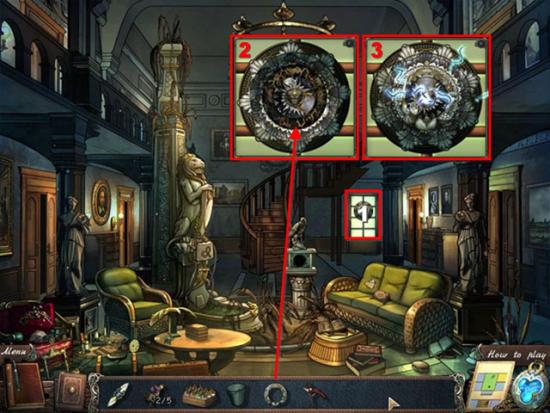
Click on the Raven statue (1) on the pedestal to reveal the Red Portal—but do NOT use the Red crystal on it yet—you need to gather a few more things first (otherwise you will have to return here anyhow). Complete the Search scene (2), and then examine the Couch (3).
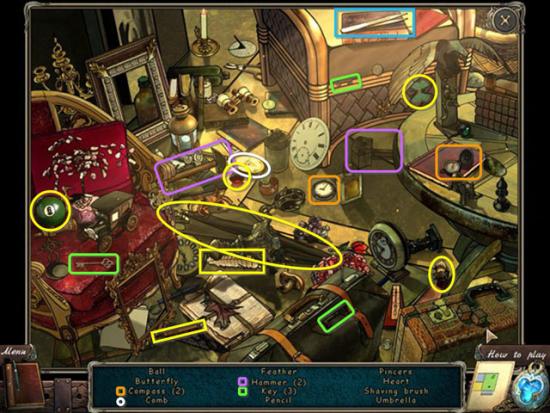
You pick up the Pincers (blue) which we would normally call “Tweezers” in Standard English. There are some minor English translation mistakes. In the screenshot above, for example, the “Comb” (white) we would normally call a “Brush” or more specifically a “Hair Brush” in Standard English.
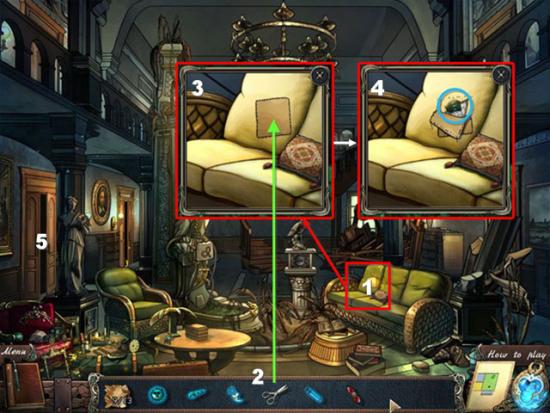
Click on the Couch (1). Then use the Scissors (2) to cut the Patch (3) revealing the Magic Activator (4) (blue). Return to the Living Room (5).
The Living Room
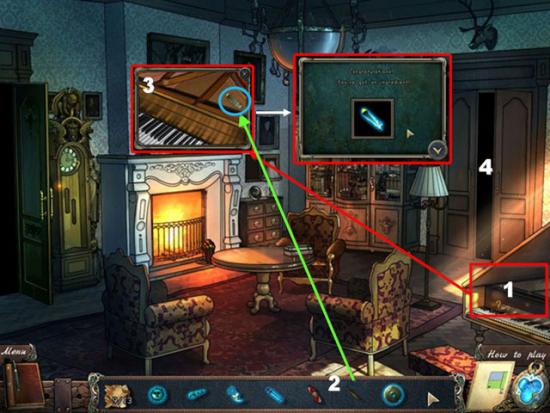
Click on the Piano (1). Use the Pincers (Tweezers) (2) to gather the Feather Ingredient (3) for the Book of Shadows. Return to the Hall (4). Place the Red Crystal in the Red Portal
Red Portal Minigame
In the Red Portal Minigame, you must match pairs of Runes. The order in which you select them does not matter. You may Skip this Minigame, if you wish.
After you have matched all the pairs required, you enter:
The Shadowy Hall
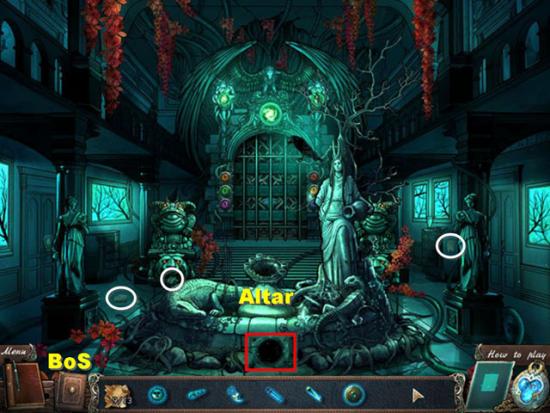
Pick up the 3 available Paper Scraps (white). The Red Portal (red) can take you back to the normal Hall (but do not go there yet). Click on the Book of Shadows (BoS) to view how the current Ingredients should be used on the Altar.
When you get to the Altar, you must place the Ingredients in their proper spaces as indicated. It does not matter in which order you place them, but each Ingredient must go in a specific slot. Click on the Altar!
Here, all the Ingredients have been placed in the proper slots. The last Item to add is the Magic Activator. Put it in its slot, and then click on it.
This is a “Match 3” type of Minigame. Click on any two adjacent Runes to swap their positions and try to create vertical or horizontal groups of 3 or more of the same Rune. All Matched Runes will disappear and additional Runes will drop from the top of the screen. Any Matches that occur as Runes drop will automatically disappear.
Your objective is to clear all the Runes in the Grey Boxes in the middle of the screen. Of course, you can Skip this Minigame, if you wish to.
After you complete (or Skip) the Minigame, you will receive the Green GATE Key.
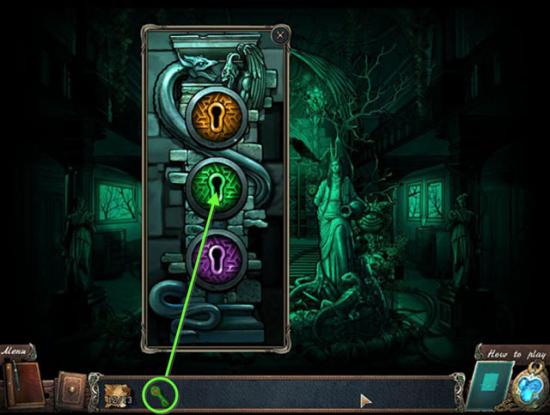
Click on the locks on the left side of the Gate at the rear of the Shadowy Hall. Place the Green Gate Key in the Green Lock.
An animated scene shows that the Hall has been restored!
Another Diary Note (Day 5) falls to the ground. Pick it up to add it to your Journal.
Note: Each major section of the game will follow a similar pattern:
Map Discussion
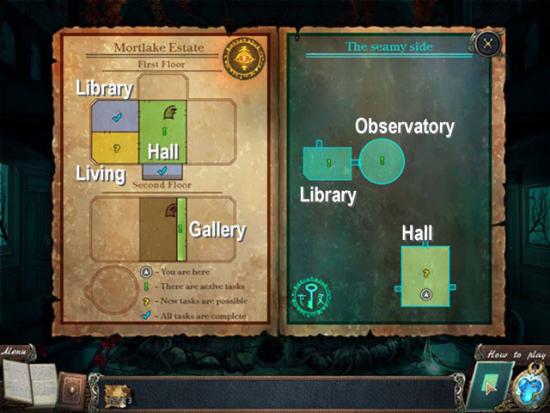
On the left are the available rooms in “normal” Mortlake Estate and on the right are the “shadowy” versions of those rooms. Note that the rooms are NOT connected in the same fashion on both sides of the map.
If you have opened a Portal (such as the Green Portal in the Library or the Red Portal in the Hall) you can travel through the Portals to the matching room on the other side of the Map. In High Difficulty mode, that is the ONLY WAY to travel between the two sides. In Normal mode, you can click on any room on the Map to transport yourself there instantly.
The Map Legend explains the symbols on each room.
The Hall
Although the Game suggests that you start exploring the Second Floor, you should first return to the Hall. You can travel there through the Red Portal in the Shadowy Hall or use the Map and click on the Hall in Mortlake Estate.
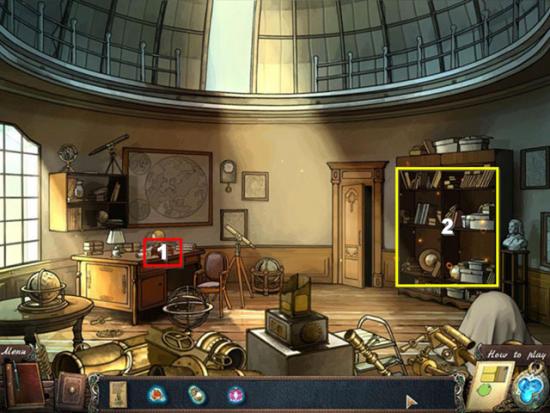
Zoom in near the back door (1) to get the Feather Duster (2). Then go upstairs (3).
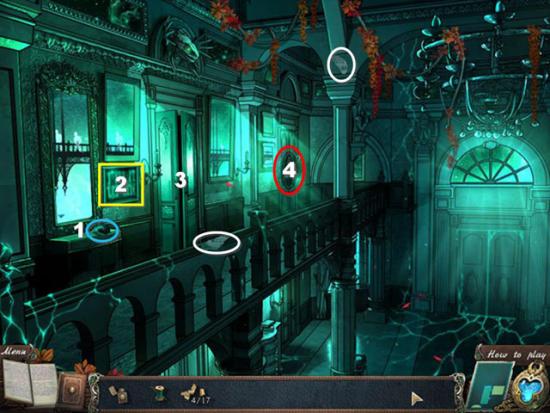
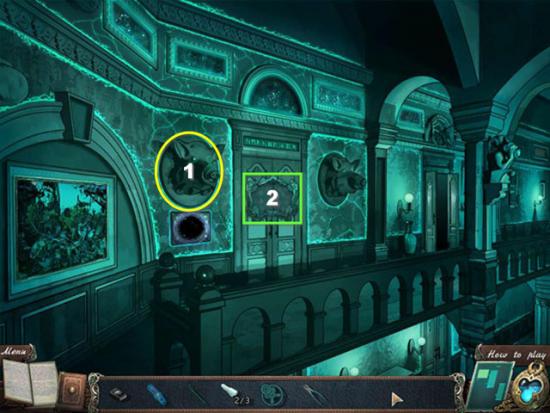
The Hall – Gallery
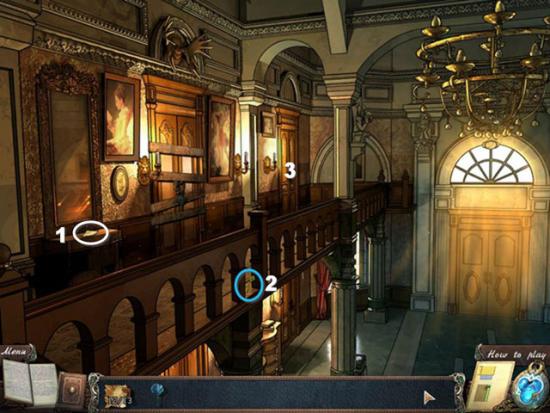
Pick up the final Paper Scrap (1) (white). Get the Bedroom Key (2) so you can unlock the Bedroom (3).
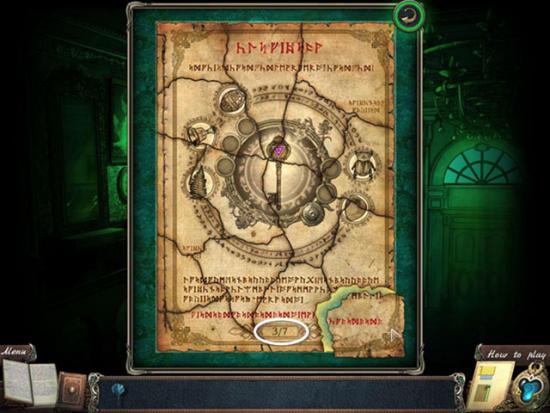
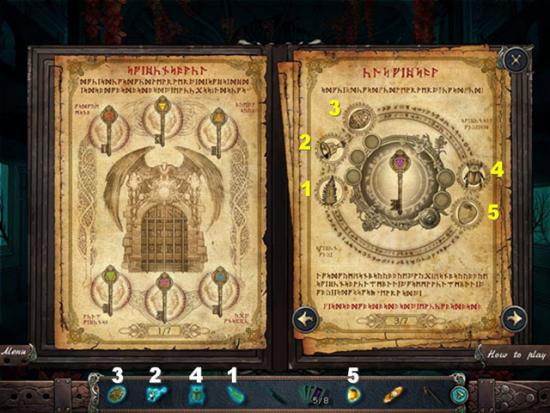
Complete the Jigsaw Puzzle by clicking and dragging the Paper Scraps to their outlined positions on the page. You have now repaired Book of Shadows Page 3/7, identifying the Ingredients you need to gather for the Purple Key.
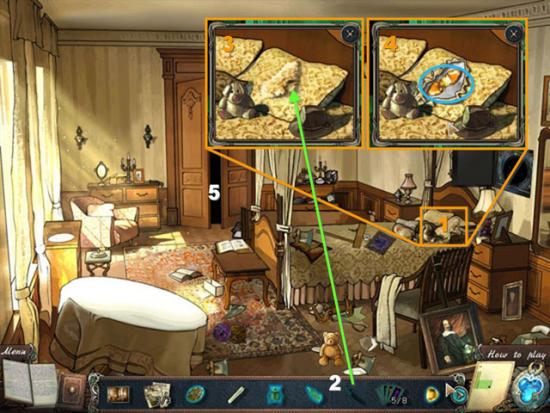
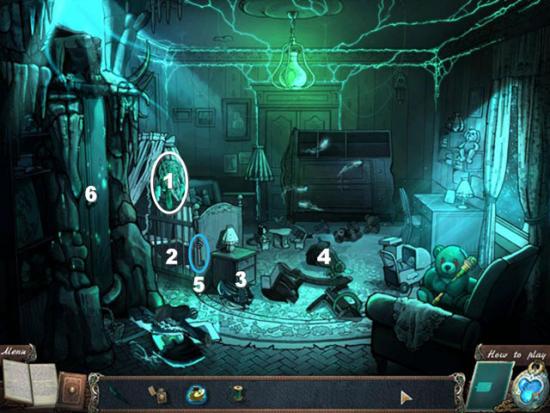
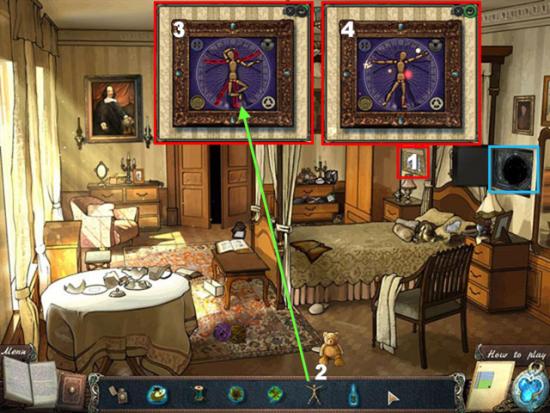
The Bedroom
Click on the Book (1) (grey) on the table at the bottom of the bed to reveal a Gallery Photo, with the solution to the Candle Puzzle in the Hall Gallery (needed much later).
Zoom into the Bedside Stand (2) (blue) and then move the Photo (A) to reveal a Time SETTING (B) (1 of 3) and the Blue Crystal (C).
Click on the Teddy Bear (3), and then click on the detritus behind it to reveal another Time Setting (2 of 3).
Click on the Painting (4) to reveal a Flask.
Zoom into the Chest of Drawers (5) (red) on the left side. Then move the Box (D) to reveal the Bedside Stand Key (E).
Click on the Wall Sconce (6) above the bedside table to reveal the Blue Portal! (Do not use it yet).
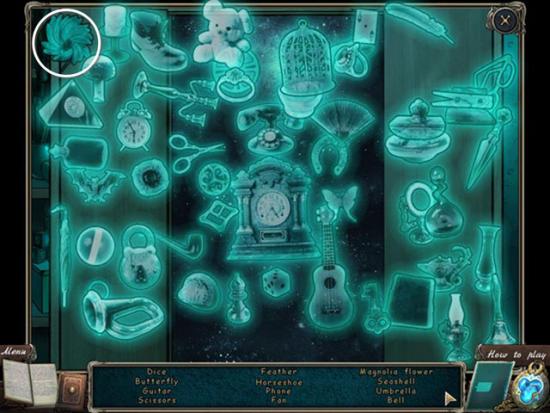
Finally, complete the Search scene (7) (yellow), after using the Bedside Stand Key to unlock the drawer.
You collect the Golden Egg Ingredient (blue).
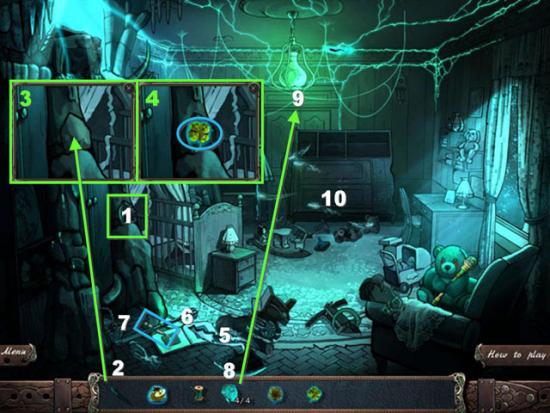
Note: From this point onward, only Key Items will be highlighted in Search scenes, unless there is something special to point out about other items.
NOW you can put the Blue Crystal into the Blue Portal.
Blue Portal Minigame
In the Blue Portal Minigame, you must select floating Runes to match the flashing symbols that make up the picture in the center of the screen. In the Screenshot above, there are two Runes highlighted in yellow that will complete the current picture. You may Skip this Minigame, if you wish to.
The Blue Portal leads (of course) to:
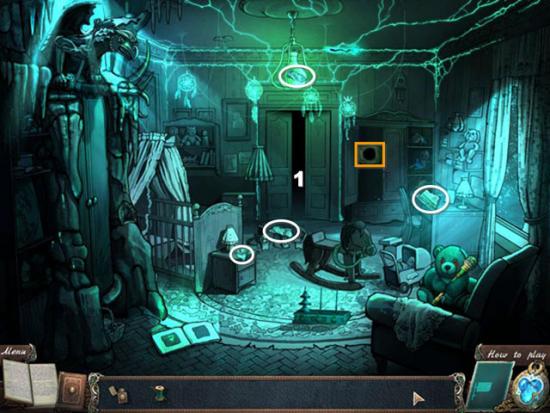
The Shadowy Bedroom
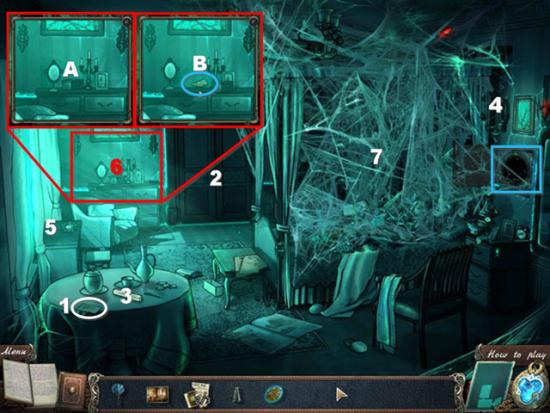
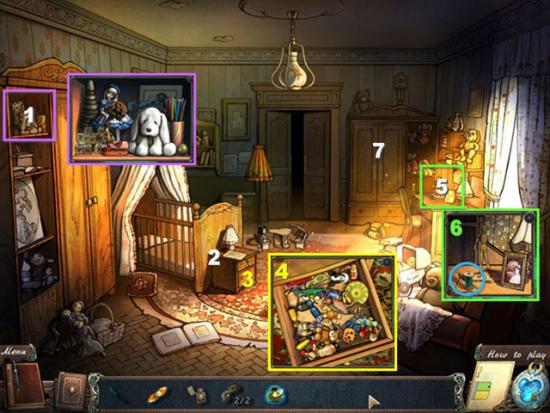
On the table at the lower left, pick up the Diary Day 6 Page (1) which contains a Key. Use the Key on the Door (2). Pick up the White Candle (3). Click on the Wall Sconce (4) to open a panel revealing the Scarab Ingredient. In front of the window on the left, pick up the Star-Shaped Key (5). Zoom into the chest of drawers (6), and then move the box (A) to reveal the Leaf Ingredient (B) (blue).
Zoom into the bed (7) to find many dusty cobwebs. Remove the cobwebs by repeatedly clicking with the Feather Duster (which the game now labels as a Broom, for some reason).
After all the Cobwebs are removed, a Spirit appears and promises to help you escape the Mansion if you will help him find his Cards.
Here is how the Shadowy Bedroom appears now:
Complete the Search scene (1) on the Bed. Then exit through the Door (2) to the Shadowy Library.
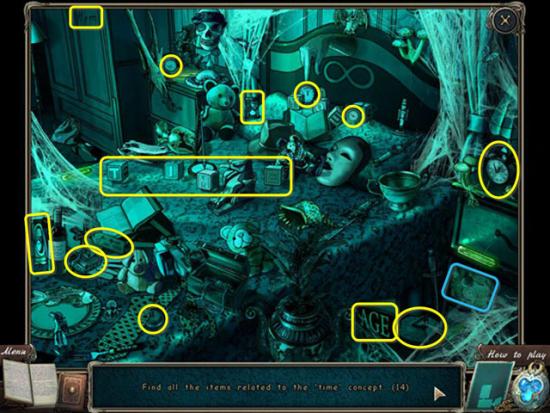
You need to find 14 items that relate to the concept of “Time.” You will receive the final Time Setting (3 of 3) (blue).
Exit through the Door (2) to the Shadowy Library.
The Shadowy Library

Complete the Search scene (1) on the floating shelves. Then exit through the door (2) to the Shadowy Observatory.
You receive a Knife (blue).
The Shadowy Observatory

Click on the Star Door (1), and then place the Star-Shaped Key (2) in it. To solve this Puzzle, rotate the outer rings until all the rings align. The center is fixed in place, so work from the center outward. When the puzzle is complete, a door will open revealing an Acid Potion Recipe and the GOLD Ingredient.
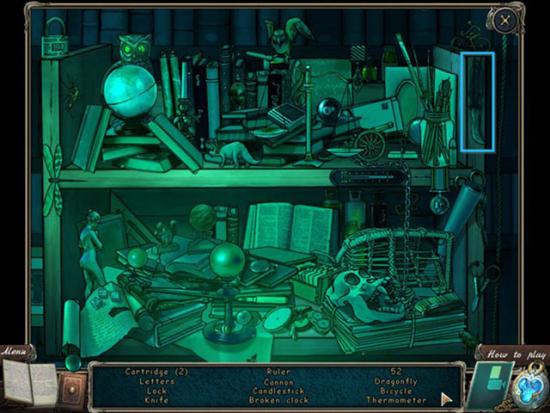
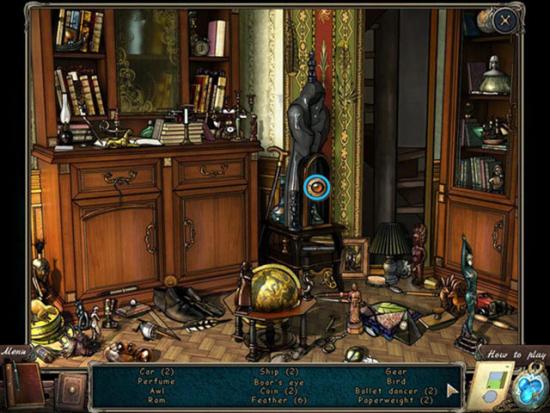
Complete the Search scene (3) on the bookshelves.
You receive 5 (of 8) Cards (white) for the Spirit in the Shadowy Bedroom. Of note here are the item descriptions “Oil Stove” which looks like an “Oil Lamp” and “Caliper” which look like “Geometry Compass”.
Now that you have the Acid Potion Recipe, return to the Shadowy Library (not pictured).
Click on the Desk (where you mixed the first potion), then place the Acid Potion Recipe in the Glass Bowl.
Now you need to gather 15 ingredients for your Acid Potion. Four of the ingredients are highlighted above. The order of the ingredients can vary, and each time you select a correct ingredient, it will be replaced by another in the search list. Some ingredients may obscure others. This Puzzle may not be Skipped.
When the green Acid is completed, use the Flask (now called a Bottle) on it. The Acid goes into your inventory.
Return to the Bedroom.
The Bedroom
Click on the Pillows (1) on the Bed. Use the Knife (2) to cut the Pillow (3), revealing the Gold Crystal (4) (blue). Exit to the Hall-Gallery (5).
The Hall – Gallery
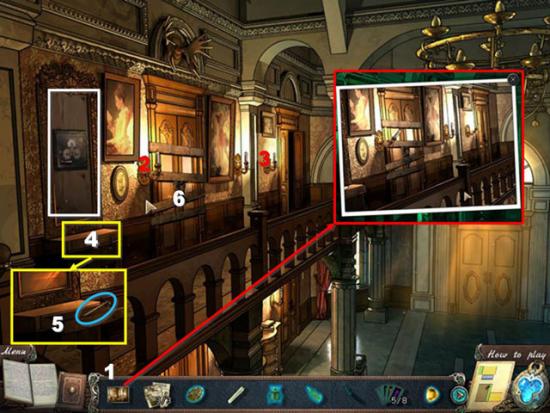
Click on the Gallery Photos (1) to display the solution to the Candles Puzzle. Click on Candles (2) and (3) (red), revealing a Safe (white) behind the Dusty Mirror. You will return to this Safe later when you have the Code to open it.
Zoom in on the Table (4) (yellow) beneath the Safe, then open the Drawer (5), revealing the Crowbar.
Now click on the Boarded-Up Doors (6).
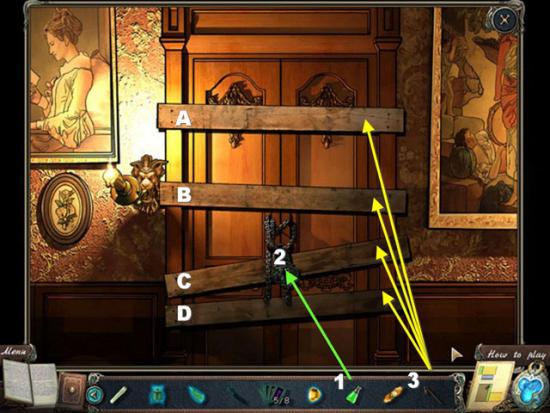
Use the Acid (1) on the Heavy Lock (2), dissolving it. Use the Crowbar (3) to remove the Boards (A, B, C, D).
Return to the Living Room.
The Living Room
Complete the Search scene (1), then click on the Clock (2) and place the Time Settings (3) on the Clock Face.
You receive the Lighter (blue).
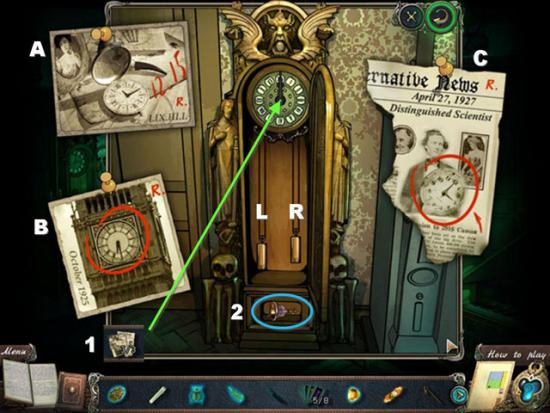
Place the 3 Time Settings (1) on the Clock Face. They will be displayed next to the clock (A, B, C).
You cannot set the Clock Hands directly. You must raise or lower the Left Weight (L) and the Right Weight (R) to move the Clock Hands.
The Left Weight moves both the Hour and Minute hands in the same direction:
The Right Weight moves the Hour and Minute hands in opposite directions:
Use the Right Weight to set the Hour and Minute hands in the proper relative positions, and then use the Left Weight to rotate them into one of the three Time Settings: 12:15, 06:30, or 03:00. The order in which you set the times does not matter, but you have to set all three times.
Completing the Clock Puzzle reveals the Bell Ingredient (2) (blue), the final Ingredient for the 2nd Key!
A box will pop up asking if you want to travel directly to the Altar (in the Shadowy Hall) to create the key. Click “Yes”. If you click “No” you will have to travel to the Shadowy Hall by yourself.
The Shadowy Hall
Open the Book of Shadows to review where the Ingredients are placed. (1) Leaf, (2) Bell, (3) Golden Egg, (4) Scarab, and (5) Gold. Zoom in on the Altar and put each Ingredient in the proper slot, then press the Magic Activator.
Play the Match 3 game (or Skip it) to receive the Purple Key. Zoom in on the left side of the Gate and open the Purple Lock with the Purple Key.
An animated scene shows that the Bedroom has been restored!
The Bedroom
Use the Crowbar (1) to smash the crockery on the table (2), revealing the Dark Candle (3) (blue).
Zoom in on the Painting (4) (purple) (see next screenshot for details). Complete the Search scene (5) yellow. Exit to Hall – Gallery (6).
Place the White Candle in the sconce at the right of the Painting. Place the Dark Candle in the sconce at the left of the Painting. Light both Candles with the Lighter (white) revealing Book of Shadows Page 4/7.
You receive 3 more Cards (blue) for the Spirit in the Shadowy Bedroom.
The Shadowy Bedroom
Talk to the Spirit (1) and give him the Cards (2). After playing Spirit Cards (below), complete the Search scene (3).
Now you play 3 Minigames of Spirit Cards. You must match pairs of available Cards, removing them from the board, until only one unmatched Card remains. The best strategy is to first match cards that are at the top of the biggest stacks of other Cards. If you make a mistake (no more available matches) then the Minigame will start over.
The solutions (1, 2, and 3) are the Code to solve the Safe Lock Puzzle in the Hall – Gallery. These Minigames may be Skipped, if you wish.
You receive Door Handles (white).
The Hall – Gallery
Zoom in on the Safe Lock Puzzle (formerly behind the Dusty Mirror). Place the Runic Cards on the Safe to start the Puzzle.

After you place the Runic Cards on the Safe, the center of each Dial will show one of the Runes. You need to rotate the Dials so that the Runes showing in the center of the Lock match the Runes at the center of each Dial.
Dial 1 rotates all three Dials. Dial 2 rotates Dials 2 and 3. Dial 3 rotates only itself. To solve the puzzle:
Click on the Handle to open the Safe, revealing a Search scene.

You receive the Cosmic Dust Ingredient (blue).
The Nursery
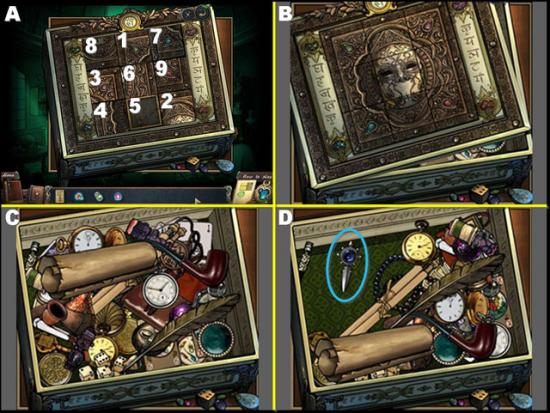
Zoom in on the Shelf of Toys (1), and then move the Dog to reveal a Screwdriver (not pictured).
Pick up the Diary Day 8 (2) page, giving you a Drawer Key. Zoom in on the Drawer (3), and then use the Drawer Key to unlock it, revealing a Drawer (4) where you need to find 2 Door Panels and 8 Bolts. You simply drag the contents of the Drawer to move them around, and click on the Items as you uncover them.
Zoom in on the Desk (5), and pick up the Spool of Thread (6) (blue). There is also a mannequin missing an arm, but you will deal with that later.
Zoom in on the Armoire (7).
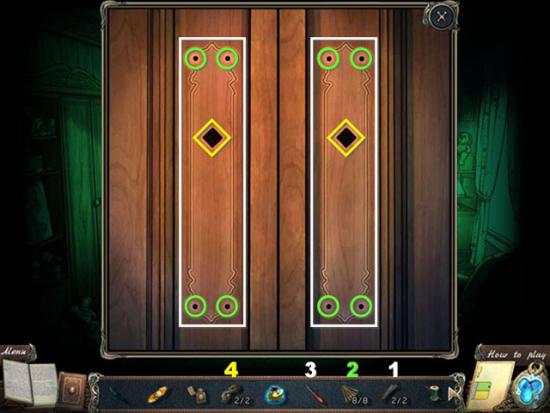
Place the 2 Door Panels (1) (white), then the 8 Bolts (2) (green). Use the Screwdriver to fasten the Bolts. Place the Door Handles (yellow).
Now you can open the Armoire, revealing clothing. Click on the clothing to reveal the Gold Portal! Place the Gold Crystal in the Gold Portal.
Gold Portal Minigame
In the Gold Portal Minigame, you must click on any of the floating Runes that are displayed in the central circle, matching both Shape and Color. The Screenshot shows you the first three Runes for this game (and it can be randomized). As you select correct Runes, they will be displayed along the border of the central circle and new Runes will appear for you to match.
When you complete (or Skip) the Minigame, you will be transported to the Shadowy Nursery.
The Shadowy Nursery
After you enter the Shadowy Nursery, the Evil Magus appears and wreaks havoc, trapping you there with Spirits! You cannot return through the Gold Portal or use the Map until you release yourself from his traps by catching all the Spirits (blue floating globs in front of the toppled Armoire) with Spirit Hunters.
So, first, gather the 4 Spirit Hunters. Click on (1) to get the first Spirit Hunter 1/4 (white). Move on the blanket (2) inside the Crib, revealing Spirit Hunter 2/4. Open the Door in the bottom of the Bedstand (3), revealing Spirit Hunter 3/4. Move the Horse Head (4) aside, revealing Spirit Hunter 4/4.
Pick up the Key (5) (blue), then click on the Cabinet (6) and use the Key to open it, revealing a Search scene.
You receive the Magnolia Flower Ingredient.
Zoom in on the Stone (1) (green), then use the Knife (2) to break the Stone (3), revealing the Clover Ingredient (4) (blue).
Move the broken Rocking Horse (5) and the Scepter (6) so you can pick up the Doll’s Hand (7) (blue).
Place the 4 Spirit Hunters (8) on the Wires (9). You need to click 4 times to place them all. The Spirits trapping you are now banished! You can now open the Armoire (10) and proceed through the Gold Portal back to the Nursery.
The Nursery
Zoom in on the Desk (1). Place the Dolls’s Hand (2) on the Broken Doll (3). Take the repaired Doll (4) (blue).
Zoom in on Bedstand Drawer (4), and move objects (5) to reveal Snake Poison INgredient (blue).
The Bedroom
Zoom in on the Puzzle (1) on the right wall. Place the Doll (2) inside the Puzzle (3). Click on the joints of the Doll until they match the red outline (4). When the Puzzle is completed (or Skipped), a panel opens revealing the Stone Ingredient.
Now you can proceed to the Altar in the Shadowy Hall in order to complete the Third Key.
The Shadowy Hall
Open the Book of Shadows to review where the Ingredients are placed. (1) Snake Poison, (2) Cosmic Dust, (3) Stone, (4) Magnolia Flower, and (5) Clover. Zoom in on the Altar and put each Ingredient in the proper slot, then press the Magic Activator.
Play the Match 3 game (or Skip it) to receive the Blue Key. Zoom in on the right side of the Gate and open the Blue Lock with the Blue Key.
An animated scene shows that the Nursery has been restored!
Instead of going directly to the Nursery, go to the Shadowy Nursery.
The Shadowy Nursery
You start by collecting 4/17 Book of Shadows Paper Scraps (white). Then, exit to the Shadowy Hall – Gallery.
The Shadowy Hall – Gallery
Pick up 2 more Paper Scraps (white) for the Book of Shadows. Get the Bear’s Ear (1) (blue) from the table in front of the mirror. Zoom in on the Key Cabinet (2) (yellow) and select the proper key for the Demonic Door (4) (red).
You will learn that you will not be able to open the Demonic Door until you have the Magic Staff, which you can get in the Shadowy Nursery (3).
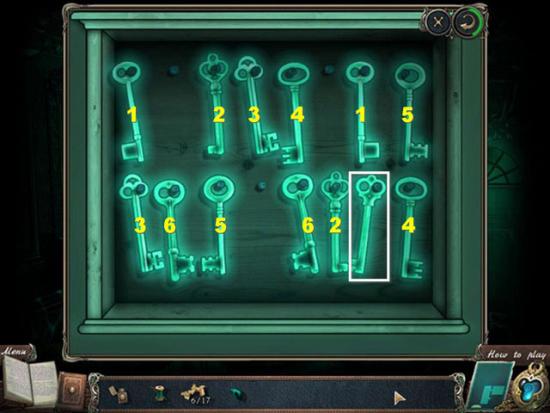
Select pairs of matching Keys to remove them from the Key Cabinet until only one Key remains. The initial configuration is shown above. After you remove each pair of Keys, the remaining Keys move around. The Key you need for the Demonic Door is highlighted in white.
The Shadowy Nursery
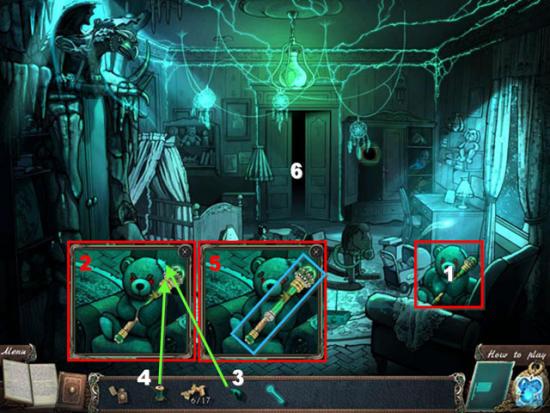
Zoom in on the Bear (1). It will not release the Staff (2) until you replace the Bear’s Ear (3) and sew it on with the Spool of Thread (4). Now you can take the Magic Staff (5) (blue).
Return to the Shadowy Hall – Gallery (6), and zoom in on the Demonic Lock.
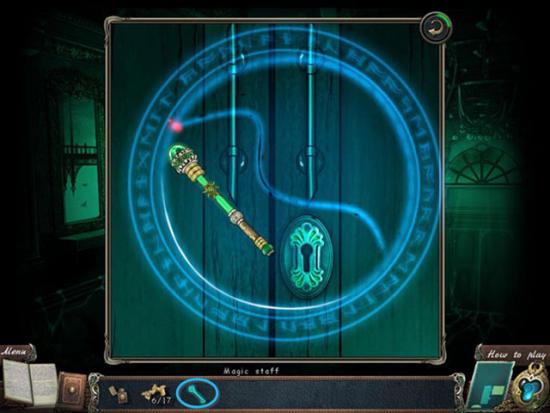
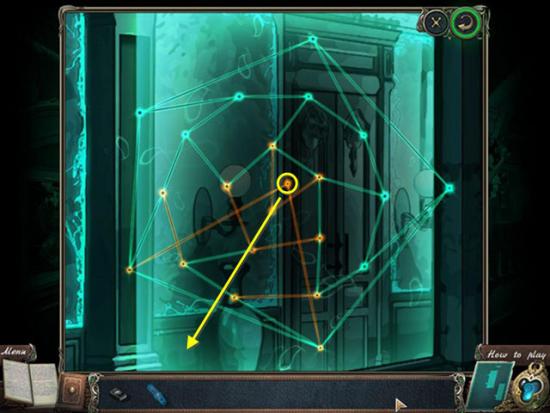
In the Demonic Lock Minigame, you need to drag the Magic Staff to trace three curved lines, starting at the end with the Red glow. Hold down your left mouse button and move the mouse to trace the lines to the end. If you get too far away from the line, you must start over.
Use the Key (blue) to open the Lock to the Shadowy Kitchen.
The Shadowy Kitchen
Pick up 4 more Paper Scraps (white) for the Book of Shadows. Use the Lighter (1) on the Candle (2), and take the Burning Candle.
Pick up the Long Stick (3) (purple) and use it to reach the Key (4) (purple). The Key falls into the Bread Dough on the table. When you attempt to take the Key, the Spirit appears and steals it, leaving a Key Print in the Bread Dough.
Pick up the Pyramid Piece (5) (blue) on the table, then complete the Search scene (6).
You receive the Leaf Ingredient (blue).
The Shadowy Nursery
Zoom in on the Puzzle (1), and then place the Pyramid Piece (2) at the top of the first spike (3).
This type of Puzzle is commonly known as the “Towers of Hanoi”. The objective is to move all the Rings from the Left Spike (L) to the Right Spike (R) so that they are stacked the same way as they started. You can move any Ring from the top of any stack, but you may only move smaller Rings onto empty spikes or larger Rings. You are not allowed to place larger Rings on top of smaller Rings. Here are the steps:
After completing this Puzzle, a panel opens and you receive the Consolidation Potion.
The Shadowy Kitchen
Pour the Burning Candle (1) into the Key Print (2) in the Bread Dough, and then add the Consolidation Potion (3), creating the Bathroom Key. Use the Bathroom Key to unlock the Shadowy Bathroom (4).
The Shadowy Bathroom
Pick up 3 more Paper Scraps (white) for the Book of Shadows. Pick up the Rite Page (green). Complete the Search scene (1) (yellow).
After the Search Scene, zoom in on the Shelves (2) and get the Pale Blue Crystal. Move the Towel (3) to reveal the Pale Blue Portal. Place the Pale Blue Crystal in the Portal.
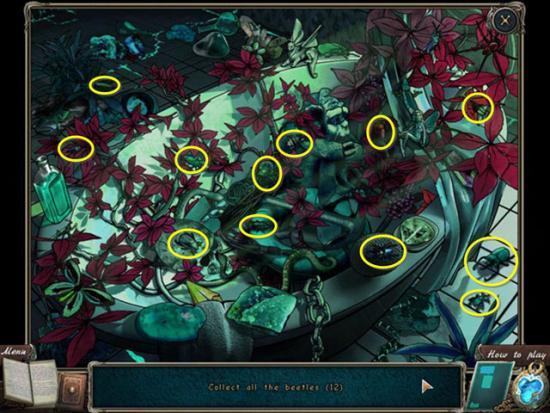
Collect 12 Beetles and receive the Beetle Ingredient.
Pale Blue Portal Minigame
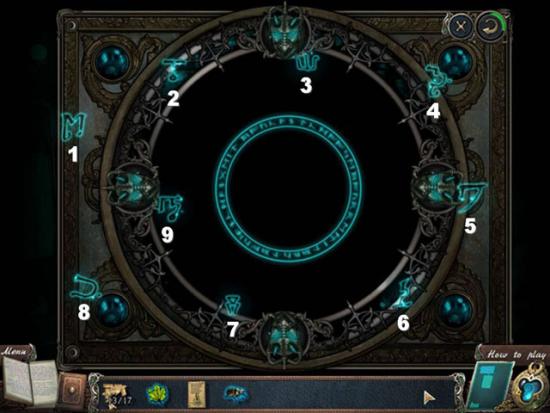
The Pale Blue Portal Minigame is a “follow the sequence” game. Runes will flash in sequence and you need to repeat the sequence by clicking on the correct Runes. The correct sequences are 1-5-7, 9-8-5-3, and 6-4-1-9-2.
The Bathroom
Move the mirror shard (1) revealing the Mirror Ingredient.
Zoom in on the wall sconce (2), then pull the chain, remove the globe, and take the Light Bulb.
Finally, pick up the remaining 4 Paper Scraps (orange). This will trigger a Jigsaw puzzle (not pictured) so you can complete the Book of Shadows Page 5/7.
If you have followed all the steps in this Chapter, you should now have 3 of the 5 Ingredients needed for the Fourth Gate Key.
Return to the Shadowy Bathroom by going through the Pale Blue Portal.
The Shadowy Bathroom
Zoom in on the wall sconce (1) (yellow). Place the Light Bulb in the socket. Pull the chain (A), then move objects (B) to reveal a box. Open box (3) to reveal Tiara Ingredient (blue).
Zoom in on the jug (4) (green). Move the jug aside (5) to reveal Hourglass Ingredient (6) (blue).
Now you can proceed to the Altar in the Shadowy Hall in order to complete the Third Key.
The Shadowy Hall
Open the Book of Shadows to review where the Ingredients are placed. (1) Tiara, (2) Mirror, (3) Hourglass, (4) Beetle, and (5) Leaf. Zoom in on the Altar and put each Ingredient in the proper slot, then press the Magic Activator.
Play the Match 3 game (or Skip it) to receive the Orange Key. Zoom in on the left side of the Gate and open the Orange Lock with the Orange Key.
An animated scene shows that the Bathroom has been restored!
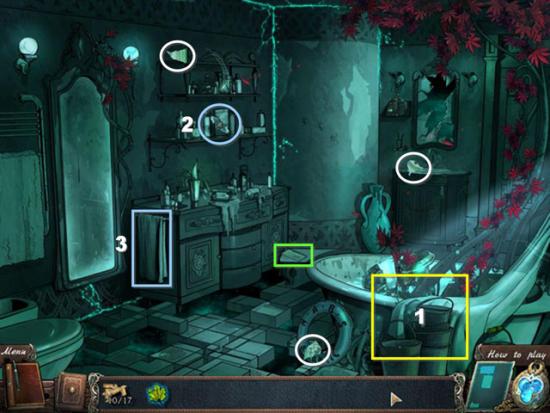
The Bathroom
Click on the Dry Cloth (1) and the Empty Bucket (2). Zoom in on the Sink (3) (green), then place the Empty Bucket there. Turn on the tap to fill the bucket with cold water. Take the Full Bucket.
Zoom in on the Dirty Mirror (4) (red). Pour the Full Bucket on the Dirty Mirror, and then use the Dry Cloth to remove the dirt in a Minigame where you click and drag your mouse to remove the dirt.
The Clean Mirror is actually an entrance to another room, but you can explore that after completing the Search scene (5) (yellow).
You receive the Seashell Ingredient.
Now, enter the Mirror:
The Study
You entered the Study through the mirror from the Bathroom, but apparently it is a one-way trip.
Zoom in on the Wastebasket (1) (red), then shift objects around (2) until you locate the Book of Shadows Page 6/7 (blue). Shift some more objects to locate the Hot Water Tap (blue).
Pick up Diary Day 10 (3) (white) and the Boar’s FANG (4) (blue).
Click on the Horn (5) to dislodge a Key, which falls to the desk below.
Complete the Search scene (6) (yellow), then use the Key to open the Door (7).
You receive the Pearl Ingredient.
The Hall – 2nd Floor
There is nothing you really need to do here (yet), so enter the 2nd door to return to the Bathroom.
The Bathroom
Zoom in on the Sink (1) (green) and place the Hot Water Tap on the faucet. Steam will reveal the code, “7158” on the paper taped to the mirror. Zoom into the Safe (2) (green) and click “7 1 5 8” on the buttons, then click on “OK”. A door opens revealing a Key.
Complete the Search scene (3) (yellow).
You receive a 2nd Boar Fang.
The Hall 2nd-Floor
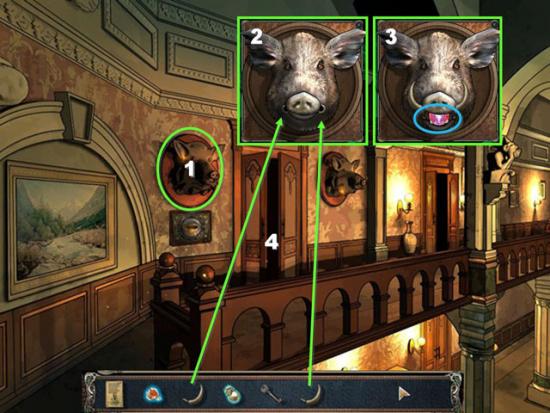
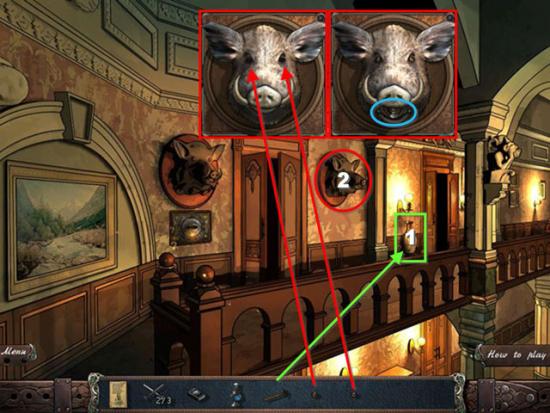
Zoom in on the Boar’s Head (1) (green), then place the Boar Fangs (2), revealing the Ruby Ingredient (3) (blue).
Return to the Study (4).
The Study
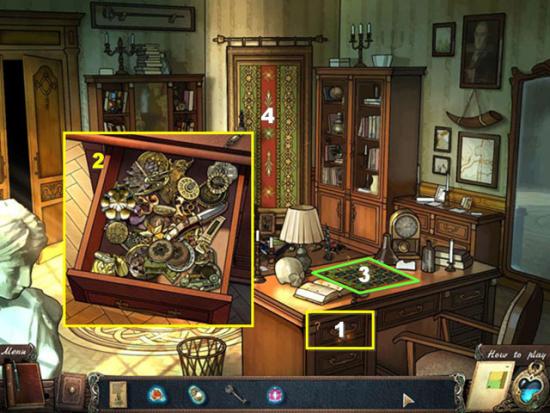
Zoom in on the Desk Drawer (1) (yellow), and then use the KEY to unlock it, revealing a drawer (2) full of objects you can shove around. You need to look for 5 Shaped Plates that will be required for the Desk Minigame (3) (green). After you finish (or Skip) the Minigame, the door to the Observatory (4) will open.
After you add the 5 Shaped Plates to the Board, your layout will look similar to the above (it can be randomized). The objective in this Minigame is to have no duplicate shapes in any Row or Column. Rows and Columns that are correctly configured will have a green light indicator, as in the two bottom rows above.
To rearrange the Plates, you must drag them off the board and then put them in an empty slot.
As an example, here is the same board with all Plates from the first two Rows dragged off the board:
Notice how the Plates have been labeled (A, B, C, and D) according to the type of Plate. Drag the Plates to the matching spots in the first two Rows to solve this Minigame. Your solution may be different.
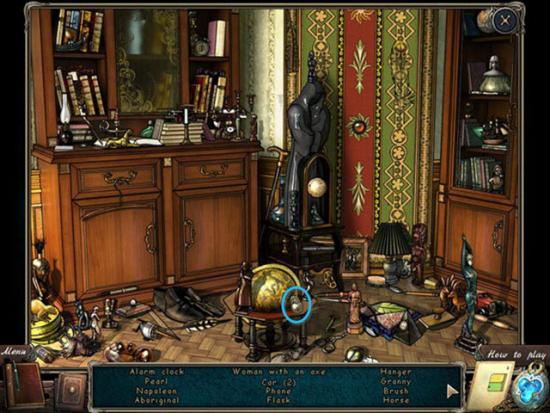
The Observatory
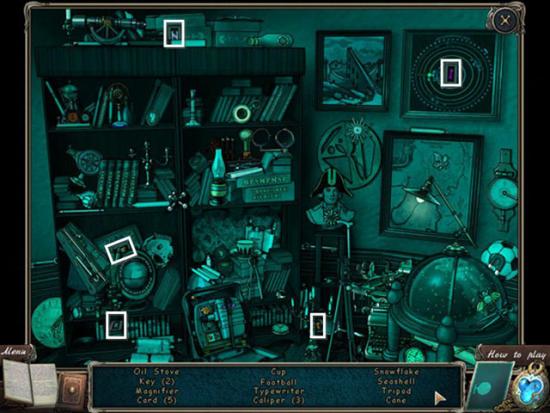
Zoom in on the Box (1) (red) on the Desk to start a Minigame (below). Complete the Search scene (2).
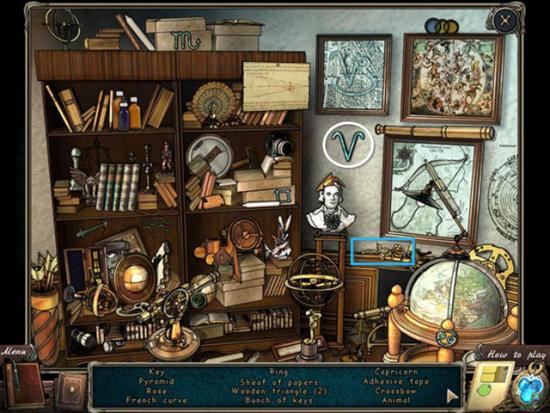
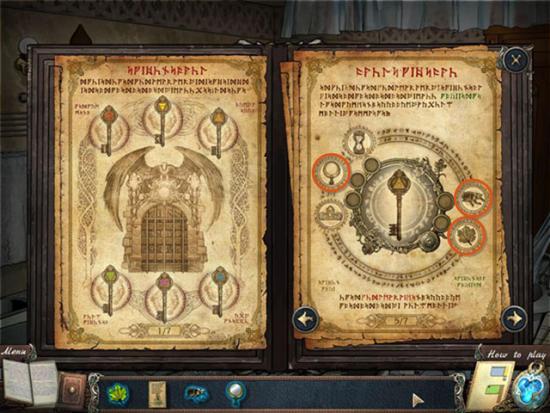
You receive the Rose Ingredient (blue). Note that the clue for “Capricorn” is wrong, you are really looking for the symbol for “Aries” (white).
Now you can proceed to the Altar in the Shadowy Hall in order to complete the Fifth Key.
The Shadowy Hall
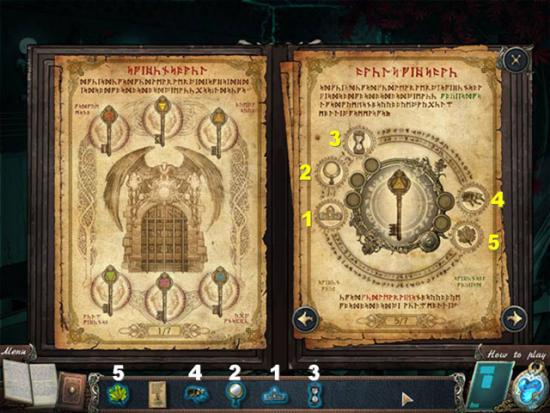
Open the Book of Shadows to review where the Ingredients are placed. (1) Rose, (2) Pearl, (3) Dagger, (4) Ruby, and (5) Seashell. Zoom in on the Altar and put each Ingredient in the proper slot, then press the Magic Activator.
Play the Match 3 game (or Skip it) to receive the Yellow Key. Zoom in on the right side of the Gate and open the Yellow Lock with the Yellow Key.
An animated scene shows that the Observatory has been restored!
The Observatory

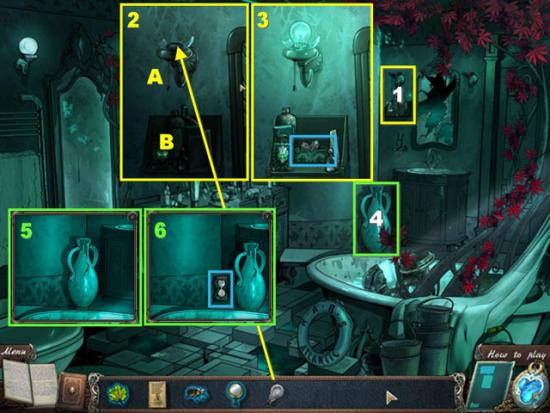
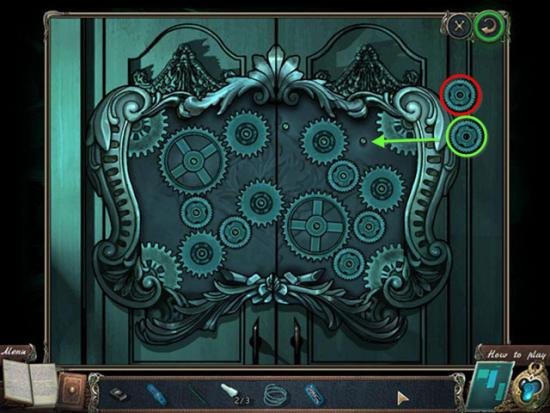
Gather the three sets of Gears (orange) to be used in the Gear Puzzle (5) (green).
Pick up the Ritual Candle (1) (blue), the Handkerchief with a Pentagram (2), the Matches (3) and click on the dustcover (4) over the globe. Click on the globe again to get a 2nd Ritual Candle.
Complete the Gear Puzzle (5) (green) and the Search Scene (6) (yellow).
Place the Gears from inventory onto the center of the puzzle to start it. Click on the Wheel (white) to start the motor. Place Gears on the axles to make sure they all spin, working from lower left to upper right. The final Gear (green) is about to be placed in the Screenshot above.
When the puzzle is complete (or Skipped), you receive the Anti-Spell Potion.
You receive a Hammer (blue). Note that the clue for “Pisces” is wrong, you are really looking for the symbol for “Cancer” (white).
The Bathroom
Use the Hammer to break the Urn (green). You will find a Boar’s Eye.
Go through the mirror into the Study.
The Study
Place the Handkerchief with a Pentagram (green) on the Magic Circle. Complete the Search scene (yellow).
You receive a 2nd Boar’s Eye (blue).
The Hall – 2nd Floor
Zoom in on Vase (1) (green) and smash it with Hammer to receive Book of Shadows Page 7/7 (not pictured).
Zoom in on Boar’s Head (2) (red) and then place Boar’s Eyes to receive 3rd Ritual Candle.
The Study
Place the 3 Ritual Candles (from Inventory) on the cloth on the floor. Use the Matches (yellow) to light each of the 3 Ritual Candles (white), and invoking the Rite.
The Spirit appears, but he is trapped in the circle. Use the Anti-Spell Potion (purple) on him to set him free. He tells you that the “Central Crystal” is in the Shadowy Living Room, and then he disappears, leaving you with the Purple Crystal.
Exit to the Hall – 2nd Floor and place the Purple Crystal in the Purple Portal (below the Boar’s Head on the left).
Purple Portal Minigame
In the Purple Portal Minigame, you must match pairs of Runes by both Shape and Color. The order in which you select them does not matter. Two pairs of Runes are highlighted above; they all have the same shape but are two different colors.
After you complete the Purple Portal Minigame, you are transported to:
The Shadowy Hall – 2nd Floor
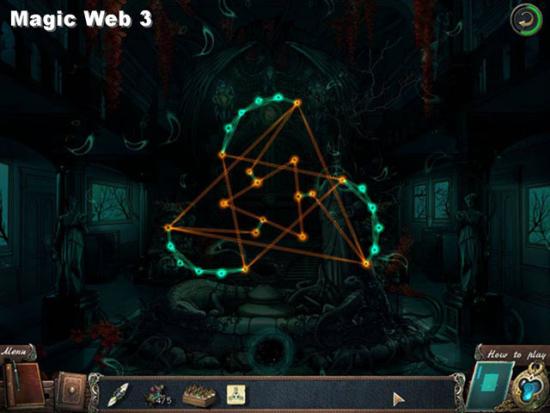
The Purple Portal is now activated. Complete the Search scene (yellow). Solve the Magic Web puzzle (red).
You receive the Sword Handle Ingredient (white).
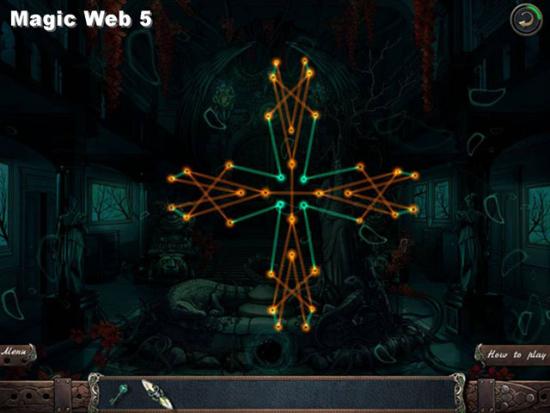
In Magic Web Puzzles, you need to move the Nodes to uncross all the Strands that glow orange. This is a rather simple example (they get more complex as the game proceeds). It is not practical to show you every step in solving these types of puzzles, and they may be Skipped.
The above screenshot shows the final move for this puzzle. Move the Node (yellow) in the direction indicated by the arrow. As soon as all Strands glow blue, the Web dissolves and you may proceed into:
The Shadowy Living Room
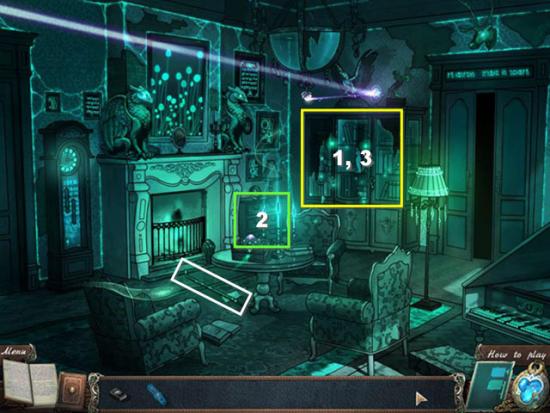
Complete the Search scene (1) (yellow). After you complete the Drawer Puzzle (2), you need to Search (3) (yellow) again. Pick up the Poker (white) or leave it here for later. Exit to the Shadowy Hall – 2nd Floor.
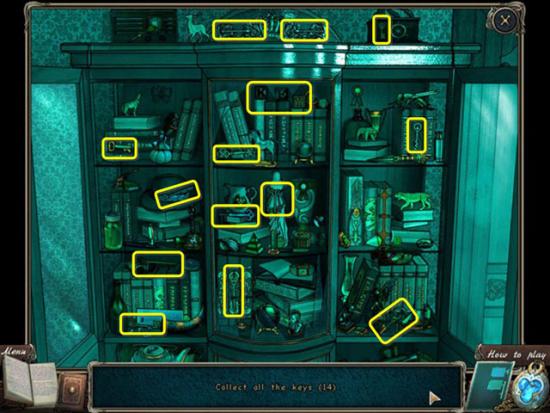
Find 14 Keys (yellow). You receive 5 Drawer Keys.
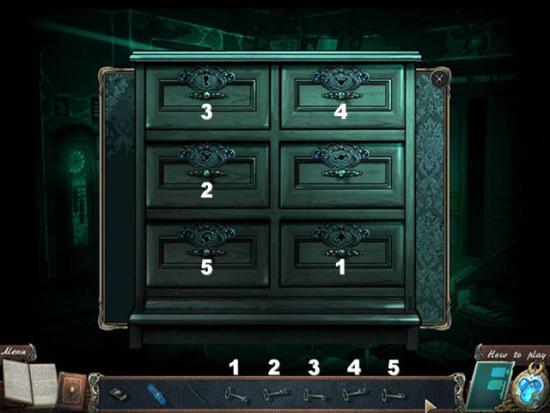
Match the Drawer Keys with the variously shaped keyholes. You receive 3/3 Gears and 2/3 Piano Keys. There is one keyhole left over, and you will return to that later.
You receive Pliers.
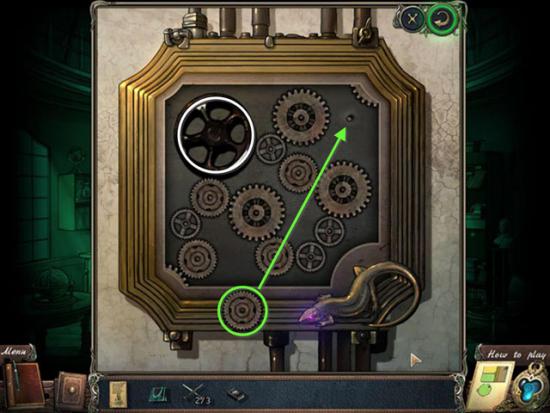
Zoom in on the Boar’s Head (1) (yellow) and use the Pliers to cut the Strong Steel String around the Boar’s snout; you receive String in your Inventory. Zoom in on the Gear Puzzle (2) (green).
Place the Gears (from Inventory) on the Gear Puzzle. This time you must get all four gears in the corners connected and turning. Start at the lower left. The above screenshot shows the final Gear (green) to be placed. Note that there is one Gear (red) left over – it is not necessary and in fact, it will not fit in the puzzle.
The Shadowy Dining Room is now unlocked, but return to the Shadowy Living Room.
The Shadowy Dining Room
Zoom in on the Picture on the wall (1) (red) to start the Chairs Puzzle. When that is solved (or Skipped), there will be a Search scene (yellow) on the table.
To solve this puzzle, you must move all the Red chairs to the left side of the table and the Green chairs to the right side. There are two empty slots at the foot of the table. The rules are that you can Move any chair to an empty slot next to it or Jump over a chair of the opposite color. One detailed solution follows (there are other solutions).
Here are the steps to solve the Shadowy Dining Room Chair Puzzle:
(A) is the starting position.
(B) Move Red chair at 7 left twice to 5.
(C) Jump Green chair at 4 to 6.
(D) Jump Green chair at 2 to 4.
(E) Jump Red chair at 9 to 7.
(F) Move Red chair at 3 to 2. Move Green chair at 8 to 9.
(G) Jump Red chair at 5 to 3.
(H) Jump Red chair at 7 to 5.
(I) Move Green chair at 6 right twice to 8.
(J) Jump Green chair at 4 to 6.
(K) Move Red chair at 5 to 4. Move Green chair at 6 to 7.
Completing this Minigame sets the Table for the Search scene.
You receive a Mirror and a Jug.
Return to Shadowy Living Room, there is now a direct door there, so you do not need to return to the hallway.
The Shadowy Living Room
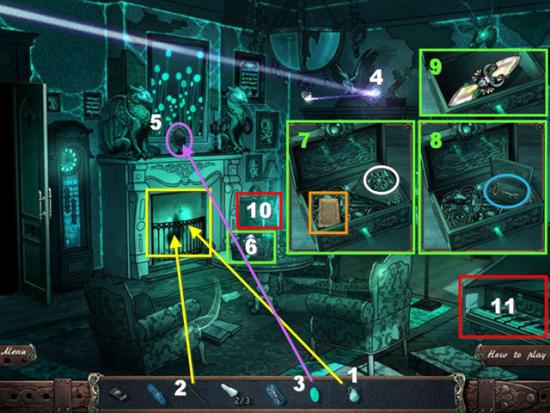
Pour the Jug (1) on the Fire (yellow) to extinguish it, revealing the Yellow Crystal. Use the Poker (2) to remove the Yellow Crystal from the fireplace.
Place the Mirror (3) on the Broken Mirror (5) (purple) to repair it. Adjust the beam from Mirror (4) to shine on Mirror (5), and then adjust the beam from Mirror (5) to shine on the Box (6) (green) on the table.
The Box opens (7), revealing Diary Day 12 (orange). Click on the Broach (white) to remove it, and then click again (8) to reveal the missing Drawer Key (blue). Continue removing items from the Box until you find the Discharged Crystal (9).
Zoom in on the Drawers (10) (red) and use the Drawer Key to open the final Drawer, receiving the 3rd Piano Key. Zoom in on the Piano (11) (red).

If you have not already done so, place the String on the soundboard, then place the 3 Piano Keys on the Keyboard. The melody you must repeat is C-G-F-E-D-C. A panel opens (yellow) revealing the Feather Ingredient.
The Shadowy Dining Room
Pick up the Note from R about the Machine you must build. Place the Yellow Crystal in the Yellow Portal.
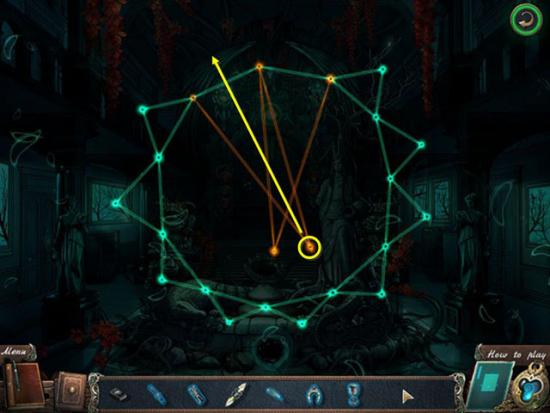
Yellow Portal Minigame
The Yellow Portal Minigame is a “follow the sequence” game. Runes will flash in sequence and you need to repeat the sequence by clicking on the correct Runes. This time there are FIVE sequences to complete, and the final Rune in each sequence will be eliminated from the board and placed in the central circle.
The correct sequences are:
You will be transported to The Dining Room.
The Dining Room
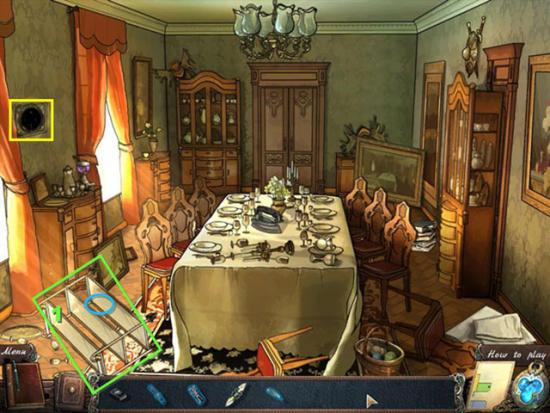
Move the toppled Cart (1) (green) to reveal a Puzzle Piece.
Return to the Shadowy Dining Room through the Yellow Portal.
The Shadowy Dining Room
Zoom in on the Chest Puzzle (1) (red). Place the Puzzle Piece (2) on the missing spot (3), lighting up some of the tiles in the Tile Puzzle (4).
Your objective is to light up all the Tiles. Clicking on any Tile reverses the state of all tiles in the same Row and Column. This Puzzle is randomized every time you play it, so no solution can be provided. When you complete (or Skip) the Puzzle, a door opens to reveal the Horseshoe Ingredient.
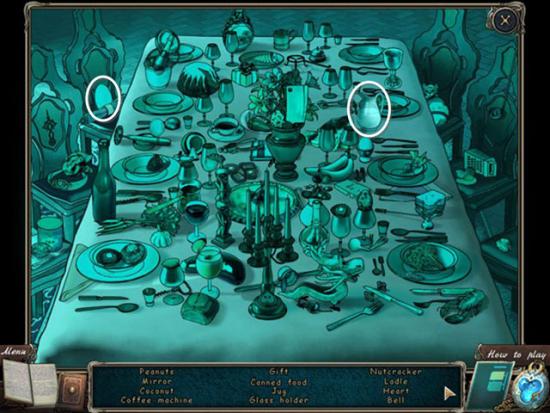
Complete the Search scene (5) (yellow) on the table.
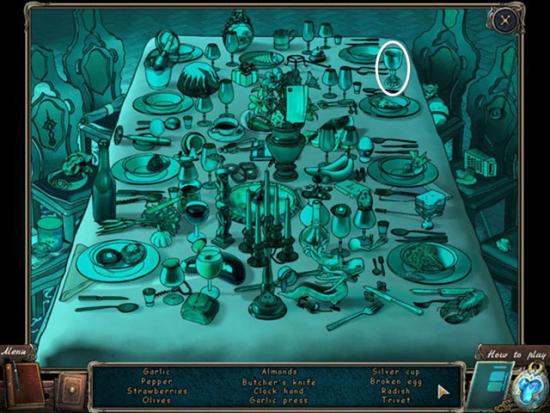
Note: here is an example of the misleading plurals in the Clues. There is only one Strawberry and one Almond, but there are two Olives (together). You receive the Silver Cup Ingredient.
Now you can proceed to the Altar in the Shadowy Hall in order to complete the Sixth Key.
The Shadowy Hall
The Evil Magus (who you finally learn is really Cagliostro) tries to block your progress with another Magic Web puzzle.
The above screenshot shows the final move. Use the same strategy for all the other Nodes, dragging them from the inner circle across the center to outside the circle.
Open the Book of Shadows to review where the Ingredients are placed. (1) Candle, (2) Silver Cup, (3) Feather, (4) Horseshoe, and (5) Sword Handle. Zoom in on the Altar and put each Ingredient in the proper slot, then press the Magic Activator.
Play the Match 3 game (or Skip it) to receive the Red Key. Zoom in on the right side of the Gate and open the Red Lock with the Red Key.
The Sixth Gate opens revealing that there is yet another Key to be found!
An animated scene shows that the Dining Room has been restored!
The Dining Room
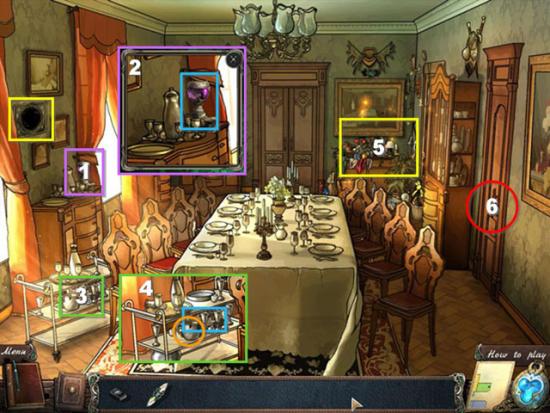
Zoom in on the Chest of Drawers (1) (purple) to reveal the Alchemist’s Bowl Machine Part (blue). Zoom in on the Cart (3) (green) and then move the Pot (orange) so you can get the Container for Components (blue).
Complete the Search scene (5) (yellow), which will give you a Kitchen Key to open the Door (6) (red).
Open the cabinet door (white) to reveal more objects. You receive a Kitchen Key (blue).
The Kitchen
Open the Oven (1), revealing dry firewood. Use the Matches to light the fire. Pick up the Bucket (2). Zoom in on the Wine Bottles (3) (green), then remove the cover (4) over the Machine Part 2/5 (blue). Pick up the Lock Part (5) (blue). Complete the Search Scene (6) (yellow) and then exit to the Hall (7).

You receive a pair of Clippers (blue).
The Hall
Zoom in on the Greenhouse Door (1) (red). Place the Lock Part in the Lock (2). Rotate the rings to line them up, starting at the center and moving outward. Rings will lock into place when they are in the correct position. The completed Lock Puzzle (3) will unlock the Greenhouse Door.
The Greenhouse
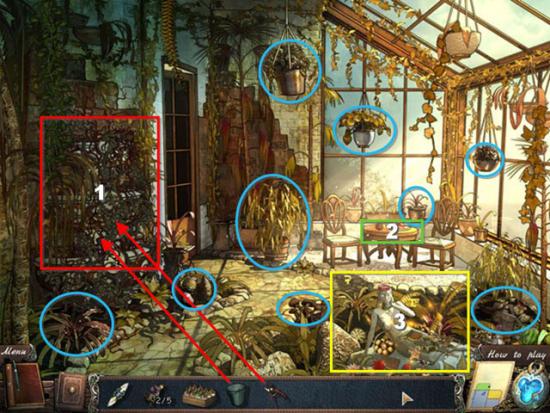
First, zoom in on the Fountain (1) (red) and then use the Clippers to cut the vines and the Bucket to get fresh water.
Now that you have a Bucket of Water, zoom in on each Withered Plant (blue), pour water from the Bucket and cut the Useful Component with the Clippers. You will collect a total of 9 Components.
Zoom in on the Table (2) (green) and pick up the Runic Code. Complete the Search scene (3) (yellow).
You receive a 2 more Machine Parts, one is named “Machine Component” and the other is “Pipes (2)” in the clues. They are highlighted in white.
Checking the Map, you discover that the only location with a currently Active Task is the Shadowy Hall.
The Shadowy Hall
Cagliostro blocks you with another Magic Web Puzzle.
This is the starting position, and it is too complicated to show a systematic solution. It IS possible to solve. You may Skip this Puzzle.
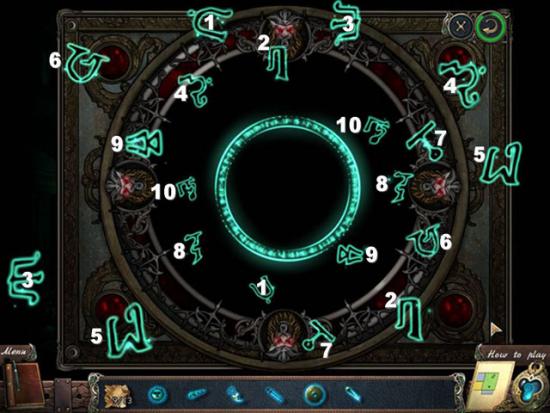
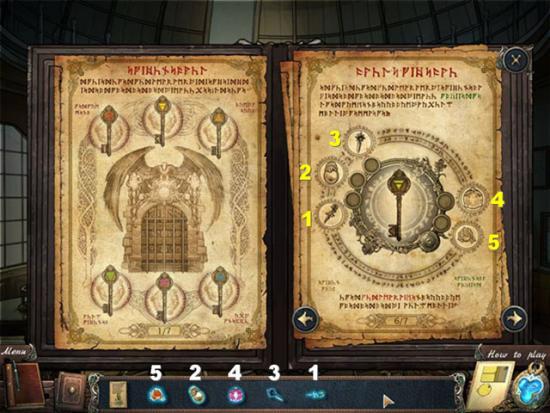
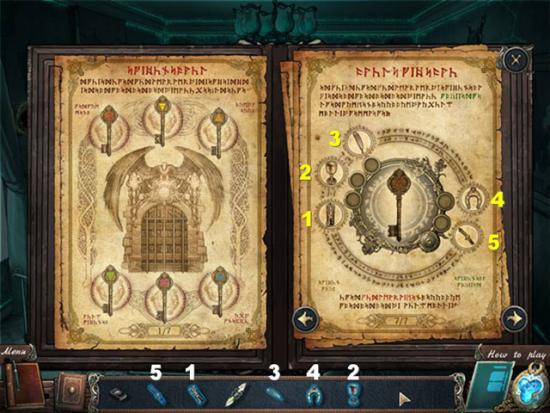
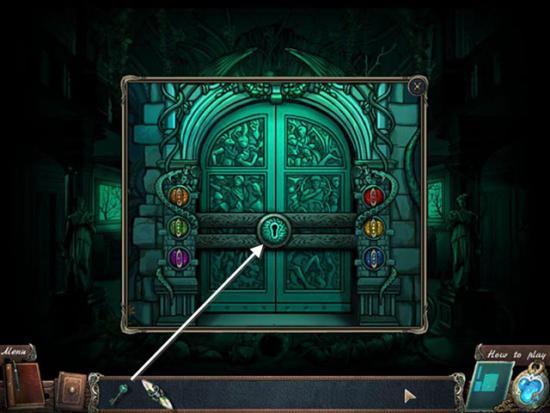
Zoom in on the Door on the left, behind the Statue, to see another Runic Door Lock puzzle. Place the Runic Code on the Lock.
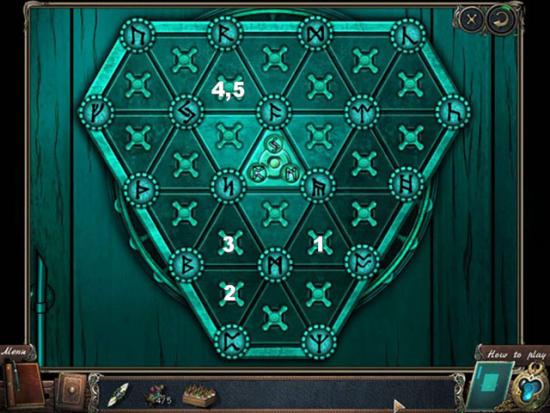
This solution example works for THIS position of the Runes outside the central triangle. The puzzle is randomized each time you play it, but the central triangle Runes are always the same. Click on a handle to rotate the three Runes clockwise.
The Door opens to the Shadowy Study.
The Shadowy Study
Cagliostro appears and throws another Magic Web puzzle at you. He is clearly becoming more desperate as you near your goal!
This is the starting position, and it is too complicated to show a systematic solution. It IS possible to solve.
Zoom in on the Cabinet (1) (green) and remove the cloth to reveal the final Machine Part (2). Zoom in on the Desk (3) (orange) and click on the desktop to reveal the BIG Key (4). Complete the Search scene (5) (yellow).
The Easel with a Book (white) turns out to be the Crystal Charging Manual, which tells you how to build the Machine and put in the Components.
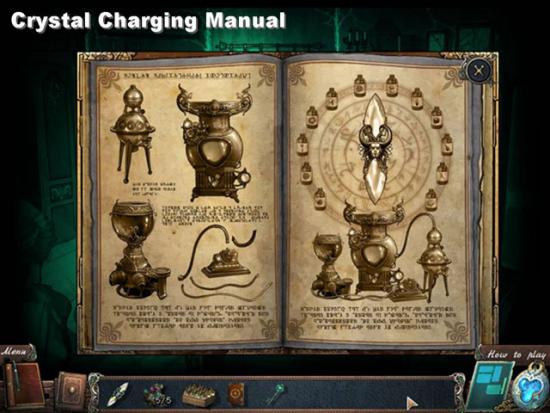
Now, return to the Kitchen to start building the Machine.
The Kitchen

Zoom into the Stove (the fire should already be lit) and then place the Crystal Charging Manual (from Inventory) on it. Outlines appear where each Machine Part should go. The first few parts are indicated above. You should be able to figure out the rest, including connecting the pipes.
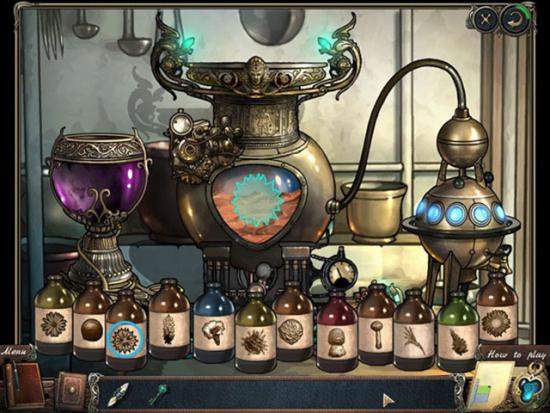
Now the 9 Components you collected in the Greenhouse have magically become 12 Ingredients. Place the Ingredients (from Inventory) on the Machine. 12 Bottles of Ingredients appear.
Click on the Bottles with the various Ingredients as their outlines appear in the window on the Machine. You have to be quick about it, or the outline will change to a different Ingredient. The Minigame also speeds up as it progresses.
After 9 Ingredients have been successfully added, you can charge the Discharged Crystal by putting it in the top of the Machine. It becomes the Central Crystal.
Now return to the Shadowy Hall.
The Shadowy Hall
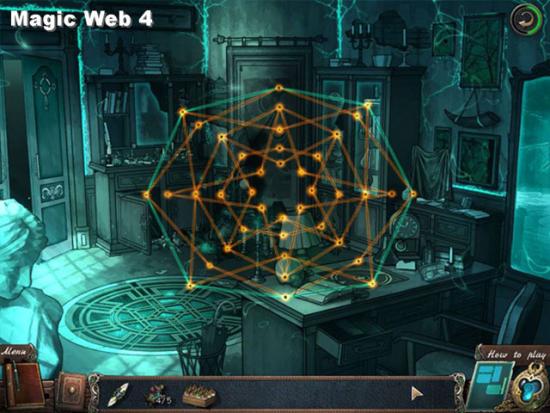
Cagliostro throws yet another Magic Web at you.
This is the starting position, and it is too complicated to show a systematic solution. It IS possible to solve. You may Skip this Puzzle.
Use the Big Key on the final lock. Enter the open door.
Heart of the House
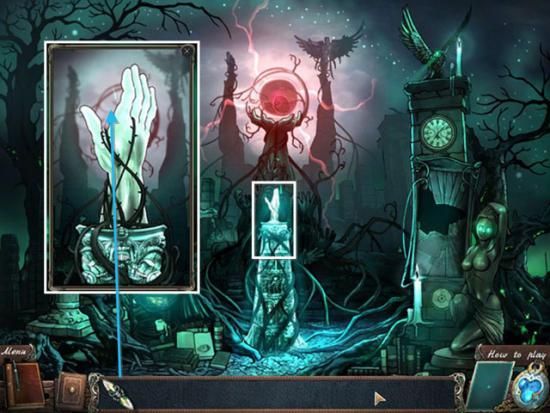
Zoom in on the Pedestal (white) and then place the Central Crystal in the Hand at the top of the Pedestal.
Final Battle
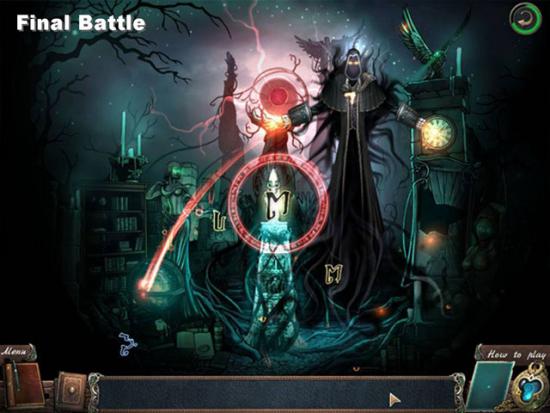
A Final Rune Minigame appears. You need to match Runes by both Shape and Color. After you match the first Rune, Cagliostro appears for the Final Battle.
You need to match Runes quickly. Your matched Runes will start appearing around the central circle. If you take too long, Cagliostro will remove Runes from both the screen and the circle. The Minigame speeds up as you progress.
When the circle of Runes is completed, you have defeated Cagliostro! Or have you?
Watch the animated scene to see what happens next and then read the final Journal Entry.
Congratulations! You have completed Mystery of Mortlake Mansion.
