
Grow A Garden 2 Base Price List
What's the most valuable crop?![Evomon Best Starter [Leafbun, Blazpup, or Bubble?]](/wp-content/uploads/2026/06/evomon-best-starter.jpg "Evomon Best Starter [Leafbun, Blazpup, or Bubble?]")
Evomon Best Starter [Leafbun, Blazpup, or Bubble?]
Grass-type, Fire-type, or Water-type?![Evomon Tier List [META and BEST Evomon]](/wp-content/uploads/2026/06/evomon-tier-list.jpg "Evomon Tier List [META and BEST Evomon]")
Evomon Tier List [META and BEST Evomon]
The Evomon dream team.
![[Roblox] Evomon Shiny Hunting Guide – Including Prismatic and Pris Shinies!](/wp-content/uploads/2026/06/evomon-shiny-hunting-guide.jpg "[Roblox] Evomon Shiny Hunting Guide – Including Prismatic and Pris Shinies!")
Mystery Masterpiece: The Moonstone Walkthrough
Welcome to our walkthrough for Mystery Masterpiece: The Moonstone.


- Prefer Gamezebo on Google

a:1:i:0;a:2:s:13:”section_title”;s:46:”Mystery Masterpiece: The Moonstone Walkthrough”;s:12:”section_body”;s:21840:”
Welcome to our walkthrough for Mystery Masterpiece: The Moonstone.
Note: Due to there being so many hidden objects to find in each level, the item lists have been rewritten to fit more at a time. All items are still accounted for, though.
General Notes & Tips
- Unlimited hints are available, though once you use one it will take time to recharge.
- Objects in the guide that are more than one in number (#) will be shown in the specified color next to the object name on the list in order to make finding that object easier. Everything else is numbered. Numbered objects are circled in red.
- Some objects on your list when you play may not line up with the objects listed below: this is due to the fact that there are more items possible than are actually listed. However, most items should line up regardless.
Table of Contents
I. Rachel Verinder
II. Franklin Blake
III. Gabriel Betteridge
IV. Godfrey Ablewhite
V. Drusilla Clack
VI. Rosanna Spearman
VII. Dr. Milton Candy
VIII. Raj Gupta
IX. Ezra Jennings
X. The Accusation
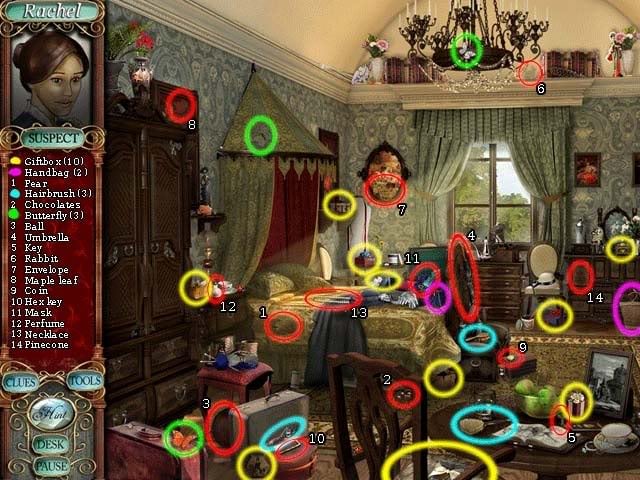
Suspect: Rachel Verinder
Rachel’s Room-
- The envelope will need to be reassembled, but cannot be without a special tool. You’ll have to return to this level later to solve the puzzle, and in the meantime the envelope will remain on your list. Select "Desk" to go to another level in the meantime.

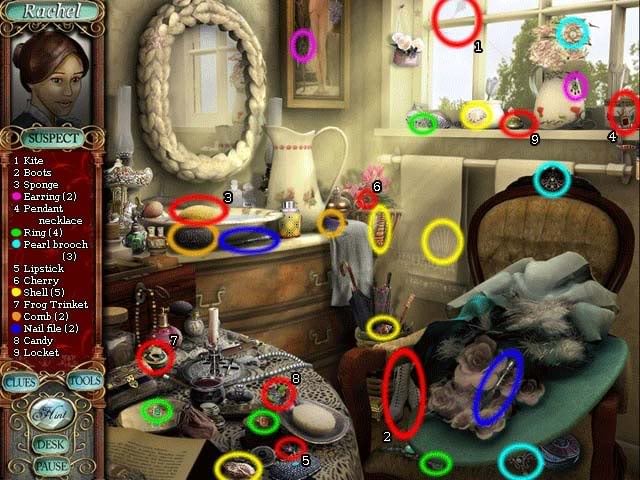
Powder Room-
- The Locket contains a clue. Use the Hex Key (from Rachel’s Room) on the Locket and click numerous times to open it and discover the Evidence Card "Locket Secret"
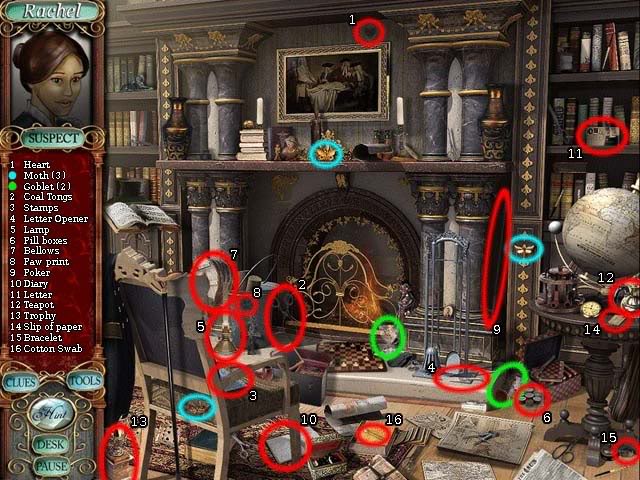
Study-
- The Cotton Swab will be added as a usable tool in your inventory once you find it.
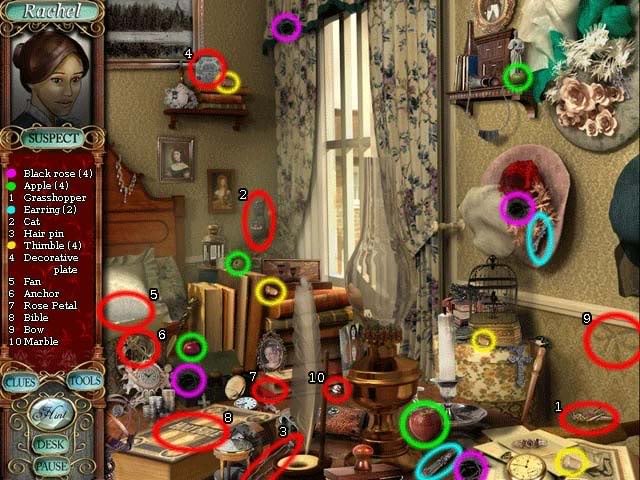
Drusilla’s Room-
- In the Bible can be found a secret lock. First drag the Bible Verse/Torn Paper onto the indicated area, and then enter the code "1-5-4". Inside you’ll uncover the Evidence Card "Note from Rachel".
Rachel’s Room-
- Click on the Envelope again. Reassemble it using the cotton swab to discover the Evidence Card "Proposal".
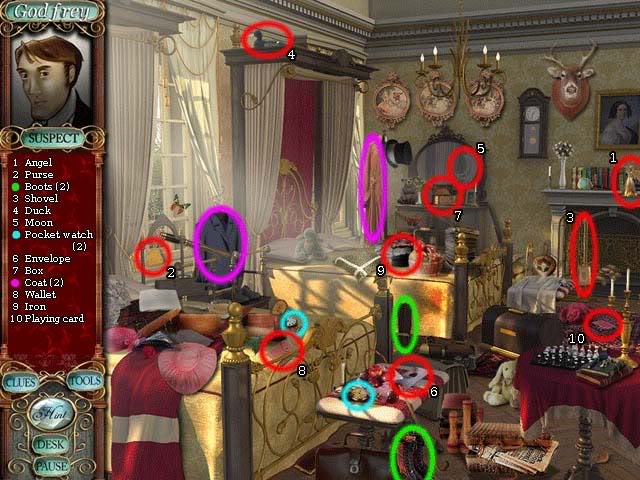
Suspect: Franklin Blake
Guest Room-
- The "Burnt Note" cannot be reconstructed until later. Once you’ve found everything else on the list, click on "Desk" to proceed to another level in the meantime.
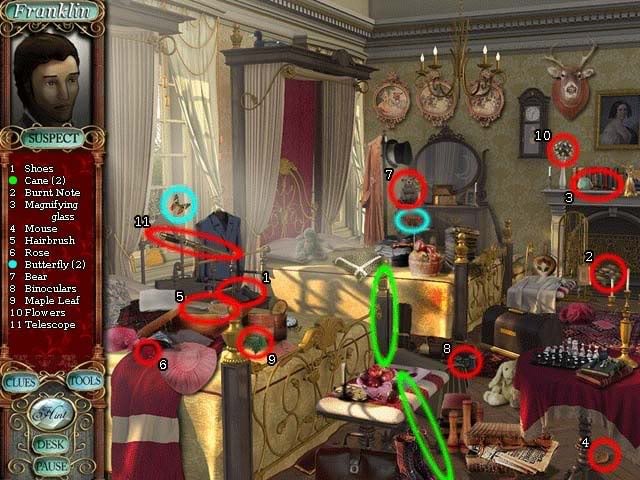
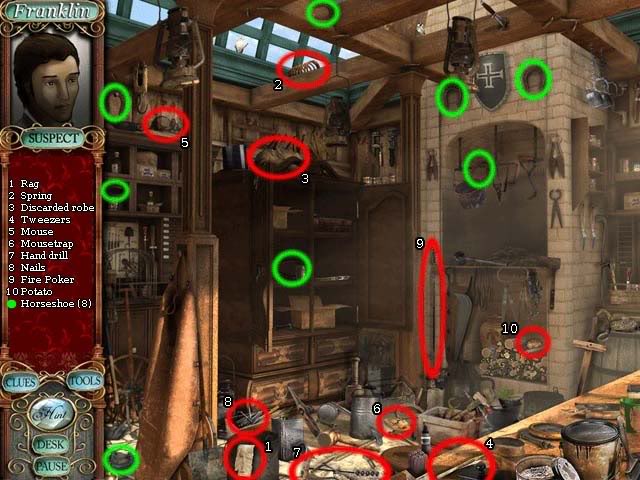
Workshop-
- The "Disgarded Robe" contains clues. Examine it to find initials and a piece that’s been cut out. When done you’ll have recovered the Evidence Card "Franklin’s Robe".
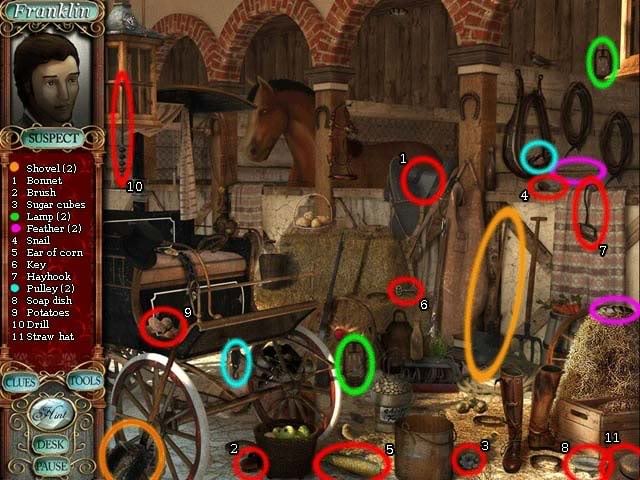
Stables-
- Once you find the "Key", it will be added to your item inventory for later use.
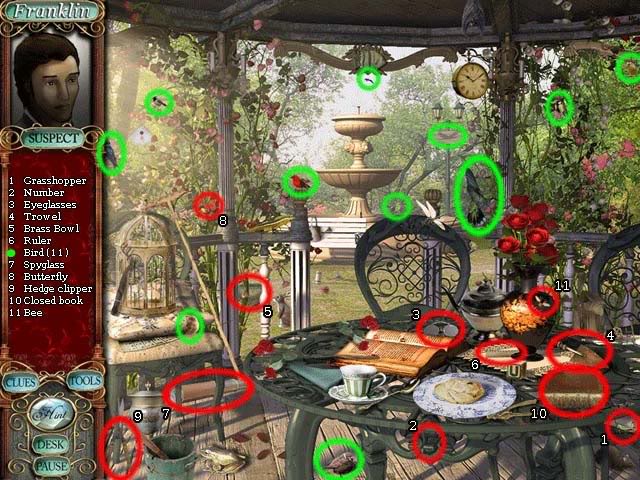
Rose Garden-
- Inside the "Closed Book" is a safe. Use the Key from your inventory to recover the Evidence Card "Love Letter".
Guest Room-
- Click on the "Burnt Note" and reassemble it with the tweezers to uncover the Evidence Card "Bank Notice".
Suspect: Gabriel Betteridge
Dining Room-
- "Dusty Bottle" will need to be revisited later. Once you’ve found everything else on the list, click on "Desk" to select another level.
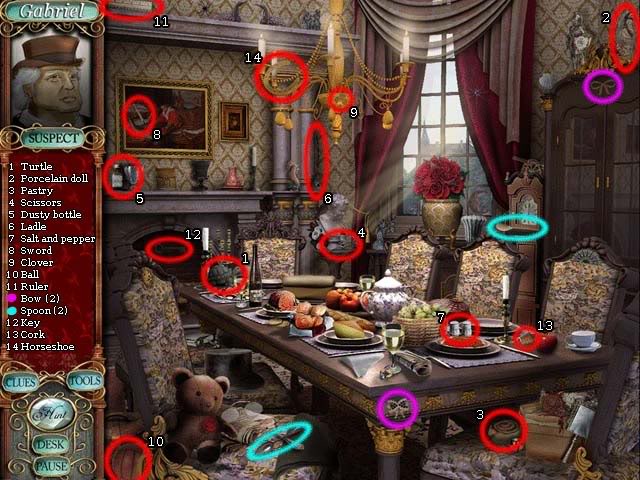
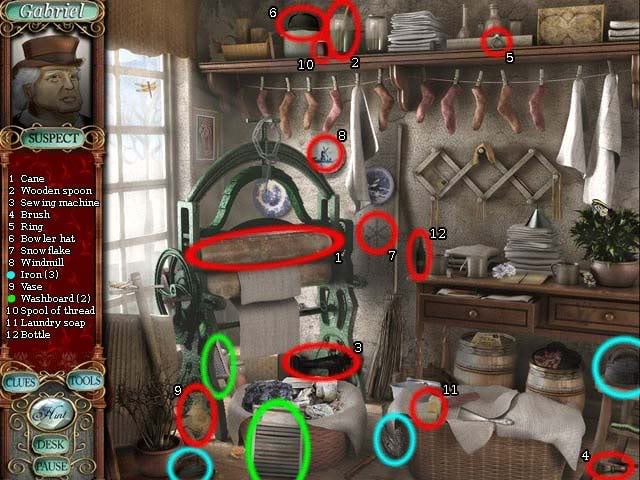
Laundry Room-
- Once you’ve found the "Bowler Hat", use the scissors to cut the threaded seams and uncover the Evidence Card "Telegram".
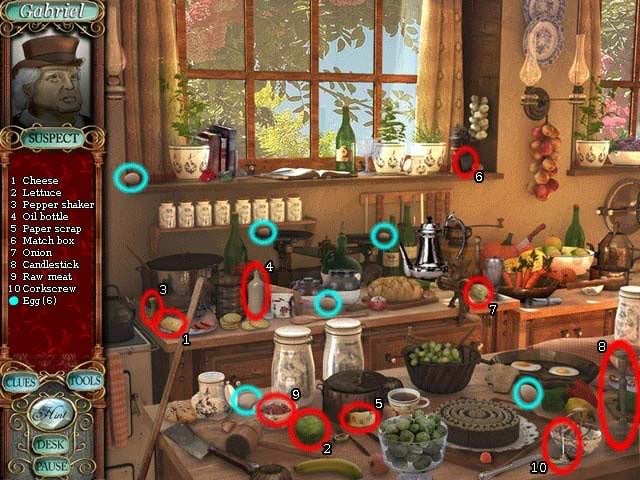
Kitchen-
- "Paper scrap" will be added to your inventory for later once you find it.
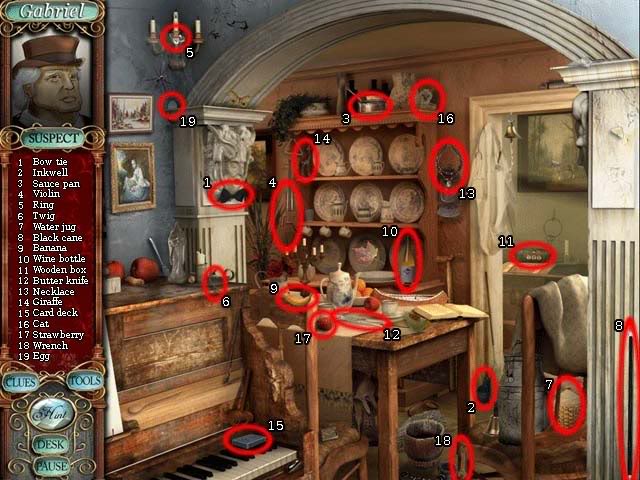
Servants’ Quarters-
- Once you find "Wooden Box", use the paper scrap to decode the combination and find the Evidence Card "Diary Page".
Dining Room-
- Click on the "Dusty Bottle" and use the brush to dust it off and discover the Evidence Card "Rat Poison".
Suspect: Godfrey Ablewhite
Rachel’s Room-
- "Footprint" will need to be returned to later. Once you found all the other items on the list, click "Desk" to proceed to another area.
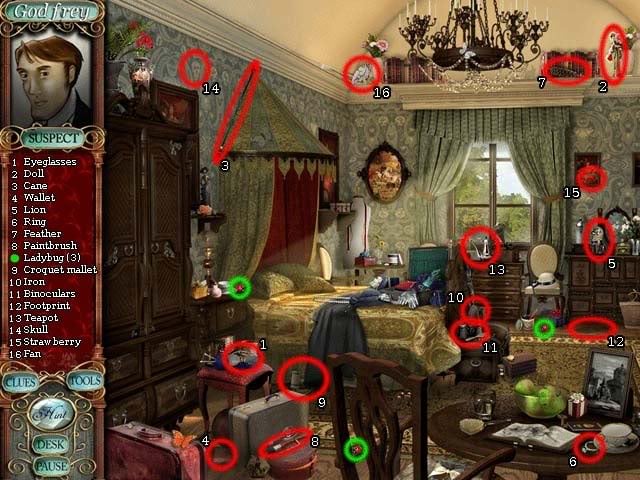
Guest Room-
- Use the Teapot on the Envelope to open it and uncover the Evidence Card "Debt Notice".
Powder Room-
- "Brush" will be added to your inventory once you find it.
Wine Cellar-
- When you find "Laundanum bottle", dust it for prints to uncover Evidence Card "Bottle of Laundanum".

Rachel’s Room-
- Click on "Footprint" and use the Blotter to pick up the print and find Evidence Card "Foot Print".
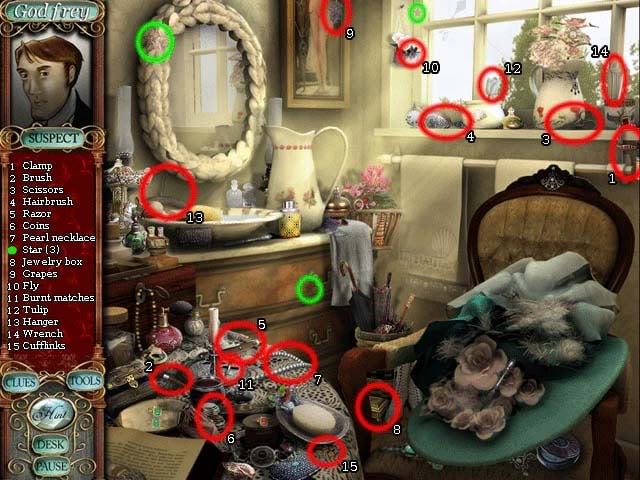
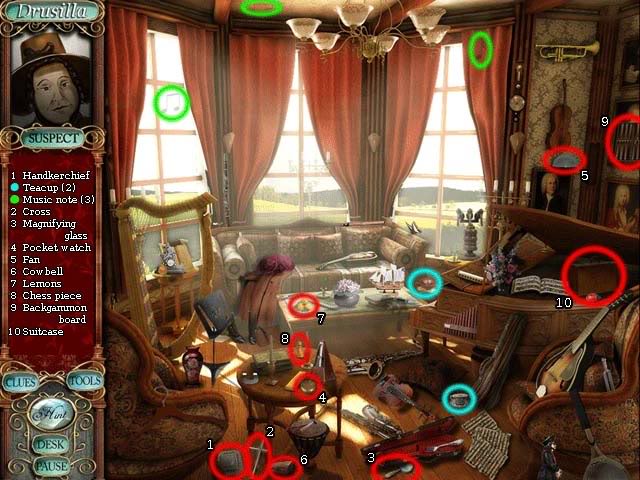
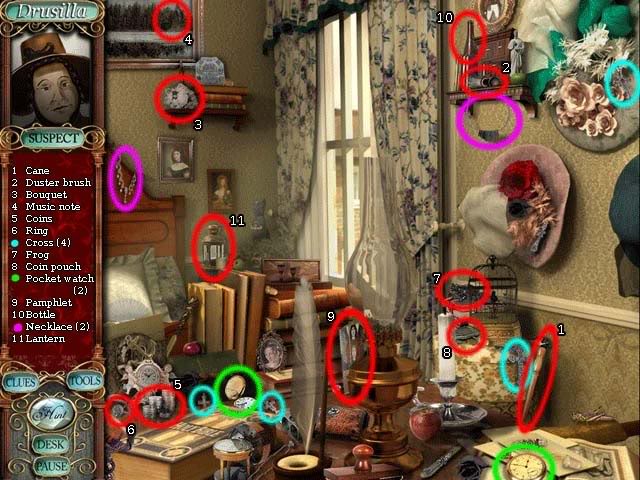
Suspect: Drusilla Clack
Music Room-
- The item "Cross" will need to be returned to later. After you’ve found everything on the list, proceed to another level by clicking "Desk" and selecting another location.
Drusilla’s Room-
- When you discover "Pamphlet" on the list, use the Magnifying lens and click whenever you see a bolded word to uncover a secret message and the Evidence Card "Pamphlet".
Garden Room-
- Once you find the item "Scraper" it will be added to your inventory for future use.

Muddy Docks-
- When you’ve found the "Fish tail", use the Scraper to uncover the rest of the fish and get the Evidence Card "Red Herring".

Music Room-
- Return to the Music Room and select the "Cross". Dust it to reveal the hidden message and achieve the Evidence Card "Cross".
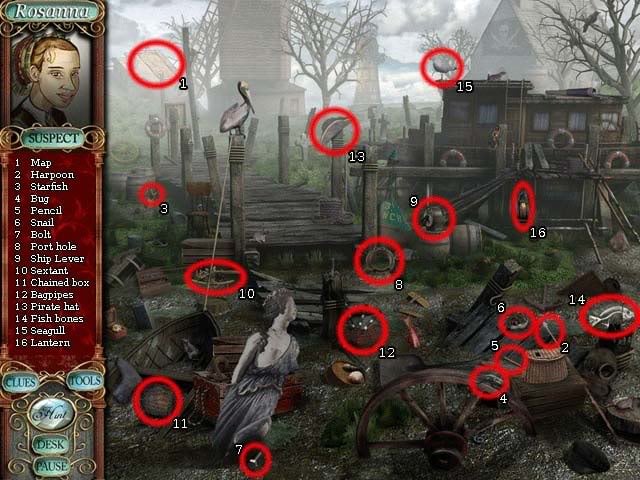
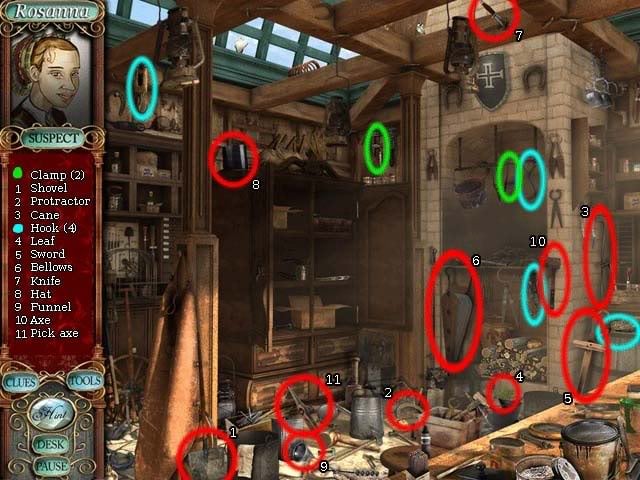
Suspect: Rosanna Spearman
Muddy Docks-
- You will need another item before you can open "Chained Box". Once you’ve found everything else on the list, exit to Desk and select a new location.
Workshop-
- "Axe" will be added to your inventory once you find it.
Laundry Room-
- Once you find "Diary", you will find a page has been torn out. Use the Pencil to reveal the impression and uncover the Evidence Card "Torn Page".
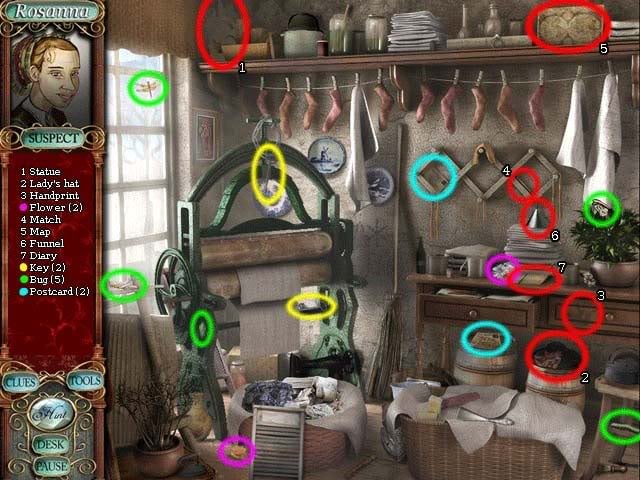
Servants’ Quarters-
- When you find "Letter", use the Match (strike it on the rock on the bottom right first) to reveal the hidden message and uncover the Evidence Card "Jailbird Letter".
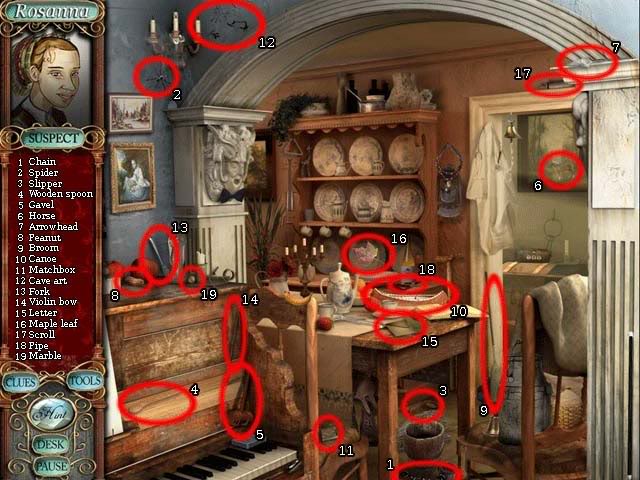
Muddy Docks-
- Use the Axe on the "Chained Box" (in order from topmost chain to bottom) to uncover the Evidence Card "Stained Fabric".
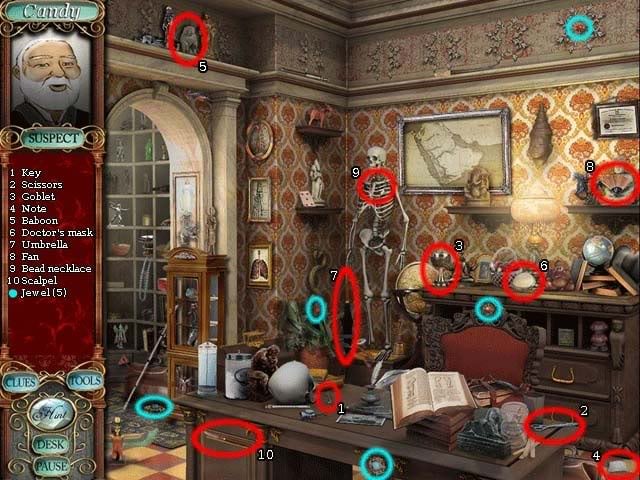
Suspect: Dr. Milton Candy
Dr. Candy’s Parlor-
- "Note" will need to be returned to later. Once you find everything else on the list, exit to Desk and select another location.
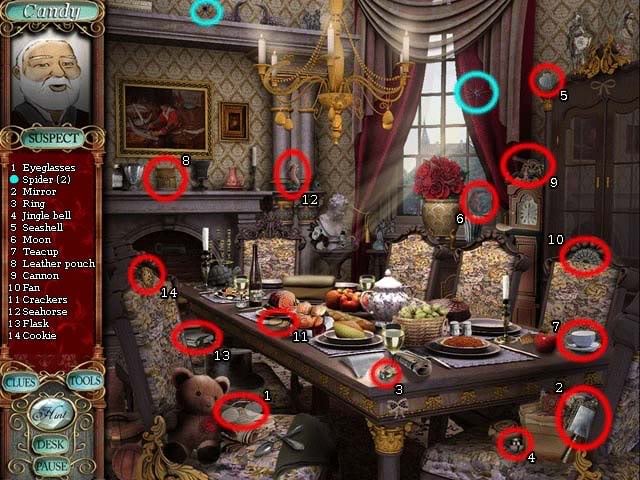
Dining Room-
- When you find "Leather pouch", use the Key to uncover the Evidence Card "Loupe".
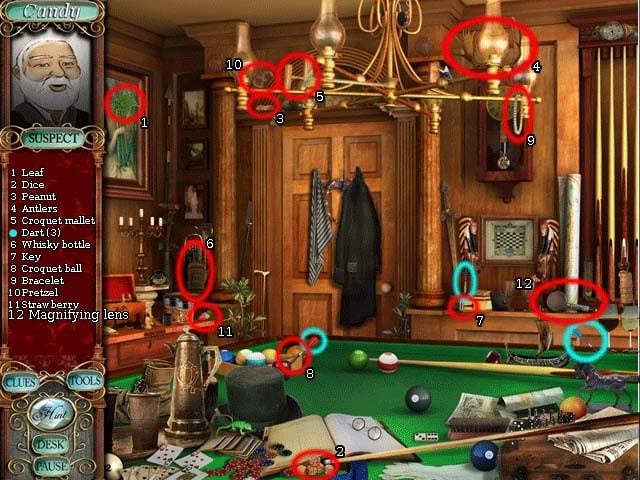
Billards Room-
- The "Magnifying lens" will be added to your inventory once you find it.
Study-
- Use the "Magnifying lens" on the "Medical Book" to uncover the Evidence Card "Book Note".
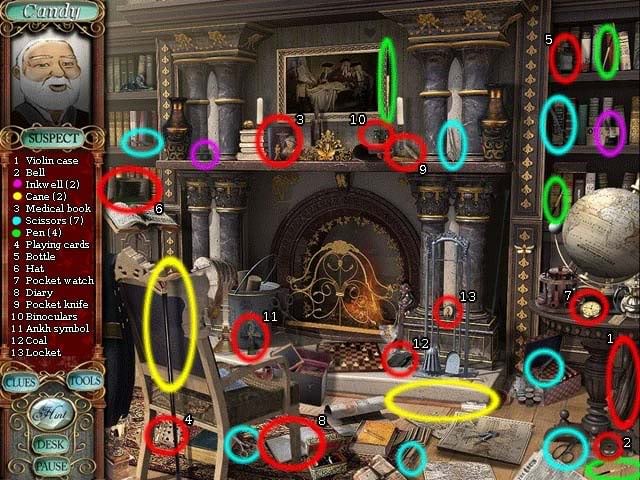
Dr. Candy’s Parlor-
- Return to the parlor and use the Mirror on "Note" to uncover Evidence Card "Secret Note".
Suspect: Raj Gupta
Garden Room-
- Once you find "Scroll" you’ll have to save it for later: once you’ve found everything else, click "Desk" to go to the next location.
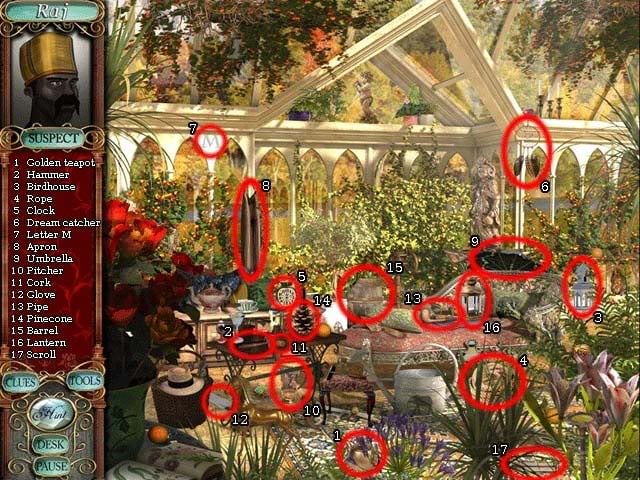
Rose Garden-
- When you find the "Urn", use the hammer on it to discover the Evidence Card "Fake Beard".
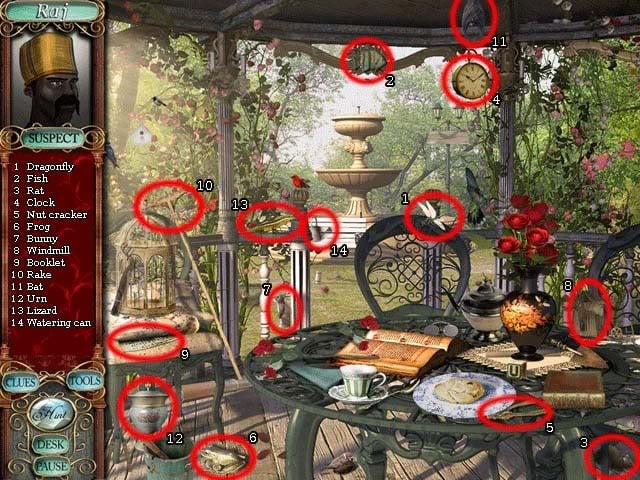
Music Room-
- Once you find the "Magnet" it will be added to your Tools for later use.
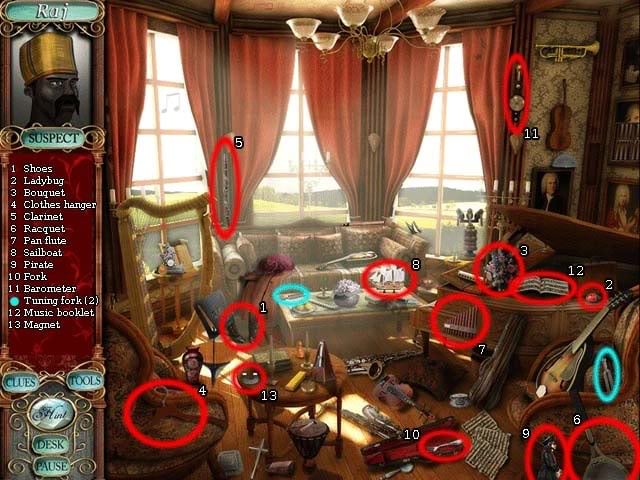
Stables-
- Use the Magnet on the "Crate" to discover the Evidence Card "Indian Knife".
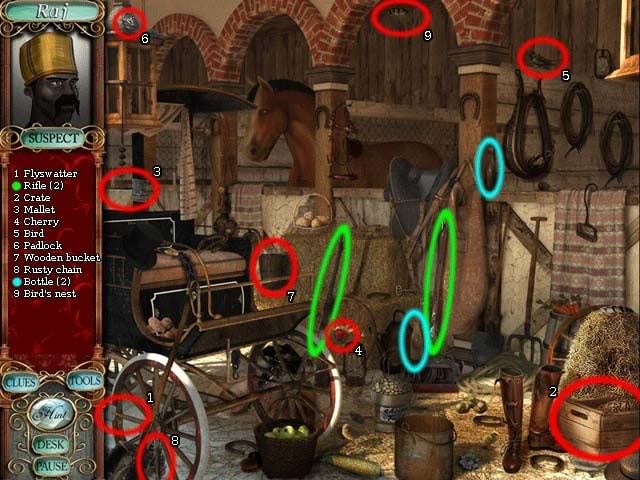
Garden Room-
- Return here and click on the Scroll to translate it and recover the Evidence Card "Translated Note".
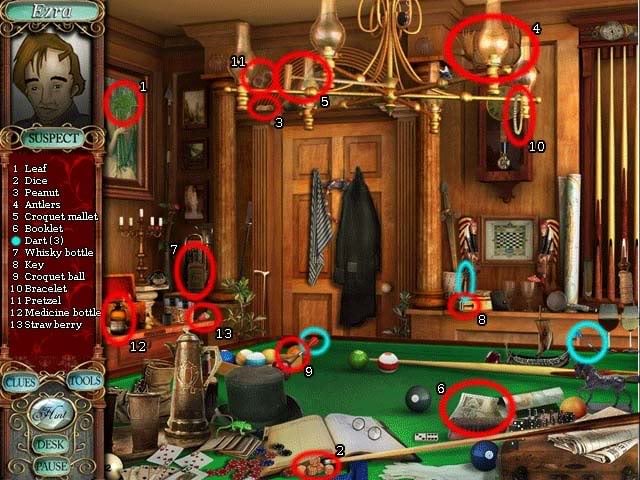
Suspect: Ezra Jennings
Billards Room-
- You will need another tool before you can examine "Medicine Bottle". Once you’ve recovered everything else, click "Desk" to proceed to the next location.
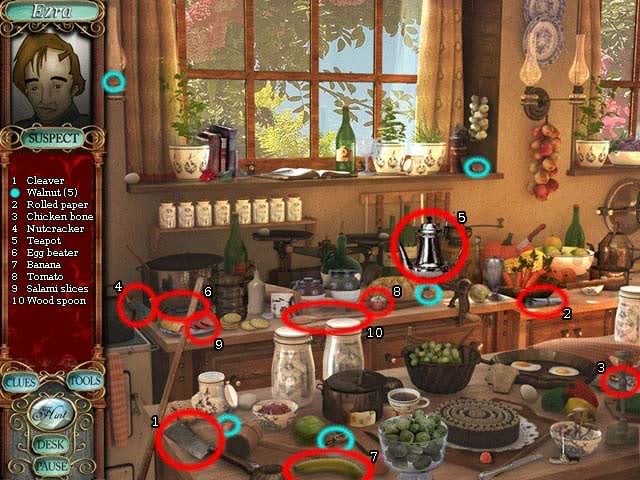
Kitchen-
- Add the "Teapot" to your Tools when you find it, and click the "Rolled paper" to discover the Evidence Card "Decoded Letter".
Wine Cellar-
- The "Dropper" will be added to your Tools once you find it.

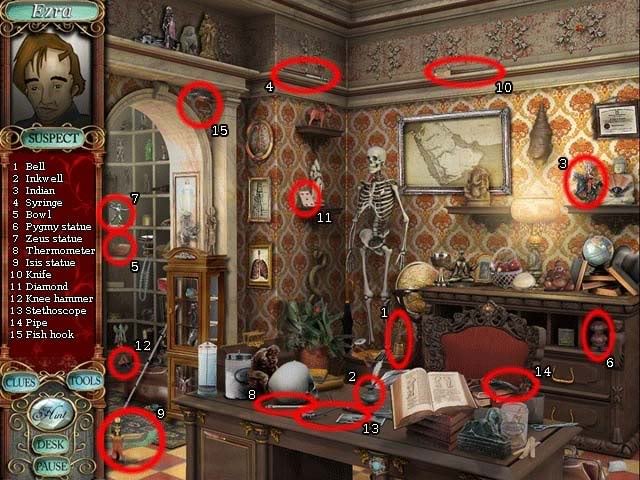
Dr. Candy’s Parlor-
- When you find the "Indian", the detective will discover loose wallpaper. Use the teapot to uncover the Evidence Card "Ezra Will".
Billards Room-
- Click on the "Medicine bottle" to test the medicine and uncover the Evidence Card "Laundanum bottle".
The Accusation
Now that you’ve finished with all the suspects, you can choose to review their evidence and stories or you can go ahead and accuse whomever you like. If you accuse the wrong person, a "Not Guilty" stamp will be placed over their picture. Once you accuse the real crook, cinematics will occur and you can sit and enjoy the ending, and choose to replay the game at this point in time. (If you really need help on this, the correct person to accuse is Godfrey Ablewhite). Congratulations, you’ve completed the game!
“;

More articles...
-
Grow A Garden 2 Base Price List
What's the most valuable crop? -
Evomon Best Starter [Leafbun, Blazpup, or Bubble?]
Grass-type, Fire-type, or Water-type? -
Evomon Tier List [META and BEST Evomon]
The Evomon dream team.