![All VV Ultimatum Titles [How to Get]](/wp-content/uploads/2026/06/vv-ultimatum-titles.jpg "All VV Ultimatum Titles [How to Get]")
All VV Ultimatum Titles [How to Get]
Do titles provide buffs?


Welcome to the Mystery Legends: The Phantom of the Opera walkthrough on Gamezebo. Mystery Legends: The Phantom of the Opera is a [game genre] game played on PC, created by PixelStorm and available at Playpond. This walkthrough includes tips and tricks, helpful hints, and a strategy guide for how to complete Mystery Legends: The Phantom of the Opera.
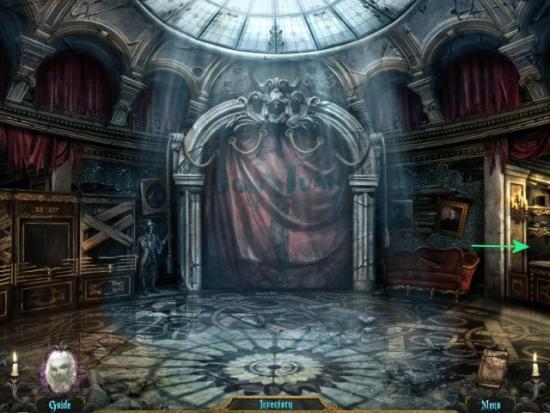
Welcome to the Mystery Legends: The Phantom of the Opera walkthrough on Gamezebo. Mystery Legends: The Phantom of the Opera is a [game genre] game played on PC, created by PixelStorm and available at Playpond. This walkthrough includes tips and tricks, helpful hints, and a strategy guide for how to complete Mystery Legends: The Phantom of the Opera.
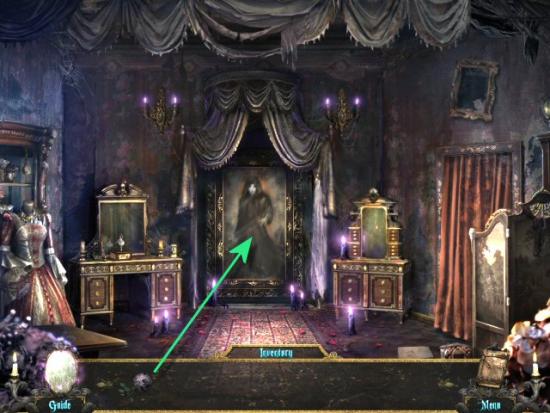
Watch the opening cutscene.
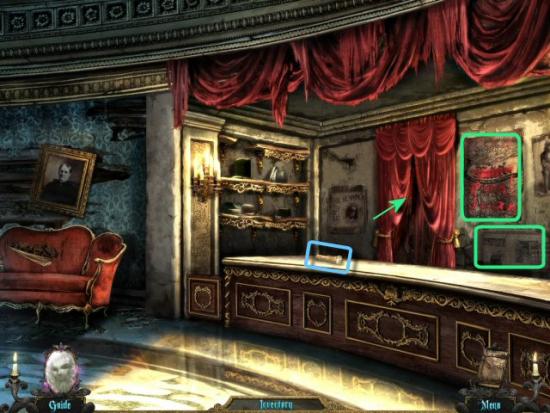
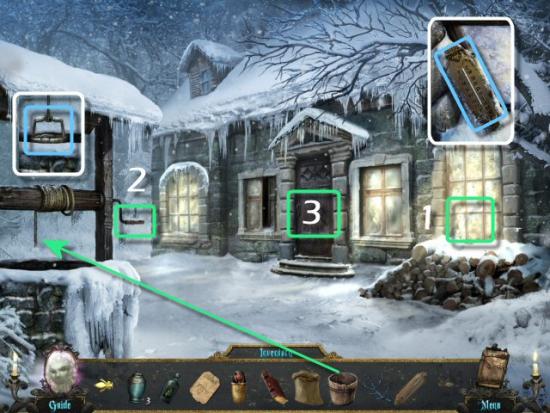
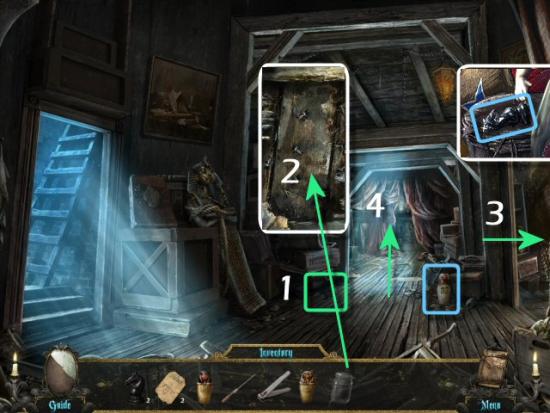
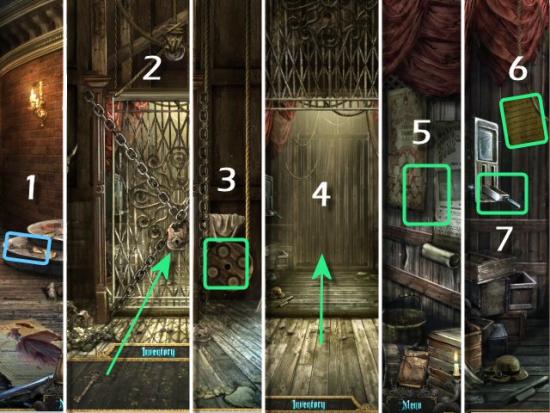
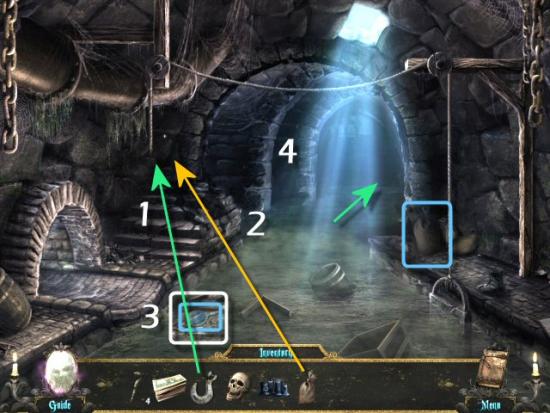
Enter the Coat Check, to the right.

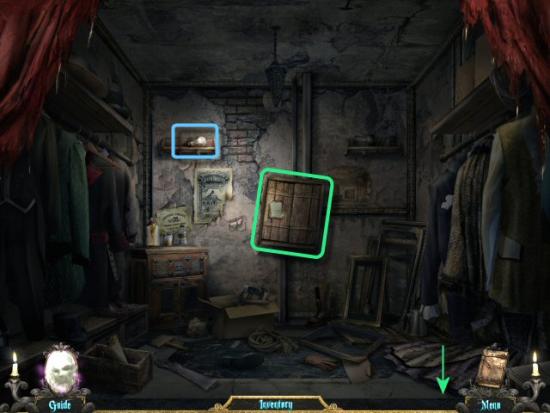
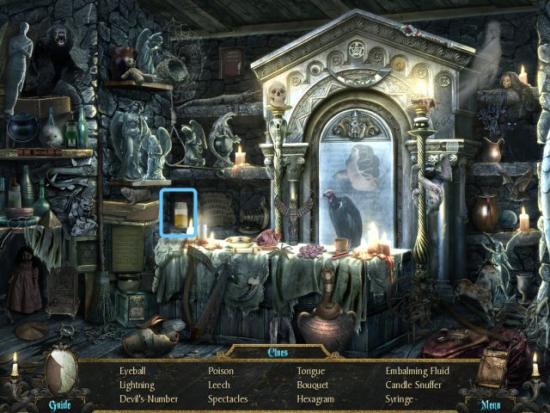
Click on the Poster and the News clipping (green), collect the Electric Torch (blue) and then enter the Cloak Closet.
Use the Electric Torch (click anywhere), collect the Light Bulb (blue) and then click on the Control Panel (click twice).
Restore power by clicking on the Toggle Switches. You need to trace the Wires from the Bulbs to the Toggle Switches in order to turn on the Bulbs in the correct sequence. This puzzle is random and your solution may be different. When complete, return to the Grand Foyer.
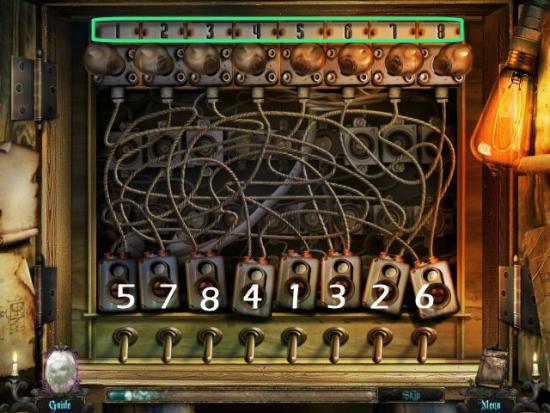
Click on the following for a video solution. Your solution may be different
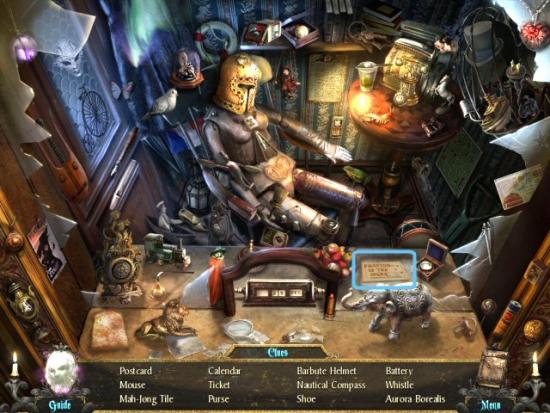
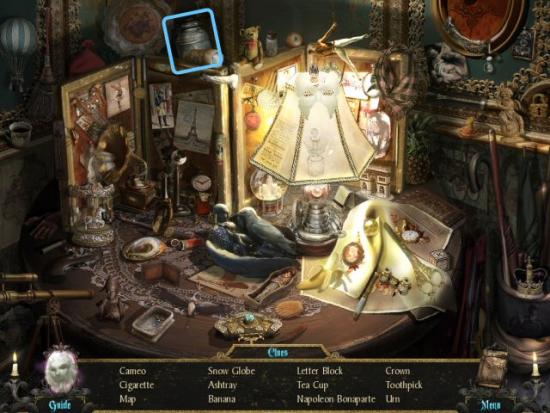
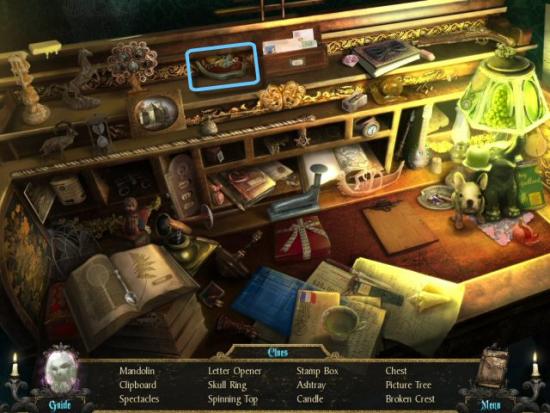
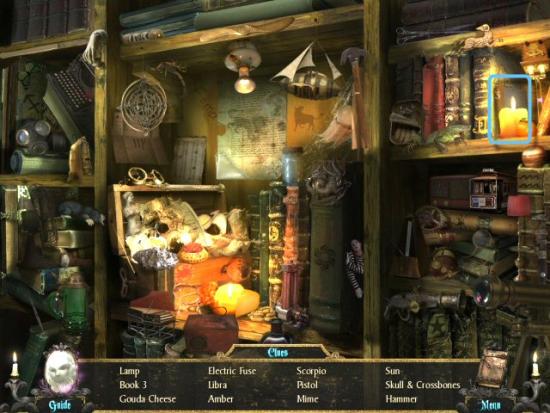
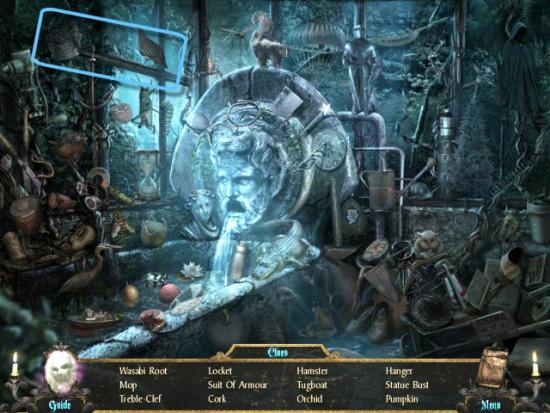
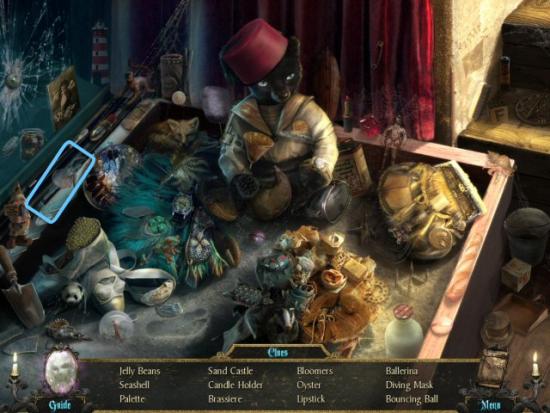
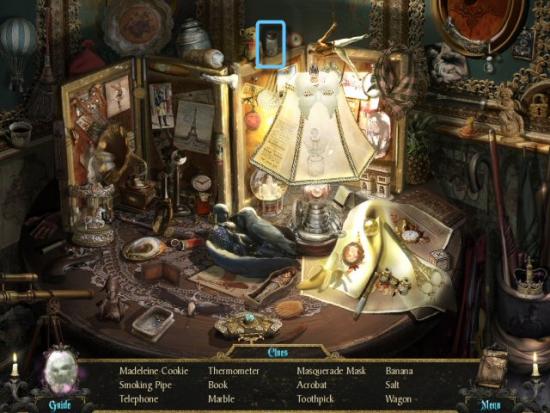
Click on the Ticket Booth Find all the objects in the list. Inventory Item: Opera Ticket
Click on the Puppet, use the Opera Ticket, click on the Curtain and then enter the Auditorium Landing.
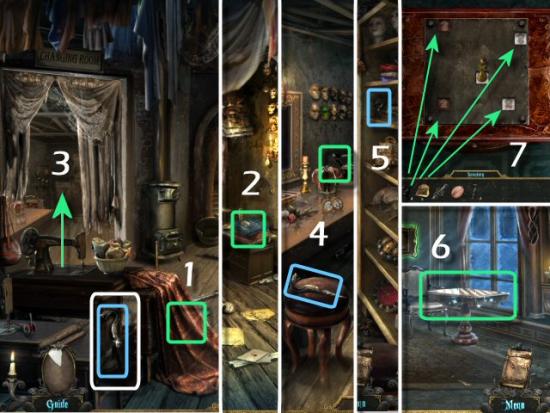
Enter the Dining Hallway (1), collect the Crest Fragment (1 of 2) and then enter the Dining Salon (2).
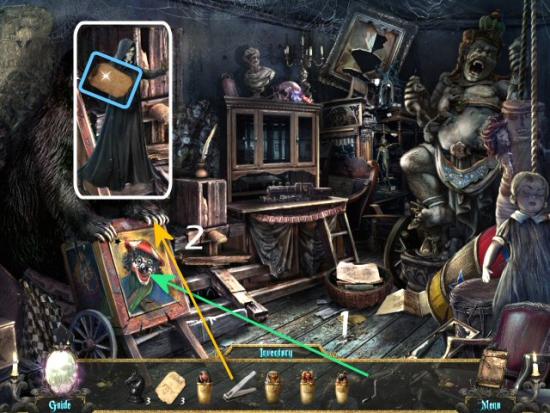
Click on the Chair (1), collect the Urn (1 of 5), collect the Black Knight (1 of 4), click on the Mantle (2) and then click on the Table (3). When you finish the object list, exit to the Dining Hallway.
Find all the objects in the list. Inventory Item: Urn (2 of 5)
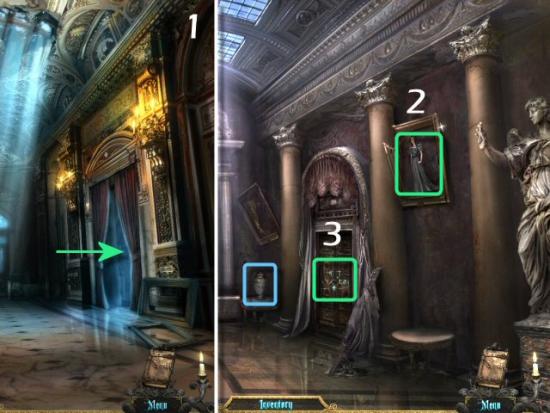
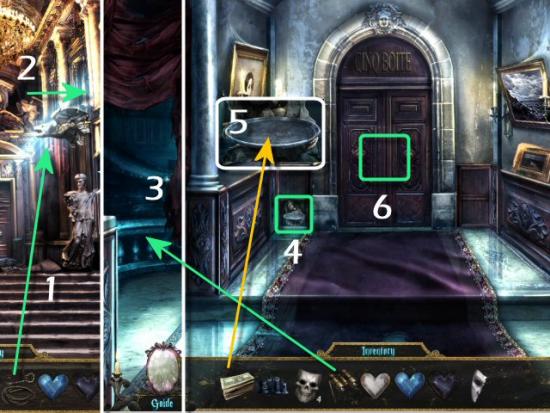
Enter the Manager’s Hallway (1), click on the Painting (2), collect the Urn (3 of 5) and then click on the door to the Manager’s Office (3).
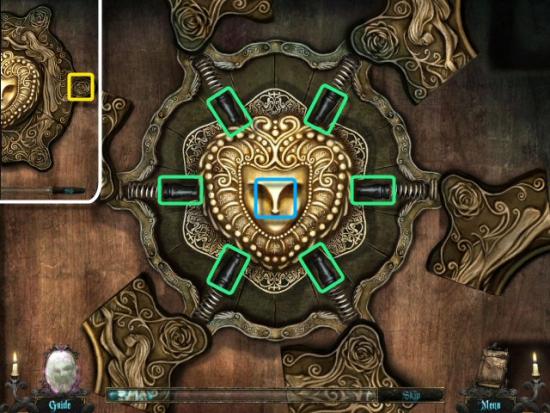
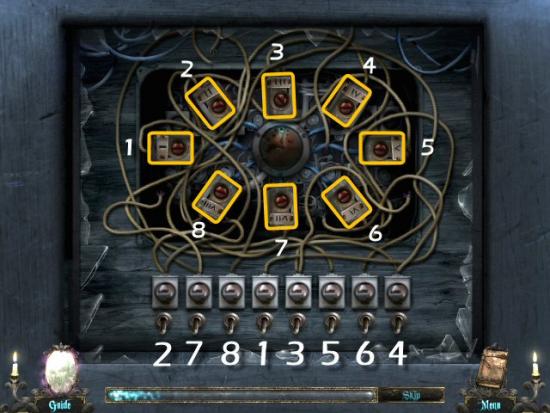
Click on any of the outer points (yellow) to open the Lock Mechanism. You must click on each Spring (green), in the correct order and then click on the Center (blue) to open the Lock. If you click on an incorrect Spring, you’ll have to start over from the beginning. Once complete, enter the Manager’s Office.
Click on the following for a video solution. Your solution may be different
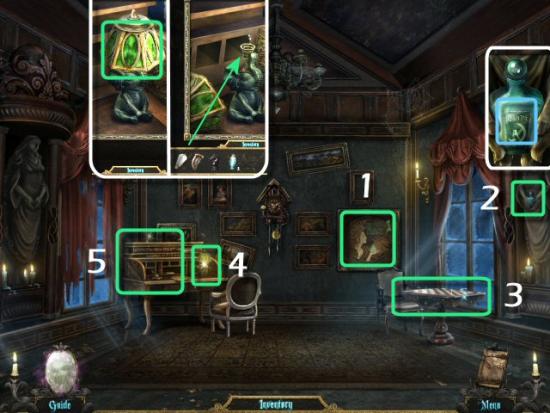
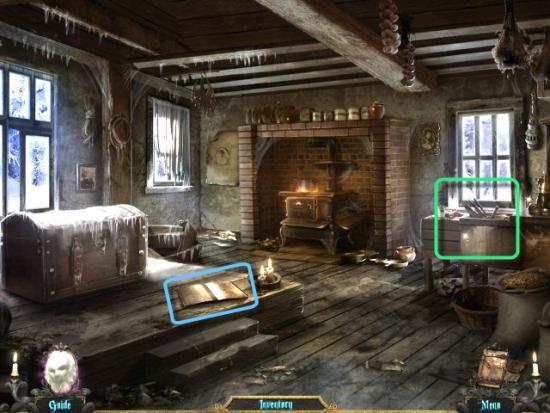
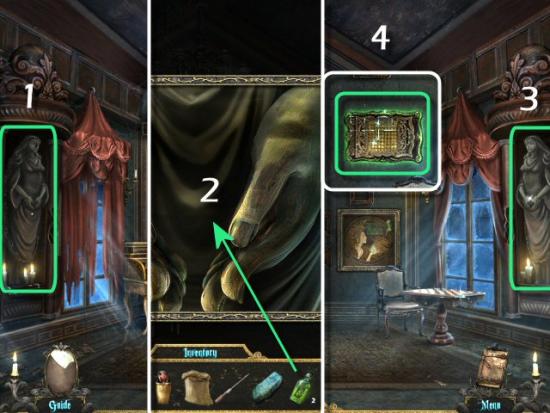
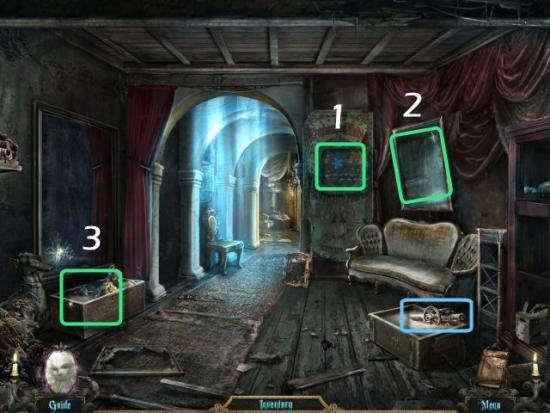
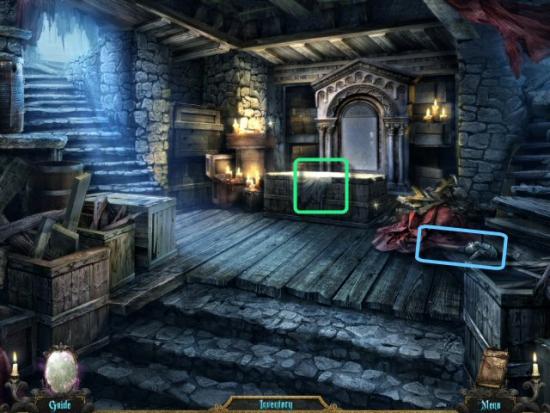
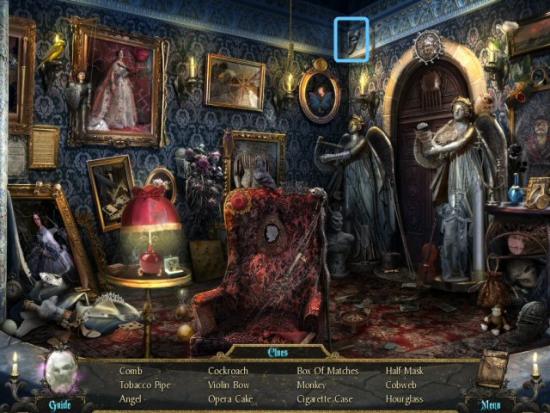
Click on the Painting (1), click on the Statue (2), collect the Empty Bottle, click on the (3) Chess Table, click on the Lamp (4), click on the Shade, use the Light Bulb in the Socket and then click on the Desk (5).
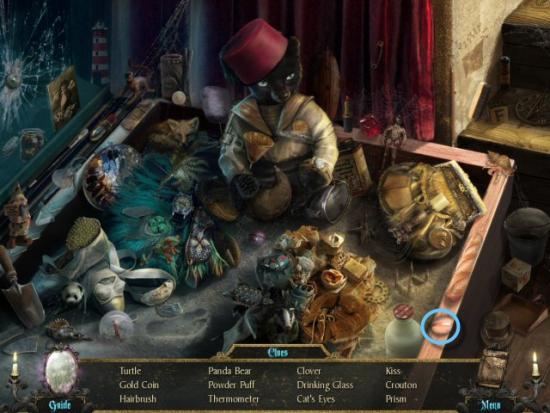
Find all the objects in the list. Inventory Item: Crest Fragment (2 of 2)
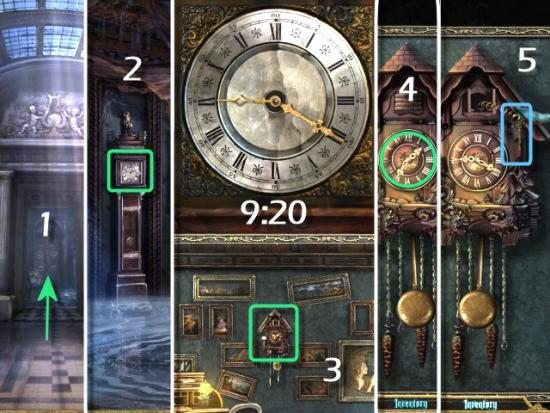
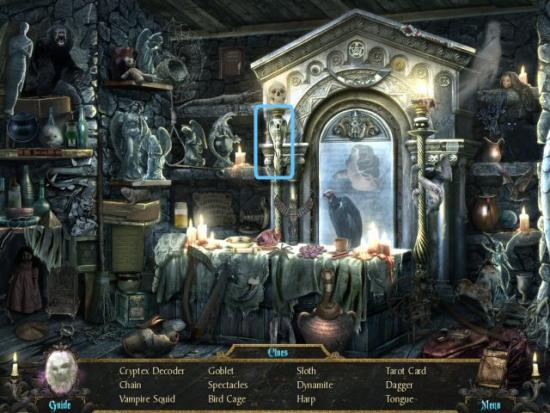
When you finish the object list, exit to the Manager’s Hallway, enter the Art Rotunda (1) and then click on the Grandfather Clock (2). Note the Time (3), return to the Manager’s Office, click on the Cuckoo Clock, click and drag the Clock Hands (4) to the correct time and then collect the Key (5).
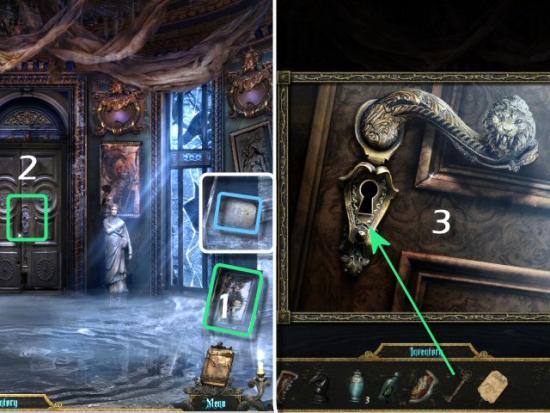
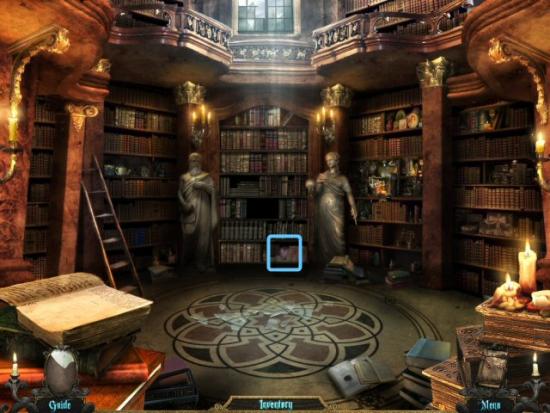
Return to the Art Rotunda, click on the Painting (1), collect the Symbol Card (1 of 4), click on the Door (2) to the Library, use the Key in the Lock (3) and then enter the Library.
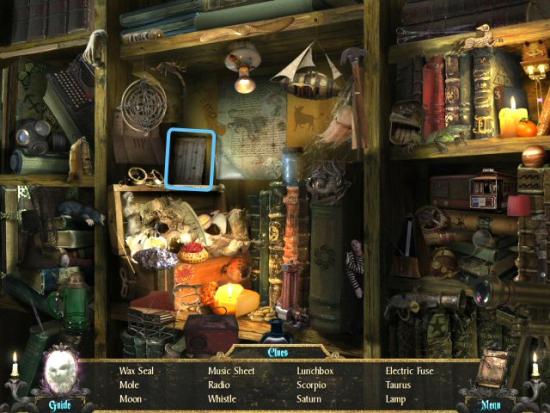
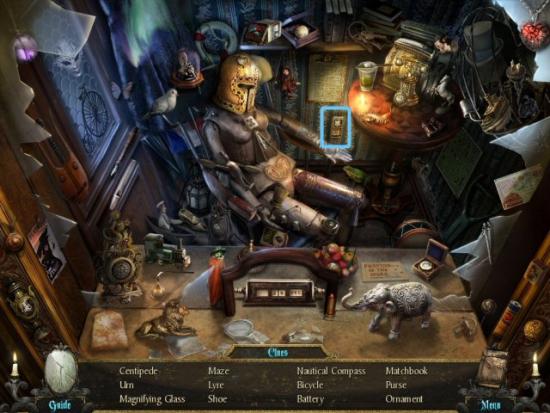
Click on the Book of Egyptian gods (1), click on the Unlit Candle (2) and then collect the Black Knight (2 of 4). Collect the Imsety Canopic Jar (1 of 4), click on the Center Bookshelves (3) and then click on the Right Bookshelves (4).
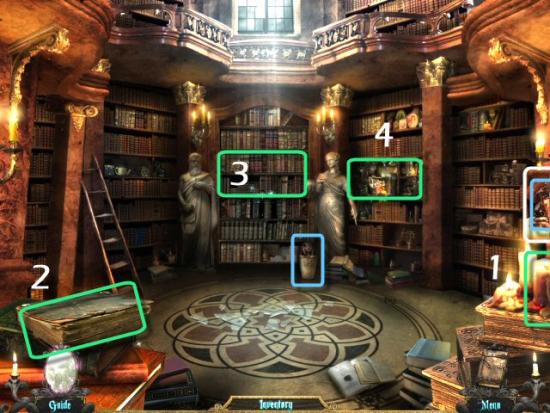
Find all the objects in the list. Inventory Item: Book 3 (1 of 2).
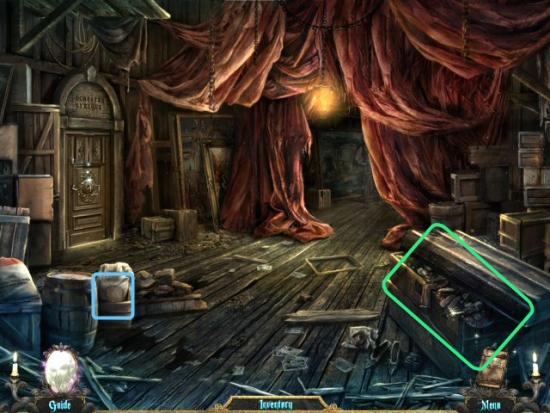
Return to the Art Rotunda, enter the Conservatory Hallway (1), collect the Sandbag, enter the Conservatory (2), click on the Statue (3), collect the Bucket and then click on the Gate (4).
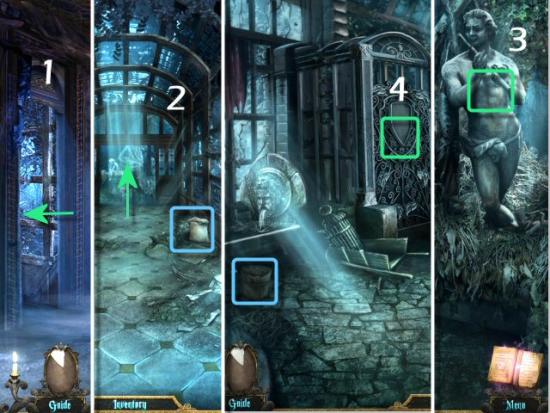
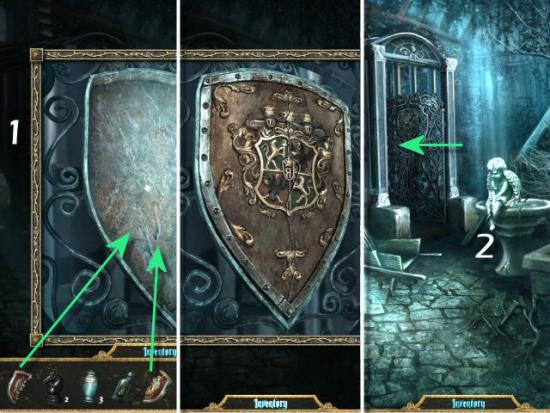
Use the Crest Fragments on the Gate (1) and enter the Conservatory Grounds (2).
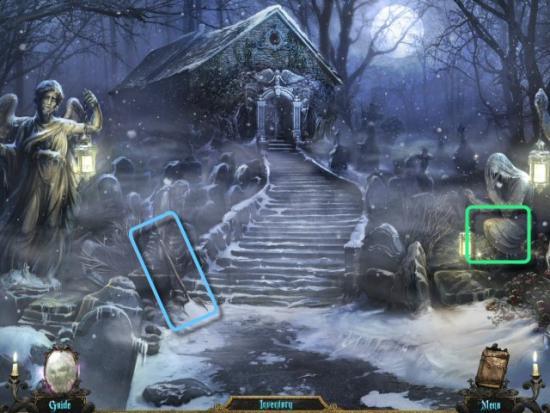
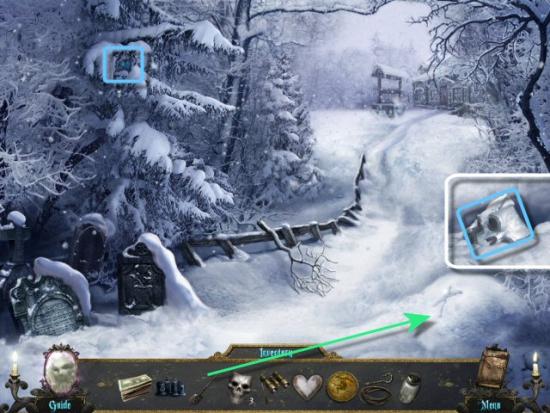
Click on the Graves, collect the Twig and then enter the Cottage Grounds.
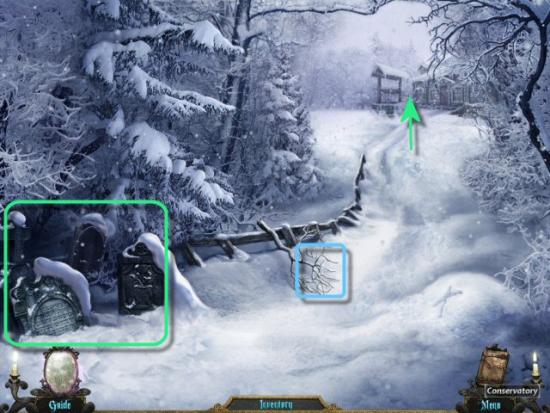
Click on the Window (1), collect the Thermometer, use the Bucket on the Well, click the Handle (2 – twice), collect the Bucket of Ice Water and then enter the Cottage (3).
Collect the Recipe Book (2 of 2) and then click on the Sink.
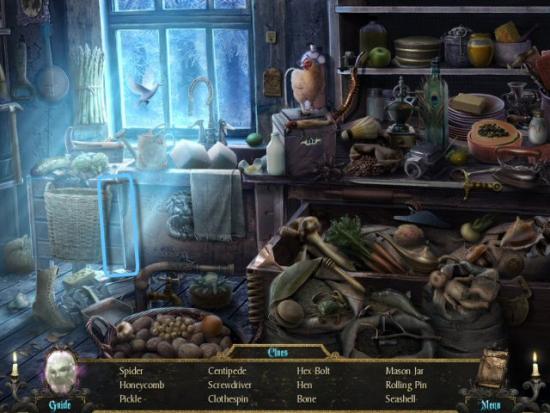
Find all the objects in the list. Inventory Item: Screwdriver
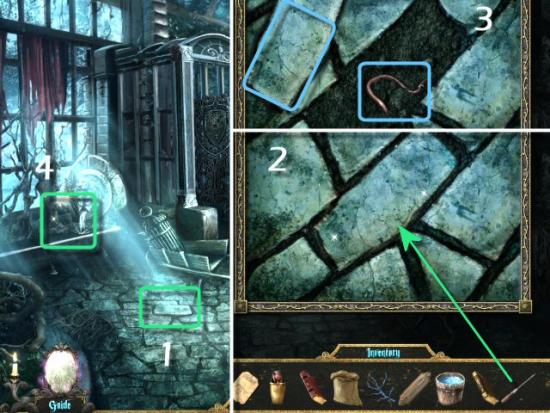
Return to the Conservatory, click on the Tile, use the Screwdriver on the Tile, collect the Worm and the Tile and then click on the Trough.
Find all the objects in the list. Inventory Item: Gardening Shears
Return to the Conservatory Hall, use the Bucket of Ice Water on the Withered Plants, use the Shears on the Plants, collect the Star Anise Buds and then return to Library.

Click on the Center Bookshelves, use the Books in the Empty Spaces, refer to the clue in the Journal (Red Poster in the Coat Check) and arrange the Books in the correct order. Click on the either side of a Book to move it one space to the right or left.
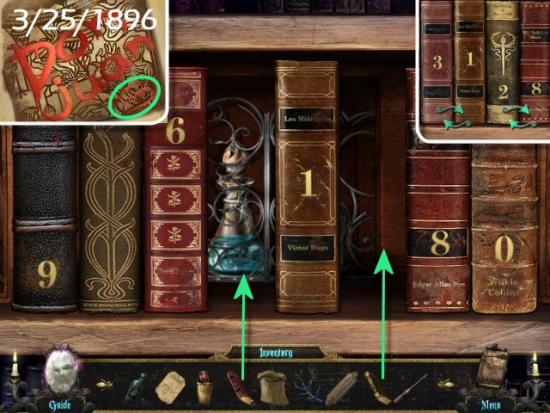
When complete, collect the Bottle of Spirits and the Empty Bottle, return to the Cottage and then click on the Stove.
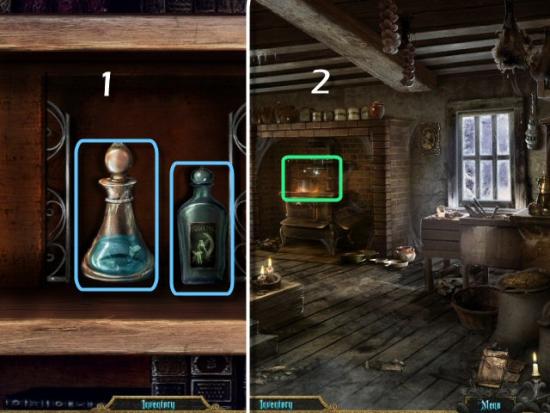
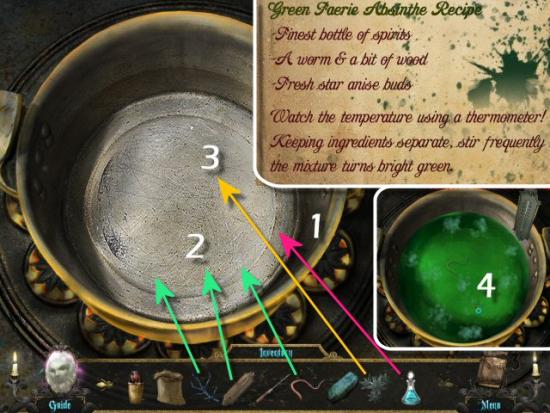
Use the Angel Spirits (1), Earthworm, Twig and Thermometer (2) and then Star Anise Buds (3), in that order, on the Pot. As soon as you add the Star Anise Buds, the minigame begins. You need to keep the Star Anise Buds (green) from touching each other by “stirring.” If they touch, they will turn red and you’ll have to keep stirring. The trick is to GENTLY click and drag a Star Anise away from the others. If you drag too quickly, the momentum will likely send it into another bunch of Star Anise. Repeat for each Star Anise in each bunch…just be sure to drag it gently to a free space in the Pot. Once all the Star Anise Buds are separate, they’ll disappear and the liquid will turn bright green. Use the Empty Bottles on the Pot of Absinthe.
Click on the following for a video example. Note that this is an arcade style game and your game will depend entirely on your actions.
Return to the Conservatory and then click on the Trough. Find all the objects in the list. Inventory Item: Mop
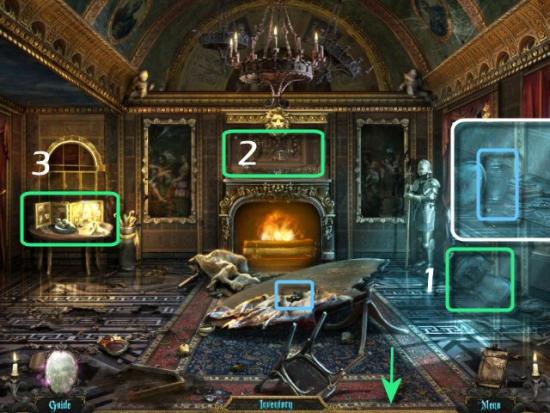
Return to the Manager’s Office, click on a Statue (1), use a Bottle of Absinthe on the Hands (2), repeat for the other Statue (3) and then click on the uncovered Safe (4).
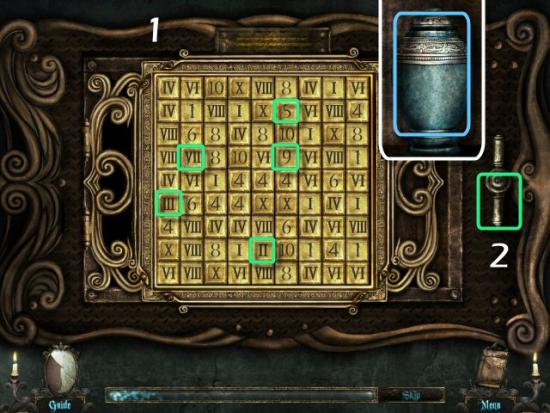
Click on 5 unique buttons to unlock the Safe. Many of the numbers appear several times, both in Arabic and Roman Numerals (1=I, 2=II, 3=III, 4=IV, 5=V, 6=VI, 7=VII, 8=VIII, 9+IX, 10=X). Only click on the Numbers that appear once (1), click on the Handle (2), collect the Urn and then return to the Auditorium Landing. Note that the solution for this puzzle is different each time you exit and return to it, and is different each time you play.
Enter the Ballroom Hallway (1), use the Sand on the Floor (2), click on the Painting (3), collect the Urn and then return to the Dining Salon.
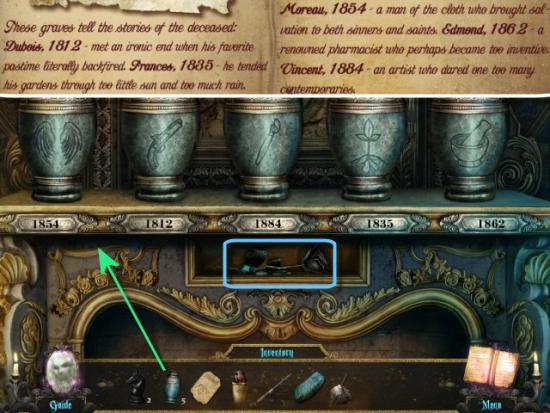
Click on the Mantle, use the Urns on the Mantle Shelf (click on each one and then click on the Mantle Shelf), refer to the clue in the Journal (Gravestones in the Conservatory Grounds) and rearrange the Urns according to the Date and the Image referring to those buried under the Gravestones. Click on an Urn then click on another to switch places. When complete, collect the Black Rose and then return to the Manager’s Hallway. The order of the Urns is:
Click on the Window (1), use the Tile on the Glass (2), collect the Qebehsenuf Canopic Jar and then return to the Ballroom Hallway.
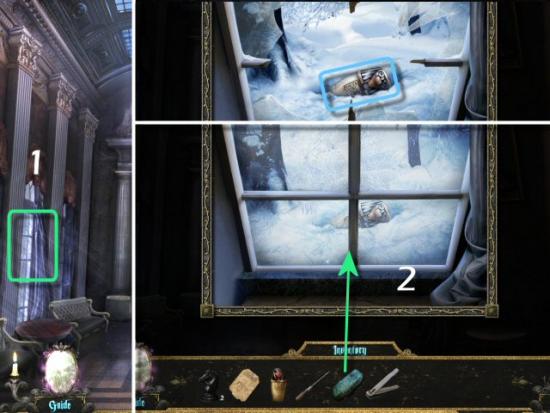
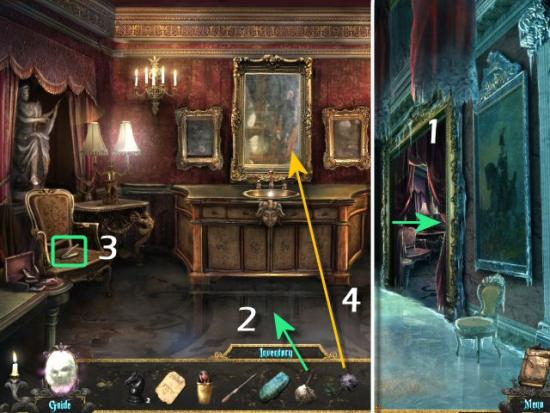
Enter the Powder Room (1), use the Mop on the Floor (2), collect the Nail Clippers (3) and then use the Black Rose on the Mirror (4).
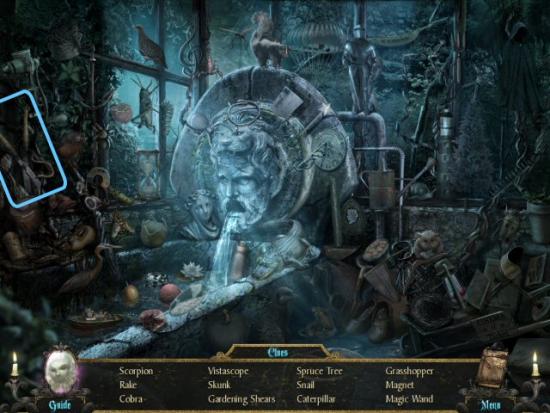
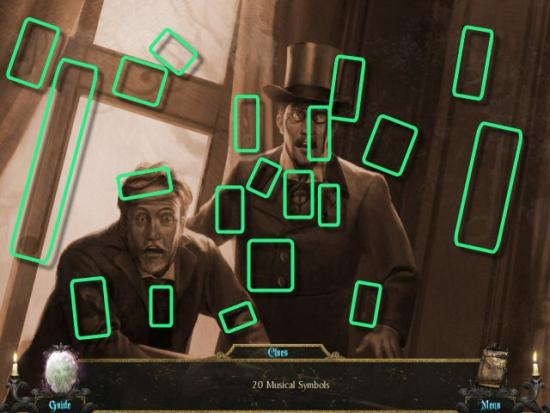
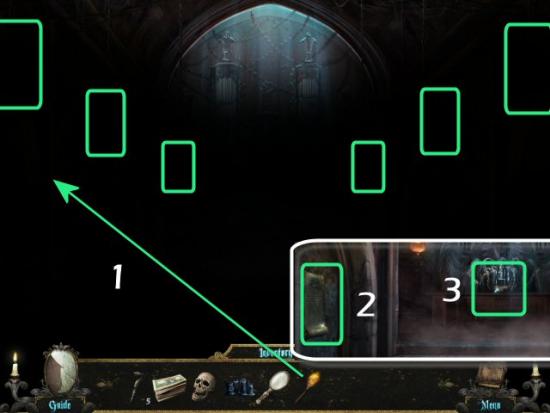
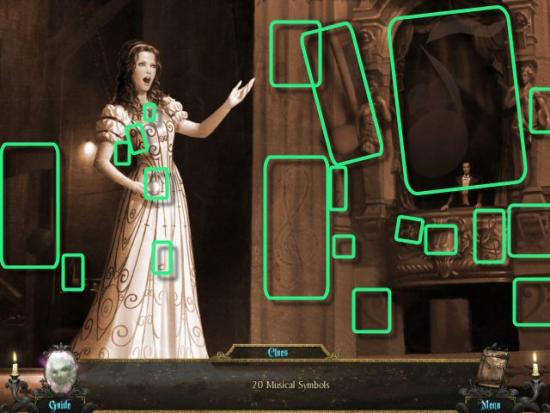
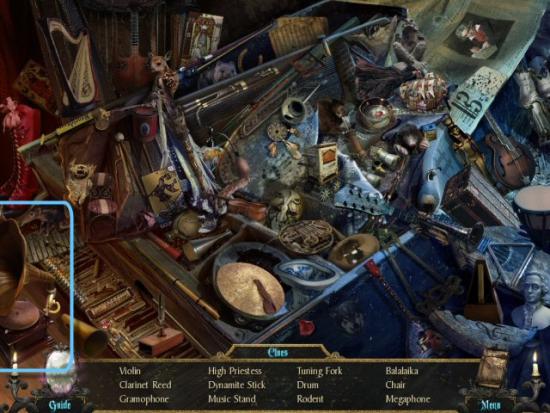
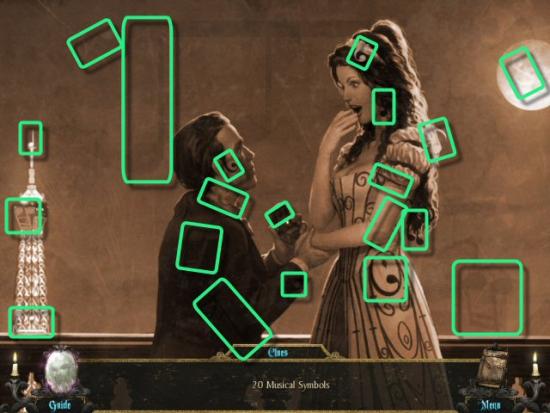
Find 20 Musical Symbols
Enter the Spy Booth through the broken Mirror, click on the Shelf (1), collect the Symbol Card (2 of 4), collect the Insect Jar, click on the Notes (2) and then enter the Understage Landing (3).

Collect the Hapy Canopic Jar, click on Floor (1), use Insect Jar on Ants (2), enter the Prop Storage (3), collect the Black Knight (3 of 4), return to the Understage Landing and enter the Understage (4).
Collect the Symbol Card (3 of 4) and then click on the Trunk.
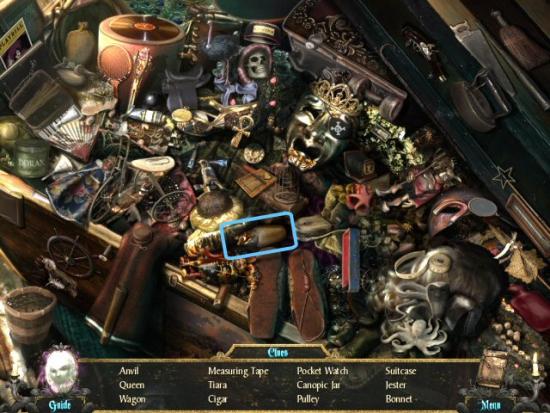
Find all the objects in the list. Inventory Item: Duamutef Canopic Jar
Enter the Elevator Lobby, click on the Statue (1), continue to the Stage Lifts (right), collect the Handle, use Screwdriver on the Panel (2), use the Jar of Ants on the Mechanism (3)
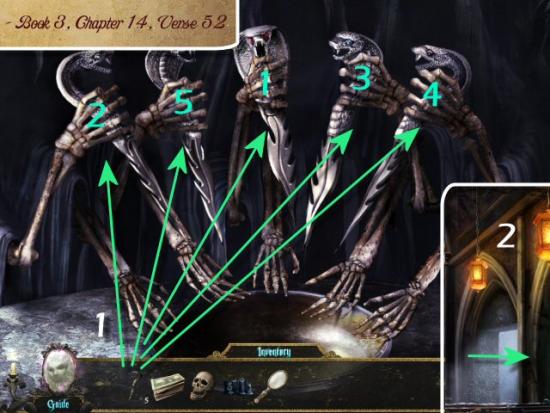
Use the Handle on the Jack-in-the-Box (1), use the Nail Clippers on the Bear’s Claws (2), click the Handle (3 – click 4 times), collect the Symbol Card, return to the Understage and click on the Door (on the left).
Use the Symbol Cards in the Empty Slots (C, D, E and F). The notes in the Music Score correspond to the Diagram at the bottom showing where each note falls on the musical scale. Mouseover each Card and take note of the Symbols. Those Symbols are located somewhere on the Board and you need to press the Symbol with a box around it for the correct note. Press the buttons so the notes at the top light up. The symbols on the cards will be different for each player.
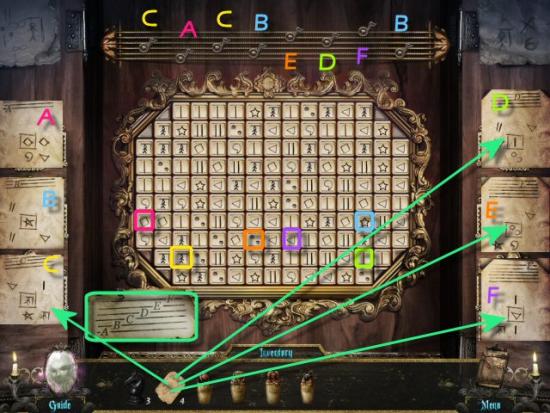
Click on the following for a video solution. Your solution may be different.
Collect the Music Stand Holder and then click on the Piano.
Find all the objects in the list. Inventory Item: Horus Statue
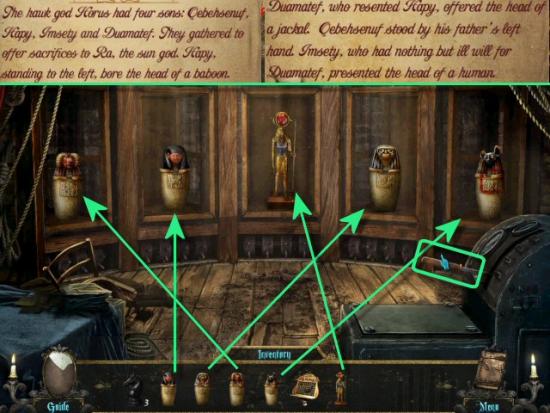
Return to the Stage Lifts, refer to the clue in the Journal (Book of Egyptian gods in the Library) and then use the 4 Canopic Jars and Horus Statue in the niches on the Lift. If you can solve the logic puzzle, you can put all 5 items directly into the correct niches. Otherwise, place them and switch their places (click on one then click on another). The clues are:
The correct order: Hapy, Imsety, Horus, Qebehsenuf and Duamutef. Click on the Handle and the Sarcophagus will lower.
Click on the following for the video solution. The solution is always the same.
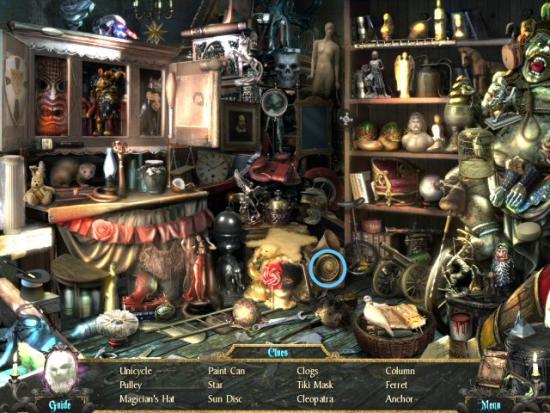
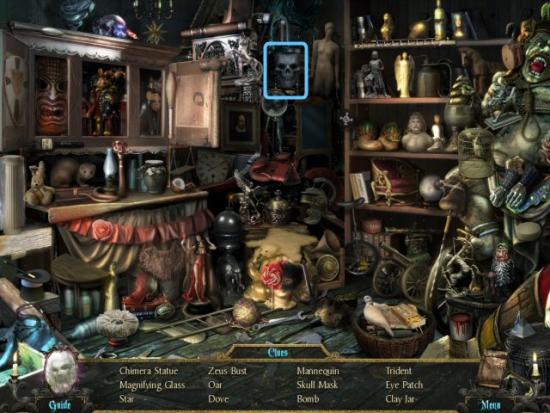
Return to the Prop Storage and click on the Pile of Junk at the back. Find all the objects in the list. Inventory Item: Sun Disk
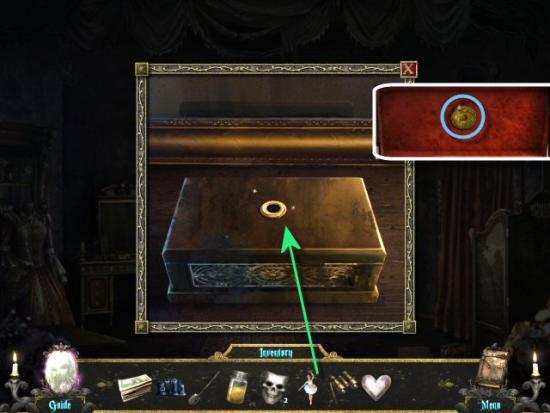
Return to the Stage Lifts, click on the Sarcophagus, use the Sun Disk, click on it, collect the Black Rose, return to the Orchestra Pit and then use the Black Rose on the Mirror.
Find 20 Musical Symbols
Collect the Key (1), return to the Elevator Lobby, use the Key in the Lock (2) and then click the Pulley (3). Enter the Service Elevator (4), click on the Playbills (5), click on the Note (6) and then click on the Elevator Switch (7).
Restore power by clicking on the Toggle Switches. You need to trace the Wires from the Bulbs to the Toggle Switches in order to turn on the Bulbs in the correct sequence. This puzzle is random and your solution may be different.
Click on the following for a video solution. Your solution may be different.
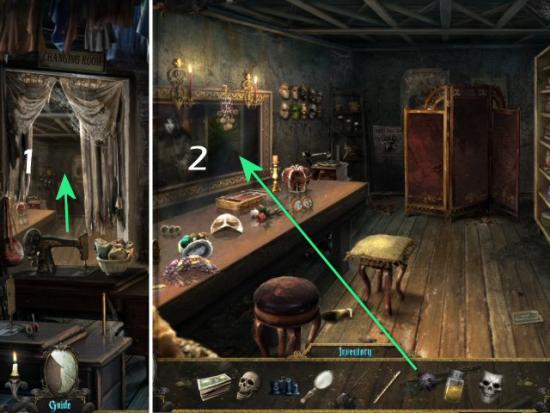
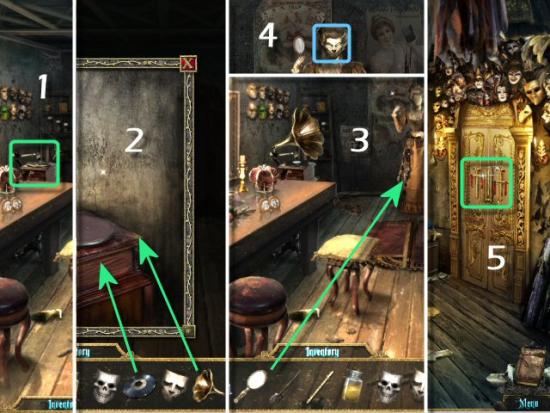
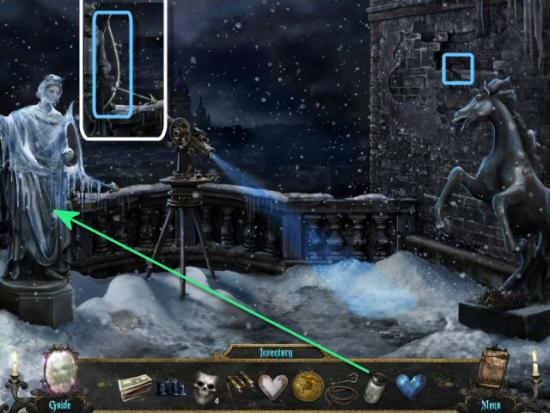
Click on the Elevator Switch, enter Actor’s Alley, click on the Poster (1) and the Mirror (2), collect the Telescope and then click on the Talc Box (3).
Find all the objects in the list. Inventory Item: Powder Puff
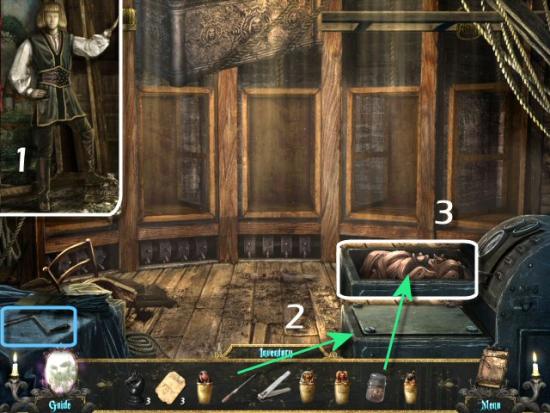
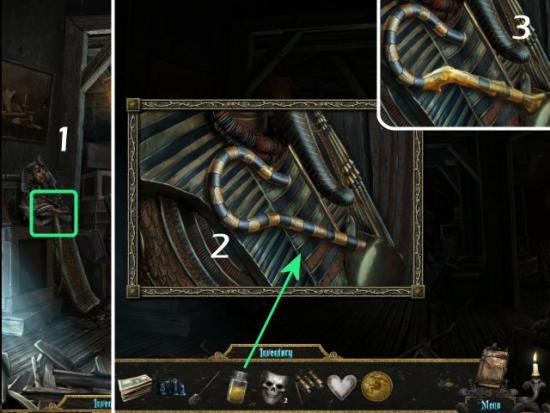
Enter Costume Alley, click on the Cloth (1), collect the Dagger (1 of 5), click on the Fabric (2) and then enter the Women’s Change Room (3). Collect the Dagger (2 of 5), click on the Gramophone (4), collect the Black Knight (5 – 4 of 4) and then exit to the Costume Alley. Return to the Manager’s Office (return to the Basement via the Service Elevator. You must click the Elevator Switch to move between floors), click on the Chess Table (5) and then use the 4 Black Knights on the marked spaces (6).
Move the 4 Black Knights so they all put the King in “check.” Standard chess rules apply and a knight can only move in an “L” pattern, over 4 squares. The Black Knights will end up on squares surrounding the King. The final position is marked by a solid square and there’s a dotted line to the “check” move. There are other solutions for this puzzle. When complete, collect the 20,000 Francs.
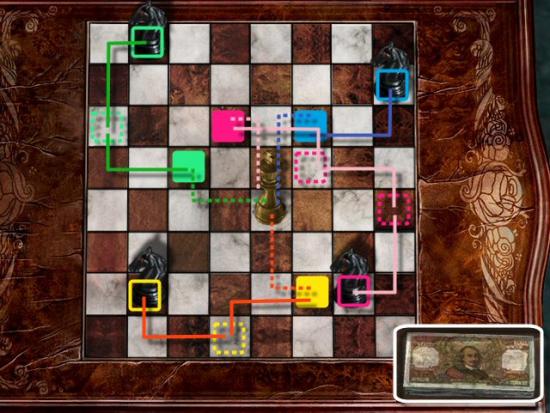
Click on the following for a video solution.
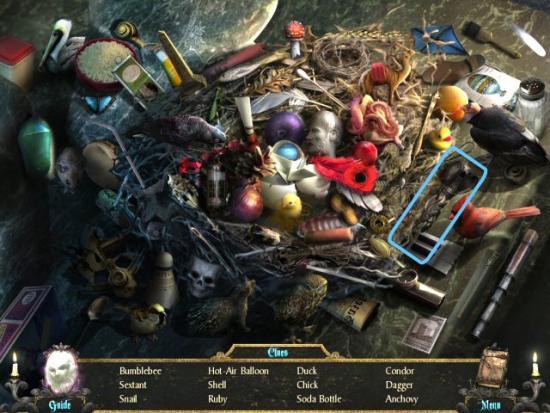
Return to the Library and click on the Right Bookshelves. Find all the objects in the list. Inventory Item: Music Sheet
Return upstairs to the Costume Alley and continue to the Industrial Alley. Collect the Dagger (3 of 5) and the Hook and then continue to the Rooftop.
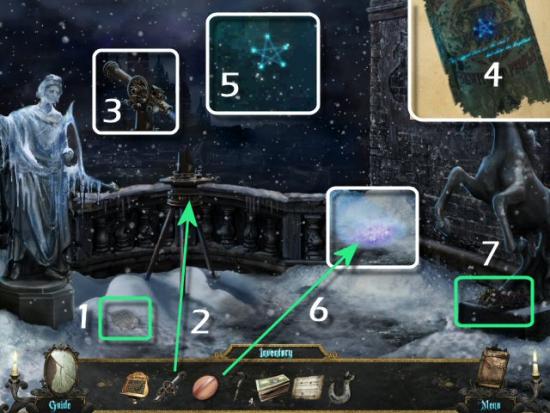
Click on the Note (1), use the Telescope on the Tripod (2) and then click on the Telescope (3). Refer to the clue in the Journal (4 – Poster in the Actor’s Alley) and use the 4 arrows to find the largest/brightest star (5). Move slowly or you’ll go right past it. It will take some searching and you’ll need to get it in the middle of the Telescope to get the starburst and complete the minigame. When complete, use the Powder Puff on the Stardust (6) and then click on the base of the Horse Statue (7).
Find all the objects in the list. Inventory Item: Dagger (4 of 5)
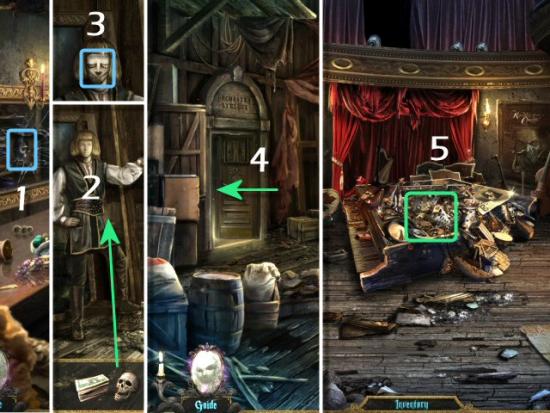
Return to the Actor’s Alley (1), use the Stardust on the Mirror (3), return to the Industrial Alley (4) and then enter the Furnace Room (5).
Click on the Coal (1), collect the Skull, click on the Fuel Can (2), use the Music Stand on the Pole (3) and then use the Music Sheet (4) on the Music Stand. Click on the Wall (5), click on the Stone (6), collect the Black Candles (7) and then click on the Door (8).

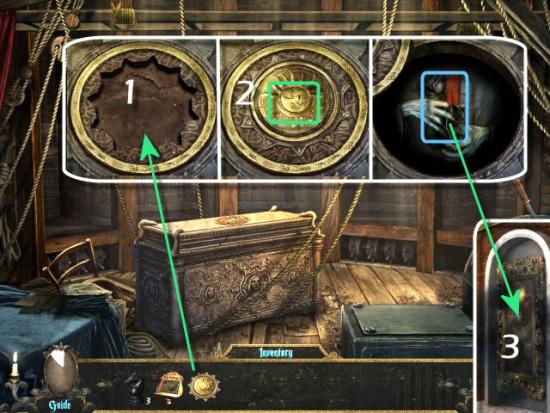
Click on any of the outer points to open the Lock Mechanism. You must click on each Spring, in the correct order, and then click on the Center to open the Lock. If you click on an incorrect Spring, you’ll have to start over from the beginning.
Click on the following for a video solution. Your solution may be different.
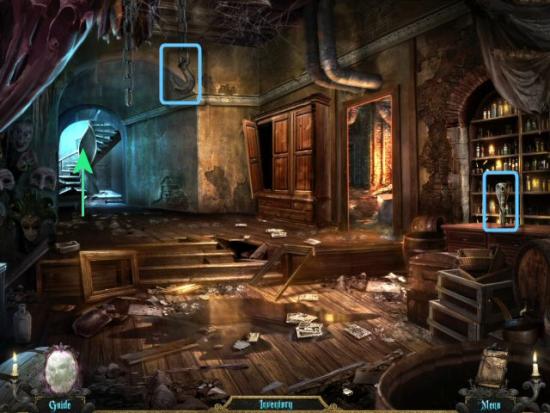
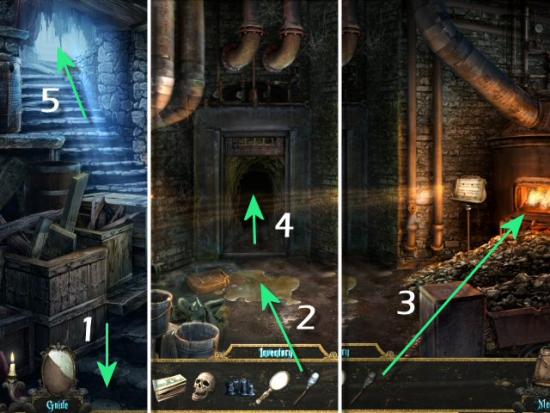
Enter the Sewers, collect Weighted Bag, use the Hook on the Rope (1), use the Weighted Bag on the Rope (2), collect the Hand Mirror (3) and then continue to the Worship Cellar (4).
Collect the Dry Torch and then click on the Altar.
Find all the objects in the list. Inventory Item: Dagger (5 of 5)
Return to the Furnace Room, use the Dry Torch on the Spilled Fuel, use the Torch on the Furnace, return to the Worship Cellar and then enter the Church.
Use the Torch on the 6 Lanterns, click on the Poster and then click on the Altar.
Use the 5 Daggers on the Skeletons (1), refer to the clue in the Journal (Poster in the Church) and then click on each Dagger, in the correct order. When complete, enter the Graveyard (2).
Collect Shovel and the click on the Kneeling Statue.
Find all the objects in the list. Inventory Item: Flute

Continue to the Crypt, click on the Arch and the Door, use the Shovel on the Black Rose and then return to the Worship Cellar and click on the Altar.
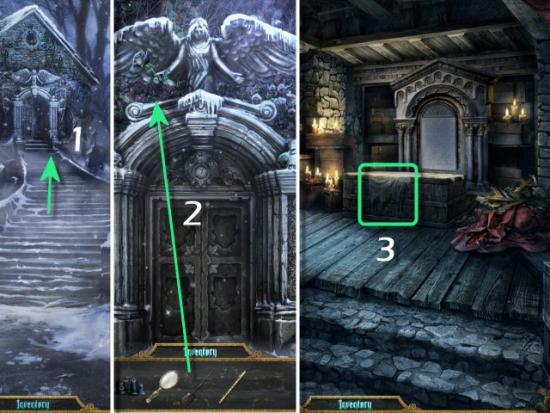
Find all the objects in the list. Inventory Item: Embalming Fluid
Return to the Rooftop and click on the base of the Horse Statue. Find all the objects in the list. Inventory Item: Skull Mask (1 of 4)

Return to the Costume Alley, enter the Women’s Change Room and then use the Black Rose on the Mirror.
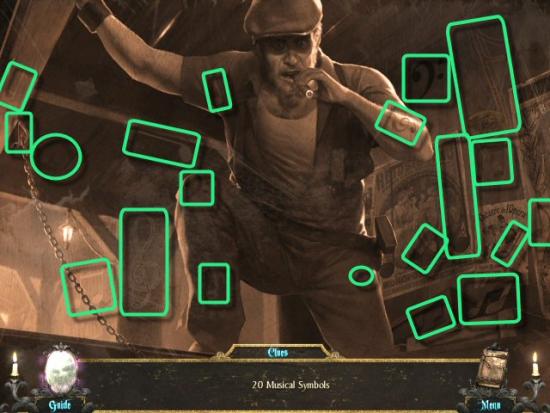
Find 20 Musical Symbols
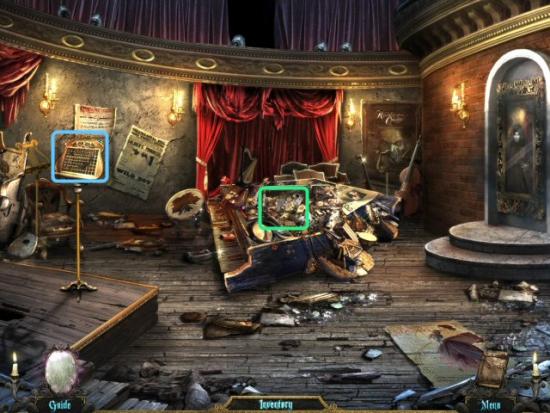
Collect the Phonograph (1), return to the Elevator Lobby, use the Skull on Hamlet (2), collect the Tragedy Mask (3), return to the Orchestra Pit (4) and then click on the Piano (5).
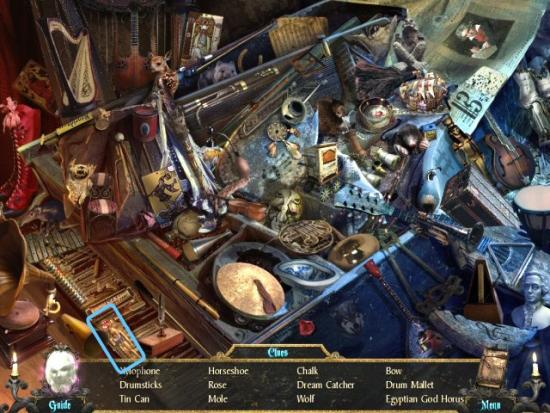
Find all the objects in the list. Inventory Item: Gramophone Horn
Return to the Women’s Change Room, click on the Gramophone (1), use the Gramophone Horn and Phonograph on the Gramophone (2), use the Hand Mirror on the Mannequin (3), collect the Comedy Mask (4) and then return to the Costume Alley and click on the Door (5).
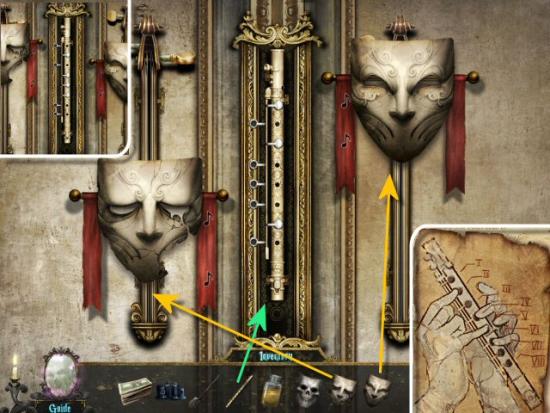
Use the Flute, Tragedy (on the left) and Comedy Masks (on the right) on the Lock. Refer to the clue in the Journal (Statue in the Conservatory), click and drag the Masks up and down until the open and closed Flute Holes match the diagram on the clue.
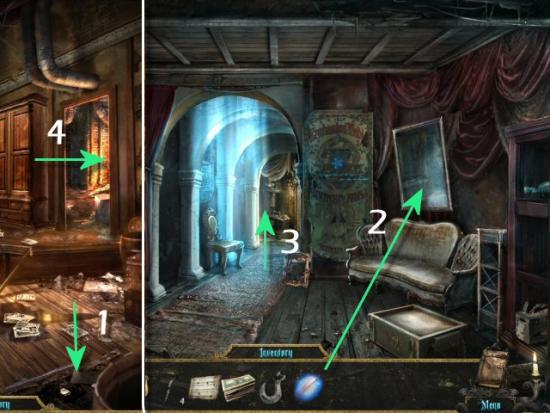
Enter Christine’s Room, collect the Heart Gem, Opera Glasses and Skull Mask (2 of 4), click on the Music Box (1), click on the Door (2), return to the Actor’s Alley and click on the Talc Box.
Find all the objects in the list. Inventory Item: Ballerina
Return to Christine’s Room, click on the Music Box, use the Ballerina on the top, click on the Top, collect the Coin and then return to the Understage Landing.
Click on the Mummy Case (1), use the Embalming Fluid (2), collect the Grappling Hook (3) and then enter the Prop Storage and click on the Pile of Junk.
Find all the objects in the list. Inventory Item: Skull Mask (3 of 4)
Return to the Dining Salon and click on the Table. Find all the objects in the list. Inventory Item: Salt
Return to the Conservatory Grounds, collect Blue Heart Gem (2 of 5), use the Shovel on the Snow, collect the Skull Mask (4 of 4) and then return to the Rooftop.
Collect the Black Heart Gem (3 of 5), use the Salt on the Statue, collect the Bow and Arrow and then return to the Ballroom Hallway.
Enter the Ballroom (1), use the Bow and Arrow on the Raoul Marionette (2), click on Raoul (3) and then collect the Sword (4). Click on the Organ Grinder (5), use the Coin in the Cup (6), use the Sword on the Phantom Marionette (7), collect the White Half-Mask (8) and then return to the Auditorium Landing.
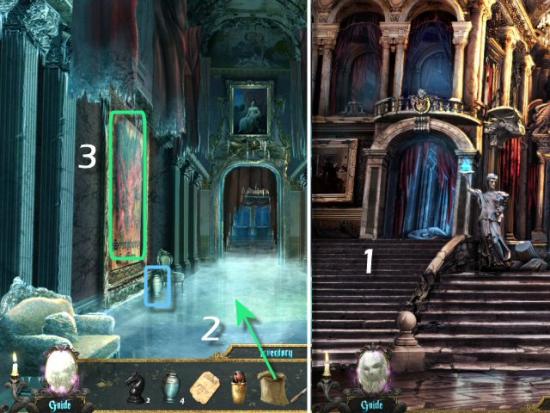
Use the Grappling Hook on the right Gargoyle (1), enter the Opera Boxes (2), use the Opera Glasses on the Balcony (3), click on Passthrough (4), use the 20,000 Francs on the Plate (5) and then click on the open door to Box 5 (6).
Find all the objects in the list. Inventory Item: Black Half-Mask
Continue to the Library, collect the Pink Heart Gem (4 of 5), return to the Grand Foyer and then click on the Ticket Booth.
Find all the objects in the list. Inventory Item: Box of Matches
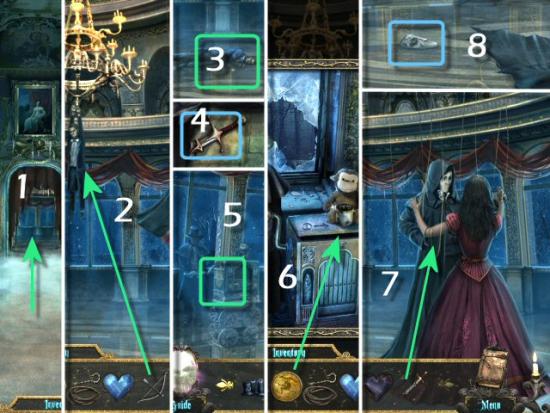
Return to the Crypt Entrance, use the 4 Skull Masks on the Door (1), click on the Door, enter the Crypt (2), collect the Red Heart Gem (3 – 5 of 5) and then click on the Altar (4).
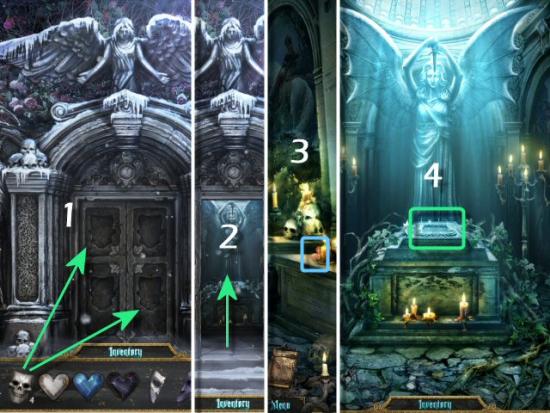
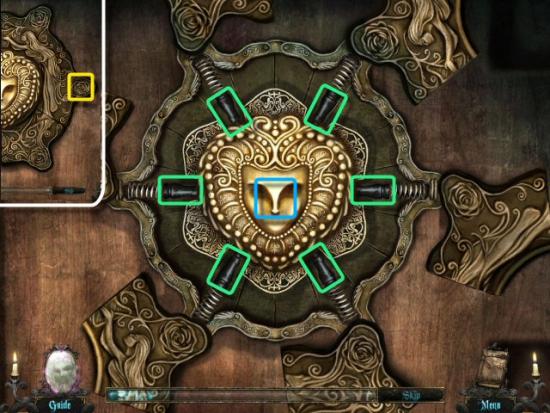
Use Black Candles on the Holder and use the Box of Matches on the Candles.
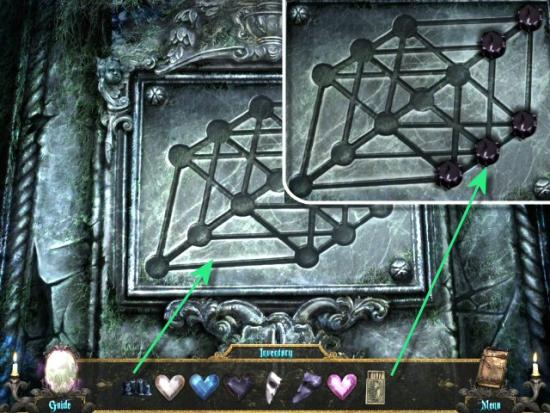
Refer to the clue in the Journal (Wall in Furnace Room), move the Candles so they’re in the positions shown in the clue. You can only move a Candle by jumping over another. The solution is: move a to e, c to g, b to h, d to j, e to I, f to l, g to k and i to m. When complete, collect the Black Rose, return to Christine’s Room and then click on the Door.
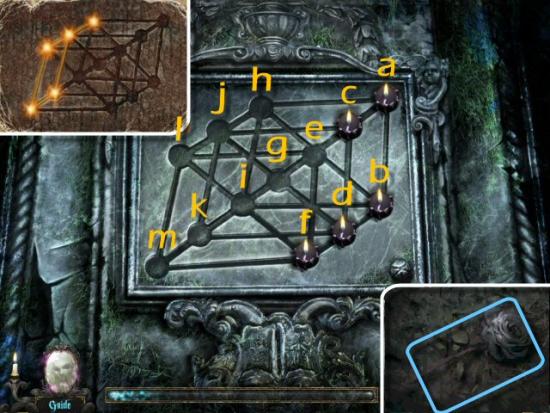
Click on the following for the video solution. The solution is always the same.
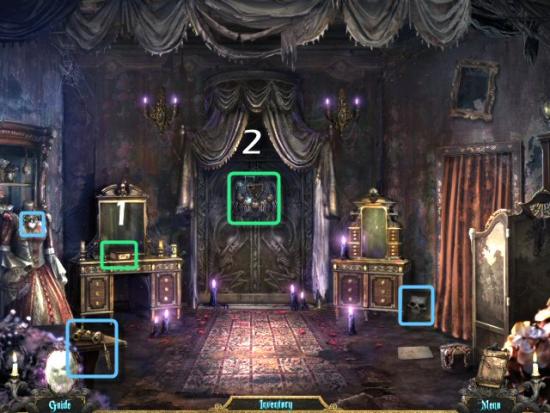
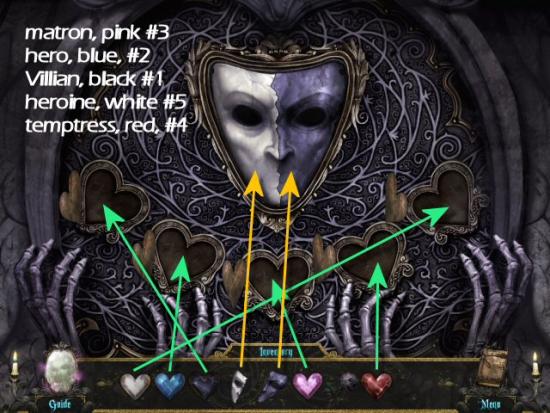
Use both Mask Halves and the 5 Heart Gems in the slots. Refer to the clues in the Journal (the Note in the Service Elevator for the positions and the Note on the Fabric, in the Costume Alley, for the colors) for the solution. You may either place the Heart Gems directly into the correct positions or place them all and then switch their positions by clicking on one then clicking on another.
Use the Black Rose on the Phantom.
Find 20 Musical Symbols
Enter the Broken Mirror and watch the ending movie. Congratulations! You’ve completed Mystery Legends: The Phantom of the Opera.
You can now access the Bonus Content, including the Bonus Chapter, by clicking on Extras, from the Main Menu.
