
Best Horror Games On Itch.io – July 2026
Across a bounty of subgenres.![Haze Seas Accessories Tier List [Best Accessories to Equip]](/wp-content/uploads/2026/07/haze-seas-accessories-tier-list.jpg "Haze Seas Accessories Tier List [Best Accessories to Equip]")
Haze Seas Accessories Tier List [Best Accessories to Equip]
The accessories with the best stat buffs in Haze Seas.
![[Roblox] Evomon Shiny Hunting Guide – Including Prismatic and Pris Shinies!](/wp-content/uploads/2026/06/evomon-shiny-hunting-guide.jpg "[Roblox] Evomon Shiny Hunting Guide – Including Prismatic and Pris Shinies!")

Mystery Legends: Beauty and the Beast Walkthrough
Welcome to the Mystery Legends: Beauty & the Beast walkthrough on Gamezebo. Mystery Legends: Beauty & the Beast is a Hidden Object/Adventure game played on PC created by Play Pond. This walkthrough includes tips and tricks, helpful hints, and a strategy guide on how to complete Mystery Legends: Beauty & the Beast.


- Prefer Gamezebo on Google

Mystery Legends: Beauty and the Beast – Game Introduction
Welcome to the Mystery Legends: Beauty & the Beast walkthrough on Gamezebo. Mystery Legends: Beauty & the Beast is a Hidden Object/Adventure game played on PC created by Play Pond. This walkthrough includes tips and tricks, helpful hints, and a strategy guide on how to complete Mystery Legends: Beauty & the Beast.
General Information
This game can be played in three difficulty modes:
- Easy: Sparkles show all interactive areas; hidden object silhouettes are available; inventory items glow when over usable areas
- Normal: Sparkles show all interactive areas; hidden object silhouettes are available.
- Expert: Sparkles only show hidden object and puzzle areas
To play the game you need to explore various scenes to find items and solve puzzles. You can find out what to do in any given scene by scanning the scene with your cursor. The cursor has the shape of a pointed finger when you’re scanning, but will change into the following icons when you can interact with something:
- Hand with pinched fingers: pick up an object
- Magnifying glass: zoom in on an object
- Gear: interact with an object
- Arrow: move on to the next scene. With a few exceptions, a downward arrow at the bottom of the screen will take you back to the previous scene
- Question mark: find information
The Journal
In the bottom right of the screen is your journal. The journal will appear as a closed book if you have read all the current entries. Whenever you interact with an object that gives you important information, the journal will sparkle and open, and a quill will write the new information in your journal.
It is essential to read the journal regularly as sometimes you will not actually see the information that goes into the journal. For example, the only way to find out the darts champion’s winning score is by reading the journal after you’ve found him.
The journal also contains a world map. The map will tell you where you are right now with a yellow X. It also shows red exclamation marks in the locations where there currently are objectives you can complete. So even if you don’t need a map to find your way around, the world map is still very helpful and at times essential to figure out where to go next.
The third section of the journal is the strategy guide. The strategy guide gives step-by-step instructions on how to complete certain objectives.
Hints and Inventory
At the bottom of the screen is the inventory. Any item that can be picked up will go into the inventory for later use. To use these items, simply click on them to pick them up and then click on the interactive area of the scene that you want to use the item on.
In the bottom left of the screen is the hints mirror to help you out when you’re stuck. Objectives that can be completed in the current scene will be circled when you click the mirror. The mirror will break and will have to be refilled before you can use it again. If there is nothing to do in the current scene, the mirror will not break and you will be told to check the world map for locations with active objectives.
Puzzles and Hidden Object Scenes
In all difficulty modes hidden object scenes and puzzles will sparkle to get your attention.
In the top right corner of each puzzle is a button with a question mark. Click this button to get an explanation on how to complete the puzzle.
All puzzles can be skipped when the blue “skip” timer at the bottom has filled up.
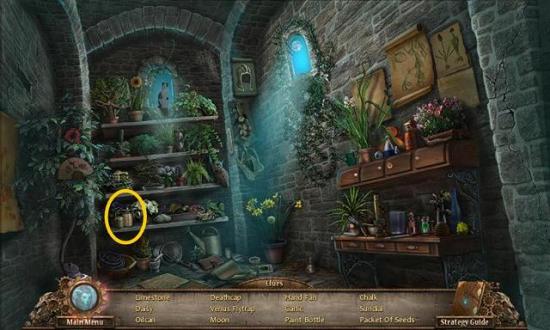
In each hidden object scene is one item you need to find in order to continue with your quest. This object is always the same in each game. However, you need to find all the other items on the list before the required item will go into your inventory.
In easy and normal modes you can help finding the items on the list by putting your cursor on the name of the item in the list. A silhouette of the item will appear in the hints mirror in the bottom right of the screen. If you are completely stuck you can click the hints mirror and the general area on the screen where one of the unfound objects can be found will be circled. The hints mirror will need to be refilled before you can use it again.
You can leave any puzzle or hidden object scene and come back to it later. Hidden object scenes will remember your progress when you return, but puzzles will be reset and you will need to start again.
Walkthrough
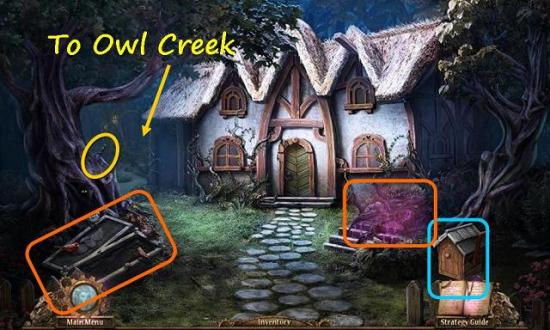
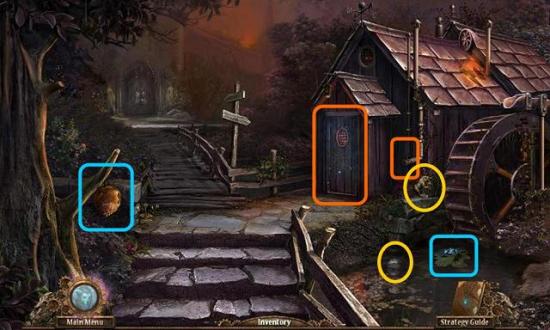
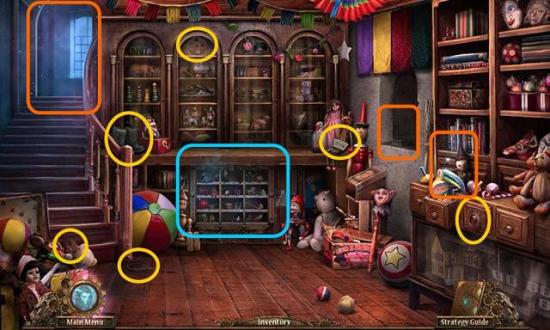
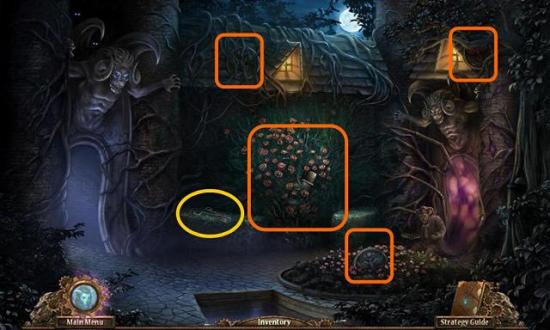
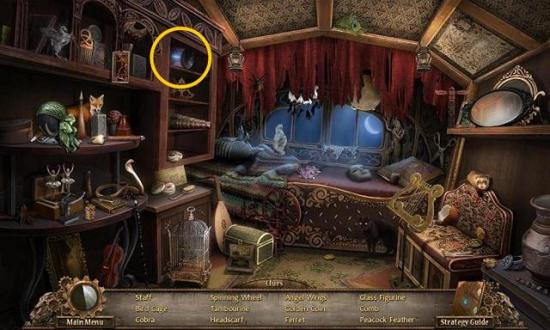
The walkthrough provides a screen shot of each new scene you get to. The screen shot will show all interactive areas in that scene, including the ones you can only interact with at a later time.
- Items that can be picked up to go into your inventory are circled yellow
- Areas that can be interacted with at the first visit are outlined in orange
- Areas that can be interacted with at a return visit to the scene are outlined in blue
Items you can pick up for the inventory are mentioned in CAPITALS at the time you can find and collect them and again when they are to be used in the scene.
The Cottage
Cottage

- The mailbox and front door are both locked; the bird feeder is empty; magical vines cover the basement door
- There is a dagger stuck in the tree. Zoom in on it and take the DAGGER
- Walk behind the cottage to Owl Creek
Owl Creek
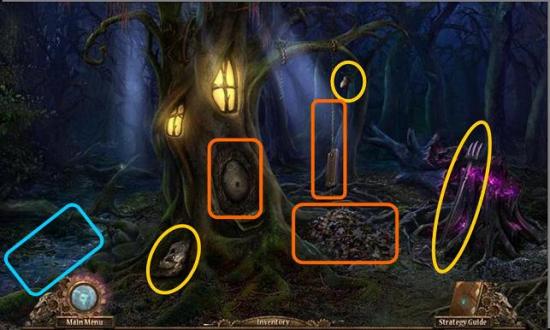
- Grab the PITCHFORK and the TORN PAINTING FRAGMENT
- There is something glittering in the water that you can’t get to right now
- Click on the door in the tree to find the acorn-shaped doorbell is missing
- Click on the broken swing to swing it and dislodge the ACORN. It falls in the pile of leaves below
- Take the PITCHFORK from your inventory and rake the leaves until you find the ACORN. Put the acorn in the front door
- Take the HERBICIDE SPRAY from Mr. Beak’s house
- Go back one screen to the cottage
Cottage
- Use the HERBICIDE SPRAY on the purple vines
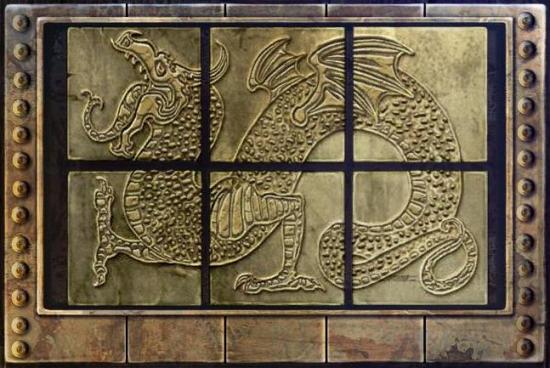
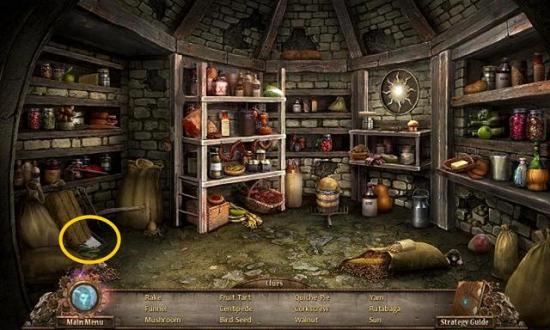
- Click on the basement door for a puzzle. You need to arrange the tiles so that each row and each column only has one of each tile. The easiest way to do this is by arranging the tiles in diagonals, as in the image below
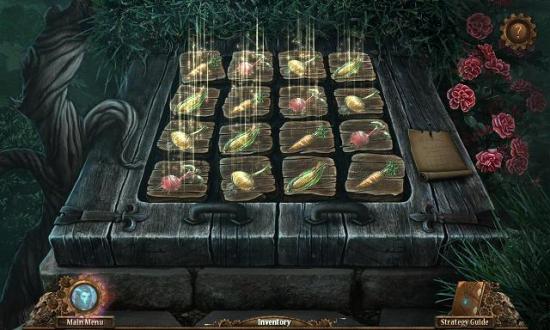
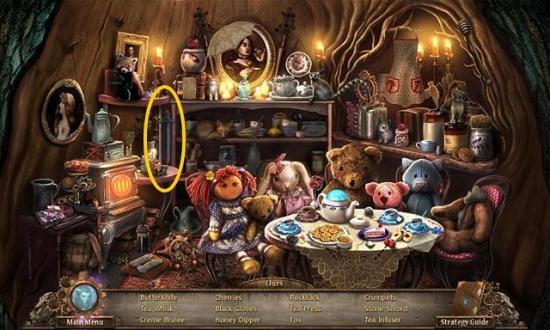
- Enter the basement for your first hidden object scene. Find the BIRDSEED
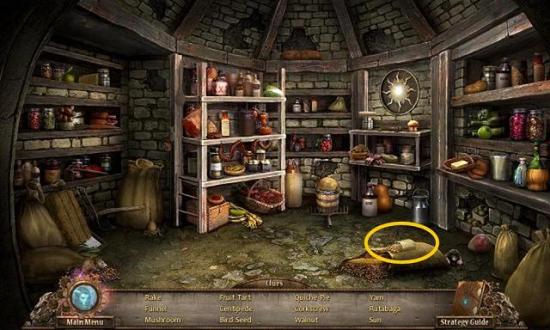
- Put the BIRDSEED on the bird feeder by the tree
- Click on the feeder again for a puzzle. This is a classic “find the order” puzzle: click on the birds to move them out of the way. If you click on the correct bird, it will stay on the side. If you click on the wrong bird, all birds hop back to the middle and you have to start again
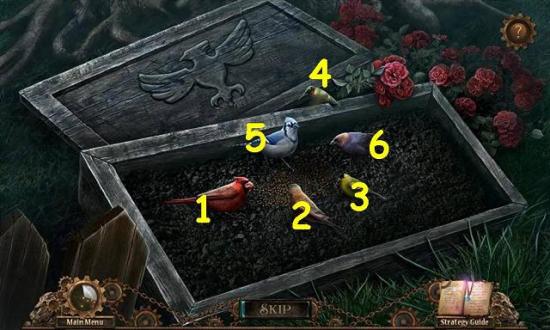
- When all the birds have moved to the side, you can pick up the COTTAGE KEY
- Click on the cottage door, insert the COTTAGE KEY and turn the key to open the door
- Enter the cottage bedroom
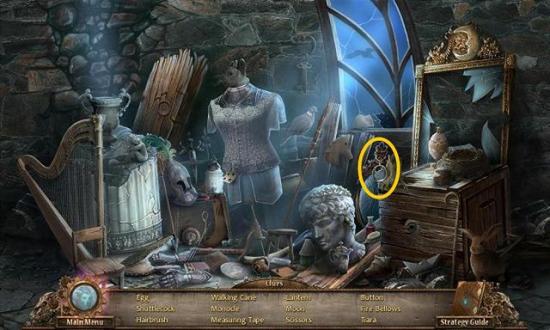
Cottage Bedroom
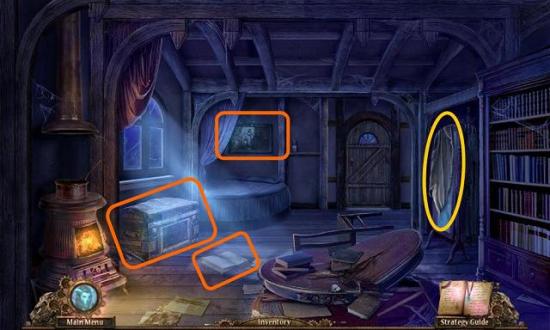
- The chest under the window is locked and needs 6 chest emblems to open.
- Click on the painting on the back wall and repair it with the TORN PAINTING FRAGMENT. The compartment behind the painting holds the first CHEST EMBLEM
- Take the YELLOW GARMENT from the mirror
- Zoom in on the book on the floor and find a GAUGE NEEDLE
- You can zoom in on the fire in the grate, but you can’t do anything with it yet
- Click on the back door for a cut scene
- After the scene, the room is full of smoke. Click on the window to open it
- Leave through the back door
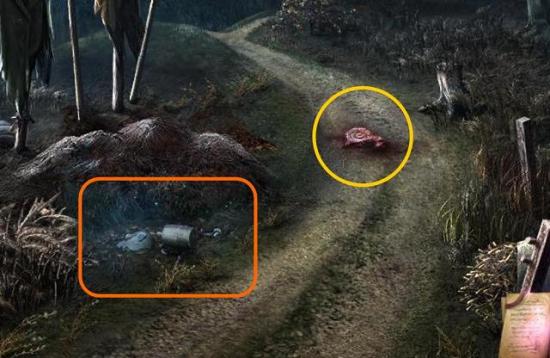
Cottage Garden

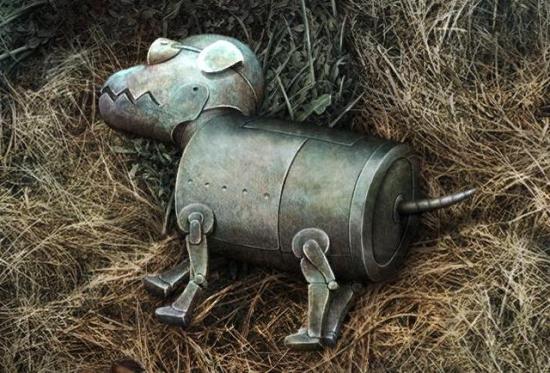
- Click on Tinbot to find CHEST EMBLEM number two. Tinbot also needs some robo biscuits to power him up
- Use the DAGGER to cut the roots around the PUMPKIN HEAD and pick up the pumpkin head
- The frog statue is missing its crown
- There are more magical vines you need to get rid of
- At the base of the vine-covered statue is a SPADE and the statue holds a DEAD PHOENIX ROSE
- You can also zoom in on the owl-shaped fountain on the back wall, but it’s inactive right now
- Exit through the door in the back wall
Hayfield
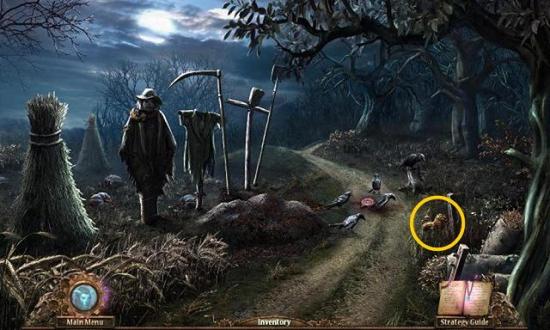
- Pick up the LION CREST
- Put the PITCHFORK on the first scarecrow, the PUMPKIN HEAD on the second scarecrow and the YELLOW GARMENT on the third scarecrow to find CHEST EMBLEMS three, four and five
- Go back two screens to the cottage bedroom
Wrapping up in the Cottage
- Click on the fire and put the DEAD PHOENIX ROSE in the fire to get a PHOENIX ROSE
- Go back to the cottage garden
- Burn the vines on the statue with the PHOENIX ROSE to find CHEST EMBLEM number six
- Go back into the cottage bedroom and place the six chest emblems on the chest for a jigsaw puzzle. Click on any two emblems to swap them around. When you click on an emblem a blue gear will appear that you can use to rotate the emblem
- Click on the chest again to open it and find the ROBO BISCUITS
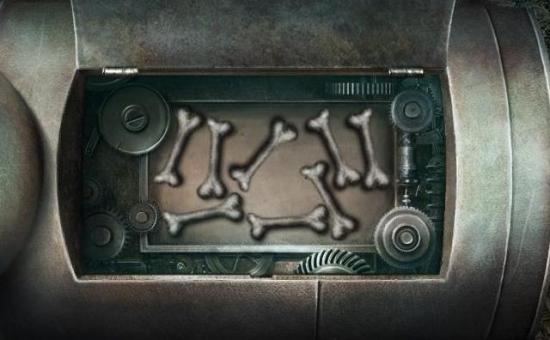
- Go back to the cottage garden, click on Tinbot and put the ROBO BISCUITS in his back compartment. You need to spread the biscuits so that they don’t overlap with each other or with the edges of the compartment. Biscuits that overlap with something are red, those that are clear are gray. One solution is shown in the image below
- Pick up TINBOT so he goes into your inventory
- Go back to the hayfield and release TINBOT on the crows (Geronimo!)
- Pick up the MYSTERY MEAT that the crows were feeding on
- Poor Tinbot will explode with the exertion so click on him to put him back together. Pieces will click into place when you drop them in the correct spot. For the head, first put the collar on, then the lower jaw, then the skull
- Click on TINBOT to put him back into your inventory
- Move forward to the Forest Path
The Forest
Forest Path
- Pick up the STONE SHIELD and the SNAKE CREST
- Use the SPADE on the base of the hollow tree to clear the hole
- Place the MYSTERY MEAT in front of the tree to lure the fox away
- Click on the hollow tree for a hidden object scene. Find the STONE SWORD
- Move forward to the Weeping Willow
Weeping Willow

- Take the BUTTERFLY NET
- Place the STONE SHIELD on the statue on the right and the STONE SWORD on the statue on the left to make the vines disappear
- Underneath the vines is a rose crest covering a rabbit hole
- Pick up the WOLF CREST
- Move on to the blacksmith’s
Blacksmith
- Pick up the BEAR CREST
- Use the BUTTERFLY NET to get the PRESSURE GAUGE from the pond
- Click on the door to the blacksmith’s. You need to move the knight along the slots to the castle in the lower right corner. The knight needs to visit all locations to unlock the door

- There is a lot of smoke coming from the door, and you need to repair the ventilation system before you can go in. Click on the pipes to the right of the door
- Put the PRESSURE GAUGE in the slot and then place the GAUGE NEEDLE on the gauge
- Check your journal for clues how to solve this puzzle. When you click on the gauge needle, it will jump to a certain position. You can also drag the needle to the desired position. You will need to find and lock three positions by clicking the buttons at the top. The journal will tell you which button locks which position. You know if a position is locked if the button stays down. So, click or drag the needle to make it move to one of the positions shown in the journal. Then click on the button corresponding with this position to lock it. Move the needle to position two, and hit the next button to lock it. Then do the same for the third
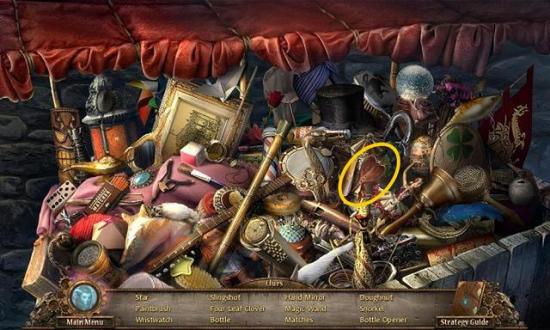
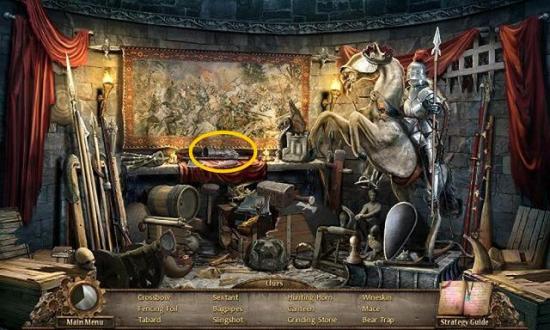
- Click on the opened door for a hidden object scene. Find the HOT POKER
- Note the poisonous frog in the pond and the beehive on the tree and move on to the Town Gate
Town Gate
- Click on the wanted poster on the left and talk to the leprechaun. You need to find her silhouette and click on it three times. She’s a bit hard to see, but some of her favorite positions are behind the rose bushes on either side, on top of the lamps on either side or on the big rock at the front
- Take the EMPTY POT
- Go back to the blacksmith, insert the HOT POKER in the beehive and put the EMPTY POT under it
- Go back to the Town Gate and find the leprechaun three times again. Then give her the POT OF HONEY and take the LUCKY COINS
Wrapping up in the Forest
- Go back two screens to the Weeping Willow and zoom in on the rabbit hole
- Place the LUCKY COINS on the rose crest and complete the image by swapping the coins and rotating them
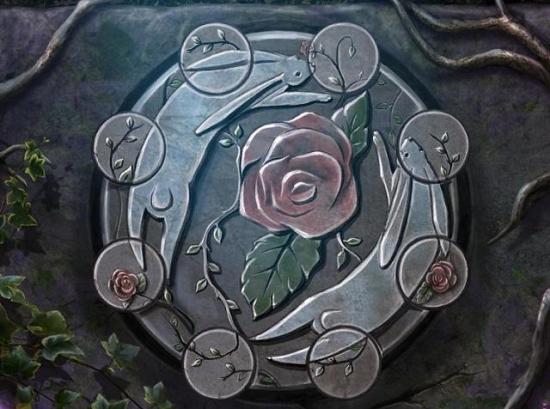
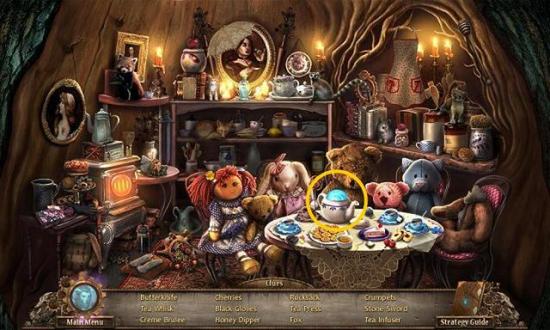
- Down the rabbit hole you find Alice in Wonderland, of course, and the first soul shard
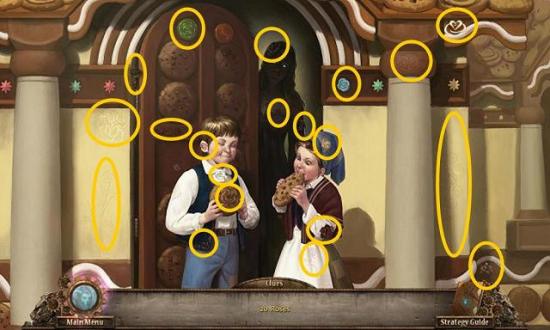
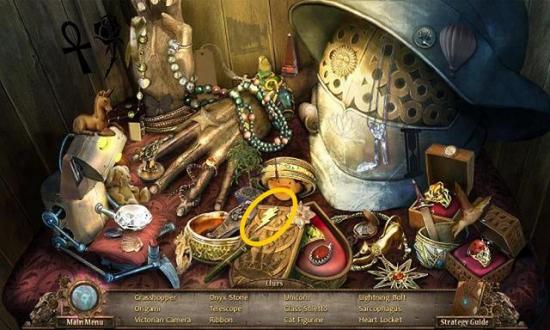
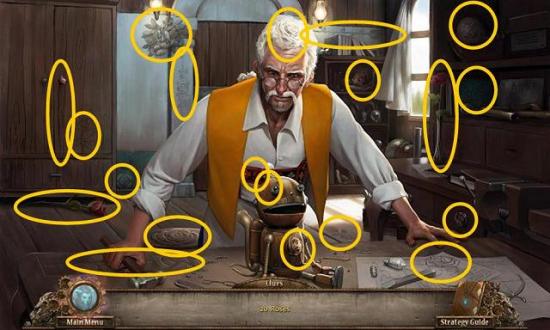
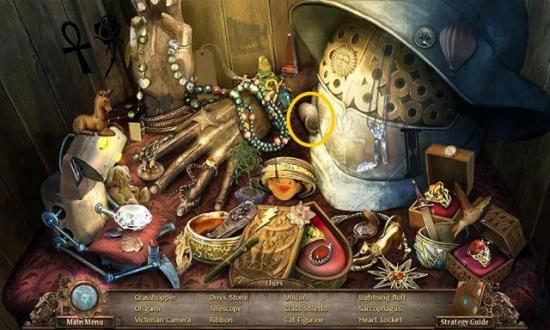
- Find the 20 roses
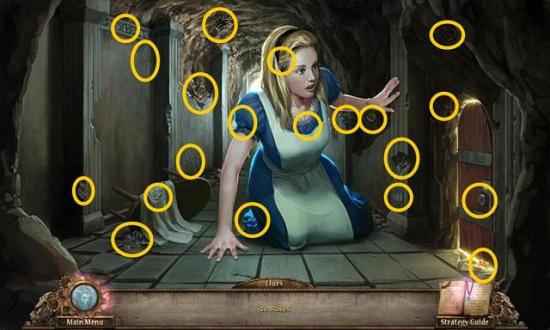
- Take the SOUL SHARD
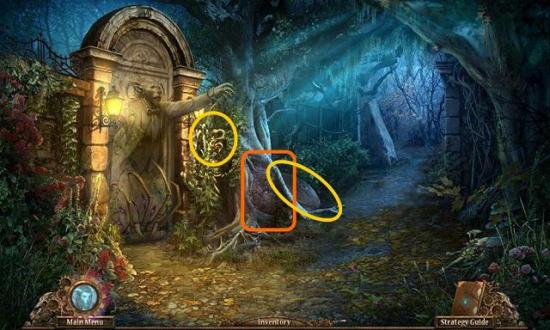
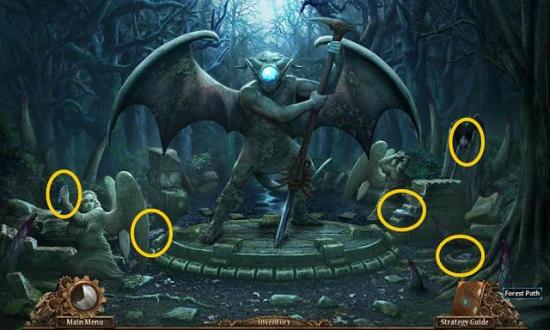
- Go back one screen to the Forest Path and place the SOUL SHARD on the Beast’s outstretched hand
- Take the PHOENIX CREST from the gate behind him and go back to the Town Gate
- Place all five crests (PHOENIX, BEAR, LION, SNAKE and WOLF) in their respective slots on the gate to open it
- Enter the Town Square
The Town
Town Square
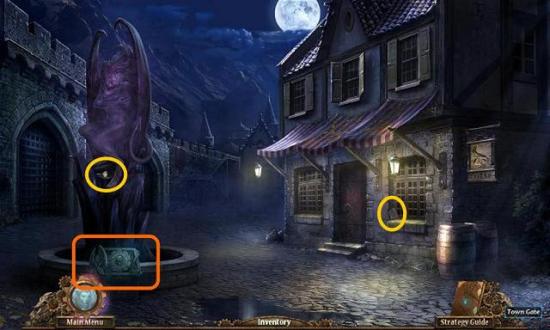
- At the base of the Demon Statue is a well cover that’s missing three engraved well stones
- Take the WISHING DUST from the base of the statue
- Take the first ENGRAVED STONE from the tavern windowsill
- Enter the tavern
Tavern
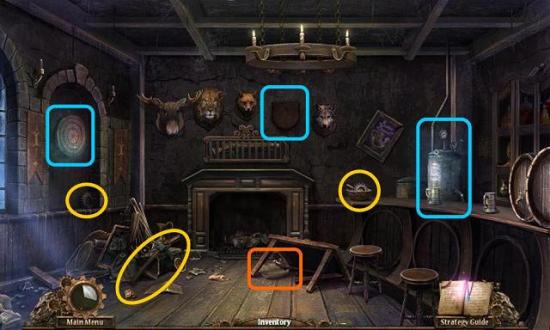
- Pick up the PICKAXE and two MACHINE PARTS
- Under the broken table is a note about a yeti; one of the animal heads is missing from the wall; the distiller needs a pressure gauge; and on the left wall is a dart board without darts
- Leave the tavern and move on to the Shop Street
Shop Street

- On the lower step is the second ENGRAVED STONE
- Inside the box on the left is a TOY ROCKET
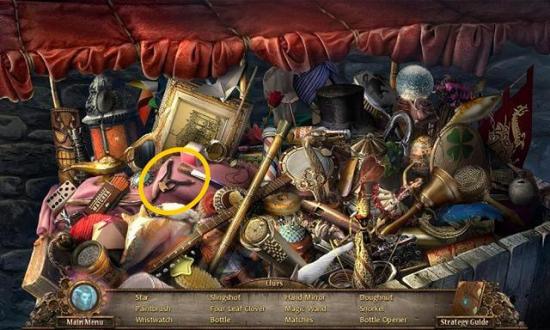
- The cart in the street has a hidden object scene. Find the LOADED SLINGSHOT
- Use the LOADED SLINGSHOT to shoot at the wind rooster on the roof
- Take the WINDUP KEY that drops down
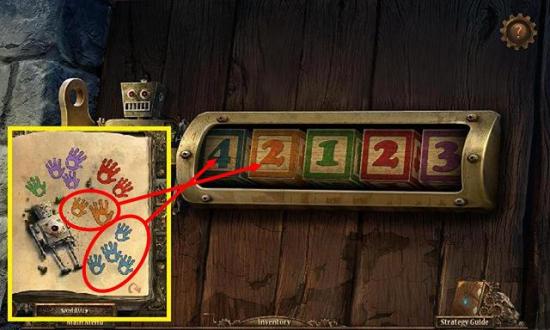
- Click on the shop window to get a journal entry with colored hands
- Click on the front door and insert the WINDUP KEY
- Colored blocks appear. You need to rotate the blocks to the correct numbers, according to the note in your journal with the hands. There is one green hand, so the green block needs to be set to 1, etc.
- Enter the Toy Shop
Toy Shop
- Pick up the third ENGRAVED STONE, the SNOW BOOTS and four MACHINE PARTS
- Click on Pinocchio on the right for a puzzle. You need to find and click on the Jack of Hearts card four times to get a PLAYING CARD. Then click on Pinocchio’s nose to get the WAND OF LIFE
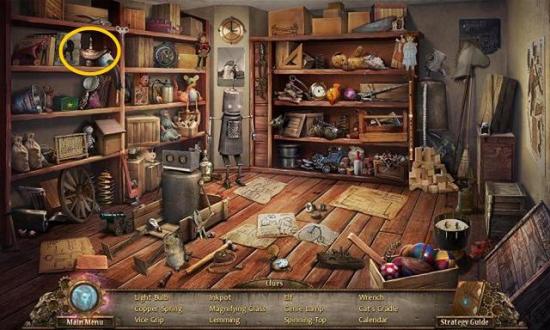
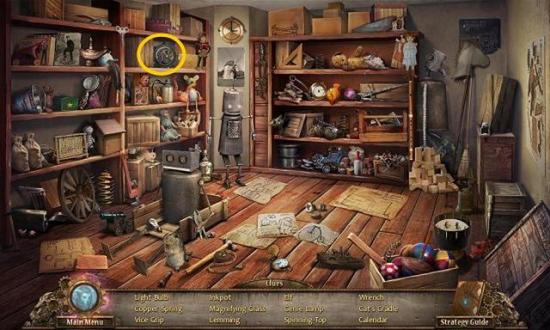
- Go to the hidden object scene upstairs and find the MAGIC LAMP
- Click on the recess in the wall and place the MAGIC LAMP on the lamp base. Then use the WISHING DUST on it to get the WAND OF POWER
- Go back to the street and on to the Cold Pass
Cold Pass

- Use the SNOW BOOTS on the snow and watch the scene
- Pick up another MACHINE PART
- Move on to the frozen wall and use the PICKAXE on it until it breaks
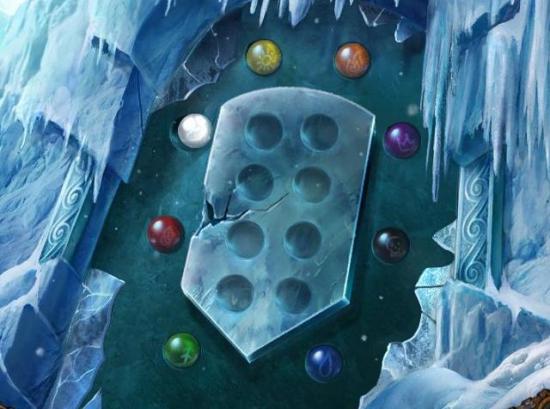
- Move the colored spheres to the symbols matching the colors
- Enter the Ice Cave
Ice Cave
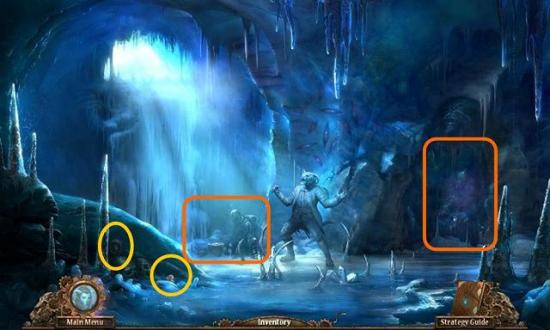
- Pick up the TOY CANDY and another MACHINE PART
- Use the TOY ROCKET on the yeti cave in the back
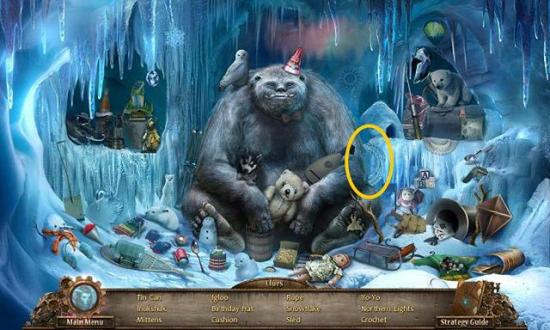
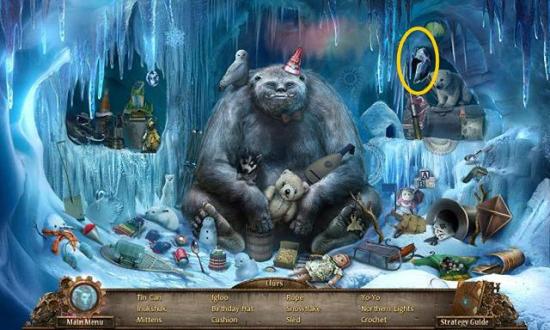
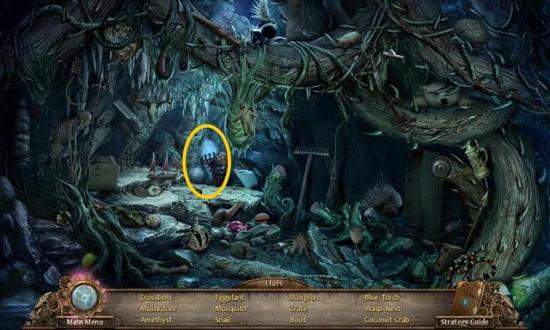
- Go to the yeti cave for another hidden object scene. Find the ROPE
- Zoom in on the frozen soldier in the back to find the DARTS. Turns out the frozen soldier was a darts champion. There is now a note in your journal saying his last winning score was 36.
Wrapping up in Town
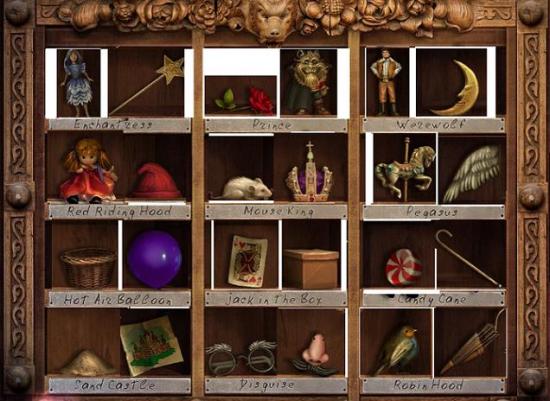
- Now go back to the toy shop and click on the sparkling display case in the back
- Put the PLAYING CARD and the TOY CANDY in the empty spaces. You now need to move objects around until they match the labels underneath the holes. Get the WAND OF DREAMS when you’re done
- Go upstairs for another hidden object scene. This time, find another MACHINE PART
- Leave the shop and go back to the Town Square
- Place the three ENGRAVED STONES on the well cover and solve the puzzle. Move the stones around to make matching pairs
- Place the three wands on the statues that appear
- Go into the tavern and click on the dart board. Place the DARTS on the board to activate the puzzle. Move your cursor around to move the red X, and then click to release the dart when the X is in the right spot. You need to make 36 in total using three darts, according to the note about the darts champion. Nine, 20 and 7 will do the trick
- Get the DISTILLERY GAUGE from the compartment behind the board
- Click on the distillery and put the DISTILLERY GAUGE in the hole
- You need to turn the knobs to achieve a pressure of 61. You can do this with 21, 4, 17, 8 and 11

- Take the tankard of VOLATILE ALE
- Go back to the square and use the VOLATILE ALE on the vines
- Enter the book of Hansel and Gretel and find the 20 roses
- Take the SOUL SHARD and go all the way back to the Ice Cave
- Give the SOUL SHARD to the Beast and pick up the ZEPPELIN KEY he leaves behind
- Now use the ROPE on the hole in the ice and climb up to the Storm Peak
Storm Peak
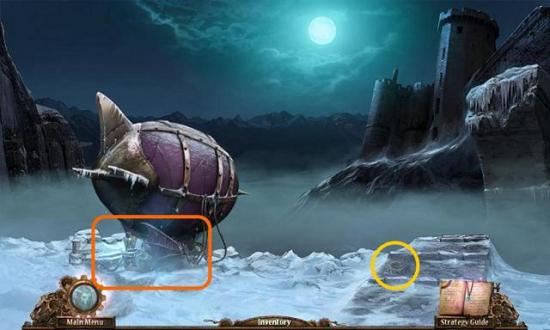
- Pick up the final MACHINE PART and click on the zeppelin to zoom in
- Put TINBOT on the loose wires to power up the machine
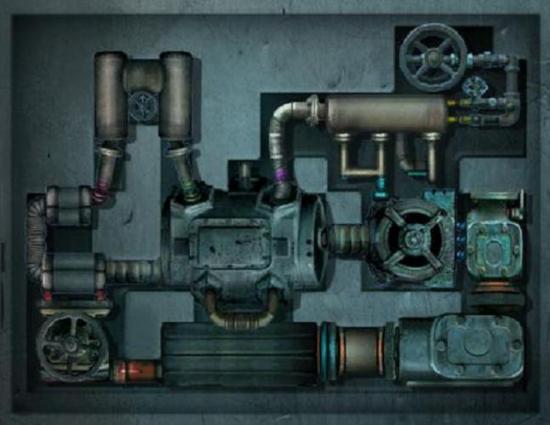
- Drop the MACHINE PARTS on the machine and fit them all in the empty space so they don’t overlap
- Zoom in on the zeppelin again, put the ZEPPELIN KEY in the ignition and turn the key
The Castle
- Pick up the SHIP’S WHEEL from under the lion statue on the right and zoom in on the door
- To open the door, move the gears around until they all turn. Two gears of the same color may not touch
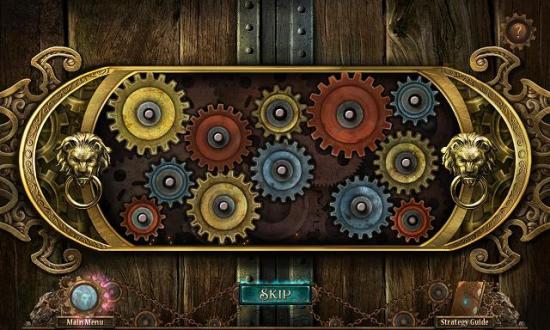
- Enter the Grand Hall
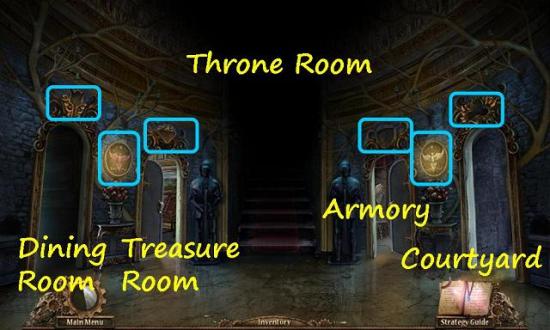
- There is nothing to do here right now so first go into the armory to the right of the stairs
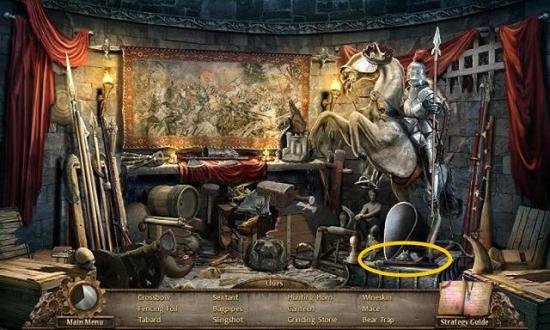
Armory
- Go up the stairs for a hidden object scene. Find the MACE
- There is nothing else here right now, so go back to the Grand Hall and go into the Treasure Room to the left of the stairs
Treasure Room
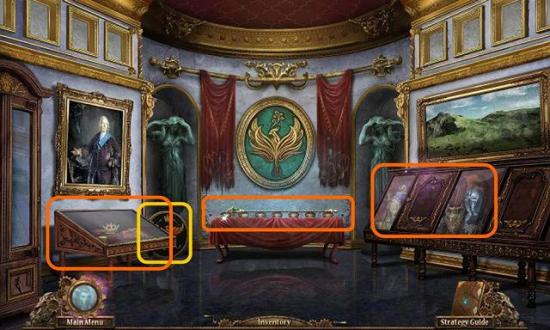
- Click on the display cabinet on the left and use the MACE to break the glass
- Take the CROWN and the GOLDEN DIAMOND
- Click on the cabinet on the right for a hidden object scene. Find the LIGHTNING PENDANT
- Click on the altar in the back and pick up the PHOENIX WAND
- Use the PHOENIX WAND to turn the round shield on the floor into a PHOENIX EGG. Don’t forget to pick up the egg
- Go back out to the hall and use the PHOENIX WAND to turn the two shields there into PHOENIX EGGS
- Go right into the courtyard
Courtyard
- Pick up the GARDENING SHEARS and use it on the rose bushes
- Click on the robot underneath the bush and open it with the LIGHTNING PENDANT
- Inside is the GOLDEN SHIELD
- Pick up the ROSE PETALS from underneath the bush
- Use the PHOENIX WAND to turn the three shields into PHOENIX EGGS
- Now return to the treasure room
Treasure Room
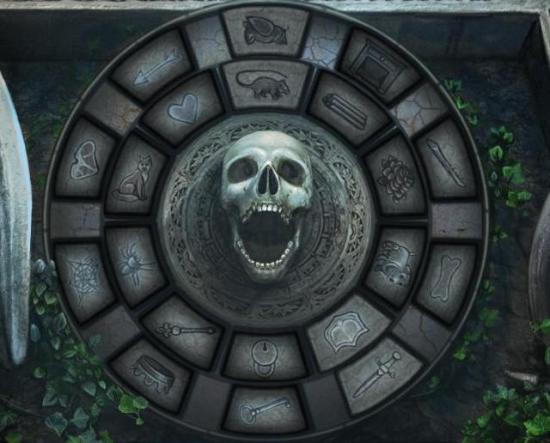
- Zoom in on the altar and put the six PHOENIX EGGS on it
- You need to move the eggs around until they are all on the pedestal with the matching color. They can move to empty spaces next to them or hop over one other egg. The trick is to start on one end and work your way to the other end
- Click on the book of Gepetto the Toy Maker and find the 20 roses
- Take the SOUL SHARD
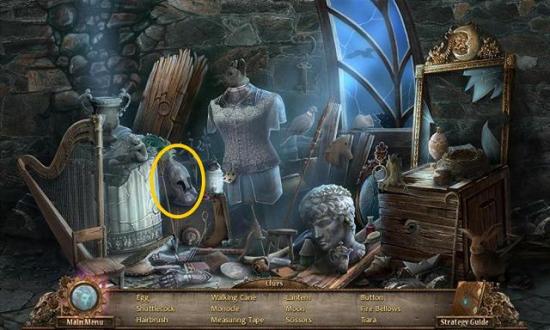
- There is also a new hidden object scene in the cabinet on the right. Find the HEART HANDLE HALF
- Go back to the courtyard and give the SOUL SHARD to the beast
- Go into the undercroft
Undercroft
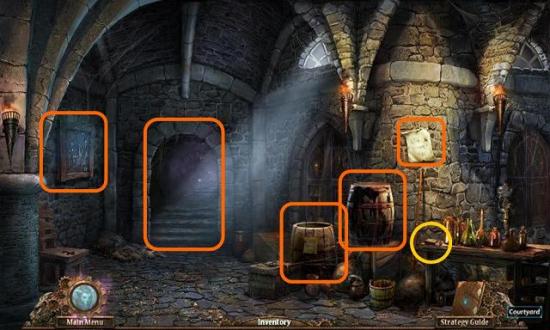
- Use the MACE on the broken barrel to get the GOLDEN ROSE. Use the MACE on the barrel again to get FIREWOOD
- Pick up the MATCHES
- Click on the note on the wall to get a new journal entry about rose water for dinner
- Click on the other barrel and put the ROSE PETALS in the water. Nothing happens right now, but you will come back to this later
- On the left wall is a keys puzzle. Find the matching pairs until one key is left. Get the AVIARY KEY
- Click on the back corridor to get a hidden object scene. Find the OILCAN
- Go back to the Grand Hall and go left into the dining room
Dining Room
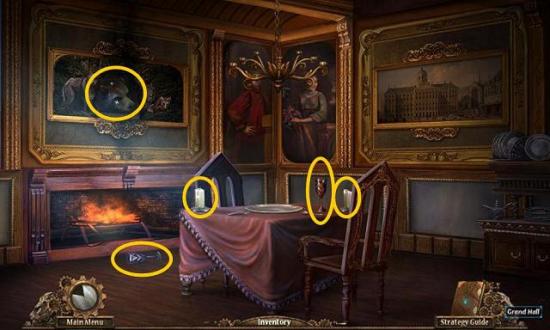
- Put the FIREWOOD in the grate and light it with the MATCHES
- The painting above the fire will burn and reveal a BEAR HEAD
- Pick up the two EMPTY GOBLETS and the two ATLANTIS CANDLES
- Go back to the courtyard and into the undercroft. Zoom in on the barrel with rosewater and fill both EMPTY GOBLETS with rosewater to get two GOBLETS OF ROSEWATER
- Go back to the dining room and put the two GOBLETS OF ROSEWATER on the table
- Pick up the GOLDEN FORK
- Go back into the Grand Hall and put the GOLDEN FORK, GOLDEN SHIELD, GOLDEN ROSE and GOLDEN DIAMOND in the matching slots above the four doors
- Go up the stairs to the Throne Room. There is nothing you can do there right now, so use the AVIARY KEY on the door to the right and go into the aviary
Aviary
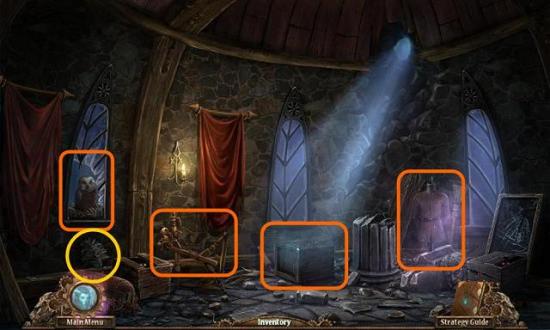
- Click on the chest in the middle to get another match two puzzle. Find the matching spools of thread until one is left. Pick up the SPOOL OF RED THREAD
- The rubble on the right has a hidden object scene. Find the MONOCLE
- Put the SHIP’S WHEEL on the spinning wheel and click to zoom in
- Oil the creature’s joints with the OILCAN
- Put the SPOOL OF RED THREAD on the wheel and turn the handle three times to make a RED SCARF
- Click on the owl in the window and give him the MONOCLE and the RED SCARF
- In his nest is another HEART HANDLE HALF
- Also pick up the FEATHER DUSTER
- Don’t forget to pick up the SHIP’S WHEEL again before you leave
- Go back to the Throne Room and place the two HEART HANDLE HALVES on the door to the left
- Go through the door into the Royal Bedroom
Royal Bedroom

- Put the two ATLANTIS CANDLES in the holders on either side of the mirror
- Dust the mirror with the FEATHER DUSTER
- Pick up the ROYAL CHEST KEY
- Click on the chest by the bed and unlock it with the ROYAL CHEST KEY
- Inside is a MECHANICAL HEART
- Go back downstairs and to the courtyard and give the MECHANICAL HEART to the robot, whose name turns out to be Barnesworth
- The robot will clear a mechanism, the reliquary, that requires venom to be activated
- By the reliquary is a ZEPPELIN REPAIR KIT
- Go back to the zeppelin at the castle entrance and give the ZEPPELIN REPAIR KIT to Barnesworth
- Put the SHIP’S WHEEL on the zeppelin and click on the zeppelin to leave
Back to the Cottage
Moon Tea
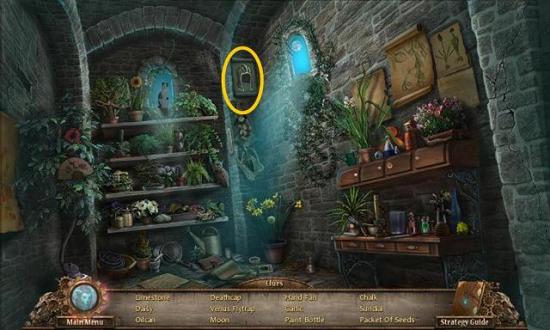
- Go into the basement for a hidden object scene. Find the SIEVE
- Go left to Owl Creek and talk to Mr. Beak. He wants some moon tea, and you can take the TEACUP that’s behind him
- Click on the stream on the left and use the SIEVE on the water to find a GEM
- Go into the cottage and through to the garden
- Put the CROWN on the frog statue to get another GEM
- Click on the fountain in the back wall and place the two GEMS in the eyes
- Collect the MOON TEA in the TEACUP
- Go back to Owl Creek and give the MOON TEA to Mr. Beak
Four Venoms and Four Helmets
- Get the MAILBOX KEY, go back to the cottage and use the key to unlock the mailbox
- Inside is a book about venomous creatures and four EMPTY VIALS
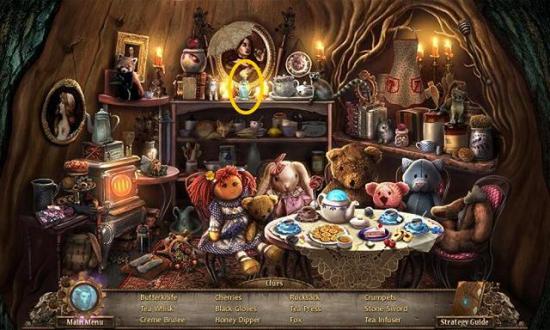
- Go through the cottage, garden and hay field to the forest path
- Click on the hollow tree for another hidden object scene. Find the TEAR CATCHER
- Go to the Weeping Willow and use the TEAR CATCHER on the tree to get TEARS OF DROWSINESS
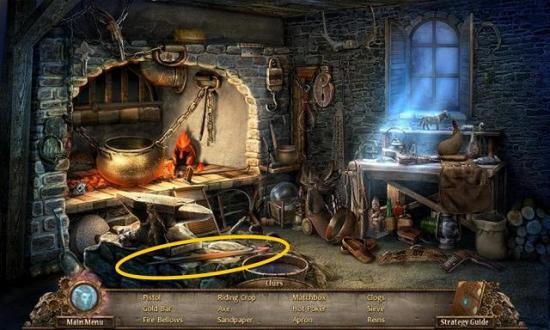
- Go to the blacksmith and click on the door for a hidden object scene. Find the HELM OF FIRE
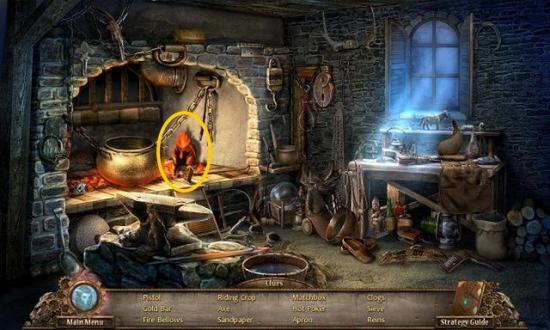
- Click on the frog in the pond and sedate it with the TEARS OF DROWSINESS
- Use one of the EMPTY VIALS to get a VIAL OF FROG VENOM
- Go on into town and go to the tavern. Put the BEAR HEAD on the wall and then move the heads around to place them in the order as seen on the painting from the dining room (it’s in your journal). The order is: wolf, bear, moose, lion, fox
- Take the BLUNDERBUSS from the compartment that opens
- Go back out and onto the shop street. The cart has a new hidden object scene. Find the SERPENT FLUTE
- Go into the Ice Cavern and use the SERPENT FLUTE on the snake by the frozen soldier
- Use an EMPTY VIAL on the snake to get a VIAL OF SNAKE VENOM
- The hidden object scene in the back wall has the HELM OF ICE
- Go through the hole to Storm Peak and take the zeppelin back to the castle
- Shoot the spider webs blocking the stairs with the BLUNDERBUSS and pick up the WEB THREADS
- Go up the stairs and right into the aviary, and use the WEB THREADS on the spinning wheel to get THREAD OF BINDING
- There is a new hidden object scene in the aviary that contains the HELM OF AIR
- Go downstairs and left into the dining room. Zoom in on the cloche on the table. Underneath it is a scorpion. Tie up the scorpion with the THREAD OF BINDING and use an EMPTY VIAL to get a VIAL OF SCORPION VENOM
- Go through the courtyard into the undercroft and enter the hidden object scene to find the HELM OF EARTH
- Go back into the armory and find the GAUNTLET OF STRENGTH in the hidden object scene
- Place the four helmets on the four suits of armor and take the ENCHANTED SWORD with the GAUNTLET OF STRENGTH
- Open the Beauty and the Beast book and find the 20 roses

- Take the SOUL SHARD
- Go back to the Throne Room upstairs and zoom in on the Beast
- You need to shoot all the spiderlings with the BLUNDERBUSS. However, you only get three bullets per round, but you have to kill all the spiderlings in each round. So you need to wait until two or more spiderlings are in your aim before you shoot
- After you’ve killed all the spiderlings, zoom in on the beast again and try to cut his ties with the ENCHANTED SWORD
- The big spider will attack and more spiderlings will drop down. Kill all the spiderlings, then cut the spider, then cut one of the purple ties tying the Beast (the tie to cut will light up). Repeat this until the beast is free and the spider is dead
- Zoom in on the spider and use the last EMPTY VIAL to get a VIAL OF SPIDER VENOM
- Give the SOUL SHARD to the Beast
- Now go back to the courtyard and place the four VIALS OF VENOM on the reliquary. Get the ENCHANTED ROSE
- Return to the Throne Room and give the ENCHANTED ROSE to the prince (formerly the Beast)
Bonus Game – Collector’s Edition Only
For the bonus game, go back to the main menu after the game, click “extras” and then “bonus game”.
- You start with the GATE KEY in your inventory
- Click on the hollow tree for a hidden object scene. Find the MOON CRYSTAL
- Use the GATE KEY on the gate and go into Phoenix Rise
- Place the MOON CRYSTAL on the guardian’s face
- Collect the five MOON SHARDS and place them on the dais around the statue
- Pick up the CRYSTALIZED FROST
- Click on the dais and pick up the ESSENCE OF EARTH
- Move on to the Burning Pass
Burning Pass
- Click on the spider web on the left to get a spider web puzzle. Keep cutting the spider web strands until all strands are cut and all spiders are isolated. Two spiders across from each other can spin new lines between them. When you’re done, pick up the FROG KEY
- Click on the cave entrance for a hidden object scene. Find the BLUE TORCH
- Now light the torches outside the cave with the BLUE TORCH. There are four of them and you can light them in any order
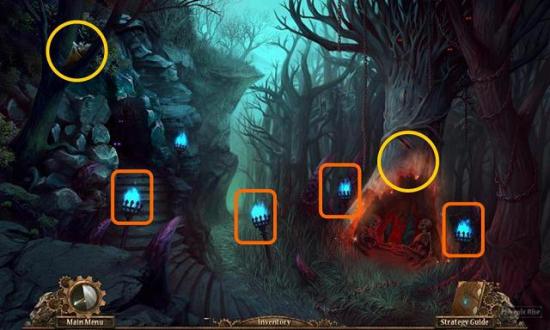
- Click on the burning tree to get the ESSENCE OF FIRE
- Collect the ORANGE CONCH SHELL
- Move on to the Siren Moor
Siren Moor
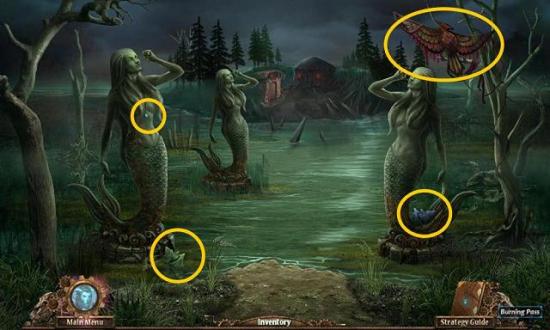
- Pick up the BLUE CONCH SHELL, GREEN CONCH SHELL, KITE and ESSENCE OF WATER
- Click on one of the sirens to get a poem in your journal. The poem says the orange shell needs to be placed on the siren with the highest voice, the blue shell on the one with the lowest voice and the green shell on the one with the mildest voice. From left to right this is GREEN, BLUE, ORANGE
- Cross the moor to the Cursed Isle
Cursed Isle
- Grab the ESSENCE OF AIR (the swirly smoke thing)
- There’s nothing else here right now so enter the Dark Sanctum
Dark Sanctum
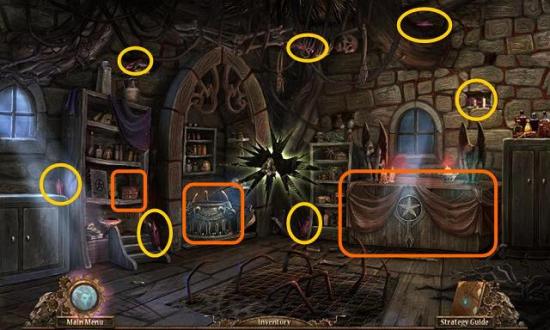
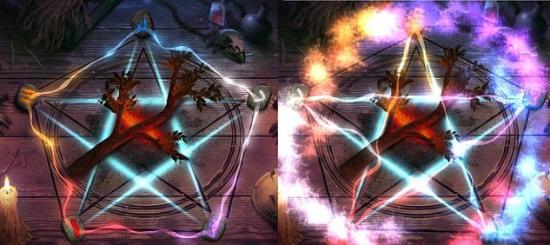
- Zoom in on the chest against the back wall to find there’s a pentagram engraved in it. You will get a journal entry telling you about the ingredients you’ll need to activate it
- Collect the seven pieces of ESSENCE OF SPIRIT
- Click on the cauldron and enter the ESSENCE OF EARTH, ESSENCE OF AIR, ESSENCE OF FIRE, ESSENCE OF WATER and ESSENCE OF SPIRIT
- Now move the bubbles around with your cursor until you only have one bubble of each color left
- Get the ELEMENTAL RUNES
- On the shelf in the Dark Sanctum is a box you can open with the FROG KEY
- Inside is the WAGON KEY
- Go back out and open the wagon with the WAGON KEY
- Inside is a hidden object scene. Find the ANGEL WINGS

- Now go all the way back to Phoenix Rise and place the ANGEL WINGS in the slot on the dais
- Click on it again to release a fire dragon. Use the CRYSTALLIZED FROST to freeze the flying fire balls
- Grab the PHOENIX FEATHER and the DEATH ORB when the dragon has been frozen
- Go back to the Burning Pass and enter the cave for another hidden object scene. Find the TREE TAP
- Use the TREE TAP on the burning tree to get the ASHES
- Now go to Siren Moor and defeat the monster with the DEATH ORB
- Pick up the POISONOUS TENTACLE
- Go to the Cursed Isle and use the POISONOUS TENTACLE on the cursed vines. Get the WAND WOOD
- Go inside and click on the chest with the pentagram. Put the ELEMENTAL RUNES, PHOENIX FEATHER, ASHES and WAND WOOD on the pentagram
- Swap the runes around until energy lines flow in a pentagram between all of them
- Then swap them again to make a pentagram with the squiggly energy lines around the outside
- Get the ELEMENTAL WAND and use it on the portal to the Corrupted Lair
- Enter the Corrupted Lair and attack the enchantress with the ELEMENTAL WAND
- She will cast four circles of runes. In each round, click on the rune that doesn’t have a matching pair
- Leave the Dark Sanctum and go back to the hidden object scene in the wagon on the Cursed Isle. Find the STORM CHARGER
- Zoom in on the burning earth next to the wagon and place the STORM CHARGER on the ground
- Put the ELEMENTAL WAND in the storm charger and then fly the kite on it to attract lightning
- When lightning has struck, zoom back in on the charger and get the SUPERCHARGED WAND
- Go back to the Corrupted Lair and use the SUPERCHARGED WAND on the portal to activate it
- Then go through the portal to BEAST SPIRE
- Attack the enchantress with the wand. She will cast a series of spells, shown by symbols over her head. You then need to find those spells among the other symbols and click on them to block them

More articles...
-
Best Horror Games On Itch.io – July 2026
Across a bounty of subgenres. -
Haze Seas Accessories Tier List [Best Accessories to Equip]
The accessories with the best stat buffs in Haze Seas.