
Best Horror Games On Itch.io – July 2026
Across a bounty of subgenres.![Haze Seas Accessories Tier List [Best Accessories to Equip]](/wp-content/uploads/2026/07/haze-seas-accessories-tier-list.jpg "Haze Seas Accessories Tier List [Best Accessories to Equip]")
Haze Seas Accessories Tier List [Best Accessories to Equip]
The accessories with the best stat buffs in Haze Seas.
![[Roblox] Evomon Shiny Hunting Guide – Including Prismatic and Pris Shinies!](/wp-content/uploads/2026/06/evomon-shiny-hunting-guide.jpg "[Roblox] Evomon Shiny Hunting Guide – Including Prismatic and Pris Shinies!")

Mystery Cruise Walkthrough
Welcome to the Mystery Cruise walkthrough on Gamezebo. Mystery Cruise is a hidden object game played on PC created by Alawar Games. This walkthrough includes tips and tricks, helpful hints, and a strategy guide to how to complete Mystery Cruise.


- Prefer Gamezebo on Google

General Information
Welcome to the Mystery Cruise walkthrough on Gamezebo. Mystery Cruise is a hidden object game played on PC created by Alawar Games. This walkthrough includes tips and tricks, helpful hints, and a strategy guide to how to complete Mystery Cruise.
Main Menu
- The Play button starts the game with the currently selected profile.
- The Change Player button opens the profile window where profiles can be selected, created and deleted.
- The Options button opens a window where there are slider bars to adjust sound effects and music volume. There is an option to switch between full screen and windowed mode. The credits list can also be accessed from the options window.
- The Exit button exits the game if Yes is selected or returns to the main menu if No is selected.
How to Play
- The default cursor in the game is the arrow. Move the cursor around the screen. As a majority of this game consists of hidden object scenes, the cursor will not change when it passes over an object of interest. Left click when the cursor passes over an object to remove it from the list.
- The hidden object scenes present a list of objects that need to be found. Many of the objects to be found are random and will not be the same from one game to the next. The exceptions are inventory items that are received after the scene has been completed, and lens frame objects.
- Some scenes require purple objects to be found. These are objects that are hidden in another scene within the main scene, and finding the scene requires clicking an object such as a drawer or a briefcase. The objects that open these scenes are identified in the walkthrough with a purple outline.
- The lens frame is an object that becomes available about half-way through the game. It appears next to the hint button at the bottom-right corner of the screen, and is required to find objects in a light purple text. After the lens frame has been selected, move it slowly over the screen and it will show invisible objects that can then be selected.
- The journal icon appears when the lens frame is available. Select it to show the progress that has been made for collecting the souls.
- After a hint has been used, it takes 1 minute for the hint button to become active again. Clicking too quickly causes the cursor to break apart for 6 seconds, and no objects can be selected when this happens.
- There are various mini-games that are encountered in the main adventure. A skip button to automatically complete these mini-games becomes active after 2 minutes.
Walkthrough
Read below for our full strategy guide and walkthrough for Mystery Cruise.
Explore the ship
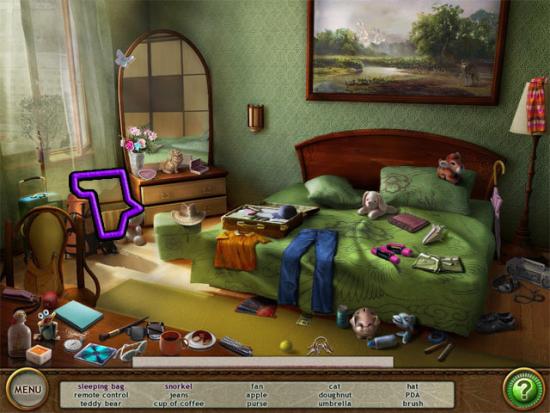
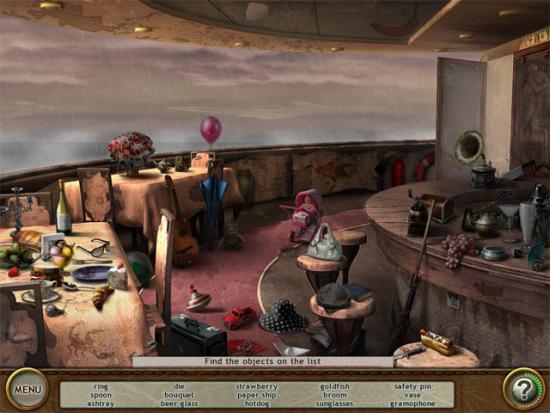
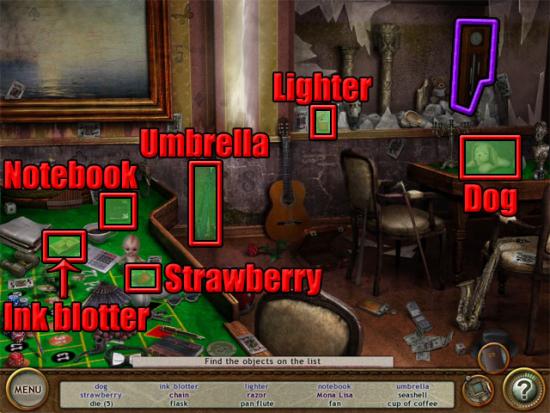
The game starts in the bedroom. Select the chest:
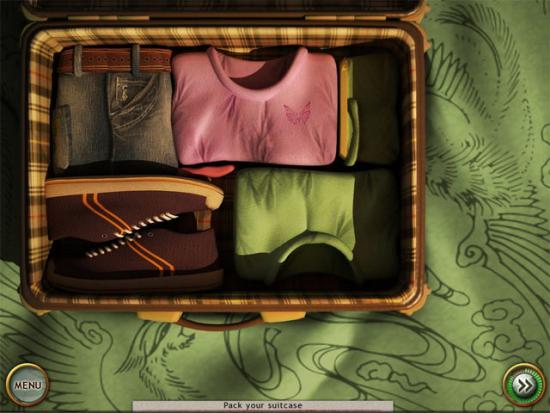
Find the purple text objects in the chest. Exit the close-up view and find the remaining objects on the list. Select the suitcase on the bed to play a jigsaw mini-game. Click and drag the jigsaw pieces to the correct positions:
Amelie travels to her cabin on the cruise ship. Find the 15 pieces of paper in the room. Select the cabinet:
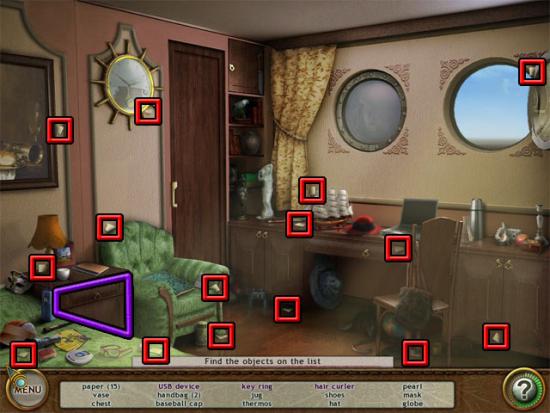
Find the purple text objects in the drawer. Exit the close-up view and find the remaining objects on the list. Use the scraps of paper on the table to play a mini-game. Put the scraps of paper in the correct positions:

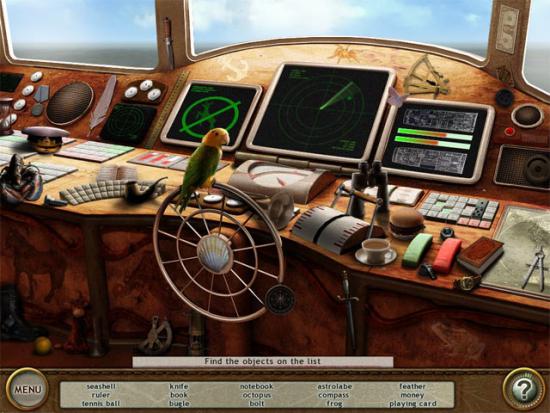
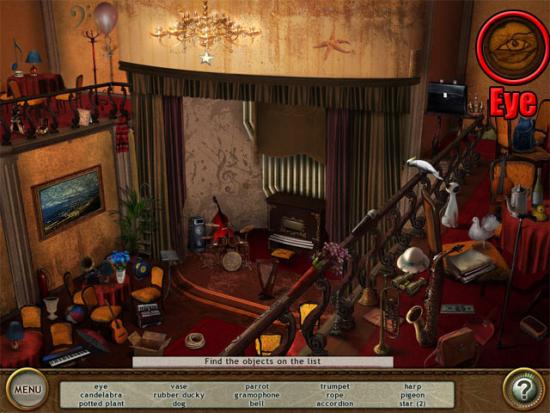
Amelie travels to the grand hall. There are no purple text or inventory objects in this scene. Find all of the objects on the list and then select the pipe organ:
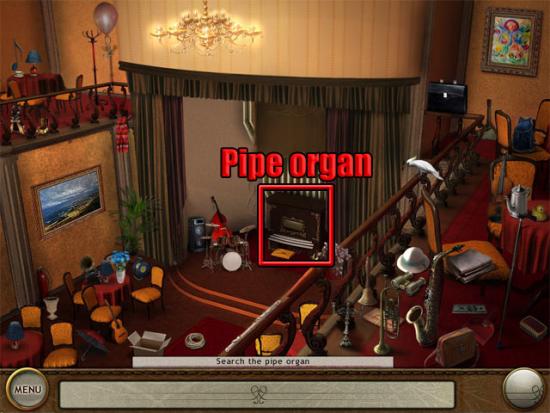
In the mini-game, repeat all of the notes that are played and a panel will open:
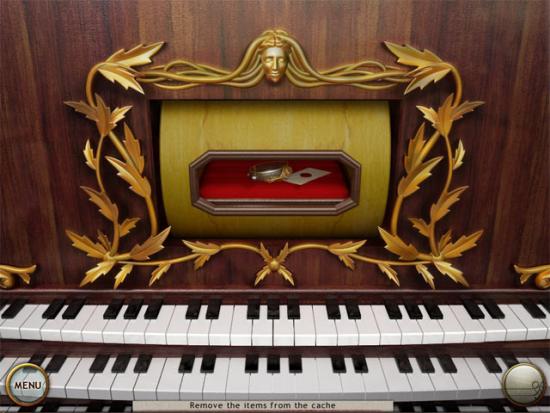
Take the bracelet and the envelope from the panel to travel to the engine room. Select the message on the screen:
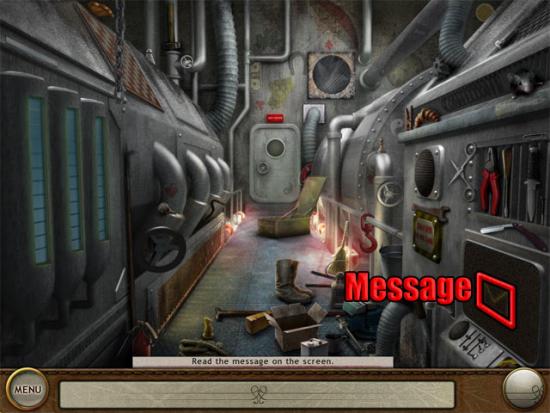
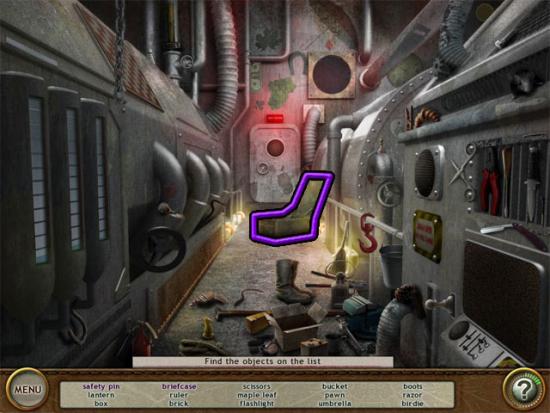
Find the two hooks, the glove and the wrench. Select the box:
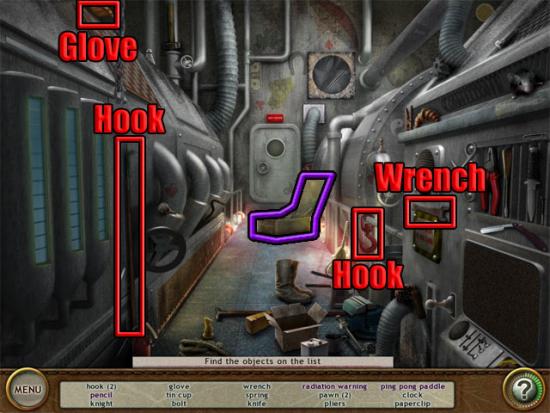
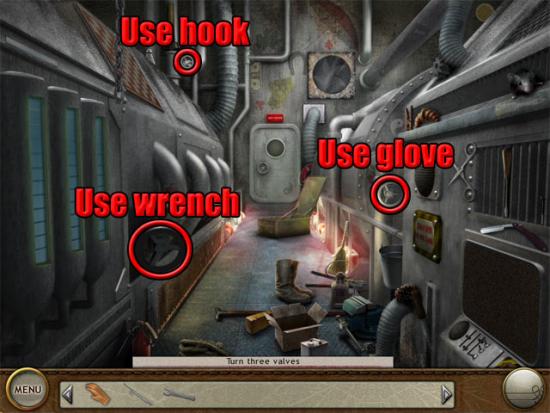
Find the purple text objects in the close-up view. Exit the view and find the remaining objects on the list. Use the hook, glove and wrench on the three valves:
Select the new message on the screen to travel to the bridge:
There are no purple text or inventory objects in this scene. Find the objects on the list and Amelie will return to her cabin. A cutscene is shown where the ship enters a storm.
Into the storm
Select the lock on the door:
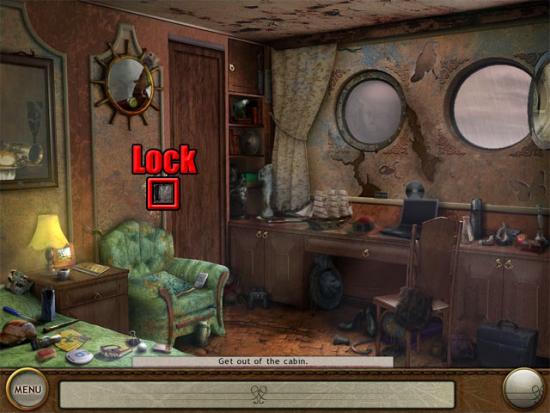
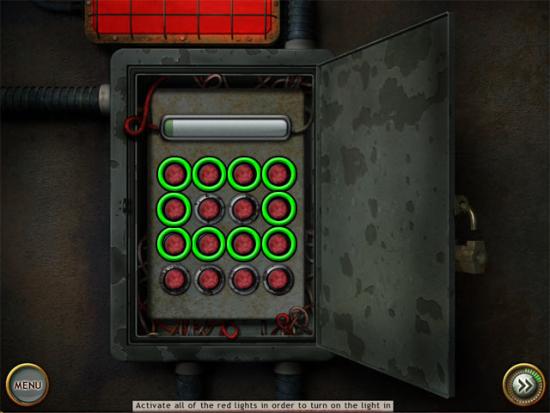
Find the four pieces of wire and the screwdriver. Select the cabinet:
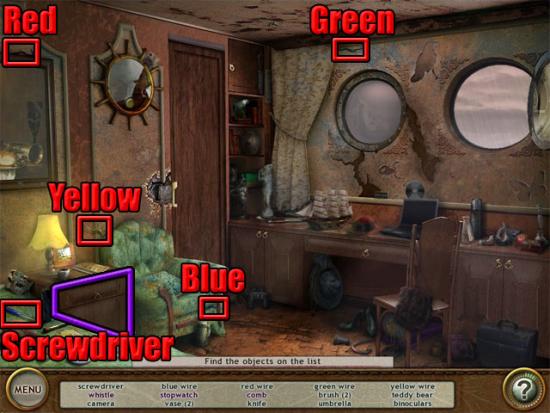
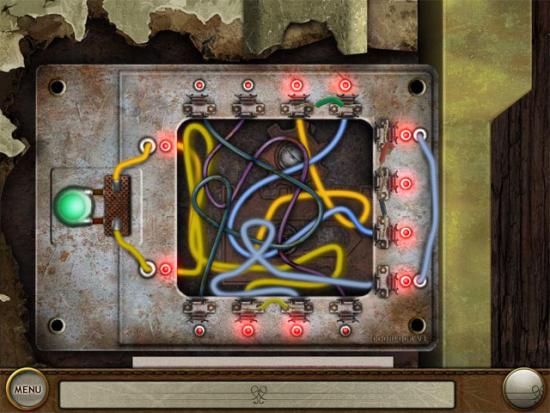
Find the purple text objects in the close-up view. Exit the view and find the remaining objects on the list. Select the lock on the door and use the screwdriver on the four screws to remove the panel. Put the wires in the correct places so that all of the lights are lit:
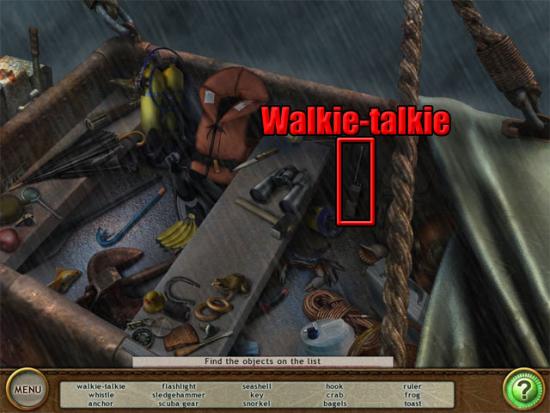
Amelie travels to the deck:
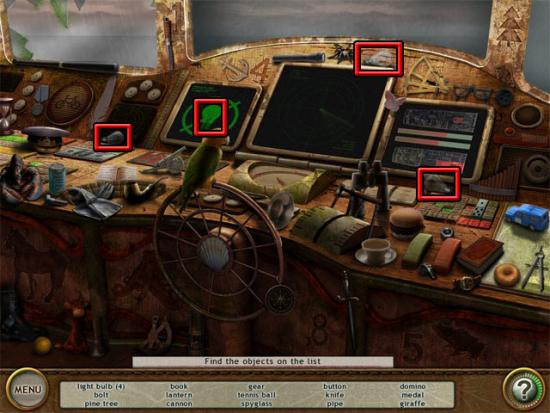
There are no purple text or inventory objects in this scene. Find the objects on the list and Amelie will travel to the lifeboats. Find the walkie talkie:
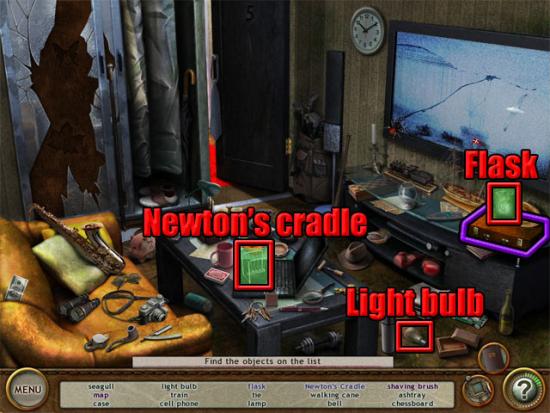
Find the remaining objects on the list to watch a cutscene where Amelie is told to go to the bridge. Find the three light bulbs:
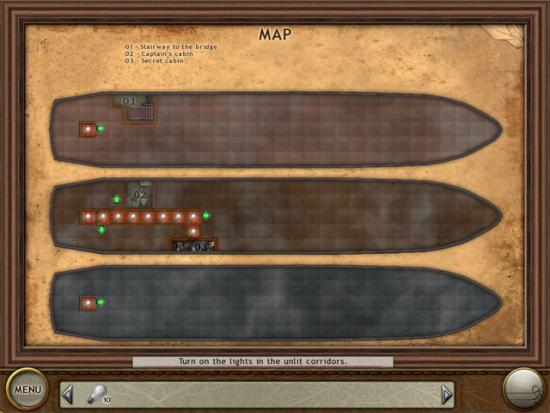
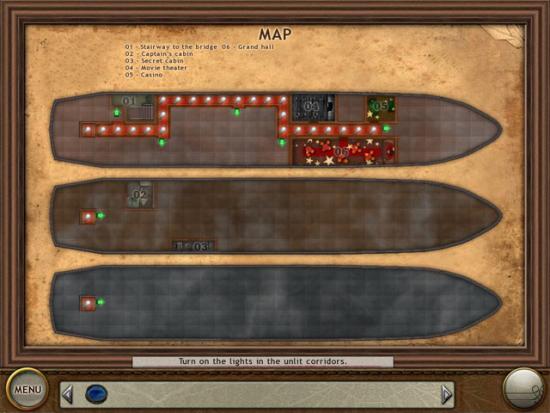
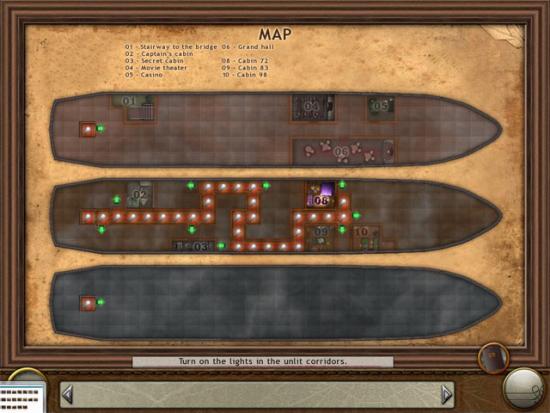
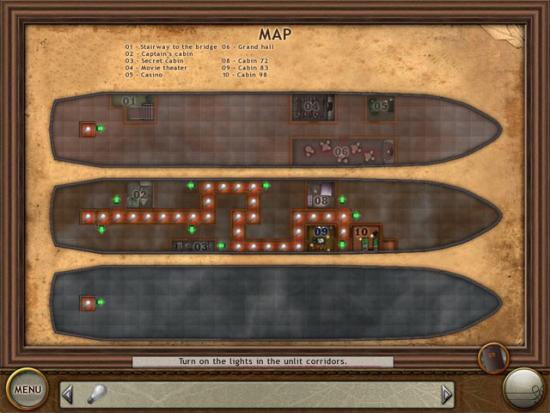
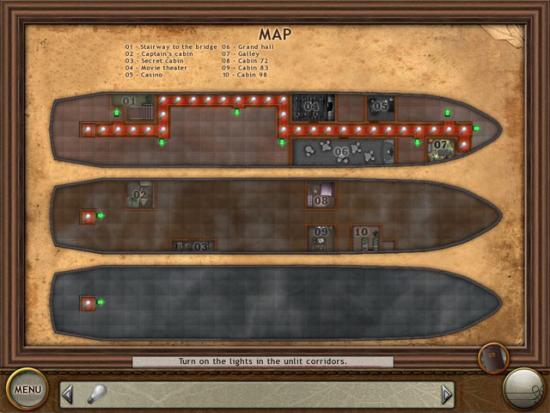
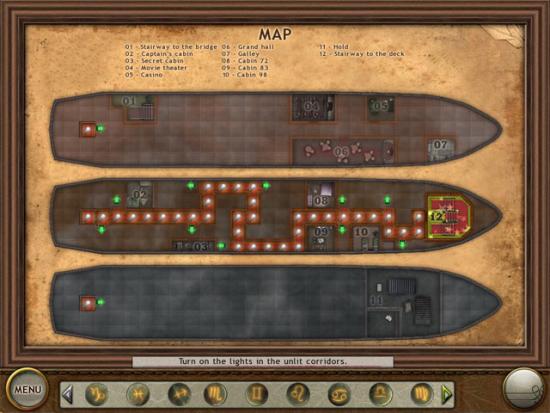
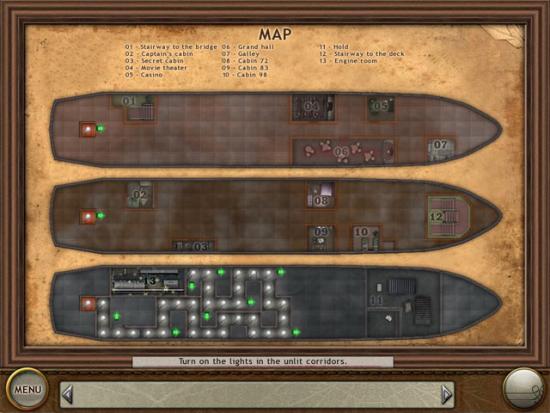
Find the remaining objects on the list and then select the map on the wall. On the top deck, move to the stairway to the bridge:
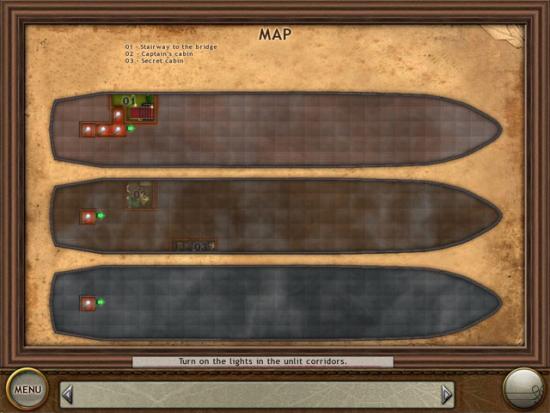
Enter the stairway and find the four light bulbs:
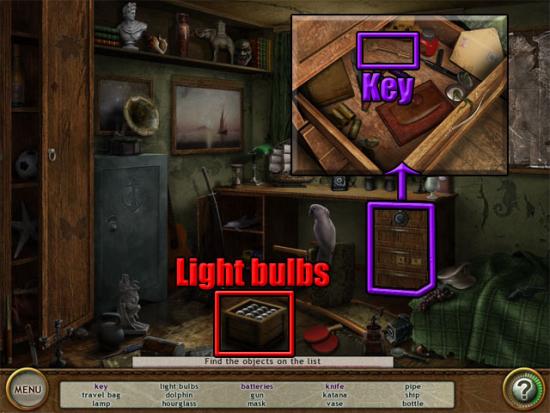
Find the remaining objects on the list and then pull the handle to return to the map screen. On the middle deck, move to the captain’s cabin:

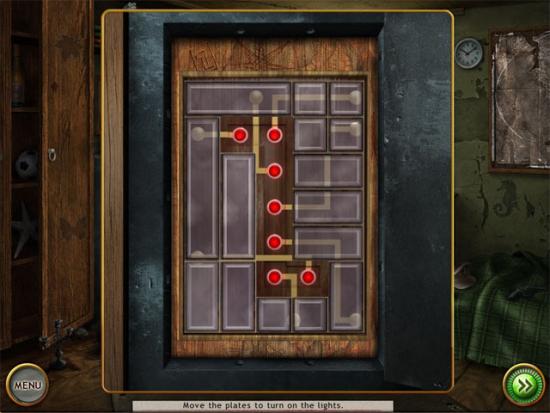
Enter the cabin. Open the drawer and take the key. Take the light bulbs:
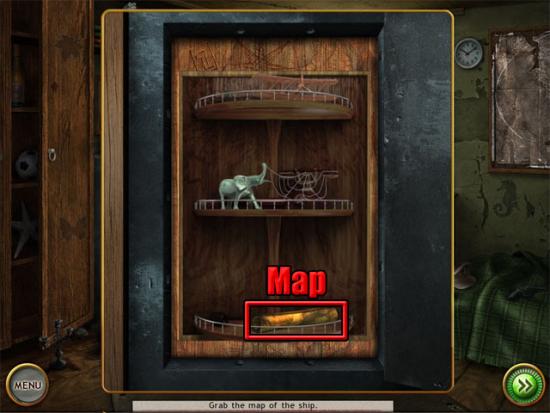
Use the key on the safe to play a mini-game where the aim is to slide all of the blocks off the lights. Click a block to select it and then click a blank area on the grid to move the block. The mini-game can be completed in many different ways. One way is shown below:
After solving the mini-game, take the map of the ship:
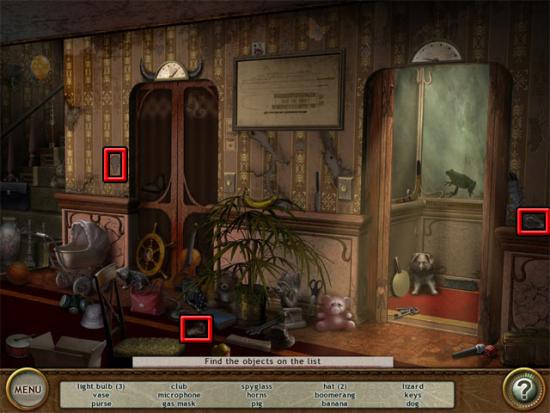
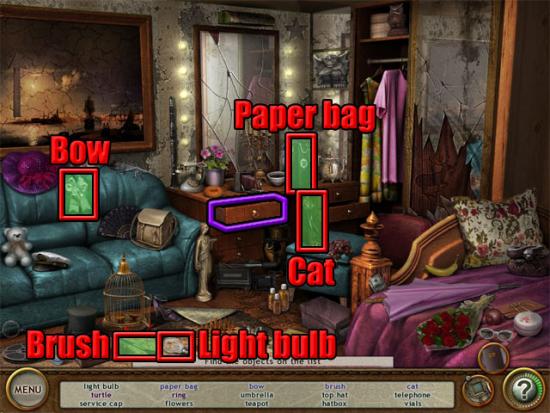
On the middle deck, move to the secret cabin:
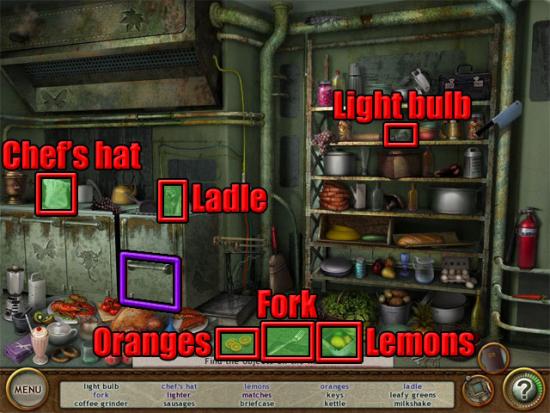
Enter the cabin and find the objects on the list:
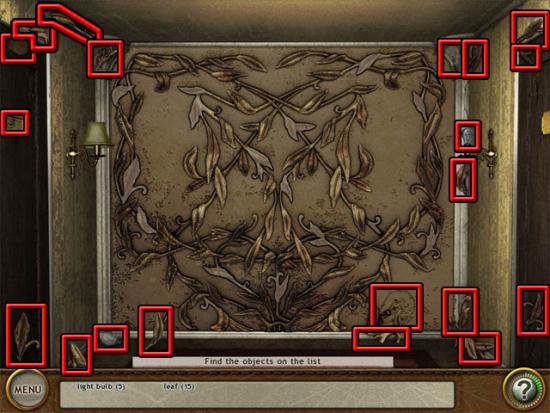
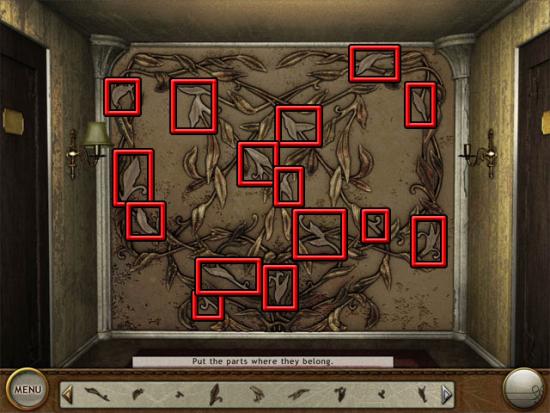
There are lighter areas on the wall where leaves now have to be placed. Put the 15 leaves in the correct places on the wall:
Find the seals
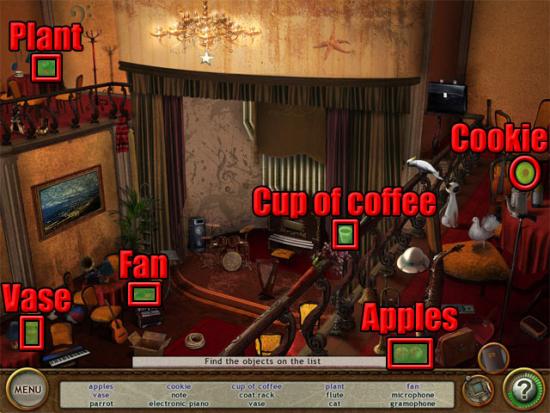
On the top deck, move to the movie theater:
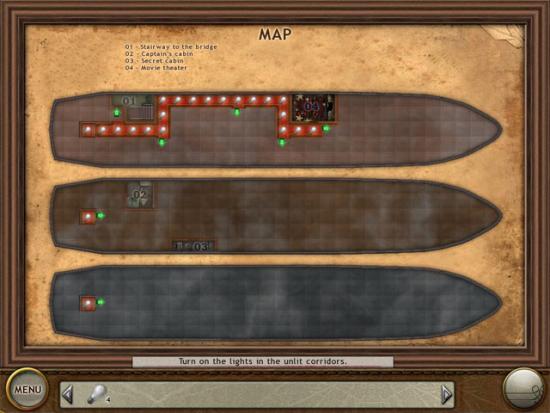
Enter the movie theater. Find the wing seal and then select the box:
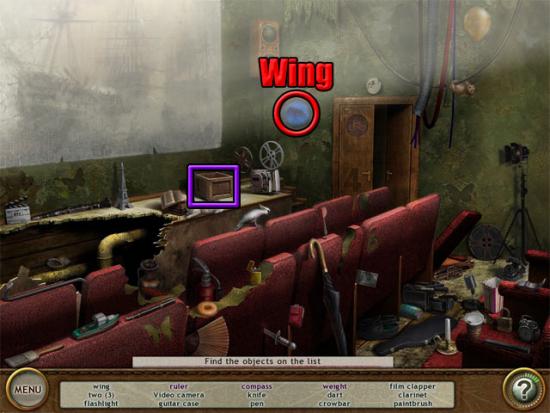
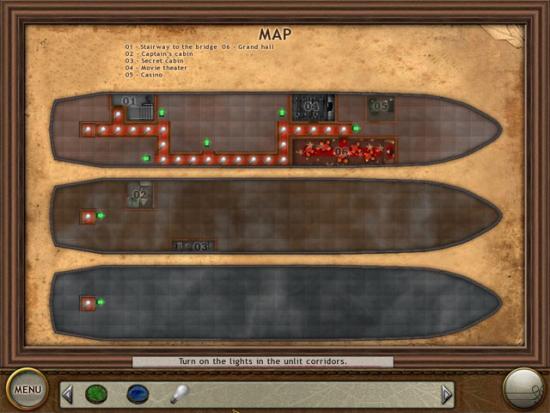
Find the purple text objects in the close-up view. Exit the view and find the remaining objects on the list to return to the map. On the top deck, move to the casino:
Enter the casino. Find the palm seal and then select the clock:
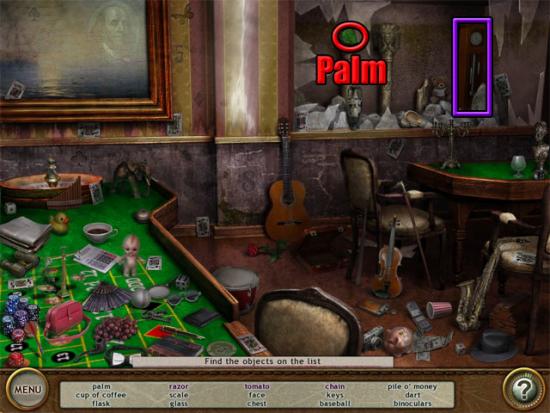
Find the purple text objects in the close-up view. Exit the view and find the remaining objects on the list to return to the map. On the top deck, click the grand hall that was found on the way to the casino to travel there automatically:
Take the eye seal:
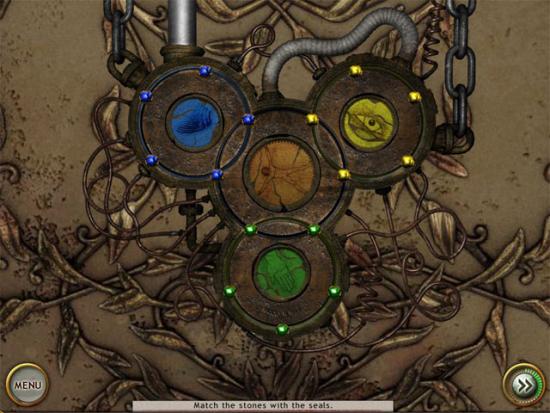
Find the remaining objects on the list to return to the map. Select room 03 on the map to return to the door of the secret cabin. Put the three seals on the slots in the contraption. The aim now is to rotate the discs so that the blue gems surround the blue seal, yellow gems surround the yellow seal and the green gems surround the green seal:
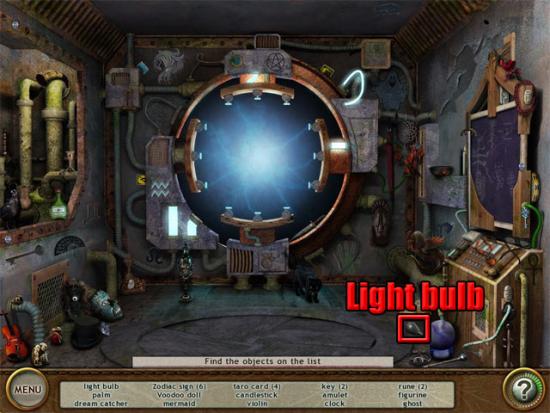
After completing the mini-game, Amelie will enter the engineer’s cabin. Select the safe on the wall to enter a hidden object scene. Find the five light bulbs and then select the object in the tank:
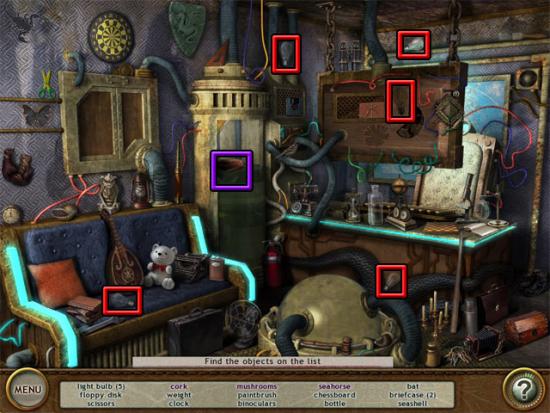
Find the purple text objects in the close-up view. Exit the view and find the remaining objects on the list. Take the lens of shadows:
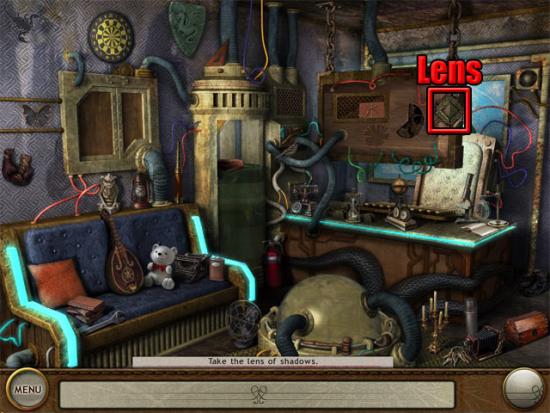
The lens will now appear next to the hint button at the bottom-right corner of the screen. Select the safe and the lens will be automatically used to see plates with different colors. The lens frame can be grabbed at the top-left corner and moved to see different plates. The aim is to rotate the plates so that the color on one side of a plate is the same as the color on the next plate. An example of how to solve one section of the puzzle is shown below:
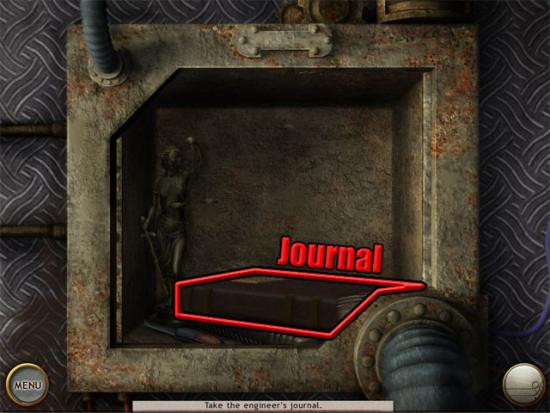
After completing the mini-game, take the engineer’s journal from the safe:
Find the soul prints
Select the stairway to the bridge on the map. Use the lens frame to find the soul prints:
Find the remaining objects on the list to return to the map. Select the movie theater. Select the box and find the purple text objects in the close-up view. Exit the view and use the lens frame to find the soul prints:
Find the remaining objects on the list to return to the map. Select the casino. Select the clock and find the purple text objects in the close-up view. Exit the view and use the lens frame to find the soul prints:
Find the remaining objects on the list to return to the map. Select the grand hall. Use the lens frame to find the soul prints:
Find the remaining objects on the list to return to the map. There are not enough light bulbs to get to room 07 at the moment. On the middle deck, move to cabin 72:
Enter the cabin and find the light bulb. Select the drawer and find the purple text objects in the close-up view. Close the view and use the lens frame to find the soul prints:
Find the remaining objects on the list to return to the map. On the middle deck, move to cabin 83:
Enter the cabin and find the light bulb. Select the briefcase and find the purple text objects in the close-up view. Close the view and use the lens frame to find the soul prints:
Find the remaining objects on the list to return to the map. On the middle deck, move to cabin 98:
Enter the cabin and find the light bulb. Select the dresser and find the purple text objects in the close-up view. Close the view and use the lens frame to find the soul prints: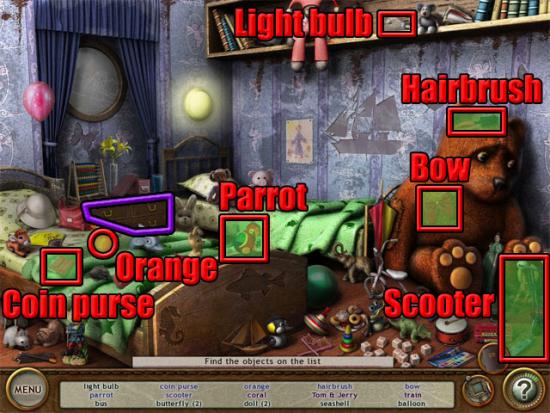
Find the remaining objects on the list to return to the map. On the top deck, move to the galley:
Enter the galley and find the light bulb. Select the oven and find the purple text objects in the close-up view. Close the view and use the lens frame to find the soul prints:
Find the remaining objects on the list to return to the map. On the bottom deck, move to the hold: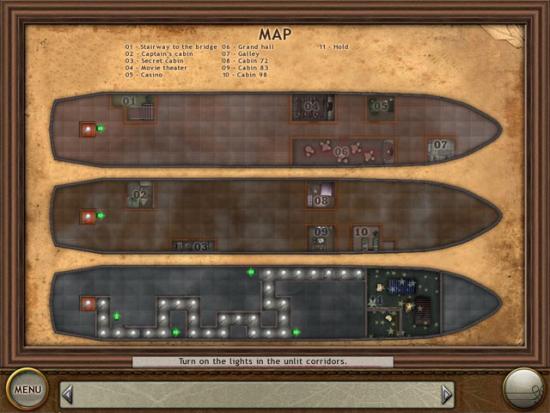
Enter the hold and go through the doorway to the staff room. Select the fuse box on the wall to enter a hidden object scene. Find the light bulb and then select the box. Find the key in the close-up view:
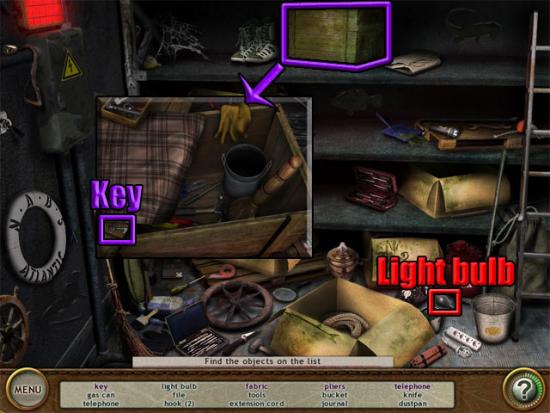
Find the other purple text objects in the close-up view. Close the view and find the remaining objects on the list. Use the key on the fuse box to play a button mini-game. Press the buttons shown below to turn on all of the lights:
Find the light bulb and then select the toolbox:
[
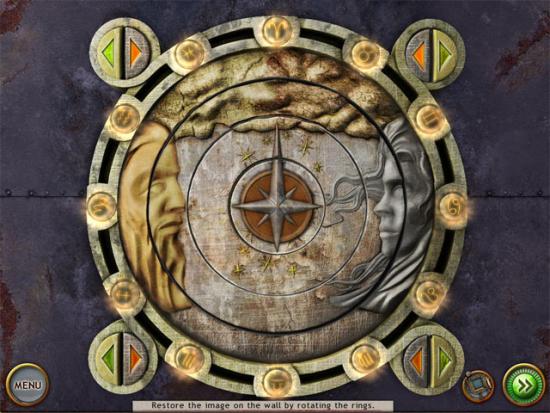
Find the purple text objects in the close-up view. Close the view and find the remaining objects on the list. Select the glowing object to view a series of rings. Press one of the buttons around the outside of the rings to see that the device is not working.
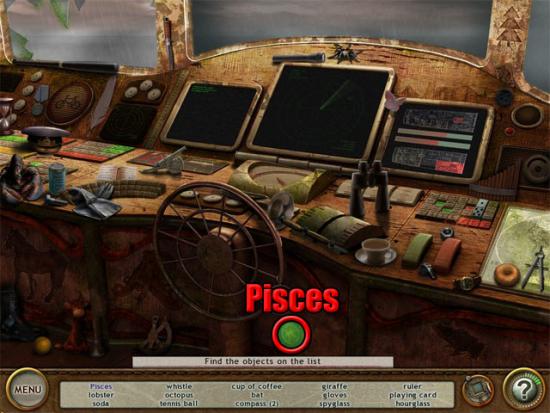
Find the zodiac signs
Enter the stairway to the bridge and use the lens frame to find the Pisces sign:
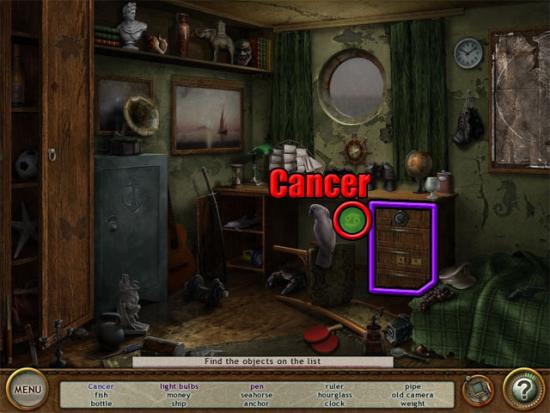
Find the remaining objects on the list to return to the map. Enter the captain’s cabin. Select the cabinet and find the purple text objects in the close-up view. Exit the view and use the lens frame to find the Cancer sign:
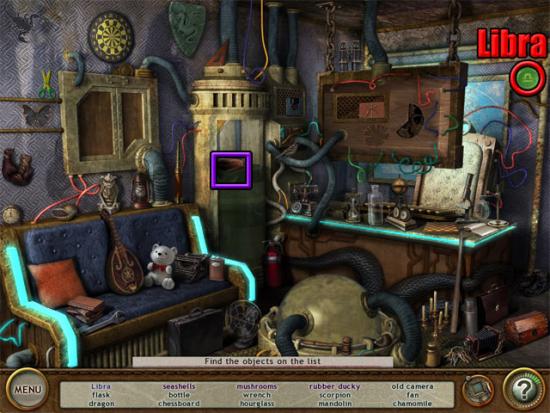
Find the remaining objects on the list to return to the map. Enter the secret cabin. Select the object in the tank and find the purple text objects in the close-up view. Exit the view and use the lens frame to find the Libra sign:
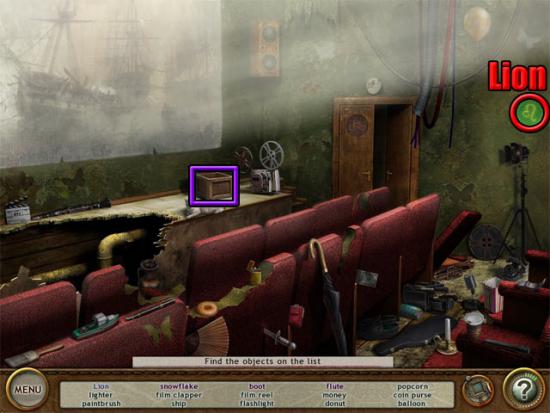
Find the remaining objects on the list to return to the map. Enter the movie theater. Select the box and find the purple text objects in the close-up view. Exit the view and use the lens frame to find the Lion sign:
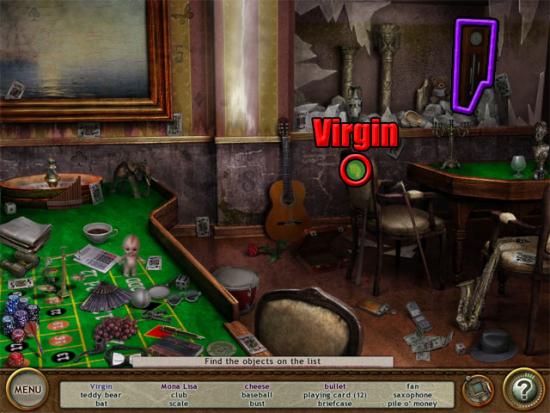
Find the remaining objects on the list to return to the map. Enter the casino. Select the clock and find the purple text objects in the close-up view. Exit the view and use the lens frame to find the Virgin sign:
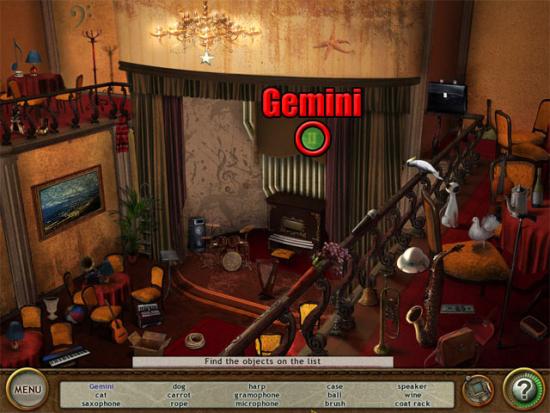
Find the remaining objects on the list to return to the map. Enter the grand hall. Use the lens frame to find the Gemini sign:
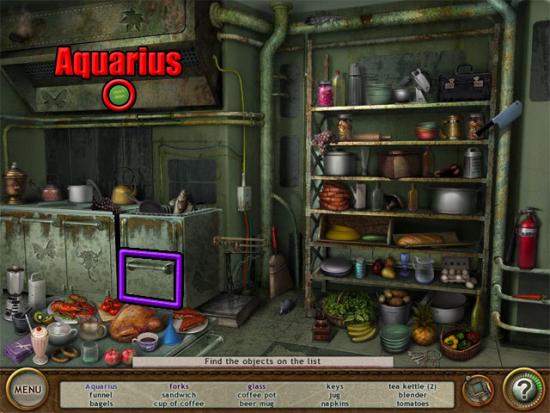
Find the remaining objects on the list to return to the map. Enter the galley. Select the oven and find the purple text objects in the close-up view. Exit the view and use the lens frame to find the Aquarius sign:
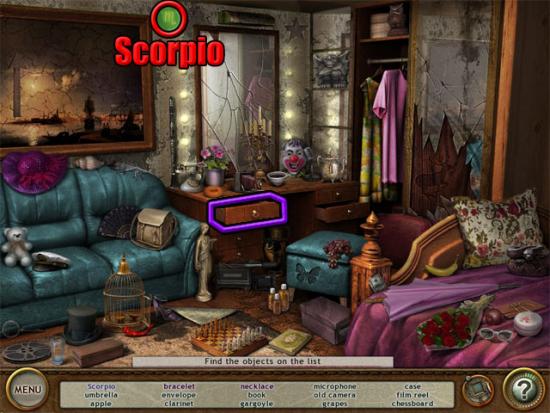
Find the remaining objects on the list to return to the map. Enter cabin 72. Select the drawer and find the purple text objects in the close-up view. Exit the view and use the lens frame to find the Scorpio sign:
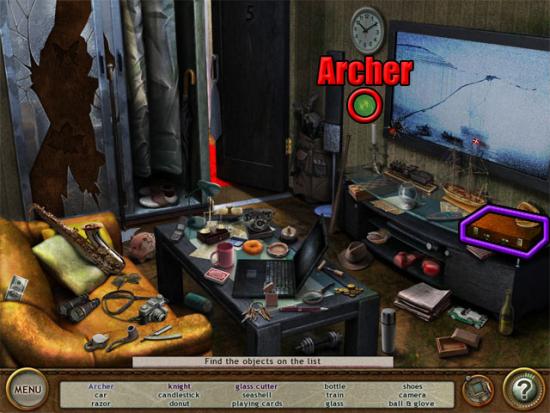
Find the remaining objects on the list to return to the map. Enter cabin 83. Select the briefcase and find the purple text objects in the close-up view. Exit the view and use the lens frame to find the Archer sign:
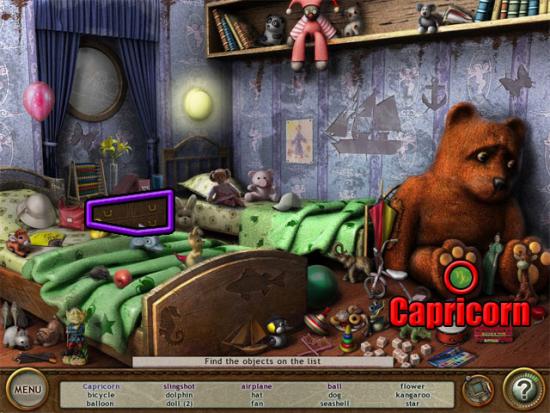
Find the remaining objects on the list to return to the map. Enter cabin 98. Select the dresser and find the purple text objects in the close-up view. Exit the view and use the lens frame to find the Capricorn sign:
On the middle deck, move to the stairway to the deck:
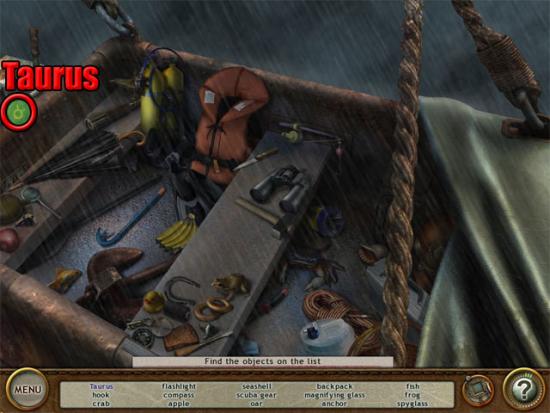
Enter the stairway. Use the lens frame to find the Aries sign:
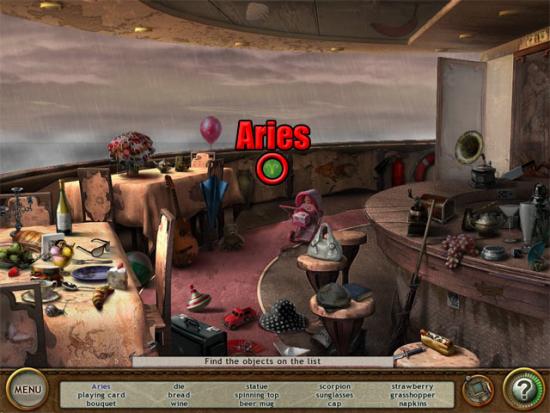
Find the remaining objects on the list and Amelie will travel to the lifeboat. Use the lens frame to find the Taurus sign:
Completing the sphere engine
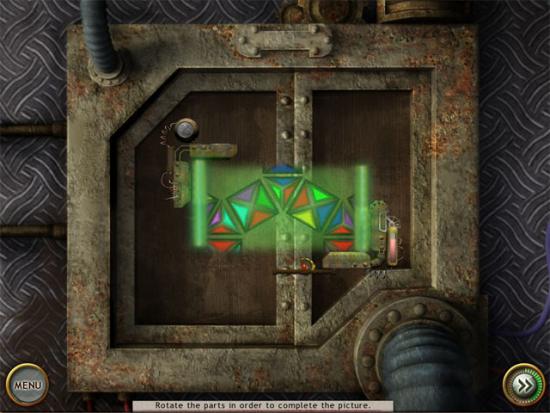
Find the remaining objects on the list. Return to the hold and put all of the keys in the locks. The aim now is to complete the image by pressing the buttons to rotate the rings. The position of the rings is random each time the game is played. The completed image is shown below:
After the cutscene, find the light bulb:
On the bottom deck, move to the engine room:
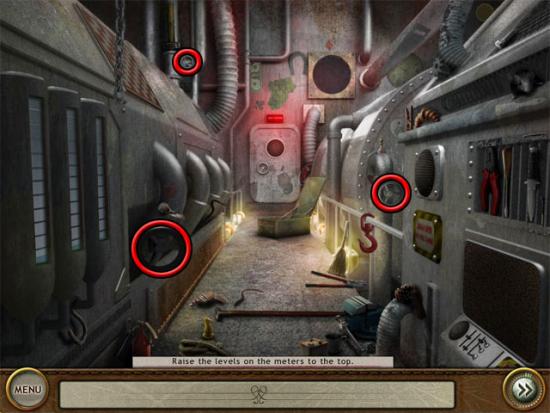
Enter the engine room and select the box:
Find the purple text objects in the close-up view. Exit the view and find the remaining objects on the list. The aim now is to rotate the valves so that the levels in the meters rise to the top. Click each valve twice:
Return to the hold. The aim here is to arrange the souls according to the colors of the rainbow. Put a soul in the top container and then click it to make it travel down to the next one. The red buttons can be used to transfer the souls to the other side of the engine. Put the six souls in the containers in the order shown below:
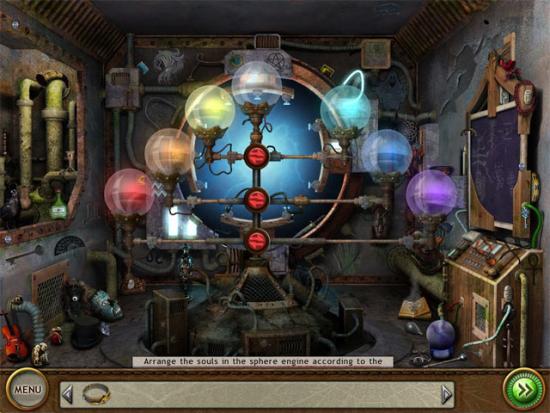
Once this has been done, use the ring on the top container to complete the game.

More articles...
-
Best Horror Games On Itch.io – July 2026
Across a bounty of subgenres. -
Haze Seas Accessories Tier List [Best Accessories to Equip]
The accessories with the best stat buffs in Haze Seas.