
Best Horror Games On Itch.io – July 2026
Across a bounty of subgenres.![Haze Seas Accessories Tier List [Best Accessories to Equip]](/wp-content/uploads/2026/07/haze-seas-accessories-tier-list.jpg "Haze Seas Accessories Tier List [Best Accessories to Equip]")
Haze Seas Accessories Tier List [Best Accessories to Equip]
The accessories with the best stat buffs in Haze Seas.
![[Roblox] Evomon Shiny Hunting Guide – Including Prismatic and Pris Shinies!](/wp-content/uploads/2026/06/evomon-shiny-hunting-guide.jpg "[Roblox] Evomon Shiny Hunting Guide – Including Prismatic and Pris Shinies!")

Mystery Chronicles: Betrayals of Love Walkthrough
Welcome to the Mystery Chronicles: Betrayals of Love walkthrough on Gamezebo. Mystery Chronicles: Betrayals of Love is a hidden object/adventure game played on the PC created by Lazy Turtle Studios. This walkthrough includes tips and tricks, helpful hints, and a strategy guide to how to complete Mystery Chronicles: Betrayals of Love.
Share this


- Prefer Gamezebo on Google

Mystery Chronicles: Betrayals of Love – Game Introduction
Welcome to the Mystery Chronicles: Betrayals of Love walkthrough on Gamezebo. Mystery Chronicles: Betrayals of Love is a hidden object/adventure game played on the PC created by Lazy Turtle Studios. This walkthrough includes tips and tricks, helpful hints, and a strategy guide to how to complete Mystery Chronicles: Betrayals of Love.
How to Use this Walkthrough
- This walkthrough is meant to be used as a guide to assist in solving mini-puzzles and acquiring all items in order to complete the game. You may explore locations in the order you wish, this walkthrough is written to take the most direct route to the game’s finish.
- Read the help window before you start playing!!!! This walkthrough assumes you have as it explains the basic gameplay.
- Hidden object huns are different each time to you play the game and the hint system can help you if you are stuck. Screenshots will only highlight the inventory item you receive.
- Inventory objects are written in bold.
- The walkthrough will state, “Use the inventory item on the blah blah,” because it assumes you have the item. If you don’t have the item, on your keyboard, press CTRL+F (at the same time). In the text box, type the name of the item you are looking for and press ENTER. This will scan the page for the appearance of that word.
- Zooming in on areas opens small windows. Once you get the item or information you need, close it by clicking the X in the top right corner or anywhere off the window. The walkthrough will not include this instruction.
- If you are new to this genre, read the Help information from the main screen or at the beginning of the game.
Gameplay and Tips
- This is a hidden object adventure game. You will move from location to location solving hidden object hunts, mini-puzzles and picking up items to use in order to proceed in the game.
- You will talk to characters as you move through the game. When the character has an exclamation point over his/her head, they have something new to say.
- Hover your mouse over every aspect of a scene and watch for your cursor to change.
- Magnifying glass cursor – Happens when hovering over an area that you can zoom in and investigate further.
- Hand cursor – When this happens, you can collect the item and add it to your inventory or you can interact with it.
- Your inventory (bottom of your screen) will be minimized during gameplay. To access your inventory, move your mouse to the bottom of your screen and it will appear.
- Items collected will be added to your inventory. To use an inventory item, click on it and click on the area it needs to be used.
- Hidden object hunts provide a list of items to find. Click on the item to cross it off the list. Clicking Hint will highlight an item. To leave a hidden object hunt, move your mouse to the bottom of the scene until it turns into a down arrow, then click to exit the scene.
- Hint system – You have unlimited hints however it takes time to recharge between use.
- Diary – Refer to your Diary (bottom left corner) for clues, story highlights and suspect lists.
- Mini-puzzles – Skip will complete the puzzle and move you forward. There seems to be no penalty.
- There is no timer or point system.
Starting the Game
- Play starts a new game (you’ll have to enter a profile name) or continues an existing game.
- Profiles allows you to choose, create or delete a player’s profile.
- Options allows you to adjust the sound and music volume. You can also change the full screen mode and the custom cursor and see the game’s credits.
- Help offers several options. Click How to Play for an explanation on how to play the game. If you are new to this genre, read the Help information.
- Quit exits the game.
Walkthrough
- When you begin play for the first time, you will be asked if you would like to see the Help menu. Click Yes. This will explain the various game elements. Note that you can revisit this help screen from the Main Menu.
- Once you are finished, click Close.

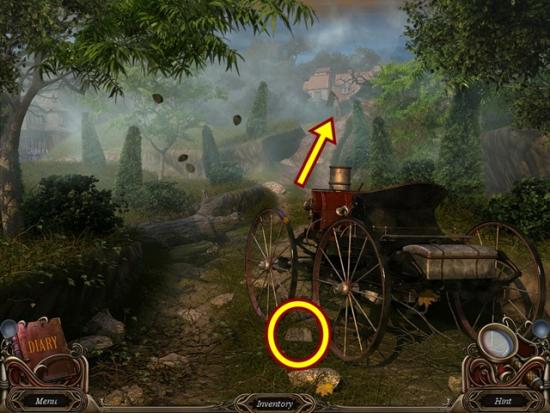
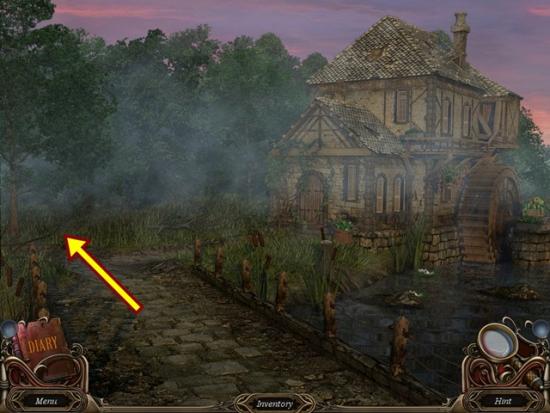
- Read the paper on the ground. Click anywhere off the note to close it. Move north.
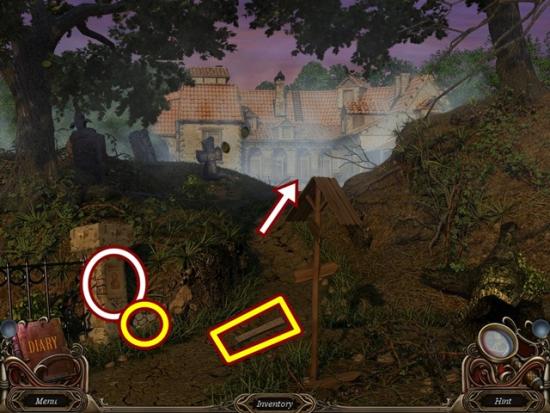
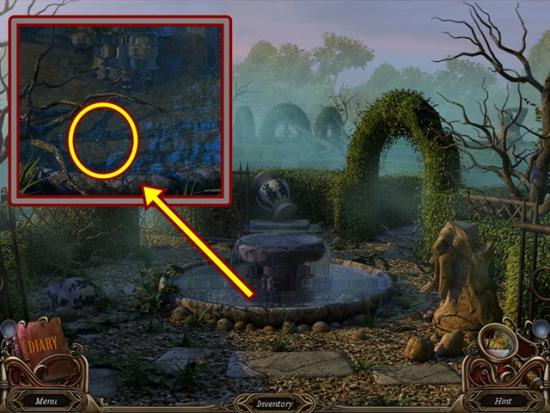
- Take the piece of paper (1 of 16). Look at the poster on the stone wall. Click anywhere off the poster to close it. Take the ladder step (1 of 3). Move north.
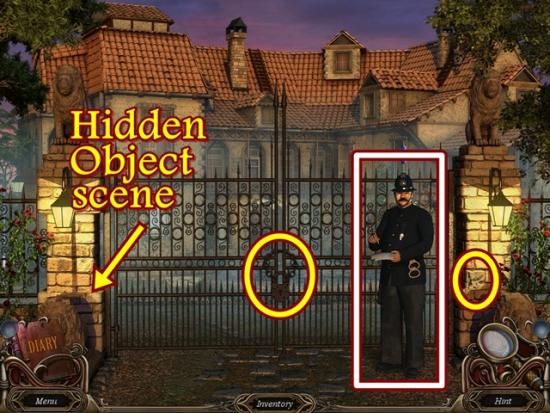
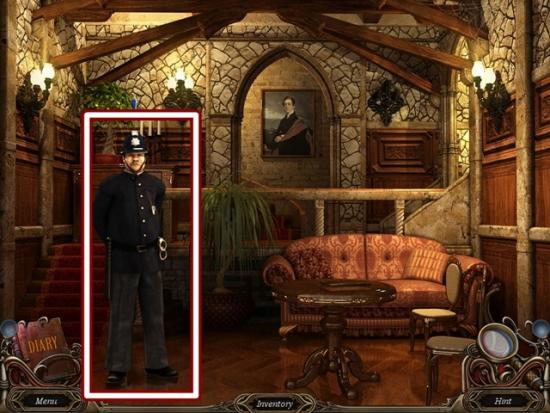
- Talk to Commissaire Bertineau. Take the piece of paper (2 of 16). After talking to the Commissaire, a hidden object hunt is triggered. Click on the left side of the gate to start a hidden object hunt.
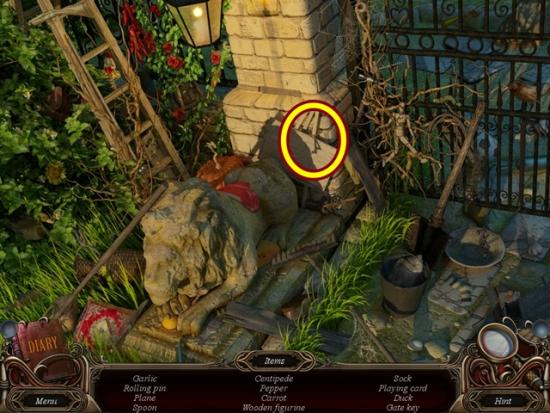
- Find all the items. When you are finished, a gate key is added to your inventory. Click on the gate’s lock. Use the gate key to unlock it. Go through the gate.
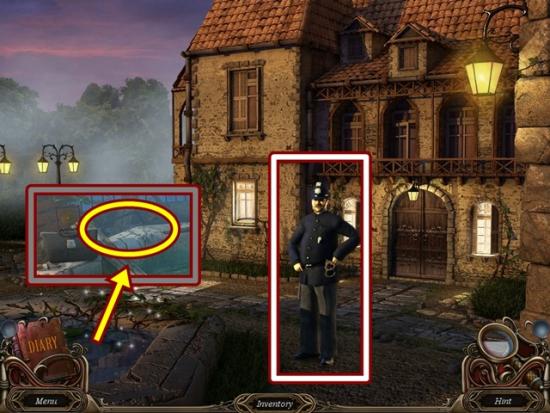
- Talk to Commissaire Bertineau. Click on the pond to start a hidden object hunt. Find all the items. When you are finished, a hacksaw (top left) is added to your inventory. When finished, go west.
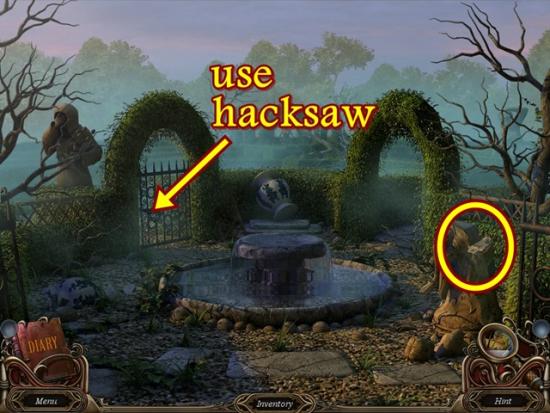
- Take the piece of paper (3 of 16). Click on the closed gate on the left. Use the hacksaw on the chains. Enter the gate.
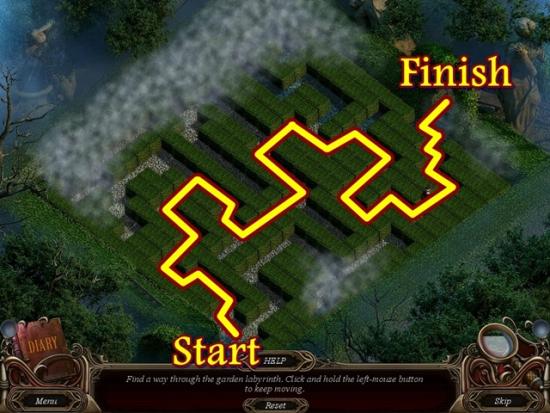
- Mini-puzzle – Make your way through the maze. Click and hold down the left mouse button and guide your character through the maze. The fog clears as you move through the maze. If you encounter a dead end, turn around and try a different path.
- Solution:
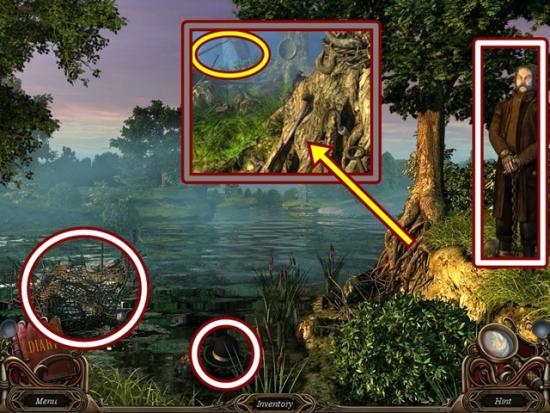
- Talk to the fisherman. Take the bowler hat and fisherman’s net to add the clues to your diary. Click on the fisherman again to add the Suspect Card – The Fisherman to your diary. This triggers a hidden object hunt beside the fisherman. Click on it to start a hidden object hunt. Find all the items. When you are finished, a dip net (top left) is added to your inventory. Go south.
- Click on the fountain. Use the dip net to get the castle key. Go south.
- Talk to the Commissaire. Click on the castle door. Use the castle key to unlock it. Enter the castle.
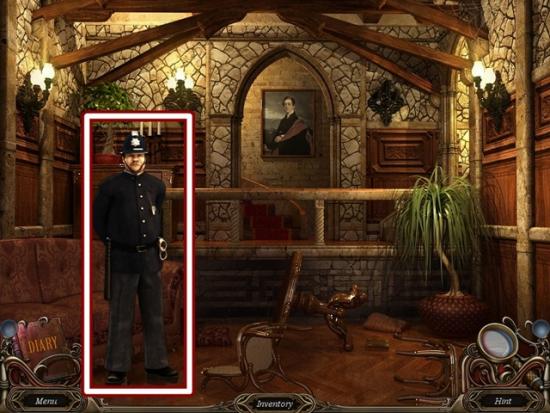
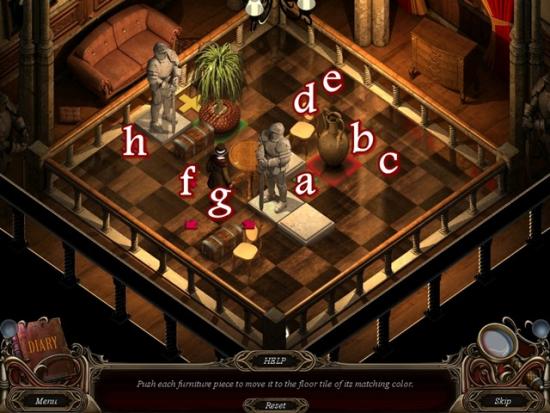
- Talk to the Commissaire. A mini-puzzle automatically starts. Use your character to move the furniture (on a coloured tile) back to its matching coloured X. Your character can only move one square at a time, either straight forward or backward or left or right, he cannot move diagonally. Use the arrows to move him. When he is beside a piece of furniture, move him so that he “pushes” the furniture.
- If you make a mistake, you can click Reset. This resets the entire puzzle so if you’ve already positioned items, you’ll have to start again.
- Plot your moves in advance and be patient. If you click too fast, you could end up moving a piece of furniture in such a way as it becomes stuck and you’ll have to click Reset and start the puzzle from the beginning.
- See the screenshots for the proper order of movements. Letters will indicate where to move the item or your character.
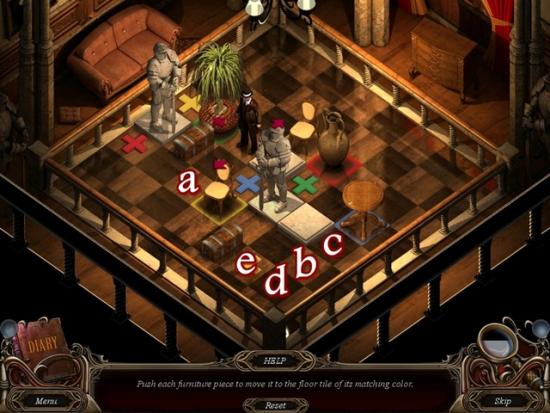
- Start by moving the lower chair. Move your character until he’s beside the yellow chair (a). Move the chair to the three tiles to the right (b). Move your character around the board until he’s directly behind the chair (c). Move it down one tile (d), then move to the right of the chair and push it one tile to the left to the yellow X (e).
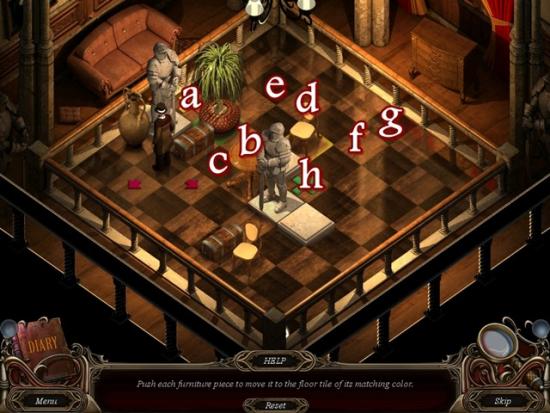
- Move your character so he’s behind the round table (a). Move the table down two squares (b), then get your character to the right of the table (c) and move it three squares to the left until it’s directly below the blue X (d). Move your character around the board until he’s below the table (e). Move the table up one tile to the blue X (f).
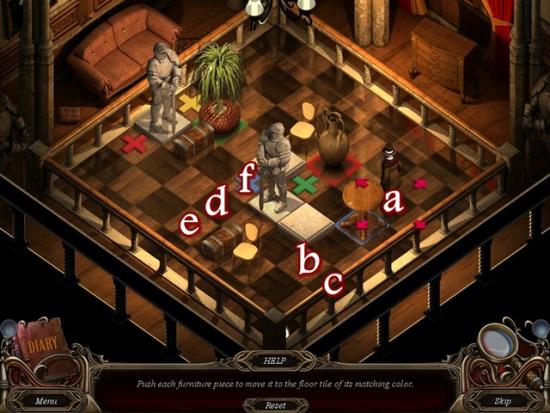
- Now move the large jug to the red X. Move your character so he’s below the jug (a). Move the jug up one tile (b). Move your character to the right of the jug (c) and move it two tiles to the left (d). Move your character so he’s above the jug (e) and move the jug down four tiles (f). Move your character around the board so he’s to the right of the jug (g). Move the jug three tiles to the left to the red X (h).
- Now move the potted plant. Move your character so he’s to the left of the plant (a). Move the plant one tile to the right (b). Move your character around the board so he’s below the plant (c), then move the plant up two tiles (d). Move your character around the board so he’s to the left of the plant (e). Move the plant two tiles to the right (f). Get behind the plant (g) and move the plant down to the green X (h).
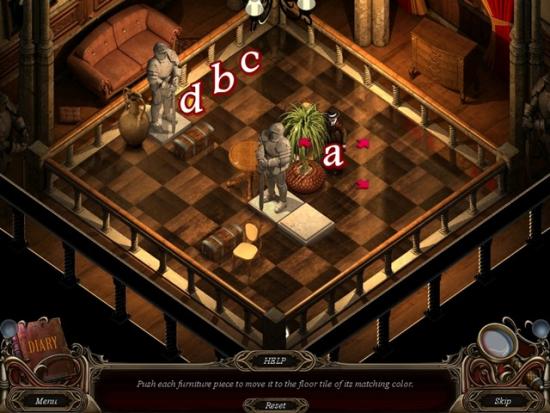
- The last item is the chair. Move your character to the right of the chair (a). Move it all the way to the left (b). Get behind the chair (c) and move it down to the yellow X (d).
- Once you are finished, you receive a piece of paper (4 of 16).

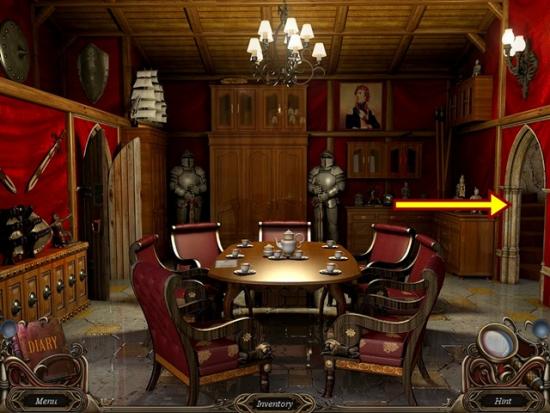
- Talk to the Commissaire again. Go through the door on the right.
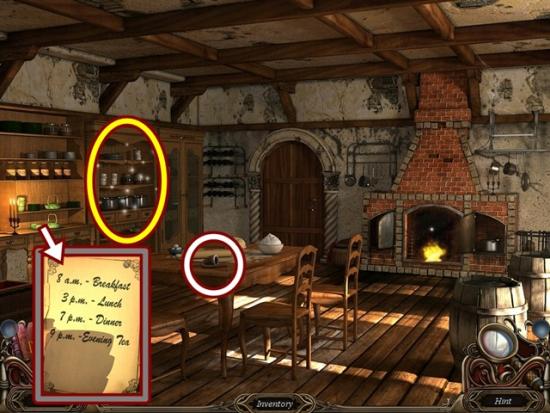
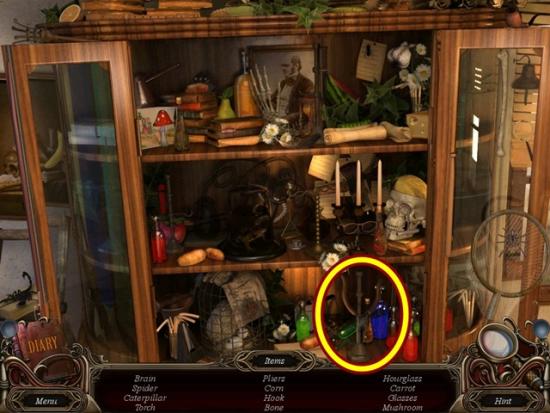
- Take the fisherman’s pipe to add the clue to your diary. Click on the shelves at the far left of the scene and take note of the dining schedule. Click on the middle shelves to start a hidden object hunt.
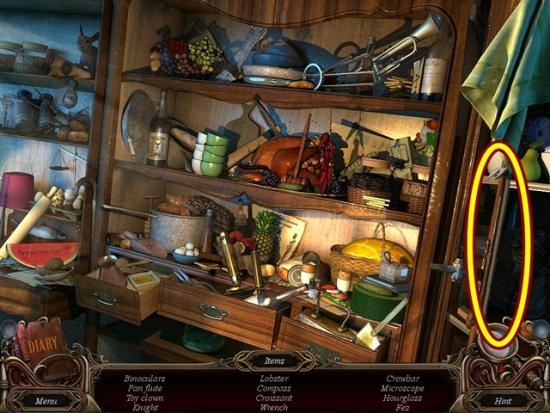
- Find all the items. When you are finished, a crowbar is added to your inventory. Leave the scene and go north (up the stairs).
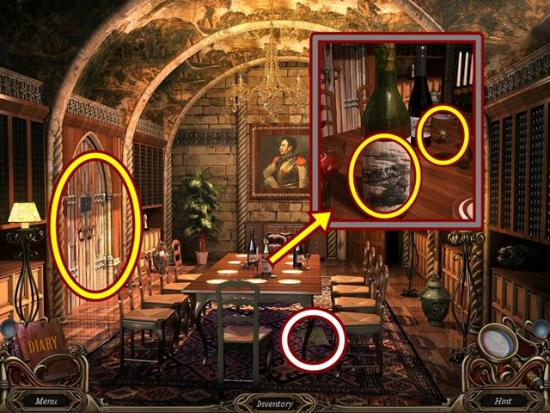
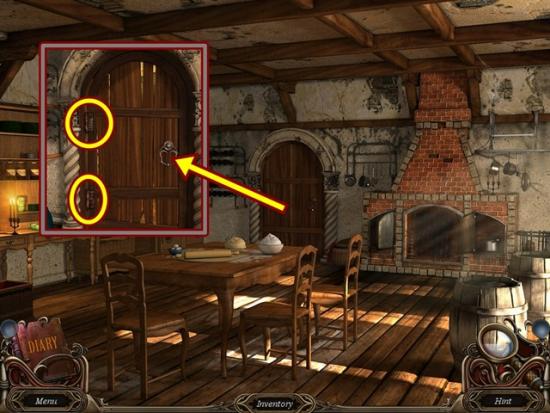
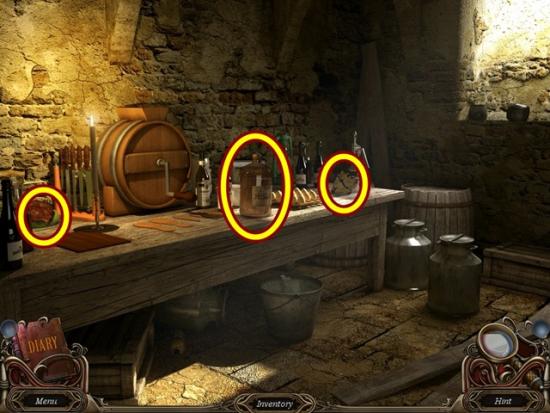
- Read the newspaper article (on the floor). Click on the area about the Duke. Click anywhere off the article to close it. Click on the wine bottles. Clean off the label on the larger bottle until it reveals the word “vinegar.” Take the sun. Click on the door on the left.
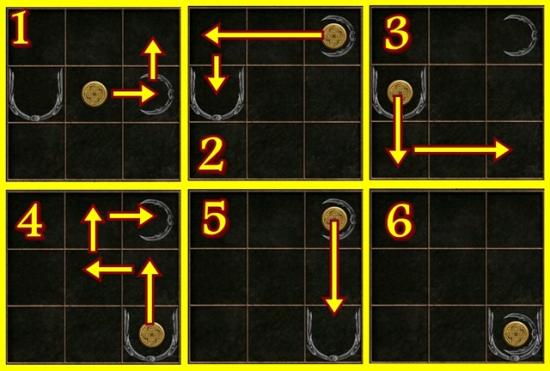
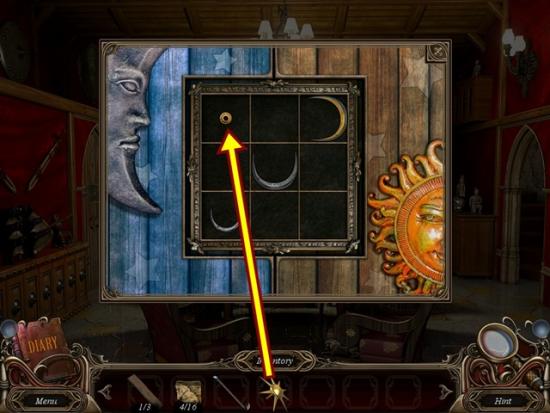
- Mini-puzzle: Get the smaller arc into the bigger arc. To move an arc, the golden sun (disc) must be inside it. To move the sun, click and drag it. It can only move up and down, left and right, it cannot move diagonally. Click Reset if you get stuck.
- To start (1), move the sun into the small arc and move the small arc into the top right position (2). Then move the sun over into the large arc (3). Move the large arc all the way down and then all the way over to the right (4). Move the sun up into the small arc (5) and move the small arc all the way down into the large arc (6).
- Solution:
- Once you have completed, the door opens. Enter the newly opened door.
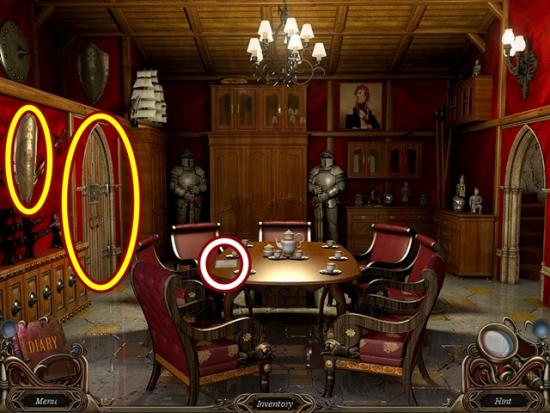
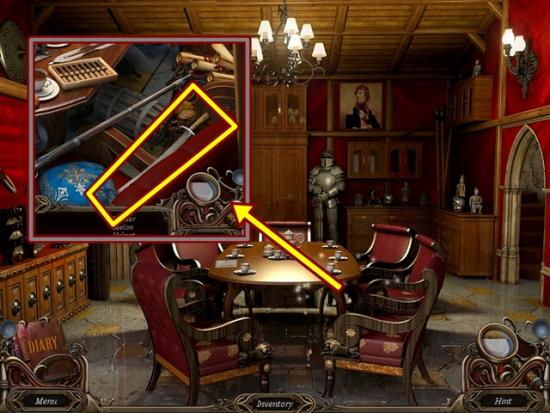
- Read the invitation on the table. Move the shield on the left wall and take the piece of paper (5 of 16). Click on the door on the left.
- Note when you clicked on the door, your inventory opened. Place the sun in the slot.
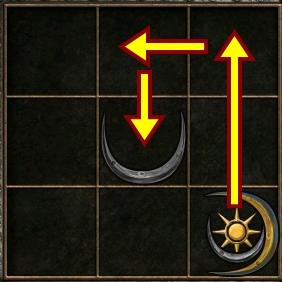
- Mini-puzzle: This is similar to the puzzle you just completed. Get the small arc into the large grey arc. The arcs can only move when the sun is inside them.
- From the start, move the sun into the large grey arc (1). Move the large grey arc all the way over to the left, then move the sun up into the large gold arc (2). Move the large gold arc all the way down to the bottom (3), then move the sun back into the large grey arc and move it one space to the right. Move the sun into the small arc (4) and move it into the large gold arc.
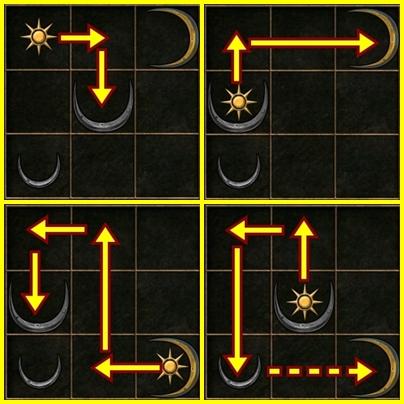
- Move the two arcs all the way to the top, then move the sun and small arc one space to the left and move it into the large grey arc.
- Once you are finished, a door opens. Enter the room.
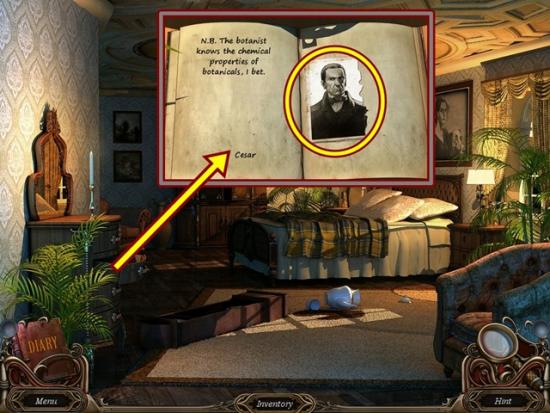
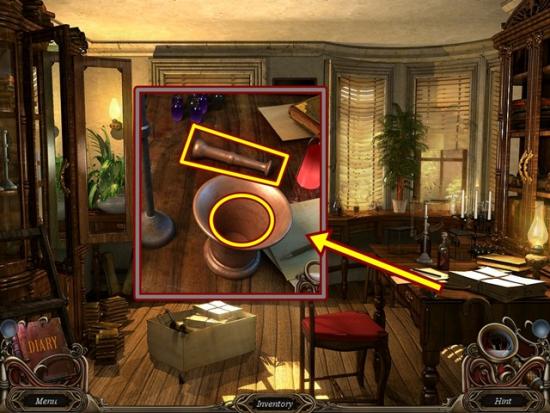
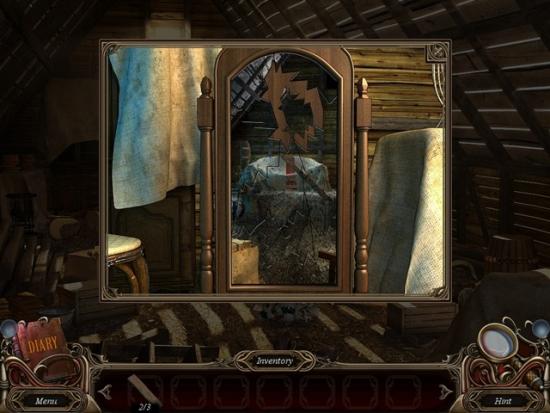
- Examine the tea pot on the floor. Open the dresser drawer. Open the book and take the dog drawing to add the clue to your diary. Click on the ripped picture. Click off the window to close it. Open the wardrobe and look inside. Use the arrows above and below each slot to spell C-E-S-A-R (the dog’s name). Turn the handle.
- Take the bottle with poison to add the clue to your diary. Go south three scenes.
- Talk to Commissaire Bertineau. The Suspect Card – The Countess is added to your diary. Go south three scenes.
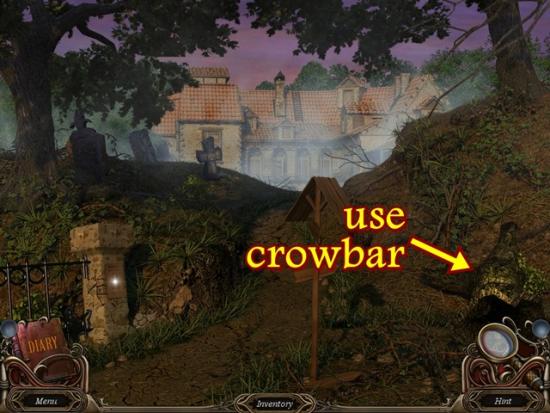
- Use the crowbar to move the dead log (you may have to click a couple of times). Go east.
- Take the piece of paper (6 of 16). Take the path towards the stable (right).

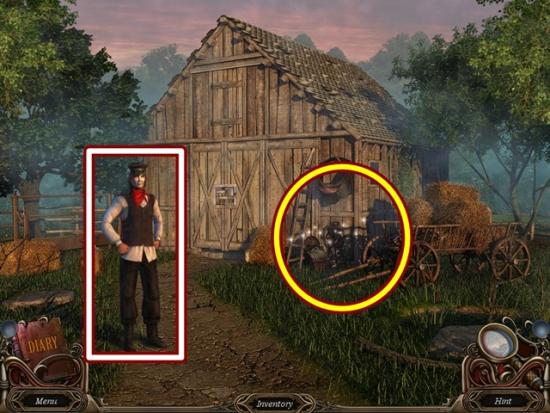
- Talk to the stableman. The Suspect Card – The Stableman is added to your diary. Click on the equipment in front of the stable to start a hidden object hunt.
- Find all the items. When you are finished, matches are added to your inventory. Talk to the stableman again to get a hint on finding firewood. Go south and then take the path to the left.
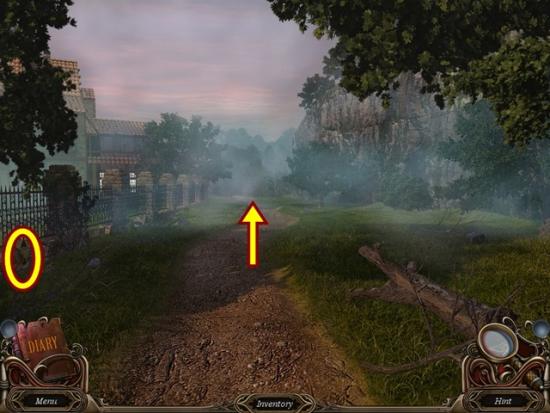
- Take the piece of paper (7 of 16). Continue up the path.
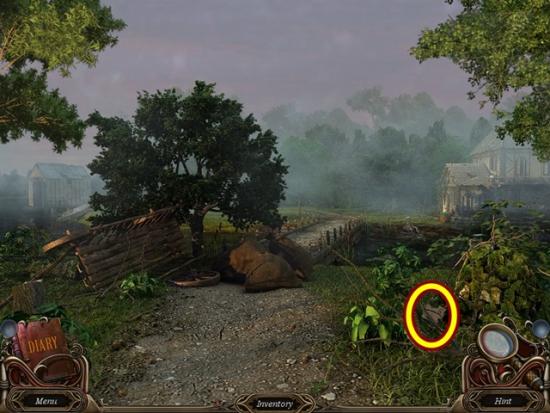
- Take the piece of paper (8 of 16). Go south three times, then go north and enter the castle. Take the centre doorway (up the stairs) and go through the door on the left (fancy tea room).

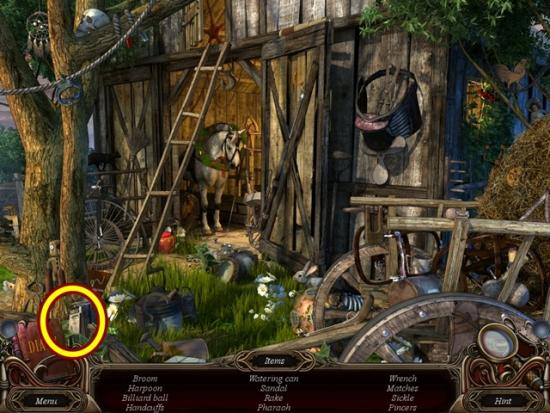
- Click on the chair (sparkling area) to start a hidden object hunt. Find all the items. When you are finished, an axe is added to your inventory. From this room, go south five scenes, then go east, then take the path to the left.
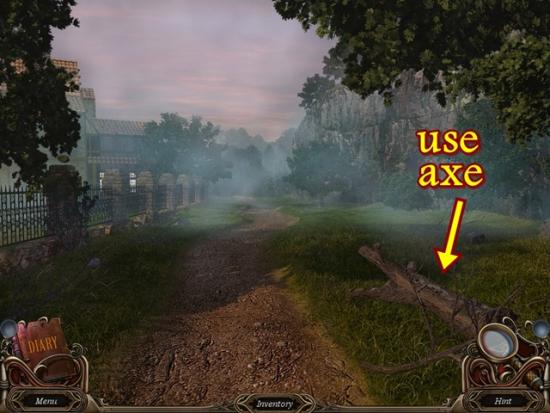
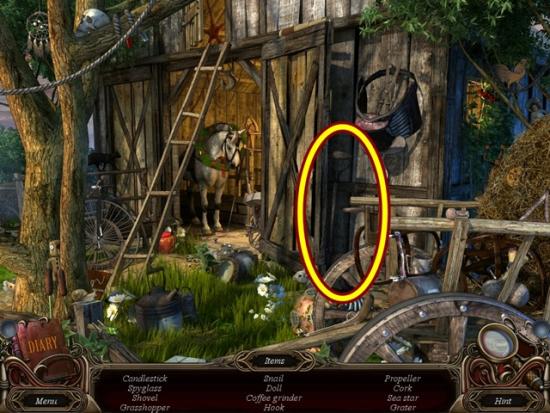
- If you haven’t done so already, take the piece of paper that is at the far left of the scene (see four screenshots above). Use the axe on the logs (three clicks) and then you get firewood. Return to the castle – south two times, north all the way into the castle and take the centre doorway into the dining room.

- Enter the open door (back wall). You have to start a fire in order to see. Click on the fireplace (far left). Add the firewood, then the matches. Click off the window to close it.
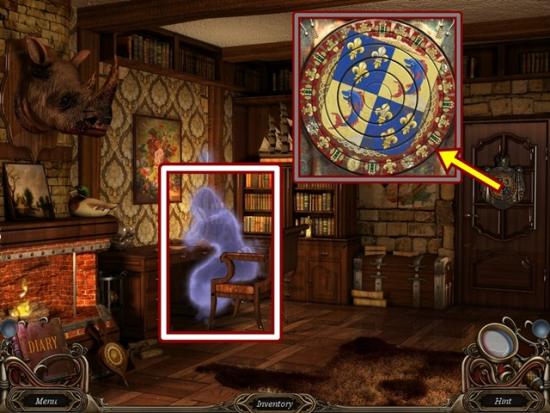
- Click on the crying ghost. It disappears. Click on the door at the back wall. Mini-puzzle: Rearrange the rotating discs so they complete a picture. Once completed, enter the newly opened door.
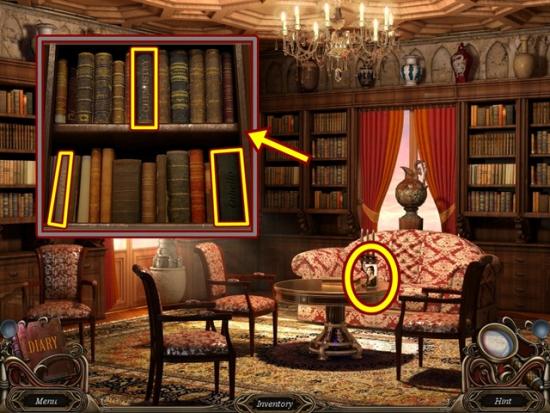
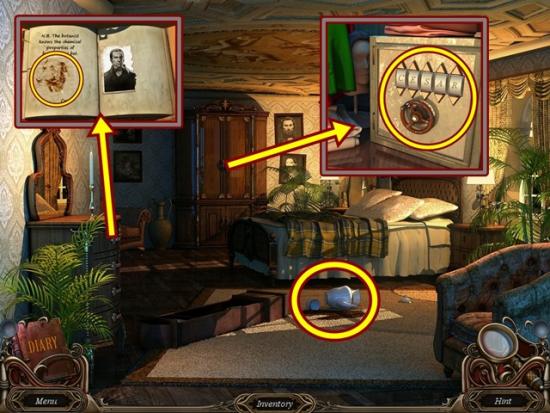
- Take the torn photo card on the table. Click on the middle book shelf. Read the Chemistry book to add information about solvents to your diary. Read the Botany book to learn about poisonous plants. Open Othello to find the note from the Duke. The note is added as a clue in your diary.
- Leave the castle – south four scenes.
- Click on the pond to start a hidden object hunt. Find all the items. When you are finished, a knife is added to your inventory. Return to the stable – go south twice, go east and then take the path to the right, towards the stable.
- Click on the equipment in front of the stable to start a hidden object hunt.
- Find all the items. When you are finished, a shovel is added to your inventory.
- Go back to the lake – go south twice, then go north all the way to the front of the castle, then go west and go through the gate on the left.
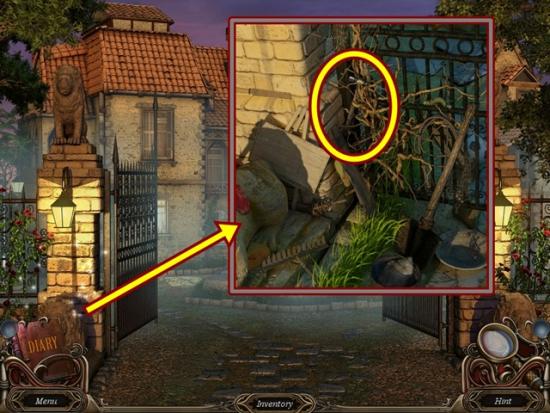
- Click on the tree to start a hidden object hunt. Find all the items. When you are finished, a slingshot is added to your inventory. Return to the castle – south twice, then enter the castle and go through the central doorway into the dining room. Enter the room at the back.
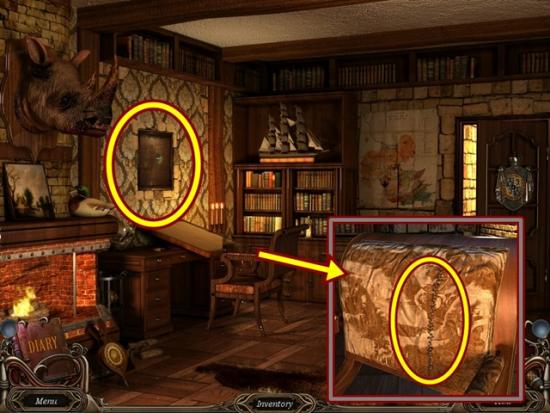
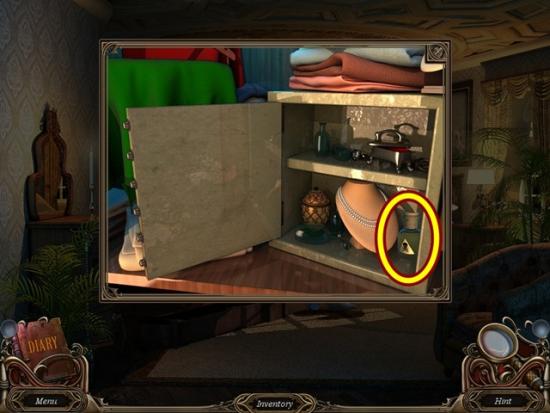
- Click on the chair. Cut the seams with the knife. The safe combination is added to your diary. Click on the painting on the wall to reveal the safe. Enter the safe combination. Click on the open safe to start a hidden object hunt.
- Find all the items. When you are finished, a glasscutter is added to your inventory. Return to the very first scene – go south six scenes, then go west to the botanist’s house.
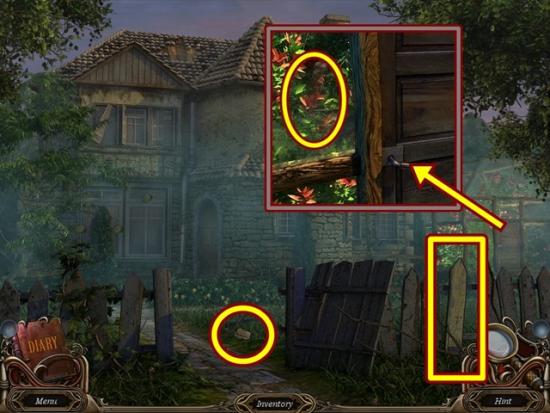
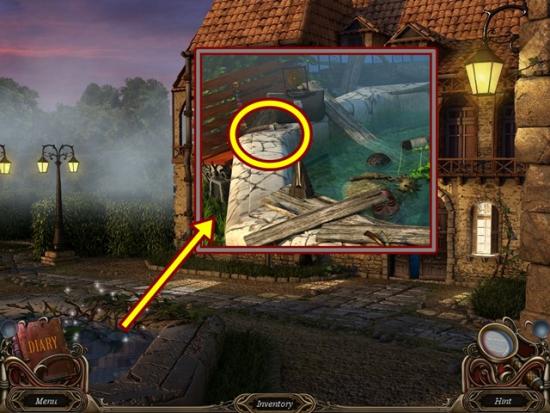
- Take the piece of paper (9 of 16). Use the crowbar on the loose fence board, then take the ladder step (2 of 3). Click on the greenhouse door (far right). Cut the glass with the glasscutter. If you don’t see the glasscutter in your inventory, scroll through your inventory using the arrows at either side.
- Enter the greenhouse.
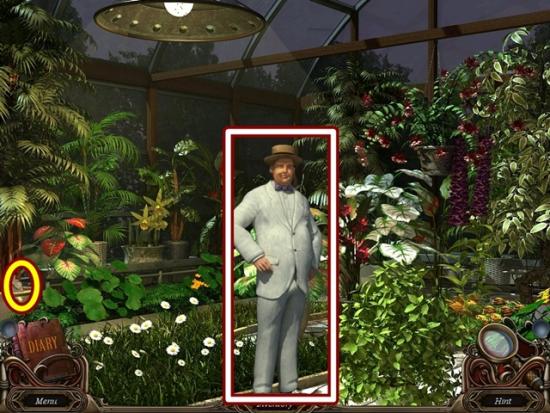
- Take the piece of paper (10 of 16). Talk to the botanist. The Suspect Cart – The Botanist is added to your diary. Return to the castle – go south twice, then continue north and enter the castle, go through the central doorway into the dining room, then go through the door on the back wall and go through the next door.
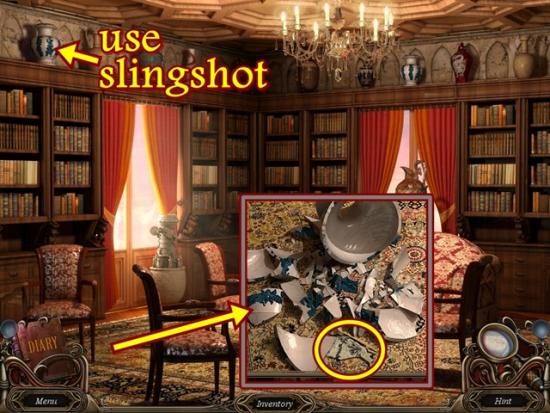
- Use the slingshot to knock the vase off the top shelf. Click on the area where it fell. Take the piece of paper (11 of 16). Leave the castle – go south six scenes, then go east, then take the path to the left and continue north.
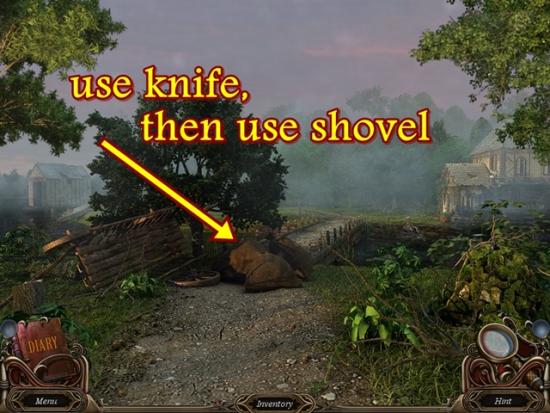
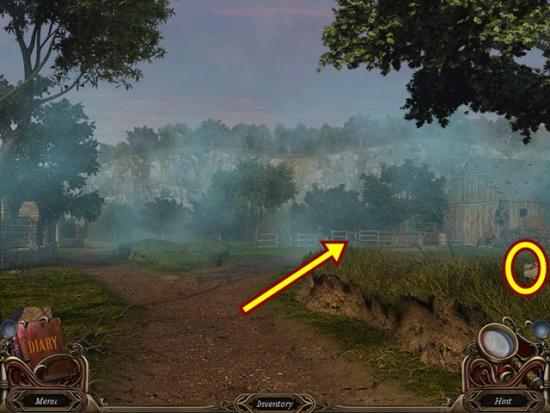
- Cut open the bags of wheat with the knife (three clicks), then shovel the wheat (three clicks). Go north.
- Take the path to the left.
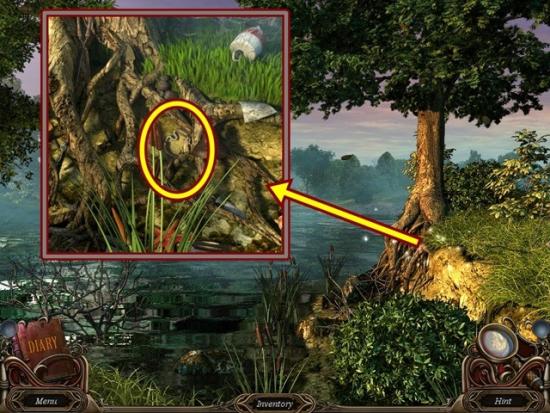
- Take the piece of paper (12 of 16). Click on the shoe in the water. Take the expensive shoe to add the clue to your diary. Click off the window to close it. Go south five scenes, continue north and enter the castle, go through the central doorway, then go left all the way to the bedroom.
- Click on the bed to start a hidden object hunt. Find all the items. When you are finished, the botanist’s house key item is added to your inventory. Return to the botanist’s house – go south seven scenes, then go west.

- Click on the front door. Use the botanist’s house key to unlock the door. Enter the house.
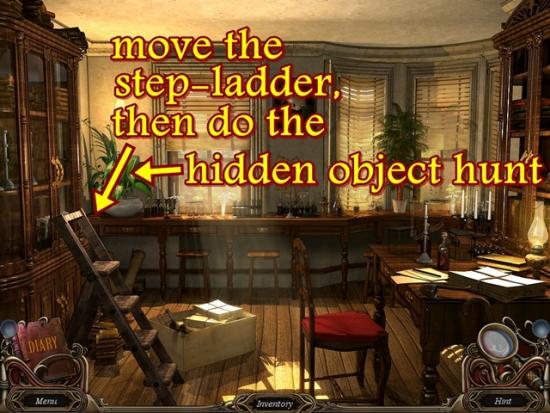
- Move the step-ladder (three clicks), then click on the cabinet to start a hidden object hunt.
- Find all the items. When you are finished, pliers are added to your inventory. Return to the boat house – go south twice, then north once, then east. Take the path to the left and go north twice and then take the path to the left.
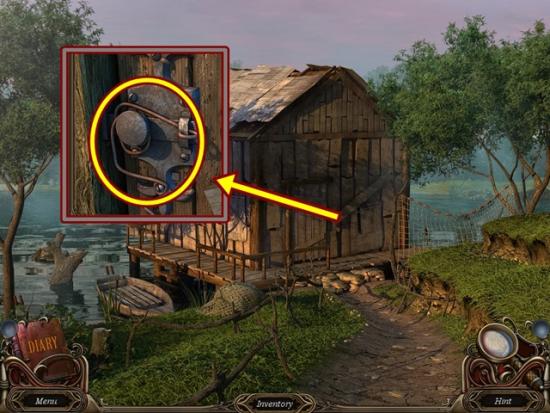
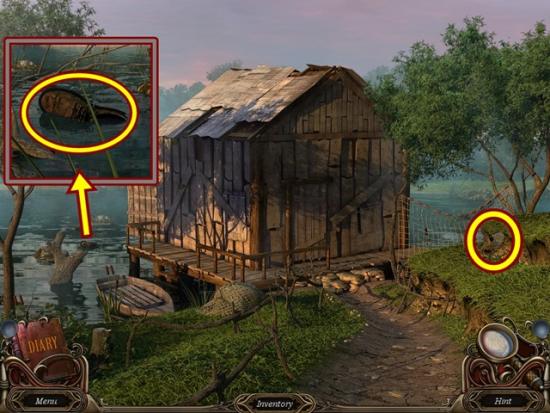
- Click on the door. Use the pliers to cut the wire (three clicks), then move the latch. Enter the boathouse.
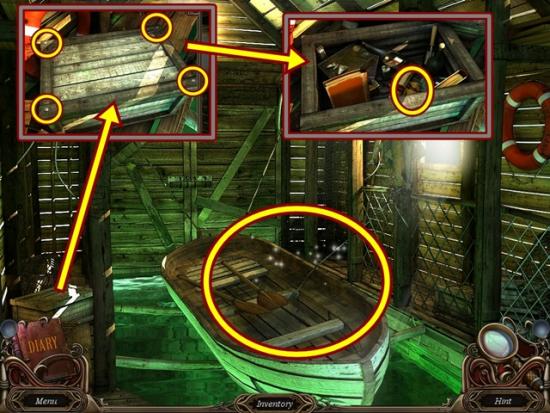
- Click on the crate. Use the crowbar on all four nails. A piece of paper (13 of 16) is automatically added to your inventory. Take the other piece of paper.
- ***Note*** When I took this piece of paper, the count then jumped to 14 of 17.
- Click on the boat to start a hidden object hunt.
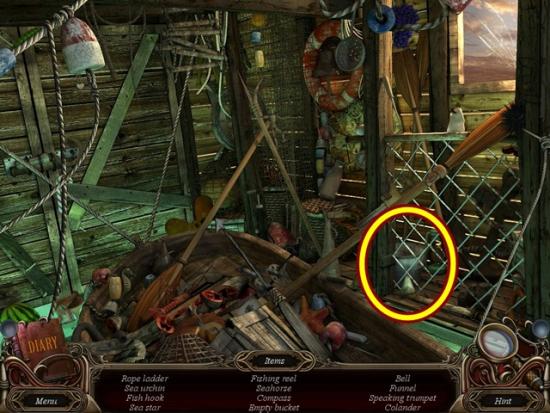
- Find all the items. When you are finished, an empty bucket is added to your inventory. Return to the front of the castle – south six scenes, then go north to the front of the castle.
- Click on the water pump. Place the empty bucket and then pump the lever. Take the full bucket. Enter the castle, go through the central doorway and go left all the way to the bedroom.
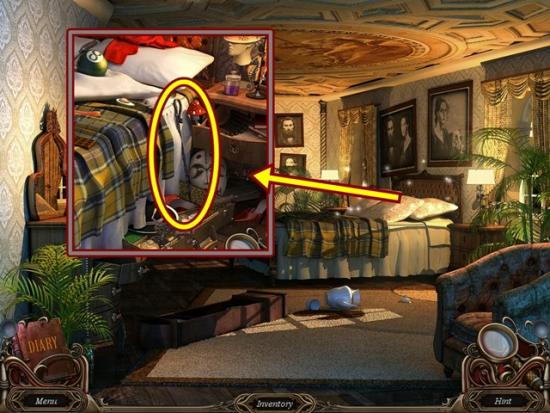
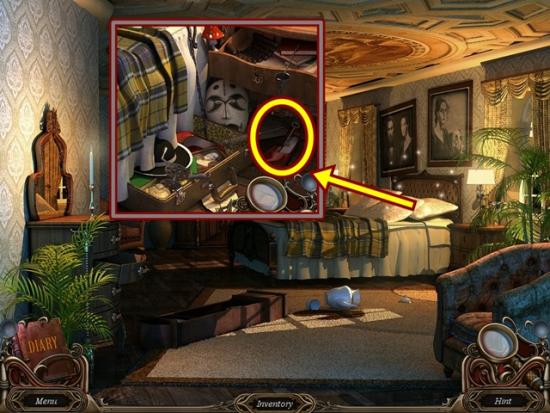
- Click on the bed to start a hidden object hunt. Find all the items. When you are finished, a poker is added to your inventory. Go south and return to the kitchen.
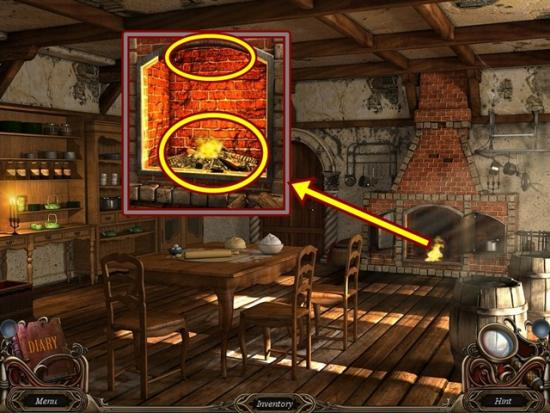
- Click on the fire. Use the full bucket to extinguish the fire, then use the poker to reach into the chimney. Take the copper coin that falls out. Click off the window to close it. Go back to the boathouse – south four scenes, then go east, then take the path to the left and go north twice, then take the path to the left. Enter the boathouse.
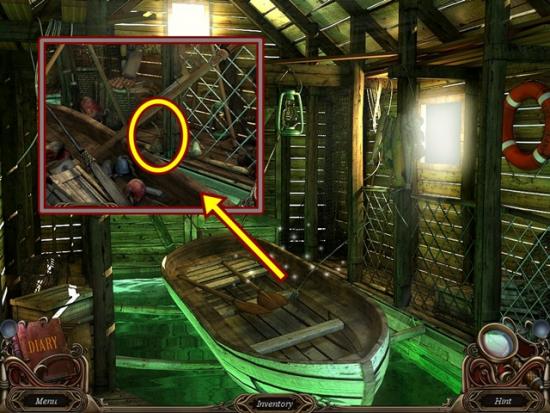
- Click on the boat to start a hidden object hunt. Find all the items. When you are finished, an oil can is added to your inventory. Return to the kitchen – south six scenes, north to the castle, then go right into the kitchen.
- Click on the cellar door. Use the oil can to oil the hinges. Open the door. Enter the cellar.
- Take the piece of paper (15 of 17) and bottle of sulphuric acid. Take the torn out jacket pocket to add the clue to your diary. Go to the stable – leave the castle, go south twice, then east and take the path to the right.
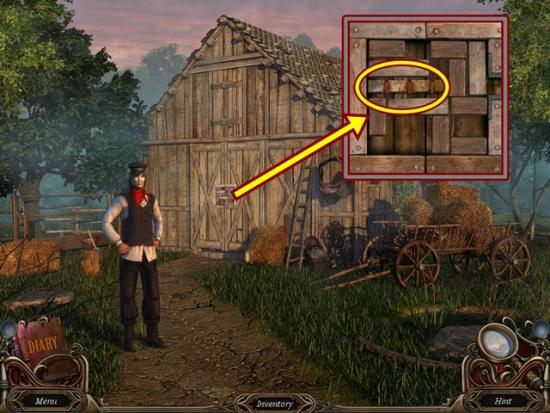
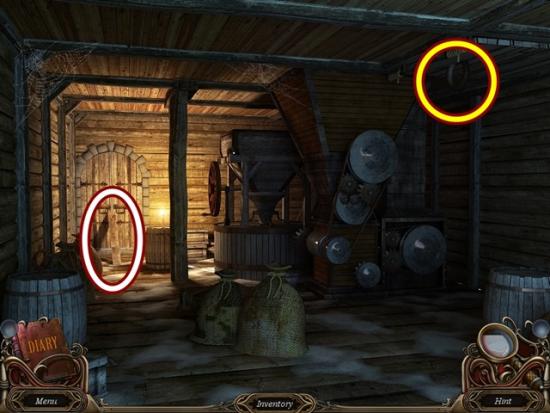
- Click on the stable door. Use the oil can on the three bar brackets.
- Mini-puzzle: Move the blocks in order to slide the metal bar out of the opening on the right.
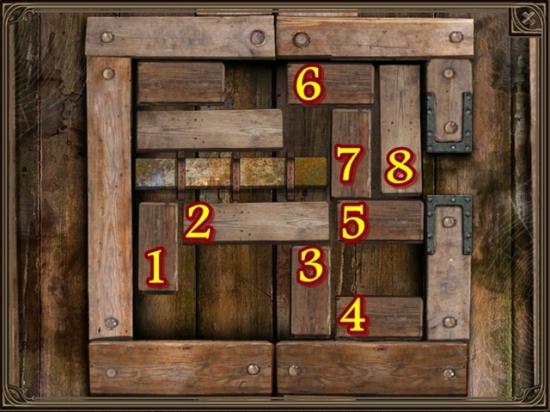
- To solve the puzzle, use the screenshot above as a guide. Move block #1 all the way down. Move block #2 all the way to the left. Move block #3 up as far as it can go. Move block #4 all the way to the left. Move block #3 back down. Move block #5 left as far as it can go. Move block #6 as far left as it can go. Move block #7 all the way up. Move block #8 all the way down. The path is now clear to slide the metal bar out through the opening.

- Enter the stable.
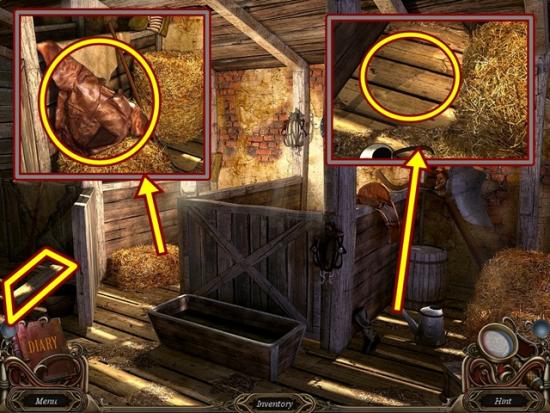
- Take the ladder step (3 of 3). Click on the hay in the stall. Take the leather jacket to add the clue to your diary. Click off the window to close it. Move the barrel. Click on the newly exposed floor. Use the crowbar on the floorboards (two clicks). Take the money to add the clue to your diary. Click off the window to close it. Leave the stable.
- Talk to the stableman. Go to the botanist’s house – go south as far as possible, then go west and enter the house.
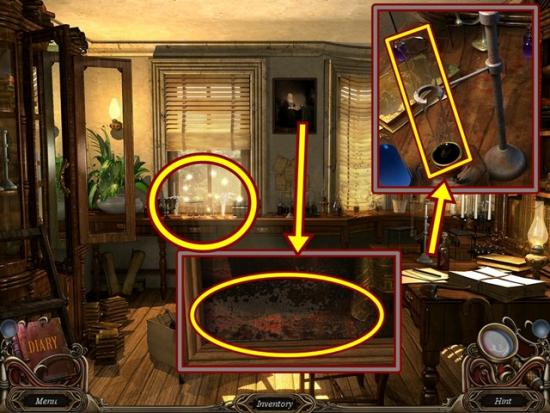
- Click on the large desk (right). Put the bottle of sulphuric acid in the test tube, then add the copper coin. Use the matches on the test tube (it takes a couple of seconds for something to happen). Take the test tube with solvent.
- Click on the wall painting. Use the test tube with solvent to dissolve the paint. A list of poisonous plants is revealed and is added as a clue in your diary. Click off the window to close it. An empty test tube is added to your inventory.
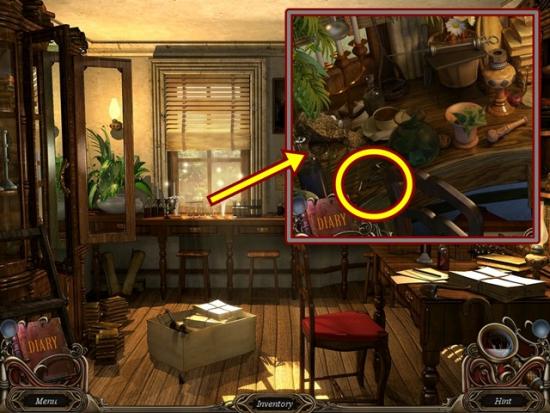
- Click on the table below the window to start a hidden object hunt.
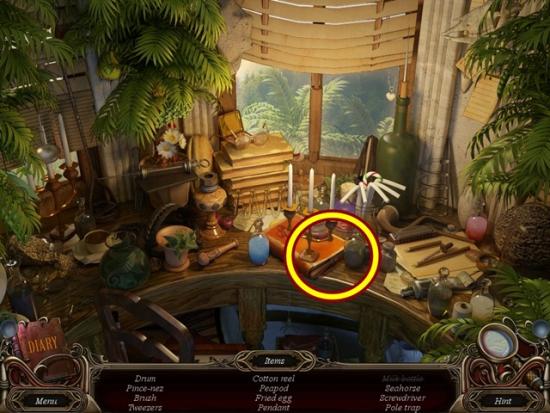
- Find all the items. When you are finished, a screwdriver is added to your inventory. Return to the castle and enter the kitchen.
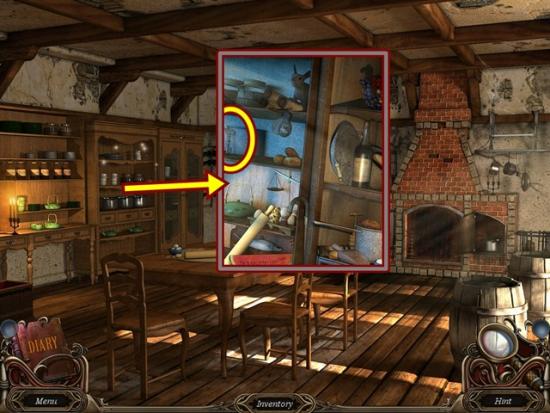
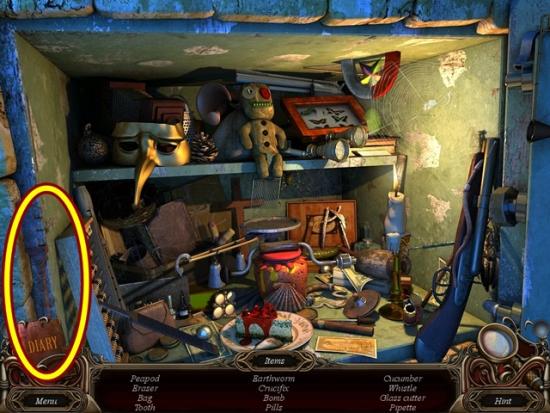
- Click on the shelves to start a hidden object hunt. Find all the items. When you are finished, a church key is added to your inventory. Leave the kitchen and go to the fancy tea room.
- Click on the chair to start a hidden object scene. Find all the items. When you are finished, a machete is added to your inventory. Enter the bedroom (left).
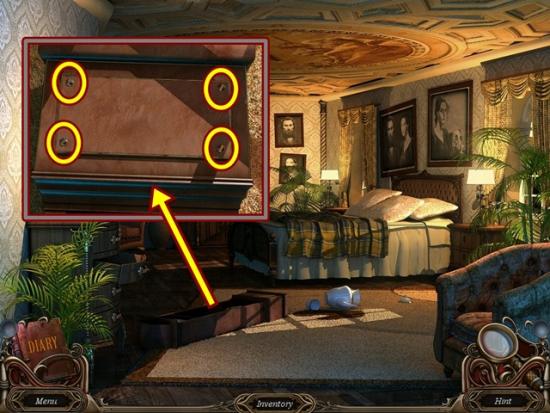
- Click on the grandfather clock. Use the screwdriver to unscrew the screws, then click on each screw to remove it.
- Mini-puzzle: Arrange the gears so they are all turning.
- Solution:
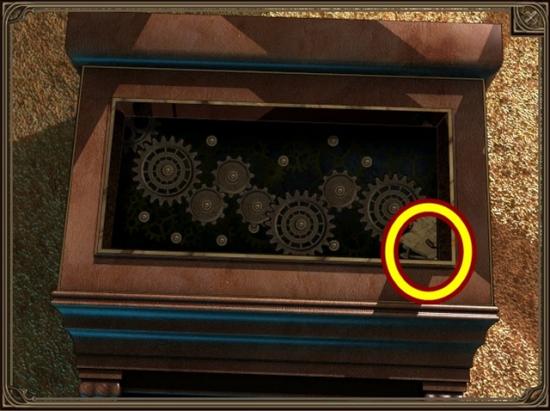
- Take the piece of paper (16 of 17) that appears. Click off the window to close it.
- Click on the dresser. Add the torn photo card to the torn photo to add the clue to your diary. Leave the castle. From the outside of the castle, go west and then take the gate on the right.
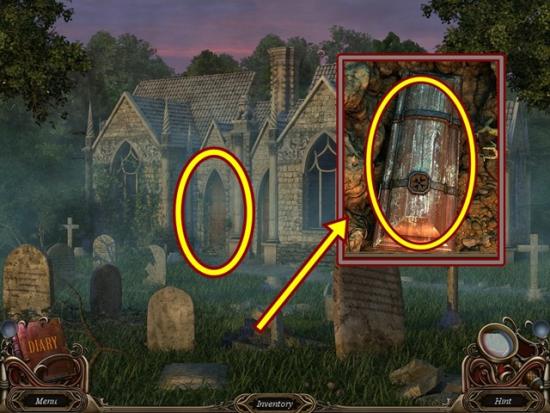
- Click on the rubble on the ground. Use the shovel to dig up the earth (three clicks). Click off the window to close it. Click on the church’s door. Use the church key to unlock the door. Enter the church.
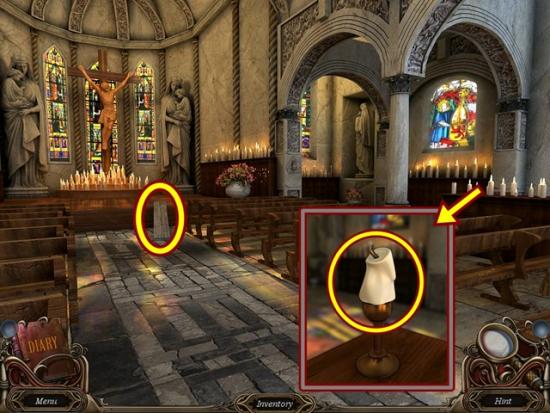
- Take the wood plank. Click on the table of candles at the far right. Take a candle. Click off the window to close it. Go south five scenes, then go east and take the path to the left.
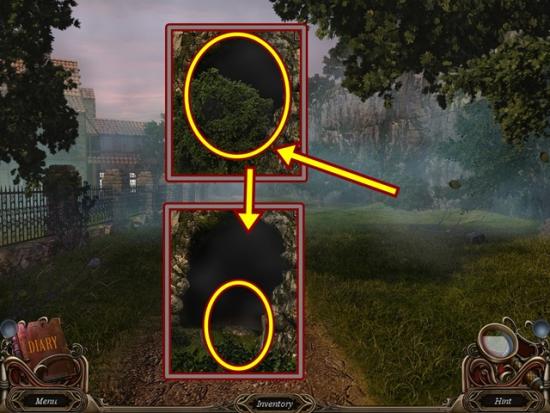
- Click on the cave (right). Use the machete to clear the bushes. Place the candle and then light it with the matches. Enter the cave.

- Take the necktie and footprints to add the clues to your diary. Click on the fire to start a hidden object scene. Find all the items. When you are finished, a razor is added to your inventory. Go to the greenhouse – go all the way south, then west and it’s the door beside the botanist’s house.
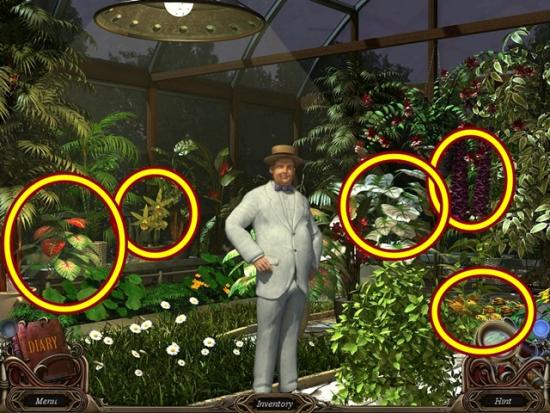
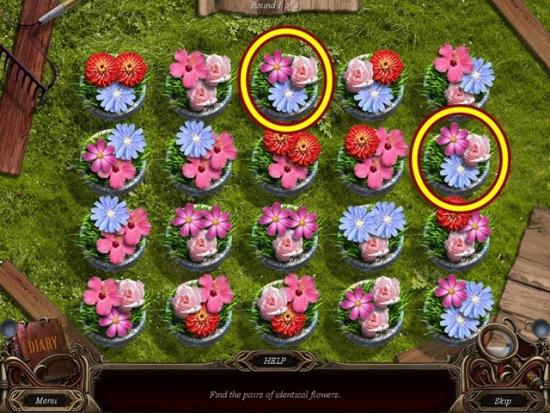
- Cut the five poisonous plants with the razor to have the narcissus, oleander, chrysanthemum, anthurium, and foxglove to your inventory. Mini-puzzle: Choose the matching flowers. There are three screens, in each, find the two matching flower arrangements.
- The poisonous plants are added as a clue in your diary. Talk to the botanist. Leave the greenhouse and enter the house.
- Click on the table (right). Add the narcissus, oleander, chrysanthemum, anthurium, and foxglove to the mortar. Grind it up using the pestle. Once it turns to liquid, put it in the empty test tube. The poison sample is added as a clue in your diary.
- Return to the castle and go to the fancy tea room.
- Go through the door on the right.
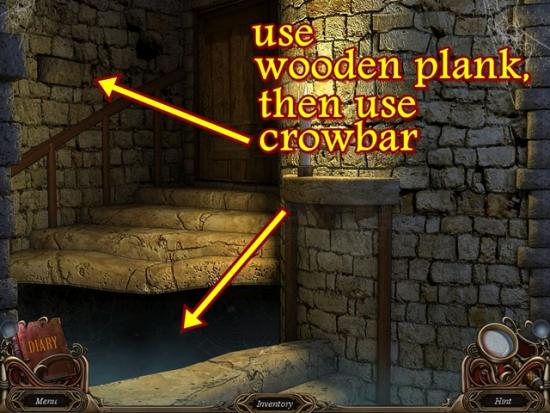
- Place the wooden plank over the gap. Use the crowbar on the loose brick. Take the piece of paper (17 of 17). Mini-puzzle: Rearrange the pieces of paper and put them back together again, like a jigsaw puzzle. Left click to select a piece and right click to rotate it to fit. Start with the corner and then do the borders and then the inside.
- Solution:
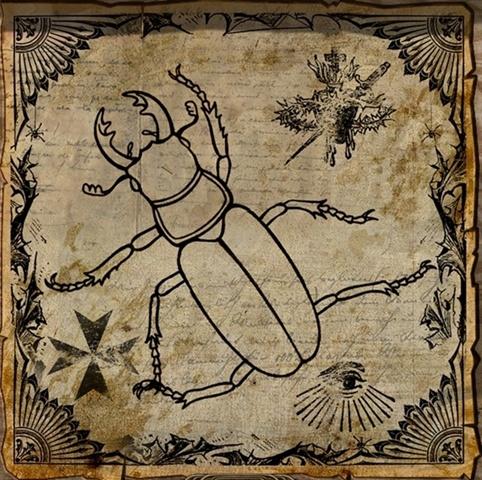
- A peculiar beetle drawing is added as a clue in your diary. Return to the church (leave the castle and go west and through the right gate).
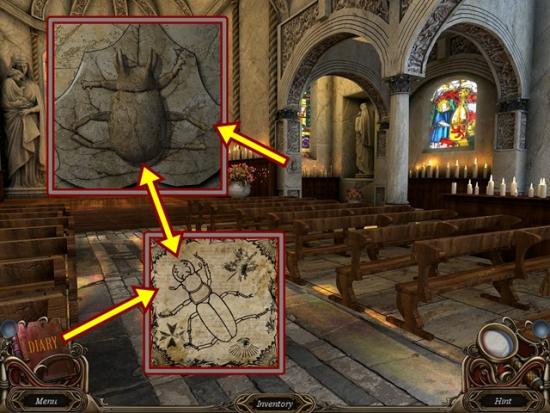
- Click on the column with the beetle. Mini-puzzle: Rearrange the beetle’s legs to match the image from the reassembled pieces of paper. Solution is in the screenshot above. The stone beetle is different from the piece of paper so match the directions of the legs.
- Once you are finished, take the grave key. Leave the church.
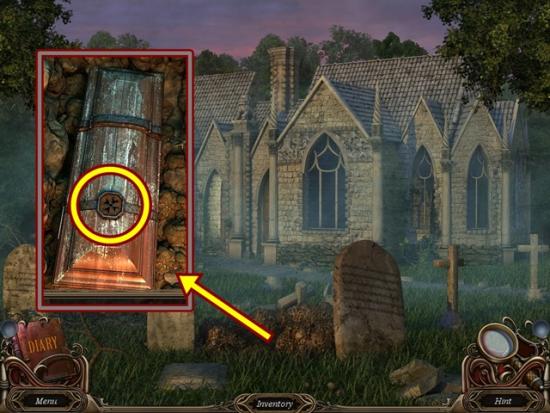
- Click on the upturned dirt. If you haven’t already done so, use your shovel to dig up the dirt (three clicks). Use the grave key in the opening. Click on the newly opened grave to start a hidden object scene.
- Find all the items. When you are finished, a door knob is added to your inventory. Return to the attic stairs (in the castle, in the room to the fight of the fancy tea room).
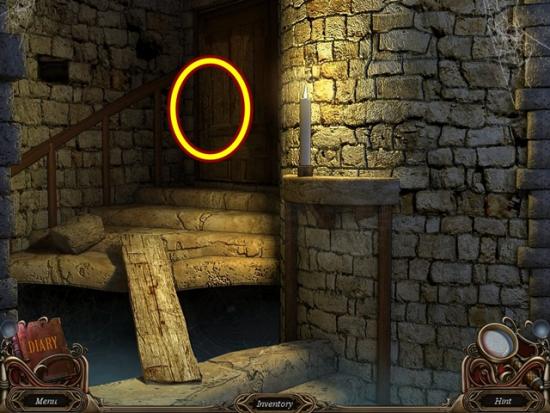
- Click on the door. Place the door knob and turn it to open the door. Enter the attic.
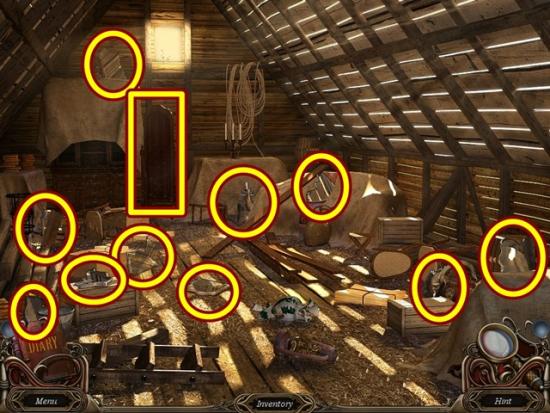
- Watch the cutscene. Pick up the ten mirror shards. Click on the mirror frame (yellow square). Place all ten mirror shards in the frame. Place the shard pieces where you figure they go, like a less exact jigsaw puzzle.
- Go back to the stable.

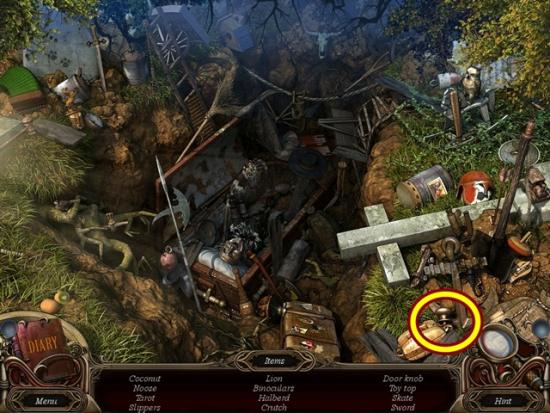
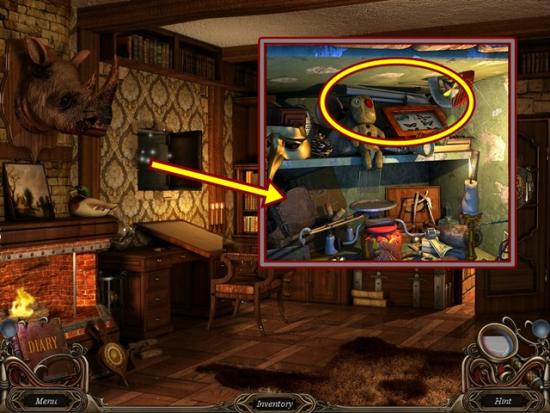
- Click on the equipment to start a hidden object scene.
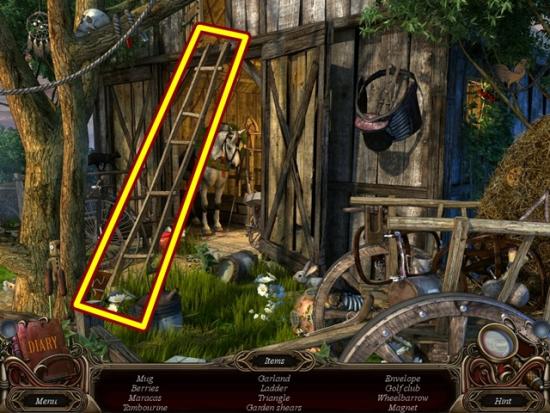
- Find all the items. When you are finished, a ladder is added to your inventory. Return to the castle’s gates.
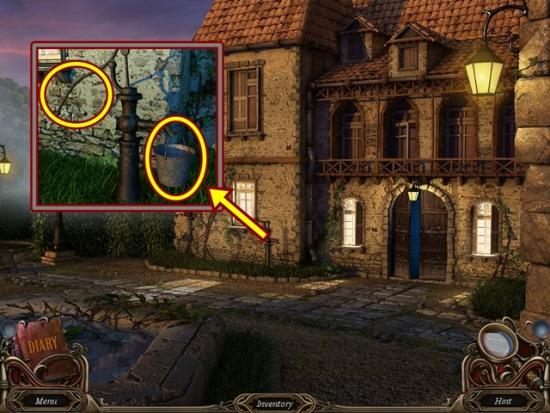
- Click on the left side of the gate to start a hidden object scene. Find all the items. When you are finished, a hammer is added to your inventory. return to the botanist’s house.
- Click on the table under the window to start a hidden object scene. Find all the items. When you are finished, nails are added to your inventory. Go to the wheelhouse – from inside the botanist’s house, go south twice, then north, then east, then take the path to the left, go north twice and then go east to the wheelhouse.
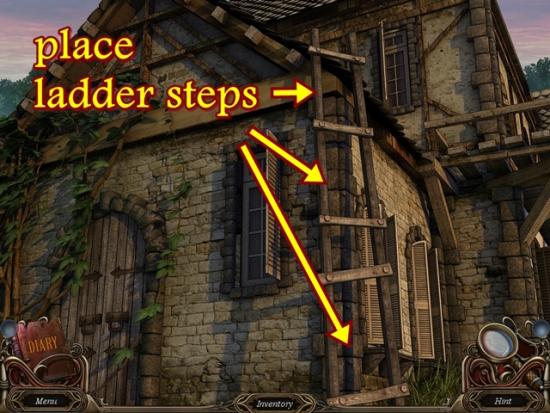
- Place the ladder. Place the three ladder steps. Place the nails on each ladder step (two each), then hammer in all the nails to secure the ladder steps. Go up the ladder.
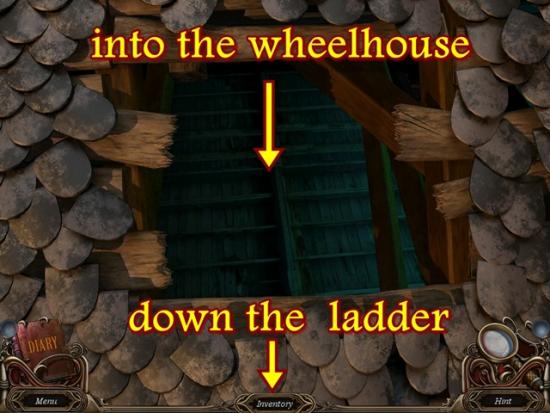
- Note there are two “down” options in this scene. The middle area will take you back down the ladder; the lower part will take you into the wheelhouse. Go down the ladder.
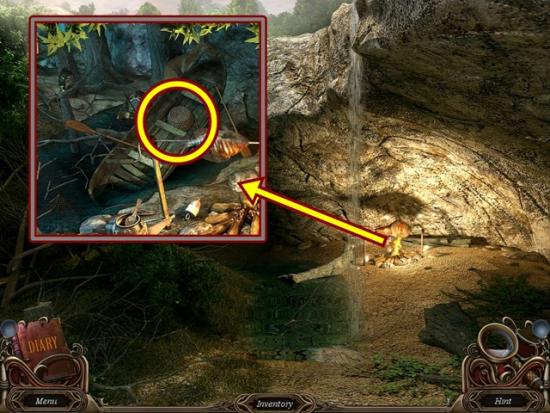
- Go south three times and enter the cave.
- Click on the fire to start a hidden object scene. Find all the items. When you are finished, a rope is added to your inventory. Go to the cemetery in front of the church.
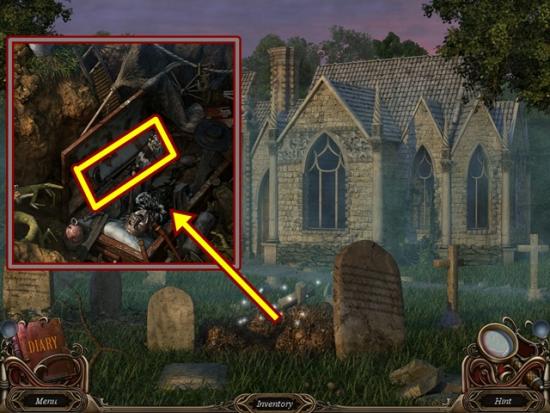
- Click on the grave to start a hidden object scene. Find all the items. When you are finished, a walking stick is added to your inventory. Return to the castle and go to the room north of the dining room.
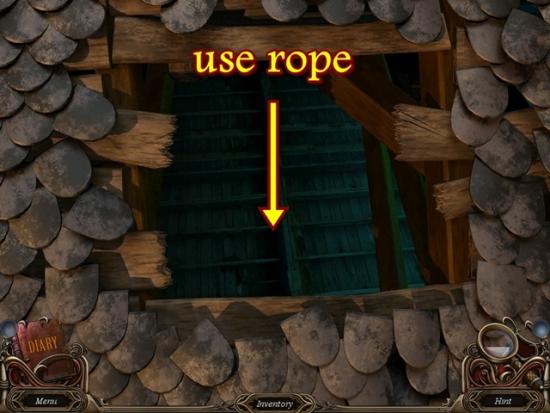
- Click on the safe to start a hidden object scene. Find all the items. When you are finished, a revolver is added to your inventory. Return to the wheelhouse and go up the ladder.
- Place the rope down the opening.
- If you need to leave this scene, remove the board blocking the door (white circle).
- Use the walking stick on the hook. When the stairs lower, climb them. Watch the cutscene.
The end!

More articles...
-
Best Horror Games On Itch.io – July 2026
Across a bounty of subgenres. -
Haze Seas Accessories Tier List [Best Accessories to Equip]
The accessories with the best stat buffs in Haze Seas.