![All VV Ultimatum Titles [How to Get]](/wp-content/uploads/2026/06/vv-ultimatum-titles.jpg "All VV Ultimatum Titles [How to Get]")
All VV Ultimatum Titles [How to Get]
Do titles provide buffs?


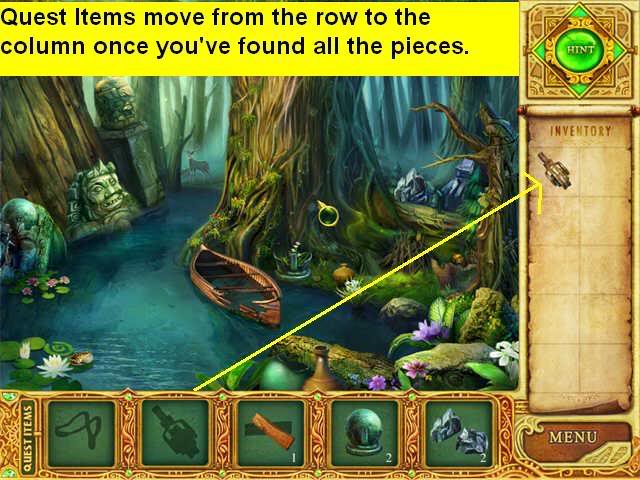
Welcome to the Gamezebo strategy guide for Mystery Age: the Imperial Staff, a hidden object adventure game. You follow the adventures of Eve and her daughter Amber as they seek to discover the truth behind a mysterious curse that is afflicting their village. This guide is divided into two sections:General TipsWalkthrough GENERAL TIPS"Quest Items" can be seen in the horizontal bar at the bottom of the screen. These have been broken into pieces. All of the pieces fo…
a:1:i:0;a:2:s:13:”section_title”;s:43:”Mystery Age: The Imperial Staff Walkthrough”;s:12:”section_body”;s:141339:”
Welcome to the Gamezebo strategy guide for Mystery Age: the Imperial Staff, a hidden object adventure game. You follow the adventures of Eve and her daughter Amber as they seek to discover the truth behind a mysterious curse that is afflicting their village.
This guide is divided into two sections:

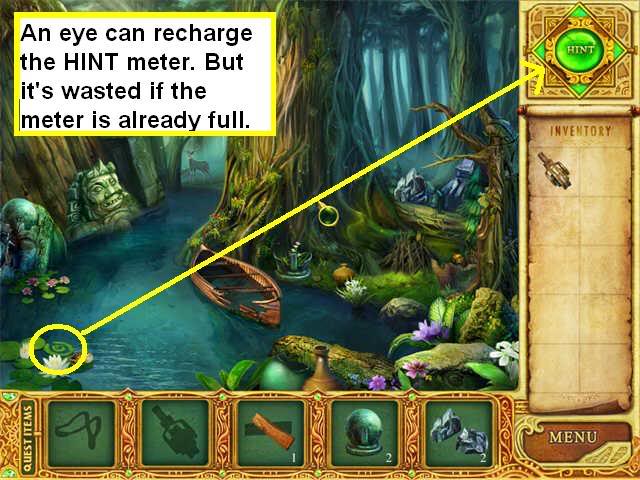
General Tips for the In-Game Hint System
General Tips for the Find 10 Objects Mini-Games
General Tips for the Puzzle Mini-Games
SPOILERS!!!!! Complete walkthrough
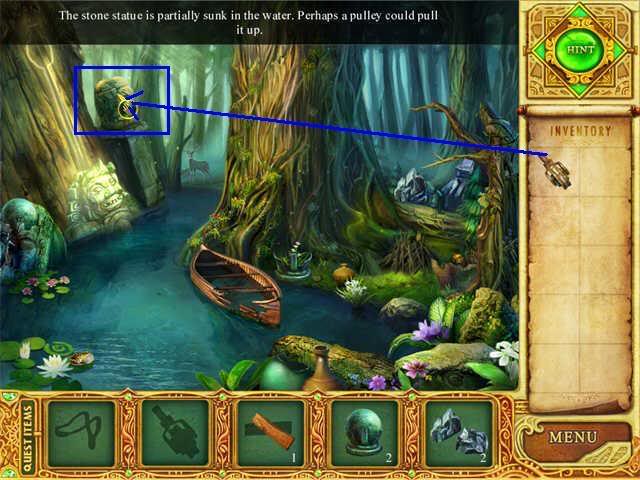
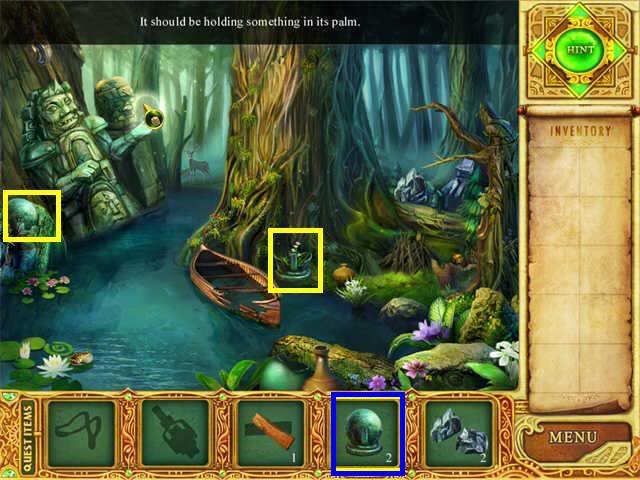
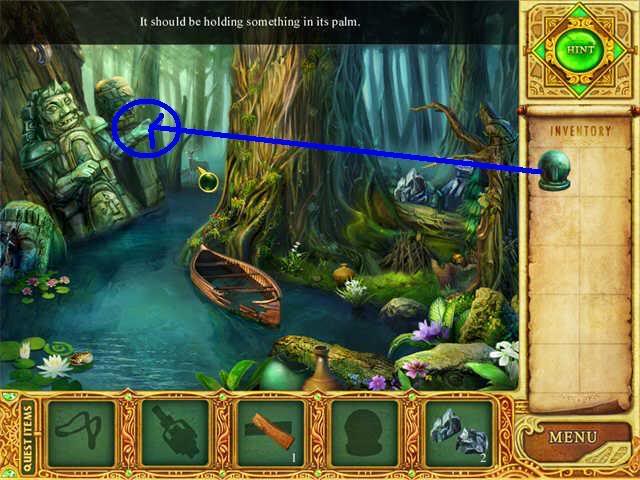
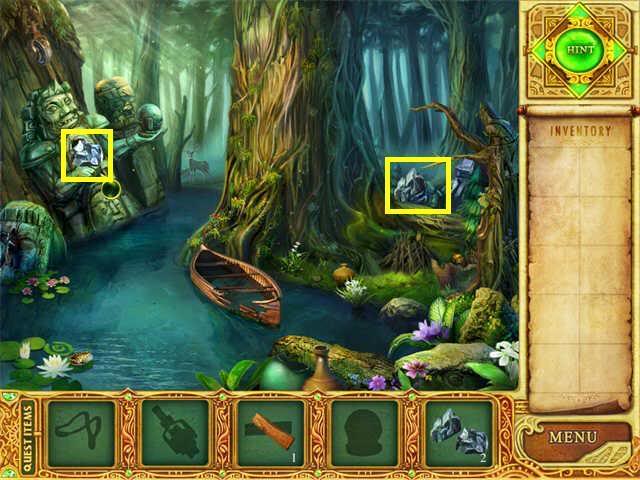
The Lake: Lift the Statue
The Lake: Open the Statue
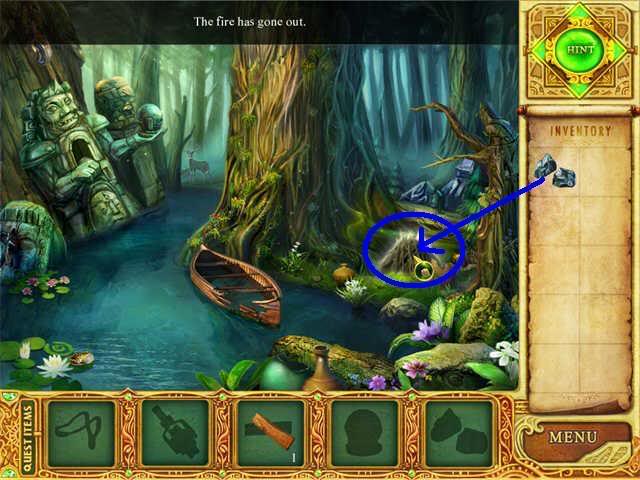
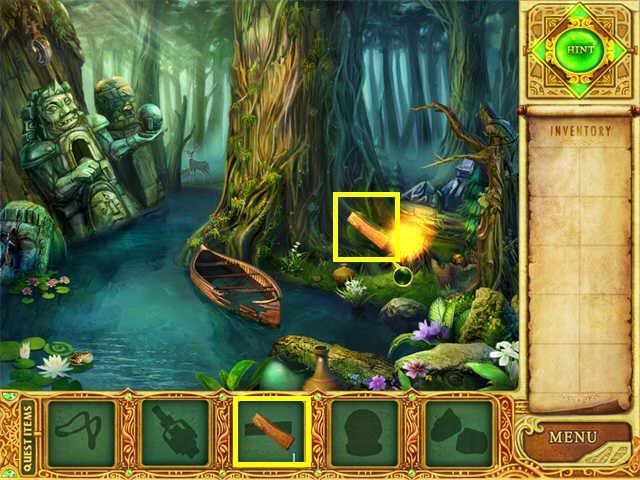
The Lake: Light the Fire
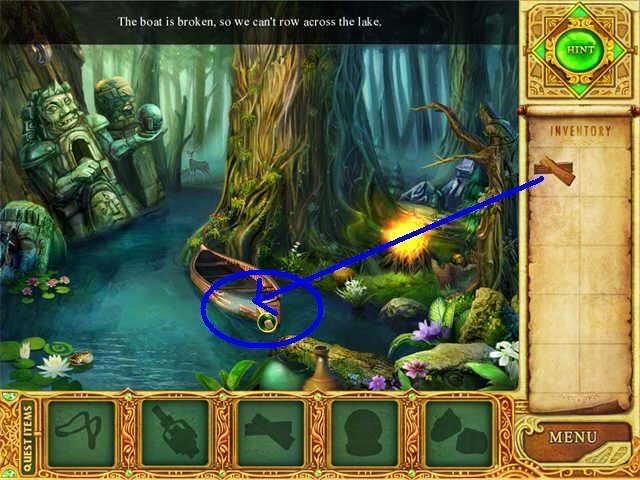
The Lake: Repair the Boat
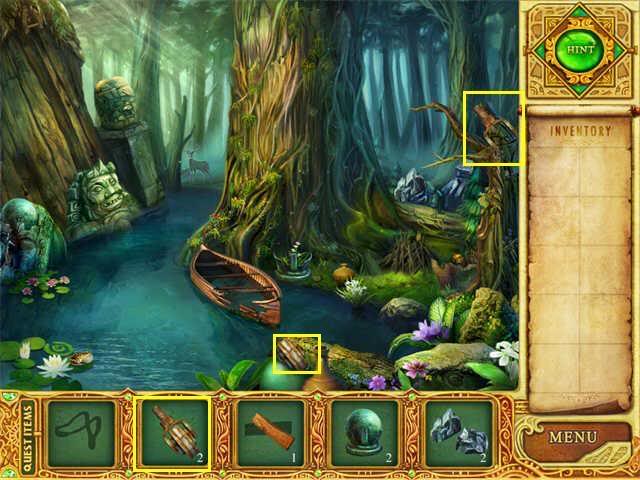
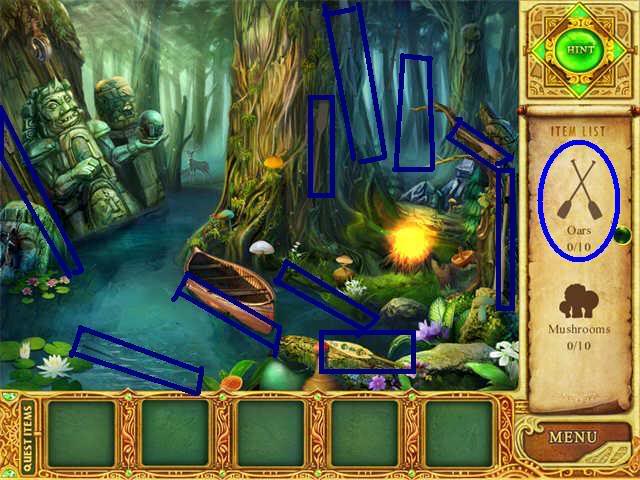
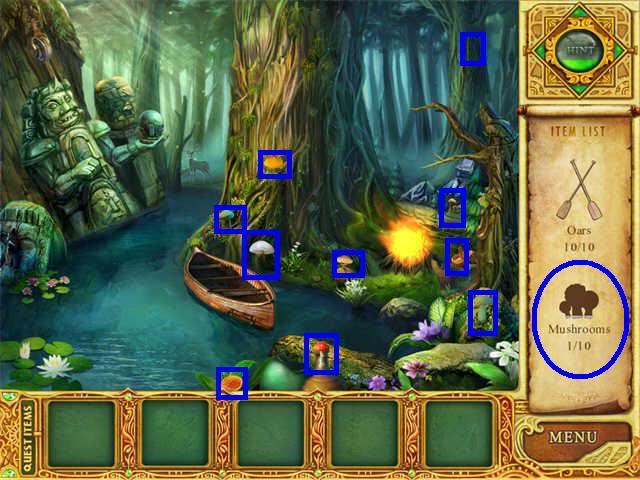
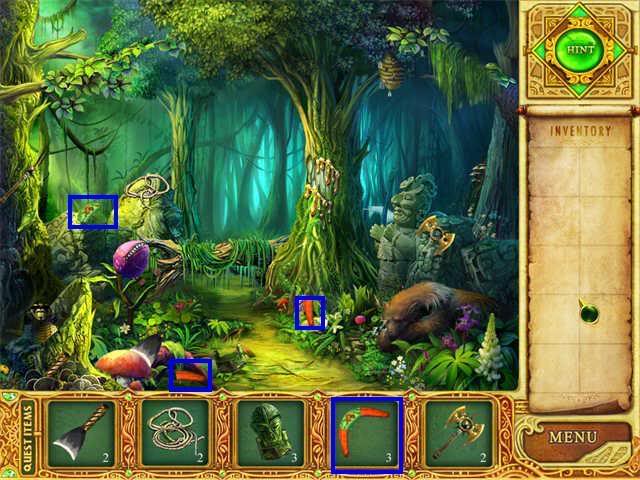
The Lake: Find 10 Oars and 10 Mushrooms
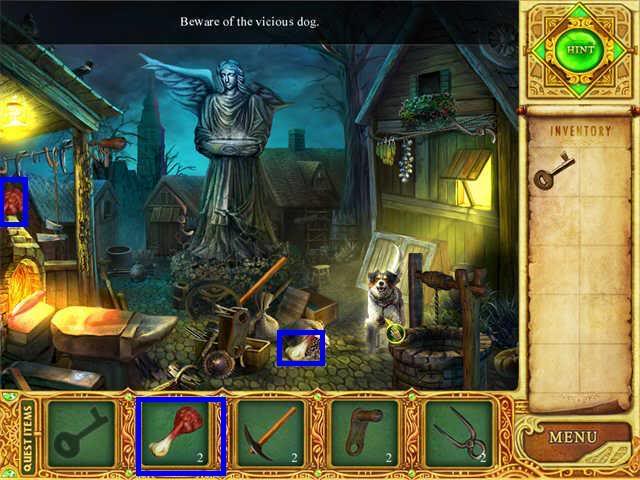
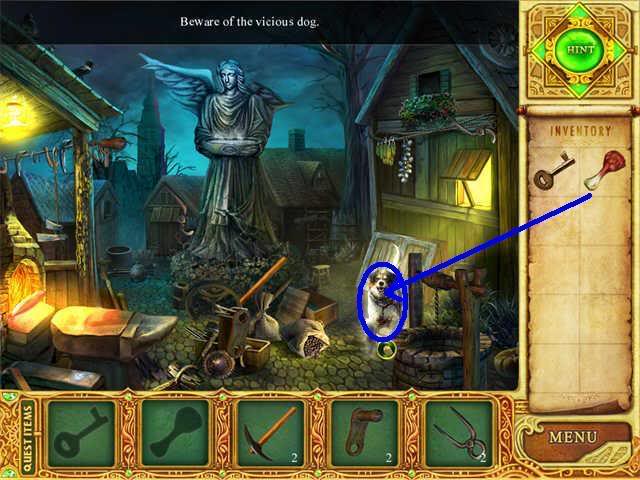
Home Village: Distract the Dog
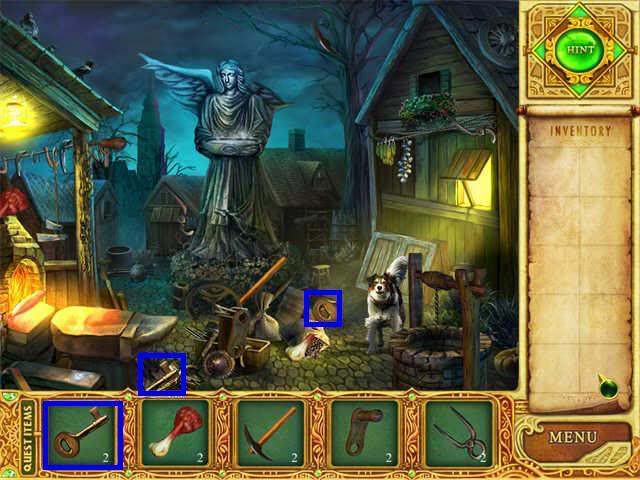
Home Village: Unlock the Cellar
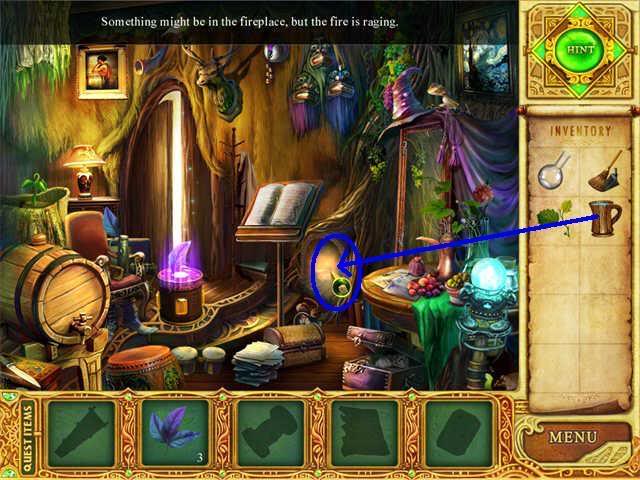
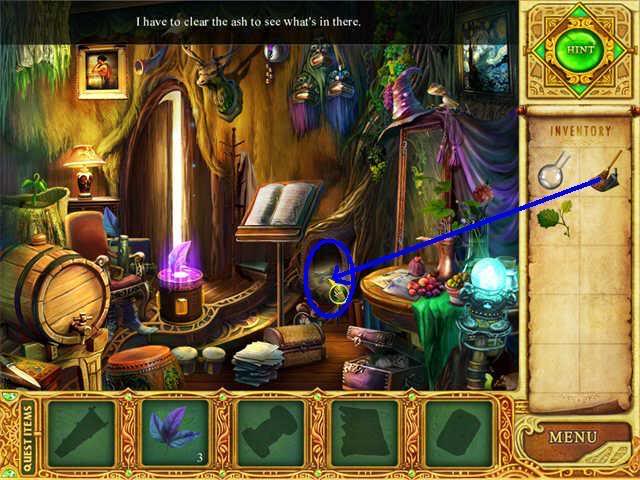
Home Village: Remove the item from the Fire


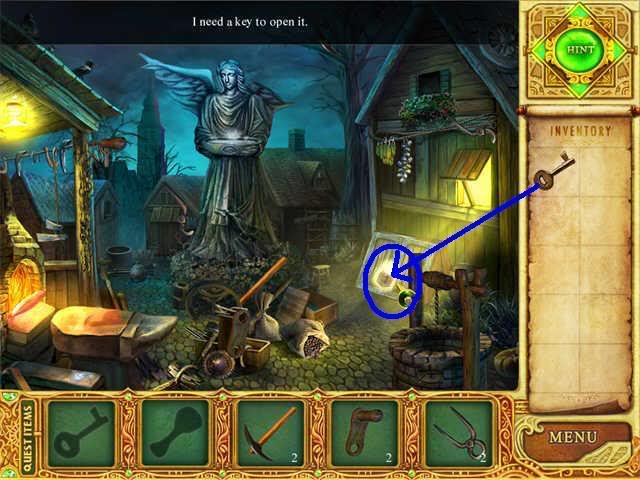
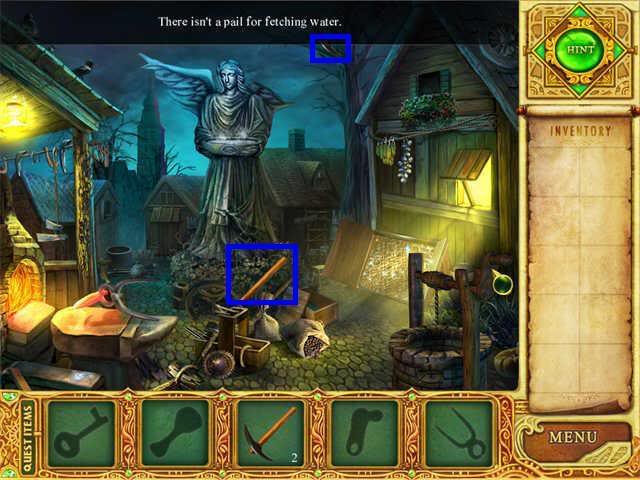
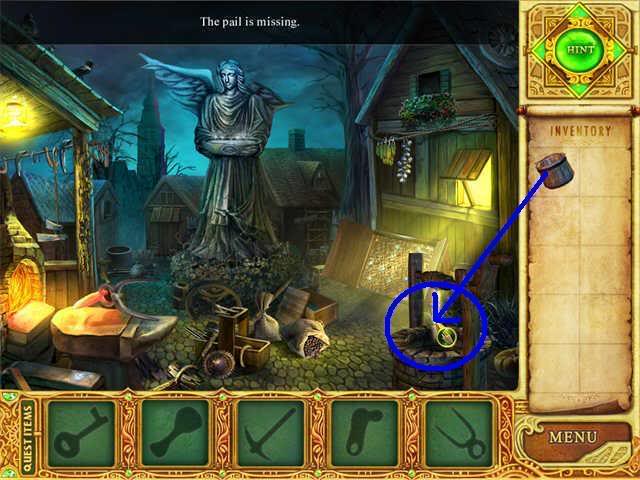
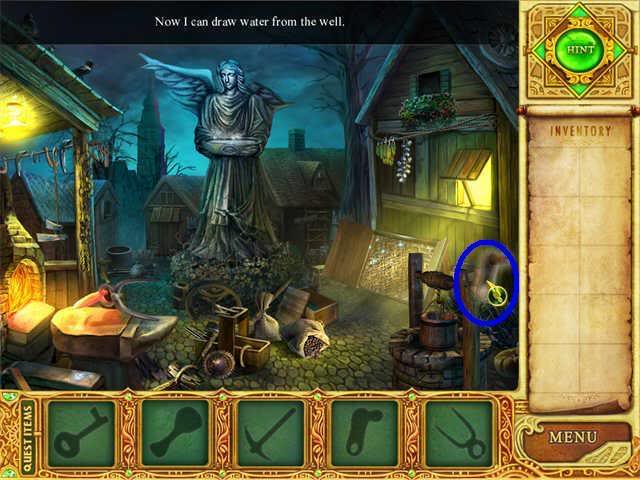
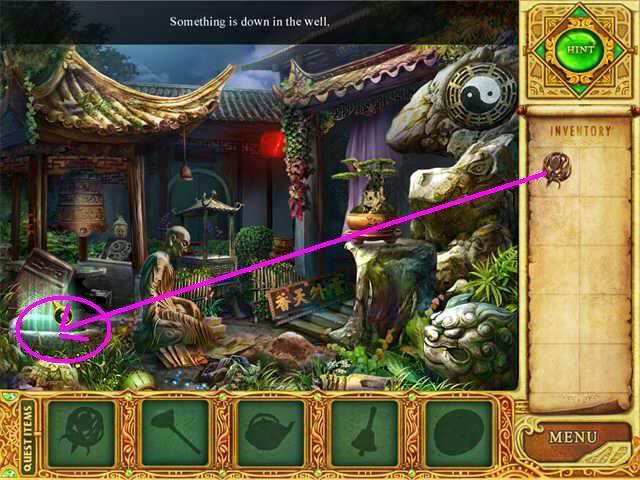
Home Village: Work the Well
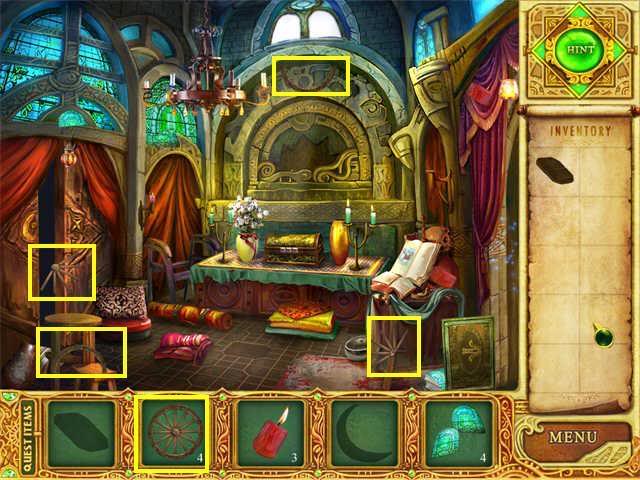
Home Village: Collect the Pickaxe
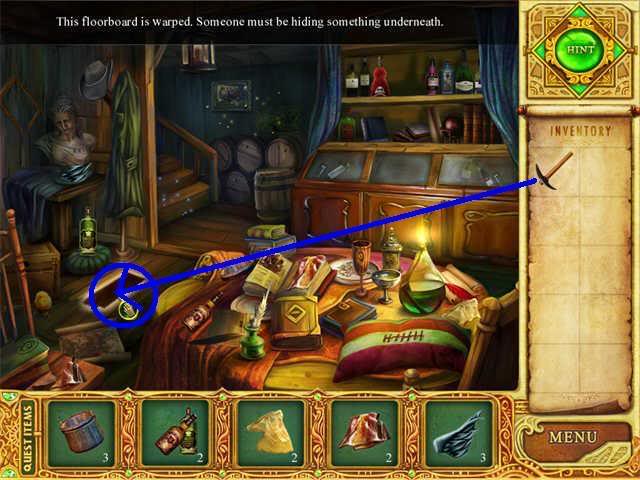
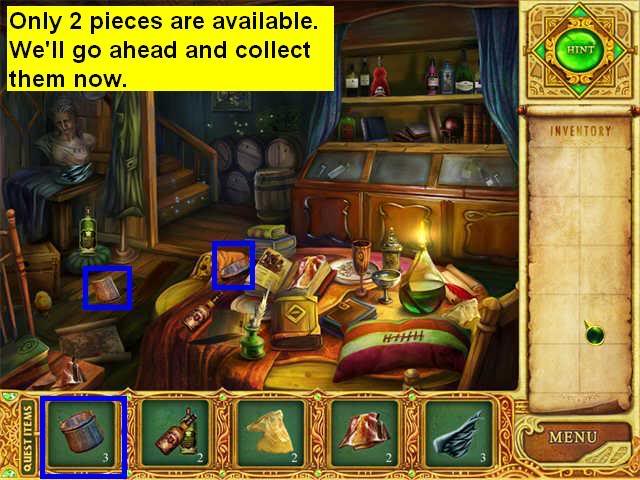
Home Village Cellar; Start Collecting Bucket Pieces
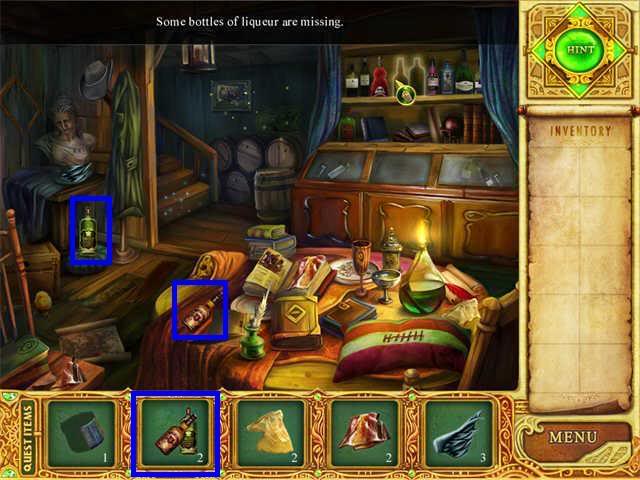
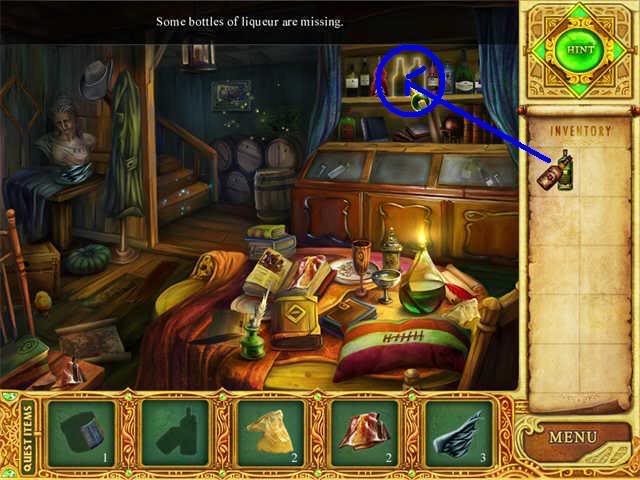
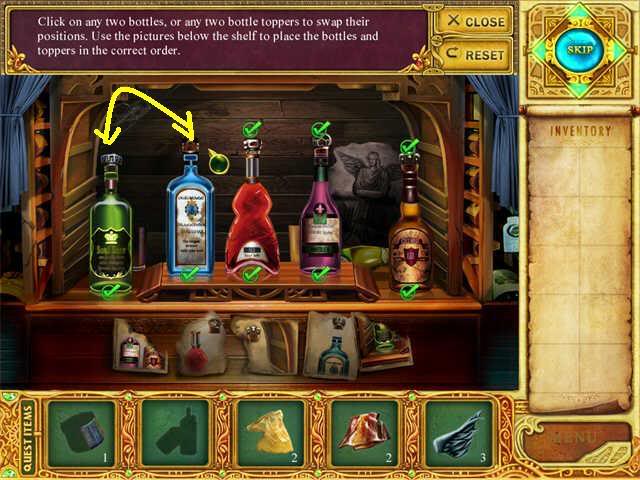
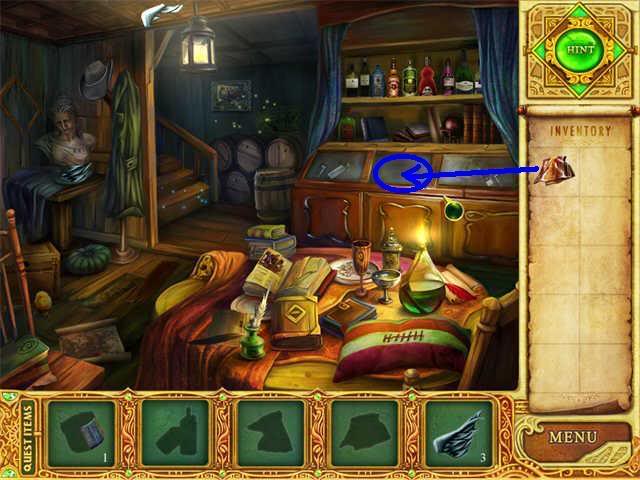
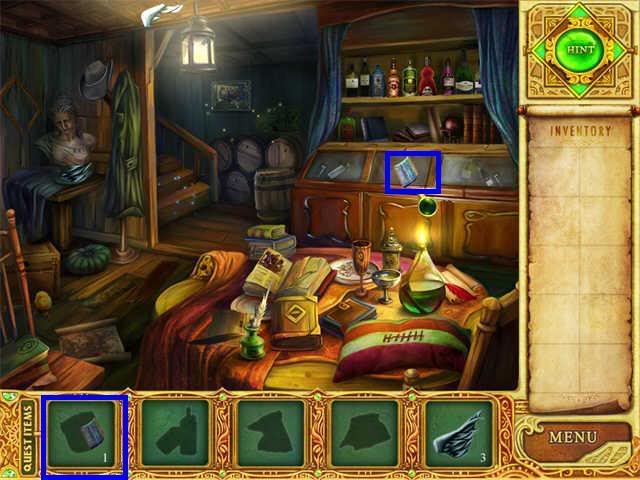
Home Village Cellar: Liquor Shelf
Bottle Puzzle
Solution:
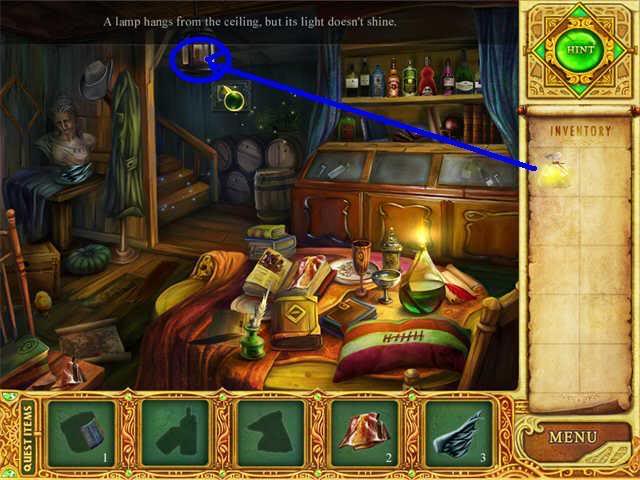
Home Village Cellar: Turn on the Lamp
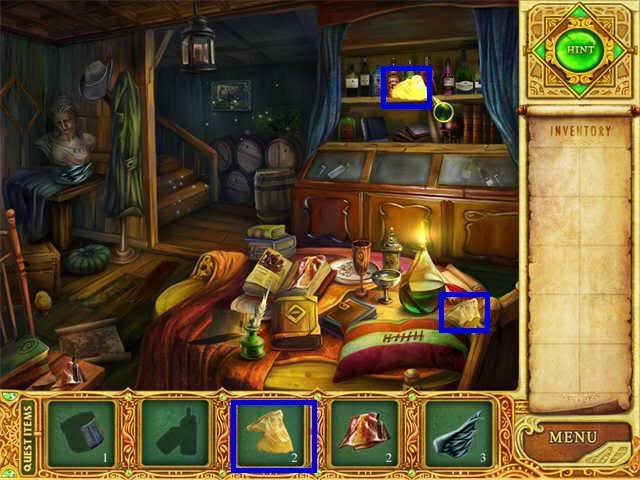

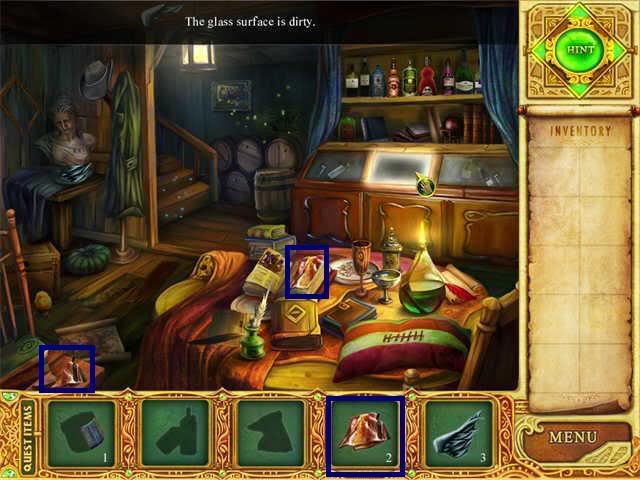
Home Village Cellar: Clean the Glass Case
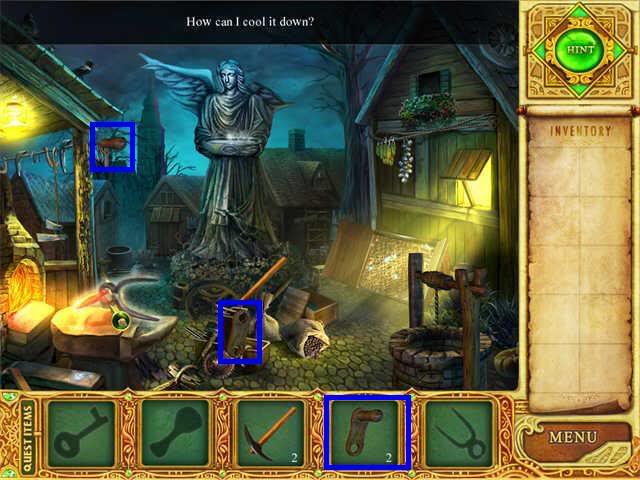
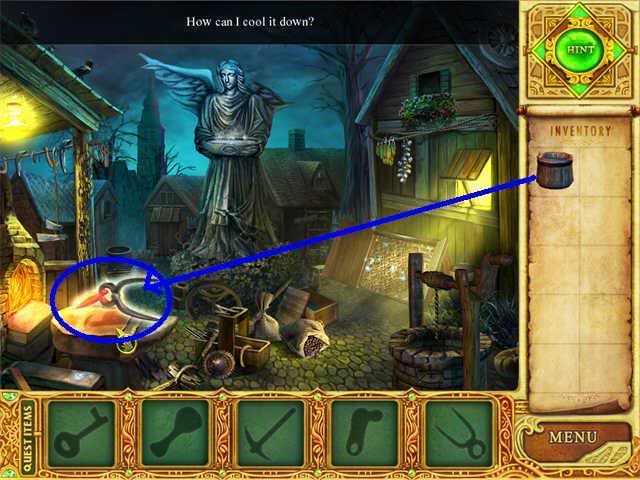
Home Village Cellar/Home Village: Cool Off the Item from the forge.
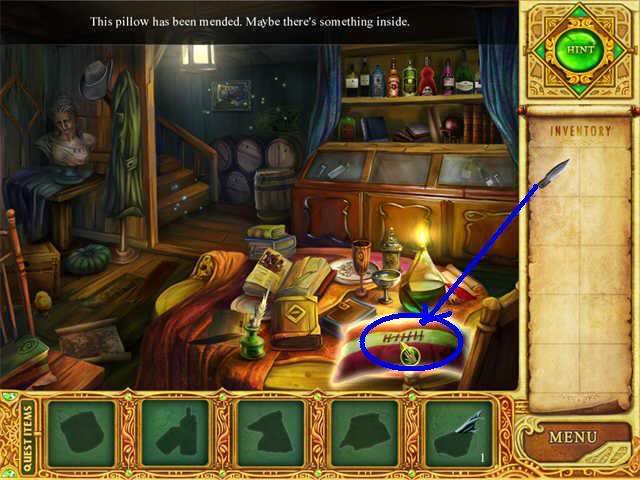
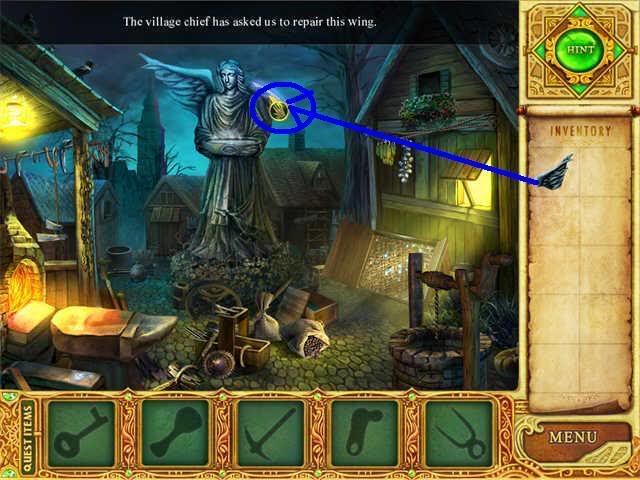
Home Village Cellar/Home Village: the Protector’s Wing

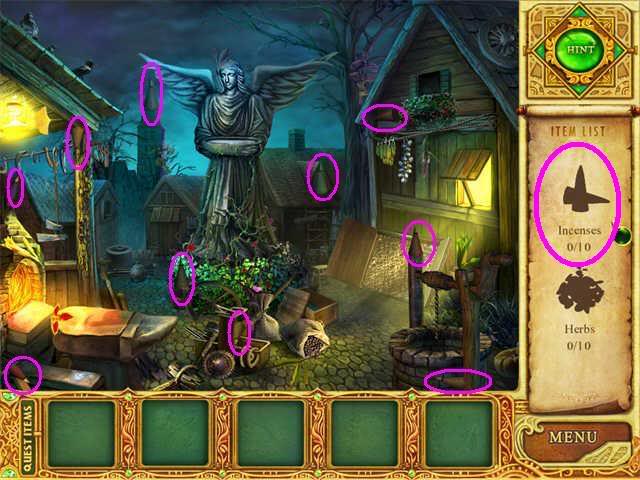
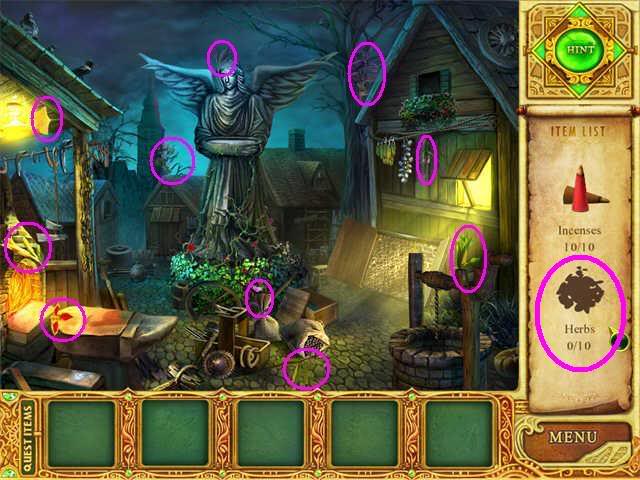
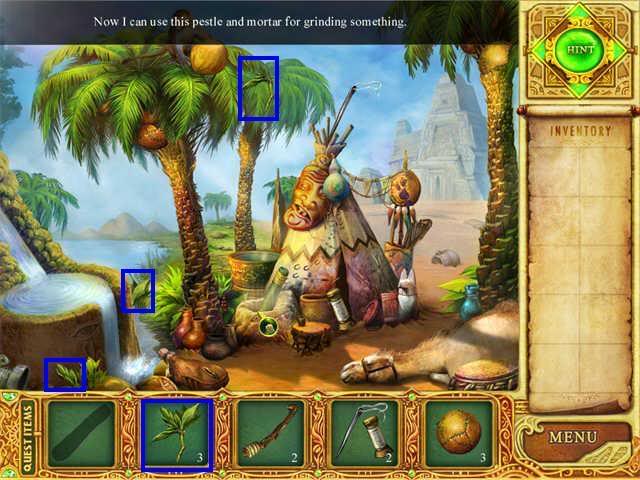
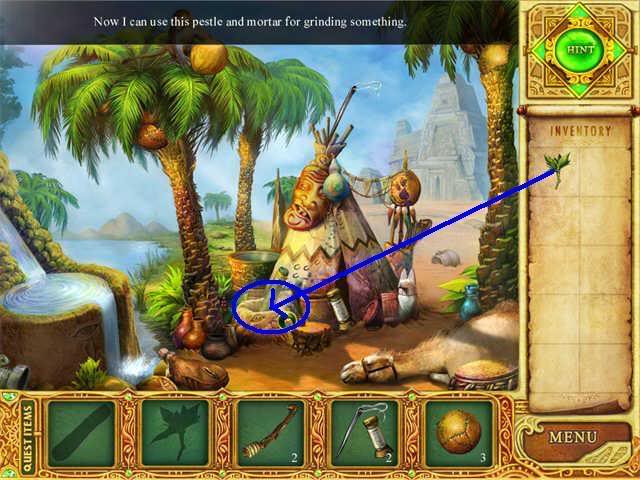
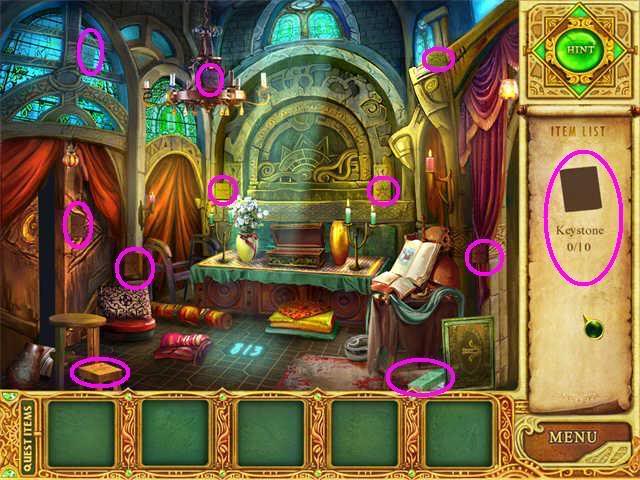
Home Village: Find 10 Incense and 10 Herbs
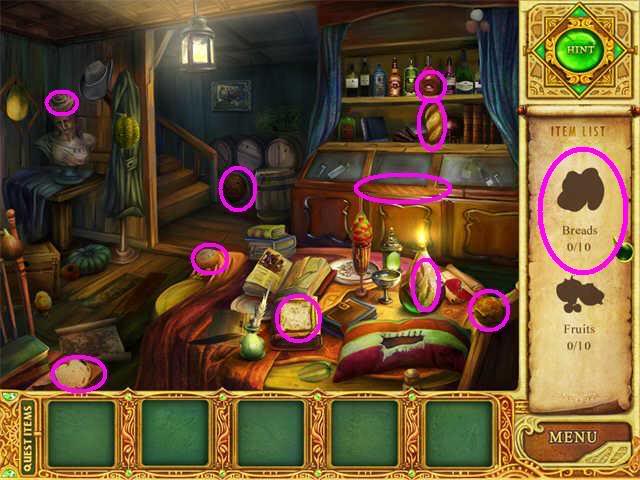
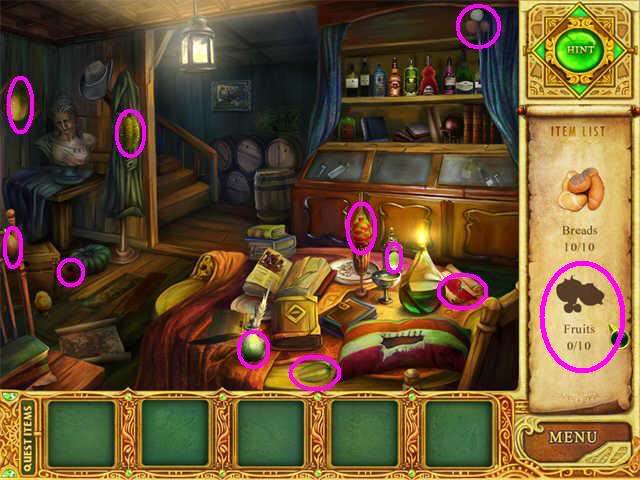
Home Village Cellar: Find 10 Breads and 10 Fruits
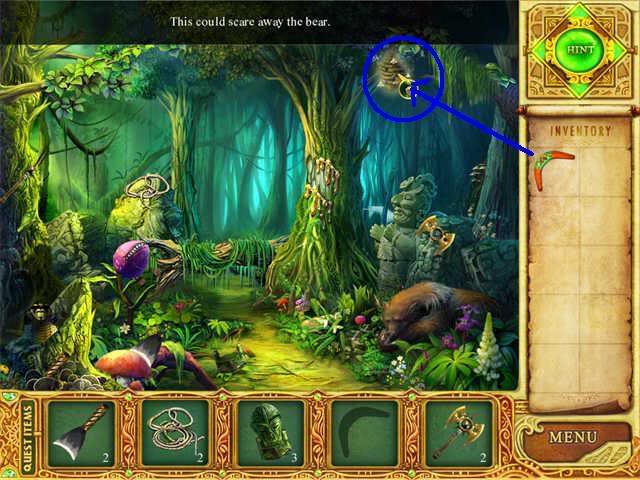
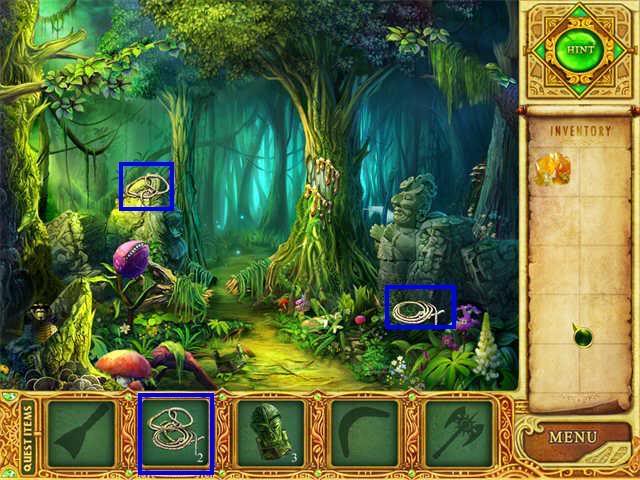
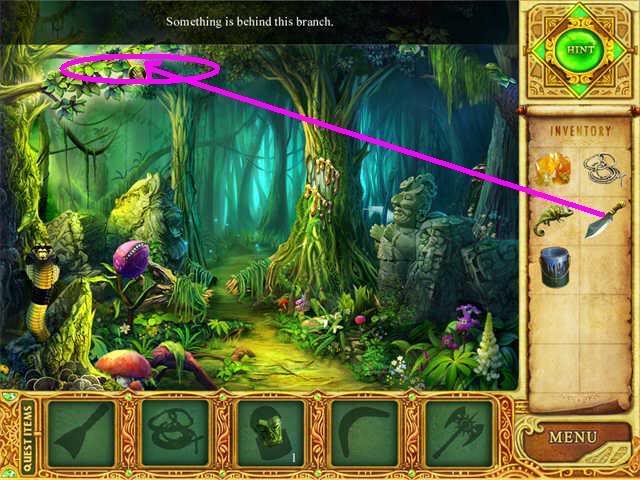
Snake Mountain Forest: Scare the Bear!
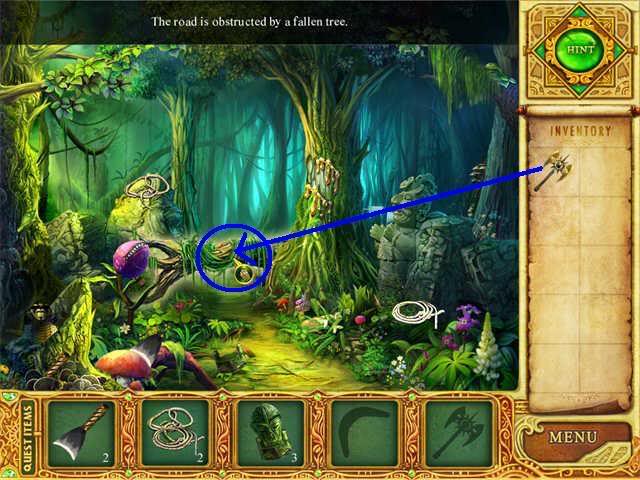
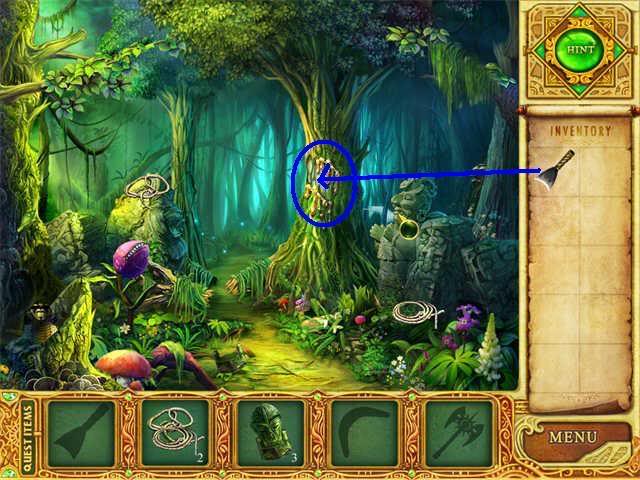
Snake Mountain Forest: Clear the Fallen Tree

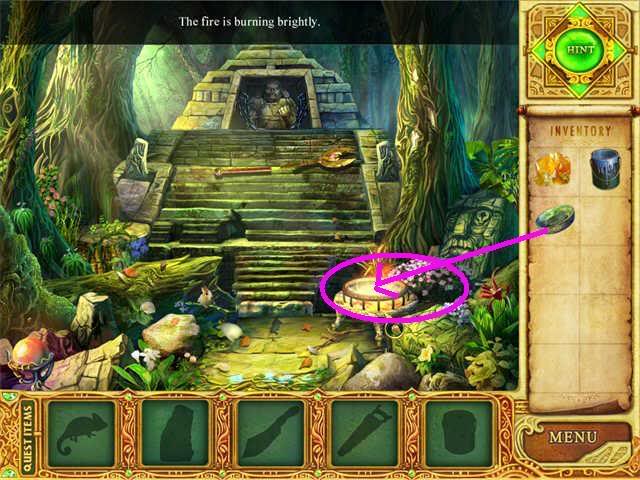
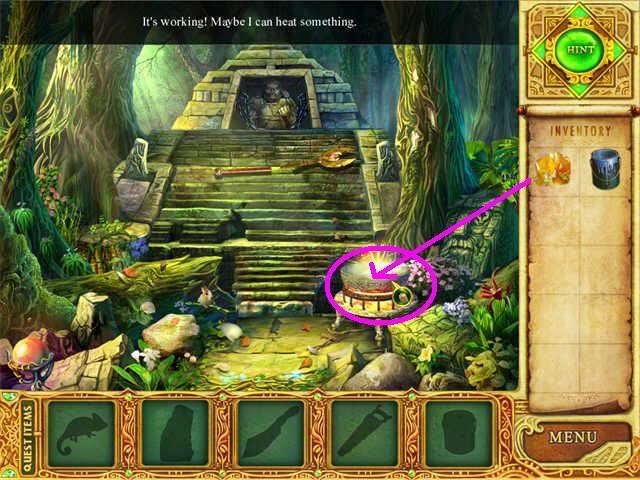
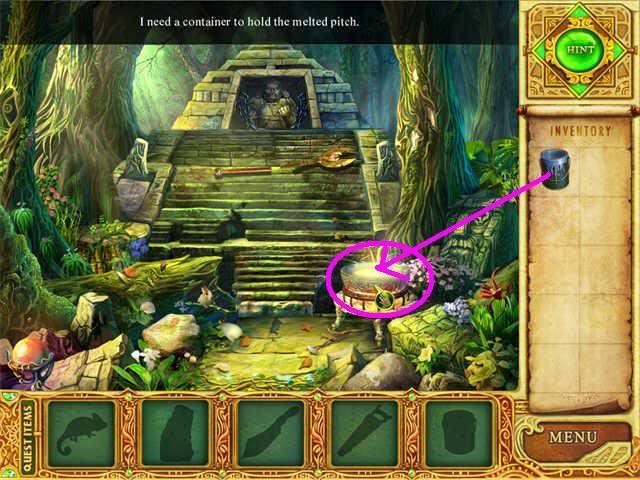
Snake Fountain Forest: Collect the Pitch

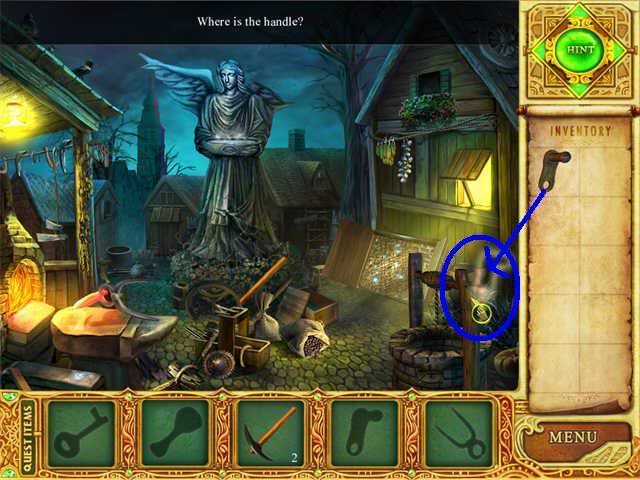
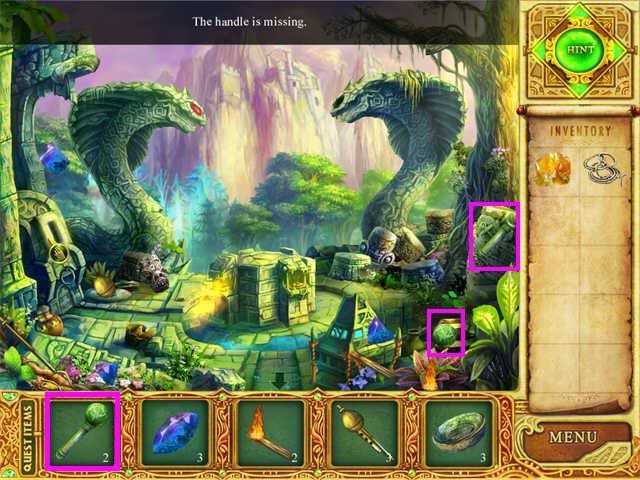
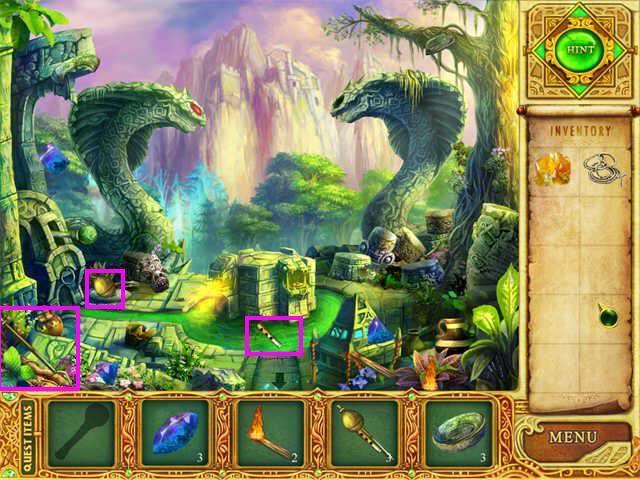
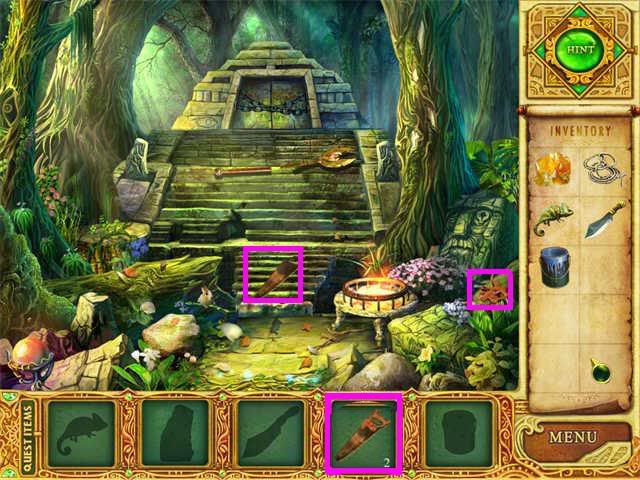
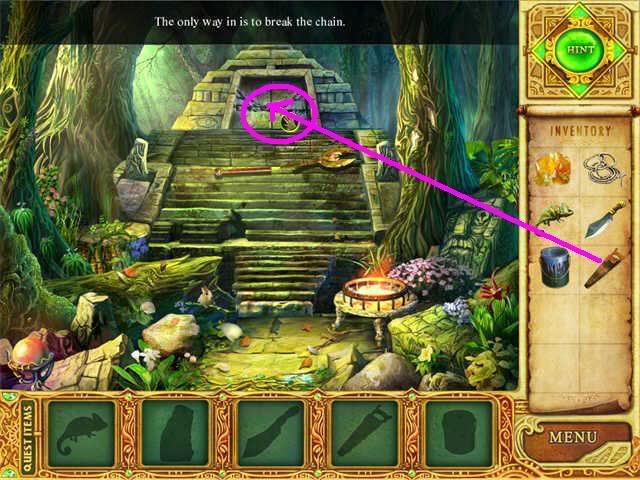
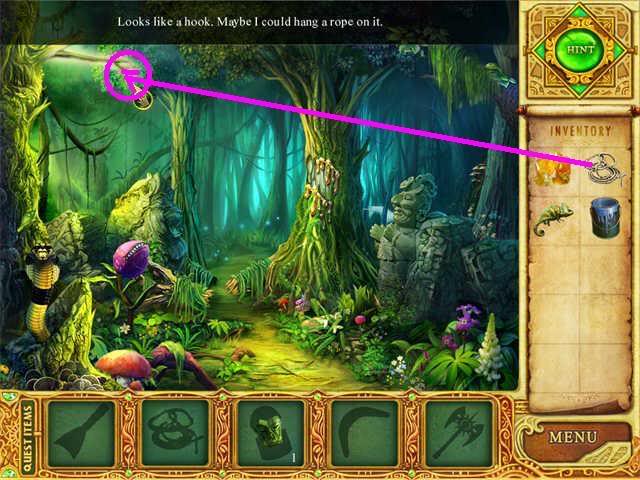
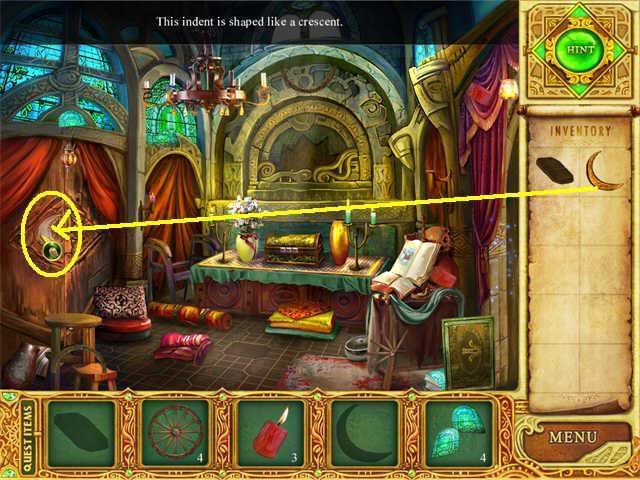
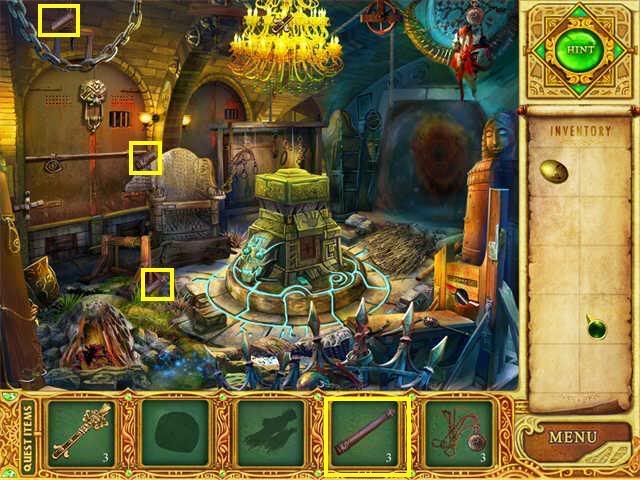
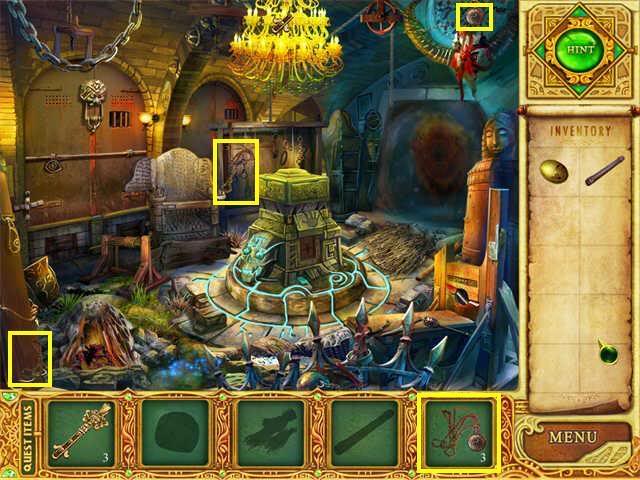
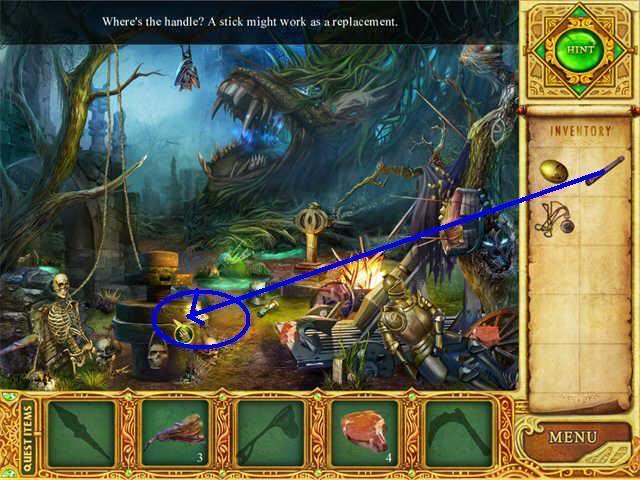
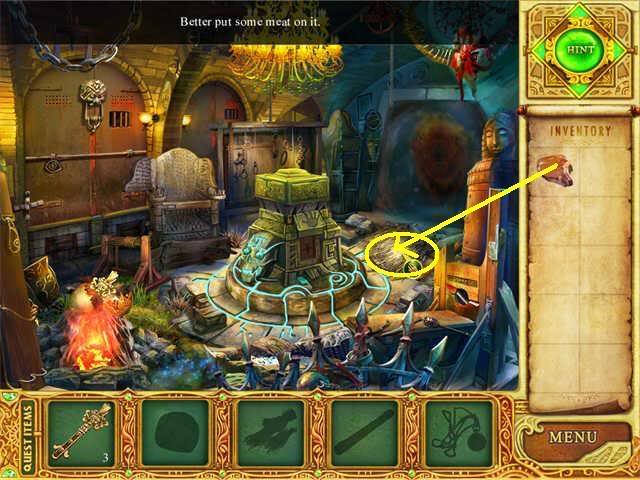
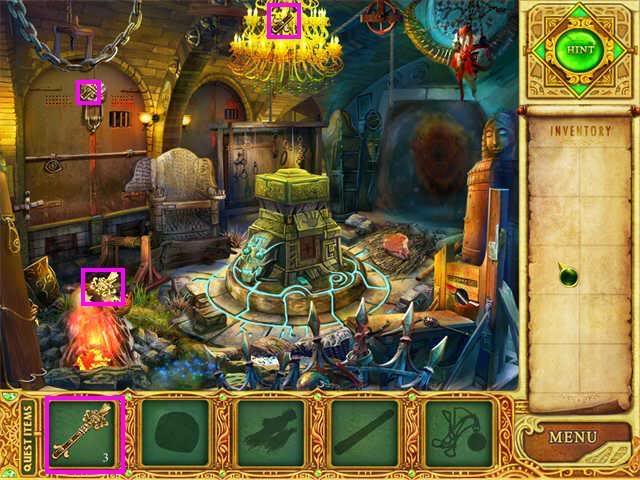
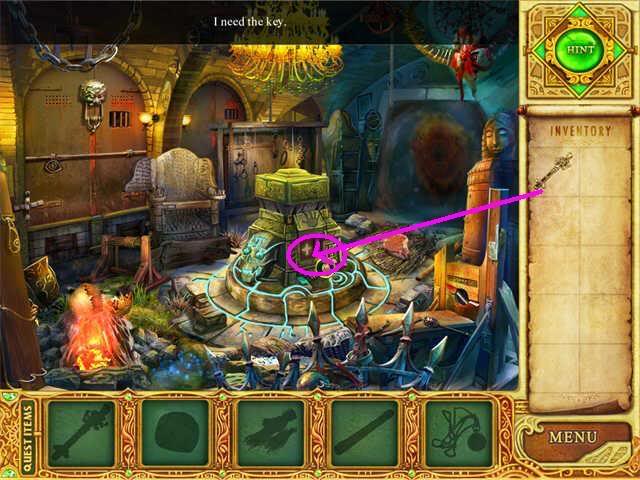
Snake Mountain Altar: The Handle


Snake Mountain Altar: The Flute
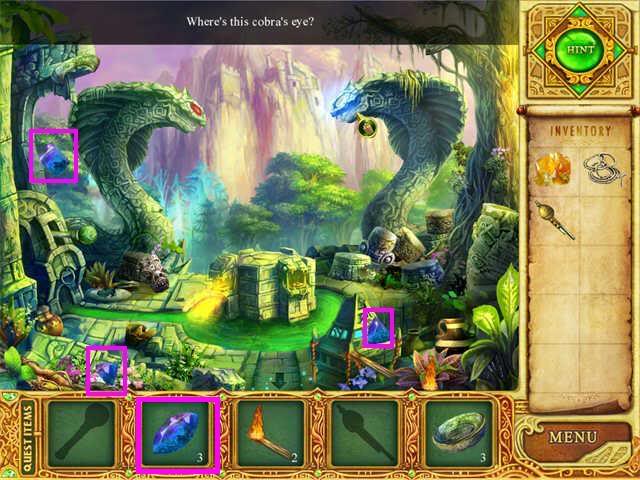
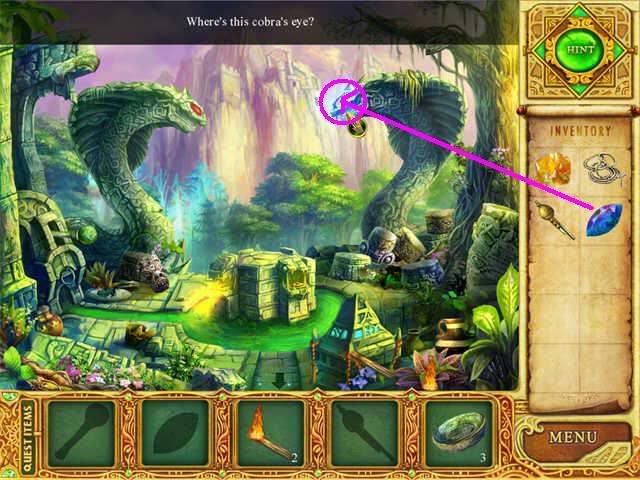
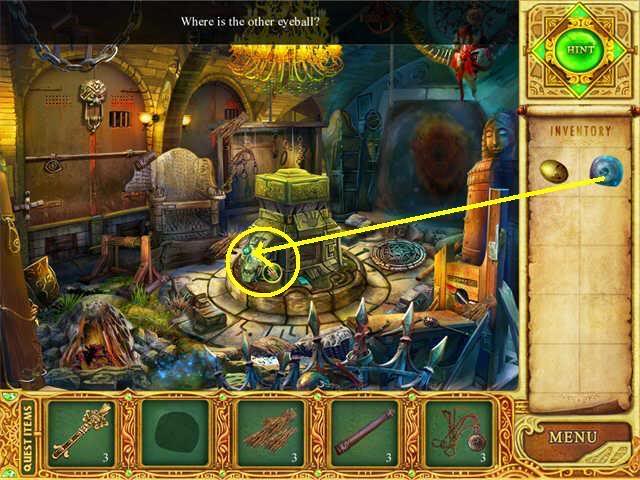
Snake Mountain Altar: The Eye of the Statue
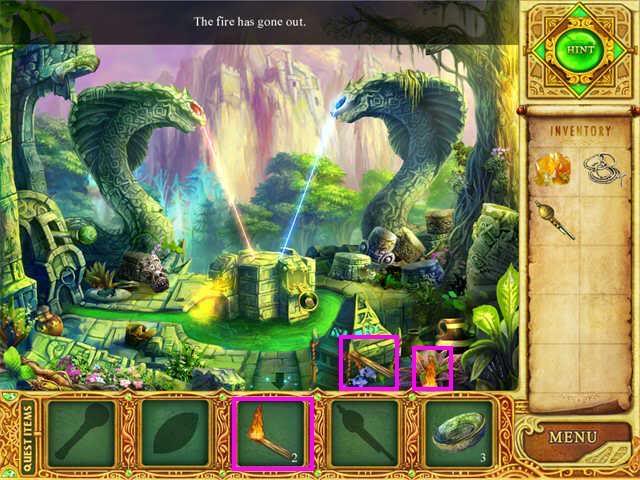
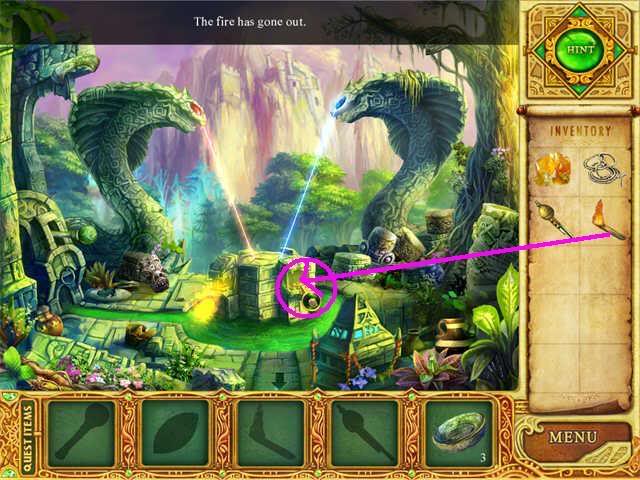
Snake Mountain Altar: Fire on the Mountain

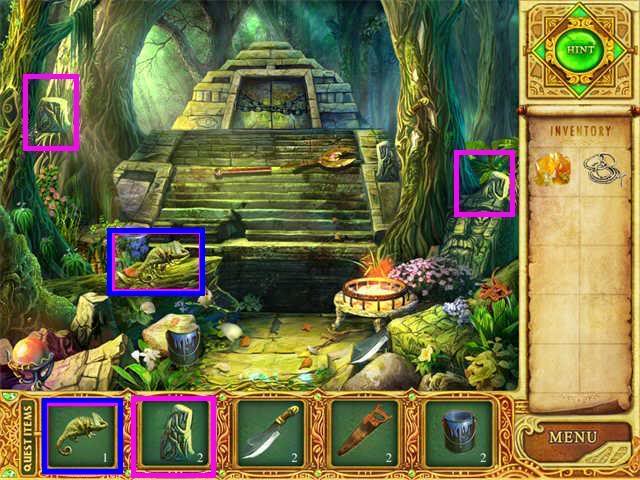
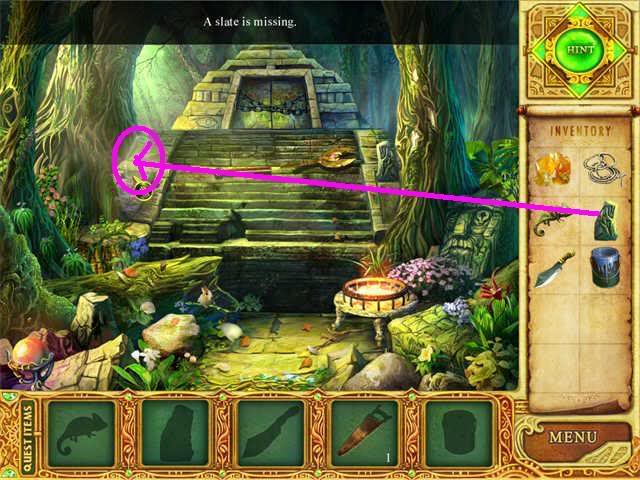
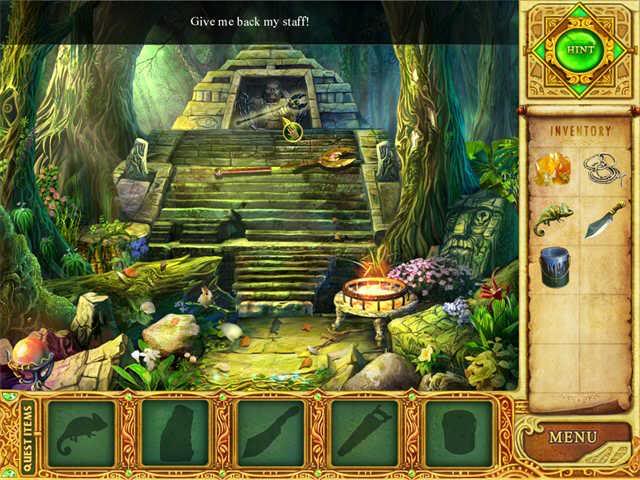
Snake Mountain Secret Chamber
Snake Mountain Secret Chamber: The Warrior Speaks
Snake Mountain Secret Chamber/Snake Mountain Forest: The Statue Restored
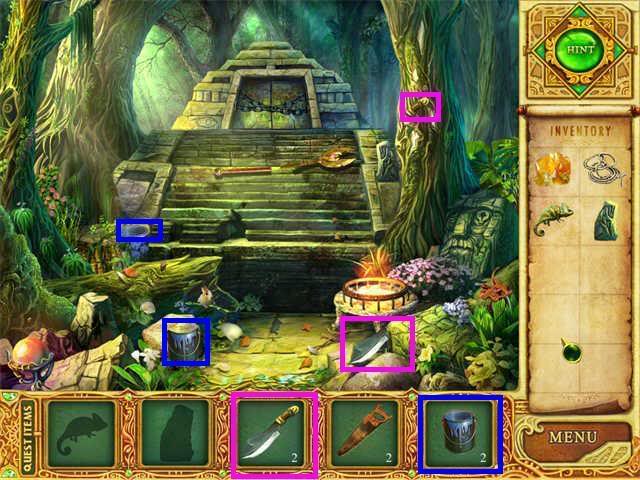
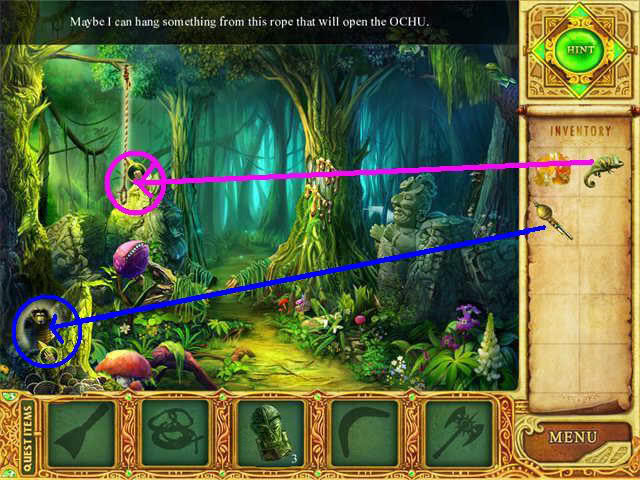
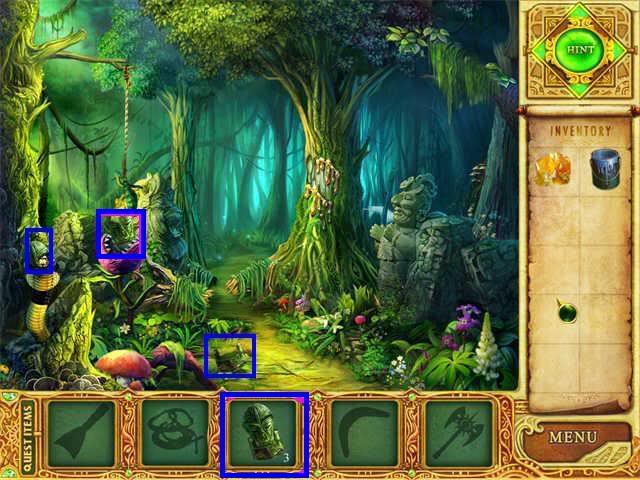
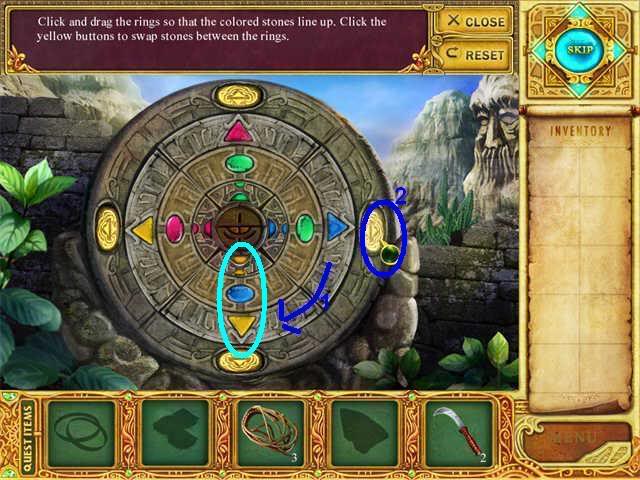
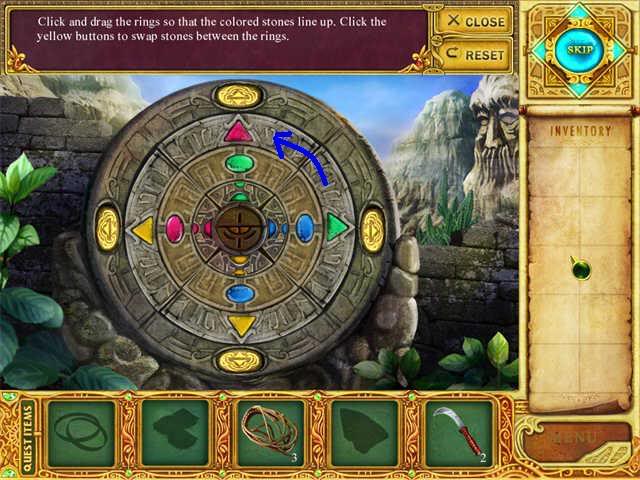
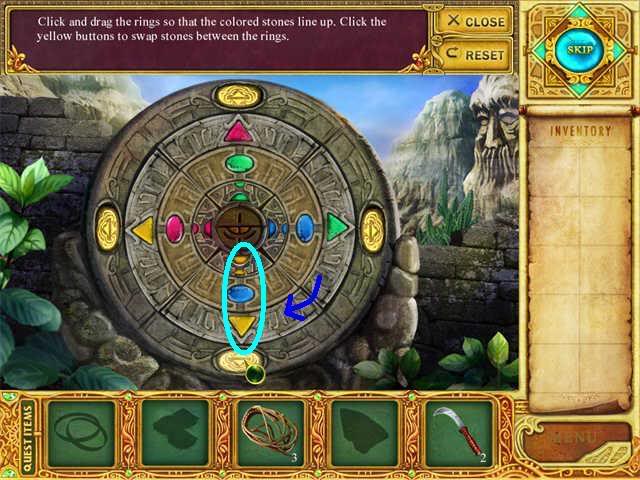
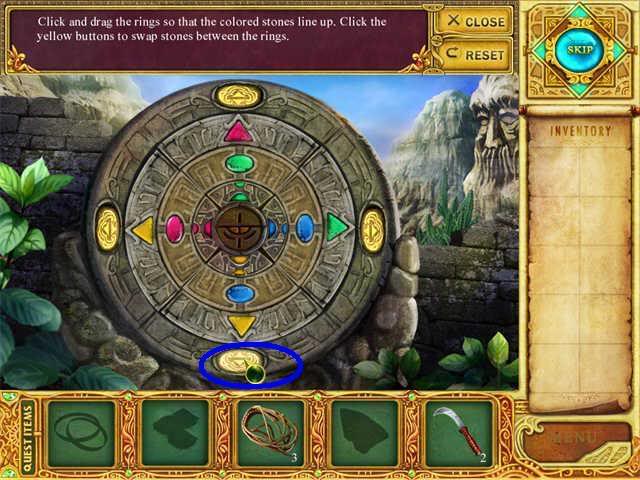
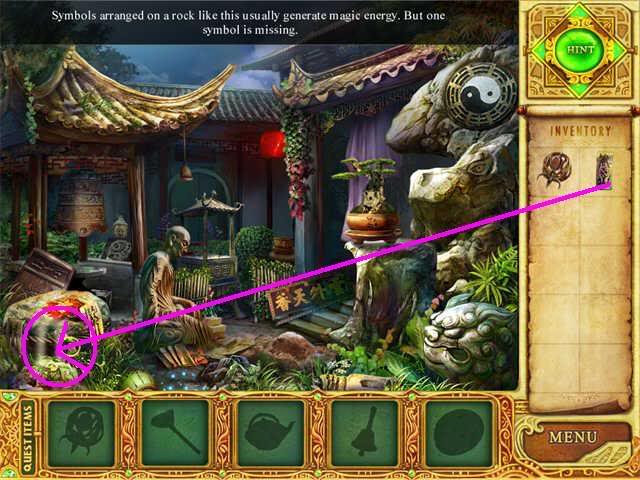
Snake Mountain Altar: The Statue’s Secret
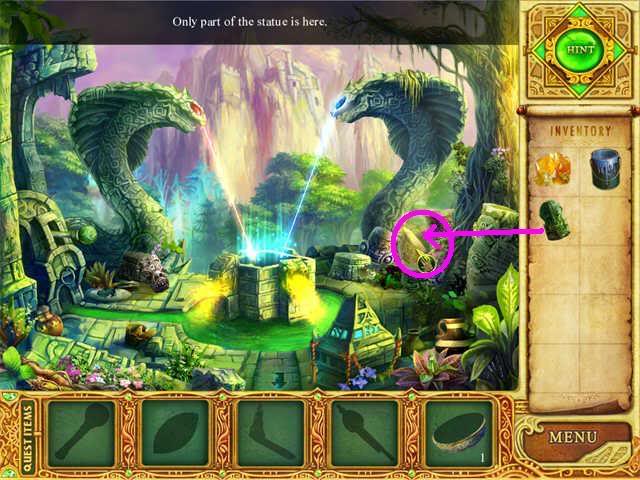
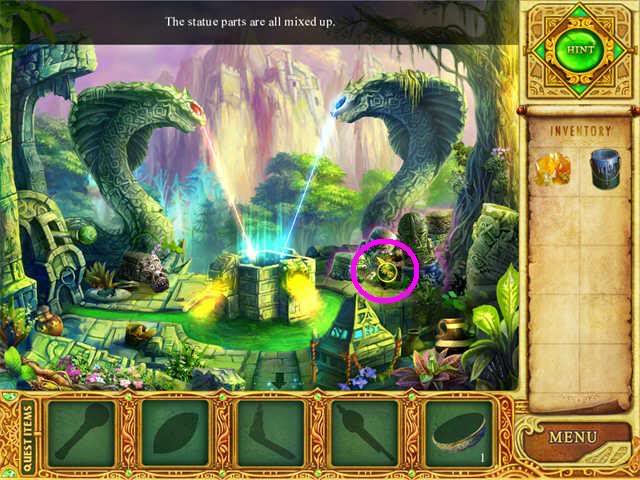
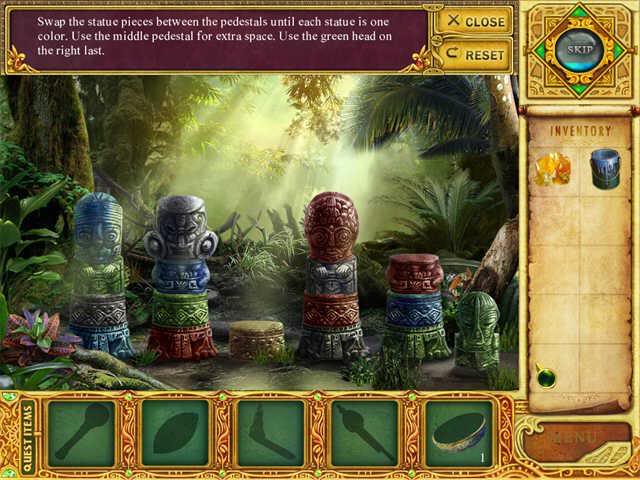
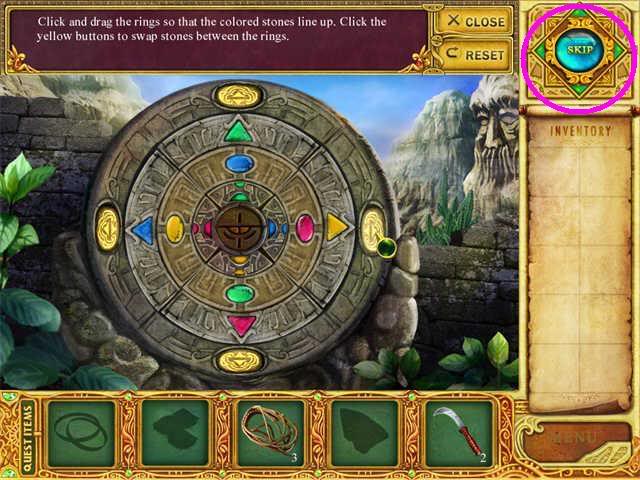
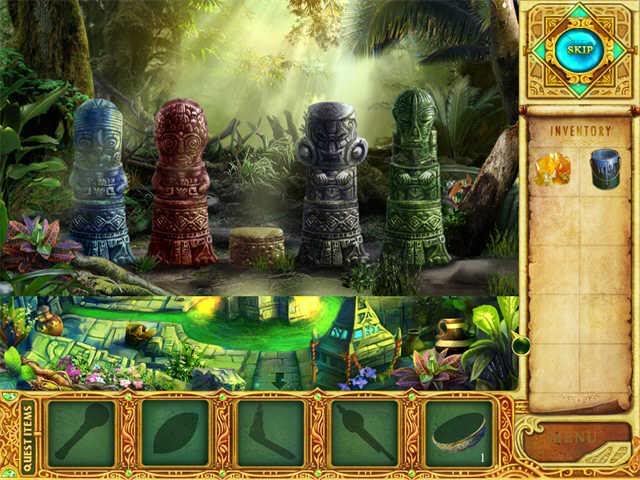
The Altar Statue Puzzle
This is a Towers of Hanoi variant.

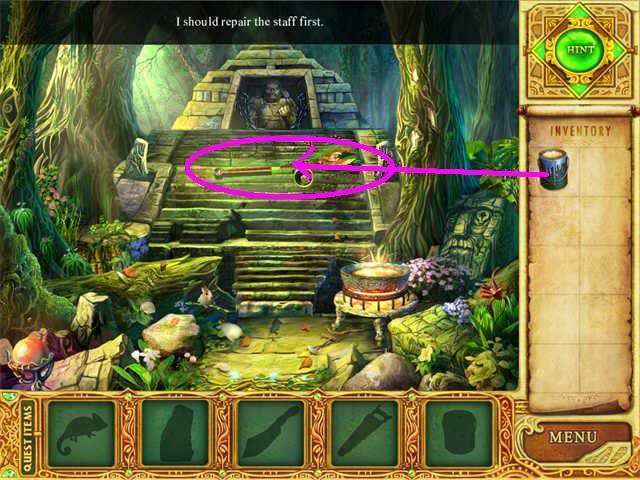
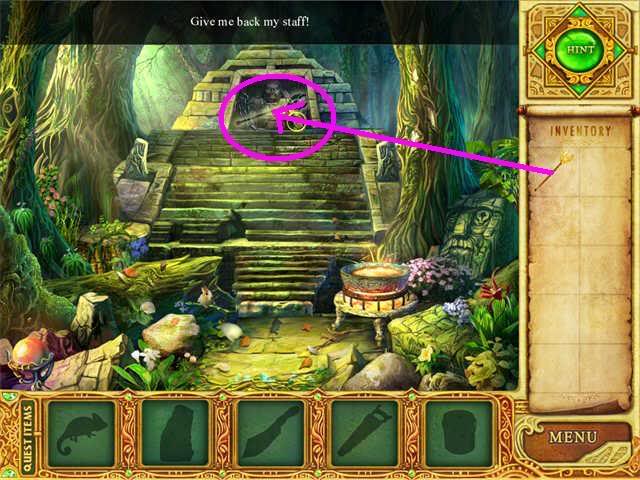
Snake Mountain Secret Chamber: Repairing the Staff
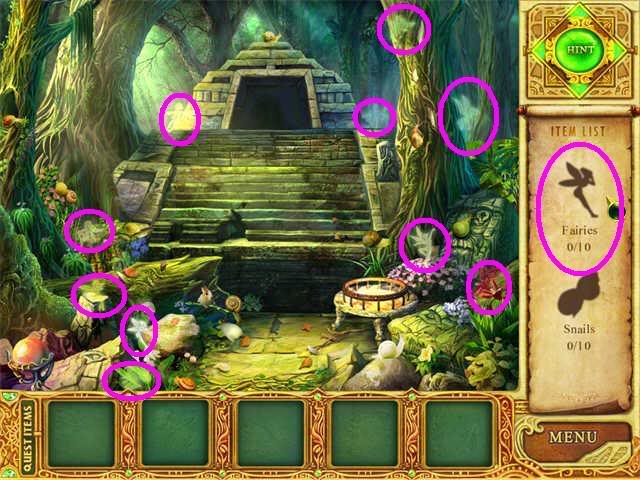
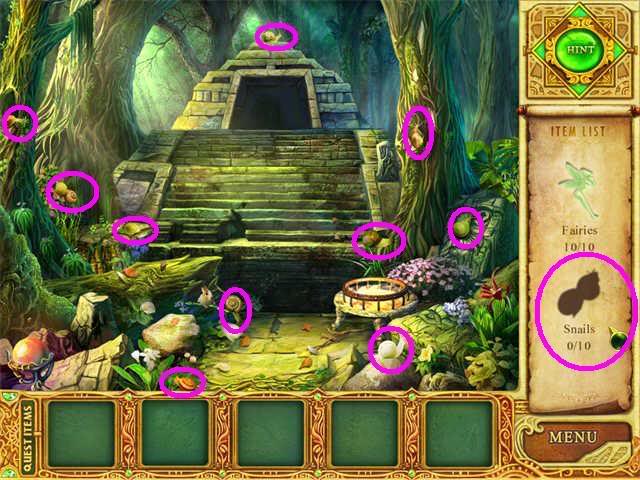
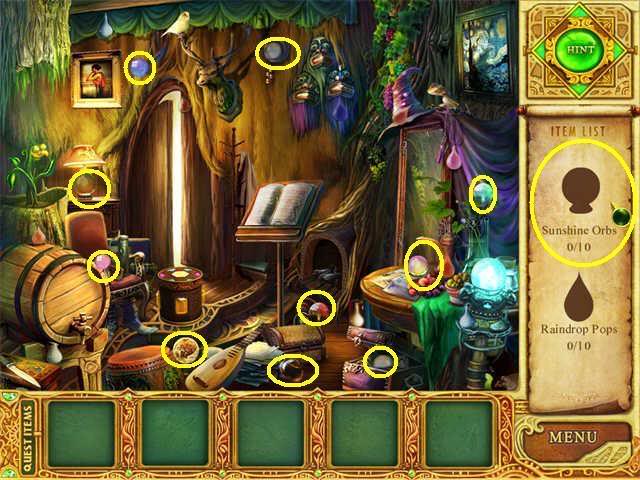
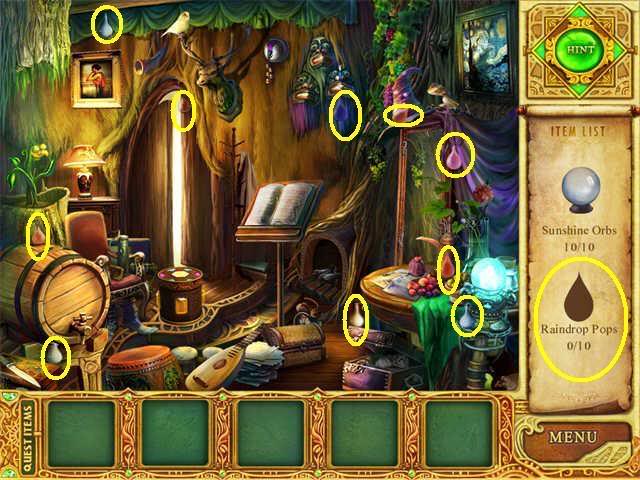
Snake Mountain Secret Chamber: Find 10 Fairies and 10
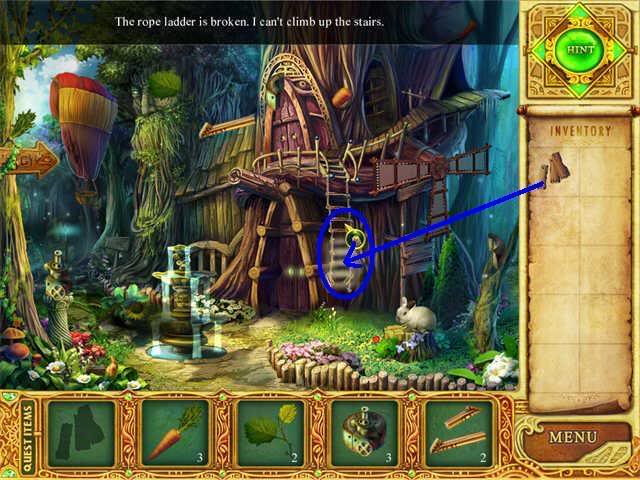
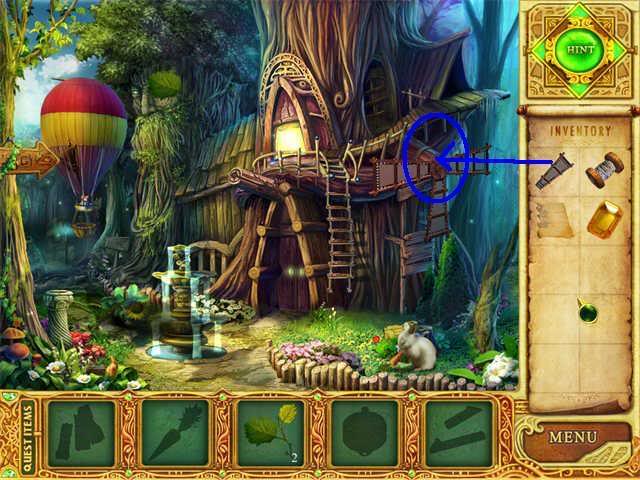
Outside the Wizard’s House: Repair the Ladder
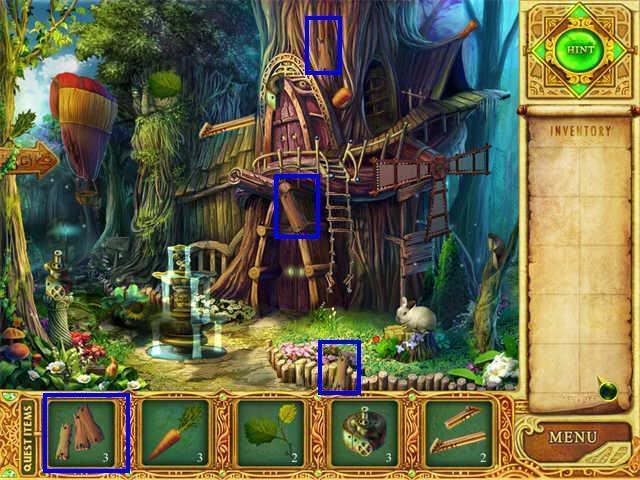
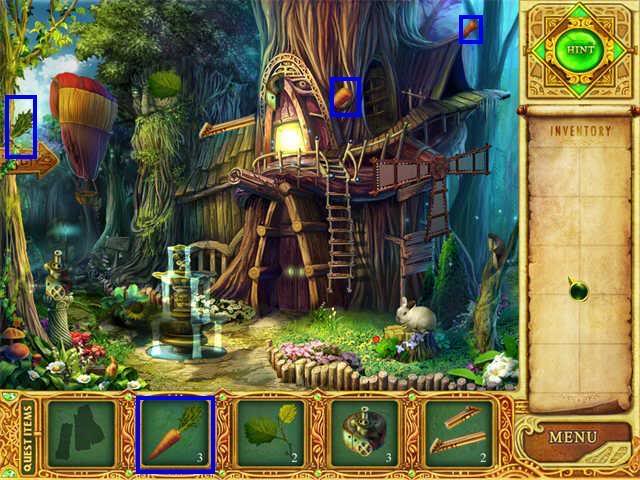
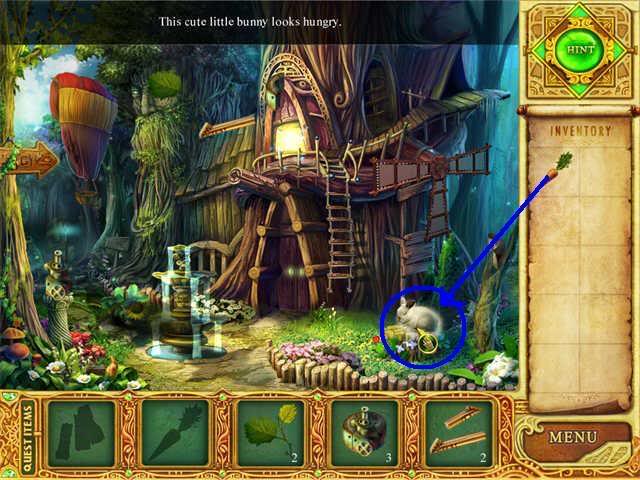
Outside the Wizard’s House: Feed the Bunny
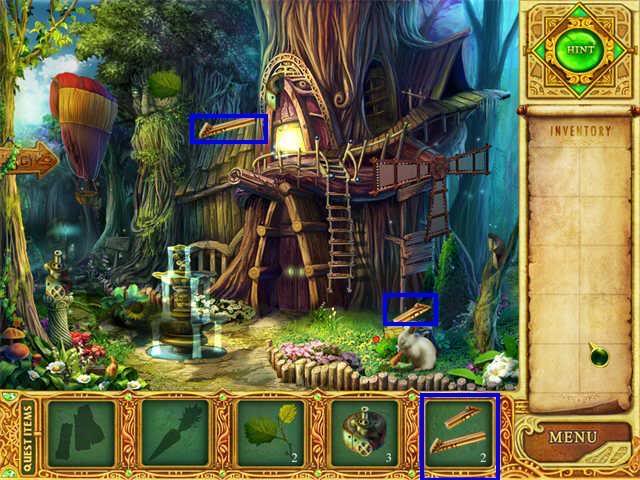
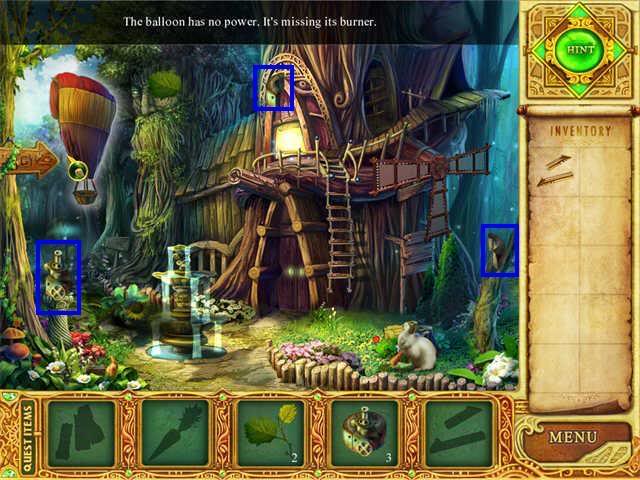
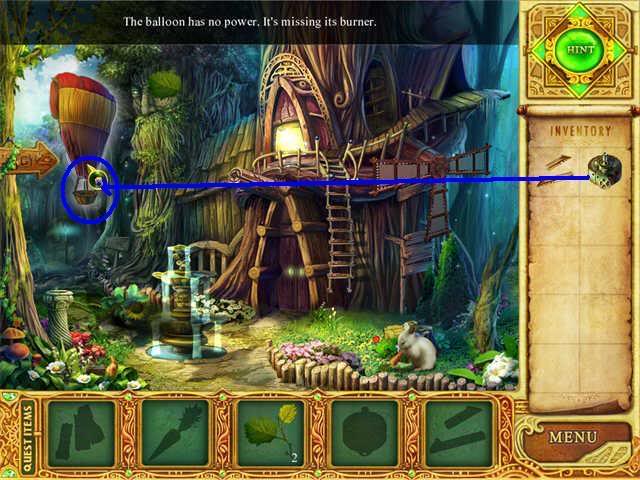
Outside the Wizard’s house: Fix the Balloon burner
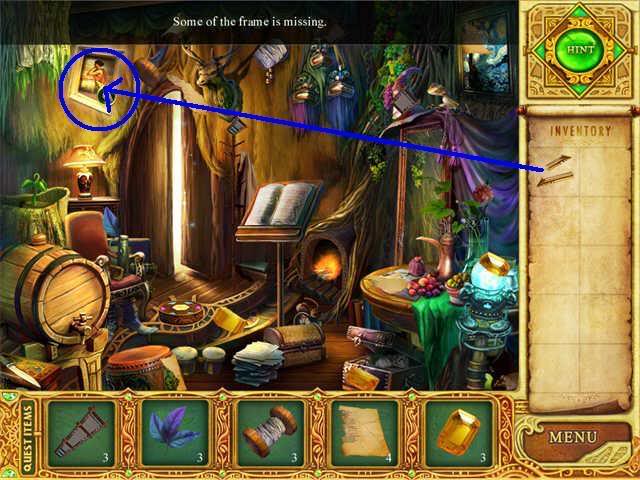
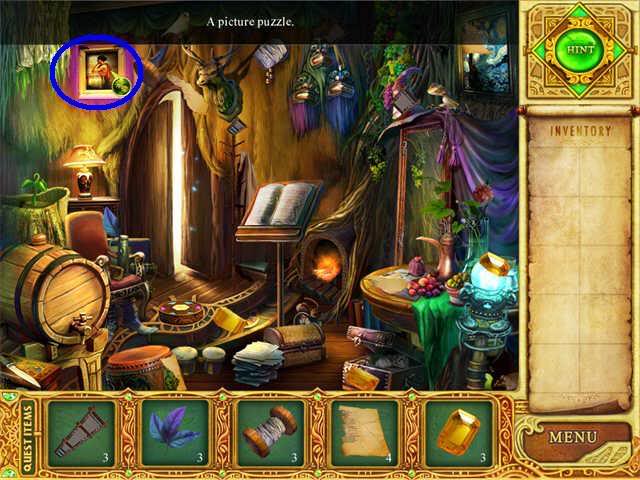
The Wizard’s House Upstairs: Fix the Frame
The Wizard’s House Upstairs: Collect as many items as possible

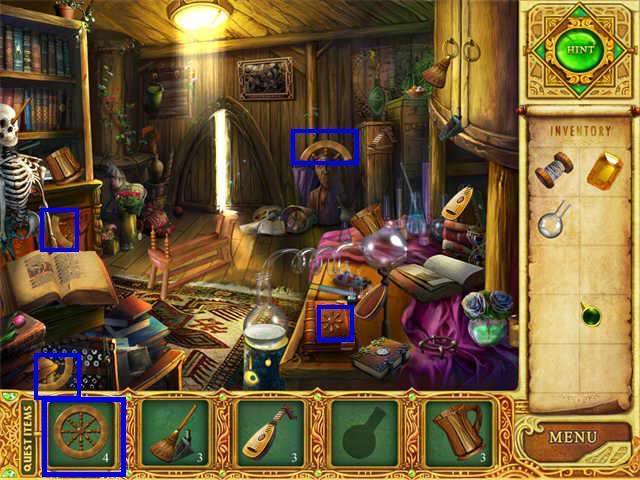
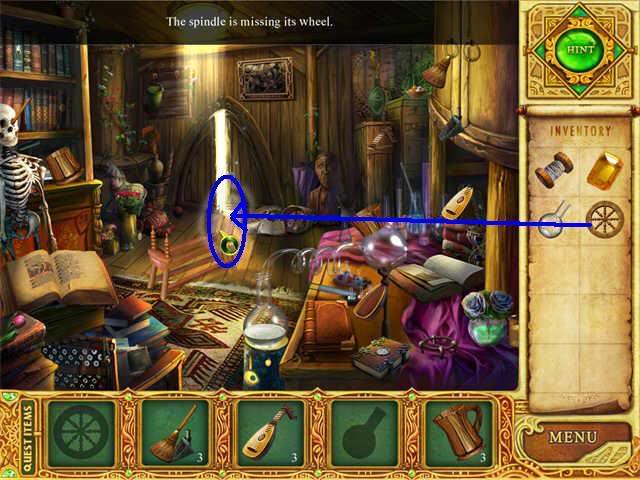
Outside the Wizard’s House: Fix the Windmill
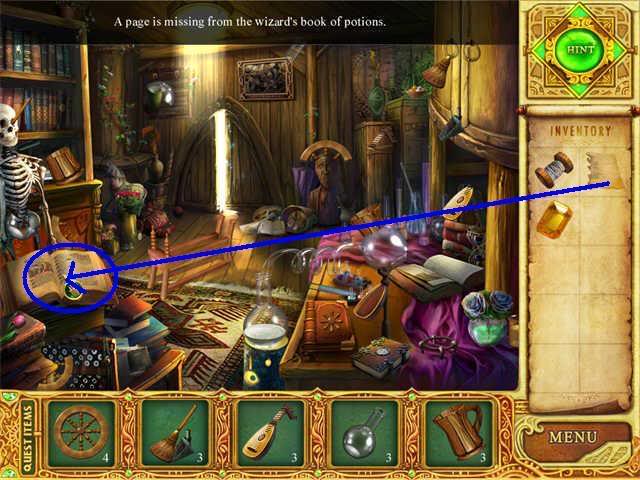
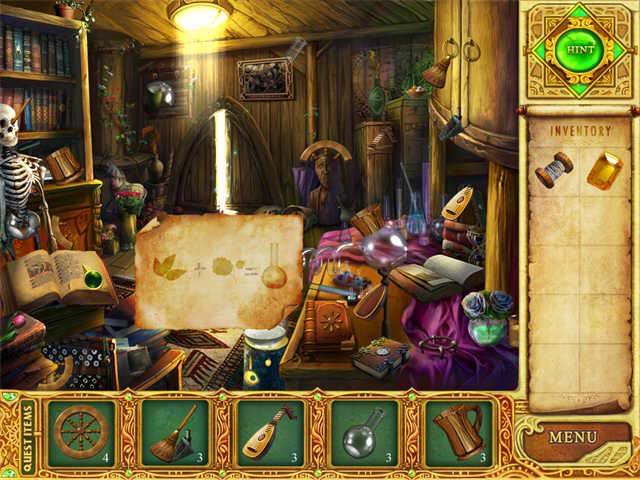
The Wizard’s Workshop: the Lost Spell
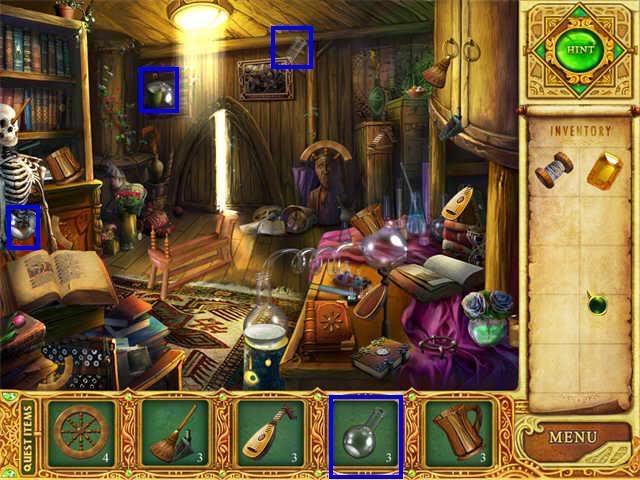
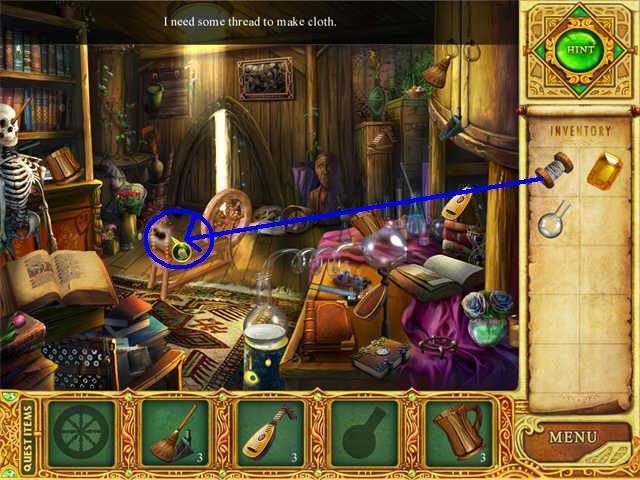
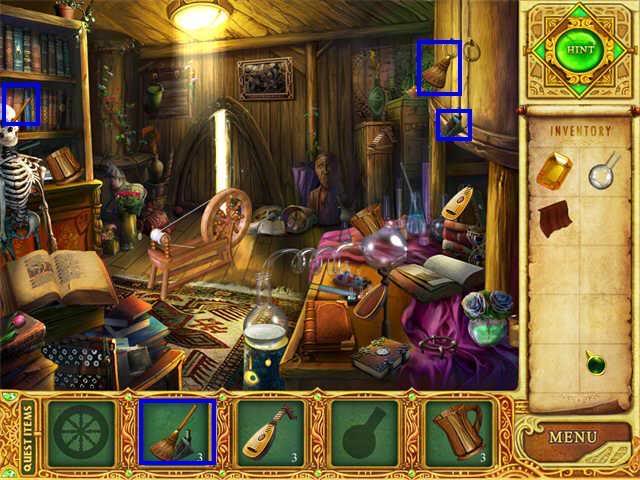
The Wizard’s Workshop: Make Cloth for the balloon
The Wizard’s Workshop: Miscellaneous Items
Outside the Wizard’s House: Repair the Balloon
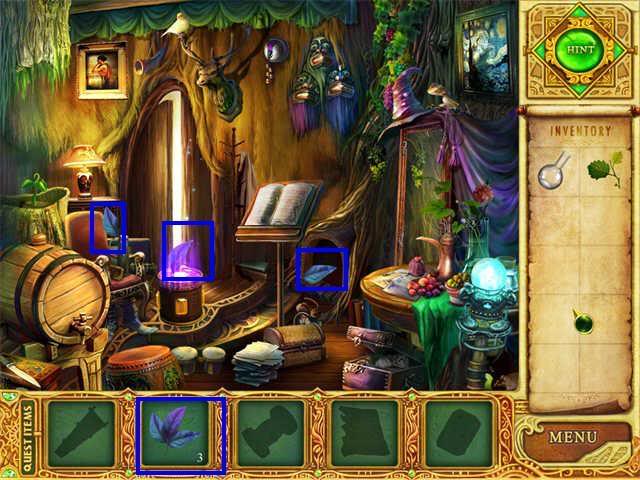
The Wizard’s House Upstairs: Collect the Blue Herb (1)
The Wizard’s House Upstairs: Collect the Blue Herb (1)
The Wizard’s Workshop: Make the Potion


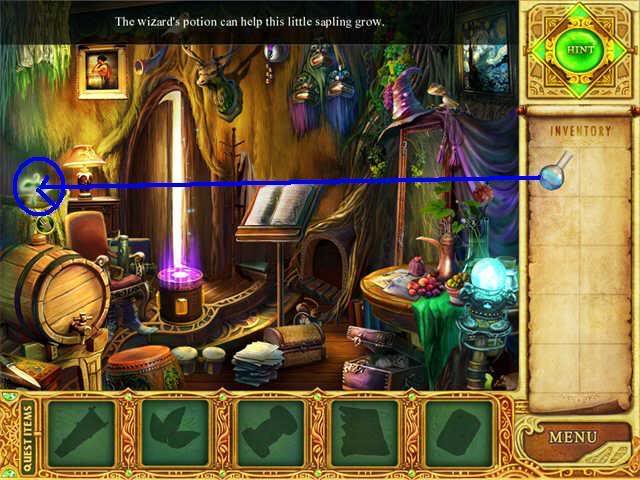
The Wizard’s House Upstairs: The Sapling
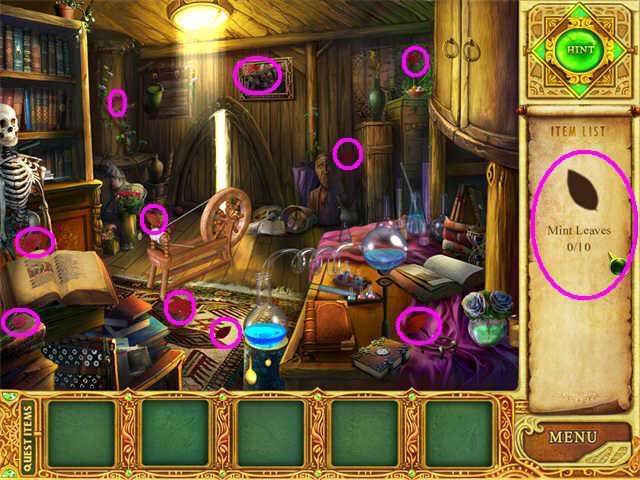
The Wizard’s Workshop: Collect 10 Mint Leaves
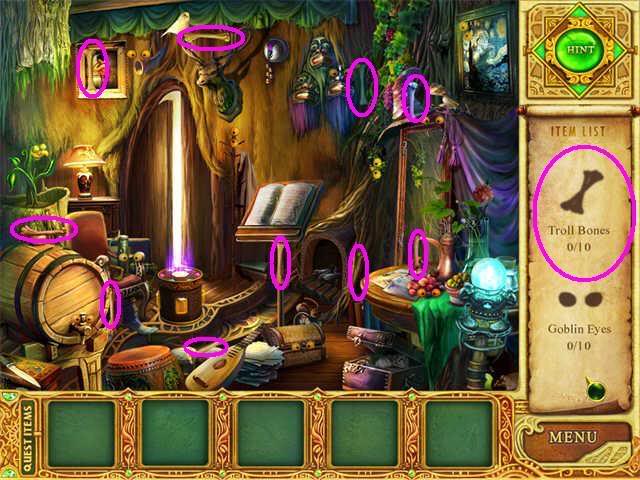
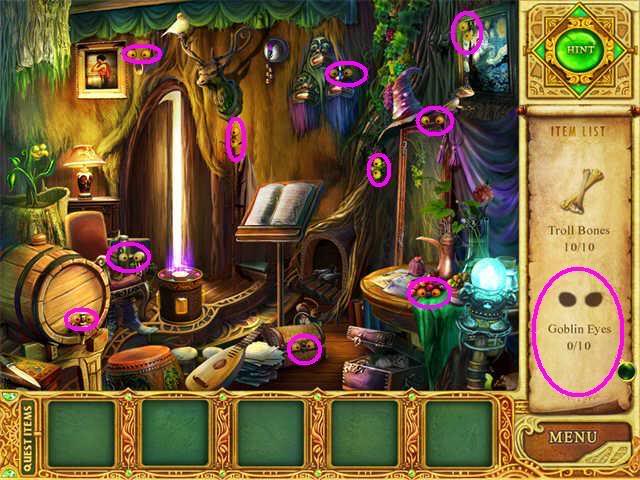
The Wizard’s House Upstairs: Find 10 Bones and 10 Goblin Eyes
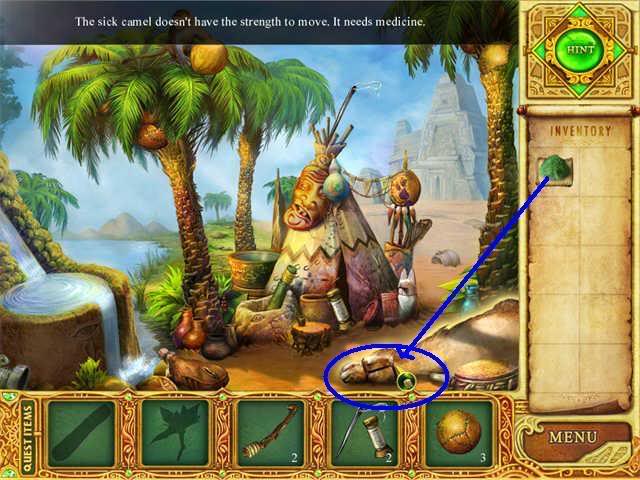
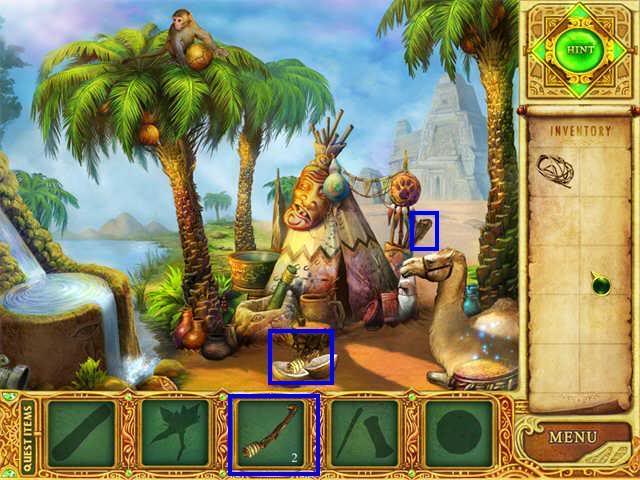
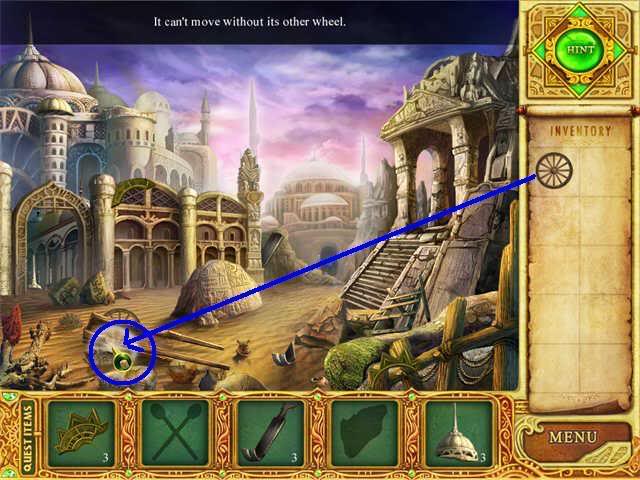
The Edge of the Desert: Cure the Camel
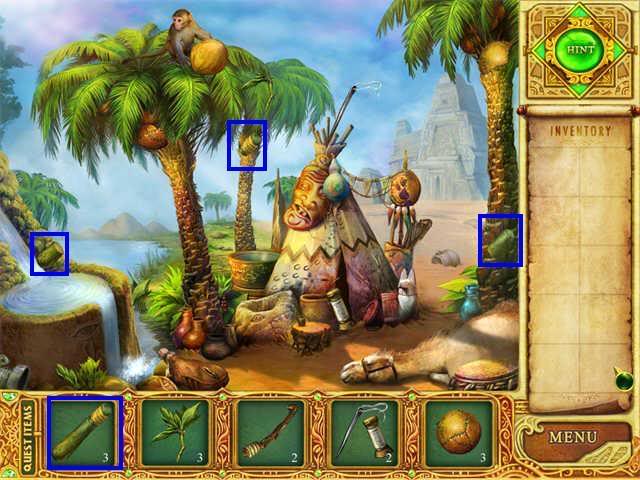

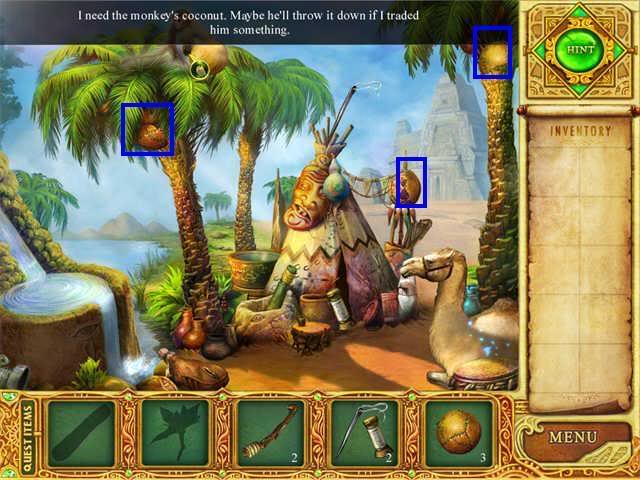
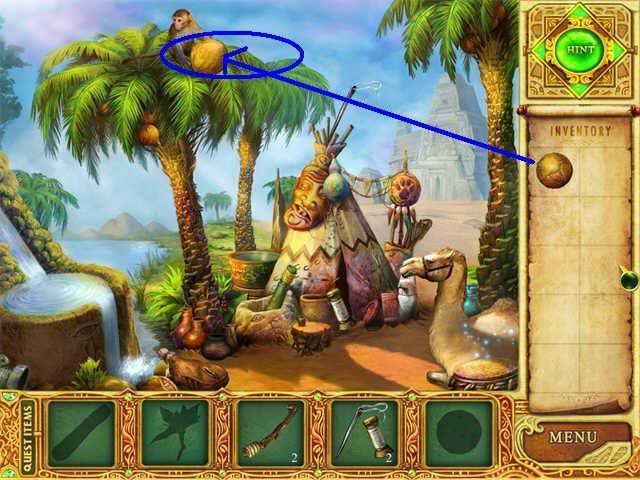
The Edge of the Desert: Give the Ball to the Monkey
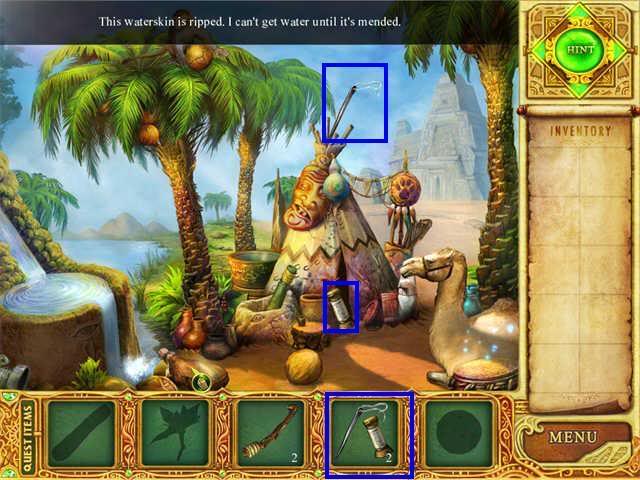
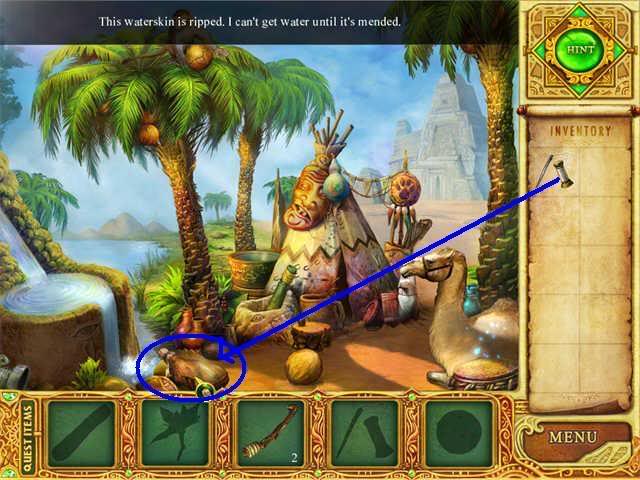
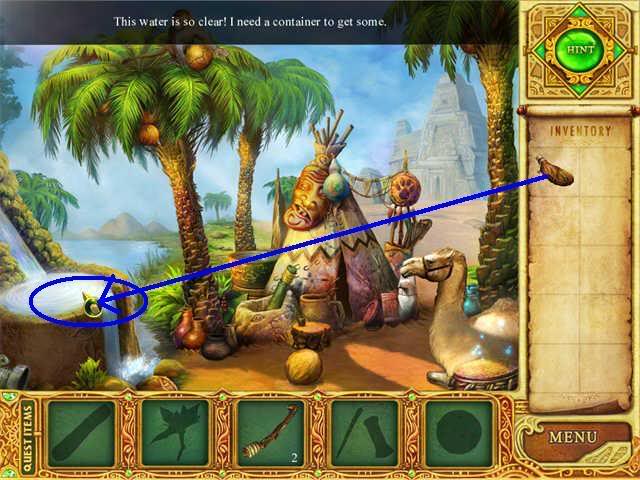
The Edge of the Desert: Collect Water for the Journey
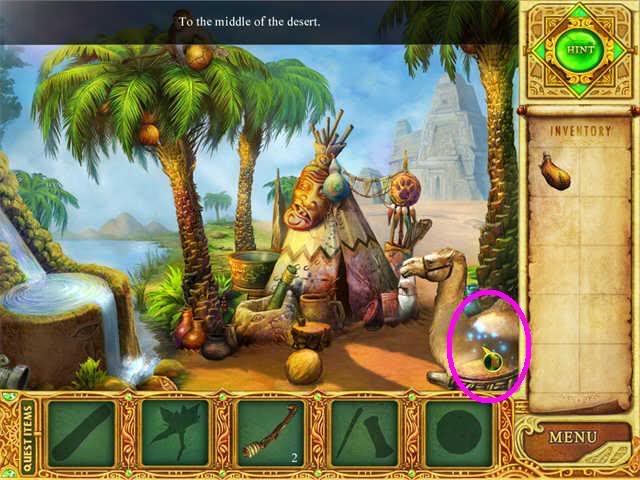
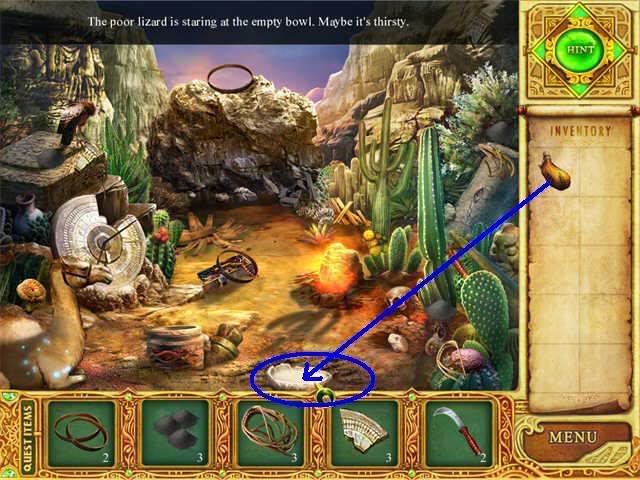
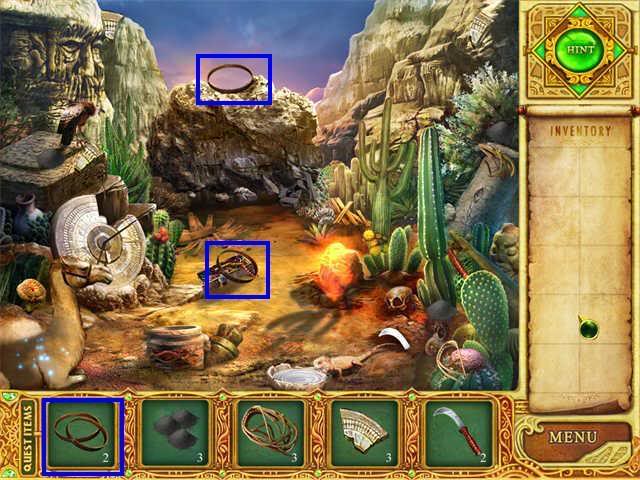
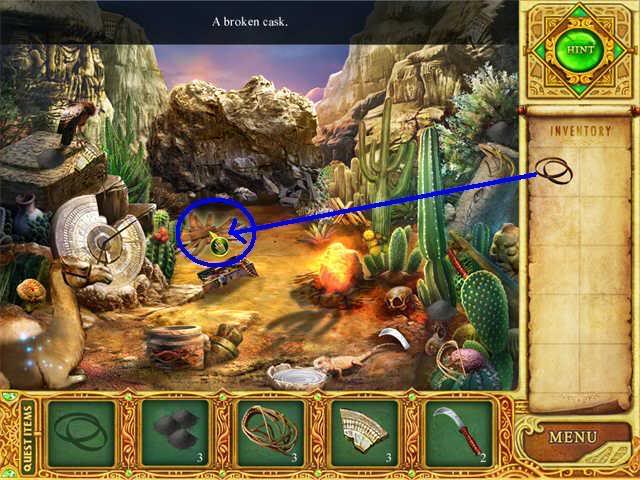
The Middle of the Desert: The Lizard
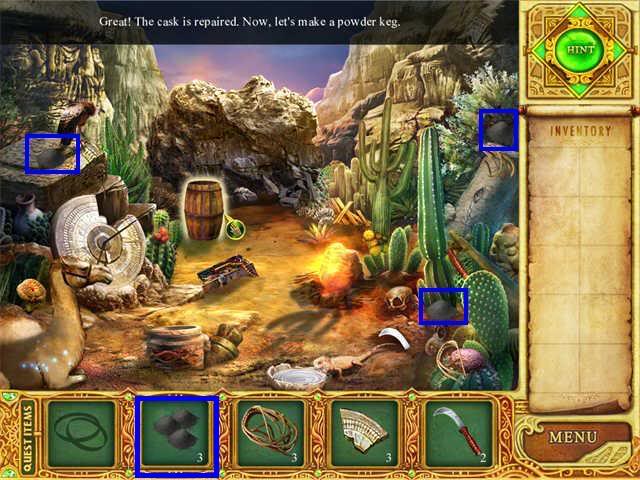
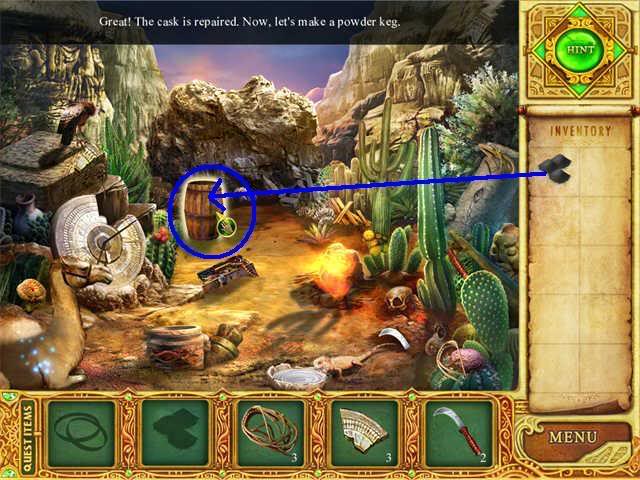
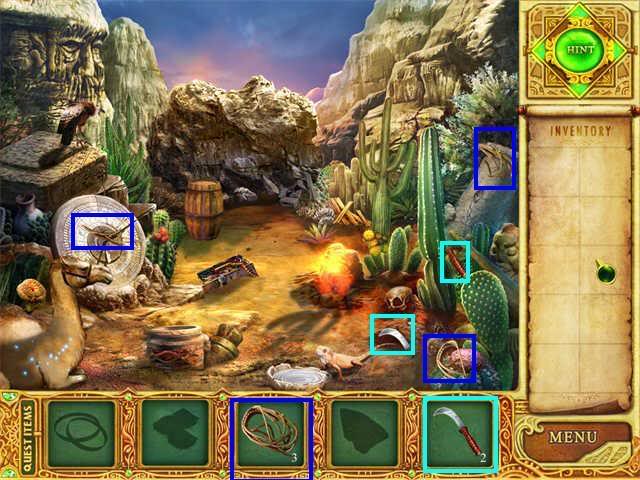
The Middle of the Desert: Build a Powder Keg (1)
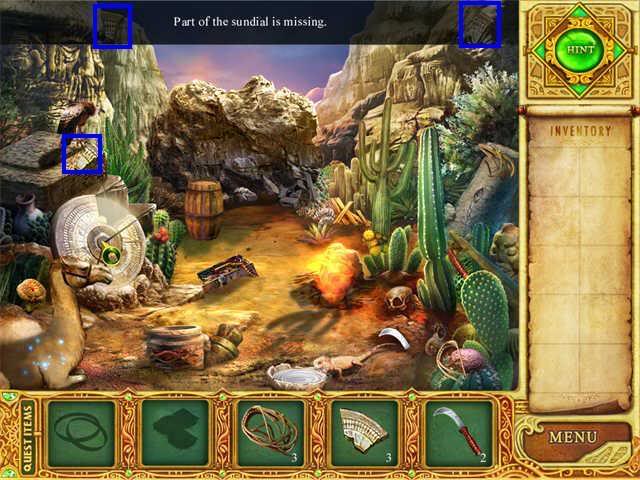
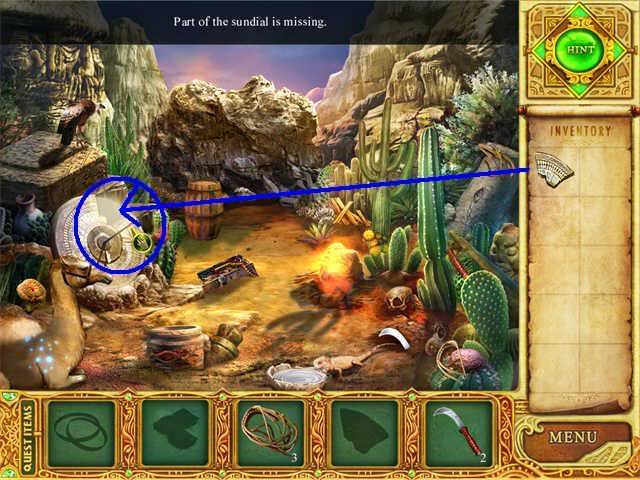
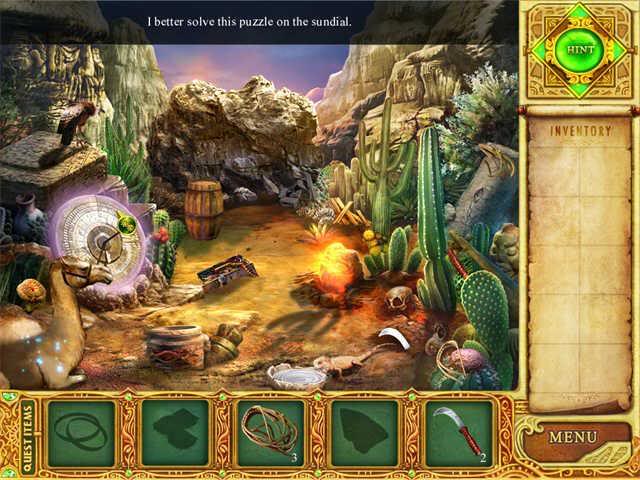
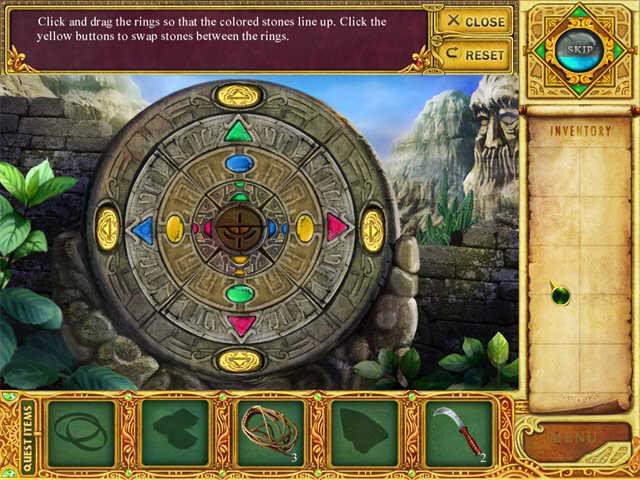
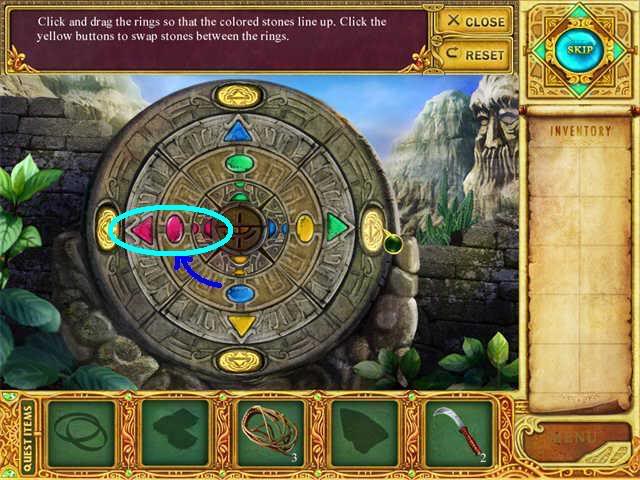
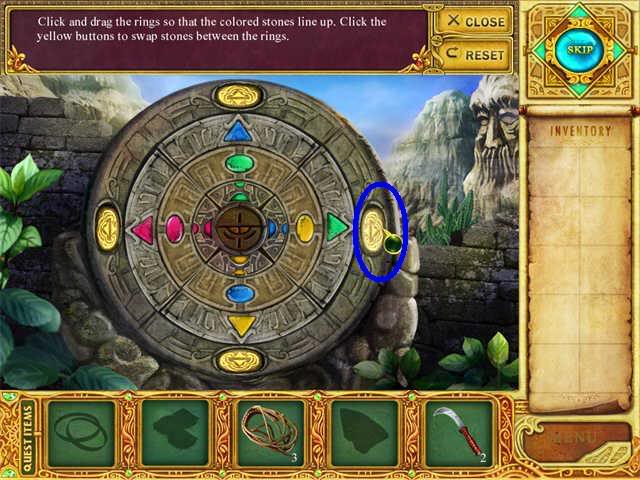
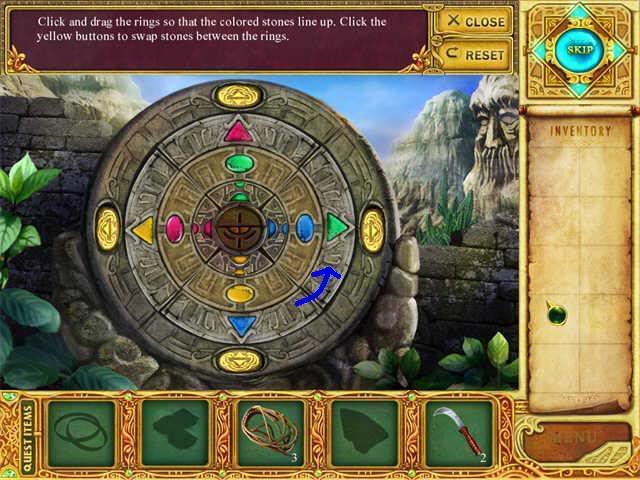
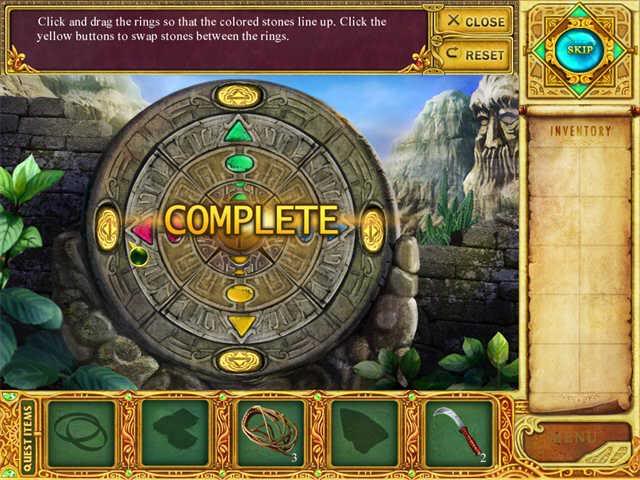
The Middle of the Desert: The Sundial

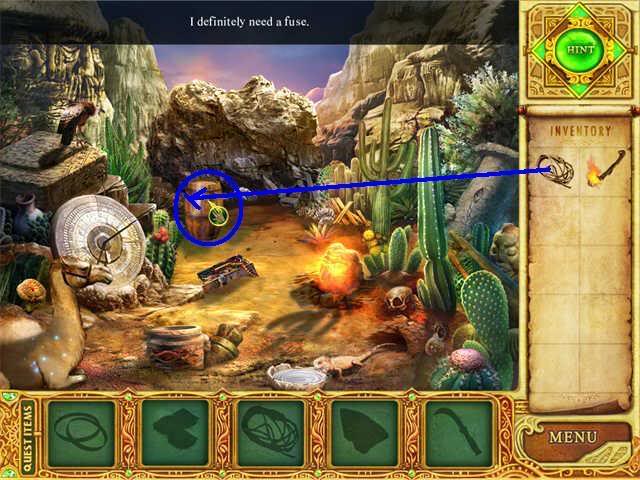
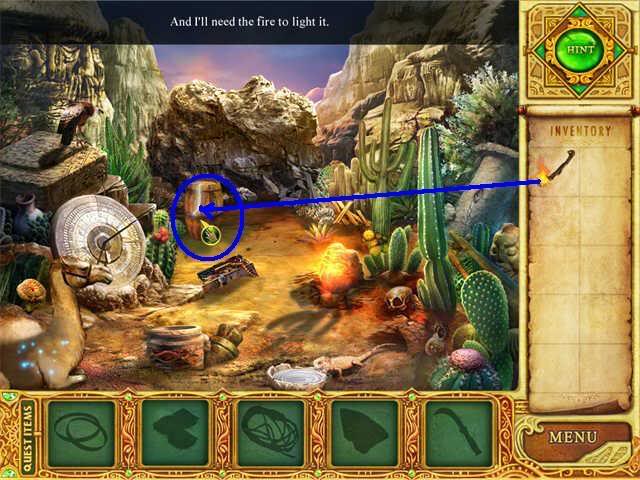
The Middle of the Desert: Add the Fuse
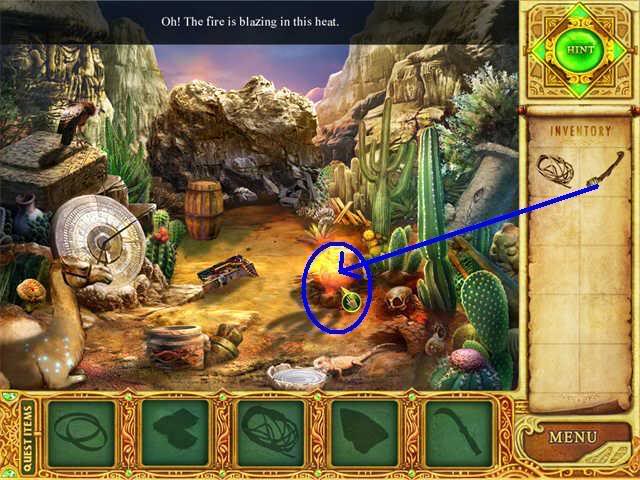
The Edge of the Desert: Find a torch

The Middle of the Desert: Clear the Wall!
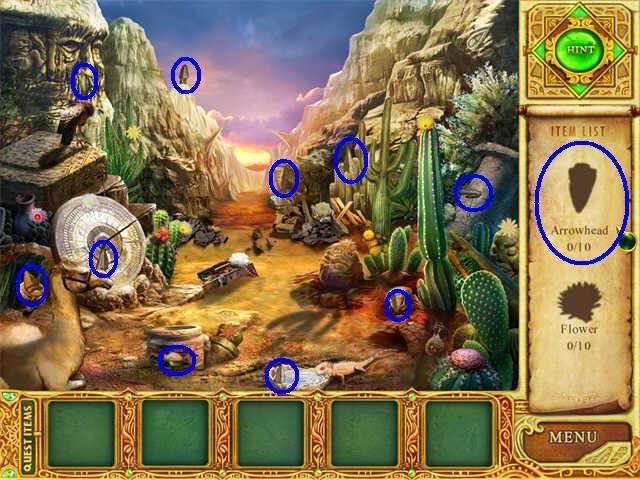
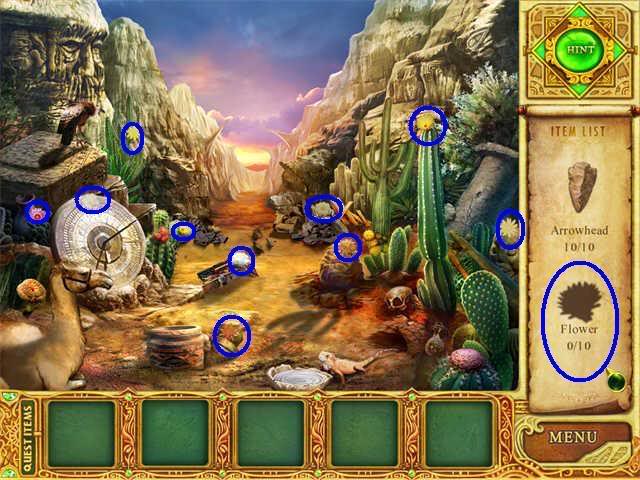
The Middle of the Desert: Find 10 Arrowheads and 10 flowers
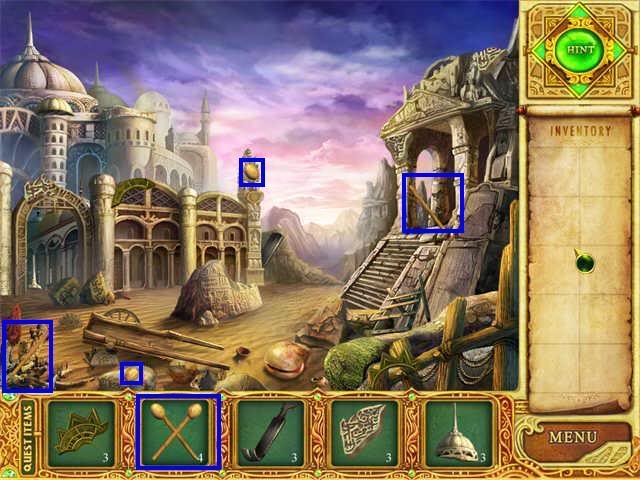
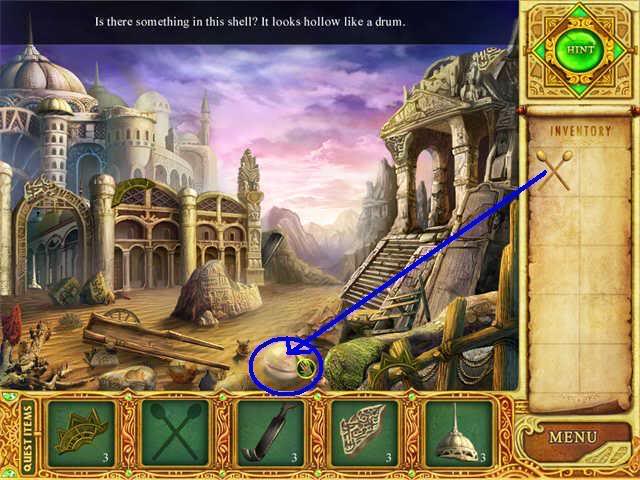
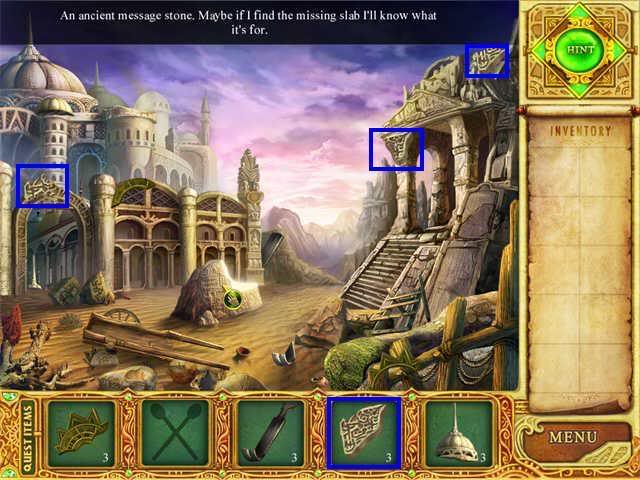
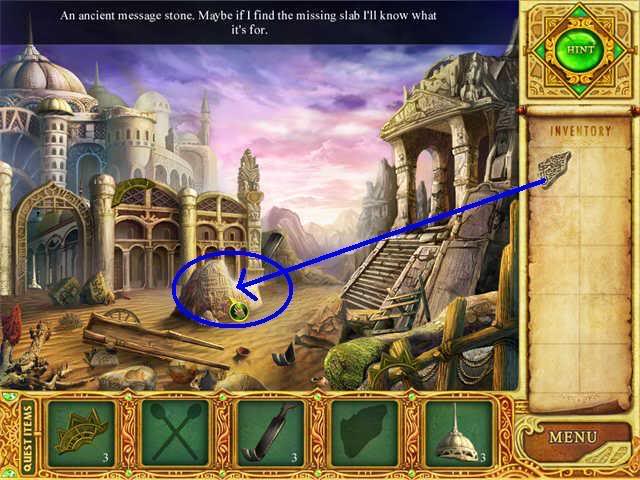
Loulan City: The Message Stone
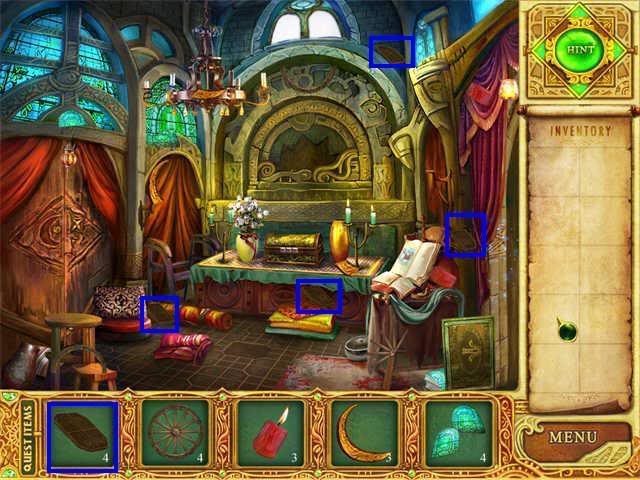
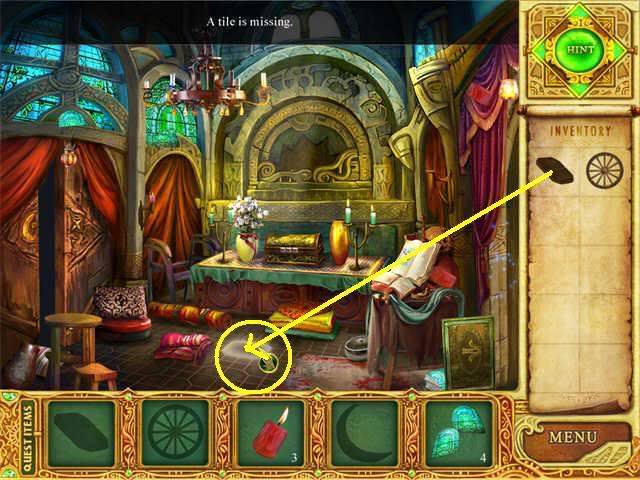
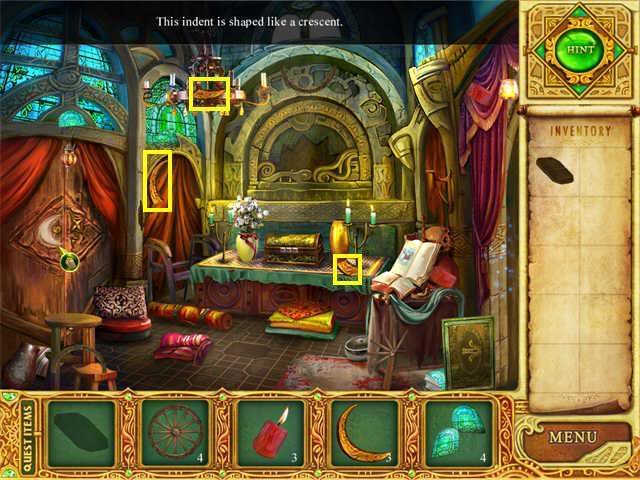
Loulan City Temple: The Tile
Loulan City Temple: Opening the Cabinet
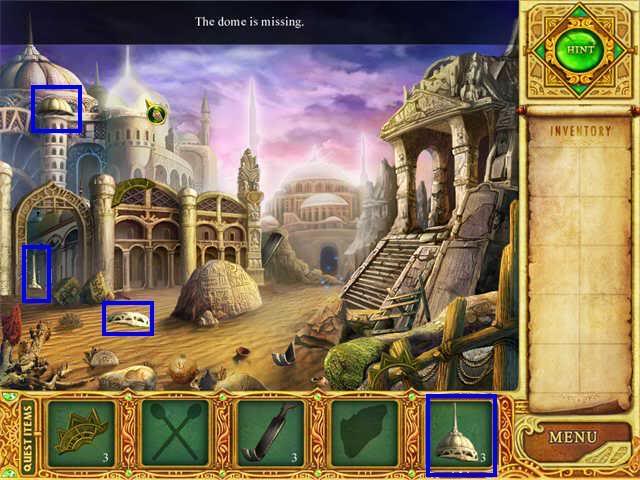
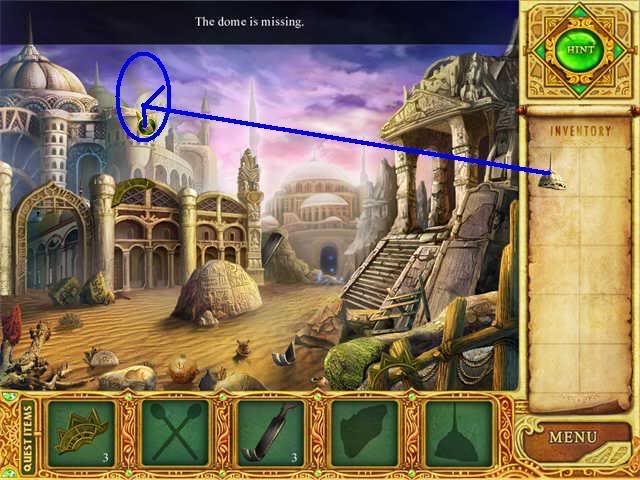
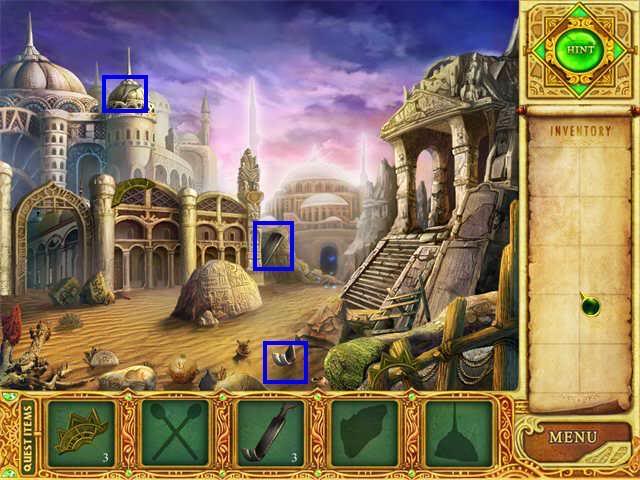
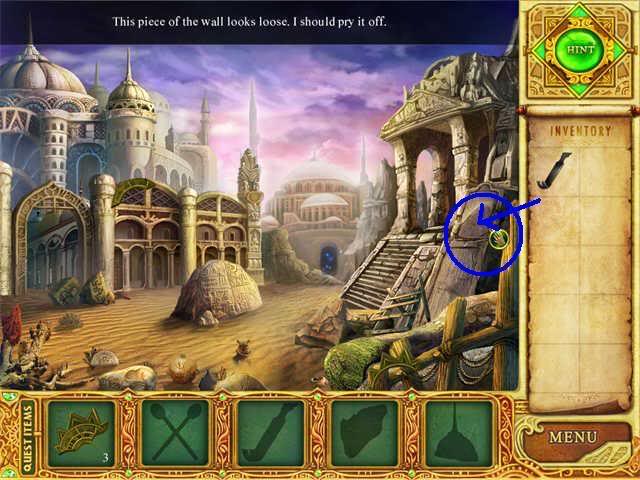
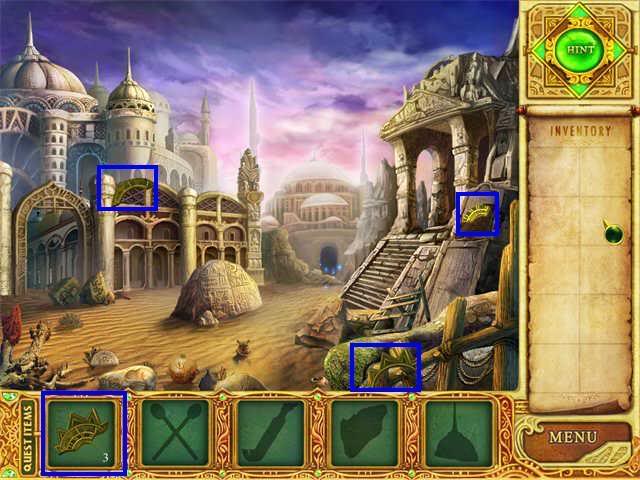
Loulan City: Restoring the Dome
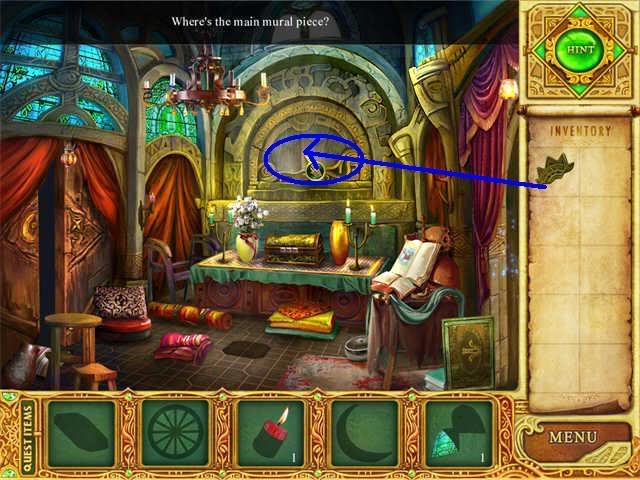
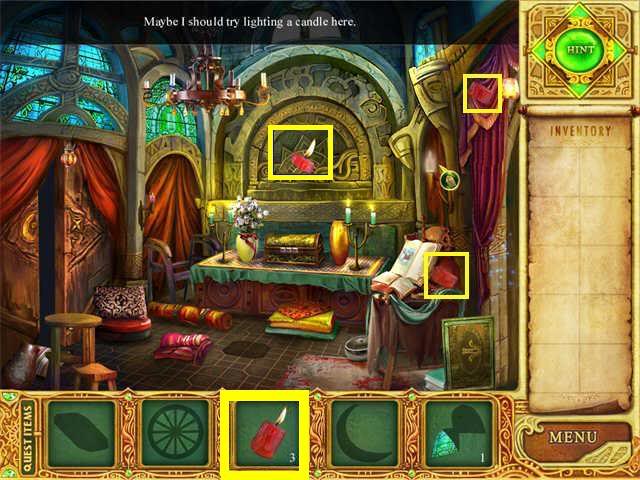
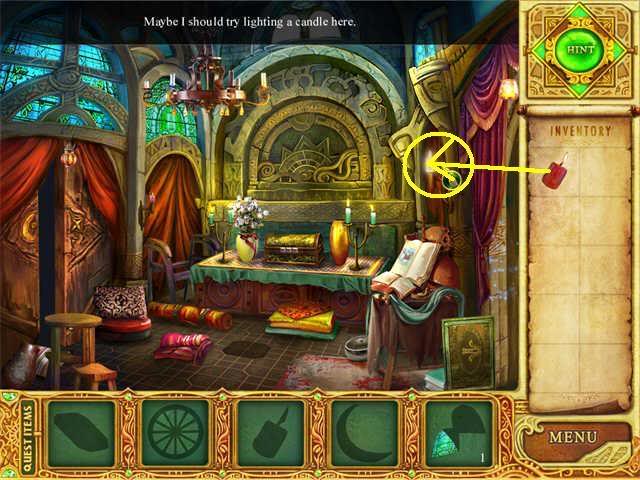
Loulan City Temple: Lighting the Candle
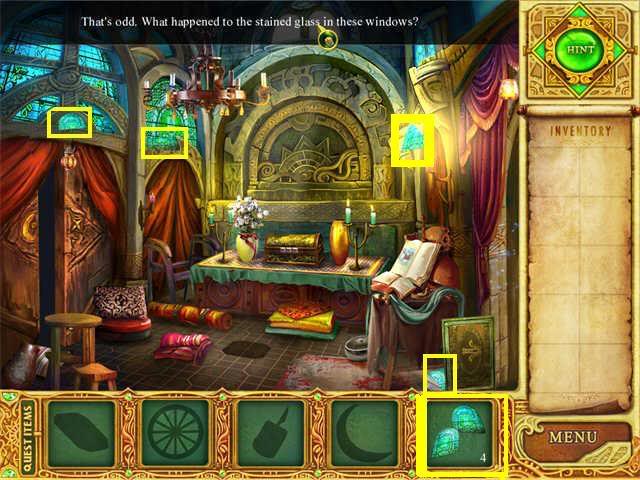
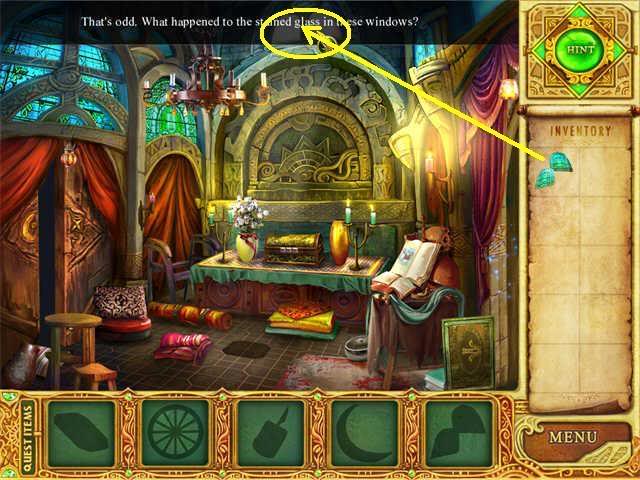
Loulan City Temple: Restore the Stained Glass Window
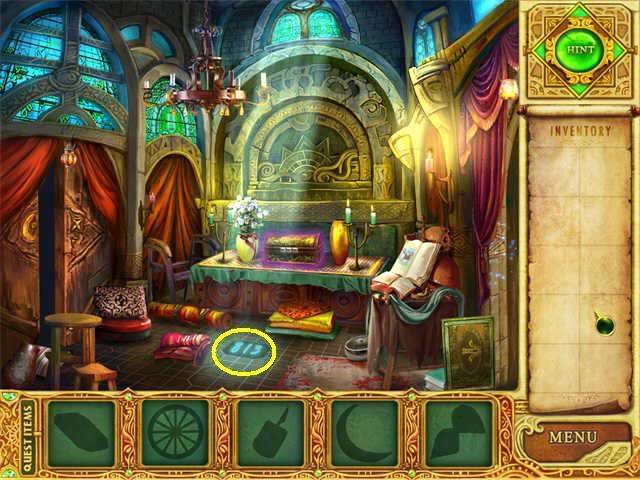
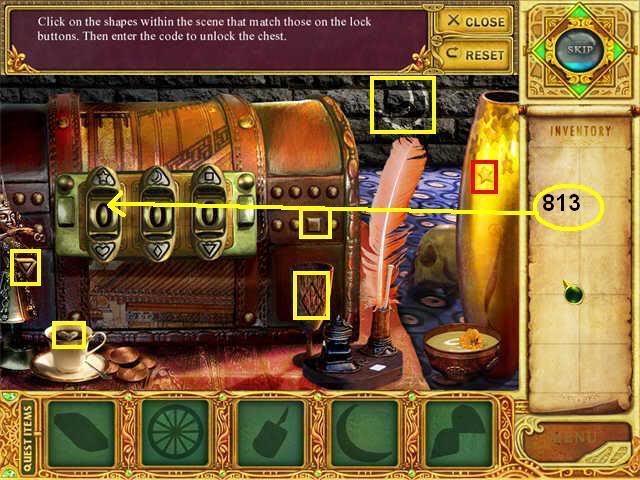
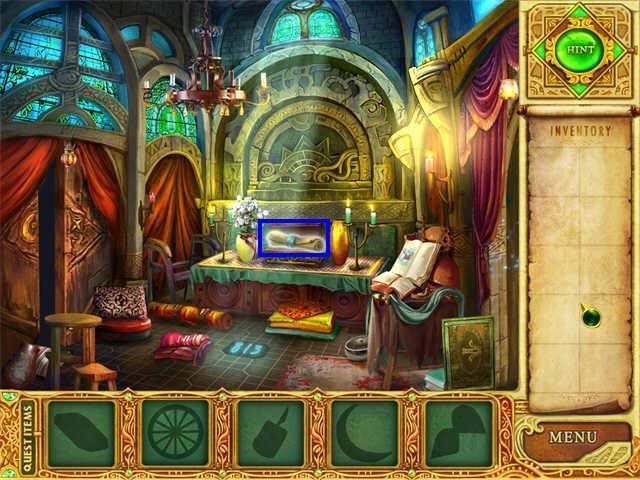
Loulan City Temple: The Chest
Click on the chest to start the puzzle.
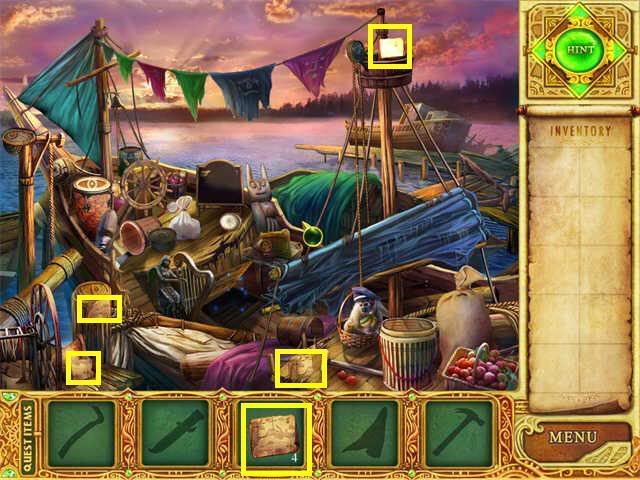
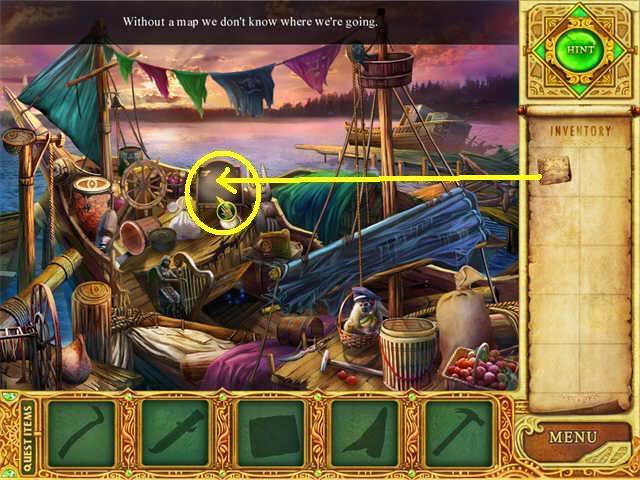
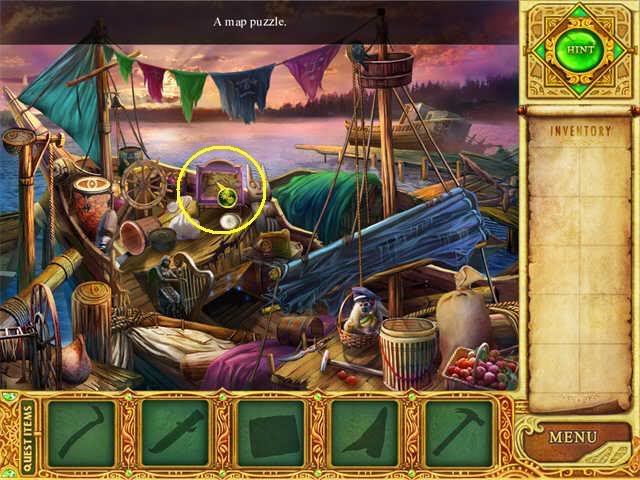
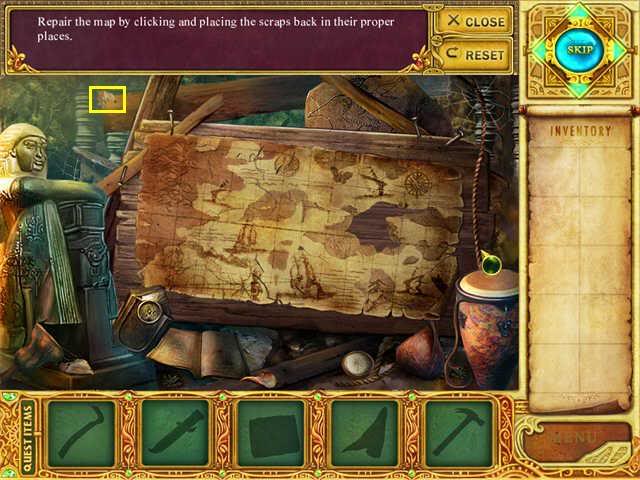
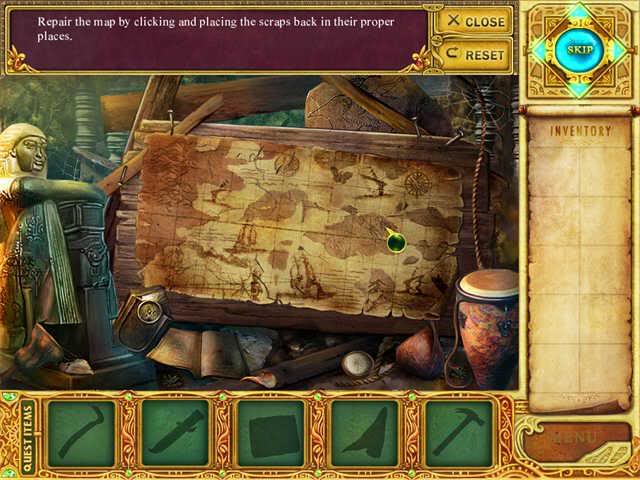
Loulan City Temple: The Map
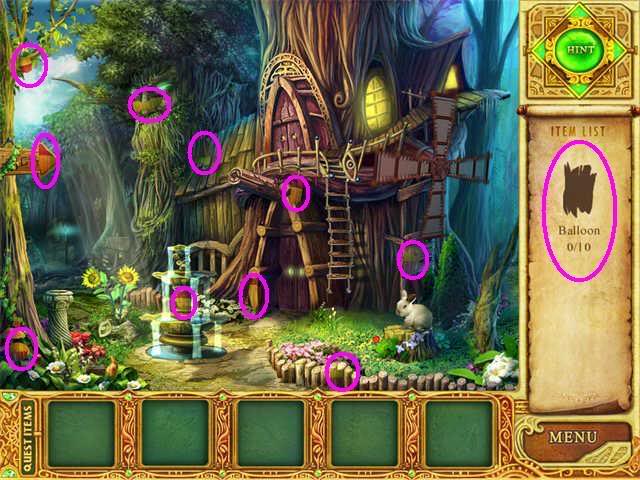
Outside the Wizard’s House: Find the 10 Balloon pieces
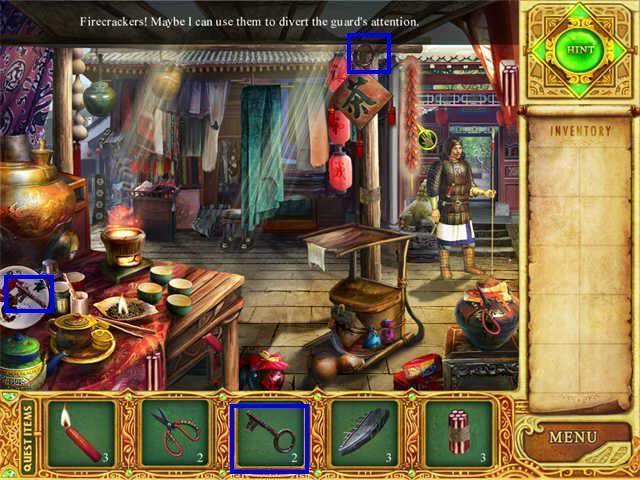
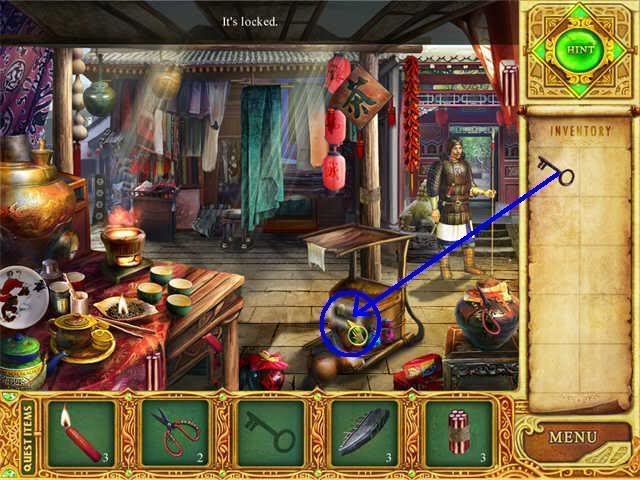
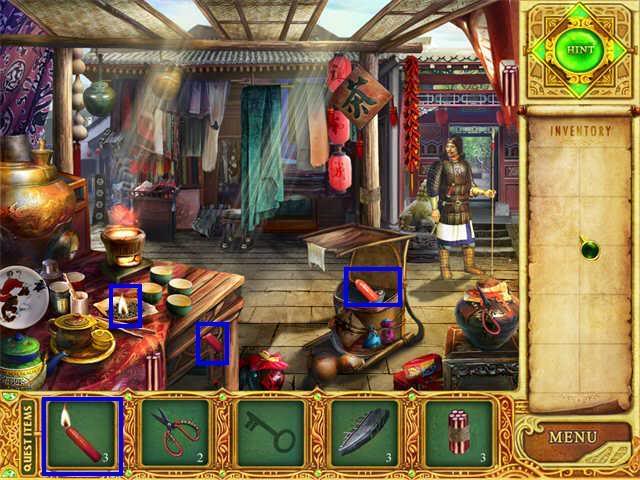
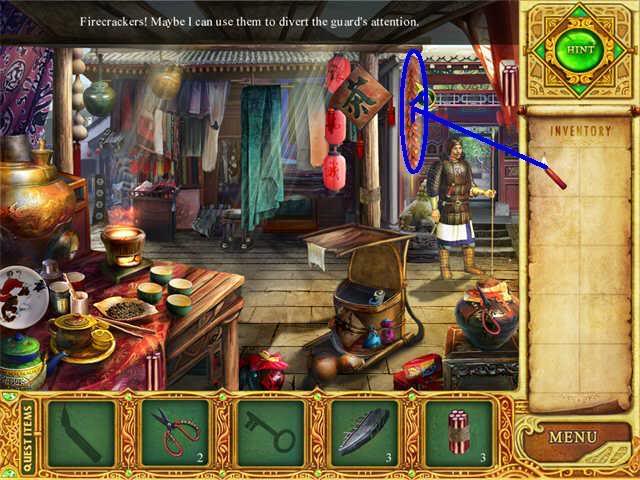
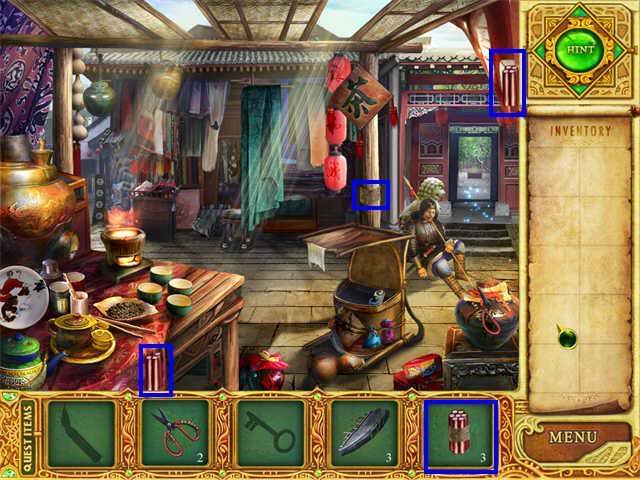
Trang City Market: Divert the Guard
Trang City Garden: Blow the Wall
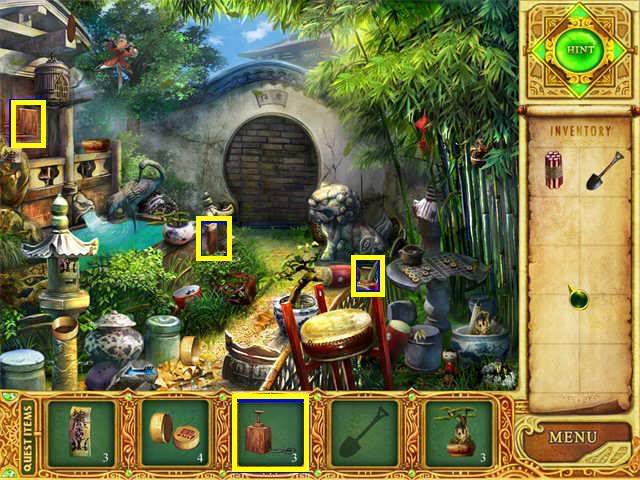
Trang City Garden: Miscellaneous
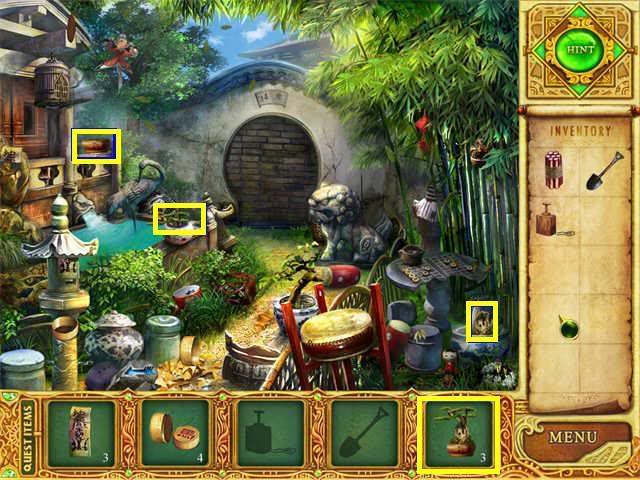
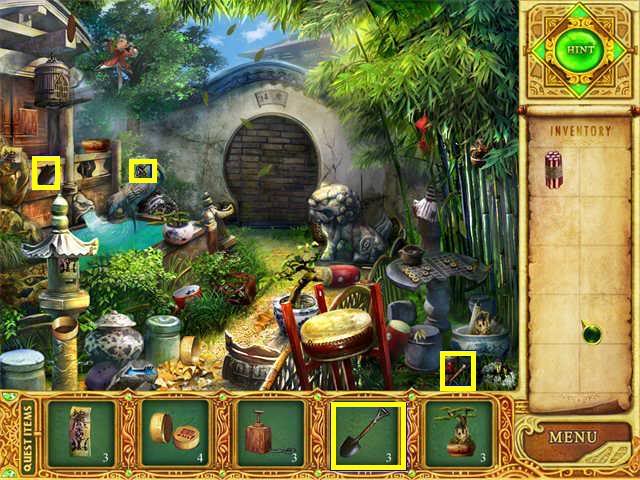
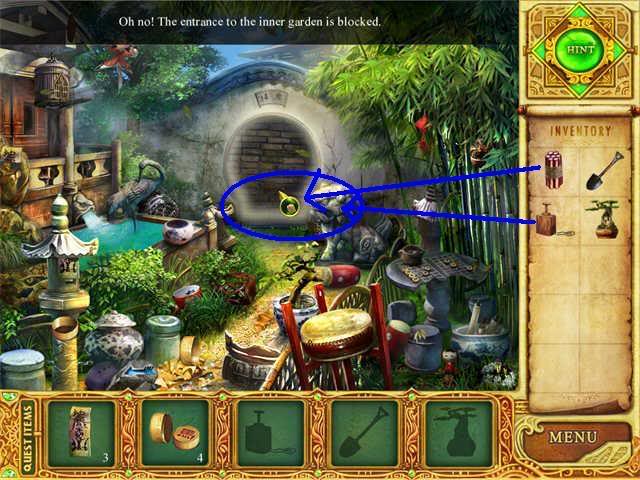
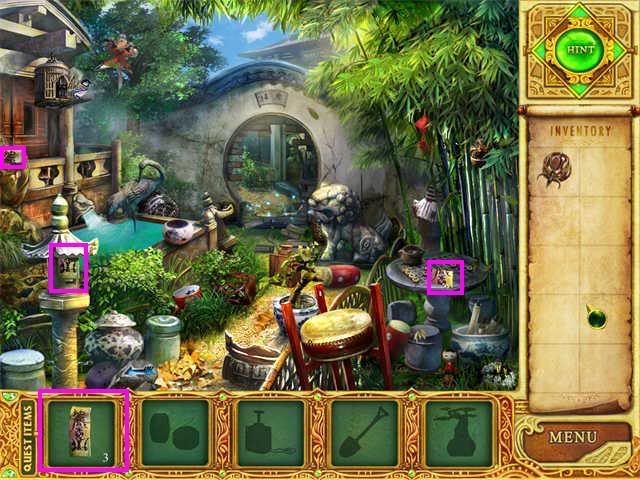
Trang City Inner Garden
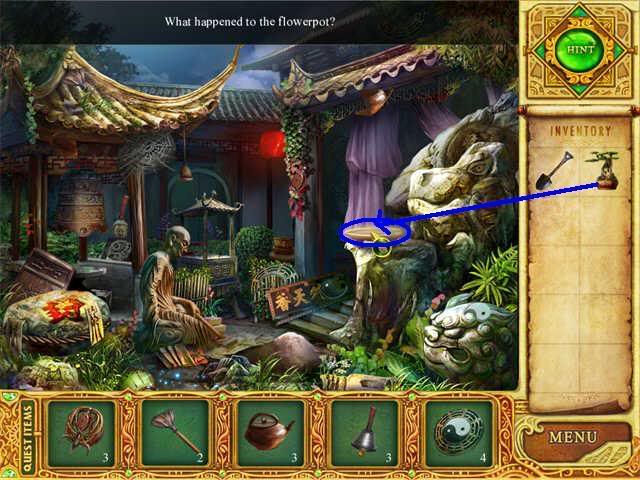

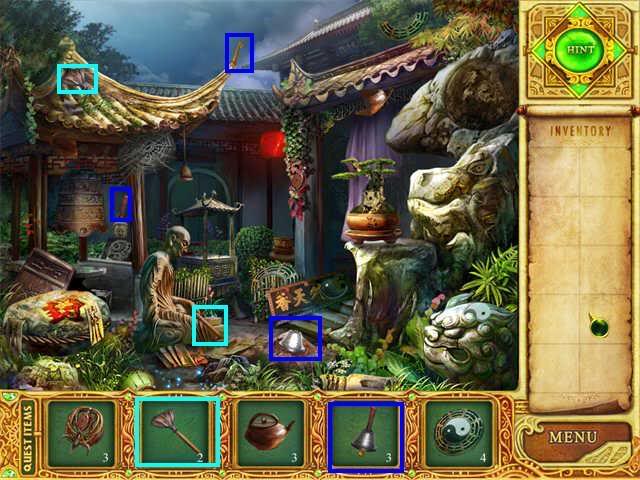
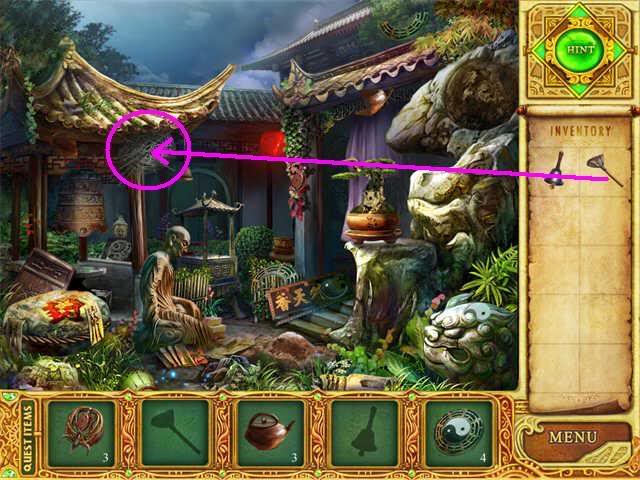
Trang City Inner Garden: The Teapot
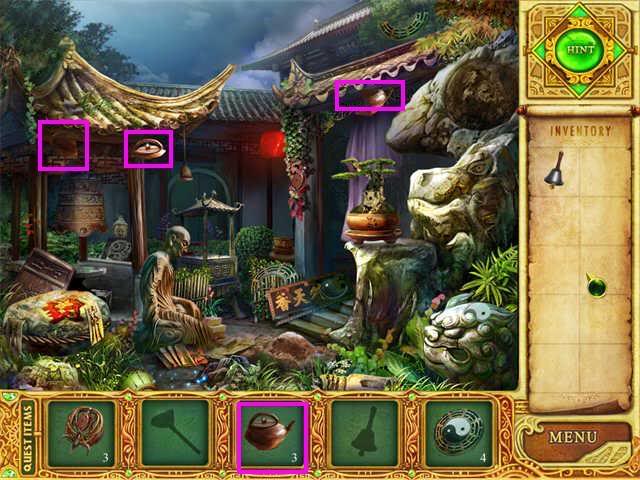
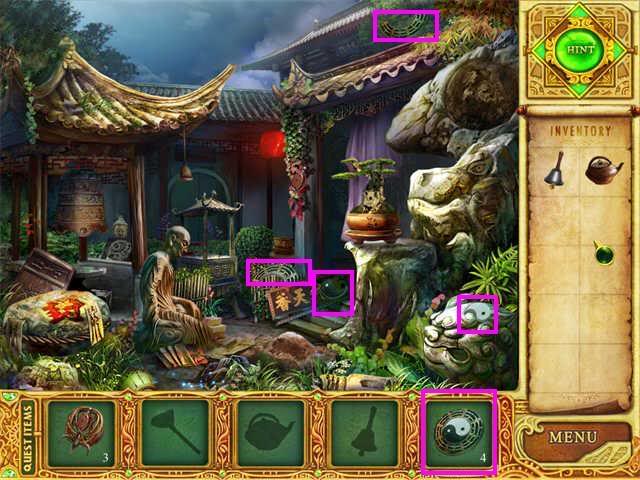
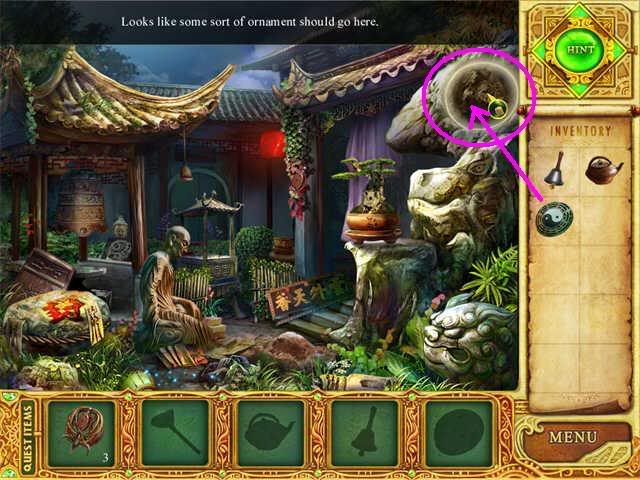
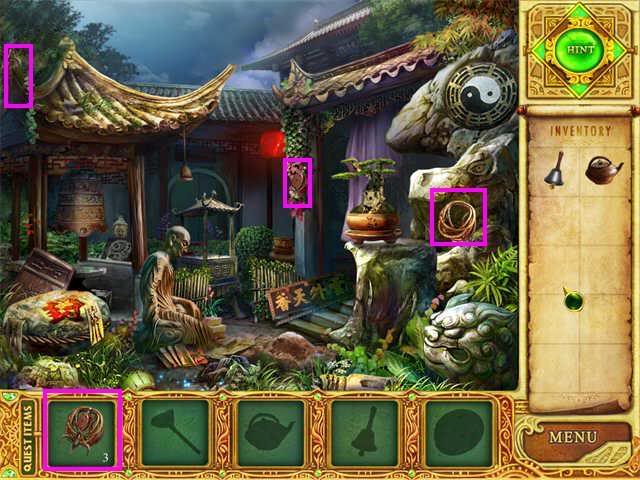
Trang City Inner Garden: The Yin Yang and the Stone Dragon
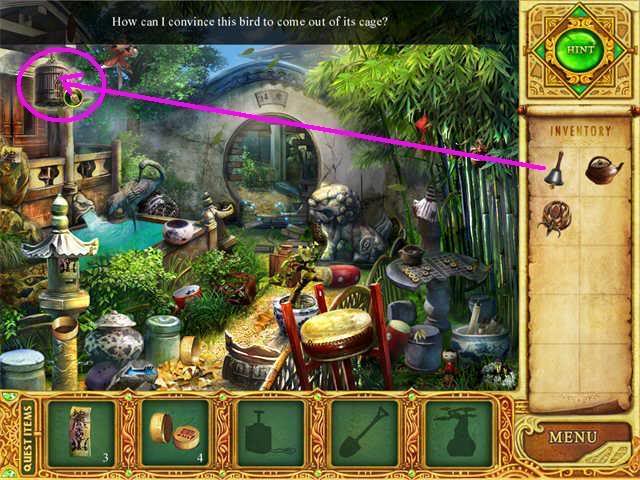
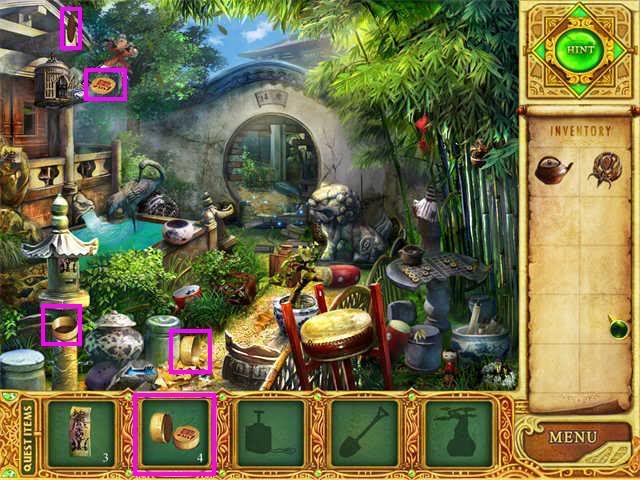
Trang City Garden: The bell and the bird
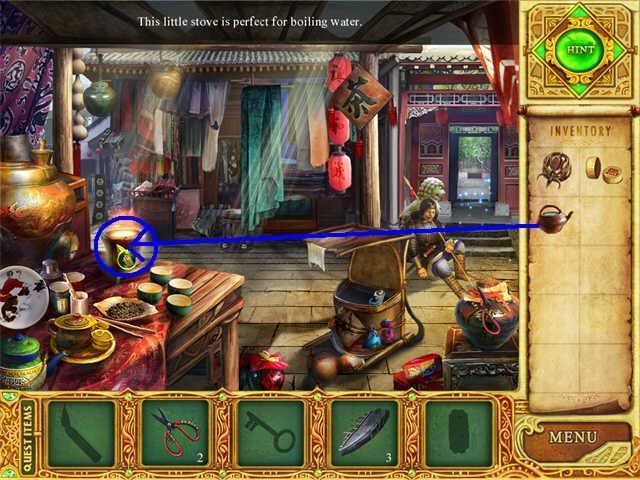
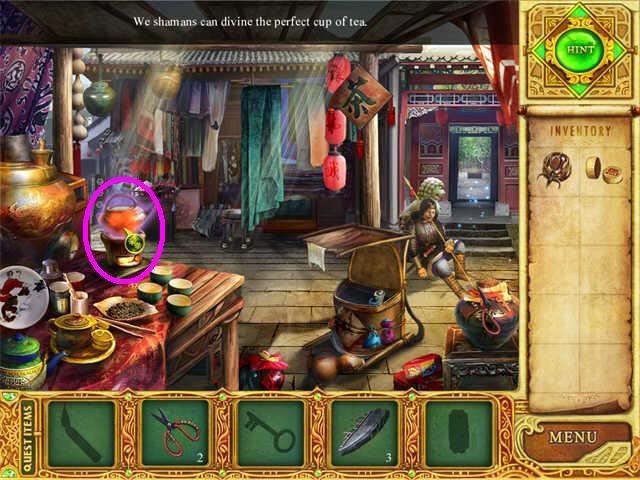
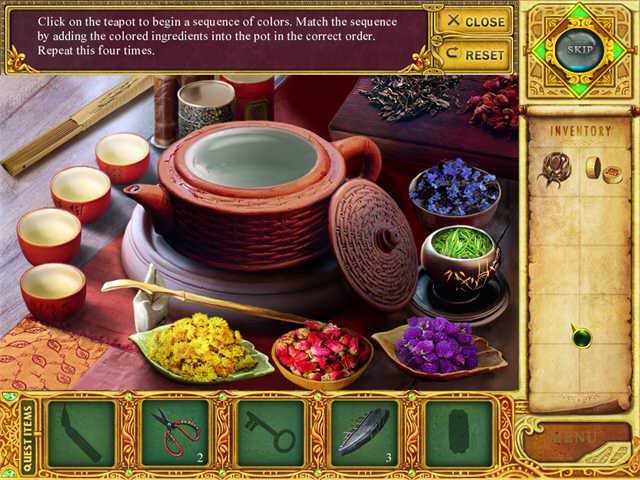
Trang City Garden/Trang City Market: The Perfect Cup of Tea

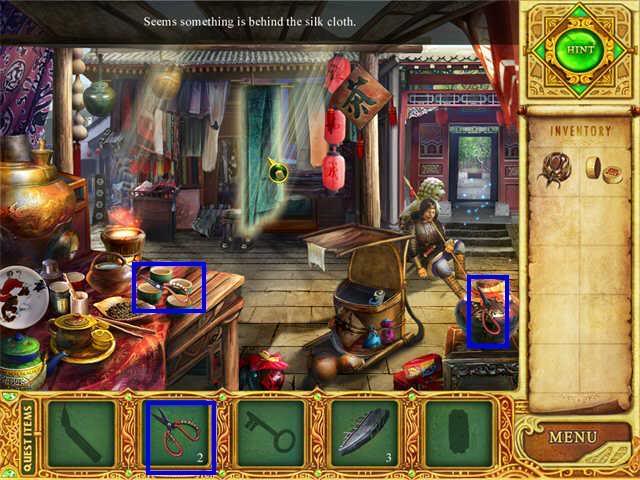
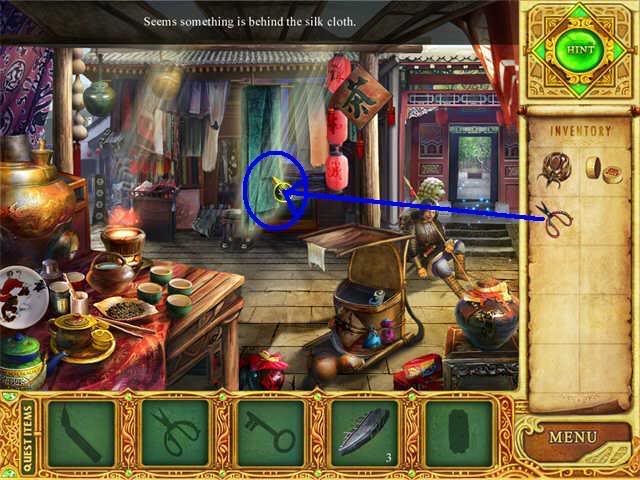
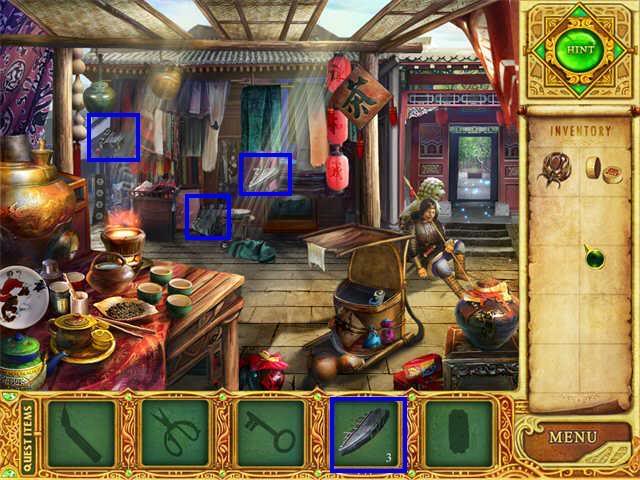
Trang City Market: Behind Curtain Number Two…
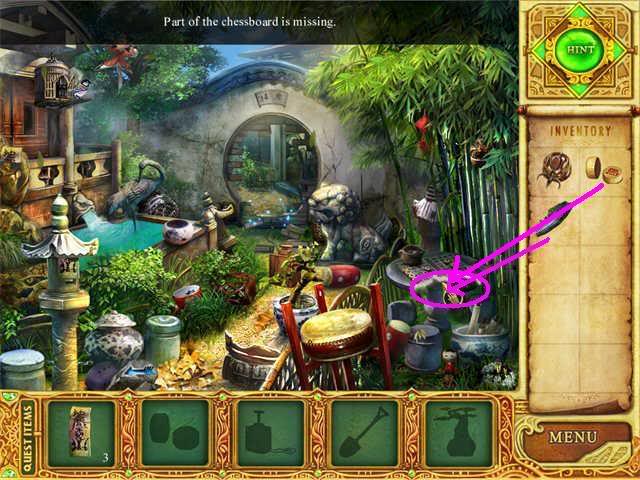
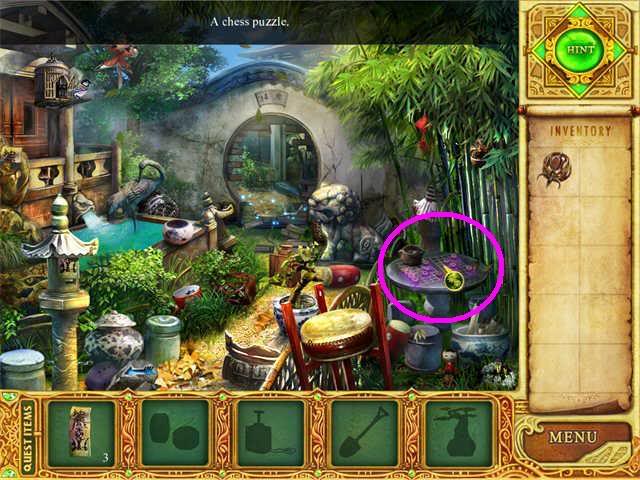
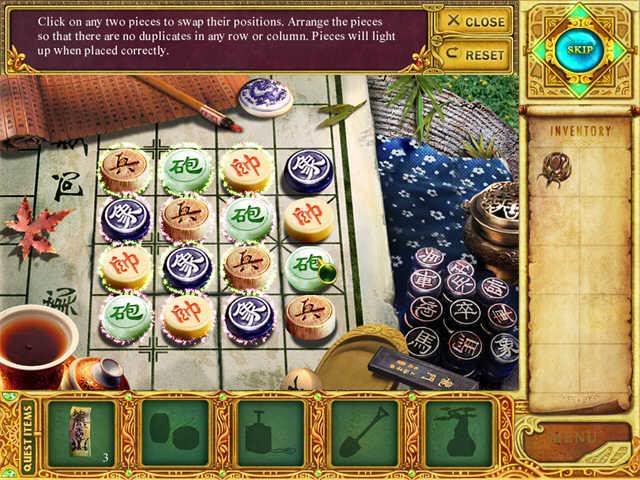
Trang City Garden: the Chessboard
Trang City Garden/Inner Garden: Parchment
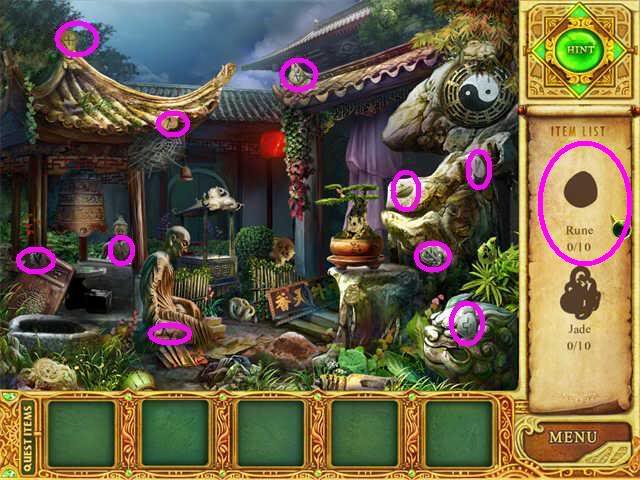
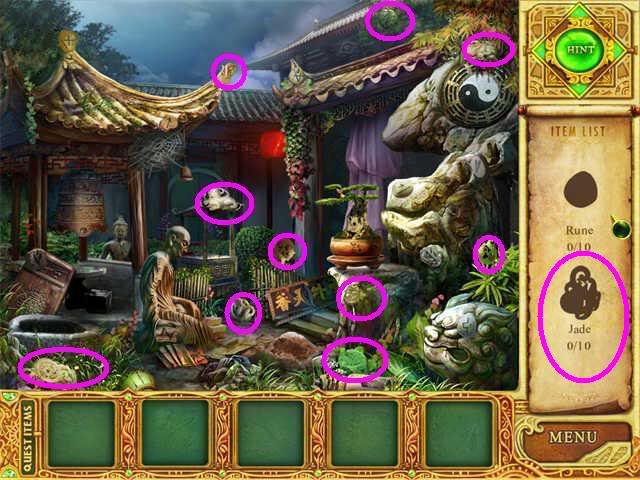
Trang City Inner Garden: Find 10 Runes and 10 Jade Stones
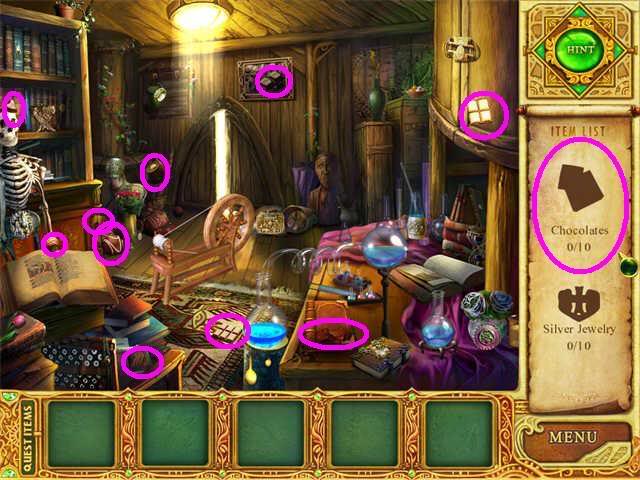
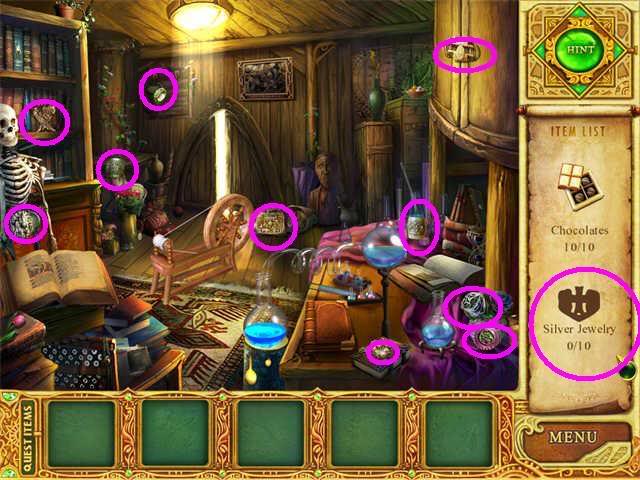
Wizard’s Workshop: Find 10 Chocolates and 10 pieces of Silver Jewelry
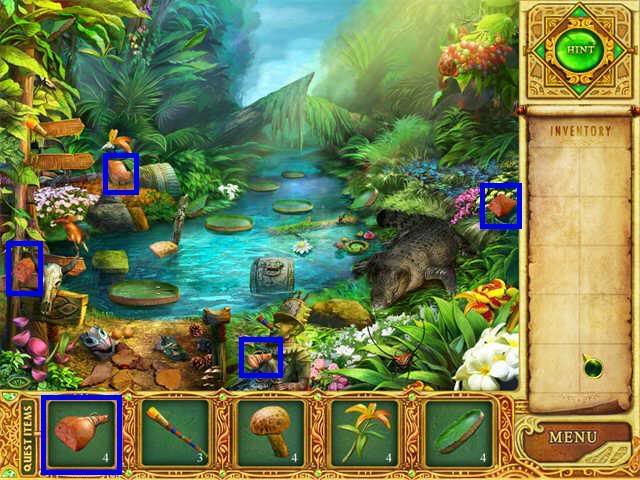
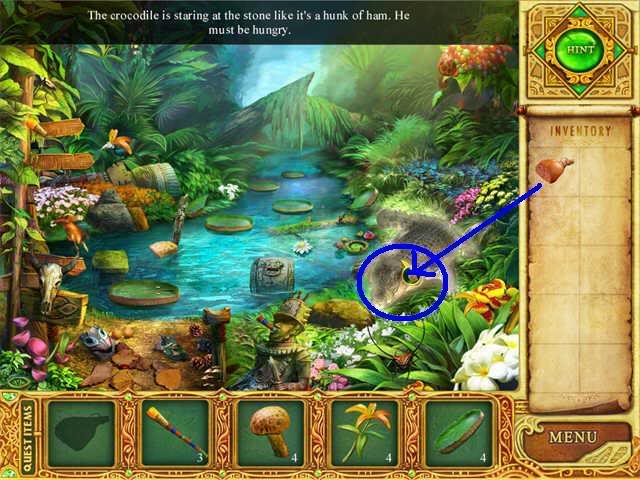
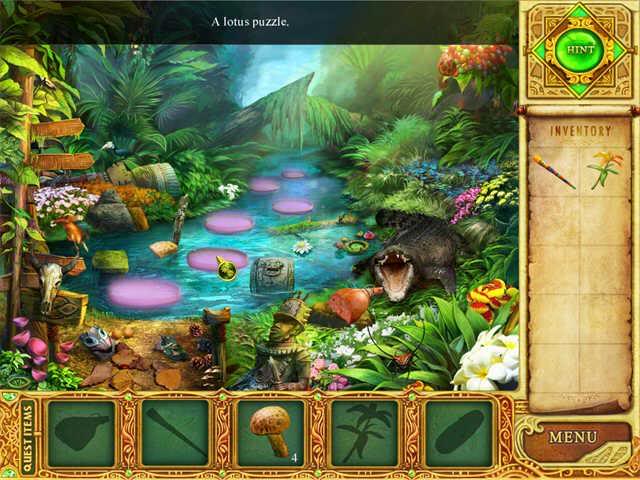
The Jungle Tribe: Feed the Crocodile
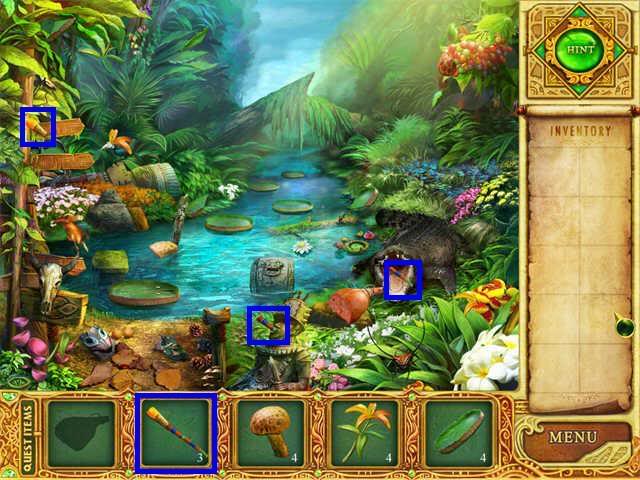

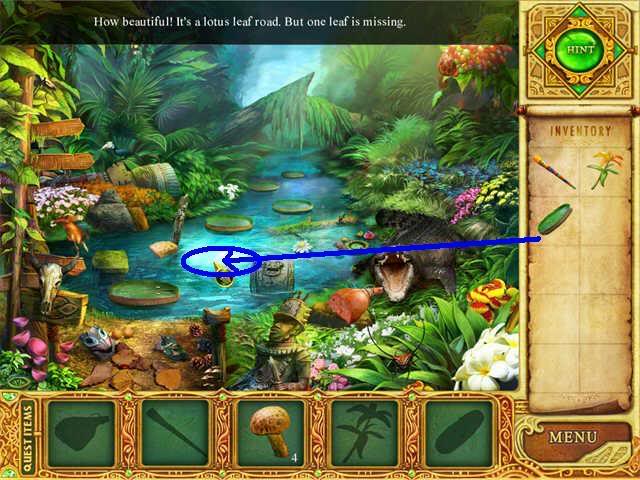
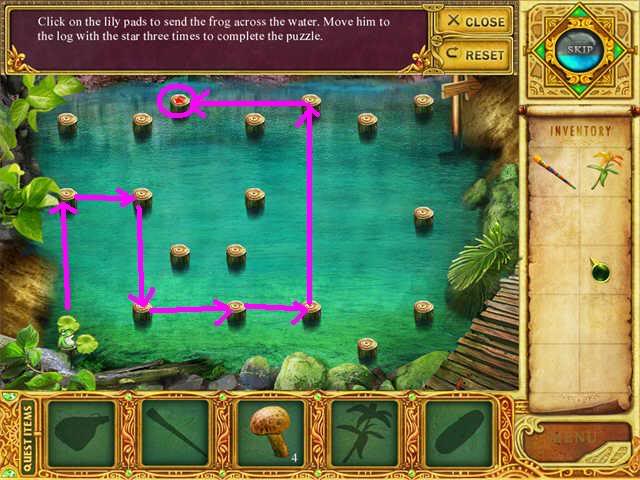
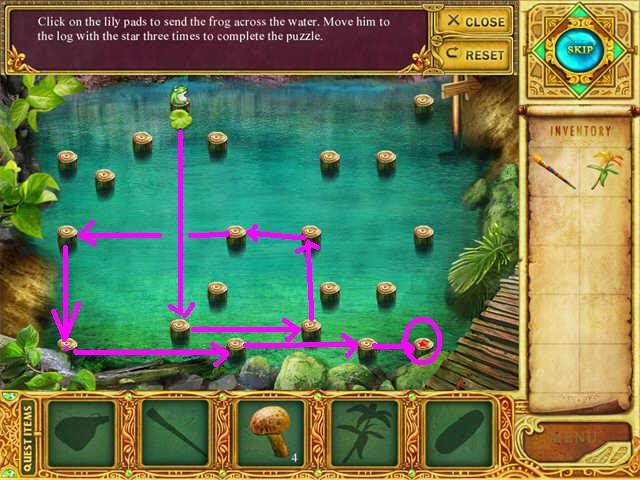
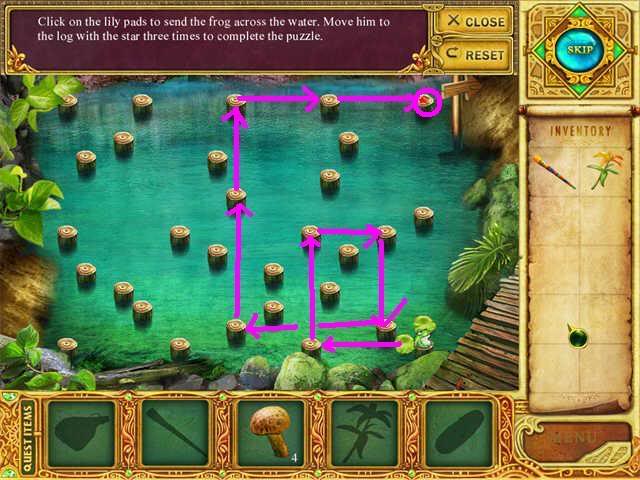
The Jungle Tribe: The lotus leaf road

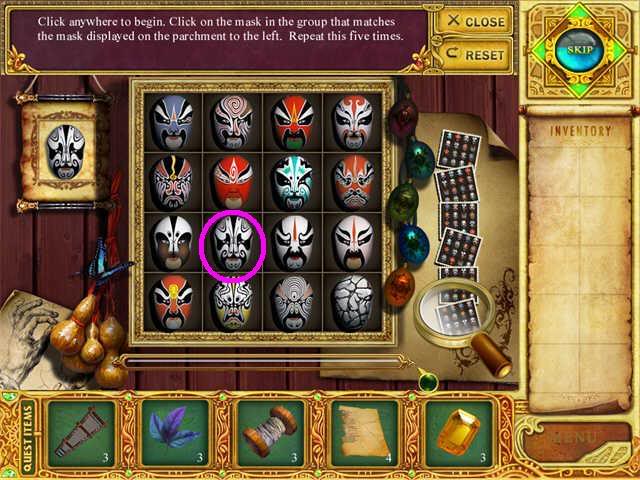
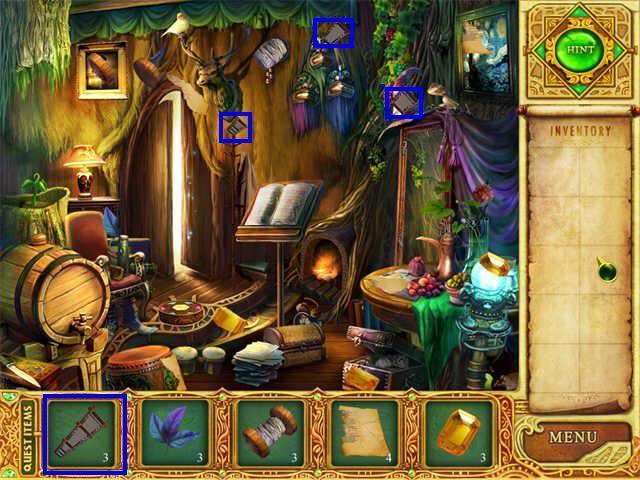
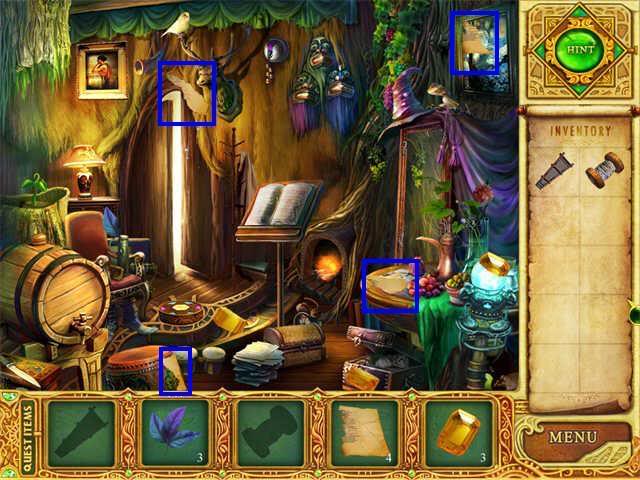
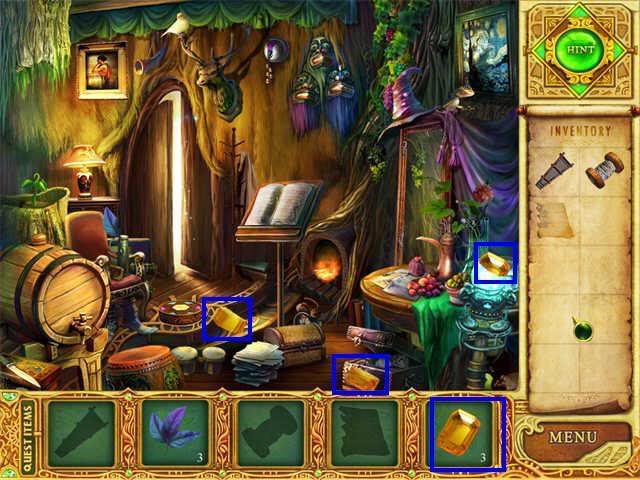
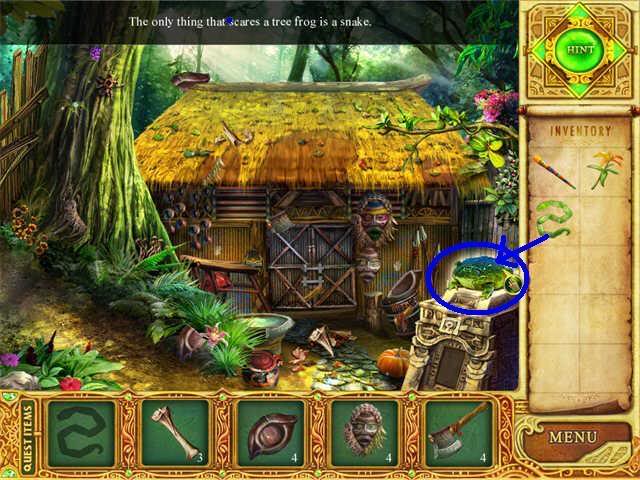
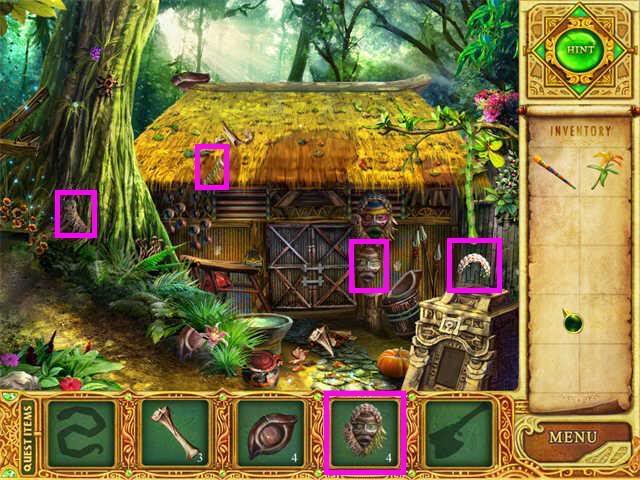
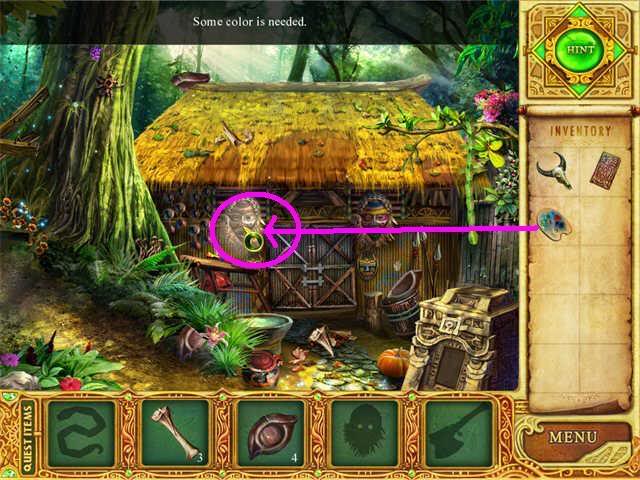
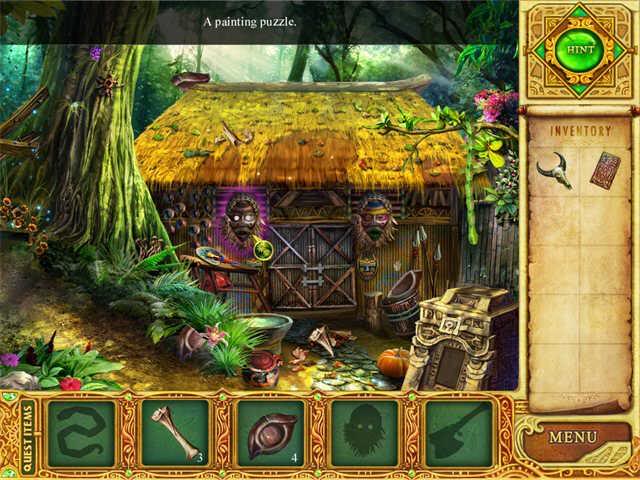
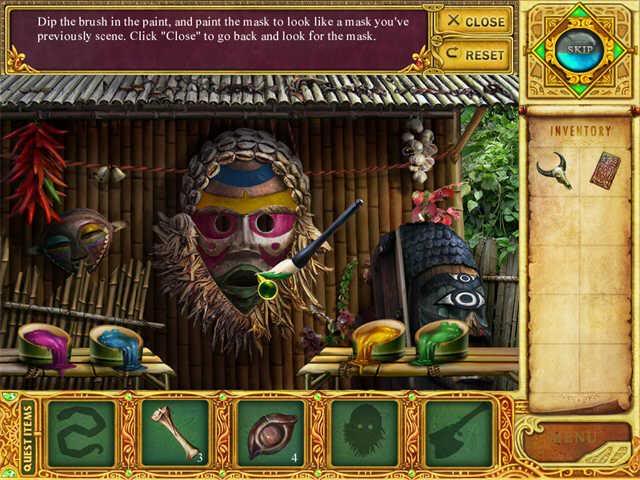
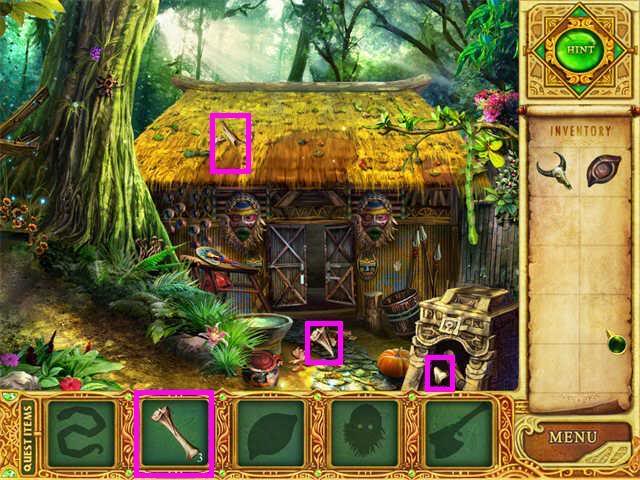
Jungle Tribe First Hut: The Painted Mask (1)
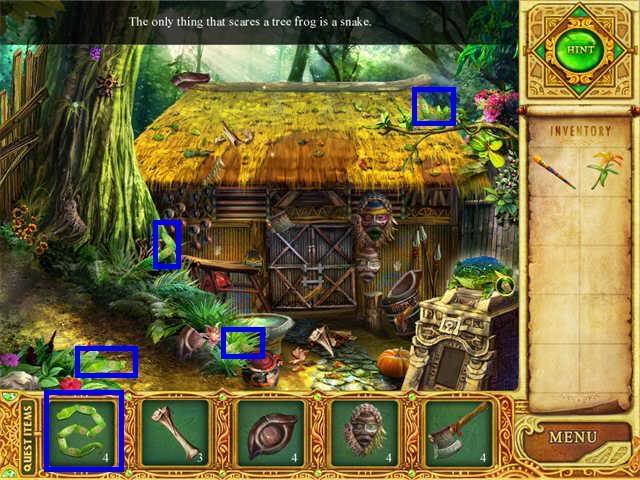

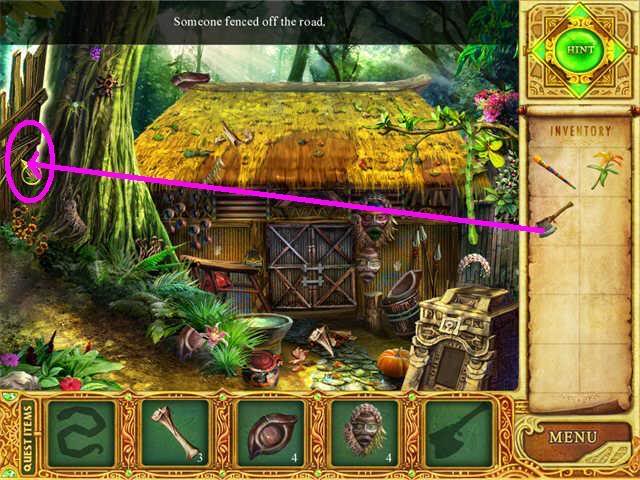
Jungle Tribe First Hut: Open the road

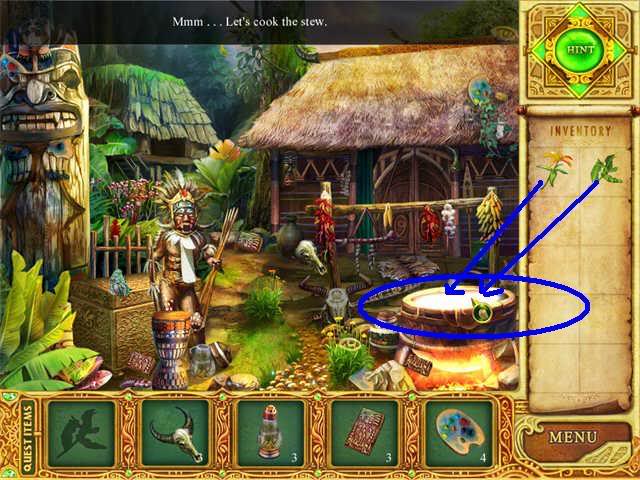
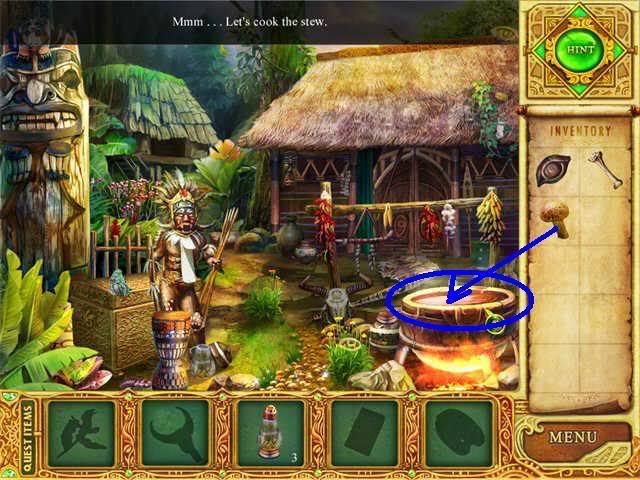
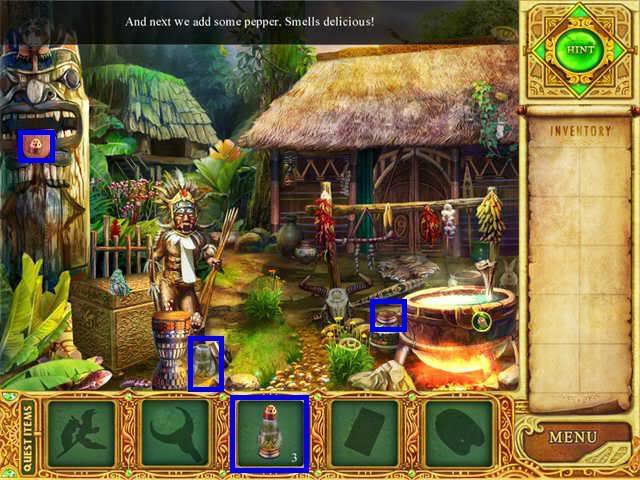
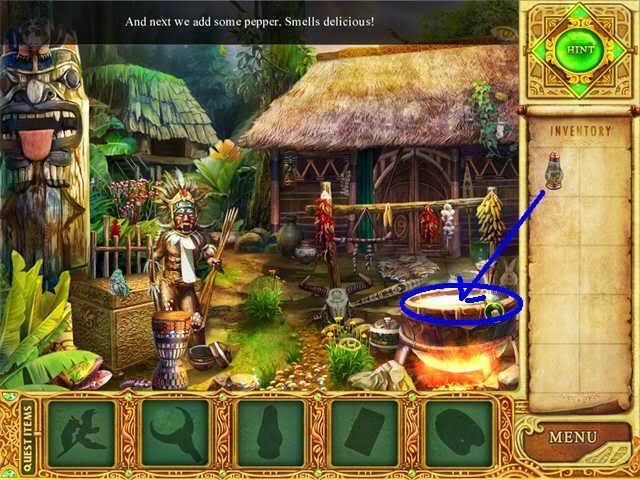
Jungle Tribe Village: Start the stew

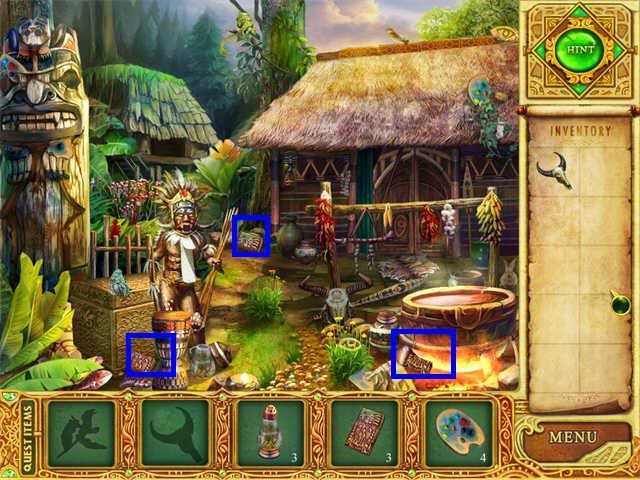
Jungle Tribe Village: Miscellaneous

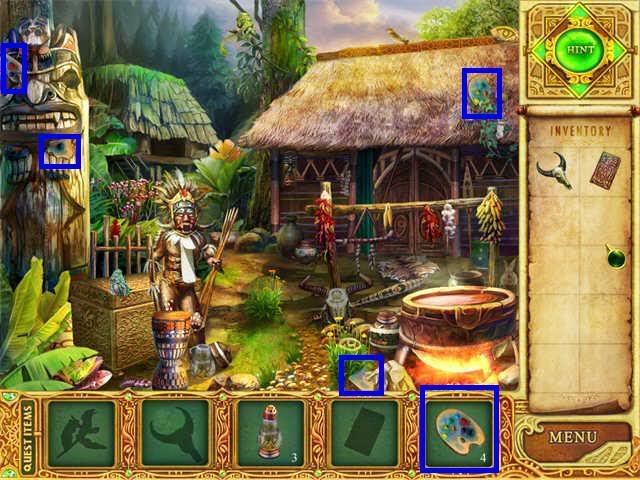
Jungle Tribe Village/First Hut: The Painted Mask (2)

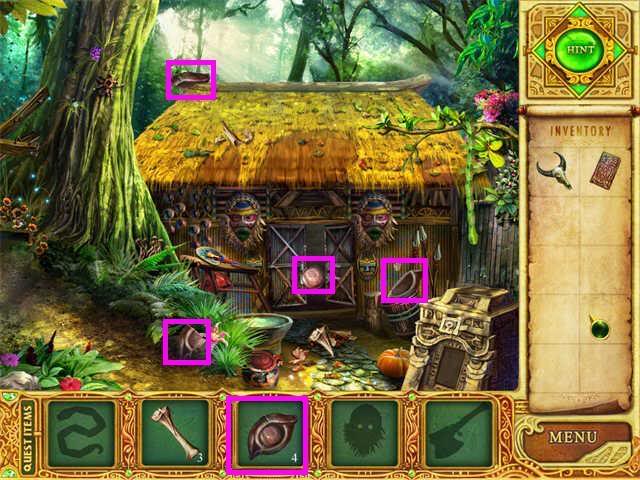
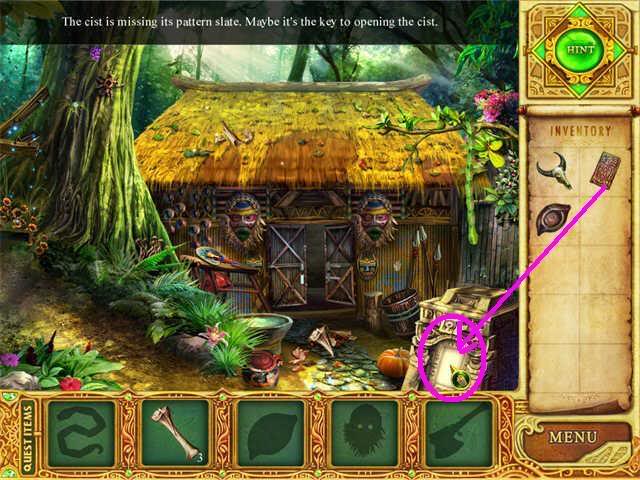
The Jungle Tribe First Hut: Inside the Cist
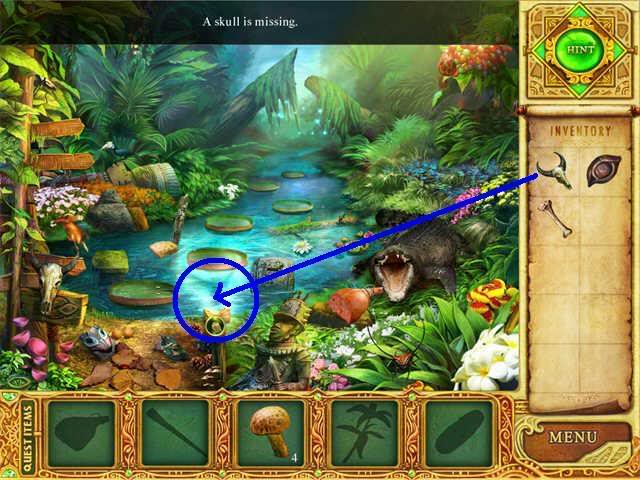
The Jungle Tribe Pond: Skull

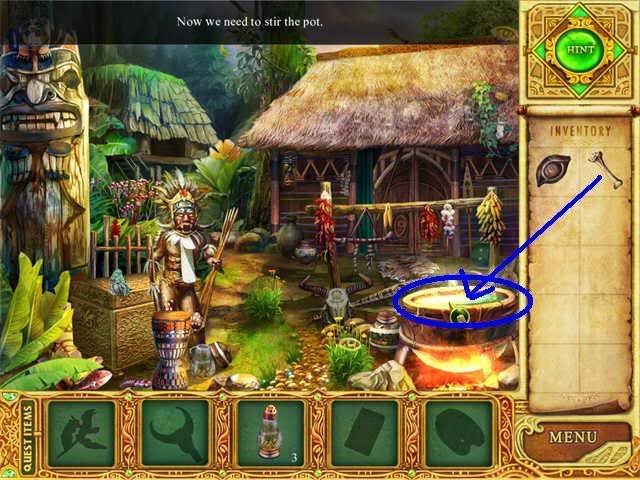
The Jungle Tribe Village: The Soup
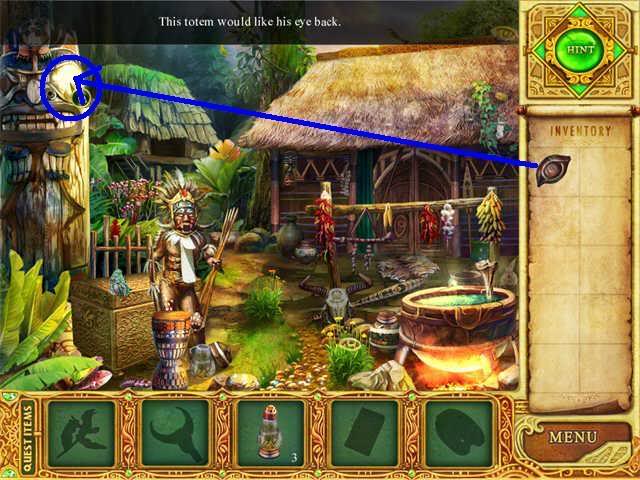
The Jungle Tribe Village: The Totem’s Eye
The Jungle Tribe Village: Collect 10 Fruits and 10 Vegetables

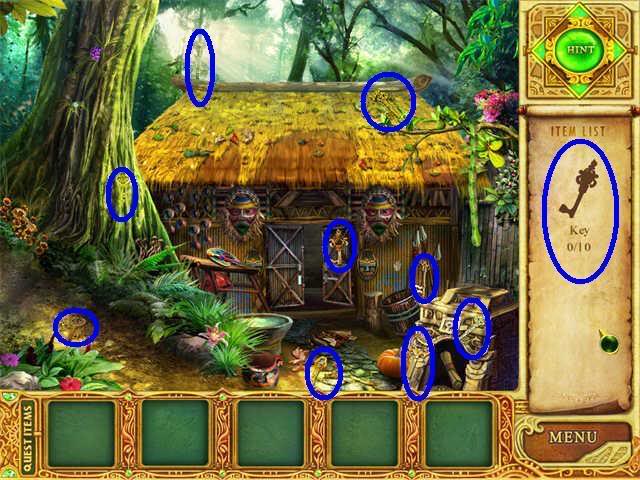
The Jungle Tribe First Hut: Collect 10 Keys
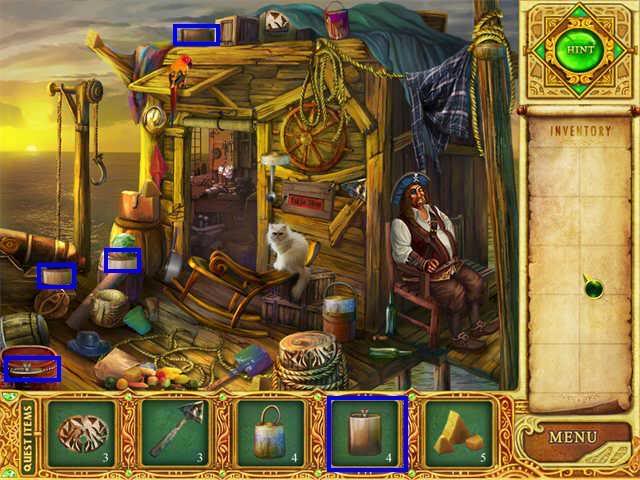
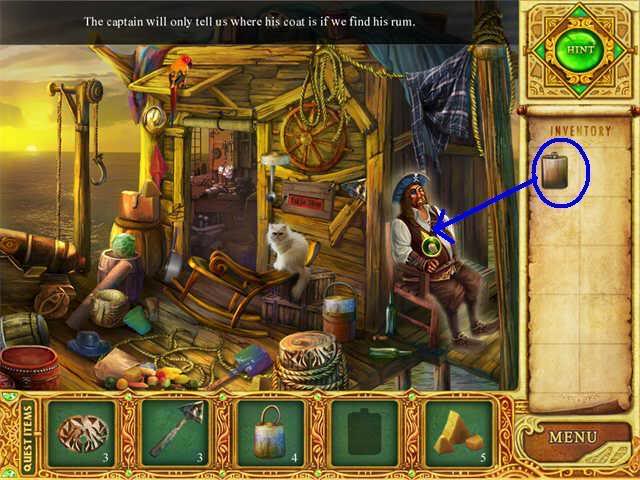
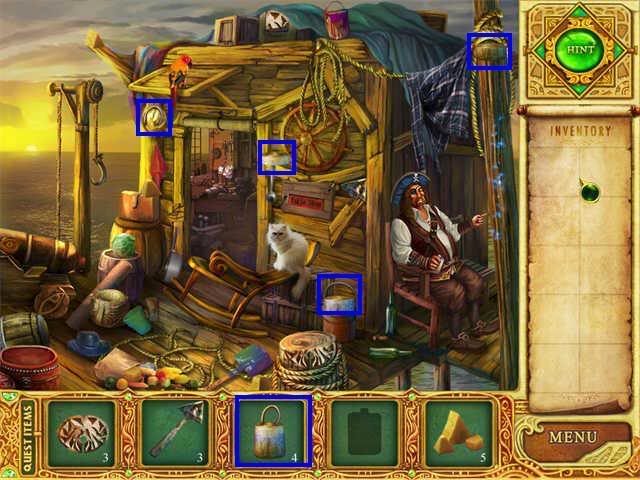
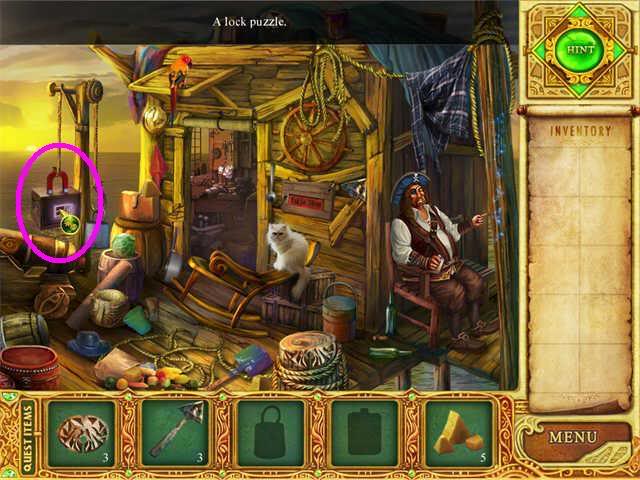
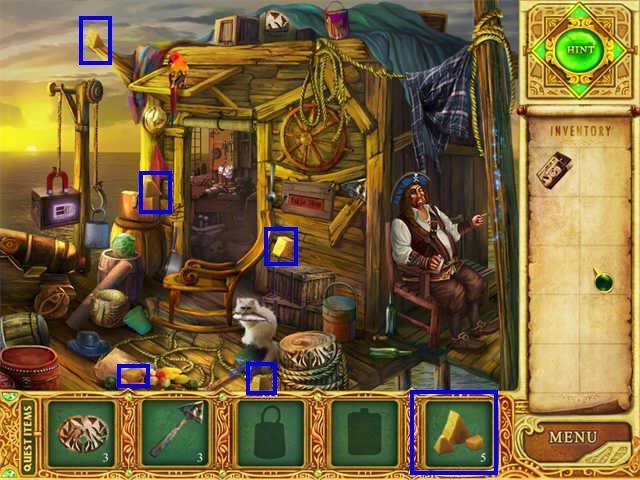
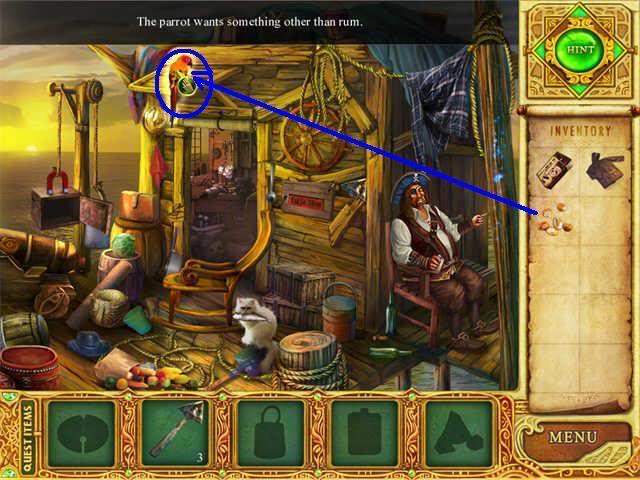
The Seaside: What does a Drunken Pirate Want?
The Seaside: Secrets Locked Away
The Docked Ship: The Medallion
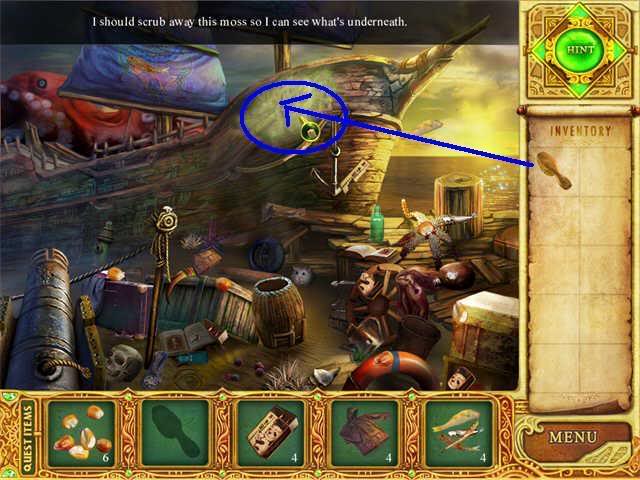
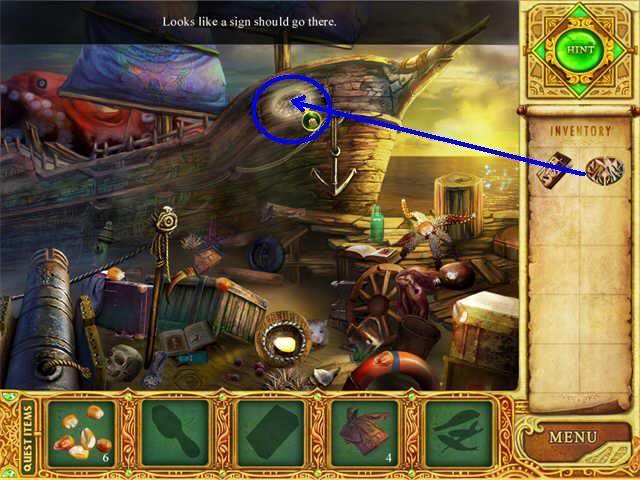
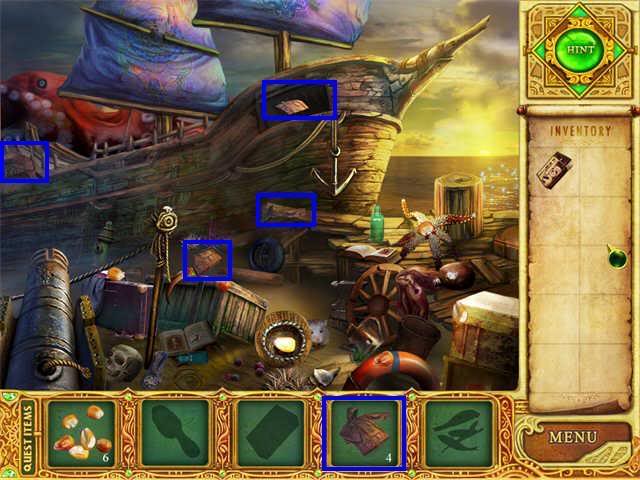
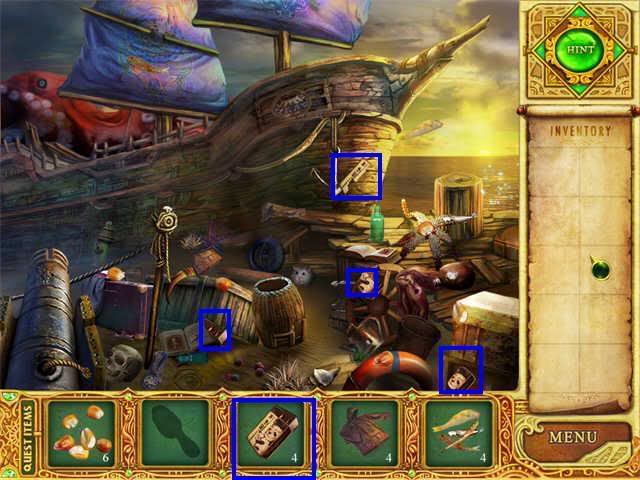
The Docked Ship: Miscellaneous
The Seaside: Feed the Cat

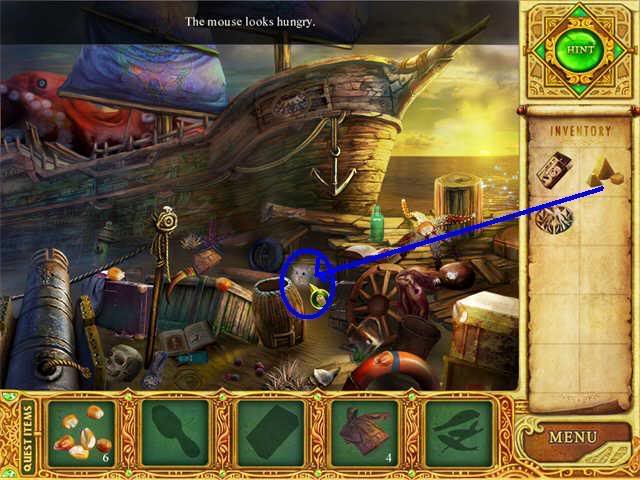
The Seaside/The Docked Ship: Who Moved My Cheese?
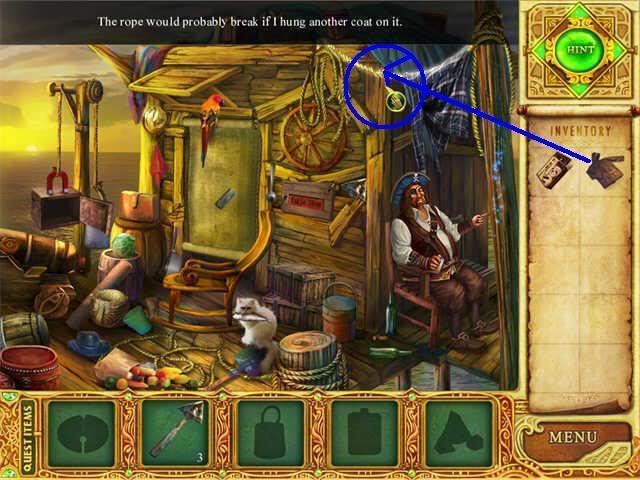
The Docked Ship/The Seaside: Polly want a corncob?
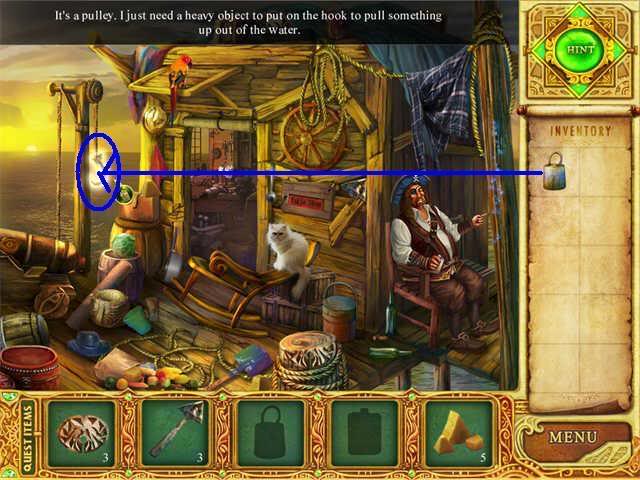
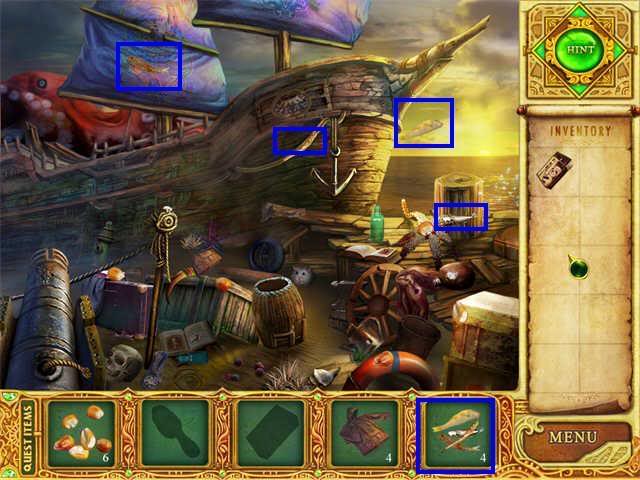
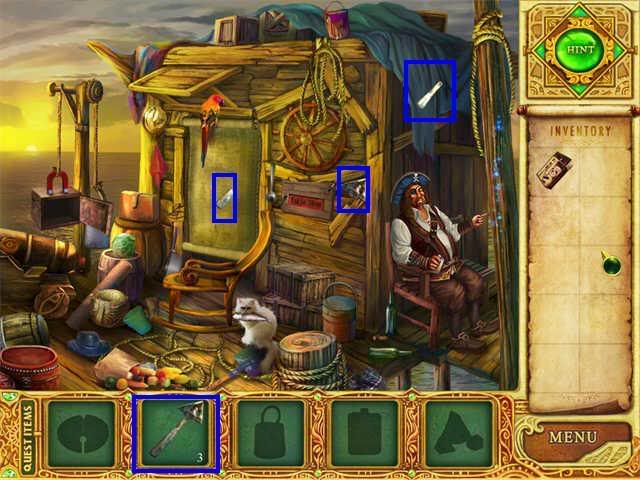
The Seaside: Find the Harpoon
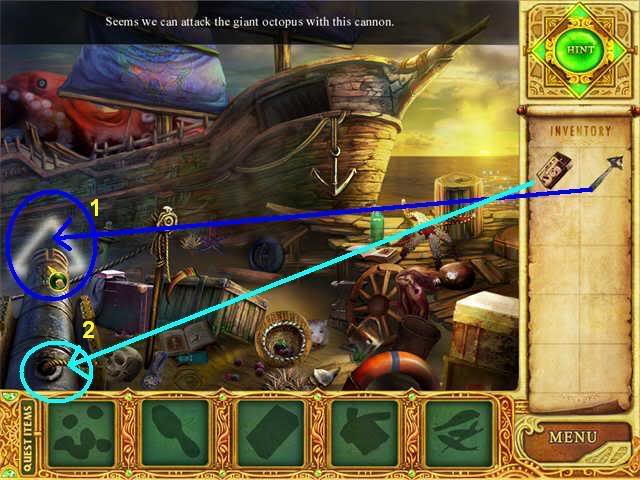
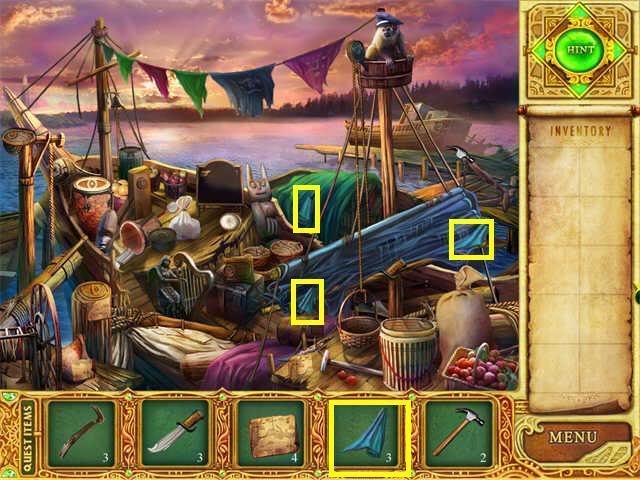
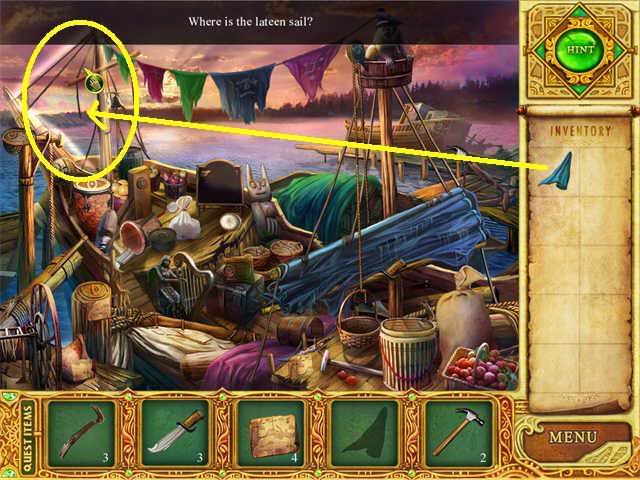
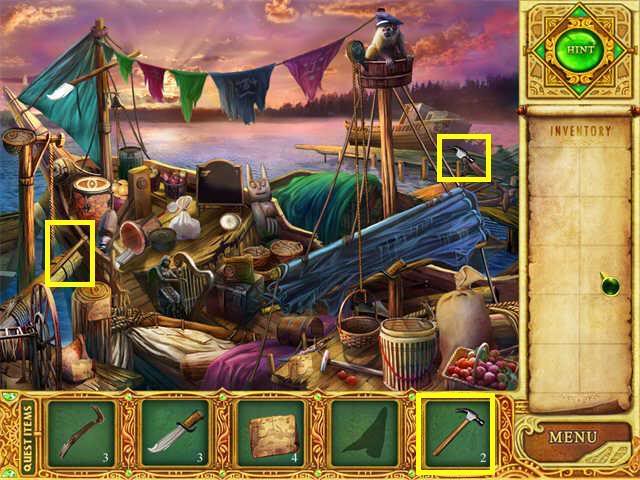
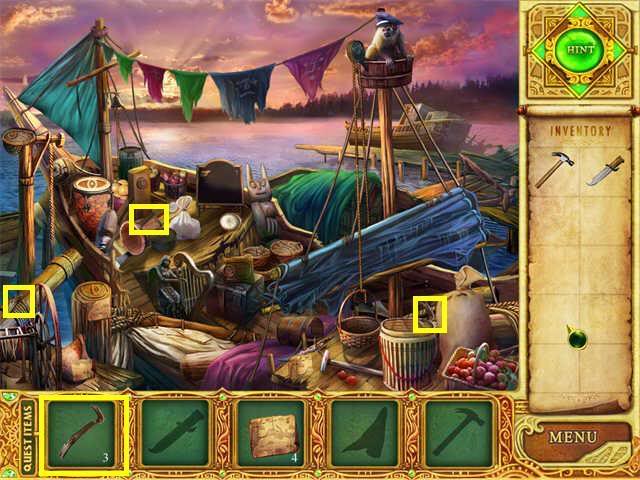
The Docked Ship: Fire when ready!
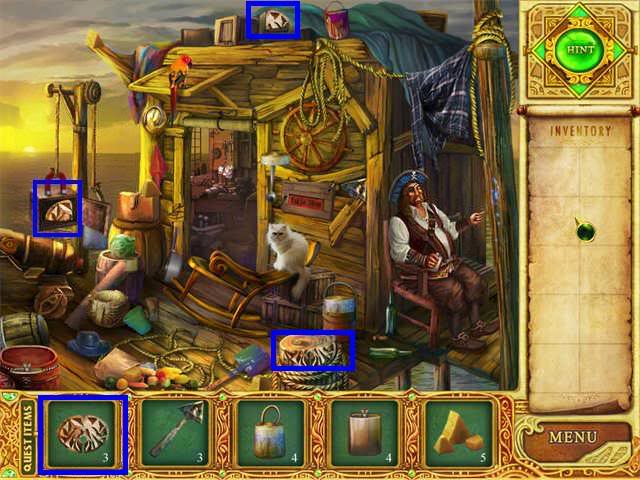
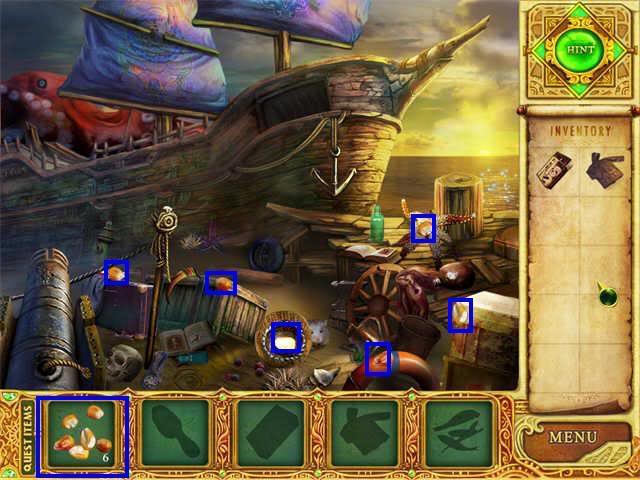
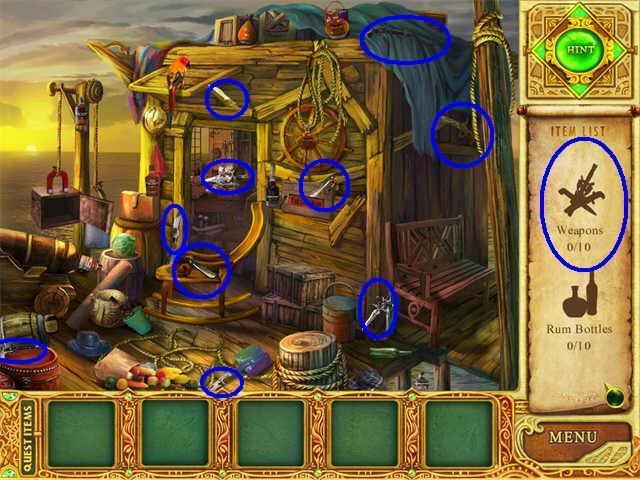
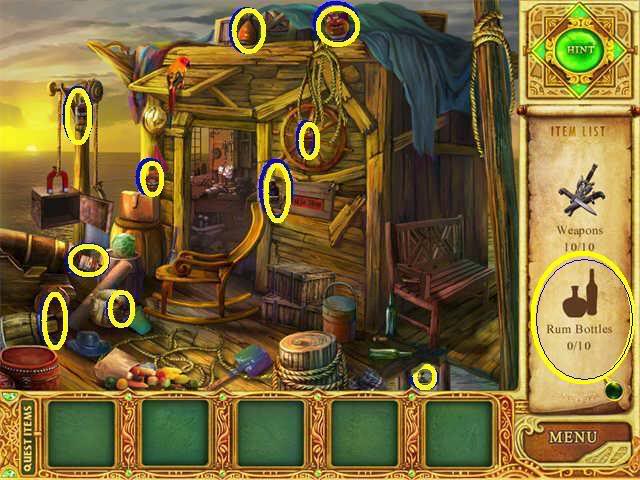
The Seaside: Find 10 weapons and 10 Rum Bottles
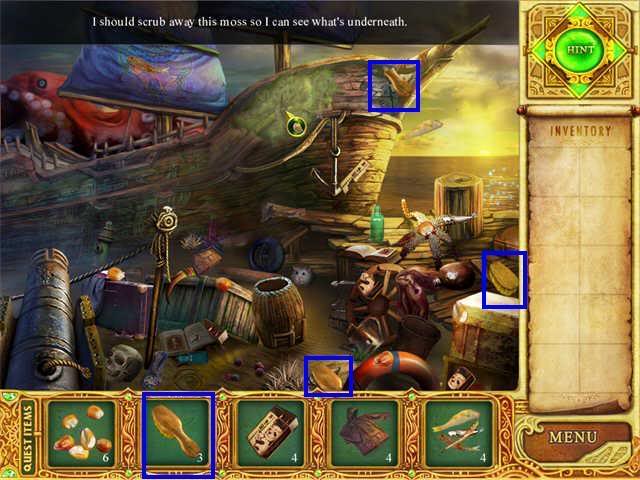
The Ship: Miscellaneous

The Ship: Where is that other location, anyway?
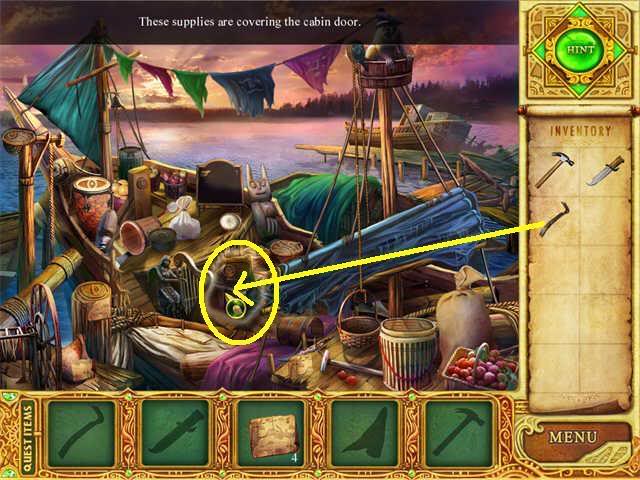
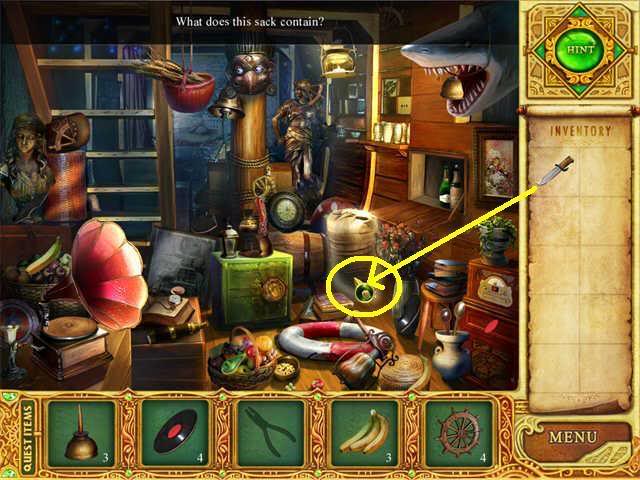
The Ship’s Cabin: What’s in the Cupboard?

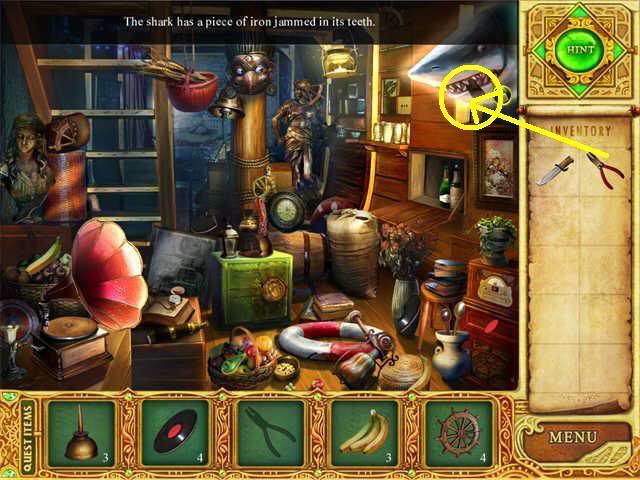
The Ship’s Cabin: Shark Bite
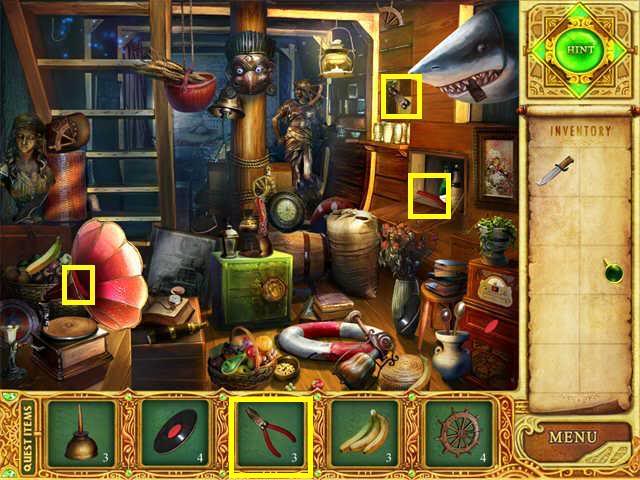
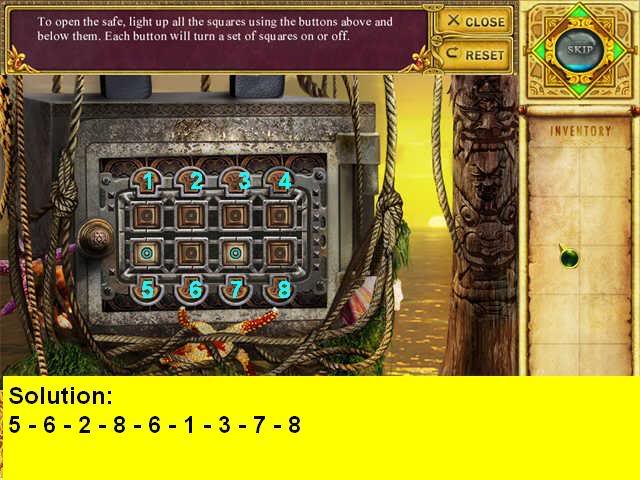
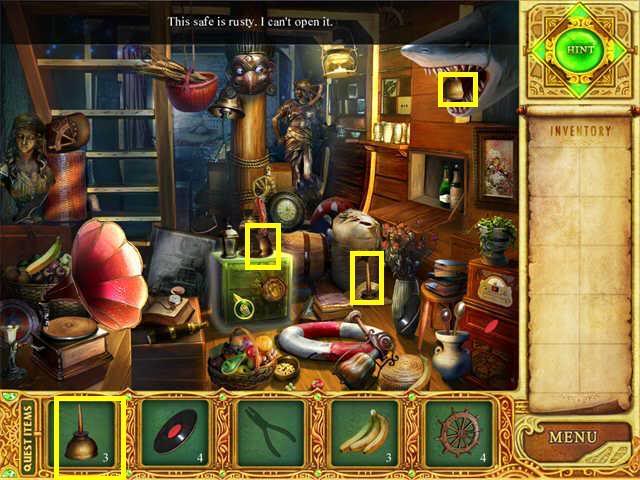
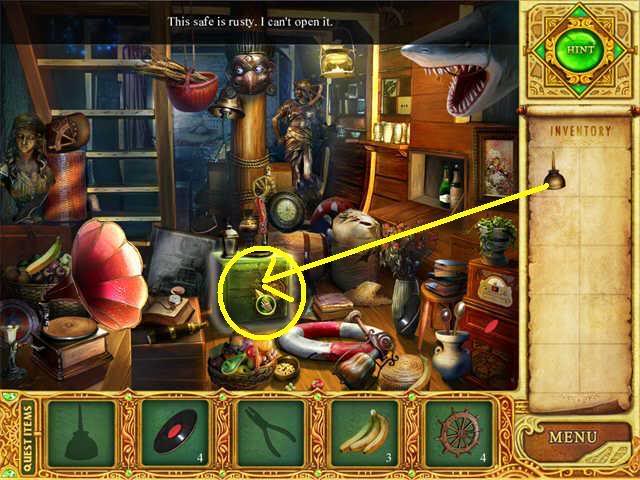
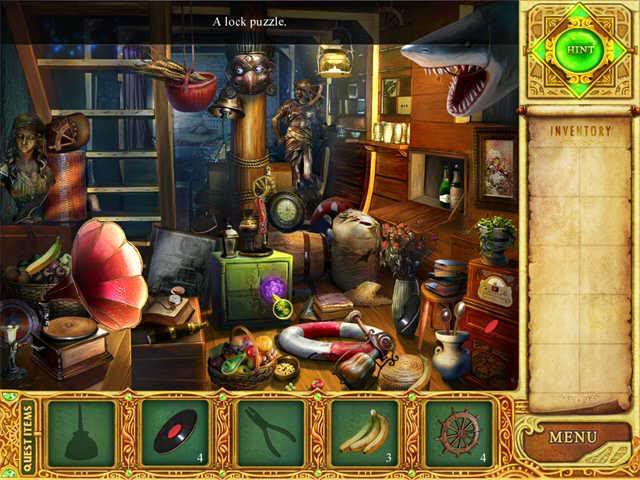
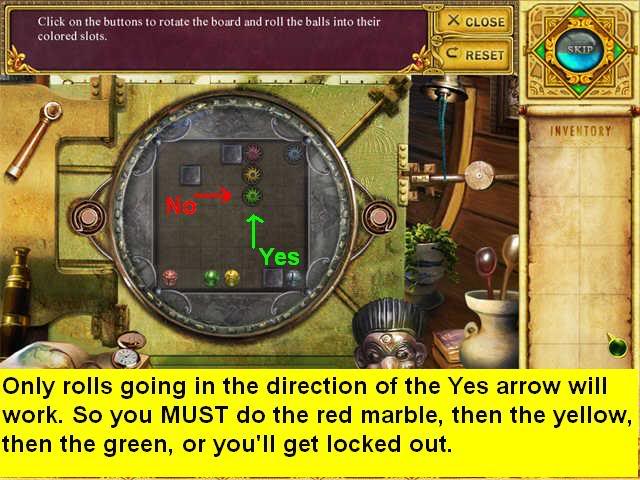
The Ship’s Cabin: The Locked Safe
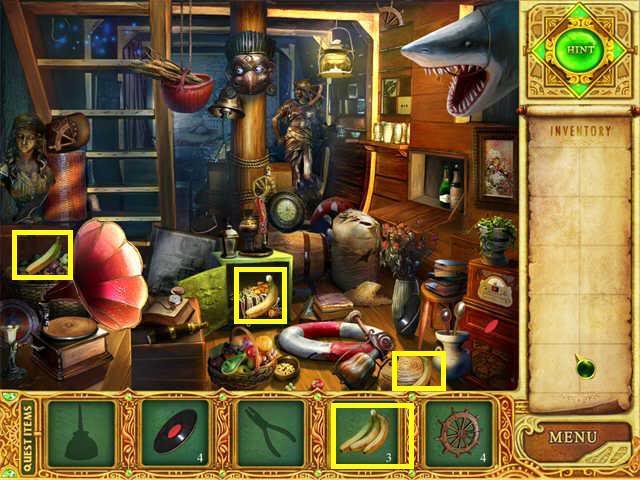
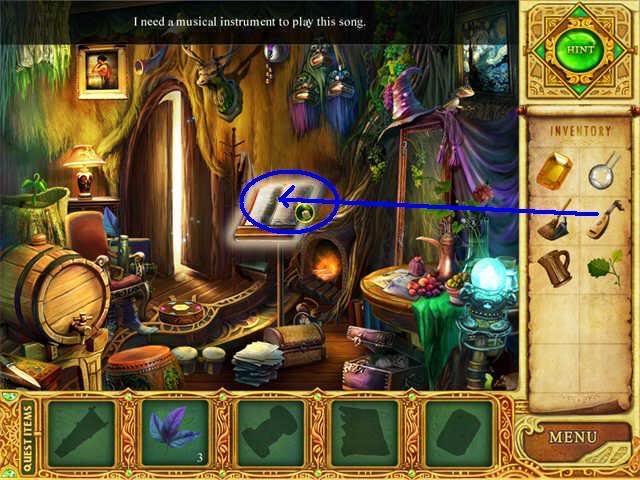
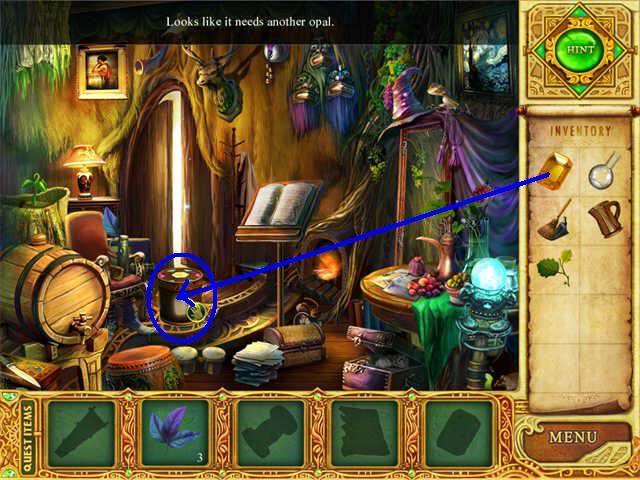
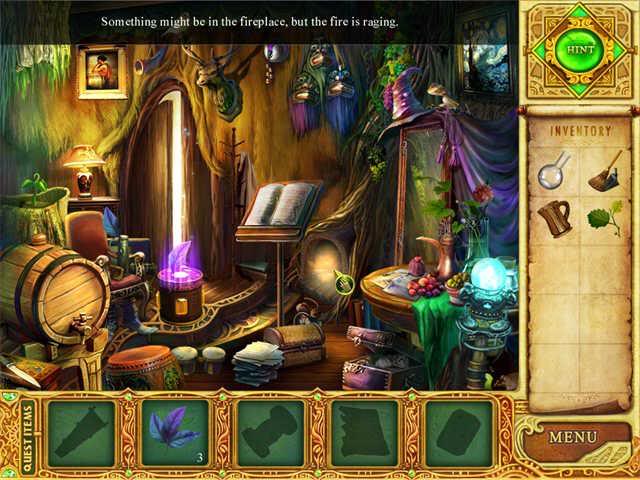
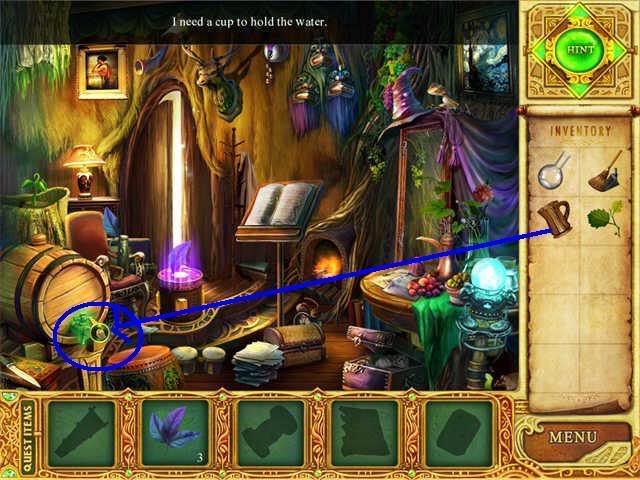
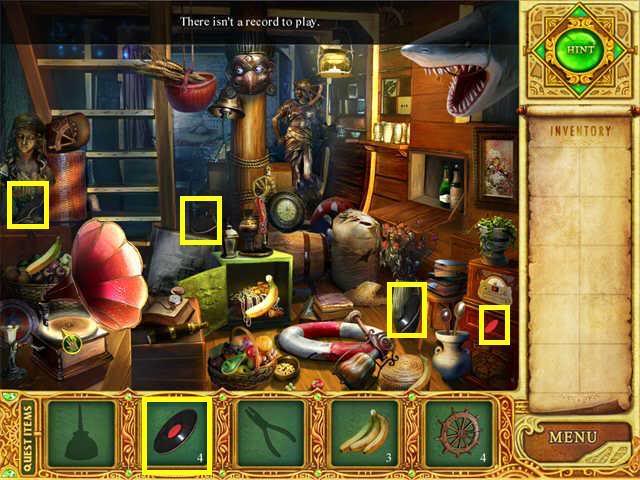
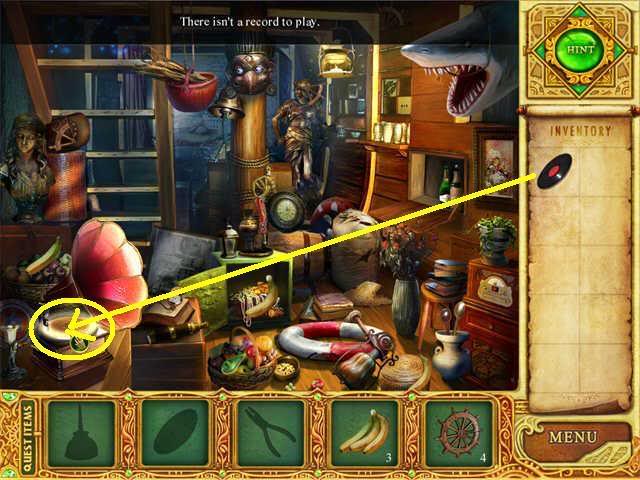
The Ship’s Cabin: Let’s have music!
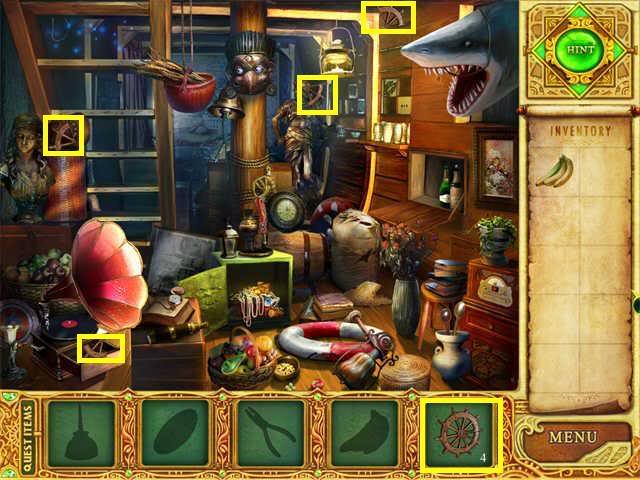
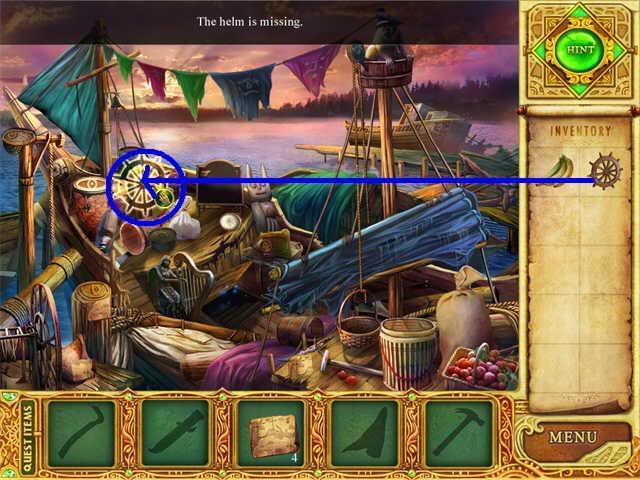
The Ship’s Cabin/The Ship: All I ask is a tall ship and a star to steer her by. And a wheel.
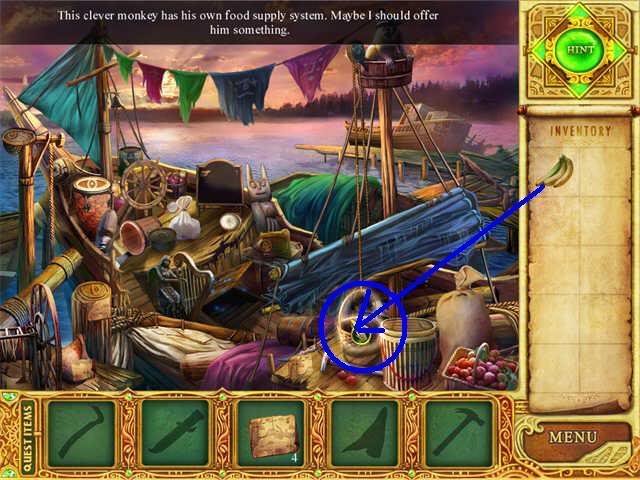
The Ship: Monkey Business
The Ship: Find 10 Gems

Atlantis Island: Open the Gateway to Atlantis
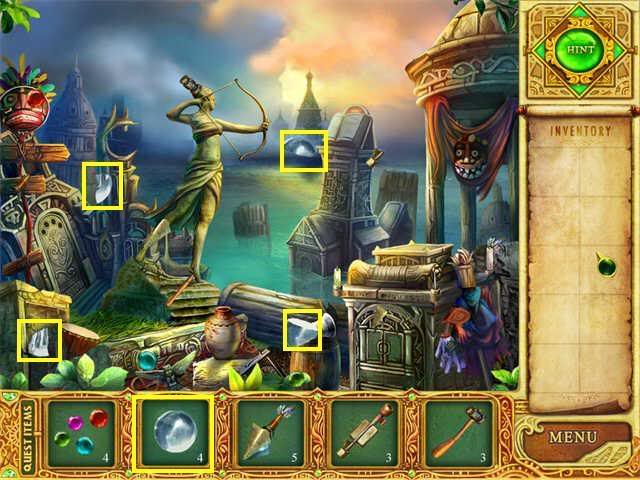
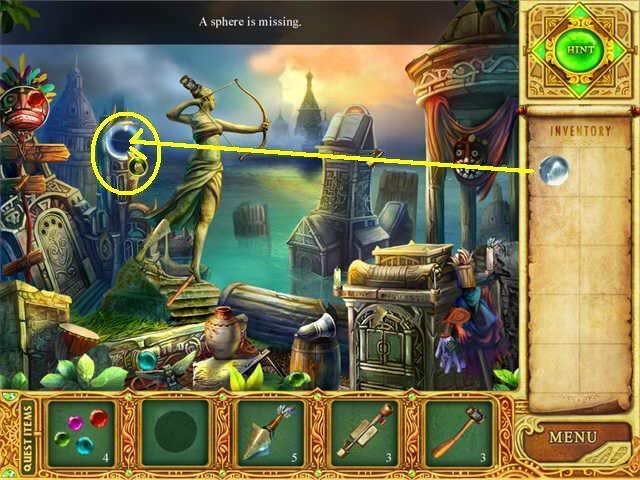
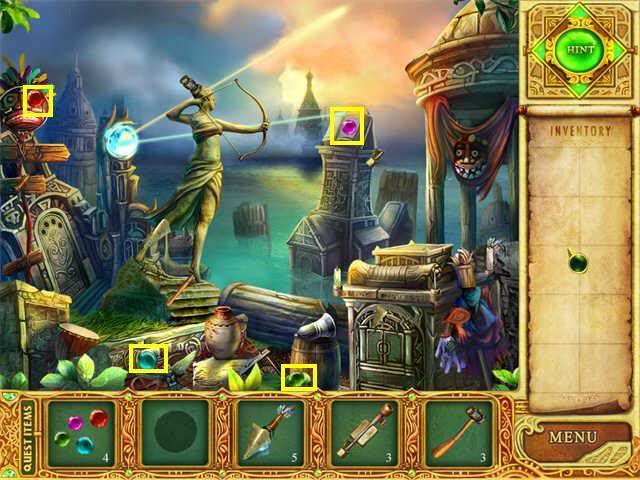
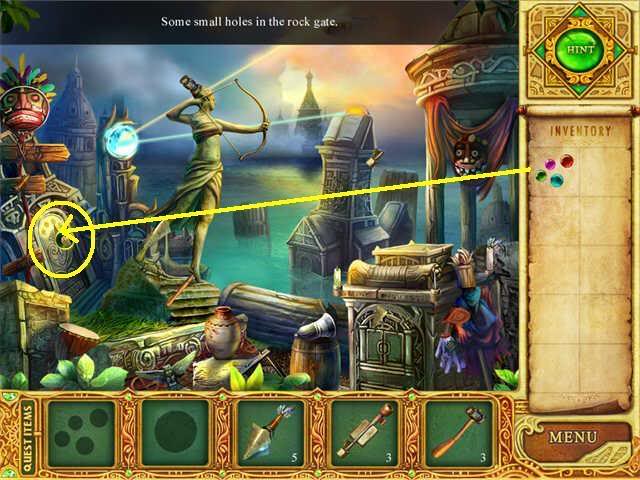
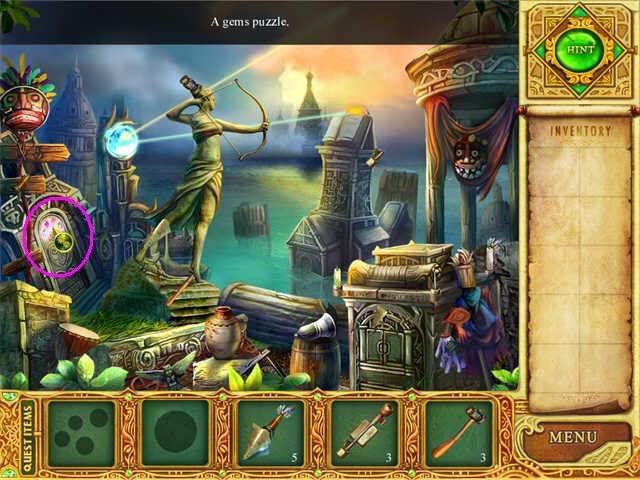
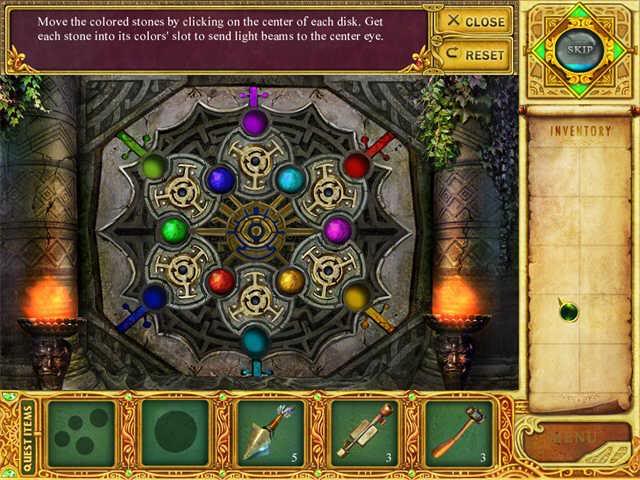
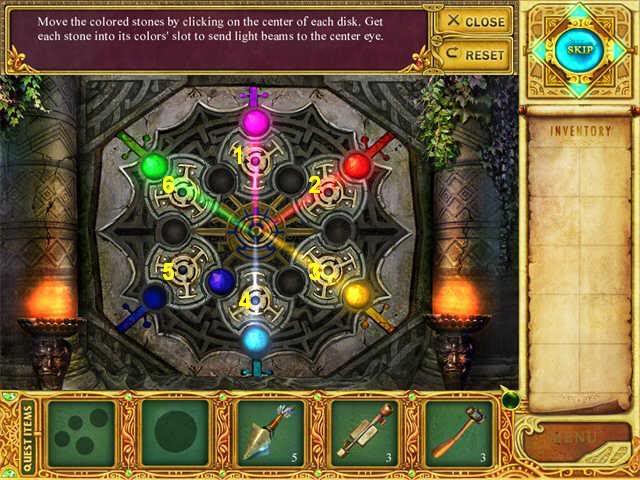
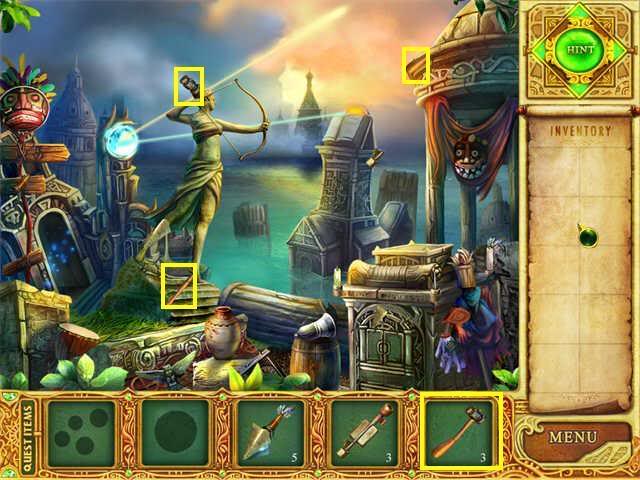
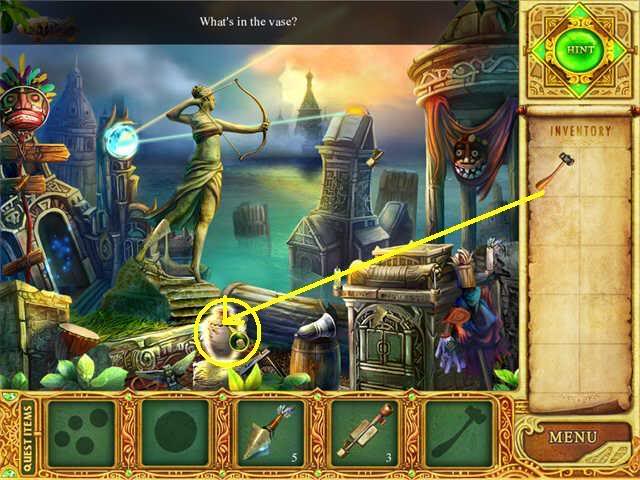
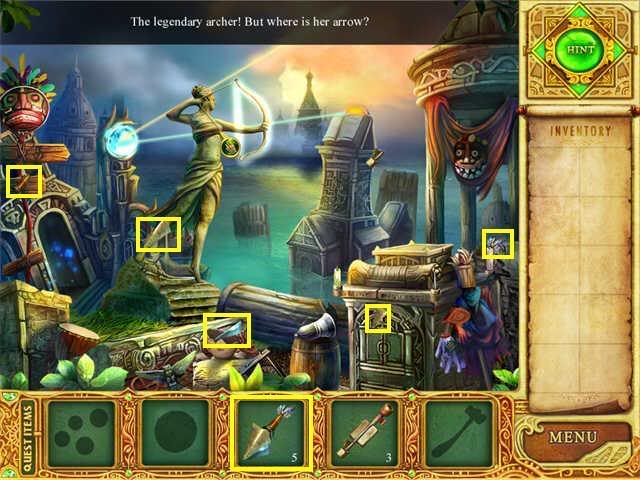
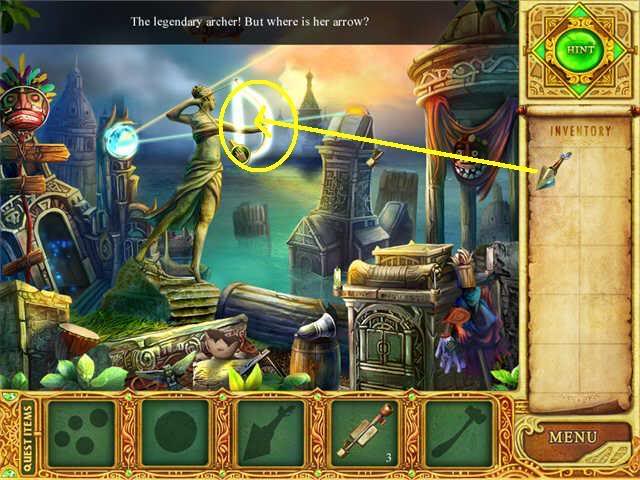
Atlantis Island: The Legendary Archer
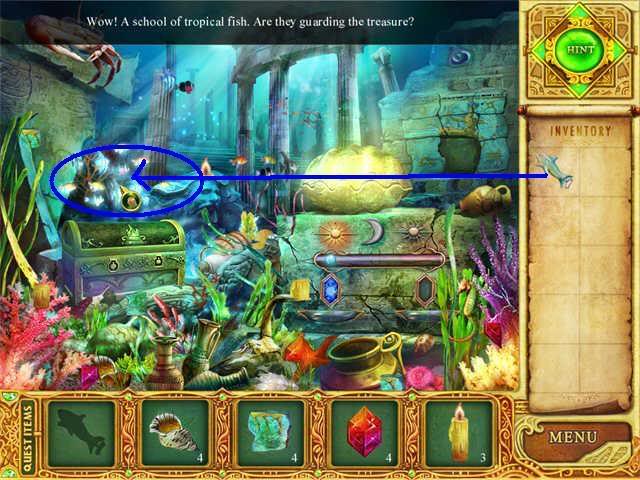
Atlantis Underwater: School’s Out!

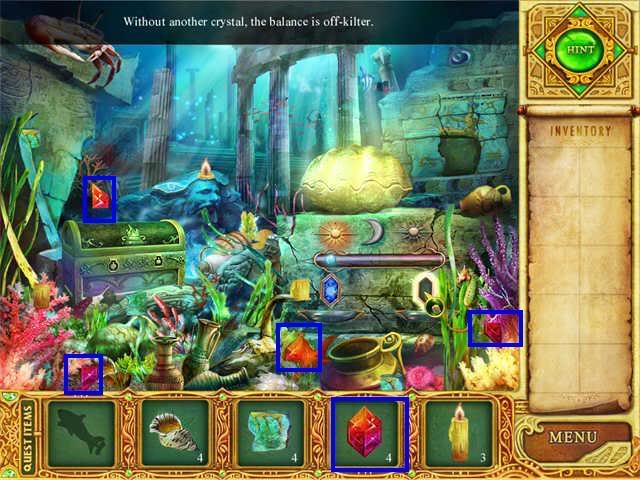
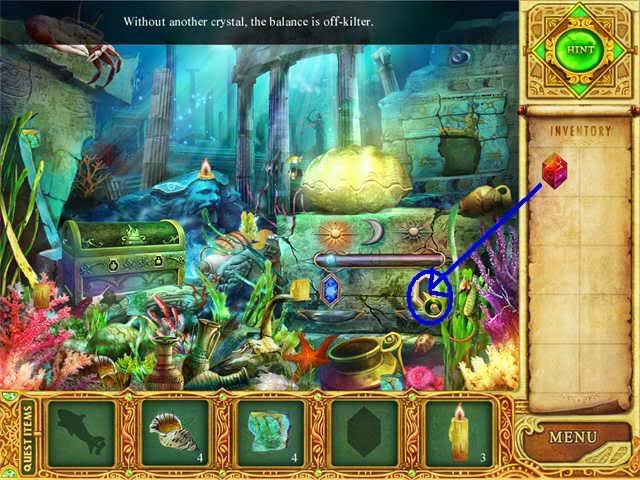
Atlantis Underwater: Balance Restored
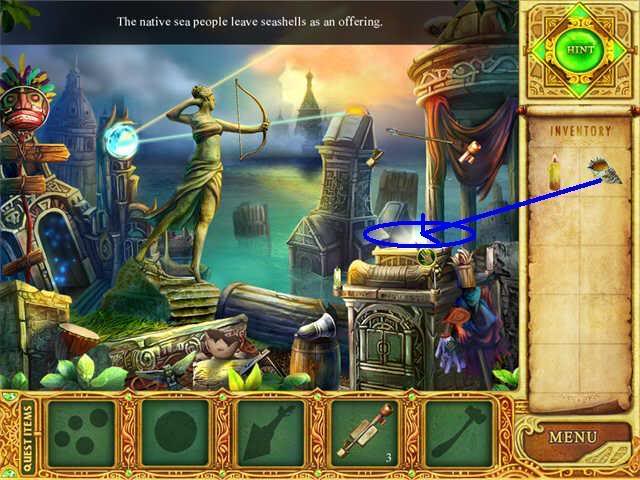
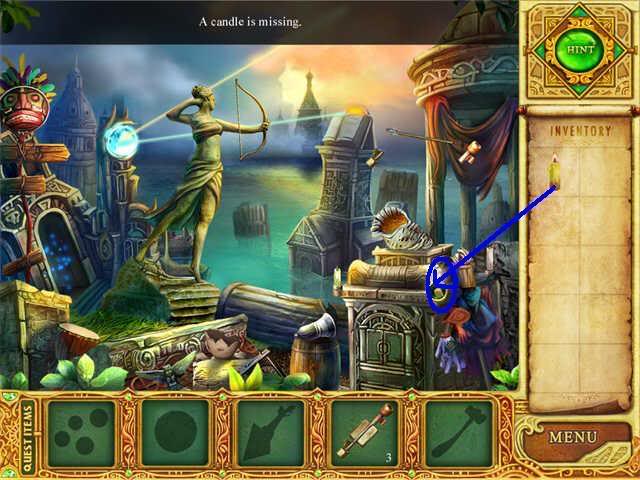
Atlantis Underwater: The Candle

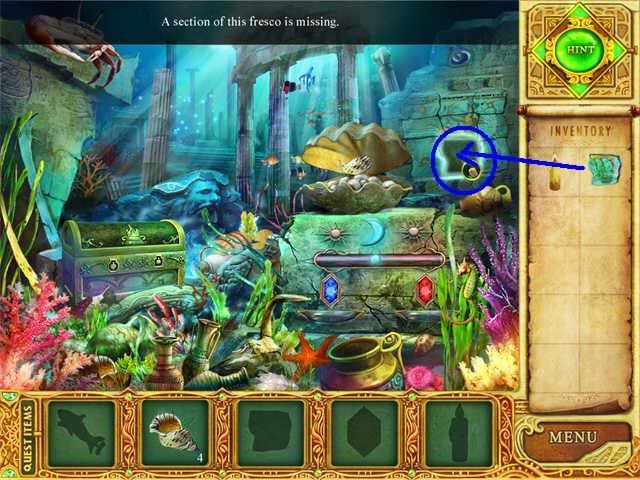
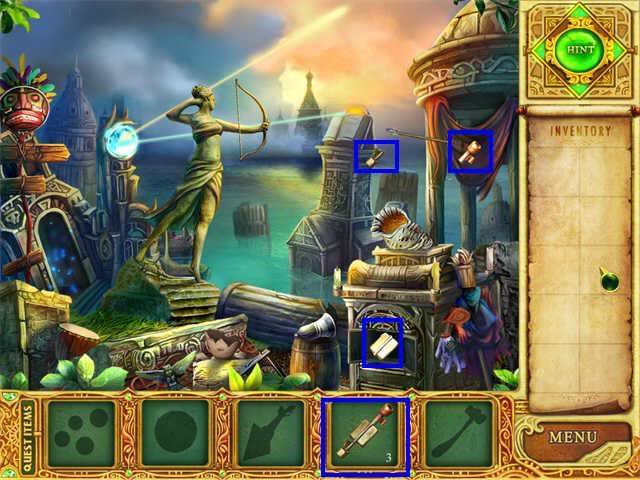
Atlantis Underwater: The Fresco

Atlantis Underwater/The Island: Restore the Altar
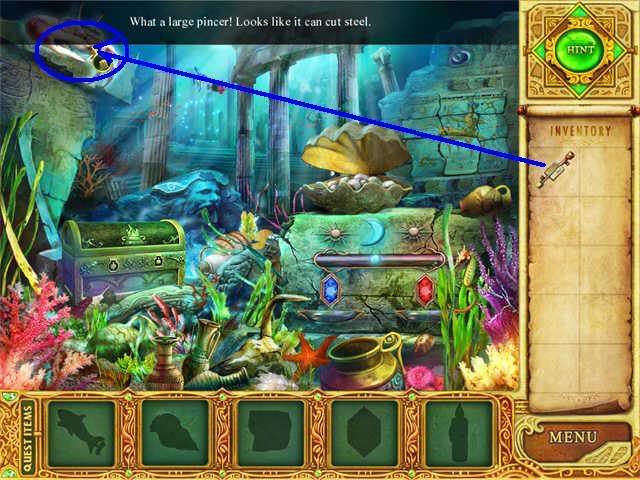
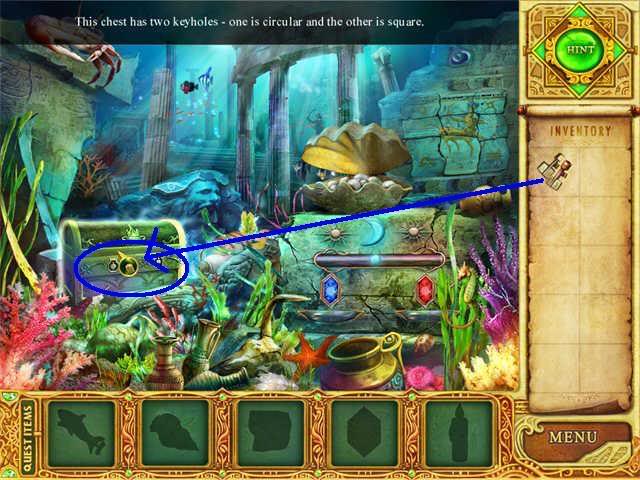
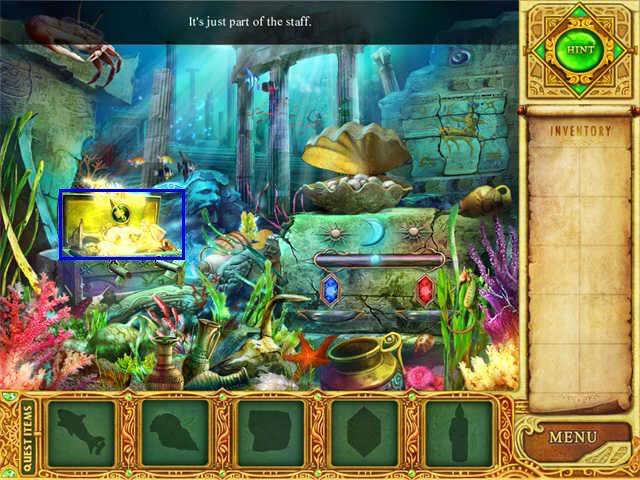
Atlantis Island/Underwater: Inside the Chest
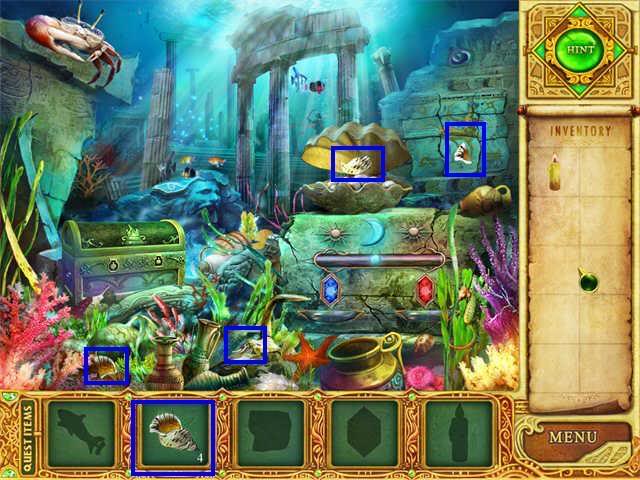
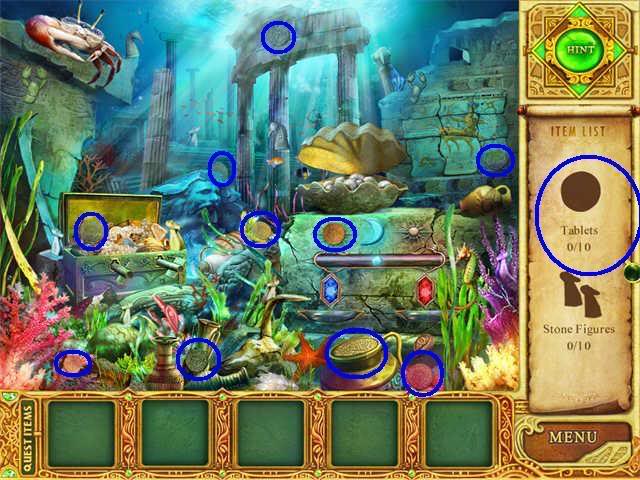
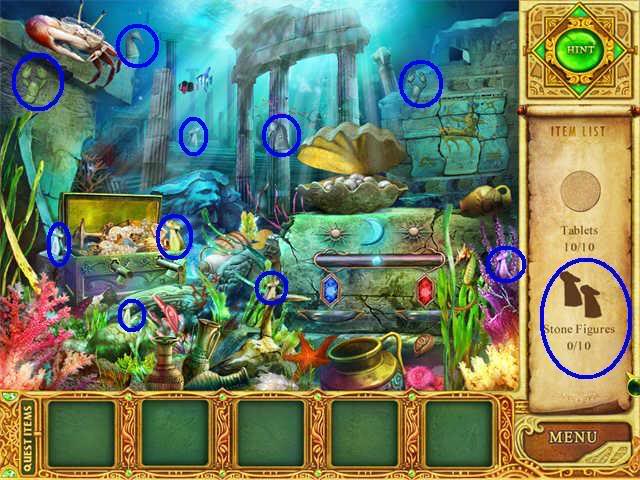
Atlantis Underwater: Find 10 tablets and 10 figurines
The Wizard’s House Upstairs: The Imperial Staff Restored
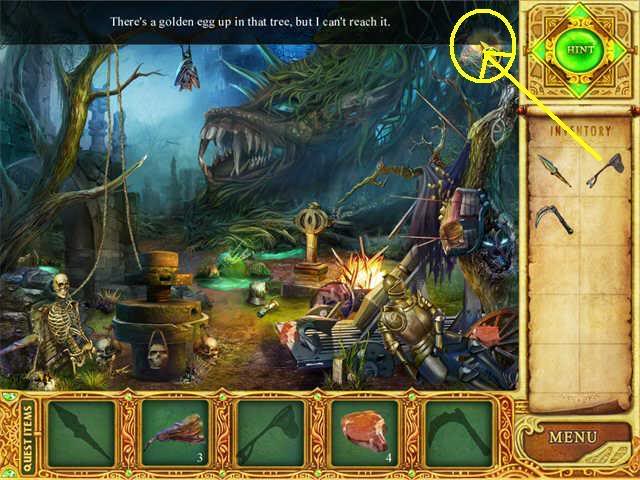
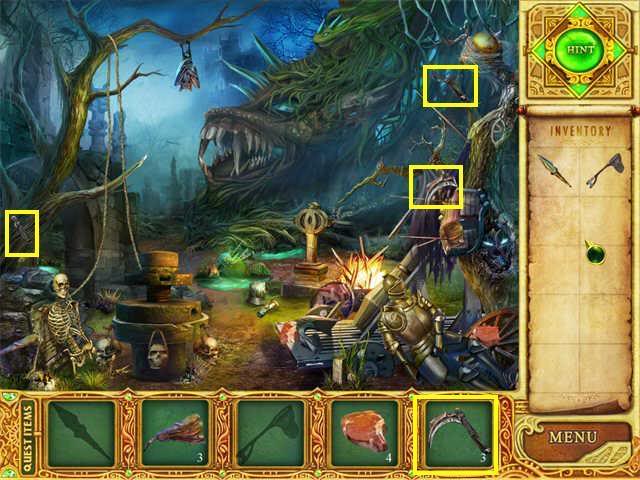
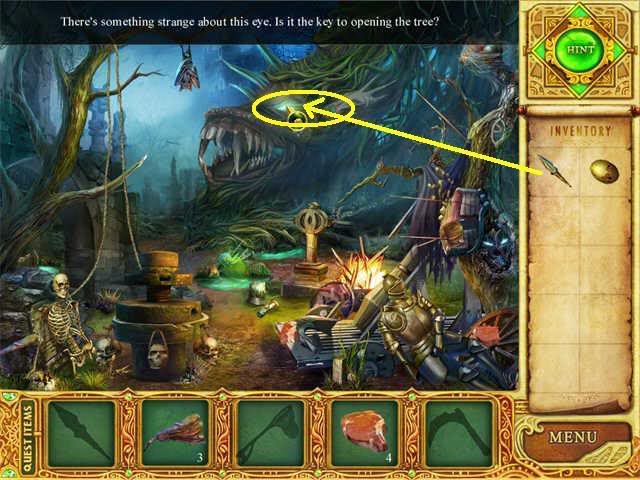
The Rescue: Collect the Golden Egg


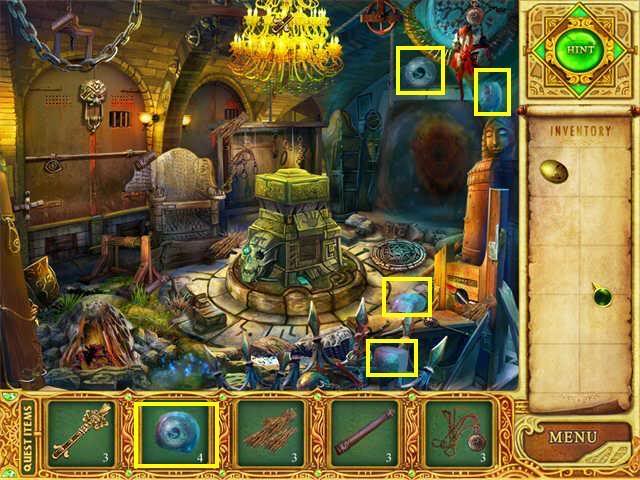
The Rescue Cave: the Crystal Skull
The Rescue Cave: Miscellaneous
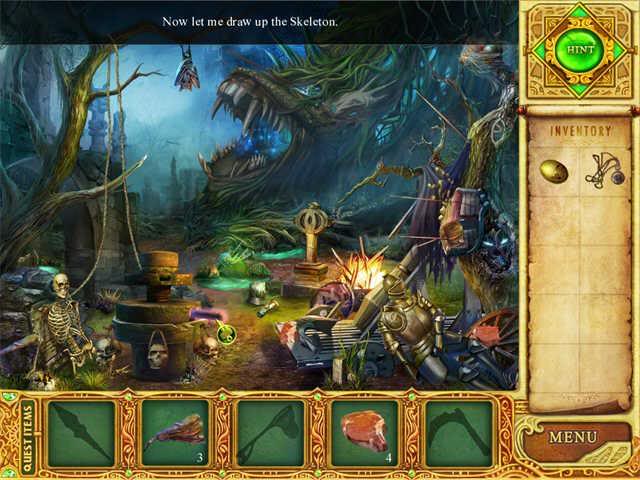
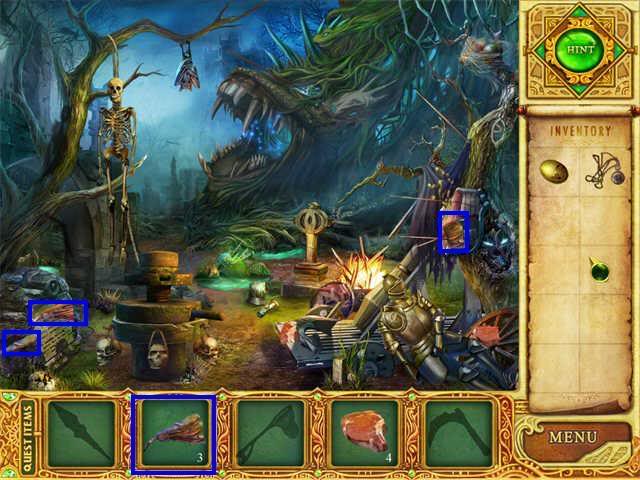
The Rescue: Skeleton Up!
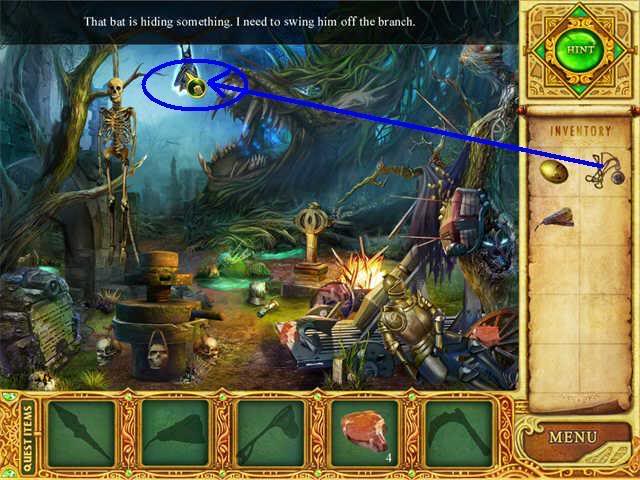
The Rescue: Bat Down!
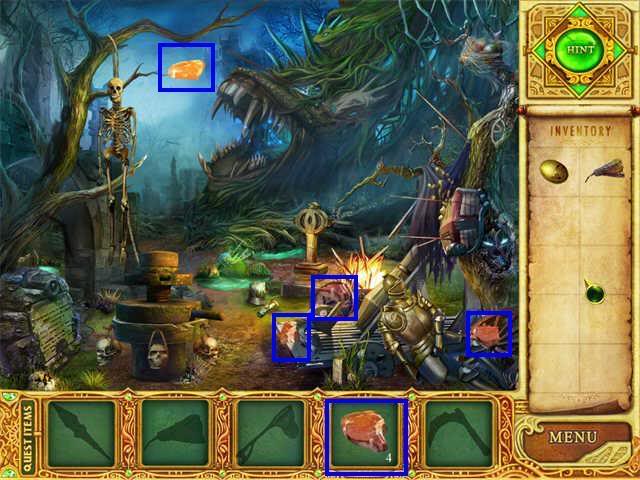
The Rescue Cave: Over Easy
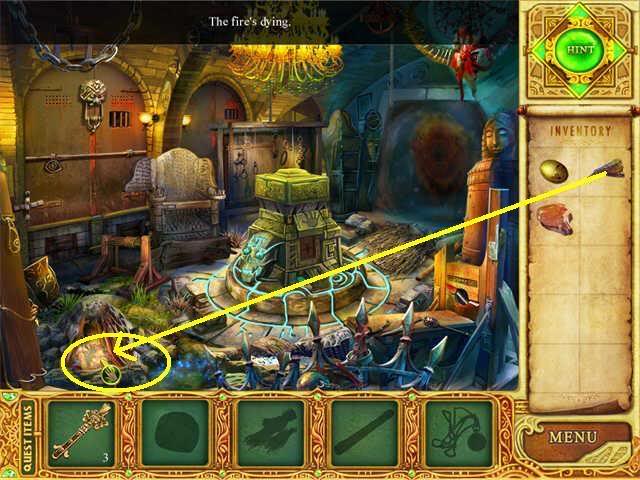
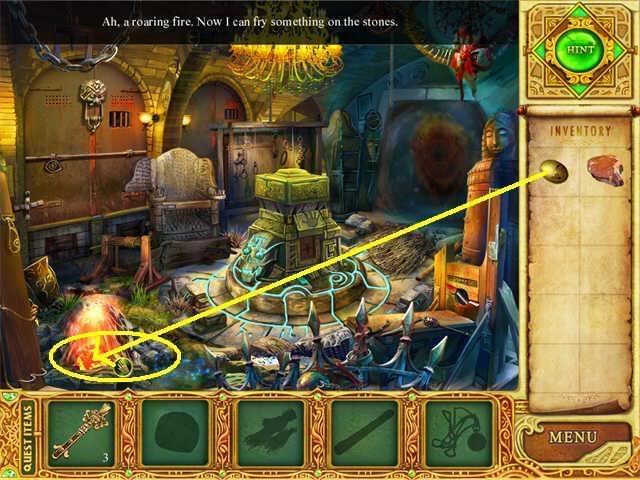
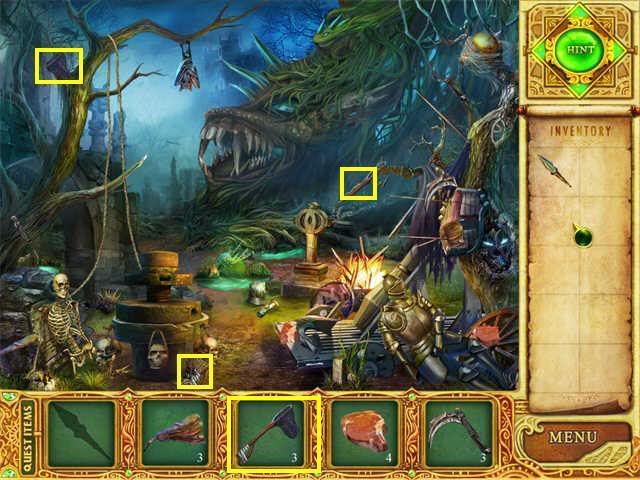
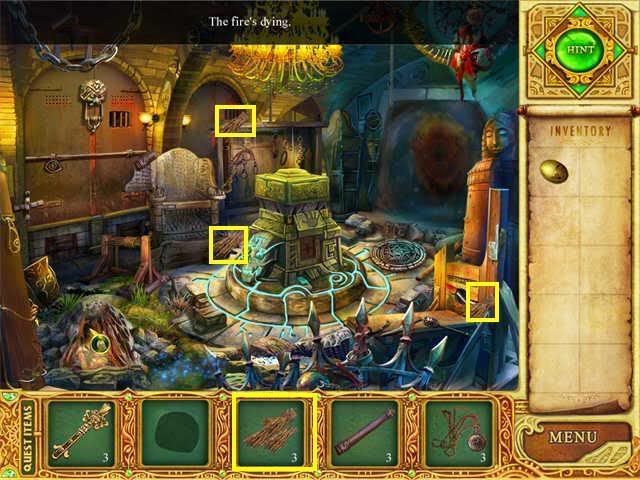
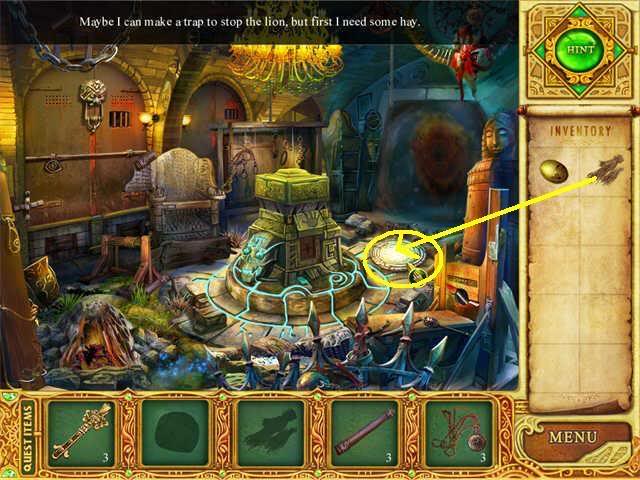
The Rescue Cave: Baiting the Trap
“;
