![Digimon UP Tier List [Supports, Buddies, and Partners]](/wp-content/uploads/2026/07/digimon-up-tier-list.jpg "Digimon UP Tier List [Supports, Buddies, and Partners]")
Digimon UP Tier List [Supports, Buddies, and Partners]
These Digimon will get you UP the leaderboard.


![Haze Seas Boss Drops [Chances, Locations, and How to Spawn]](/wp-content/uploads/2026/07/haze-seas-boss-drops.jpg "Haze Seas Boss Drops [Chances, Locations, and How to Spawn]")

Welcome to the Mystery Age: The Dark Priests walkthrough on Gamezebo. Mystery Age: The Dark Priests is a Hidden Object Game played on the PC created by Digital Quarter. This walkthrough includes tips and tricks, helpful hints, and a strategy guide on how to complete the Mystery Age: The Dark Priests.
Welcome to the Mystery Age: The Dark Priests walkthrough on Gamezebo. Mystery Age: The Dark Priests is a Hidden Object Game played on the PC created by Digital Quarter. This walkthrough includes tips and tricks, helpful hints, and a strategy guide on how to complete the Mystery Age: The Dark Priests.
This hidden object game requires visiting several locations and using inventory items to advance play.
Beginning Play:
Navigation:

A short clip explains the background and introduces the story line for play.
This is a goal-oriented guide. In most scenes, only necessary objects are collected.
The first scene is on the way to the village.
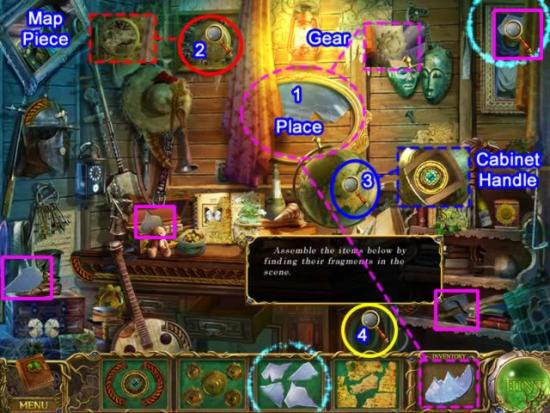
In fragmented object scenes, only the parts of the first object can be found. As items are placed, the last part of another object is revealed. Click the magnifying glass cursors to receive a hint for object placement.
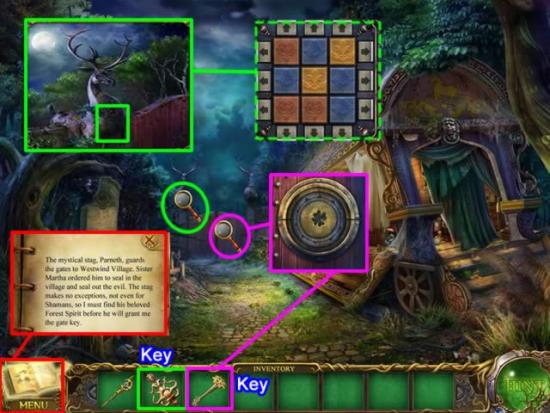
Open the gate to enter Westwind Village.
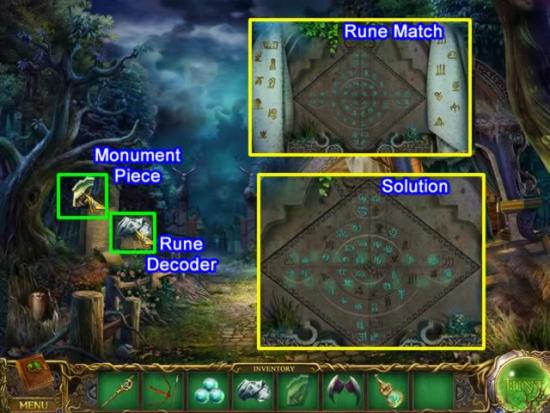
Solve the puzzle by filling the grid with all the same colored tiles.
Open the gate:
Click the forward arrow through the open gate.
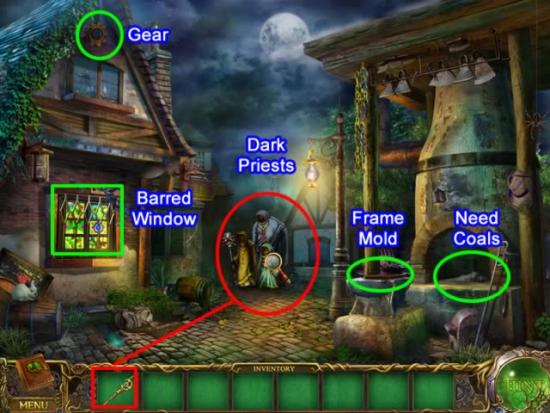
Use the IMPERIAL STAFF to dispell the dark priests.
Move the mouse around the scene. When the cursor turns into a magnifying glass, click to see what is needed.
None of these tasks have the necessary items to act on them.
Follow the forward arrow into the village square.
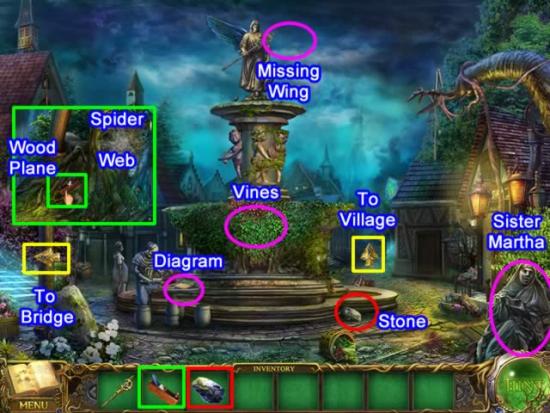
Explore the area.
Place the cursor on the left side of the scene until it turns into an arrow.
Click to go to the bridge.
Move the cursor to right of the fountain. It turns into an arrow.
Click the arrow to enter the village.
Investigate the area.
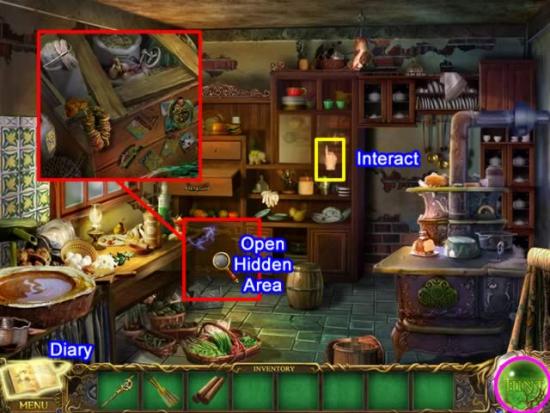
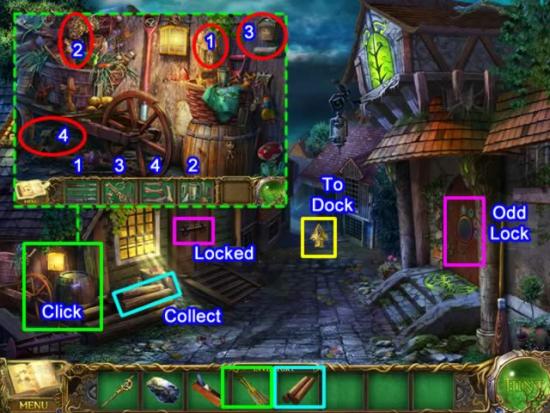
Click the glowing barrel on the left of the carpenter’s shop to access the fragmented object area.
Continue down to the dock.
Investigate the dock area. The diary adds instructions for
Get the LADDER in the bushes.
Click the glowing area to access the hidden object area.
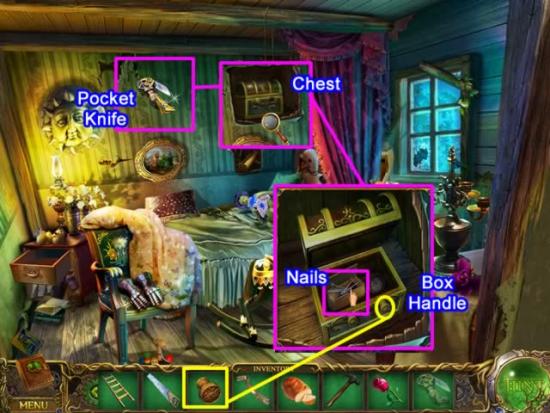
Return to the carpenter’s shop.

Use the KEY to unlock the door.
Explore the workroom.
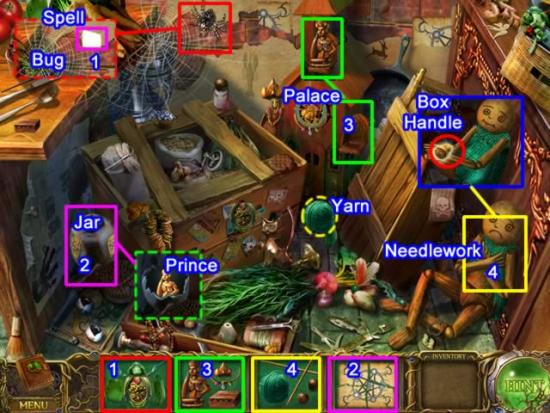
Open the fragmented object area by the entrance to the bedroom.
Assemble and place the objects in the order indicated above.
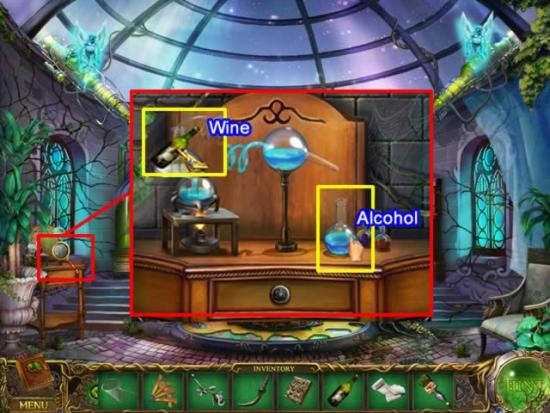
Enter the kitchen.
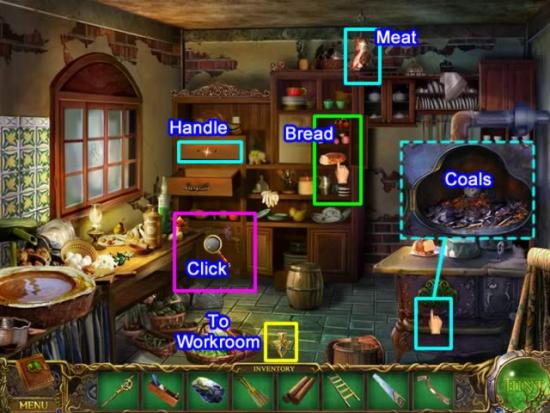
Explore the kitchen.
Click the active area to the right of the counter top.
Assemble and place the objects in the order indicated above.
Exit the kitchen to the workroom.
Enter the bedroom through the door on the right.
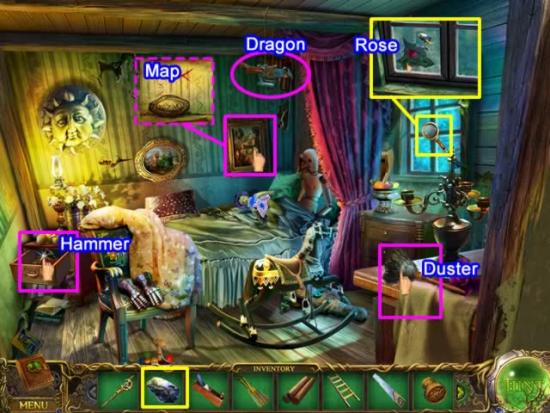
Inspect the bedroom.
Exit the carpenter’s shop.
Click the arrow at the bottom of the screen to return to the village square.
Click the arrow on the left to go to the bridge area.
Use the DUSTER from inventory to clean off the cob webs on the tree.
Click to access the fragmented object area.
Click the bottom of the screen to return to the village square.
Click the the arrow at the top of the screen to re-enter the village.
Enter the carpenter’s shop and go into the bedroom.
Return to the workroom.
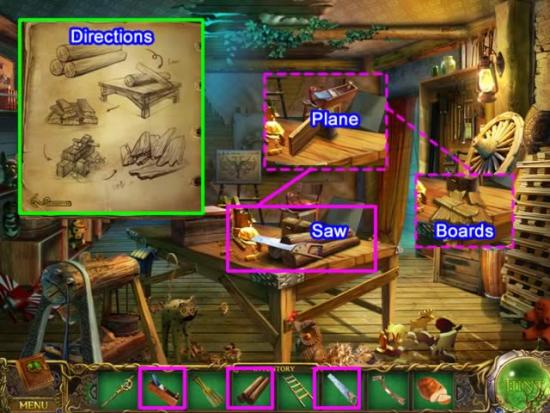
Follow the directions from the diary to make boards.
Exit the carpenter’s shop.
Click the arrow at the top of the screen to go to the dock area.

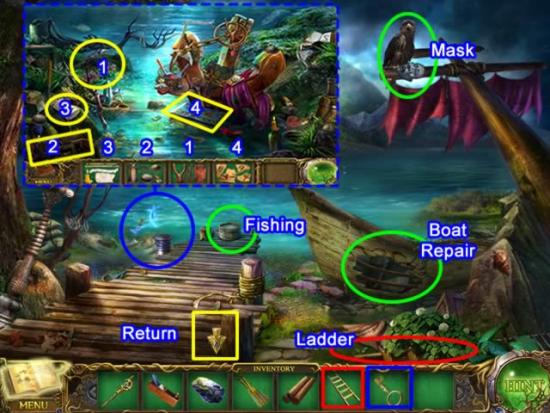
Prepare the boat.
Click the arrow on the boat to cross the lake.
This is the first of many trips you take back and forth to the island.

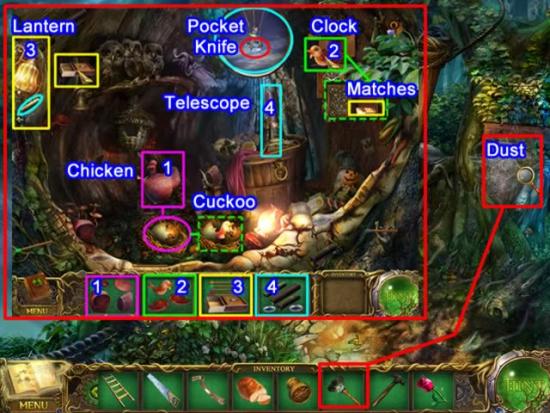
At the watchtower landing, click the green outlined magnifying glasses to learn what actions to take in this area.
Click the arrow at the bottom of the screen to go back across the lake to the dock.
Return to the carpenter’s shop.
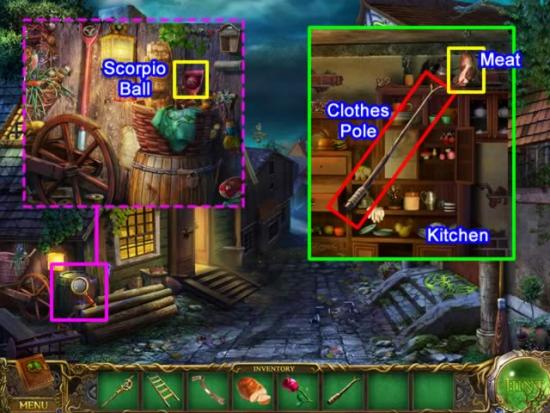
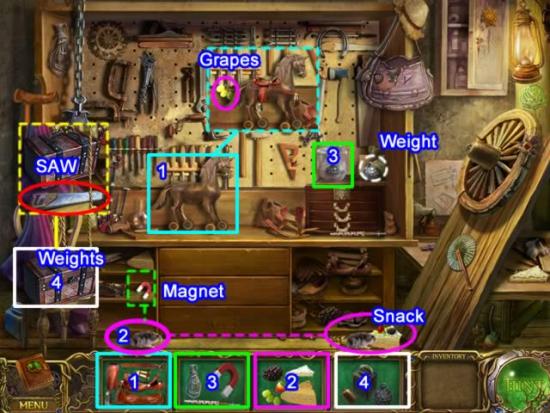
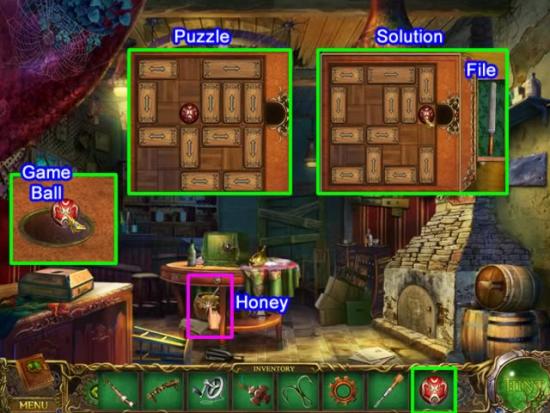
Click the hidden object area at the side of the shop. Collect the SCORPIO BALL.
Enter the shop. Go to the kitchen.
Use the CLOTHES POLE to reach the hanging meat. Click to add the MEAT to inventory.
Return to the dock.
At the dock:
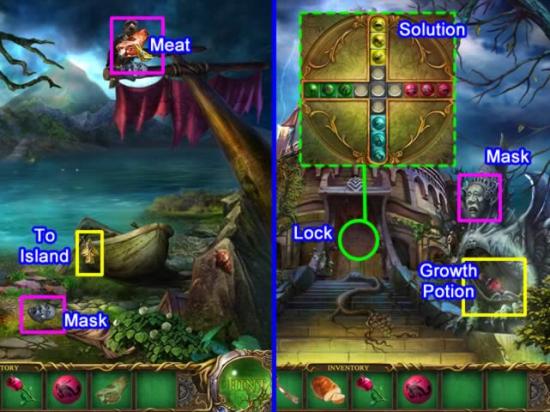
On the island:
The door opens. Enter aura garden.
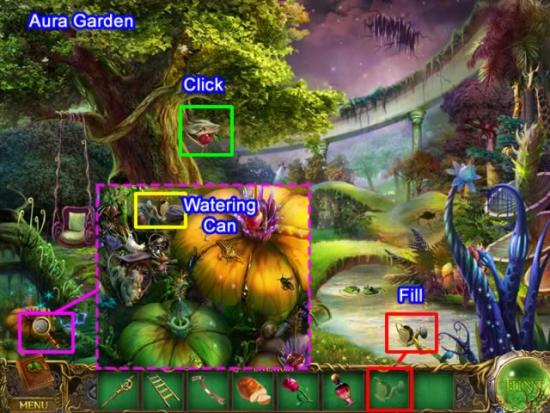
In the garden area:
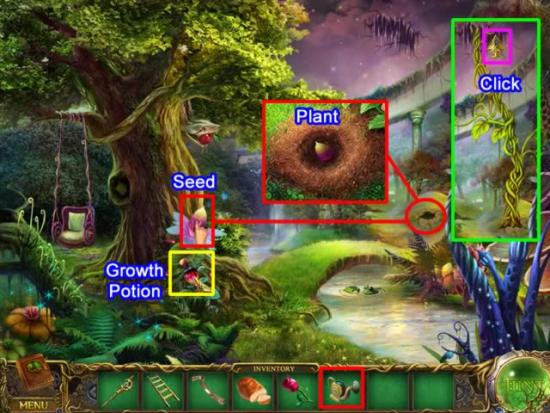
Click the arrow on the vine. Enter the ice hall.
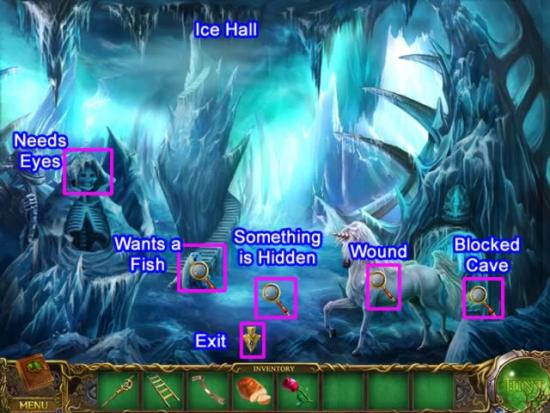
Click the magnifying glasses shown above. These are the tasks needing completion. Instructions for healing the unicorn appear in the diary.
Exit the hall to the aura garden. Exit the garden to the watchtower entrance.
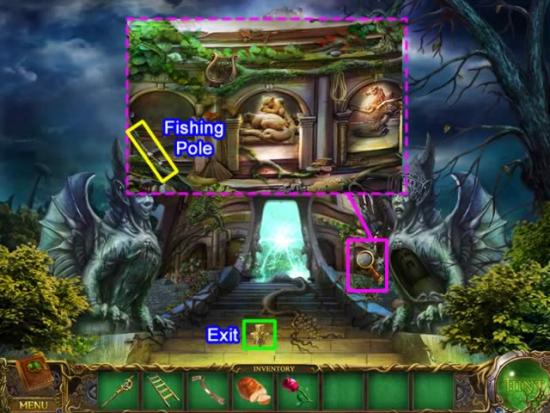
Click the magnifying glass on the right to access the hidden object area.
Collect the items listed. The FISHING POLE goes to inventory.
Click the arrow to return to the dock.
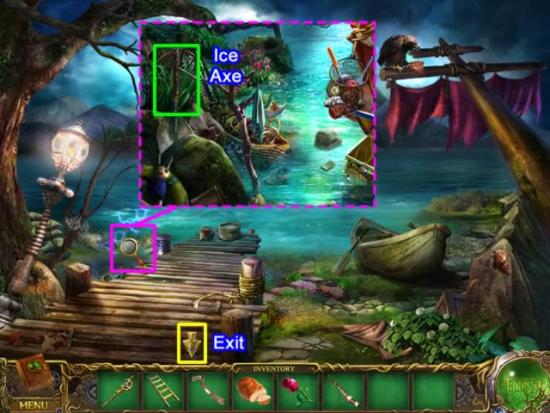
Open the hidden object area.
Collect the items listed. The ICE AXE goes to inventory.
Exit the area.
Go past the carpenter’s workshop to the town square.
Click the arrow on the left side of the screen to go to the bridge area.
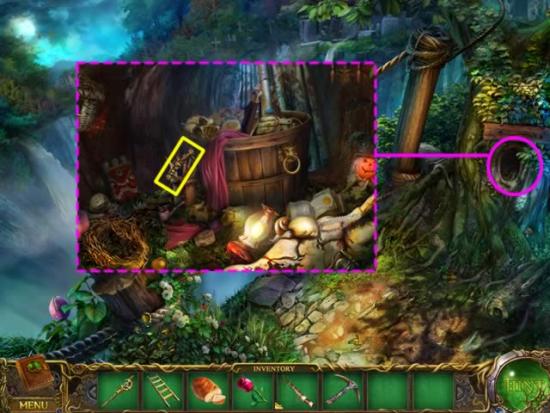
Click the tree bole to access the hidden object area.
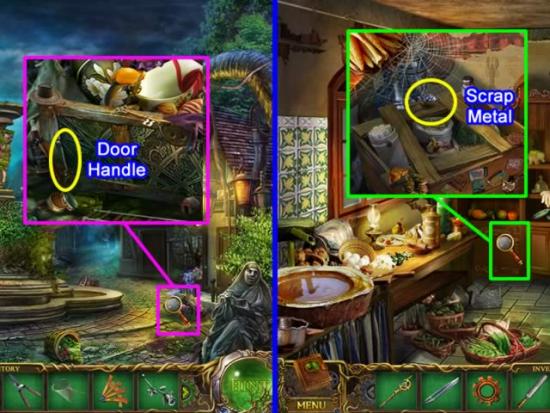
Collect all the listed items. The DRAWER HANDLE goes to inventory.
Return to the town square.
Click the arrow at the top of the screen to go to the carpenter’s shop. Enter the shop.
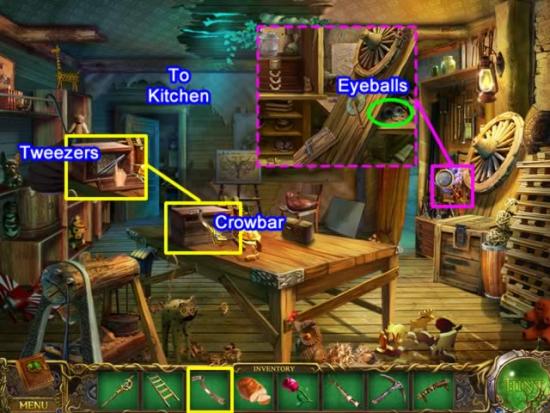
Click the magnifying glass on the right to access the hidden object area.
Collect all listed items. The EYEBALLS go to inventory.
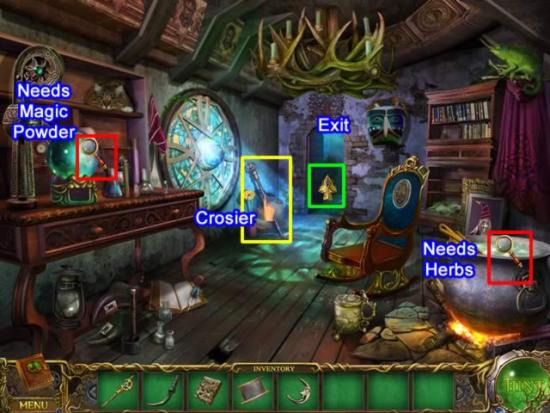
Click the box on the work table.
Use the CROWBAR from inventory to open it. Retrieve the TWEEZERS for inventory.
Enter the kitchen.
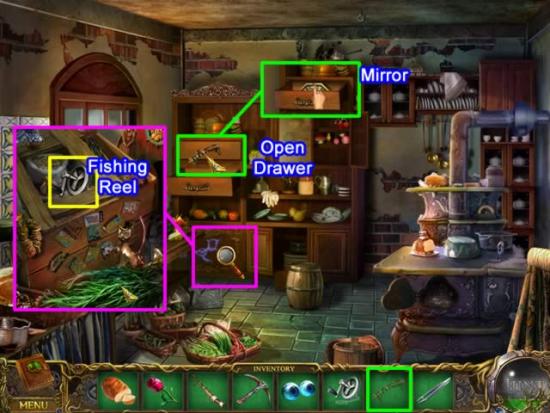
Click the magnifying glass on the right to access the hidden object area.
Place the DRAWER HANDLE from inventory on the upper drawer.
Exit the carpenter’s shop, return to the dock and cross the lake.
Enter the aura garden and climb the plant to the ice hall.
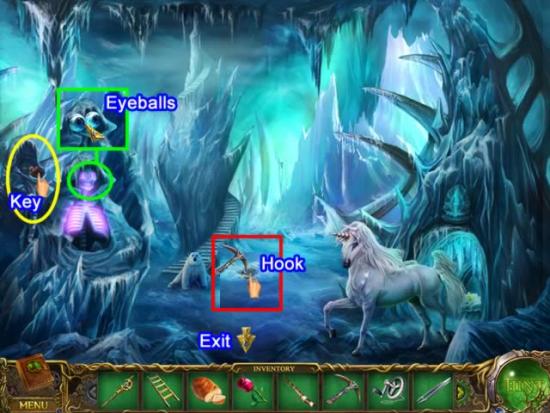
Place the EYEBALLS on the watcher. Collect the SINISTER KEY from his hand.
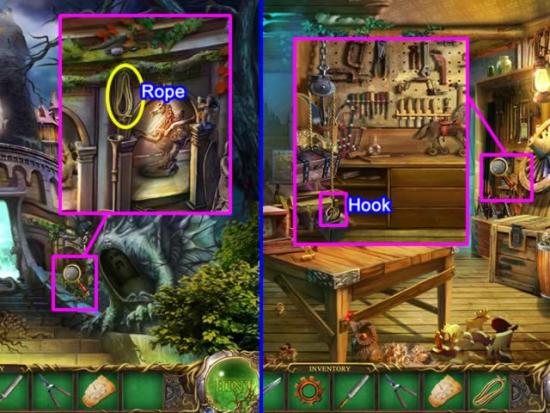
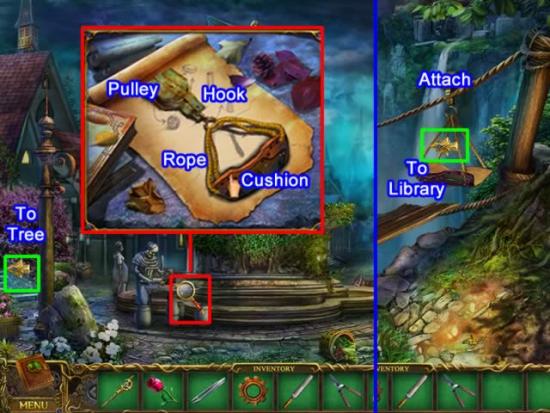
Use the ICE PICK from inventory on the floor of the hall. Get the HOOK for inventory.
Exit the ice hall to the aura garden.
Click the hidden object area on the lower left.
Exit the garden.
Return to the dock.
Proceed past the carpenter’s shop to the town square.
Click the arrow in the lower part of the screen to return to the forge area.
At the house:
Click the arrow at the bottom of the screen to return to the wagon area.
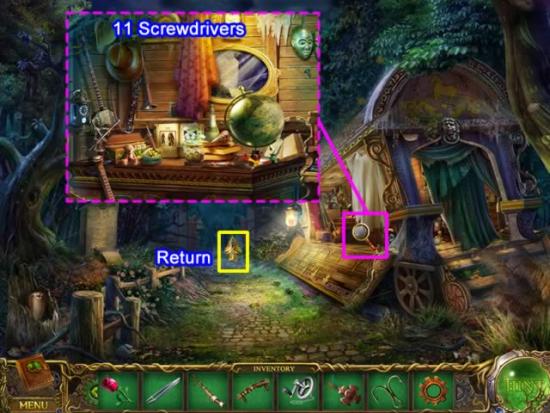
Click the magnifying glass to access the wagon.
Find 11 screwdrivers in the scene. One SCREWDRIVER goes to inventory.
Return to the house.
Enter the house through the window.
Click the magnifying glass on the rear cabinet to access the fragmented object area.
Exit the house and return to the dock.

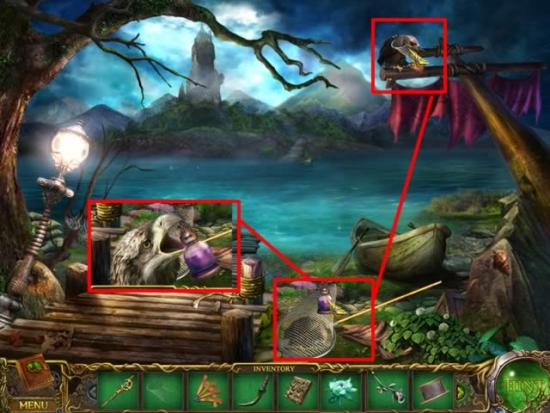
At the dock:
Snag the herrings and reel them in.
Reel them all in and receive a HERRING for inventory.
Cross to the island. Proceed through the aura garden and up the plant to the ice hall.
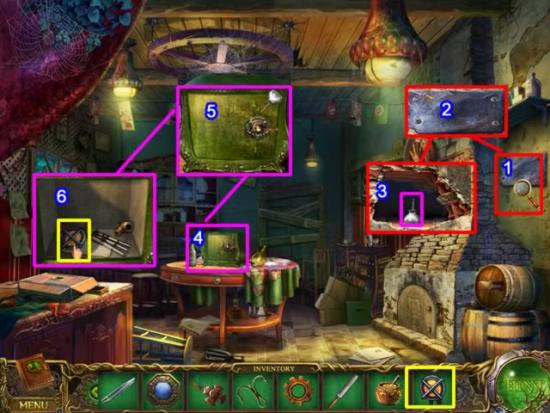
Enter the lava cave.
Return to the stone creatures guarding the entrance to the island.
Return to the lava cave.
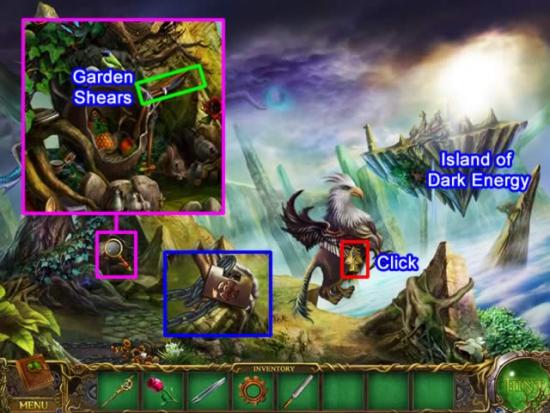
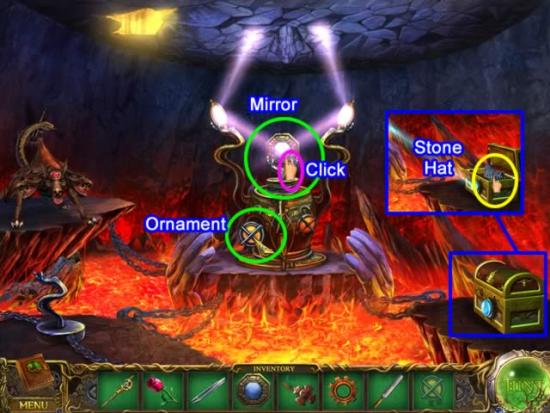
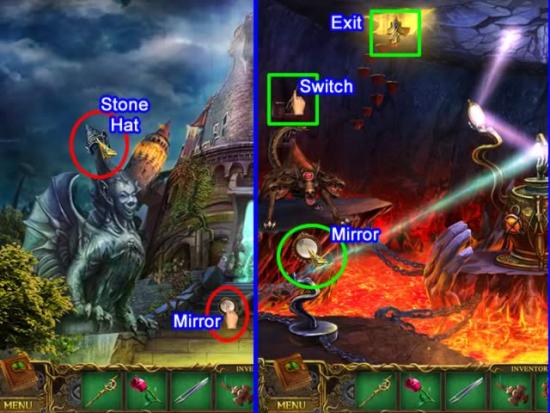
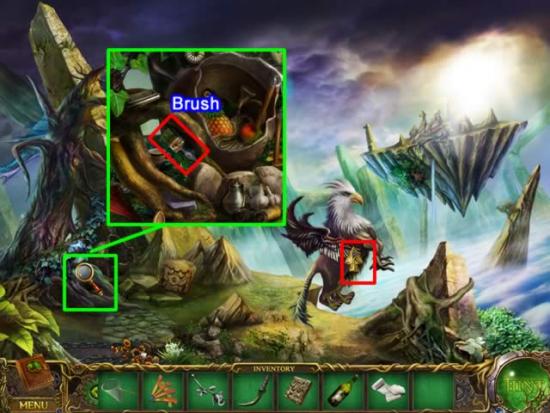
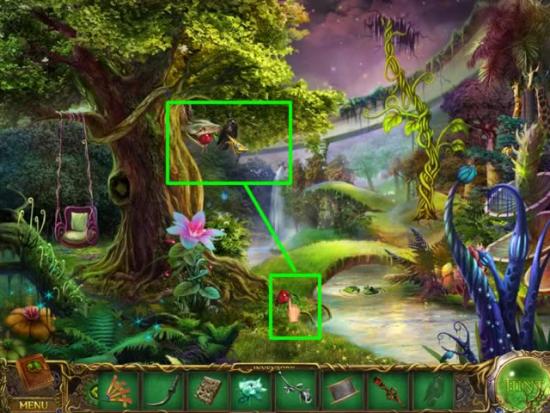
At the top of the watchtower, a griffin is chained to a tree.
The griffin moves off exposing a hidden object area.
Click the griffin to fly to the island of dark energy.
Explore the Dark Priests lair.
Return to the watchtower and descend to the entrance.
At the watchtower entrance:
Cross the lake and return to the carpenter’s shop.
Go to the town square.
Click to open the fragmented object area:
Exit the square to the left.
Go to the tree. Access a hidden objects area.
Return to the town square.
Click the magnifying glass to access the area.
Go left out of the square to the tree.
Explore the library courtyard.
Approach the door.
The lock is a gem-swap puzzle.
Enter the library.

Investigate the area.
Tasks yet to be done:
Return to the village square.
Go to the carpenter’s shop. Enter the kitchen.
Return to the forge area.
Enter the house.
Exit the house.
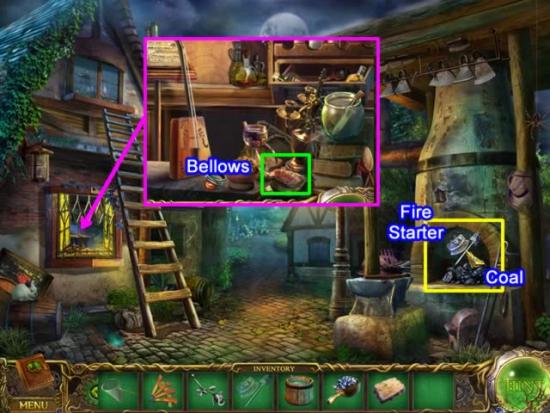
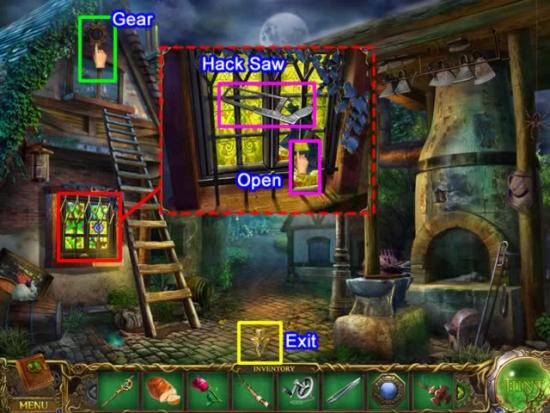
The fire isn’t hot enough. Return to the house.
Exit the house.
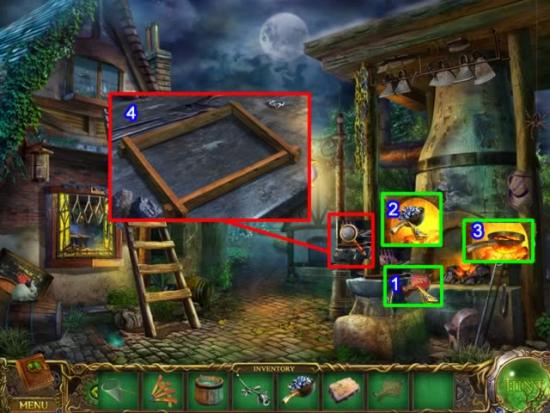
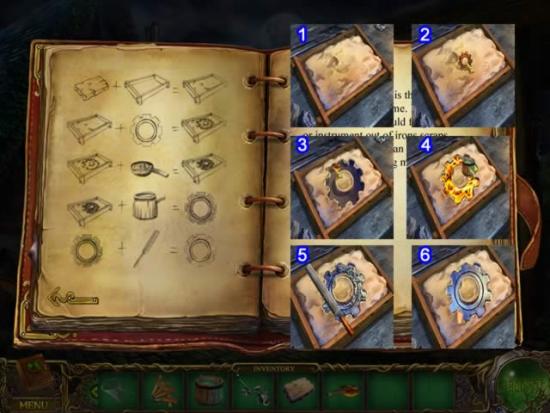
Follow the directions from the diary to make the gear.
Return to the carpenter’s shop.
Return to the town square.
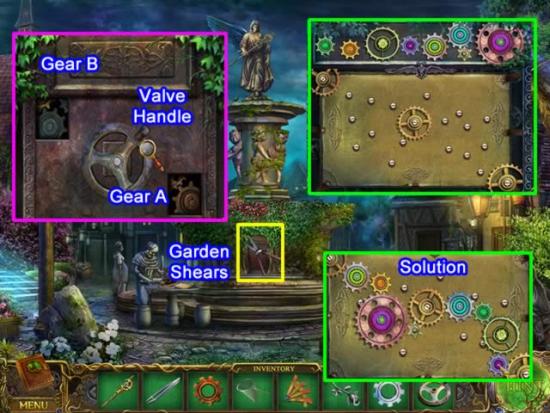
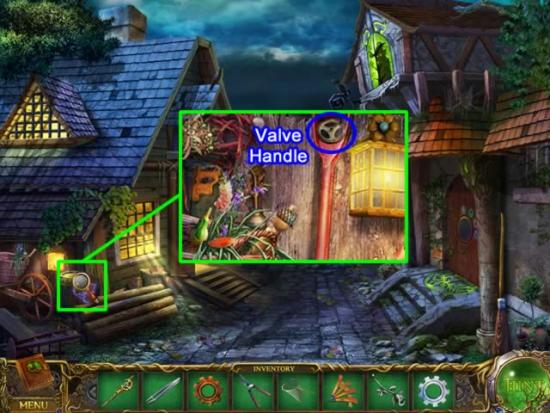
Place the gears.
The door opens.
Enter the fountain chamber.
Exit the room.
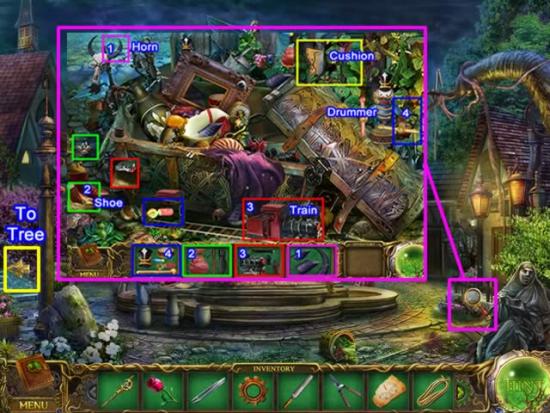
Access the hidden object area on the right side of the square.
Exit the square at the bottom.
Proceed past the forge area to the wagon.
Access the hidden object area.
You are finished with the village temporarily.
Go to the watchtower island.
Go through the aura garden, the ice hall, up the stairs to the lava cave and up to the griffin.
Click the magnifying glass to access the hidden object area.
Click the griffin to fly to the lair of the Dark Priests.
Return to the watchtower.
Descend through the levels to the unicorn.
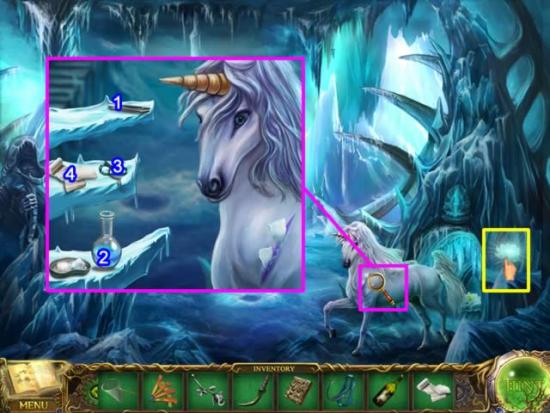
Heal the unicorn:
The area enlarges for the procedure.
Pick up the SNOW LOTUS FLOWER for inventory.
Descend to the aura garden.
Click the magnifying glass to access the hidden object area.
Return to the fountain room in the town square.
Click the magnifying glass to access the hidden object area.
Return to the carpenter’s shop.
Enter the kitchen.
Exit the carpenter’s shop.
Use the zip line to go to the library.
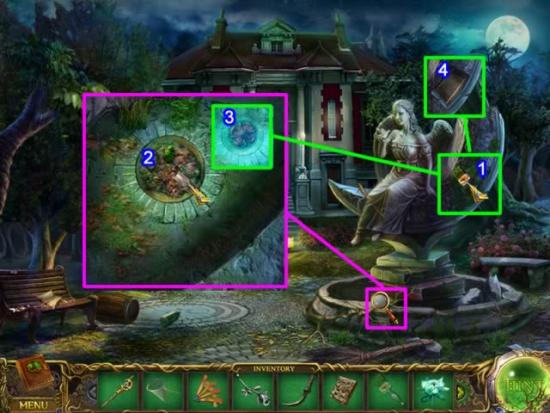
First stop, the statue:
Enter the library.
Click the magnifying glass to access the hidden object area.
Place the WHEEL on the ladder.
Move the ladder to the shelf containing the bottles. Click the TAMING POTION to add it to inventory.
Exit the library and go to the dock.
Cross the lake and go to the aura garden.
Continue to the top of the watchtower.
Ride the griffin to the Dark Priests lair.
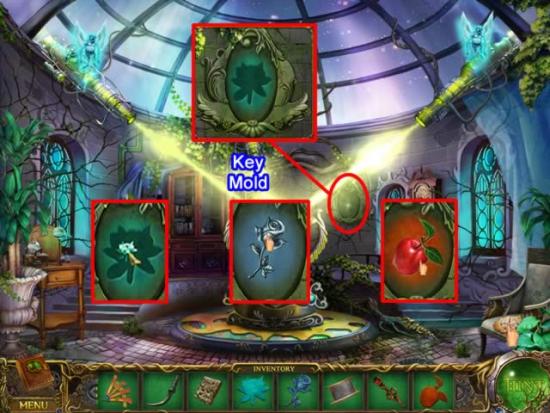
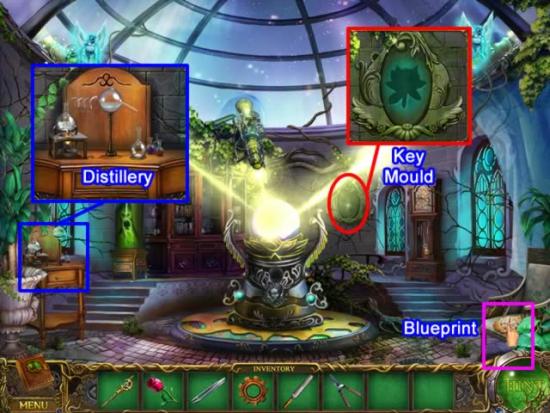
Create the keys for the mystery house. Click the key mold to access the area.
The mold will change shape into the silhouette of a rose. Repeat the above steps.
The mold will change shape into the silhouette of an apple. Repeat the above steps.
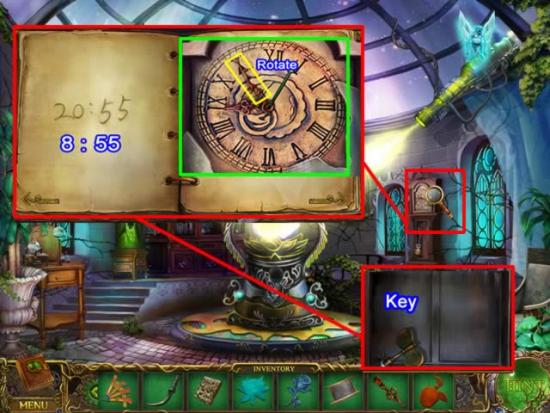
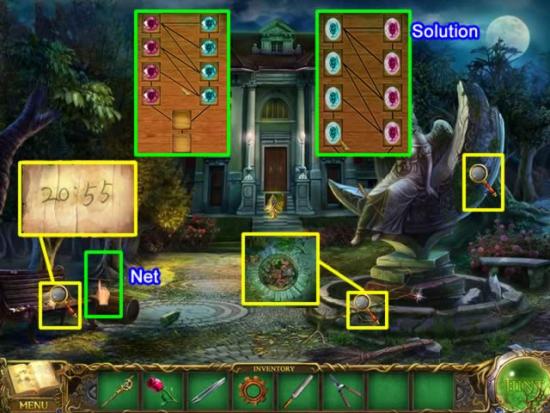
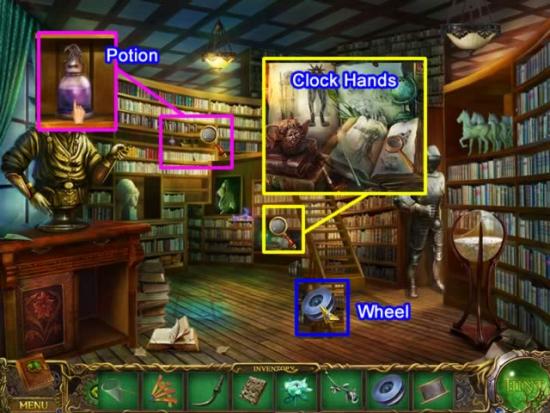
Click the grandfather clock to access the face.
According to the note found at the library, the time should be set to 20:55 military time, or 8:55 p.m.
Return to the watchtower.
Click the magnifying glass to access the hidden object area.
Descend the watchtower, cross the lake and enter the carpenter’s shop.
Enter the carpenter’s bedroom.
Return to the top of the watchtower.
You have now collected all the key parts to enter the mysterious house.
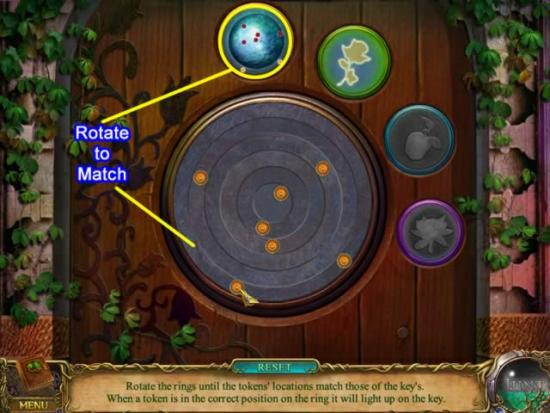
Click to access the door lock.
A matching puzzle opens.
Repeat the ring rotation for each key. The door will open when all the key disks are dim.
Enter the house.
Explore the room.
Investigate the area.
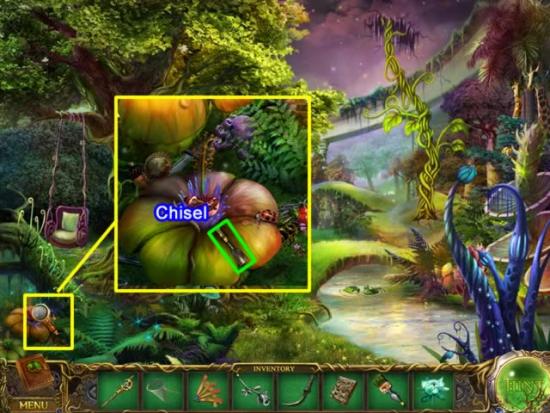
Click the magnifying glass on the chest to open the fragmented object area.
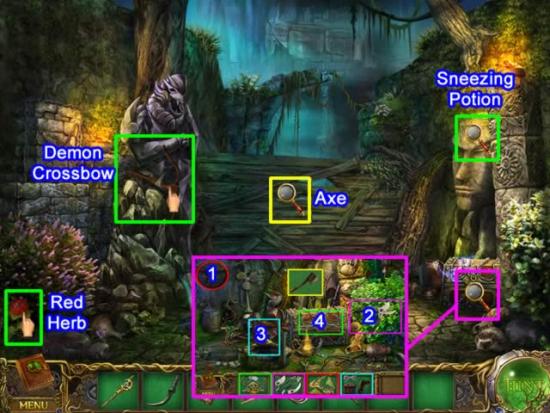
Use the AXE to chop through the gate.
Enter the demon statue area.
Investigate the area.
Click the magnifying glass to access an interactive area.
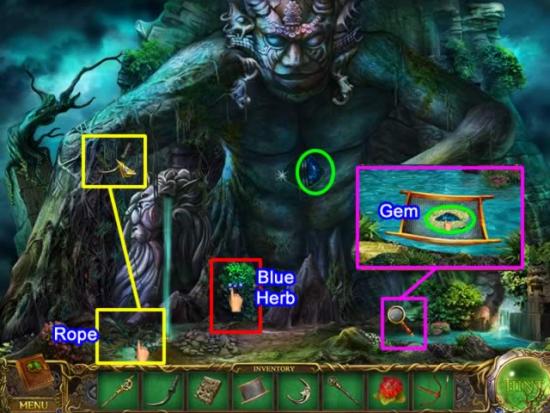
Place the SAPPHIRE in the demon’s heart.
Return to the courtyard.
Return to the house.
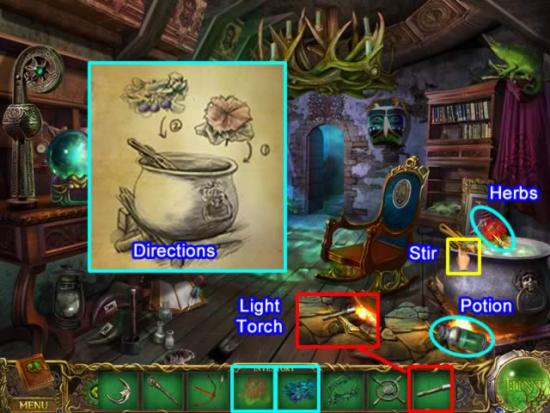
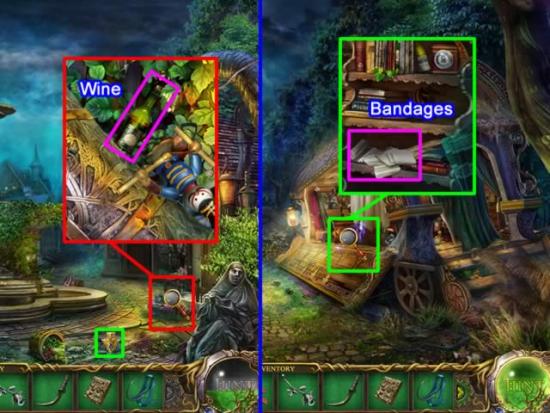
Follow the directions for making the sneezing potion. The steps must be done in order.
Before you leave, place the UNLIT TORCH in the coals. The LIT TORCH goes to inventory.
Exit to the courtyard.
Place the RUBY in the other chamber of the stone demon’s heart.
His stomach opens.
Place the VINE ROPE in the opening and enter.
Click the magnifying glass on the right side of the screen to access a fragmented object area.
Exit the cave.
Go to the village square.
Go to the old bridge and take the zip line to the library.
Exit the library and return to the village square.
Enter the chamber under the fountain.
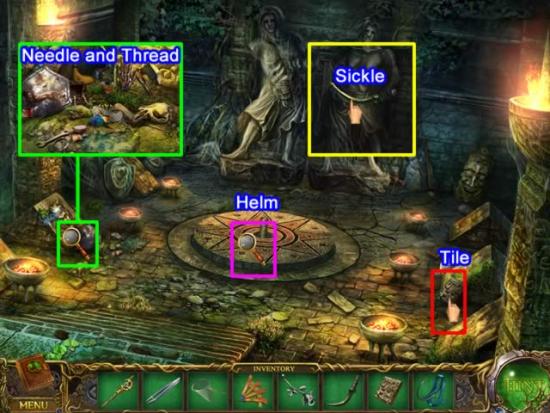
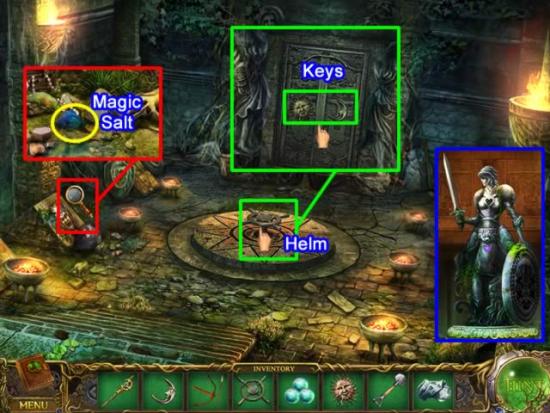
Click the magnifying glass to access the hidden object area.
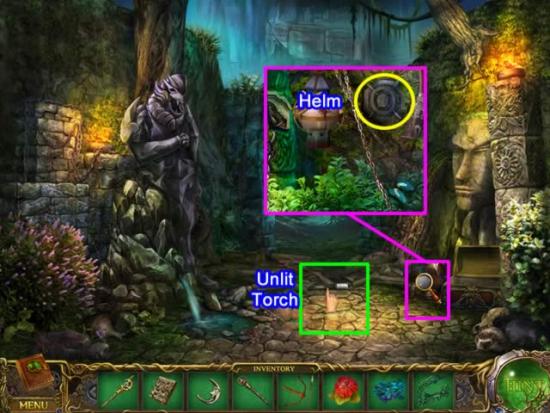
Fit the HELM on the stand. Click to move the statues aside and reveal a door.
Place the SUN KEY and MOON KEY in their slots. Click to open the door.
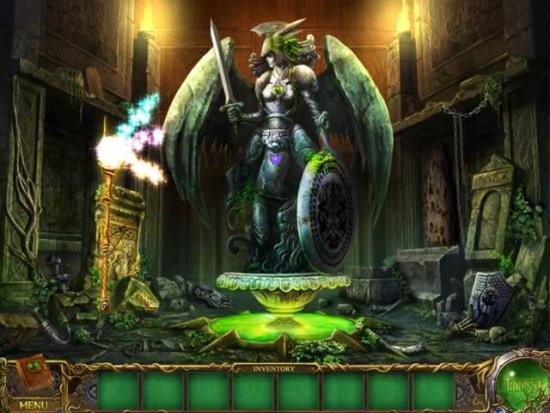
Enter the chamber and view the Great Protectorate statue. She is missing her heart, helm and wings.
Exit the chamber and return to the mysterious house.
Head toward the pirate’s cave.
Click the magnifying glass in the couryard area to access a hidden object area.
Proceed to the cave.
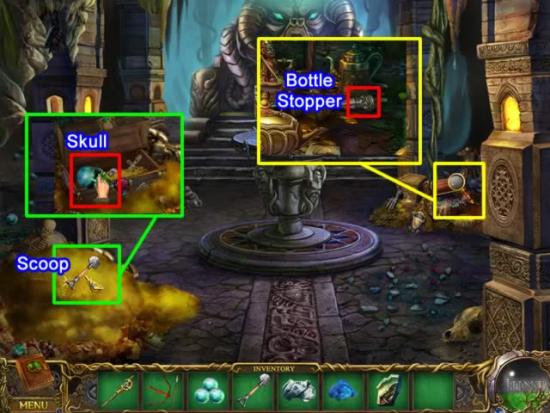
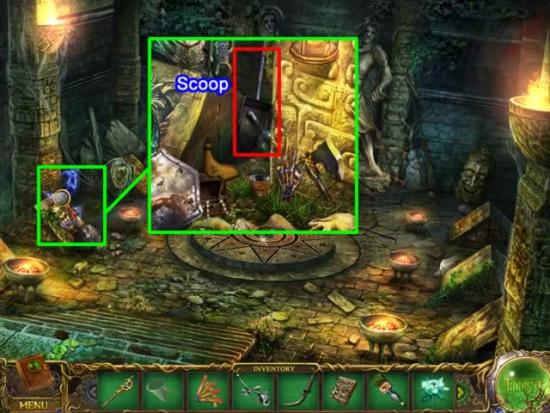
Click the magnifying glass to access the hidden object area.
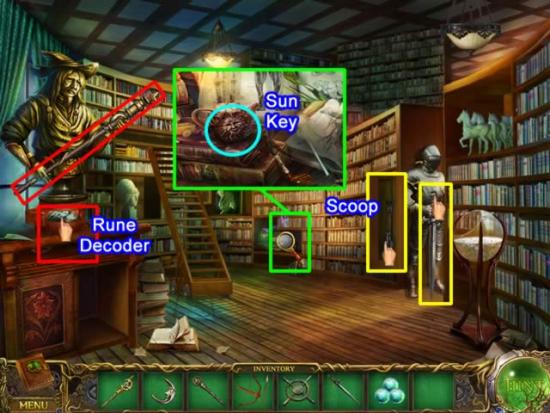
Use the SCOOP to excavate the yellow sand.
Uncover the trunk. Use the BOTTLE STOPPER for a key.
Open the trunk and get the CRYSTAL SKULL.
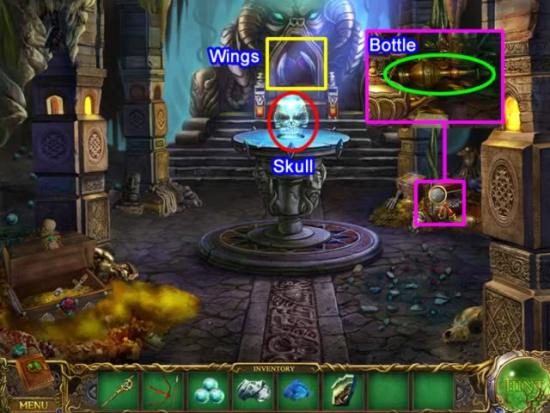
Place the CRYSTAL SKULL on the altar.
A compartment behind it opens. Get the ANGEL WINGS.
Click the magnifying glass to access the hidden object area.
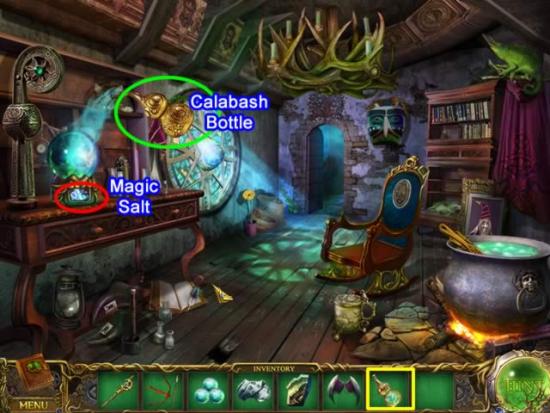
Collect all the items. The CALABASH BOTTLE goes to inventory.
Exit the cave.
Enter the house.
Exit the house.
Return to the wagon.
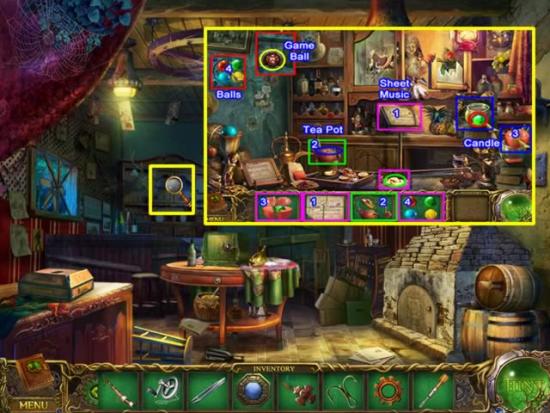
Click to open the matching puzzle.
The puzzle opens. Collect the ANGEL HELM.
Next stop: the lair of the Dark Priests.

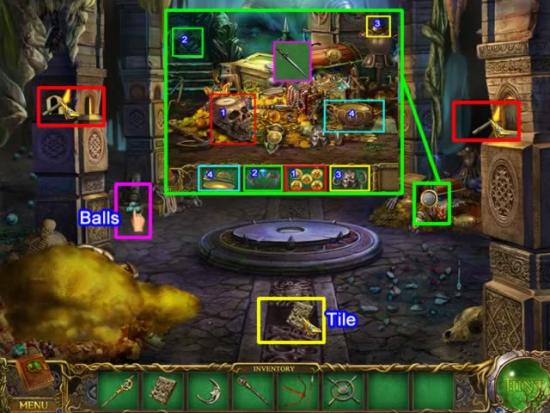
The protective beams are now disarmed.
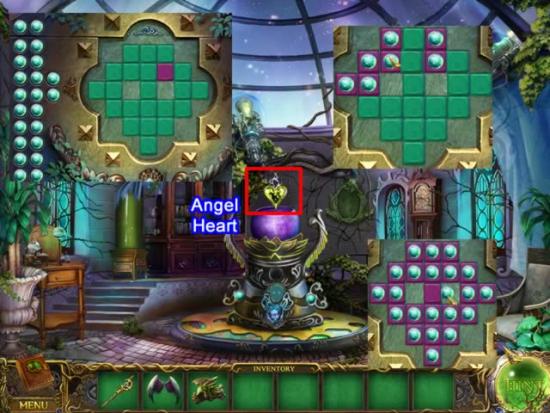
The balls can only be placed on a purple square.
Placing a ball will turn some squares green and others purple.
If there are no purple squares, try repositioning a ball.
Complete the puzzle and receive the ANGEL HEART.
Return to the chamber under the fountain.
There is a short video clip to wrap up the story.
Congratulations! You have completed Mystery Age: The Dark Priests.
