- Wondering how to get Monopoly GO! free rolls? Well, you’ve come to the right place. In this guide, we provide you with a bunch of tips and tricks to get some free rolls for the hit new mobile game. We’ll …
Best Roblox Horror Games to Play Right Now – Updated Weekly
By Adele Wilson
Our Best Roblox Horror Games guide features the scariest and most creative experiences to play right now on the platform!The BEST Roblox Games of The Week – Games You Need To Play!
By Sho Roberts
Our feature shares our pick for the Best Roblox Games of the week! With our feature, we guarantee you'll find something new to play!All Grades in Type Soul – Each Race Explained
By Adele Wilson
Our All Grades in Type Soul guide lists every grade in the game for all races, including how to increase your grade quickly!
Mysteries of Magic Island Walkthrough
Welcome to The Mysteries of Magic Island walkthrough on Gamezebo. Mysteries of Magic Island is a Hidden Object Game played on the PC created by Perfect Future Studio. This walkthrough includes tips and tricks, helpful hints, and a strategy guide on how to complete Mysteries of Magic Island.
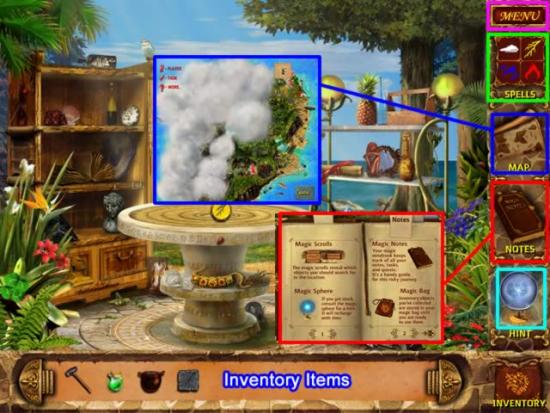
The Mysteries of Magic Island – Game Introduction
Welcome to The Mysteries of Magic Island walkthrough on Gamezebo. Mysteries of Magic Island is a Hidden Object Game played on the PC created by Perfect Future Studio. This walkthrough includes tips and tricks, helpful hints, and a strategy guide on how to complete Mysteries of Magic Island.
Tips and Tricks
General description
This is a hidden object game that requires visiting several locations to collect and use inventory objects and create magic spells.
There is no timer and no score is kept.
There are two modes of play:
- Normal – Skip and hint buttons recharge quicker. Active zones are highlighted with sparkles. The map shows the location of the task and the player.
- Advanced – Skip and hint buttons take longer to recharge. Active zones are not indicated. The map shows only the location of the player.
A player cannot change modes during the game. Should you wish to switch modes, you must begin again as a different player.
This guide is written using Normal mode.

Navigation:
- Menu – Change options, resume the game or return to the main menu.
- Spells – Created throughout the game and used to perform various tasks.
- Map – Shows your location on the island (a witch icon), tasks to be performed (a check mark) with an icon related to that task (a question mark). Areas not yet completed are covered by clouds.
- Notes – Provides hints and tips.
- Hint/Skip Globe – When full, clicking the Hint globe will highlight a random item when searching an area. For mini-games the globe will be green. A full globe indicates you can skip a game.
- Scrolls – Lists number and items to be found at a location.
- Inventory – Shows what items are available for use.
There is a short clip that introduces the characters and sets the story line for play. A tutorial walks you through the first few steps.
Walkthrough – The Fire Spell
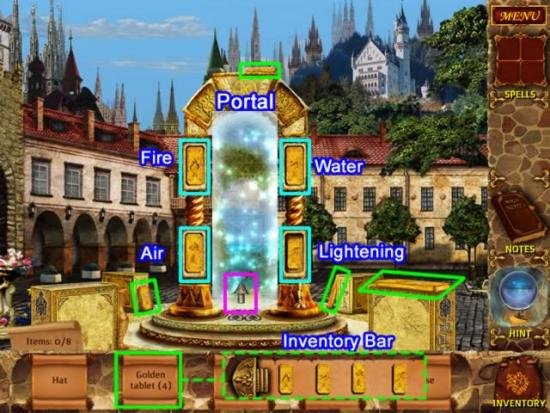
Collect the eight items shown on the scrolls.
The four GOLDEN TABLETS (outlined in green) represent four elements. These are inventory items.
After all items are collected the tablets will appear in the inventory bar.
Click each tablet and match the symbol etched on it to the corresponding slot in the portal.
When correctly placed, the portal entrance glows and an arrow (outlined in pink) points the way.
Click to enter.
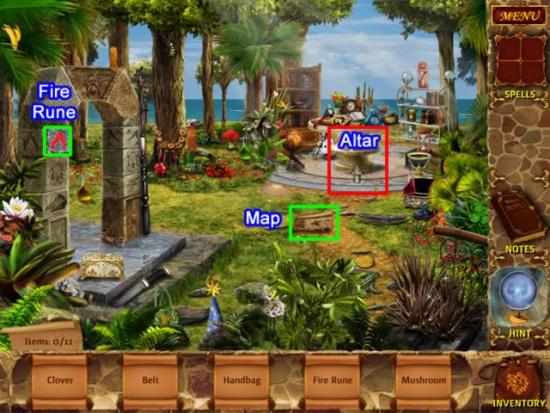
Collect the items listed on the scrolls. The items listed in the screenshot above may not be the same as yours.
The MAP is now available on the menu wall. Consult this as needed to see tasks or locations.
The FIRE RUNE goes into inventory.
After all items are collected the altar location begins to sparkle and the cursor turns into an arrow indicating that this area is now accessible.
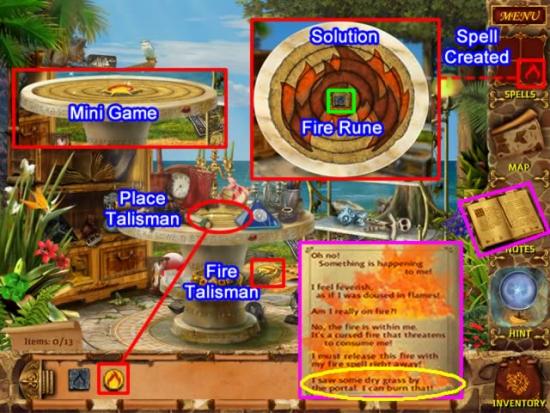
Collect all the items listed on the scrolls. The FIRE TALISMAN goes to inventory.
After all items are collected, place the FIRE TALISMAN in the center of the altar.
All items disappear. Click the altar to open a mini game.
- Work from the outside in to match the patterns.
- Rotate each circle until it matches the closest outer circle.
- A correctly placed circle will lock into place.
- The solution is shown above.
- Place the FIRE RUNE in the center of the puzzle.
The completed Fire Spell is now available.
The Notes open. The last paragraph on the page indicates the next task.
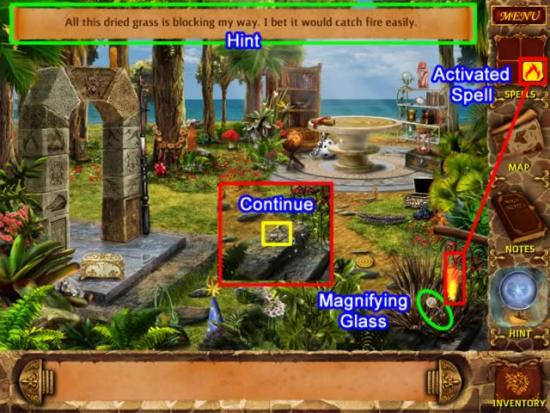
Exit the altar location.
Place the cursor over the sparkling bush in the lower right corner. The cursor turns into a magnifying glass. Click and a hint appears at the top of the screen.
Click the Fire Spell icon to activate it. Click the bush to burn it, revealing a set of stairs.
Click the arrow to descend the stairs.
The Alchemist’s Workshop
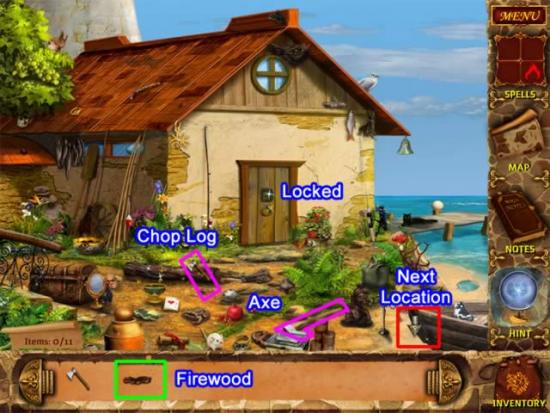
Collect the items listed on the scrolls.
Select the AXE from inventory.
Click the AXE on the sparkling log several times to chop it.
Click the FIREWOOD for inventory.
The door to the workshop is locked.
All tasks for this location are currently completed.
Place the cursor on the bottom right of the screen. When the cursor turns into an arrow, click to go to the next location.
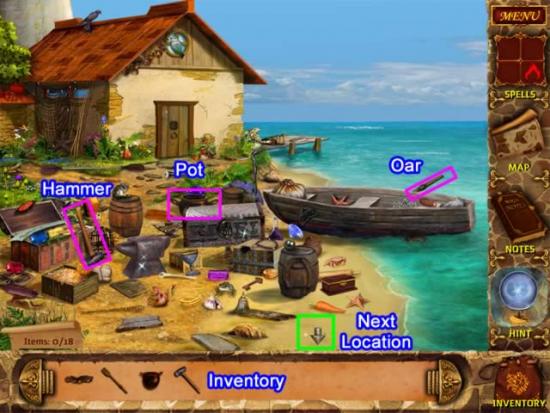
Collect the items listed on the scrolls.
Items added to inventory are the HAMMER, POT and OAR.
All tasks are completed for the area.
Move the cursor along the bottom of the screen until it turns into an arrow.
Click to continue to the next location.
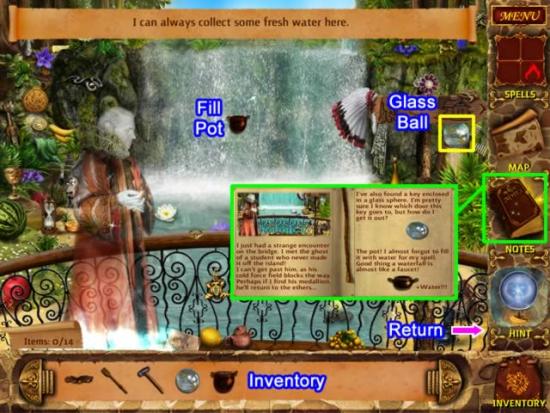
Collect the items listed on the scrolls.
The GLASS BALL is added to inventory.
Select the POT from the inventory list. Drag the pot to the waterfall to fill it with water. Note that whenever water is needed, it can be obtained here.
The Notes book glows. Click to open it and read about the ghost and see the hints on what tasks to do.
Place the cursor on the right corner of the screen to return to the previous location.
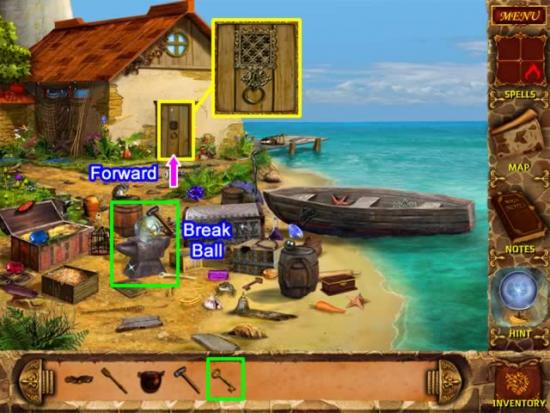
Place the GLASS BALL on the anvil.
Use the HAMMER to break the ball and obtain the KEY for the workshop door.
Advance once to get to the workshop.
Click the door to access the lock. Place the KEY in the lock and click to open the door.
Enter the workshop.
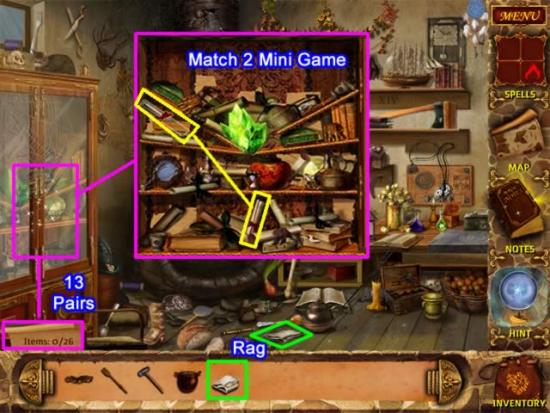
Collect the items listed on the scrolls. The RAG goes into inventory.
Click the cabinet to open a match-two mini game.
- Click an item. If there is a match for it, the item will lighten and float.
- Find the duplicate item.
- There are 26 items to collect or 13 pairs.
Receive the Acid Potion recipe.
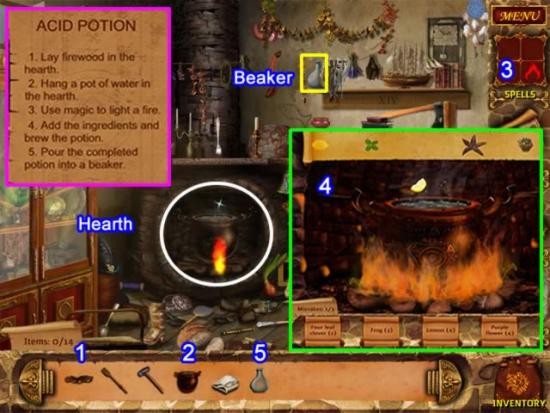
Collect the items listed on the scrolls. The BEAKER is added to inventory.
Follow the directions to make the Acid Potion:
- Place the FIREWOOD (1) in the hearth.
- Hang the POT OF WATER (2) in the hearth.
- Click the Fire Spell (3) to light the firewood.
Add the ingredients (4):
- The scrolls at the bottom contain the number and type of each ingredient.
- Click a corresponding ingredient as they scroll across the top.
- Three mistakes are allowed for clicking incorrect ingredients or missing the pot.
- The game will restart if more than three mistakes are made.
Successfully adding the ingredients creates a green acid potion.
- Click the empty BEAKER and place it in the pot to get a portion of the potion.
Exit the cabin
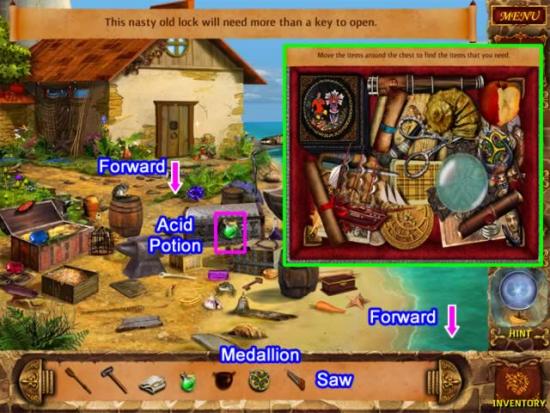
Move the cursor until a forward arrow appears. Click.
Use the ACID POTION on the lock on the chest. The remaining potion returns to inventory.
Move the objects around in the popup area to find the listed objects. The MEDALLION and SAW go to inventory.
Move the cursor until a forward arrow appears. Click.
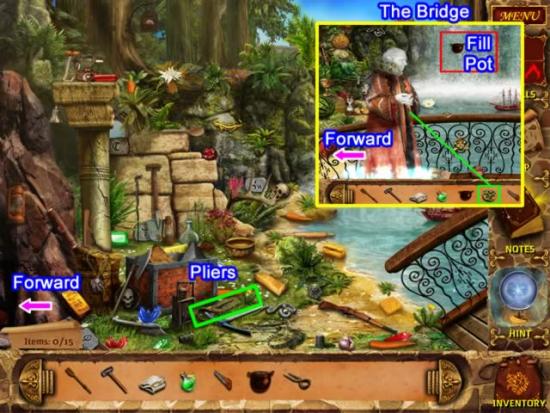
Please refer to The Bridge inset above:
- Fill the POT at the waterfall.
- Give the MEDALLION to the ghost.
- Continue across the bridge.
Collect the items listed on the scrolls.
The PLIERS go into inventory.
Move the cursor until a forward arrow appears. Click to enter the cave.
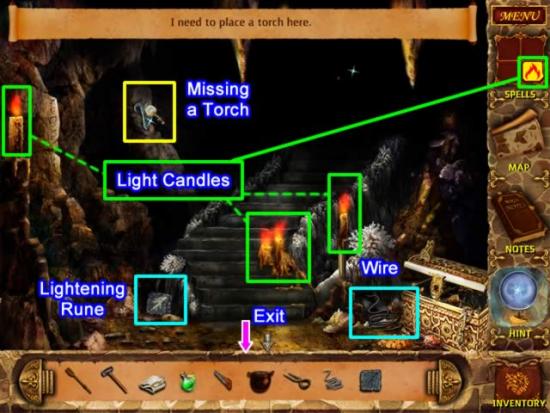
Collect the LIGHTENING RUNE and WIRE for inventory.
Click the Fire Spell to light the three candles.
A torch is required to see further into the cave.
Exit the cave and return to the workshop to construct the torch.
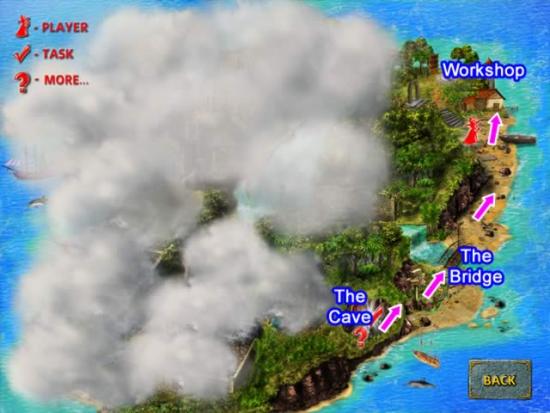
The map is a handy tool to orient yourself.
You cannot click on a location and beam yourself there, but it’s helpful to see how to return to a particular spot.
To return to the workshop:
- Exit the cave.
- Click to enter the bridge.
- Click to exit the bridge. You are now by the boat where the chest is located.
- Click once more to approach the workshop.
- Click the workshop door to enter.
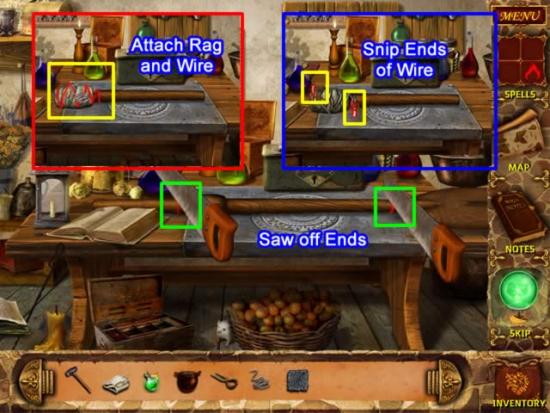
Click the work table to open the area. Construct the TORCH:
- Place the OAR on the table. A red line appears on the oar indicating where to cut.
- Place the SAW on the red line and click to saw off the end.
- Repeat the process for the other end.
- Place the RAG on the stick as shown in the left inset above.
- A red line appears showing where to bind the rage. Place the WIRE on the rag and click.
- Use the PLIARS to snip both ends of the wire.
- Place the TORCH in inventory.
Refer to the map in the above screenshot to return to the cave.
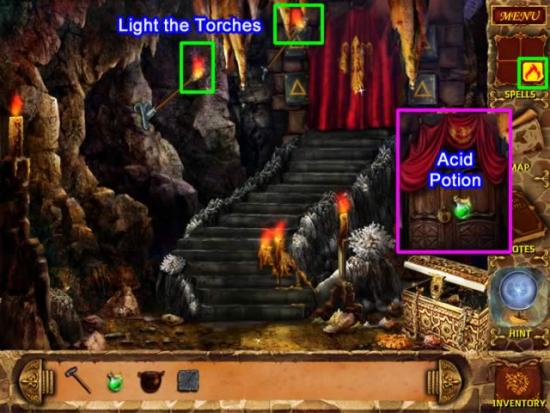
Place TORCH in the empty holder. Use the Fire Spell to light it.
Another torch is revealed. Light it with the Fire Spell.
Click the red curtains at the top of the step to raise them.
Use the Acid Potion on the lock to dissolve it and reveal the entrance to the Hall of Beams.
The Hall of Beams is where each talisman for the remainder of the spells is located.
The Hall of Beams
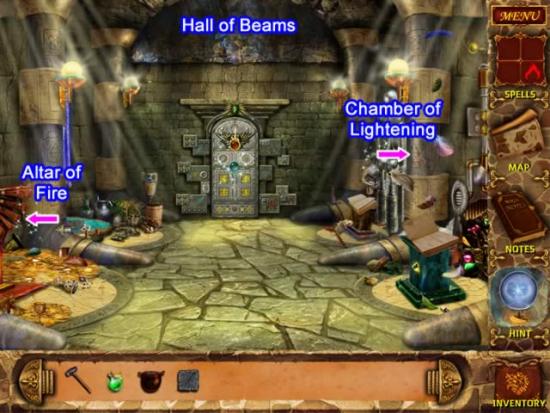
Enter the Hall of Beams.
Place the cursor on the left side of the screen to enter the Altar of Fire.
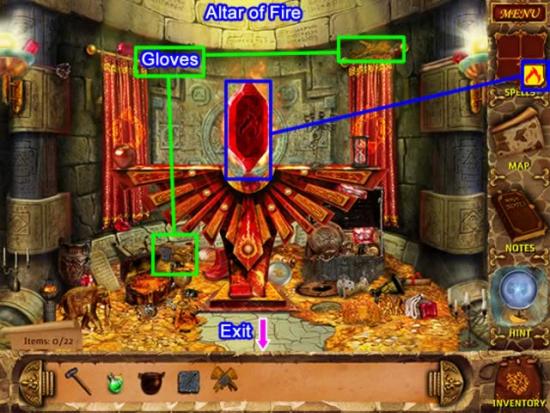
Use the Fire Spell on the fire crystal to light the room.
Collect the items listed on the scrolls. The GLOVES go into inventory
Return to the Hall of Beams.
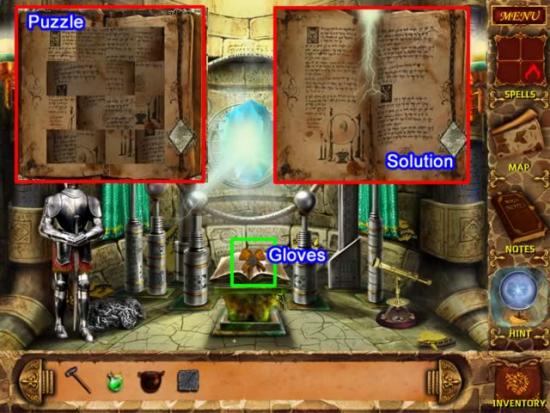
Enter the Chamber of Lightening on the right side of the Hall
Use the GLOVES to open the book in the front of the altar.
Solve the popup game by switching pieces of the book with adjacent pieces to reconstruct the pages in the book.
- Start with the pieces closest to the spine. They are darker on the right or left side depending on which page they are on.
- The pieces with a symbol can be worked out once the spine pages are in place.
- The pieces with writing will be the last to place.
- The solution inset to shows how the completed book looks.
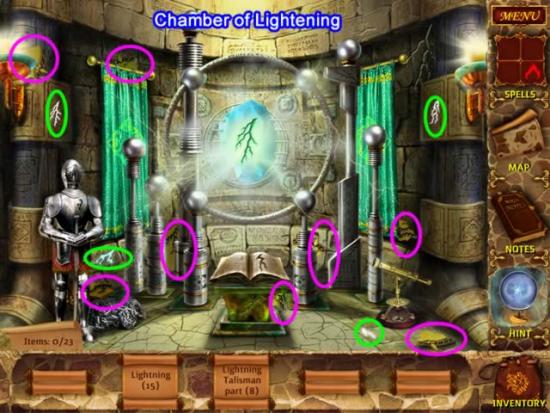
Collect the pieces of the Lightening Talisman highlighted in pink above.
The lightening bolts outlined in green flash on and off so can be hard to find.
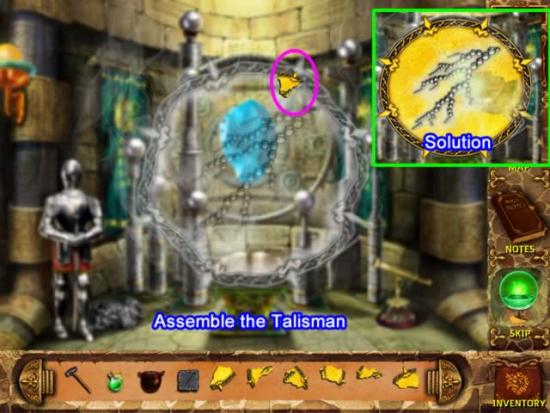
Assemble the LIGHTENING TALISMAN by placing the pieces from inventory into the outline.
- The simplest way to solve this puzzle is to match the points on the pieces with the points in the outline.
- As each piece is placed correctly, it will expand and lock into place.
- The solution is shown above.
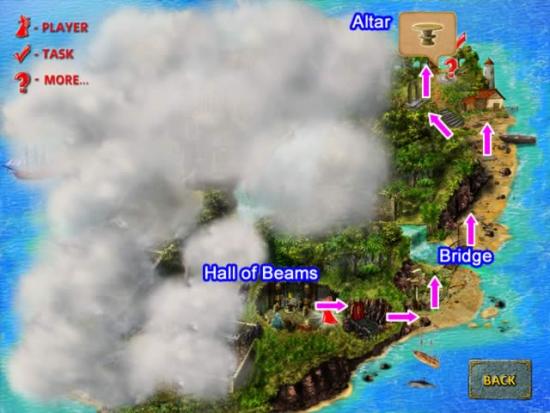
The Lightening Spell can only be created on the altar.
Follow the path indicated above to reach the altar from the Hall of Beams.
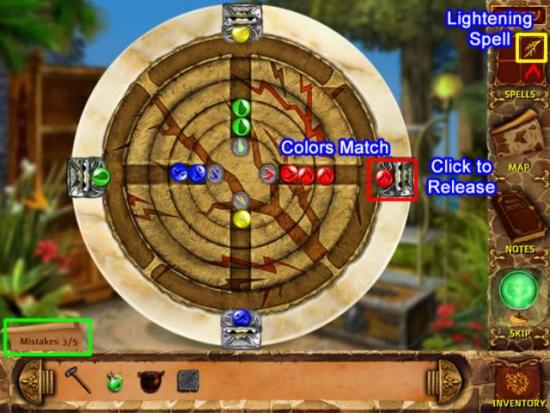
Place the LIGHTENING TALISMAN in the center of the altar.
Solve the ball drop puzzle:
- When the rings stop spinning, only one correct ball drop is possible.
- In the above example, note that the yellow ball at the top is aligned with green balls, the green outside ball on the left is aligned with blue balls and the blue ball at the bottom doesn’t match the yellow ball in the slot.
- Only the red ball on the right matches the line of already dropped balls.
- Click the head holding the red ball to release it.
- Each time the wheel spins the colors on the outside balls change.
- Five incorrect drops will restart the puzzle.
- Successfully completing the puzzle provides the Lightening Spell.
Refer to the map in the above screenshot to return to the Hall of Beams.
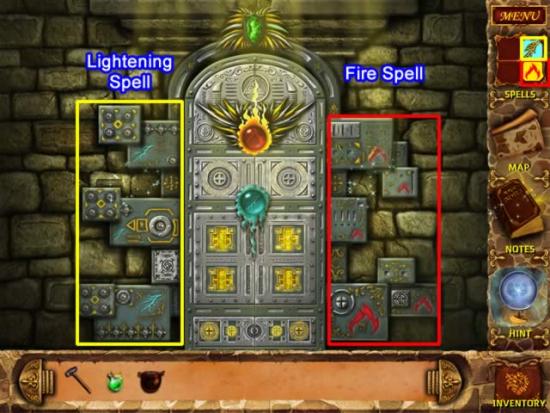
Open the door by solving two sets of puzzles.
Use the Fire Spell to open the fire rune puzzles.
Use the Lightening Spell to open the lightening rune puzzles
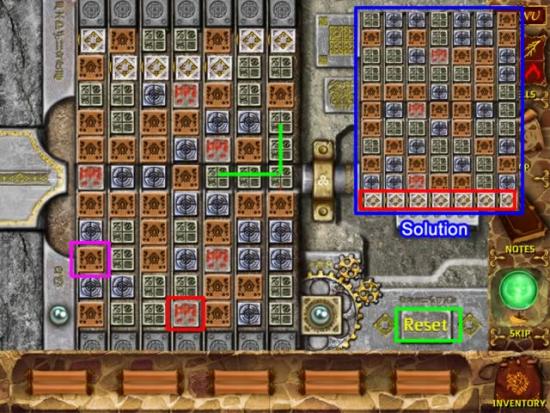
Move the golden runes to the bottom row to open the fire lock:
- Click on a sequence of three or more tiles to remove them.
- Use the fire runes (outlined in red above) to blow up tiles around it.
- If a fire rune is next to a golden rune, the golden rune won’t be blown up.
- The brown tiles are wooden and can be removed only one at a time. These are helpful to arrange a sequence of three or more tiles.
- One approach is to begin at the bottom and work your way up. Match as many in a sequence as possible.
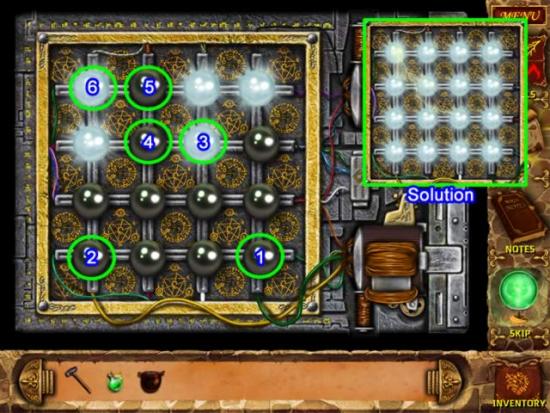
Click the bulbs so that all are lit to open the lightening lock. One solution:
- Start at the lower corners and work your way in.
- Click the lower right (1) then the opposite side (2).
- Click the bulb labeled (3), then the one next to it.
- Finally click the bulbs labeled (5) and (6).
The door opens.
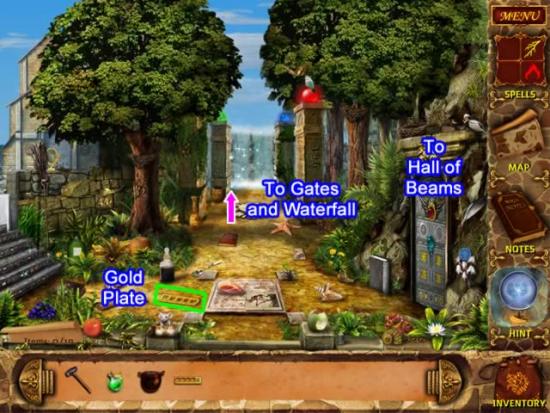
Collect the items on the scrolls. The GOLD PLATE goes to inventory.
Go north toward the Gates and the Waterfall.
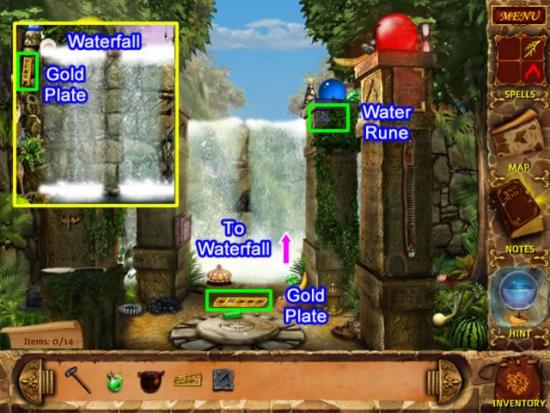
Collect the items listed on the scrolls.
The WATER RUNE and GOLD PLATE go to inventory.
Go forward to the Waterfall and collect another GOLD PLATE.
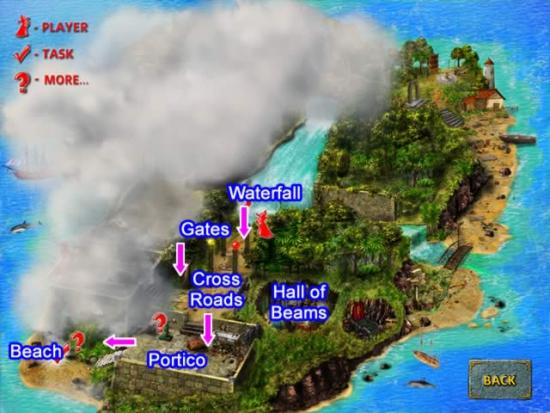
From the Waterfall, return to the Gates.
Go forward again to the Cross Roads.
Descend the stairs to the Portico.
Descend the stairs to the Beach.
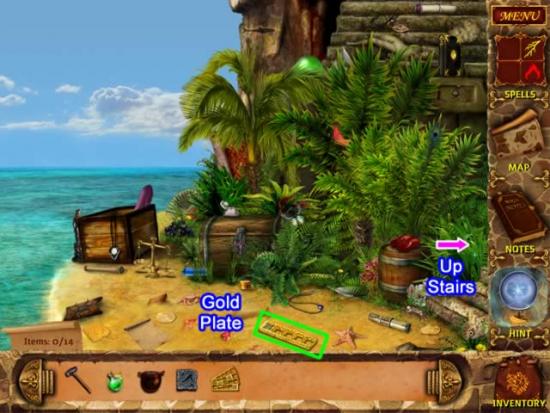
Collect the items listed on the scrolls. The GOLD PLATE goes to inventory.
Ascend the stairs to the Portico.
Investigate the area at the left rear of the Portico
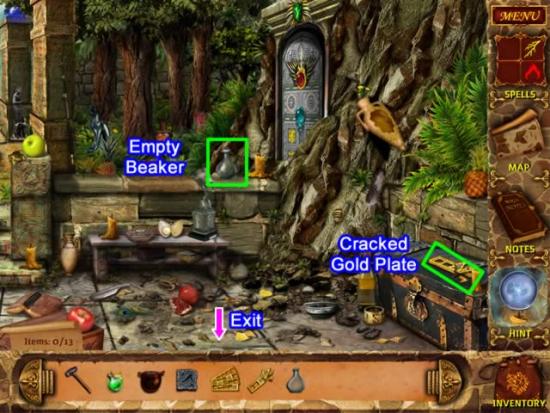
Collect the items listed on the scrolls.
The CRACKED GOLD PLATE and the BEAKER go to inventory.
Exit the location. Go up the stairs and enter the Hall of Beams.
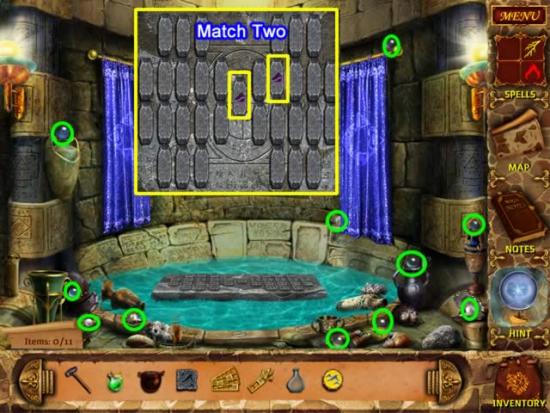
Enter the Chamber of Water. Collect the 11 pearls.
Complete the match-two game to collect the WATER TALISMAN.
Return to the Altar (refer to the map if necessary),
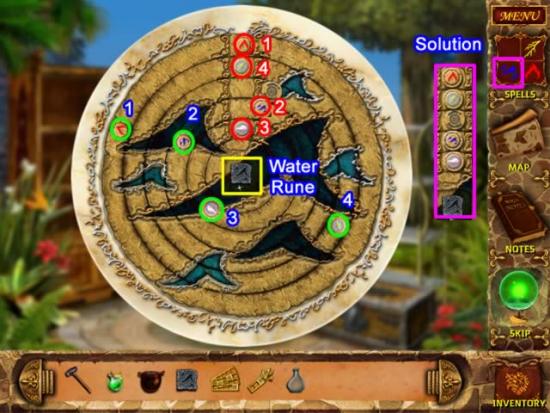
Place the WATER TALISMAN on the Altar.
Align the elements at the top of the circle. In the above screenshot, the numbers outlined in blue represent the starting position of the element and the order in which they should be moved.
The corresponding number, outlined in red, shows the final position of the elements.
To accomplish this:
- Move the fire element (1) to the position labeled in red (1) at the top of the circle
- Move the water element (2) to a position just outside of the top of the circle.
- Move the air element (3) to the to the top of the circle.
- Move the lightening element (4) to the top.
Place the WATER RUNE in the center of the circle.
The alignment solution is shown above. The new Water Spell has been added.
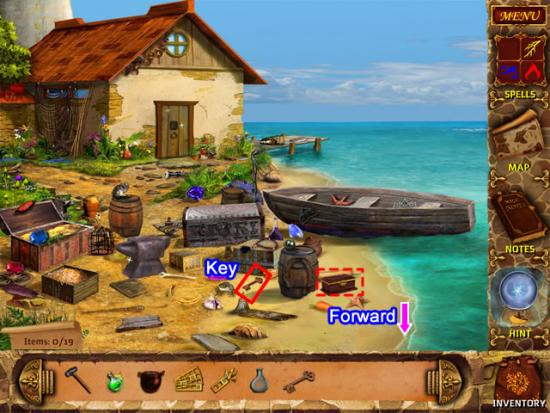
Exit the Altar area and continue to the boat area.
Stop long enough to collect the KEY. It will fit the small chest outlined with a dashed-red line in the screenshot above. We are not ready for the puzzle the chest presents yet.
Continue through the Hall of Beams south to the Portico.
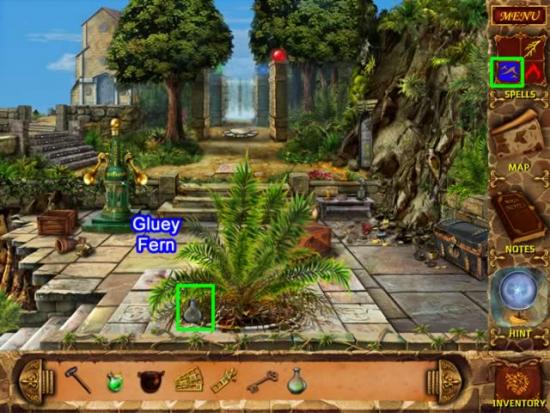
Use the Water Spell on the Gluey Fern.
Juice from the plant begins to fall. Collect them in the EMPTY BEAKER.
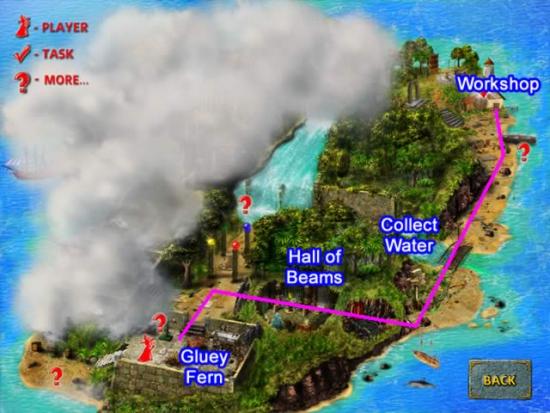
Return to the Workshop.
If the POT is still empty, stop on the bridge and fill it with water.
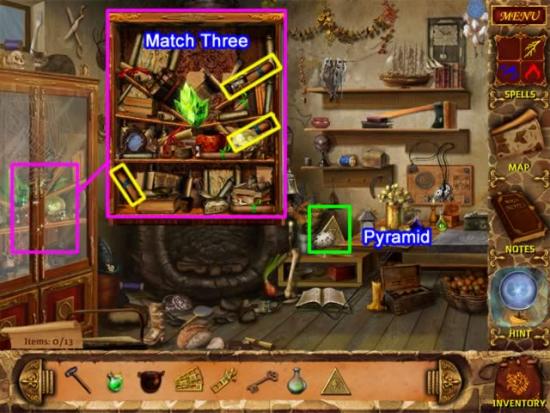
Collect the items listed on the scrolls. The PYRAMID goes to inventory.
Click the cabinet to open a match-three puzzle.
Receive the recipe for the Glue Potion.
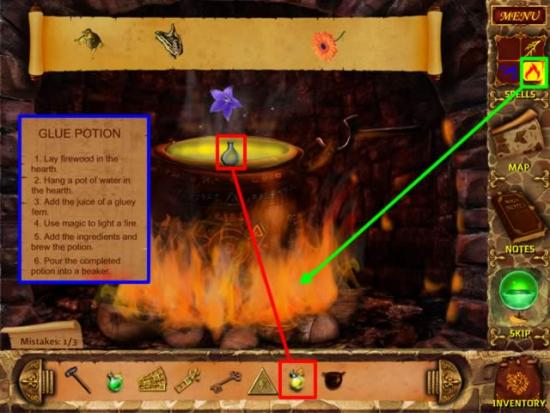
Follow the GLUE POTION recipe:
- There is no need to gather firewood; it is already laid in the hearth.
- Hang the POT of water.
- Add the BEAKER OF GLUEY JUICE.
- Use the Fire Spell to light the fire.
- Pick the ingredients from the moving selection.
- Use the now-empty BEAKER for the GLUE POTION.
Exit the Workshop.
Go forward once to the boat.
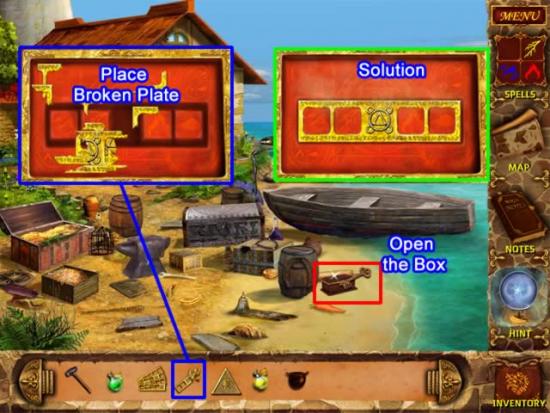
Open the box with the KEY.
Place the CRACKED GOLD PLATE on the form. It breaks into pieces.
Use the outline to place each piece in the correct location.
Apply the GLUE POTION to mend the plate. The reminder of the potion returns to inventory.
You have now collected all five of the GOLD PLATES.
Proceed to the Hall of Beams and exit the Fire and Lightening Door to the road.
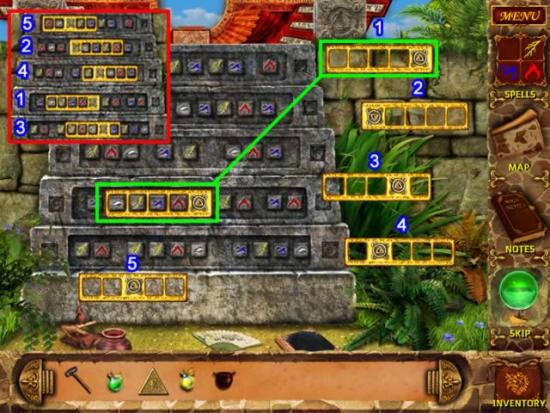
Click the stairs to access a puzzle.
- Place each plate so that one of each element shows in the empty slot.
- Each plate has a filled in slot. This cannot be placed over an element. Fit it on a step so the filled slot is in a gap in the element sequence.
One solution is shown above. Yours may be different.
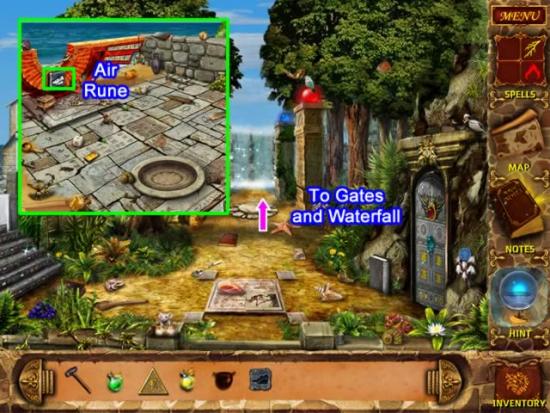
Solving the plate puzzle opens the Air Alter area.
Collect the items listed on the scrolls. The AIR RUNE goes to inventory.
Exit the area. Proceed as indicated above to the Waterfall.
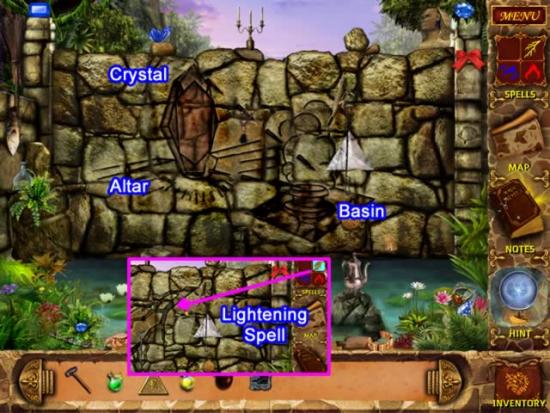
Use the Lightening Spell on the stone wall.
The new etching reveals a red crystal on the winged altar where the AIR RUNE was found.
It also depicts air swirling up from the basin in front of the altar.
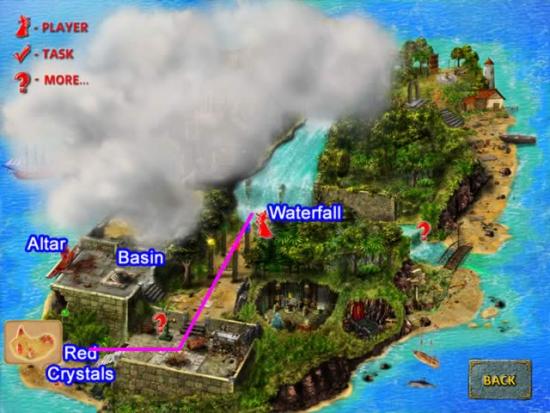
Retrace your steps from the Waterfall.
Descend the steps to the Portico.
Descend to the Beach where the red crystals are buried.
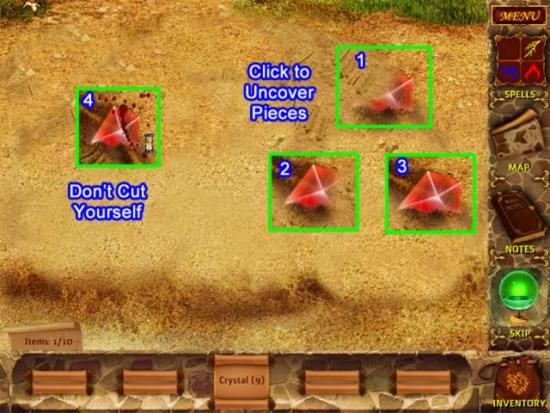
Find the 10 crystal shards:
- Click on the sand to begin searching for a shard.
- When one is located (1), click around the area (2) to keep uncovering more of it (3) and send it to inventory.
- The shard(s) must be uncovered before the tide comes in and covers them again.
- If you click too close to a shard you can cut your finger (4) and must begin digging again.
After recovering all the CRYSTAL SHARDS, return to the winged altar.
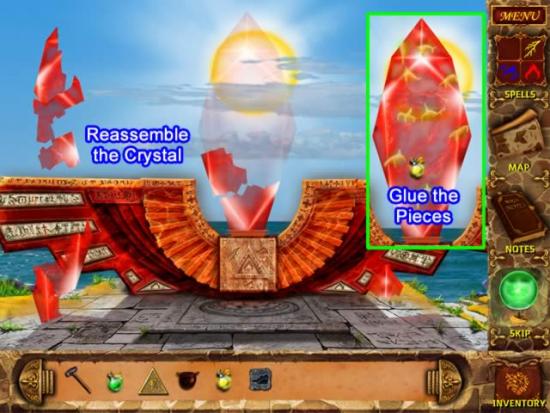
Click the altar to open the area. The shape of the crystal appears.
Place the CRYSTAL SHARDS on the altar. They float around the outline.
To reassemble the crystal:
- Begin at the base and following the outline, place each piece.
- Click the GLUE POTION to seal the cracks of the assembled crystal.
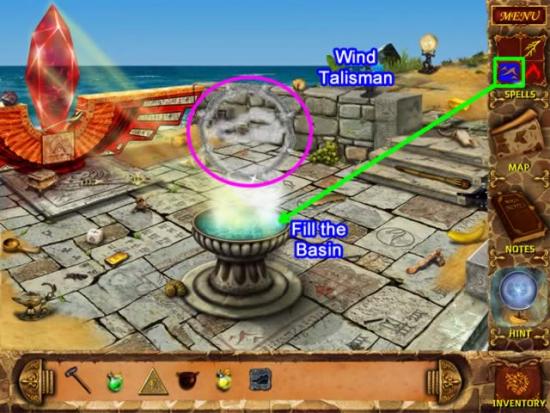
The beams of light from the crystal focus on the empty basin.
Use the Water Spell to fill the basin.
The mist rises revealing the outline of the Wind Talisman.
Return to the Hall of Beams to get the talisman.
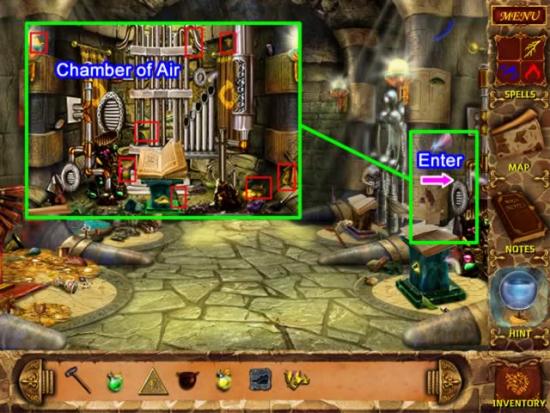
Enter the Chamber of Air.
Collect the WIND TALISMAN PIECES.
Return to the Wind Altar.
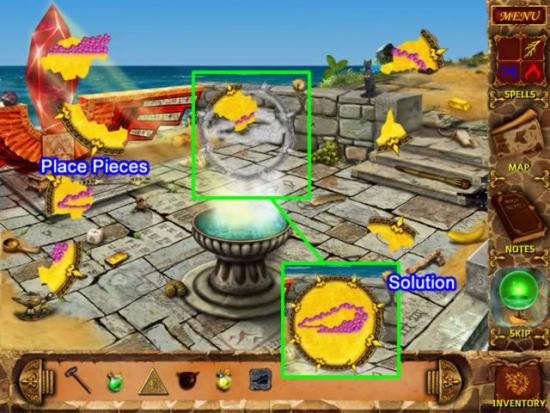
Select the WIND TALISMAN PIECES and Click the outline above the basin.
Place the pieces in the outline.
Use the points on the pieces as a guide to correctly place them.
Add the completed WIND TALISMAN to inventory.
Before going to the altar, go to the Beach and open the chest
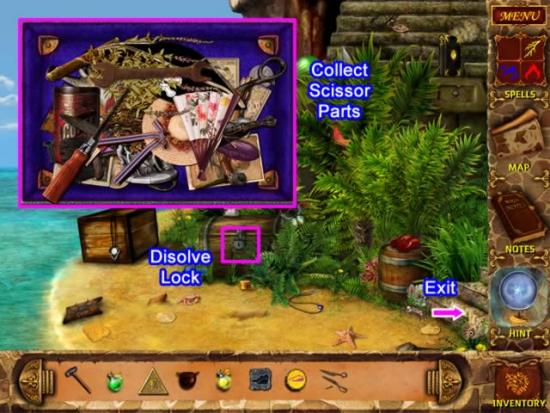
Use the ACID POTION on the lock on the trunk.
Play the move-the-objects puzzle.
Collect SCISSOR PARTS for inventory.
Retrace your path.
Go through the Hall of Beams and continue to the bridge.
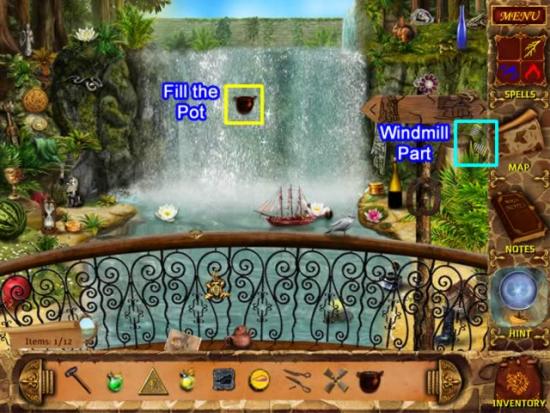
Find the objects listed on the scrolls.
The WINDMILL PART goes to inventory.
While you are here, fill the empty pot with water.
Continue to the Altar
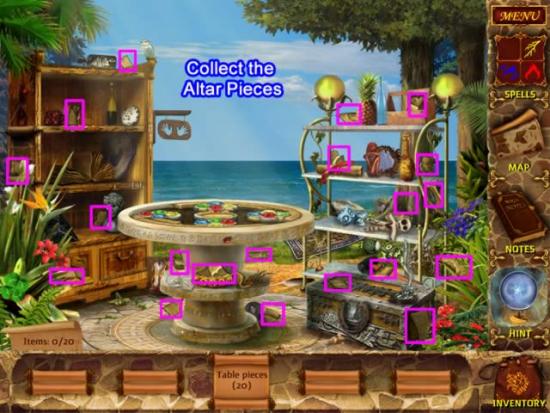
The Altar explodes when the WIND TALISMAN is placed in the center.
Collect the 20 pieces. Refer to the above screenshot to see where the pieces are hiding.
Once collected, they must be reassembled in the circle.
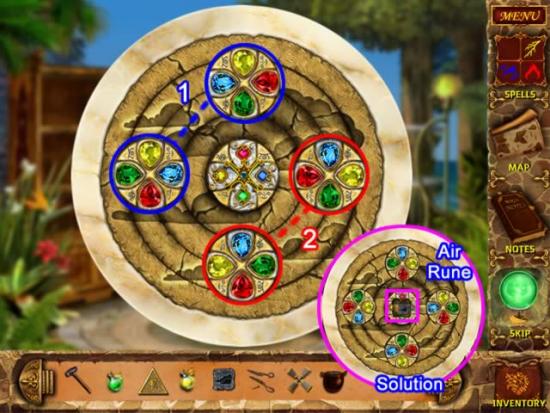
Place the pieces so they form the pattern shown above.
Gem rotation puzzle:
- Rotate the jewels so the same colors match the circles on each side and the center.
- The top and left circles rotate together.
- The right and bottom rotate together.
- The solution is shown in the inset.
Place the WIND RUNE in the center of the completed gem wheel.
The Wind Spell is now available.
Proceed to the Hall of Beams. The Grandmaster instructs you to return to the alchemist’s hut and make an oil potion.
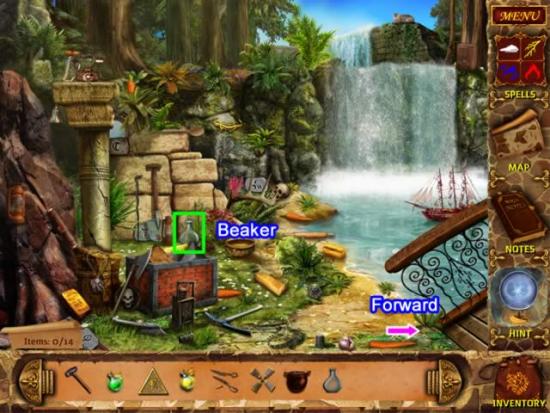
At the base of the bridge, collect the items listed on the scrolls.
The BEAKER goes to inventory.
Continue toward the Workshop.
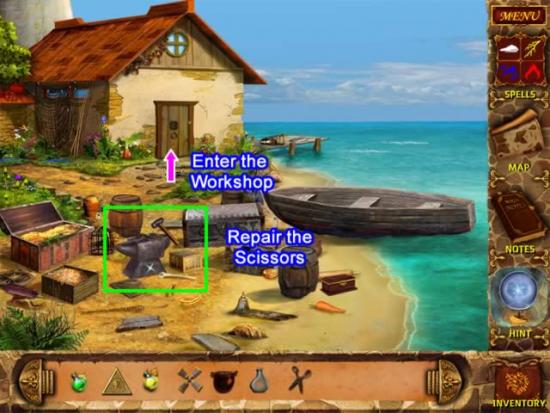
Stop at the anvil.
Place the SCISSOR PARTS on the anvil.
Use the HAMMER to repair them.
Add the SCISSORS to inventory and continue to the Workshop.
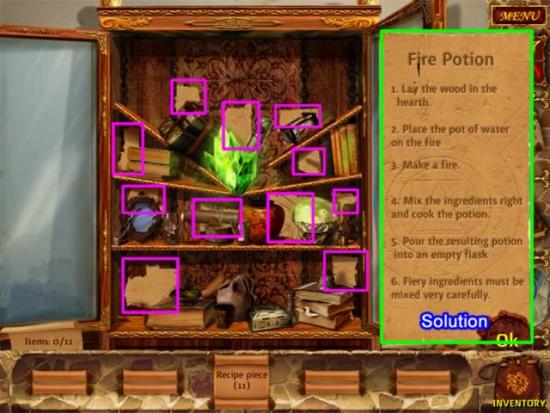
Enter the Workshop.
Click the cabinet.
Collect the Fire Potion recipe scraps and piece them together.
See above for the location of the scraps and the competed potion.
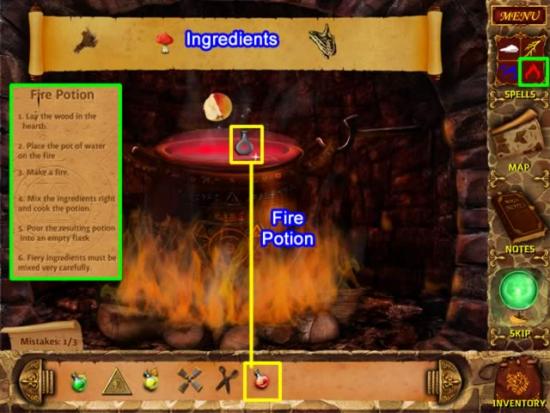
Follow the directions to complete the FIRE POTION:
- Hang the POT.
- Use the Fire Spell to light the fire.
- Add the ingredients.
- Place the potion in the BEAKER.
- The FIRE POTION is now in inventory.
The Temple
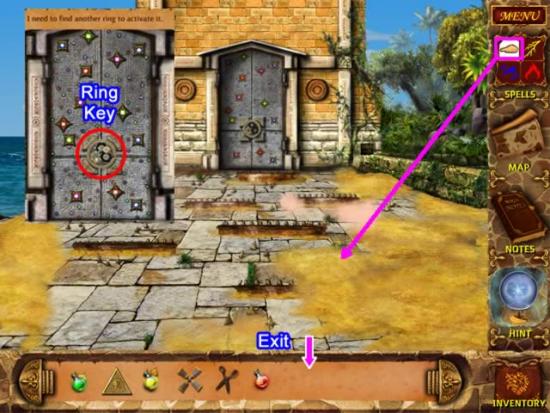
Return to the altar where the wind talisman was created.
Go up the stairs to the right.
To cross the courtyard to the Temple, use the Wind Spell to blow the sand away and reveal the stone path to the door.
Inspect the door. It requires a round lock.
You are directed to the Gates.
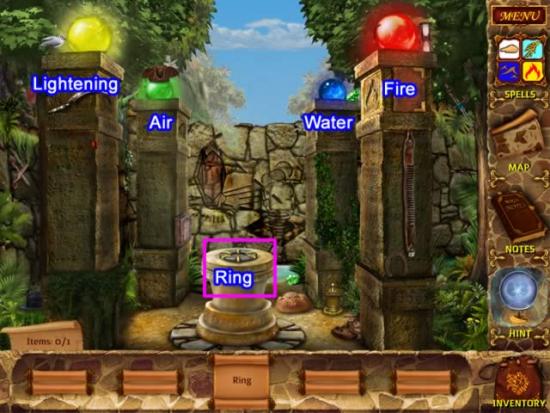
Use the SCISSORS to remove the foliage on the two columns and reveal their element runes.
Each column contains an element rune.
Use each spell on the globe atop the column corresponding to the element.
The globes will light up.
Play the repeat sequence game.
Once completed, the pedestal in the center will rise up. Take the RING.
Return to the Temple.
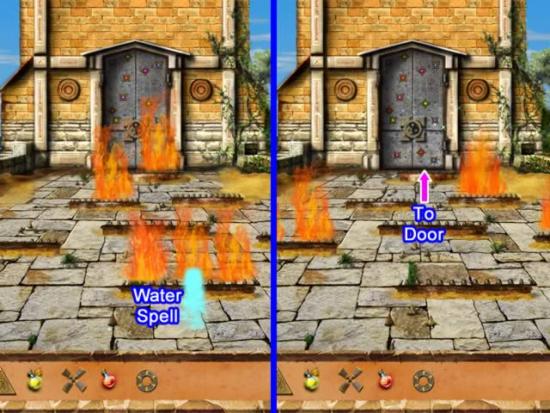
Fire grids are blocking the path to the Temple.
Using the Water Spell on a flame grid will cause it to jump to a different grid.
Clear a path up the middle to gain access to the door.
Place the ring on the door. You are told a second ring is needed.
Return to the Portico where the Gluey Fern is.
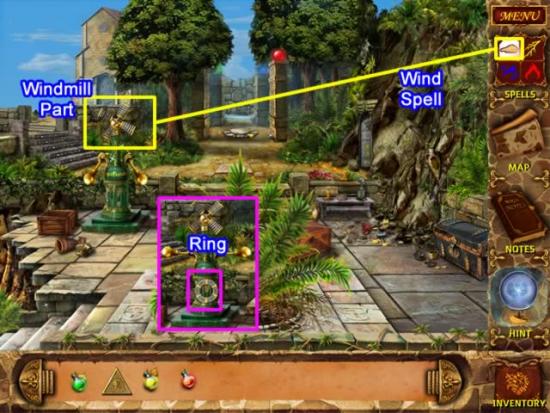
Place the WINDMILL PART on the mechanism.
Use the Wind Spell to start the contraption.
The arms raise and reveal a RING.
Retrieve the RING and return to the Temple.
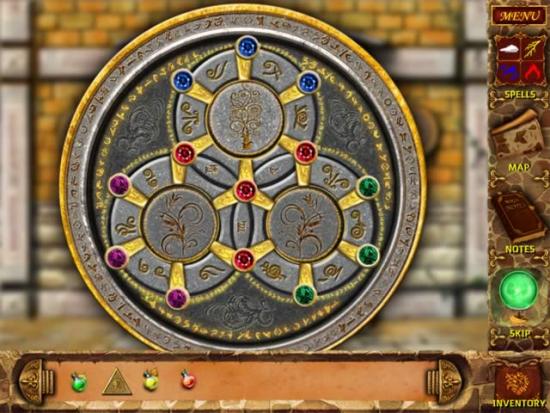
Lock puzzle:
- Rotate each ring and exchange the gems so all the blue are on top, green are on the right, purple on the left and red in the middle. This is the only combination that will open the door.
Enter the Temple.
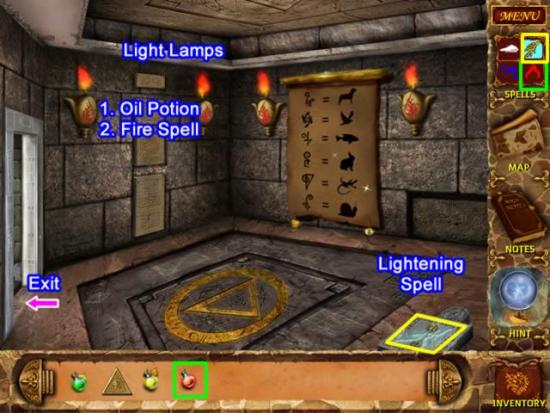
Collect all the amulets.
Enter the door to the right.
Light the lamps:
- Use the OIL POTION on the first lamp.
- Use the Fire Spell to light it.
The next lamp will be revealed. Repeat the process for each lamp in succession.
Use the Lightening Spell on the plate on the floor and retrieve a KEY.
Return to the central room and enter the door on the left.
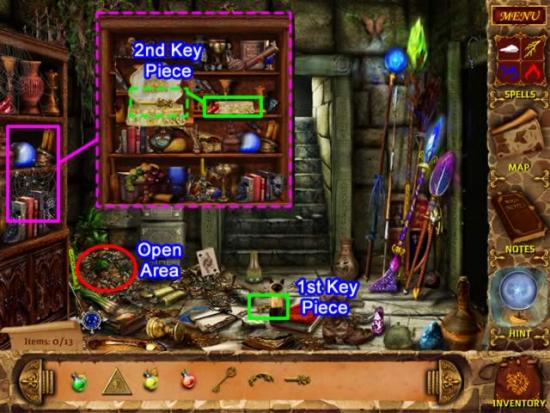
Collect the items listed on the scrolls. Find the first KEY PIECE.
Open the cabinet area.
Find each pair of matching items.
After all items are matched, the white box opens revealing the second KEY PIECE.
Click the debris area in the left corner of the room to gain access.
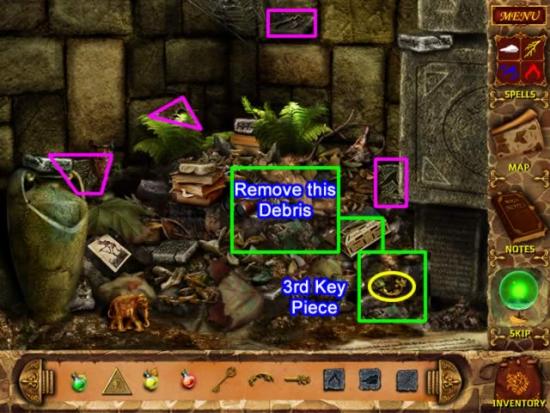
Collect the four RUNES outlined in pink above.
Move the debris away in the area indicated to find the third KEY PIECE.
You will be returned to the room.
Go up the stairs.
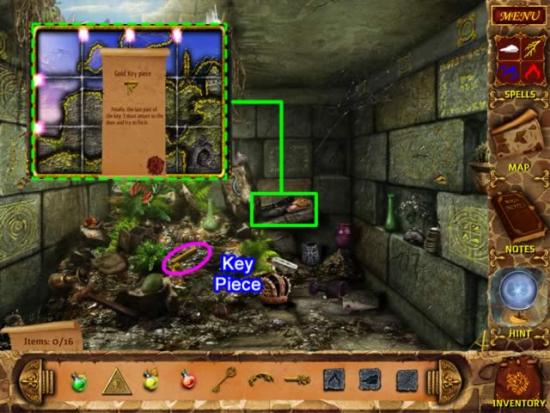
Collect the a KEY PIECE.
Click the box outlined in green to open a puzzle.
Swap pieces to form a geographical map.
- Start with the dark blue pieces at the top and work across.
- Match the gold boundary lines to see the pattern.
The above screenshot inset gives you an idea of how to complete the puzzle.
Take the last KEY PIECE.
Exit the room, go down the stairs and enter the main room.
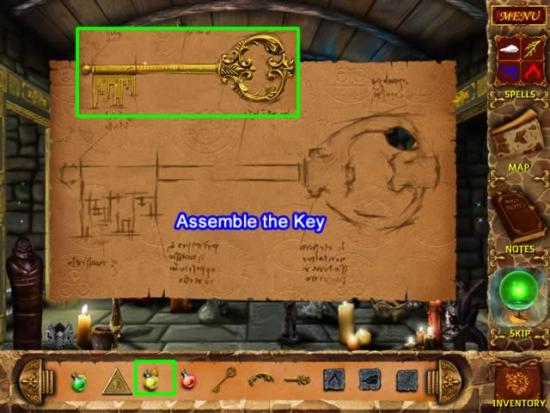
Upon entering the room, a pattern for the KEY PIECES appears.
Match the pieces to their location on the pattern.
Apply the GLUE POTION to the final key.
Approach the door that needs two keys to gain access.
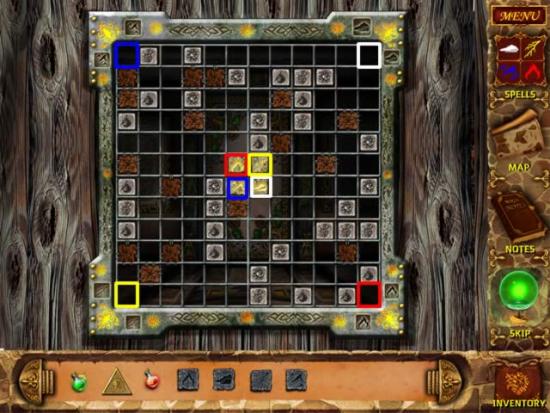
Move the element runes tiles from the center to the corner with a matching rune.
- Click to activate a tile. When activated, a tile will wobble.
- Grey tiles can be moved one space in any direction.
- Grey tiles will periodically shift positions.
- Brown tiles cannot be moved.
- The easiest approach is to start with the air (white), followed by lightening (yellow), then fire (red) then water.
- To reset the puzzle, exit then re-enter.
Completing the lock puzzle will open another room.
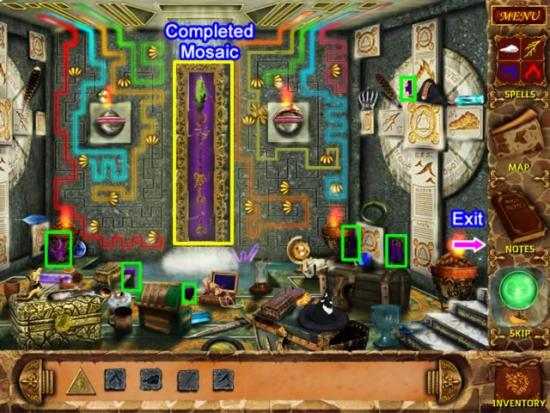
A colored light will appear at the top of the wall from the ceiling.
Trace the path the light should take through the maze and click on its ending shell.
As soon as one light is connected, another will appear. Repeat the process.
The last light, the yellow beam on the right wall will go through a bee to get to its shell. Be sure and click the shell and not the bee.
Once the lights are completed, a set of scrolls with items to find appears.
Find all the items. The six MOSAIC PIECES are outlined in green in the above screenshot and go to inventory.
After all items are collected, a mosaic column appears. Place the MOSAIC PIECES from inventory on the correct place. The completed mosaic is shown in the screenshot.
Leave this room.
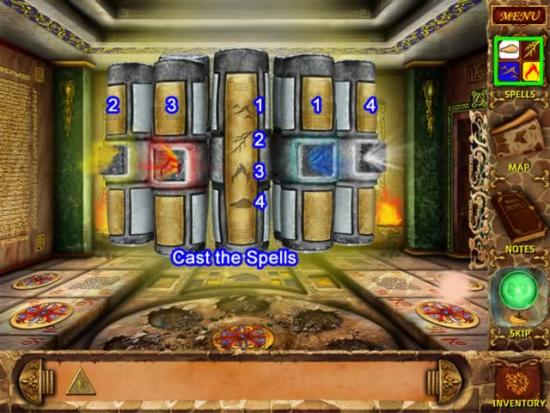
Place the runes from inventory into the corresponding slot on the column.
The central column indicates the order the spells should be cast.
The numbers on the central column correspond with the numbers on the column element.
Click each spell in the correct order and click on the column rune.
The columns will disappear and a new room opens up.
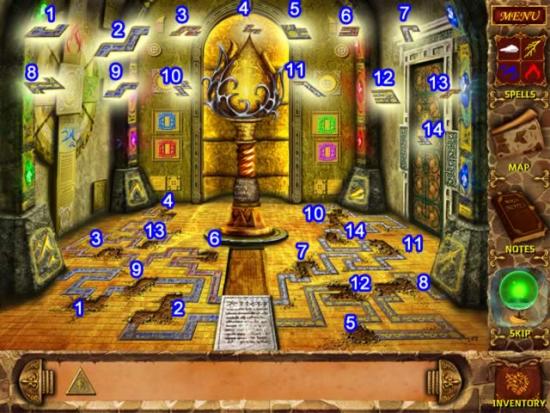
Use the Wind Spell to clean up the room and expose all the MOSAIC PIECES.
Collect the pieces for inventory.
Select the pieces and click on the altar. They float above the ceiling.
Match the floating piece with its spot in the mosaic. They correspond by color and shape.
The screenshot above shows the floating tile and its place in the mosaic.
Place all the tiles.
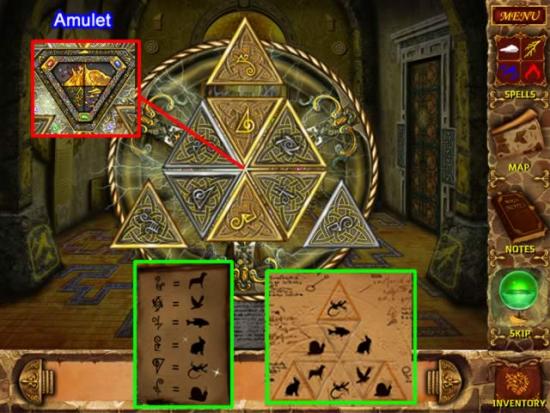
The flower opens to reveal a pyramid, missing its top.
Place your PYRAMID from inventory on top to open a game.
Using the keys from page 18 of your journal and the temple wall, translate the symbols into animals.
Rotate and swap the tiles to rearrange them.
It’s easiest to start with the outside tiles and work inward.
To reset the game, exit and re-enter. The pattern of tiles will probably be different.
When all symbols match the animals, the pyramid will open and reveal an AMULET in the middle.
Take the AMULET for inventory.
Exit the area via the door on the right.
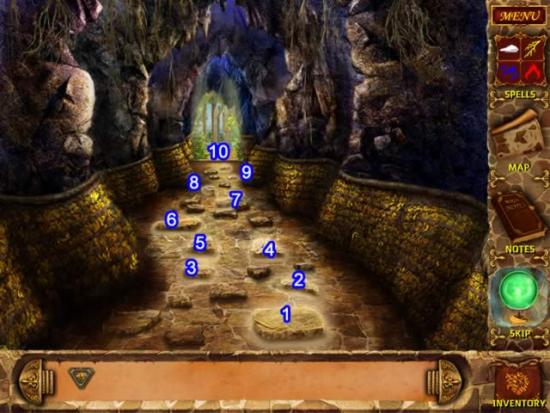
Select the correct pattern of stones to cross this area.
A correct step will light up. An incorrect choice will force you to start over.
The screenshot above shows the correct pattern.
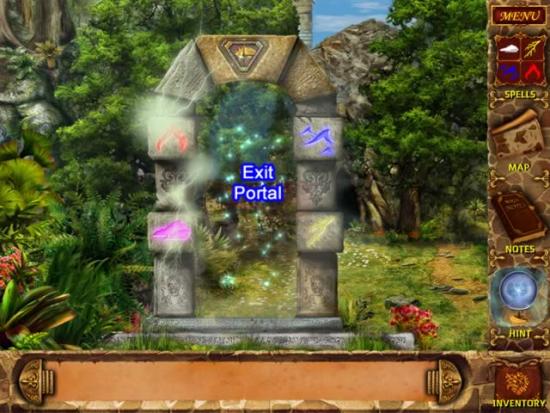
Cast each spell one last time on each rune.
Place the AMULET atop the portal arch.
Exit into the arms of the Grandmaster.
Congratulations! You have completed Mysteries of Magic Island.
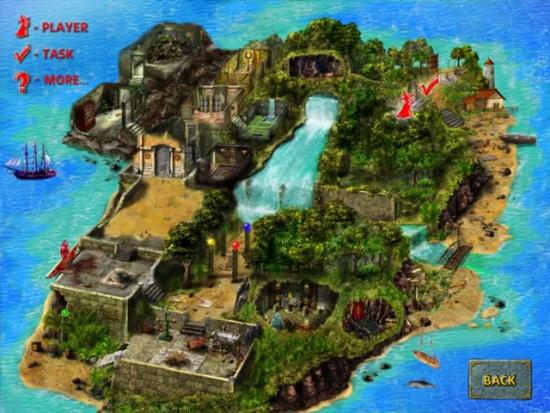
Appendix: Map of the Island
More articles...
Monopoly GO! Free Rolls – Links For Free Dice
By Glen Fox
Wondering how to get Monopoly GO! free rolls? Well, you’ve come to the right place. In this guide, we provide you with a bunch of tips and tricks to get some free rolls for the hit new mobile game. We’ll …Best Roblox Horror Games to Play Right Now – Updated Weekly
By Adele Wilson
Our Best Roblox Horror Games guide features the scariest and most creative experiences to play right now on the platform!The BEST Roblox Games of The Week – Games You Need To Play!
By Sho Roberts
Our feature shares our pick for the Best Roblox Games of the week! With our feature, we guarantee you'll find something new to play!All Grades in Type Soul – Each Race Explained
By Adele Wilson
Our All Grades in Type Soul guide lists every grade in the game for all races, including how to increase your grade quickly!


