
Best Horror Games On Itch.io – July 2026
Across a bounty of subgenres.![Haze Seas Accessories Tier List [Best Accessories to Equip]](/wp-content/uploads/2026/07/haze-seas-accessories-tier-list.jpg "Haze Seas Accessories Tier List [Best Accessories to Equip]")
Haze Seas Accessories Tier List [Best Accessories to Equip]
The accessories with the best stat buffs in Haze Seas.
![[Roblox] Evomon Shiny Hunting Guide – Including Prismatic and Pris Shinies!](/wp-content/uploads/2026/06/evomon-shiny-hunting-guide.jpg "[Roblox] Evomon Shiny Hunting Guide – Including Prismatic and Pris Shinies!")

Musaic Box Tips Walkthrough
If you have a good ear for music, Musaic Box provides an unusual form of game play, where you can use the melodies you hear to help solve the puzzles. Even if you’re not musical, you can still solve the puzzles geometrically, although then the game is much more ordinary. This Strategy guide is divided into General Tips and then a walkthrough of the full adventure room by room with solutions for all puzzles. Have Fun! GENERAL TIPS Tips for Finding the Score Pieces Although bille…


- Prefer Gamezebo on Google

a:1:i:0;a:2:s:13:”section_title”;s:15:”Musaic Box Tips”;s:12:”section_body”;s:21061:”
If you have a good ear for music, Musaic Box provides an unusual form of game play, where you can use the melodies you hear to help solve the puzzles. Even if you’re not musical, you can still solve the puzzles geometrically, although then the game is much more ordinary.
This Strategy guide is divided into General Tips and then a walkthrough of the full adventure room by room with solutions for all puzzles.
Have Fun!
GENERAL TIPS
Tips for Finding the Score Pieces
- Although billed as a hidden object game, The Musaic Box is really a point and click adventure game, like a Nancy Drew game where you have to find the pieces of a treasure map hidden around the room. Instead of looking for specific objects, you will need to click everywhere in the room to turn on lights, turn over mirrors, look in coat pockets, etc. to find all the missing pieces.
- When you find a piece of the score in the room, it will enlarge, and then you will click it again to “copy it to your book.” The actual piece will stay where it is in the room, which can be confusing. If you click on it yet again, you will just get a message that you have already copied it.
- Pieces for an individual song’s score may be hidden in more than one room, or in the musaic box itself, where they will be revealed as you solve other song puzzles.
- Sometimes you will have to perform several actions in a sequence, like turning on a lamp and then moving a picture to reveal a hidden piece.
- There are two kinds of hints in the rooms. First, you will see sparkles in places where you should try clicking. Second, the words in the black bar at the top of the screen may give you more information. These are especially helpful for solving the sequence puzzles.
- The counter in the map of the house tells you the number of score pieces left to find in the room
- If you have found all the score pieces in a room and the next room hasn’t opened yet, go back through the book to see if there are any completed song puzzles to solve. Usually solving a song puzzle will give you a piece to another score, but it may also open another room.
- If you get a message while you are in the book that you have “revealed a piece” to another score or “revealed a key” you don’t have to do anything—the piece will automatically be put in the song book in the right place.
Tips for Solving the Musical Puzzles
- Each color on the puzzle pieces represents one musician. You may only have one square of each color in any one column. If you put two squares of the same color in one column, the symbols on them will turn dark to tell you they’re in the wrong place.
- Pieces must fit both geometrically and musically, that is, so that the tones associated with the puzzle play the correct song. If you are not musical, you will have to use the HINT button to check some of the geometrically interchangeable pieces.
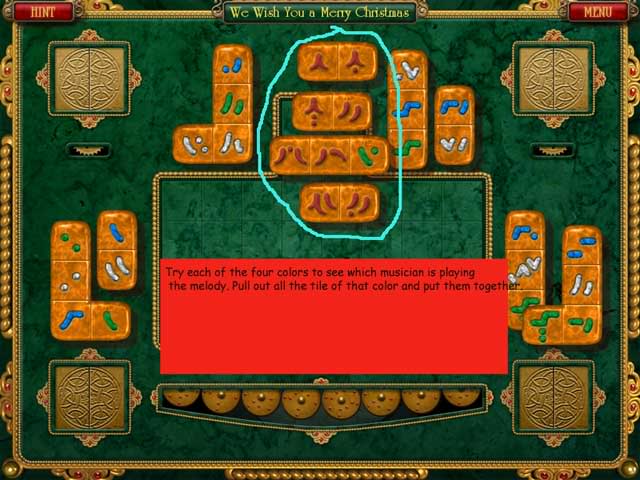
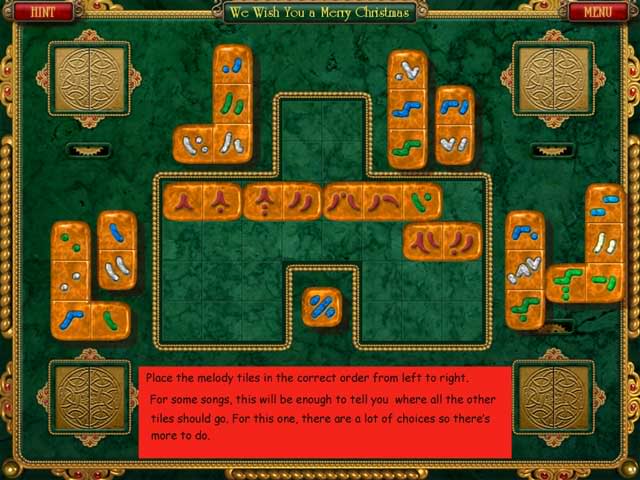
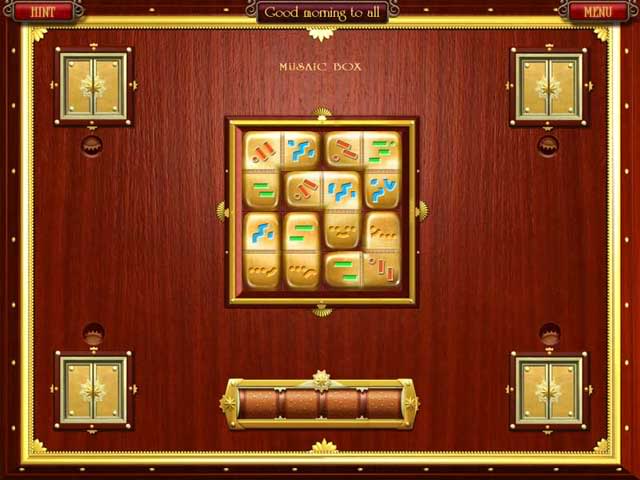
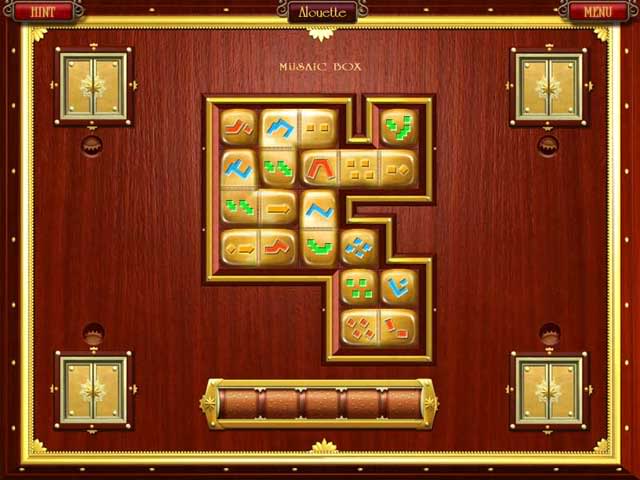
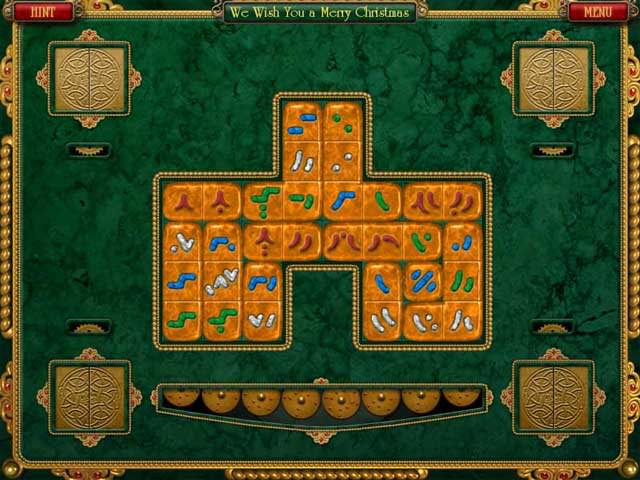
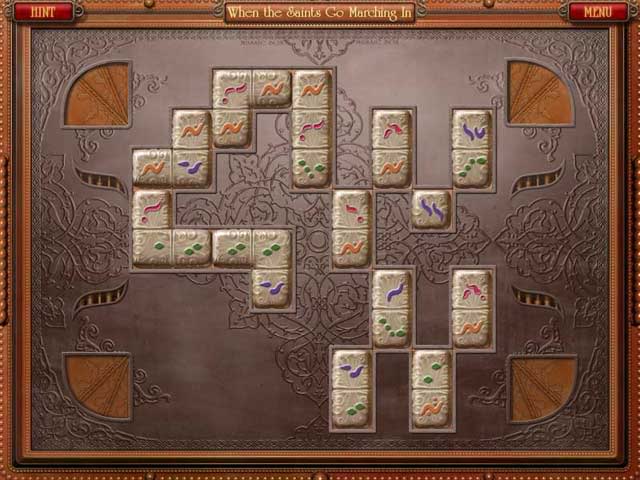
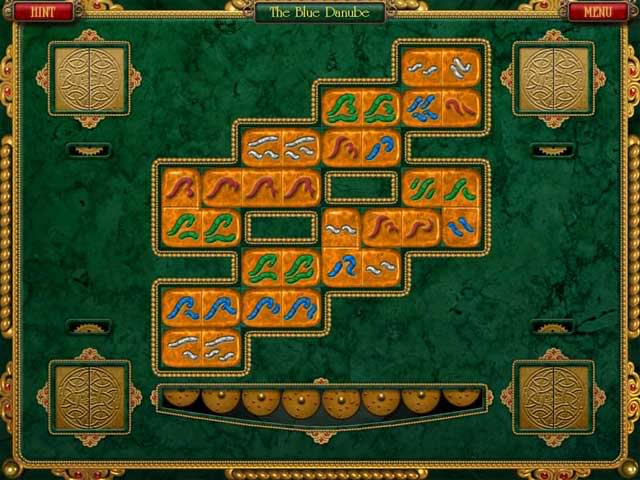
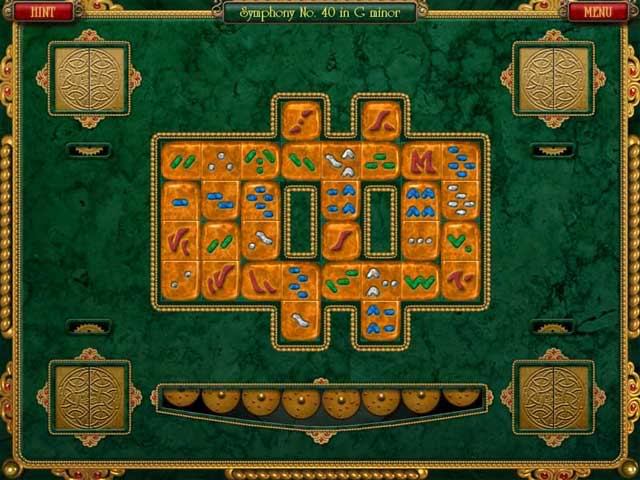
- If you are musical, the fastest way to solve the puzzles is first to determine which color has the melody. This is normally red or orange. Then collect together all the tiles with the melody on them. Listening to the music, place the tiles in order from left to right, and set them in the puzzle. They may not be in the right rows yet, but they’ll be in the right columns. Now solve the puzzle geometrically so that all the pieces fit. The pictures below show this technique.

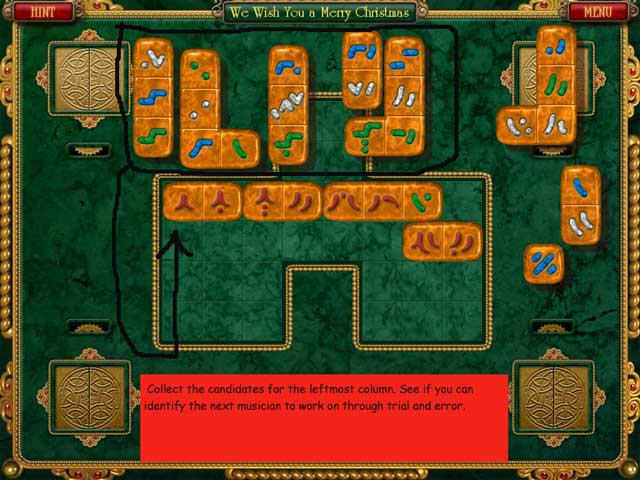
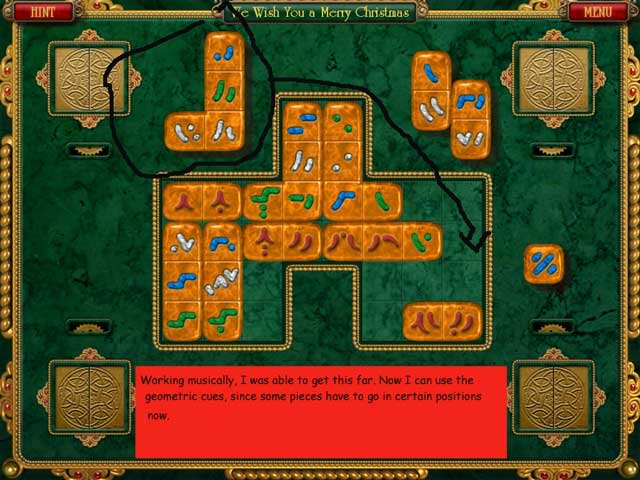
- If you are not musical, you can still use a similar method by working with one color at a time. Gather together all the pieces with red tiles. Check to see if any of them have specific locations where they must go for geometrical reasons. You can use the HINT button to verify your attempts. Then go for the next color.
- The HINT button only tells you if you have a tile placed correctly musically, that is, if it’s in the right column. It might still be in the wrong row position, so you may still have to move pieces that the HINT button says are good.
ROOM BY ROOM WALKTHROUGH (SPOILERS!!!!!)
- Each room includes at least two pictures, one that shows the room as it looks when you enter it, and one that shows it after all the hidden pieces are revealed.
ROOM 1: STUDY
Starting position for the Study:
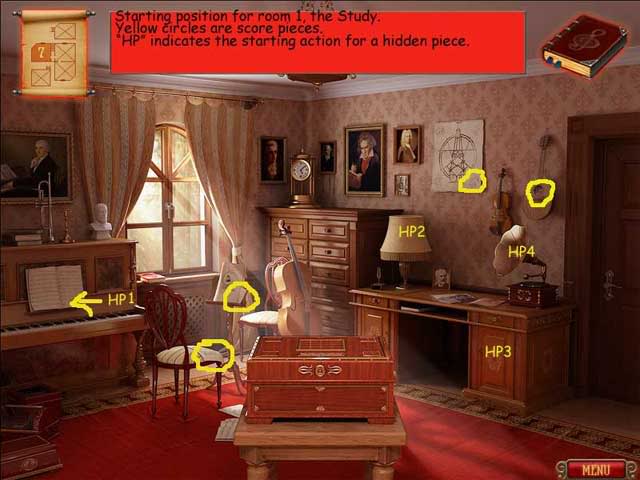
Hidden pieces in the Study:
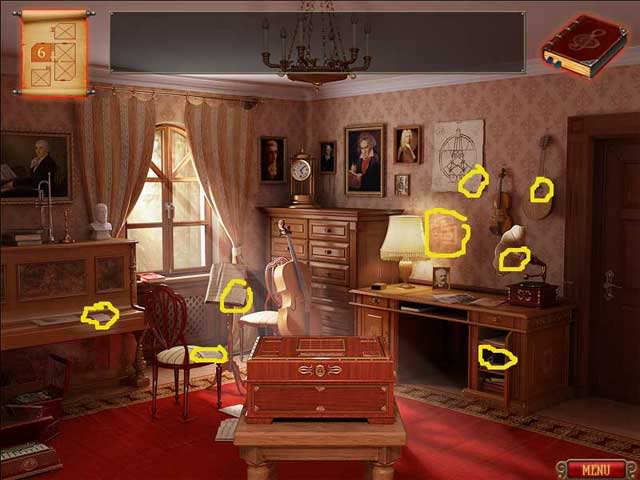
- The first hidden piece is on the piano–click on the piano lid to pull it down.
- For the second hidden piece, click on the lamp to turn it on–you will see a piece on the wall.
- The third hidden piece is inside a cabinet in the desk–click on the door to open it.
- For the 4th hidden piece, click on the gramophone to turn it towards you—there will be a piece inside.
Song puzzles that can be completed in the Study:
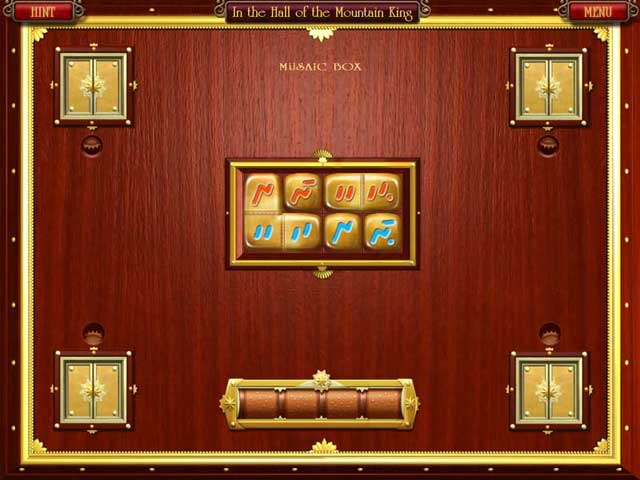
In the Hall of the Mountain King (tutorial)
Good morning to All (reveals a piece to Yankee Doodle)
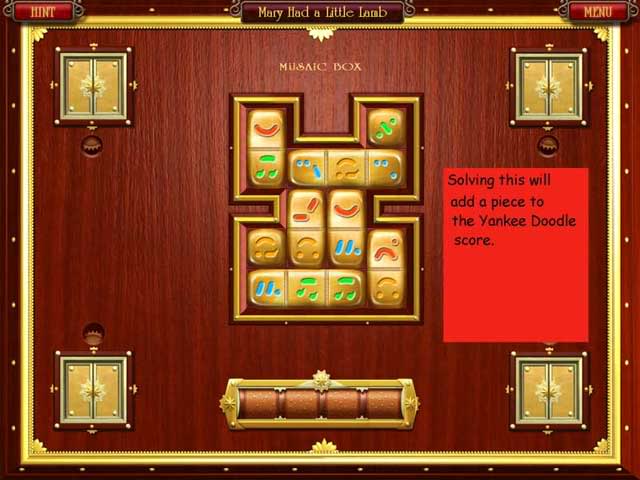
Mary Had a Little Lamb (reveals a piece to Yankee Doodle)
Yankee Doodle (reveals a piece to Czardas and unlocks the basement)

ROOM 2: BASEMENT:
Starting position for the Basement:
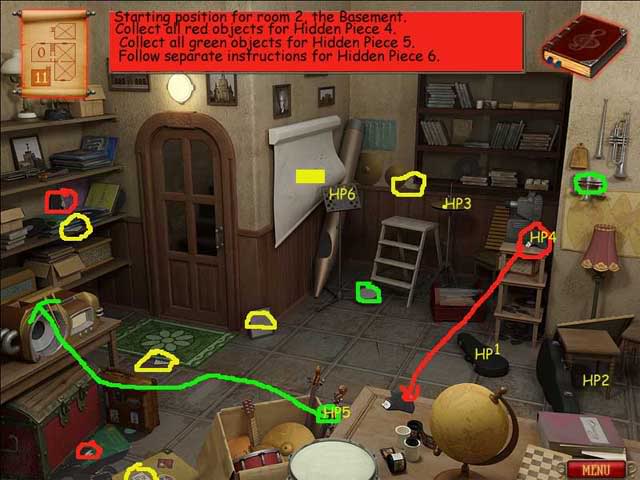
Hidden pieces in the Basement:
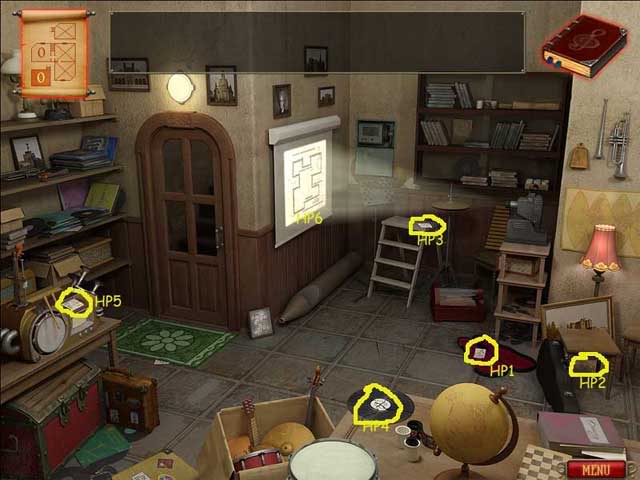
- The first hidden piece is in the violin case.
- The second hidden piece is under the little table. First turn on the lamp, then move the picture and you will see it.
- The third hidden piece is inside the cymbals. It will fly out and land on top of the stepladder.
- The 4th hidden piece requires putting together pieces of a record, then clicking on the record (see the red objects in the starting picture.)
- The 5th hidden piece requires putting together a musical machine, then the piece will print out (see the green objects in the starting picture)
To get the 6th hidden piece in the basement:
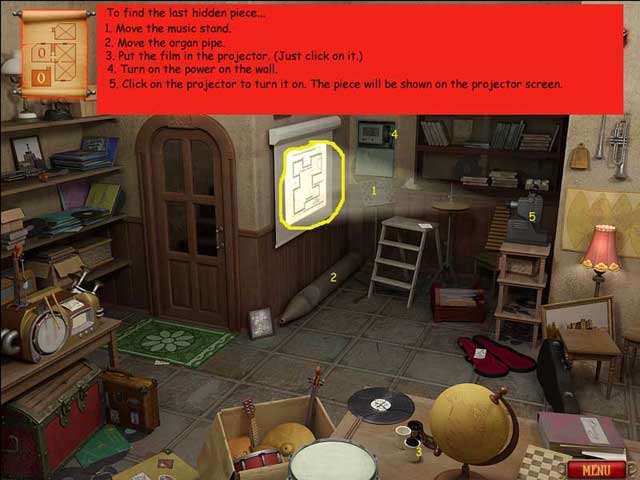
- Move music stand
- Move organ pipe
- Pick up film strip which will go into projector
- Click on power
- Click on film screen
Song puzzles that can be completed in the Basement:
Czardas (reveals a piece to Alouette)

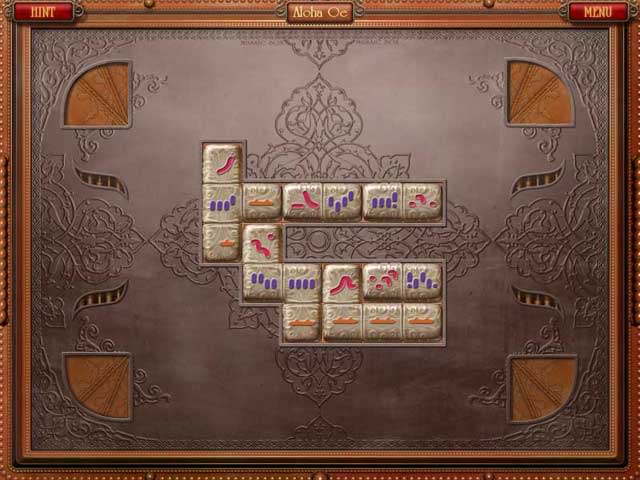
Alouette (reveals piece to Aloha Oe)
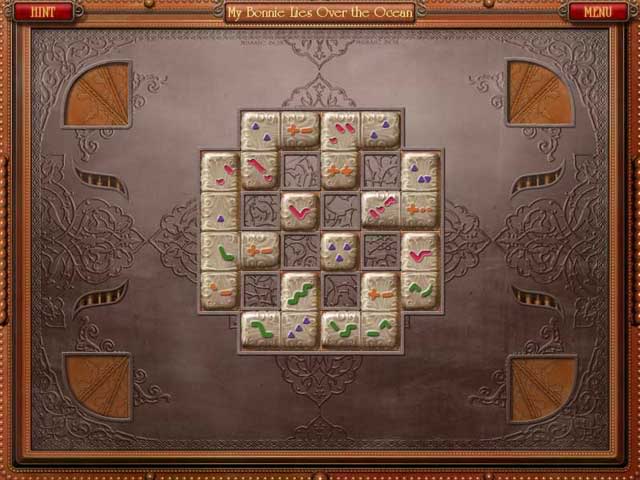
Aloha Oe (reveals a piece to My Bonnie Lies Over the Ocean)
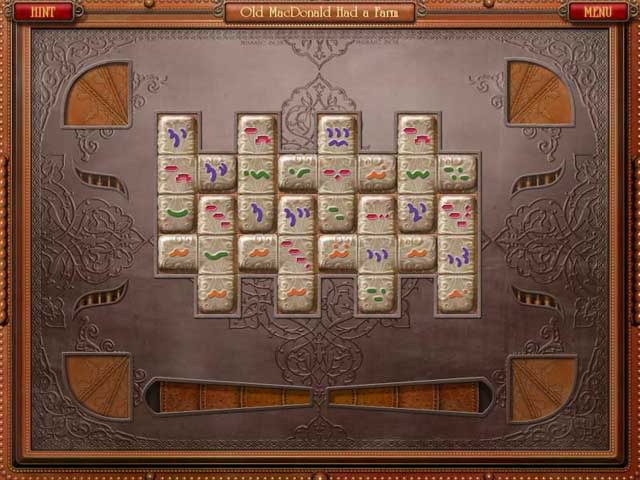
My Bonnie Lies Over the Ocean (reveals a piece to Old McDonald)
Old McDonald (reveals a piece to Jingle Bells and the key to the next room)
ROOM 3: WORKROOM
Starting Position for the Workroom:
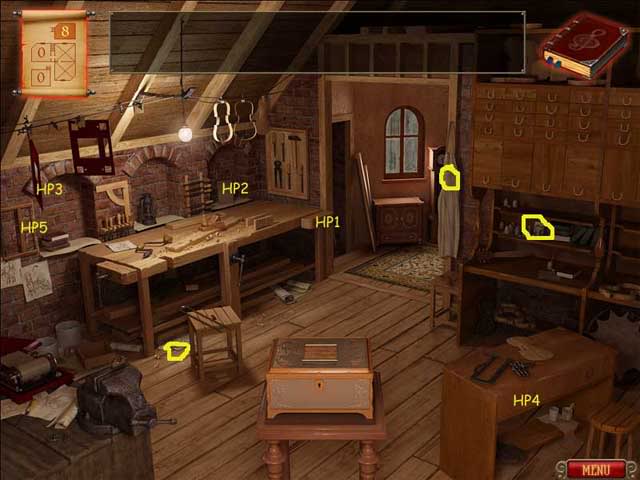
Hidden Pieces in the Workroom:
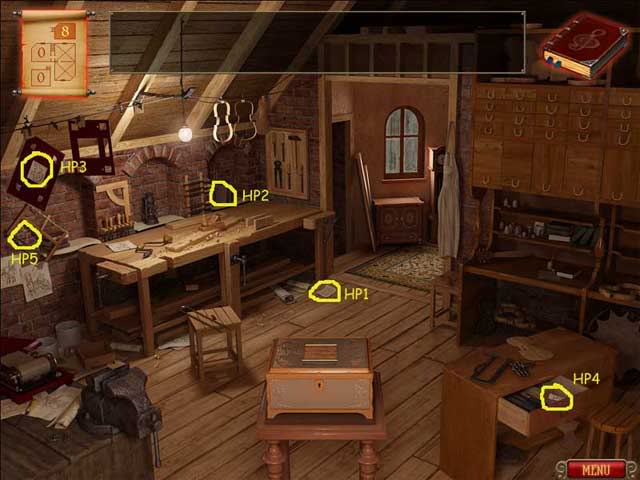
The first hidden piece will fall on the floor when you click on the clamp on the far right of the workbench.
The second hidden piece is behind the piece of stone.
The third hidden piece is on the back of the varnished wood.
The 4th hidden piece is inside a drawer in the desk.
The 5th hidden piece is on the wall. Move the wooden frame and you will see it.
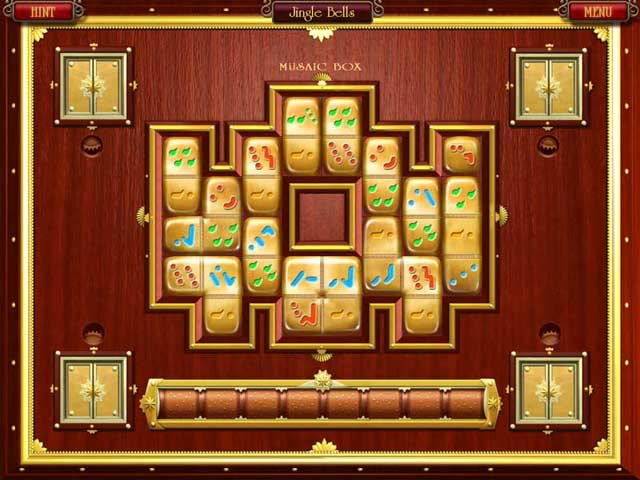
Song Puzzles that Can Be Solved in the Workroom:
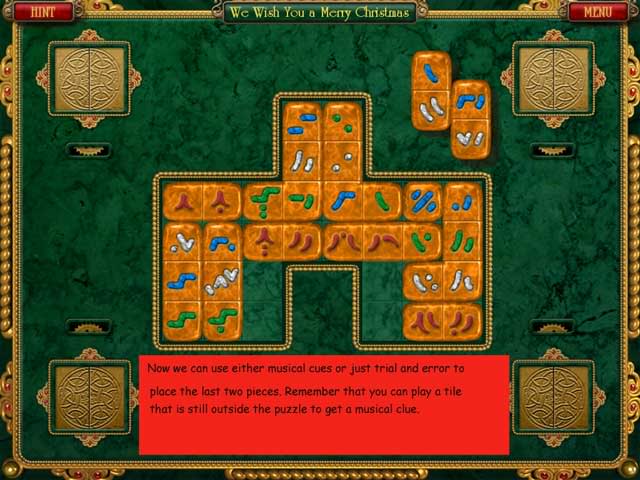
Jingle Bells (reveals a piece to We Wish You a Merry Christmas)
We Wish You a Merry Christmas (reveals a piece to When the Saints Go Marching In)
When the Saints Go Marching In (reveals a piece to the Blue Danube)
The Blue Danube (reveals a piece to Mozart’s Symphony No. 40 in G Minor)
Mozart’s Symphony No. 40 in G Minor (reveals a piece to Go Down Moses and the key to the next room)
ROOM 4: LIBRARY
Starting Position for the Library:
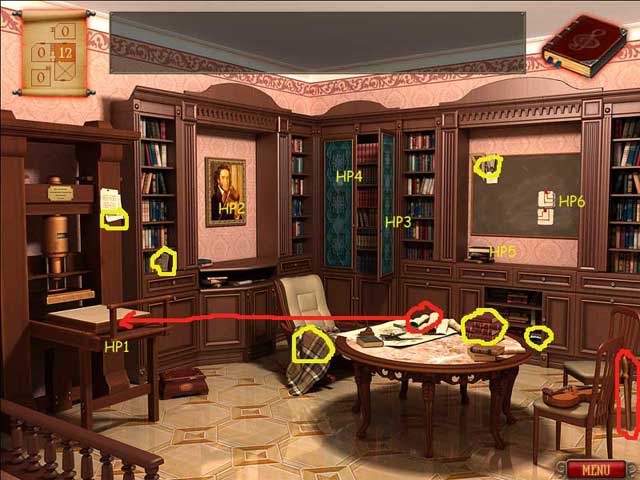
Hidden Pieces in the Library
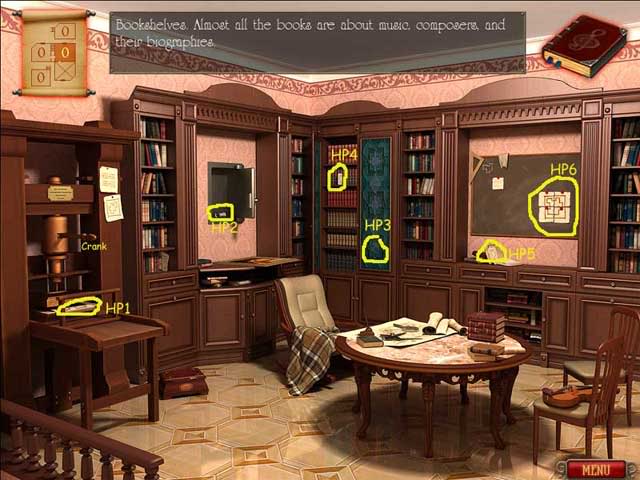
- For the first hidden piece, find the crank by the far right chair and the blank paper on the table (circled in red on the starting picture). Turn the crank. The piece will come out of the press.
- For the second hidden piece, click on the painting to remove it, then click on the safe to open it. The hidden piece is inside.
- For the third hidden piece, click on the righthand glass door to close it. The hidden piece is part of the design on the lower right.
- For the 4th hidden piece, click on the lefthand glass door to open it. The hidden piece is on the bookshelf behind the door.
- For the 5th hidden piece, click on the stack of books under the chalkboard. The hidden piece is inside.
- For the 6th hidden piece, you will have to click on the papers on the lower right on the chalkboard so that you can see all 4 parts. Arrange them in order, then click on the piece.
Song Puzzles that Can Be Solved in the Library:
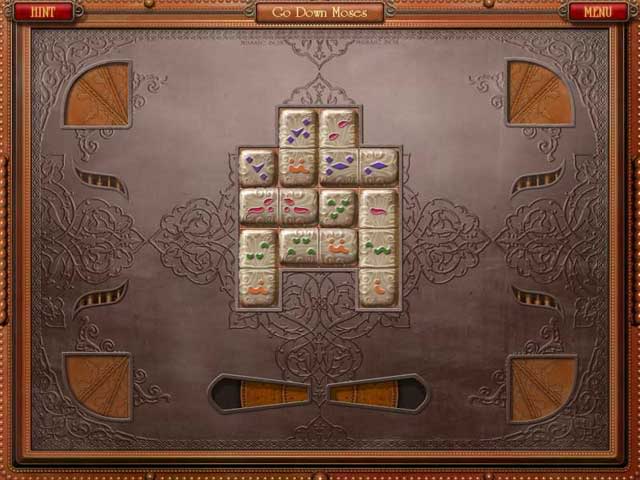
Go Down Moses (reveals a piece to Dance of the 4 Little Swans)
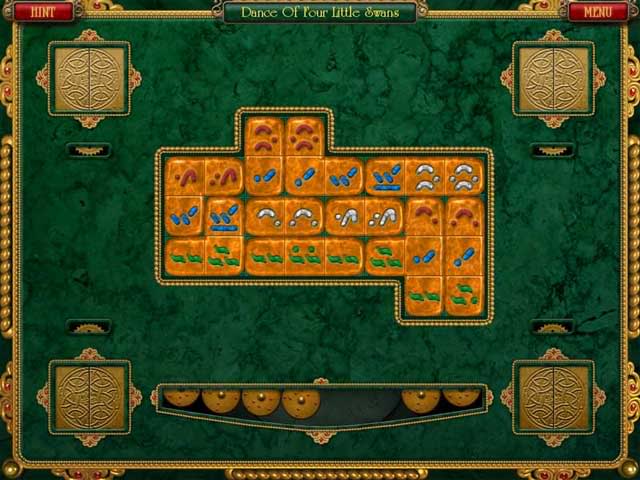
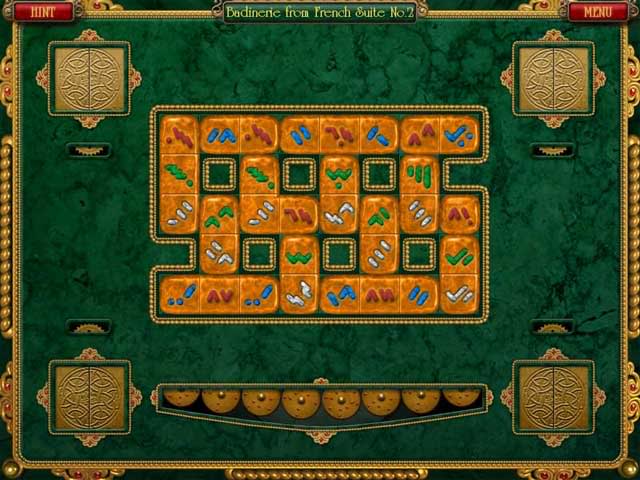
Dance of the 4 Little Swans (reveals a piece to Badinerie)
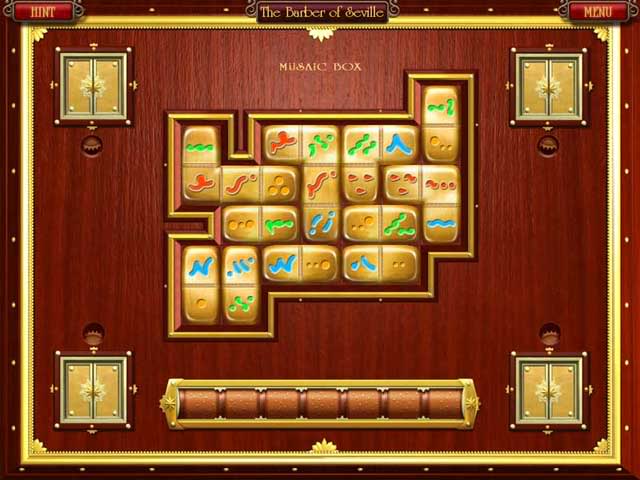
Badinerie (reveals a piece to Barber of Seville)
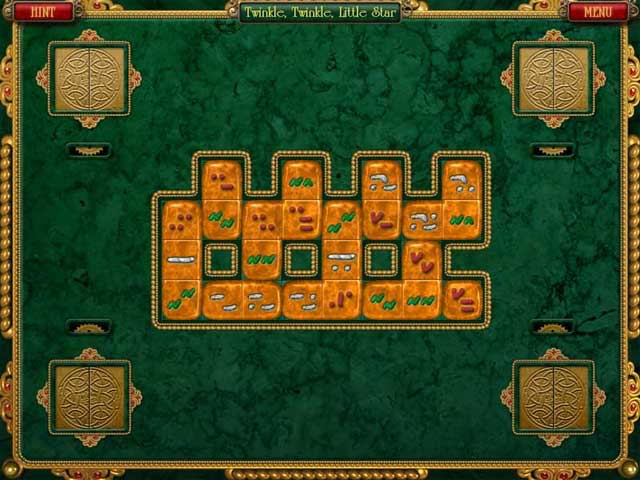
Barber of Seville (reveals a piece to Twinkle, Twinkle, Little Star)
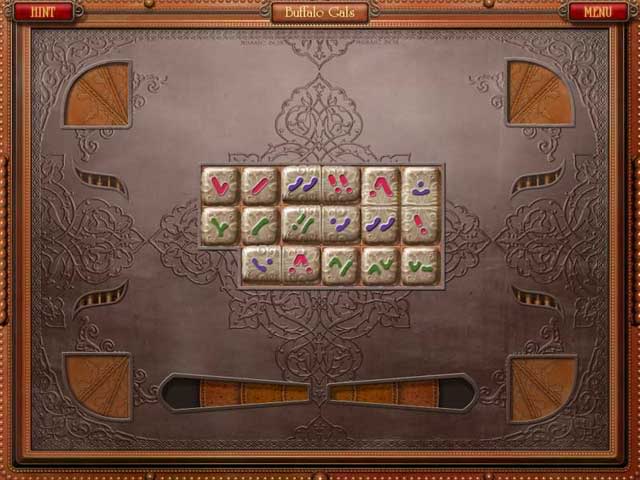
Twinkle, Twinkle, Little Star (reveals a piece to Buffalo Gals)
Buffalo Gals (reveals a piece to Fly Away on the Wing of the Wind and the key to the next room)
ROOM 5: MUSEUM ROOM
Starting Position for the Museum Room:
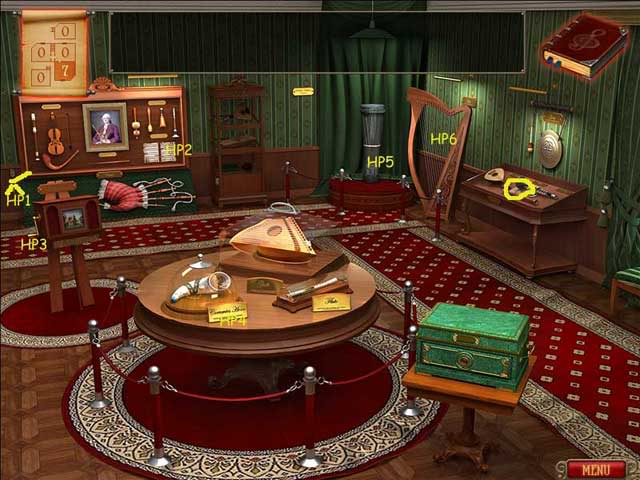
- The only piece you can see in the beginning is just visible under the instruments on the desk on the far right. Move each of the instruments and you can pick it up.
Hidden Pieces in the Museum Room:

- To get the first hidden piece, plug in the cord on the far left wall, then turn on the switch on the display case. The piece is on the green tile on the bottom shelf.
- The second hidden piece will appear on the music sheets on the display case next to the painting. It will appear after you move the instruments on the desk.
- The third hidden piece will appear after you turn the crank several times on the standing music box.
- To get the 4th hidden piece, look for the horn on the central table. First touch the name plate, then remove the glass dome. The hidden piece is inside the horn.
- To get the 5th hidden piece, turn the drum several times until you see it.
- To get the 6th hidden piece, strum the harp. The piece will fall to the floor in front of the harp.
Song Puzzles that can be Solved in the Museum Room:
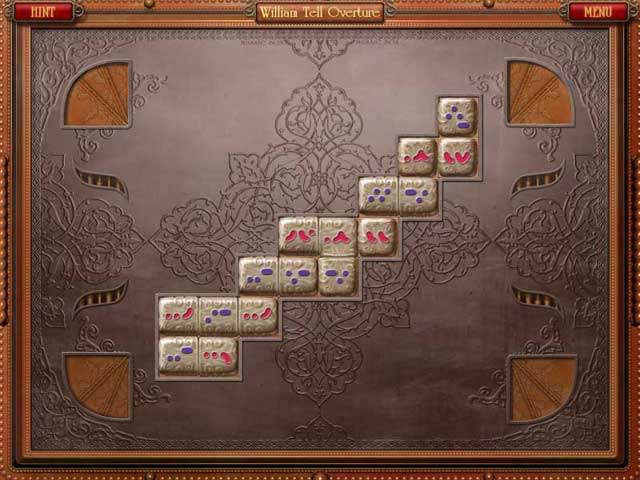
Fly Away on the Wings of the Wind (reveals a piece to the William Tell Overture)

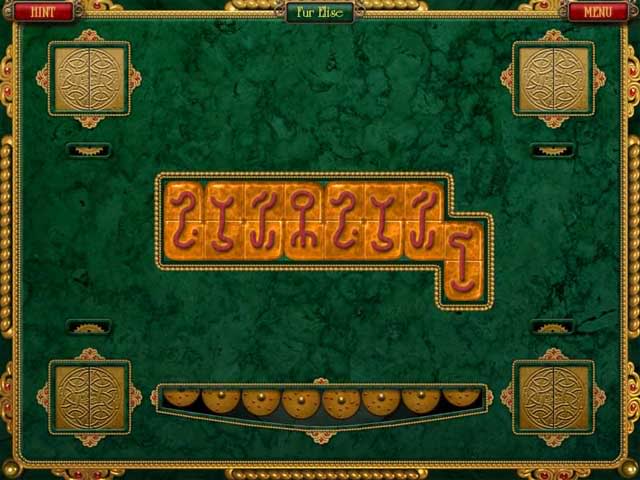
The William Tell Overture (reveals a piece to Fur Elise)
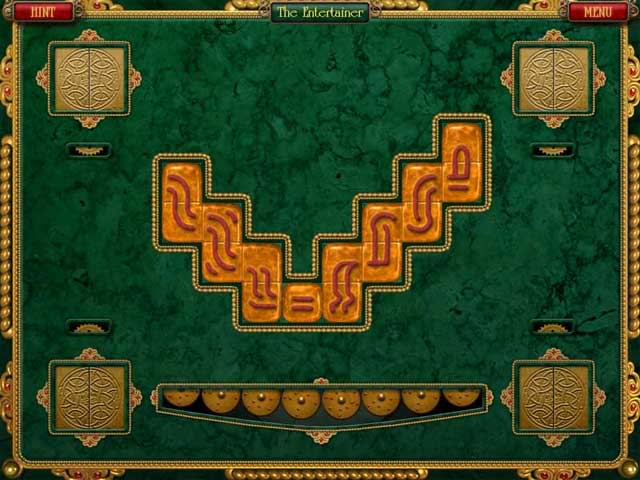
Fur Elise (reveals a piece to The Entertainer on page 5 of the book)
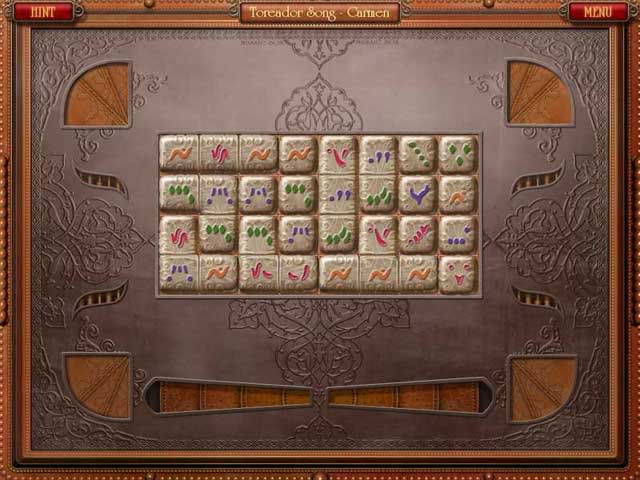
The Entertainer, page 5, (reveals a piece to the Toreador Song on page 11)
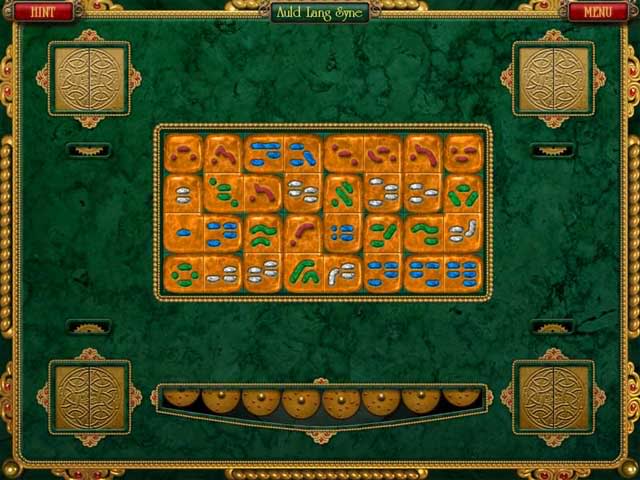
The Toreador Song, on page 11, (reveals a piece to Auld Lang Syne on page 3)
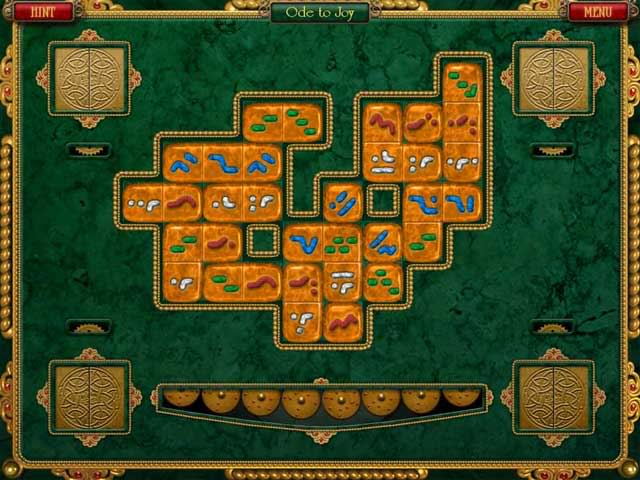
Auld Lang Syne, page 3 (reveals a piece to Ode to Joy at the end of the book)
Ode to Joy
“;

More articles...
-
Best Horror Games On Itch.io – July 2026
Across a bounty of subgenres. -
Haze Seas Accessories Tier List [Best Accessories to Equip]
The accessories with the best stat buffs in Haze Seas.