![All VV Ultimatum Titles [How to Get]](/wp-content/uploads/2026/06/vv-ultimatum-titles.jpg "All VV Ultimatum Titles [How to Get]")
All VV Ultimatum Titles [How to Get]
Do titles provide buffs?


Welcome to the Murder Island: Secret of Tantalus walkthrough Gamezebo, written by Lynne Basinet. Murder Island: Secret of Tantalus is an interactive adventure hidden object game played on PC, created by Big Finish Games. This walkthrough includes tips and tricks, helpful hints, and a strategy guide for how to complete Murder Island: Secret of Tantalus.

Welcome to the Murder Island: Secret of Tantalus walkthrough Gamezebo, written by Lynne Basinet. Murder Island: Secret of Tantalus is an interactive adventure hidden object game played on PC, created by Big Finish Games. This walkthrough includes tips and tricks, helpful hints, and a strategy guide for how to complete Murder Island: Secret of Tantalus.
Copyright Information
This walkthrough was created by Lynne Basinet, for Gamezebo.com, and is protected under US and International Copyright laws. Any unauthorized use, including re-publication, in whole or in part, without permission, is strictly prohibited.
Create your profile, adjust the Options, if you like, and then click Play.
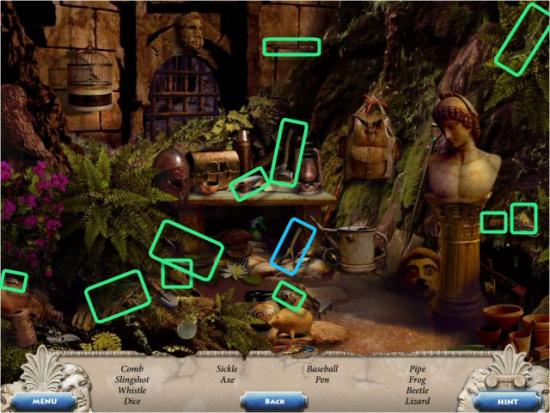
Click on the Search Scene (1). When complete, use the Slingshot on the Vase (2) and then enter the Temple (3).

Find all the items in the list. Inventory Item: Sling Shot
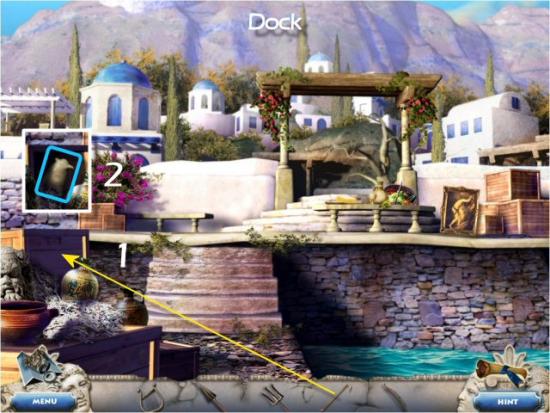
Collect the Envelope, Key, 3 Tiles, 2 Bells and then continue to the Wharf (1).
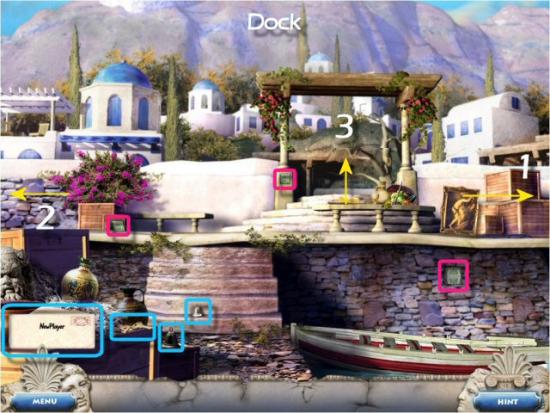
Collect 3 Tiles, return to the Dock (click back) and then continue to the Walkway to Beach (2 – see previous Dock screenshot).
Collect 3 Tiles and the Fish, use the Fish on the Cat (1) and receive another Bell (2). Return to the Dock (click back) and then continue to the Terrace (3 – see previous Dock screenshot).

Collect 3 Tiles, 4 Bells and the Lyre.
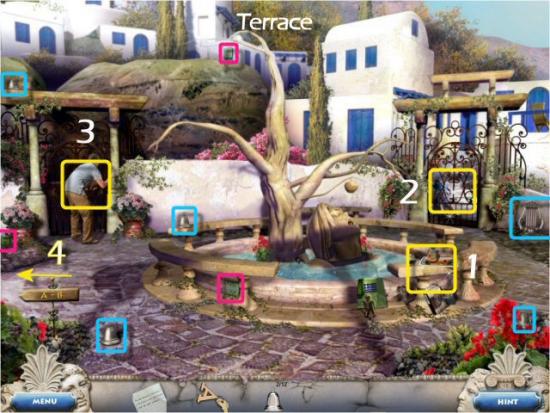
Click on the Search Scene (1 – see previous Terrace screenshot) and find all the Items in the list. Inventory Item: Mirror (“Reflection?”). Scroll/Map Piece: 2 of 30. Interactive Item: Cup of Tea.
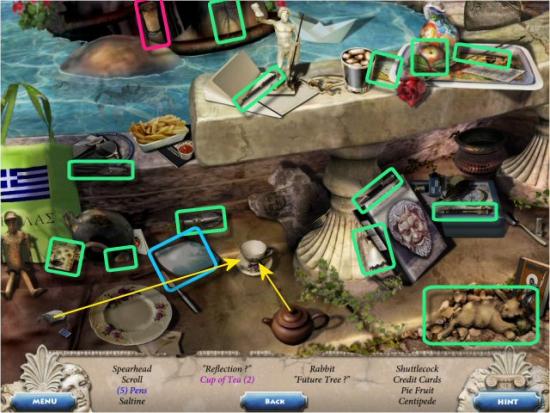
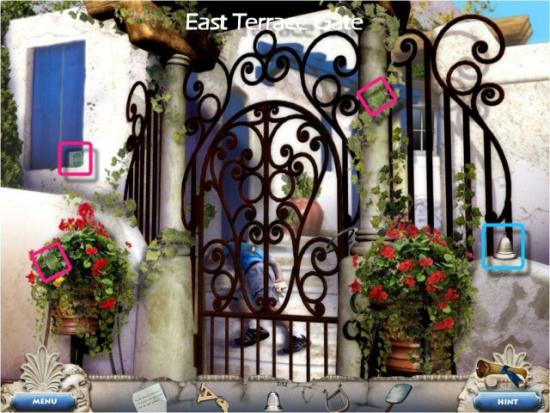
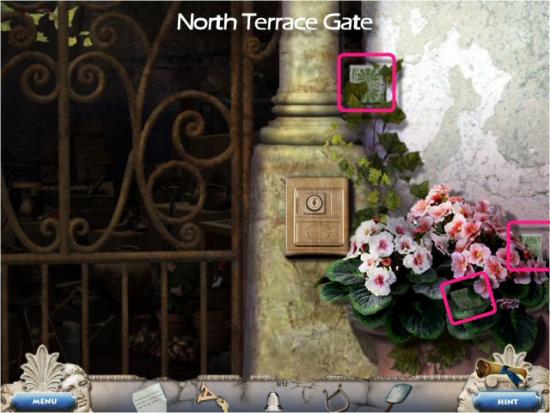
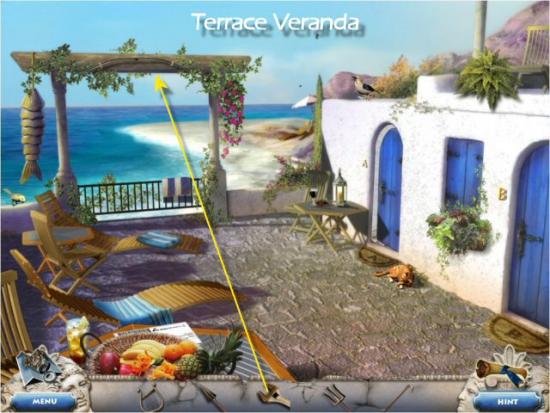
Click on the East Terrace Gate (2 – see previous Terrace screenshot), collect 3 Tiles, 1 Bell, return to the previous area (click back) and then click on the North Terrace Gate (3 – see previous Terrace screenshot).
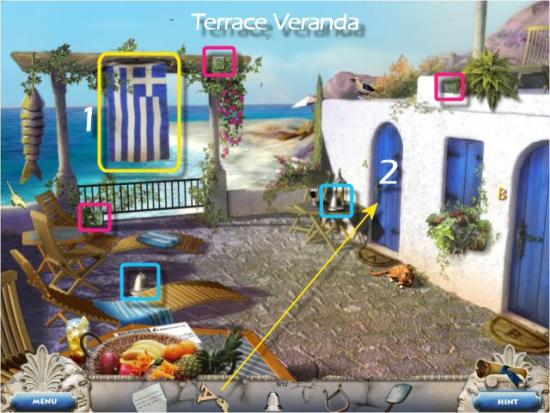
Collect 3 Tiles, return to the Terrace (click back) and then continue to the Terrace Veranda (4 – see previous Terrace screenshot).
Collect 3 Tiles, 2 Bells, click on the Flag (1), use the Key on Door (2) and then enter Your Room.
Collect 3 Tiles, 1 Bell and then click on the Search Scene (1).
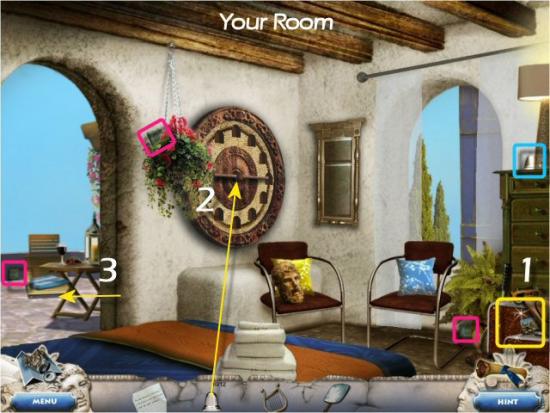
Find all the Items in the list. Inventory Item: Bell. Scroll/Map Piece: 3 of 30. Interactive Item: Glass of Wine. Riddle Items: “Elephant Treats?” (Peanuts) and “Stickers?” (Stamps).
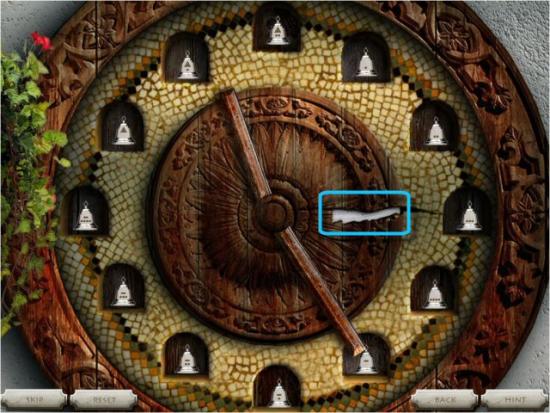
Use the Bells on the Bell Clock (2 – see previous Your Room screenshot). Each Bell has Symbols on them that represent the numbers 1 through 12. Arrange the Bells so they form the Numbers on the Clock. Click and drag each Bell to a Niche on the Clock and then collect the Note. Return to the East Terrace Gate.
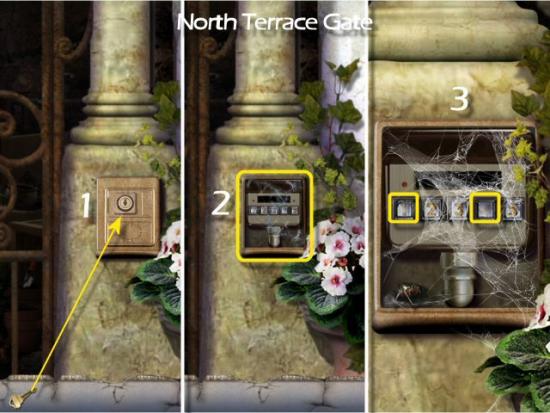
Use the Mirror on the Lock (1), enter the Combination (2 – click above or below each number) and then collect the Key. Return to the Terrace (click back) and then click on the North Terrace Gate (3 – see previous Terrace screenshot).

Use the Key in the Lock (1), click on the Keypad (2) and then enter the 3- Digit Code (3).
There is no clue for the Code, however, since some of the keys look like quite worn (1 and 4), the Code must be a combination of only those keys. Since you need a 3 Digit Code, one of the numbers will be repeated. This means there are only 8 possible Permutations: 1,1,1, 1,1,4, 1,4,1, 1,4,4, 4,1,1, 4,1,4, 4,4,1 and 4,4,4. The correct answer is 4,1,4 and it’s the same, every time you play.
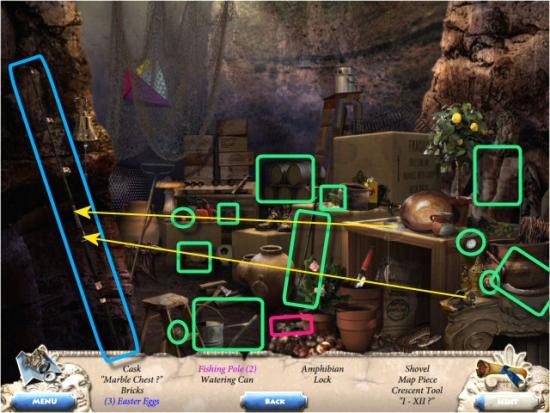
Click on the open Gate and find all the items in the list. Inventory Item (Interactive Item): Fishing Pole. Scroll/Map Piece: 4 of 30. Riddle Items: “Marble Chest?” (Marble Statue’s Torso) and “I-XII?” (Watch).
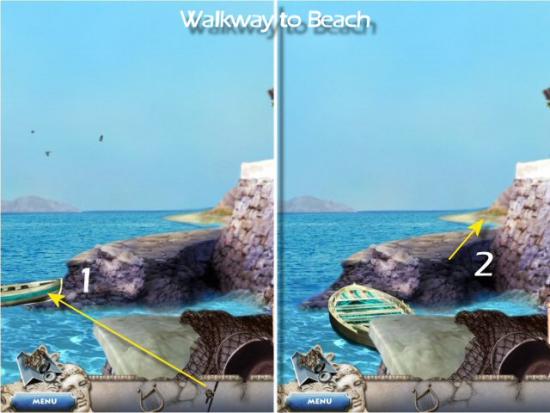
Return to the Walkway to Beach (click back twice and then left), use the Fishing Pole on the Boat (1) and continue to the Beach (2).
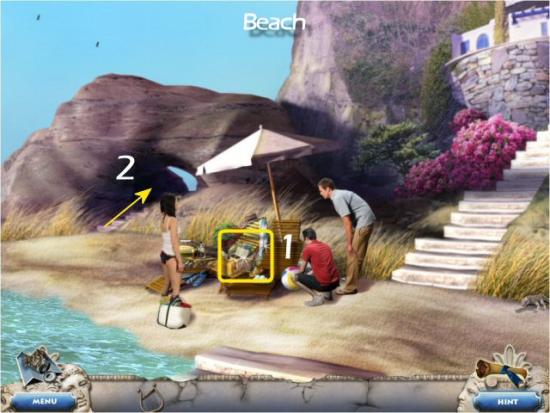
Click on the Search Scene (1).
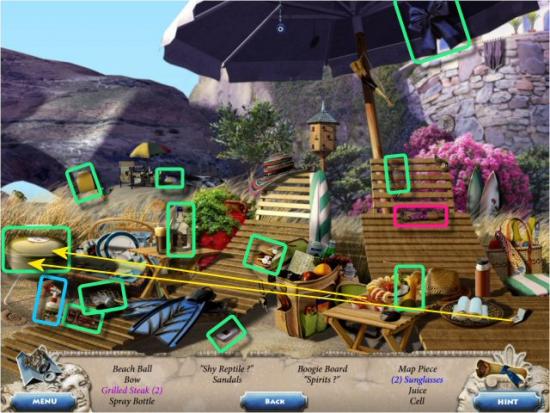
Find all the items in the list. Inventory Item: Spray Bottle (Bee Smoker). Scroll/Map Piece: 5 of 30. Interactive Item: Grilled Steak. Riddle Items: “Shy Reptile?” (Turtle) and “Spirits?” (Bottle of Liquor).
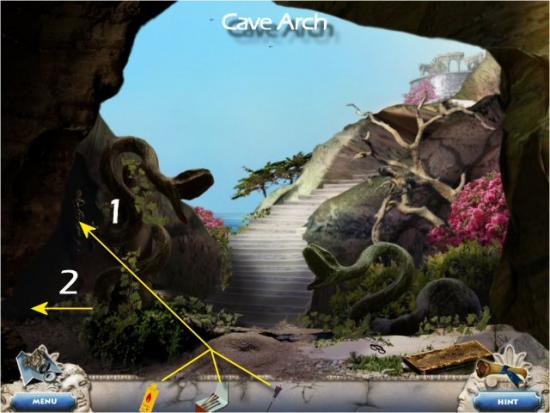
Continue to the Cave Arch (2 – see previous Beach screenshot), collect 3 Tiles and continue to the Ruins (1).
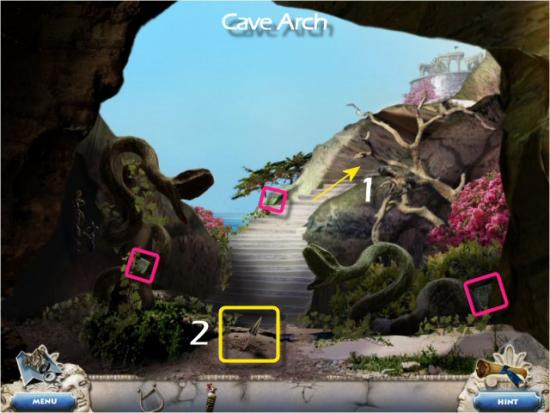
Collect 3 Tiles (Note that the third Tile won’t be available until after you complete either the search scene or the Tile Puzzle), use the Bee Smoker on the Hive (1), collect the Honey (2) and return to the Cave Arch (click back once).
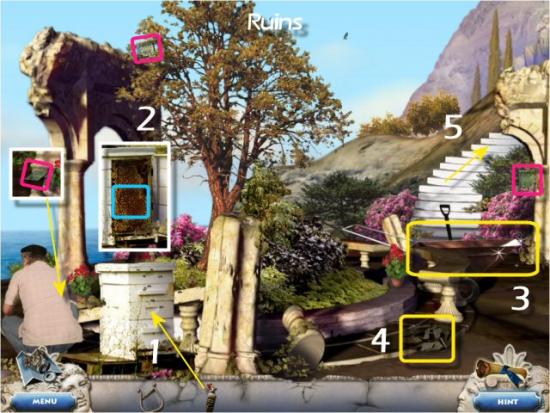
Use the Honey on the Ant Hill (1), collect the Spear, return to the Ruins (2) and click on the Search Scene (3 – see previous Ruins screenshot).
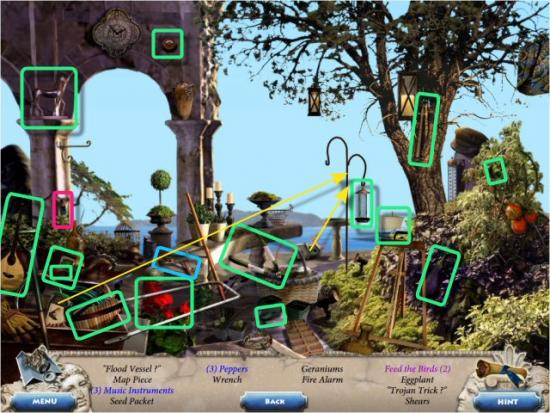
Find all the Items in the list. Inventory Item: Wrench. Scroll/Map Piece: 6 of 30. Interactive Item: Feed the Birds. Riddle Items: “Trojan Trick?” (Horse) and “Flood Vessel?” (Ship).
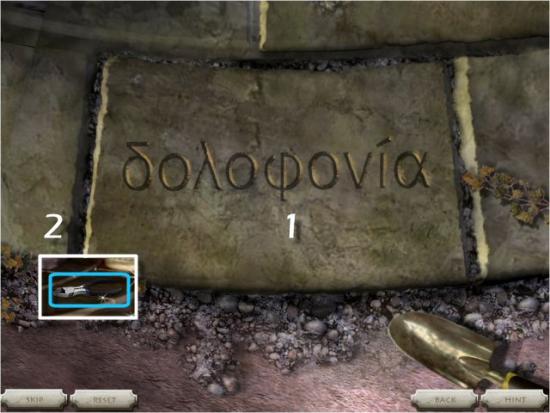
Click on the Tiles (4 – see previous Ruins screenshot) and reconstruct the message. Mouseover a Tile, click on the Blue Circle to rotate it, click and drag it into position and then click to place it. When complete (1), collect the Pliers (2 – revealed when you complete the Tile Puzzle) and then continue to the Plaza Entrance (5 – see previous Ruins screenshot).
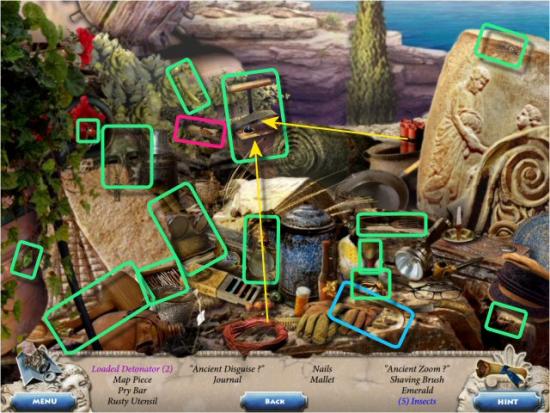
Collect 3 Tiles and click on the Search Scene (1).
Find all the Items in the list. Inventory Item: Pry Bar. Scroll/Map Piece: 7 of 30. Interactive Item: Loaded Detonator. Riddle Items: “Ancient Disguise?” (Mask) and “Ancient Zoom?” (Magnifying Glass).
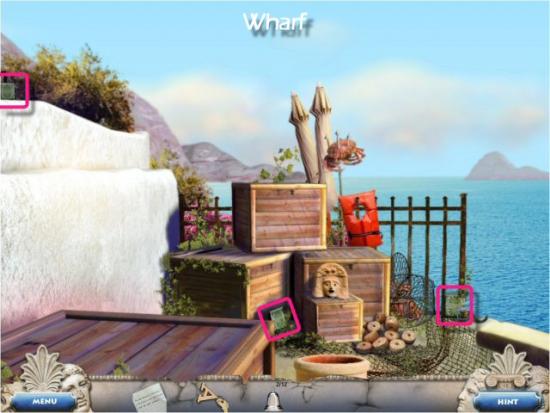
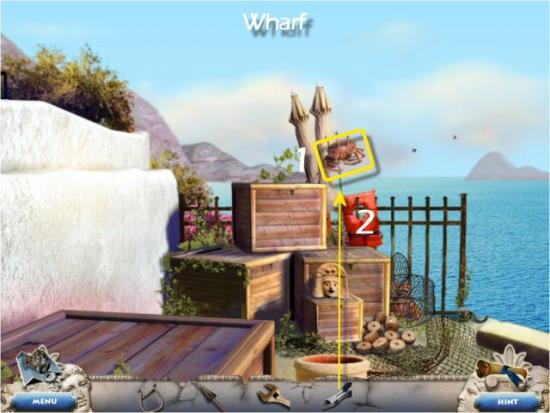
Return to the Wharf, click on the Crab (1), use the Pliers on the Trident (2) and return to the Dock.
Use the Pry Bar on the Crate (1), collect the Owl (2) and return to the Terrace Veranda.
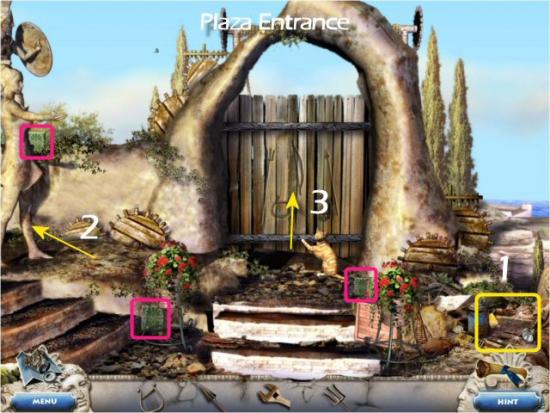
Use the Wrench on the Bow (1), return to the Plaza Entrance and continue to the Statue Garden (2 – see previous Plaza Entrance screenshot).
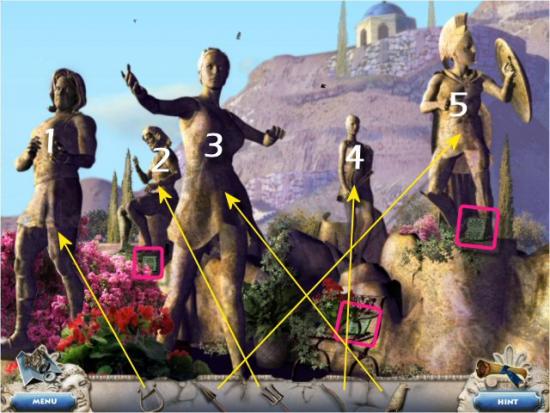
Collect 3 Tiles, use the Lyre on Apollo (1), the Spear on Ares (5), the Trident on Poseidon (2), the Bow on Artemis (4), the Owl on Athena (3) and then return to the Plaza Entrance (click back once) and continue to the Plaza Stairs (3 – see previous Plaza Entrance screenshot; the Gate will now be open).
Collect 3 Tiles, the Long Board and then continue to the Plaza Pool
Collect 3 Tiles and click on the Search Scene (1).
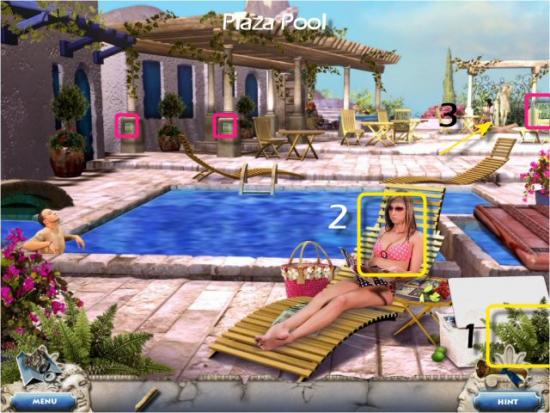
Find all the Items in the list. Inventory Item: Polish Remover. Scroll/Map Piece: 8 of 30. Interactive Item: Play a CD. Riddle Item: “Ringo’s Vehicle?” (Yellow Submarine).
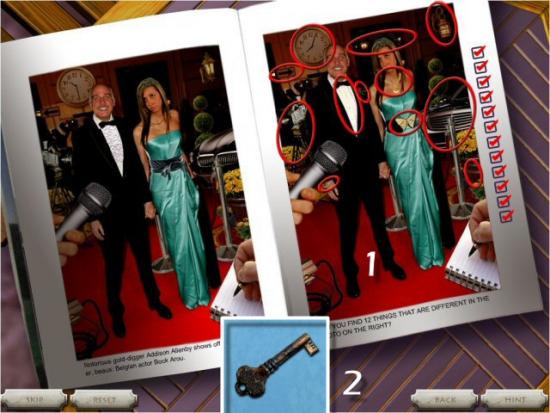
Click on Addison (2 – see previous Plaza Pool screenshot) and then click on the Magazine. Find 12 differences (1) and receive the Old Key (2).
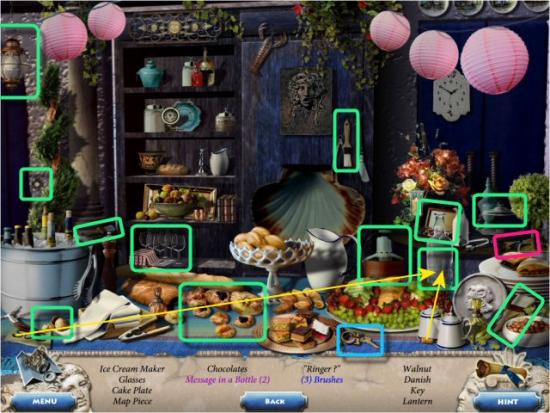
Continue to the Plaza (3 – see previous Plaza Pool screenshot), collect 3 Tiles, the Pieces of Wood and then click on the Search Scene (1).
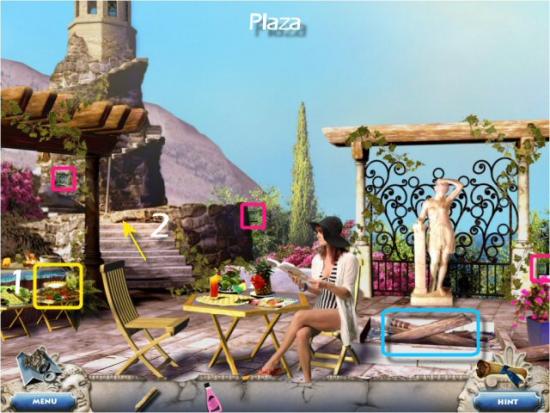
Find all the Items in the list. Inventory Item: Key. Scroll/Map Piece: 9 of 30. Interactive Item: Message in a Bottle. Riddle Item: “Ringer?” (Door Bell).
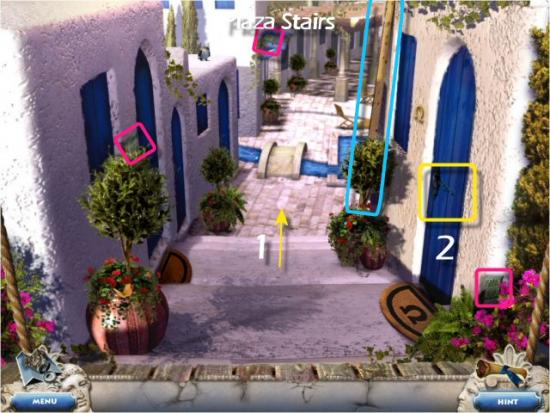
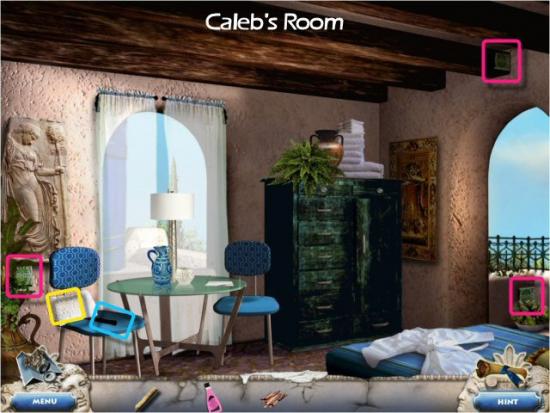
Return to the Plaza Stairs (click back twice), use the Key on the Door (2 – see previous Plaza Stairs screenshot) and enter Caleb’s Room. Collect 3 Tiles, click on the Pillow, collect the Hammer and then return to the Plaza Steps and click on the Search Scene.
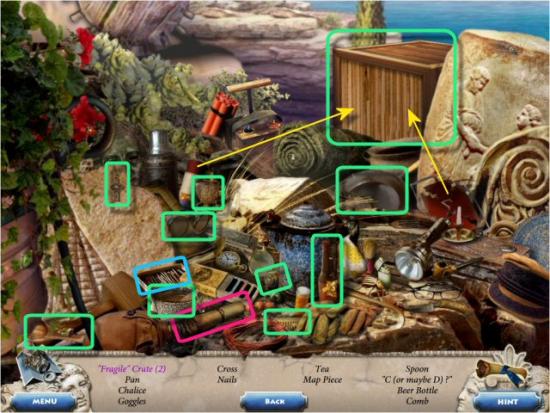
Find all the Items in the list. Inventory Item: Nails. Scroll/Map Piece: 10 of 30. Interactive Item: Fragile Crate. Riddle Item: “C (or maybe D)?” (Battery).
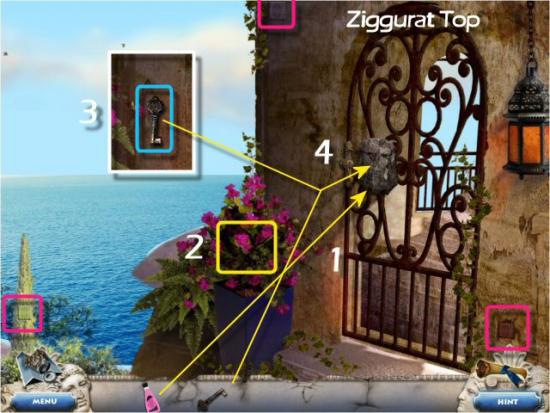
Return to the Plaza and continue to the Ziggurat Steps (2 – see previous Plaza screenshot). Collect 3 Tiles; use the Long Board, Pieces of Wood, Nails and Hammer on the Mast (1 – use them in any order) and then continue to the Ziggurat Top (2).

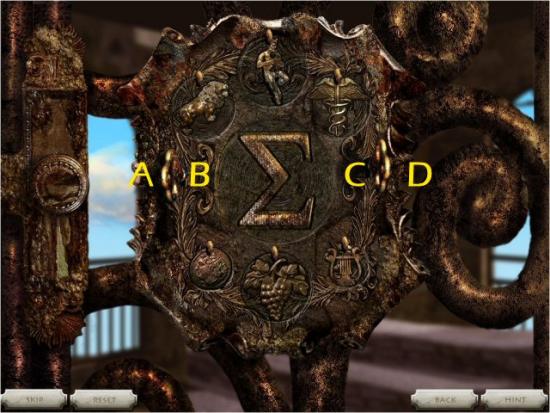
Collect 3 Tiles, click on the Plant (1), collect the Key (2), use the Polish Remover on the Lock (3) and then use both Keys in the Lock (4).
Click on the left and right sides of both Keys (not on the Key itself) and turn the Symbols so they’re in upright positions. “A” rotates the top 3 buttons, “B” rotates the bottom 3 buttons, “C” rotates the 2 left buttons and “D” rotates the 2 right buttons. The solution is click “A” 3 times, “B” once, “D” once and “C” 3 times.
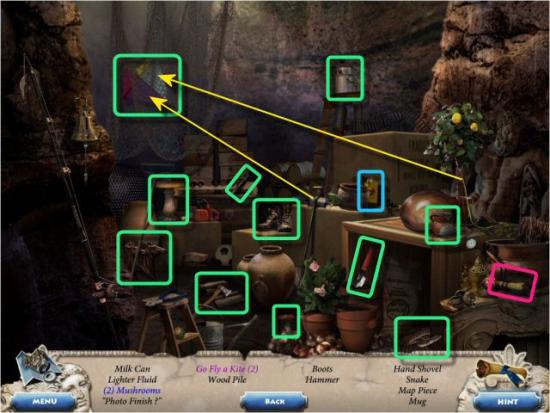
Return to the North Terrace Gate and click on the Search Area. Find all the Items in the list. Inventory Item: Lighter Fluid. Scroll/Map Piece: 11 of 30. Interactive Item: Go Fly a Kite. Riddle Item: Photo Finish?” (Horse Carving).
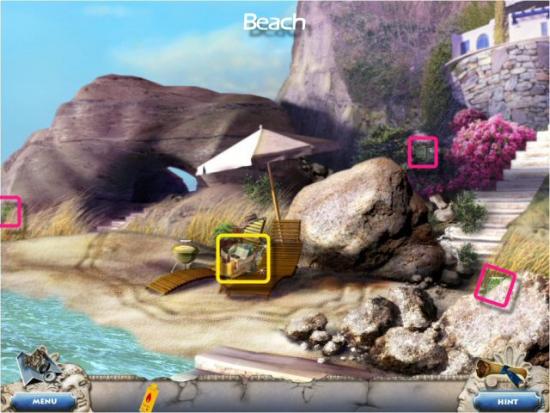
Return to the Beach, collect 3 Tiles and click on the Search Area (1).
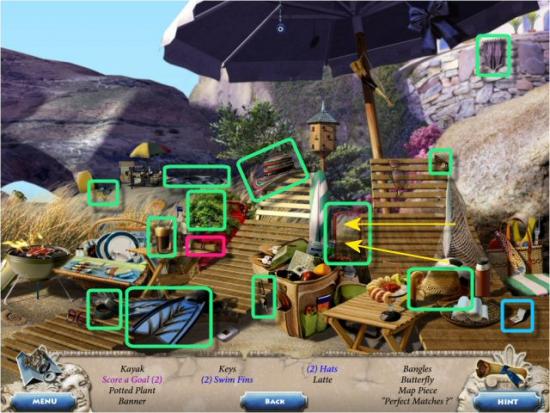
Find all the Items in the list. Inventory Item (Riddle Item “Perfect Matches?”): Matches. Scroll/Map Piece: 12 of 30. Interactive Item: Score a Goal.
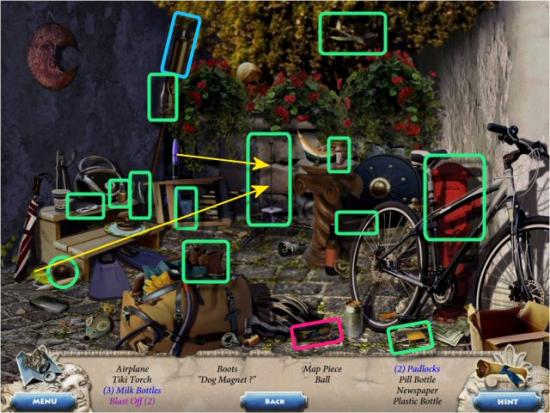
Continue to the Beach Rooms (2 – see previous Beach screenshot), collect 3 Tiles and click on the Search Scene (1).
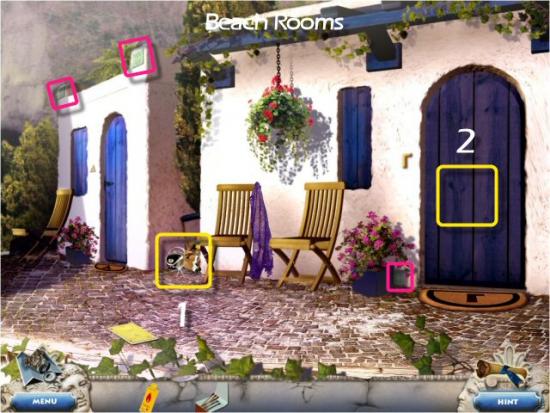
Find all the Items in the list. Inventory Item: Tiki Torch. Scroll/Map Piece: 13 of 30. Interactive Item: Blast Off. Riddle Item: “Dog Magnet?” (Fire Hydrant).
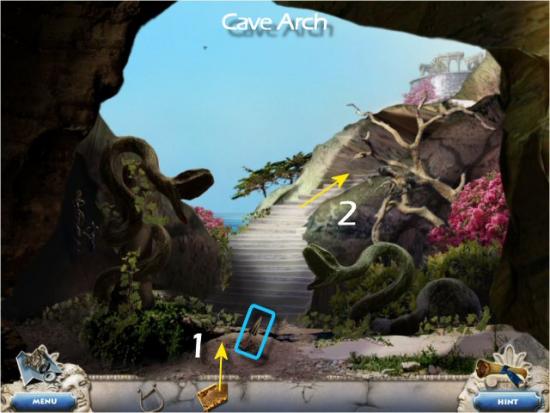
Return to the Cave Arch, use the Lighter Fluid, Matches and Tiki Torch in the Torch Holder (1 – use them in any order) and then continue to the Cave (2).
Collect 3 Tiles and the Key and then click on the Search Scene.
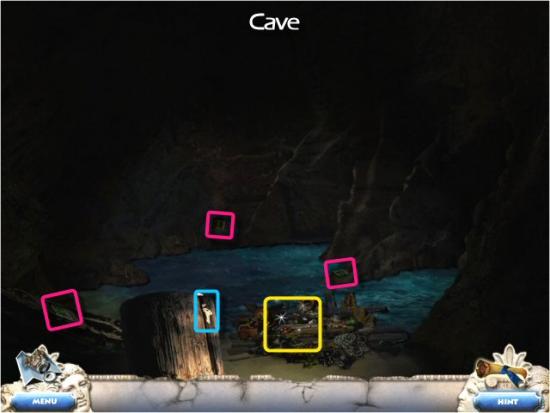
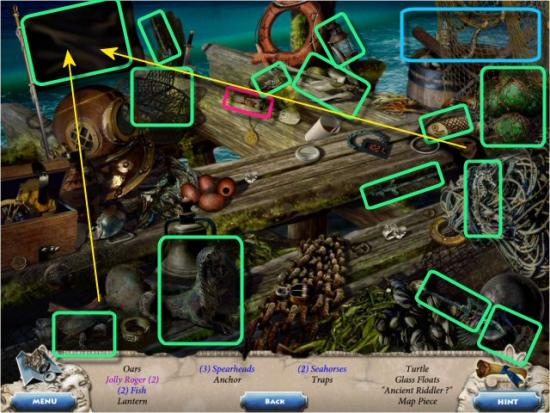
Find all the Items in the list. Inventory Item: Oars. Scroll/Map Piece: 14 of 30. Interactive Item: Jolly Roger. Riddle Item: “Ancient Riddler?” (Sphinx).
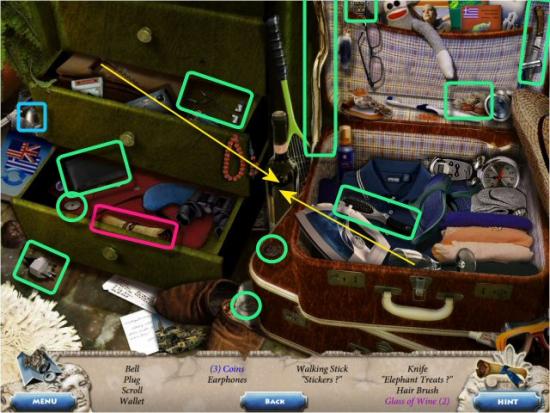
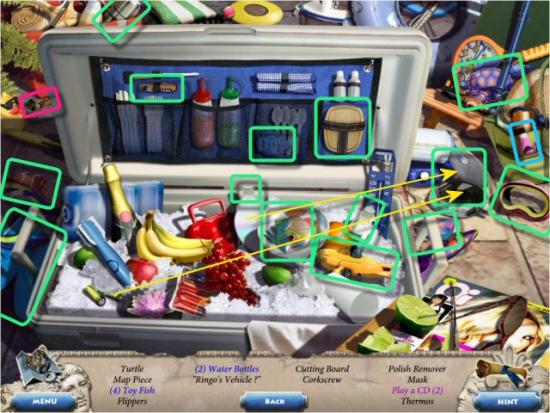
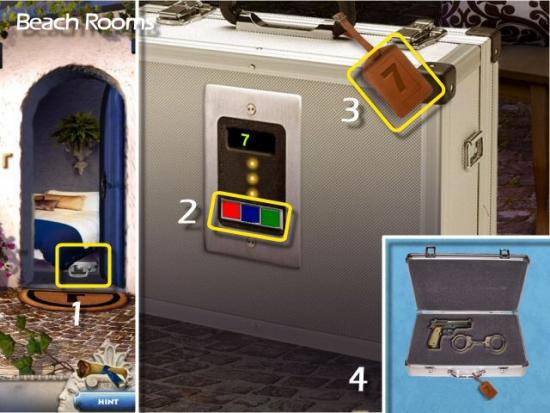
Return to the Beach Rooms, use the Key on the Door (2 – see previous Beach Rooms screenshot) and then click on the Briefcase (1). The Briefcase requires a 3 Digit Color Code to open it. Click on the Red, Blue and Green buttons to open it (2). Note that after 3 clicks, a number appears. This means that each color has a number assigned to it; there’s a Luggage Tag (3) with the number 7 on it. After a 3 attempts, you can figure out what the value for each number is (click on each color 3 times in a row; Red = 1, Blue = 5 and Green = 10). The solution is any combination of Blue once and Red twice: 5 plus 1 plus 1 = 7. When complete, you’ll receive Handcuffs and a Gun.
Return to the Walkway to Beach, use the Oars on the Boat, collect 3 Tiles and then click on the Search Scene (1).
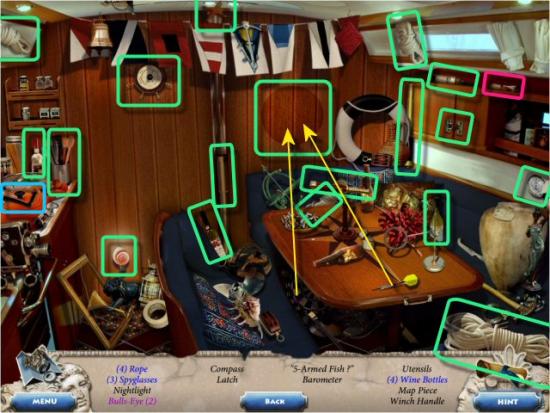
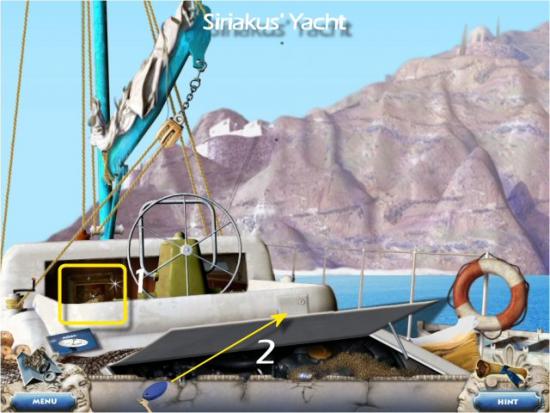
Find all the Items in the list. Inventory Item: Winch Handle. Scroll/Map Piece: 15 of 30. Interactive Item: Bull’s Eye. Riddle Item: “5-Armed Fish?” (Starfish).
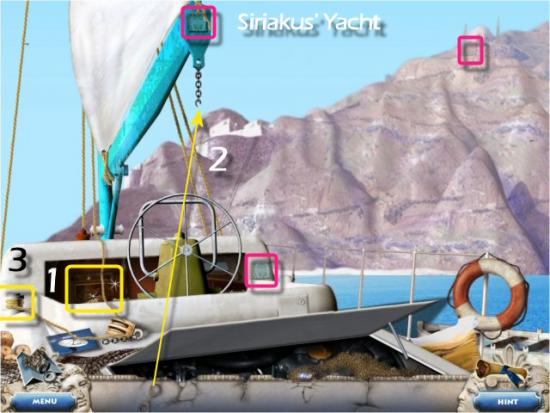
Use the Handcuffs on the Pulley and the Winch Handle on the Winch (2 and 3 – see previous Siriakus’ Yacht screenshot). Collect 3 Tiles and click on the Search Scene (1).
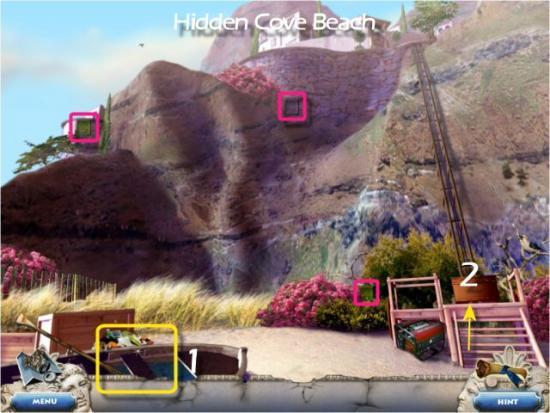
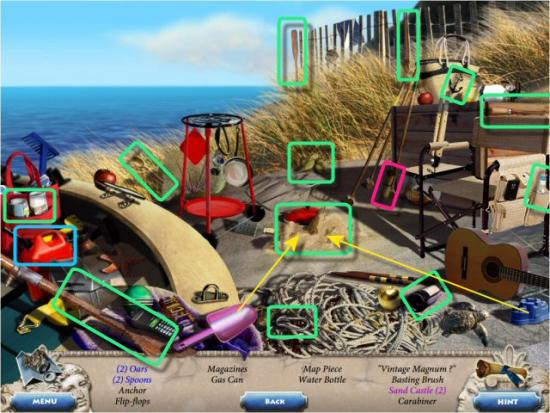
Find all the Items in the list. Inventory Item: Gas Can. Scroll/Map Piece: 16 of 30. Interactive Item: Sand Castle. Riddle Item: “Vintage Magnum?” (Large Bottle of Champagne).
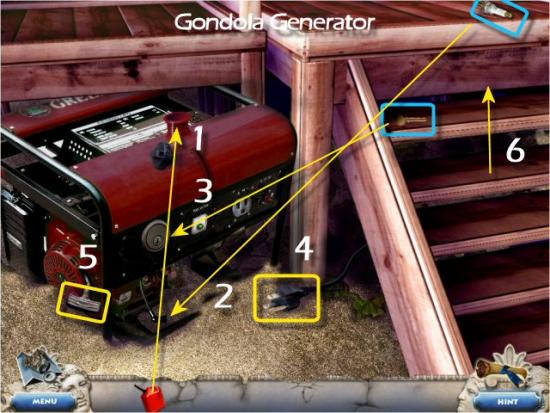
Continue to the Gondola Generator (2 – see previous Hidden Cove Beach screenshot) and collect the Spark Plug and the Key. Use the Gas Can on the Fuel Filler (1), use the Spark Plug on the Wire (2), use the Key in the Ignition (3), click on the Key, click on the Plug (4), click on the Starter (5) and then continue to the Villa Exterior (6).
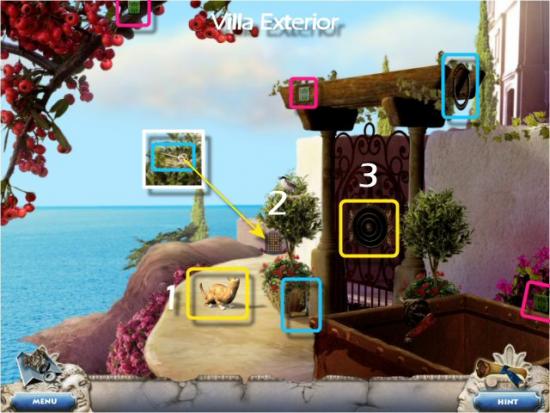
Collect 3 Tiles, the Ring and the Handle. Click on the Cat (1), collect the Key and then use the Key on the Far Door (2).
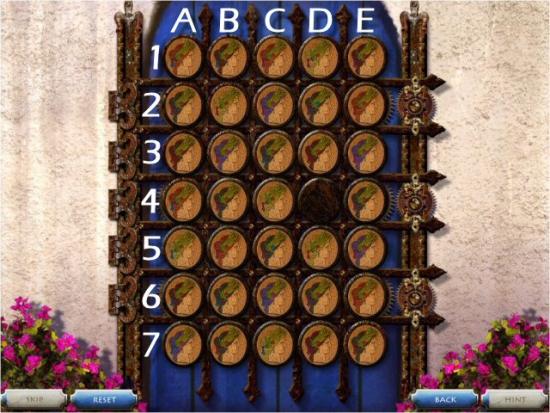
Match the 17 Pairs of Images. Click on one then click on its mate to eliminate them.
A1 + A4 | B1 + A6 | C1 + B5 | D1 + C4 | E1 + D7 |
A2 + D6 | B2 + D5 | C2 + E3 | D2 + C5 | E2 + E6 |
A3 + D3 | B3 + E5 | C3 + B6 | B4 + E4 | A5 + C7 |
C6 + A7 | B7 + C7 |
Collect 3 Tiles and click on the Search Scene (1).
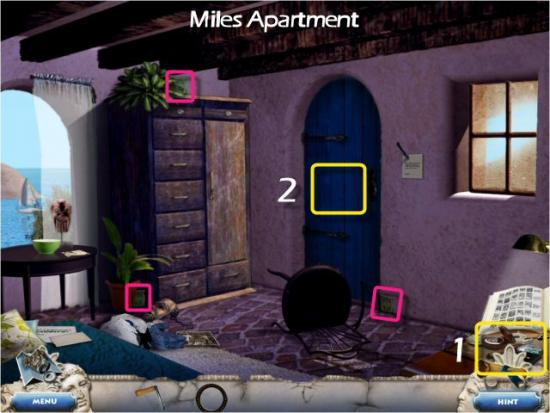
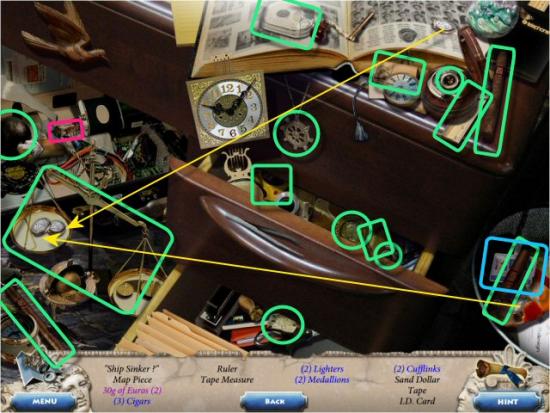
Find all the Items in the list. Inventory Item: ID Card. Scroll/Map Piece: 17 of 30. Interactive Item: 30g of Euros. Riddle Item: “Ship Sinker?” (Cannonball).
Click on the Door (2 – see previous Miles’ Apartment screenshot) and continue to Miles’ Balcony. Collect 3 Tiles and click on the Search Scene (1).
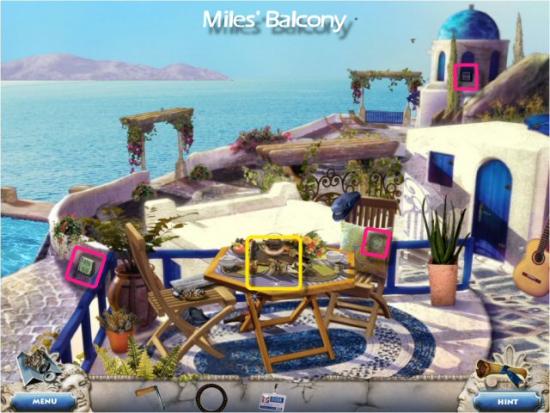
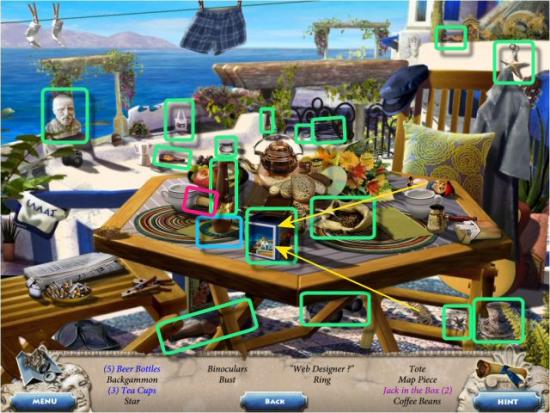
Find all the Items in the list. Inventory Item: Ring. Scroll/Map Piece: 18 of 30. Interactive Item: Jack in the Box. Riddle Item: “Web Designer?” (Spider).
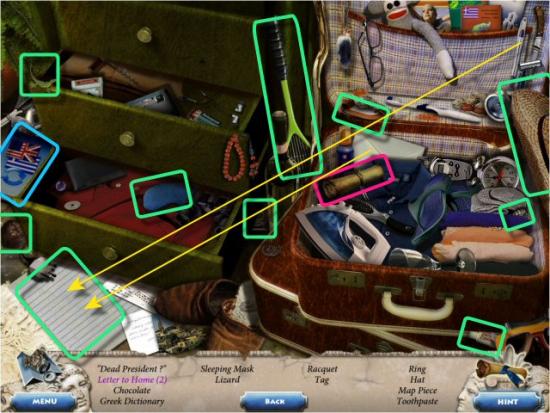
Return to Your Room and click on the Search Scene. Find all the Items in the list. Inventory Item: Greek Dictionary. Scroll/Map Piece: 19 of 30. Interactive Item: Letter to Home. Riddle Item: “Dead President?” (Dollar Bill).
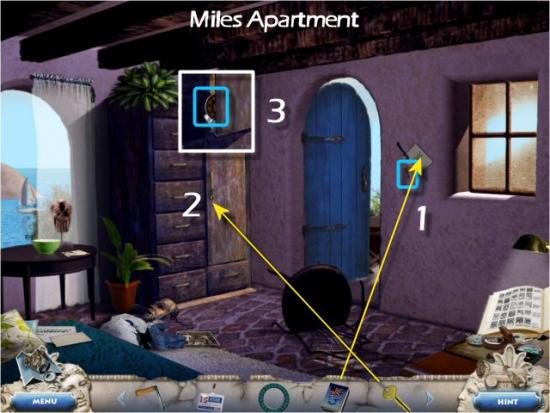
Return to Miles’ Apartment, use the Greek Dictionary on the Note (1), collect the Key, use the Key on the Wardrobe (2) and collect the Ring (3).
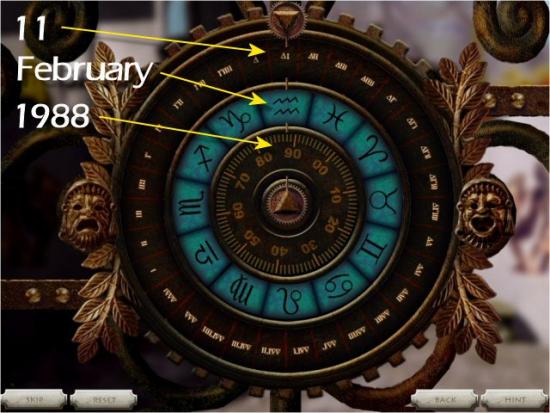
Return to the Villa Exterior and use the 3 Rings on the Door (3 – see previous Villa Exterior screenshot). Rotate the Rings to the correct positions in order to unlock the Door. The Outer Ring has the Days in Greek, from 1 to 31; the next Ring has the months according to the Zodiac and the Inner Ring has the Years, from 0 to 99. Click on a Ring to advance it to the next setting. The solution is Miles’ ID, with his birthdate, 11 February (Aquarius) 88.
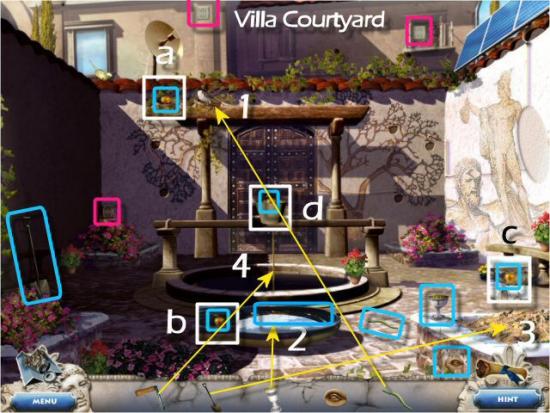
Collect 3 Tiles, the Goblet, Shovel, Eye and Worm. Use the Worm on the Bird (1), use the Goblet on the Water (2), use the Shovel on the Dirt (3), use the Handle on the Well (4) and then collect the 4 Golden Apples (a, b, c and d) and the Shield. Note that when you try to collect the Apple, you’ll collect the Shield, first. Click again to collect the Apple.
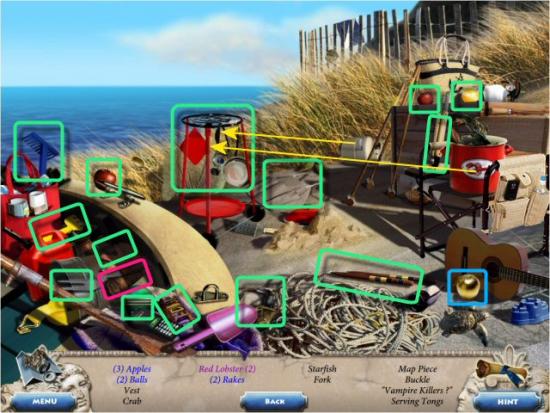
Return to Hidden Cove Beach and click on the Search Scene. Find all the Items in the list. Inventory Item: Golden Apple (1 of 3 Apples). Scroll/Map Piece: 20 of 30. Interactive Item: Red Lobster. Riddle Item: “Vampire Killers?” (Stakes).
Return to the Villa Courtyard, use the Eye and Shield on the Right Wall (1), use the 5 Golden Apples on the Front Wall (2) and then enter the Villa (3).

Collect 3 Tiles and click on the Search Scene (1).
Find all the Items in the list. Inventory Item: Float Key. Scroll/Map Piece: 21 of 30. Interactive Item: Caduceus Symbol. Riddle Item: “SSW?” (Compass).

Return to Siriakus’ Yacht, and click on the Search Scene (1).
Find all the Items in the list. Inventory Item: Postcard. Scroll/Map Piece: 22 of 30. Interactive Item: Hung Painting. Riddle Item: “Boat Spinner?” (Propeller).
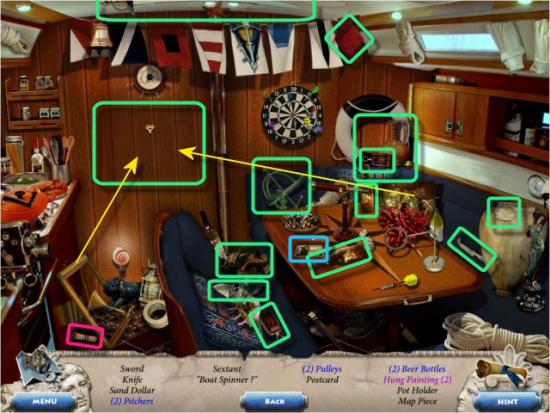
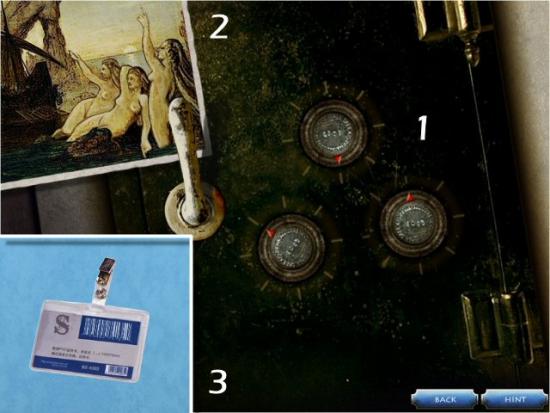
Use the Float Key (2 – see previous Siriakus’ Yacht screenshot) and use the Postcard on the Open Compartment. Set the 3 Dials to open the Safe. Set each Dial (1) according to the position of the arms on the 3 Sirens, in the Picture on the Postcard (2), and receive a Security Passcard (3).
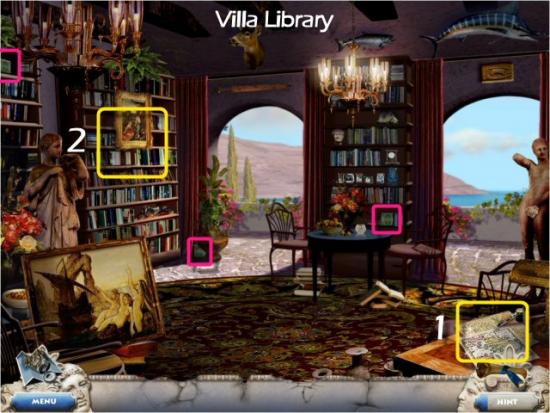
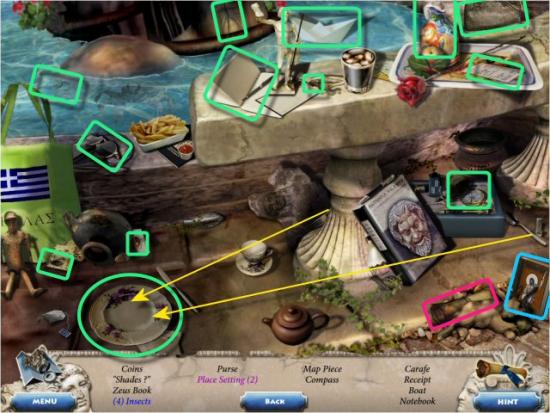
Return to the Terrace and click on the Search Scene. Find all the Items in the list. Inventory Item: Zeus Book. Scroll/Map Piece: 23 of 30. Interactive Item: Place Setting. Riddle Item: “Shades?” (Sunglasses).
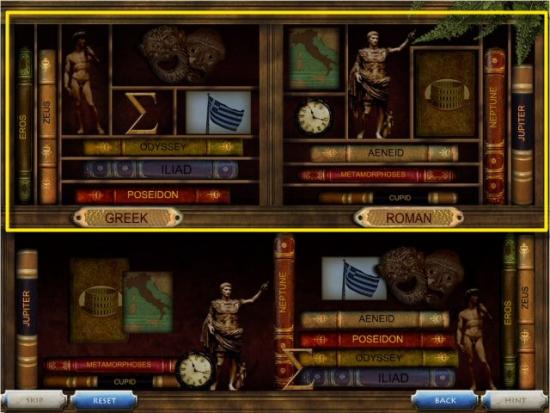
Return to the Villa Library and use the Zeus Book on the Bookshelves (2 – see previous Villa Library screenshot). Arrange the objects on the bottom in their appropriate compartments under Greek or Roman elements. Click and drag each object to a Niche. Note that the order of the books isn’t important.
Use the Security Passcard on the Door and enter the Security Room.
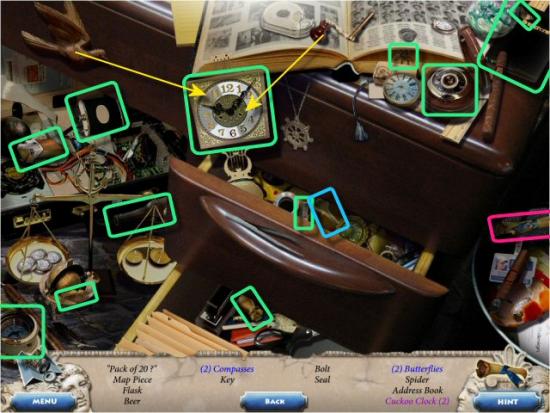
Return to Miles’ Apartment and click on the Search Scene. Find all the Items in the list. Inventory Item: Key. Scroll/Map Piece: 24 of 30. Interactive Item: Cuckoo Clock. Riddle Item: “Pack of 20?” (Pack of Cigarettes).
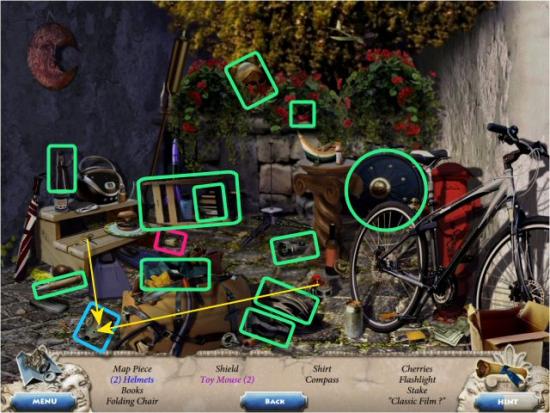
Return to the Beach Rooms and click on the Search Scene. Find all the Items in the list. Inventory Item (Interactive Item): Toy Mouse. Scroll/Map Piece: 25 of 30. Riddle Item: “Classic Film?” (Loose Film Negative).
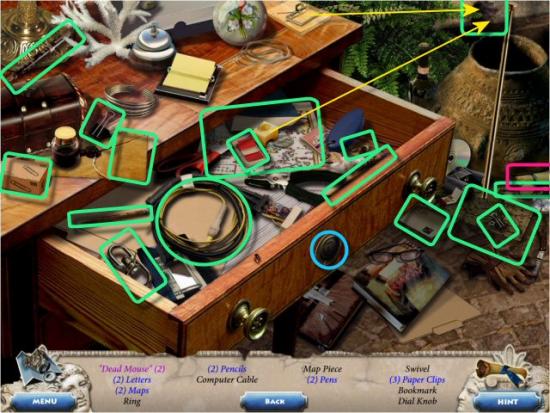
Return to the Villa Library and click on the Search Scene. Find all the Items in the list. Inventory Item: Dial Knob. Scroll/Map Piece: 26 of 30. Interactive Item (Riddle Item): “Dead Mouse?” (Loaded Mousetrap).
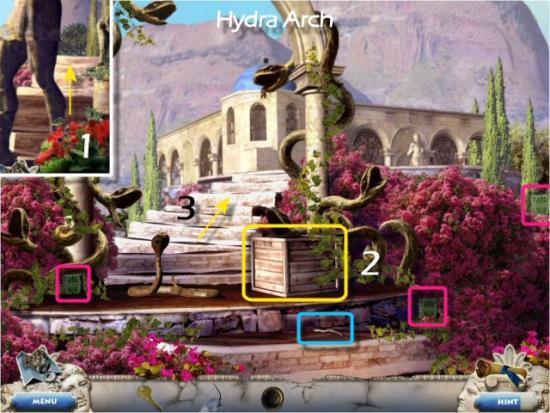
Return to the Statue Garden and continue to the Hydra Arch (1). Collect 3 Tiles and the Stick.
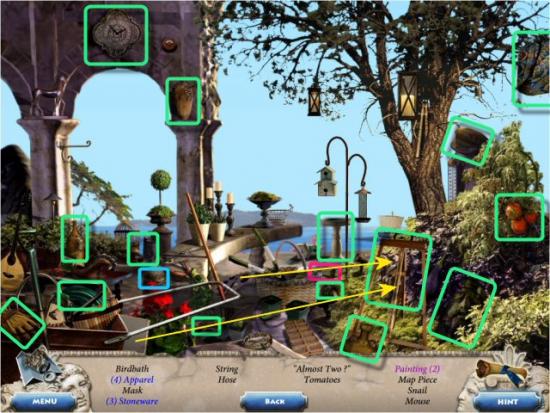
Return to the Ruins and click on the Search Scene. Find all the Items in the list. Inventory Item: String. Scroll/Map Piece: 27 of 30. Interactive Item: Painting. Riddle Item: “Almost Two?” (Clock).
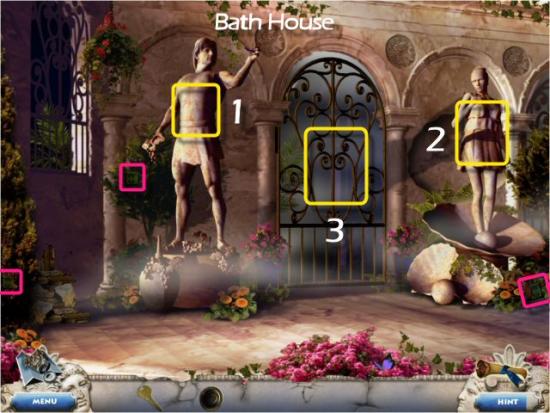
Return to the Hydra Arch and use the Stick, String and Toy Mouse on the Crate (2 – see previous Hydra Arch screenshot). Continue to the Bath House (3 – see previous Hydra Arch screenshot) and collect 3 Tiles.
Return to the Plaza Pool and click on the Search Scene. Find all the Items in the list. Inventory Item: Goblet. Scroll/Map Piece: 28 of 30. Interactive Item: Inflated Float.
Return to the Plaza and click on the Search Scene. Find all the Items in the list. Inventory Item: Oyster Shell. Scroll/Map Piece: 29 of 30. Interactive Item: Lit Jack-o-Lantern. Riddle Item: “Three Spines?” (3 Books).
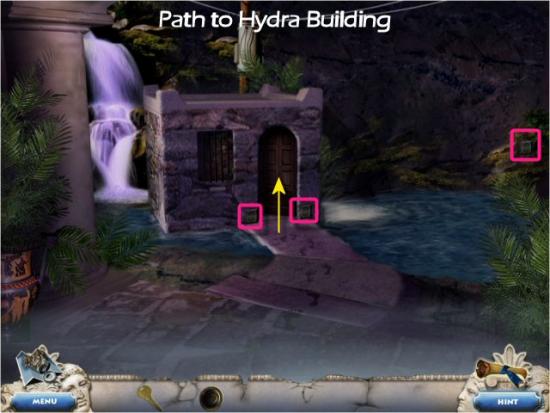
Return to the Bath House, use the Stone Goblet on Dionysus (1 – see previous Bath House screenshot), use the Shell on Aphrodite (2 – see previous Bath House screenshot) and then enter the Path to Hydra Building (3 – see previous Bath House screenshot). Collect 3 Tiles and enter the Hydra Building.
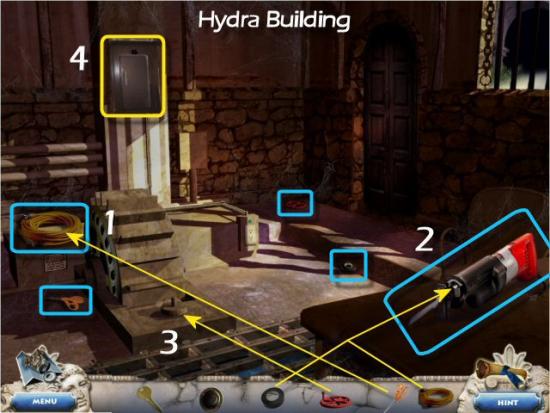
Collect the Electrical Tape, the Valve and the Scissors. Use the Scissors on the Electrical Cable (1) and collect the Electrical Cable. Use the Electrical Cable and Electrical Tape on the Reciprocating Saw (2) and collect the Reciprocating Saw. Use the Valve on the Water Wheel (3), click on it and then click on the Electrical Box (4).
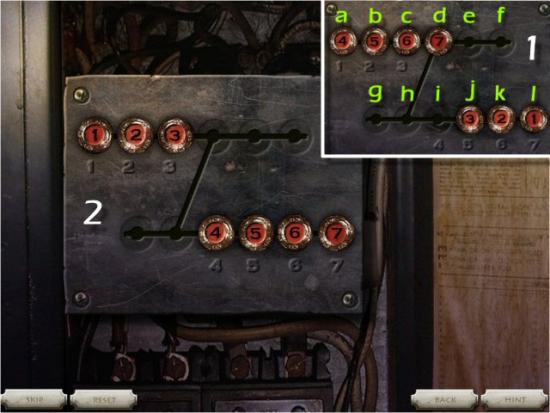
Move the Controls (1) so they’re located at their Numbered Positions (2). Click and drag each Control to a new position, using the 2 spaces, at the lower left, to move Controls out of the way. The quickest solution is:
|
|
|
|
|
|
|
|
|
|
|
|
Click on the following for the video solution
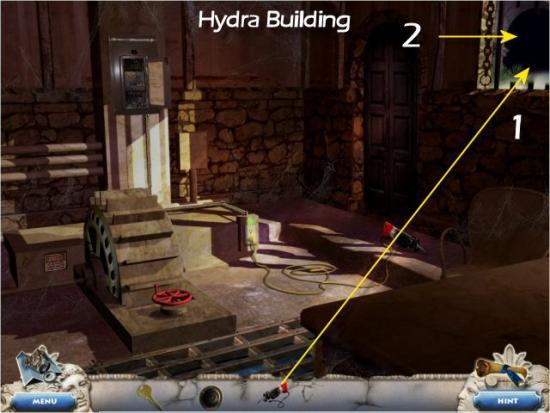
Use the Reciprocating Saw on the Bars (1) and then exit the Hydra Building (2).
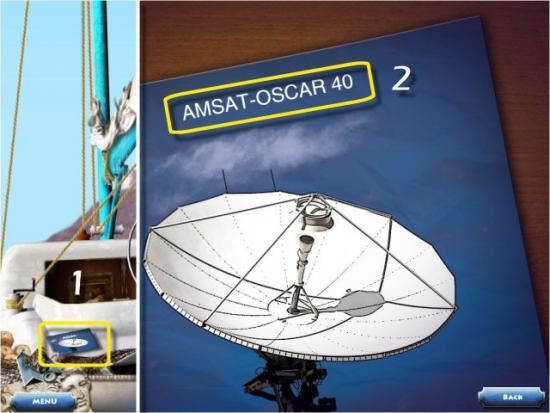
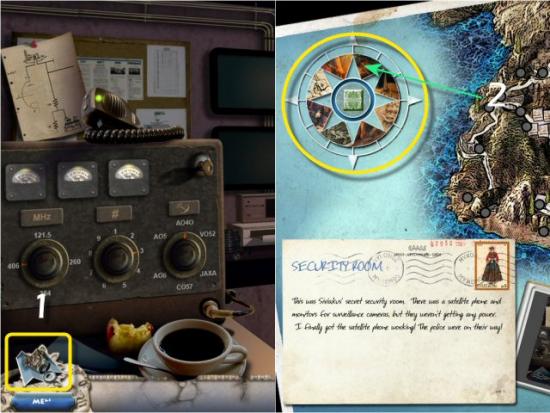
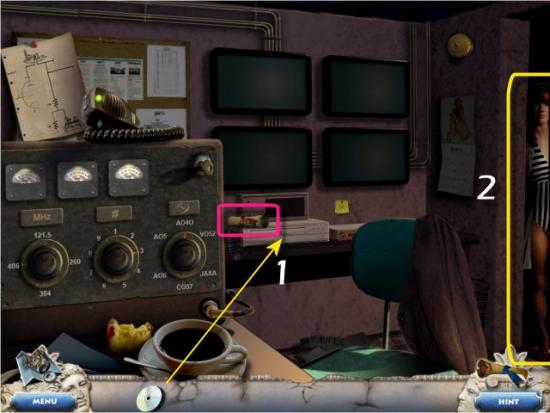
Return to Siriakus’ Yacht, click on the Brochure (1) and note the information (2).
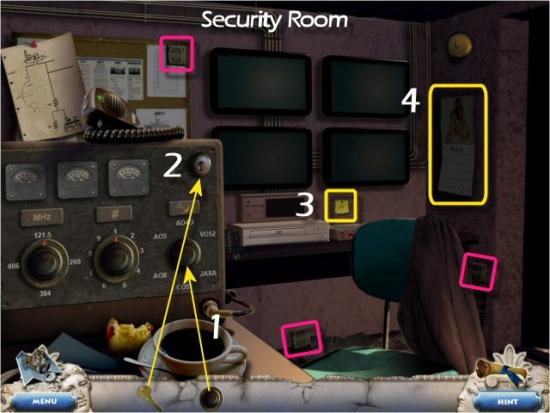
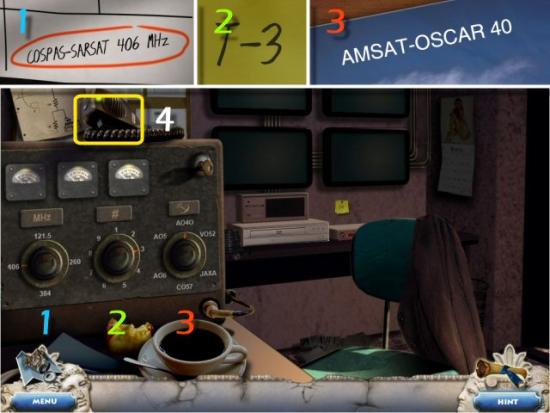
Return to the Security Room, collect 3 Tiles, use the Dial Knob on the Dial (1) and use the Key in the Lock (2). Click on the Calendar (3) and click on the Sticky Note (4). You now have all the information you need to power up the Satellite Phone.
Click on each Dial, move the indicators to the proper Setting (1, 2 and 3) and then click on the Mic (4).
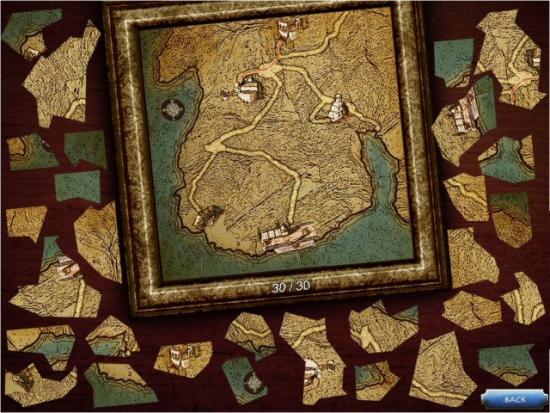
If you’ve been collecting the Tiles, you should have all 96, now. Click on the Interactive Map (1) and then click on each of the Spokes (2) to read about the Legend of Tantalus and other Greek Legends. Note that once the game is over, you won’t be able to access it. If you click Play, with your same profile, the game will begin again.
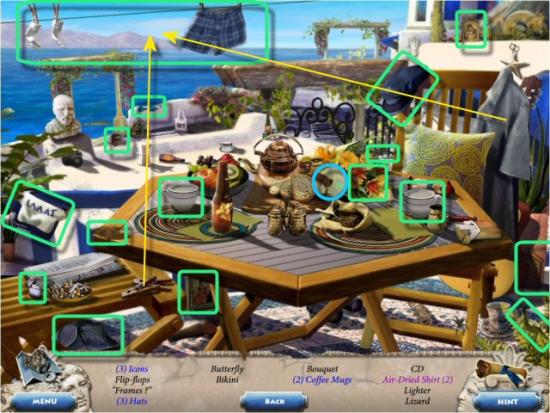
Return to Miles’ Balcony and click on the Search Scene. Find all the Items in the list. Inventory Item: CD. Scroll/Map Piece: 30 of 30. Interactive Item: Air-Dried Shirt. Riddle Item: “Frames?” (Glasses).
Return to the Security Room, use the CD in the Player (1), click on Kyra (2) and then collect the final Scroll/Map Piece.
If you’ve been placing the pieces of the Map, as you collected them, you’ll only have a few more to do now. You must complete the Map, now, in order to progress. Mouseover a Map Piece, click on the Blue Circle to rotate it, click and drag into position and then click to place it.
Return to the Path to Hydra Building and click on the Controls (in the column, at the lower left). You need to move the Blue Valve to the opposite side to shut off the Waterfall. Click on each piece to slide it to an open spot. You may need to click on a block more than once to get it to go in the direction desired. The shortest solution is a little over 30 steps. Note that in the following screenshots, some compound moves have been combined and only 24 images are shown.
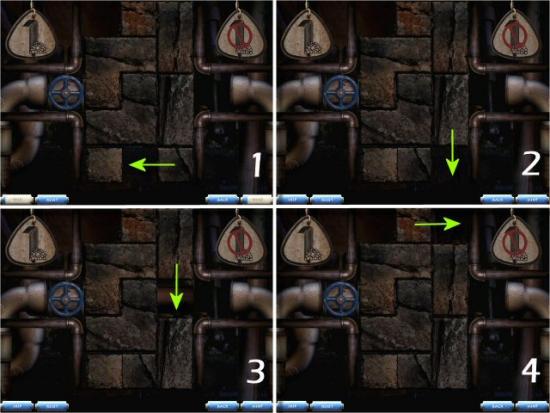
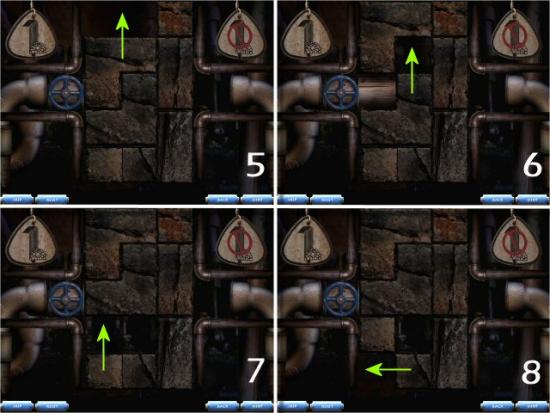

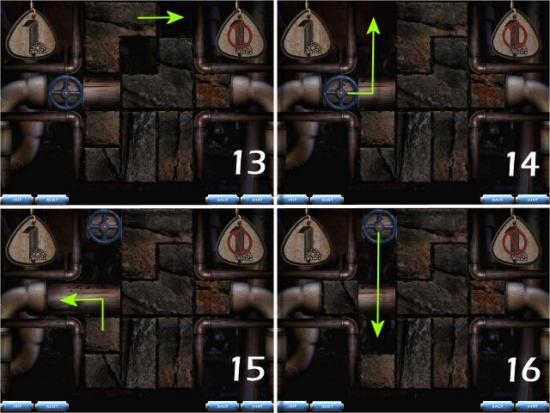
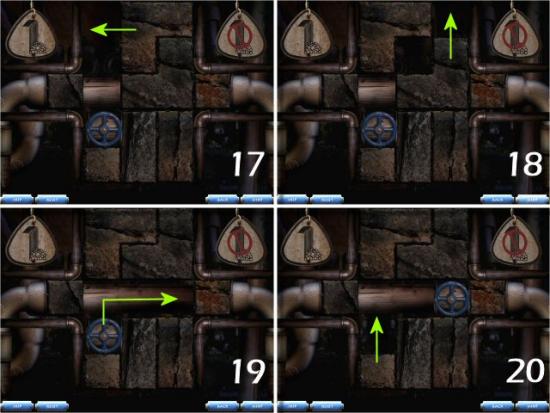
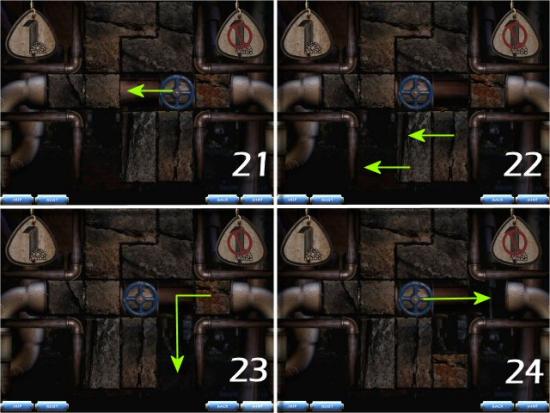
Click on the following for the video solution
Caution: If you haven’t found all the Tiles, this is your last chance to do so. Once you continue, you won’t be able to return to any other part of the game.
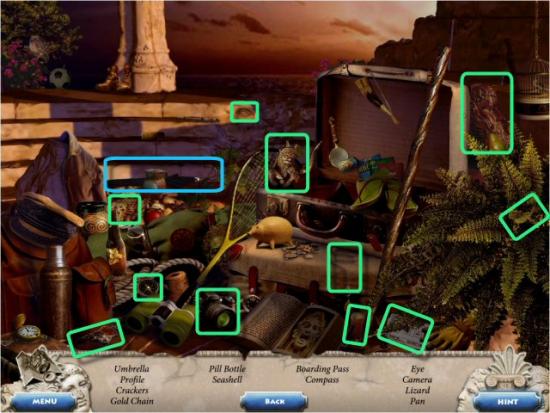
Continue to the Temple (1) and click on the Search Scene (2).
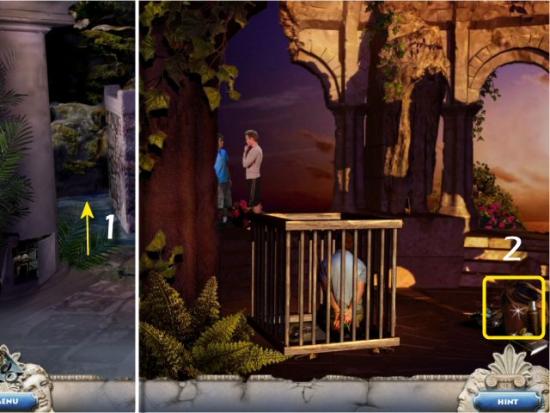
Find all the items in the list. Inventory Item: Umbrella.
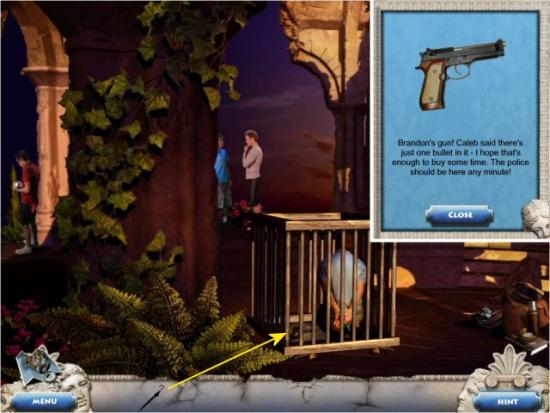
Use the Umbrella on the Gun
The End!
Congratulations! You’ve completed Murder Island: The Secret of Tantalus.
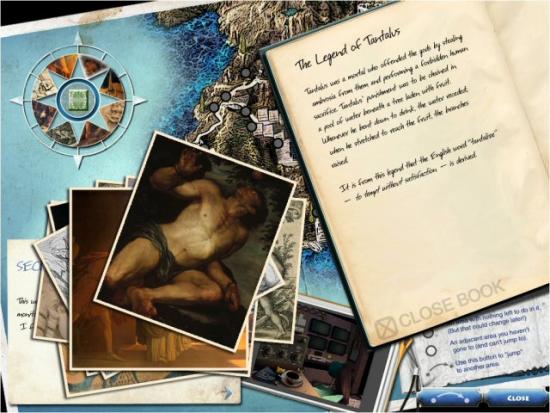
The Legend of Tantalus
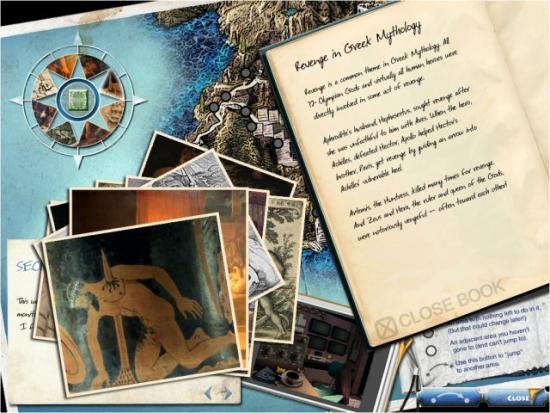
Revenge in Greek Mythology
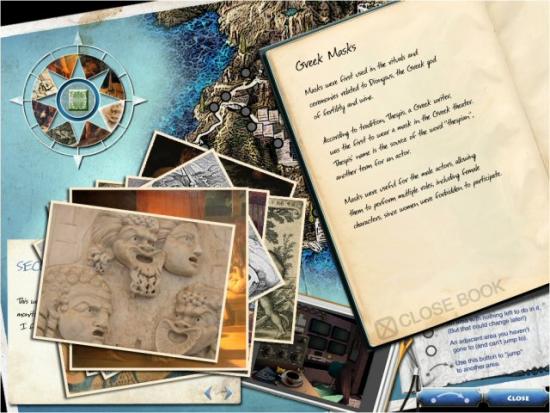
Greek Masks
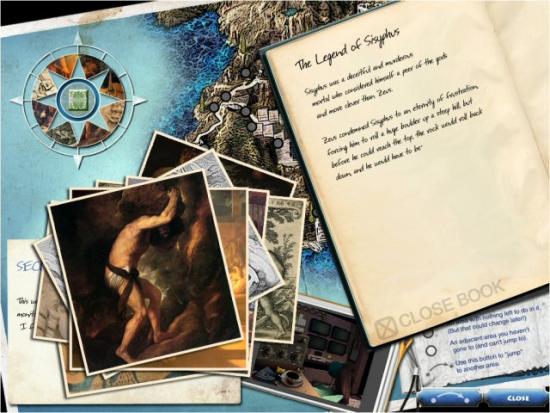
The Legend of Sisyphus
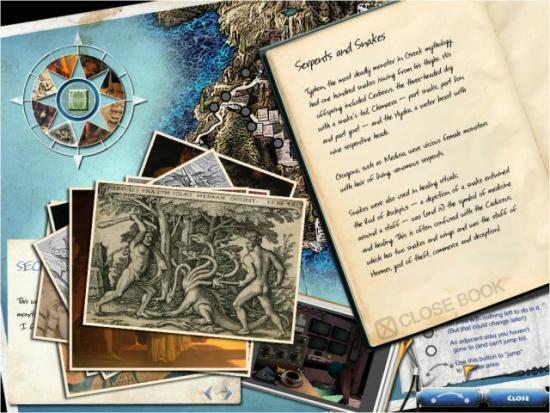
Serpents and Snakes
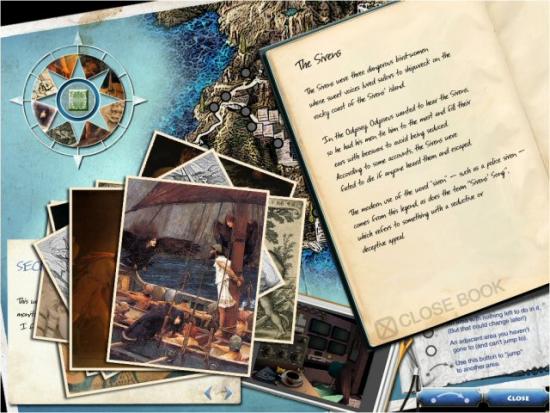
The Sirens
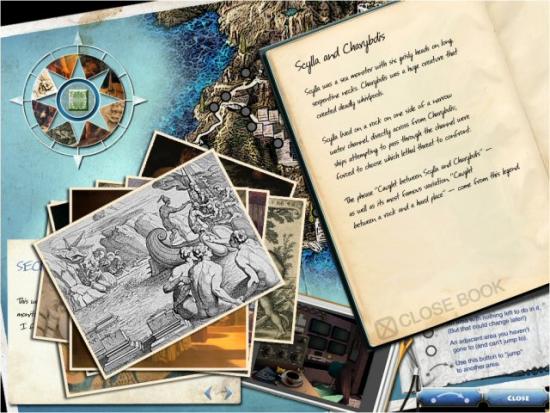
Scylla and Charybdis
Temples and Rituals

