- Wondering how to get Monopoly GO! free rolls? Well, you’ve come to the right place. In this guide, we provide you with a bunch of tips and tricks to get some free rolls for the hit new mobile game. We’ll …
Best Roblox Horror Games to Play Right Now – Updated Weekly
By Adele Wilson
Our Best Roblox Horror Games guide features the scariest and most creative experiences to play right now on the platform!The BEST Roblox Games of The Week – Games You Need To Play!
By Sho Roberts
Our feature shares our pick for the Best Roblox Games of the week! With our feature, we guarantee you'll find something new to play!All Grades in Type Soul – Each Race Explained
By Adele Wilson
Our All Grades in Type Soul guide lists every grade in the game for all races, including how to increase your grade quickly!
Moxxie’s Tabloid Adventures Walkthrough
Welcome to Gamezebo's strategy guide for Moxxie's Tabloid Adventures. GENERAL GAMEPLAYThis is an interactive adventure hidden object game. It has 14 locations and 16 mini-games. Some locations have more than one scene. Most locations have pop-up scenes where you search for more items to complete the level. You can choose to play in Novice or Expert Mode. In Novice Mode you'll be shown a list of objects to find. It's easier to play in this mode but you won't earn as many …
a:1:i:0;a:2:s:13:”section_title”;s:39:”Moxxie’s Tabloid Adventures Walkthrough”;s:12:”section_body”;s:61038:”
Welcome to Gamezebo’s strategy guide for Moxxie’s Tabloid Adventures.

GENERAL GAMEPLAY
- This is an interactive adventure hidden object game. It has 14 locations and 16 mini-games. Some locations have more than one scene. Most locations have pop-up scenes where you search for more items to complete the level.
- You can choose to play in Novice or Expert Mode.
- In Novice Mode you’ll be shown a list of objects to find. It’s easier to play in this mode but you won’t earn as many points.
- In Expert Mode you won’t be shown a list of objects to find and delays between tips will be longer, but you will earn more points.
- Hints are unlimited and they recharge quickly. The Hint button contains a question mark when it is charged and ready to use. It is located in the lower left corner beside Moxxie’s face.
- All of the mini-games have the SKIP option but it must charge up before you can use it.
- You can move through the dialogue in the scenes faster by clicking your mouse.
- Cut scenes have a SKIP option in the lower right corner of the scene.
- At the beginning of the game you are given a basic tutorial while you play the first scene.
- Not all items will be visible when you enter a scene. You must hunt for and uncover many items within each scene.
- In Novice mode the items that need to be collected and are currently visible within a scene are listed at the top of the screen.
- In some levels you must move back and forth between two scenes to accomplish your goals.
- The goals for the scene are listed in the lower right corner. They are very helpful in determining what to do next. You do not always have to accomplish the goals in the order they are listed.
- When you take an item from your inventory to use it in a scene, be sure to move it to the location where it is to be used and look for the cursor to flash and change colors between yellow, green and blue. The cursor’s flashing change of colors indicates that you are in the correct spot and can click the item into use.
- Sometimes when a location is complete you will have to click anywhere on the screen in order to go to the next scene. Sometimes you will be automatically taken to the next scene.
WALKTHROUGH
Location 1: Moxxie’s apartment – Get ready for work
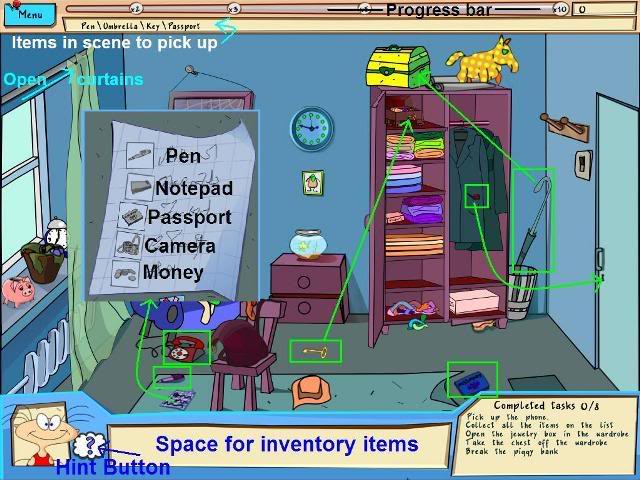
- Answer the phone.
- Open the wardrobe, pick up the yellow key from the floor and open the jewelry box to find the notepad.
- Push back the window curtains.
- Turn off the alarm clock when it rings.
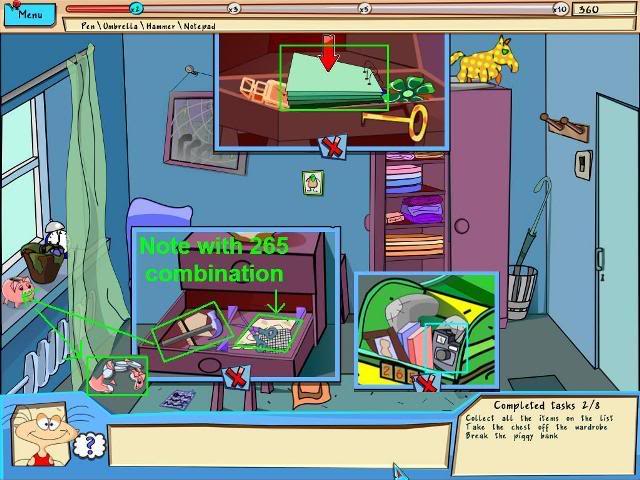
- Get the hammer from the lower drawer in the small two drawer chest and break the piggy bank on the windowsill. Pick up the money.
- Get the umbrella from beside the wardrobe and use it to knock the yellow chest off the top of the wardrobe.
- Look again in the lower drawer of the two drawer chest and move the purple book to find a note with the combination 265. Use the 265 combination to open the yellow chest to find the camera.
- Look under the right edge of the carpet and get the passport.
- Pick up the pen that is on the floor.
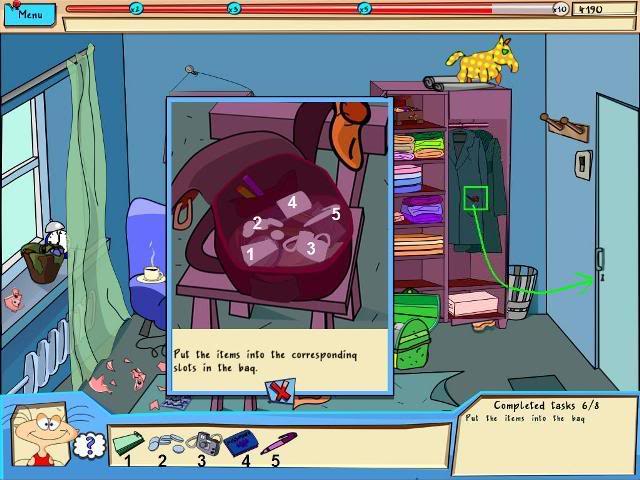
- Open the bag that is on the chair and put the items from your inventory where they belong according to their silhouettes.
- Open the right door of the wardrobe and get the key from the coat pocket and unlock the door to the apartment.
- Please look at the screen shots to see the locations of the items in this scene.
Location 2: Outside Moxxie’s apartment – Help Granny recover her money
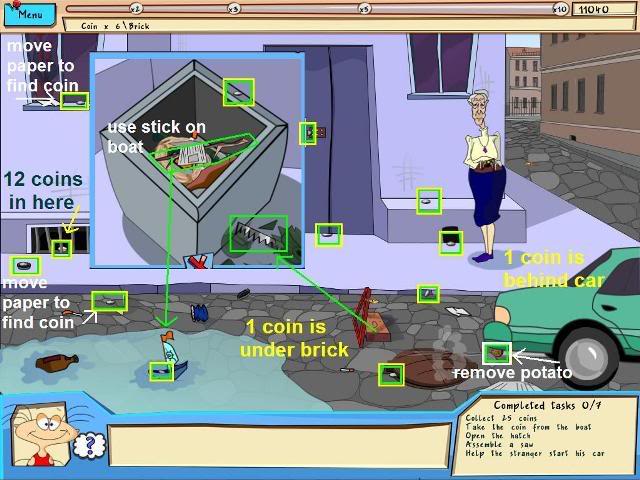
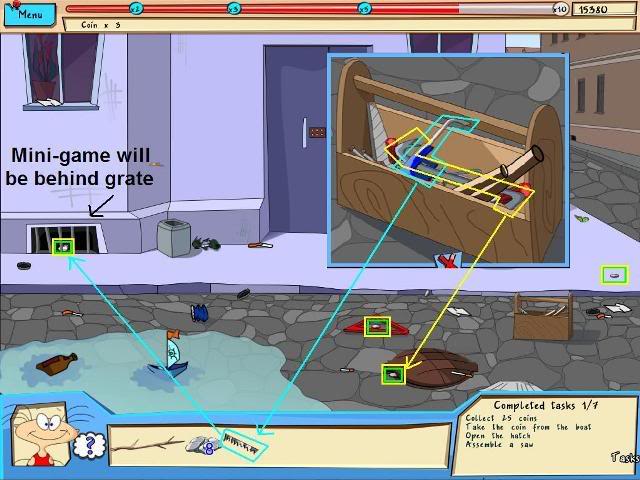
- Click on the trash can beside the door to get a close up view.
- Get the stick from the trash.
- Get the coin on the edge of the trash can.
- Pick up the brick from the center of the street and use it to break the bottle beside the trash can in the close up view.
- Get the hacksaw blade from the broken bottle. Be careful!
- Use the stick on the boat in the puddle and it will move to the edge of the puddle so you can get the coin.
- Move the piece of paper in the windowsill to get a coin.
- Move the piece of paper that is on the left side of the street above the puddle to get a coin.
- Click on the potato in the car’s exhaust pipe and the car will drive away.
- Click on the tool box to get a close up view.
- Get the hacksaw handle and it will combine with the blade in your inventory.
- Get the crowbar from the toolbox.
- Use the crowbar to move the manhole cover and get one coin.
- Find and pick up all the coins shown in the scene to get 13 coins.
- Use the hacksaw on the grate on the left and click on the coin. You will be taken to a mini-game.
- Please look at the screen shots to see the locations of the items in this scene.
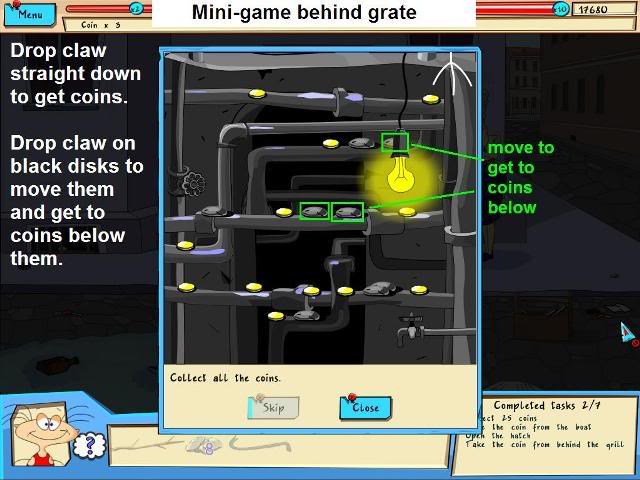
- There are 12 coins to collect in this mini-game. This is a random game so the coins will be in different places in each game.
- Move the white claw at the top on the scene straight over a coin and click to pick up the coin.
- Sometimes a black piece will be obstructing the straight line between the claw and the coin.
- Click the white claw when it is over the black piece and the claw will toss the black piece to another place and you can then click to get the coin.
- Pick up the unobstructed coins first then move the black pieces to get the other coins.
- When you have gotten the 12 coins you will be taken back to the street scene.
- Give the 25 coins to Granny and then click anywhere on the screen to end this scene.
Choose between Expert Mode and Novice Mode
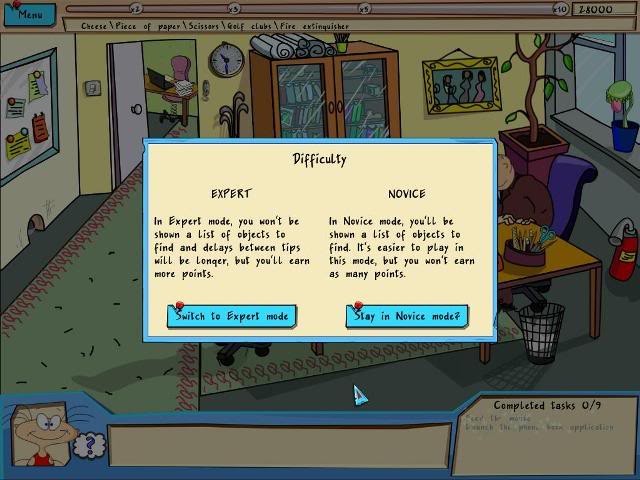
- At this point in the game you will be asked to choose between Expert Mode and Novice Mode.
- In Expert Mode you won’t be shown a list of objects to find and delays between tips will be longer, but you will earn more points.
- In Novice Mode you’ll be shown a list of objects to find. It’s easier to play in this mode but you won’t earn as many points.
Location 3: The office of Moxxie’s boss – Get the work assignment
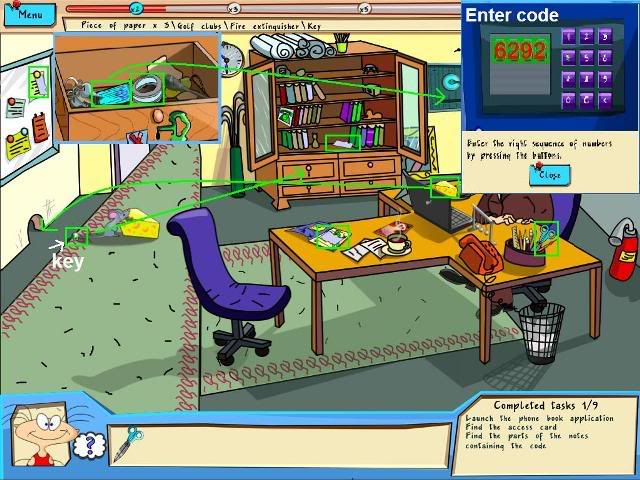
- Get the cheese from the desk and put it in front of the mouse hole.
- The mouse will come out. Get the key that is on the mouse’s tail.
- Use the key on the large lower locked drawer in the cabinet on the back wall.
- Get the small blue access card (map) and the roll of tape from the drawer.
- Open the magazine on the table in front of the boss’ desk to find a piece of paper.
- Open the doors on the large cabinet on the back wall and get 1 piece of paper.
- Get the third piece of paper from the bulletin board on the left.
- Get the scissors from the desk and they will combine with the tape and the 3 papers in your inventory to form a piece paper with tape on it.
- Stick the paper to the window to reveal the code for the safe. The code is 6292.
- Move the picture that is on the wall to the right of the cabinet to reveal the safe.
- Click on the safe to get a close up view.
- Insert the small blue access card (map) into the slot on the safe and click on the handle to open it.
- A close up of a key pad will appear. Enter the code 6292.
- Please look at the screen shot to see the locations of the items in this scene.
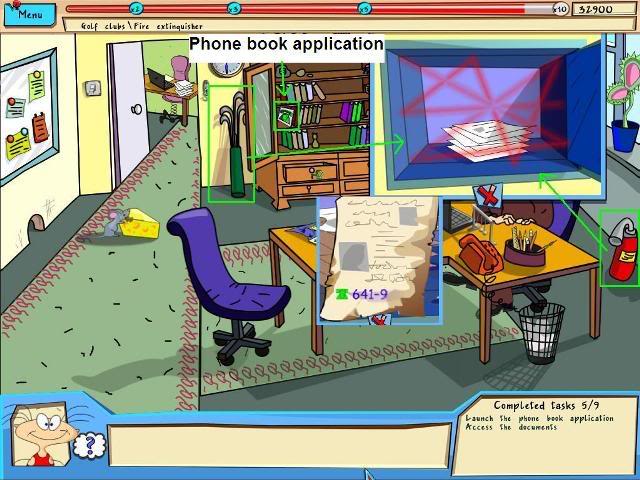
- The safe has laser beams.
- Use a golf club on the laser beams in the safe (click twice) and a fire will start.
- Use the fire extinguisher on the fire.
- Click on the charred papers to see the first 4 digits of a phone number. The number is 641-9.
- Click on the telephone book application disk in the cabinet on the back wall and a close up view will open.
- Click on the disk in the close up view. The disk will go into your inventory.
- Please look at the screen shot to see the locations of the items in this scene.
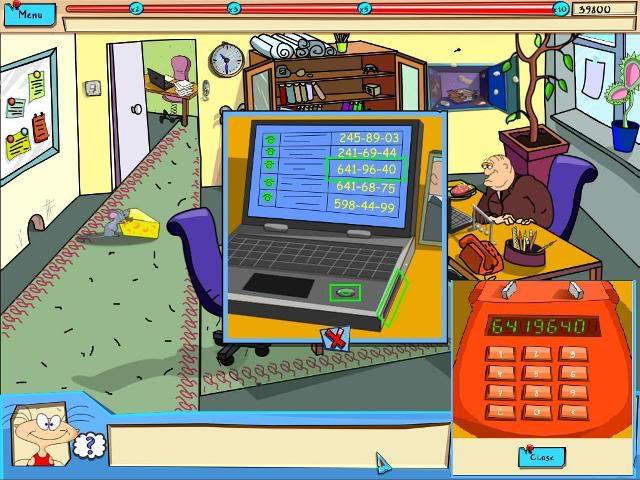
- Click on the computer on the desk to get a close up view.
- Click on the small red button to turn on the computer.
- Click on the disk drive door to open it.
- Insert the disk from your inventory into the disc drive and see the phone numbers.
- Click on the phone number 641-96-40 and you will get a close up view of the red phone.
- Click on the buttons on the red phone to enter the phone number.
- Finish the conversation and set up a meeting with the psychic, Vanessa Star to end the level.
- Please look at the screen shot to see the locations of the items in this scene.
Location 4: Vanessa Star’s house – Make a potion to open the door
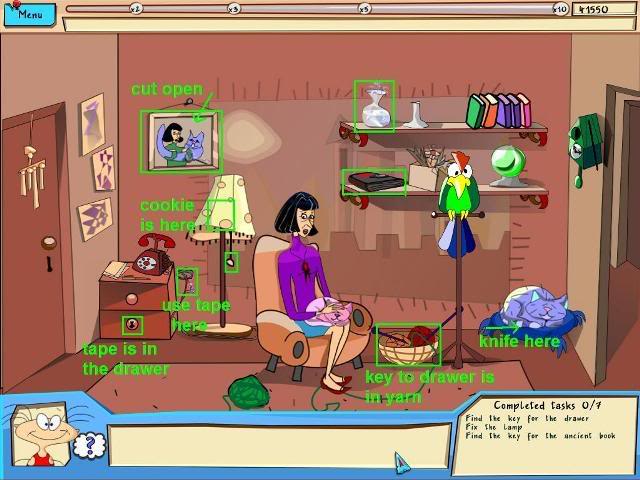
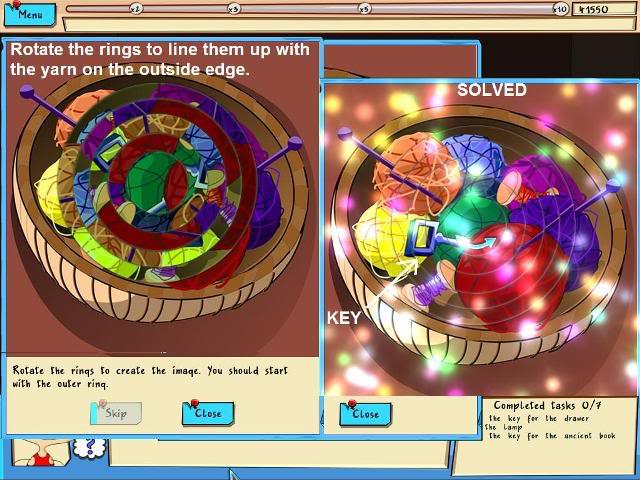
- Click on the basket of yarn on the floor to reveal a close up view of a rotation puzzle.
- Begin with the outermost ring and rotate each ring to line up the yarn colors with the yarn in the outer part of the basket.
- When they are lined up correctly the puzzle will sparkle.
- Take the key from the basket of yarn.
- Use the key to unlock the lower drawer in the two drawer cabinet on the left of the room.
- Click on the drawer to get a close up view and take the tape from the drawer.
- Use the tape on the sparking lamp wires.
- Click on the lamp pull to turn on the light to reveal a shadow of a cookie.
- Take the cookie and give it to the parrot.
- The parrot will say WOOF and scare away the cat to reveal a knife.
- Use the knife to cut open the portrait on the left wall to reveal a gold key.
- Please look at the screen shot to see the locations of the items in this scene.
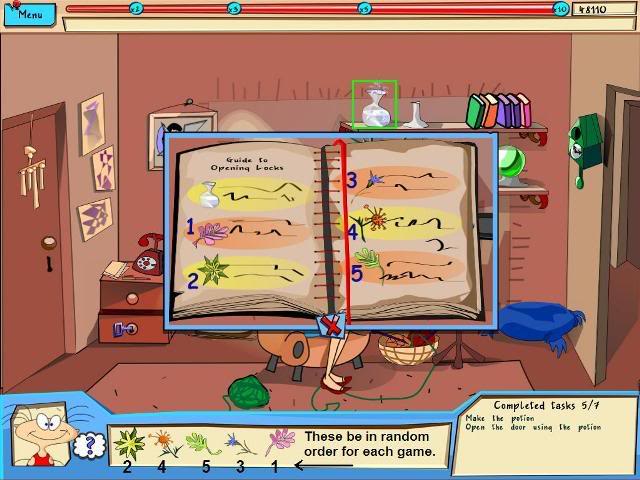
- Click on the ancient book on the first shelf on the wall to get a close up view and use the gold key on it.
- Flip through the pages of the book and click on each herb and the ones you need will go into your inventory.
- When you have collected all the herbs flip back to the first page to see the recipe. You can leave the book open.
- Add the herbs to the white container of acid on the top shelf in the order specified in the book. The order that the herbs go into your inventory may vary but the recipe order of the herbs is the same every time you play.
- When the potion is complete you can close the book and put the potion on the key hole of the door on the left of the room.
- Click on the door to open it and end this scene.
Location 5: Office reception area – Get in to see the boss with your photo
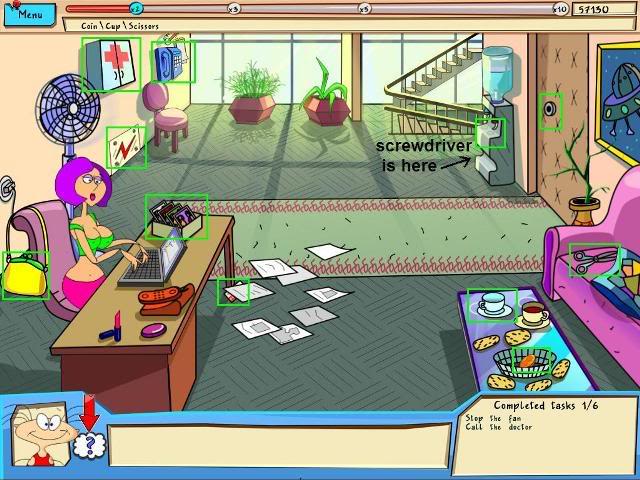
- Click on the box of photos on the secretary’s desk and a memory match game will appear. This is a typical find the two that are the same memory game. Flip the photos to see each image. Find the matching images and click two matching images in sequence. As matched pairs are found they will stay flipped face up.
- Click on the stack of paper on the desk beside the photos and they will fall to the floor. Pick them up and you will find a red and white card with a Doctor’s phone number.
- Click on the water cooler to find a screwdriver.
- Click on the pillow on the sofa to find a pair of scissors.
- Click on the electrical panel with the red lightening bolt on the left side of the room.
- When you have the close up view of the electrical panel use the screwdriver on a screw to open it.
- Use the scissors to cut the wires and stop the fan.
- Click on the crackers in the bowl on the coffee table to find a coin at the bottom of the bowl.
- Please look at the screen shot to see the locations of the items in this scene.
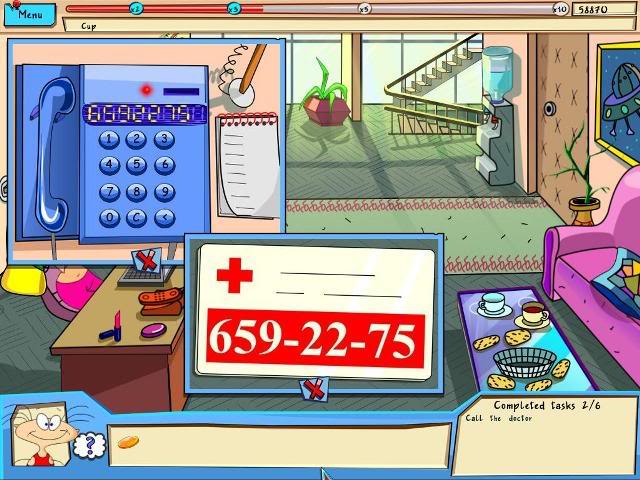
- Click on the blue telephone in the back left of the scene to get a close up view.
- Use the coin and the phone number on the red and white card to call the doctor and get the name of sleeping pills. The name is Som Num.
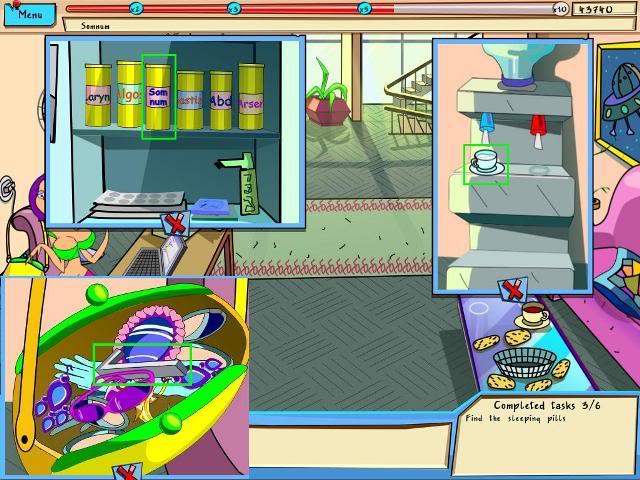
- Click on the first aid box on the left wall and get the Som Num.
- Click on the water cooler to get a close up view and take the white cup from the coffee table to the water cooler and place it under the cold water tap. The full cup of water will go to your inventory and combine with the Som Num.
- Give the Som Num drink to the secretary and she will go to sleep.
- Click on the secretary’s handbag to get a close up view. Get the door handle.
- Place the door handle in the hole in the door to open the door and end this scene.
- Please look at the screen shot to see the locations of the items in this scene.
Location 6: Moxxie’s apartment – Clean up the mess
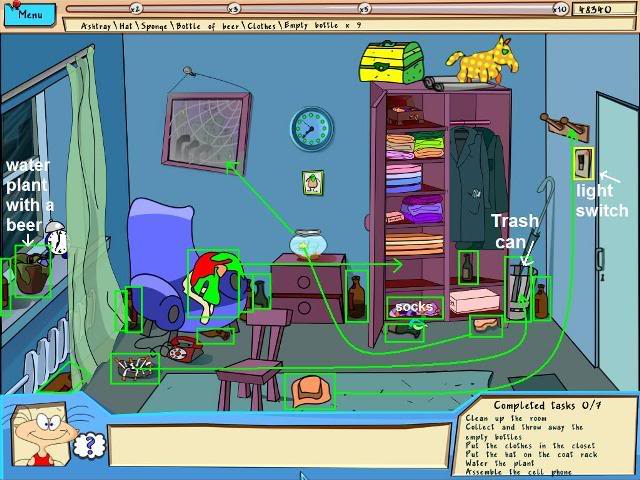
- This scene will be dark when you enter. Turn on the light switch that is by the door. There is a small red light on the switch plate to help you find it.
- Find and pick up the 10 empty beer bottles and 1 bottle of beer.
- Open and close the wardrobe doors and the window curtains to find all the bottles.
- Use the bottle of beer on the plant in the window.
- Put the empty bottles of beer in the trash can on the right of the wardrobe near the door.
- Pick up the ashtray and put it in the trashcan.
- Pick up the sponge from under the wardrobe and dip it in the fish bowl and use it to clean the picture on the left back wall.
- Pick up the hat and hang it on the coat and hat rack by the door.
- Pick up the clothes from the chair and put them in the left side of the wardrobe.
- Please look at the screen shot to see the locations of the items in this scene.
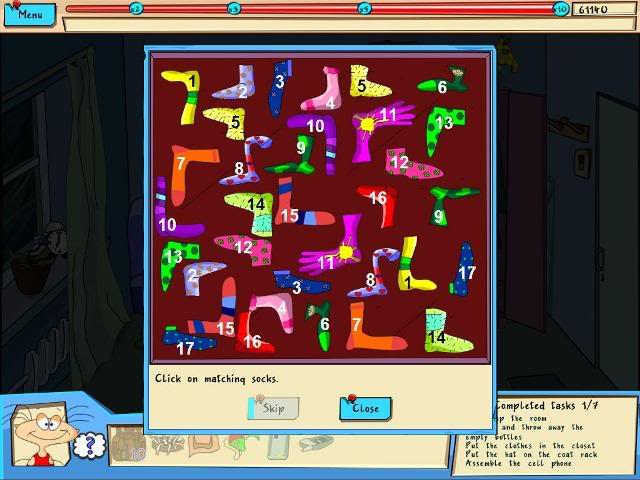
- Click on the socks in the bottom of the wardrobe to open a matching mini-game.
- Click on matching pairs of socks. As each pair is matched they will disappear.
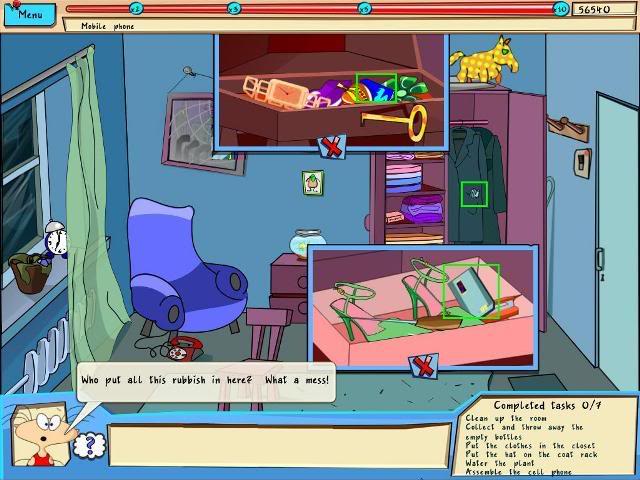
- Open the white box in the wardrobe floor and get the cell phone battery.
- Get the cell phone from the coat pocket in the wardrobe.
- Look in the jewelry box on the top shelf in the wardrobe and get the blue SIM card.
- All 3 items will combine in your inventory so Moxxie can call her friends.
- Click anywhere on the screen to end the scene.
- Please look at the screen shot to see the locations of the items in this scene.
Location 7: Church graveyard and shed – Investigate a vampire
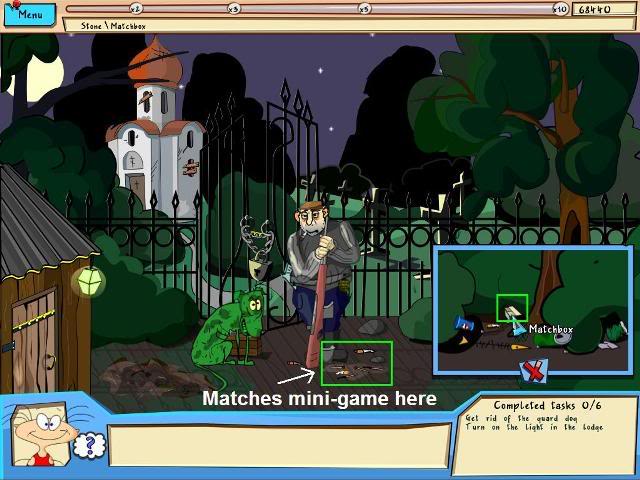
- In this scene you will go back and forth between the graveyard and the shed on the left.
- Click on the low green bushes on the right of the scene to get a close up view of some trash. Get the match box from the trash.
- Click on the trash around the feet of the guard to be taken to a mini-game.
- Please look at the screen shot to see the locations of the items in this scene.
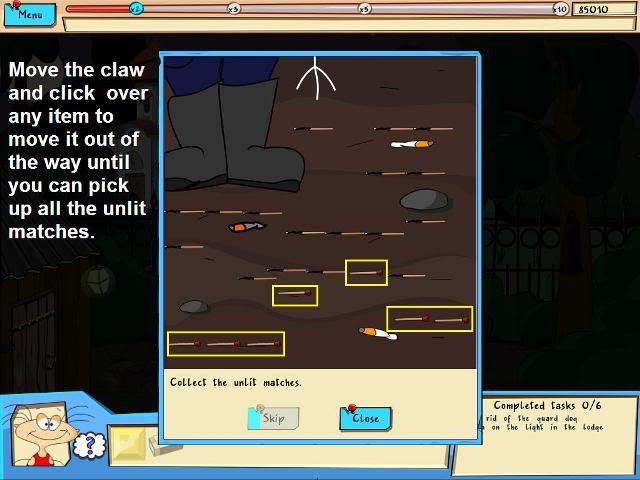
- There are 7 unlit matches to collect in this mini-game. This is a random puzzle so the matches will be in different places in each game.
- Move the white claw at the top on the scene straight over a match or other object to pick it up or toss it aside.
- Click the white claw when it is over a burnt match or another piece of trash and the claw will toss it aside. Keep doing this until you can get to the unlit matches and pick them up.
- When you have gotten the 7 unlit matches you will be taken back to the graveyard scene.
- The box of matches and the unlit matches will combine in your inventory.
- Please look at the screen shot to see the locations of the items in this scene.
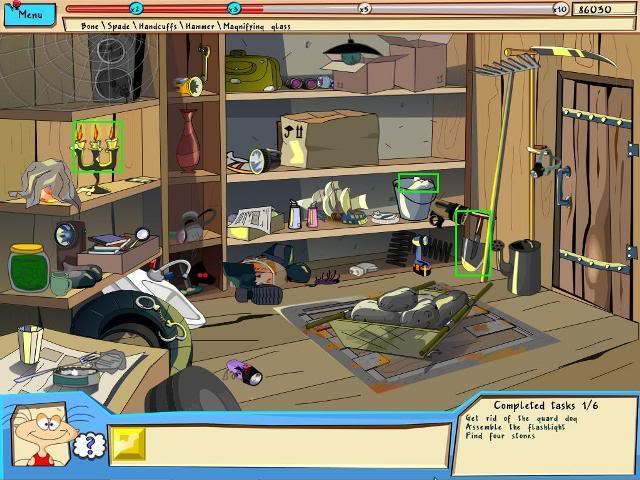
- Go into the shed on the left and it will be dark. Move to the left side of the scene and use your lit matches to light the candles on the middle shelf.
- Get the dog bone from the bucket on the bottom shelf on the right.
- Get the small shovel/spade that is on the floor near the door on the right.
- Please look at the screen shot to see the locations of the items in this scene.
- Go back outside through the door of the right.
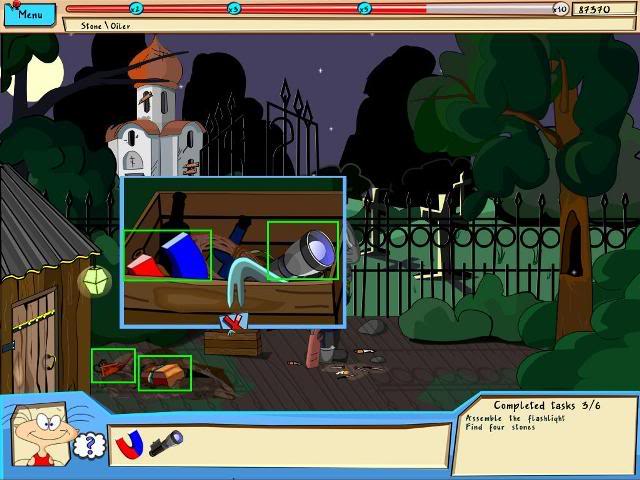
- Give the bone to the dog and the dog will leave to reveal a toolbox.
- Click on the tool box to get a close up view and get the magnet and the flashlight.
- Use the shovel to dig in the loose dirt that the dog was guarding to reveal an oil can and a locked chest.
- Click the oil can into your inventory.
- Please look at the screen shot to see the locations of the items in this scene.
- Go back inside the shed to look for a key.
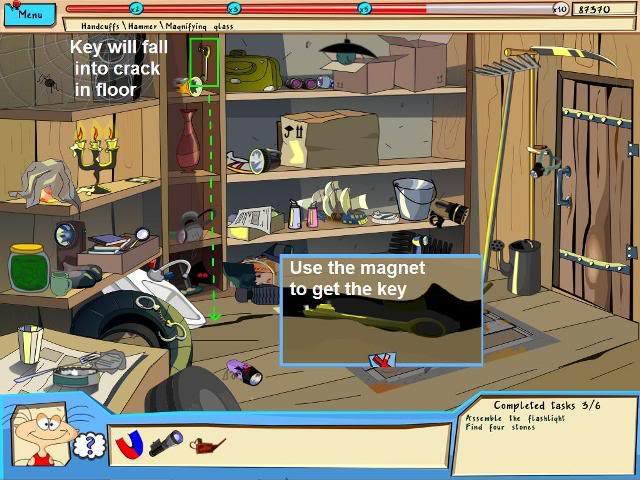
- The key is hanging on the side of the top small shelf in the middle of the room. Try to get the key and it will fall into a crack in the floor.
- Click on the crack in the floor to get a close up view and use the magnet to get the key.
- Please look at the screen shot to see the locations of the items in this scene.
- Go back outside through the door on the right.
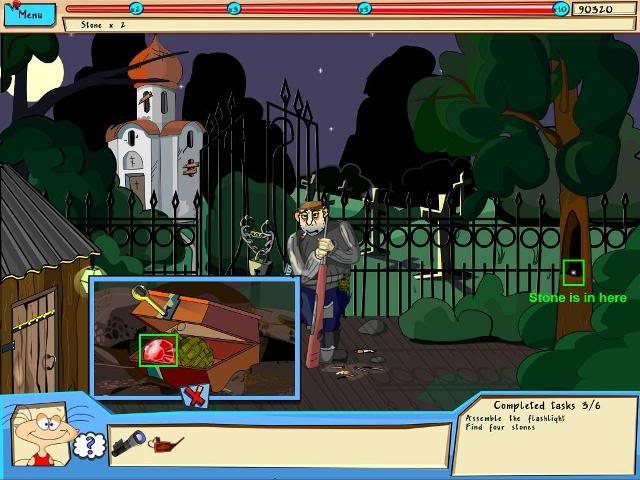
- Click on the chest to get a close up view and use the key to open the chest to reveal a round red stone. Pick up the red stone.
- Look inside the hollow place on the tree on the right of the scene to find and pick up a square yellow stone.
- Please look at the screen shot to see the locations of the items in this scene.
- Go back inside the shed.
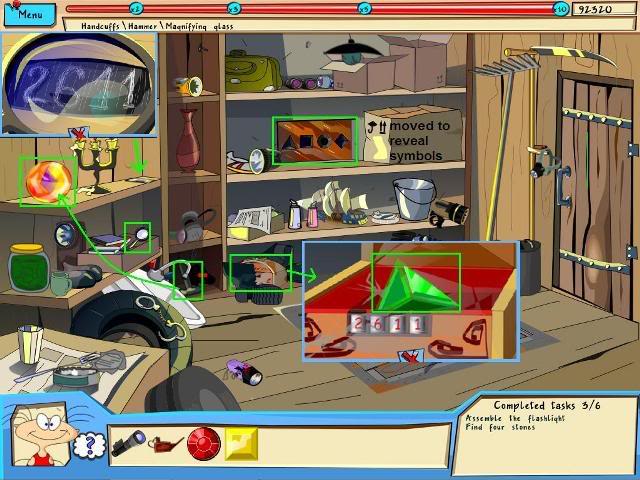
- Click on the large cardboard box on the middle shelf in the center of the room to reveal a panel with four shapes. We need to find the stones that fit into those shapes.
- Click on the rag that is covering an orange/yellow stone on the middle shelf on the left side of the room.
- Pick up the hammer that is on the floor under the lower small shelf in the middle of the room.
- Use the hammer to break the orange/yellow stone that you just uncovered to reveal a purple diamond shaped stone. Pick up the purple stone.
- Pick up the magnifying glass that is in the left bottom shelf.
- Use the magnifying glass to read the numbers on the small moving panel on the middle left shelf. The numbers are 2611.
- Click on the orange chest that is partially obscured by the boots under the lower in the middle of the room.
- When you get the close up view enter the code 2611 by clicking on the dials. The chest will open to reveal a green triangle stone. Pick up the stone.
- You now have the 4 stones you need.
- Please look at the screen shot to see the locations of the items in this scene.
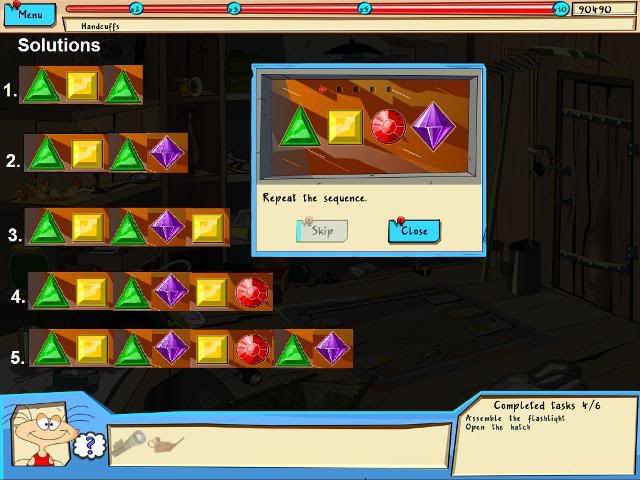
- Click on the panel with the geometric shapes to get a close up view and put the stones into the spaces with the matching shapes. A Simon Says type mini-game will open.
- There will be 5 sequences to repeat. After each sequence stops you must repeat the sequence by clicking on each colored stone in the same order.
- Please look at the screen shot to see the solution for the sequences. These sequences are the same for each game and are not random.
- The sequences are:
- 1. Green, yellow, green
- 2. Green, yellow, green, purple
- 3. Green, yellow, green, purple, yellow
- 4. Green, yellow, green, purple, yellow, red
- 5. Green, yellow, green, purple, yellow, red, green, purple
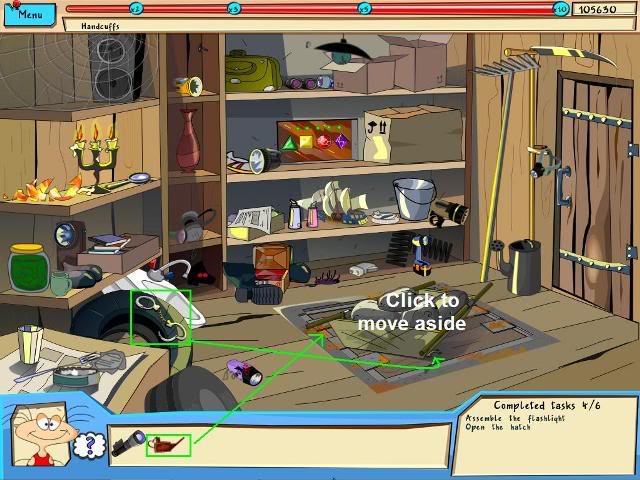
- Click on each large rock and the stretcher in the center of the floor and they will move aside to reveal a rusty hatch door in the floor.
- Use the oil can to clear the rust from the hatch door.
- Pick up the handcuffs that are on the lower left of the scene and attach them to where the handle for the hatch door should be.
- Once the handcuffs are attached click on them to open the hatch door.
- Pick up the battery that is in the spider web in the lower left corner of the open hatch doorway. It will combine with the flashlight in your inventory.
- Pick up the flashlight from your inventory and the candle light will go out.
- Put the circle of light from your flashlight over the open hatch door and click to open a mini-game.
- Please look at the screen shot to see the locations of the items in this scene.
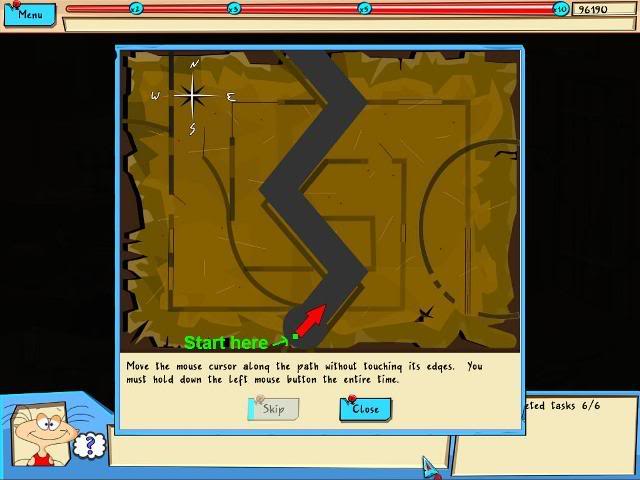
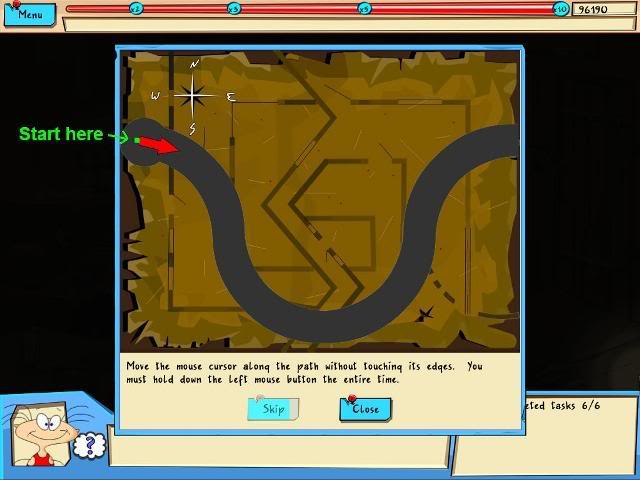
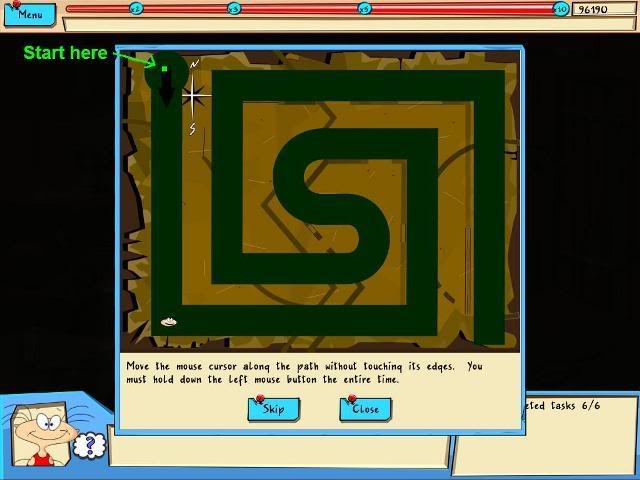
- In this mini-game you have to move Moxxie through a series of three paths without touching the edges.
- To start the game click on the blunt end of the red arrow and Moxxie’s head will appear. Then move Moxxie’s head with your mouse through the path to the end without touching the edges.
- The game instructions say that you have to hold down the left mouse button the entire time you are moving Moxxie through the path but I did not find that I had to hold down the mouse button. Once her head appeared I did not hold down the mouse button. I just move the head/cursor through the path and each time that worked.
- When you complete these three paths you will emerge in a dark place.
Location 8: Church basement – Find a way out of the basement
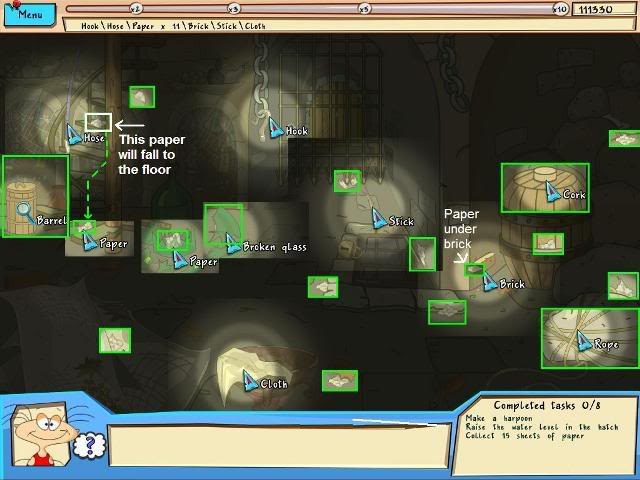
- In this scene you will only have the flashlight to find your way around.
- Find and pick up the hook, hose, stick and brick.
- Use the brick to break the large green glass bottle in the center of the floor.
- Pick up a large piece of the green broken glass that is to the right on the bottle.
- Use the broken glass to cut the rope that is on the large rock in the lower right corner.
- The rope, hook and stick will combine to make a harpoon in your inventory.
- Pick up the various pieces of paper in the scene.
- When you click on the piece of paper on the stairs, the stairs will break and the piece of paper will fall to the floor.
- Please look at the screen shot to see the locations of the items in this scene.
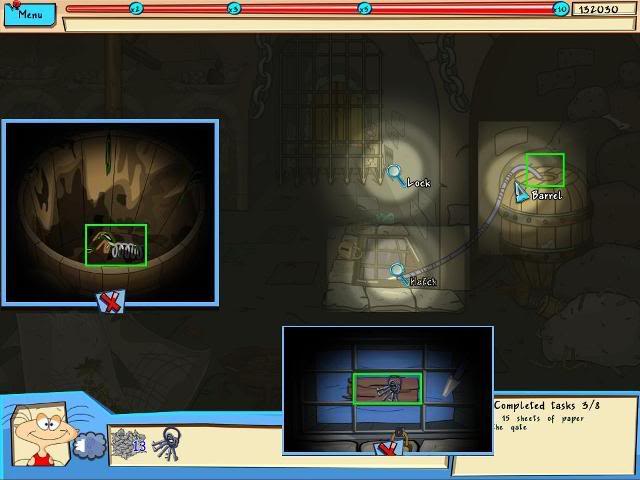
- Click on the barrel on the left to get a close up view.
- Click on the barrel top to remove it.
- Use the cloth from your inventory to get the corkscrew out of the barrel.
- Use the corkscrew on the cork on the large barrel on the right.
- Put the hose from your inventory into the barrel where you removed the cork and the hose will go from the barrel to the locked hatch and fill that area with water.
- Click on the locked hatch to get a close up view and use the harpoon from your inventory to get the keys.
- When you have the keys click on the locked panel just above and to the right of the locked hatch to get a close up view.
- Please look at the screen shot to see the locations of the items in this scene.
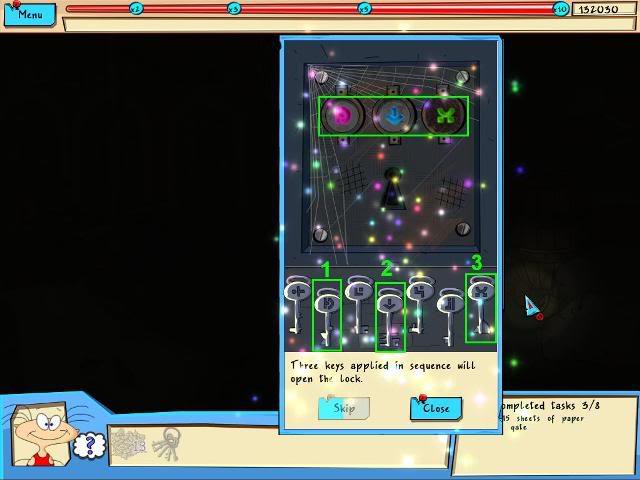
- Insert the keys in the lock to reveal a puzzle.
- Choose the correct three keys in sequence to open the lock.
- Please look at the screen shot to see the solution.
- When the puzzle is solved the iron bars will raise and Moxxie can get to the wooden door.
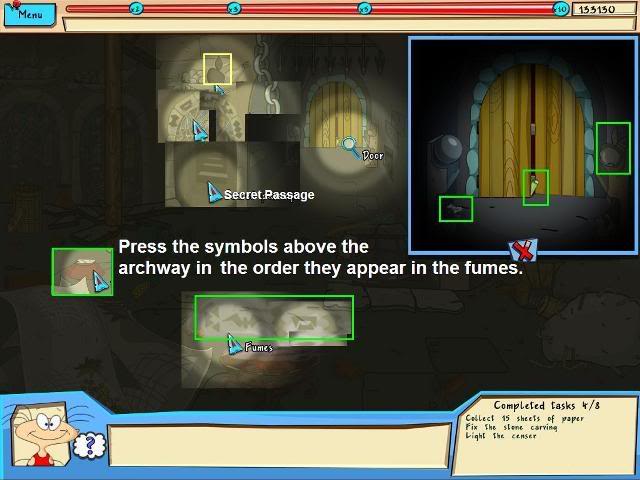
- Click on the wooden door to get a close up view.
- Pick up the stone apple, the lighter and the piece of paper.
- Put the stone apple in its place over the stone archway to the left of the wooden door. Symbols will appear over the door.
- Click on a brown bowl on the left floor of the scene and turn it over to reveal a piece of paper.
- You should now have all 15 pieces of paper.
- Place the 15 pieces of paper in the censer bowl in the lower center of the scene.
- Use the lighter to light the paper.
- The fumes will reveal symbols like the ones over the stone archway.
- Click on the symbols over the archway in the order they appear in the smoke fumes to unlock a secret passageway. The symbols in the fumes are random so they change their order from game to game.
- Click on the secret passageway to exit this scene.
- Please look at the screen shot to see the locations of the items in this scene.
Location 9: Shaggy’s apartment – Rebuild Shaggy’s computer
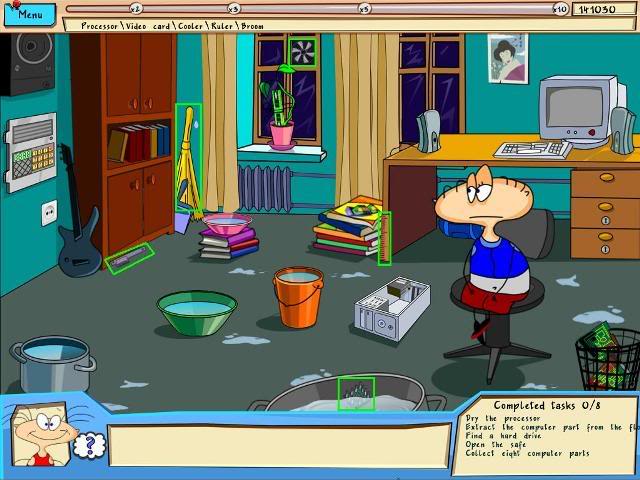
- Find and collect a Processor, Ruler, Broom, Video Card and Cooler.
- Please look at the screen shot to see the locations of the items in this scene.
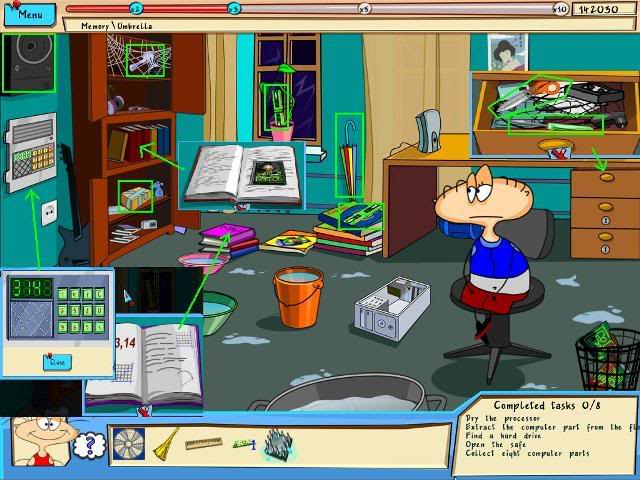
- Open the curtains on the right window to find the umbrella. Click it into your inventory.
- Open the door on the cabinet on the left of the room.
- Use the broom on the spider webs to free the hair dryer and the hair dryer will go into your inventory and dry the wet processor.
- Click on the dry processor on the floor to move it back to your inventory.
- Put the ruler into the plant in the window to get a piece of memory for the computer.
- Move the top magazine from the stack beside the desk to get another piece of memory for the computer.
- Click on the center burgundy colored book (Detective book) on the book shelf to reveal the hard drive for the computer. Click it into your inventory.
- Click on the pink math book on the floor to see the answer for pi, which is 314.
- Click on the wall safe on the left side of the room and enter the code 314 to reveal a part for the computer.
- Click on the top drawer in the desk to get a close up view and pick up the screwdriver and the scissors.
- Use the screwdriver on the black speaker on the left wall to reveal a part for the computer.
- Use the scissors on the taped box on the next to the bottom book shelf to reveal a part for the computer.
- Take the umbrella from your inventory and click it on the computer desk to the left of the keyboard. The umbrella will open to cover and protect the computer.
- Please look at the screen shot to see the locations of the items in this scene.
- Put the 8 computer parts from your inventory in the empty computer chassis on the floor and a puzzle mini-game will open.
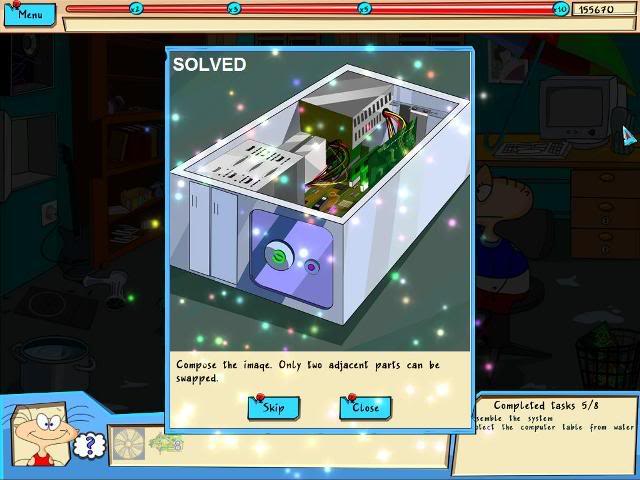
- Reconstruct the image by swapping two adjacent pieces at a time.
- Each piece will lighten when it is in the correct place.
- Please look at the screen shot for the solved image.
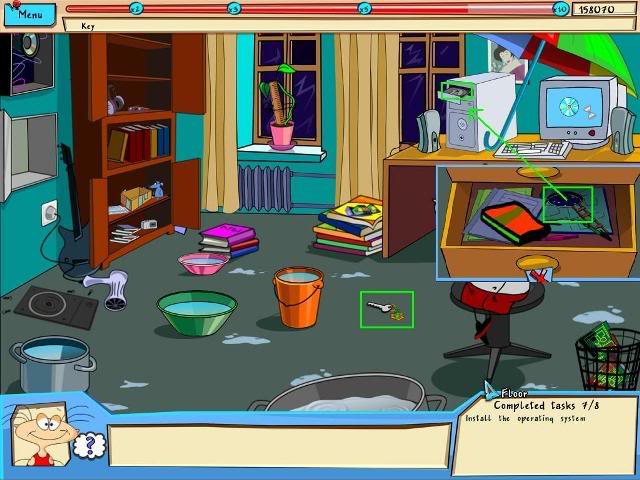
- Put the fan from your inventory in the computer chassis and the computer will move to the desk and reveal a key on the floor.
- Use the key to open the bottom drawer on the computer desk. Click on the CD case to open it. Get the CD from inside the case and close the case and the drawer.
- Put the CD in the disk drive on the computer.
- Finish your conversation with Shaggy to end the scene.
Location 10: Train to Tinyville – Help settle everyone and get some sleep
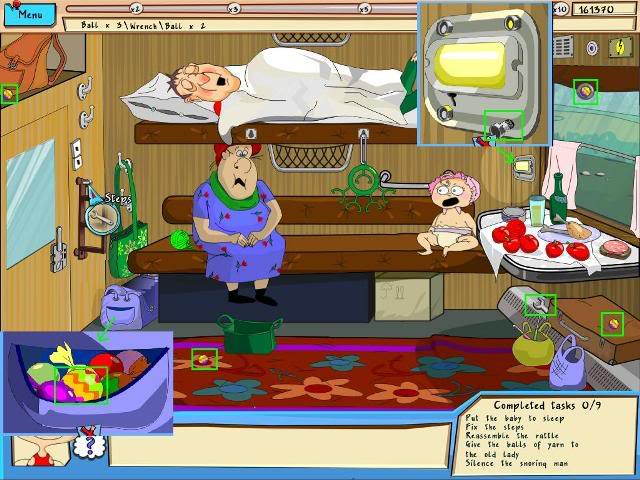
- Pick up the 3 multi-colored balls in the train compartment that are a part of the baby’s rattle.
- Click on the purple duffle bag on the left to get a close up view and get another of the multi-colored balls.
- Pick up the wrench that is beside the suitcase under the window.
- Click on the small light to the left of the window to get a close up view and get a bolt.
- Put the bolt on the brown steps/ladder beside the door then use the wrench to tighten the bolt and the ladder will be fixed.
- Now you can get the last ball for the baby’s rattle that is on the edge of the storage area.
- Put the 5 balls on the baby’s rattle.
- Please look at the screen shot to see the locations of the items in this scene.
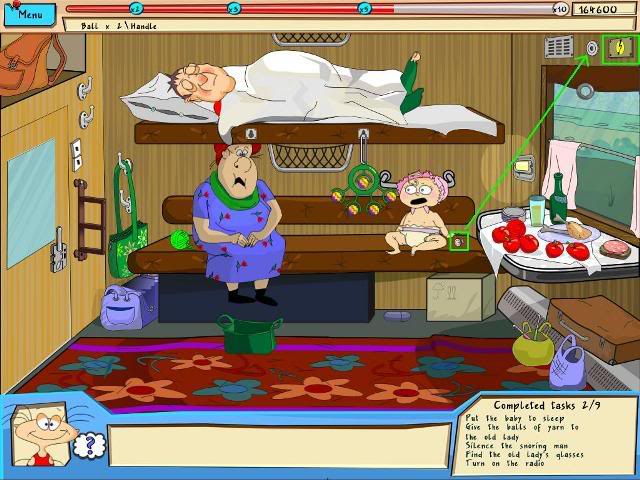
- Click on the small knob that is on the right of the baby.
- Put the knob in the hole that is in the center above the window.
- Click on the electrical panel with the lightening bolt on it that is to the right of the radio knob to reveal a mini-game.
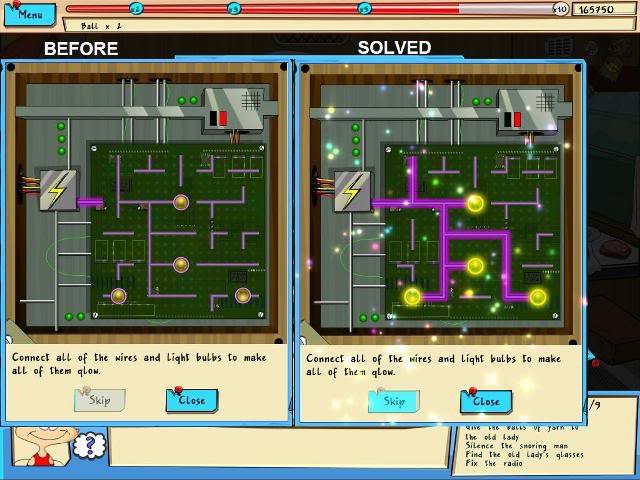
- Connect the wires from the lightening bolt on the left to all of the light bulbs to make them glow.
- Please look at the screen shot to see one possible solution.
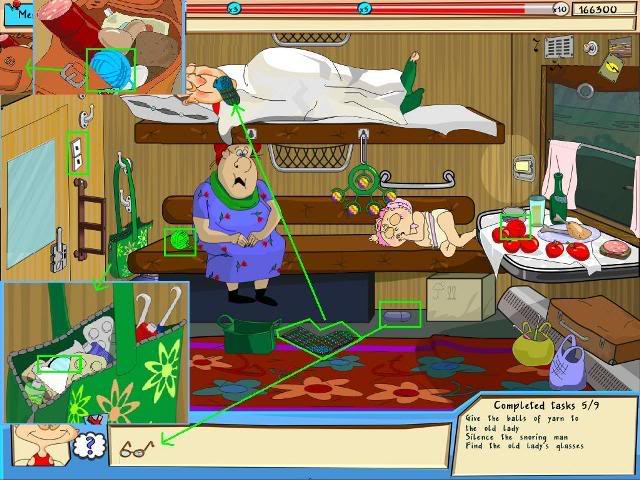
- Click on the large brown leather bag in the upper left storage and get a ball of blue yarn from it.
- Get the green ball of yarn from beside the lady and the red ball of yarn from the table with the food.
- Give the 3 balls of yarn to the lady.
- Click on the lavender glasses case that is on the floor under the baby to find a broken pair of glasses.
- Give the broken glasses to the lady and she will then allow you to look in her bag to get another pair.
- Click on the lady’s green bag to find another lens for her glasses. Click the lens into your inventory and it will combine with the broken glasses to repair them.
- Give the repaired glasses to the lady and she will knit a sock and fall asleep.
- Put the knitted sock in the snoring man’s mouth.
- Turn off the light switch that is by the door; then click anywhere in the scene to end the scene.
- Please look at the screen shot to see the locations of the items in this scene.
Location 11: Tinyville farmhouse – Help the farm lady with the chores
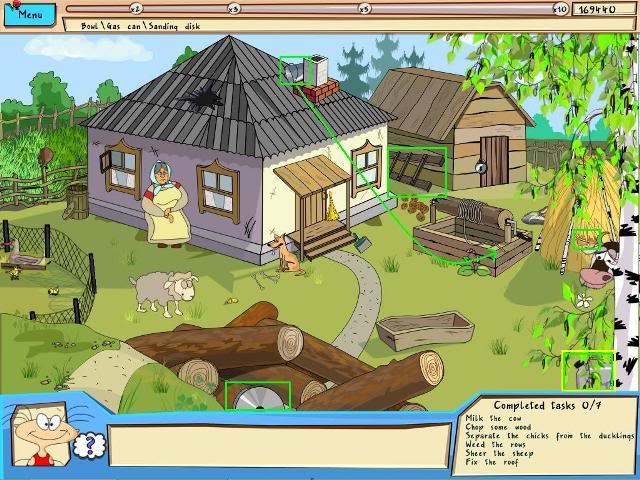
- Get the sanding disk, the bowl and the gas can from the scene.
- Click on the ladder and put it against the house so you can get the bucket.
- Put the bucket on the end of the rope on the well. It will automatically go down the well and return with a bucket of water.
- Click the bucket of water into your inventory, and then put it in the water trough.
- The cow will come to the water trough and the empty bucket will go back to your inventory.
- Please look at the screen shot to see the locations of the items in this scene.
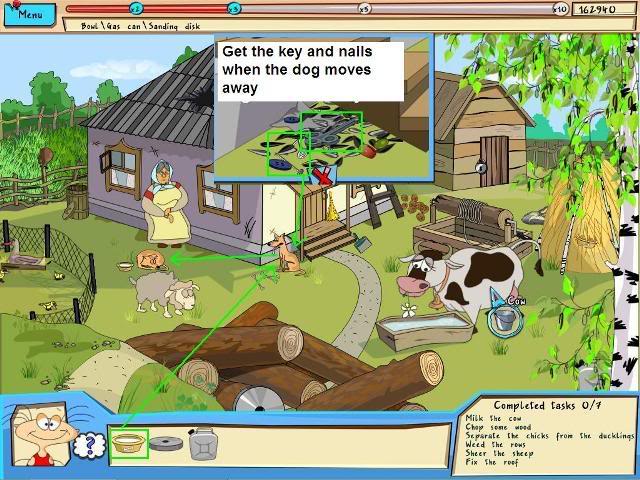
- Click the empty bucket onto the cow and the bucket will fill with milk and go into your inventory. The milk will combine with the bowl in your inventory.
- Give the bowl of milk to the dog and it will move away and sleep.
- Click on the area under the front porch to get a close up view and click the key and the nails into your inventory.
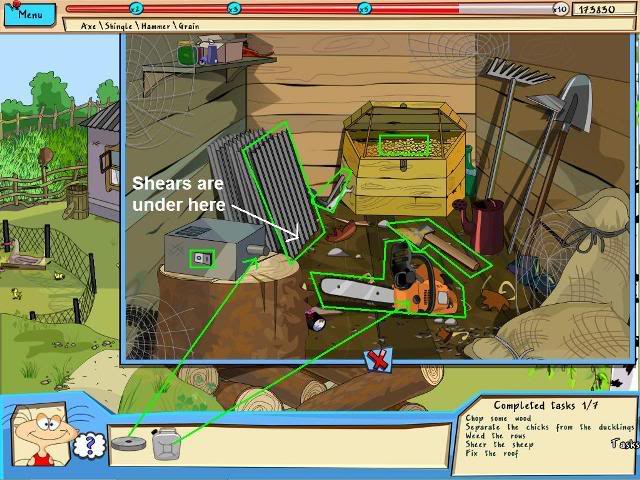
- Use the key to open the barn and go inside.
- Open the grain bin on the back wall and get some grain for the ducks and chickens.
- Click a roofing shingle into your inventory and shears will be revealed.
- Click the shears into your inventory.
- Click the axe on the floor into your inventory.
- Put the sanding disk on the grinder.
- Turn on the grinder with the switch.
- Sharpen the shears and the axe on the grinding wheel. Turn the grinding wheel off.
- Put the gas can on the chainsaw. Click the chainsaw into your inventory.
- Click the hammer that is on the floor beside the grain bin into your inventory.
- Close the shed scene and go back into the farm yard.
- Please look at the screen shot to see the locations of the items in this scene.
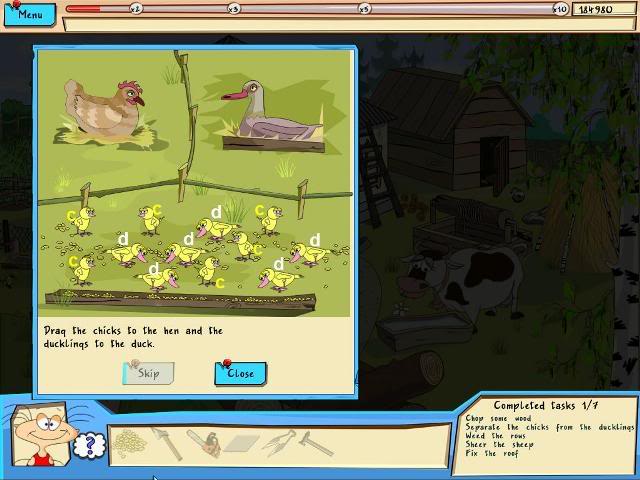
- Click on the chicken pen to get a close up view.
- Put the grain in the wooden trough and a mini game will appear.
- Click and drag the chicks to the hen and the ducklings to the duck.
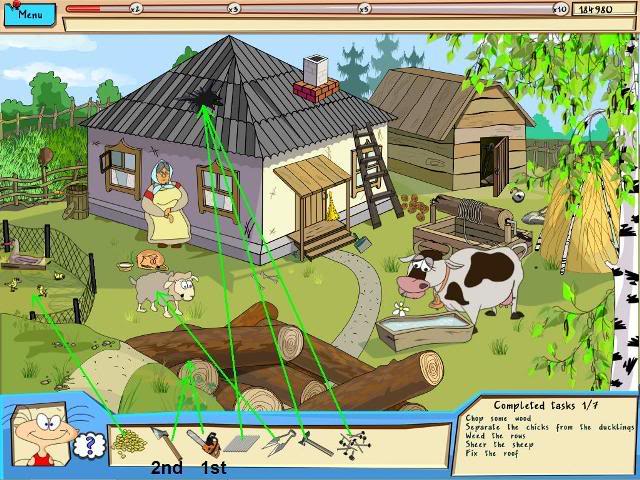
- Click the roof shingle, nails and hammer from your inventory on to the hole in the roof to repair it.
- Click the shears on the sheep to shear it.
- Click the chainsaw on the logs.
- Click the axe on the logs.
- Click on the log pieces to reveal a mini-game puzzle.
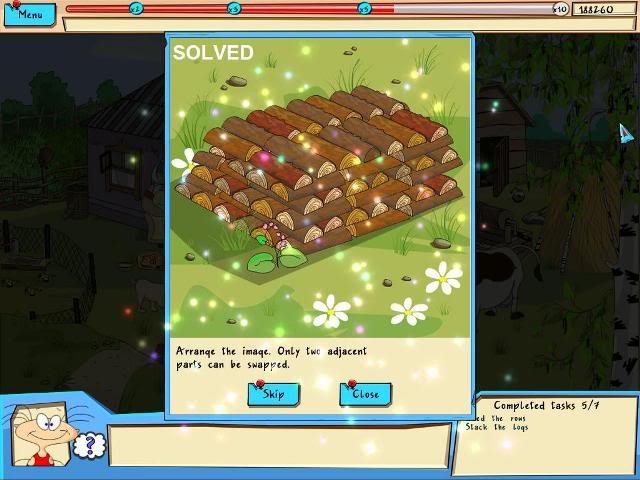
- Reconstruct the image by swapping two adjacent pieces at a time.
- Each piece will lighten when it is in the correct place.
- Please look at the screen shot for the solved image.
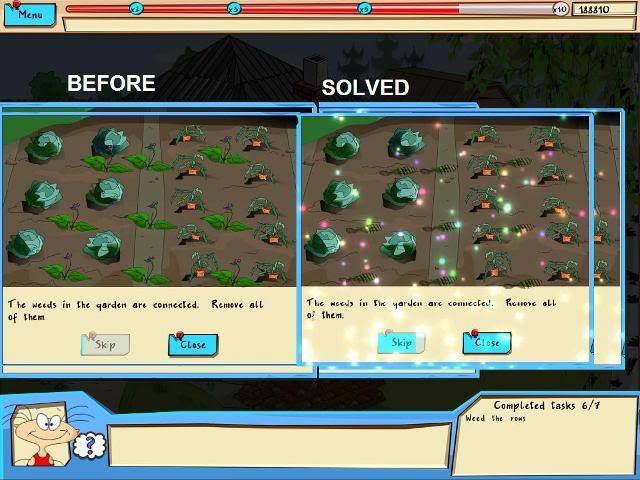
- Click on the garden that is behind and to the left of the house to reveal a mini-game.
- The weeds with the small purple flowers are connected so when you click on them some others appear or disappear.
- Click on the weeds until they all disappear.
- Please look at the screen shot for the before and solved images.
- Finish your conversation with the farm lady to end the scene.
Location 12: Tinyville at Martha’s house – Help Martha with various things
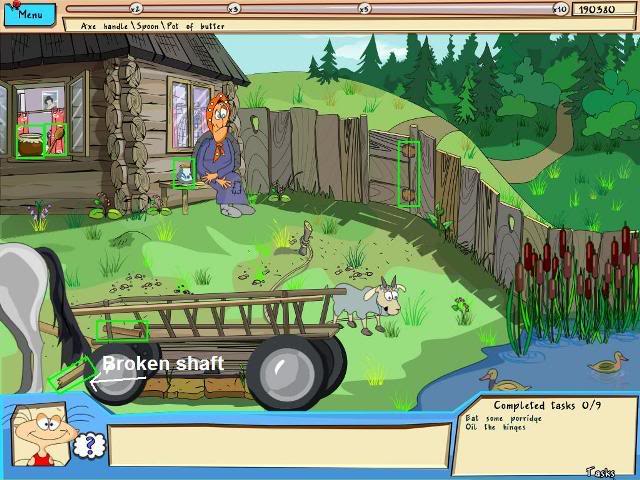
- Open the side window on Martha’s house and take the spoon and the pot of butter.
- Click on the porridge pot beside Martha to get a close up view.
- Eat the porridge with the spoon and find an axe blade in the bottom of the pot.
- Click the axe blade into your inventory.
- Use the butter to oil the gate hinges.
- Click on the axe handle that is in the wagon and it will combine with the axe blade in your inventory.
- Please look at the screen shot to see the locations of the items in this scene.
- Go through the gate to the forest.
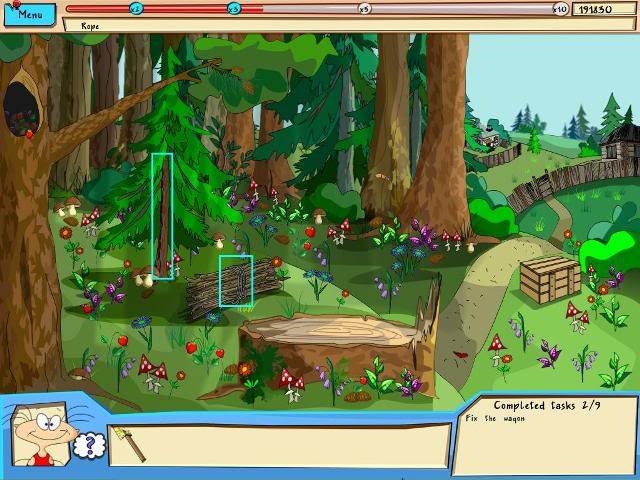
- Click on the pile of brushwood to get the rope.
- Click the axe on the small pine tree in the center of the scene to get a pole.
- Go back to Martha’s house.
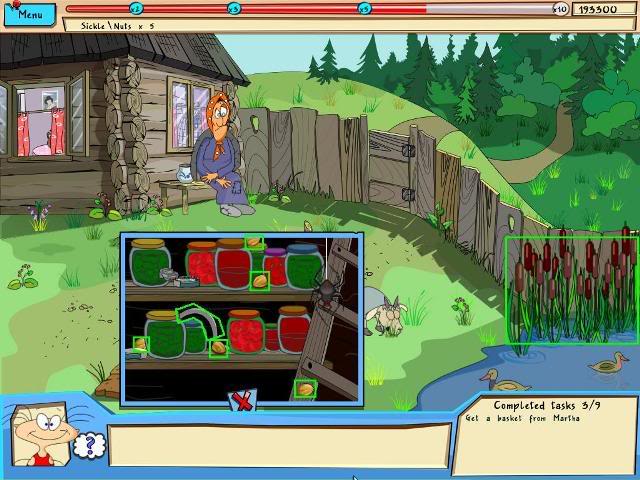
- Click the pole on the broken shaft on the front of the wagon.
- Click the rope on the broken shaft on the front of the wagon.
- The wagon will move away to reveal a Cold Cellar.
- Click on the Cold Cellar to get a close up view and pick up the 5 nuts and the sickle.
- Use the sickle on the reeds in the lower right on the edge of the water.
- Give the reeds to Martha and she will make you a basket.
- Click the basket into your inventory and go back to the forest.
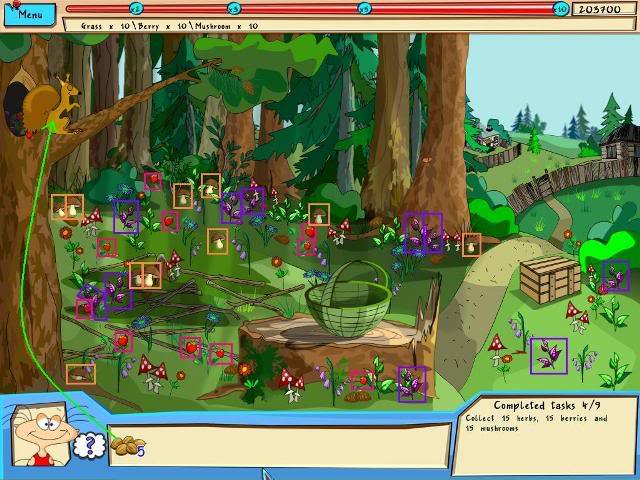
- Put the basket on the stump.
- Collecting ten each berries, mushrooms and purple leaf herbs from the scene.
- Please look at the screen shot to see the locations of the items in this scene.
- Give the 5 nuts to the squirrel to open a mini-game.
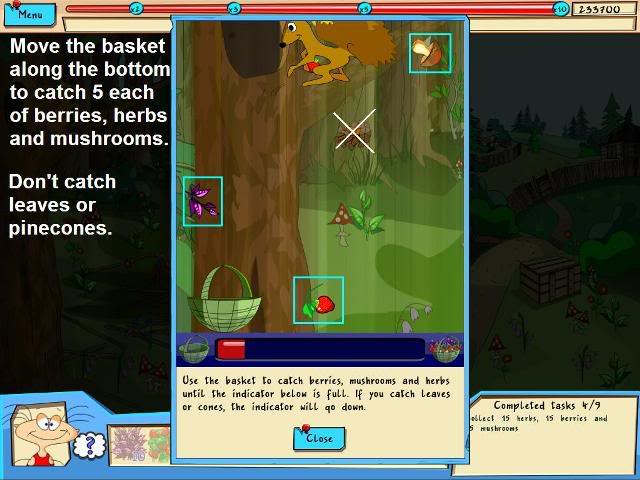
- Slide the basket along the bottom to catch the berries, mushrooms and purple leaf herbs.
- Try not to catch the pinecones and leaves as they take away from your progress.
- When you fill the progress meter at the bottom you will be taken back to the forest scene and 5 each of the berries, mushrooms and purple leaf herbs will be added to your inventory.
- When you have 15 of each, click them from your inventory into the basket on the stump; then click the full basket into your inventory.
- Go back to Martha’s house.
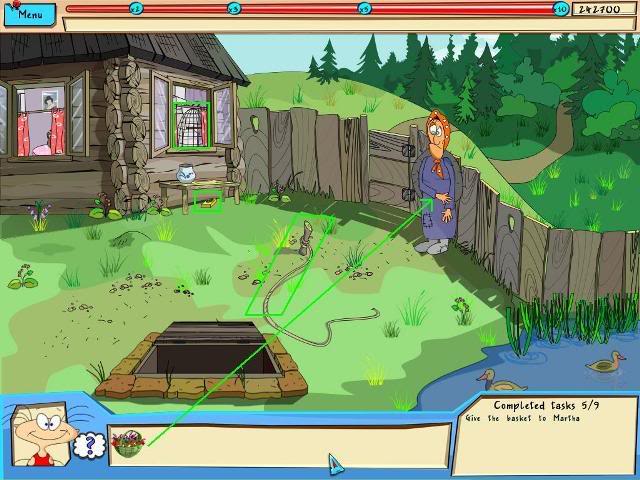
- Give the full basket to Martha.
- Get the grain from under the bench.
- Get the birdcage from the window.
- Get the rope and stick from the yard.
- Go to the forest in search of the bird.
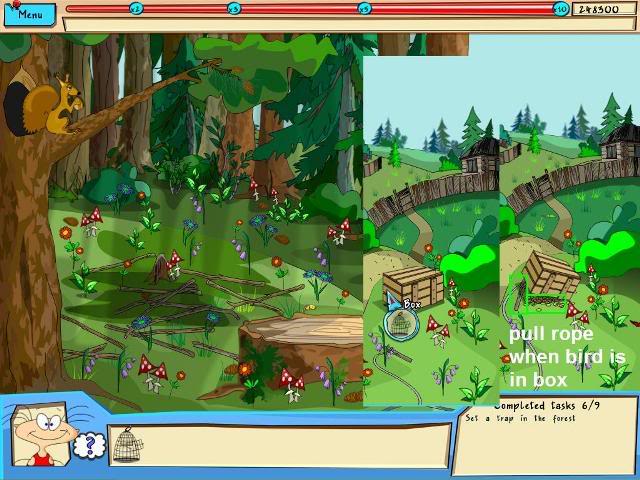
- Click the rope and stick on the wooden crate on the right of the scene.
- Click the grain on the wooden crate trap on the right of the scene
- When the bird is inside the box, click on the rope to trap the bird.
- Click the birdcage onto the wooden crate.
- Click on the wooden crate again to put the bird in the cage into your inventory.
- Go back to Martha’s house and try to give her the bird.
- Finish your conversation with her to end the scene.
Location 13: Tabloid Office – Turn in stories and pictures
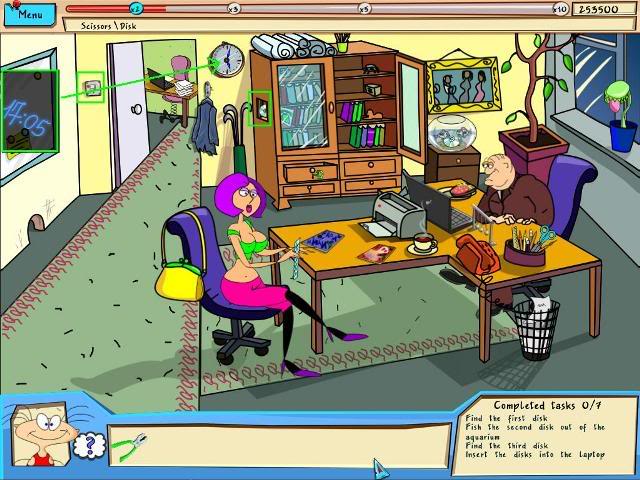
- Turn off the lights with the switch by the door on the left.
- Click on the notes on the bulletin board on the left to remove them and see the glow in the dark time of 17:05.
- Click on the wall clock and set the hands to 5:05 and a panel will open in the side of the cabinet to reveal the first CD.
- Click the CD into your inventory.
- Click on the laptop to get a close up view and click on the disk drive to open it.
- Click the CD into the open disk drive, then close the close up view.
- Please look at the screen shot to see the locations of the items in this scene.
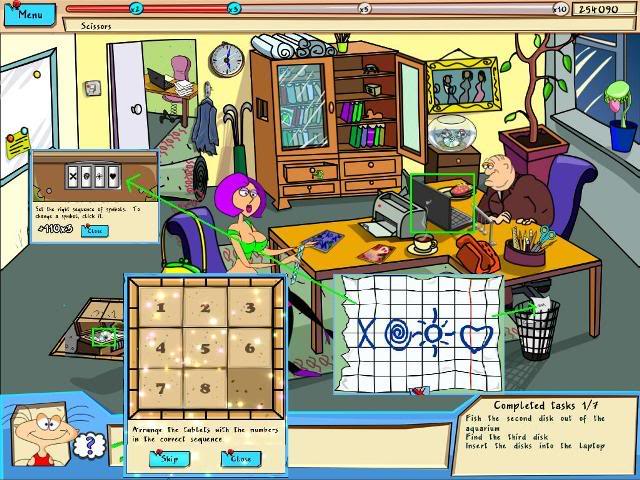
- Roll up the carpet to reveal a number mini-game.
- Slide the numbers to put them in order from 1 to 8 to complete the puzzle and reveal a small chest.
- Click on the note in the trash can to reveal a code.
- Click on the small chest to get a close up view and rotate the dials to match the code that is on the note to unlock the chest.
- Click the CD that is inside the chest into your inventory.
- Click on the laptop to get a close up view and click on the disk drive to open it.
- Remove the other CD from the disk drive and put the second CD in, then close the close up view.
- Please look at the screen shot to see the locations of the items in this scene.
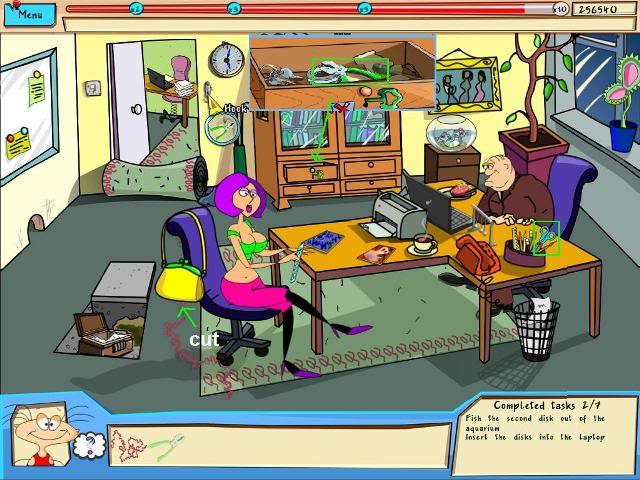
- Get the scissors from the desk and cut a piece of yarn.
- Look in the top drawer of the cabinet on the back wall to find the pliers.
- Remove the coat from the coat hook near the door.
- Use the pliers to remove the coat hook from the wall. It will go into your inventory and combine with the yarn.
- Use the hook and yarn in the fish bowl to get the disk.
- Click on the laptop to get a close up view and click on the disk drive to open it.
- Remove the other CD from the disk drive and put the third CD in.
- Please look at the screen shot to see the locations of the items in this scene.
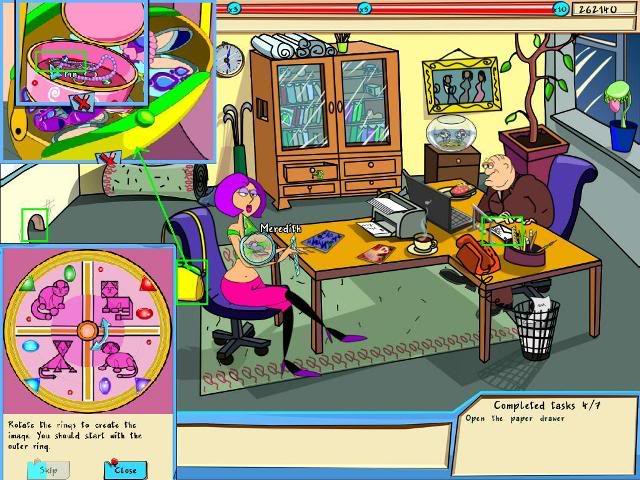
- Click on the lower left drawer in the cabinet to find it is locked.
- Click on the mouse hole to get the mouse.
- Put the mouse on Meredith and she will leave.
- Click on Meredith’s purse to get a mini-game.
- Rotate and line up the image with the outside edge starting with the largest rings and working toward the center.
- When the puzzle is solved find and click on the lock pick pin inside the small pink case.
- Use the lock pick on the locked paper drawer to get the paper.
- Put the paper in the printer.
- After the reports print, click on the envelope on the desk next to the boss to read your new assignment.
- Please look at the screen shot to see the locations of the items in this scene.
Location 14: Haunted House – Revenge
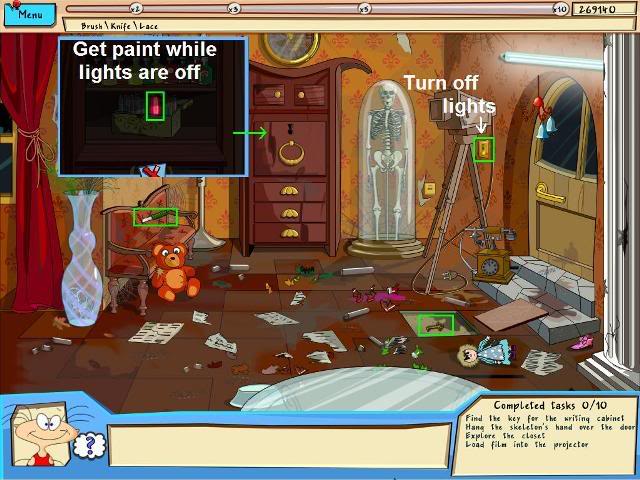
- Get the knife that is sticking in the back of the red sofa.
- Use the knife to pry up the loose floor tile in front of the door on the right.
- Get the key that is under the tile and use it to open the locked cabinet.
- Open the small green box that is inside the cabinet.
- Turn off the lights with the switch by the door.
- Click on the one glow in the dark paint while the lights are off.
- Turn the lights back on.
- Please look at the screen shot to see the locations of the items in this scene.
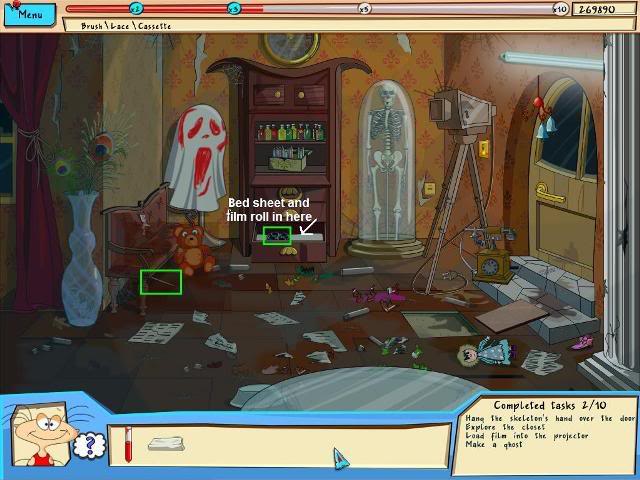
- Open the bottom drawer in the chest to find a bed sheet and a film roll.
- Move the teddy bear to find a paint brush.
- Click it into your inventory and it will combine with the paint.
- Drape the bed sheet over the fan.
- Paint on the bed sheet with the brush in your inventory.
- Please look at the screen shot to see the locations of the items in this scene.
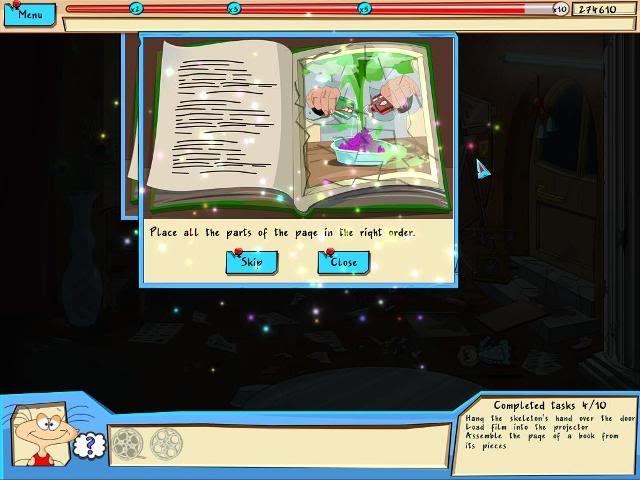
- Open the top part of the cabinet to find a book.
- Click on the book to get a close up view of a puzzle.
- Reconstruct the puzzle by dragging the pieces to their proper place.
- Please look at the screen shot for the solved image.
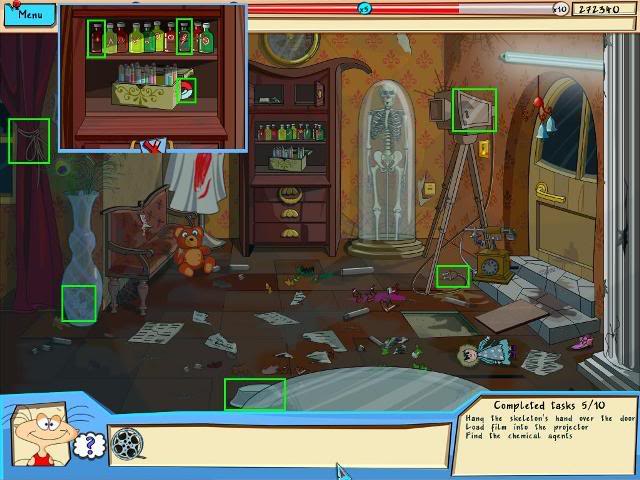
- Click on the chemicals in the cabinet to get a close up view.
- Click the magnet into your inventory.
- Click the two chemicals on the top shelf that look like the ones in the picture in the book.
- Click on the bowl in the lower center of the scene and it will go on to the table.
- Mix the two chemicals in the bowl to create a spooky green haze.
- Get the lace curtain tie from the curtain on the far left and it will combine with the magnet.
- Use the magnet and lace string to get the film roll from the large white glass vase on the left.
- Open the film projector on the right near the door.
- Put the two film rolls in the projector. Close the projector and the close up view.
- Click on the power cord plug for the projector and it will plug into the wall socket and begin running.
- Please look at the screen shot to see the locations of the items in this scene.
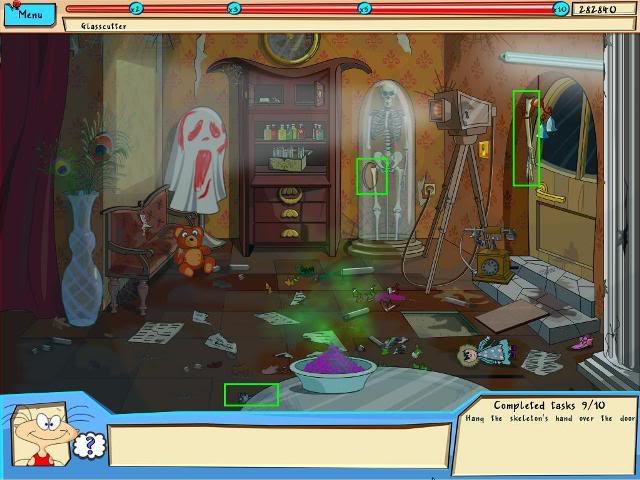
- Pick up the glass cutter that was under the bowl in the lower center edge of the scene.
- Use the glass cutter to cut the glass case and get the skeleton’s hand.
- Click the skeleton’s hand into the light fixture over the door.
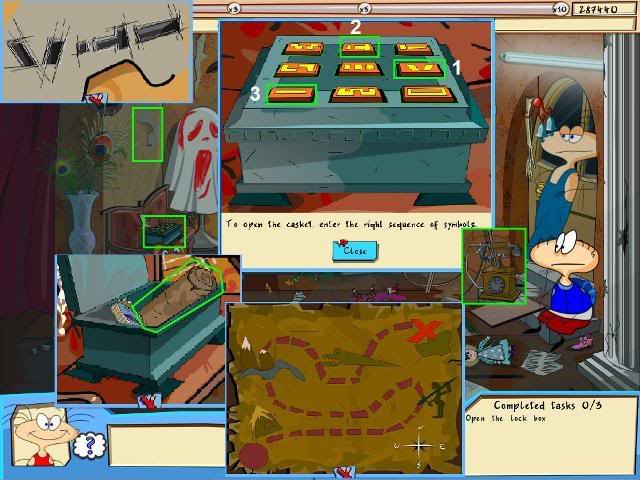
- After Boar and Shaggy arrive you discover a box with symbols.
- Look at the torn wallpaper piece on the upper left wall near the corner. Click on it and some symbols are revealed.
- Click on the box to get a close up view and press those same symbols in the order they are on the paper to open the box.
- Click on the brown roll of paper inside the box to reveal a treasure map.
- Answer the telephone.
- Please look at the screen shot to see the locations of the items in this scene.
Congratulations! Moxxie and her friends are off to another adventure.
“;
More articles...
Monopoly GO! Free Rolls – Links For Free Dice
By Glen Fox
Wondering how to get Monopoly GO! free rolls? Well, you’ve come to the right place. In this guide, we provide you with a bunch of tips and tricks to get some free rolls for the hit new mobile game. We’ll …Best Roblox Horror Games to Play Right Now – Updated Weekly
By Adele Wilson
Our Best Roblox Horror Games guide features the scariest and most creative experiences to play right now on the platform!The BEST Roblox Games of The Week – Games You Need To Play!
By Sho Roberts
Our feature shares our pick for the Best Roblox Games of the week! With our feature, we guarantee you'll find something new to play!All Grades in Type Soul – Each Race Explained
By Adele Wilson
Our All Grades in Type Soul guide lists every grade in the game for all races, including how to increase your grade quickly!


