
Best Horror Games On Itch.io – July 2026
Across a bounty of subgenres.![Haze Seas Accessories Tier List [Best Accessories to Equip]](/wp-content/uploads/2026/07/haze-seas-accessories-tier-list.jpg "Haze Seas Accessories Tier List [Best Accessories to Equip]")
Haze Seas Accessories Tier List [Best Accessories to Equip]
The accessories with the best stat buffs in Haze Seas.
![[Roblox] Evomon Shiny Hunting Guide – Including Prismatic and Pris Shinies!](/wp-content/uploads/2026/06/evomon-shiny-hunting-guide.jpg "[Roblox] Evomon Shiny Hunting Guide – Including Prismatic and Pris Shinies!")

Mountain Crime: Requital Walkthrough
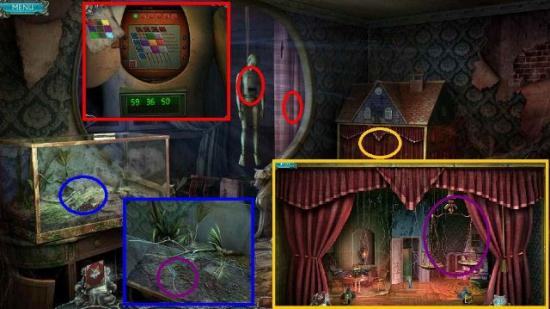
Welcome to the Mountain Crime: Requital walkthrough on Gamezebo. Mountain Crime: Requital is a Hidden Object-Adventure game played on the PC created by Alawar. This walkthrough includes tips and tricks, helpful hints, and a strategy guide to how to complete Mountain Crime: Requital.


- Prefer Gamezebo on Google

Mountain Crime: Requital – Game Introduction
Welcome to the Mountain Crime: Requital walkthrough on Gamezebo. Mountain Crime: Requital is a Hidden Object-Adventure game played on the PC created by Alawar. This walkthrough includes tips and tricks, helpful hints, and a strategy guide to how to complete Mountain Crime: Requital.
General Information
- Option Menu–Contains volume controls, full/window screen, custom cursor, and enable sparkles.
- I recommend disabling the custom cursor.
- The Journal is crucial to the game. While there is a Tasks list, it sometimes isn’t too useful, but important puzzle solutions will automatically store in the Journal.
- In addition, the Map is extremely helpful. If you are not sure what to do next, take a look at the map and visit the areas where there is an action to perform.
- The Hint system is very good and will give you hints outside of hidden object scenes. You will not waste a hint if you are in a room where there is nothing to do.
- The hidden object scenes are to find fragmented objects. You will usually automatically build something upon completion of the scene.
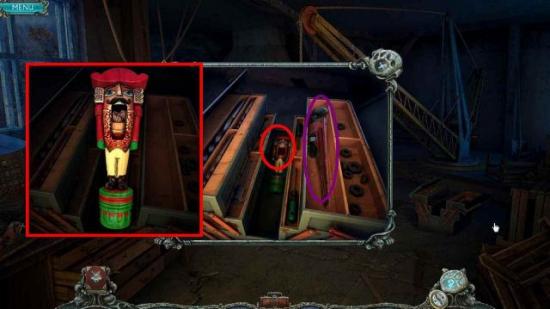
- The objects to find are placed in a circle which is approximately centered around the ultimate item you will need to pick up.
- The camera will then temporarily focus on in the area you need to check; be sure to remember to pick up the now available item.
- Sometimes there are multiple same items in a HO scene that can satisfy the request, but just one is circled in the walkthrough.
The Beginning
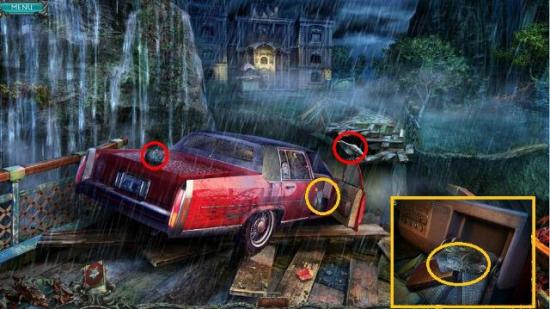
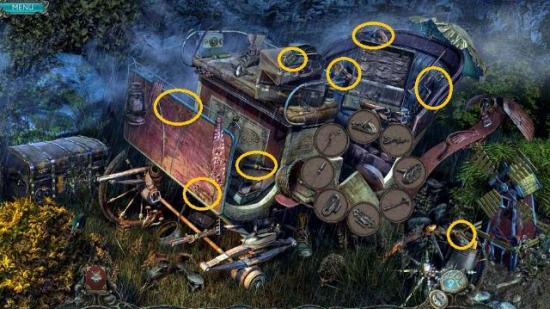
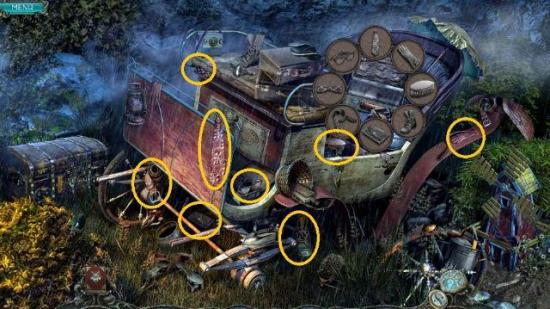
Destroyed bridge
- Pick up the ROCK
- Use the ROCK on the raven
- Examine the inside of the car
- Examine the map
- Move items in the front seat until you receive the DOCTOR’S BAG
- Go forward

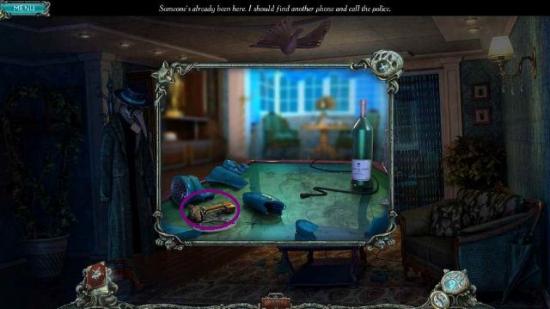
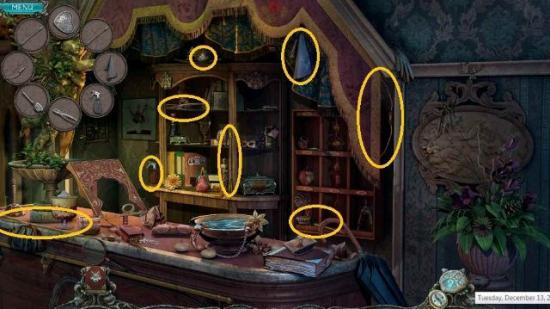
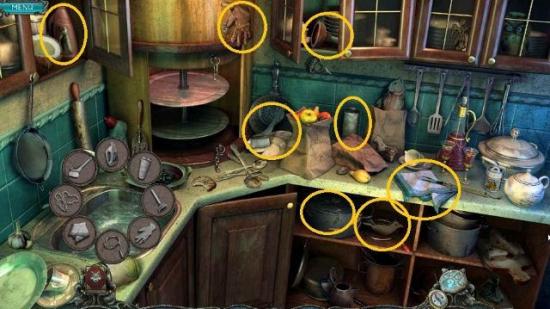
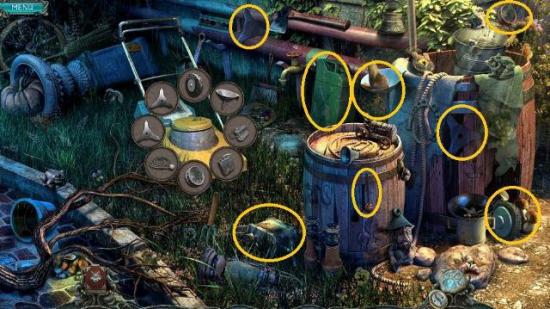
Hotel Entrance
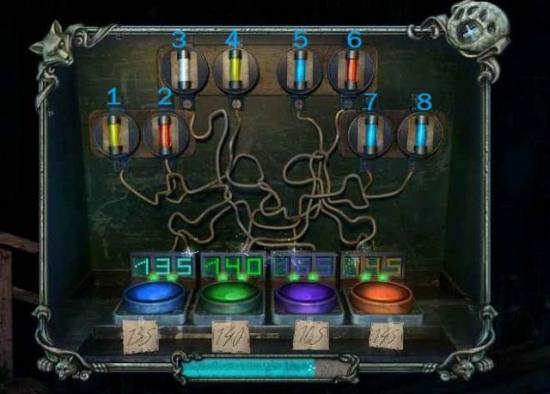
- Examine the electrical box
- Note the missing button
- Examine the sign
- Pick up the FUSES
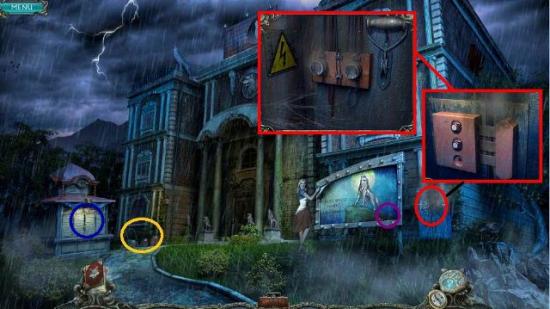
- Do the HO scene
- Pick up the BUTTON
- Push each button from the bottom up to open the lock
- Remove the old fuses
- Place the new FUSES
- Pull the lever
- Examine the kiosk to the left
- Note the unusual lock and that it needs a feather
- Enter the hotel
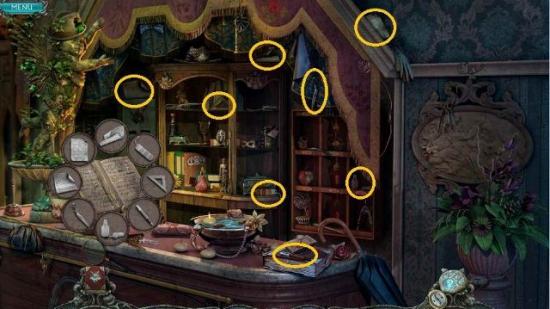
Lobby
- Read the note
- Examine the counter area
- Do the HO scene
- Pick up the GUEST REGISTRY
- Go upstairs and to the right
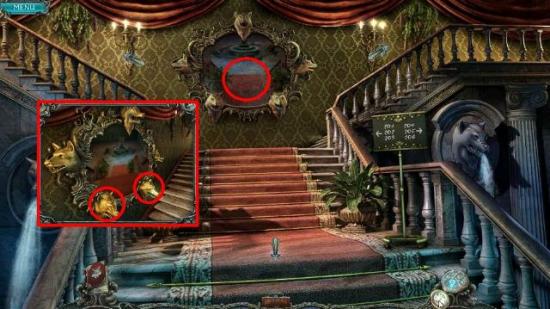
Stairs
- Examine the mirror
- Note the wolf head keyholes
- Head to the right
Second Floor
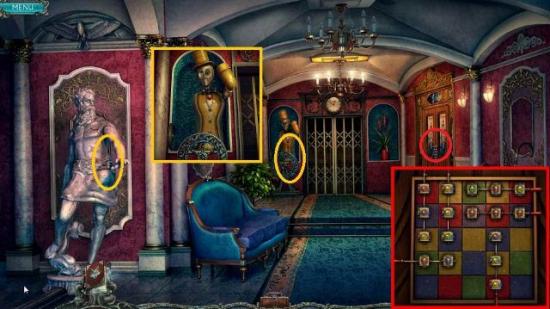
Right Wing
- Examine the base of the statue
- Solve the simple puzzle.
- Pick up the MARBLE SPHERE and DOLL
- Examine the bird cage
- Note the doll in the birdcage and the stuck latch
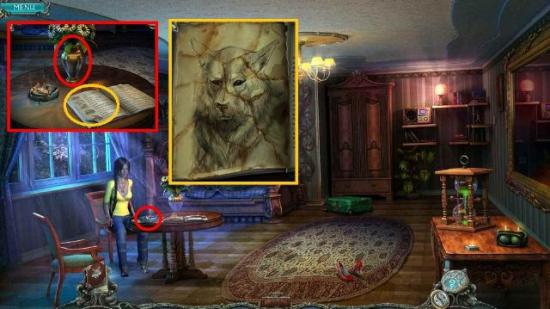
- Examine the door to Room 205
- Click on the handle.
- Enter Room 205
Room 205
- Pick up the map from the coffee table
- Answer the phone
- Examine the statue
- Note that you need scales
- Head to the other wing
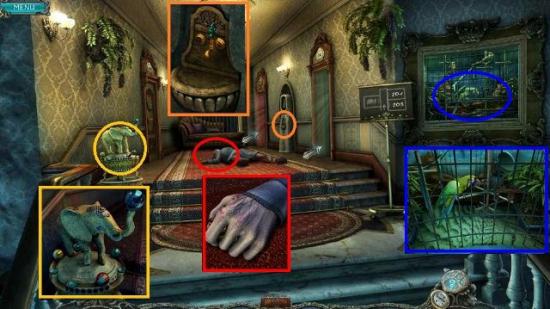
Left Wing
- Talk to Jack
- Examine the body
- Examine hand and note the snake bite
- Talk to Katherine
- Examine the elephant; note that it is missing some spheres
- If you want to decrease inventory clutter, place the MARBLE SPHERE
- Examine the birdcage; nice bird!
- Examine the water cooler; note the missing hot water spigot
- Return to Room 205
Room 205
- Do the HOS
- Pick up the DOCTOR’S BAG
- Return to the other wing and enter Room 203
Room 203
- HOS
- Pick up MEASURING TAPE
- Examine the grill above the desk; note you need something remove the screws.
- Examine the cabinet below the window; note you need something to remove the tape
Room 201
- Enter Room 201
- Examine the burning ashtray
- Click on the flower vase to put out the fire
- Click on the paper scraps
- Examine the book
- Arrange the paper scraps on the left side; they will lock into place when in the right spot
- Engage in conversation with Katherine and Jack
- Receive the KEY TO ROOM 204
- Head to the Right Wing and use the KEY to enter Room 204
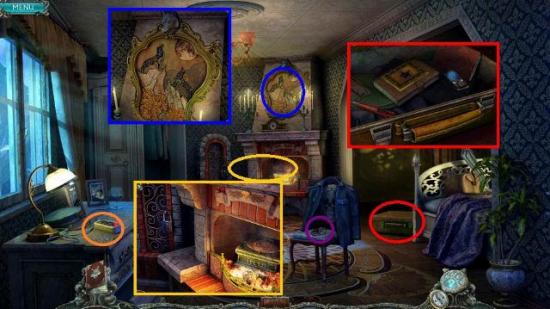
Room 204
- Pick up the HANDCUFFS from the chair
- Examine the suitcase
- Click on both latches
- Pick up the BOX CUTTER and CELLPHONE
- Examine the fireplace; note the lock with a flame and the box in the fire
- Examine over the mantle; note the 2 wolf shapes missing
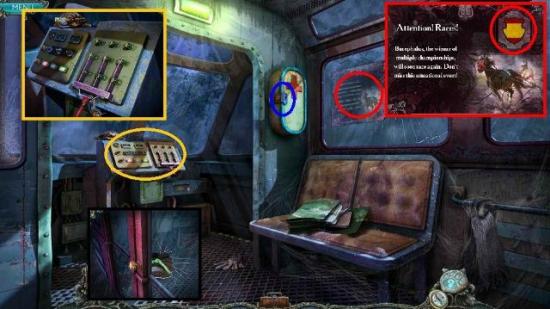
- Examine the desk and note the power strip
- Return to Room 203
Room 203
- Use the BOX CUTTER (from Room 204) on the tape on the cabinet
- Receive the STICKY TAPE
- Click on the doors
- Pick up the WOLF FIGURINE
- Note the doll missing its head
- Return to Room 201
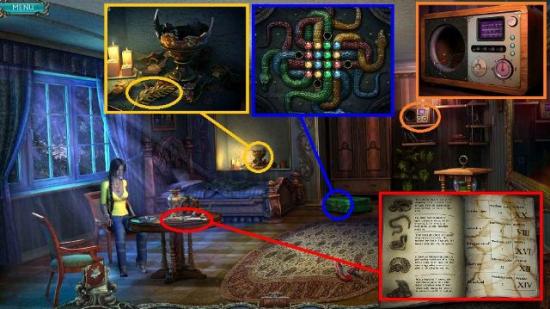
Room 201
- Use the HANDCUFFS (from Room 204) on Jack and then Katherine
- Use the STICKY TAPE (from Room 203) on the book and turn the page for snake bit info
- Examine the broken vase that Jack shot
- Pick up the FEATHER
- Examine the suitcase; note the unusual lock
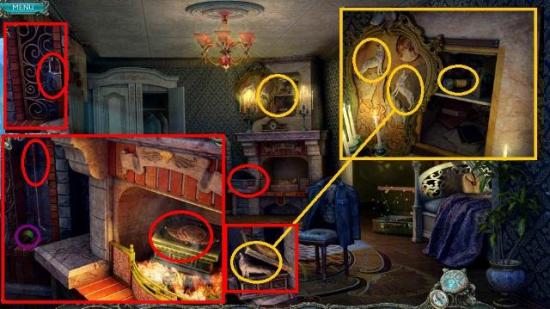
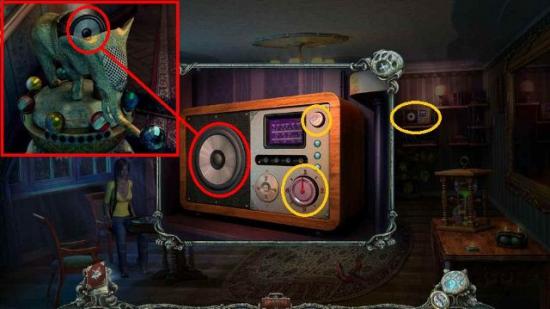
- Examine the radio; note the missing speaker
- Return to the hall
Left Wing
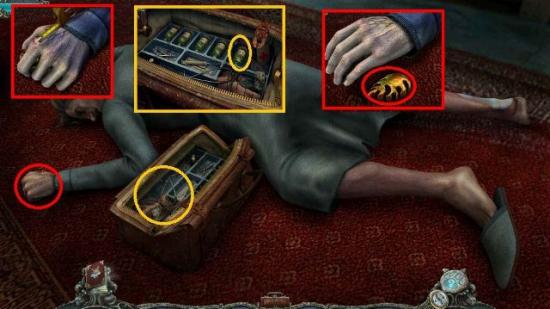
- Examine the body and the hand
- Place the DOCTOR’S BAG
- Use the MEASURING TAPE (from Room 203) on the hand
- It is a Lebetina viper bite
- Return to Room 201 and read the book
- Antidote needed is random
- Return to the hall
- Examine your bag
- Click on Antidote XX and receive a SYRINGE AND ANTIDOTE
- Use the SYRINGE on the hand
- Watch the cut scene; you have accidentally killed him!
- Pick up the FLAME-SHAPED KEY
- Return to Right Wing and Room 204
Room 204
- Examine the fireplace area
- Use the FLAME-SHAPED KEY (from the Left Wing Hallway) on the lock
- Pick up the MARBLE SPHERE
- Pick up the FIRE POKER and use it on the box in the fire
- Click on the box and pick up the WOLF FIGURINE
- Examine the area above the mantle
- Place the 2 WOLF FIGURINES (from here and Room 203)
- Examine the puzzle; you need a code.
- Return outside to the Hotel Entrance
Hotel Entrance
- Examine the booth
- Use the FEATHER (from Room 201) on the lock
- Pick up the MARBLE SPHERE
- Pick up the NEWSPAPER
- Pick up the PUZZLE PART
- Note the box missing some parts
- Return to the Hotel Lobby
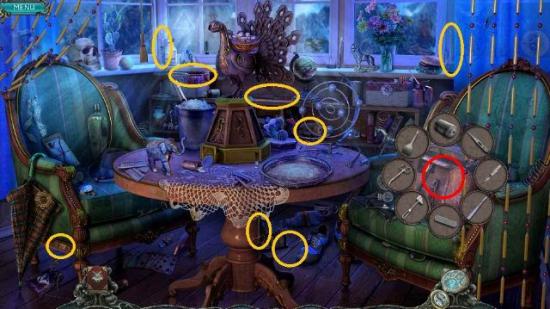
Hotel Lobby
- Do the hidden object scene at the counter
- Pick up the TAP
- Return to the Left Wing

Left Wing
- Examine the elephant
- Place the 3 MARBLE SPHERES (from booth at the Front Entrance, from Room 204, and from the Right Wing)
- Pick up the SPEAKER when the elephant breaks
Room 201
- Examine the radio
- Insert the SPEAKER
- Press the power button
- Change the channel by pressing the lower right button several times
- Hear the radio report
- Talk to Katherine
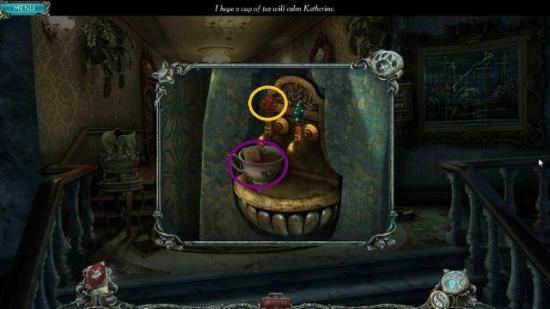
- Head to Room 205
Room 205
- Do the hidden object scene
- Pick up the TEA CUP
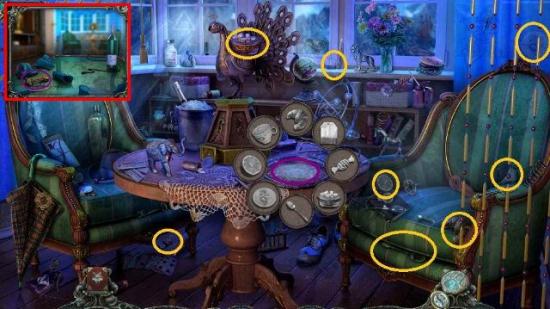
- Examine the coffee table
- Someone has wrecked the phone but the wires look fine
- Pick up the WOLF KEY
- Return to the Left Wing
Left Wing
- Examine the water cooler
- Place the TAP (from the Hotel Lobby)
- Place the TEA CUP (from Room 205)
- Click on the TAP
- Pick up the TEA CUP
- Go to Room 201
Room 201
- Give Katherine the TEA
- Have a chat
- Receive a STAR
- Return to Room 204
Room 204
- Examine the suitcase
- Place the STAR on the book
- Pick up a WOLF KEY
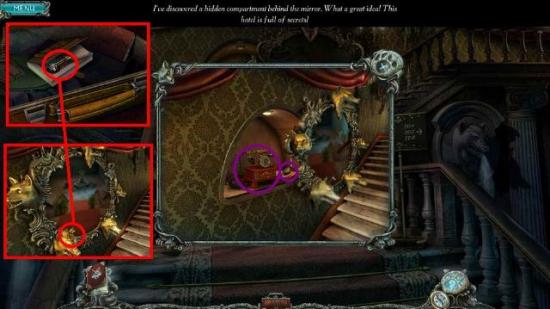
- Return to the Stairs
Stairs
- Examine the mirror
- Place the 2 WOLF KEYS (from Rooms 204 and 205)
- Pick up the PHONE and DOLL HEAD
- Return to Room 205
Room 205
- Place the PHONE on the coffee table
- Hear the conversation
- Return to Room 203
Room 203
- Examine the cabinet
- Put the HEAD on top of the doll
- Pick up the DOLL
- Go to Room 201
Room 201
- Katherine is dead
- Examine Katherine’s locket
- Pick up the piece of paper with the drawing
- Examine the suitcase
- Solve the lock puzzle
- This is random
- I found the buttons on this puzzle to be a little difficult to move. If you can’t get one to move, just move a different one and then come back to it. It will usually move.
- One method to solve this is to work on getting all the buttons that are next to the extra spots into those spots. This will give you plenty of room to move around.
- This one is slow but not difficult.
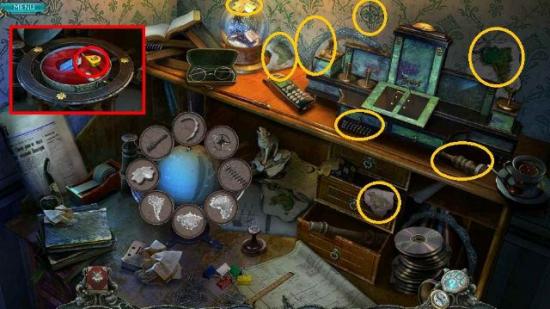
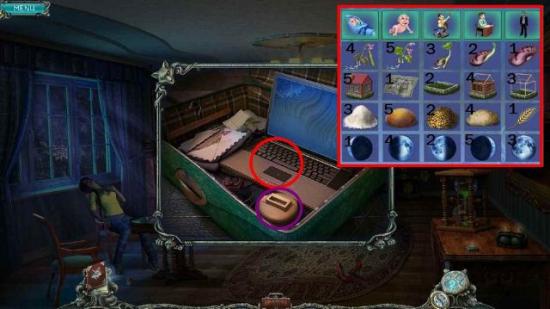
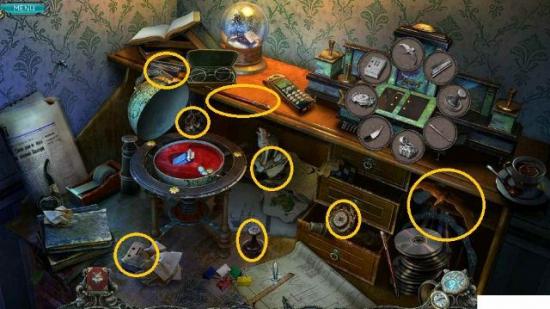
- Examine the contents
- Open the laptop
- Solve the puzzle by swapping tiles around, starting with youngest to oldest.
- Press the Cancel button
- Watch the video
- Click out of the video
- Examine the suitcase again
- Pick up the PHONE CHARGER
- Go to Room 204
Room 204
- Put the PHONE CHARGER on the desk
- Put the CELL PHONE (from the suitcase) in the charger
- Pick up the CELL PHONE
- Scroll through the messages
- One message will have the solution to the puzzle behind the picture on the mantle; it will copy into your journal
- At the end you will receive a new message with a hint for where to go next
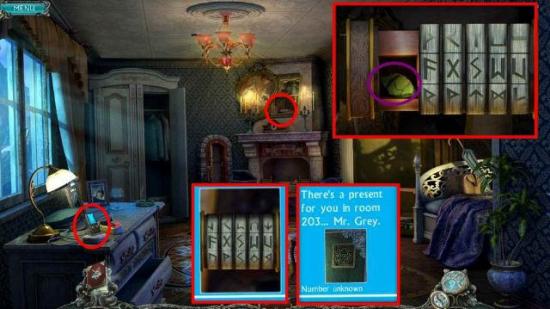
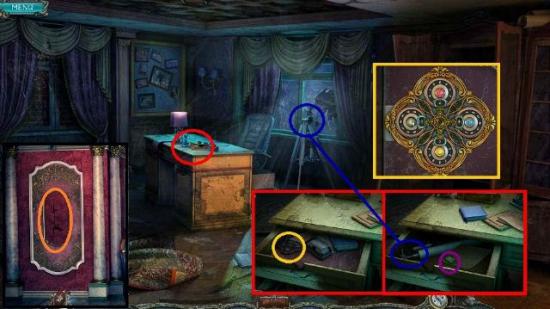
- Examine the flashlight over the mantle and enter the combination (random)
- Pick up the JEWEL
- Return to Room 201
Room 201
- Do the hidden object scene
- Pick up the SCREWDRIVER
- Examine the grill
- Use the SCREWDRIVER on the grill
- Use the BOX CUTTER on the package
- Place the JEWEL (from Room 204) onto the eye hole in the box
- Receive a KEY for Room 206
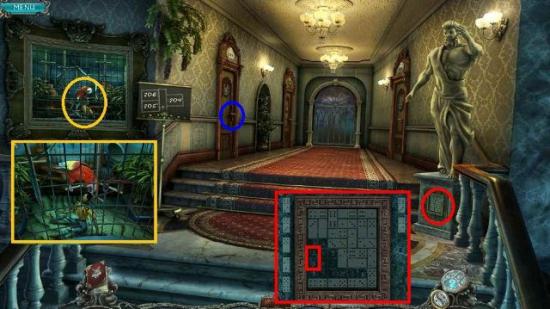
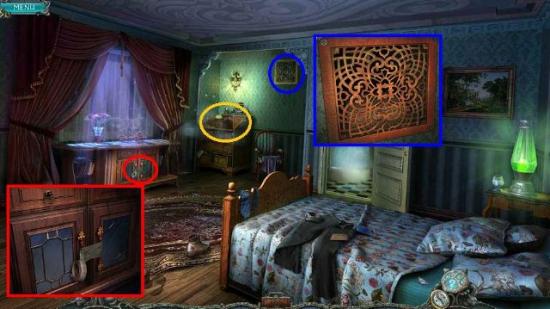
Room 206
- Use the KEY (from Room 201) on the door for Room 206
- Enter the room
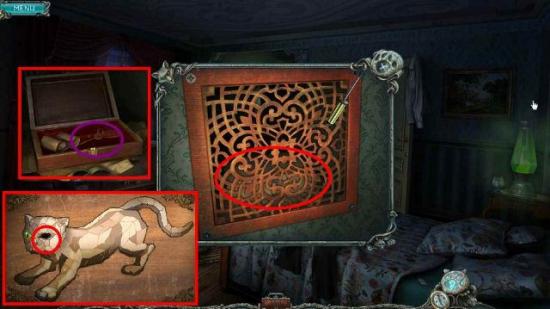
- Click on the curtain to expose the dummy
- Examine the dummy and note the puzzle is missing a piece.
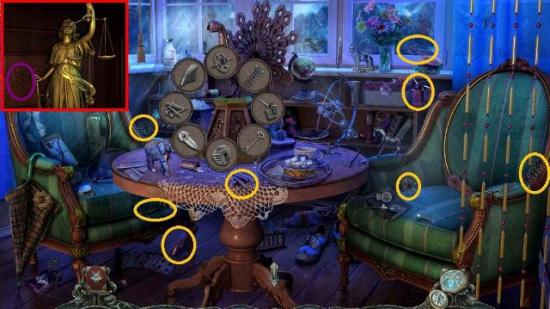
- Examine the puppet theater.
- Pick up the SCALES.
- Note the strings for 4 puppets.
- Examine the glass cage.
- Click on the handle to remove the top
- Note that you cannot get the PLIERS because of the scorpions.
Room 205
- Examine the closet
- Place the SCALES (from Room 204) in the statue’s hand.
- Pick up the DOLL
- Do the hidden object scene
- Pick up the MAGNET ON A STRING
Room 204
- Use the MAGNET on the PLIERS in the cage
- Receive the PLIERS
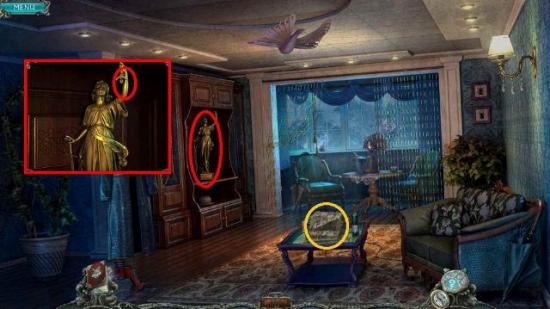
Right Wing
- Examine the bird cage
- Use the PLIERS on the hook
Left Wing
- Examine the bird cage
- Use the PLIERS on the hook
- Pick up the PARROT
Right Wing
- Place the PARROT in the bird cage
- Pick up the DOLL
Room 204
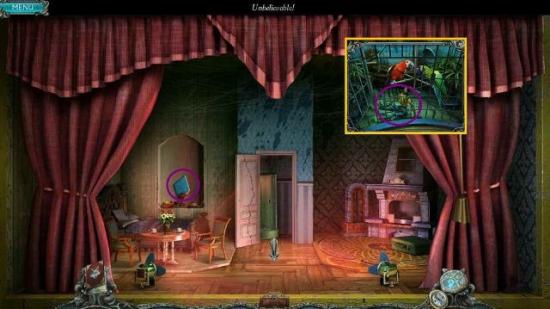
- Place the 4 DOLLS in the puppet theater
- Watch the show
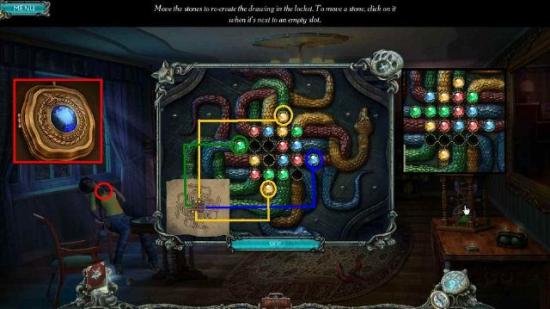
- Pick up the MISSING PART
- Place MISSING PART on the puzzle in the mannequin’s chest
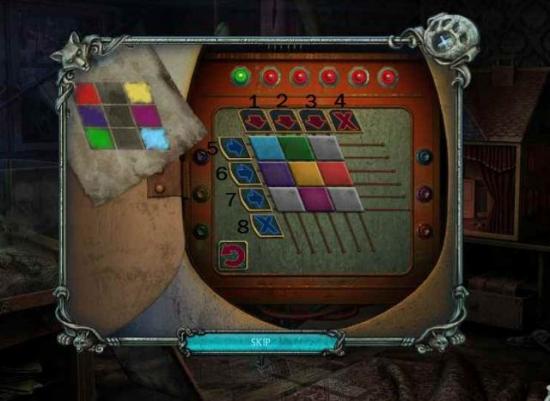
- Solve the puzzle by moving the tiles around to match the paper.
- The trick to this puzzle is partly to not allow the tiles to be on both ends of a row or column or you won’t be able to move them.
- The video solution will give you some ideas of how to do the puzzle on your own or you can just use the solution that follows. There will be many other solutions to this puzzle
- Pick up the PUZZLE PART and return to the HOTEL LOBBY
- 5-1-1-1-4-3-8-3-3-3
- 5-7-7-7-5-8-3-3-3-7
- 5-5-1-5-8-6-3-1-8-3
- 3-3-5-1-8-3-7-3-7-4
- 7-7-5-7-4-7-1
The Grounds
Hotel Lobby
- Have a conversation with Nick and Jack
- Receive the PUZZLE PART
- Head through the door to the left
Elevator Lobby
- Examine the statue; note you need a trident
- Examine the mechanical man; note you need some pieces
- Examine the door to the right
- Place the 3 Puzzle PARTS
- Click on each part to match the colors to the background
- Head through the door
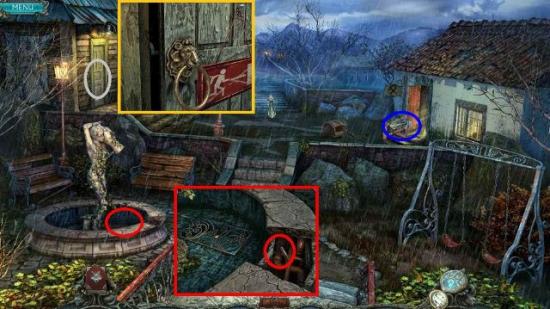
Back Door
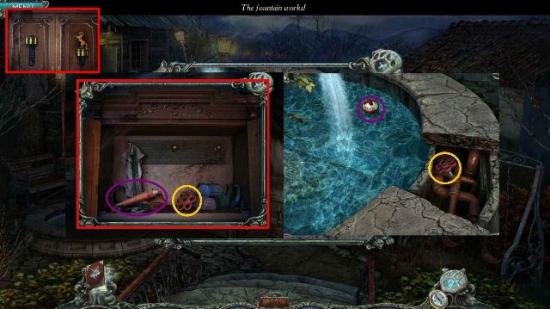
- Examine the fountain; note there is something under the grate and you need a valve handle
- Examine the door to the left; note you need something to unlatch the door
- Head through the door to the right
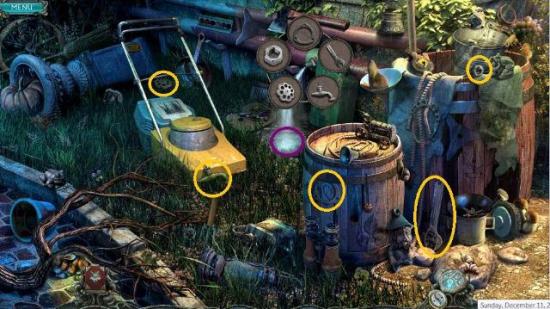
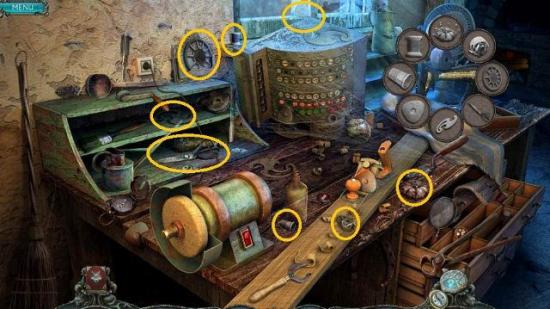
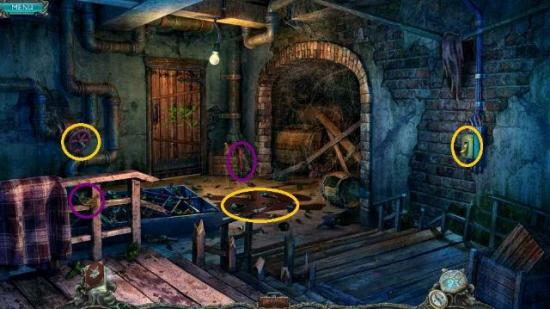
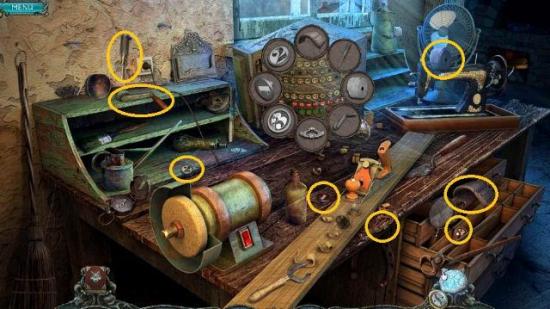
Workshop
- Do the hidden object scene to the left
- Pick up the PRUNING SHEARS
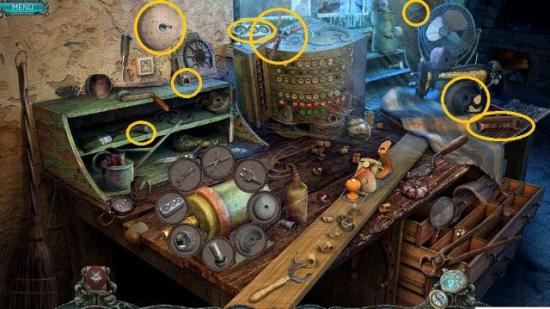
- Examine the chest; note the rusty hinges
- Examine the hole in the floor and then note the crane above it needs a hook
- Examine the bellows; note the hole
- Examine the fireplace; note the spot for some clay.
- Head outside and then forward
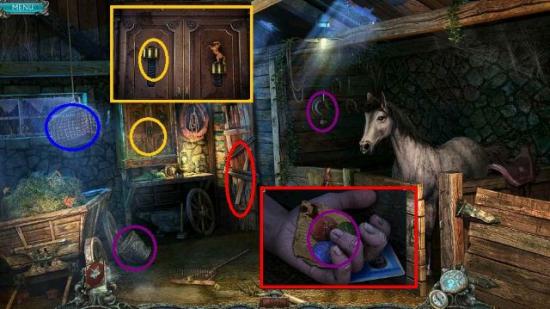
Stable Entrance
- Do the hidden object scene
- Pick up the OILER
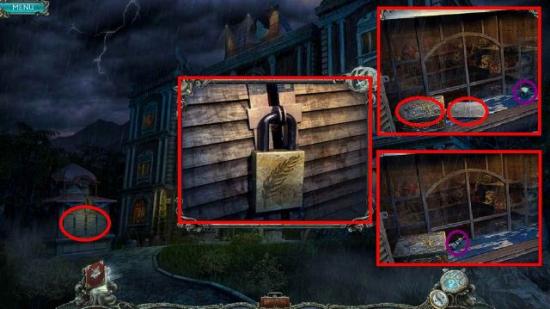
- Examine the stable door; note the lock that needs a specific pattern
- Examine the squirrel on the tree; note that it has the eye for the elevator man
- Examine the water pump; note that it has a nut that needs tightening
- Attempt to go forward
- Use the PRUNING SHEARS (from the Workshop) to open the way
- Go forward

Mountain Lift
- Examine the bench
- Click on the wallet
- Pick up the COIN and the ACCESS CARD
- Note the radio with parts that might be useful
- Examine the top of the lift; note the missing wheel
- Examine the lift itself; note the handle is broken
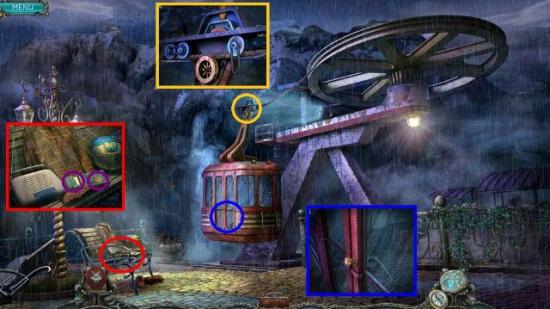
Back Door
- Examine the door to the left
- Use the ACCESS CARD (from the Mountain Lift) on the door
- Enter
Ski Rental
- Note the broken snow shoes
- Pick up the CROW BAR
- Examine the gumball machine
- Use the COIN (from the Mountain Lift) in the gumball machine
- Pick up a WALNUT
- Pick up the STICKY TAPE
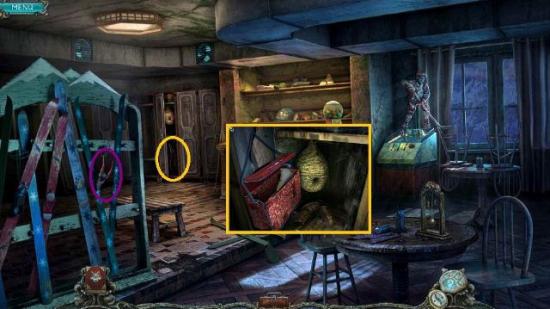
- Examine the locker; note you need to get rid of the wasp’s nest
- Examine the arcade game: note a hockey player is missing
Workshop
- Do the hidden object scene
- Pick up the MITTEN
- Repair the bellows with the STICKY TAPE (from the Skin Rental)
- Use the OILER (from the Stable Entrance) on the chest
- Pick up the PIPE WRENCH
- Examine the nutcracker
- Put the WALNUT (from the Ski Rental) into the nutcracker
- Receive a CRACKED WALNUT
Mountain Lift
- Examine the lift door
- Use the PIPE WRENCH on the window
- Click on the door handle from the inside
Inside the Lift
- Examine the poster; note the colors and shape of the shield on the upper right. This is random in the game but yours will open the stable door
- Note the locked first aid kit
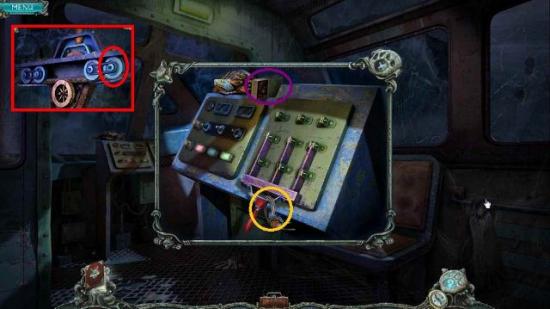
- Examine the controls; you need something to cut the wire
Stable Entrance
- Give the squirrel the CRACKED WALNUT (from the Workshop)
- Use the PIPE WRENCH on the water pump
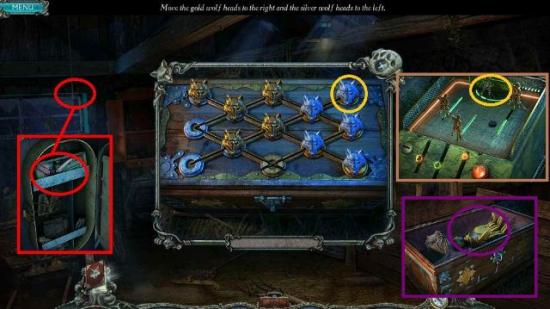
- Solve the stable door puzzle
- Turn the top dial to get the correct shape and the bottom dial to get the correct colors
- Enter
Stable
- Pick up the HOOK from the wall
- Pick up the BUCKET from the floor
- Use the CROWBAR on the door
- Enter the closet
- Examine the dead man’s hand
- Pick up the TILES
- Examine the cabinet; note you need a horse figurine
- Examine the hanging box
Stable Entrance
- Place the BUCKET (from the Stable) on the water pump
- Click on the handle
- Pick up the BUCKET OF WATER
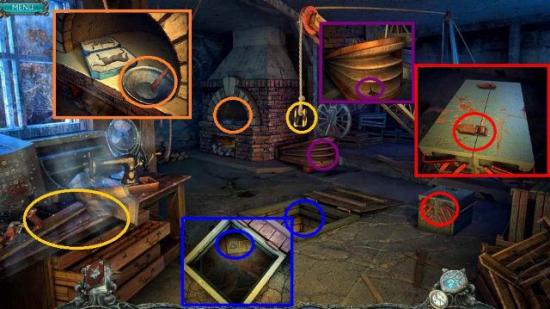
Workshop
- Put the HOOK on the crane
- It will pick up the package
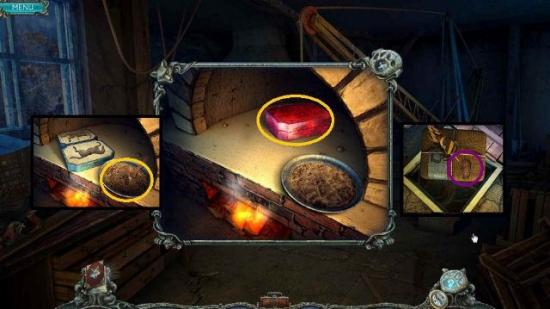
- Pick up some CLAY
- Examine the fireplace
- Put the CLAY in the bowl
- Put the WATER in the bowl
- Click on the bowl
- Click on the mold
- Use the MITTEN on the mold
- Pick up the CLAY HORSE
Stable
- Place the CLAY HORSE on the cabinet
- Pick up the VALVE HANDLE and BUG SPRAY
Back Door
- Use the VALVE HANDLE on the fountain
- Pick up the KEY to the first aid kit
Inside the Lift
- Use the KEY on the first aid kit
- Pick up the Razor
Stable
- Use the Razor on the hanging box
- Examine the box
- Pick up the HOCKEY PLAYER
- Note you need a wolf’s head
Ski Rental
- Use the BUG SPRAY on the wasp’s nest in the locker
- Pick up the ROBOT HAND
- Examine the arcade game
- Place the HOCKEY PLAYER
- Insert the tiles
- Adjust the hockey players to make a goal
- Position the right player forward and the left and center players back
- Press the red button
- Pick up the WOLF’S HEAD
Stable
- Place the WOLF’S HEAD on the box
- Pick up the ROBOT HAND
- Return inside the hotel
The Third Floor
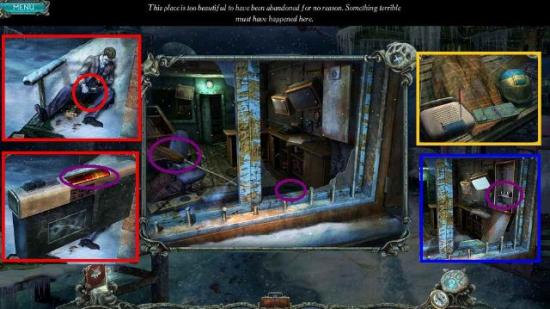
Elevator Lobby
- Examine the elevator robot
- Place the EYE, HAND, and ARM
- Click on the red button on the robot’s chest
- Enter the elevator
Hall
- Do the hidden object scene
- Pick up a SUITCASE KEY
mcr48
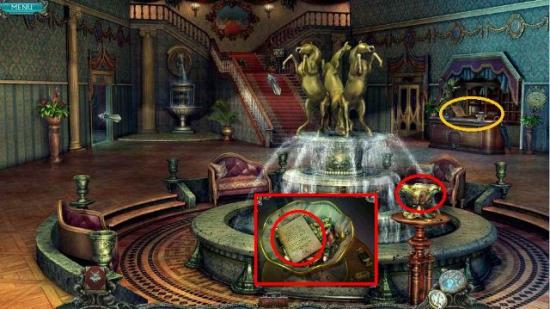
- Examine the chess table
- Pick up the SHIP IN A BOTTLE and DRAWING PIECE
- Note you need some chess pieces
- Examine the chest on the sofa; note it needs a round key
- Head forward
mcr49
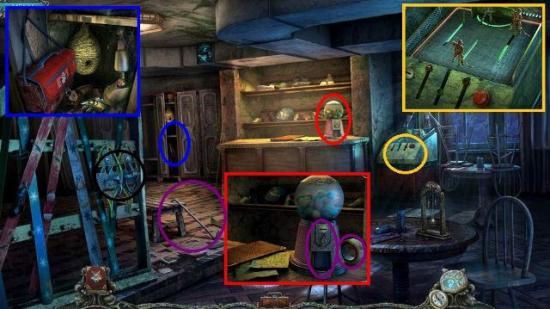
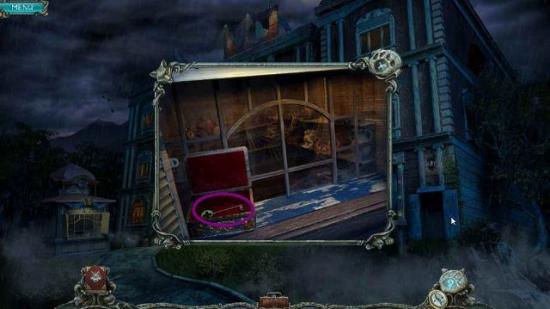
Passage
- Examine the suitcase
- Use the KEY (from the Hall)
- Pick up a SHIP IN A BOTTLE and a SCRUB BRUSH
- Examine the painting to the right; note it needs something to go into Zeus’ hand.
- Examine the left door; the key is in the door
- Place the NEWSPAPER (from the Hotel Entrance) under the door
- Head through the right door
mcr50
Utility Room
- Use the SCRUB BRUSH (from the Passage) on the SHIP IN A BOTTLE and pick it up
- Pick up the FIREWOOD
- Examine the cupboard; note that you need a man-shaped figure
- Examine ladder; note that it is missing a wheel
- Pick up the GLASS CUTTER
- Examine the shelves
- Pick up the PENCIL and the DRAWING PIECE
- Note the drawing missing pieces
mcr51
Passage
- Examine the door lock
- Use the PENCIL (from the Utility Room) on the lock
- Pick up the KEY
- Use the KEY
- Enter
Sea Room
- Examine the yarn basket on the sofa
- Pick up the SCISSORS
- Examine the aquarium
- Use the GLASS CUTTER (from the Utility Room)
- Pick up the SHIP IN A BOTTLE and the CHESS PIECE
- Examine the television; it is dusty and missing some pieces
- Examine the shelf to the right.
- Pick up the DRAWING PIECE
- Place the 4 SHIPS IN BOTTLES (from the Hall, Passage, Utility Room, and Sea Room)
mcr52
Utility Room
- Examine the shelf and the framed drawing
- Place the 3 DRAWING PIECES (from the Hall, Utility Room, and Sea Room)
- Pick up the drawing.
- The ships with matching dates will copy into your journal.
Sea Room
- Place the ships in their appropriate places based on the drawing, which is conveniently placed and may be zoomed in on.
- Just start on one, pick it up, and put it where it needs to go until you are finished.
- Look in the peephole; will he stay alive?
- Pick up the JOKER KEY
Hall
- Use the JOKER KEY (from the Sea Room) on the chest
- Pick up the LADDER WHEEL
- Do the Hidden Object scene
- Pick up the PINCERS
mcr53
Utility Room
- Put the LADDER WHEEL on the ladder
- Examine the cabinet
- Click on it to open
- Pick up the FEATHER DUSTER and the AXE
Passage
- Use the AXE on the center beam
- Examine the table and open the drawer
- Pick up the LIGHTNING BOLT
- Examine the Zeus drawing
- Place the LIGHTNING BOLT
- Click on the control panel twice
- Click on the hanging wires
- Click on the control panel to turn the lights back on
- Head down the Passage and up the stairs
mcr54
Head to the Roof
- Pick up the LIGHTER
- Examine the chimney
- Note the broken antenna
mcr56
Hunter’s Room
- Do the hidden object scene
- Pick up FLASHLIGHT
mcr55
- Examine the birdcage; note the locked up chess piece
- Examine the gramophone
- Use the PINCERS to remove the nail
- Open the drawer
- Pick up the HIEROGLYPH KEY and TV KNOB
- Examine the fireplace
- Place the LOGS
- Use the LIGHTER
- Receive BOILING WATER
- Examine the frozen refrigerator
- Use the BOILING WATER
- Click on the door
- Pick up the DOOR HANDLE
mcr57
Utility Room
- Examine above the ladder
- Use the FLASHLIGHT
Use the DUSTER - Use the SCISSORS on the iron cord
- Receive the ELECTRIC CORD
- Pick up the OILER
mcr60
Passage
- Examine the door
- Place the DOOR HANDLE and click on it
Japanese Room
- Examine the dragon statue
- Use the OILER on the latches
- Pick up the LION
- Examine the scroll
- Examine the cabinet to the right of the senator
- Pick up BIRD
- Talk to the senator
- Examine the lock; you need 3 hieroglyphs
- Examine the vase
- Pick up the CHIMNEY SWEEP
mcr58
Utility Room
- Examine the CUPBOARD
- Place the CHIMNEY SWEEP
- Take the weights off the house the sweep is on and the next one over.
- Hang the smaller weight on the house with the lower roof and the larger weight on the higher roof
- Houses 1 (big) and 2 (small)
- Houses 2 (big) and 3 (small)
- Houses 3 (none) and 4 (small)
- Houses 4 (big) and 5 (small)
- Pick up the CHIMNEY BROOM and ANTENNA PIECE
Roof
- Place the ANTENNA PIECE on the antenna
- Use the CHIMNEY BROOM on the chimney
Hunter’s Room
- Do the hidden object scene
- Pick up the RABBIT
mcr61
- Examine the bird cage
- Place the BIRD on the cage door
- Pick up a CHESS PIECE
- Examine the mantle of the fireplace
- Place the RABBIT and LION
- Press the animals in the order given from the scroll in the JAPANESE ROOM: it should be in your journal
- Mine was Horse, Lion, Rabbit, Marten
- Pick up a HIEROGLYPH KEY
- Examine the fireplace
- Pick up the CHESS PIECE
mcr62
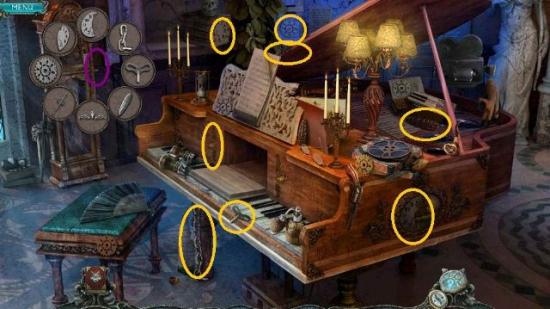
Sea Room
- Examine the TV
- Use the DUSTER
- Place the TV KNOB
- Place the ELECTRIC CORD near the outlet by the TV
- Click on the TV
- Receive the solution for the chess puzzle
- Return to the Hall
mcr63
Hall
- Do the hidden object scene
- Pick up the CHESS PIECE
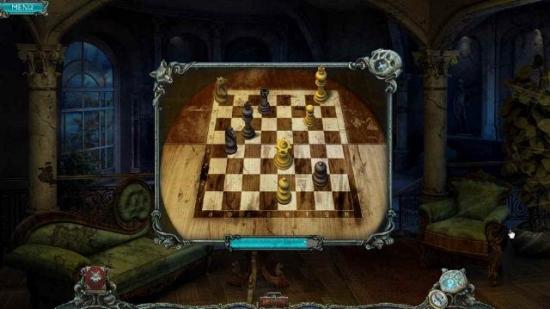
- Examine the chessboard
- Place 4 chess pieces (Sea Room, Hall, Hunter’s Room, Japanese Room) according to the TV screen
- Pick up the HIEROGLYPHIC KEY
Japanese Room
- Place the 3 HIEROGLYPH KEYS (Hall and 2 in the Hunter’s Room)
- Return to the Hotel Lobbyq
The Ground Floor
Hotel Lobby
- Do the hidden object scene
- Pick up the CHIP from cupid’s diaper
- Examine the door to the right
- Place the CHIP
- Solve the puzzle
- Enter the restaurant
Restaurant
- Pick up the TABLECLOTH
- Examine the cabinet to the left
- Note you need an access card to get into the tubes
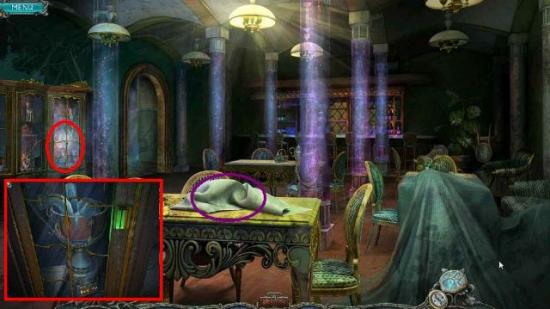
Bar
- Click on the chairs on the table to move them, 3 times
- Hang the TABLECLOTH on the wall
- Pick up the PIGEON
- Note the fire extinguisher missing its hose
- Click on the projector
- Go into the kitchen
Kitchen
- Click on the right stoves dials; whoa!
- Pick up the FIRE EXTINGUISHER HOSE
Bar
- Use the HOSE on the fire extinguisher behind the bar
- Pick up the FIRE EXTINGUISHER
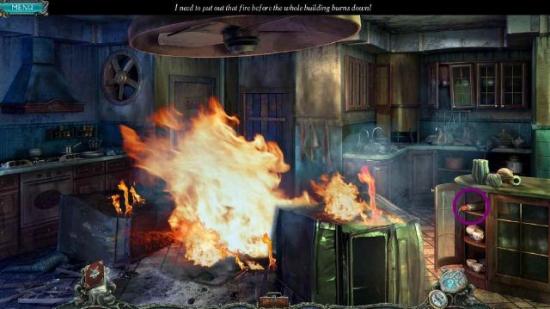
Kitchen
- Use the FIRE EXTINGUISHER on the fire
- Do the hidden object scene
- Pick up a BROOM

- Examine the left door
- Do the slider puzzle now or later
- Still need KEYS
- Go through the other door
Cellar Stairs
- Examine the power box
- Do the fuse puzzle
- 1 & 7 go with green, need a blue 40 and yellow 90
- 2 & 5 go with purple, need blue 90 and red 75
- 3 & 8 go with blue, need blue 60 and white 75
- 4 & 6 go with orange, need yellow 90 and red 55
- Click on the box to turn on the lights
- Pick up the PIGEON
- Use the BROOM on the glass
- Pick up the SLEDGEHAMMER
- Note the broken valve
- Open the door and go forward
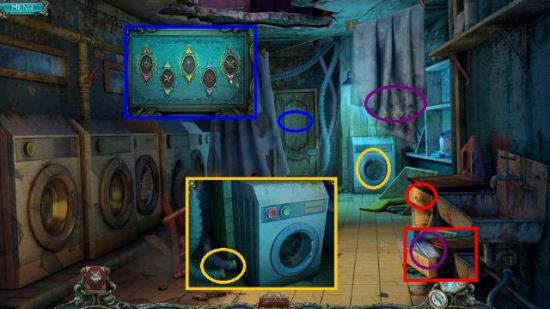
Laundry
- Pick up the DIRTY BED SHEET
- Examine the drawer next to the sink
- Pick up DETERGENT
- Examine the washing machine
- Open the door
- Put the DIRTY BED SHEET and then the DETERGENT into the machine
- Close the door
- Attach the tubing
- Press the red button
- Open the door and pick up the ANGEL and the symbols
- Examine the next door and match up the symbols with what you have.
- This is a random puzzle
- Go through the door
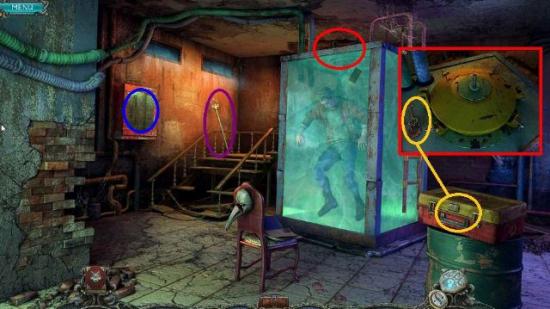
Cellar
- Examine the top of the water box
- Pick up the KEY
- Use the KEY in the tool box
- Pick up the WRENCH
- Use the SLEDGEHAMMER on the glass cabinet
- Pick up the LASSO
- Use the LASSO on the TRIDENT
Cellar Stairs
- Use the WRENCH on the VALVE HANDLE
Cellar
- Examine the top of the water box
- Use the VALVE HANDLE
- Pick up the ACCESS CARD from the water
Kitchen
- Do the hidden object scene
- Pick up the PIGEON
Restaurant
- Use the ACCESS CARD on the cabinet to the left
- Pick up the PIPES
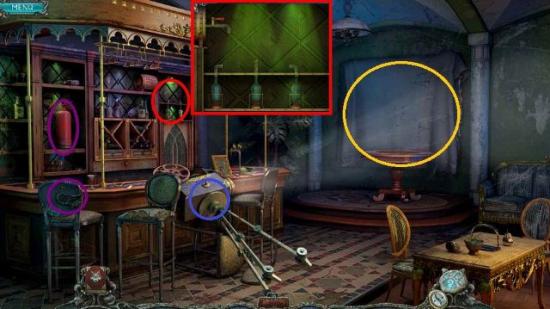
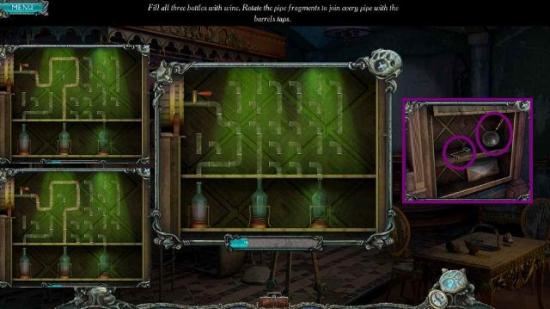
Bar
- Place the PIPES on the puzzle
- You will fill each bottle separately.
- Click on the pipes to rotate them.
- Examine the secret compartment
- Pick up the LENS and FREEZER KEY
Hotel Entrance
- Examine the box at the booth
- Place the 3 PIGEONS and 1 ANGEL (from Bar, Cellar Stairs, Kitchen, and Laundry)
- Pick up the FREEZER KEY
Kitchen
- Examine the freezer door.
- Solve the slider puzzle (see above)
- Place the 2 FREEZER KEYS
- Enter the freezer
- Pick up the FILM REEL and the OLD KEY
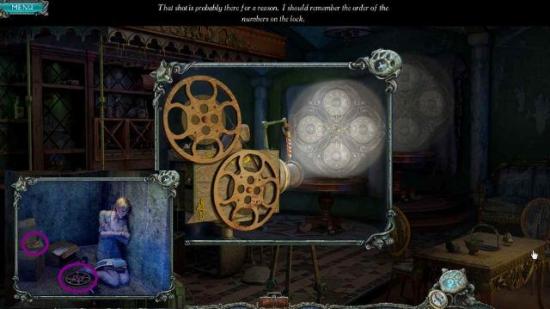
Bar
- Place the FILM REEL on the camera
- Place the LENS on the holder in front of the camera
- Note the numbers for the lock
Front Entrance
- Do the hidden object scene
- Pick up the CHISEL
Elevator Lobby
- Place the TRIDENT on the statue
- Use the SLEDGEHAMMER on the exposed plaster
- Examine the door
- Use the KEY
Office
- Examine the desk
- Use the CHISEL on the drawer
- Examine the code you received from the movie in the bar
- This will be random
- Simply enter the code
- Pick up the SPYGLASS and BUTTON
- Place the SPYGLASS on the tripod
- Look in the telescope and see a man
The Mountain
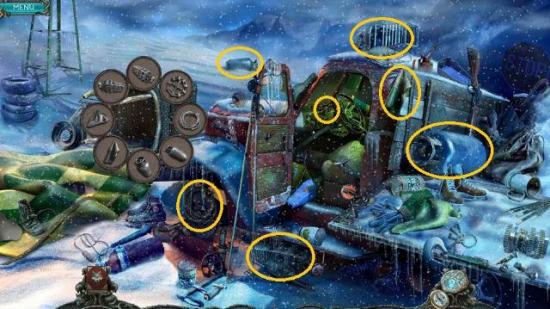
Workshop
- Do the hidden object scene
- Pick up the BAG KEY
Ski Rental
- Examine the locker
- Use the BAG KEY on the bag
- Pick up GAS TANK and SNOWSHOE STRAPS
- Use the STRAPS on the SNOWSHOES and receive SNOW SHOES
- Pick up the WIRE CUTTERS that were behind the snowshoes.
Stable Entrance
- Do the hidden object scene
- Pick up the MOUNTAIN LIFT WHEEL
Mountain Lift
- Place the WHEEL on top of the lift
Inside the Lift
- Examine the control
- Pick up the MATCHES
- Use the WIRE CUTTERS on the wired lever
- Flip the lever
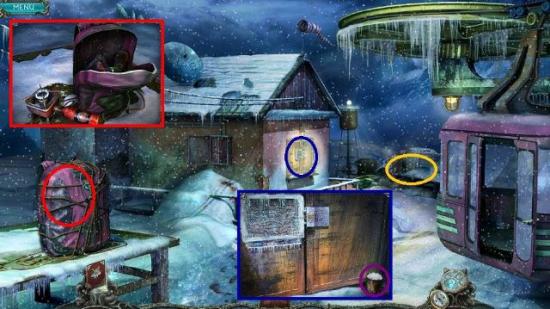
Station
- Use the SNOWSHOES to get to the hidden object scene
- Find the objects and pick up the KNIFE
- Examine the window area
- Pick up the MUG OF SNOW
- Examine the backpack
- Use the KNIFE on the backpack
- Click on the stove to lay it on the table
- Click on the gun to note it has not bullets
- Place the GAS TANK on the stove
- Use the MATCHES (from Inside the Lift)
- Place the MUG OF SNOW on the fire
- Pick up MUG OF WATER
- Pour the HOT WATER on the lock of the window
- Place the BUTTON on the puzzle lock
- Pick up the BROOM
- Use the BROOM on the snow covered body
- Pick up the tape recorder.
- Click on the battery cover
- Pick up the BATTERY
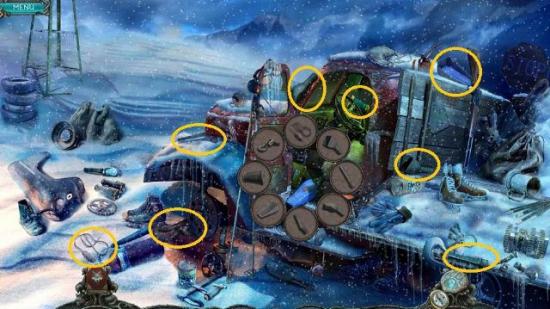
- Do the hidden object scene
- Pick up the SCREW DRIVER
- Return down the lift
Outside the Mountain Lift
- Examine the bench
- Use the SCREW DRIVER on the radio
- Pick up a BATTERY
Station
- Pick up the remote
- Put the BATTERIES in
- Pick up the HAIRPIN on the window ledge
- Use the HAIRPIN in the lock
- Pick up the BULLETS
- Examine the backpack
- Pick up the gun
- Place the BULLETS in the gun
- Return down the lift
- Watch the end scenes

More articles...
-
Best Horror Games On Itch.io – July 2026
Across a bounty of subgenres. -
Haze Seas Accessories Tier List [Best Accessories to Equip]
The accessories with the best stat buffs in Haze Seas.