
Best Horror Games On Itch.io – July 2026
Across a bounty of subgenres.
Grow A Garden 2 Base Price List
What's the most valuable crop?![Evomon Best Starter [Leafbun, Blazpup, or Bubble?]](/wp-content/uploads/2026/06/evomon-best-starter.jpg "Evomon Best Starter [Leafbun, Blazpup, or Bubble?]")
Evomon Best Starter [Leafbun, Blazpup, or Bubble?]
Grass-type, Fire-type, or Water-type?
![[Roblox] Evomon Shiny Hunting Guide – Including Prismatic and Pris Shinies!](/wp-content/uploads/2026/06/evomon-shiny-hunting-guide.jpg "[Roblox] Evomon Shiny Hunting Guide – Including Prismatic and Pris Shinies!")
Monster Quest Tips Walkthrough
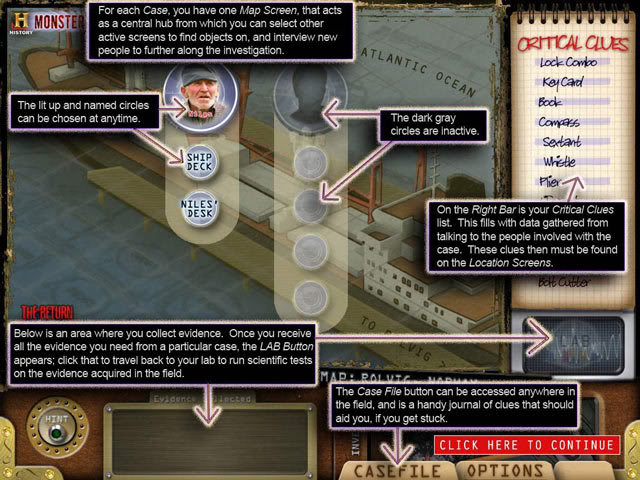
Monster Quest is a hidden object game based on The History Channel’s television program of the same name. Our strategy guide includes a complete walkthrough for all the quests, including screenshots of each location with all objects marked. GENERAL TIPS In this game, everything fits together: witness statements, your case notes, the information in the Monsterpedia, and the objects in the Hidden Object Scenes. If you skip any of these, you won’t have enough information to pass the quizzes abo…


- Prefer Gamezebo on Google

a:1:i:0;a:2:s:13:”section_title”;s:18:”Monster Quest Tips”;s:12:”section_body”;s:62581:”Monster Quest is a hidden object game based on The History Channel’s television program of the same name. Our strategy guide includes a complete walkthrough for all the quests, including screenshots of each location with all objects marked.
GENERAL TIPS
- In this game, everything fits together: witness statements, your case notes, the information in the Monsterpedia, and the objects in the Hidden Object Scenes. If you skip any of these, you won’t have enough information to pass the quizzes about the case.
- To read the Monsterpedia, click on the tab with the word on it. Same for the casebook.
- There are very few save points in the game. You can really only save at the start of a new Quest when you are in the office, at the end of all fieldwork for a Quest (which means you’ve completed all the hidden object scenes and the LAB icon has appeared) or at the end of ALL labwork for a Quest (you have completed all 3 mini-games). If you leave midway through any of these phases, you’ll have to start over at the previous save point. If you play a Quest all the way through, you won’t even notice this issue, but it’s annoying if you leave mid-phase.
- The Find List contains items from multiple locations. All of the items for one location have the same color highlighter streak.
- Each Hidden Object scene has multiple text pop-ups. Some are just jokes. Some contain important clues. They tend to flicker on and off quickly, but try to get your cursor in a position to read them as they can be helpful.
- From time to time your casebook will open. Read it carefully–there will be important clues there.
- The PDA clipped to your casebook often has a picture of something you will need to look for.
- You will need to go back to the map frequently. If you find a clue, you may need to go back to the map to ask more questions of a witness. If you open a door in a scene, you will have to go back to the map to access the new location.
- You get unlimited hints—you just need to wait for them to recharge.
- The mouse mechanics for the mini-games are unusual. You can drag a piece into place with the usual left mouse button. However, if you want to rotate a piece, you must first select it with the left mouse button and then continue to hold the left button down while you use the right button to rotate the item.
- Items in the inventory tray will be used in Hidden Object scenes. Items in the evidence tray will be automatically used in the Lab phase.
- To use an inventory item, drag it from the inventory area to the spot on the scene where you want to use it.

SPOILERS BELOW
Quest 1: Return of the Kraken
Office: Quest 1: Return of the Kraken
Objective: Read about the Kraken in the Monsterpedia- Answer to Quiz: “2006”

You may save at this point
Travel: Quest 1: Return of the Kraken
- Talk to Niles. He will give you your new objectives.
Objective: Find the toolbox combination written on a scrap of paper
Objective: Find the toolbox. Unlock it by dragging the combo from the inventory to the toolbox.
Location 1.1: Return of the Kraken: Ship Deck
- Search for the pink clues from the Find List here.
- All of the objects are marked on the screenshot.
- You will see the toolbox, but you don’t need it until later.
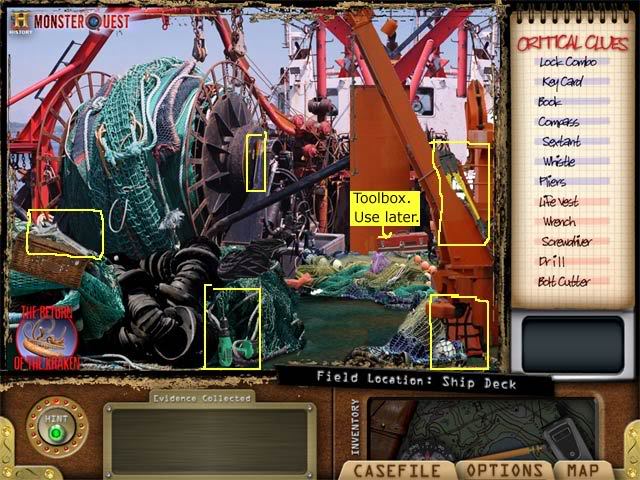
- Return to the map.
Location 1.2: Return of the Kraken: Niles’ Desk
- Search for the blue clues from the Find List here.
- All of the objects are marked on the screenshot.
- When you click on the scrap of paper with the combination, it will go into your inventory tray.
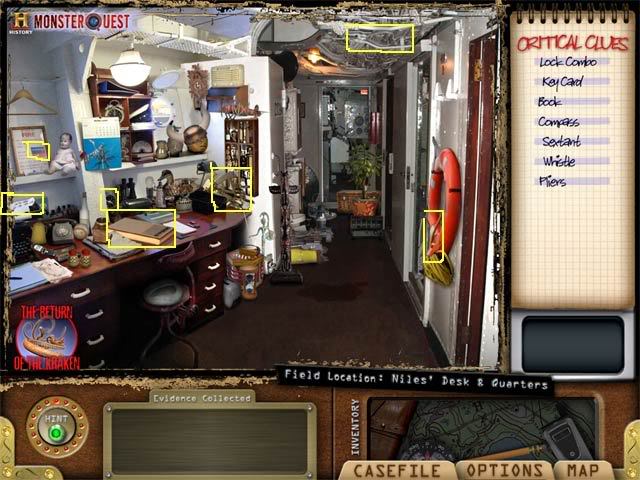
- Return to the map.
Location 1.1: Return of the Kraken: Ship Deck
- Drag the scrap of paper from the inventory tray to the toolbox.
- The toolbox will open and you will see the crew list.
- Return to the map.
- Talk to Niles. He will tell you the name of the crewman who was attacked by the monster. It was Rollie Tuskin. (This will unlock Rollie as a witness.) He also tells you Rollie’s diving suit was “torn to shreds.”
- Talk to Rollie.
- You will find out that the ship’s oceanographer took the torn suit. You want it for evidence. Rollie says he will take you back to the location if you can find the GPS coordinates.
Objective: Find the suit fragments.
Objective: Find the data chip with the GPS coordinates.
Location 1.3: Return of the Kraken: Med Lab.
- You will see the torn suit on the floor. You need to find all the different fragments.
- Check your case notes. In the center of your PDA you will see a picture of one of the suit fragments so you know what you’re looking for.
- Search for the pink clues on the Find List.
- All of the objects are marked on the screenshot.
- The suit fragments will go into the evidence tray for examination later.
- The tissue sample has been prepared in a red petri dish on the lab station on the right.
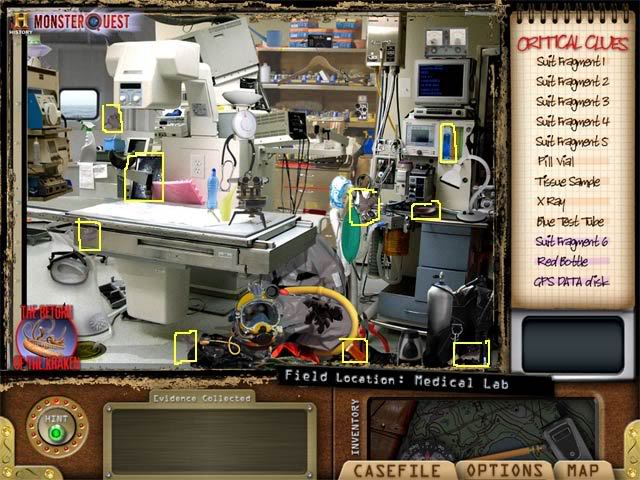
- Return to the map.
Location 1.4: Return of the Kraken: The Bridge
- Search for the blue clues on the Find List.
- All of the objects are marked on the screenshot.
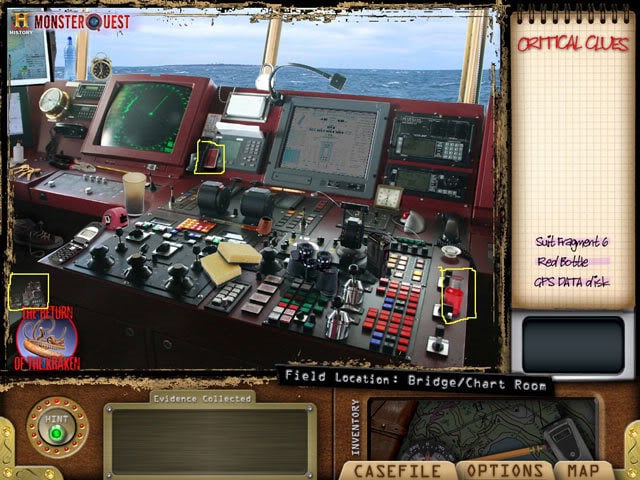
- Return to the map.
- Talk to Rollie again. He will agree to take you to the dive site (although he won’t go in the water). You need to find diving gear. He tells you there were cameras on the site. You need the film for evidence.
Objective: Collect the dive gear you’ll need.
Objective: Go to the dive site and get the film from the cameras.
Location 1.5: Return of the Kraken: Dive Ready Room
- Search for the green clues on the Find List.
- All of the objects are marked on the screenshot.
- To pick up the dive mask, you must click on one of the white parts of the frame (the noseguard is easiest).
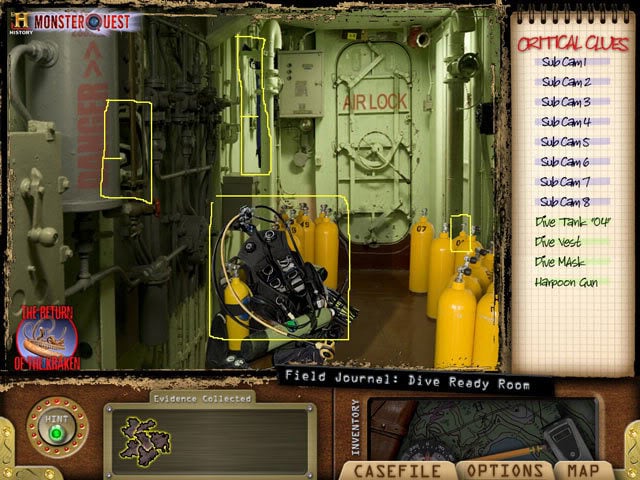
- Check your case notes. In the center of your PDA you will see a picture of the kind of camera you will have to search for. Some of them will be attached to the drill rig, some will be attached to upside down mushroom shaped weights.
- Return to the map.
Location 1.6: Return of the Kraken: Dive Site
- Search for the blue clues on the Find List.
- All of the objects are marked on the screenshot.
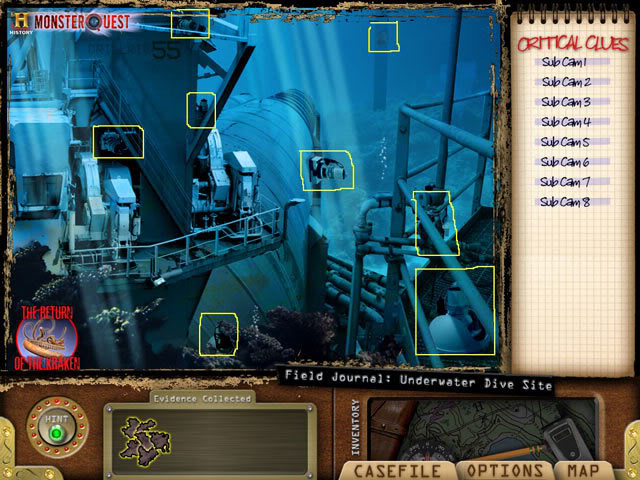
- Once you have collected all of the sub cams, they will go into your evidence tray.
- Return to the map.
- This time when you return to the map the Lab Icon will be available. Now you are ready to examine the evidence you’ve collected.
- After you click on the Lab Icon, you may exit the game and your progress through the Hidden Object scenes will be saved.

- Click on the Lab Icon.
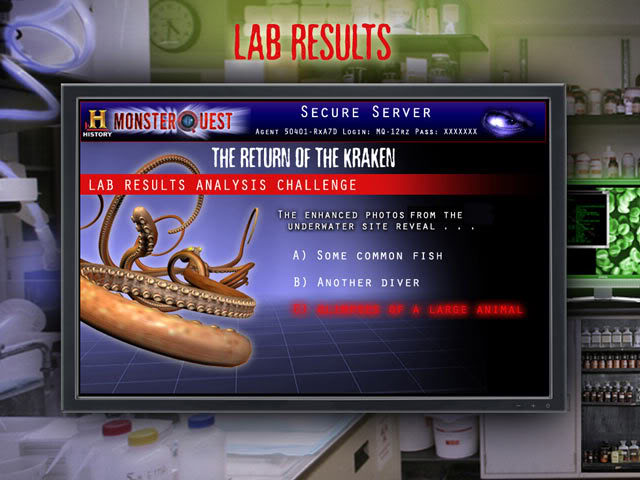
Lab Test 1.1: Return of the Kraken: Enhanced Computer Images
- Compare the images at the bottom of the screen (the enhanced ones) with the ones at the top. You are looking for differences between them. In particular, you are looking for evidence of the creature that attacked Rollie.
- The differences are highlighted on the screenshot.
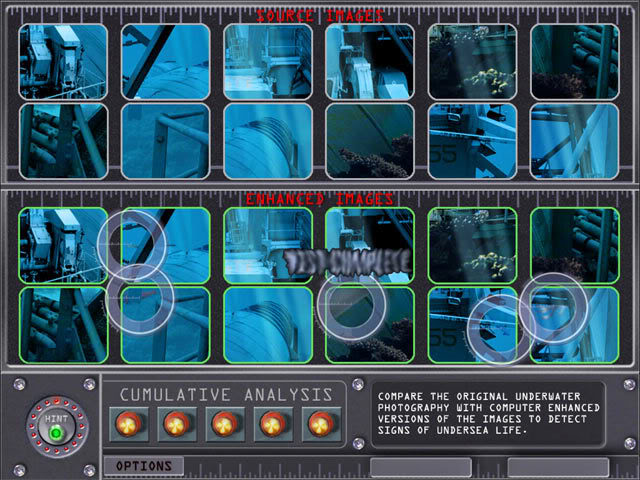
Note that you cannot save at this point! You must complete all 3 lab tests before you get to the next save point.- The enhanced images definitely show “glimpses of a large animal.” Now you must do further tests to determine what animal it was.
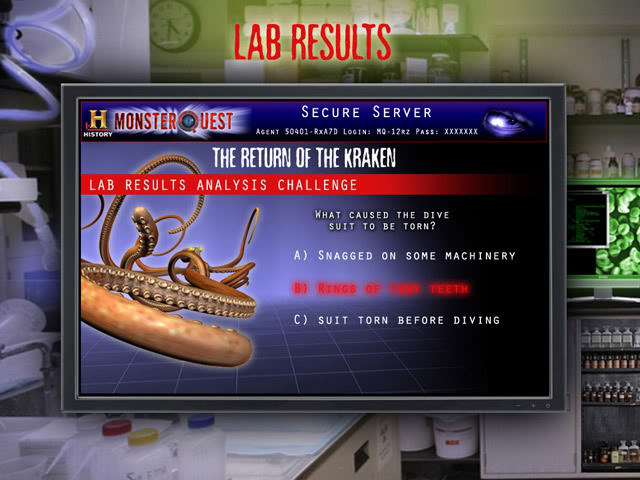
Lab Test 1.2: Return of the Kraken: Suit Fragments Jigsaw Puzzle
- This is a fairly simple jigsaw puzzle, but the mouse mechanics are a bit unusual. To move a piece, click and drag holding down the left mouse button. To rotate a piece, select it by clicking the left mouse button, then, while still holding down the left button, click the right button to rotate it. Once you get used to this, it goes quite quickly.
- Here is a screenshot of the almost-completed puzzle.
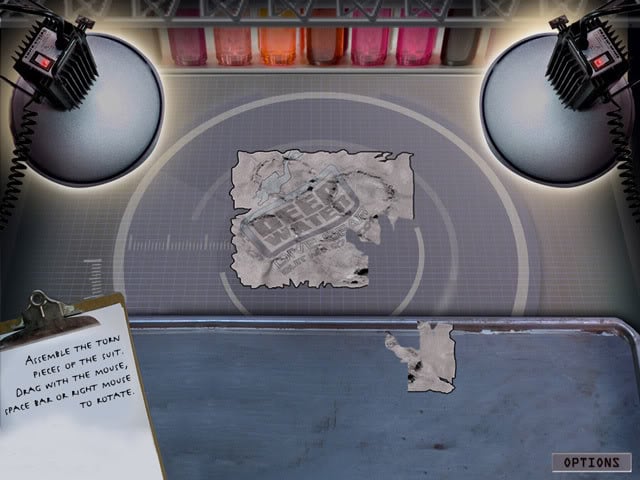
- After analyzing the tears of the suit, you determine that it was torn by “rings of tiny teeth.” This is consistent with an animal with tentacles.
- Now you just need to zero in on the exact species.
Still no save point yet!
Lab Test 1.3: Return of the Kraken: Computer Reconstruction Jigsaw Puzzle
- Another jigsaw puzzle. This time you are using the computer to reconstruct what the creature was, based on the glimpses seen in the photographs
- Here again you have to use the same rotation method. To rotate a piece, select it by clicking the left mouse button, then, while still holding down the left button, click the right button to rotate it.
- The screenshot shows the almost-completed puzzle.
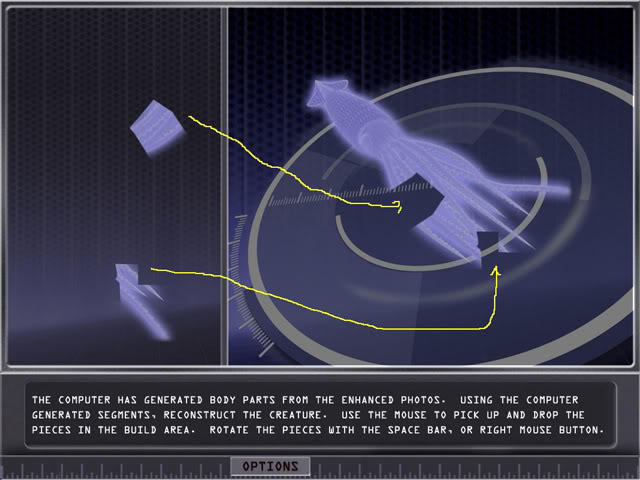
- Computer reconstruction was consistent with the other evidence. It was most likely a “giant Humboldt squid.”
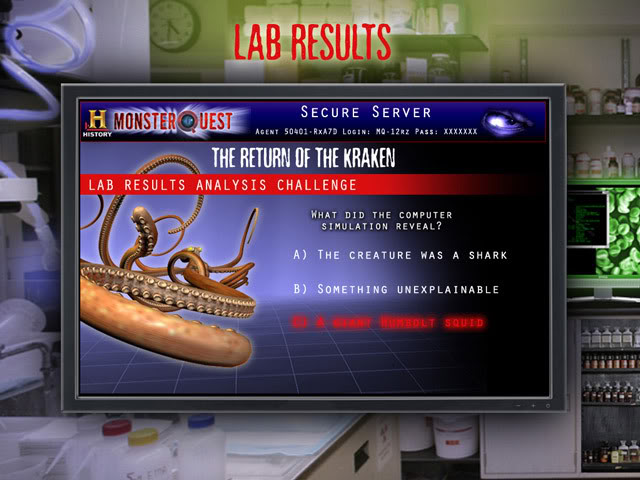
- Conclusion: There is as yet no proof that the Kraken monster exists, but the legends may have been based on the Giant Humboldt Squid, which can be vicious and extremely large, like the one that attacked Rollie.
- You will automatically return to the Office for your next case.
- You may exit the game once you are back in the office and your Quest 1 results will be saved.
Quest 2: Return of the Kraken
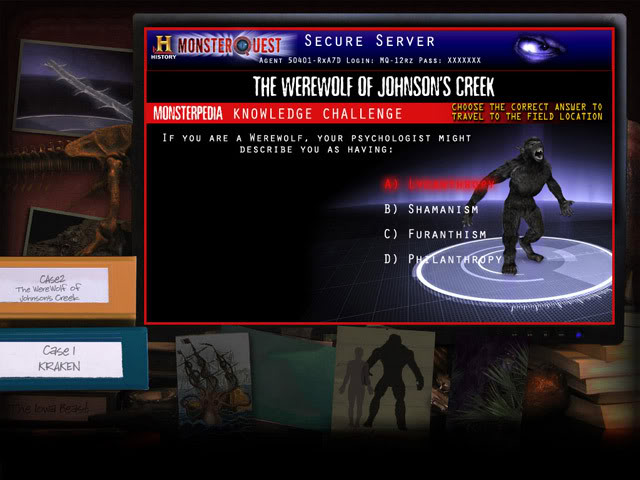
Office: Quest 2: The Werewolf of Johnson’s Creek
Objective: Read about werewolves in the Monsterpedia- Answer to Quiz: “lycanthropy”
You may save at this point
Travel: Quest 2: The Werewolf of Johnson’s Creek
- Talk to Arnold. He will tell you about his encounter with the creature. It was wearing clothes, but had patches of fur all over its body and big teeth.
Objective: Find a fabric sample.
Objective: Find some plaster to make a cast of footprints.
Location 2.1: The Werewolf of Johnson’s Creek: Arnold’s Barn
- Search for the pink clues from the Find List here.
- All of the objects are marked on the screenshot.
- The fabric scrap will go into the evidence tray.
- The bag of plaster will go into your inventory.
- Drag the bag of plaster to the footprint by the doorway. The plaster cast will go into the evidence tray.
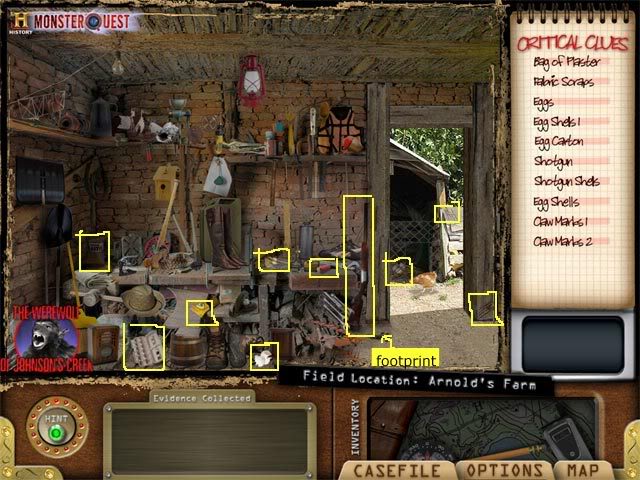
- Return to the map.
- Talk to Arnold. He will tell you he doesn’t believe in werewolves, but this creature did scare him. He says that Barry, the mechanic in town, said it was a werewolf and he is working on a car that hit it. (This will unlock Barry as a witness.)
- Talk to Barry. He tells you the car is out having its frame straightened. He gives you the location of the crash on Highway 5. He also tells you there are claw marks there.
- Read your case book. You note that you broke the plaster cast you took at Arnold’s barn.
Objective: Locate car parts to try to search for car’s owner.
Objective: Compare the claw scrapes at the two scenes.- Return to the map.
Location 2.2: The Werewolf of Johnson’s Creek: Crash Site
- Search for the blue clues from the Find List here.
- All of the objects are marked on the screenshot.
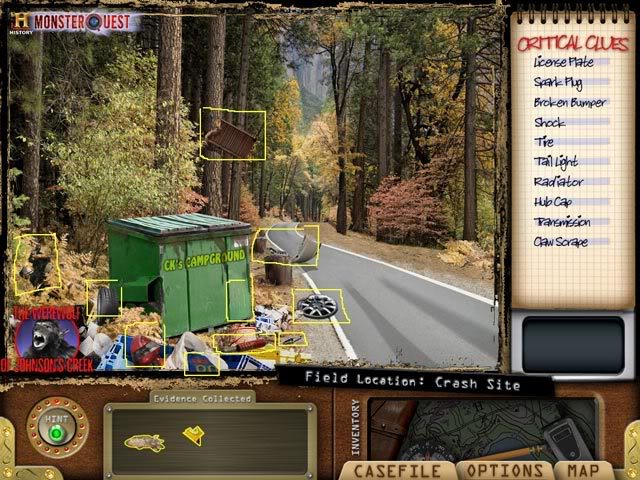
- You will determine that the claw marks are similar.
- Return to the map.
- Talk to Barry again. He seems to truly believe it was a werewolf.
Location 2.3: The Werewolf of Johnson’s Creek: Barry’s Garage
- Search for the green clues from the Find List here.
- All of the objects are marked on the screenshot.
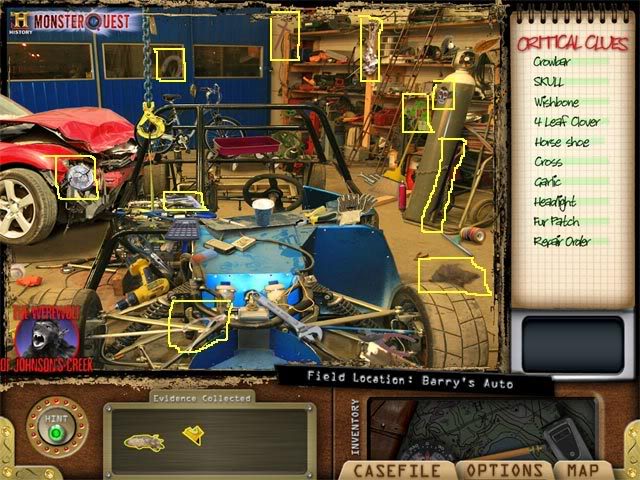
- The crowbar will go into your inventory. You will use it in another scene.
- You can tell from the objects in the garage that Barry is very superstitious.
- You also find the name of the owner of the car.
- Return to the map.
- Talk to Gladys. (She was unlocked as a witness when you found the repair order with her address.) She admits she and her husband were both sleepy when they had the accident. She says the creature was 7 feet tall. You can’t imagine what kind of animal could cause that much damage to the car. She also says she’s a big circus fan.
- Review your case book. You kept the fur sample you found at the garage (even though it didn’t go into your evidence tray.) You like circuses, too—you decide to go.
Objective: Get circus tickets.
Objective: Find the address of the circus.
Location 2.4: The Werewolf of Johnson’s Creek: Gladys’ House
- This is the only location in the game that really doesn’t make any sense in terms of the story. Instead of searching for clues to the creature, you steal a bunch of stuff from Gladys that you don’t need, including buttons and a cuckoo clock. However, the game will go back to normal after this scene.
- Search for the salmon clues from the Find List here.
- All of the objects are marked on the screenshot.
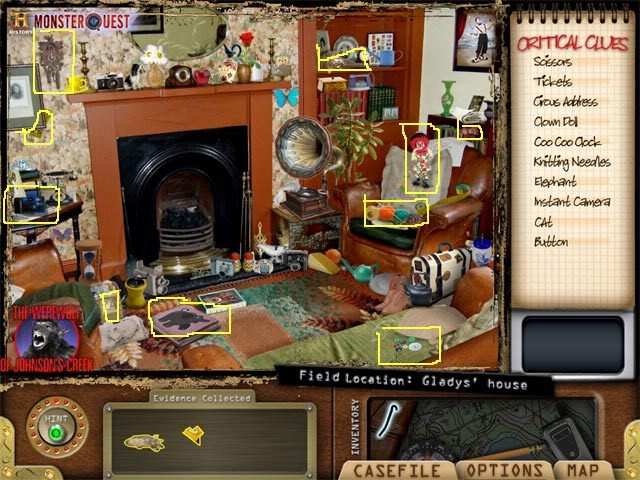
- The circus logo seems familiar.
- The scissors will go into your inventory.
- Return to the map.
- Terry, a circus worker, has been unlocked as a witness. Talk to him.
- Terry seems skeptical that werewolves exist, but invites you to look around.
- You now receive two objectives that don’t come naturally out of the story. However, they will fit in once you find them.
Objective: Read a newspaper story
Objective: Find a bandage with blood on it.
Location 2.5: The Werewolf of Johnson’s Creek: Circus
- Search for the pink clues from the Find List here.
- All of the objects are marked on the screenshot.
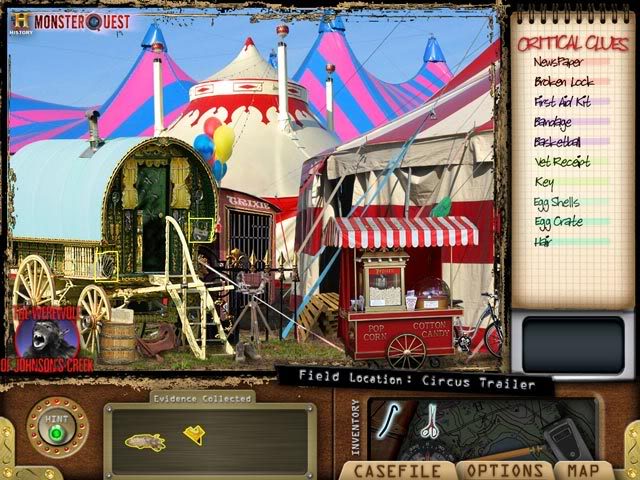
- When you read the newspaper story, you discover that the circus has a basketball-playing bear named Trixie who can’t perform right now because she has a skin condition. Her favorite food is eggs. There is a picture of her wearing a yellow basketball jersey with the circus logo.
- Return to the map.
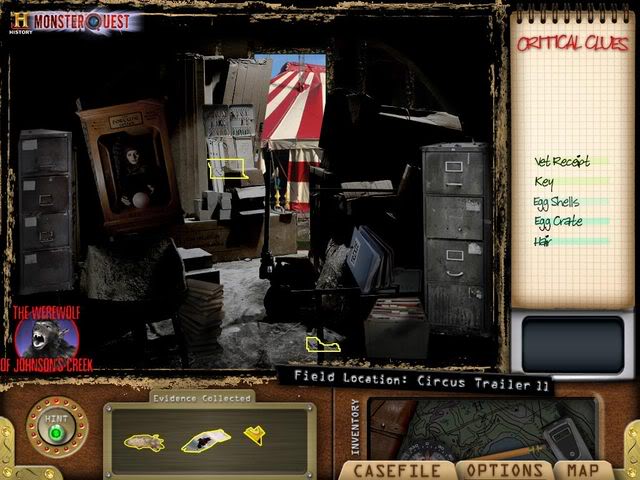
Location 2.6: The Werewolf of Johnson’s Creek: Storage
- Search for the purple clues from the Find List here.
- All of the objects are marked on the screenshot.
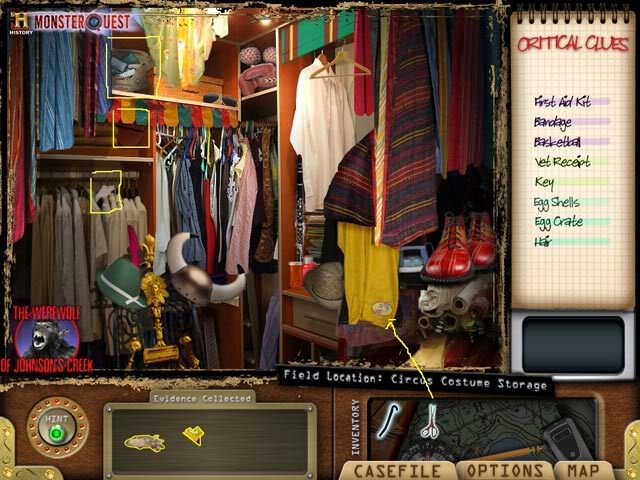
- You will find the bandage with blood. It will go into your evidence tray.
- Drag the scissors from inventory to the basketball jersey to take a sample to check against the fabric sample from Arnold’s barn.
- There is a tightly closed case, but it’s a red herring. You will not use the crowbar in this scene.
- Return to the map.
- Return to the circus again.
Location 2.5: The Werewolf of Johnson’s Creek: Circus
- Move your cursor slowly up the stairs to the trailer on the lefthand side, like you were walking up the stairs. Just as you reach the doorknob, you will get pop-up text asking “How can I get this door loose?”
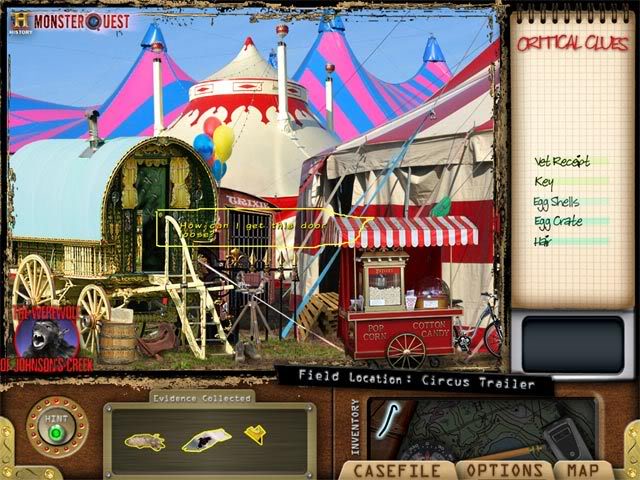
- After you see the pop-up, drag the crowbar from inventory to the door knob. This will unlock the inside of the trailer.
- Return to the map. (You have to go back to the map to get to a different location.)
Location 2.7: The Werewolf of Johnson’s Creek: Terry’s Trailer
- Search for the yellow-green clues from the Find List here.
- All of the objects are marked on the screenshot.
- You will find a vet receipt that shows that Trixie had some of her fur shaved as part of the treatment for her skin condition.
- You also find the key to Trixie’s cage. This will go into your inventory.
- Return to the map.
- Return once again to the Circus scene.
Location 2.5: The Werewolf of Johnson’s Creek: Circus
- This time drag the key from your inventory to Trixie’s cage. You will get a message that a new location has been opened. See screenshot.
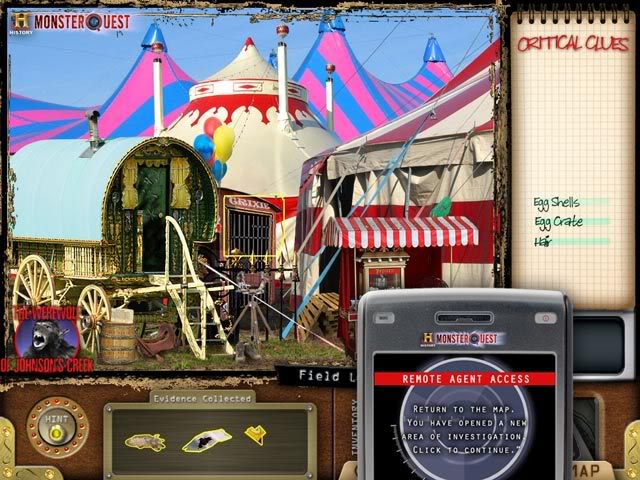
- Return to map.
Location 2.8: The Werewolf of Johnson’s Creek: The Cage
- Search for the green clues from the Find List here.
- All of the objects are marked on the screenshot.
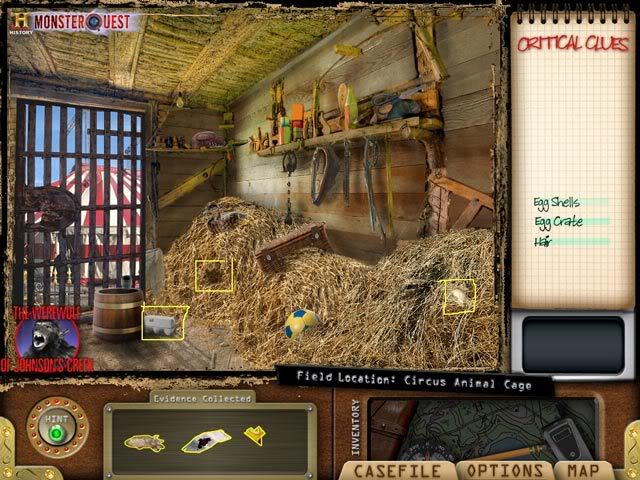
- Now you will be able to compare the fur sample from Trixie’s cage with the sample from the crash site.
- Return to map.
- Click on the lab icon.
- After you click on the Lab Icon, you may exit the game and your progress through the Hidden Object scenes will be saved.
Lab Test 2.1: The Werewolf of Johnson’s Creek: Plaster Cast Jigsaw
- You must reassemble the broken plaster cast. Remember to hold down the left mouse key while clicking the right if you need to rotate a piece.
- Color isn’t much help with this puzzle as the plaster has dried unevenly. Try working with the black edge along the lower pieces.
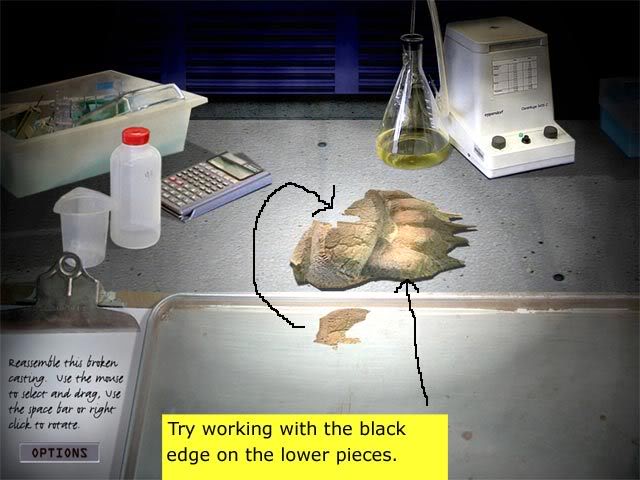
- The footprint is a bear, but not a species native to this region.

Lab Test 2.2: The Werewolf of Johnson’s Creek: Fiber Analysis
- This is easier than it looks at first.
- The top structure gives you the code for the bottom structure. Y = yellow, G = green, R = red-orange.
- Find pieces in the tray that you can put into the bottom picture so that it will match the codes on the top.
- Use the same rotation method that you used for the jigsaw puzzles.
- It is easier to get the pieces to stick if you just put the circle in the right place, rather than trying to match the straight lines.
- There is only one correct answer.
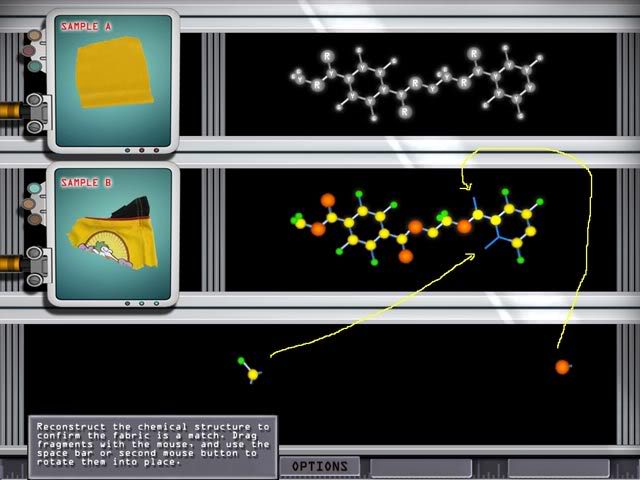
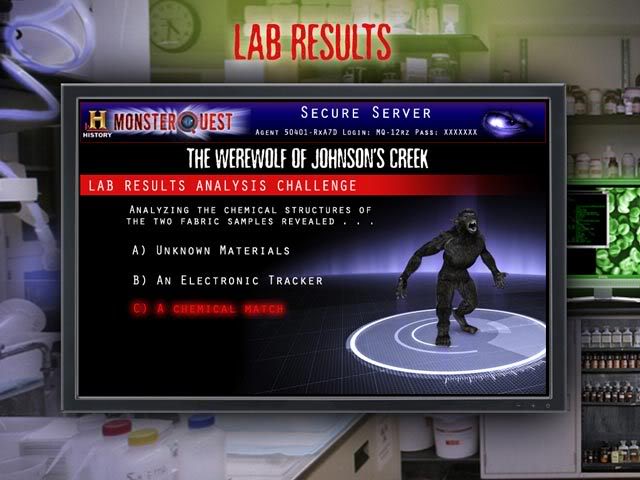
- You determine that the two fabric samples are a “chemical match.”
Lab Test 2.3: The Werewolf of Johnson’s Creek: DNA Test
- Here again you will use the top image as a pattern for setting up the bottom image.
- Move the pieces from the tray to their correct spots in the bottom image, based on the pattern in the top.
- Use the same rotation technique as the jigsaw puzzle.
- A piece will only stick if it is in the correct spot.
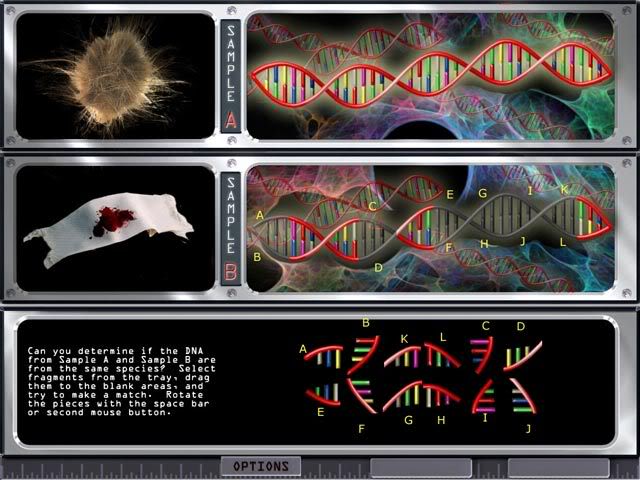
- Although the quiz answer only says that both samples come “from the same species,” you actually determined that it was the same animal. Gladys’ car hit Trixie.
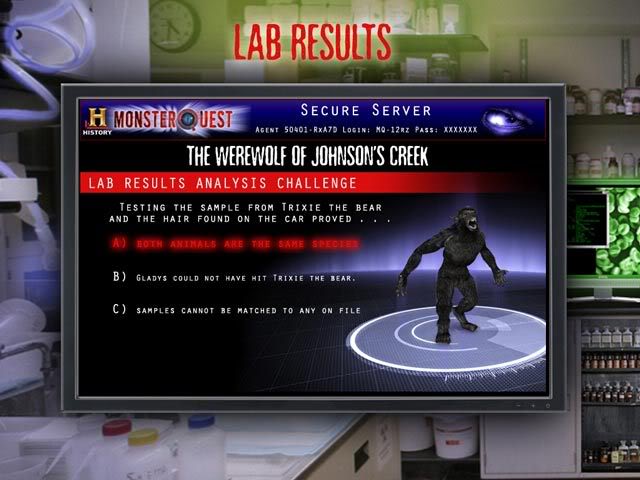
- Conclusion: This was a misidentification. The “werewolf” was actually Trixie, a circus bear who wears clothes. Instead of being a human with fur, she is a fur-bearing animal who had been shaved down to the skin in patches due to a skin condition.
- You will automatically return to the Office for your next case.
- You may exit the game once you are back in the office and your Quest 2 results will be saved.
Quest 3: El Monstro del Lago Verde (the Monster of the green lake)
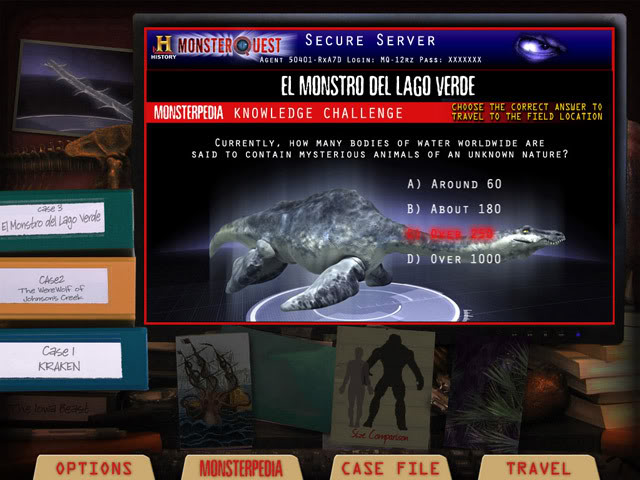
Office: Quest 3: El Monstro del Lago Verde
Objective: Read about sea monsters in the Monsterpedia- Answer to Quiz: “over 250”
You may save at this point
Travel: Quest 3: El Monstro del Lago Verde
- Talk to Javier. He will tell you about his encounter with the lake monster. He says the villagers think it is good luck. He took a few pictures, not very good because they were in a hurry to get away.
Location 3.1: El Monstro del Lago Verde: Javier’s garage
- Search for the yellow clues from the Find List here.
- All of the objects are marked on the screenshot.
- You will get to look at one of the pictures Javier took.
- Return to the map.
Location 3.2: El Monstro del Lago Verde: Dusty Alley
- Search for the green clues from the Find List here.
- All of the objects are marked on the screenshot.
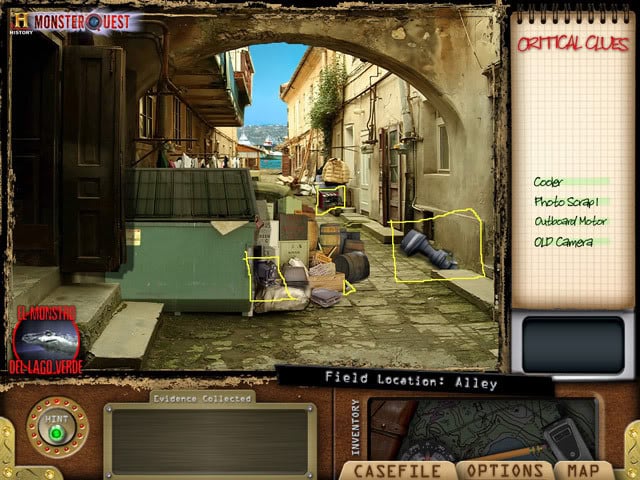
- Notice that the lock on the dumpster is rusty, but don’t do anything about it yet.
- Return to the map.
- Talk to Rodrigo, the storekeeper. He sells a lot of things related to the monster, which he says is good luck for the village. He also claims to have once found a baby monster, but it died. He says he has its skeleton locked in a case in his office. He sells necklaces that include its green scales for luck.
Objective: Find an instant camera so you’ll be ready to take your own pictures
Objective: Find one of the good luck necklaces so you can trade it to Rodrigo for a look at the skeleton.
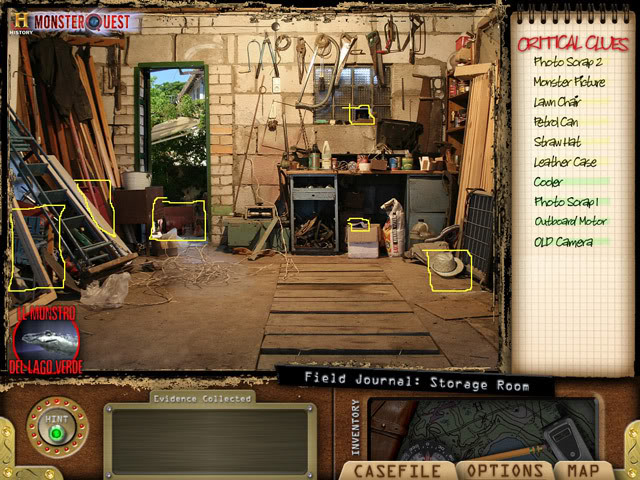
Location 3.3: El Monstro del Lago Verde: Rodrigo’s Office
- Search for the purple clues from the Find List here.
- All of the objects are marked on the screenshot.
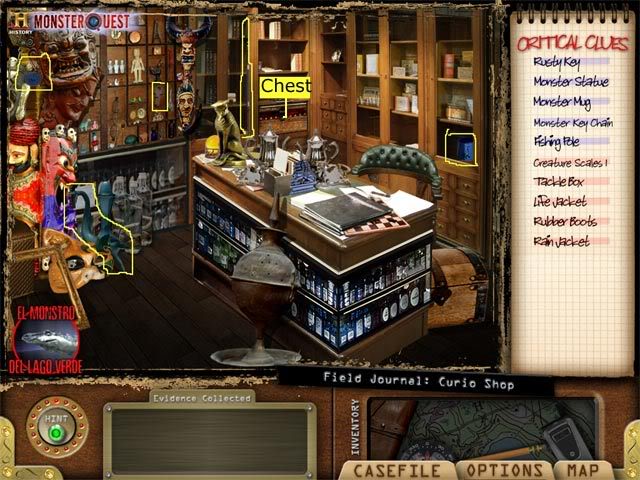
- You see the chest with the skeleton, but can’t open it yet.
- You find a rusty key that goes into inventory. Now where have you seen a rusty lock?
- Return to the map
Location 3.4: El Monstro del Lago Verde: The Docks
- Search for the pink clues from the Find List here.
- All of the objects are marked on the screenshot.
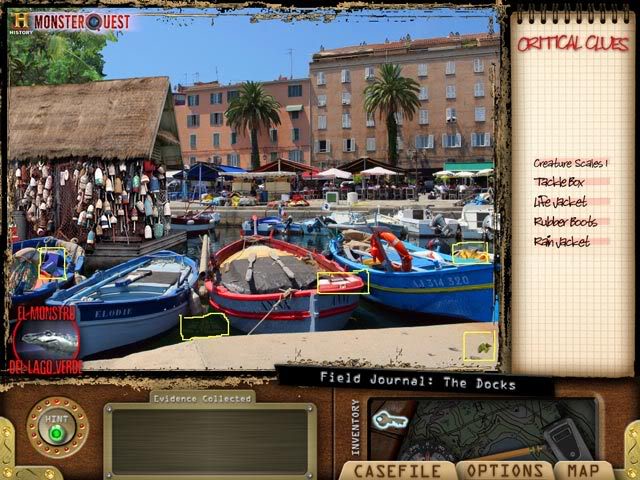
- Return to the map
Location 3.2: El Monstro del Lago Verde: Dusty Alley
- Now you are ready to use the rusty key on the rusty lock. Return to the alley. Drag the key from inventory to the lock on the dumpster.
- You find a file of ripped photos in the dumpster. They go into your evidence tray.
- Return to the map.
- Talk to Rodrigo again. He tells you that he traded one of the El Monstro necklaces to Javier. Maybe he still has it in his store.
Location 3.5: El Monstro del Lago Verde: Javier’s Store (now unlocked in the first column)
- Search for the green clues from the Find List here.
- All of the objects are marked on the screenshot.
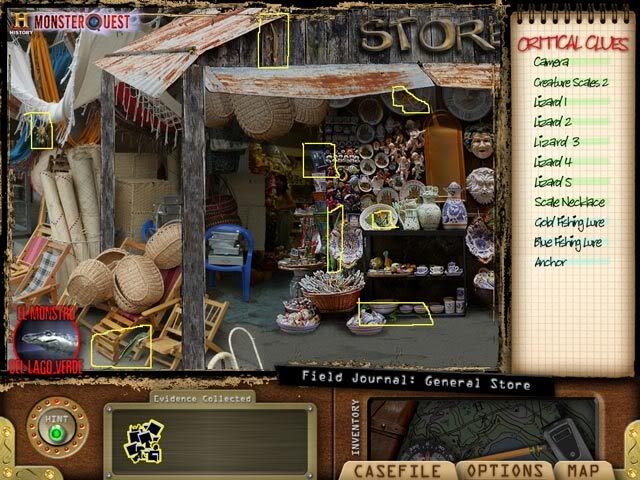
- You buy an instant camera here. That should be useful. It goes into your inventory.
- You also buy the El Monstro necklace.
- There are a lot of small lizards here! You notice more green scales.
- Return to the map
Location 3.4: El Monstro del Lago Verde: The Docks
- You return to the The Docks to do some more investigating. Were Javier and his brother really fishing like he said?
- Search for the blue clues from the Find List here.
- All of the objects are marked on the screenshot.

- About all you can say after this is that people do seem to fish from small boats here.
- Return to the map
- Talk to Rodrigo again. You offer him the necklace in exchange for a look at the skeleton. He says yes. He also says you can take a picture of it.
- Go back to Rodrigo’s office.
Location 3.3: El Monstro del Lago Verde: Rodrigo’s Office
- Rodrigo has opened the chest so you can see the skeleton. Drag the camera to it to take the picture.
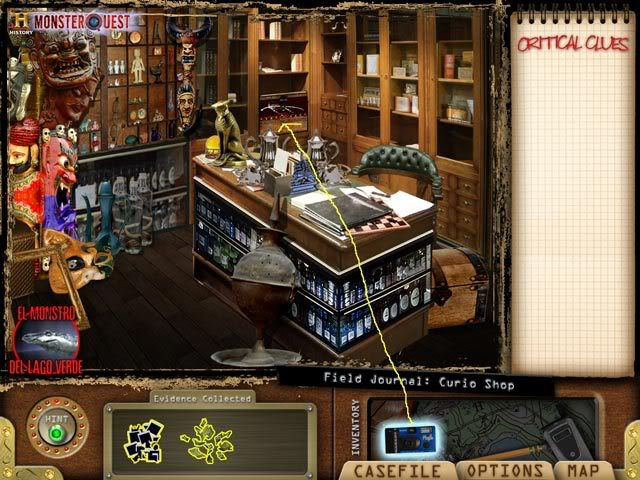
- The camera will go back into your inventory and you will see the picture in your evidence tray.
- Return to the map.
- Now you have enough evidence to go to the lab.
- Click on the lab icon.
- After you click on the Lab Icon, you may exit the game and your progress through the Hidden Object scenes will be saved.
Lab Test 3.1: El Monstro del Lago Verde: Torn up Photo Jigsaw
- Jigsaw puzzle, usual rotation trick.
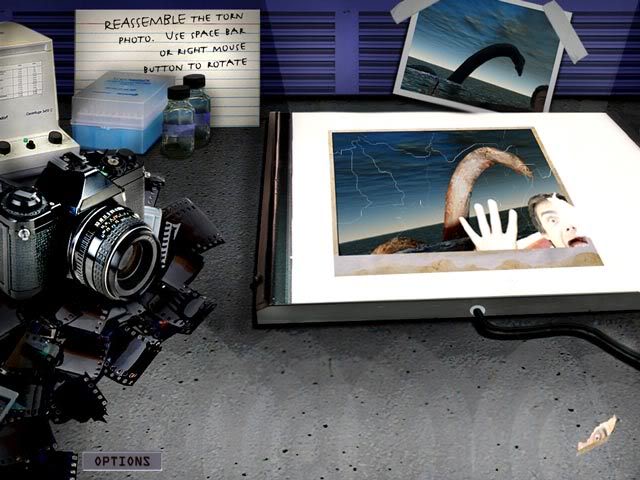
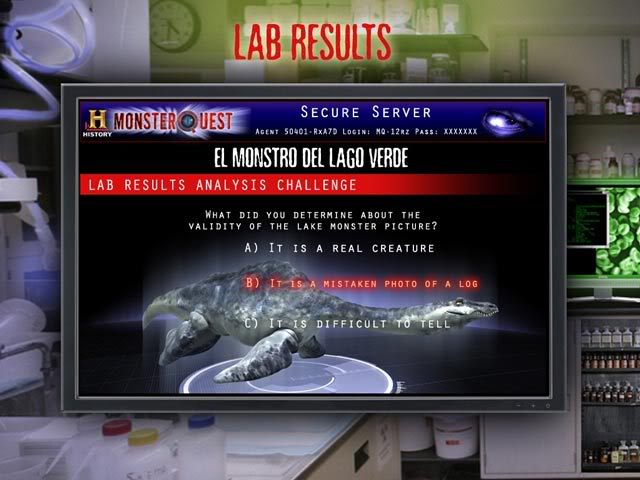
- According to the story, you can tell from this picture that the “monster” was a floating log.
Lab Test 3.2: El Monstro del Lago Verde: DNA Analysis
- For this puzzle you must take the 5 molecules from the right window and place them on top of their matching pairs in the center. Use the same rotation trick from the jigsaw puzzles. We have marked each matching pair with matching letters.
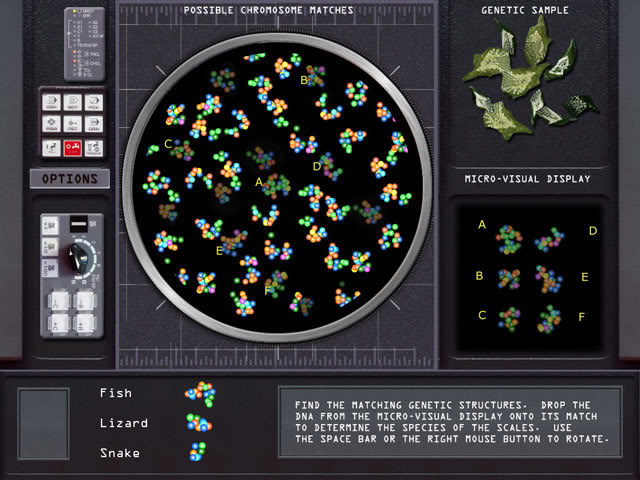
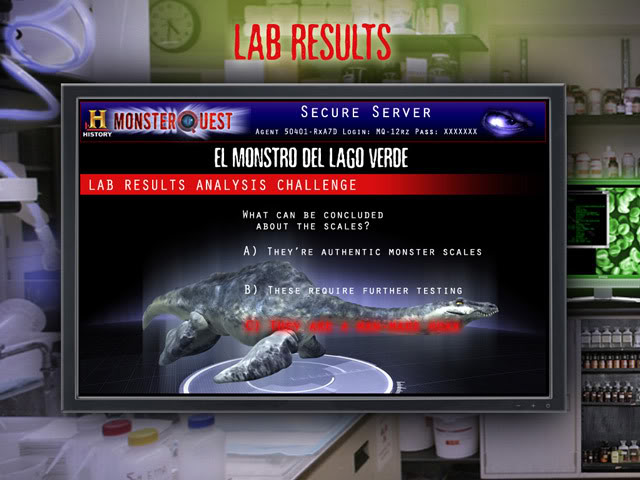
- Analysis shows that the scales are from a Gar fish.
- You conclude that the scales are part of a man-made hoax, since whoever harvested them would know they were from a fish, not a giant sea creature.
Lab Test 3.3: El Monstro del Lago Verde: Skeleton reconstruction jigsaw
- This is just a jigsaw puzzle, using the pieces on the left to build the skeleton in the top tray, using the bottom tray as a model
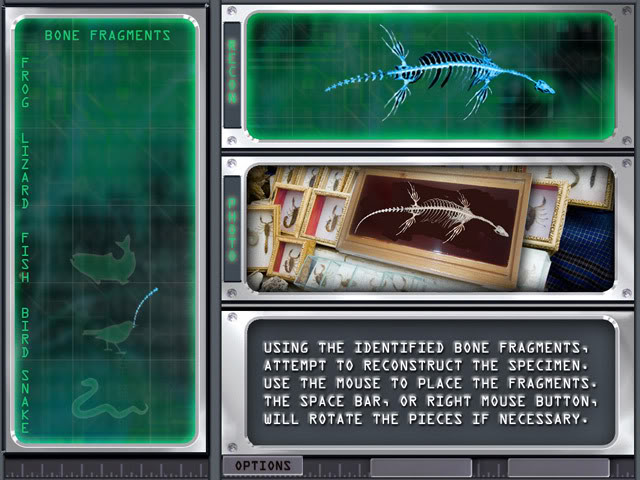
- You conclude that the “infant monster” is in fact a hoax made up of bones from several different common animals.
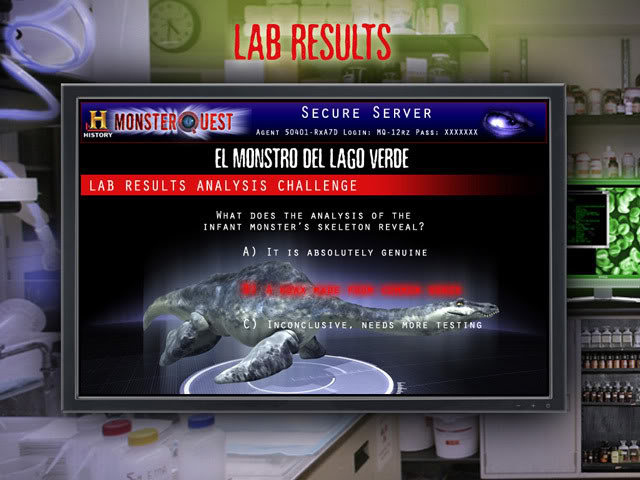
- Conclusion: The photo, the skeleton, and the scales were all deliberate hoaxes by people trying to make money. (For some reason at this point in the story the names of the characters are changed, but it’s the same characters.)
- You will automatically return to the Office for your next case.
- You may exit the game once you are back in the office and your Quest 3 results will be saved.
Quest 4: Nightmare From the Sky (mothman)
Office: Quest 4: Nightmare From the Sky
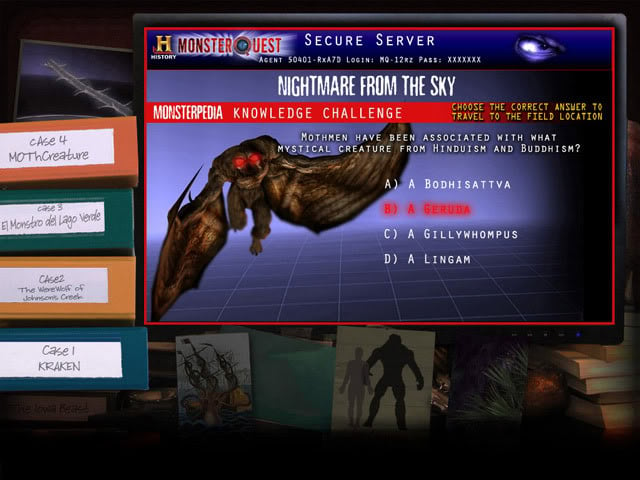
Objective: Read about mothmen in the Monsterpedia- Answer to Quiz: “Geruda” (a misspelling)
You may save at this point
Travel: Quest 4: Nightmare from the Sky
- Talk to Veronica, a local reporter. She tells you a boy has posted anonymously that he saw a giant moth-like creature. He had pictures from his cell phone. A local man, Freddy of the Dark Wing Pub, claims to have a tooth from a previous attack.
Objective: Investigate the tooth
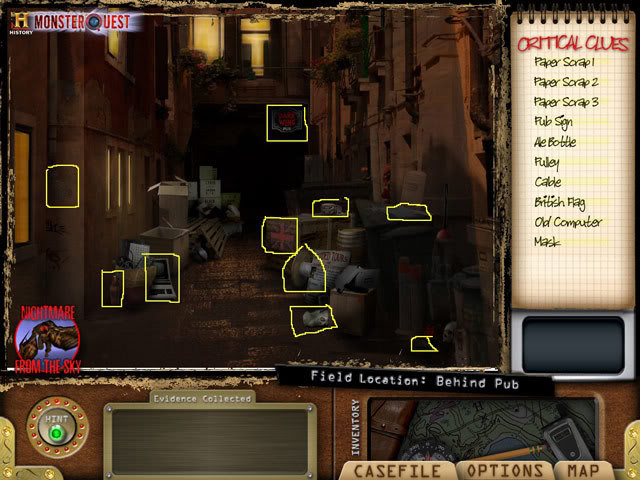
Location 4.1: Nightmare from the Sky: Alley (behind pub)
- Search for the yellow clues from the Find List here.
- All of the objects are marked on the screenshot.
- Return to the map.
- Talk to Freddy. Freddy says he knows the Dark Wing monster is real—he was attacked by it as a child, and he still has a tooth. He has inherited the pub from his father, and changed its name to the Dark Wing Pub. He invites you to a special ale tasting in the pub’s basement.
Location 4.2: Nightmare from the Sky: Pub
- Search for the pink clues from the Find List here.
- All of the objects are marked on the screenshot.
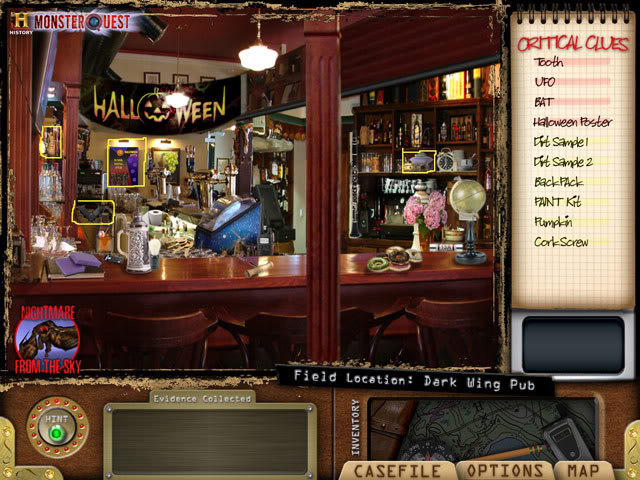
- The tooth is on the shelf behind the counter. It will go into your inventory.
- Return to the map.
Location 4.3: Nightmare from the Sky: Basement (of the Pub)
- Search for the yellow clues from the Find List here.
- All of the objects are marked on the screenshot.
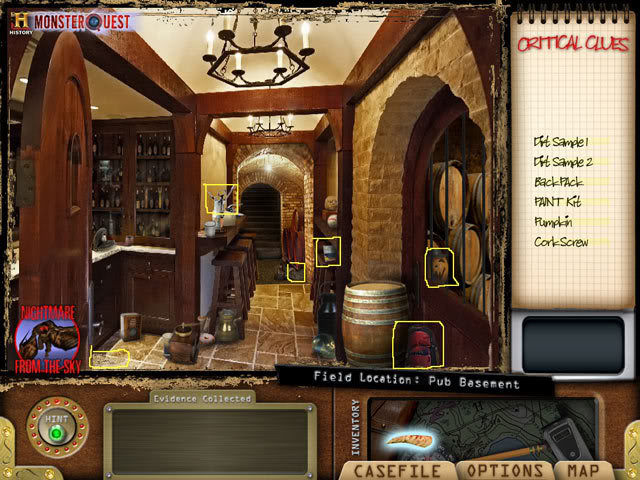
- You find some odd dirt samples in the basement.
- Return to the map.
- Talk to Freddy. You ask him if he knows who saw the creature the other night. He points out Navin (this unlocks him as a witness).
- Talk to Navin. He is a college student from a fraternity, Williams Hall. He admits he was the person who posted the Internet photos of the Dark Wing monster. He says it was evil. He also tells you it’s college break so most people are away, and he has lost his passkey. You decide to investigate the fraternity.
Location 4.4: Nightmare from the Sky: College Hall
- Search for the blue clues from the Find List here.
- All of the objects are marked on the screenshot.
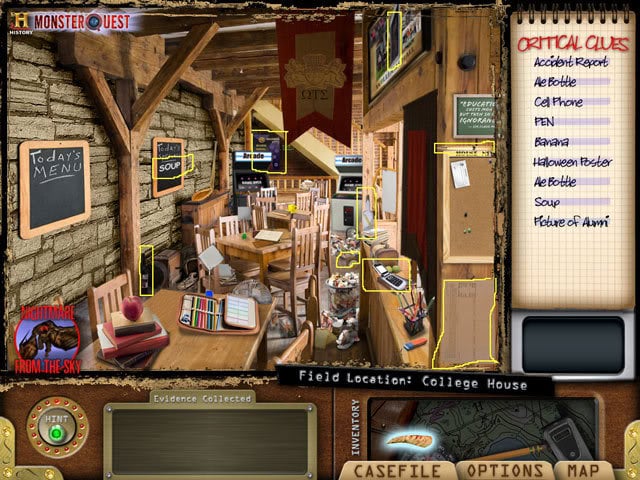
- You find a bottle of expensive ale from the Dark Wing Pub—too expensive for college students?
- You also find an alumni picture that includes Freddy. Well, that explains the ale. The alumni picture goes into your evidence tray.
- Return to the map.
- Talk to Veronica the reporter to bring her up to date. She tells you there have been reports of something happening at an abandoned factory in town. The guard is Victor Rattlegate (he is unlocked as a witness after this).
- Review your case notes. The “accident report” is about the fraternity students trying to sneak a goat into the Dean’s office.
- Talk toVictor. He says he saw something, it might be the monster, but he is pretty unclear on the details. He is afraid to go into the factory now. He says it is going to be sold soon. You decide to check out the factory.
Location 4.5: Nightmare from the Sky: Factory Center
- Search for the green clues from the Find List here.
- All of the objects are marked on the screenshot.
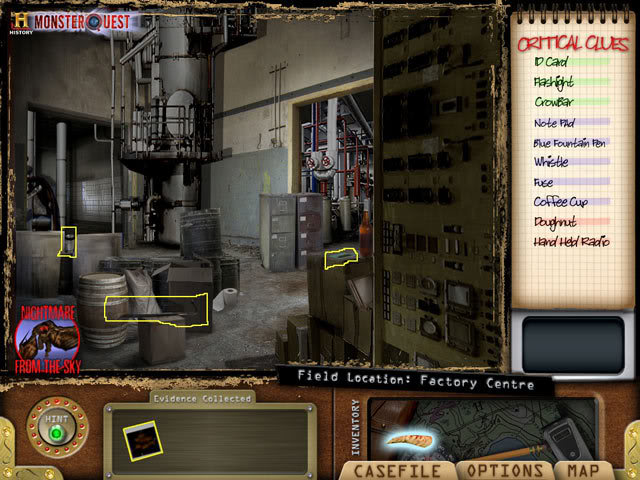
- The crowbar goes into your inventory.
- You find Navin’s missing college pass card. Why would it be here?
- Return to the map.
Location 4.6: Nightmare from the Sky: Factory East
- Search for the pink clues from the Find List here.
- All of the objects are marked on the screenshot.
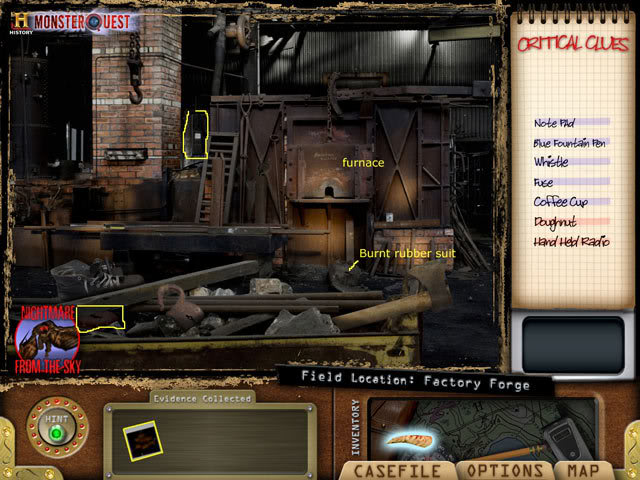
- You find a doughnut on the ground and a handheld radio (walkie-talkie). Maybe this is where the thing scared the guard.
- Pop-up text shows you a furnace and a burned rubber suit.
- Return to the map.
Location 4.7: Nightmare from the Sky: Factory West
- Search for the blue clues from the Find List here.
- All of the objects are marked on the screenshot.
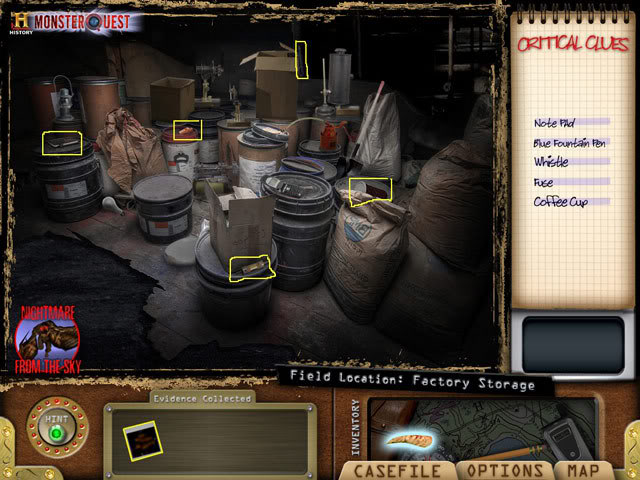
- You find a cup of Starbucks coffee. Doesn’t look like something that the guard would have. You also find a fuse that still looks good. It goes into your inventory.
- Pop-up text tells you there is oily dirt on the floor—similar to the dirt samples you found in the pub basement.
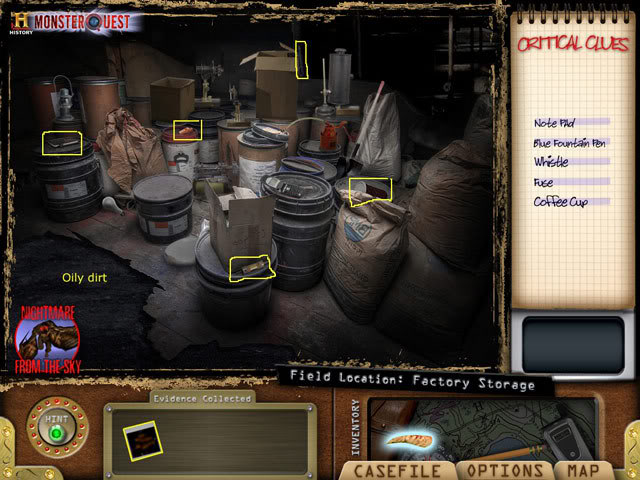
- Return to the map.
- Talk to Veronica. She has been doing some research, and found out that Freddy was bitten by a goat during a college prank. His father was a founding member of Williams house. The accident report from the college was also about a goat. Sounds like this fraternity has strong traditions.
- You decide it’s time to investigate Navin’s pictures of the monster.
Location 4.8: Nightmare from the Sky: Computer Lab
- Search for the aqua clues from the Find List here.
- All of the objects are marked on the screenshot.
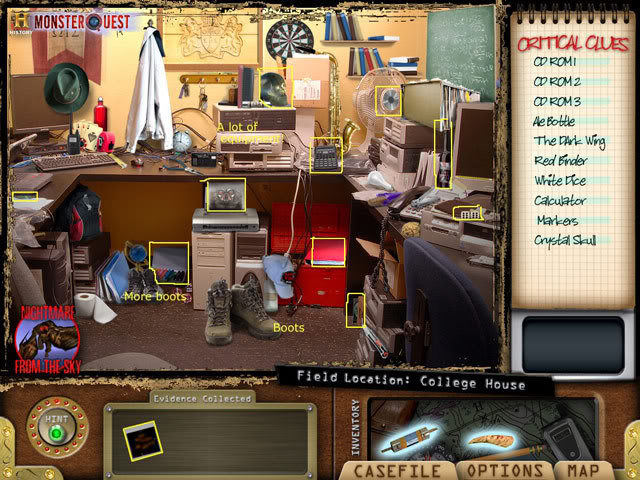
- The CD with Navin’s backup files goes into the evidence tray. There’s a lot of equipment in here! And a lot of boots…
- Return to the map.
- Talk to Veronica. She has found blueprints showing that there is a tunnel underneath the factory. She is afraid to go down there, but you decide to investigate. She has also found a bunch of small squares that look like code.
Location 4.9: Nightmare from the Sky: Underground
- Search for the purple clues from the Find List here.
- All of the objects are marked on the screenshot.
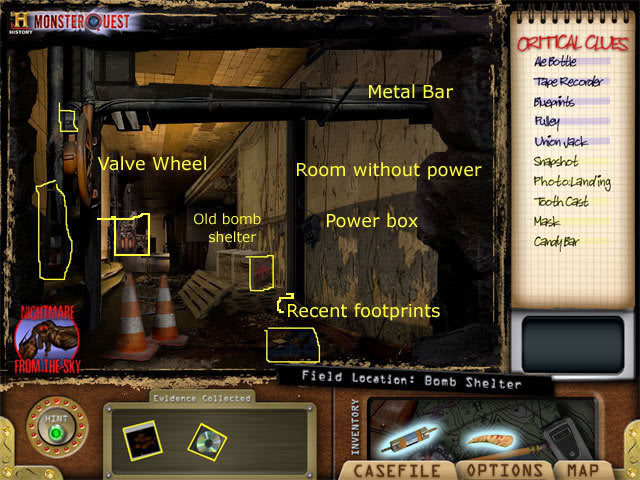
- There is a lot of pop-up text in this scene. You see recent footprints leading into a dark room without power. There is a power box on the wall. You realize this area is an old bomb shelter, probably from WWII. You wonder if people even remember it’s here.
- You also notice a metal bar from the ceiling and a valve wheel. You find a tape recorder, a pulley, and more ale from the pub. Who left the footprints?
- Drag the fuse from inventory to the powerbox to get the lights turned on.

- There’s nothing to tell you, but another location is now available.
- Return to the map.
Location 4.10: Nightmare from the Sky: Shop (workshop)
- Search for the yellow clues from the Find List here.
- All of the objects are marked on the screenshot.
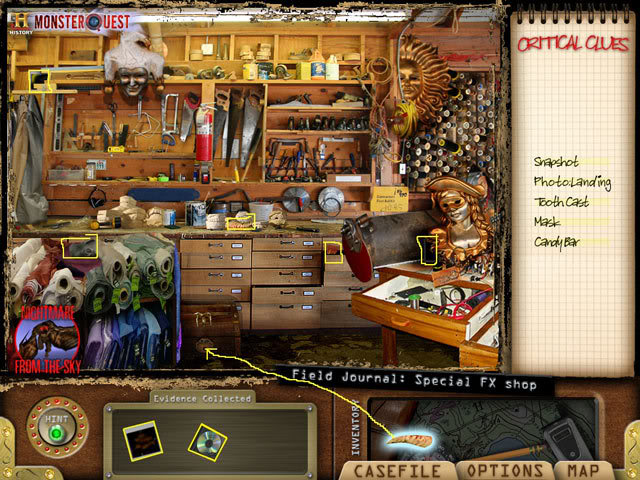
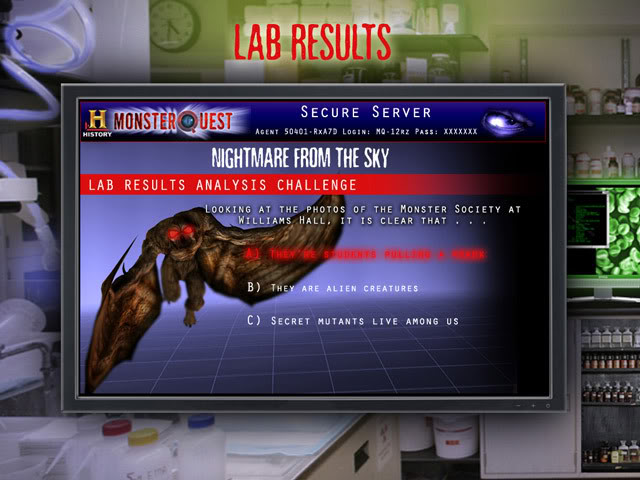
- You find a photo of The Monster Society. It’s clear from several modern items that this workshop is not abandoned—it’s being kept up to date.
- You notice a chest on the ground with a round keyhole
- Drag the tooth from inventory to the chest and it will open.
- You find a book in code which goes into your evidence tray.
- Return to the map
- Now you have enough evidence to go to the lab.
- Click on the lab icon.
- After you click on the Lab Icon, you may exit the game and your progress through the Hidden Object scenes will be saved.
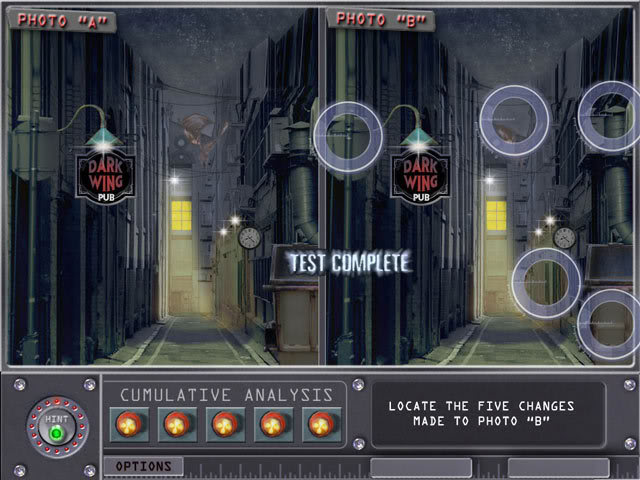
Lab Test 4.1: Nightmare from the Sky: Photo comparison
- You are looking for evidence that the photo has been altered.
- Click on anything in the righthand photo that is different from the left.
- There are 5 differences. (Oddly, only one of them seems to have anything to do with the hoax, but maybe they were just practicing their editing technique.)

- You conclude that the photos are “a digitally altered fake.”
Lab Test 4.2: Nightmare from the Sky: Photo comparison
- You are looking for proof that the Monster Society members are really the students from Williams Hall. Click on anything in the righthand photo that also appears in the lefthand photo. Things like the same sweater, hand gesture, etc. (This is the weakest point logically in the whole game, since lots of people might have the same sweater.)
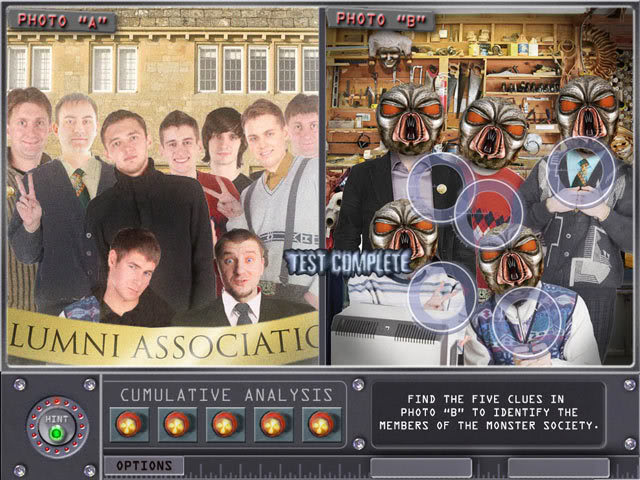
- You conclude the Monster Society members are probably “students pulling a prank.”
Lab Test 4.3: Nightmare from the Sky: Code Analysis
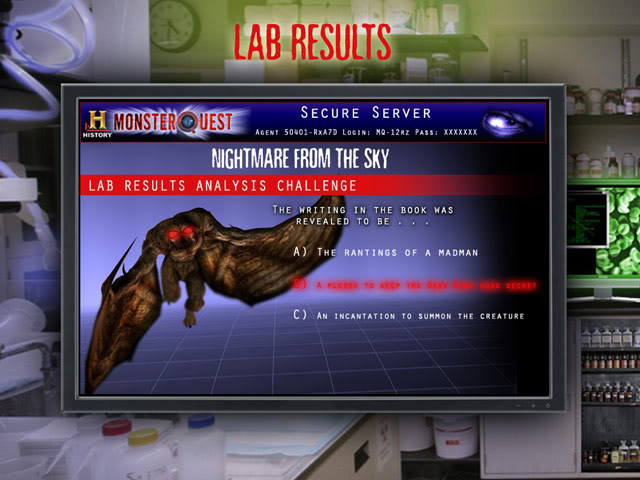
- You will now decode the book you found by placing the squares that Veronica found over the top of the pages that are hard to read.
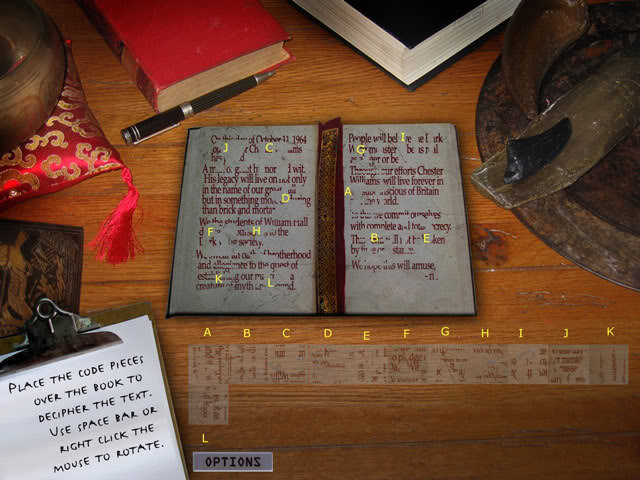
- This will reveal that the Dark Wing monster is a hoax that the students have pledged to maintain and keep secret.
- Conclusion: The Dark Wing Monster is a hoax maintained over many years by a college fraternity.
- You will automatically return to the Office for your next case.
- You may exit the game once you are back in the office and your Quest 4 results will be saved.
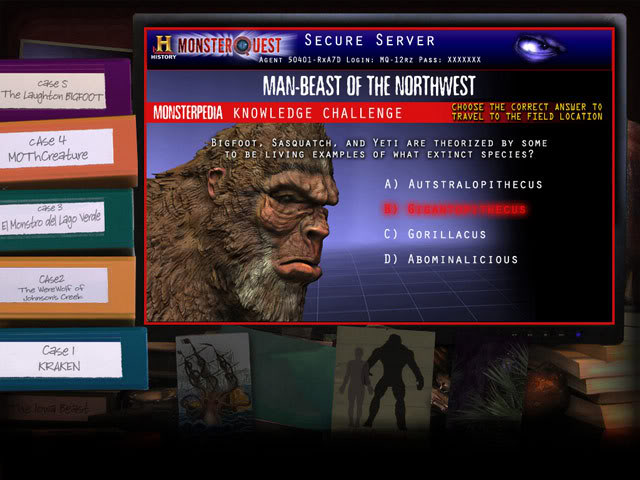
Quest 5: Man-Beast of the Northwest (Big Foot)
Office: Quest 5: Man-Beast of the Northwest
Objective: Read about Big Foot in the Monsterpedia- Answer to Quiz: “Gigantopithecus”
You may save at this point
Travel: Quest 5: Man-Beast of the Northwest
- Talk to Gordon, a local hotel owner. He tells you a local couple, Sarah and Todd Marshall, had a Sasquatch encounter in the woods. Sarah is an experienced camper, but Todd spent one night there and then came back to the hotel. Gordon also tells you he stocks a lot of junk food.
Objective: Investigate the sighting.- Talk to Sarah (now unlocked as a witness). She didn’t see an animal. She sounds like a credible witness. She said she did hear wood-knocking and saw tracks, but she felt like she was being watched and didn’t stay to investigate.
Objective: Check out the footprints Sarah reported.
Objective: Look for broken sticks associated with wood-knocking, a previously reported Big Foot behaviour.
Location 5.1: Man-Beast of the Northwest: Creek
- Search for the green clues from the Find List here.
- All of the objects are marked on the screenshot.
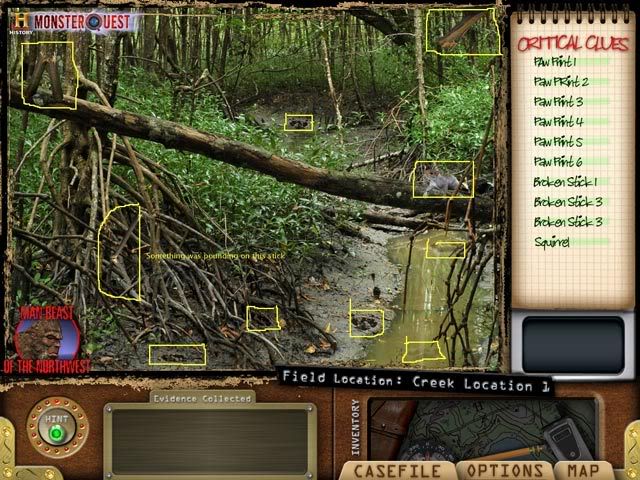
- You discover both the footprints and the broken sticks Sarah spoke of. You, too, feel like you’re being watched.
- Return to the map.
- Sarah’s husband, Todd, has been unlocked as a witness. Talk to Todd. Todd says he didn’t actually see any creatures, but their campsite was trashed. He says he’s trying to follow a new lifestyle and a healthier diet but the campsite getting attacked was too much for him—he found a room at a hotel. You decide to investigate the campsite.
Location 5.2: Man-Beast of the Northwest: Campsite
- Search for the yellow clues from the Find List here.
- All of the objects are marked on the screenshot.
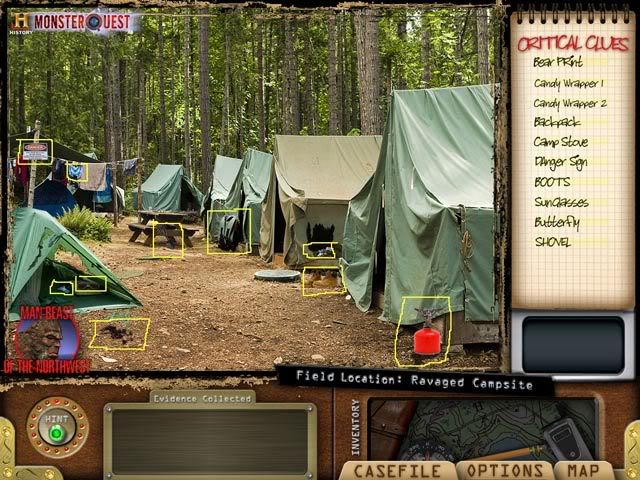
- You find several candy wrappers and a bear footprint.
- Return to the map.
- Talk to Todd again. He admits he was hiding candy wrappers around the camp. It looks like that attracted a bear. But the footprint from the camp doesn’t match the ones you found at the creek. Todd suggests you talk to Gordon, the hotel owner, again, since he is really into Big Foot lore. He even says he has a Big Foot scalp. Todd also tells you there was a crazy guy who came through their camp claiming to be part Big Foot, but Todd didn’t believe him.
Objective: Examine the Big Foot scalp.- Talk to Gordon again. Gordon says, yes, he has a Big Foot scalp, but he didn’t get it from the crazy guy Ben. He got it from Chad Michaels, a hunter, who got it from a native friend who said his grandfather took it from a Sasquatch during a fight in the woods. Gordon keeps it with his other stuff in his junk room.
Location 5.3: Man-Beast of the Northwest: Junk Room (hotel)
- Search for the aqua clues from the Find List here.
- All of the objects are marked on the screenshot.
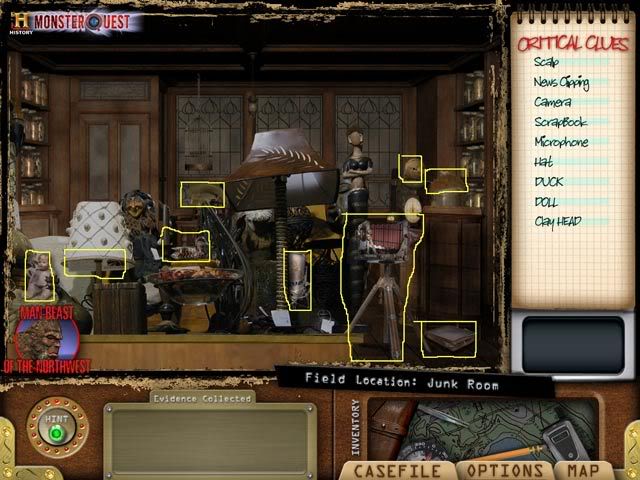
- You will be able to read a newspaper clipping that has more information about Chad Michaels, the hunter who gave Gordon the scalp. He claims to have had an actual encounter with a sasquatch.
- Return to the map.
- Talk to Chad Michaels (now unlocked). He says he used to be a Big Foot hunter. But then one day he caught one in a trap, and he realized they just want to be left alone. It changed his life. He let the creature go and stopped hunting them. Left all his equipment and everything. He tells you you can go look if you want. He had a hunter’s shack near the creek where you found the footprints.
- You can now investigate either the shack or the woods around it. We started with the shack. (If you start with the woods, you will have to go to the shack and then come back before you can complete the inventory task.)
Location 5.4: Man-Beast of the Northwest: Hunter’s Shack
- Search for the pink clues from the Find List here.
- All of the objects are marked on the screenshot.
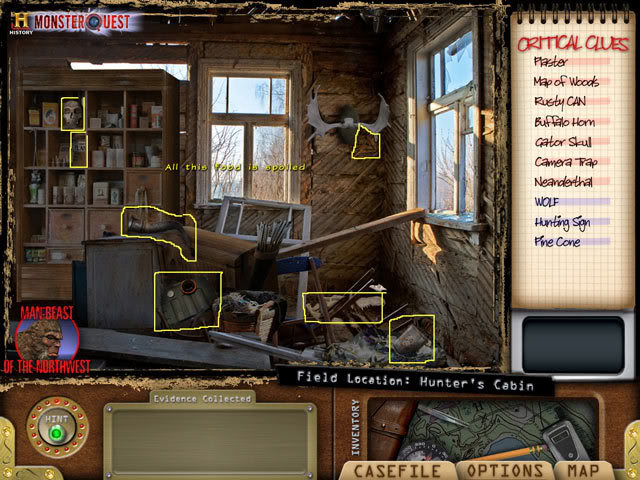
- You will get a pop-up telling you the food is spoiled. So at least it seems Chad Michaels is telling the truth that he stopped hunting.
- You will find some plaster. It goes in your inventory.
- You also find a map showing where Chad Michaels had his camera traps.
- Return to the map.
Location 5.5: Man-Beast of the Northwest: Woods outside the cabin
- Search for the blue clues from the Find List here.
- All of the objects are marked on the screenshot.

- You will get pop-up text pointing out a big footprint.
- Drag the plaster from inventory to the footprint to make a cast.
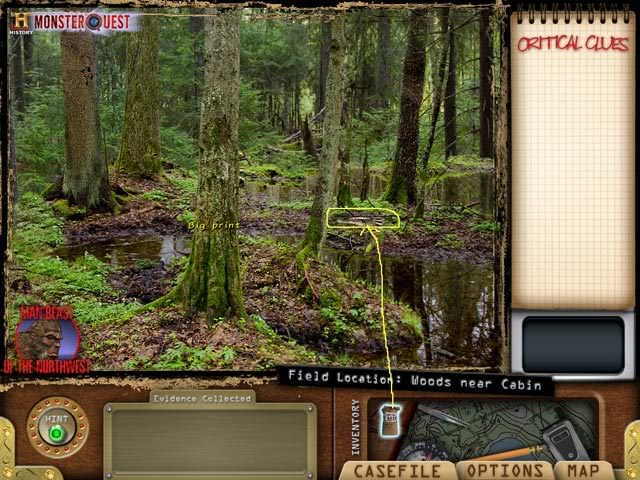
- Return to the map.
- Ben is now unlocked as a witness. Talk to Ben. (He’s the crazy guy from the woods.) He mentions the casting you took. He says he saw something big down by the cabin last night, so the footprint might really be a sasquatch. Three new locations are now unlocked.
Objective: Check Chad’s camera traps.
Objective: Check Chad’s trap for hair samples.
Location 5.6: Man-Beast of the Northwest: Marsh
- Search for the yellow clues from the Find List here.
- All of the objects are marked on the screenshot.
- Although the story and the Find List indicate you are looking for hair samples, the pictures are actually 4 different tan bear traps.
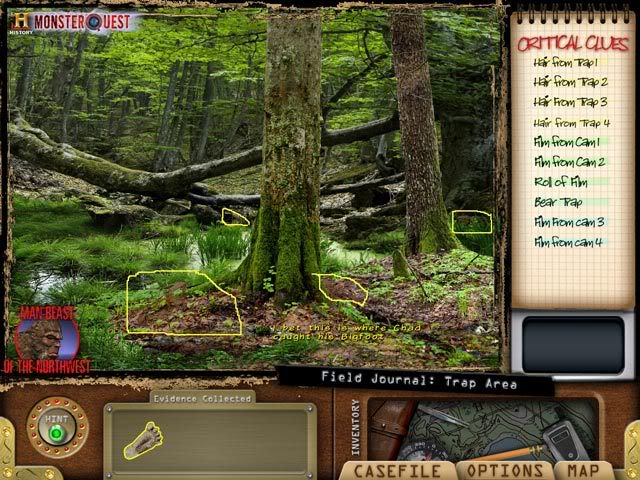
- You will get pop-up text suggesting this is where Chad Michaels trapped the animal.
- There will now be hair samples in your evidence tray.
- Return to the map.
Location 5.7: Man-Beast of the Northwest: Trail
- Search for the green clues from the Find List here.
- The camera traps are like the one you found in the Hunter’s Shack: black rectangular case with a red lens. The easiest way to find them is to look for the red lens.
- All of the objects are marked on the screenshot.
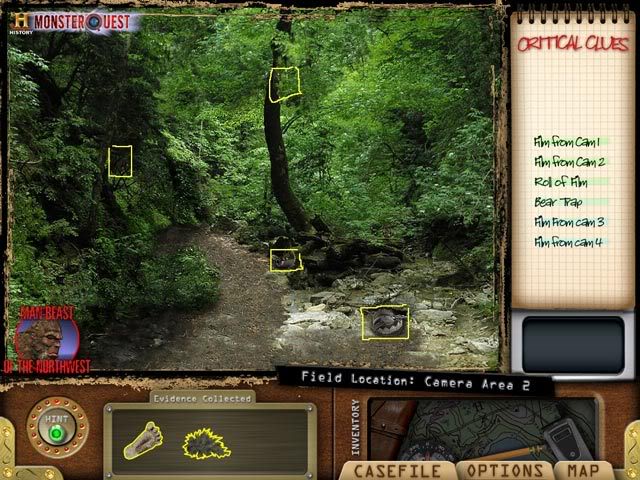
- Film from the camera will now be in the evidence tray.
- Return to the map.
Location 5.8: Man-Beast of the Northwest: Ravine
- Search for the aqua clues from the Find List here.
- All of the objects are marked on the screenshot.
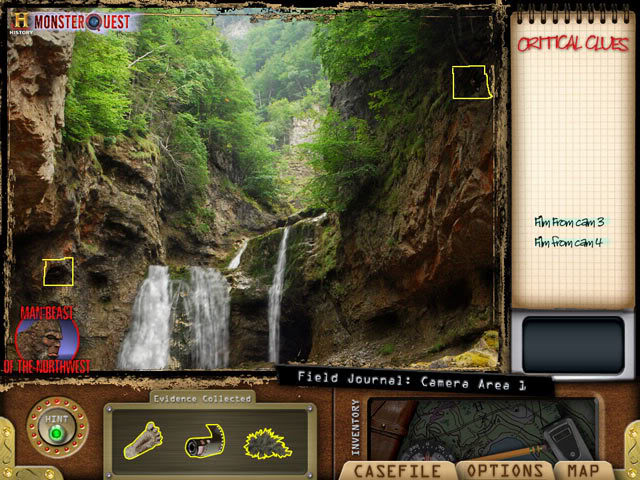
- Return to the map.
- Now you have enough evidence to go to the lab.
- Click on the lab icon.
- After you click on the Lab Icon, you may exit the game and your progress through the Hidden Object scenes will be saved.
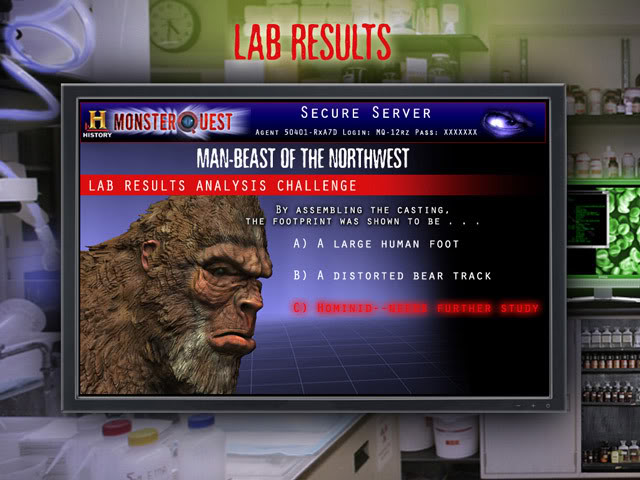
Lab Test 5.1: Man-Beast of the Northwest: Plaster Case jigsaw
- What is it with you and plaster casts? Oh, well. You have to put this one back together just like the one for the “werewolf.” Same rotation method.
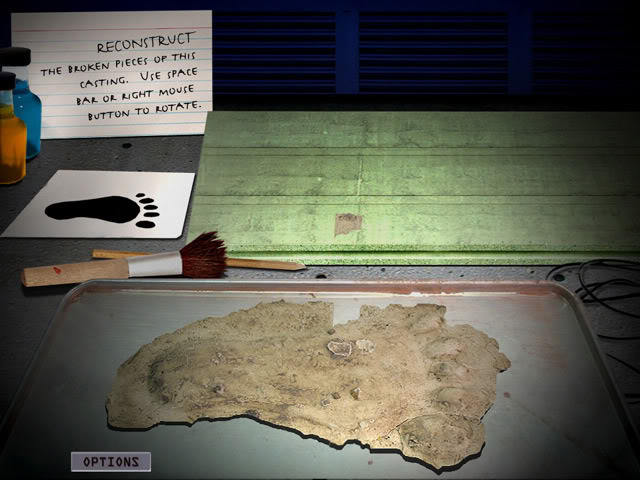
- The footprint is of no known animal—but footprints are quite easy to fake. Results inconclusive. They are large hominid prints, but need further investigation.
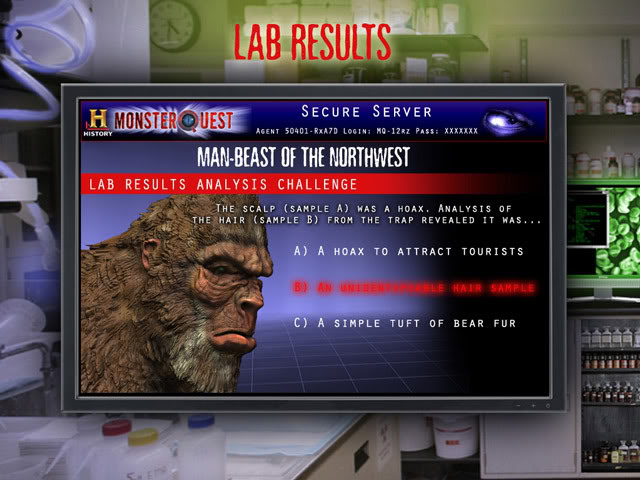
Lab Test 5.2: Man-Beast of the Northwest: DNA Analysis of Hair Samples
- You are comparing the hair samples from the scalp on the left and the tufts of hair you found in the traps on the right. You can only click on the right. Identify 5 differences.
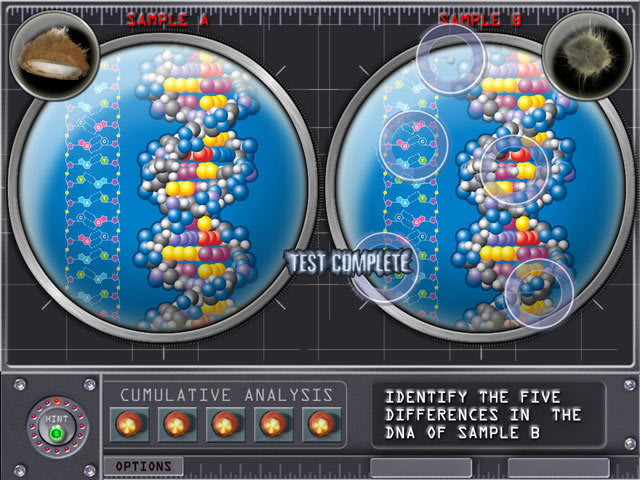
- The hair on the left is from common animals, so the scalp is a hoax. The hair on the right (from the trap) is an unidentifiable hair sample.
Lab Test 5.3: Man-Beast of the Northwest: Photo comparison
- You are comparing two sets of photos taken at different times in the woods. Mark any differences on the bottom set. There will be 5 differences in all. You are looking for glimpses of a large, reddish-brown humanoid creature.
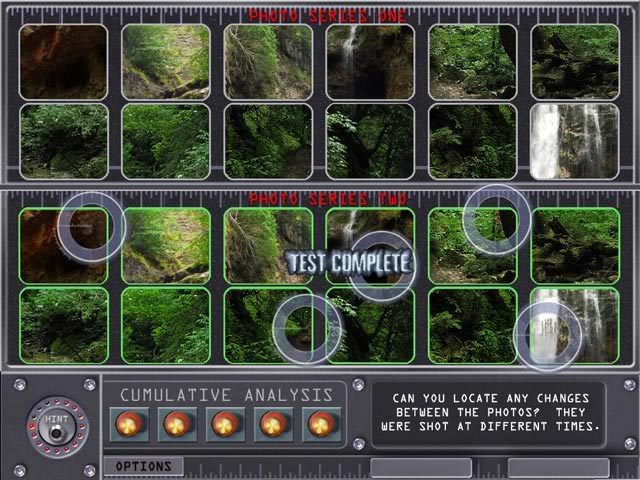
- There was something on the pictures, but you can’t say positively what it was. So you conclude that nothing has been proven: further study is needed.
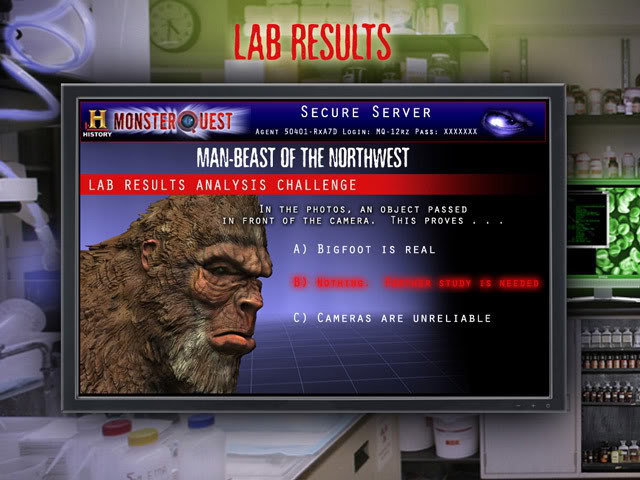
- Conclusion: You were able to determine that it was a bear that attacked the campsite and that the Sasquatch scalp from the hotel was a 100 year old hoax. But the evidence regarding Chad Michaels’ traps and the sighting in the marsh was inconclusive.
“;

More articles...
-
Best Horror Games On Itch.io – July 2026
Across a bounty of subgenres. -
Grow A Garden 2 Base Price List
What's the most valuable crop? -
Evomon Best Starter [Leafbun, Blazpup, or Bubble?]
Grass-type, Fire-type, or Water-type?