![Digimon UP Tier List [Supports, Buddies, and Partners]](/wp-content/uploads/2026/07/digimon-up-tier-list.jpg "Digimon UP Tier List [Supports, Buddies, and Partners]")
Digimon UP Tier List [Supports, Buddies, and Partners]
These Digimon will get you UP the leaderboard.

![Haze Seas Boss Drops [Chances, Locations, and How to Spawn]](/wp-content/uploads/2026/07/haze-seas-boss-drops.jpg "Haze Seas Boss Drops [Chances, Locations, and How to Spawn]")

Welcome to Gamezebo's walkthrough of Mishap: An Accidental Haunting. General Game Information Hidden Object game where we find the Burtons' home being haunted by a group of ghosts. With the help of ghost-hunter Milton Hobblepop, you'll be searching for objects, clues, gadget parts, and hidden ghosts. You'll also face each master spectre in a minigame showdown. There are 8 chapters with 4 rooms each, for a total of 32 rooms in all. There is no timer for the hidden object are…
a:1:i:0;a:2:s:13:”section_title”;s:42:”Mishap: An Accidental Haunting Walkthrough”;s:12:”section_body”;s:41945:”
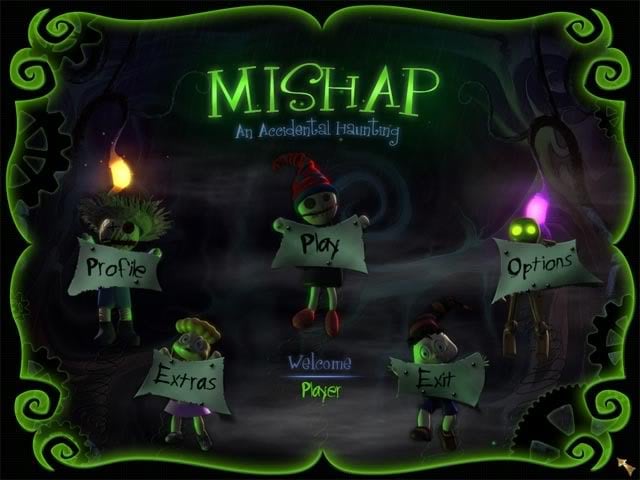
Welcome to Gamezebo’s walkthrough of Mishap: An Accidental Haunting.

General Game Information
Game Elements
Options
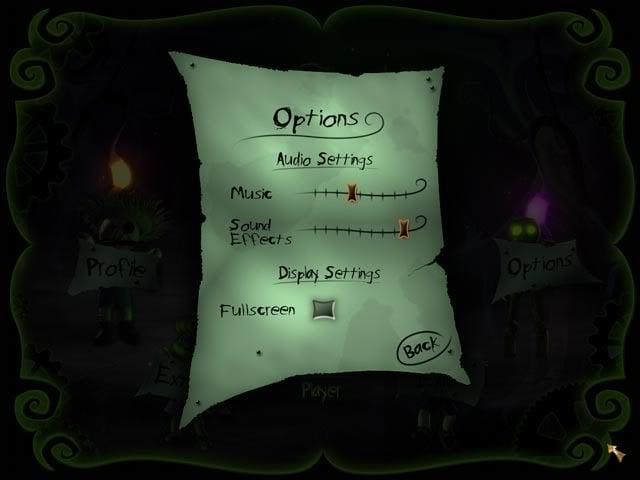
You can adjust the game’s music and sound effects volume, as well as change the screen resolution size.
Extras
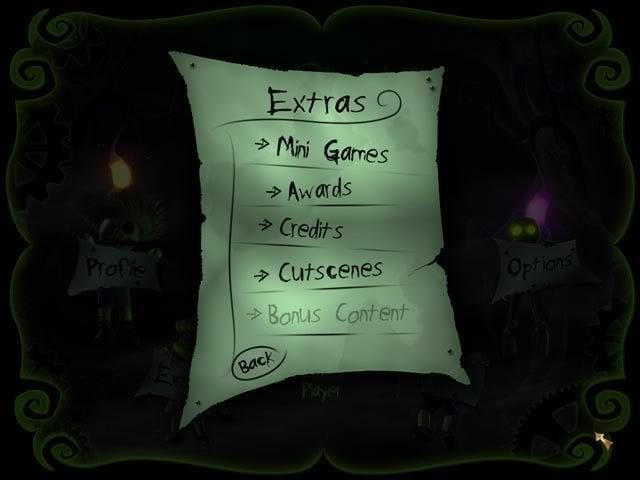
Playing the game unlocks extra features that are accessible from the main menu.
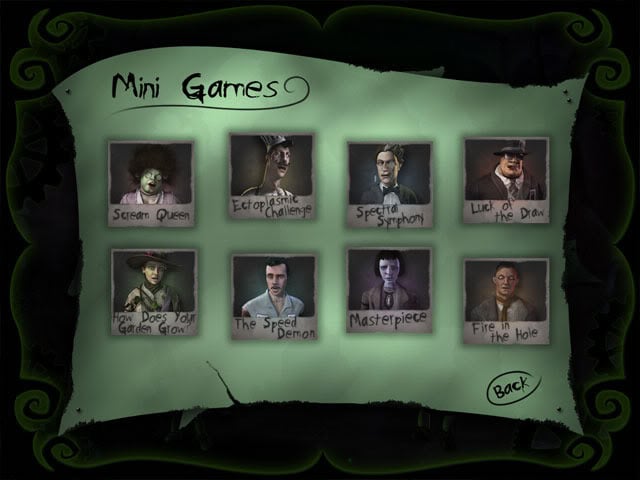
You can replay mini-games that you’ve already played or skipped earlier.
View trophies you’ve won. Earn all 8 gold trophies to unlock the secret award. Click on gold or silver trophies to see bonus artwork of the ghosts.
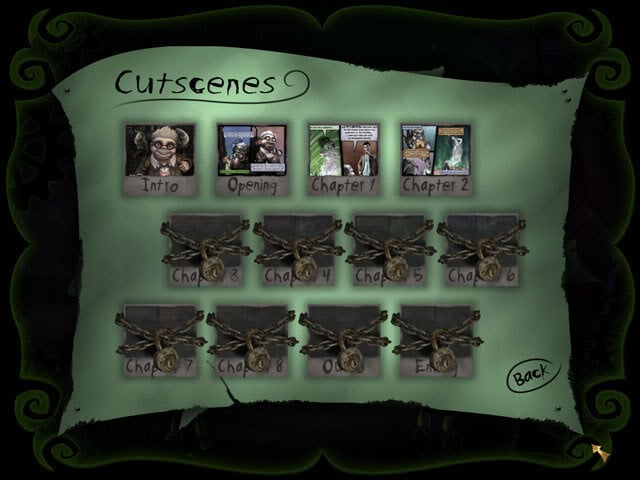
Watch cutscenes from chapters you’ve played, or scenes you may have skipped by mistake.
Sample Game Scene
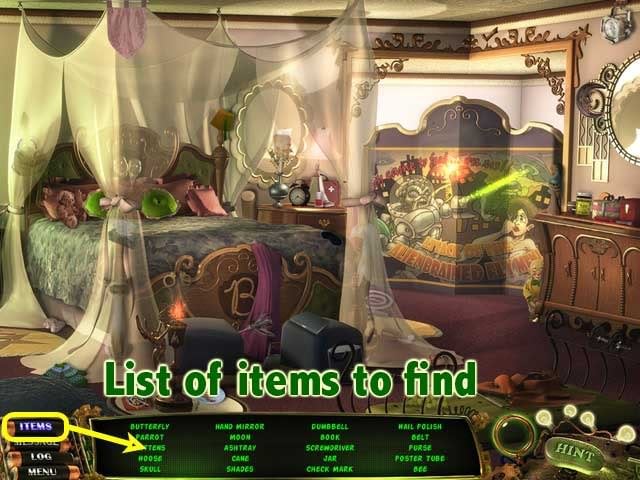
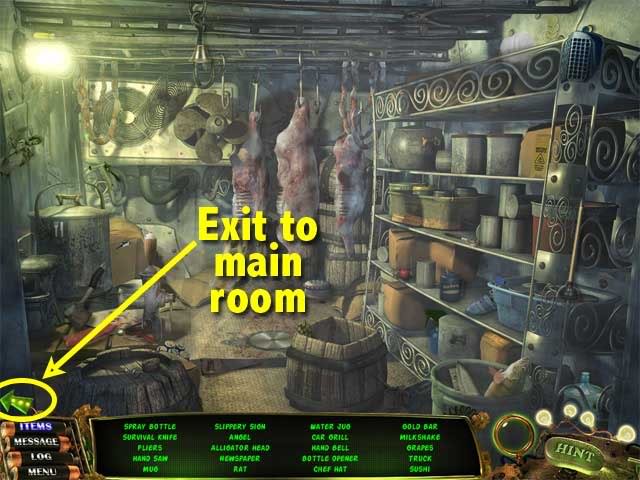
Here you will see the list of items you are required to find in each scene.
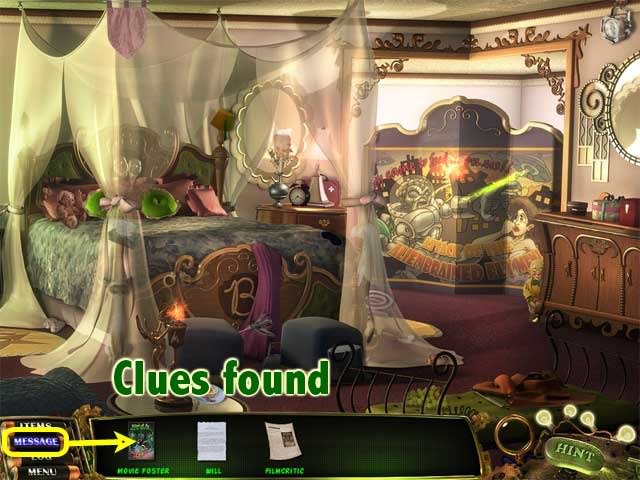
Here you’ll find the messages that you have collected. These clues give insights on how to appease the ghosts.
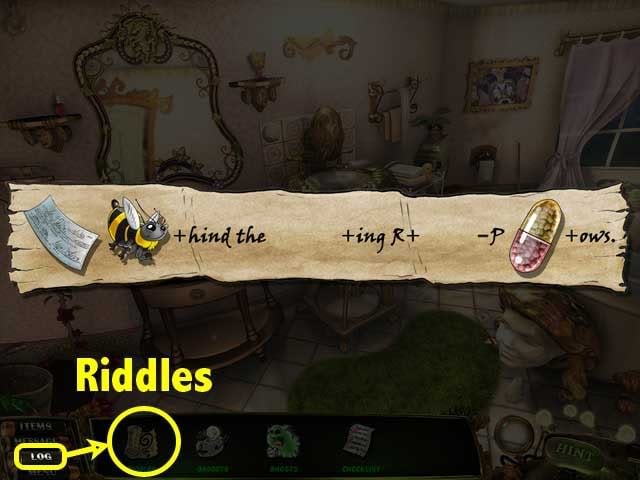
Once you find the missing pieces of the riddle, it will be available to solve. The riddle will provide you with the location of the last gadget piece.
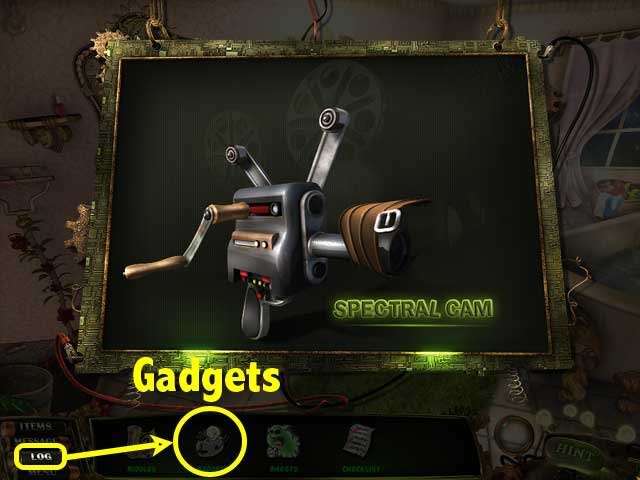
Each gadget needs 5 pieces that are scattered around the rooms. Here you can track the progress of the gadget’s completion.
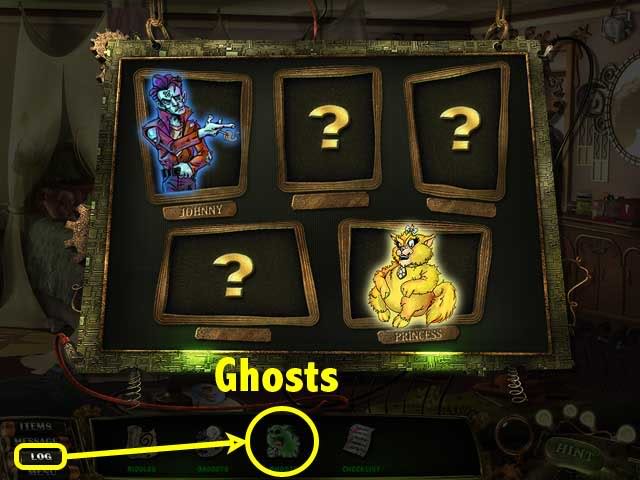
Each chapter has 5 hidden ghosts. Here you can view which of the ghosts you’ve captured.
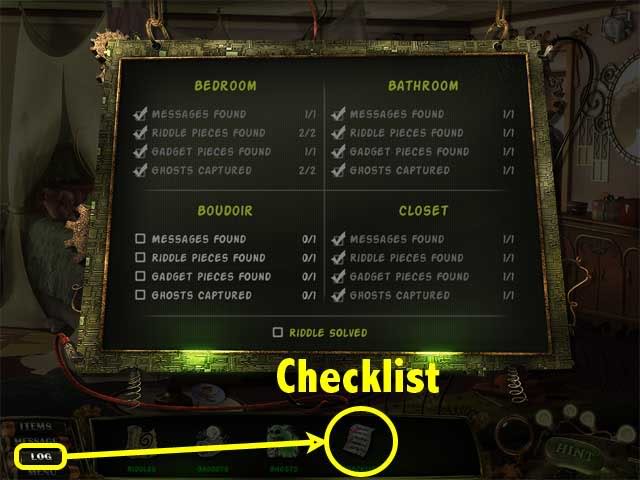
Here you’ll find your task list. View this to check your progress for each chapter, and to see what else needs to be done in order to advance to the next area of the house.
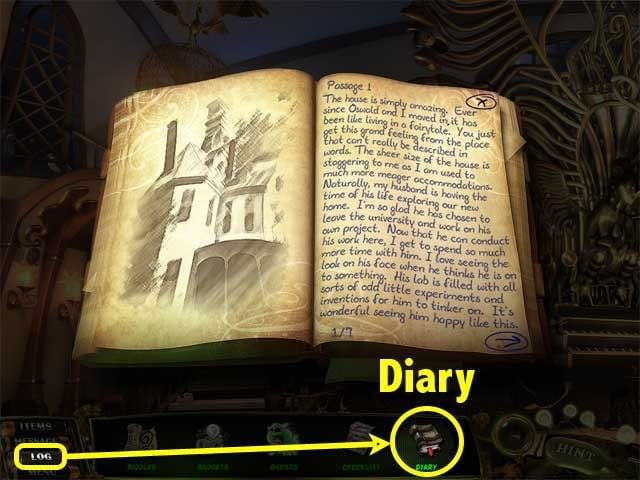
A new diary page is revealed after every chapter. Read to find out the back story of the house’s original occupants, which ties into the mysterious hauntings.
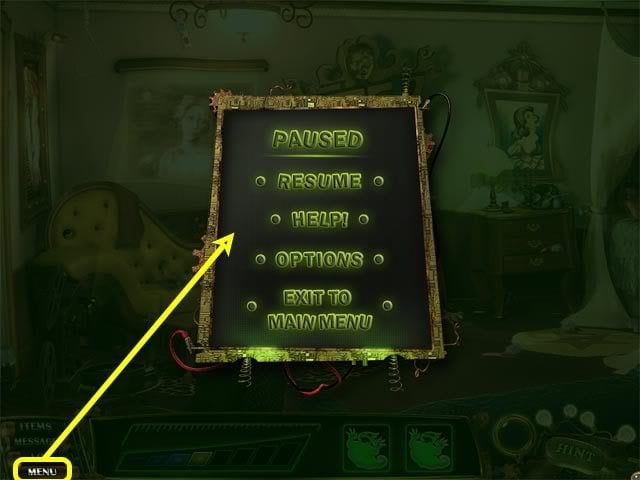
Clicking on Menu brings up a dialog screen. From here you can exit the game, access Help, and change Options.
General Tips

WALKTHROUGH
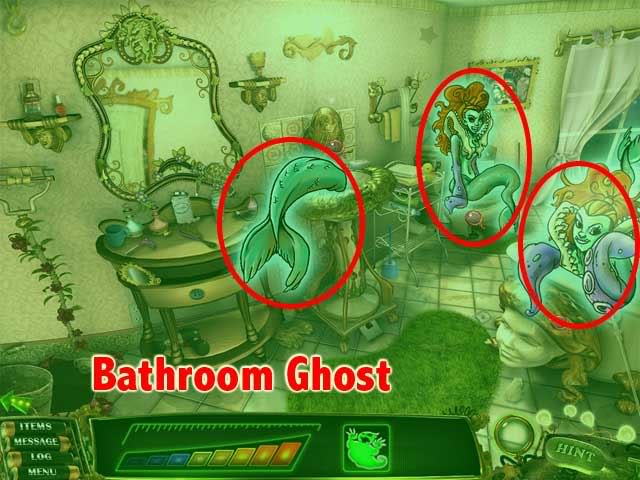
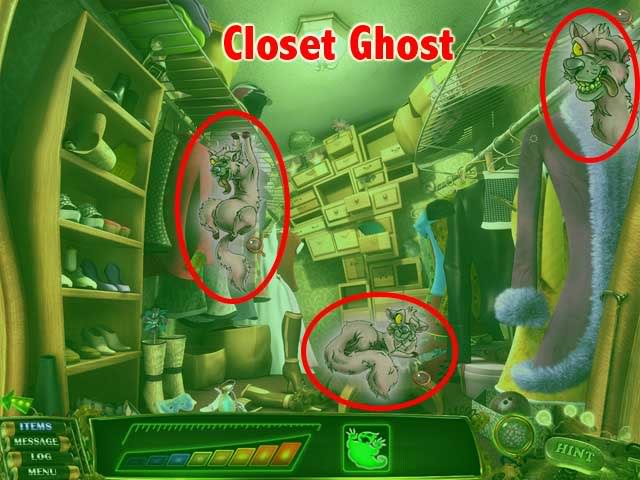
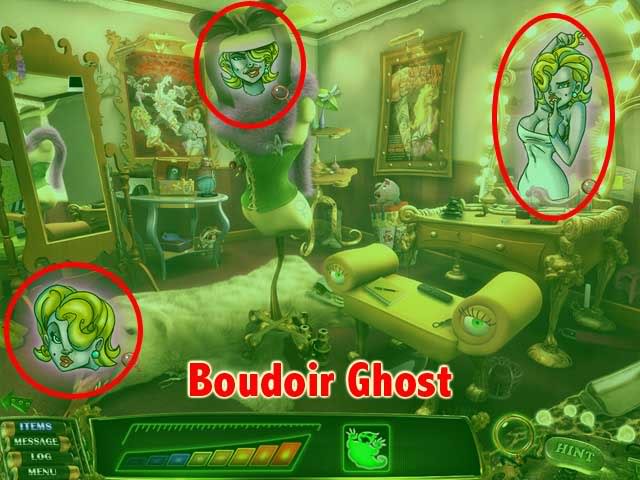
Chapter 1: Bedroom, Bathroom, Closet, Boudoir
The main Bedroom is a scrolling panoramic scene. In the room are doorways to the Bathroom, Closet and Boudoir.
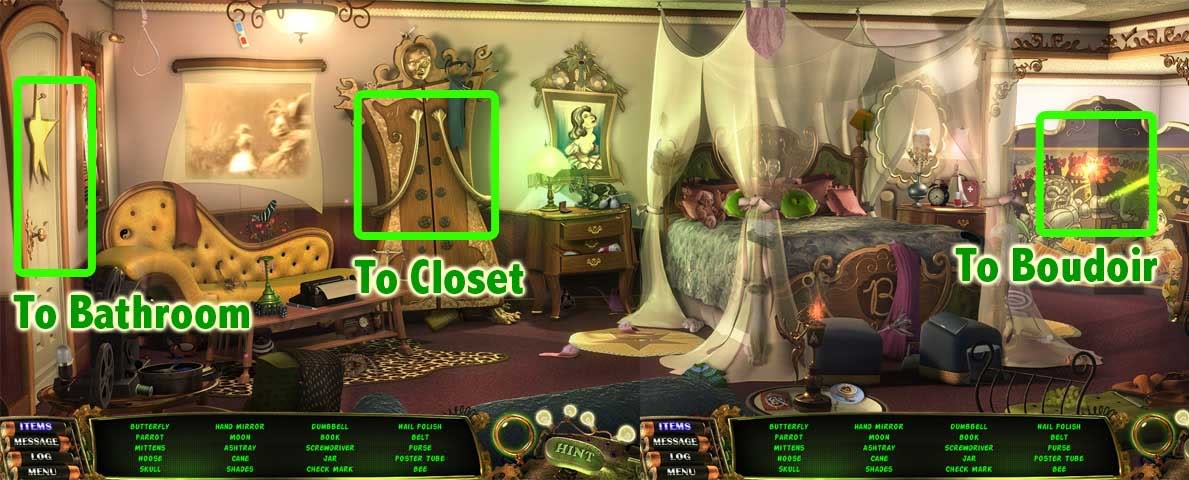
Click on the green monocle to enter Ghost Vision mode. Below are the locations of the hidden ghosts for all the rooms in this chapter:
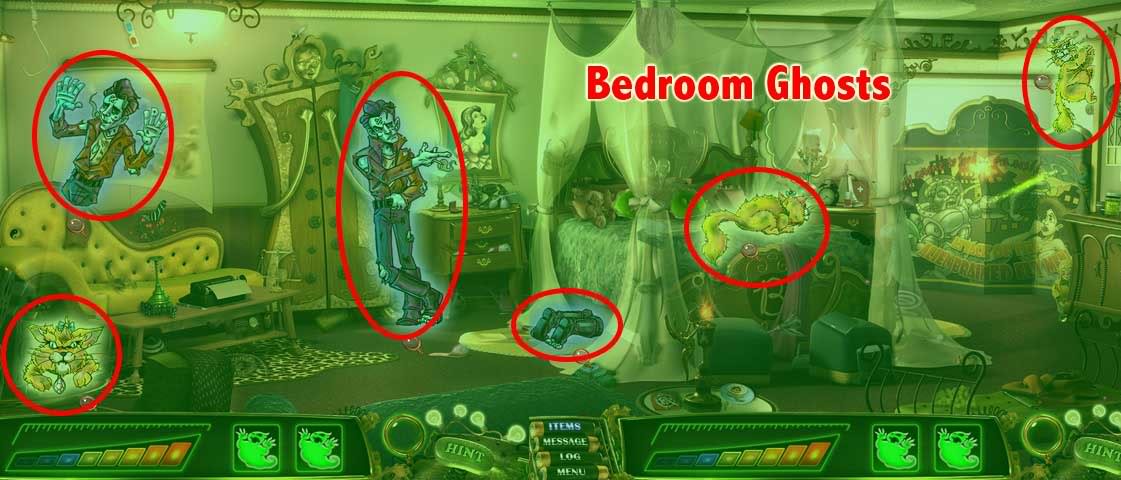
The main room has 2 ghosts, and the smaller rooms have 1 ghost each.
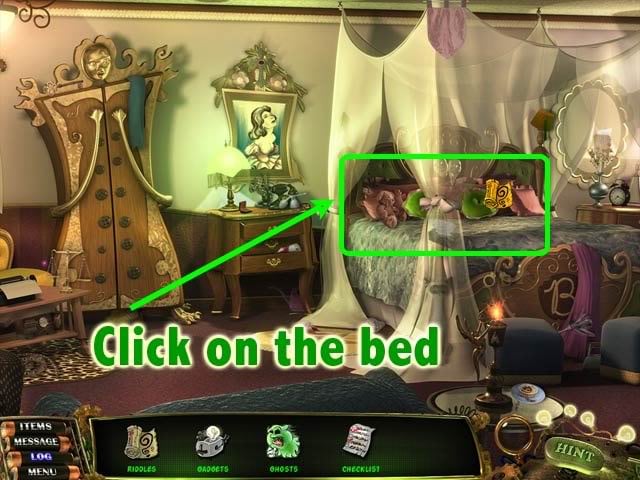
Once you’ve found all the hidden ghosts and required objects on your item, you can now solve the riddle.

The pictograph riddle reads "Check behind the matching round pillows."
Go to the Bedroom.
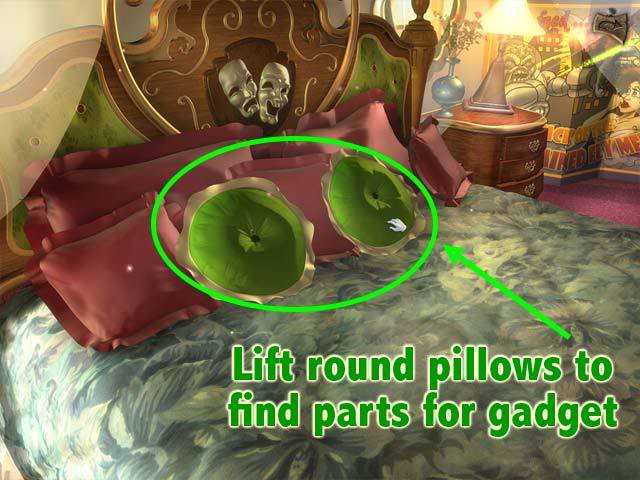
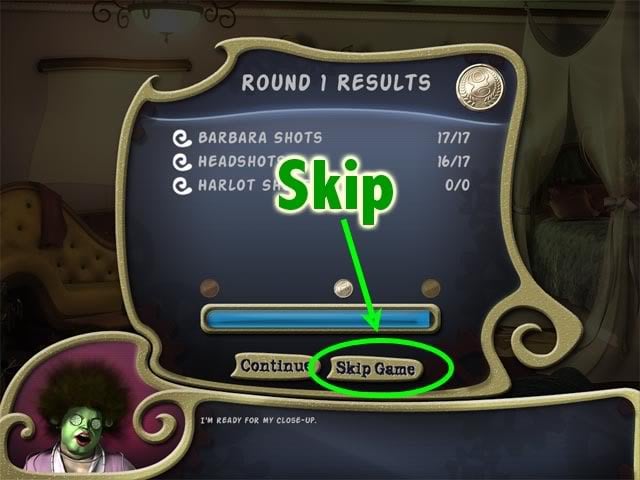
You’ve found the last part of the Spectral Cam gadget. You will now face Barbara Taylor’s ghost in the Scream Queen showdown.
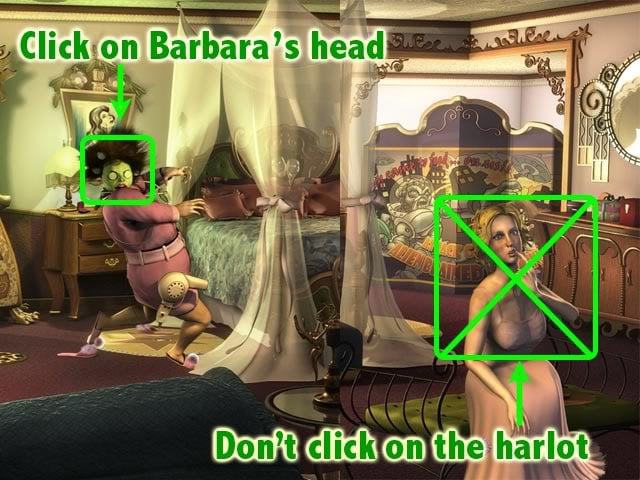
There are 3 rounds in this mini-game. Each round gets progressively faster and more difficult. You may skip the mini-game, but you must go through Round 1 first.
1st round: Click on Barbara’s head 17 times. No harlot in this round.
2nd round: Barbara appears faster. Harlot appears only once or twice.
3rd round: Barbara and Harlot appear equally. To concentrate, it helps to turn off your computer audio.
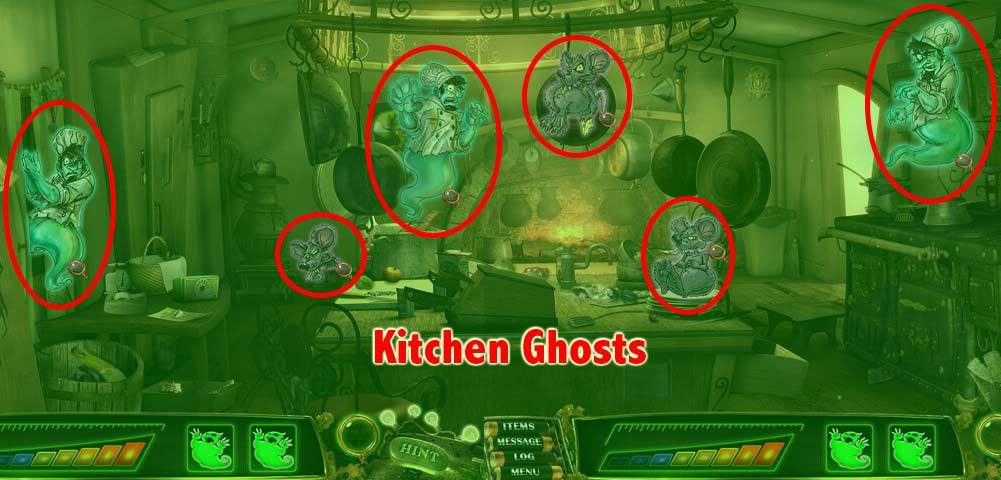
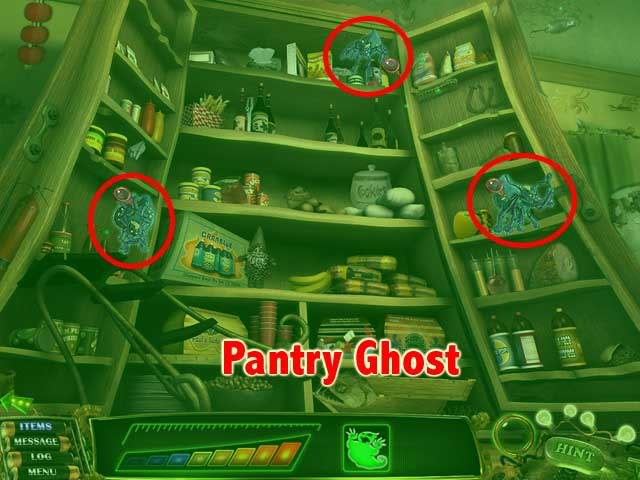
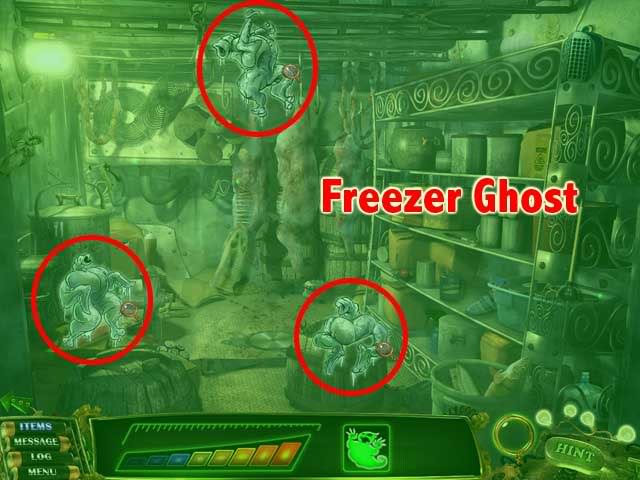
Chapter 2: Kitchen, Pantry, Freezer, Dining Room
The Kitchen is a scrolling panoramic scene. Connecting to the Kitchen are the doorways to the Pantry, Freezer and Dining Room.
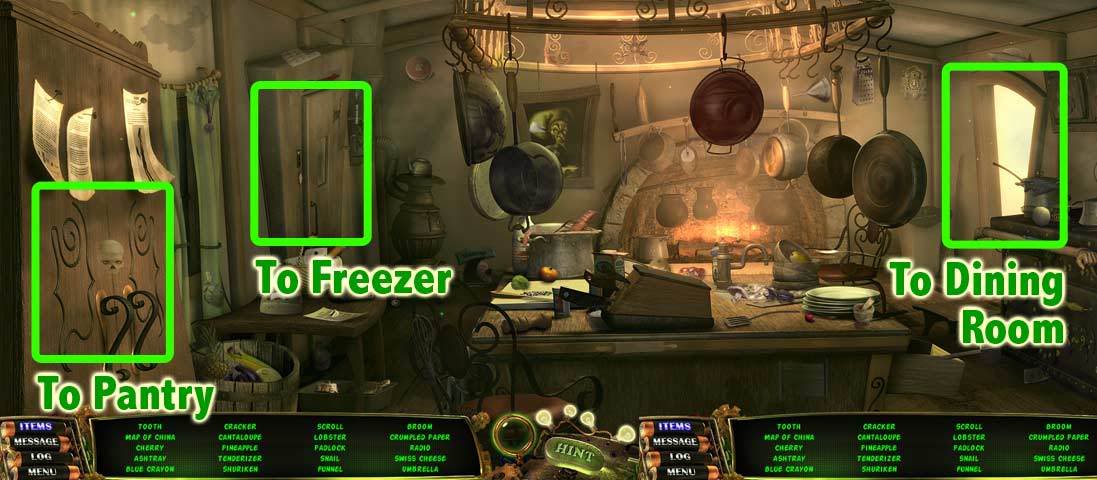
Click on the green monocle to enter Ghost Vision mode. Below are the locations of the hidden ghosts for all the rooms in this chapter:
Once you’ve found all the hidden ghosts and required objects on your item, you can now solve the riddle.

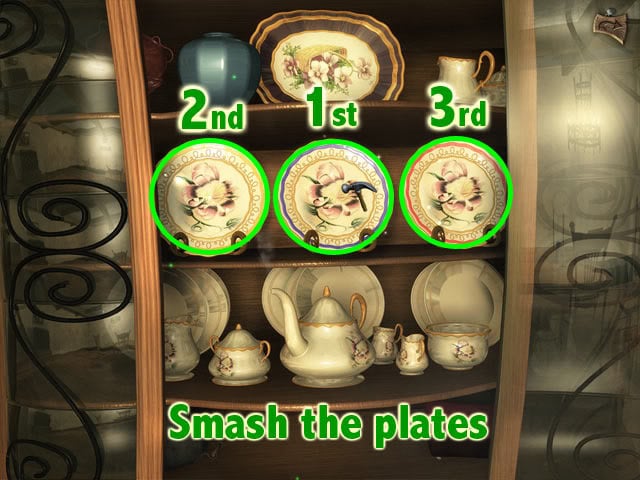
The pictograph riddle reads "Smash the china in the correct order… blue, gold, red."
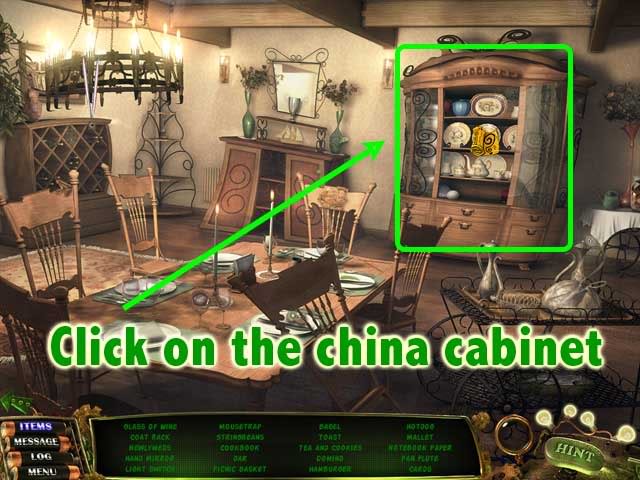
Go to the Dining Room.
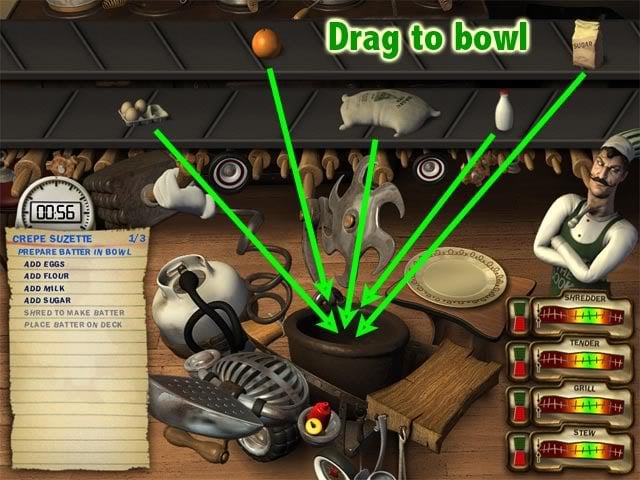
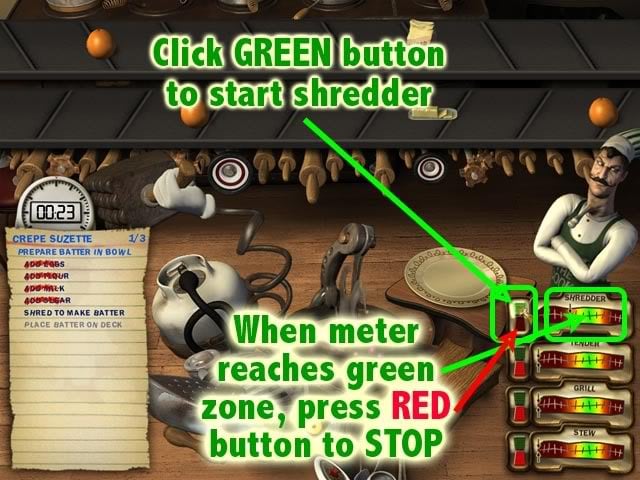
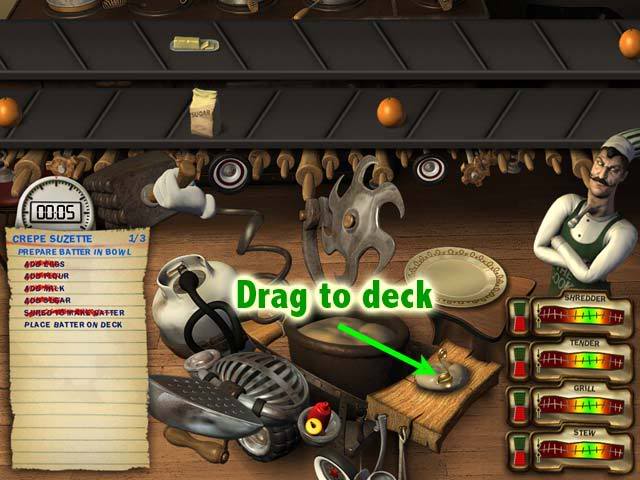
You’ve found the last part of the Culinator gadget. You will now face Chef Pierre Le’ Fronge’s ghost in the Ectoplasmic Chef Challenge showdown. If you’ve played Cooking Mama, this will be a cinch.
In Round 1, you will prepare Crepes Suzette.
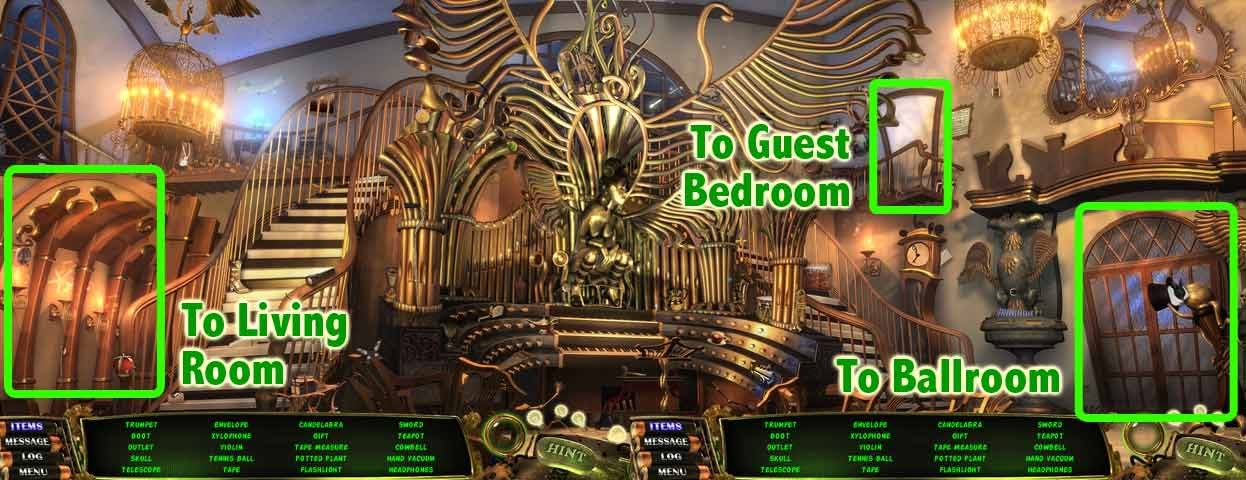
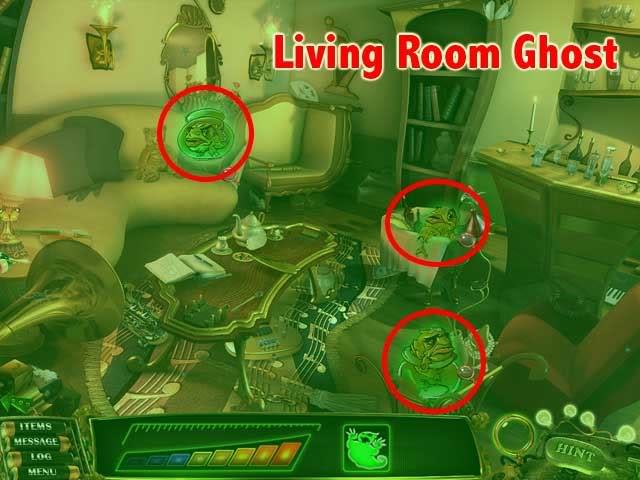
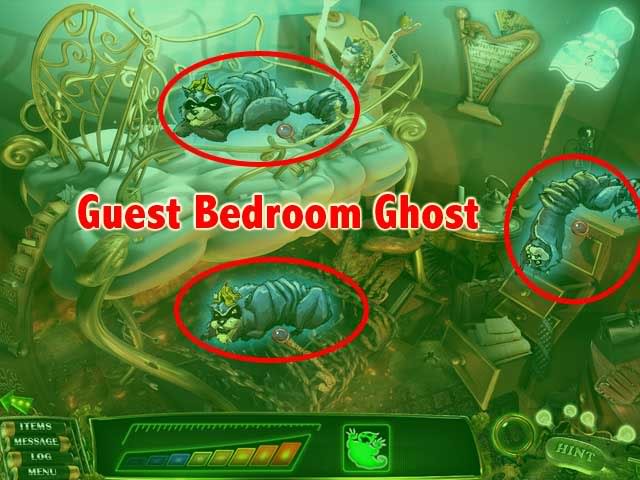
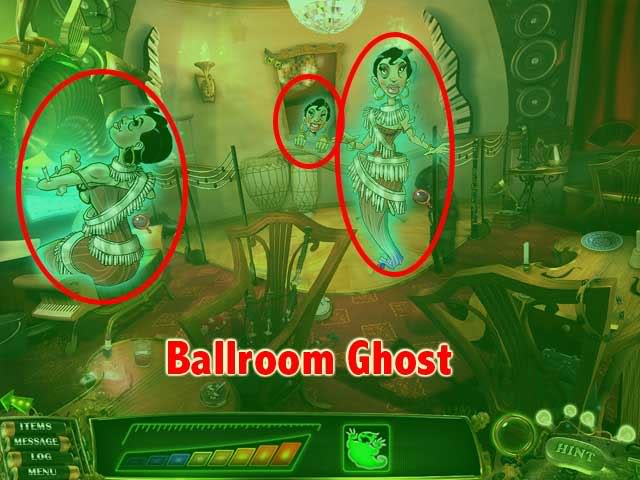
Chapter 3: Foyer, Living Room, Guest Bedroom, Ballroom
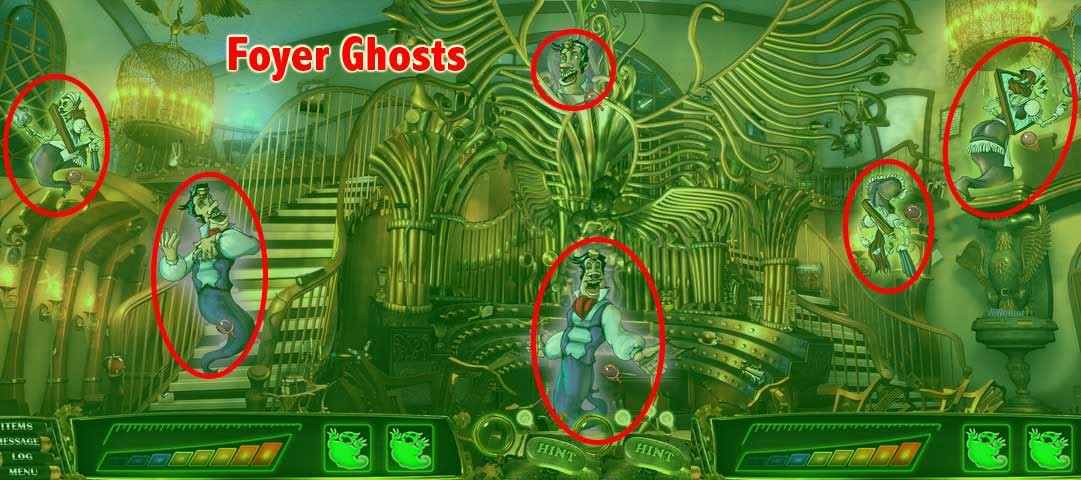
The Foyer is a scrolling panoramic scene. Connecting to the Foyer are the doorways to the Living Room, Guest Bedroom, and Ballroom.
Click on the green monocle to enter Ghost Vision mode. Below are the locations of the hidden ghosts for all the rooms in this chapter:
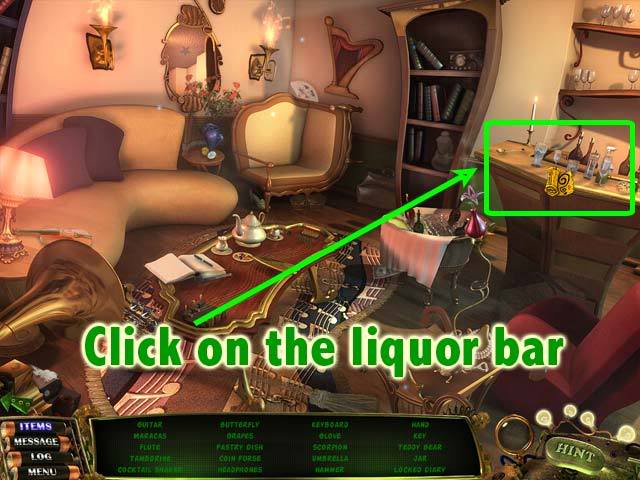
Once you’ve found all the hidden ghosts and required objects on your item, you can now solve the riddle.

The pictograph riddle reads "Tap the glasses…high ball, pony, flute."
Go to the Living Room.
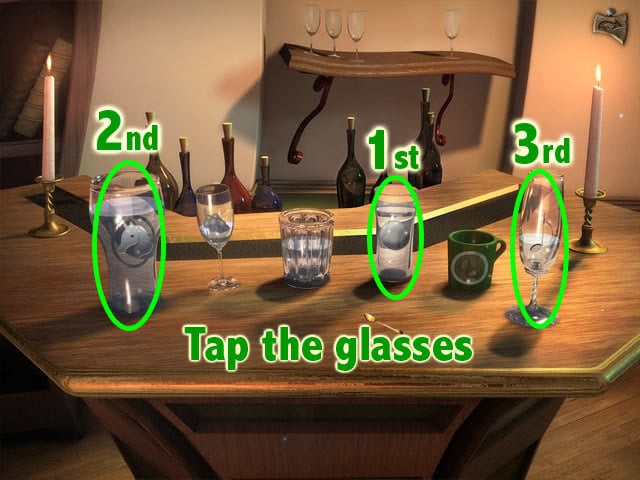
You’ve found the last part of the Harmonic Resonator gadget. You will now face Olaf’s ghost in the Spectral Symphony showdown.
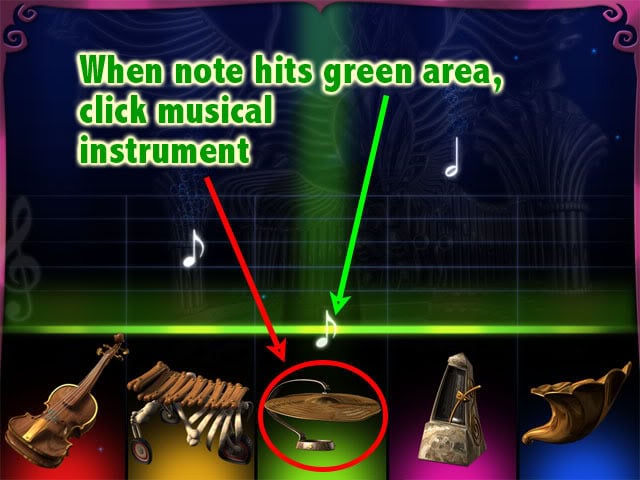
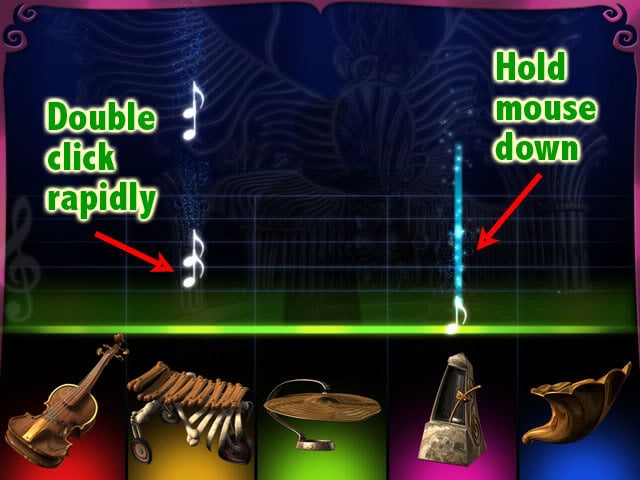
1st round: Don’t forget to hold the mouse button down for long notes.
2nd round: Move more quickly between instruments.
3rd round: Lots of very quick multiple notes.
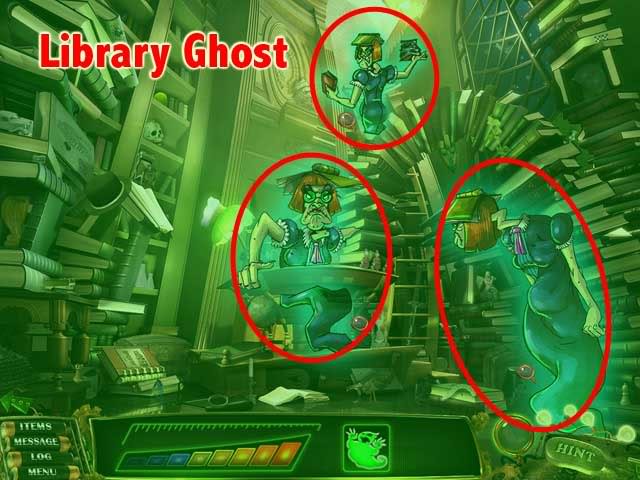
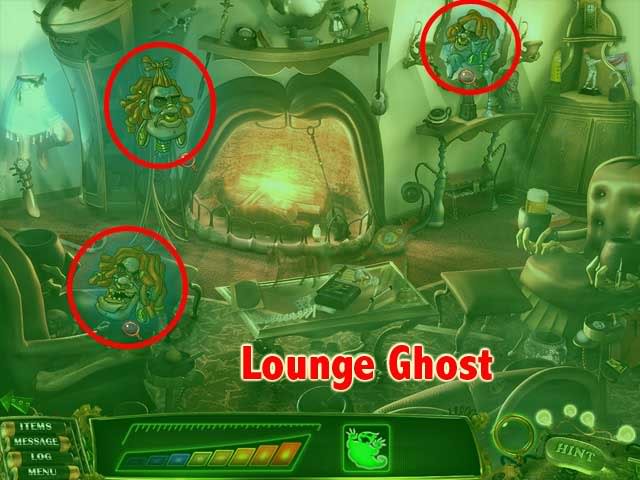
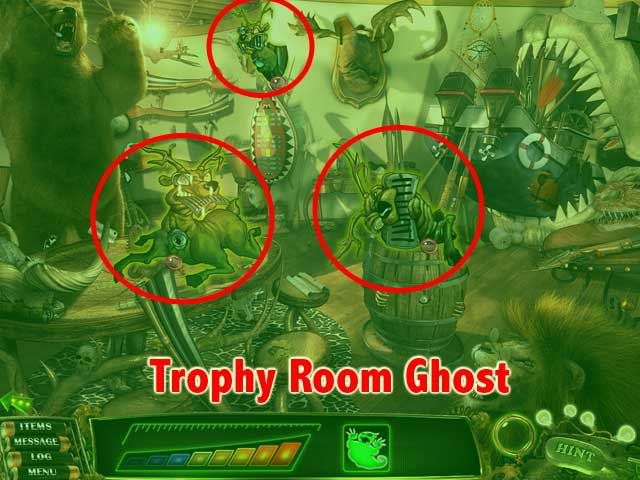
Chapter 4: Parlor, Library, Lounge, Trophy Room
The Parlor is a scrolling panoramic scene. Connecting to the Parlor are the doorways to the Library, Lounge, and Trophy Room.
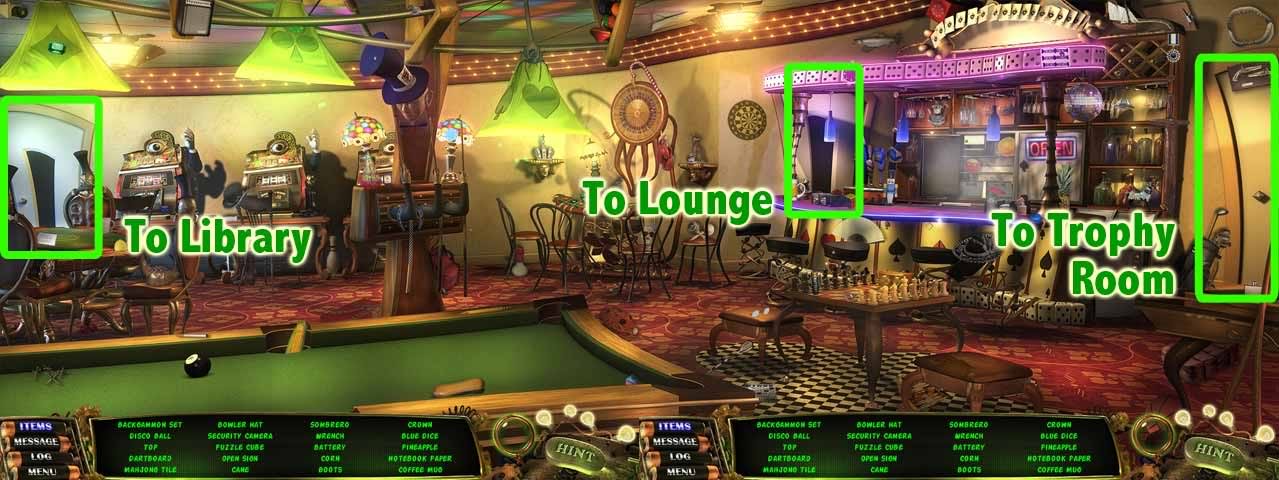
Click on the green monocle to enter Ghost Vision mode. Below are the locations of the hidden ghosts for all the rooms in this chapter:

Once you’ve found all the hidden ghosts and required objects on your item, you can now solve the riddle.

The pictograph riddle reads "Drop the 8-ball in the top right corner pocket."
Go to the Parlor.
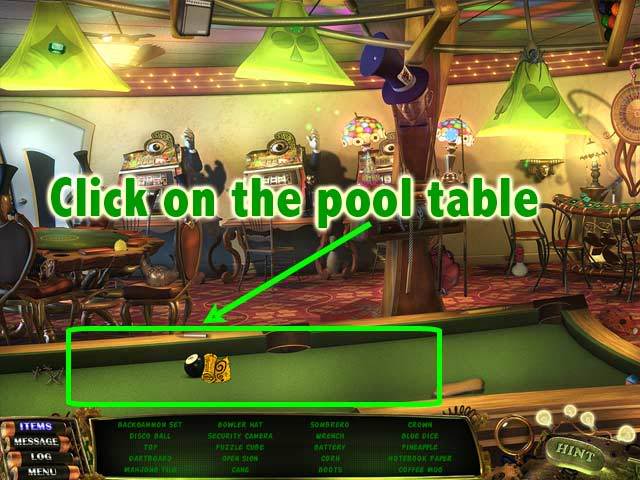
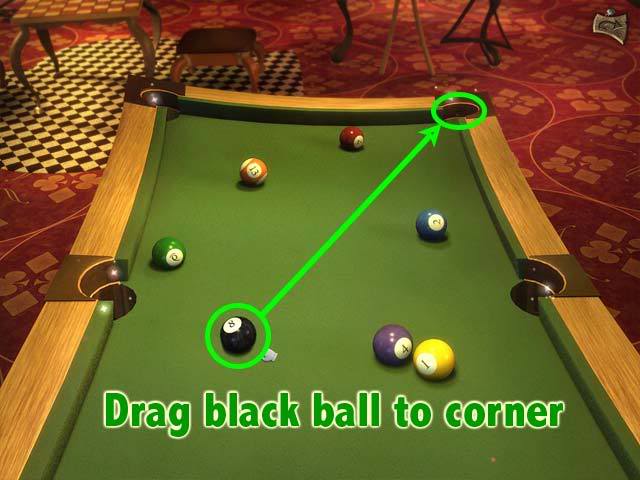
You’ve found the last part of the Lucky Lenses gadget. You will now face Jack Diamond’s ghost in the Luck of the Draw showdown.
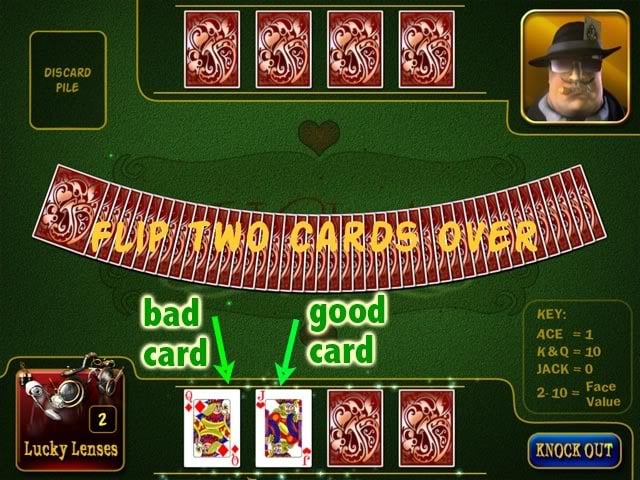
Draw 4 cards (any will do, it doesn’t matter). Open the first two cards, and memorize them. You want all your cards to be either a Jack or a very low number (Ace or 2). If either of your first two cards are higher than a 2, trade them in later.
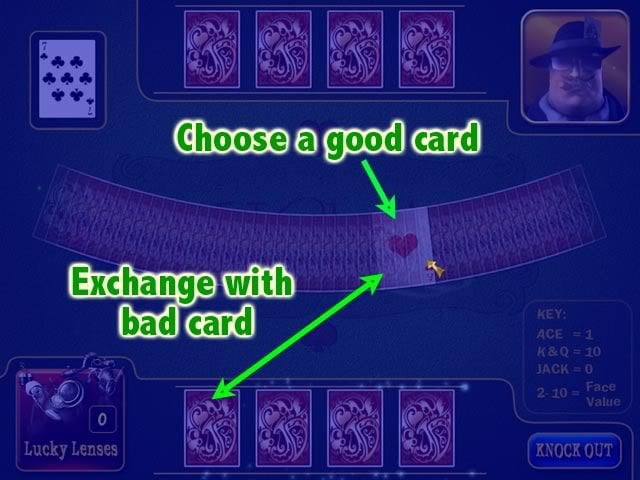
Now use a Lucky Lenses free peek to glance through the card spread. If you see a Jack, Ace, or 2, select it and exchange it with your bad card. Or use the free peeks for your third and fourth cards. Memorize your new cards.
Keep replacing any of your 4 cards with lower values, from the card spread or the discard pile. Memorize each one whenever you change it. If you don’t like the card you picked, just discard it.
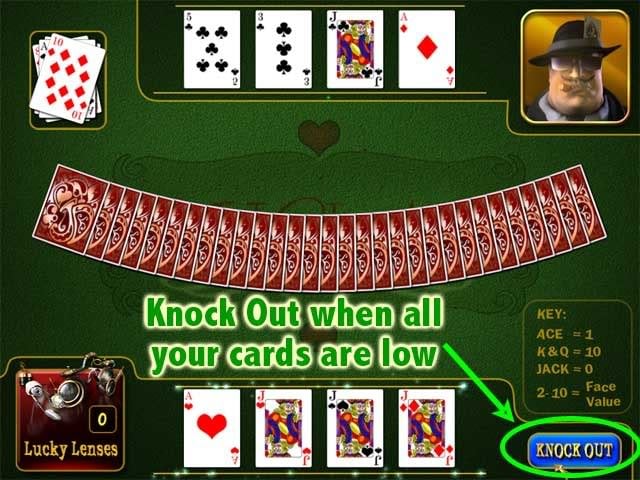
When your 4 cards all have low values (Jack, Ace or 2), click "Knock Out" to end the round. All cards will be revealed and counted. The player with the lowest total card value wins.
1st round: Easy round. One of 1st two cards usually a Jack or Ace.
2nd round: Still easy. You’ll probably be able to click Knock Out before the ghost does.
3rd round: The ghost will knock you out in 6 turns. Try to get your total card value below 5.
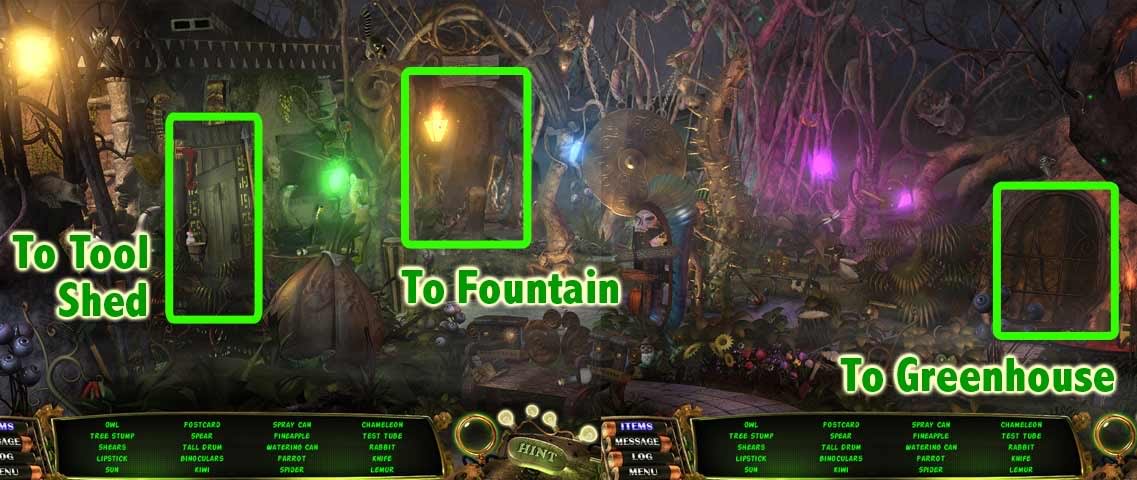
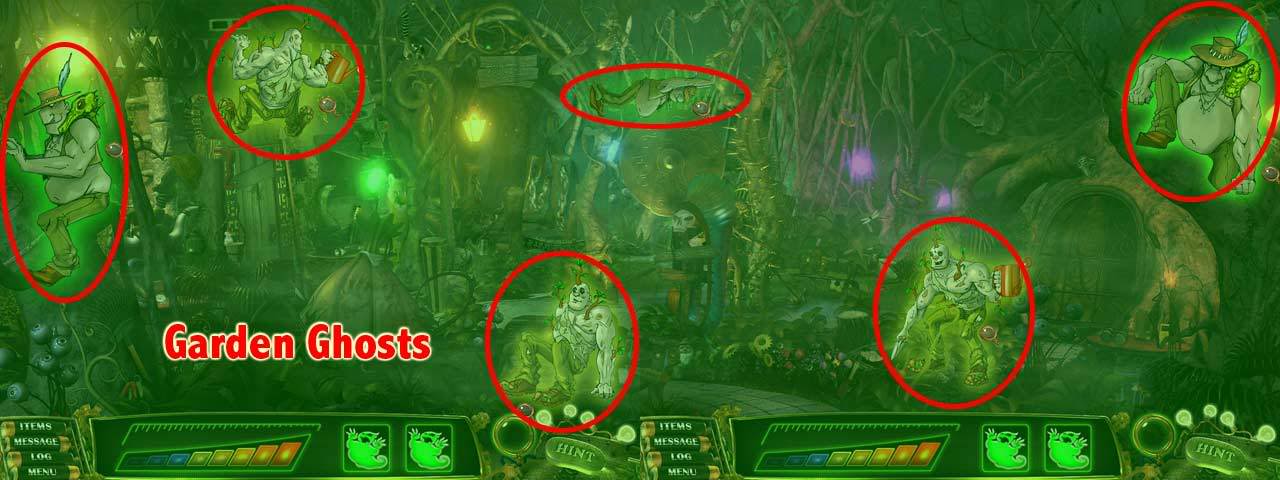
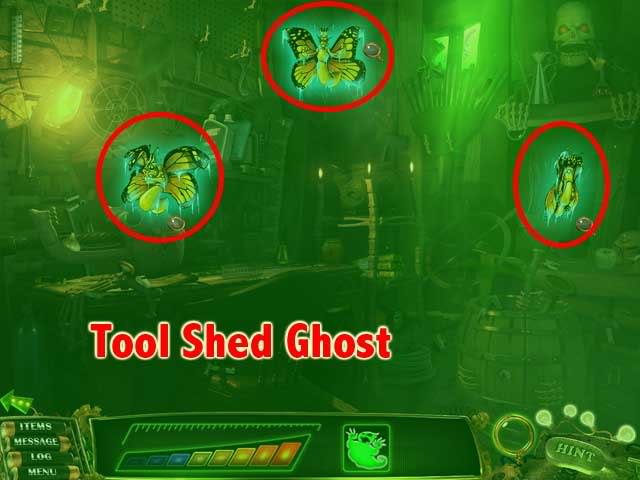
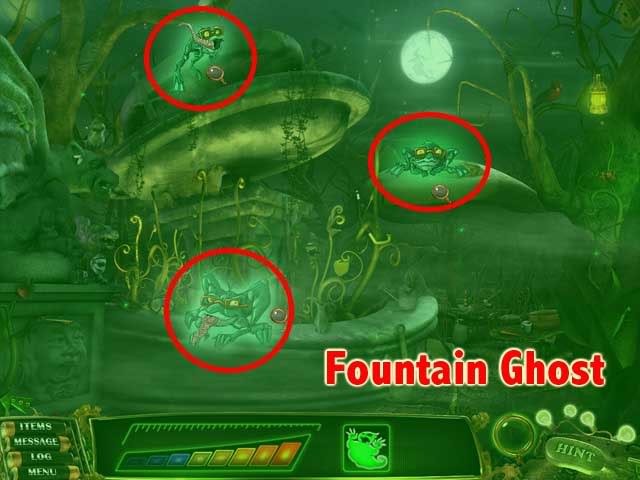
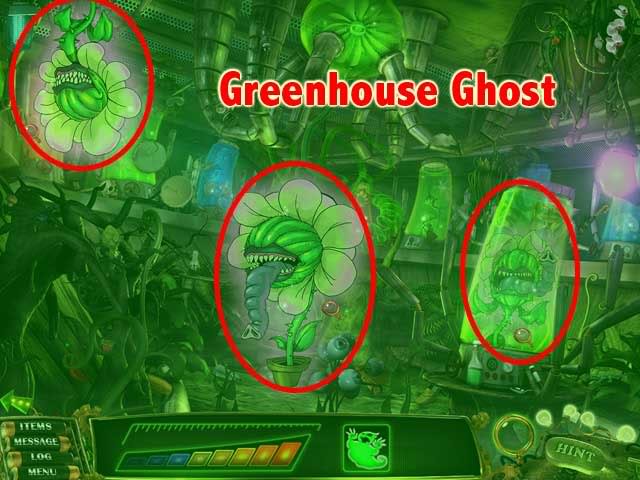
Chapter 5: Garden, Tool Shed, Fountain, Greenhouse
The Garden is a scrolling panoramic scene. Connecting to the Garden are the doorways to the Tool Shed, Fountain, and Greenhouse.
Click on the green monocle to enter Ghost Vision mode. Below are the locations of the hidden ghosts for all the rooms in this chapter:
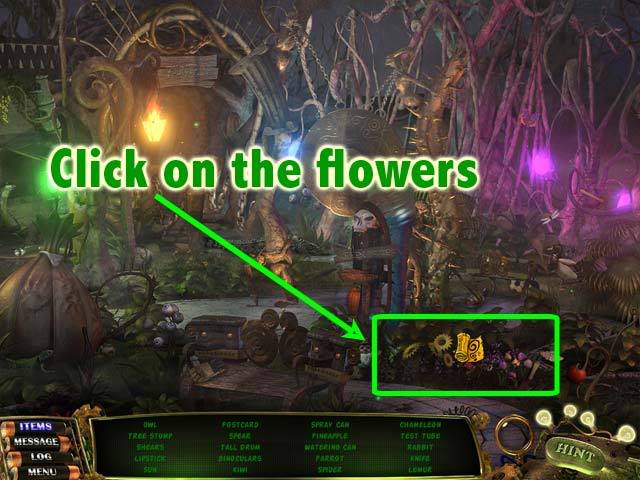
Once you’ve found all the hidden ghosts and required objects on your item, you can now solve the riddle.

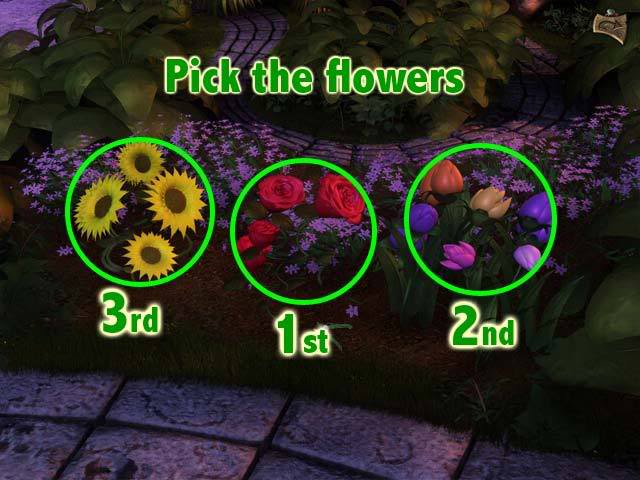
The pictograph riddle reads "Pick a bouquet of roses, tulips, and sunflowers."
Go to the Garden.
You’ve found the last part of the Bug Blaster gadget. You will now face Dorothy Britton’s ghost in the How Does Your Garden Grow? showdown.
This is similar to tower defense games, where you choose your weapons and the best place to put them. You start out with limited weapons, but get more as you defeat the bugs.
General tips:
You get 5 of each weapon. The best weapons are the mirrors and blue electrical zappers. Use these before resorting to trimmers and honey pots.
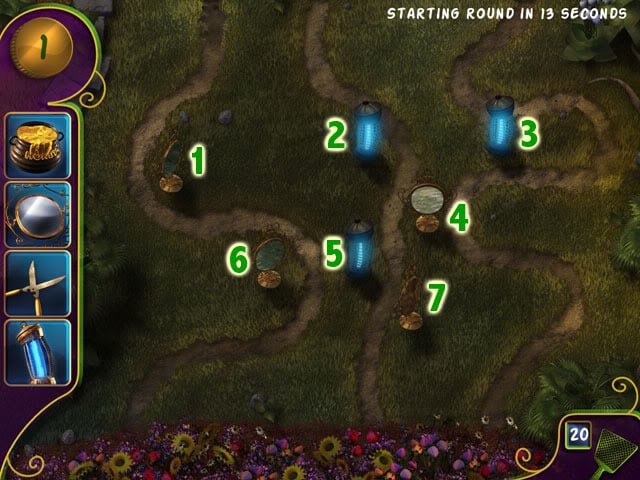
The best place to put the weapons are in the middle part of the screen (rather than on top or at the bottom). Put them inside curves and corners, focusing most on the center path. Once placed, weapons can’t be moved, except at the start of a level.
Save your fly swatter hits. Let the weapons do their job. Only when the bugs are close to the flowers should you swat them. To see the remaining health of a bug, let your cursor hover above it.
1st round: Blue zappers and mirrors should be enough. As soon a weapon becomes available, place it.
2nd round: Add honey pots to the center of the weaponry. Put them where they can cover 2 paths.
3rd round: Spiders are easily defeated, except the giant one at the end. Use trimmers to add damage.
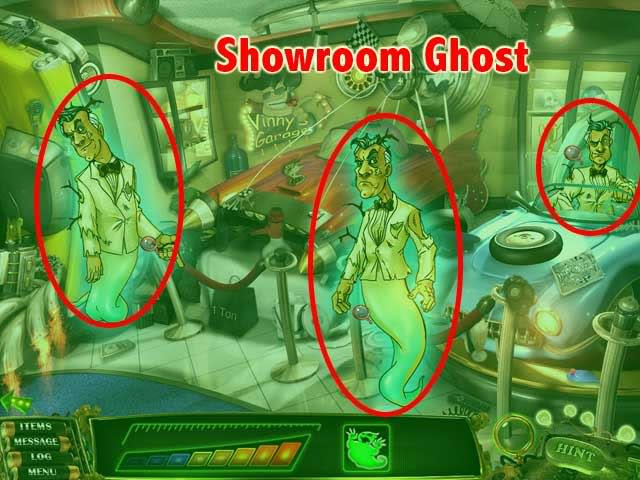
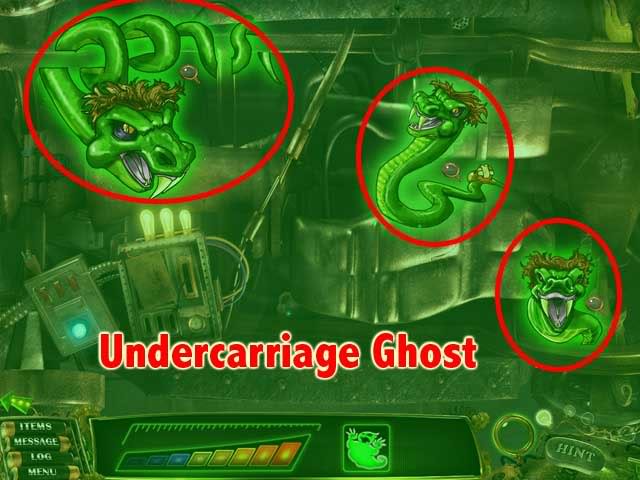
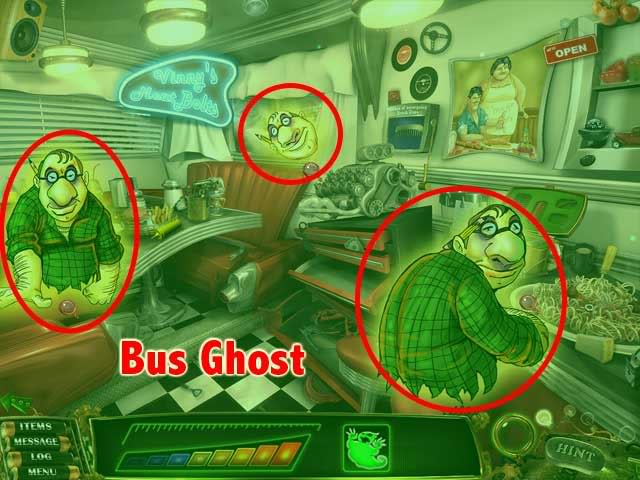
Chapter 6: Garage, Showroom, Undercarriage, Bus
The Garage is a scrolling panoramic scene. Connecting to the Garage are the doorways to the Showroom, Undercarriage, and Bus.
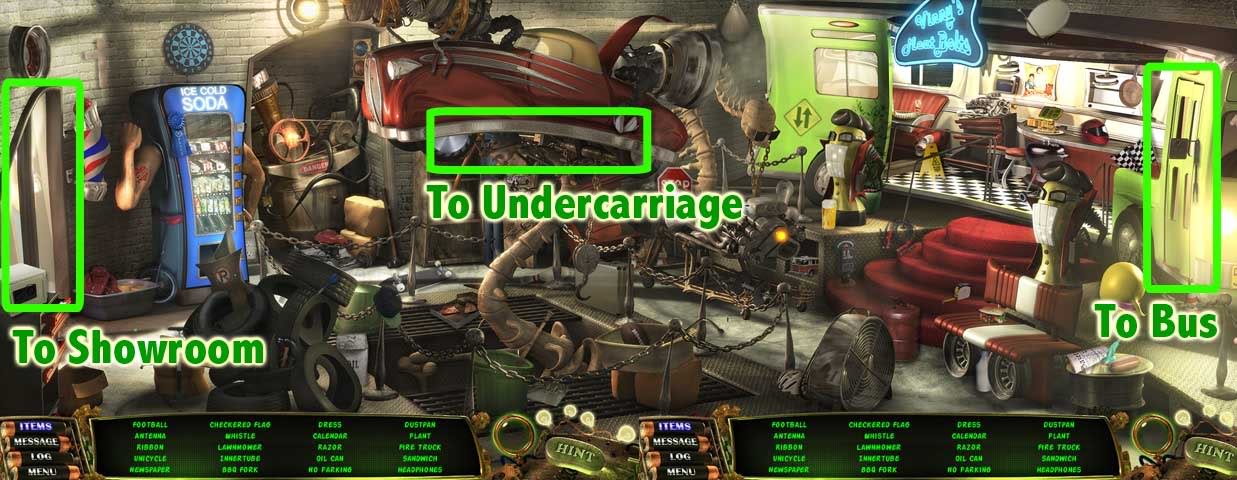
Click on the green monocle to enter Ghost Vision mode. Below are the locations of the hidden ghosts for all the rooms in this chapter:
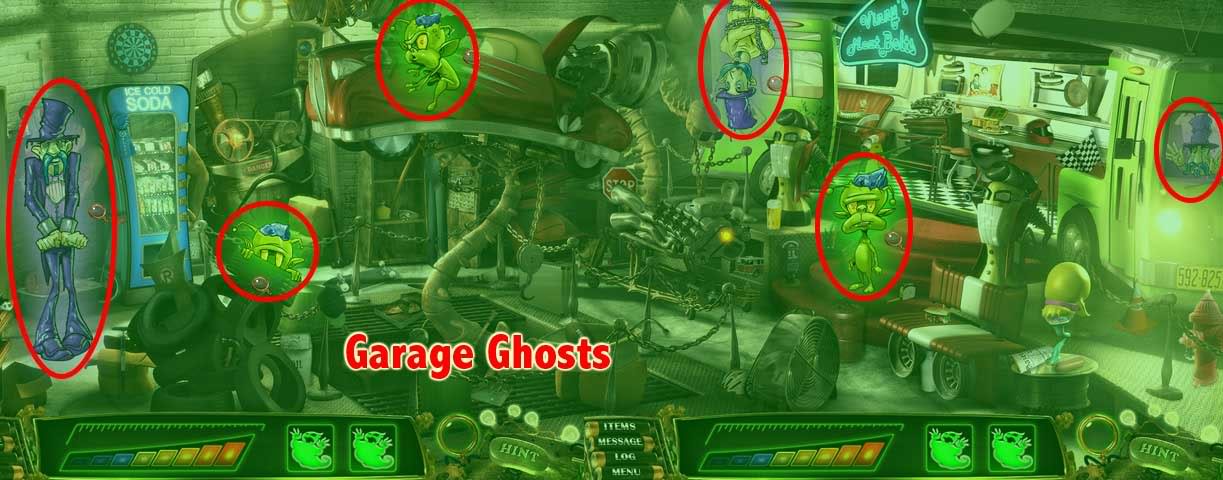
Once you’ve found all the hidden ghosts and required objects on your item, you can now solve the riddle.

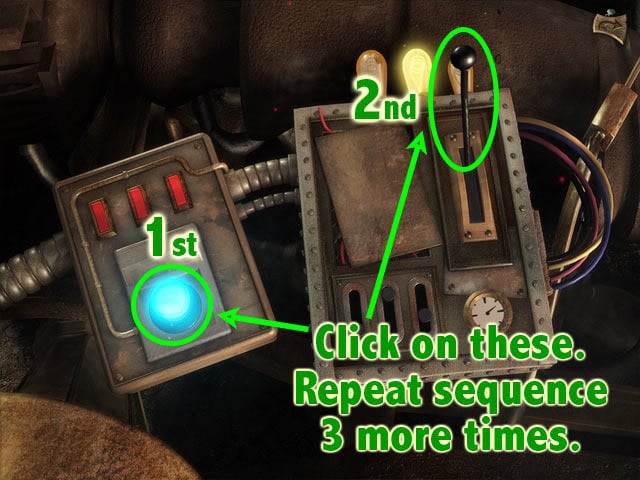
The pictograph riddle reads "Press the button and pull the handle four times."
Go to the Undercarriage.
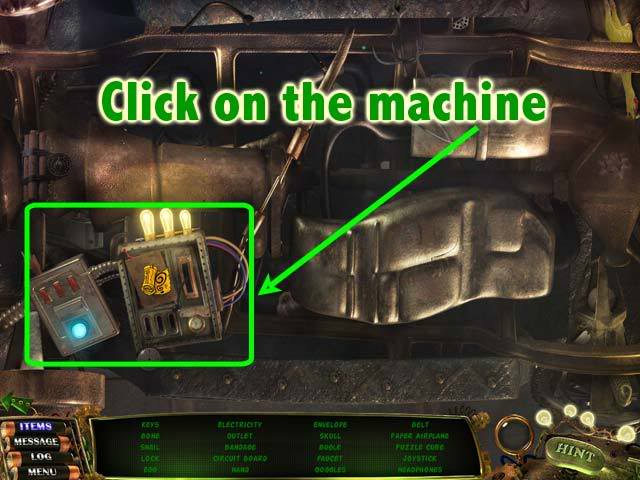
You’ve found the last part of the Phantom Dragster gadget. You will now face Vinny Torino’s ghost in the Speed Demon showdown.
The rules are simple: Click the mouse when the needle hits the green zone (on all 4 gauges and 1 large meter).
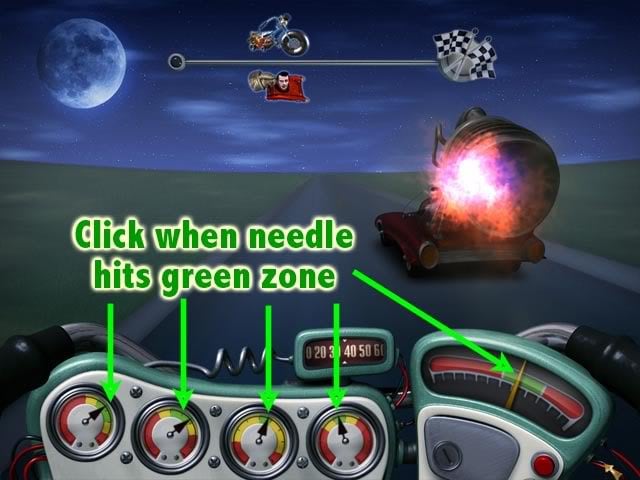
1st to 3rd rounds: Somewhat easy, just a matter of timing.
4th and 5th rounds: Hit the mouse button just a notch before the green zone.
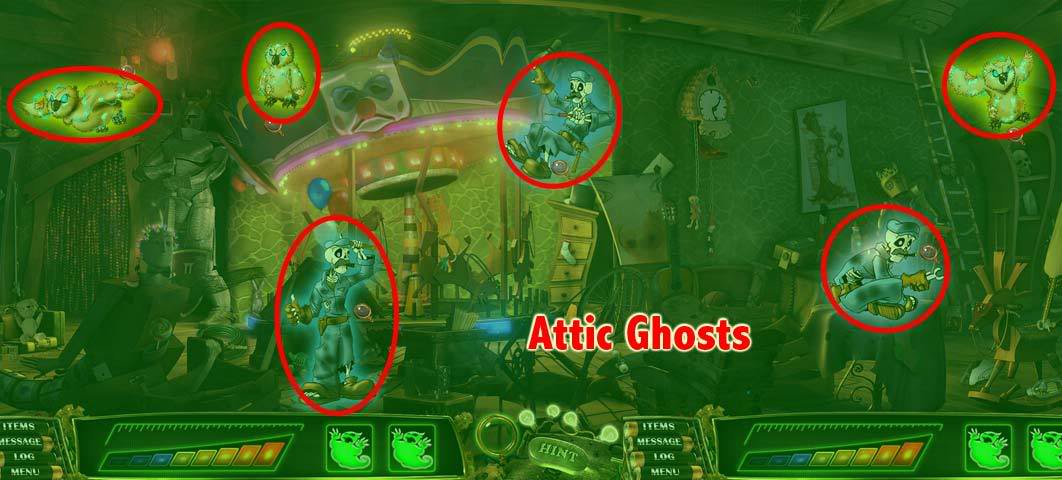
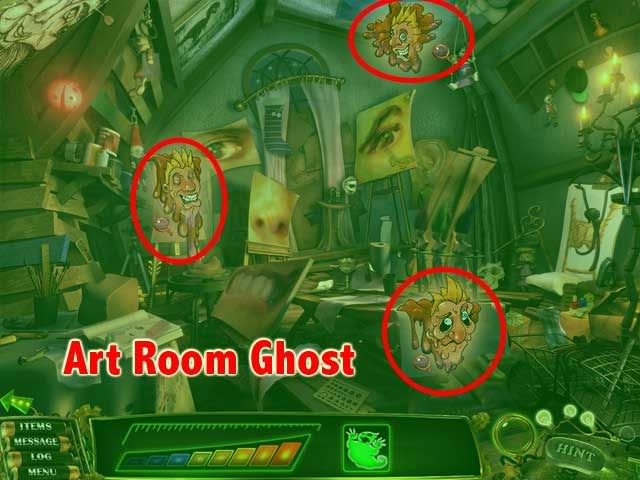
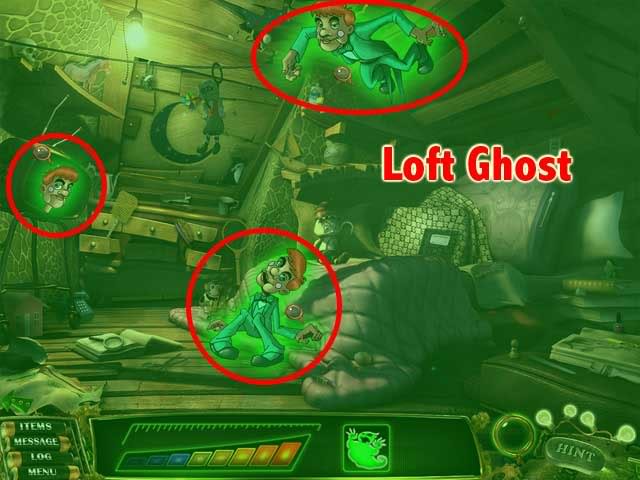
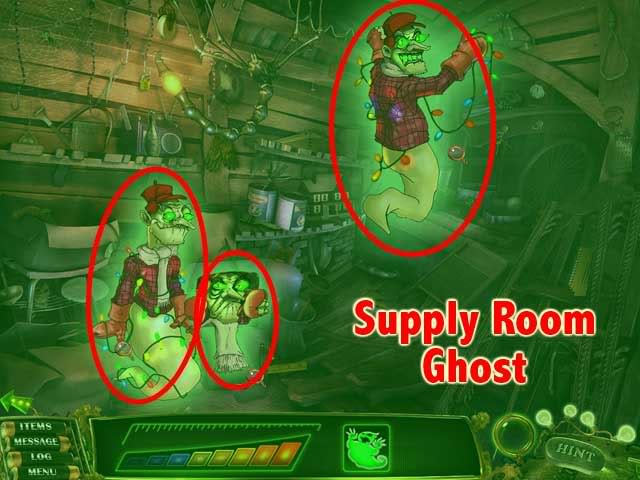
Chapter 7: Attic, Art Room, Loft, Supply Room
The Attic is a scrolling panoramic scene. Connecting to the Attic are the doorways to the Art Room, Loft, and Supply Room.

Click on the green monocle to enter Ghost Vision mode. Below are the locations of the hidden ghosts for all the rooms in this chapter:
Once you’ve found all the hidden ghosts and required objects on your item, you can now solve the riddle.

The pictograph riddle reads "Knock the bent nail back into place."
Go to the Loft.
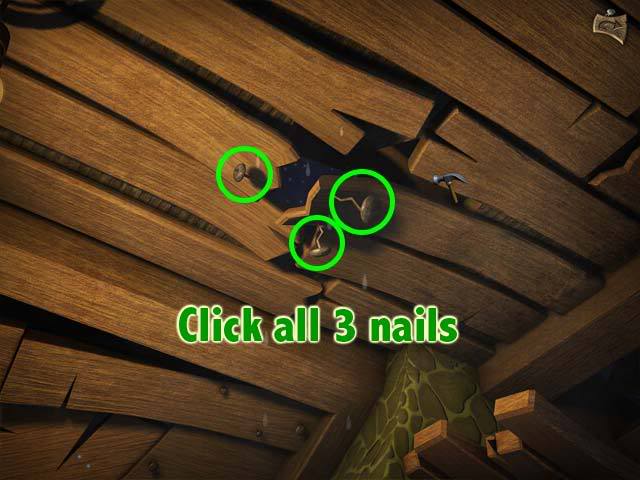
You’ve found the last part of the Art-O-Matic gadget. You will now face Judith Kaufman’s ghost in the Masterpiece showdown.
This is a simple minigame. All you have to do is keep your cursor inside the pink circle as it moves around the screen.
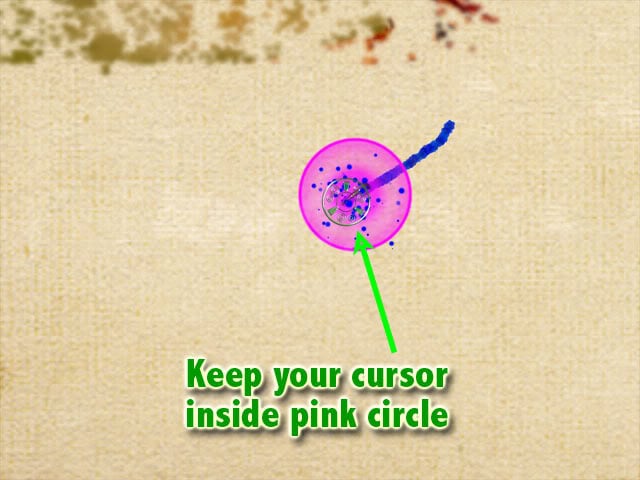
Tips: Don’t look at the drawing. Just keep your eyes on the pink circle. And try not to blink!
There are 4 rounds. For the later rounds, it will be very difficult to keep within the pink circle. Use the circle’s pointer arrow as a guide to tell you which direction it will go next.
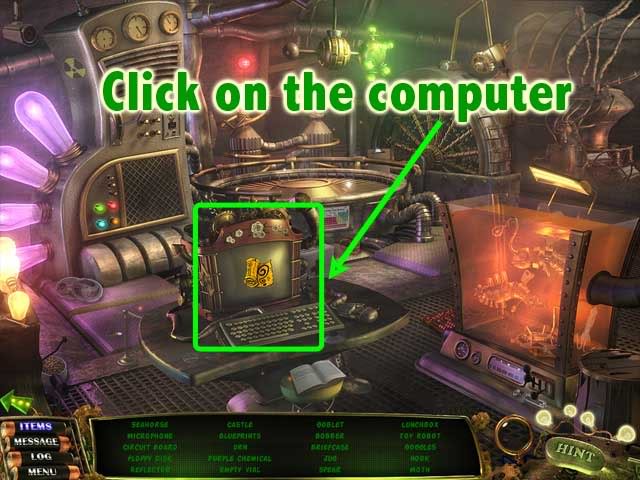
Chapter 8: Basement, Boiler, Cellar, Lab
The Basement is a scrolling panoramic scene. Connecting to the Basement are the doorways to the Boiler, Cellar, and Lab.
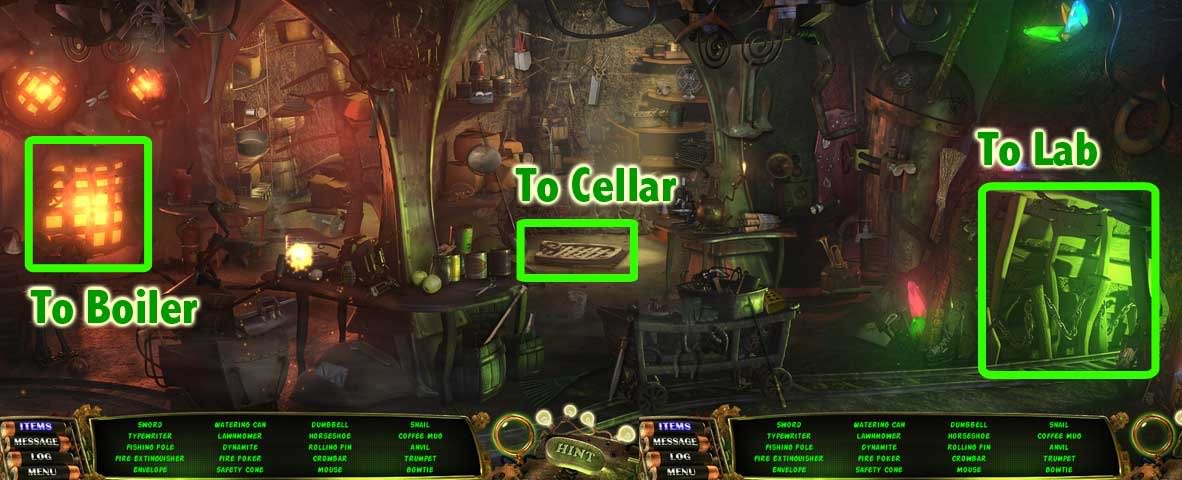
Click on the green monocle to enter Ghost Vision mode. Below are the locations of the hidden ghosts for all the rooms in this chapter:
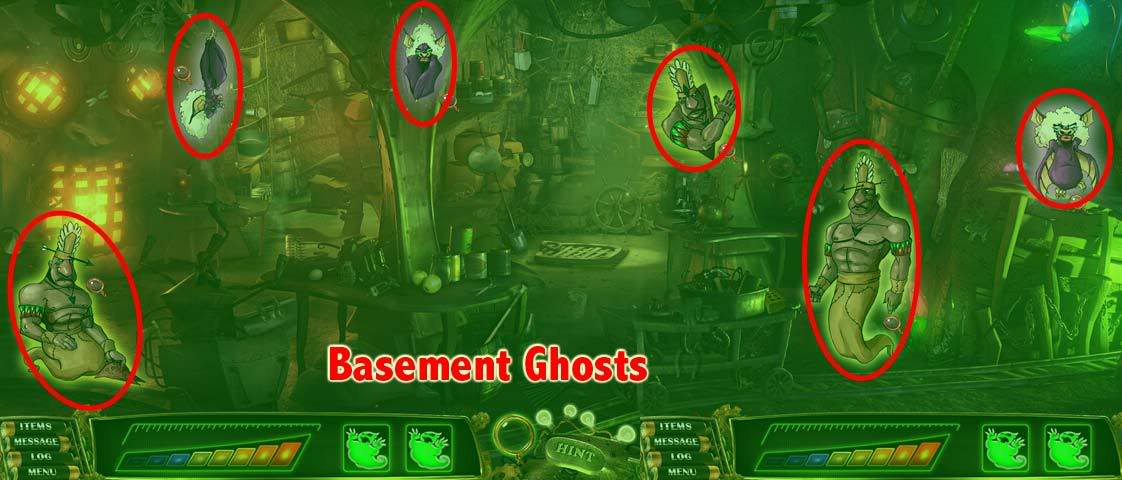
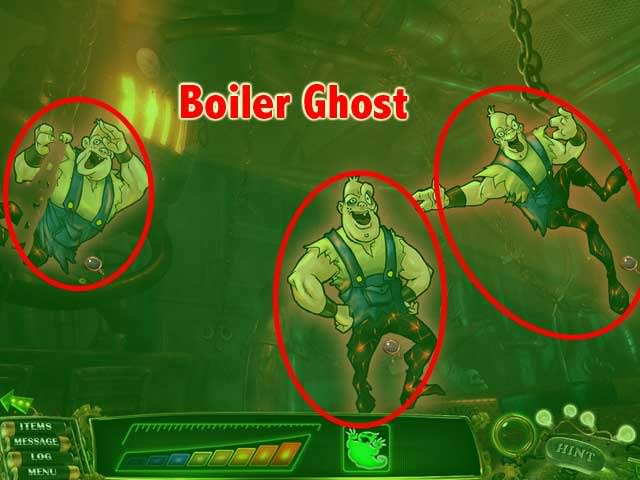
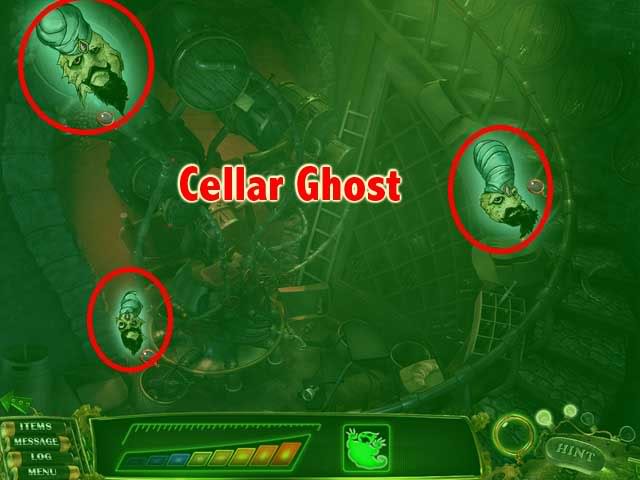

Once you’ve found all the hidden ghosts and required objects on your item, you can now solve the riddle.

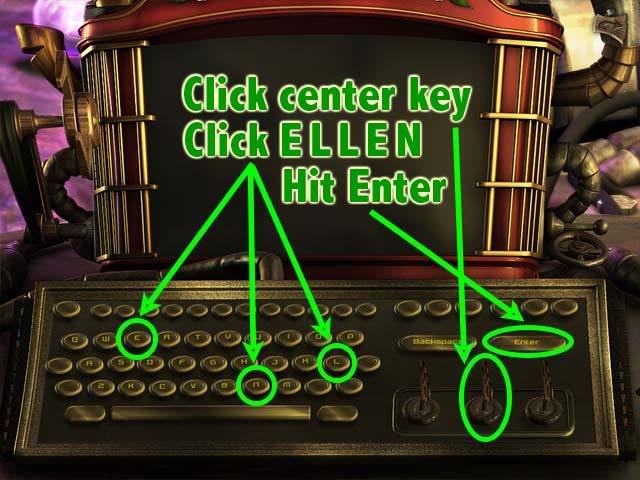
The pictograph riddle reads "Turn the center key, and type the password."
(You can find the password in the blueprint drawing under Messages).
Go to the Lab.
You’ve found the last part of the Fahrenheit Angler gadget. You will now face Burt Flintock’s ghost in the Fire in the Hole showdown.
This is a fishing game, where you try to collect 5 wedding rings in each round.
Finding the right angle to drop the magnet takes some getting used to. There are several obstacles in the way, but you can reel them in or explode them with dynamite.

Spray your fire extinguisher at incoming fireballs. Warning: The number and speed of fireballs increases with every level.
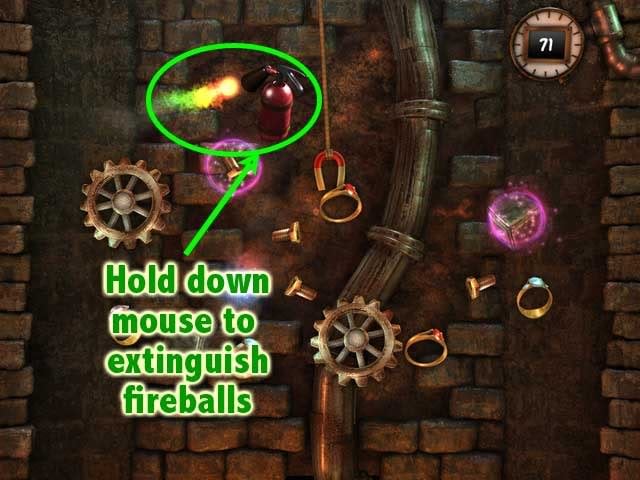
Hit pink glowing obstacles to make them stop moving around, but choose a spot that won’t obstruct your path to the rings.
Blue flames bounce your magnet back up. The only thing you can do is wait till they get out of the way.
Tip for Round 5: Don’t reel in the big metal wheel, or it will consume all your time. Instead, position the pink glowing dynamite near the wheel and explode it.
Conclusion
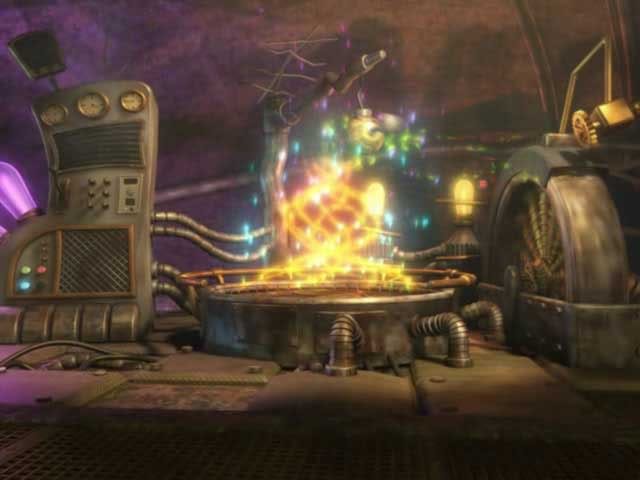
After the last ghost has been set free, enjoy the cutscene.
Congratulations!
You have completed Mishap: An Accidental Haunting.
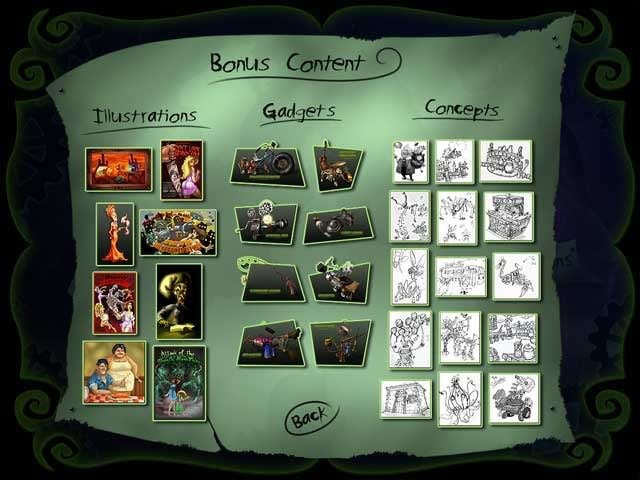
After completing the game, you’ll be given access to Bonus Content.
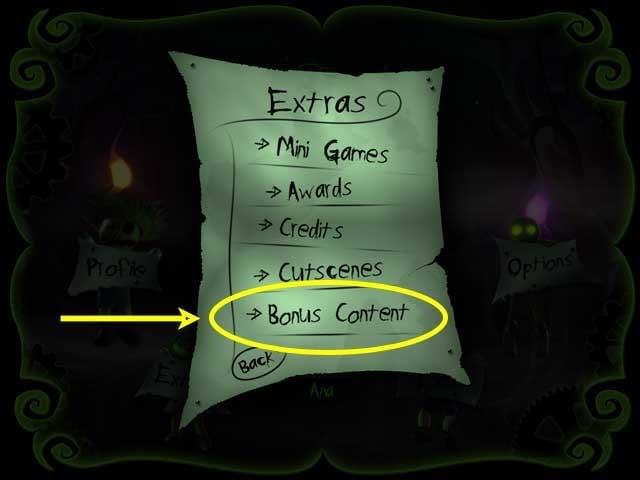
Go the main menu, click on Extras, and select Bonus Content. You can view illustrations and poster art, 3D gadgets, and rough concept sketches.
“;
