- Wondering how to get Monopoly GO! free rolls? Well, you’ve come to the right place. In this guide, we provide you with a bunch of tips and tricks to get some free rolls for the hit new mobile game. We’ll …
Best Roblox Horror Games to Play Right Now – Updated Weekly
By Adele Wilson
Our Best Roblox Horror Games guide features the scariest and most creative experiences to play right now on the platform!The BEST Roblox Games of The Week – Games You Need To Play!
By Sho Roberts
Our feature shares our pick for the Best Roblox Games of the week! With our feature, we guarantee you'll find something new to play!Type Soul Clan Rarity Guide – All Legendary And Common Clans Listed!
By Nathan Ball
Wondering what your odds of rolling a particular Clan are? Wonder no more, with my handy Type Soul Clan Rarity guide.
Mind’s Eye: Secrets of the Forgotten Walkthrough
Welcome to the walkthrough for Mind’s Eye: Secrets of the Forgotten on Gamezebo. Mind’s Eye: Secrets of the Forgotten is a hidden object game for PC. This walkthrough includes tips and tricks, helpful hints, and a strategy guide to complete Mind’s Eye: Secrets of the Forgotten.
General Tips
Welcome to the walkthrough for Mind’s Eye: Secrets of the Forgotten on Gamezebo. Mind’s Eye: Secrets of the Forgotten is a hidden object game for PC. This walkthrough includes tips and tricks, helpful hints, and a strategy guide to complete Mind’s Eye: Secrets of the Forgotten.
- There is no timer or timed option for play. No time is kept for scoring.
- Hints are unlimited and take only 20 seconds to refill.
- After the initial tutorial scenes, a roll of film is hidden each scene. Finding it right away will fill the hint bar immediately. If the hint bar is already full, finding the film roll will store an immediate refill for later use.
- The game does not save your progress during a scene. If you quit prior to finding all the objects or completing a mini-game associated with a scene, you will need to repeat that area again.
- Most scenes are dark so you may want to adjust your brightness to find objects more easily.
Navigation
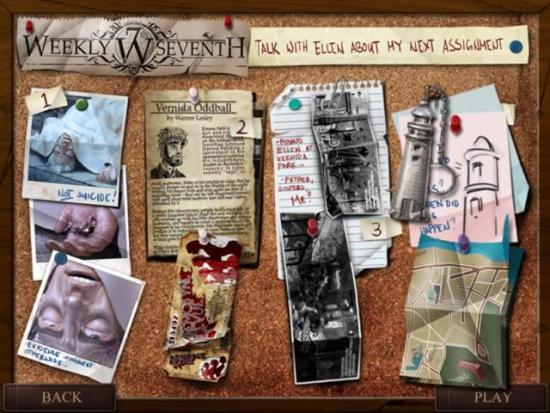
The Bulletin Board

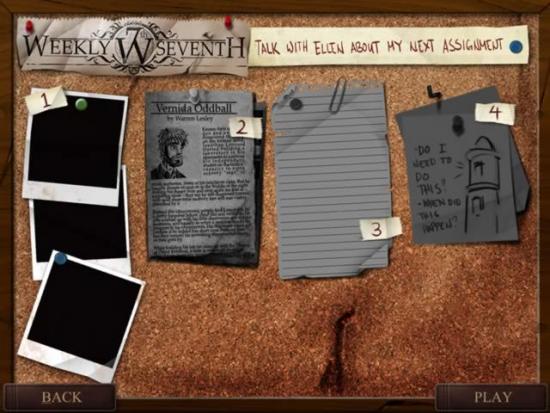
As you complete each chapter, a summary of important parts of each chapter will appear here. Each time you begin play, this will appear so you can keep track of your progress.
Click Play
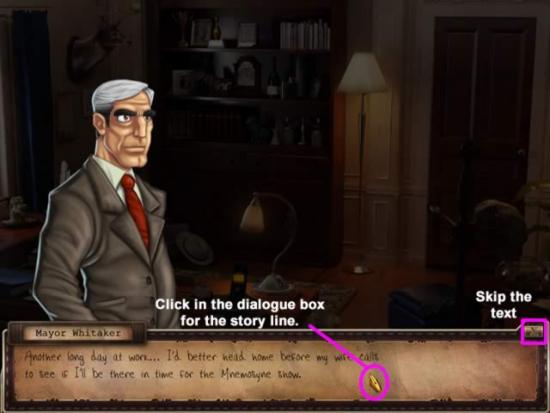
To follow what the characters are thinking or saying, click in the dialogue box. This is recommended for the first time through to figure out the story.
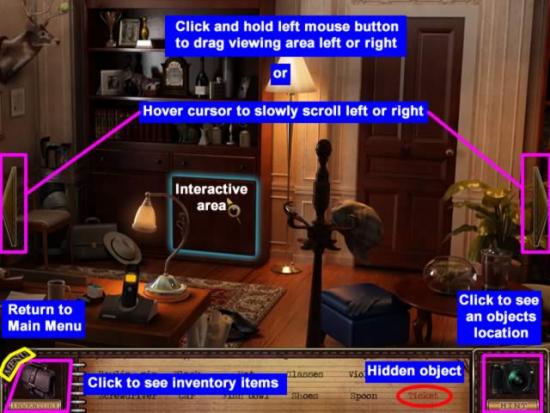
- Viewing: To see an area not currently visible, either click and hold your left mouse button down and drag right or left or place your cursor over one of the side areas to slowly pan in that direction.
- Interactive areas: To find an interactive area, move the mouse around the scene. The cursor will change to a magnifying glass and the area involved with be outlined in blue. If an inventory item is needed to gain access, it will give you a clue as to which item is needed.
- Inventory: When found, an item or items from the object list will go in to inventory for later use. Click the Inventory bag or the tab below it to see what is available. If you selected and item but then decide not to use it, right clicking will send it back to inventory.
- Hidden objects: Items shown in red require a specific action to be performed before the object is visible. These items are hidden in an interactive area
- Hints: Clicking the camera or the hint tab below it will highlight a random item from the object list.
- Menu: Your progress in a scene will not be saved if you return to the main menu before finding all of the objects.
WALKTHROUGH – Chapter 1: The Death of the Mayor
Location: The Mayor’s Office – 6:37 P.M.
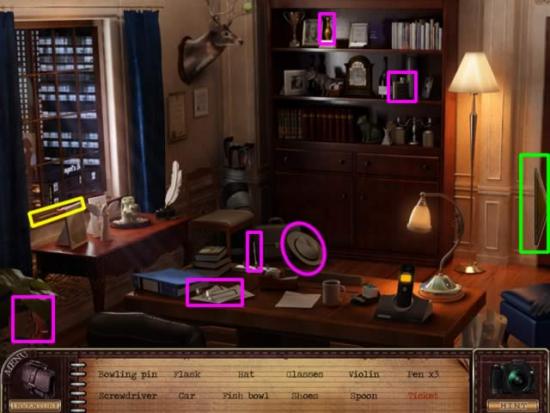
Scroll left. Collect – Bowling pin, Flask, Hat, Glasses, Violin, and Pen 1/3. The Screwdriver (outlined in yellow) on the window sill will go to inventory.
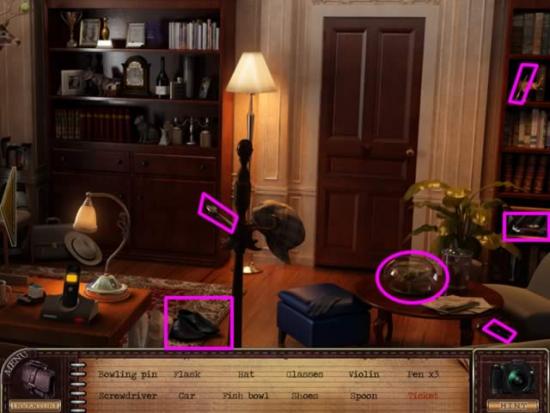
Scroll right. Collect – Shoes, Spoon, Fishbowl, Car, Pen 2/3 (on book shelf) and Pen 3/3 (under chair).
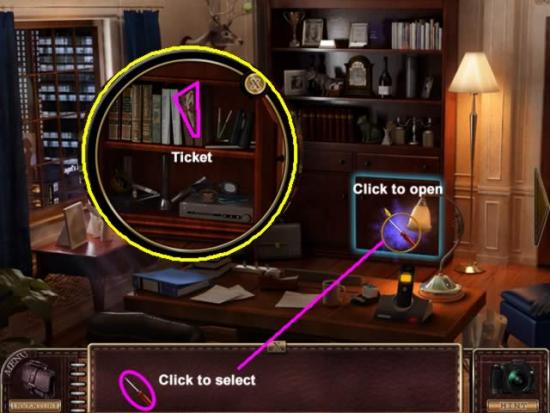
To retrieve the hidden ticket:
- Click Inventory to view what is available.
- Click the screwdriver. It becomes part of the cursor. The interactive area will begin to sparkle.
- Place cursor over interactive area on the wall. Click to open the area.
- The area is open and the cursor shows a magnifying glass. Click to enlarge the area
- Collect the ticket and close the area.
Location: The Lighthouse
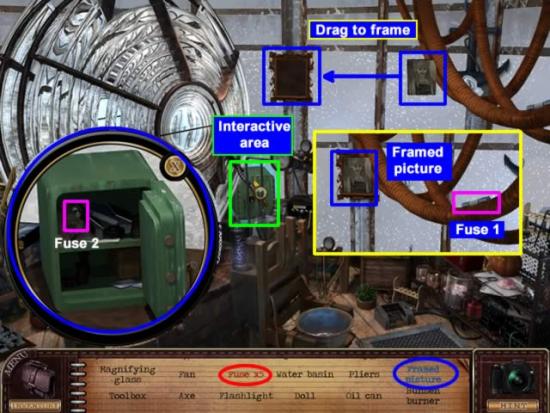
If a list item is written in blue, it means objects must be combined to obtain the item.
- Left-click on the picture of the girl and, while holding down the mouse button, drag her picture to the frame.
- The background objects will remain stationary, but the viewing angle will change so the picture is superimposed on the frame.
- Once they are aligned, click the framed picture to remove it from the list.
Note that there are five fuses listed in red. This does not mean all five are hidden from view, but at least one is.
The green box is an interactive area that does not require an inventory item to open it. Click it to find the hidden fuse. There is one more fuse in this area (shown above) to be collected
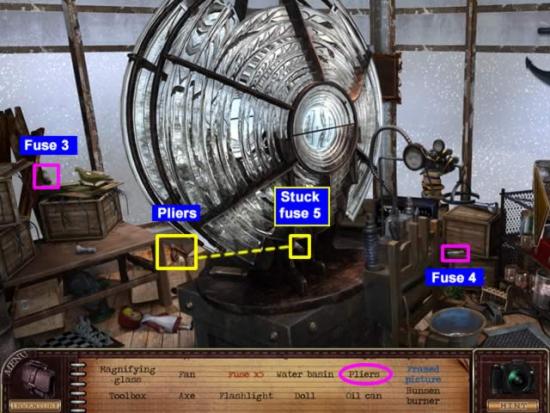
- Scroll to the left and collect two more fuses for inventory. The Pliers will also go into inventory. Use them to obtain the last fuse that is stuck.
Mini-Game: Fix the Machine
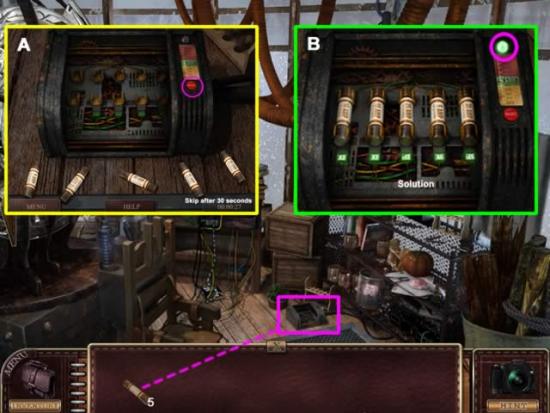
- Scroll to the right. Open the inventory and drag a fuse to the black power box on the floor to begin the game.
- Goal: Place the fuses correctly so that the needle stays in the green area of the power bar. The green light at the top of the power bar will glow green when the fuses are correct and the hatch door will open.
- Insert “A” shows the fuse box and fuses. Each fuse has a different amount of power and the slots will amplify of de-amplify its power. Click the red Reset button to eject the fuses and try again if your solution is incorrect.
- The puzzle can be skipped after the 30 second timer has elapsed.
- Insert “B” show one correct solution. The fuse placement from left to right is: 10, 15, 25, 5, and 20.
Location: Weakly Seventh Newsroom: 8:22 P.M.
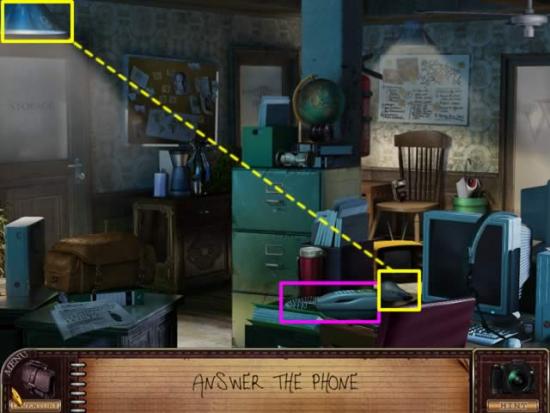
- Click on the telephone so Gabrielle can have a conversation with her boss.
- Illuminate the room by clicking on the light bulb on the desk. It will go to inventory. Place it on the blue light fixture in the upper left corner to get the object list.
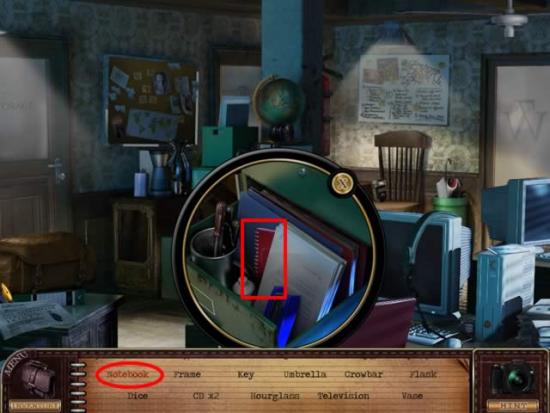
- Collect all the items on the list. The notebook is in the second draw of the green filing cabinet. No inventory items are collected.
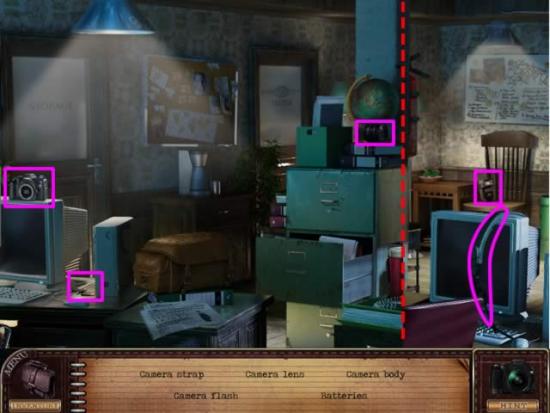
- After another telephone conversation, collect the camera parts as shown above. The red dashed line indicates a side portion of the scene has been stitched with the main area so all objects can be viewed in one screen shot.
Location: City Hall 8:46 P.M.
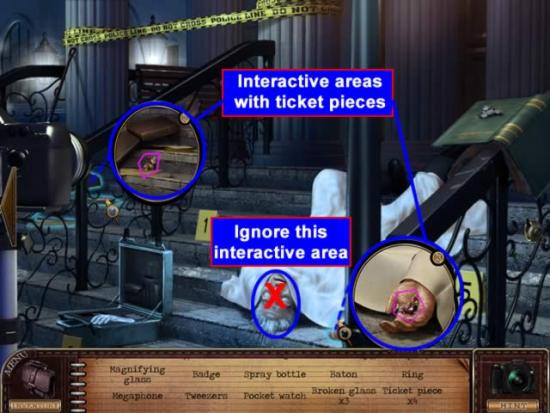
- There are three interactive areas. The overturned brief case on the steps and the mayor’s hand contain ticket pieces you’ll need to collect. The third area, the mayor’s face can be ignored. It does not contain any objects to be collected.
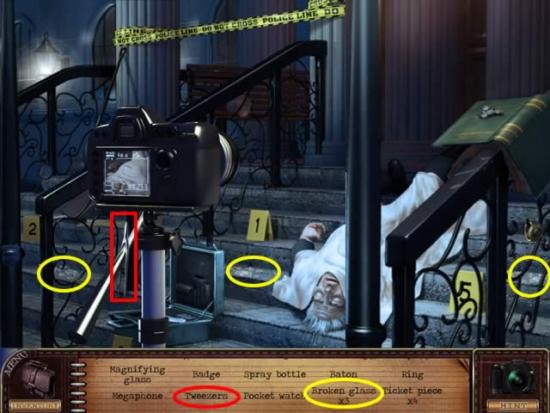
- Collect the tweezers for inventory. They are used to pick up the three areas of glass indicated in yellow.
Location: Office of the Mayor – 9:02 P.M.
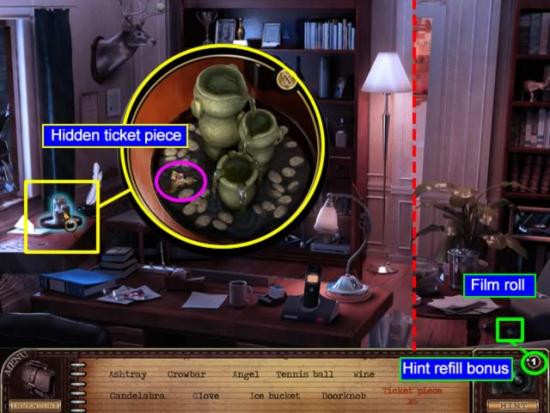
- The red-dashed line indicates a break in the continuity of the scene. The portion on the right is from the far right side.
- There are no inventory items. The hidden ticket piece is in the fountain.
- Collect the film roll under the chair for an immediate Hint refill. If you find the roll within 20 seconds of entering a scene (the time it takes for the bar to refill), the hint bar will fill immediately. If the bar is already full, the immediate refill number will show next to the camera. The bonus hints will accumulate each time you find a roll of film in a scene and will carry forward throughout the game.
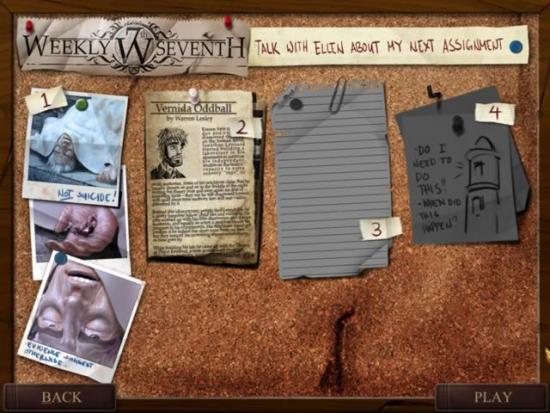
Chapter 1 completion notes.
Chapter 2: A Change of Assignment
Location: Weekly Seventh Newsroom – 10:08 A.M.
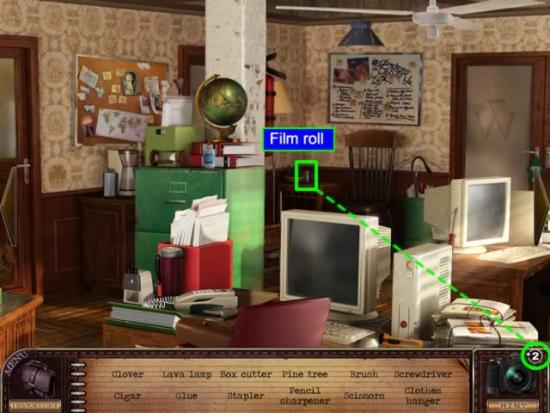
- There are no hidden or inventory items in this scene. Collect the film roll for a refill bonus.
Mini-game: Assemble the Ticket
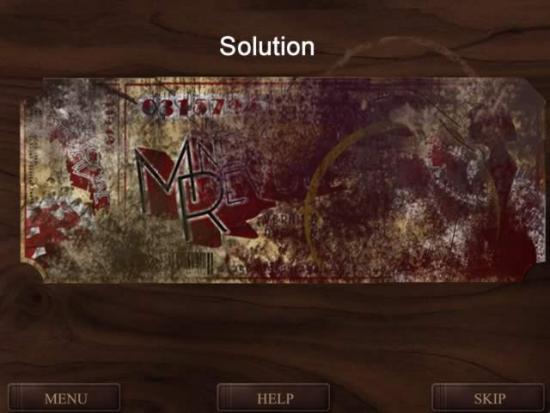
- This is a standard jig-saw type puzzle. The completed puzzle is shown above.
Mini-game: Spot the Differences
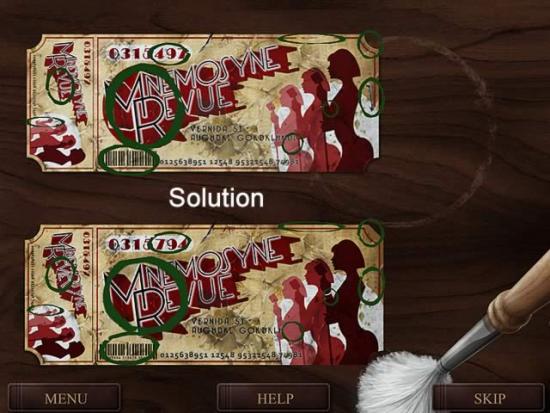
- Use the brush to clean the bottom ticket. The differences are circled in green.
Location: Ellen’s Office
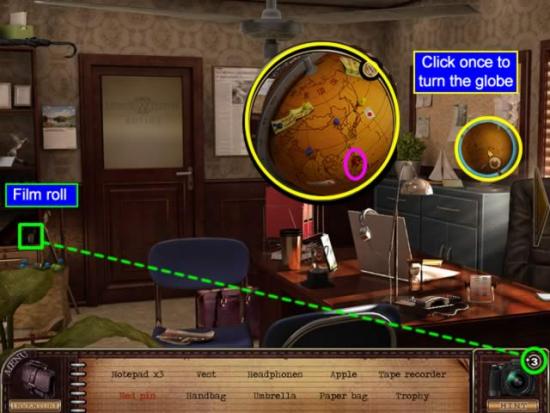
- To find the Red pin, click on the globe to access the interactive area.
- Click on the globe once to rotate it. Collect the pin.
- Collect the film roll.
Location: Subway Station 4 – 12:14 P.M.
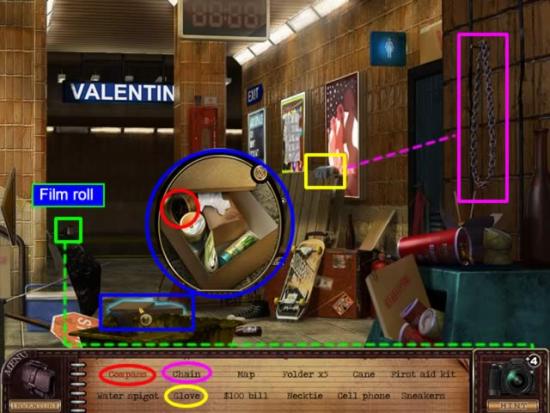
- Open the box to access the interactive area and retrieve the hidden Compass.
- The Glove is an inventory item that will be used to collect the Chain
- Click the film roll for the extra hint.
- Trivia fact: On the left side of the scene is a map of subway stops. The names for the stops will be seen again when the credits roll at the end of the game showing the game developers.
Location: Restroom, Subway Station 4 – 12:32 P.M.
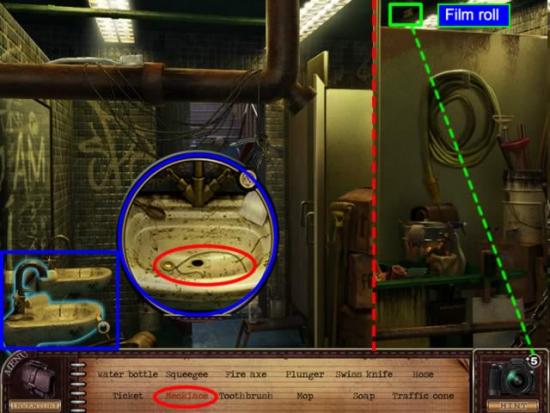
- The red-dashed line indicates a break in the continuity of the scene. The portion on the right is from the far right side. The film roll is located here.
- Click on the sink to open the interactive area and collect the Necklace.
Location: Leonard’s Lab – 1:17 P.M.
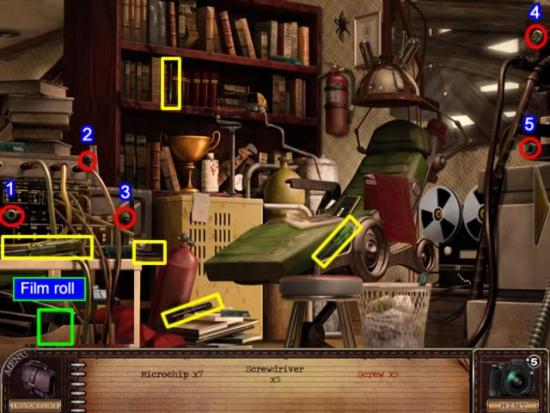
- The five screwdrivers will go into inventory. Each red-circled screw is an interactive area. The numbers correspond to the expanded areas in the next screen shot.
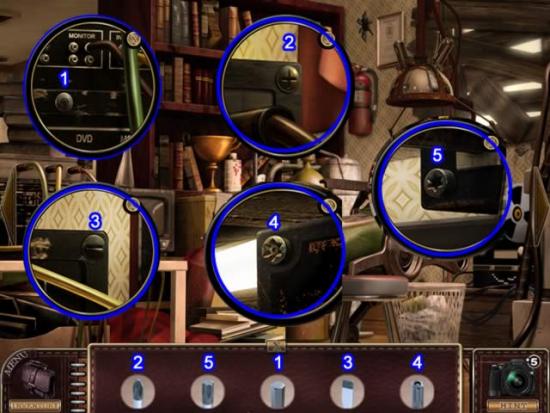
- The numbers above the screwdriver heads in inventory match the expanded view of the screws.
- Click on the individual screws to expand the area.
- Select the proper screwdriver from inventory and click it on the screw head to remove it.
Mini-Game: Fix the Monitor
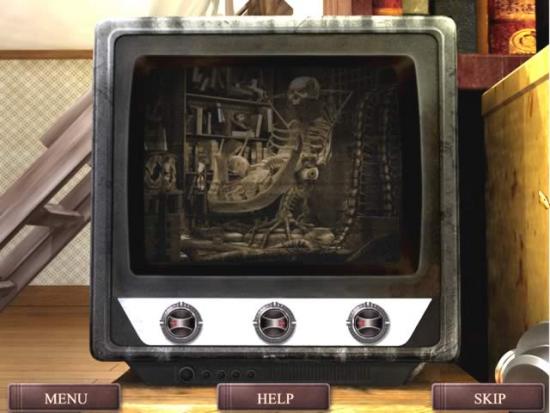
- Adjust the knobs until the entire picture is visible. The sequence and position of the knobs to clear the picture changes each time you play.
Location: The Demented Apartment
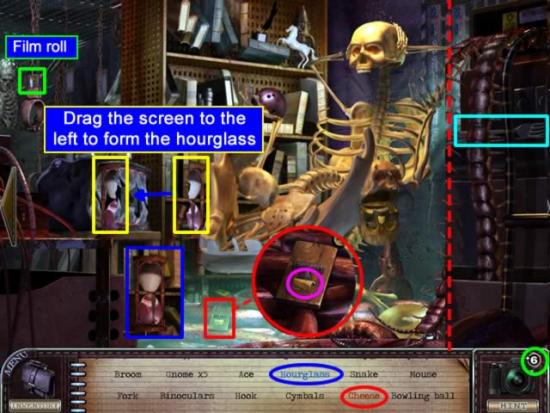
- Adjust the angle by dragging the screen to the left to combine the two pieces of the Hourglass item.
- Obtain the Fork (on the far right of the scene, shown in aqua) for Inventory.
- Place the fork on the mousetrap to spring the trap and then click the trap to open the interactive location. Click on the cheese to collect it.
- The roll of film is inside a chain link as shown in green.
Location: The Doll Room
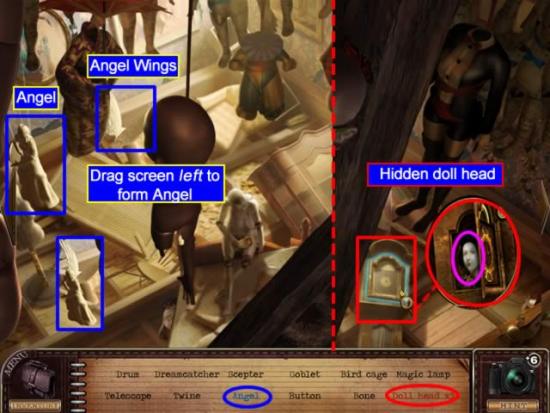
- Align the screen angle to attach the wings to the angel.
- Click on the clock face to open the interactive area and obtain the hidden doll’s head.
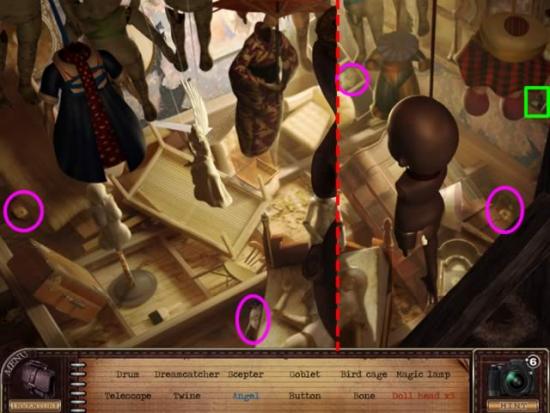
- Collect the other four doll heads for Inventory as shown.
- The roll of film is highlighted in green.
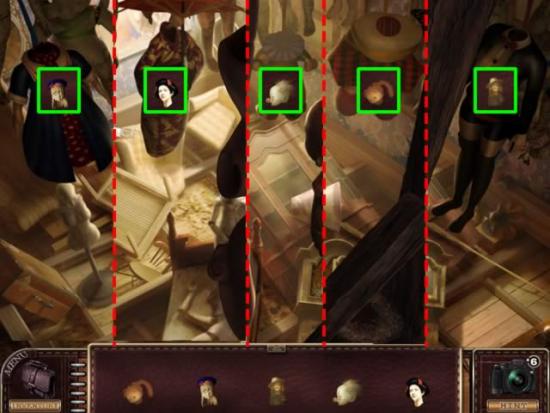
- Match the doll heads from inventory to the correct body.
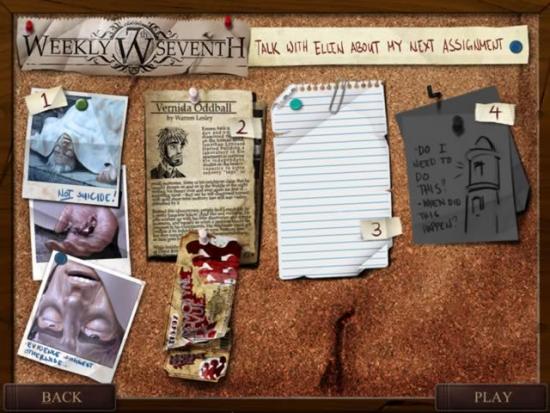
Chapter 2 Completed
Chapter 3: Following the Clues
Location: Lighthouse
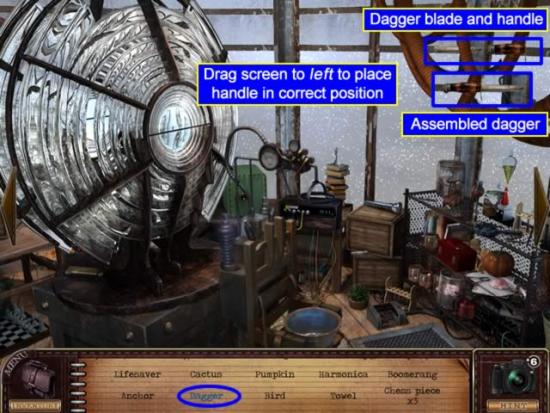
- Assemble the two dagger parts by repositioning the angle of the screen as shown above.
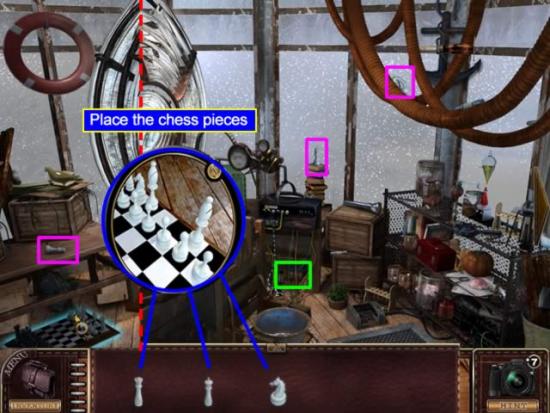
- Collect the chess pieces
- Open the chess board interactive area
- Place the three pieces on the board
- Collect the roll of film from under the cabinet
- Click the glowing power supply to “Exit the Room”.
Location: Weekly Seventh Editor’s Office – 4:49 P.M.
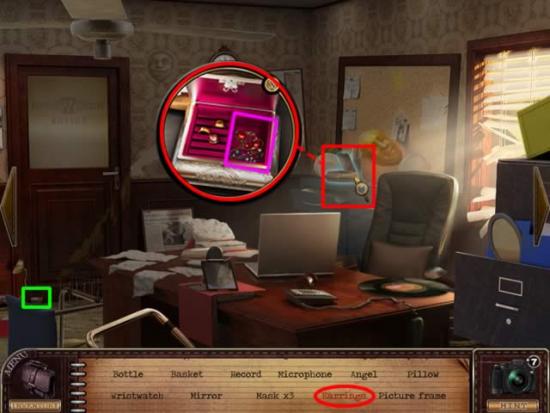
- Collect the items. The hidden earrings are in the box on the cabinet. The roll of film is on the floor by the door.
Location: Vernida Central Park – 8:22 P.M.
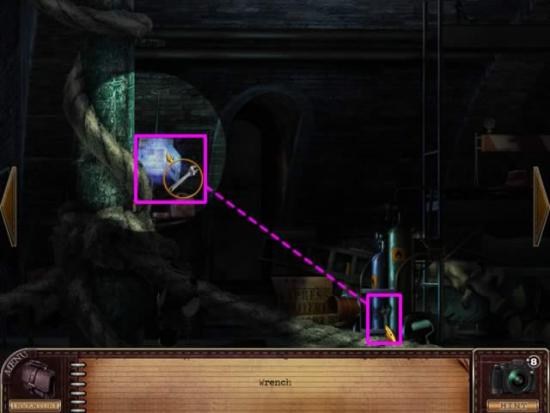
- Collect the wrench and then click on the switch box with it to turn on the lights.
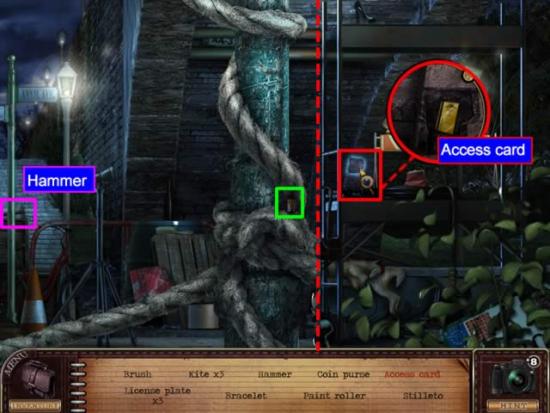
- Get the Hammer for Inventory. Click the hammer twice on the loose brick to break it and obtain the hidden Access card.
- The roll of film is embedded in the rope and is highlighted in green
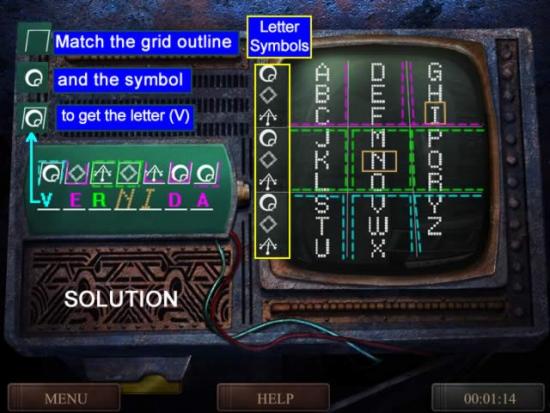
Use the key card to access the coded lock. The first two letters “N” and “I” are given to you as a hint on how to break the code.
- The grid is set up like a tic-tac-toe board with open sides on all but the middle grid.
- There are three letters per grid and each is associated with one of the three symbols.
- The symbols are the same across the grid for each row of letters: row 1 contains the letters “A”, “D”, “G” and all are assigned the symbol that looks like a “Q”.
- To find the missing letters, match the grid outline and the symbol.
There are three code sequences to break. The first one, as shown above, is “VERNIDA”
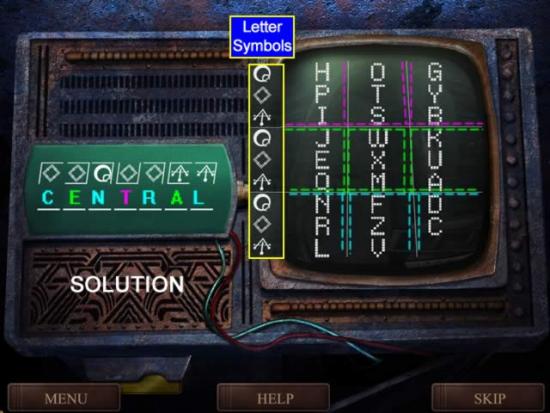
- Use the same method to solve the second set of code. The solution is “CENTRAL”.
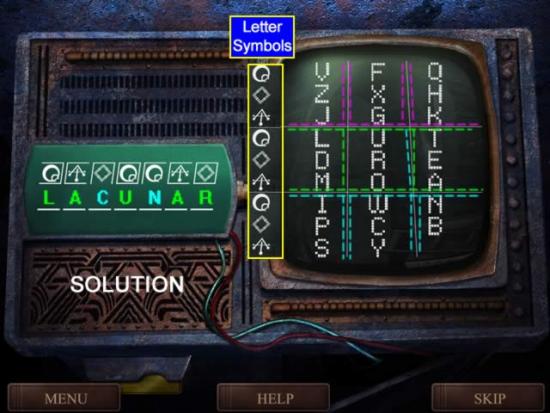
- The solution to the last code set is “LACUNAR”.
- In case there are others for whom the definition of this word didn’t immediately spring to mind, according to Webster’s Dictionary, it is a ceiling constructed with recessed panels. There is also a medical condition called Lacunar Amnesia described as a condition in which memory is partially lost or the memory of isolated events is lost. You can decide which definition best fits the story line.
Location: The Sunken Subway
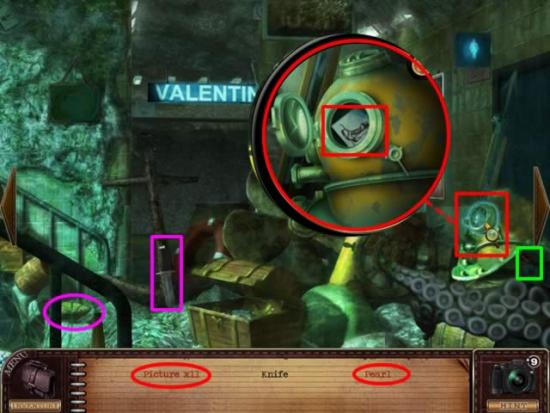
- Collect the knife for inventory and then use it to open the oyster to obtain the pearl.
- The hidden picture is inside the diver’s helmet.
- The roll of film is right below the helmet (highlighted in green above). If you haven’t been using hints, the maximum amount of extra hints you are given for finding the rolls of film is nine.
Mini-Game: Match the Tiles
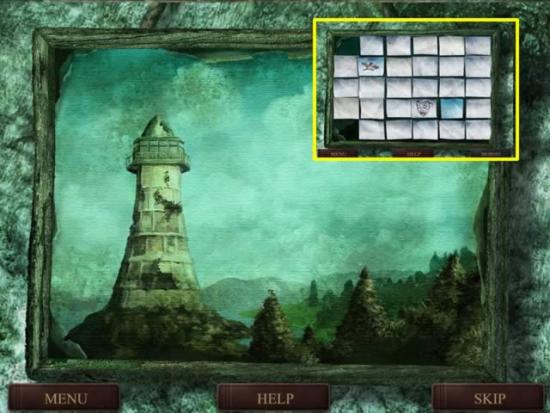
Matching the pictures on the tiles will cause them to fall away and reveal this painting.
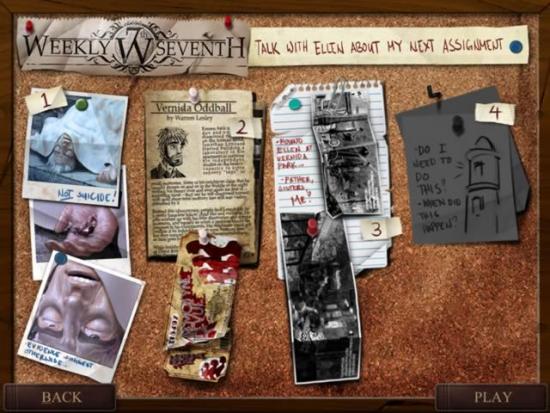
Chapter 3 has been completed.
Chapter 4: The Cathedral
Location: Abandon Lighthouse – 11:07 A.M.
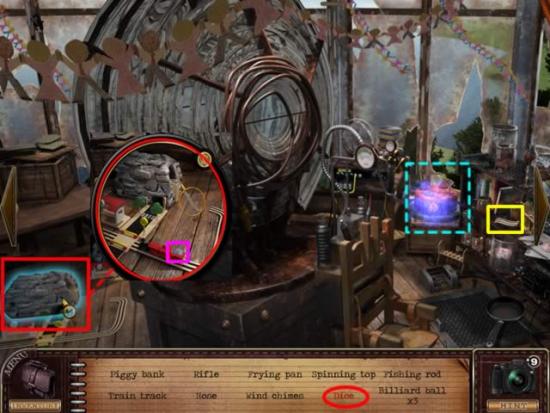
- Click the section train tracks on the right to put it in inventory.
- Open the interactive area and place the train track in the empty slot. The engine will come out with the dice on top.
- After all items have been collected, the round object in the background will begin glowing and the message “Acquire the Pentagram” appears. Click the glowing object.
Mini-Game: Towers of Hanoi
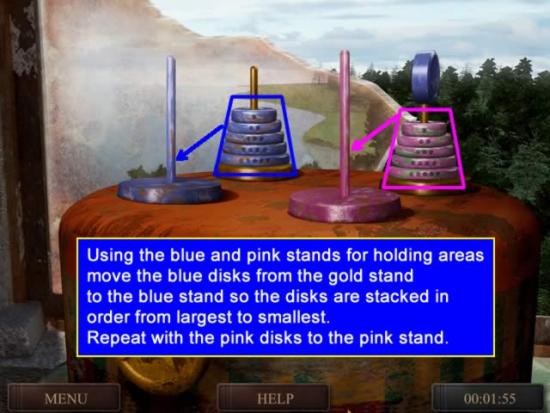
- Move the blue rings to the blue base from largest to smallest. Once this is completed, the disk from the pink rings will lift. Repeat the sequence for the pink rings.
- Once both set of rings are on the correct base, the pentagram on the side will open.
- To see how to move the rings, view the video of the solution for the blue rings.
Location: The Mnemosyne Cathedral
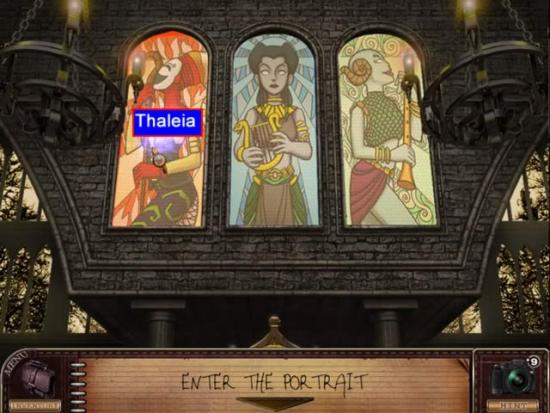
- Click on the window to enter the portrait for Thaleia
Location: The Steps of Torment
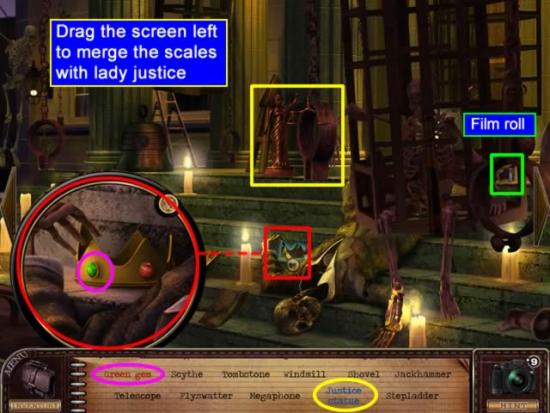
- Drag the screen left to align the scales with the statue.
- Click on the crown to enlarge the area and collect the green gem for inventory
Mini-Game: Fix the Phone
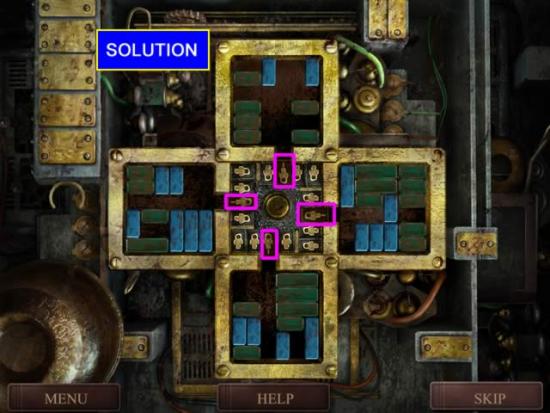
- Move the four circuits from the outside arms to the center by sliding the pieces to clear a path. The solution is shown above. To see how each arm was done, here are videos by area:
Top
Left side:
Bottom
Right side:
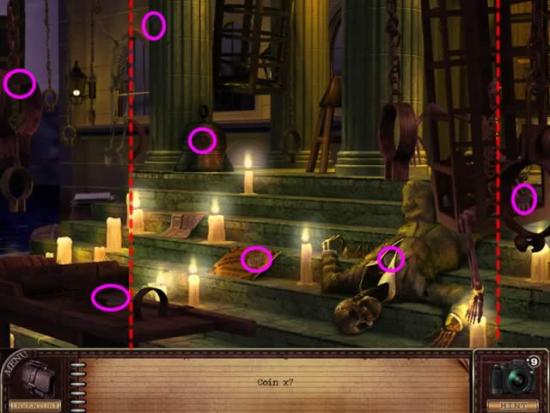
- Collect the seven coins as shown above. Note the red-dotted lines indicate a portion to the right or left has been added to this angle.
- The coins are added to inventory.
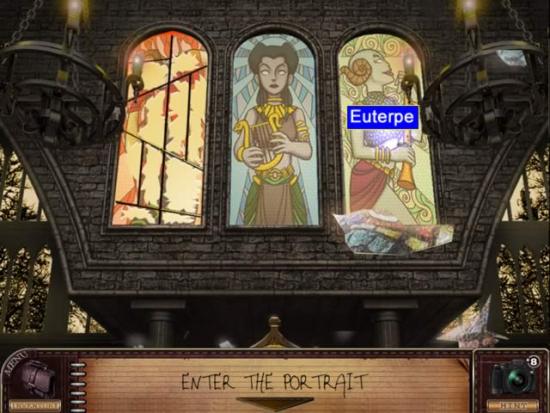
- Click the window to enter the portrait of Euterpe
Location: The Old Vernida
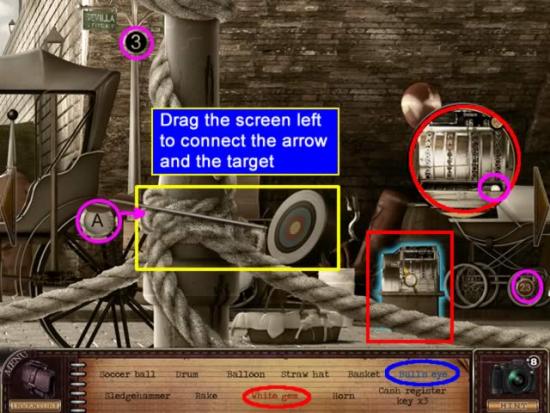
- Drag the screen so the angle has the arrow hitting the bull’s eye on the target
- Collect the three cash register keys. The “A” is behind the lamp post by the arrow.
- Click on the cash register and add the keys from inventory. Collect the White gem.
- After all the items are collected a glowing outline of a door appears with the message to “Enter the Portal” Click on the glowing area
Mini-Game: Match the Eyes
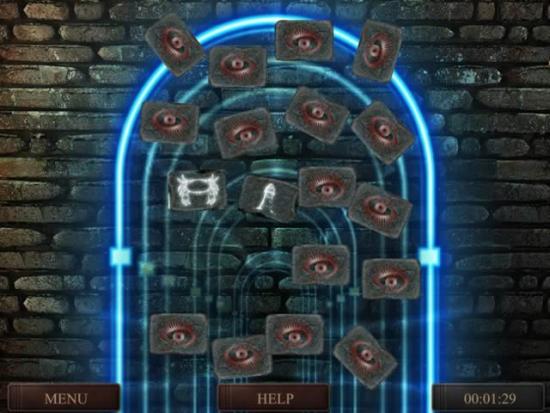
- Find the matching image to remove the tiles covering the portal.
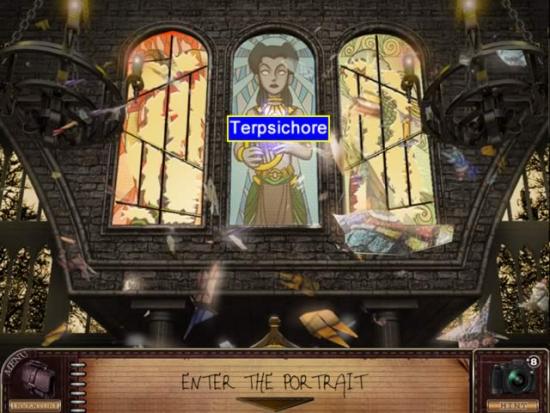
- Click the window to enter the portrait for Terpsichore
Location: The Pipes
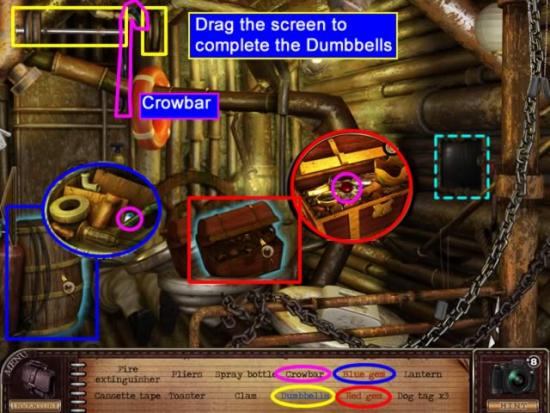
- Collect the Crowbar for inventory.
- Drag the screen to the left to insert the weight on the end of the weight rod to complete the Dumbbells.
- Click on the chest to access the interactive location and get the Red gem.
- Use the crowbar to pry open the barrel. Collect the Blue gem.
- After all items have been collected, the frame on the side wall begins to glow. Click to open it.
Mini-Game: Fix the Display
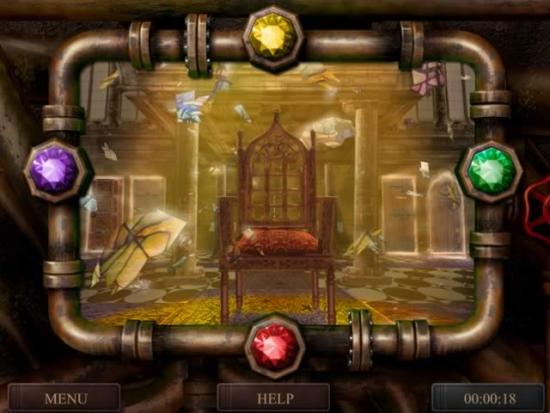
- Place the gems in the correct position to clarify the picture. The gem positions show above is one solution. Yours may be different.
- The last window shatters.
Mini-Game: Assemble the Throne
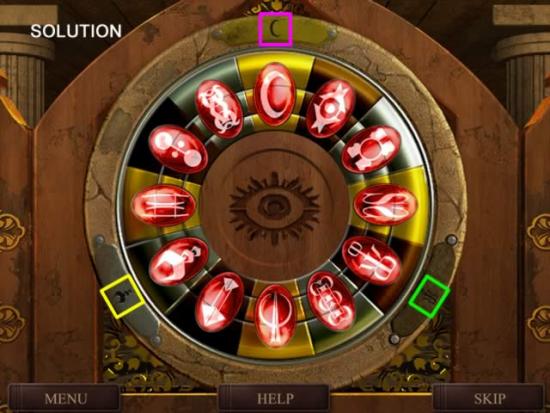
- Rotate the outer ring until the top of the three symbols match the symbol shown on the outer plate.
- Alternate rotating the two inner rings: click the second ring once and then the inner most ring. The two inner rings are counter to each other and the puzzle is designed so that all three pieces will align quickly.
- Collect the pieces for the eye
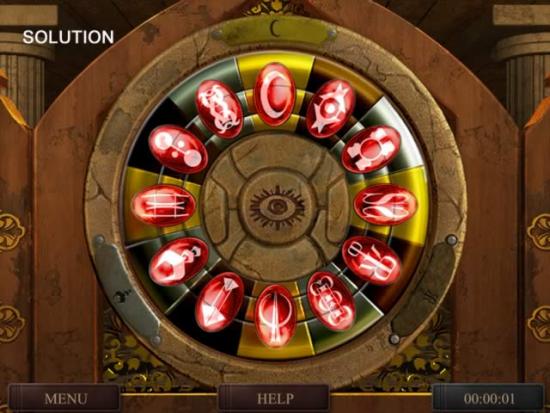
- Fit the inner eye pieces as shown above.
- Dialog and cut scenes will wrap up the story.
Congratulations! You have completed Mind’s Eye.
More articles...
Monopoly GO! Free Rolls – Links For Free Dice
By Glen Fox
Wondering how to get Monopoly GO! free rolls? Well, you’ve come to the right place. In this guide, we provide you with a bunch of tips and tricks to get some free rolls for the hit new mobile game. We’ll …Best Roblox Horror Games to Play Right Now – Updated Weekly
By Adele Wilson
Our Best Roblox Horror Games guide features the scariest and most creative experiences to play right now on the platform!The BEST Roblox Games of The Week – Games You Need To Play!
By Sho Roberts
Our feature shares our pick for the Best Roblox Games of the week! With our feature, we guarantee you'll find something new to play!Type Soul Clan Rarity Guide – All Legendary And Common Clans Listed!
By Nathan Ball
Wondering what your odds of rolling a particular Clan are? Wonder no more, with my handy Type Soul Clan Rarity guide.


