![Digimon UP Tier List [Supports, Buddies, and Partners]](/wp-content/uploads/2026/07/digimon-up-tier-list.jpg "Digimon UP Tier List [Supports, Buddies, and Partners]")
Digimon UP Tier List [Supports, Buddies, and Partners]
These Digimon will get you UP the leaderboard.

![Haze Seas Boss Drops [Chances, Locations, and How to Spawn]](/wp-content/uploads/2026/07/haze-seas-boss-drops.jpg "Haze Seas Boss Drops [Chances, Locations, and How to Spawn]")

Welcome to Gamezebo's strategy guide for Million Dollar Quest. Journey with Sandra on a trip around the world for a chance to win one million dollars, or is there an even greater prize at stake. GENERAL TIPS Hints will refill overtime, so do not hesitate to use them if you are stuck. (About 100 seconds.) In each scene, the Hint Button is located in the upper right hand corner of the screen. It will look like a light bulb. There are no penalties for miss clicks. So feel free to click o…
a:1:i:0;a:2:s:13:”section_title”;s:32:”Million Dollar Quest Walkthrough”;s:12:”section_body”;s:80006:”
Welcome to Gamezebo’s strategy guide for Million Dollar Quest.
Journey with Sandra on a trip around the world for a chance to win one million dollars, or is there an even greater prize at stake.
GENERAL TIPS
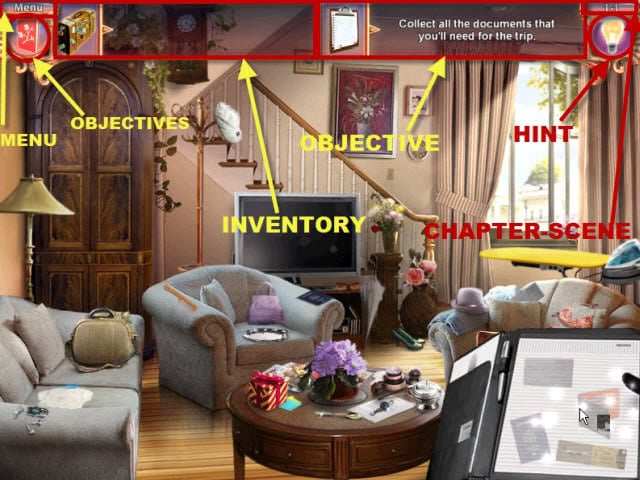
User Interface

Your scene screen contains the Menu, in the upper left corner.
Below the Menu, the red card contains your Objectives.
Next to that is the Suitcase, this is your inventory, occasional items can be placed here for use later.
Next to this is the Clipboard, this area contains the current objective or list of items needed to be found.
On the far right is your Hint icon, the light bulb, this is also used to skip mini games if you become stuck.
Above the Hint icon is your current Chapter and Section.
Screen Shot Guide
The highlighted areas use different colors for different actions. The below notes explains each highlight.
RED highlighted area’s are items need to collect.
YELLOW highlighted areas are points of interest.
GREEN highlighted areas are items that need to be moved.
PURPLE highlighted items are items you can pick up and put in your inventory to be used elsewhere.
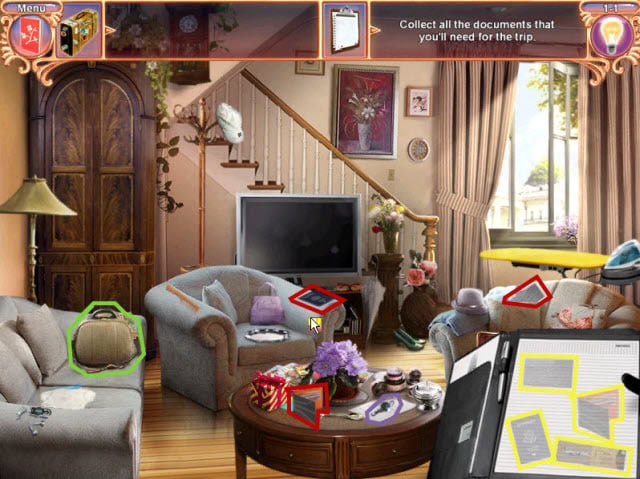
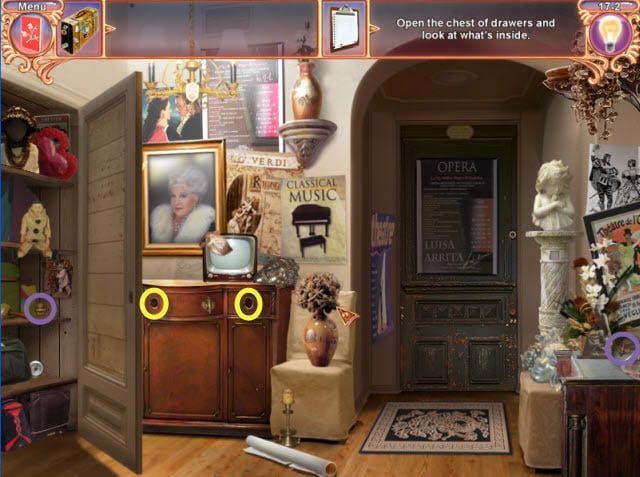
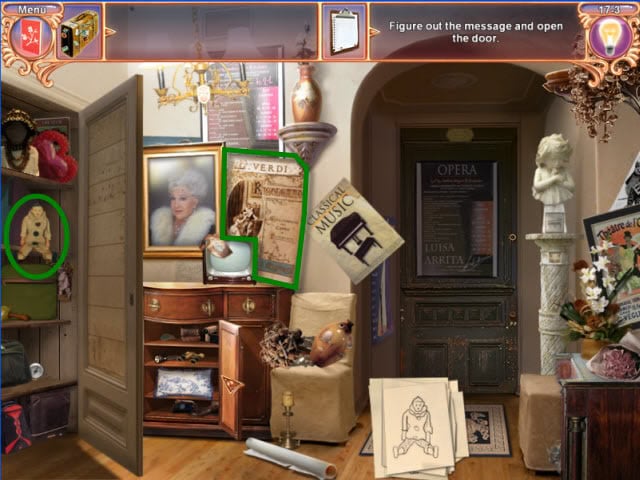
Chapter 1 – Scene 1
Three of the needed documents are out in the open, highlighted in red.
Move the purse, in green, to find the fourth document.

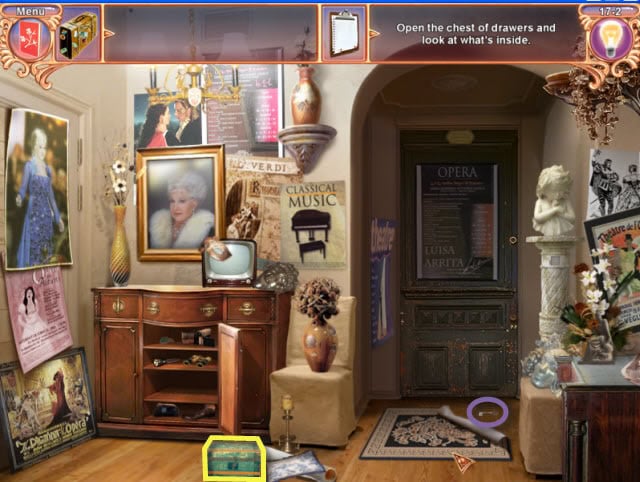
Chapter 1 -Scene 2
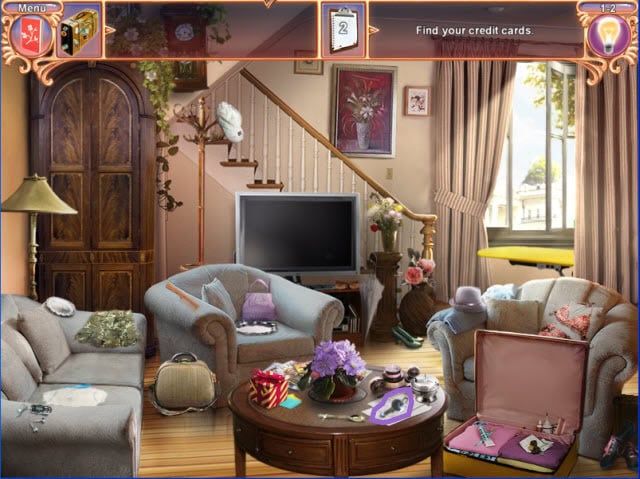
Gather the keys, in purple.
A crow will fly in and grab the keys.
Click on the crow to find items to distract him.
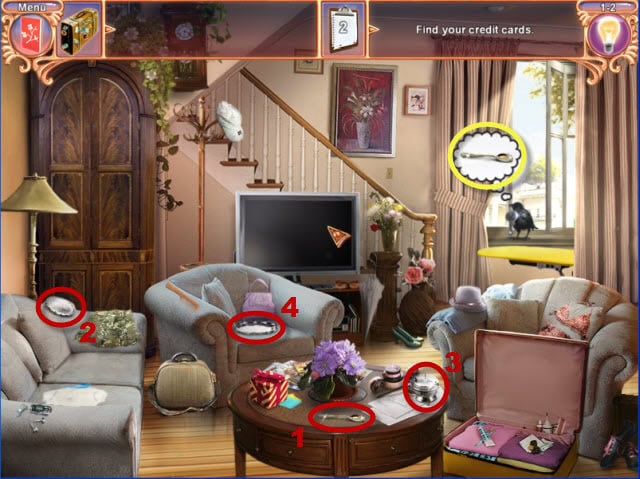
1. The spoon on the table.
2. The Platter on the couch.
3. The urn on the table.
4. The plate on the chair.
5. Click on the bird to make him drop the keys.
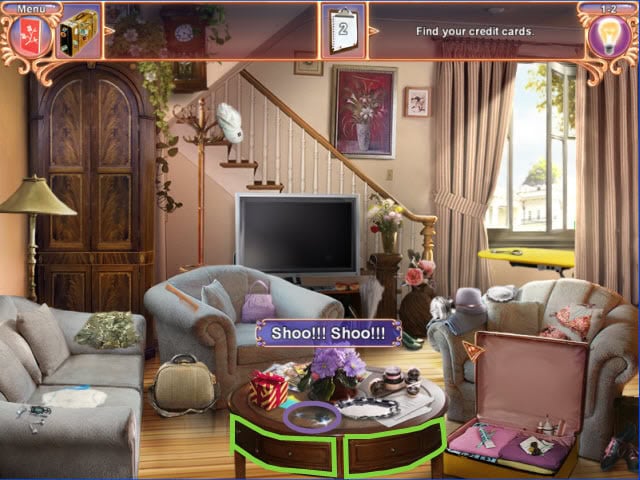
Use the key, highlighted in purple, on the right hand drawer.
Open both drawers, highlighted in green.
Gather the credit card, highlighted in red.
Move the three items, highlighted in purple, and gather the second credit card, underneath.
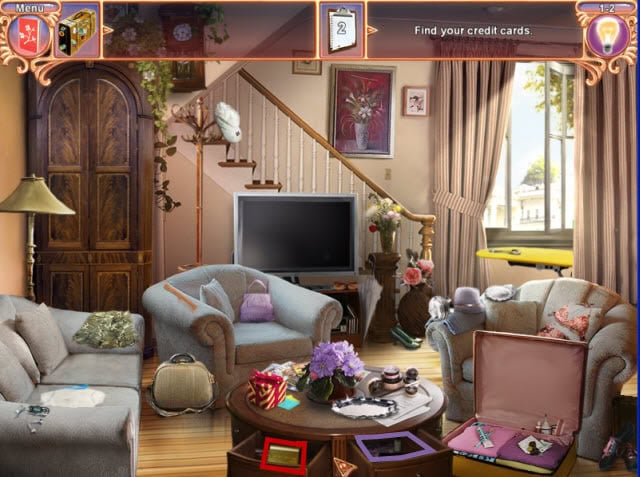
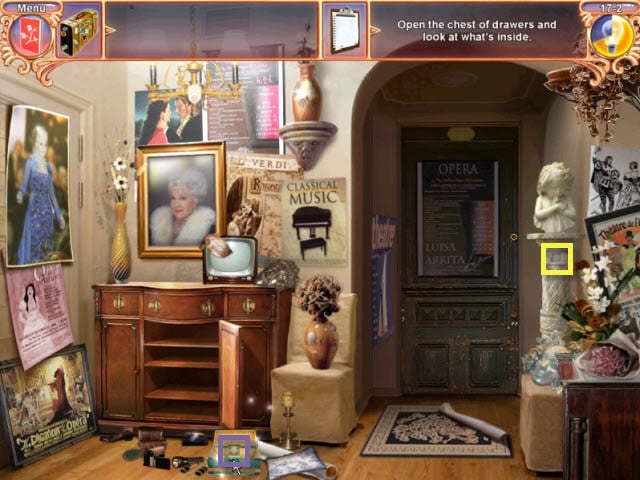
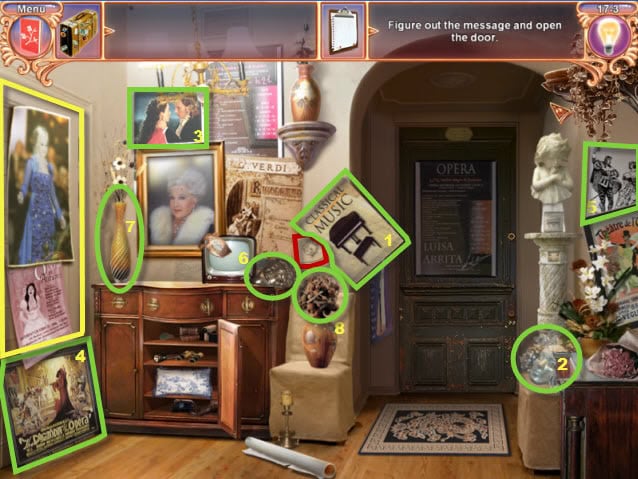
Chapter 1 – Scene 3
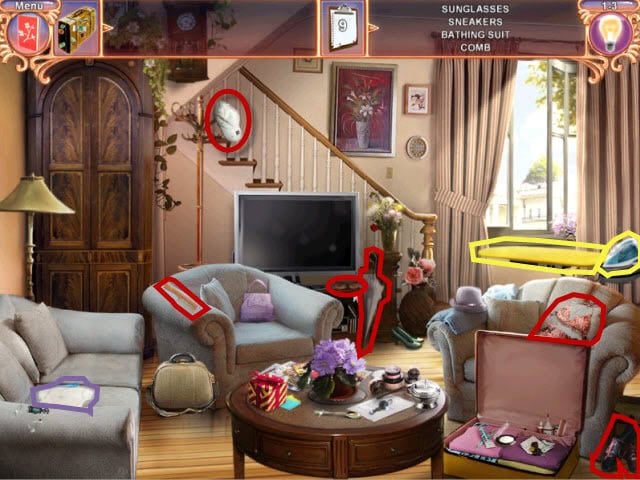
Gather the items highlighted in red.
Next, move the t-shirt, highlighted in purple, to the ironing board, highlighted in yellow.
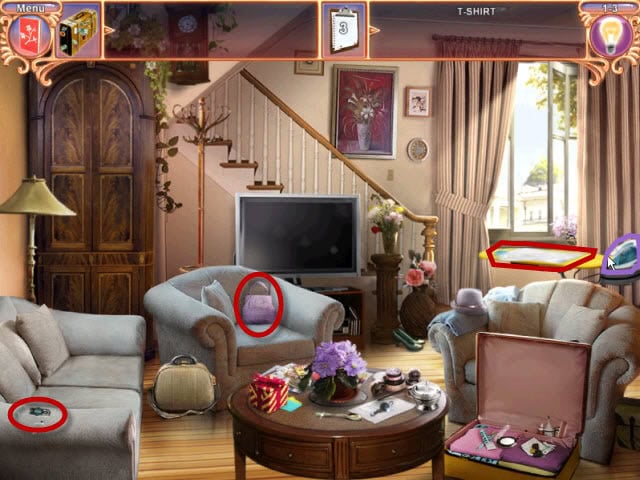
Use the iron, highlighted in purple, on the t-shirt, highlighted in red.
Then gather the t-shirt and the remaining items highlighted in red.
Chapter 2 – Scene 1
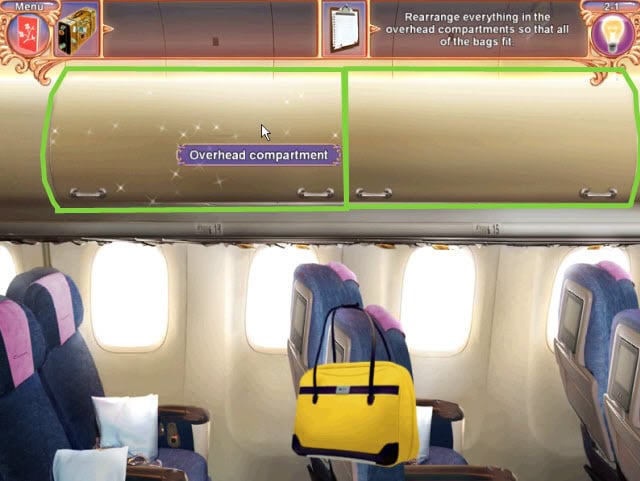
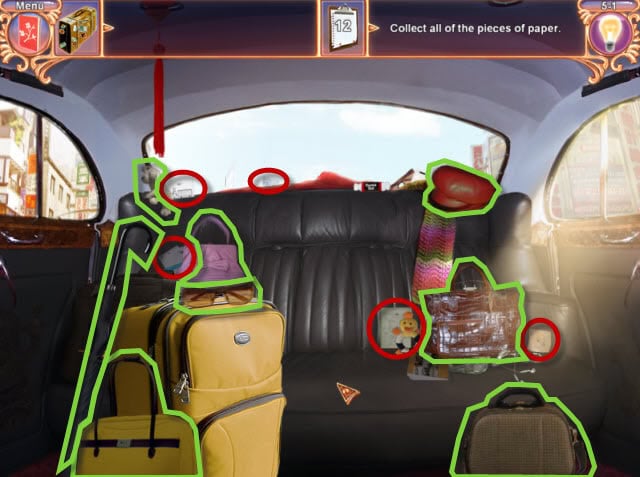
Open both luggage doors highlighted in green.

Remove all the luggage highlighted in green.
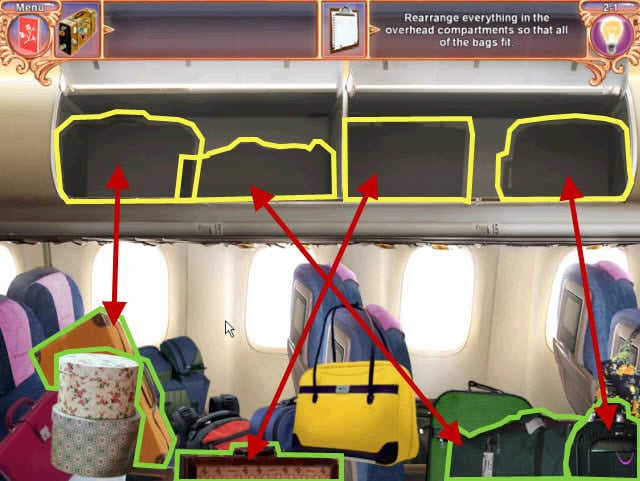
Now move the luggage, highlighted in green, into the matching silhouette, highlighted in yellow.
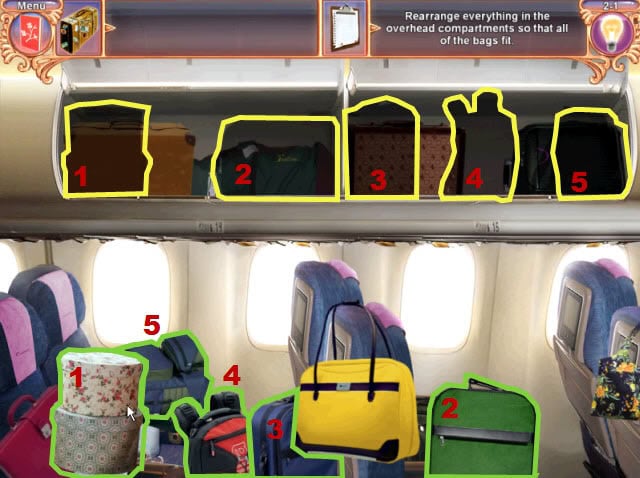
Repeat with the next layer of luggage.
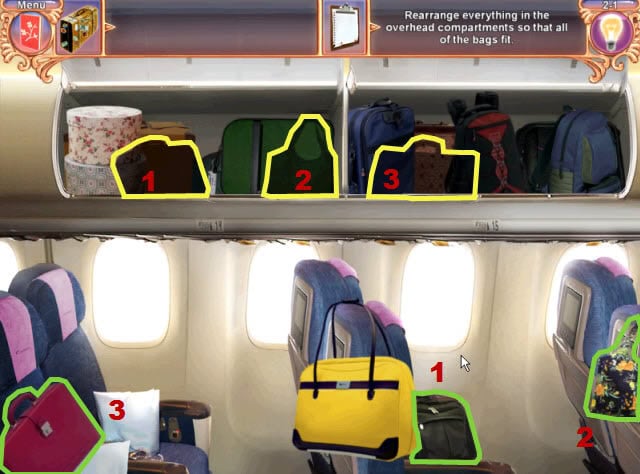
Repeat with the third layer.

Now your bag can be placed in the compartment.
Chapter 2 – Scene 2
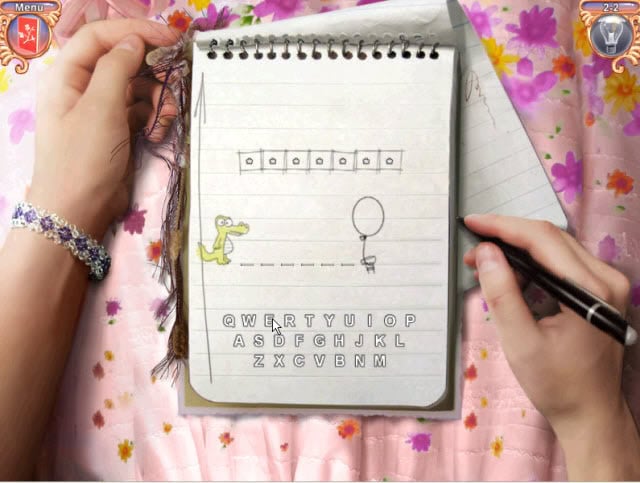
The first mini game you will encounter is a simple hangman game.
Click on the letters in the lower section to guess at the word.
A correct guess will add missing letters to the word you need to guess.
An incorrect guess will move the alligator one-step closer to popping the balloon.
Correctly guessed letters are circled and incorrectly guessed letters are crossed out as you play.
If you miss, too many times the alligator will chomp on the balloon, popping it.
You will then be given a new game with a new word to guess.
Most of the words are related to the game.
Guess three different words correctly to complete the mini game.
TIPS: Some of the most commonly letters used are R, S, T, L, N, and E.
Chapter 2 – Scene 3
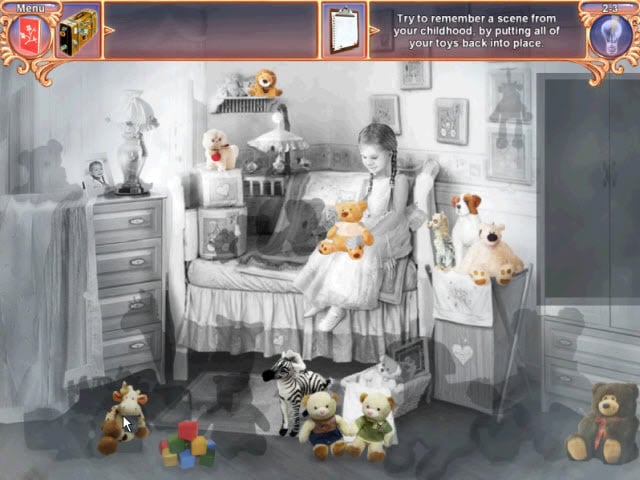
In this mini game, you must match each toy to its matching silhouette.
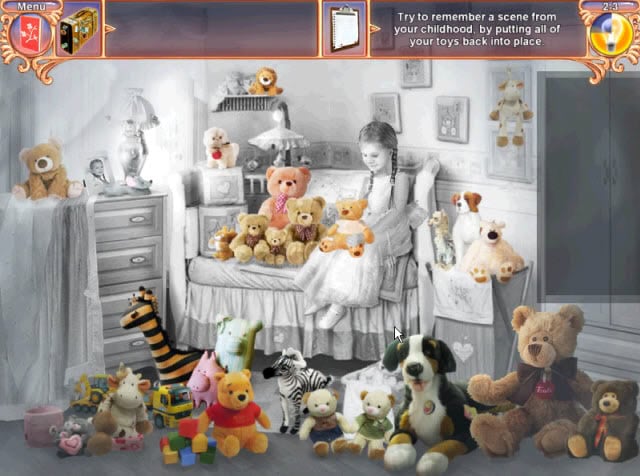
Repeat with a second set of toys, too complete this mini game.
Chapter 3 – Scene 1
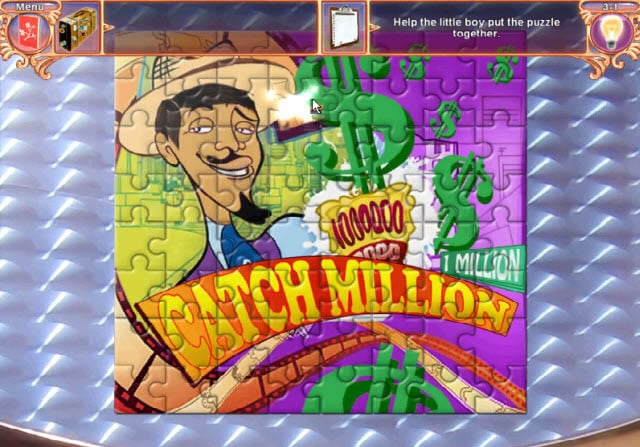
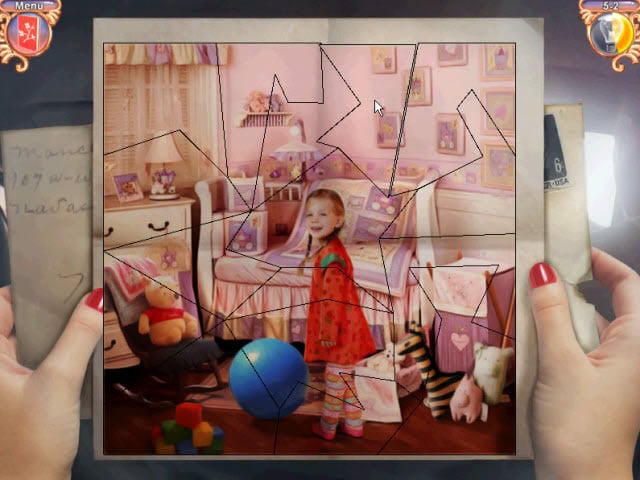
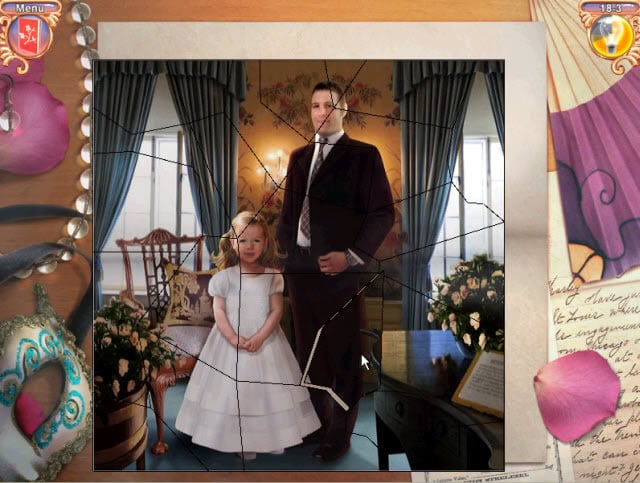
Your next mini game tasks you with helping a little boy piece together his puzzle.
Look at above screen shot for help completing the puzzle.
Chapter 3 – Scene 2
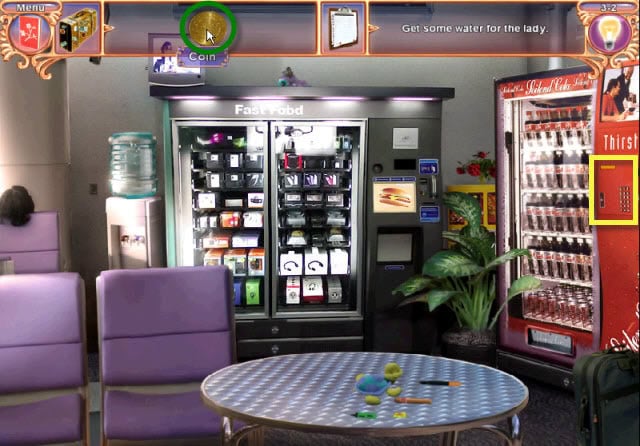
Use the coin, highlighted in green, on the drink machine, highlighted in yellow.
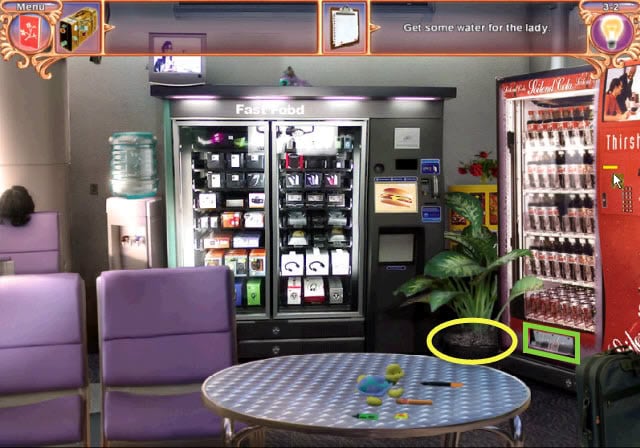
Use the drink bottle, highlighted in green, on the plant, highlighted, in yellow.
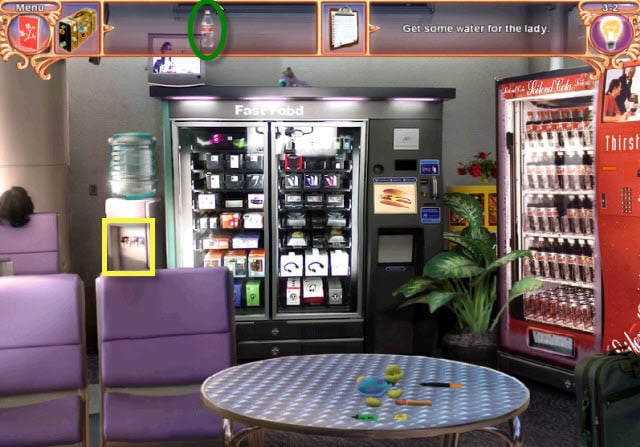
Now use the drink bottle, highlighted in green, on the bottled water stand, highlighted in yellow. Click on the bottle of water to finish.
Chapter 3 – Scene 3
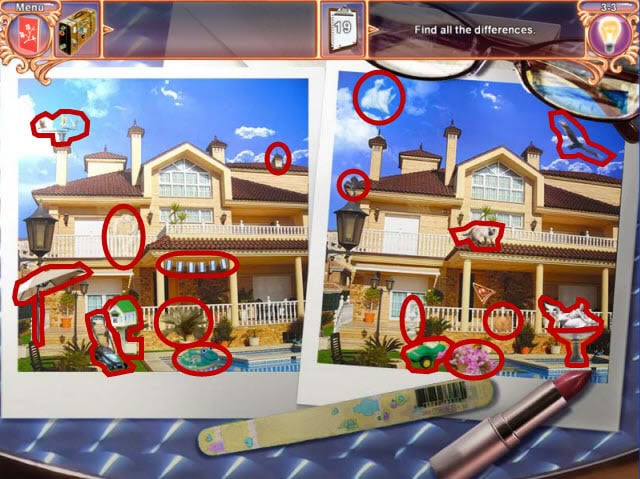
Your next mini game is a spot the differences game.
Compare both images and gather the items that are not in both pictures, highlighted in red.
Chapter 4 – Scene 1
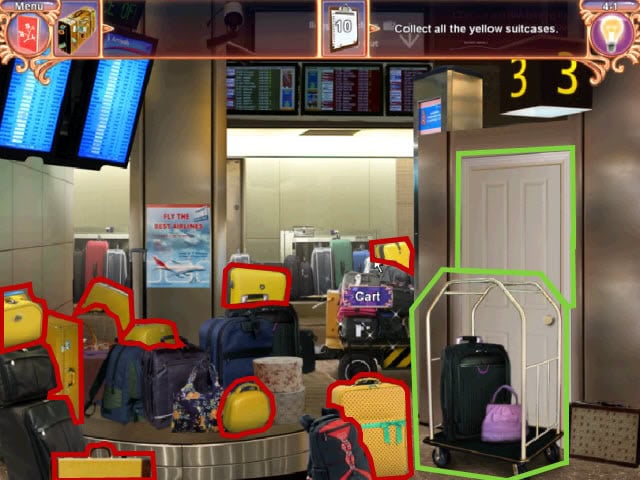
Collect all the yellow suitcases highlighted in red.
Then move the luggage cart highlighted in green and then open the door behind the cart, highlighted in green.
Click to enter the closet.
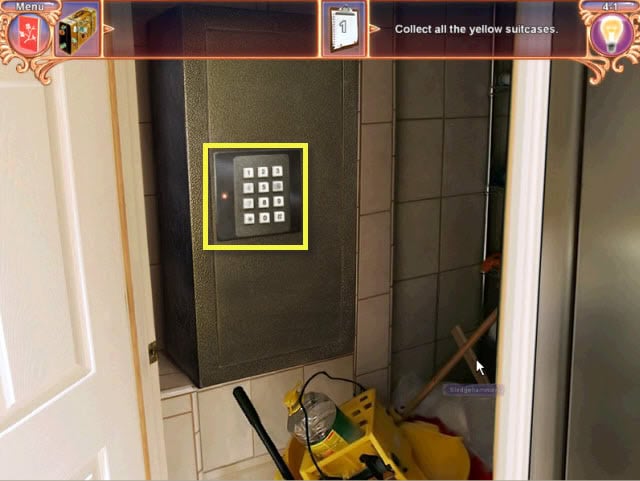
The keypad, highlighted in yellow, has three smudged numbers; four, six, and seven.
The correct sequence to open the panel is; 7, 4, then 6.
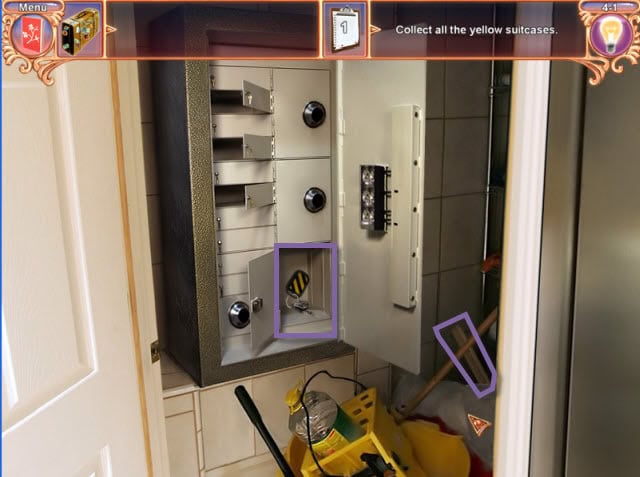
Now gather the keys and the hammer, highlighted in purple.

Now use the hammer, highlighted in purple, on the yellow block, highlighted in green.
Next, use the keys, highlighted in purple, on the cart, highlighted in green.
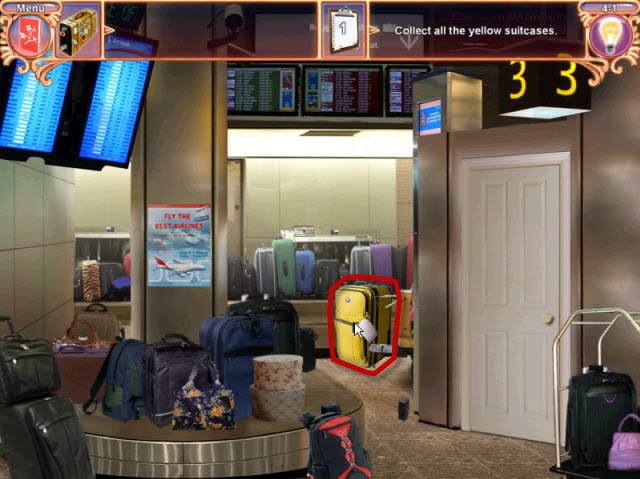
Now you can collect the last yellow suitcase, your own, highlighted in red.
Chapter 4 – Scene 2
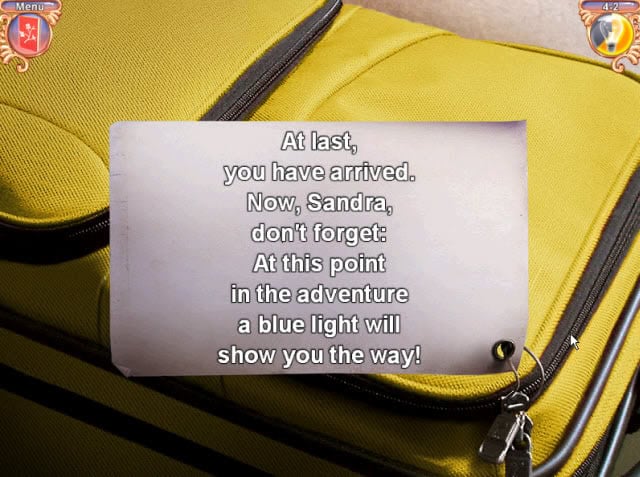
Attached to your suitcase is a note, which is your next mini game.
Rearrange the sentences to spell out the message.
Chapter 4 – Scene 3
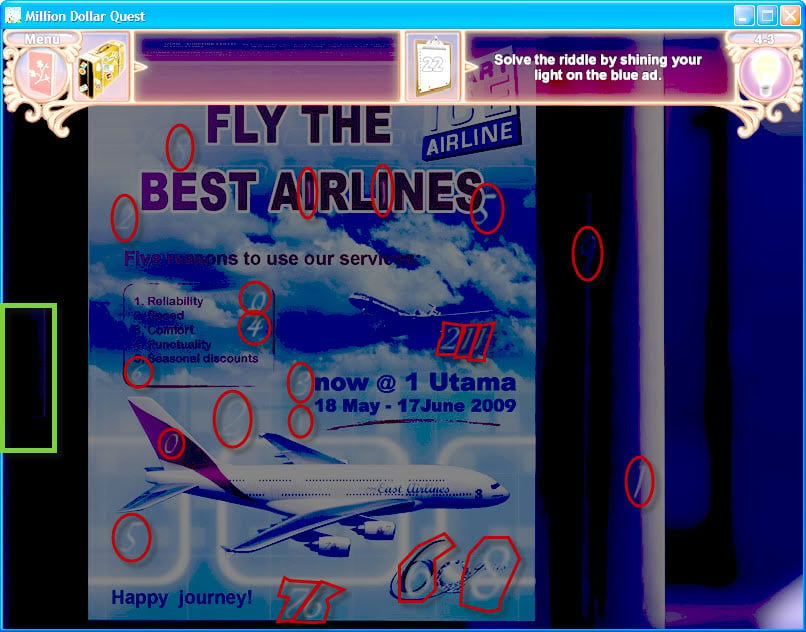
Click on the light switch, highlighted in green, and then proceed to use your flashlight to find the twenty-two numbers hidden on the poster, highlighted in red.
Chapter 4 – Scene 4
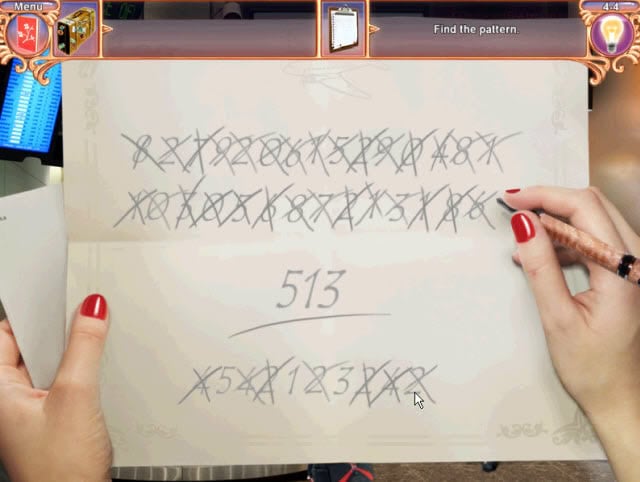
This mini game is a two-step process. First, cross out all the zeros, then the ones, etc., until you have crossed out all numbers.
You will now have a list of numbers on the bottom half of your paper.
Cross out any numbers that you have duplicates of and you will be left with just three numbers, 5, 1, and 3.
Chapter 5 – Scene 1
Gather all the scraps of paper highlighted in red.
Next, move all the items highlighted in green.
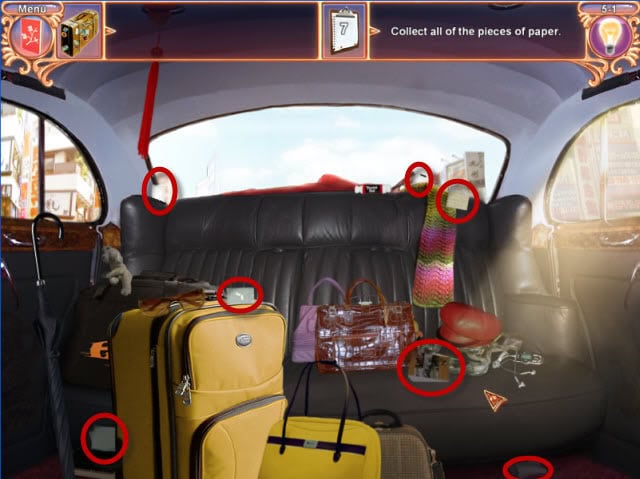
Gather all the remaining scraps of paper highlighted in red.
Chapter 5 – Scene 2
This mini game is a variation on the classic puzzle.
Place the pieces all back in the correct order to complete the photo.
Chapter 5 – Scene 3
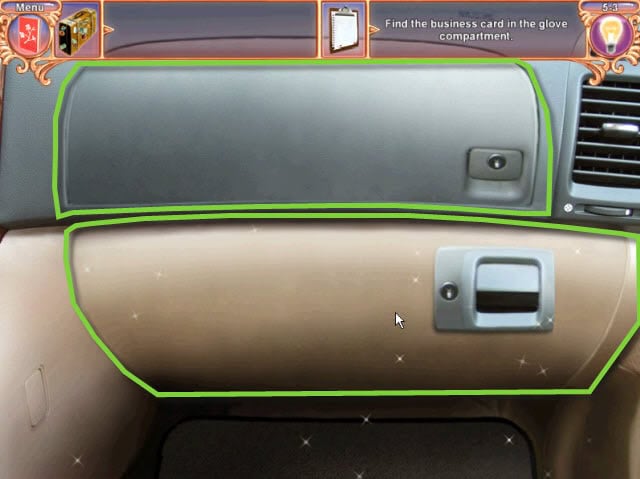
Open both sections of the glove box highlighted in green.
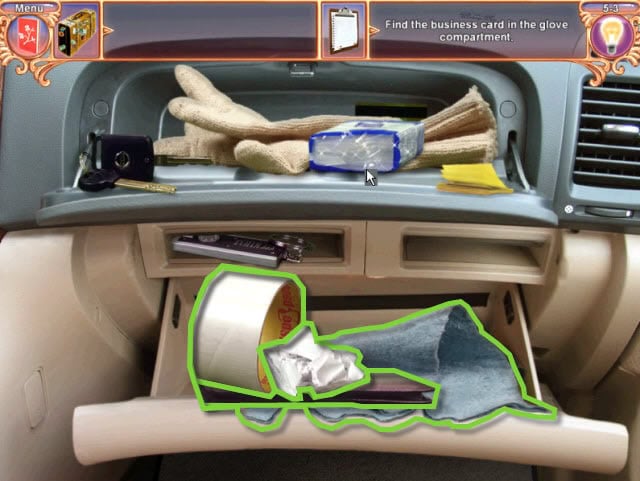
Move the four items, highlighted in green, to uncover the business card.
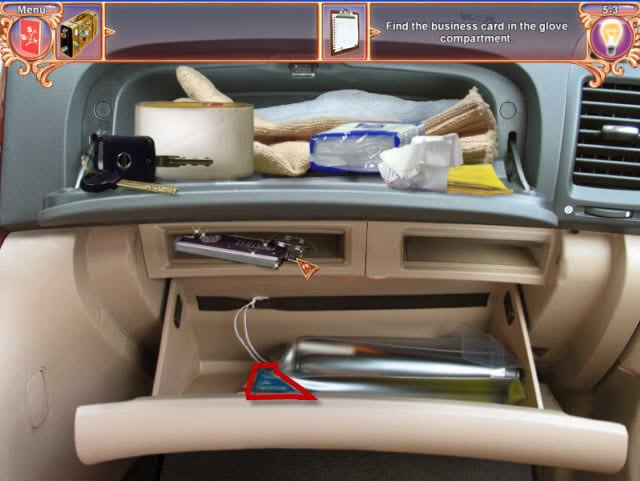
Gather the business card highlighted in red.
Chapter 6 – Scene 1
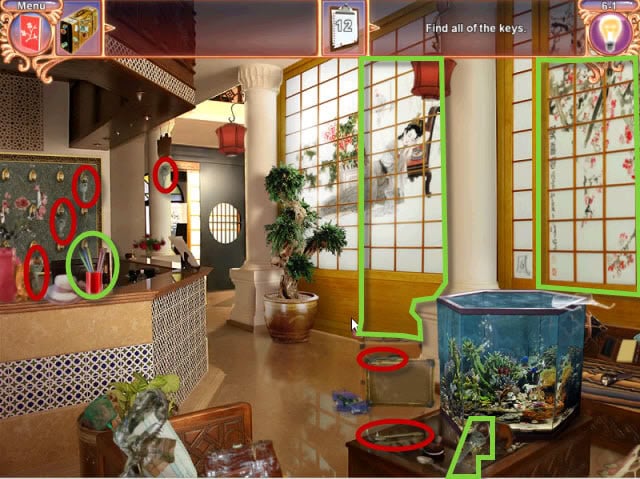
Collect all the keys highlighted in red.
Open both sliding doors and click on the red can, at the check in desk, highlighted in green.
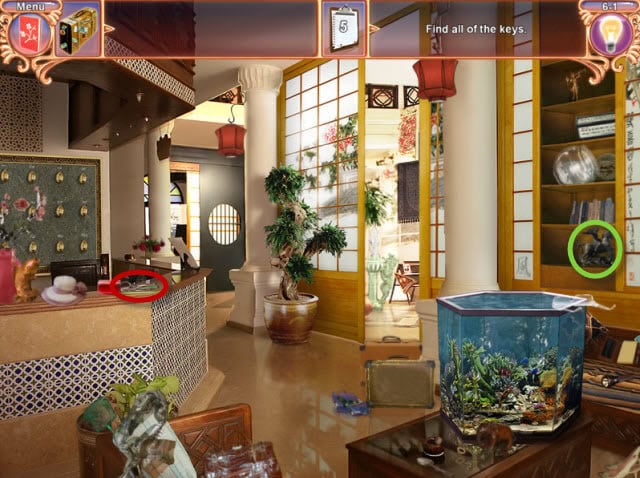
Collect the key that fell out of the red can, highlighted in red.
Move the horse statue, highlighted in green, on the bookcase.
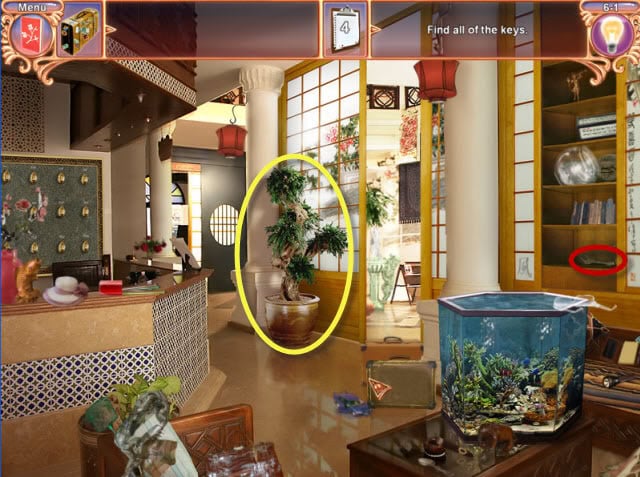
Gather the key, highlighted in red, which was behind the horse statue.
Click on the bonsai tree, highlighted in yellow, to find the remaining keys.
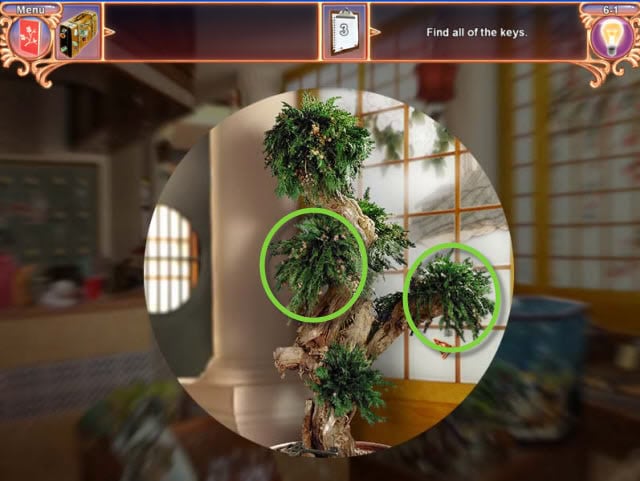
Move the branches, highlighted in green, to reveal the missing keys.

Collect the remaining three keys highlighted in red.
Chapter 6 – Scene 2
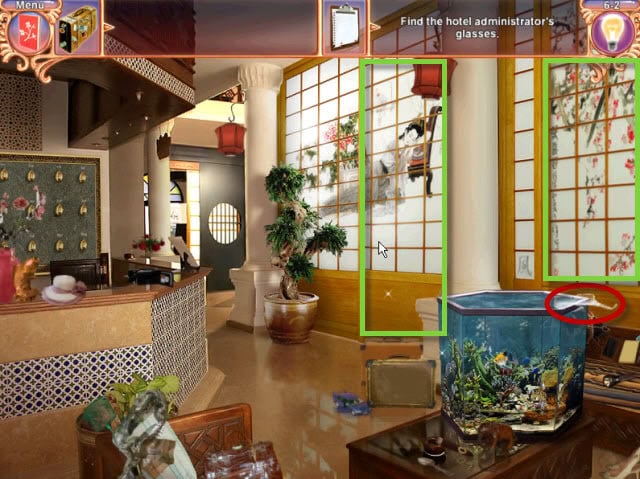
Click on the glasses highlighted in red.
They will fall into the fish tank.
You will need to empty the fish tank before you can retrieve the glasses.
Open both doors highlighted in green.
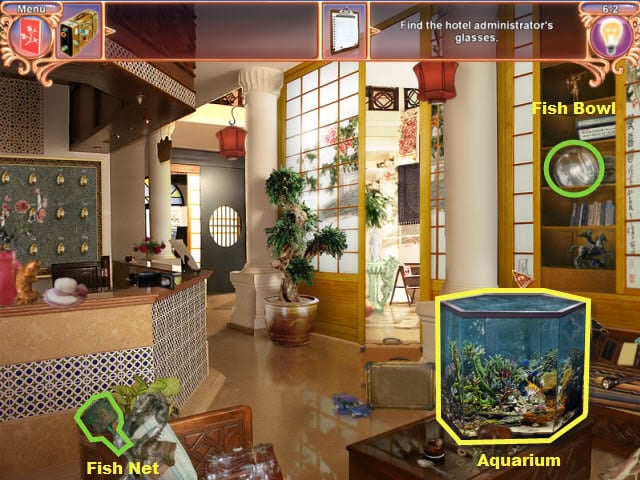
Gather the fish bowl, highlighted in green, and use it on the aquarium, highlighted in yellow.
Then use the fish net, highlighted in green, on the aquarium, to save the fish.
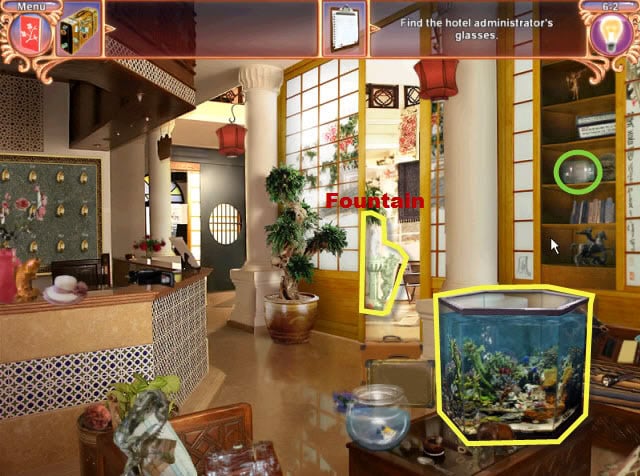
Use the jar, highlighted in green, on the aquarium, highlighted in yellow, to fill the jar with water.
Click on the fountain in the background behind the door you opened earlier, highlighted in yellow, to empty the jug.
You will need to fill the jug four times to empty the tank of water.
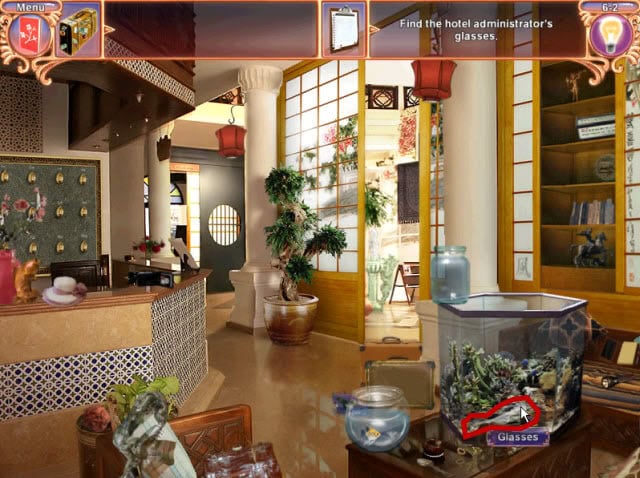
Click on the glasses highlighted in red.
Chapter 6 – Scene 3
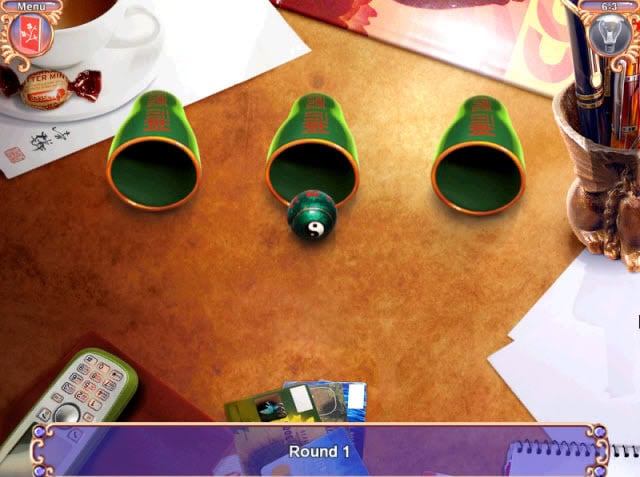
This mini game is a simple Ball and Cup game.
Follow the cups and guess the correct hiding place of the ball three times to continue. Remember if you are stuck, you can always skip a mini game as soon as the light bulb in the upper right corner is fully highlighted.
Chapter 7 – Scene 1
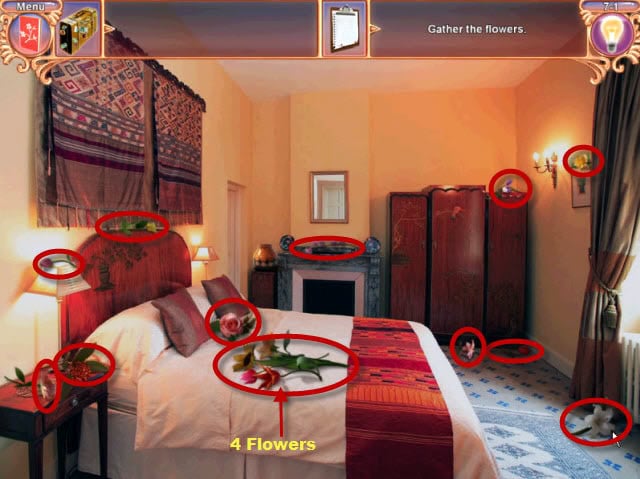
Collect all the flowers highlighted in red.
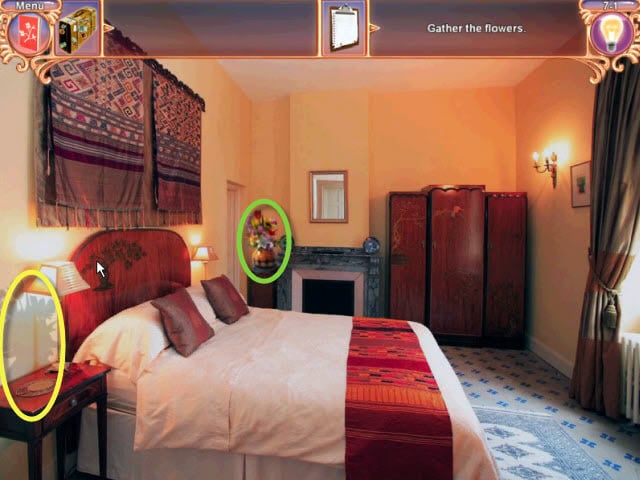
Move the vase of flowers, highlighted in green, to the nightstand beside the bed, highlighted in yellow.
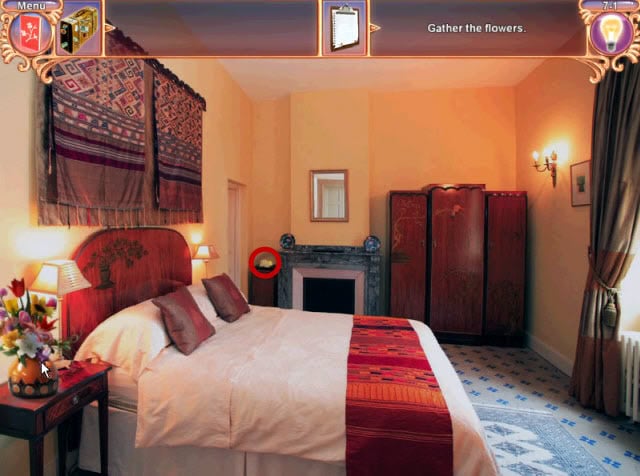
Gather the note, highlighted in red, which was underneath the vase of flowers.
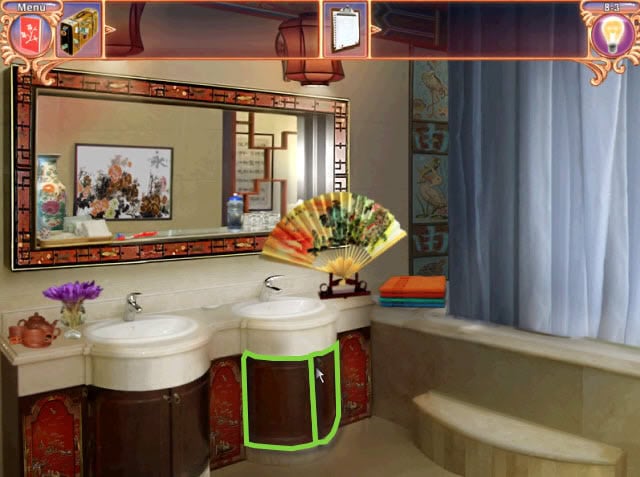
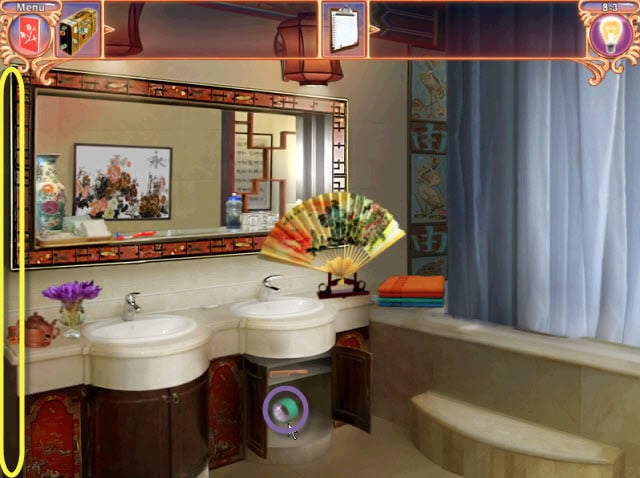
Chapter 7 – Scene 2

Move the shower curtain, fan, and the four doors under the counter, highlighted in green.
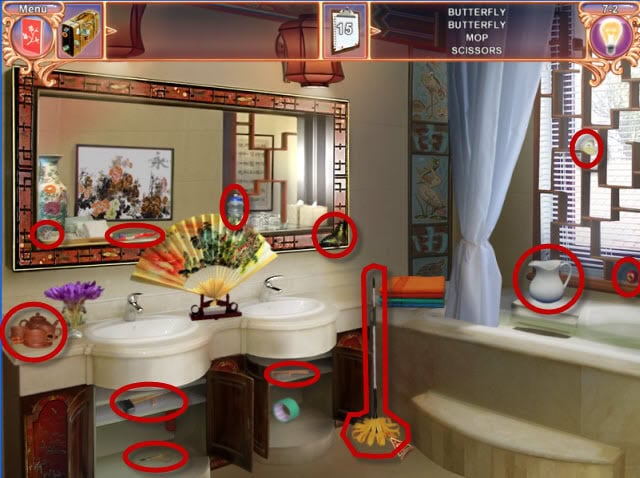
Gather all the items highlighted in red.

Now gather the next two items, highlighted in red.
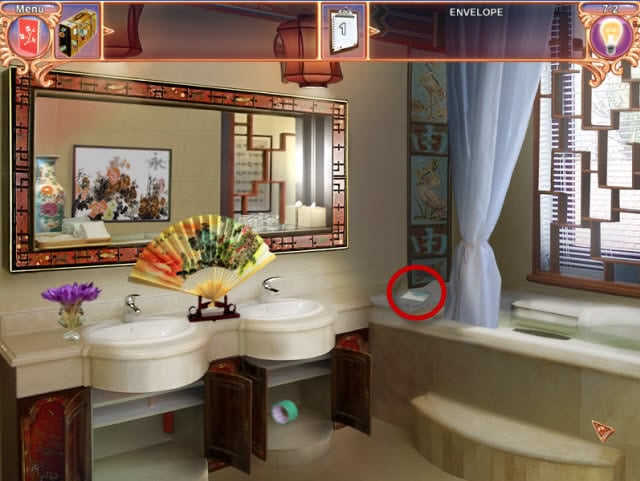
Now you can gather the last item, the envelope, highlighted in red.
Chapter 7 – Scene 3
This mini game is a simple matching pairs.
Joker card can be paired with any other card.
Tip: Match pairs that will uncover other cards first.
Chapter 8 – Scene 1
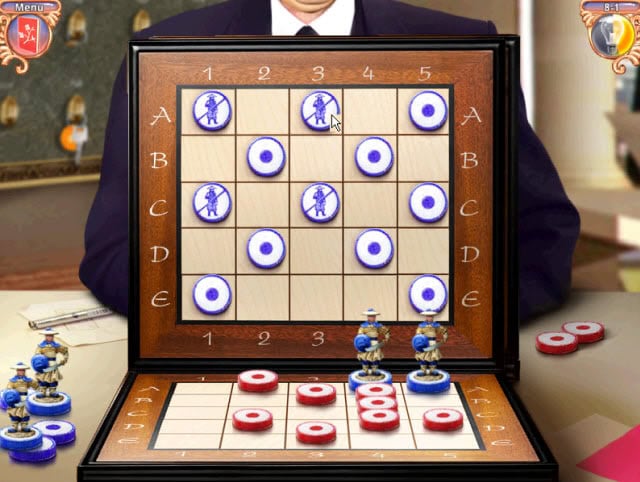
This mini game is a variation on the Battleship game.
The bottom section contains your 4 pieces and the owner’s guesses.
The top section is where the owner’s pieces are hidden, and where you make your guesses.
A chip that looks like a simple bull’s-eye marks misses.
A chip showing a soldier with a line crossed through it marks hits.
Blue chips represent your attempts; with red chips representing the owners attempts.
A correct guess, finding one of your opponents’ hidden pieces, will give you another move.
Win one game to complete this mini game.
Chapter 8 – Scene 2

This mini game is another simple picture puzzle.
Piece all of the pictures pieces back together to complete this mini game.
Chapter 8 – Scene 3
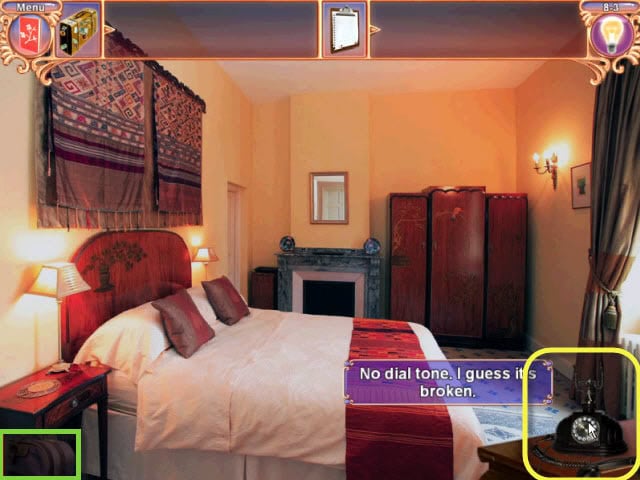
Click on the phone highlighted in yellow.
There is no dial tone.
Move the suitcase highlighted in green.
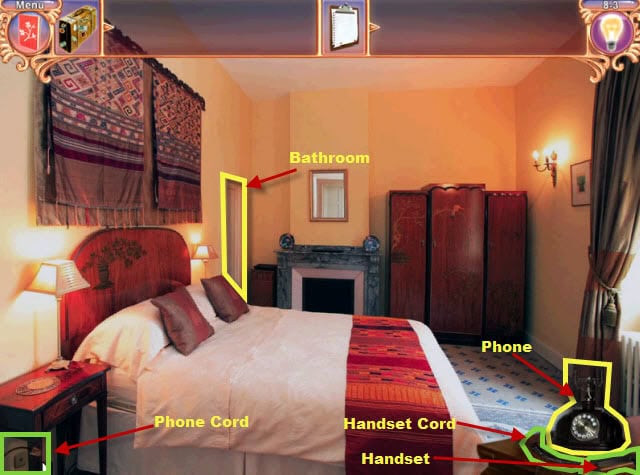
Click on the phone cord highlighted in green.
Click on the phone again highlighted in yellow.
Now the cord is shorted out.
Click on the handset cord and handset highlighted in green.
Now click on the bathroom door highlighted in yellow.
Open both bathroom counter doors highlighted in green.
Next, gather the tape highlighted in purple.
Click on the left side of the screen, highlighted in yellow, to return to the bedroom.
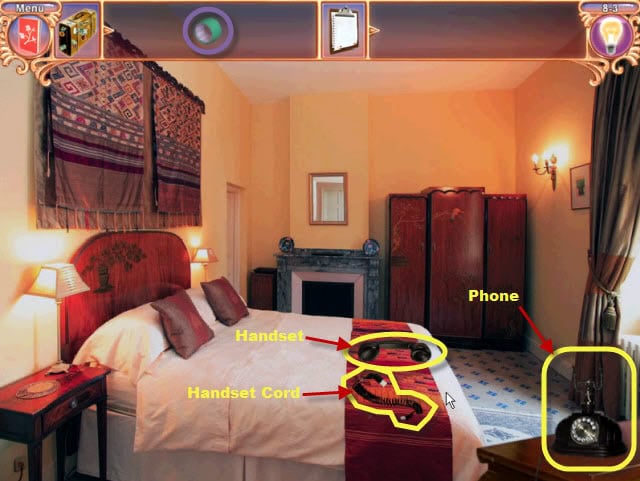
Click on the tape, highlighted in purple, on the handset cord, highlighted in yellow.
Now click on the handset cord and click on the handset highlighted in yellow.
Next click on the phone, highlighted in yellow, to replace the now fixed handset.
Click on the phone one more time to make your phone call and complete this section.
Chapter 9 – Scene 1
Gather all the scraps of paper highlighted in red.
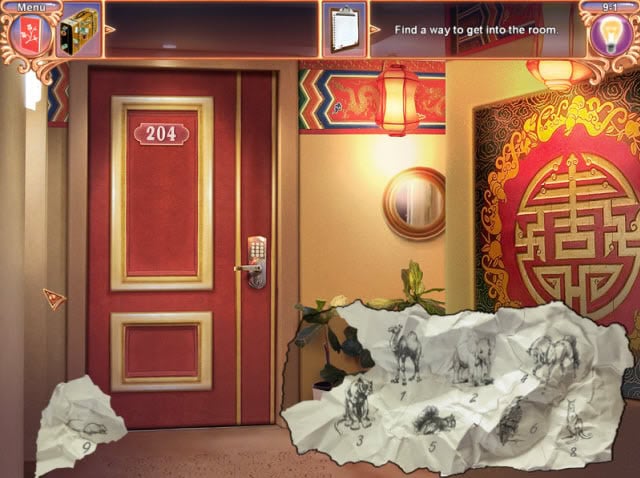
Piece all the scraps of paper together.
This one is fairly simple.
Move the first scrap to the lower right hand corner, moving each remaining piece to the left of the previous one.
Once the bottom line is filled, repeat the process, starting from the upper right corner.
Chapter 9 – Scene 2
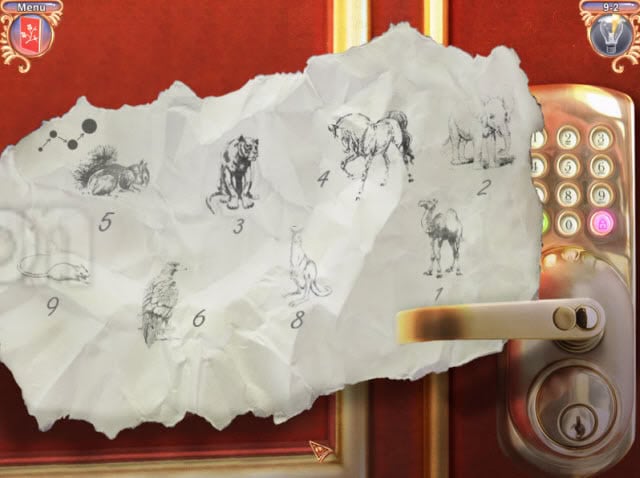
For this mini game, you need to arrange the animals from smallest to largest in an up and down zigzag pattern, starting in the lower left corner.
Click on the animal you wish to move and then click on the spot you want to move it to, to arrange them in the correct order.
Chapter 9 – Scene 3
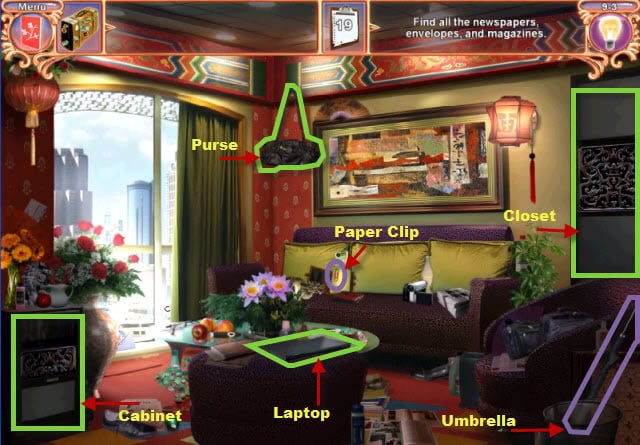
Open the cabinet door and laptop computer, highlighted in green.
Gather the paper clip, highlighted in purple, and use it on the closet, highlighted in green. Finally pick up the umbrella, highlighted in purple, and use it on the purse, highlighted in green.
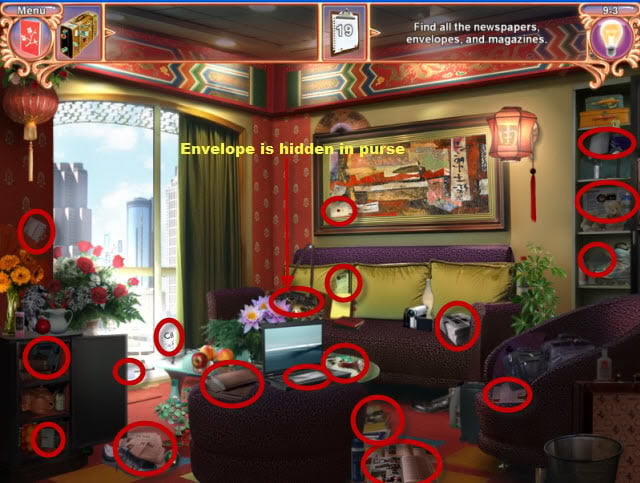
Gather all newspapers, envelopes, and magazines; highlighted in red.
Chapter 9 – Scene 4
This min game is another twist on the classic puzzle.
Place all the pieces in the white area to complete the image.
This mini game is a little more difficult than others due to requiring very precise placement.
The pieces must be placed just perfectly.
If too close to another piece or edge of white area, your pieces will turn red.
Just move the pieces slowly, little bit a time, until there are no more red beads and the piece is perfectly arranged.
Chapter 9 – Scene 5
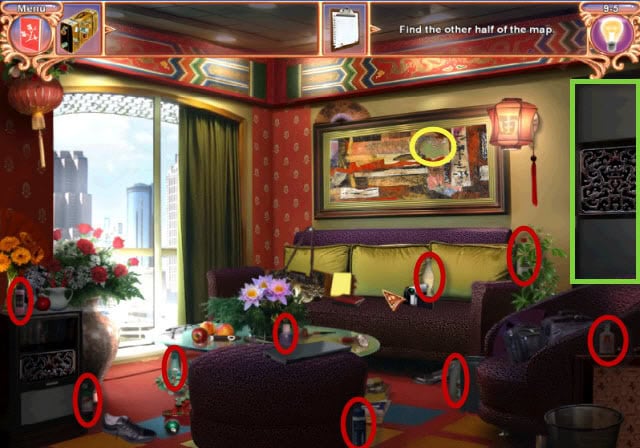
The other half of the map you need is on the painting highlighted in yellow.
Click on the map and find out you must find a solvent to remove the map piece from the rest of the picture.
Collect all the solvents highlighted in red.
Then open the closet highlighted in green.
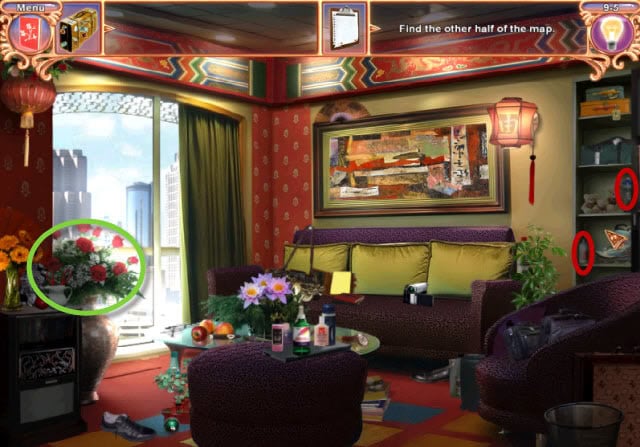
Collect the two bottles, highlighted in red, inside the closet.
Next, move the roses out of the large floor vase, in front of the window, highlighted in green.
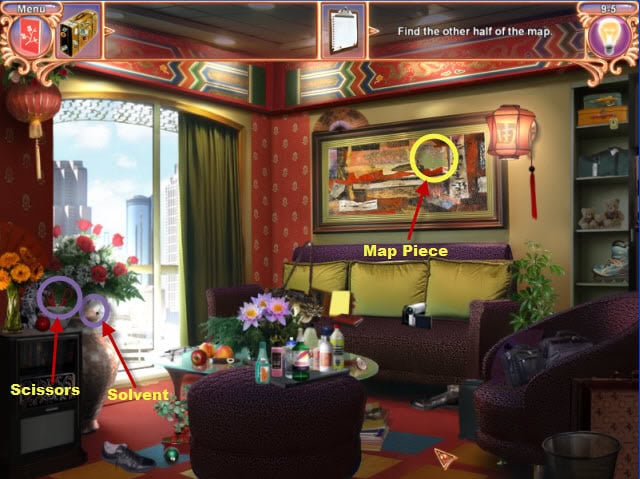
Gather the solvent highlighted in purple.
Use the solvent on the map piece, on the picture, highlighted in yellow.
Next gather the scissors, highlighted in purple, and use it on the map piece.
Chapter 10 – Scene 1
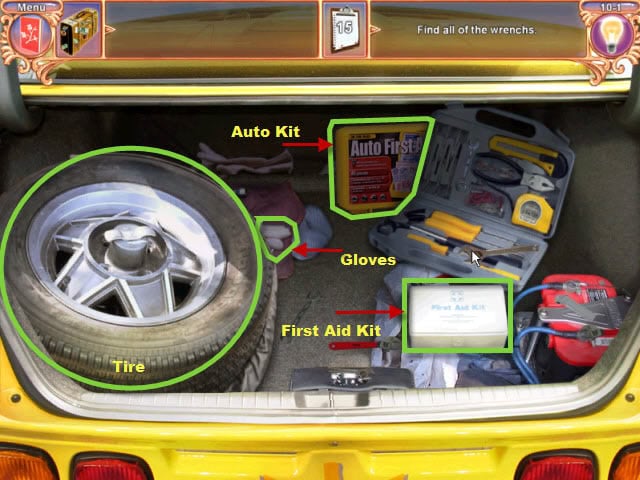
Start by moving the First Aid Kit, Auto Kit, and Tire; highlighted in green.
Then move the gloves under the Tire, also highlighted in green.

Gather all the wrenches highlighted in red.
Then move the two blankets highlighted in green.

Gather the remaining three wrenches highlighted in red.
Chapter 10 – Scene 2
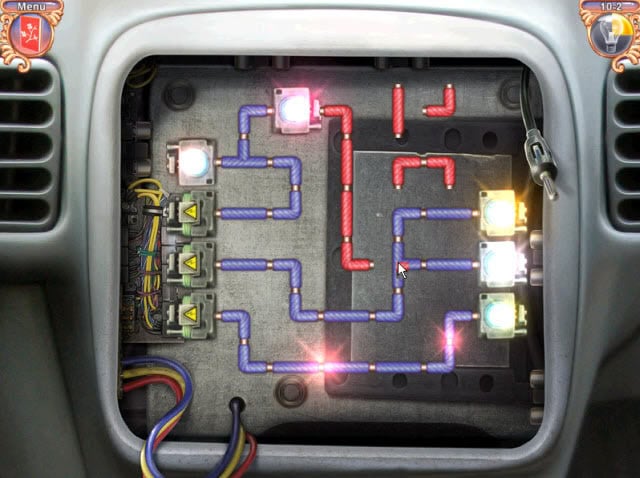
For this mini game, you need to arrange the wires to direct electricity to each of the lights.
A completed circuit will change from the standard red wires, too the completed blue wires.
Light up all the lights to complete this mini game.
Chapter 10 – Scene 3
For this mini game, you need to drag the icon around until there are no crossed lines.
This is one of the more difficult mini games.
Just keep moving pieces around until no lines cross and remember you can always skip it if are stuck.
Chapter 11 – Scene1
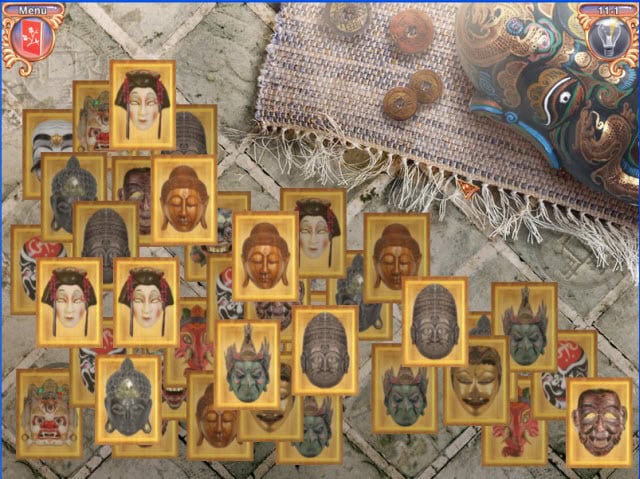
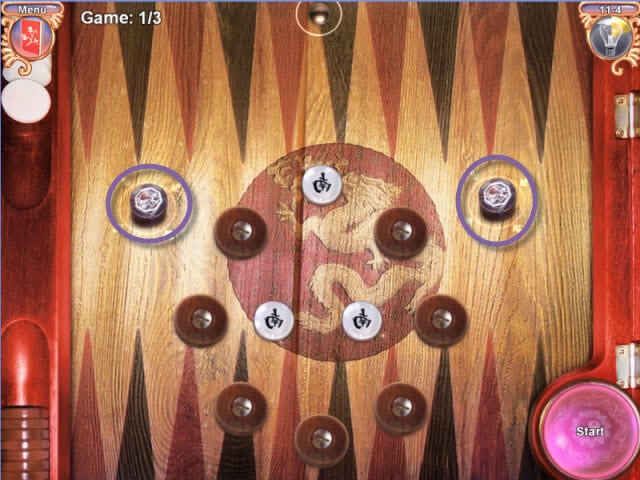
This is a simple mahjong style game using cards.
Just remember to make matches that cover lower cards before matching cards that are alone.
Chapter 11 – Scene 2

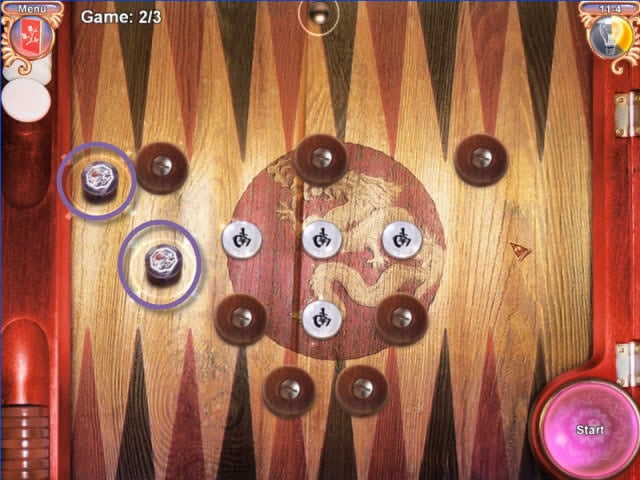
Another, simple mahjong style game using cards, just like the last one.
Chapter 11 – Scene 3
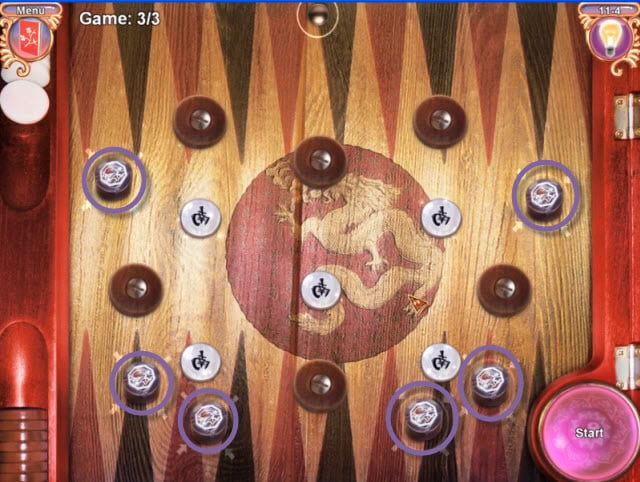
This is yet another simple mahjong style game using cards.
Chapter 11 – Scene 4
This mini game is a unique bumper game.
The objective is to guide the dropped ball so it hits and clears all the white pieces.
You are given a number of bumpers you can place anywhere on the board.
Once you have placed the bumpers where you want them, click on the Start button in the lower right corner.
If you miss any of the white pieces, the board will reset and you can try again.
Your personal bumpers are highlighted in purple.
They are shown in position to complete the level.
These are just my own successful placements.
Likely more placements are successful.
This is the solution for the second bumper game.
This is the solution for the third bumper game.
Chapter 11 – Scene 5
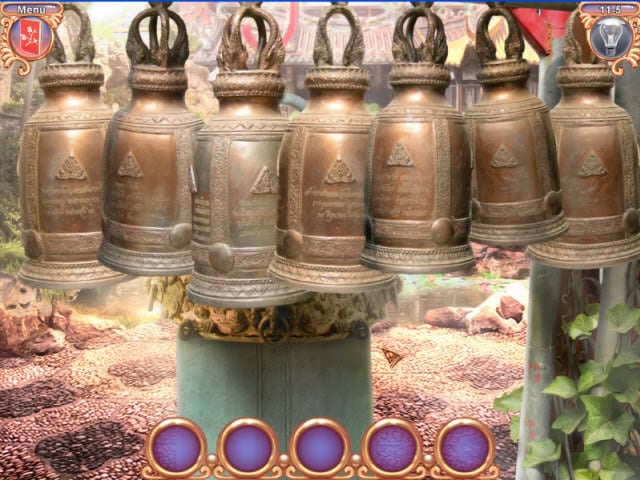
This mini game is a variation on the Simon Says game.
The key here is to watch the bells.
As each bell rings, it shakes a little bit.
After the sequence, ends simple repeat the sequence, by clicking on the bells in the correct sequence.
If you click on the wrong bell, in the sequence, all the bells will shake and it will repeat the sequence.
As you complete each sequence, you will receive a check in the circle at bottom of screen.
After five correct sequences, you will have completed the task.
Chapter 12 – Scene 1
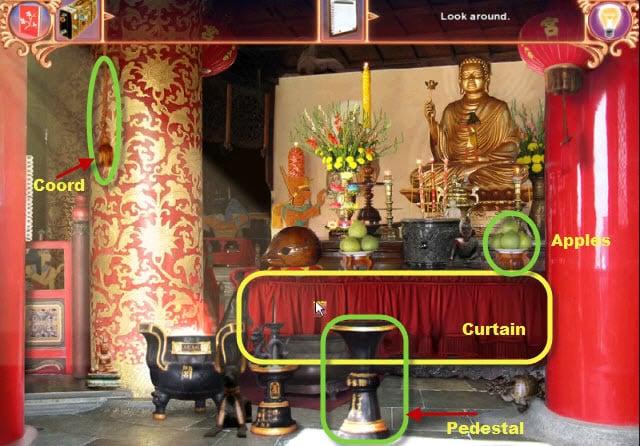
Click on the cord, highlighted in green, to move the curtain, highlighted in yellow.
Next, move the pedestal and the dish of apples highlighted in green.
Gather each of the Egyptian pieces, highlighted in green, and place in their matching slots on the wall.
Move the pedestal, highlighted in green, if have trouble reaching the last two silhouettes.
Use the crow bar, highlighted in green, on the panel, highlighted in yellow, to reveal a safe.
Chapter 12 – Scene 2
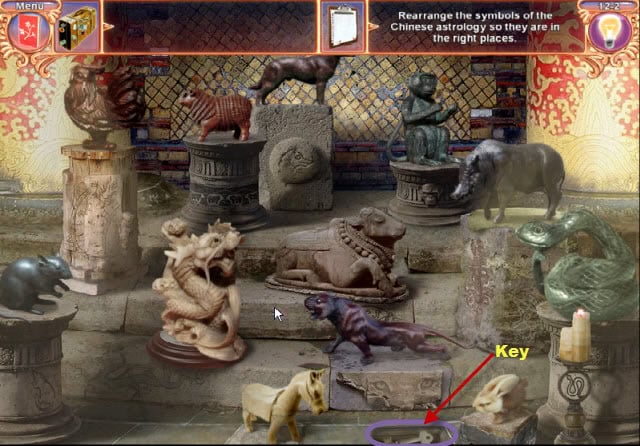
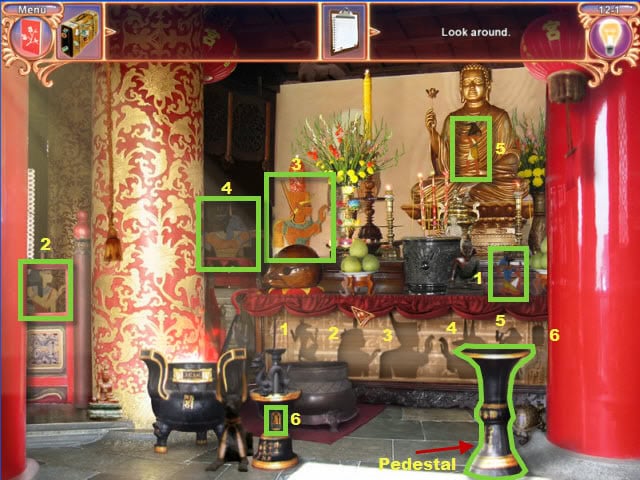
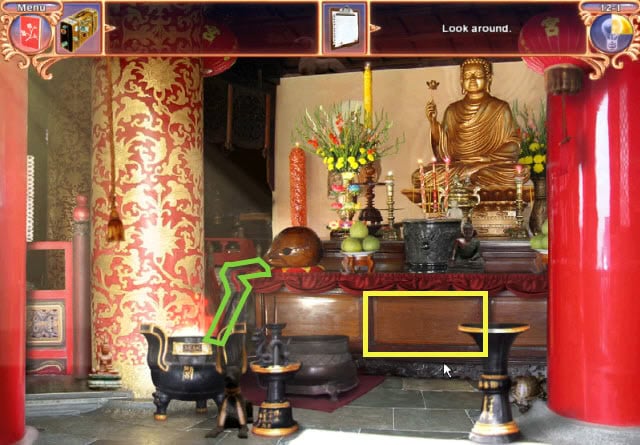
Arrange each of the Chinese zodiac symbols onto their matching pedestals.
Once, completed gather the key highlighted in purple.
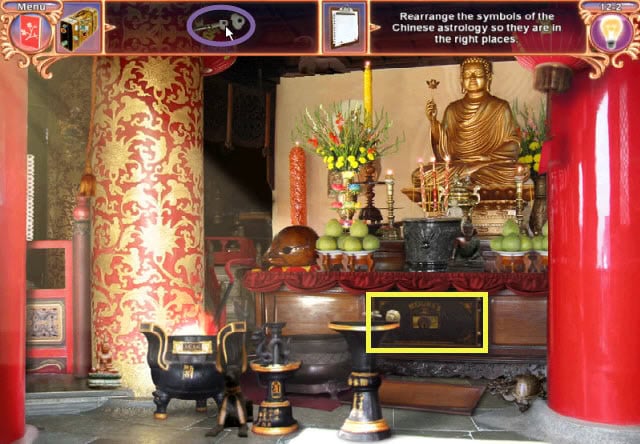
Now use the key, highlighted in purple, on the safe, highlighted in yellow.
After the safe is open, gather all the items inside.
Chapter 12 – Scene 3
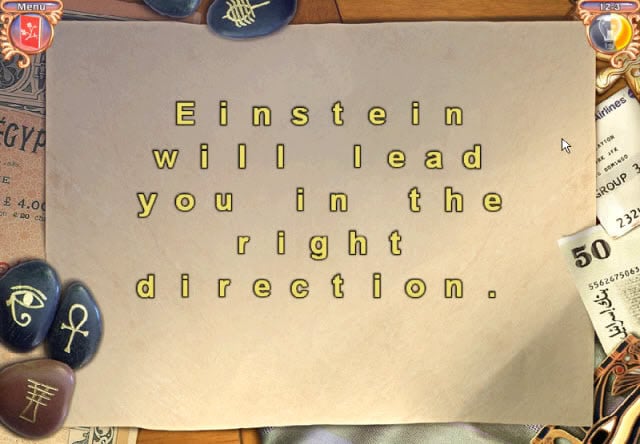
In this mini game, you need to unscramble each word in the sentences on the note.
Click the letter you wish to move and click where you wish to move it.
Chapter 13 – Scene 1
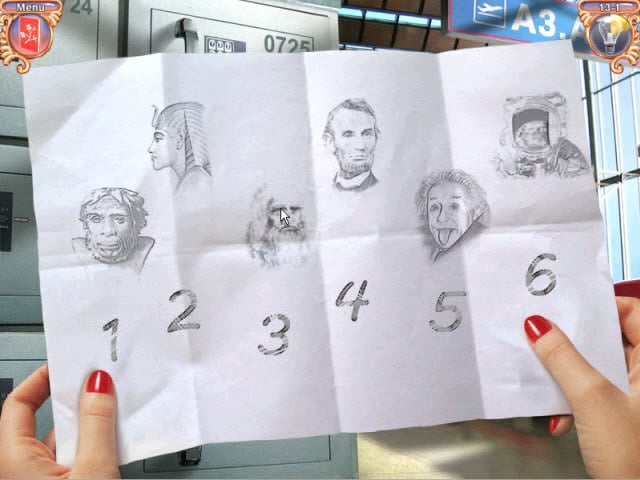
In this mini game, you must rearrange the historical figures in chronological order to figure out the locker number.
Chapter 13 – Scene 2
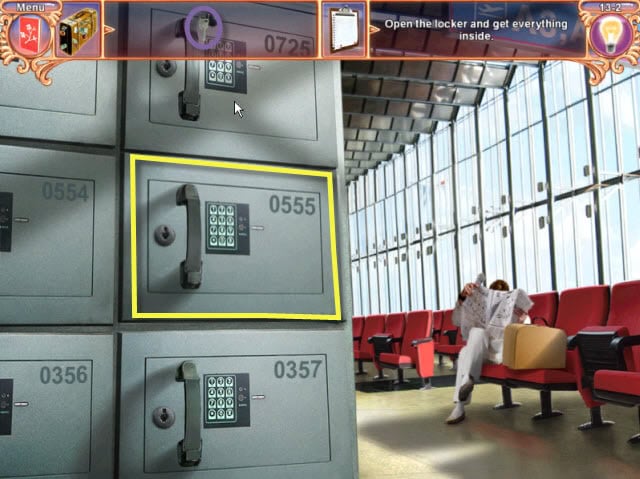
Use your key, highlighted in purple, on the locker, highlighted in yellow, to open the locker. Once the locker is open, gather all the items located inside.
Chapter 13 – Scene 3
This mini game is a tile swapping puzzle game.
Tiles can only be swapped with adjacent tiles, horizontally or vertically.
Chapter 13 – Scene 4
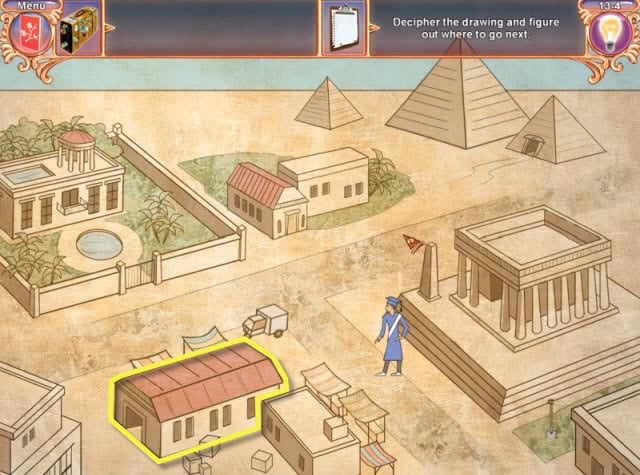
To decipher the drawing, in this mini game, you must help the Poor Egyptian character through his journey.
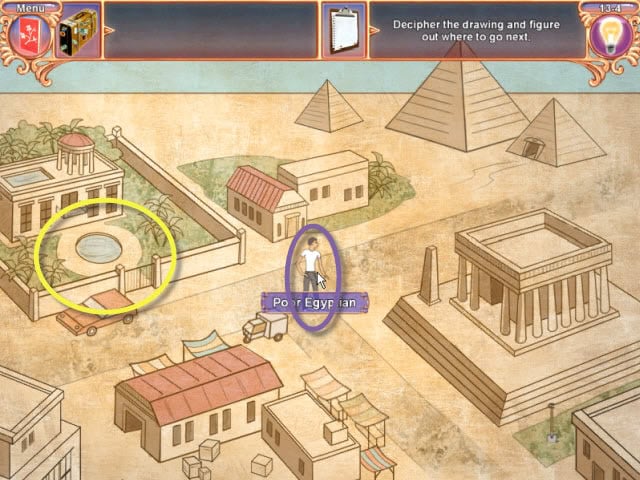
Click on the Poor Egyptian highlighted in purple.
Next click on the mansion highlighted in yellow.
Then click on the rich relative.
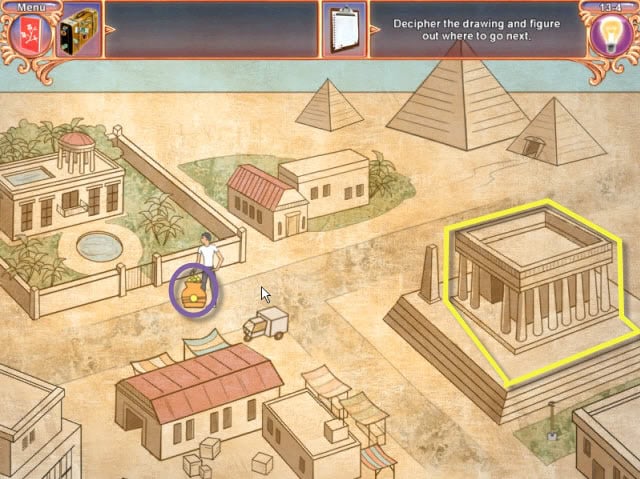
Move the jar of money, highlighted in purple, to the university, highlighted in yellow.
Next, move the Egyptian to the University.
Now move the Egyptian to the warehouse highlighted in yellow.
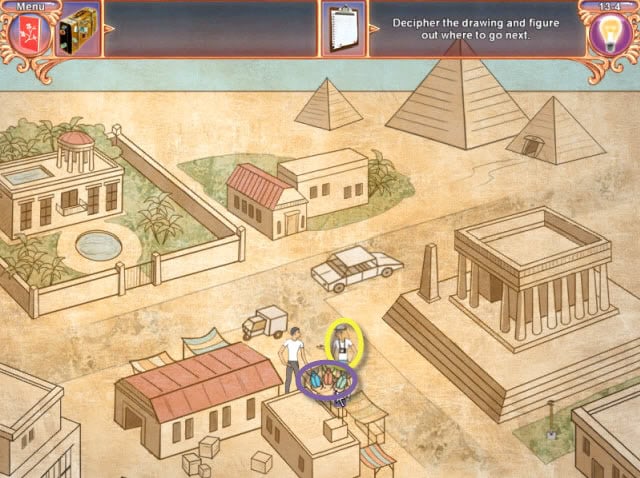
Help your Egyptian sell souvenirs to tourists.
Give the beetles, highlighted in purple, to the tourist, highlighted in yellow.
Next, move the Egyptian back to the University again.
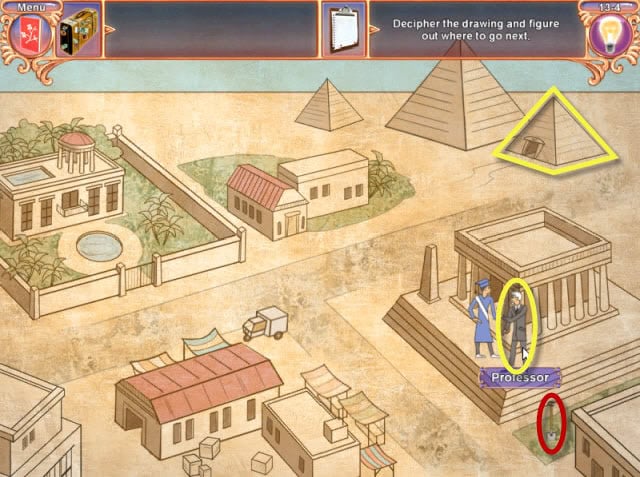
Click on the professor highlighted in yellow.
Before you can graduate, you need to complete a practicum.
Move the Egyptian student to the shovel, highlighted in red, and then move the Egyptian to the Pyramids, highlighted in yellow.
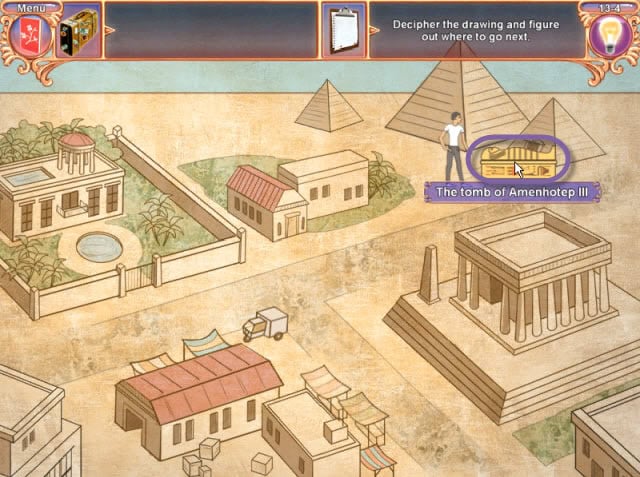
Lastly, move the tomb, highlighted in purple, to the university.
Finish by moving the Egyptian back to the University one last time.
Chapter 14 – Scene 1
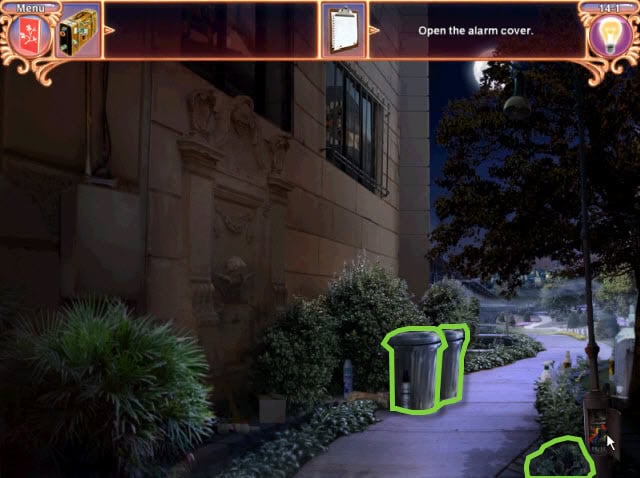
To get to the alarm cover, you first need some light, to get that; you must first fix the street light.
Start by tipping over the two trashcans, highlighted in green, and move the small bush next to the street lamp.
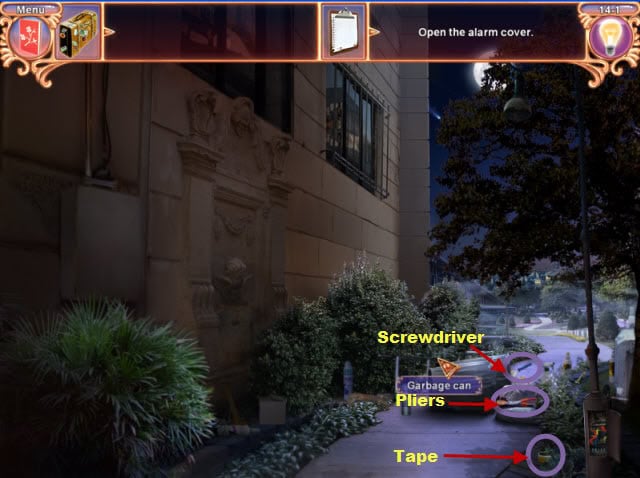
Now gather the screwdriver, pliers, and the tape, highlighted in purple.
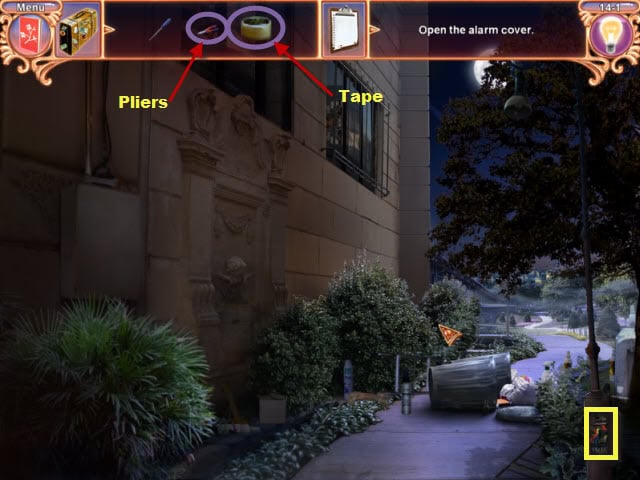
Use the pliers, highlighted in purple, on the streetlamp, highlighted in yellow.
Next, use the tape, highlighted in purples, on the streetlamp.
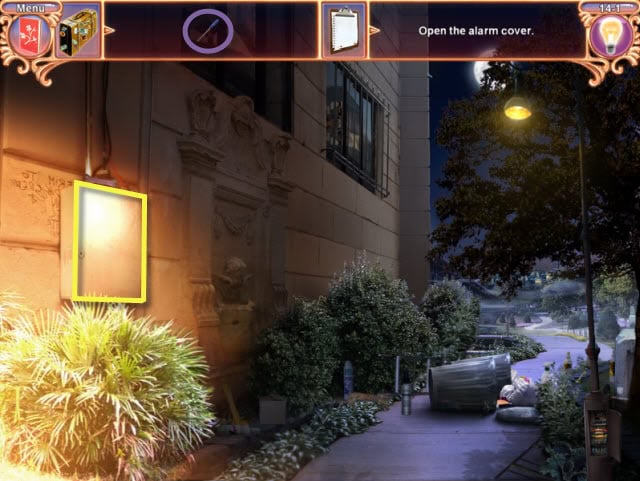
Now the streetlight is working, use the screwdriver, highlighted in purple, on the alarm cover, highlighted in yellow.
Chapter 14 – Scene 2
For this mini game, you will need to position all the wires to connect all the circuits.
Red pieces are incomplete sections and blue pieces represent completed sections.
Light up all the lights to complete the mini game.
Chapter 14 – Scene 3
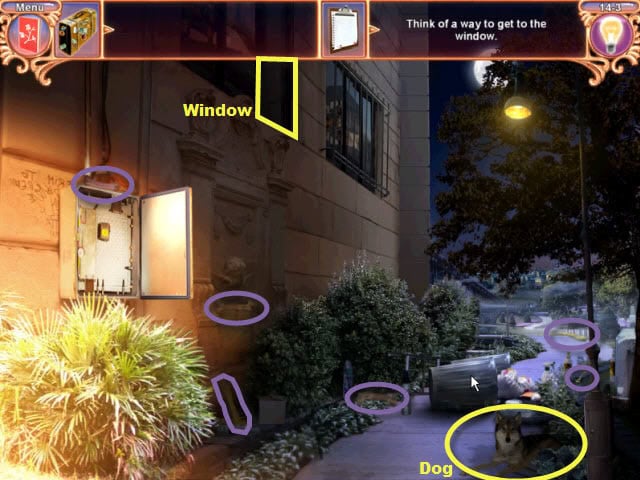
Notice the window, with no bars, highlighted in yellow.
To reach it you need to find the pieces of the ladder.
Notice the dog in the lower right corner next to the street lamp, highlighted in yellow.
The first piece of the ladder is underneath the dog, he looks hungry.
Find all the hidden dog bones, highlighted in purple and give them to the hungry dog.
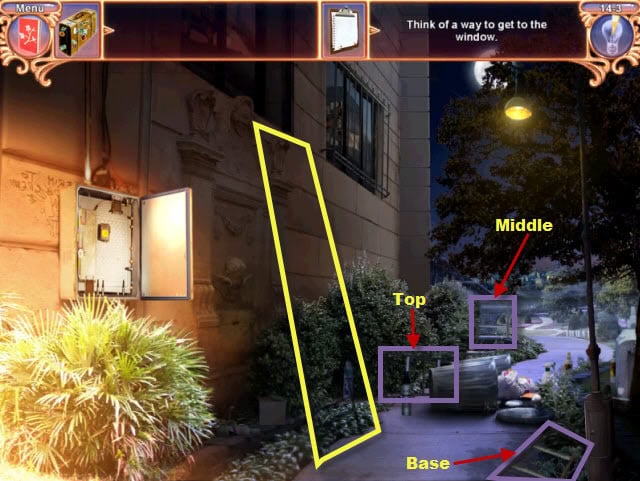
Now the dog has moved you can gather the three sections of the ladder, highlighted in purple, and place in the outlined area, highlighted in yellow, and climb up to the window.
Chapter 14 – Scene 4
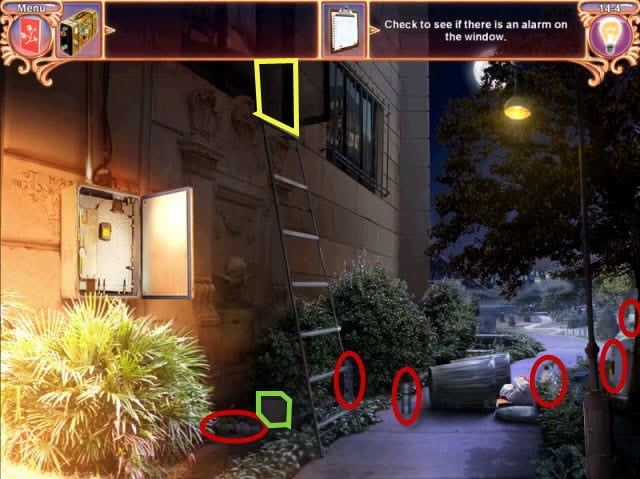
Now open the window highlighted in yellow.
Next, gather all the aerosol cans, highlighted in red, to check the window for an alarm. Lastly, move the box highlighted in green.
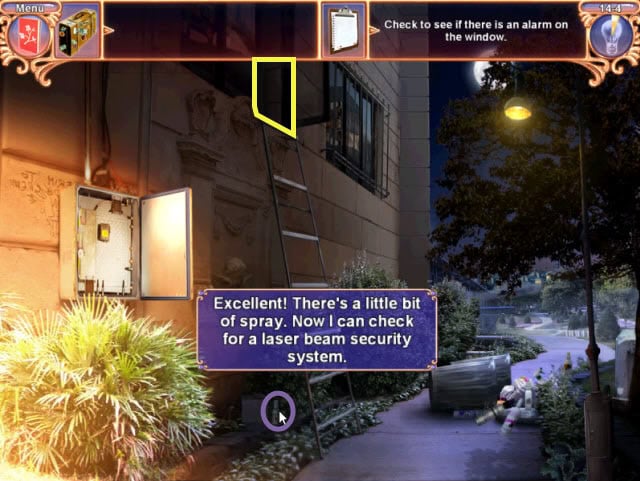
Gather the last spray bottle, highlighted in purple, and use it on the open window, highlighted in yellow.
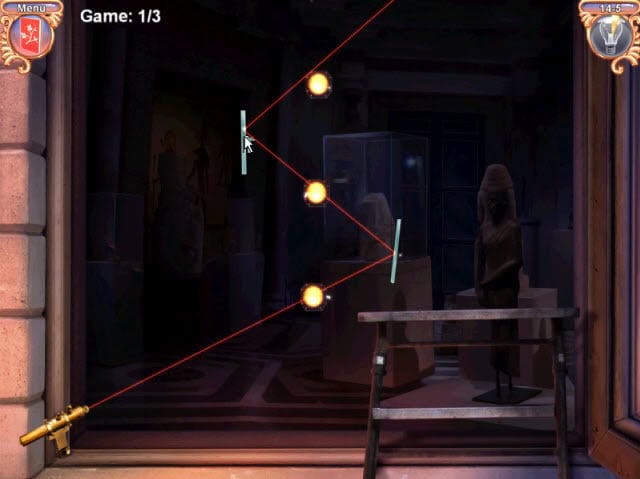
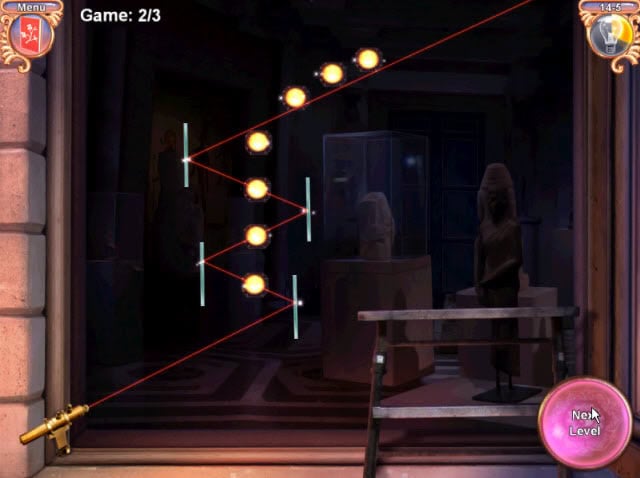
Chapter 14 – Scene 5
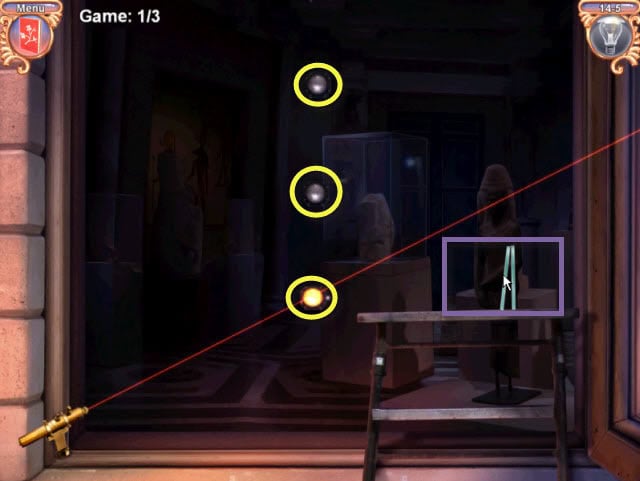
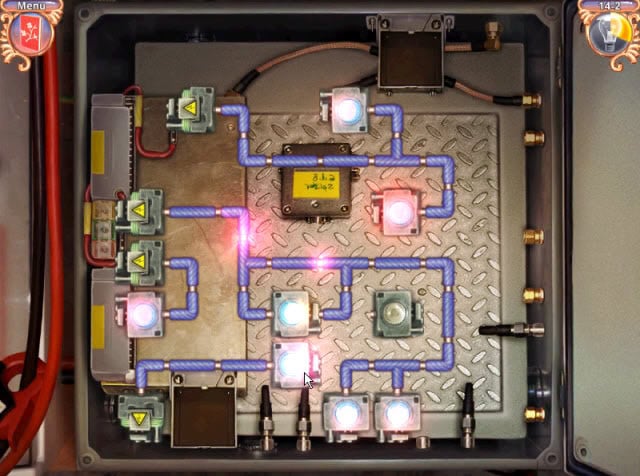
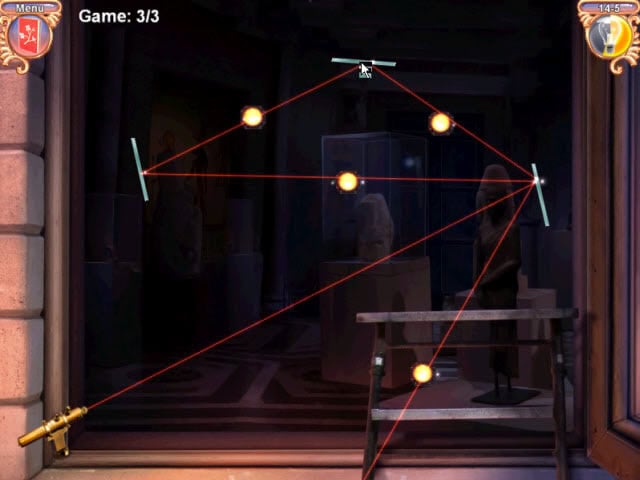
For this mini game, you need to use the mirrors, highlighted in purple, and arrange them in the windows to deflect the laser beam.
Your goal is to deflect the laser beam so it highlights up each of the lights, highlighted in yellow. You must solve three problems to pass this mini game.
Below is the solution for each window puzzle. These are just my own personal solutions.
There may be other successful arrangements.
Chapter 15 – Scene 1
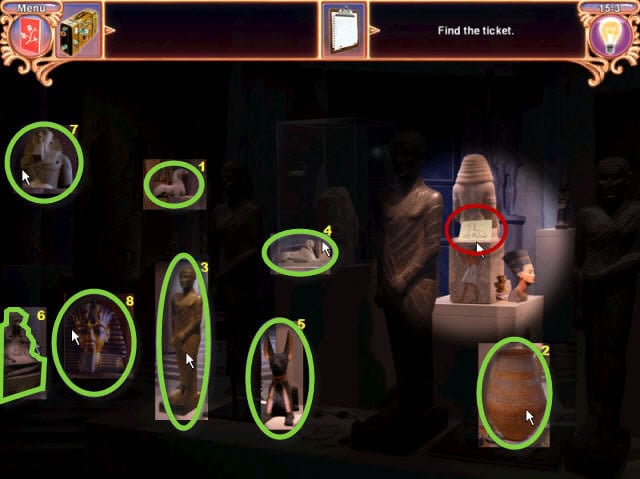
Using your flashlight, gather all the letters scattered around the museum, highlighted in red.
Chapter 15 – Scene 2
This mini game is another word scramble game.
Click on the individual letters and click where they should go, to unscramble the message.
Chapter 15 – Scene 3
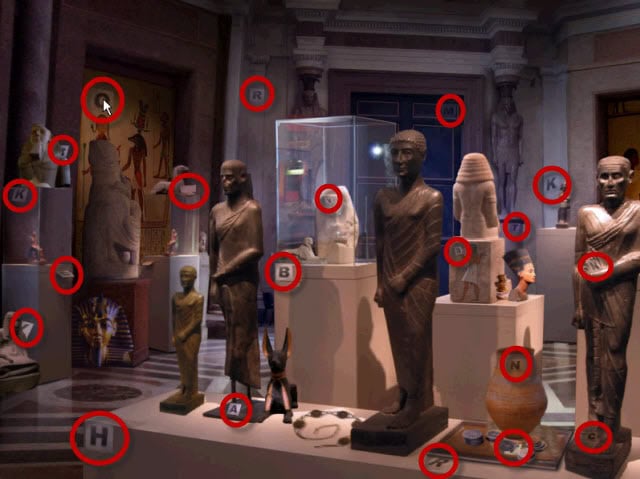
In this mini game, you will find your first clue highlighted in red.
Each clue leads to another sculpture in the museum.
Click on each sculpture, pictured in the clue, to reveal the next clue.
Each sculpture, highlighted in green, is numbered one through eight, in the order of the clues discovered.
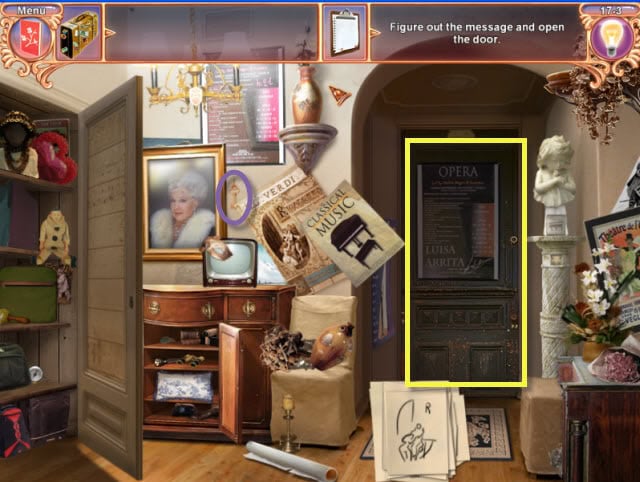
You will find the opera tickets under the last sculpture.
Chapter 16 – Scene 1
Move the envelope, highlighted in green, in the open drawer on the desk, under the cash register.
Then move the two papers in the cubbyhole, highlighted in green, click twice to move the papers.
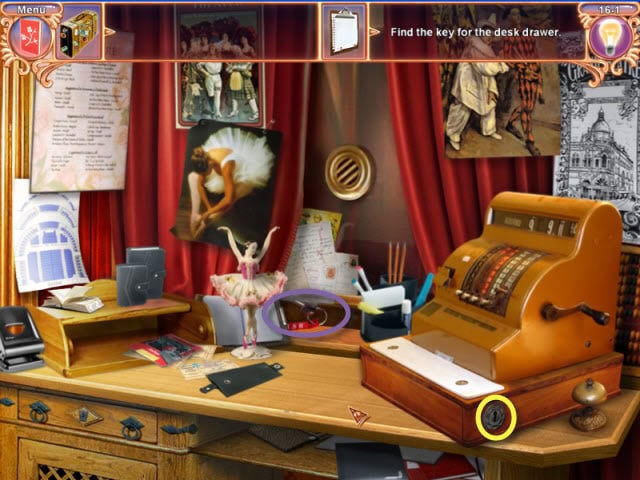
Finally, click on the black sleeve, highlighted in green, just in front of the ballerina figurine.
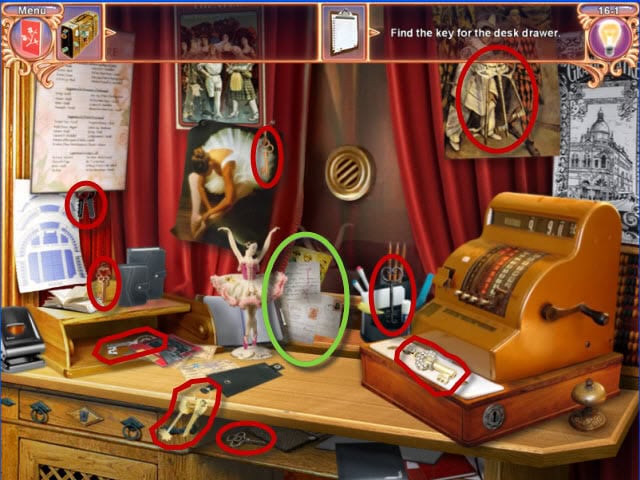
Now gather all the keys highlighted in red.
Next, move the postcards, highlighted in green, found in the window.
Gather the keys, highlighted in purple, that were behind the postcards.
Use the keys on the cash register highlighted in yellow.
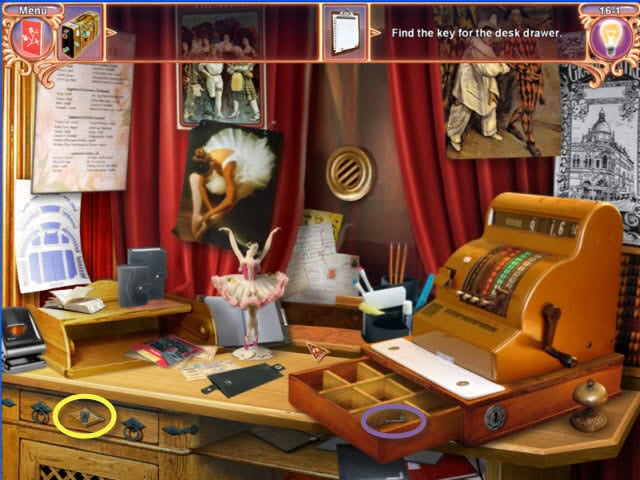
Gather the key, highlighted in purple, which is inside the cash register.
Use the key on the desk drawer highlighted in yellow.
Now collect the pieces of paper inside of the drawer.
Chapter 16 – Scene 2

This is another picture puzzle; simply arrange the pieces to complete the picture.
Chapter 16 – Scene 3
This mini game is yet another, unscramble the message, game.
Rearrange the letters to spell out the message.
Chapter 17 – Scene 1
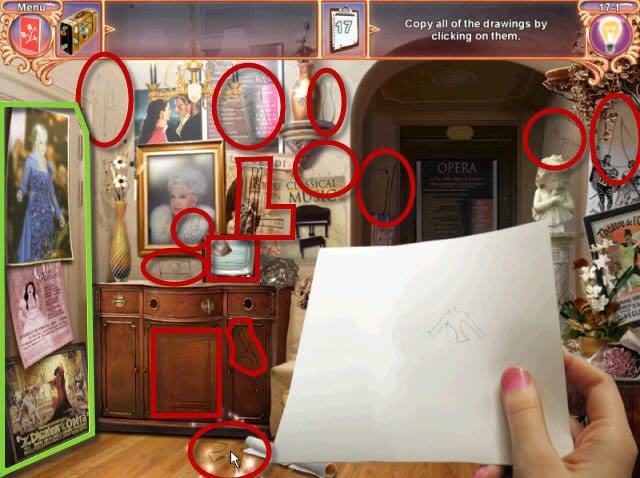
Gather each of the sketches pieces highlighted in red.
Next, open the closet, highlighted in green, to find the remaining pieces.
Gather the remaining sketch pieces highlighted in red.
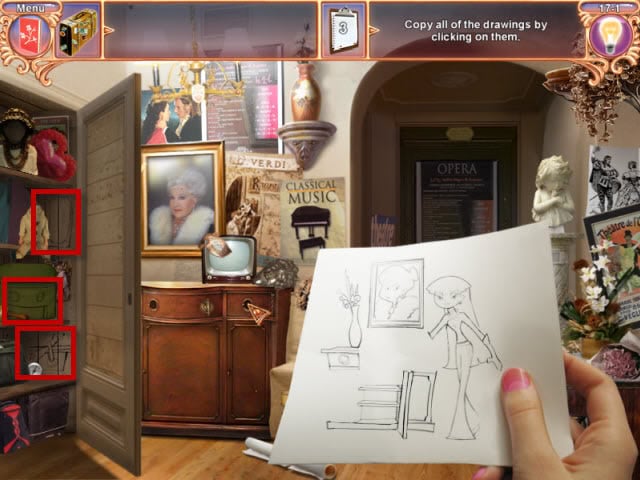
Chapter 17 – Scene 2
First, open the closet again and move the green bag highlighted in green and the toy behind it.
Next, move the bouquet of flowers, highlighted in green, and the statue behind them.
Grab the knob, highlighted in purple, which was behind the green bag in the closet.
Next, grab the handle, highlighted in purple, which was behind the bouquet of flowers and the statue.
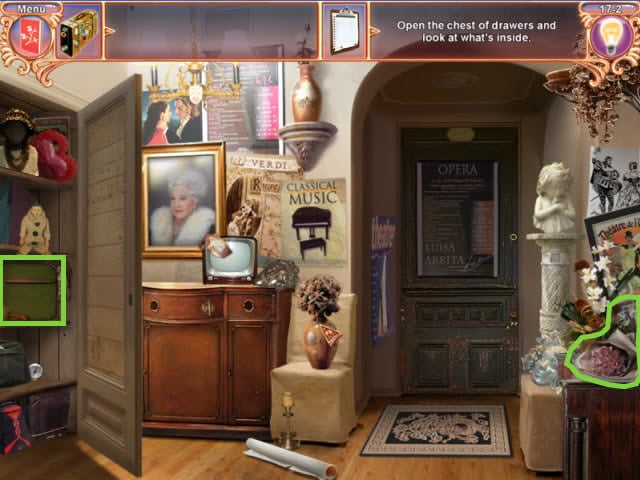
Place both handles in the empty spots on the dresser highlighted in yellow.

To open the cabinet turn each handle to their horizontal position, then turn the knob on the far left one more time.
Next move the carpet highlighted in green.
Finally, move the pillow and the green chest behind it, highlighted in green.
Use the key, highlighted in purple, to open the chest, highlighted in yellow.
Gather the small tile inside.
Now use the tile, highlighted in purple, on the statue, highlighted in yellow.
Click on the statues bust to reveal a hiding spot.
Chapter 17 – Scene 3
Following your clue from last scene, you will follow a series of clues to find the hidden key to open the dressing room.
Each spot clicked on will reveal another clue, a sketch, showing the location of the next clue.
The clues are ordered numerically.
The location of each clue is highlighted in green.
The first clue, shown here, is highlighted in red.
On clue eight, click on the vase to overturn it and reveal next clue.
Next, open the closet, highlighted in yellow.
Click on the clown, highlighted in green, in the closet to obtain your next clue.
Finally, click on the poster on the wall, highlighted in green, and the picture underneath it as well to reveal the missing key.
Use the key, highlighted in purple, on the dressing room door, highlighted in yellow.
Chapter 18 – Scene 1
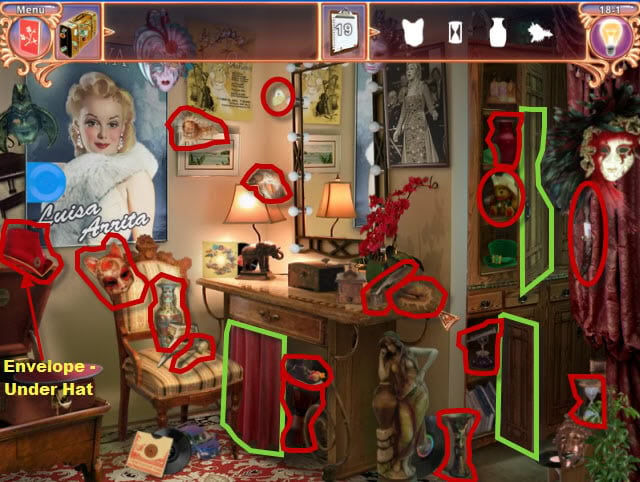
Open the areas highlighted in green.
Next, gather the items, highlighted in red, as shown in your objectives list.
The final item on the list is an envelope hidden under the marked red hat.
Chapter 18 – Scene 2

This mini game is a simple unscramble the words.
Click on the letter wish to move and click where it needs to be placed, to unscramble the message.
Chapter 18 – Scene 3
This mini game is another simple photo puzzle.
Rearrange the pieces to complete the photo.
Chapter 18 – Scene 4

Start by opening the areas highlighted in green.
Next, click on the music box, highlighted in yellow, for a musical clue.
Gather the record, highlighted in purple, at place it on the turntable, highlighted in yellow.
Next, gather the record arm, highlighted in purple, and place it on the turntable.
Now, click on the record arm, highlighted in purple, to start playing the record and reveal the hidden key.
Use the hidden key, highlighted in purple, on the desk drawer, highlighted in yellow.
Remove the silver mask and papers inside the drawer.
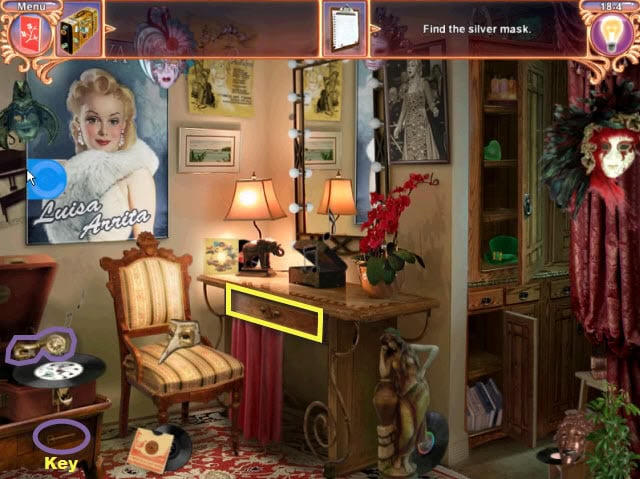
Chapter 19 – Scene 1

Gather all the items, highlighted in red, as shown in the objectives area.
After gathering all items, gather the envelope that is underneath the radio, on the bed.
Chapter 19 – Scene 2
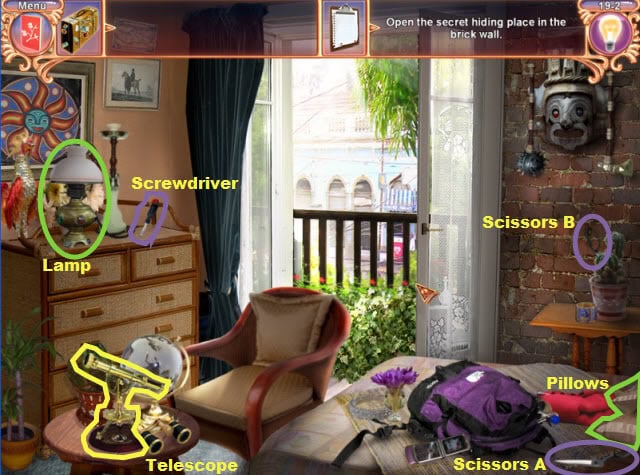
Start by moving the lamp on the dresser and the pillows on the bed, highlighted in green.
Next, gather the one-half of the scissors, underneath the pillows, highlighted in purple.
Next, gather the other half of the scissors, highlighted in purple, in the cactus plant on the bedside table.
Finally, gather the screwdriver, highlighted in purple, on the dresser and use it on the telescope, highlighted in yellow, on the coffee table.
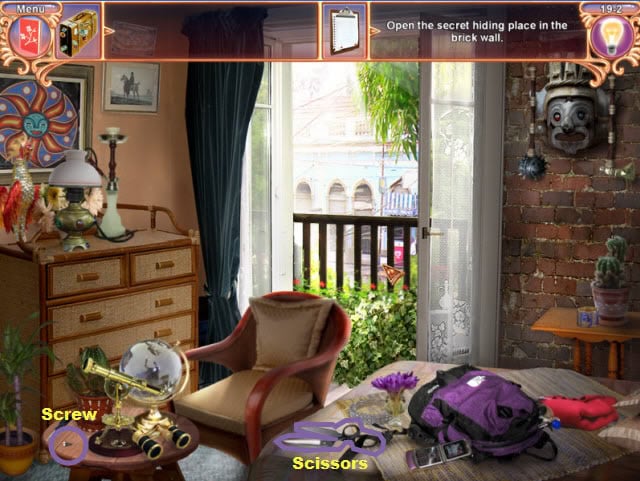
Now, click on the screw, highlighted in purple, and use it on the scissors, highlighted in purple. Next, click on the bottom scissors, Scissors B, and click on the top half of the scissors to repair the scissors.
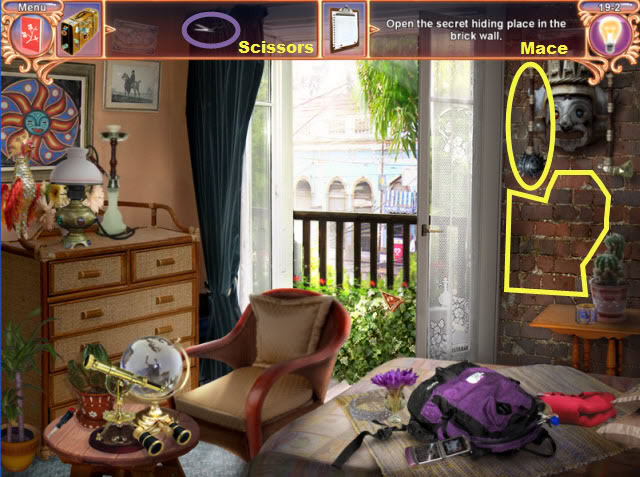
Now use the scissors, highlighted in purple, on the mace, highlighted in yellow, attached to the mask on the wall.
Pick up the mace and use on the wall, highlighted in yellow, to reveal what is inside. Gather all the items.
Chapter 19 – Scene 3
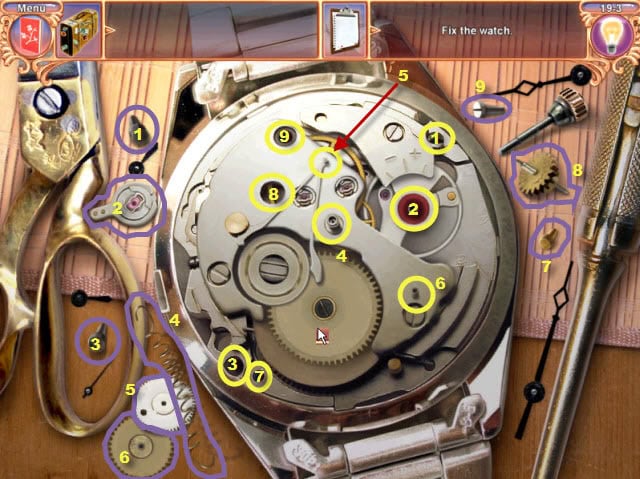
To repair the watch, place the pieces, highlighted in purple, into their matching, numbered spots, highlighted in yellow.
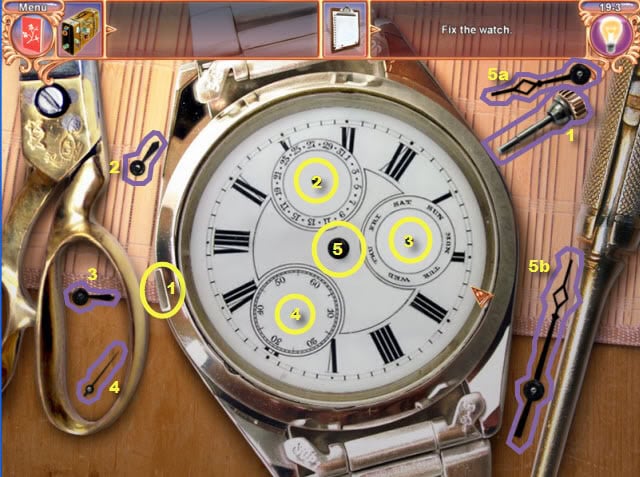
Now, place the hands of the clock, highlighted in purple, into the matching, numbers spots, highlighted in yellow.
Chapter 20 – Scene 1

Check the printer, highlighted in yellow, and notice it is the panel is stuck.
Move the two photos, highlighted in green, on the front of the desk.
Next, move the postcard and the silver date stamp, highlighted in green, located on the desk.
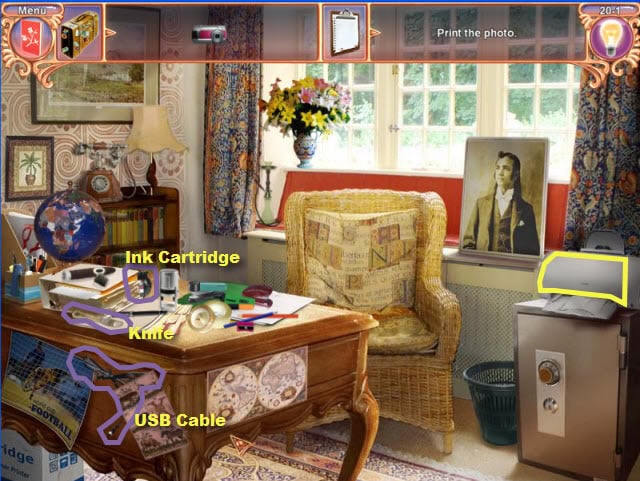
Gather the USB cable and the new ink cartridge, highlighted in purple.
Next, use the knife, highlighted in purple, on the printer panel highlighted in yellow.
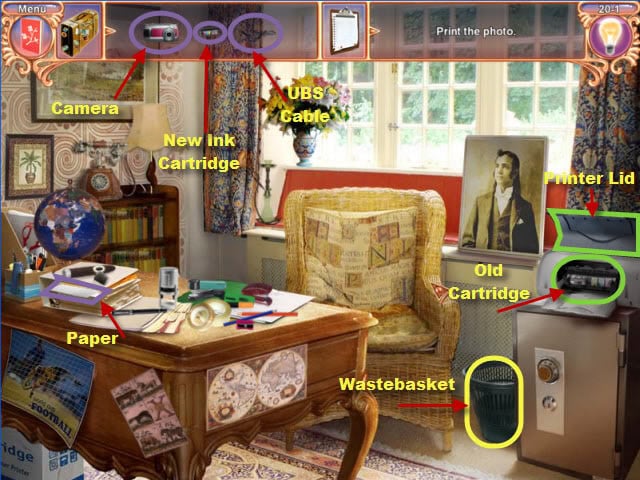
Remove the old cartridge from the printer, highlighted in green, and place it in the wastebasket, highlighted in yellow.
Next, use the new ink cartridge, highlighted in purple, on the printer. Now, use the USB cable, highlighted in purple, on the camera, highlighted in purple.
Next, use the camera and cable and the printer.
Close the lid to the printer highlighted in green.
Finally, gather the paper, highlighted in purple, and insert into the printer.
Chapter 20 – Scene 2
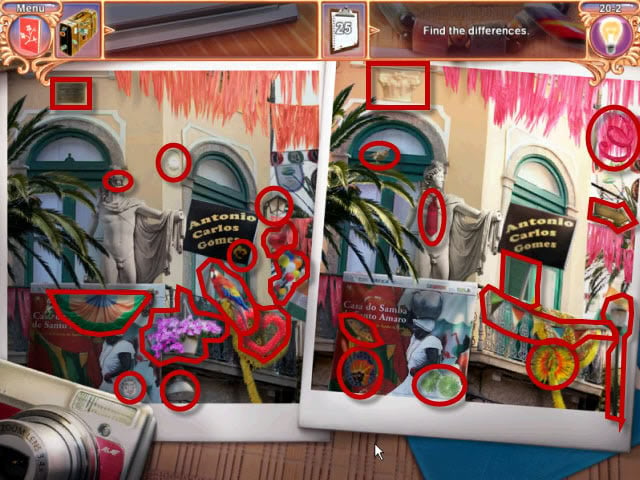
This mini game is another spot the difference mini game.
Gather the items from each photo, highlighted in red, that are not located in the other photograph.
Chapter 20 – Scene 3
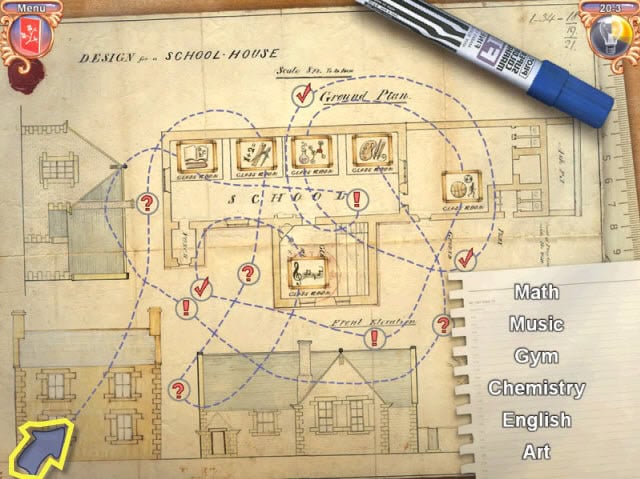
In this mini game follow, the dotted line, starting at the arrow, highlighted in yellow.
Follow the dotted line through all the classes.
Rearrange the list on the right side, by clicking on the class names and placing them in the correct order, in which they are visited, when following the dotted line.
Chapter 21 – Scene 1
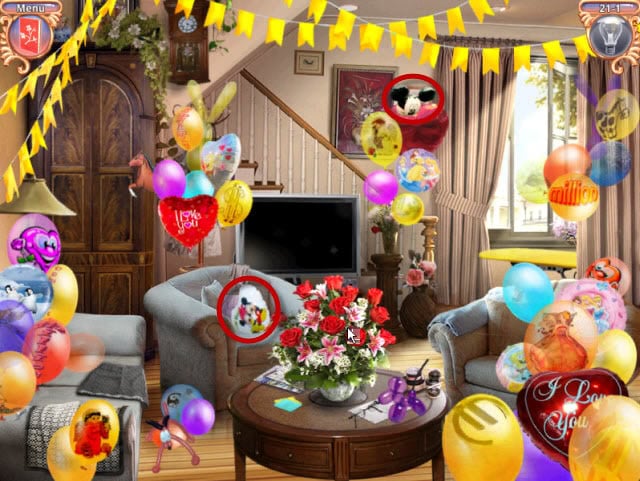
In this scene, match the balloon pairs until there is only one balloon left.
Click on the remaining balloon, a red heart shaped balloon, to find a note.
An example match, highlighted in red, is shown in the screen shot.
Chapter 21 – Scene 2
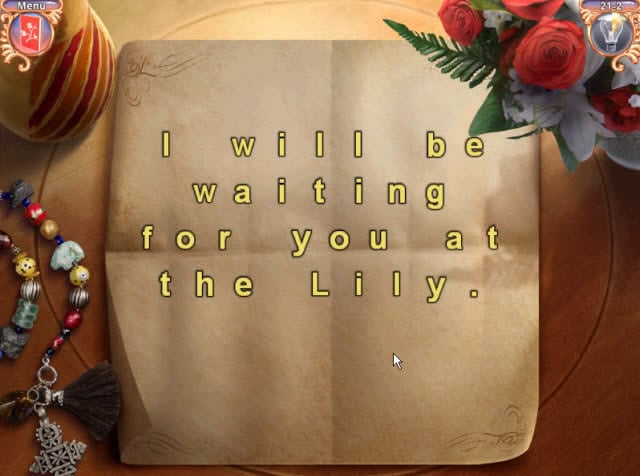
This mini game is another simple word scramble.
Unscramble the words by moving the letters around to form the message.
Chapter 21 – Scene 3
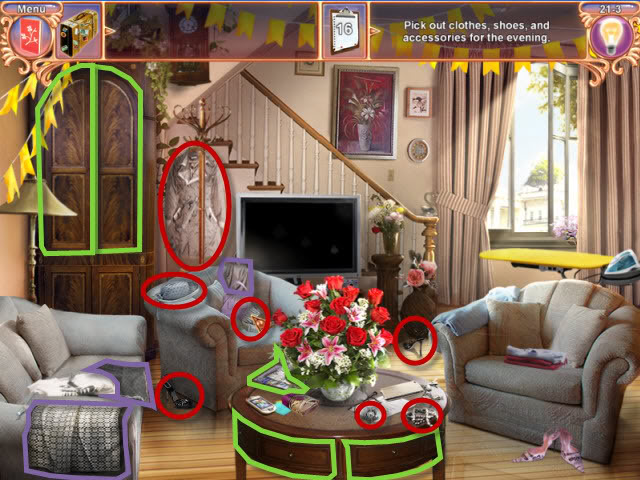
Start by opening the closet doors and the coffee table doors, highlighted in green.
Also, move the papers on the coffee table, highlighted in green, behind the vase of flowers. Next, gather the items, highlighted in purple, that need ironing.
Now, gather the other clothes, highlighted in red.
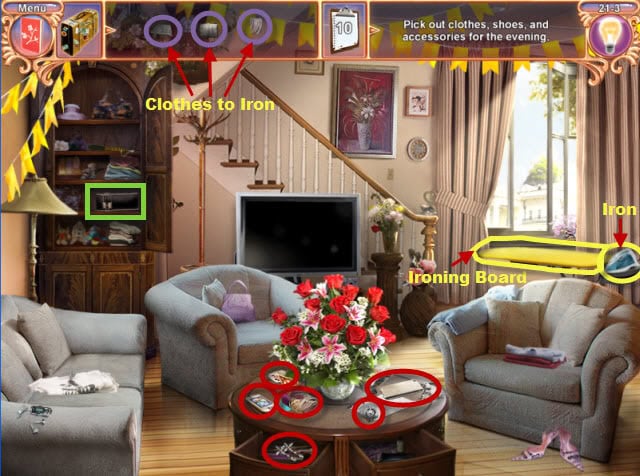
Move each of the clothing, highlighted in purple, one at a time to the ironing board, highlighted in yellow.
Use the iron, highlighted in yellow, on each piece of clothing, and then gather them.
Gather the purse, highlighted in green, in the closet.
Now fill the purse with the items highlighted in red. Lastly, gather the purse off the couch.
Chapter 22 – Scene 1
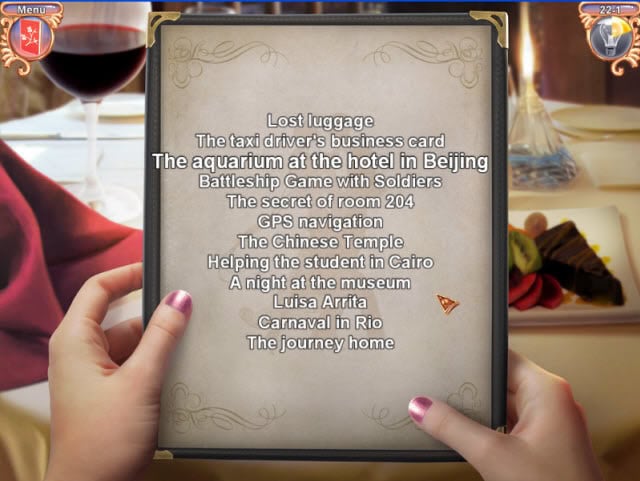
For you last mini game, you need to rearrange the list of events into chronological order.
The correct order is:
1. Lost luggage.
2. The taxi driver’s business card.
3. The aquarium at the hotel in Beijing
4. Battleship Game with Soldiers
5. The secret of room 204.
6. GPS Navigation
7. The Chinese Temple
8. Helping the student in Cario
9. A night at the museum
10. Carnaval in Rio
11. The Journey home.
Congratulations, you have finished your Million Dollar Quest!
“;
