![Digimon UP Tier List [Supports, Buddies, and Partners]](/wp-content/uploads/2026/07/digimon-up-tier-list.jpg "Digimon UP Tier List [Supports, Buddies, and Partners]")
Digimon UP Tier List [Supports, Buddies, and Partners]
These Digimon will get you UP the leaderboard.

![Haze Seas Boss Drops [Chances, Locations, and How to Spawn]](/wp-content/uploads/2026/07/haze-seas-boss-drops.jpg "Haze Seas Boss Drops [Chances, Locations, and How to Spawn]")

Welcome to the Millenium Secrets: The Emerald Curse walkthrough on Gamezebo. Millenium Secrets: The Emerald Curse is an adventure created by JetDogs for PC. This walkthrough includes tips and tricks, helpful hints, and a strategy guide to how to complete Millenium Secrets: The Emerald Curse.
Welcome to the Millenium Secrets: The Emerald Curse walkthrough on Gamezebo. Millenium Secrets: The Emerald Curse is an adventure created by JetDogs for PC. This walkthrough includes tips and tricks, helpful hints, and a strategy guide to how to complete Millenium Secrets: The Emerald Curse.
Main Menu
Continue – Resume your previous adventure.
New Game – Start a new adventure.
Options – Change the game settings.
SFX Volume – Change the volume limit for sound effects.
Music Volume – Change the volume limit for music throughout the game.
Fullscreen – Select this to put the game in full screen mode. Unheck it to have the game float in a window while you play.
Tutorial – Turn this on or off while playing to display or not to display tips.
Advanced Mode – Turn this on for a greater challenge while playing.
Credits – View the credits.
Exit – Quit the game.
Controls and Gameplay:
Emerald Curse is a point and click adventure game. You navigate the world by pointing at objects of interest and clicking to examine them. You can navigate the environment by pressing the arrows on the left and right side of the screen, and when you examine certain items the camera will go in close. Return to your previous area by pressing the arrow on the bottom of the screen by your inventory.
To use items, you must have all the items necessary in your inventory before you can use them. You can tell what you can use by the background color of the items in your inventory, Red are currently unavailable to use, while green items you can use. Click an item in your inventory, and then click on the world where you want to use it.
In each area there are items that are strictly for Bonuses. These Bonus Items, once all of them are found, allow you to use more hints. You get 3 extra hints when you find all of them.
The Hint System:
When you use a Hint, the game will show you where your next objective is. Click on the ? mark on the bottom right of your screen to use them. You have a limited number of hints, so use them wisely.
When starting a new adventure you have a choice between Casual and Advanced. The main difference is that Casual is an easier game to play as you can access hints much easier and a tutorial helps you along throughout the game.

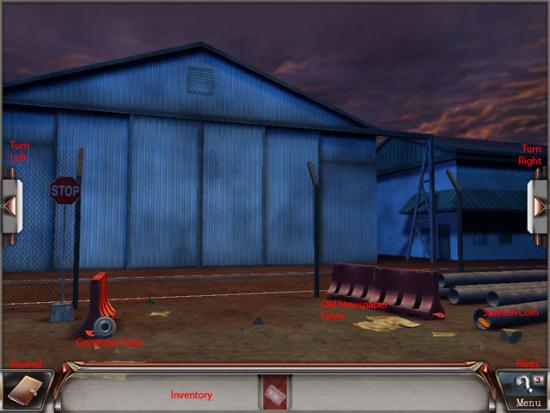
On this screen, pick up the Generator Gear, the Spanish Coin, and move the Old Newspaper on the ground to uncover the Grate. You cannot access the second Gear or Coin yet, so move to the left or right to the next screen.
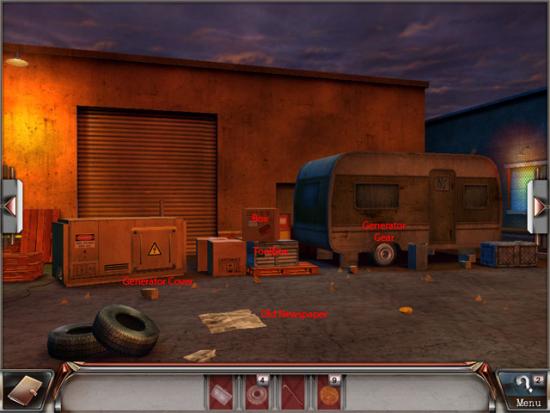
Here, uncover one of the Spanish Coins from underneath the Old Newspaper, then pick up the other Spanish Coin off the ground. There is a Generator Gear on the wheel of the trailer, take that as well. Next, remove the Box from the pile, which will uncover the Toolbox. Open this box to retrieve the Crowbar. Exit from this screen, and then return to the first screen. Investigate the Grate and use the Crowbar by selecting it on the inventory, then use it on the Grate. Take the Generator Gear and the Spanish Coin. Next, move to this screen.
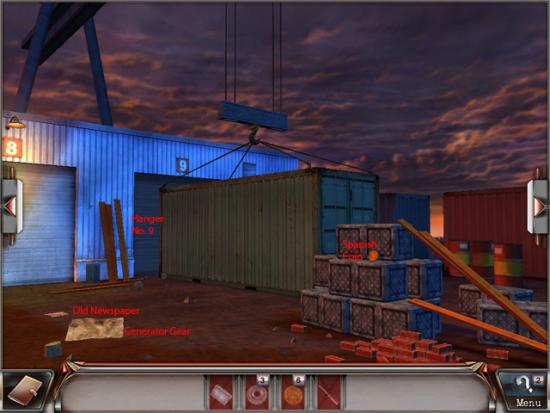
Take the Spanish Coin from the pile of boxes, and then remove the next Old Newspaper from the ground, then take the Gear that is under that. Go to the next screen to your right.
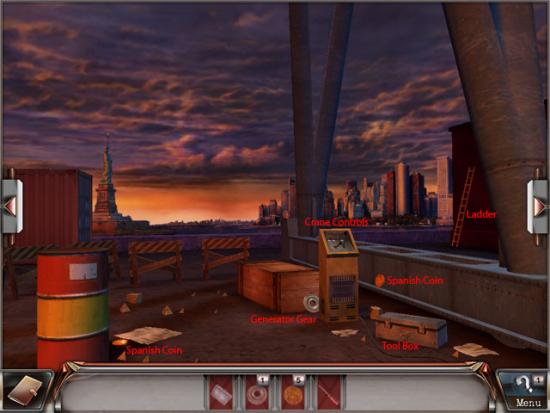
Take the last Generator Gear from the ground, as well as the Spanish Coin sitting on the ledge, and the one Coin which is lying near the base of the barrel. There is a Ladder leaning up against the building on the right, take that now. Next, open the toolbox on the ground and take the Screwdriver from it, as well as the next Coin. We need this to open the Generator Box. Go right one screen.
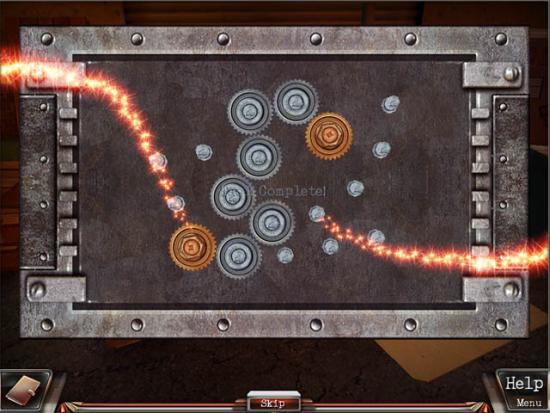
Investigate the Generator Cover and use the Screwdriver. Click on each bolt to unscrew them and the cover will fall off. Next, using your gears, place them on the spools sticking out in the box. When you have placed them it won’t work, so we need to fix this manually. Place the Gears in the motion from the left Gold one reaches the right Gold Gear.
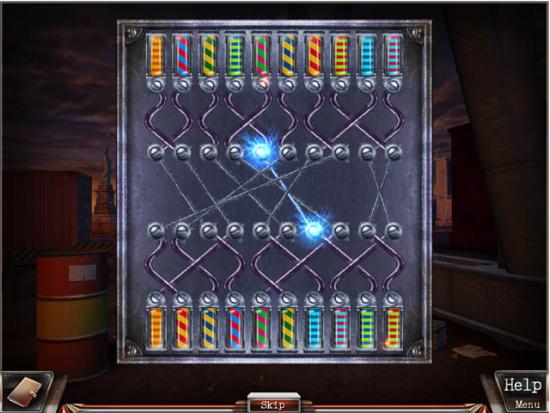
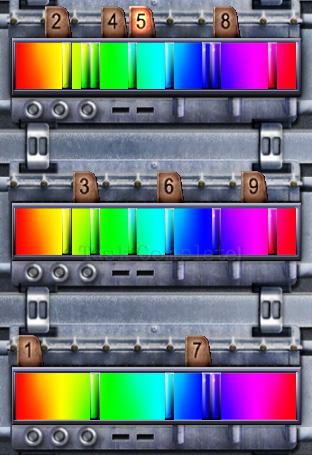
Once the Generator is up and running again, head left a screen. Use the Crane Controls to move the crate away from Hanger No. 9. The wires are disconnected, so it’s up to us again to fix this problem. Match each end of the wire that corresponds to the same colored plug by clicking on one screw and then clicking on the other one. The solution is here:
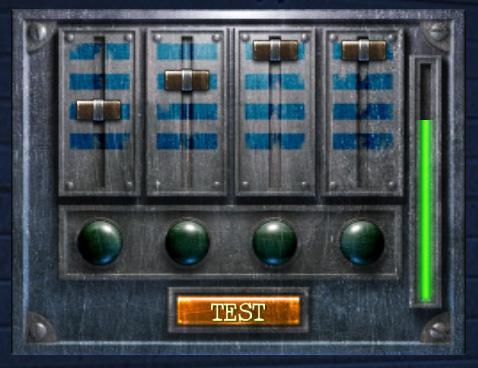
Great, now we can move that crate! Once the crate has moved, there will be a Coin under where it was. Nab that and then check out the door to Hanger No. 9. You need to crack the code, and to do so we must test the lock combination. Place each slider in a position and test it out. The ones that light up green are correct, so change the ones that are red. You have 4 chances to get it right. The answer to the lock is as such:
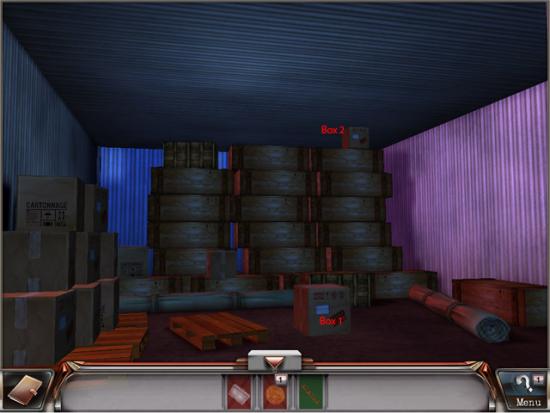
First up examine the obvious Box (1) on the floor, which will unveil the last of the 9 Spanish Coins. Next, use your ladder and then click on the Box (2) on the top of the crates, then click on the box again. You’ve found it, the Briefcase! Watch the next cut scene, you’ll see 3 Agents drive up and take your Briefcase. Shoot! Off to the Professors Apartment then!
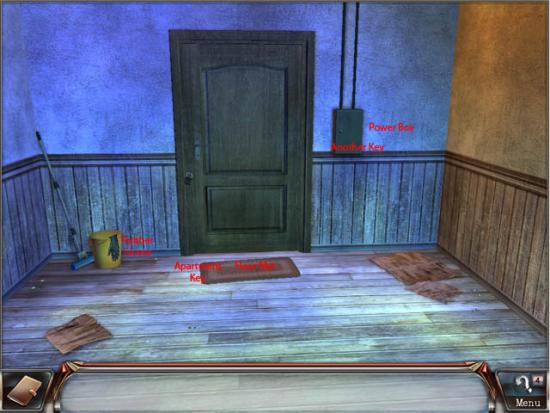
We need to enter the apartment to find clues, and we don’t have a key. Most people usually leave a spare key around their place in case of they ever lose theirs, and the Professor is no different. There is a key under the Floor Mat, as well as one in the Power Box. Before you grab that key, take the Rubber Gloves from the bucket, then equip them to grab the key otherwise you’ll get shocked! With that key, let’s enter the Apartment.
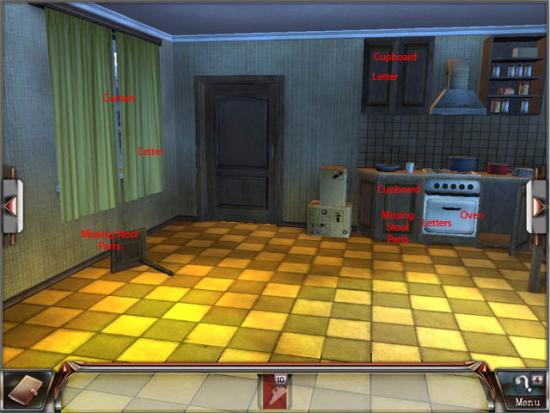
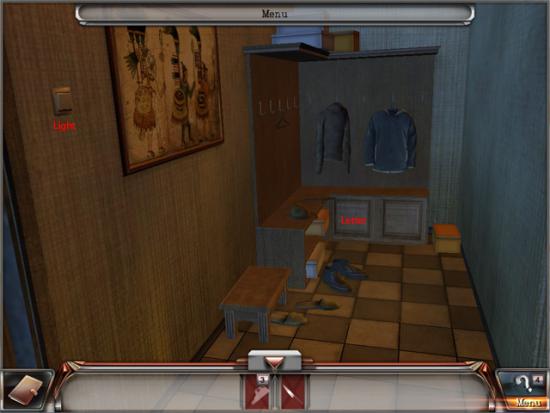
Let’s grab some items first. There are some Missing Stool Parts on the left that you can take, and when you open the Oven there is a Letter hidden behind the Dutch Oven. Open up the Cupboard and take some more of the Missing Stool Parts that are hidden in there. Above that Cupboard there is another Cupboard with two doors. Open them and take the piece of the Letter that is sitting there. Next, open the Curtains on by the window and take the Letter that is there. Once you have all of the above, go Left one screen.

Open the Curtain and Pantry, then take most of the Stool Parts in the Pantry. Open the Drawer on the bottom of the Pantry and take the Piece of Letter that is inside of it. Go Left another screen.
Open the Door on the left and examine the floor mat from within the washroom. Take the Letter that is there then go back to the hall. Flip the Switch on the wall right now. Go Left once again.
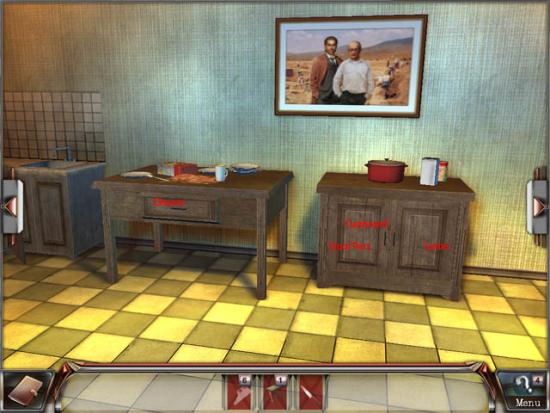
Open the Cupboard on the right and take the last Stool Part and the Letter from it. Next examine the Drawer on the left and take the piece of Letter that is sitting in it as well as the Knife. Once you have that go back to the screen with the Boot sitting on the Window Sill. Use your newly acquired Stool to reach the Letter above the Pantry. Go Left another screen and enter the Hallway on the right.
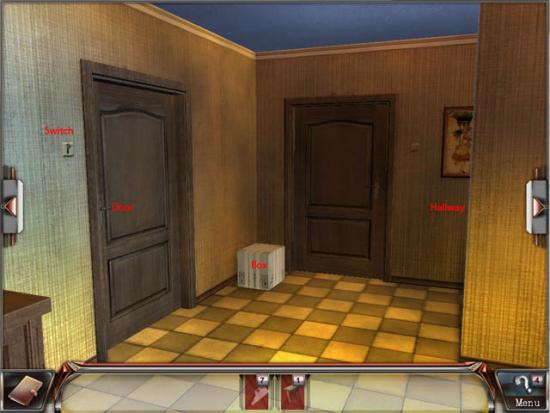
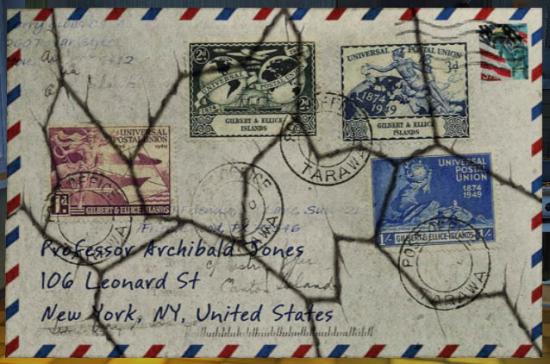
Hit the Light Switch to get some light in the room, then open the small door under the coats to get another piece of the Letter. Go back to the Hallway and use your Knife on the Box to get the last piece of the Letter. When you have the last of the pieces, you must puzzle them together. The solution is:
Go through the Door in front of you once you have completed this puzzle.
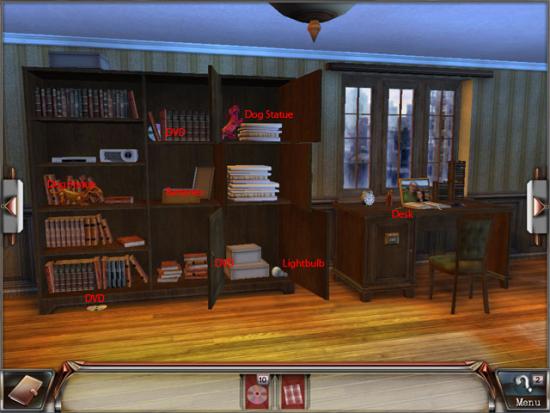
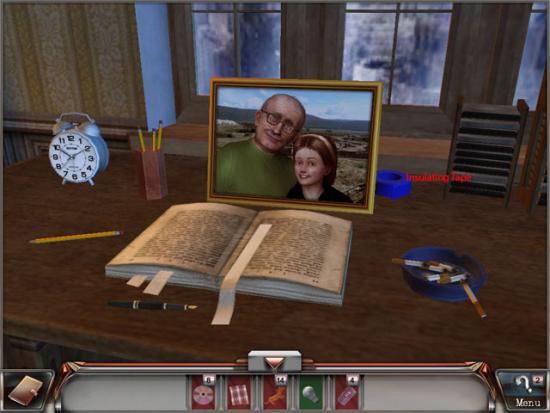
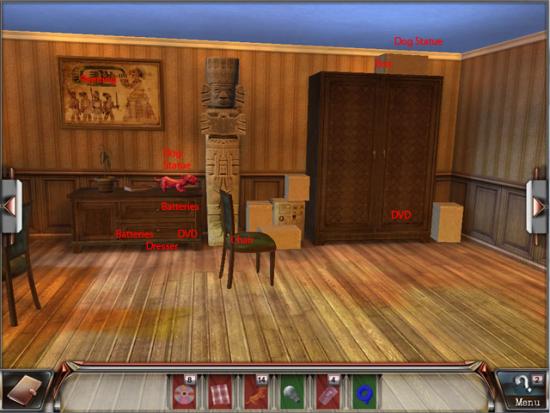
Open up all the doors on the huge dresser and start grabbing the items that are in it. There are 3 DVD’s, 2 Dog Statue, Some Batteries, and 1 Lightbulb. Examine the Desk next and grab the Insulating Tape.
In this room open the Dresser drawers and take the Batteries from the top and bottom drawers, then move the book over and take the DVD. Click the Chair to move it to the right, then click the box on top of the Cabinet and take the next Dog Statue. Go Right one screen now.
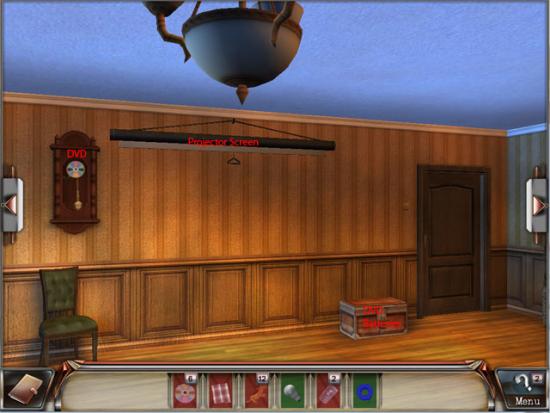
Take the DVD from the Clock, then pull down the Projector Screen. Go right another screen.
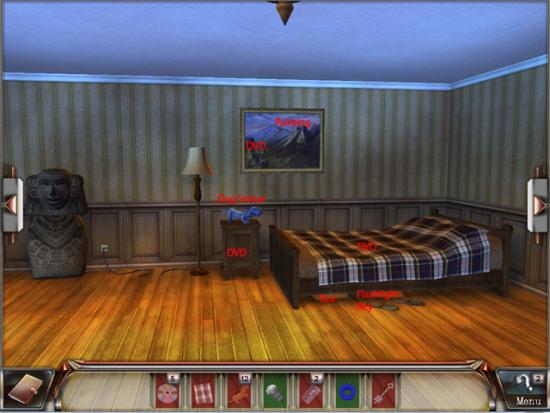
Grab the Dog Statue off the night stand, then take a look at the painting; clicking the painting will reveal a DVD you can take. Take a look under the bed at the Box and in the box you will find a Flashlight and a Key, take both. Pull off the Bed Sheet and take the next DVD that is hidden under it. The last DVD is hidden inside that night stand, so go grab it. Now, use that lightbulb on the lamp. Go Left one screen and use your new Key on the Locked Trunk and take the last battery and a DVD which is under a book from inside. Go Right one screen and place the Bed Sheet on the Window. Now take the DVD’s you have and put them in the DVD player. We have to decrypt the DVD’s in order to view them. The solution is as follows:
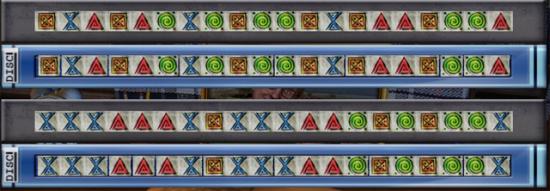
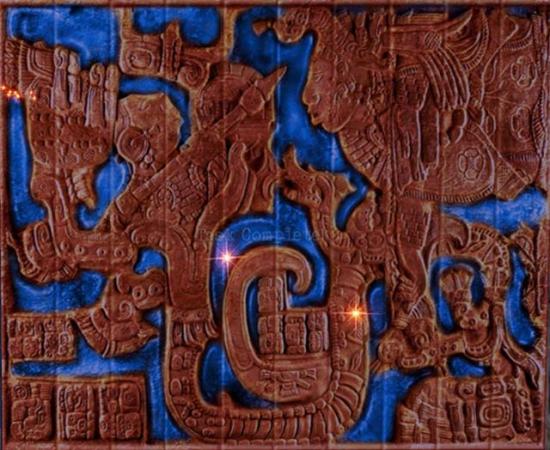
A cut scene will now play documenting the Professors discovery. Once this is done go Right one screen and use your Insulating Tape on the broken wire to turn on the light. A code appears! Remember the numbers 624 and go to the safe under the desk. Take the documents once you open the Safe, and grab the last Battery while you are at it. When you have that go to the screen with the weird disk in the closet. There is a secret entranceway here and you need to solve the puzzle before it opens. Click each ring to rotate them, and it will form an Aztec image like this:
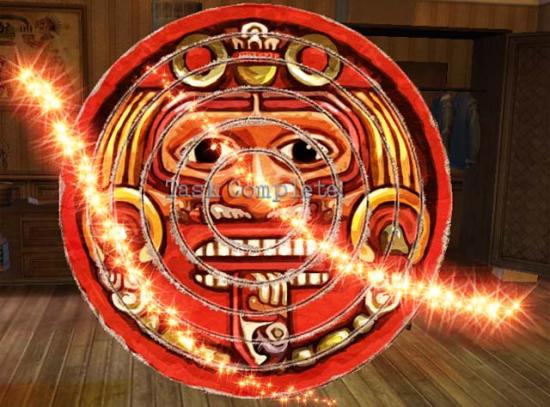
Once the door unlocks, pull out your Flash Light and proceed into the darkness.
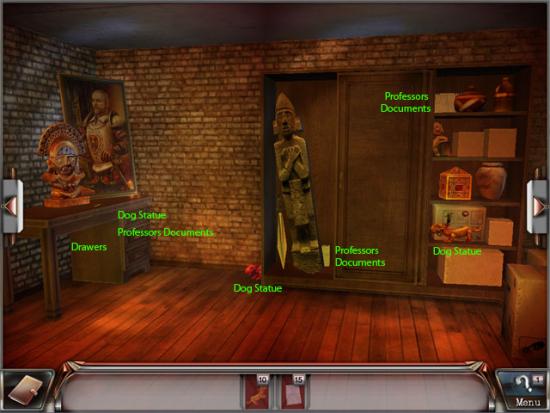
When you arrive at the basement floor it is pretty dark here, good thing we have that flashlight. There are two Dog Statues in plain sight, one by the left side of the shelving unit and one on the second to bottom shelf on the right. There is another one in the top drawer on the left side of the room. There are also three pieces of the Professor’s Documents in the room, one in the second drawer on the left and one on the very top shelf of the unit, while another is inside the closet at the bottom of the Statue. Once you have all of these items go right one screen.
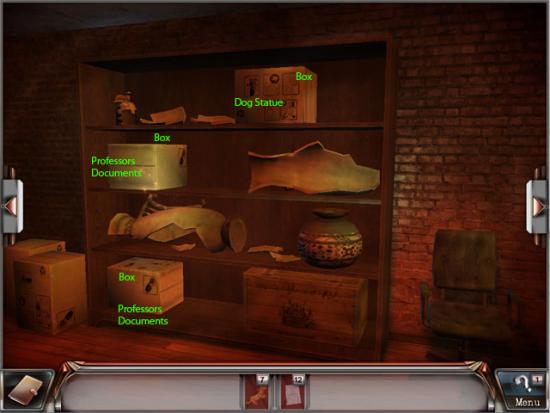
Grab the two Professor’s Documents which are hidden behind two of the boxes, while another Dog Statue is hidden behind the third box. When you have these, go right again.
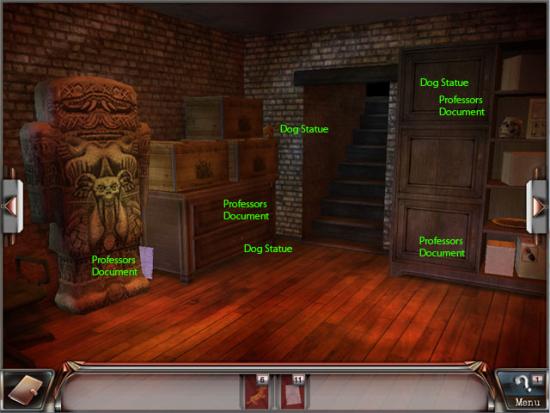
In this area there is a Dog Statue on top of the storage unit to the left, while a Document is cleverly hidden behind the ear of the Mayan statue, as well as in the bottom drawer under the hinged door; while you are looking in that drawer there is a Dog Statue hidden above; more are found in the three dresser drawers on the right, and one Dog Statue is found in the middle of them; there is one above the huge Mayan calendar disc seated atop the desk; lastly, there is one more of the Professor’s Documents in the crate sitting on top of the desk. When you have the last object in the apartment, it’s time to get out of here!
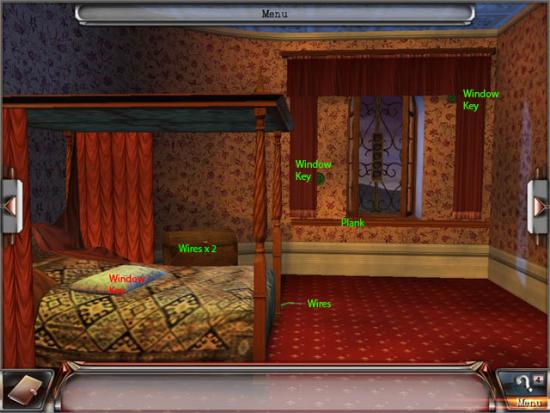
You want to go exploring James’ Manor right now, but he has you under security cameras eyes. We need to disable it before we go out exploring. In order to get out, we have to open the window which needs 5 keys. Two are hidden behind the window curtains, and one is under your pillow on the bed. Pick up the wires off the floor, and go get the two wires that are in the chest. Then turn Left.
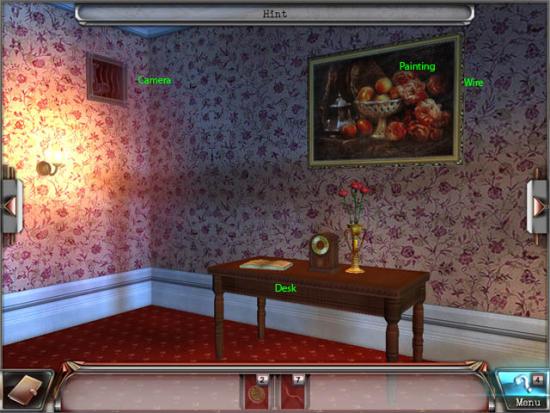
Click on the desk to slide it towards the camera, and then examine the painting and take the Wire that is hidden behind it. Next, go to the screen to your Left.
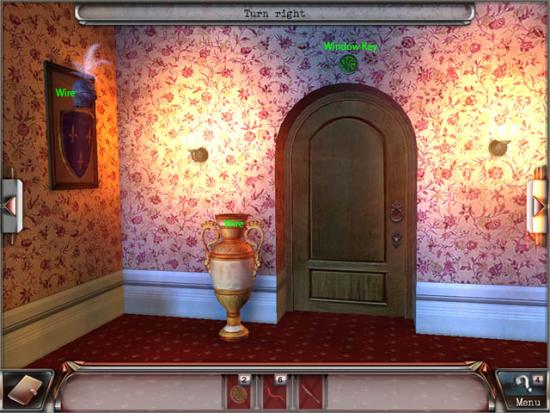
Here there is a Window Key above the door, and there are two Wires located behind the helmet on the wall, and one in the vase by the door. Go Left after getting these three items.
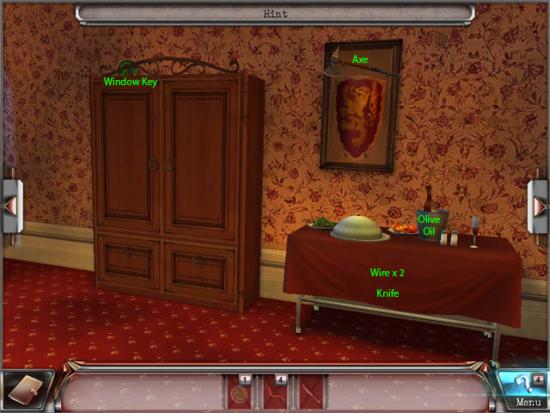
The last Window Key is on the Armoire to the top left. Two Wires are in the drawers of the cabinet, while two are hidden in the food cart under the red cloth. While you are investigating down there grab the Knife and the Olive Oil that are on the cart. Lastly, grab the Axe from the display above the food. Now return to the Security Camera.
When you get to the camera, use you Knife to unscrew the bolts, then select the Wires and use them on the camera. Another wire puzzle appears, which you must connect the circuit boards to one another to short circuit the camera. The solution is this:
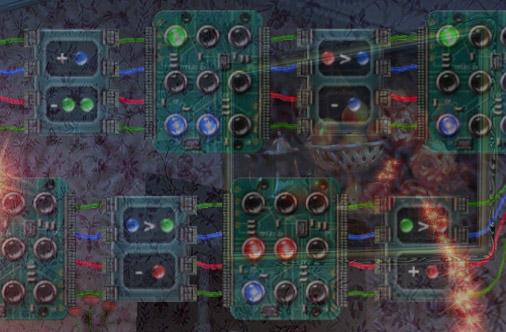
|+ Blue | |Red > Blue |
|- Green Green | |- Blue |
|Blue > Green | |Green > Red |
|- Red | |+ Red |
When you have the camera disabled, go to the window and use the Window Keys on it to make your escape; however it is rusted shut so you have to use your Olive Oil to make it open. When you are outside, click on the other window to make your way across the ledge. You are stuck however when the bricks come loose, so you must return to your room. Use the Axe to chop the Plank which is right underneath the window sill, this will get you the plank you need to get across the gap. With that Plank in hand, return outside and place it down to get to the other window.
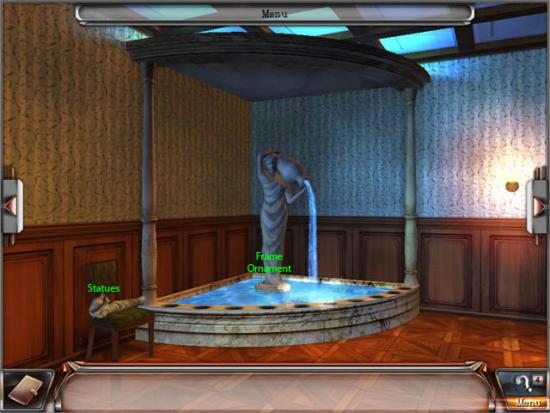
You hear some voices through the wall, and listening in might give us some clues. The Fountain is missing its Statues so let’s recover them. Grab the one off the chair, then turn Left.
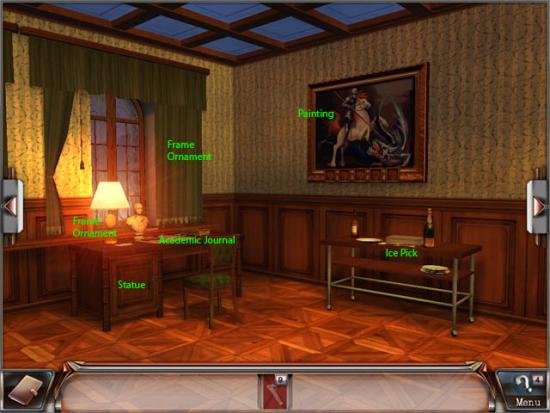
There is a painting that is missing some of its ornaments, we will come back to this later once we have them. Go to the cart with the Champaign and move the box over and take the Ice Pick that is lying there. A Frame Ornament is hidden behind the curtain by the desk, move it out of the way and take it. Examine the desk door to uncover another Statue. Next up take a look at the desk, there is another Frame Ornament hidden in the window. When you have that take the Academic Journal that is on the desk, then proceed to the Left screen.
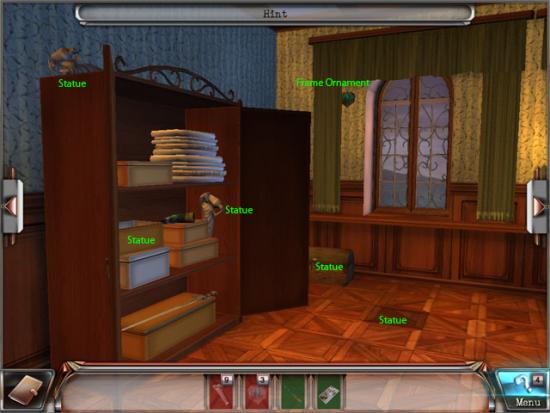
There are several items on this screen we must obtain. There is a Statue above the dresser and two inside, as well as one in the small chest on the floor, with one more hidden in the darker floor paneling (Open it up and take it). A Frame Ornament exists behind the left curtain by the window. When you have all of these items, go Left once again.
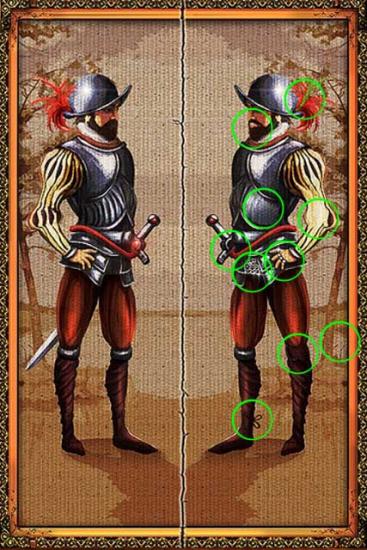
Click on the painting on the wall and a puzzle will start. You must find the 10 differences between the paintings by clicking on them. (You can click on either of them to solve this puzzle)
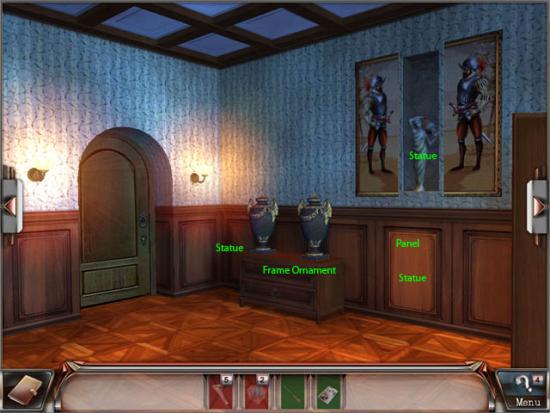
When it opens up, take the Statue that is there, then click on the brighter wall panel to reveal another Statue; then go check the desk with the vases on it. There is another Statue on the left when you are examining the desk, and a Frame Ornament in the top drawer. When you have these four items, go to the room to your Left.
Use the Statues on the border to the pond and the last Frame Ornament will appear under the main statue. Take it and head back to that painting we saw earlier and put them in.
So it seems that James is out to get the Professor! We must learn more.
Go to the only door in the room and slide the Academic Journal we picked up off the desk earlier, under the door. Use the Ice Pick to push the key through to the other side, and then pick up the key fom the Journal. Use the new Key on the door and get out of here.
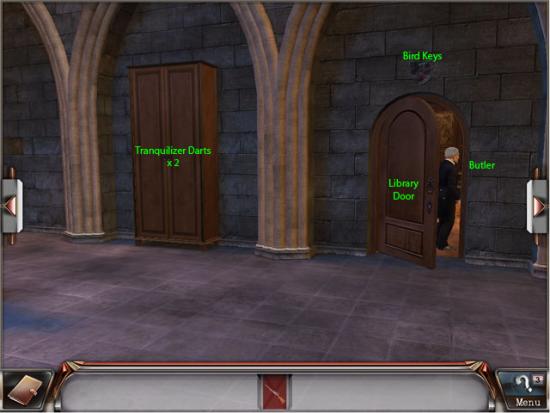
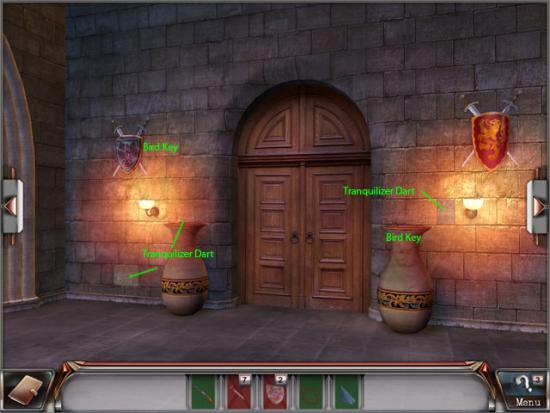
We need to take that Butler out in order to make some progress into the Library. If you investigate the storage unit on the left there are two Tranquilizer Darts hidden near the bottom. Above the door to the Butler there is something called a Bird Key, let’s take it for now as we might need it later. When you have these two items, head Left one screen.
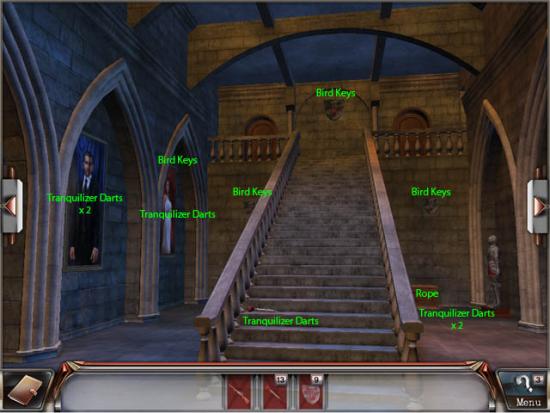
There are Three Bird Keys hidden on the walls, one at the top of the stairs, and one on each side of the staircase. There is a Tranquilizer Dart sitting right there on the steps; if you examine the chest to the right there is a Rope hidden beside it. Next, examine the paintings on the wall. Behind the blue one, there is a Tranquilizer Dart when you click on the Painting, also there is one hidden in a brick that is a lighter color than the rest of the bricks, just to the right of James painting; behind the Red painting of the woman there is another Tranquilizer Dart as well as a Bird Key, to get this key click on the painting to make it drop down, and then click on the tile above the painting that is a lighter color than the rest of the bricks to open it. When you have these items, go Left another screen.
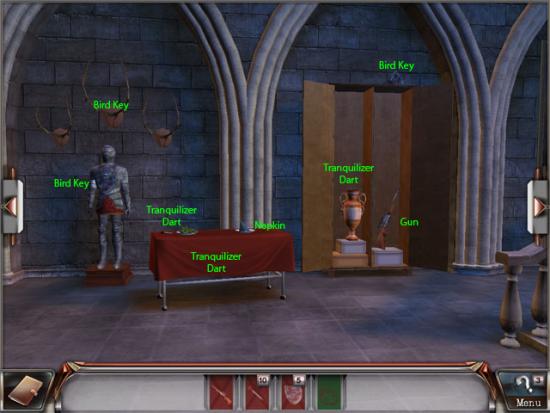
More Keys and Darts are scattered around here. Open up the doors on the right to uncover a vase on the left, which upon investigation shows a Tranquilizer Dart lodged in the top, and behind the right door there is a Gun which will be perfect for using the Darts on the Butler. Another two Darts are on the food cart, one on top and one under the red cloth which is draped over the cart, click to life it up. Take the Napkin while you are at it, we could use this later. Now for the Keys, one is set up top of the closet, above where the Gun was located. Another is attached to the chest of the Knight’s Armor, and the last one is behind the antlers right above the suit of armor; click it to move it out of the way and then take it off the wall. Go Left another screen.
A very obvious Bird Key is right there on the wall for you to take, just up on the left plaque. Facing this wall there are two Vases on each side of the door, in the left one there is another Dart, and in the right vase the last Bird Key is to be found. There are two discolored wall panels, one to the right of the right vase, and one to the bottom left of the left one, that when clicked on reveal two more Tranquilizer Darts. When you have all of these five items, go back to the main stair with the paintings on the wall (Go Left or Right two times)
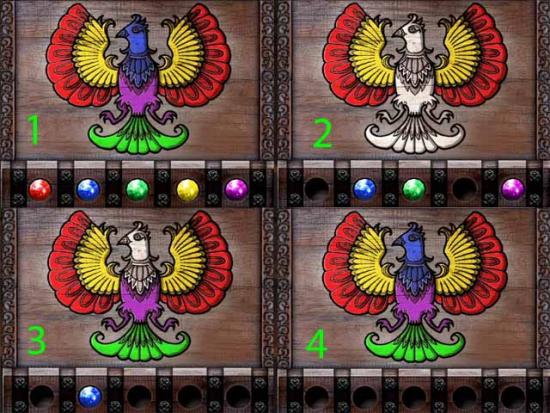
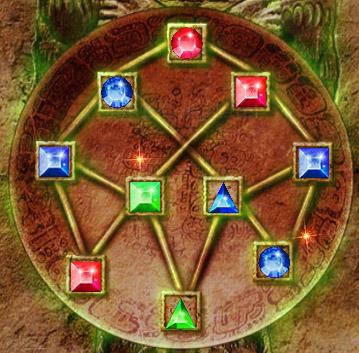
Investigate the Trunk which is on the ground to the right of the stairs. It needs our Bird Keys to unlock, so select them and then use it on the trunk. You also need a code, which will show itself to you in the form of a puzzle. The way this puzzle works is, you need to click a jem and then place it on the same colored spot you see. Jot down the colors you see on a piece of paper if you cannot remember where they go. The way you do it is like such:
There will be two Darts in plain sight, with a third under the brown book. With the last Dart in our possession, it’s time to say good night to Mr. Butler. Walk over to him, click on your Gun which is already loaded, and then click on him to put him to sleep. With that Rope we have in our inventory, we can tie him up so he doesn’t run to James when he awakens, and let’s put the Napkin in his mouth for good measure so he doesn’t scream for help. Enter the Library once the Butler is taken care of.
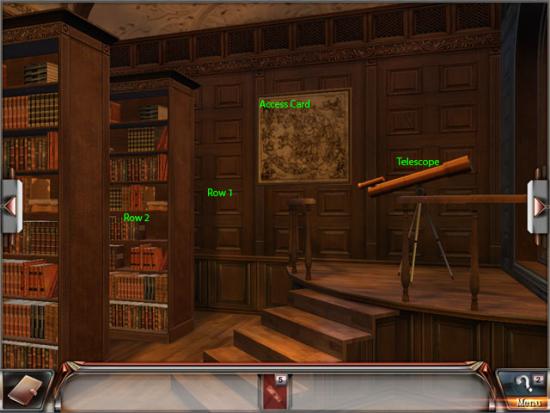
Check out that big chart hanging up on the wall, it’s pretty suspicious… and suspicions are correct! Click on it to slide it to the side to find a hidden Access Card. There are 10 of them, so we have to find 9 more. Enter Row 1.
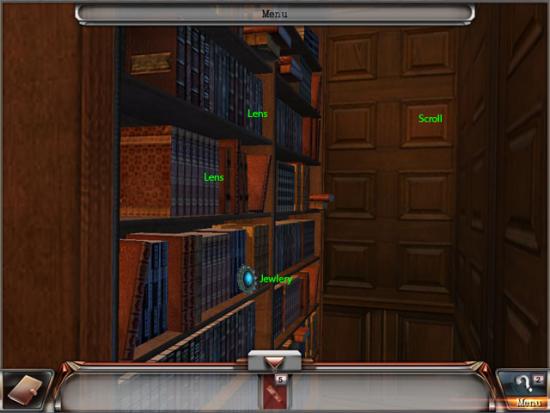
There is a big piece of Jewelry right there on the shelf, a bonus item, so lets take it. A Lens is hidden behind the books on the middle shelf on the left as well as the top shelf behind more books, and one Scroll is in a hidden panel on the wall (Right side, second from top square). When you have these items, go back one screen, then enter the second row of books (Row 2) from the wall.
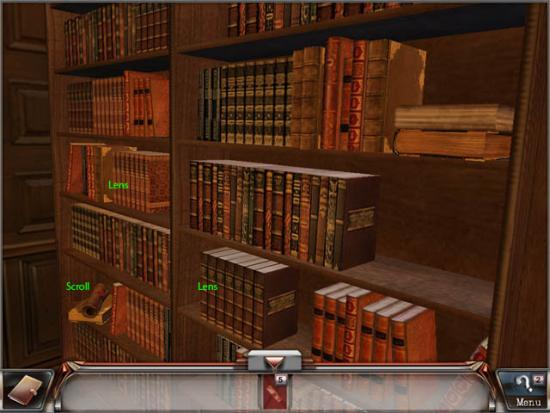
Take the Scroll from the very bottom left side of the screen. Two Lens’s are hidden behind books, the bottom right set of books and the set of books in the middle of the left side. When you have these go back one screen and then go Left two screens. (Don’t go to the one with the Double Bookcase, we can’t do anything there yet.)
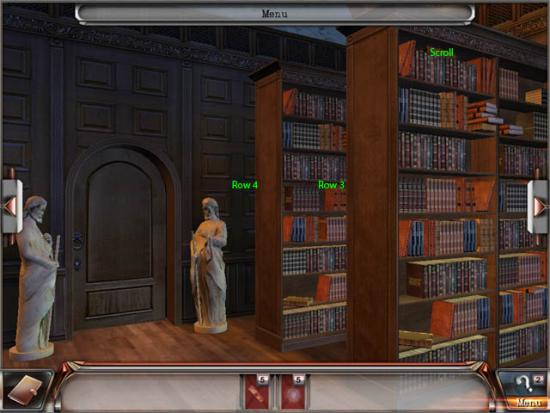
A Scroll is on top of the right bookcase, right at the very top, take it.
Enter Row 3.
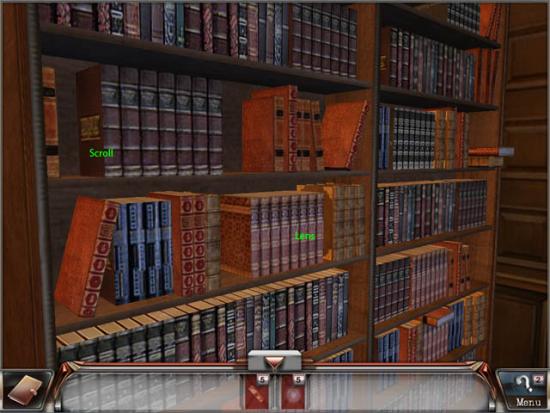
There is a Lens and a Scroll hidden behind two more sets of books. Take them and then return to the room, then enter Row 4.
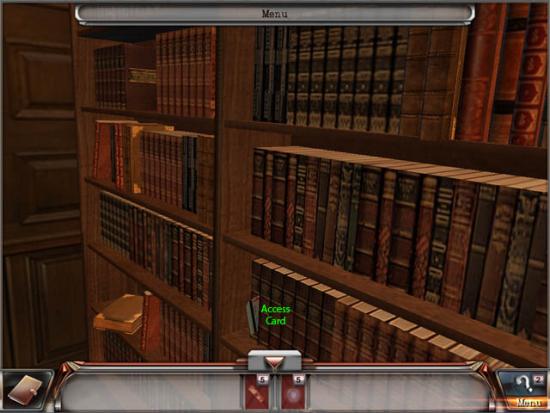
There is an Access Card wedged between two books near the bottom of the screen, take it and then go back, then Left one screen.
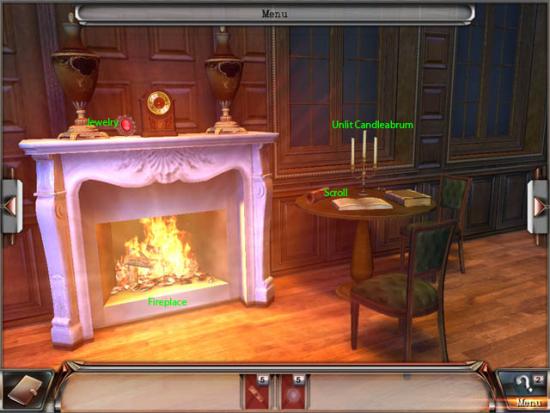
The last Scroll is on the table for easy taking, and there is an Unlit Candelabrum as well. Take the Candles and then use them from your inventory on the Fireplace. Go Left one screen when you have these.
Use your 5 Lenses on the Telescope and you will get a puzzle. Remember this pattern:

This will also be saved in your Journal for further referencing. Return to the screen with the double bookcase, then click on it to activate a puzzle. To unlock the puzzle, you must match the colors. Click a book, and then click another to swap the two around. When you have all of the books matched up, head down the secret passageway! Here is where that code came in handy. Press each button to light them up like the pattern from the Telescope. Since it is really dark down here, take your lit Candlestick and enter the dark room.
When you arrive at the basement you’ll find that a large magnetic field is active, but turning on the lights first will help us see around in the dark. Turn Left one screen and flip the switch on the wall.
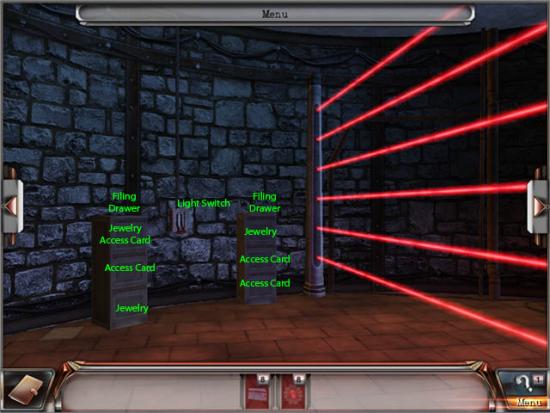
Inside of the left Filing Drawer, the top drawer has 1 Jewelry and 1 Access Card, the second has another Access Card, and the bottom has one more Jewelry; on the floor to the left of the cabinet there is a tile of a different color that you can open to reveal another access card. The right cabinet has an Access Card underneath the file folder on top, one Jewelry in the top drawer, and one Access Card in each of the other two drawers. When you have these, go Left one screen.
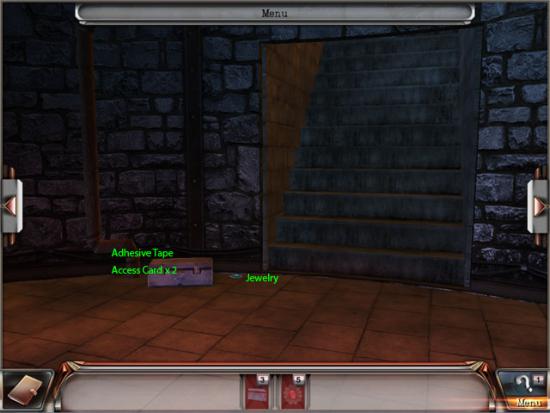
Examine the toolbox that is on the floor by the stairs. Take the Jewelry off the floor, then pop open the box and take the Adhesive Tape and Access Card. One more Access Card is wedged in between the pipe and wall near the top left of the screen. With that last card in hand, go left one screen and then use your Cards on the control box on the wall, a puzzle will start. The order for placing the cards in the machine is: 1, 5, 4, 8, 6. The force field will go down now, so take a look at the shelf unit to your left.
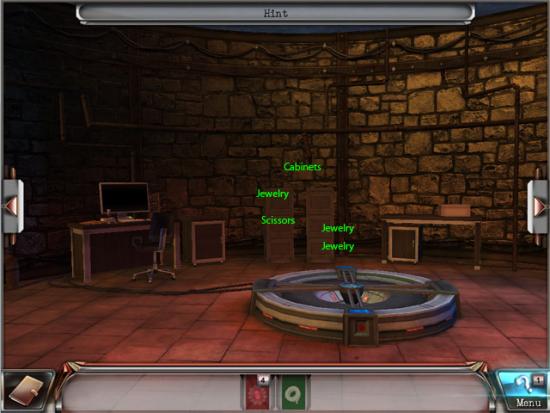
Examine the cabinets first, there are 3 pieces of Jewelry and one pair of Scissors. Next take a look at the desk to the left.
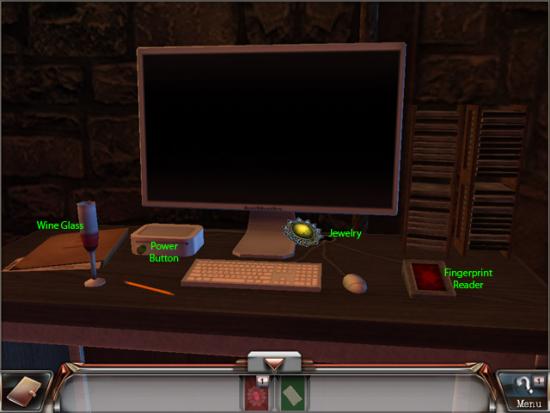
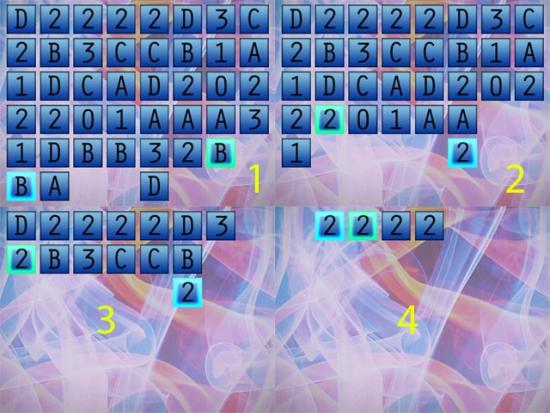
Take the last piece of Jewelry and then use your Piece of Tape and use it on the Wine Glass to take Lord Scofield’s finger print, then use it on the Fingerprint Scanner. This will boot on the PC. A code goes on the screen which you must decipher to access the data. You must play Mahjong to unlock it. This means that you must click the letter or number on the BOTTOM of the entire puzzle and match it up to another piece of the same letter or number along the BOTTOM row.
When this is complete, you find out that you must go to Barcelona to find the Professor.
In order to get into this building 3 locks must be found. Take the Shovel, then click on the off colored panels on the wall and ground. Take the Snake Keys from each of them, and then use the shovel on the grass to uncover the last Key. Use the Snake Keys on the door.
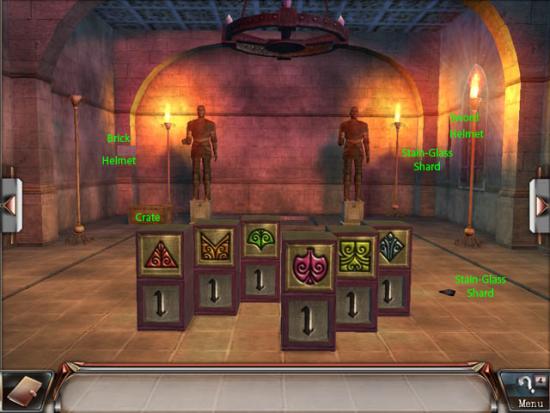
In this room click on the 6 tiles on the ground to unveil some patterns. Take the Stain-Glass Shard off the ground, then click on the Brick on the left column by the statue to uncover a Helmet. Check out the crate on the ground, and take the next Stain-Glass Shard, a Sword, and a Shield. There is a crack along the right wall, examine it and take the two items, and click the brick to find a Stain-Glass Shard. Go Right one screen now.
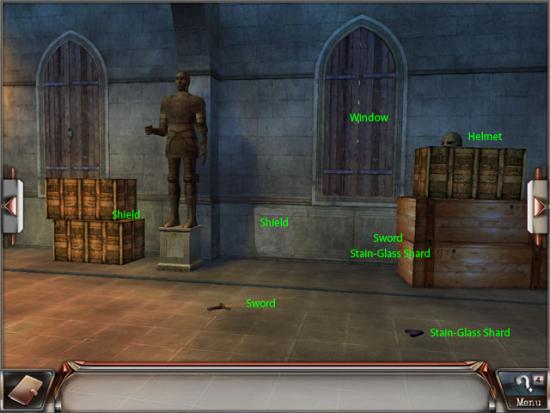
Take the items from the floor, and then move the crate on the left to take the Shield, and click the stone wall to find another Shield. Take the Helmet, then click to the bottom left of the crates to look behind them to find a Sword and Stain-Glass Shard. Go Right one more screen.
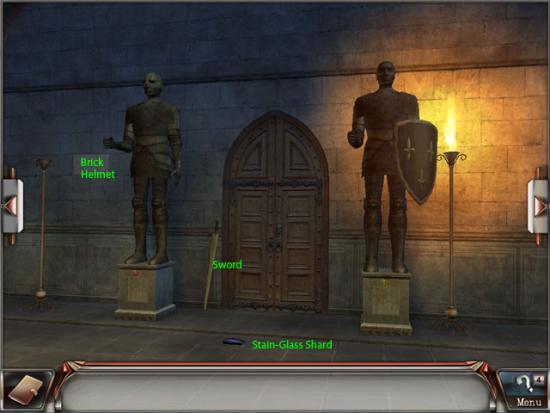
Take the items off the floor, click the Brick to find a Helmet, then examine the base of the right statue to locate another Stain-Glass Shard. Go Right another screen.

Take the items off the floor again. Examine the Crate on the floor and take the Helmet and Stain-Glass Shard, and look in the hole on the ground to find another Shield and Stain-Glass Shard. Move the crate on the right to get the last Shield. With all these items in hand, place one of each on the four statues around the room, and the Stain-Glass Shards in the broken window. The window has a puzzle, where you must reassemble the pieces. The result should look like this:
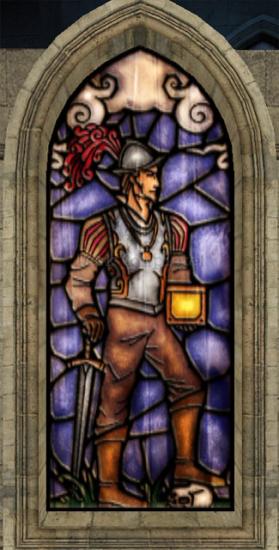
This shines light to the opposite wall in the room. When all the Swords, Shields, and Helmets are on the statues, go to the wall with the light shining on it, and click the lantern the man is holding. This will open up and an Elevator Key will be inside the hidden box. Go to the main chamber and click on the numbers on the pillars. Each color corresponds to a number under each statue. The numbers for each are: 3, 3, 3, 2, 5, 2
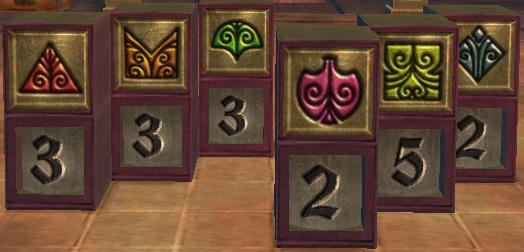
Use the Elevator Key on the elevator to access it.
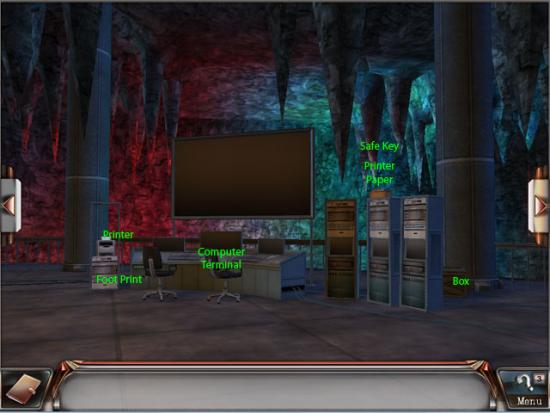
Power needs to be restored to the computer. Grab the Printer Paper off of the tower on the right and slide the book over to get the Safe Key. Look at the box behind those towers, there is a bonus item, the Step you can find, and one Power Supply and a piece of Printer Paper under the red books, in the box. With these, go Right one screen now.
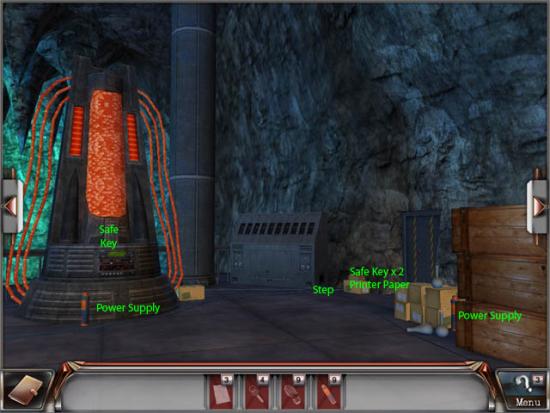
Take the two Power Supply units from the room. Examine the collection of boxes by the Storage Room and take the Step, Safe Key, and Printer Paper, then move the money on the left to get another Key. Look at the other box to the left side of the room behind the generator and take the Power Supply Unit behind the box. Lastly, click on the center of the generator (Right below the orange liquid) to investigate the panel, which will reveal a key. Go Right.
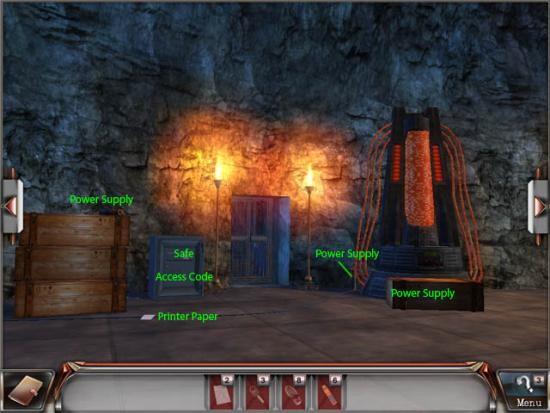
Take the Power Supplies from the top of the left stack of crates, and behind the generator on the right; another is behind the crate which is in front of the generator. Take the Printer Paper off the floor, then go Right another screen.
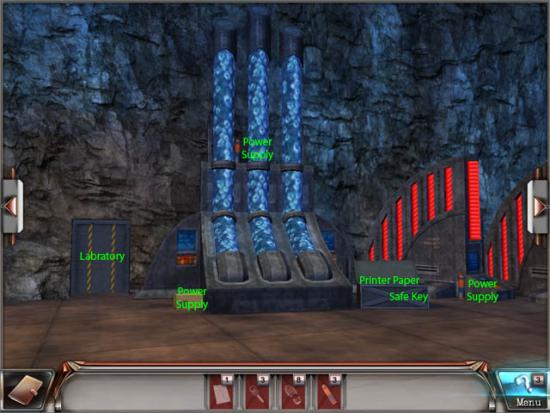
Look in the steel crate on the right and take the Printer Paper and Safe Key from inside. Grab the Power Supply which is beside the box to its right, then move the box on the left to take the next one. Go back to the place where you plug in the Power Supply Units into their slots, and use them on the machine; this will start the computer. Put the Printer Paper in the Printer now and take the sheet that prints. There is a Step to the right of the Printer when you are looking at it. Go find the safe next (2 clicks to the Left or Right).
Inside the safe there is a piece of paper under a red book with the second part of the Access Code. The code is:
431 + 117
= 548
548 is the code. Use this on the computer terminal to open the Storage Room, and head over there next.

Look at the crate and box and take the items inside and behind them, including the 3 Foot Prints. Take the Crystal from the overhead light. Go Right.
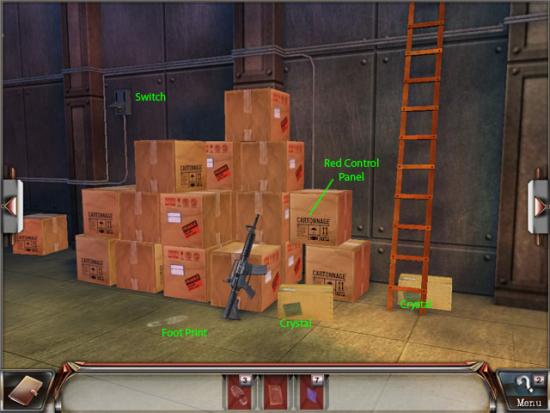
Nab that Foot Print then move the two small boxes to reveal two Crystals as well as the large box in the middle of the stack on the left for one more. Move the box on the right to uncover a Red Control Panel. Go Right.
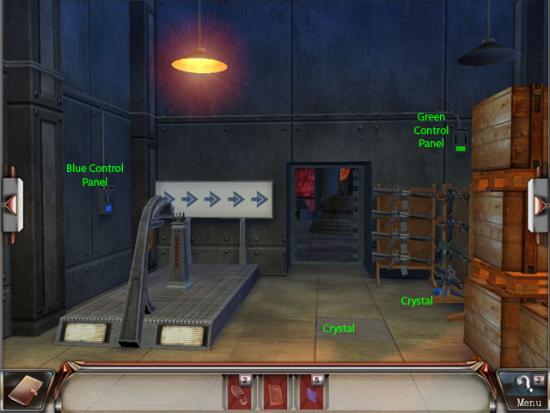
Take the Crystal by the guns, and then remove the off colored floor panel to get the next one. Go Right again.

The last two Foot Prints are on the floor. A Crystal is high up on the top box to the left, and one behind the crate on the right most pallet. Move the steel box on the left to uncover the Yellow Control Panel. Now that you have done all that, go Left again and place the Crystals on the machine by the door. A color sequence appears, which is:
Red -> Yellow -> Green -> Blue -> Purple
This is the order of the switches that need to be pulled to deactivate the laser field. Go around the room and flip each switch in that order. Look at the Safe when the laser field goes down, and you’ll find that it is broken. Repair it by connecting all of the objects in the shortest manner possible. The solution is:
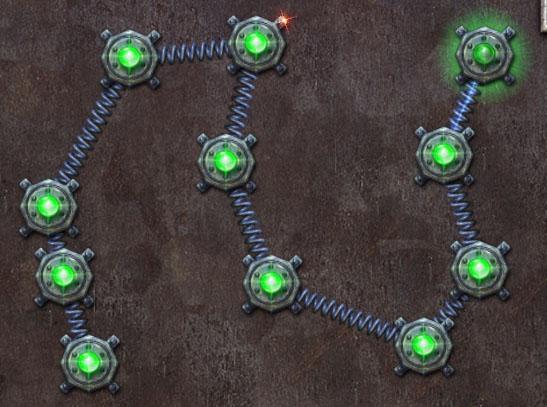
Take the Information on Ocean Dream and the Paper with Access Code. The code is 545. Go to the computer terminal in the other room and enter it, and the Laboratory will open.
Explore the room here and take viles of Acid that are scattered around the room. Move the Microscope to find a Magic Key. Slide the scale on the right desk to find a Sticky Note. On the very top left shelf move the middle box to uncover another Sticky Note. Rotate the right chair to find a Sticky Note. Move one screen Left and flip the blackboard to get another Note. Move Left again, and move the red folder on the shelf to find another thing of Acid. Examining the desk with the computer on it, the top drawer has another Note and the folding door has a Magic Key hidden behind a box. Looking at the computer itself, move the tower out of the way to find another Tube of Acid. Move left again; in the trash bin there is a Dart, moving the big statue reveals another vile of Acid. Flipping around the top box on the stack shows another Sticky Note. Look at the box to the left of that and you’ll see a stick of Acid on the floor and a Dart under the yellow book. Go through the white door on your right.
Open the closet and grab yourself the middle white lab coat to find another Sticky Note. The weird Mayan statue on the desk is a puzzle. The solution looks like this:
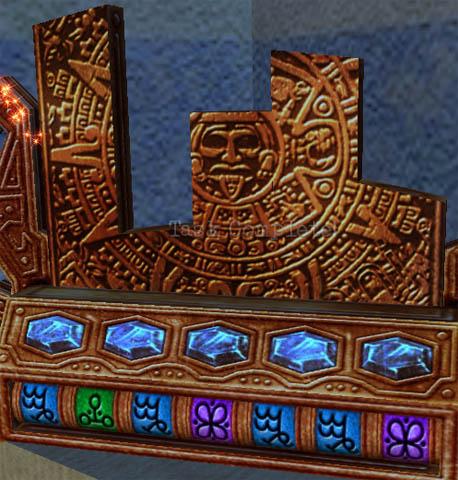
Blue, Green, Blue, Purple, Blue, Blue, Purple
Go Left once you have this code, and touch the box under the desk and the Tube of Acid is an easy grab. A Sticky Note is attached to the TV screen up on the ceiling. While we are here put the Video Tape in the VCR player. Look Left again, take the Video Tape off the dolly, the Sticky Note from the soap dispenser, then go Left once again. In the Drawer there is a Magic Key, and under the book another vile of Acid is found; Inside the cupboard on the bottom a stack of books lies in front of a Tube of Acid. slide the chair over and take the Sticky Note that is behind it which should be your last one. The code is 22. Move the Pillow on the bed to find yet another Tube of Acid.
Exit this room and return to the previous area, and find the small box on the floor that needs Magic Keys, and use them on the box, which will open to give you a Dart. Go look at the white door to the other room again, and click on the long tube that is on the bottom shelf. Remember, the code is Blue, Green, Blue, Purple, Blue, Blue, Purple. With that done take the next Dart. Go to the science equipment and investigate the right desk. Place your Tubes of Acid in the machine which starts a puzzle. To solve it, you must place each set of colors on one of the three bars. The only one you do not need is 10. The answer should look like this:
Take the Acid you just got and look at the table to your left and use it on the block to get the last Dart. Go to the other room and find the Dart Board and use your Darts on in. You must score 22 points with 5 darts, so a possible solution is 1, 2, 3, 7, 9. There are other solutions, that is only one of them that works. Take the book of Information About the Girl. Time to go to the Oceanarium!
In order to get past the lady by the door we have to dress the part of an employee. If you turn to your left you will see a row of lockers, a Jacket in the right one, and a Natilus Shell in the one to the left. Look at the next set of lockers to the left and open them one by one, you should get a Hat, and a Skirt. If you click just to the left of the lockers, you will find a door to the janitors closet, open it and move the bag in the middle of the pile to find another Natilus Shell. Turn Left again. Behind the Dolphin Poster is a code, 128, which is used on the locker by the Hat. (A Natilus Shell can be found on the top left of the poster).
Look at the scaffolding and you will find another Natilus Shell, and move the blue paint bucket to find another one. One more Natilus Shell is found under the dark blue floor tile. Turn Left again. Slide the box on the floor over to get yet another Natilus Shell. There is a Key in the box on top of the scaffold, which can be used on the other locker you couldn’t get into. Go to the lockers now and grab the camera for Kate’s Photo and the Employee Pass. You need some Glue, you can find it in the top drawer by the Ocean employee. Open the bottom drawer for another Natilus Shell, and take the one in the bucket on the right. Move the box on the top of the left shelf to get your last Natilus Shell. Use the Employee Pass to get past the lady.
You have to find 15 Star Fish in this room and upstairs. There are 4 tools you must also get right now for later.
Once you have all 15 Star Fish return to the front desk and give her the Star Fish. She will give you the keys, which open the door in the other room. Go talk to Bob who is working on a mechanical octopus. He will ask for his tools, and the last two are by the door to the other room shoved away in the left most corner behind a box. Since we have all the tools now, give them to Bob. Try to get the ride going by pulling the switch on the yellow box. It won’t work, so use your Sticky Tape around the room to connect the wires. You can easily spot the gaps between the wires by the electrical sparks that fly from them. There are 13 gaps in the room, and a few of them are behind boxes. Once that’s done go activate the ride.
What you have to do here is click 15 Red Switches to unlock the basement in the other room. They are all located on the walls. When that is done, head to the basement in the other room and use your flashlight to see your way through.
There are valves located along the pipes that you have to shut off if you want to make progress through here. Follow the pipes and click each of the 10 valves to turn them off. A key is located in a small box immediately to your left, and a valve is only accessible when you are looking at the box directly. The Key you have can open a box which also holds a valve; this box is right near the ladder. When all the valves are shut off, head to the secret room!
You just know there are some important documents here, so search around the room to find them.
Coins are circled in red.
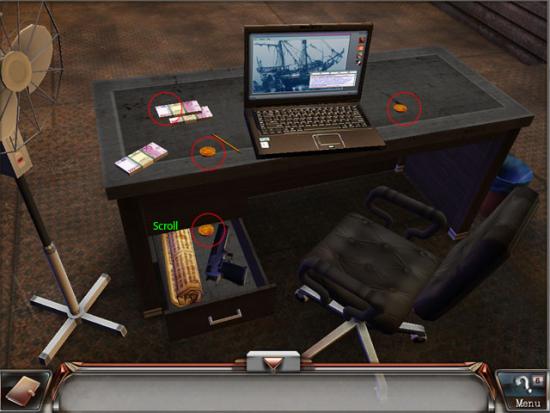
The safe puzzle answer is:
A Scroll and Coin is found inside the safe.
Going to the Right screen, there are 4 Scrolls, one on the bottom left shelf, one on the top middle left shelf and one directly below that, and one on the bottom middle right shelf. Going right again, there are two Coins by the chest and one Scroll in it. Go right once more, and there is a Scroll on the top shelf to the left and one on the middle of the right shelf. Slide the box out of the way and another chest appears with 3 Coins and a Scroll inside it. With that last item collected, a cut scene will play.
You’ve been caught, and you have to escape! Take the Planet Sign’s from the statues eye sockets. There is a crack in the wall to the right of the Professor with another Planet Sign of a different type, take it. A large rock on the floor to the left of the Professor reveals a Blue Planet Sign. Talk to the Professor a couple of times and he will point out a puzzle for you to do. Turn right one screen and pull the discolored stone from the wall to get another Blue Planet Sign. Above on the pillar is a Red Planet Sign. Under the skull on the floor a Yellow Planet Sign exists. Inside the vase another one is to be found. Go Right again, and there is a large portion of the wall you can break apart to get a Green Planet Sign.
The boulder in the corner by the column reveals a Blue Planet Sign. Up on the pillar near the light a Yellow Planet Sign is stuck to the wall. Moving right along to the Right, move the broken vase to show a Green Planet Sign. Another Sign is under the bench, and the last Green Planet Sign is up on the column. Move the broken piece of vase off the floor to find the last Sign. Now go do the puzzle. Place each sign with the symbol that is on them into the slots in the wall and the key will open up. Take it and place it on the secret exit panel on the wall. This will show a puzzle, but with this solved we can get out of here!
Here’s how you do it:
Slide each row and column up and down, left and right, to match the pattern on the right. There are many ways of solving this puzzle, but the method that is easiest is to work your way from one bottom corner to the top. Switch pieces in and out to work your way through this puzzle. Start on one end and work your way to the other, that’s the trick.
Once you get through the hall, you have to stop the spiky rollers to get across the room to the door. Slide the brick on the left to get a Symbol and take the one directly above it. If you click on the center of the wall right in front of you it will crumble revealing another one. Go Right one screen. Take the two Symbols that are in plain sight, then examine the can on the table to find another one. Click the blue wall for a puzzle. Rotate each piece so a single picture forms. The completed picture looks like this:
The bridge will lower when this is complete, meaning we can just walk over those rollers of death. There is a Symbol hidden by the table on the left on the floor. Look at the table top to find another Symbol in the container. A Symbol is hidden under the floor, click it for the tiles to break away and reveal the trap with the Symbol in it. Go Left one screen and open the box on the table for one more Symbol and then head across the bridge.
To stop the spinning blade you must recover the remaining Symbols and place them in the Idols. A piece of jewelry is on the floor, take it for a bonus. Move the brick on the left hand side of the screen to find another Symbol. Go Left a screen, take the two pieces of Jewelry and the Symbol from the floor and examine the chest by the wall, it also contains a Symbol. Move the statues head on the left to get yet another Symbol. Turn Left and take the Symbol and Jewelry from the steps, as well move the block on the stairs to get another Symbol. Look at the vase on the left for one more Symbol and Jewelry. Turn to your left again and pick up the remaining Symbols off the floor. Open the chest for a Symbol. With these in hand, place them in the Idols by the blade, and head through the door.
Get closer to the pool of water, a piece of Jewelry is right behind the waterfall. Click the door at the far end of the hall to view the bandits talking. Click on the gold scale, you’ll need weight to put the scale down, which means finding 5 stone pyramids. Turn to your Left and pick up the Axe that is on the ground. Move the block by the door and open the chest to start a puzzle. You have to move the colored pieces into their corresponding colored box.
Chances are that you are going to get stuck here, and here’s a fix. Try to get the gems to the box opposite of where they should be, then do one final rotation to place them all in their spots, like this:
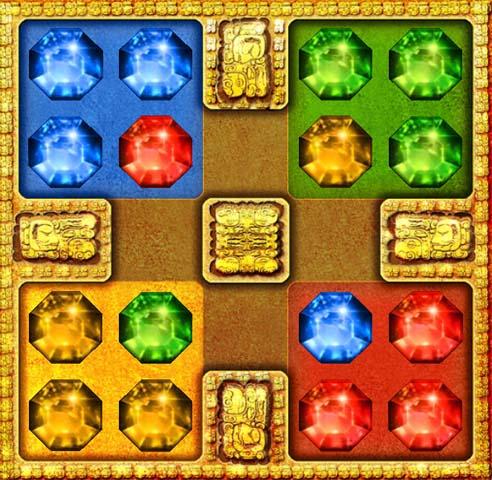
Then just rotate them all around to their proper spots. Take the Pyramid once you have it open, and then go Left one screen.
Move the block by the cliff to show another Pyramid, then take the two Jewelry from the statues eyes. A third Pyramid is lying right on the ground behind the statues head. When you have that, go back to the tree and click on the rock that is above the waterfall; it will fall over and a red piece of Jewelry will show itself, now look at the pond and examine it. Use the Axe on it to get the next Pyramid, and take the other one from the water and the last piece of Jewelry. Go back to the scale and place the Pyramids on it. Place the Pyramids so the scale balances out, like so:
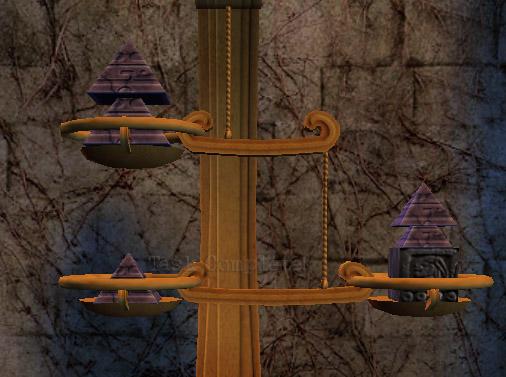
Put the two biggest on the top step, the medium on the bottom left one, and the other two on top of the block. Go to your right and open the door to the next room.
The pillars are missing their gems, and in order to solve this puzzle we have to put them back. Turn to your right and take the Green Crystal off the bench. Examine the container to the left of the bench and take the green one that is inside, and the orange one which is on the floor. Open the cupboard in the corner to find a Blue Crystal, behind the pot a Yellow Crystal.
Turn Right once more and take the Yellow Crystal from the Idols eye, and the Orange Crystal from the top of the Idol on the right. Move the vase in the middle of the floor to get the last Yellow Crystal. Go Right again and open the second cupboard in the corner. A Blue Crystal is at the top, and the last Orange Crystal is on the bottom. In the room there is a broken vase, turn it to get the last Green Crystal and click the pot near the back of the room to get the last Blue Crystal. With all of these in hand, go deposit them in the statues. Click the pillars to rotate them, and shine the beam of light into the green gem up near the ceiling. Go through the door.
You have to jump across the pillars in a specific order. The order is: Blue, Red, Red, Green
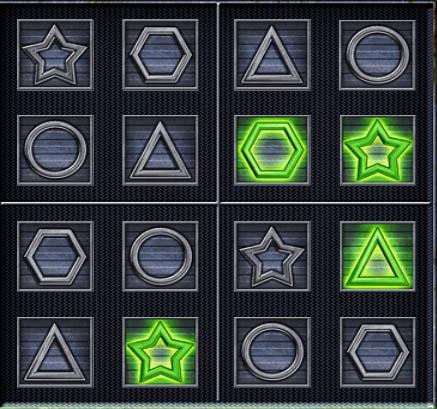
Take the Chest Key off the Idol, and take the Green Virus Key from the staff that it is holding. Click the box that the statues left arm is resting on to start a puzzle.
Each cell has to be bordered by a gem of the same shape or color. Place each of them into the slots. The result should look like this:
Pick up the Red Virus Key off the ground by the bottom of the screen, then turn to your left. Push the boulders and pick up the items off the ground. Go to the vase, take the Key, then move the mask over and get that one too. Touch the dark brown disc on the wall to get another Key, open the chest on the floor for another of the same type, then turn to your left again. Take the Blue Chest Key off the pillar by the door, move the boulders around and get more of the Keys that are on the ground, and take the Green Virus Key off the wall. When you have those items, keep turning to your left.
Take the Red Virus Key off the wall, open the left chest and take the last blue and red Keys. Examine the left Idol and move the block to the left of it to reveal a Yellow Key. Take the last Green Key off of the floor. Now, go two screens to your left or right, and deposit the Keys that match the Idol. It will descend into the floor and a Yellow Key will be revealed. Once you have that last Key, place all of the Keys into their respective Idols. A cut scene will play, and the Mayan Virus will be destroyed! Watch the last cut scene, and look forward to more adventures with Kate and the Professor!
