
Grow A Garden 2 Base Price List
What's the most valuable crop?![Evomon Best Starter [Leafbun, Blazpup, or Bubble?]](/wp-content/uploads/2026/06/evomon-best-starter.jpg "Evomon Best Starter [Leafbun, Blazpup, or Bubble?]")
Evomon Best Starter [Leafbun, Blazpup, or Bubble?]
Grass-type, Fire-type, or Water-type?![Evomon Tier List [META and BEST Evomon]](/wp-content/uploads/2026/06/evomon-tier-list.jpg "Evomon Tier List [META and BEST Evomon]")
Evomon Tier List [META and BEST Evomon]
The Evomon dream team.
![[Roblox] Evomon Shiny Hunting Guide – Including Prismatic and Pris Shinies!](/wp-content/uploads/2026/06/evomon-shiny-hunting-guide.jpg "[Roblox] Evomon Shiny Hunting Guide – Including Prismatic and Pris Shinies!")
Millennium 3: Cry Wolf Walkthrough
Welcome the Millennium 3: Cry Wolf walkthrough on Gamezebo. Millennium 3: Cry Wolf is a role-play game played on PC created by Aldorlea Games. This walkthrough includes tips and tricks, helpful hints, and a strategy guide to how to complete Millennium 3: Cry Wolf.


- Prefer Gamezebo on Google

Millennium 3: Cry Wolf – Game Introduction
Welcome the Millennium 3: Cry Wolf walkthrough on Gamezebo. Millennium 3: Cry Wolf is a role-play game played on PC created by Aldorlea Games. This walkthrough includes tips and tricks, helpful hints, and a strategy guide to how to complete Millennium 3: Cry Wolf.
General Gameplay
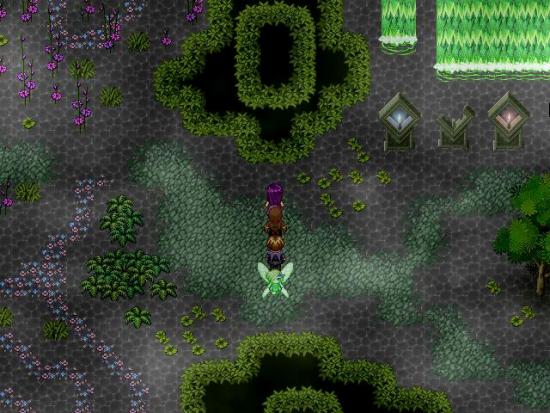
Like the previous installments, Millennium 3 is a game you shouldn’t rush. The more time you take to explore everything, the more secrets you will uncover! You can walk around using either your mouse or your keyboard, but if you’re a keyboard player you might want to take some time to scan each new map with your cursor to find objects of interest or secret rooms. For example, sometimes places where you can jump are hard to see, and with the cursor you can find jump spots more easily. In other places the cursor may change into a gloved hand to grab things or a magnifying glass to inspect things.
Not all secrets are visible this way! Often it pays to just try running into objects or blind walls – you never know what you may find! There are 32 secret rooms scattered throughout the game, which often contain some very useful goodies.
Getting Started
Although this game is part 3 of a series, you can play it as a standalone game. In the title menu, if you want to play on from MM2, select ‘import’; if you want to start a new game simply select ‘start’.
First select the difficulty mode. There are 4 difficulty levels at which you can play this game: very easy, easy, normal and hard. The difference between those levels is mainly that fights are much harder when the difficulty level increases. Additionally, only in hard mode can you find all 11 animal kings.
Next, you can select whether you want to use guide arrows or not. These arrows are very useful, especially if you’re playing this game for the first time. Throughout the game you can switch them on and off by hitting F5. Note that the arrows only appear when you change windows.
The developers of this game have really listened to their players, and in this installment of the game you can select to have visible or invisible encounters. Invisible encounters means that you never know when you are going to be attacked next, while you can see your visible enemies coming. Note that you can’t change this setting during the game.
When using invisible encounters, Marine will have a skill that allows you to set the encounter rate (hide or flight). You don’t get this with visible encounters. In addition, when you use visible encounters only a few enemies respawn when you change windows, but enough of them respawn to give you plenty of training opportunities. However, many animal kings are still invisible, and encounters on the world maps are invisible, too.
Finally, you can select to play a basic tutorial, giving you basic instructions on your menus and how to move around.
Menus
There are 3 main menu keys. They are:
- ESC – the main menu with items and equipment lists etc. You can also save here.
- S – the quests menu. The open quests are listed on the first window. Click arrow left from the quest with the highest number to get your completed quests list.
- A – the party list. Here you can change active members of your party by moving them from one side of the screen to the other.
Battle
The battle system in MM3 is pretty standard for RPGs. When you get to a battle screen, you first need to select if you want to fight, rush or escape. ‘Fight’ means that you manually select the action for each one of your characters. These actions can be:
- Attack – melee attack with whatever weapon you’re holding.
- Skill – attack with a spell specific to your character, or choose a skill to heal a party member or boost your status.
- Defend – you don’t attack but defend yourself against coming attacks. You may lose less HP this way.
- Item – select an item to heal or cure a party member, or to throw at the enemy.
Keep an eye on your characters’ status bars during fights. When their HP (green) bar gets reduced to 0, your character is knocked out and won’t be able to participate in the rest of the battle. When all your characters are knocked out, you lose and will have to go back to a previous save. For some battles you don’t have to go to a previous save, but you lose 10% of your gold.
KO’d characters can be revived with mandragore, both during and outside of battles. At a certain level Abu will also gain the “cure KO” skill that you can also use during and outside of battles. You can further heal people during and outside of battle with various potions and foods, and some characters have healing spells. You can also revive and heal everyone in your party by sleeping in an inn or your headquarters. Note that Marine can revive herself once during each battle.
Skill actions generally cost MP. When your MP (blue bar) reaches 0, you can’t cast any more spells until you’ve rested or taken MP-increasing items.
During battle, you may get afflicted with various negative statuses. Some statuses, such as fatigue, boredom and cold, affect your ability to fight. Others, such as bleed or venom, actually reduce your HP with each action. You need to cure those during your fights if you don’t want your characters to die. In addition, some of the statuses remain after the fight until you rest or otherwise cure them. The venom status will keep reducing your HP while you walk. However, you will know if you’re walking around with a poisoned character as the screen will flash red.
Character Stats
Always equip everyone with the best armor and weapons you can find. Also pay attention to the bonus qualities items have, such as protection against a particular color magic or afflictions such as fatigue and blindness. Some items may be cursed, however. These items generally are very good, but the problem is that you can’t unequip them. To get them off you need to go to one of the shrines on the world map and ask for exorcism.
Regularly swap the orbs you’ve collected at the various guilds for stats increases, and when you have some money to spare go to the guilds to buy more increases (they’re all 1000G per person per guild). Finally, get everyone in your party promoted in the shrines on the world maps. Each different promotion will give different stats increases. Don’t forget these as the extra stats will make you much stronger in battle!
Useful Skills
Marine has a few useful skills you should know about. Going into Marine’s SKILL menu from the ESC menu (when you’re not in battle) you can select the following options:
- Strategy -Here you can pick one of three battle options, which are
— COUNTER – This is a good strategy but can be tricky if you meet an opponent who also counters. In that case Marine and the opponent will keep hitting each other until one of them is dead.
— REGEN – Marine regenerates some HP each round.
— ATTACK FIRST – I personally like this one, as you can get a hit in (and often eliminate one of the opponents) before anyone else. - Hide or Flight – Change the random encounter rate. This sets the minimum number of steps to take before you encounter any opponents. You can set it to low when you’ve found a good place to do some leveling up or high when you just want to make it through a map as quickly as possible. Note that this is only available when you’ve selected invisible encounters. Visible monsters can’t be changed.
- Talk – When you’ve forgotten where you are going, select Marine’s Talk skill from the SKILL menu for a reminder.
Walkthrough: Quests 1-5
Go east and get the battle staff from the chest. If you’re playing a new game, go into your equipment menu and equip Marine with the staff.
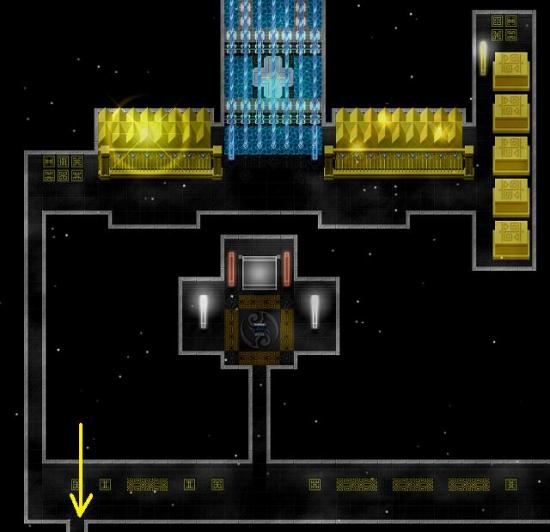
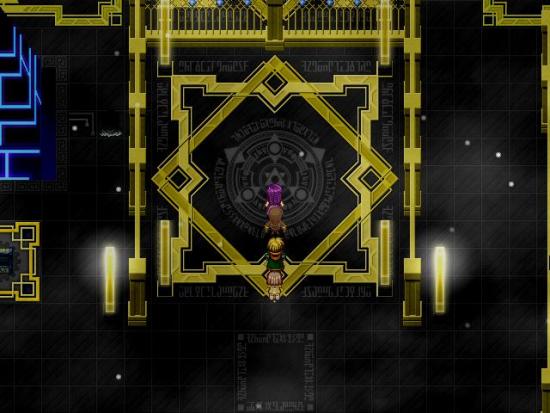
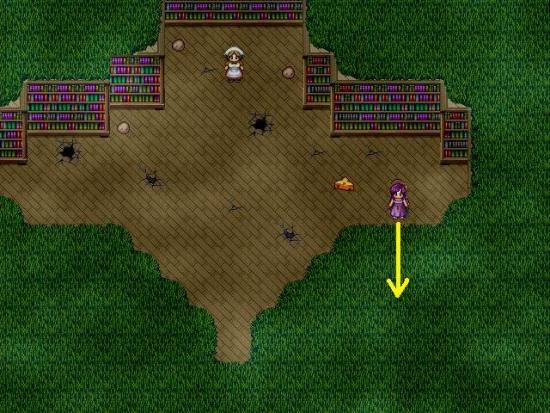
Go into the cave and talk to Merryll. Explore the cave – it’s not very large. Make sure you find both secret rooms while you’re here, as you won’t be able to go back. In particular, find secret room #1, as Marine will learn the very useful healing spell.
When you’re done in the cave, make your way northeast and talk to Kusinov. Don’t worry too much about this fight as you will most likely lose, or Kusinov will admit defeat in a few rounds.
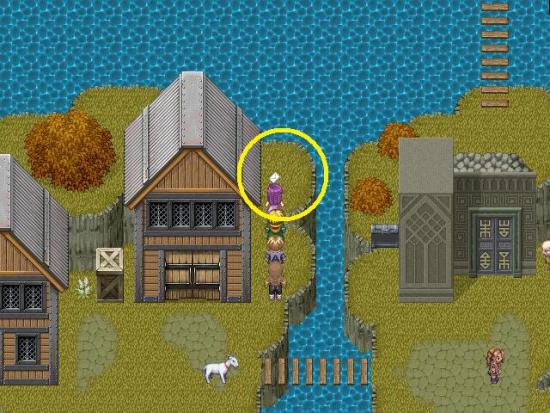
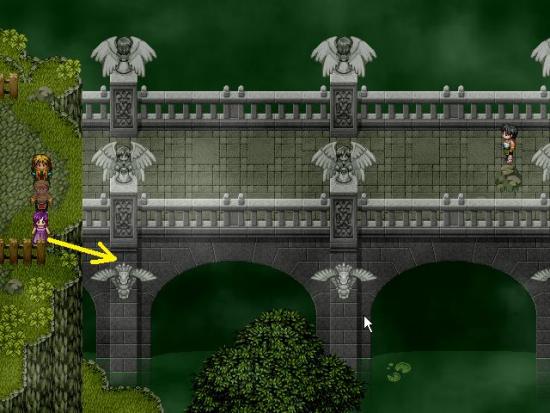
You will awake on the Mystrock Territory world map, with the party members from MM2. If you’re playing on from MM2, forget about this map and just go east across the bridge. If you’re playing a new game, spend some time wandering around this map, fighting whatever decides to attack you, to gather some feline meat, monkey meat, gold and experience. Ignore the woman in the Guild of Magic who talks about the 30 red orbs, as this is a leftover from MM2 and isn’t actually a quest in this game. You can, however, exchange your magic points at the Guild of Mind.
Note that there is another ‘one chance only’ secret room in the bridge map, before you talk to Merryll again. Talk to Merryll for another fight you can’t win. Going well so far isn’t it!
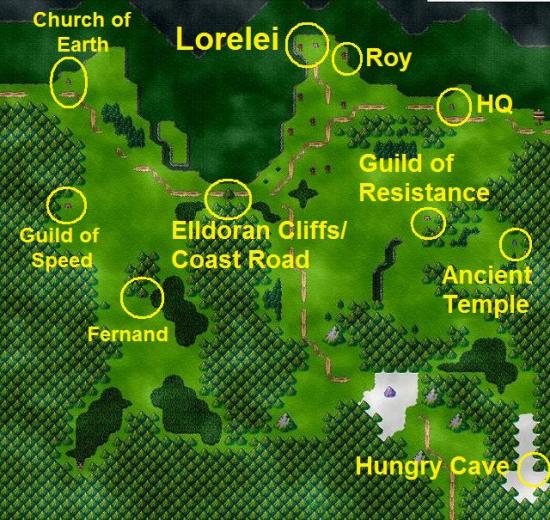
When you’re on the other side of the bridge, go on to the Eastern Territory world map. You can heal up in the inn in the Church of Earth, which is very close to where you enter the map.
Eastern Territory

Make your way to the mountain with the tunnel and go in. Talk to the man guarding the fence. You can’t take the Coast Road right now because of the orcs, but he suggests you take the Higher Path.
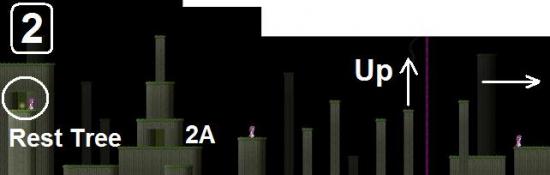
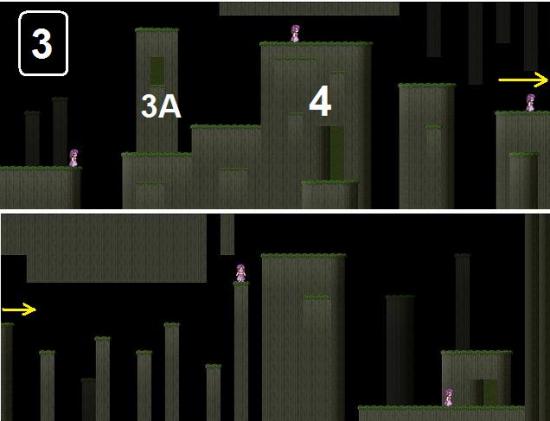
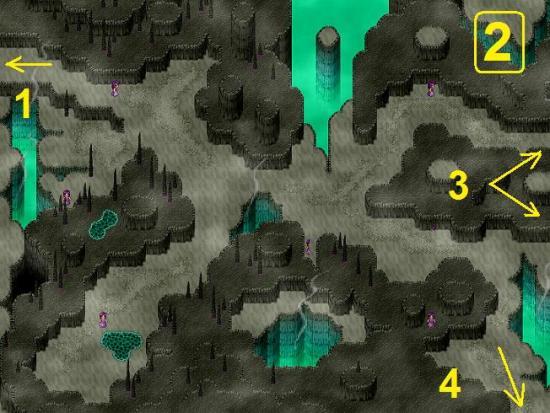
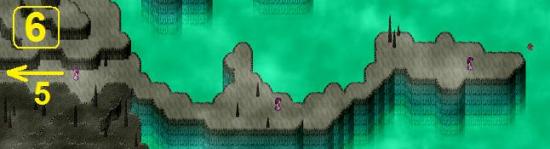
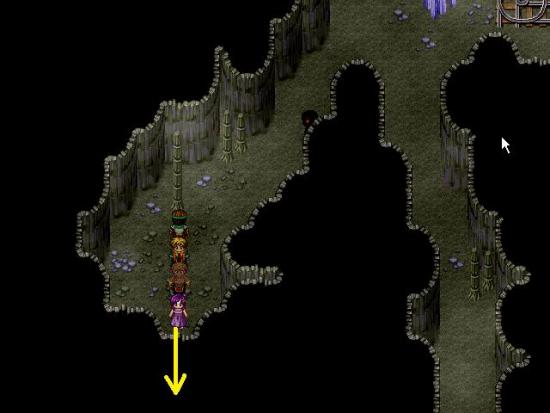
Go back out to the world map and then instantly go back into the mountain. You can now select Higher Path or Coast Road. Select the Higher Path to get to the Elldoran Cliffs. The main route through the Elldoran Cliffs is due east. Just keep going east all the time (maps 1, 2, 3, 4, 5). However, do explore the side maps on the way, as several of them have lots of orbs and other goodies.
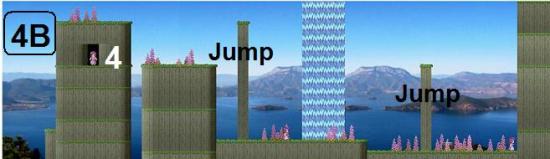
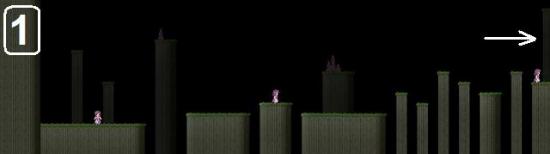
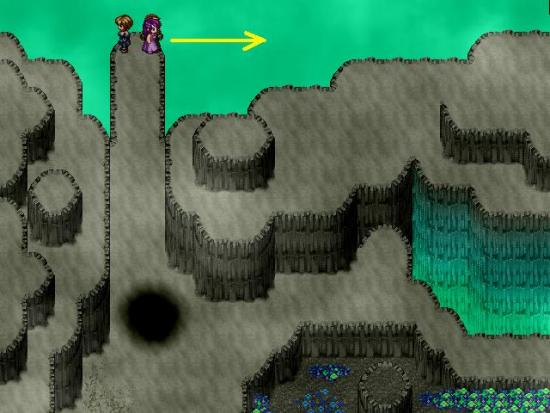
Elldoran Cliffs
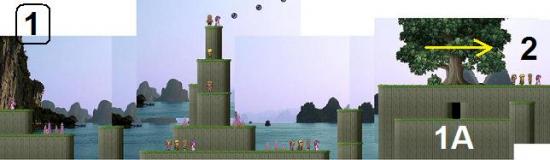
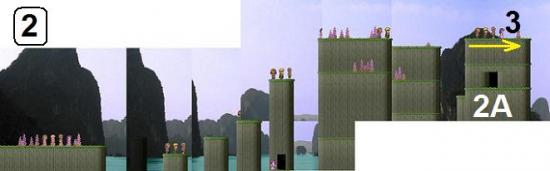
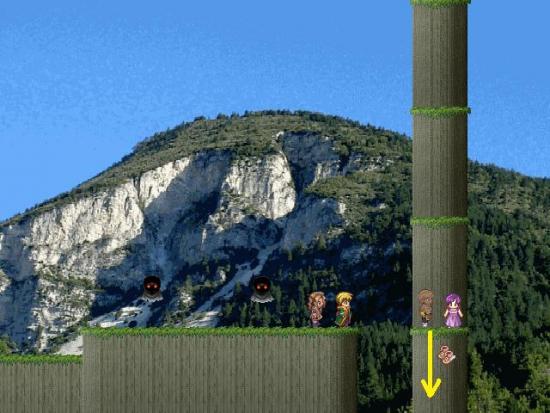
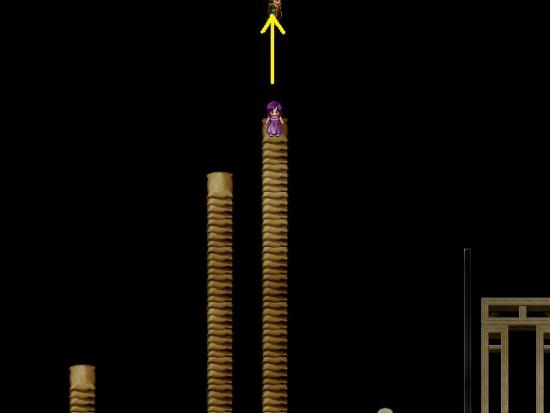
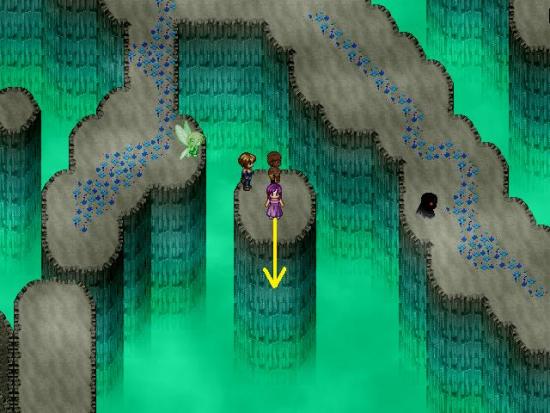
On map 4B, jump from the high platform onto the first pillar and then jump right. Go back up to the high platform and back to the first pillar, then jump again. You’ll land on the second pillar. Jump right for more orbs (not down! You won’t get the orbs if you jump down and you only get one chance at this).
1. Reach Lorelei
Easy one to start you off with. Go into the Eastern Territory and through the higher path. Lorelei is on the other side of the path, to the north.
2. Cure an unknown disease
On your way to Lorelei, in the Church of Earth in the Eastern Territory, you will find a woman whose friend is gravely ill. You need to find a cure for her. This cure can be found much later in the game. Once you’re in the throne room of the Castle of Malice (see quest #14), Merline will get ill with the pox. Although Abu can heal her, veteran Millennium players will know better than to cure the pox willy-nilly, especially if you’re looking for a cure for someone else too. So don’t cure Merline! Leave the castle and go back to the Cult of Dragon. Go to the east map and talk to Theos, by the temple. Theos only gives out his miracle cure to people who are gravely ill, and the pox qualifies as gravely ill. Once you have the cure, have Abu cure Merline, and take the cure to the Church of Earth to cure the woman.
3. Find Adam the Blacksmith
Lorelei
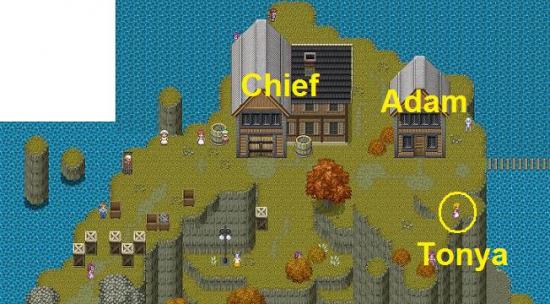
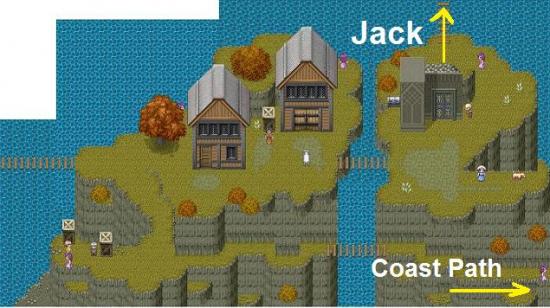
When you first arrive in Lorelei, you need to find someone who will get you further on your way. Cross the bridge to go to the east map, and on the east map exit to the north. You will meet Jack again. After he has joined you, go to the chief in the large house on the first map. Jezabel will now leave your party. Aw!
You need to find Adam the blacksmith to get some armor to destroy the orcs. Put Jack in your party (press A to change party members) and go to the house next door. Go upstairs and talk to the old woman. Quest complete!
Adam will give you a lot of armor, so check if any of it is an upgrade for your party members. If you’re playing on from MM2, Gravitron will have a bit of a meltdown and break when you leave the blacksmith’s.
4. Find Tonya’s son
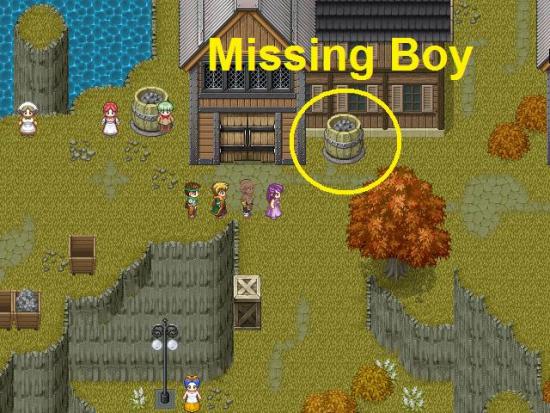
Tonya, in the southeast of the main Lorelei map, has lost her son. You need to finish this quest before you go to the Orcish Fortress, because there will not be able to leave the fortress with any dynamite and there is no more dynamite after the fortress. You’ll find some dynamite in the Hungry Caves on your way to the fortress. As soon as you have the dynamite, turn back and go back to Lorelei. Blow up the barrel of rocks next to the chief’s house to find the missing boy.
5. Find Sheela’s Husband
Sheela, a green haired woman in the Guild of Resistance in the Eastern Territory, wants you to find her husband Tibert, who has been abducted by the orcs, and return him to her. He’s in one of the prisons in the Orcish Fortress – see below.
If you’ve got your gear from MM2, you can try going east into the circle of mountains and then into the Ancient Temple now, but if you’ve started a new game, you’re likely going to get slaughtered. So, first go south and into the cave in the mountains there, to go to the Hungry Caves.
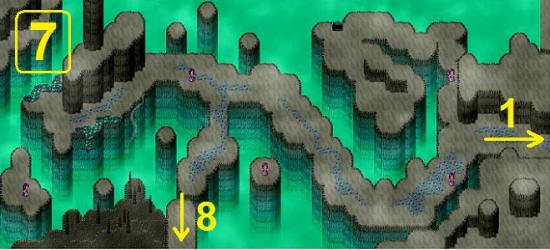
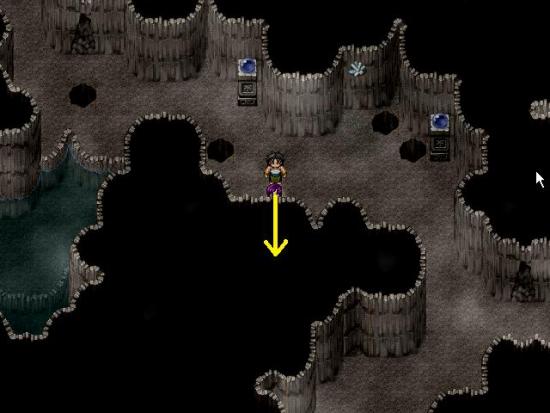
Hungry Caves
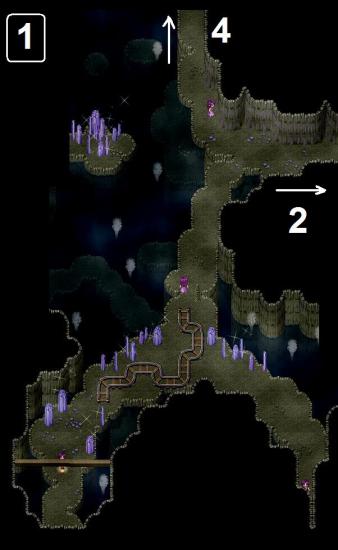
In the Hungry Caves, go east to map 2.
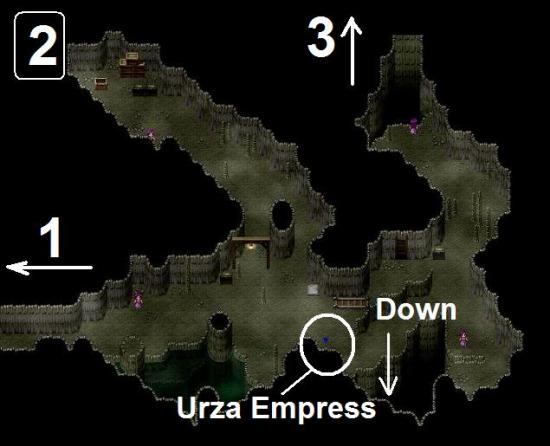
Ignore the blue arrow going south for now, as you will encounter an animal king (the Urza Empress) that’s too strong for you right now. Do go down the rope ladder to the first pillar map. Touch the pillar there to get 2 fights and a reward. If you’re starting a new game, the red urzas are quite hard to get past. You may need to wander around here a bit and do some fighting to level up to get past them. Be assured, though, that this is the hardest part of the game, fighting-wise, and that by the time you come out of the Orcish Fortress, you will be a lot stronger and battle-ready.
Tips to fight the urzas:
- Put your less effective party members at the end of your party as they will be blown away right to left. Marine can’t be blown away.
- If you’re playing on from MM2, put Gravitron at the end of your party, as they can’t blow him away.
- Use Marine’s Green Orb spell on groups of urzas as they are as effective as her normal attack, yet hit all of them at the same time. When they hit marine, use her heal spell (from secret room #1) on herself so she doesn’t die. When they try to blow her away, she won’t be hurt, so that’s a good time to get a Green Orb in.
On map 2 you can find some dynamite in crates. Once you’ve found it, go back to Lorelei to find Tonya’s son (quest #4).
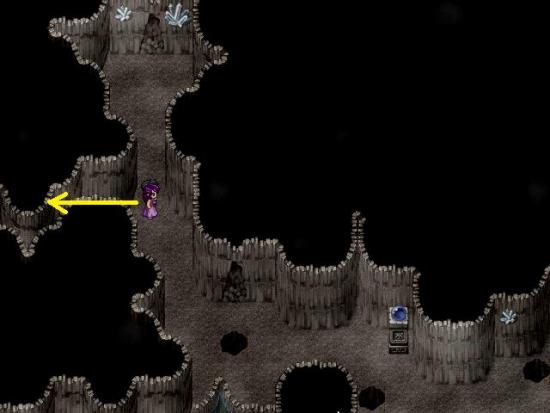
From map 2, jump across the gap in the northeast to go to map 3.
Go up the rope ladder in the northeast for another pillar room. Touch the pillar to fight the monsters inside it.
Go back to the first map of the cave and exit north to map 4.
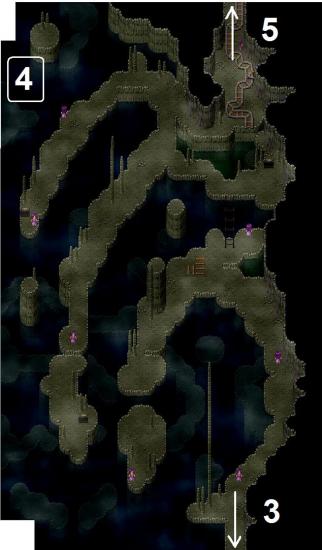
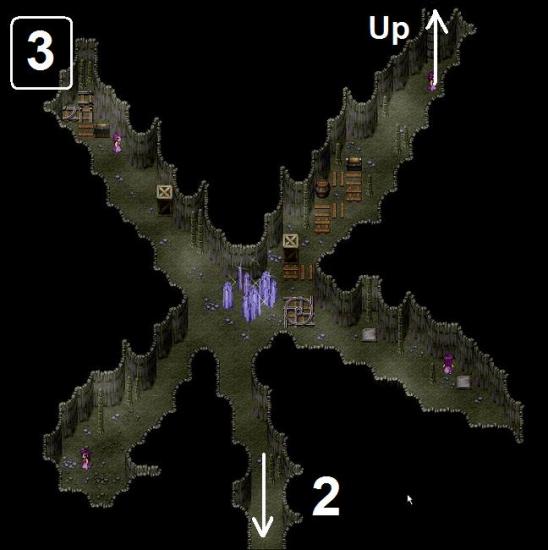
Go north again to map 5.
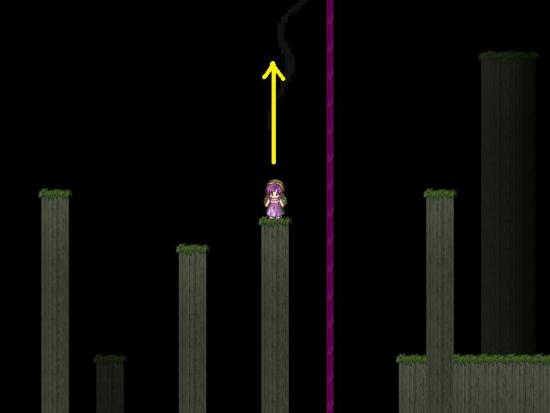
Ignore the switch at the end of the track – it does nothing. Follow the railroad track that goes to the edge of the chasm and try and jump into the chasm.
NB: Make sure you have completed the lost son quest before you do this, though, as after this it will be hard to find dynamite! Also make sure to save before you jump into the chasm, especially if you’re having a hard time with those red urzas, as you will encounter some difficult battles at the bottom of the chasm that you can’t avoid.
When you’re all set and ready, jump into the chasm and you will be taken to the entrails.
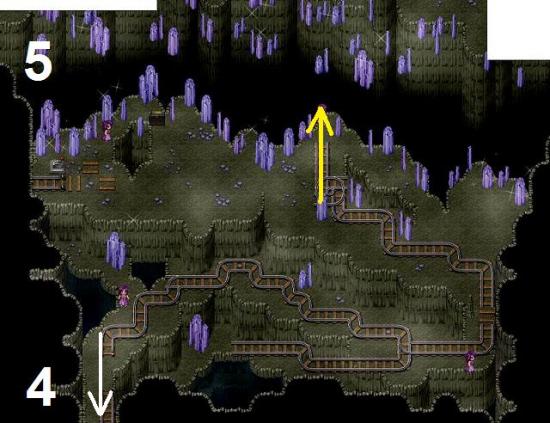
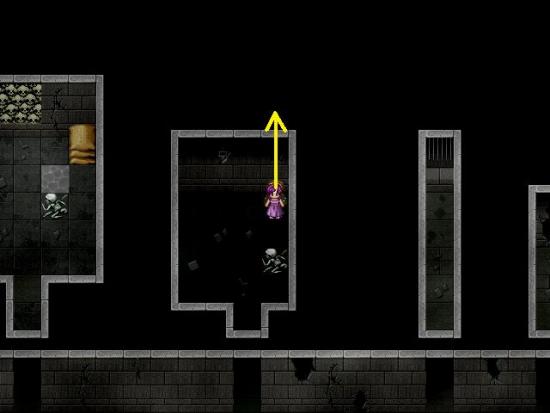
Entrails
Go east to map 2.
Behind the door on the second map of the entrails is a tree where you can rest and heal up. You probably need to, after those battles! Monsters will not regenerate in this part of the game, so it is safe to run back to the tree whenever you need to.
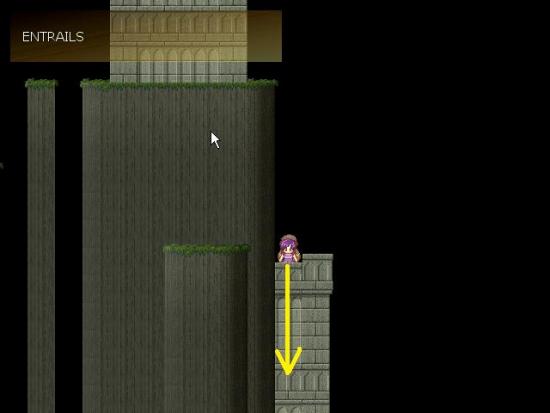
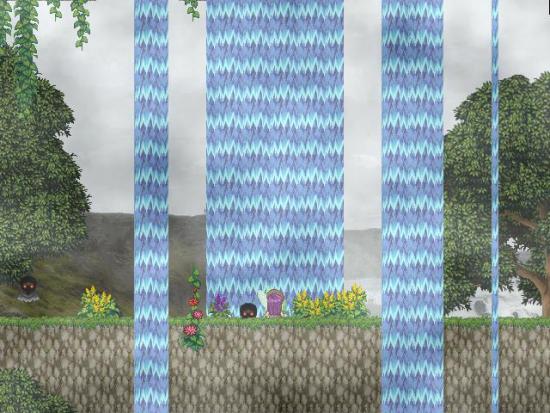
East from the door to the rest tree is a pillar next to a narrow purple waterfall. Jump upwards to get to a secret room (see Secret Rooms below) in which you’ll meet an old friend. Hirado’s back, yay! Inside the room, jump up again to get the Sipirutua for Hirado to equip.
Behind the next door is map 2A.

East of map 2 is map 3, which has several side maps.
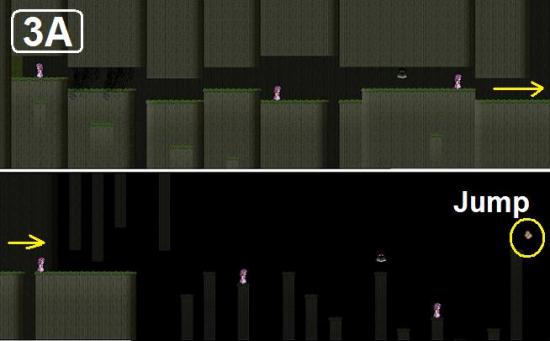
On map 3A, if you jump into a wall, try jumping to one of the lower platforms and then onwards. At the end, equip your air sandals for an interesting string of orbs. If you don’t have the air sandals yet, make sure you don’t blow up the fortress on your way out so you can come back here later.
At the end of map 3 is another little side map with not much to do there (inspect the tree to get a Voodoo Doll). The main path goes on through the door in the middle of map 3.

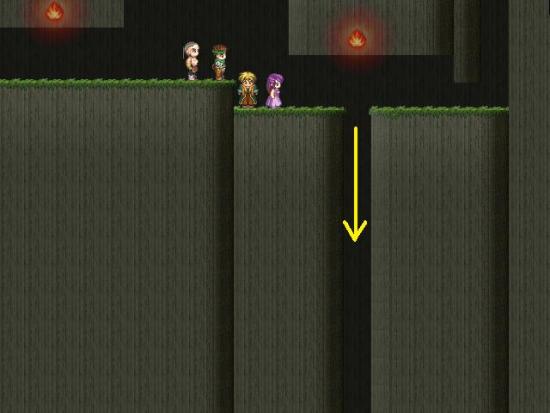
You can go through the high door in the middle of map 4 by standing behind the pillar to the right of it and jumping up. Not much to do there except find a few orbs. The way on is off to the east again.
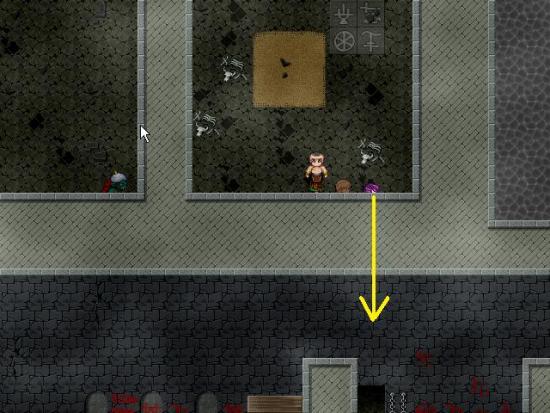
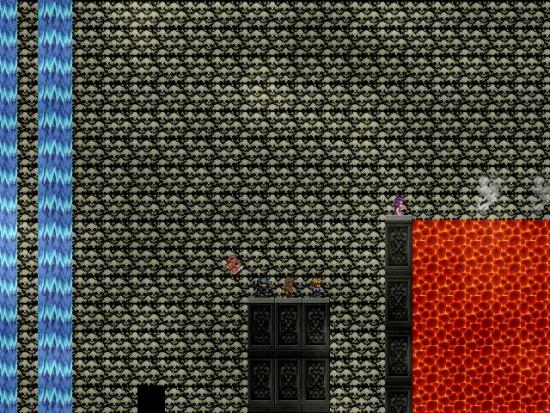
Just before the Orcish Fortress is a deep chasm that you can jump into from the east side (arrow down). It may seem you’re stuck at the bottom, but to the right is dynamite. Marine will blow you out of the chasm with the dynamite.
Quests 6-10
6. Kill the Orc Lord
Go to the entrance of the Oricish Fortress (no more urzas, yay!). Initially I couldn’t find my way in, but on the right hand side of the map you can walk down a straight slope. Make sure to pick up the dynamite in the wall to the left of the front door.
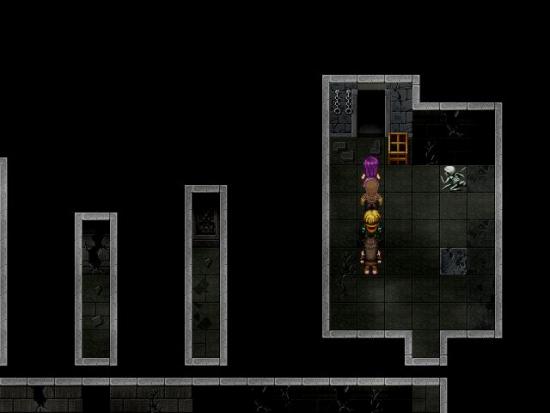
Orcish Fortress
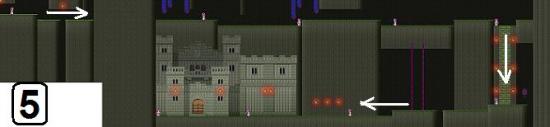
Inside the Orcish Fortress you will need to blow your way through walls with dynamite. Dynamite can be found in chests and other locations, and the red haired orc veterans may drop them at times. There are two orc veterans on either side of a door that keep regenerating, so if you need more dynamite, keep fighting them over and over.
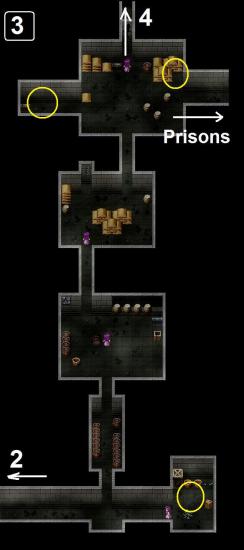
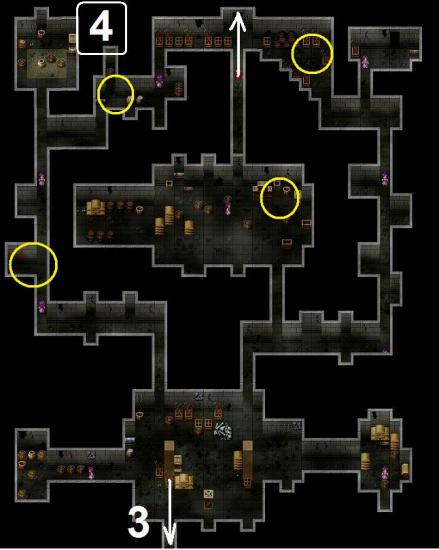
There are 16 orcs in the fortress that won’t attack you, but you get the option to kill them or to leave them alone. You need to kill them all. I’ve circled them in yellow on the maps. Don’t forget the orc in the little room off the bottom right of the main area. There is a hidden passage to him.
You can jump on top of a stack of bags in the top right corner of the main room to get to more areas to explore.
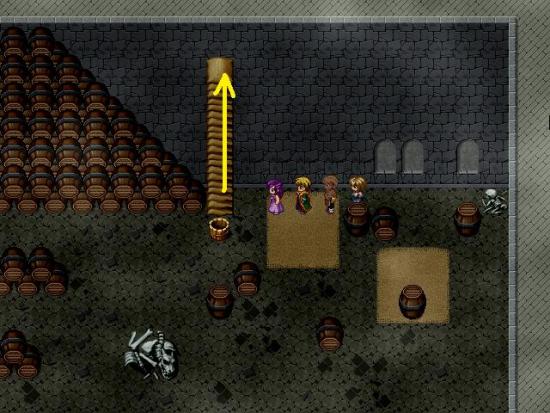
Go through the large gates in the main area to map 2.
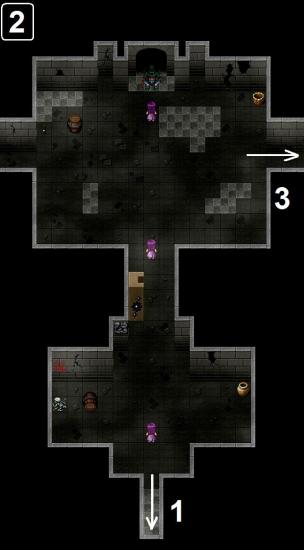
Go into the room straight in front. You will need to fight lots of orcs in this room, and when you’re done you need to defeat the Orc King. Hirado’s white orb spell was very effective. When you’ve defeated him, he will drop the Gongo Key.
Go out of the room where you fought the Orc King and go right (do clear out the room on the left as there are a couple more non-attacking orcs you have to kill there).
There is a silver chest in this area that you can open with a magical key. If you don’t have a magical key yet, make sure not to blow up the fortress before you leave, so you can come back for the chest later.
At the next junction, first go right to the prison block. You can use the Gongo Key to liberate the prisoners from their cells. Among the prisoners are James, who will reveal a secret about Jack, and Tibert, Sheela’s husband. Leave the cells and go north to map 4.
Clear out the next area (remember the locked chest for later). When you’re done in the Orcish Fortress, have defeated the Orc King, freed the prisoners and done everything else you want to do here, make your way north to the lift.
If you still have dynamite in your inventory, Marine will blow up the Fortress behind you and you won’t be able to go back. However, if you do want to go back later, go into your inventory and use up all your dynamite before getting on the lift and then leave. I recommend you do this if you haven’t found all the secret rooms yet or if you don’t yet have the magical key to open silver chests. You can go back to the fortress later, fight more orcs for dynamite and still blow the place up, if you like. The quest will still be completed. Hirado will leave the party after come up on the lift, regardless of whether or not you’ve blown up the fortress.
Bring Tibert back to his wife in the Guild of Resistance and then go back to Lorelei. You need to talk to the chief again, but he is not in his house. Go to the east map of Lorelei and find Jezabel wandering around. She will tell you the chief is on the path along the coast in the south.
Find the chief and talk to him. He’s a bit useless and freaks out when he hears about Jack’s furry little problem. Go back towards Lorelei and you will meet Salome, a new friend who will join your party. Salome has a special skill, allowing her to change between mermaid and human forms. She will only stay as a mermaid for a certain amount of time, after which she can only transform again after you’ve rested. Note that you will need to re-equip her after each transformation.
7. Stolen Toolbox
After you’ve released Tibert from the orc prison and taken him back to his wife in the Guild of Resistance, he will go back to his home in Lorelei. Go to the basement of the house next to the chief’s house and talk to him again. His toolbox has been stolen and he asks you to retrieve it. It is in the Hungry Caves, in a large crate on Hungry Caves map 3. It’s only there after you’ve activated the quest.
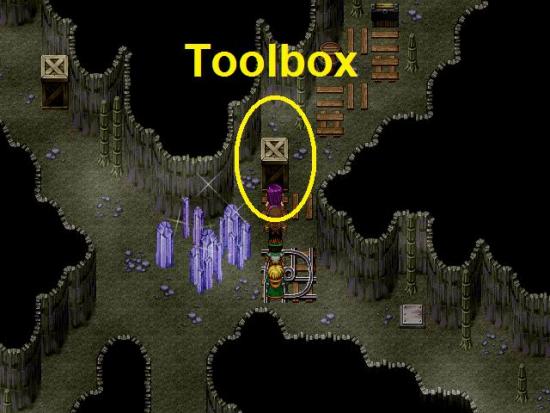
Return the toolbox to Tilbert and you will get the Explorer Medal as a reward.
8. Find the Lost Library
Ronan, in the Guild of Resistance in the Eastern Territory, wants you to find a map to the Lost Library. It will be a while before you’ll be able to complete this quest. After you come back from the Castle of Malice the first time (see quest #14), go to Mani’s Shack in the Forbidden Zone and talk to the witch who will have appeared there. She is Imogen’s lost sister (see quest #12). Take her back to Imogen, then leave the swamp and go straight back into the swamp and back to Imogen’s house. Talk to Imogen again and she will give you the map to the Lost Library. Make sure to use the map to the library before you give it back to Ronan.
9. Broken Key
Roy, who lives in the second tree to the right of Lorelei, has broken his key and now can’t get into his house anymore. He asks you to fix it for him. Karine can fix it, once she’s reached level 40.
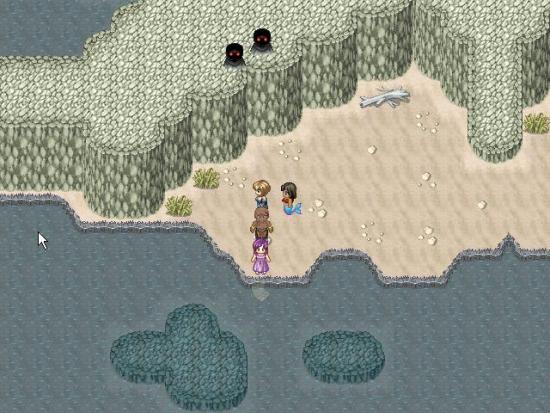
Back to the main story. Now you’ve got Salome in your party, go back to the cave in the mountain and take the Coast Road. On the beach of the first map you can just see a piece of paper in the water. Make sure Salome is in her mermaid form (though she doesn’t have to be in your active party) and she will be able to read the letter. It will take you to a secret room. There is a seriously good weapon for Salome in this room that will allow her to stay in her mermaid form permanently. There isn’t much else on the Coast Road, but you can fight some sharks and get some useful shark meats.
You probably could do the Ancient Temple now if you like, but it is still quite hard and you will have to come back there later anyway. So I’d leave it for later. It’s time to go east, to the Forbidden Zone.
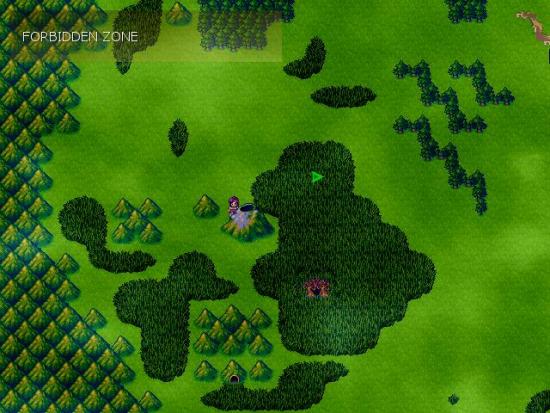
Forbidden Zone
When you’re there, you’re told you have to find a witch in a coven in the swamp, to get a cure for both Jack and Salome.
On the Forbidden Zone world map you will find the Guild of Strength and Mani’s shack. Mani sells some useful items, among which the air sandals for long jumps and the magical key for opening silver chests. Get these here if you don’t have them from MM2 game already.
Note: I recommend saving up each time you enter the Forbidden Zone as you may be attacked by the Orc Avenger (quest #31) as a random event and he is VERY hard to beat. I didn’t manage to defeat him until everyone was more than level 50 and I had Gravitron equipped with the Maddening Axe in my party.
10. Kill the Rogue
Before you do anything else, make your way all the way south, to the water, as you will meet your old friend Karine there, who will join your party. Karine has a craft skill, which allows her to fix broken items. Select it from her skills menu to fix all your broken equipment. It may be that she will need to level up a bit first.
Swamp of Witches
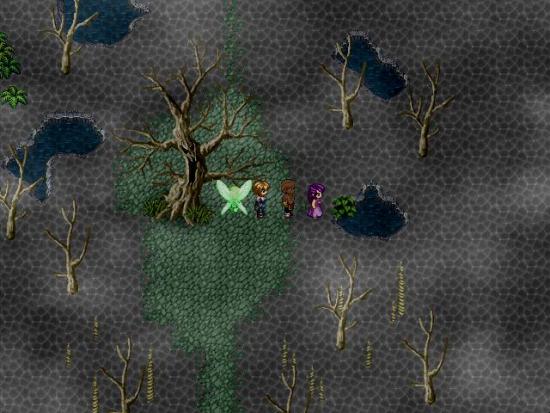
Enter the swamp. Inside the swamp, Dee will be able to absorb points from the little green crystals along the way if she is in your active party.
Go and explore the portal on the left if you like, but there is nothing there to advance your quest right now. This area will be described under quest #23.
Go through the middle portal.
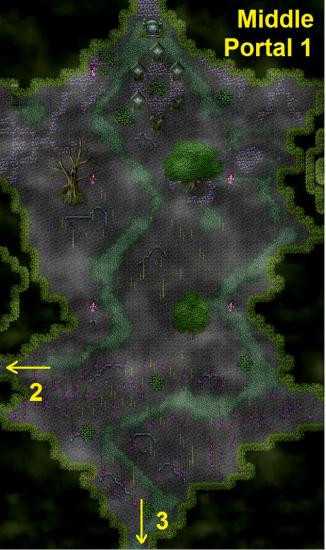
Follow the west path down and exit.
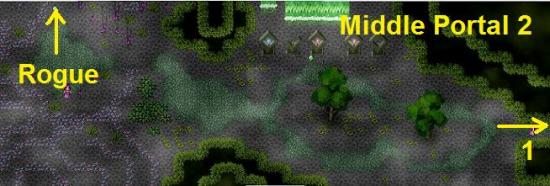
Go to the west end of the map and jump to the little island with the orbs on it. Save up, as you will be attacked by the Rogue when you pick up the green crystal for Dee. I just managed with Marine at level 45.
Quests 11-15
11. Deliver Item
This is an oddly numbered quest, as it will be triggered much later in the game, when you’re on your way to the Castle of Malice. Markus, the guy guarding the temple in the Cult of the Dragon wants you to give something to his friend in the Guild of Strength, which is on the Forbidden Zone world map. Make sure you return to Markus when you’re done to get your reward.
12. Find Mazurine
After killing the rogue, go back to where you came through the portal and now take the east path down. Go to the next map and interact with the flower in the center.
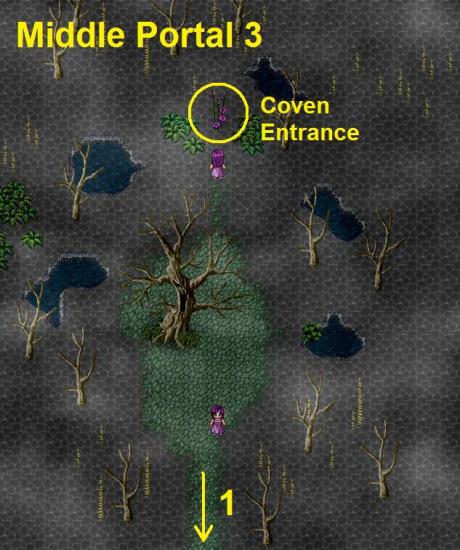
After a fight, you’ll be taken to a flower bridge to one of the witch covens. Talk to Grezaline. She says the witch you’re looking for must be Mazurine. Mazurine has left the swamp, but her assistant is still there. Grezaline will repair the portal to her coven.
Go back to the swamp entrance and then go through the portal that was just repaired, on the right.
Go south, it doesn’t matter which path you take. On the east side you will find a witch selling some very useful stuff. Remember this for when you run out of mandragore etc. Find the jump spots in the south and go to the flower in the center.
On the next flower bridge, Gravitron, if he’s with you, will have another breakdown. There is also a locked house – remember this. Go to the next map.
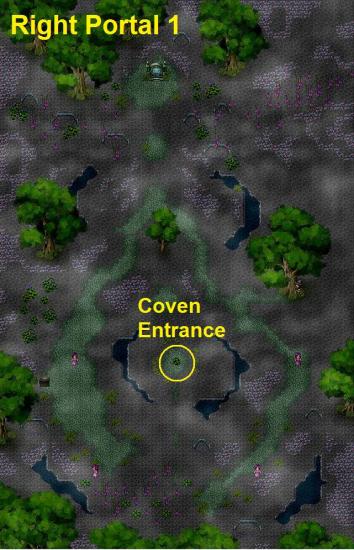
In the east is another witch selling more stuff, but the path goes on to the west and then south. There is a coven entrance near the chest, but we’ll ignore it for now as you need to find a way past an obstacle in there first. First go to the coven entrance in the center.
Have a good look around the next flower bridge as there will be a key hidden up in a tree. If you have your guide arrows on, you will be directed to it.
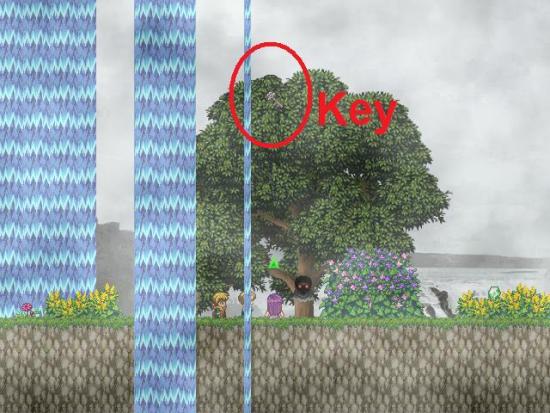
Jump to get the key. If you interact with one of the ghosts near the other tree, they will tell you you can’t go any further. Go back to the locked house, which you can now enter with the key. Talk to Imogene, who has lost her sister Brunhilde. Talk to her again and she will get rid of the ghosts blocking the way for you.
Go back out and east and now go to the coven entrance by the chest. Cross the flower bridge to the next coven.
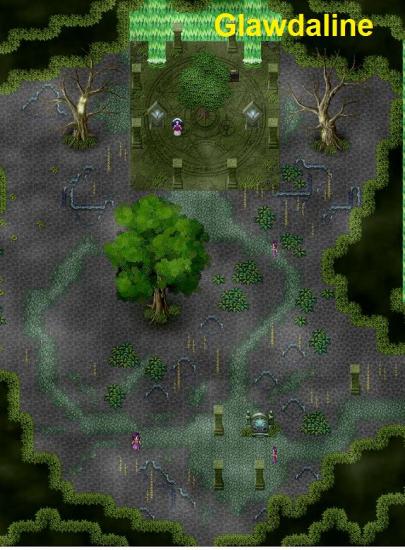
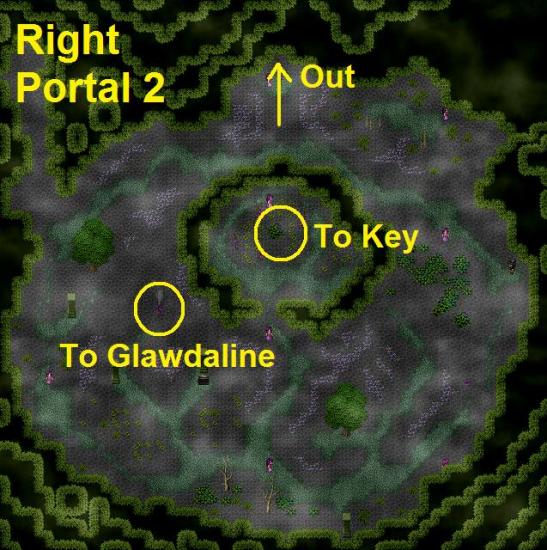
Go up the middle path and talk to Glawdaline. She tells you Mazurine has fled to the Desert of Souls, and she gives you the map to the entrance.
Now go back to the world map and go east. The entrance to the Desert of Souls will have appeared on your world map.
The Desert of Souls is a bit of a maze, so I recommend you switch on your guide arrows to get through. I will not describe the eastern areas of the Desert of Souls, as there is nothing there to advance your main quest right now. Instead I’ll just post the maps.
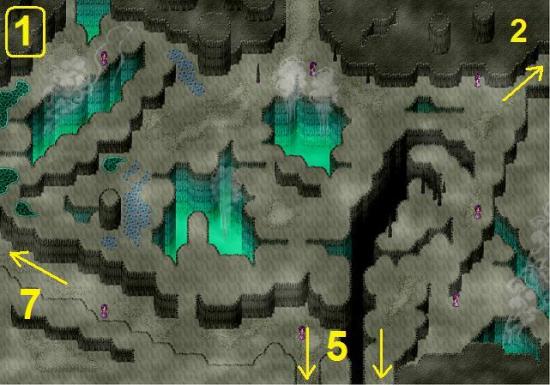
The way to Mazurine is from map 1 to map 7.
Then south to map 8 where you’ll find a black hole portal.
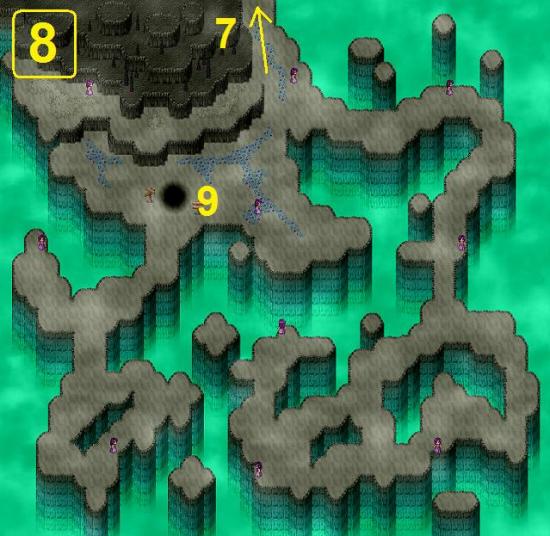
Go through it to get to map 9. Salome’s Blue Orb works really well on the zombies.
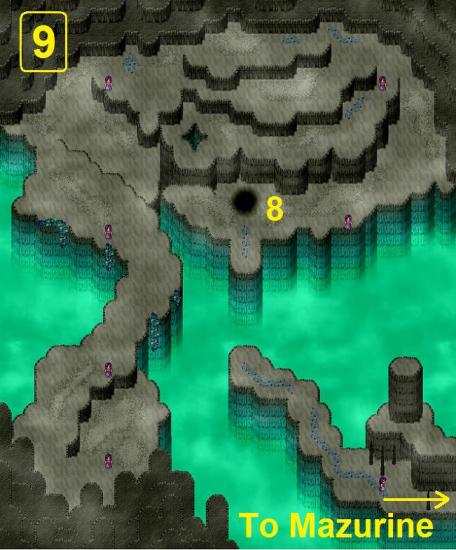
Exit in the southeast and keep going east as far as you can until you get to a second black hole. Mazurine’s desert coven is on the other side of the second black hole portal.
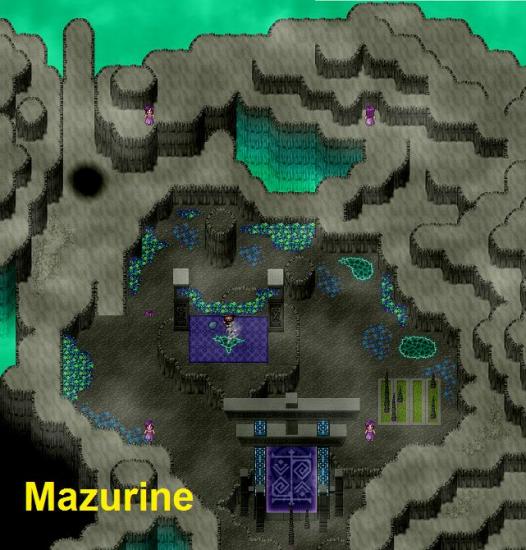
Save up, because you’re about to enter a boss fight, and then go and talk to Mazurine (the ramp to her platform is at the front, slightly hidden behind the stone structure). After you’ve defeated her guards, Mazurine tells you she’s not really a witch, and that the Dragon Lord will be able to cure your party. She will give you the Glorious Seal of Mazurine so the Cult of the Dragon will let you pass.
13. Perfect Recipe
Talk to Mazurine again to get a side quest. She wants you to find perfect honey, stinky bubbles and raw bromium. You get the perfect honey from killing the Queen Bear. A witch in the swamp sells the stinky bubbles. You can get the raw bromium on map 6 of the desert of souls. Equip the air sandals. If you’re playing in hard mode, save up before you give the items to Mazurine, as you may have to fight the Animal King of quest #40.
14. Destroy the Gate
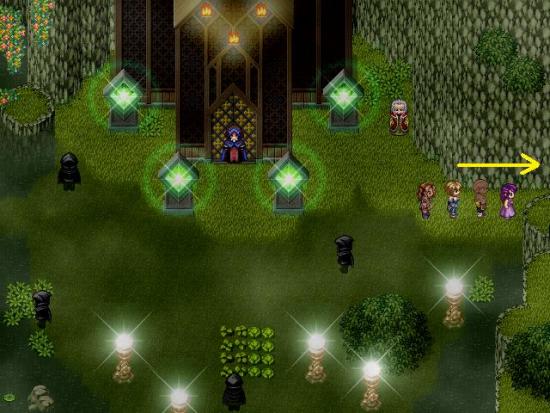
Go back to the Forbidden Zone world map and go northeast to the Cult of the Dragon. Show your seal to the guy blocking the way and go through. Quickly go into the east map of the cult to trigger quest #11. Outside the cult you will be caught up by Jezabel, who will come with you again, yippee! Work your way through some challenging, though not impossible ambushes and enter the Castle of Malice.
Marine’s Green Orb works really well on the Demon Vipers (blue snakes) in the castle.
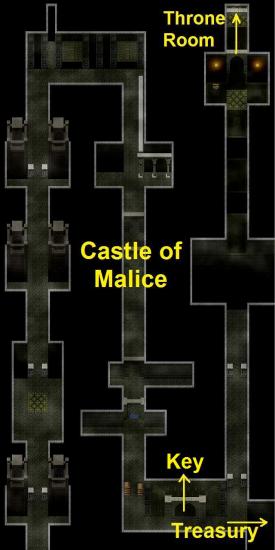
Follow the path around until you come to a big chasm. Equip the air sandals and jump over it. You get to a dead end, for which you need to find Norman, the scientist. Exit the castle, go back to the Eastern Territory and now go into the Ancient Temple.
Ancient Temple
You’ll meet Norman at the entrance of the temple, but he quickly gets out of your way. Walk into the first room. You can heal up here by either of the blue pillars, in exchange for gold or experience points.
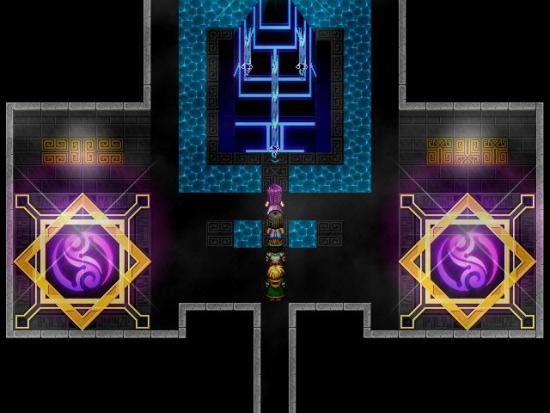
Your way on is blocked by a green barrier. To open the barrier, hit the colored poles in the same order as the colors in the symbol on the floor, which is: red, green, red, yellow, green. If you make a mistake, you can reset the sequence by leaving the room.
On the next map, follow the path all the way around and go west at the end.
Clear out this area and then exit south.
In the big room at the end and exit east.
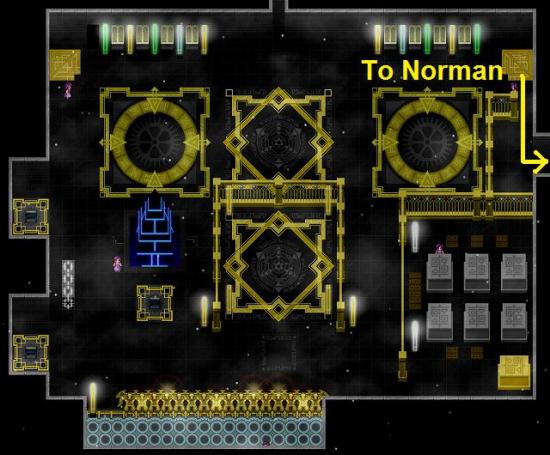
Talk to Norman and he will fix Gravitron.
In the northwest of the end room is a smaller side room with another color puzzle. One symbol on the floor is lit and there is a row of 6 colored pillars. The symbol on the floor is pale blue, so first hit the pale blue pillar. The yellow symbol will come on, so hit the yellow pillar. Then the purple, then the red. If you walk into the center of the room after all the symbols have been lit, you will get animal king #33.
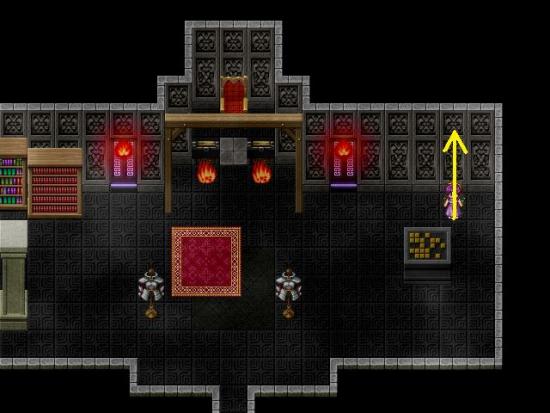
When you’re done in the temple, go back to the Castle of Malice, to the electronic gate. Have Gravitron in your party and he will blast open the door.
15. Stop the Transformations
Go into the throne room and inspect the throne. It needs an item to be placed on it. Leave the throne room. Merline will say she feels ill. She’s come down with pox! Although Abu and Salome can both cure her, don’t cure her just yet. Go back to the east map of the Cult of the Dragon and get a special cure from Theos. Give the cure to the ill woman in the Church of Earth to complete quest 2.
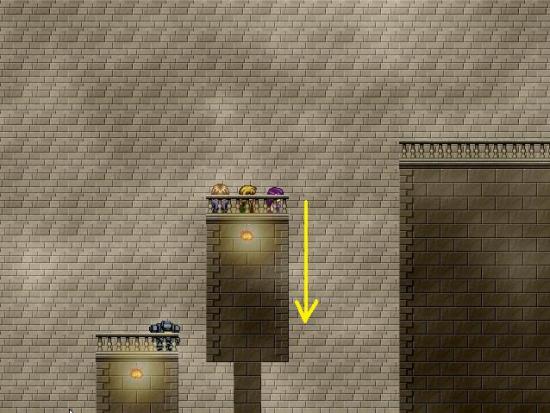
Go back to the main area of the Castle of Malice until you come to a giant gate. Enter it. Make sure you have your air sandals equipped. Go into the door on the big platform and start jumping to the right. There will be explosions around you, but if you keep moving you won’t die. Just keep going!
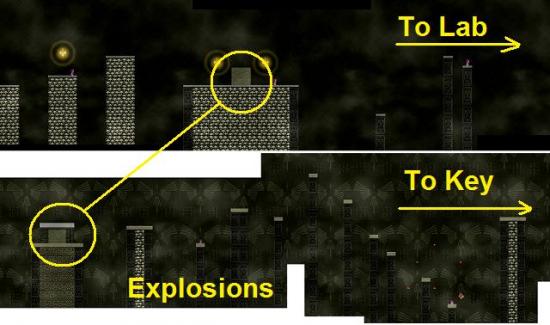
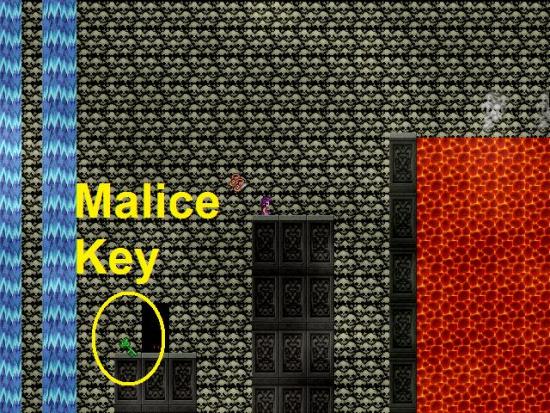
At the end of a giant jump, near a lava pit, jump down to a black door. Beside it is the Malice Key. Hard mode players, beware of the animal kings behind the door (#38) and by the lava (#39)!
Go back out to the main hallway of the castle and walk due east. You can jump across a big gap here to get to the treasure room. Once again, make sure to have Gravitron in your party. Have him blast open the doors blocking your way. You will find the Cup of Heroes in a silver chest, which you can open with the Malice Key.
Once you go back to the throne room and put the cup on the throne, you’ll be in for a long sequence that you can’t get out of until you’ve played it through. Afterward, you won’t be able to go back to the castle, though you will be able to continue playing until you’ve done everything you’ve wanted to do. So before you put the cup on the throne, make sure you’ve found everything in the castle, including the secret rooms.
After putting the cup on the throne, turn around and walk through the sparkles.
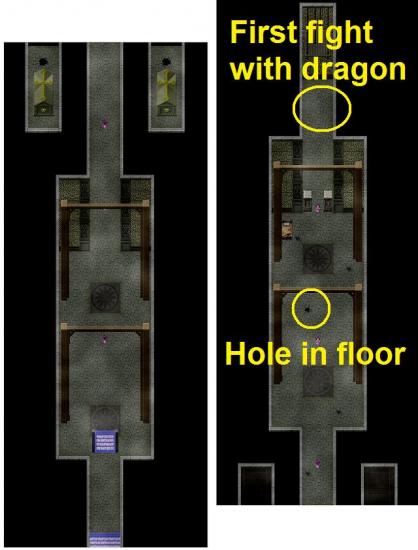
Make your way to the end of the hallway and face the dragon. Just make sure you’re not wiped out entirely, because after about 10 rounds the dragon will get bored of fighting and let you go.
Heal up and turn around. There is now a hole in the center of the room. Walk into it.
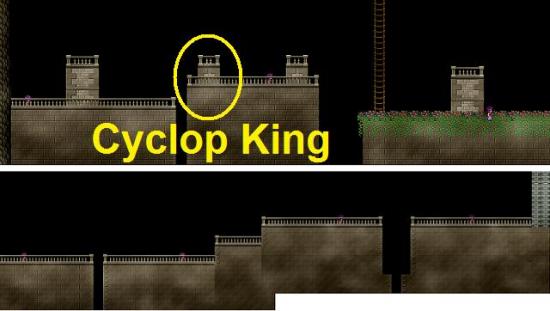
In the next area you will encounter the Cyclop King (quest #32). You can’t avoid him. He is very strong, but with a well equipped Gravitron (use the Maddening Axe from the Dwarf King) in your party you should be able to defeat him in a few rounds.
The exit of this area is quite hard to find, but just walk to the far end on the right and scan around with your mouse for an exit symbol and then click on it. Then jump across the platforms. You will meet the dragon again. Just let him kill you as you can’t defeat him. He will throw you in his Pit of Malice.
In the pit, talk to Benoit to get a scene. At the end of the scene, talk to Jezabel. You’ll have to fight the dragon a third time, with Jack, Salome and Gravitron. You get a moment to change their equipment, should you need to. They’re a mighty gang of fighters!
After the fight, escape to the right, battling your way through to the right. Aaaaaaaaaand you’ll have to face the dragon a fourth time! This time you actually have to defeat him. Have Marine focus her energy on healing everyone while the rest keep hitting hard. Use Marine’s Red and White Orbs, too. At the end of the fight, there’ll be a very pleasant surprise for you!
Somehow Marine manages to cut her hair sometime between defeating the dragon and exiting the castle, making her look incredibly young! When you come out of the castle, you can reorganize your party in your party menu under A, as always.
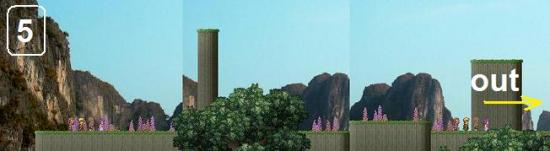
This is the official end of the story, but you can still go and finish up all the quests you still need to do. When you’re entirely done and ready to save for the next installment of Millennium, go back to Mystrock Territory and exit south to end the game.
Ancient Library Book Quests 16-29
Once you’ve found the map to the hidden library, select it from your inventory to be taken to the library. Inside the library are several sparkling books with quests inside. Some quests need to be completed in a specific order in order to complete all of them. Once you’ve completed a book, once again interact with the bookshelf where the entry used to be, to get a copy of the book you just completed.
16. Grimoire Chronicles
Talk to the witch. Then go back to the swamp, right portal. Go south and past the house of the two witches. On the next map, go to the flower bridge in the center of the map. The next coven may look deserted, but there is actually a witch behind the tree.
She doesn’t have Grimoire XI, but Grimoire XII. Go back to the house in the tree next to Lorelei and talk to Roy (the guy in the broken key quest). He will change the book to Grimoire XI. Give it to the witch in the library and you will receive dynamite.
17. Bitter Truth
The woman in Bitter Truth doesn’t want to be bored on her own. Use your Philosophical pages that you found in the secret room in your headquarters (secret room 07) until Marine is bored. Save before you do this, as Marine is quite resistant to boredom and you will need to try many times before it works. It usually helps to unequip all Marine’s gear before you try and inflict boredom on her. If you don’t have any philosophical pages left, the blue lions in the Eastern Territory sometimes inflict boredom too.
Talk to the woman again, and she may say “at least you still have goals”. This means you still have unfinished quests. You can only complete this quest if you’ve completed all other ones.
18. Dawn’s Light
Equip Gravitron with the photo bulb from the Ancient Temple and select his cam shot skill when you’re up on the ledge beside the woman.
19. Treasure of Memories
Once you have completed all other quests, go to the Treasure of Memories book and open the chest.
20. Deadly Sin
The first time through Deadly Sin (provided you haven’t done Gates of Night yet), simply pick up all the gold, talk to the ghost, who will tell you you’re a sinner, and exit. Then go to Eternal Eden. Later on, in Gates of Night you will be able to go back to Deadly Sin.
Second time, make it to the end of the dungeon without touching any of the gold. Talk to the ghost to complete the quest. Exit at the start of the dungeon – note that you can pick up the gold on your way out!
21. Eternal Eden
Only sinners are allowed to leave Eden, so first do the Deadly Sin book and commit the sin of greed by collecting the gold. Then return to Eternal Eden to complete the quest. There is a secret way back into Deadly Sin (in Gates of Night) to complete that quest after this.
22. Last Heroes
Put Jack, James and Salome in your party, in that order, and talk to the woman by the window.
23. The Lost Orb
Click on the colored squares on the wall and 3 orbs appear. Push the orbs to the stars of the same color. You will then hear a voice saying “the lost orb will appear in one of the witches’ covens”.
Go back to the swamp and enter the left portal.
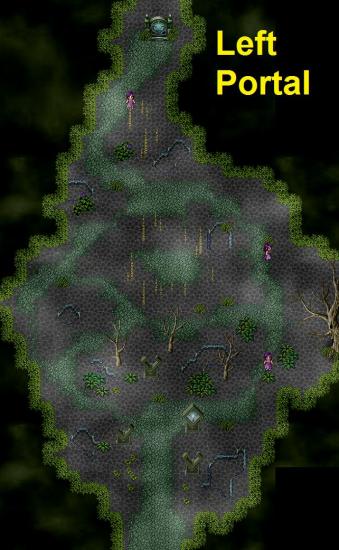
Go to the south map and into the coven entrance there. Cross the flower bridge; the orb is in the coven on the other side. Once you pick it up, you will be teleported back to the library.
24. Curse of the Immortals
Don’t go into this book before you’ve completed Lord of Twilight, as you won’t be able to get out of the cell (at least not that I’ve found) and you’ll have to go to a saved game and start again from there. Give the old man the Jar of Immortality the vampire in Lord of Twilight gave you.
25. Three Stars of Destiny
Push the fairies onto the colored rugs: first the purple, then the green, then the red one. Then go to the organ in the center and play the left hand side for some extra stats.
26. Gates of Night
Note: Don’t do this quest before you’ve completed the Deadly Sin and Eternal Eden ones. Inside the gate you will encounter all the animal kings you’ve already defeated, with no chance to save or change party members in between. So, the earlier in the game you complete this, the easier this quest.
When you’re done, walk around the gate and click on the far left corner of the north wall. This will take you back to Deadly Sin where you can now complete that quest.
27. Lord of Twilight
First do Dawn’s Light. Make sure to pick up the Dawn’s Light book off the shelf once you’re done with it. Speak to the vampire and then open the Dawn’s Light book in your inventory. Don’t forget to speak to the vampire again straight after, so he will give you the Jar of Immortality.
28. Take Me Higher
You need to have dynamite for this, which you will receive as a reward for the Grimoire Chronicles quest. Equip Marine with the air sandals to make the first big jump. Then on top of that jump, select the dynamite from your inventory so your party is blasted to the top of the next pillar.
29. Heroes Never Die
Go into the first alley to start a series of fights. There are 4 fights, and after each of them you will have to select new party members. Each member can only be used for one fight.
Animal Kings 30-40
30. Queen Bear
The Queen Bear is in Elldoran Cliffs, map 2, close to the place where you first meet Jack and James. She hit hard but only has about 1500 hp herself. Your reward is Perfect Honey.

31. Orc Avenger
The Orc Avenger may attack you at any time while you’re wandering through the Forbidden Zone, so make sure you’re always healthy and recently saved when you have to go there. This is a very hard fight, even with Gravitron and his Maddening Axe.
32. Cyclop King
You will meet the Cyclop King in the Castle of Malice, after you’ve first fought the dragon. You can’t avoid him. He has tens of thousands of HP, but Gravitron can knock several thousand HP off him with each hit. Make sure you also use Marine’s Red Orb, and Salome’s Blue Orb was also quite effective.
33. Perfect Tron
The Perfect Tron is in the Ancient Temple. Go to the grand room at the end and exit to the small room to the northwest of it. One symbol on the floor is lit and there is a row of 6 colored pillars. The symbol on the floor is pale blue, so hit the pale blue pillar. The yellow symbol will come on, so hit the yellow pillar. Then the purple, then the red.
Walk into the center of the room for your boss fight. I had no trouble with him when I came back from the Castle of Malice first time to have Gravitron repaired. Put the fixed Gravitron in your party. If you don’t have a good weapon for Gravitron yet, use his laser spell.
34. Queen Raflesia
Queen Raflesia is hiding in the cave just south of the entrance to the swamp. She is no match for Gravitron once you have him repaired. Note that you have to fight her twice in a row.
35. Urza Empress
The Urza Empress is inside the Hungry Cave. She will ambush you when you’re poking around behind the blue arrow. I found her no match for me by the time I had Gravitron repaired.
36. Lord of the Assassins
At some point during the game, I don’t know exactly when, an envelope will appear next to one of the houses on the second map of Lorelei. I found it after first talking to Mazurine.
Read the note and go in the direction of the Castle of Malice. In the snowy area close to the castle you will find the Lord of the Assassins.

This is a tough fight, even at level 55 and with Gravitron. Keep trying, though, as he doesn’t have very many HP.
When you’ve defeated him, heal up and save, and go back to your headquarters. Go towards the bedroom. Marine will have to fight him again on her own. Make sure to equip Marine with items that increase her eva points. You will surprise him so you have an extra move. Cast a White Orb on Marine and then try to poison him with a box of bugs, because then he will lose HP with each swing he takes. Once he was poisoned, I mainly focused on healing Marine with potions. It’s a tough one, but it can be done, good luck!
37. King Dwarf
The King Dwarf is inside secret room #20 behind the middle portal of the swamp. He’s a little man with a very big axe! You will get his axe (Maddening Axe) as a reward. Tip: wait until you have Gravitron in your party and use his laser spell.
38. Sir Honey (Hard Mode Only)
Sir honey is behind the door in the Castle of Malice where you found the Malice Key. He hits hard but only has about 2000HP. You will be rewarded with more perfect honey and a nice sword.
39. Trinite (Hard Mode Only)
Trinite is behind the giant doors in the Castle of Malice, after the series of exploding jumps, near the big lava pit. Another animal king who is no match for Gravitron.
40. Soul Incarmal (Hard Mode Only)
When you return the items for Mazurine’s perfect recipe, she will get angry and set her Soul Incarmal on you. He’s a tough one, but if you do this when Gravitron is repaired and in your party, you should manage.
Secret Rooms
1 – In cave with Merryll. If you miss this one, you can’t go back.
2 – In cave with Merryll. If you miss this one, you can’t go back.
3 – By the bridge before you talk to Merryll again. If you miss this one, you can’t go back.
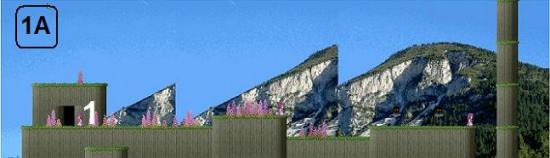
4 – Elldoran Cliffs, map 1A.
5 – Elldoran Cliffs, map 3. Equip air sandals for part 2.
6 – Elldoran Cliffs, map 4B.

7 – Headquarters.
8 – Ancient Temple.
9 – Ancient Temple.

10 – Mermaid Shrine in Lorelei. Have Salome in her mermaid form to get goodies.
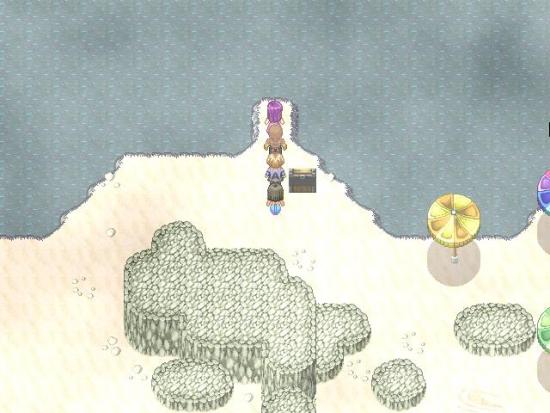
11 – Coastal Road. Have Salome in her mermaid form. The Eternity Trident from the chest keeps Salome in her mermaid form permanently.
12 – Inside secret room 11.
13 – Hungry Caves, map 3.
14 – Entrails, map 2. Hirado is here. Jump up to get a nice accessory for Hirado.
15 – Entrails, map 2A.
16 – Entrails, map 5. Blast your way out with dynamite you can find at the bottom.
17 – Orcish Fortress.
18 – Orcish Fortress, prison block.
19 – Orcish Fortress, on top of pile of sacks in the main room of the fortress.
20 – Swamp, middle portal. The Dwarf King is here. Defeat him to get the seriously amazing Maddening Axe.
21 – Swamp, middle portal, map 2.
22 – Swamp, flower bridge
23 – Swamp, right portal, map 2.
24 – Desert of Souls, map 7.
25 – Desert of Souls, near Mazurine.
26 – Castle of Malice, on your way to the key.

27 – Castle of Malice, main area.
28 – Castle of Malice, jump down before meeting dragon for the second time.
29 – Castle of Malice, jump right from room 28.
30 – Mani’s Shack.
31 – Cult of Dragon.
32 – Forbidden Zone.
Unnumbered – Orcish Fortress.
With many thanks to the people on the Aldorlea forum, without whom I’d never managed to figure out some of the Library Quests!

More articles...
-
Grow A Garden 2 Base Price List
What's the most valuable crop? -
Evomon Best Starter [Leafbun, Blazpup, or Bubble?]
Grass-type, Fire-type, or Water-type? -
Evomon Tier List [META and BEST Evomon]
The Evomon dream team.