Midnight Mysteries: Devil on the Mississippi Walkthrough

Welcome to the Midnight Mysteries – Devil on the Mississippi Collector’s Edition walkthrough on Gamezebo Midnight Mysteries – Devil on the Mississippi Collector’s Edition is a Hidden Object Game played on the PC created by Mumbo Jumbo. This walkthrough includes tips and tricks, helpful hints and a strategy guide on how to complete Midnight Mysteries – Devil on the Mississippi Collector’s Edition.

By
Share this
  • Share this on Facebook
  • Share this on Twitter

Midnight Mysteries: Devil on the Mississippi – Game Introduction

Welcome to the Midnight Mysteries – Devil on the Mississippi Collector’s Edition walkthrough on Gamezebo Midnight Mysteries – Devil on the Mississippi Collector’s Edition is a Hidden Object Game played on the PC created by Mumbo Jumbo. This walkthrough includes tips and tricks, helpful hints and a strategy guide on how to complete Midnight Mysteries – Devil on the Mississippi Collector’s Edition.

General Tips

This hidden object game requires visiting several locations and using inventory items to advance play.
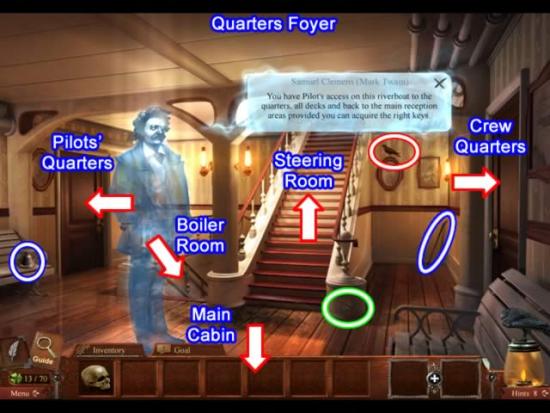
  • Play is mostly linear and task-drive. There are some options for the order of exploring locations.
  • CAPITALIZED inventory items are meant to make it easier to find where this guide may deviate from your own play.
  • A black cat will jump out and briefly freeze the cursor as a penalty for rapid clicking.
  • Always move the cursor around a scene. Watch the cursor to see if it changes into a hand or an eyeball.
  • Hidden object scenes contain two types of items: clues to help solve the mystery which are added to the journal and puzzle clues (listed in green) that describe an item rather than specifically naming it. For example a “Small Writing Instrument” is a pen.
  • After all the listed hidden object items are found, a final item is listed. This is an inventory item.
  • Find hidden ravens to increase the number of hints available.

Main Menu:

  • Profiles – Click the blue gears at the top of the screen to create, delete or switch player profiles.
  • Achievement Room – View trophies earned for such things as finding all 100 clovers or completing a hidden object scene in less than a minute.
  • “Dem Bones”. Bonus game. Unlocked after completing the game in story mode.
  • Play – Begin or resume a game.
  • Unlimited Hidden Objects. Find all hidden objects in a scene. Collect 70 clovers to unlock.
  • Options – Change music and sound effects volume. You may select or deselect full screen and a custom cursor.
  • Help – Describes how to interact with the game.
  • Exit – Quit the game.
  • Bonus Chapter. Unlocked after completing the game in story mode.
  • Bonus Room – Concept art, character sketches, wallpapers and a surprise room.
  • Strategy Guide – Directions for completing play.

Screen Navigation:

  • Menu – Change your options, resume the game or return to the main menu.
  • Hint System – In a hidden object scene, click on a specific item to see its silhouette. During game play, a hint will show what to do next. Collect ravens to increase the number of hints. The hint globe turns into a Skip globe for puzzles.
  • Journal – Clicking an object can add clues or information. The journal glows or automatically opens when new information is added.
  • Inventory/Object/Goals Tabs – A scrollable list of icons showing available inventory items or a list of hidden items to be collected. The Goals tab helps direct play.

Symbol Meanings:

  • Eyeball – Zoom in on interactive area.
  • Hand – Pick up an item.
  • Green Sparkles – Interact with an object.

Walkthrough

A short clip explains the background and introduces the story line for play.

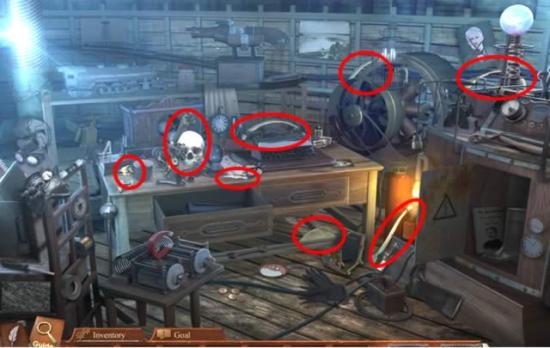
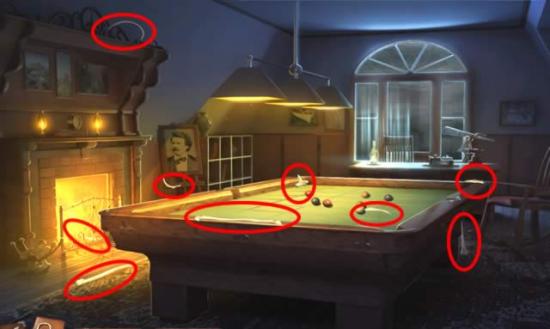
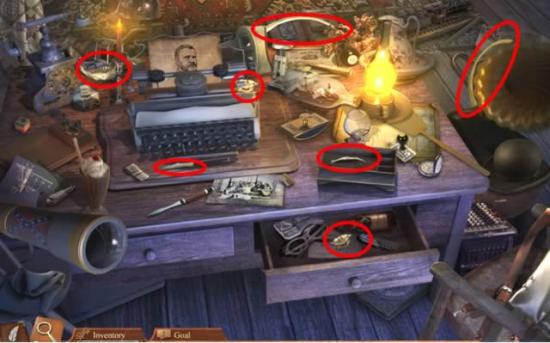
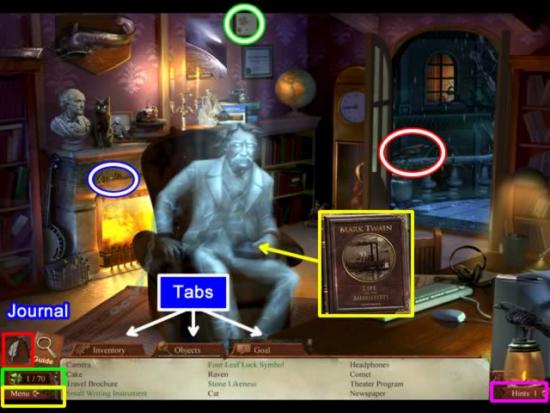
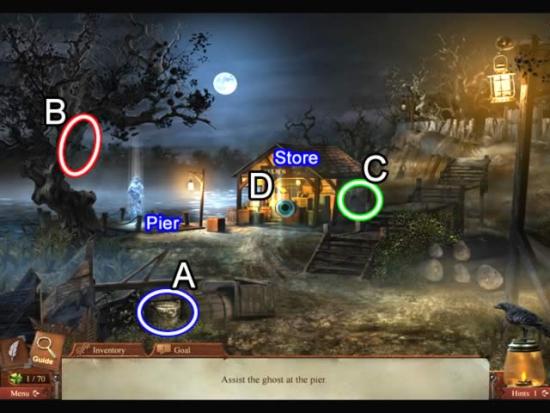
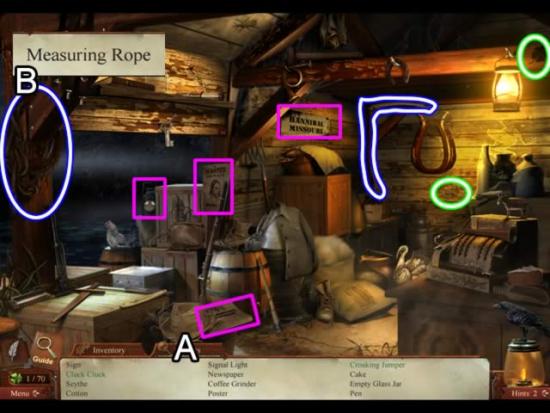
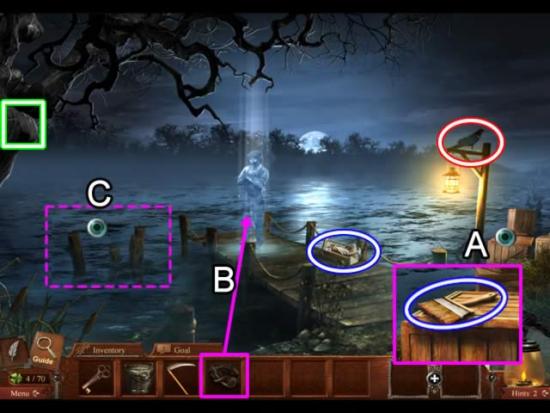
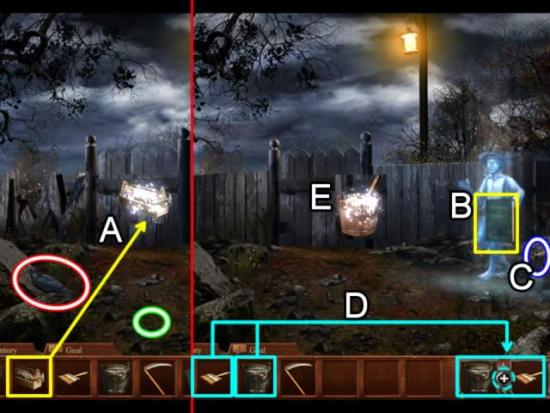
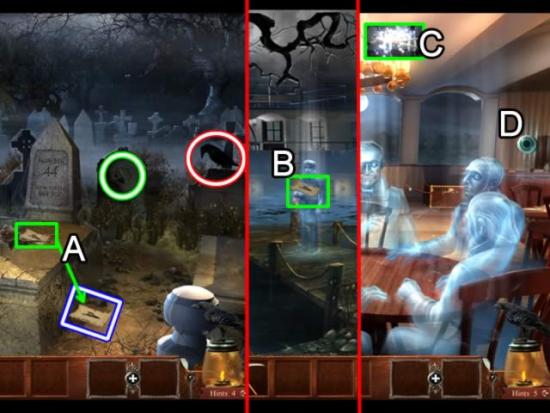
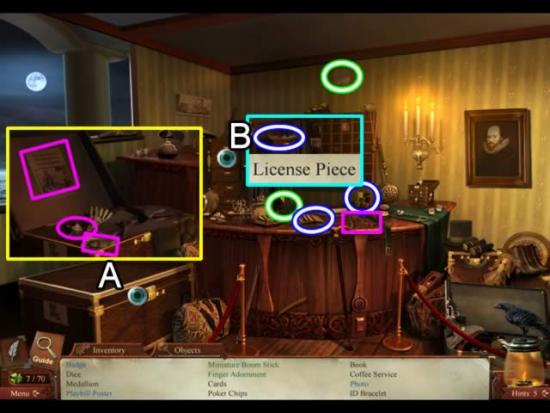
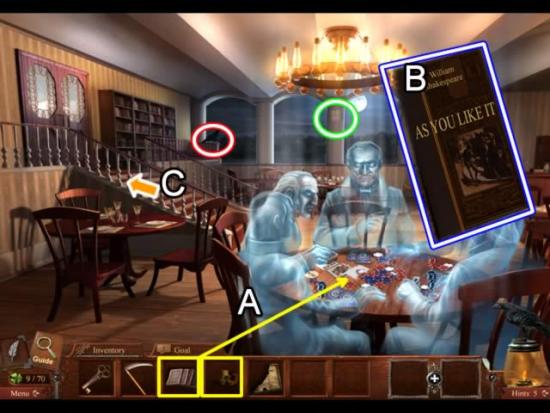
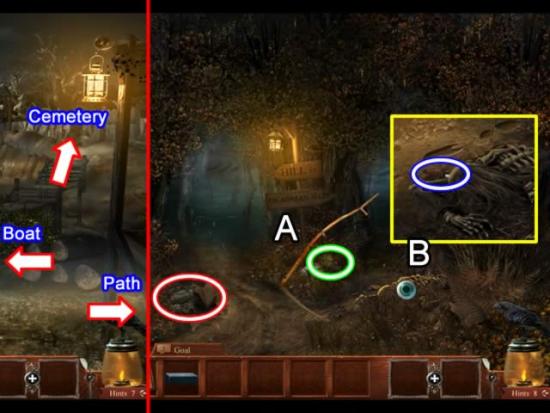
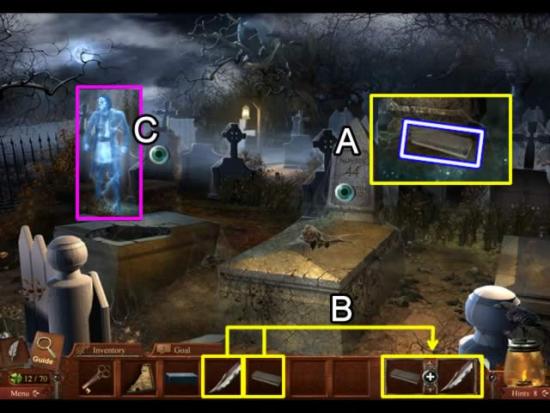
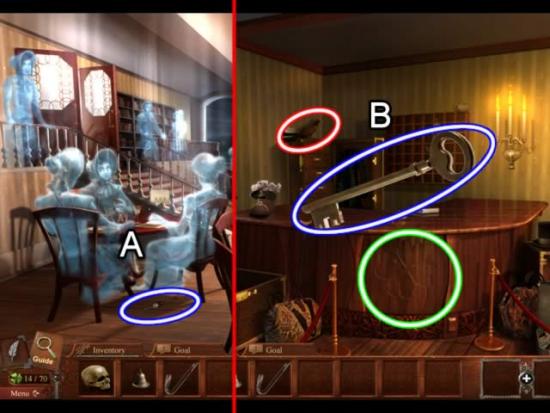
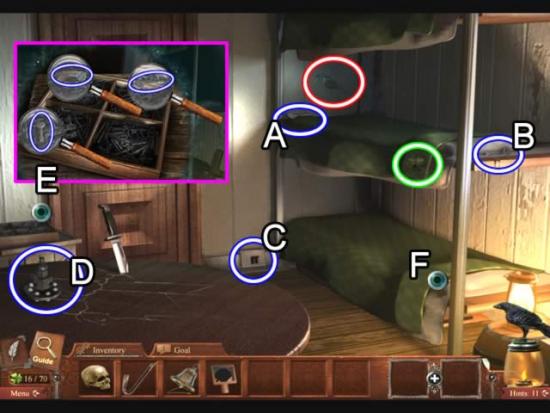
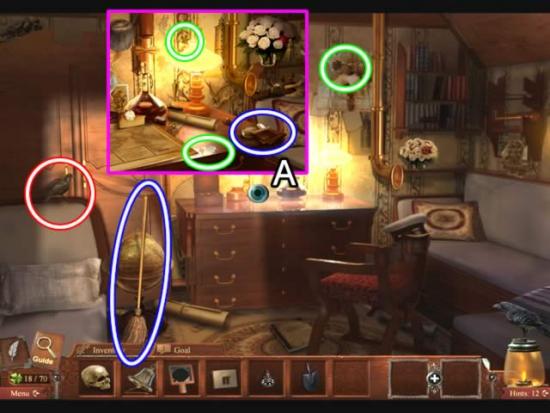
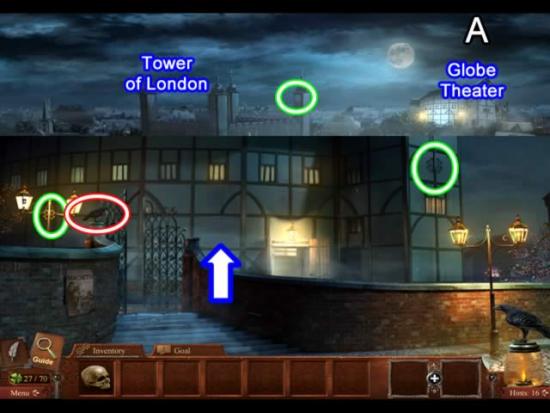
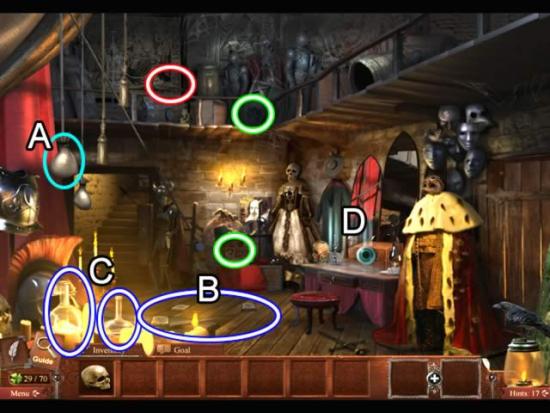
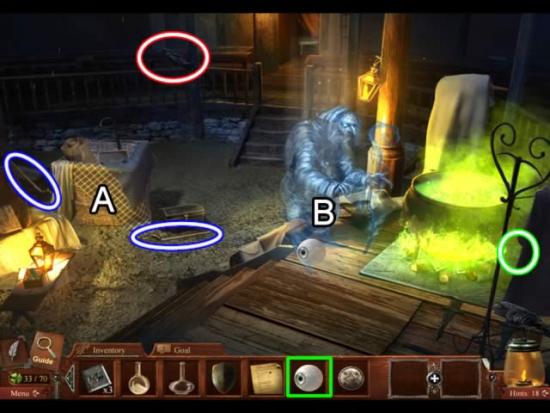
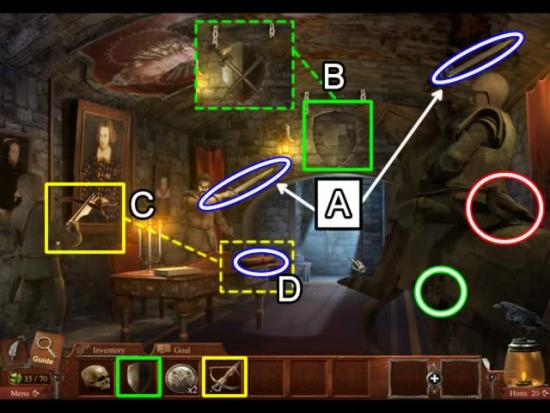
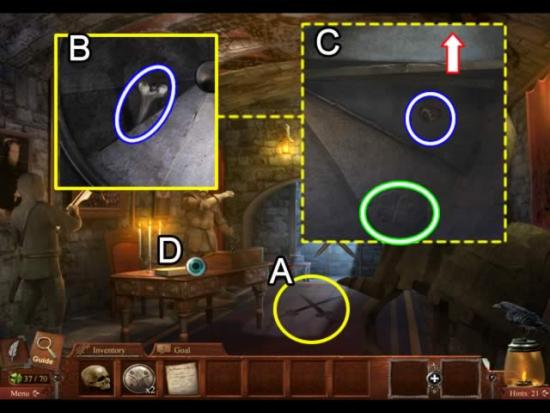
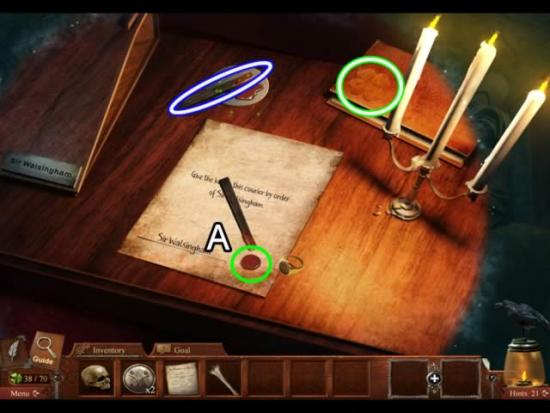
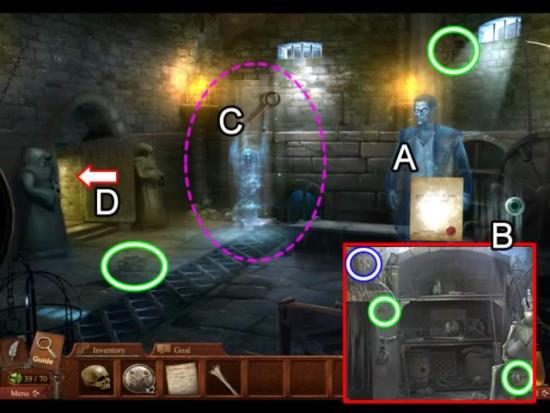
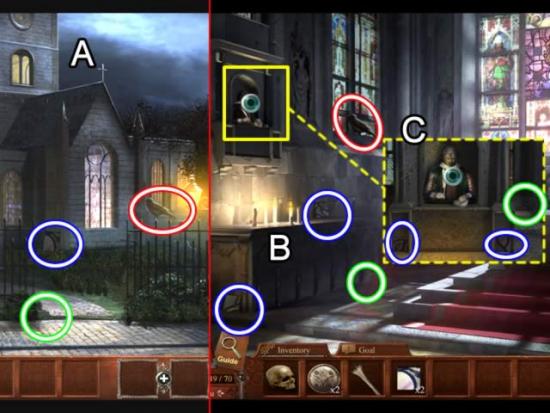
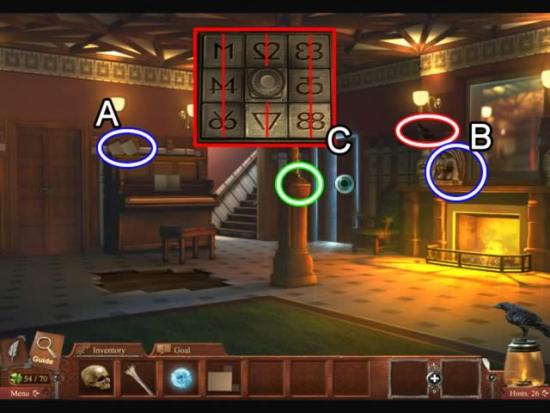
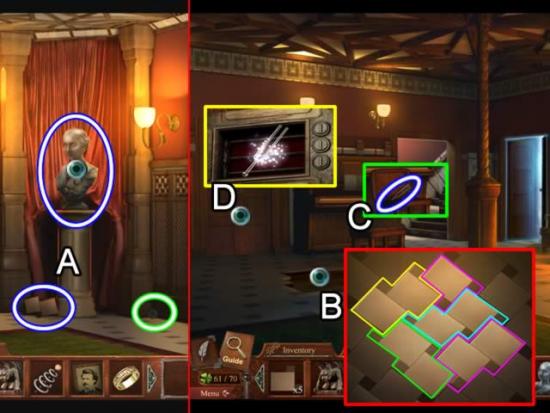
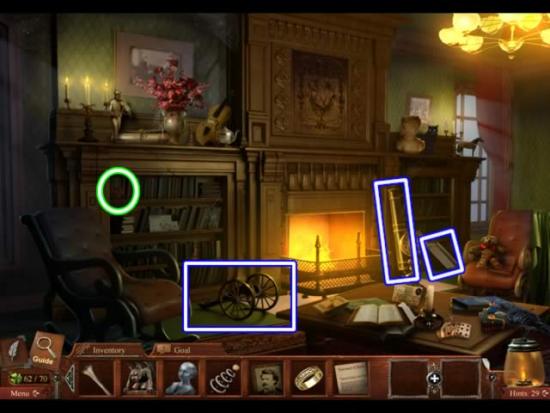
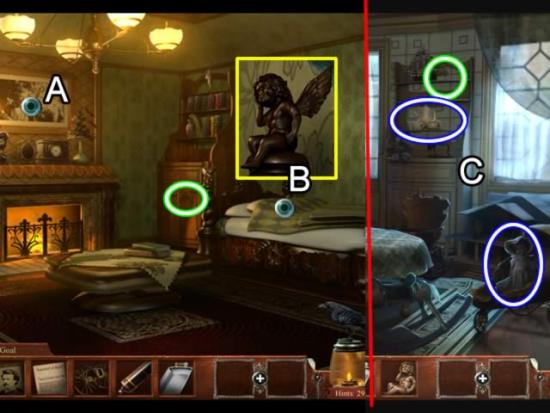
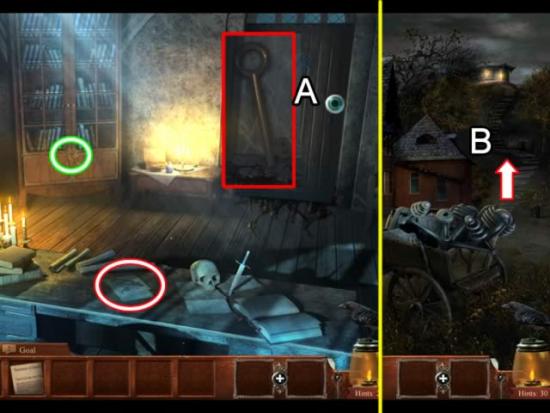
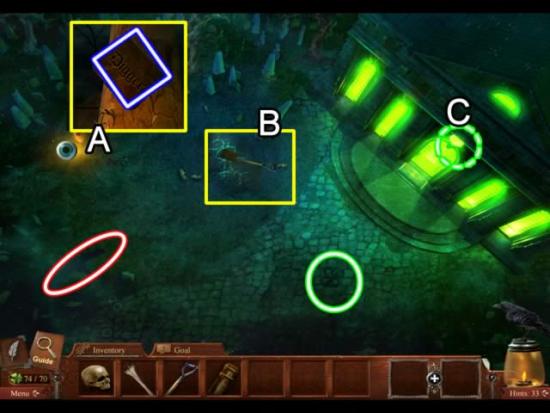
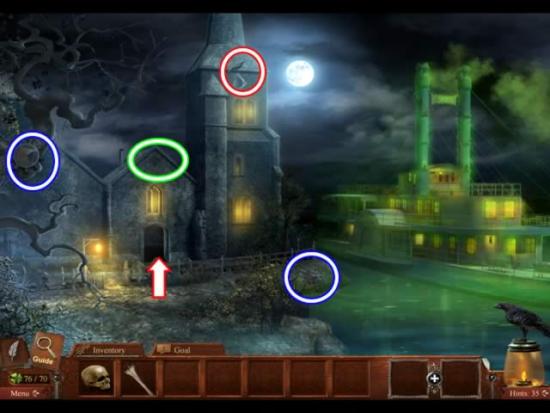
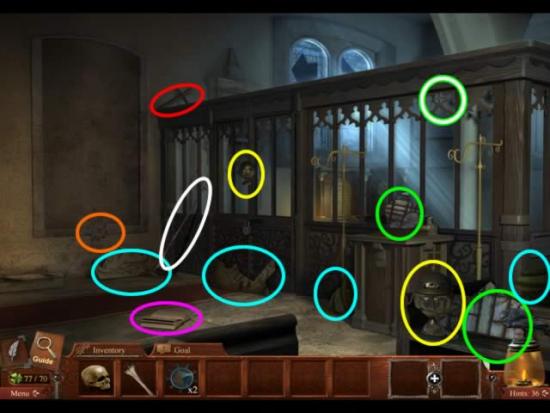
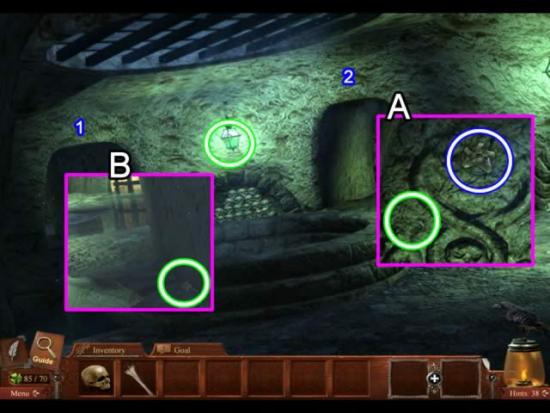
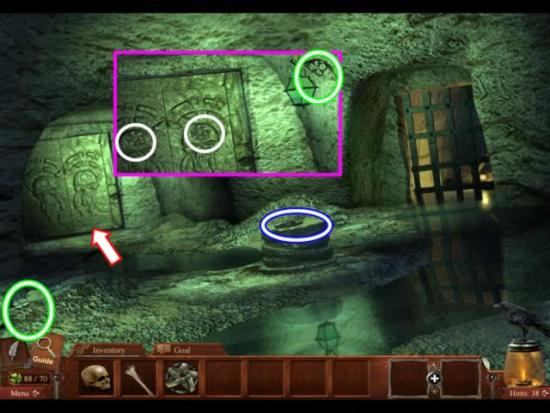
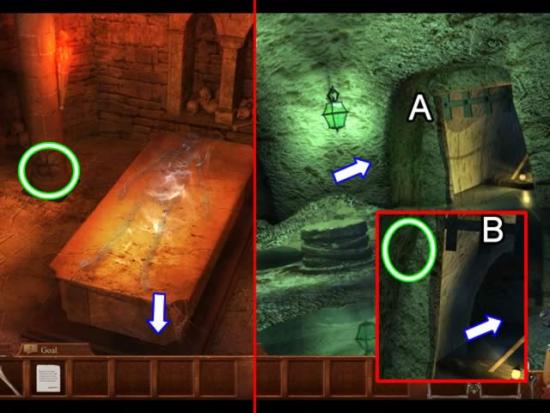
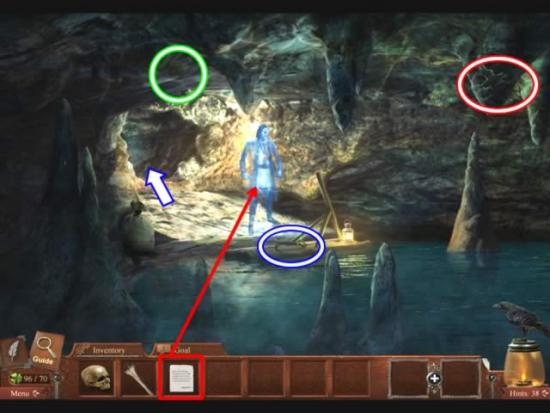
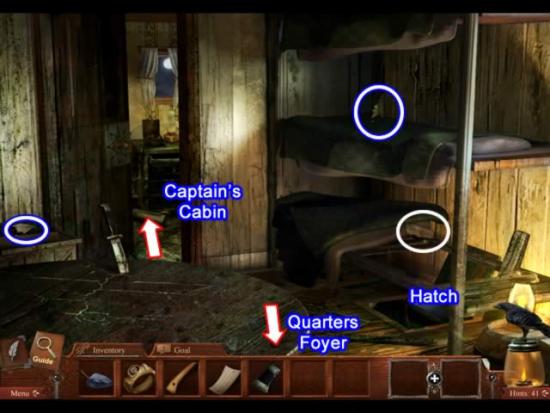
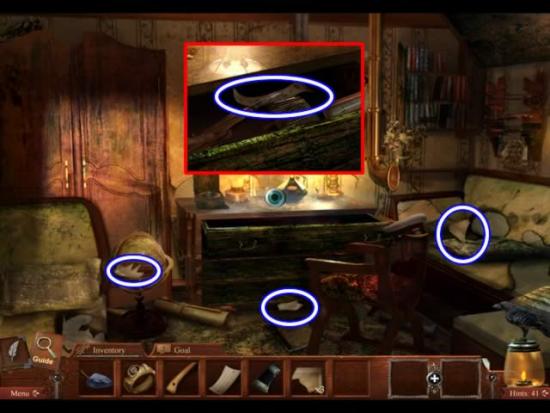
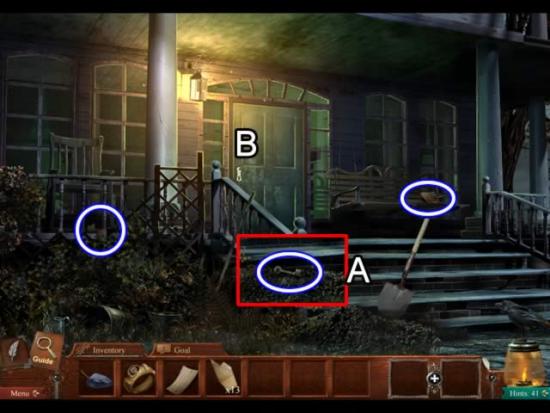
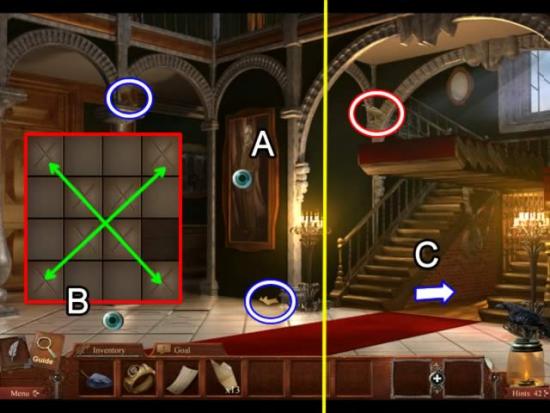
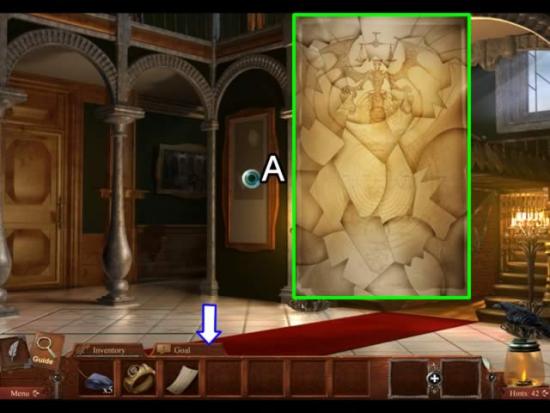
Screenshot key: Inventory items are outlined in blue and white circles or squares. Clovers are circled in green and white. Ravens are circled in red and white. Picking up clovers and ravens are not always mentioned in the scene description. Be sure and pick them up first; once an interactive area is complete it can’t be opened again.

Beginning play:

 Devil on the Mississippi
  • Follow the tutorial for collecting and combining inventory items. Give the HOT TEA to Samuel Clemens to start the hidden object scene.
  • Pick up the first clover, raven and inventory item: KEY.
  • Note the different tabs you will encounter during play. The Goal tab is especially helpful if you are unsure of what to do and don’t want to use a hint.
  • The Journal provides a recap of progress as well as hints.
  • After your conversation with Mr. Clemens, click the book to teleport to a Hannibal, Missouri and begin your adventure.

Chapter 1: Hannibal, Missouri

 Devil on the Mississippi
  • Samuel Clemens gives you the overall task: Board the boat. Smaller goals must be met first. Click the Goals tab to see the first step.
  • Pick up the PAINT BUCKET (A), raven (B) and clover (C) in this scene.
  • Open the hidden object area (D) in the store before going to the pier.
 Devil on the Mississippi
  • Pick up the two clovers (not listed in the items).
  • Collect the items on the list (A). The clue items are highlighted in pink. Items added to inventory items are a SCYTHE and MEASURING ROPE (B).
  • The scene dissolves. Approach the ghost on the pier.
 Devil on the Mississippi
  • Get the clover, raven and TOOLBOX.
  • Inspect the crates (A). Pick up the PAINT BRUSH.
  • Give the MEASURING ROPE to the ghost (B). Logs pop out of the water (C). Zoom in to open a puzzle.
 Devil on the Mississippi
  • Untangle the logs by removing the top log. The order is shown above.
  • The ghostly riverboat appears. The ghost on the pier gives you a copy of THE ADVENTURES OF TOM SAWYER.
  • The next goal is to restore the wooden fence.
  • Return to the landing. Go up the hill to the right of the store.
 Devil on the Mississippi
  • Drag the TOOLBOX to the fence.
  • Tom Sawyer appears before the repaired fence. Give him THE ADVENTURES OF TOM SAWYER (B).
  • Pick up the MATCHES on the rock beside him (C).
  • Drag the PAINT BUCKET and PAINT BRUSH to the combine box (D). Click the “+” sign to get WHITEWASH.
  • Place the WHITEWASH on the fence (E).
  • Enter the cemetery.
 Devil on the Mississippi
  • Attempt to pick up the piece of paper on the grave (A). Pick up the TICKET from the ground.
  • Collect the clover and raven.
  • Return to the pier. Give the TICKET to the captain (B). Board the steamboat.
  • Use the MATCHES to light the chandelier (C). Zoom in on the hidden object scene (D).
 Devil on the Mississippi
  • Objects listed in blue indicate they cannot be found in the current scene. Move your cursor around until the eyeball appears (A). Click to open the chest.
  • Collect the items on your list. Inventory items are the CARDS and POKER CHIPS.
  • Open the second drawer in the cabinet to get the last item (B), the LICENSE PIECE.
 Devil on the Mississippi
  • Place the POKER CHIPS and CARDS on the table (A). Receive a BOOK (B).
  • Pick up the raven and clover.
  • Head up the stairs (C).
 Devil on the Mississippi
  • Access the interactive area on the bookcase (A). Place the BOOK in the empty slot. Other books are added. Note the numbers in the book titles: 3, 12, 8, 2.
  • Take the IVORY INLAY (B).
  • Pick up the clover and raven.
  • Attempt to enter the double doors at the top of the stairs. Find that you need a license to gain access.
  • Exit the boat and return to the landing (click down three times).
 Devil on the Mississippi
  • Follow the path on the right.
  • Pick up the raven and clover at the crossroads.
  • Use the SCYTHE to remove the vegetation around the skeleton (A).
  • Inspect the remains (B). Pick up the DULL KNIFE.
  • Return to the landing. Go up the hill to the cemetery.
 Devil on the Mississippi
  • Examine the tombstone marked “44”. Pick up the WHETSTONE (A).
  • Combine the DULL KNIFE and WHETSTONE to get a SHARP KNIFE (B).
  • Inspect the grave on the far left (C). Give the SHARP KNIFE to Joe. He digs a hole and gives you a SKULL.
  • Speak with John Clemens. Inspect his grave.
 Devil on the Mississippi
  • Pick up the objects in the pit (A): a clover and four IVORY INLAY pieces. The four new pieces are added to the existing piece in inventory.
  • Place the IVORY INLAY pieces into the five empty slots on the box lid (B). Insert the KEY into the key hole. A metal strip appears.
  • The inlays resemble a clock face. Drag the strip to the numbers listed on the books from the ship (C. Clicking an inlay in the correct order turns the inlay white. Refer to the above inset for the solution.
  • Take the LICENSE PIECE from the box (D).
  • Combine the two LICENSE PIECES into a PILOT’S LICENSE.
  • Return to the boat.

Chapter 2 – Exploring the Ship

 Devil on the Mississippi
  • Give the PILOT’S LICENSE to the ghost of Pilot William Brown. Enter the Quarters Foyer.
  • The Quarters Foyer is the central point for exploring the boat. Areas to visit are shown above.
  • Collect the clover and raven. Add the BELL CANOPY and CROWBAR to inventory.
  • Return to the Main Cabin.
 Devil on the Mississippi
  • Speak to the ladies at the table by the stairs (A). They disappear. A BELL CLAPPER falls to the floor. It is a good idea to combine objects as soon as possible to help having to scroll to find inventory items. Combine the BELL CANOPY and BELL CLAPPER to get a BELL.
  • Click the clerk at the reception area on the far right of the room.
  • Get the clover and the pheasant-looking raven. The clerk gives you a KEY.
  • Return to the Quarters Foyer. Use the KEY to open the door to the Crew Quarters.
 Devil on the Mississippi
  • Get the GAUGE HOUSING (A) and the clover and raven.
  • Inspect the Manifest (B). Find the two symbols without a match (trebble cleff and starfish). Turn the page and note the time associated with the symbols (4 a.m.).
  • Get a KEY from Henry.
  • Cross the foyer and use the key to open the door to the Pilots’ Quarters.
 Devil on the Mississippi
  • Pick up KEY (A) and KEY (B) from the bed. Get the SWITCH (C) and STEAM VALVE (D).
  • Zoom in on the box on the left (E). Move the magnifying glass around to find the three KEYS.
  • Inspect the lower bunk (F).
 Devil on the Mississippi
  • Use the CROWBAR to pry open the trapdoor (A). Collect the SHOVEL, two KEYS and a clover.
  • Click the lock on the rear door (B) to open a puzzle.
  • The goal is to insert and move the seven KEYS to an open spot. Each time a key is inserted possible paths are shown. Press the center reset button if no moves are available. View the puzzle as triangles. Beginning from the open slot at the start, move the keys to close the three green circles. Each move is numbered.
  • Enter the Captain’s Quarters.
 Devil on the Mississippi
  • Get the MOP, the raven and the clover.
  • Play the hidden object area on the desk (A). Pick up two more clovers and METAL POLISH.
  • Return to the Quarters Foyer. Use the MOP to clean the floor at the foot of the stairs. Pick up the LEVER.
  • Report to Baker in the Boiler Room.
 Devil on the Mississippi
  • Pick up the GREEN VALVE (A) and RED VALVE (B).
  • Use the SHOVEL to fill the cart with coal (C). When the cart is full, pull the lever (D) to move the cart to the boiler.
  • Pick up the GAUGE (E) hidden behind the cart.
  • Click left to enter the boiler room.
 Devil on the Mississippi
  • Pick up the GAUGE FACE on the left side of the boiler and the ANGEL ARM on the floor beneath the engine. Get the clover and raven.
  • Click the lever (A) to fill the boiler with coal. A window opens for coal pieces. Continue stacking the pieces of coal until the gauge is in the red.
  • If you have not already done so, combine the BELL CANOPY and BELL CLAPPER to get a BELL and the GAUGE HOUSING and GAUGE to get a TEMPERATURE GAUGE.
  • Access the engine (B). Get the clover and raven. Place the ANGEL ARM (1), RED VALVE (2), GREEN VALVE 3), GAUGE FACE (4), STEAM VALVE (5), SWITCH (6), TEMPERATURE GAUGE (7) and BELL (8).
  • Use the METAL POLISH to shine up the boiler plate (C). Zoom in on the boiler and get the clover that appeared (D).
  • Exit the Boiler Room. Continue up the stairs to the Steering Room
 Devil on the Mississippi
  • Interact with Pilot Brown and Clemens. Pick up the book and journal (A). Collect the raven and clover.
  • Return to the Quarters Foyer.
  • Have one last word with Pilot Brown. Inspect his watch (B). Get the clover. Drag the minute hand around the watch until it is set to the time found in the Crew Quarters: 4:00.
  • Exit the boat. Have a final conversation with the captain.

Chapter 3: London, 1600

 Devil on the Mississippi
  • There are two locations to explore. Mr. Clemens wants to find Shakespeare’s tomb and open it. Get the clover on the tower. Head to the theater (A).
  • Collect the two clovers and raven. Enter the theater.
 Devil on the Mississippi
  • Pull the weight sack (A). Pick up the three NUMBERED BLOCKS that fall on the floor (B).
  • Pick up the ACID POWDER and CHEMISTRY BOTTLE (C).
  • Access the hidden object area on the table (D).
 Devil on the Mississippi
  • Collect the EYEBALL, MANUSCRIPT, SHIELD and COIN for inventory.
  • Go up the stairs to the loft.
 Devil on the Mississippi
  • The following two screenshots show possible solutions for traversing through the four mazes. Drag the lantern through each level to progress. Hitting a wall or bunker flashes red, but you are not required to start over.
 Devil on the Mississippi
  • After completing the last level, continue to the Stage.
 Devil on the Mississippi
  • Pick up the TONG PARTS (A). Combine them to get TONGS.
  • Give the EYEBALL to the witch (B). Have a conversation. She vanishes; William Shakespeare appears.
 Devil on the Mississippi
  • Use the TONGS to extract the three NUMBERED BLOCKS from the coals (A).
  • Fill the CHEMISTRY BOTTLE with liquid from the cauldron (B). Combine the FILLED CHEMISTRY BOTTLE and the ACID POWDER to get CORROSIVE ACID.
  • Talk to William Shakespeare. Give him the MANUSCRIPT in exchange for two NUMBERED BLOCKS (C).
  • Return to the theater gate.
  • Remove the Macbeth poster on the wall. Pour the CORROSIVE ACID on the bars. Retrieve three NUMBERED BLOCKS.
  • Click down once to get back to the city view. Go to the Tower of London.
 Devil on the Mississippi
  • Pick up the CROSSBOW (A).
  • Access the puzzle (B). Place the NUMBERED BLOCKS on the puzzle to begin.
  • The goal is to use the 11 numbered blocks to fill in the empty spaces around a solid block forming a mini-square. Each mini-square must contain the numbers 1-8. Suggested solution: start at mini-square (1). There is only one number missing. Drag a “2” into the empty spot. Mini-square 2 is also missing only one number. Drag a “6” there. Continue finding the square with the fewest empty spaces. The complete solution is shown in the next screenshot.
  • Once the puzzle is solved, the water drains. Pick up the ARROW (C). Combine the CROSSBOW and ARROW to get a LOADED CROSSBOW.
 Devil on the Mississippi
  • Enter the Tower.
  • Speak with Sir Walsingham. Collect a COIN.
 Devil on the Mississippi
  • Take the SWORDS from the two soldiers (A).
  • Place the SHIELD in the niche above the door (B). Add both SWORDS to the chains.
  • Give the archer the LOADED CROSSBOW (C). He shoots the Queen mosaic on the ceiling. Pick up the DOCUMENT that drops to the desk (D).
  • The swords drop down barring the exit.
 Devil on the Mississippi
  • Click the “X” on the floor formed by the shadow of the two swords (A). Click the trapdoor under the carpet.
  • Remove the LEG BONE wedged in the cover (B).
  • Click the fourth stair to open a hidden compartment (C). Get the SIGNET RING and clover. Click up to return to the room.
  • Access the interactive area on the desk (D).
 Devil on the Mississippi
  • Collect the clover. Pick up the stick of SEALING WAX and place it on the document (A). A drop of wax falls onto the document. Place the SIGNET RING in the wax. Receive a PERMISSION LETTER.
  • Go down the spiral stairs to the dungeon.
 Devil on the Mississippi
  • Give the PERMISSION LETTER to Ingram Frazer and have a conversation (A). He gives you a KEY and disappears. A witch in chains appears.
  • Access the hidden object area (B). Collect two clovers and an EYEBALL.
  • Use the KEY to free the witch from her shackles (C). Give her the EYEBALL.
  • Exit via the side door (D). Go up the stairs and down to the exit the Tower.
 Devil on the Mississippi
  • Return to the stage at the Globe Theater (A). Give the MANUSCRIPT to Shakespeare.
  • Click the steamboat to go to Stratford (B).
 Devil on the Mississippi
  • Pick up the two clovers and the raven in the main square. Approach the door (A). Get the clover to the left of the door. Click the eyeball on the door to open it.
  • Enter the Shakespeare’s home.
 Devil on the Mississippi
  • Get the STAINED GLASS piece.
  • Inspect the bedside table (A). Read the will. Take the clover.
  • Exit the home. Go up the hill to the church.
 Devil on the Mississippi
  • Pick up the clover, raven and STAINED GLASS piece outside of the church (A).
  • Pick up two more STAINED GLASS pieces inside (B).
  • Inspect the alcove (C). Get two more STAINED GLASS pieces and a clover.
  • Click the bust and read the conspiracy theory.
 Devil on the Mississippi
  • Look closer at the tomb (A). Pick up the clover and the two STAINED GLASS pieces.
  • Open the stained glass puzzle (B). Place the eight STAINED GLASS pieces in the center of the window to begin the game. Place each piece in the window based on color and pattern. The correct placement is shown. Receive six COINS.
 Devil on the Mississippi
  • Click the tomb. Place the eight COINS in the center to start the puzzle.
  • The goal is to place the coins on the buttons according to its pattern. In the screenshot, the buttons highlighted with a square show the fixed buttons. The pink button is the key to placing the first two buttons. All buttons on the outside have only a single pattern. The pink button has two: dots and an up arrow.
  • The colored rings show what pattern is included on each button:
    • Green circle: all buttons must have lines.
    • Red circle: all buttons must have dots.
    • Yellow circle: all buttons must have a down arrow.
    • Aqua circle: all buttons must have an up arrow.

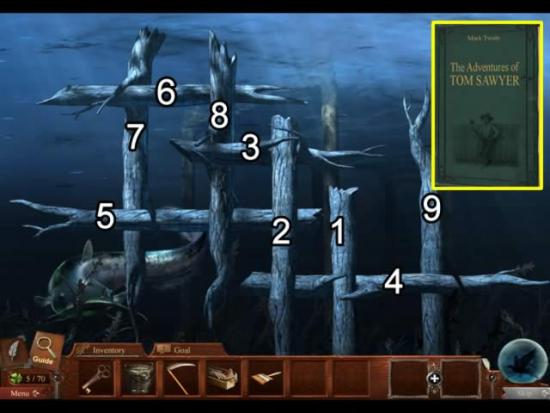
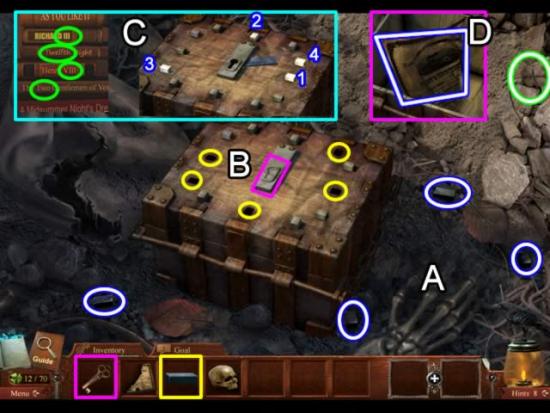
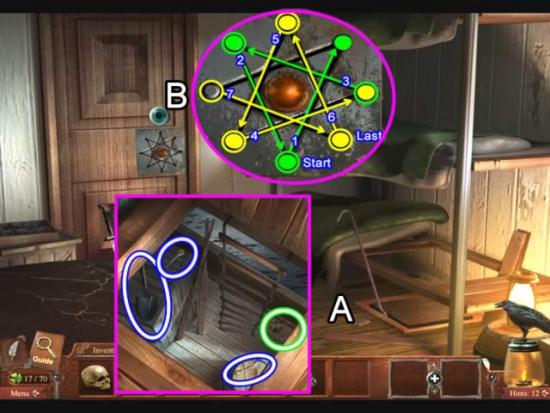
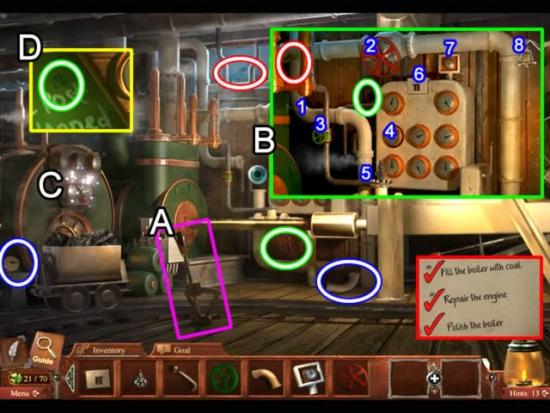
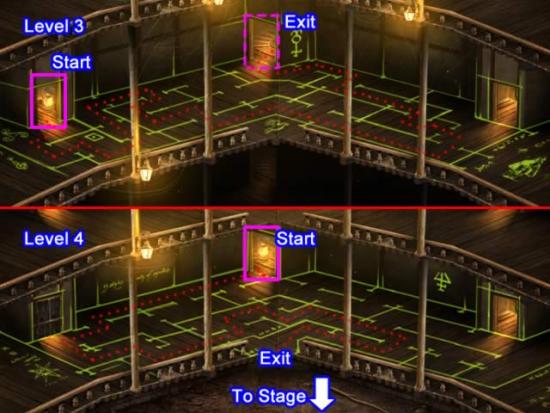
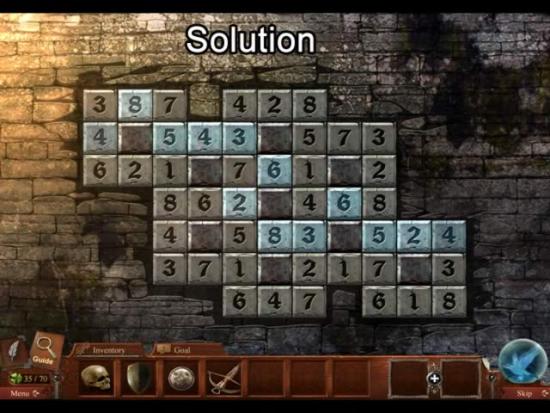
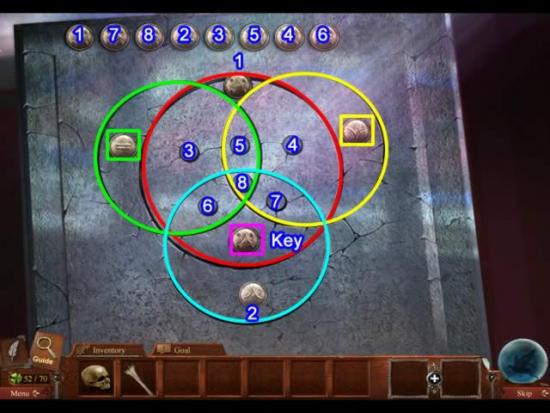
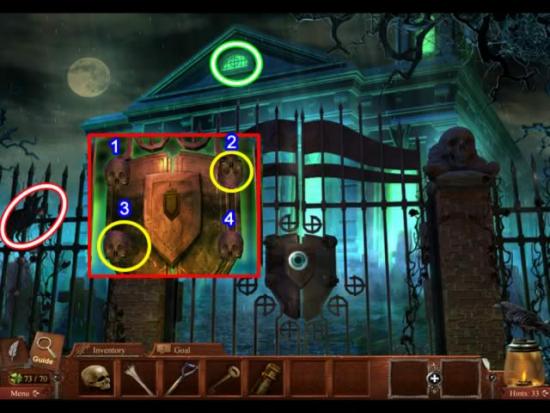
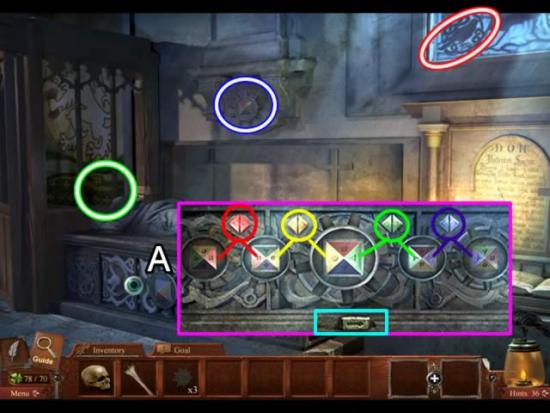
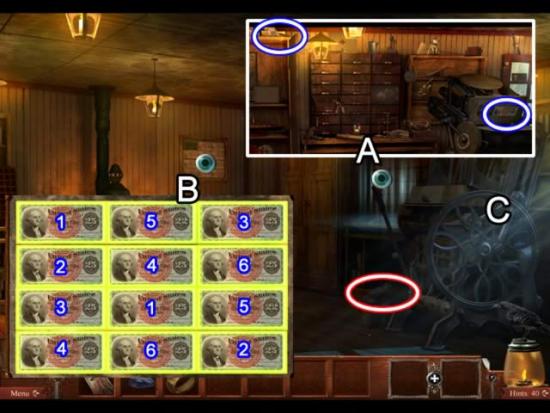
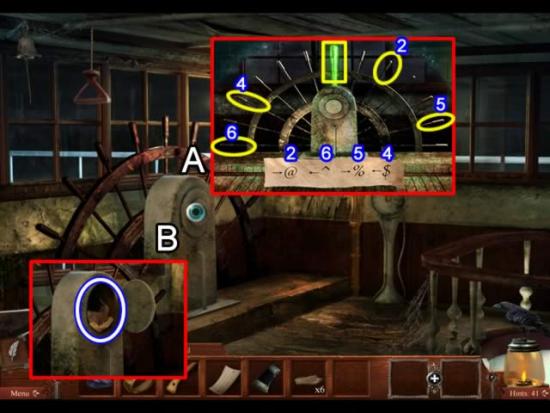
Buttons in overlapping circles contain multiple symbols. Click outside of the puzzle to reset it.

  • Solution:

o Place the coin with just dots on button 1.

o Place the coin with just an up arrow on button 2.

o Button 3 has lines and dots on the coin.

o Button 4 has a down arrow and dots.

o Place a coin with dots, lines and a down arrow on button 5.

o The coin on button 6 has dots, lines and an up arrow.

o Place a coin with up and down arrows (a diamond) and dots on button 7

o Button 8 has all four patterns on it.

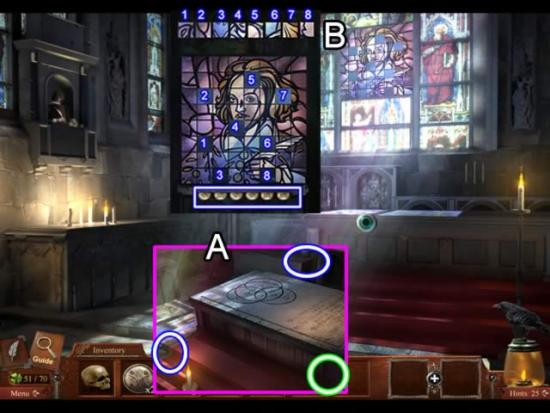
In the screenshot, the numbers on the buttons correspond with the coins in the row above.

  • Solving the puzzle opens the tomb.
  • Exit the tomb area. Speak with Walsingham. Receive a copy of “A Yankee in King Arthur’s Court”. Speak with Samuel Clemens.
  • Exit the church. Continue clicking down until the steamboat is back at the pier in London. Give Twain the book to teleport to the next location.

Chapter 4: Connecticut

 Devil on the Mississippi
  • Speak with Mr. Clemens about the goal for this location.
  • Pick up the GLOWING SPHERE (A).
  • Approach the house (B). Pick up the FLOOR TILE PIECE.
  • Enter the house.
 Devil on the Mississippi
  • Pick up the FLOOR TILE PIECE (A) and the GARGOYLE (B).
  • Inspect the glowing doors (C). The lock tiles contain numbers combined with their mirror image. Swap the tiles until they are in numerical order (see above insert).
  • Enter the lab.
 Devil on the Mississippi
  • Give Tesla the GLOWING SPHERE (A).
  • Try the experiment (B). Drag the bomb from the stand to first bottom center supports on the riverboat replica. Click the red button to blow up the boat.
  • Take the KEY from Tesla.
  • Collect the FLOOR TILE PIECE and TESLA COIL (C).
  • Open the hidden object area (D). Pick up a CUE BALL.
  • Exit the lab. Go up the stairs.
 Devil on the Mississippi
  • Pick up the FLOOR TILE PIECE on the left.
  • Click the door (A). Click through the conversations. Use the KEY to open the door.
 Devil on the Mississippi
  • Pick up the CUE STICK and PAINTING OF MARK TWAIN (A).
  • Inspect the hidden object scene (B). Get a WEDDING RING.
  • Open the interactive area on the pool table (C). Place the CUE STICK and CUE BALL on the table. Rotate the cue stick until it is aligned with the yellow ball. Click to make the shot. Watch the table be cleared of all balls. The felt pulls back. Take the BANKRUPTCY DOC. Receive the Hustler achievement.
  • Exit the room and go left.
 Devil on the Mississippi
  • Pick up the FLOOR TILE PIECE at the end of the hallway (A).
  • Check out the bust. It is Livy Clemens. Her bust falls to the floor and is added to inventory.
  • Return to the entry room.
  • Zoom in on the floor (B). Place the five FLOOR TILE PIECES in the outline to start the puzzle. Place each piece based on shape. A correctly placed piece locks into place. The inset shows the solution.
  • The piano bench lid pops open after the puzzle is solved (C). Take the TUNING FORK.
  • Zoom in on the door (D). Place the TUNING FORK on the lock.
 Devil on the Mississippi
  • Pick up the CANNON MOUNT, CANNON BARREL and SERVING TRAY. Combine the CANNON MOUNT and CANNON BARREL to get a CANNON.
  • Return to the upstairs hallway.
  • Give the WEDDING RING to the ghost of Livy Clemens.
  • Enter the bedroom.
 Devil on the Mississippi
  • Inspect the painting (A) and read about the trip.
  • Access the bed. Take the ANGEL.
  • Exit the bedroom. Enter the playroom.
  • Talk to the children. Get the TEA CUPS and DOLL. Combine the TEA CUPS and SERVING TRAY to get a TEA SET. Give the TEA SET to the children. Enter a conversation.
  • A dollhouse opens.
 Devil on the Mississippi
  • Place the inventory items collected from the house into their representative rooms (A).
  • A secret door is revealed (B).
 Devil on the Mississippi
  • Get the raven and clover. Zoom in on the door (A). It opens. Take the KEY.
  • Exit the house.
  • Take the stairs to the right to the hilltop (B).
 Devil on the Mississippi
  • Give Huddelston the BANKRUPTCY DOC (A).
  • Use the KEY to enter the study.
 Devil on the Mississippi
  • Pick up the POKER and MANUSCRIPT (A).
  • Use the POKER to retrieve the STAR from the fireplace (B).
  • Inspect the carpet (C). Drag the STAR around to find where it fits. When it starts sparkling, click to place it.
  • Enter the trapdoor. Exit at the riverboat.
  • Get on the riverboat to get to the next location.

Chapter 5: Deptford, England – 1593

 Devil on the Mississippi
  • Get the clover and raven at the wharf (A). Go up the steps to the city of Deptford.
  • Take the APPLES from the cart and the clover (B).
  • Get the raven from the roof. Approach the tavern (C).
 Devil on the Mississippi
  • Pick up the SHOVEL HANDLE and clover outside the tavern (A).
  • Get the TURKEY from the back of the room and the WATER from the bench. Place them on the table with the APPLES (B). Have a conversation with the gentlemen.
  • After the ghosts leave, a CANNON BARREL is revealed by the fireplace.
  • Exit the tavern. Go to the church gate.
 Devil on the Mississippi
  • Inspect the lock mechanism. Rotate the skulls to get the correct combination to open the gate. Skull 2 rotates 1, 2 and 4. Skull 3 rotates 1, 3 and 4. Skulls 1 and 4 affect only themselves. The solution appears to be random. One combination I found was all skulls being right side up. Another was with skulls 1, 3 and 4 being up and skull 4 being down. Once the right combination is found, all of the skull’s eyes turn green and the tab flips up from the keyhole. Insert the KEY.
  • Enter the cemetery.
 Devil on the Mississippi
  • Access the grave (A). Take the MARKER. Combine it with the SHOVEL HANDLE to get a SHOVEL.
  • Use the SHOVEL to dig up the paupers grave (B).
  • Talk to John Perry. He gives you an AIMING TRIPOD. Pick up the clover above the center archway (C).
  • Return to the wharf.
 Devil on the Mississippi
  • Zoom in on the branch in the water (A). Take the CANNON BALLS from the skeleton.
  • Place the CANNON BARREL, CANNON BALLS and AIMING TRIPOD on the wharf (B) to trigger a game.
 Devil on the Mississippi
  • The goal is to shoot cannon balls into the grid to find the hidden battle ships. The numbers on side of the columns and rows indicate how many spaces contain portions of the battle ships.
  • You have 50 cannnon balls (A) to begin. The inset (B) shows how many of each length of ship to find. Each time one is uncovered, the number decreases.
  • The best strategy is to start with a column or row with the most covered spaces (circled in yellow). A bad move is to fire in a row or column clearly showing it has no part of a battle ship (pink).
  • Once the blockade is uncovered, board the boat to Chiselhurst.

Chapter 6: Chiselhurst, England

 Devil on the Mississippi
  • Pick up the clover, raven and two GEARS.
  • Enter the church.
 Devil on the Mississippi
  • Pick up a clover, two WINDOW PIECES (green), two INCENSE BURNERS (yellow), four FRESCO PIECES (aqua), a CANDLESTICK (white), CROSS (red), GEAR (orange) and BOOK (pink).
  • Resore the church. Place every piece collected (except the gear) in its proper place. Drag each piece around the scene until it sparkles white.
  • When all objects are correctly placed, the double doors to Walsingham’s tomb open.
 Devil on the Mississippi
  • Pick up the last GEAR.
  • Click the side of the tomb to open a puzzle. Place the GEARS on the open slots. The goal is to align the gears so the colors match horizontally and with the colored arrows along the top. When the lever at the bottom is pulled the gears rotate 90 degrees. Swap the gears and pull the lever. Correctly positioning gears lights up the arrows.
  • When the tomb opens, pick up a clover on the right side of the lid. Go down the steps.
 Devil on the Mississippi
  • Go to entrance #3 (A). Get a clover and raven. This entrance is a dead end. Return to the main room.
  • Go to entrance #1 (B). Get a clover and a CROSS KEY. This is also a dead end. Exit to the main room.
  • Enter the middle arch (C). Get the clover. Continue downward. Take the clover on the top right side of the skeleton door. Place the CROSS KEY on the door to open the next set of chambers.
 Devil on the Mississippi
  • Enter tunnel #2. Get a clover and a STAR KEY (A).
  • Enter tunnel #1. Get a clover (B). Continue forward.
 Devil on the Mississippi
  • Pick up a clover and the second STAR KEY. Go to the door on the left. Pick up the clover on the lantern holder. Place both STAR KEYS on the door.
  • Enter the next chamber. Pick up the clover by the torch on the left. Continue forward.
 Devil on the Mississippi
  • Enter chamber #1. Get the KEY BLADE (A).
  • Enter chamber #3. Get the KEY HANDLE (B). Combine the two pieces to get a DAGGER KEY.
  • Enter chamber #2. Use the DAGGER KEY to open the door.
 Devil on the Mississippi
  • Click through the conversations. Get the PARDON and instructions on what to do next.
  • Click down five times to get back to the green well chamber. The gate on the right is now raised (A). Go forward. Take the clover on the side of the wall by the gate. Continue to the cave entrance.

Chapter 7: Collecting the Bones

 Devil on the Mississippi
  • Collect the clover, raven and HOOK. Give the PARDON to Joe. He gives you a LEG BONE.
  • Re-enter the cave.
 Devil on the Mississippi
  • Pick up the ROPE. Combine it with the HOOK to get a GRAPPLING HOOK.
  • Go toward the cave entrance (A). Fill the entrance with rocks to seal in Joe. Watch the level bar on the upper right to see how many rocks need to be stacked.
  • The roof of the cave opens (B). Use the GRAPPLING HOOK to reach the top of the cave.
 Devil on the Mississippi
  • Solve a puzzle to exit the cave. The goal is to find a path from the rain drop at the top left to the leaf at the bottom right and the snowflake at the top right to the sun in the bottom left. Click one of the symbols to start. Path choices are illuminated.
  • Exit the grave in Hannibal, Missouri. Go down the hill to the store.
 Devil on the Mississippi
  • Play the hidden object scene (A). Open the cash register drawer to get the CURRENCY. Note: The currency is used in the bonus chapter. Get the KEY.
  • Go right to the crossroads.
 Devil on the Mississippi
  • Pick up the PELVIS. Take the path on the right to town.
  • Collect the clover. Go down the hill.
 Devil on the Mississippi
  • Inspect the wagon. It turns into a hearse. Go to the back. Use the KEY to unlock the doors and open a puzzle.
  • The goal is to rotate the board to eliminate the symbols. Align three symbols to eliminate them. The game repeats with more symbols three times.
  • Open the casket.
 Devil on the Mississippi
  • Remove the flowers. Remove the pennies from the eyes (A). Take the two ARM BONES (B).
  • Return to the cemetery. Enter the grave marked “44” to descend to the cave. Go right to the cave entrance.
 Devil on the Mississippi
  • Pick up the RIB CAGE (A). Click up twice to return to the well cave (B). Take the left entrance. Go forward twice. Marlow’s tomb is the center cave (C).
 Devil on the Mississippi
  • Place the collected bones on the tomb (A).
  • Watch the concluding scenes and the ensuing conversations.

Congratulations! You have finished playing Midnight Mysteries – Devil on the Mississippi Collector’s Edition. Return to the main menu to play games that are now unlocked.

Collector’s Edition Bonus Chapter

 Devil on the Mississippi
  • Speak with Samuel Clemens.
  • Enter Tesla’s lab (A). Play the hidden object scene. Get the COAL BOMB.
  • Go upstairs to the billiard room (B). Play the hidden object scene. Get a DEATH RING.
  • Return to Mr. Clemens. Teleport to Hannibal.
  • Go right to the crossroads. Take the path on the right to town. Go down the street to the Clemens shop.
 Devil on the Mississippi
  • Inspect the door (A). Click a pattern on the left and find its match on the right. The solution is shown above.
  • Enter the shop.
 Devil on the Mississippi
  • Play the hidden object scene (A). Get a MAGNIFYING GLASS and CURRENCY.
  • Inspect the back wall (B). Place the two pieces of CURRENCY on the board. Add the MAGNIFYING GLASS. Use the magnifying glass to inspect each of the bills. Click a bill and then click its match. The solution is shown above. Take the GUN BARREL.
  • Click the printing press wheel (C). The stove recedes revealing an entrance to a tunnel.
 Devil on the Mississippi

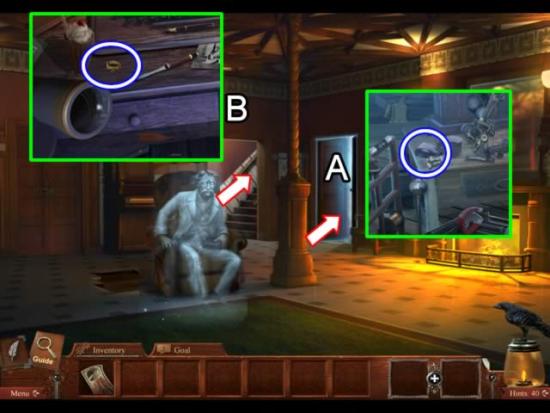
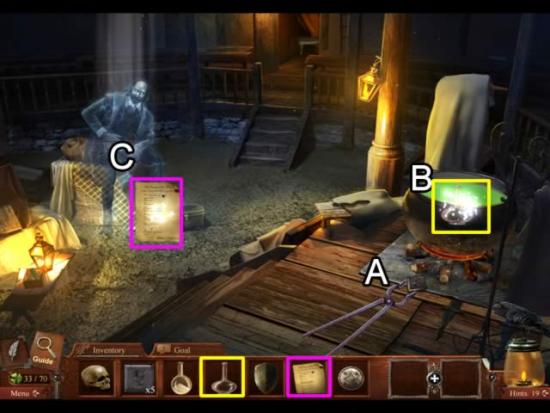
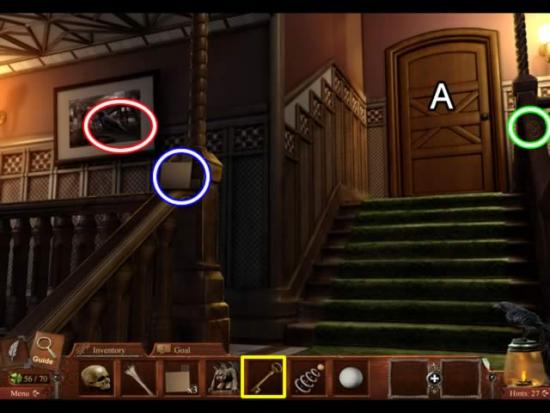
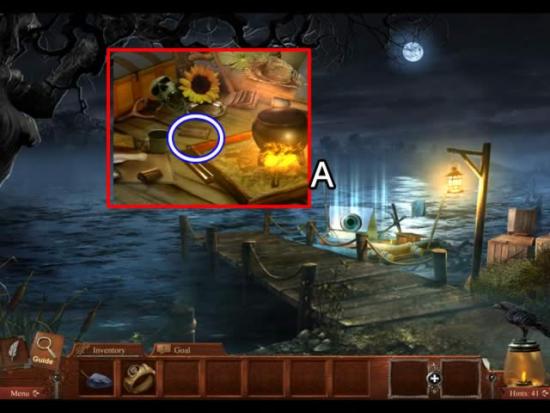
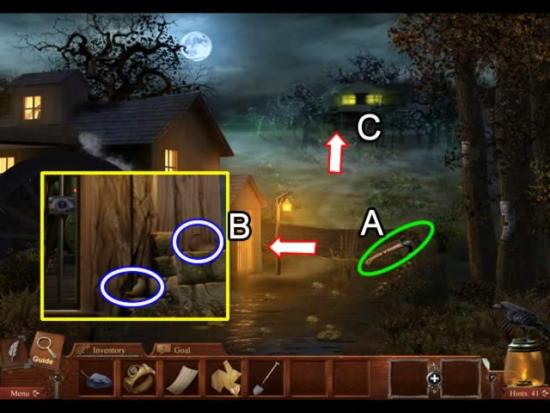
Pick up the ANTLER and BANJO NECK. Go forward (A).

  • Get the ENVELOPE (B). Go forward to exit the tunnel.
  • Pick up a LEFT BOOT and a CHAIR SEAT outside the cabin.
 Devil on the Mississippi
  • Pick up the items scattered around the cabin. The numbered items correspond to their location in the screenshot:
    1. Lantern Housing
    2. Pants
    3. Candle
    4. Banjo Head
    5. Chair Legs
    6. Letter
    7. Gun Stock
    8. Coffee Pot
    9. Coffee
    10. Right boot
    11. Shirt
    12. Deer Head
 Devil on the Mississippi
  • Combine the items and place them in their correct place. The numbered items correspond to their location in the screenshot:

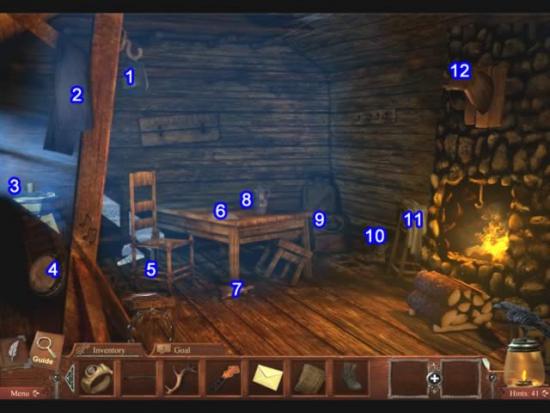
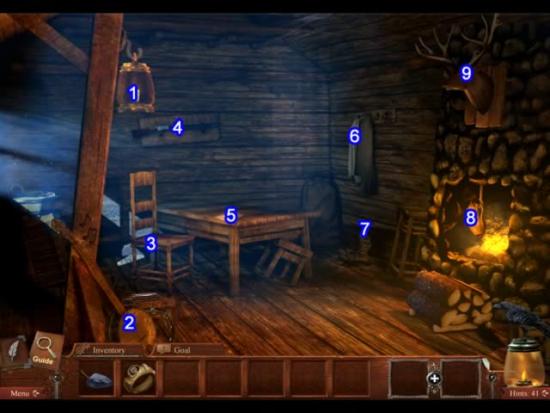
1. Candle + Lantern Housing = Lit Lantern

2. Banjo Neck + Banjo Head = Banjo

3. Chair Legs + Chair Seat = Chair

4. Gun Stock + Gun Barrel = Shotgun

5. Letter + Envelope = Sealed Letter

6. Pants + Shirt = Huck’s Clothes

7. Left Boot + Right Boot = Pair of Boots

8. Coffee + Coffee Pot = Pot of Coffee

9. Deer + Antler = Deer Head

  • Speak with Huck. Exit the cabin. Retrace your steps to the pier.
 Devil on the Mississippi
  • Access the hidden object area on the raft (A). Get the HATCHET HANDLE and the TICKET.
  • The raft floats away. Click the riverboat to dock with it.
 Devil on the Mississippi
  • Solve a puzzle to board the boat. The goal is to remove at least two like-colored barrels until none remain. Each time a group of barrels is removed, the ones above fall down and move over. Having an uneven number left at the end will reset the puzzle.
  • The above screenshot shows one solution.

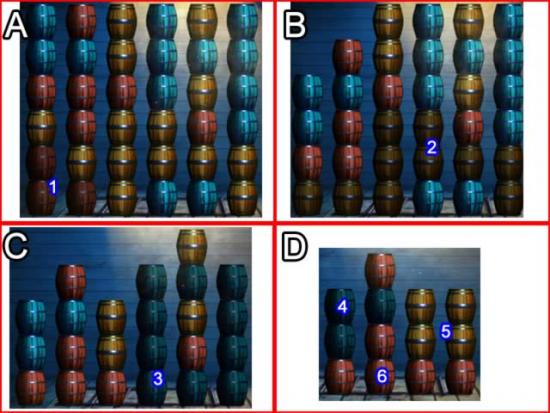
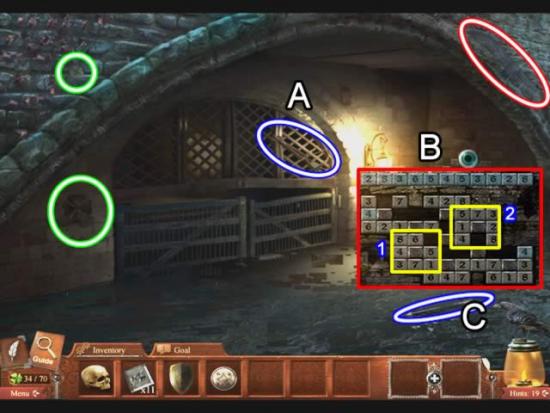
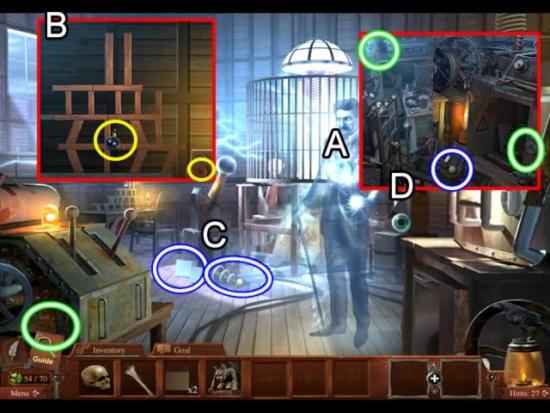
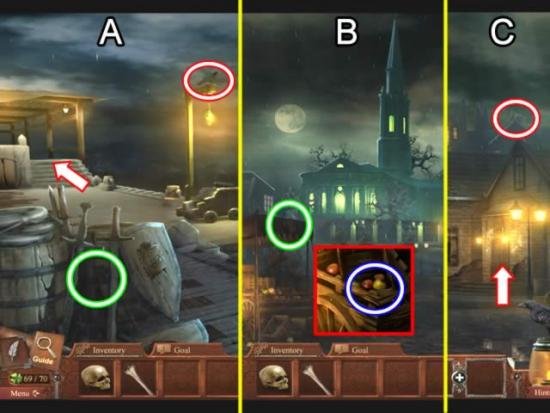
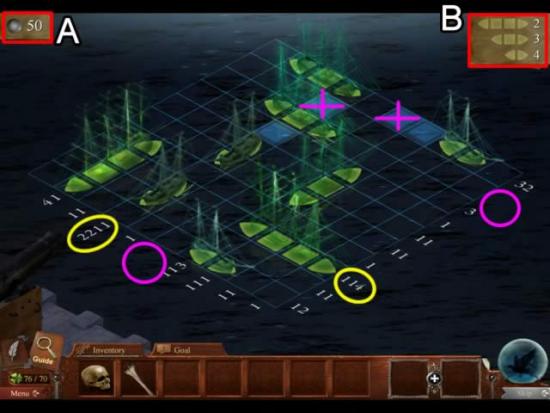
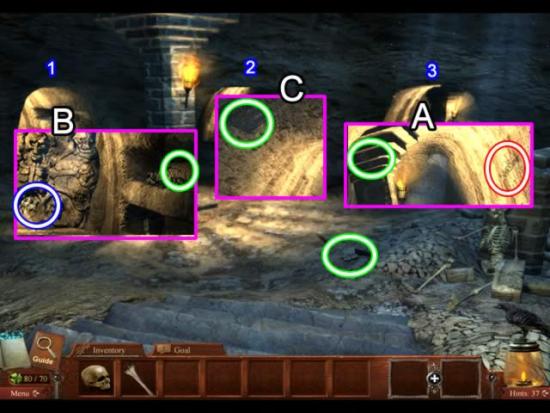
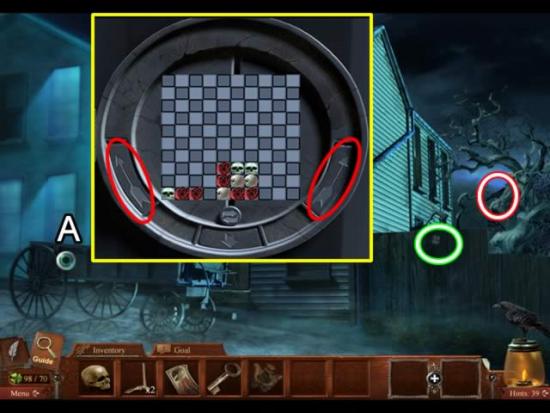
A. Remove the bottom group of three red barrels (1).

B. Remove the large group of yellow barrels (2).

C. Remove the blue barrels (3).

D. Remove the three blue barrels (4), the four yellow barrels (5) and the remaining red barrels (6).

  • Take the HATCHET HEAD to the left of the barrels and the LADDER from under them.
  • Affix the LADDER to the hatch. Enter the Pilots’ Quarters.
 Devil on the Mississippi
  • Pick up the three CONTRACT PIECES.
  • Enter the Captain’s cabin.
 Devil on the Mississippi
  • Pick up the three CONTRACT PIECES.
  • Access the hidden object area. Get the coded message.
  • Click down twice to get to the Quarters Foyer. Go up the stairs to the Steering Room.
 Devil on the Mississippi
  • Zoom in on the helm (A). Use the coded message to steer the boat. The arrows show the direction from the central green peg. The symbols equate to the number keys on a keyboard and indicate how many pegs from the green peg to go. Solution: 2 right; 6 left; 5 right; 4 left.
  • A compartment in the steering column opens. Take the three CONTRACT PIECES.
  • Retrace your steps to the Pilots’ Quarters. Go down the hatch to the raft. Click the raft to leave the riverboat and head to shore.
  • Go forward from the pier and speak with Jim.
 Devil on the Mississippi
  • Combine the HATCHET HANDLE and the HATCHET HEAD to get a HATCHET.
  • Use the HATCHET (A) to cut down a tree.
  • Approach the mill gate (B). Pick up the two CONTRACT PIECES.
  • Head up the hill (C).
 Devil on the Mississippi
  • Use the SHOVEL to dig up the dirt and get the MANSION KEY (A).
  • Pick up the two CONTRACT PIECES on the porch.
  • Use the MANSION KEY to open the door (B).
 Devil on the Mississippi
  • Pick up the two CONTRACT PIECES. Inspect the painting (A) Take the CONTRACT PIECE. Examine the floor tiles (B). This is a slider puzzle. Arrange the tiles to form two “X” patterns. This opens a concealed elevator (C).
 Devil on the Mississippi
  • Take the elevator down to the secret room.
  • Pick up the four COAL BOMBS (red) and 12 CONTRACT PIECES (yellow).
  • Return to the elevator and go back upstairs.
 Devil on the Mississippi
  • Access the painting (A). Place the 28 CONTRACT PIECES on the board. Solve the jig-saw puzzle. Work from the outside in. The above screenshot shows the completed picture. The picture turns into a CONTRACT.
  • Exit the mansion. Return to the mill.
 Devil on the Mississippi
  • Inspect the four cards on the tree (A). They form a pattern. The filled in symbol indicates the card suit, the missing spoke on the wheel signifies the number. Examine the above screenshot to understand the sequence. The first card is the Ace of Spades. The second is the six of Hearts. The third is the Two of Clubs. The fourth is the Seven of Diamonds.
  • Go to the mill. Zoom in on the lock (B). Place the DEATH RING in the center. Rotate the ring until the jester cap is on top.
  • The lock mechanism opens (C). Use the cards on the tree to unlock the door. Rotate the cog on top to the correct suit. Click the number in the row below it. The first line is shown. Continue for the next three cards.
 Devil on the Mississippi
  • Enter the mill. Place the COAL BOMBS and the CONTRACT in the furnace.
  • Quickly exit the mill.
  • Return to the mansion. Watch the cut scene.
  • Enter the door on the left. Place the TICKET on the curtain. Watch the show.

Congratulations! You have finished the bonus chapter for Midnight Mysteries – Devil on the Mississippi Collector’s Edition.

Collector’s Edition Bonus Game – “Dem Bones”

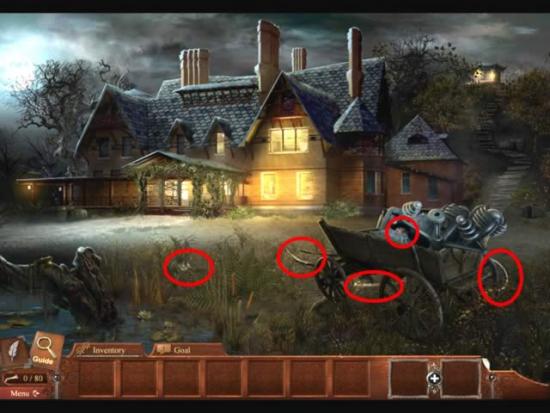
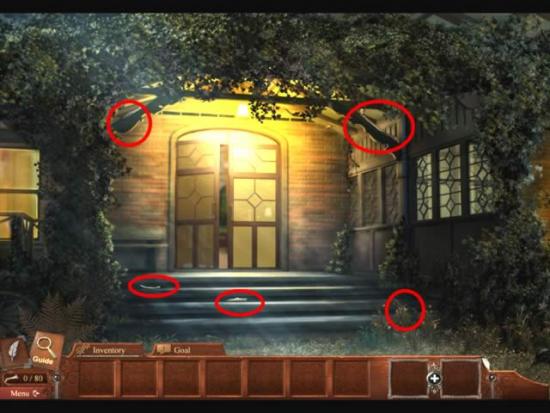
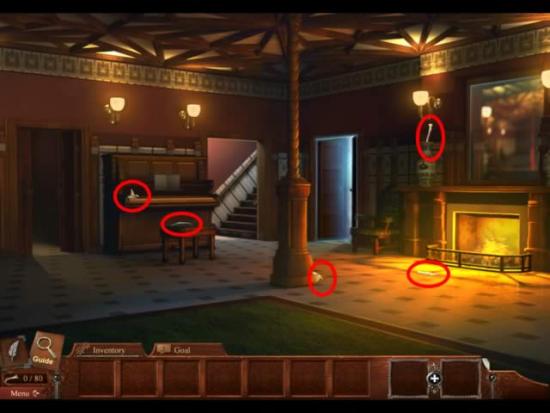
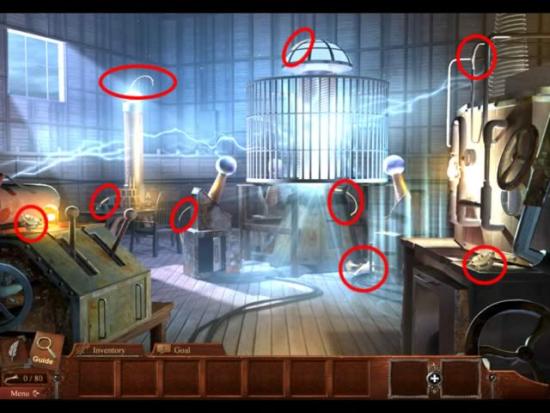
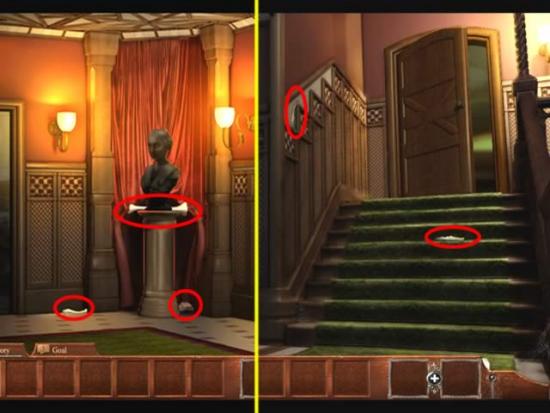
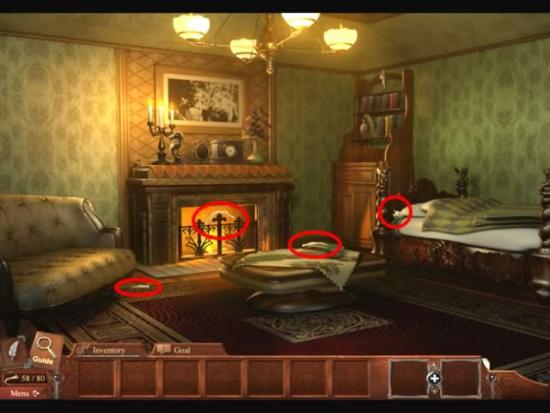
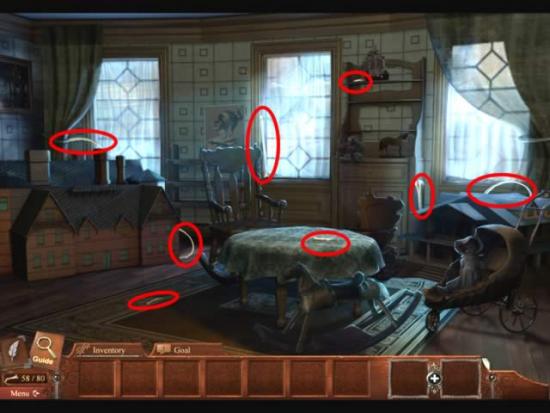
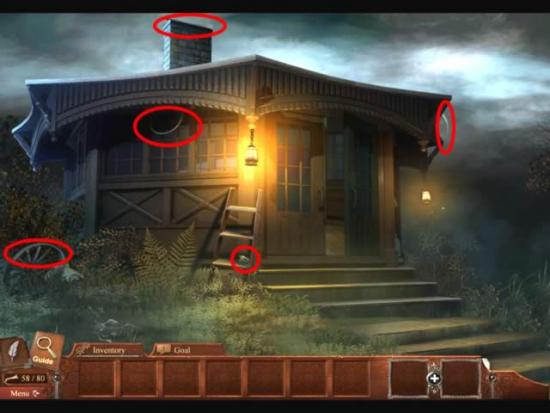
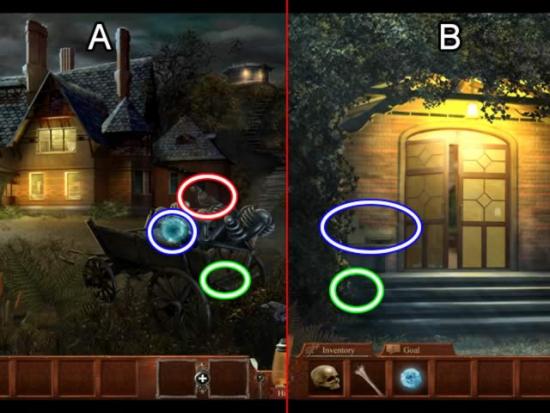
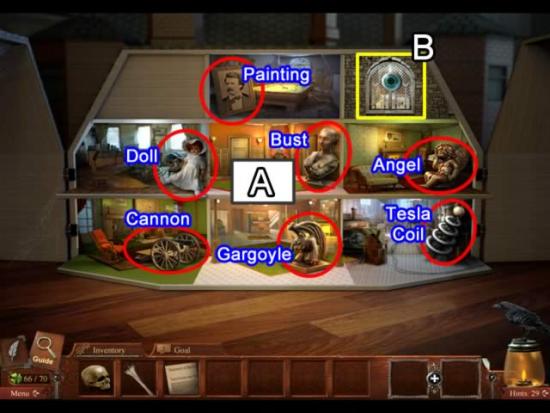
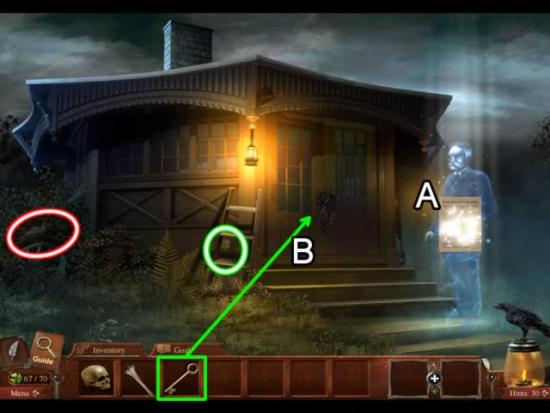
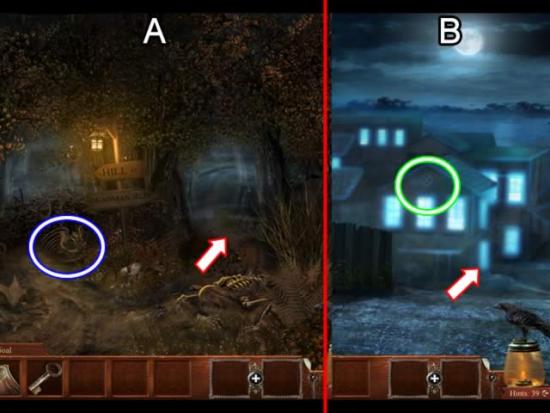
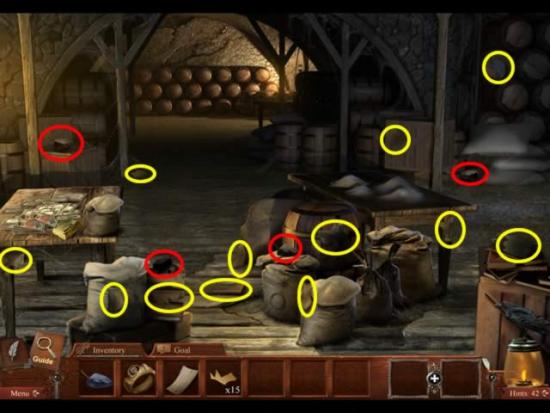
Find the 80 bones spread around the house and grounds. Here is a clue to the location of the bones:

  • Yard – 5
  • Porch – 5
  • Entryway – 5
  • Parlor – 5
  • Tesla’s Lab – 9
  • Tesla’s Lab Hidden Object Area – 8
  • Stairs – 2
  • Billiards Room – 9
  • Billiards Room Hidden Object Area – 7
  • Hallway – 3
  • Bedroom – 4
  • Playroom – 8
  • Outside Hilltop Study – 6
  • Hilltop Study – 4

The followIing screenshots show the all the bones.

 Devil on the Mississippi
  • Yard – 5
 Devil on the Mississippi
  • Porch – 5
 Devil on the Mississippi
  • Entryway – 5
 Devil on the Mississippi
  • Parlor – 5
 Devil on the Mississippi
  • Tesla’s Lab – 9
 Devil on the Mississippi
  • Tesla’s Lab Hidden Object Area – 8
 Devil on the Mississippi
  • Billiards Room – 9
 Devil on the Mississippi
  • Billiards Room Hidden Object Area – 7
 Devil on the Mississippi
  • Hallway – 3
  • Stairs – 2
 Devil on the Mississippi
  • Bedroom – 4
 Devil on the Mississippi
  • Playroom – 8
 Devil on the Mississippi
  • Outside Hilltop Study – 6
 Devil on the Mississippi
  • Hilltop Study – 4