
Best Horror Games On Itch.io – July 2026
Across a bounty of subgenres.![Haze Seas Accessories Tier List [Best Accessories to Equip]](/wp-content/uploads/2026/07/haze-seas-accessories-tier-list.jpg "Haze Seas Accessories Tier List [Best Accessories to Equip]")
Haze Seas Accessories Tier List [Best Accessories to Equip]
The accessories with the best stat buffs in Haze Seas.
![[Roblox] Evomon Shiny Hunting Guide – Including Prismatic and Pris Shinies!](/wp-content/uploads/2026/06/evomon-shiny-hunting-guide.jpg "[Roblox] Evomon Shiny Hunting Guide – Including Prismatic and Pris Shinies!")

Memoria Walkthrough
Memoria is a point-and-click adventure game created by Daedalic Entertainment. In this game, you take on the role of Geron the bird-catcher and Sadja the princess in two separate time periods as they explore a riddle that affects them both deeply. Gamezebo’s walkthrough will provide you with detailed images, tips, information, and hints on how to play your best game.


- Prefer Gamezebo on Google

Game Introduction – Memoria
Memoria is a point-and-click adventure game created by Daedalic Entertainment. In this game, you take on the role of Geron the bird-catcher and Sadja the princess in two separate time periods as they explore a riddle that affects them both deeply. Gamezebo’s walkthrough will provide you with detailed images, tips, information, and hints on how to play your best game.
Game Tips
Interacting with the World

- Memoria utilizes a single-click system of interactivity. When you hover over an interactive object, the cursor will change to reflect what action can be taken with that object. A hand means you can pick up or use it, an eye means you can examine it, a foot means you can walk towards it, etc. Left-clicking on an interactive object will automatically cause that interaction to then take place.
- Non-interactive objects, like scenery, will merely have a normal arrow cursor when hovered over. Clicking on such an area will cause Geron/Sadja to walk there. There is one exception to this rule that is called out in the walkthrough.
- Double-clicking an exit will cause Geron/Sadja to leave the area immediately instead of walking across the screen to the exit.
Inventory and Magic
- The inventory bar is available at any time by moving your cursor to the very bottom of the screen. Doing so will cause the inventory to appear. Moving your cursor off the inventory will cause it to disappear again.
- In the settings menu, accessed by clicking the gear icon in the inventory, you can also assign the inventory to open up upon clicking instead of just hovering.
- The inventory keeps track of items you have collected, magic spells you have available, as well as options like the menu and Questlog.
- To use an item, left-click on it and it will be considered in hand. Move your cursor from the inventory to the object in the world you want to use the item on and click to do so.
- To use an item on another item in your inventory, simply click on the first item, then move left or right to the second item and click on it.
- To use a magic spell, left-click on the spell from the left-hand area of the inventory and then use it like an item, by clicking on another item in your inventory or in the world.
- To examine an item or spell in your inventory, right-click instead.
- If you have enough items in your inventory, scrolling arrows will appear on either the left or right side of the inventory bar. Clicking on these will scroll through your items.
Questlog and Hints
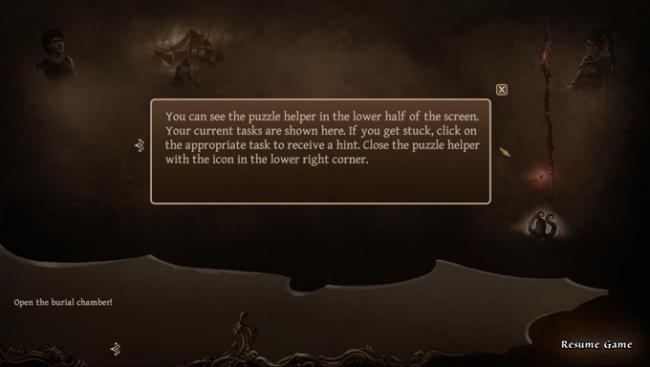
- To view the Questlog, open the inventory and select the book icon from the far right side of the screen.
- This area keeps track of data on the people, places, and items you’ve encountered so far. It also tracks your current objective.
- If you’d like an extra hint on your current objective, click on it. A hint will appear to the right of the objective.
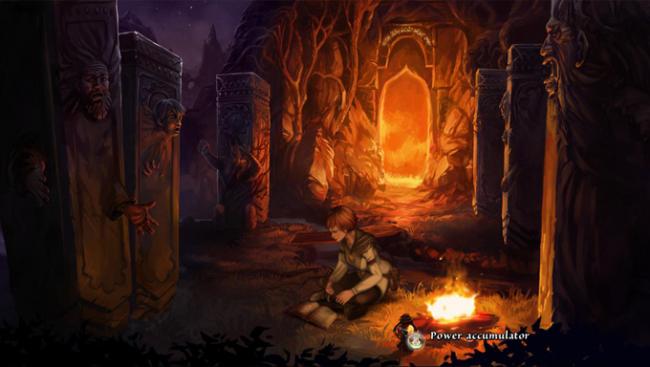
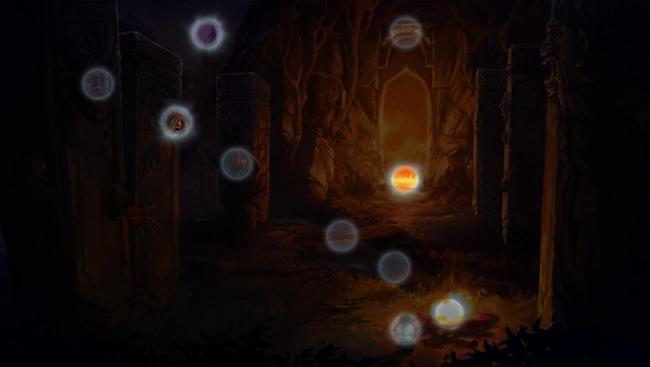
- There are two additional “helpers” available in Memoria: enter the settings menu by clicking on the gear-shaped icon in the inventory. The first area, “Game Settings,” has options for the “Hotspot Indicator” and “Combination Helper.”
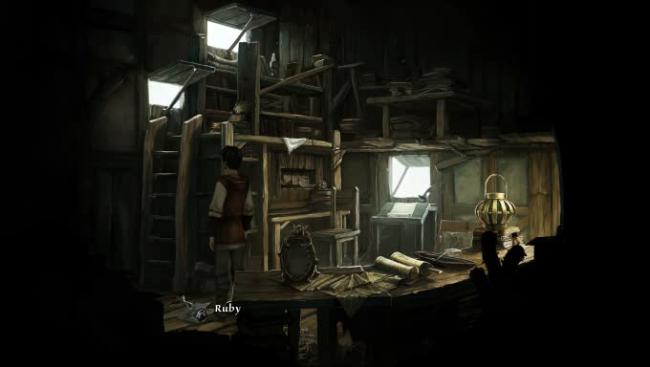
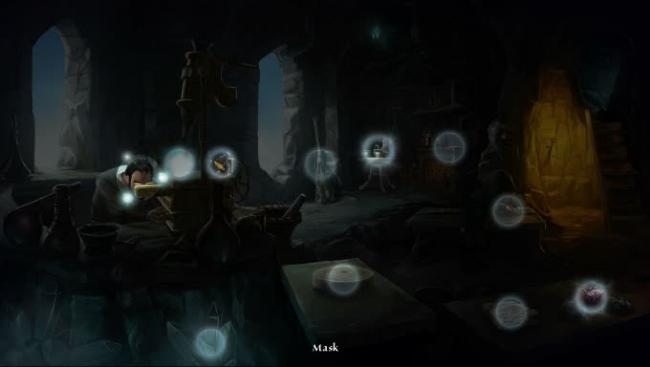
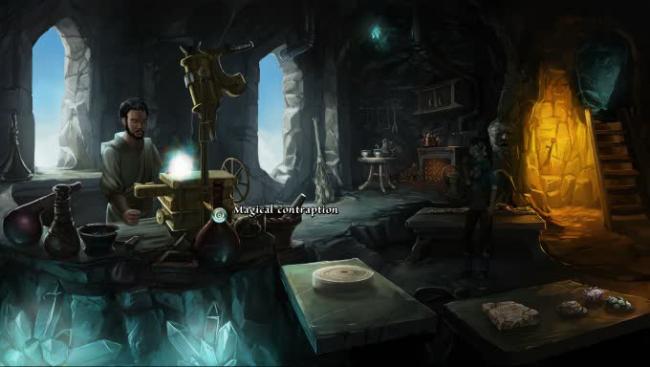
- The Hotspot Indicator is turned on by default. With this on, pressing space will cause all interactive areas in a scene to glow with a ball of white light, as in the image above.
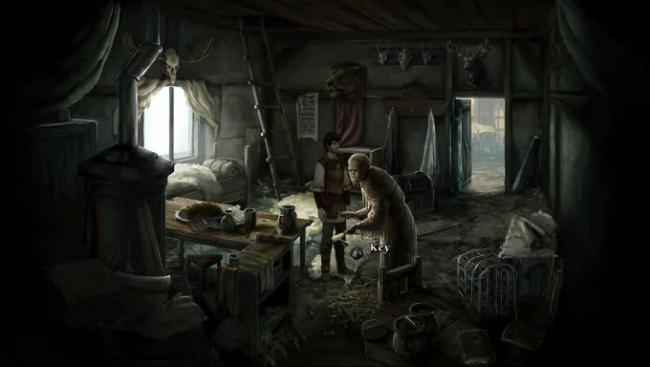
- The Combination Helper is turned off by default. With this on, the golden border around objects will glow when placed over a hotspot that the object can be used with. So, holding a key over its lock will cause it to glow, but holding the key over a person will not.
- Hint: Memoria is a direct sequel to The Dark Eye: Chains of Satinav. While you don’t need to play Chains of Satinav to enjoy/understand Memoria, there are some plot points and character history not explained outright. Talking to NPCs and examining the world around you will sometimes offer information on the events of Chains of Satinav and the overarching world of The Dark Eye.
- Hint: Magic is very important in Memoria. If you get stuck in an area, don’t forget which spells you have available and their dual uses—sometimes a spell is all you need.
- Hint: Many achievements in Memoria are easy to miss, or cannot be earned at the same time. If you’re going for all achievements, be sure to save often. If two achievements are mutually exclusive, save, earn one, then load and earn the other.
- Some achievements are called out in this walkthrough, but the full list of achievements and how to earn them is available at the end.
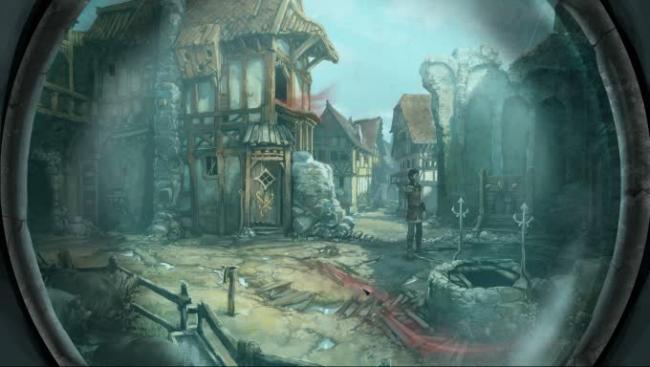
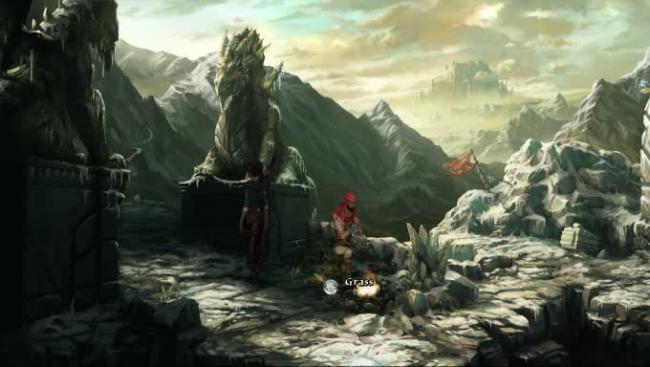
Prologue
Overview: Geron enters the camp of the traveler Fahi and his daughter, in search of a spell that will revert Nuri back to her original fairy body.
- This short section acts as a tutorial for the game. If you’d like a few hints on how to play, select “Yes” when asked “Would you like an introduction to the game?”
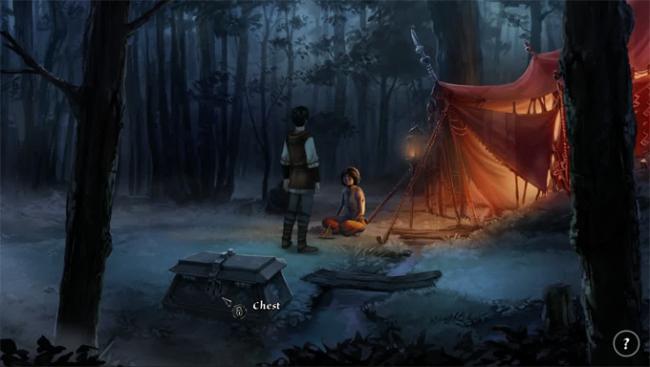
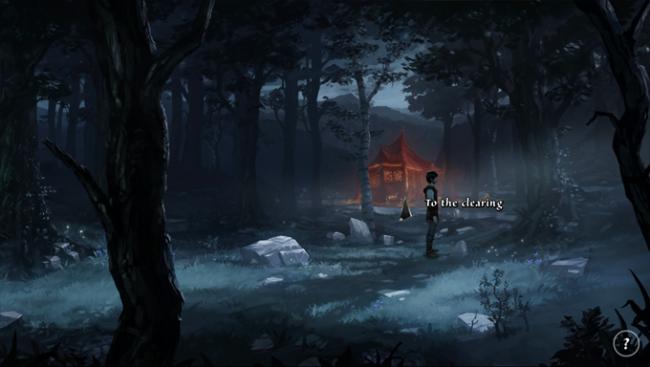
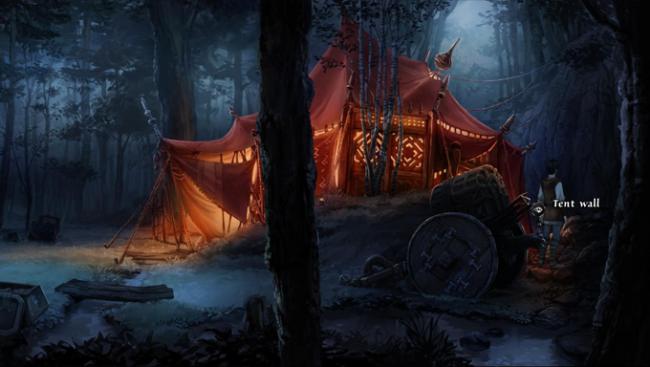
- Walk to the right until you see the red tent in the background.
- Enter the tent area by clicking on “To the clearing.”
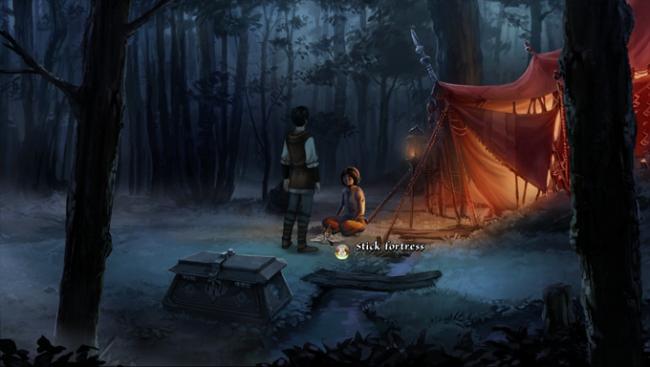
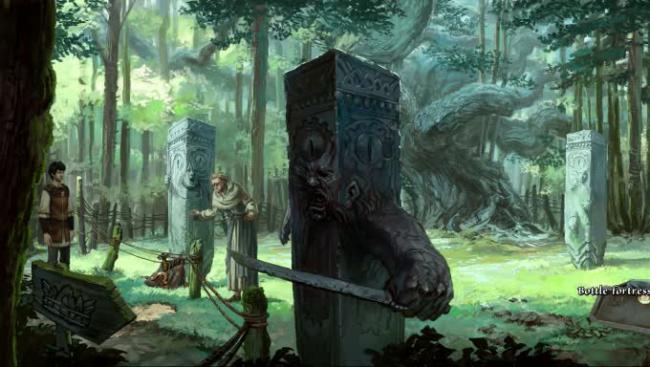
- After a short conversation, the girl will ask you to prove yourself by fixing her stick fortress.
- If you click on the stick fortress, it will stand up momentarily but then fall back over.
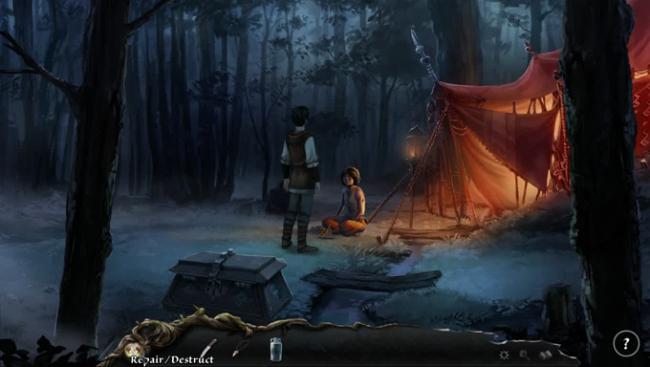
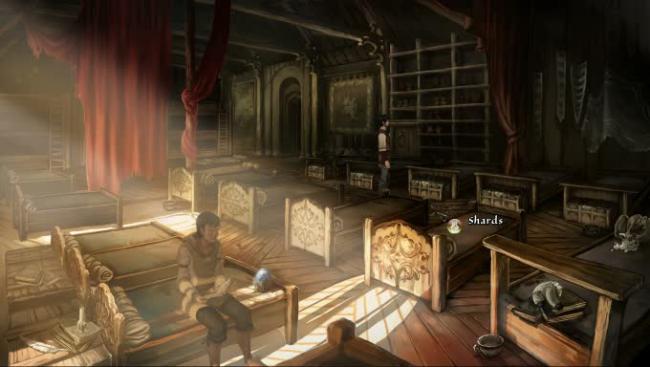
- Open the chest and take the BOTTLE.
- Use Geron’s MAGIC – REPAIR/DESTRUCT on the BOTTLE in your inventory to get SHARDS.
- Use SHARDS on the stick fortress.
- Use MAGIC – REPAIR/DESTRUCT on the stick fortress.
- The girl will let you pass. Geron walks into the tent and begins speaking to Fahi.
- When Fahi asks if you’d like some tea, select either option.
- When Fahi asks if you like riddles, say either “Yes, I like riddles” or “As long as they’re solvable…”
- When Fahi asks if you’re ready, select either option.
- Fahi begins to tell Geron his dream, and the Prologue ends.
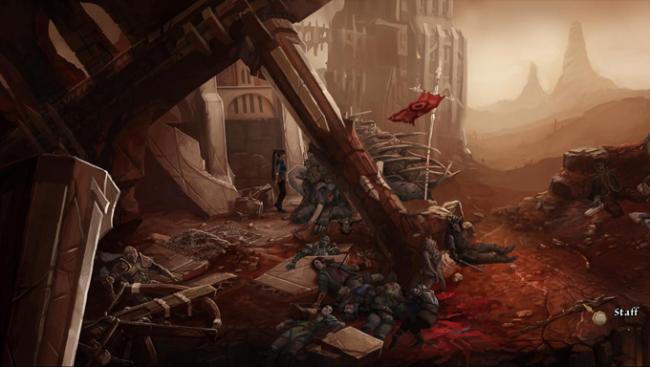
Chapter 1
Overview: We are now witnessing Fahi’s dream, which takes place 450 years ago. Instead of Geron, we control Princess Sadja, in a dark tomb her party is attempting to open.

- After the dialogue, feel free to talk to your party members to learn more about them and Sadja’s adventure, or skip this entirely.
- Exit the room to the south by clicking on “To the hall.”
- Continue east, “To the battle site.”
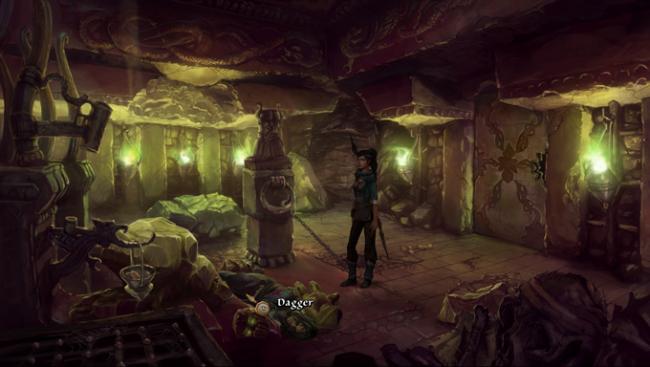
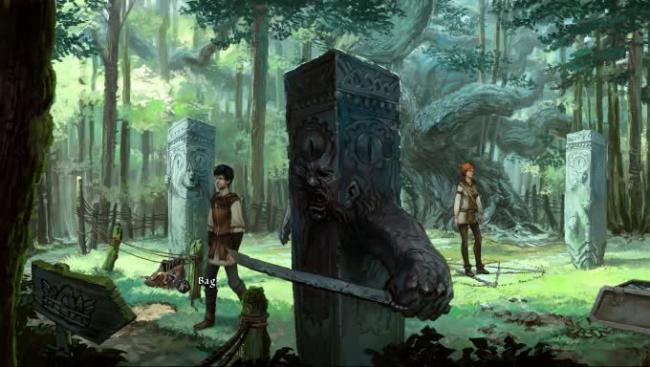
- Pick up DAGGER from the floor near the center of the room.
- Use DAGGER on the bag strapped to Harun’s side. A number of items will fall out, below his body.
- Move to the south edge of the scene. Pick up HORSE BRUSH, ALCOHOL, and BANDAGE.
- Return to the tomb where your party is waiting, by traveling north, west, and north again.

- Use HORSE BRUSH on the tomb entrance. The magician will use it to wipe away the dust and reveal the door lock.
- While opening the door, the beetle key breaks. It needs to be glued somehow.
- Use DAGGER on the dark area marked “????” to the right of the magician. This will make STICKY DAGGER.
- Use STICKY DAGGER on the magician; he’ll use the stickiness to hold the beetle key together and open the door.
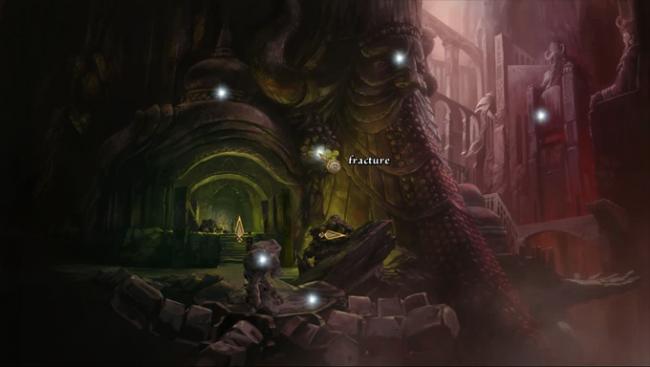
- Sadja and the magician will enter the tomb, but it’s dark and they cannot light a fire or use magic.

- Take the DUSTY SILVER PLATTER from the middle of the floor.
- Take the incense bowl from the left side of the screen. Sadja will cut her hand on the hook while reaching for it.
- In your inventory, combine ALCOHOL and BANDAGE to get ALCOHOL-SOAKED BANDAGE.
- Use ALCOHOL-SOAKED BANDAGE on the bloody hook to get BLOODY BANDAGE.
- Use BLOODY BANDAGE on the incense bowl. Now take incense bowl to get INCENSE BOWL WITH BANDAGE and INCENSE STICK.
- Use DUSTY SILVER PLATTER on the hook. Sadja will hang the platter on the hook.
- In your inventory, combine ALCOHOL and BANDAGE again.
- Use ALCOHOL-SOAKED BANDAGE on the DUSTY SILVER PLATTER. This will shine it up just enough to reflect light onto the statue.
- After a short event, Sadja ends up in an almost pitch-black tomb with the magician out of commission.
- Take DUSTY SILVER PLATTER from the hook (although it will be SHINY SILVER PLATTER in your inventory now).
- Use BOWL WITH BANDAGE on the hook; Sadja will hang it back in place.
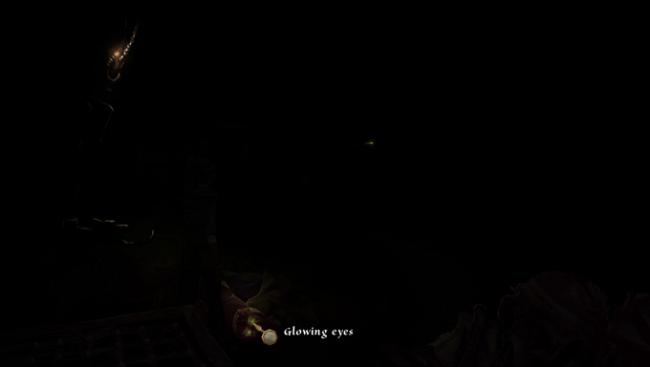
- Use INCENSE STICK on the guardian’s glowing eyes to get SMOLDERING STICK.
- Use SMOLDERING STICK on INCENSE BOWL.
- Sadja will reach up and someone begins speaking to her. Ask it whatever questions you would like, until you can request “Open the door,” then “Command the guardians,” and finally “Create light!”
- Sadja will gain MAGIC – ACTIVATE/DEACTIVATE.
- Use MAGIC – ACTIVATE/DEACTIVATE on the darkness.
- When given the choice, you can select “Free the staff,” but the demon staff will explain he’s too firmly in place. Choose “End” to stop touching the staff and move freely.
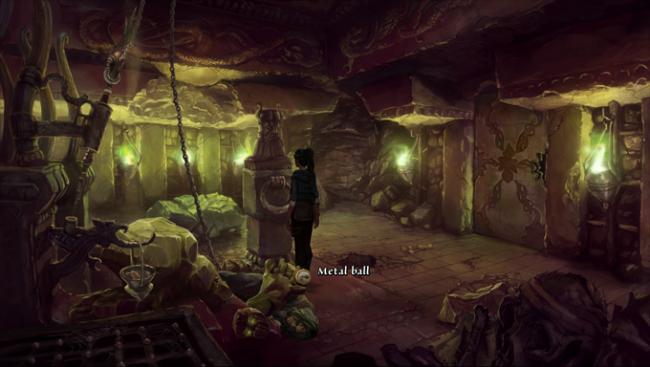
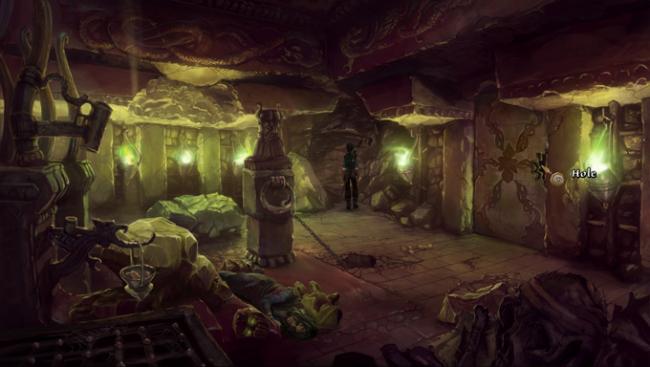
- In the scene, use METAL BALL on RING. The METAL BALL is somewhat obscured by the guardian’s arm; the RING is the large stone ring attached to the center column.
- Sadja will drop the METAL BALL through the RING.
- Now use METAL BALL on HOLE in the floor. Sadja will drop the METAL BALL into the HOLE, pulling the demon staff out of its holder. It will get stuck in the RING.
- Take the STAFF.
- Use MAGIC – ACTIVATE/DEACTIVATE on the REMAINS of the guardian.
- He will move slightly, allowing easier access to the magician.
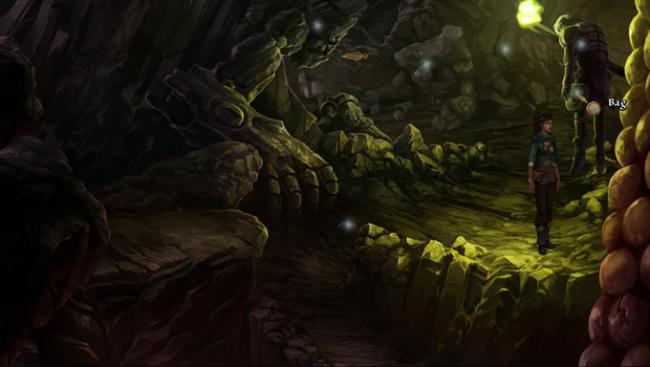
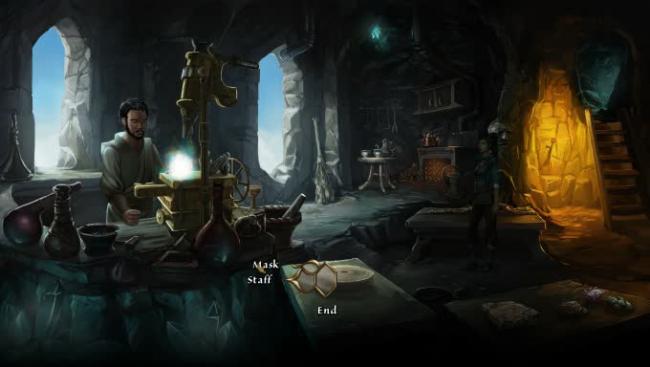
- Take the DAGGER from the magician. Sadja will also pick up the MASK and the magician will speak.
- With his final breaths, he instructs Sadja to take the MASK to the prince of Drakonia. But first, she has to get out of this tomb.
- Use MAGIC – ACTIVATE/DEACTIVATE on the braziers near the door to make it dark again.
- Now you can see the SLIVER OF LIGHT in the back wall. Use STICKY DAGGER on SLIVER OF LIGHT to open the hole a bit more.
- Examine the SLIVER OF LIGHT. You’re now looking into the cave with Harun’s body.
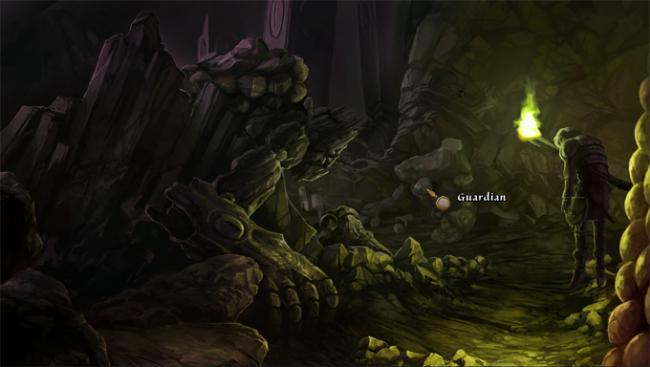
- Use MAGIC – ACTIVATE/DEACTIVATE on the guardian leaning against the wall.
- You’re now controlling the guardian, much like an item. Use him on the ROCK FACE to his left.
- He will pound the wall, shaking the room.
- Use the guardian on the ROCK FACE two more times. A BRAZIER will fall to the ground.
- Use the guardian on the BRAZIER; he will pick it up.
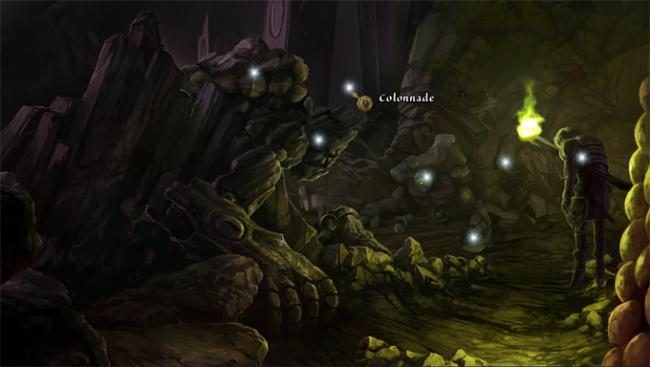
- Now use the guardian, holding the BRAZIER, on the COLONNADE. He will toss the BRAZIER into another room—specifically, it lands in the crypt entryway.
- Return to the tomb where Sadja is; the exit arrow is just above the guardian.
- Use MAGIC – ACTIVATE/DEACTIVATE on the darkness again to light up the room.
- Look out the HOLE in the right-hand side of the tomb door. Sadja is now looking onto the crypt entryway.
- Use MAGIC – ACTIVATE/DEACTIVATE on the BRAZIER on the ground.
- Use MAGIC – ACTIVATE/DEACTIVATE on the guardian on the ground.
- Use the guardian on his ARM; he will grab it.
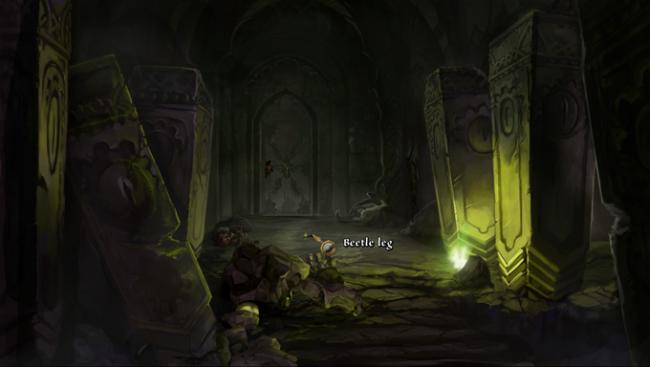
- Use ARM on BEETLE LEG; the guardian will slide his arm into the BEETLE LEG and it ends up near the door.
- In your inventory, use BANDAGE on STAFF to get STAFF WITH BANDAGE.
- Use STAFF WITH BANDAGE on BEETLE LEG to pick it up.
- In your inventory, use STICKY DAGGER on BEETLE LEG to make STICKY LEG.
- Use STICKY LEG on BEETLE on the tomb door to complete the lock.
- Another hole opens up in the door, this time in the bottom-right corner.
- Return back to the room Sadja is currently in by clicking “back” on the hole she’s looking out of.
- In the room, use the CHAIN on the new hole in the door. Sadja will roll the ball through the hole.
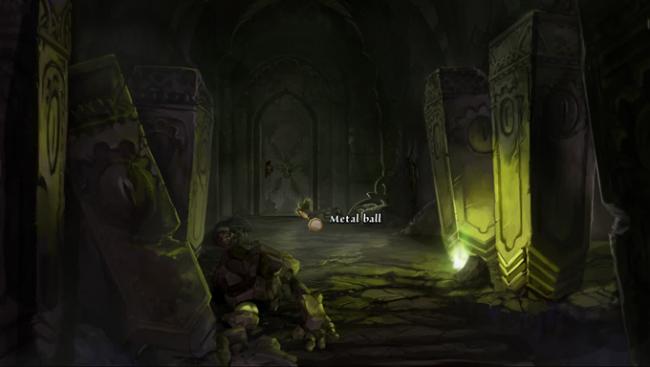
- Look out the upper hole again. The METAL BALL is now sitting just outside the door.
- Use MAGIC – ACTIVATE/DEACTIVATE on the ARM near the door.
- Use the ARM on the ORNAMENTAL SHELF; it will grab onto the shelf for leverage.
- Use the ARM on the METAL BALL. It will roll the ball towards the guardian.
- Use MAGIC – ACTIVATE/DEACTIVATE on the guardian.
- Use the guardian on METAL BALL. He will grab the ball and Sadja orders him to pull down the door. The demon staff explains he’s not strong enough.
- Use the guardian on the southern exit, “To the hall.” He will throw the METAL BALL into the next room.
- Use MAGIC – ACTIVATE/DEACTIVATE on the standing guardian in the hall.
- Use the guardian on the METAL BALL; he will pick it up and tug, but is not strong enough.
- Use MAGIC – ACTIVATE/DEACTIVATE on the HAND that the guardian is standing on.
- The giant colossus awakens and tears the door off.
- After a brief cutscene, you’ll have a dialogue with Rachwan. Select any option, but you’ll have to offer him the ruby to progress.
- You’ll be back in Fahi’s tent as Geron; Fahi has finished telling the dream.
- When he mentions “unimportant details,” you can pry for more information or just select “The riddle?” to move on.
- Once the conversation is over, you’ll be in Geron’s room. Nuri—who is currently trapped in the body of a raven—has hurt her wing.
- Geron needs to create a salve for her. If you check the recipe on the desk next to Nuri, you’ll learn it requires ground-up whirlweed and fat or grease.
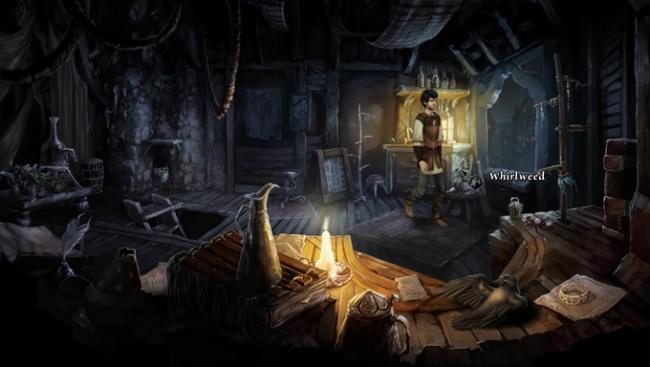
- Take the WHIRLWEED from near the dresser.
- Use the WHIRLDWEED on the BIRDBATH near the center of the room.
- Use the KNIFE on the BIRDBATH WITH WHIRLWEED; Geron will grind up the whirlweed with the butt of the knife.
- Use the KNIFE on the CURTAIN in the left-hand corner to get STRIP OF FABRIC.
- Use STRIP OF FABRIC on the POT near the CURTAIN. Geron dips the fabric in the pot and covers it in grease.
- Use the now GREASY RAG on BIRDBATH WITH WHIRLWEED JUICE. This completes the recipe.
- Use SALVE on Nuri. Geron wraps her wing, a cutscene begins, and Chapter 1 ends.
Chapter 2
Overview: Geron decides to take Nuri to see Fahi to boost her spirits, but soon discovers Fahi’s camp has been attacked and he has gone missing. Geron needs to figure out what happened to Fahi, who is Nuri’s only hope of returning to her old self.
- Geron and Nuri are in a beautiful forest; Geron is encouraging her to try flying.
- Geron offers happy memories to make it easier; select any memory each time the option appears. After three memories, Geron decides to take a break.
- Exit on the southern edge of the screen, “To the campground.”
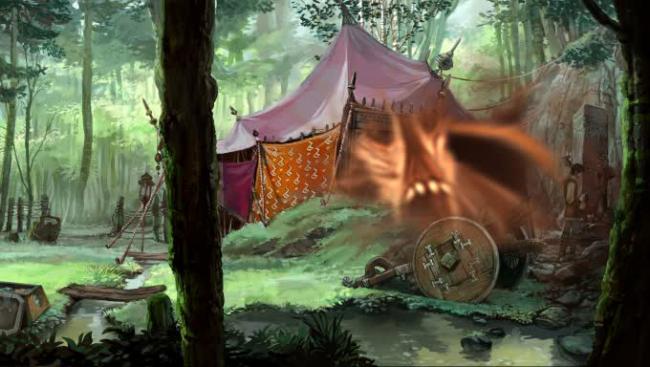
- Geron finds Fahi’s camp in disarray; apparently a mob attacked the night prior and was turned into stone. Fahi and his daughter are nowhere to be found, and two mages are investigating the scene.
- Note that NURI is now an item in your inventory.
- Use NURI on the stone pillar that the mage, Owlric, is speaking to. Geron will advise her on what to say.
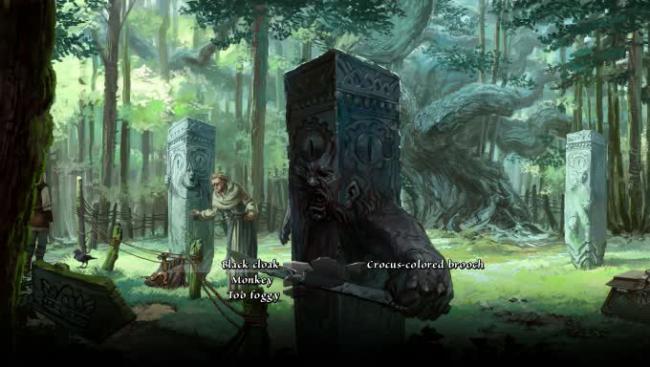
- You want NURI to distract Owlric, so give her the longest answers possible: “Eleven to fifteen,” “Crocus-colored brooch,” “From the north-east,” and “To the north-west.”
- Owlric will become overwhelmed by NURI’s answers and ask Bryda to help him take notes.
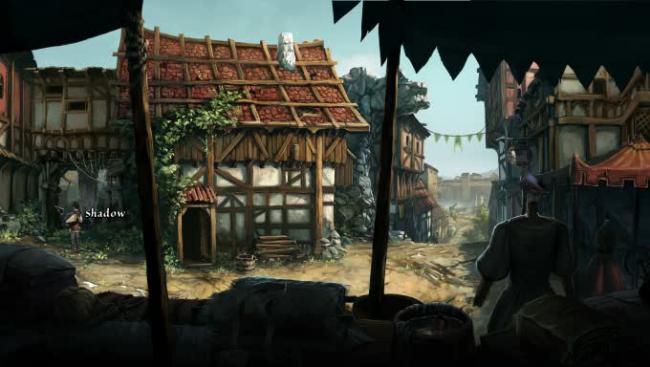
- Move “Around the clearing,” the exit just left of the stone pillar. Geron will appear on the other side of the camp.
- Use KNIFE on the BARRIER to cut the rope, and then move into the tent.
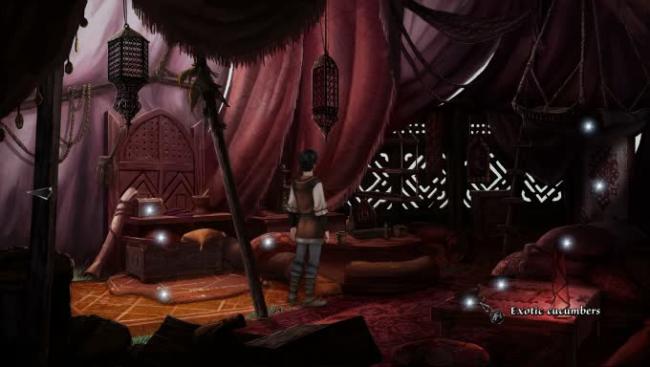
- Inside the tent, take the EXOTIC CUCUMBERS from the table.
- There are a number of other items; move each one until you see a key flash under one of them.
- Take the KEY. Bryda will announce that she is going into the tent; Geron needs to get out.
- Use KNIFE on the WALL HANGING on the right side of the screen to cut an opening in it.
- Exit to the outside. Bryda walks in; Geron notices another statue behind the tent, with the MASK from Sadja’s time in its hand.
- Use the WEDGE under the cart to move it out of your way.
- Move back to the clearing on the left; use the KEY on the LOCK.
- Open the CHEST to reveal the BOTTLE FORTRESS and CHISEL. Take the CHISEL.
- Move back to the other side of the clearing, near Owlric.
- Use MAGIC – REPAIR/DESTRUCT on the BOTTLE FORTRESS, which is just barely in view from this location.
- The sound distracts Owlric briefly; take the HAMMER from his bag while he is looking away.
- In your inventory, combine HAMMER and CHISEL.
- Move back to the other side of the clearing and go behind the tent to the statue with the MASK.
- Use HAMMER AND CHISEL on the MASK.
- Walk left, back to the clearing, where you’ll be confronted by Owlric. He takes the MASK and leaves you to be questioned by Bryda.
- Answer Bryda’s questions honestly to receive the achievement “Honesty Is The Best Policy.” The correct answers are: “A powerful magic weapon,” “It was behind the tent,” and “Geron.”
- Ask Bryda all of the questions presented and when out of dialogue options, she’ll say “That’s enough.”
- Geron will retrieve NURI and leave the campground; you’ll be back in his room again.
- After speaking to Nuri, who decides to stay behind and rest, you need to go to the Inn.
- Exit Geron’s room via the stairs.
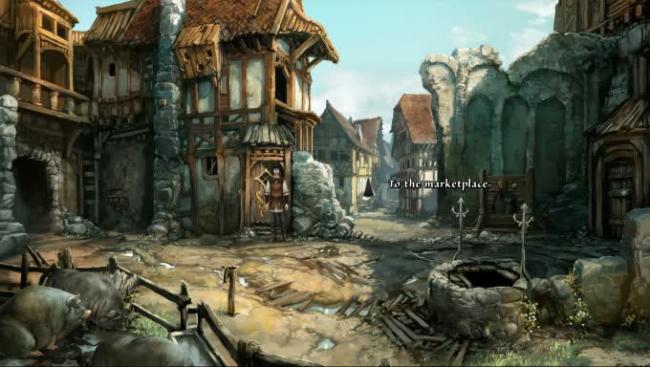
- The Inn is in the center of town, so go north via the “To the marketplace” exit.
- From the marketplace, enter the door of the central building, “To the taproom.”
- Geron will see his friend Jacomo and start up a conversation.
- Feel free to ask Jacomo about Fahi and himself, or just select “Fifth member of the mob” to learn that the group of three men currently in the bar were present last night.
- When the conversation with Jacomo ends, you will have WINE JAR in your inventory.
- Also, turn the PORK ROAST on the spit above him to earn the “Crispy” achievement. Now interrogate the group of men.
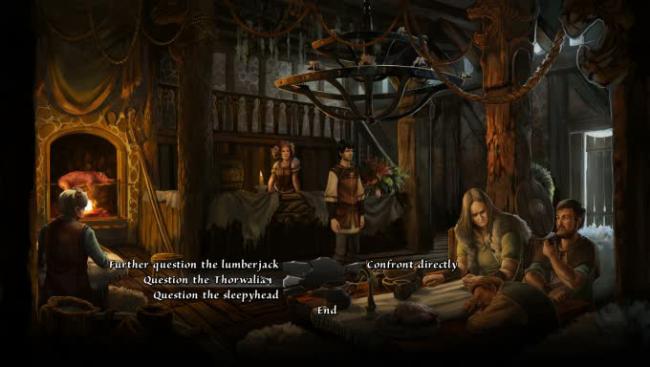
- Question all three men separately to begin with. After you’ve spoken to each one, select “Express suspicion.”
- Geron claims someone is lying. Select “The Thorwalian is lying.”
- For your reason, select “He wasn’t even here.” Solving this mystery correctly earns you the “Master Detective” achievement (although it pops up slightly later).
- Hilda the barkeep interrupts and admits she was the one with the angry mob and describes the event to Geron. Bryda appears and drags him outside.
- Feel free to ask Bryda any questions you have, or select “Count me in” to move forward.
- Bryda will give you CHARCOAL AND PARCHMENT, LIST, and MAGIC – ODEM ARCANUM. This new spell allows Geron to see magical items nearby, which will glow red.
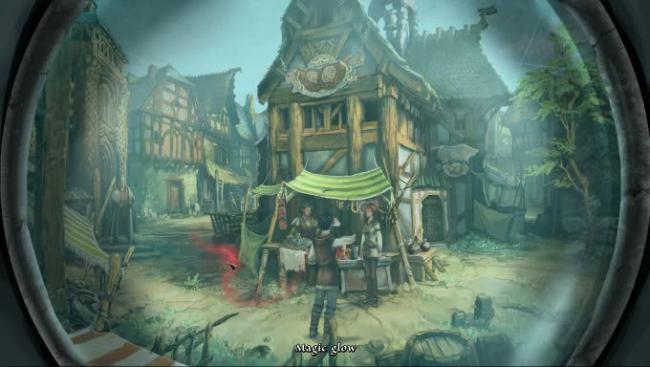
- Use MAGIC – ODEM ARCANUM and you’ll see a red streak near the vendor’s stall. Click on the red streak when it says “magic glow” to receive HEAP OF SHARDS.
- Note: magic glows do not indicate they are interactive by changing the cursor to a hand or eye, etc. They will remain an arrow but the description will change.
- Bryda leaves to wait in the clearing where Fahi’s camp was. You now need to create a sketch of the culprit, find bait for him, and find an astral accumulator.
- Let’s start by following the streak of red to its destination: exit to Geron’s house.
- Use MAGIC – ODEM ARCANUM in the area in front of Geron’s house. Another magic glow appears.
- Click on this magic glow and Geron comments it’s leading to his window. Enter Geron’s house via the door “to the inside.”
- Once inside, use MAGIC – ODEM ARCANUM again. The magic glow appears in front of the dresser.
- Click on “magic glow” to get PURPLE SHARDS.
- In your inventory, combine HEAP OF SHARDS and PURPLE SHARDS. You will end up with HEAP OF SHARDS, but both piles will be combined.

- Use MAGIC – REPAIR/DESTRUCT on HEAP OF SHARDS to get GLASS BOX.
- Now return to the marketplace vendor; exit Geron’s house via the stairs and head north.
- Give the vendor the GLASS BOX and Geron will learn that the missing piece was a ruby; whoever destroyed the box was searching for rubies.
- The GLASS BOX will break after the conversation; use MAGIC – REPAIR/DESTRUCT on the HEAP OF SHARDS again.
- Enter the taproom of the inn.
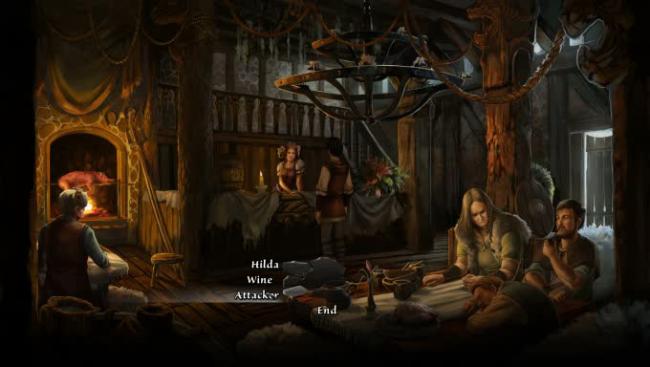
- Speak to Hilda. Select “Attacker” and she will create a rough sketch of the culprit.
- Use MAGIC – REPAIR/DESTRUCT on the wine barrel. It will spring a leak.
- Use WINE JAR on the leaky wine barrel. You can give the WINE JAR to Jacomo or keep it yourself.
- Use GLASS BOX on the leaky wine barrel to get WINE BOWL.
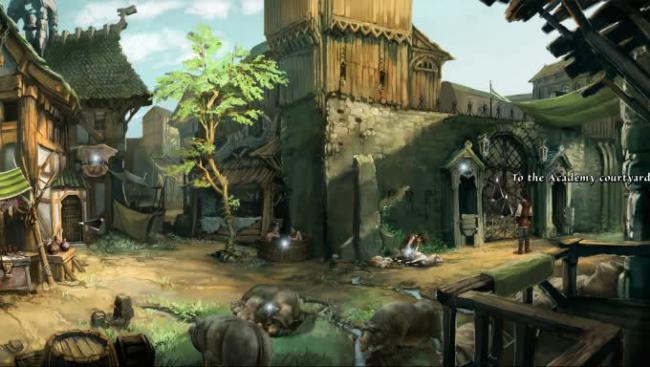
- Exit the taproom and head east from the marketplace to the Magic Academy. Enter the Academy courtyard.
- You’ll be stopped upon entering; select “Talk to Owlric Bodiak” to be granted access.
- Enter the door near the center of the screen that leads “Up.”
- You can go to the Magister’s Chamber to the left of the stairs and speak to Owlric to learn a little about the MASK and his investigations, but nothing useful—the conversation is optional.
- Enter the first door in the hallway, “Into the library.”
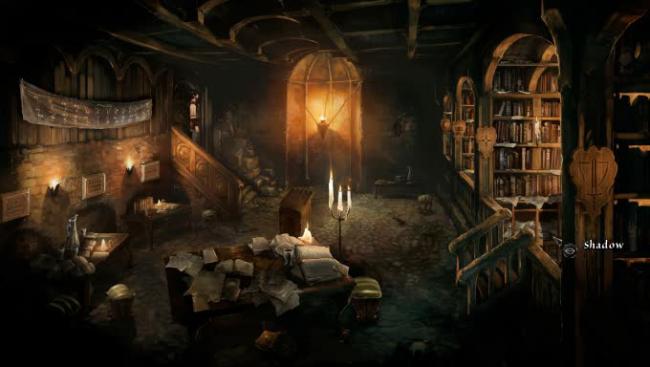
- Talk to the Shadow near the bookshelves. Ask the Shadow “What are you doing?” He’ll explain his magic spell that hardens liquids.
- Select “What are you really doing?”
- Now give the Shadow the WINE BOWL. He says he could turn the wine into a ruby, but wants something foreign in exchange.
- Give the Shadow the EXOTIC CUCUMBERS. He’ll now turn the WINE BOWL into FAKE RUBY.
- Talk to the Shadow again and ask “Astral accumulator?” He says one is in the dormitory.
- Exit the library and enter the second door in the hallway, “To the dormitory.”
- In this room, a student on a bed will kick you out if he hears or sees you. There are brittle floorboards and glass shards on the ground that will make noise if Geron steps on them. These areas are hotspots, so press the space bar to pinpoint them easily.
- Use MAGIC – ODEM ARCANUM to see a magic glow on the fourth treasure chest from the door.
- To get to this chest without alerting the student, take the following path: walk straight from the door, past the curtain.
- Turn around the bed and walk up between the first two beds.
- Use MAGIC – REPAIR/DESTRUCT on the glass shards on the floor. They will become a bowl.
- Walk past the bowl and open the fourth treasure chest.
- Take the POWER ACCUMULATOR from the chest.
- While you’re here, walk directly down from that chest to the egg on the bed.
- Take the egg, or POWER ACCUMULATOR (2), from the bed.
- Exit the room by retracing your steps backwards, without alerting the student, to get the “Masterful Sneaker” achievement.
- Now leave town and return to the clearing where Bryda is waiting: exit the Academy, head west, and go north to Geron’s house. Go out the western tunnel exit to reach the clearing.
- Examine the bag that Owlric left behind to get MAGIC SEASHELL. This is what Owlric was using to “speak” to the stone pillars.
- Only one pillar is any use to you—go behind the tent and use the MAGIC SEASHELL on the pillar that was holding the MASK.
- This pillar remembers the attack and will turn your drawing into GOOD SKETCH.
- Now return to Bryda. First, give her the POWER ACCUMULATOR (2), the one that looks like an egg. This is the wrong item, but it earns you the “Baited” achievement.
- Give Bryda the POWER ACCUMULATOR, the correct, silver one.
- Give Bryda the FAKE RUBY.
- Give Bryda the GOOD SKETCH.
- Once you’ve handed everything over, an event occurs, and we are now in control of Sadja again in the past.
- Sadja is starving and her guide, Rachwan, refuses to share his food with her. Bribing him with silver does nothing, so let’s move on immediately.
- Pick up the following items from this screen: ROPE, PELT, WOODEN LOGS, DANDELION, and STICK.
- Sadja needs to create a trap to catch a rabbit.
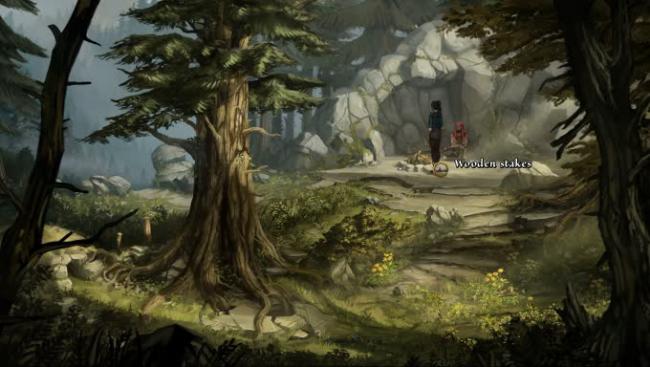
- In your inventory, use DAGGER on WOODEN LOGS to get WOODEN STAKES.
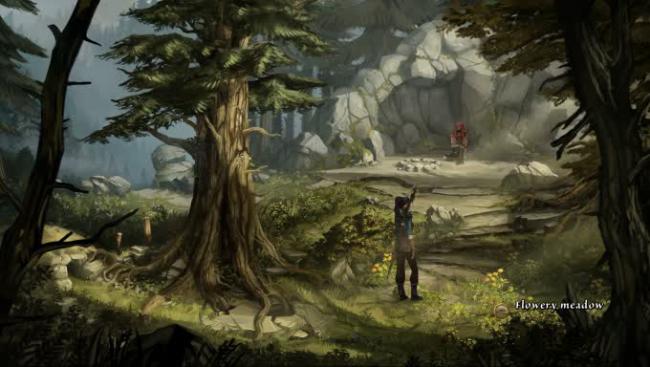
- Use PELT on the flowery meadow in the bottom-right area of the screen.
- Use STICK on PELT.
- Use WOODEN STAKES on PELT. The PELT will be fastened to the ground.
- Take STAKES from the PELT. One stake will remain, fastening the PELT.
- Use ROPE on PELT WITH HOLES. Sadja will thread the ROPE around the PELT to make TIED-UP PELT.
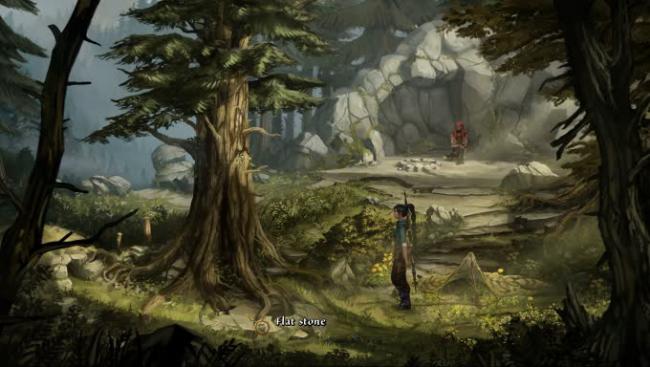
- Use DANDELION on the flat stone in front of the tree.
- Return to the dandelion patch and pick up another DANDELION.
- Use DANDELION on the hole on the left side of the screen.
- Use BUSHES WITH END OF ROPE; Sadja will walk toward the bushes and a rabbit will peek its head out of the hole.
- Use BUSHES WITH END OF ROPE again; Sadja will walk farther and the rabbit will emerge, running under the trap.
- Use BUSHES WITH END OF ROPE one more time; Sadja will walk behind the bushes and trap the rabbit. Doing this correctly the first time earns you the “Firun’s Disciple” achievement.
- Pick up the CLOSED TRAP with the rabbit inside. Sadja needs to cook her meal now.
- Rachwan offers flint stones to Sadja; take these from his hand.
- Use WOODEN STAKES on the fireplace.
- Use FLINTS on the WOODEN STAKES.
- Rachwan decides to end your partnership abruptly. Sadja awakens almost item-less, and Rachwan is gone.
- Move west and exit “Up the hill.” This ends Chapter 2.
Chapter 3
Overview: Abandoned by Rachwan with most of her items stolen, Sadja must make her way through the maze-like forest to find him, her only hope of reaching Drakonia.
- Note: the forest is a sprawling maze that is extremely easy to get lost in. If you wander around the forest long enough, an option to skip the maze appears. Skipping the maze puts you at the spider’s nest with the items you would have found while exploring.
- To make it through the forest without skipping, follow the instructions below.
- Sadja will automatically pick up a handful of berries and lay some down at the path she first entered from. You can use this trick yourself by placing berries at the entrance to each scene you came from.
- Take the western path.
- Take the northern path.
- Sadja discovers her dagger stuck in a tree, just out of reach.
- Take the northeastern path.
- Take the northern path, near the thorn bush.
- Take the northern path.
- Take the northern path.
- Take the northern path yet again, near the mushrooms.
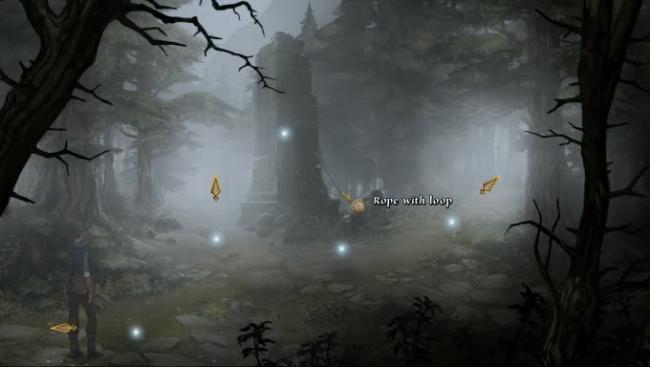
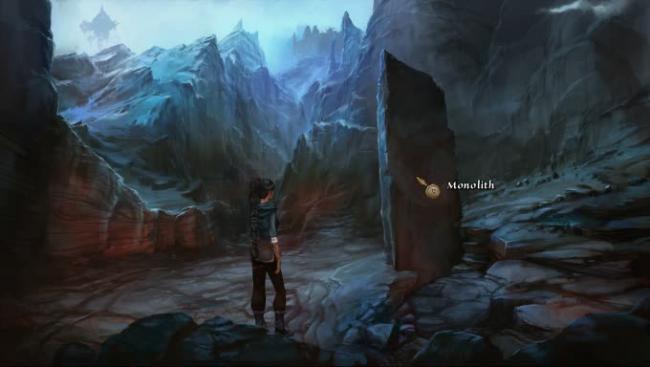
- You’ll enter an area with a monolith, which has a ROPE WITH LOOP dangling from it. Take the ROPE WITH LOOP.
- Now, head back to where the dagger was. If you placed berries at each entrance, just follow your berries. Otherwise, follow these directions:
- Take the southwestern path.
- Take the eastern path.
- Take the western path.
- Take the eastern path.
- Take the eastern path.
- You should now be back in the screen with the dagger.
- Use ROTTEN ROPE on the DAGGER to pull it out of the tree. It lands on the ground.
- Pick up DAGGER.
- Now it’s time to get out of the forest.
- Take the northeastern path.
- Take the northern path, near the thorn bush.
- Take the northern path.
- Take the northern path. You’ll end up in the screen with the broken-off mushrooms again.
- This time, take the western path.
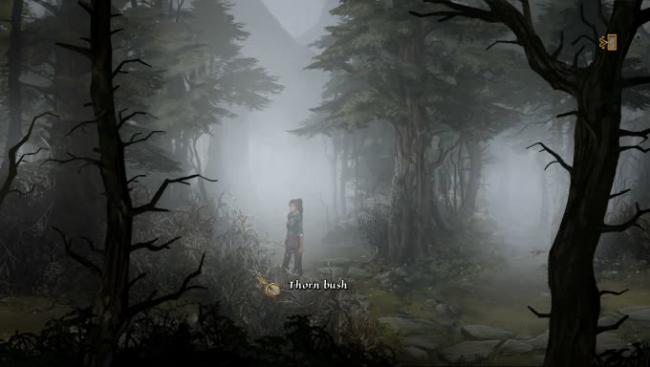
- There’s a giant thorn bush in this screen.
- Use DAGGER on the thorn bush. Sadja hacks through the bush.
- Take the western path that is now available behind the bush.
- There is a giant spider web on this screen, and Sadja’s STAFF is trapped behind the web.
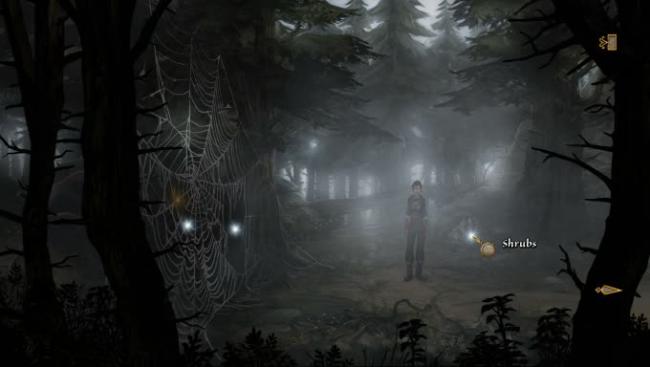
- Take SHRUBS.
- In your inventory, use ROTTEN ROPE on SHRUBS to make BUNDLED-UP SHRUBBERY.
- In your inventory, use FLINTS on BUNDLED-UP SHRUBBERY to make FIRE.
- Use FIRE on the spider web.
- After Sadja tosses the fire, take the STAFF. She will escape off-screen automatically and earn the “Level Up” achievement.
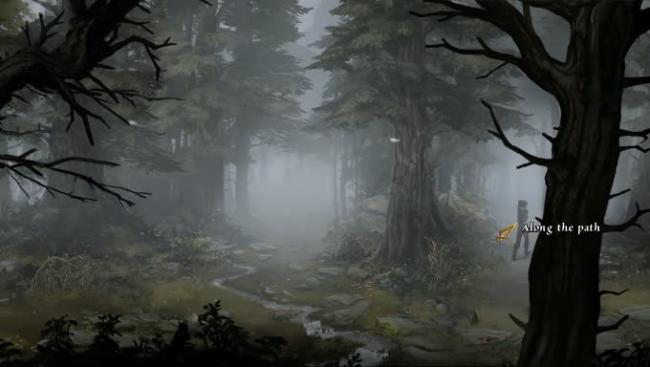
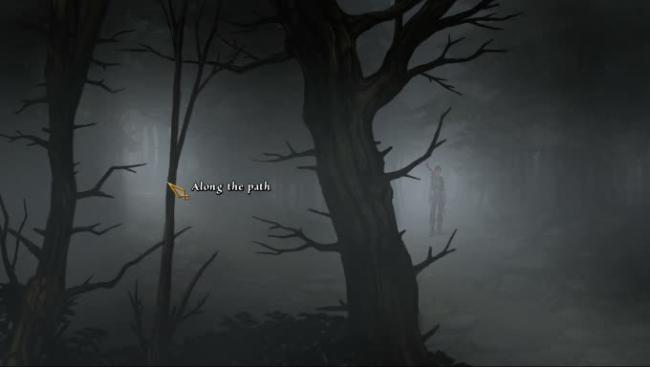
- After the conversation with your demon staff, head north “Along the path.”
- Sadja comes upon a ruined campsite, but there’s nothing of interest here.
- Continue north. There’s still a bit of forest maze left, but this area is much easier to navigate.
- Take the western path.
- Take the western path again.
- Take the northwestern path.
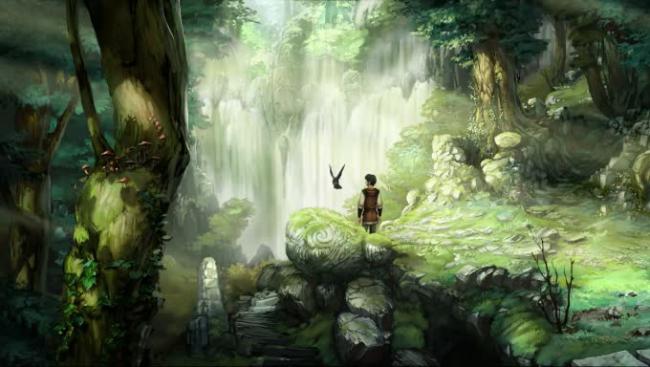
- Sadja will emerge from the forest; a waterfall is visible in the distance.
- Head down the hill towards the waterfall.
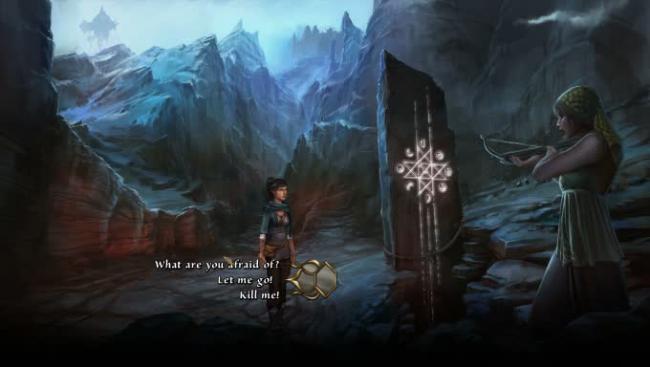
- You enter a scene with two Amazons on the ground and Rachwan tied up, dangling from a tree.
- The younger Amazon questions you; select “Tell the truth” for her questions.
- You can then ask her about a number of items, or select “End” to move on.
- The demon staff requests Rachwan’s necklace.
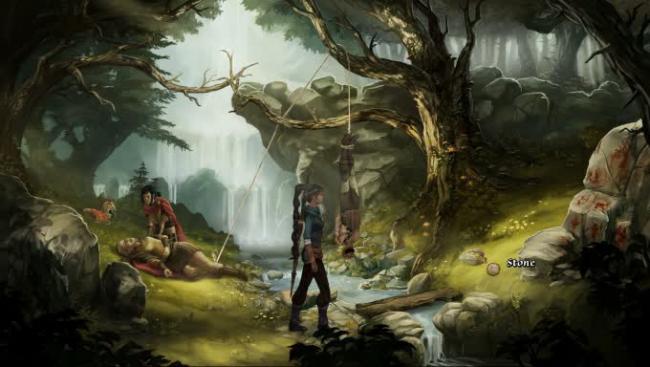
- Pick up the STONE from the ground near the tree.
- Use STONE on the small waterfall near the bottom of the screen.
- Go up by exiting to the east. Sadja will move to the rocks above the tree.
- Use DAGGER on the branch. This lowers Rachwan closer to the stream and gives Sadja BRANCH.
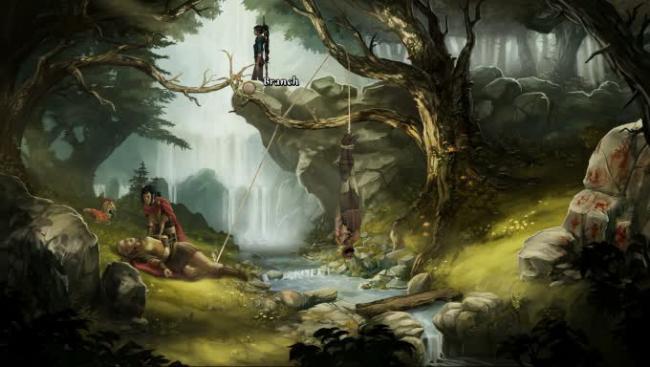
- Use BRANCH on the large waterfall behind the stream; Sadja will drop BRANCH into the stream, which will catch Rachwan’s necklace.
- Move back down and pick up BRANCH WITH NECKLACE. You now have RACHWAN’S NECKLACE in your inventory.
- The demon staff will also teach Sadja a new spell, MAGIC – SEND VISION. This allows Sadja to put a thought in a person’s mind by casting it on a personal item they own.
- In your inventory, use MAGIC – SEND VISION on RACHWAN’S NECKLACE.
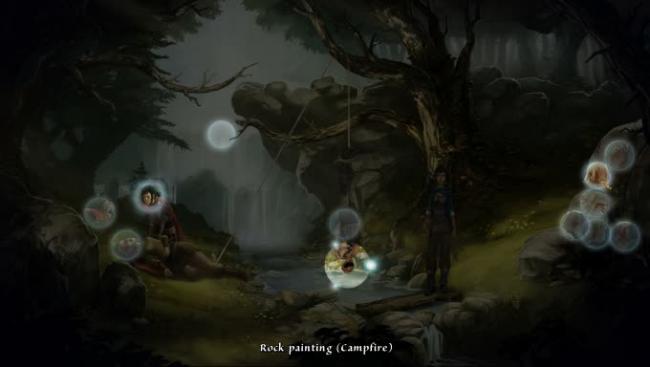
- This spell darkens the screen and casts circles of light on the interactive objects. The focus of the spell, Rachwan, will be highlighted as well. You need to select three objects for him to associate. The order you select the objects in does not matter.
- Select the ROCK PAINTING (CAMPFIRE), YOUNG AMAZON, and RACHWAN (by clicking on his highlighted torso, not his head).
- The spell doesn’t exactly go as planned, but the young Amazon gives you a piece of her cloak.
- In your inventory, use MAGIC – SEND VISION on PIECE OF CLOTH FROM THE AMAZON.

- The same options will appear, although this time the focus is the Amazon.
- Select RACHWAN, AMAZON SHIELD, and ROCK PAINTING (FRUIT).
- The Amazon receives a vision to pluck Rachwan from the tree like a piece of fruit. She will send Sadja and Rachwan back up the hill.
- Use DAGGER on Rachwan to cut his bindings.
- After an event in which the demon staff reveals a new power, we return to Geron in the clearing.
- Fahi is there and speaks to him; feel free to talk about anything you’d like, but select “Riddle” and then “The ruby is the stone” to continue.
- Fahi vanishes and Chapter 3 ends.
Chapter 4
Overview: Despite Fahi’s warnings, Geron decides his only option is to enter Drakonia and learn the rest of Sadja’s story to solve the riddle. First, he must meet with Owlric at the Academy for advice on how to enter the ancient fortress.
- This chapter begins near the waterfall again; Geron continues to encourage Nuri to try flying. Select all of the dialogue options and Nuri will finally take flight again.
- After this scene, Geron automatically appears in the courtyard of the Magic Academy. A group of mages stands in the circle.
- Attempt to enter through the same door you used last time, leading up. Bryda will appear and tell you Owlric is not at the Academy, to find him at home.
- Geron leaves and automatically appears in front of Owlric’s home.
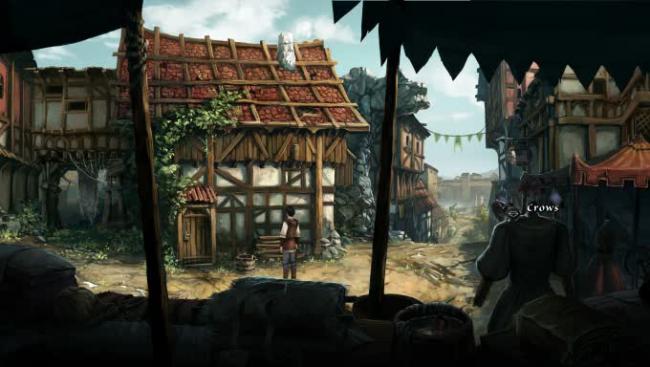
- Click on the crows to shoo them away. Nuri was sitting with them and gets annoyed with Geron for scaring her friends.
- Talk to Nuri and select any of the dialogue choices you like; to progress, choose “Enter the house.”
- Nuri will fly in the window. You now control her in Owlric’s library.
- Note: Nuri doesn’t have an inventory; she will pick up an item and hold on to it.
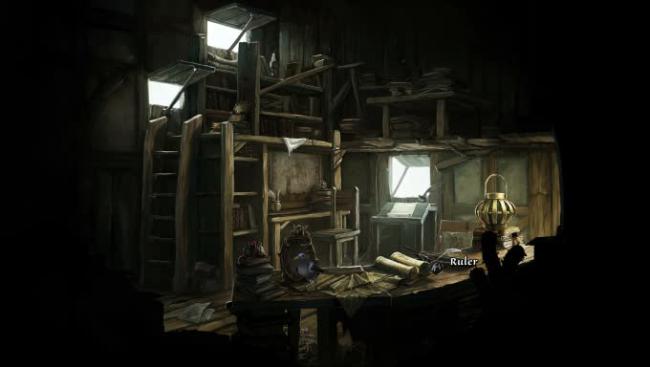
- Pick up the RULER from the desk.
- Use RULER on BOOKS. Nuri uses the RULER like a lever and knocks the BOOKS away.
- Pick up LOCKPICKS.
- Nuri does so and flies out automatically, giving Geron the LOCKPICKS.
- Use LOCKPICKS on the door to Owlric’s house, and then go into the house.
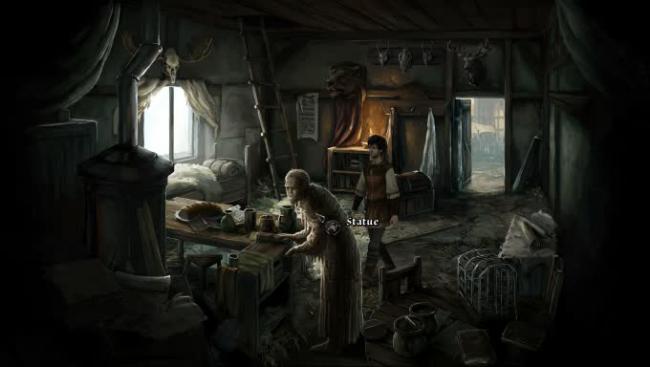
- Inside the house, touch the STATUE of Owlric. He will turn to dust.
- Take the DRAWER, HONEY, and CANDLE.
- Go up the stairs to the attic.
- In the attic, take the BROOM. Go back downstairs.
- Use the BROOM on the HEAP OF DUST that was Owlric.
- Geron will sweep Owlric’s remains away from the table.
- Use DRAWER on HEAP OF DUST. Geron dumps some Owlric dust onto the pile that was stuck in the drawer.
- Use MAGIC – REPAIR/DESTRUCT on HEAP OF DUST. The Owlric statue will reform, this time with a KEY in his hand.
- Use CANDLE on the KEY in Owlric’s hand. Geron pours wax around the KEY.
- Take the KEY that’s covered in wax. You’ll now have WAXEN MOLD.
- In your inventory, combine WAXEN MOLD and HONEY to get WAXEN MOLD WITH HONEY.
- Go back outside to the front of the house.
- Outside, use WAXEN MOLD WITH HONEY on the Shadow standing on the left side of the screen. The Shadow will use his hardening spell to harden the honey mold.
- In your inventory, use KNIFE on ENCHANTED WAXEN MOLD. Geron will scrape the wax off, leaving you with KEY.
- Go back inside Owlric’s house and upstairs to the attic.
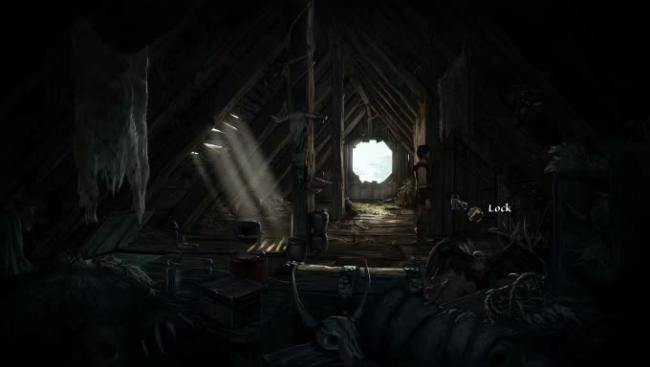
- Use KEY on the door lock upstairs.
- Open the door, and then go into Owlric’s office.
- Inside the office, take the CONTAINER on the center desk.
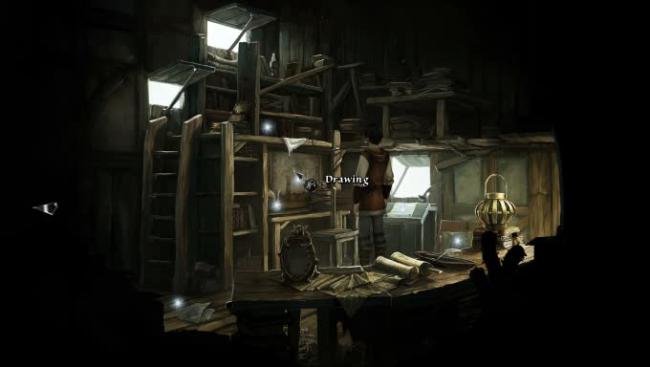
- Examine the drawing above where the CONTAINER was.
- Geron discovers a secret compartment behind the drawing. Examine the secret compartment to enter a close-up.
- Examine the studies if you’d like, then take the PETRIFIED RAT.
- When Geron touches it, the PETRIFIED RAT turns to dust.
- In the close-up of the secret compartment, use CONTAINER on HEAP OF DUST to get CONTAINER OF DUST.
- Exit the close-up and use CONTAINER OF DUST on the strange gleam in the floorboard. Geron will pour the dust into the hole.
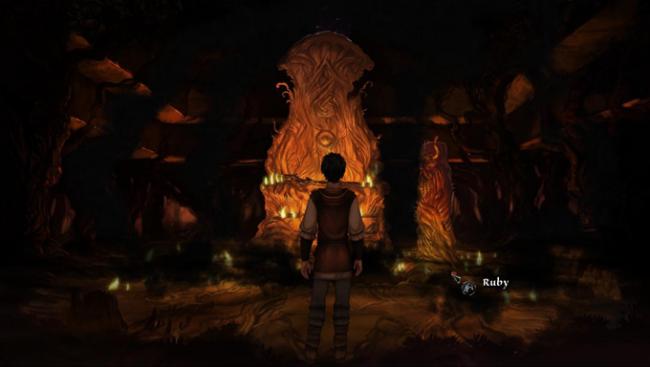
- Use MAGIC – REPAIR/DESTRUCT on the strange gleam. The PETRIFIED RAT will re-solidify and push the glowing object to the surface; it’s a RUBY.
- Take the RUBY.
- Geron will note it’s cracked and then pass out.
- You’re now in control of Sadja again. She’s outside the wall to Drakonia and still struggling with Rachwan.
- Work through the conversation with the demon staff; ask about the “Mask,” “Formula,” then “Petrified hands.”
- After this third dialogue, the demon staff will teach you MAGIC – DE/PETRIFY. This spell can turn plants and small animals to stone or back to normal.
- Use MAGIC – DE/PETRIFY on the blue plant just above Sadja.
- Use MAGIC – DE/PETRIFY again on the blue plant.
- After another short conversation, you’ll be in control again and need to get the MASK onto Rachwan.
- Use MAGIC – DE/PETRIFY on the thorn bush near the center of the screen to turn it to stone.
- Use BRANCH on the fireplace near the thorn bush.
- Use FLINTS on the fireplace (now noted as “stick”). This starts a fire.
- If you speak to Rachwan, he’ll mention that he’s not cold because he’s able to keep cold out of his mind. Let’s change that.
- In your inventory, use MAGIC – SEND VISION on RACHWAN’S NECKLACE.
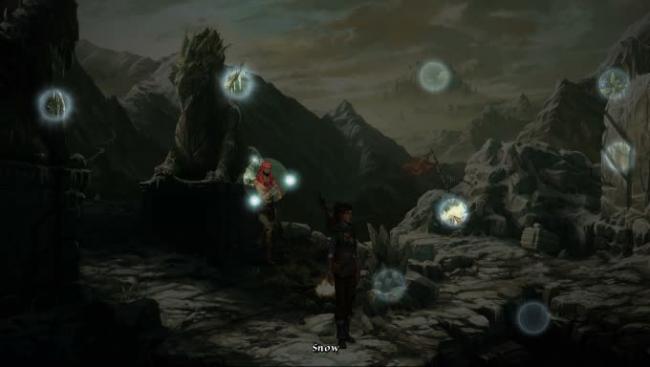
- When given the options of what to show him, select “Icicle,” “Icy glitter,” and “Snow.” The first two are above and to the left of Rachwan, while “Snow” is to the right above the thorn bush.
- Rachwan will become cold and bend down near the fire.
- Use MAGIC – DE/PETRIFY on the grass at Rachwan’s feet. The grass will grow up and ensnare Rachwan in stone.
- Use MASK on Rachwan.
- The demon staff will now give you the incantation. Select the correct phrases after he says them. You just have to repeat what he tells you, but some of the options are very similar:
- First: “Fdan Fasgadan Esplas De Quatan!” which is the second choice.
- Second: “Hmurilor Grasz Ferell Goran!” which is the third choice.
- Third: “Hll Bemutir Gherul Fellan!” which is the second choice.
- Fourth: “Juntir Quatan Phelunir Sodan!” which is the first choice.
- This completes the spell of the MASK. Sadja learns its true nature and we return to Geron, who awakens in Owlric’s library.
- A voice speaks to Geron. Exit the library to the left.
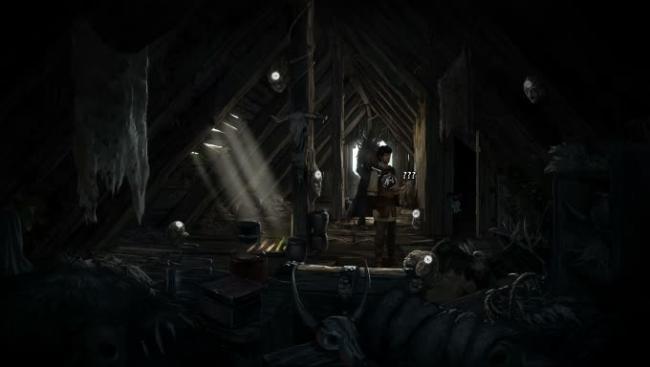
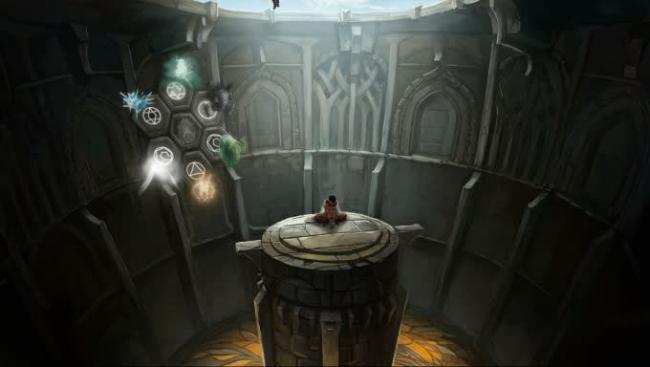
- The demon culprit that appeared at Fahi’s camp is in the attic. He tells Geron he must solve the riddle of the six elemental beings; six stone faces appear in the attic.
- Each face is associated with one of the following elements: ice, fire, earth, water, air, and ore.
- You need to speak to the faces and select which element each belongs to.
- The head on the upper-right side of the screen says “Of all my siblings, I was the last to come into being. I give life to all, yet as I give, I also take back. Who am I?” Select “Earth.”
- The head just left of the attic says “I am the sister with the greatest patience. I shape my treasures for eons, and bear the face of the world. Who am I?” Select “Ore.”
- The head just below the attic says “I know the world like no other. One can reach through me, and yet I hide the greatest secrets. Who am I?” Select “Water.”
- The head just left of the demon says “Keep me fed, or I will vanish away. Keep me in check or I will harm you. Who am I?” Select “Fire.”
- The head in the rafters says “Like my sister, I am sometimes hot, sometimes cold, and always in motion. But unlike her, I am always the same. Who am I?” Select “Air.”
- The head on the left side of the screen says “Keep me far from my sister in the middle. First she steals my form and then my substance. Who am I?” Select “Ice.”
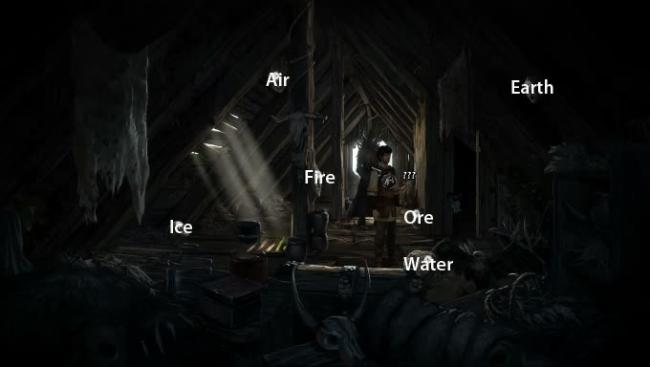
- After you’ve assigned the correct element to each head, talk to the demon, marked as “???” again.
- The heads will vanish and Geron is told the gate to Drakonia is now open to him.
- The demon tells Geron to step closer; talk to him again and Geron does so, to find he is petrified as well and holding a book.
- Bryda appears and Geron fills her in; they examine the book the demon was holding. Chapter 4 ends.
Chapter 5
Overview: Geron and Bryda read through the journal they discovered, which tells of Sadja’s arrival in Drakonia, when she asks to meet the Prince so she can deliver the MASK. But the welcome is not as warm as expected, and Sadja must prove her intentions to the army’s leaders in order to join the battle.
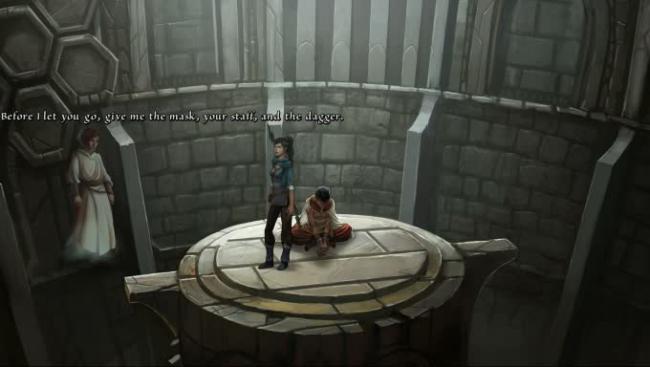
- After a long conversation and walk through Drakonia with Xerxes, Sadja is taken to the Prince. Xerxes requests her MASK, DAGGER, and STAFF.
- You have to hand these over; you can either give the items directly to Xerxes or drop them into the abyss below. The result will be the same.
- After handing over the items, Sadja will speak to Prince Kasim. We learn they know each other quite well.
- After this conversation, Sadja is taken to the guest room.
- Exit the guest room to the main hall.
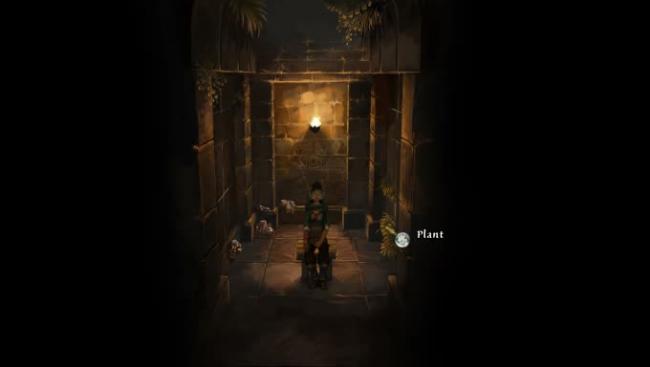
- Sadja will be stopped immediately and sent back to her room. Now, however, her plant is swaying in the (non-existent) breeze.
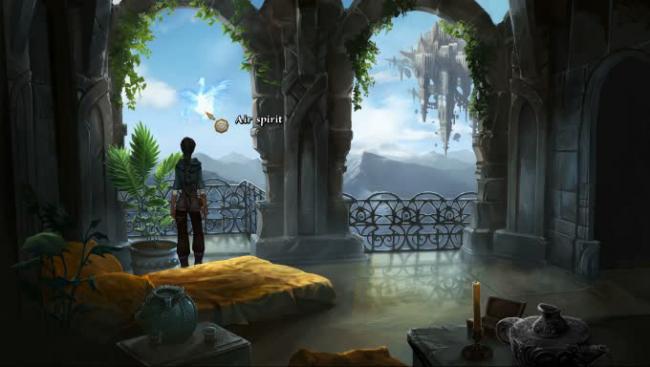
- Examine the plant and an air spirit appears.
- Talk to the spirit. Select the following dialogue choices: “Let’s play!” then “Let’s play hide and seek!” and finally “You hide me from the magicians!”
- The air spirit picks Sadja up and you can now travel around the fortress via an overworld map. However, she is still supposed to be in her room, so many NPCs will send her back if they notice her.
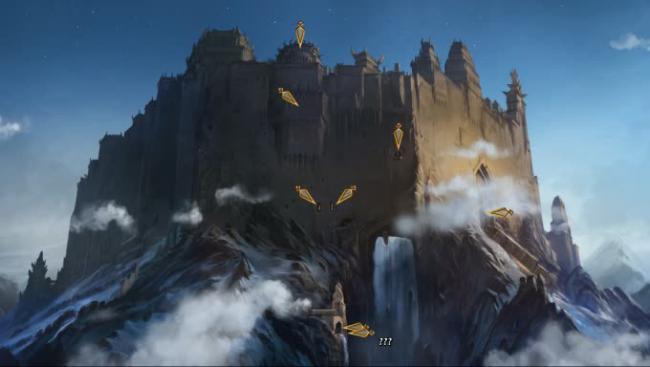
- First, travel to the ??? area at the bottom of the fortress, near the waterfall.
- Sadja will speak to the admiral and request to be included in the battle.
- Select any of the dialogue choices you’d like, but specifically choose “Protest innocence” and “Weapon” at some point. Sadja needs to find a weapon she can take into battle and prove that she is not affiliated with Prince Kasim’s plan.
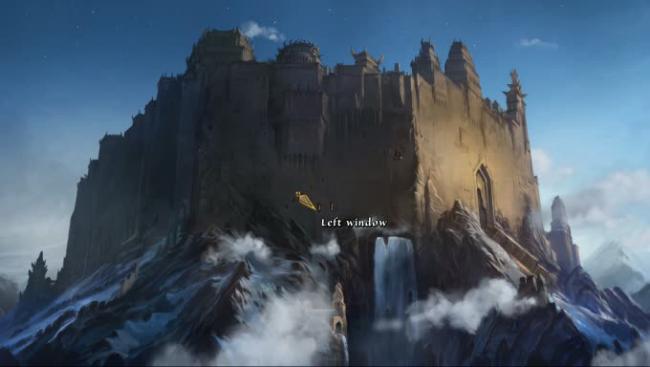
- Exit the hall and enter the left window, slightly to the left of the large waterfall.
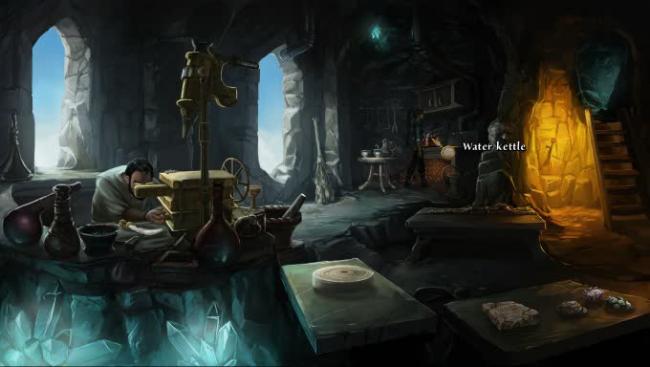
- Use the WATER KETTLE on the STOVE, then exit out the same window you just entered.
- Now enter the right window; the researcher will be distracted by the boiling water.
- Take the DAGGER from his table and exit out the window you just entered.
- Now go to the observatory. It’s the second entrance from the top of the fortress.
- This room has many large spheres hanging from the ceiling and three horns in the center of the room.
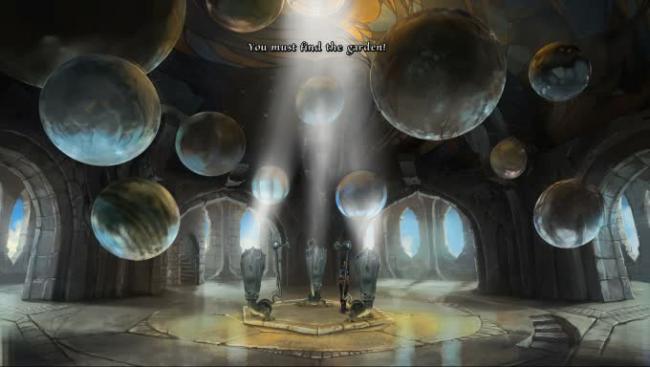
- Using a horn will allow Sadja to turn it. Clicking on a horn and then a sphere will turn the horn toward that sphere.
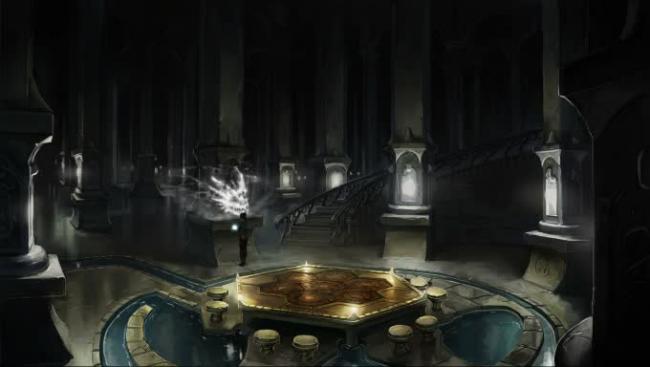
- Your goal is to have all three horns point towards the center of the ceiling, as shown in the picture above.
- To do this, simply move each horn towards the sphere directly above it, where the light is streaming in the image.
- Sadja will overhear the Prince’s plan. He is seeking the Garden of Oblivion.
- Go back outside and return to the council hall via the entrance near the small waterfall.
- Give the DAGGER to the admiral. Sadja will request it be blessed; she’ll be told it takes time.
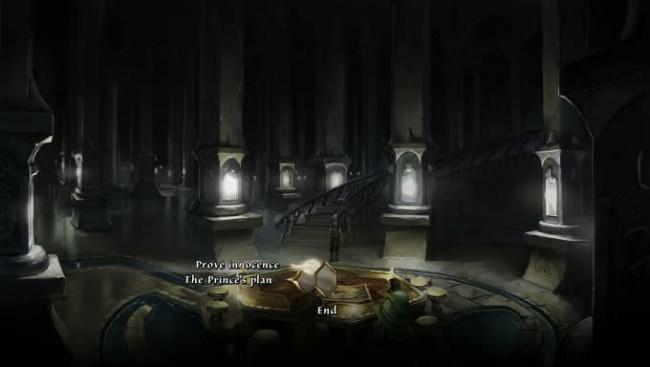
- Talk to the admiral; after overhearing the Prince, you can now select “The Prince’s plan.”
- After a brief dialogue, Sadja will be granted the freedom to roam the fortress and will appear in the hall of dragons.
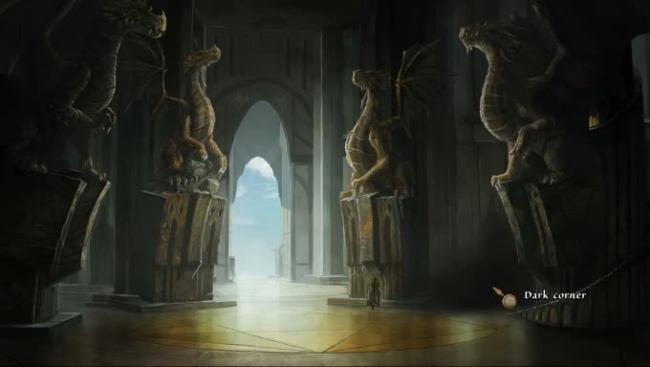
- Examine the dark corner in the hall to receive DARKNESS, a lamp that emits darkness instead of light.
- Exit the hall of dragons to the main hall.
- From the main hall, enter the library. It is marked as “???” until you have gone inside once (the room to the upper right, covered in ice).
- Head up to the reading room.
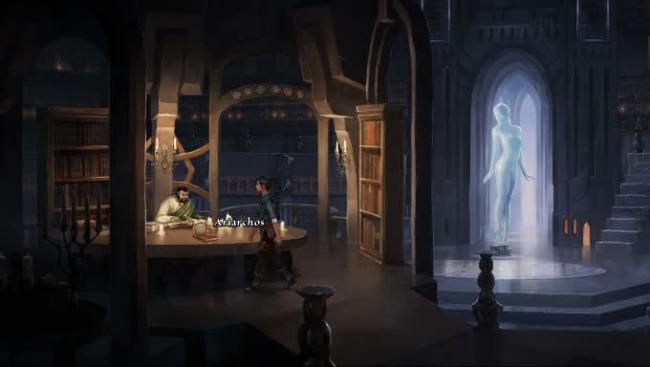
- Speak to Ariarchos. He’s examining an ancient text about the Garden of Oblivion.
- Exhaust all dialogue options with Ariarchos. Specifically, ask about both Halef ben Jalif and the Garden of Oblivion, then when given additional choices, ask about the Three Chambers.
- Ariarchos will give you a DRAWING from the ancient text.
- After you’re done speaking, exit the library. Enter the lab of the ore adept, where the STAFF is being kept.
- First, speak to the ore adept. Exhaust his dialogue options, but mostly be sure to ask about the MASK.
- Sadja will learn the adept gets a bad feeling from the MASK, and only likes to research objects that give him good feelings.
- Now speak to the STAFF.
- After confirming his identity as Halef, Sadja and the STAFF are on better terms; she can now use his magic while touching him (but the STAFF cannot be moved from the table).
- Use MAGIC – SEND VISION on the ore adept.
- Note: The fact that you can cast the spell on him directly is something of a bug. You should have to cast it on the GOBLET OF THE ORE ADEPT, which gets knocked to the floor when you enter this room via the window once you’re free to wander. Pick up the GOBLET from the floor and either cast the spell on it or the adept directly.
- For the spell, select MASK, TEA TABLE, and ORES. He will comment that he’s interested in the MASK, but still distracted by the SPHERE.
- Use MAGIC – SEND VISION on the ore adept (or GOBLET) again.
- Select ??? (SPHERE), TABLET, and BROOM.
- He will become repulsed by the SPHERE and begin researching the MASK, learning that it stores memories and its power can be reversed.
- He will explain this to Sadja; select “Reverse mask’s magic?” and then “Reverse the mask’s magic!”
- End the conversation and then use RUBY on the ore adept.
- Select “Pressure the researcher.”
- He’ll finally agree and will “fix” the MASK, then have Sadja test it out.
- Sadja will slowly be able to use her magic spells without touching the STAFF. First, she’ll receive MAGIC – ACTIVATE/DEACTIVATE.
- Use MAGIC – ACTIVATE/DEACTIVATE on the magical contraption.
- After a brief dialogue, Sadja will regain MAGIC – SEND VISION.
- Use MAGIC – SEND VISION on the ore adept. Choose any three items you’d like.
- After this, Sadja gains MAGIC – DE/PETRIFY.
- Use MAGIC – DE/PETRIFY on the ore adept. He will be transformed into a crystal.
- Take the ??? SPHERE from the ore adept’s table. (Note: The SPHERE continues to be marked as “???” in the inventory, but will be referred to as SPHERE here.)
- The stone face in the wall will awaken and join Sadja automatically, giving you ORE SPIRIT.
- You’ll also have ENCHANTED RUBY in your inventory now.
- We need to find the three secret doors around Drakonia now. One door is opened by finding five elemental spirits, so we’ll do that along the way.
- First, go back to the council hall where the admiral was previously.
- In the council hall, use the SPHERE on the center flame that “seems to be singing.” The FIRE SPIRIT will join you.
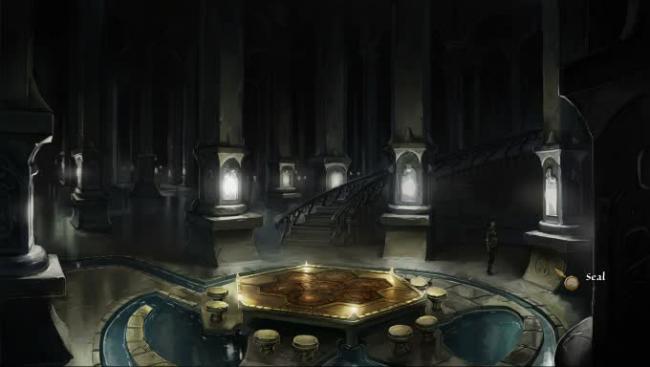
- Touch the SEAL to the right of the council table. Sadja will enter the secret chamber
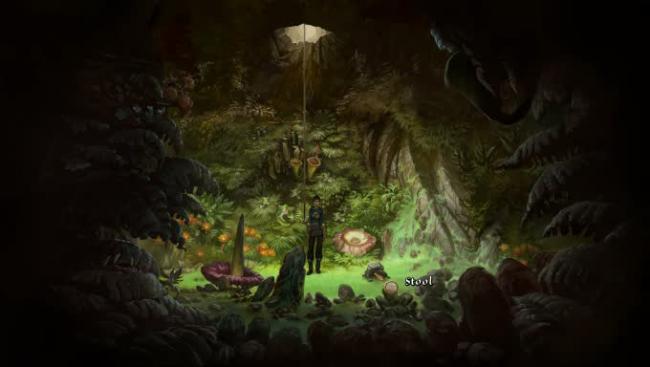
- Use the stool; Sadja sits down and puts on the MASK.
- Use MAGIC – DE/PETRIFY on the plants around the room. Petrify plants until a spirit begins talking to you.
- Use MAGIC – ACTIVATE/DEACTIVATE on the seal that appears.
- Sadja will meet the djinn and learn about the creation of the MASK.
- Once you leave the chamber, return to the library off the main hall.
- Move to the stained glass window in the center of the room.
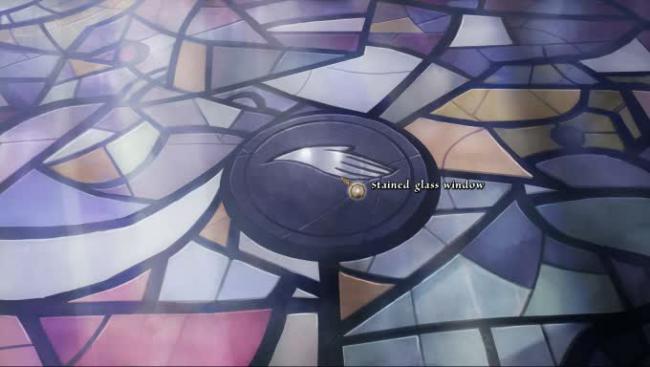
- This takes you to a close-up of the window.
- In your inventory, use ENCHANTED RUBY on DARKNESS to make REVERSED DARKNESS.
- Use REVERSED DARKNESS on stained glass window.
- While you’re here, go back up to the reading room.
- Use SPHERE on the bookshelf to receive ICE SPIRIT.
- Exit back to the main hall.
- Enter the room below the library, the underground lake (it will be marked as “???” if you haven’t been there yet).
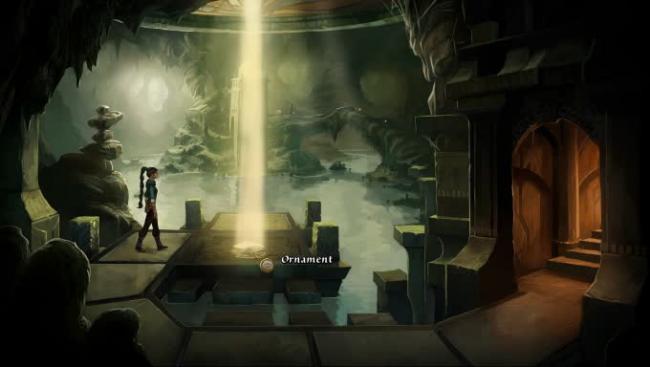
- Place the DRAWING on the ornament on the floor. This completes the seal and opens the second secret chamber.
- Touch the seal to enter the chamber.
- Sit on the stool again and use MAGIC – ACTIVATE/DEACTIVATE on the seal that appears.
- Sadja will learn more about the MASK during a cutscene.
- When you’re back in the underground lake, use SPHERE on the lake to receive WATER SPIRIT.
- Exit the lake and head outside, then go to the roof.
- Use SPHERE on the garden beds to receive the EARTH SPIRIT. You’ll receive the Elementals achievement for finding all the spirits.
- Look down into the pit where the Prince is being held.
- The AIR SPIRIT is attached to a hexagon in the pit. You need to use your spirits on the hexagon and place them in the correct order.
- The correct order matches the table in the council hall.
- Place the spirits in this order:
- Top center: WATER SPIRIT
- Top left: ICE SPIRIT
- Top right: ORE SPIRIT
- Bottom left: AIR SPIRIT (already there)
- Bottom right: EARTH SPIRIT
- Bottom center: FIRE SPIRIT
- Once arranged, a seal will appear in the center space. Click on the seal and Sadja will float down to touch it, entering the third and final chamber.
- Sit on the stool again and use MAGIC – ACTIVATE/DEACTIVATE on the seal that appears.
- Sadja will learn the final secret of the garden.
- After a fairly lengthy cutscene, Sadja will be standing before a monolith.
- Walk toward the monolith and a seal will appear in the ground.
- Touch the seal and a hole opens up.
- Use your ROPE on the monolith.
- Enter the hole.
- Sadja is now in the Garden of Oblivion.
- Sit on the stool.
- Sadja will learn the name of the djinn, but Kasim appears, leaving her trapped.
- Examine the hole to shout for help.
- Walk to the left side of the screen and the trees will begin rustling.
- Follow the rustling with your mouse, along the bottom of the screen to the right.
- The AIR SPIRIT appears and flies Sadja out of the Garden.
- At the top of the hole, Sadja is stopped by Kasim’s servant who threatens to kill her.
- Select any of the dialogue options.
- Select any of the options related to the lie.
- Select “You can’t kill me.”
- Geron and Bryda finish reading the book and Chapter 5 ends.
Chapter 6
Overview: An angry mob and the local army are hunting Fahi and the demon in the forest. Geron needs to locate Fahi and get him to safety.
- After talking to Nuri, leave the waterfall.
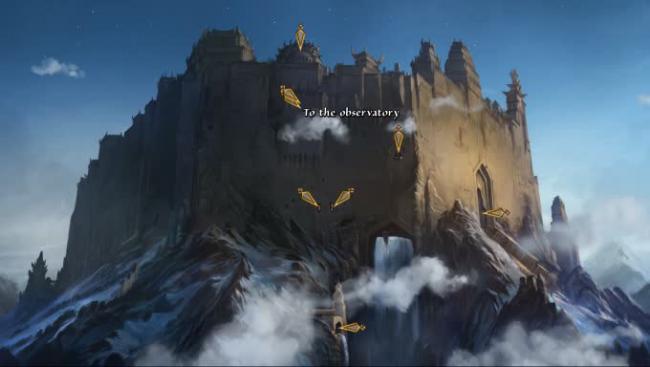
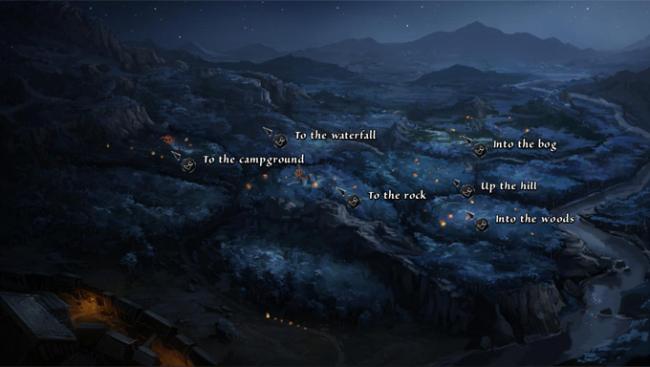
- For this chapter, the forest will be represented by an overworld map. Fahi is hiding in one of these sections, but we don’t yet know where. In the image above, the key areas you’ll interact with are displayed:
- “To the campground,” “To the waterfall,” “Into the bog,” and “Into the woods” are all areas you’ll need to visit during the chapter’s puzzle sequences.
- “To the rock” and “Up the hill” are areas that the messenger may travel to. Otherwise, they provide no value.
- First, go to the campground. Speak with Bryda or the lecturer.
- Select “Organization” and then “Messenger” to learn that the messenger carries an enchanted scroll.
- Go into the bog.
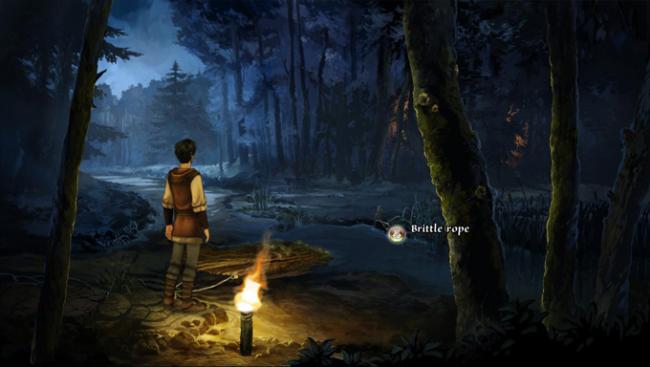
- Use MAGIC – REPAIR/DESTRUCT on the BRITTLE ROPE.
- Cross the bridge and go deeper into the swamp.
- Talk to the group leader; he is waiting for the messenger.
- Leave the swamp, but on your way out use MAGIC – REPAIR/DESTRUCT on the fixed rope to break the bridge.
- On the forest map, you’ll see a small light moving between locations. Each time you enter the map, it will move to a new location and stop. If you miss where it goes, enter an area and exit to the map again; it will move to a new location.
- Enter whichever location the light lands on.
- Use MAGIC – ODEM ARCANUM; a magic glow will appear.
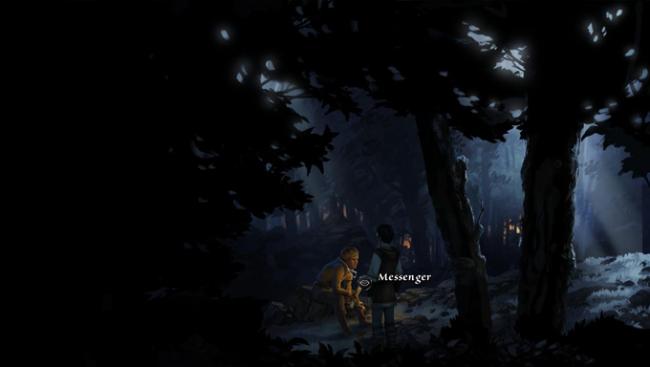
- Click on the magic glow to enter the area where the messenger is sitting.
- Talk to the messenger and select “Send into the moor.”
- Go back into the bog with the bridge. The messenger will be asleep at the entrance.
- Note: If you did not re-break the bridge, the messenger will make his run to the swamp and then return to traveling between the other areas.
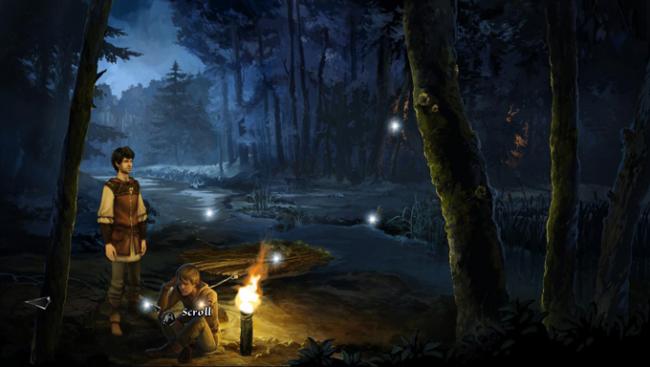
- Take his SCROLL.
- Go into the woods near the bottom right of the map, where two soldiers are standing near a giant tree.
- Talk to the group leader and select “Give new orders.”
- The group will leave for the river, but one soldier will stay behind.
- Go to the waterfall. Speak to Nuri.
- Note: At some point during the previous events, Geron should have mentioned “Nuri should be back by now.” If she is not at the waterfall, travel around the woods some more until he comments.
- Tell Nuri to fly “…from the cliff,” “over the river,” and “to the moor.” This takes her over the forest with the single guard.
- Nuri will return and say she saw a girl sitting in a tree.
- Select “Cause some confusion.” Nuri flies off and scares the guard away.
- Return into the woods with the large tree.

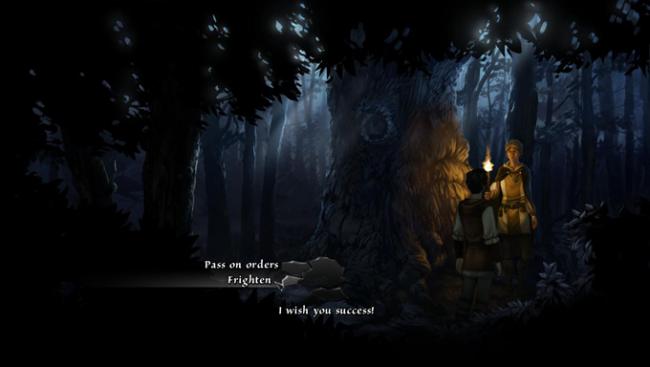
- Talk to the tree.
- Fahi’s daughter hops down; Geron needs to smuggle her to the waterfall, where Fahi is waiting. Geron decides to ask Bryda for help.
- Go back to the campground where Bryda is.
- Take the LAMP from the front of the tent.
- Go inside the tent; the lecturer is asking Bryda to reorganize the troops; he kicks Geron out upon seeing him.
- Walk to the back of the tent.
- Use KNIFE on TENT WALL.
- Use LAMP on TENT WALL.
- Geron peeks in while Bryda is deciding on the new orders.
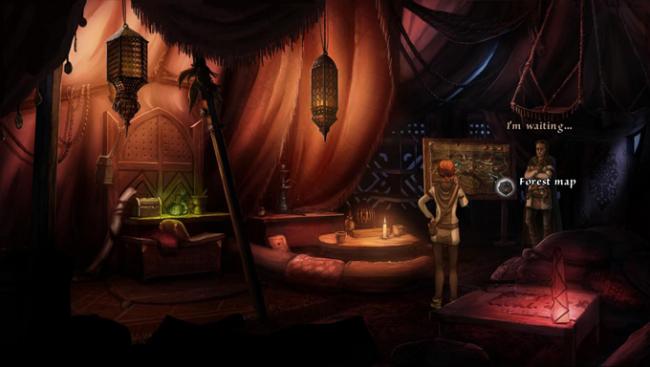
- Use LAMP on FOREST MAP. Geron shines a light on the northern forest and Bryda redirects the troops there.
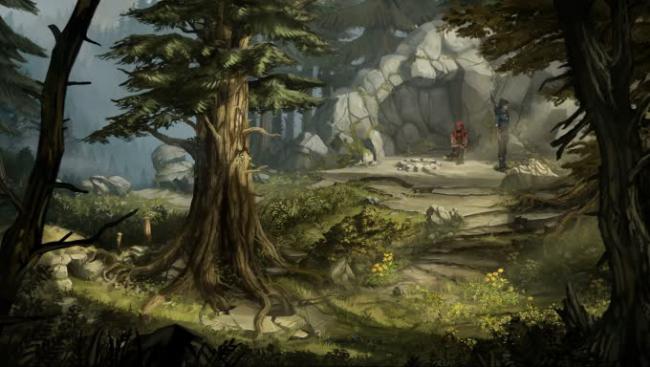
- After a brief scene, Geron will be at the waterfall, where he’ll learn the truth about Fahi and the demon everyone is hunting.
- Work through the single dialogue options.
- Ask the demon any questions you like, then choose “I’m ready” to proceed.
- Nuri can be changed back into a fairy, but something goes wrong…Chapter 6 ends.
Chapter 7
Overview: Trapped with little other option, Geron is shown the final leg of Sadja’s journey. We take control of Sadja on board the fortress, on its way to war. But her war is closer, as Kasim has broken into the fortress and is trying to destroy it from within.
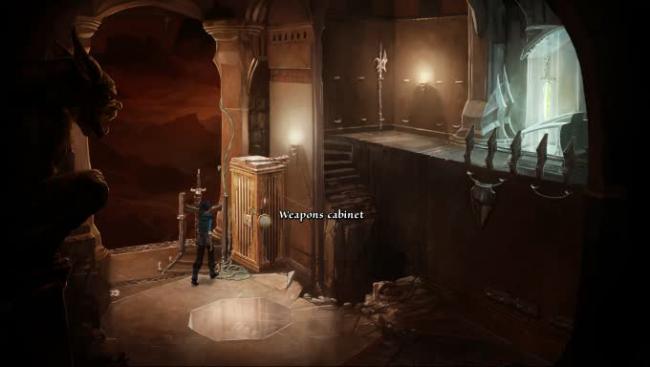
- After a short dialogue, you take control of Sadja within the fortress. The STAFF is locked in a weapons cabinet and we need to free him.
- Use the weapons cabinet to shake it and knock the MACE to the floor.
- Take MACE.
- Next to the cabinet, take VINE.
- On the left side of the room, take SHURIKEN.
- From the weapons rack, take LONGSWORD. You’ll also receive SCABBARD.
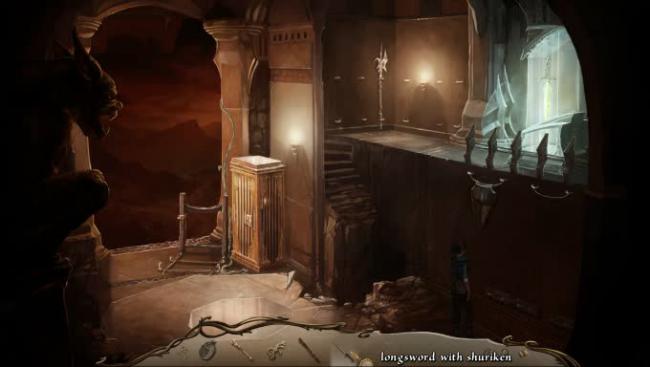
- In your inventory, combine LONGSWORD with SHURIKEN to get LONGSWORD WITH SHURIKEN.
- Use LONGSWORD WITH SHURIKEN on SHIELD to knock it down.
- Pick up SHIELD.
- Now we need to get up the broken stairs.
- In your inventory, combine MACE and SCABBARD.
- Use MACE IN SCABBARD on the point of impact (black hole). This will create DANGEROUS CONSTRUCTION.
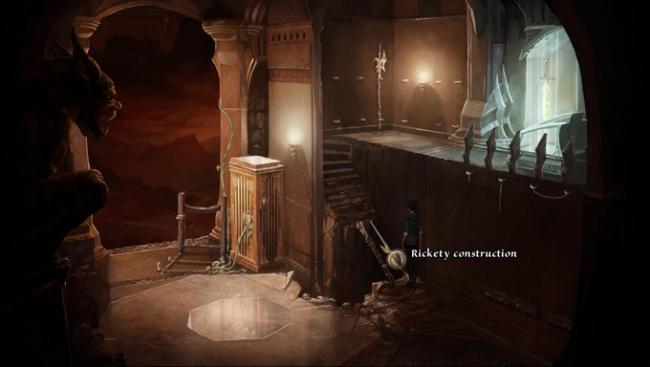
- Use LONGSWORD WITH SHURIKEN on DANGEROUS CONSTRUCTION. This will create RICKETY CONSTRUCTION.
- Use SHIELD on RICKETY CONSTRUCTION to finish the makeshift bridge.
- Climb up and take HALBERD.
- If you try to break the glass on the sword up here with the HALBERD, Sadja will be unable to swing it. We need something shorter.
- Climb back down. Take SHIELD from the bridge.
- Take MACE IN SCABBARD from RICKETY CONSTRUCTION.
- Use HALBERD on DANGEROUS CONSTRUCTION.
- Use SHIELD on RICKETY CONSTRUCTION.
- Use the MACE IN SCABBARD on the weapons rack to remove the SCABBARD.
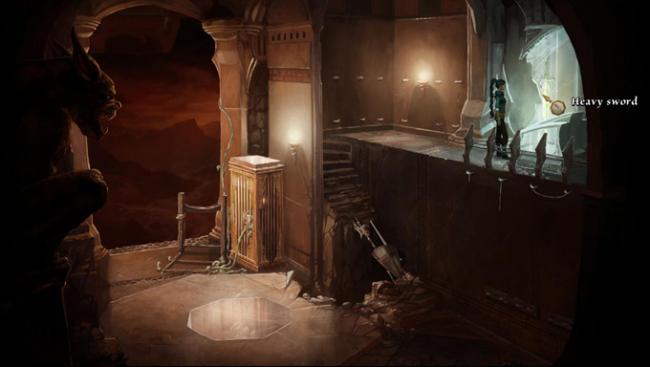
- Climb back up and use MACE on HEAVY SWORD to break the glass.
- Take HEAVY SWORD.
- Climb back down.
- Take SHIELD.
- Take HALBERD.
- Take SWORD WITH SHURIKEN.
- Use the following items on the weapons rack near the cabinet: HALBERD, HEAVY SWORD, LONGSWORD WITH SHURIKEN, SHIELD, and MACE. Sadja will place them in the rack.
- Use VINE on the weapons rack.
- Use VINE again; Sadja will pick up the other end. Tie it to the weapon cabinet that houses the STAFF.
- Sadja will close up the weapons rack once it is “heavy enough.” Use the weapons rack on the entrance to the room—the wide open space of red sky. She will push the rack out the door and the cabinet door will fly open.

- Take STAFF from the cabinet.
- Use MAGIC – ACTIVATE/DEACTIVATE on the floating crystal in the center of the room (beneath the glass floor).
- The fortress will float slightly higher and you can now exit through the front.
- Head up through the next center door.
- Sadja will be standing on a platform outside the fortress—go right to the flotation chamber.

- Sadja will walk along the bridge and end up inside the main part of the fortress, where the admiral has been slain.
- Head inside the door to the floatation chamber.
- In this room, Kasim is drawing power from the floating crystals.
- Speak to Ariarchos and he will give you DAGGER.
- Pick up STONES off the floor.
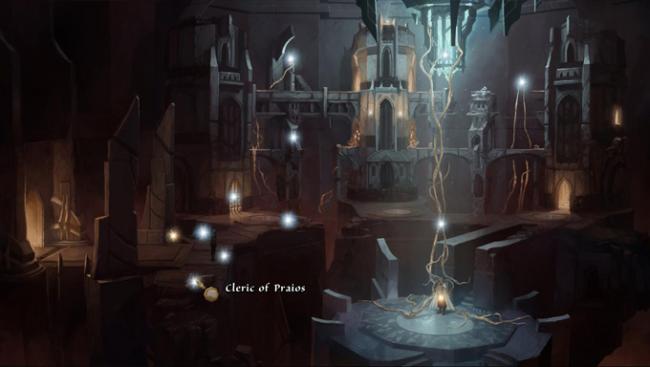
- Examine the Cleric of Efferd to get BELT.
- Examine the Cleric of Boron to get QUILL (optional – not used).
- Examine the Cleric of Praios to get PRAIOS SCEPTER (optional – not used).
- Use STONE on Prince Kasim. Sadja will throw a stone at him and he’ll respond.
- Use STONE on Prince Kasim again. He comments again.
- Use your last STONE on Prince Kasim. He gets angry and puts up a MAGIC SHIELD.
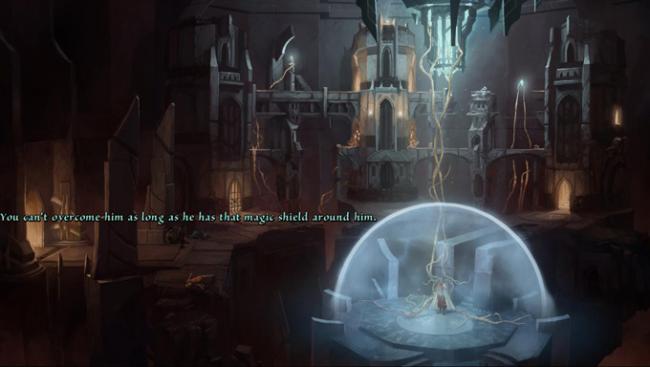
- Now our job is even harder, but Ariarchos decides to finally give you the KEY to the TOWER DOOR at least.
- We need to disable the five FLOATING CRYSTALS Kasim is drawing power from.
- Use KEY on TOWER DOOR to enter Tower 1.
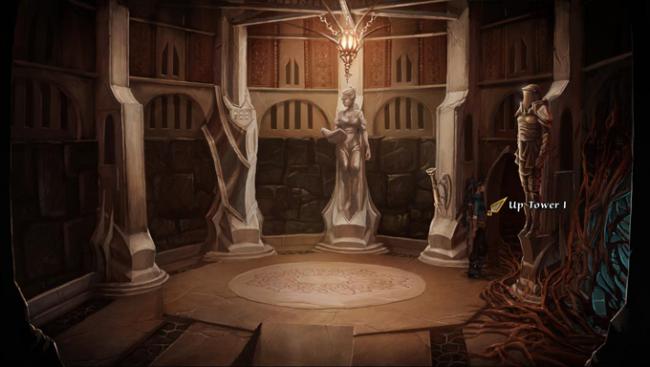
- Go upstairs to Up Tower 1.
- Touch the floating crystal to deactivate it. This lowers Tower 1 slightly.
- Go right out the door and take ORNAMENTAL HEAD.
- Go back inside Tower 1 and touch the crystal again to reactivate it.
- The Tower will raise back up; go out the right door to Bridge 1.
- On Bridge 1, use MAGIC – ACTIVATE/DEACTIVATE on the FLOATING CRYSTAL. It will turn off and fall down a level.
- Continue right into Tower 2.
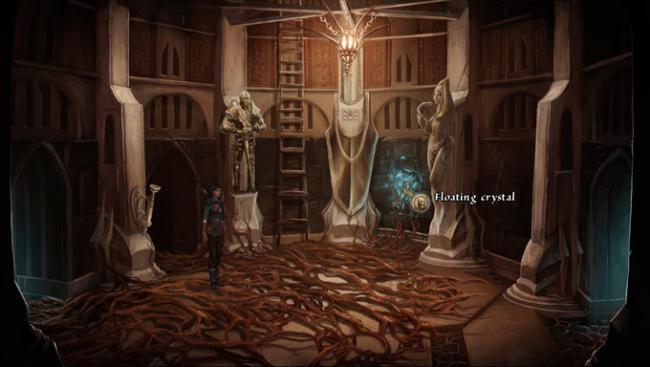
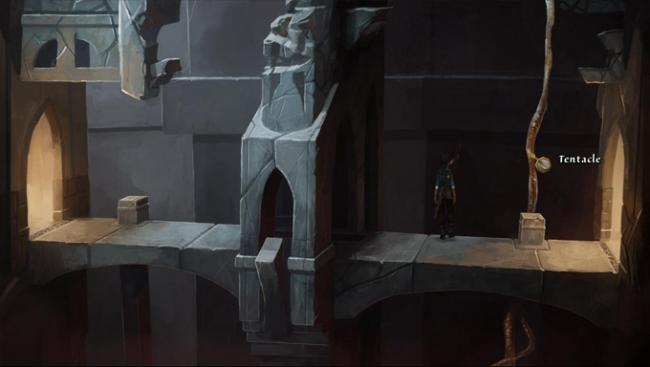
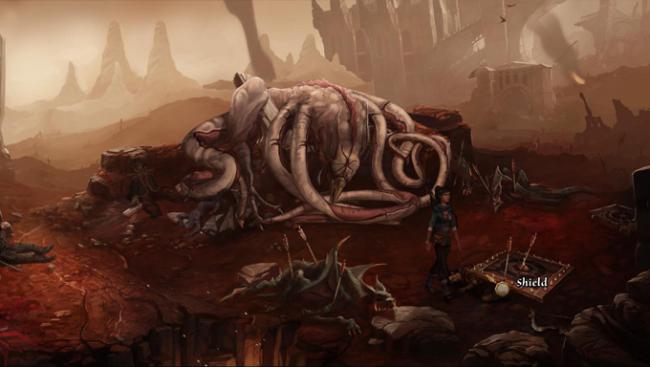
- In Tower 2, tentacles have taken over.
- Use ORNAMENTAL HEAD on the FLOATING CRYSTAL here. Sadja will chuck the head at the crystal, shattering it.
- Pick up CRYSTAL SPLINTER that flew off towards the right-hand door.
- In your inventory, use MAGIC – ACTIVATE/DEACTIVATE on the CRYSTAL SPLINTER. This will put it to sleep and let you walk past the tentacles.
- Exit left, back to Bridge 1 and enter Tower 1 again.
- Touch the FLOATING CRYSTAL to deactivate it and lower the Tower.
- Go outside to the lower bridge.
- Use BELT on the FLOATING CRYSTAL sitting here.
- In your inventory, use MAGIC – ACTIVATE/DEACTIVATE on the SLEEPING CRYSTAL.
- Use CRYSTAL SPLINTER on the tentacles across the chasm; they will reach out and grab it.
- Use MAGIC – ACTIVATE/DEACTIVATE on the FLOATING CRYSTAL attached with the BELT. The tentacles will reach out for this crystal and form a bridge.
- Cross the tentacle bridge to the lower Tower 2.
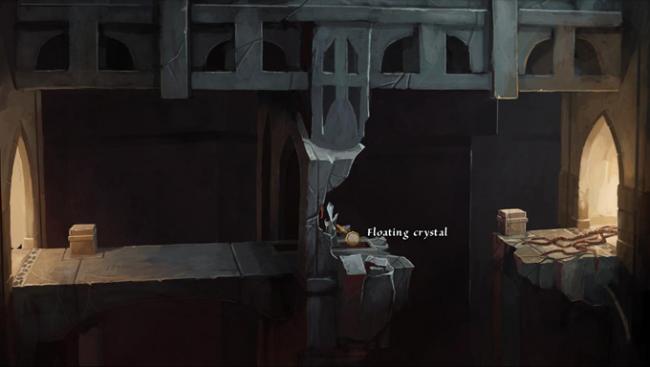
- Continue heading right, to Bridge 2.
- This Bridge has two long tentacles dangling near the Tower 3 door.
- Use the DAGGER on the first tentacle.
- Use the DAGGER on the second tentacle.
- Use the DAGGER on the first tentacle that pops back up. You should end up with just the second tentacle, as in the image above.
- Continue right into Tower 3.
- Head upstairs in Tower 3. This room is hazy with an illusion cast by Kasim; first head left out the door.
- There should be a tentacle holding a FLOATING CRYSTAL within reach. Use MAGIC – ACTIVATE/DEACTIVATE on it.
- Go back inside Tower 3.
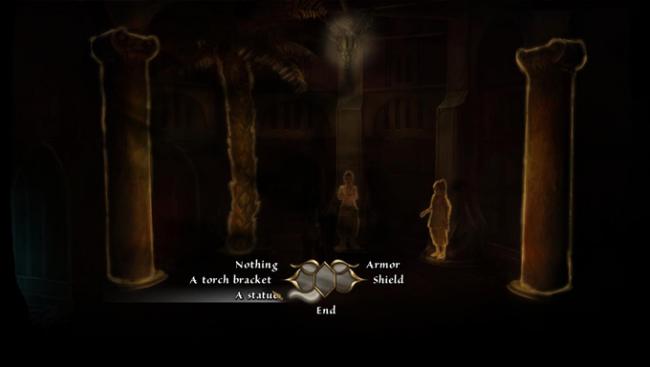
- You need to click on each of the five imagined objects and clarify what they actually are to break the spell.
- In order, from left to right, they are: torch bracket, armor, statue, shield, nothing.
- Once you’ve selected the correct object for each one, the illusion will lift and the room will appear normal.
- Touch the FLOATING CRYSTAL in this room to deactivate it, the final crystal.
- Head right, exiting out the window.
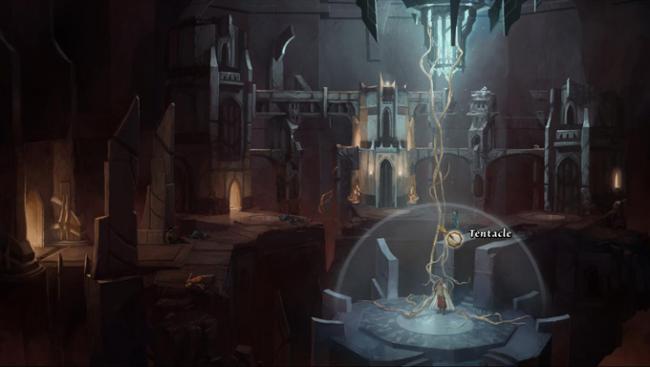
- Kasim’s magic shield should now be low enough that you can approach the tentacles above him that connect him to the MAIN CRYSTAL.
- Use DAGGER on these tentacles.
- Sadja will confront him and then be trapped by one last-ditch effort.
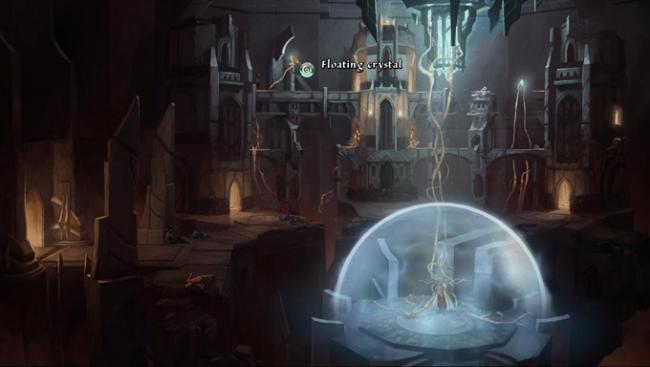
- Use MAGIC – ACTIVATE/DEACTIVATE on the MAIN CRYSTAL at the top of the room.
- The fortress is destroyed; Sadja awakes in a pile of corpses.
- Click on the STAFF a few times, until Sadja wakes up and walks towards it.
- Pick up the STAFF.
- Move to the right, towards the noise.
- Use STAFF on SHIELD to free the Young Amazon.
- Use BANDAGE on Young Amazon.
- A final threat appears, and Chapter 7 ends.
Chapter 8
Overview: We return to the forest with Bryda and Geron, who is still petrified. Geron can see and speak, but no one can hear him. Bryda continues to read from the ancient text.
- You can examine anything around you, but it does little good.
- Use MAGIC – REPAIR/DESTRUCT on the POWER ACCUMULATOR near the fire.
- This gets Bryda’s attention. She puts the MASK on you and asks you to repair the RUBY.
- Use MAGIC – REPAIR/DESTRUCT on the MASK.
- You’ll now have MAGIC – ACTIVATE/DEACTIVATE.
- Use MAGIC – ACTIVATE/DEACTIVATE on the POWER ACCUMULATOR.
- You’ll receive MAGIC – SEND VISION. Bryda will walk into the burial chamber.
- Use MAGIC – SEND VISION on NURI’S NECKLACE.
- For the vision, select Mountaintop, River, and Campfire.
- Nuri will appear and you’ll remember MAGIC – DE/PETRIFY.
- Use MAGIC – DE/PETRIFY on Geron. He’ll realize the MASK is too weak.
- Use MAGIC – SEND VISION on NURI’S NECKLACE again.
- This time, select Nuri, POWER ACCUMULATOR, and Geron.
- Nuri will bring the POWER ACCUMULATOR closer.
- Use MAGIC – DE/PETRIFY on Geron to free him.
- Walk into the burial chamber.
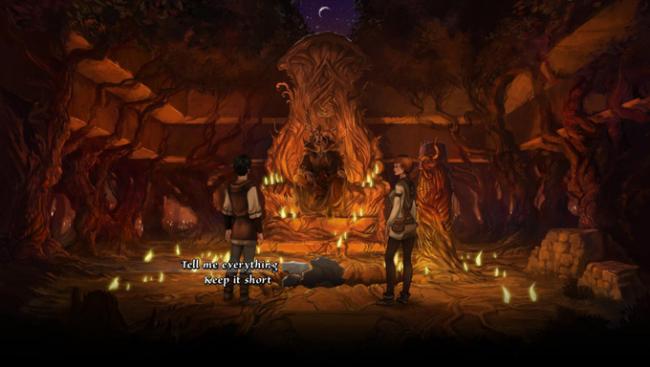
- In the burial chamber, the STAFF offers to explain his goals at length. If you want the long version, select “Tell me everything.” For an abridged version, select “Keep it short.”
- Feel free to ask about any dialogue choices you’re interested in. When you’re ready to continue, choose “I’m ready,” put the MASK on the bust, and continue.
- There are no wrong choices here; tell the story however you’d like.
- At the end of the story, when you are alone in the chamber, exit back to the forest.
- Speak to Fahi. He requests you find proof Bryda’s story was wrong.
- Go back inside the burial chamber.
- Take RUBY.
- Go back outside and give the RUBY to Fahi.
- Answer his questions however you’d like.
- Once the story is proven false, you will be given the choice to change Nuri back or leave her as she is.
- This choice is yours; you will get a separate achievement for each option.
- Watch the final cutscene; the game ends.
Achievements
The following achievements are listed in the order they can be earned in-game. Since most areas become inaccessible once you finish their associated chapter, many non-story-related achievements are missable. Additionally, some achievements exclude others: for instance, you cannot get “Clumsy Oaf” and “Masterful Sneaker” on the same attempt. To get both achievements without restarting, save your game, get one, then load and get the other.
- The achievements are listed with the following info: Achievement Name – Chapter it can be earned in – whether it’s earned automatically or can be missed
- Getting the Job Done – Prologue – Missable: When Fahi asks if you like riddles, select “No, I don’t like them.” This ends the game, so save beforehand.
- Causing Tremors – Chapter 1 – Missable: After you receive MAGIC – ACTIVATE/DEACTIVATE, use it on the guardian near Harun’s corpse. Have the guardian knock the rock face to his left three times to knock down the BRAZIER, then have him knock the rock face to his right until you earn the achievement.
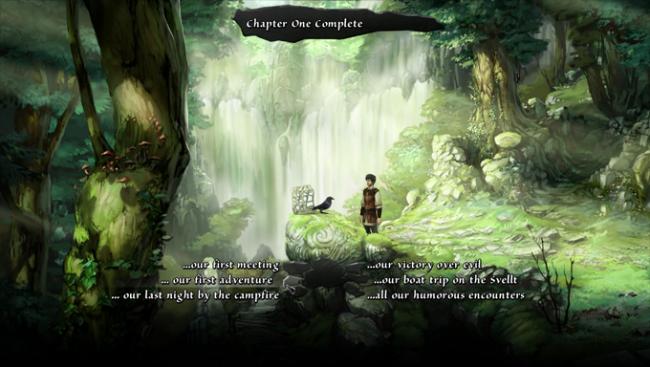
- Chapter One Complete – Chapter 1 – Automatic: Earned upon completing Chapter 1.
- Honesty Is The Best Policy – Chapter 2 – Missable: When Bryda questions you after discovering the MASK near Fahi’s tent, select all the honest answers. The answers are: “A powerful magic weapon,” “It was behind the tent,” and “Geron.”
- Crispy – Chapter 2 – Missable: Any time in the Inn before the end of Chapter 2, use the pig on the spit near Jacomo. It will turn and earn you this achievement.
- Master Detective – Chapter 2 – Missable: When interrogating the three men at the Inn, select the one who is lying on the first try. To do this, question all three men separately. Then, “Express suspicion,” select “The Thorwalian is lying,” and “He wasn’t even here.” (Cannot be earned with Nosebleed.)
- Nosebleed – Chapter 2 – Missable: When interrogating the three men at the Inn, accuse the wrong man or select the wrong reason for accusing the Thorwalian. (Cannot be earned with Master Detective.)
- Masterful Sneaker – Chapter 2 – Missable: In the dormitory, when sneaking in to steal the astral accumulator, do not make any sound or alert the student. You have to get into the room and back out with the item without alerting him. (Cannot be earned with Clumsy Oaf.)
- Clumsy Oaf – Chapter 2 – Missable: In the dormitory, make noise and get kicked out of the room multiple times until you earn the achievement. Should take about three noise-making trips. (Cannot be earned with Masterful Sneaker.)
- Baited – Chapter 2 – Missable: When delivering the three items to Bryda in the clearing, give her the POWER ACCUMULATOR (2) first—this is the one you picked up off the student’s bed, and it looks like a shiny egg.
- Firun’s Disciple – Chapter 2 – Missable: When Sadja is trying to catch the rabbit, do so on the first try. Follow the instructions from this walkthrough and you should get this one. The important part is to get the actions in order once the rabbit emerges from its hole – be sure two dandelions are in place and then tap on the BUSHES WITH END OF ROPE three times.
- Chapter Two Complete – Chapter 2 – Automatic: Earned upon completing Chapter 2.
- The Journey’s The Reward – Chapter 3 – Missable: You have to wander around in the forest for a long time. Just keep wandering until you earn the achievement. It takes long enough that you’ll probably find your way out by the time it’s earned.
- Phex Be With You – Chapter 3 – Missable: You have to find the fox in the forest maze. The fastest way to do so is to take this path from the entrance: east, north, northeast, north, northwest. (Recommend you combine this achievement with The Journey’s The Reward.)
- Level Up – Chapter 3 – Automatic: Earned after throwing fire at the spider web and taking the STAFF, once Sadja is safe on the next screen.
- Chapter Three Complete – Chapter 3 – Automatic: Earned upon completing Chapter 3.
- Doombringer – Chapter 4 – Automatic: Received when you touch Owlric’s statue and turn him to dust.
- Sadist – Chapter 4 – Missable: Upon entering Owlric’s home and finding him a statue, touch the statue and he turns to dust. Now use your MAGIC – REPAIR/DESTRUCT spell on the dust pile to turn him back into a statue. Touch him to turn him to dust again, then use MAGIC – REPAIR/DESTRUCT to fix him. Do this about ten times total and the achievement should unlock.
- Chapter Four Complete – Chapter 4 – Automatic: Earned upon completing Chapter 4.
- Renegade – Chapter 5 – Missable: When you arrive at the prison pit housing the Prince, use the three items Xerxes requests (MASK, STAFF, and DAGGER) on the pit chasm. (Cannot be earned with Being Kind.)
- Being Kind – Chapter 5 – Missable: When you arrive at the prison pit housing the Prince, give all three items Xerxes requests directly to him (MASK, STAFF, and DAGGER.) (Cannot be earned with Renegade.)
- A Knack For Spirits – Chapter 5 – Missable: When Sadja is sent to the guest room and encounters the air elemental, select the correct dialogue choices in order: “Let’s play!” then “Let’s play hide and seek!” and finally “You hide me from the magicians!”
- Big Brother – Chapter 5 – Missable: Received when you turn the horns in the observatory to eavesdrop on the Prince’s conversation, if you turn them the correct direction the first time.
- Elementalist – Chapter 5 – Automatic: Received when you collect all five spirits.
- Seek And Ye Shall Find – Chapter 5 – Missable: Requirements unknown; “Find the Caverns of Fail.”
- Chapter Five Complete – Chapter 5 – Automatic: Earned upon completing Chapter 5.
- Chapter Six Complete – Chapter 6 – Automatic: Earned upon completing Chapter 6.
- Chapter Seven Complete – Chapter 7 – Automatic: Earned upon completing Chapter 7.
- Finish Line – Chapter 8 – Missable: When asked if you want to change Nuri back, select “Change her back.” (Cannot be earned with A Gift Called Freedom.)
- A Gift Called Freedom – Chapter 8 – Missable: When asked if you want to change Nuri back, select “Leave her as is.” (Cannot be earned with Finish Line.)
- Chapter Eight Complete – Chapter 8 – Automatic: Earned upon completing Chapter 8.
Congratulations!
You have completed Gamezebo’s walkthrough for Memoria. Be sure to check back often for game updates, staff and user reviews, user tips, forums comments and much more here at Gamezebo!

More articles...
-
Best Horror Games On Itch.io – July 2026
Across a bounty of subgenres. -
Haze Seas Accessories Tier List [Best Accessories to Equip]
The accessories with the best stat buffs in Haze Seas.