
Best Horror Games On Itch.io – July 2026
Across a bounty of subgenres.
Grow A Garden 2 Base Price List
What's the most valuable crop?![Evomon Best Starter [Leafbun, Blazpup, or Bubble?]](/wp-content/uploads/2026/06/evomon-best-starter.jpg "Evomon Best Starter [Leafbun, Blazpup, or Bubble?]")
Evomon Best Starter [Leafbun, Blazpup, or Bubble?]
Grass-type, Fire-type, or Water-type?
![[Roblox] Evomon Shiny Hunting Guide – Including Prismatic and Pris Shinies!](/wp-content/uploads/2026/06/evomon-shiny-hunting-guide.jpg "[Roblox] Evomon Shiny Hunting Guide – Including Prismatic and Pris Shinies!")
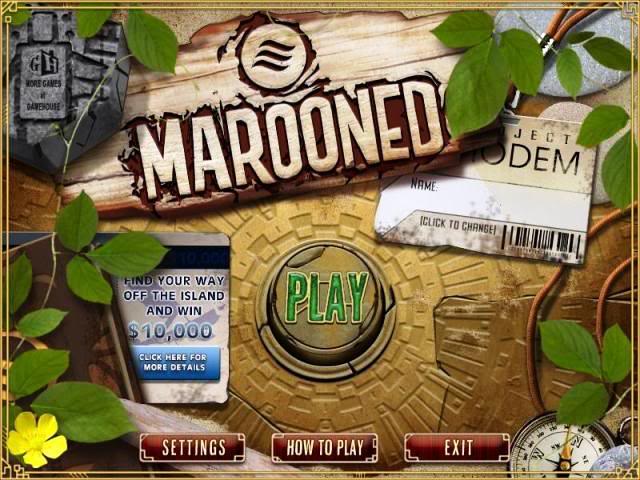
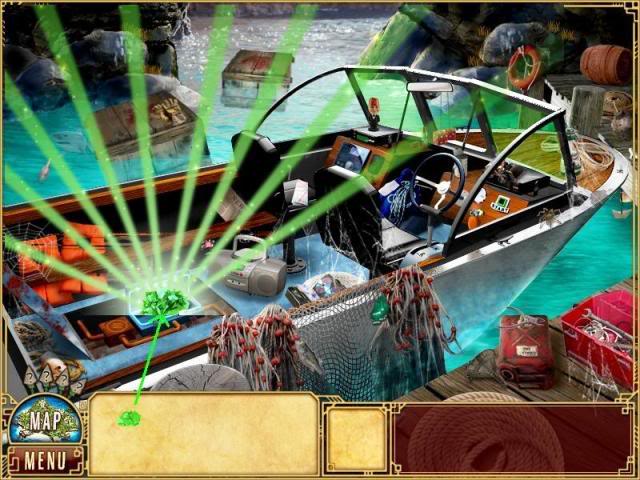
Marooned Walkthrough
Welcome to Gamezebo's walkthrough for Marooned. Have I lost my mind? Oh no wait, it's just my memory! Let's help Macy put together the pieces of the puzzle and restore her lost memory. GENERAL TIPS HIDDEN OBJECTS There are three different styles of hidden object game play used in this game. TRADITIONAL – You are provided with at list and you should find and click on each item on the list. The traditional hidden object list will have different it…


- Prefer Gamezebo on Google

a:1:i:0;a:2:s:13:”section_title”;s:20:”Marooned Walkthrough”;s:12:”section_body”;s:57220:”
Welcome to Gamezebo’s walkthrough for Marooned.

Have I lost my mind? Oh no wait, it’s just my memory!
Let’s help Macy put together the pieces of the puzzle and restore her lost memory.
GENERAL TIPS
HIDDEN OBJECTS
There are three different styles of hidden object game play used in this game.
- TRADITIONAL – You are provided with at list and you should find and click on each item on the list. The traditional hidden object list will have different items each time you play the game. The items on the list in your game may not be the same ones shown in the walkthrough.
- PHRASE – You are provided with a clue and you should find the two items that complete the phrase associated with the clue.
- GROUPED – You are asked to find a certain number of the same related item, such as 15 socks or 15 starfish.
INVENTORY
Locked Inventory Object
Each scene contains a Locked Inventory Object. It is shown behind bars in the lower center of the screen. As you find each hidden object in the scene the bars will move up. When all the hidden objects are found, the locked object will be unlocked and available to use.
Regular Inventory
The regular inventory items are hidden in each scene and will go into your inventory when they are found. Your regular inventory items are shown on the lower left of the screen.
- OUTLINED OBJECTS – these objects are hidden in the current scene.
- DIMMED OBJECTS – these objects are hidden in a different scene or they are in the current scene but have not been revealed yet.
- AVAILABLE OBJECTS – these objects are shown in your inventory by a picture of the object and have been found and are available to use.
Move your cursor over an active available inventory item to display its name. This may help guide you as to the best place to use it.
HOT SPOTS
Hot Spots are places or items where an action can be performed with an item from your inventory. A puzzle piece will appear when your cursor moves over a Hot Spot in a scene.
You can use an inventory item to search the scene for Hot Spots.
Once you have found a Hot Spot you can click on it to get a message about what action might be needed at that spot.
Click on an available object in your inventory to pick it up, then click it on a Hot Spot in the scene to use it.
HINTS
You are given 5 Hint Spears at the beginning of the game. They are shown in the lower left corner of the screen. You can use the Hint Spears to find hidden objects and Hot Spots.
There is a bonus hidden Hint Spear in each scene. Find and click on it to replenish your Hint Spears. You are not limited to have only 5 Hint Spears. They will stack on top of each other in your spear holder.
MAP
The MAP button is located in the lower left corner. Click on it to view the whole island. You can click on an open scene on the MAP to travel to it.
MINI-MAP
Run your cursor over the MAP button to reveal the Mini-Map. The Mini-Map allows you to quickly travel between open scenes without going to the map of the whole island.
STRATEGY TIPS
There is no timer or accumulated score in this game.
Pay close attention to Macy’s dialogue as it will give you clues and direction on how to solve tasks and what to do next.
I did not find any way to skip the dialogue or cut scenes in this game even on subsequent play as the same player.
WALKTHROUGH
Throughout the game you may choose from several locations on the Map to explore. This walkthrough is only one of several ways that you can travel through this game.
The traditional hidden object list will have different items each time you play the game. The items on the list in your game may not be the same ones shown in this walkthrough.
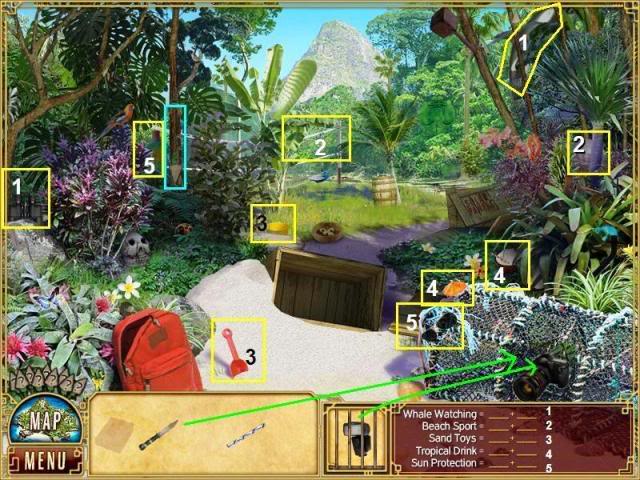
THE BEACH – WHERE AM I?

- Find each item on the list to unlock the shovel.
- Use the shovel to dig up the crate in the center of the scene.
- Find the crowbar to go into your inventory.
- Use the crowbar to open the crate and discover the journal.
- Read the journal entry and close the journal to complete the scene.
You will be taken to the map of the island where you can choose your next location.
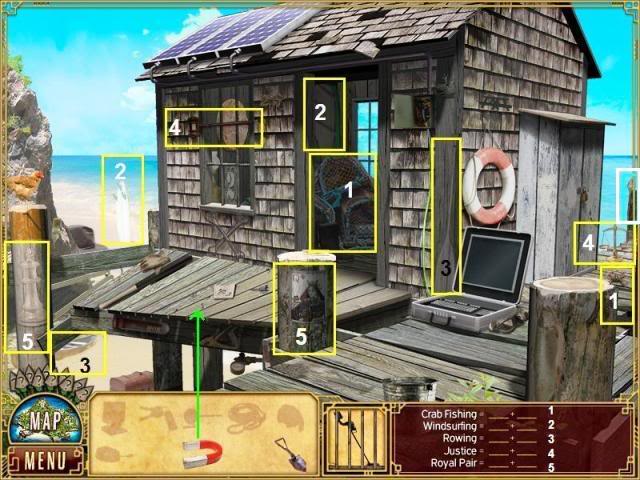
THE BEACH – SOLAR PANELS
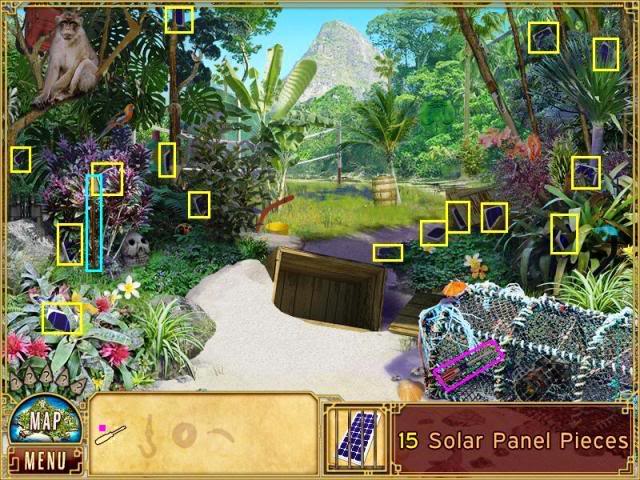
- Find 15 solar panels to unlock the solar panel to go into your inventory.
- Find the screwdriver to go into your inventory. The screwdriver will be used in another scene.
- Go to the Boathouse.
BOATHOUSE – FIRST VISIT
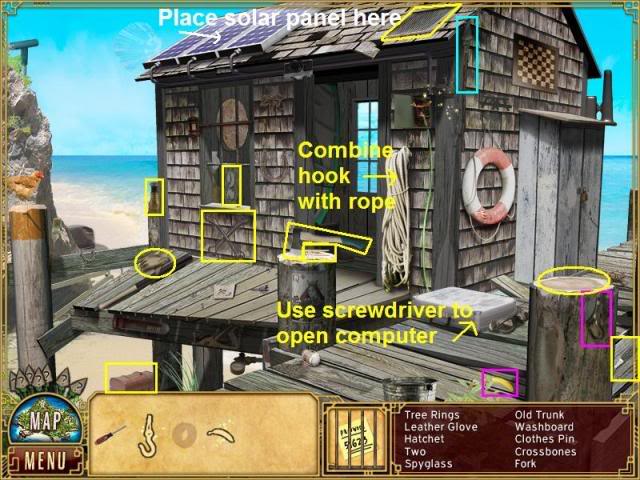
- Find each item on the list to unlock the computer password code.
- Take the solar panel from your inventory and put it on the roof with the other solar panels.
- Use the screwdriver from your inventory to open the computer case.
- Find the hook and the banana to go into your inventory.
- Place the hook on the rope underneath the electrical box and they will combine and go into your inventory.
- Go back to the Beach.
BEACH – FEED THE MONKEY
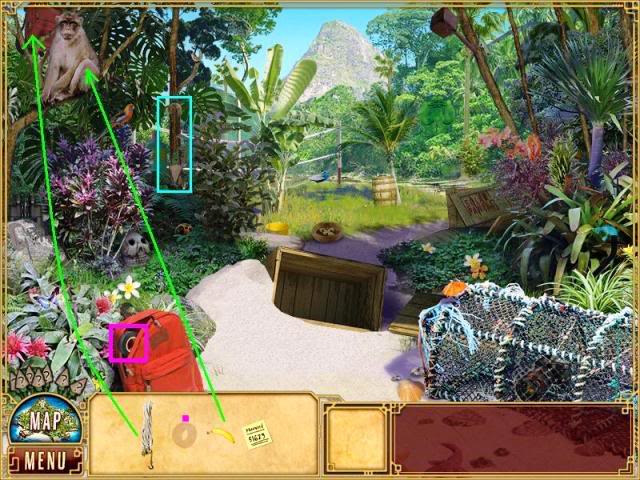
- Give the banana to the monkey in the upper left tree and it will move away.
- Use the hook and rope to get the backpack in the upper left tree
- Discover more information for your journal. Close the journal.
- Take the tape from the backpack to complete the scene.
- Go back to the Boathouse.
BOATHOUSE – COMPUTER

- Use the tape from your inventory on the sparkling electrical wires.
- Use the computer pass word from your inventory on the computer.
- Read the journal entry and close the journal to complete the scene.
BOATHOUSE – SHELLS
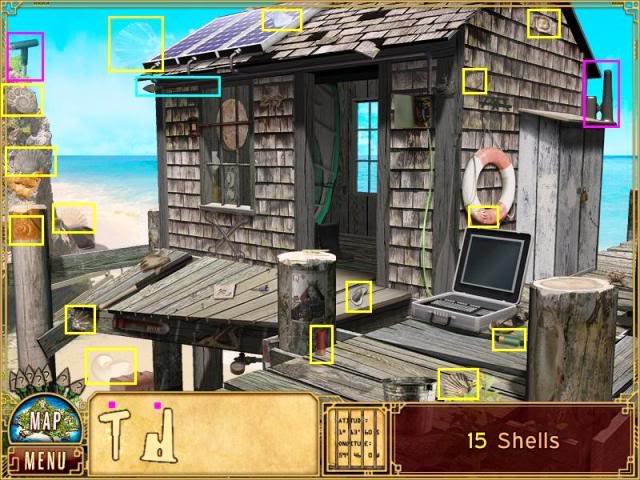
- Find 15 shells to unlock the GPS coordinates to go into your inventory.
- Find the antenna to go into your inventory.
- Find the throttle to go into your inventory.
- This will complete the scene.
- Go to the Caves.
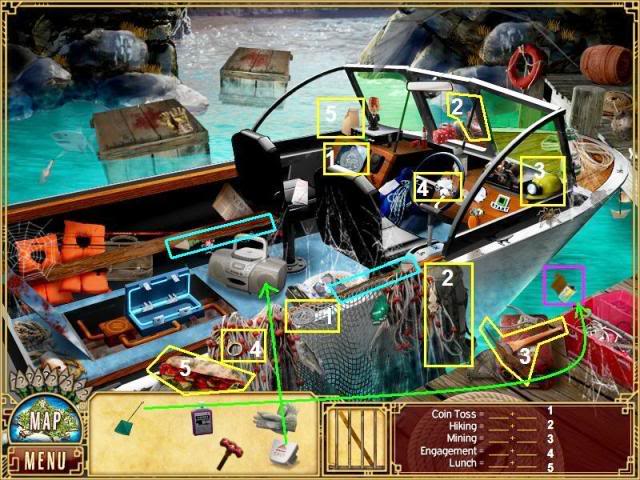
CAVES – BOAT – FIRST VISIT
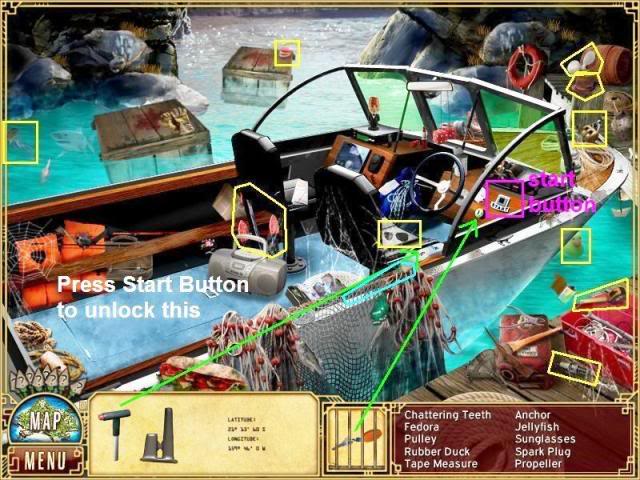
- Find the items on the list to unlock the Key to go into your inventory.
- Place the throttle from your inventory in the boat throttle slot.
- Place the key from your inventory in the boat ignition key slot.
- Press the Start Button near the ignition key and the boat’s storage compartment will open and information will go into your journal. Close the journal to complete the scene.
- Go to the Jungle Path.
JUNGLE PATH – FIRST VISIT
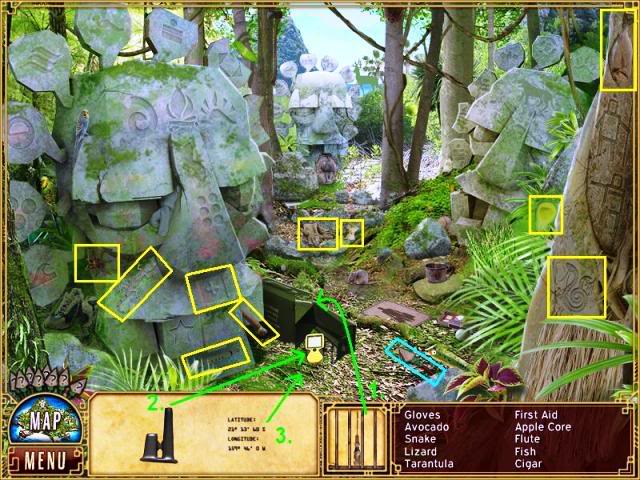
- Find the items on the list to unlock the screwdriver to go into your inventory.
- Use the screwdriver in the green metal box in the center of the scene to get the GPS unit.
- Use the antenna from your inventory on the GPS unit.
- Use the GPS coordinates from your inventory on the GPS unit.
- Read the journal entry and close the journal to complete the scene.
- Go to the Shipwreck.
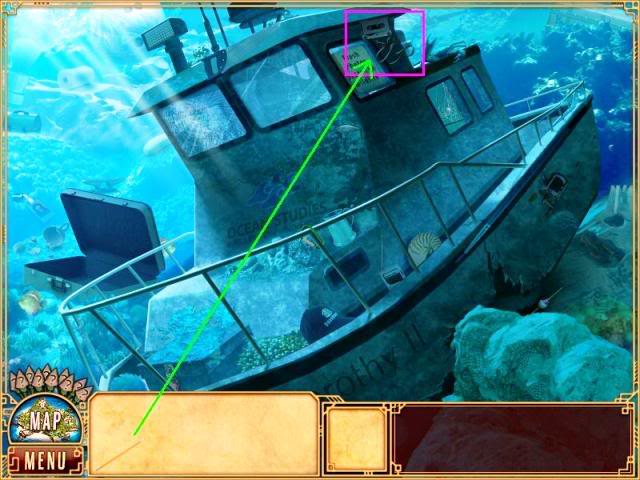
SHIPWRECK – STARFISH
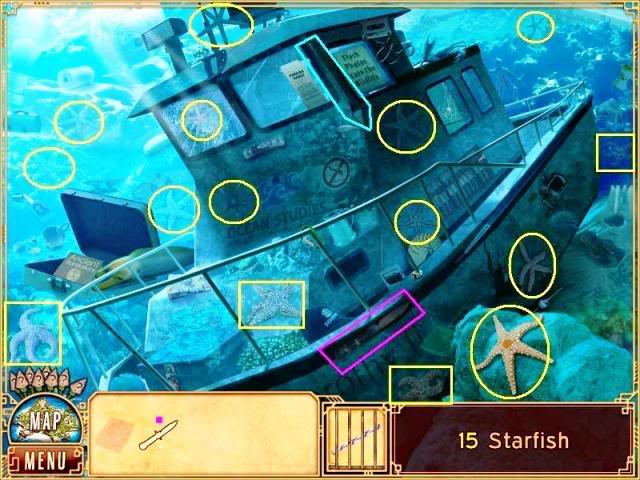
- Find 15 starfish to unlock the drill bit to go into your inventory.
- Find the knife to go into your inventory.
- Go to the Beach.
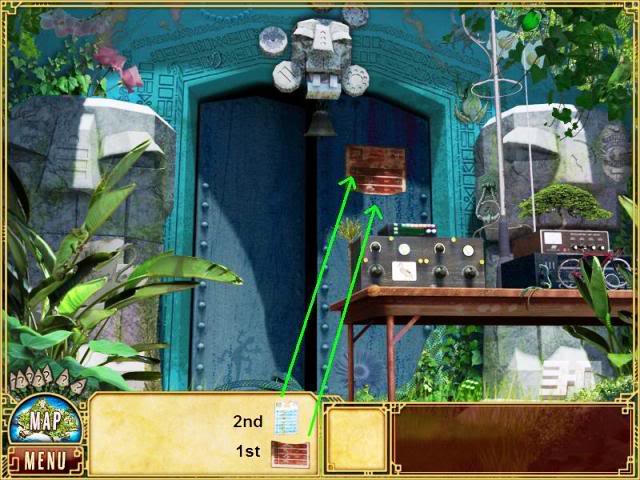
BEACH – FIND THE FLASH
- Find the items on the list of pairs to unlock the camera flash to go into your inventory.
- Use the knife from your inventory to cut open the mesh container in the lower right corner to reveal the camera.
- Put the flash onto the camera to complete the scene.
- Go back to the Shipwreck.
SHIPWRECK – THE EEL
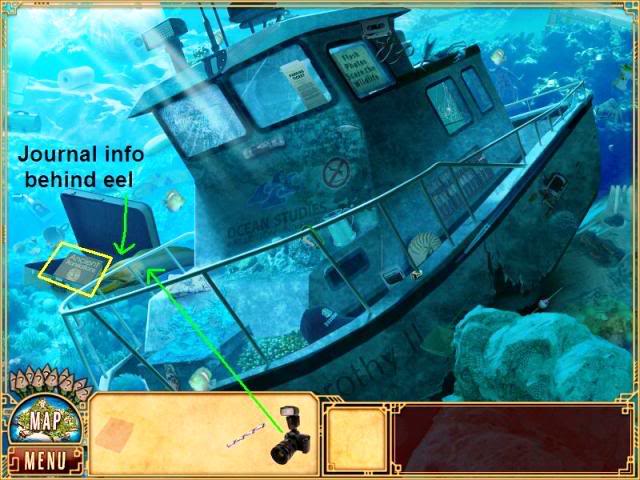
- Use the flash camera from your inventory to scare away the eel.
- Information from the chest will go into your journal. Close the journal.
- Get the Ancient Translations book from the chest after the eel is gone to complete the scene.
- Go to the Artifact Room
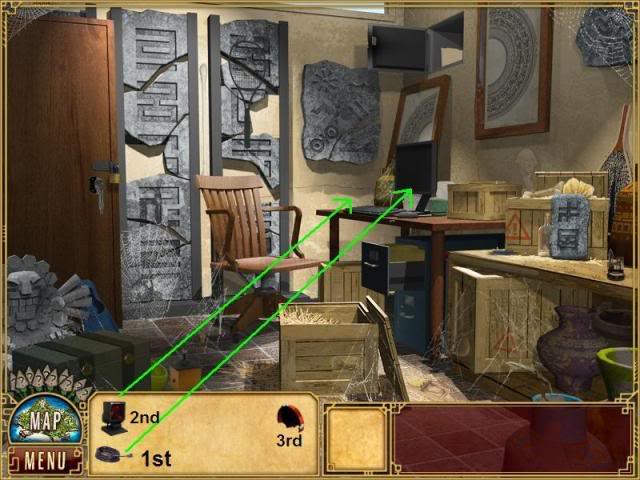
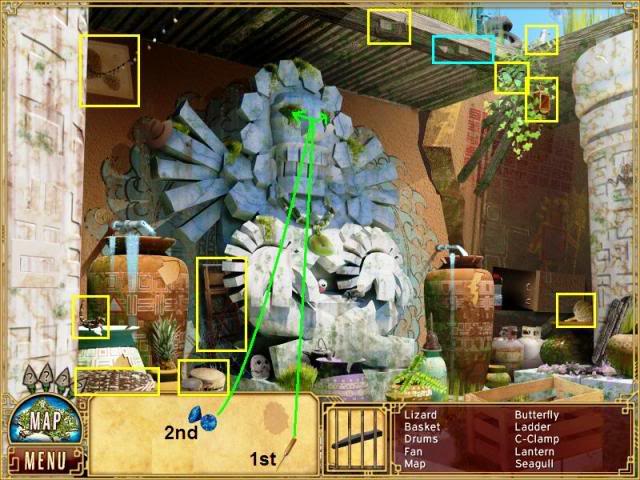
ARTIFACT ROOM – FIRST VISIT
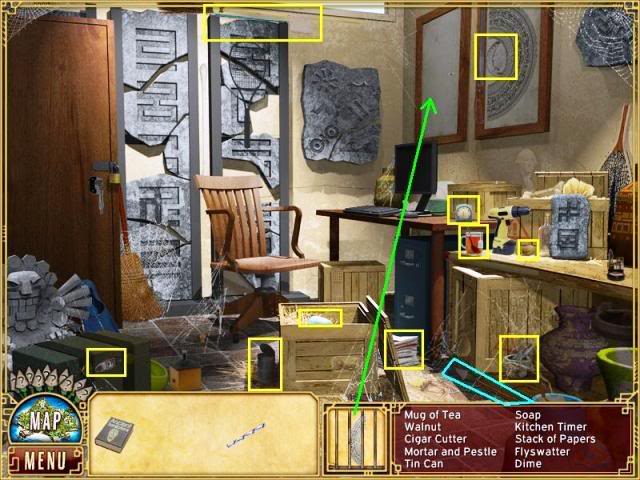
- Locate the items on the list to unlock the tribal art piece to go into your inventory.
- Place the tribal art piece in the empty frame beside the other tribal art piece on the wall over the computer.
- The tribal art piece will move to reveal a safe.
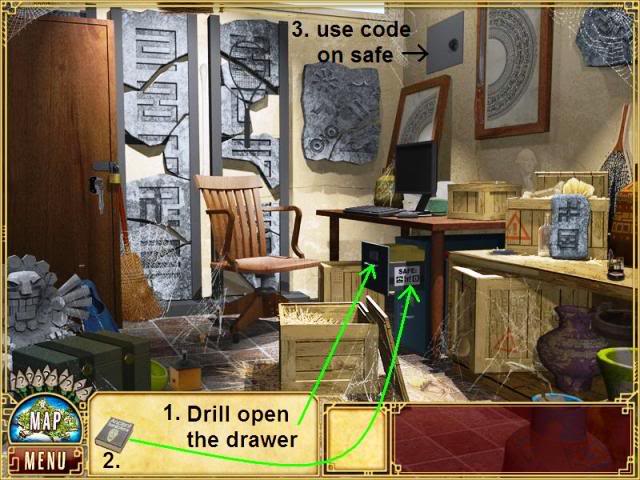
- Put the drill bit on the yellow and black drill that is on the wooden work table and they will combine and go into your inventory.
- Use the drill on the blue 2 drawer file cabinet under the computer. You will get more information for your journal. Read and close the journal.
- Use the Ancient Translations book in your inventory on the safe combination on the side of the blue 2 drawer file cabinet. It will be translated and go into your inventory.
- Use the translated combination on the safe to find top secret information inside. It will go into your journal.
- Close the journal to complete the scene.
WELLERTON UNIVERSITY, NEW YORK CITY – 8 MONTHS EARLIER
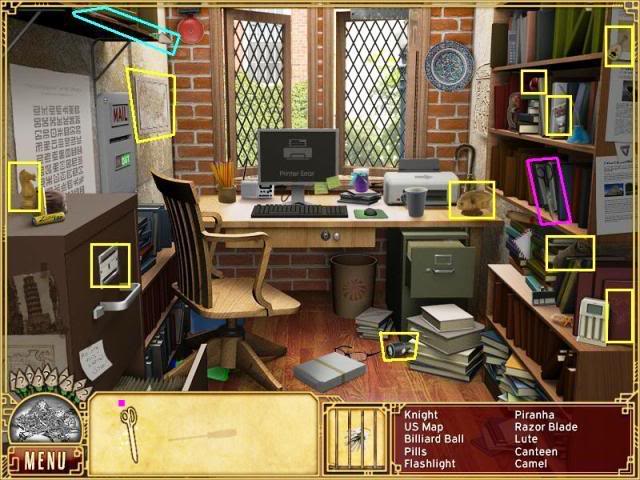
- Locate the items on the list to unlock the keys to go into your inventory.
- Find the scissors to go into your inventory.
- Use the scissors on the paper strap on the pile of printer paper that is in the floor. Paper will go into your inventory.
- Put the paper from your inventory into the printer. You will get more information for your journal. Read and close the journal.
- Use the keys in your inventory on the center desk drawer to get the screwdriver.
- Use the screwdriver on the mailbox on the left wall to get more information for your journal.
- Close the journal to end the scene.
- Go to the Science Lab.
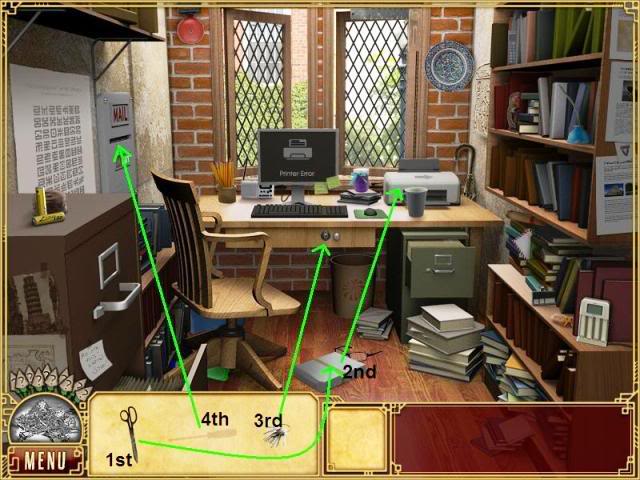
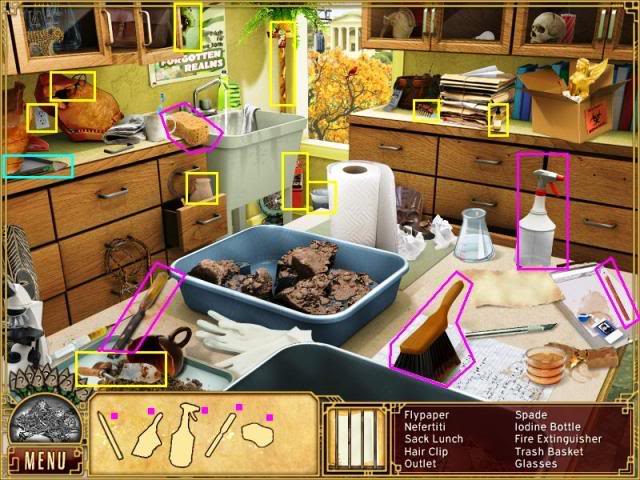
SCIENCE LAB – FIRST VISIT
- Locate the items on the list to unlock the pressure relief valve to go into your inventory.
- Find the developer to go into your inventory.
- Find the gloves to go into your inventory.
SHIPWRECK – EJECT BUTTON & FISH NET
- Locate the items on the list to unlock the eject button to go into your inventory.
- Find the fish net to go into your inventory.
- Go to the Caves.
CAVES – BOAT – FILM ROLL
- Locate the items on the list to unlock the pole to go into your inventory.
- Use the fish net from your inventory to pick up the film that is floating in the water to the right of the boat. The film will go into your inventory.
- Use the eject button on the silver cassette tape player in the boat to open it.
- Go to the Science Lab.
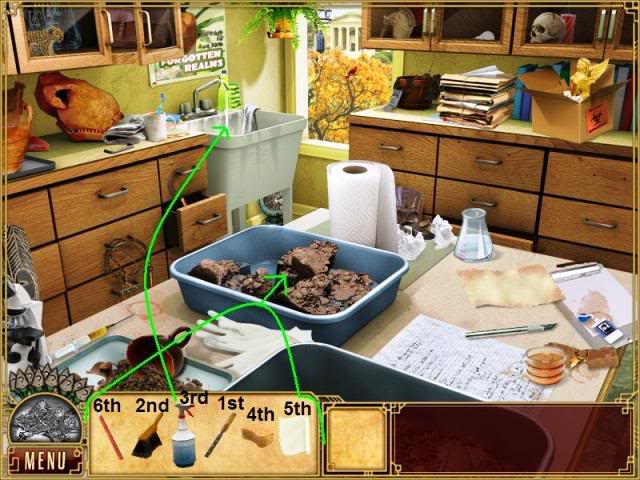
SCIENCE LAB – DEVELOP THE FILM
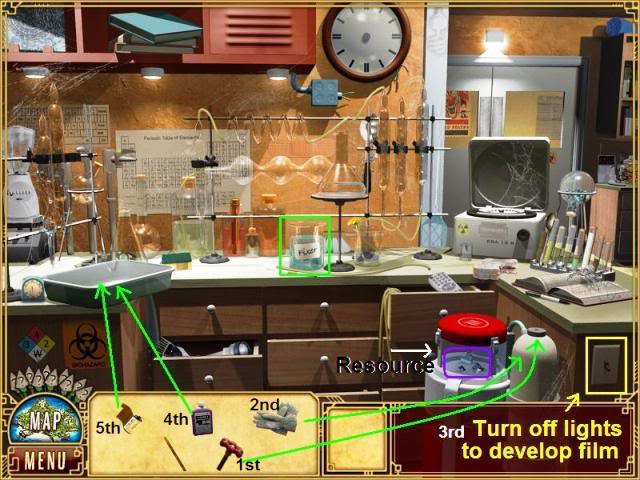
- Put the pressure relief valve from your inventory on the top of the white tank in the lower right corner.
- Use the gloves from your inventory to turn the pressure relief valve until the clear case opens to reveal some of the Resource. Information will go into your journal. Read and close the journal.
- Turn off the lights with the switch in the lower right corner.
- Put the developer from your inventory in the pan on the table.
- Put the film from your inventory in the pan on the table.
- The film will develop and go back to your inventory.
- Put the developed film into the fixer on the center of the table.
- Pictures of an explosion will go into your journal. Close the journal to complete the scene.
- Go to the Jungle Path
JUNGLE PATH – TROPICAL BIRDS
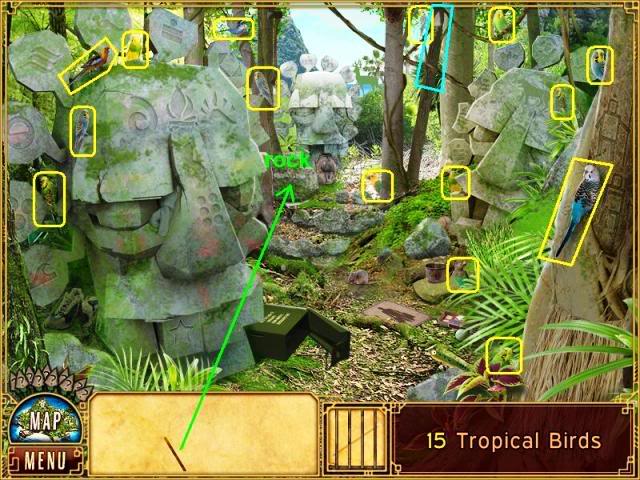
- Locate the 15 tropical birds to unlock the pencil to go into your inventory.
- Use the pole from your inventory to lift the rock to find a storm evacuation notice that will go into your journal.
- Close your journal to complete the scene.
- Go to the Shipwreck.
SHIPWRECK – CASSETTE TAPE
- Use the pencil from your inventory to rewind the cassette tape. The tape will go into your inventory to complete the scene.
- Go to the Caves.
CAVES – BOAT – PLAY THE TAPE
- Put the audio tape into the tape player on the boat.
- Listen to the tape and the information will go into your journal.
- Close the journal to complete the scene.
WELLERTON UNIVERSITY, NEW YORK CITY – 10 MONTHS EARLIER
- Locate the items on the list to unlock the tracing paper to go into your inventory.
- Find the empty spray bottle to go into your inventory.
- Find the chisel to go into your inventory.
- Find the pencil to go into your inventory.
- Find the brush to go into your inventory.
- Fill the empty spray bottle at the sink faucet.
- Use the chisel from your inventory 3 times on the dirty items in the blue dishpan on the table in the center of the scene.
- Use the brush on the dirty items in the blue dishpan twice on the dirty items in the blue dishpan.
- Use the spray from your inventory on the dirty items in the blue dishpan.
- Use the sponge from your inventory on the dirty items in the blue dishpan.
- Put the tracing paper from your inventory on the cleaned items in the blue dishpan.
- Use the pencil from your inventory on the tracing paper to get a rubbing from the images on the stones.
- The paper rubbing will go into your journal. Close the journal to complete the scene.
- Go to the Living Quarters.
LIVING QUARTERS – SOCKS
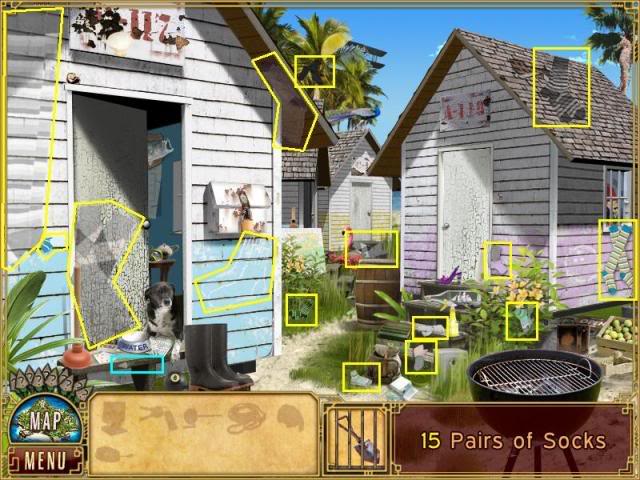
- Locate the 15 socks to unlock the shovel to go into your inventory.
- Go to the Artifact Room.
ARTIFACT ROOM – BROOMS
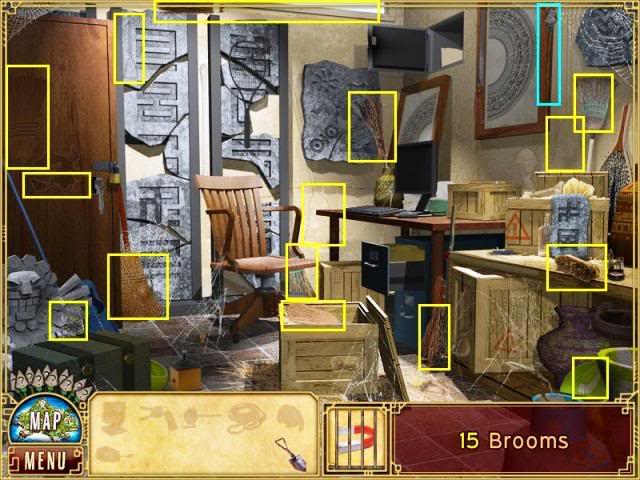
- Locate the 15 brooms to unlock the magnet to go into your inventory.
- Go to the Boathouse.
BOATHOUSE – METAL DETECTOR
- Locate the pairs of items on the list to unlock the metal detector to go into your inventory.
- Use the magnet from your inventory on the loose board on the front of the deck at the boathouse to find the power cord. Click on the power cord and it will go into your inventory to complete the scene.
- Go to the Waterfall.
WATERFALL – WELL
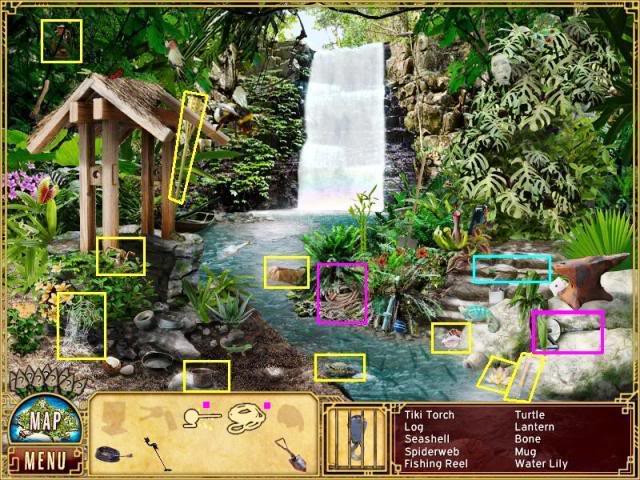
- Locate the items on the list to unlock the grappling hook to go into your inventory.
- Find the rope to go into your inventory.
- Find the crank to go into your inventory.
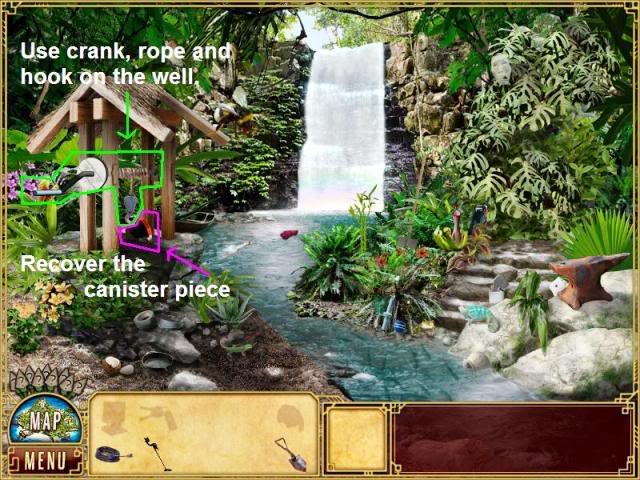
- Put the crank from your inventory on the well on the left of the scene.
- Put the rope from your inventory on the crank.
- Put the grappling hook from your inventory on the rope. The rope will lower down the well and come back up with a piece of a canister attached to the hook. Information about the explosion will go into your journal. Close the journal.
- Click on the red broken canister lid that is on the end of the rope at the well to put it into your inventory and to complete the scene.
- Go to the Living Quarters.
LIVING QUARTERS – ID CARDS
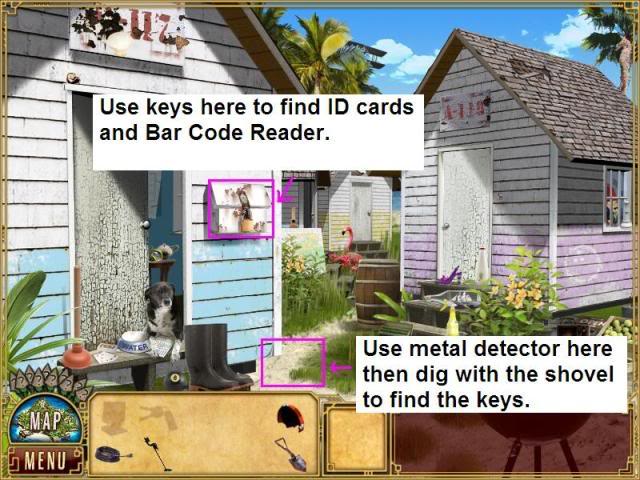
- Use the metal detector from your inventory on the sand in the lower center of the screen. A small flag will pop up when you find the right location.
- Use the shovel from your inventory to dig at the flag and you will find the keys.
- Use the keys on the padlock on the mailbox on the wall beside the door.
- Seven ID cards will go into your journal. Read the information and close the journal.
- Get the bar code reader from the same mailbox and it will go into your inventory to complete the scene.
- Go to the Artifact Room.
ARTIFACT ROOM – BAR CODE READER
- Put the power cord from your inventory on the computer on the desk. The computer will power on.
- Put the bar code reader from your inventory on the computer. It will connect to the computer and power on.
- Put the canister lid with the bar code from your inventory on the bar code reader beside the computer. You will get information from the scientist’s notes for your journal.
- Close the journal to complete the scene.
- Go to the Jungle Path.
JUNGLE PATH – VIAL
- Locate the pairs of items on the list to unlock the vial to go into your inventory.
- Go to the Science Lab.
SCIENCE LAB – FLASHLIGHTS
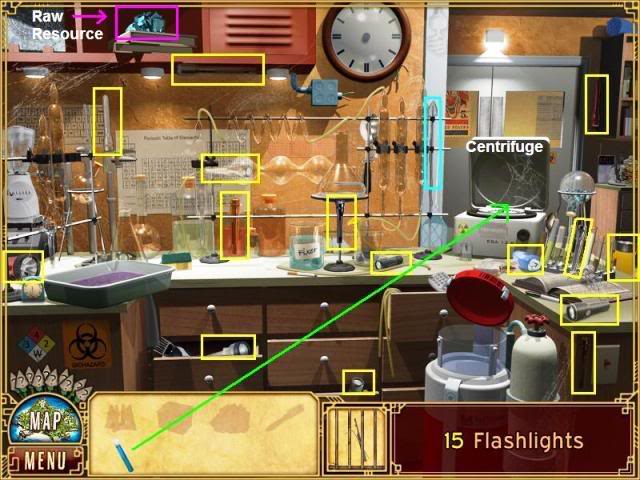
- Find the 15 flashlights to unlock the lock pick to go into your inventory.
- There is a white centrifuge on the right side of the table. It is rectangular and the black lid is open. Put the vial from your inventory in the centrifuge and as it works a book will fall from a shelf on the upper left. Information about the Akoni using the Resource will go into your journal.
- Close the journal.
- Behind where that book fell, on the shelf, is a blue large piece of the Raw Resource. Click it into your inventory to complete the scene.
- Go to the Shipwreck.
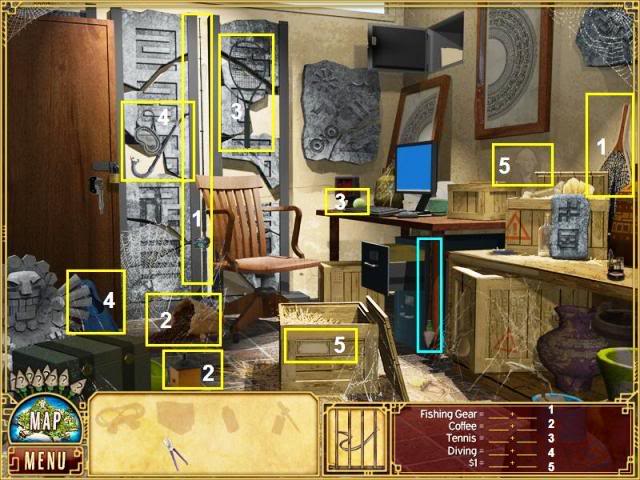
SHIPWRECK – LEAKY BATTERY
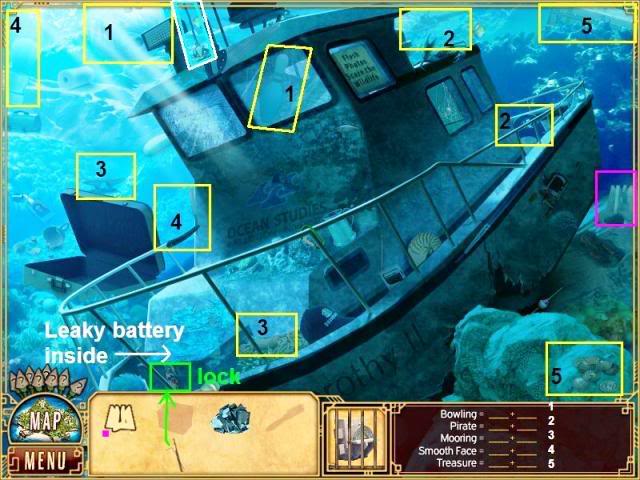
- Locate the pairs of items on the list to unlock the statue body to go into your inventory.
- Use the lock pick from your inventory on the lock on the chest in the front of the shipwreck. When it is open click on the leaky battery and it will go into your inventory.
- Find and click on the resource stand and it will go into your inventory.
- Go back to the Jungle Path.
JUNGLE PATH – BRUSH
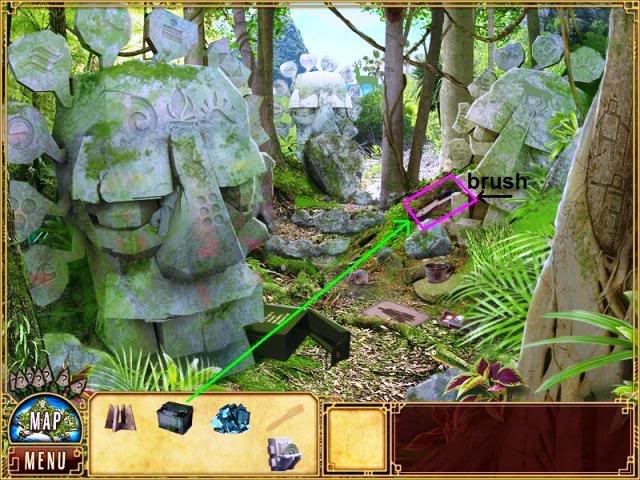
- Use the leaky battery from your inventory on the vines in the right center of the scene to dissolve them. A brush will be revealed.
- Click on the brush and it will go into your inventory to complete the scene.
- Go back to the Shipwreck.
SHIPWRECK – TABLET
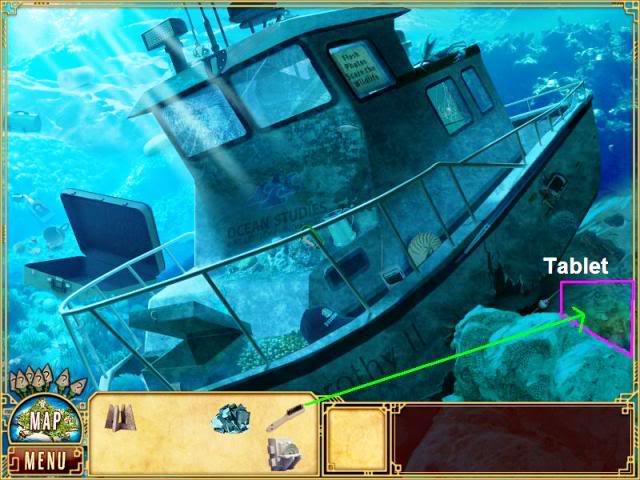
- Use the brush from your inventory on the tablet covered with grime on the lower right of the scene behind the big rock in the corner. When it is clean the missing tablet piece will go into your journal.
- Close your journal to complete the scene.
- Go to the Ruins.
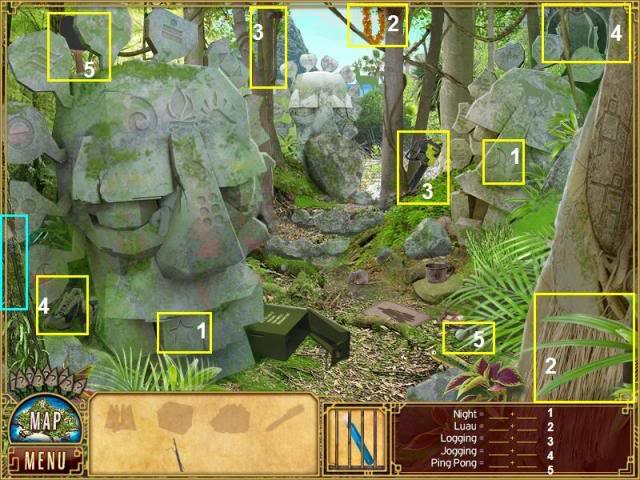
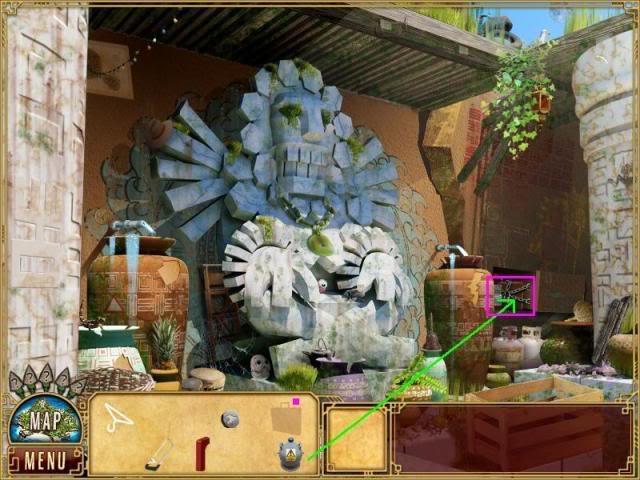
RUINS – LIGHT SOURCE

- Locate the items on the list to unlock the statue head to go into your inventory.
- There is a stone base in the left center part of the scene where you will assemble the statue and resource piece.
- Place stone body and the stone head on the base.
- Place the resource stand and then the raw resource at the base of the statue.
- The resource will change and turn gold and create a light source.
- Information about the light source will do into your journal. Close the journal to complete the scene.
- Go to the Condo.
MACY BLACK’S CONDO – NEW YORK CITY = 8 MONTHS EARLIER
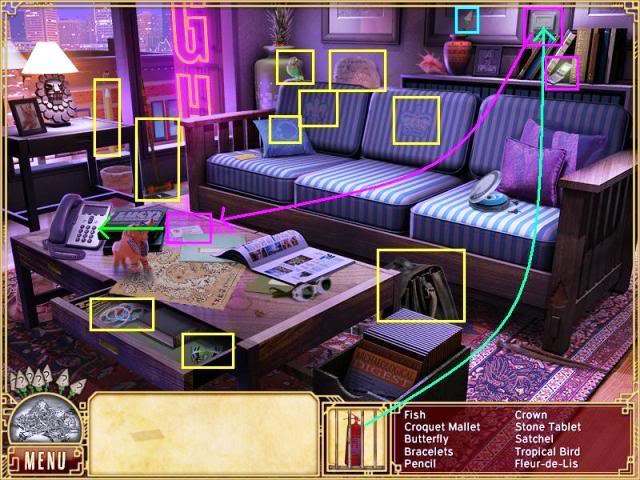
- Locate the items on the list to unlock the fire extinguisher to go into your inventory.
- Put the fire extinguisher from your inventory on the thermostat on the upper right of the scene. A business card will be forced out and land on the coffee table.
- Put the business card on the telephone on the coffee table and it will call your cell phone.
- Your cell phone will ring and flash in the upper right of the scene. Click on your cell phone and listen to a message from Radimar. The message will go into your journal. Close the journal to complete the scene.
- Go to the Waterfall.
WATERFALL – STONE FRAGEMENT
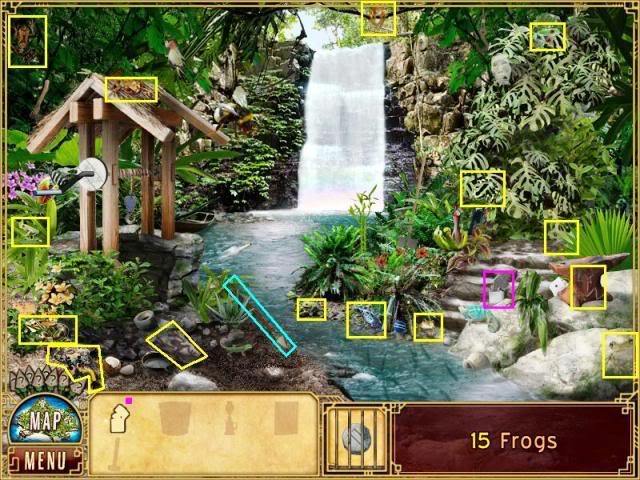
- Find the 15 frogs to unlock the stone fragment to go into your inventory.
- Find the cigarette lighter to go into your inventory.
- Go to the Boathouse.
BOATHOUSE – BENT KEY

- Find the list of items to unlock the bent key to go into your inventory.
- Find the oil lamp to go into your inventory.
- Find the empty bucket to go into your inventory.
- Go to the Temple Door.
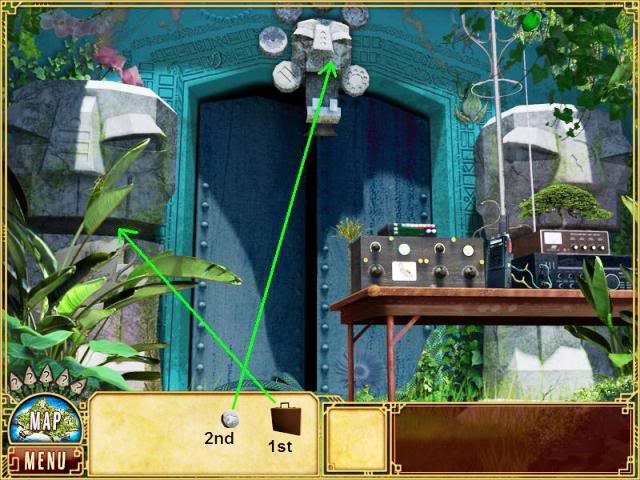
TEMPLE DOOR – FIRST VISIT
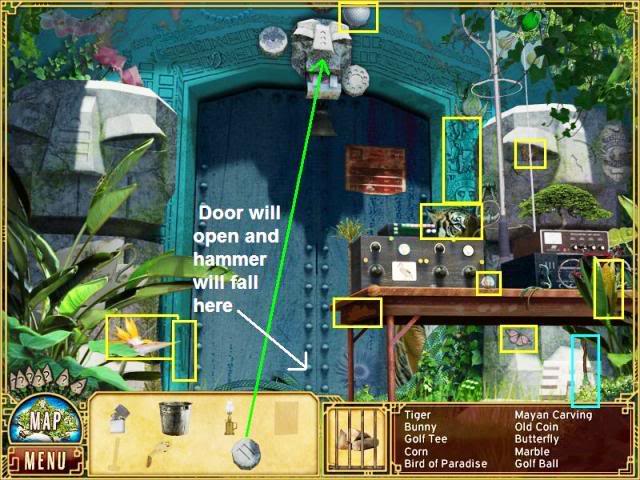
- Find the list of items to unlock the firewood to go into your inventory.
- Put the stone fragment from your inventory on the carving above the temple doors. The doors will open slightly and a hammer will fall to the ground.
- Click on the hammer to put it into your inventory.
- Go back to the Waterfall.
WATERFALL – WATER BUCKET
- Put the bucket from your inventory on the hook at the well. It will lower and bring back a bucket filled with water. The water will go into your inventory.
- Go to the Living Quarters.
LIVING QUARTERS – LIGHT THE GRILL
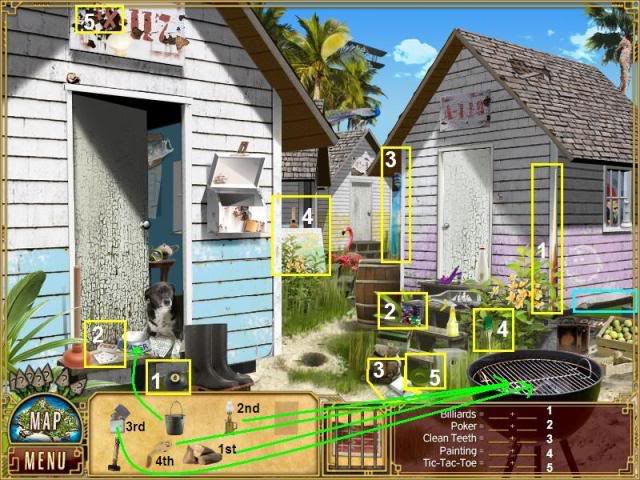
- Locate the pairs of items on the list to unlock the partial weather poster to go into your inventory.
- Put the bucket from your inventory on the dog dish. The dog will move to reveal a cooking schedule that will go into your journal. Close your journal.
- Put the firewood from your inventory on the grill in the lower right corner.
- Put the oil lamp from your inventory on the grill.
- Put the lighter from your inventory on the grill and it will light the fire.
- Put the bent key from your inventory in the fire on the grill.
- The hot key will go into your inventory to complete the scene.
- Go back to the Waterfall.
WATERFALL – ANVIL
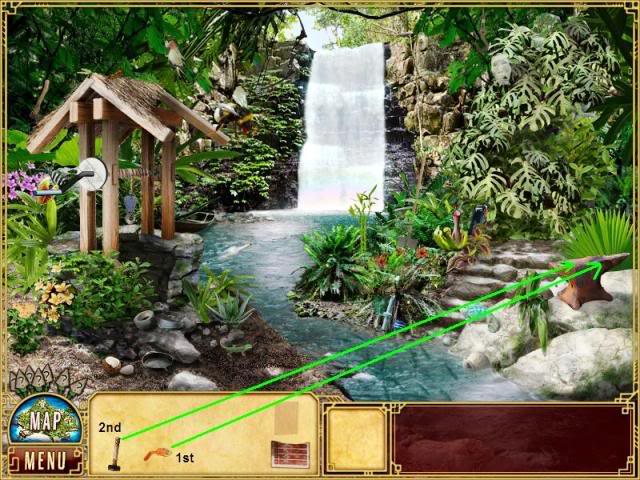
- Put the hot key from your inventory on the anvil on the right of the scene.
- Put the hammer on the hot key to straighten it.
- The repaired key will go into your inventory to complete the scene.
- Go to the Boathouse.
BOATHOUSE – USE KEY
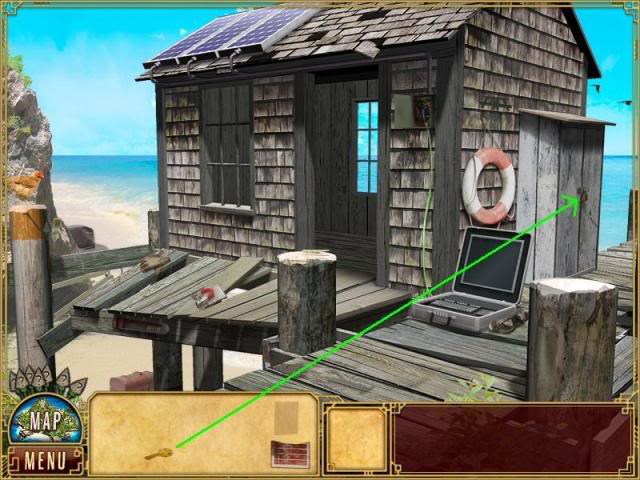
- Put the key from your inventory on the lock on the storage shed on the on the right of the scene.
- The shed will open and a weekly food list will go into your journal. Close the journal.
- Click on the bright blue weather forecast poster hanging near the top of the inside of the open door of the storage shed. It will go into your inventory to complete the scene.
- Go to the Temple Door.
TEMPLE DOOR – WEATHER
- Put the red partial weather poster from your inventory on the other partial weather poster on the Temple Door.
- Put the blue weather forecast poster from your inventory on the partial weather poster on the Temple Door.
- The weather information will go into your journal. Close the journal to complete this scene.
- Go to the Ruins.
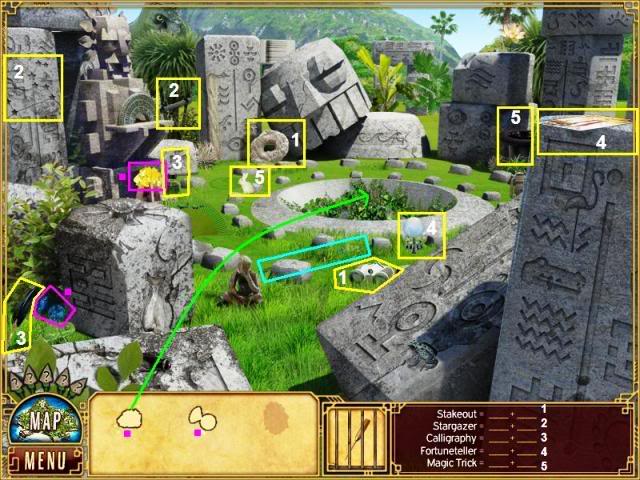
RUINS – BUTTERFLIES
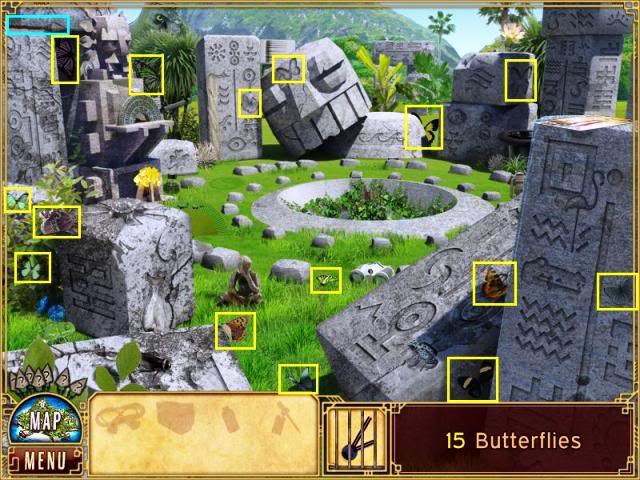
- Find the 15 butterflies to unlock the clock hands to go into your inventory.
- This will complete the scene.
- Go to the Science Lab.
SCIENCE LAB – CLOCK
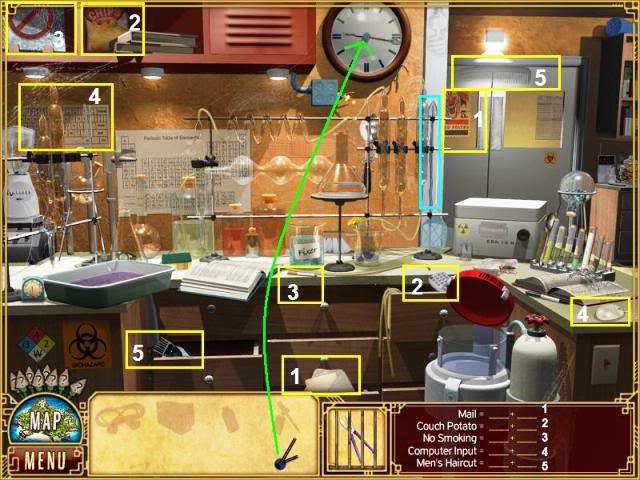
- Locate the pairs of items on the list to unlock the wire cutters to go into your inventory.
- Put the clock hands from your inventory on the clock in the upper center of the scene.
- Go to the Artifact Room.
ARTIFACT ROOM – WIRE
- Locate the pairs of items on the list to unlock the wire to go into your inventory.
- Go to the Plane Wreck.
PLANE WRECK

- Find the list of items to unlock the axe to go into your inventory.
- Find the vial with chemical formula to go into your inventory.
- Find the tagged dropper to go into your inventory.
- Use the wire cutters from your inventory on small hole in the middle of the plane. Click on it several times with the wire cutters to cut it open to reveal the flight recorder.
- The flight recorder will go into your inventory to complete the level.
- Go to the Artifact Room.
ARTIFACT ROOM – FLIGHT RECORDER
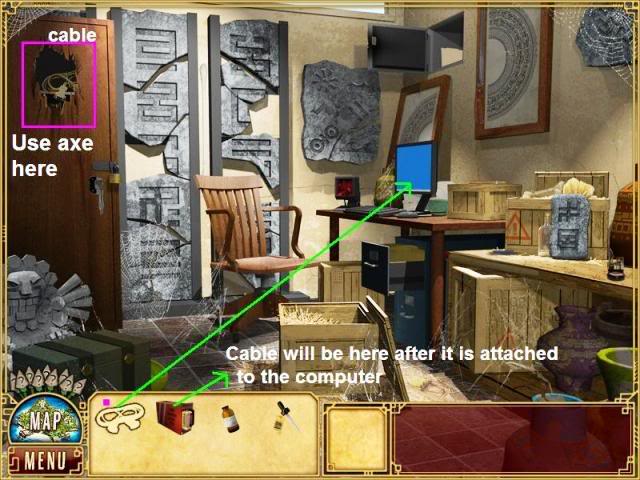
- Use the axe from your inventory on the locked door on the left of the scene.
- Click on the cable wire to put it into your inventory.
- Use the cable wire from your inventory on the computer.
- Connect the flight recorder to the end of the wire that is on the floor in the middle of the scene.
- Listen to the recording and it will go into your journal. Close the journal to complete the scene.
- Go to the Science Lab.
SCIENCE LAB – CHEMICAL BOTTLE
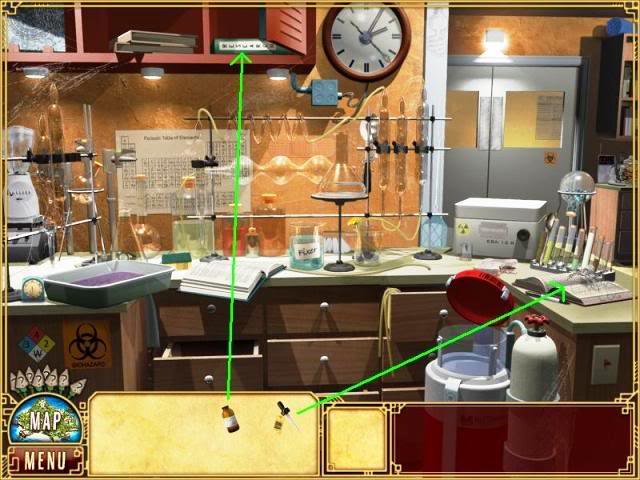
- Put the wire from your inventory on the broken sparking wires and a cabinet door next to the large clock will open to reveal a reference book.
- Put the chemical bottle from your inventory on the reference book and it will put information about the drug in your journal. Close your journal.
- Put the tagged dropper from your inventory on the log book on the right edge of the scene on the table and it will put information about Radimar and the drug in your journal. Close your journal to complete the scene.
WELLERTON UNIVERSITY – NEW YORK CITY – 2 MONTHS EARLIER
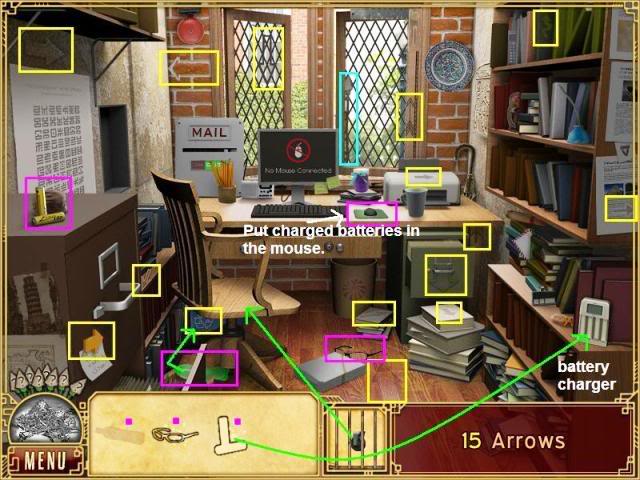
- Find the 15 arrows to unlock the chair wheel to go into your inventory.
- Find the dead batteries go into your inventory.
- Find glasses to go into your inventory.
- Put the chair wheel on the chair in the middle of the scene and it will roll away to reveal a green soda bottle and a blue recycle bin.
- Click on the green soda bottle and it will go into your inventory.
- Put the green soda bottle from your inventory and put it into the recycle bin to reveal a newspaper.
- Put the glasses from your inventory on the newspaper and it will go into your journal. Read and close your journal.
- Put the dead batteries from your inventory in the battery charger on the far right of the scene. The batteries will charge and go back into your inventory.
- Put the charged batteries into the computer mouse on the desk.
- A letter from the university dean will go into your journal. Read and close your journal to complete the scene.
- Go to the Waterfall
WATERFALL – WIRE STRIPPERS
- Locate the pairs of items on the list to unlock the wire strippers to go into your inventory.
- Locate the duct tape to go into your inventory.
- Locate spout to go into your inventory.
- Locate the walkie-talkie to go into your inventory.
- Go to the Temple Doors
TEMPLE DOORS – LIZARDS
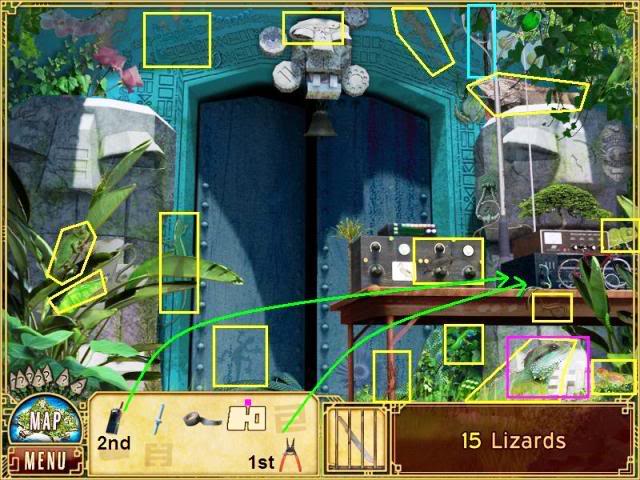
- Locate the 15 lizards to unlock the machete to go into your inventory.
- Locate stone lever to go into your inventory.
- Put the wire strippers from your inventory on the wires on radio receiver on the table on the right of the scene.
- Put the walkie-talkie from your inventory on the stripped wires to listen to the message.
- The information will go into your journal. Close the journal.
- Go to the Temple Interior
TEMPLE INTERIOR
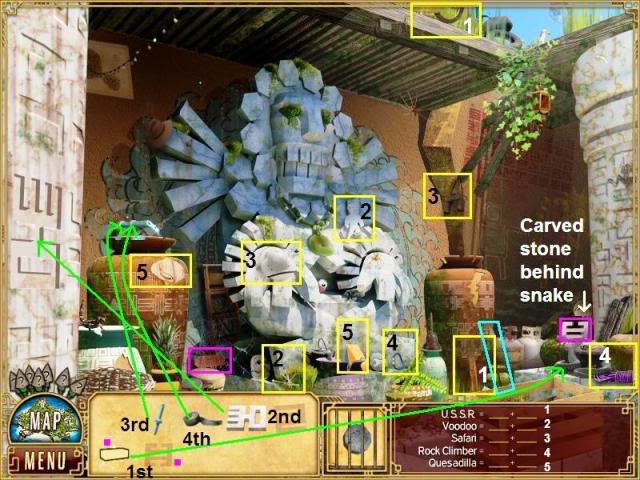
- Locate the pairs of items on the list to unlock the stone fragment to go into your inventory.
- Locate the brick to go into your inventory.
- Put the brick from your inventory on the cobra snake on the lower right of the screen to reveal a carved stone. Click the carved stone into your inventory.
- Put the stone lever from your inventory in the matching indentation on the column on the right of the scene.
- Water will flow from the wall over the large urn on the left of the scene.
- Put the spout from your inventory over the water flow.
- Put the duct tape from your inventory over the spout.
- An open canister will appear on the right of the scene and a note from the scientists will go into your journal. Close the journal to complete the scene.
- Go to the Temple Door.
TEMPLE DOOR – CARVED STONE
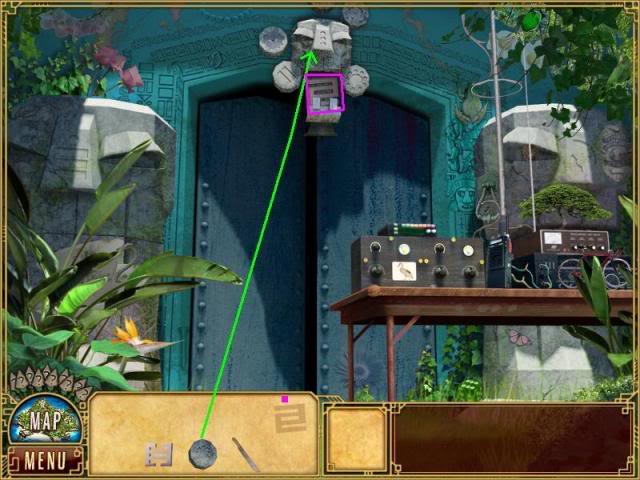
- Put the stone fragment from your inventory on the stone carving at the top of the Temple Door to reveal a carved stone.
- Click the carved stone into your inventory to complete the level.
- Go back to the Waterfall.
WATERFALL – CARVED DOOR
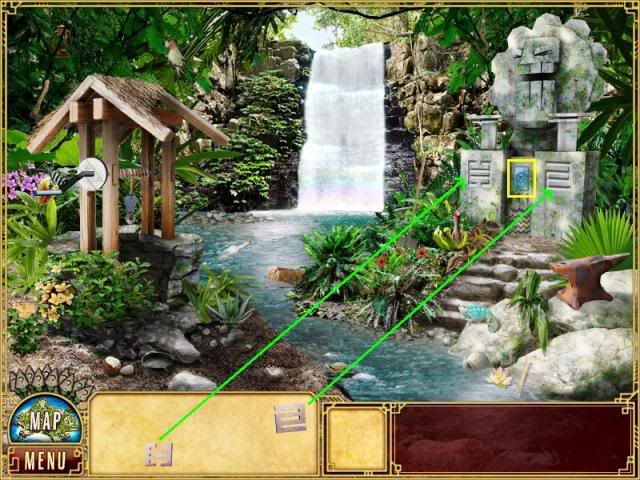
- Use the machete from your inventory to cut through the plants on the right of the scene to reveal stone doors.
- Place the carved stones from your inventory and place them in the matching indentations on the stone doors.
- Click on the blue button in the center of the doors and a message about the Akoni and the Resource will go into your journal. Close your journal to complete the scene.
WELLERTON UNIVERSITY – NEW YORK CITY – 10 MONTHS EARLIER
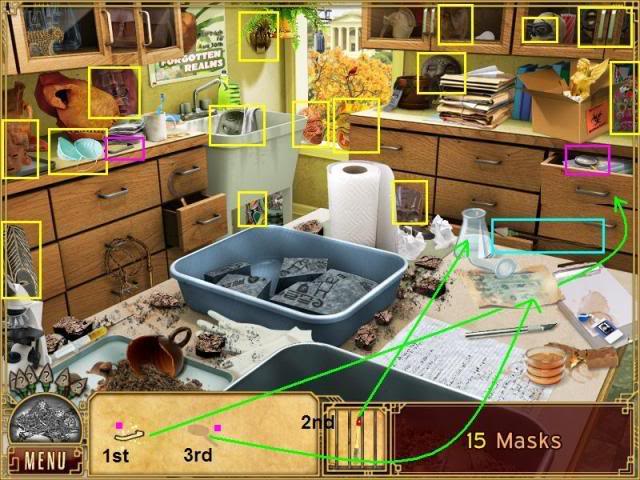
- Locate the 15 masks to unlock the small brush to go into your inventory.
- Locate drawer handle to go into your inventory.
- Use the drawer handle on the drawer on the right that is missing the handle.
- When the drawer opens click the magnifying glass into your inventory.
- Put the small brush from your inventory into the glass beaker on the table. It will tip over and spill on a paper on the table.
- Put the magnifying glass on the wet paper to reveal a drawing about the Akoni’s beliefs. This will go into your journal. Close the journal to complete the scene.
- Go to he Temple Interior
TEMPLE INTERIOR – SPIDERS
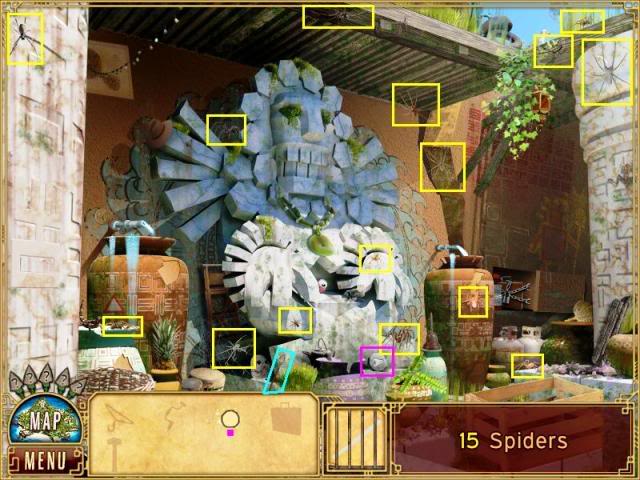
- Locate the 15 spiders to unlock the hacksaw blade to go into your inventory.
- Locate stone fragment to go into your inventory.
- Go to the Temple Door.
TEMPLE DOOR – KEY
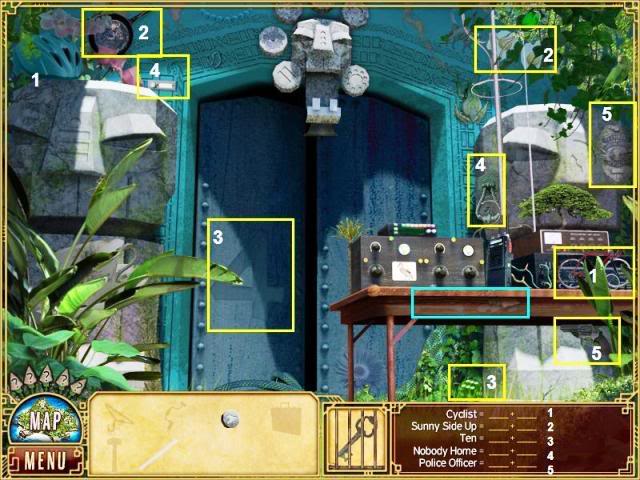
- Locate the pairs of items on the list to unlock the key to go into your inventory.
- Go to the Plane Wreck
PLANE WRECK – LEVER
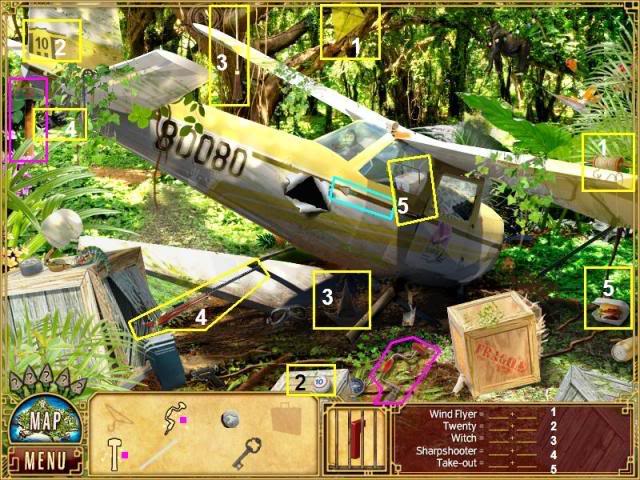
- Locate the pairs of items on the list to unlock the release lever to go into your inventory.
- Locate the hand drill to go into your inventory.
- Locate the sledge hammer to go into your inventory.
- Go to the Living Quarters.
LIVING QUARTERS – HANGER
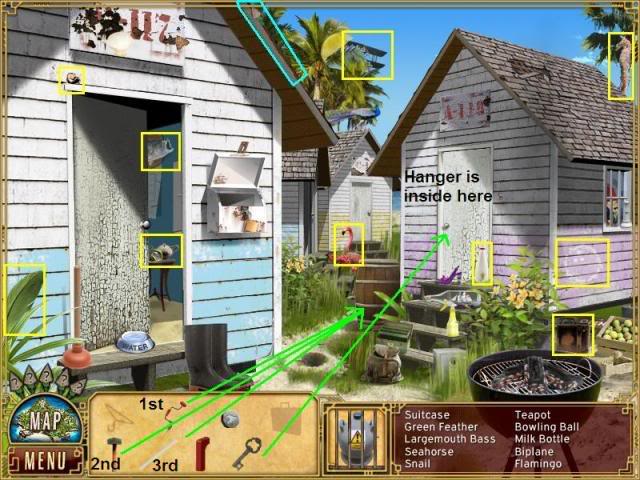
- Locate the items on the list to unlock the liquid nitrogen to go into your inventory.
- Put the hand drill from your inventory on the barrel in the center of the scene to drain the water.
- Put the sledge hammer from your inventory on the barrel to break it.
- Put the hacksaw blade from your inventory on the hacksaw handle that is inside the barrel. The assembled hacksaw will go into your inventory.
- Put the key from your inventory on the white front door of the building on the right to open it.
- When the door opens click on the hanger and it will go into your inventory to complete the scene.
- Go to the Temple Interior.
TEMPLE INTERIOR – SUITCASE
- Put the liquid nitrogen from your inventory on the chains that are on the suitcase on the right side of the screen.
- Click on the suitcase to put it into your inventory to complete the scene.
- Go to the Plane Wreck.
PLANE WRECK – DOOR

- Put the hanger from your inventory on the door of the plane and it will open to reveal a control panel.
- Put the red release lever from your inventory on the control panel to open a secret compartment on the plane.
- Put the hacksaw from your inventory on the secret compartment to cut it open. Click it several times until it cracks open to reveal a notebook.
- The notebook with information about Radimar will go into your journal. Close your journal to complete the scene.
- Go to the Temple Door.
TEMPLE DOOR – OPEN THE SUITCASE
- Put the suitcase from your inventory in the mouth of the large stone head on the left of the scene.
- Put the stone fragment on the carved statue that is over the temple door and it will crack open the suitcase. Notes from the suitcase go into your journal.
- Close the journal to complete the scene.
- Go to the Ruins.
RUINS – LIGHT RESOURCE
- Locate the pairs of items on the list to unlock the ice pick to go into your inventory.
- Locate the blue crystal eyes to go into your inventory.
- Locate the light resource to go into your inventory.
- Place the light resource from your inventory into the round depression in the center of the scene. A large carved stone pillar will rise out of the ground.
- Go to the Temple Interior.
TEMPLE INTERIOR – EYES
- Locate the items on the list to unlock the charcoal to go into your inventory.
- Use the ice pick from your inventory to clean the moss from the eyes of the large stone statue in the center of the scene.
- Put the blue crystal eyes in the eye sockets of the large stone statue to complete the scene.
- Go to the Caves.
CAVES – HAMMER
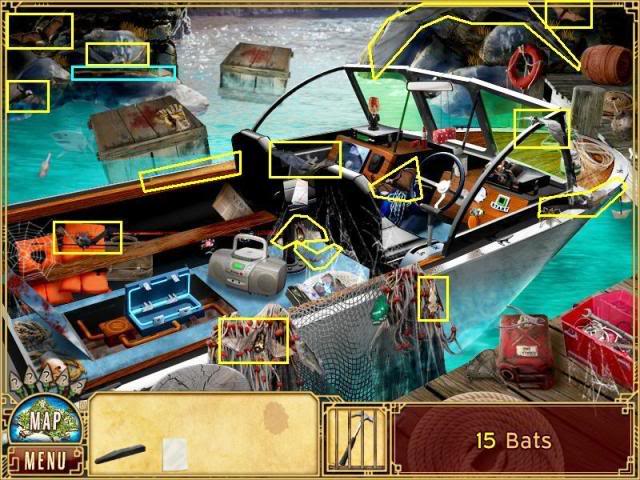
- Locate the 15 bats to unlock the hammer to go into your inventory.
- Go to the Plane Wreck.
PLANE WRECK – TRACING PAPER
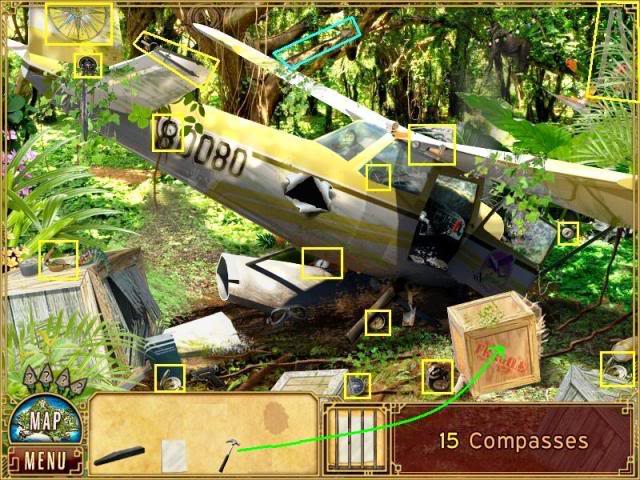
- Locate the 15 compasses to unlock the tracing paper to go into your inventory.
- Use the hammer from your inventory to open the crate in front of the plane to find a piece of raw resource. This will complete the level.
- Go to the Ruins.
RUINS – FINAL PIECE
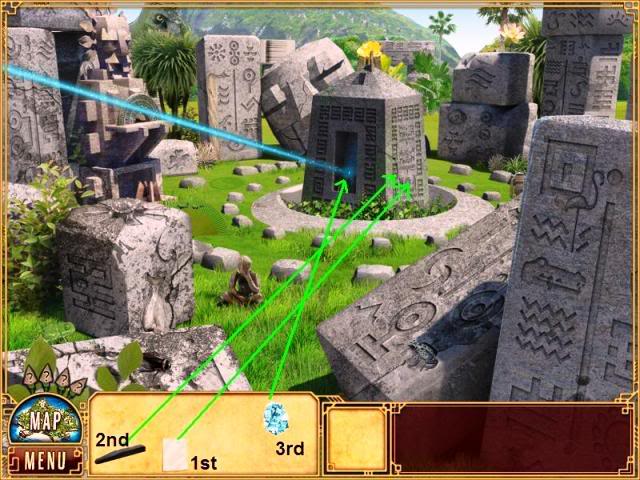
- Put the tracing paper from your inventory on the right side of the carved stone pillar in the center of the scene.
- Use the charcoal piece from your inventory to take a rubbing on the tracing paper.
- The final piece of the tablet will go into your journal. Read and close the journal.
- Put the raw resource from your inventory on the stone pillar where the blue light is pointing. The raw resource will be processed into energy resource and it will go into your inventory to complete the scene.
- Go to the Caves.
CAVES – ENERGY SOURCE
- Place the energy resource from your inventory into the blue power generator compartment of the boat to give the boat power. Now Macy can start the boat.
Congratulations! You have helped Macy restore her memory and escape the island.
“;

More articles...
-
Best Horror Games On Itch.io – July 2026
Across a bounty of subgenres. -
Grow A Garden 2 Base Price List
What's the most valuable crop? -
Evomon Best Starter [Leafbun, Blazpup, or Bubble?]
Grass-type, Fire-type, or Water-type?