
Best Horror Games On Itch.io – July 2026
Across a bounty of subgenres.![Haze Seas Accessories Tier List [Best Accessories to Equip]](/wp-content/uploads/2026/07/haze-seas-accessories-tier-list.jpg "Haze Seas Accessories Tier List [Best Accessories to Equip]")
Haze Seas Accessories Tier List [Best Accessories to Equip]
The accessories with the best stat buffs in Haze Seas.
![[Roblox] Evomon Shiny Hunting Guide – Including Prismatic and Pris Shinies!](/wp-content/uploads/2026/06/evomon-shiny-hunting-guide.jpg "[Roblox] Evomon Shiny Hunting Guide – Including Prismatic and Pris Shinies!")

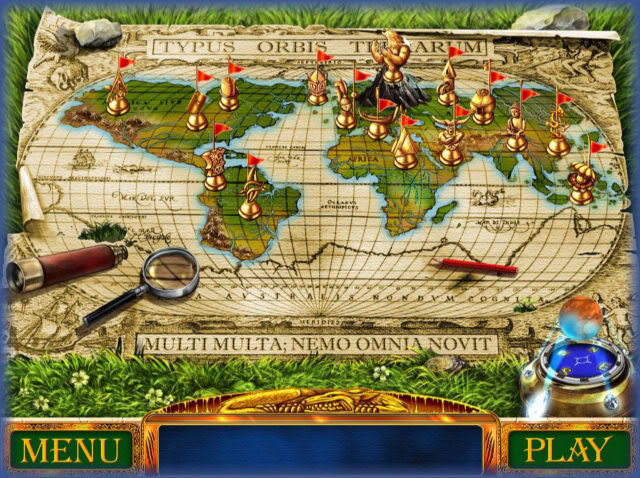
Magic Encyclopedia: Moon Light Walkthrough
Welcome to our strategy guide for Magic Encyclopedia 2: Moon Light. This game is the sequel to Magic Encyclopedia: First Story. This is a hidden object/adventure game with 32 levels and 18 mini games. Storyline – Katrina is a student at the Magic school and she receives a letter from her brother asking for her help in finding Professor Forbos who has mysteriously disappeared. Gameplay – Each game screen consists of five items along the bottom of the screen that are divided up into several p…


- Prefer Gamezebo on Google

a:1:i:0;a:2:s:13:”section_title”;s:42:”Magic Encyclopedia: Moon Light Walkthrough”;s:12:”section_body”;s:54468:”
Welcome to our strategy guide for Magic Encyclopedia 2: Moon Light. This game is the sequel to Magic Encyclopedia: First Story.

This is a hidden object/adventure game with 32 levels and 18 mini games.
Storyline – Katrina is a student at the Magic school and she receives a letter from her brother asking for her help in finding Professor Forbos who has mysteriously disappeared.
Gameplay – Each game screen consists of five items along the bottom of the screen that are divided up into several pieces and placed all over the scene. Once you find all the pieces they are placed along the right side of the screen in your inventory. There are several areas on the screen that are hotspots and when you see these items you click on them and the piece of an object will be hidden in or behind something in that scene. Once you have all the items you will look for activated spots that highlight when you mouse over them. They will have a symbol with a hammer which means you can place an item from your inventory to work with it. If you see a hand over an area that means you are to click on it for further instructions.
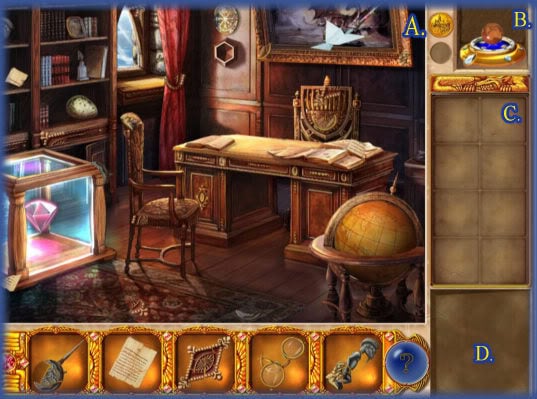
A. Location – Click on coins to move from location to location.
B. Level Map and Progress Bar – Click here to return to level map. There is a progress bar under the level image.
C. "Wolf Artifact" – This area along the right keeps track of all completed items and puts them in your inventory for you to play on hotspot areas.
D. Inventory – These are the items you need to find in order to complete the puzzle.
Action Indicator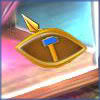
You can perform an action on this item.
Entry or Exit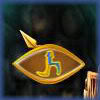
This symbol means you can enter or exit through this door or portal.
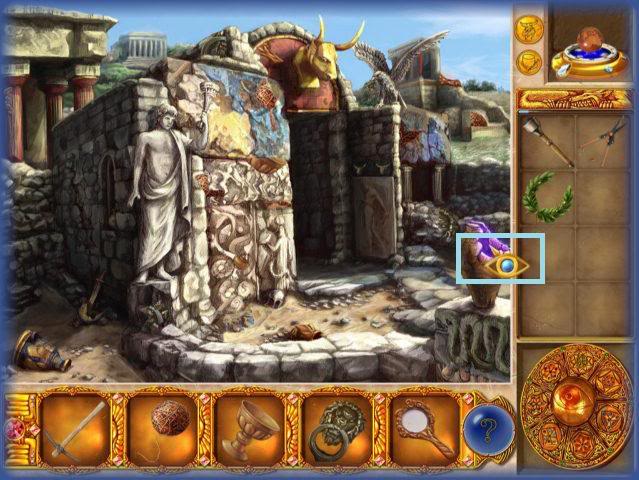
"Eye"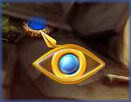
When you see this symbol click on it as it allows you to look inside and behind things in the scene.
Puzzle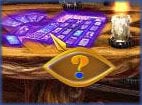
This is a puzzle indicator. You must now solve a mini game puzzle to proceed.
Hand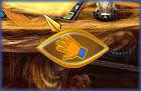
This mean you can click on an item to perform an action.
GENERAL TIPS AND STRATEGY
Once the Amulet is is present each search screen will have 1 to 2 gems located on it. You must find ALL gems to complete the game. They are very well hidden in some screens and tend to blend into the same color.
It’s best to find all the pieces first and see which items you have that are fully formed in your inventory before you proceed to other screens.
All screens have a hint function at the bottom right and you can use this as many times as you need without penalty. It has to recharge between uses.
There are no hints for the gems.
Each mini game offers you the option of skipping once the timer is full on the screen.
You may use the coins at the top of a screen to change locations or use several of the doors once opened they will be marked with green coloring and the icon with the moving legs.
Items are well hidden look along the edges of picture, tables and chairs.
WALKTHROUGH
LOCATION 1 – Fobro’s Vault
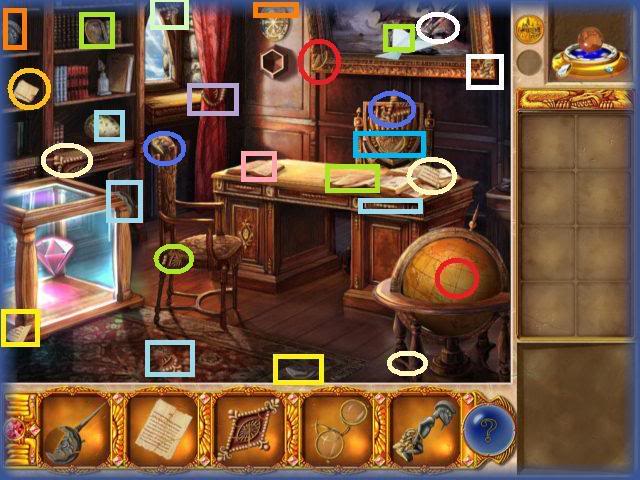
Items Needed : Statuette, Magic Glasses, Decoration, Page with Spell.
- After searching for all hidden items in the room you will..
- Take decorative items and and place it on right side desk panel.
- It will open click on piece of magic glasses.
- Use magic glasses over spell book to read it and click on piece of spell that appears.
- Use the statuette to break the Dragon’s egg. Click on spell piece.
- Use spell and drag it to gem with force field.
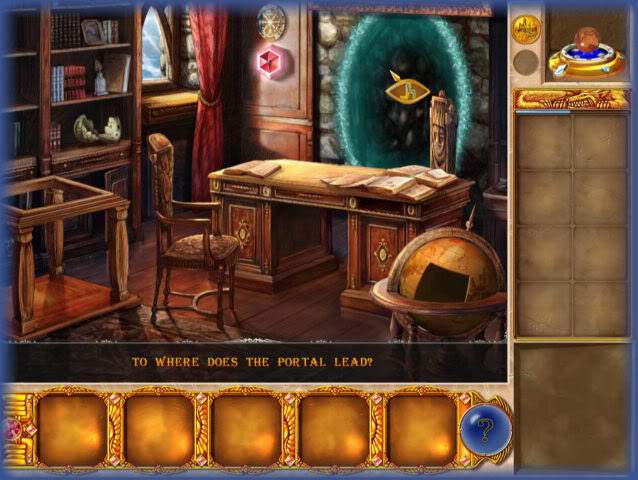
- Place stone in opening to left of door and portal will open.
- Click on portal to enter the vault.
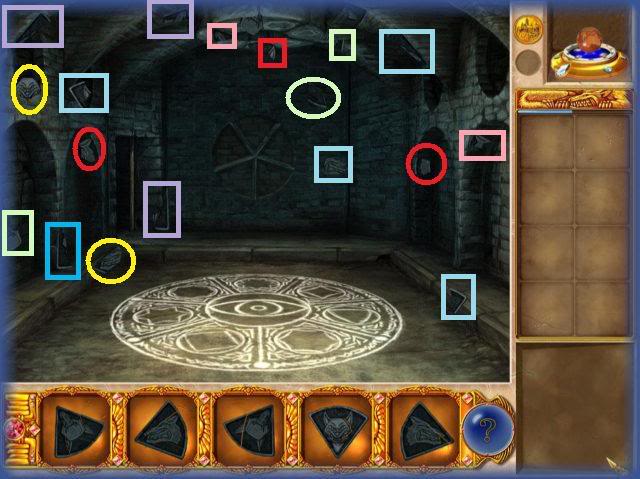
Items to locate –Find pieces of 5 triangle stones.
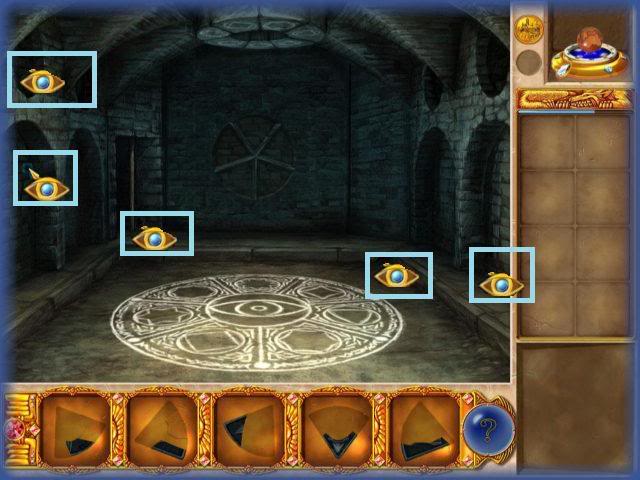
- Location of hot spots you can look into.
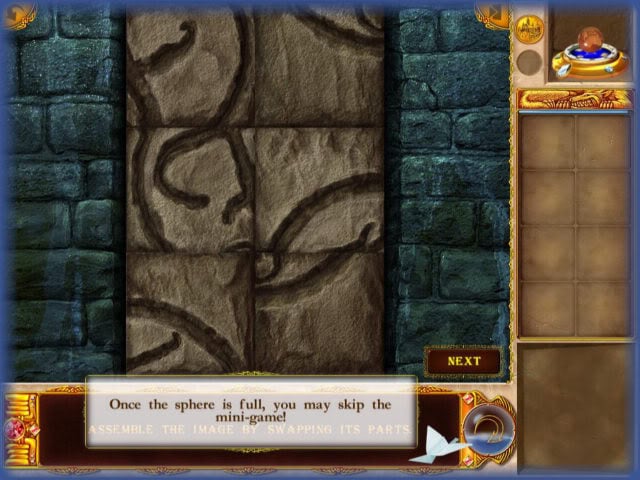
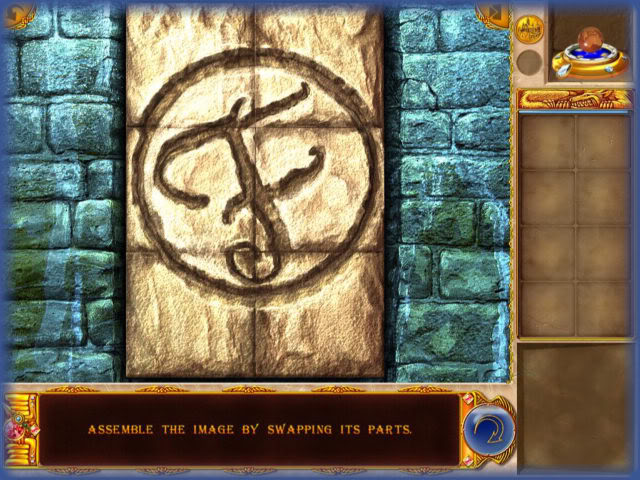
MINI GAME – Rearrange stones to complete picture. Solution to puzzle.
Scroll appears click on it.
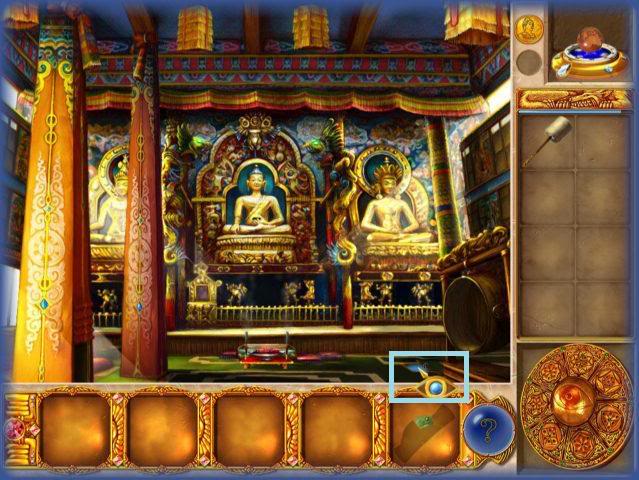
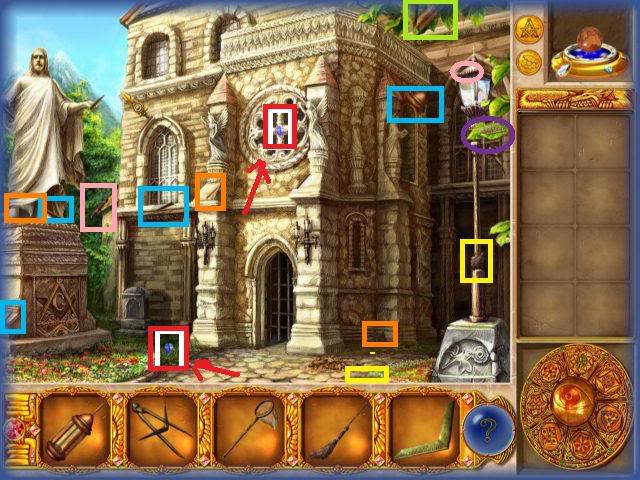
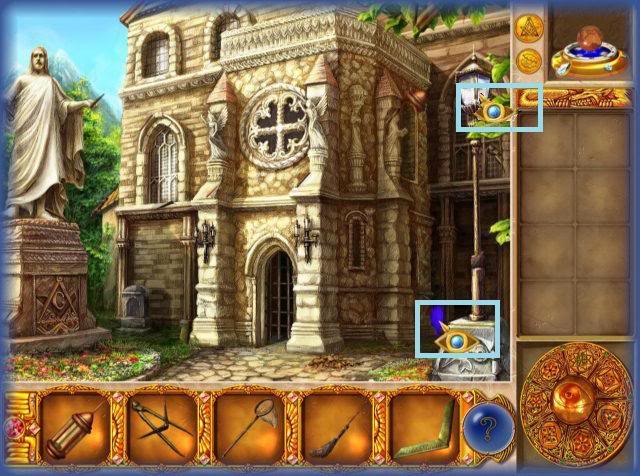
LOCATION 2 – Tibetan Monastery

- From this point on you will be collecting gems for the amulet seen bottom right. (Gem circled above) There are 1 to 2 gems in each search screen. You must find all gems to win game. If you do not find them all it will show on the level map. You can click on the amulet at any time to visit the Professor’s vault.
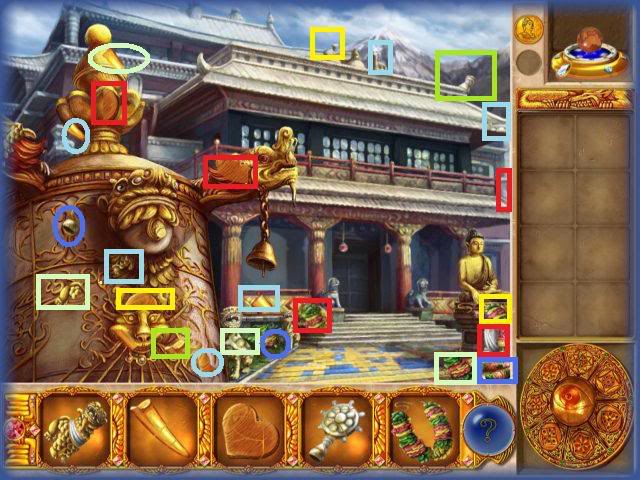
Items to find – Statue, Horn, Clapper, Tibetan Sign, Flower Garland
NOTE – Gem is highlighted in red be sure to click on it.
- Place horn on face where it snapped off.
- Place clapper on bell where last floral piece is released.
- Place flower garland on Buddha which triggers puzzle and releases blue piece underneath. Click and it goes into inventory.
- Click on blue gem under Buddha
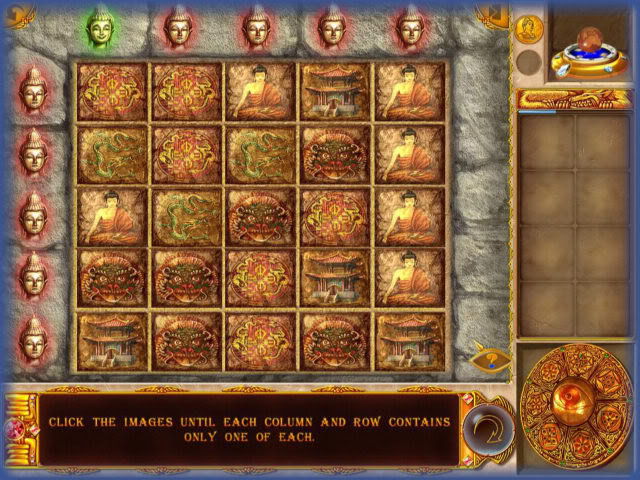

This puzzle is solved by placing each item in a row so that each row vertically and horizontally do not have an item that repeats.
SOLUTION (SEE IMAGE)
S-Snake
H-House
W-Woman
D– Dragon
SL – Symbol
Row 1 – S, H, W, D, SL
Row 2 – W, SL, H, S, D
Row 3 – D, W, S, SL, H
Row 4 – SL, S, D, H, W
Row 5 – H, D, SL, W, S
Take statue and place it in between row of dogs on left side of lawn.
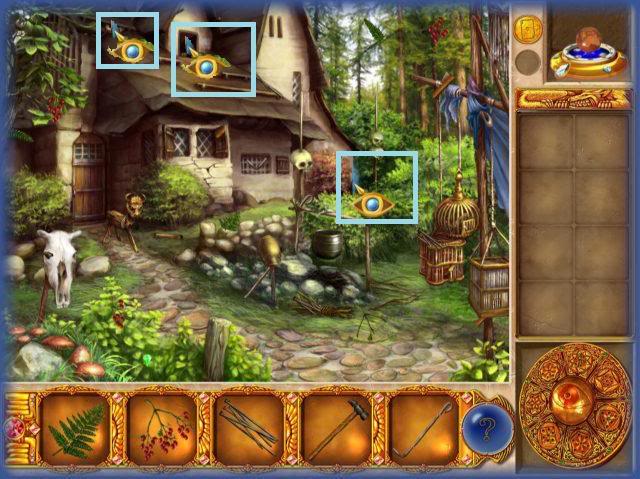
Click on 2 hot spots with eye symbols and click on pieces.
Take Tibetan sign and place on top of building. This will cause the door to become active and you can go inside building.
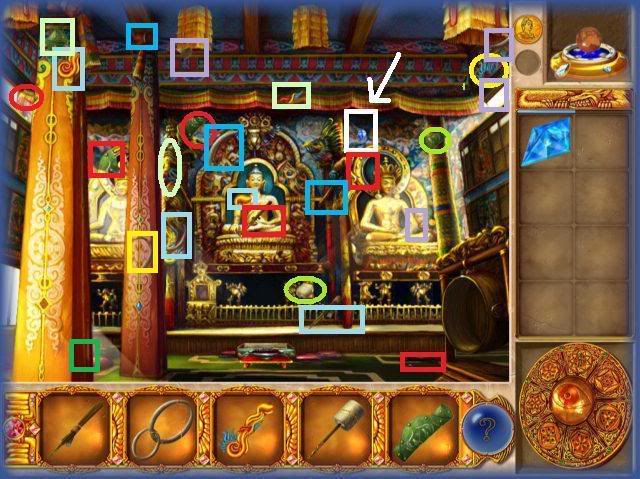
Items to locate – Candles with soothing aroma, a ring for opening door, dragon tail, large drum stick and thick cloth.
NOTE- Gems are highlighted in white and arrows.
Click on this to find piece inside floor.
- Place blue gem in left column. When it opens up click on piece of drum.
- Place dragon’s tail on dragon in center. They become very angry you must calm them down.
- Incense ready to be lit. Place incense to burner. Once it burns a piece falls out. Click on this piece.
- Place the door handle over the door on the right side of floor. It becomes a hotspot. Click on it and on the item inside.
- Place thick cloth over drum.
- Hit drum with drum stick.
- This causes a scroll to appear.
- Click on scroll.
LOCATION 3 – Fortune Teller’s Cottage
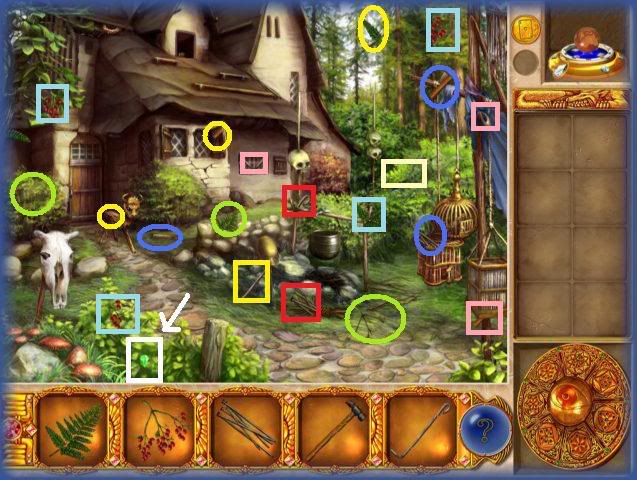
Items to find – Fern leaf, Spurge flax, Nails, Hammer, Fire poker.
NOTE – Gem highlighted with white and has arrows
Click on these areas to find additional hidden pieces.
- Nails to wood animal.
- Hammer to wood animal
- Wood animal moves out of way. Click on piece revealed.
- Door opens enter cottage
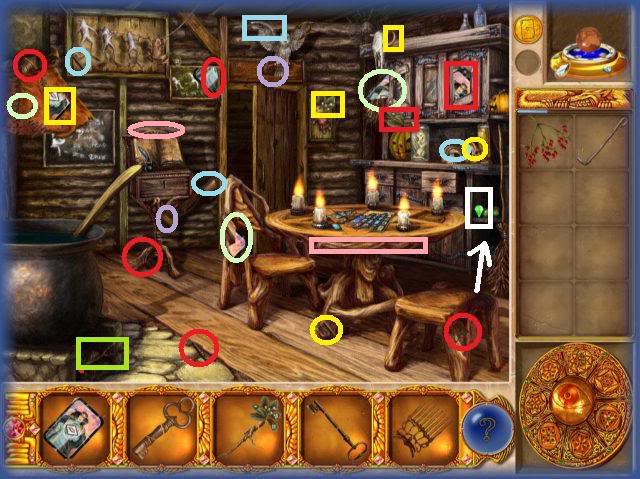
Scene 2 – Inside Cottage
Items to find – Tarot card, Key, Mandrake root, Key (2), Fortune Teller’s comb.
NOTE- Green gem highlighted white in image.
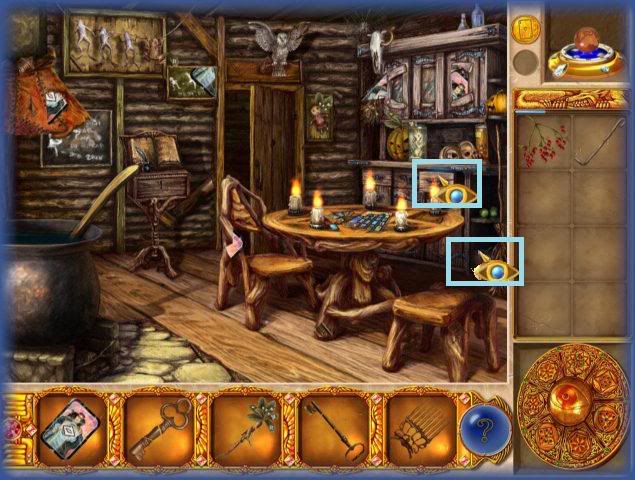
Areas to look inside.
Place Tarot card on table to activate mini game.
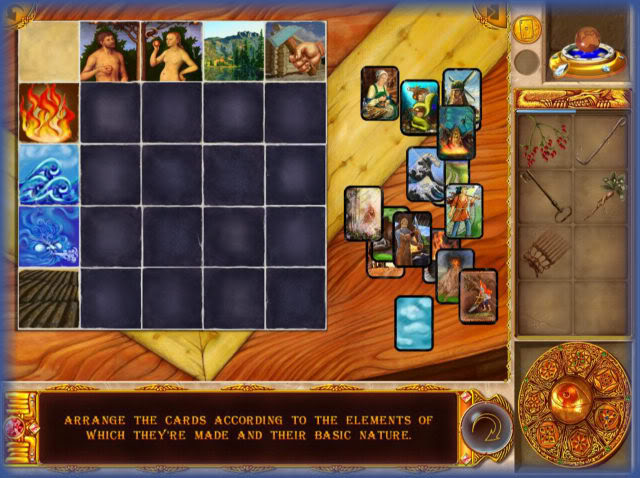
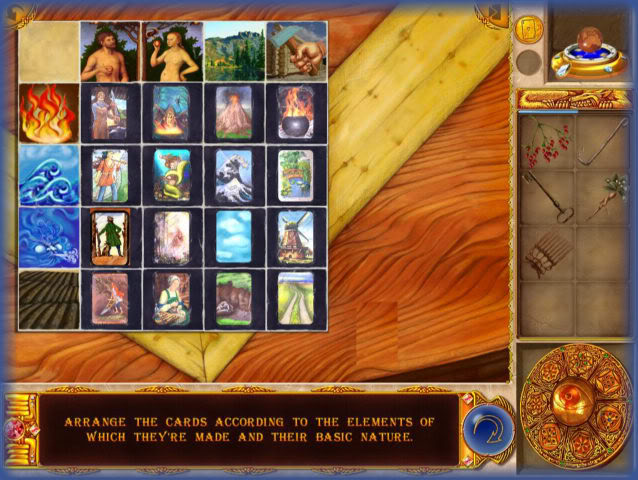
MINI GAME – Arrange cards according to the elements of which they’re made and their basic nature.
Solution (See Image)
- Along side vertically Fire, Water, Wind and Earth
- Male, Female, Nature, Artificial – Along top horizontally
- Smith, Witch, Volcano, Hearth
- fisherman, mermaid, typhoon, bridge
- Hunter, Fairy, Clouds, windmill
- Farmer, healer, steep, road.
- Go back to scene 1
- Place key on birdcage bird disappears click on item.
- Go back inside cottage.
- Use poker to re-ignite fire under cauldron.
- Place paper over candle fire to make ink appear on paper then it goes back to inventory.
- Place paper with writing (Spell) on cauldron to activate and spell will appear at top.
- Place all 4 items in cauldron, fern leaf, mandrake, spurge flax, and Fortuneteller’s comb for hair.
- Key is presented
- Place key on locked cabinet
- Scroll appears click on it.
LOCATION 4 – German Castle
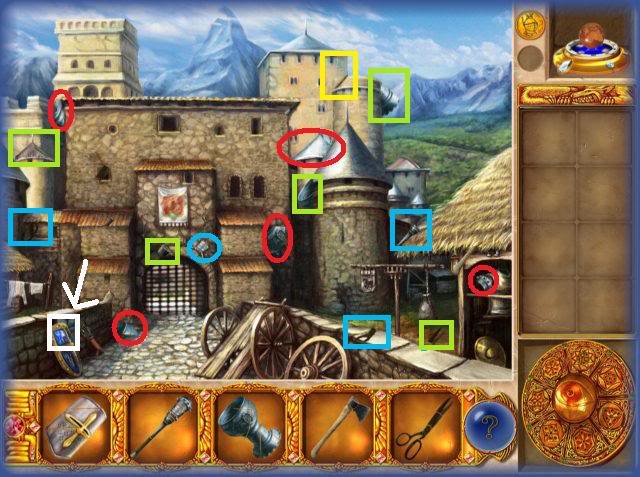
Items to find – Helmet, Mace, Goblet, Axe and Scissors.
NOTE- Gems are highlighted in white with arrows.
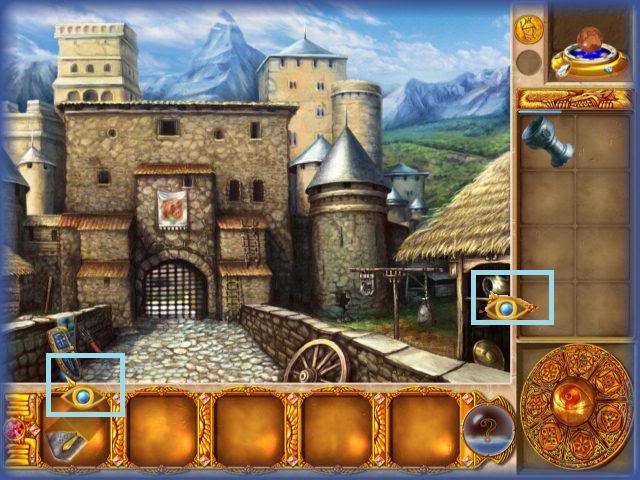
Click on these areas to find more hidden objects.
- Use mace on area on right side of castle click on item it leaves.
- Clothes line on Left turns to rope which is now in inventory.
- Use Axe on Wagon turns to boards
- Scissors to clothes
- Place rope on boards
- Makes into ladders that will appear on building.
- Go in through window
Scene 2
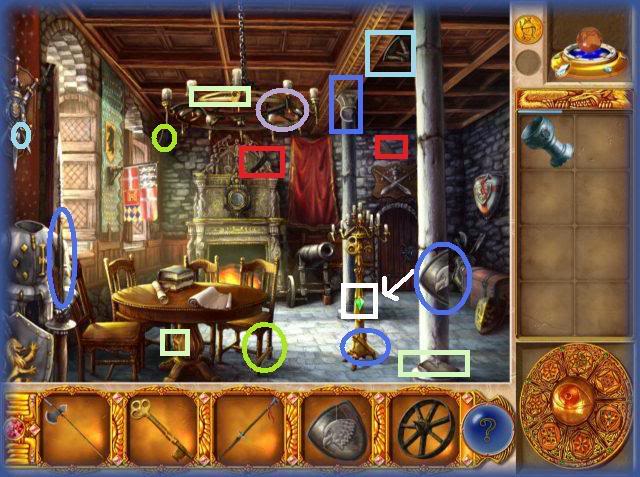
Items to locate – Halberd, Key, Lance, Shield, and Cannon Wheel.
NOTE – Gems are highlighted in white and arrows.
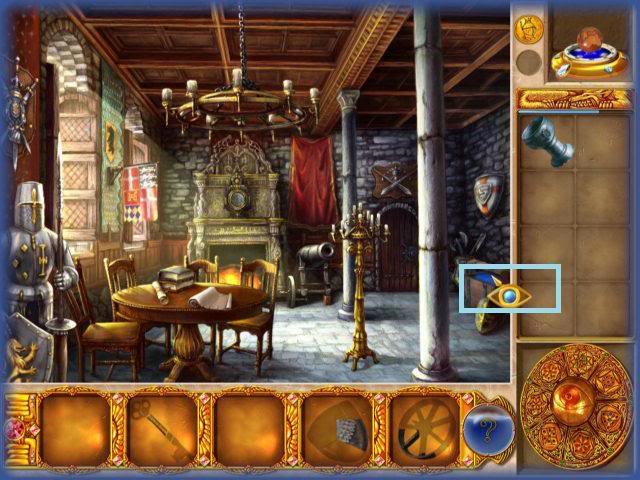
click on look inside.
- Lance on hanging bag
- Scene 2
- Helmet to armor click on key
- Halbred to trunk – turns into hot spot click and look inside.
- click on item in trunk. Key now complete.
- Key to clock gives piece for shield.
- Shield to over door.
- Door triggers mini game.
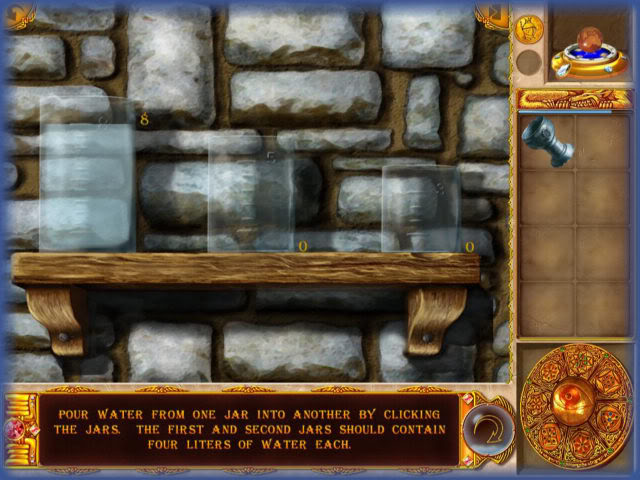
MINIGAME – Pour water from one jar to another by clicking on jars. Pour so that the first and second jars have 4 liters each.
Solution
Containers are called 8,5 and 3. or A, B and C. respectively.
1. 8 to 5 then 8 to 3 (0,5,3)
2. 5 to 3 (3,2,3)
3. 3 to 8 (0,2,6)
4. 5 to 3 (2,0,6)
5. 8 to 5 (2,5,1)
6. 5 to 3 (3,4,1)
7. 3 to 8 (4,4,0)
OR
A into B then A into C
C into A then B into C
C into A
B into C
A into B
B into C
C into A
- After puzzle, bring goblet to door it will fill up with water.
- Take goblet to fire when fire is out click on last wheel piece.
- Wheel to cannon
- Scroll comes out of cannon
- Click on scroll
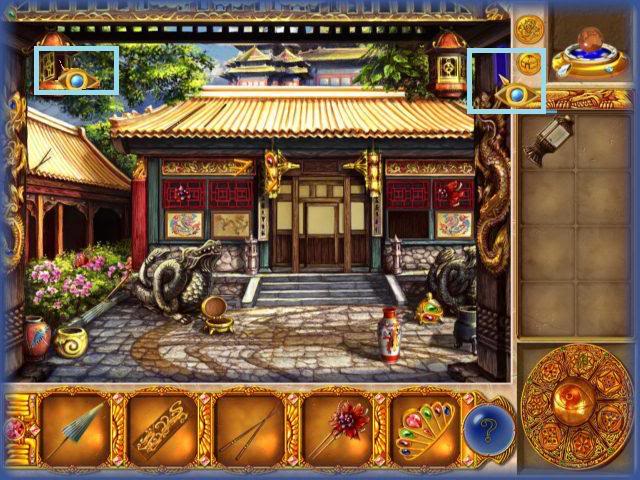
LOCATION 5 – Palace of the Golden Dragon, Asia
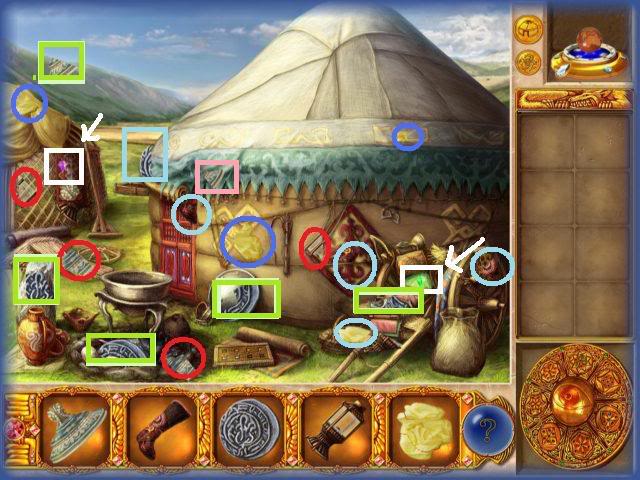
Items to find – Lid, Boot, Silver coin, lamp and butter.
NOTE – Gems are highlighted in white and arrows.
Take coin add to collection center
Triggers Minigame

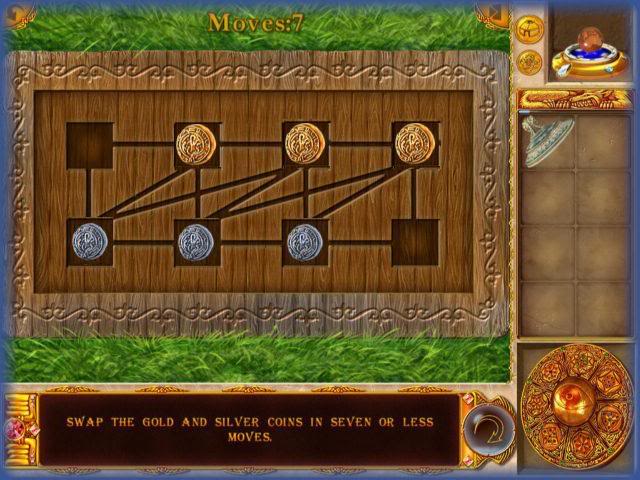
MINIGAME – Swap the silver and gold coins in 7 or less moves.
Solution
Number the spaces 1 to 4 top row and 5 to 8 bottom row.
Move 5 to 1, 3 to 5, 7 to 3, 4 to 7, 6 to 4, 2 to 6 and 1 to 2, (7 Moves.)
After puzzle finished click on piece of boot that appears.
Boot to door and door opens
walk through door
Scene 2
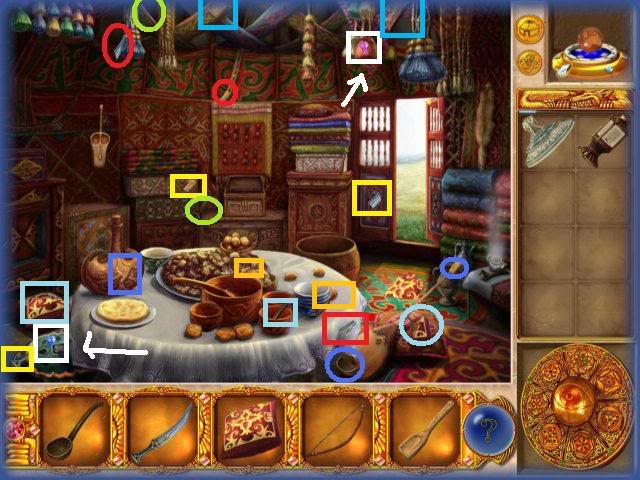
Items to find – Scoop, Dagger, Pillow, bow and blade.
NOTE-Gems are highlighted in white and arrows.
Place lid on teapot click on pillow piece.
Blade to jug where butter is churned click on piece that flies out.
Pillow to fabric bundle against wall click on piece that comes out.
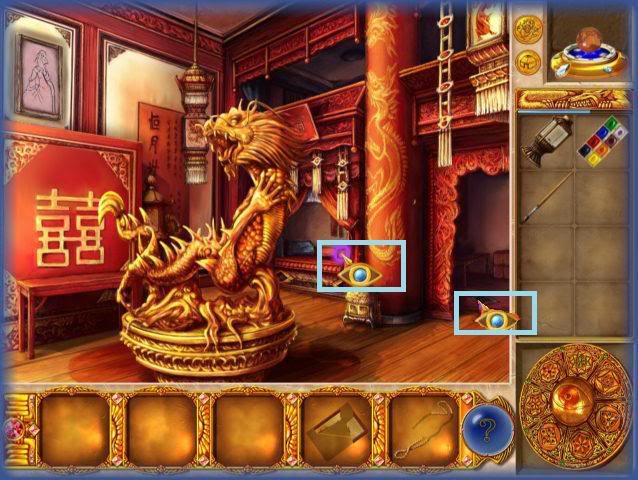
Scene 3
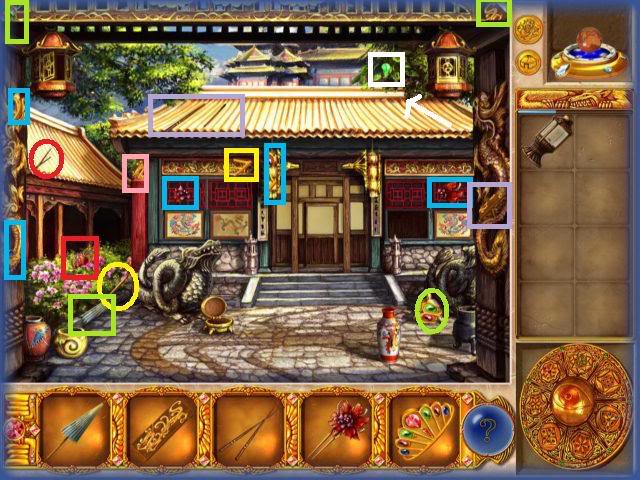
Items to find – Umbrella, Plate, Chinese Sticks, hairpin, and diadem.
NOTE- Gems are highlighted in white and arrows.
Click on these locations to find hidden pieces.
- Umbrella to vase on Left side. It will open click on piece that comes out.
- Diadem to gold pot in front of dragon.
- Dragon then turns and breathes fire Click on Chinese stick that appears.
- Chinese sticks to vase on lower right (red, yellow and white vase)
- click on piece that comes out.
- Plate to panel above door.
- Door now opens becomes entrance to next scene.

Items to find – Brush, Paints, garter, Window covering, and rope.
NOTE- Gems are highlighted in white and arrows.
Click on these locations for hidden pieces.
- Garter to curtain it will tie back click on items exposed.
- This gives a new hidden hotspot click on it and curtain piece inside.
- Bring paints to left bench
- Bring Brush
- Opens mini-game
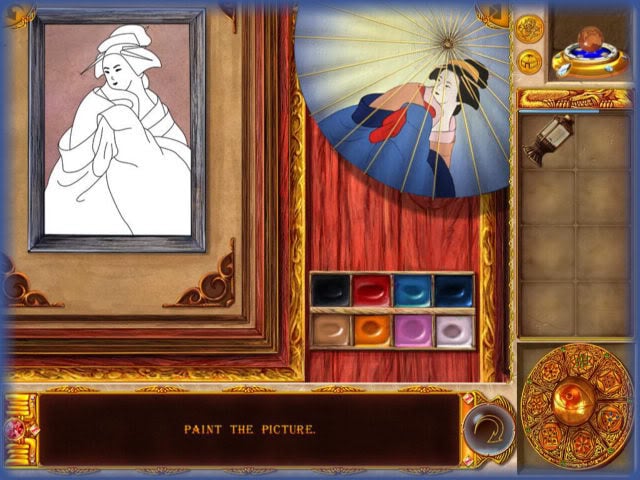
MINIGAME – Paint the image on the left to look exactly like image on the right.
Click on the paint color you want then click on the area to paint.
TIP – Be careful with pink and skin tone.
- After puzzle is completed click on piece left behind.
- place lamp to dragon which will light it.
- Then place lamp on nail right column.
- Hotspot appears click inside it. (R floor area)
- Place window covering in open window
- Triggers minigame.
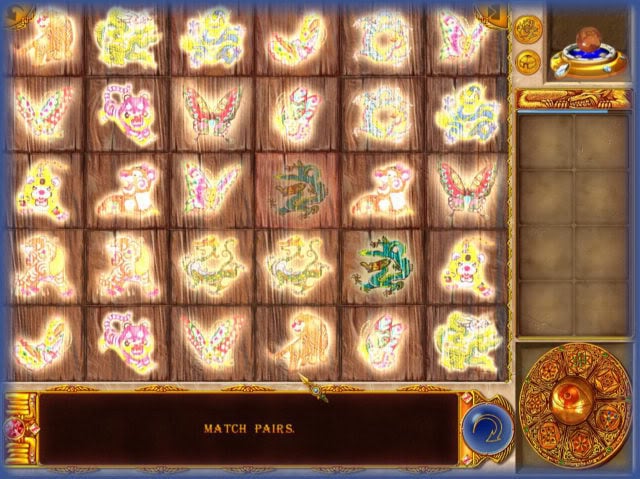
MINIGAME 2
Match all like pairs.
NOTE – Solution is shown but it may differ from your puzzle.
- Click on piece that appears after puzzle completed.
- Hairpin to gold box.Click on piece that appears.
- Go back to hut
- Use rope on bag that’s at the lower right. Butter piece given.
- Drag butter to pastry on table
- plate moves click on piece on table.
- Drag bow to item on wall that looks like a wooden face
- It will play a moment then a piece will appear click on it.
- Drag scoop to pot.
- triggers puzzle

MINIGAME – Pour the milk in such a way that all 3 containers have 8 liters.
You have 3 containers one holds 24 liters and the others hold 13, 11, and 5.
Solution
- Fill 11 and the 5 from the 24 liter bottle.
- This leaves 8 in the 24 bottle.
- Next empty 5 by pouring it into the 13 liter bottle.
- Fill the 13 from the 11 bottle. (8 liters)
- and leave remaining 3 liters in 11 liter bottle. This leaves the 5 liter bottle empty.
- Now pour 5 liters from the 13 into the 5 liter leaving 8 liters in the bottle. Finally pour contents of 5 liter bottle into the 11 liter bottle giving 8.
- After puzzle click on piece in pot.
- Dagger to box
- Take Scroll.
LOCATION 6 – Fire Worshippers Temple
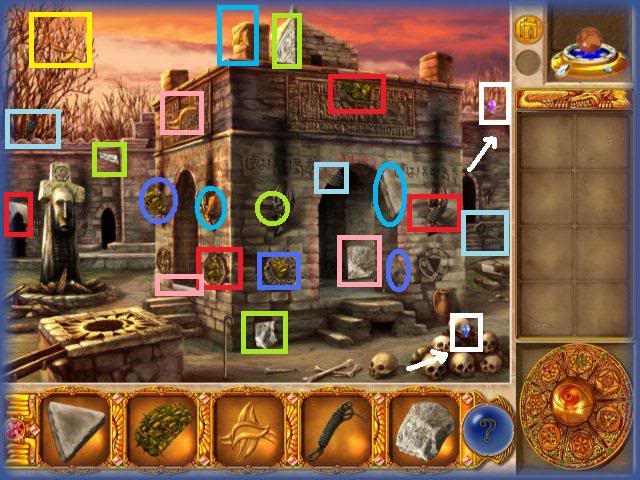
Items to find – Triangular stone, sponge, golden symbol, rope, and heavy stone.
NOTE- Gems are highlighted in white and arrows.

Click on these areas for hidden pieces.
Triangular stone to building
Triggers Minigame
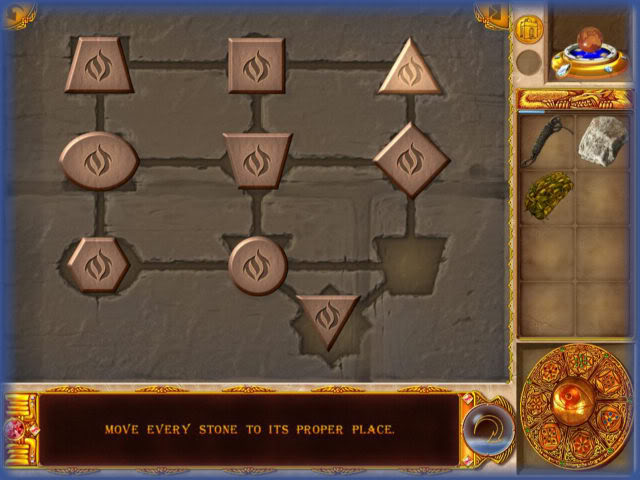
MINIGAME – Move every stone to it’s appropriate place.
This puzzle is solved by moving stones til they fit the background by shape.
Click on items until you have them correctly placed.
You may skip this puzzle if you wish by hitting the skip button without penalty.
- After puzzle water pours from hole.
- Fill jug with water
- Bring sponge to water jug
- Once its wet its back in inventory
- Wet sponge to Cross
- Click on piece gold symbol now complete
- Gold symbol to hole.
- Slab becomes exit to underground scene.
- Rope to cane sticking out of ground in front of slab
- Rope to entrance
- It will hook between cane and door
- Enter next scene
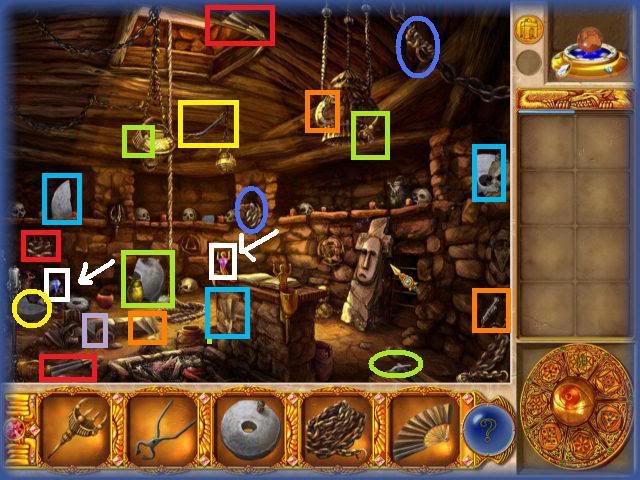
Items to find – Torch, Pinchers, Millstone, Chain and Fan.
NOTE Gems are highlighted in white and arrows.
Click on these areas for hidden pieces.
- Millstone to hole.
- Gives fire stone which goes to inventory.
- Firestone to tank.
- Pour into and click on piece.
- Rope to cross which locks it down.
- Torch to spot on Right side.
- Level torch moved click it on.
- This moves it down.
- Now click on piece.
- This opens hotspot click on it and piece inside.
- ‘Fan on fire which brings fire back heavier
- use Pincer to fire turns to pincer with coal in inventory.
- Drag pincer with coal to fire under Cross.
- Scroll appears take it.
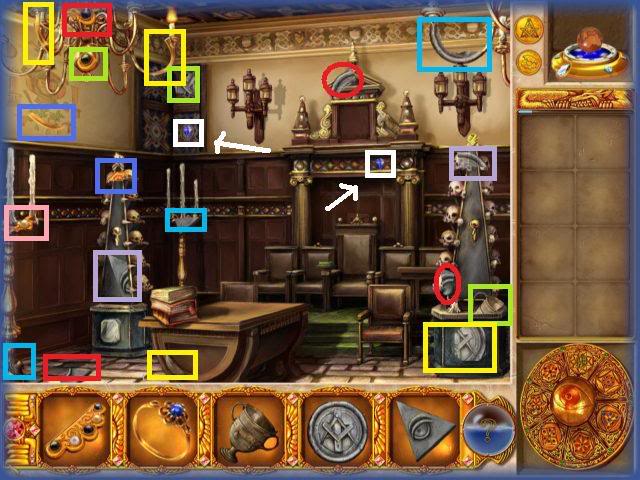
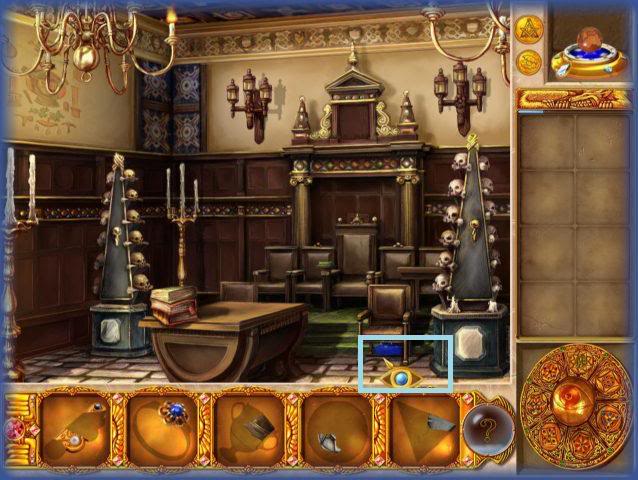
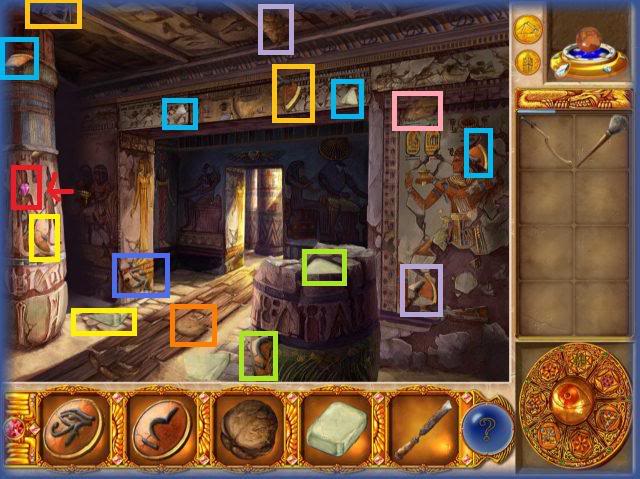
LOCATION 7 – Masons, Pearl Diver’s Hut,
Items to find – Lantern, Compass with Sharp edges, net, broom and triangle.
NOTE – Areas in red are gems.
Click on these areas to find hidden pieces.
Lantern to building light area.
- Lantern to building light area.
- Door opens
- Broom to leaves.
- click on circle piece
- Go inside.
Items to find – Jewel with pearls, a diamond ring, Goblet, Key and plate.
NOTE-Gems highlighted with white and arrows.
Click on these areas to find hidden pieces.
- Click on ring finished.
- Ring to lantern.
- click on hotspot piece.
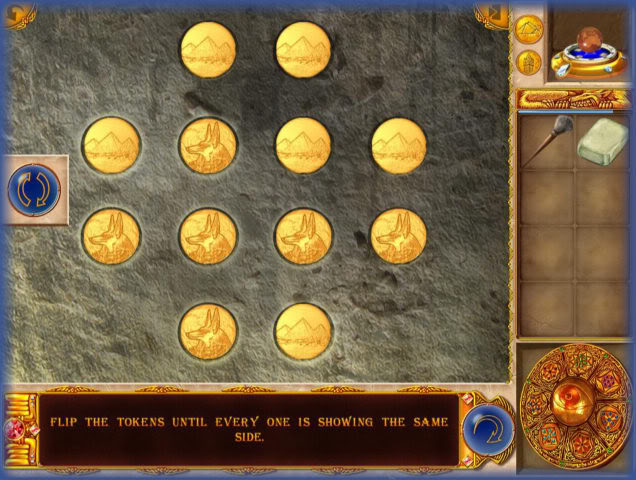
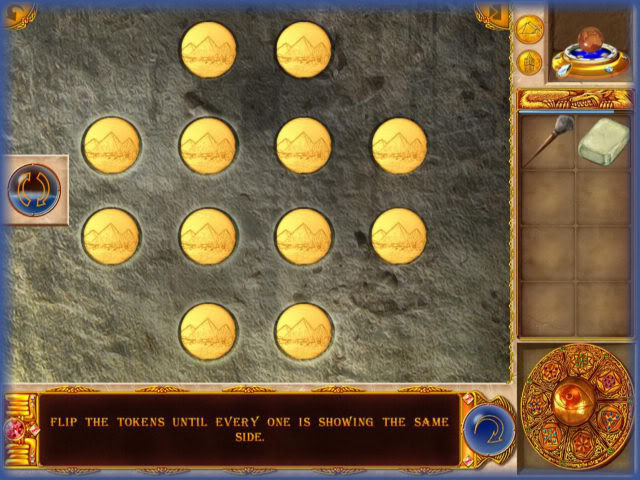
- Triangle to mason sign
- Triggers Minigame
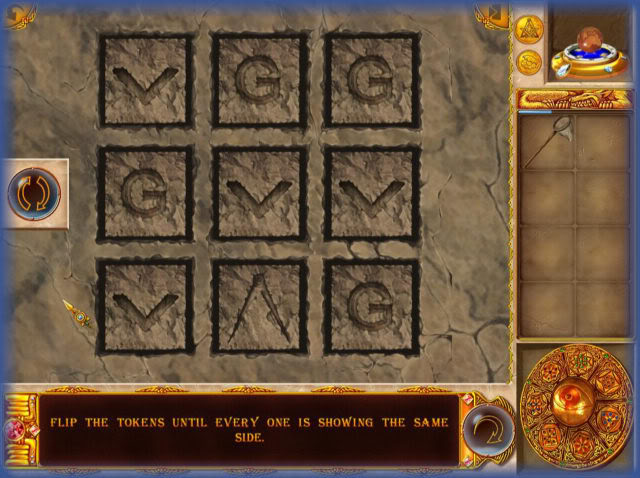
MINIGAME – Flip the tokens til every one is showing the same side.
Different solutions possible.
May click on hint button if you get stuck.
After puzzle statue drops what is in hand into leaves.
Click on piece near statue.
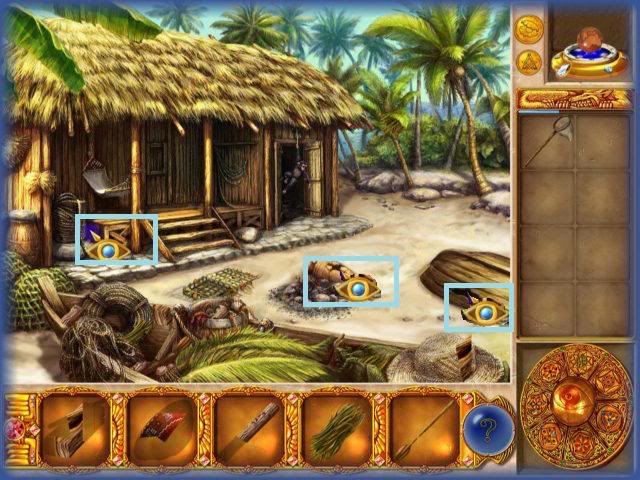
Pearl Diver’s Hut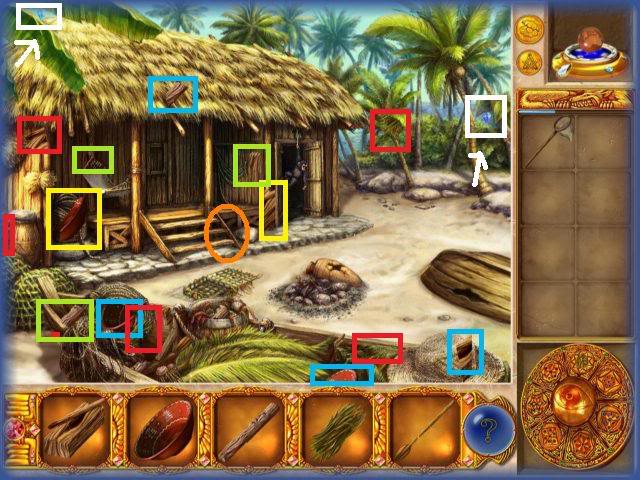
Items to find – Dry log and a stick, bowl, stick, dry algae, and oar.
NOTE- Gems are highlighted in white with arrows.
Click on these areas to find hidden pieces.
- Butterfly net to green netting on left side near boat.
- Fly goes into inventory.
- Hammock hot spot click on it and item inside.’
- Boat hot spot click on it and item inside
- Place dry algae on campfire.
- Dry log and stick to fire. It will light and crab runs away.
- Vase now has hotspot click on it and item inside.
- Oar to coconut tree.
- Coconut falls click on it.
- Place stick in fire to make it sharp and pointed.
- Drag pointed stick to coconut to punch holes.
- Bowl to coconut for milk.
- Bowl of milk in Inventory.
- Take bowl of milk to Monkey in doorway.
- He will leave and let you in now.
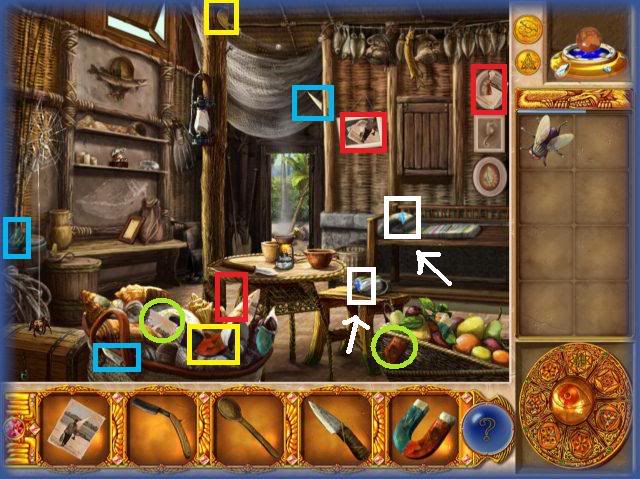
Items to find – Photo, Razor, Spoon, Knife, and Magnet.
NOTE – Gems are highlighted in white with arrows.
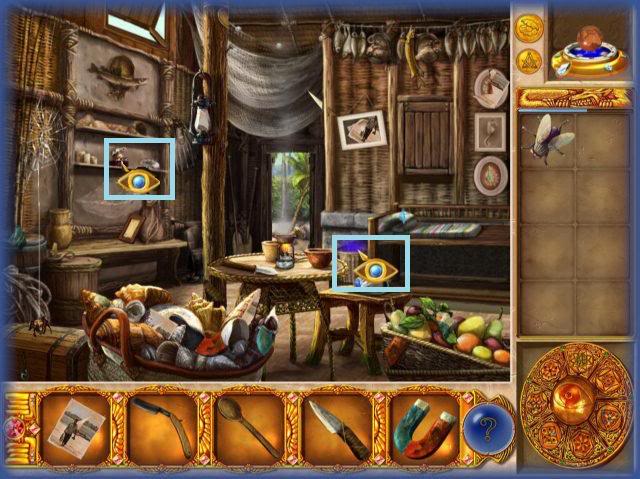
Click on areas to find hidden pieces.
- Spider to Fly.
- Lifts up and click on 2 pieces left.
- Knife to fish then click on item.
- Photo to frame.
- Triggers minigame puzzle.
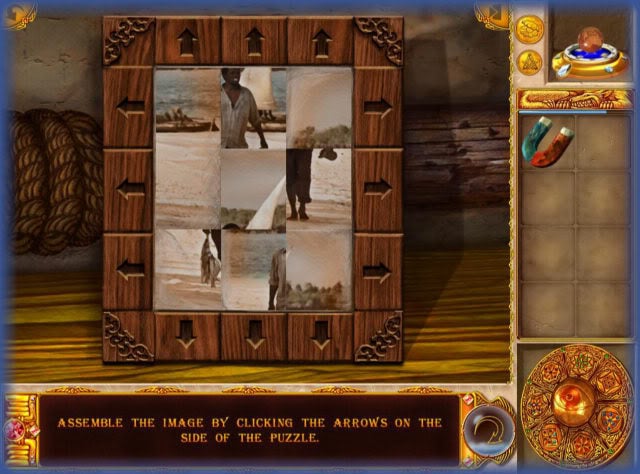
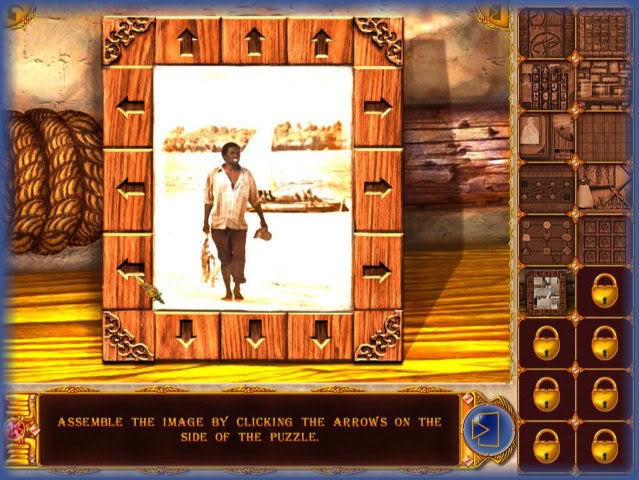
MINIGAME – Click on arrows along picture frame to reassemble picture.
Solution seen above.
- After solving puzzle click on piece left behind.
- Inside trash can there is a hot spot click on it and item inside.
- Spoon to boiling water on table.
- Click on last piece and go back to mason scene.
- Magnet to flowerbed then pick up item.
- Go inside building.
- Compass with sharp edges to skull tower on left.
- This turns into hot spot click on it and items in it.
- Razor to back of center chair. Click on last triangle piece.
- Triangle to plate above chair then click on last goblet piece.
- Candle flickering upper left
- Goblet to candle
- Candle lights then floats down and opens panel in wall.
- Piece comes out click on it.
- Go back inside to hut on beach
- Click on hotspot on left wall shelf center item and item in it.
- Place jewel inside it.
- Scroll will appear take it.
LOCATION 8 – The Wizard’s House and Labyrinth
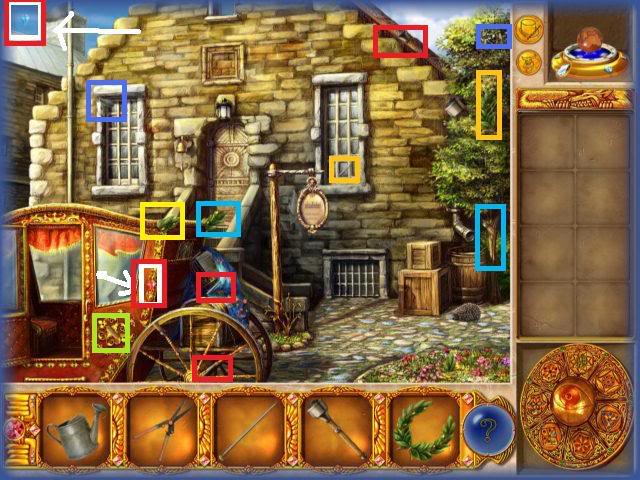
Items to find – Watering Can, Hedge Clippers, Knitting Needle, Torch and Laurel Wreath.
NOTE – Gems are highlighted in white and red squares with arrows.

Click on these areas to find hidden pieces.
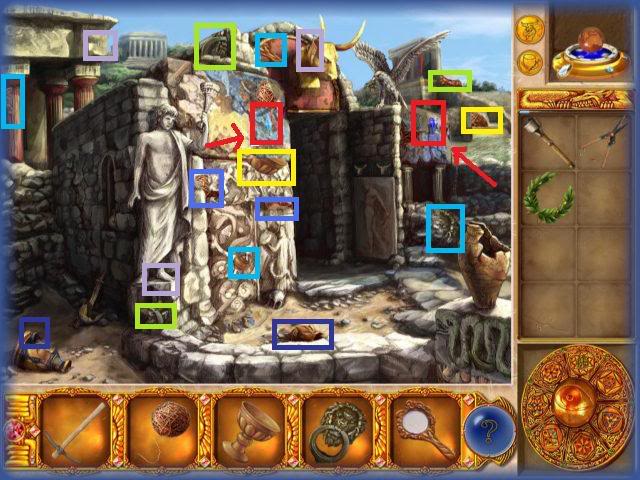
Labyrinth
Items to find – Pick, Magic Yarn, Goblet, Door Handle, Mirror.
NOTE – Gems highlighted in red.
Click on these items to find hidden pieces.
- Wreath to statue
- Fire starts.
- Torch to fire
- Torch back in inventory lit.
- Lit torch to bird.
- Pick axe to crack in wall on left.
- click on piece that appears mirror finished
- Mirror to bird click on piece it drops
- Back to Wizard’s house
- Door knocker on door click on piece that drops
- Window locked from inside.
- Throw string through labyrinth so you can find your way out.
- Bring lit torch to right side holder.
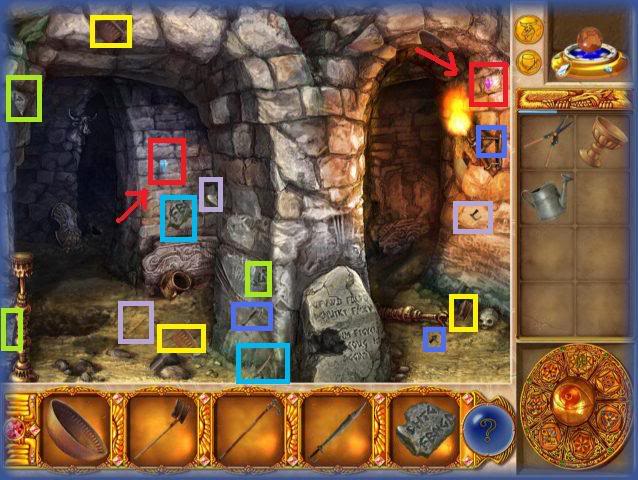
Items to find – Bowl, Spade, Walking Stick, Sword, Piece of stone.
NOTE Gems highlighted in red with arrows.
- Place gold bowl on left holder to collect water.
- place goblet in bowl back in inventory filled with water.
- Spade to hole which digs piece click on it sword is done.
- Use sword to take out stone piece.
- Place piece of stone in missing spot
- Red hot runes the letters now glow
- Throw goblet of water on it right away
- triggers minigame
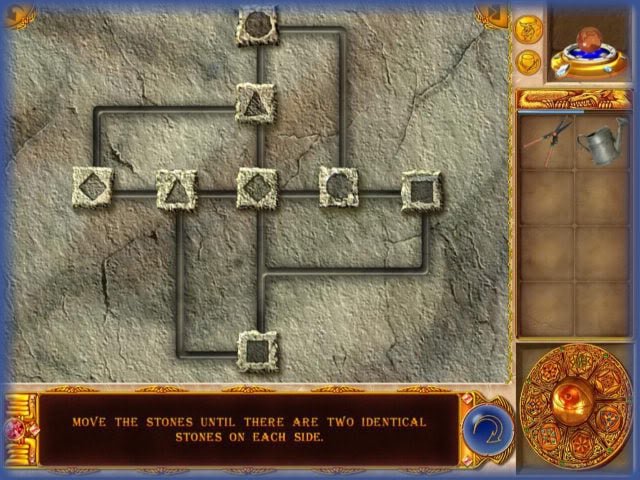
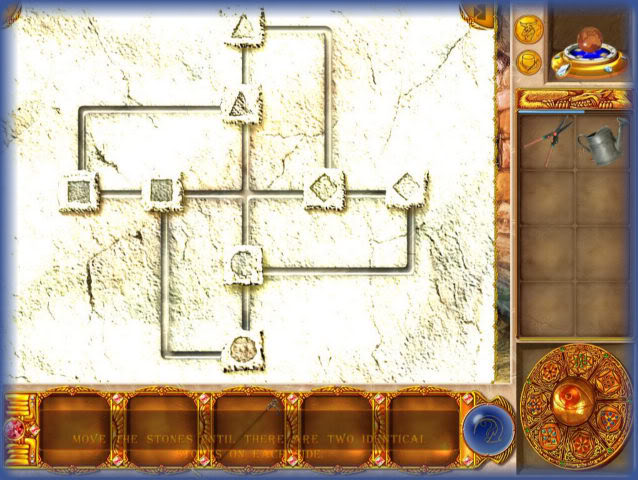
MINIGAME – Move the stones until there are 2 identical stones on each side.
Solution in image above.
- Go back to wizard’s house
- place walking stick into drain pipe
- Watering can to drain pipe in inventory full.
- Water dead plant with watering can.
- Magic apple grows
- Use hedge clippers to pick magic apple
- Give apple to hedgehog it will carry it away and reveal last piece of knitting needle
- Use knitting needle to open window.
- Now you can enter Wizard’s house
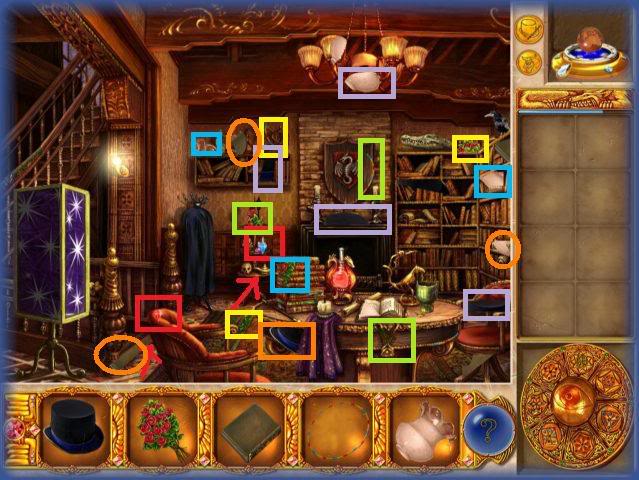
Items to find – Top hat, flowers, book, hoop and lampshade.
NOTE –Gems circled in red with arrows.
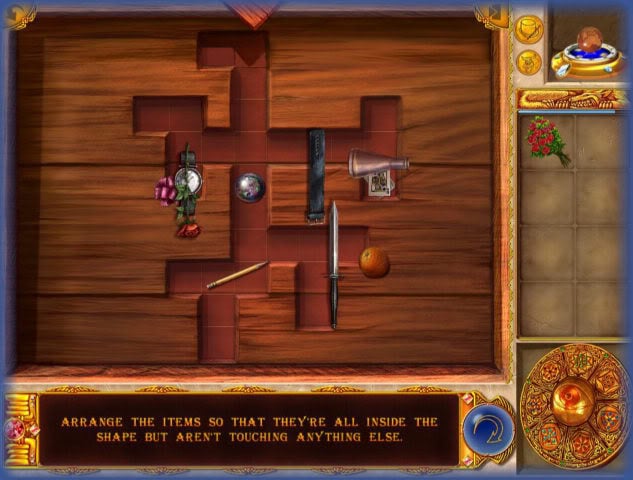

MINIGAME – Arrange items so they are all inside the shape but nothing is touching.
Solution – See image.
- Click on coat rack for piece.
- Put flowers in vase.
- Place lampshade on lamp far left.
- Click on last piece of book.
- Place book on shelf
- Alligator opens mouth last piece of top hat click on it
- Place top hat on candle it lights it.
- place hat on flowers bunny now in hat
- place hat and bunny in transformation box close it
- place hoop over box
- click on it then click on scroll inside.
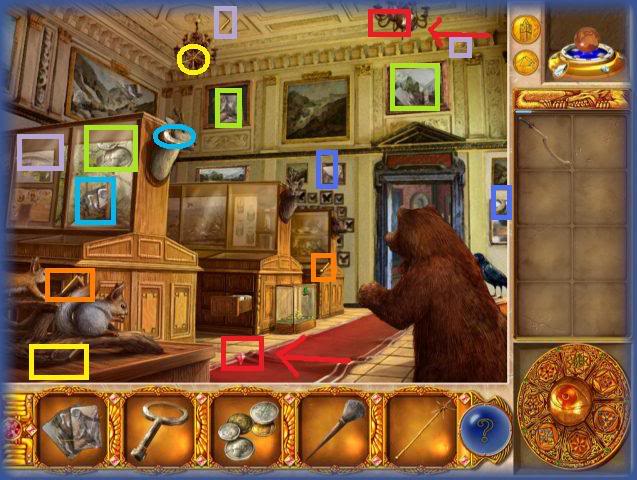
LOCATION 9 – Egypt, Art Museum
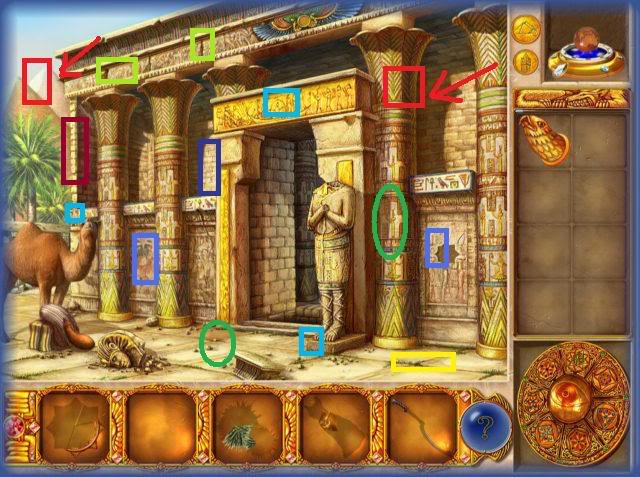
Items to find – Key, hawk beak, Thorns, Cat Statue, and Egyptian Sword.
NOTE – Gems are highlighted in Red.
- Give thorns to camel and he will leave.
- Click on items he left behind.
- Put key in missing slot.
- Triggers Minigame
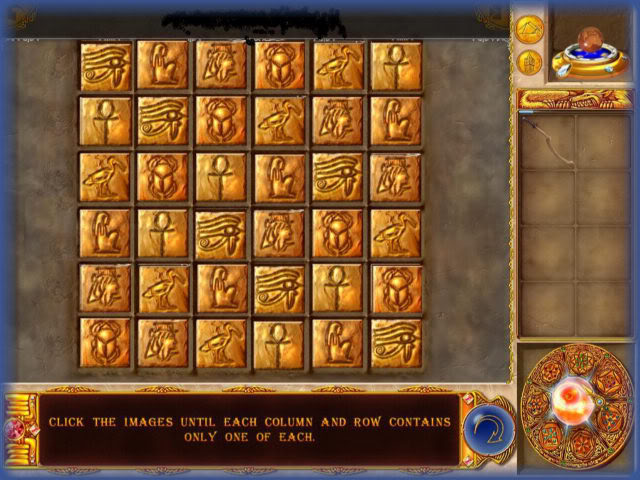
MINIGAME –Click on images until each column and row have only one of each image in it.
Scene 2
Items to find – Cards, Key, Coins, Brush, Magical Staff.
NOTE – Gems are highlighted in red with arrows.
Next Hall
Items to find – Painting, empty oil lamp, Monocle, Decoration, piece of flooring.
NOTE – Gems are highlighted in red with arrows.
- Go to scene 1 with animals.
- Take animal cards and place in open file cabinet drawer.
- This triggers a minigame
MINIGAME – Match the animal pictures. (Game varies no image.)
- After minigame click on piece in drawer.
- Go back to Egypt scene and place cat on top of building.
- Floor lifts up and building opens.
- Go inside building.
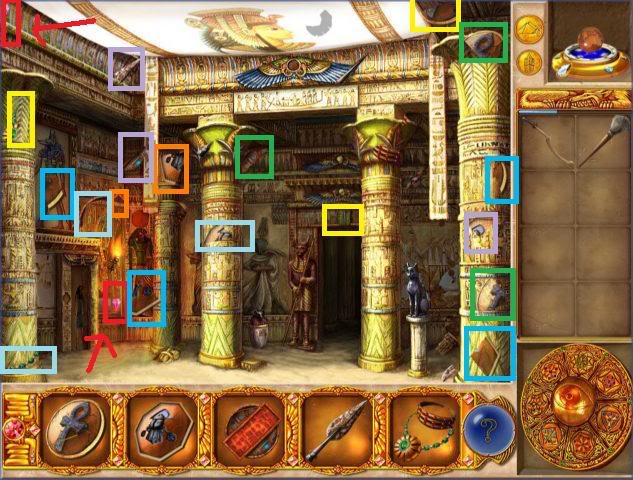
Items to find – Disc with Egyptian symbol, Disc with Cache symbol, key, spear head, and Collar.
NOTE – Gems are highlighted in red with arrows.
- Give spearhead to guard he will turn. Click on piece that appears.
- Use sword on black shadow item on ceiling it cuts open and piece falls down click on it.
- This completes collar. Place collar on cat and click on piece left.
Items to find – Disc with symbol 1., Disc with symbol 2., Nut, Eraser, and Chisel.
NOTE – Gem highlighted in red with arrow.
- Once you have nut go back to museum and give it to the real squirrel (one on the right.)
- Pick up final piece of magical staff.
- Take magical staff and click on bear. It will disappear into the picture on the wall.
- Now take magical staff and click on Raven. He will fly into a picture and leave a piece for you to click on.
- Use magical staff on stuffed squirrel and he will disappear. Final piece of coins left click on them.
- Click on donation box with coins and a drawer opens with last piece of key.
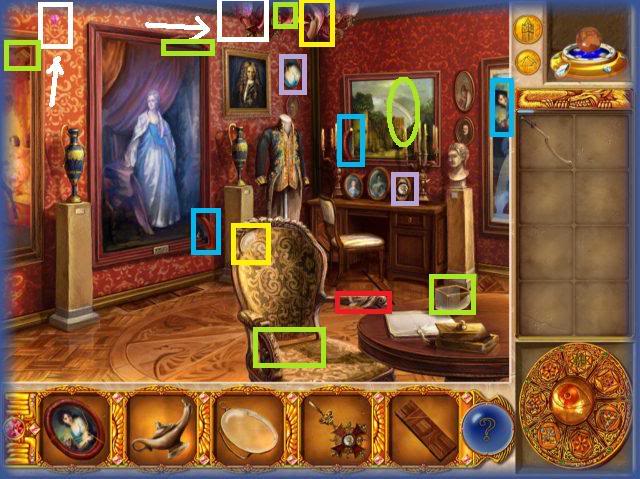
- Go to next room.
- Use Key to open drawer. Click on last piece of portrait.
- Click portrait of female on the square picture of male on wall. It replaces it and leave a piece so you can complete medal.
- Drag medal to military outfit on mannequin and it will give you the final piece for the monocle.
- Use monocle on sign under the huge center painting. "It was a fake!" You will need to erase inscription and write a new one.
- Take floor piece and repair floorboard under portrait.
- Repairs floor and gives you a piece of chisel.
- Go to distant hall use chisel to move the image on wall to see what is under it. Click on last piece of eraser.
- In this same room look toward the left far corner and place the Cache symbol on the door. This will cause it to become a minigame.
MINIGAME – Flip tokens until they all have the same image on the same side.
Solution varies see finished puzzle.
- After puzzle is solved hot spot appears. Click on it and take the disc with symbol.
- Go back to very first picture where the camel used to be and use the brush on the pile of sand.
- This uncovers the last piece of the disc.
- Go to the room with paintings and use eraser on inscription of huge center portrait.
- Her pose changes and the correct vase is now lit while the cursed one is inactive. Click on the lit vase and the piece that comes from it.
- Go back to first scene where camel was and place oil lamp on skin with oil and it will move to inventory as lamp with oil.
- Place lamp with oil on the lantern fire on left side of room called the great hall. (room with the guard where you cut ceiling earlier)
- click on last piece of disc on floor.
- Go back to first room, place disc with L shape symbol on it in the middle spot over door. It closes and the one underneath it opens.
- Then take the disc with the eye like pattern and place it on the bottom opening over the door. It closes it up and releases a piece of key.
- Take the key and click on door to the far left near where you lit the lantern. The door opens and there is a scroll there.
- Click on the scroll.
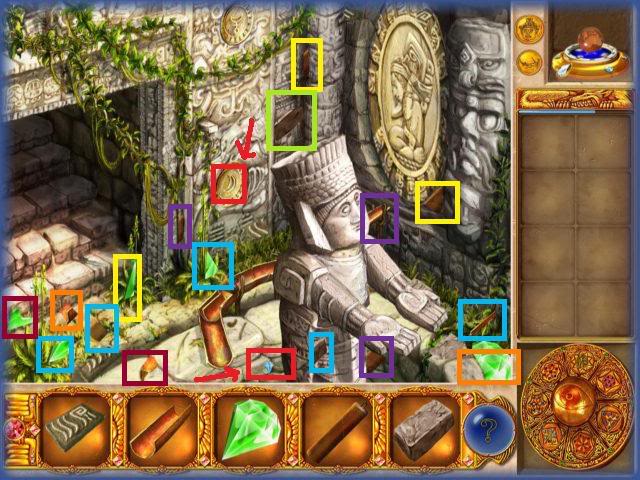
LOCATION 10 -Venice, Maya Observatory
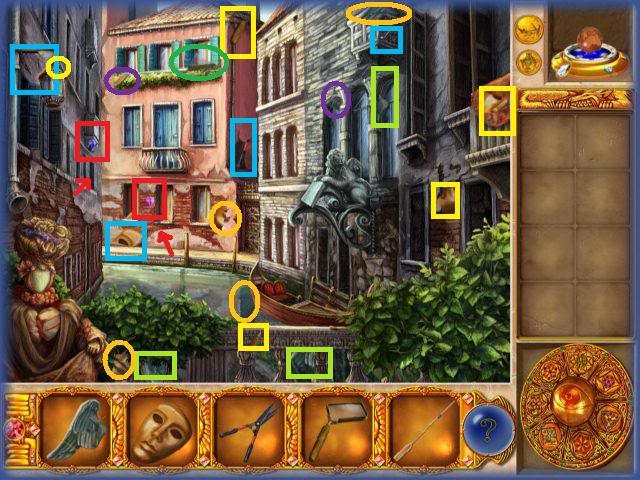
Items to find – Lion wing, mask, pruning shears, magnifying glass, and oar.
NOTE – Gems are highlighted with red and arrows.
- Place mask on mannequin on far left.
- Take the last wing piece.
- Place stone wings on stone lion.
- Book opens and final oar piece appears
- Place oar on boat and boat moves up a little bit and exposes another hidden piece. Click on it and add to inventory.
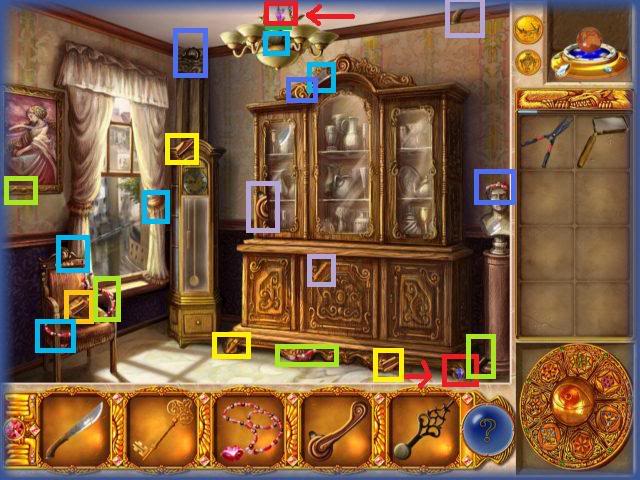
Items to find – Machete, key, pendant, window handle, and clock hand.
NOTE- Gems are found highlighted in red with arrows.
- Click on lower cupboard which opens door. There is a box inside and commentary says, "jewelry is missing and things are jumbled up."
- Click on clock door it says, "Clock door, it’s unlocked!"
- Drag window handle to window. The window closes and last piece of pendant appears.
- Drag pendant to jewelry box which becomes a minigame puzzle.
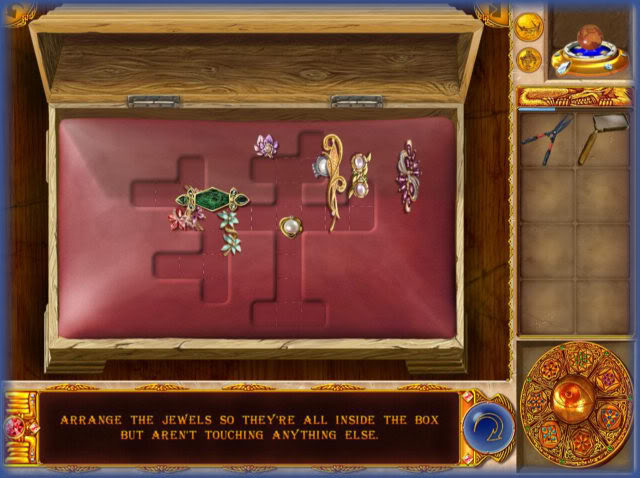
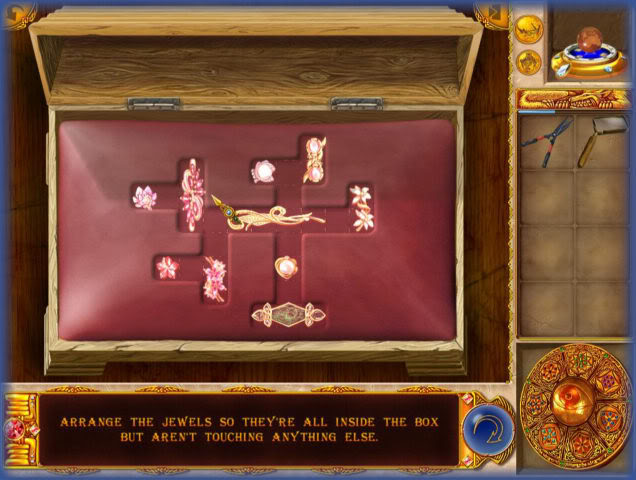
MINIGAME – Arrange so that the jewels are all inside the box but non touching.
NOTE – The pieces can rotate in different directions when you click on them.
You can use the hint button if you want to skip the puzzle without penalty.
- When finished with puzzle last piece of key appears. Click on it.
- Go to new room Maya observatory.
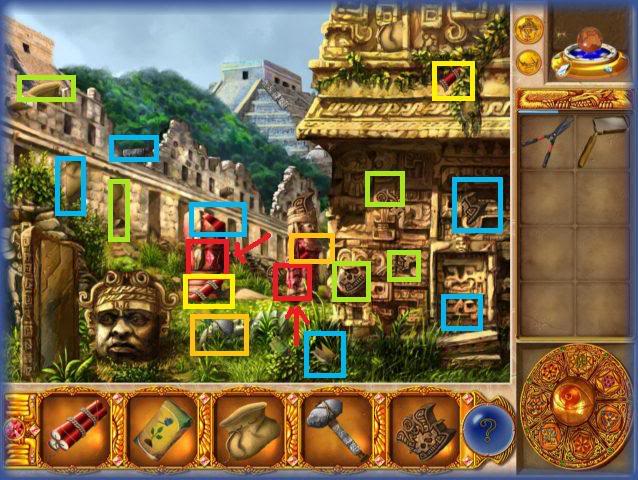
Find items – Dynamite, fertilizer, empty sack, hammer, and head jewel.
NOTE – Gems are highlighted in red with arrows they are very hard to see.
- Take empty sack to pile of sand. Bag fills up and goes to inventory.
- Take head jewel to stone head and a hot spot appears with this text, "He wants to see his own reflection"
- Drag hammer to sheet of metal. Now it is straight but needs to be cleaned.
- Go back to Venice and place fertilizer on flower bush. It will bloom with many flowers.
- Use pruning shears to cut flower and it goes into inventory.
- Go to room and give the flower to lady in the portrait on far left. The picture moved and a safe is exposed. Click on safe and piece inside it.
- Back to Maya observatory.
- Place bag of sand on sheet metal. It becomes very shiny and gives up its last dynamite piece.
- Bring dynamite to short door on right. Hot spot, "How can I light it?"
- Use magnifying glass on dynamite to light it. There is an explosion and door opens.
- This is entrance to the final room.
Find items – Tablet with symbol, gutter, gem, weight, and stone stair.
NOTE – Gems are highlighted with red. One is found behind the wall once you activate the wall.
- Tablet with symbol gos on round stone picture carving on right side of statue. It repairs and removes and a wall of water is in its place.
- Go back into room in Venice.
- Open clock door and place weight inside.
- It chimes and and piece of clock hand comes out.
- Place clock hand on clock face.
- Place key on safe and last piece of machete inside. Click on it and go back to room off of observatory.
- Place machete on vines and cut them away. Expose carving and minigame is triggered.
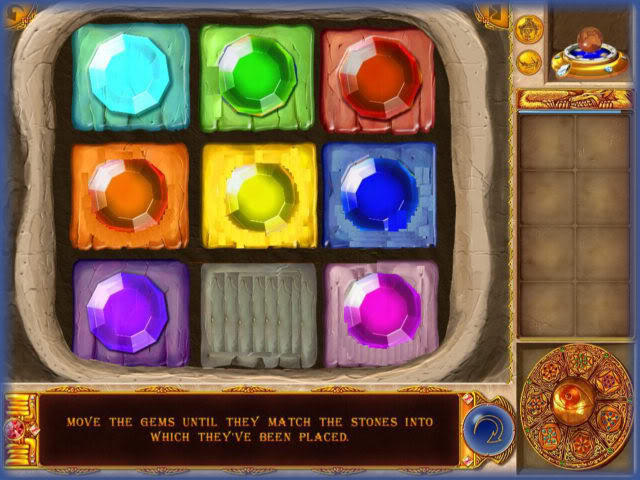
MINIGAME – Move the gems until they match the color of the stones they have been placed.
- When puzzle finished you will receive last piece of broken stair.
- Go to room off of observatory and put stone where the broken stair is. Hot spot appears click on it and last piece of gutter is inside click and add to inventory.
- Place piece of gutter on established gutter by statue.
- Statue changes shape and a piece of gem is exposed under his left arm.
- Place large green gem in statues hands.
- It will activate and a sunbeam will go through it and it will open a wall area which has one pink gem that you need to complete the game. It is the only hidden gem in the game.
- Now all the gems are in the amulet and you are taken to a story screen and back to the Professor’s basement. "This is a portal, click on it"
- Go toward Dragon mountain to finish the quest.
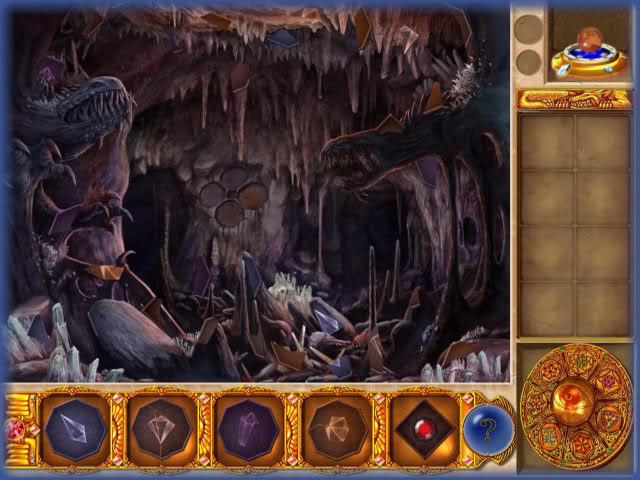
Items to find – 5 Stone plates of various shapes.
NOTE – No more gems to find.
After you have found all the pieces and the stones are formed you need to place them in the empty slots on wall.
NOTE you can see the color if you look closely. Match the color to your stone.
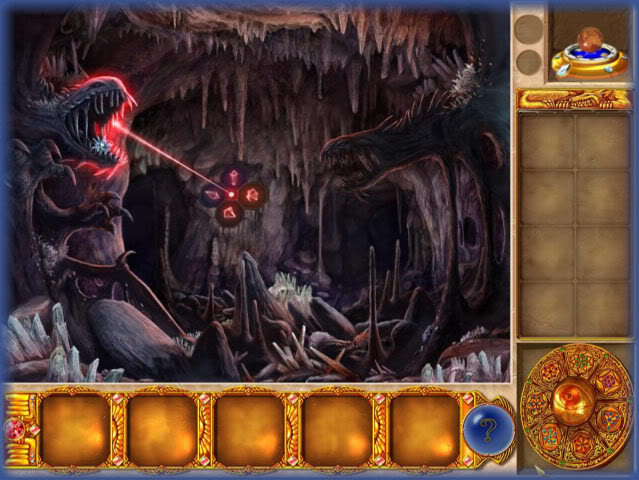
Once you have these in place red light will shine through the walls and one of the dinosaurs has the peace gem in its mouth. Click on it to complete the game.
Congratulations! You have completed Magic Encyclopedia 2: Moon Light!
“;

More articles...
-
Best Horror Games On Itch.io – July 2026
Across a bounty of subgenres. -
Haze Seas Accessories Tier List [Best Accessories to Equip]
The accessories with the best stat buffs in Haze Seas.