
Best Horror Games On Itch.io – July 2026
Across a bounty of subgenres.![Haze Seas Accessories Tier List [Best Accessories to Equip]](/wp-content/uploads/2026/07/haze-seas-accessories-tier-list.jpg "Haze Seas Accessories Tier List [Best Accessories to Equip]")
Haze Seas Accessories Tier List [Best Accessories to Equip]
The accessories with the best stat buffs in Haze Seas.
![[Roblox] Evomon Shiny Hunting Guide – Including Prismatic and Pris Shinies!](/wp-content/uploads/2026/06/evomon-shiny-hunting-guide.jpg "[Roblox] Evomon Shiny Hunting Guide – Including Prismatic and Pris Shinies!")

Magic Academy II Walkthrough
Welcome to Gamezebo's strategy guide for Magic Academy II. This is a Hidden Object Adventure game in which you must both find objects and solve tasks in the scenes to progress. You play as Irene, a young magic student who has just graduated from the Academy and is applying for her first job with the Wizards Council. This Strategy Guide is divided into two sections: General Tips (no spoilers) Detailed Walkthrough GENERAL TIPS To return to the Main Menu, click on the M…


- Prefer Gamezebo on Google

a:1:i:0;a:2:s:13:”section_title”;s:28:”Magic Academy II Walkthrough”;s:12:”section_body”;s:100462:”
Welcome to Gamezebo’s strategy guide for Magic Academy II. This is a Hidden Object Adventure game in which you must both find objects and solve tasks in the scenes to progress. You play as Irene, a young magic student who has just graduated from the Academy and is applying for her first job with the Wizards Council.
This Strategy Guide is divided into two sections:
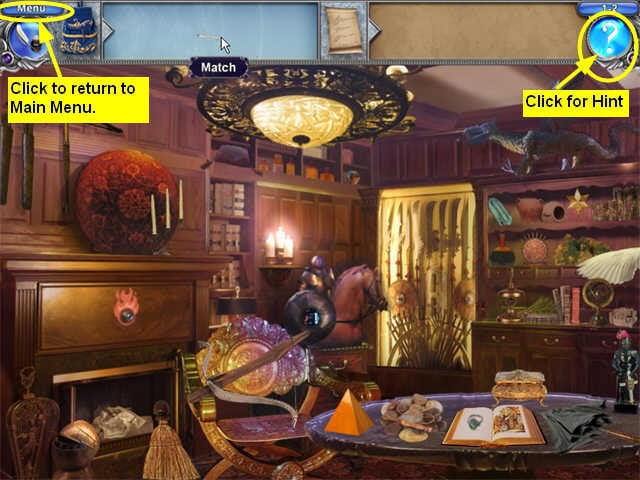
- To return to the Main Menu, click on the MENU button in the upper left.
- Each Chapter has multiple Tasks, usually 3 or 4. Tasks may be Hidden Object scenes, inventory tasks like figuring out how to use items in the scene to unlock a cabinet, Find the Differences, or various other puzzles.

- There are 23 chapters. Each chapter has multiple tasks.
- You can only save at the end of a complete Chapter. So if a Chapter has 4 tasks and you’ve finished 3 and then exit the game, you will have to start all over again with the first task for that Chapter.
- The game will tell you if you are trying to exit at a point where you can’t save.
- There is no timer.
- There is a lot of dialog in the game. You can skip one line at a time by clicking anywhere on the screen. However, you won’t understand the story or your task objectives if you skip it.
- You cannot skip the mini-games. If you get stuck, check the spoiler section of the walkthrough for the puzzle solution.
- There are four kinds of Hidden Object scenes in the game: List of Names, List of Silhouettes, Multiples and Pairs.
- For a List of Names or a List of Silhouettes, you have to find items that match what is on the Find List. Note that additional items will be added to the Find List as you go. In these scenes you cannot collect an item until its name/silhouette appears on the Find List.
- For Multiples, you will be told to find, say, "15 bottles." There will be a counter in the top center of the screen. As you find the items, the counter will count down, so you know how many you have left to find. Items may vary in color or size.
- For Pairs, you are told to find pairs of objects that exactly match each other. To clear a pair, you drag one to its match. Remember to check in cupboards and behind moveable items.
- If you collect an item that you don’t need yet, or don’t know where to use, it will go into your inventory at the top left of the screen and you can use it later.
- As you move the cursor around the scene, some items will have text labels.
- In some cases if you click on an object or an area in the scene, Irene will give you a hint about what to do there.
- In some cases you will not be able to proceed in the scene until you have gotten the pop-up hint, so if you get stuck and can’t figure out why the game won’t let you proceed, try clicking on an object you know is important to see if there is a hint attached to it.
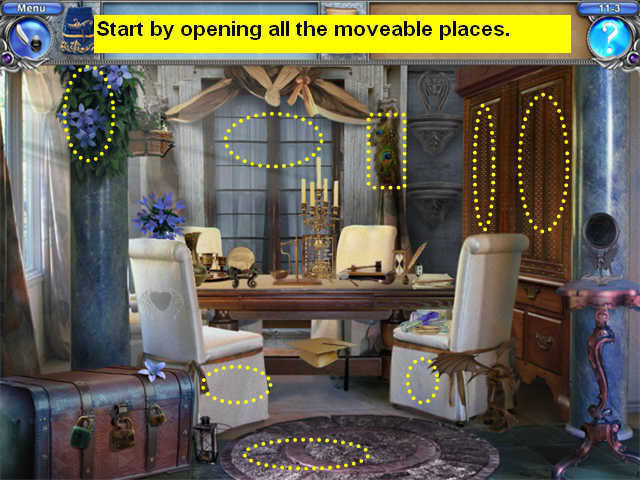
- There are usually 3 to 5 interactive areas in each location where doors, panels, or curtains can be opened or shut. You will be able to do this at any time during the location, even if you don’t need to do so.
- As you move the cursor around the scene, some areas will sparkle. This usually means it is a moveable area, like a cabinet door that will open, but it can also mean there is something important you have to do there.
- You may have to open a cabinet door to get something, then close it again to get something else that was blocked by the open door. So always check both positions of the moveable areas.
- Most moveable objects can be moved at any time. A few need keys. If the object is locked, clicking on it will bring up a text bubble that says it’s locked or it needs a key.
- Some tasks let you move from one room to another. Sometimes you do this just by clicking on a doorway. Sometimes you have to find a large silver arrow and click it. The game is inconsistent about this.
- Some items will automatically go into the inventory tray. Others have to be dragged there. The game is inconsistent about this.
- You can click on the ? in the upper right corner to receive a hint.
- You get unlimited hints, you just have to wait for the ? to recharge.
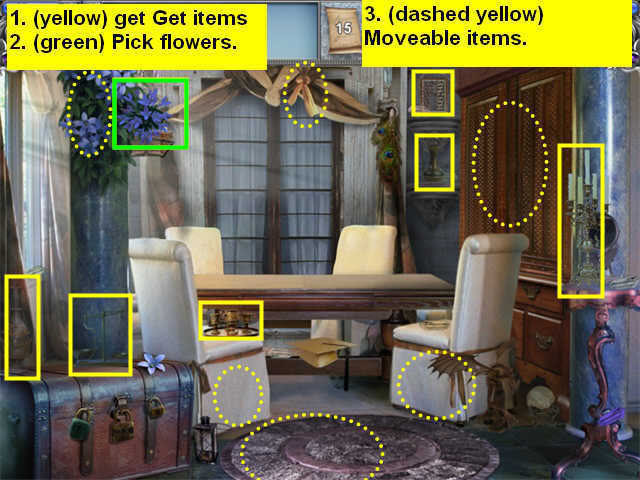
- "Cyan" is neon blue.
- An object that can be picked up, like a key, is marked with a solid square.
- A place where you can interact with the scene, like a lock, is marked with a solid oval.
- A door or panel that can be opened or shut is marked with a dashed oval.
- If an area is marked with a dashed oval and there is an item marked with a solid square inside the oval, it means that the object is hidden inside or behind something that you have to move.
- Chapter 1: Lord Nort’s Study
- Chapter 2: The Meeting Hall
- Chapter 3: The Training Hall
- Chapter 4: Dark Corridor
- Chapter 5: The Master of Illusions’ Room
- Chapter 6: Lord Nort’s Study
- Chapter 7: Gwend’s Study
- Chapter 8: The Greenhouse
- Chapter 9: Richard’s Room
- Chapter 10: The Gallery
- Chapter 11: The Councilors’ Room
- Chapter 12: The Tower Entrance
- Chapter 13: The Observatory
- Chapter 14: Rand’s Tower
- Chapter 15: The Library
- Chapter 16: The Tower Cellar
- Chapter 17: The Alchemy Laboratory
- Chapter 18: The Entrance to the Laboratory Cellar
- Chapter 19: The Laboratory Cellar
- Chapter 20: Loriana’s Room
- Chapter 21: The Fortress Cellar
- Chapter 22: The Room with the Book
- Chapter 23: The Ruined Bridge
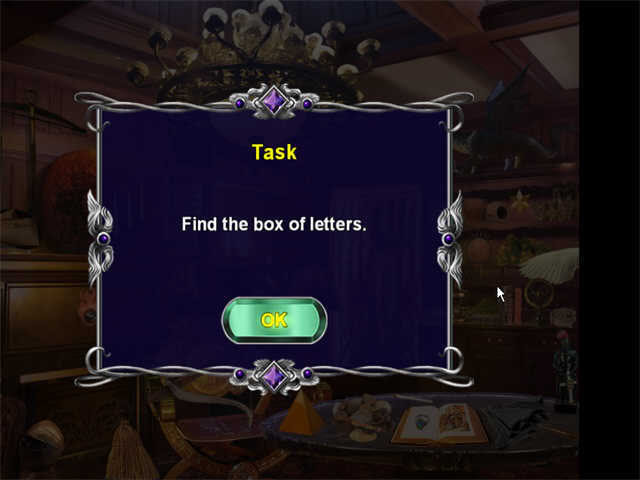
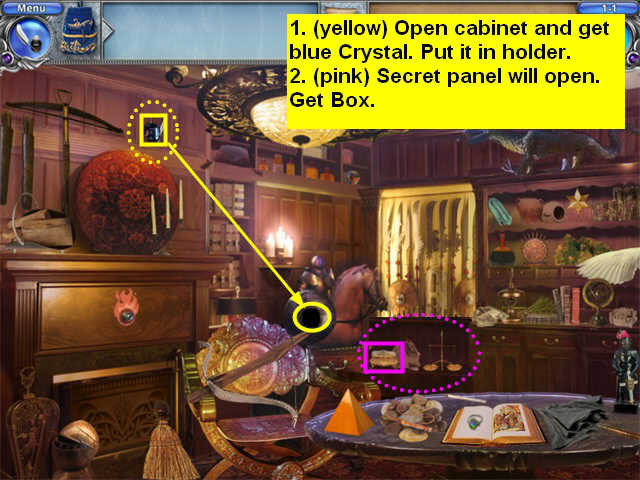
Task 1.1: Find the Box of Letters
- Talk to Lord Nort. He will tell you that the Treatise on Light and Darkness has been stolen.
- He will consider making you a Junior Councilor, but first you have to find a box of reference letters for him.
- Many objects in the study are moveable. Just click them again to put them back if they aren’t what you’re looking for.
- Start by clicking on the panel above the large red disk on the mantel. It will open.
- Take the Blue Crystal from the panel.
- Put it in the black crystal holder.
- A secret panel will open to the right of the black crystal holder.
- Take the small box there.
Mission accomplished! Lord Nort will return to give you your next task.
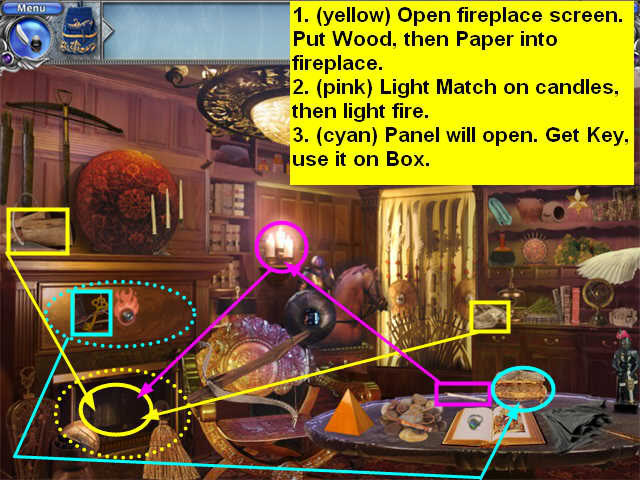
Task 1.2: Find the Key to the Box
- Lord Nort will give you a hint-you need the help of one of the elements. Since there’s a fireplace, I’d try fire.
- Click on the Fireplace screen to open it.
- Take the Firewood from the mantel and put it in the fireplace.
- Take the Pile of Papers from the right side of the room and put it in the fireplace.
- Pick up the match from the table.
- Use the candles to light the Match. Now you have a Burning Match.
- Use the Burning Match to light the fire. A secret panel will open above the fireplace.
- Take the Key from the secret panel.
- Put the Key in the lock on the Box.
- The box is still locked.
Task 1.3: Solve the Puzzle Lock for the Box
- This will trigger a puzzle.
- You must connect all the pipes so that all the lights are lit.
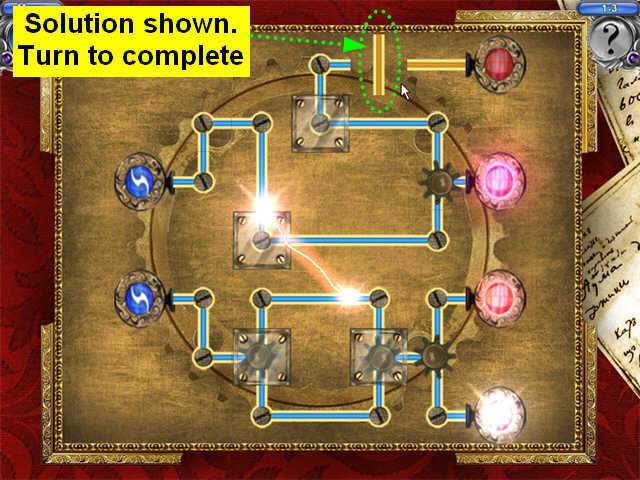
- There was a noise from the Balcony!
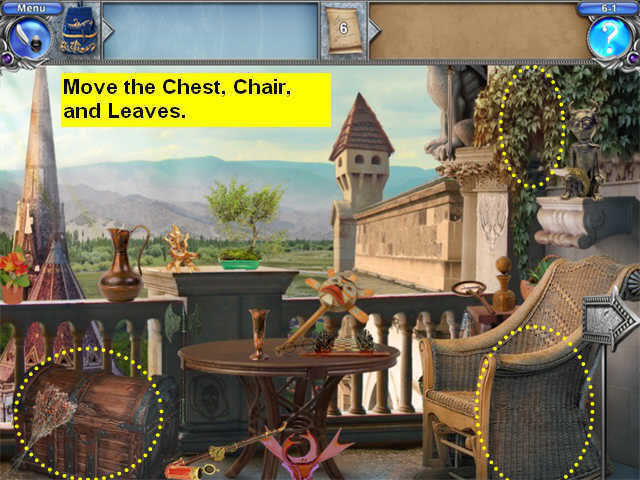
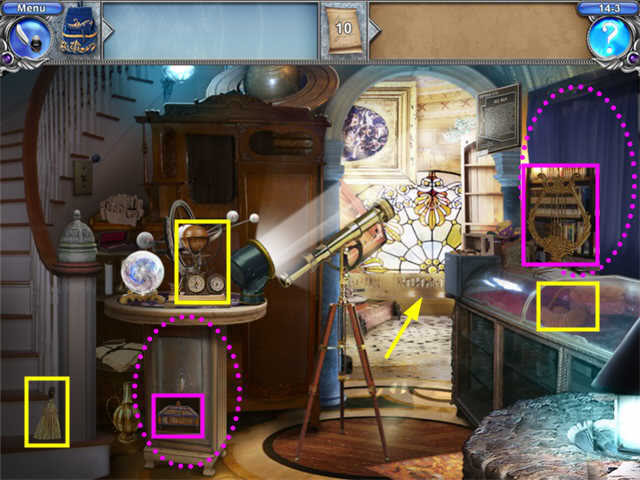
Task 1.4: Investigate the Balcony
- This is a Hidden Object scene. You must find the objects whose silhouettes are shown in the upper right.
- You will not be able to collect an object until its silhouette appears on the Find List.
- Collect as many objects as possible.
- Open the Chest on the left. There is an object inside.
- Move the leaves in the upper right.
- Move the Chair on the right.
- There was an object behind the Chair. Collect it.
- Irene sense something in the cabinets, but it’s locked. There’s a Key on the ledge below the Skulls drawing.
- Use the Key to open the dresser.
- Collect the item inside.
- Move the pitcher on the table and collect the hidden Ring.
- Lord Nort will make you a Junior Councilor.
Task 2.2: Collect the Candles
- Collect the 8 candles that you can see.
- Each candleholder will count as one, regardless of the number of individual candles it has.
- Now open the two doors on the left, the cabinet in the center, and the two doors in the grandfather clock on the right.
- Collect the remaining 7 candles.
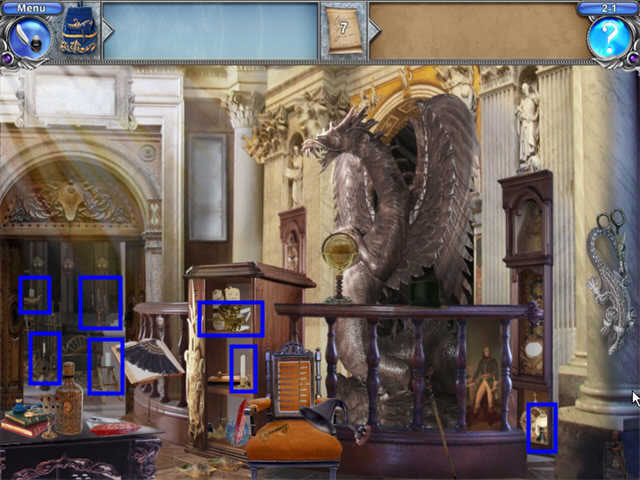
- Irene will tell you she has to set a protective spell.
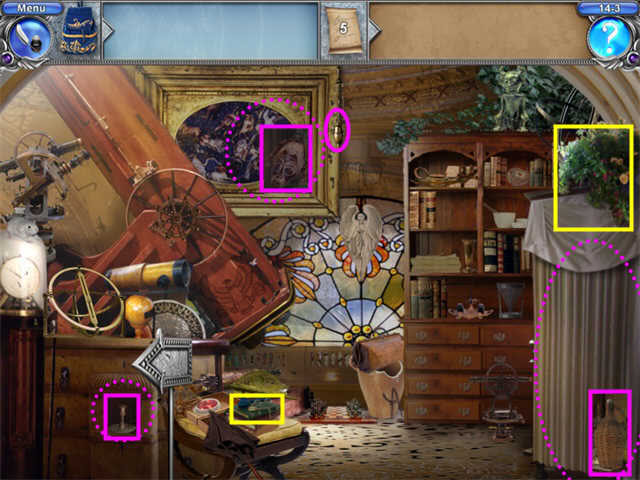
Task 2.2: Find the Paintings
- Take the painting of the man from the lower right and put it in the frame on the wall.
- Take the Protective Crystal (red) from the table and put it on the painting.
- The painting will glow and a Clock will appear on the wall.
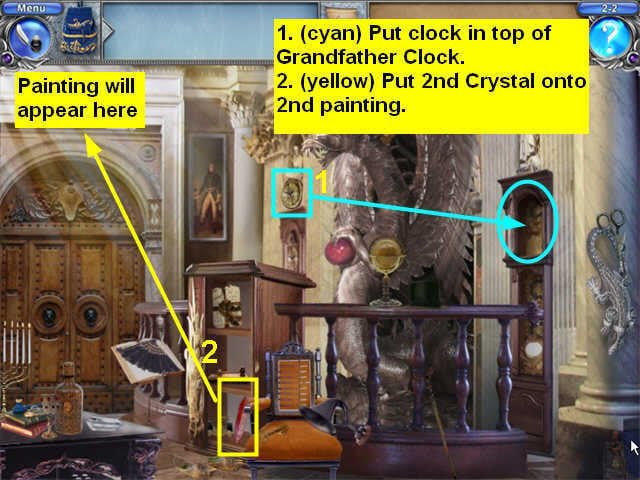
- Open the two panels of the Grandfather Clock.
- Open the cabinet in the center.
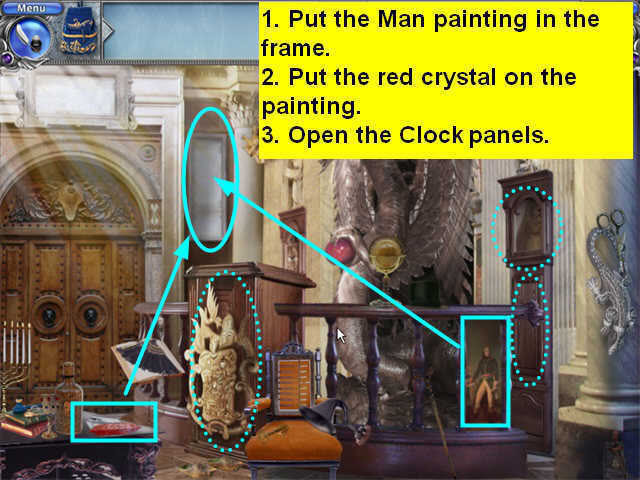
- Take the clock from the wall and put it into the Grandfather Clock.
- A painting will appear in the upper left of the scene.
- Take the 2nd Crystal from the cabinet and put it on the 2nd painting.
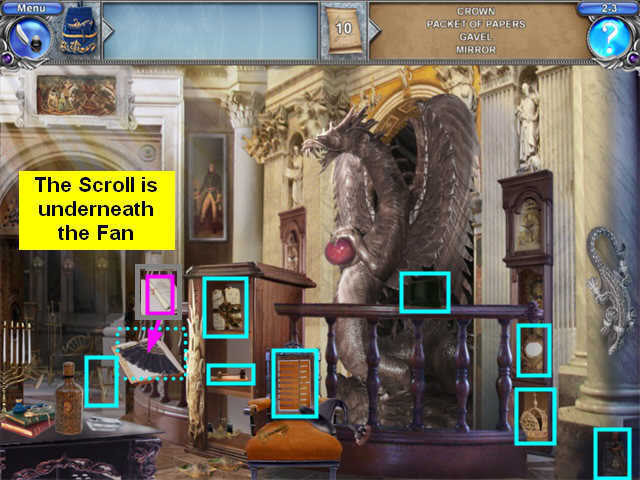
Task 2.3 Find the Scroll
- This is a Hidden Object scene. Collect the items listed on the Find List.
- You will not be able to collect an object until its name appears on the Find List.
- Collect as many objects as possible.
- Open the two doors on the left.
- Open the chest in the center.
- Open the Grandfather Clock panels.
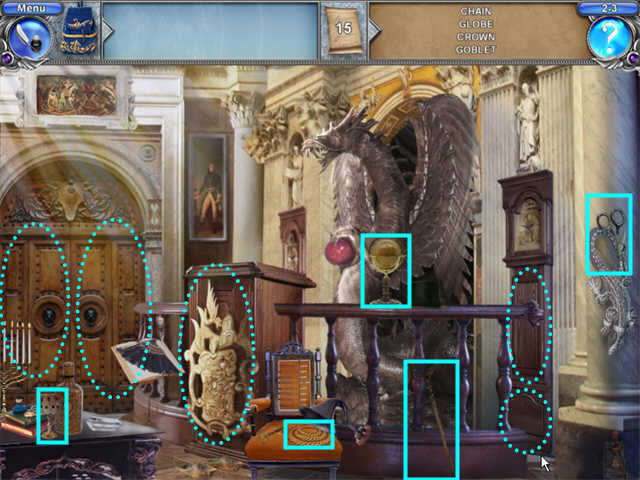
- Now collect the remaining objects.
- The Abacus is on the back of the chair.
- The Scroll is hidden underneath the Fan.
Task 3.1: Find Loriana’s Comb
- This is a Hidden Object scene. Collect the items listed on the Find List.
- You will not be able to collect an object until its silhouette appears.
- Collect as many objects as possible.
- Open the two doors on the left.
- Open the panel in the center.
- Open the doors on the cabinet on the right.
- Open the door on the glass cabinet on the right.
- Now collect the remaining objects.
- The Comb is hidden behind the Hand on the bottom shelf of the cabinet on the left.
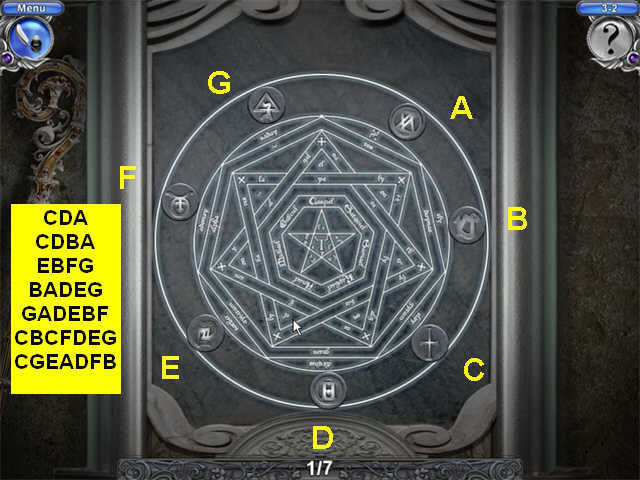
Task 3.2: Learn the Protective Spell
- You must copy each sequence you see.
- You will have to complete 7 sequences to pass.
- The counter at the bottom of the screen tells you which number you are working on.
- The sequences are not related to each other.
- If you make an error, you will just have to redo that particular sequence, you don’t have to go all the way back to the beginning.
- See the screenshot for the 7 sequences.
Task 3.3: Reveal the Training Monsters
- It helps to understand this puzzle if you realize there is a good dragon (the 5 headed statue who is your helper) and bad dragons.
- The bad dragons are hidden in the room. You have to first find them, and then use magical energy from your helper dragon to defeat them.
- First open the cabinet behind the Dragon Statue
- Collect the Key there.
- Use the Key to unlock the Dragon Statue.
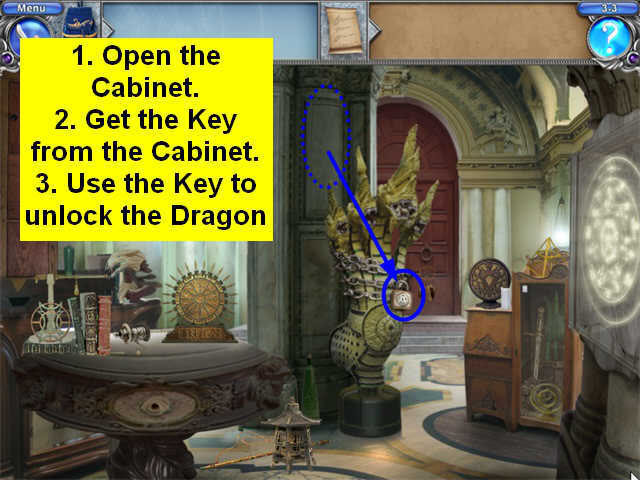
- Now your helper is ready to help you.
- A blue crystal will appear on the helper dragon’s stomach.
- Take the crystal and put it on the hole on the front of the table.
- A secret panel will open and reveal a potion. It looks like a hockey puck.
- Take the potion and put it on the right wall.

- This will reveal the first bad dragon, which starts to come out of the wall.
- Your helper dragon has glowing Magical Energy in one of its mouths.
- Take the Magical Energy, and put it on the bad dragon.
- The bad dragon will freeze and drop a Fan on the floor.
- Collect the Fan.
- Put the Fan on a post in the upper left of the scene.
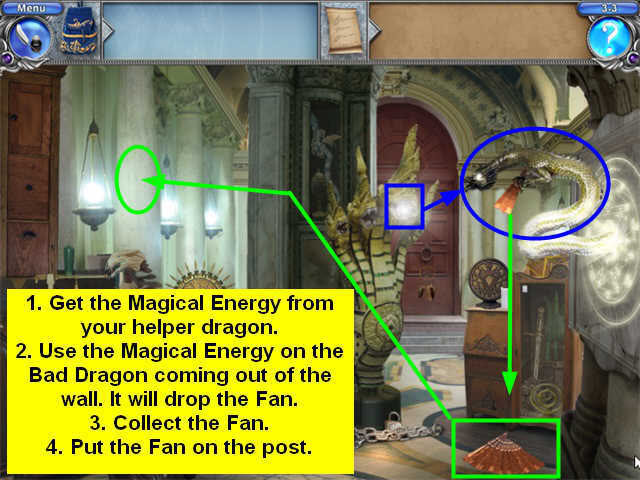
- It will stick and a new bad dragon will be revealed. This one is all pink.
- Again, your helper dragon will produce Magical Energy.
- Take the Magical Energy, and put it on the bad pink dragon to defeat it.

- Councilor Loria will tell you about Professor Ferrous. There’s a rumor that he has been put in charge of keeping a box with one of the last Demons in it, but she thinks it’s just a fairy tale. You decide to go check it out.
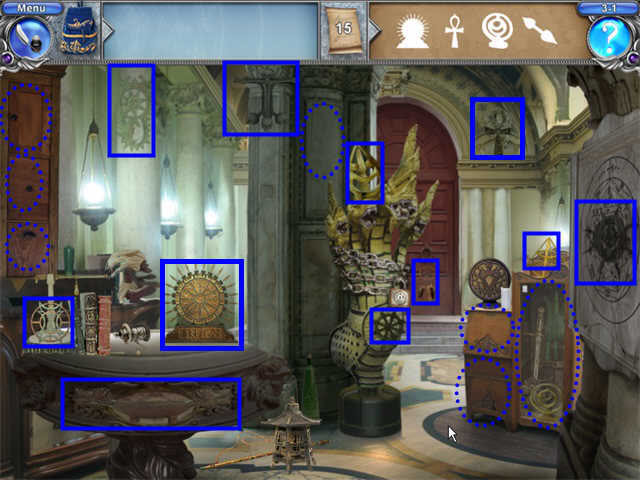
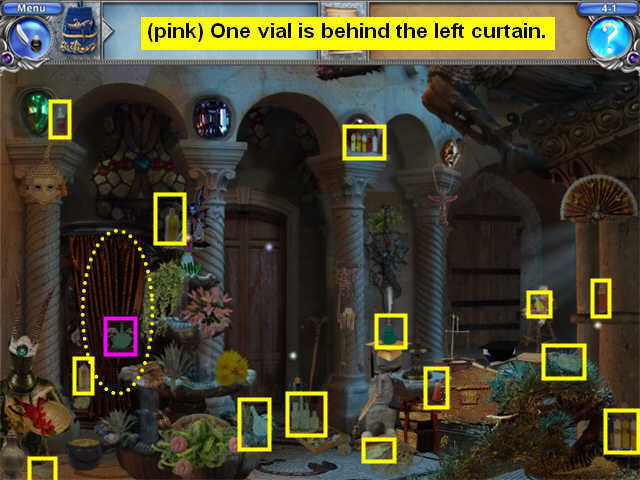
Task 4.1: Find the Vials
- This is a Hidden Object Multiples scene. There is no Find List. The counter at the top of the screen tells you how many items you have left to find.
- Collect all the vials.
- One is hidden behind the curtain on the left.
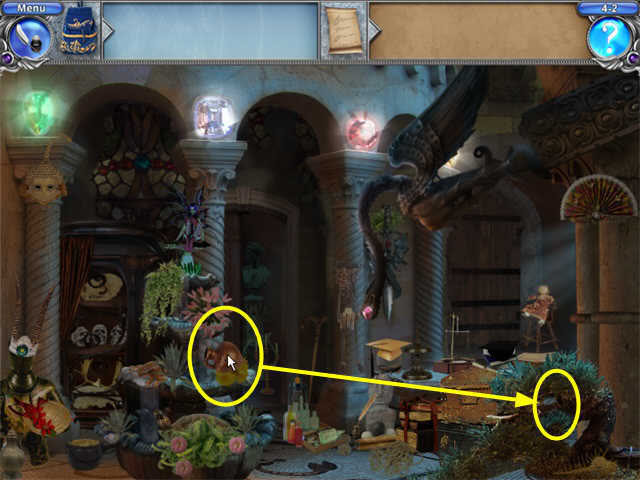
Task 4.2 Find the Chalice of Light and Grow the Pinecones
- Begin by opening the curtain on the left and the door in the center.
- Now find the 4 colored lights and place them in the 4 colored crystals at the top of the scene.
- The dragon statue will move.
- The Chalice will appear in the upper right. Collect it.

- Use the Chalice to get water from the center fountain, then use the water on the Pine Tree.
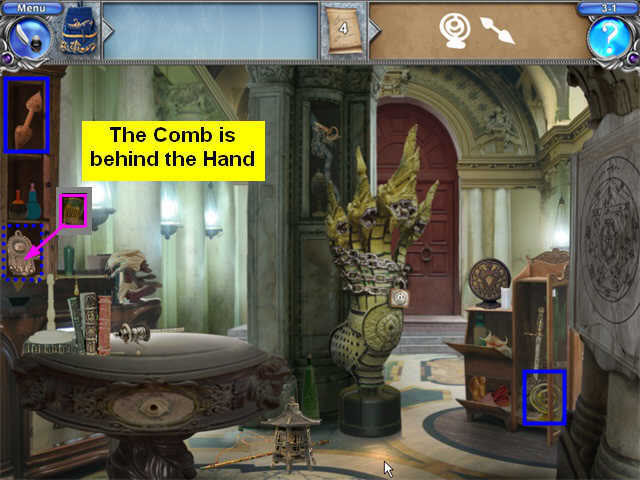
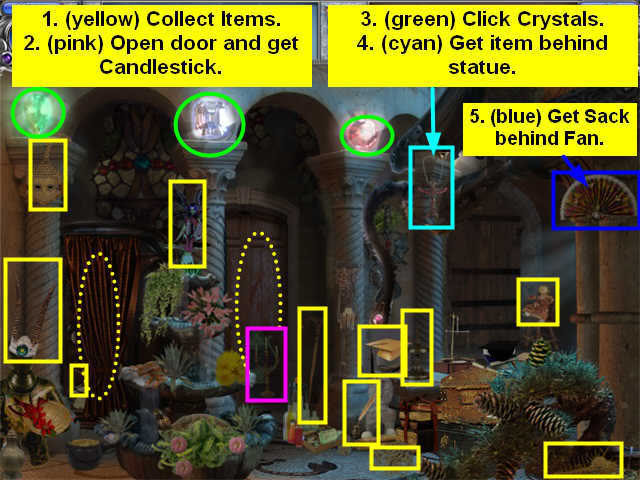
4.3 Find a Sack to Collect the Pinecones
- This is a Hidden Object scene. You must find the objects whose silhouettes are shown in the upper right.
- You will not be able to collect an object until its silhouette appears on the Find List.
- Collect as many objects as possible.
- There is just a small part of the antlers showing behind the curtain on the left. You can collect it or open the curtains first.
- Open the door in the center and collect the Candlestick.
- Click on the three glowing Crystals.
- The Dragon statue will move, revealing another item. Collect it.
- Move the Fan on the right and collect the Sack.
Chapter 5: The Master of Illusion
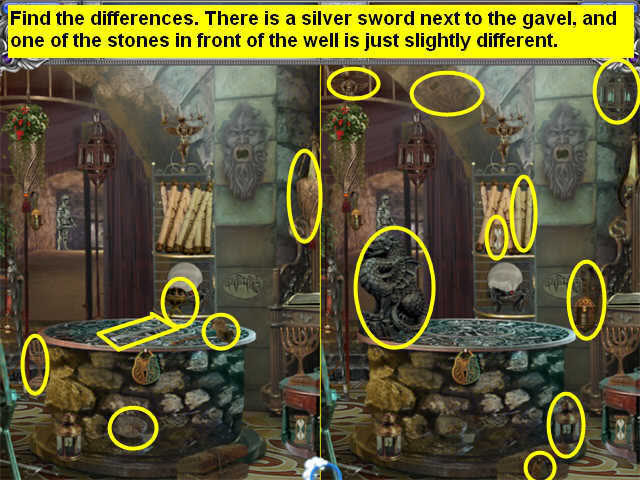
Task 5.1: Find the Illusions
- This is a Find the Differences game.
- There is a silver sword next to the gavel on the well cover that can be hard to see.
- One of the stones on the front of the well is just slightly different.
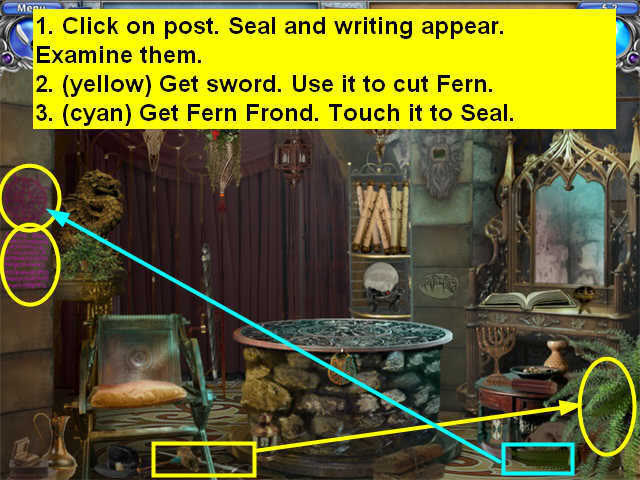
Task 5.2: Open the Well Cover
- First click on the stone post on the left.
- A symbol will appear with words below it. Click on both for more information.
- Pick up the sword on the floor.
- Use the sword to cut a leaf from the plant on the lower right.
- The leaf will fall to the ground.
- Pick up the leaf and touch it to the Magic Seal.
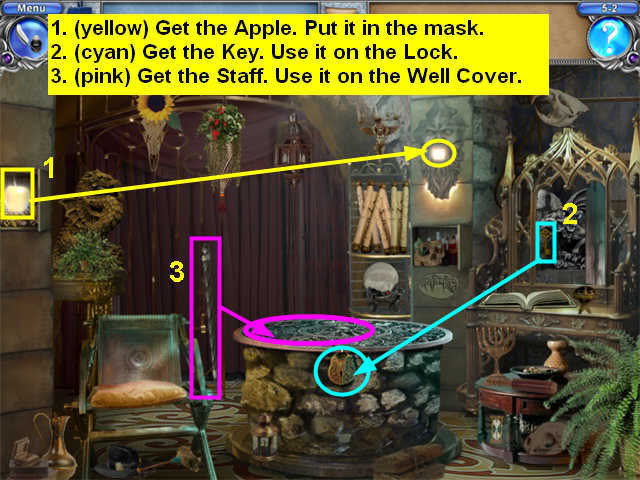
- The Seal will open revealing the Angel’s Apple. Collect it.
- Put the Angel’s Apple in the mouth of the mask on the right wall.
- The case on the right will open, revealing a Key.
- Take the Key and use it on the lock on the Well Cover.
- Try to open the Well Cover-it’s too heavy.
- Take the Magic Staff and use it to prop open the Well Cover.
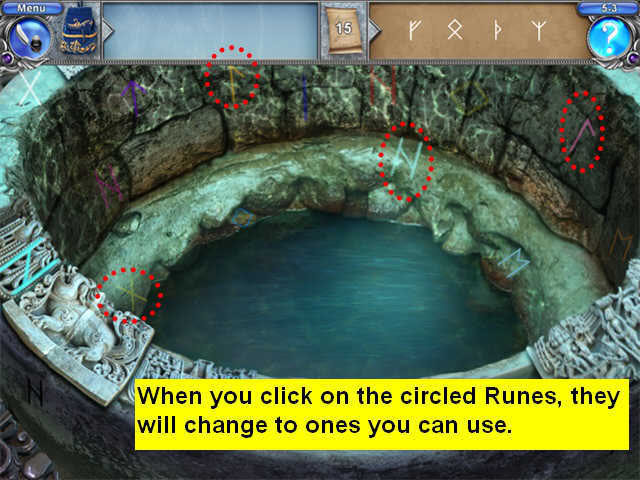
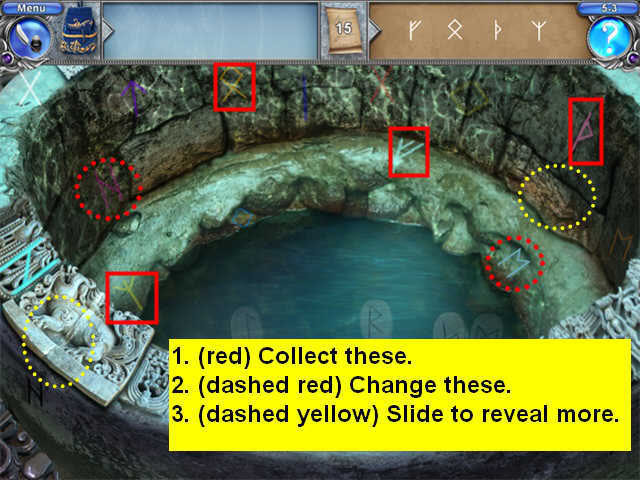
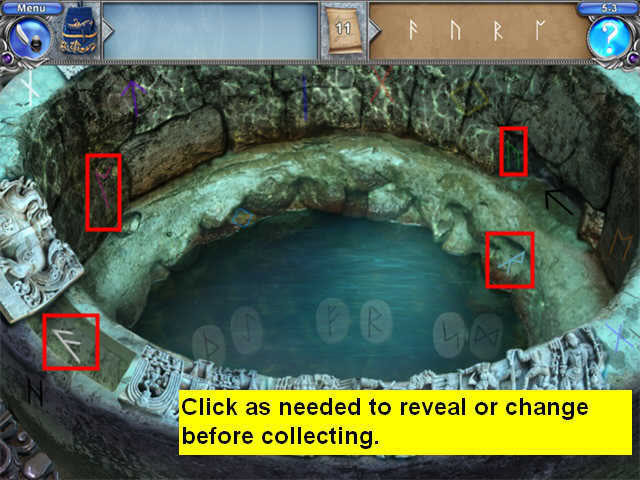
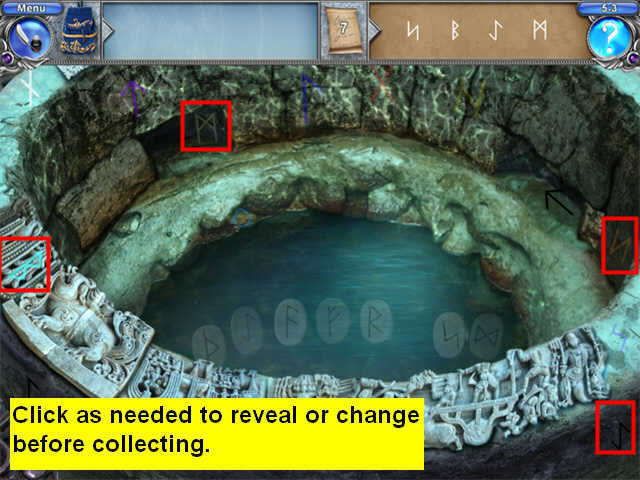
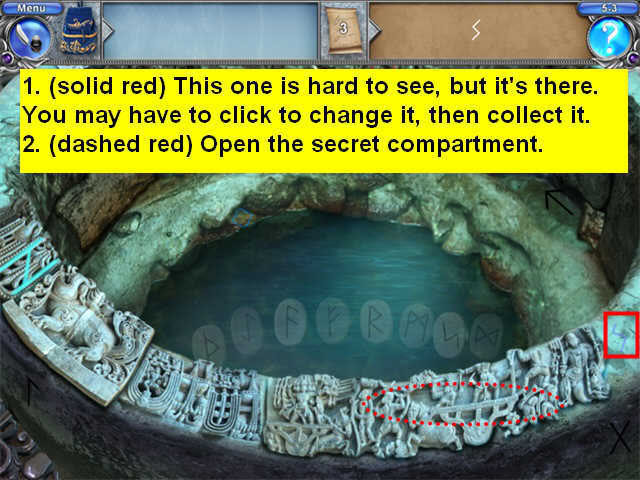
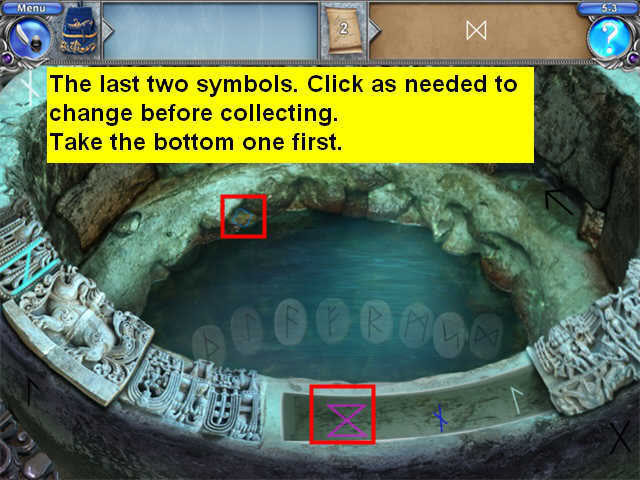
Task 5.3: Read the Runes
- This is a Hidden Object scene.
- You cannot collect a Rune until it appears in the Find List.
- Each Rune has two forms, so you have to click on the Runes to change them to see if the one you need is the other form.
- There are also several places where you can move stones or panels to reveal more Runes.
- Solution:
Task 5.4: Pairs Matching
- This is a pairs matching game. Just remove the pairs in pairs.
- Note that that are two similar "F" Runes, one point slightly up, one pointing slightly down.
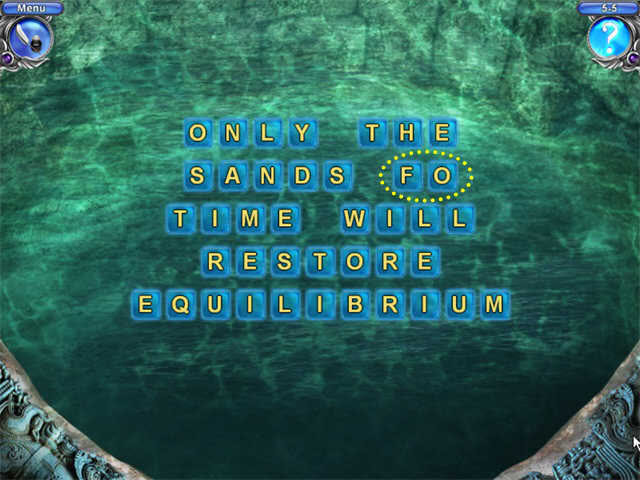
Task 5.5: Unscramble
- Unscramble each word to form the phrase:
- Only the Sands of Time Will Restore Equilibrium.
- The Master of Illusion tells you that there was a demon in the box, but someone freed it. ("One of us…")
- He also tells you Lord Nort is looking for you.
- Oh, and Lord Nort is a specialist on magic boxes.
Chapter Six: Lord Nort’s Study
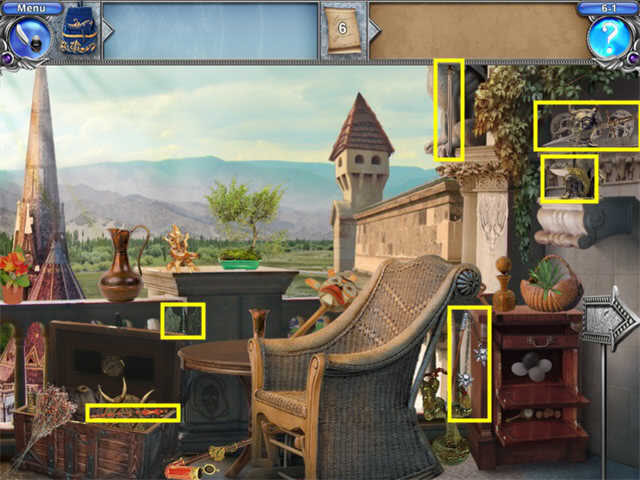
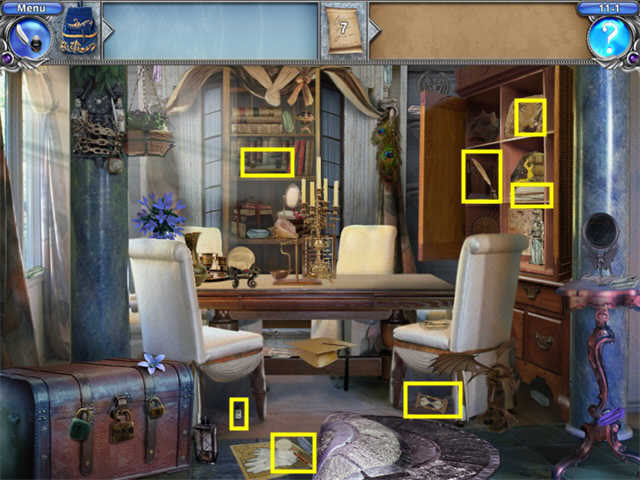
Task 6.1: Collect the weapons.
- This is a Hidden Object scene. Collect all the weapons you can see.
- Click on the 3 panels shown in the screenshot to reveal more weapons.
- When you have finished in this room, click on the large silver arrow to go to the Balcony.
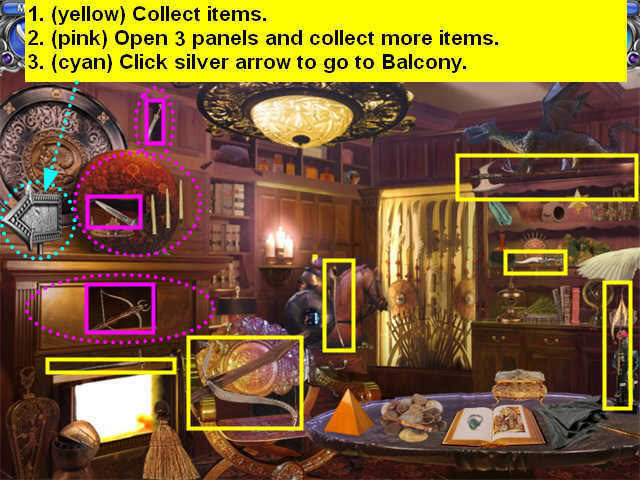
- Click on the chest to open it.
- Click on the leaves and the chair to move them.
- Collect the remaining 6 items as shown in the screenshot.
- Lord Nort will tell you you have been assigned to work with Councilor Gwend, the old man who claimed to have the demon box.
Chapter Seven: Councilor Gwend’s Study
Task 7.1 Find the Demon’s Journal
- Councilor Gwend says he had a demon’s journal, but you will have to find it.
- This is a Hidden Object scene. Collect the items listed on the Find List.
- You will not be able to collect an object until its silhouette appears.
- Collect as many objects as possible.
- Click on the arrow button above the fireplace. A Key will appear.
- Collect the Key and use it to open the two lower panels on the bookcase.
- Open the two glass doors of the bookcase.
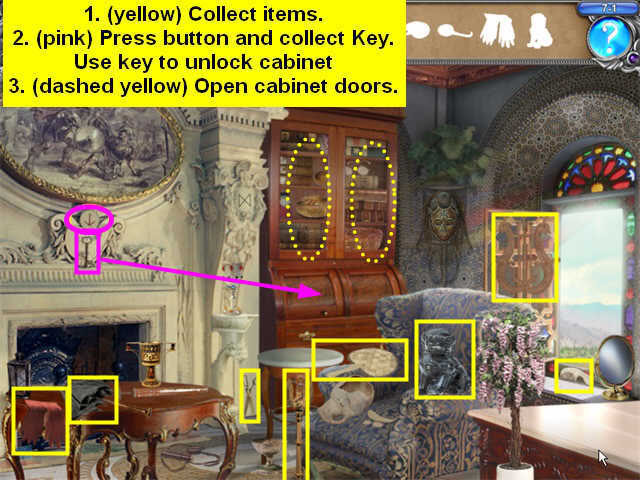
- Collect the next set of items.
- You will see a Runestone in the bookcase panel on the left. Collect it.
- Put the Runestone on the matching symbol on the pillar to the right of the fireplace.
- The painting above the fireplace will open.
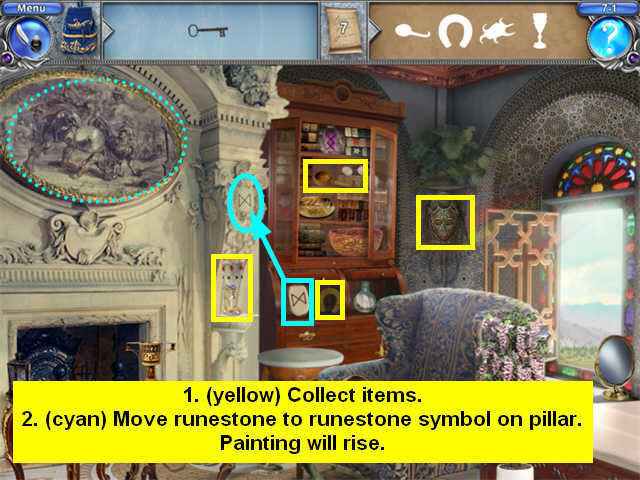
- Collect more items.
- The last item is hidden behind the horse statue.

Task 7.2: Use Mirrors to open the Journal
- We need two mirrors, but there is only one in the room. We’ll have to make a second one.
- Put the first Mirror on the table.
- Open the right panel in the bookcase.
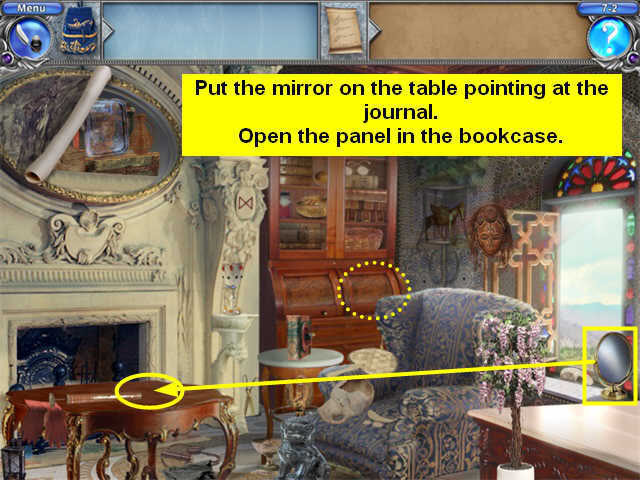
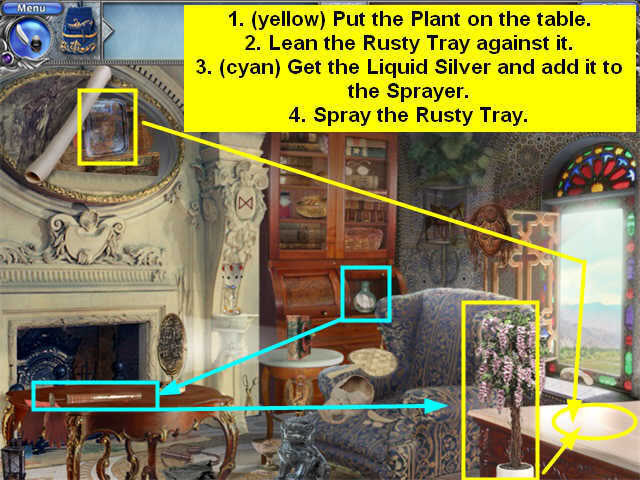
- You can try to put the Rusty Tray onto the other table, but it needs a support.
- Take the potted plant and put it on the right-hand table.
- Take the Rusty Tray from behind the painting and lean it against the potted plant.
- Take the liquid silver from the right bookcase panel and combine it with the sprayer that is on the left table.
- Now take the sprayer and spray the Rusty Tray with it. This makes a second mirror.
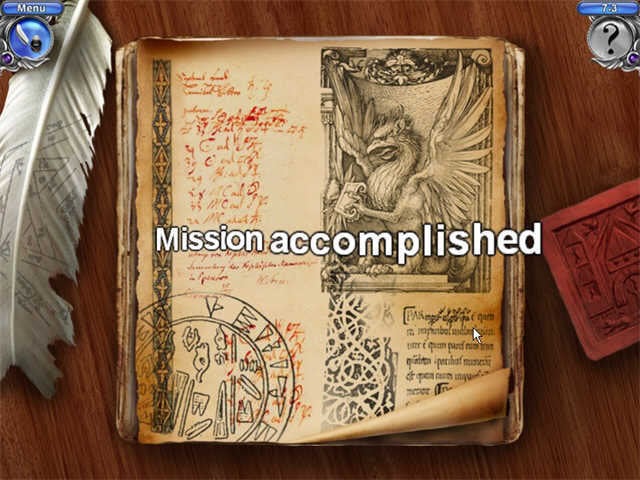
Task 7.3 Decipher the Journal Entries.
- You just have to turn each piece in place to make a complete picture.
- Note that some of the lines are written in red.
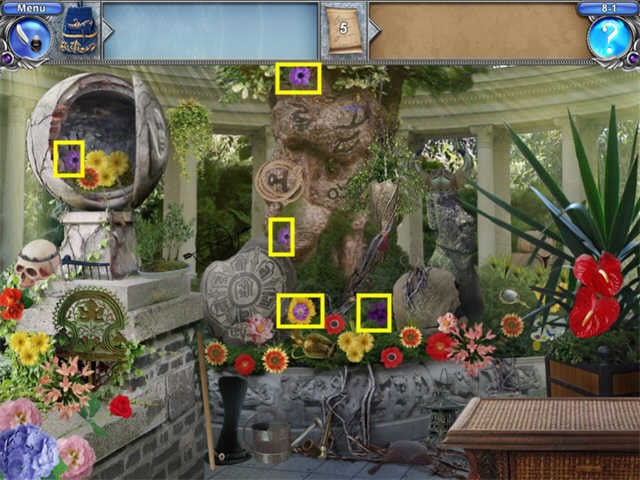
Task 8.1: Pick the Purple Flowers
- This is a Hidden Object Multiples scene. There is no Find List.
- The Counter at the top tells you how many items you have left to find.
- Collect the first 20 visible purple flowers.
- Click on the 3 moveable objects shown in the screenshot.
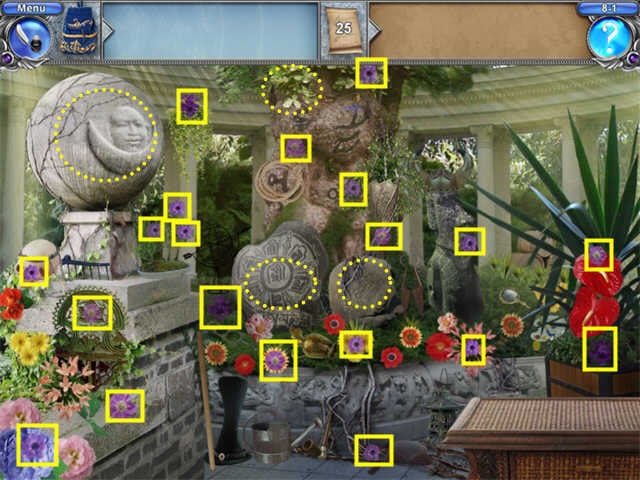
- Collect the remaining 5 flowers.
Task 8.2: Clean up the Garden
- This is a Hidden Object scene. Collect the items listed on the Find List.
- You will not be able to collect an object until its silhouette appears.
- Collect as many objects as possible.
- Move the 3 objects with dashed outlines in the screenshot.
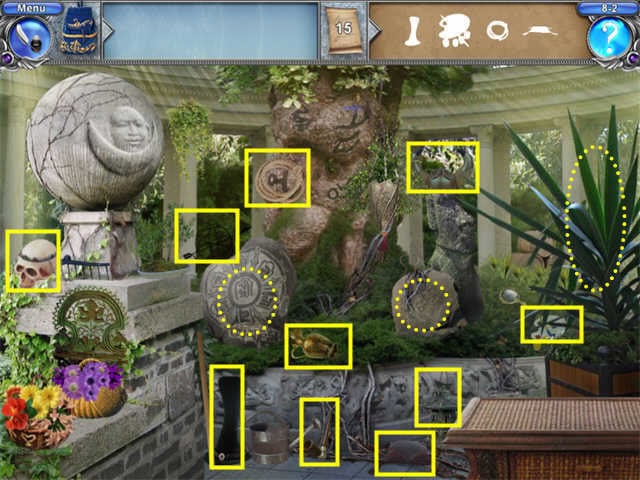
- Now collect the remaining items. Remember that you can’t pick up an item until its silhouette appears in the Find List.
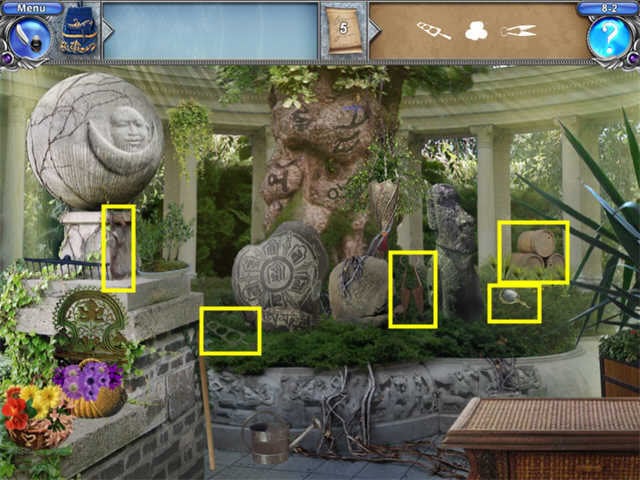
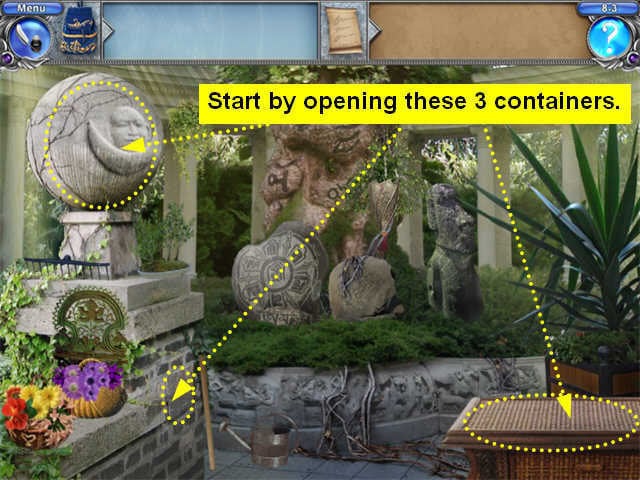
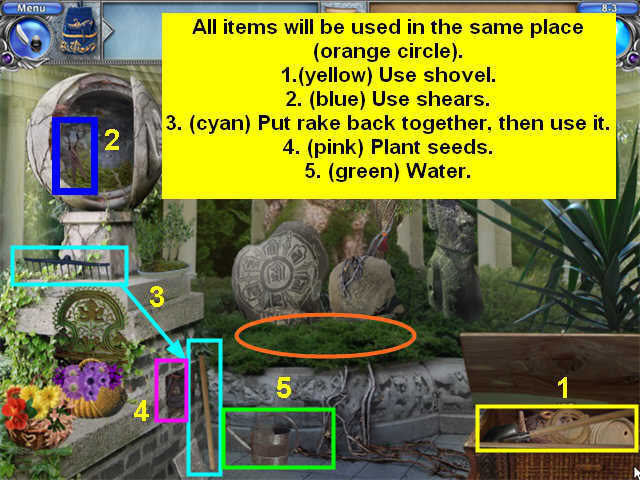
Task 8.3: Prepare the Garden
- All the tools will be used in the same place, the plant bed in the center.
- Start by opening the 3 moveable areas to reveal the tools.
- The tools must be used in this sequence.
1. Use the Shovel from the chest on the right.
2. Use the Shears from inside the moonstone statue on the left.
3. Put the rake back together, then use it.
4. Take the seeds and plant them.
5. Water with the watering can.
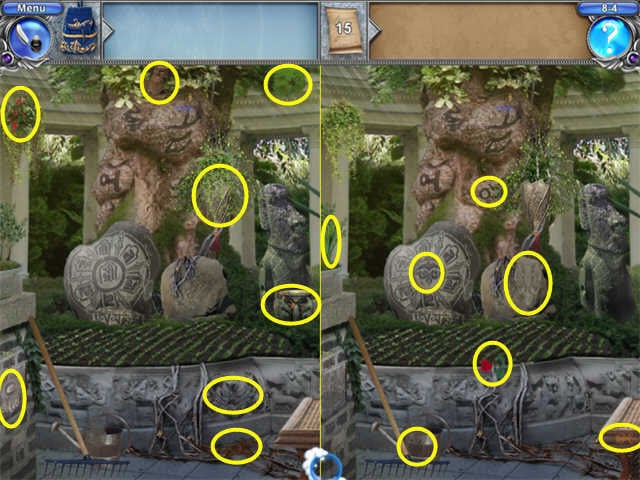
Task 8.4: Remove the Illusions
- This is a Find the Differences scene.
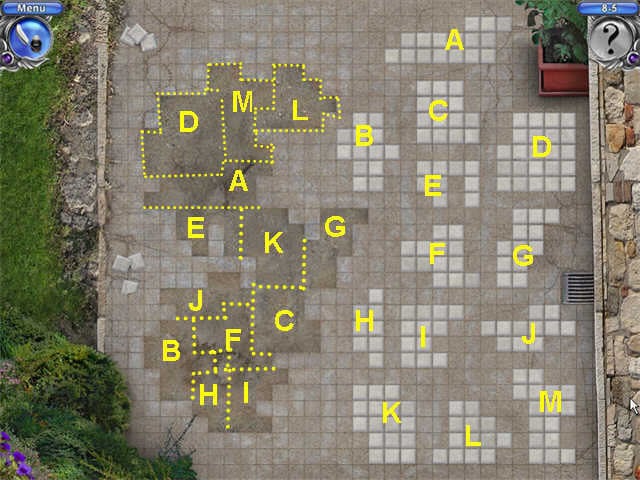
Task 8.5: Repair the Path
- Use the tiles on the right to fill in the missing spaces on the left as shown.
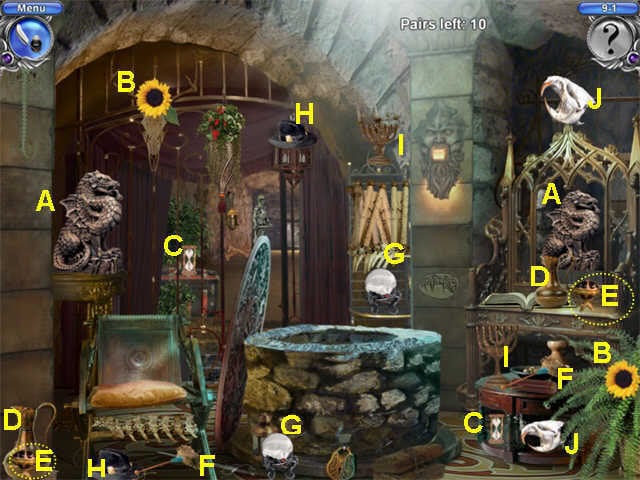
Task 9.1: Mirror Images
- Collect the items in pairs as shown.
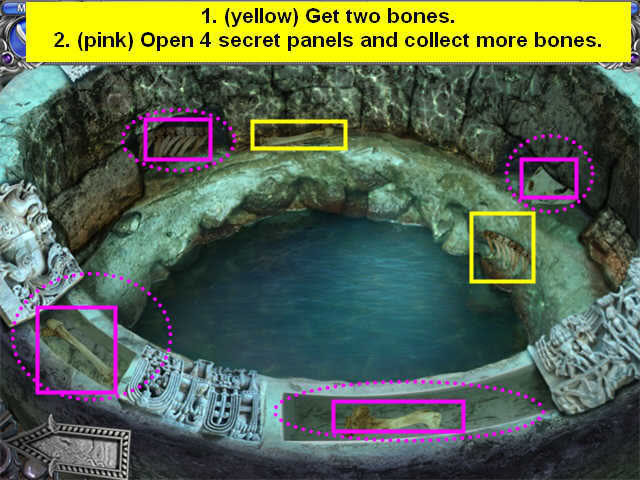
Task 9.2: Collect the Bones
This is a Hidden Object Multiples scene. There is no Find List. The counter at the top of the screen shows how many items you have left to find.
Collect all the bones you can find.
Move the panel and the curtain to reveal two more.
Click on the well to look in.
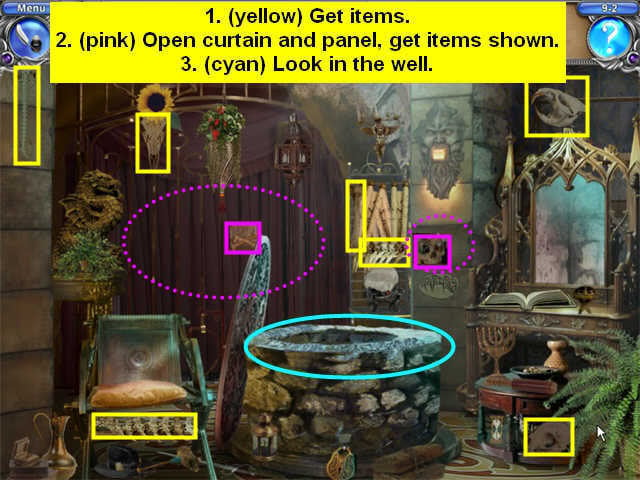
You will have to open the 4 secret panels to find the remaining items.
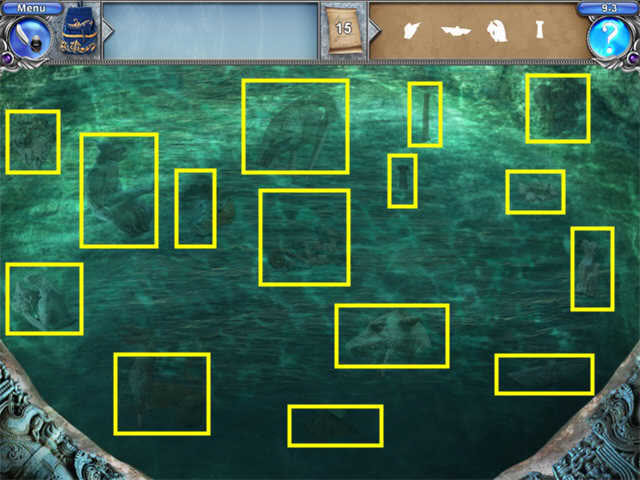
Task9.3: Hidden Images
- This is a Hidden Object scene. Collect the items listed on the Find List.
- You will not be able to collect an object until its silhouette appears.
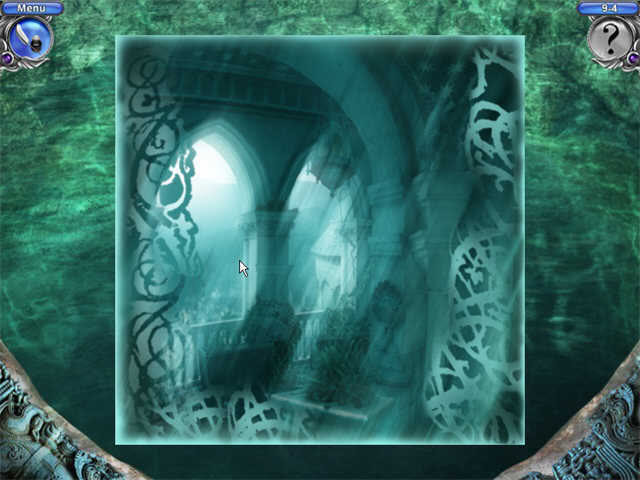
Task 9.4: Combine the Fragments
- Solution:
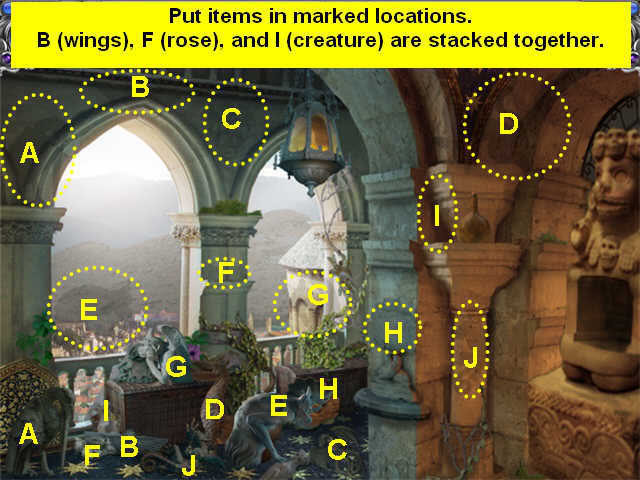
Task 10.1: Replace Items
- The items are scattered around the floor.
- If you look carefully at the walls, you can see shadow outlines of where the items go.
- Put the items back as marked in the screenshot.
- The second screenshot shows all the items back in place except the last one to help as a guide.
- Note: in the lower left corner, three items are stacked together, wings, a rose, and a small creature statuette. You should be able to tell which one you got when it’s on your cursor.
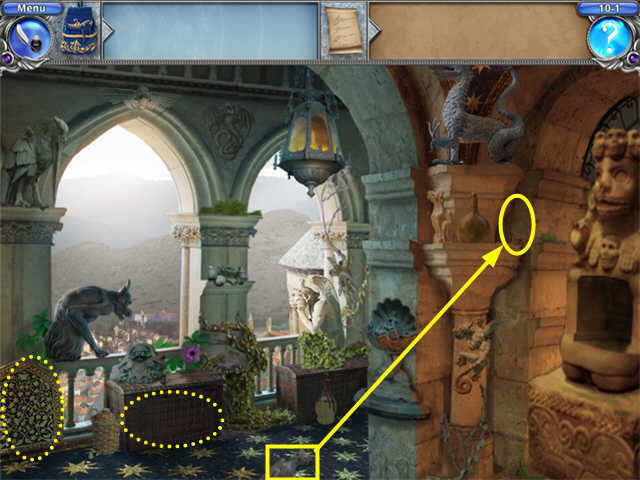
Task 10.2 Find the Secret Door
- When all the items are back in place, a red crystal drops down from the lamp.
- Click on the crystal, and the large statue slides to the right.

- Quickly click on the panel on the post next to the statue.
- The panel will open revealing a piece of ore. The statue will slide back.
- Click on the crystal again so the statue slides out of the way.
- Collect the ore.
- You can see a Secret Door behind the statue, but you can’t do anything about it yet—it’s locked.
- The statue slides back .
- Put the ore into the statue.

- The ore shatters, revealing a Key.
Task 10.3: Open the Secret Door.
- Although the task is called "open the Secret Door," you have to do other things here as well.
- Take the Key. It will go into your inventory tray at the top left.
- Click on the crystal. The statue slides right.
- Quickly take the Key from inventory and use it on the Secret Door.
- Now it will stay open.
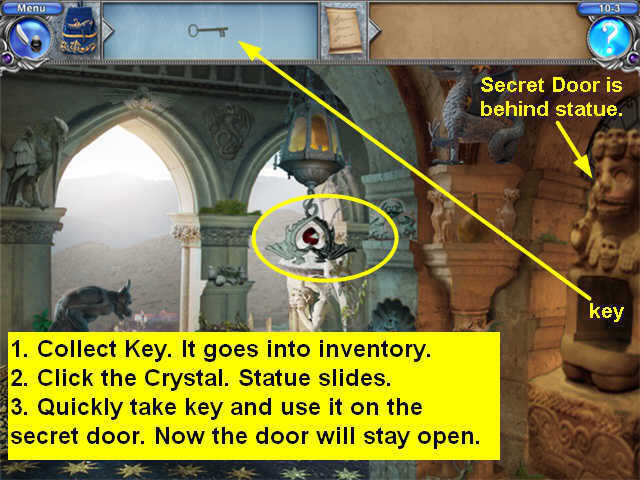
- Go through the Secret Passage into the next room.
- Click on the statue to find out about the fungus.
- Return to the corridor.
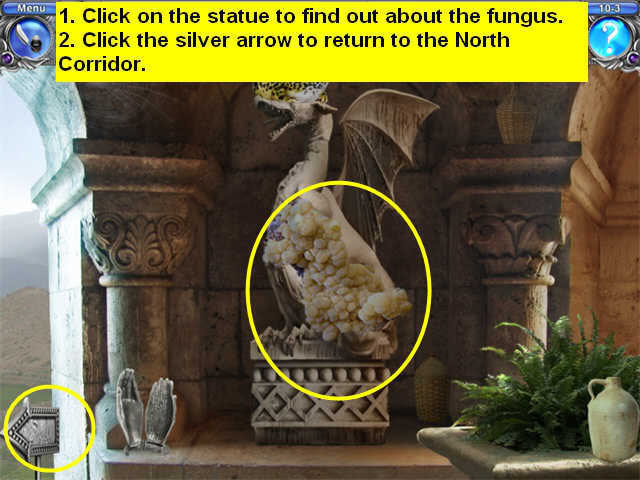
- Get the Knife from the lower left. If the panel is closed, just click once to open it.
- Go back to the Secret Room.
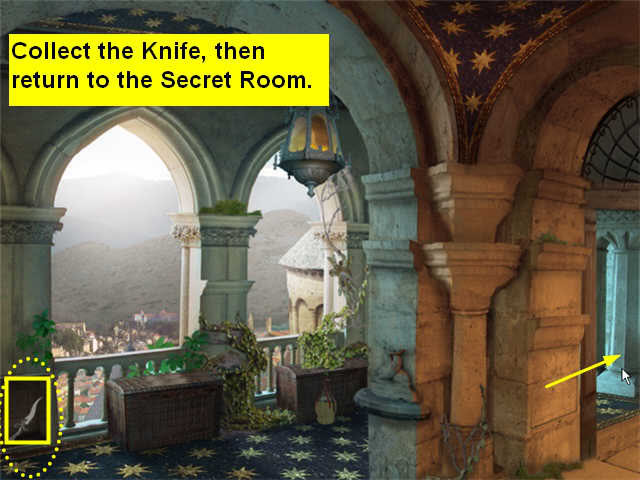
- Use the knife three times on the fungus.
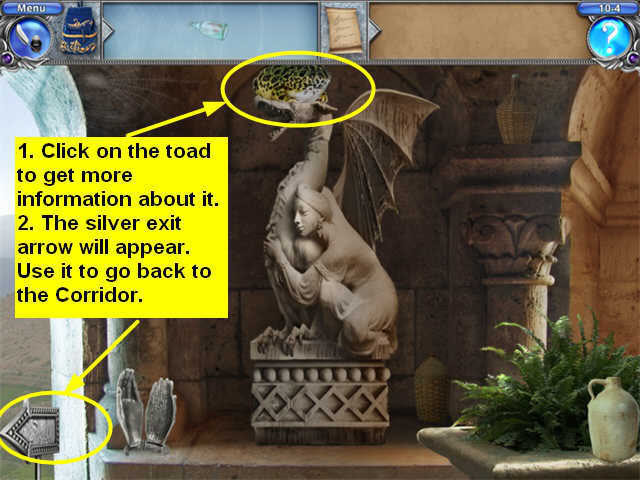
Task 10.4: Create an Illusion and Drive Away the Toad
- The Royal Toad is sitting on the statue’s head.
- It’s poisonous, so you can’t touch it. You have to lure it away.
- You have the Elixir or Illusions that Richard gave you.
- At this point even though you’re not supposed to touch the toad, the game will not let you leave this room until you click on the toad to find out more about it. So click on the toad.
- Now a silver exit arrow appears in the lower left. Go back to the corridor.
- Collect the Dried Plant, then return to the Secret Room.
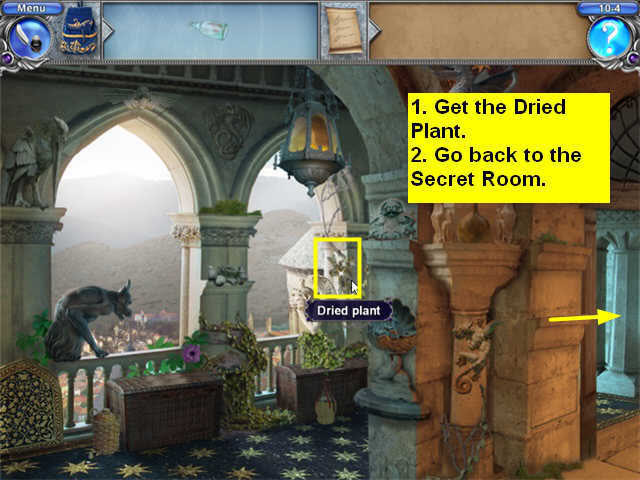
- Put the Dried Plant on the floor in front of the Statue.
- Put the Elixir of Illusion on the Dried Plant.
- The Plant will turn into a grasshopper and the Toad will chase it.
Task 10.5: Repair the Statue
- When the toad jumped off, the statue broke.
- You need water, a container to hold the water and "an element of life force."
- The game becomes very picky at this point. You have to do everything in the exact order and you can only carry one item at a time, so you have to make a lot of trips back and forth between the two rooms.
- Start by clicking on the Silver Hands. They will automatically move to the bench.
- From now, click on the Silver Hands after you complete each step and it will tell you what the next step is.
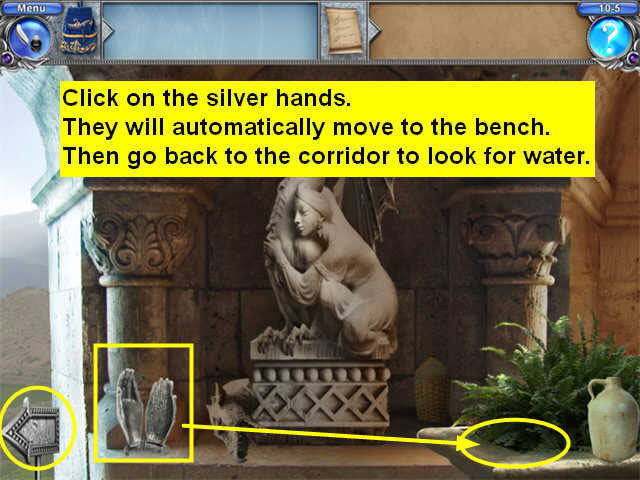
- Go out to the Corridor to look for water.
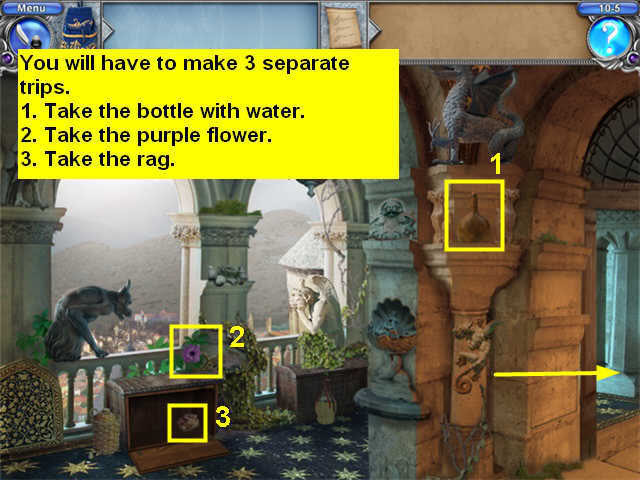
- Take the brown bottle from the post and go back to the secret room.
- Put the water into the hands.
- Click for information. You need something sticky.
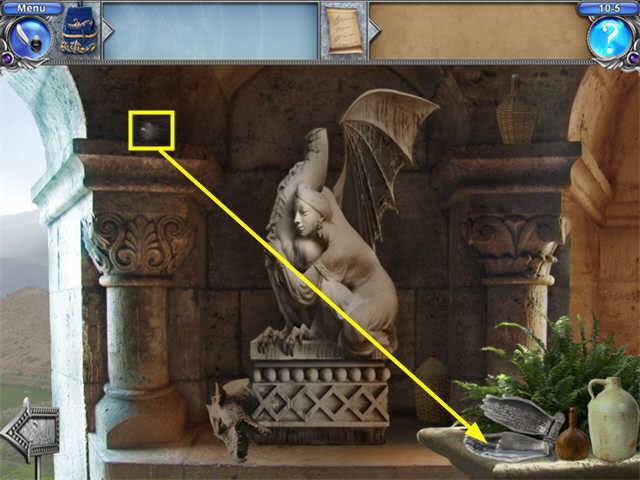
- Click on the Spiderweb in the upper left.
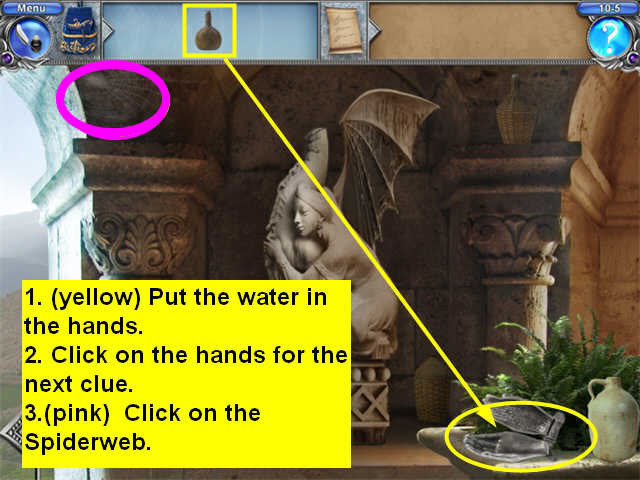
- It will crumple into a ball.
- Collect the spider web and put it in the water.
- Click on the hands for more information. You need life force.
- Go back out to the corridor.
- Collect the purple flower.
- Return to the Secret Room.
- Put the flower in the water.
- Click on the hands for information. You need something to spread the potion.
- Go back to the corridor.
- Get the rag.
- Return to the Secret Room.
- Put the rag in the potion.
- Put the potion on the broken statue.
- Put the head back in place.
- Click on the repaired statue once to move it.
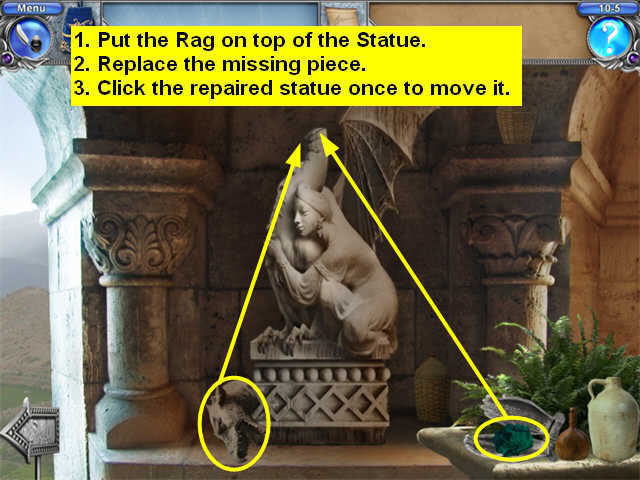
- A box is revealed.
- Click on the box to look at it.
Chapter 11: The Councilors’ Room
Task 11.1: Collect items for the Councilors
- As you click on logical objects, you will get a pop-up to tell you if it’s something the Councilors could use.
- You will have to click two more times, once to close the pop-up and once to collect the object.
- You will also need to check all the moveable areas.
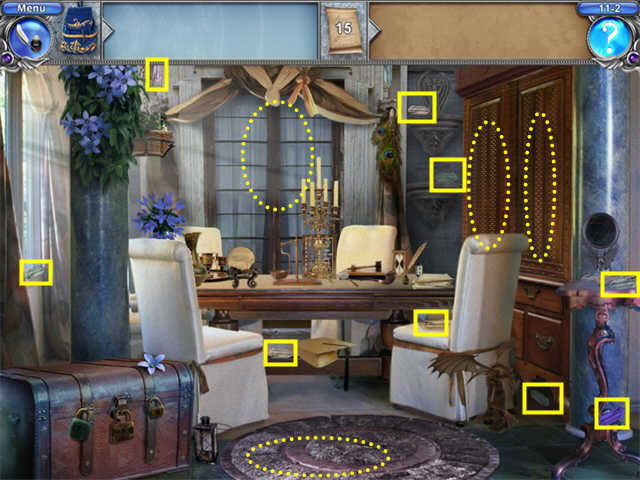
Task 11.2: Collect the Crystals
- This is a Hidden Object Multiples scene. There is no Find List.
- The Counter at the top of the screen tells you how many items you have left to find.
- Collect all the crystals.
- Search the moveable areas as well.
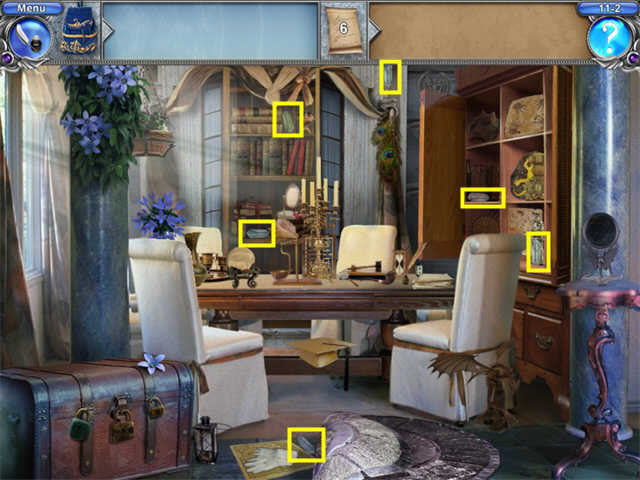
Task 11.3: Open the Chest
- Click all the moveable areas in the scene.
- When you move the peacock feather on the wall, you’ll see a Key. Collect it.
- Use that Key on the Cuckoo Clock lock.
- Click on the Cuckoo Clock. A key will appear.
- Use this first clock key on the rightmost lock on the trunk.
- Click the Cuckoo Clock again. A 2nd key will appear.
- Use the second clock key on the leftmost lock on the trunk.
- Click the Cuckoo Clock again. A third key will appear.
- Use the third clock key on the middle lock on the trunk.
- Click the trunk to open.
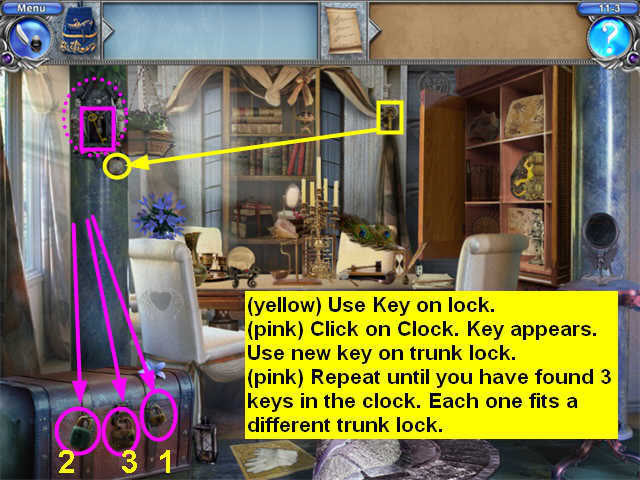
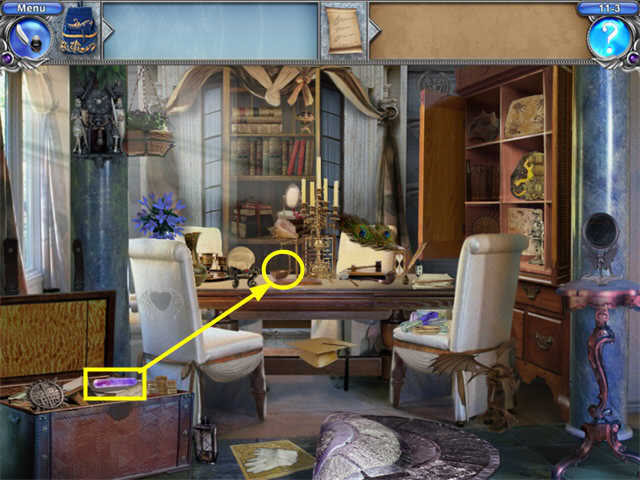
- Take the Purple Crystal.
- .Put it in the Scales on the table.
- Lord Nort will tell you about Counselor Rand. You can visit him if you can find the pass to the tower.
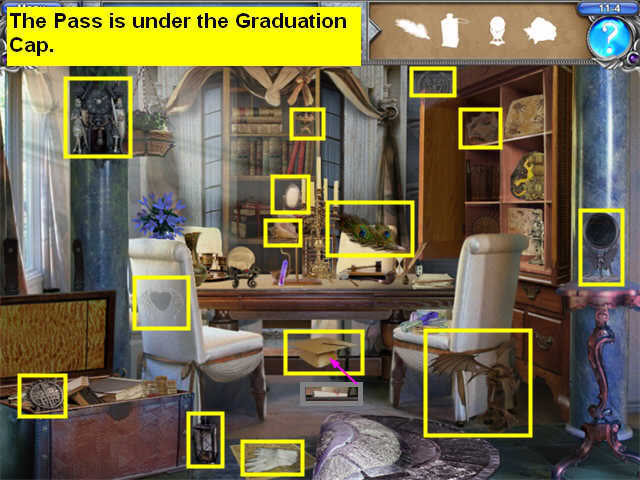
Task 11.4 Find the Pass
- This is a Hidden Object scene. Collect the items listed on the Find List.
- You will not be able to collect an object until its silhouette appears.
- Start by opening all the moveable areas.
- Now collect the remaining items. Remember that you can’t pick up an item until its silhouette appears in the Find List.
- The Pass is underneath the Graduation Cap.
Chapter Twelve: The Entrance to the Tower
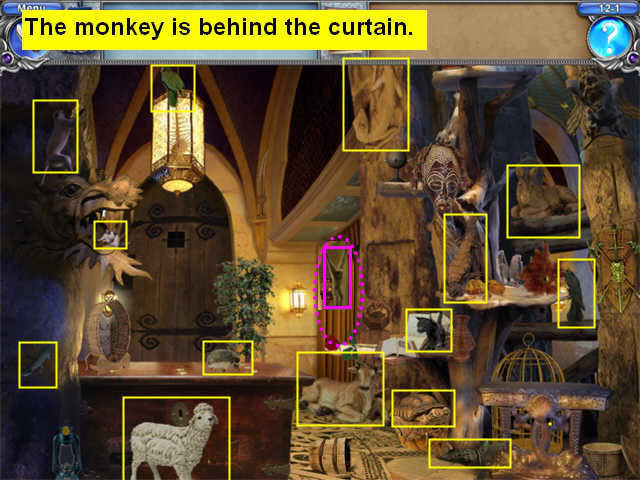
Task 12.1: Collect the animals.
- Collect the 14 you can see.
- Open the curtain to see the monkey.
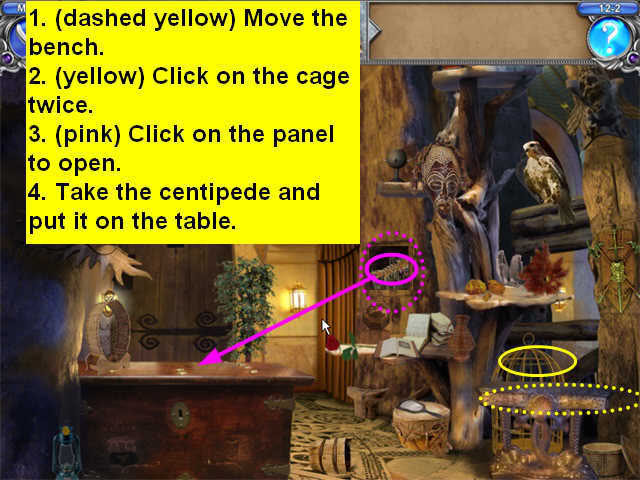
Task 12.2 Cage the Falcon
- Move the bench in the lower right so you can get to the cage.
- Click the cage twice and it will move along the floor a little.
- Click on the panel on the wall and it will open.
- Get the centipede from behind the panel.
- Put the centipede on the table. The Falcon will come eat it.
- Put the cage on the table.
- A 2nd centipede will now appear in the secret compartment.
- Get it and put it in the cage.

- The Falcon will go into the cage.
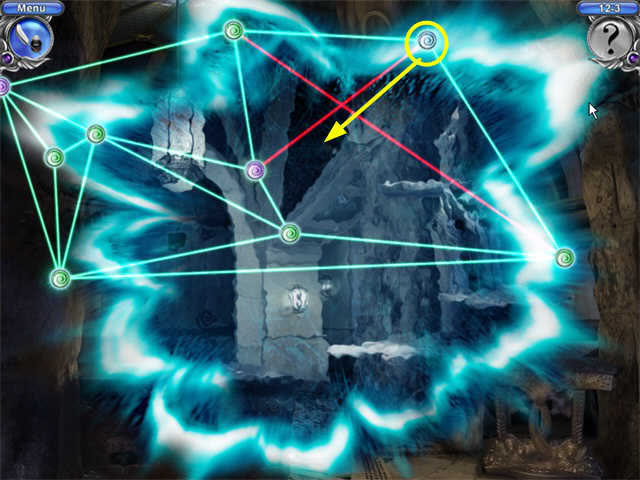
Task 12.3: Cast the Spell
- You have to untangle the threads so no two cross each other. There are several different solutions.
- Here’s one.
Task 12.4: Remove the Illusions
- This is a find the differences puzzle.
Task 12.5: Find the Hat of Invisibility
- This is a Hidden Object scene. Collect the items listed on the Find List.
- You will not be able to collect an object until its silhouette appears.
- Start by collecting all the items you can see.
- Open the curtain to get the next item.
- Take the Mask.
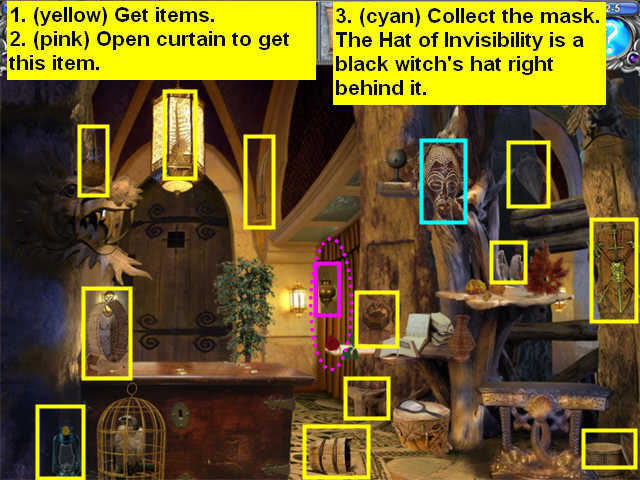
- The Hat of Invisibility is a black witch’s hat right behind the Mask.
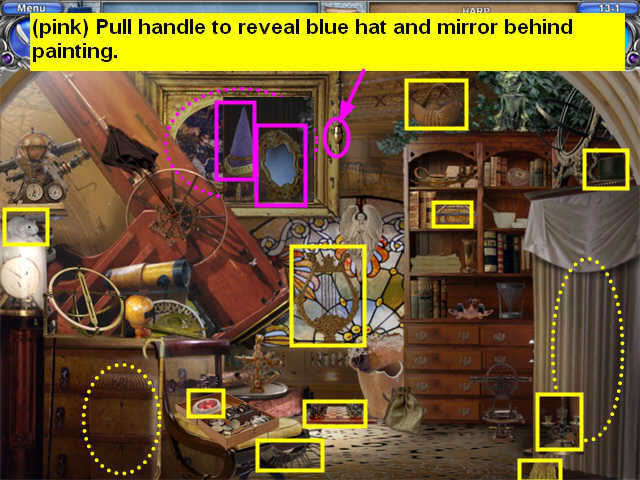
Task 13.1: Find the Magic Magnifying Glass
- This is a Hidden Object scene. Collect the items listed on the Find List.
- You will not be able to collect an object until its name appears.
- Start by collecting all the items you can see.
- Open the curtain to get the next item.
- Pull the handle by the painting.
- The painting will swing open. Take the blue hat and the mirror.
- The Magic Magnifying Glass is underneath the umbrella.
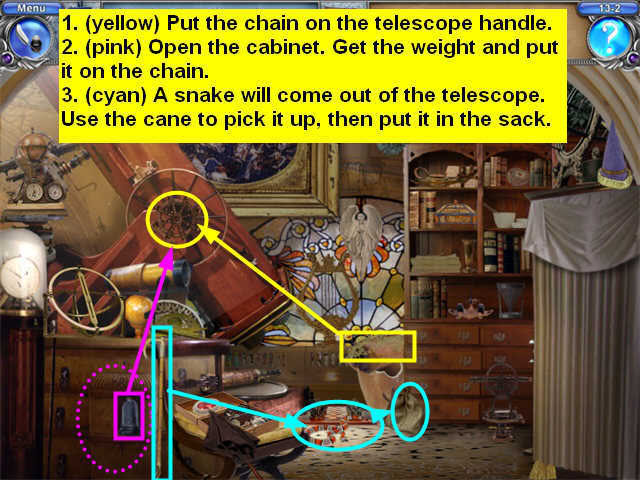
Task 13.2: Open the Telescope Mechanism
- Put the chain on the telescope handle.
- Open the cabinet and get the weight.
- Put the weight on the chain.
- A snake will come out of the telescope and go on the floor near where the chessboard was.
- Use the Cane by the cabinet to pick up the snake.
- Put the snake in the sack.
Task 13.3 Find the Measuring Instrument
- This is a Hidden Object scene. Collect the items listed on the Find List.
- You will not be able to collect an object until its silhouette appears.
- Start by collecting all the items you can see that are on the Find List.
- Most the curtain to reveal two more items.
- Open the cabinet to reveal another item.
- Pull the handle to open the painting and find another item.
- One more item will appear on the Find List. Collect it.

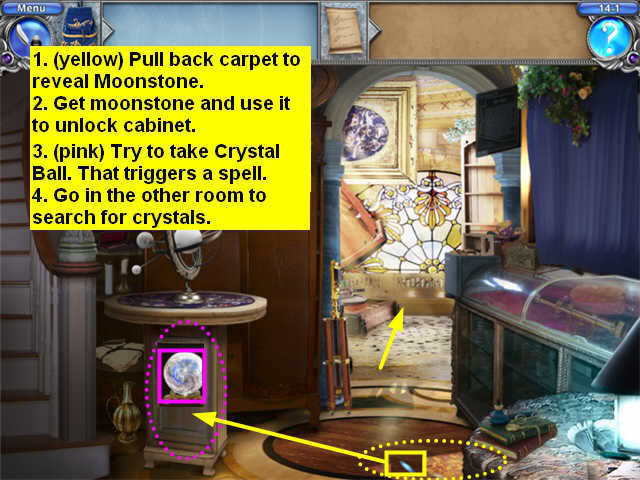
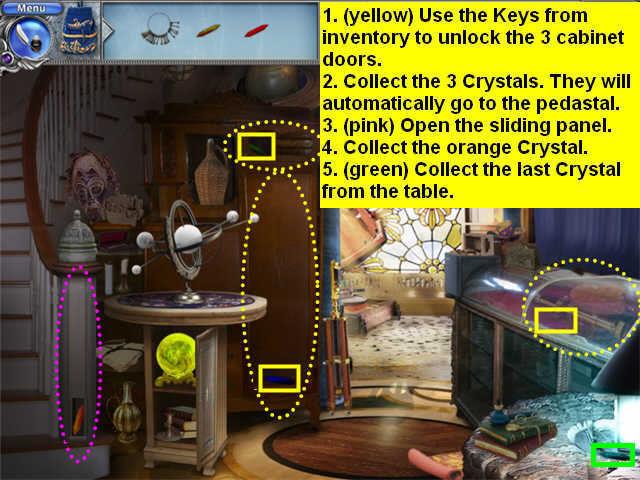
Task 14.1: Find the Crystal Ball
- Click on the rug to move it. This reveals the Moonstone.
- Take the Moonstone and use it on the cabinet. This will reveal the Crystal Ball.
- Click on the Crystal Ball. Uh oh-that triggered a protective spell.
- Now you have to find 7 different colored crystals.
- Go in the other room.
- Take the key ring.
- Use the keys to unlock the cabinet drawers.
- The bottom drawer has two crystals in it.
- Click the keys on the inventory tray to put them there.
- Pick up each crystal and click it on the inventory tray. They don’t go in automatically.
- Go back to the other room.
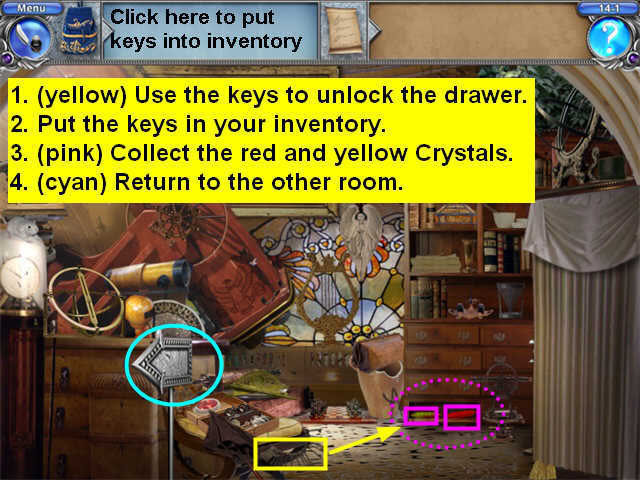
- Use the Keys on the 3 cabinet panels as shown.
- There is another sliding panel that doesn’t need a key.
- Collect 5 more crystals. These will automatically go on top of the pedestal.
- Now take one crystal at a time and put it on the Crystal Ball. You can do this in any order.
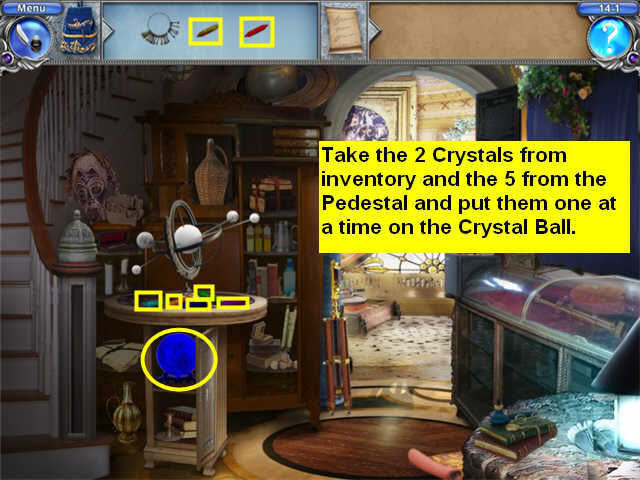
- The door to the other room will glow, but don’t go in yet.
- Instead, click on the Crystal Ball one more time, and it will automatically go up on the pedestal.
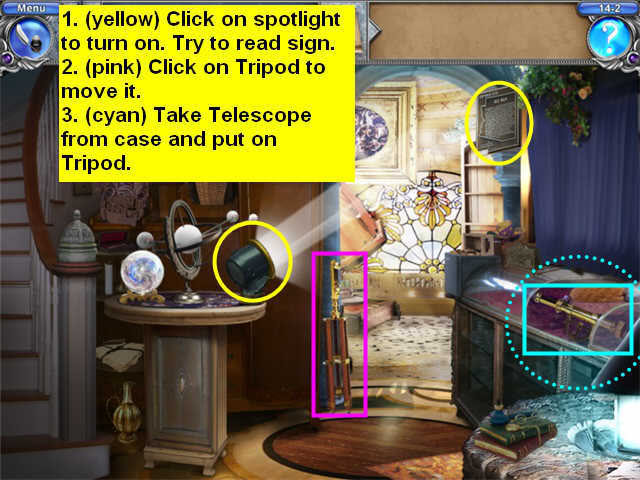
Task 14.2: Read what is on the Board
- Move the Mask. The light switch is behind it-turn it on.
- Click on the Saturn model to open it.
- Get the Spotlight from the Saturn model. It will automatically go onto the pedestal.

- Click on the spotlight to turn it on.
- Try to read the sign-it’s too small.
- Take the Tripod. It will automatically go into the center of the room.
- Click on the glass case to open it if it’s not already opened.
- Take the Telescope and put it on the Tripod.
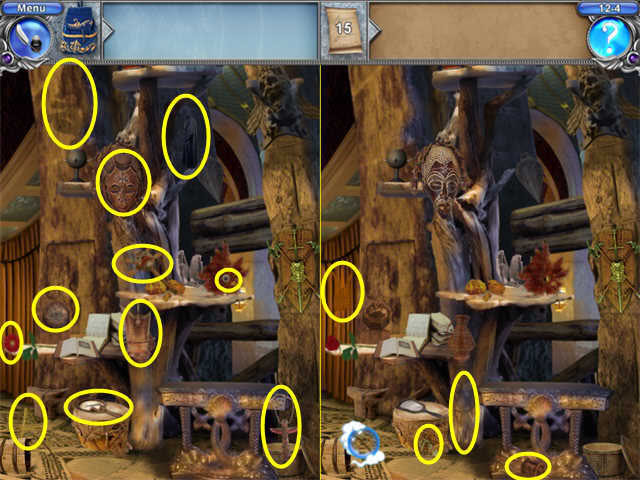
Task 14.3 Restore everything
- 10 objects have been moved out of place. You will have to find them.
- There are 5 in the first room and 5 in the second. See screenshots.
Chapter 15: The Ancient Library
Task 15.1: Find the Scrolls
- This is a Hidden Object Multiples task. There is no Find List.
- The Counter at the top of the screen tells you how many items you have left to find.
- First collect all the scrolls you can see.
- Open the two cabinets to reveal more.
- There is another behind the plant on top of the left cabinet.
- Move the rocking chair in front of the right cabinet to find the last one.
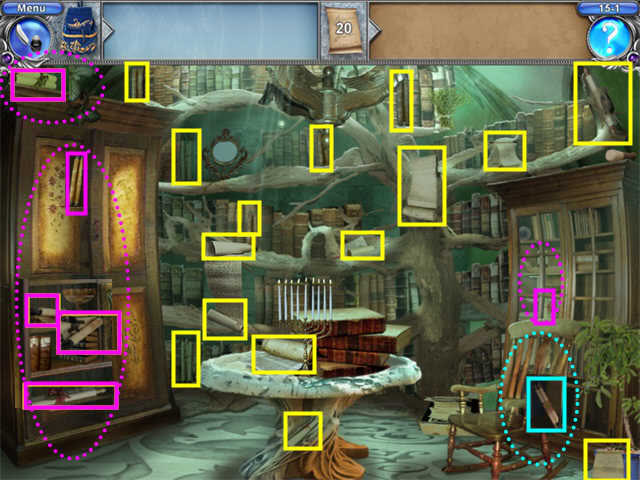
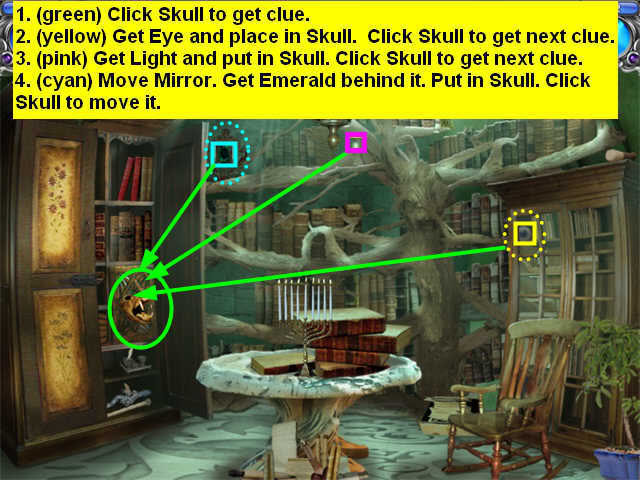
Task 15.2: Find the Secret Hiding Place
- There is a strange looking skull in the cabinet on the left. The secret compartment is behind it.
- To get to the secret compartment, you have to restore the skull with 3 items: the eye from the right cabinet, a glowing dot, and a gem behind the mirror.
- Once you put all 3 of those on the skull, it will move and you can get to the compartment and take the parchment.
- The screenshot starts with the left cabinet open.
- You must click on the Skull first, or you won’t be able to pick up the Eye.
- Then click on the Skull after you place each object to get the clue about the next one.
- So the click sequence is going to be Skull-Right Cabinet-Eye-Skull-Skull-Light-Skull-Skull-Mirror-Emerald-Skull-Skull-Compartment Door-Scroll.
Task 15.3: Read the Scroll
- To make the writing visible, you need crushed rubies.
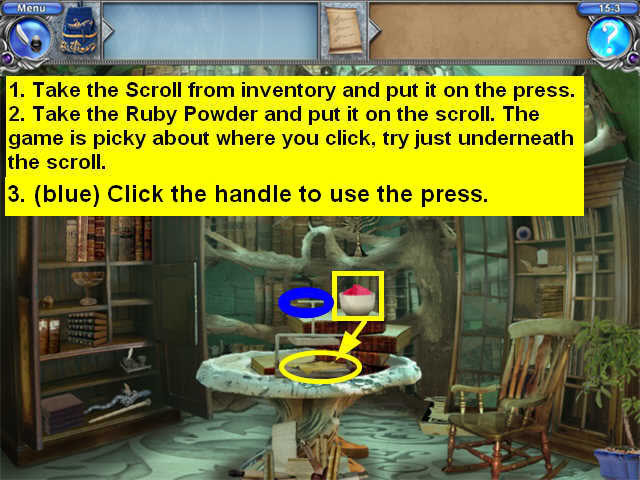
- Start by finding a mortar, ruby, pestle, and a press.
- The ruby is inside the secret compartment where the scroll was.
- Get the mortar first.
- Put the ruby inside it.
- Get the pestle, and it will make ruby powder.
- Get the press and it will go on the table.
- Move the Candlestick on the table out of the way.

- Place the Scroll from inventory on the press.
- Place the ruby dust on the scroll. The game is picky about where you click. Try just underneath the scroll.
- Click on the press handle to use it.
Task 16.1: Free the Guard.
- Open the drawer to the right of the door. There is a Key there.
- Use the Key on the small box just above the drawer.
- There are two blue crystals in the box. Take them.
- Put the blue crystals in the mouths of the middle dragon statues in the center to charge them.
- The crystals will disappear and reappear as charged crystals in the outer dragon’s mouths.
- Put the charged crystals one on each side of the door.
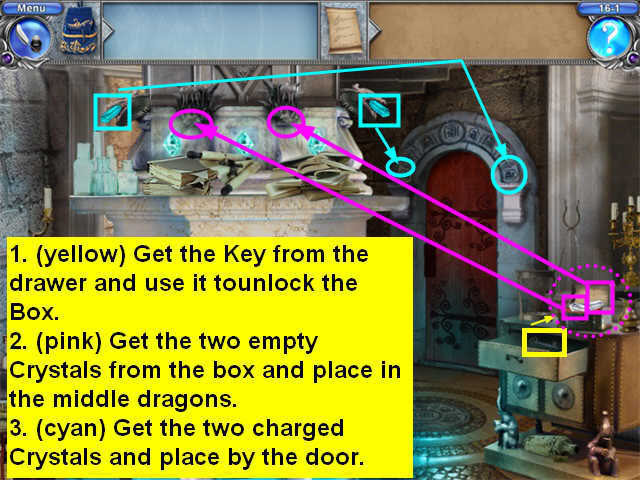
- The door will open and the guard will come out and give you Rand’s note.
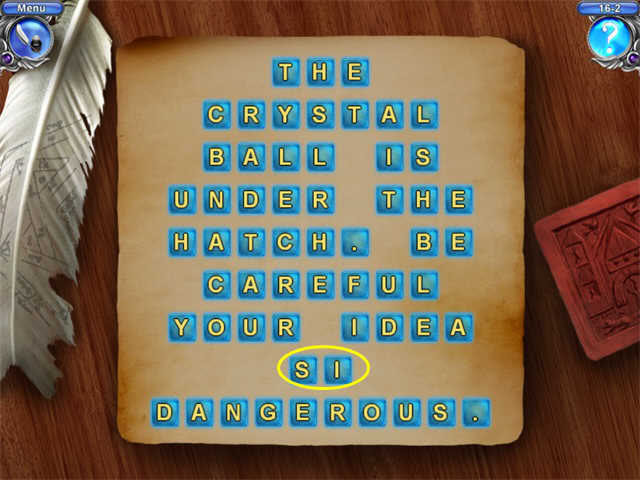
Task 16.2: Unscramble the Note
- Solution: The Crystal Ball is under the hatch. Be careful, your idea is dangerous."
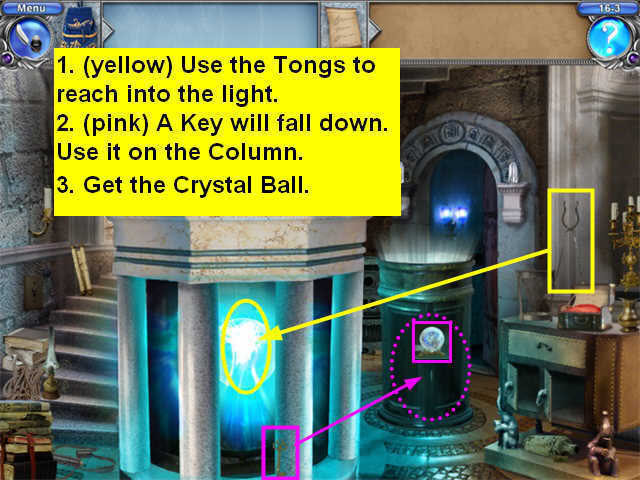
Task 16.3: Get the Crystal Ball
- First move the rope on the left side of the stairs to reveal the power switch.
- Turn the Power Switch on. A column will rise out of the floor.
- The column is locked!
- Look in the cabinet under the drawer where the key for the last task was. You will find two Energy Orbs.
- Put the Orbs into the outer dragon’s mouths.
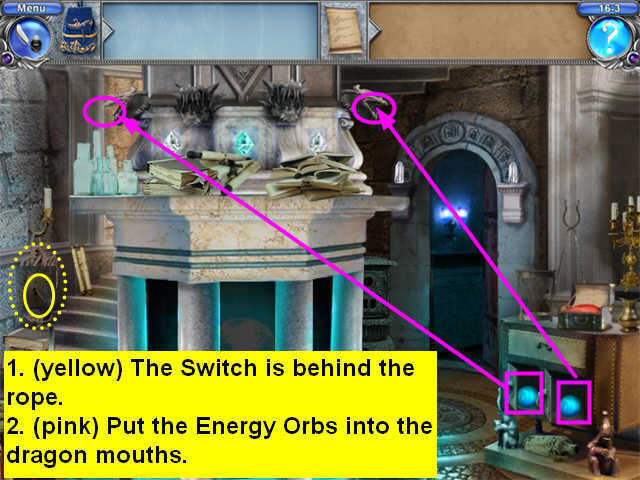
- The apparatus will glow.
- Take the Tongs from the wall and reach into the glowing center.
- A Key will fall out.
- Take the Key and use it to unlock the column.
- Take the Crystal Ball.
Chapter 17: The Alchemy Laboratory
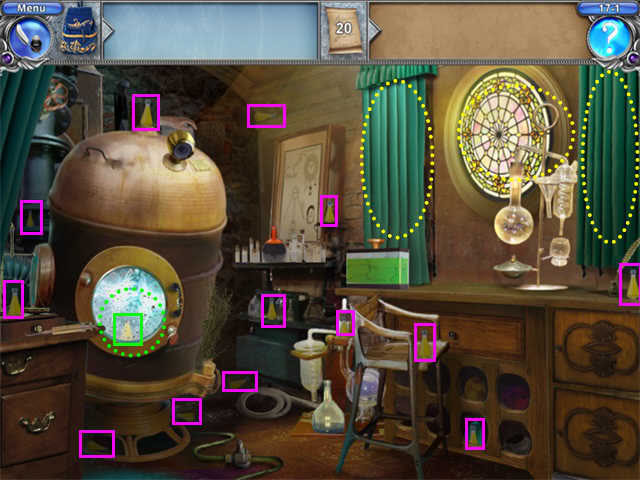
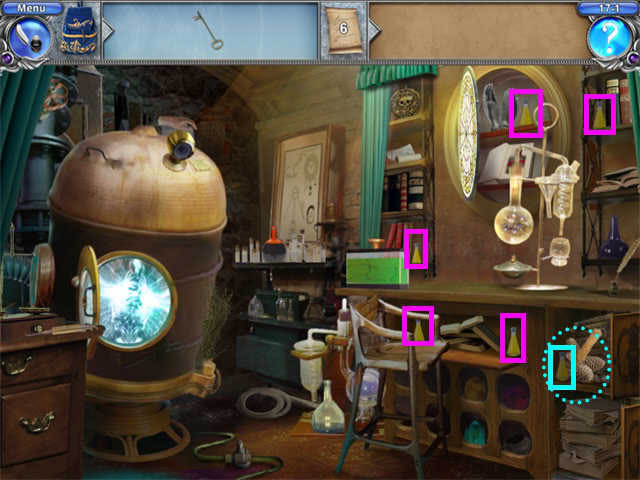
Task 17.1: Collect the Yellow Vials
- This is a Hidden Object Multiples scene. There is no Find List.
- The counter at the top of the scene will show you how many objects you have left to find.
- Collect any yellow vials.
- You will have to open cupboards and move some objects to find them all.
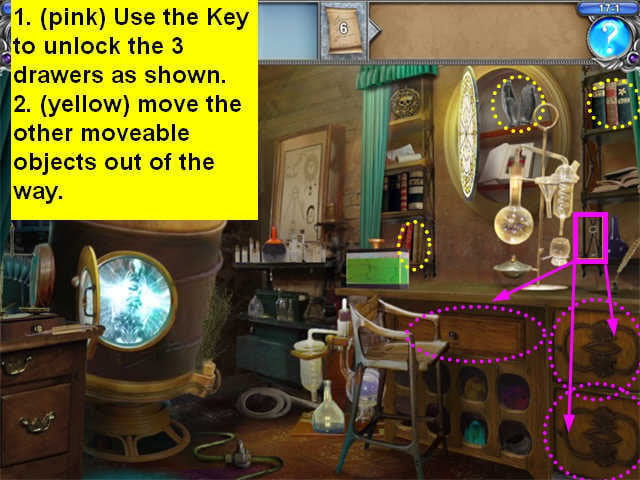
Task 17.2: Put fluid from the Boiler into the Tank
- Open the door to the Boiler.
- Put the Hose in the Boiler.
- Pick up the large Flask and put it on the table.
- Put the Syringe in the Flask.
- Pick up the Full Flask and put it in the tank.

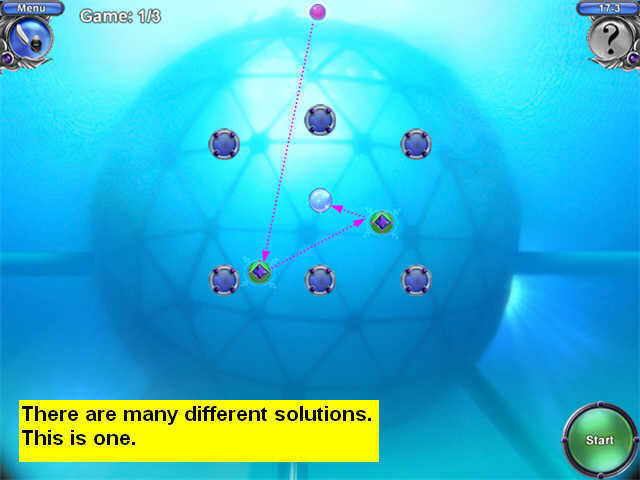
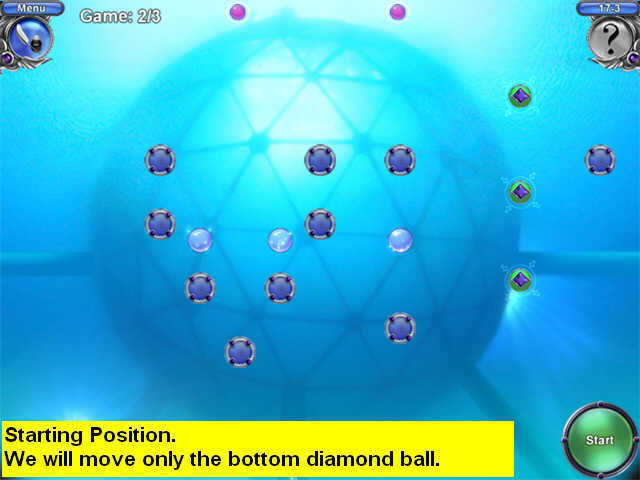
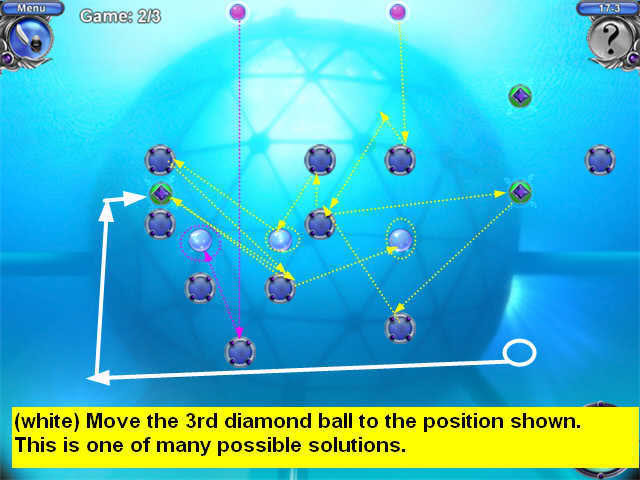
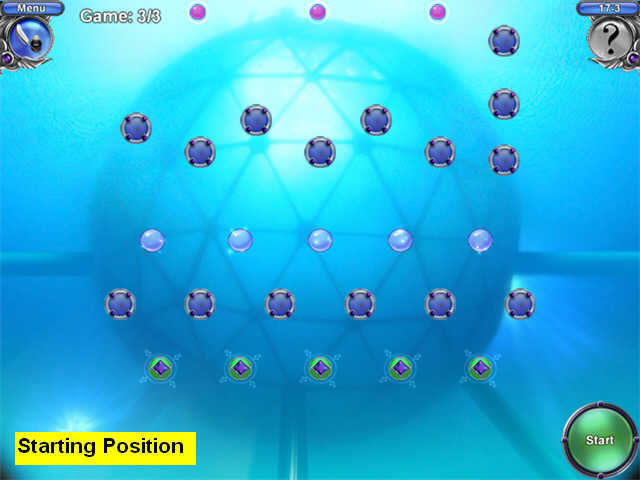
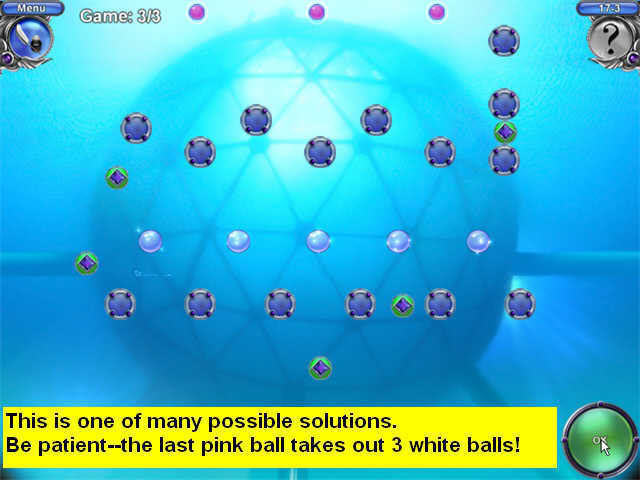
Task 17.3: Pop the Bubbles
To win a round, you must pop all of the white bubbles.
You must win 3 rounds to complete the task.
The pink bubbles will bounce around, and they will pop a white bubble if they touch it.
The only thing you control is the diamond bubbles. You can drag these anywhere you want.
Your goal is position the diamond bubbles so the pink bubbles will bounce off them in a way that will pop the white bubbles.
You get to keep retrying until you get it right.
There are many different solutions. Here are the 3 I used.
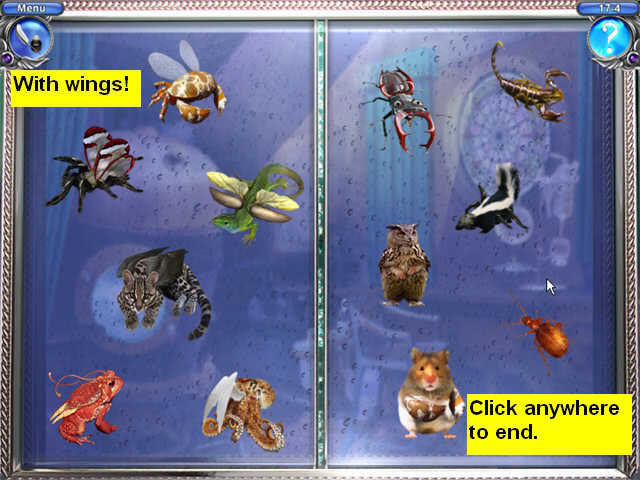
Task 17.4: Separate the Creatures
- You need to separate the creatures into two groups: one with wings, one without.3
- Look carefully at the pictures-it’s not based on what they are in real life, but in how they came out after the Professor’s experiment.
- To swap any two creatures, just click on them.
- When they are all on the correct side, they will begin shaking.
- Click anywhere to continue.
Chapter 18: The Entrance to the Laboratory Cellar
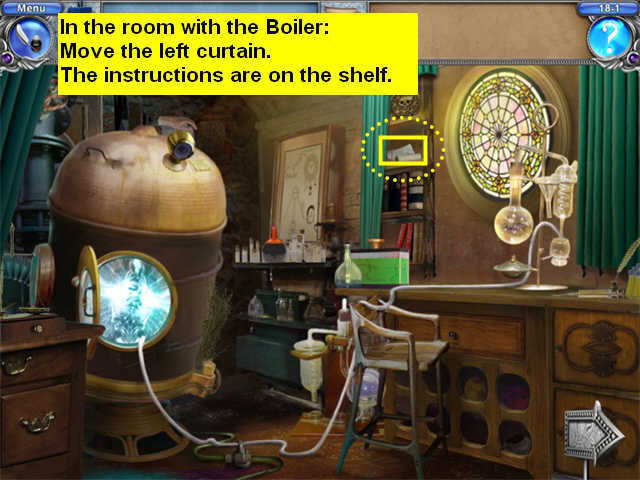
Task 18.1 Find the Instructions
- They’re on a scroll behind the curtain in the room with the Boiler.
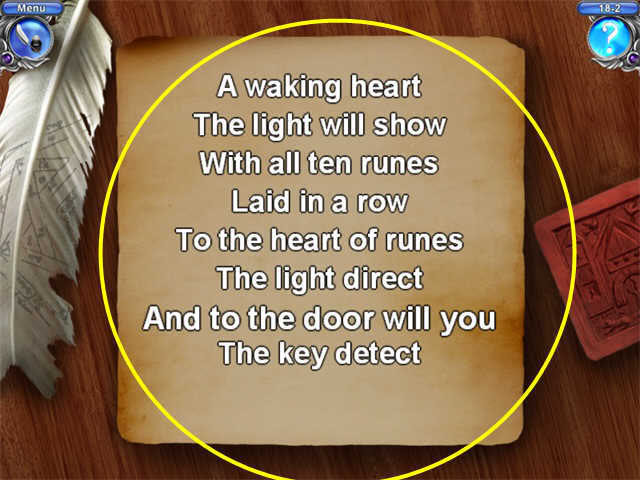
Task 18.2 Read the Scroll
- You have to put the lines in the correct order.
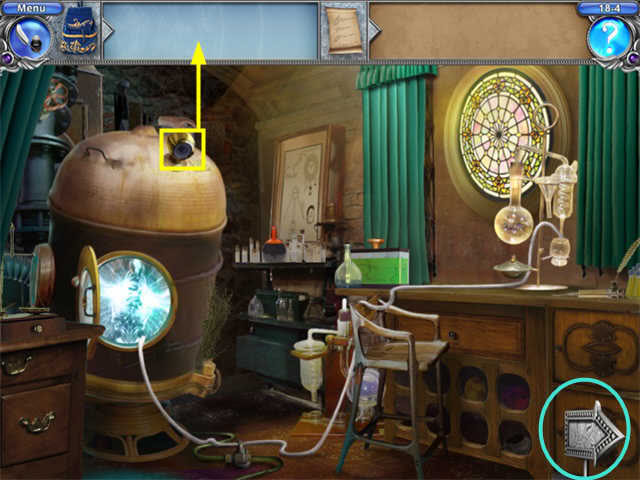
Task 18.3 Find the Runes
- There are 5 Runes in each room.
- First take the Lever from Inventory and put it on the light switch.
- Turn on the light. Now you can see the Runes.
- Click on the Rune Slots on the large cylinder in the center. If you don’t do this, you won’t be able to put any Runes in place there.
- Now collect the 5 Runes in this room.
- Put them into their matching slots.

- Go into the other room.
- For some reason the Inventory Tray will only hold 4 Runes from this room at a time.
- Collect any 4 Runes
- Go back to the other room to place them.
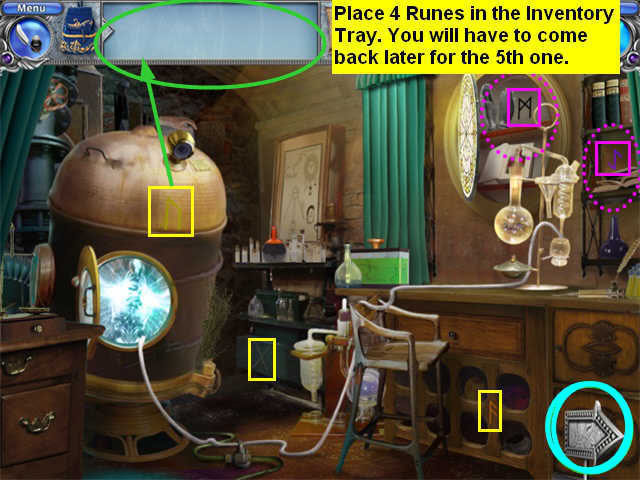
- Place them in the Rune Slots.
- Go back to the room with the Boiler to get the last Rune.
- Place it in its slot. This will reveal the Heart of Runes.
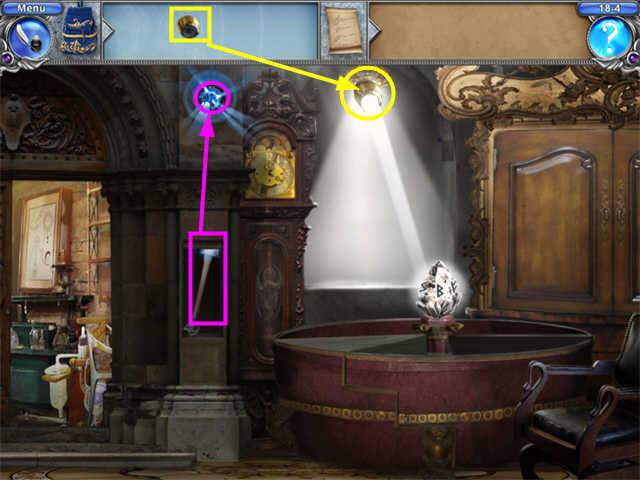
Task 18.4 Aim a shaft of light at the Heart of Runes
- Go into the room with the Boiler and look around.
- There is a Light Amplifier on top of the Boiler. Get it.
- Go back to the room with the Runes.
- Put the Light Amplifier on the beam of light.
- Two things will appear: a Hammer and a blue gem.
- Use the hammer on the blue gem.
Chapter 19: The Laboratory Cellar
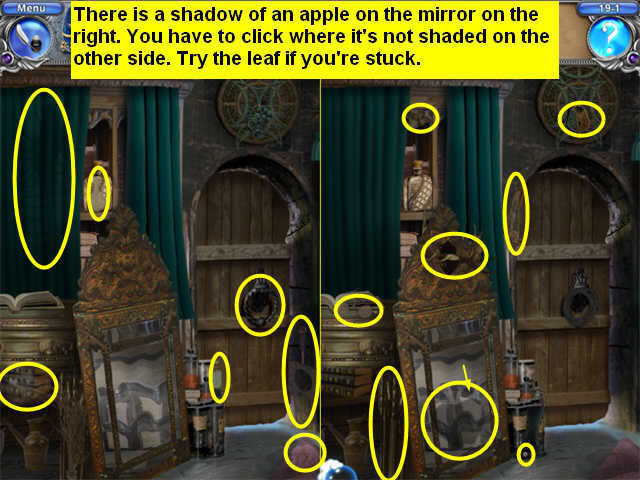
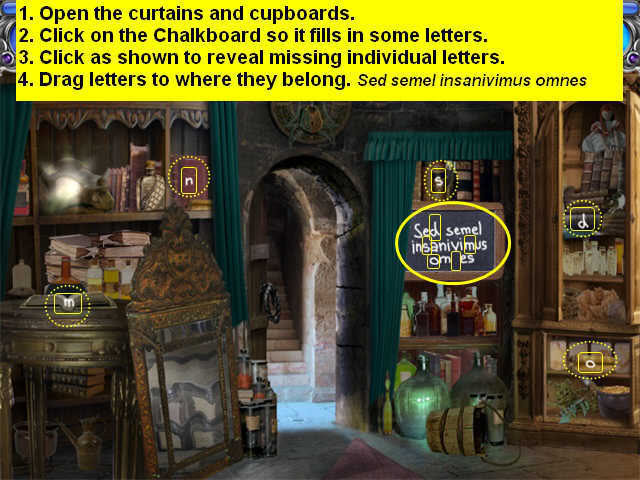
Task 19.1 Get Rid of the Illusions
- This is a Find the Differences scene.
- Click on every place that is different.
- One of the differences is a faint black pattern on the curtain.
- Another difference is the shadow of a large apple on the right mirror. Make sure you click on an area that is not shaded on the other mirror-the leaf is good.
Task 19.2: Find the Potion
- Open the curtains.
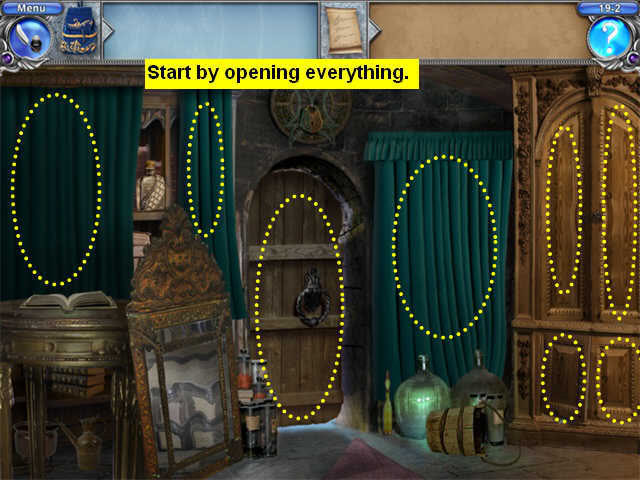
- You will see a blackboard behind one curtain.
- Click on the blackboard twice and some letters will appear on it.
- It’s a Latin phrase, but some of the letters are missing.
- Click around the room anywhere there are books or scrolls. 5 letters will appear.
- See the screenshot for the exact locations.
- Drag the individual letters to their spot in the saying.
- Sed semel insanivimus omnes
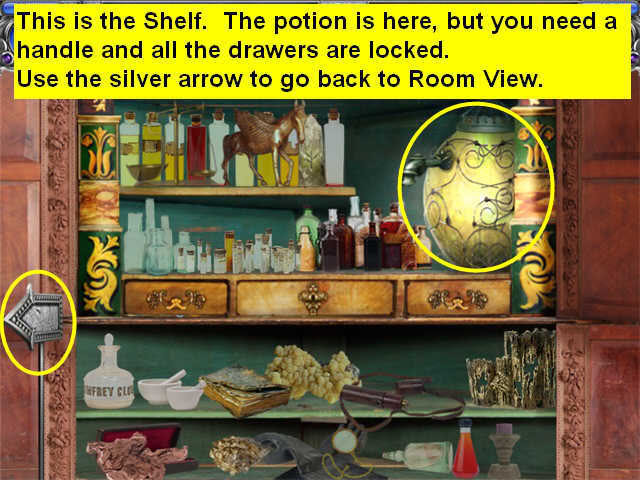
Task 19.3: Use the Potion on the Crystal Ball
- You start out looking at a zoom view of the shelf behind the chalkboard.
- You can see the potion in the container on the right, but there is no handle to turn it.
- Try the drawers-they’re locked.
- Click on the large silver arrow to return to the Room View.
- There are two keys on the mirror. Put them in the Inventory tray.
- Click on the Cabinet to zoom in on the shelf again.
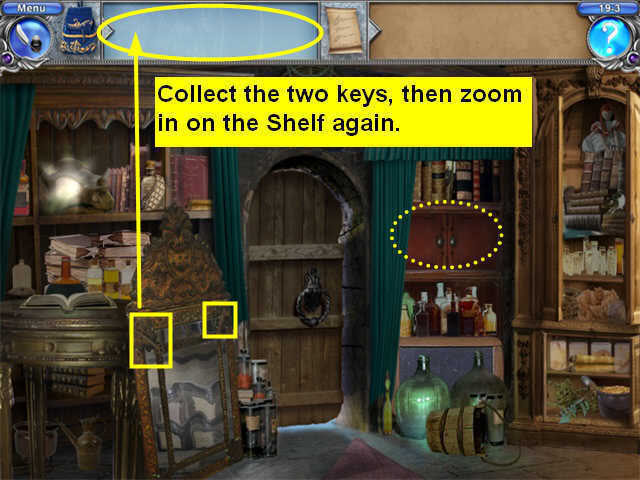
- Try the keys on the 3 drawers.
- The left and right drawers will open.
- A secret compartment will open at the upper left. It has a 3rd key.
- Take the 3rd key and use it on the center drawer.
- It will open. The drawer contains a 4th Key.
- Put the 4th Key in the Inventory Tray.
- Return to Room View.
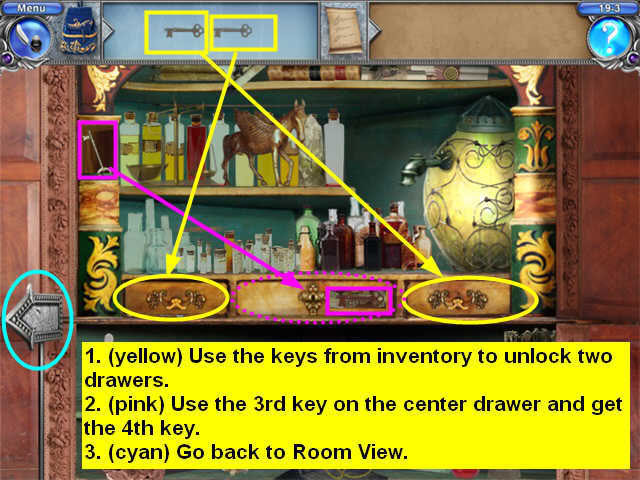
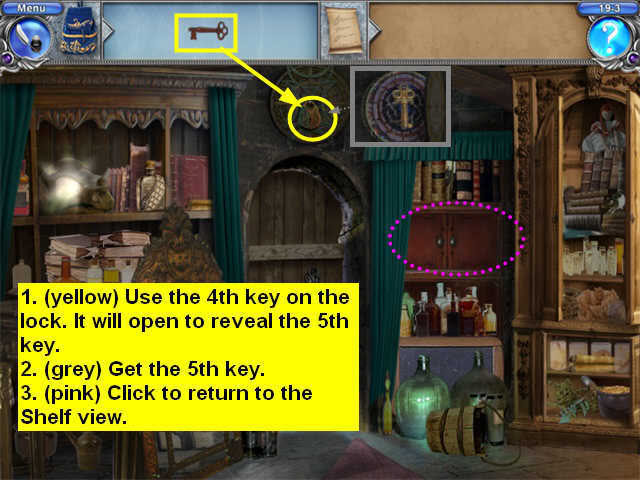
- Use the 4th Key on the lock above the door.
- Take the 5th Key and put it in the inventory try.
- Click on the Cabinet to return to Shelf View.
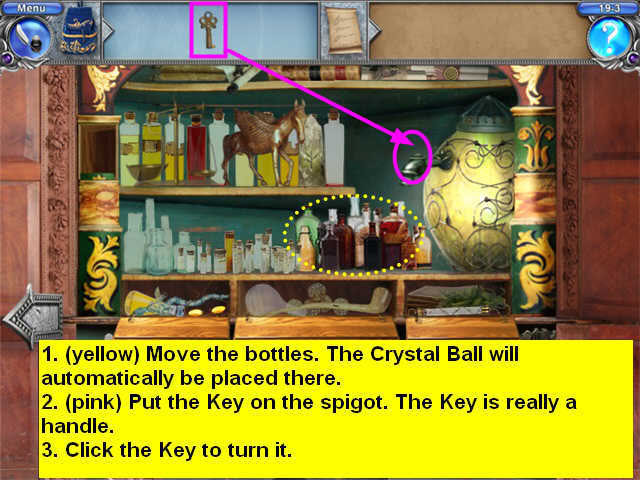
- Move the bottles next to the Potion. The Crystal Ball will automatically go there.
- Put the 5th Key in the spigot. It’s really a handle.
- Click the key to turn it.
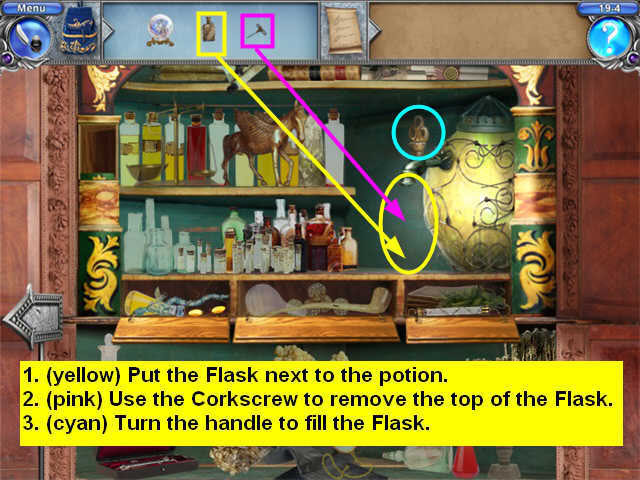
Task 19.4: Find a Flask
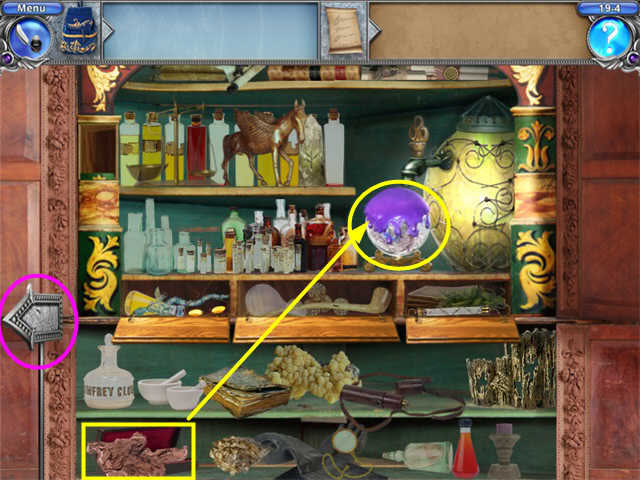
- Use the rag to clean the Crystal Ball.
- Put the Crystal Ball back in the inventory tray.
- Click on the Silver Arrow to return to Room View.
- Get the Flask from the left shelf. Put in the Inventory Tray.
- Get the Corkscrew from the bottom right. Put in the inventory tray.
- Click on the Shelf to go to Shelf View.

- Put the Flask next to the Potion.
- Use the Corkscrew to remove the top of the Flask.
- Click on the handle to fill the Flask.
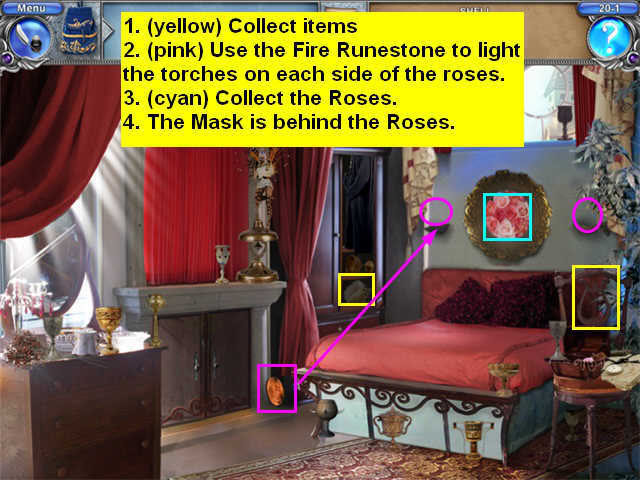
Task 20.1 Find the Mask.
- This is a Hidden Object scene. Collect the items listed on the Find List.
- You will not be able to collect an object until its name appears.
- Start by collecting all the items you can see that are on the Find List.
- The "eyes" are on the cabinet in the lower left.
- Move the curtain to reveal two more items.
- Lift the mattress and take the Key.
- Use the Key to unlock the cabinet.
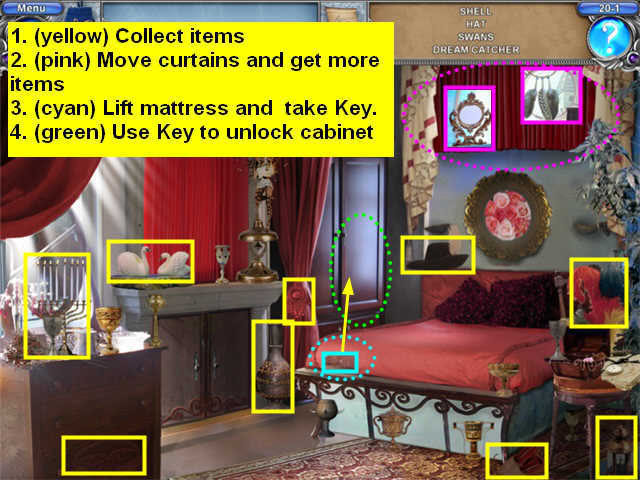
- The shell is in the cabinet.
- The Lyre is part of the chair behind the feathers.
- Use the Runestone (behind the Vase) to light the two torches above the bed.
- After the torches are lit you will be able to take the Roses.
- The Mask is behind the Roses.
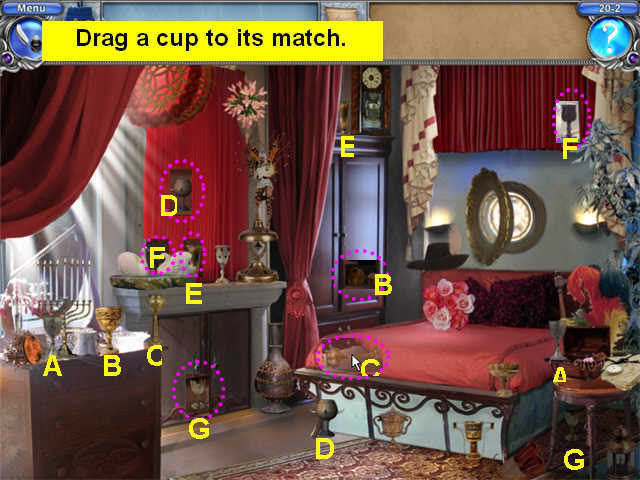
Task 20.2 Restore the Chalice
- You must match pairs of goblets. Just collect one pair of a match and touch it to the other one.
- There are 7 pairs in all.
- One of the goblets is under the edge of the mattress. Lift the mattress, take that goblet, then match it to its mate.
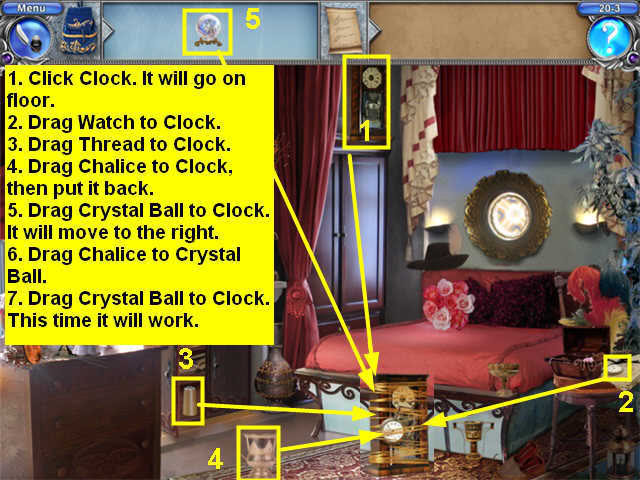
Task 20.3 Use the Clocks
- Click on the Clock above the Cabinet. It will automatically move to the floor in front of the bed.
- Drag the watch from the bedstand to the Clock.
- Drag the thread from the small cabinet to the Clock. "This will tie the Clock and the Watch together.
- Drag the Chalice to the Clock to put the potion on it.
- Put the Chalice back where it was.
- Drag the Crystal Ball from inventory to the Clock. It won’t stick, but will instead move to the right on the floor.
- Drag the Chalice to the Crystal Ball to put potion on it.
- Drag the Crystal Ball with potion to the Clock. This time it will stick.
Chapter 21: The Fortress Cellar
- The Demon is here, but he is blind and in chains.
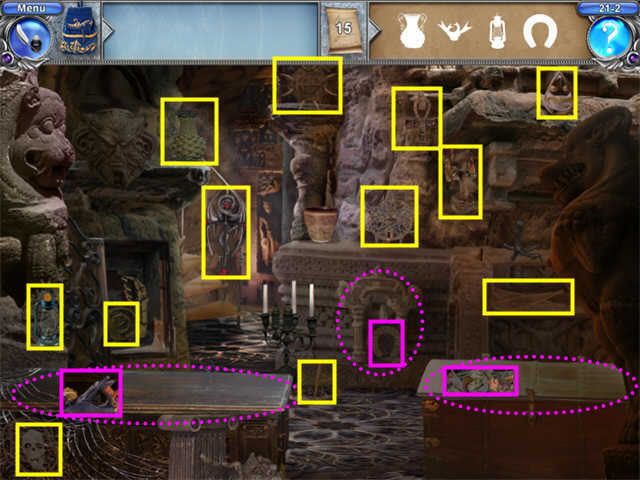
Task 21.1: Find the Box
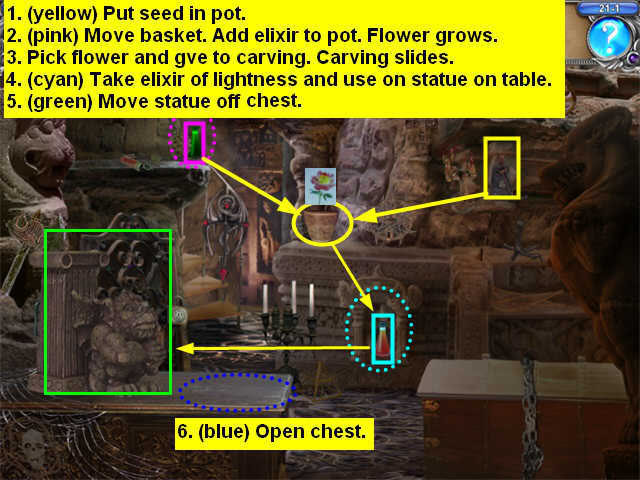
- There is a Bag of Seeds on the right. Collect it.
- Put a seed in the pot in the center.
- Move the basket in the upper left.
- There is a green vial behind it, the Elixir of Growth.
- Put the Elixir of Growth in the pot. A flower grows.
- Pick the flower and give it to the carving underneath the pot. The carving slides.
- There is a red vial, the Elixir of Lightness.
- Take the red vial and use in on the heavy statue on the left chest.
- Click the statue to move it.
- Open the left Chest.
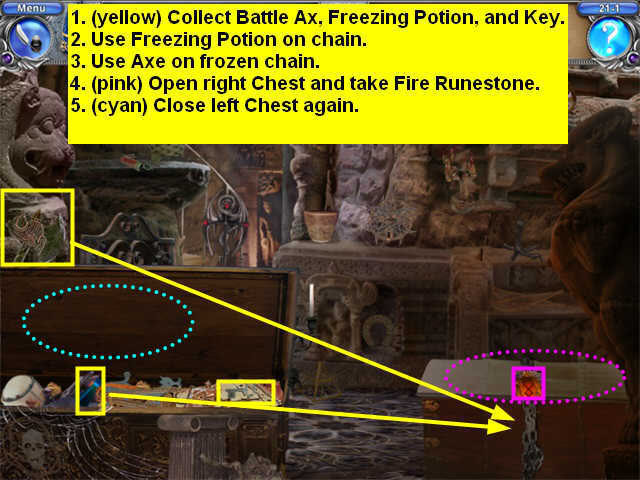
- Collect the Freezing Potion and the Key from the chest.
- Collect the Battle Ax from behind the left Chest.
- Use the Freezing Potion on the chain on the right Chest.
- Use the Battle Ax to break the frozen chain.
- Click the right Chest to open.
- Collect the Fire Stone from the right Chest.
- Close the left Chest again.
- Put the Fire Stone in the mouth of the statue on the right.
- It will shoot out a beam of light towards the Statue on the left.
- Collect the Energy Ball from the mouth of the statue on the left.
- Put the Energy Ball into the eye of the statue above.
- Use the Key from Inventory on the gate behind the left chest.
- Take the 2nd Energy Ball there and put it in the other eye.
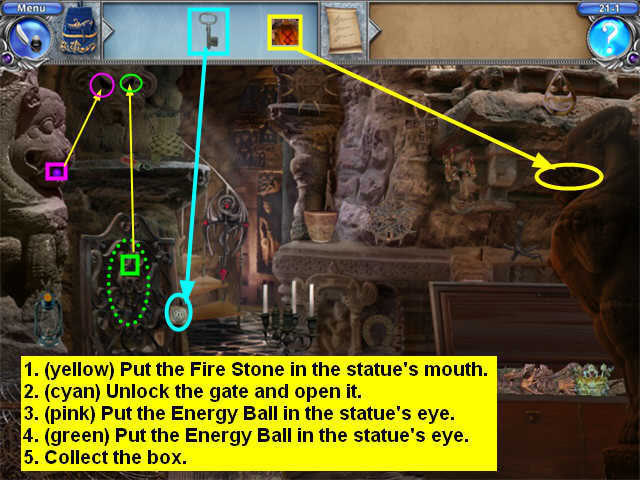
- The statue will move, revealing the Demon Box. Collect it.
Tasks 21.2: Find the Object the Demon is hiding in.
- This is a Hidden Object scene. Collect the items listed on the Find List.
- You will not be able to collect an object until its silhouette appears.
- Start by collecting all the items you can see that are on the Find List.
- Slide the carving where the Elixir of Lightness was to find the Horseshoe.
- Open each Chest. There is one item inside each.
- Continue collecting items until you have found them all.
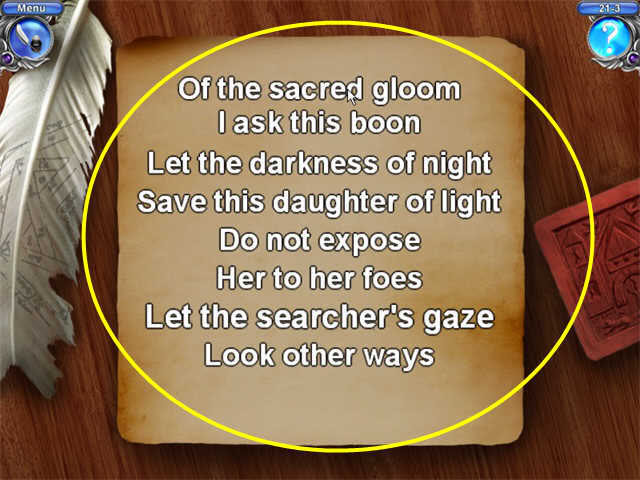
Task 21.3 Cast the Spell
- There’s no logical requirement for the order of the poem, you just have to try trial and error.
- The person who freed the demon is here! You have to get the book before it’s too late!
Chapter 22: The Room with the Book
Task 22.1 Remove the Protective Spells from the book
- Collect the glowing energy balls and place them in the statue’s eyes.
- The chains will drop off the statue below it and a Key will appear in its mouth.
- Take the Key and unlock the stained glass panel.
- Move the leaves aside in the center.
- Open the panels on the stone pillars.
- Now take the 4 hearts and put them on the tile in the front. You must click on a shadow heart for it to count.
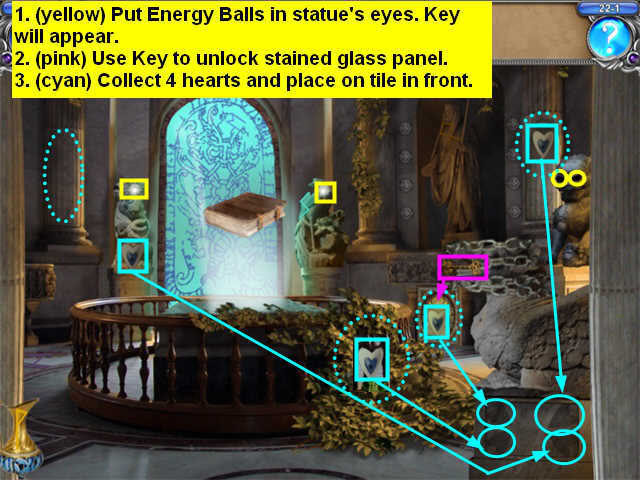
- So far, so good. At this point the puzzle gets way pickier than it needs to be.
- The Heart tile will open.
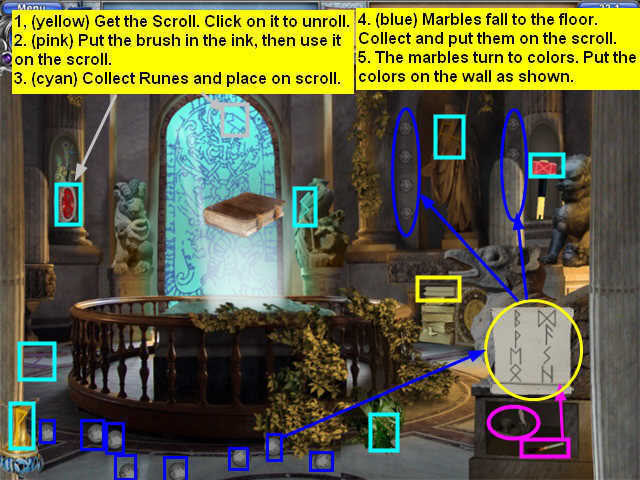
- Take the Scroll out of the compartment where the stained glass panel was.
- It will automatically go over by the Heart tile.
- Click on the scroll until it unrolls.
- In the compartment behind the heart tile there is a brush and some ink.
- Touch the brush to the ink, then touch the brush to the blank scroll.
- Runes will appear on the scroll.
- Now collect the Runes from around the room.
- Put them one at a time on the scroll.
- Some of the letters are very picky.
- For both the M and the P, try clicking to their right side.
- Try to notice which spot worked when you clicked, because you’ll have to click there again in a minute.
- When you have all 8 Runes placed, 8 marbles will fall down.
- Pick up the marbles, and put them one at a time onto the Scroll.
- Any marble can go on any Rune, but you have to click in exactly the same spot you did when you put the letters there.
- The letters turn into color splotches.
- Collect the color splotches and put them into the circles on the back wall.
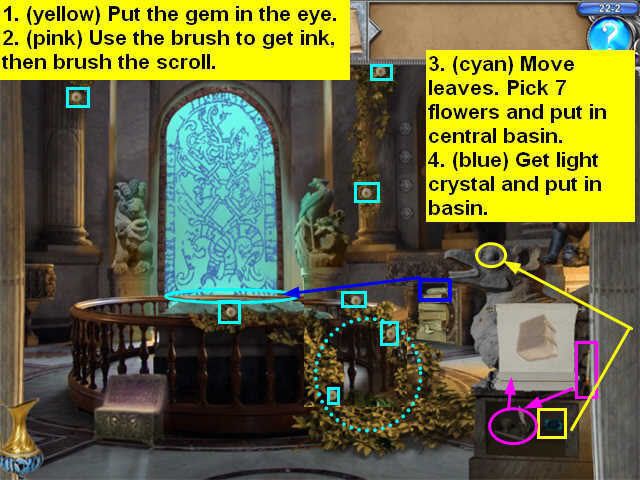
Task 22.2 Get the Demon to Touch the Box
- Look in the compartment behind the heart tile.
- Take the blue gem and put it in the eye of the bird statue. A stream of light appears.
- Take the brush that is next to the scroll.
- Dip it in the ink, then use it on the scroll.
- A faint image of the book appears.
- To make an illusion, you need rainbow paint.
- Move the leaves in the center.
- Now collect 7 white flowers and put in the central basin.
- After you have collected the flowers, you will be allowed to take a Light Crystal from the compartment behind the stained glass.
- Put the light crystal in the central basin.
- Wait a few seconds. The flowers will turn colors.
- Take the pitcher from the left side and put it by the flowers.
- Put the flowers in the pitcher one at a time.
- Put the pitcher into the stream of water falling from the bird statue.
- Put the pitcher onto the scroll to paint the illusion.
- Click on the Illusory Book. It will drop into the compartment where the ink is.
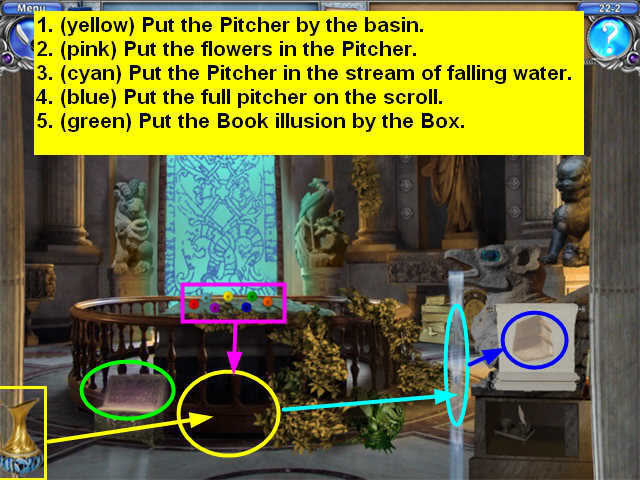
- Take the Illusory Book and put it in the demon box.
- The demon arrives, but is not fooled.
Task 22.3 Align the Strands of Time
- You have to untangle the lines so none overlap.
- There are many possible solutions. Here’s the one I used.

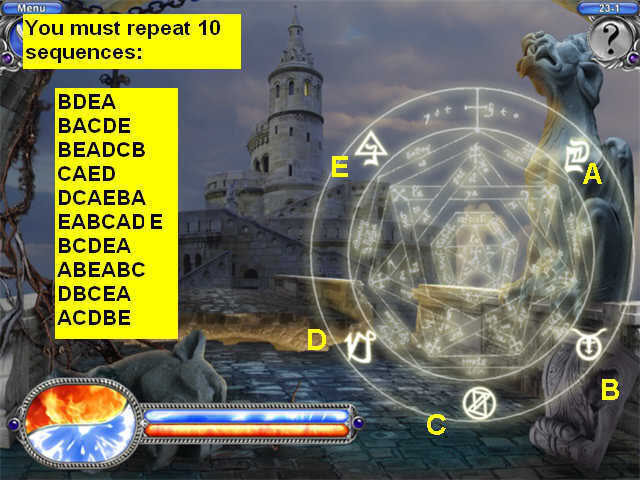
Task 23.1 Defeat the Demon
- Your energy bar is blue. The demon’s is orange.
- A sequence will play on the wheel.
- If you repeat the sequence correctly, you will strike a blow against the demon and you will see the orange bar go down.
- The demon will then strike you, and you will see the blue bar go down.
- If you make a mistake, you don’t strike the demon.
- You need to complete 10 sequences to defeat the demon.
- The sequences are always the same as long as you don’t make a mistake. If you make a mistake, they change.
- I have listed 10 sequences that will work on the screenshot.
- Click on the screenshot to enlarge it, then print it.
- If you mess up, I recommend going back to the main menu and restarting the battle so you can use the walkthrough sequences.
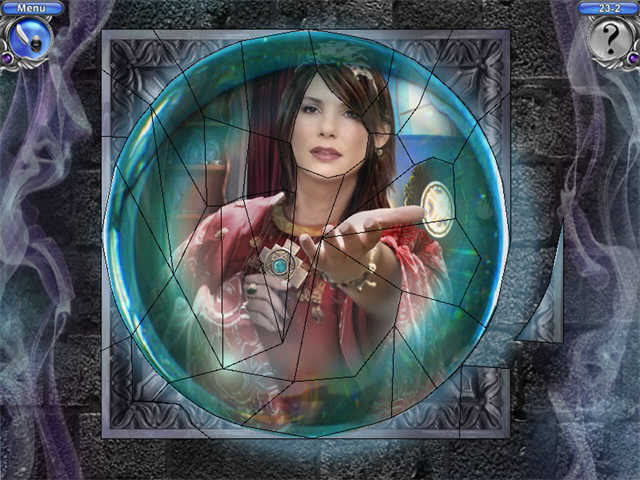
Task 23.2 Complete the puzzle
- This is a regular jigsaw puzzle. There is a colored picture in the center and a grey fancy frame around the outside.
- If you put two pieces together correctly even if they’re not in their final position, they will stick together.
- Here is the solution:
- Complete the closing dialog.
“;

More articles...
-
Best Horror Games On Itch.io – July 2026
Across a bounty of subgenres. -
Haze Seas Accessories Tier List [Best Accessories to Equip]
The accessories with the best stat buffs in Haze Seas.