
Best Horror Games On Itch.io – July 2026
Across a bounty of subgenres.
Grow A Garden 2 Base Price List
What's the most valuable crop?![Evomon Types Guide [Strengths, Weaknesses, Resistance]](/wp-content/uploads/2026/06/evomon-types.jpg "Evomon Types Guide [Strengths, Weaknesses, Resistance]")
Evomon Types Guide [Strengths, Weaknesses, Resistance]
Your companion guide during battles.
![[Roblox] Evomon Shiny Hunting Guide – Including Prismatic and Pris Shinies!](/wp-content/uploads/2026/06/evomon-shiny-hunting-guide.jpg "[Roblox] Evomon Shiny Hunting Guide – Including Prismatic and Pris Shinies!")
Maestro: Music of Death Walkthrough
Welcome to the Maestro: Music of Death walkthrough on Gamezebo. Maestro: Music of Death is a hidden object adventure game played on the PC created by ERS Game Studios. This walkthrough includes tips and tricks, helpful hints, and a strategy guide for how to complete Maestro: Music of Death.


- Prefer Gamezebo on Google

Maestro: Music of Death – Game Introduction
Welcome to the Maestro: Music of Death walkthrough on Gamezebo. Maestro: Music of Death is a hidden object adventure game played on the PC created by ERS Game Studios. This walkthrough includes tips and tricks, helpful hints, and a strategy guide for how to complete Maestro: Music of Death.
General Tips
- You may choose from one of two possible gameplay modes at the start of both the main and (if applicable) bonus adventure: Regular Mode and Expert Mode. Expert Mode features skip and hint buttons that take longer to recharge, as well as active zones not being indicated.
- Hints are available throughout the game for both adventure and hidden object gameplay by clicking on the violin in the bottom right corner of the screen. Hints are unlimited, but will take a while to recharge before they can be used again.
- Throughout the game, you will also have the aid of a Journal: this can be accessed from the bottom left corner of the screen. Use the Journal to follow the story as well as take note of valuable clues and hints.
- Puzzles may be skipped, however you will have to wait an allotted period of time before the option activates.
- Clicking excessively will result in your cursor being temporarily disabled.
- Inventory items are shown at the bottom of the screen and are noted with CAPS throughout the guide below. You may use the arrows on either side of the box to toggle for more items if you’re holding more than can be displayed at any given time.
- Hidden object locations are largely randomized: as such, Key Items only are circled in the guide below.
- Hidden object locations often have items listed in red: this means they are obstructed, or you must do something specific to acquire them. Items of this nature have been boxed in the screenshots in the guide below.
- The guide below is written for both the normal edition of the game and the Collector’s Edition. For the Collector’s Edition bonus content and adventure guide, please refer to the chapter entitled “Epilogue: Bonus Adventure”.
Chapter 1: The Bridge
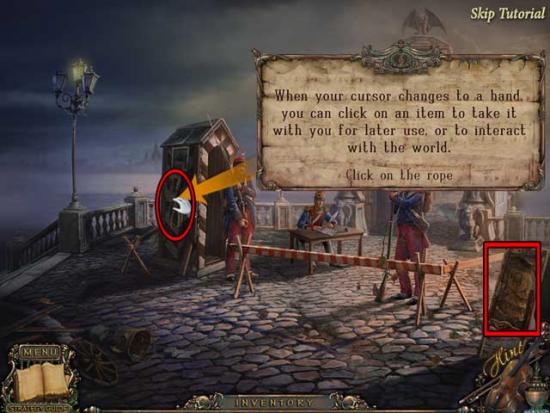
Bridge Entrance
- Click on the VIOLIN lying in the middle of the street. It will be added to the bottom right corner of your screen as your Hint icon.
- Pick up the ROPE hanging on the side of the guard post to add it to your inventory, then take a closer look at the sign on the right.

- Use the ROPE on the hook to pull it out of the sign and add the HOOK to your inventory.
- Proceed to the next location via the path on the left.
River’s Edge
- Talk to the woman sobbing at the edge of the river. She will give you the MEDALLION.
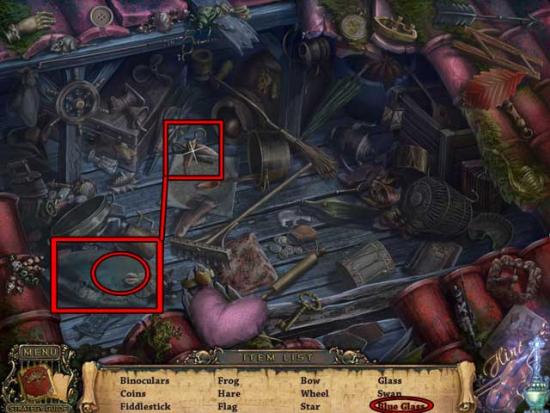
- Enter the hidden object scene that appears.
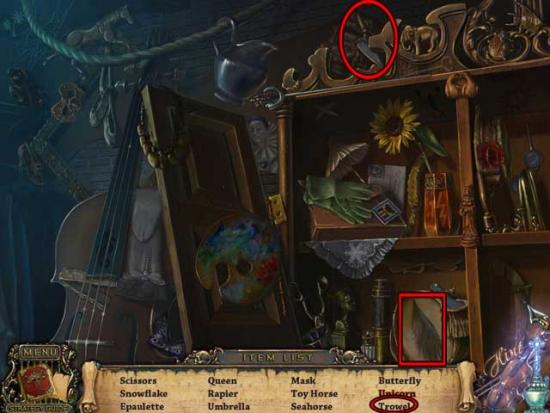
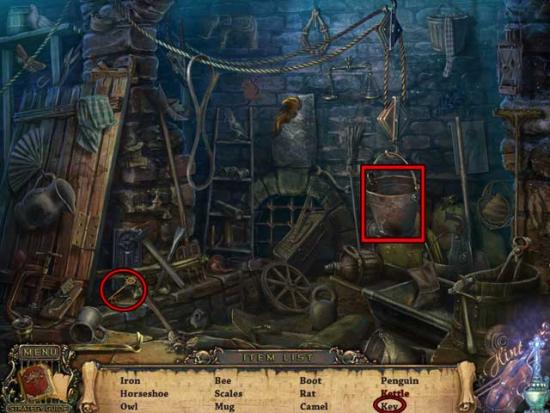
- Find the objects listed at the bottom of the screen: objects are randomized. The boxed locations show areas you can click on to reveal the hidden objects listed in red. The Key Item is circled and shown below.
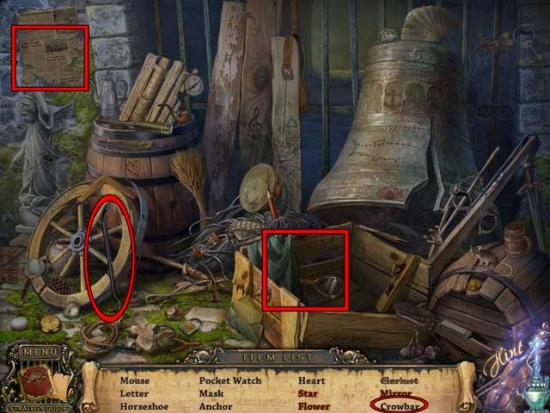
- Upon completing the area, the CROWBAR will be added to your inventory.
- Before leaving this area, take a closer look at the barrel floating in the river. Use the HOOK on the barrel to bring it ashore, then take another look. Use the CROWBAR to break it open.
- Collect the RUBY hidden inside the barrel to add it to your inventory.
- Return back up the steps.
Bridge Entrance
- Pick up the BOARD lying on the ground to add it to your inventory, then take a closer look at the guard slumped at the table.
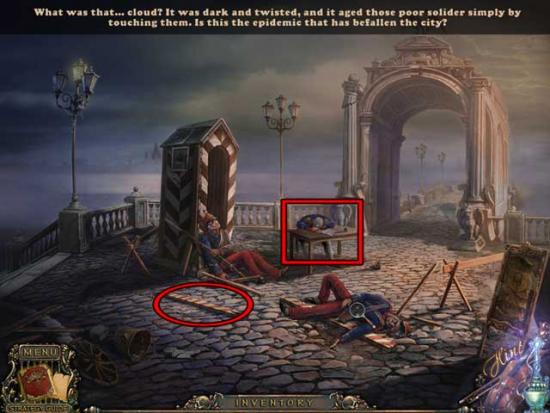
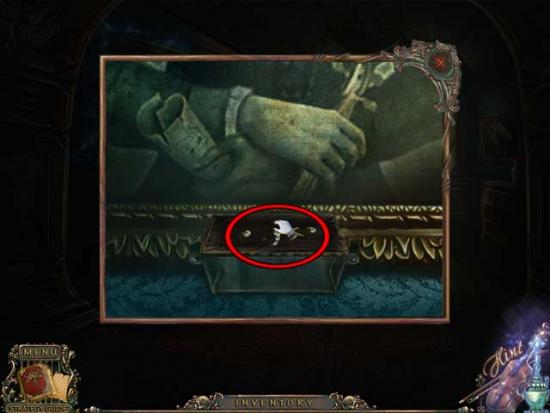
- Read the Note lying in the book, then pick up the yellow MEDALLION FRAGMENT (1/2) to add it to your inventory.

- Proceed through the archway and onto the Bridge.
Bridge
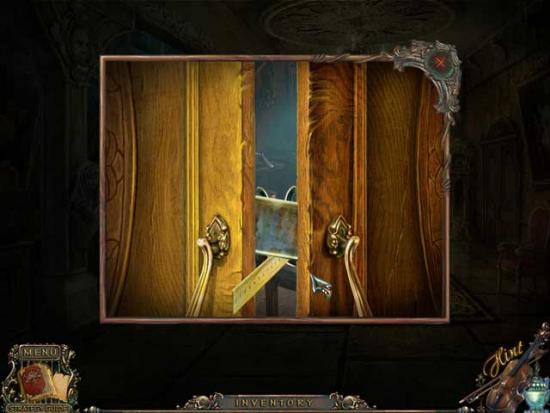
- Pick up the MATCHES on the right to add them to your inventory, then use the BOARD on the gap marked with an “X”. Before proceeding across, take a closer look at the pile of junk on the left.
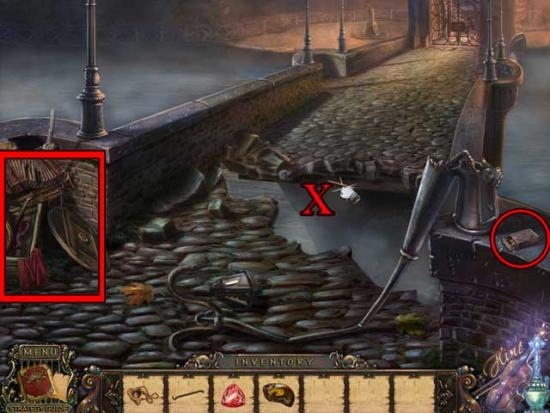
- Click on the red rag to remove it, then click on the SHIELD FRAGMENT (1/2) beneath it to add it to your inventory.
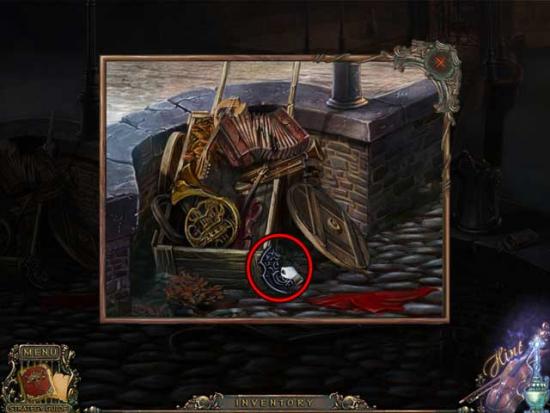
- Proceed across the gap.
Town Entrance
- Take note of the poster on the right: there’s a silver bullet lodged inside. This will come in handy later.
- Take a closer look at the gargoyle on the left at the bottom of the gate pillar.
- Use the RUBY on the gargoyle’s empty eye socket to restore it, then collect the KNIFE that appears to add it to your inventory.
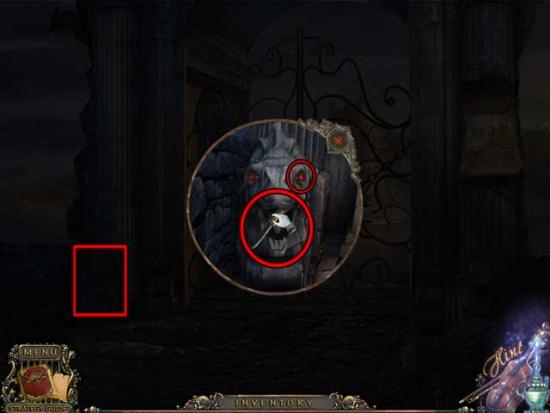
- Take note of the recess in the gate panel, then return to the River’s Edge.
River’s Edge
- Enter the re-appeared hidden object area.
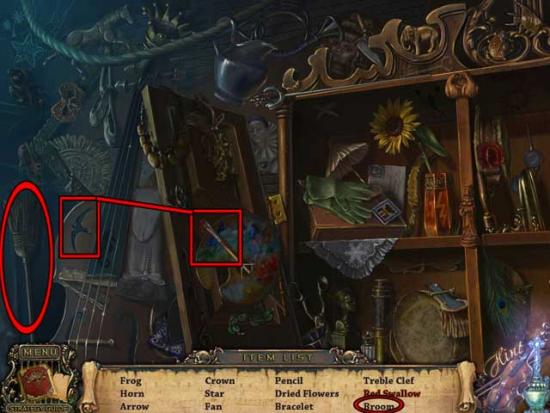
- Find the objects listed at the bottom of the screen: objects are randomized. The boxed locations show areas you can click on to reveal the hidden objects listed in red (in this case, use the Pencil on the Fish outline to obtain the Fish Drawing). The Key Item is circled and shown below.
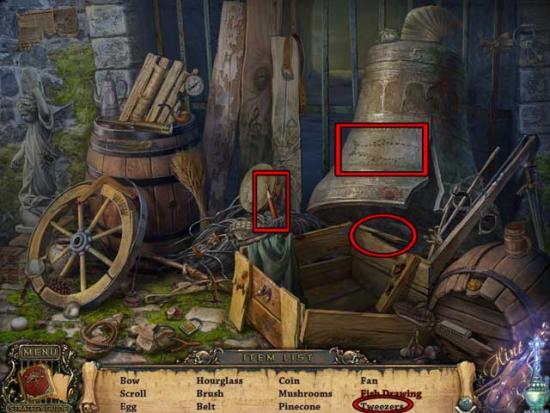
- Upon completing the area, the TWEEZERS will be added to your inventory.
- Take a closer look at the boat on the left side of the screen. Use the KNIFE on the netting to remove it and obtain the FLEUR-DE-LIS.
- Return to the Town Entrance.
Town Entrance
- Take a closer look at the poster on the right: use the TWEEZERS to remove the SILVER BULLET and add it to your inventory.
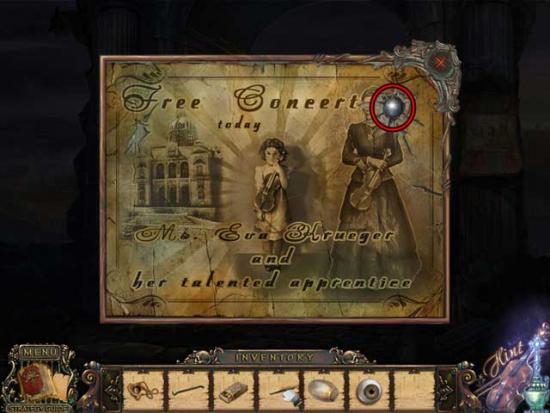
- Take a closer look at the panel in the middle of the gate. Use the FLEUR-DE-LIS on the indentation.
- A puzzle will appear. Swap the tiles until you’ve completed the image: tiles in their correct locations will turn a lighter shade. The solution is shown below:
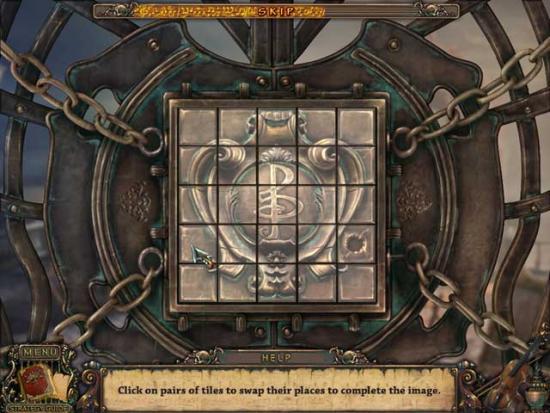
- Enter the Town.
Chapter 2: The Town
Town Entrance
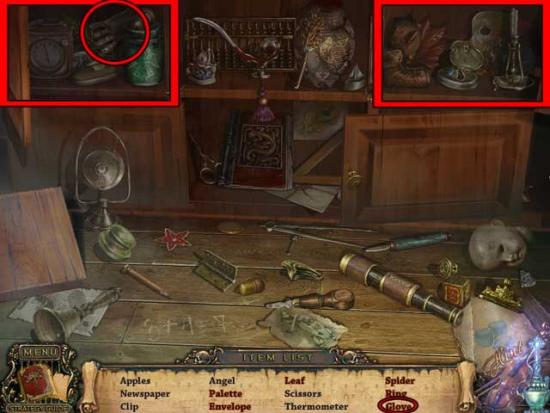
- Take a closer look at the newspaper lying on the ground. Pick up the GLOVES and add them to your inventory.
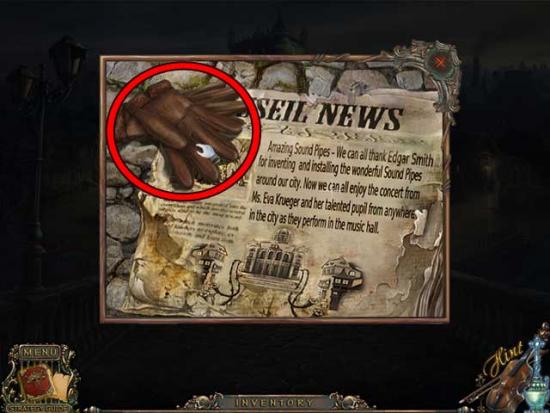
- Head down the street to the left.
Maestro Statue
- Click on the old woman hiding behind the statue: she will promptly run away. Continue down the street after her.
Theater Road
- A tree will fall, blocking your path.
- Click on the gate post on the left for a closer view. Click on the BRICK to add it to your inventory.
- Return to the Maestro Statue.
Maestro Statue
- From here, continue through the hole in the fence on the left: it’s marked by fluttering fireflies.
Maestro Park
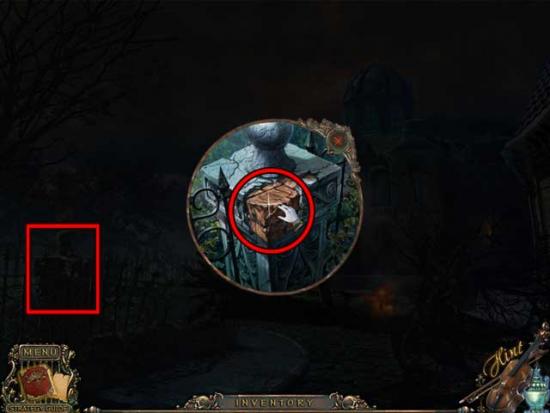
- Click on the hidden object area.
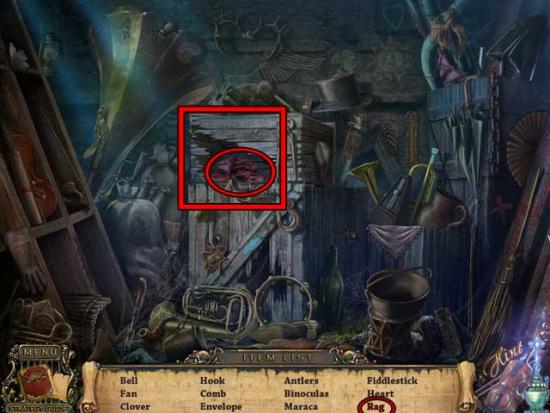
- Find the objects listed at the bottom of the screen: objects are randomized. The boxed locations show areas you can click on to reveal the hidden objects listed in red. The Key Item is circled and shown below.
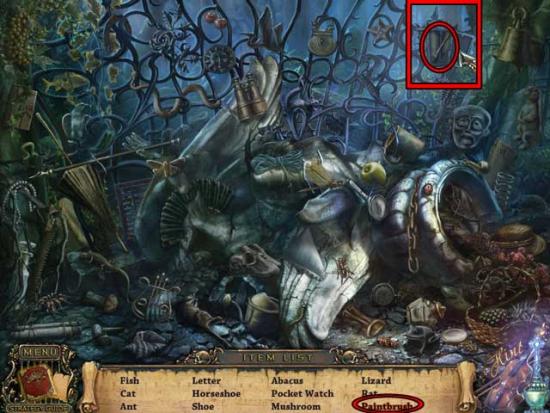
- Upon completing the area, the PAINTBRUSH will be added to your inventory.
- Take a closer look at the shield in the fence on the left: place the SHIELD FRAGMENT (1/2) inside.
- Return to the Town Entrance.
Town Entrance
- Take the street to the right.
Smithy Yard
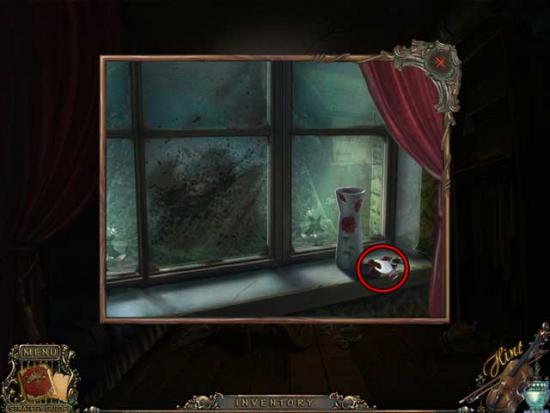
- Take a closer look at the window of the house on the left. Use the BRICK to break the glass and obtain the MEDALLION FRAGMENT (2/2).
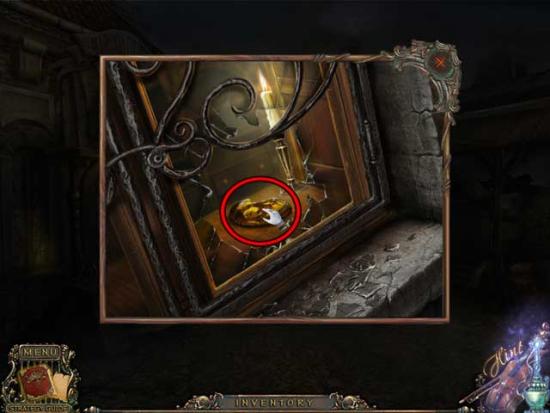
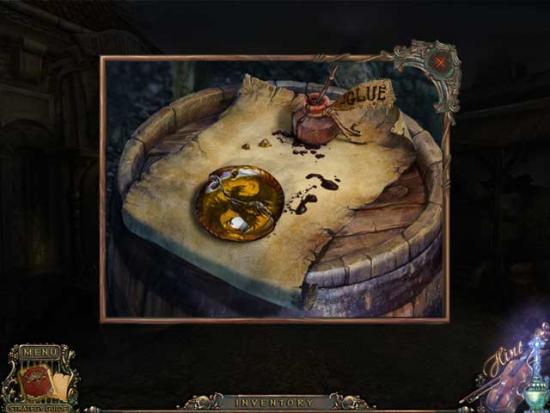
- Take a closer look at the barrel on the far right.
- Use the PAINTBRUSH on the bottle of glue, then place both MEDALLION FRAGMENTS on the barrel. Use the brush to spread glue on the first fragment, then place the second fragment with the first to obtain the fixed MEDALLION.
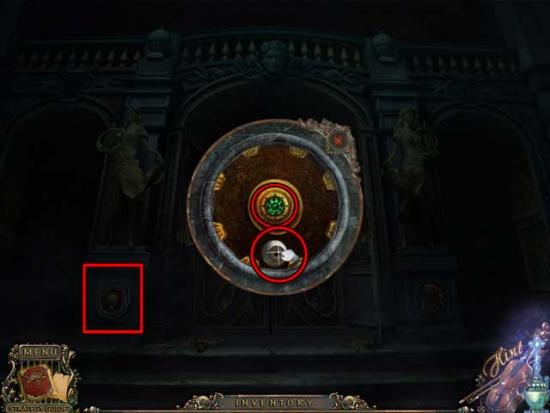
- Take a closer look at the eagle design above the doorway on the left. Place the MEDALLION in the circular depression in the middle to trigger a puzzle.
- Place the statue feathers back where they belong: the solution is shown below.
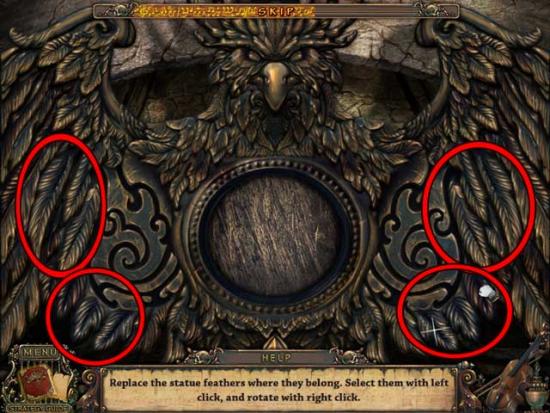
- Enter the Smithy.
Smithy
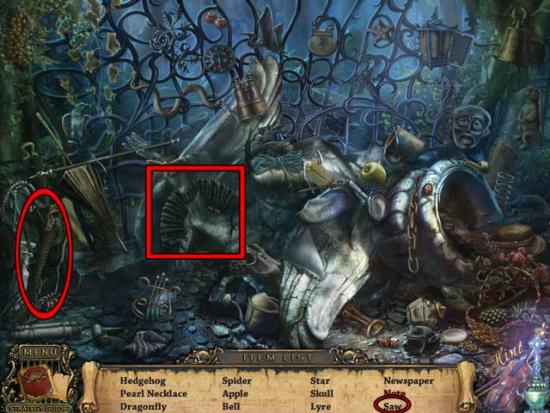
- Click on the hidden object area.
- Find the objects listed at the bottom of the screen: objects are randomized. The boxed locations show areas you can click on to reveal the hidden objects listed in red. The Key Item is circled and shown below.
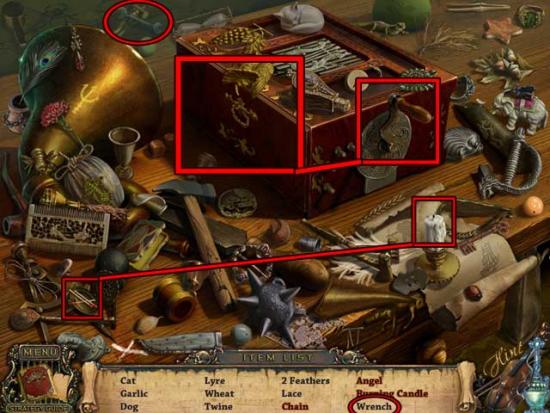
- Upon completing the area, the WRENCH will be added to your inventory.
- Pick up the POKER lying on the floor to add it to your inventory, then take a closer look at the suit of armor.
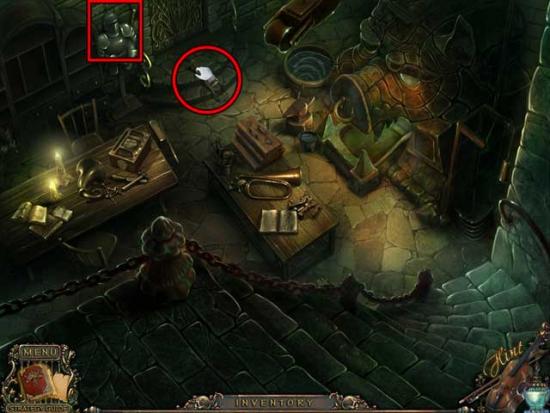
- Click on the visor of the suit of armor to lift it, then collect the EMERALD inside.
- Take a closer look at the furnace on the right.
- Pick up the BUCKET OF WATER sitting just to the left of the furnace to add it to your inventory, then take a closer look at the toolbox on the shelf on the upper left.
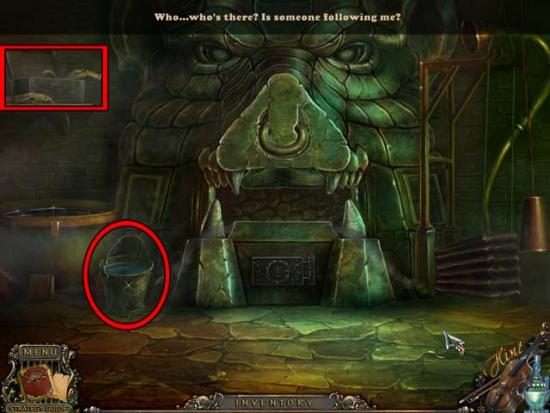
- Pick up the LAMPSHADE inside the toolbox to add it to your inventory.
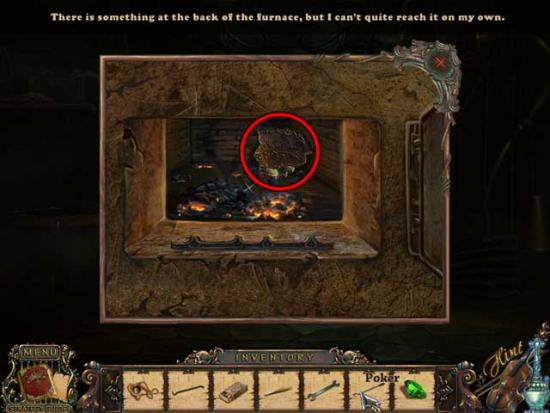
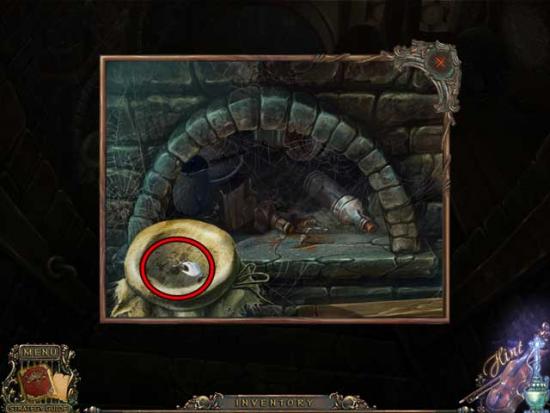
- Take another look at the furnace: take a closer look at the dark hatch beneath the mouth, then open it with the GLOVES for a closer view.
- Use the POKER to retrieve the NAMEPLATE PIECE (1/4) inside the furnace and add it to your inventory.
- Return to the Town Entrance.
Town Entrance
- Take a closer look at the bottom of the light post on the left. The post has a ribbon tied to it.
- Use the WRENCH to remove the four screws holding the panel in place. Pick up the LETTER K inside the light post to add it to your inventory.
- Return to the Maestro Statue.
Maestro Statue
- Take a closer look at the statue. Use the KNIFE to remove the ivy covering the nameplate.
- Once cleared, place NAMEPLATE PIECE (1/4) in the empty nameplate space.
- Continue to the left to Maestro Park.
Maestro Park
- Enter the hidden object area.
- Find the objects listed at the bottom of the screen: objects are randomized. The boxed locations show areas you can click on to reveal the hidden objects listed in red. The Key Item is circled and shown below.
- Upon completing the area, the SAW will be added to your inventory.
- Return to the Theater Road (the road blocked by the tree).
Theater Road
- Use the BUCKET OF WATER to put out the fire on the tree, then use the SAW to cut it apart and open up the path to the Theater again.
- Continue forward to the Theater Entrance.
Theater Entrance
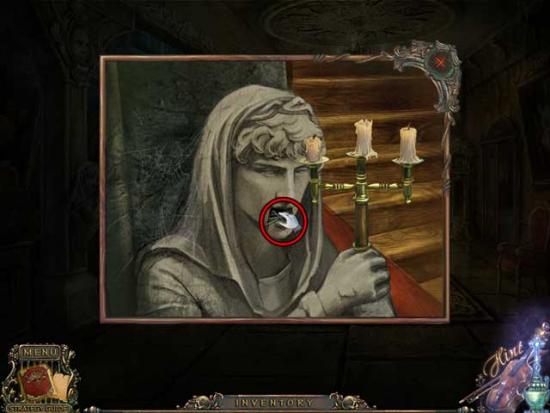
- Take a closer look at the base of the statue on the left.
- Use the EMERALD in the center cavity to open it and reveal the EYE (1/2). Click on it to add it to your inventory.
- Return to the Theater Road and turn right.
Alley Bakery
- Click on the old woman: she will flee once again.
- Click on the hidden object area on the left.
- Find the objects listed at the bottom of the screen: objects are randomized. The boxed locations show areas you can click on to reveal the hidden objects listed in red. The Key Item is circled and shown below.
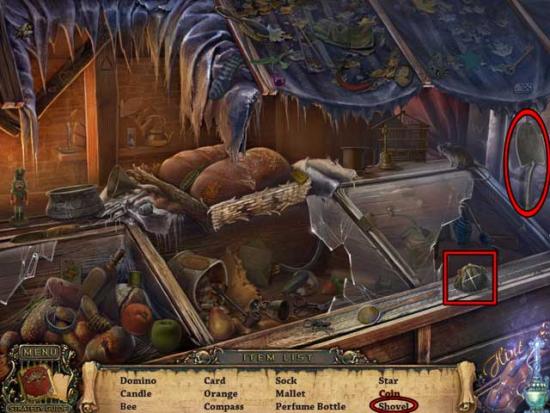
- Upon completing the area, the SHOVEL will be added to your inventory.
- Return to the Smithy Yard.
Smithy Yard
- Take a closer look at the pile of coal to the right of the Smithy.
- Use the SHOVEL and the EMPTY BUCKET on the pile of coal, then click on the shovel to fill the bucket and obtain the BUCKET WITH COAL for your inventory.
- Enter the Smithy.
Smithy
- Take a closer look at the furnace.
- Click on the ring in the “nose” of the furnace to reveal a hidden component that resembles a tongue for forging.
- Take a closer look at the hatch at the bottom of the furnace. Use the BUCKET WITH COAL to heat the furnace.
- Zoom in on the forgery part of the furnace, or “tongue”.
- Use the SILVER BULLET on the forge to create the SILVER NOTE and add it to your inventory.
- Return to the Theater Entrance.
Theater Entrance
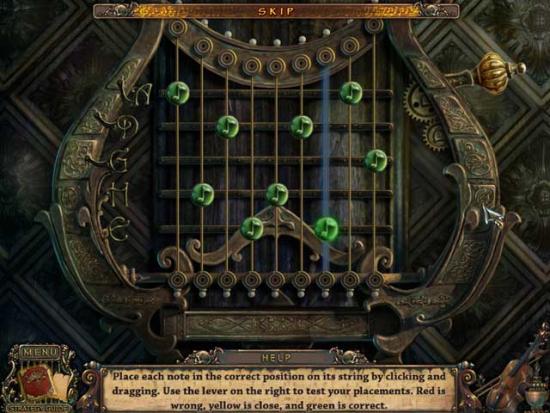
- Take a closer look at the mechanism on the door of the Theater. Use the SILVER NOTE on the empty string to trigger a puzzle.
- Slide the notes up and down the strings until they’re in their proper locations: red is wrong, yellow is close, and green is correct. Click the lever at the top right of the screen to check your solution. The final solution is shown below:
- Enter the Theater.
Chapter 3: The Theater
Entrance Hall
- Continue through the door on the far end of the hall, on the left.
Storage Room
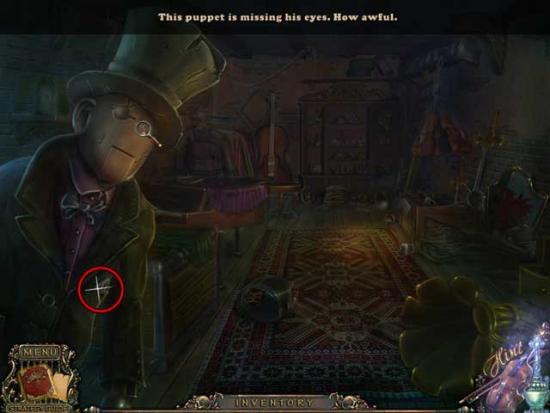
- Notice the puppet on the left is missing his eyes. Use EYE (1/2) on the puppet, then take a closer look at its pocket. Pick up the ORNATE BUTTON and add it to your inventory.
- Exit the Theater and return to the Smithy.
Smithy
- Click on the re-appeared hidden object area.
- Find the objects listed at the bottom of the screen: objects are randomized. The boxed locations show areas you can click on to reveal the hidden objects listed in red. The Key Item is circled and shown below.
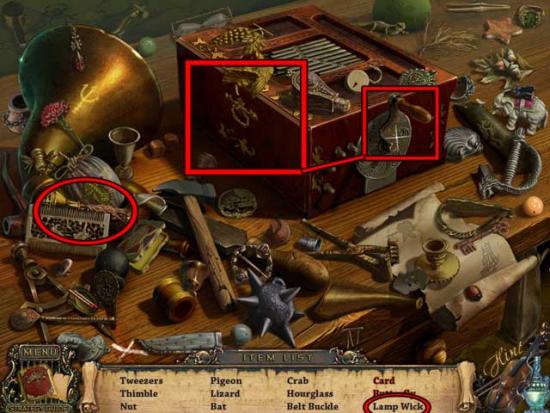
- Upon completing the area, the LAMP WICK will be added to your inventory.
- Take a closer look at the toolbox sitting on the table in the center of the room.
- Use the ORNATE BUTTON on the toolbox, then collect the SCREWDRIVER inside to add it to your inventory.
- Return to the Theater.
Entrance Hall
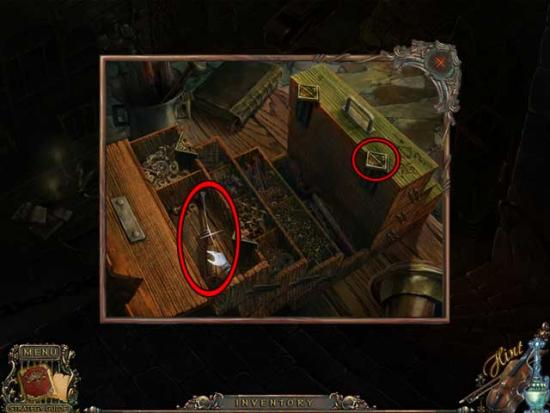
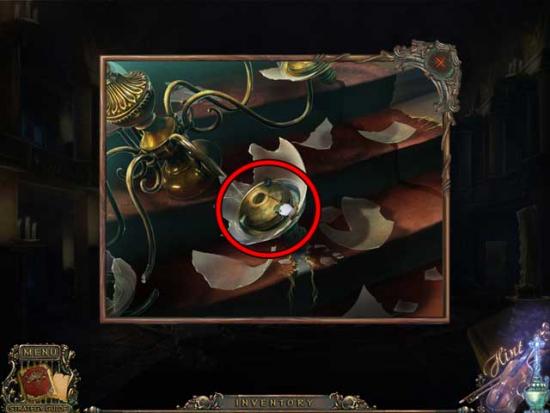
- Take a closer look at the broken chandelier lying in the center of the hall.
- Use the SCREWDRIVER on the chandelier to remove the OIL RESERVOIR and add it to your inventory.
- Enter the Storage Room on the left.
Storage Room
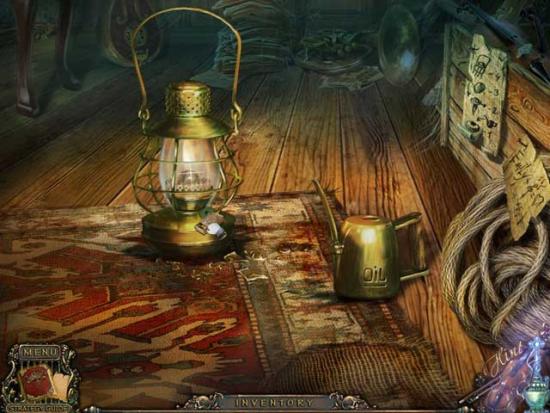
- Take a closer look at the far right edge of the carpet.
- Place the LAMP WICK, the LAMPSHADE, and the OIL RESERVOIR on the carpet.
- Use the Oil on the Oil Reservoir, then place the Lamp Wick, Lampshade, and Cover on the lamp in that order (there’s also an instruction sheet in the background if you need it).
- Use the MATCHES on the lamp to light it.
- Click on the hidden object area that appears at the back of the room.
- Find the objects listed at the bottom of the screen: objects are randomized. The boxed locations show areas you can click on to reveal the hidden objects listed in red. The Key Item is circled and shown below.
- Upon completing the area, the BROOM will be added to your inventory.
- Exit the Theater and return to the Alley Bakery.
Alley Bakery
- Click on the hidden object area.
- Find the objects listed at the bottom of the screen: objects are randomized. The boxed locations show areas you can click on to reveal the hidden objects listed in red. The Key Item is circled and shown below.
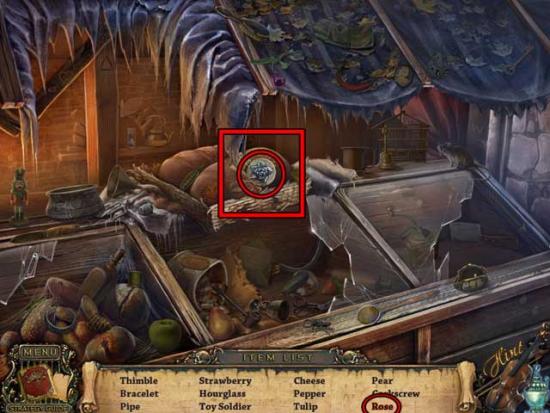
- Upon completing the area, the ROSE will be added to your inventory.
- Take a closer look at the pile of leaves in the background.
- Use the BROOM on the pile of leaves to remove them. Pick up the HANDLE and add it to your inventory.
- Take a closer look at the advertisement board on the right.
- Use the HANDLE on the board to rotate the papers and reveal the EYE (2/2). Pick it up to add it to your inventory.
- Return to the Theater Storage Room.
Storage Room
- Place the EYE (2/2) in the puppet’s eye socket. Once both eyes have been restored, the mouth will open revealing the SHEET MUSIC. Click on it to add it to your inventory.
- Click on the hidden object area at the back of the room.
- Find the objects listed at the bottom of the screen: objects are randomized. The boxed locations show areas you can click on to reveal the hidden objects listed in red. The Key Item is circled and shown below.
- Upon completing the area, the TROWEL will be added to your inventory.
- Exit the Theater and return to the Maestro Statue.
Maestro Statue
- Take a closer look at the potted plant near the bottom of the statue.
- Use the TROWEL on the dirt to reveal the LETTER M and add it to your inventory.
- Continue to the left.
Maestro Park
- Take a closer look at the small “Maestro Park” sign beneath the statue in the middle of the screen that’s missing letters.
- Use the LETTER M and the LETTER K from your inventory on the sign to restore it, revealing a hidden alcove. Pick up the FLUTE inside to add it to your inventory.
- Return to the Theater.
Entrance Hall
- Take a closer look at the door on the right.
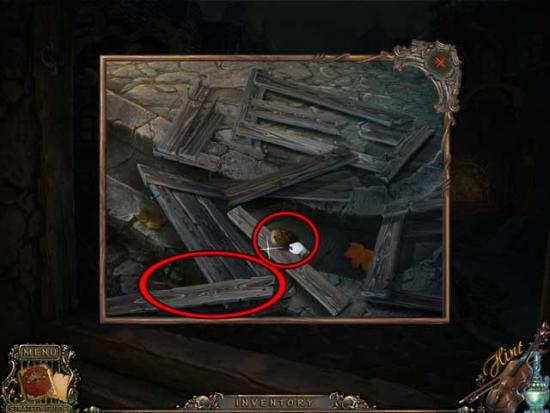
- Use the CROWBAR to remove the boards covering the door: make sure you remove the boards in order from top to bottom. Once finished, enter through the door.
Stage
- Take a closer look at the music stand on the right. Use the SHEET MUSIC on the stand, then use the FLUTE to activate a puzzle.
- Play the flute according to the sheet music: notes that appear to be connected must be played twice to proceed. Play the notes according to the coloring of the flute on the left, which will give you a clue as to where each note is located on the instrument: a colored guide is shown below.
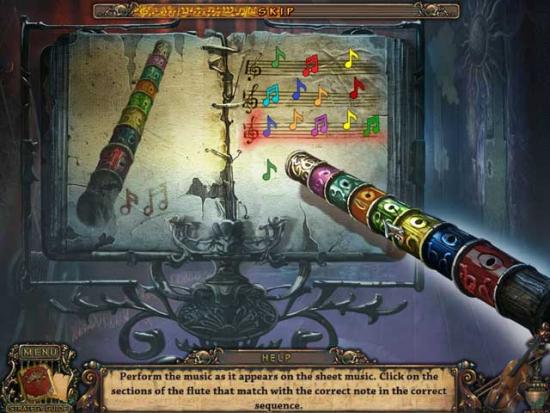
- Upon completing the puzzle, the curtains will rise, revealing a concert hall filled with dead patrons.
- Take a closer look at the deceased audience.
- Click on the bag on the left for a closer look, then click on the KEYS inside to add them to your inventory.

- A hidden object area will appear over the piano: click on it to enter.
- Find the objects listed at the bottom of the screen: objects are randomized. The boxed locations show areas you can click on to reveal the hidden objects listed in red. The Key Item is circled and shown below.
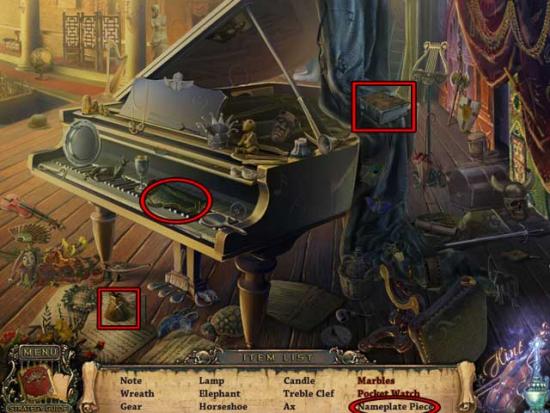
- Upon completing the area, the NAMEPLATE PIECE (2/4) will be added to your inventory.
- Leave the Theater and return to the Alley Bakery.
Alley Bakery
- Take a closer look at the locked cellar panel in the background.
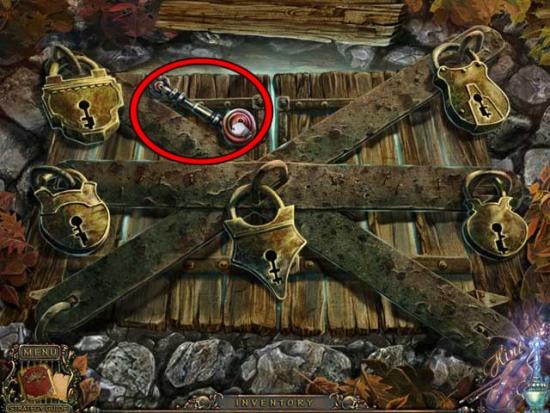
- Use the KEYS on the door to trigger a puzzle.
- Find the key that matches each lock to open the doors: the solution is shown below:
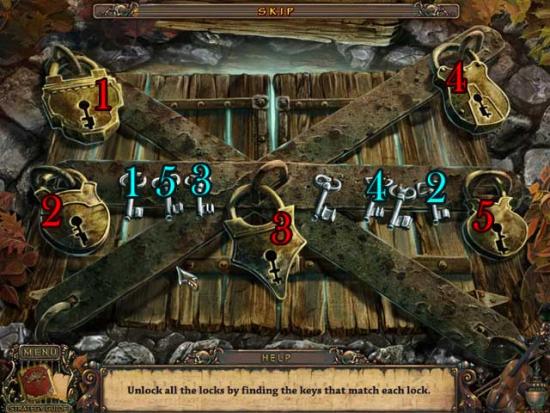
- Once finished, click on the doors to open them, then proceed inside.
Wine Cellar
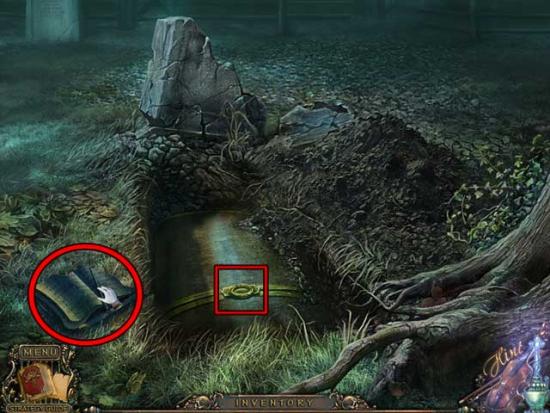
- Take a closer look at the loose floorboard at the bottom of the stairs.
- Use the CROWBAR to remove the board, revealing the SHIELD FRAGMENT (2/2) inside. Click on it to add it to your inventory.
- Return to Maestro Park.
Maestro Park
- Take a closer look at the shield on the fence to the left.
- Place the SHIELD FRAGMENT (2/2) inside the cavity to complete the shield, revealing a new path through the fence.
- Enter down the new path.
Chapter 4: Maestro Park
Fountain
- From here, continue down the path to the right.
Lake Lookout
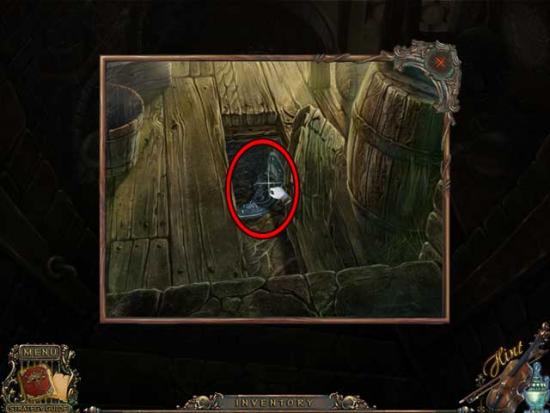
- Click on the hidden object area to enter.
- Find the objects listed at the bottom of the screen: objects are randomized. The boxed locations show areas you can click on to reveal the hidden objects listed in red. The Key Item is circled and shown below.
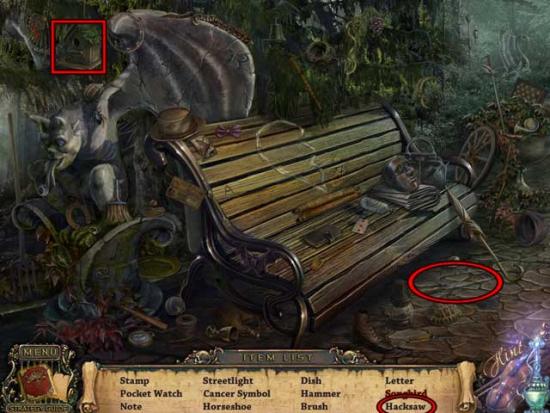
- Upon completing the area, the HACKSAW will be added to your inventory.
- Return to the Fountain.
Fountain
- Proceed forward, up the steps straight ahead in the far background.
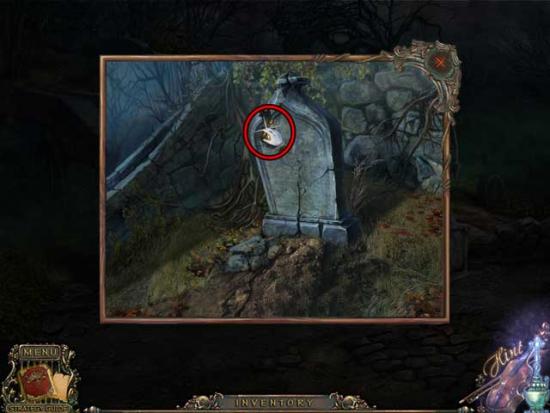
Cemetery Steps
- Take a closer look at the grave on the right: click on the sparkling object embedded in the tombstone to add the VIOLIN to your inventory.
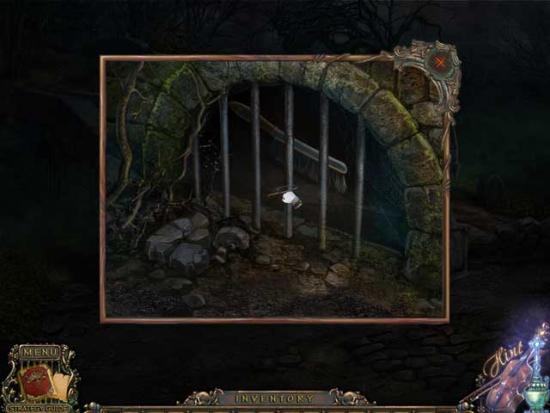
- Take a closer look at the barred grate beneath the steps on the left.
- Use the HACKSAW on the bars, then retrieve the BRUSH inside to add it to your inventory.
- Backtrack all the way back to the Wine Cellar.
Wine Cellar
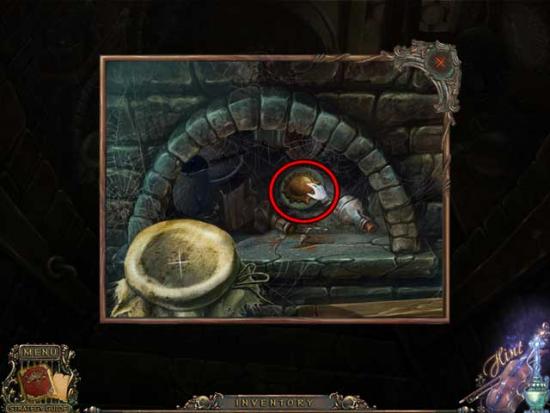
- Take a closer look at the stone oven on the right. Use the BRUSH to clear the cobwebs away, then click on the SUN to add it to your inventory.
- Return to the Cemetery Steps.
Cemetery Steps
- Take a closer look at the base of the state on the left.
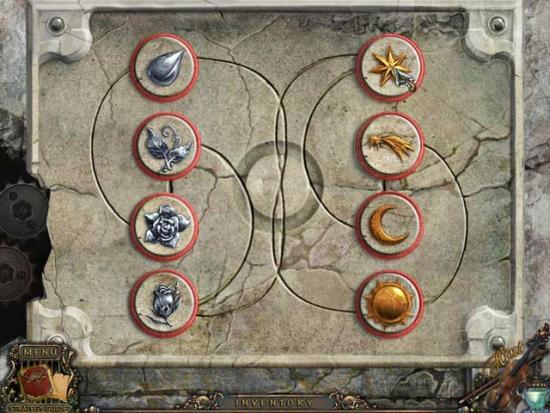
- Place the ROSE and SUN pieces into the empty slots to trigger a puzzle.
- Click and drag the various pieces into their correct positions: the middle area is a temporary space. For the silver pieces on the left, drag the Leaves to the middle, then the Rose to the prior position of the leaves, etc in that order: it will eventually lead to all pieces being in their proper locations. For the gold pieces on the right, follow the exact pattern, only reversed: drag the Moon into the middle space, followed by the Star to the Moon’s place, and continue in that order: it will eventually lead to all pieces being in their proper locations. The solution is shown below:
- Upon completing the puzzle, the panel will open, revealing the VALVE. Click on it to add it to your inventory.
- Return to the Fountain.
Fountain
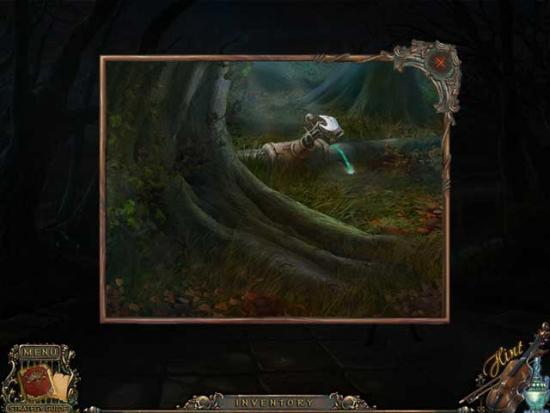
- Take a closer look at the area on the left: it’s marked by fluttering fireflies.
- Use the VALVE on the water pipe, then click on it to shut the water off.
- A hidden object scene will appear over the drained fountain. Click on it to enter.
- Find the objects listed at the bottom of the screen: objects are randomized. The boxed locations show areas you can click on to reveal the hidden objects listed in red. The Key Item is circled and shown below.
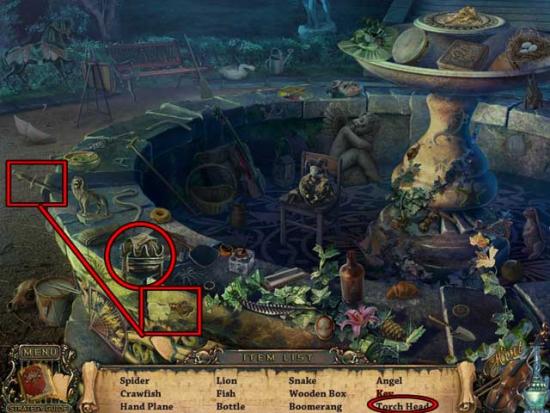
- Upon completing the area, the TORCH HEAD will be added to your inventory.
- Return to the Cemetery Steps.
Cemetery Steps
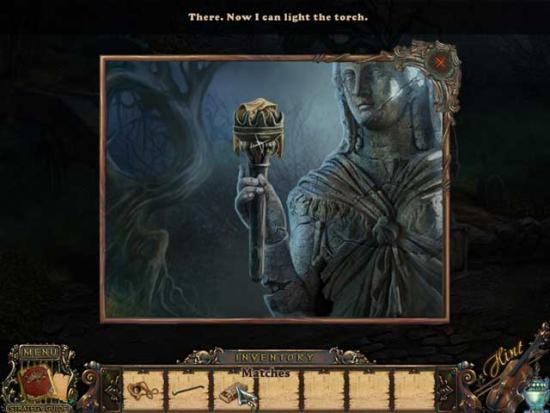
- Take a closer look at the statue on the right.
- Use the TORCH HEAD on the missing upper portion of the statue’s torch, then use the MATCHES to light it. Click on the TORCH to add it to your inventory.
- Take a closer look at the pile of brush and vines at the top of the steps: use the TORCH to burn the obstruction away and continue up the steps to the Cemetery.
Cemetery
- Examine the base of the tree (near where the mysterious eyes are watching you). Pick up the COOKIE and add it to your inventory.
- Take a closer look at the bird’s nest higher up in the tree: click on the SKULL to add it to your inventory.
- Examine the ruined grave in the middle of the screen.
- Click on the NAMEPLATE PIECE (3/4) to add it to your inventory, then take a closer look at the coffin.
- Use the SKULL you found in the bird’s nest on the indentation, then click on the coffin to open it.
- Take a closer look at the coffin pillow: click on the PIANO to add it to your inventory.
- Now before you leave, take a closer look at the lone grave in the background on the left: it’s the grave of Edgar Smith. Click on the MEDALLION to add it to your inventory (you will now have two MEDALLIONS).
- Return to the Fountain.
Fountain
- Take a closer look at the bench on the right. Use the COOKIE on the crow, then click on the COIN to add it to your inventory.
- Proceed to the right.
Lake Lookout
- Take a closer look at the telescope on the railing. Use the COIN on the slot on the left to activate it.
- Use the viewfinder arrows to take a closer look at the gazebo island, and notice the odd symbols etched in the stone: Horn w/Valves, Drum w/Drumsticks, Piano w/Piano Keys, and Violin w/Skull.
- Exit the telescope, and a hidden object scene will appear. Click on it.
- Find the objects listed at the bottom of the screen: objects are randomized. The boxed locations show areas you can click on to reveal the hidden objects listed in red. The Key Item is circled and shown below.
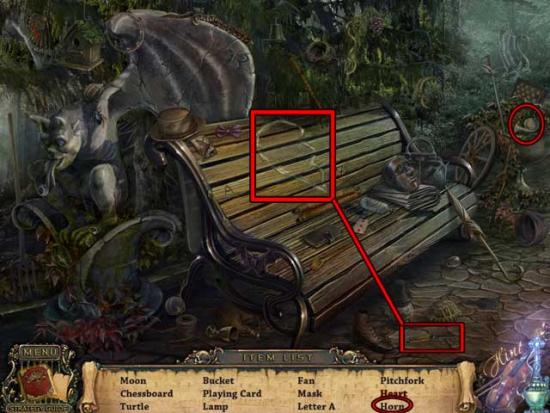
- Upon completing the area, the HORN will be added to your inventory.
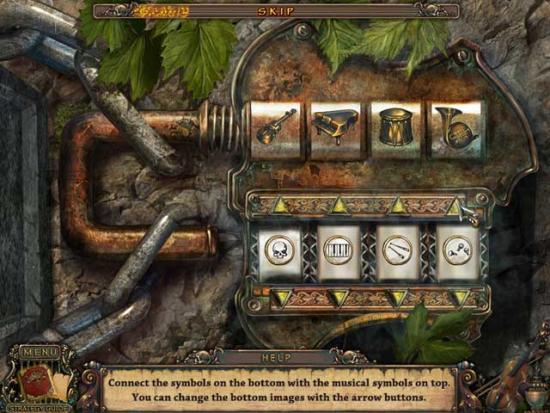
- Take a closer look at the padlock chaining the boat to the stone dock.
- Use the VIOLIN, the PIANO, and the HORN in their proper slots to trigger a puzzle.
- Using the clues given by the stone etchings on the island you saw via the telescope, match each of the symbols with their appropriate instruments: the solution is shown below.
- Now you can use the boat. Click on it to continue towards the Island Gazebo.
Island Gazebo
- Click on the MASK and the FIDDLESTICK to add them to your inventory.
- Proceed back to the Maestro Statue.
Maestro Statue
- Place the NAMEPLATE PIECE (3/4) in the groove in the statue, then continue ahead to the Wine Cellar.
Chapter 5: The Catacombs
Wine Cellar
- Take a closer look at the large barrel at the back of the screen.
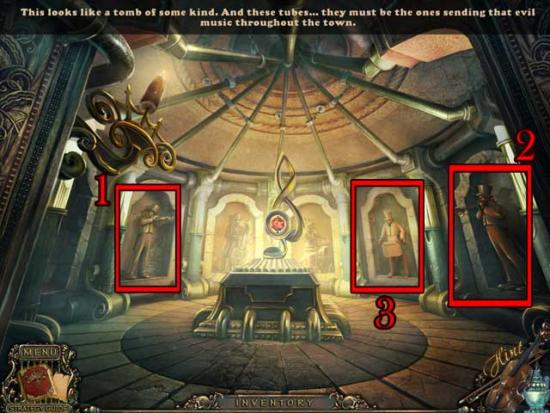
- Use the MASK on the golden maestro body to trigger a puzzle.
- Click on two of the symbols to swap their positions: once a symbol is in its proper location, it will glow yellow. The solution is shown below:
- Proceed through the new passageway.
Catacombs
- Continue down the passageway on the left.
Boiler Room
- Click on the hidden object area on the left.
- Find the objects listed at the bottom of the screen: objects are randomized. The boxed locations show areas you can click on to reveal the hidden objects listed in red. The Key Item is circled and shown below.
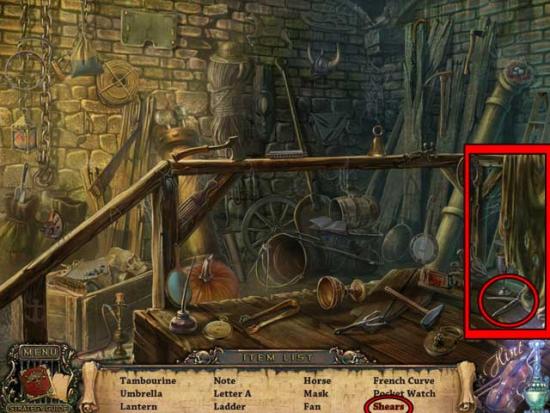
- Upon completing the area, the SHEARS will be added to your inventory.
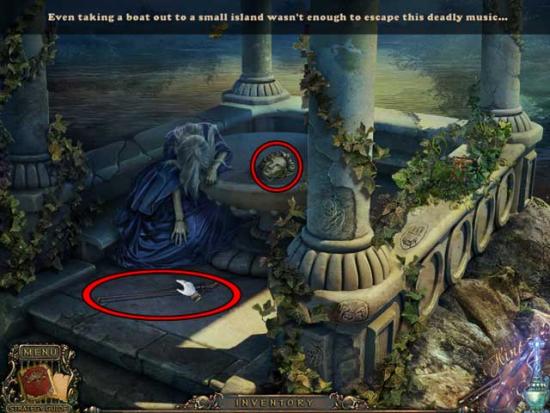
- Return to the Island Gazebo.
Island Gazebo
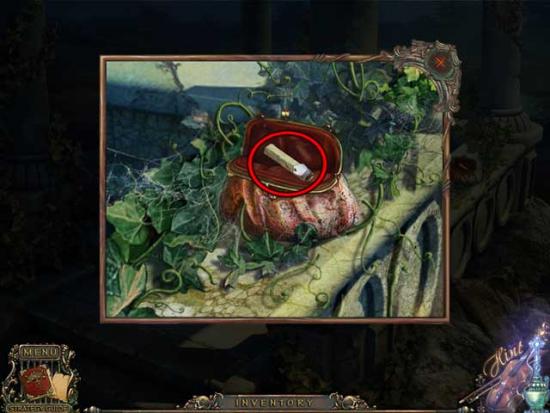
- Take a closer look at the ivy on the stone banister on the right.
- Use the SHEARS to cut the ivy away, then click on the purse to open it. Collect the CHALK inside to add it to your inventory.
- Return to the Fountain.
Fountain
- Click on the re-appeared hidden object area.
- Find the objects listed at the bottom of the screen: objects are randomized. The boxed locations show areas you can click on to reveal the hidden objects listed in red. The Key Item is circled and shown below.
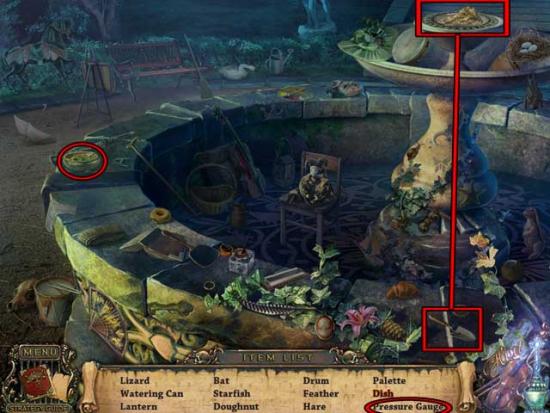
- Upon completing the area, the PRESSURE GAUGE will be added to your inventory.
- Return to the Catacombs.
Catacombs
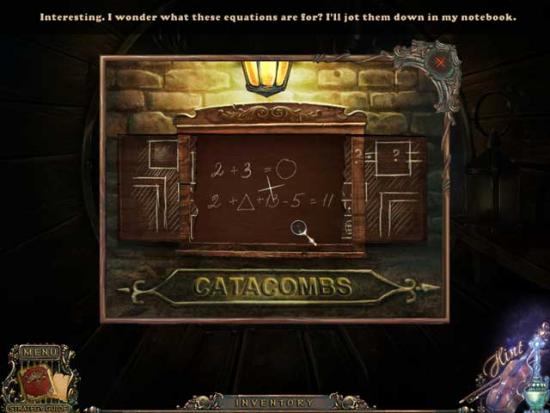
- Take a closer look at the board on the wall straight ahead between the two passageways.
- Click on the board to open it, then use the CHALK on the innermost part to reveal an equation: this will give you a crucial hint to an upcoming puzzle.
- Continue down the passage to the left.
Boiler Room
- Click on the re-appeared hidden object area.
- Find the objects listed at the bottom of the screen: objects are randomized. The boxed locations show areas you can click on to reveal the hidden objects listed in red. The Key Item is circled and shown below.
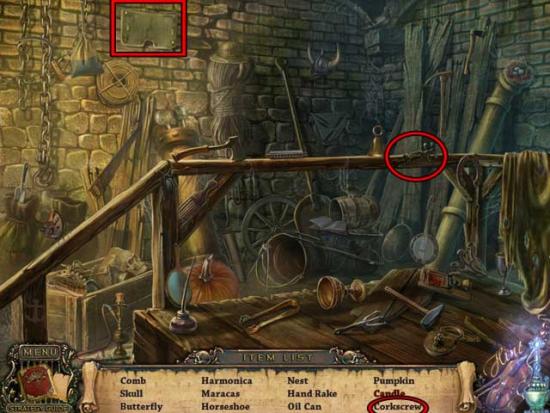
- Upon completing the area, the CORKSCREW will be added to your inventory.
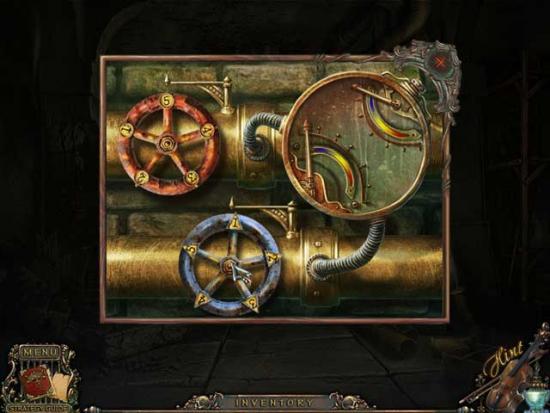
- Take a closer look at the pipes to the left of the boiler and to the right of the prior location of the hidden object scene.
- Use the PRESSURE GAUGE on the gap between the hoses to trigger a puzzle.
- Rotate the pressure valves to turn off the steam: the math equation from the previous room will give you a hint. The solution is to rotate the red valve to 5 and the blue valve to 1 to shut the pressure off, and is shown below:
- Exit the Boiler Room and return to the Wine Cellar.
Wine Cellar
- Take a closer look at the wine bottle on the shelf on the right.
- Use the CORKSCREW to remove the cork, then click to add the WINE BOTTLE to your inventory. Don’t forget to also pick up the HANDLE, which will be added to your inventory as well.

- Take a closer look at the stone oven on the left.
- Use the WINE BOTTLE on the strainer on the left, then click on the TRUMPET VALVES to add them to your inventory.
- Now, return to the Catacombs and proceed down the passage to the right.
Tomb
- Now, there’s a couple things you can do in this room before continuing on.
- Notice there’s four musician statues in this room, each missing something necessary to play their instrument.
? 1. Use the FIDDLESTICK on the violinist.
? 2. Use the TRUMPET VALVES on the trumpeter.
? 3. Use the HANDLE on the organist.
- Upon restoring the organ to working order, a secret passageway will open. Continue through the passageway: we’ll return later to restore the cellist.
Chapter 6: The Workshop
Skull Passage
- There’s nothing you can do here just yet, so continue up the steps to Union St.
Union St.
- Click on the hidden object area.
- Find the objects listed at the bottom of the screen: objects are randomized. The boxed locations show areas you can click on to reveal the hidden objects listed in red. The Key Item is circled and shown below.
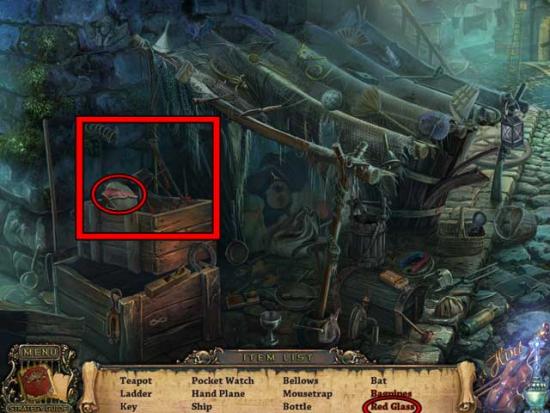
- Upon completing the area, the RED GLASS will be added to your inventory.
- Take a closer look at the wooden crate on the right.
- Use the CROWBAR to break apart the wooden crate. Pick up the DOOR KNOCKER PIECE (1/2) to add it to your inventory. Don’t forget to also click on the BOARDS to add them to your inventory.
- Continue up the street.
Union St. Crossing
- Continue forward to the Mansion Entrance.
Mansion Entrance
- Take a closer look at the mailbox to the right of the mansion doors. Click on the bottom slot to open it and obtain the DOOR KNOCKER PIECE (2/2) to be added to your inventory.

- Return to Union St.
Union St.
- Take a closer look at the door of the workshop on the right.
- Use the DOOR KNOCKER PIECES on the slot to open the door and proceed inside.
Workshop
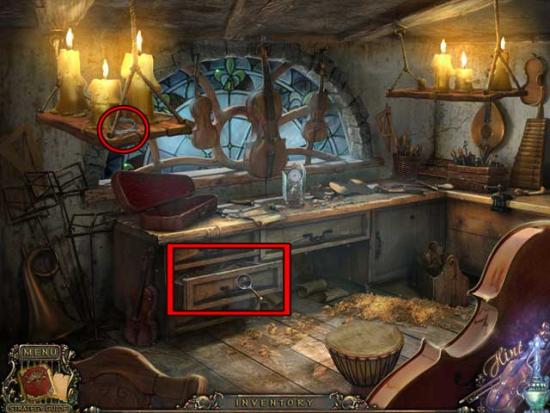
- Take a closer look at the candle shelf on the left. Pick up the CELLO STRINGS and add them to your inventory.
- Click on the middle drawer on the left to open it and take a closer look inside.
- Inside, pick up the HAMMER to add it to your inventory, and note the sign that says “7am”.
- Return to the Tomb.
Tomb
- Take a closer look at the statue of the cellist (he’s on the left, next to the violinist).
- Use the CELLO STRINGS on the cello to restore it. A pedestal will raise in the center of the room.
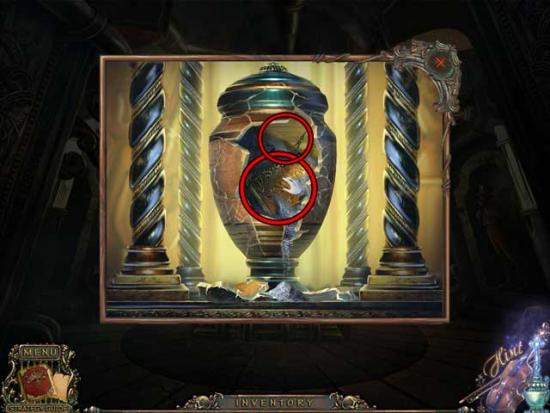
- Take a closer look at the Urn on the pedestal.
- Use the HAMMER on the Urn to break it open, and collect the NAMEPLATE PIECE (4/4) and the CLOCK HANDS to add them to your inventory.
- Return to the Maestro Statue.
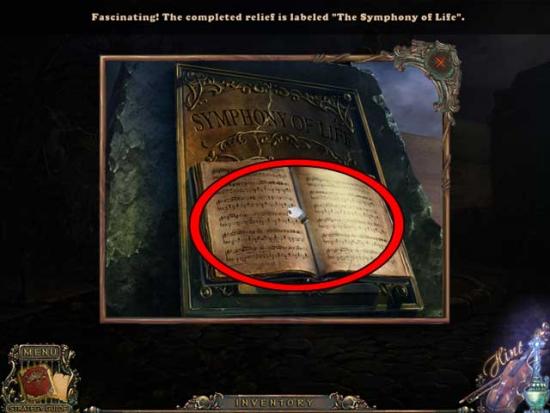
Maestro Statue
- Take a closer look at the statue nameplate. Place the final NAMEPLATE PIECE (4/4) into the slot to restore it. Click on the sheet music on the statue to obtain the SYMPHONY OF LIFE.
- Return to Union St.
Union St.
- Enter the hidden object area.
- Find the objects listed at the bottom of the screen: objects are randomized. The boxed locations show areas you can click on to reveal the hidden objects listed in red. The Key Item is circled and shown below.
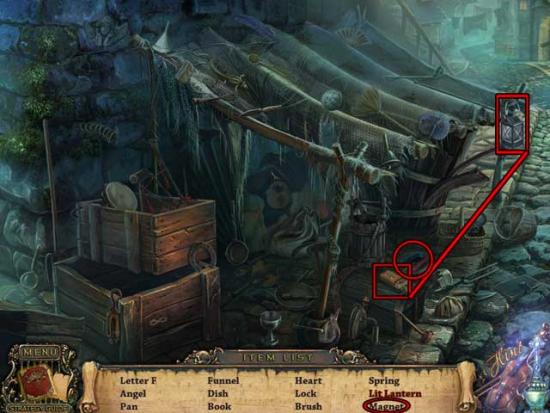
- Upon completing the area, the MAGNET will be added to your inventory.
- Return to the Skull Passage.
Skull Passage
- Take a closer look at the open pipe on the left.
- Use the MAGNET on the Skull Key inside to obtain the KEY.
- Take a closer look at the window-like grate on skulls on the right.
- Use the KEY on the lock on the upper right to remove the bars and trigger a puzzle.
- Remove pairs of identical skulls until only one remains (smack in the middle). The solution is shown below:
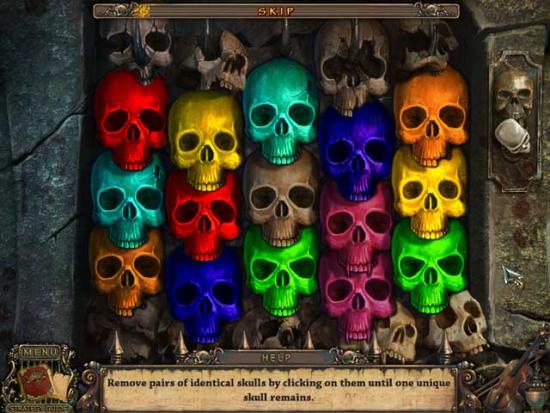
- Once you’ve narrowed down the final skull, click on it to reveal the TREBLE CLEF. Click on it to add it to your inventory.
- Return to the Workshop.
Workshop
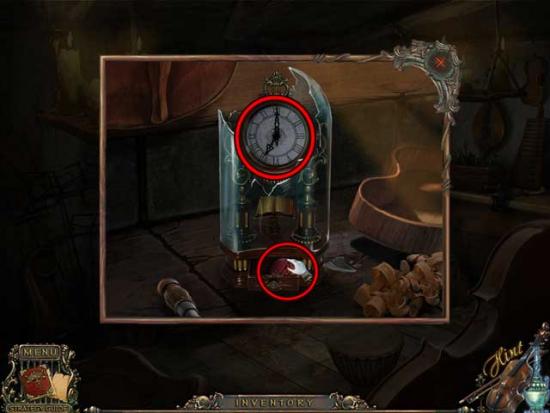
- Take a closer look at the broken clock on the center of the work desk.
- Use the CLOCK HANDS on the clock, then move them so they’re at the proper position for “7am”. The solution is shown below. Done right, a small drawer at the bottom will open. Click on the NOTE to add it to your inventory.
Exit the Workshop and return to the Mansion Entrance.
Chapter 7: The Mansion
Mansion Entrance
- Take a closer look at the panel to the left of the entrance doors.
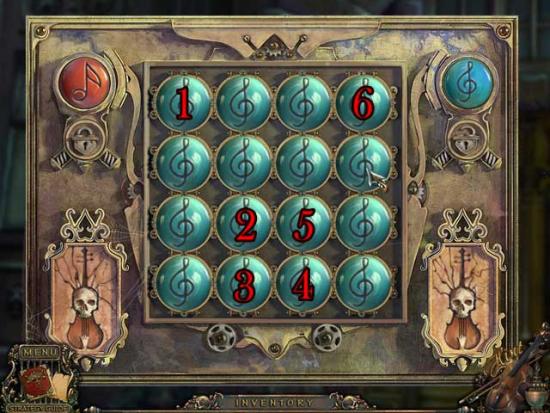
- Place the TREBLE CLEF and the NOTE into their proper locations to trigger a puzzle.
- Change all the notes to treble clefs by clicking on them: the solution is shown below. (Please note, there are multiple solutions to this puzzle.)
- Enter the Mansion.
Foyer
- Click on the hidden object scene at the back of the room.
- Find the objects listed at the bottom of the screen: objects are randomized. The boxed locations show areas you can click on to reveal the hidden objects listed in red. The Key Item is circled and shown below.
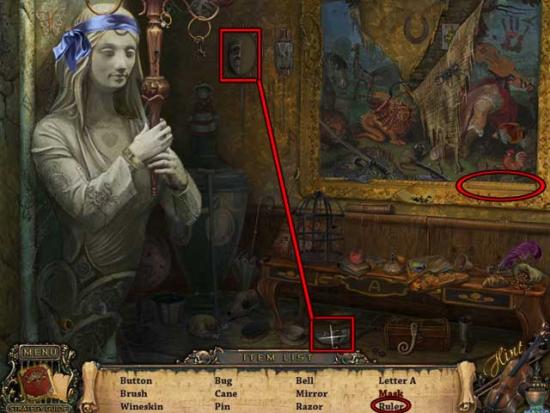
- Upon completing the area, the RULER will be added to your inventory.
- Take a closer look at the door on the right. Use the RULER on the gap between doors to lift the lock and gain access to the Kitchen.
Kitchen
- Take a closer look at the curtains on the right.
- Click twice on the curtains to open them all the way, then click on the CANDLESTICK to add it to your inventory.
- Return to the Foyer.
Foyer
- Take a closer look at the statue on the left.
- Use the CANDLESTICK on the statue’s empty hands: this will trigger its mouth to open. Click on the NAILS to add them to your inventory.
- Exit to the Mansion Entrance.
Mansion Entrance
- Take a closer look at the ladder on the left.
- Use the BOARDS, NAILS, and HAMMER on the ladder to repair it, then proceed up.
Roof
- Click on the hidden object scene.
- Find the objects listed at the bottom of the screen: objects are randomized. The boxed locations show areas you can click on to reveal the hidden objects listed in red. The Key Item is circled and shown below.
- Upon completing the area, the BLUE GLASS will be added to your inventory.
- Take a closer look at the broken gutter just to the right of the ladder. Pick up the GREEN GLASS to add it to your inventory.
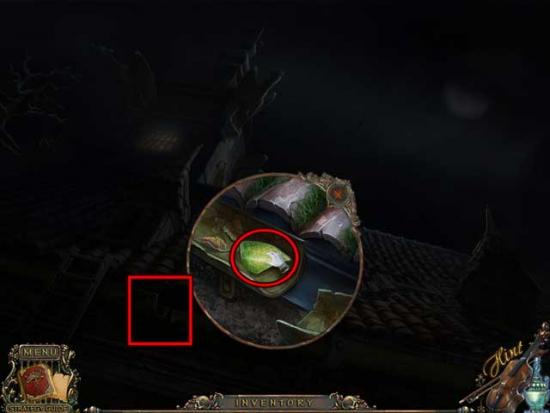
- Take a closer look at the window above.
- Place the RED GLASS, GREEN GLASS, and BLUE GLASS into their proper positions: the solution is shown below.

- Click on the completed window to open it and proceed into the Attic.
Chapter 8: The Attic
Attic
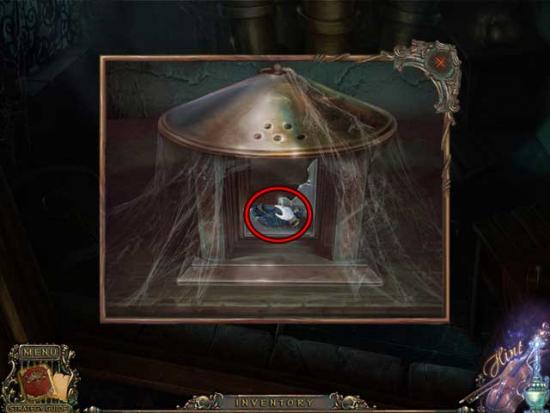
- Pick up the FEATHER DUSTER on the right, then take a closer look at the lantern in the upper right corner.
- Click on the glass of the lantern to break/remove it, then click on the MOTH to add it to your inventory.
- Return to the Kitchen inside the mansion.
Kitchen
- Take a closer look at the spill on the table. Use the FEATHER DUSTER to remove the flour and reveal part of the code for the mansion safe.
- Return to the Foyer and proceed up the stairs.
Stairway
- Take a closer look at the Note on the pillar: it will provide the final clue needed for the safe.
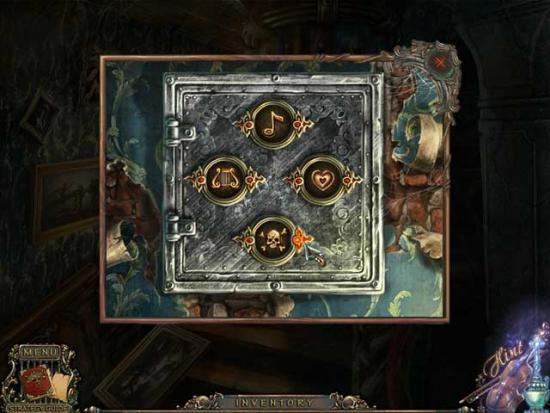
- Click on the rightmost painting on the left (of a man and woman) to reveal the safe, then click on it for a closer view.
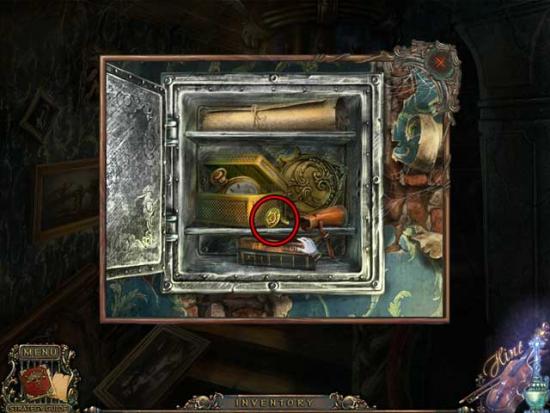
- Input the correct code into the safe using the clues in your journal: the solution is shown below.
- Collect the SIGNET RING from inside the safe to add it to your inventory.
- Return to the Foyer.
Foyer
- Click on the hidden object area.
- Find the objects listed at the bottom of the screen: objects are randomized. The boxed locations show areas you can click on to reveal the hidden objects listed in red. The Key Item is circled and shown below.
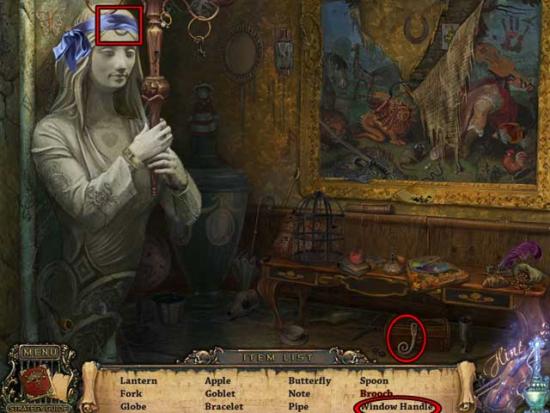
- Upon completing the area, the WINDOW HANDLE will be added to your inventory.
- Take a closer look at the door at the back of the room. Use the SIGNET RING on the lock to open it and proceed into the office.
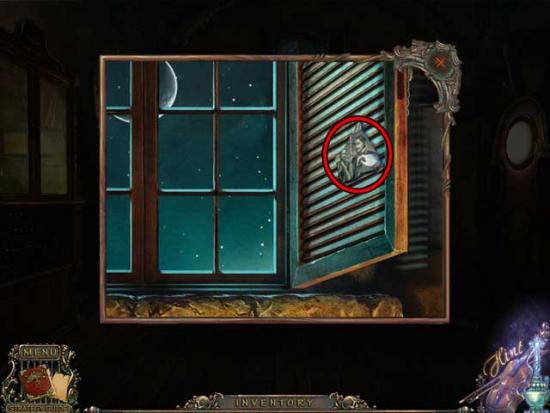
Office
- Take a closer look at the window above the desk.
- Use the WINDOW HANDLE on the window to open it, then collect the PHOTO PIECE hidden inside to add it to your inventory.
- Take a closer look at the desk in the center of the room.
- Use the PHOTO PIECE on the desk to trigger a puzzle.
- Reassemble the photos, using the right click to rotate pieces as necessary. The solution is shown below:
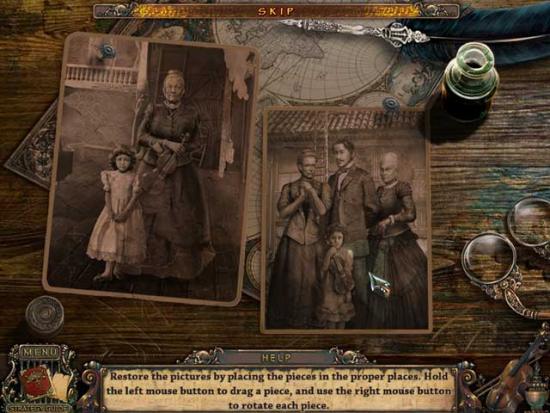
- Upon completing the puzzle, pick up the KEY that appears to add it to your inventory.
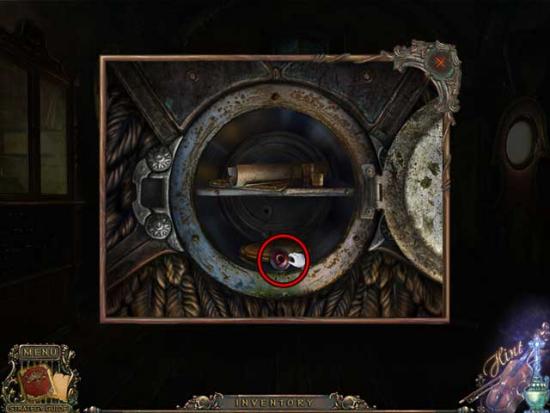
- Examine the large eagle statue on the left.
- Use the KEY to open the safe, then collect the BUTTON inside.
- Return to the Roof.
Roof
- Click on the hidden object area.
- Find the objects listed at the bottom of the screen: objects are randomized. The boxed locations show areas you can click on to reveal the hidden objects listed in red. The Key Item is circled and shown below.
- Upon completing the area, the KEY will be added to your inventory.
- Continue into the Attic.
Attic
- Click on the trapdoor in the upper left corner of the screen.
- Use the BUTTON on the puzzle to activate it.
- Rotate the rings until they recreate the solution image shown below: the process of reaching the solution is randomized. Upon completing the puzzle, use the KEY on the lock that appears to open the trapdoor.

- Continue into the next room.
Chapter 9: Emily’s Home
Upstairs Hall
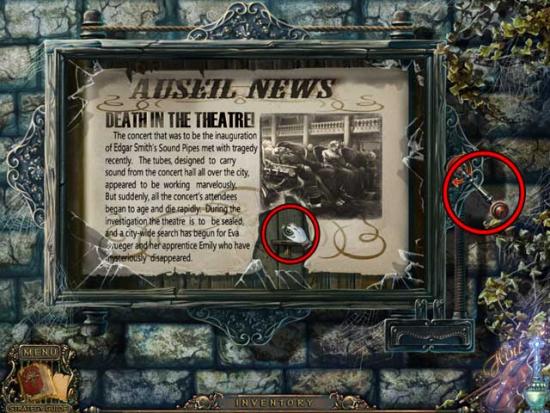
- Take a look at the Note lying on the floor: note the position of the musician on the left, you’ll need it to solve a puzzle later.
- Follow the bend of the hall to access the Bathroom.
Bathroom
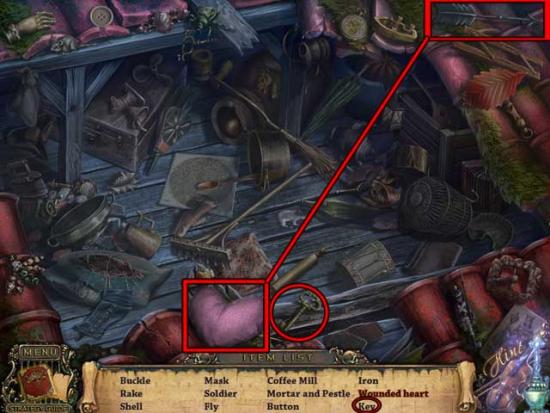
- Click on the blanket hanging in front of the sink and the shower curtain covering the tub to move them out of the way. Moving the shower curtain will reveal a hidden object scene. Click on the area to enter.
- Find the objects listed at the bottom of the screen: objects are randomized. The boxed locations show areas you can click on to reveal the hidden objects listed in red. The Key Item is circled and shown below.
- Upon completing the area, the DOLL HEAD will be added to your inventory.
- Return to the Upstairs Hall.
Upstairs Hall
- Enter the door at the back of the hall.
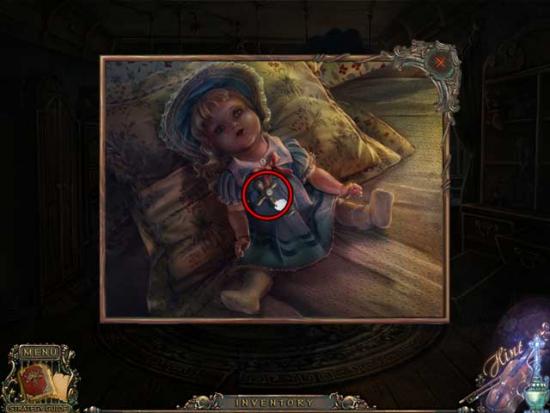
Emily’s Room
- Zoom in on the bed.
- Use the DOLL HEAD on the doll body to restore it and reveal the VALVE. Click on it to add it to your inventory.
- Return to the Bathroom.
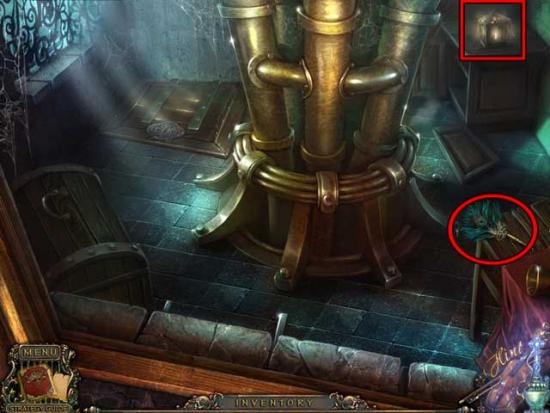
Bathroom
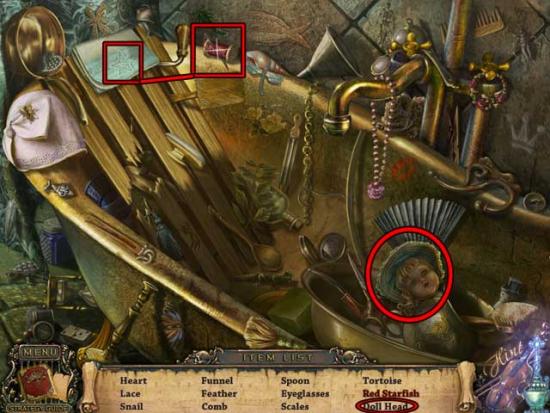
- Enter the hidden object area over the bathtub.
- Find the objects listed at the bottom of the screen: objects are randomized. The boxed locations show areas you can click on to reveal the hidden objects listed in red. The Key Item is circled and shown below.
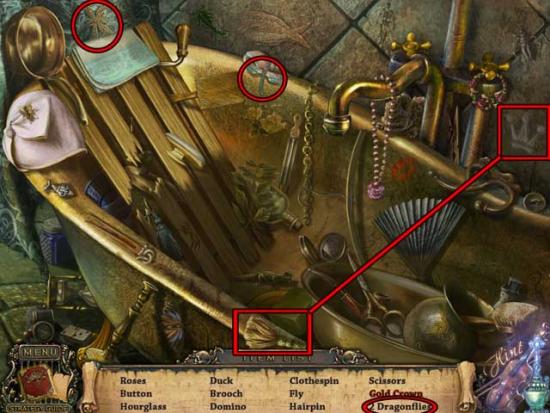
- Upon completing the area, the DRAGONFLY will be added to your inventory.
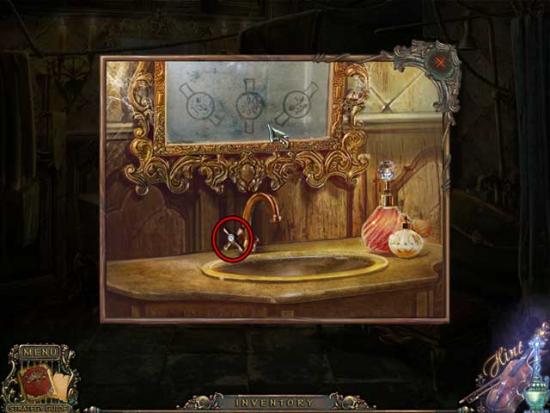
- Examine the sink.
- Use the VALVE on the faucet to turn on the hot water, then note the images that appear in the mirror: you’ll need them to solve a puzzle.
- Return to the Upstairs Hall.
Upstairs Hall
- Take a closer look at the door on the left.
- Rotate the dials so that they match the clue shown in the bathroom mirror: the solution is shown below.
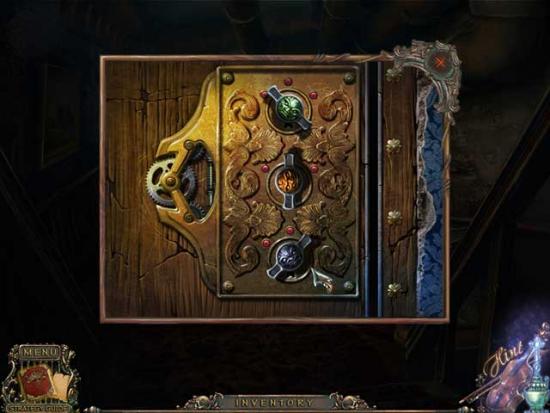
- Enter through the door.
Bedroom
- Click on the hidden object area.
- Find the objects listed at the bottom of the screen: objects are randomized. The boxed locations show areas you can click on to reveal the hidden objects listed in red. The Key Item is circled and shown below.
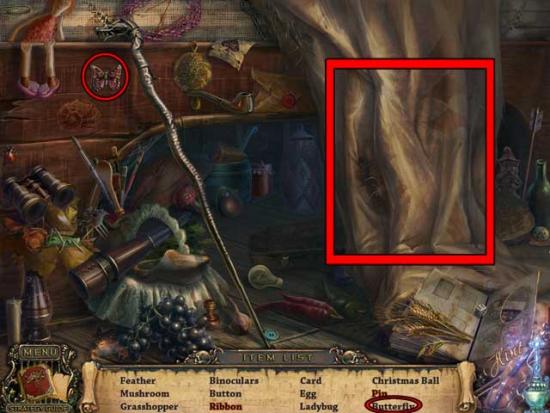
- Upon completing the area, the BUTTERFLY will be added to your inventory.
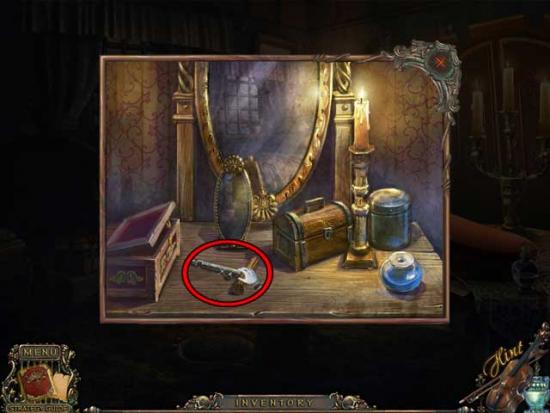
- Take a closer look at the dresser in the corner of the room. Pick up the SWITCH to add it to your inventory.
- Return to the Attic.
Attic
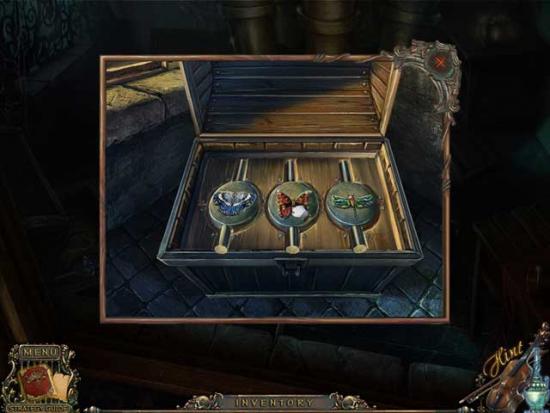
- Take a closer look at the chest in the lower left corner of the screen and open it.
- Place the BUTTERFLY, the MOTH, and the DRAGONFLY into their proper slots inside, then collect the LADDER that appears to add it to your inventory.
- Return to the Upstairs Hall.
Upstairs Hall
- Take the first right, where the steam can be seen pouring into the hall.
Ladder Platform
- Use the LADDER on the blue peg in the center of the screen, then climb down into the next area.
Basement
- Click on the hidden object area.
- Find the objects listed at the bottom of the screen: objects are randomized. The boxed locations show areas you can click on to reveal the hidden objects listed in red. The Key Item is circled and shown below.
- Upon completing the area, the KEY will be added to your inventory.
- Examine the Note on the floor: note the position of the musician, you will need this to solve a puzzle later.
- Return to the Bedroom.
Bedroom
- Enter the hidden object area.
- Find the objects listed at the bottom of the screen: objects are randomized. The boxed locations show areas you can click on to reveal the hidden objects listed in red. The Key Item is circled and shown below.
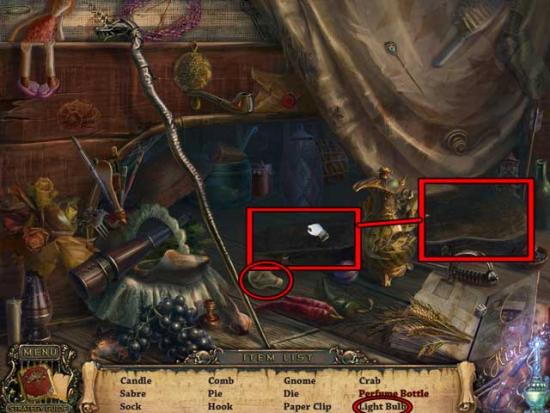
- Upon completing the area, the LIGHT BULB will be added to your inventory.
- Take a closer look at the violin case on the table on the right. Use the KEY to open it, then take a closer look inside.
- Examine the Note inside the case, and note the position of the violinist: it will come in handy later.
- Return to Emily’s Room.
Emily’s Room
- Zoom in on the desk by the window to enter a puzzle. Note the puzzle will not activate until you’ve read all the Notes (mentioned above) that have a musician on them.
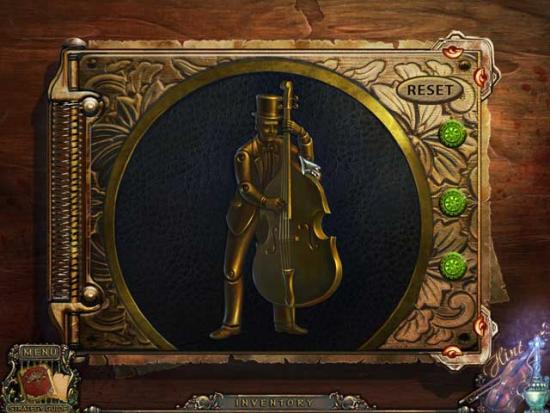
- Arrange the joints of each of the musicians so they’re in their proper locations: the solutions are shown below. Use the left and right mouse clicks to move the pieces either clockwise or counterclockwise.
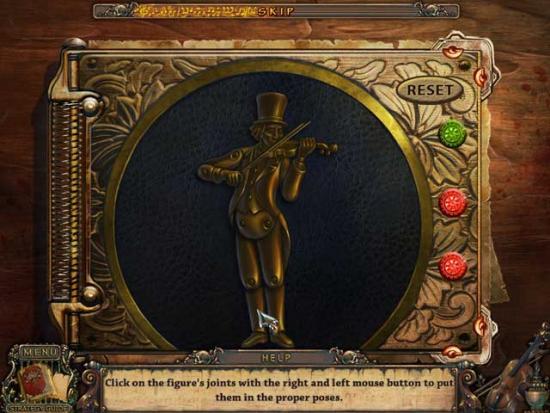
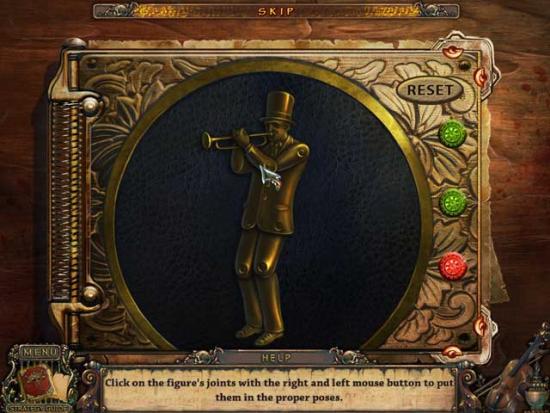
- Upon completing the puzzle, a new Note will appear. Click on the MEDALLION (#3) to add it to your inventory.
- Return to the Basement.
Chapter 10: The Maestro
Basement
- Click on the hidden object area.
- Find the objects listed at the bottom of the screen: objects are randomized. The boxed locations show areas you can click on to reveal the hidden objects listed in red. The Key Item is circled and shown below.
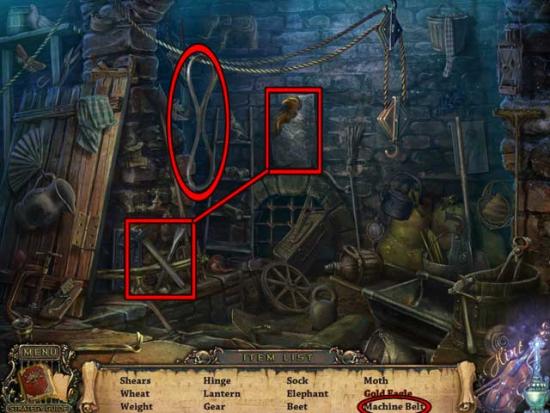
- Upon completing the area, the MACHINE BELT will be added to your inventory.
- Take a closer look at the machine on the left.
- Place the LIGHT BULB, the MACHINE BELT, and the SWITCH in their proper locations, then click on the switch to restore power.
- Proceed down the now-lit hallway and examine the door.
- Place the three MEDALLIONS into each of the slots, triggering a puzzle.
- Use the arrows around the picture to slide the various tiles into their proper locations: there are multiple ways of reaching the solution, with the final solution shown below.

- Continue into the next room.
Music Hall
- Take a closer look at the mirror on the left. Use the CROWBAR to shatter it.
- Examine the music stand in front of the violinist. Place the SYMPHONY OF LIFE onto the stand.
- Once Emily drops the VIOLIN (you will have to wait a few moments), pick it up, then take a closer look at the fireplace.
- Use the VIOLIN in the fireplace, then watch the ending unfold.
Congratulations! You’ve completed Maestro: Music of Death! Continue to “Epilogue: Bonus Adventure” to read the walkthrough for the Collector’s Edition bonus adventure.
Epilogue: Bonus Adventure
The Bonus Adventure is for the Maestro: Music of Death Collector’s Edition only. In order to access it: Go to the Main Menu, select Extras, then click Play to begin!
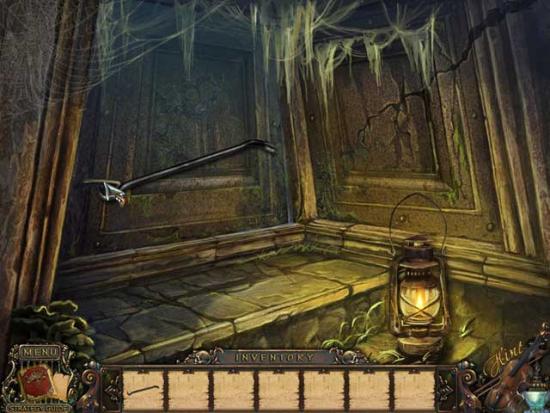
Music Hall
- Pick up the CROWBAR lying on the floor to add it to your inventory, then take a closer look at the broken mirror.
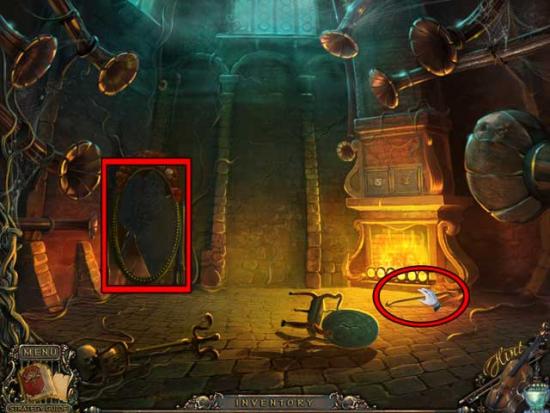
- Click on the GLASS SHARD in the close-up of the broken mirror to add it to your inventory.
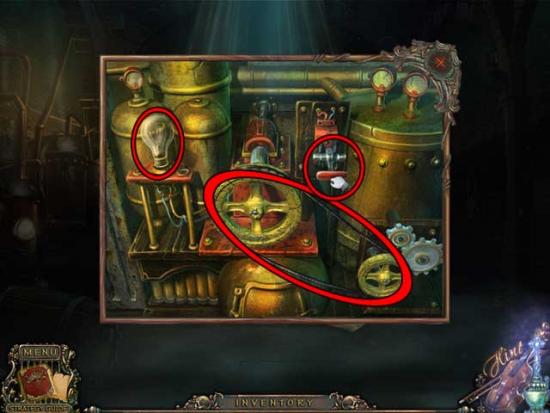
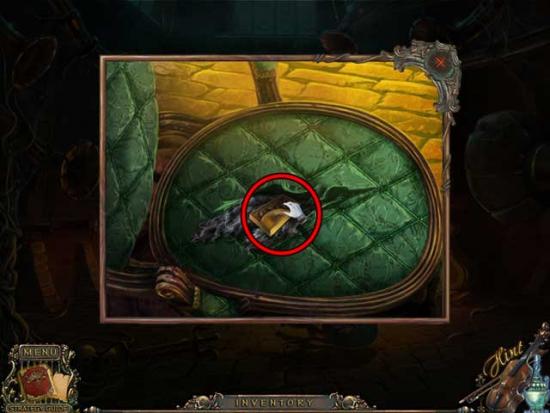
- Take a closer look at the green chair lying on the floor. Use the GLASS SHARD to cut it open and collect the PUZZLE PIECE.
- Zoom in on the panel above the fireplace. Use the PUZZLE PIECE to trigger a puzzle.
- Restore both images to complete the puzzle: use the right mouse button to rotate as necessary. The solution is shown below:
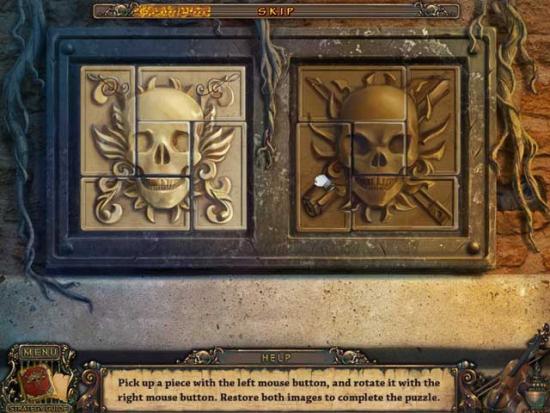
- Upon completing the puzzle, a Secret Passageway will open. Click on it to enter.
Secret Passageway
- Use the CROWBAR to remove the bindings holding the door shut, then proceed outside.
Maestro Statue
- Continue left to Maestro Park.
Maestro Park
- Enter the hidden object area.
- Find the objects listed at the bottom of the screen: objects are randomized. The boxed locations show areas you can click on to reveal the hidden objects listed in red. The Key Item is circled and shown below.
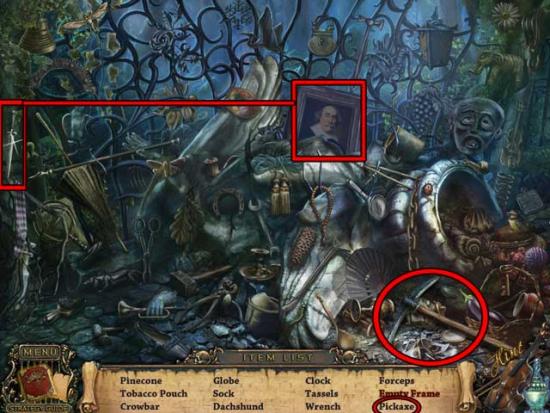
- Upon completing the area, the PICKAXE will be added to your inventory.
- Return to the Maestro Statue.
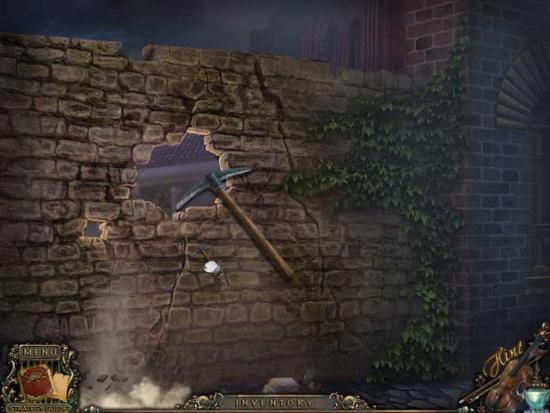
Maestro Statue
- Take a closer look at the wall in the background on the right.
- Use the PICKAXE on the wall to break it apart, then proceed through into the next area.
Courtyard
- Click on the hidden object area.
- Find the objects listed at the bottom of the screen: objects are randomized. The boxed locations show areas you can click on to reveal the hidden objects listed in red. The Key Item is circled and shown below.
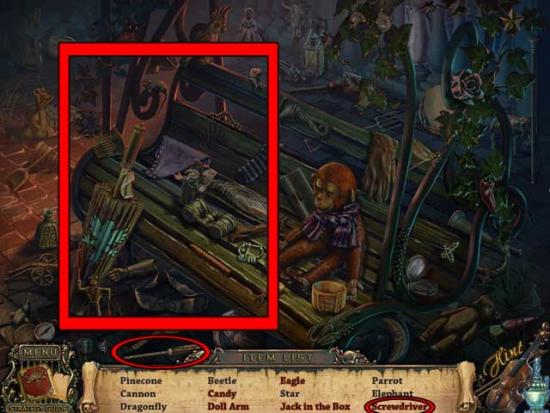
- Upon completing the area, the SCREWDRIVER will be added to your inventory.
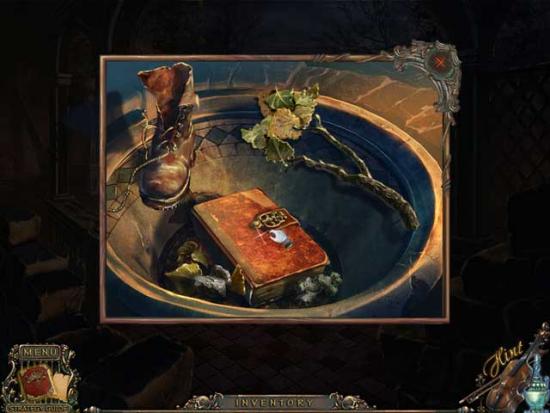
- Take a closer look at the fountain in the middle of the courtyard. Remove the items inside the fountain until you find the BOOK. Click on it to add it to your inventory.
- Exit the Courtyard and proceed to the Smithy Yard.
Smithy Yard
- Take a closer look at the bottom of the center shed post: click on the SHEARS PIECE to add it to your inventory.
- Enter the Smithy.
Smithy
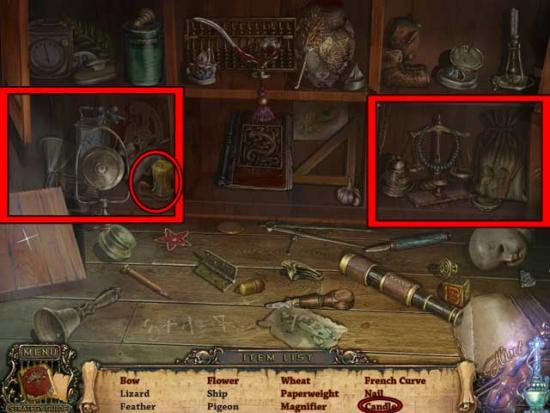
- Click on the hidden object area.
- Find the objects listed at the bottom of the screen: objects are randomized. The boxed locations show areas you can click on to reveal the hidden objects listed in red. The Key Item is circled and shown below.
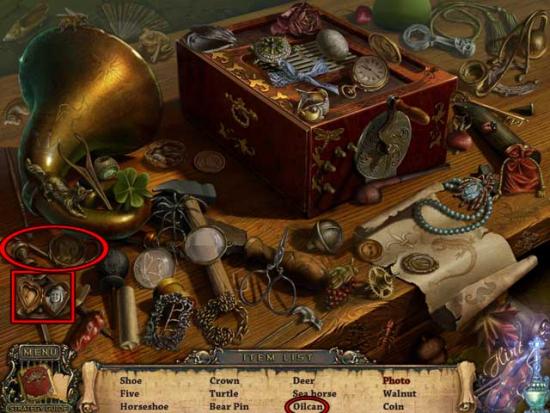
- Upon completing the area, the OILCAN will be added to your inventory.
- Proceed to the Town Entrance.
Town Entrance
- Take a closer look at the discarded suitcase.
- Use the SCREWDRIVER on the suitcase latch to undo the screws and obtain the BOLT. Take note of the Treble Clef design that appears.
- Return to the Courtyard.
Courtyard
- Before entering the hidden object area, click on the ruined railing on the left.
- Place the SHEARS PIECE and the BOLT on the banister, then drag one half of the Shears onto the other, and use the Bolt to piece them together. Click to acquire the GARDEN SHEARS which will be added to your inventory.
- Click on the hidden object area.
- Find the objects listed at the bottom of the screen: objects are randomized. The boxed locations show areas you can click on to reveal the hidden objects listed in red. The Key Item is circled and shown below.

- Upon completing the area, the SKULL (1/4) will be added to your inventory.
- Exit the Courtyard and return to Maestro Park.
Maestro Park
- Click on the hidden object area.
- Find the objects listed at the bottom of the screen: objects are randomized. The boxed locations show areas you can click on to reveal the hidden objects listed in red. The Key Item is circled and shown below.
- Upon completing the area, the SKULL (2/4) will be added to your inventory.
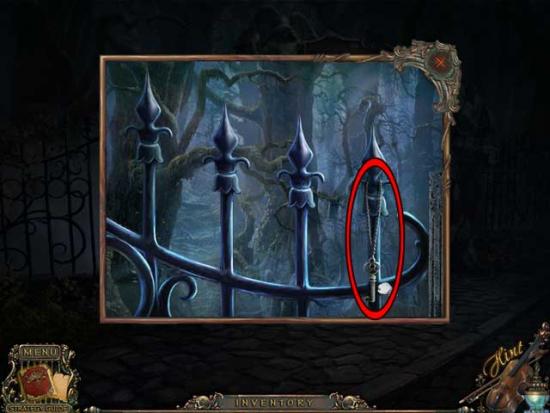
- Take a closer look at the brush on the top of the fence between the statue and the gap that cannot be entered. Use the GARDEN SHEARS to cut it away and reveal the KEY. Click on it to add it to your inventory.
- Return to the Smithy Yard.
Smithy Yard
- Take a closer look at the locked door on the right. Use the OILCAN to clear the keyhole, then use the KEY to unlock the door. Proceed inside.
Storage Shed
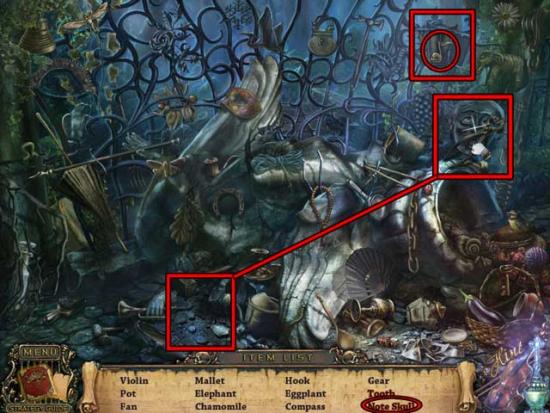
- Click on the hidden object area.
- Find the objects listed at the bottom of the screen: objects are randomized. The boxed locations show areas you can click on to reveal the hidden objects listed in red. The Key Item is circled and shown below.
- Upon completing the area, the SKULL (3/4) will be added to your inventory.
- Return to the Town Entrance.
Town Entrance
- From here, continue straight forward to the building between the two roads.
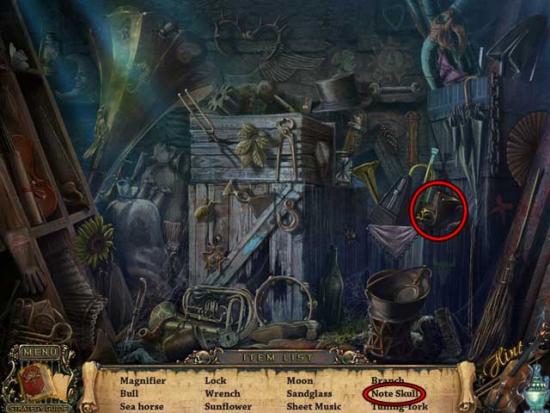
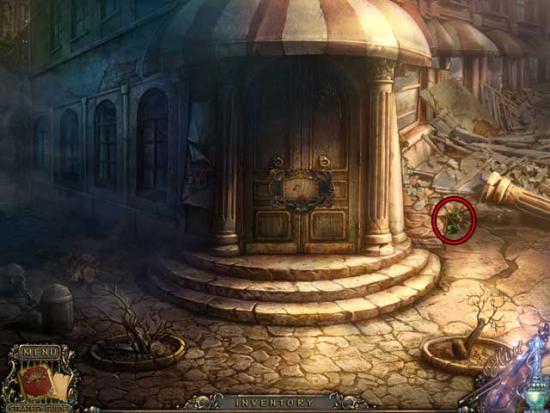
Music School Entrance
- Take a closer look to the right of the entrance. Pick up the SKULL (4/4) to add it to your inventory.
- Examine the door.
- Use all four of the SKULLS from your inventory on the various scales missing them to trigger a puzzle.
- In order to complete the puzzle in the quickest and easiest fashion (solution pictured below), follow these steps while referring to the screenshot provided:
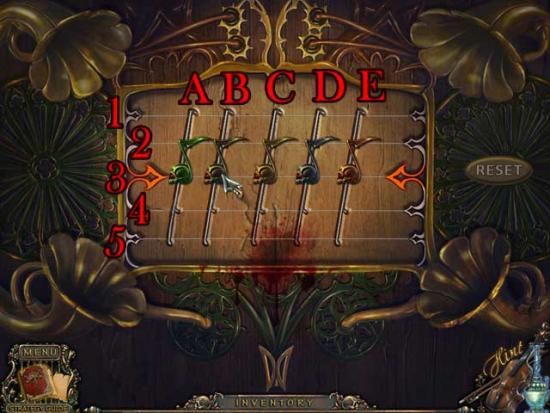
? Move Skull “E” to line 5
? Move Skull “C” to line 5
? Move Skull “D” to line 3
? Move Skull “B” to line 4
? Move Skull “A” to line 3
- If necessary, you can press the reset button to reset the puzzle. Once completed, the door will open.
- Enter the Music School.
Foyer
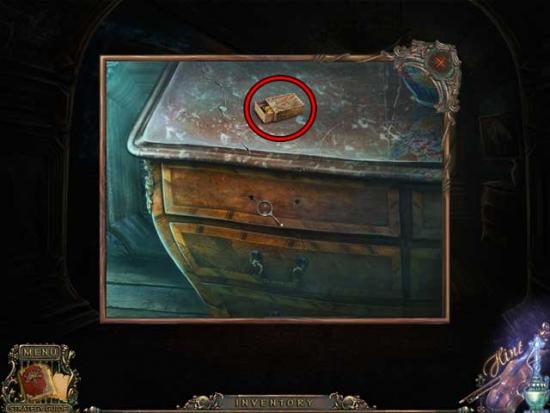
- Take a closer look at the dresser at the far end of the room on the right.
- Pick up the MATCHES to add them to your inventory.
- Take a closer look at the door on the far end of the room on the left.
- Move the gray box to the far right of the puzzle to unlock the door: you will need to slide numerous blocks in order to do this. The solution is outlined below; please refer to the screenshot as reference.

? Move block 2 once space to the right.
? Move block 1 up one space
? Move the gray block to the left
? Move block 3 up as far as it will go
? Move block 4 all the way to the left
? Move block 3 all the way down
? Move block 6 all the way down
? Move block 7 all the way down
? Move the gray block all the way across the board to the right
- Upon completing the puzzle, the door will open. Enter.
Bedroom
- Enter the hidden object area.
- Find the objects listed at the bottom of the screen: objects are randomized. The boxed locations show areas you can click on to reveal the hidden objects listed in red. The Key Item is circled and shown below.
- Upon completing the area, the GLOVE will be added to your inventory.
- Take a closer look at the chair in the middle of the room. Pick up the NAMEPLATE to add it to your inventory.
- Examine the window. Click on the RED CROSS to add it to your inventory.
- Zoom in on the bed on the left, then click on the blankets to remove them. Click on the DEAD ROSE to add it to your inventory.
- Exit back to the Foyer.
Foyer
- Take a closer look at the glowing portrait on the left.
- Use the NAMEPLATE on the gap at the bottom of the portrait to trigger a secret compartment. Collect the TREBLE CLEF inside to add it to your inventory.
- Return to the Town Entrance.
Town Entrance
- Take a closer look at the discarded suitcase on the ground.
- Use the TREBLE CLEF on the indentation to open the suitcase.
- Inside is a Note and a BLACK CANDLE. Click on it to add it to your inventory.
- Proceed back to the Storage Shed.
Storage Shed
- Click on the hidden object area.
- Find the objects listed at the bottom of the screen: objects are randomized. The boxed locations show areas you can click on to reveal the hidden objects listed in red. The Key Item is circled and shown below.
- Upon completing the area, the RAG will be added to your inventory.
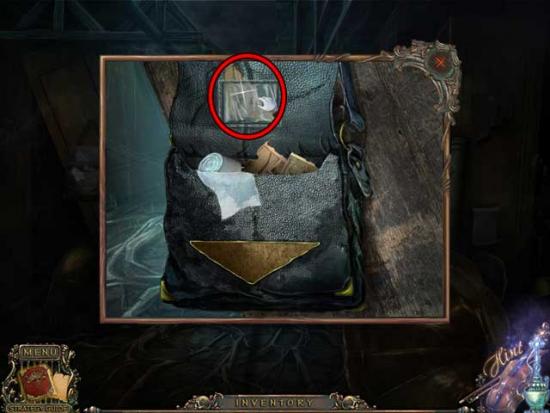
- Take a closer look at the hanging bag on the left.
- Use the RED CROSS to open the bag, then click on the BOOK PAGE (1/3) to add it to your inventory.
- Take a closer look at the shelf on the right.
- Use the GARDEN SHEARS on the rose to cut it, then use the GLOVE to pick up the ROSE and add it to your inventory.
- Return to the Smithy.
Smithy
- Click on the hidden object area.
- Find the objects listed at the bottom of the screen: objects are randomized. The boxed locations show areas you can click on to reveal the hidden objects listed in red. The Key Item is circled and shown below.

- Upon completing the area, the LEVER will be added to your inventory.
- Take a closer look at the container of water near the top of the screen, next to the forge oven.
- Use the RAG on the water to obtain the WET RAG.
- Return to the Bedroom.
Bedroom
- Click on the hidden object area.
- Find the objects listed at the bottom of the screen: objects are randomized. The boxed locations show areas you can click on to reveal the hidden objects listed in red. The Key Item is circled and shown below.
- Upon completing the area, the CANDLE will be added to your inventory.
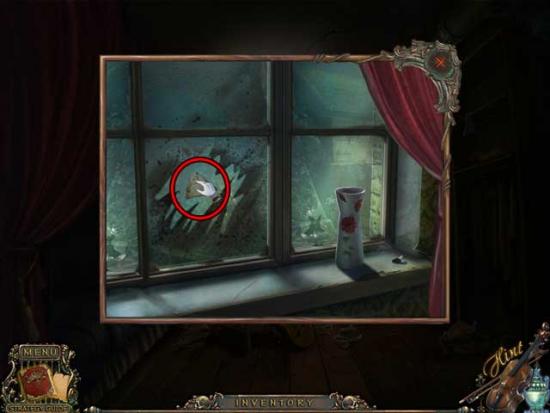
- Zoom in on the window at the back of the room.
- Use the WET RAG on the dirty window to clean it and reveal the BOOK PAGE (2/3). Click on it to add it to your inventory.
- Return to the Foyer.
Foyer
- Take a closer look at the panel beneath the immediate window of the stained glass window at the far end of the room.
- Remove the panel to reveal a hidden mechanism. Use the LEVER on the mechanism, then click on it to trigger the opening of a secret trapdoor.
- Enter through the trapdoor.
Hidden Crypt
- Pick up the BROOM on the immediate right to add it to your inventory: it’s hard to miss.
- Take a closer look at the casket on the left. Pick up the BOOK PAGE (3/3) inside to add it to your inventory.
- Take a closer look at the coffin on the upper right. Use the CROWBAR to open the casket, then click on the SKULL to add it to your inventory.
- Return to the Music School Entrance.
Music School Entrance
- Take a closer look at the pile of leaves on the left. Use the BROOM to clear them away, then click on the HANDLE to add it to your inventory.
- Return to the Foyer.
Foyer
- Take a closer look at the dresser in the far right corner. Use the HANDLE on the top drawer, then click to open it. Collect the KEY inside to add it to your inventory.
- Exit and proceed back to the Smithy.
Smithy
- Take a closer look at the table in the middle of the room.
- Place the BOOK on the table, then use the KEY to open it.
- Place the three BOOK PAGES inside the book to restore it and reveal a key sequence of events.
- Return to the Hidden Crypt.
Hidden Crypt
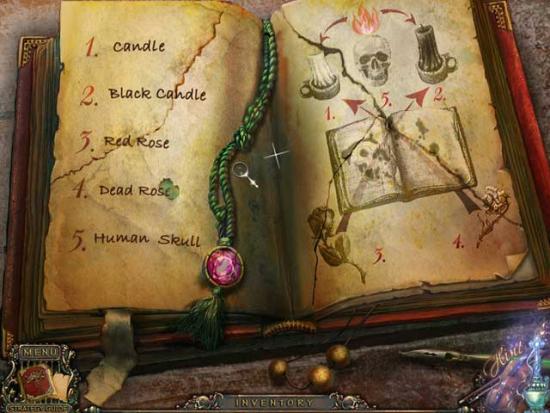
- Take a closer look at the book lying on the floor.
- Place the SKULL, the CANDLE, the BLACK CANDLE, the ROSE, and the DEAD ROSE around the book according to the screenshot below.
- Use the MATCHES to light each of the Candles.
- Drag the Rose to the Black Candle to burn it, then repeat the process with the Candle and the Dead Rose.
Congratulations! You’ve completed Maestro: Music of Death Collector’s Edition! Now that you’ve completed the bonus adventure, return to the Extras portion of the Main Menu and enjoy your unlocked exclusive bonus content!

More articles...
-
Best Horror Games On Itch.io – July 2026
Across a bounty of subgenres. -
Grow A Garden 2 Base Price List
What's the most valuable crop? -
Evomon Types Guide [Strengths, Weaknesses, Resistance]
Your companion guide during battles.