- Wondering how to get Monopoly GO! free rolls? Well, you’ve come to the right place. In this guide, we provide you with a bunch of tips and tricks to get some free rolls for the hit new mobile game. We’ll …
Best Roblox Horror Games to Play Right Now – Updated Weekly
By Adele Wilson
Our Best Roblox Horror Games guide features the scariest and most creative experiences to play right now on the platform!The BEST Roblox Games of The Week – Games You Need To Play!
By Sho Roberts
Our feature shares our pick for the Best Roblox Games of the week! With our feature, we guarantee you'll find something new to play!All Grades in Type Soul – Each Race Explained
By Adele Wilson
Our All Grades in Type Soul guide lists every grade in the game for all races, including how to increase your grade quickly!
Macabre Mysteries: Curse of the Nightingale Walkthrough
Welcome to the Macabre Mysteries: Curse of the Nightingale, Collector’s Edition walkthrough on Gamezebo. Macabre Mysteries: Curse of the Nightingale, Collector’s Edition is a Hidden Object Game played on the PC created by Blue Tea Games. This walkthrough includes tips and tricks, helpful hints and a strategy guide on how to complete Macabre Mysteries: Curse of the Nightingale, Collector’s Edition
Macabre Mysteries: Curse of the Nightingale – Game Introduction
Welcome to the Macabre Mysteries: Curse of the Nightingale, Collector’s Edition walkthrough on Gamezebo. Macabre Mysteries: Curse of the Nightingale, Collector’s Edition is a Hidden Object Game played on the PC created by Blue Tea Games. This walkthrough includes tips and tricks, helpful hints and a strategy guide on how to complete Macabre Mysteries: Curse of the Nightingale, Collector’s Edition
General Tips
This hidden object game requires visiting several locations and using inventory items to advance play.
- Play is mostly linear although there are some options for the order in which to explore locations.
- CAPITALIZED inventory items are meant to make it easier to find where this guide may differ from your own play.
- There are 20 Macabre Objects. These are morphing objects that are triggered in scenes at different times during the game. These objects speed up the time for the hint button to refill.
- The Map is inconsistent. It is supposed to show when an area of interest (i.e. a hidden object scene) is available in a particular room. More times than not, it doesn’t show up. The best way to use the map is for orientation.
- Always move the cursor around a scene. Watch the cursor to see if it changes into a hand or magnifying glass.
Main Menu:
- Play – Begin or resume a game.
- Extra Game Play – Only available after completing the game.
- Options – Change music and sound effects volume. You may select or deselect full or wide screen and a custom cursor. Access the Help tab here to see how to interact with the game.
- Bonus Content – Bonus puzzles, movie gallery, concept art, wallpapers and music are only available after completing the Extra Game Play.
- Exit – Quit the game.
- Players – Click the tab to create, delete or switch player profiles.
Screen Navigation:
- Hint- Clicking will show a random item from an itemized list. Selecting an inventory item and pressing hint eye will also give an indication of where to use the item.
- Visions – Review cutscenes.
- Map – Shows current and available locations as well as areas of interest. Current objective hints are available. Character profiles are also added as the game progresses.
- Inventory/Item List – A scrollable list of icons showing available items for use or fragments of hidden items to be collected.
- Options – Change your options, resume the game or return to the main menu.
- Guide – Help for game play is included in the collector’s edition.
Symbol Meanings:
- Magnifying Glass – Zoom in on interactive area.
- Hand – Interact with an object.
- Sparkles – Hidden object areas.
Walkthrough
A short clip explains the background and introduces the story line for play.
If you are not familiar with hidden object games, click “Yes” when asked if you would like a tutorial. This will show you how to interact with objects and characters.
In this walkthrough, inventory items in screenshots are highlighted in blue and white. Macabre Objects are shown in red and white. They are numbered in this walkthrough for reference purposes only; you may find them sooner or later depending on how you play the game.
Directions for where to go are given based on the location names from the Map.
Chapter 1: The Theater Grounds

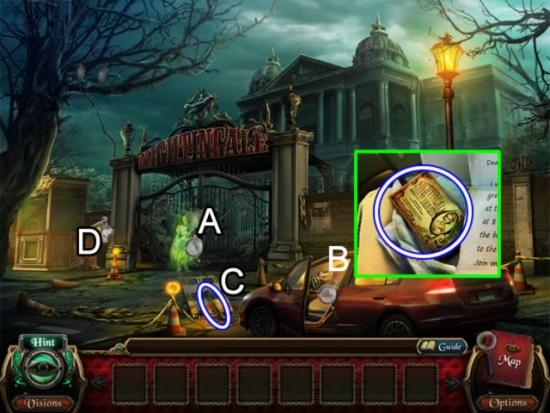
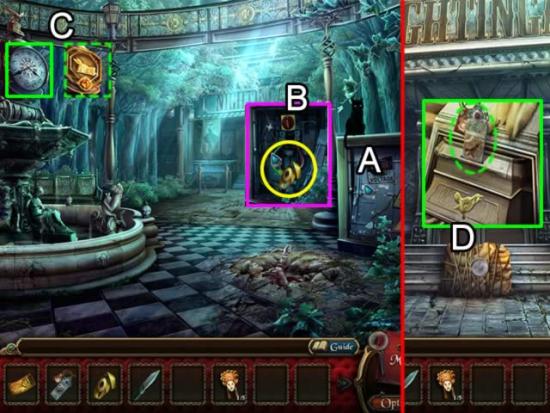
- Click the phantom ballerina by the gates (A) to begin play.
- Inspect the box inside the car (B). Take the GOLDEN TICKET – NIGHTINGALE’S MASTERPIECE SHOW.
- Take the HAMMER leaning against the sign (C).
- Follow the direction arrow (D) to the left.
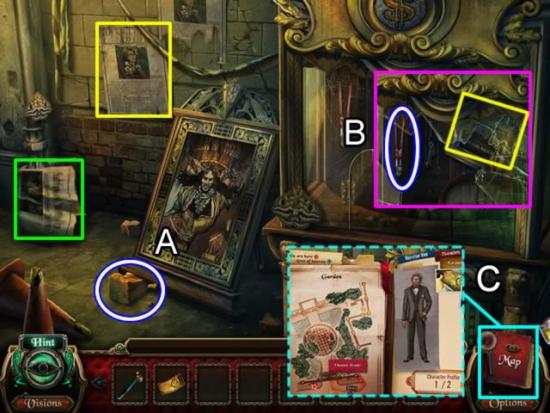
- Pick up the BROKEN BRICK (A). Use it to smash the glass on the ticket booth (B).
- Take the BOLT CUTTERS from the booth.
- Zoom in on the two character profiles and the newspaper (green) for additional story background.
- Examine the Map (C). Note the addition of the two profiles. Move your cursor over the map. Only areas shaded in red area available.
- Return to the Theater Front.
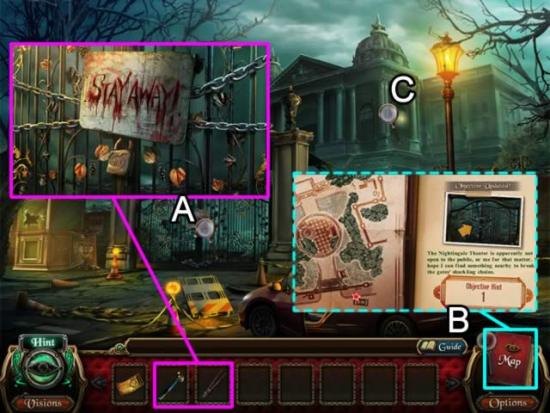
- Inspect the gate (A). Use the HAMMER to smash the lock and the BOLT CUTTERS to remove the chains.
- Note that a new objective has been added to the Map (B). Use these objectives to guide your activities.
- Zoom in on the tower (C) to view the shadow.
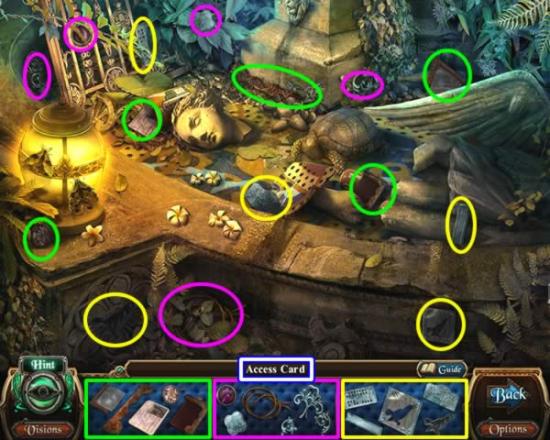
- Play the hidden object scene by the fountain in the Courtyard.
- Pick up the fragments of the three parts of the ACCESS CARD.
- Go forward to the Theater Entrance and then right to the Announcement Area.
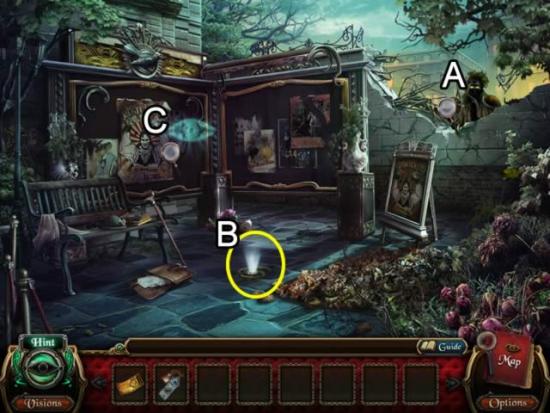
- Click the shadow (A) to open the interactive areas in this scene.
- Inspect the monocle (B) for a secret vision.
- Look at the announcement board to open a hidden object scene.
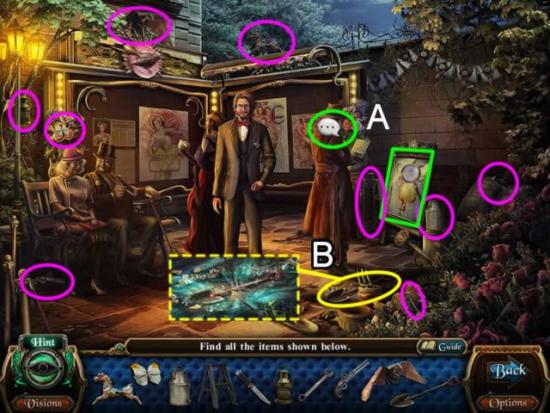
- Move your cursor around the scene to listen to conversations and learn more about the theater and this production (A).
- Find the hidden objects. The shovel (B) is the key to unlock the secret vision provided by the monicle. Finish the scene. Collect the SHOVEL.
- Return to the Theater Entrance.
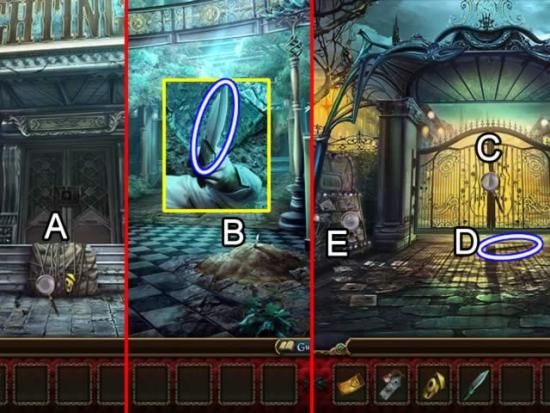
- Zoom in on the package on the steps (A). Take the ELECTRICAL TAPE.
- Return to the Courtyard.
- Use the SHOVEL to dig up the pile of dirt (B). Take the SHARP KNIFE.
- Return to the Theater Front.
- Click the locked gate (C). Pick up the METAL ROD that falls to the ground (D).
- Play the hidden object scene on the left (E).
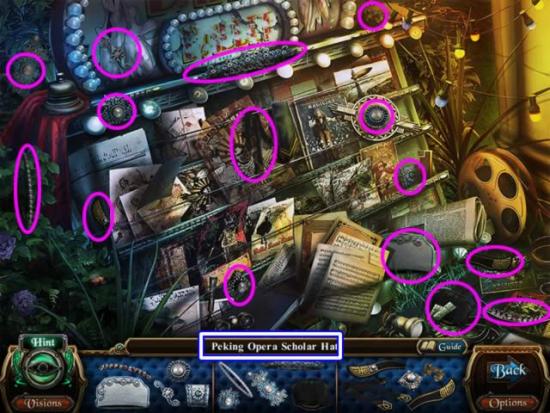
- Collect the fragments for the PEKING OPERA SCHOLAR HAT. This is the first ORIENTAL PERFORMING MASK (1/5).
- Return to the Courtyard.
- Use the METAL ROD to pry off the cover of the generator (A). Use the ELECTRICAL TAPE to mend the wires.
- Watch the clock face above the fountain. It will morph into the first of 20 Macabre Objects used to refill the Hint eye faster.
- Go to the Theater Entrance.
- Inspect the sack at the base of the steps (D). Use the SHARP KNIFE to cut the ropes. Insert the ACCESS CARD in the slot (dashed green) to activate the door locks.
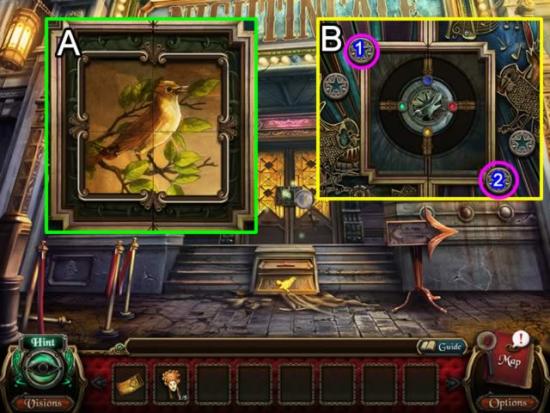
- Click the four tiles in the first puzzle (A) until a song bird appears.
- Click the star buttons in the second puzzle until all light are simultaneously lit. The pattern may be random. The above screenshot shows one solution.
- Go right to the Announcement Area. Click the bench to play a hidden object scene.
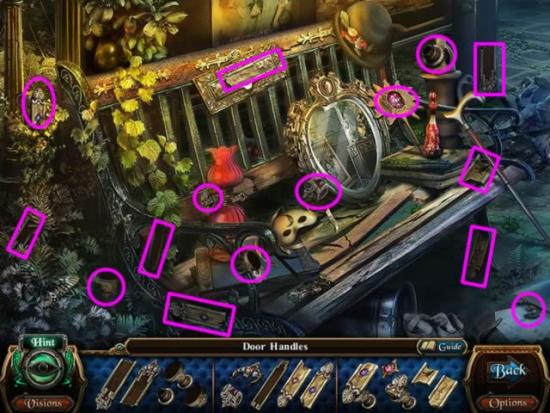
- Collect the fragments of the DOOR HANDLES.
- Return to the entrance.
- Place the the DOOR HANDLES in their slots on the door.
Chapter 2: Entering the Theater
- Go up the stairs on the right to the Guest Hallway.
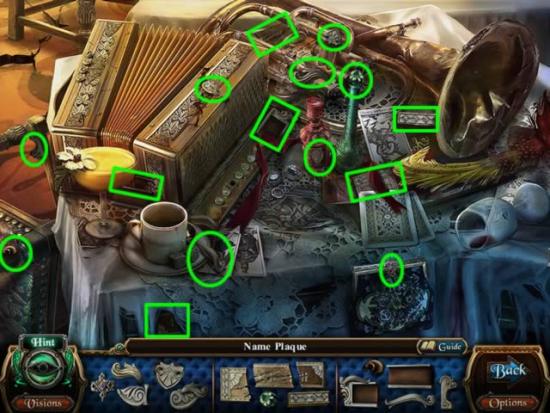
- Enter the first door on the left, the Dining Room.
- Pick up the SLEDGEHAMMER on the floor to the left of the table.
- Play the fragmented object scene on the table. Collect the pieces for the NAME PLAQUE.
- Return to the Lobby.
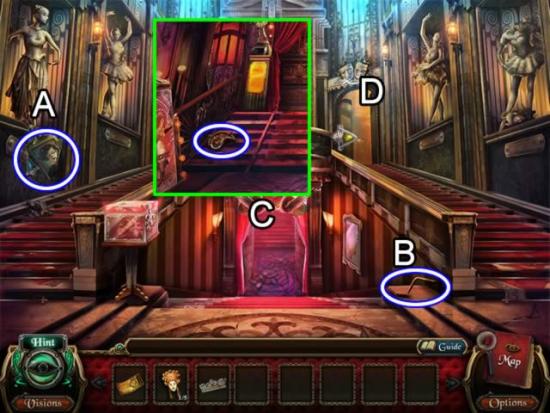
- Use the SLEDGEHAMMER on the wall on the left (A). Take the SEVERED PORTRAIT PIECE.
- Pick up the GRAMOPHONE CRANK (B).
- Go down the stairs to Rose’s Solo Show Hallway (C). Pick up the BIRD EMBLEM HALF.
- Return to the Lobby. Go up the right staircase to the Guest Hallway (D).
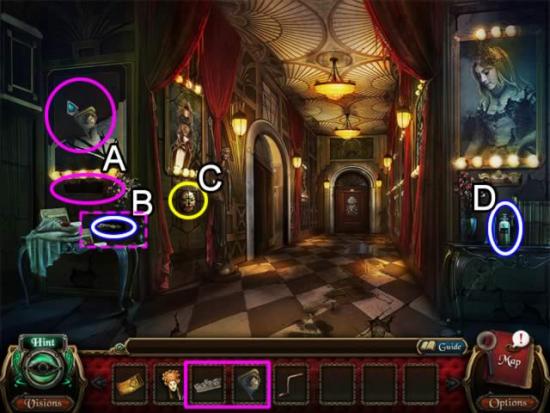
- Place the SEVERED PORTRAIT PIECE in the picture frame (A).
- Insert the NAME PLATE in the groove below it.
- Click the name plate to add a character profile and open a hidden nook (dashed pink). Take the PERFUME VIAL from the nook (B).
- Take the ORIENTAL PERFORMING MASK (C) and pick up the RUST REMOVER (D).
- Return to the Lobby. Go up the left staircase to the Office Hallway.
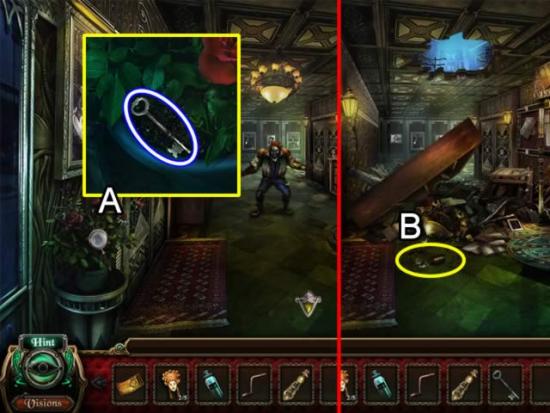
- Inspect the roses on the left (A). Take the CRYSTAL BOX KEY.
- Click down to open a cutscene.
- Check out the bottle of pills on the floor (B).
- Return to the lobby.
Chapter 3: Peking Opera Show
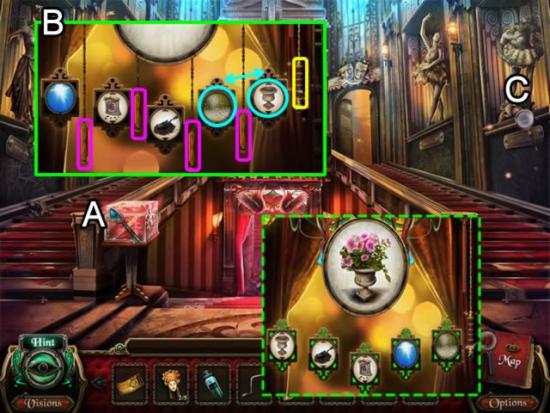
- Use the CRYSTAL BOX KEY to open the glowing box at the foot of the stairs (A).
- The goal is to use the pull cords (pink) to arrange the images until they are in the correct order to grow the flowers. Pulling a cord will swap the image on the right with the one on the left. Pull the cord on the far right (yellow) to test if the images are in the correct location. Correctly placed images glow green; incorrect images flash red.
- The solution is shown in the dash box: pot, dirt, seeds, sun, rain.
- Receive the GREEN TICKET – PEKING OPERA SHOW.
- Zoom in on the headless ballerina on the right (C) to open a fragmented object scene.
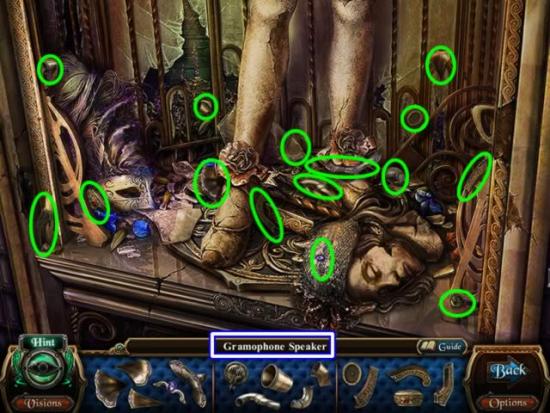
- Collect the pieces for the GRAMOPHONE SPEAKER.
- Go up the right staircase. Return to the Dining Room.
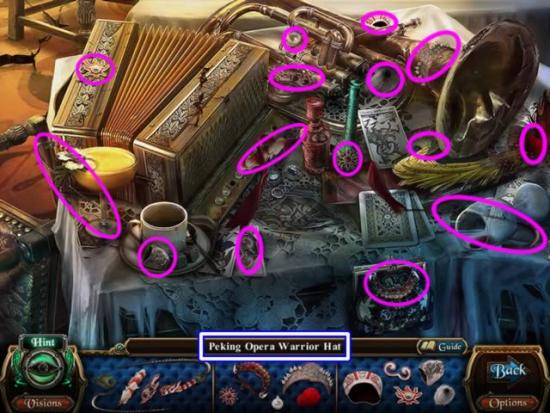
- Play the fragmented object scene on the table.
- Collect all of the pieces for the PEKING OPERA WARRIOR HAT. It is added to the ORIENTAL PERFORMANING MASK COLLECTION (3/5).
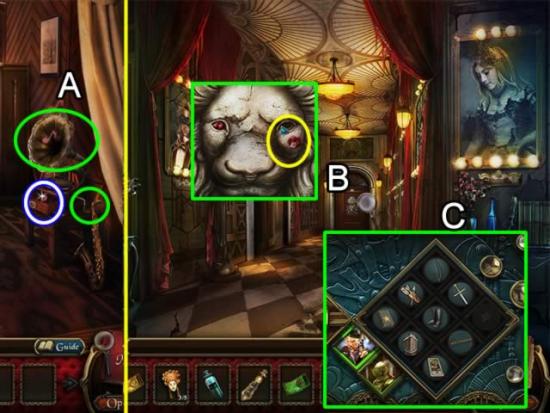
- Insert the GRAMOPHONE SPEAKER and GRAMOPHONE CRANK in the broken gramophone (A). Take the RUBY from the drawer.
- Examine the door at the end of the hallway (B).
- Place the RUBY in the lion’s eye.
- Play the slider puzzle (C). Use the empty slot to help move the icons so they are associated with the correct person. The archer should have a bow, arrow and book. The knight has a helm, sword and boots. The extra two pieces are in the empty row. The placement order is not important.
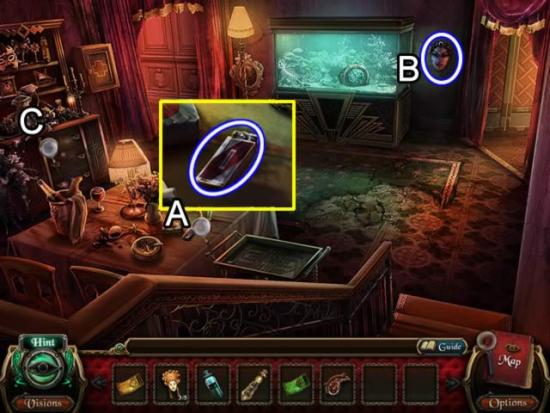
- Pick up the LIGHTER from the table (A).
- Take the ORIENTAL PERFORMANING MASK (4/5) from the wall (B).
- Zoom in on the cabinet to open a hidden object scene (C).
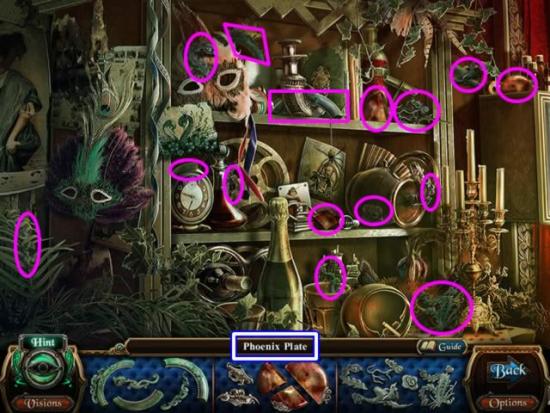
- Collect all of the pieces of the PHOENIX PLATE.
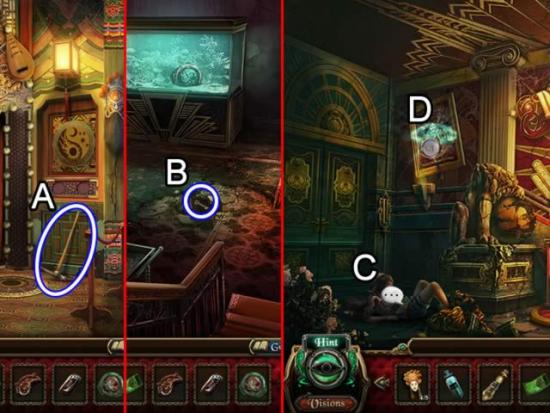
- Go right to the Oriental Performance Hallway (A). Get the PICKAXE.
- Return to the Rest Area.
- Use the PICKAXE to dig up the BLACK-TINTED KEY (B).
- Take the left hallway to the Acrobatic Show Hallway.
- Speak with the young woman (C).
- Zoom in on the eye to open a secret vision.
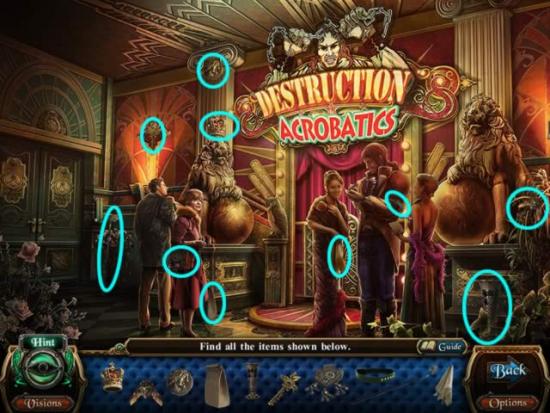
- Collect the objects shown. Take the POWDER ROOM KEY from the wall where the eye was.
- Return to the Oriental Performance Hallway.
- Use the POWDER ROOM KEY to open the door on the right.
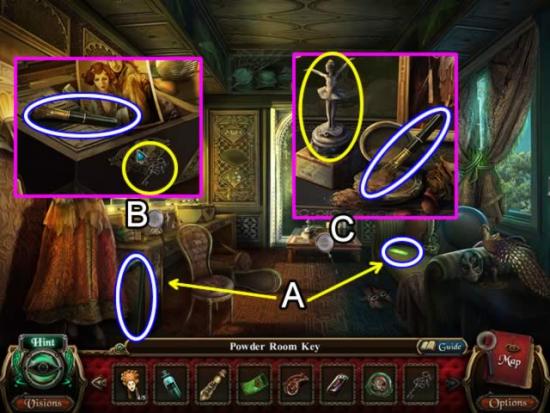
- Pick up the LONG CROWBAR and LIGHT STICK (A).
- Inspect the makeup table (B). Use the BLACK-TINTED KEY to open the black butterfly box. Take the UNPOWDERED BRUSH. Look closer at the photograph.
- Go to the low table in front of the mirror (C). Place the UNPOWDERED BRUSH in the loose powder. Receive a POWDER BRUSH. Click the ballernia for more information.
- Return to the Acrobatic Show Hallway.
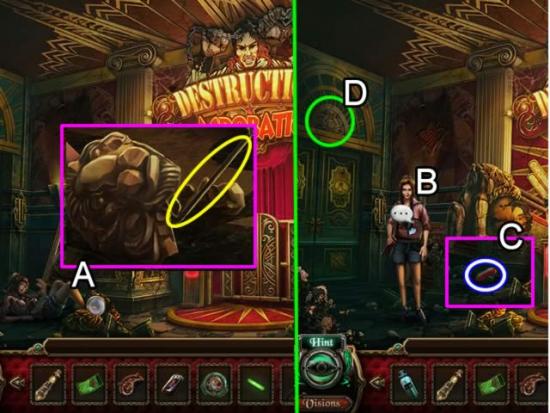
- Use the LONG CROWBAR to remove the statue part from the woman’s foot (A).
- Speak with the woman (B). She gives you a SUN EMBLEM. After she leaves, pick up the ROPE CUTTING KNIFE that was hidden behind her.
- Click the morphing Macabre Object (2/20) above the doors (D).
- Return to the Oriental Performance Hallway.
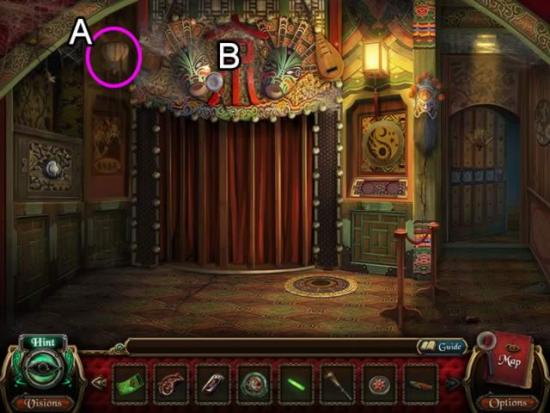
- Click the morphing Macabre Object (3/20) lantern by the entrance (A).
- Inspect the masks to open a fragmented object scene (B).
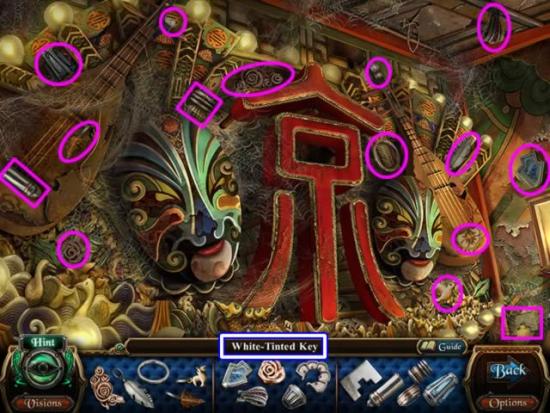
- Collect all of the pieces of the WHITE-TINTED KEY.
- Enter the Powder Room door on the right.
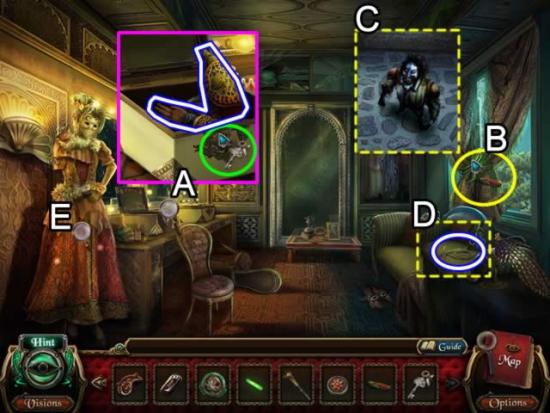
- Inspect the dressing table (A). Use the WHITE-TINTED KEY to open the white box. Take the PUPPET’S LEFT ARM.
- Use the ROPE CUTTING KNIFE on the cord binding the curtains (B).
- Look out the window to see the madman (C). Click him to make him run away.
- Pick up the ROPE from the sofa (D).
- Look closer at the mannequin to open a fragmented object scene.
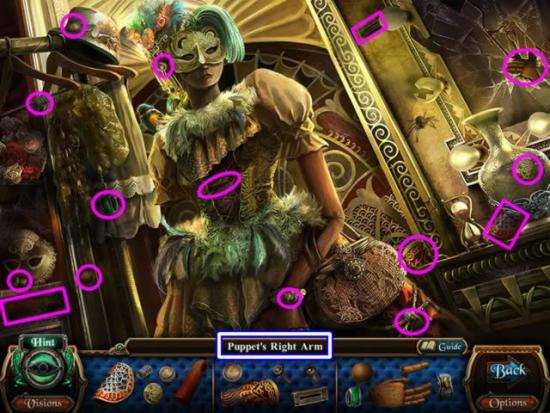
- Collect the fragments for the PUPPET’S RIGHT ARM.
- Exit the Powder Room.
- Speak to the student in the hallway.
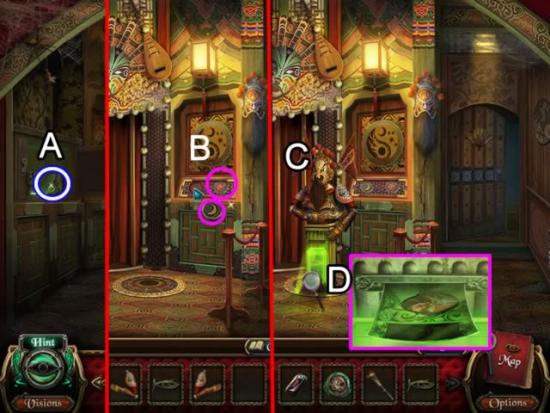
- Place the LIGHT STICK in the dark safe (A). Take the MOON EMBLEM.
- Insert the SUN EMBLEM and the MOON EMBLEM in the circular indentations on the ticket window (B).
- Attach the PUPPET’S RIGHT and LEFT ARM (C) on the ticket taker.
- Zoom in on the ticket slot (D). Insert the GREEN TICKET – PEKING OPERA SHOW in the slot to open the doors.
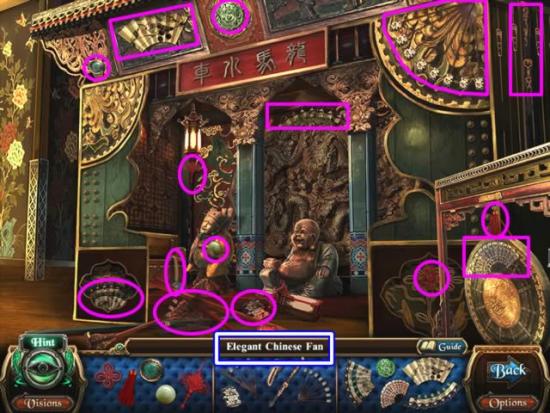
- Open the interactive area on the stage.
- Collect the fragments for the ELEGANT CHINESE FAN.
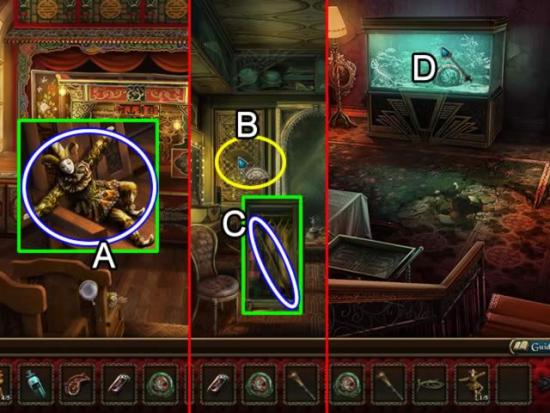
- Zoom in on the front row theater seat (A). Take the CLOWN DOLL COLLECTION (1/5).
- Return to the Powder Room.
- Place the ELEGANT CHINESE FAN in the outline by the mirror (B). Take the FISHING ROD from the closet (C).
- Return to the Rest Area.
- Use the FISHING ROD to retrieve the DRAGON PLATE.
- Return to the Oriental Performance Stage.
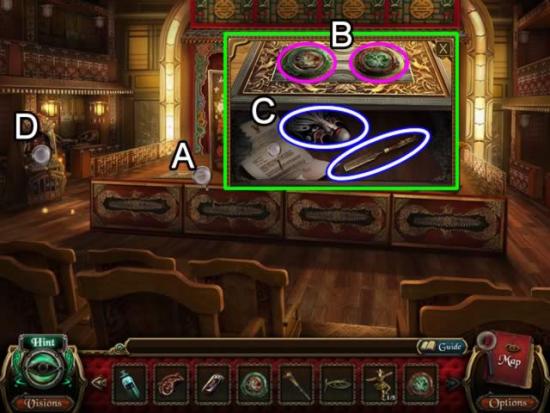
- Inspect the cover on the stage (A).
- Insert the PHOENIX PLATE and DRAGON PLATE in the circular indentations (B).
- Read the document (C). Take the ORIENTAL PERFORMING MASK (5/5) and the SMALL CHISEL.
- Zoom in on the cabinet on the left (D) to open a puzzle.
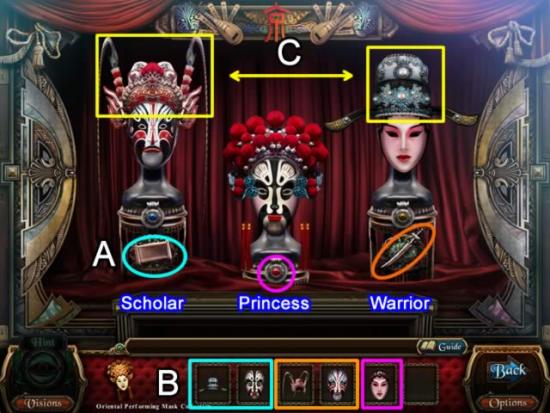
- Examine the symbols on the base of each mask to determine the correct placement (A). The scroll represents the scholar. The jewel represents the princess and the saber represents the warrior.
- Move the cursor over the collection on the bottom (B) to see the description of the item. Use these as keys to place the correct hat and mask on each stand.
- Swap the items (C) until the hats and masks are correct. The lights on each stand turns on when items are correct. See the next screenshot for the solution.
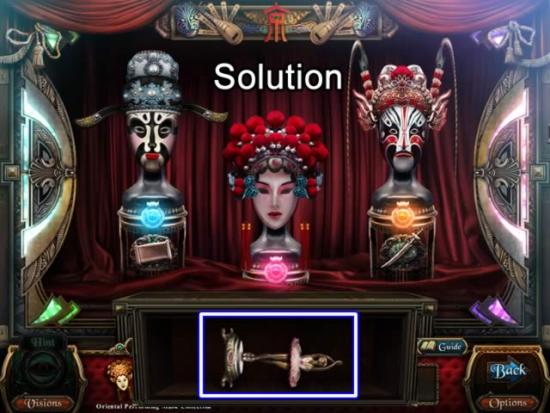
- Take the ballerina for the DANCING FIGURINE COLLECTION (1/4).
- Return to the hallway.
Chapter 4: Acrobatic Destruction Show
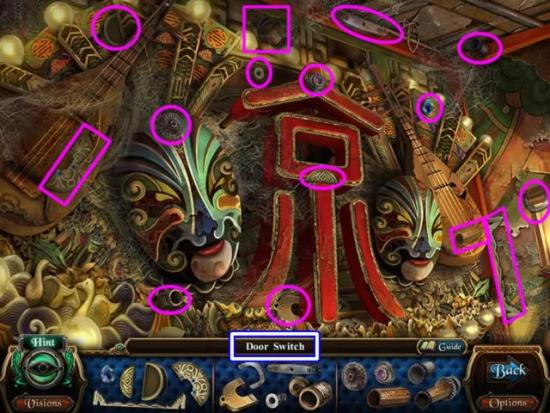
- Zoom in on the masks above the door to open a fragmented object scene.
- Collect the DOOR SWITCH fragments.
- Return to the Rest Area.
- Zoom in on the cabinet on the left to open a fragmented object scene.
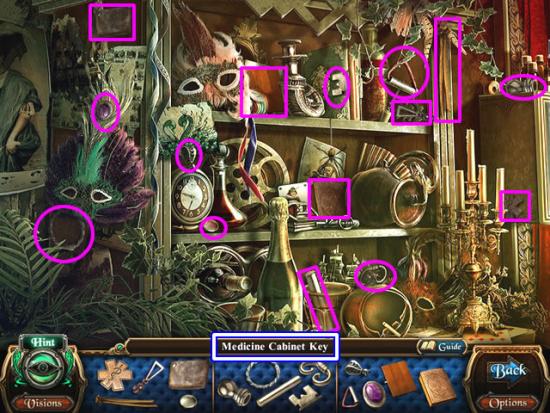
- Collect all of the parts for the MEDICINE CABINET KEY.
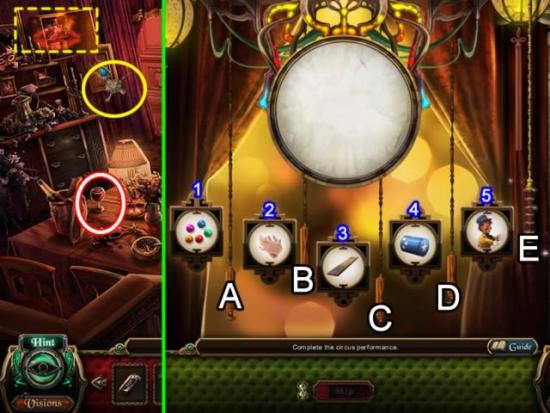
- Pick up the morphing wine glass Macabre Object (4/20).
- Use the MEDICINE CABINET KEY to open the cabinet. Click the eye to open a minigame.
- The goal is to swap the images so they are in the correct order by pulling the cords.
- Cord A swaps images 1 and 2.
- Cord B swaps images 1 and 3.
- Cord C swaps images 2 and 5
- Cord D swaps images 4 and 5.
- Cord E tests to see if the images are in the correct order.
- The best way to solve this puzzle is to use cords A and D to position the images and cord C to move them. The correct order is barrel, plank, man, balls and hands.
- SOLUTION. Pull the cords in this order: C, A, D, C, D, B, A. There is no reset button, but clicking the Back button and entering the puzzle again will reset the images to their original positions.
- Collect the RED TICKET – ACROBATIC DESTRUCTION SHOW.
- Enter the Acrobatic Show Hallway.
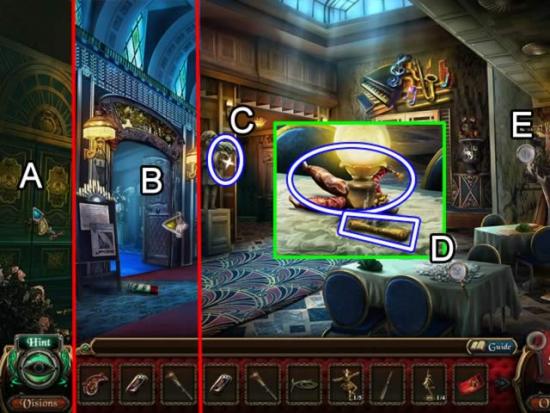
- Place the DOOR SWITCH on the double green doors on the left.
- Go through the Skylight Corridor and enter the Ballroom (B).
- Pick up the MUSIC INSTRUMENTS COLLECTION (1/5) item (C).
- Inspect the candle on the table (D). Use the LIGHTER to melt the wax. Pick up the CLOWN DOLL COLLECTION (2/5) item and the CHEST HANDLE.
- Zoom in on the poster on the right (E) to open a fragmented object scene.
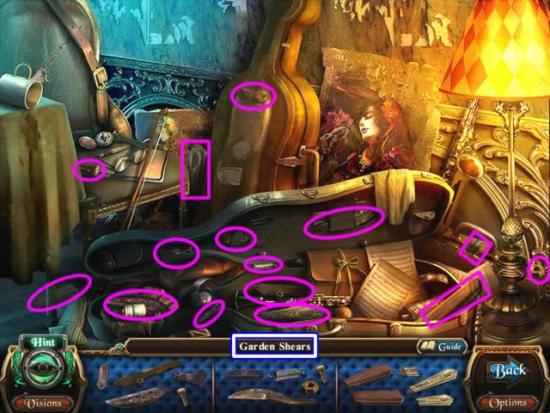
- Collect the items to form GARDEN SHEARS.
- Return to the Skylight Corridor.
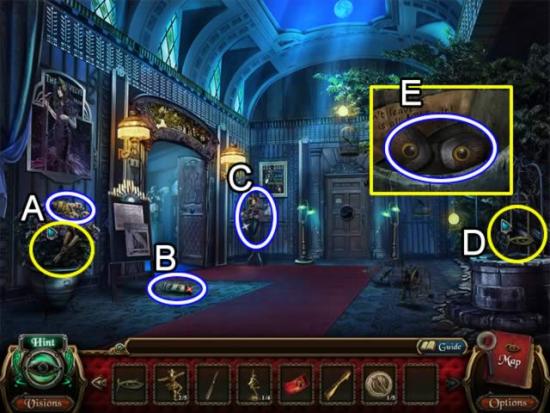
- Use the GARDEN SHEARS on the plant (A). Pick up the OWL WINGS.
- Get the PESTICIDE (B) and CLOWN DOLL COLLECTION (3/5) item (C).
- Add the ROPE to the rope on the well (D). Inspect the bucket. Take the OWL EYES (E).
- Exit the Skylight Corridor.
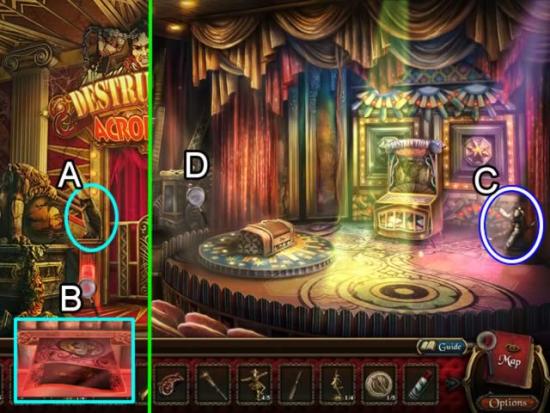
- Add the missing OWL EYES and WINGS to the owl (A).
- Zoom in on the ticket slot (B) and insert the RED TICKET – ACROBATIC DESTRUCTION SHOW in the slot.
- Pick up the CLOWN DOLL COLLECTION (4/5) item (C).
- Inspect the curtains on the left (D) to open a fragmented object scene.
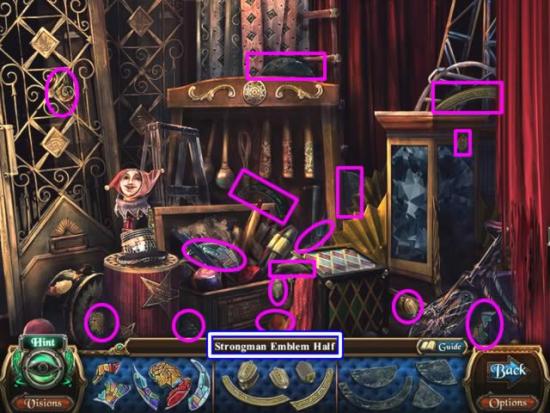
- Collect all of the fragments of the STRONGMAN EMBLEM HALF.
- Exit to the Hallway. Speak the to mayor.
- Enter the Skylight Corridor.
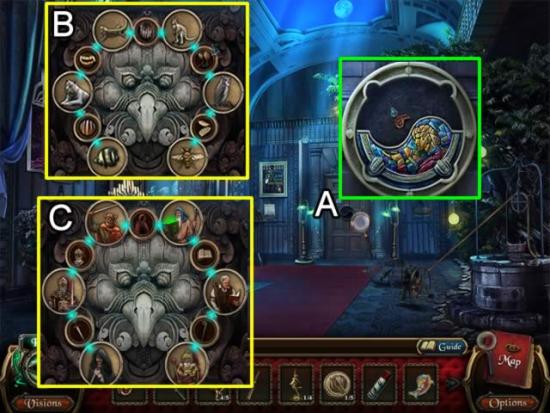
- Zoom in on the door at the end of the hall (A).
- Place the BIRD EMBLEM HALF and the STRONGMAN EMBLEM HALF in the outline.
- Click the bird’s head to open the first of two puzzles.
- The goal of both puzzles is to arrange the images on the disks to correspond with the smaller swap disks. With the expection of the two end disks, the images must be related to the smaller disks on either side of it. The solutions are shown in inset (B) and (C).
- Enter Andreas’ Room.
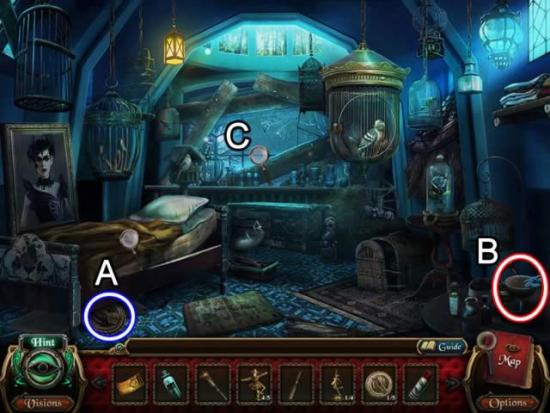
- Take a closer look at the blanket on the bed (A). Take the MUSIC INSTRUMENTS COLLECTION (2/5) item from the floor.
- Pick up the Macabre Object (5/20) on the right (B).
- Zoom in on the window to play a fragmented object scene (C).
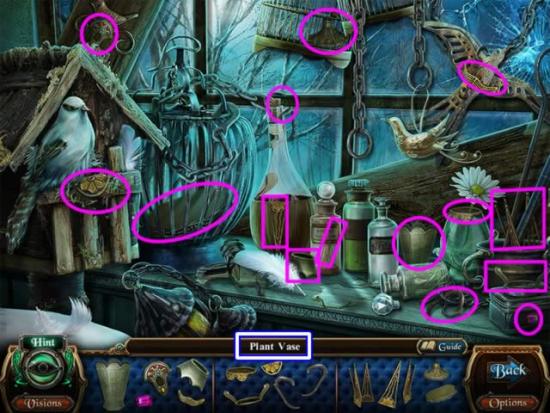
- Collect all of the parts for the PLANT VASE.
- Return to the Ballroom.
- Play the fragmented object scene on the right by the poster.
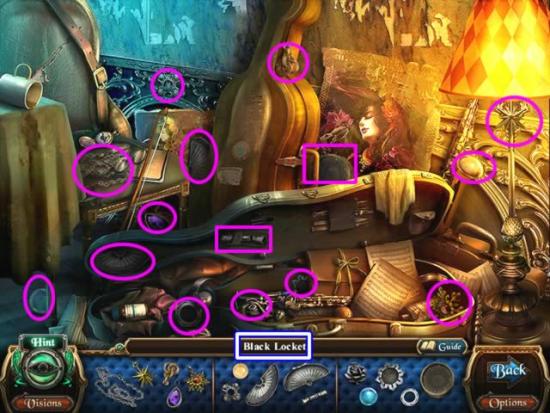
- Find all the pieces for the BLACK LOCKET.
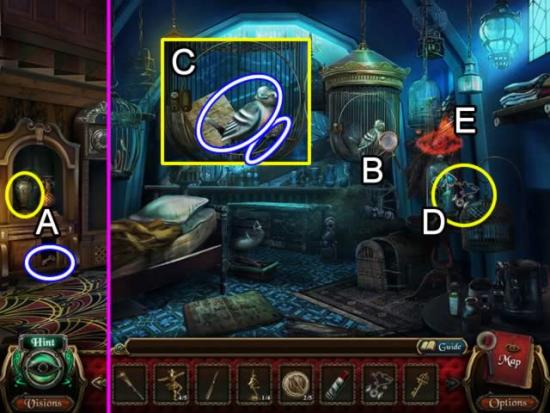
- Place the PLANT VASE in the cabinet on the left (A). Take the BIRDCAGE KEY.
- Return to Andreas’ Room.
- Inspect the birdcage (B).
- Use the BIRDCAGE KEY to unlock the door.
- Zoom in on the open cage (C). Read the note. Take the BIRD FIGURINE and CHEST KEY.
- Use the BLACK LOCKET on the glass enclosing the rose (D).
- Click the eye (E) to open a minigame.
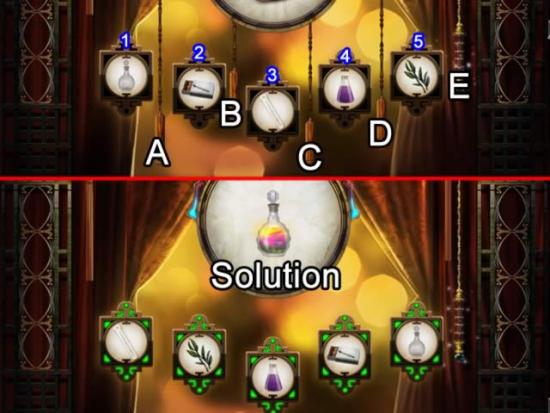
- The goal is to swap the images so they are in the correct order by pulling the cords.
- Cord A swaps images 1 and 2.
- Cord B swaps images 1 and 3.
- Cord C swaps images 2 and 5
- Cord D swaps images 4 and 5.
- Cord E tests to see if the images are in the correct order.
- The best way to solve this puzzle is to use cords A and D to position the images and cord C to move them. The correct order is test tube, leaves, beaker, matches and bottle.
- SOLUTION. Pull the cords in this order: D, C, A, B, D, C. There is no reset button, but clicking the Back button and entering the puzzle again will reset the images to their original positions.
- Collect the BLUE TICKET – THE VELVET DIVA SHOW.
- Return to the Acrobatic Performance Stage.
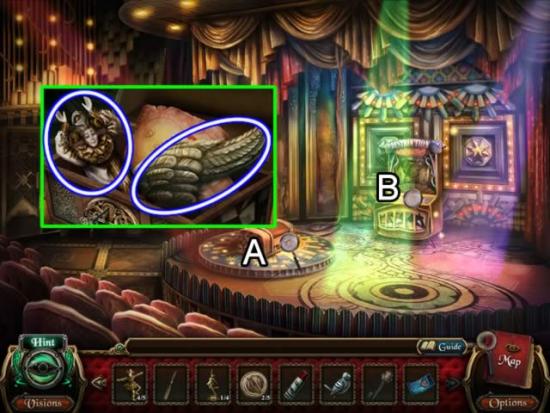
- Examine the trunk (A). Place the CHEST HANDLE in the slot and insert the CHEST KEY in the keyhole.
- Take the CLOWN DOLL COLLECTION (5/5) item and the LEFT ANGEL WING from the trunk. Examine the love letters.
- Zoom in on the clown theater to open a game (B).
- Swap the clowns so their actions match the background effects. See the next screenshot for the solution.
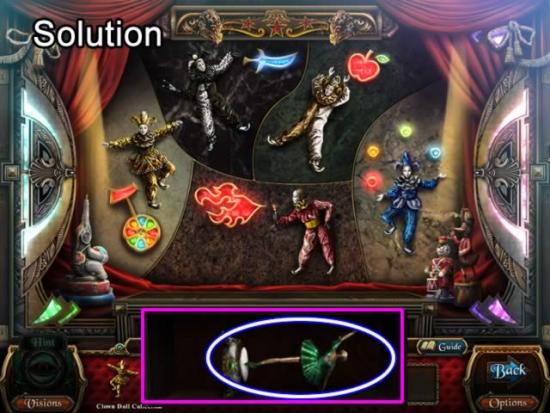
- Take the DANCING FIGURINE COLLECTION (2/4) item.
Chapter 5: The Velvet Diva Show
- Return to Andreas’ Room.
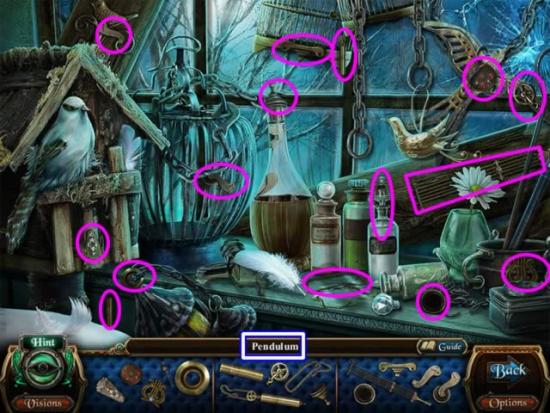
- Play the fragmented object scene on the window.
- Collect the pieces for the PENDULUM.
- Return to the Ballroom.
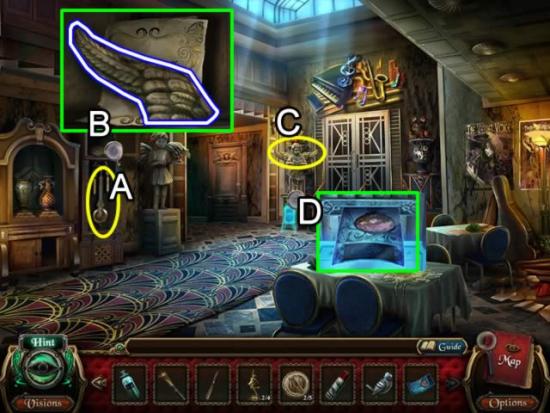
- Place the PENDULUM in the clock (A).
- Zoom in on the compartment that opens (B). Take the RIGHT ANGEL WING and read the note.
- Place the LEFT and RIGHT ANGEL WINGS on the ticket taker (C).
- Insert the BLUE TICKET – THE VELVET DIVA SHOW into the slot (D).
- Enter the Velvet Diva Performance Stage.
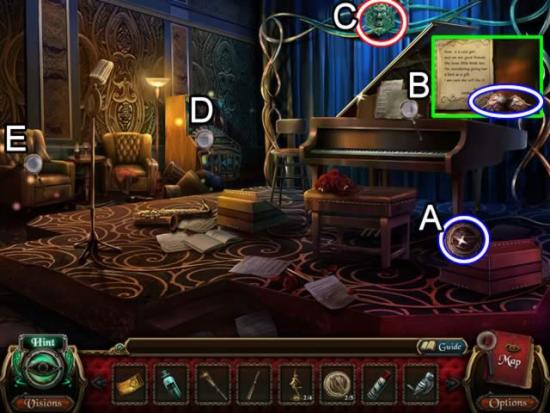
- Pick up the MUSIC INSTRUMENT COLLECTION (3/5) item (A).
- Inspect the music shelf on the piano (B). Take the RUBY BUTTERFLY WING. Read the note.
- Click the Macabre Object (6/20) on the back wall (C).
- Inspect the music instrument mechanism (D) to update the objectives.
- Zoom in on the chair (E) to open a fragmented object scene.
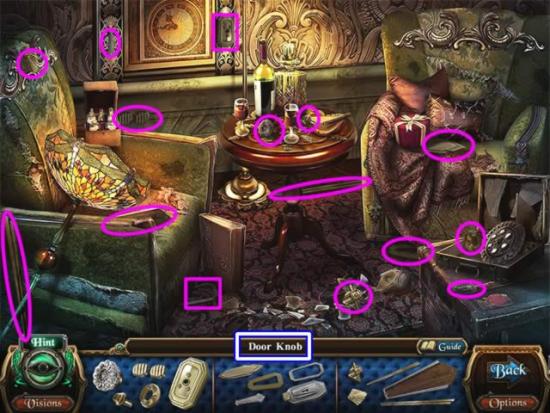
- Collect all of the items to construct a DOOR KNOB.
- Return to the Ballroom
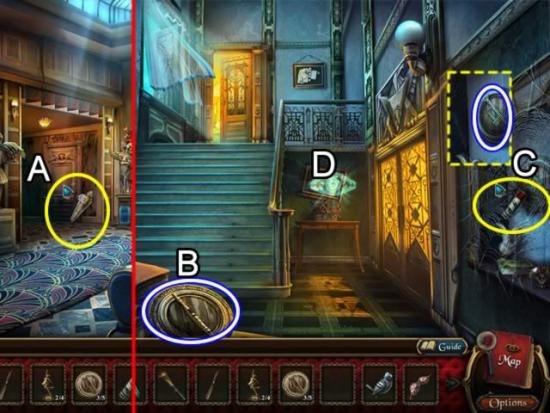
- Insert the DOOR KNOB in the slot on the door on the left (A).
- Enter the Staircase.
- Pick up the MUSICAL INSTRUMENT COLLECTION (4/5) item (B).
- Spray the PESTICIDE on the spider (C). Get the MUSICAL INSTRUMENT COLLECTION (5/5) item.
- Click the eye (D) to open a hidden object scene.
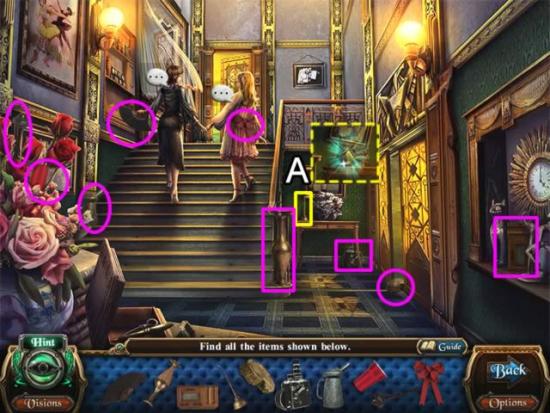
- Collect all of the items. Listen to the conversations to update a character profile. The oil can unlocks a secret vision (A).
- Take the OIL CAN and head up the stairs to return to the Ballroom.
- Enter the Velvet Diva Performance Stage
- Zoom in on the musical instrument collect mechanism to open a minigame.
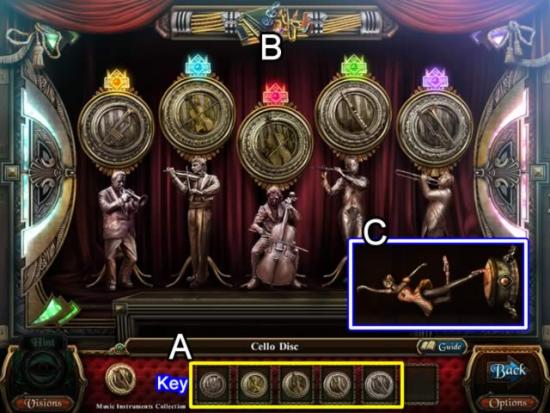
- Use the symbols along the bottom (A) as a key to match the musicians with their instruments. Click the disk above the musicians to swap them (B). A light comes on when a disk is correctly placed. Get the DANCING FIGURINE COLLECTION (3/4) item (C).
- Zoom in on the chair on the left for a fragmented object scene.
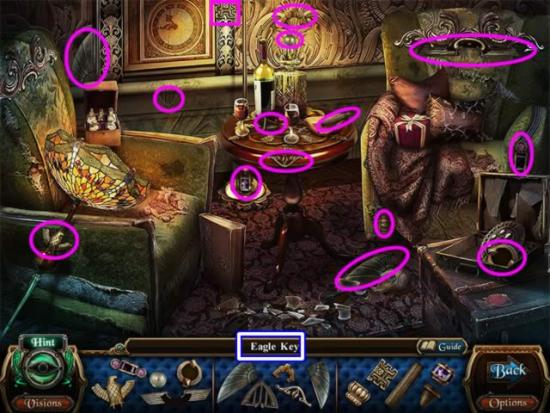
- Collect the items to assemble the EAGLE KEY.
- Return to the staircase.
Chapter 6: The Director
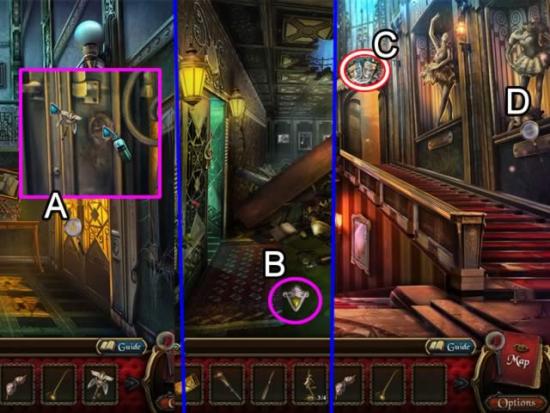
- Inspect the lock on the double doors (A). Apply the RUST REMOVER. Insert the EAGLE KEY.
- Enter the doors and find yourself in the Office Hallway. Go down to the Lobby (B).
- Click the Macabre Object (7/20) above the doors at the top of the stairs (C).
- Click the headless ballerina for a fragmented object scene (D).
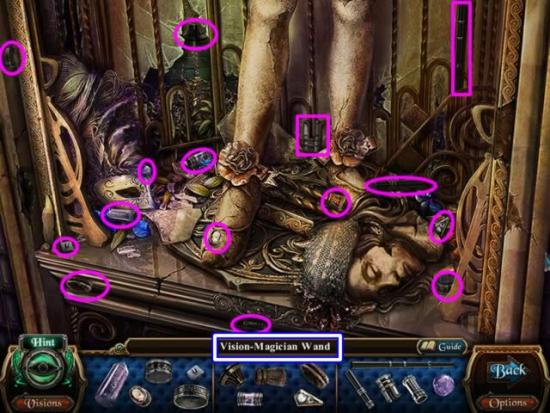
- Collect the parts for the VISION-MAGICIAN WAND.
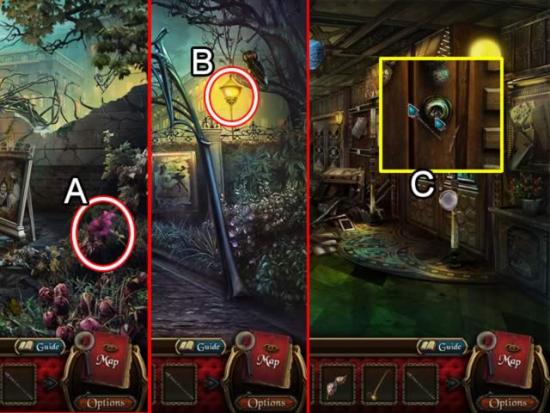
- Exit the theater.
- Go right to the Announcement Area. Pluck the morphing flower for Macabre Object (8/20).
- Return to the front of the theater. Go down to the blocked gate (B). Click the morphing street light for Macabre Object (9/20).
- Go back inside of the theater. Go up the left staircase to the Office Hallway.
- Examine the lock on the director’s office door (C). Use the SMALL CHISEL to clear the lock. Insert the VISION-MAGICIAN WAND in the keyhole.
- Enter the office and speak with the mayor.
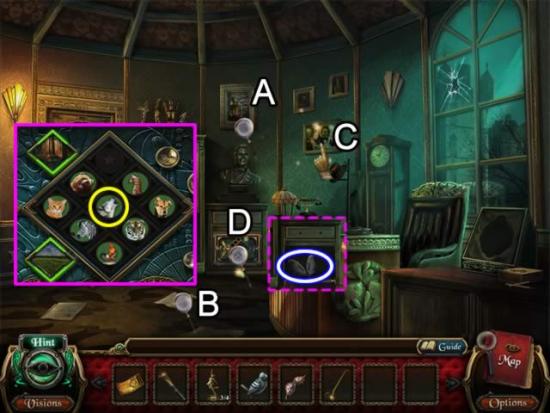
- Get character profile updates by inspecting the framed poster (A), the paper on the floor (B) and clicking the photo (C).
- Click the design on the cabinet (D) to open a puzzle.
- Slide the animals to arrange them by habitat. The wolf must be in the intersecting row and column. See the inset above for the solution. Take the SAPPHIRE BUTTERFLY WINGS.
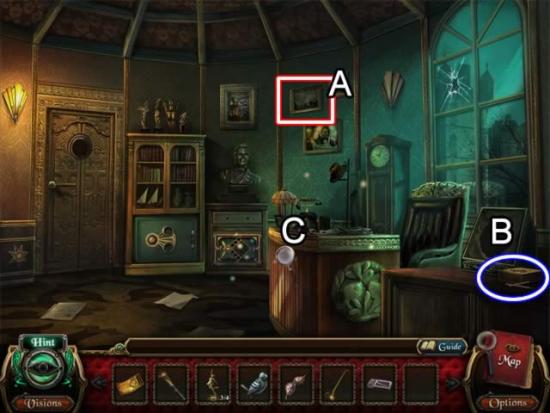
- Click the morphing picture (A) for Macabre Object (10/20).
- Pick up the BOX OF MATCHES (B).
- Play the fragmented object scene on the desk (C).
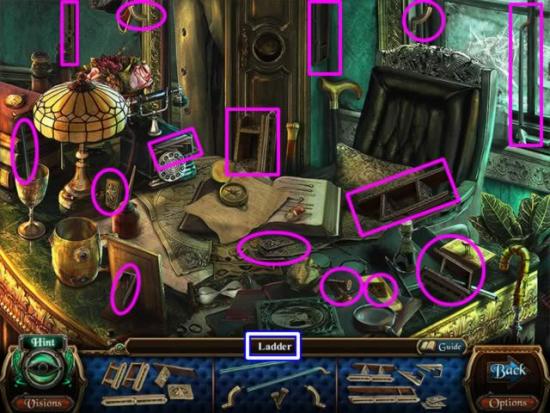
- Collect the parts of the LADDER.
- Return to the hallway and place the LADDER to reach the hole in the ceiling.
- Enter the Exhibition Room.
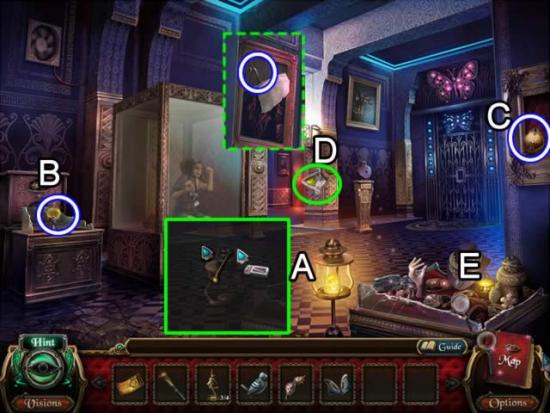
- Use the OIL CAN and BOX OF MATCHES to light the lamp (A).
- Pick up the CRYSTAL BALL COLLECTION (1/6) item (B) and the COPPER PETAL (C).
- Go left into the Magician Show Hallway (D). Take the DRAWER HANDLE from the torn poster frame (dashed green).
- Return to the Exhibition Room.
- Play the fragmented object scene in the display case (E)
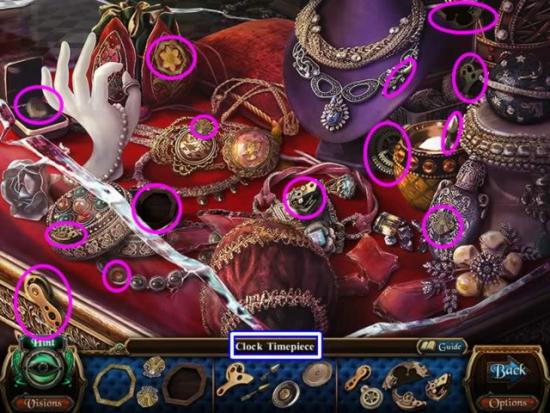
- Collect all of the parts for the CLOCK TIMEPIECE.
- Go down to exit the Exhibition Room. Enter the Director’s Office.
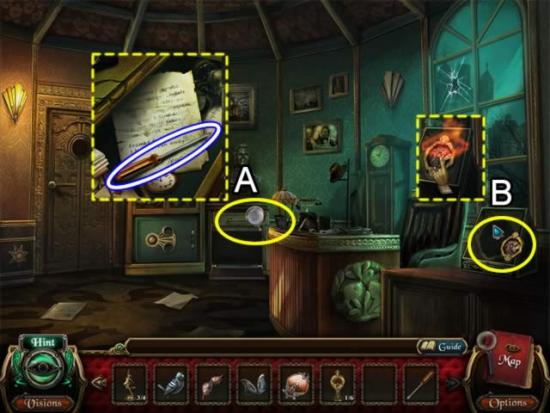
- Place the DRAWER HANDLE in the slot on the cabinet drawer (A).
- Zoom in to inspect the drawer. Take the SCREWDRIVER and read the note (dashed yellow).
- Insert the CLOCK TIMEPIECE in the stand on the right (B).
- Click the eye to begin a minigame.
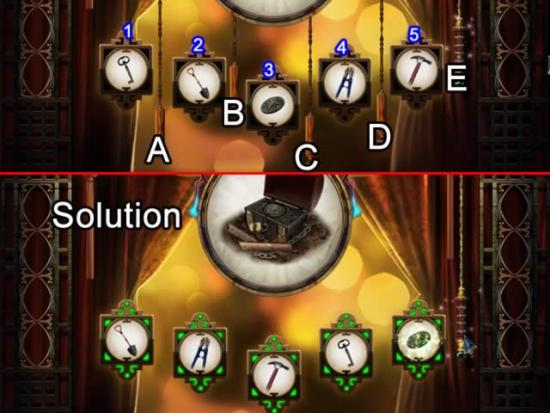
- The goal is to swap the images so they are in the correct order by pulling the cords.
- Cord A swaps images 1 and 2.
- Cord B swaps images 1 and 3.
- Cord C swaps images 2 and 5
- Cord D swaps images 4 and 5.
- Cord E tests to see if the images are in the correct order.
- The best way to solve this puzzle is to use cords A and D to position the images and cord C to move them. The correct order is: shovel, bolt cutters, hammer, key and plate cover.
- SOLUTION. Pull the cords in this order: C, A, B, C, D, A, C. There is no reset button, but clicking the Back button and entering the puzzle again will reset the images to their original positions.
- Collect the WHITE ROSE KEY.
- Play the fragmented object scene on the desk.
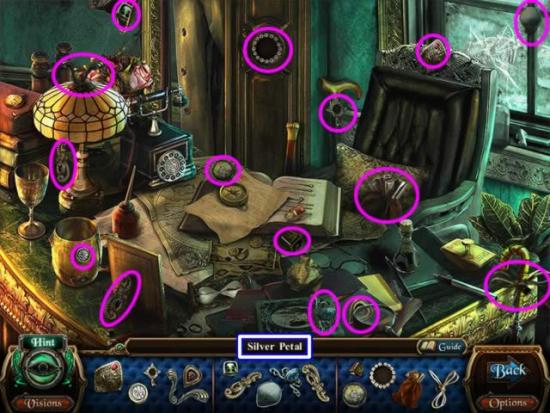
- Collect all of the pieces to form a SILVER PETAL.
- Exit the office. Go up the ladder and through the Exhibition Room to the Magician Show Hallway.
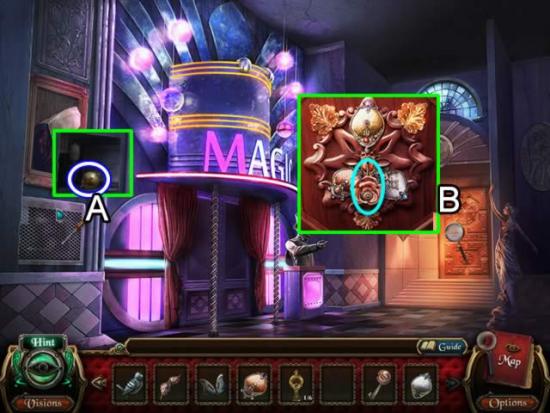
- Use the SCREWDRIVER to remove the vent cover (A). Take the GOLD PETAL.
- Inspect the door (B). Place the GOLD, SILVER and COPPER PETALS in the petal impressions. Insert the WHITE ROSE KEY in the lock.
- Enter Rose’s Room.
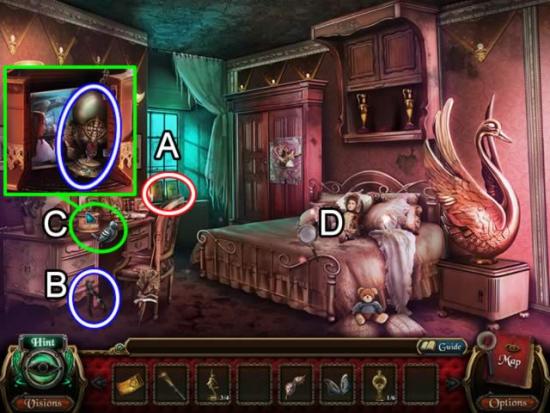
- Pick up the Macabre Object (11/20) on the window ledge (A).
- Take the WIRE CUTTER (B).
- Place the BIRD FIGURINE on the music box (C). Zoom in and take the CRYSTAL BALL COLLECTION (2/6) item. Look at the picture.
- Check out the bed (D) for a fragmented object scene.
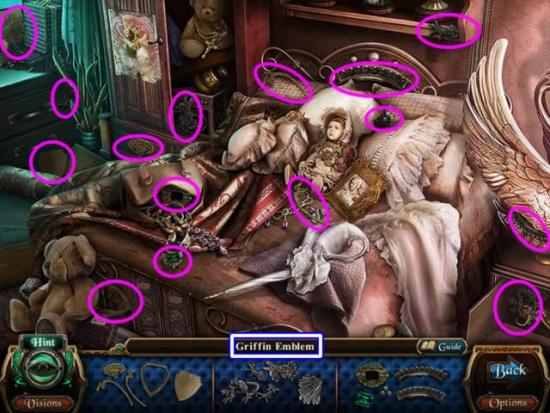
- Collect all of the parts of the GRIFFIN EMBLEM.
- Exit Rose’s Room.
- Return to the Exhibition Room.
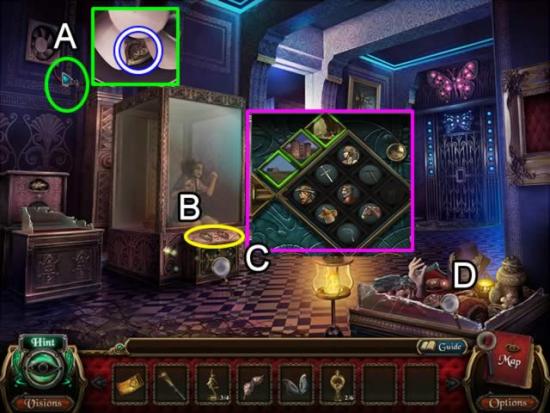
- Snip the wire to the fan (A) with the WIRE CUTTER. Inspect the fan and take the MANTICORE EMBLEM.
- Insert the GRIFFIN and MANTICORE EMBLEMS in the impressions in the display stand containing the reporter (B) to trigger a puzzle.
- Slide the icons around until they are aligned with the correct vocation. The placement order doesn’t matter.
- Speak to the freed reporter.
- Play the fragmented object scene in the jewelry display (D).
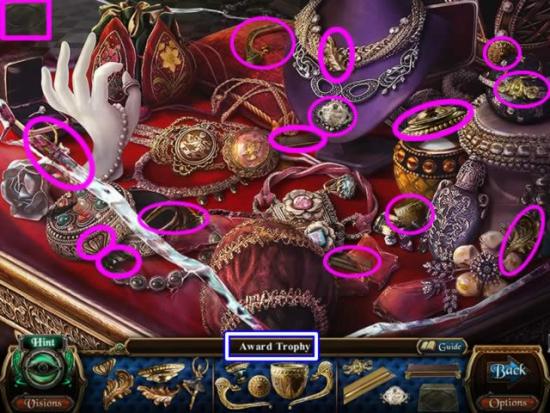
- Collect the pieces of the AWARD TROPHY.
- Return to Rose’s Room.
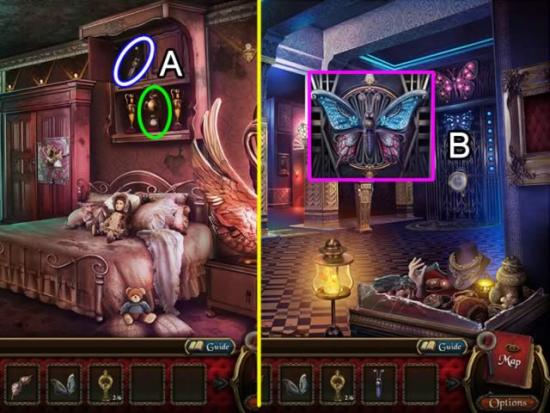
- Place the AWARD TROPHY in the empty slot (A). Take the BUTTERFLY BODY from the cabinet.
- Return to the Exhibition Room.
- Zoom in on the doors below the neon butterfly (B). Insert the BUTTERFLY BODY and SAPPHIRE and RUBY BUTTERFLY WINGS in the impressions.
- Enter Abigail’s Room.
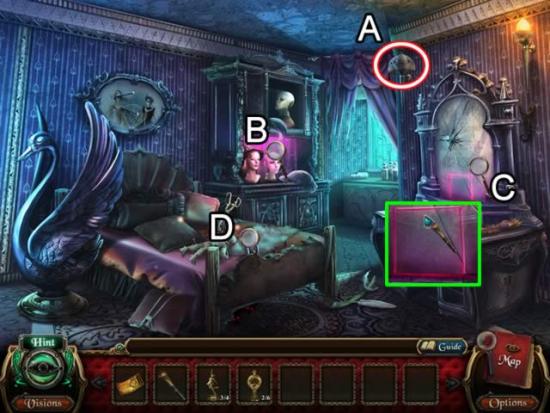
- Click the morphing lamp (A) for Macabre Object (12/20).
- Examine the mannequin heads (B) for a character profile update.
- Inspect the mirror (C). Use the POWDER BRUSH on the red square to reveal a message.
- Play the fragmented object scene on the bed.
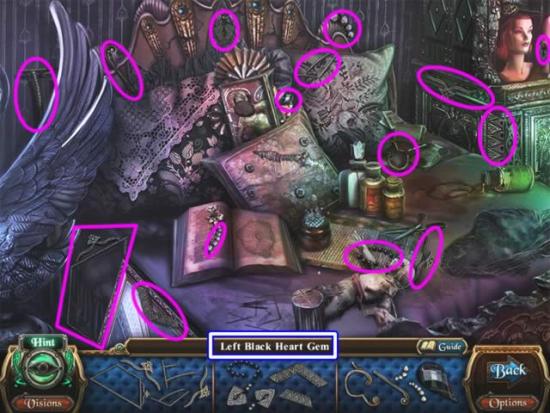
- Collect the pieces for the LEFT BLACK HEART GEM.
- Return to Rose’s Room.
- Play the fragmented object scene on her bed.
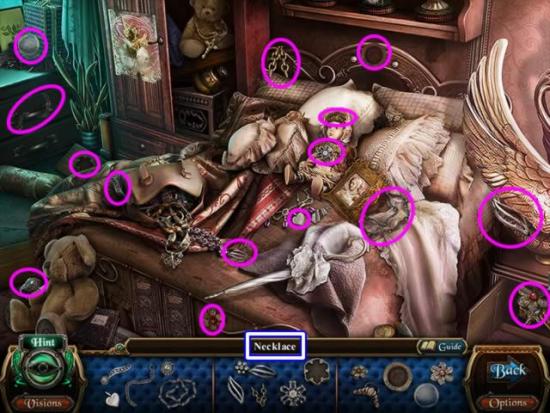
- Collect the pieces of the NECKLACE.
- Return to the Exhibition Room.
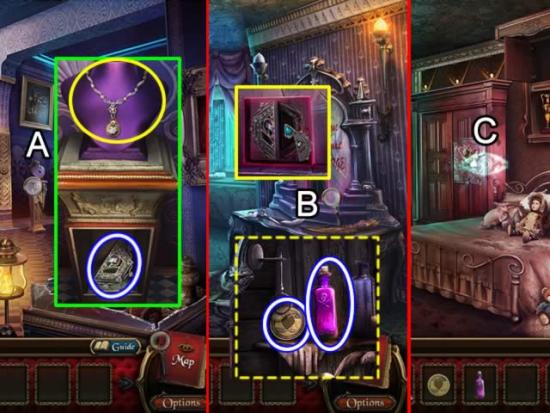
- Zoom in on the necklace stand (A). Place the NECKLACE in the outline on the form. Take the RIGHT BLACK HEART GEM.
- Go forward to Abigail’s Room.
- Open the interactive area on the mirror (B). Insert the LEFT and RIGHT BLACK HEART GEMS in the square inset. Take the HEART COIN and POISON BOTTLE.
- Return to Rose’s Room.
- Click the eye (C) to play the hidden object scene.
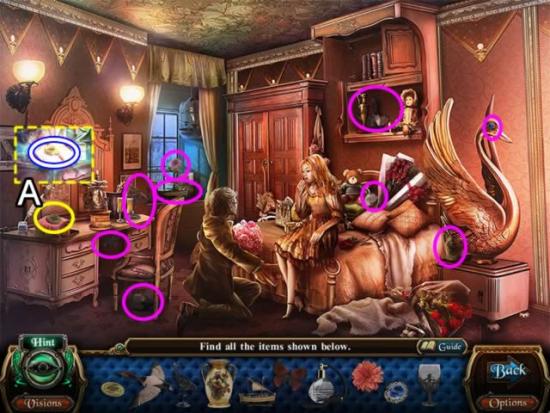
- Collect the items shown. The coin (A) is a secret vision EYE COIN item.
- Return to the Director’s Office.
- Play the fragmented object scene on the desk.
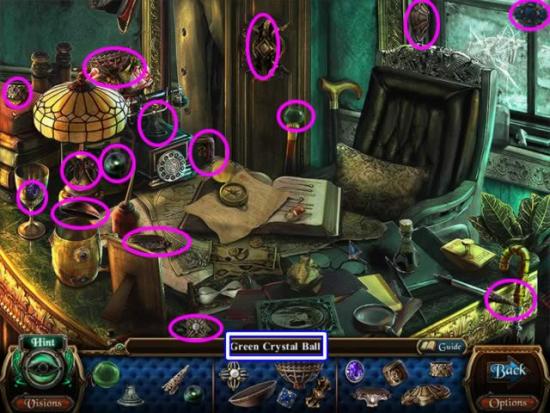
- Collect all of the items to create a GREEN CRYSTAL BALL.
Chapter 7: Magician HOG-DINI Show
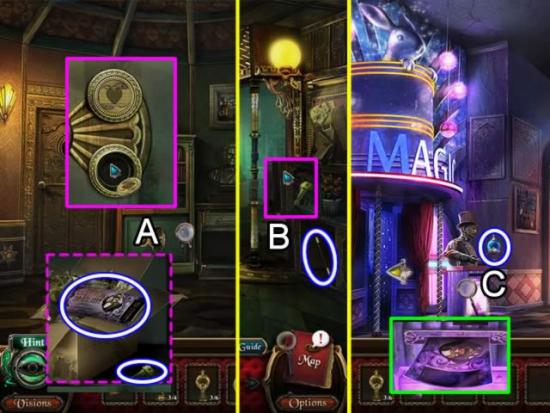
- Zoom in on the safe (A). Place the HEART and EYE COINS in the grooves to open the safe. Take the PURPLE TICKET – MAGICIAN HOG-DINI SHOW ticket and the CABINET KEY.
- Exit to the hallway.
- Use the CABINET KEY to open the cabinet door (B). Take the MAGIC WAND.
- Return to the Magician Stage Hallway.
- Give the ticket taker (C) the MAGIC WAND. Take the CRYSTAL BALL COLLECTION (4/6) item. Insert the PURPLE TICKET – MAGICIAN HOG-DINI SHOW ticket in the slot to open the doors.
- Enter the Magician Show Stage area.
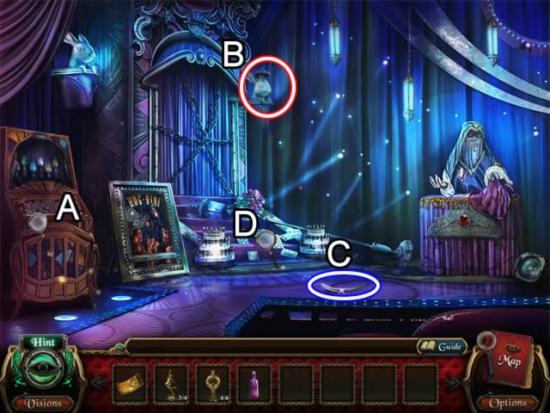
- Examine the crystal ball mechanism (A) to update the objectives.
- Click the Macabre Object (13/20) item (B).
- Pick up the FEATHER (C).
- Play the fragmented item scene on the steps (D).
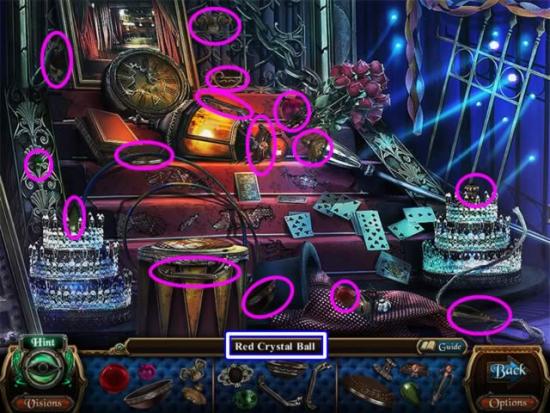
- Collect the parts of the RED CRYSTAL BALL (5/6).
- Return to Rose’s Room.
- Place the SWAN FEATHER on the swan. Click the eye to open a puzzle.
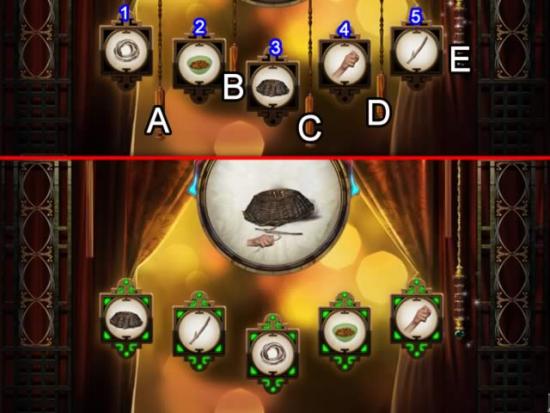
- The goal is to swap the images so they are in the correct order by pulling the cords.
- Cord A swaps images 1 and 2.
- Cord B swaps images 1 and 3.
- Cord C swaps images 2 and 5
- Cord D swaps images 4 and 5.
- Cord E tests to see if the images are in the correct order.
- The best way to solve this puzzle is to use cords A and D to position the images and cord C to move them. The correct order is: nest, twig, string, bowl and hand.
- SOLUTION. Pull the cords in this order: B, C, D. There is no reset button, but clicking the Back button and entering the puzzle again will reset the images to their original positions.
- Collect the SKULL GEM.
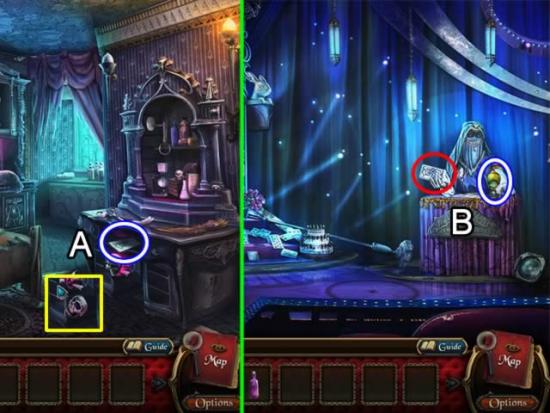
- Return to Abgail’s Room.
- Place the SKULL GEM in the slot on the dresser (A). Take the TAROT CARD.
- Return to the Magician Show Stage area.
- Give the TAROT CARD to the fortune teller (B). Get a CRYSTAL BALL COLLECTION (6/6) item.
- Zoom in on the crystal ball mechanism on the left to play a puzzle.
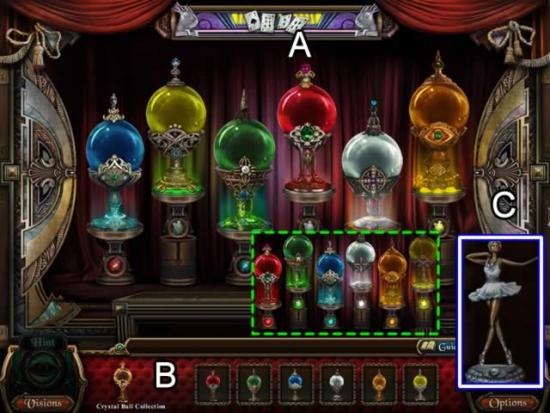
- Swap the crystal balls on the stands (A) until they are in the same order as shown at the bottom (B). The solution is shown (dashed green). Get the DANCING FIGURE COLLECTION (4/4) item.
- Return to the Lobby (go down four times).
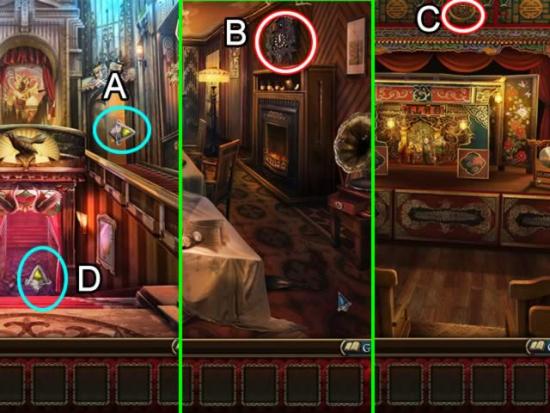
- Go through the door at the top of the right staircase (A).
- Go forward and enter the Dining Room door on the left. Click the Macabre Object (14/20) item (B).
- Exit the Dining Room. Go through the doors at the end of the corridor. Go right and then forward until you reach the Oriental Performance Stage. Take the Macabre Object (15/20) item (C).
- Retrace your steps to the Lobby.
- Go down the steps (D) to Rose’s Solo Show Hallway.
Chapter 8: Nightingale’s Masterpiece Show
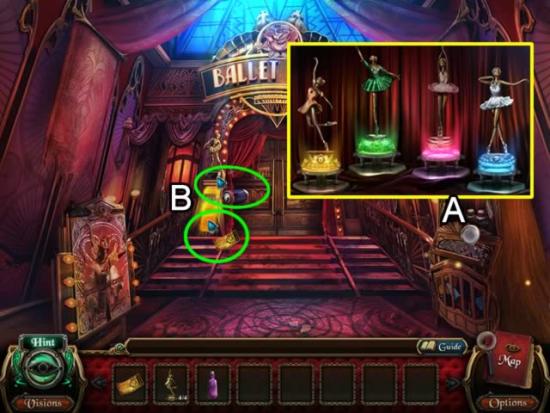
- Access the dancing figurine mechanism on the right (A). Swap the figurines so the dancer matches the color on the bottom of each stand. Correctly placed figurines light up. The solution is shown above. Take the BATTERY.
- Place the BATTERY in the ticket taker’s slot (B). Place the GOLDEN TICKET – NIGHTINGALE’S MASTERPIECE SHOW on the ticket taker to open the doors.
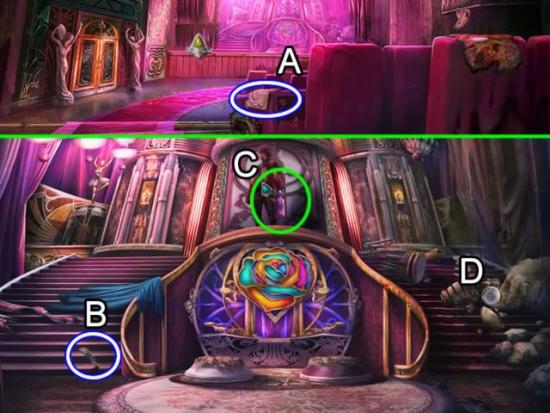
- Pick up the piece of SAND PAPER on the chair (A). Go toward the stage.
- Get the BOX CUTTER from the steps (B).
- Give the POISON BOTTLE to Andreas (C).
- Play the fragmented object scene on the stairs on the right (D).
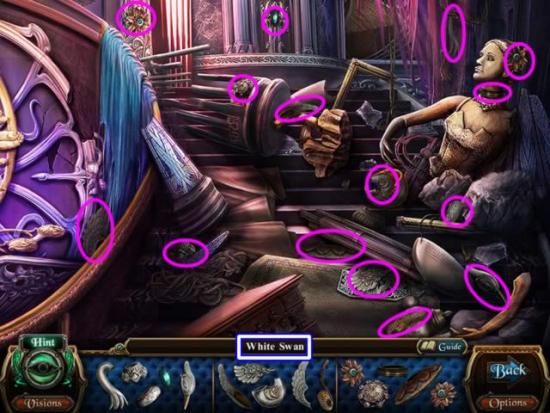
- Collect te pieces of the WHITE SWAN.
- Go back once to the seat area.
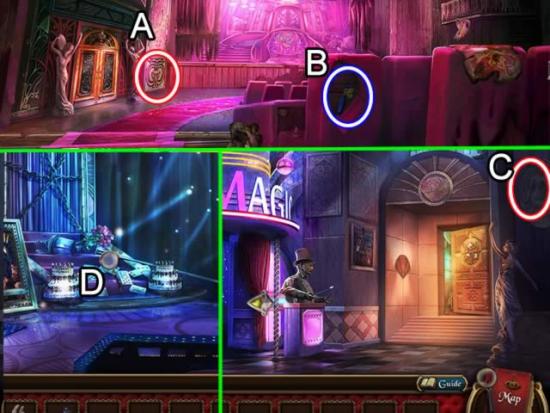
- Click the Macabre Object (16/20) to the left of the stage (A).
- Use the BOX CUTTER to rip the seat back (B). Take the WATER HANDLE.
- Return to the Magician Show Hallway. Click the Macabre Object (17/20) on the column on the right (C).
- Enter the Magician Show Stage area.
- Play the fragmented object scene on the stairs (D).
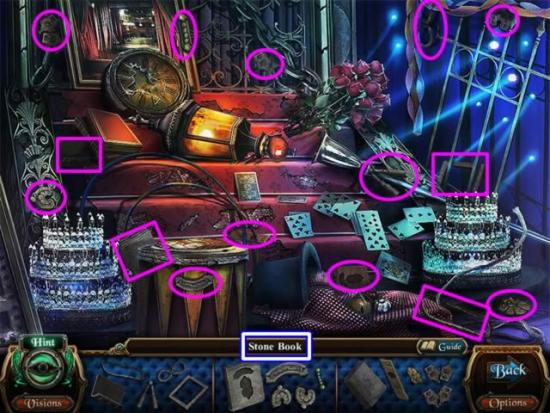
- Collect all of the parts of the STONE BOOK.
- Go to Abigail’s room.
- Play the fragmented object scene on her bed.
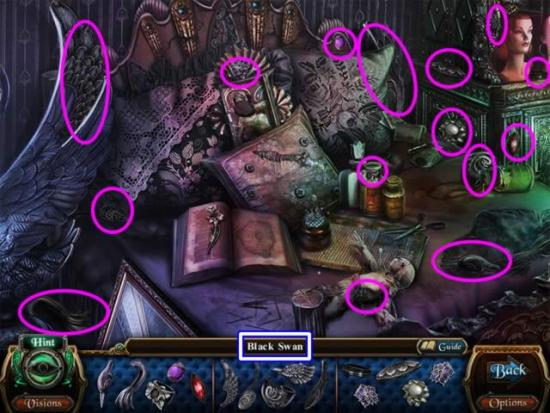
- Collect the pieces of the BLACK SWAN.
- Return to Rose’s Solo Stage.
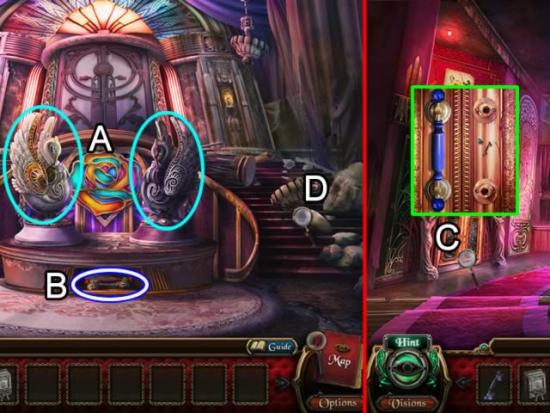
- Use the SAND PAPER to remove the grime from the pedestals.
- Place the WHITE and BLACK SWANS (A).
- Take the FIRE HANDLE and read the note (B).
- Return to the seat area.
- Zoom in on the double doors on the left (C). Place the WATER and FIRE HANDLES on the doors to open them.
- Return to the stage area.
- Play the fragmented object scene on the stairs.
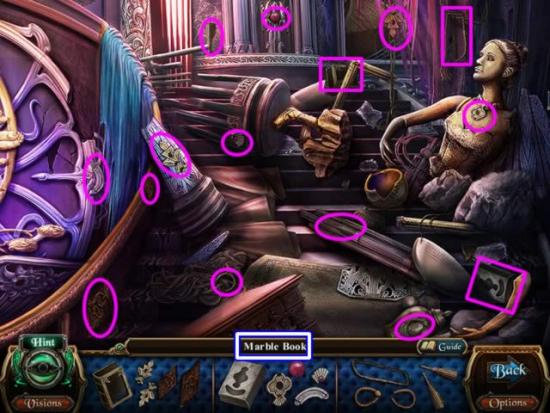
- Pick upthe fragments of the MARBLE BOOK.
- Return to the double doors to the left of the seats. Go through to the Back Stage.
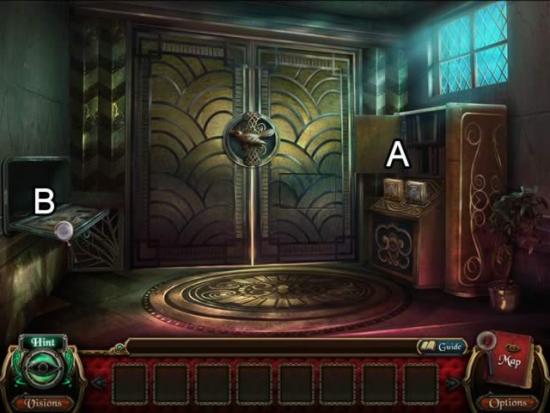
- Place the MARBLE and STONE BOOKS in the slots (A).
- Examine the map (B).
- Exit the theater (click down four times). At the entrance, go right to the Announcement Area.
- Play the fragmented object scene on the bench.
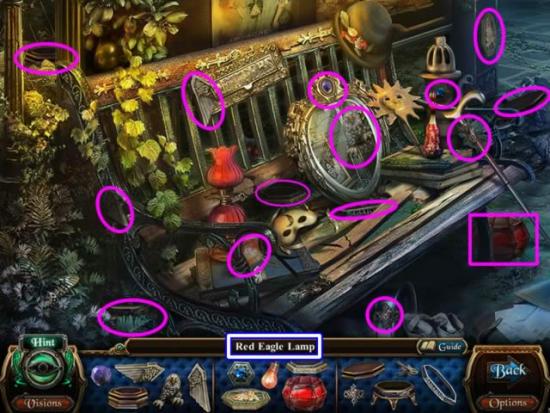
- Collect the items to construct a RED EAGLE LAMP.
- Return to the theater entrance. Go down to the fountain.
- Play the fragmented object scene in the fountain.
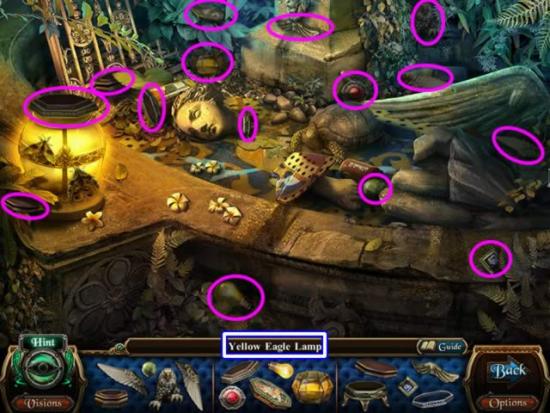
- Pick up the items for the YELLOW EAGLE LAMP.
- Go down to the locked gate.
- Play the fragmented object scene by the information stand.
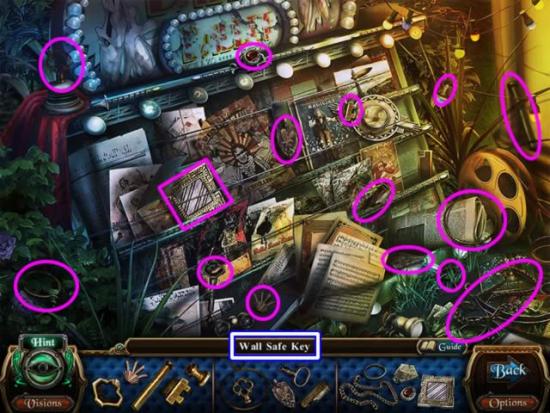
- Get the items indicated to make a WALL SAFE KEY.
- Return to the front of the theater.
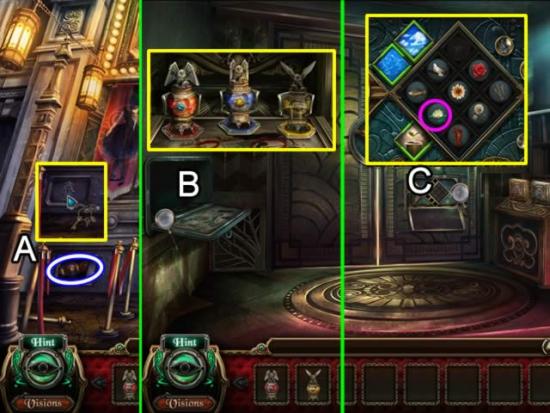
- Use the WALL SAFE KEY on the safe (A). Take the BLUE EAGLE LAMP.
- Return to the Lobby; go down the stairs and into the Back Stage area.
- Zoom in on the map (B). Place the RED, BLUE and YELLOW EAGLE LAMPS in their same colored bases.
- Open the puzzle area in the door (C). Slide the image to match its environment. The key image is the water lily; it must be at the intersection of water and plant.
- Go up the stairs to the balcony.
Chapter 9: Finding the Vision Fragments
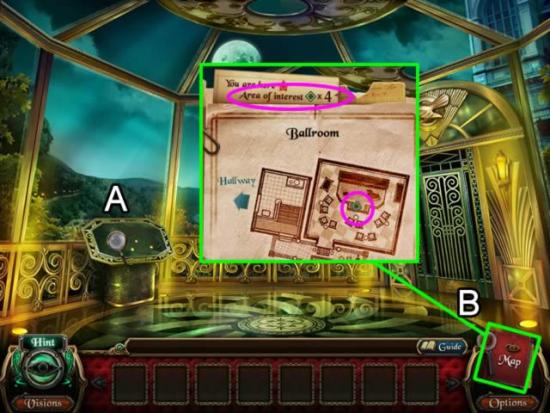
- Clicking the map pedestal (A) reveals the hint that the vision fragments are located on each of the four stages.
- Now is a good time to use the Map (B). The Area of Interest indicators are correct and are helpful for navigating.
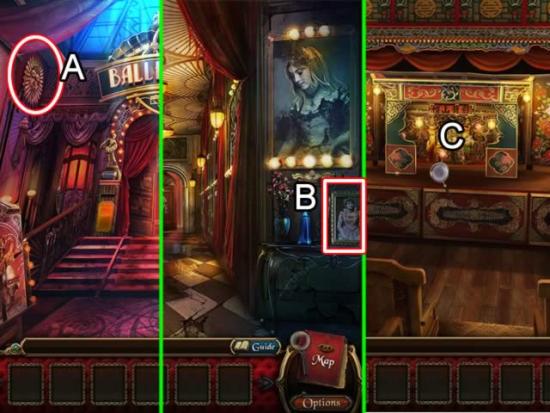
- Descend the steps from the Balcony. Stop at Rose’s Solo Show Hallway and get the Macabre Object (18/20) on the left wall (A).
- Take the stairs to the right.
- At the head of the Guest Hallway, pick up Macabre Object (19/20) on the table on the right (B).
- Continue down the hallway. Go left at the Rest Area and then straight to the Oriental Performance Stage (C). Play the fragmented object scene here.
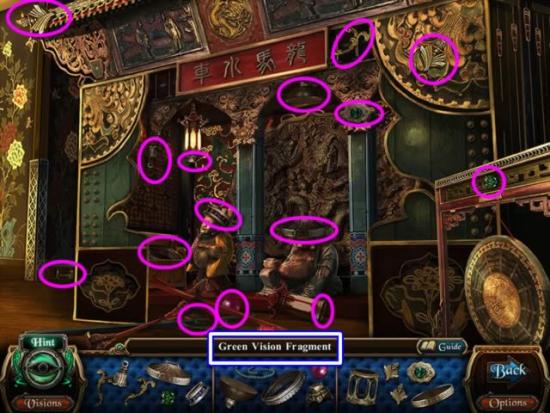
- Collect the items for the GREEN VISION FRAGMENT.
- Return to the Rest Area. Go left. Enter the Acrobat Performance Stage for the second object scene.
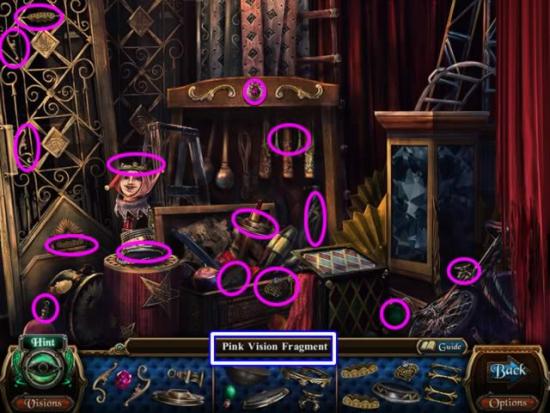
- Collect the items for the PINK VISION FRAGMENT.
- Exit the stage area. Go left to the Velvet Diva Performance Stage for the next object scene.
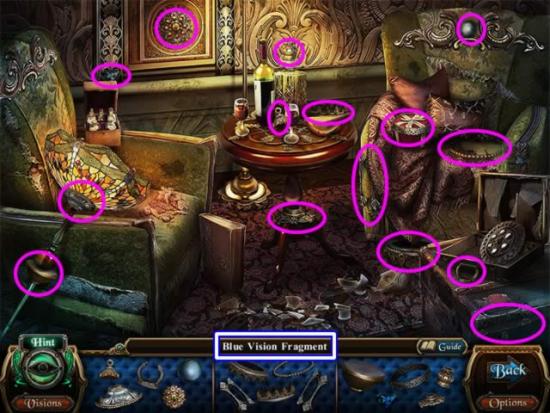
- Collect the pieces of the BLUE VISION FRAGMENT.
- Exit the stage area.
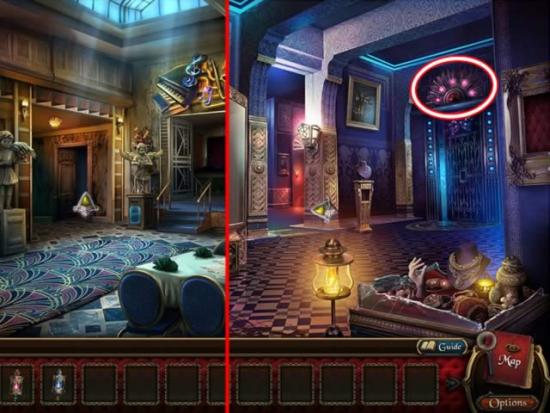
- Go through the door on the right. Use the double doors in the staircase area to reach the Office Hallway. Go up the ladder to the Exhibition Room.
- Get the last Macabre Object (20/20) from the neon lights over the entrance to Abigail’s Room.
- Go left to the Magician Show stage for the last vision fragment.
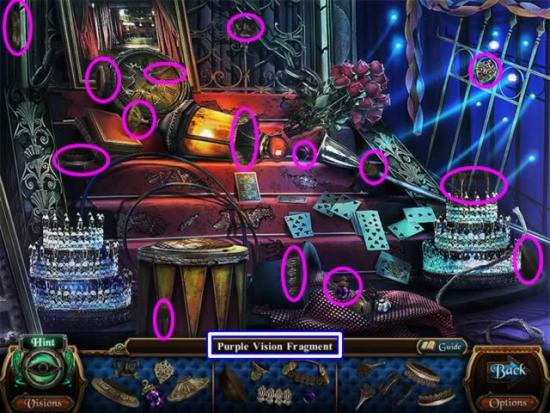
- Collect the pieces for the PURPLE VISION FRAGMENT.
- Return to the Lobby. Go forward to Rose’s Solo stage.
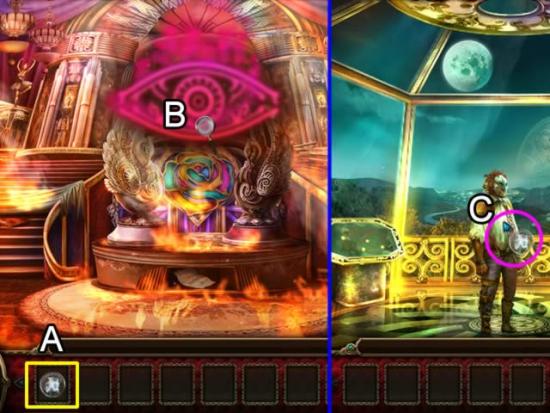
- Watch the cut scene and receive the NIGHT OF FIRE VISIONS (A).
- Click the eye for another cut scene (B).
- Go up to the Balcony.
- Give the NIGHT OF FIRE VISIONS to Andreas.
Congratulations! You have completed playing Macabre Mysteries: Curse of the Nightingale Collector’s Edition. Additional game play has now been unlocked. Click Bonus Game Play from the main menu to continue playing.
Bonus Game
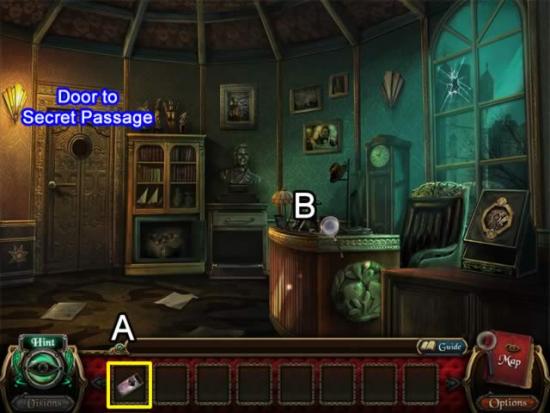
- Begin play with a VISION MAGIC SHOW TICKET in inventory.
- Solve the fragmented object scene on the desk (B) to open the door to the secret passage.
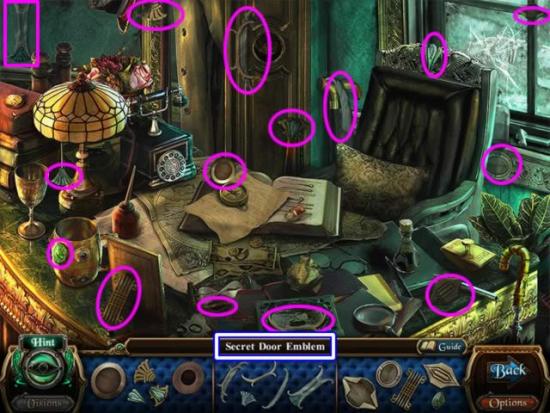
- Collect the items to form the SECRET DOOR EMBLEM.
- Insert the SECRET DOOR EMBLEM in the circular slot in the door.
- Enter the passageway.
- Play the fragmented object scene on the left.
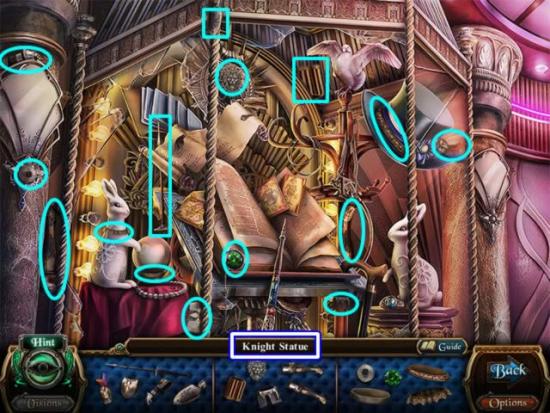
- Collect the items for the KNIGHT STATUE.
- Go down the hallway to the right to the Organ Room
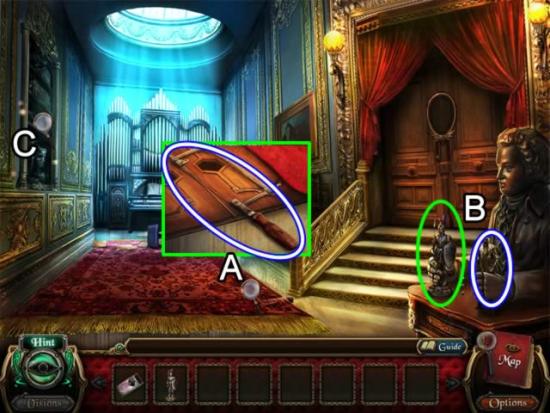
- Zoom in on the carpet (A). Take the HACKSAW hidden under it.
- Place the KNIGHT STATUE in the empty hand of the statue (B). Take the STATUE OF MR. WILSON.
- Play the fragmented object scene on the wall (C).
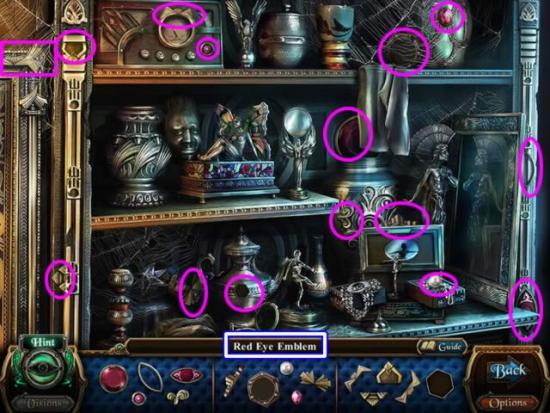
- Collect the items for the RED EYE EMBLEM.
- Return to the Vision Magic Show Hallway.
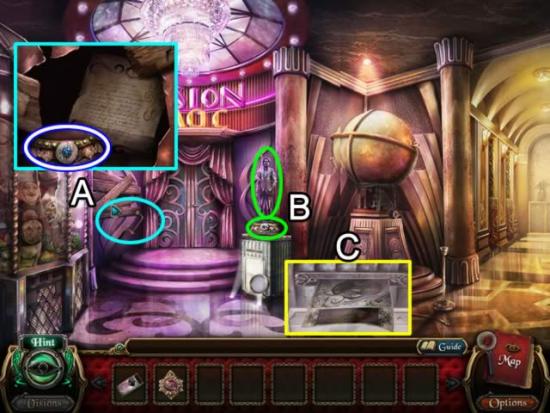
- Use the HACKSAW to cut away the boards (A).
- Inspect the nook. Read the letter and take the STATUE BASE.
- Place the STATUE BASE on the ticket stand (B). Set the STATUE OF MR. WILSON atop the base.
- Insert the VISION MAGIC SHOW TICKET in the slot.
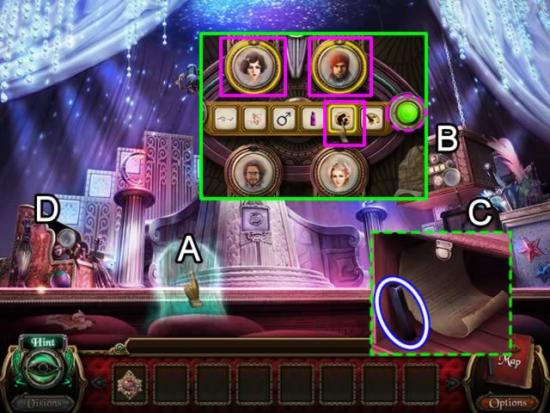
- Remove the ghost from the seat (A).
- Play the game on the right (B).
- The goal is to match an icon in the middle bar with one or more characters. Place the cursor or an icon. The character(s) associated with that icon are outlined in yellow. Click the icon to scroll through the possible choices. After all are selected, press the green button to check your answers. The above screenshot shows the solution.
- Take the ORGAN KEY and read the note (C).
- Play the fragmented object scene on the left (D).
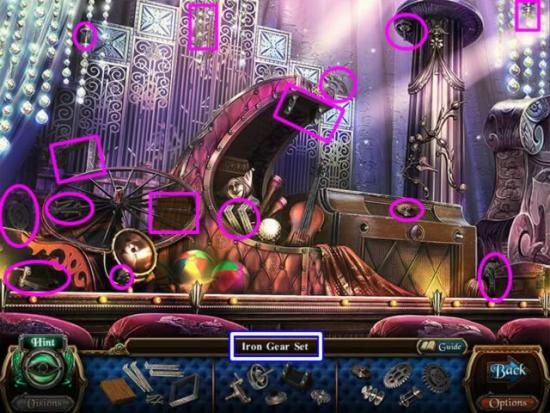
- Collect the pieces for the IRON GEAR SET.
- Exit the stage area. Go down the hall to the Organ Room.
- Play the fragmented object scene on the wall.
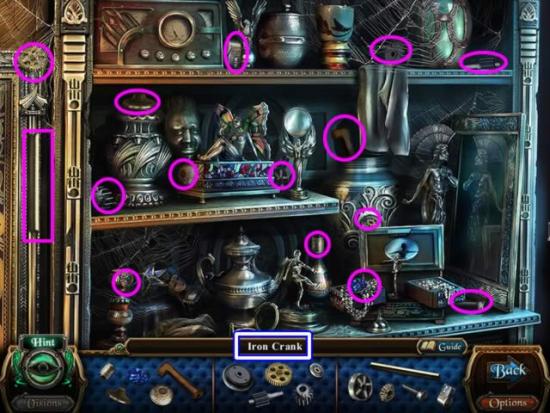
- Pick up the parts of the IRON CRANK.
- Return to the Vision Magic Hallway.
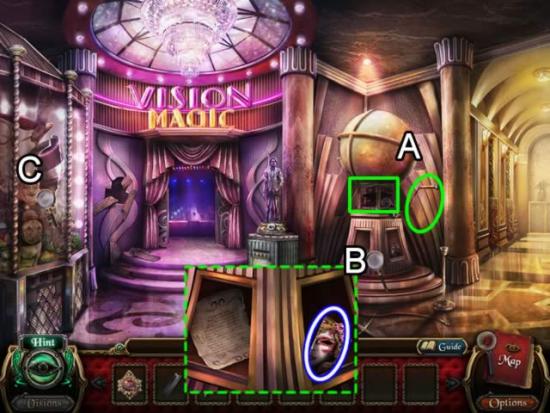
- Place the IRON GEAR SET and IRON CRANK in the globe (A).
- Zoom in on the base of the stand (B). Read the note and take the HALF VELVET MASK.
- Play the fragmented object scene on the left (C).
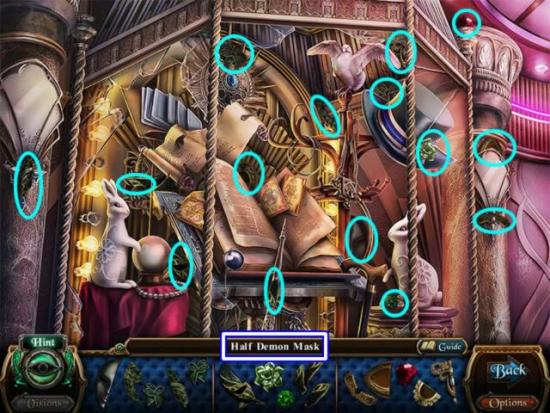
- Collect the parts for the HALF DEMON MASK.
- Return to Mr. Wilson’s office.
- Play the scene on the desk.
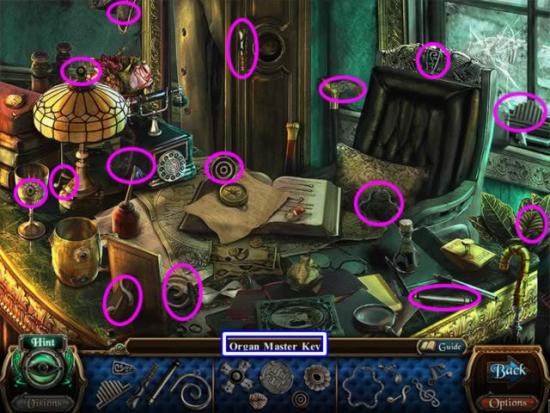
- Pick up the pieces for the ORGAN MASTER KEY.
- Return to the Organ Room.
- Place the HALF DEMON MASK and the HALF VELVET MASK in the outline on the door.
- Enter Darcy’s Room.
- Play the hidden object scene on the right.
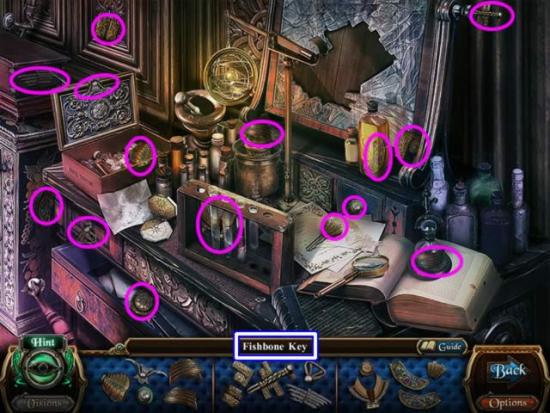
- Collect the pieces for the FISHBONE KEY.
- Return to the hallway.
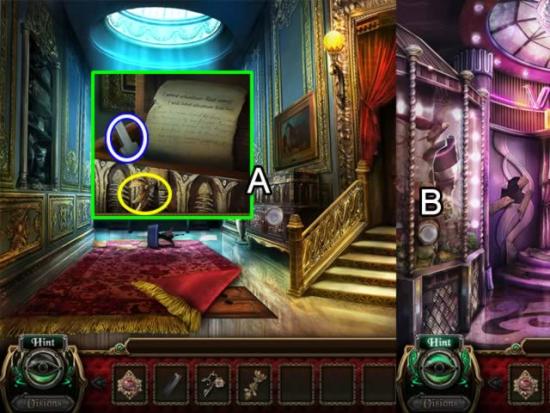
- Zoom in on the chest (A). Insert the FISHBONE KEY in the lock. Read the note. Take the ORGAN KEY.
- Return to the Vision Magic Hallway.
- Play the fragmented object scene (B).
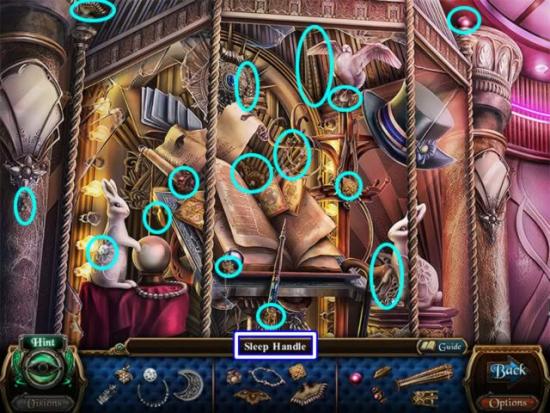
- Pick up the pieces for the SLEEP HANDLE.
- Enter the Vision Magic Show Stage.
- Play the fragmented object scene on the left.
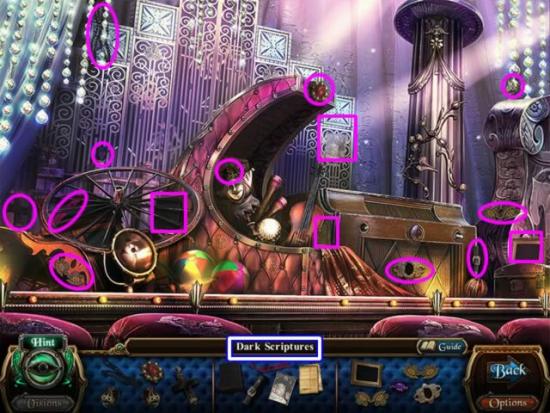
- Get the pieces for the DARK SCRIPTURES.
- Return to Darcy’s Room.
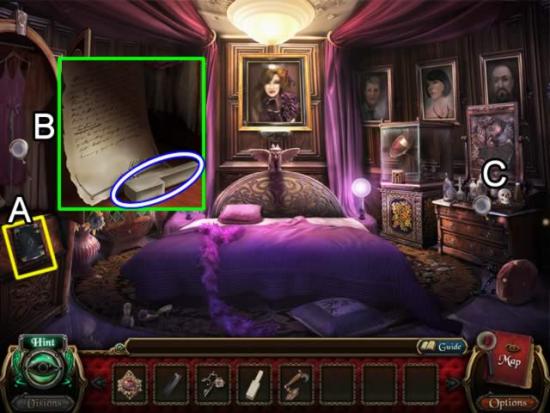
- Place the DARK SCRIPTURES in the slot (A) to open the armoire.
- Inspect the contents (B). Read the note and take the ORGAN KEY.
- Play the fragmented object scene (C).
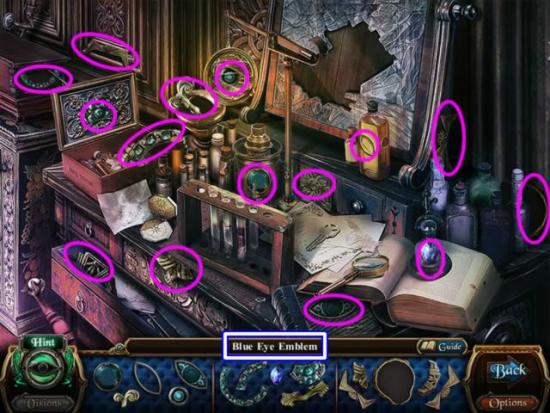
- Collect the BLUE EYE EMBLEM pieces.
- Return to the Vision Magic Show Stage.
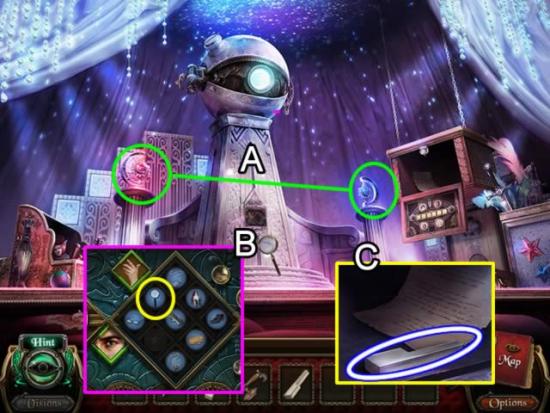
- Place the RED EYE EMBLEM and the BLUE EYE EMBLEM in their holders (A).
- Play the puzzle (B). Place the items associated with a hand or eye. The magnifying glass must be at the intersection of the row and column.
- Inspect the opening (C). Take the ORGAN KEY and read the note.
- Return to the Organ Room.
- Play the fragmented object scene on the wall.
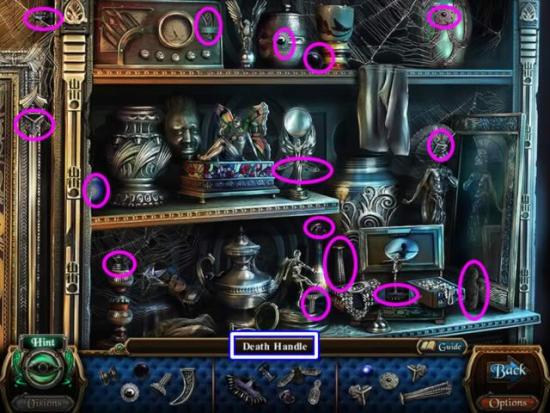
- Collect the pieces for the DEATH HANDLE.
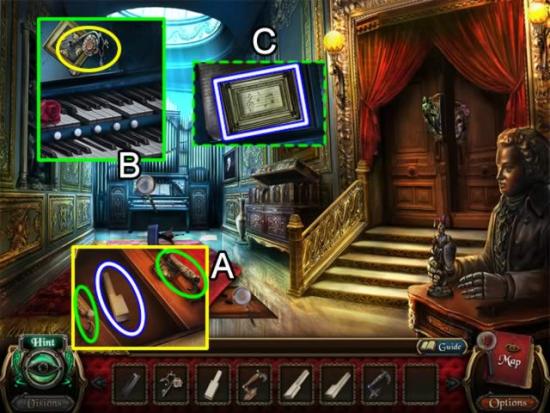
- Inspect the exposed flooring by the rug (A).
- Insert the DEATH HANDLE and SLEEP HANDLE in the slots. Take the ORGAN KEY.
- Zoom in on the organ (B). Put the five ORGAN KEYS in the empty slots. Insert the ORGAN MASTER KEY in the keyhole opening.
- Inspect the contents (C). Take the MUSIC NOTE PLAQUE and read the note.
- Enter Darcy’s Room.
- Click the eye over the bed to open a hidden object scene.
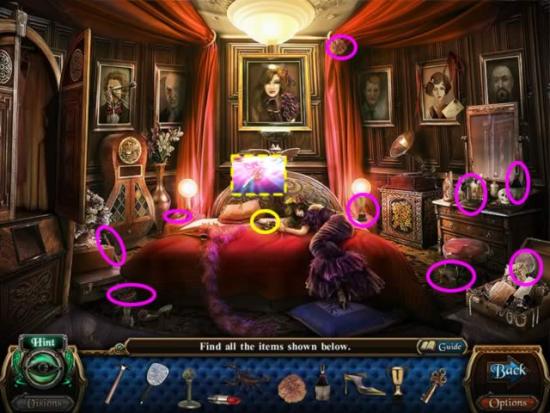
- Collect the objects. The key unlocks a secret vision. Get a GRAMOPHONE KEY.
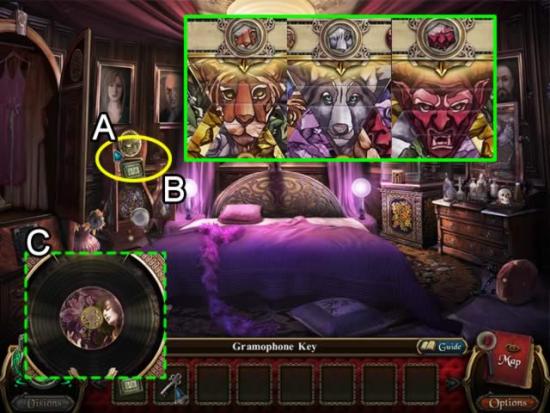
- Place the MUSIC NOTE PLAQUE in the slot (A) to open a puzzle (B).
- There are three progressively harder disk rotation puzzles. The goal is to rotate the disks until a pattern aligns that matches the image in the circle above the puzzle. In the first puzzle all the disks are independent of each other, so just match the pattern. Begin puzzle two from the innermost disk. One last movement of the outer disk is needed. Puzzle three is a devil. The best approach is to position the image from the second disk first. This disk affects all other disks. Position it and then work with the other three to align them. Take the OLD RECORD DISK.
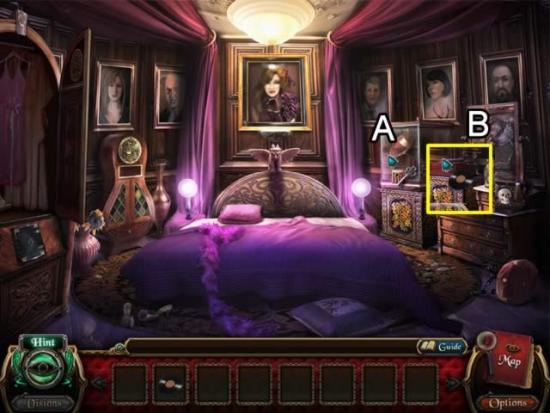
- Use the GRAMOPHONE KEY to unlock the cabinet (A).
- Place the OLD RECORD DISK on the gramophone.
- Watch the final cut scene.
Congratulation! You have completed the bonus play for Macabre Mysteries: Curse of the Nightingale Collector’s Edition. The Bonus Content is now available from the main menu.
More articles...
Monopoly GO! Free Rolls – Links For Free Dice
By Glen Fox
Wondering how to get Monopoly GO! free rolls? Well, you’ve come to the right place. In this guide, we provide you with a bunch of tips and tricks to get some free rolls for the hit new mobile game. We’ll …Best Roblox Horror Games to Play Right Now – Updated Weekly
By Adele Wilson
Our Best Roblox Horror Games guide features the scariest and most creative experiences to play right now on the platform!The BEST Roblox Games of The Week – Games You Need To Play!
By Sho Roberts
Our feature shares our pick for the Best Roblox Games of the week! With our feature, we guarantee you'll find something new to play!All Grades in Type Soul – Each Race Explained
By Adele Wilson
Our All Grades in Type Soul guide lists every grade in the game for all races, including how to increase your grade quickly!


