![Digimon UP Tier List [Supports, Buddies, and Partners]](/wp-content/uploads/2026/07/digimon-up-tier-list.jpg "Digimon UP Tier List [Supports, Buddies, and Partners]")
Digimon UP Tier List [Supports, Buddies, and Partners]
These Digimon will get you UP the leaderboard.

![Haze Seas Boss Drops [Chances, Locations, and How to Spawn]](/wp-content/uploads/2026/07/haze-seas-boss-drops.jpg "Haze Seas Boss Drops [Chances, Locations, and How to Spawn]")

Welcome to Gamezebo's walkthrough for Luxor Adventures. Navigation: General TipsScoring TipsEpisode 1A: Egypt, Present DayEpisode 1B: Egypt, Present DayEpisode 2: Venice, 1509Episode 3: Hollywood, 1937Episode 4: Boston, 1773Episode 5: England, 1193Episode 6: Egypt, 1261Episode 7: Venice, 1509Episode 8: Hollywood, 1937Episode 9: Boston, 1773Episode 10: England, 1193Bonus General Tips Each Episode contains multiple hidden object scenes associated with that era. You will collect obje…
a:1:i:0;a:2:s:13:”section_title”;s:28:”Luxor Adventures Walkthrough”;s:12:”section_body”;s:63850:”Welcome to Gamezebo’s walkthrough for Luxor Adventures.
Navigation:
General Tips

Scoring Tips
Walkthrough
There is a short clip that introduces the characters and sets the story line for play. Episode 1A: Egypt, Present Day
This is the only episode that is split into two parts. This is done to collect the tools you’ll need and establish the background story for the rest of the game.
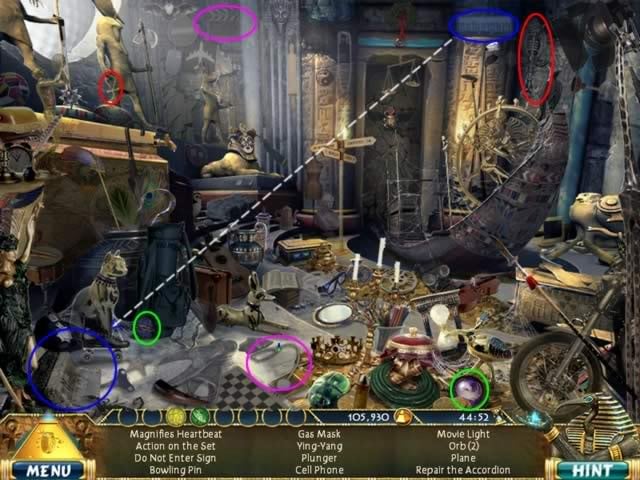
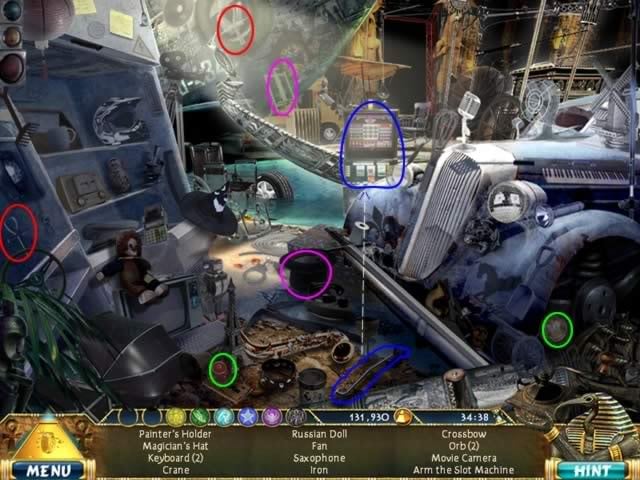
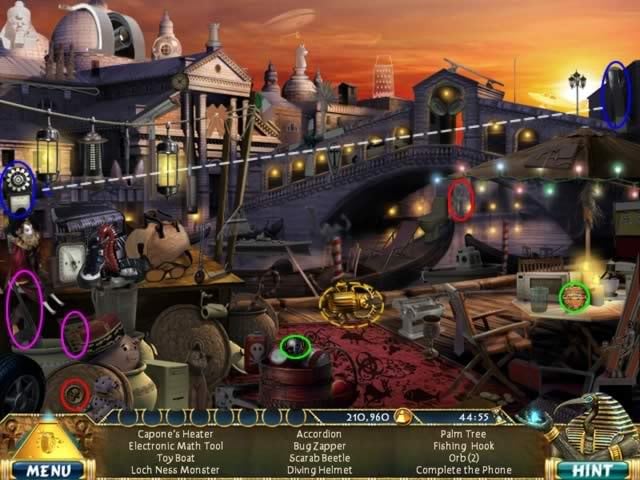
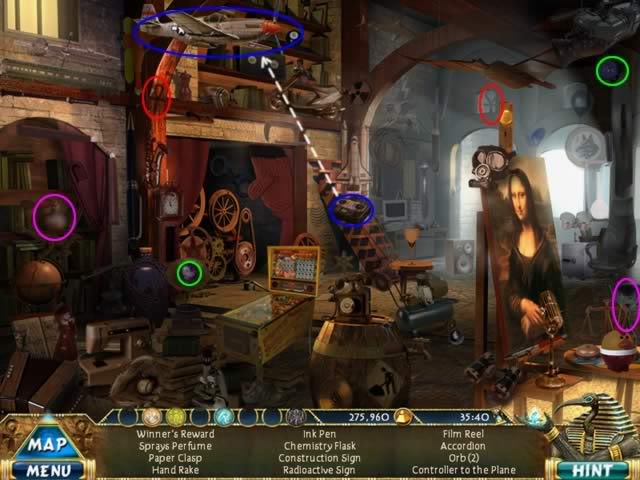
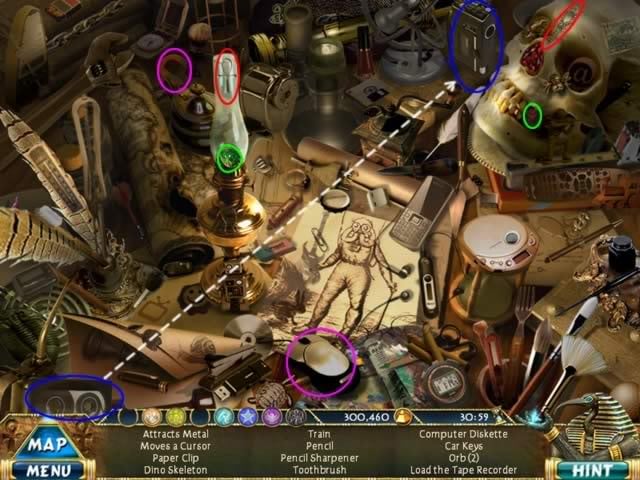
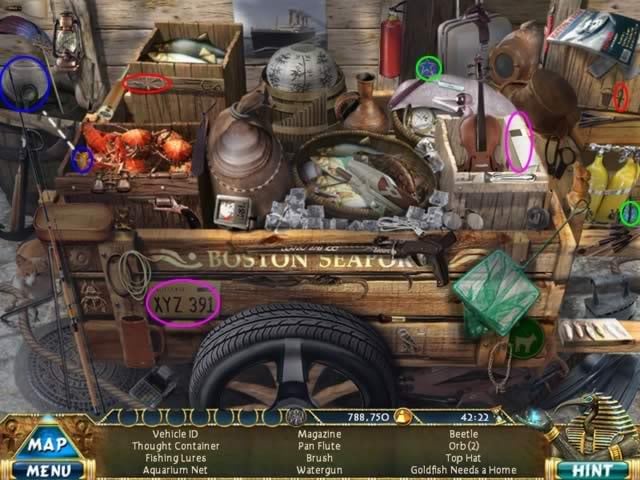
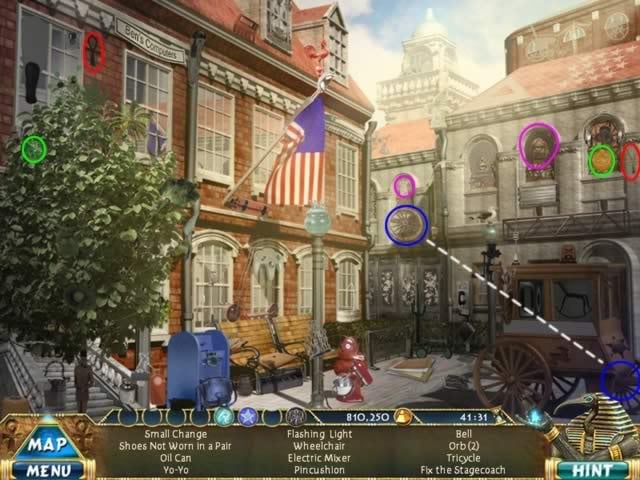
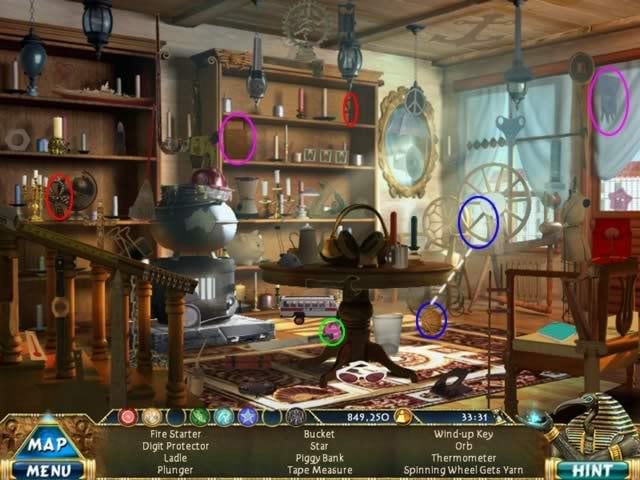
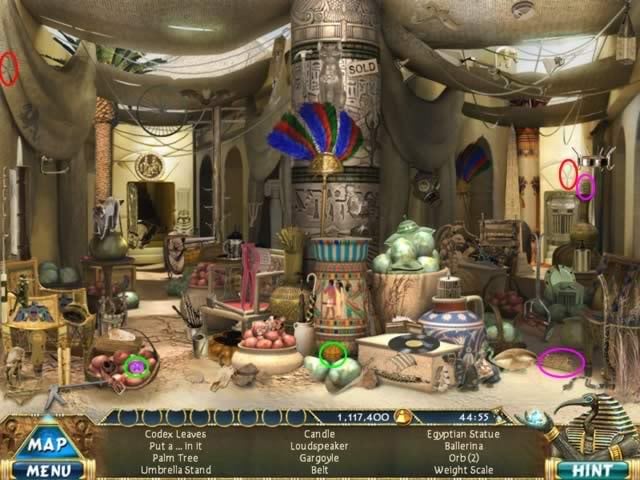
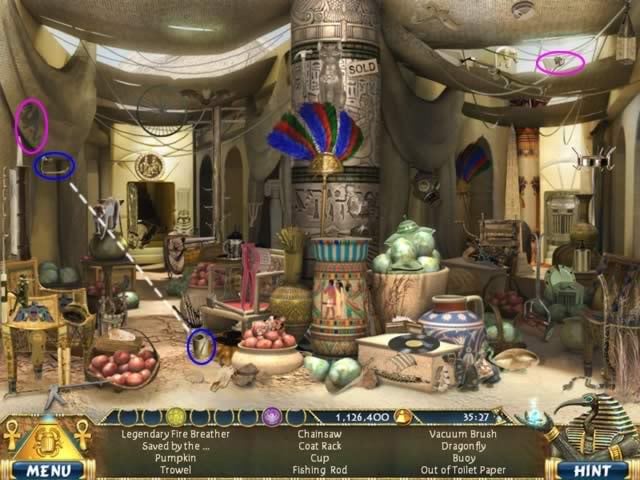
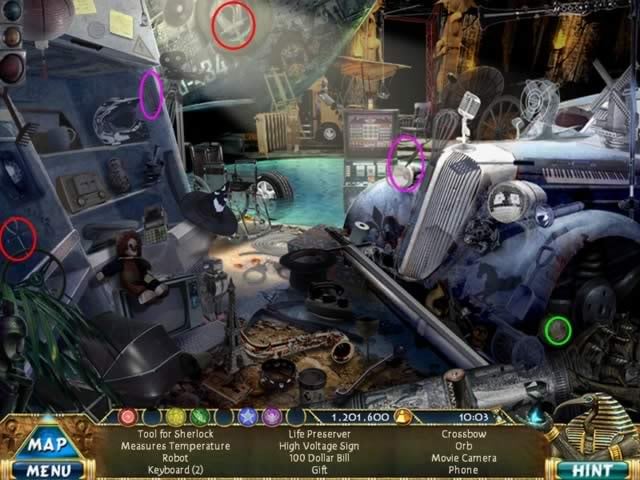
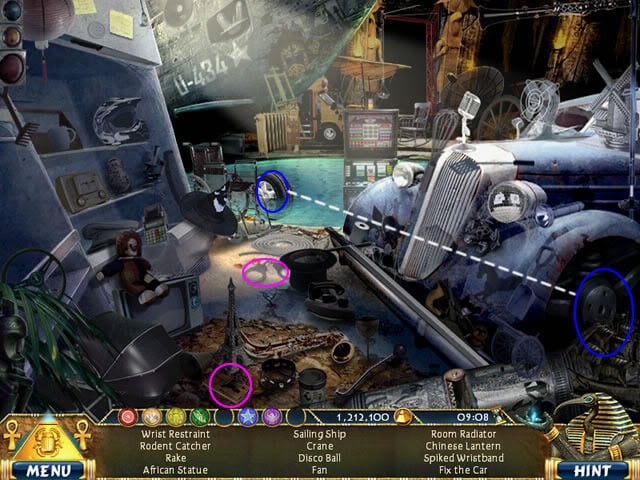
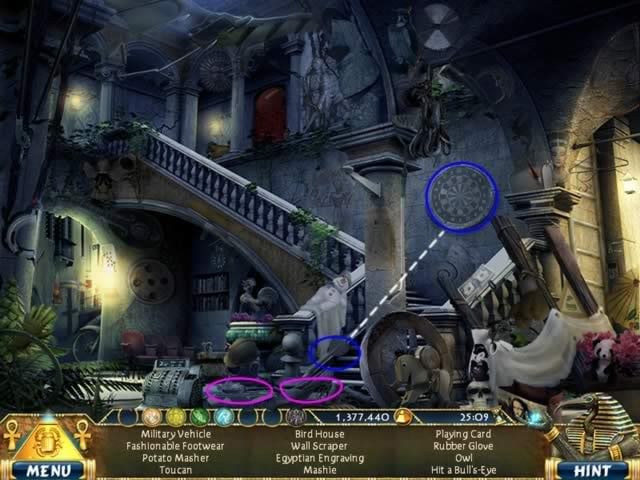
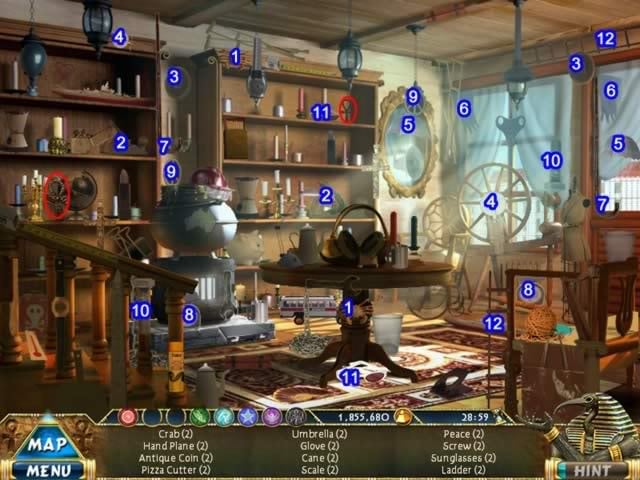
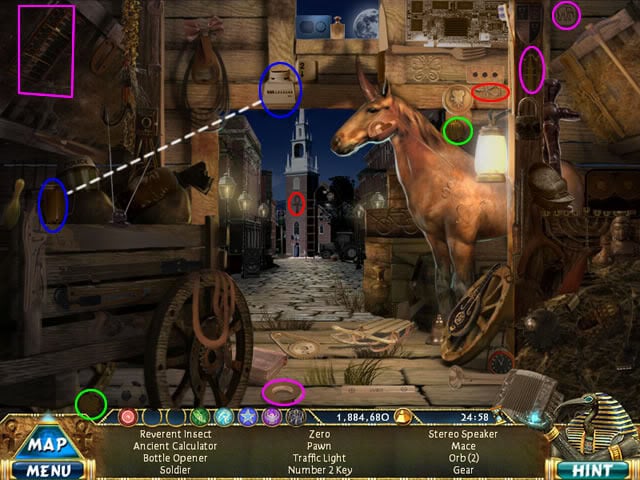
Every time you play you will have a different list of objects. The screen shots show where Ankhs (circled in red), Orbs (circled in green), clues (circled in pink), and combined (circled in blue) objects are located.
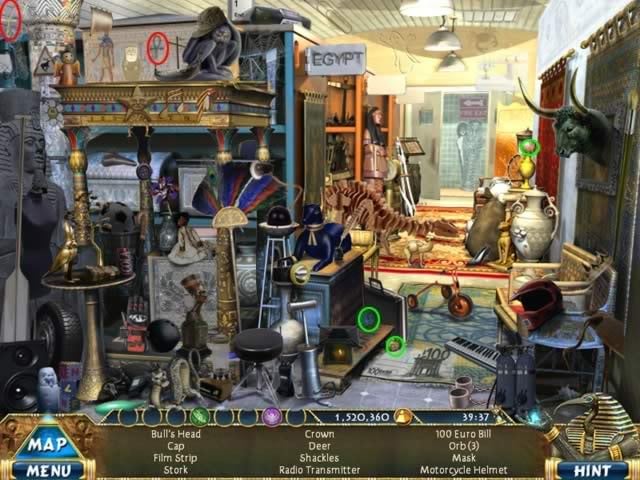
Location: Dig site
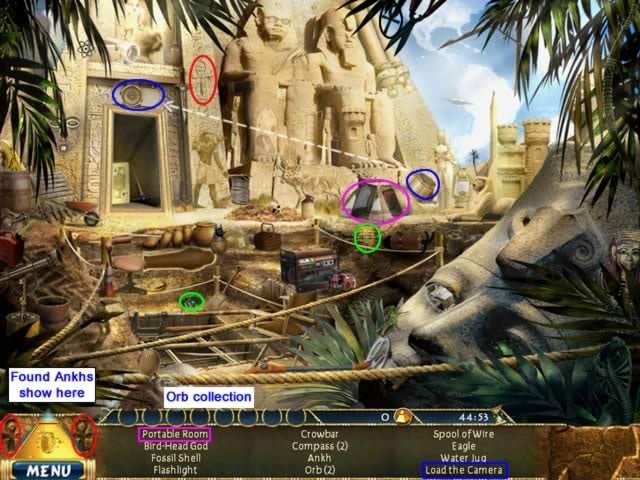
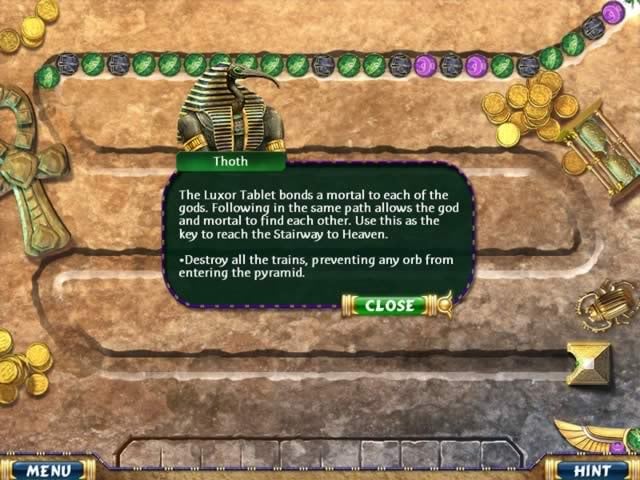
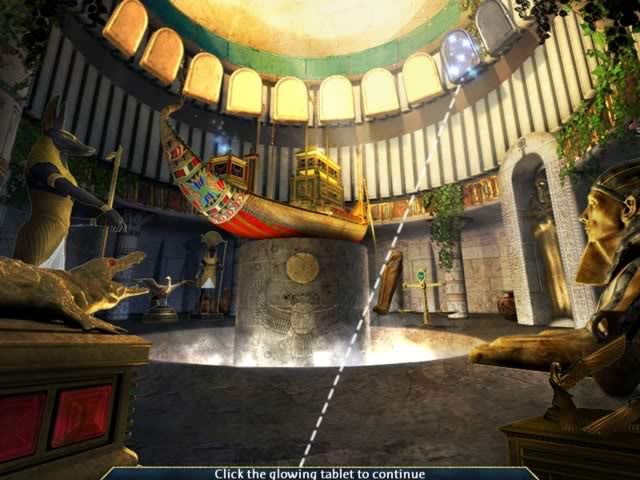
There is only one riddle to be solved in this scene: "Portable Room" is a tent (circled in pink). The two parts of the combine object ("Load the Camera") are circled in blue. The dashed white line indicates dragging the film to the camera. When the "Bird-Head God" object is clicked (the object is to the right of the door) Toth, the God of Wisdom, will move to the bar at the bottom of the screen and hints will be available.
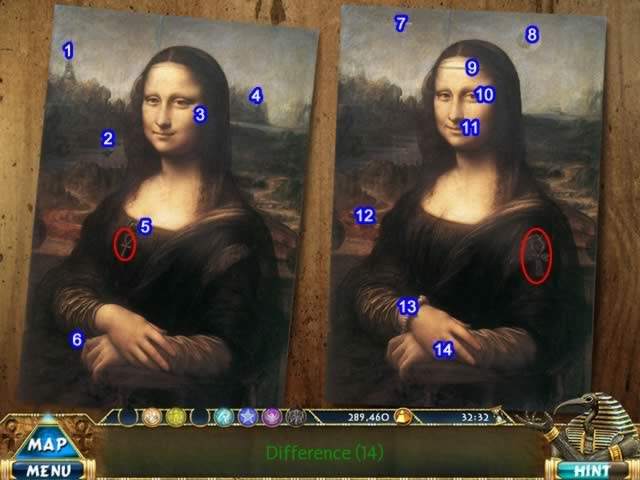
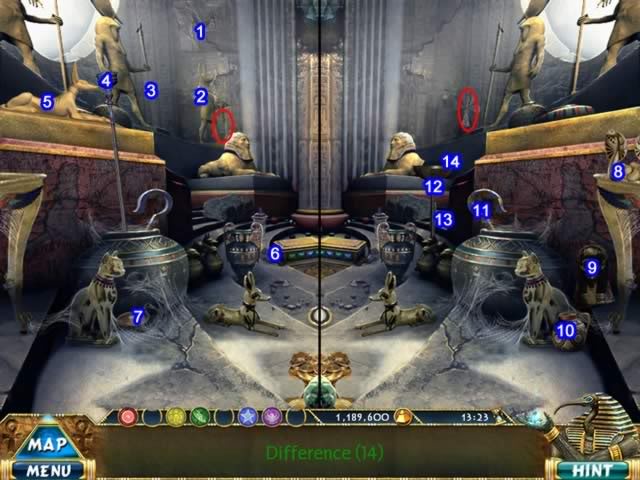
Location: Hieroglyphics Room
Puzzle: Spot the Difference
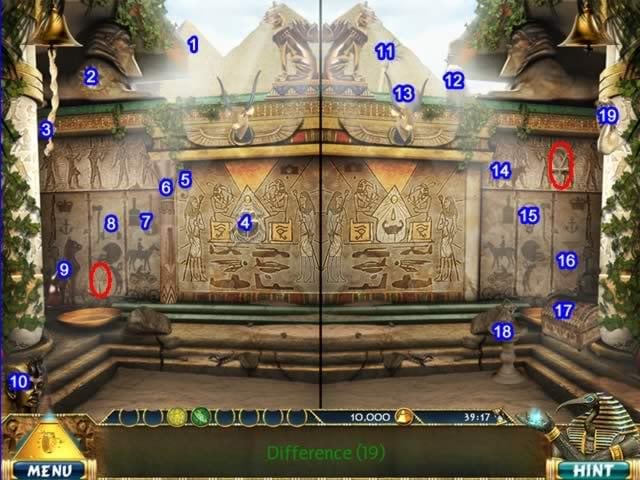
Note: The two Ankhs are not included in the Differences count.
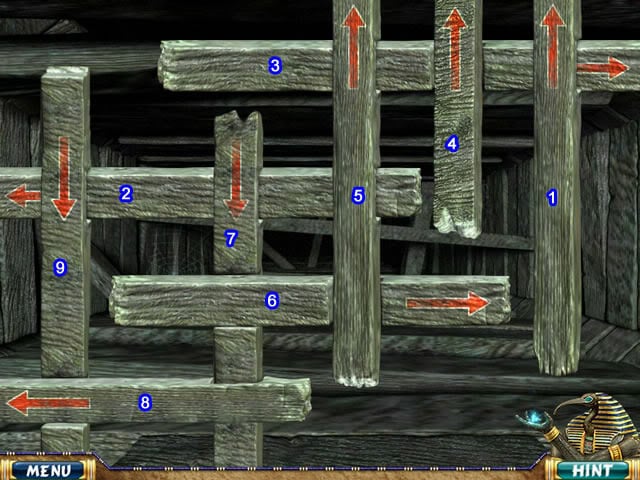
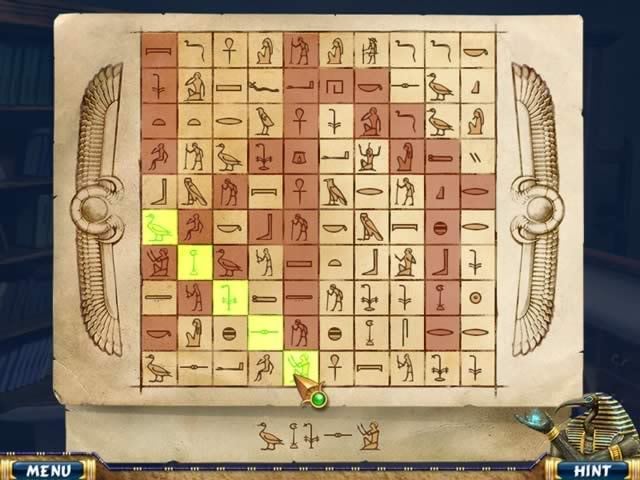
Puzzle: Slide the Logs
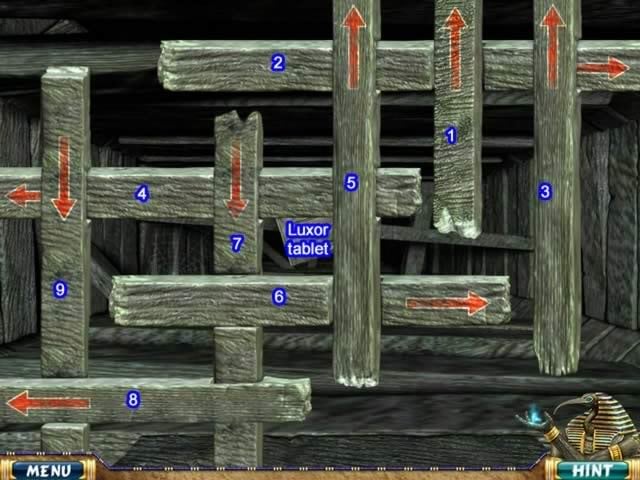
No Ankhs to be found. Slide the logs in the order indicated to reveal the Tablet of Luxor needed for future play.
Artifact collected: Tablet of Luxor.
Episode 1B: Egypt, Present Day
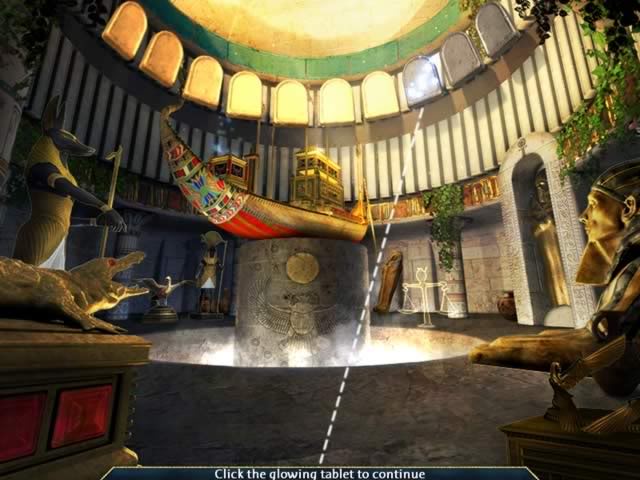
Location: Judgment Room of Osiris
You will return to this location at the completion of each episode. The artifacts collected at the end of each episode represent the Court of Osiris. More orbs need to be collected in the before the story can continue.
Location: Hall of Columns
Riddle/Combine Clues:
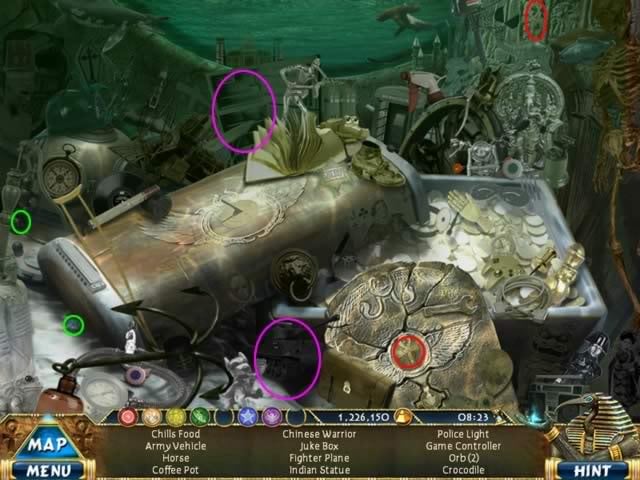
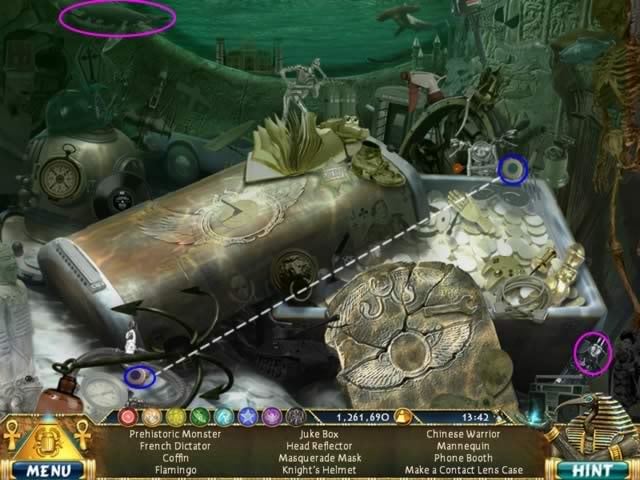
Location: Underwater Pool

Riddle/Combine Clues:
Location: Column Hall
Riddle/Combine Clues:
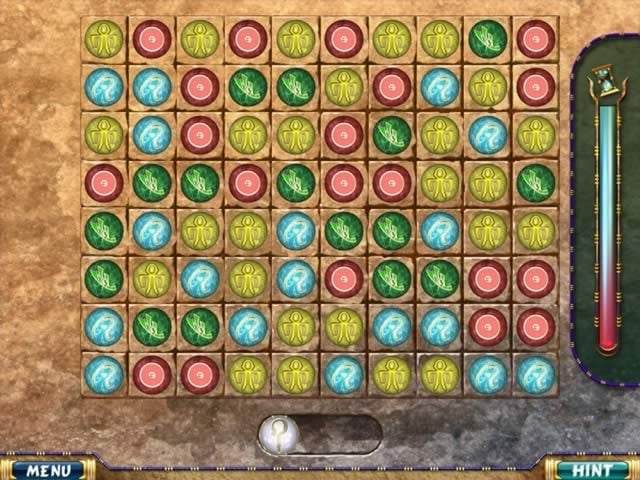
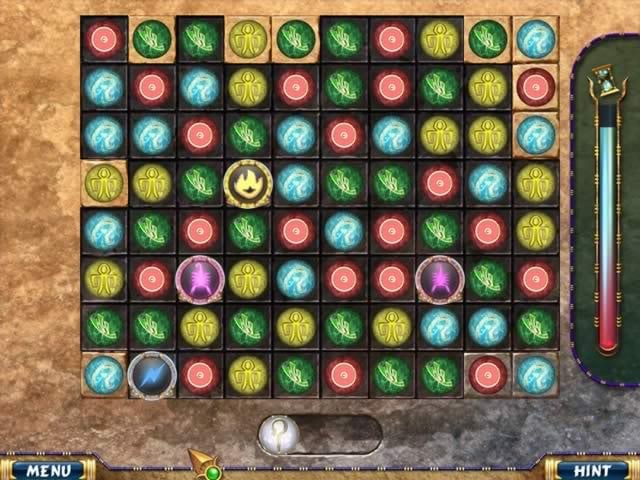
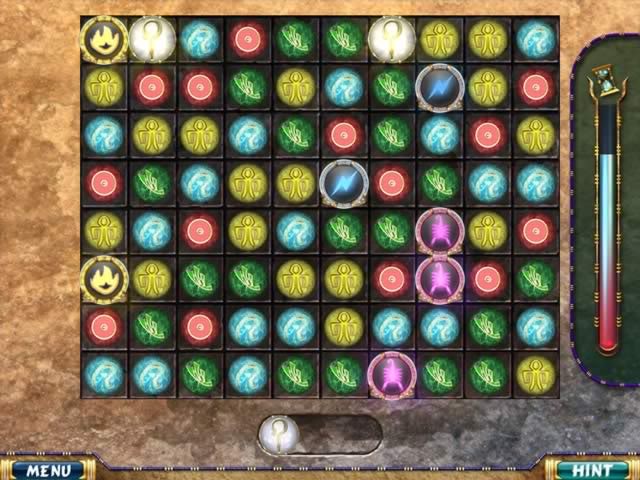
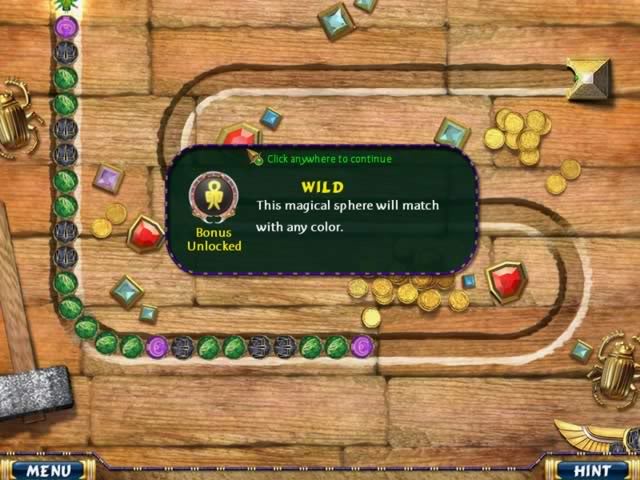
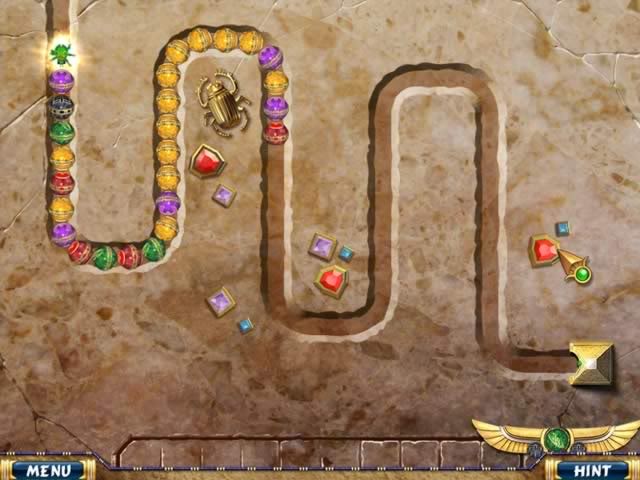
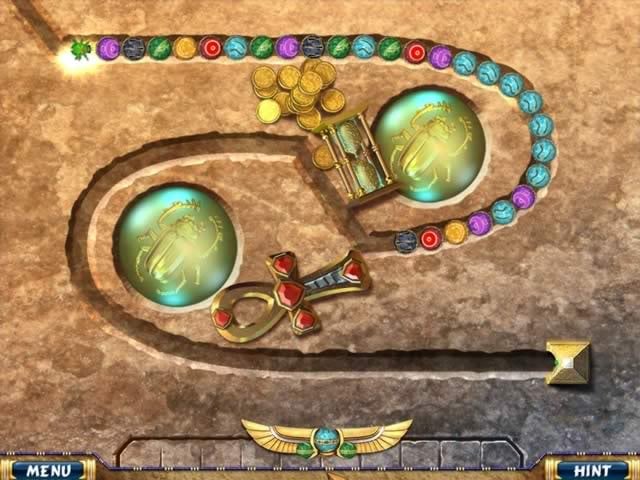
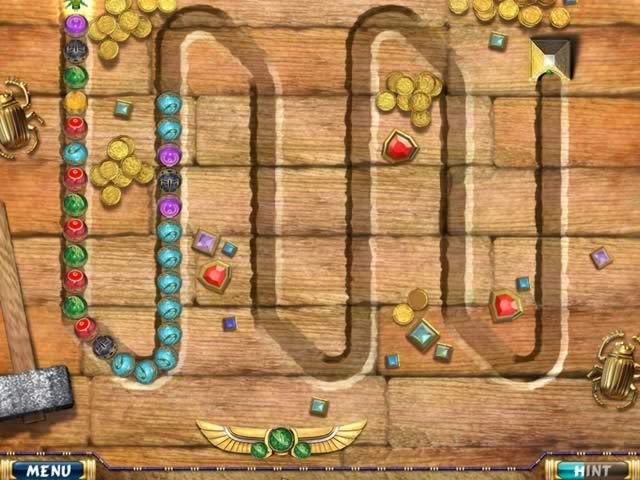
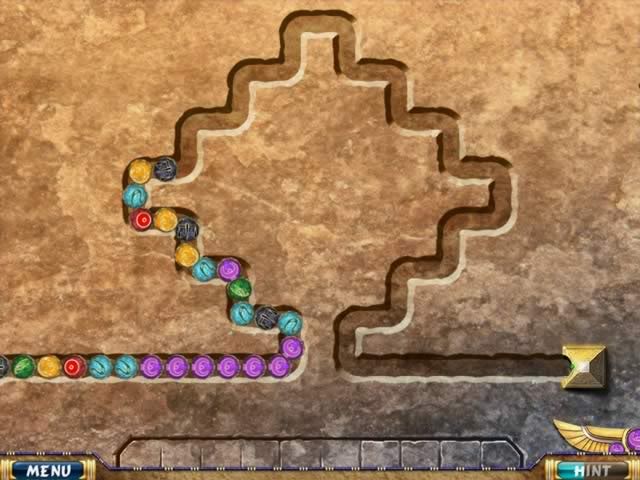
Puzzle: Luxor
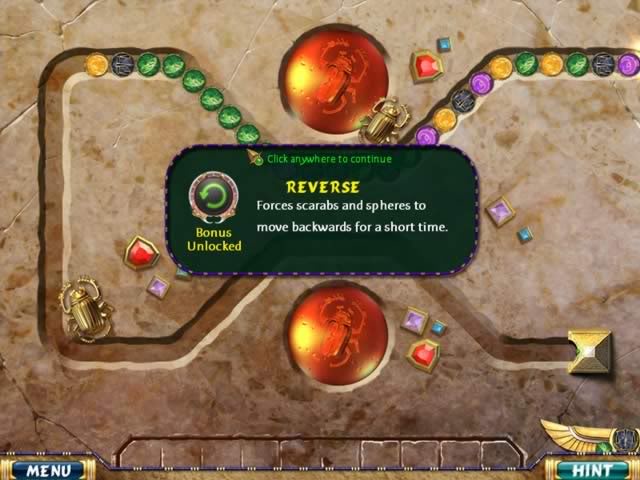
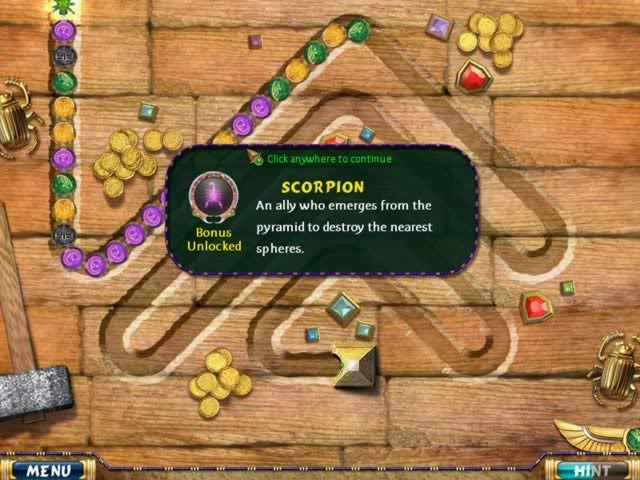
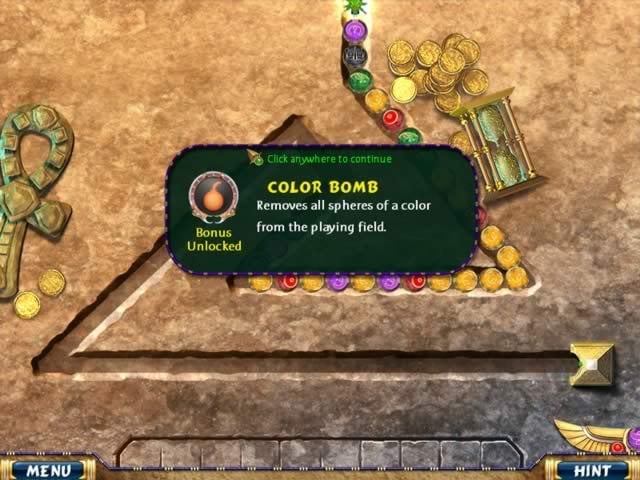
After you have collected all the orbs, the last task for each episode is to play the Luxor mini-game. It will get progressively harder, but with more power-ups to assist you. If you do not complete the game before all the orbs reach the pyramid, you will not have to re-start the entire episode, just this game.
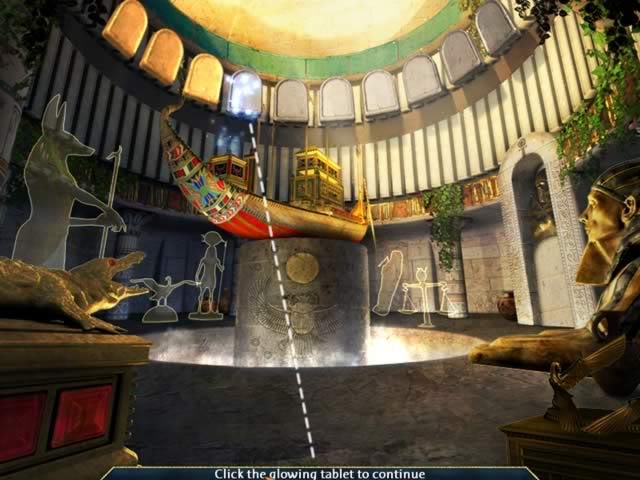
Artifact collected: Stairway to Heaven artifact (a boat)
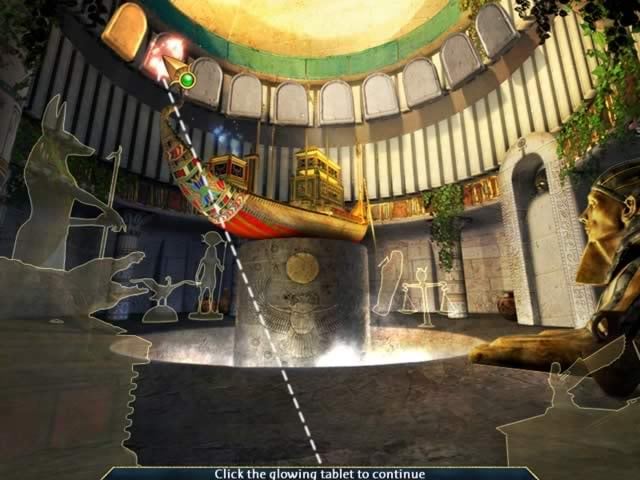
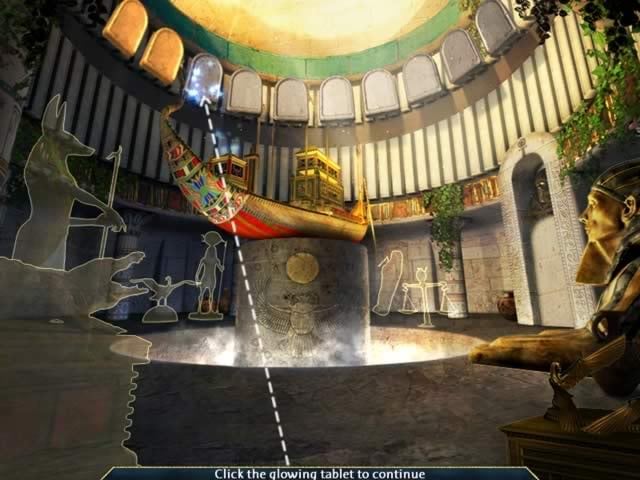
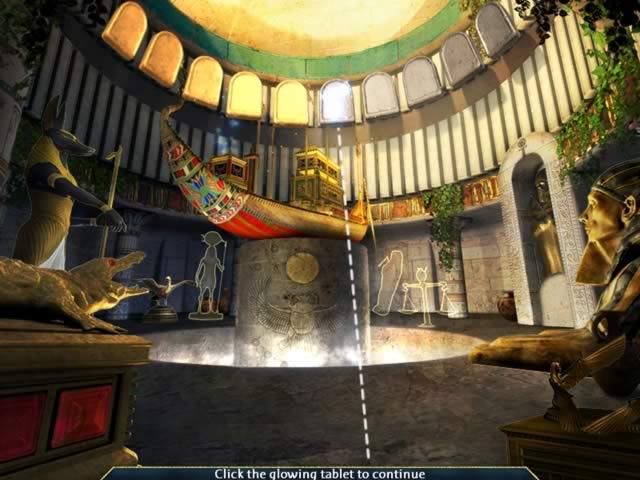
Location: Judgment Room of Osiris
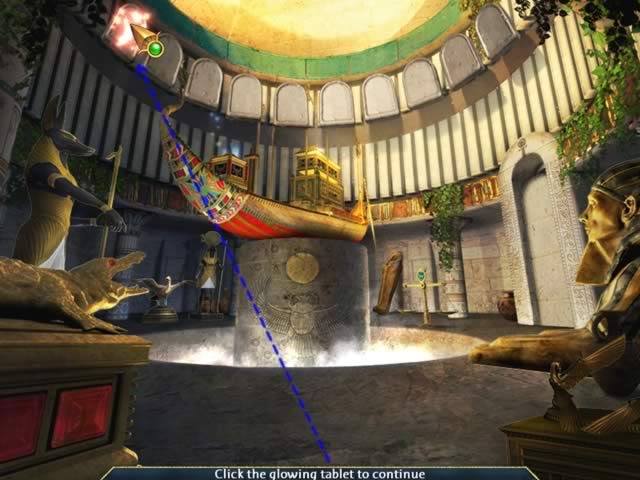
Completing the Luxor Tablet game returns you to this location to begin a new episode.
Click on the glowing tablet to continue.
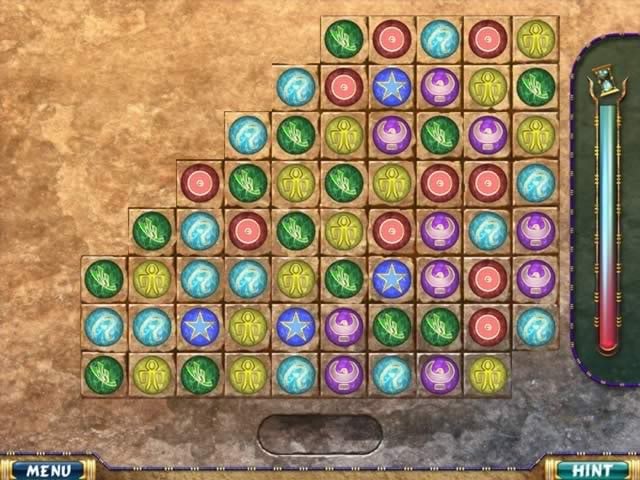
Puzzle: Match-3
Before you can begin a new episode, you must complete a mini-game to collect three white orbs. For this game, you have already had one of the orbs but must collect the other two.
Your first goal for this game is to clear the board of stone tiles:
Match 3 in a row to clear the tiles.
Matching 4 or more will earn a special help.
Once all the tiles are clear, two (and later 3) white orbs will appear at the top of the columns
Your goal is to move the white orbs to the bottom of the column. They can only be lowered by removing orbs below them. If you still have the special helps earned, they can be used to clear the board faster but they will not destroy a white orb.
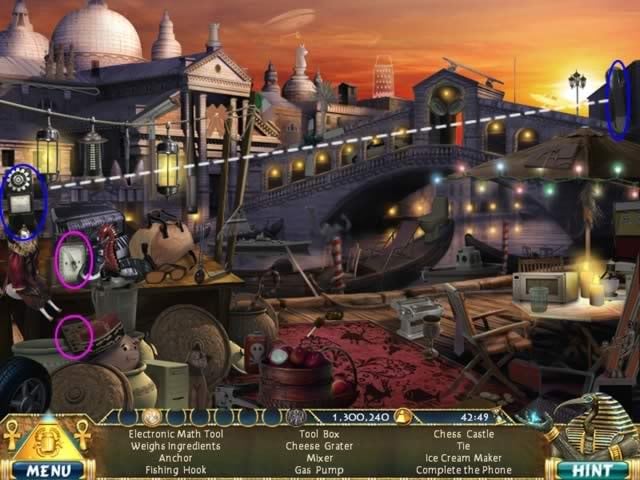
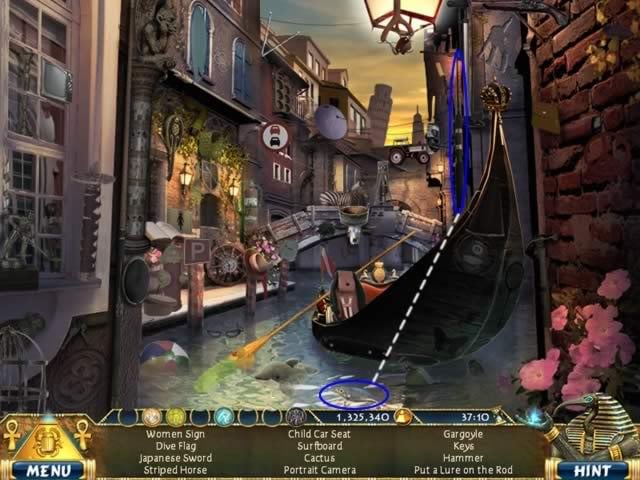
Episode 2: Venice, 1509 B.C.
Many items are misplaced in time. Your goal is to collect the items on the object list to restore order.
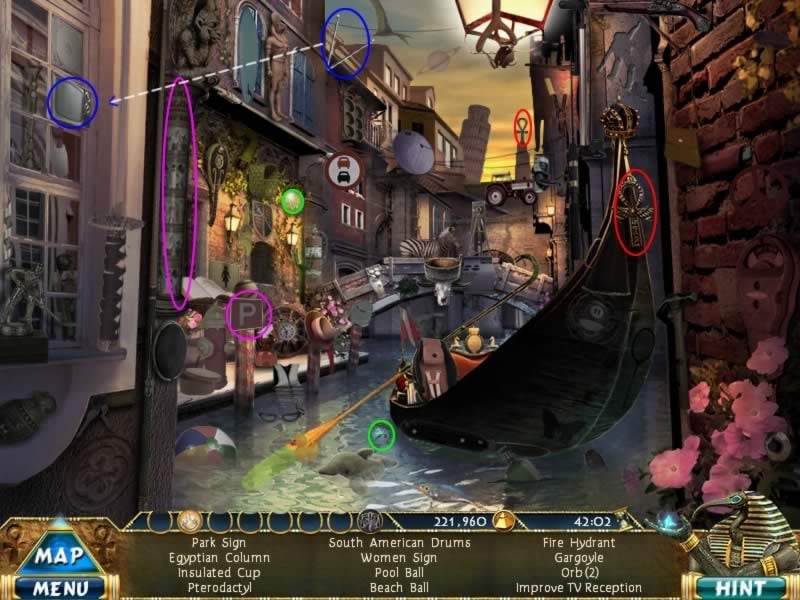
Location: Grand Canal
Riddle/Combine Clues:
You also collected the gold Scarab Beetle (circled in orange). This object provides a Map option located above the Menu. You can click on the Map and see what other locations are available to you.
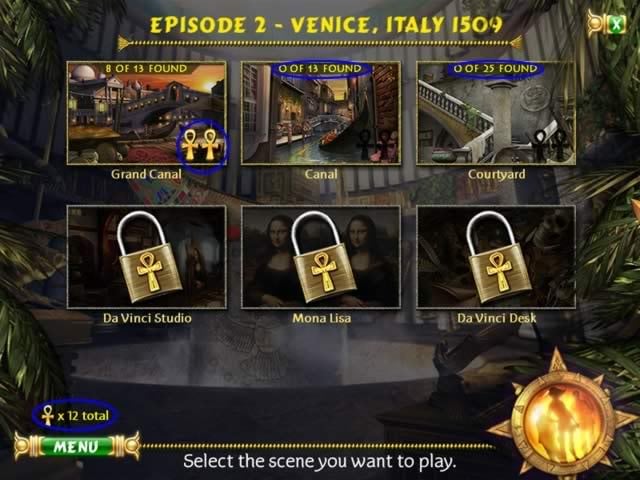
You can switch to any unlocked scene. Note the information contained shows how many Ankhs and objects have been found in each location and how many Ankhs you have collected so far.
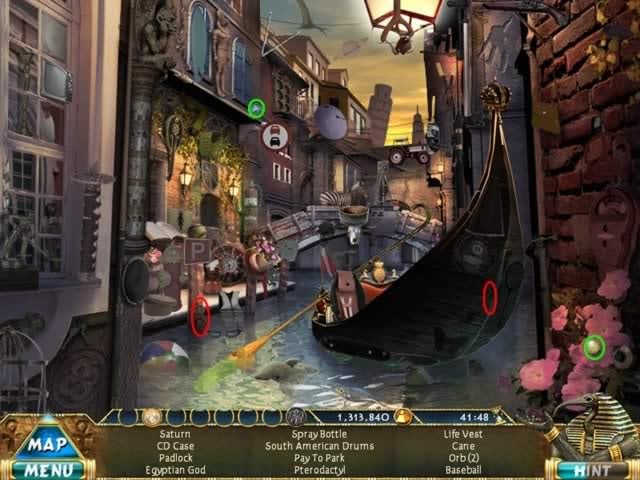
Location: Canal
Riddle/Combine Clues:
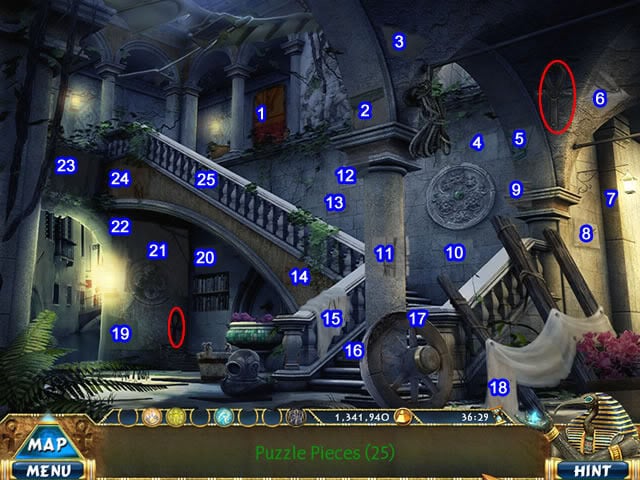
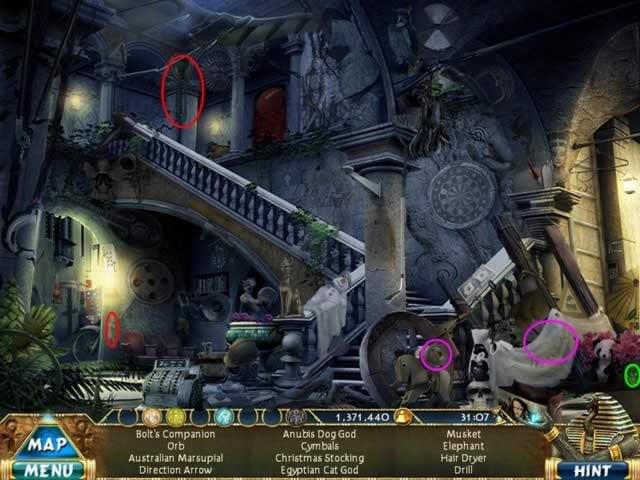
Location: Courtyard
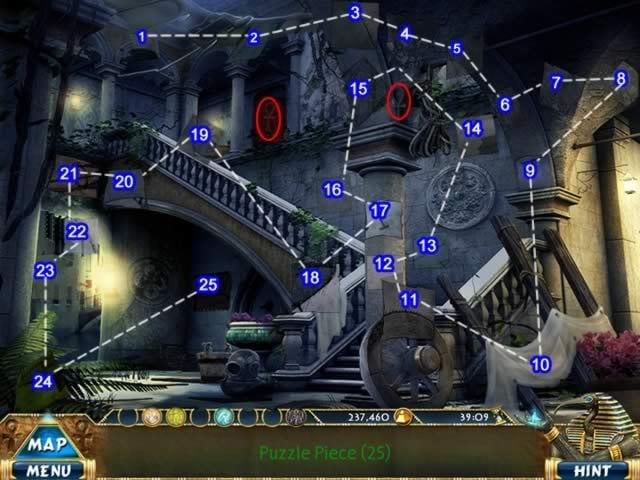
Puzzle: Collect the pieces
There are 25 (labeled) squares to be collected and 2 Ankhs (not included in the 25 items).
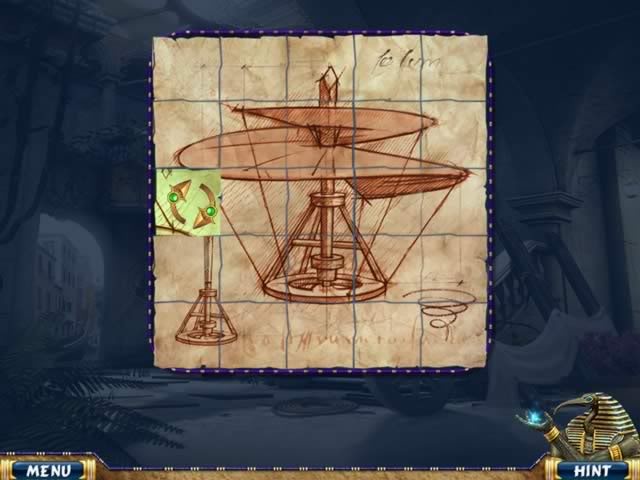
Puzzle: Jigsaw puzzle
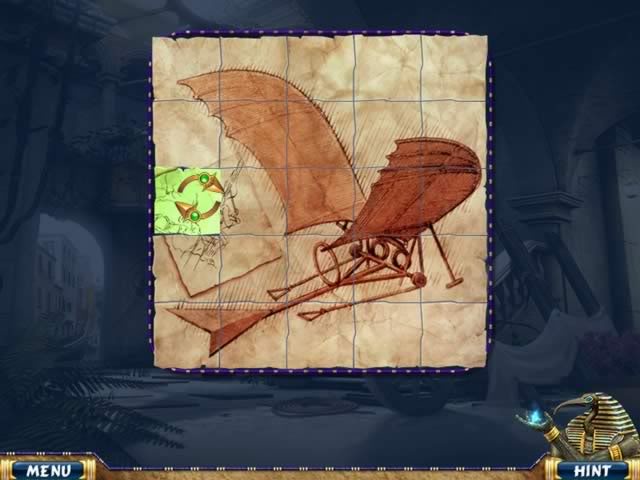
This shows the completed Da Vinci flying machine.
Completing this puzzle will unlock the other three locations for this episode.
Location: Da Vinci Studio
Riddle/Combine Clues:
Puzzle: Spot the Differences
The two Ankhs are not included in the number of differences.
Hard to spot differences:
Location: Da Vinci Desk
Riddle/Combine Clues:
Puzzle: Luxor

Court Member Collected: The Sphinx of Sekhmet
Location: Judgment Room of Osiris
Click on the glowing tablet to continue.
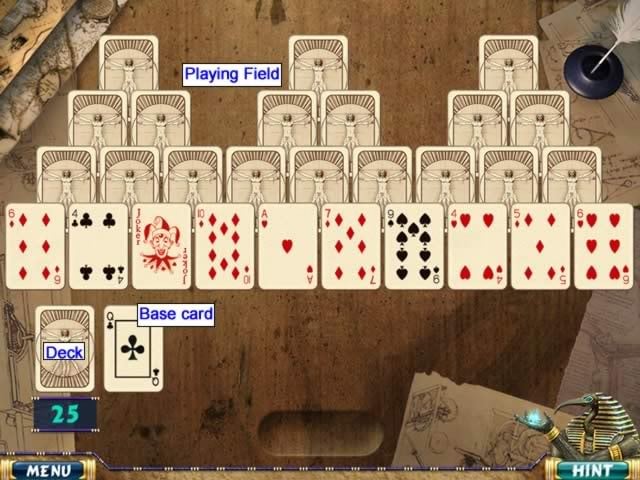
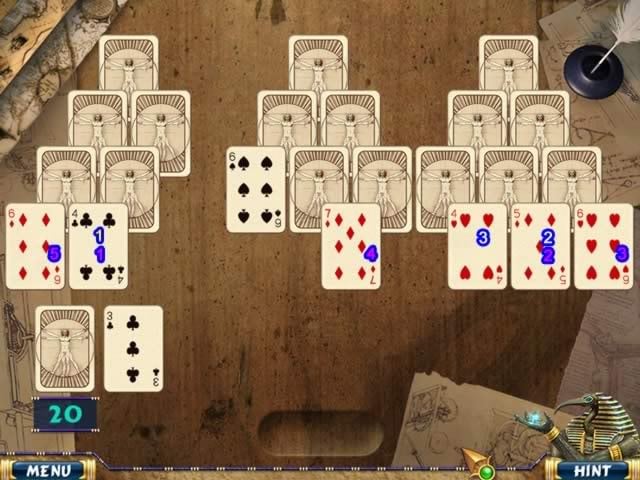
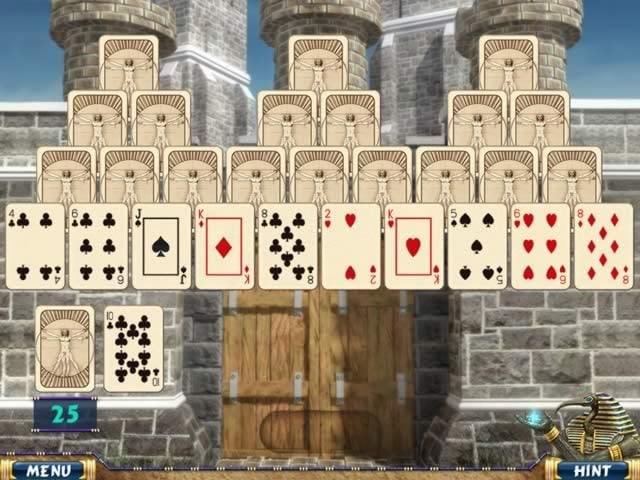
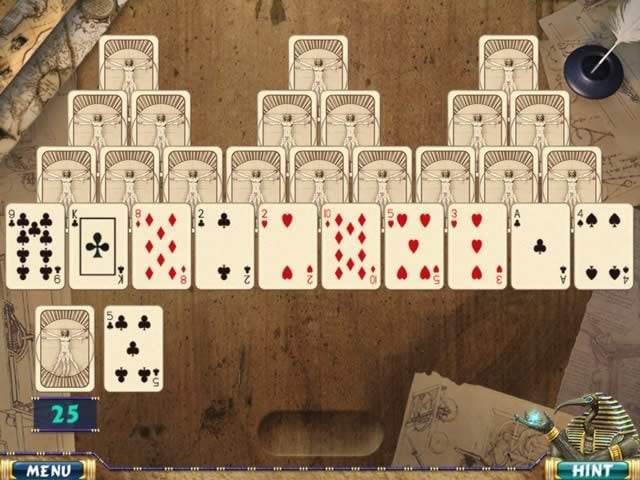
Puzzle: Card Sequence
The goal is to remove all the cards from the playing field and uncover the 3 white orbs under the cards at the top.
The card showing near the deck is the base card you work from. You may go up or down from this card to remove cards from the playing field. In this case, with the Queen showing, you could go up to a King or down to a Jack if either were showing. Were it not for the Joker, you would need to draw from the deck since there would be no match for the Queen. Use the Joker to act as a Jack and remove the 10 and 9.
Once you have run out of plays, click on the deck to get a new base card.
One option based on the 3 of Clubs card showing is numbered in white. If you chose this option, you would:
This does not produce many opportunities to uncover more cards from the playing field.
The other option, shown in pink reveals the following moves:
This will open up more cards and speed the game along.
You must remove all available cards before selecting a new base card.
The game is over when you have removed all of the cards and obtained the three white orbs.
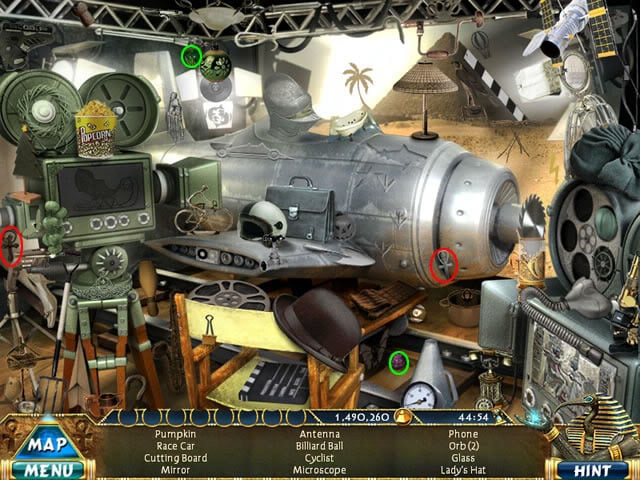
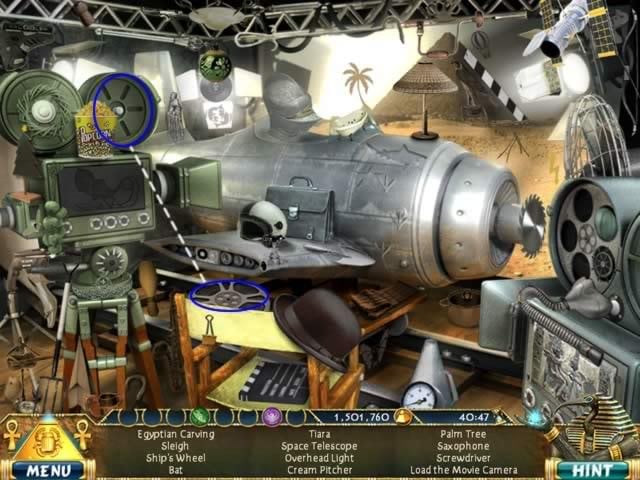
Episode 3: Hollywood, 1937
You are continuing to move through time to remove incorrect objects from this era.
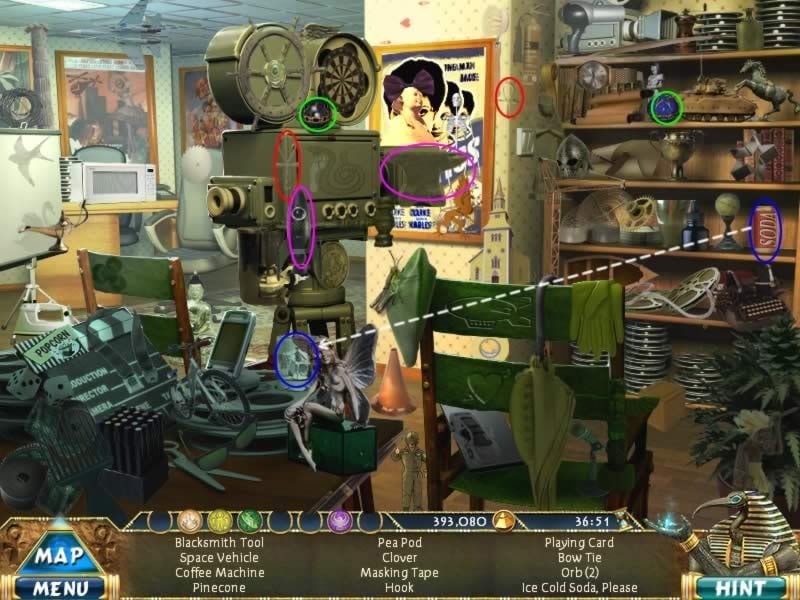
Location: Movie Set
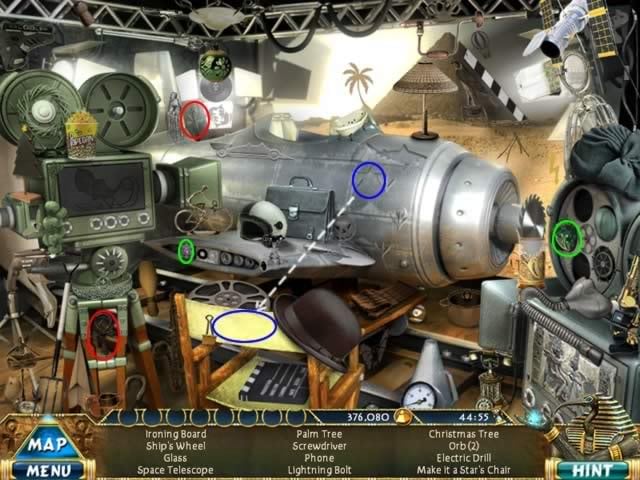
There are no riddle clues in this scene.
Combine clue:
Location: Prop Room
There are no riddle clues in this scene.
Combine clue:
Location: Editing Room
Riddle/Combine Clues:
Location: Mogul’s Office

Find the duplicate items in addition to the 2 Ankhs
Location: The Airport
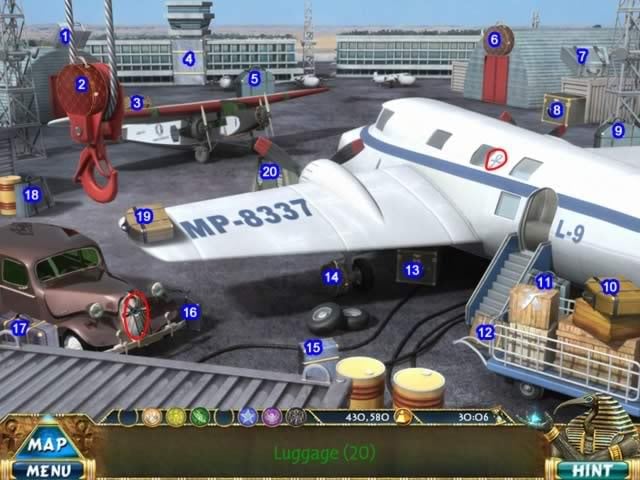
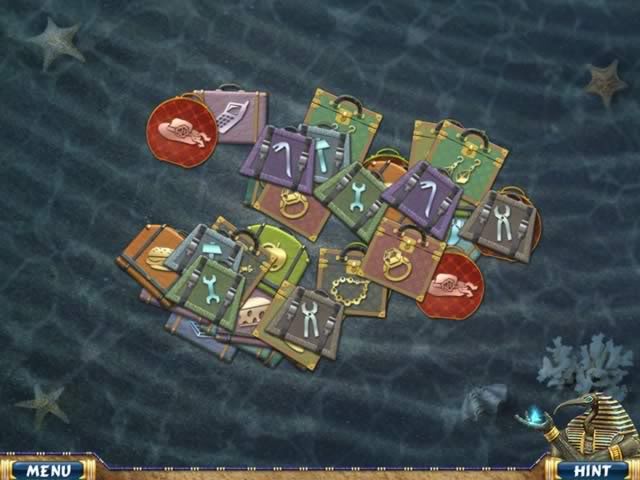
Find all the bags in addition to the 2 Ankhs
Location: Plane Cockpit
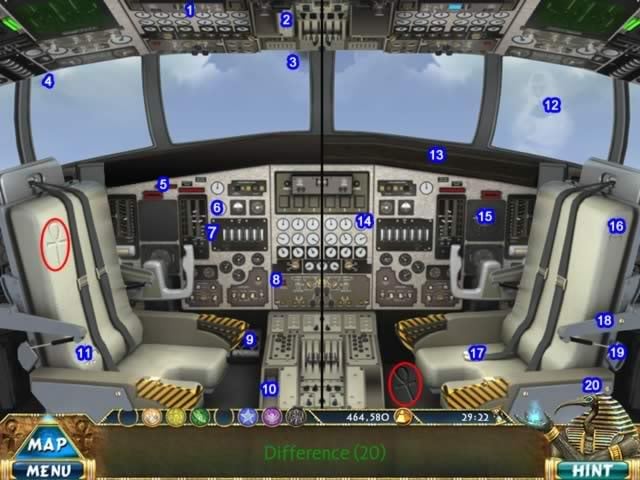
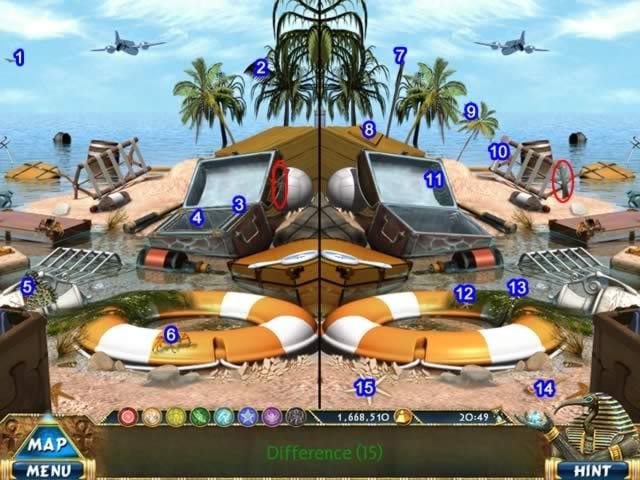
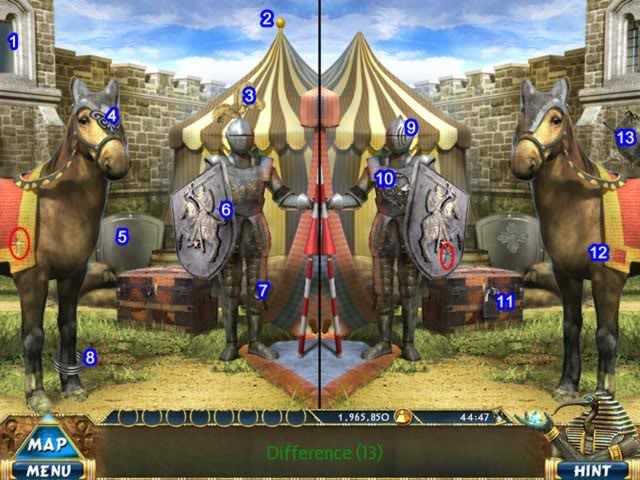
Puzzle: Spot the Difference
Work you way down the left side of the image following the numbers, then to the differences on the right. Don’t forget to collect both Ankhs.
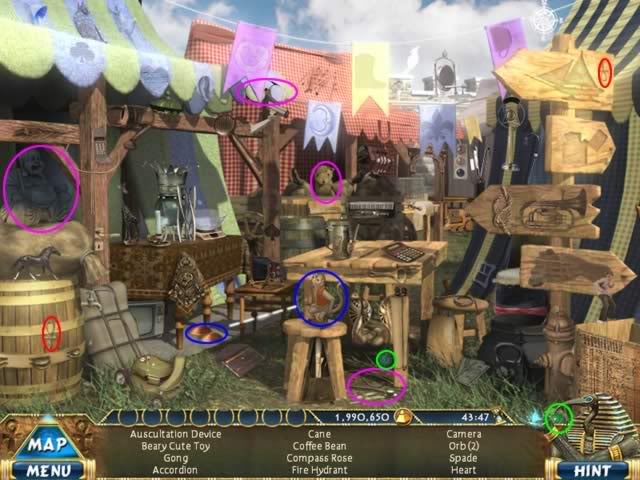
Location: The Island

Riddle/Combine Clues:
Puzzle: Luxor
Court Member Collected: The Wings of Isis Treasure Box
Location: Judgment Room of Osiris
Click on the glowing tablet to continue:
Puzzle: Remove the Matching Tiles
Click on the matching pair of top tiles to access lower tiles and clear the tiles.
Obtain the three white orbs to continue.
Episode 4: Boston, 1773
You are continuing to move through time to remove incorrect objects from this era.
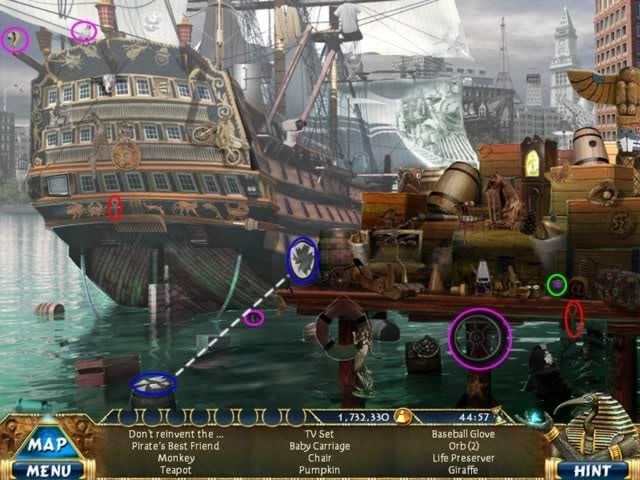
Location: Floating Harbor
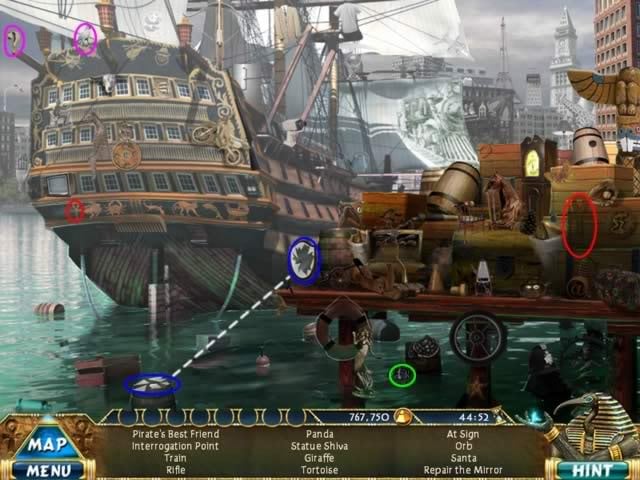
Riddle/Combine Clues:
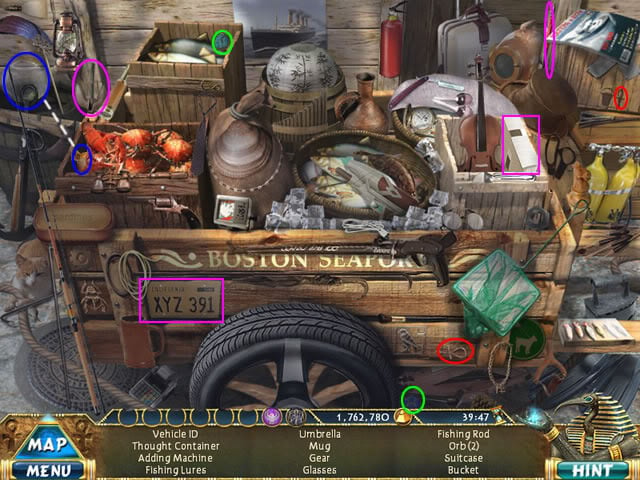
Location: Pier
Riddle/Combine Clues:
Location: Boston Streets
Riddle/Combine Clues:
Location: Franklin Shop
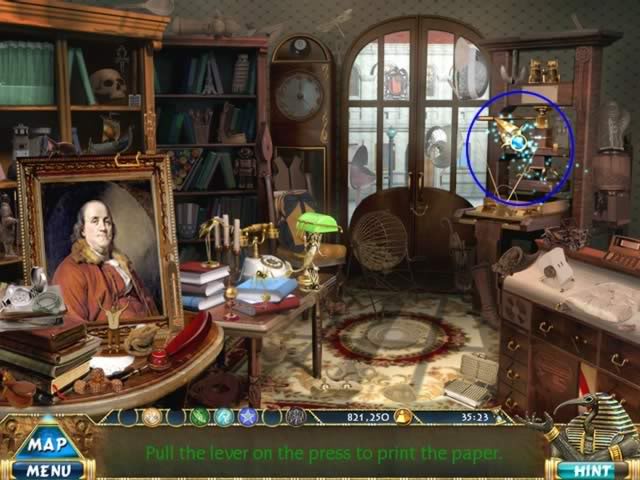
Pull the lever on the printing press shown by the sparkling cursor.
Puzzle: Match Hieroglyphic Sequence
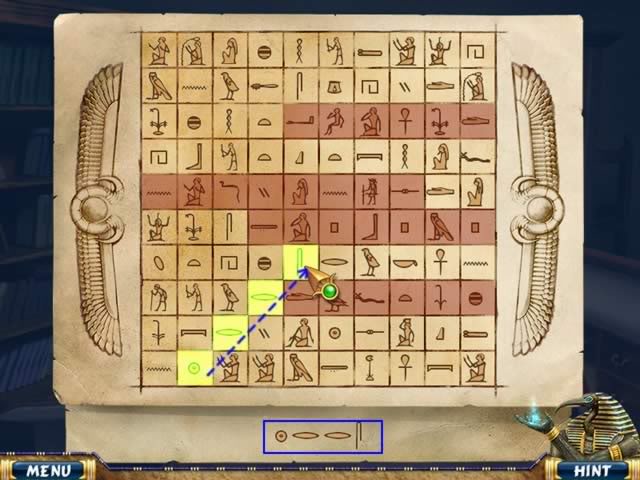
Find the sequence in the puzzle tiles that matches the sequence shown at the bottom. Click the left mouse button on the first tile in the sequence and, holding it down, drag the cursor across the sequence. The sequences can be horizontal, vertical or diagonal.
Location: Franklin Shop
Pull the lever on the printing press again to continue:
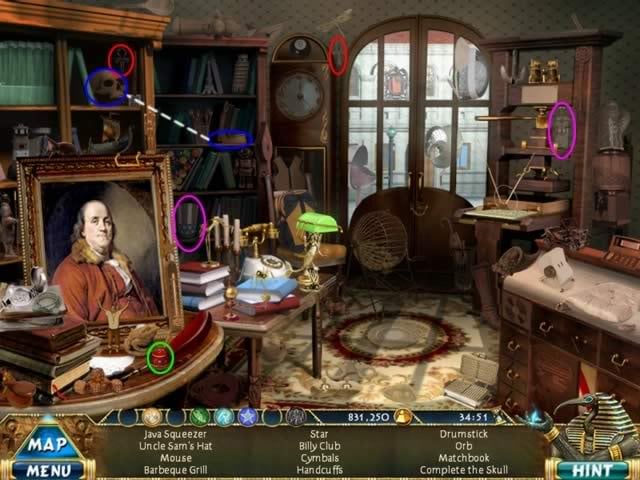
Riddle/Combine Clues:
Location: Candle Shop
Riddle/Combine Clues:
Location: Deacon Larkin Stable
Riddle/Combine Clues:
Puzzle: Luxor
Court Member Collected: The Regeneration Crocodile of Sobek
Location: Judgment Room of Osiris
Click on the glowing tablet to continue:
Puzzle: Match-3
Episode 5: England, 1193
You are continuing to move through time to remove incorrect objects from this era.
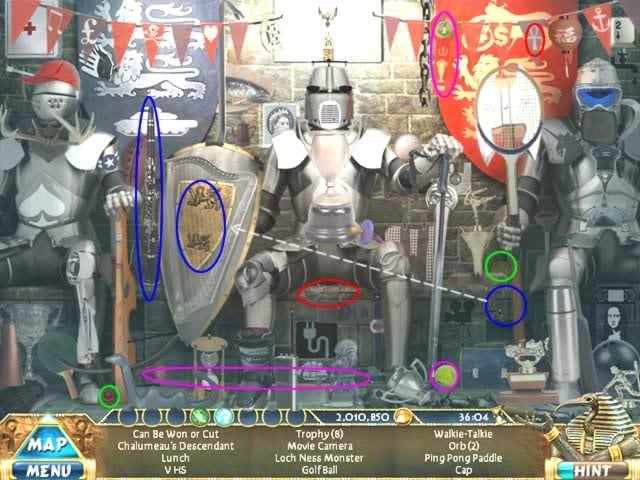
Location: Jousting Arena
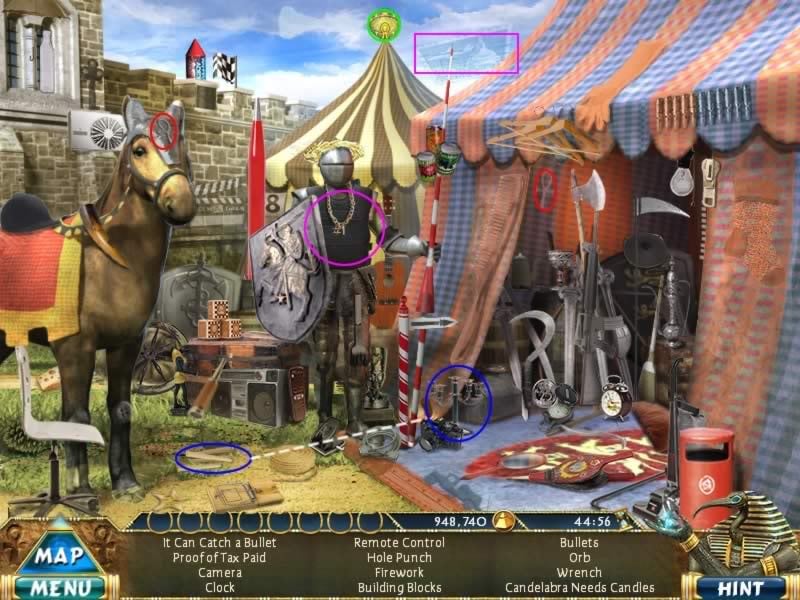
Riddle/Combine Clues:
Location: Renaissance Fair
Riddle/Combine Clues:
Location: Knight Training

Riddle/Combine Clues:
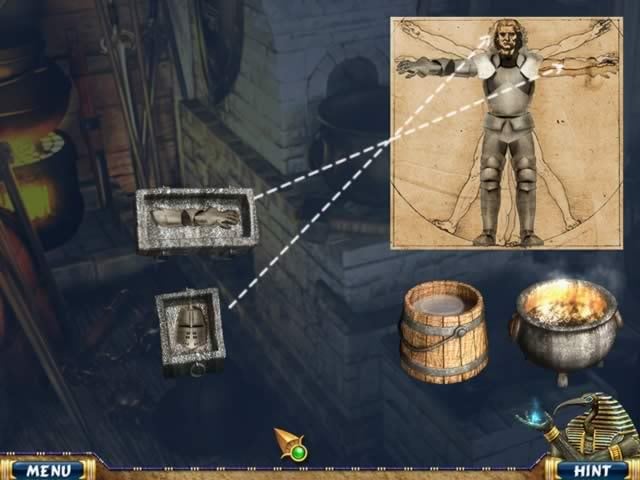
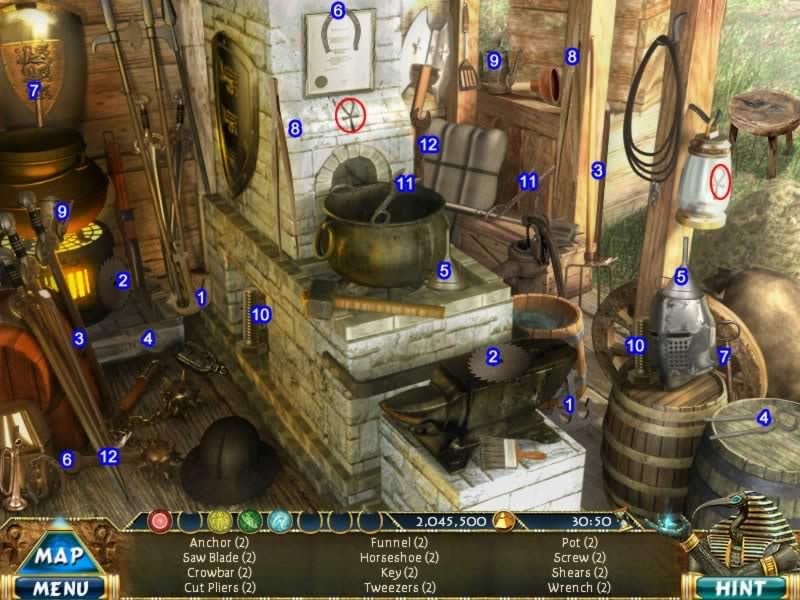
Location: Blacksmith Shop
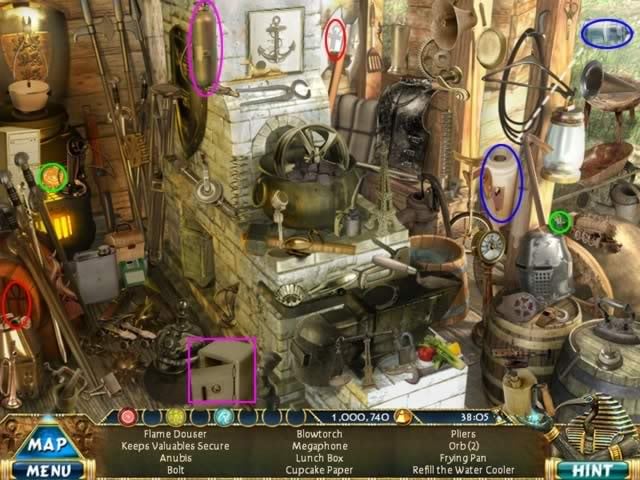
Riddle/Combine Clues:
Puzzle: Armor the Man
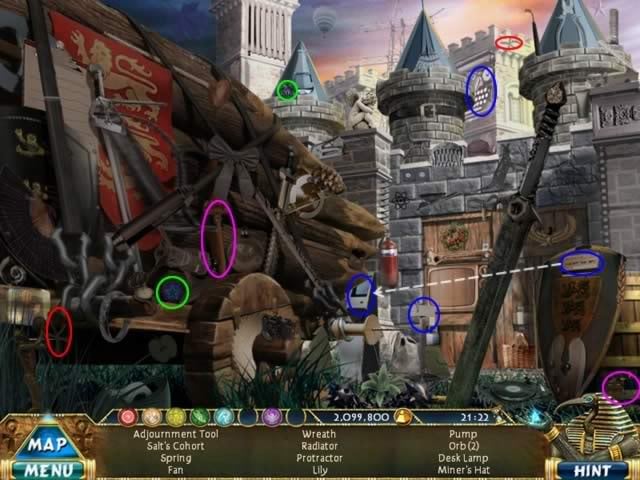
Location: Robin Hood Village
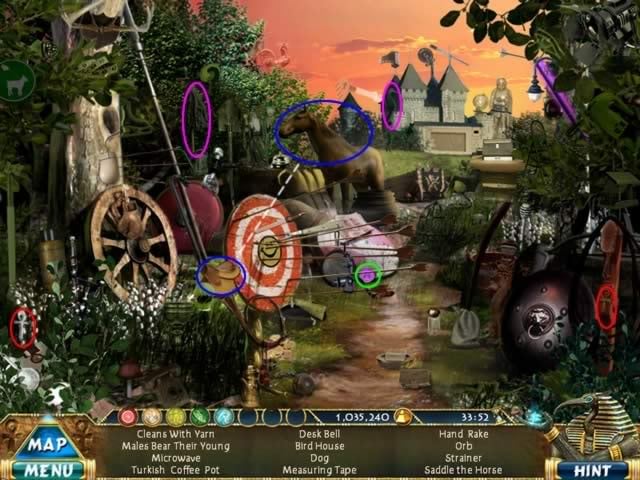
Riddle/Combine Clues:
Location: Castle Attack

Riddle/Combine Clues:
Puzzle: Luxor
Court Member Collected: The Statue of Anubis
Location: Judgment Room of Osiris
Click on the glowing tablet to continue:

Puzzle: Card Sequence
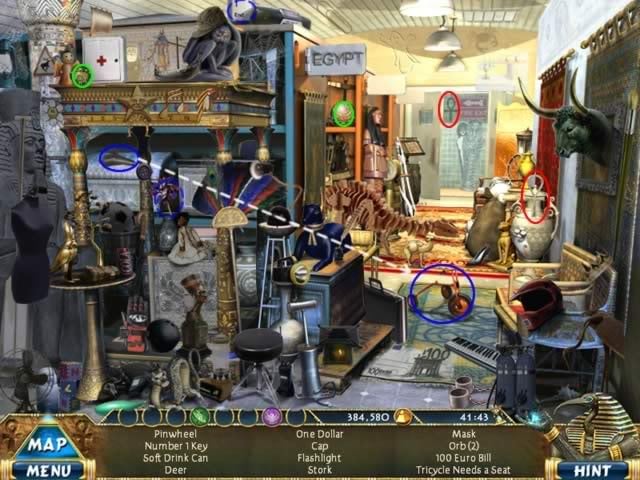
Episode 6: Luxor, Egypt, 1261 B.C.
For the rest of the game, the number of objects to be collected doubles. There will be two screens at the same location for the clues. There are still only two Ankhs to collect and they will be on the first screen.
Location: Market
Riddle Clues:
Riddle/Combine Clues:
Location: Sphinx
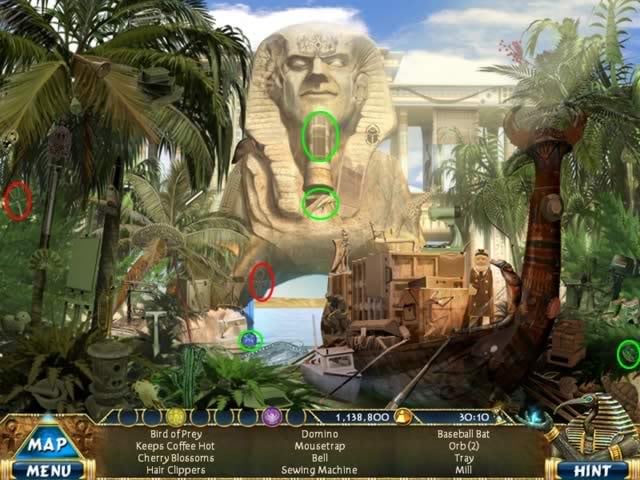
Riddle Clues:
Riddle/Combine Clues:
Location: Hieroglyphic Room
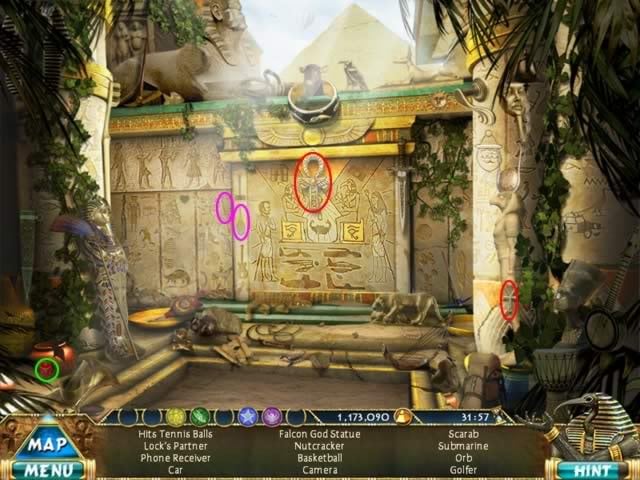
Riddle Clues:
Riddle/Combine Clues:
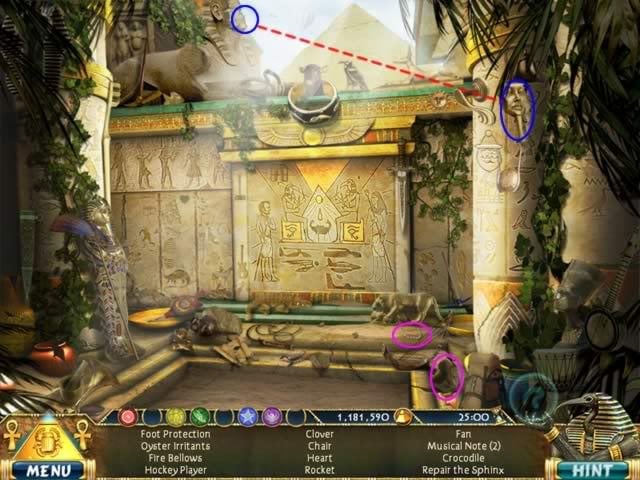
Puzzle: Slide the Logs
Unlocks last three scenes.
Puzzle: Spot the Difference
Location: Column Hall
Riddle Clues:
Riddle/Combine Clues:
Location: Underwater Pool
Riddle Clues:
Riddle/Combine Clues:
Puzzle: Luxor
Court Member Collected: Geb’s Creator-Goose
Location: Judgment Room of Osiris
Click on the glowing tablet to continue:
Puzzle: Match-3
Episode 7: Venice, 1509 B.C.
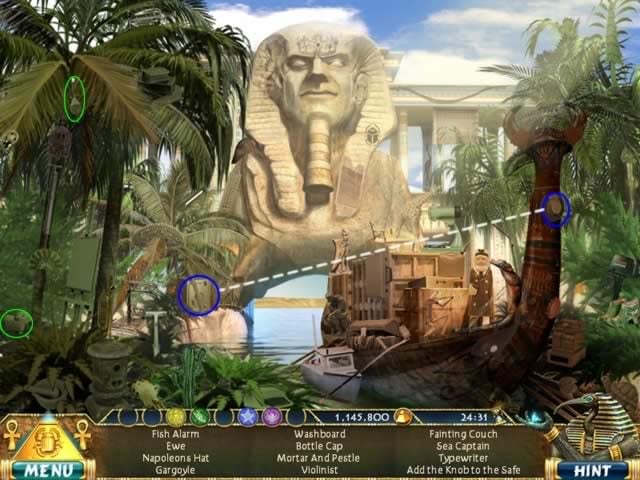
Location: Grand Canal
Riddle Clues:
Riddle/Combine Clues:
Location: Grand Canal
No Riddle or Combine clues in this scene. Collect the Ankhs and orbs shown.
Combine Clue:
Puzzle: Collect the Pieces
There are 25 (labeled) squares to be collected and 2 Ankhs (not included in the 25 items).
Puzzle: Jigsaw puzzle
This shows the completed Da Vinci flying machine.
Completing this puzzle will unlock the other three locations for this episode.
Location: Courtyard
Riddle Clues:
Riddle/Combine Clues:
Location: Da Vinci Studio
Riddle Clues:
Riddle/Combine Clues:
Location: Da Vinci Desk
Riddle Clues:
Riddle/Combine Clues:
Puzzle: Luxor
Court Member Collected: The Statue of Ra
Location: Judgment Room of Osiris

Click on the glowing tablet to continue.
Puzzle: Card Sequence
Episode 8: Hollywood, 1937
You are continuing to move through time to remove incorrect objects from this era.
Location: Movie Set
There are no riddle or combine clues in this scene. Collect the Ankhs and orbs indicated.
Combine clue:
Location: Prop Room
There are no riddle or combine clues in this scene. Collect the Ankhs and orbs indicated.

Combine clue:
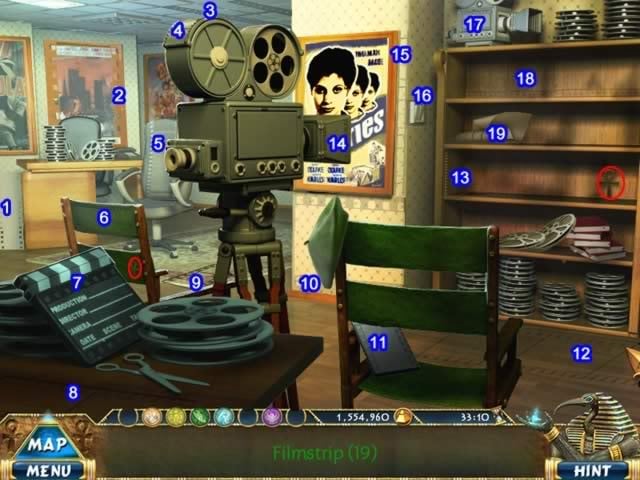
Location: Editing Room
Puzzle: Find the Film Strips
Location: Mogul’s Office

Find the duplicate items in addition to the 2 Ankhs
Location: The Airport

Find all the bags in addition to the 2 Ankhs.
Location: Plane Cockpit

Riddle/Combine Clues:
* This clue appears on the second screen but is shown here to avoid redundancy
Location: The Island
Puzzle: Spot the Difference
Puzzle: Luxor
Court Member Collected: The Sarcophagus of Nut
Location: Judgment Room of Osiris
Click on the glowing tablet to continue:
Puzzle: Remove the Matching Tiles
Click on the matching pair of top tiles to access lower tiles and clear the tiles.
Obtain the three white orbs to continue.
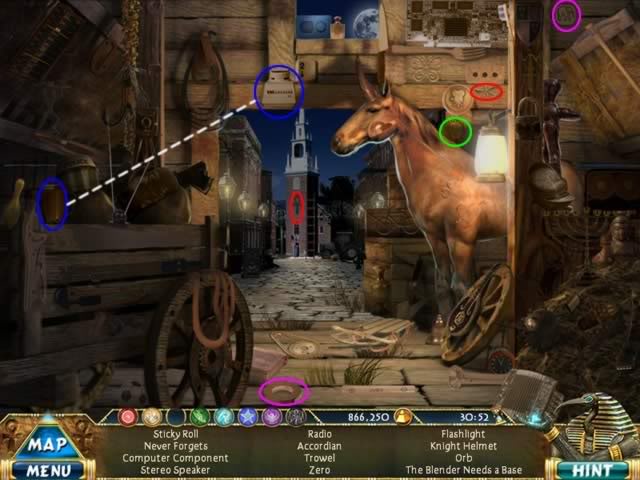
Episode 9: Boston, 1773
You are continuing to move through time to remove incorrect objects from this era.
Location: Floating Harbor
Riddle/Combine Clues:
* These clues appear on the second screen but are shown here to avoid redundancy.
Location: Pier
Riddle/Combine Clues:
* These clues appear on the second screen but are shown here to avoid redundancy.
Location: Boston Streets
Puzzle: Find the Minutemen
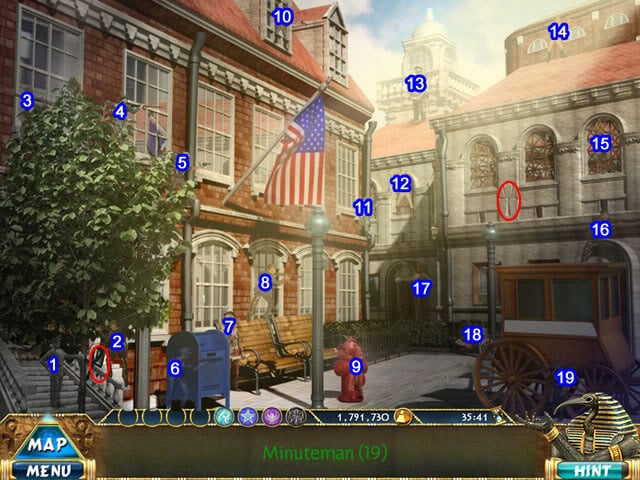
Find all the minutemen in addition to the 2 Ankhs
Puzzle: Match Hieroglyphic Sequence
Find the sequence in the puzzle tiles that matches the sequence shown at the bottom. Click the left mouse button on the first tile in the sequence and, holding it down, drag the cursor across the sequence. The sequences can be horizontal, vertical or diagonal.
Location: Franklin Shop
Riddle/Combine Clues:
* These clues appear on the second screen but are shown here to avoid redundancy.
Location: Candle Shop
Puzzle: Find the duplicate items in addition to the 2 Ankhs
Location: Deacon Larkin Stable
Riddle/Combine Clues:
* These clues appear on the second screen but are shown here to avoid redundancy.
Puzzle: Luxor
Court Member Collected: Ma’at’s Scale of Justice
Location: Judgment Room of Osiris
Click on the glowing tablet to continue.
Puzzle: Match-3
Episode 10: England, 1193
You are continuing to move through time to remove incorrect objects from this era.
Location: Jousting Arena
Puzzle: Spot the Difference
Location: Renaissance Fair
Riddle/Combine Clues:
* These clues appear on the second screen but are shown here to avoid redundancy
Location: Knight Training
Riddle/Combine Clues:
* These clues appear on the second screen but are shown here to avoid redundancy
Location: Blacksmith Shop
Puzzle: Find the duplicate items in addition to the 2 Ankhs
Location: Robin Hood Village
Riddle/Combine Clues:
Location: Castle Attack
Riddle/Combine Clues:
Puzzle: Luxor
Court Member Collected: The Judgment Orb of Osiris
Location: Judgment Room of Osiris
Click on the last glowing tablet to continue
Puzzle: Match-3
Collect the two black orbs
Watch the final clip to see what happens to the characters.
Bonus
The credits will automatically roll when you complete the game. The last line in the credits says "Try to Shift the Play".
When you are returned to the opening screen, place your cursor over the word "Play", press and hold the shift key and click on Play. You will be welcomed to the secret orb chamber
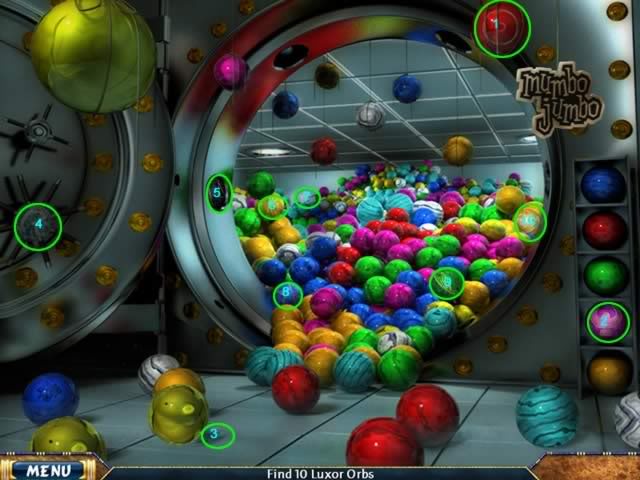
Puzzle: Find the Luxor orbs
“;
