![Digimon UP Tier List [Supports, Buddies, and Partners]](/wp-content/uploads/2026/07/digimon-up-tier-list.jpg "Digimon UP Tier List [Supports, Buddies, and Partners]")
Digimon UP Tier List [Supports, Buddies, and Partners]
These Digimon will get you UP the leaderboard.


![Haze Seas Boss Drops [Chances, Locations, and How to Spawn]](/wp-content/uploads/2026/07/haze-seas-boss-drops.jpg "Haze Seas Boss Drops [Chances, Locations, and How to Spawn]")

Welcome to the Lume Part 1 walkthrough on Gamezebo. Lume Part 1 is a point and click adventure game played on PC or Mac, created by State of Play. This walkthrough includes tips and tricks, helpful hints, and a strategy guide for how to complete Lume Part 1.
Welcome to the Lume Part 1 walkthrough on Gamezebo. Lume Part 1 is a point and click adventure game played on PC or Mac, created by State of Play. This walkthrough includes tips and tricks, helpful hints, and a strategy guide for how to complete Lume Part 1.
Copyright Information
This walkthrough was created by Lynne Basinet, for Gamezebo.com, and is protected under US and International Copyright laws. Any unauthorized use, including re-publication, in whole or in part, without permission, is strictly prohibited.
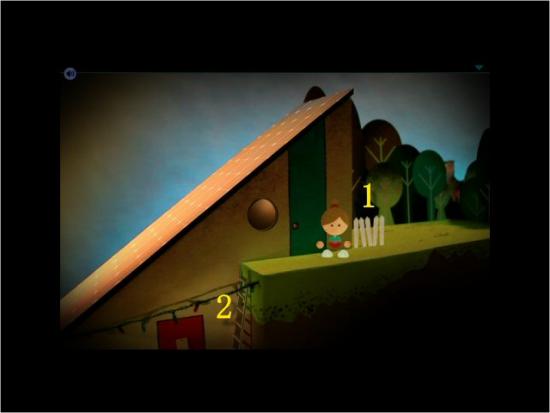
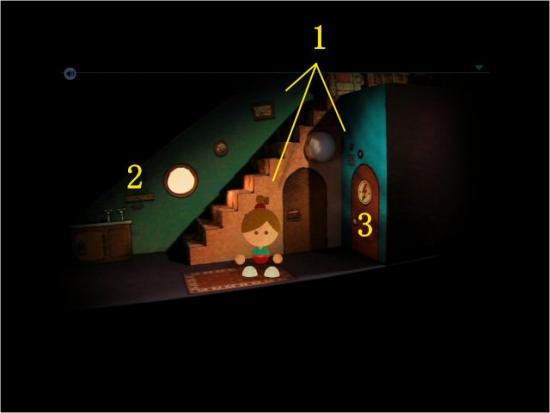
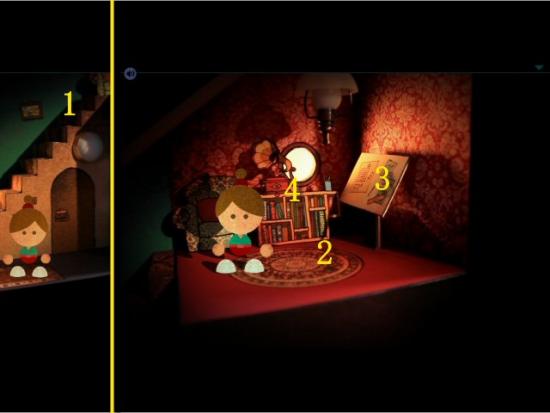
Collect the Pickets from the Fence (1) and then continue down the Ladder (2).

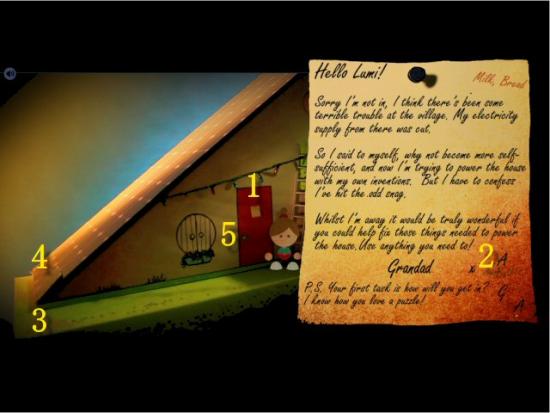
Click on the Note (1) and notice the things scrawled in the margins (2). You may want to make note of these. Exit the Note, continue toward the end of the Roof (3) and then click on the Solar Panel (4 – the one with the faint, green outline). When complete, click on the Door Handle (5).
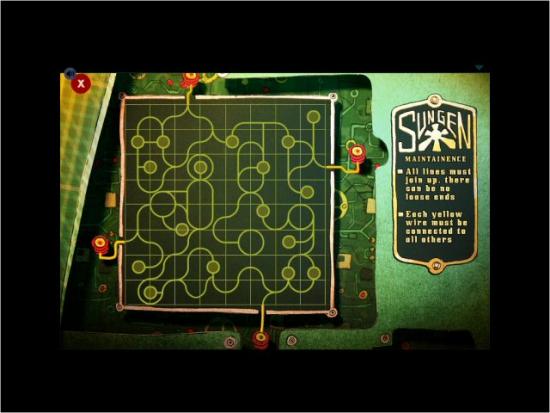
The object is to create a continuous path to connect the all the wiring to the 4 Terminals. There can be no loose wires. Click on a square to rotate it clockwise; right clicking has no effect. Continue until all the wiring is connected.
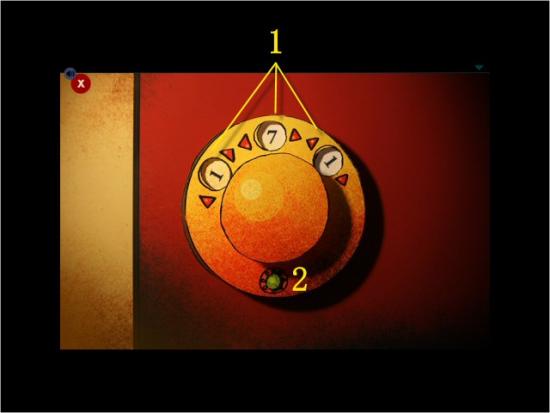
Refer to the Note on the Door and enter the Code in the Lock. On the Note, there were 3 letters: A G A. Those correspond with their position in the alphabet: 1 7 1. Enter that number by clicking on the Arrows next to each number (1) and then click the Green Button (2). Click on the Door Handle to enter the House.
Note the Pictures hanging on the Walls (1), click on each set to view them and then click on the Keys (2). When complete, enter the Electrical Closet (3).
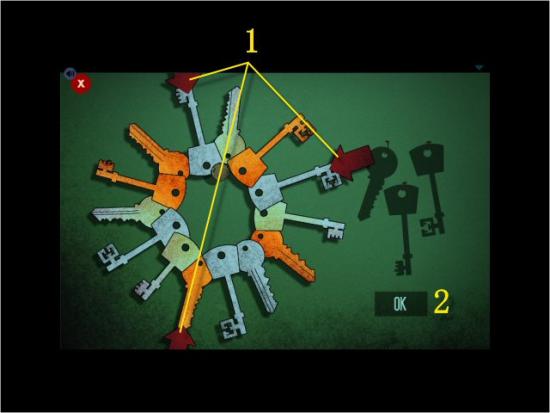
The object is to match the Keys that represent the 3 Silhouettes. Click on the 3 Keys (1) and then click on the OK button (2).
Take the Keys from Inventory, use them on the Panel (1) and then click on the Unlocked Panel (2). When complete, click on the Door (3) to exit.
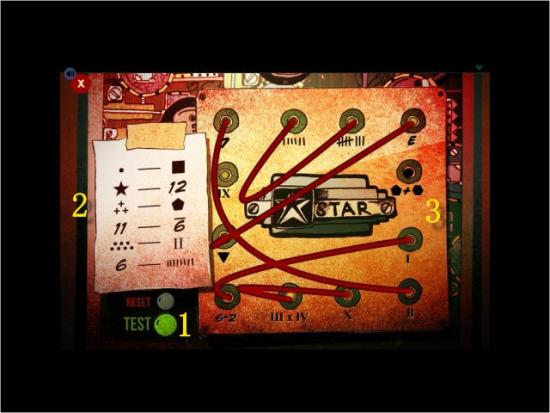
The object is to connect the 6 Wires, using the Diagram as a guide. Connect the Wires and then click on the Test Button (1)
Diagram (2)
Dot = 1 | Square = 4 | Star = 10 | 12 |
3 Crosses = 3 | Pentagon = 5 | 11 | 6 with Line above* = 9 |
7 Dots = 7 | II = 2 | 6 | 8 Lines = 8 |
*This is an upside down 9; the line indicates the bottom of the number.
Wiring (3)
7 | 6 Lines = 6 | 8 Hashmarks = 8 | E = 5 |
IX = 9 | Pentagon + Hexagon = 11 | Triangle = 3 | I = 1 |
6 – 2 = 4 | III x IV = 12 | X = 10 | B = 2 |
Solution
I and 6 – 2 | X and III x IV | Triangle and E |
Pentagon + Hexagon and 6 Lines | 7 Dots and B | 6 and 8 Hashmarks |
Click on the Stairs (1), click on the Green Book (2 – it may contain a clue; it may not) and then click on the Drafting Table (3). When complete, click on the Gramophone Crank (4).
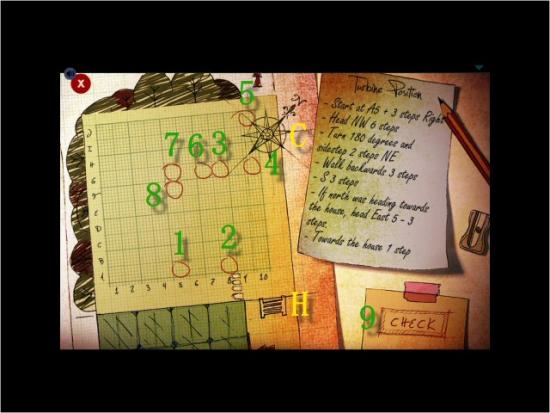
The object is to follow the directions to end up on the correct spot. Note that some of the information is extraneous and doesn’t affect where you need to move. Other information changes your orientation and will affect where you move. Please note the Compass (C) and the location of the House (H). The solution is:
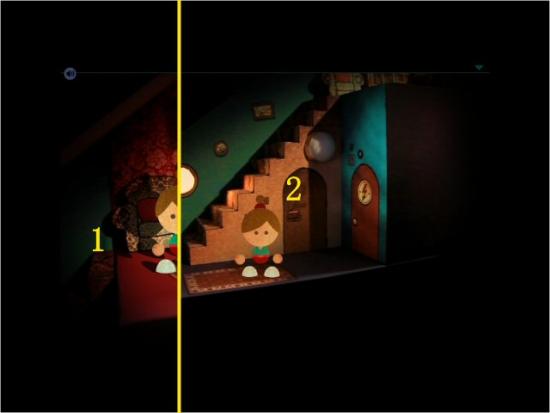
Click on the Stairs (1) and then click on the Door (2). When complete, click on the Door to enter the Storage Closet.
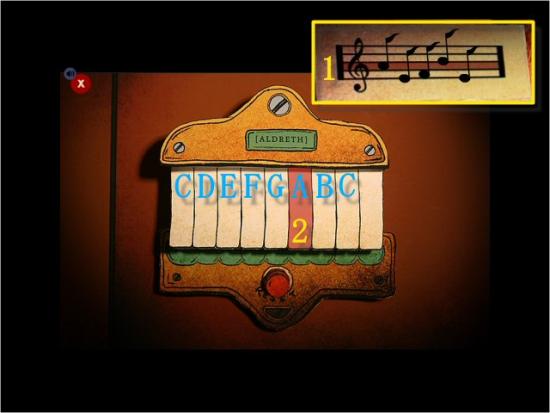
The object is to play the Melody (1) you heard (Score shown) on the Gramophone. Using the clue from the Gramophone, and the Red Key as the starting Note (2), click on the Keys to play the Melody. The solution is: A E F B E
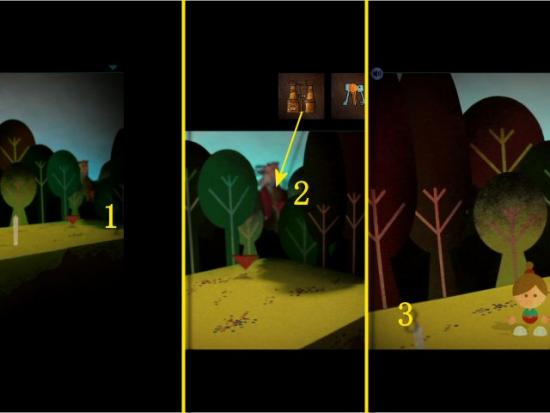
Collect the Binoculars (1), return Upstairs (2) and then Unlock the Door (3 – click on the Red Ramp) and go outside.

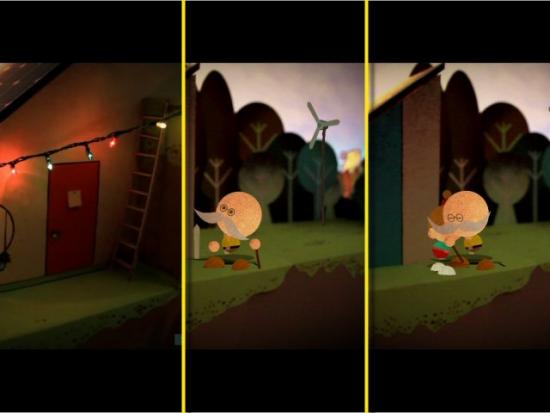
Continue toward the Gap in the Trees (1 – click over near the right side), take your Binoculars from Inventory and use them on the Gap between the Trees (2) and then return to the House (3).
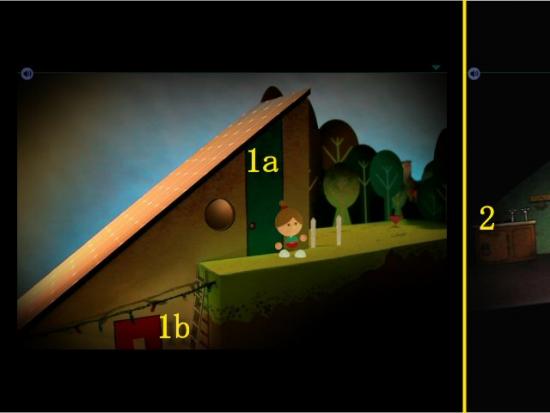
Go inside (either 1a – click on the Green Door, since it’s now unlocked, and go down the Stairs, or 1b – go down the Ladder and enter through the Red Door) and then click on the Cabinet under the Sink (2).
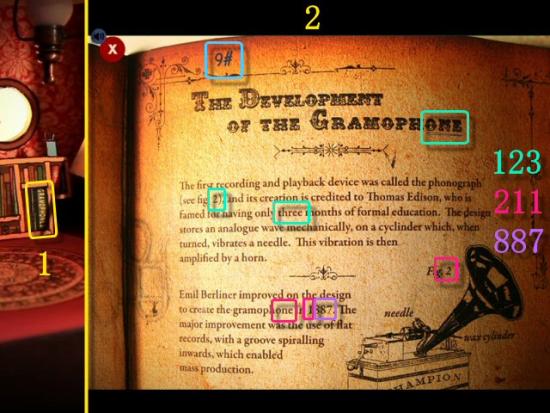
The object is to take the Clue (2) you’ve found, upstairs, in the Green Book (1) and figure out how to illuminate the 3 lights and unlock the Cabinet.
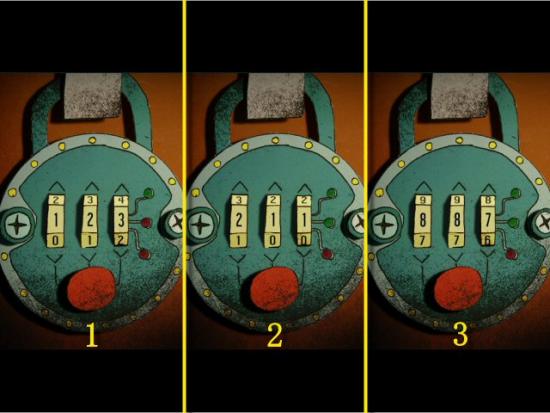
The numbers are:
Credit for the following solution (which completely replaces my totally incorrect solution…even though I managed to get it to work, LOL) goes to Gamezebo member Craig Elliot with many thanks! You can see his original post in User Tips.
Enter each number by clicking on the Top or Bottom Arrows then click on the Red Button. Repeat for the remaining 2 sets of numbers.
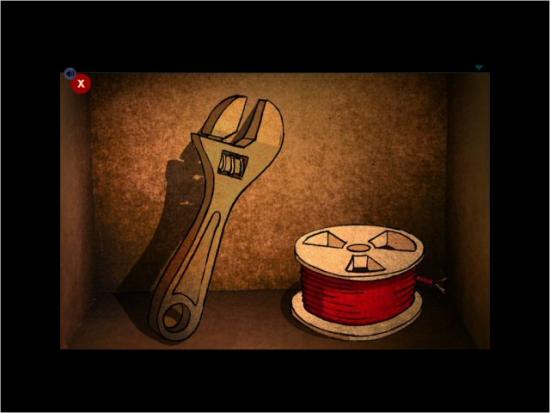
Collect the Spanner (1) and the Electrical Wire (2).
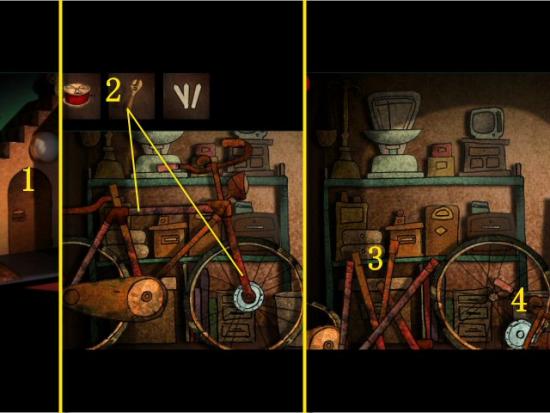
Click on the Storage Closet (1), use the Spanner on the Bicycle Dynamo Hub (2) and the Frame (3) and then collect the Dynamo and the Poles (4).
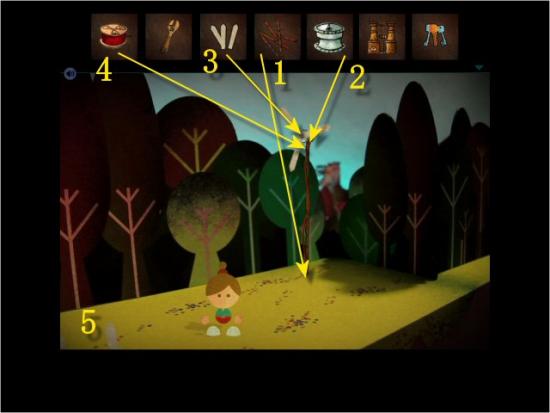
Return to the Underground Connector (either go outside, go up the Ladder and then head toward the Gap in the Trees, or go Upstairs, go outside and then head toward the Gap in the Trees). Take the Poles from Inventory and use them on the Connector (1), take the Dynamo from Inventory and use it on the Pole (2), take the Pickets from Inventory and use them on the Dynamo (3) and then take the Electrical Wire and use it on the Dynamo (4). Return to the House (5) and go inside (Downstairs).
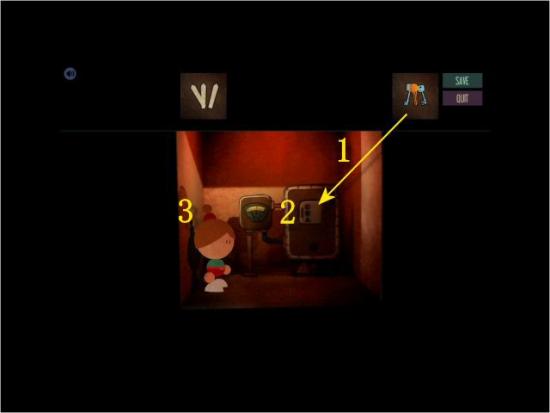
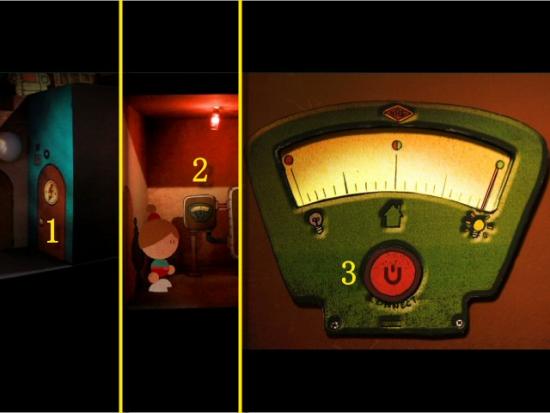
Enter the Electrical Closet (1), click on the Meter (2) and then click on the Red Button (3 – “Connect”) to start the power.
Watch the ending movie. Congratulations! You’ve completed Lume Part 1.
