- Wondering how to get Monopoly GO! free rolls? Well, you’ve come to the right place. In this guide, we provide you with a bunch of tips and tricks to get some free rolls for the hit new mobile game. We’ll …
Best Roblox Horror Games to Play Right Now – Updated Weekly
By Adele Wilson
Our Best Roblox Horror Games guide features the scariest and most creative experiences to play right now on the platform!The BEST Roblox Games of The Week – Games You Need To Play!
By Sho Roberts
Our feature shares our pick for the Best Roblox Games of the week! With our feature, we guarantee you'll find something new to play!Type Soul Clan Rarity Guide – All Legendary And Common Clans Listed!
By Nathan Ball
Wondering what your odds of rolling a particular Clan are? Wonder no more, with my handy Type Soul Clan Rarity guide.
Love & Death: Bitten Walkthrough
Welcome to the Love & Death: Bitten walkthrough on Gamezebo. Love & Death: Bitten is a time hidden object adventure game played on PC created by PlayFirst. This walkthrough includes tips and tricks, helpful hints, and a strategy guide to how to complete Love & Death: Bitten.
General Information
Welcome to the Love & Death: Bitten walkthrough on Gamezebo. Love & Death: Bitten is a time hidden object adventure game played on PC created by PlayFirst. This walkthrough includes tips and tricks, helpful hints, and a strategy guide to how to complete Love & Death: Bitten.
Main Menu

- The More Games button displays a window which shows other games from PlayFirst. Each button links to a page about the game on the PlayFirst website.
- The Options button displays sliding bars to adjust sound, music, ambient and voice volume. There is an option to switch between full screen and windowed mode, and an option to mute all sound. Press the back button to return to the main menu or the credits button to view the list of people that were involved in the making of this game.
- The Change Player button displays the profile window, where player profiles can be renamed, added and deleted. Select a profile and then click the OK button to return to the main menu.
- Odette’s Journal shows the number of golden leaves and the clues that have been unlocked on the current profile.
- Press the Play Now button to start the game with the currently selected profile.
- The Quit button exits the game if Yes is selected or returns to the main menu if No is selected.
How to Play
- The default cursor in the game is the grey arrow. Move the cursor around the screen until it changes. A magnifying glass will appear over objects that can be examined for a description. A hand icon will appear over objects that can be added to the inventory. Directional arrows appear over doorways and other exits to indicate that a new area can be accessed. Single left click to perform an action when one of these icons appears.
- In the main game window, the portrait at the bottom-left corner of the screen shown the playable character along with text about the current task. The inventory is shown below the character text. The cauldron can be selected to view the golden leaves and the clues that have been unlocked. The golden leaf counter displays the current total of leaves, and will glow when a golden leaf is in the same area. The task area at the bottom-right corner of the screen displays the current tasks that need to be completed, and also has buttons to reveal a hint and access the game menu.
- There are golden leaves scattered throughout many locations in the game, and 100 of them must be found in order to complete the adventure. There are actually more than 100 leaves available, although once 100 have been found the golden leaves will disappear from every location. You can check whether a golden leaf is in the area by looking at the leaf counter at the bottom of the screen. If it is glowing, one or more leaves are in the area. Sometimes you will not be able to find all of the leaves straight away, as you will need to return to the area at a later time or with a different character in order to find them.
- Hidden object scenes are accessed by selecting the ravens that appear throughout the game. The list of objects that need to be found is shown at the bottom of the screen in these areas. Objects with yellow text are combination objects, where one or more objects must be used on another object in order to remove the name from the list. Objects with blue text must be found in a specific order. There are also inventory objects, which are added to the inventory once the scene has been completed. Combination, ordered and inventory objects are always in the same place each time the game is played, while the names of other objects on the list will change each time the game is played.
- Clicking too quickly in a hidden object scene causes the cursor to spin uncontrollably for three seconds.
- Hints can be used in main areas and hidden object scenes in order to reveal the location or object that should be selected next. It takes 30 seconds for the hint counter to become active after a hint has been used.
- Mini-games occur at certain points in the game, featuring tasks such as putting tiles back in the correct order or diverting a light beam onto mirrors. The skip puzzle button will become active three minutes after the mini-game has started, and pressing this will automatically complete the puzzle.
Walkthrough: Chapter 1 – The Search
The game starts in the butcher shop. Select both shutters to close them:
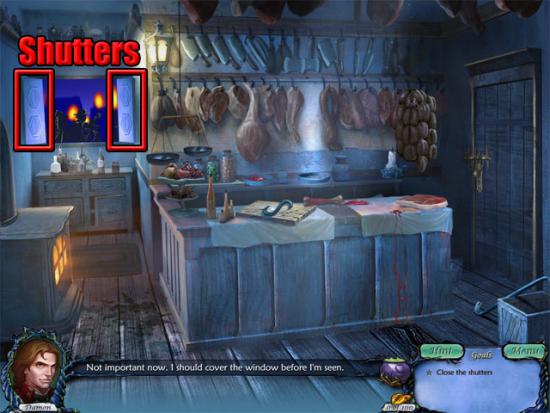
Select the door to see that it is locked. The following objects can now be selected in the room:
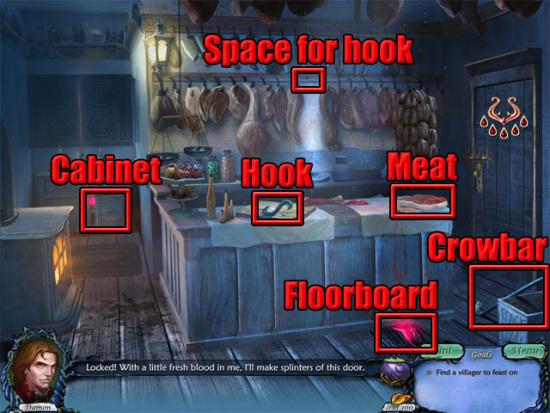
Take the crowbar and use it on the floorboard. Press the skip button to close the help window. Open the cabinet. Take the meat hook and use it on the space for the hook. Take the bloody meat and use it on the meat hook. Find the five pools of blood:
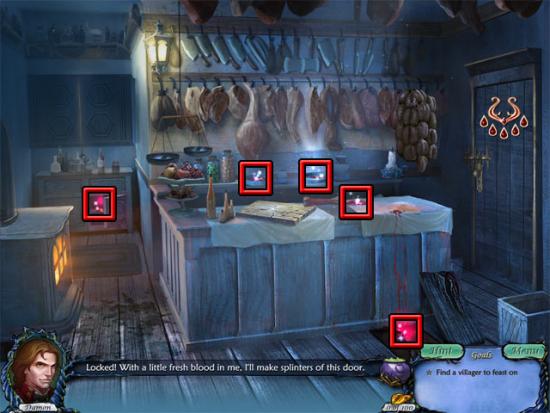
Open the door and a wolf will appear. Take the bone on the counter and give it to the wolf:
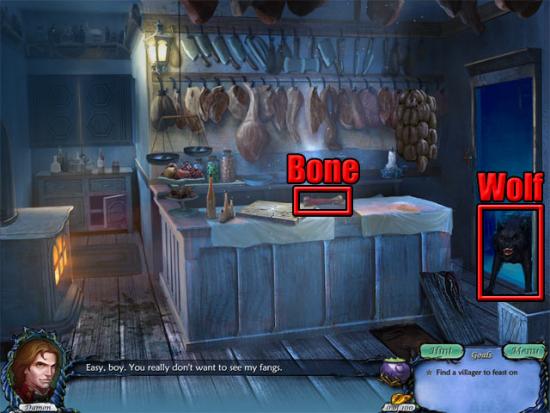
Move right through the doorway to enter the storage room. Press the skip button to close the help window. Take the two golden leaves. Examine the lock:
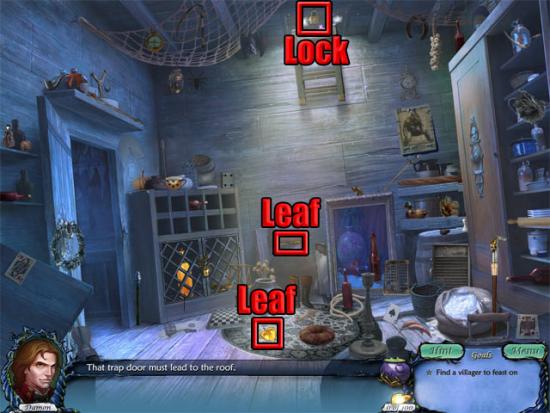
A raven will appear after the lock has been examined. Select the raven to enter a hidden object scene. Take the key:
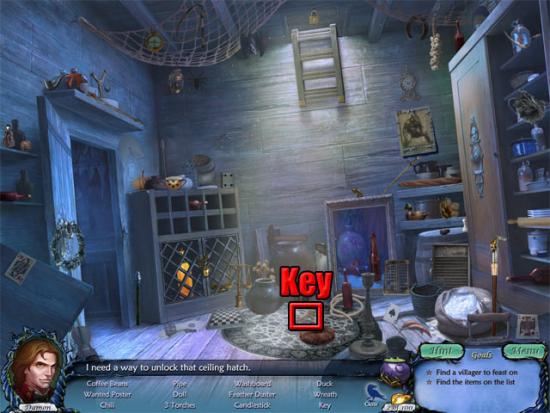
Find the remaining objects on the list to receive the key. Use the key on the lock to open the ceiling hatch. Fly through the hatch to play the rooftop hatch mini-game. Take the golden leaf. Select the bottom-left tile to start the maze and then follow the route shown below:
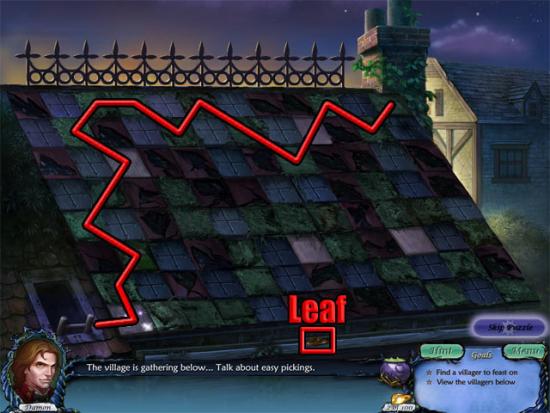
Examine the crowd three times and people will move away. Select Victoria:
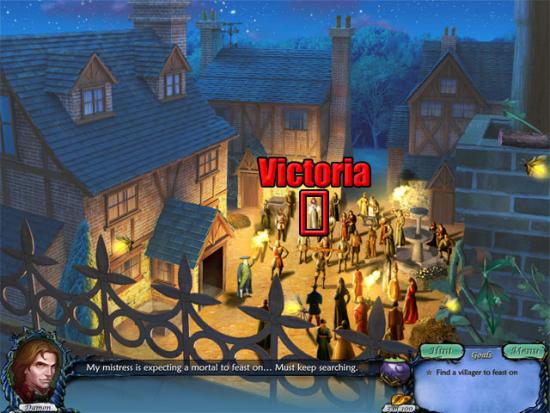
After the cutscene, select the glowing cauldron to see the current progress. Select the back button to exit the cauldron screen and complete the first chapter.
Chapter 2 – The Choice
Examine Damon on the roof and both doors will open. Take the twigs and the two golden leaves:
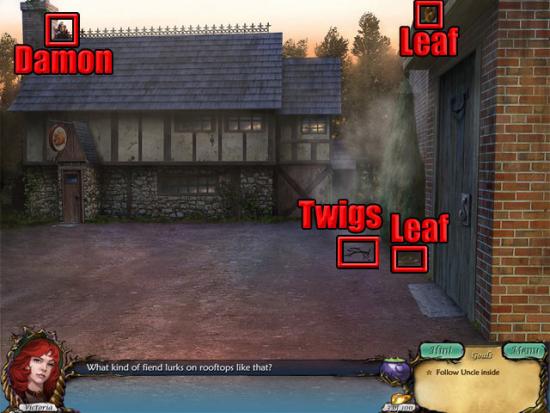
Go through the left doorway to enter the butcher shop. Take the two golden leaves:
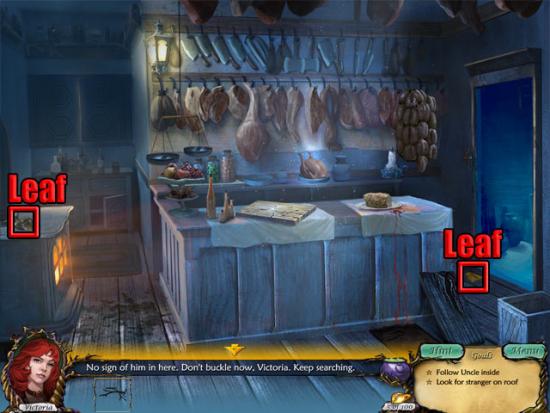
Move right to the storage room to see that the ladder is too high to reach. Move left to the butcher shop and a raven will fly into the room. Select the raven to start a hidden object scene. Complete the yellow combination objects:
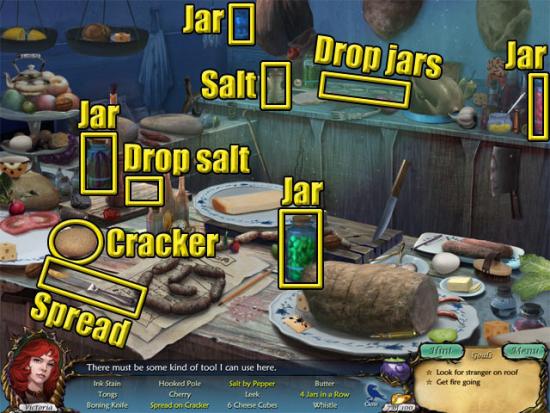
Find the boning knife and the hooked pole. Take the three golden leaves:
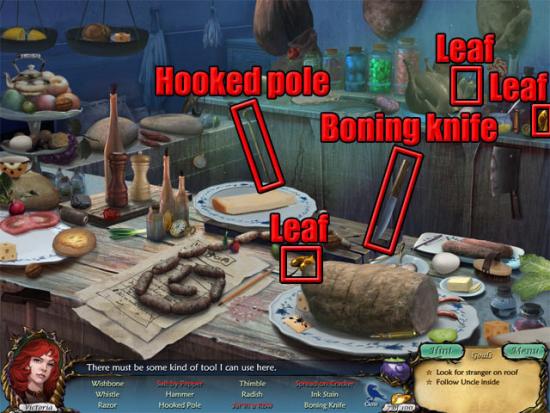
Find the remaining objects on the list to receive the boning knife and the hooked pole. Move right to the storage room. Use the hooked pole on the ladder:
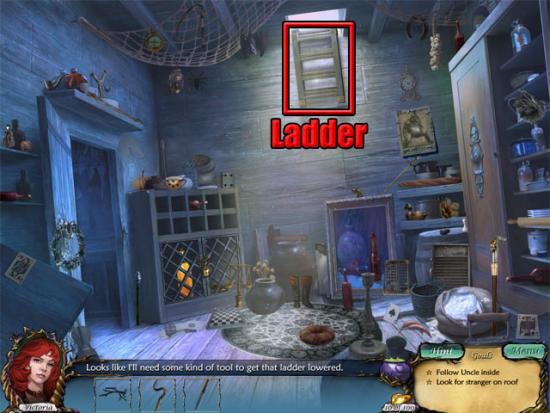
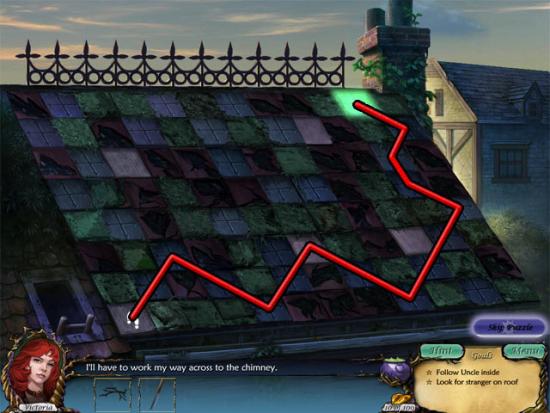
Climb up the ladder to play the rooftop hatch mini-game. Select the bottom-left tile to start the maze and then follow the route shown below:
Select the raven to enter a hidden object scene. Complete the yellow combination objects:
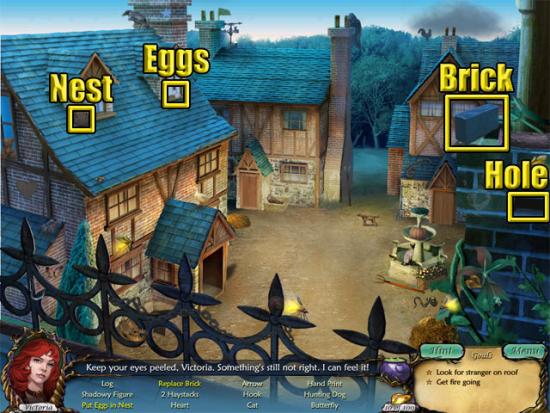
Find the log. Take the three golden leaves:
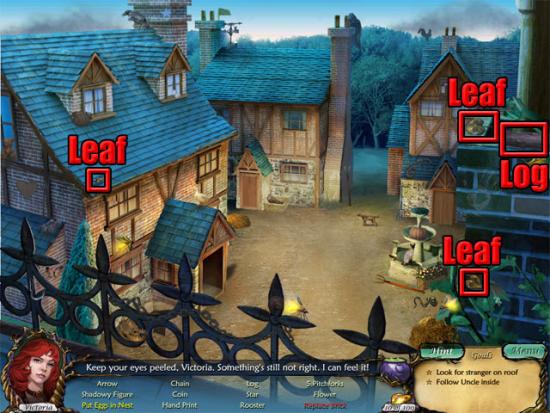
Find the remaining objects on the list to receive the log. Move back, down, left, back and right into Victoria’s house. The following hotspots are available:
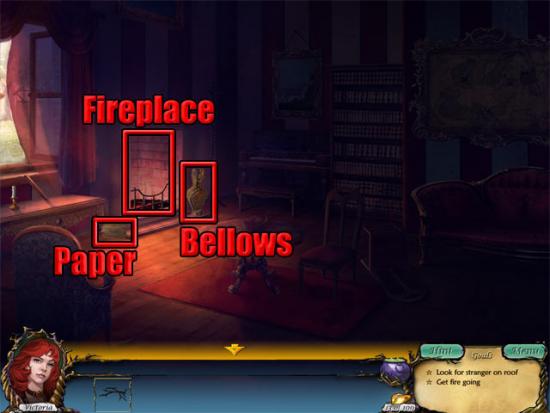
Take the bellows and the crumpled paper. Use the bellows, crumpled paper, twigs and branch on the fireplace to talk to Damon. After he leaves, select the raven to enter a hidden object scene. Complete the yellow combination objects:
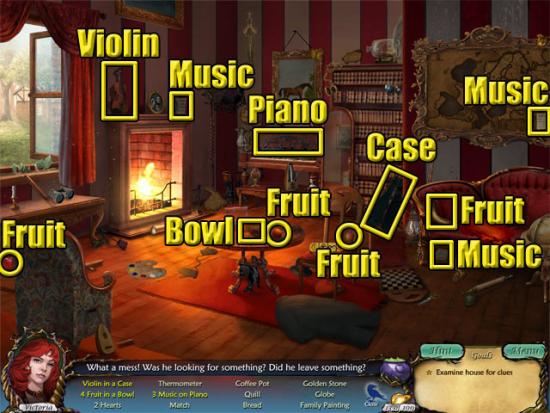
Find the match, golden stone and bread. Take the three golden leaves:
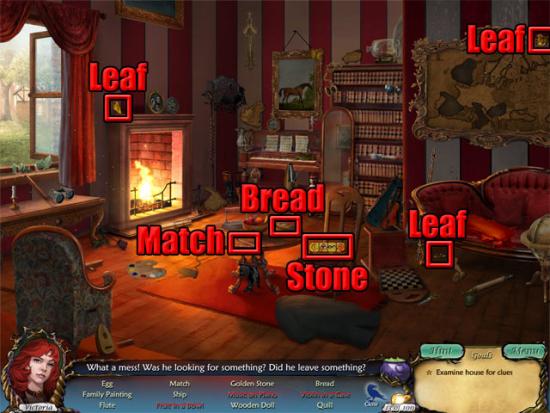
Find the remaining objects on the list to receive the match, golden stone and bread. Move left through the window to the bridge. Take the six throwing stones:
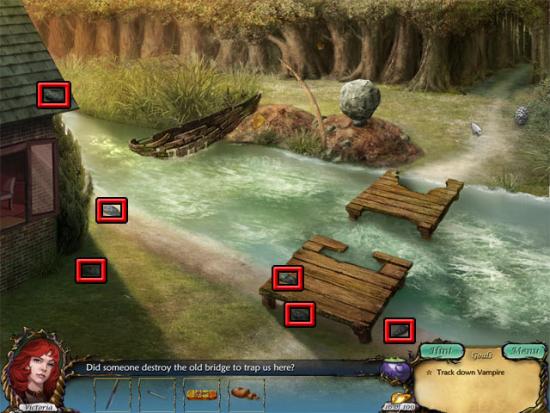
Use the throwing stone on the boat and a throwing gauge will appear. Throw the stone when the cursor is in the blue section of the gauge. If successful, the stone will hit the boat and it will start to break apart. If unsuccessful, the stone will be returned to the inventory so that you can try again. Hit the boat with two more stones and it will break apart completely. Throw stones at the two boards that are furthest away. Take the four boards:
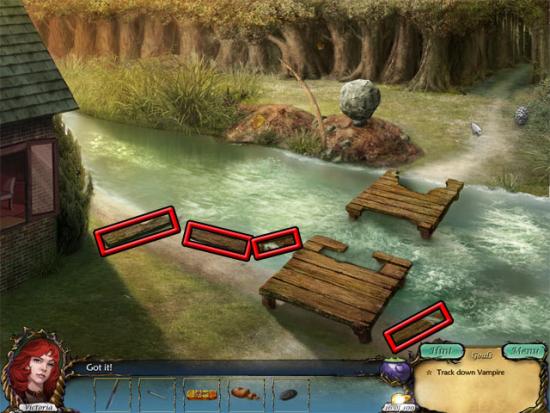
Use the four boards on the hole in the bridge. Throw the last stone at the rock on the other side of the river to complete the bridge. Take the two golden leaves. Take the white arrowhead and the white pinecone:
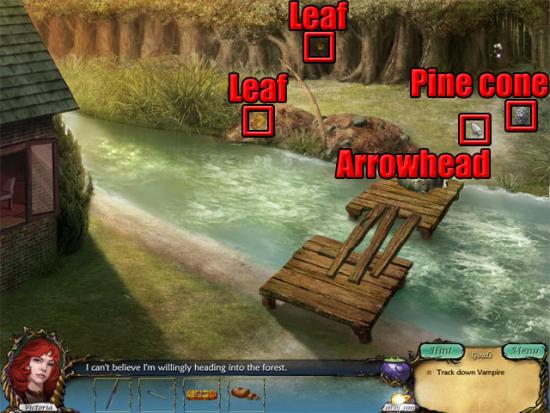
Enter the forest. Use the knife on both vine areas:
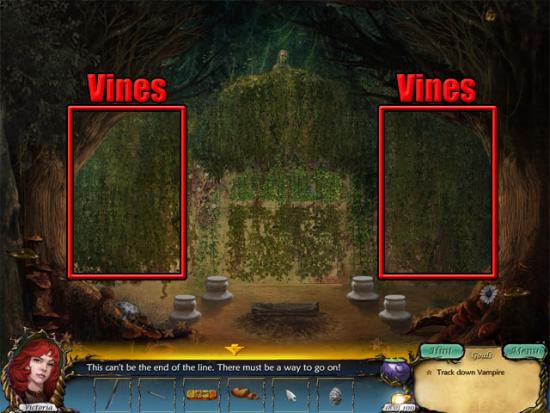
Take the four golden leaves. Take the white mushroom and the white flower:
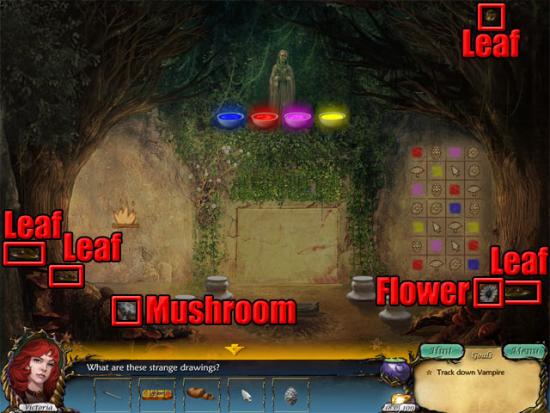
Use the match on the log in the middle of the room to reveal numbers on the left wall. Put the mushroom in the red bowl, the arrowhead in the yellow bowl, the pine cone in the blue bowl and the flower in the pink bowl. Put the yellow arrowhead on the top-left pillar, the blue pine-cone on the top-right pillar, the pink flower on the bottom-left pillar and the red mushroom on the bottom-right pillar:
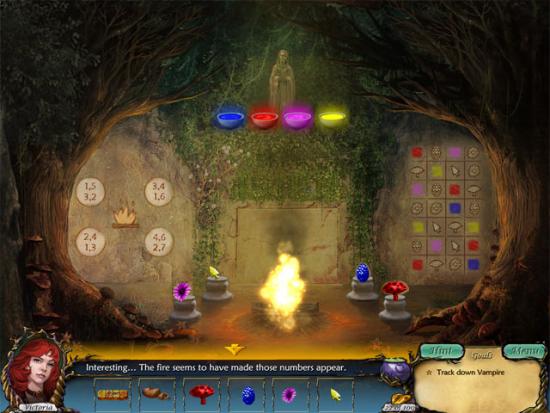
Change the symbols on the walls to the ones shown above the pillars:
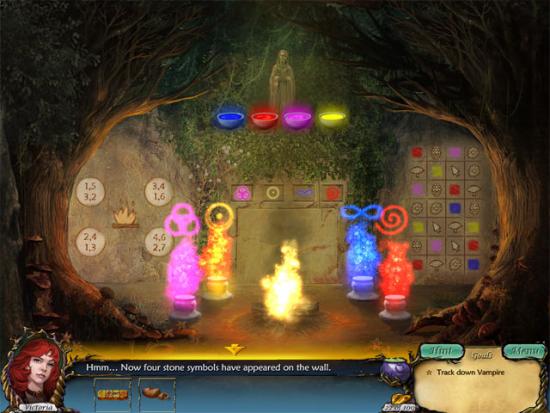
Examine the panel to view the tile puzzle mini-game. Use the golden stone on the slot below the squares. Put the tiles in the following positions:
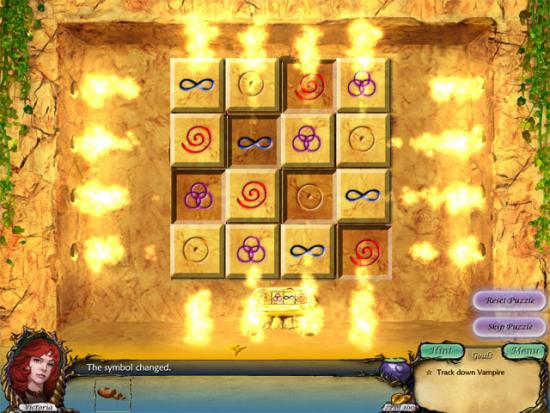
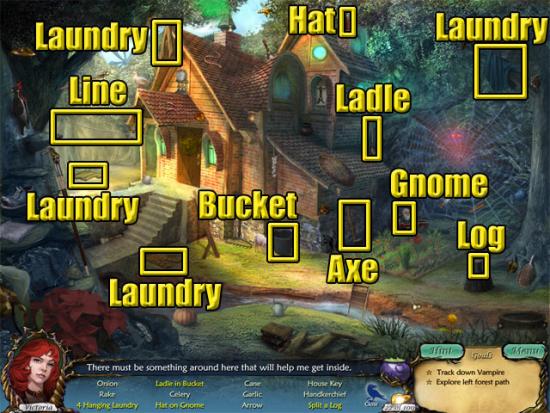
Go through the right doorway to the forest house. Select the door of the house and a raven will appear. Select the raven to start a hidden object scene. Complete the yellow combination objects:
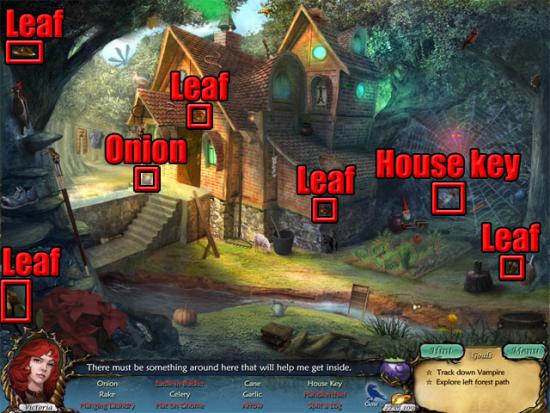
Take the onion and the house key. Take the five golden leaves:
Use the house key on the door to open it. Enter Odette’s house. Odette won’t talk to Victoria until her cough is cured. Move to the stove and examine the book. Examine the outlines and the onion will be added to the slot. Move back to the parlor and a raven will fly into the room. Examine the raven to enter a hidden object scene. Find the bat wing and fish hook. Take the golden leaf:
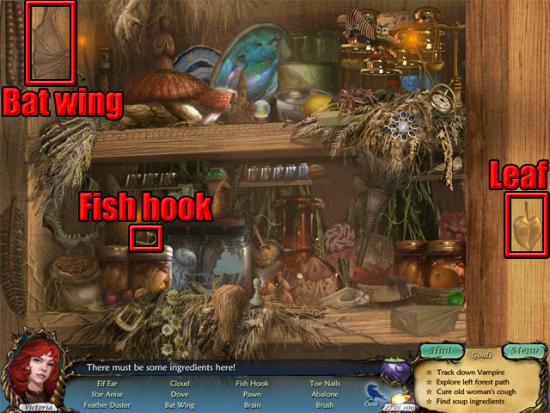
Find the remaining objects to receive the bat wing and the fish hook. Take the two golden leaves:
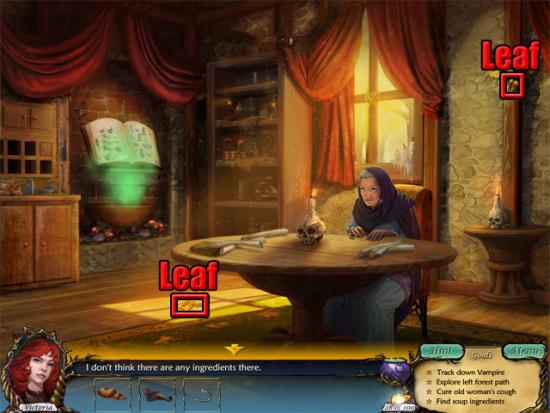
Exit the forest house. Move back twice to the bridge and left to Victoria’s house. Select the raven to start a hidden object scene. Complete the yellow combination objects:
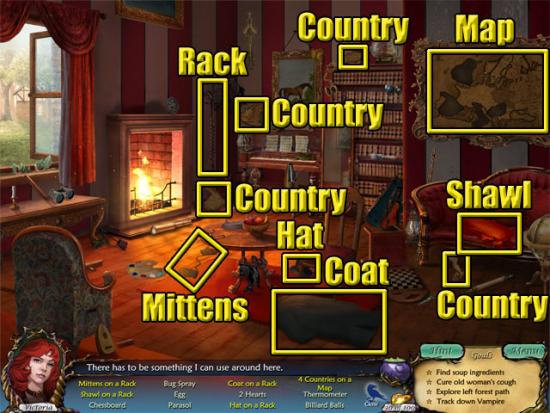
Find the bug spray. Take the four golden leaves:
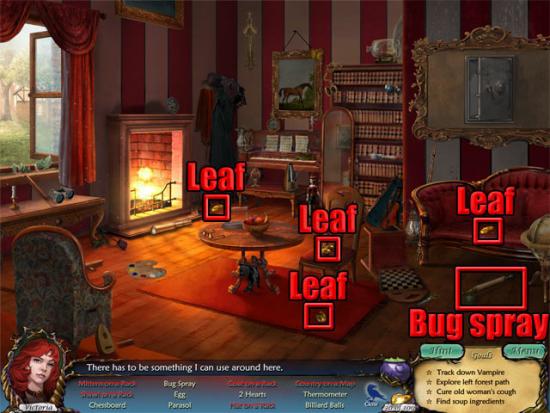
Find the remaining objects to receive the bug spray. Open the safe and take the wine cabinet key. Move back to the town square and go through the left doorway to the butcher shop. Select the raven to start a hidden object scene. Add the yellow combination objects to the bread in the following order:
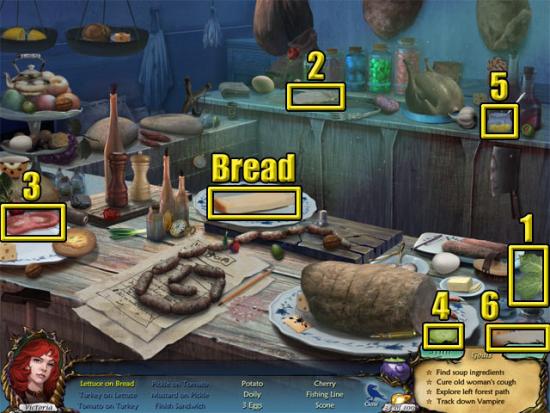
Find the three eggs, potato and fishing line. Take the golden leaf:
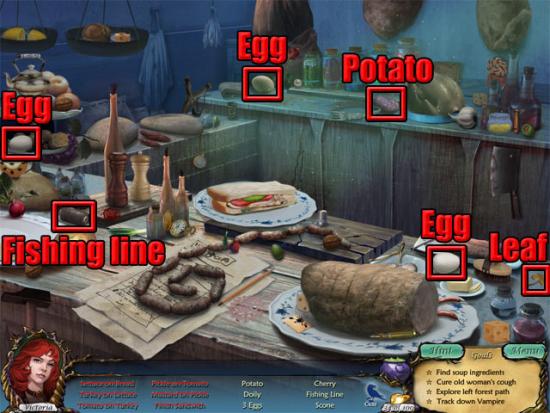
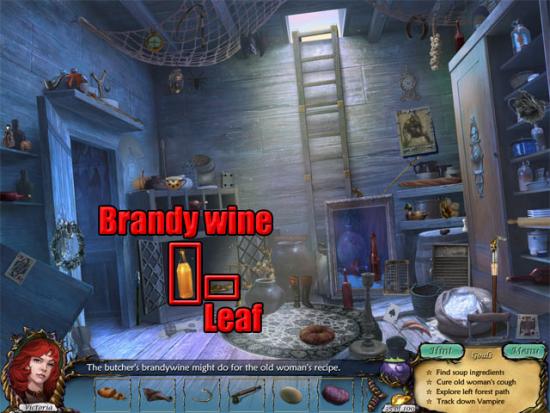
Find the remaining objects to take the egg, potato and fishing line. Move right through the doorway to the storage room. Use the wine cabinet key on the lock. Take the brandy wine and the golden leaf:
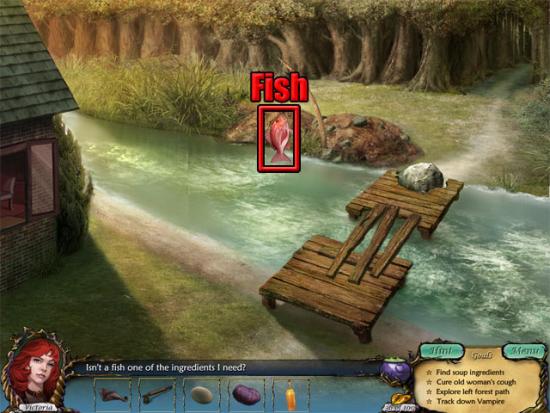
Move left, back, right and forward through the window to the bridge. Use the fishing line and the hook on the pole. Use the bread on the hook and click when the marker is in the middle of the gauge to catch a fish. Take the fish:
Move forward to the forest and go through the left doorway to the castle gate. Select the raven to enter a hidden object scene. Complete the yellow combination objects:
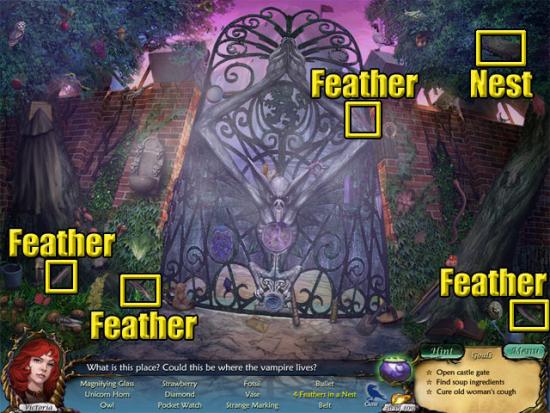
Find the unicorn horn. Take the golden leaves:
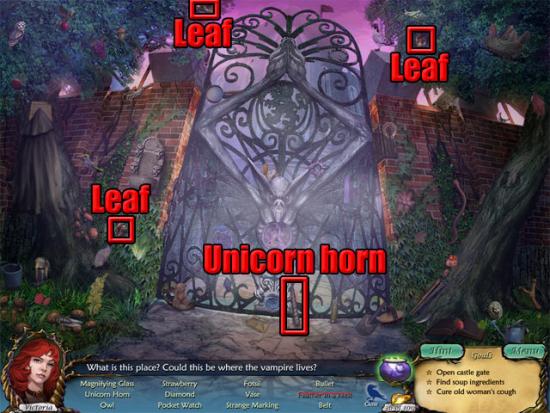
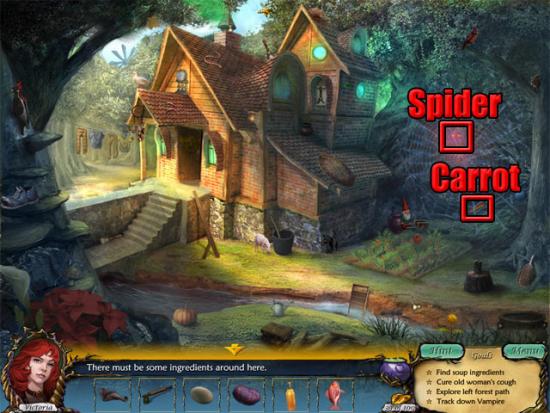
Find the remaining objects to receive the unicorn horn. Move back and go through the right doorway to the forest house. Use the bug spray on the spider and then take the carrot from the web:
Enter the house and examine the book to insert all of the ingredients into the slots:
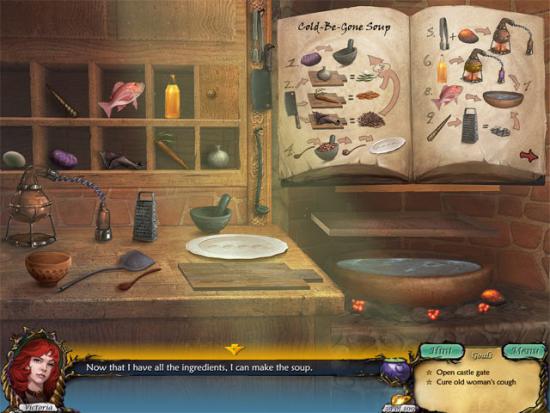
Follow the steps shown below to make the potion:
1: Add the potato to the mortar bowl.
2: Add the onion to the board and use the knife on it. Add the carrot to the board and use the knife on it. Use the bat wing on the board and use the knife on it.
3: Add the chopped onion, chopped carrot and chopped bat wing to the mortar bowl.
4: Use the wooden spoon on the mortar bowl and then use the wooden spoon on the plate. Do this four times.
5: Use the tongs on the lump of coal and then use the tongs on the burner to light it.
6: Use the brandy wine on the burner.
7: Take the purple liquid from the small bottle and use it on the large bowl.
8: Use the fish on the large bowl.
9: Use the unicorn horn on the grater and add the grated horn to the large bowl.
10: Add the four balls on the plate to the large bowl.
11: Add the egg to the grill above the large bowl.
12: Use the ladle on the large bowl and then add the liquid to the small bowl. Do this four times.
13: Use the spatula on the egg.
14: Add the egg to the small bowl to make the cold-be-gone soup.
Take the bowl of cold-be-gone soup. Back away from the desk and give the cold-be-gone soup to Odette to receive two mirrors. Move back twice to the forest and go through the left doorway to the castle gate. Examine the circle on the front of the gate. Use the mirrors on the two empty slots to play the Gargoyle mini-game. Rotate the red chips so that the light reflects off all of the mirrors:
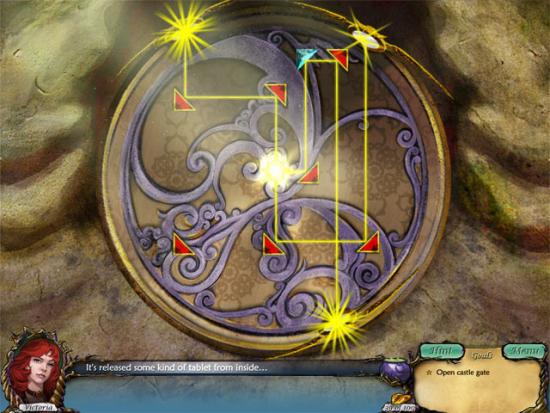
Take the mysterious tablet and the gate will open. Move forward to the courtyard to complete the second chapter.
Chapter 3 -The Vampire’s Surprise
Select Victoria to reveal the mysterious tablet. Take the golden leaf and the mysterious tablet:
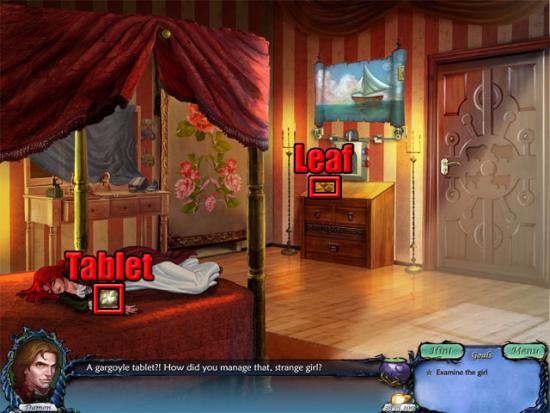
raven to enter a hidden object scene. Complete the yellow combination objects:
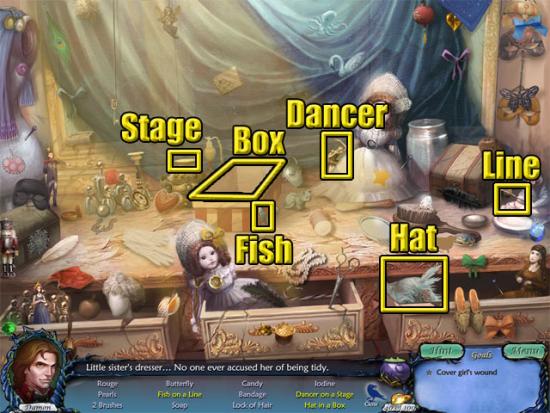
Find the iodine, bandage and both brushes. Take the four golden leaves:
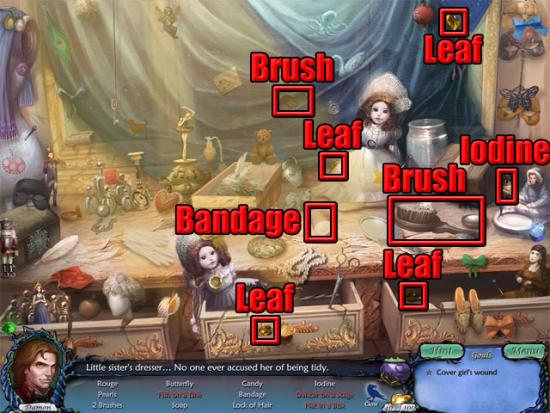
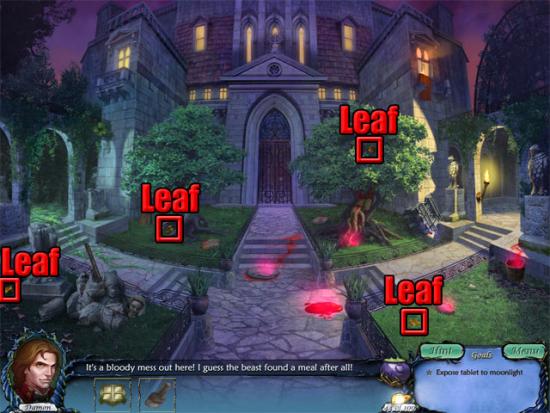
Find the remaining objects to receive the iodine, bandage and brush. Use the iodine and bandage on Victoria’s wound. Move back to the courtyard. Take the four golden leaves:
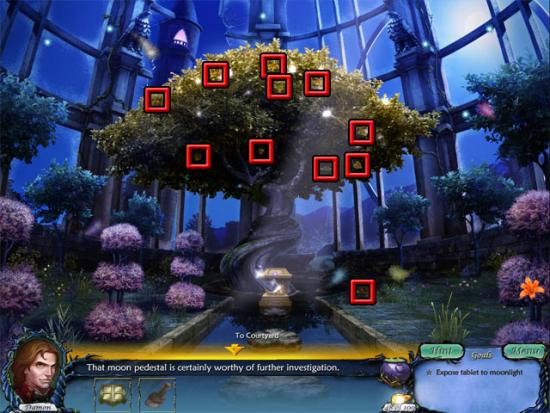
Move right through the doorway to enter the aviary. Take the eleven golden leaves:
Examine the moon pedestal. Use the mysterious tablet on the slot to see spaces for four symbols. Take the golden leaf:
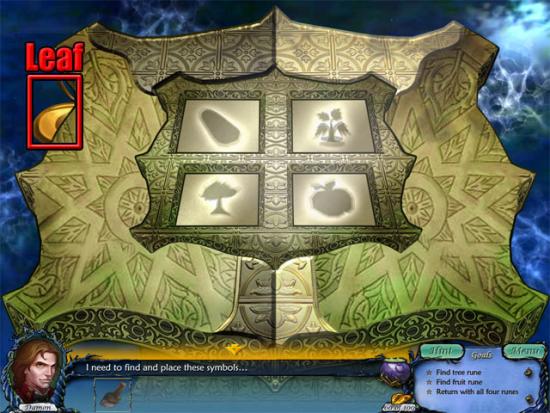
Move back three times to the castle gate. Select the raven to enter a hidden object scene. Complete the yellow combination objects:
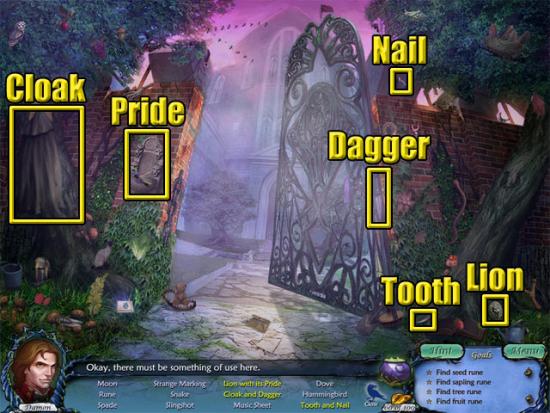
apling rune and spade:
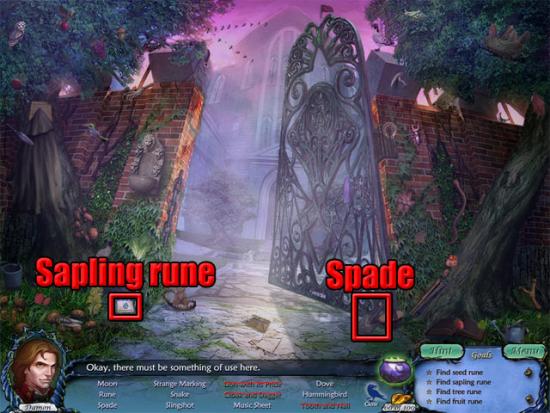
Find the remaining objects to receive the sapling rune and spade. Move forward to the courtyard and left to the garden. Examine the rune below the rubble and Damon will say that he needs to build his strength. Move the left rock:
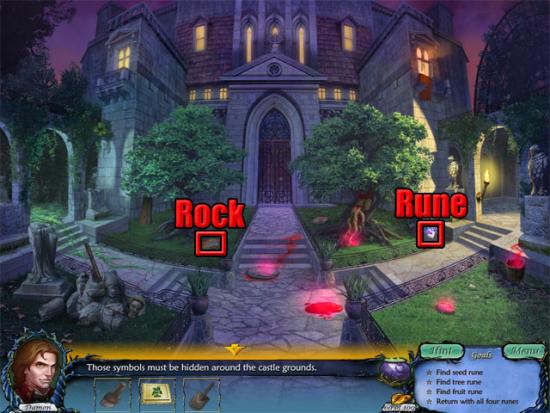
Take the flower that was revealed by moving the left rock. Move left to the garden. Examine the angel and a raven will appear. Select the angel to enter a hidden object scene. Find the flower, seed rune and sun engraving. Take the four golden leaves:
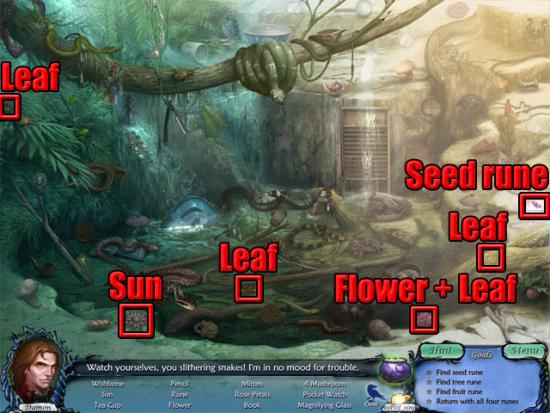
Find the remaining objects to receive the flower, seed rune and sun engraving. The following hotspots are available:
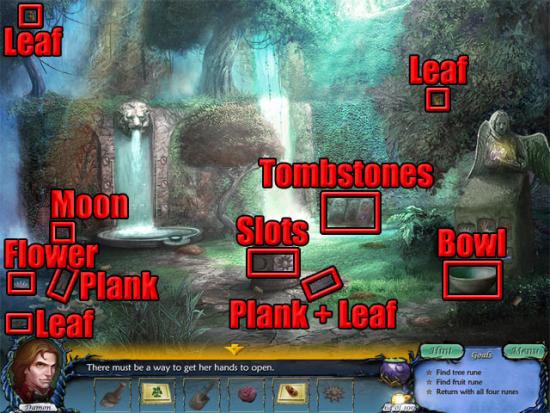
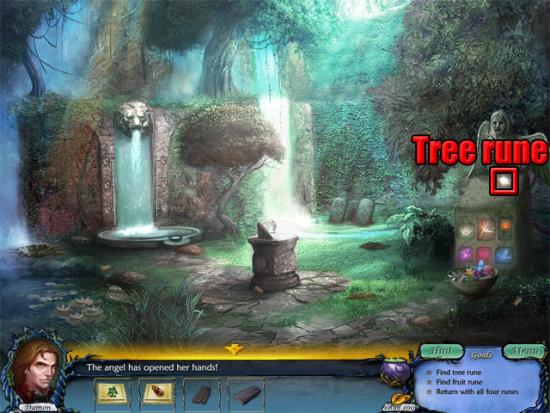
Take the planks. Take the four golden leaves. Take the moon engraving. Use the sun and the moon engraving on the slots on the pedestal and then take the blue flower. Take the white flower in the pond. Use the brush on the tombstones three times and then take the purple flower. Use the spade on the tombstones and then take the orange flower. Use the six flowers on the bowl and then take the tree rune:
Move back to the courtyard. The following hotspots are available:
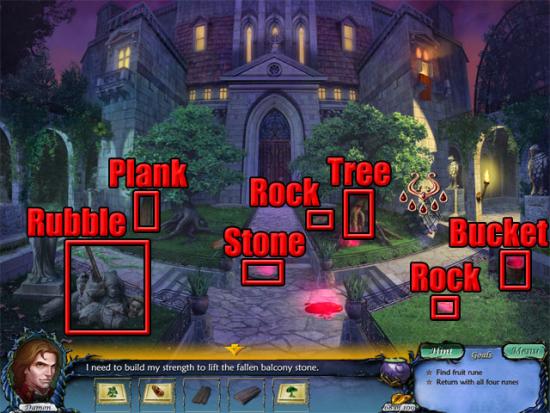
Move the two rocks and the bucket. Take the plank. Use the planks on the rubble three times. Take the iron pipe that was revealed in the rubble. Use the iron pipe on the stone to break it. Take the three sharp stone pavers and use them on the tree. Find the five pools of blood:
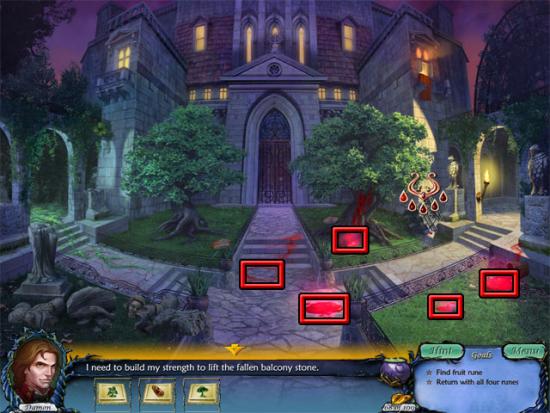
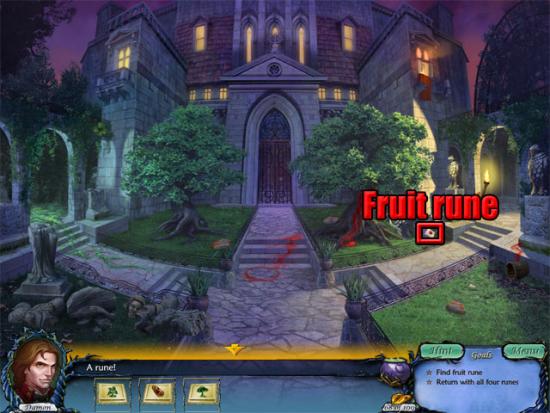
Move the balcony stone and take the fruit rune:
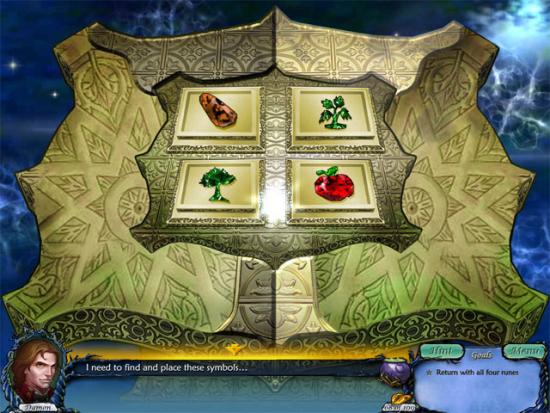
Move right to the aviary. Examine the mood pedestal and use the four runes on the slots:
Take the key. Move back to the aviary and fly to the tower room:
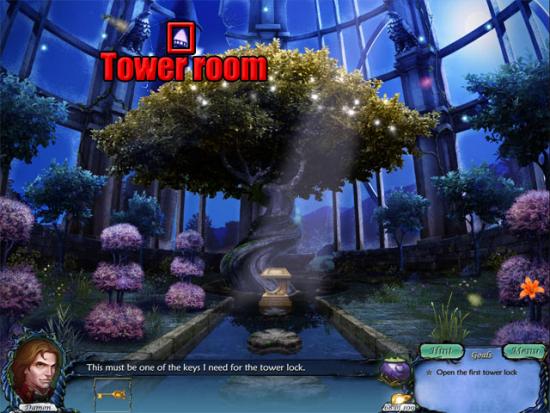
Take the three golden leaves. Examine the tower lock:
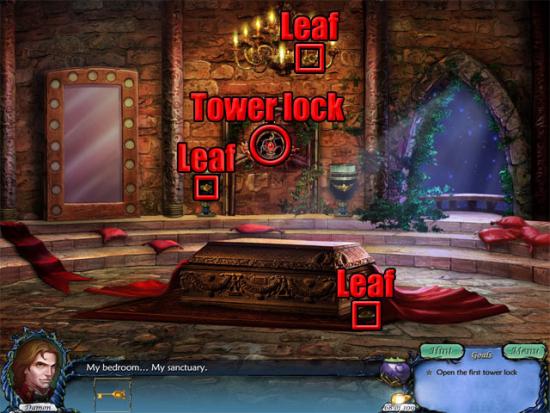
Use the key on the tower lock to complete the chapter.
Chapter 4 – Change of Heart
Examine the door and a raven will fly into the room. Select the raven to enter a hidden object scene. Complete the yellow combination objects:
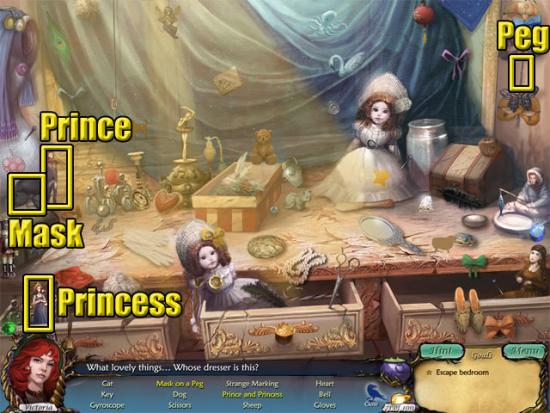
Take the key, sheep and the dog. Take the golden leaf:
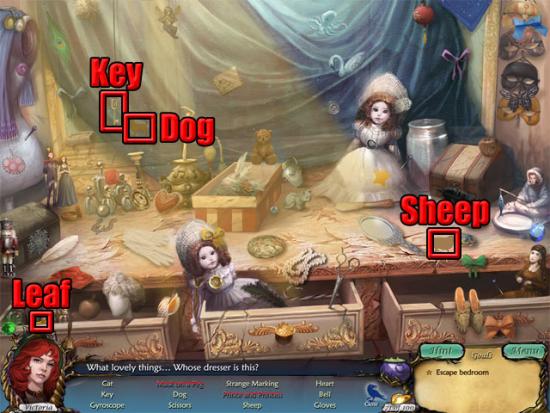
Find the remaining objects to receive the key, sheep and dog. Examine the painting of flowers on the wall to reveal the antechamber entrance. Take the two golden leaves:
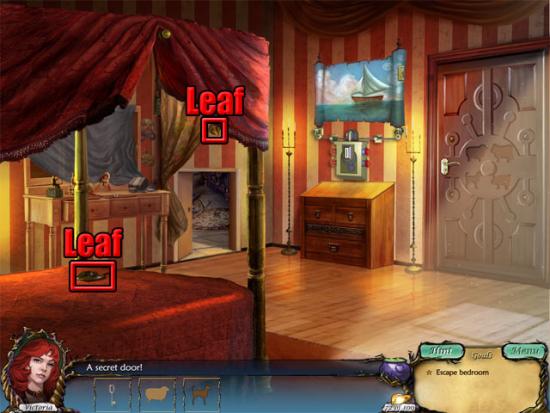
Enter the antechamber. Examine the rocking horse to hear something rattling inside. Use the key on the chest and a raven will fly into the room. Select the raven to enter a hidden object scene. Complete the yellow combination objects:
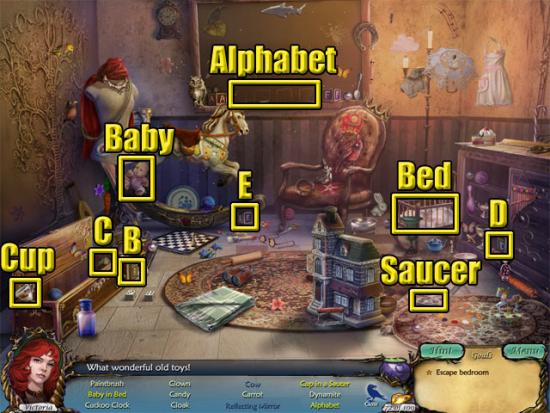
Find the carrot, mirror, cow and dynamite. Take the three golden leaves:
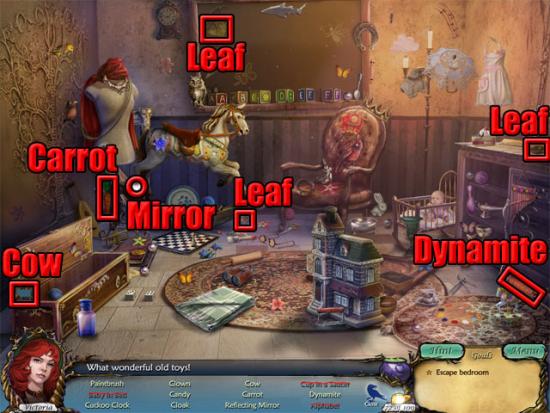
Find the remaining objects to receive the carrot, mirror, cow and dynamite. Use the carrot on the rocking horse and then take the wooden pig:
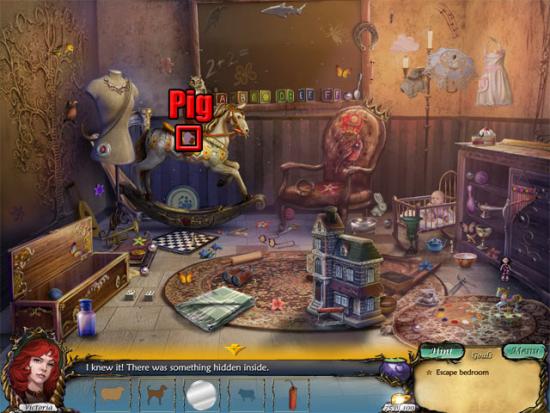
Move back to the bedroom. Use the four wooden animals on the door and it will open. Go through the doorway to enter the hallway. Take the two golden leaves:
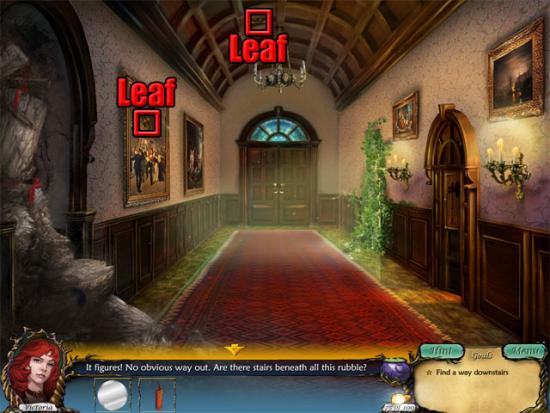
Move right to enter the weapon room. Select the raven to enter a hidden object scene. Complete the yellow combination objects:
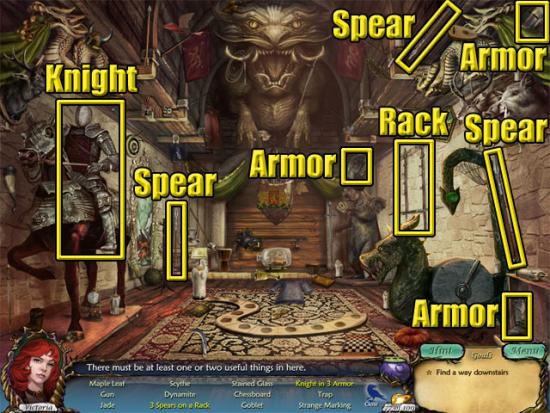
Find the scythe and the dynamite. Take the four golden leaves:
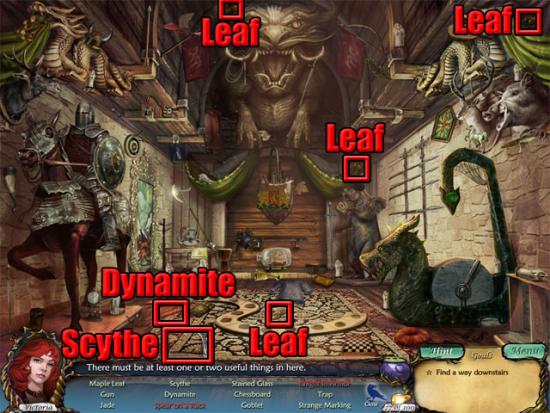
Find the remaining objects to receive the scythe and the dynamite. Move back to the hall. Use the scythe on the foliage:
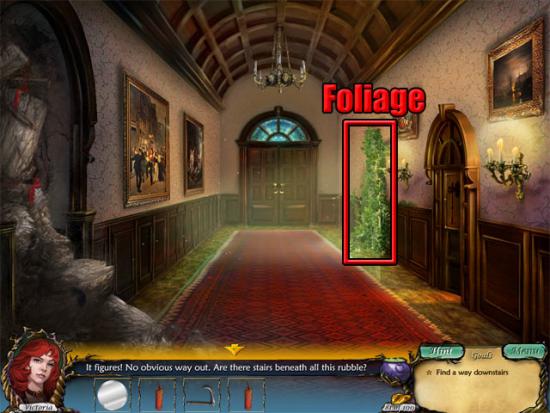
Go through the doorway to the balcony. Try to take the key from the bird’s nest. Select the lever on the machine to learn that the bird likes to sing:
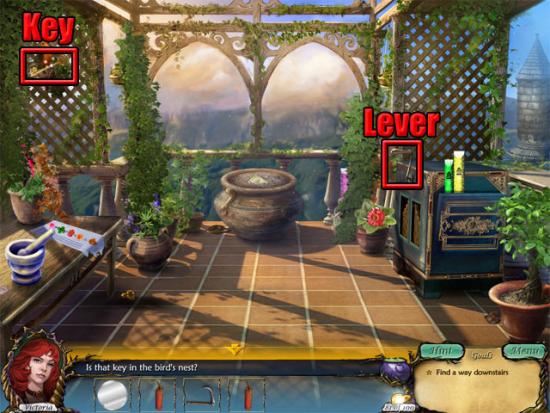
Use the scythe on the three sections of ivy. Take the flute pieces and use them on the slot:
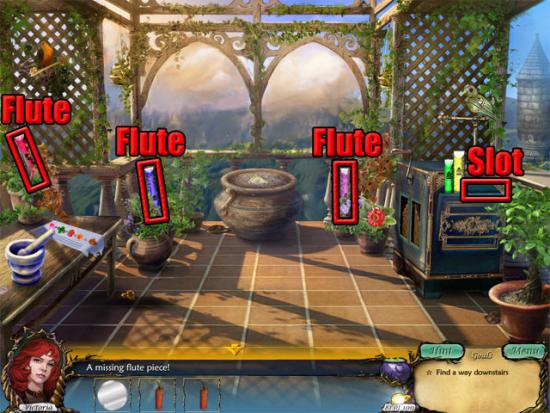
Select the bird to view a series of notes. Copy the notes by pressing flutes of the same colour. Do this four times and the bird will fly away. Take the key and the three golden leaves:
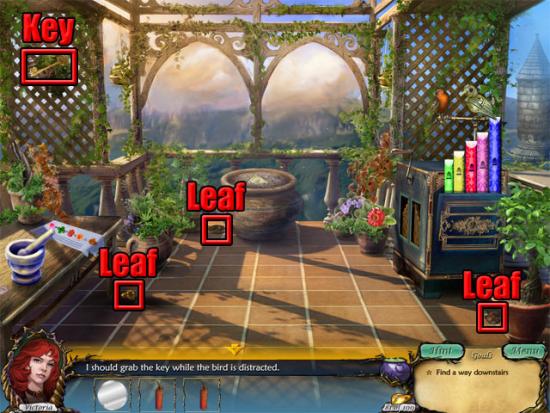
Move back to the hall. Use the key on the door at the end of the hall to open it. Move forward through the doorway to enter the study. Select the raven to enter a hidden object scene. Complete the yellow combination object:
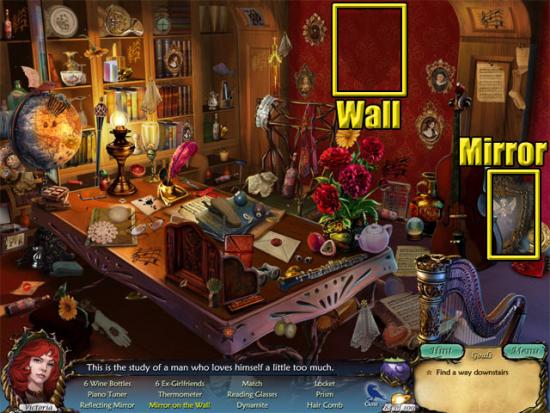
Find the match, dynamite, mirror and piano tuner. Take the five leaves:
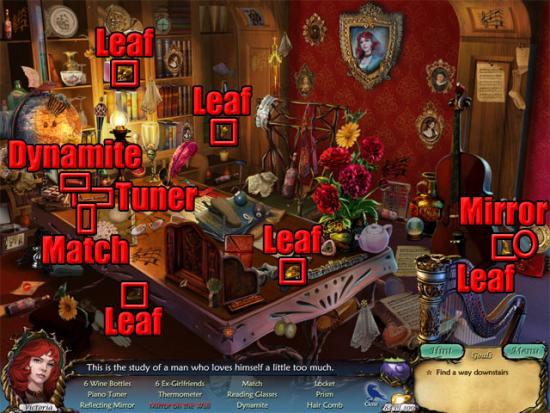
Find the remaining hidden objects to receive the match, dynamite, mirror and piano tuner. Move back to the hallway. Use the three sticks of dynamite on the rubble at the left side of the hallway. Use the match on the three sticks of dynamite to blast away the rubble. Move left to the grand foyer. Take the two golden leaves:
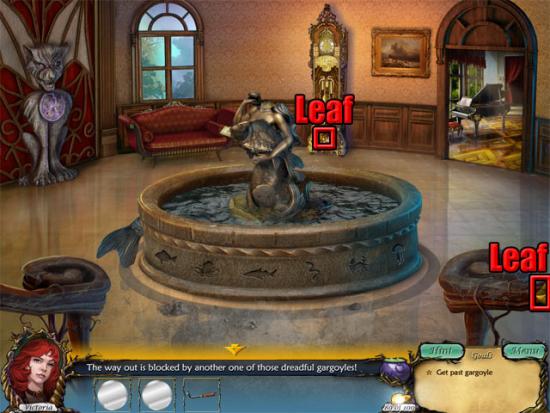
Go through the doorway to enter the ballroom. Examine the slot at the right side of the curtains. Take the pulley and use it on the slot. Take the golden leaf:
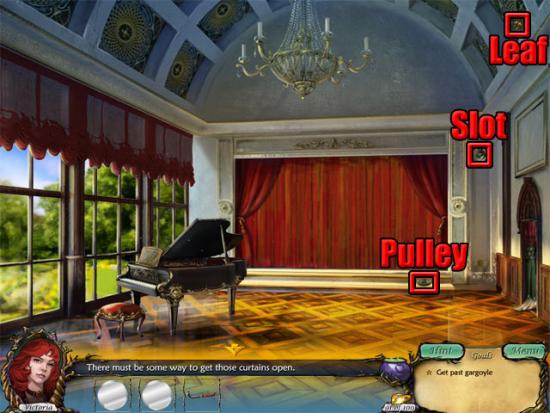
Move right through the doorway to enter the costume room. Select the raven to enter a hidden object scene. Complete the yellow combination object:
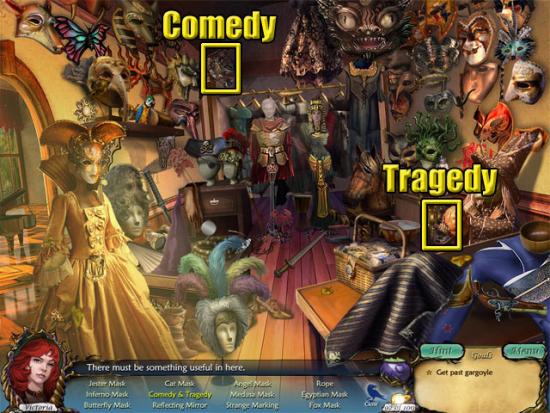
Find the rope and the reflecting mirror. Take the seven golden leaves:
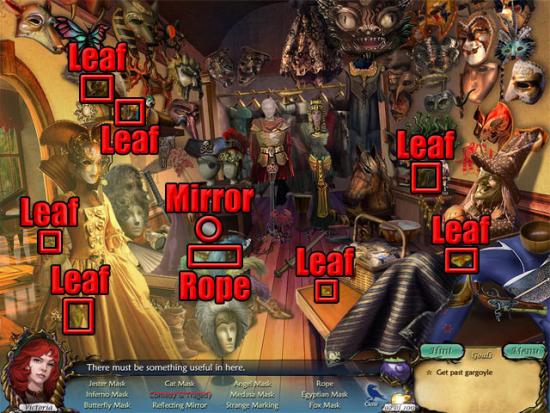
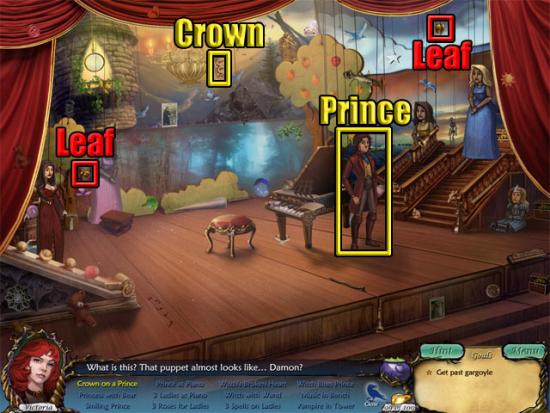
Find the remaining objects to receive the rope and the reflecting mirror. Move left to the ballroom. Use the rope on the pulley and then select the pulley to open the curtains. Select the raven to enter a hidden object scene. The scene must be completed in a specific order. Start by taking one of the golden leaves. If you have been following the guide up to this point, you should now have 100 golden leaves. Take the crown and use it on the prince:
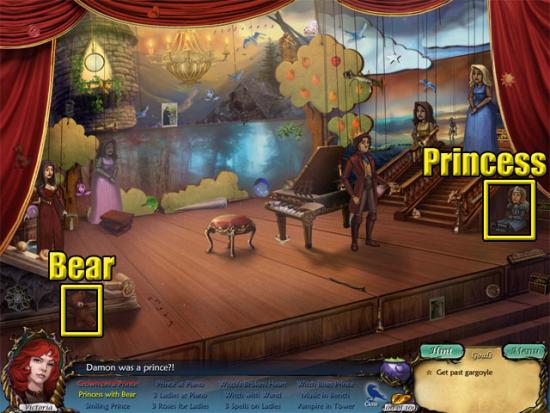
Use the bear on the princess:
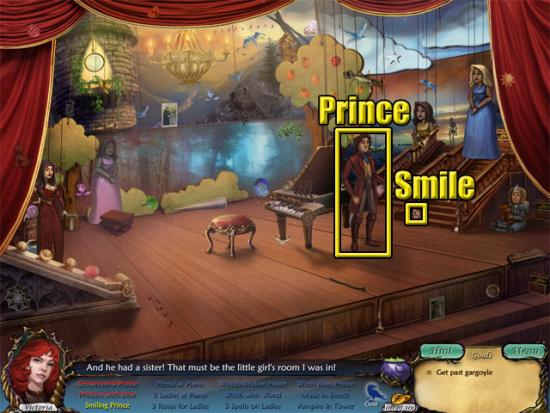
Use the smile on the prince:
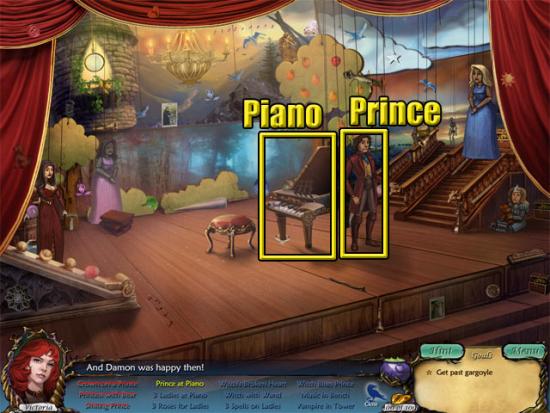
Use the prince on the piano:
Use the three ladies on the piano:
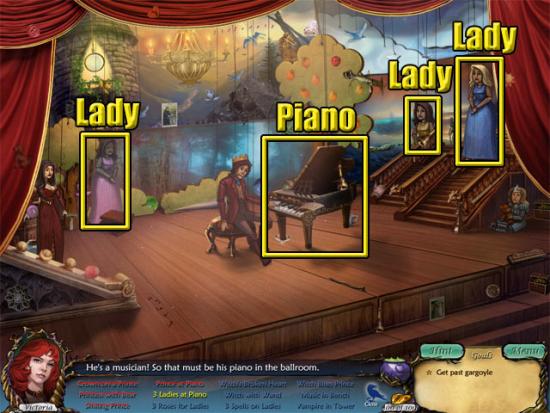
Give the three roses to the ladies:
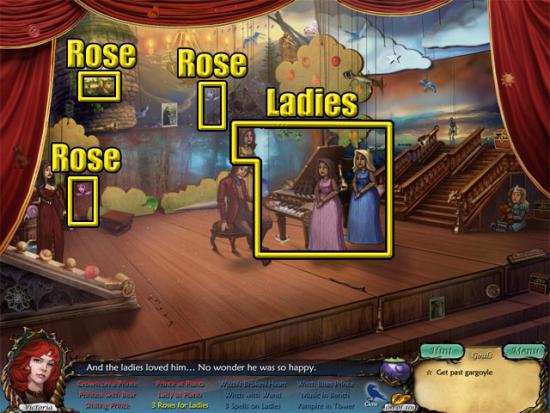
Give the broken heart to the witch:
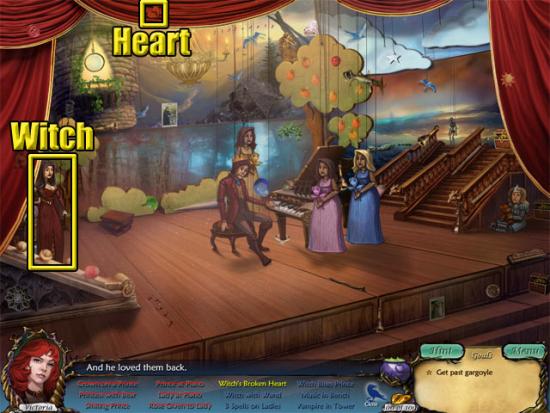
Give the wand to the witch:
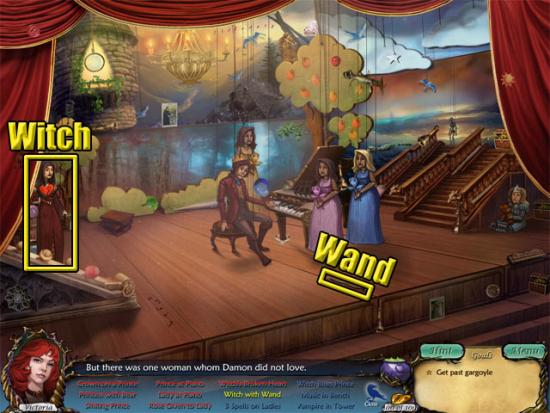
Use the three spells on the ladies:
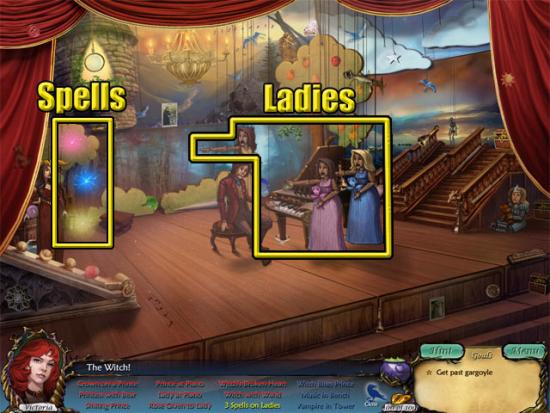
Use the witch on the prince:
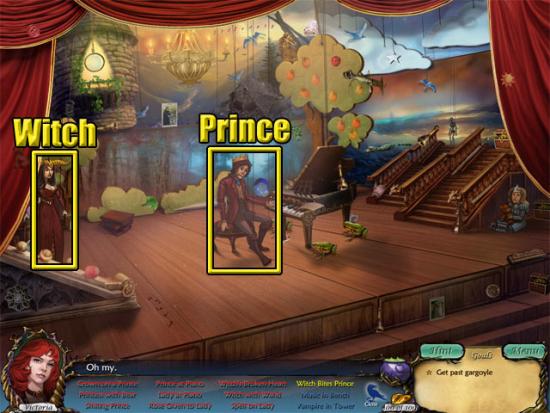
Use the music on the bench:
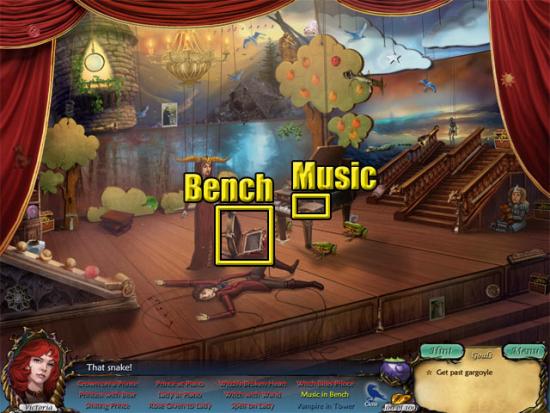
Use the vampire on the tower to receive the key:
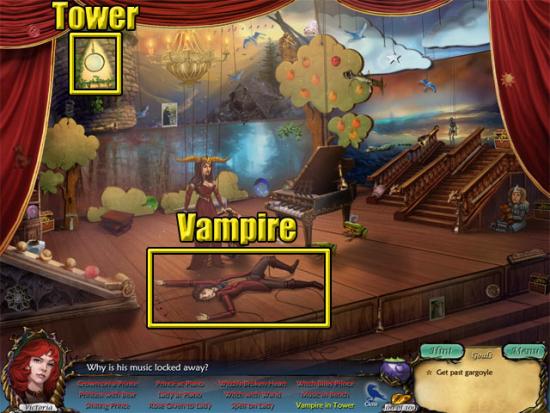
Use the key on the piano bench:
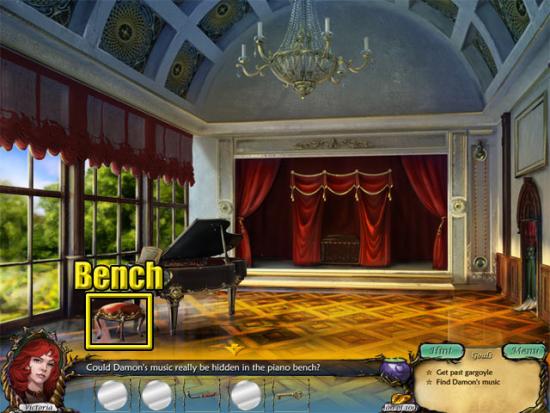
Take Damon’s music and use it on the piano to hear that it is out of tune. Use the piano tuner on the piano to tune it. Use Damon’s music on the piano again to and the mirror will drop to the floor. Take the mirror:
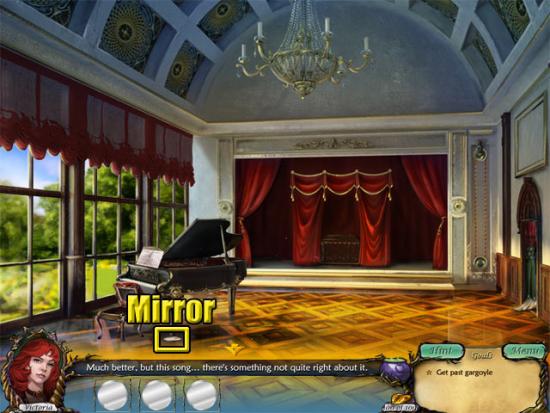
Move back to the grand foyer. Examine the circle on the gargoyle. Use the mirrors on the four empty slots to play the Gargoyle mini-game. Rotate the red chips so that the light reflects off all of the mirrors:
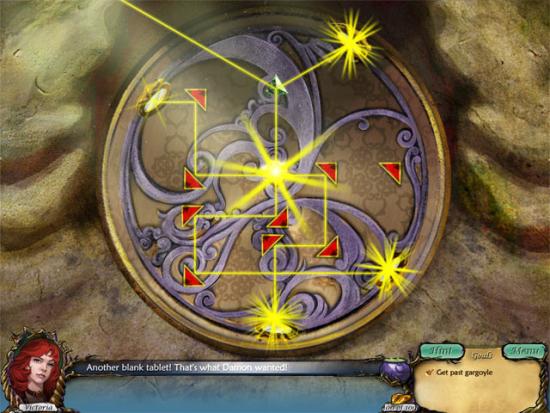
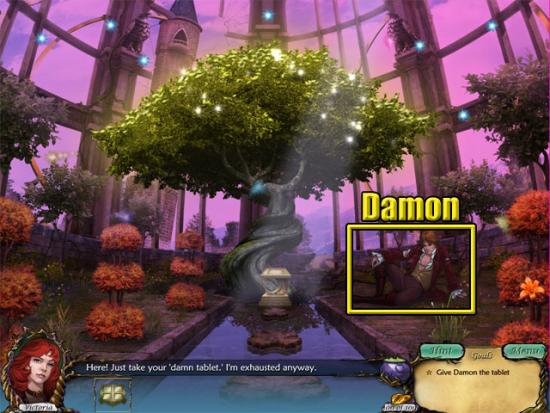
Take the mysterious tablet. Go through the left doorway to the courtyard to see Damon. Go through the right doorway to the aviary. Give the mysterious tablet to Damon to complete the chapter:
Chapter 5 – Lovers Part
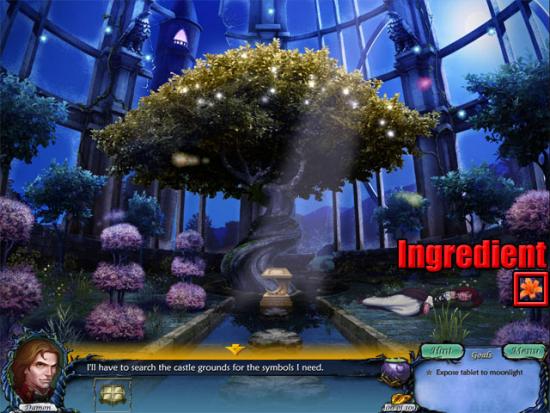
Examine the moon pedestal and use the mysterious tablet on the slot to see four more runes that need to be found. Back away from the pedestal. Take the ingredient:
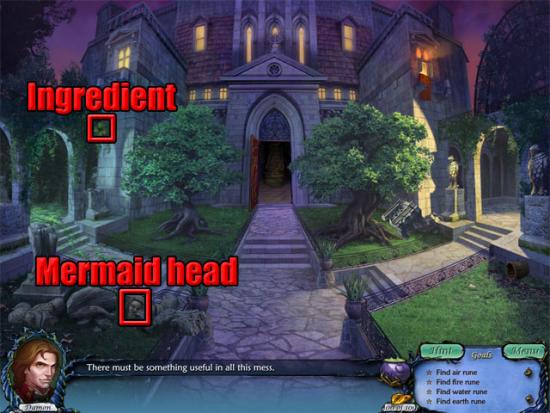
Move back to the courtyard. Take the ingredient and the mermaid head:
Go through the window to enter the bedroom. Select the raven to enter a hidden object scene. Complete the yellow combination objects:
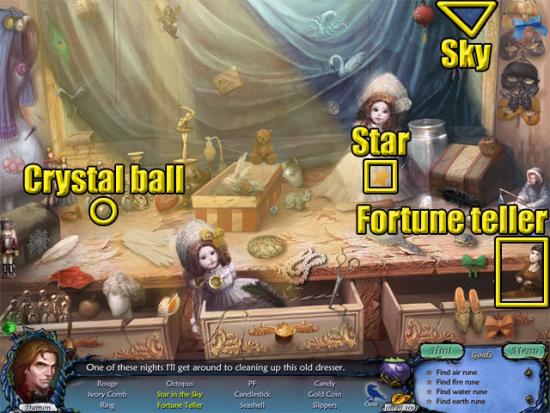
Find the gold coin and the octopus:
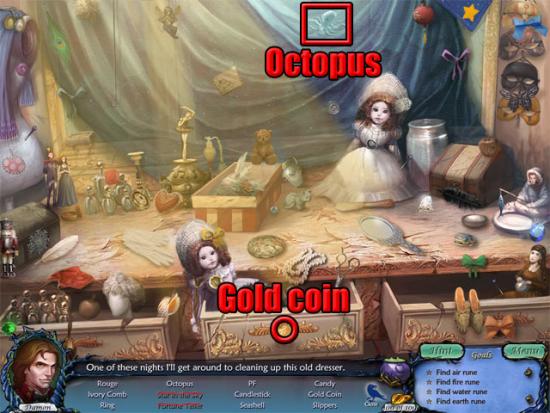
Find the remaining objects to receive the gold coin and the octopus. Enter the antechamber and raven will fly into the room. Select the raven to start a hidden object scene. Complete the yellow combination objects:
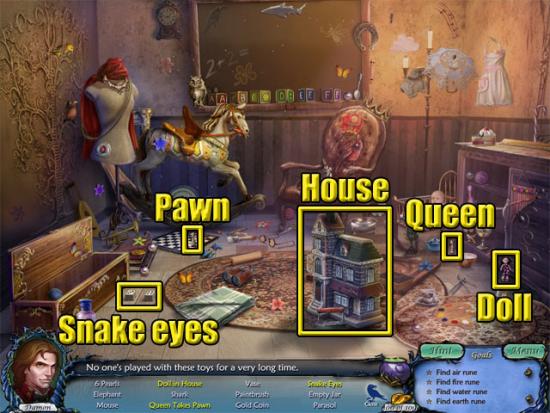
Find the gold coin, empty jar and shark:
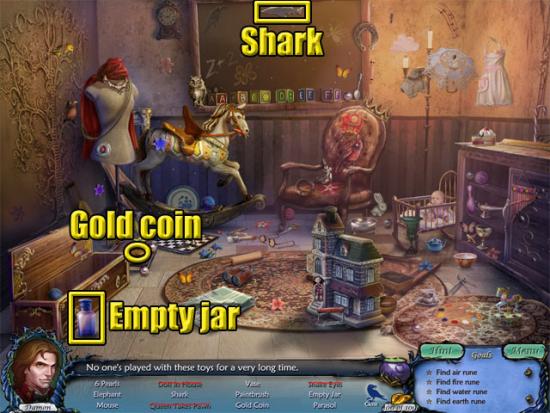
Find the remaining objects to receive the gold coin, empty jar and shark. Go through the doorway to the hallway. Move forward to the study and a raven will fly into the room. Select the raven to start a hidden object scene. Complete the yellow combination object:
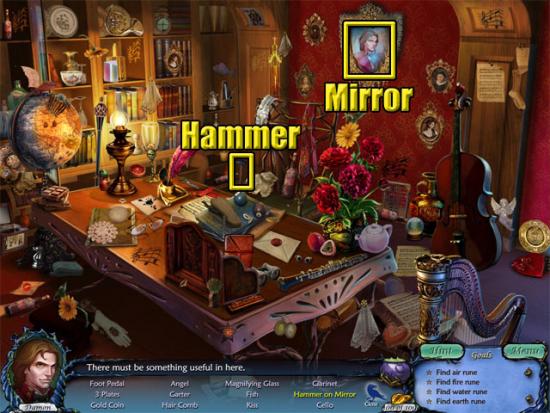
Find the foot pedal, gold coin and fish:
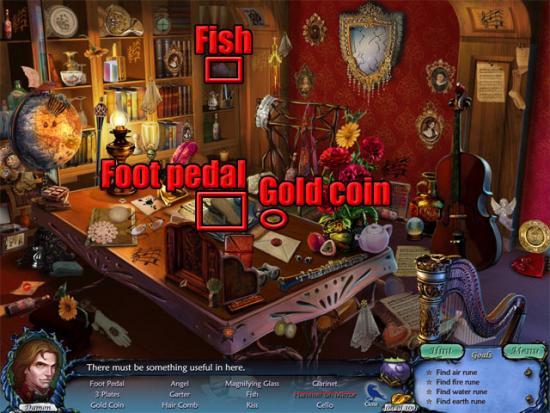
Find the remaining objects to receive the foot pedal, gold coin and fish. Move back and right through the doorway to the weapon room. Examine the faded rune. Take the eleven candles:
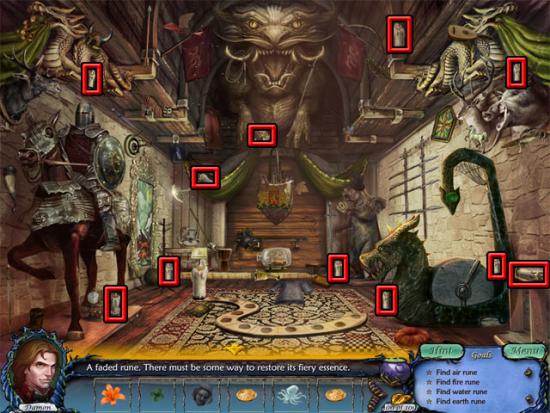
Use the candles on the holes. Take the axe. Use the foot pedal and the axe on the grinding wheel:
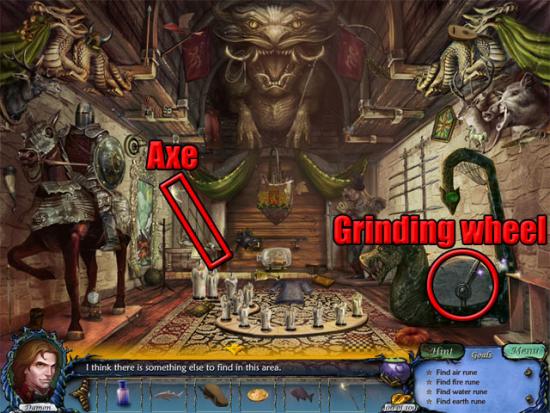
Take the fire rune above the left candle. Move back, left and right twice to enter the costume room. Select the raven to start a hidden object scene. Find the eel, crab, jellyfish and fan:
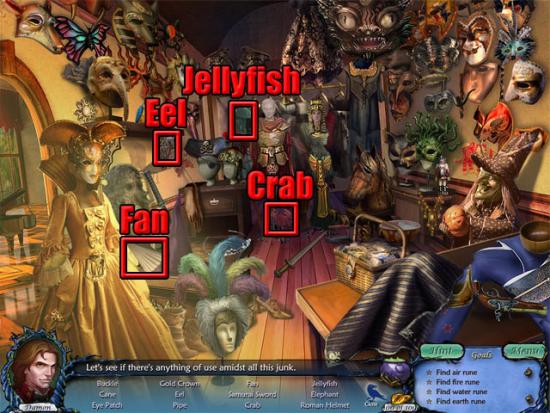
Find the remaining objects to receive the eel, crab, jellyfish and fan. Move left and back to the grand foyer. Take the mermaid tail:
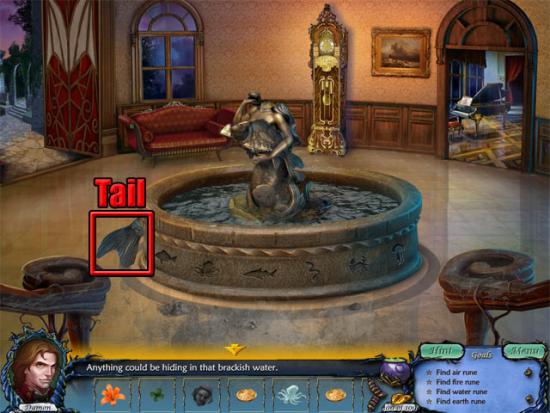
Use the mermaid head and the mermaid tail on the statue. Use the six stone shapes on the slots below the statue. Take the water rune and the ingredient:
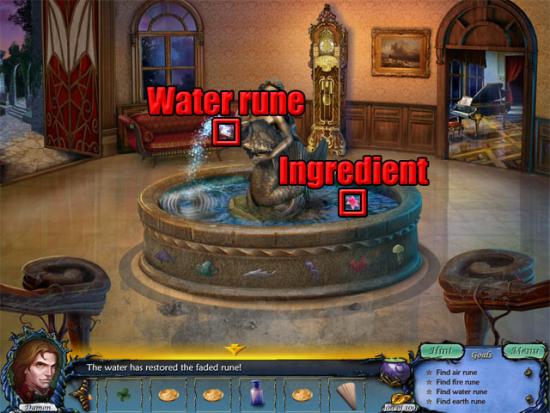
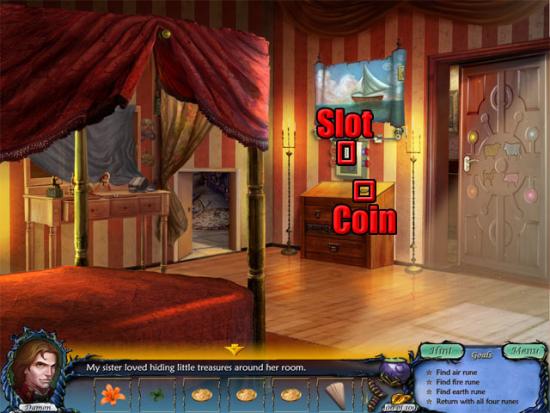
Use the empty jar on the water to fill it. Take the jar of water. Move back twice to the bedroom. Take the gold coin. Use the four gold coins on the slot:
Use the fan on the air rune:
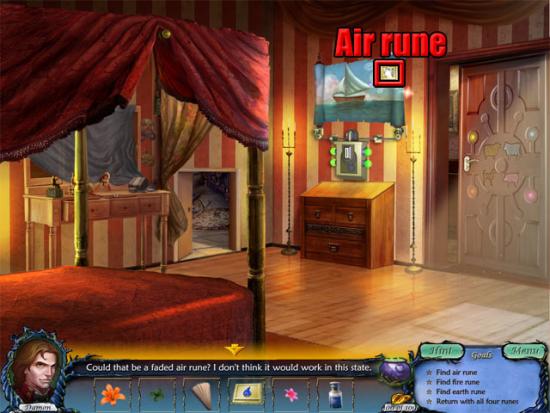
Take the air rune. Return to the hallway and go through the right doorway to the balcony. Take the ingredient. Use the four ingredients in the bowl:
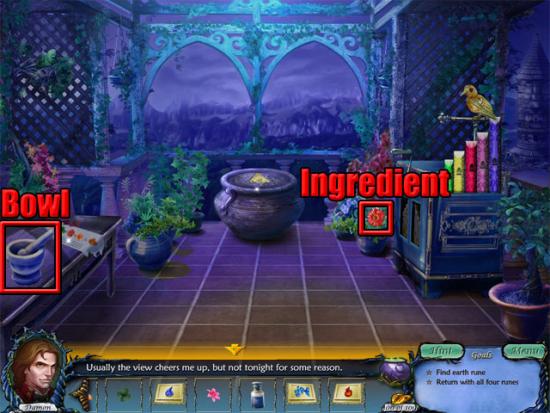
Take the fast growth powder from the bowl. Use the jar of water and the fast growth powder on the rune. Take the earth rune:
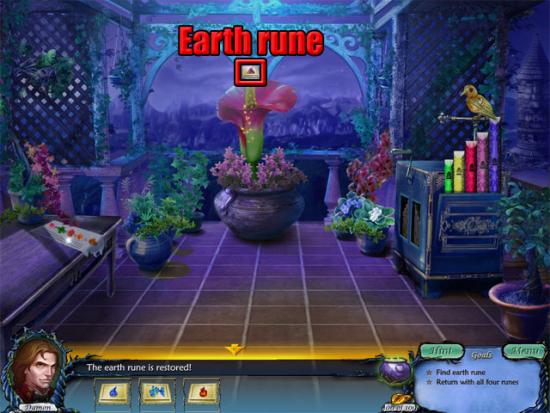
Move back three times and right to the aviary. Examine the moon pedestal to view the tablet. Use the four runes on the slots:
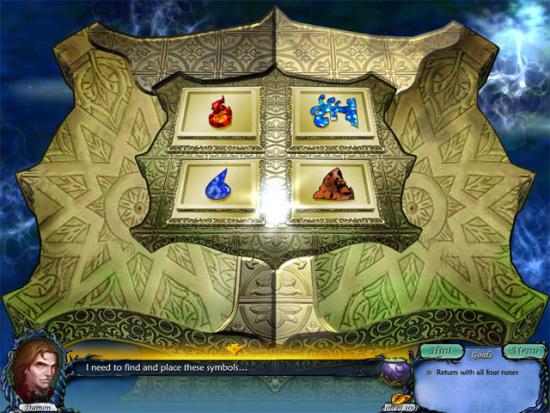
Take the key. Move back to the aviary. Fly up to the tower room. Examine the tower lock and use the key on the keyhole to complete the chapter.
Chapter 6 – The Witch’s Return
Move back to the courtyard and left to the garden. Move to the waterfall to see that three valves are missing. Back away from the waterfall and find the three valves:
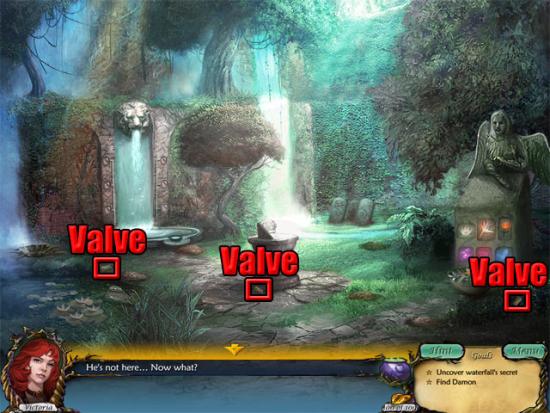
Move to the waterfall and use the valves on the slots to start the mini-game. The aim now is to turn the valves so that the colour in the pool is the same as the colour in the small basin. Follow these steps to complete the mini-game:
1: Left blue
2: Left yellow
3: Left red + left yellow
4: Left red + left blue
5: Left blue + left yellow
6: Left red + left blue + right blue
7: Left red + left yellow + right yellow
8: Left blue + left yellow + right yellow
9: Left red + left blue + right red
10: Left red + left blue + left yellow
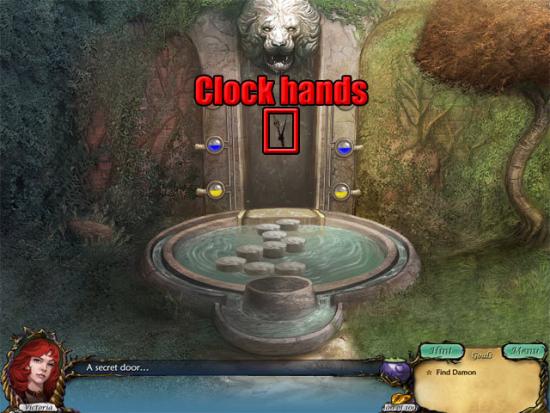
Take the clock hands:
Move forward into Celeste’s chamber. Move to the mirror to see that there are 11 missing discs that need to be found. Move back to the chamber. Take the doll, skull, glass of blood and ladle:
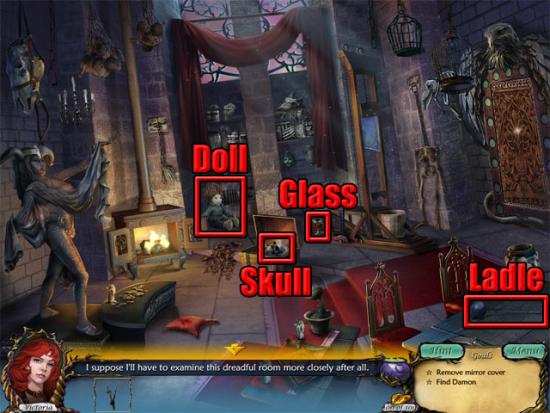
Select the bugs and they will move. Select the hand on the shelf. Select the three heads on the shelf. Select the bird in the cage. Use the doll on the guillotine and then pull the lever. Use the skull on the statue of Celeste. Use the glass of blood on the plant. Use the ladle on the jar:
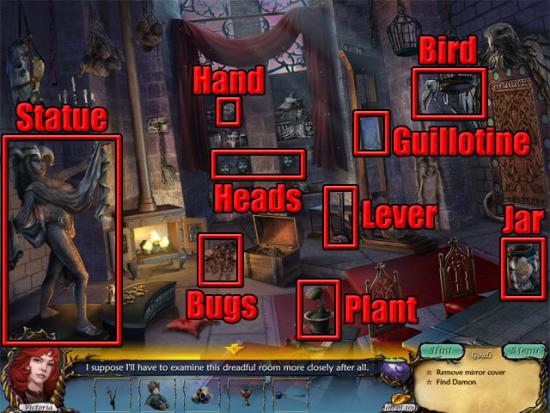
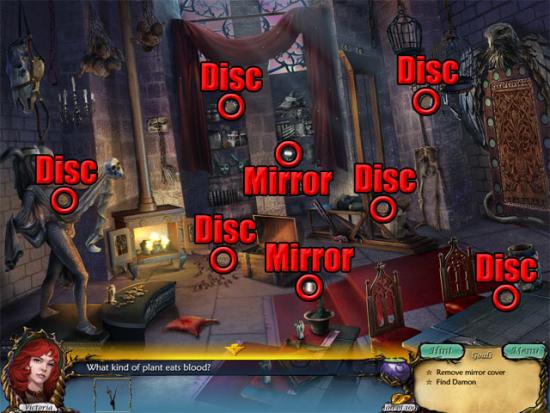
Take the six wooden discs and the two mirrors:
Move back twice to the garden. Select the raven to enter a hidden object scene. Find the five wooden discs and the three mirrors:
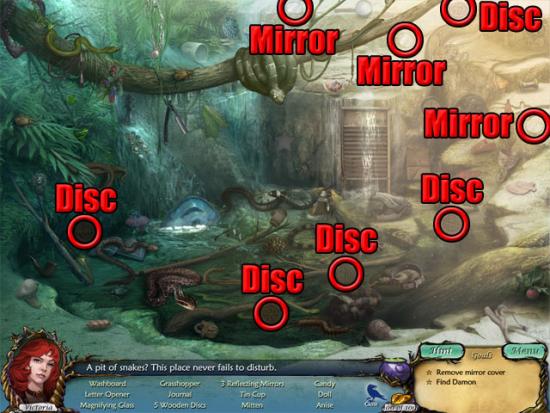
Find the remaining objects to receive the five wooden discs and the three mirrors. Move forward twice to return to Celeste’s chamber. Examine the mirror to play the Witch’s Mirror mini-game. Place the discs in the correct places on the frame:
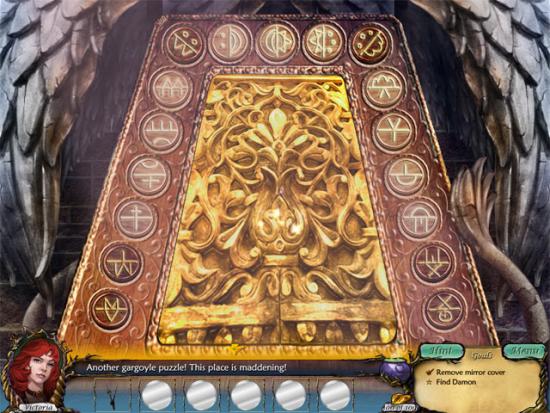
Examine the circle on the mirror. Use the mirrors on the five empty slots to play the Gargoyle mini-game. Rotate the red chips so that the light reflects off all of the mirrors:
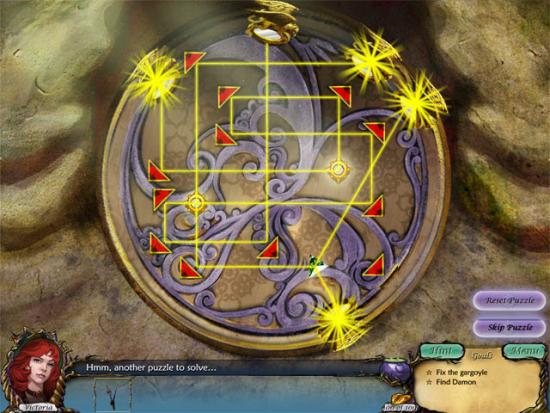
Take the mysterious tablet to complete the chapter.
Chapter 7 – Love and Death
Go through the right doorway to the tower room. Examine the lock on the door to see that only one keyhole remains. Back away from the lock. Move forward through the doorway, back three times and right to the aviary. Examine the moon pedestal and put the mysterious tablet in the slot to view the runes that need to be found. Move back twice and then forward into the grand foyer. Examine the clock to see that it is missing twelve gears. Exit the view of the clock and move right to the ballroom. Select the raven to start a hidden object scene. Find the two cogs:
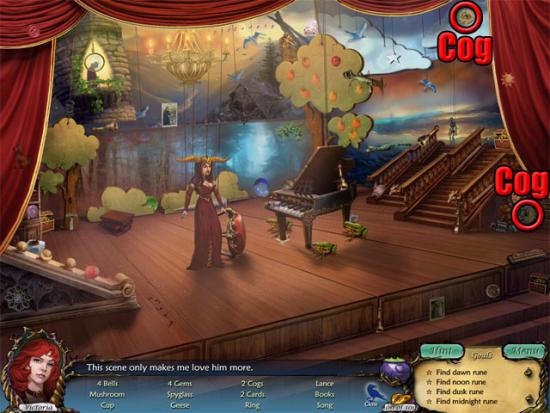
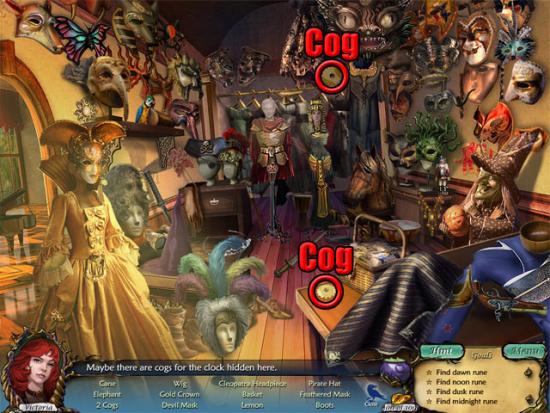
Find the remaining objects to receive the two cogs. Move right to the costume room. Select the raven to start a hidden object scene. Find the two cogs:
Find the remaining objects to receive the two cogs. Move left to the ballroom and back three times to the bedroom. Select the raven to start a hidden object scene. Complete the yellow combination objects and find the two cogs:
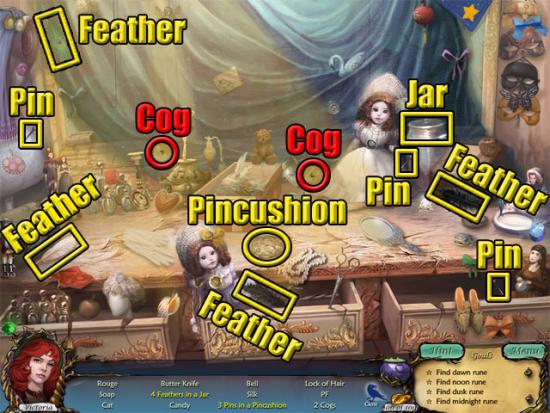
Find the remaining objects to receive the two cogs. Move forward to the antechamber. Select the raven to start a hidden object scene. Find the two cogs:
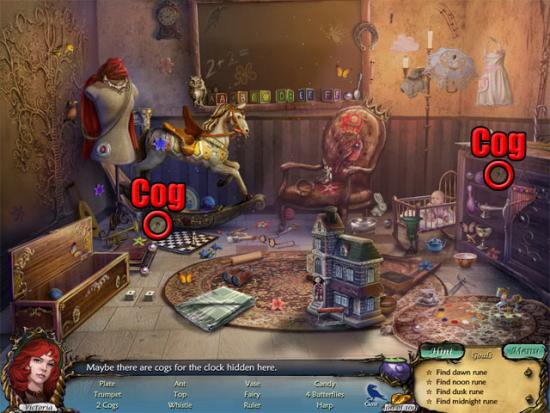
Find the remaining objects to receive the two cogs. Move back, forward to the hallway and right to the weapon room. Select the raven to start a hidden object scene. Find the two cogs:
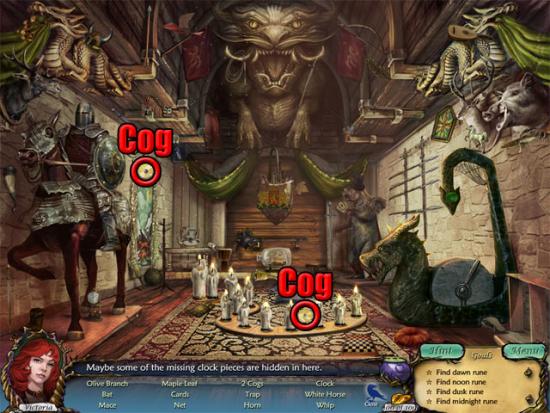
Find the remaining objects to receive the two cogs. Move back to the hallway and forward to the study. Select the raven to start a hidden object scene. Find the two cogs:

Find the remaining objects to receive the two cogs. Move back and left to return to the grand foyer. Examine the clock. Use the clock hands on the face to start the Grandfather Clock mini-game. The aim is to place the correct cogs into the slots and then rotate them so that the image shown below is made:
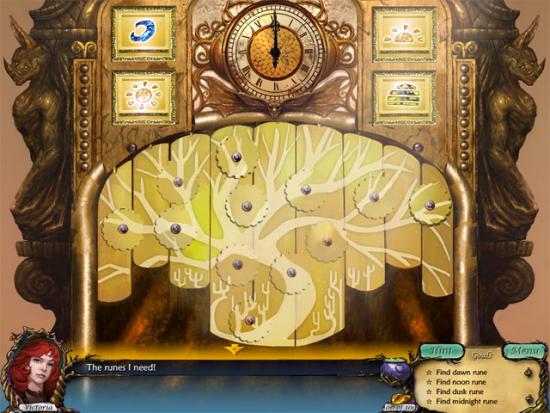
Take the four runes. Move back, forward through the left doorway to the courtyard and right to the aviary. Examine the moon pedestal and use the four runes in the slots on the mysterious tablet:
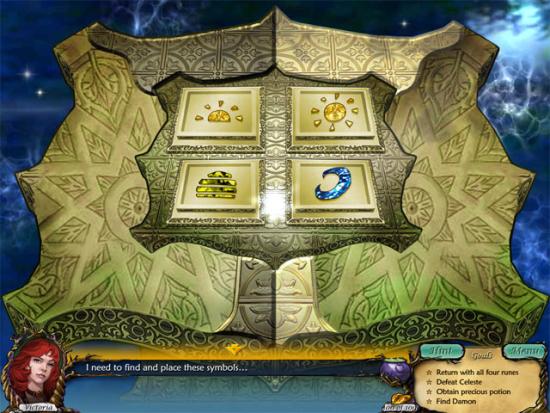
Take the key. Move back twice, left to the garden, forward twice to Celeste’s chamber and right to the tower room. Examine the tower lock and use the key on the keyhole. Take the potion. Move back, forward to Celeste’s chamber, back three times to the courtyard, forward to the grand foyer and right to the ballroom. Give the potion to Damon. Select the piano to play the sheet music mini-game. Put the notes in the following order:
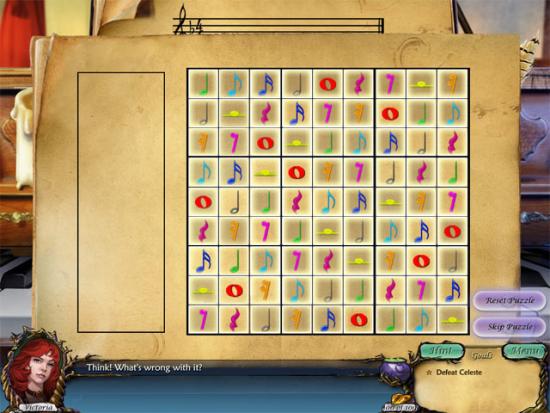
Play the notes shown on the sheet music. After the cutscene, select the glimpse the future button on the cauldron screen. Follow the steps shown below to make the potion:
1: Use the tongs on the lump of coal and then use the tongs on the burner to light it.
2: Add the green liquid to the burner.
3: Add the blue liquid to the burner.
4: Add the brown object to the board and use the knife on it.
5: Use the orange object on the grater.
6: Add the red flower, brown liquid and red liquid to the mortar bowl.
7: Put the glass of red liquid on the grill.
8: Add the two chopped objects and the contents of the mortar bowl to the large bowl.
9: Add the hair to the glass of blue liquid.
10: Add the yellow liquid to the large bowl.
11: Add the leaf to the large bowl.
12: Use the tongs on the large bowl.
13: Add the lump from the large bowl to the white tray. Do this five times.
14: Use the brush on the glass of blue liquid.
15: Use the brush to paint the five lumps on the white tray.
16: Add the five blue lumps to the large bowl to complete the game.
More articles...
Monopoly GO! Free Rolls – Links For Free Dice
By Glen Fox
Wondering how to get Monopoly GO! free rolls? Well, you’ve come to the right place. In this guide, we provide you with a bunch of tips and tricks to get some free rolls for the hit new mobile game. We’ll …Best Roblox Horror Games to Play Right Now – Updated Weekly
By Adele Wilson
Our Best Roblox Horror Games guide features the scariest and most creative experiences to play right now on the platform!The BEST Roblox Games of The Week – Games You Need To Play!
By Sho Roberts
Our feature shares our pick for the Best Roblox Games of the week! With our feature, we guarantee you'll find something new to play!Type Soul Clan Rarity Guide – All Legendary And Common Clans Listed!
By Nathan Ball
Wondering what your odds of rolling a particular Clan are? Wonder no more, with my handy Type Soul Clan Rarity guide.


